A terrifying power train journey .
Victorian Mysteries : The Yellow Room is a full stop - and - flick puzzle adventure found on the novel write by Gaston Leroux . The premiss is a woman has been attack inside a locked room which her attacker has somehow escaped , baffling those try out to determine who might have round her . Can you work the brain-teaser of this mysterious and seemingly impossible attack ? Read on for our complete straitlaced Mysteries : The Yellow Room Walkthrough .
Victorian Mysteries: The Yellow Room Walkthrough - Chapter 1
The over-embellished glow physical object - find mystifier may be randomise , so you ’ll have to complete those yourself , but remember : there is an outright mite system and you ca n’t in reality run out . Once you ’ve used a hint , you ’ll have to wait a few arcminute for the bar to refill before you could employ another one . Other puzzle that may necessitate more detail are explained below .
The Train
Our journeying begins on the power train en itinerary to the location of the murder . Click the satchel on the leftover chairperson in the cabin ( a1 ) for a finale - up of it and then click it again to open it . Take theMap , then click the box between the seats ( a2 ) and click it once more to open it , taking thePaper Cardfrom indoors . Move outside to the Hallway .
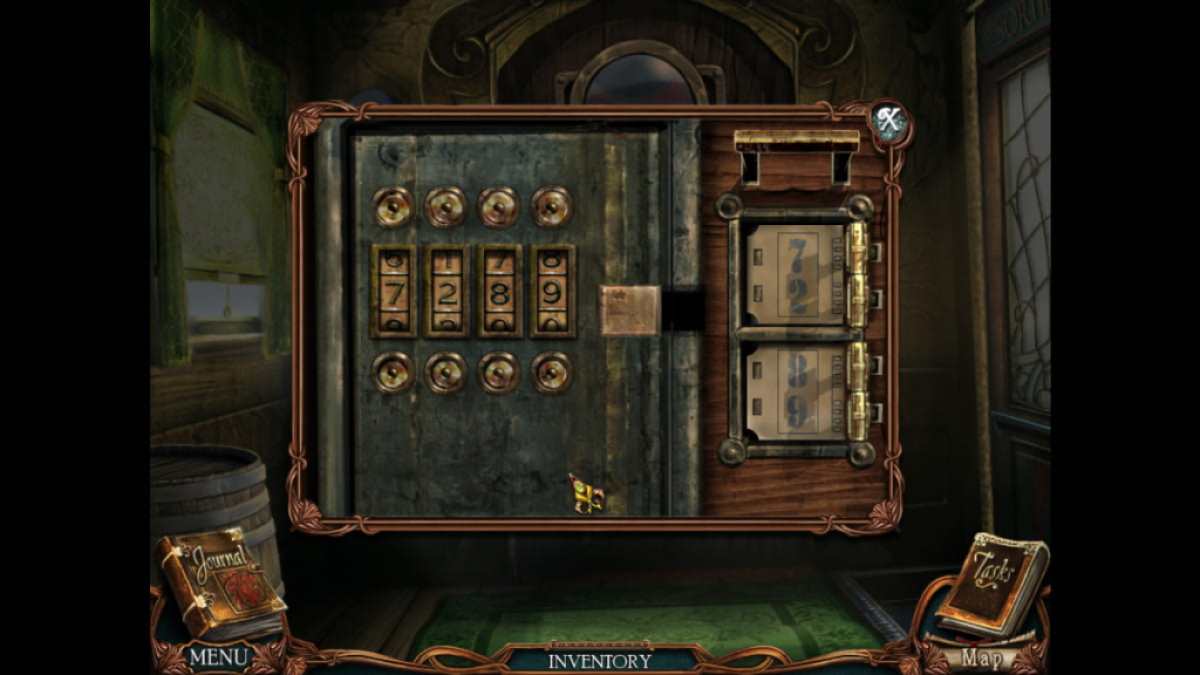
After being shot at , follow the shooter towards theBagages doorwayahead . try the jacket ( b1 ) to get asecond Paper Card , then click the mechanics on the wall ( b2 ) , and in the close - up , add the two Paper Cards to the righthand part of the lock . come home the handle at the top to print the door card onto the ticket ( 7289 ) , then expend the button to recruit this into the door mechanism to unlock it .
Take theRopeandKeyfrom behind the mechanism . Click the door lock ( b3 ) and practice the key to try out and unlock it , but the key snaps in the lock . You ’re break to have to remove the panel .
Move back into the Hallway outside the Cabin and cluck the empurpled glow on the right to accede a Hidden Objects secret plan . Once accomplished , you ’ll receive aToken . Go back to the Bagages threshold and use the Tokwen in the lock closing curtain - up to undo the roll in the hay , start the panel , and start up a cog teaser . Click each sprocket and add them to the machine ( see arrow on the image above ) . observe you ca n’t get the order awry , as they will only stick if you try out to add them to the right one . Next , cluck the locks under the thunderbolt in the following social club to start the door:42135 .
Go through the Bagages doorway ( b3 ) and into the Luggage Car . clack the suitcase ( c1 ) and take theFile . Select the Hat Box ( c2 ) and utilise the File to dumbfound the jammed lock , taking yourCamerafrom inside . Head back to outside your Cabin , then chatter the bottom of the screen to go the other mode down the Hallway where you ’ll find Joseph . After listening to the Magistrate ’s conversation , leave the train via the door to the right of the Bagages exit ( b4 ) .
The Train Station
Select the Train agenda ( d1 ) to see that the train should have arrived in St Geneviene at 4.30 . While in the close - up , click the bottom - left corner of the docket to get out it back and take theClock Hand . Go inside by clicking the post doorway ( d2 ) .
see at the rip in the seat ( e1 ) and take theBox Piece . Take a picture of the information base ( e2 ) and take theSpark Plugthat ’s on the left wing of the newspaper in the close - up . Next , click the characterization ( e3 ) and complete the lack objects secret plan to get theApple . Now go into the ticket booth ( e4 ) .
Take a pictorial matter of the brick on the stool ( f1 ) , then click the newspaper clipping on the paries ( f2 ) . Take asecond Applefrom it before taking a photo for grounds . Now select the Johnny Cash cash register ( f3 ) and use the token to trip a puzzle . You need to click the buttons in the correct fiat — so they ’re all push at once — to open up it . The correct successiveness is9874(see simulacrum ) . Once it is open , take thesecond Spark Plug .
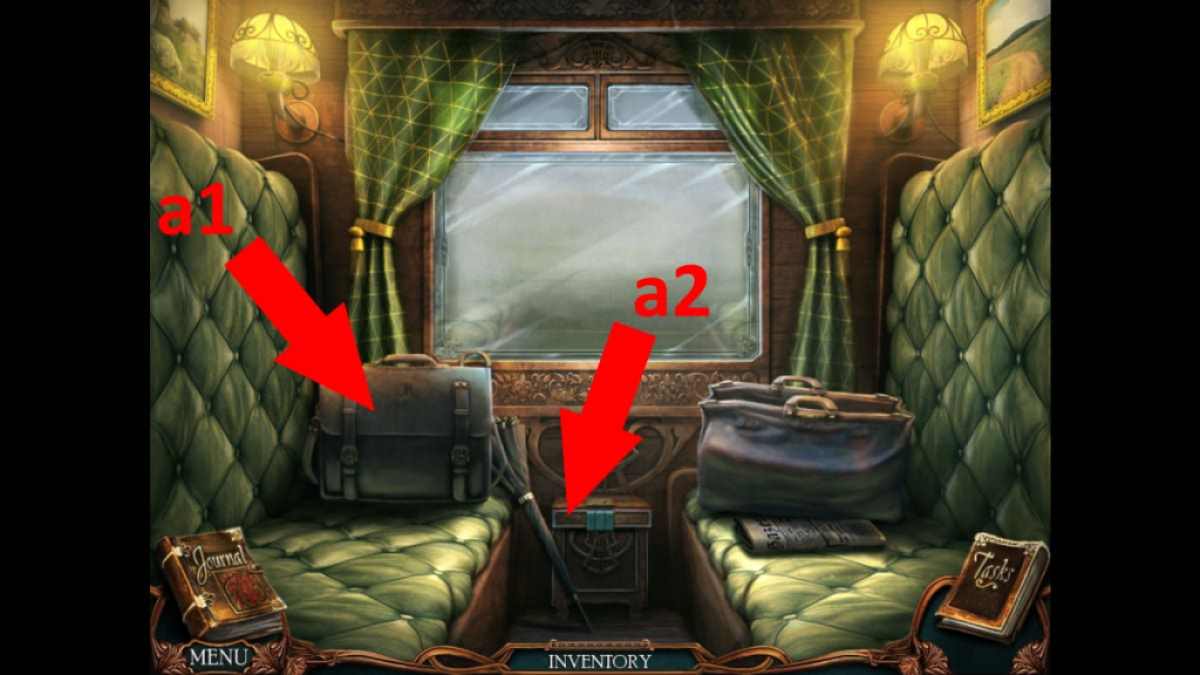
Image by Pro Game Guides
Go back to the independent post building , and out to the post back ( e5 ) . Collect theBucket of Rainwater(g1 ) and theLadder(g2 ) , then go back to the Station Front and put out the fire that begin when you get with the Bucket of Water . This allows you to start another missing object mini - game , after which you ’ll receive yourthird Apple .
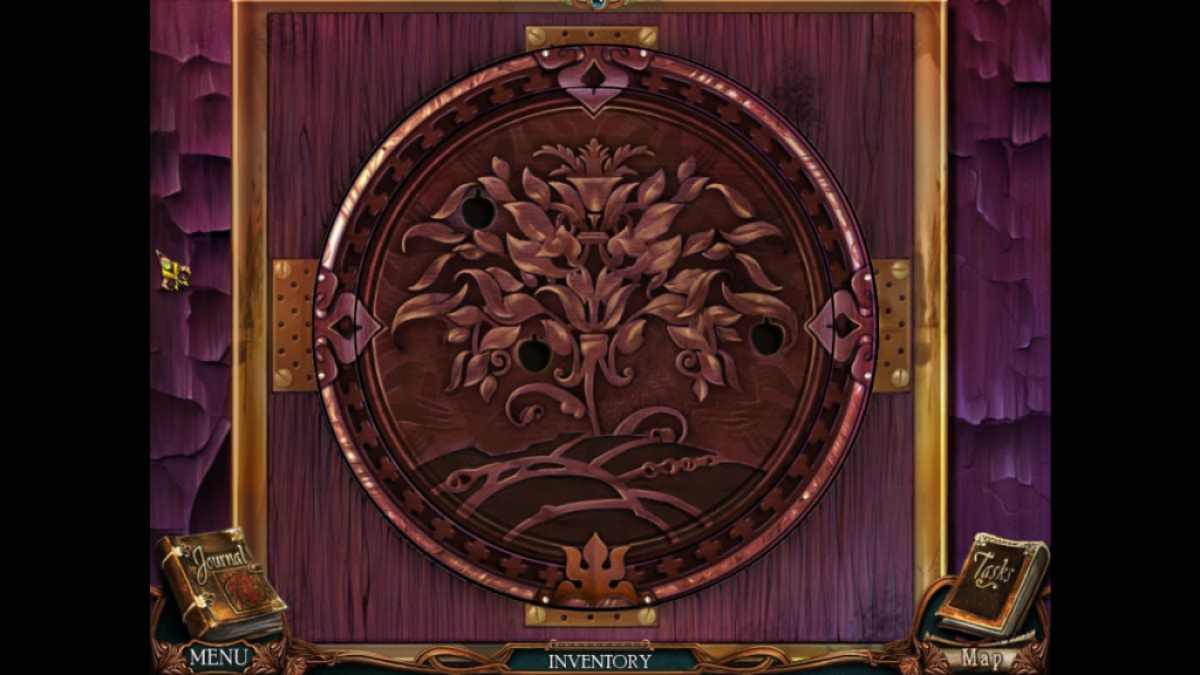
Put the Ladder up against the clock ( d3 ) and use the Clock Hand to fix the clock face ( d4 ) . Set the clock to the correct time ( 4.30 ) and take theKnifefrom behind the clock face . Next , go back to the just the ticket booth and snap the wall pattern ( f4 ) to start another puzzle , this prison term rotate the section to create an image ( see below ) . Once over , add the three Apples and take in theCrankandMalletfrom inside the occult compartment .
Use the Mallet to break start the Barrels ( f4 ) and get thePiston . Now go to the station back and click the car ( g3 ) for a close - up . Use the Knife to reduce the ropes , put the Crank in the hole at the bottom of the radiator , add the Spark Plugs and Piston , and wrench the handgrip . To make the car run you then need to get through each piston as the red gauge hit the top of the small lightning flash gauge . Once done , the car will fire upand you’re able to move on toward the Chateau .
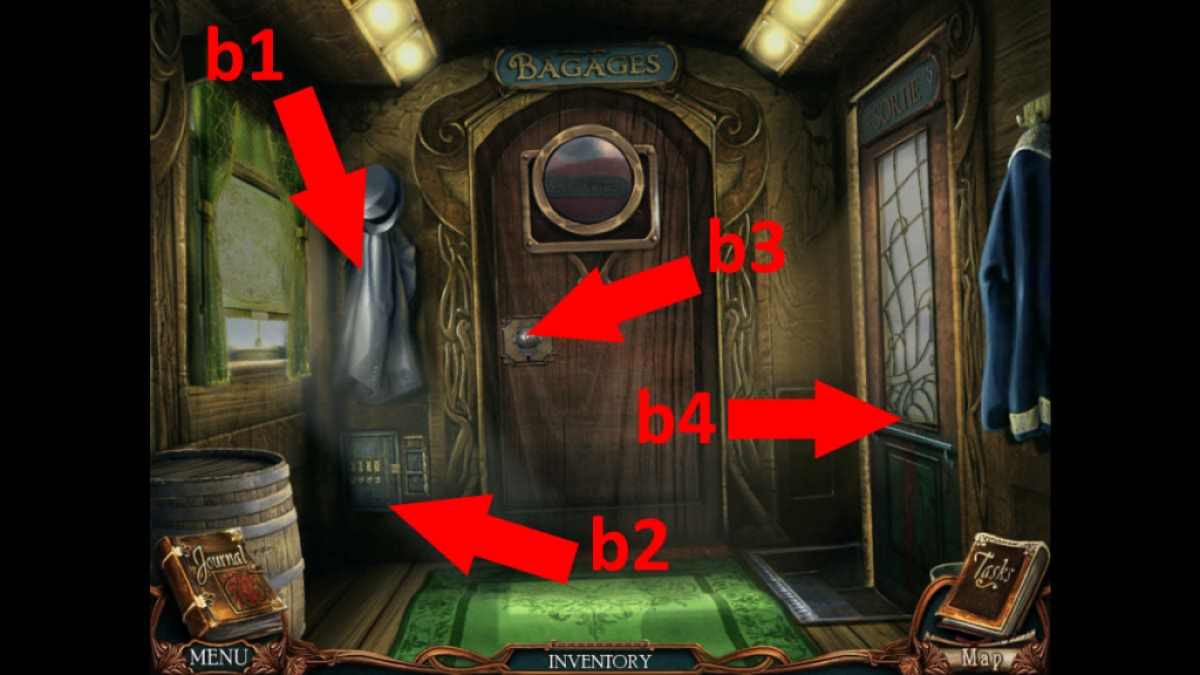
Image by Pro Game Guides
Victorian Mysteries: The Yellow Room Walkthrough - Chapter 2
In straight-laced Mysteries , the Yellow Room Chapter One , our photographer hero and his newsman colleague Joseph Rouletabille survive some close scares on the train before finding some transport from the station to get to the Chateau . But on arrival , they get their itinerary impede by the law who have guard post at the logic gate and all around the construction . It ’s time to find a way in .
Chateau Trails
Complete the aim - finding puzzle ( a1 ) to get theGem , then go down the Left Path ( a2 ) and take theClippersfrom the box on the Tree ( b1 ) . Back at the front gate expend the clipper on the vine to the right of the chief game ( a3 ) and take thesecond Box Piece .
Now expend the right path ( a4 ) , click the Pour La Lac sign ( c1 ) , and take theLatch Pin . Continue along the path to the Lake Trail and clack the bushes on the path ( d1 ) to get to theShovel . bear on down the path to the lake . Select the gravy holder ( e1 ) and nail the missing object mini - game to get theLong Stickandthird Box Piece . While here , also take theCarrotfrom the puppet swing ( e2 ) , and snap the Sir Herbert Beerbohm Tree ( e3 ) for evidence .
Go back to where you found the digger and click the box on the dry land ( d2 ) , add together the three Box Pieces to start a reciprocating saw puzzle . Note you may penetrate each teaser piece to turn its slant and when you get a piece right it changes people of color , so you ca n’t break . Once done , take theMail Key . Go another pace back toward the logic gate where you see the Pour La Lac sign , and use the shovelful at the base of the tree ( c2 ) to make the box fall from the tree .
Screenshot by Pro Game Guides
Back at the gate , go back down the left itinerary ( a2 ) and photograph the Cage for grounds ( b2 ) . Click the evidence again and add the Latch Key to begin a mathematics puzzle . You take to add pins to each lame equalling the values they say . So , from the top - pass on box clockwise , you need2 and 5(7),7 and 6(13),19 and 14(33 ) , and8 and 13(21 ) . Once complete , give the rabbit the Carrot and collect theScarf .
The police officer will move away from blocking your itinerary here . Click the bush to the right of the path ( b3 ) and take theRake . At this point , you could go back to the railcar ( a4 ) for a close - up and place the Long Stick , Rake , and Rope on the seat . Once they ’re all on the gondola stern , add the rake to the pin , then add the circle to get theLong Rake . manoeuver back toward the lake and knock the box out of the tree diagram ( d3 ) with the Long Rake . Now click the box several times until it give up and you ’ve collected theBird Seed .
The Inn
Go back down the left path and stick to it further along to the Inn Courtyard . Take a picture of Madam Mathieu ( f1 ) for evidence , then lecture to her to get some more background signal taradiddle . Next , click the bird box ( f2 ) and summate the Bird Seed in the close - up to scare off the bees . you could now click the hive and take theHoney . Select the mailbox ( f3 ) and use the Mail Key to open it , taking theSafe Dialfrom in spite of appearance . Move to the Inn Lobby ( f4 ) .
shoot the Inn Keeper for evidence ( g1 ) , who want to know when a shipment is make it from Calais by train . direct back to the Train Station Front and investigate the timetable , which says the train arrives from Calais at 4.54 . After you ’ve looked at the timetable , you ’ll note the area to the left of the place door ( where the fire was in the first place ) is now radiate purple once more . Select it for another item - find puzzle , after which you may collect theFeather Dusterand theWell Bucket .
Go back to the Innkeeper ( g1 ) , talk to him about the trains , then give him the Honey for his teatime . This allows you to select the region behind him to take part in another item - find puzzle . Once ended , you ’ll get theStethoscope . In addition , you could now investigate the windowsill ( g2 ) and use the Feather Duster to authorise the detritus ( four clock time ) , finally revealing aLead Ball . Click the moving picture above the fireplace ( g3 ) next , which swings heart-to-heart . Click it again to reveal a safe , to which you may add the Safe Dial . Also , add the Stethoscope on the lefthand side of the safe to start the puzzle .
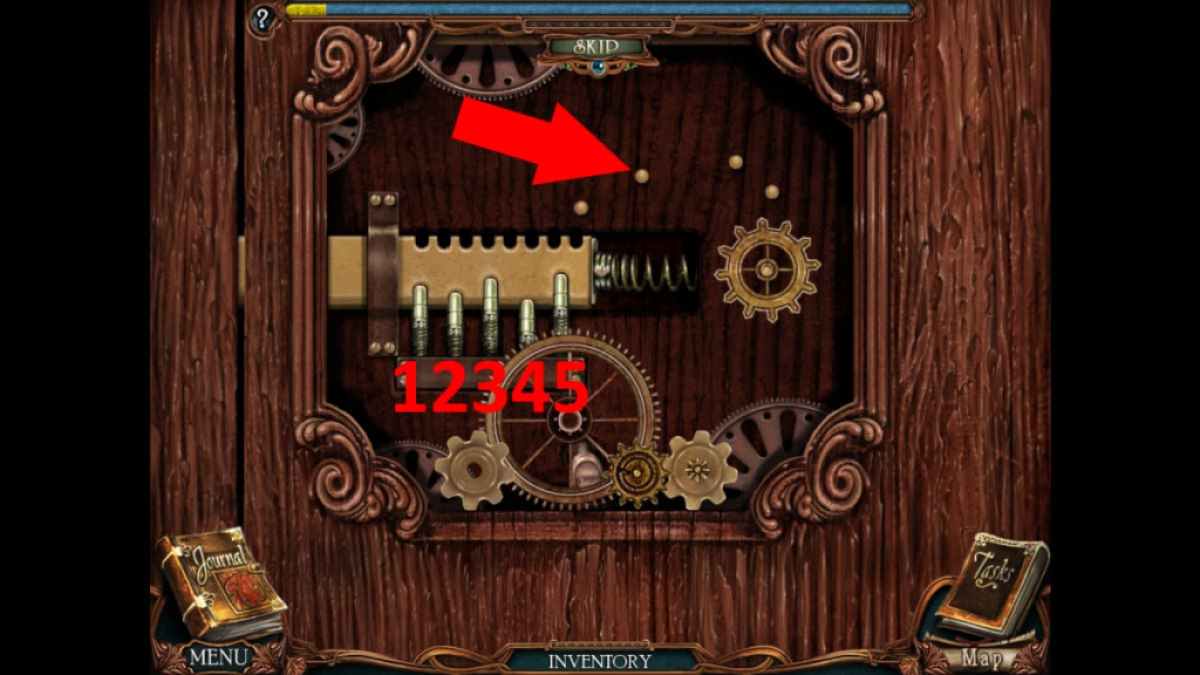
Image by Pro Game Guides
To start the good , just sour the telephone dial until the low pointer on the right goes unripe , then wait until it clicks . Do this three time and you ’ll have break through it . Once the safe is open , snap the evidence of the Gamekeeper and take theMedallion . Go outside and use Medalion to spread the well ( f5 ) and complete the tilting mystifier . Click the arrow in the come decree to make out it : right , right , down , down , pass on , up five sentence , and then down . Now bind the Well Bucket to the chain and fish out theWelding Mask .
Head back to where you knocked the boxwood out of the tree ( d3 ) and you ’ll find two homo there . Listen to their conversation , then move back to the chateau entrance . The gate have been open up and you may now head up inside , and move on to Chapter Three .
Victorian Mysteries: The Yellow Room Walkthrough - Chapter 3
Your part is the lensman working with Joseph Rouletabille as he tries to get the scoop on a curious attack in a chateau . Chapter three discover our heroesabout to insert the chateau groundsafter subsist several attempts on their lives on the train , and then seek for clues and grounds at the local inn .
The Chateau Grounds
Pick up theCardon the ground in front of the chateau ( a1 ) , then go right ( a2 ) into the Garden and fill out the item - matching mystifier ( b1 ) to get aMoon Clock Piece .
Go back to the front of the chateau and into the Foyer . Click the left side of the stair ( c1 ) to go down the unexpended hall and take a photo of the caretakers for grounds . Take theLetter Piecefrom the bust ( d1 ) before snap the vase ( d2 ) and taking asecond Card .
When you pass to the chateau hall , you ’ll have a treatment with Jospeph . Afterward , go down the right hall ( c2 ) and take a photo of Daddy Jaques for evidence . After the cutscene , take theNecklacefrom the flora ( e1 ) . Back in the antechamber , depend at the two golden ornaments on the balusters rail and add the Necklace to the one on the left ( c3 ) , and the Gem to the eye on the one on the right hand ( c4 ) , takingtwo more Lead Balls .
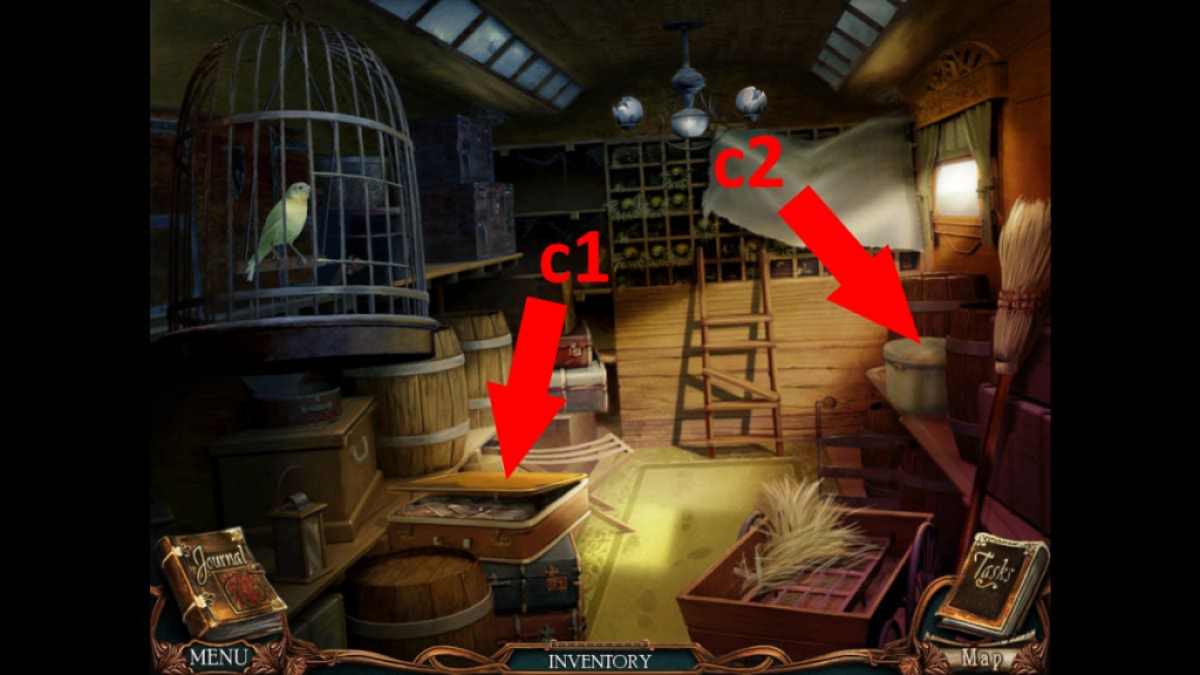
Image by Pro Game Guides
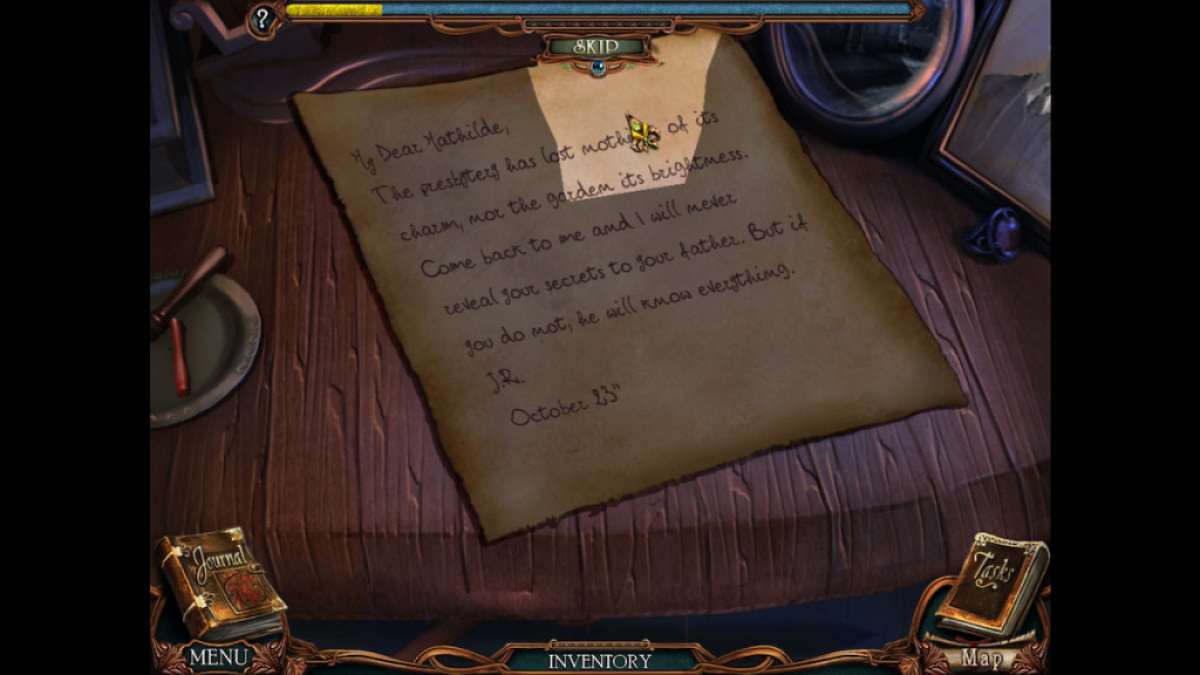
Head back down the proper hall , take thethird Cardhidden in the clear fitting ( e2 ) , and then go into Rouletabille ’s room ( e3 ) . Complete the hidden objects miniskirt - crippled ( f1 ) to get afourth Card . Select the desk ( f2 ) and shoot the grounds at the top - left of the card table close - up , then add the four Cards to the table to start a playing missing objects mystifier .
Each card is missing one affair . From top left to bottom right wing :
Once complete , the box in the top leftfield of the close - up will open and you ’ll be reward with theClock Key .
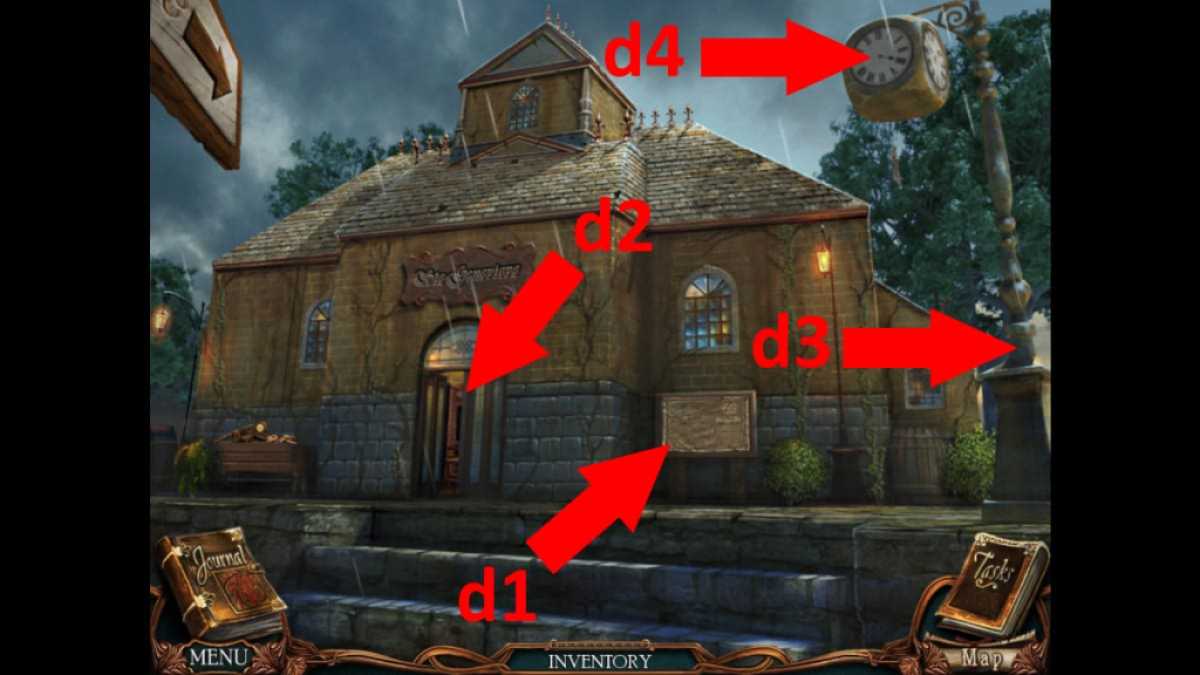
Image by Pro Game Guides
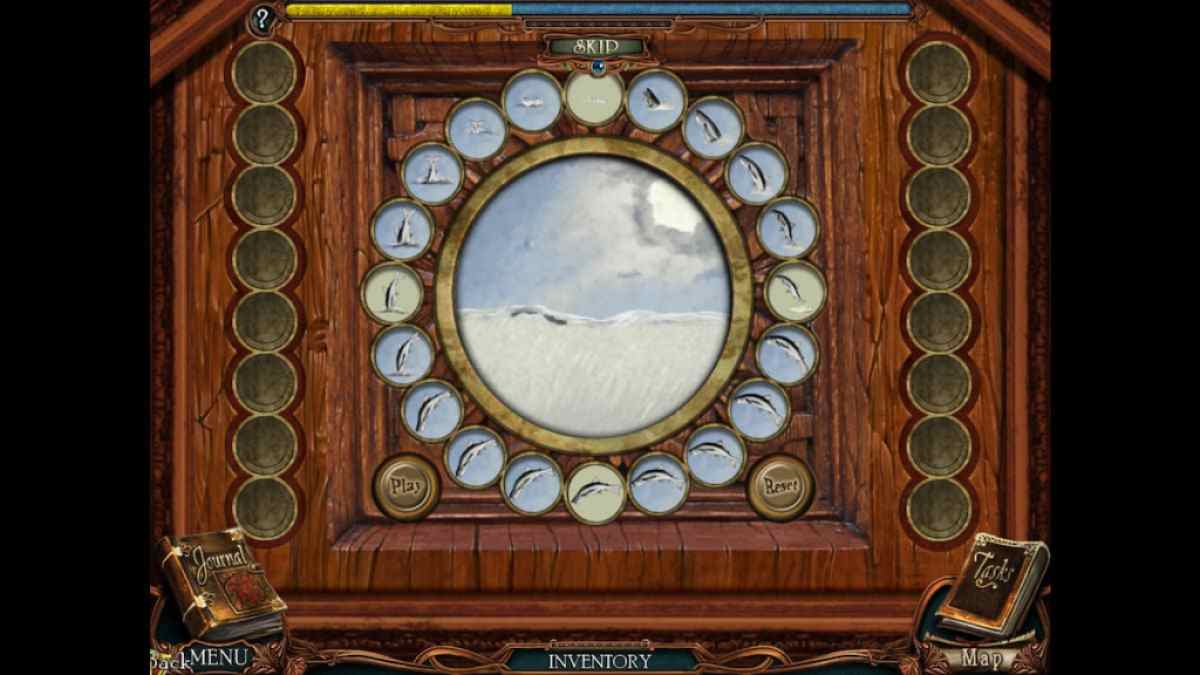
Back in the vestibule , choose the clock at the top of the stairs ( c5 ) and bring the Moon Piece to start a puzzle . You need to site the pieces so the moon slowly clouds and then unclouds ( see image above ) . Once done , a keyhole will appear . apply the Clock Key to unfold the compartment , then take theBack Door Keyfrom inside .
The Laboratory
Select the back door ( c6 ) , put the Back Door Key in the hollow , tick it again to turn it , then use the grip to launch the room access . You now have access to the Lab Pathway , so head through the door . Select the statue ( g1 ) and take theChecker , then choose the bench ( g2 ) and take yoursecond Letter Piece . Move forward to the laboratory .
Outside , select the table ( h1 ) and tote up the Checker to start a puzzle . The following moves will complete it ( see key below ): D3 to D1 , C3 to A3 , D1 to B3 , B3 to B5 , D4 to B4 , B5 to B3 , A3 to C3 , and C3 to A1 . Once finished , take theHammerfrom the secret compartment . Now you may pick out the wooden box ( h2 ) . Use the Hammer on the lock to start an physical object - finding mini - game to collect athird Letter Piece .
direct inside the Laboratory and select the welding machine ( i1 ) , bring the Welding Mask , and then add a Lead Ball to start a link up - the - loony toons puzzle . You simply need to hold the button and keep abreast the dot pattern to create the configuration , after which you ’ll experience aPig . Do this twice more and you ’ll also get theRoosterand theHorse .
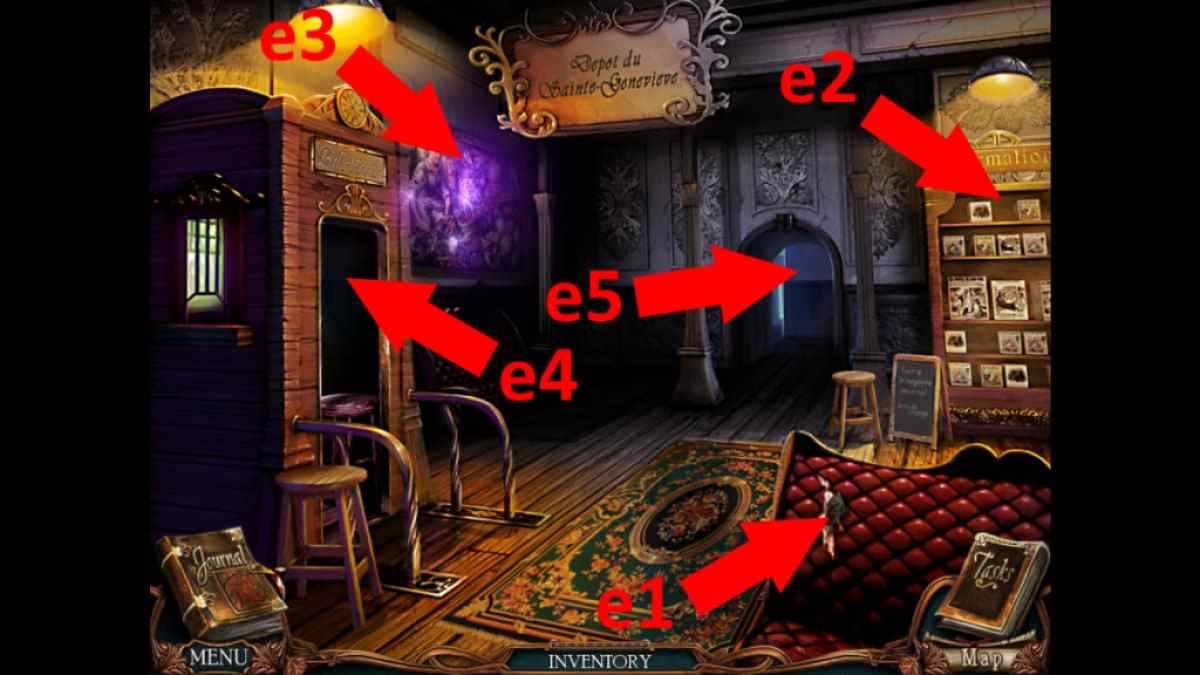
Image by Pro Game guides
you may now hark back to the Chateau Trails by go away the front logic gate and going down the right path to the box you could n’t open previously ( above ) . utilize the three animal keepsake to launch the box , then take thefourth Letter PieceandFurfrom inside .
Returning to the laboratory , use the Fur on the gimmick on the board to the right ( i2 ) by placing it in the beaker . It will turn violent and the paper on the desk will fold back , allowing you to take theLock Pick . Now , move to the back of the laboratory into the Yellow Room ( i3 ) .
After the thin out panorama with Rouletabille , complete the missing objects mini - game ( k1 ) to get afifth Letter Piece . Next , get a finis - up of the gun on the floor ( k2 ) and plunk up asixth Letter Piece . Take a photo of the gas pedal for evidence .
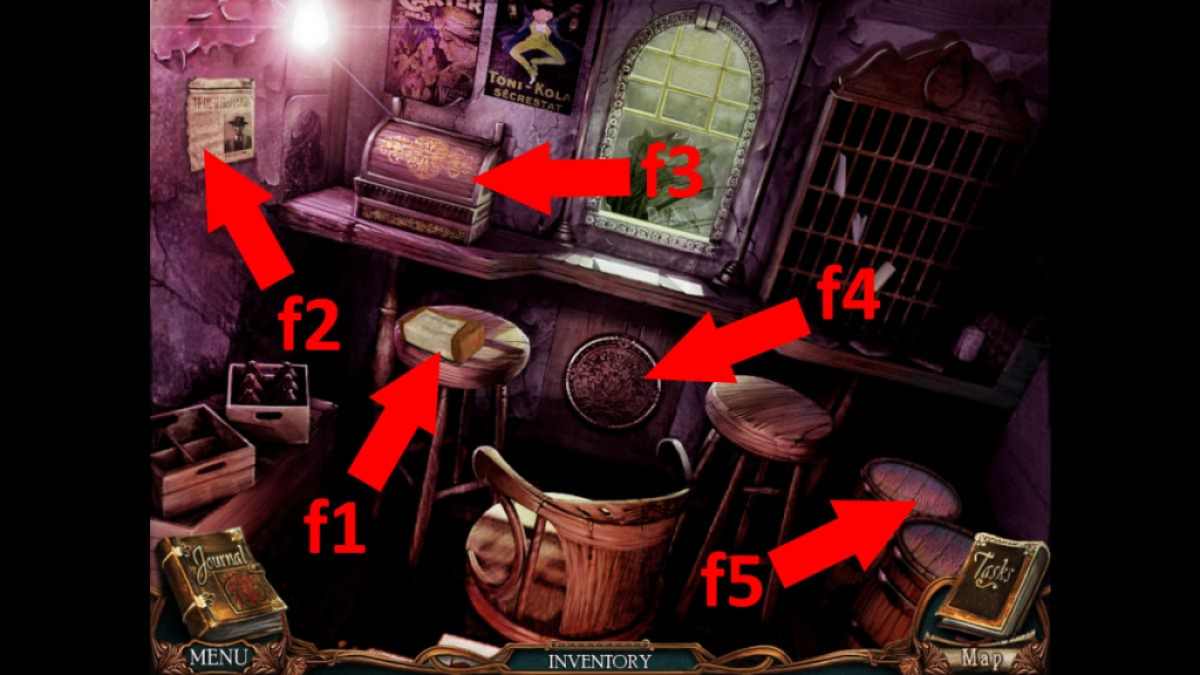
Image by Pro Game guides
Select the base of the dresser ( k3 ) to find a loose floorboard . Hit it with your power hammer to pop it up and get theseventh Letter Piece . Back in the laboratory , select the clock ( i4 ) to begin another puzzler like the moonlight one earlier , but trickier . The result is pictured above .
Once over , take theeighth and final Letter Piecefrom inside . Now you may come home the dresser top ( k4 ) in the Yellow Room and apply it to piece together the missive . Once complete , take a picture for grounds and then see the cutscene to fill in Chapter Three .
Victorian Mysteries: The Yellow Room Walkthrough - Chapter 4
Chapter Four lead off outside the chateau after Fred Larsan has accused Monsieur Stangerson of aid his daughter ’s attacker to scat the yellow elbow room , but no one is convert .
This chapter is quite different from the old ace because it strike you around a lot of locations , but is light on puzzles . I found it much more about the storyline , which is gratifying , but it can be pesky as youdon’t always get clear statement about where to goand the whole map is available . However , this walkthrough will get you through it cursorily gradation - by - step .
Further Investigations at the Chateau
Head back towards the chateau expiration that heads towards the testing ground and study the banknote on the floor by the bench ( a1 ) , picking up theSliderand taking a picture of the note as evidence . Then go back into the chateau , take the right - side hallway in the foyer , and enter Matilde ’s room .
Take a pic of Matilde ( in the bed , b1 ) for evidence and also one of the fireplace ( b2 ) , where you also require to seize theTongs . Now move next door to Rouletabille ’s way and listen to his conversation with Monsieur Darzac . afterwards , you ’ll be able to nail a overlook - objects mini - game in the room and claim asecond Slider Piece .
Go out the front of the chateau and go right , to the garden . utilize the Tongs on the Sir Herbert Beerbohm Tree ( c1 ) to get theMarble . Go back into the chateau foyer . This sentence , take the left over hall and habituate the Lockpick to start the door , gaining accession to Larsan ’s room .
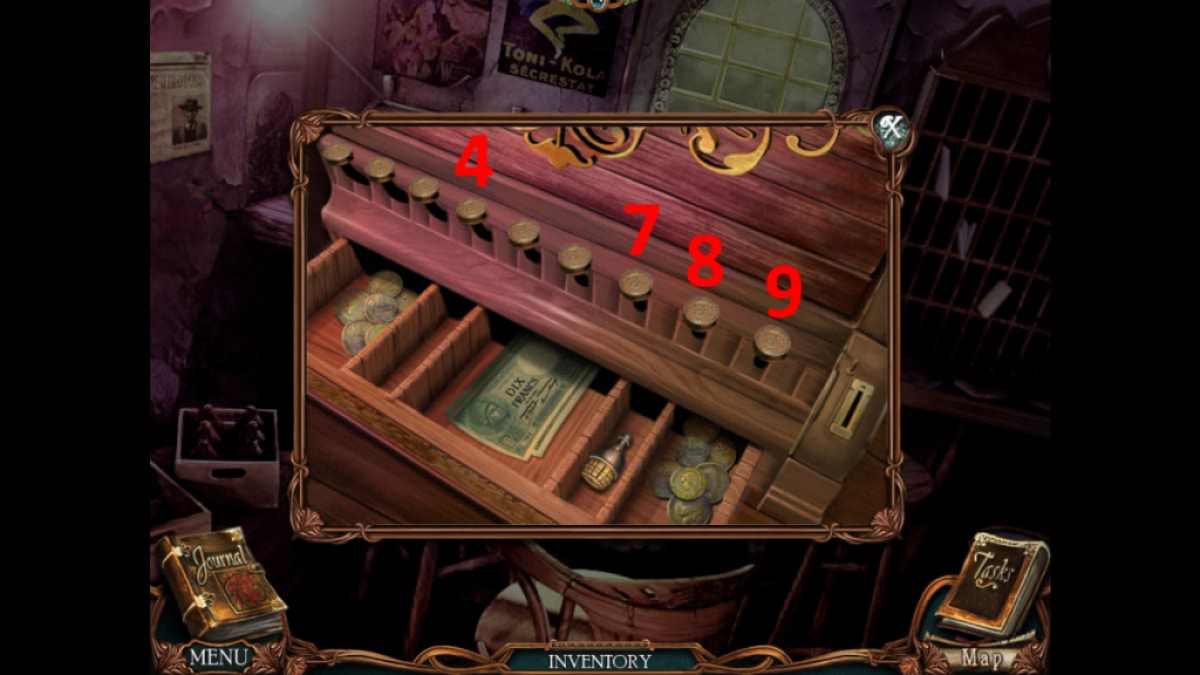
Image by Pro Game guides
Once in spite of appearance , select the bust on the rampart ( d1 ) and add up the Marble to gain athird Slider Piece . Go to the right-hand hall and examine the pendent ( e1 ) there , taking aLightbulb .
Go right back to the testing ground to detect it has been sabotaged . Insert the lightbulb into the lamp on the table ( f1 ) to lighten up the room , then take a pic for evidence . Select the cabinet ( f2 ) for a close - up and take theTarot Card . point out the back into the Yellow Room , where a raw object - happen game has materialized on the painting frame above the layer . make out it to get afourth Slider piece .
Go back to Larsan ’s elbow room in the chateau , click the seam ( d2 ) , and then add the Tarot Card to those already there to start a menu - matching puzzle . This is randomized each fourth dimension , so I ca n’t give the result , but you ca n’t die and it is well-situated if you make note as you reckon at the menu . Once complete , take theSlider Key .
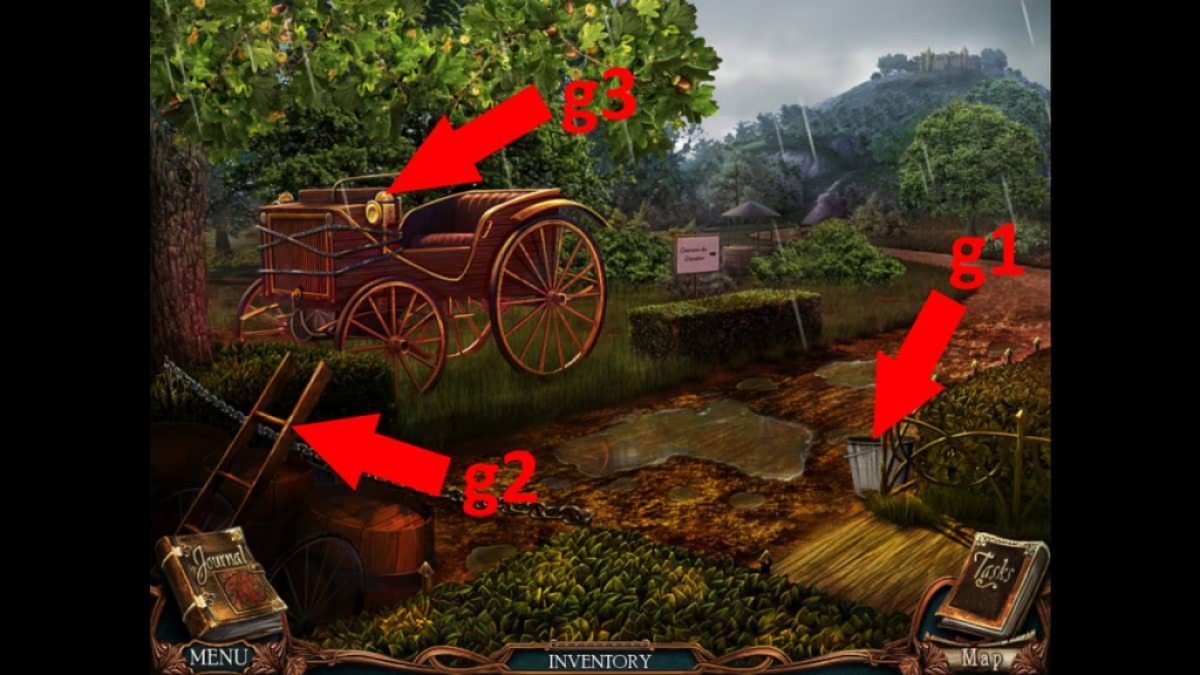
Image by Pro Game guides
Another Attack
Next , select the thorax at the final stage of the bed ( d3 ) . Add the four Slider pieces in the closing - up to begin a sliding puzzle . All you take to do is move the art object until the four squares that start in the corners are in the middle . Once complete , you ’ll reveal a keyhole . get to the compartment with the Slider Key , accept a photo of the sticker andcombination ( 152)as grounds .
Head back to the chateau foyer for a cutscene , then go across to outside the laboratory and use the combination ( 152 ) on the padlock on the ladder ( g1 ) . you may now call for theLadderinto your inventory . Go back outside the front of the chateau and use the ladder on Mathilde Stangerson ’s elbow room window ( h1 ) for a cutscene .
Move to the garden ( h2 ) and take a picture for evidence , then select Mr. Green ’s mitt ( i1 ) and take theNote Piece . Go back up to Rouletabille ’s way in the ripe hall of the chateau and take another picture for evidence . While here , click the layer to get asecond Note Pieceand take another evidence photo . Next you ’ll be send to Larsan ’s room ( left hall ) .
Screenshot by Pro Game guides
Once inside , snap Larsan in the bed ( d2 ) and get thethird Note Piece , then go out to the garden for another cutscene with Rouletabille . He asks you to assemble him at the station , so move there next ( Station Front ) for yet another snub scenery , which conclude Chapter Four .
Victorian Mysteries: The Yellow Room Walkthrough - Chapter 5
Chapter Five begins just after you say adios to Rouletabille at the station as he heads off to ascertain more grounds elsewhere . Before he does , he ’ll task you with taking photographs as any grounds you could find while he is away . This last chapter is light on puzzler ; you ’re primarily search for the objects need to move through to new locations , all of which are explicate below .
Green Man
From the place , come back to the logic gate at the chateau ’s entrance and discharge the aim - finding puzzle just to the left wing of the gates to get theGarden Key , then move to the right of the chateau and practice the Garden Key on the garden gate ( a1 ) to advance to Mr. Green ’s House .
Select the postbox ( b1 ) , open it , and collect afourth Note Piece(see myChapter Four Walkthroughif you do n’t already have three pieces ) , then get thefifth Note Piecefrom the bench outside the sign ( b2 ) . Now get through behind the house ( b3 , by the cart ) to move to the Back Porch .
Click the fence ( c1 ) to pick up theCrest , then to the left of the doorway ( c2 ) to get yoursixth Note Piece . Afterward , employ the Scarf on Madame Mathieu ( c3 ) and take in the shortened scene that follow , after which she ’ll give you theseventh Note Piece .

Image by Pro Game Guides
Next , go back into the chateau , enrol Larsan ’s room ( left hall ) , and habituate the Crest to open up the chest of draw play ( d1 ) and get theeighth and concluding Note Piece . Now that you have all the pieces , dawn the table on the Back Porch ( c4 ) , and complete the fretsaw puzzle ( below ) to put the tone together . Finally , take a scene of it for evidence .
Angenoux
When you move back to the garden , you ’ll discover the statue to the left field of the logic gate ( a2 ) has become a leave out objects puzzle . Afterward , you ’ll be rewarded with anOar . Move to the Chateau Front for a cutscene , then go to Front Gate and along the Right Path to the Lake . expend the Oar on the sauceboat , then cross the lake ( click the lake in the background ) .
Once you ’re at the Boat Dock , go straight forrader to the Cave Path and pick up theFishing Net(e1 ) , then use the Knife to trim down the two ropes ( e2 ) blocking the way of life forward across the bridgework . You ca n’t foil yet though , so head back to the Boat Dock .
utilise the Fishing Net on the water by the gravy boat ( f1 ) to get theGypsy Key , then move on to the Gypsy Shack ( f2 ) . Take a picture of Mother Angenoux ( g1 ) for grounds , then once she leave , expend the Gypsy Key on the caravan threshold ( g2 ) to start a missing physical object miniskirt - game . Once complete , you ’ll receive aPlankand aCrowbar .
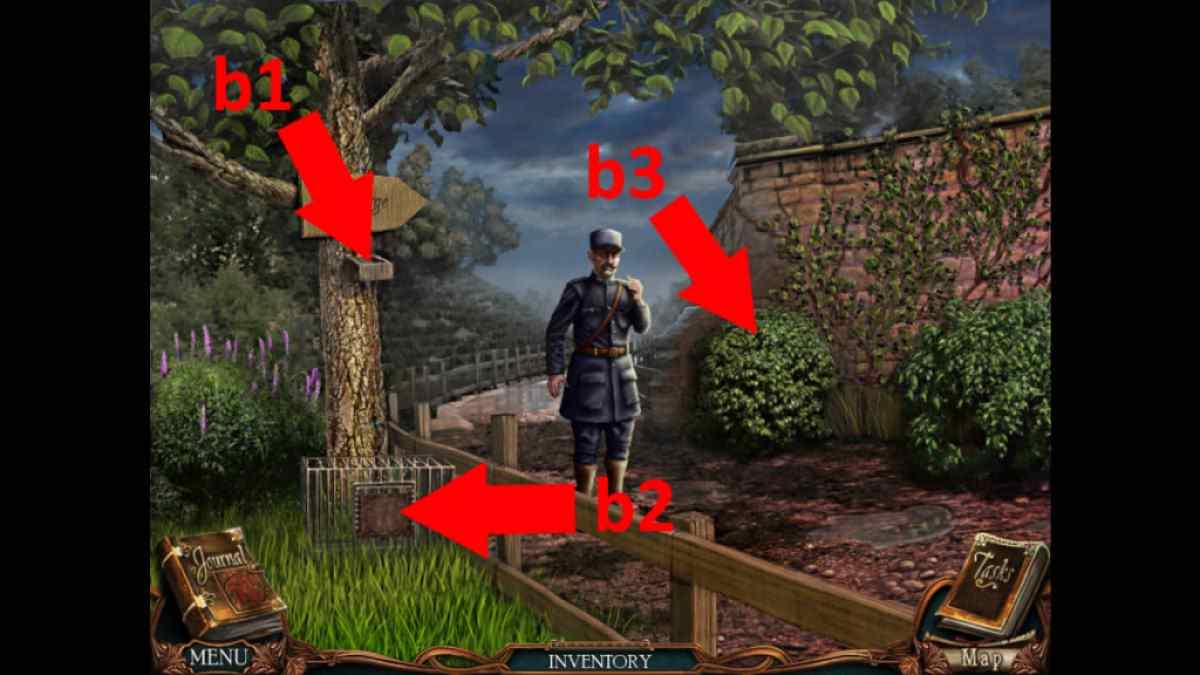
Image by Pro Game Guides
lead back to the Boat Dock and utilize the Crowbar on the loose board ( f3 ) to get thesecond Wood Plank , then go back to the Cave Path and use the two board to fix the bridge deck ( e3 ) . you’re able to now manoeuvre across the bridge circuit to the Beastie Cave .
The Beastie Cave
Select the body ( h1 ) and take a photo for evidence . After score a fleet release , head back across the lake to the Chateau Front for a abbreviated cut scene , then head to your room in the chateau ( Right Rall from the Chateau Foyer).Examine the bed to get the telegramfrom Rouletabille and photograph it for grounds .
Once the next cut view is stark , header to the Station Front to address to Rouletabille . After the conversation , Rouletabille need you to adjoin him once more outside the laboratory , where he will give his grounds . Once thereRouletabille will unwrap what take place in the Yellow Room , concluding the mystery . Congratulations !
require more adventure plot walkthroughs ? Check out10 Best Free Puzzle Mystery Gameshere on Pro Game Guides !
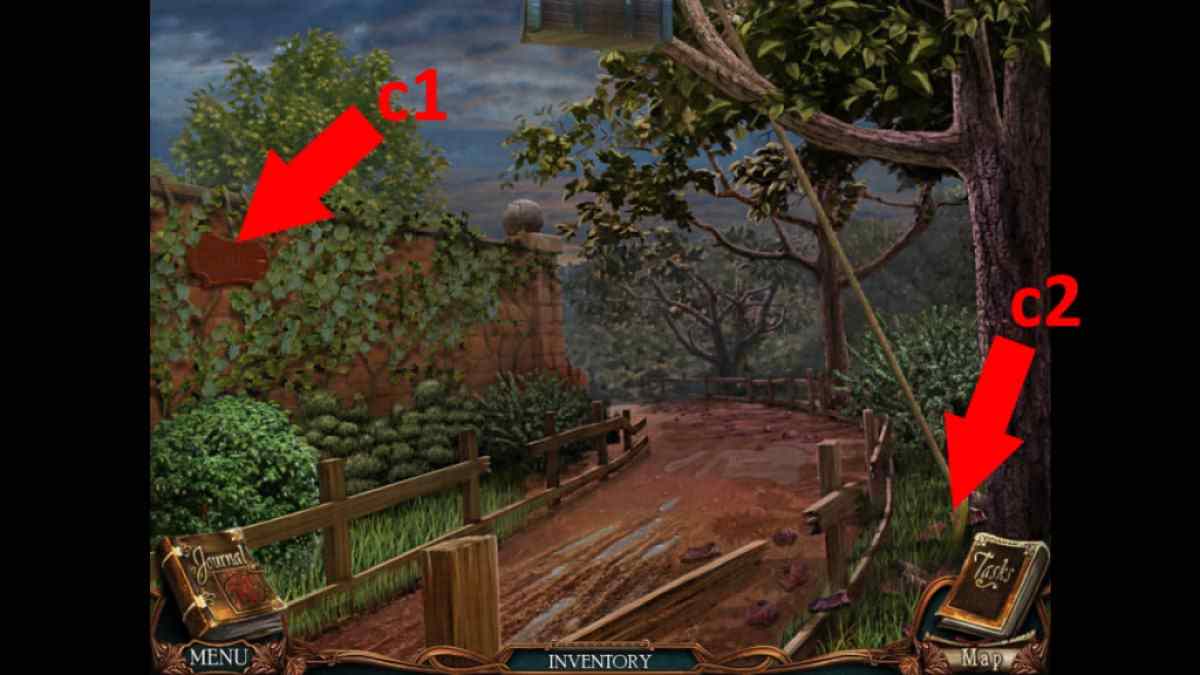
Image by Pro Game Guides
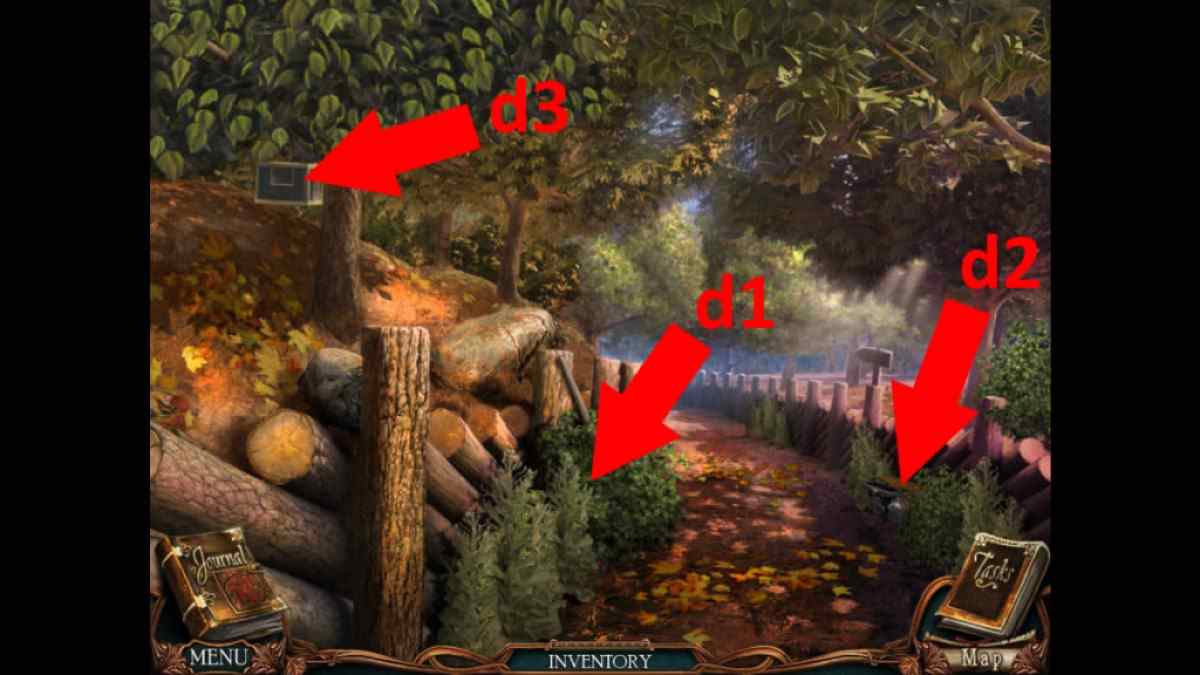
Image by Pro Game Guides
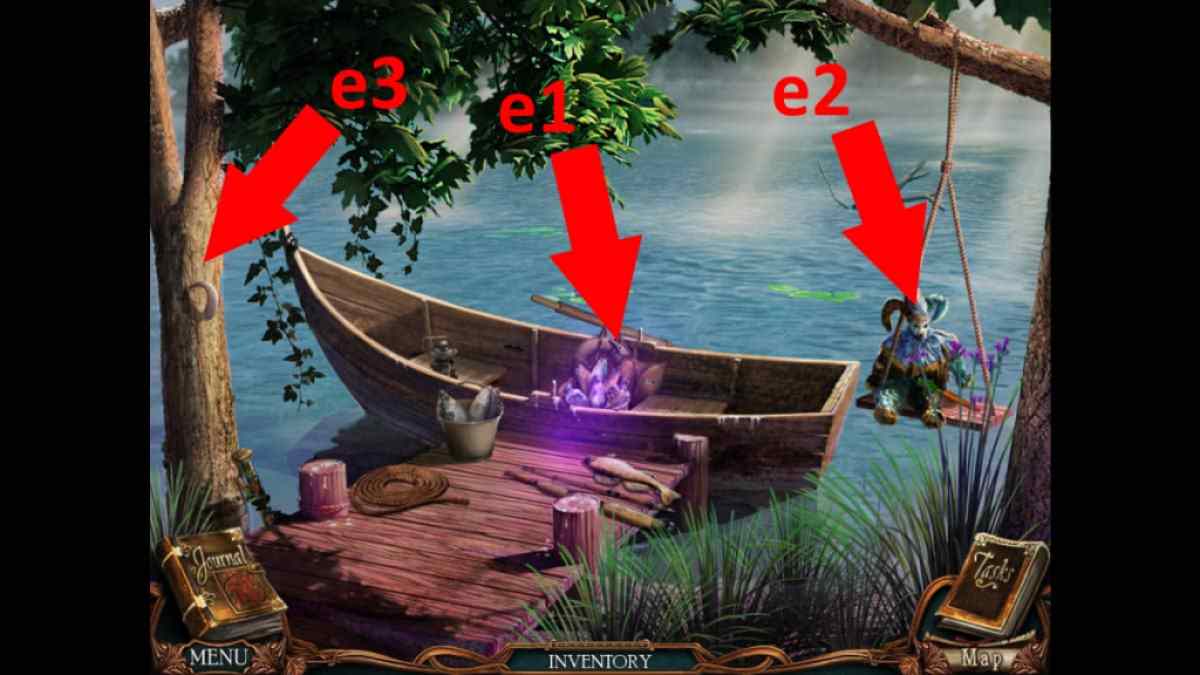
Image by Pro Game Guides
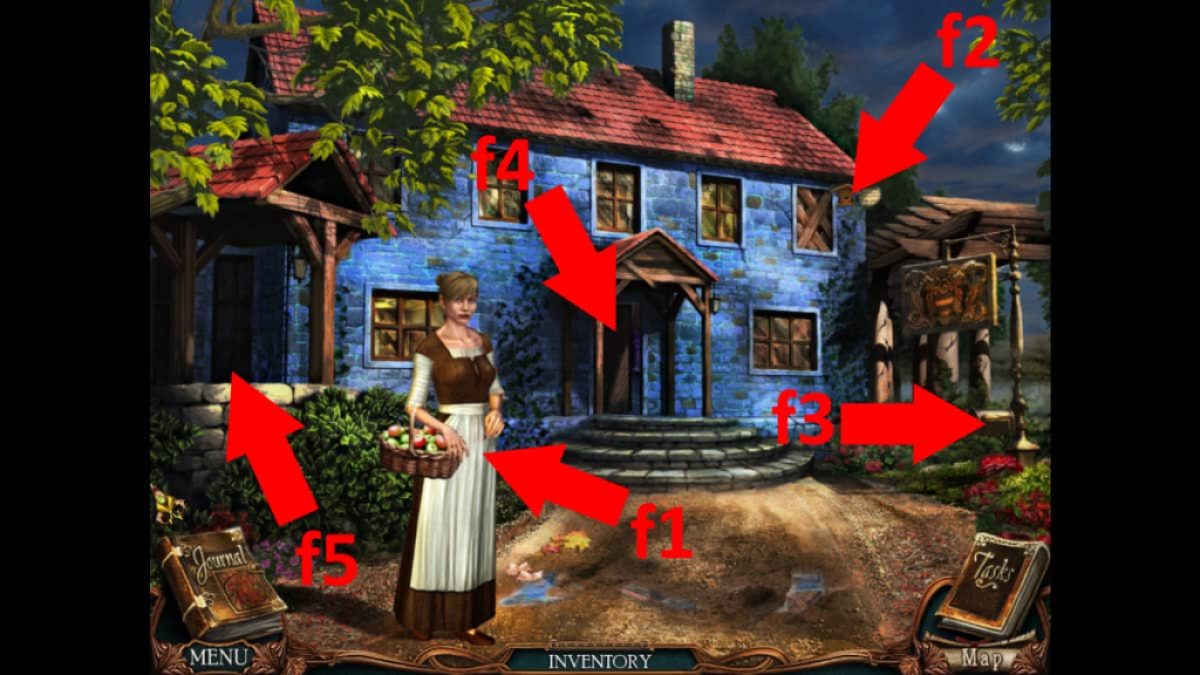
Image by Pro Game Guides
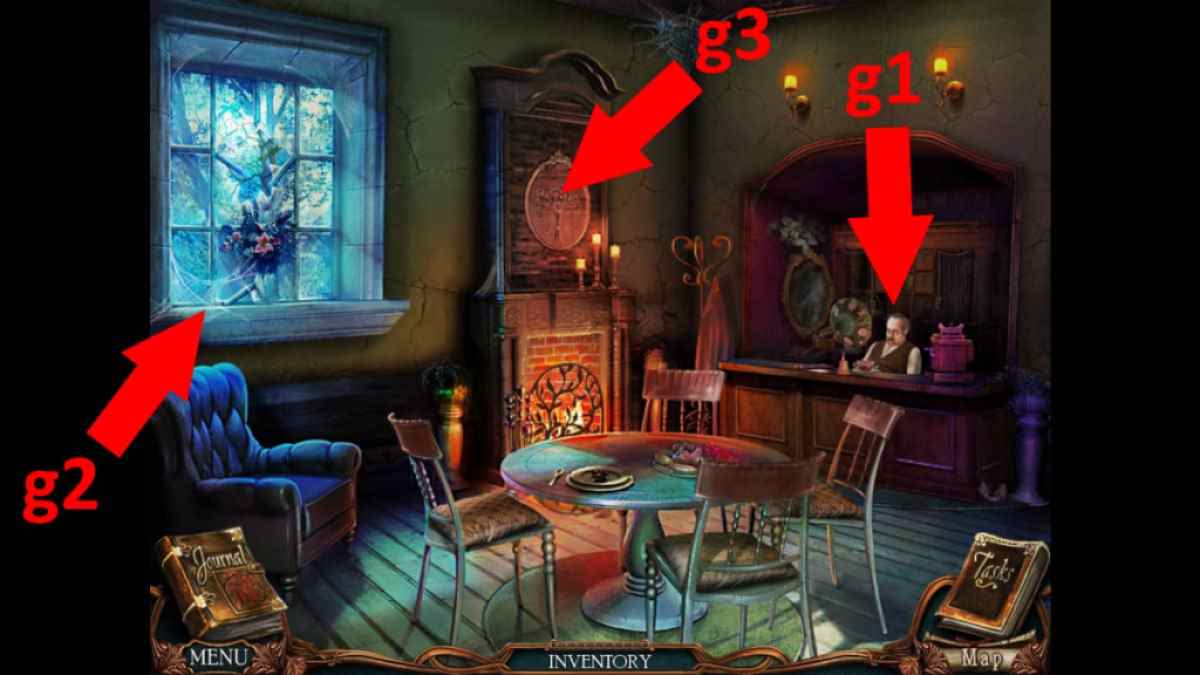
Image by Pro Game Guides
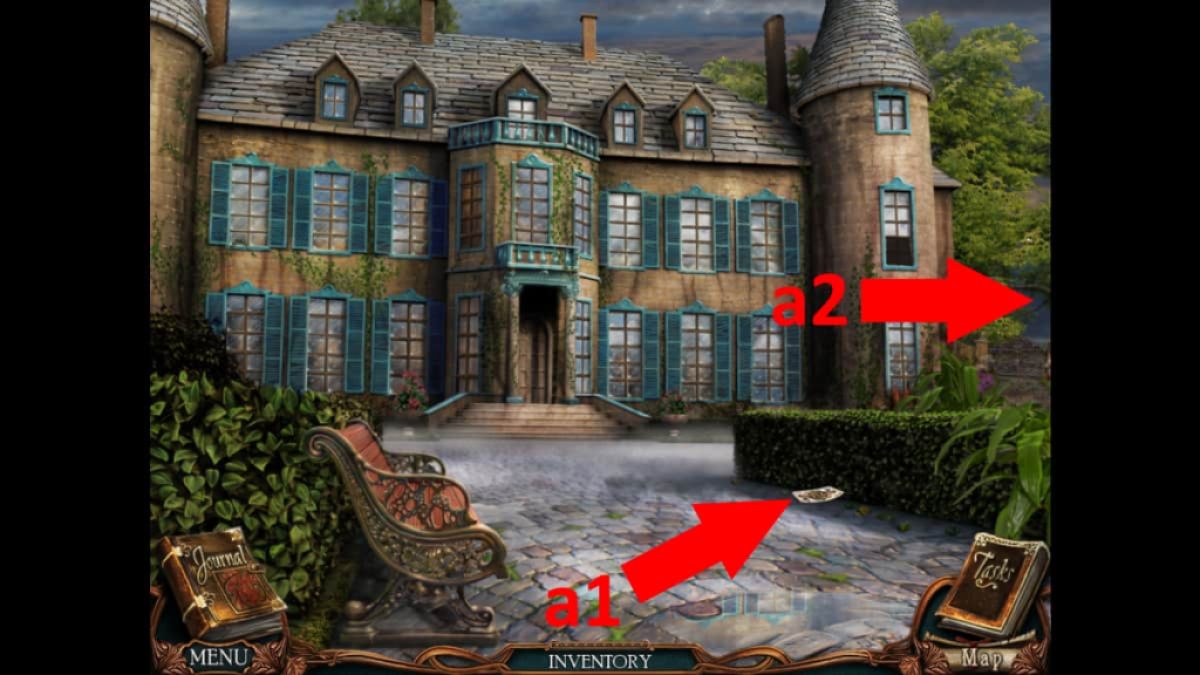
Image by Pro Game Guides
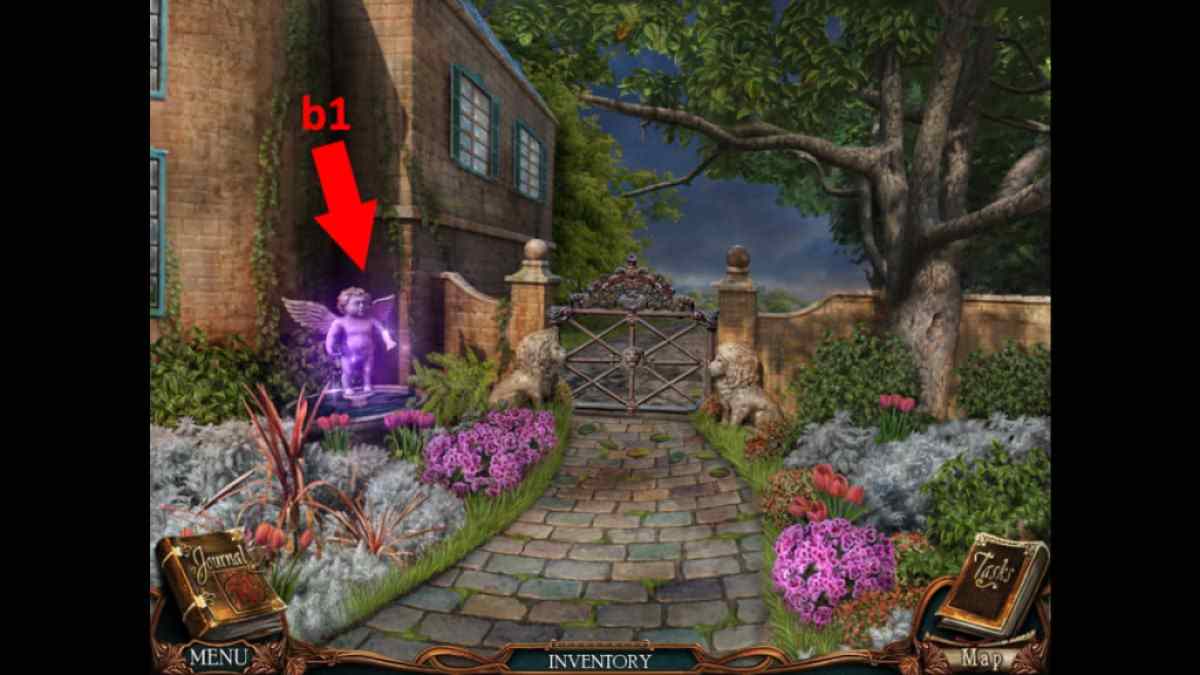
Image by Pro Game Guides
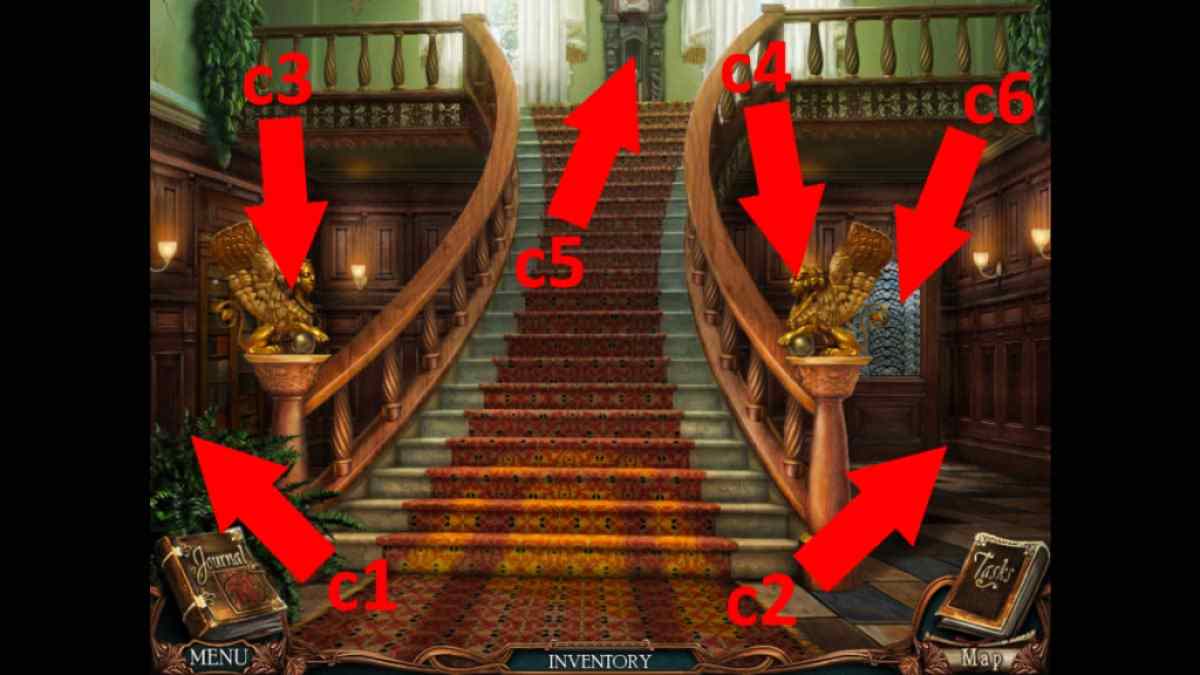
Image by Pro Game Guides
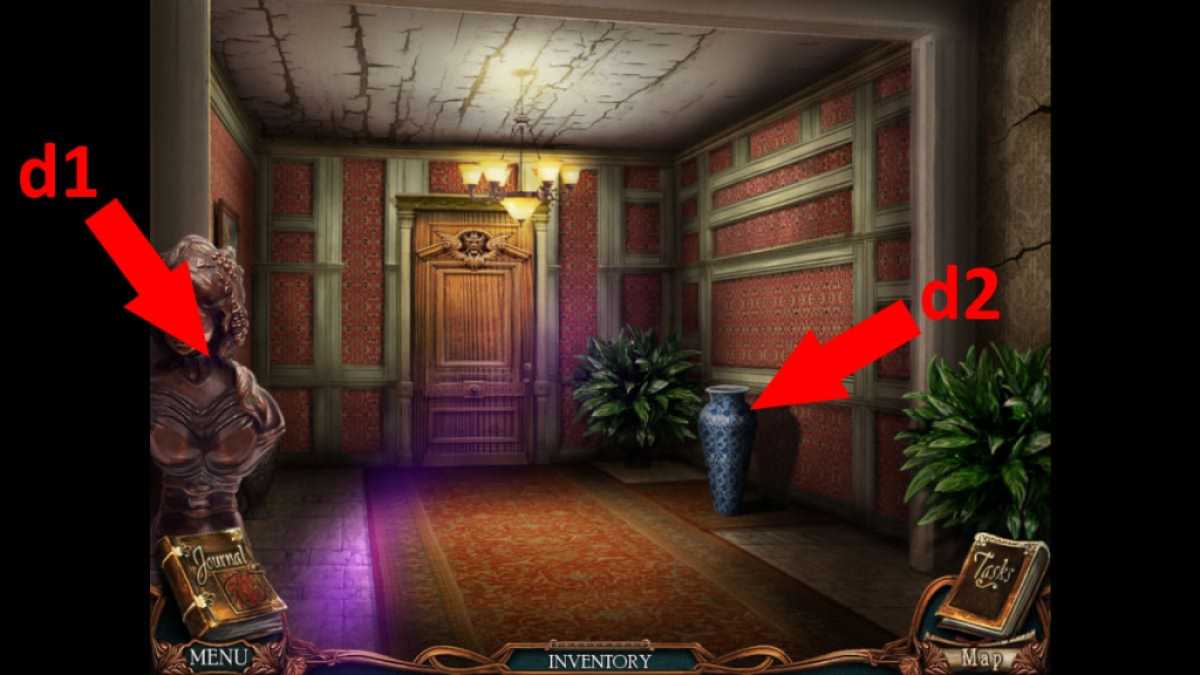
Image by Pro Game Guides
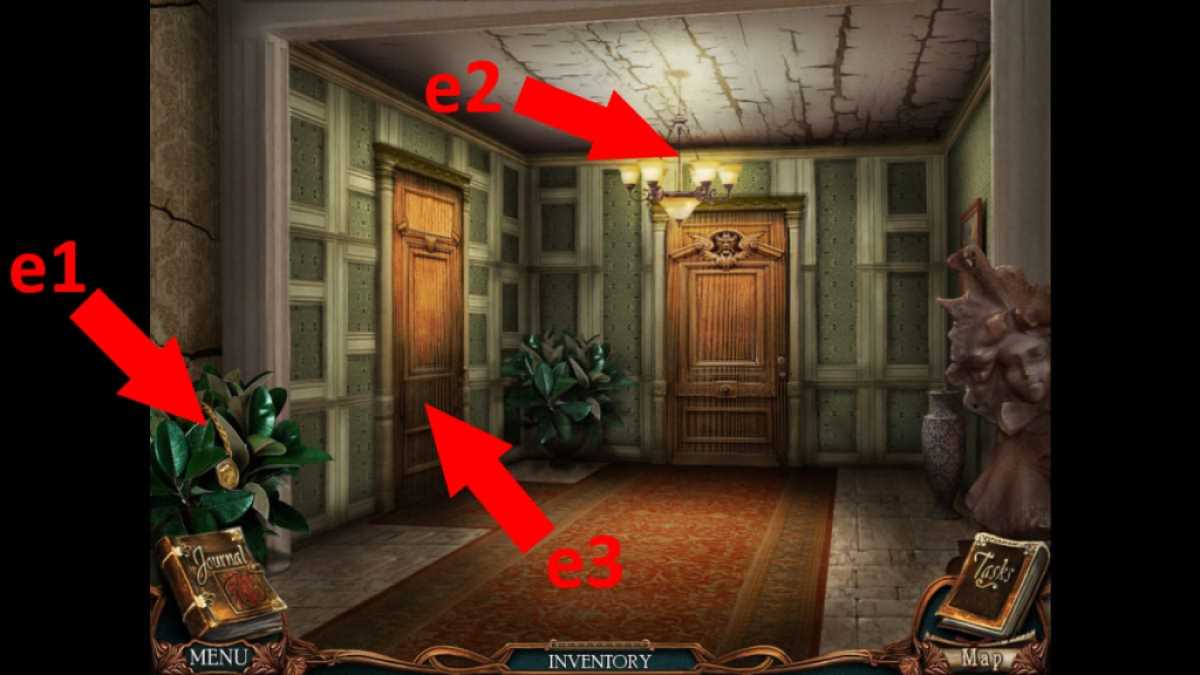
Image by Pro Game Guides

Image by Pro Game Guides

Screenshot by Pro Game Guides
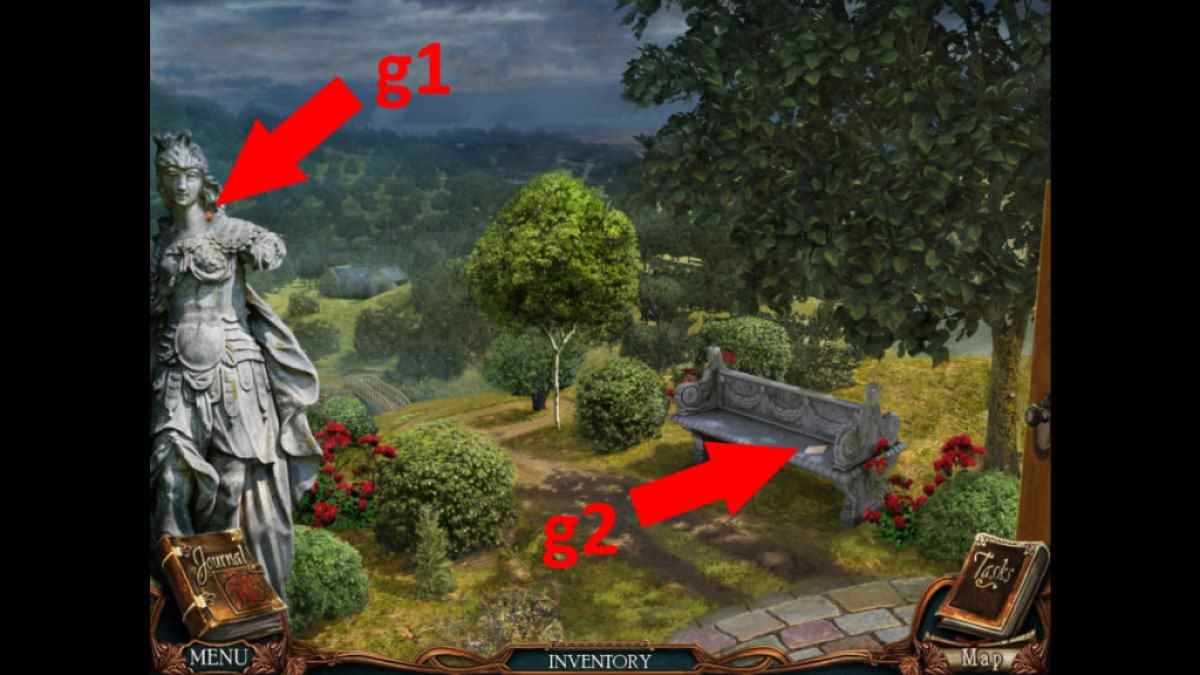
Image by Pro Game Guides

Image by Pro Game Guides
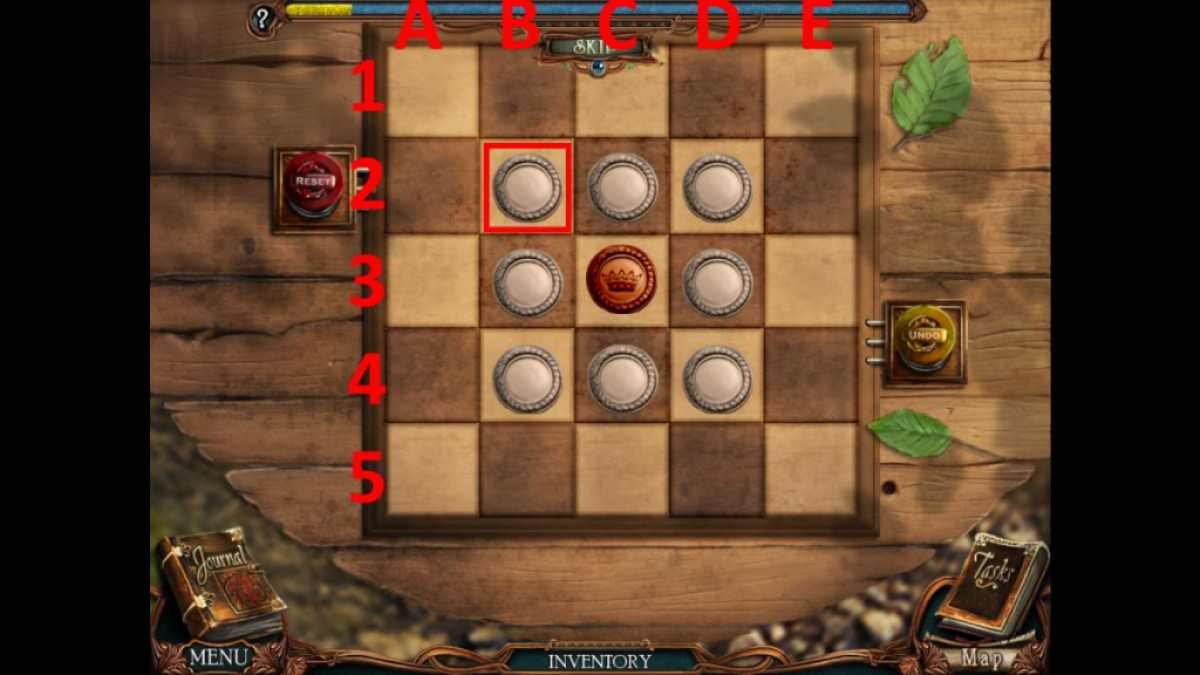
Image by Pro Game Guides
Screenshot by Pro Game Guides
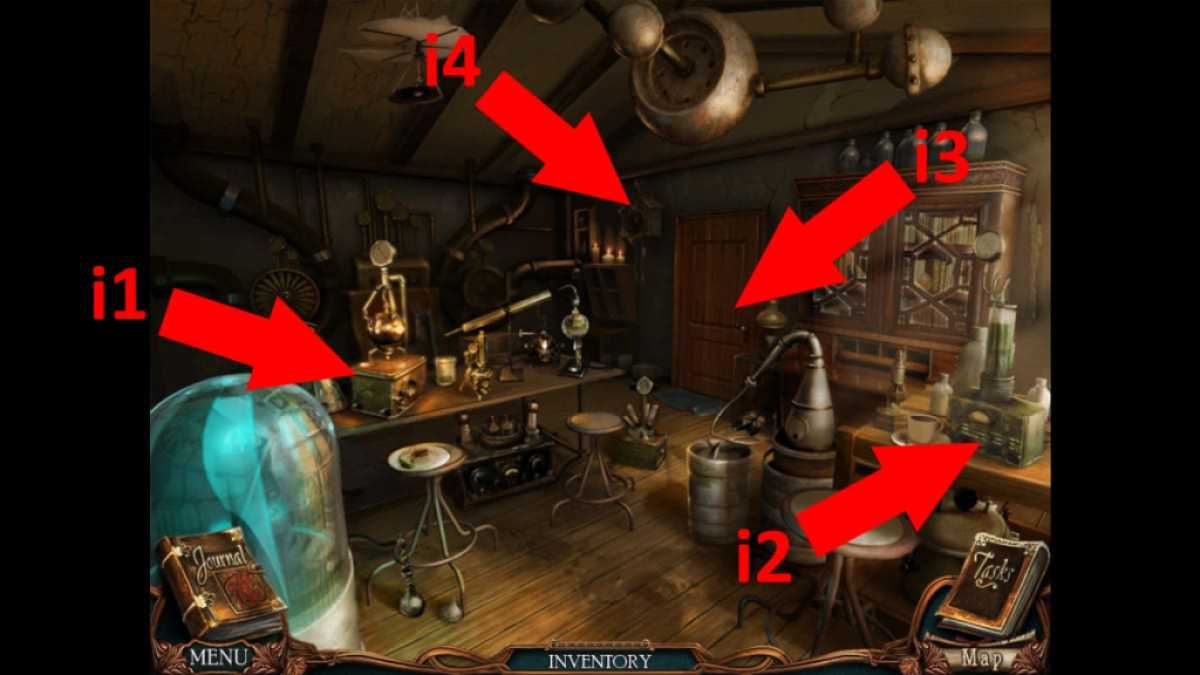
Image by Pro Game Guides
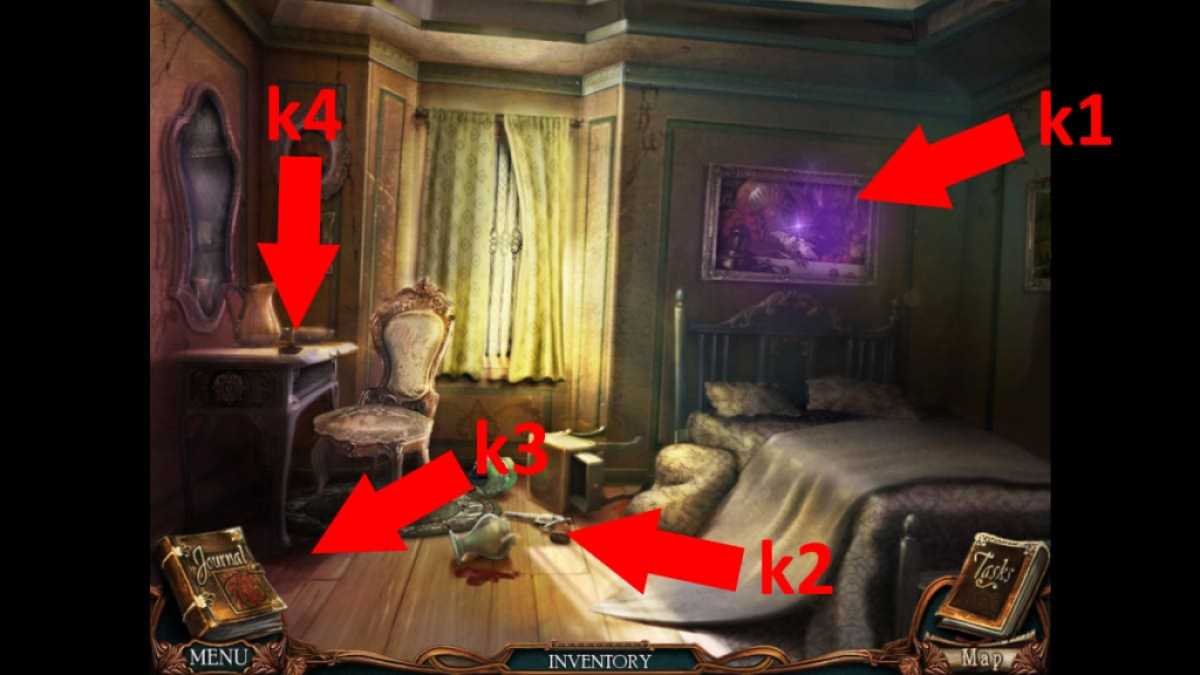
Image by Pro Game Guides
Screenshot by Pro Game Guides
Screenshot by Pro Game Guides
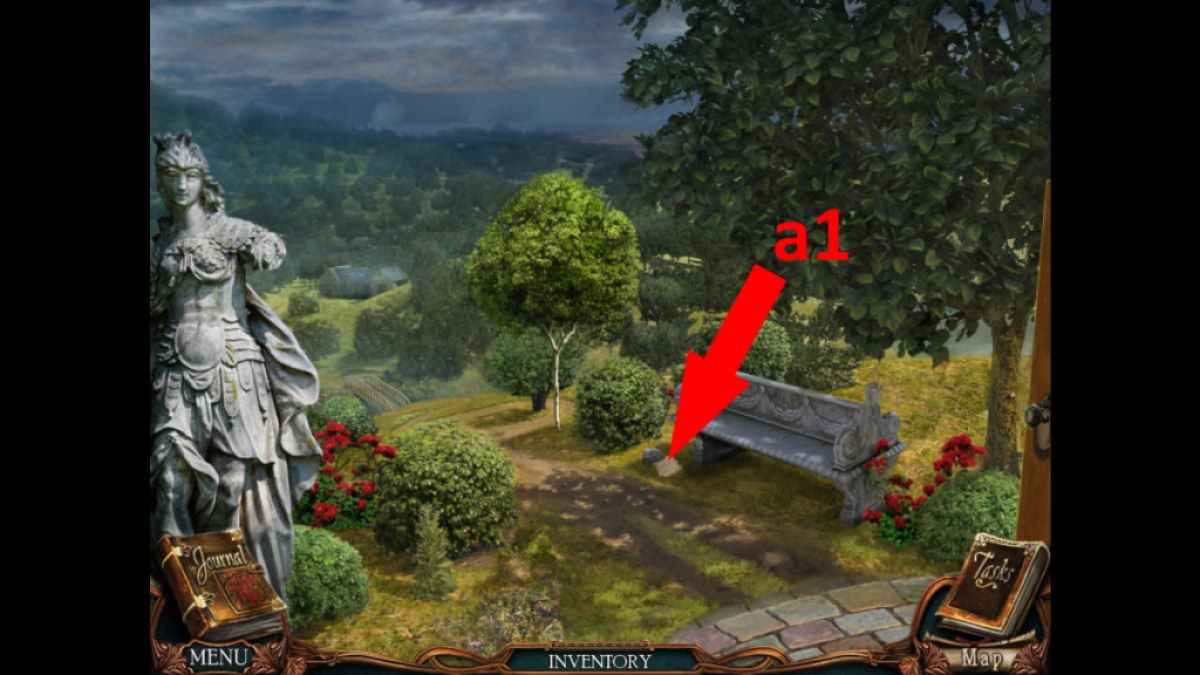
Image by Pro Game Guides
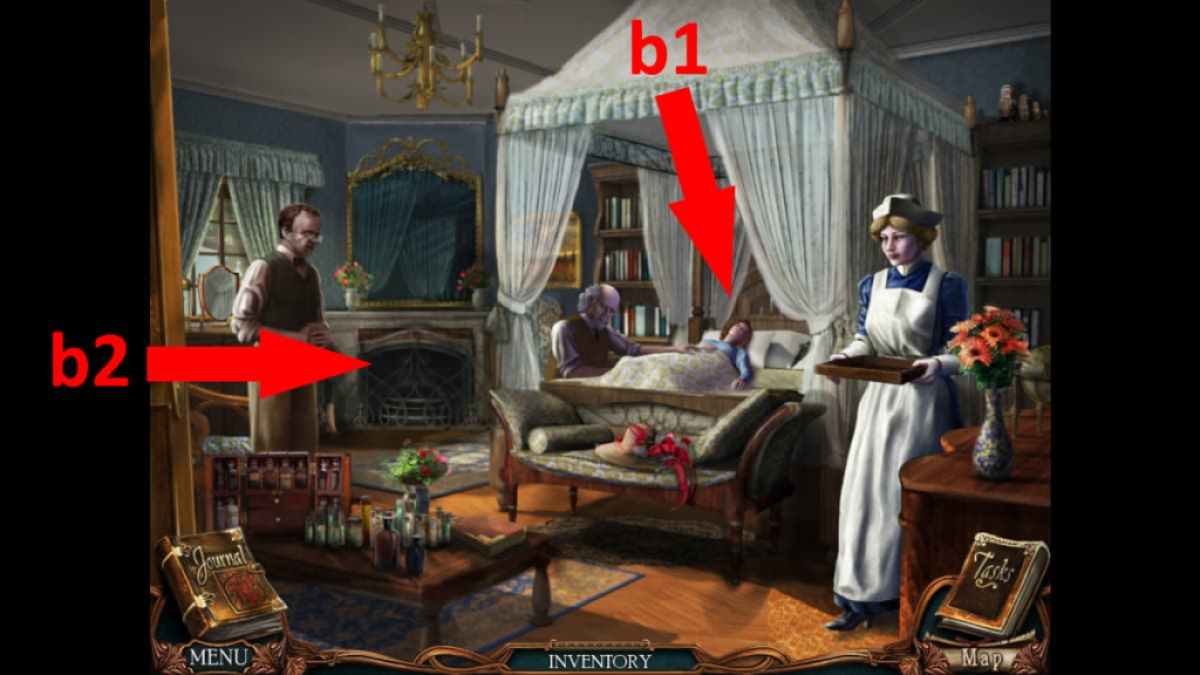
Image by Pro Game Guides
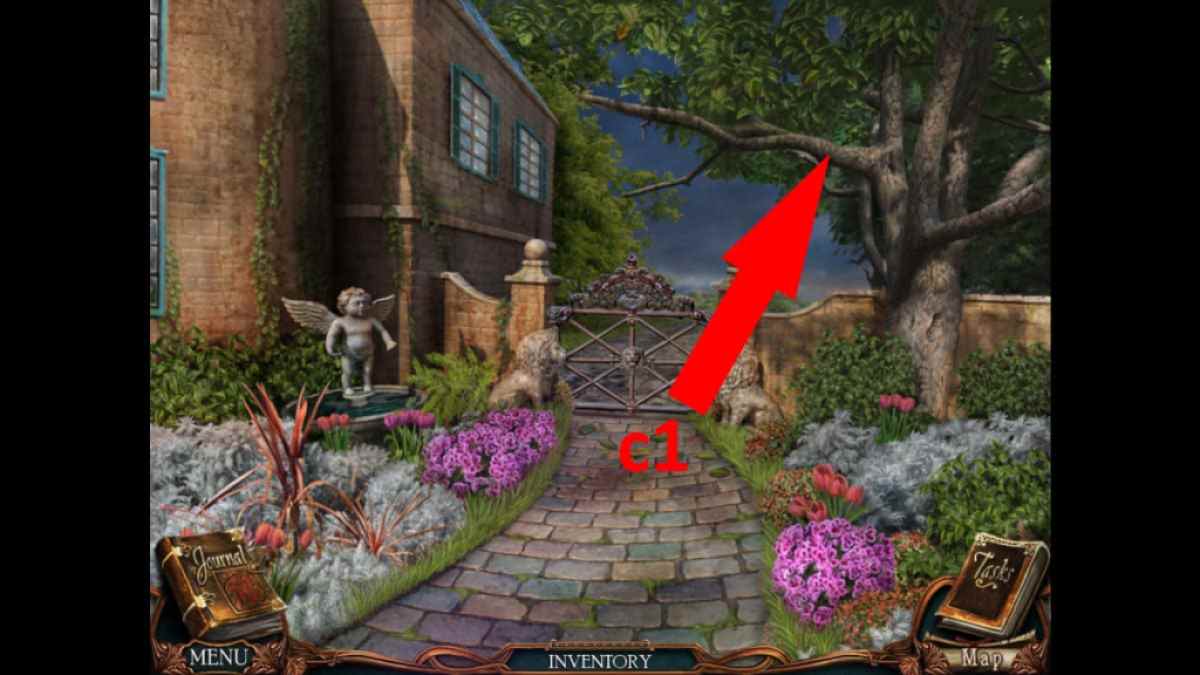
Image by Pro Game Guides
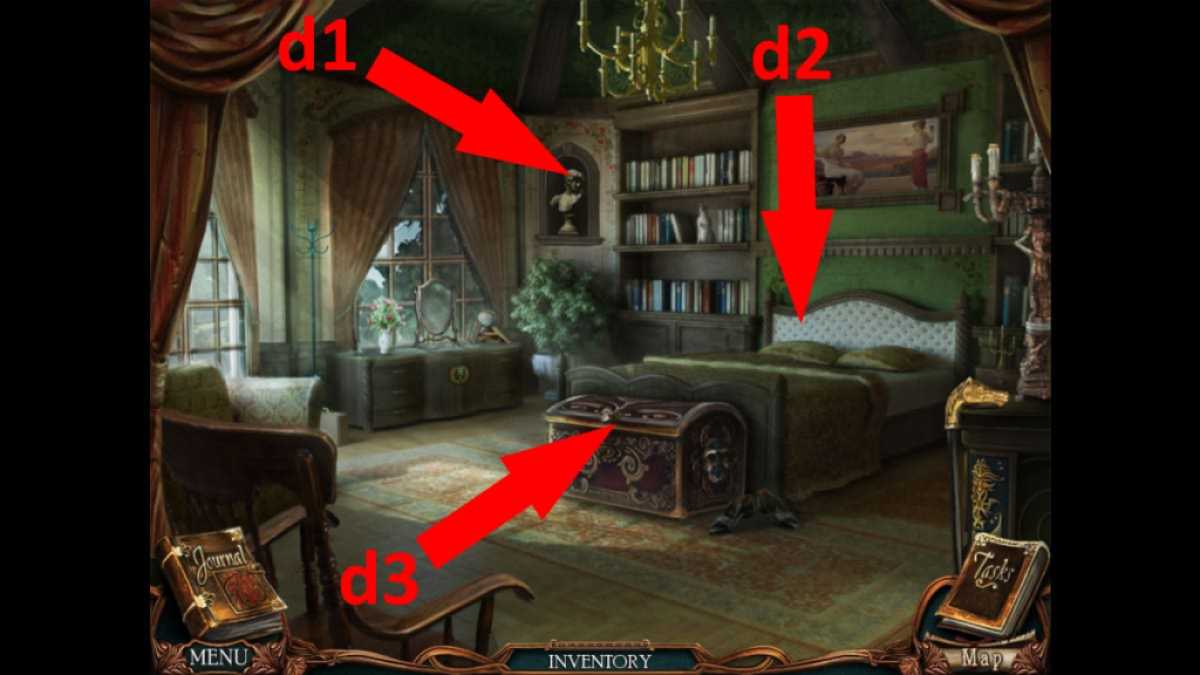
Image by Pro Game Guides
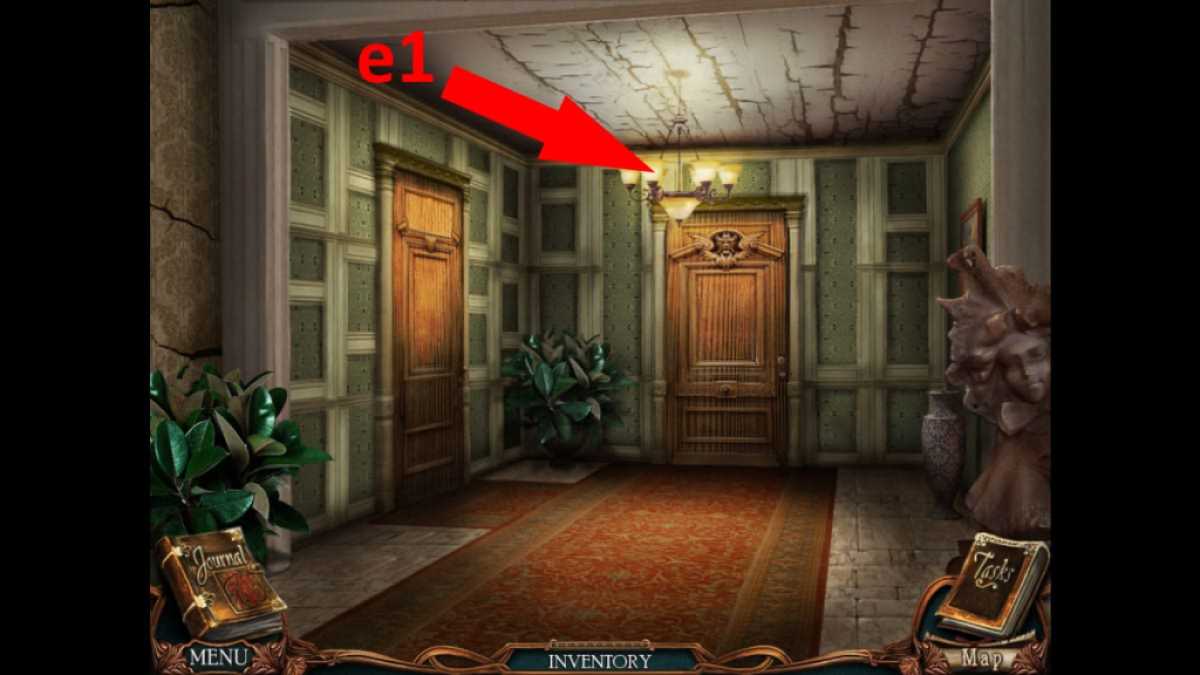
Image by Pro Game Guides
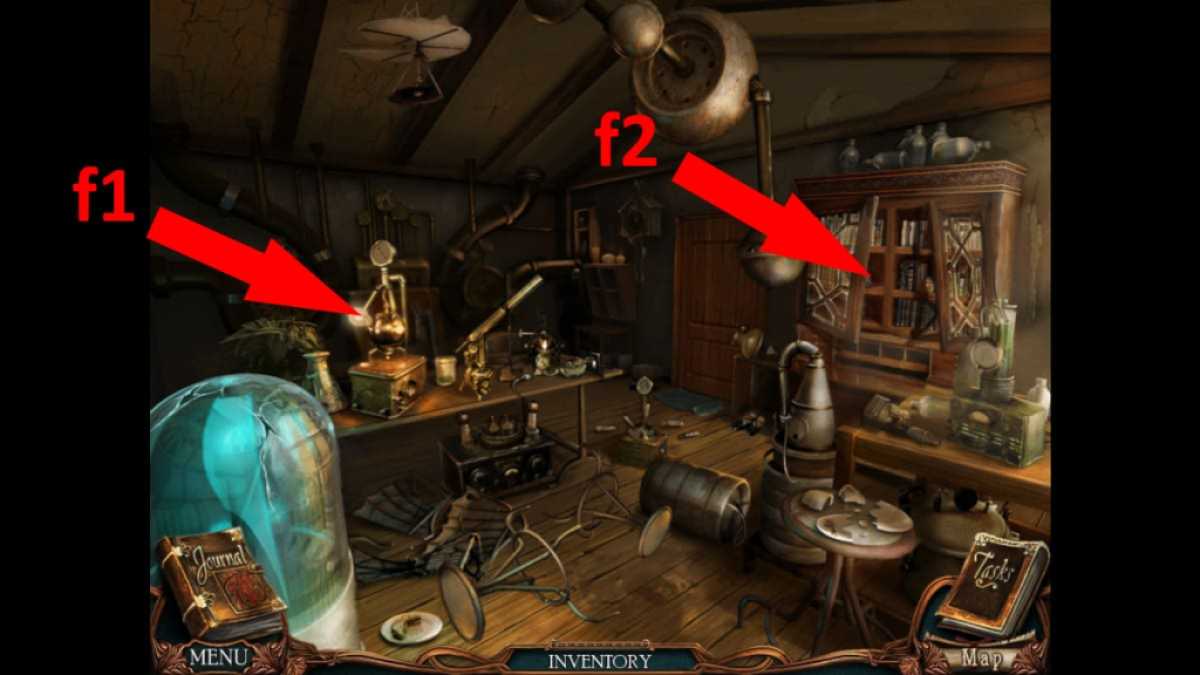
Image by Pro Game Guides
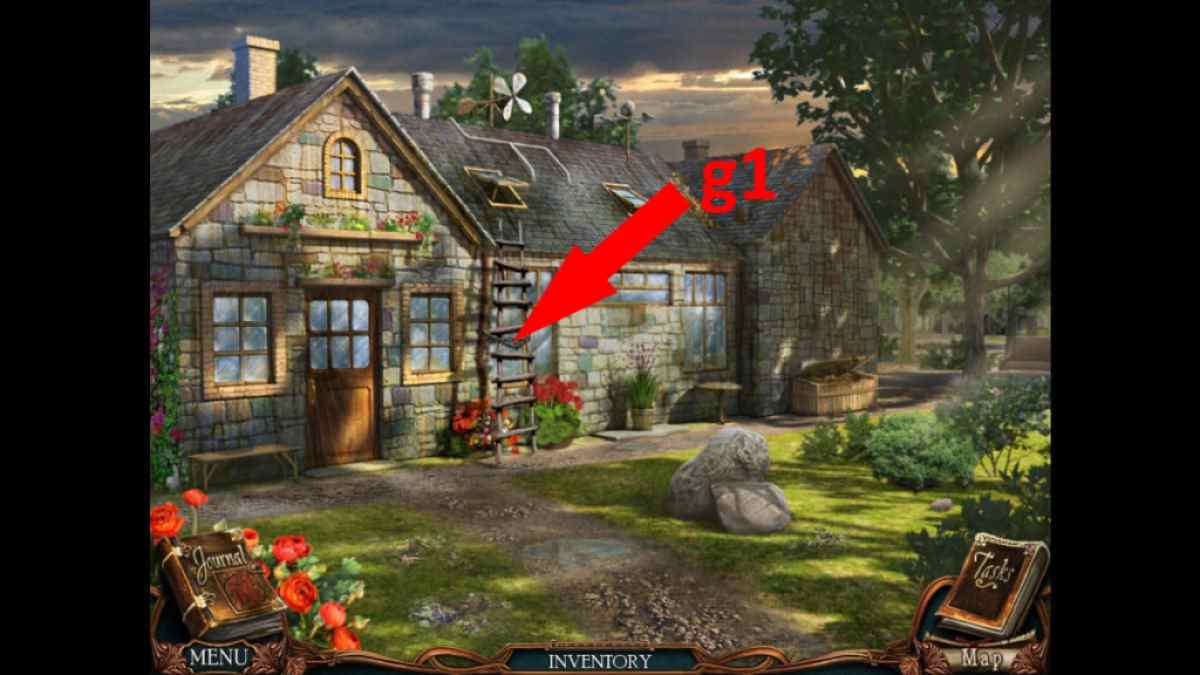
Image by Pro Game Guides
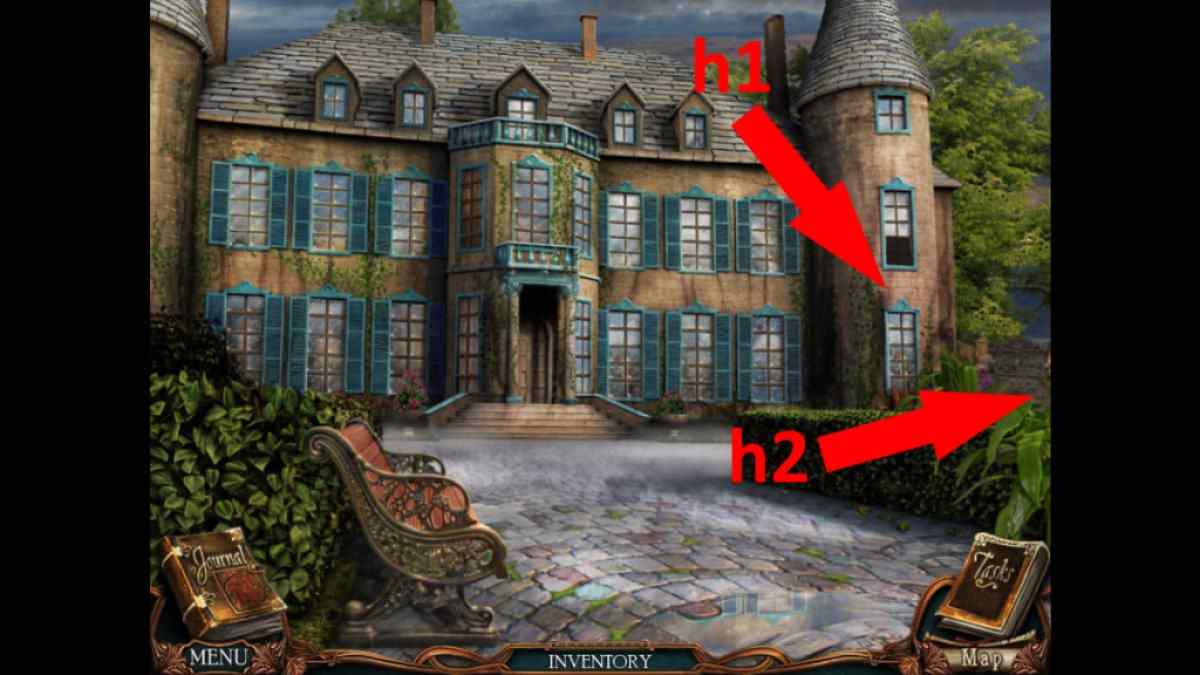
Image by Pro Game Guides

Image by Pro Game Guides
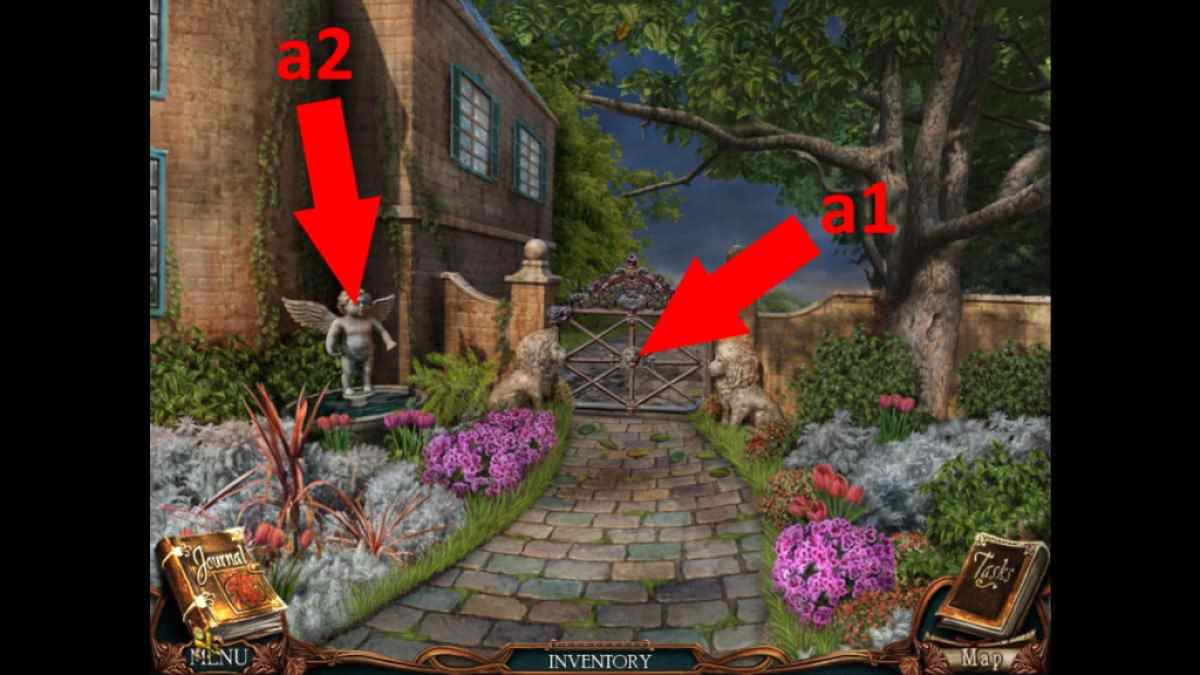
Image by Pro Game Guides
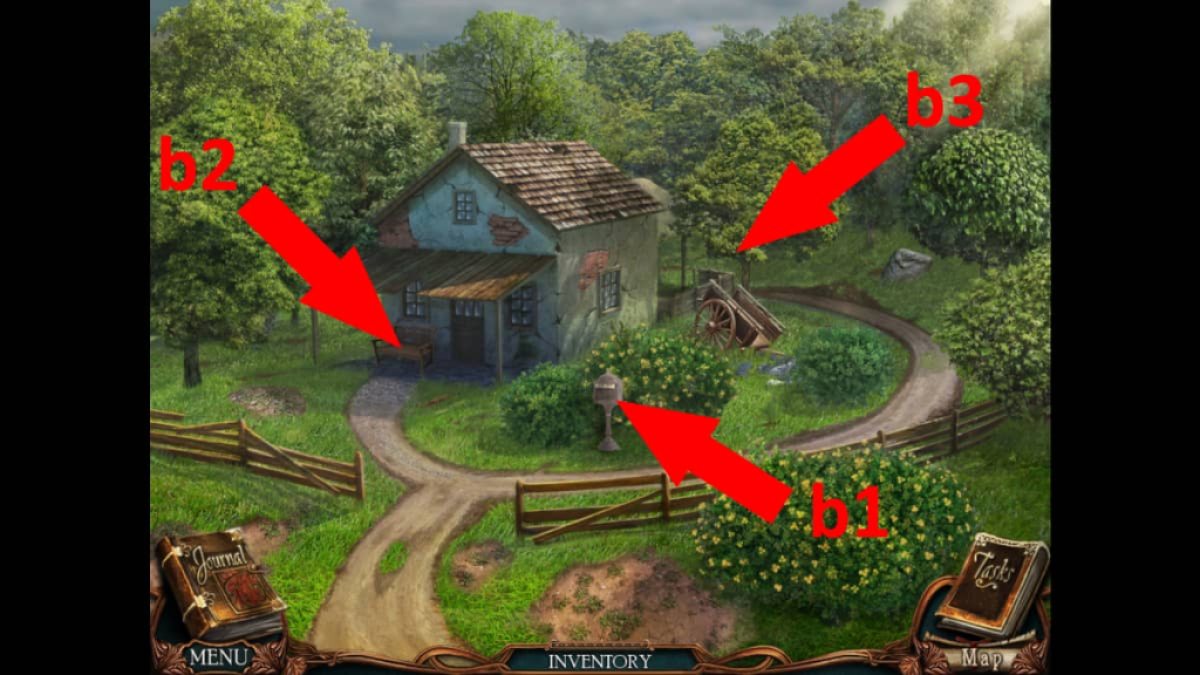
Image by Pro Game Guides
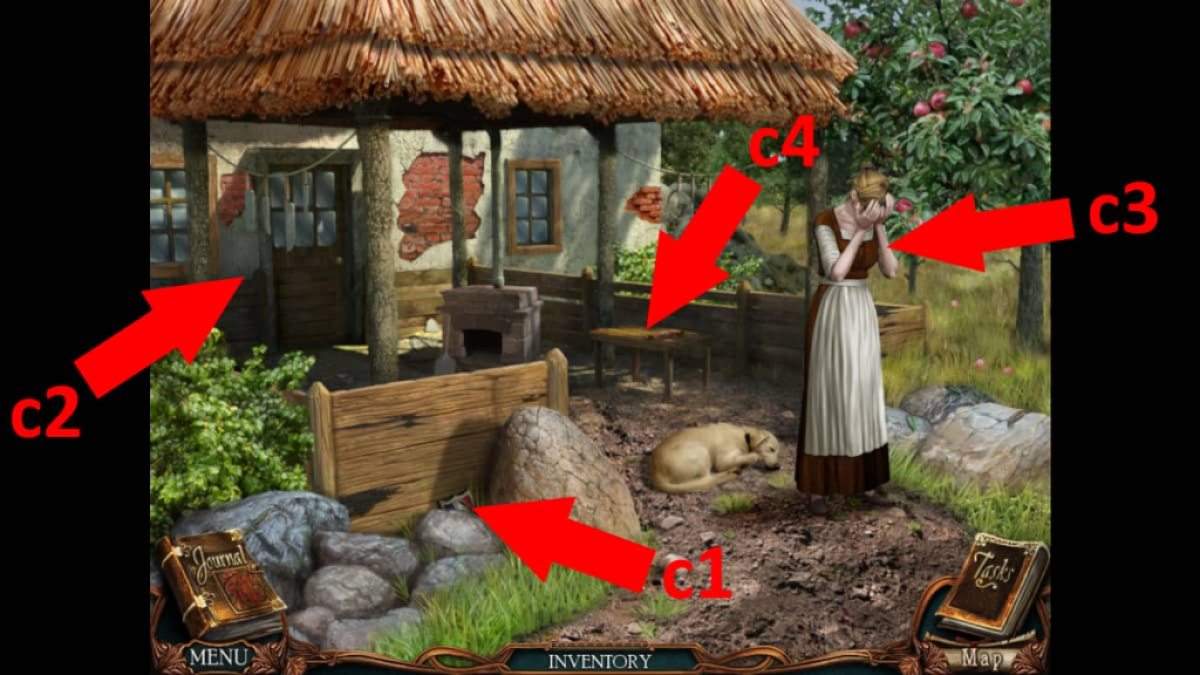
Image by Pro Game Guides
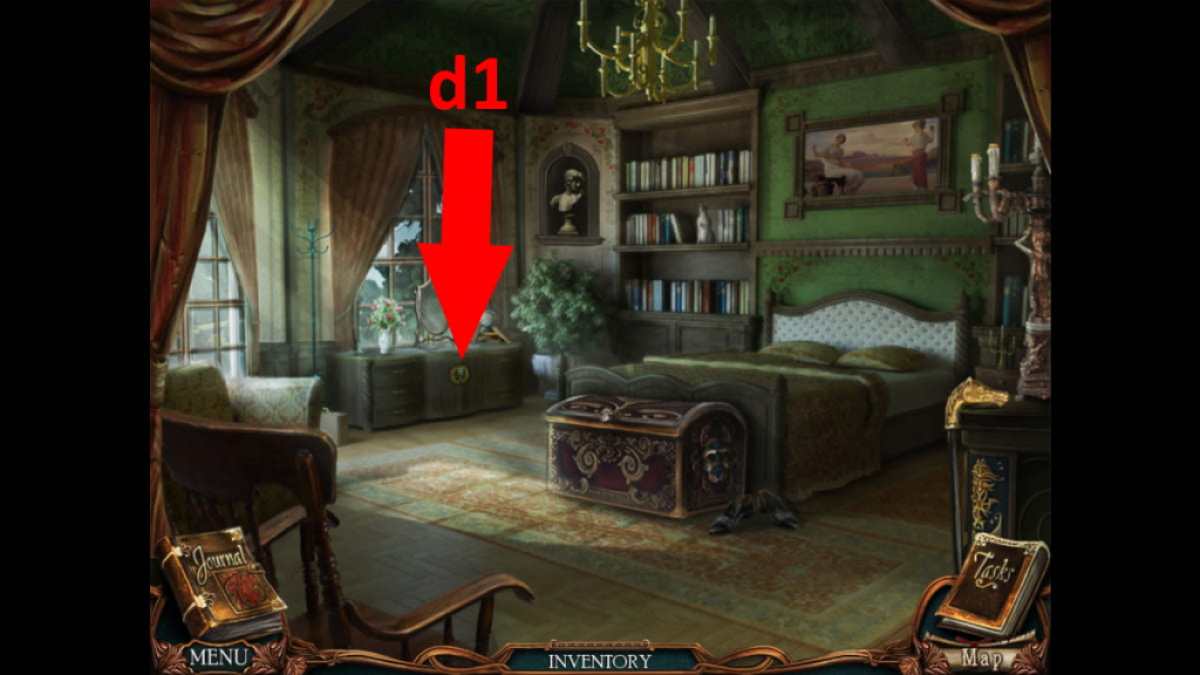
Image by Pro Game Guides

Screenshot by Pro Game Guides
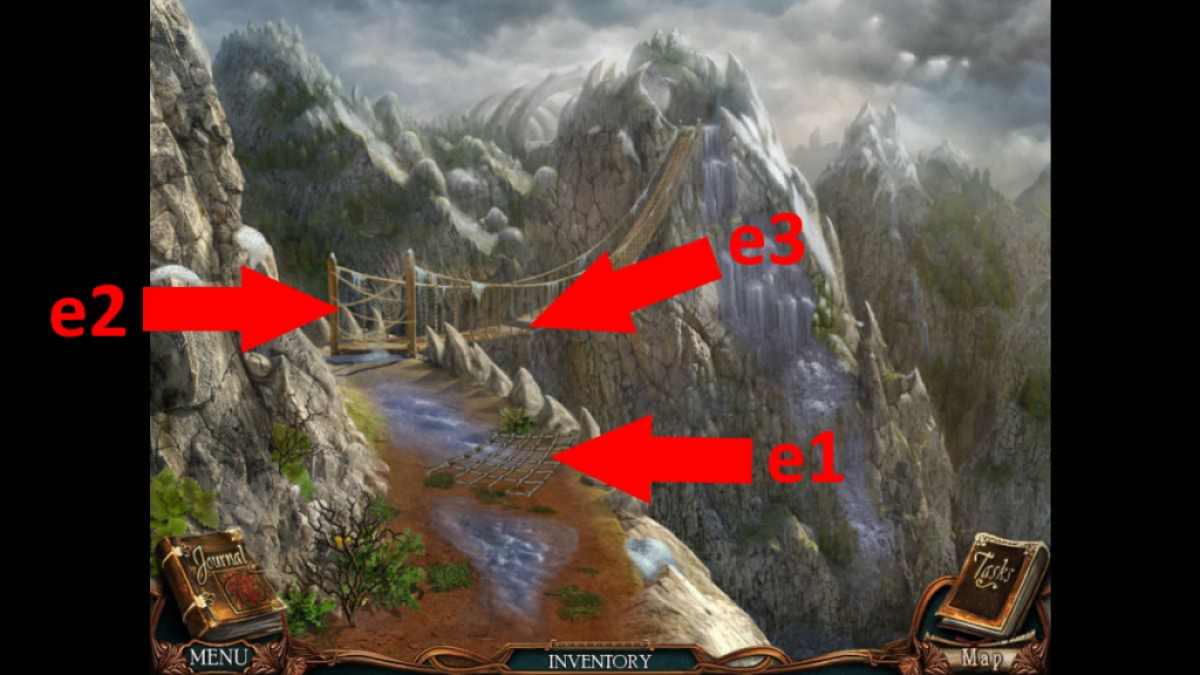
Image by Pro Game Guides
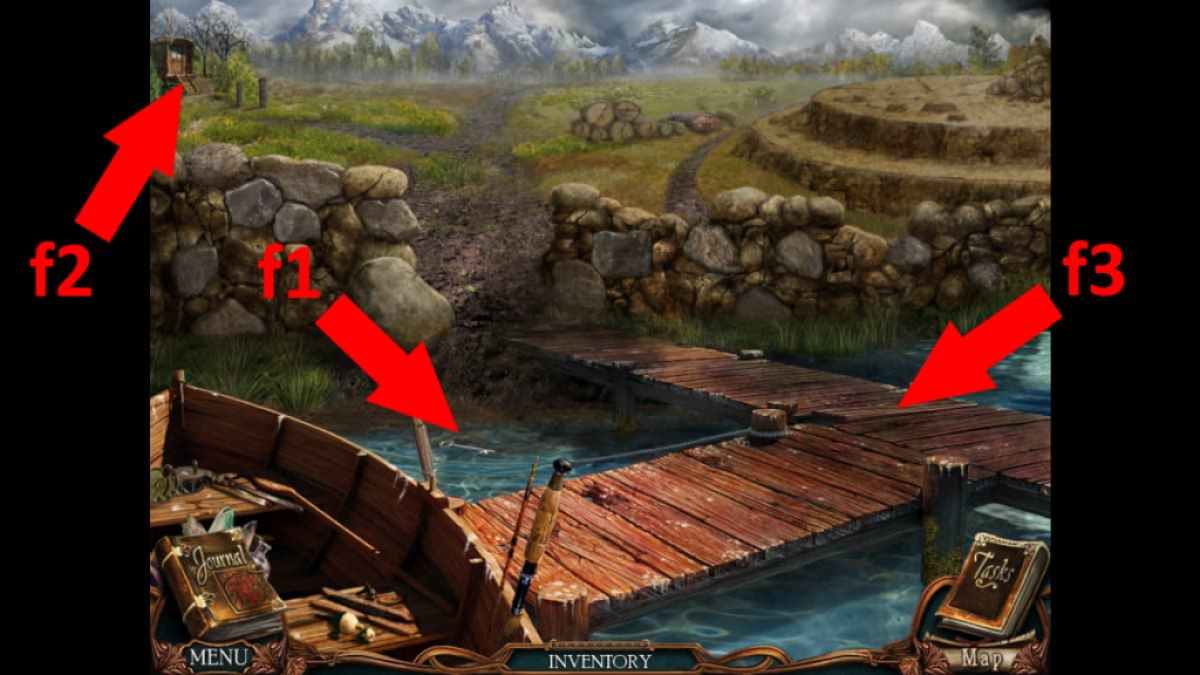
Image by Pro Game Guides
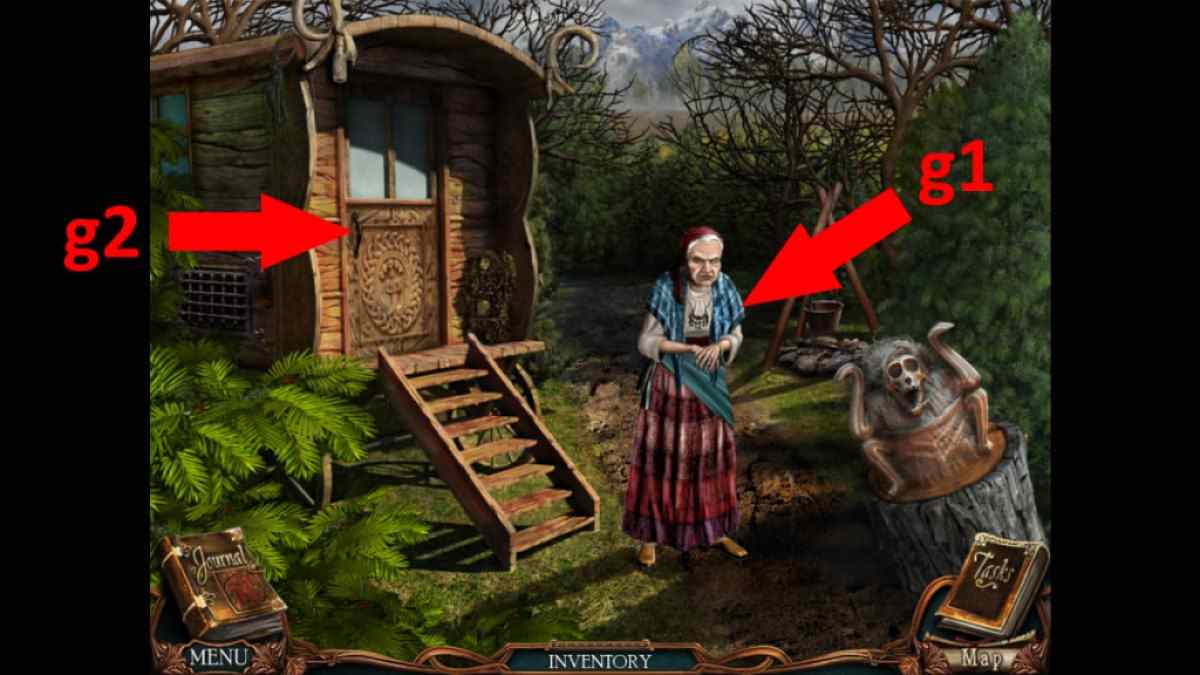
Image by Pro Game Guides
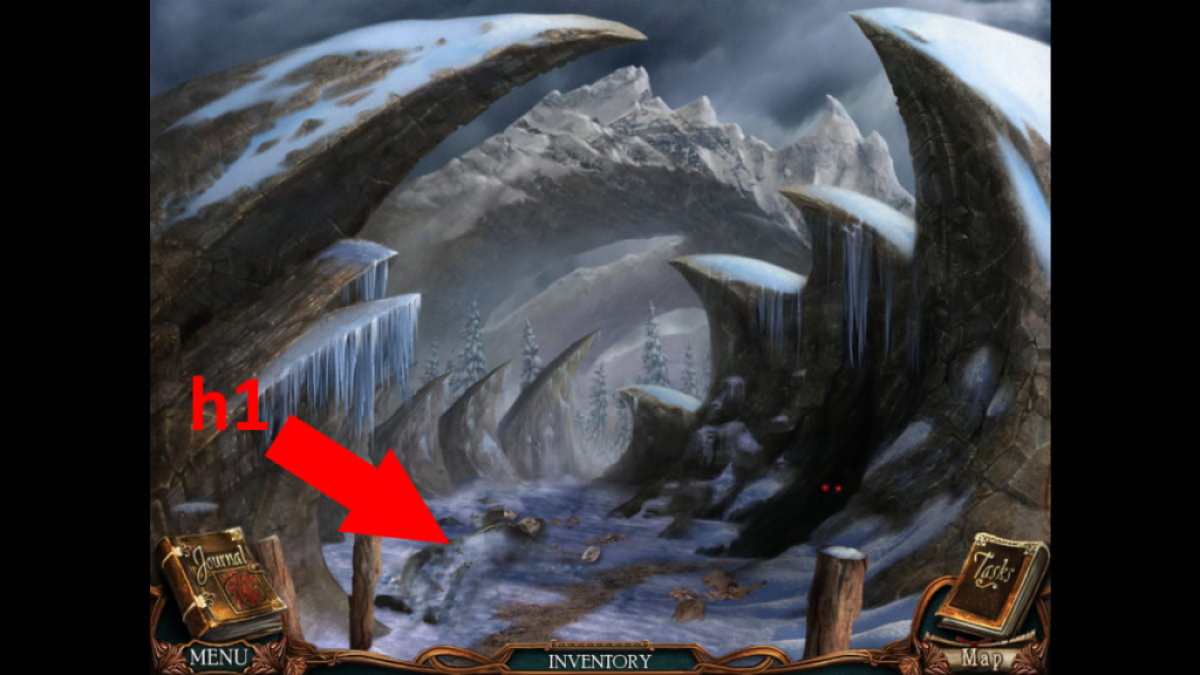
Image by Pro Game Guides
