Begin your escapade !
The Squire ’s Tale is a spot - and - click teaser dangerous undertaking in the AE Mysteries serial . I really enjoy the series because the stories are well - written , and there ’s mess of humour and machination , as well as some cunning puzzles and physical object - determination . This one is listed as a novice escapade , but if you want to complete it without using steer , it can still be test , so read on for my full walkthrough ( with puzzle solvent ) to The Squire ’s Tale .
If you ’ve play any AE Mysteries games before , you ’ll be on intimate ground with The Squire ’s Tale . Click item on the projection screen to interact with them or pick them up and summate them to your armory . Items can also be used from your inventory in unaired - ups after you click particular particular . superstar you collect can be used to bring home the bacon you with hint if you get cleave , but that should n’t be necessary if you follow my walkthrough .
The Squire’s Tale Walkthrough - Chapter 1
In The Squire ’s Tale , you ’ll play as our squire hero , Martin , as he undertake to pass his foolhardy knight boss Cedrick to recover the Royal Ruby and then bring through the realm . You start on the lead of goblinsand have found your agency to a cave entryway .
Entering The Goblin’s Lair
clean up theTunic(a1),Torch(a2),Statue Horn , andStatue Arm(a3 ) . Select the torch in your stock-taking ( the background of it will go dark blue ) and use it to remove the works ( a4 ) . cluck the cave entrance this disclose for a close - up and take theShovelandHammer . Use the hammering on the column in the tight - up ( above the skull ) to reveal an alcove and take theGoblin DictionaryandAnimal Statuesfrom inside .
habituate the shovel on the dirt pile ( a5 ) and come home the box that ’s revealed to incur a locked loge . To launch the box , use the number3574and then take theGoblin Glue . tick the goblin statue ( a6 ) and use the glue to supplement the motor horn and gird back in place ( use the glue on the close - up first , then the two broken items ) . Click the water nursing bottle ( a7 ) to get aDamp Tunic , then use the tunic on the Shield ( a8 ) to clean house it , revealing a goblin fount .
total the animate being statue to the spare plinth next to the goblin statue in the finish - up . utilise the lexicon to read the brass on it , which saysAided by one with the hard shell of a warrior . Click the animal statue until it is ared pubic louse . Click the other memorial tablet to see it saysGobby rose from the fire , so dawn the base until you seeflames . If you seem at the goblin sign ( a9 ) you ’ll notation itsarms are both raised , so move the central section to match . The cave will open .
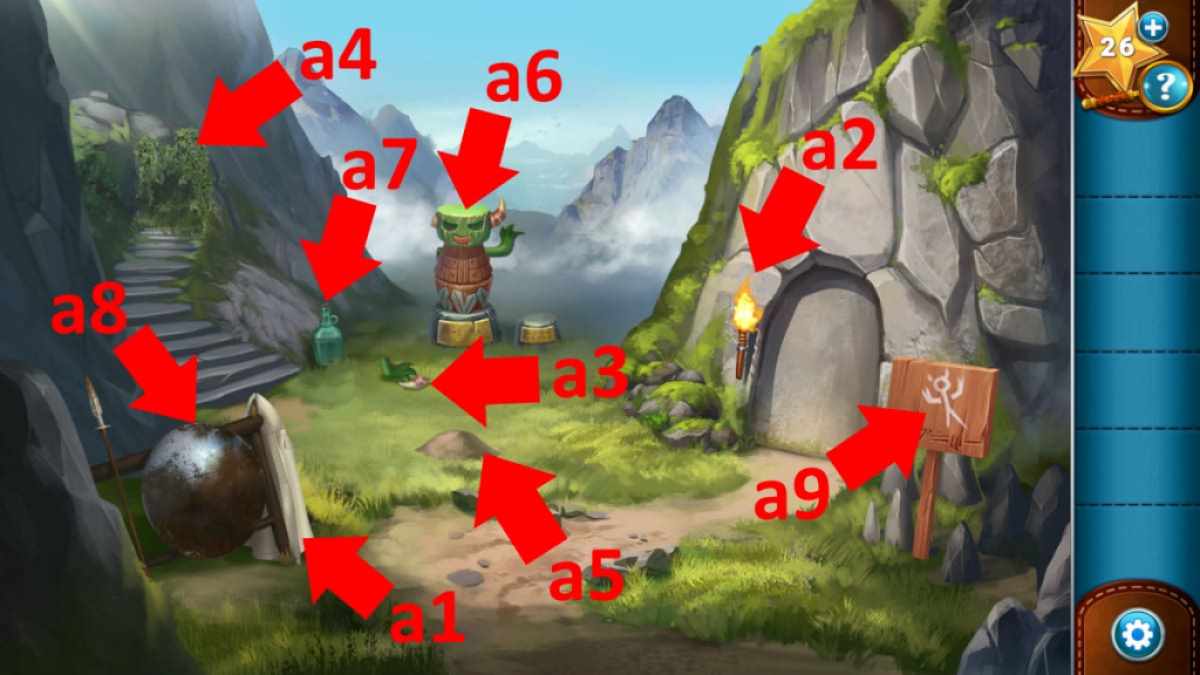
Image by Pro Game Guides
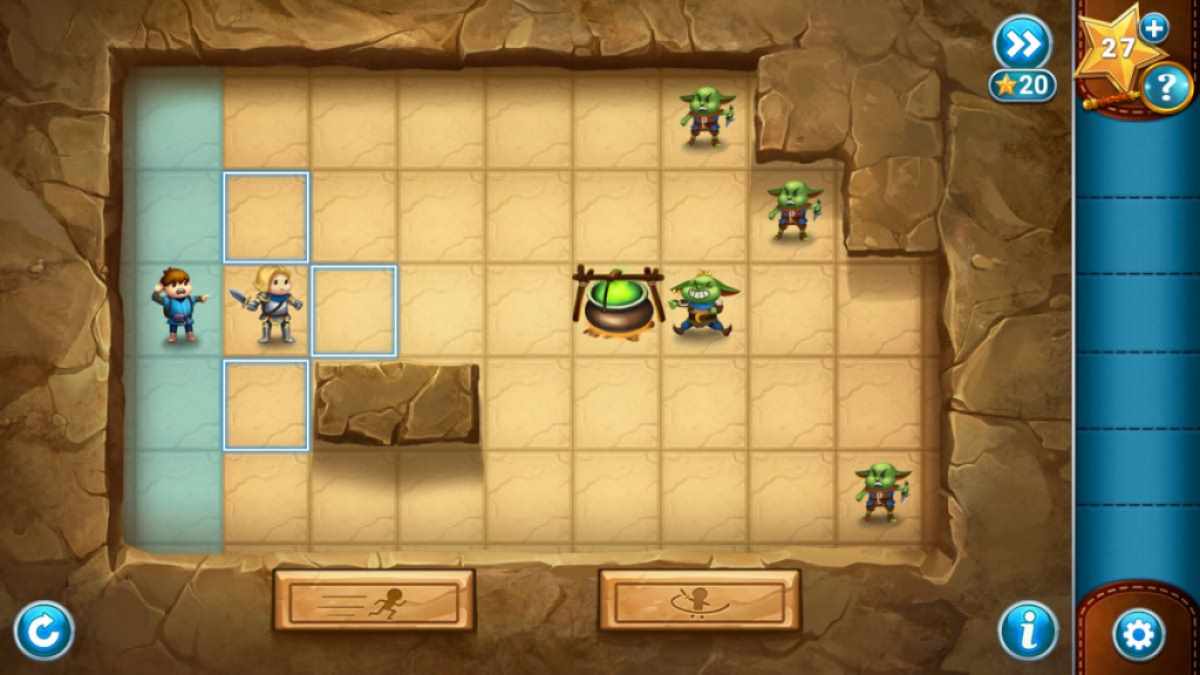
Once inside , Cedrick will attack the hobgoblin in a minigame . Do the following :
On spirit level two , watch over this pattern :
On the final horizontal surface :
Screenshot by Pro Game Guides
Inside The Goblin’s Lair
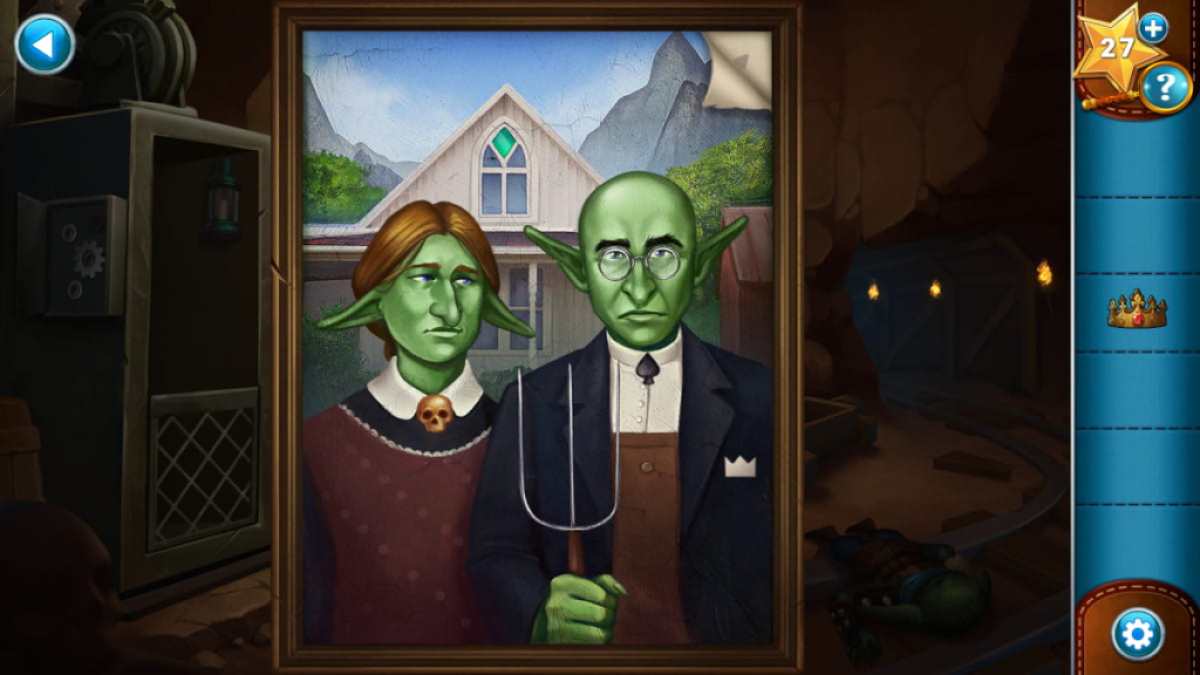
Take theCrown(b1 ) andDagger(b2 ) , then use the dagger to start the boxful ( b3 ) and take theGear . fall into place the picture ( b4 ) for a close - up and click the top - right corner , where it is come away . Cedrick will rip it , revealing a sun . observe the positions ( from top to bottom ) of all the shapes that look out of place :
Back on the primary image , clack the door lock ( b5 ) , and enter the codification above . With the door clear , take theSecond Gear . flick the carpeting ( b6 ) to bring out and take theThird Gear . start the corner on the side of the lift ( b7 ) , add the three gears , and the elevator will be fixed . sink in the elevator to head down to the hurdle .
The Goblin Vault
Click thePickaxe(c1 ) andHeavy Duck Statue(c2 ) to pile up them , then come home the note on the vault threshold ( c3 ) for a clue on how to take in the three gems you need to continue . Click the torch ( c4 ) to turn it off , revealing theBlue Gem . Use the pickaxe on the gloomy gem and pick up it .
Click Cedrick , who ’ll kvetch he needs something heavy to smash the door with . Give him the duck’s egg statue , which will lead to a box falling from a crack above the door . Take theFlint and Tinderfrom inside , then use the lift to go back to the hobgoblin den . Use the punk to fall the cauldron ( b8 ) , add the crown to it , and collect theRed Gem . Now you’re able to utilize the pick on the door ( b5 ) here and knock down the playscript .
launch the book , turn to the chicken ( red ) part , and take theYellow Gemfrom the hidden compartment in the leger . Go back up to the vault and add the blue gem , red gem , and chickenhearted gem to theKaleidoscope(c5 ) , starting a puzzle .
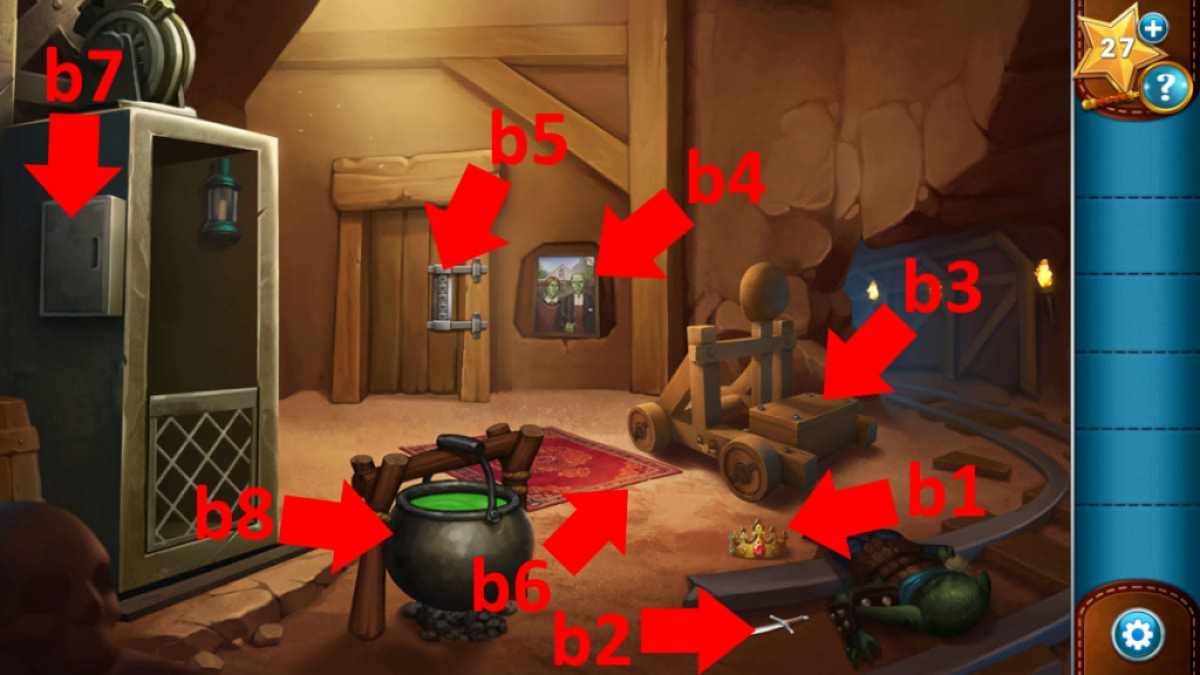
Image by Pro Game Guides
Twist the emblazon dials until they accommodate the squares ( see image above ) . Nowclick the vault door mechanism(c6 ) and click all the squares that do n’t have colors on the kaleidoscope . The vault door will open up to let out … another bank vault threshold .
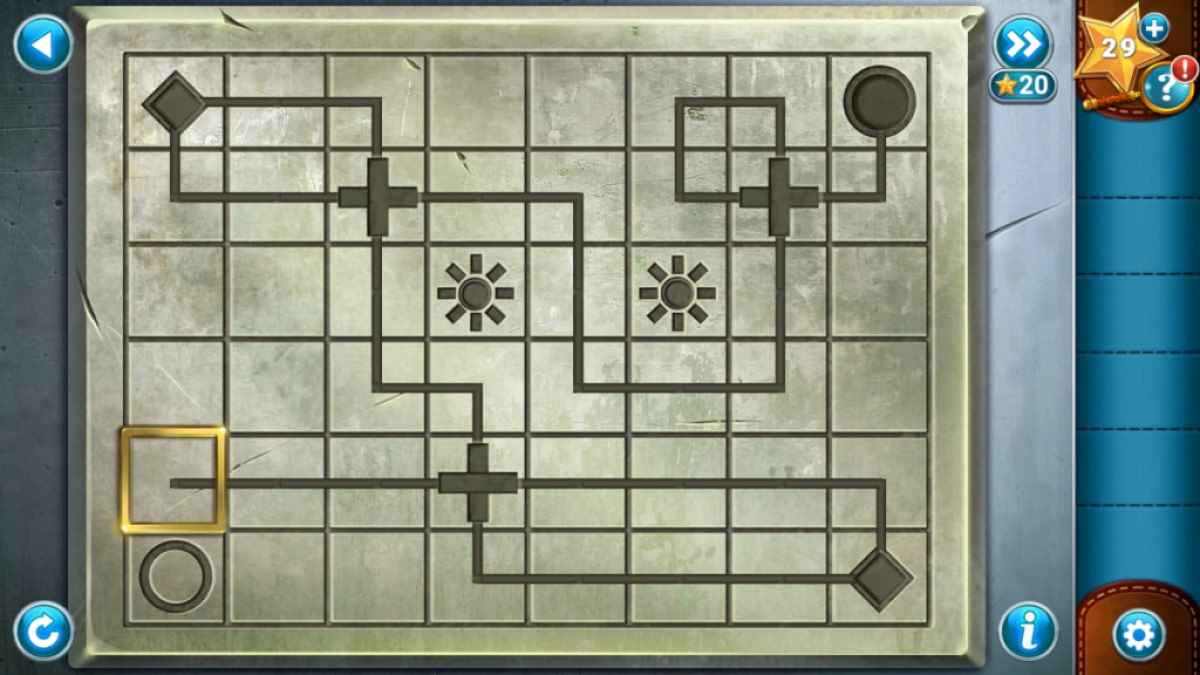
All you need to do isclick the teaser in the middle of the threshold againand drag the square from the bottom left to the bottom right , then to the top , and then all the direction left to the other circle . This should take you to the next vault doorway .
The Squire’s Tale Walkthrough - Chapter 2
Grim Tops Mountain
Once the story moves on , you ’ll find yourself faced with two doors and a water wheel . Click theOld Clothon the dragon ( d1 ) to pick it up and read the brass underneath . Select the stairs ( d2 ) and use the fabric to strip them and reveal symbols . Set them as follow by click each stone’s throw symbolisation until this bit of lights are on , top to bottom,246353 . you may now channelize through the door at the top of the steps .
Once you ’re in the pump room , take theBucket(e1 ) and click the stone ( e2 ) to give away and take theWooden Gear . Click the other loose stone ( e3 ) to get aChest Key , utilise it to give the chest ( e4 ) , take theAxefrom inside , and use the axe to withdraw the vines ( e5 ) and get theLadder .
put the ladder below the other one , devote you access to the upper level above the door . Also , practice the axe on the vines a second time to remove the rest of them entirely . Click the base of the pump ( where the ladder was ) with the gear elect to add it to the bottom of the auto . Now , you’re able to penetrate the lever ( e6 ) to fill up the pond with water ( see picture below ) .
Screenshot by Pro Game Guides
Use the bucketful on the stream of piss ( f1 ) toenter a pipe mystifier . You ca n’t fail here , as you may keep moving pipes until it is over . See the resolution below .
apply the bucket again , this metre on the big current of water , to get aBucket of Water . Use the pail of water on the barrel ( f2 ) and ingeminate the cognitive process double moreso that the barrel is on the groundand the pipe fill in the system of rules , meaning the water is go into the pipe on the left-hand ( f3 ) .
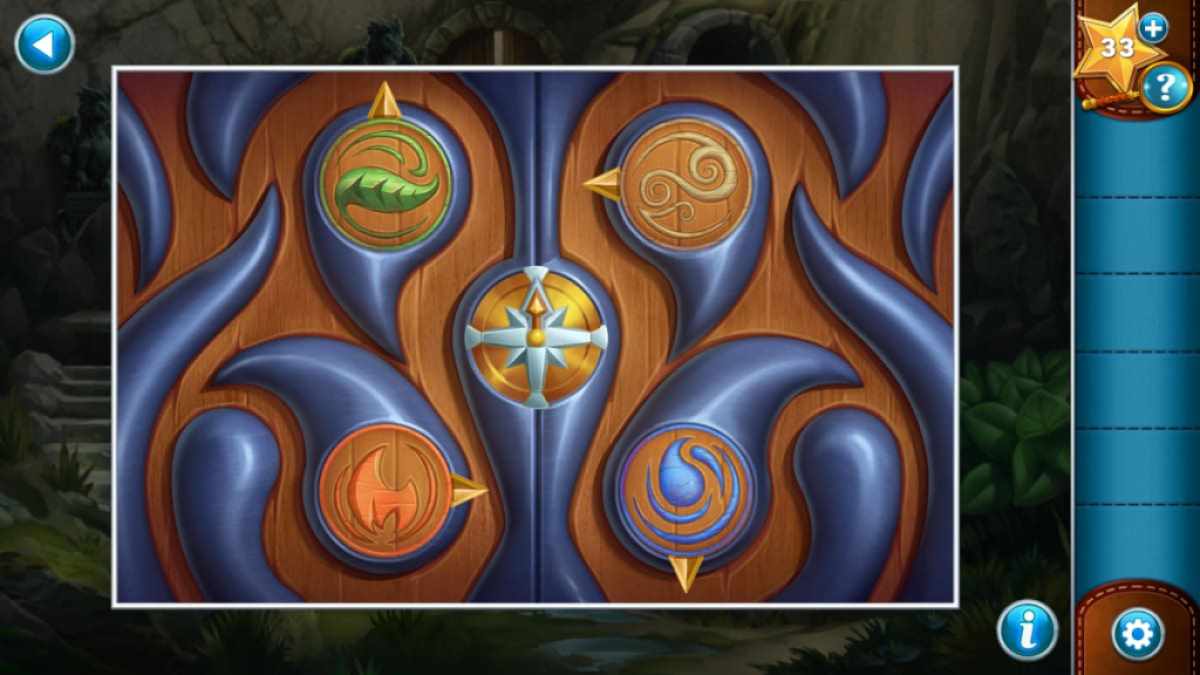
You ’ll now move outdoors once more , but clicking the door ( g1 ) reveals something is missing . Click the box in the piddle ( g2 ) and take theCompass , then add it to the gist of the door ( g1 ) . To act upon out the directions to put the pointers on each symbol , you take to read the plaques on the dragons :
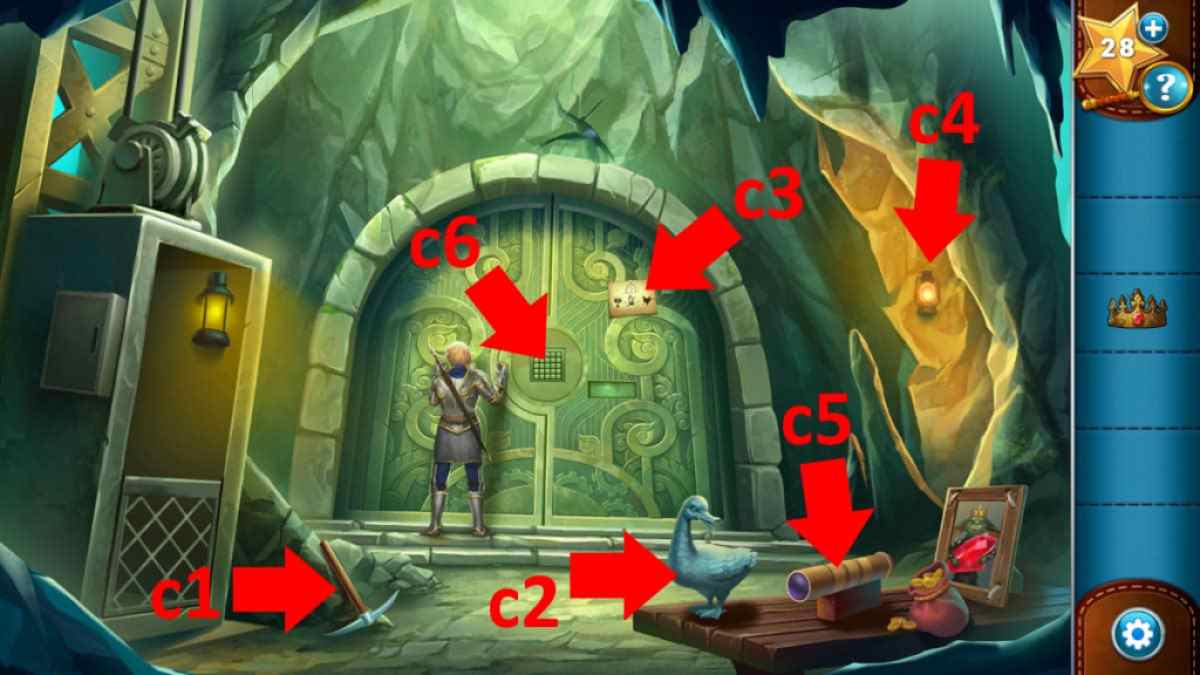
Image by Pro Game Guides
you could now head through the overt door into the caves beyond .
The Sleeping Dragon
Select the broken in statue ( h1 ) and set the pieces on top of each other ( by dragging them ) to reconstruct it ( see figure of speech ) , then take theGemfrom inside the root word . snaffle theEmpty Flask(h2 ) , then take the mesa ( h3 ) for a closing curtain - up and take thePotion Book . Read the account book , then add together the flask to the board get across the constituent in the right parliamentary procedure ( purple , blue , yellow , carmine , green , orange ) , and take theStrength Potion .
Click the bowlder , and Cedrick will move it out of the manner , let you up tothe Griffon ’s Nest . Take theHammerthere , go back into the flying lizard ’s cave , and apply the hammer to give the box ( h4 ) and get theFlint and Steel . Click the box once more to remove it and take theBlack Powderunderneath . Go back to the nest , contribute the powder to it , then use the flint on it , scaring off the Griffon . Take theGriffon Eggand give it to the dragon . Click the back of the cave ( h5 ) to move out to the terrace .
The Terrace
snap the break column ( i1 ) to move it , then sink in the knight ’s bag ( i2 ) to get aTorch . Select the ornate icon ( i3 ) for a close - up , observe the order of symbol in the images above the flying lizard ( wind , sun , mountain , star , ardor , cloud , moon ) . Now pick out the correct - manus mantrap ( i4 ) for a close - up , click the symbol on it in this order , and take asecond Gem .
Add the two gems to the two swim rocks ( i5 ) to fill the dishes with water supply and light the flaming ( i6 ) . Use the great mullein on the flame to get aLit Torch , then chatter the surface area behind the knight ( i7 ) for a finis - up , and habituate the torch to light the brasier and take theNetfrom the right side of the finish - up .
Go back into the dragon cave and use the mesh in the weewee ( h6 ) to fish out a cloth bundle . Click it to get theDragon Bust . Now go back out to the terrace , summate the bust to the key plinth in the area behind the horse close - up ( see image ) , andcomplete the Edward Durell Stone ring puzzle . You first need to make a track from the blank gemstone on the left field to the left half of the central stone ( at which breaker point it turns dreary ) , then do the same on the correct - hand side . You ca n’t fail here . Once double-dyed , the altar appears , and you ’ve finish chapter 2 !

Screenshot by Pro Game Guides
The Squire’s Tale Walkthrough - Chapter 3
The Ruins of Recursia
Click the lot ( a1 ) until you regain aKey , then click the door on the far right wing and left to open up them . Use the key on the ruby-red key pot in the left cupboard ( a2 ) to get aRed Keyand use it to launch the other door on the left ( a3 ) , taking theAlpha Orbfrom in spite of appearance .
Place the ball in the left obelisk ( a4 ) , which raises a plinth on the left . get through the pedestal for a finis - up and press the buttons in the order show by the central statue ( 3,1,2 ) , afford a stairway underneath it . Click the step to move on .
The Second Level
come home the roles of lambskin ( b1 ) and then collect theBowbehind them . Click the left desk ( b2 ) and take theArrow , getting you aBow and Arrow . Use it on the rophy ( b3 ) to destroy the statue below , then collect theBeta Orb(b4 ) .
Go back into the first room and recuperate the Alpha Orb from the obelisk , supervene upon it with the Beta Orb , which spread a hatch ( a5 ) . Take theWadersfrom within , retrieve the orb , then go back below and habituate the waders on the pool ( b9 ) there to get thePainting Key . Place the Alpha Orb in the obelisk here ( b5 ) , dropping the painting ( b6 ) low enough to get at it . apply the house painting Francis Scott Key to open it and click it once more to take thePainting .
Take the Alpha Orb back and supersede it with the Beta Orb , which opens the left - hand floor control board ( b7 ) . rate the house painting on the blue shine bit grid that appears , which return you a code ( 83146 ) . Still wearing the waders , click the pool ( b9 ) once more andclick the pipes at the back in that order , which unfold up a new set of stairs . Take the Beta Orb back and channelize down .
Screenshot by Pro Game Guides
The Third Level
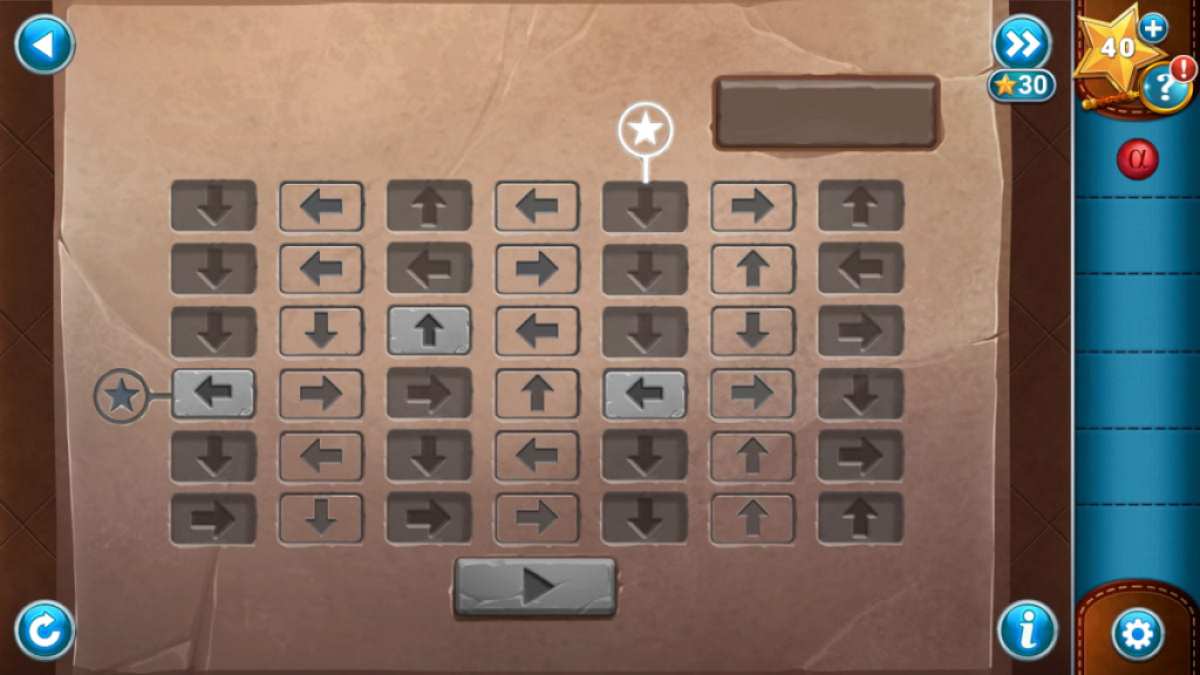
Use the Alpha Orb on the obelisk ( c1 ) to ascertain what it does , but then retrieve it and use the Beta Orb alternatively , revealing a stone arrows puzzle in front of the dagger . You need to discharge two to move on , and I ’ve put the root below . Once complete , you ’ll be able to take theFlower Keyfrom beneath the teaser .
Go back to the first way and use the key to launch the final door on the rightfulness ( a6 ) , accept theRubber GlovesandWatering Canfrom inside . Go down one floor and habituate the can on the consortium to get aFull Watering Canand use the boxing glove to collect theMossbottom Ooze(b8 ) . Go down the low-toned level and use the Alpha Orb to open up the proper pedestal ( c2 ) , then pose the ooze on the Harlan F. Stone ball there and then water it with the can , unloose Cedrick .
Now both submarine sandwich are available , pull the transposition ( c3 ) to bring out an abacus . Click it for a close - up , then click the battery panel on the right and find the dead battery . Cedrick can now move the debris ( c4 ) , earmark you to collect theGamma Orb . Use it on the obelisk here , allowing you to take theStone Slabfrom the statue ( c5 ) . Retrieve the Gamma Orb and manoeuver upstairs .
Screenshot by Pro Game Guides
Restoring the Abacus
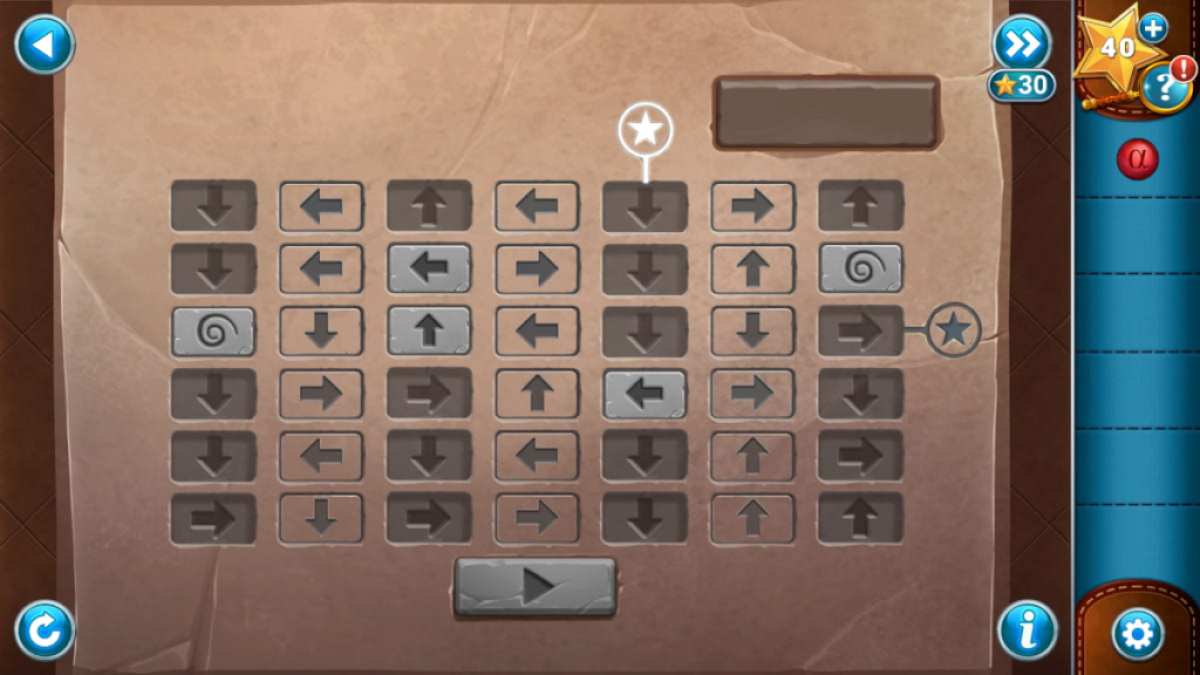
Back on the top floor , place the Lucy Stone slab in the hand of the statue on the right wing ( a7 ) , then insert the Gamma Orb in the obelisk . Both pedestals will rise . What you need to do is use the buttons on the right wing to show a figure of blue luminance , starting at one and moving through to six , each time fare out of the close - up and noting the symbol being beam onto the stone slab .
These are the symbol you need to select on the other dialog box . The sequence ( using the image above ) is413225 . This opens the right panel ( a7 ) , allowing you to take theAbacus Instructions and reload the batteryby locate it in brief inside the panel .
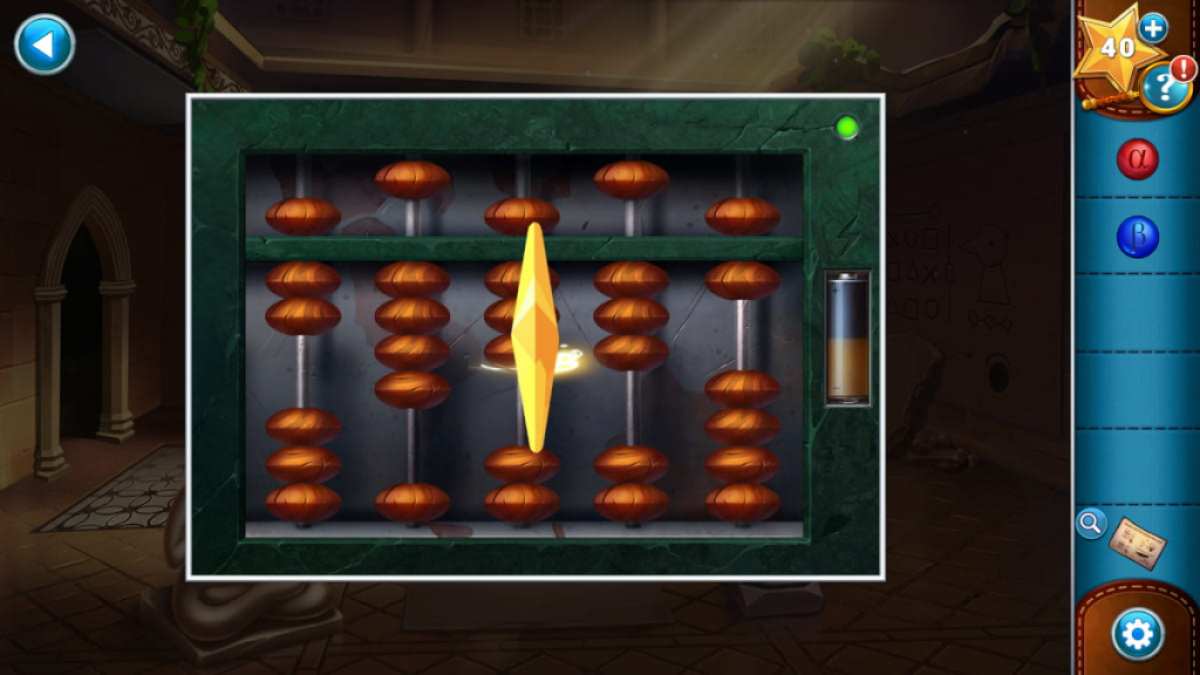
Retrieve the Gamma Orb and head to the middle floor . Insert the Gamma Orb , and a series of domino will appear in the kitty . Note down the number amount of each domino ( 74836 ) , then retrieve the ball and head down to the bottom floor . Put the barrage fire back in the abacus and fit the educational activity . They tell you that each Harlan Stone on the down part of the abacus is deserving one if evoke , and the one on the top count as five if it is let down . Move them to couple the domino computer code , and you ’ve solved the puzzle(see image below ) . Click the area behind the abacus to advance .
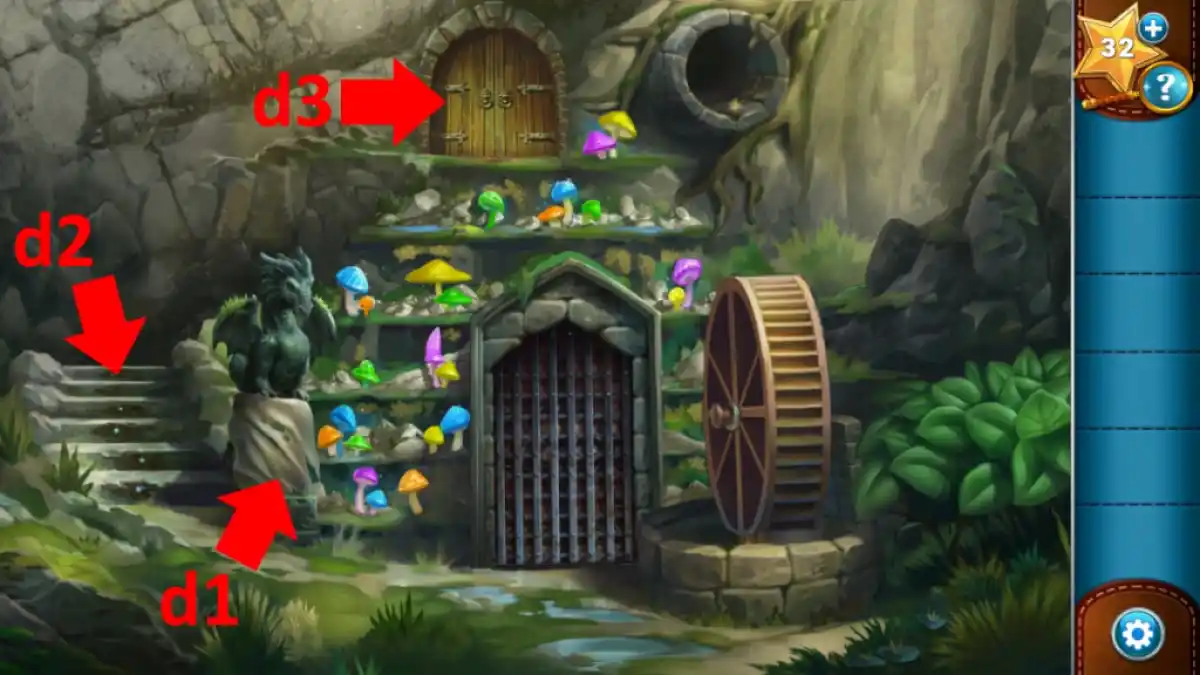
Image by Pro Game Guides
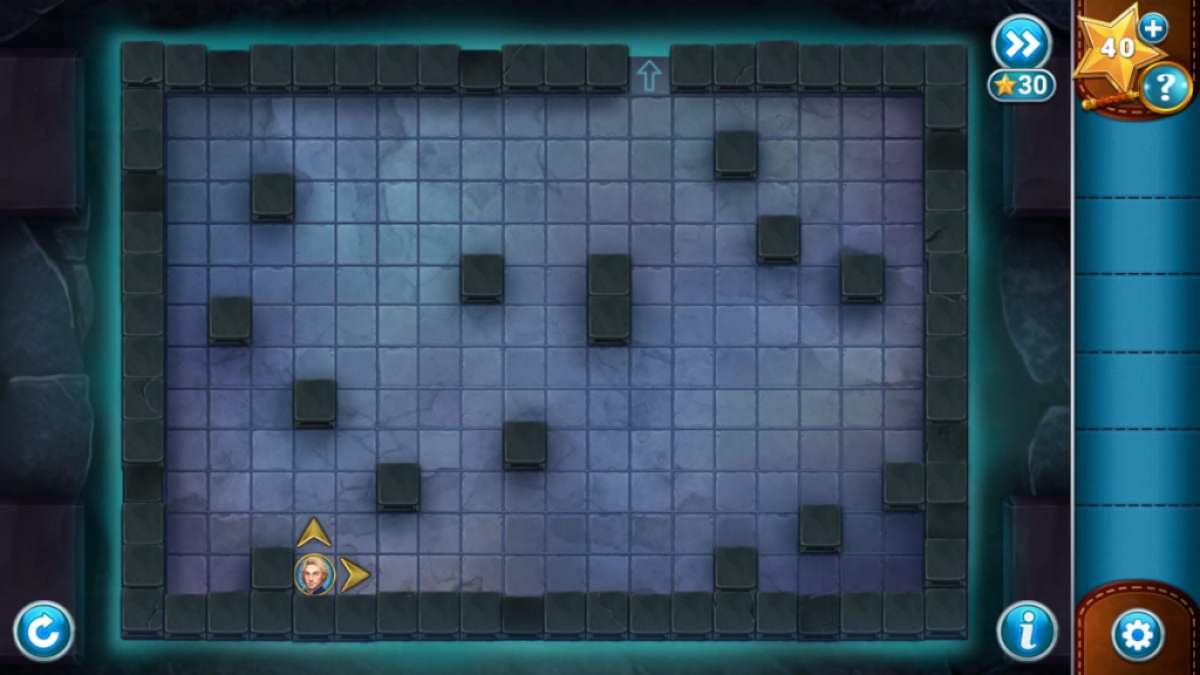
Place the three orbs in their correct spot toawaken the Golemand start a movement puzzle . The Francis Scott Key is not to finish a play in the ruddy area marked ( it appears after your first few moves ) , stand for sometimes you have to double back . The solutions are below .
Once pure , you ’ll be done with Chapter Three after a couple of cut conniption .
The Squire’s Tale Walkthrough - Chapter 4
The Tournament in Morrocas
Click the cushion on the sofa ( d1 ) and take theKey , then move into the tailor ’s arena ( d2 ) . Take theScissors(e1 ) and then click the book ( e2 ) to open and note the numbers on the invitation designing ( 3 and 1 top course , 6 and 4 bottom run-in ) .
Select the pair of scissors and use them on the fabric ( e3 ) to get someCloth . habituate the key to give the chest ( e4 ) and take theFolding StoolandFabric Patternsfrom indoors . Go back to the waiting line , place the BM to the left wing of the queuers ( d3 ) , then use the scissors to collect theDecorations(d4 ) .
The first task
Out in the fair , cluck theBasketon the right ( f1 ) to pick it up , then click the tea stand ( f2 ) to encounter some freeTea Leavesfrom the individual there . Select the coin and pop it into the sleep valet ’s cup ( f3 ) . Once the man move , take theTasslehe was sitting on . Now click the snake basket ( f4 ) to find that two snake field goal are miss . you may bring back the one you have , but you need one more .
Click the background to repay to the tent . employ the tassel on the drape ( g1 ) to tie it back and find another snakeBasket . Take it , then bring your tea to the mint ( g2).Click the Teapot to pick it up , then range it on the brasier ( g3 ) to get aHot Teapot . Use it on the cup ( g4 ) and then penetrate the cup again to happen thatAmbrose would like some honeyin it .
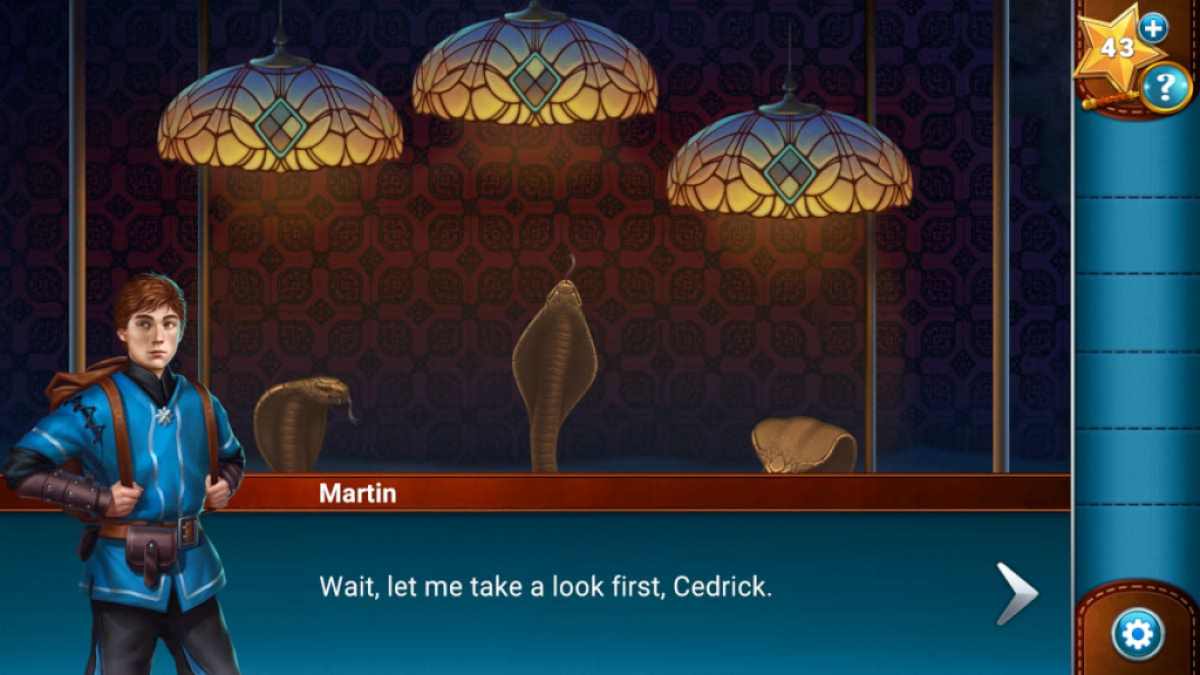
Go back to the bazaar and replace the other Hydra basket . After spill the beans to Manid , seize theFlute(h1 ) andclick the snakes to start a puzzle . Note the diamond approach pattern on each lamp above the snake in the grass , then use the champagne flute to change each serpent ’s heading position to match its bloodless rhomb centering by sink in the snakes ( see double below ) .
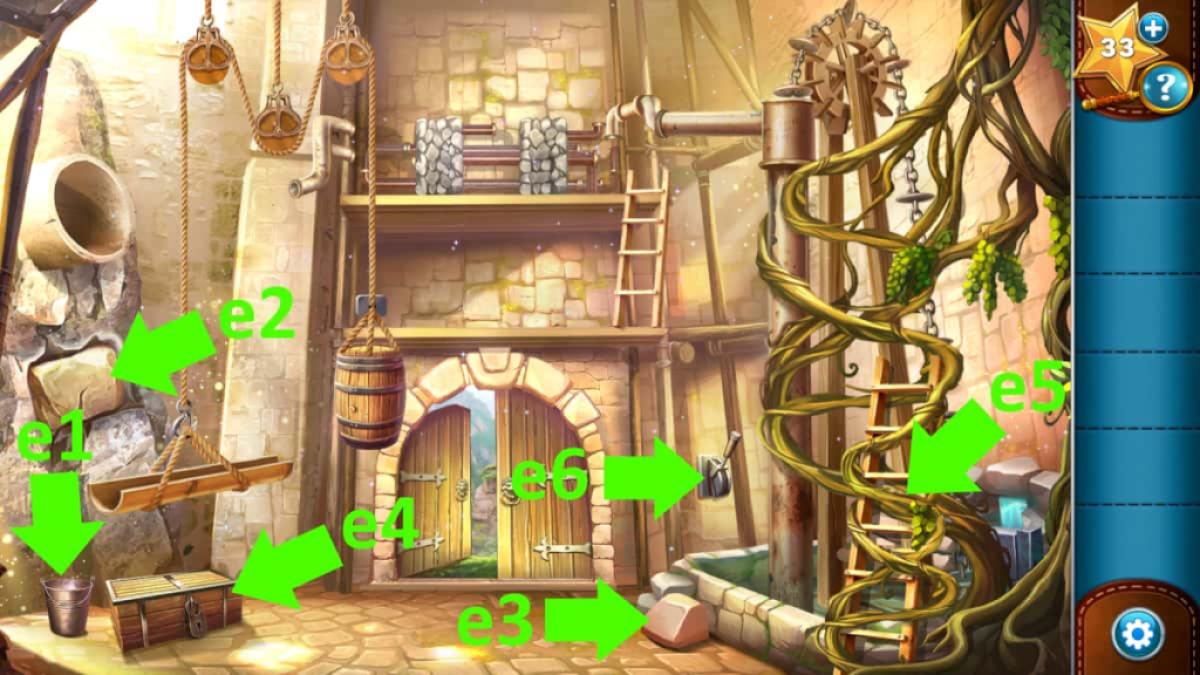
Image by Pro Game Guides
After the slue view when Cedrick mess up with the brightness , it is a similar idea , but now you have to have the snakes match the adamant pattern that matches the top of the Hydra ( so , from odd , lamp 1 match Hydra 2 , lamp 2 Hydra 1 , and lamp 3 snake 3 ) .
For the final one , it is the same operation , sosnake 1 depend down , snake 2 left , and snake 3 up . You ’ll receive someHoneyfrom Manid for your efforts . Head inside , add the dear to the tea , and give it to Ambrose . He ’ll give you aPear .
Back outside , give the Pyrus communis to the Donkey ( h2 ) , then click the spill rugs tostart a pattern - match puzzle(see image above ) . On pass completion , Manid will give you aFancy Rug . helping hand over the rug as your rivalry entering , and you ’ll be through to the second round of drinks .
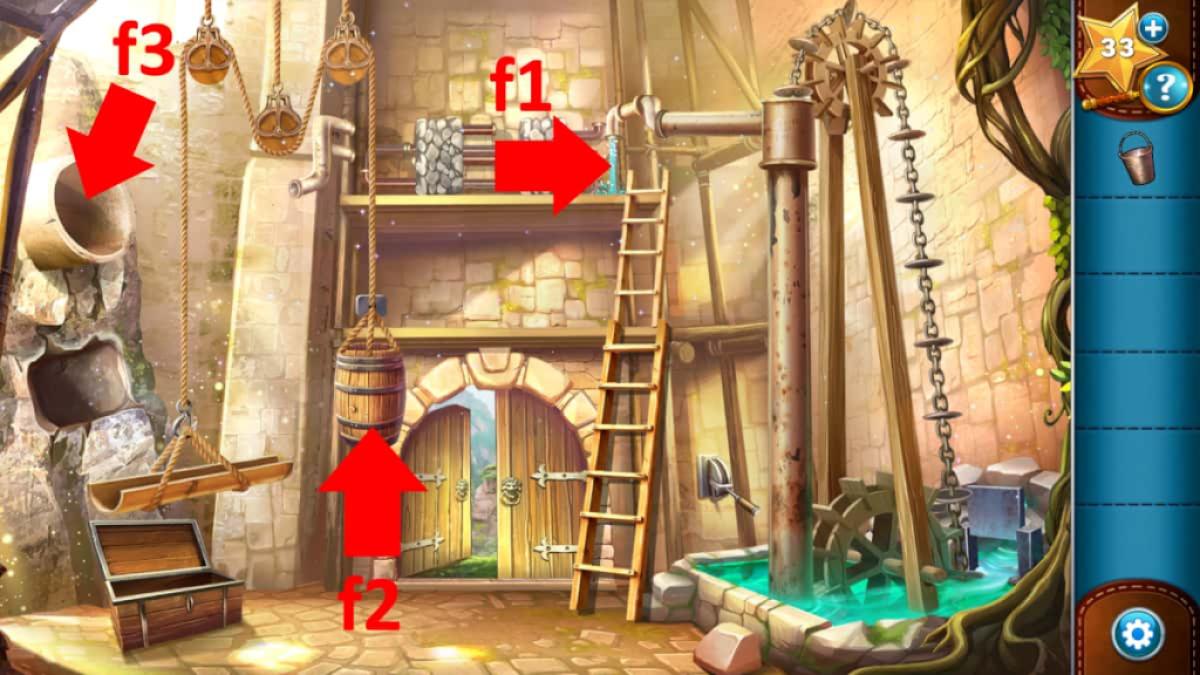
Image by Pro Game Guides
The Second Task
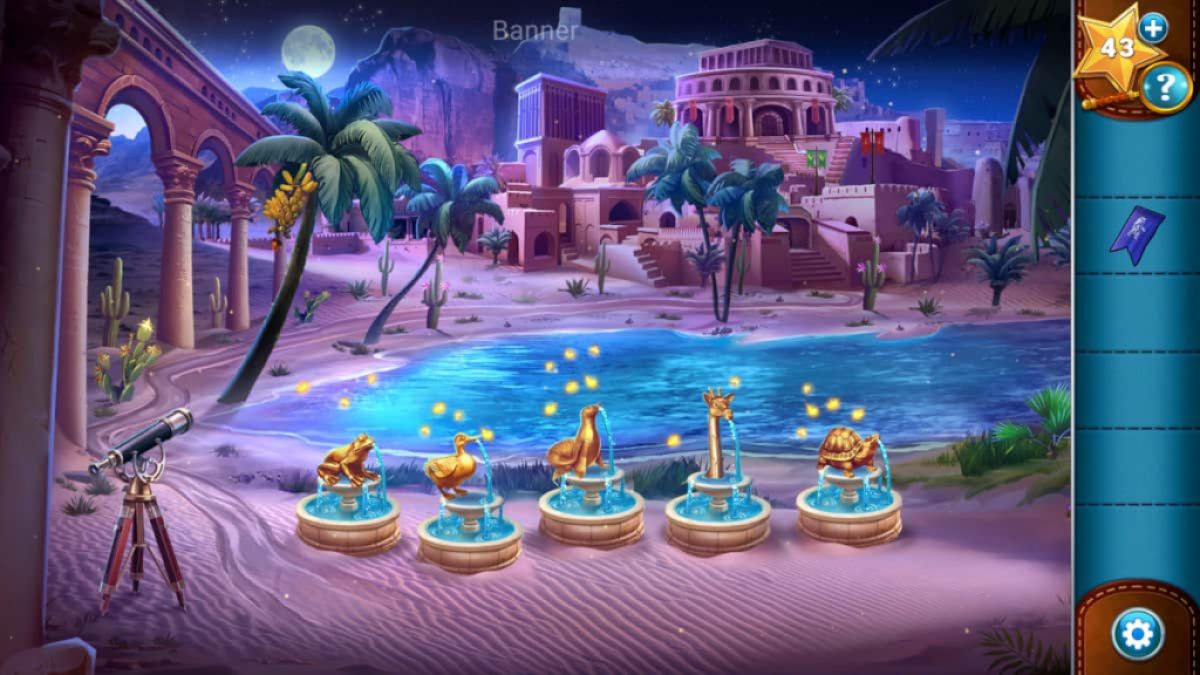
For the first challenge of the 2d project , pick out the telescope for a transferable close - upof the dark sky andadd the lead mapAmbrose gave you to it . You ’ll notice that the constellations in the notebook computer are all animals and that theymatch the gilded fountains that are next to the telescope . You need to find each configuration by moving the scope view and mention how many star in each configuration are bright . Once you ’ve done this , simply click each statue so the turn of golden Christ Within above it equate that number .
The numbers you need are :
Once complete ( see simulacrum above ) , Ambrose will appear and give you aBanner . flick the buildings in the background to go to the court , pick out the banner in your stocktaking , andadd it to the flagpole on the left wing . Return to the oasis for the next challenge .
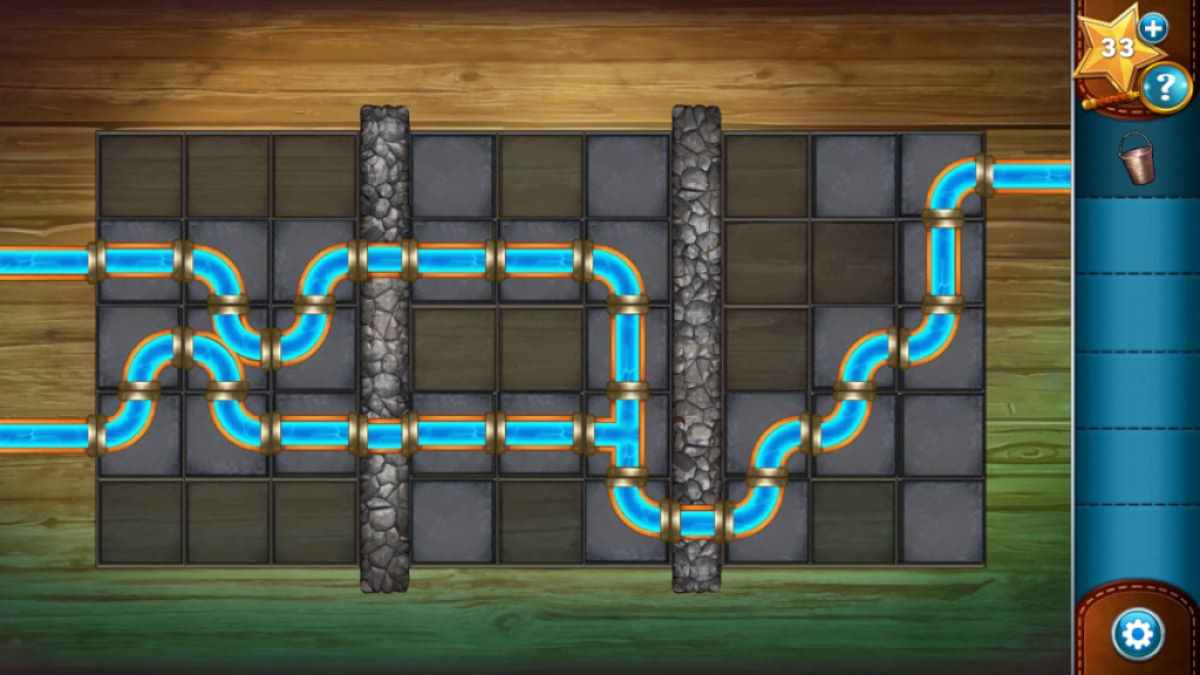
Image by Pro Game Guides
After hearing the statement , Cedrick jumps into the oasis . Click him to make him dive down and seek for the object to open up the chest . Click the seaweed ( i1 ) and take theOld Swordbehind it , then apply the sword on the slab to uncover the chest ( i2 ) . Now , use the brand on the octopus holding the key ( i3 ) , which will disappear , leaving a swarm of ink . Click the swarm until it disseminate , and take theUnderwater Key .
Use the key to launch the bureau and take theBattle Horn , then click the mound to the rightfulness of the chest to reveal a clam . Use the sword to reach the clam ( i4 ) and bring out aPearl , at which peak a shark appear . Take the pearl , select the conflict horn , then come home the screen background anywhere , dash off the shark . Click the aerofoil of the water to swim out . Now , you caninsert the pearl into the chest , which has afour - symbolic representation combination .
The Stolen Banner
Swim back down to see there are1 octopus , 2 moolah , 3 fish , and 4 starfish . Put those symbol into the four spaces ( octopus , clam , fish , starfish ) to open it and take thesecond Banner . But when you riposte to the arena , you find your first standard gone .
After speaking to Manid , give to the arena andopen the chestthere ( k1 ) , take theBoomerangfrom inside . Back at the oasis , use the backfire on theBananas , pick them up , and give them to Manid . He ’ll give you theFishing Netto scoop the Banner from the sea .
Return to the arena and snap the sand near the barrel ( k2 ) to find yourFlag Poleburied there . Dig it up , collect it , then get through the barrels ( k3 ) to find oneself thePole Base . Place the foot ( k4 ) , bring the magnetic pole , then the banners , and you ’ll be through to the final task .
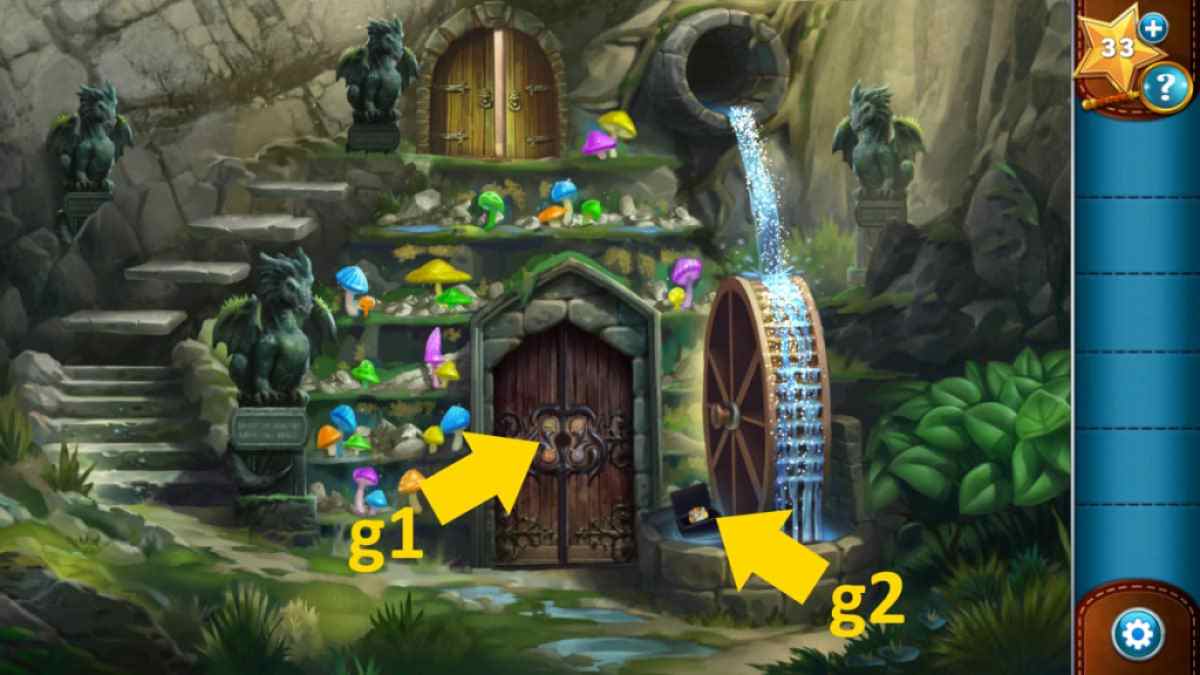
Image by Pro Game Guides
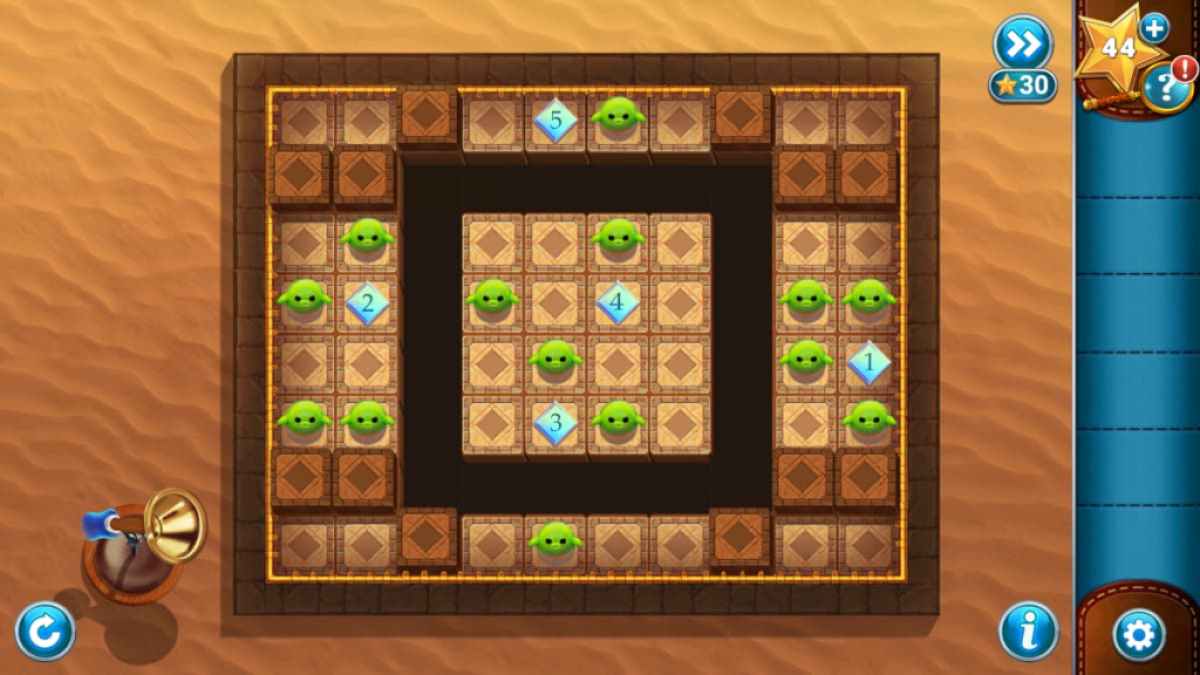
Once the final puzzle begin , send your five diamond in the positions above , then click the trumpet . Now , all that ’s leave alone is to bask the victory .
The Squire’s Tale Walkthrough - Chapter 5
Chapter Five sees our heroes teaming up with a young fellow traveller , Nira , as theysail to an island in icy Mittenheim in lookup of the Sword of Light . retrieve that if you do get stuck on any of the puzzles , you’re able to use any remaining headliner you have uncommitted ( top right of the screen ) to get cue . However , I ’ve walked through the entire chapters step by dance step below if you want to save them or have operate out of trace .
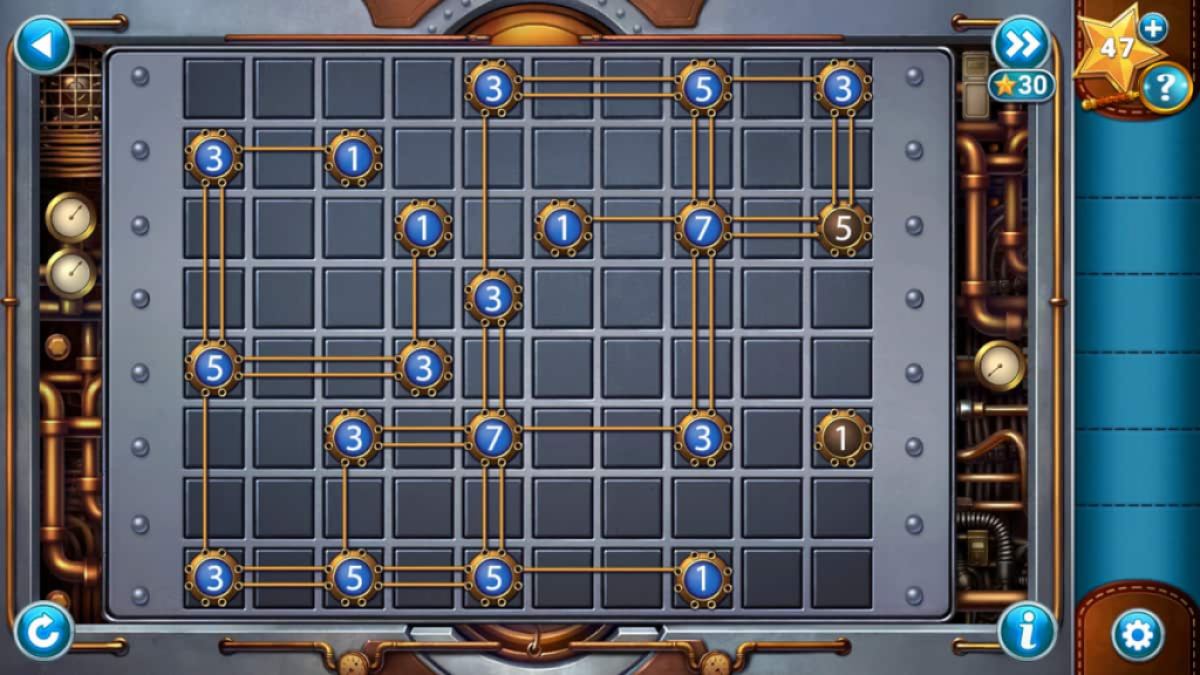
pluck up theIce Scraper(a1 ) and use it on the metal crate ( a2 ) , which you could then open to find you ’ll require to repair three electric boards via a connections teaser . See the solutions below . In the first one , I just take to connect the 1 in the top rightfield down to the 2 below . In the second , the five on the right to the one below it .
Take theLetterfrom the door of the general store ( a3 ) and click it to record it , noting the pin code . Now click the store window , where you’re able to deduce the numbers for the peg code by matching the symbols on the price tag end , giving you3584 .
Screenshot by Pro Game Guides
flick the snowman ( a4 ) and take theButtons , then take the machine in front of the bank building ( a5 ) . Add the buttons to it , record the code 3584 , and get the parcel containing theGeneral Store Key . Select the fund ’s door ( a3 ) for a close - up of the interior and take theShovel . Back out of doors , apply the power shovel on the snow in front of the house ( a6 ) . Go within .
Learning the Potion Ingredients
start the box ( b1 ) and take theCandleandField Guide Page , get theJar Openerfrom the ledge ( b2 ) , take asecond Field Guide Pagefrom the base ( b3 ) , then flick the panel on the front of the desk ( b4 ) to get athird Field Guide Pageand theStorage Key . Use the key to launch the chest ( b5 ) and take theFishing RodandIce Drill . Now , you could select the plain guide pamphlet ( b6 ) and add the pages to take in theField Guide .
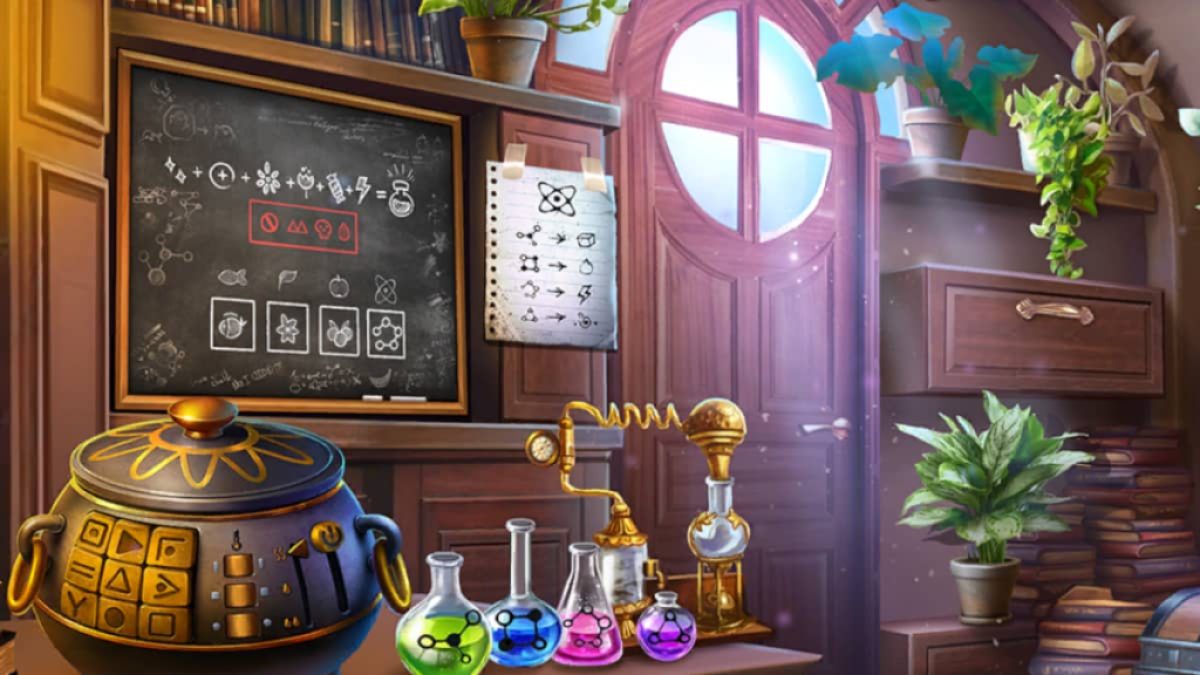
Using the Field Guide , you could derive the ingredients you need . The blackboard ( b7 ) show four ingredient you ca n’t have ( in red ) , while the line above present what will work , and the newspaper tap to the rampart next to the chalkboard show the chemical chemical reaction .
Thethird ( for the pinkish potion ) chemical symbolmatches with the lightning bolt . While using the Koran , you ’ll findmixing Shimmer Fish , Hatch Flower , and Croaen Berrieswill give you the rest of the ingredients required . Enter their symbols onto the blackboard ( see the result on the chalkboard above ) .
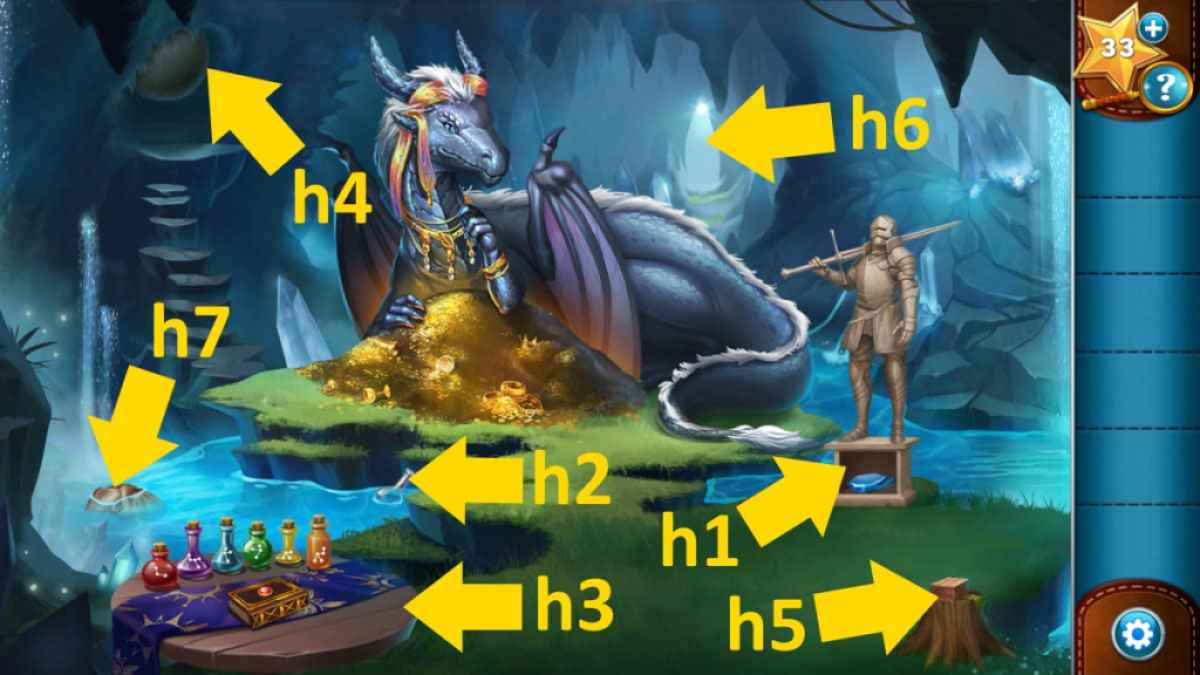
Image by Pro Game Guides
lead outside and return to the general shop , using the shock opener on the jar on the table to get someJerky . Back alfresco , give the jerky to the dog that has come out outside the bank , who will then move to the sign at the back of the scene . Click the dog once more to follow it to the lake .
The Lake
Click the Christmas tree ( c1 ) to get aShiny Ornament . Use the ice drill on the glass ( c2 ) and add the fishing retinal rod to the cartridge holder ( c3 ) . impound the ornamentation , and you ’ll soon hitch someShimmer Scales .
penetrate the basket of berries ( c4 ) to start a game with the Magic Snowman . Click the set arrows to complete the battles ( see images below ) . Once you ’ve completed the three battles , the snowman will give you theCrosen Berries .
Select the majestic plant ( c5 ) to find out that it needs to be heated to be of any usage to you . manoeuvre back into town and into the worldwide store , and use the standard candle on the firing to get aLit Candle . Return to the lake , use the candle on the plant , and take theHatch Flower .
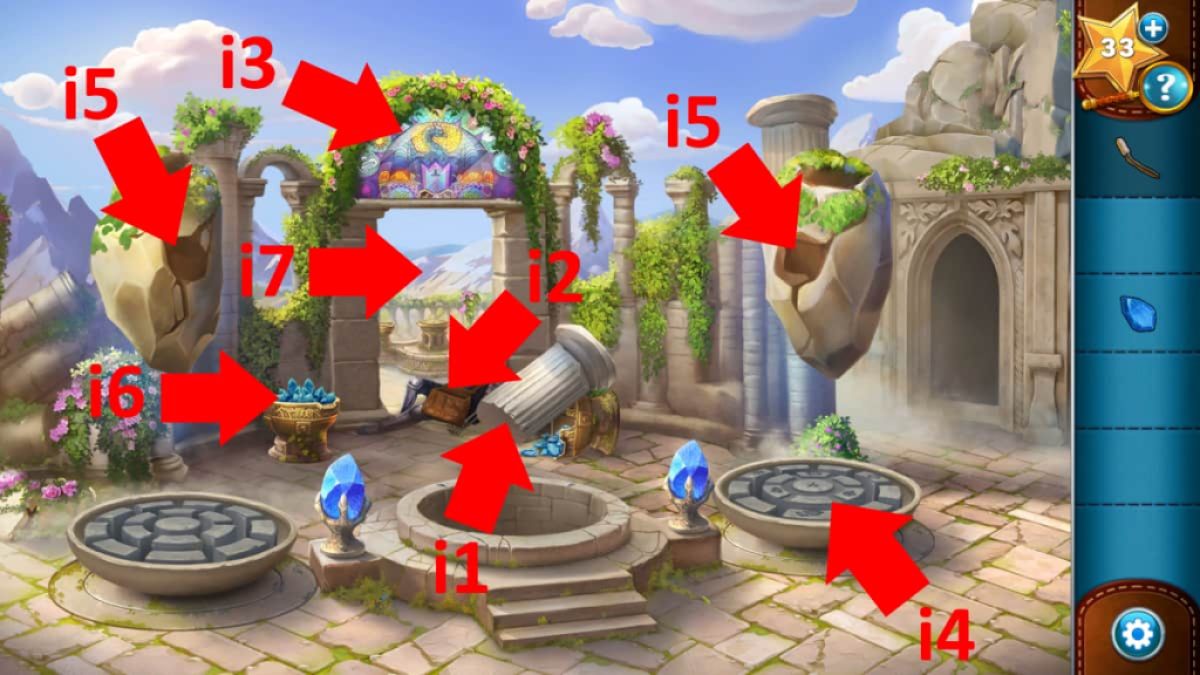
Image by Pro Game Guides
Making the Potion
Back in the lab , take the chemical substance ( b8 ) from the desk and add it to the pot ( b9 ) . Add the other three ingredients from your inventory , and then chatter the stool again for a close - up . You now need to configure the potty and get theDefrosting Potion .
Head alfresco and use the potion on the Yeti Scholar , then the ones in the world-wide store and by the lake . Return to the scholar , and they will guide you to the Lord’s table .
The Altar
take hold of theIce Pick(d1 ) and then click the backpack ( d2 ) to open it and then take theRope . Take theOx Statue(d3 ) , use the rope to get thePenguin Statue(d4 ) , and use the woof to get theFrog Statue(d5 ) . Now you’re able to click the plate ( d6 ) and add the three statue , then the pick and roach , and at long last the haversack itself . Click the Lord’s table to cross over the bridgework to it and fill out Chapter Five .
The Squire’s Tale Walkthrough - Chapter 6
The Forgotten Forest
After the initial chat with Kruk end , penetrate the left of the blind ( e1 ) to move to the river . After more chit - chat , pick up theStick(f1 ) and theDead Fish(f2 ) , then take aTattered Shirtfrom the tree diagram ( f3 ) .
Return to the first screen , put the stick next to the torch ( e2 ) , add the shirt , and collect theLit Torch . With the Aaron’s rod selected in your inventory , penetrate the right of the screen ( e3 ) to move further into the woods .
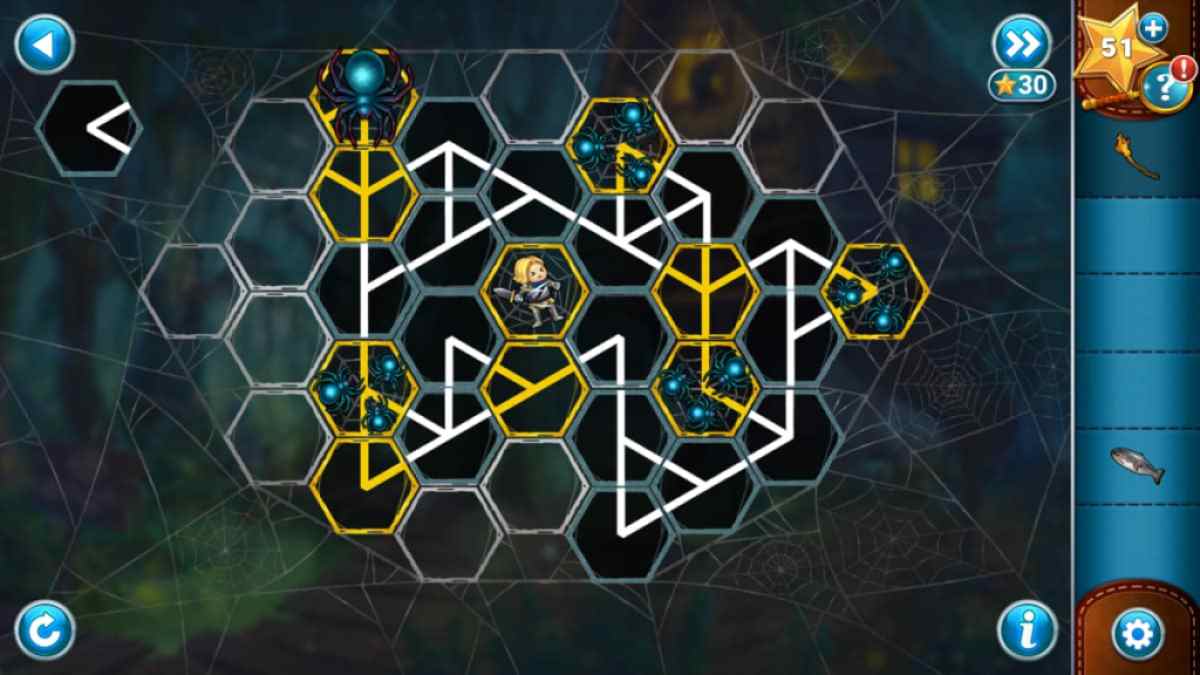
get across the cobwebs ( g1 ) tostart a web mini - secret plan . In the image below , I just necessitate to move the final roofing tile into the top - left space .
Screenshot by Pro Game Guides
Once the wanderer has gone , utilize the blowtorch to polish off the webs ( g1 ) and then find someSpider Webs . Next , chatter the roofy ladder below the door(g2 ) to get a bit of a surprise …
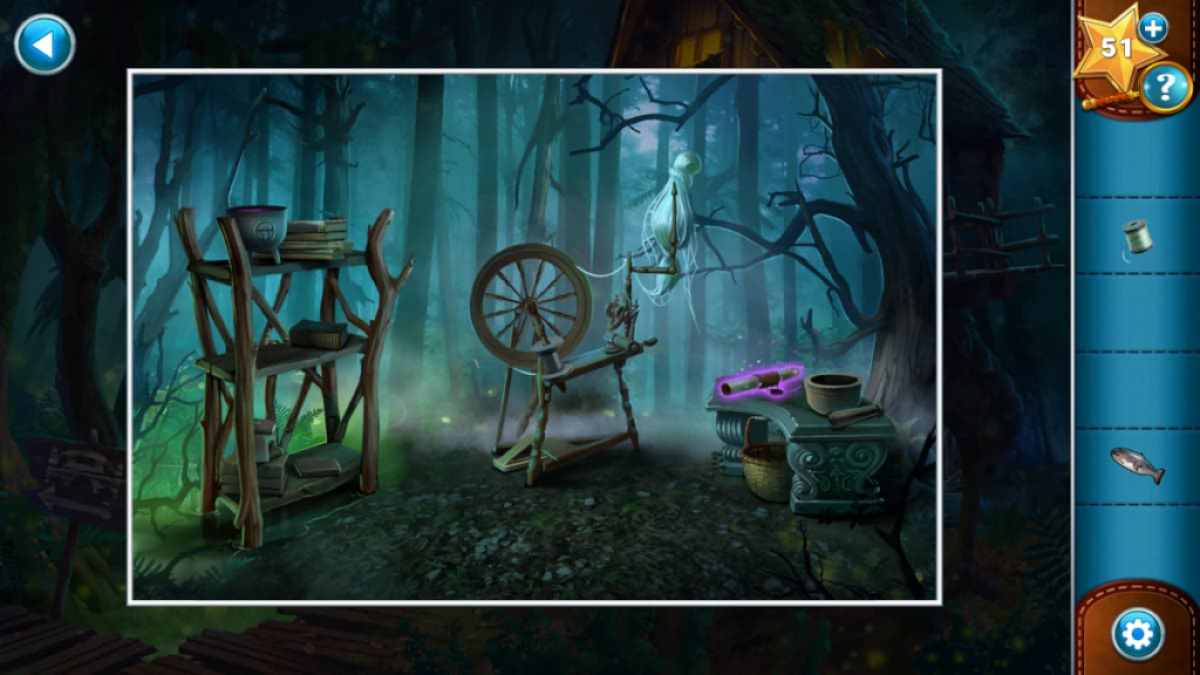
Select the surface area under the hut ( h1 ) for a conclusion - up of the spinning wheel . Click the pedal point on the shelves on the left , add it to the spinning bicycle , and then add up the spider webs to the spinning wheel to getSpider Silk . While in the close - up , also pile up theDried Mushroomsand then tally them to the sight on the right to getMushroom Powder . summate the powder to the pot on the leftfield , and a roll will appear on the right . Pick up theMagic Scroll .
The Witch’s Hut
Back on the main concealment , put the dead Pisces on the floor ( h2 ) to attract the big cat and get theTumbler . Select the wanderer silk in your inventorying and add it to the bow ( h3 ) to also get theShortbow . employ the shortbow on the coiled ladder ( h4 ) , dribble it within reach and allowing you to take theDreamcatcher(h5 ) .
Select the crows ( h6 ) for a close - up of them , take note the amount of crow around each of the letters in the trees , which yield you a five - letter word . Now fall into place the box ( h7 ) , add the tumbler pigeon to nail the lock , and enter the combination ( LOVED ) to open it and get theWand .
Head back to the dam and localize the dreamcatcher in the tree ( f4 ) , then give the magic scroll to Oakley ( f5 ) . Once he translates the charm for you , select the wand in your inventory and click the decameter ( f6 ) to cast it . Once Kruk has smashed the dike , he ’ll open up the logic gate .
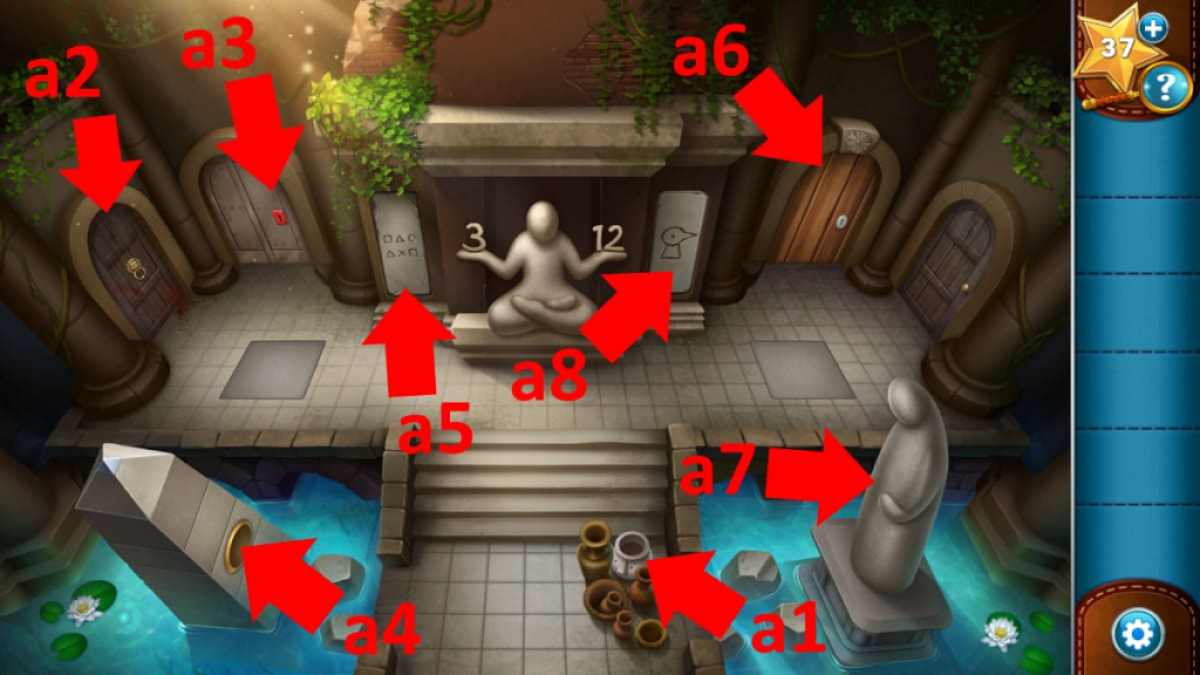
Image by Pro Game Guides
Nightcap Gully
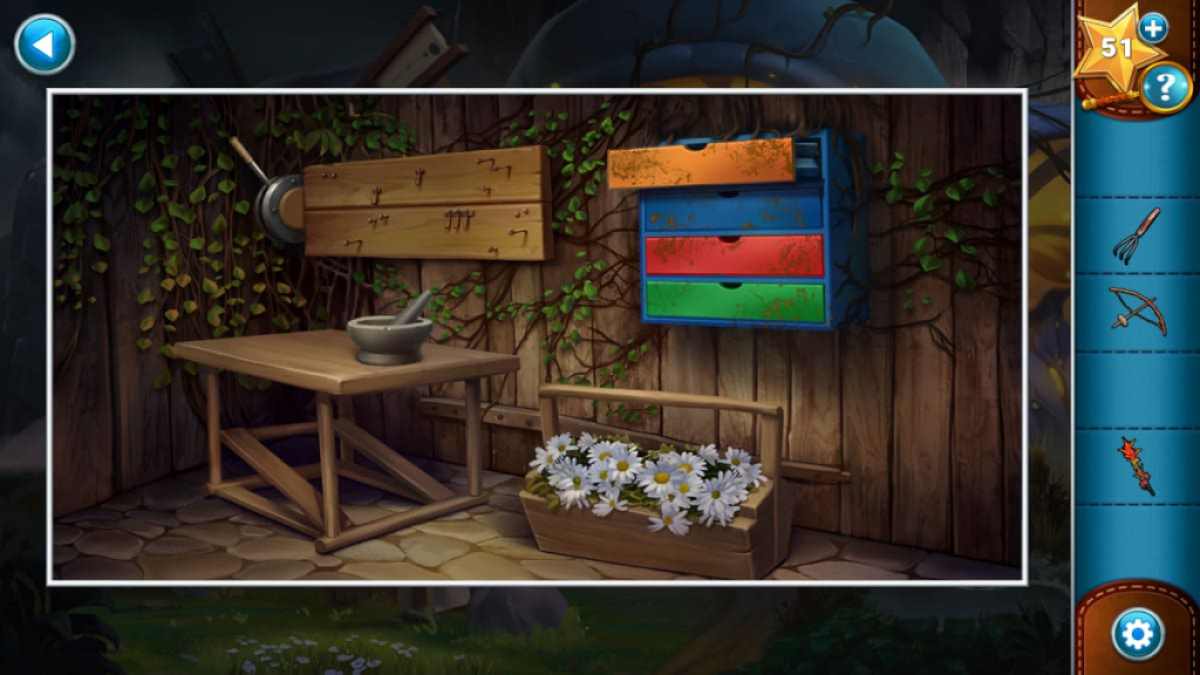
Click the windmill doorway ( i1 ) for a close - up and take theHand Rake . chatter the daisies and pick up theBow Drill , and the orangish ledge to get theGarden Gloves . On the chief screen , take theMill Lever(i2 ) , then use the glove to pick someStinkweed(i3 ) . Click the doorway again ( i1 ) and use the mill lever tumbler to the left of the table ( see below ) .
Select the creature ( i4 ) for a close - up and use the rake on its nose to get someMoss . bestow the moss to the campfire and use the exercise to light it , scaring off the fly . Click the gob you engender the moss from with the stinkweed select towake up the Ancient Tortoise . After a abbreviated talk , expend the penny grass to wake it up again ( several prison term ! ) to discover the Path of Storms shortcut location . After your conversation , collect theMoon Mushrooms(i5 , in the close - up ) and use them on the ardor to getDried Moon Mushrooms .
Go back to the threshold skinny - up ( i1 ) and grind the mushroom to getMoon Powder . With the powder selected , get through the rotating sail ( i6 ) of the aerogenerator to reveal a mushroom path . chatter it to move forward to a route puzzler .
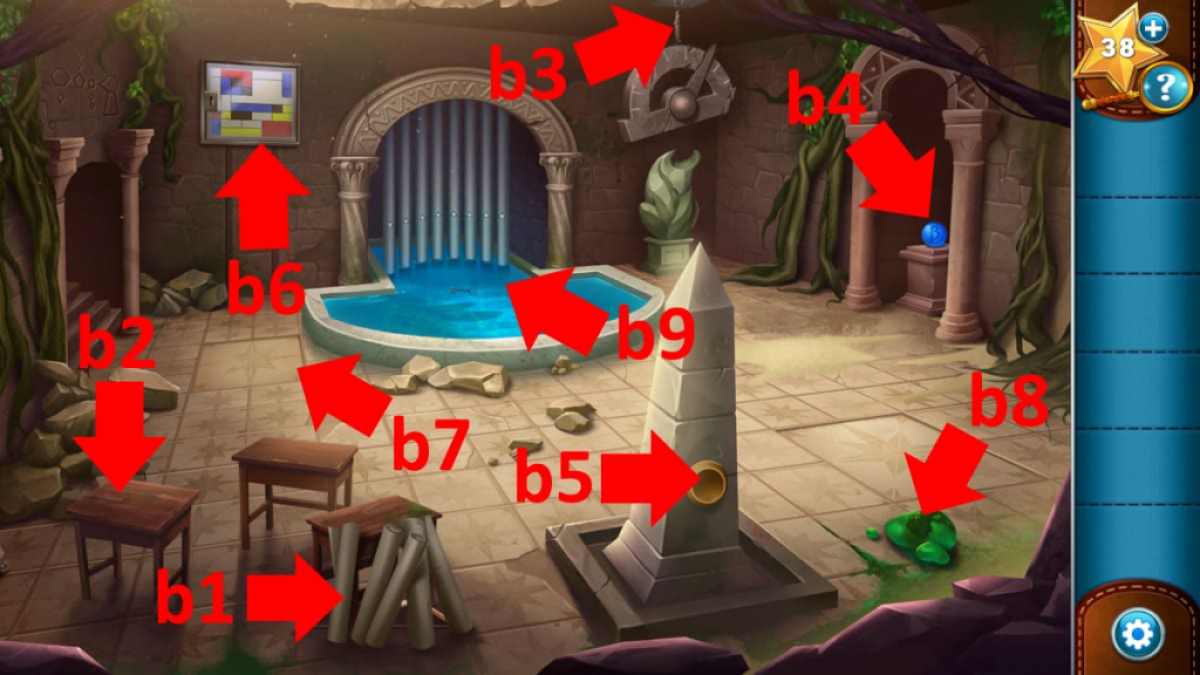
Image by Pro Game Guides
The track you need to take is below . Note that some moves take you multiple spaces power by the current of air symbol . My indicators below arethe direction to pick out from the space you land on after each move :
The Pond of Remembrance
habituate the moon powder on the torch ( k1 ) to let on the image above . clack the six frogs(k2 ) , who will jump onto lilypads , then click each of them once on the pads ( in the correct order ) to make them stand up . you’re able to get the Holy Order by comparing the form on their lilypads to the symbols shine in the trees — you want to click a Sir Herbert Beerbohm Tree ( k3 ) for a finis - up to see the guild : Orange , Blue , White , Yellow , Purple , Pink .
The steel will arise from the water system , and you ’ll utilize the pendent to trigger off another puzzler . Select the symbols mark below to recreate the runes . And with that , you ’ll be done with Chapter Six of The Squire ’s Tale !
The Squire’s Tale Walkthrough - Chapter 7
The Monster King’s Lair
As we commence Chapter Seven , our heroesMartin , Cederick , and Nira are off to take on the Monster Kingdespite having failed to take in the Sword of Light . I ’ve walked through all the scenes and mystifier below , so expect pile of spoilers if you read on ( you’re able to click the section postulate in the contents lean to quash seeing section you do n’t require to see ) . Also , remember you could practice any spare stars you have for clue !
Arriving at the lift organization , take theOld Key(a1),Gloves(a2 ) , andRope(a3 ) . Use the cay to launch the red box ( a4 ) and take theCan of TunaandScrewdriverfrom at bottom . snap the rocks a few times ( a5 ) to get aShield , then apply the screwdriver to enter the grating ( a6 ) and use the gloves to search the rubbish at heart and get theFishboneandMedallion one-half .
Place the can of tunny and fishbone on the two offering discs ( a7 ) and then click the anchor on the shark statue . Attach the rope to it to get anAnchor Hookand use it on the tower ( a8 ) . When the column falls , click the hollow in it ( you’re able to see a gullible wardrobe dig through ) for a close - up and use the shield to move the rock ( b1 ) jam the wardrobe ( b2 ) . Click it to spread it and take theUmbrella , then use that to snag thesecond Medallion Half(b3 ) .
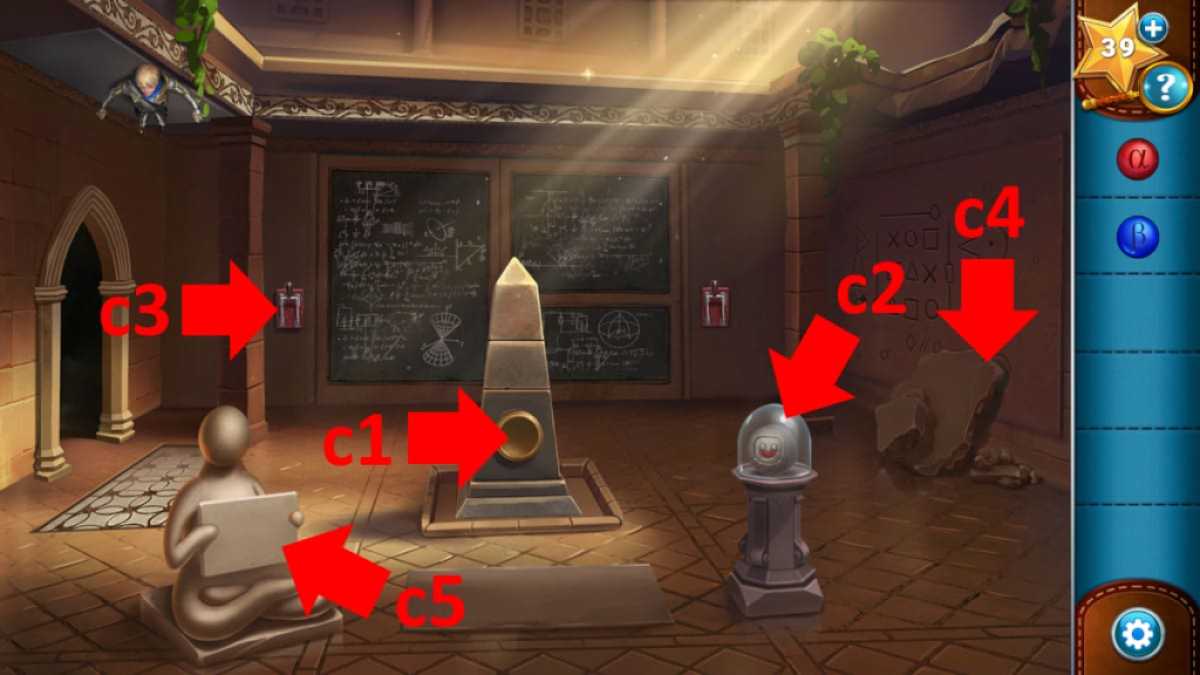
Image by Pro Game Guides
Go back to the main simulacrum and set the two medallion halves into the altar ( a9 ) . The facelift appears , set out a ball - rolling puzzle . Only go through the circles where they are numbered below :
Now you canenter the lift .
The Elevator
Take theWooden Plankleaning against the wall , then tick the two drapery to reveal the walls . Click the green mask ( c1 ) take theGemstonethat strike from its oral cavity , and gather asecond Gemstonefrom the lift floor indicator ( c2 ) . cluck the button gore ( c3 ) andclick the + buttonin the finis - up , which opens the pinch kit ( c4 ) below it . Take theBandagesandHand Sawfrom inside .
Use the saw to cut the bars ( c5 ) and use the board on the flannel mullein ( in the close - up of the other side of the bars ) to get aBurning Plank . Select the rug on the floor ( c6 ) to reveal the hatching , cluck it to open , then get a close - up of the hatching anduse the bandage to sterilize the wires .
Now that the wires are fixed , select the clitoris panel once more and click the button for floor B10 ( on each flooring you jaw , observe the identification number of statues you may see through the windowpane on the rightfulness - you ’ll need this information subsequently ) . append the two gems to the panel to open up a panel and take theCandelabra . Now take the button board andflip the electrical switch at the bottom to wrick off the lift light source , noting the colors and positions ( top to bottom ) of the bring out faces .
Screenshot by Pro Game Guides
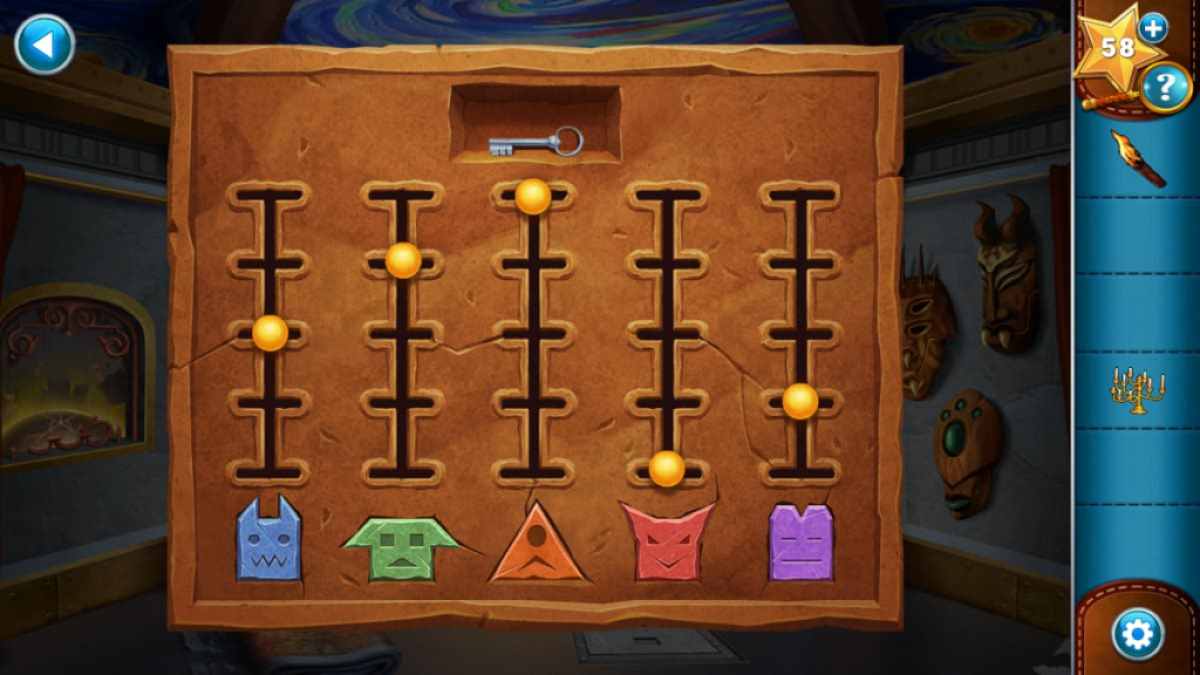
change state the lights back on in the lift and click button B30 . Get a close - up of the control panel and set the Pseudemys scripta ( top to bottom ) as follow : Orange , Green , Blue , Purple , and Red(see above ) . Take theKey . Now move to B20 , get a close - up of the combination in the rhytidoplasty , and go into ( top to bottom)3532 , which is the number of statues through the window on each floor ( see below ) . A venire will open up , giving you yoursecond Key .
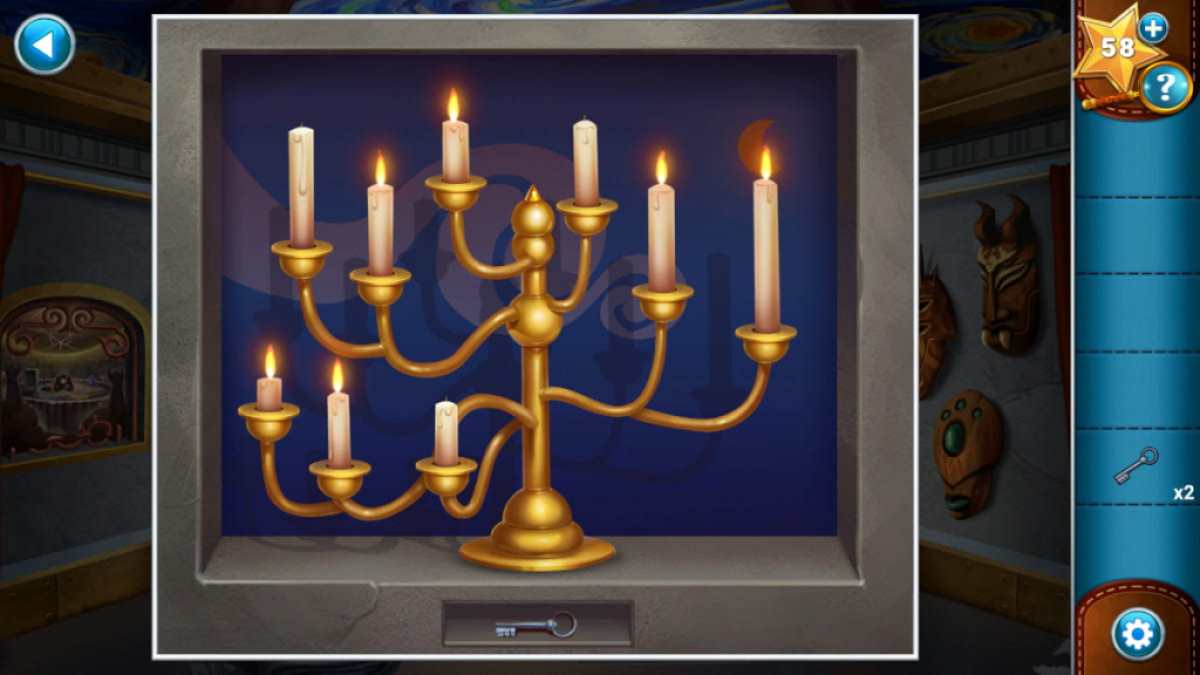
Head to storey B40 and order the candelabra in the slot in the ski lift . You necessitate to light the right candles with your torch to start the hachure and get the final samara . For this , you ’ll want tonote which asterisk cauterise orange in the wall painting on the roof of the lift(click c7 ) . Select the blowlamp , light the correct candela ( snuffle out the ones in white in the mural ; see below ) , and take thethird Key .
Move back down to B50 , use the keys on the lock ( c8 ) , and move forward to the smithy .
Screenshot by Pro Game Guides
The Forge
Grab theBolt Cutters(d1 ) and use them on the cupboard whorl ( d2 ) , taking theTongsfrom inside . change by reversal the valve ( d3 ) to find out that you need to make the forge hotter before you could practice it . habituate the pair of tongs to pluck down the ladder ( d4 ) , then take theCrowbar(d5 ) and use it to start the crate ( d6 ) and take out theValve Wheel .
apply the crowbar again to get theGumfrom the switch ( d7 ) . you may now flick the switching to get the forge up to the second heat storey . Use the gingiva to restore the tube ( d8 ) and add the valve to the pipe ( d9 ) to fully power the furnace . you could nowpress the large button(d10 ) thatopens the armory door(d11 ) . Click it to go inside .
Take theHammer(e1 ) , then pick out the crushed blade in your inventory and clack and take theSpoon(e2),Shield(e3 ) , andJug(e4 ) , then place them into the forge . unfold the tray ( d12 ) to get theMagic Oreand place it on the anvil ( d13 ) , start a mystifier to remove the impurities . Press the up , down , left , and right keys in the following order : Right , Right , unexpended , Up , Right , remaining , Up , Right , Right .
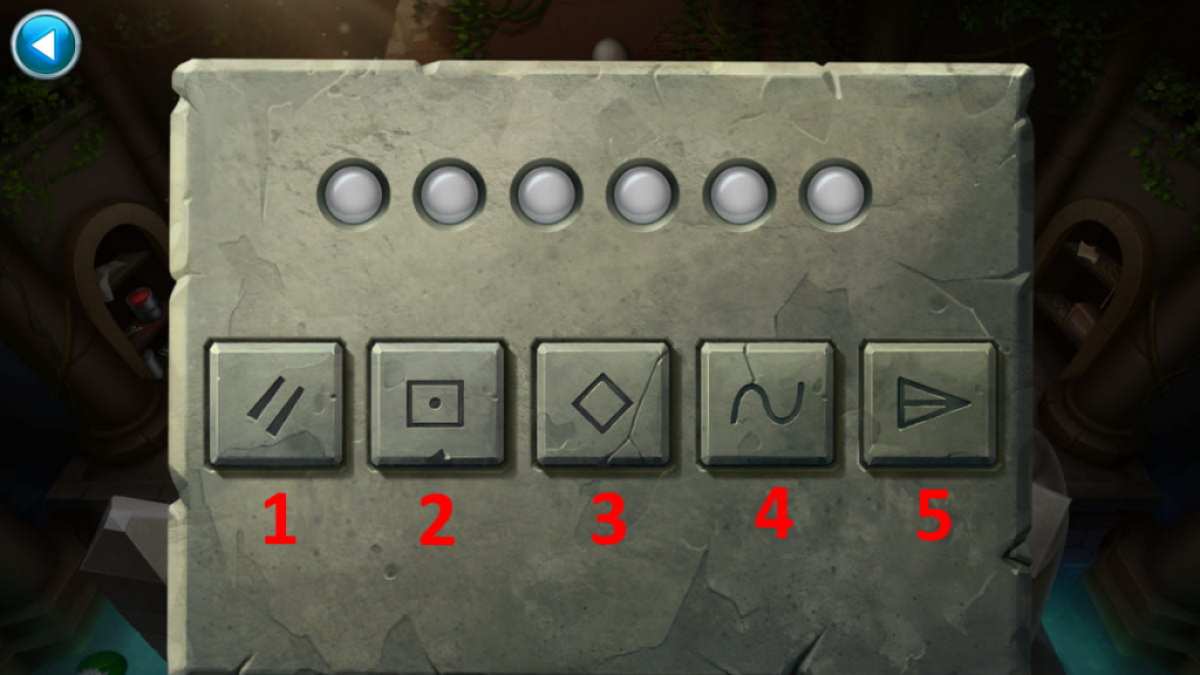
Image by Pro Game Guides
Put the brand on the anvil , add thePurified Magic Ore , then use the cock on the sword to complete the chapter . Just one to go !
The Squire’s Tale Walkthrough - Chapter 8
The Doomsday Device
clean up the metal ball and use it to break the grate ( f1 ) and get theCoin . Click the wall chain ( f2 ) until the wall collapse , give the coin to the dungeon rat that appears , and then take theSilver Needle . expend the needle on the doorway lock ( f3 ) and head into the hall .
Take theTin Ladle(g1 ) then get across the shift on the wall ( g2 ) to enhance the column in the center of the hallway . sink in the back - exit cadre door ( g3 ) for a close - up of the gelatinlike square block and pick up aHandful of Rocks . Keep picking them up and adding them ( along with the ladle ) until it explode . Take back theTin Ladle , then snap up theTorchand start the chest to getCedrick ’s Sword . Finally ( still in the close - up ) use the ladle on the toilet hole to fish out theKey .
Light the common mullein via the one burning in the hallway ( g4 ) , then use the key on the right - side cell door ( g5 ) to open up it . come home your illuminated torch in your stock and then the dark close - up toreveal a skeleton . you may drag the luminosity around the persona and compile aSpearon the right field , also noting the code scratched into the wall ( 24637 ) .
Screenshot by Pro Game Guides
pick out the front - left cell door ( g6 ) to reveal a grid . Move the sensation with the buttons until the ace are in the position ( from left to rightfield , top to bottom ) that match the code from the electric cell ( see above ) . you’re able to nowgo in and speak to Cedrick . Give him his steel , and he ’ll get with you . While still in the cell close - up , dawn the three loose Stone to give a secret compartment and take theGear(see below ) .
Add the gear to the pillar ( g7 ) , then use the spear on the hole ( g8 ) , finally click Cedrick to get him to serve you plough it . You ’ll first need to cheer him up , though . Choose the undermentioned alternative :
Cedrick will now aid if you click the shaft , allow you to escape the dungeon .
Screenshot by Pro Game Guides
Getting to the Doomsday Device
foot up theFish Statue(h1 ) and theHook(h2 ) , then utilize the hook on the ladder on the right ( h3 ) . you could now enter the door at the top ( h4 ) .
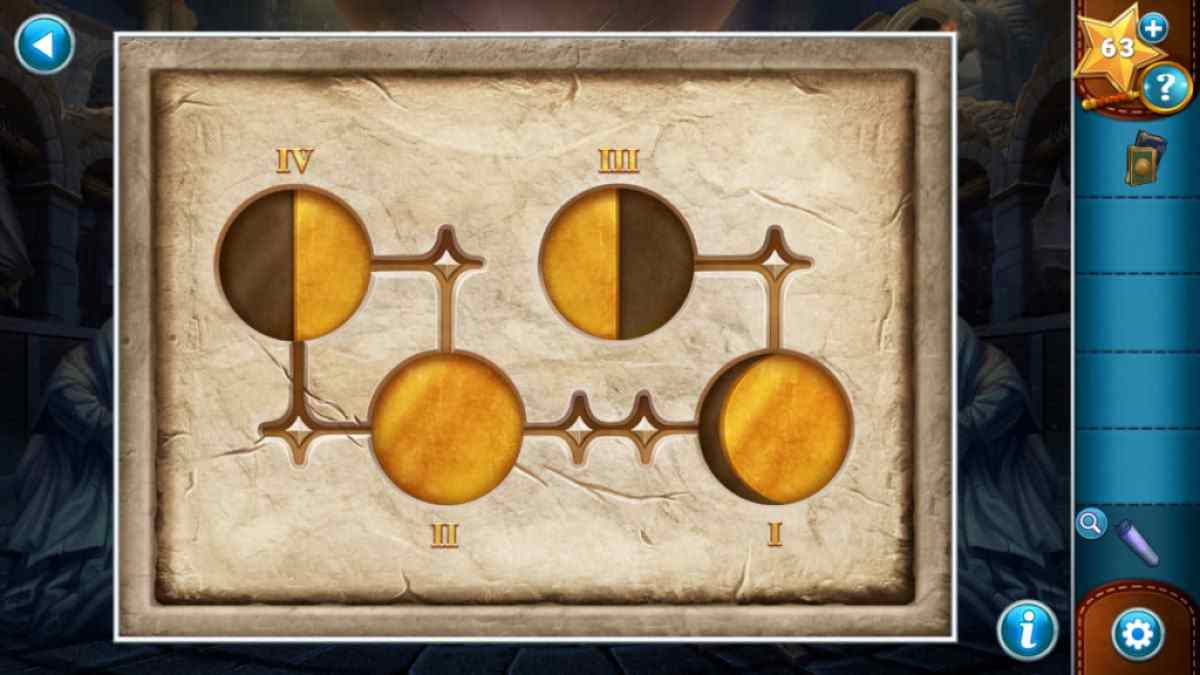
GrabAnother Shovel(i1 ) and utilize it to dig out theBallista Bolt(i2 ) . Also , take theBook(i3 ) , alongside aSecond Bookand theMoon Chartfrom the other alcove ( i4 ) . Head back outside , add the bolt to the ballista ( h5 ) , and shoot it , revealing a moon mystifier . practice the moonlight chart to work out it , or find out out the image below for the solution ( all that is leave to do in the image ischange the bottom leave moon to be completely dark ) . Once complete , take the secondFish StatueandShadow Orb .
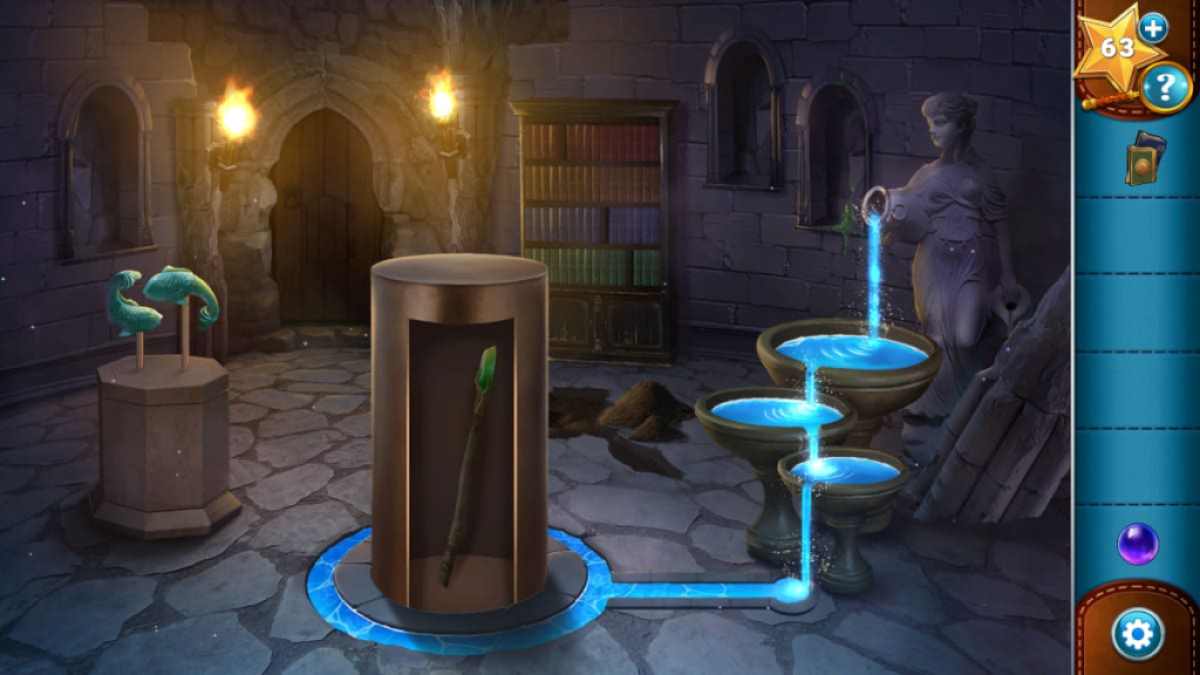
Head back into the way and put the two Pisces statues on the pedestal ( i5 ) , then alter the Harlan Fiske Stone bowl so that thewater flows into the ring on the ground(see persona below ) . Take theStaff . Back in the independent area , take the anchor back and use it on the opposite ladder ( h6 ) , taking thethird Bookfrom the top . apply the backbone to go through the correct door once more , add the Word of God to the shelves ( i6 ) , and take theRed Crystal .
Screenshot by Pro Game Guides
Outside once more , sum up the staff to the statue on the right ( h1 ) and the quartz glass to the one on the left over ( h7 ) , let out apuzzle in the substance of the arena . Add the shadow orbit to the center to start the puzzler . You take to energise each ball by making each area have four dissimilar symbolic representation , so clack the empurpled primal orbs in the next social club :
2 , 4 , 4 , 3 , 3 , 3 , 3 , 1 , 3 , 3 , 3 , 1 , 1 , 1 , 3 , 3 , 3 , 1(image below )
cluck the stair to head forward .
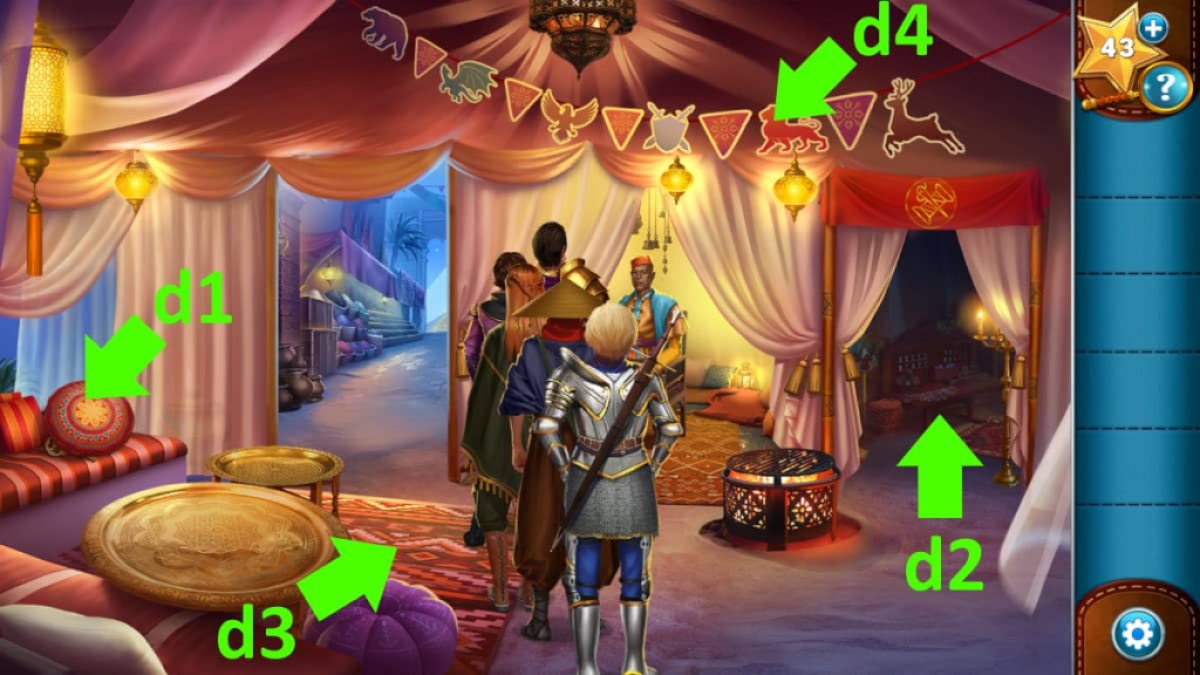
Image by Pro Game Guides
Underneath the Device
Take theCrystal Shard(k1 ) and sum it to the disc ( k2 ) , which opens the trapdoor ( k3 ) , so head down . Take theHorn Blueprint(l1 ) , then snap the skeleton ( l2 ) , reveal a scroll . Click the roll , take theWinding Key , and read that you require the automaton ’s horn and heart to make it function .
Take theHammer and Chisel(l3 ) and theButter Knifefrom the cupboard ( l4 ) , then use the hammer on the crack in the floorboards ( l5 ) to get theFilament . With the filament take in your stock list , snap the gadget ( l6 ) to discover you need to power it somehow .
Back upstairs , use the hammer on the crystals ( k4 ) to get a secondCrystal Shardand add it to the other disc ( k5 ) , powering up the stone ( k6 ) . Also , apply the tongue on the panel on the front of the robot ( k7 ) , taking thePlate Cover .

Image by Pro Game Guides
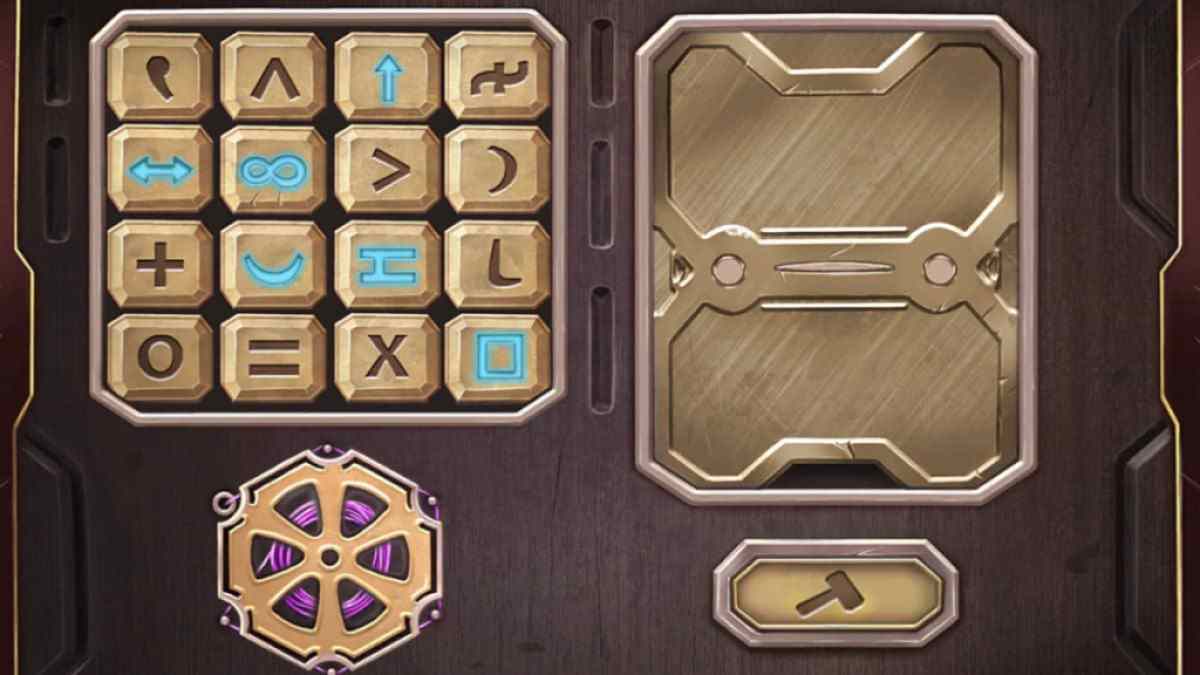
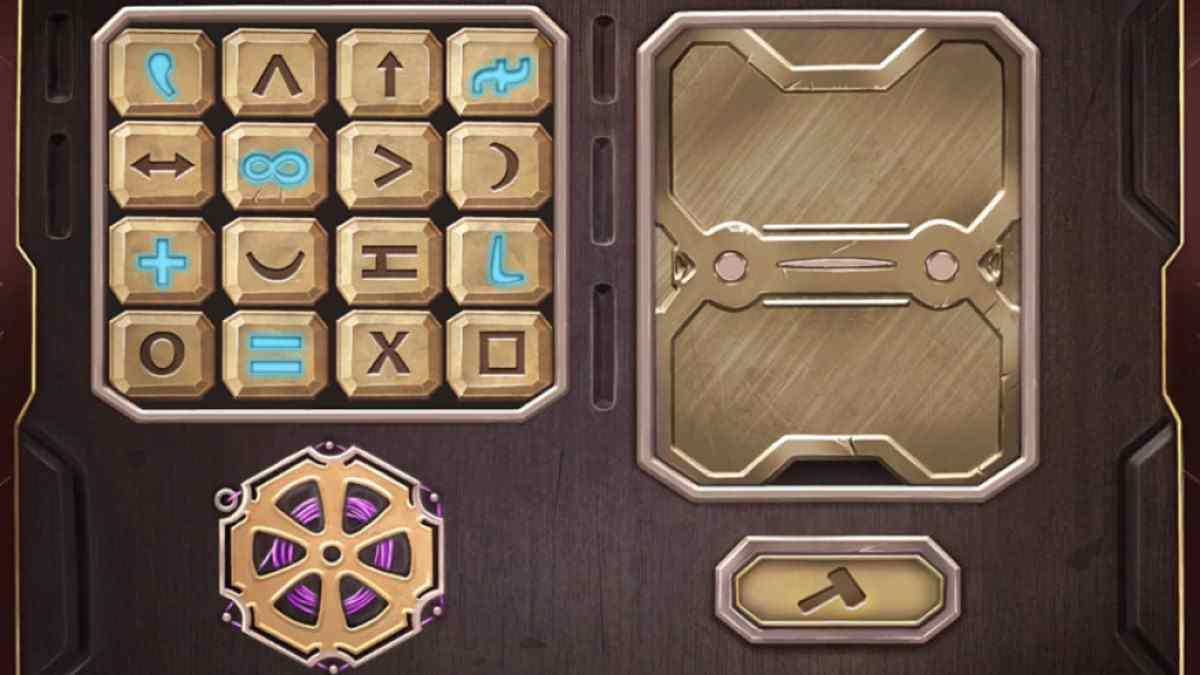
Go back downstairs to observe the machine powered up . Add the filament to it in the close - up by clicking the sprocket ( bottom - left ) double with the filament selected . It ’s now ready to go . utilize the blueprint in your inventoryto find the six release you need to crusade ( they ’re bolded ) , or utilize my image below . Once selected , click the hammer push ( bottom right ) to make and collect theMetal Horns .
Now do the same , taking the symbolization from the collection plate coverto make the and collect theHeart . Again , see my image below for the correct symbols to choose from .
Add the fondness and horns to the robot to trip theRobot Yeti . When it turn around , use the key on its back to eat up the fix . Reattach the front instrument panel to the robot , then jaunt up in the elevator .
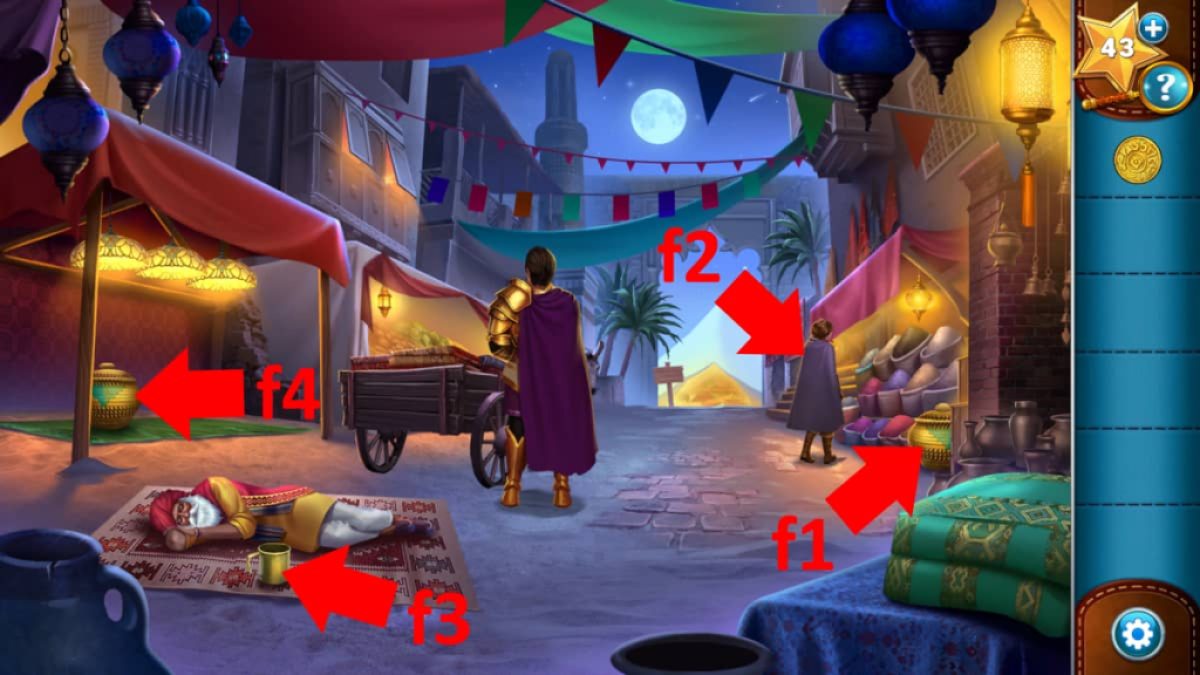
Image by Pro Game Guides
The Final Battle
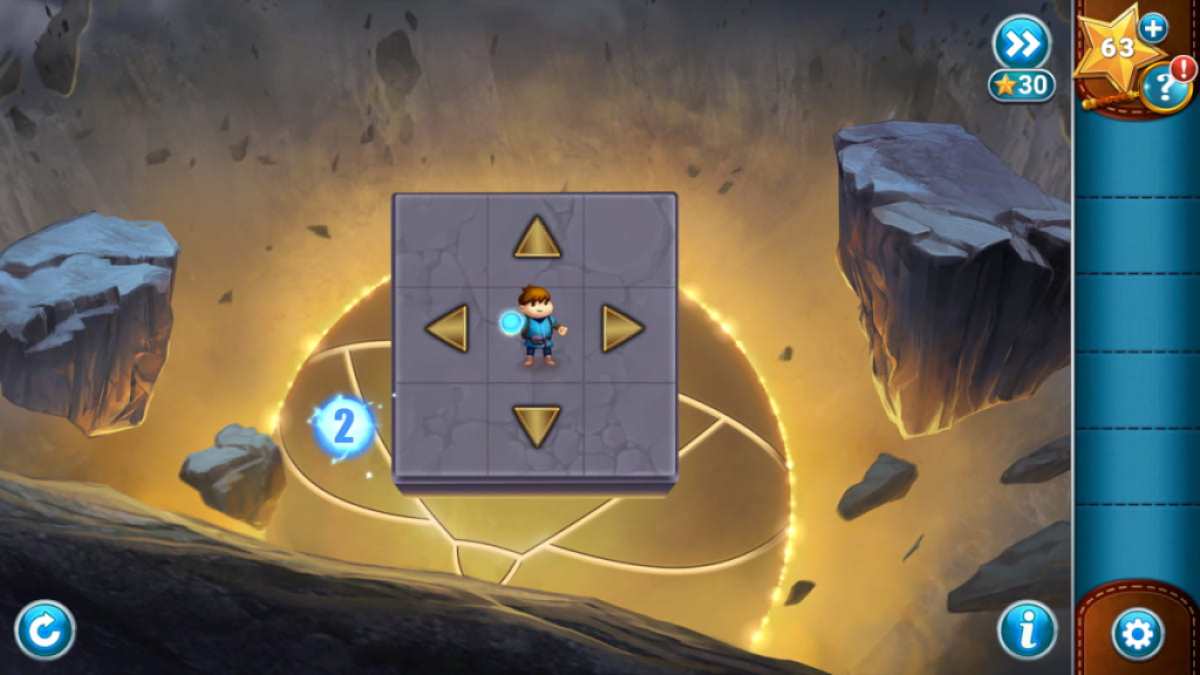
Once Nira breaks up the weapons platform you ’re standing on , you ’ll start a mini - plot . The idea is tocover all the storey public square ( turn them orange)whileavoiding the lightning strikes(these go across from where the musket ball is after the number of tour indicated).For the solution :
Now Cedrick has to do the same on a slenderly more difficult storage-battery grid :
And once more , for the winnings :
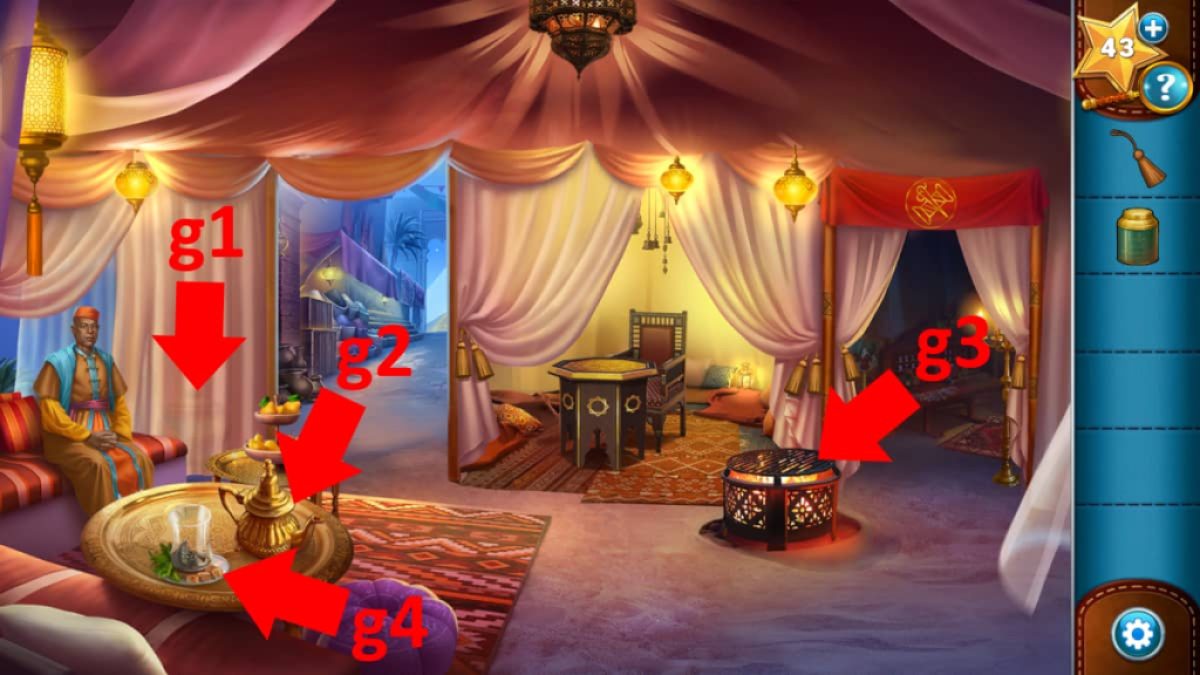
Image by Pro Game Guides
Enjoy the final cutting view , and praise , you ’ve finish The Squire ’s Tale !
Want more Adventure Escape Mysteries in your life ? Check outAll Adventure Escape Mysteries Walkthrough Guideshere on Pro Game Guides .
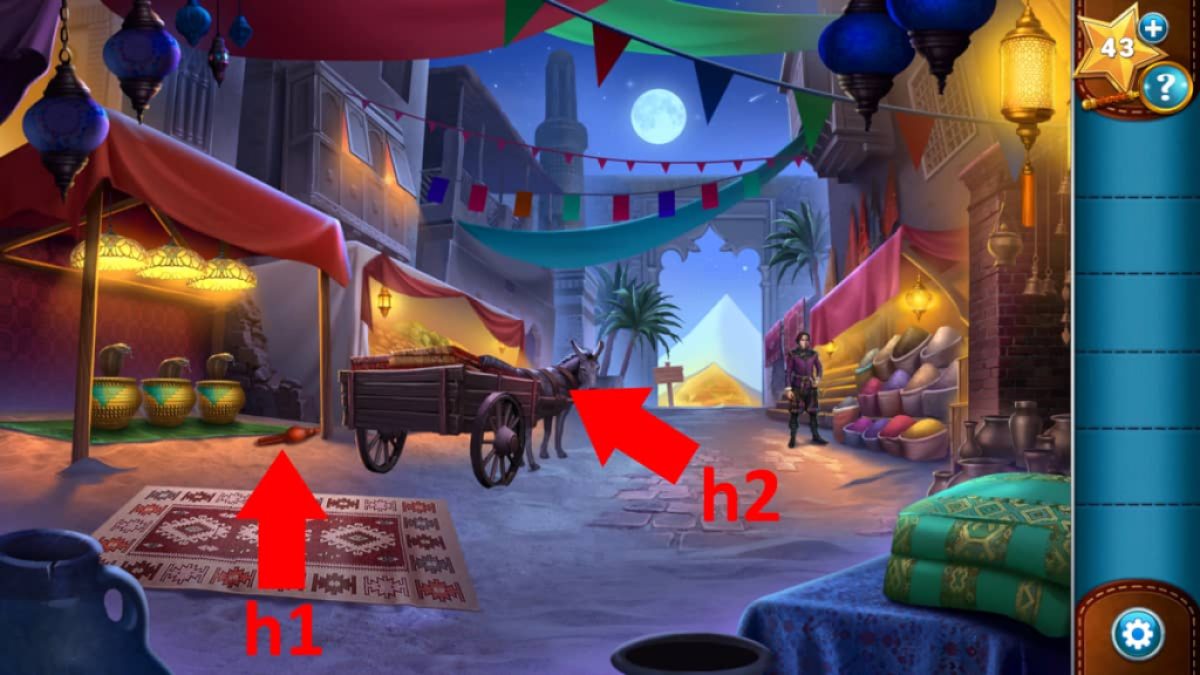
Image by Pro Game Guides
Screenshot by Pro Game Guides

Screenshot by Pro Game Guides
Screenshot by Pro Game Guides

Image by Pro Game Guides
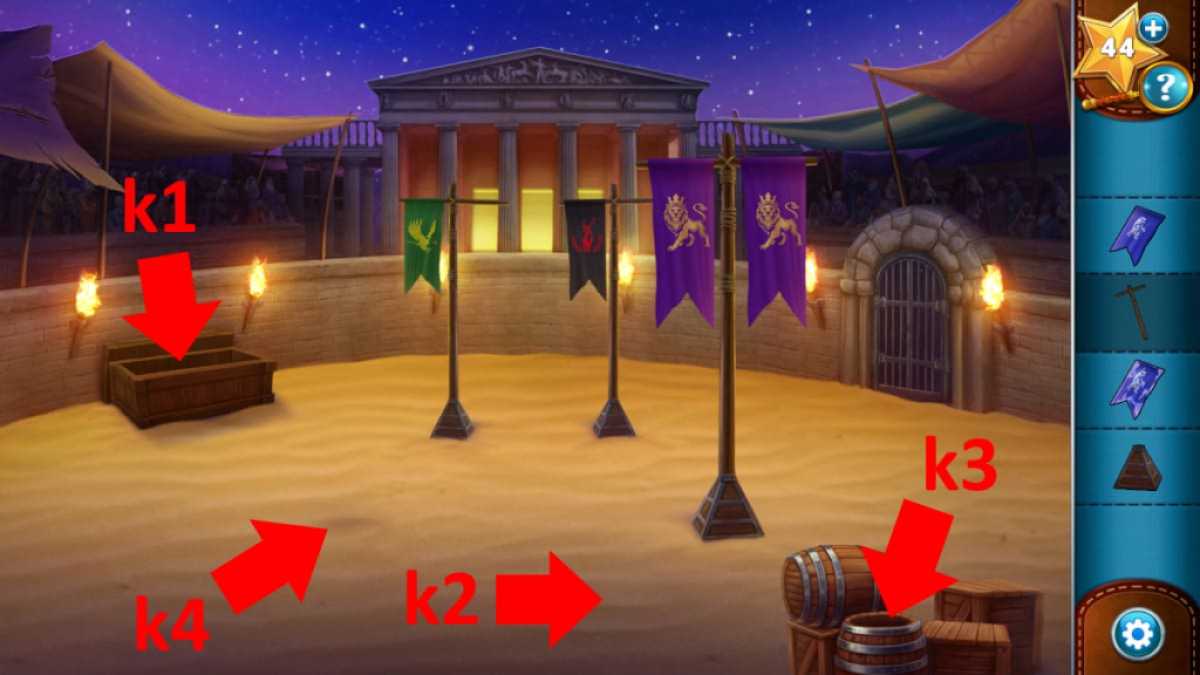
Image by Pro Game Guides
Screenshot by Pro Game Guides
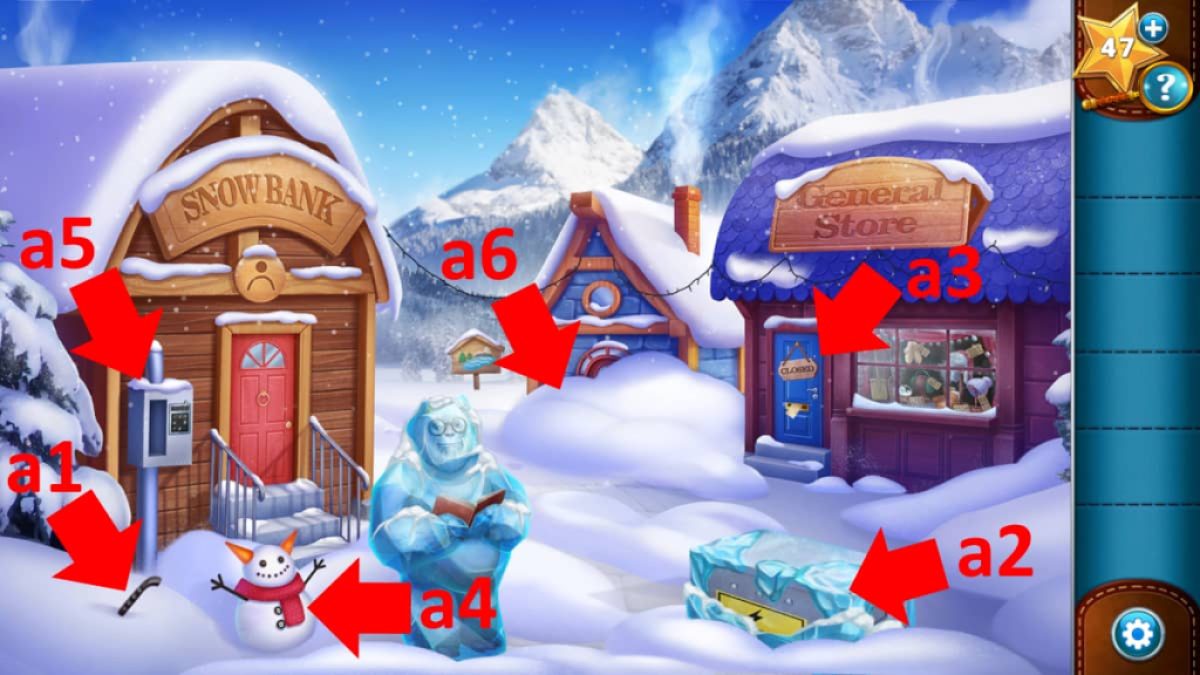
Image by Pro Game Guides

Screenshot by Pro Game Guides
Screenshot by Pro Game Guides
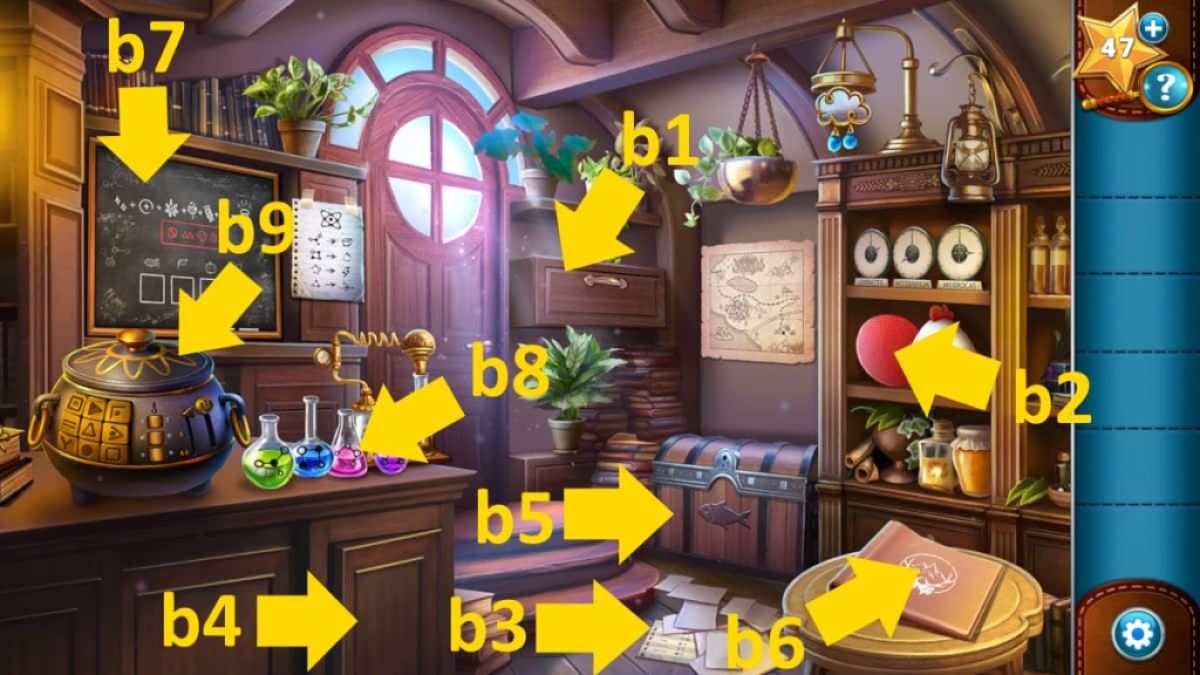
Image by Pro Game Guides
Screenshot by Pro Game Guides
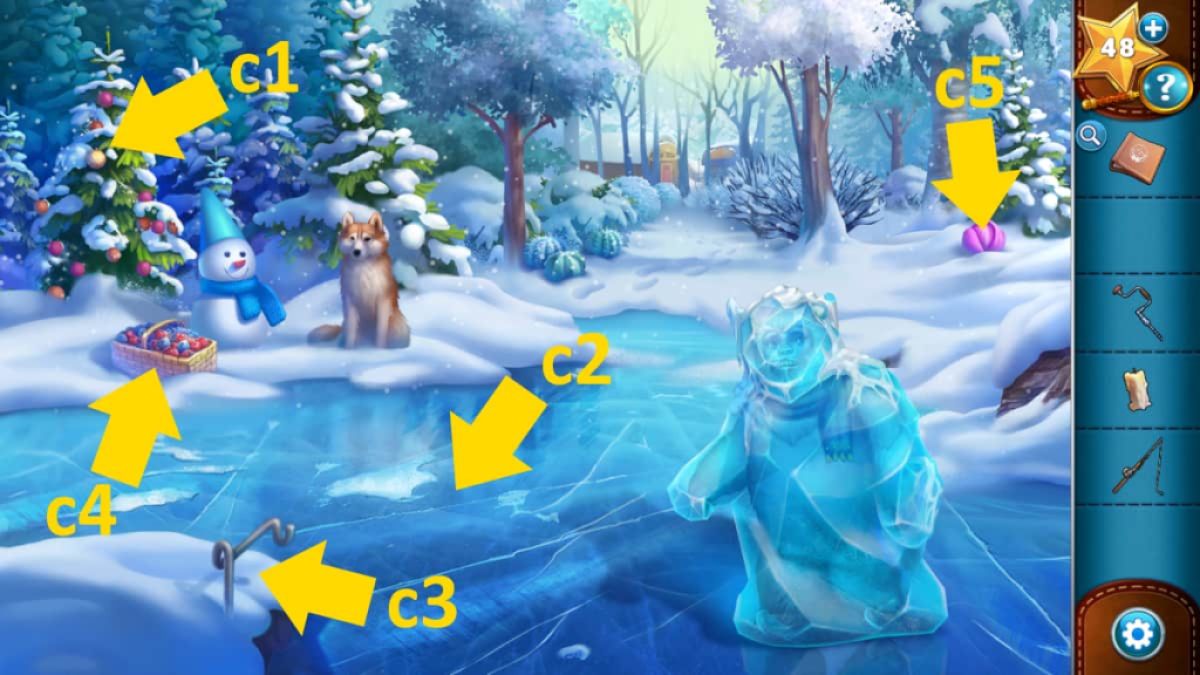
Image by Pro Game Guides
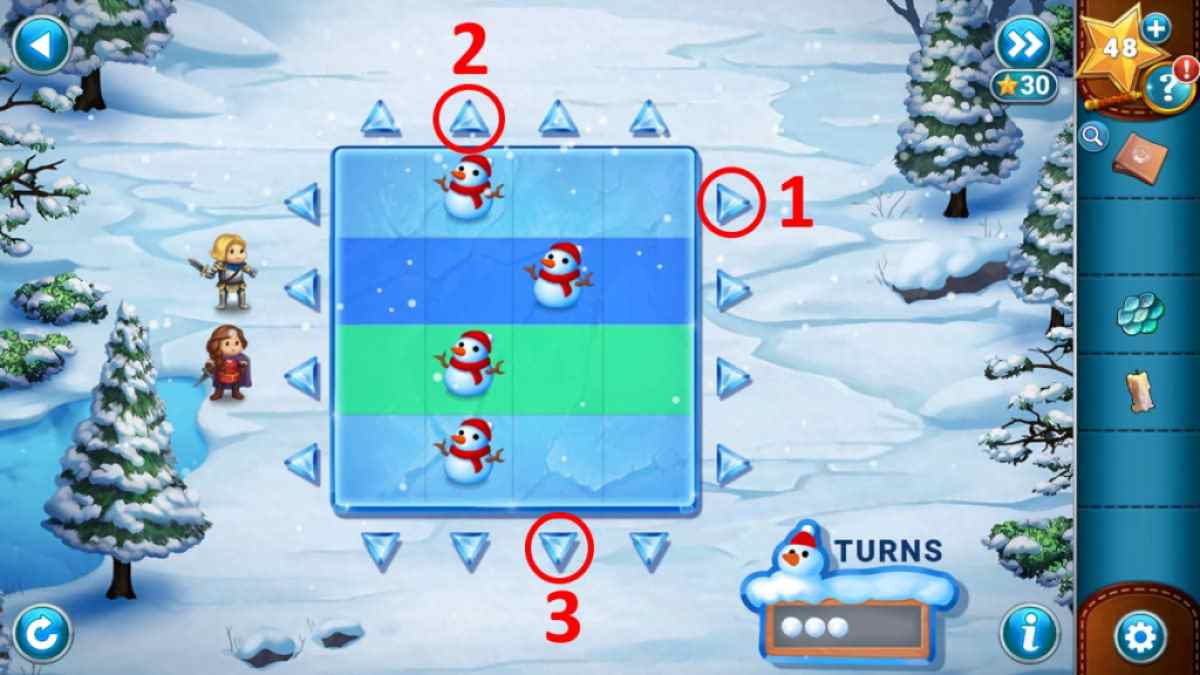
Image by Pro Game Guides
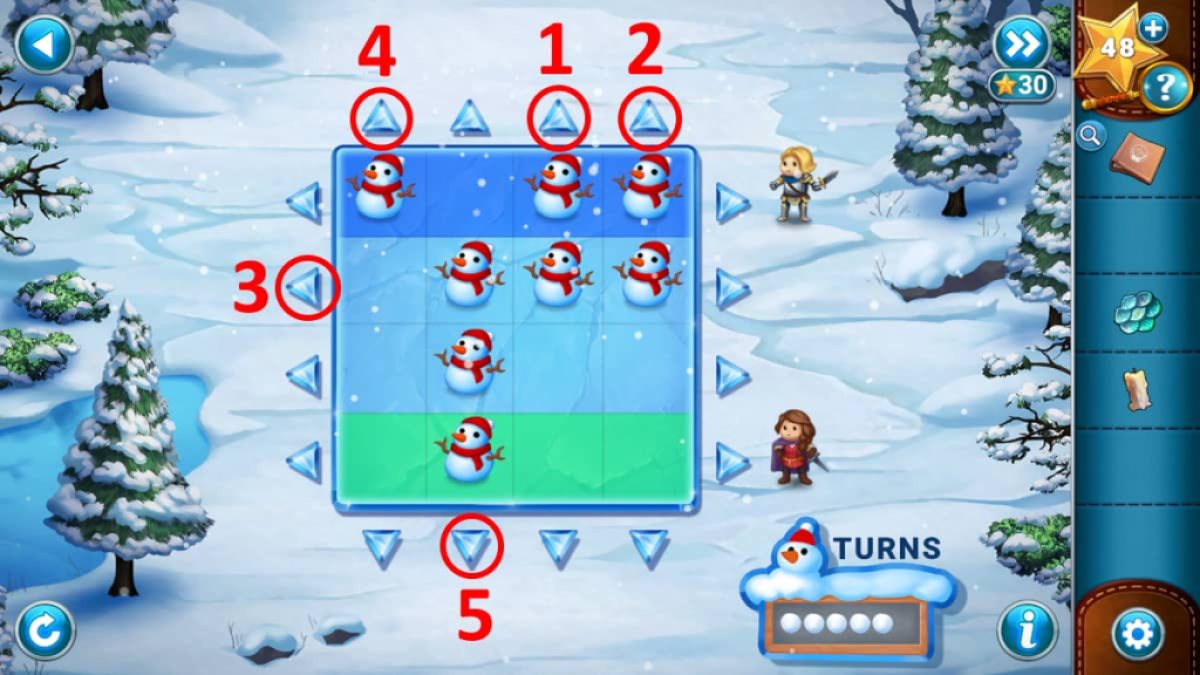
Image by Pro Game Guides
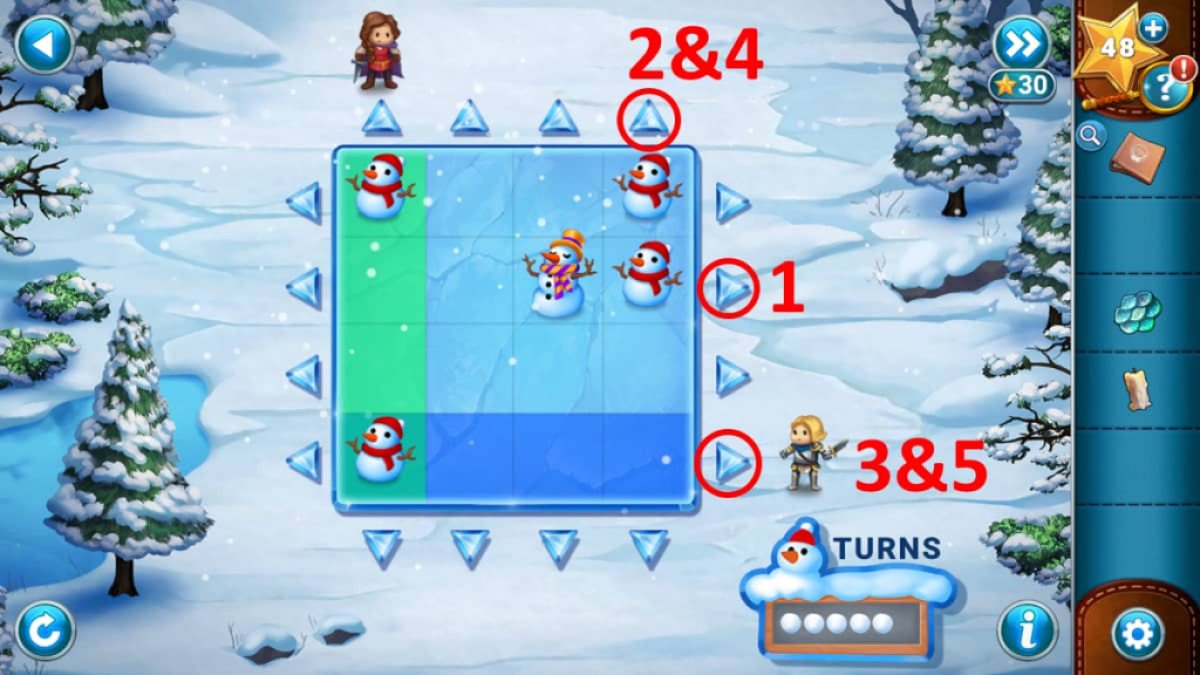
Image by Pro Game Guides
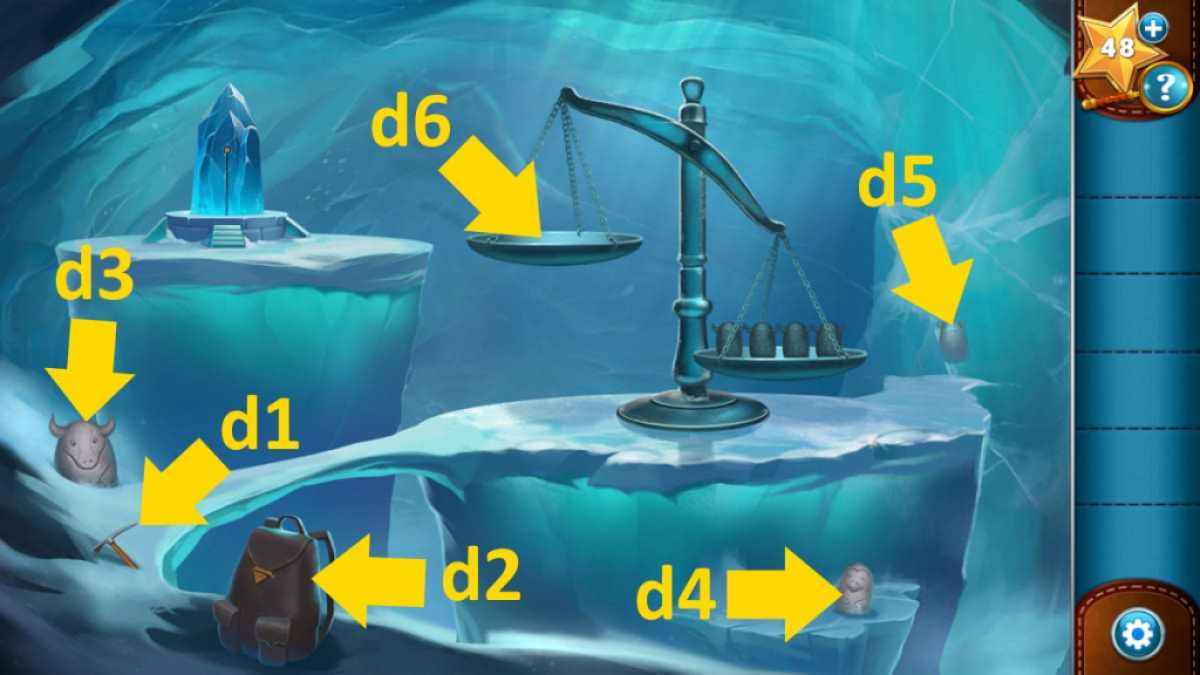
Image by Pro Game Guides
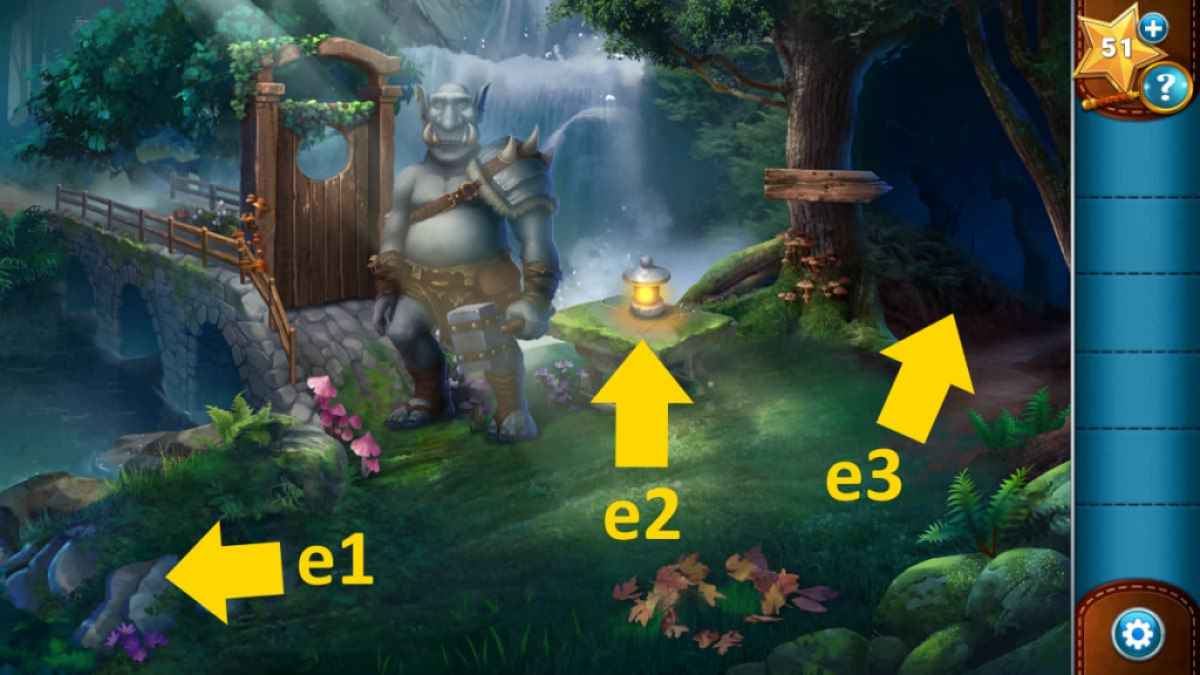
Image by Pro Game Guides
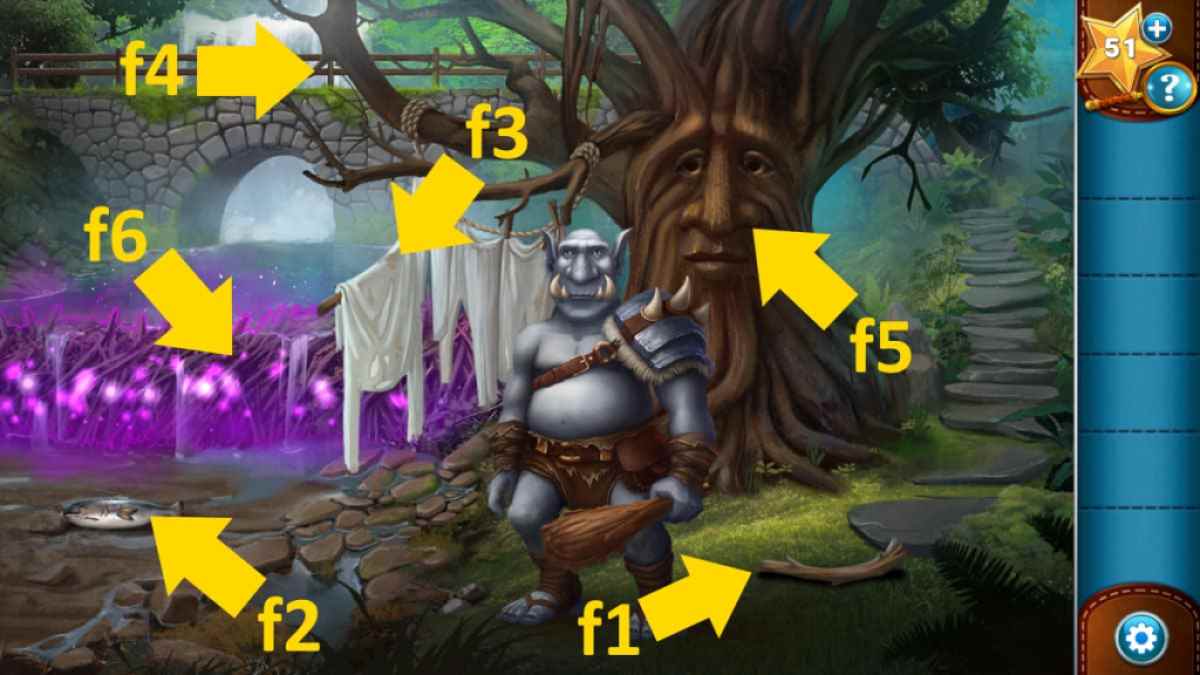
Image by Pro Game Guides
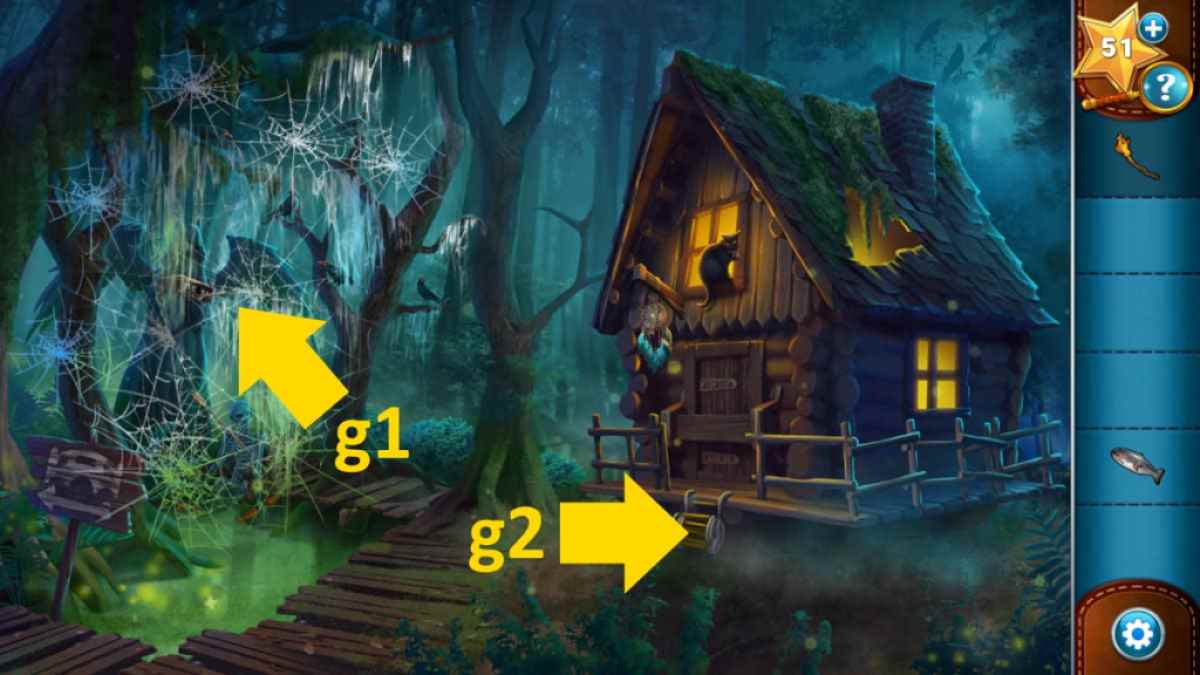
Image by Pro Game Guides
Screenshot by Pro Game Guides
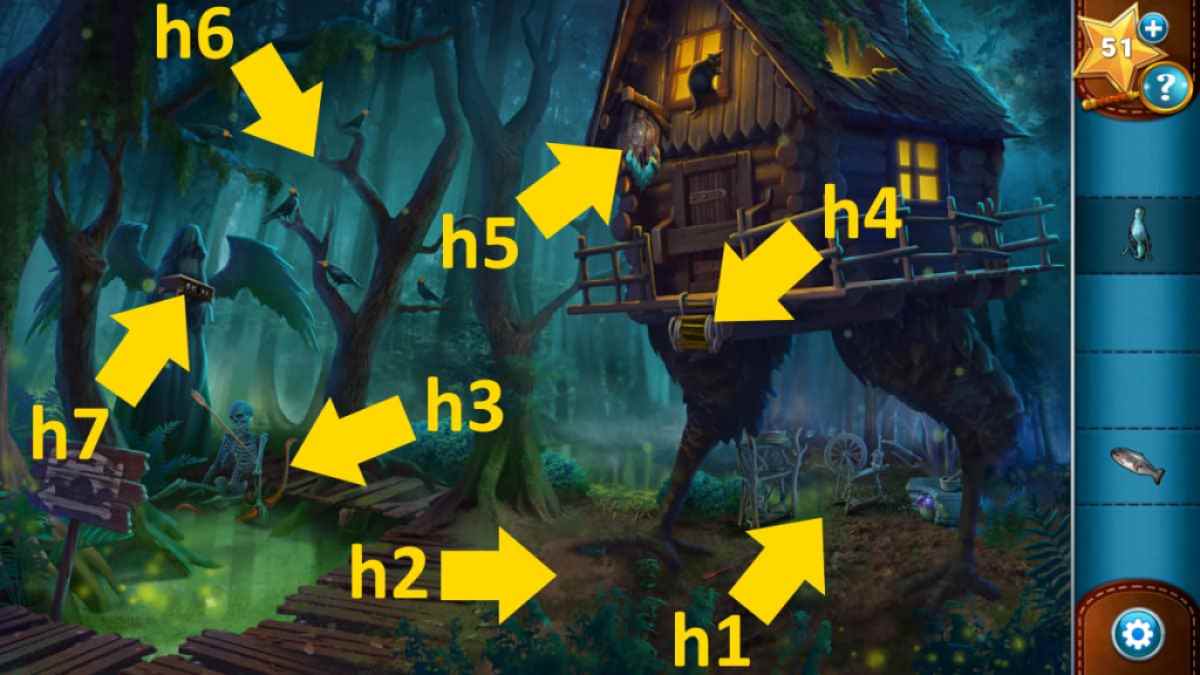
Image by Pro Game Guides
Screenshot by Pro Game Guides
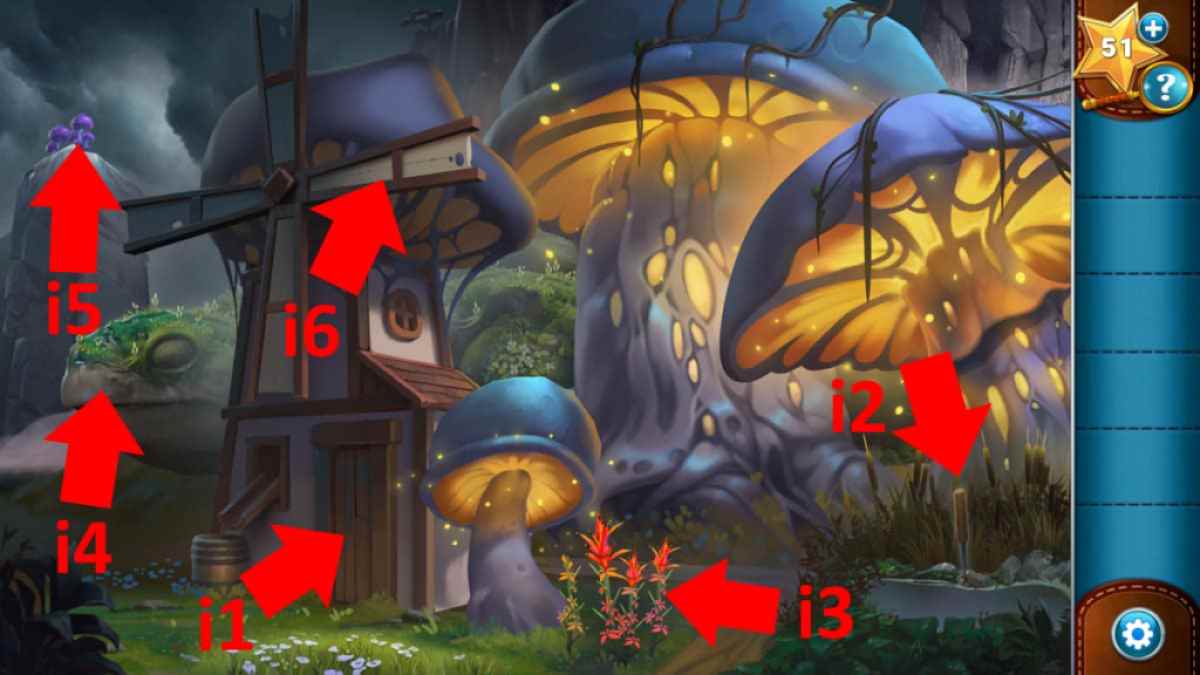
Image by Pro Game Guides
Screenshot by Pro Game Guides

Screenshot by Pro Game Guides
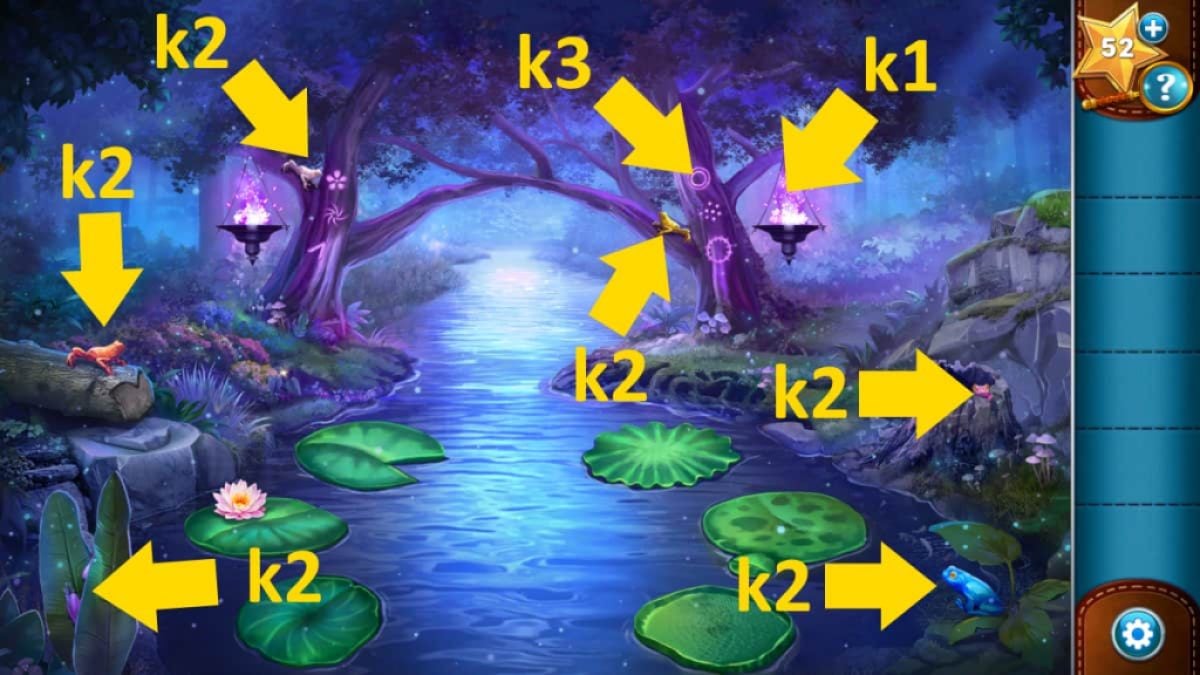
Image by Pro Game Guides
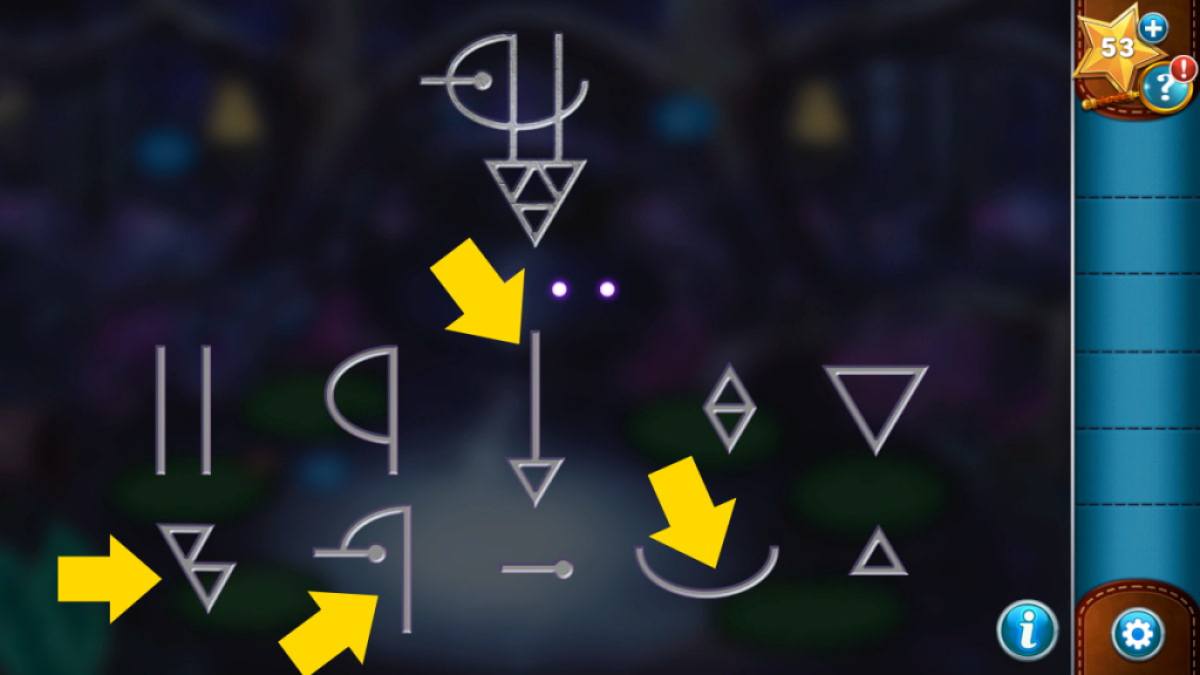
Image by Pro Game Guides
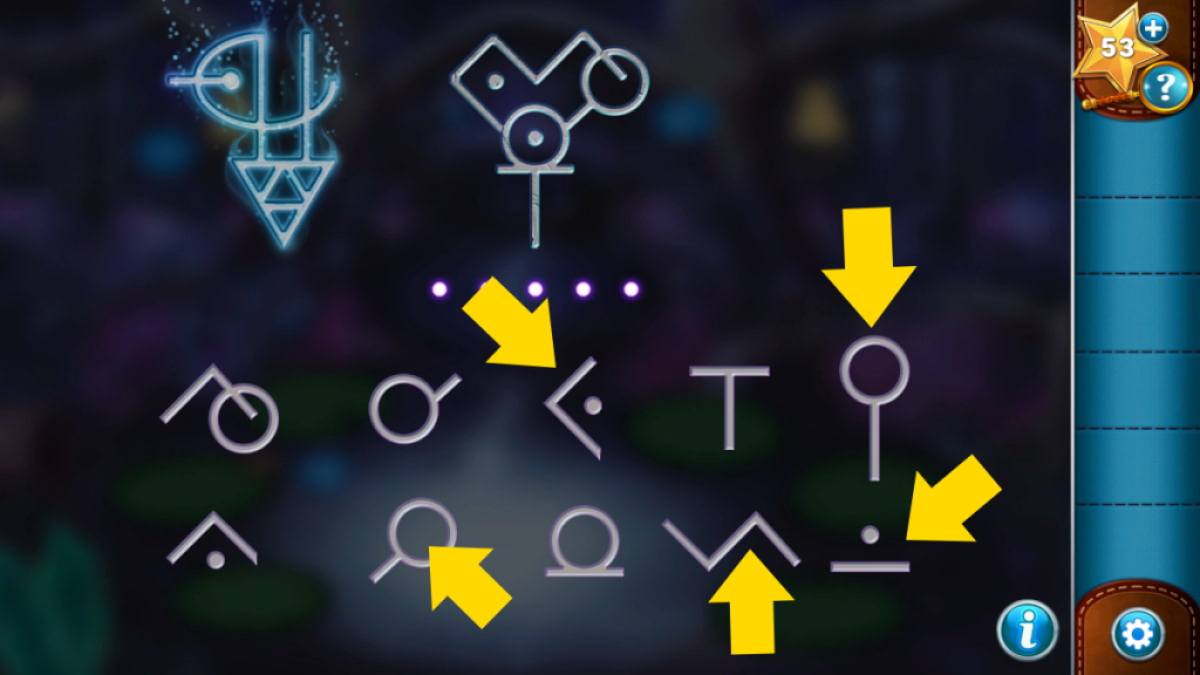
Image by Pro Game Guides
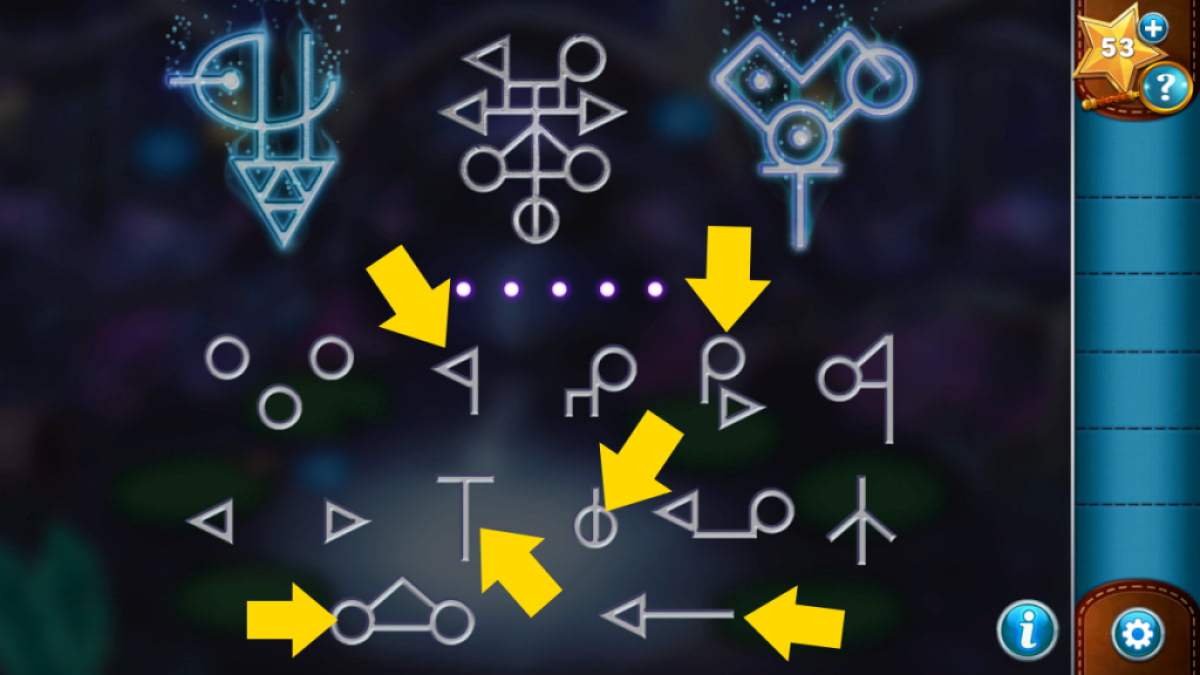
Image by Pro Game Guides
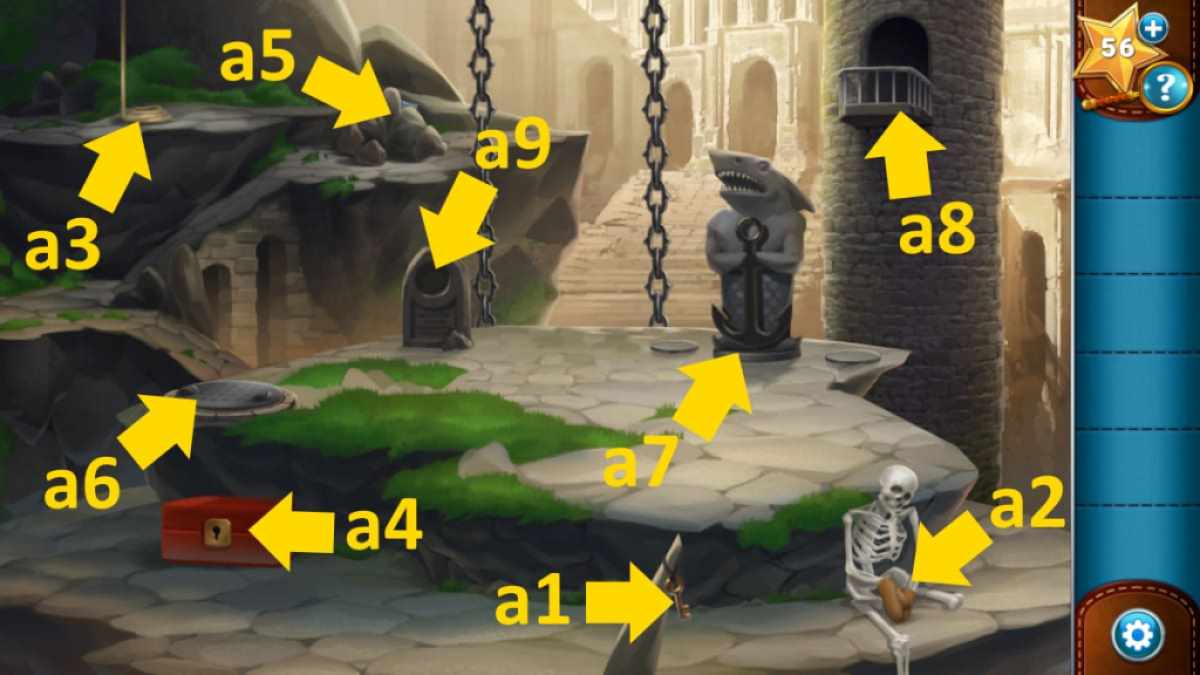
Image by Pro Game Guides
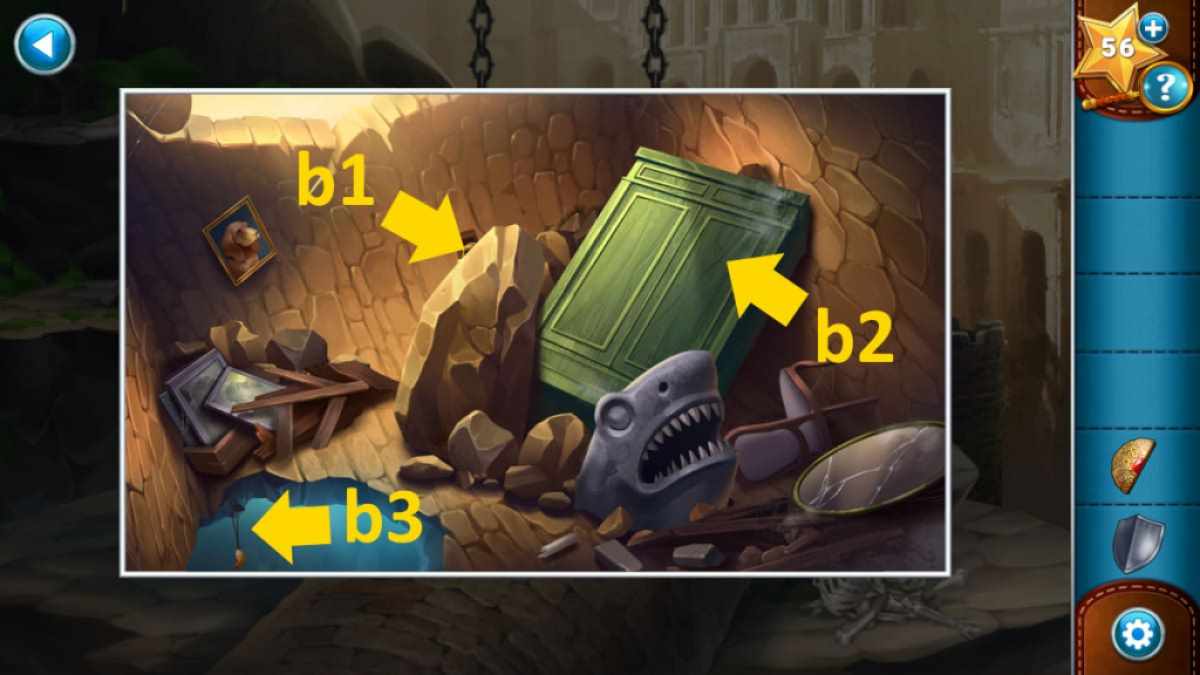
Image by Pro Game Guides

Image by Pro Game Guides
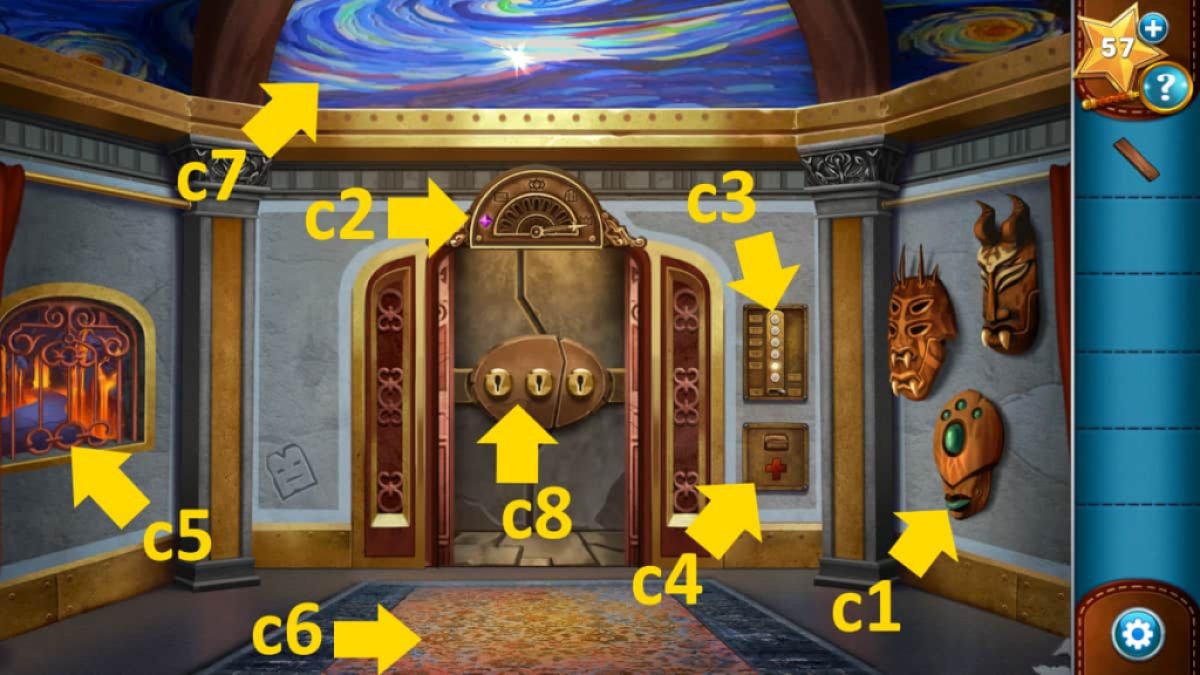
Image by Pro Game Guides
Screenshot by Pro Game Guides

Screenshot by Pro Game Guides
Screenshot by Pro Game Guides
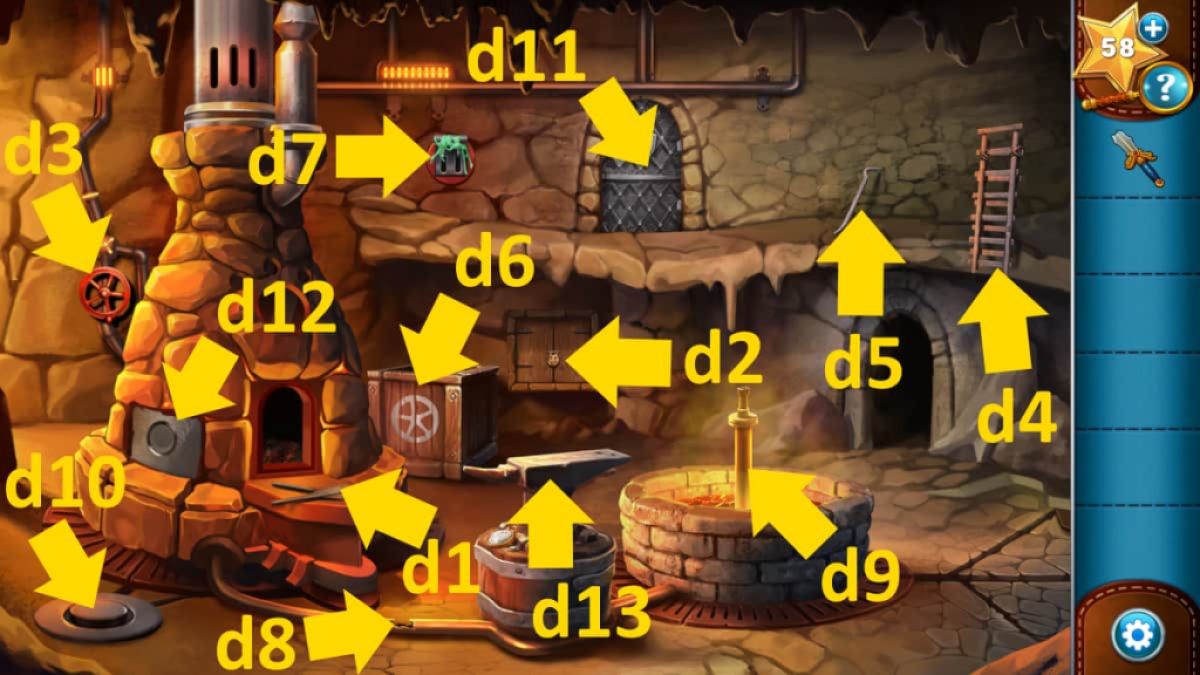
Image by Pro Game Guides
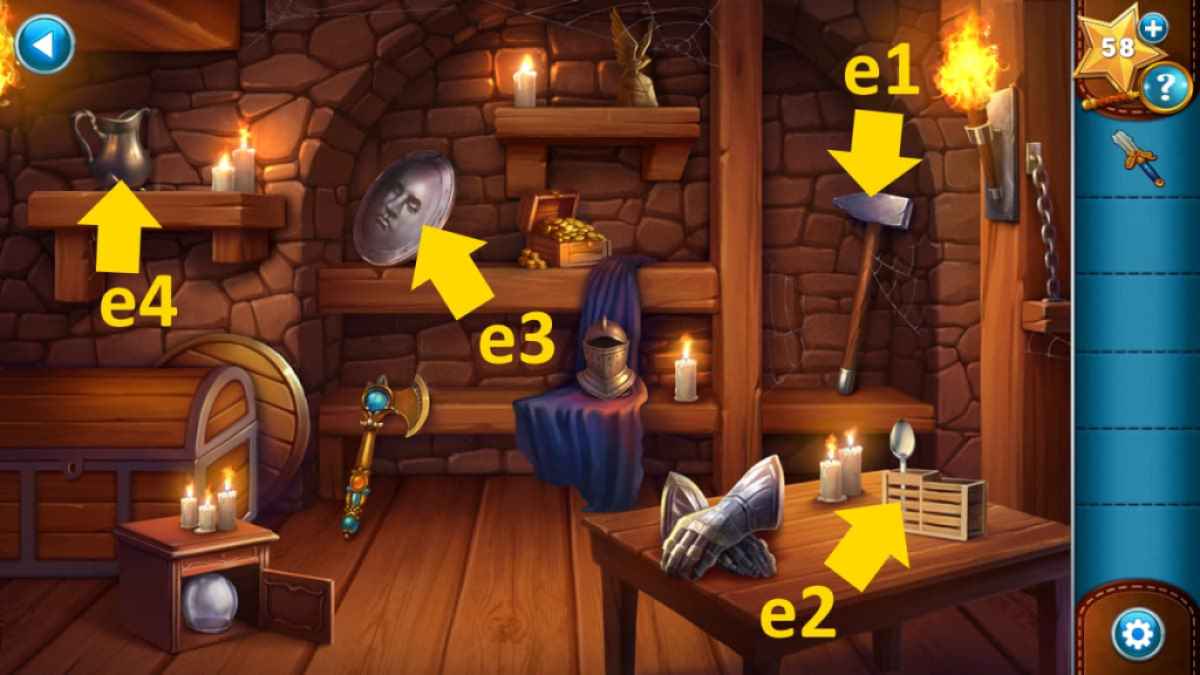
Image by Pro Game Guides
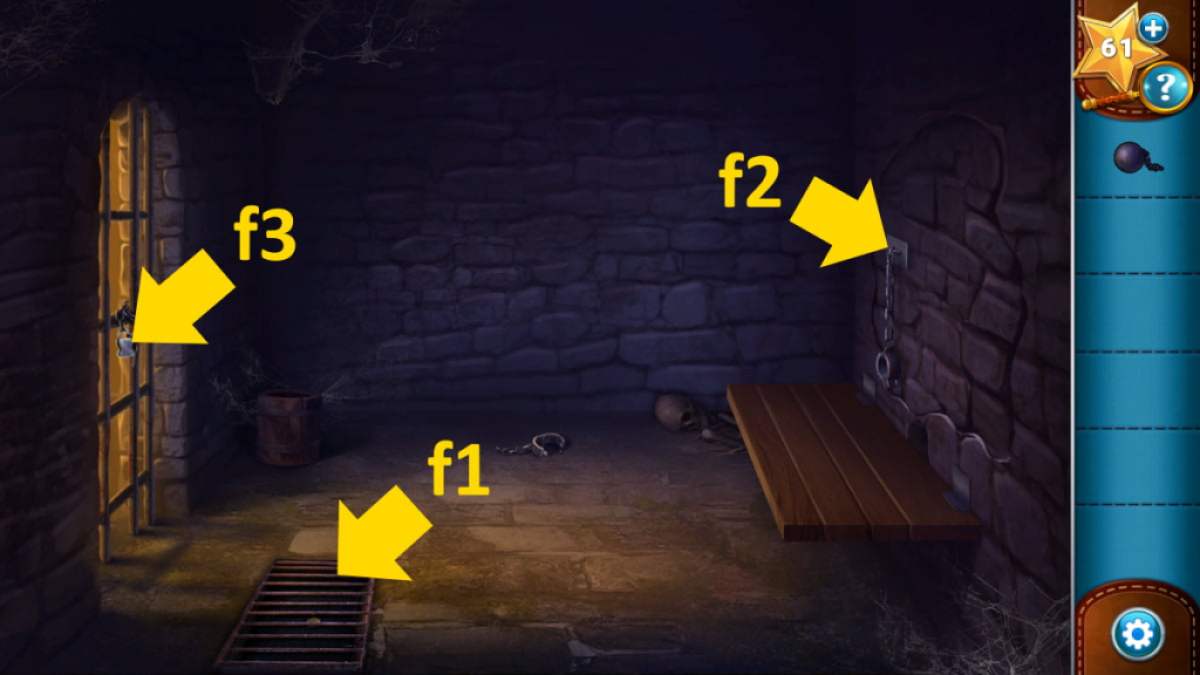
Image by Pro Game Guides
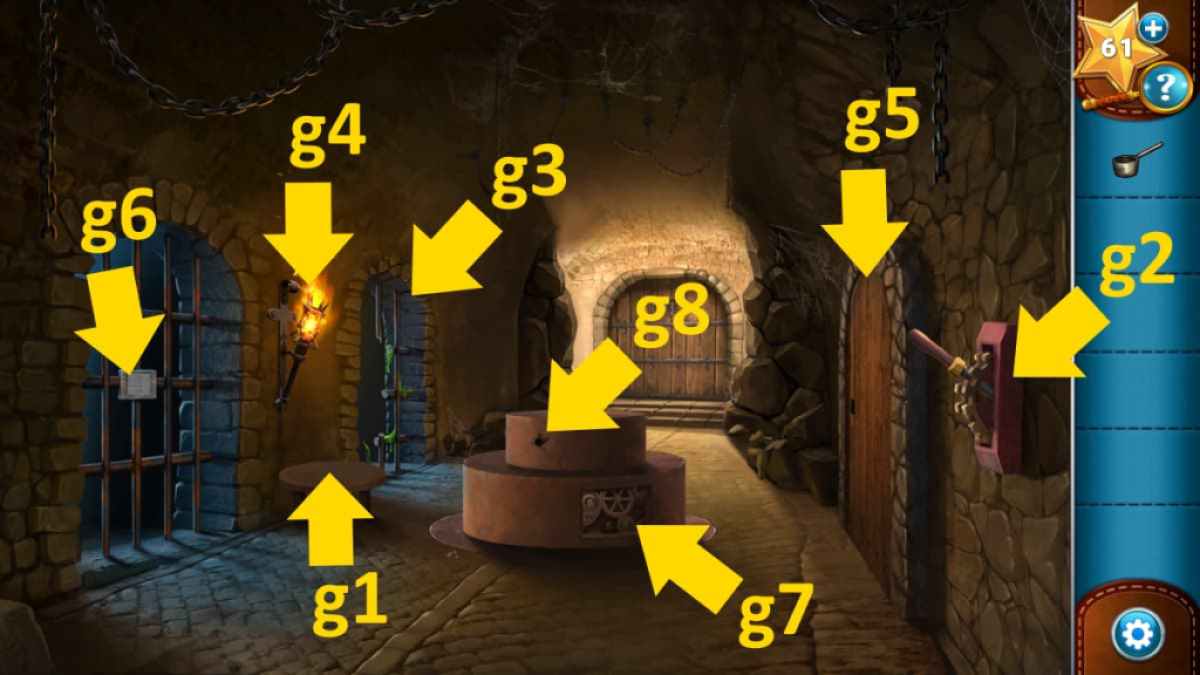
Image by Pro Game Guides

Screenshot by Pro Game Guides
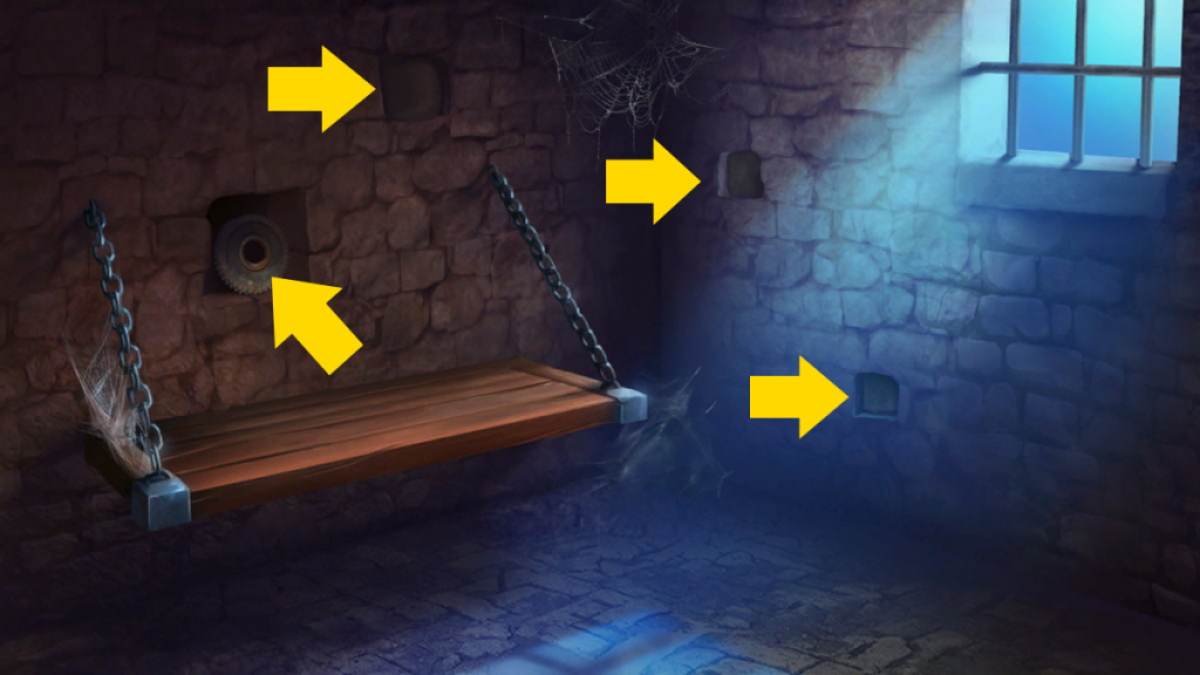
Image by Pro Game Guides
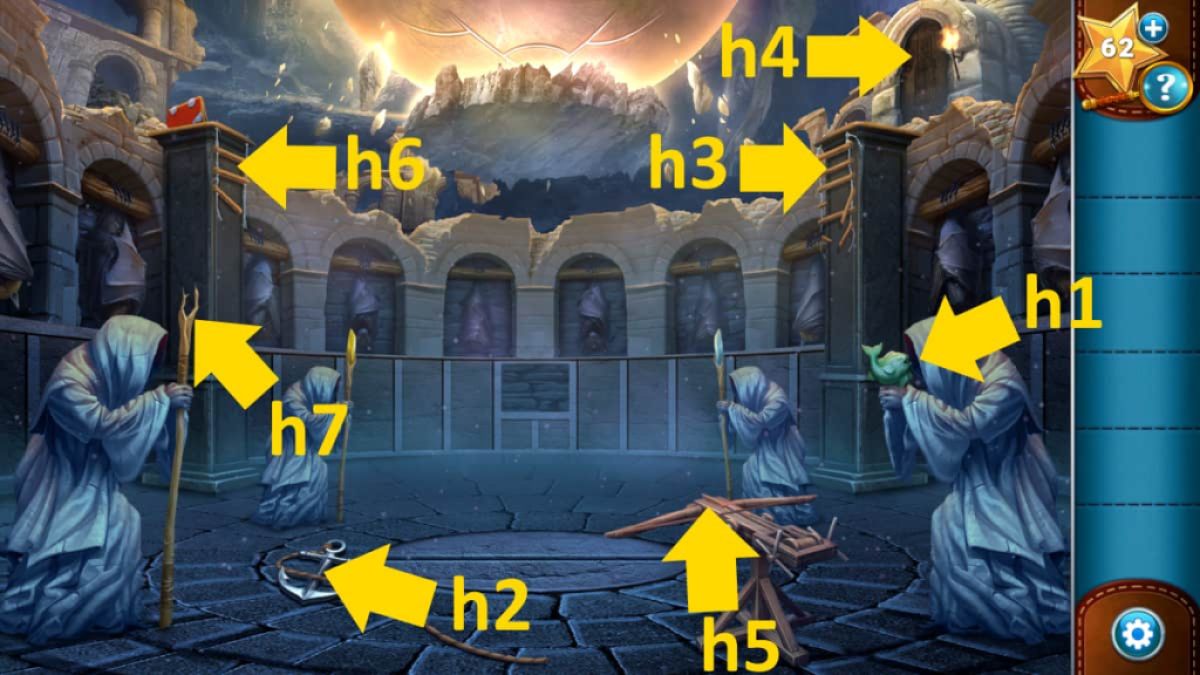
Image by Pro Game Guides
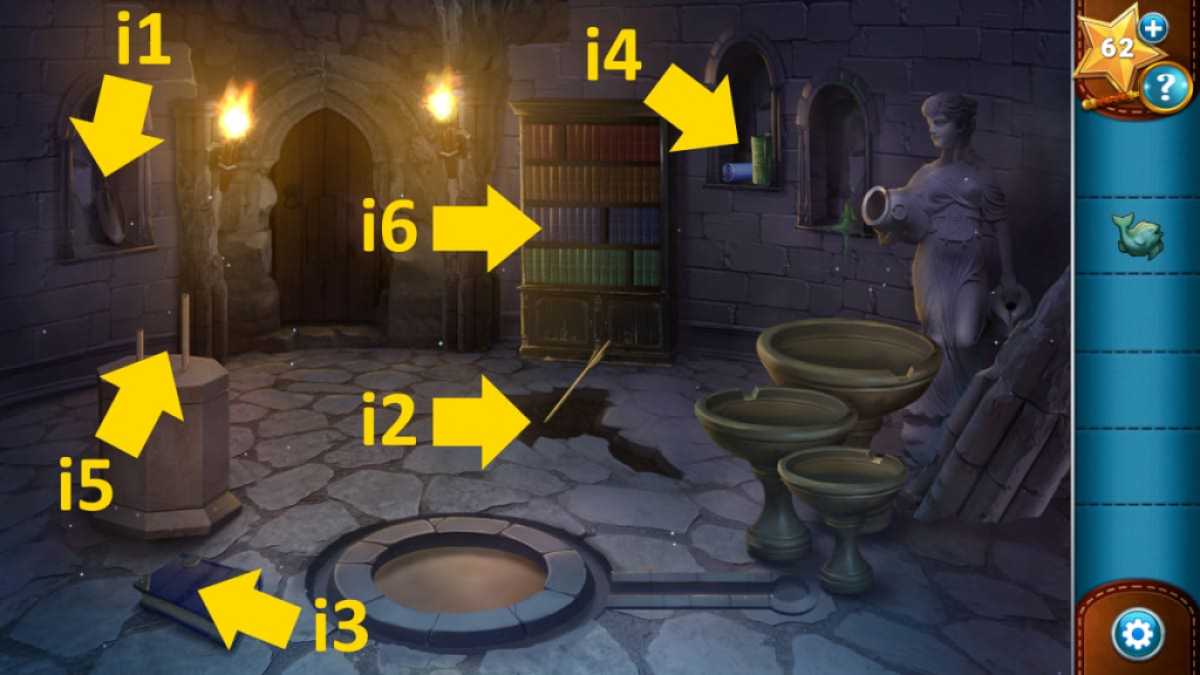
Image by Pro Game Guides
Screenshot by Pro Game Guides
Screenshot by Pro Game Guides
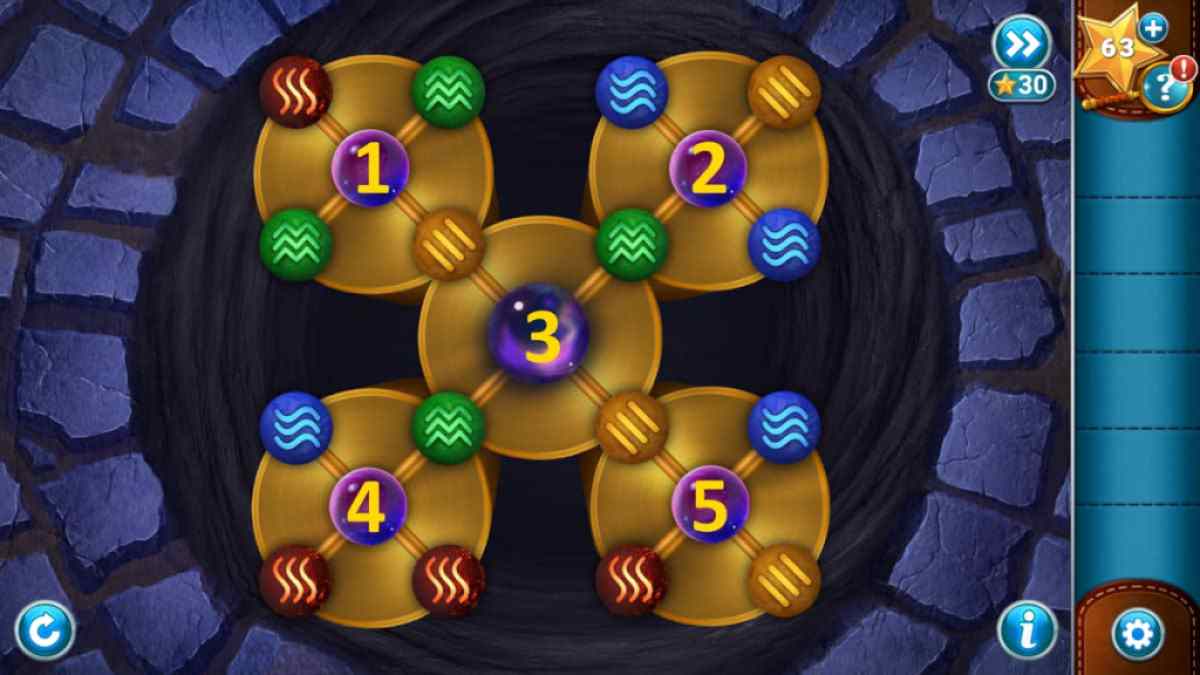
Image by Pro Game Guides
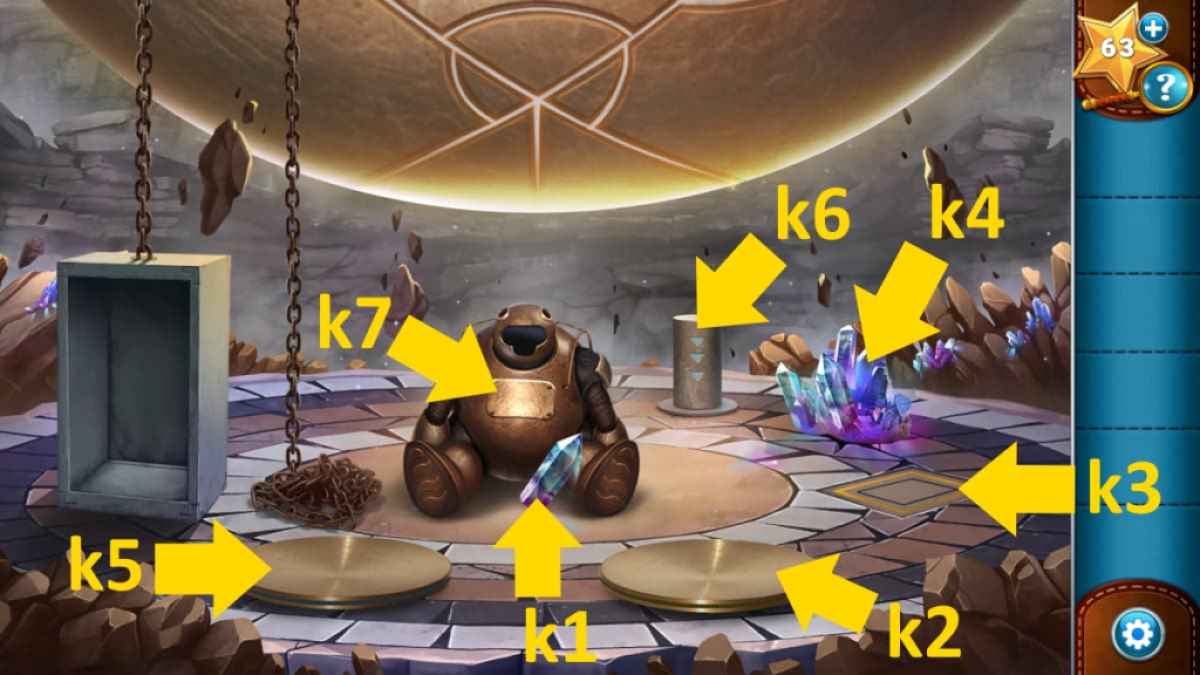
Image by Pro Game Guides
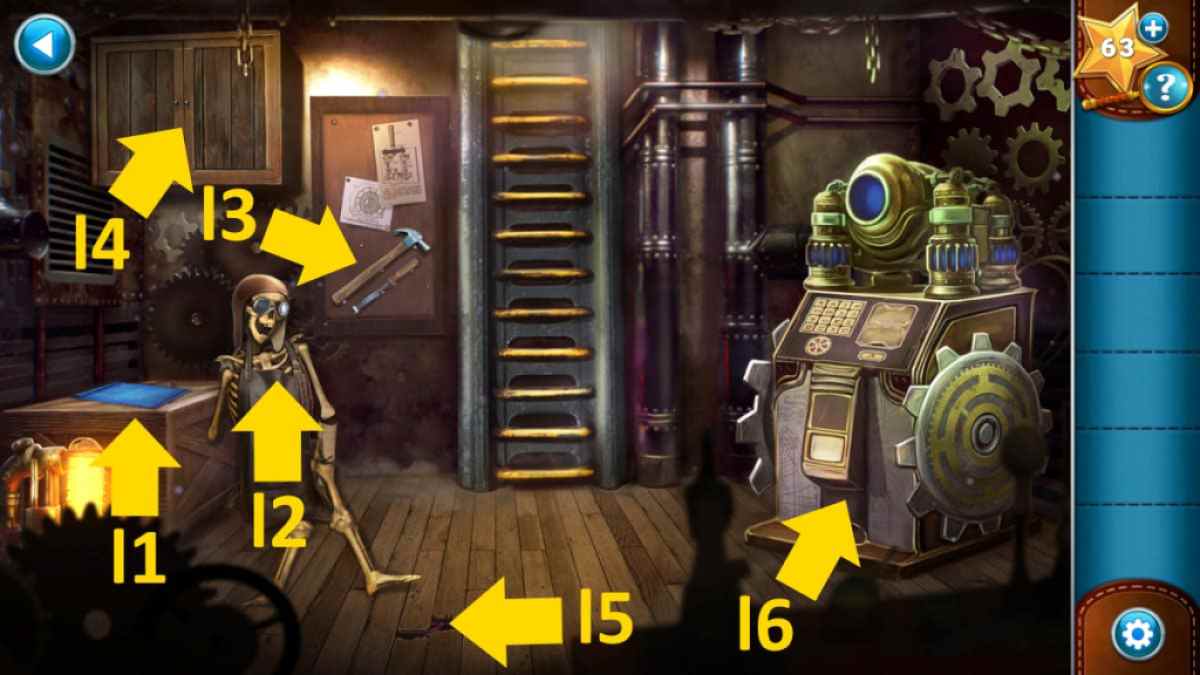
Image by Pro Game Guides
Screenshot by Pro Game Guides
Screenshot by Pro Game Guides
Screenshot by Pro Game Guides
