Which direction ’s up ?
risky venture Escape Mysteries is an imaginative series of point - and - click puzzler RPGs , with Sweet Dreams tell the floor of a son lost in his aspiration . If you ’re await for hints about fix and puzzle in Sweet Dreams Chapter 6 , read on for my full walkthrough .
Adventure Escape Mysteries Sweet Dreams walkthrough, Chapter 6
This chapter of Sweet Dreams start as our heroes enter the third and final portal , having exited from Arlo ’s sleeping accommodation after being shrivel . If you postulate information about earlier or later chapter in the game , we ’ve got you covered . Head over to mySweet Dreams walkthrough hub pagewhere you will find everything you need .
Three wall puzzles
get across the doors ( a1 ) to spread them and then again to look at the pipes inside . Now count at the gadget on the wall ( a2 ) which shows a serial of lines head to a declamatory over-embellished window pane , the same as on the tobacco pipe diagram . Work out a way toget from the start to the large globe by using five pieces of pipe(after the green one ) , and entering those colors into the equipment . If you ’re stuck , the sequence isyellow , glum blue , purple , light blueness , and green(see below ) .
Once stark , you ’ll receive theStar Picture . Put this in the frame ( a3 ) and you ’ll find aStar . Use the mavin to reach the drear threshold ( a4 ) , then click it to go through .
You ’ll be face with a grid full of pointer on a wall . Starting from the top - leave blot , you need to sink in all of the arrows in a continuous line , but all ofthe arrow focussing are reverse . See the answer below if you get stick .
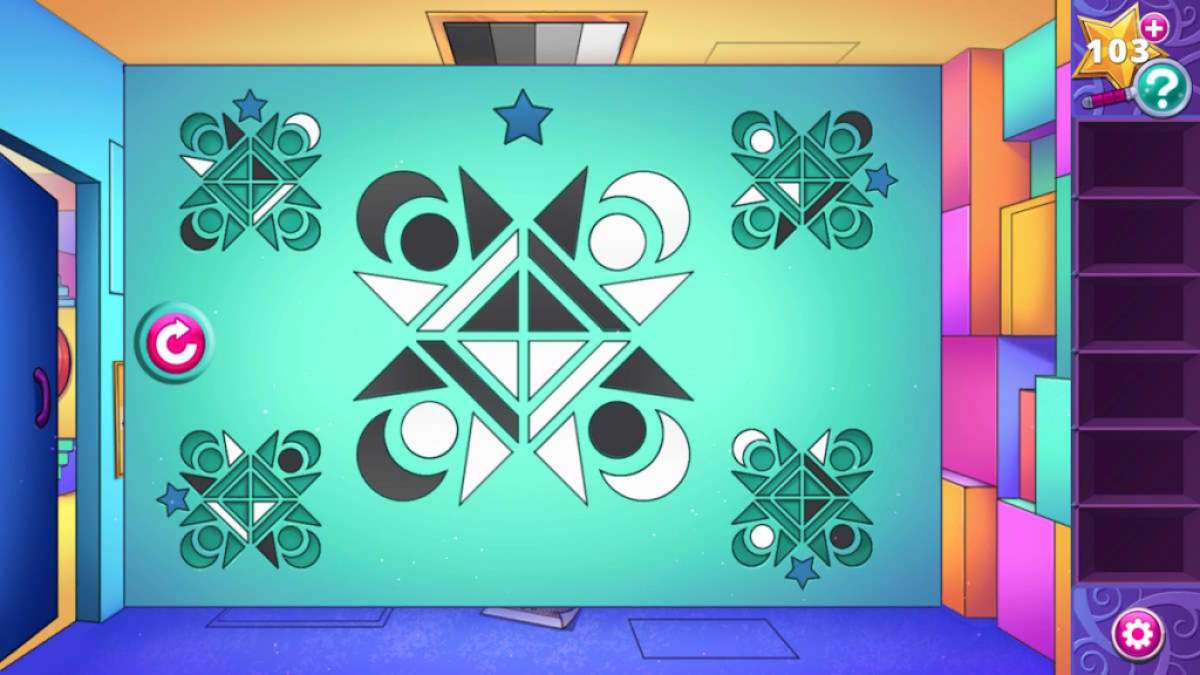
You ’ll now be faced with a new puzzle wall . For this one , notation theposition of the star in each of the outer icon , and then imagine those images twist so the star is at the top ( as it is in the cardinal image ) . re-create the semblance of the symbols onto the key double consequently . The answer is below .
One bulwark to go and this time it ’s another maze - same puzzle . You necessitate tofollow the four - shade sequenceat the top of the wall and meet in every block on the power grid . I ’ve put the solution below if you ’re stuck on this one .
The torn pieces
pluck up theTorn Puzzle Board Picture(b1 ) , then click the right sequence of shapes on the wall according to the excogitation in the first room ( a5 ) .
However , as it is upside down , the parliamentary law of the button you require to campaign is triangle , circle , dash , and upsides - down whizz . Take thesecond Torn Puzzle Board Picturethat appear in a box on the right of the screen ( b2 ) .
Put the snap pieces in the frame ( a3 ) to receive thePuzzle Board . Go back into the side room and add this board to the wall ( b3 ) to start a jigsaw puzzler . You ’ll want to rotate the board to inclose many of the pieces and if you ’re getting stuck on it , check the image above which has just one piece left to place in it .
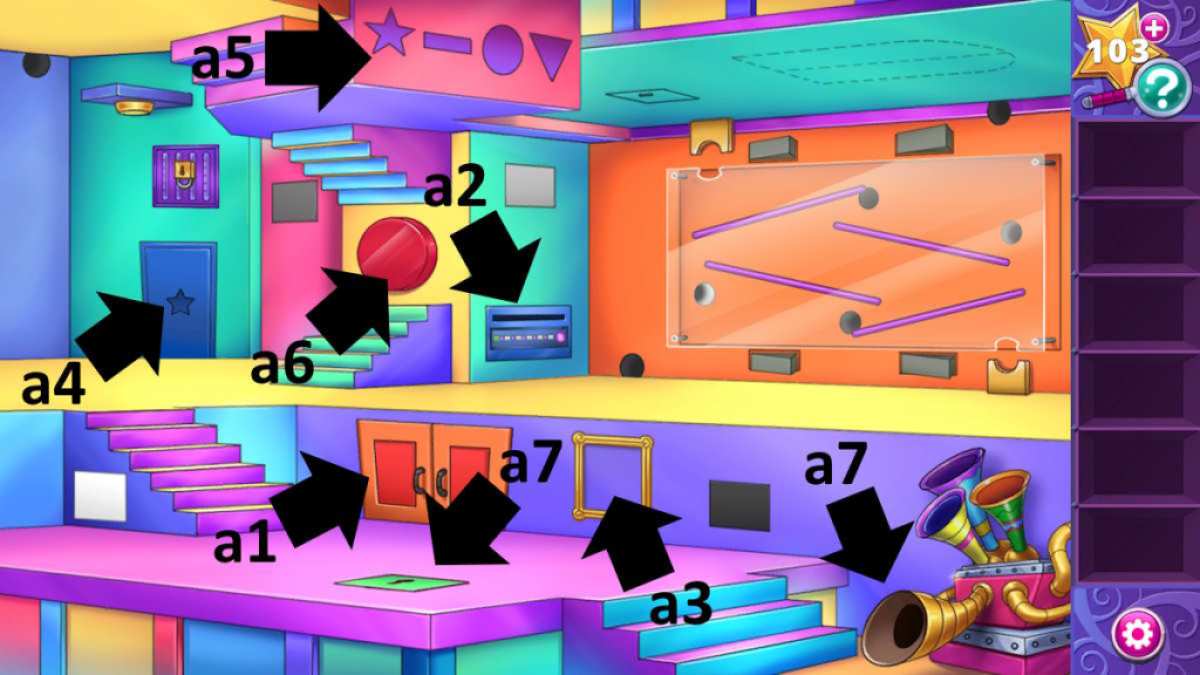
Image by Pro Game Guides
associate : AE Mysteries Picture Perfect walkthrough
The reversing room
When you ’re finish , head back out to the main room to ascertain that the big red clit ( a6 ) now has a symbol on it , which earmark you to turn back the room . Press the button . Click the pocket-sized hatch ( c1 ) to regain aGreen Key . rescind the room once more , then employ it to afford the green hatch ( a7 ) .
Reverse the room again and a banner will pass from the open hatch , displaying the symbolic representation ( from the top)Moon , Dash , Star , and Circle . turn it again , go into the side elbow room , and press this sequence of anatomy . The right hatch will open ( b4 ) , grant you to take aGlass Ball .
Go back to the main room , countermand it , commit the ball on the pedestal ( c2 ) , and then reverse it again . The glass ball will smash , allow for you to take theGold Key . vacate back and employ the cay to launch the purplish wall puzzle ( c3 ) .
Screenshot by Pro Game Guides
You ca n’t do anything here yet except note the familiar normal of four symbols , which this meter are superstar , moon , donut , and reverse star . However , note the number of square each is fructify in , which change the succession to theDonut , Star , Reverse Star , and then the Moon . enroll this code in the side room once more and take thetwo Planks , while mention all the clues .
Two planks and a blue ball
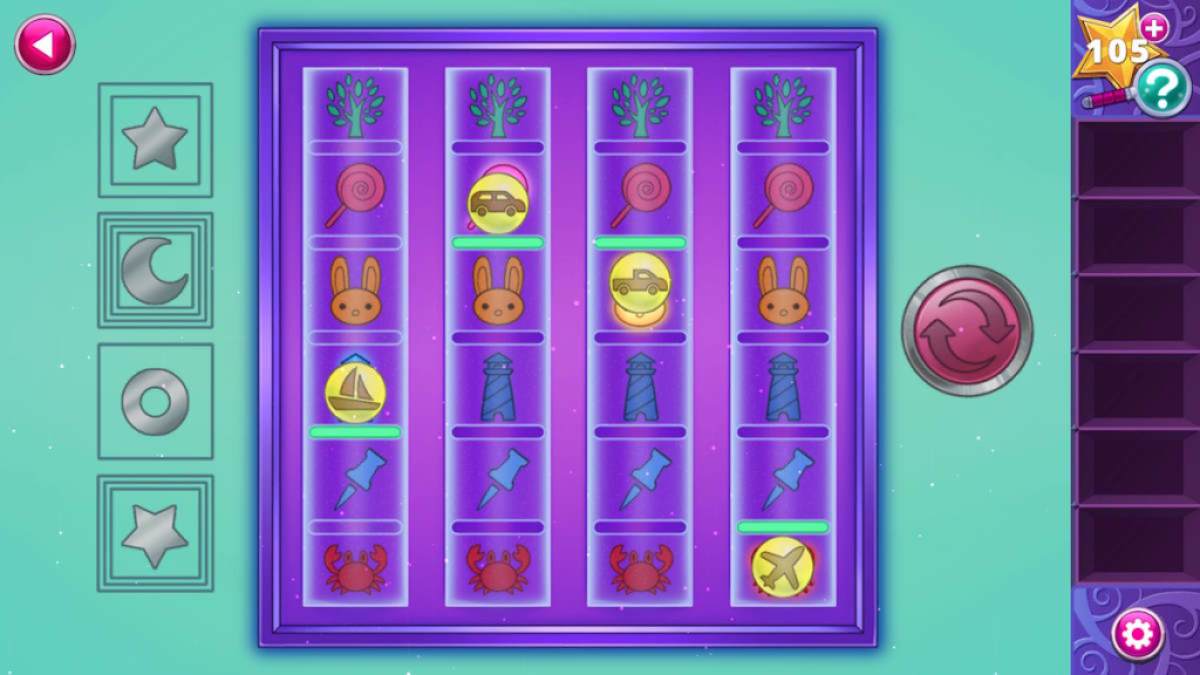
Now you could undertake the purple puzzler ( c3 ) . You require to place the planks so that the jaundiced musket ball continue the conform to items :
you could turn the figure of speech , which will make the balls cut down to country on the next plank in its column . Do the plane first , as once in post it ca n’t move so is a squeamish way to get the look of the teaser . I ’ve pictured the completed puzzle above . Once done , you ’ll obtain aBlue Ball .
Without reversing the room , set the empurpled ramp ( d1 ) up as demonstrate above , place the patrician orb ( d2 ) , and then overthrow the elbow room . The egg will go through a pickle toreveal the yellow donut symbol(d3 ) . You ’ll get the ball back , so repeat the cognitive operation to make the lump drop through the relief of the holes until you have all four symbols ( see below ) .
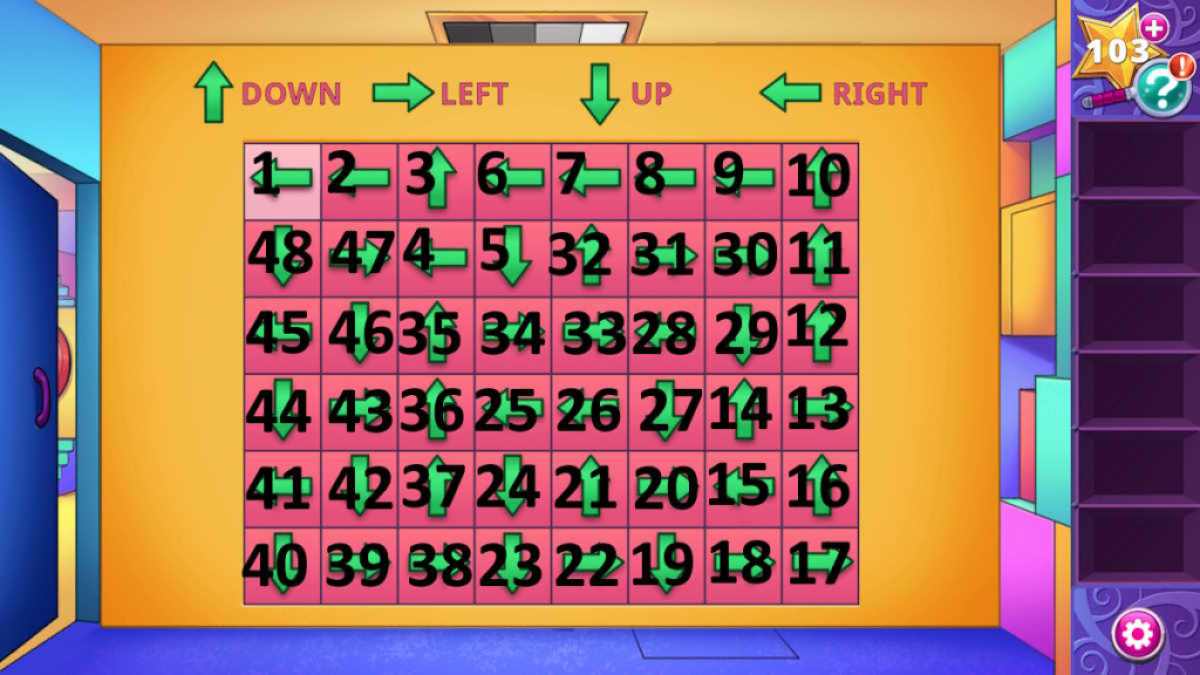
Image by Pro Game Guides
This time notice the screen background shades on each symbol , as this is marked on the ceiling of the side elbow room ( b5 ) . This give you the orderCross , Circle , Dash , and Donut . Press those buttons in the side elbow room and you ’ll receive thePaper Mache Ball .
Put the ball into the confetti cannon ( a7 ) , get through it to burn it , and you ’ll receive theDoor Picture Pieces . take them in your stock for a conclusion - up and rearrange them to make the door ( note that you may fall into place opus to turn them to different angle ) . Once done , you ’ll have theDoor Picture . Put it in the word picture physique ( a3 ) to get aDoor , rate it on the level ( c4 ) , and head through .
Related : The Squire ’s Tale Walkthrough Guide ( AE Mysteries )
Screenshot by Pro Game Guides
Freeing the crystal
Grab theSmall Crystal Ball(e1 ) , click Diamond Guy ( e2 ) to raise his hat to find theGauge , and then unfold the draw ( e3 ) to find aTurn Key . Use the turn key on the yellow box ( e4 ) to flip over Square Guy , who will thank you by give you theSmall Key .
clack the switch to the right of the crystal so it flex crimson ( from blanched ) , and then drop the lechatelierite ball through the green portal ( above e2 ) . It will descend through red , blue , and then pink , which take in you theGear . you’re able to also place the small crystal ball ( e5 ) to see that you need two more to turn the crystal ( you’re able to take it back later if you need it ) .
choose the arena at the back of the room for a faithful - up ( e6 ) and note the symbols on the wall behind . expend the small key fruit to open up the cabinet ( e7 ) and work out which of the symbol on the back walls equates to two symbolization ( on the two sides ) to find out the nerve you require to input on the paries . See the correct result above .
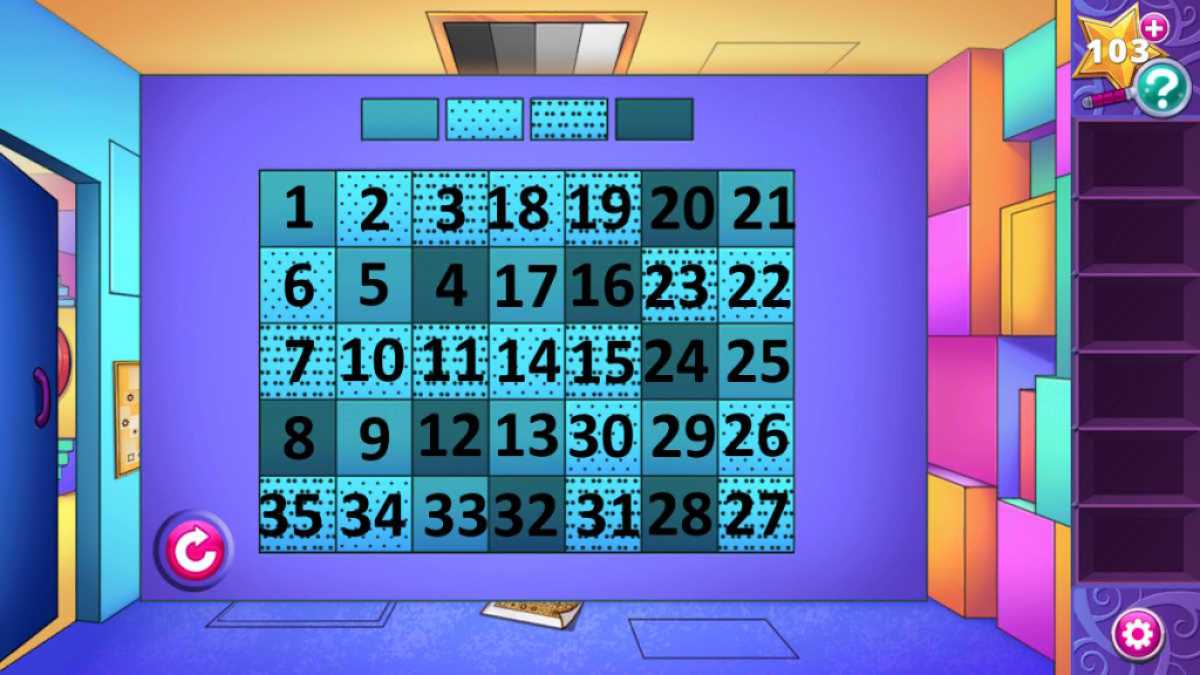
Image by Pro Game Guides
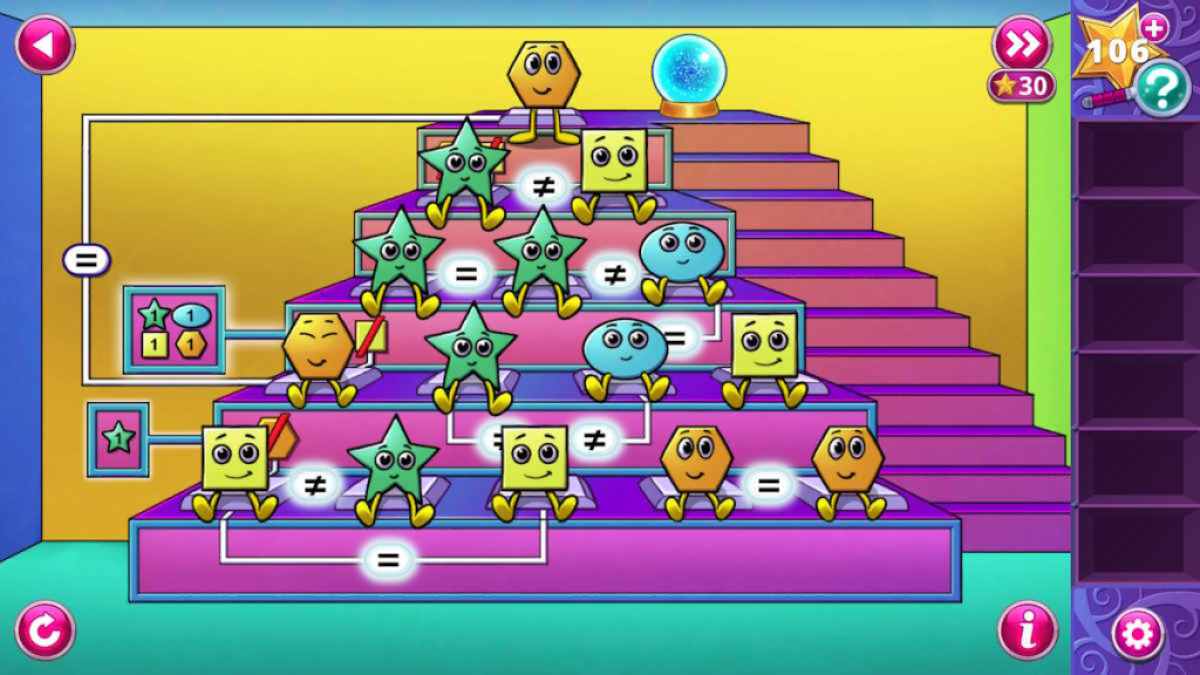
take the Great Pyramid that rises and complete the maths puzzle ( discharge puzzle render above ) to take theLarge Crystal Ball . Drop it into the portal ( e11 ) to set it .
get to the cupboard ( e8 ) to recover aLever , then take thePicture(e9 ) and place it on the step ( e10 ) to make a ramp . Put the gauge , lever , and pitch in the machine ( e12 ) and Diamond Guy will shrink , get to the gate and allow you to pick up theMedium Crystal . sink it through the green portal vein and you ’ll receive the finalExit Crystal . With that , you ’ll complete the chapter .
If you want to stay with Pro Game Guides for the thrilling conclusion , join me in ourSweet Dreams walkthrough Chapter 7 - Adventure Escape Mysteries !
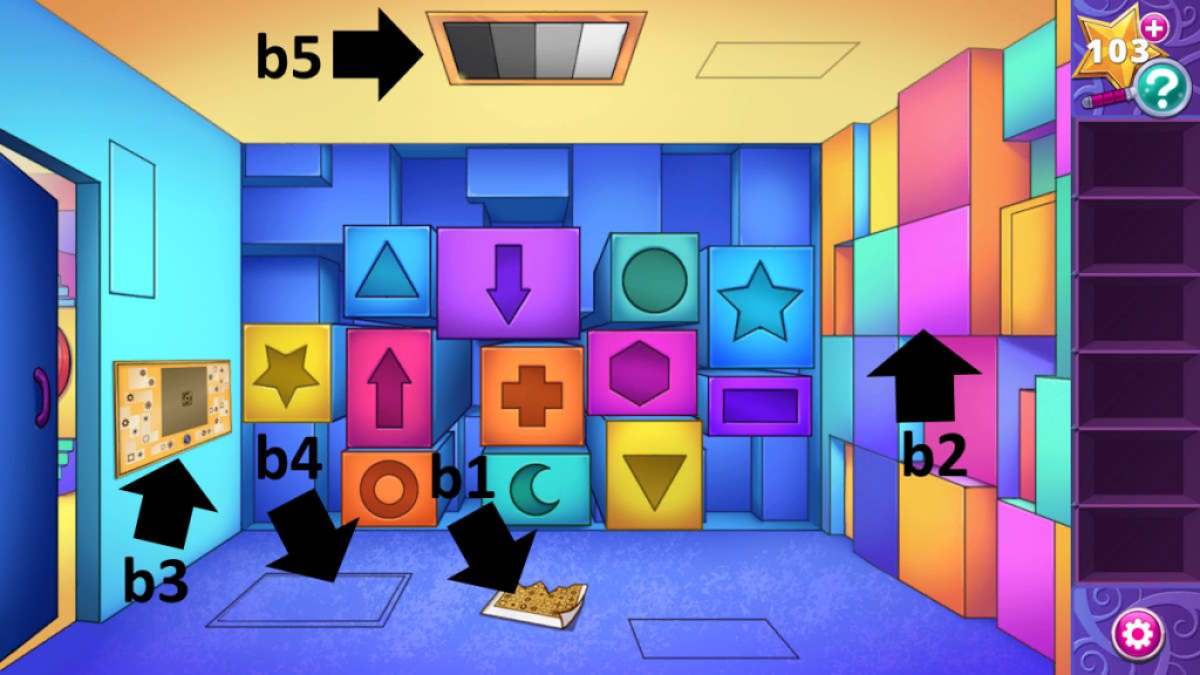
Image by Pro Game Guides

Screenshot by Pro Game Guides
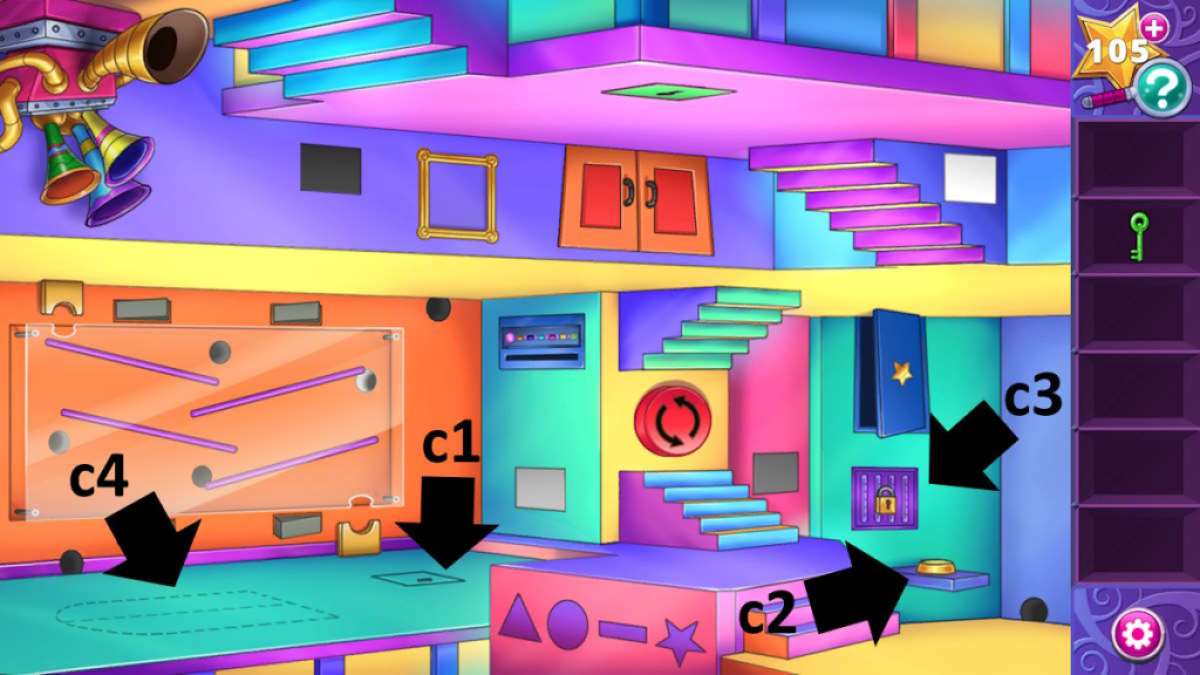
Image by Pro Game Guides
Screenshot by Pro Game Guides
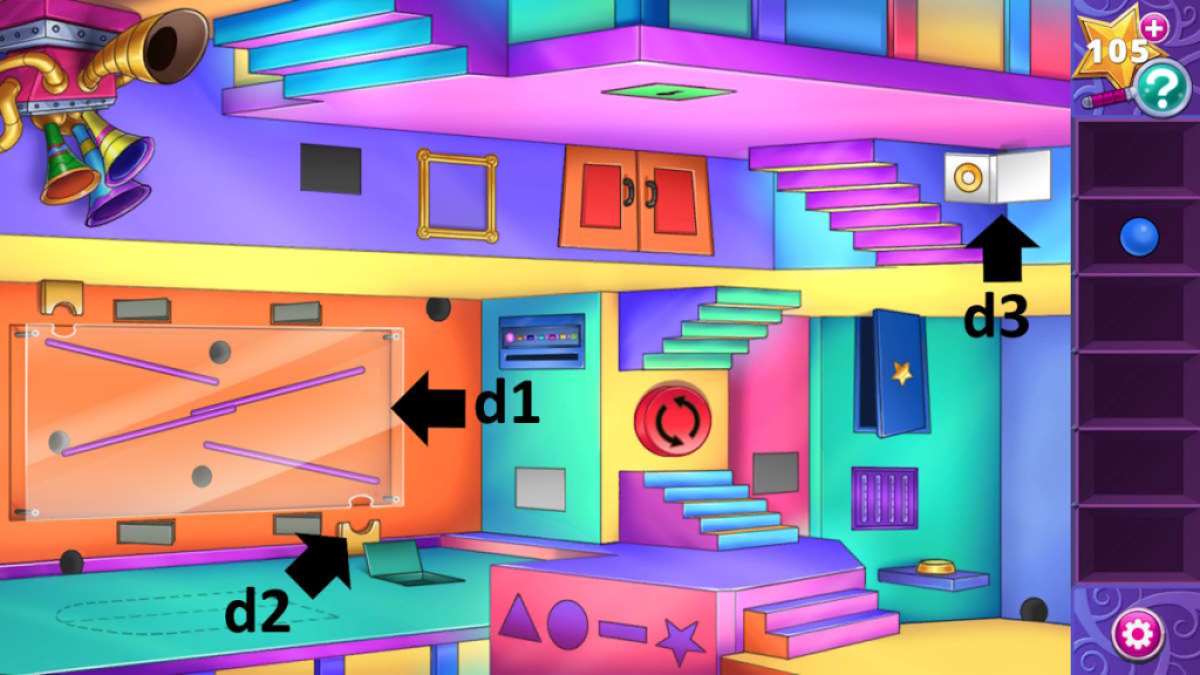
Image by Pro Game Guides
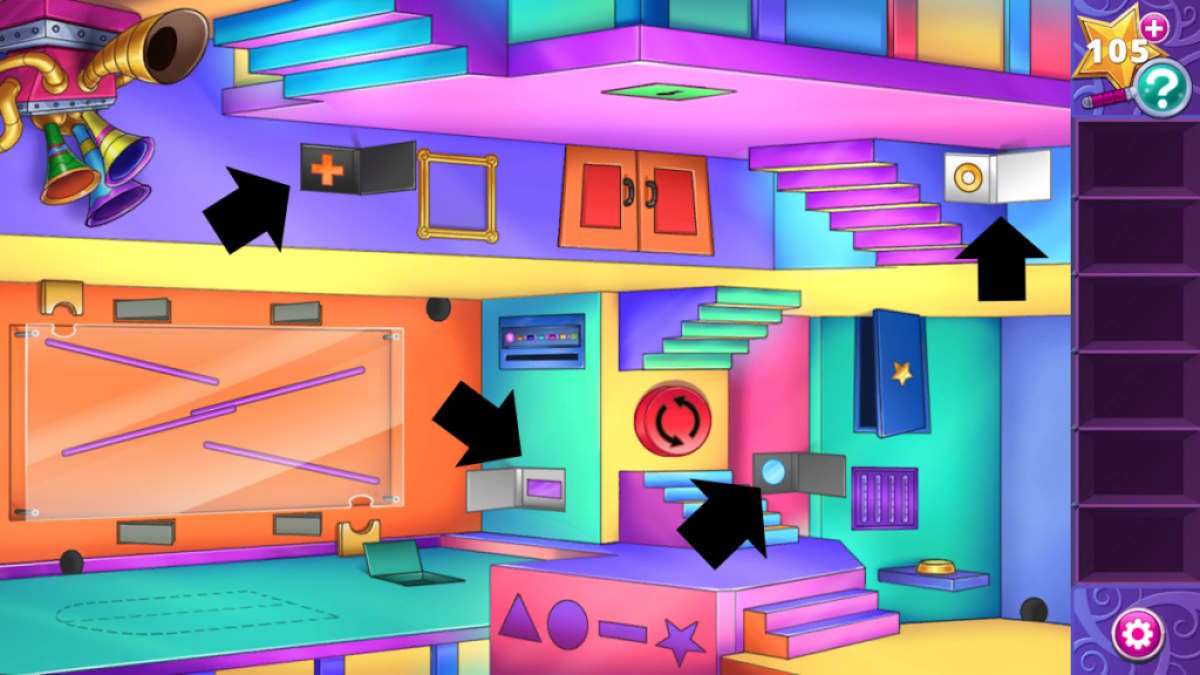
Image by Pro Game Guides

Image by Pro Game Guides
Screenshot by Pro Game Guides
