Fixing the pharos !
Adventure Escape Mysteries is a serial of puzzle RPGs in which you point and click your agency through the story . If you ’re stuck at any moment during your plays , below you ’ll get hold a full Chapter 3 walkthrough of Sweet Dreams .
Adventure Escape Mysteries Sweet Dreams walkthrough, Chapter 3
At the close of Chapter 2 , Arlo and Revi had almost made it to the gate but alternatively , their balloon had erupt and crashed to earth ! This guide covers the whole of the following chapter , in which they get help from Shoku . If you require earlier or later chapters , do n’t worry . Just head to mySweet Dreams walkthrough hub page .
Entering the lighthouse
Take theStick(a1 ) , theFire Signand asecond Stick(a2 ) , athird Stick(a3 ) , and theShovel(a4 ) . pink down the sandcastle ( a5 ) to feel afourth Stick , then add them to the fire ( a6 ) and expend the sign to help guide you in building it ( see the image below with just the purple stick left to blank space ) .
clack the shutters ( a7 ) to open them and take theOven MittandKettle . Use the spadeful on thetwo buried Stars(a8 ) and then pick them up with the oven mitt ( along with athird Star , a9 ) . Throw the three stars on the flack to get it going , then utilise the kettle in the ocean to get some pee . Put the full kettle on the flak until you get aHot Kettle , then apply it on the ice ( a10 ) to melt it , and fulfill Ozzy .
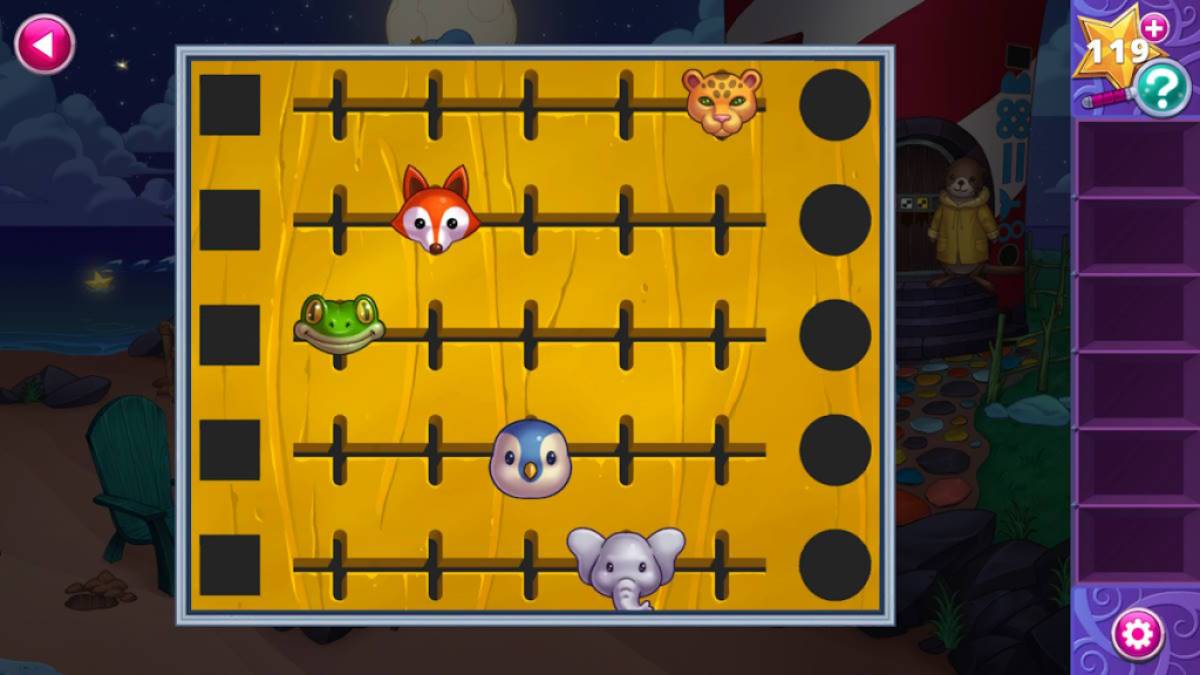
Next , you call for to use the jumping animals ( b1 ) and the codification on the rampart ( b2 ) to exercise out the positions of the animals to beat the code on the cupboard ( b3 ) . You need tonote the identification number of wheels(or the shape ) that represent each creature and the matching symbolic representation ’s closeness to the square and circle on the side of the lighthouse . I ’ve shown the answer below .

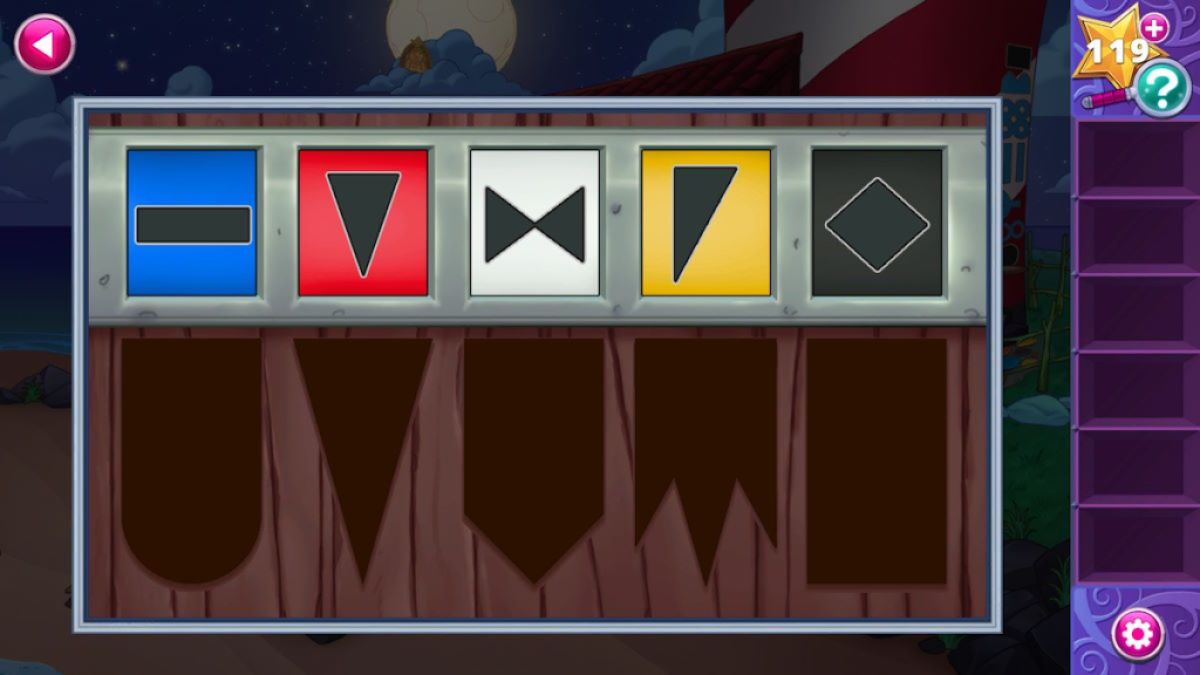
This releases a rowing of flags . Note the form of each flagstone , then equal it to one of the colors on the threshold ( b4 ) . In the characterisation below , I just ask to make the first box ( blue ) to show a circle to fill in the teaser .
After you ’ve get to the doorway , you may head inside Ozzy ’s mansion .
Related : The Squire ’s Tale Walkthrough Guide ( AE Mysteries )

Screenshot by Pro Game Guides
Collect the castle flags
Select the spiky urchin ( c1 ) to have anUrchin Spine , then click the crack in the pillar ( c2 ) to find the starfish and get aPearl , which you may supply to the Pisces range on the column ( c3 ) . wait out for the immature fish floating by and click its back to get aFlag . channelize upstairs .
dawn the sand ( d1 ) to get asecond Flag , tot the two flag to the castle here ( d2 ) , and then lead upstairs again .
Click the cracked plank ( e1 ) to reveal a green clitoris , and then come home the window ( e2 ) to open it . take the window once more to unveil a kite puzzle . What you necessitate to do is follow each circle from the base to see which animal ore symbolisation is at the top . The answers are :
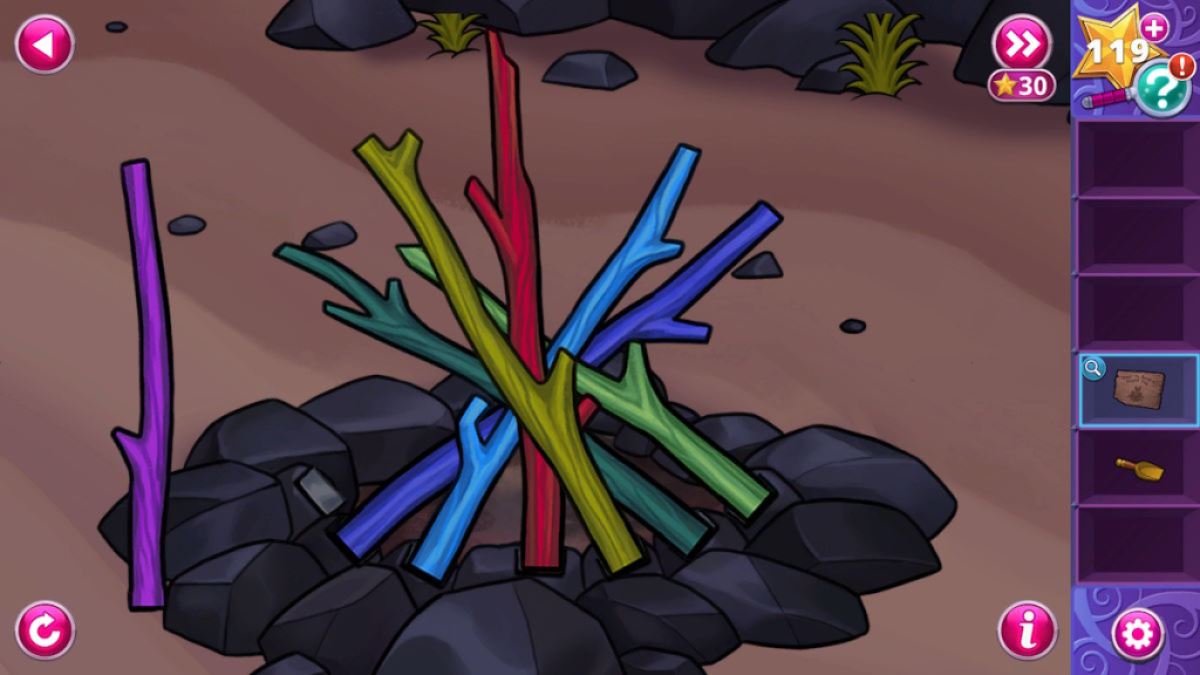
Image by Pro Game Guides
Now select the bottle thresh game on the wall ( e3 ) and , from left to right , select the items in the inclination above and blast those bottle to succeed the mystifier ( from left , it istop , bottom , top , bottom , top , middle , middle ) . Once you ’ve succeeded , take theDoubloonfrom the motorcar .
Talk to Catherine ( e4 ) to discover that she desire something bluish and sparkly . Now expend the urchin needle to pop the balloons ( e5 ) , pick up athird Flagplus aParty Cracker , and then maneuver back downstairs . Use the party snapper to wake up the turtle ( d4 ) and when it moves , take asecond Pearl .
Add the flags to the castle ( d2 ) , then click the entrance to the castle ( d3 ) to start a labyrinth puzzle . If you ’re stuck on this one , I ’ve grade the shells you need to go through in order on the range above . snap the crab to stopping point , and get yoursecond Doubloon .

Image by Pro Game Guides
The pirate parrot
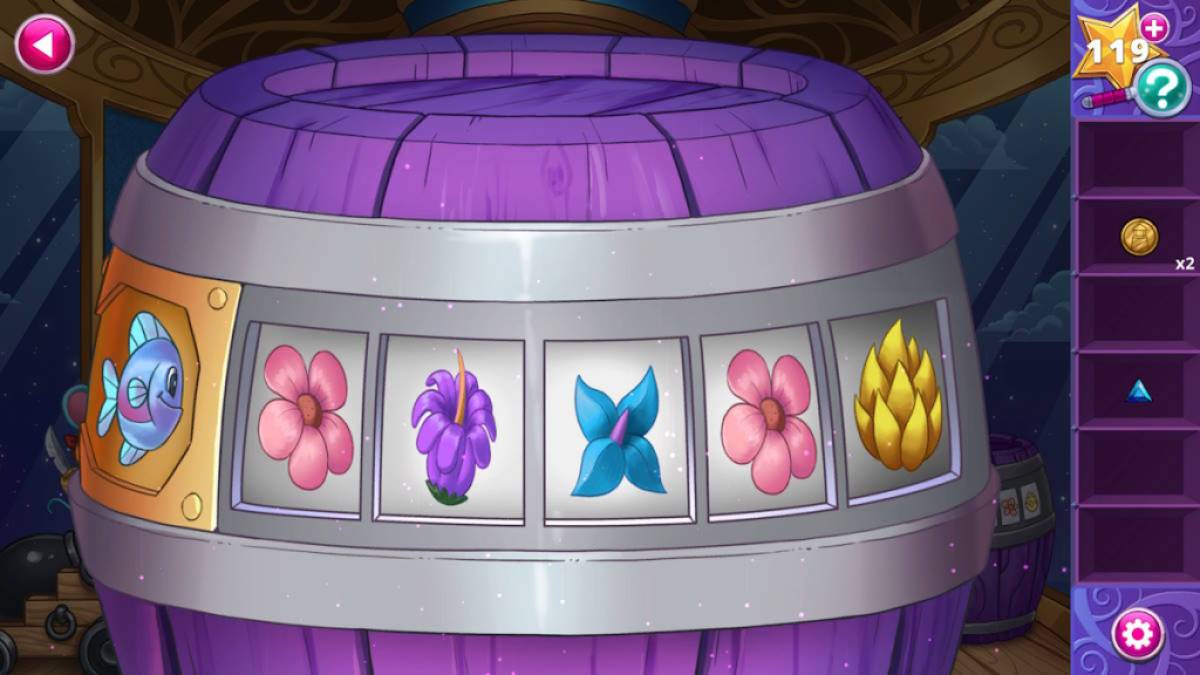
Head up once more until you meet the pirate parrot , who involve something mellisonant . Take theGemstone(f1 ) , then pick out the barrel ( f2 ) for a puzzler .
Note the Pisces the Fishes is one of the ones you realise on the lowest floor of the beacon . If you catch , it swim in a particular pattern to the different flower . The order isPink , Purple , Blue , Pink , and Yellow . Change the images to be that pattern ( see below ) and you ’ll receive athird Pearl .
Click the cannon ( f3 ) three times and get afourth Pearl , then head back down to Catherine ( e4 ) and give her the gemstone . Take theCotton Candyshe gives you up to the pirate parrot , which allows you to press theBlue Buttonbehind his wing ( f4 ) . mention it fire up up on the treasure chest ( f5 ) .
Screenshot by Pro Game Guides
Go down one floor and compress theGreen Button(e1 ) , down again and press thePurple Button(d5 ) , steer down to the aquarium , contribute the remaining drop to the fish carving ( c3 ) , then take thethird Doubloonthat appear in the Pisces ’s middle .
Press thePink Button(c2 ) , then channelise right back on a higher floor to the treasure bureau ( f5 ) . Press the yellow push button on the treasure chest and take yourfourth Doubloon . supply them to the captain ’s door ( f6 ) and then head in spite of appearance .
pertain : AE Mysteries Picture Perfect walkthrough
Screenshot by Pro Game Guides
The captain’s room
Take theCorkscrew(g1),Package(g2 ) , andButterfly Net(g3 ) , and then get out back the carpet nook ( g4 ) to expose four symbols ( red sail , blue anchor , skull , striped sheet ) . Select the ships in bottles ( g5 ) and use the corkscrew on the yellow - sweep ship nursing bottle to get theKey . Now observe the bottle letter that match the symbol on the flooring , which give you the wordAHOY .
Click the curtains ( g6 ) to open them and find aSculpture , and use the key on the locked cabinet ( g7 ) to chance asecond Sculptureand someSoap . Use the mesh to collectfour Star Jewels(g8 ) , then use the soap on Lotti ’s flipper ( g9 ) to absolve it .
She can now unfold the package and you athird Sculpture . Take thefourth Sculpturefrom the lounge she was model on , then total them all to the shelf below the ships in bottles ( g5 ) . Once position , fall into place the light replacement above the sculpture to reverse on the lamps on either side of the window ( g6 ) . Note the shapes and put the sculpture into that order ( see above ) . This open up the gold buttons below each sculpture and Lotti will give you aSpyglass .
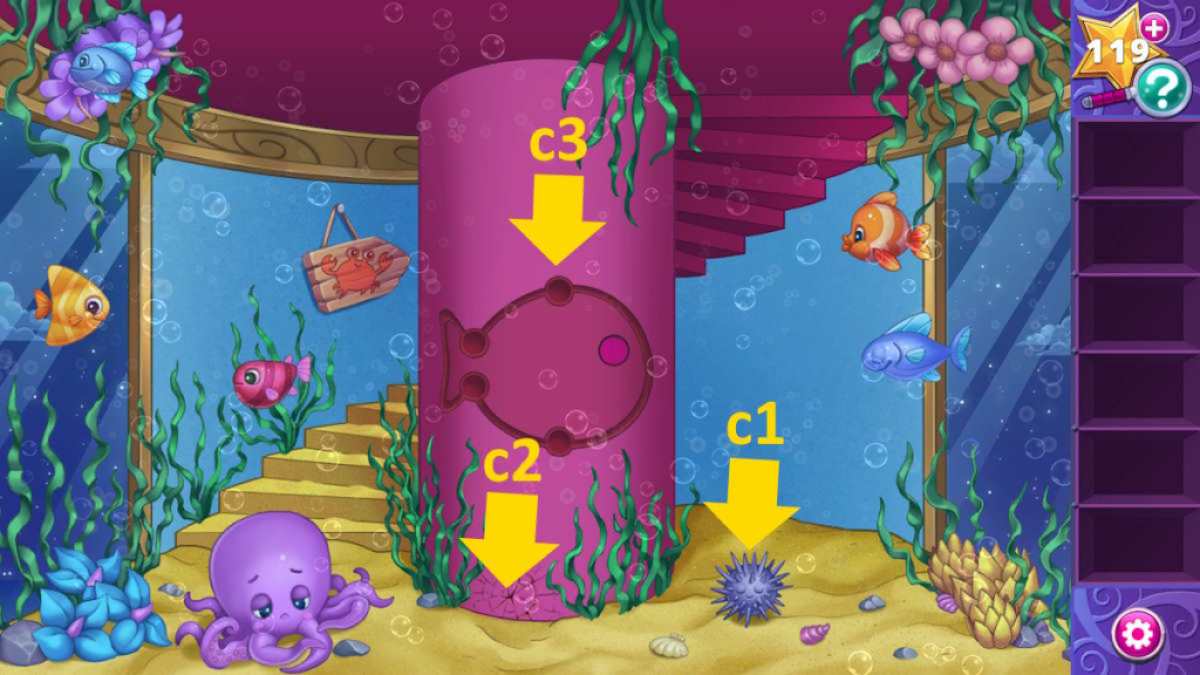
Image by Pro Game Guides
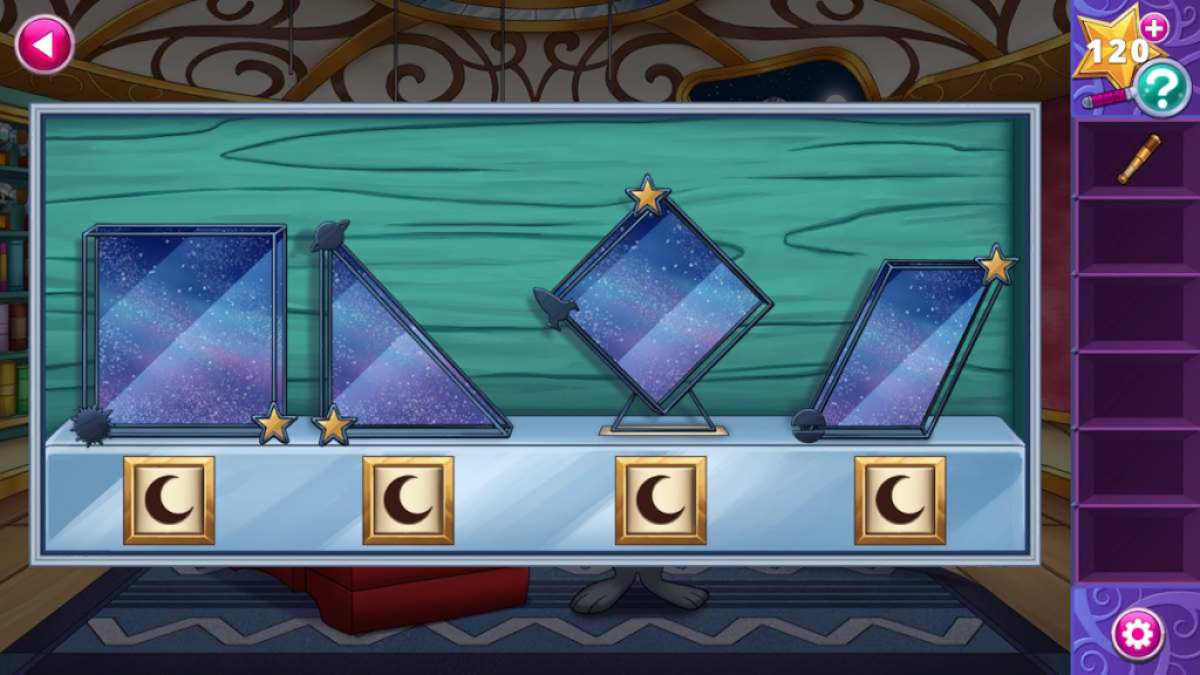
Use the field glass on the window ( g6 ) to catch blank . Look back at the sculptures , and mention the grey quoin shape on each one and the position of the object on each sculpture concerning it . This is the bod you want to select with the gold button below . From left to right ( in price of the gold buttons ) , I ’ve mark the shapes you need 1 - 4 on the image above ( round moon , satellite , triplex Sun Myung Moon , and galaxy ) . This opens the compartment below , from which you’re able to takethree Star Jewels .
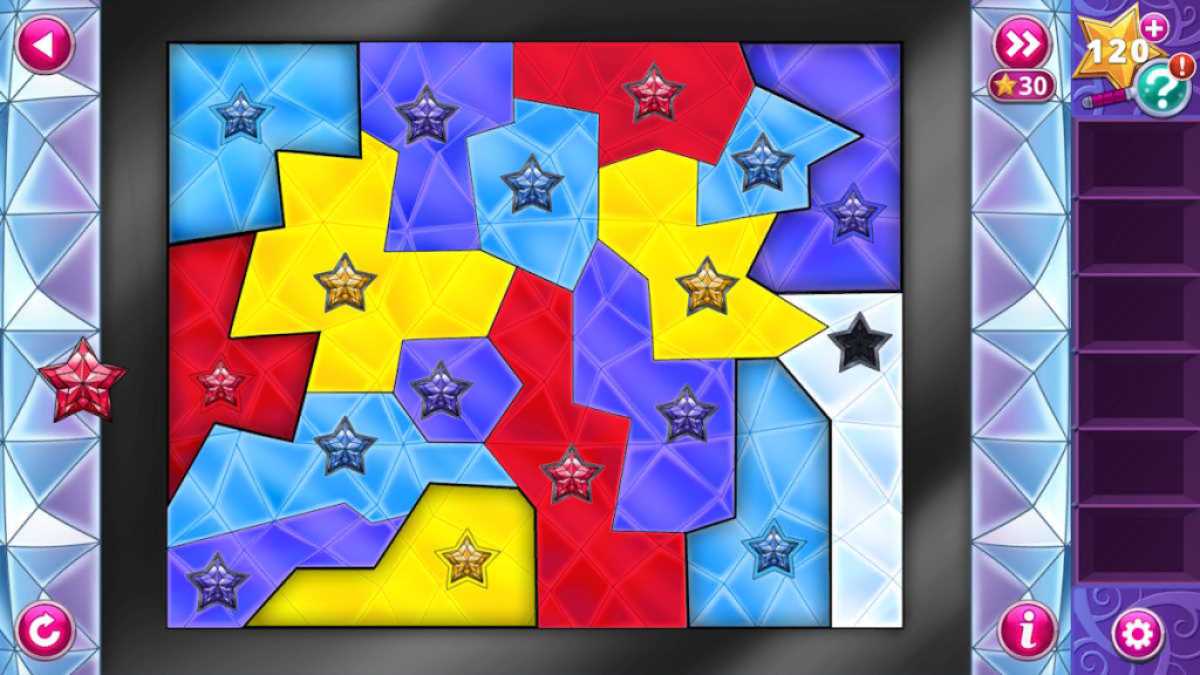
Select the ball ( g10 ) next and spell out the word AHOY by using the buttons to regain the two parts of each missive . Once complete , it will open , allow you to takefive Star Jewels . Add all the jewels to the lantern ( g11 ) and then utilise them to color the chalk so that no color is next to itself . See the almost complete lantern above . They ’ll give thanks you for fixing the beacon and you’re able to move on out of the dream world , conclude Chapter 3 .
If you want to keep on with us here at Pro Game Guides , simply fall into place through to mySweet Dreams walkthrough Chapter 4 - Adventure Escape Mysteries !
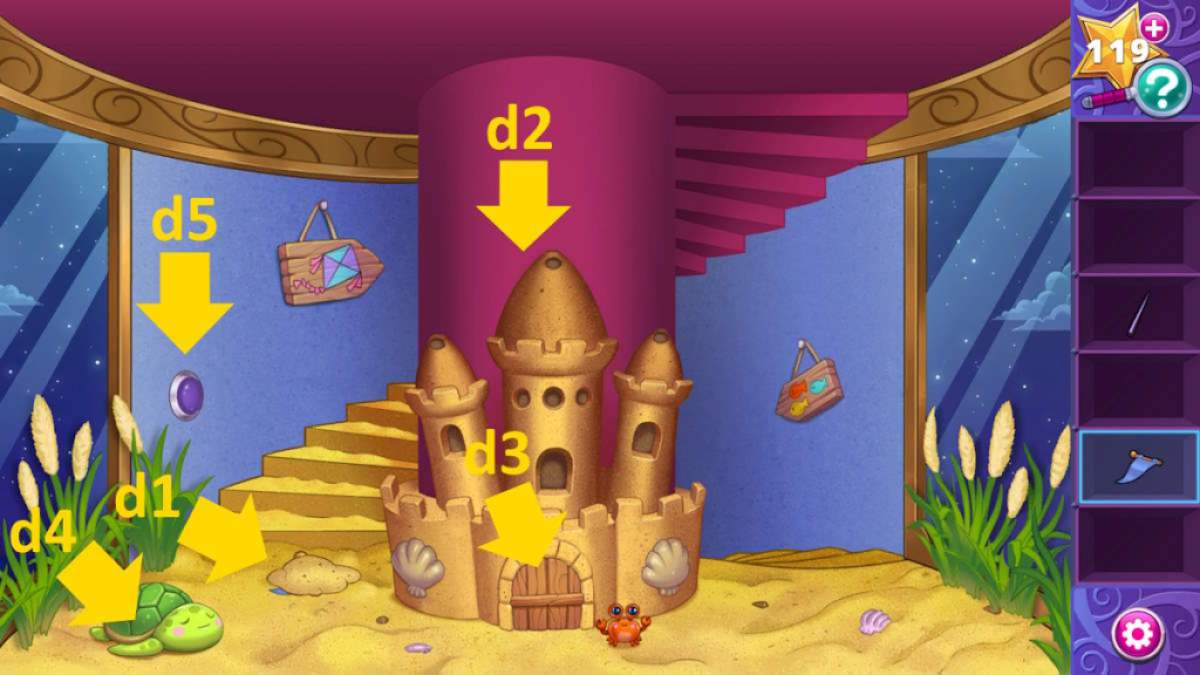
Image by Pro Game Guides
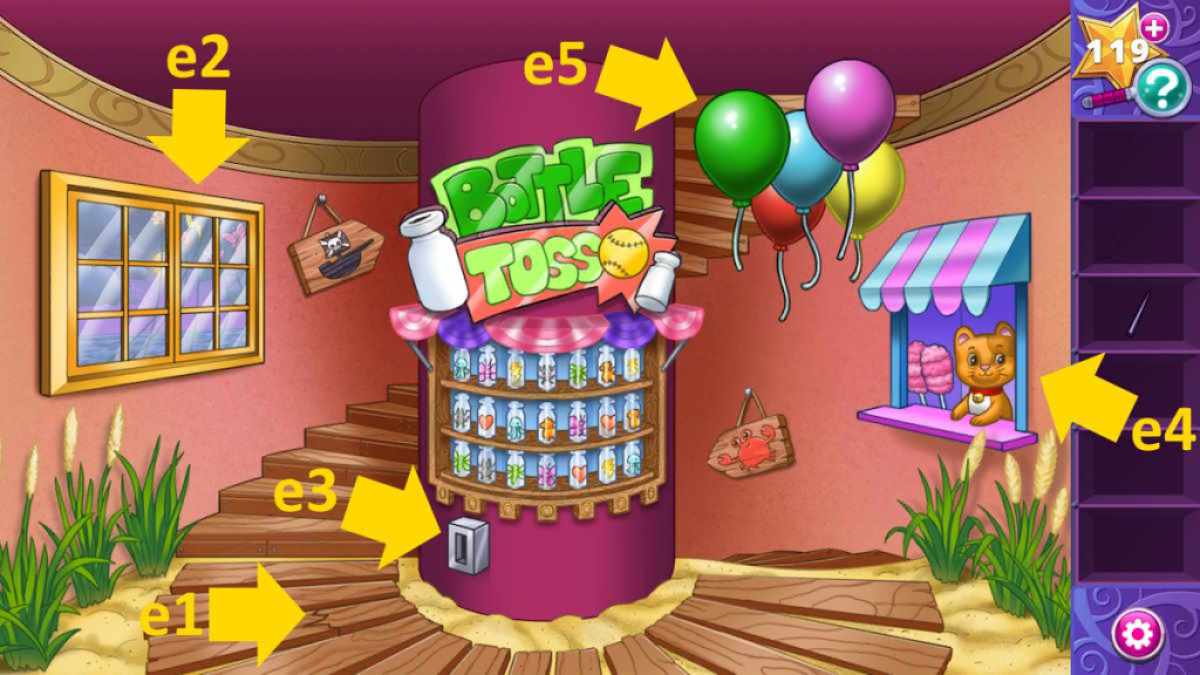
Image by Pro Game Guides
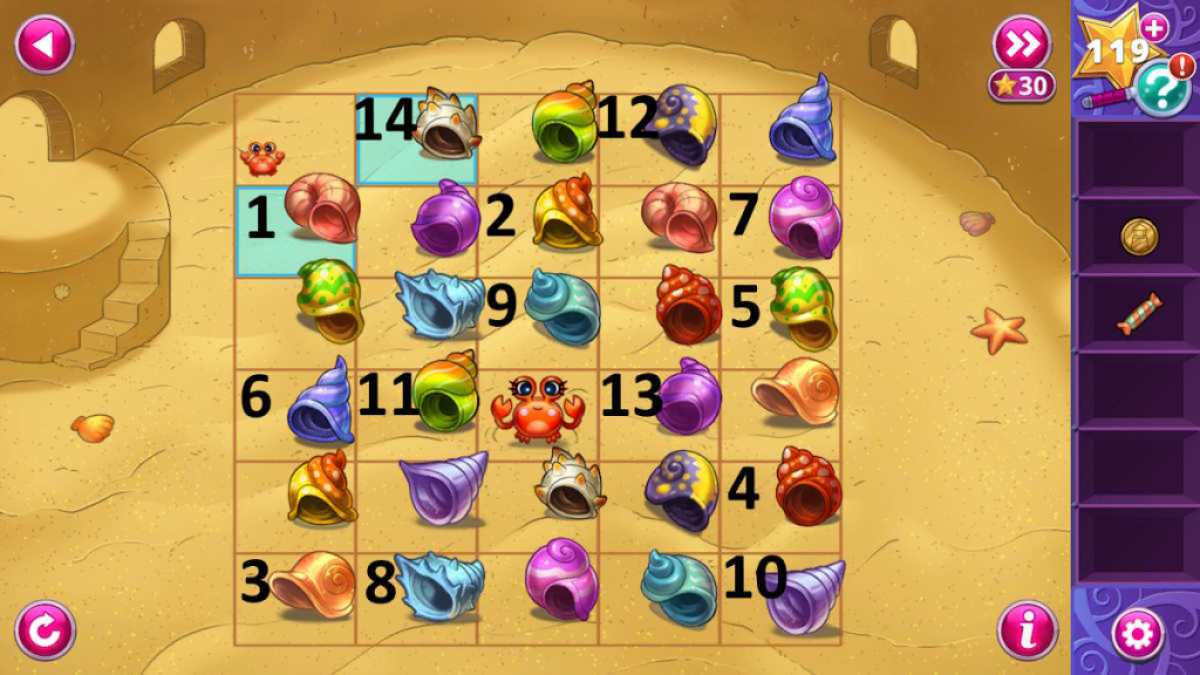
Image by Pro Game Guides
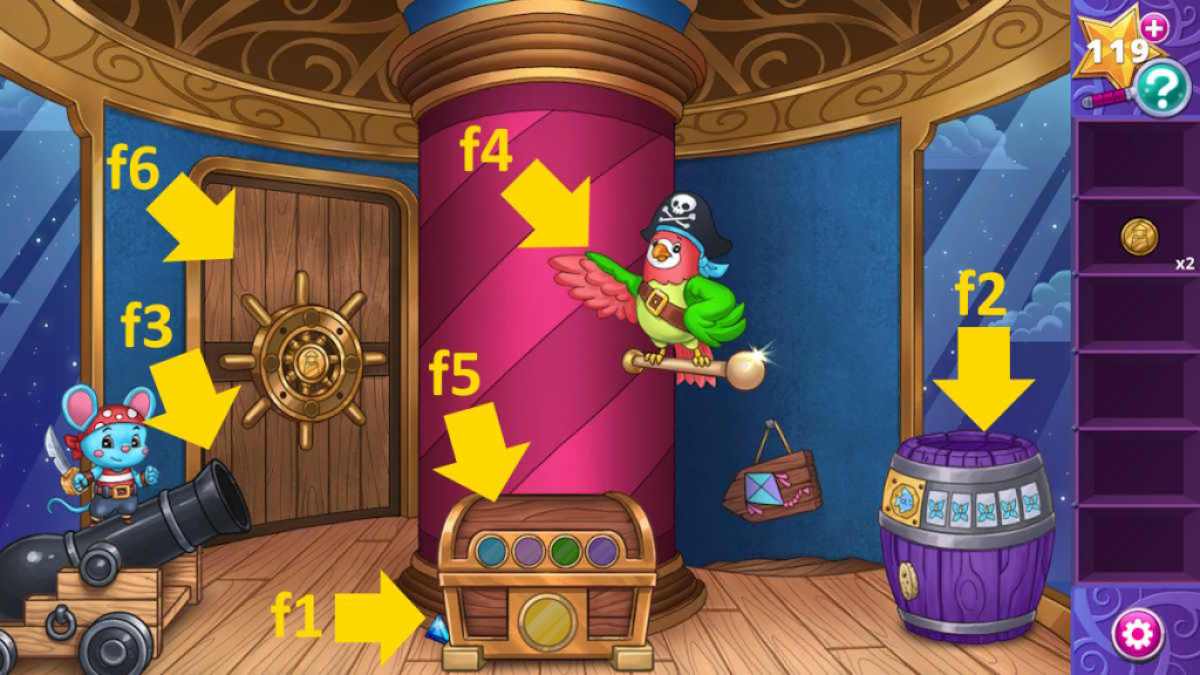
Image by Pro Game Guides
Screenshot by Pro Game Guides
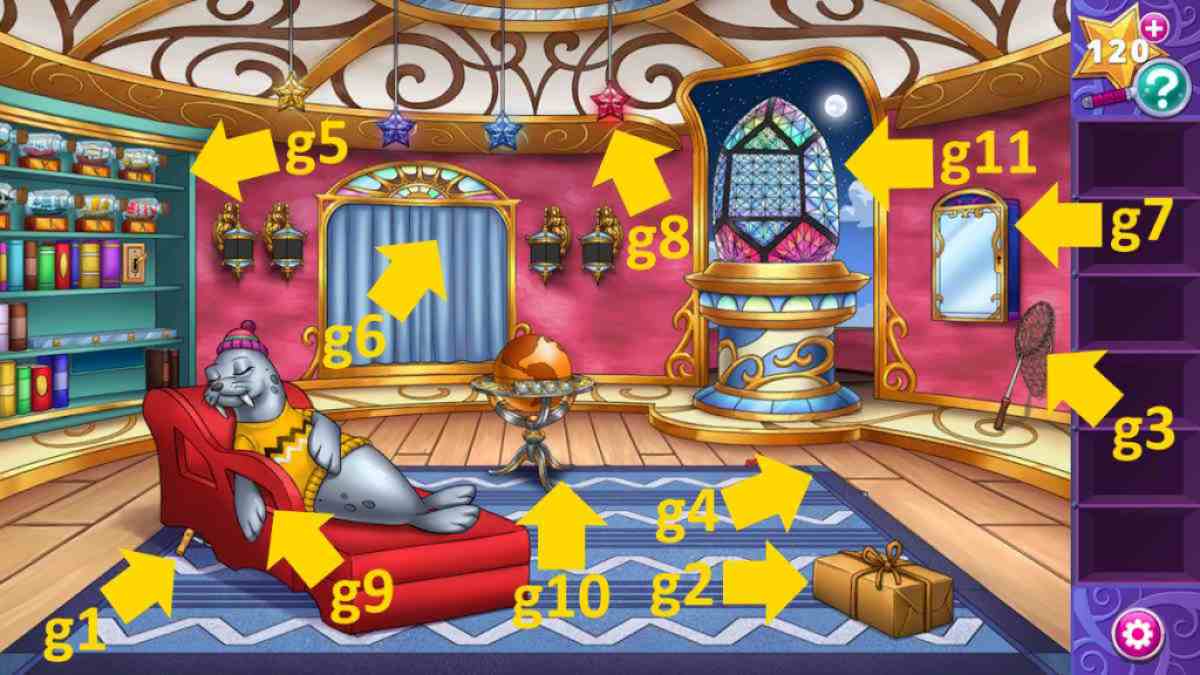
Image by Pro Game Guides
Screenshot by Pro Game Guides
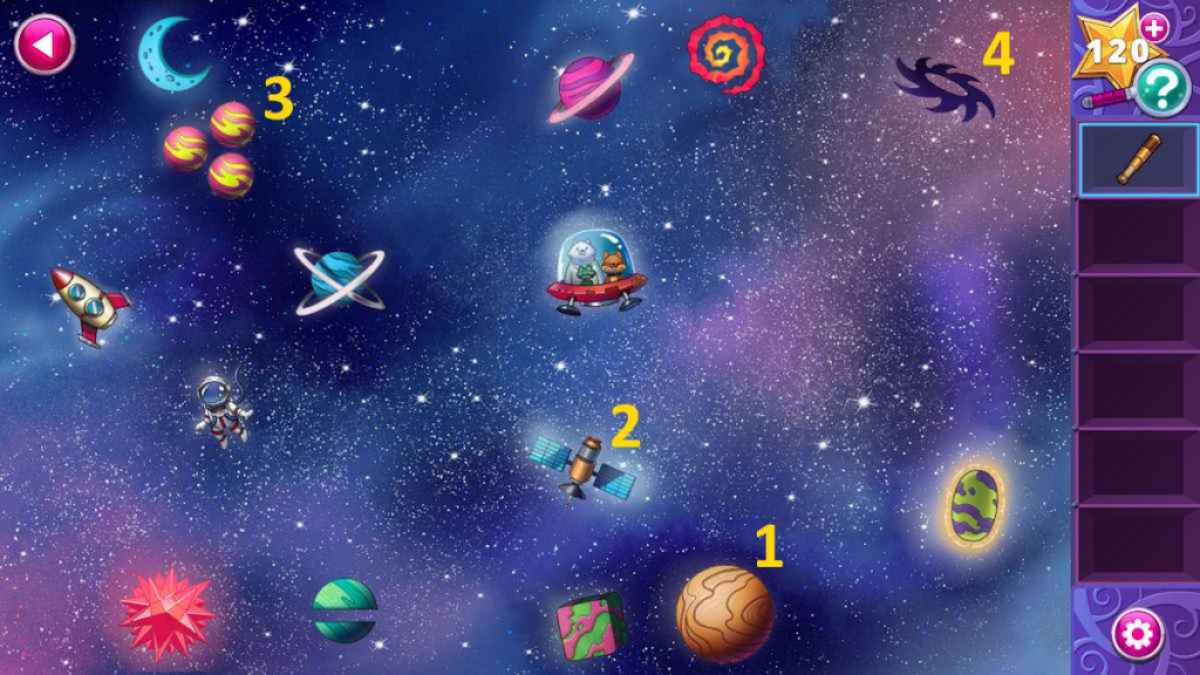
Image by Pro Game Guides
Screenshot by Pro Game Guides
