" What ’s the wecommended amount of dedotated wam I should have to the server ? " - SuperKai64
Setting up a consecrate server for you and your friends inanygame can be a number of a daunting task , and Soulmask is quite a routine more complex than most . But worry not , for in this guide , I ’ll go through the process step by step .
How do you run a dedicated server in Soulmask?
Before I begin , I do have some quick prolusion :
fine , so so as to set about operate a consecrate server , you take to make a brochure in a special property on whatever drive you plan on running the Soulmask waiter from . That place is the root of your drive , which is to say NOT somewhere like ProgramFiles(x86 ) .
Step 1: Creating your server folder
To get there , open up Explorer ( you’re able to do this by searching ' This PC ' in the Windows hunting bar ) and plainly start the drive on which you ’d like to deploy the server . you could look at the images below for an example of this .
Once you ’re in your root , you ’re lead to desire toright clickanywhere in the solution , hover over ' New ' , and then select ' Folder ' . Name this folder ' SteamCMD ' .
Next you ’re go to go tothis internet site , the Official Valve Developer wiki , and scroll down until you see " Download SteamCMD " . Underneath the heading you ’ll see " 1 . Download SteamCMD for Windows : [ 1 ] " . That [ 1 ] will be a link , which will download the SteamCMD for you right out , in a .ZIP data format . Navigate over to yourDownloadsfolder and locate the .ZIP that downloaded .

Right click the .ZIP filing cabinet , and select ' Extract Files … '
Once presented with the cover below , dilate the tree diagram by hitting the little + to the left wing of the drive you make the SteamCMD folder in , and then select that leaflet . Once it ’s spotlight in blue , strike ' OK ' .
Right come home on the single file and loom over the7Zipsection of your circumstance menu . Then rack up ' Extract Files … ' and you ’ll be presented with a popup . To the right side of the dad up you ’ll see a button marked with ' … ' ; hit this will allow you to see a visual port standardised to WinRAR . Hit the pointer to the left of the drive you made the folder on , and take the ' SteamCMD ' folder you made . Then hit ' OK ' .

Image by Pro Game Guides - Main Drive
Once all that ’s done , we ’ll move on to the next subdivision , which is actually using the SteamCMD user interface to arrange up a server .
Step 2: Using SteamCMD
This flake gets a mo scary looking , but I can assure you it ’s all quite unproblematic . What you ’ll need to do is go over to your Windows search bar and then type inCMD . Right - clickCommand Promptand selectRun as Administrator . You ’ll be lay out with the mastery prompt window , and you ’ll call for to come the commands as both shown and write below .
Something important to note is that your crusade may have a dissimilar ' label ' allot to it . This tend to happen if you have multiple storage mediums , so ensure you ’re using the correct recording label .
Here , the commands will be written as ' C : ' , but yours may variegate , so be certain to double check where you made the SteamCMD folder .

Screenshot by Pro Game Guides - Root
After inputting the 2nd dictation , the unconscious process of download the consecrate server files will start . When you see ' Success ! App ' 3017310 ' fully installed . ' you ’re all done , and can close out of the dictation immediate window by typewrite ' Exit ' .
Step 3: Dedicated Server Settings
This part is mostly up to you to separate out , as this will order the waiter options you ’ll be using . However , we ’ll still go through some of them and point out what function they have . In that SteamCMD leaflet you made earlier , there ’ll now be a whole lot of single file and leaflet . You ’ll want to pilot into the newSteamAppsfolder , then intoCommon , and then finally intoSoulmask Dedicated Server for Windows . In there , you ’ll seeStartServer , which is a heap Indian file .
First , make a copyof this file to do all of your edits on , and leave the original alone . you may do this by right - clicking the file , choose Copy , and then right - clicking on a blank space in the windowpane and hitting hitting Paste . to edit the file , right - chatter StartServer - Copyand selectEdit . If prompted to select a program to blue-pencil the file in , useNotepad .
You ’ll be met with a notepad page that looks like the one below .
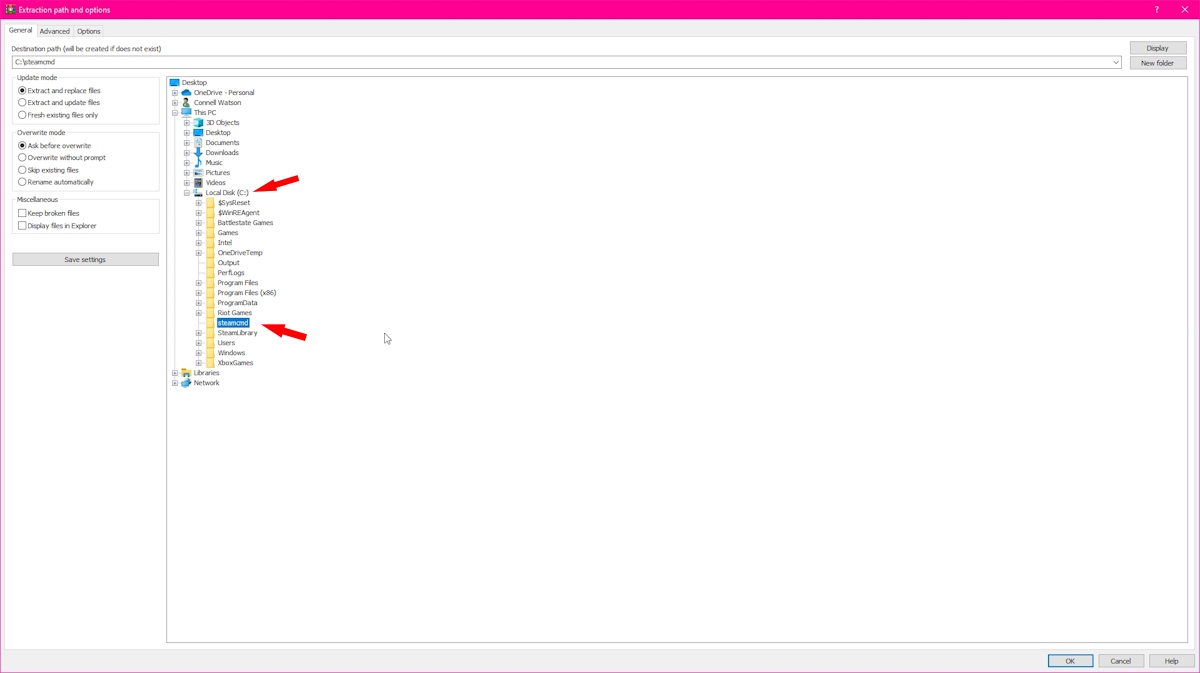
Image by Pro Game Guides
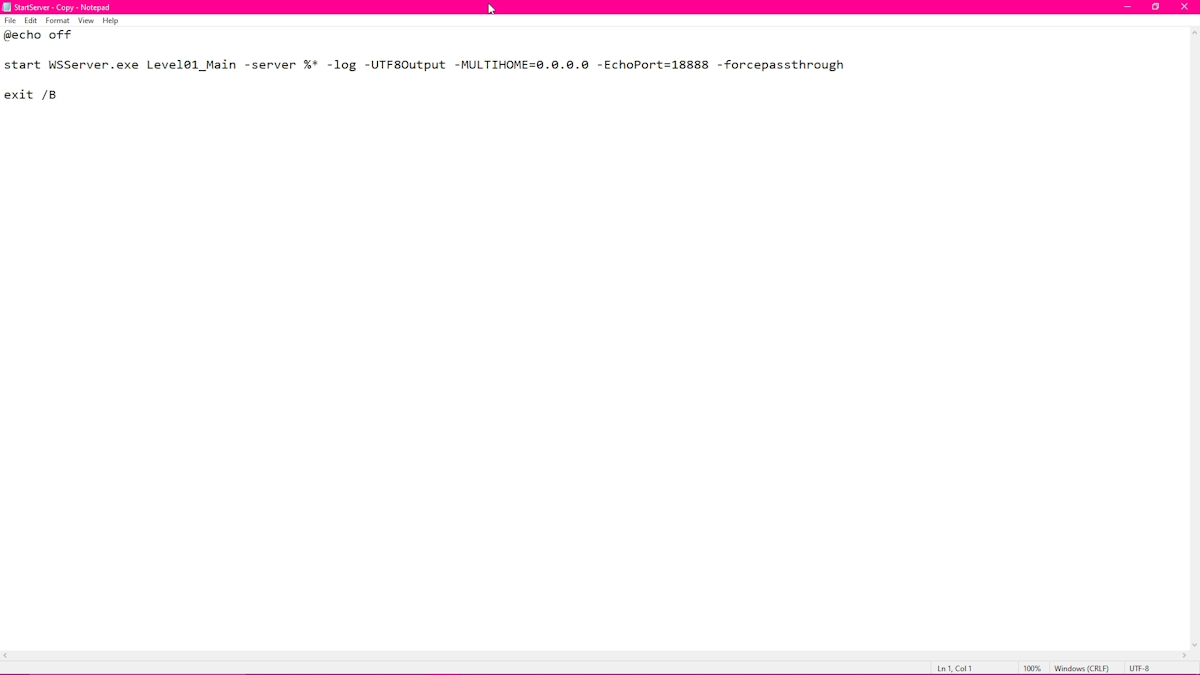
What you ’ll be doing in parliamentary procedure to edit some of the inauguration parameters is appending some new things onto the end of that pre - existent textbook . Below I ’ll detail some exercise of some of the most authoritative inauguration commands , and lay them out so you could put them in yourself .
So , a full line would attend like this , for example :
take off WSServer.exe Level01_Main -server % * -log -UTF8Output -MULTIHOME=0.0.0.0 -EchoPort=18888 -forcepassthrough -MaxPlayers=1 -pve -SteamServerName = PGG -PSW = PGG1Test -adminpsw = PGGAdmin1 -port=7777 -QueryPort-27015

Image by Pro Game Guides
As mentioned earlier , this part is really up to you — just make trusted everything is formatted correctly using the examples render . Also , be sure to checkthese resourcesfor some more startup properties and GM Commands whilst in - plot . PortandQuery Portare both advanced dictation and are both in recounting to port wine - furtherance . This is a complex procedure with too many variables to cover in this guide ( as the process changes between routers ) , so please name tothis universal guideon how to go about it
Your end finish with that process is toopen port 7777on theUDP protocol , andopen port 27015on theUDP communications protocol .
Once you ’re all done with this techno - garbage , you ’ll want to double clickStartServer - Copyto load up your waiter , and please keep in mind that this can take some serious time depending on your hardware and internet amphetamine .

Screenshot by Pro Game Guides - First Command
To connect to your host , you ’ll need to hop in game , selectOnline , then hitConnect to the server directlyin the bottom result . Then , input your IPV4 address , the larboard you used ( default is still 7777 unless you change it ) and then the password . As of right now there come out to be an issue in regards to personally hosted waiter showing up inyourserver browser app , but reports indicate that others may be able to see it just fine .
think , donotgive out your IPV4 speech to anyone you do n’t trust ; if you designate to host a public server , it ’s suggest you go through a private host serve , resourcefulness for which can be found in - game .
And with that , you ’re ready to get stuck in . If you ’re look for more Soulmask substance from us here at Pro Game Guides and you ’re a slight stuck on the craft system , we ’ve nonplus you covered with ourquick craft template . And if you need to get in touch with the community , we ’ve compiled alist of all the games socialsfor you !

Screenshot by Pro Game Guides - Second Command

Screenshot by Pro Game Guides - Downloading

Image by Pro Game Guides - Completion
Screenshot by Pro Game Guides

Image by Pro Game Guides

Image by Pro Game Guides

Screenshot by Pro Game Guides
