Can you solve the mystery ?
Royal Legends 1 : Marshes Curse is an escapade mystery secret plan that offers a tremendous mixture of compelling storying , full point - and - clickpuzzles , and secret object determination , with some catch - three elements discombobulate in too . As with all good games in this writing style , you may place your own difficulty levels , but if you make it a challenge , it can be a little frustrating if you get stuck . I ’ve play through the whole biz and put this walkthrough together in case you get a scrap stuck along the way .
Full Royal Legends 1 walkthrough - Marshes Curse
To make this guide more achievable , I ’ve broken it down intothree roughly even component part . Below you ’ll receive the walkthrough for what we ’re call up Chapter 1 , which takes you up to and through theSwamp Maze .
Finding out the details of the murder
Take theAmuleton the floor at the infrastructure of theMessage Board(a1 ) . Select thecarriage door(a2 ) and , in the close - up , take the Magnifying Glass ( which open up the Hints lineament ) , then open and read the letter . Once read , take the gang that was underneath . get across the samara on the modest hatch here , and it will break in off .
Come out from the stroller and cluck thecockerel(a3 ) and take the twoWitch ’s Coinsin the close - up , and also take theMap(it feel like a scroll ) and take the Missing poster . apply the Ring on the Sir Ernst Boris Chain to launch the Royal Post boxful and take theNotefrom at heart , along with theBroochandGrapes Amulet .
Now center on themarket stall(a4 ) and grab thePiece of Leatherin the end - up . This reveals a puzzle underneath it . All you have to do is place your Grapes Amulet into its center and then fill out it by moving the shapes into the correct spots by click them . You ca n’t fail . This open a surreptitious compartment , from which you ’ll have aHookand aHorn .
Go back to the cockerel and use the Horn . You ’ll necessitate to keep clicking it until it fills up the bar , then the cockerel will fly off and reveal aBarretteyou can pick up . Now pick out the equipage once more and practice the Barrette on the fundamental stub to spread out the corner . snap and open theSatchelinside , take out theNotebook , and grab theRoyal Medal .
Next , tick on the group of people resist together in the square ( a5 ) , pick out the Royal Medal , and dawn the mass to make them disperse . cluck the scene again and take to complete either a missing target or a catch - three puzzle . On culmination , you ’ll get theLaundry Address . Show this to the Advisor , Duncan , who appears and then moves on to the next location .
Questioning Bertha
Grab theWitches Belongingson the floor ( b1 ) , then get a close - up of thewell(b2 ) and take theNutandCutting Board . While here , you could also add the Hook to the rope in the well .
Come back to the main ikon and select thechest(b3 ) . Take theWitch ’s Coinon the soil , then use the Brooch to launch the lock of the chest . Take thePainted Stoneand theWeathervanefrom inside . Go back to the well and use the Weathervane in the handle slot on the well , then use it once sequester to bring up the pail . Take thePlankfrom inside the bucketful , then pick up theWater Bucket .
pertain : lose Lands 3 Full Walkthrough ( Golden Curse )
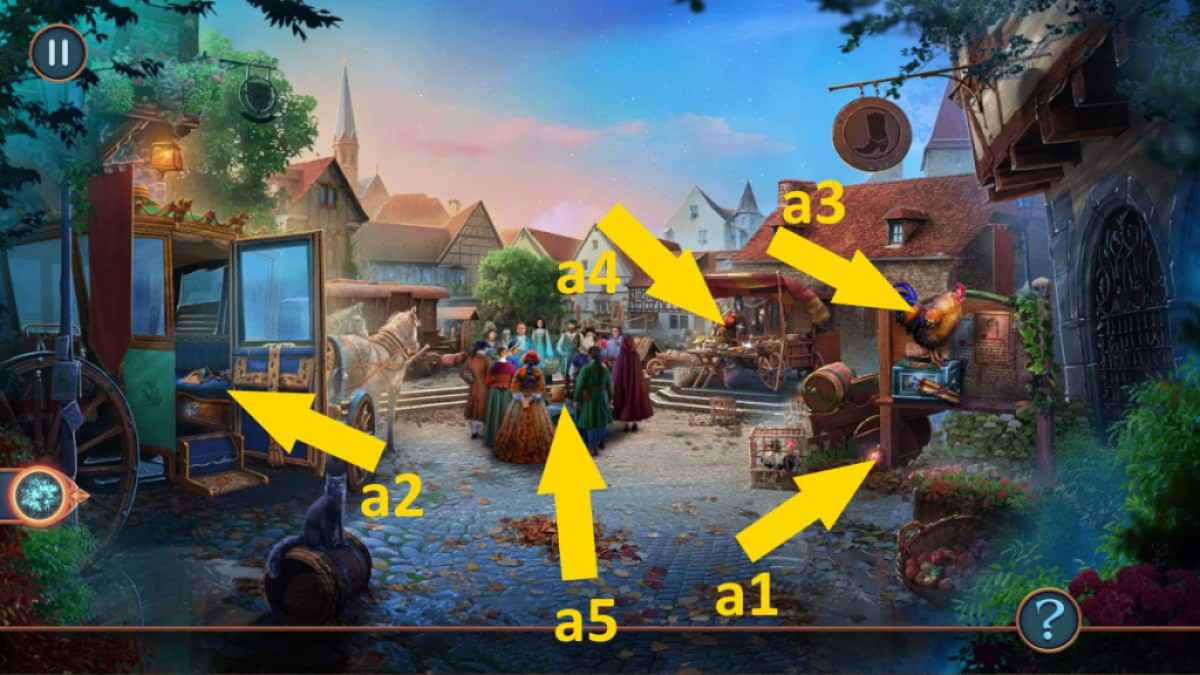
Image by Pro Game Guides
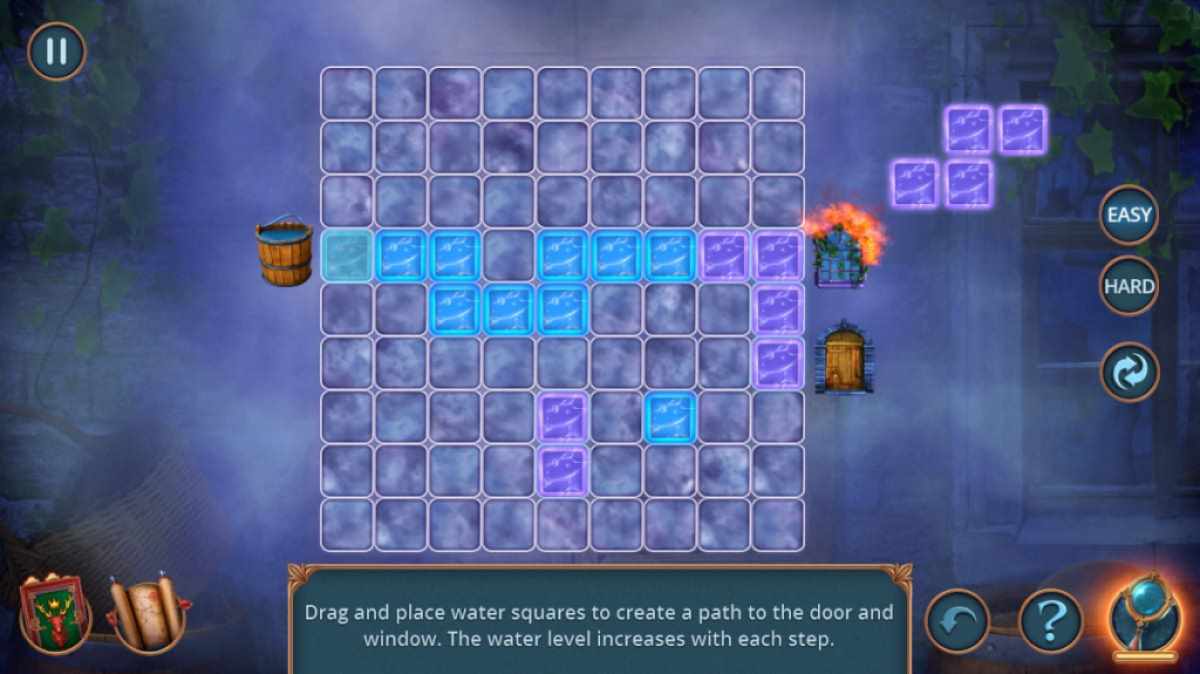
habituate the Water Bucket on the fire to start a mini - game . You simply need to make two straight lines between the fire on the right and the body of water pail on the left to win . When you unite one straight line between them , the blocks that made it will disappear , clearing you some place to keep going . There is n’t a good response , as the puzzle randomizes , but you may keep try on until you finish it . Once done , you canenter the Laundry .
Go inside and tick the window ( c1 ) to remove the bullet . Get theAmuleton the floor ( c2 ) , then select Bertha to free her from the rophy . She gives you aValveand asks you to bring her a Soothing Decoction .
Making the decoction
Select the bubbling barrel ( c3 ) and take the greenParasolto let on a tap . apply the Valve on the tap , then the Nut , and they ’ll bond and empty some of the water from the barrelful . Now you could take theCuttersand theButtonfrom inside the barrel .
fall into place thefireplace(c4 ) and select the tympanum there , moving it onto the sweetener above the fire ( also grab theWitch ’s Cointhat is underneath the kettledrum ) . Use the Button to unfasten the box lid here , then take theTongs , Nails , and your secondPainted Stonefrom inside .
Go to the primal mesa ( c5 ) to get theBroken Bellowsand a secondPlank . Click the record here to see the Soothing Decoction recipe you take .
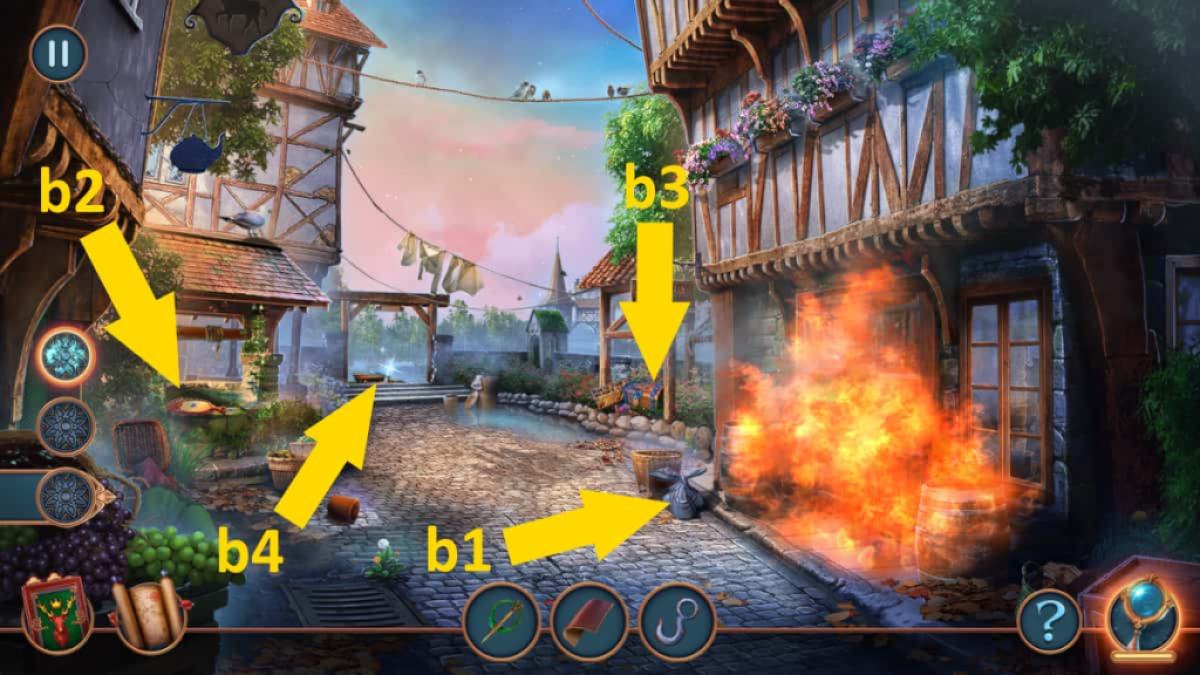
Image by Pro Game Guides
take your mapping and go back outside the Laundry . Go back to the Well , place the two Painted Stones on its rim , then take theMirror , Trowel , andPuppet with Needlefrom inside the expose secret compartment .
Go back to the Well and use the Trowel to turn over up and take theValerian Root . In your stock , select the Bellows , and while take , sum up the Leather and Doll with Needle to mend them . Go back into the Laundry and use the working Bellows on the fire ( c4 ) . chatter the Kettle to getBoiling Water . Go back to the mesa ( c5 ) and commit the Kettle , Chopping Board , and Root on it . Click the table once more ( it will now have a purplish mist over it ) to again choose either an item matching or match - three game .
fill in it fix you theSoothing Decoctionyou can give to Bertha , who will now tell you her tale . Afterward , she ’ll give you aHairpinthat you could use on the traveling bag by the bubbling barrelful ( c3 ) to get aHeavy Statuettefrom within .
Screenshot by Pro Game Guides
Go back outside and cluck thewharf(b4 ) at the back . Place the two Planks , then place the Nails here , too , then use the Statuette to bonk the nail in and unsex it . Click the boat to advance toMartha ’s house .
Getting into Martha’s House in Royal Legends Chapter 1
Outside , collect theWitch ’s Belongings(d1 ) and then clack theblue cloth(d2 ) in the close - up of the cart . Take theJackfrom the cart , then use the Cutters to separate the chain and get theChain and Hookfrom the bag it was protect .
pick out the front door of Martha ’s menage ( d3 ) and pull the twine , breaking the glassful and get aFuse . apply your mirror where the methamphetamine hydrochloride used to be to get a flavour at the other side of the lock , which is aslide bolt . utilise the chain and come-on to unbolt it , and the door opens . guide inside for a cutscene in which Duncan is dragged into the basement , with the way of life then blocked behind him .
concern : Echo Bay Murders – Chapter 1 Walkthrough
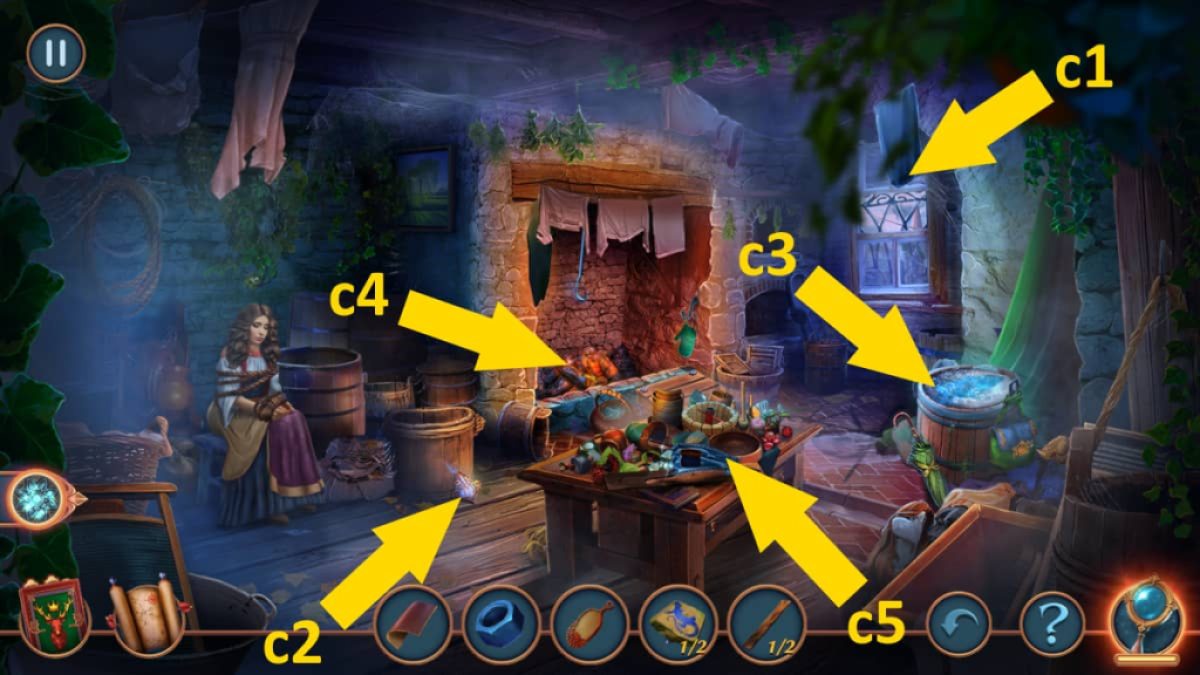
Image by Pro Game Guides
Take theAmulet(e1 ) , then click thecabinet(e2 ) , gather theNote , and unveil thesymbols underneath it . choose thechest(e3)and take theTubeandTracing Paperon top . Selecting the tube in your stock shows it postulate several items connect to it . you’re able to only add the fuse for now .
Click therug(e4 ) , which pulls it back to disclose a trap door but also triggers the cat to add up and hold it . Select thebench(e5 ) next and utilise the doodly-squat to fix it , taking theGemstoneandPowder(which you’re able to add up to the pipe in your inventory ) from underneath afterward . Use the parasol to catch the handle of thecasethat is also underneath the bench and pull it out . Grab theFigurinefrom on top of the casing .
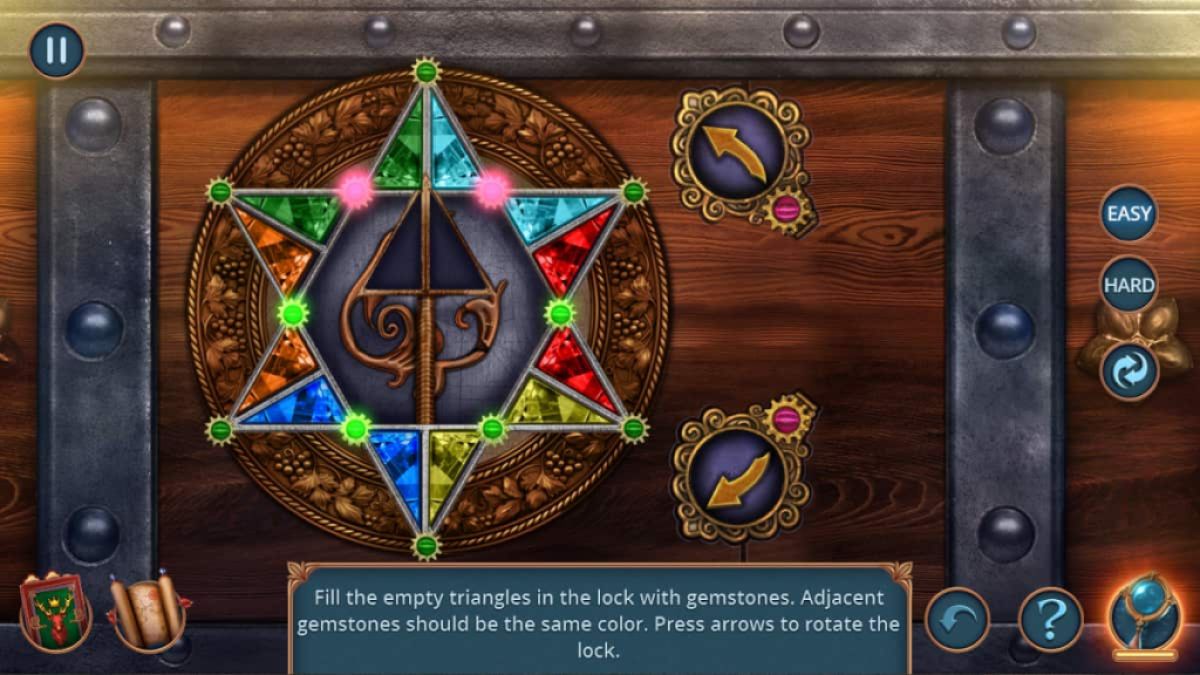
Back in the room , blue-ribbon thepiano(e6 ) and use the statuette on the blue slot on the top . Now you could take theCufflinkandMatchesfrom inside the forte-piano , then use the Tongs to grab yoursecond Gemstone . Go back to the dresser , put the two gemstone in its lid , then complete the mystifier . Place a gem pair from the nub to the location the mechanism is pointing to by clicking the gem . Spin the mechanism by clicking the dials . Each color needs to end up in aside - by - side pairto finish the puzzle ( as pictured ) . Do n’t interest , because if you put a piece of music in the unseasonable place , you’re able to switch it with the right one later . Once done , take theAxefrom the chest .

Image by Pro Game Guides
Saving Duncan
Now utilize the axe on the Ellen Price Wood impede thedoors(e7 ) , which gets you admission to thebasement . lead down , and you ’ll feel Duncan in a piece of bother . Take theWitch ’s Belongingsfrom the chairperson ( f1 ) , then take thedressing table(f2 ) , and in the close - up , take theBlue Clay . Come back out and click thetable(f3 ) , where you may accumulate aKeyand say a blusher formula ( click the recipe a second sentence to add it to the board for easy access code ) . Next , utilise the Cufflink to open and then collect the greenSpellbookon the table . you’re able to also put the Blue Clay on the table now , as it is an fixings for the blusher .
Back in the main basement image , use the Spellbookin your inventory to get rid of the colossus . After a cutscene with Duncan , he ’ll give you aLantern . Click the sorry area at the back of the basement ( f4 ) and apply the Lantern on it to start a teaser ( token finding or equal three ) . finish the teaser get you aBracelet . expend the Bracelet on the two holes on the medical dressing mesa close - up ( f2 ) to open a hole-and-corner compartment , and take theSaltpepper , Pencil , andWitch ’s Coinsfrom in spite of appearance . Add the Saltpepper to the Tube in your armoury which , as long as you have added the other ingredients mention above , will now deform the tube intoDynamite .
Use the map to go back upstairs and utilize the Pencil with the Tracing Paper on the storage locker ( e2 ) to get theMystical Code . Now select the case you extract from under the bench ( e5 ) and use the Mystical Code to open it ( simply click the symbols in the correct order as they are on the trace paper – 6,1,4,3 , if bet at the symbols from leave to right wing ) , taking theAmuletandMousefrom indoors . utilise the Mouse to move the computed tomography away from the trapdoor , then pick up theCinnabarandWitch ’s Coinsfrom where it was sitting . Place the Dynamite on the trapdoor and then place the Matches to light it . Take theSwamp Map , Note , andPegfrom the compartment you discover .
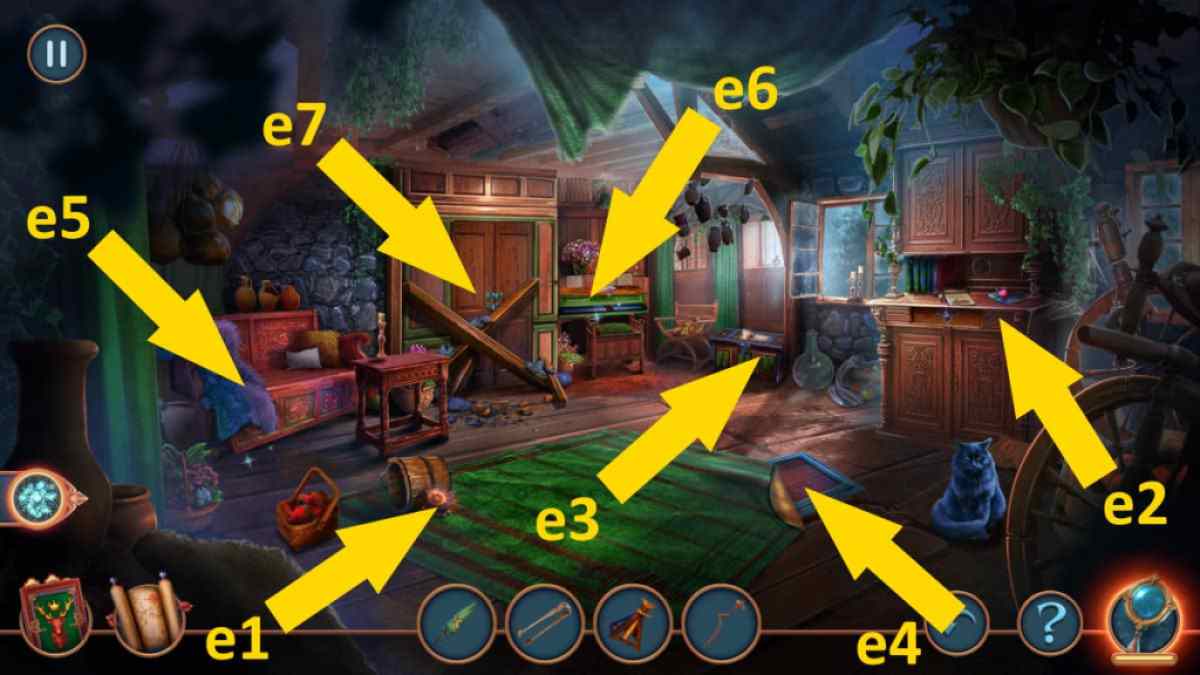
Image by Pro Game Guides
Getting to the swamp
Use the mathematical function to move outside of Martha ’s house and utilise the Peg to fix the pushcart ( d2 ) , collect theWitch ’s Coins , Key , Glue , and woodenTubafter the cart moves . Place the Tub under theladder(d4 ) to balance it , then take theRopeandMortarfrom the tree .
manoeuvre back down to the basement and put the Cinnabar and the Mortar on the tabular array ( f3 ) . This will create the paint you need to lead off a coloring puzzle . but copy the colors that are already there to discharge it , after which you ’ll open up a secret compartment . Click it to get a tight - up and take theNoteandCleaning Agentfrom inside .
Go back into the basement , select the dressing table ( f2 ) , and habituate the Cleaning Agent on the red substance on the green box . apply the brush that ’s in the close - up to finish up the cleansing chore , then dawn the key to start the box and take theKnockerand thirdKeyfrom inwardly . Go back on a higher floor and append the three Keys to the pianoforte ( e6 ) , which open a compartment from which you’re able to take someFeathersand a secondAmulet Part . In your inventory , use the glue to fixate the two talisman parts and get anAmulet .
Screenshot by Pro Game Guides
practice the Amulet to reach the drawer on the cabinet ( e2 ) and take theNote , Corkscrew , andBarn Keyfrom inside . Head back outside and use the Barn Key to enter thebarn(d5 ) . obtain the items expect inside ( or run mates - three ) to garner theSaddle and Reins . Click the horse ( d6 ) for a last - up , tot up the Saddle and Map to the horse , then watch the next slash panorama .
Getting rid of the roots
pull together theAmulet(g1 ) , then select theBasket(g2 ) and take theWitch ’s Coins , Pendant , Scoop Net Pole , andRevealing Powder . Select theCage(g3 ) and use the Revealing Powder and then the feather on the lock to let on a puzzle . grow the part until they match , then take theLeaf CupandLace Shawlfrom inside . observe thatthis puzzle was bugged for me on PCand the only elbow room I could complete it was to use a hint .
Related : Haunted Hunt Walkthrough – Adventure Escape whodunit
choose the Scoop Net Pole in your stock and add the Pendant , Rope , and Lace Shawl to it to make aScoop Net . Click the Basket ( g2 ) and utilize the Scoop Net to fish out the pocketbook and take theMagnetandSwamp Lily Amuletfrom inside .
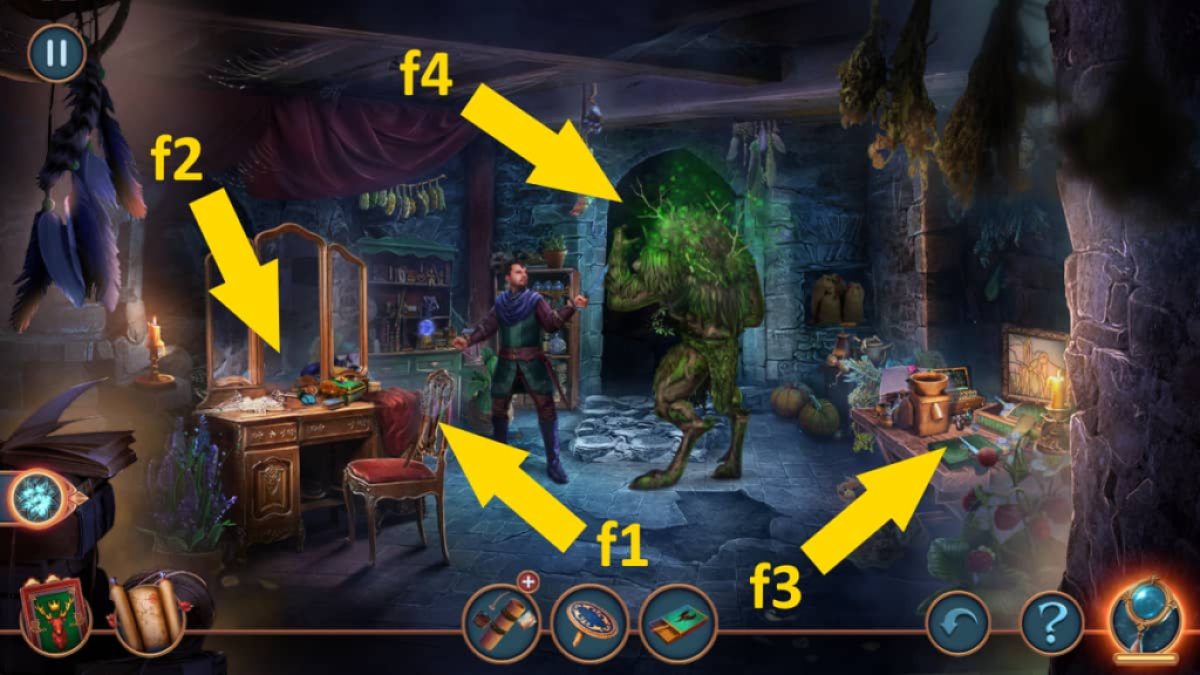
Image by Pro Game Guides
Click theTree(g4 ) to move the branches and bring out a boxwood . Use the Swamp Lily Amulet to open up it and grab theNoteandMagical Sword . Click theMagical Barrier(g5 ) , use the Magical Sword to cut through , and protrude a puzzle to make it through the swamp .
The swamp maze
To get through each set of stepping stones , you need toclick the stones in lodge to get across . This intend in reality making a path from the bottom to the top of the screenland , which make it easier . On Easy , click the left path twiceand then follow the image above to get the animals in the correct gild .
later on , snap the left over course again , and you ’ll now also have up and down path options . Click left , up , and lead to get to the next puzzle ( below ) . This time you need toclick the sequence markedbut using the same symbols , so it is pretty easygoing . Once you ’ve completed the 2d puzzle , flick the left route once more for another weakened scene .
If you want to continue with this walkthrough , check over outRoyal Legends 1 Walkthrough , Chapter 2 , to get the next section here at Pro Game Guides !
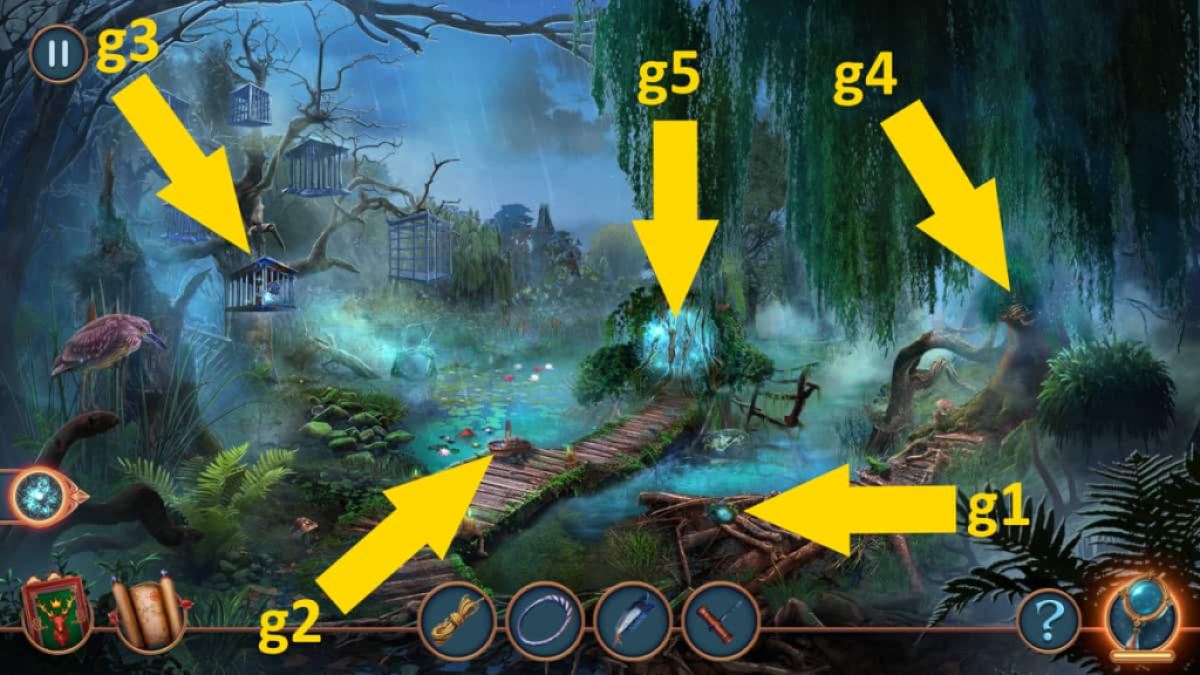
Image by Pro Game Guides
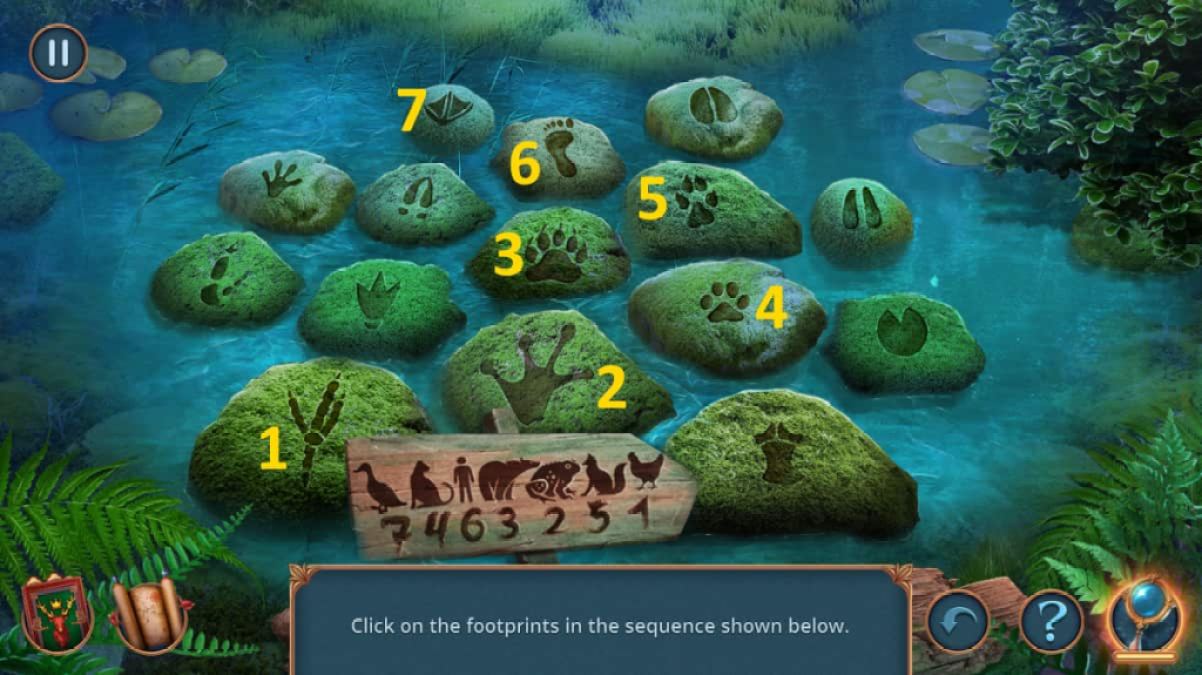
Image by Pro Game Guides
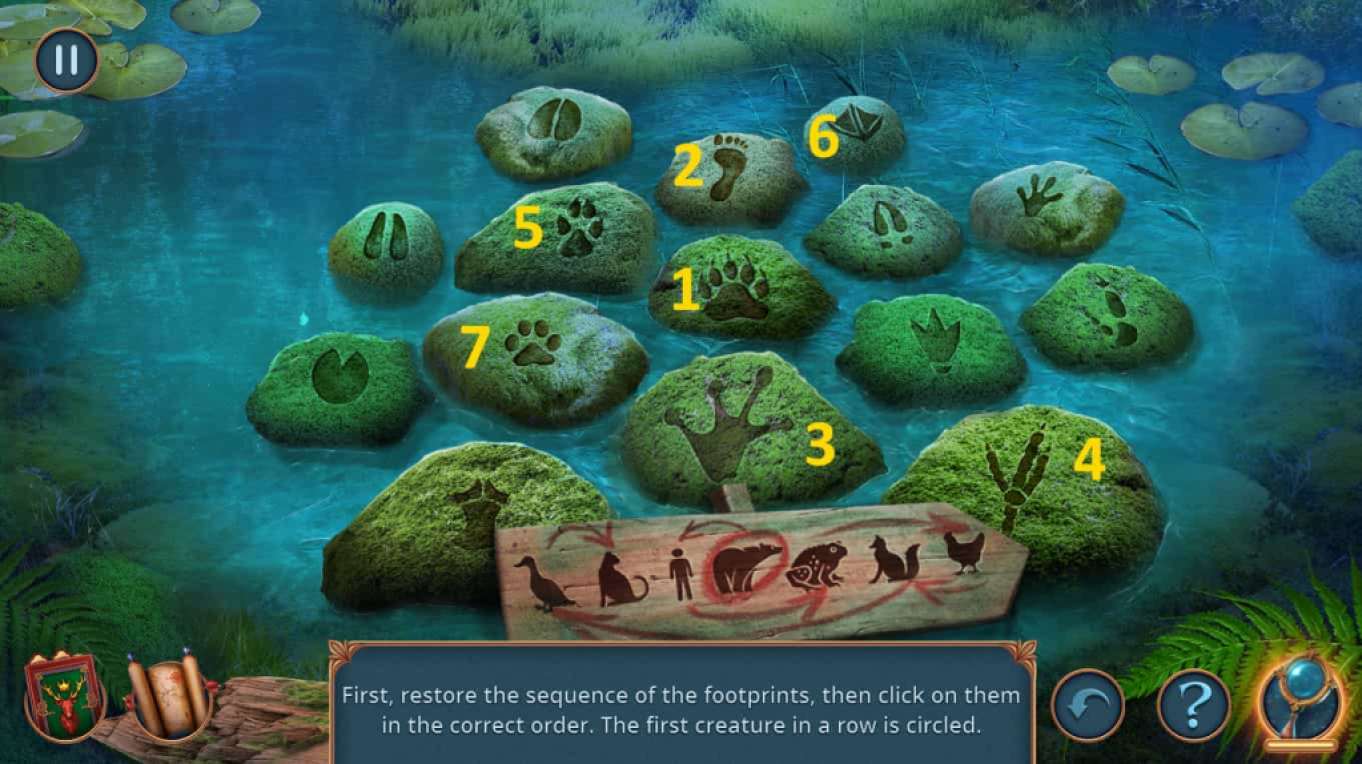
Image by Pro Game Guides
