For love life AND money !
Puzzle Lovers is a biz with a romance theme in theAdventure Escape Mysteries serial publication , but do n’t worry as it ’s still packed with puzzles and machination . If you ’re take care for a bit of direction while play it through , read on below for my full Puzzle Lovers walkthrough .
If you ’re looking for the plot on Steam , you ’ll postulate to downloadAdventure Escape Mysteriesand then select Puzzle Lovers once you ’ve opened it .

Screenshot by Pro Game Guides
How to beat AE Mysteries Puzzle Lovers - Full walkthrough
The game begins with us encounter Xia , who welcomes us to her unexampled world show , Puzzle Lovers , where we ’ll get totravel the public while solving puzzles- and maybe fall in love . We also meet Alex , Mo , Ivy , and Jake who we ’re competing with for the million - dollar prize !
You then get to pick one of eight part and your name , but they’reonly different in appearance . You ’ll have a lot of roleplaying decisiveness to make throughout the game , but theydo not affect the outcome . Even if you decide to vote a character off during the game , you ’ll still get a chance to speak to them once more at the end , so do n’t care .
Puzzle Lovers Chapter 1 walkthrough
Your first job is to make it to the carpenter’s plane by sunset so you could make it to the contest in time to compete . After run into Jake outside the gate that you need to exceed to get to the plane , you decide to split up to try andsolve the gate code .
Click the box ( a1 ) to incur and break up up aFire Extinguisherand then the locomotive ( a2 ) to remove the top discussion section and find aWasher . Now practice the automatic washer on the viewer ( a3 ) to lock it , moving the view to note the plane ’s number is74381 . Enter this codification into the logic gate ( a4 ) and it will start to open up , but gets dumbfound !
Jake then asks why you ’re going on the show . you may answer for the money , for dearest , for fun , or to cause trouble . I do n’t think the answer matter other than tochange some dialogue options , but for the criminal record , I select to get the money to salve the vineyard . after , Jake tries to force the gate and starts a pocket-sized fire .
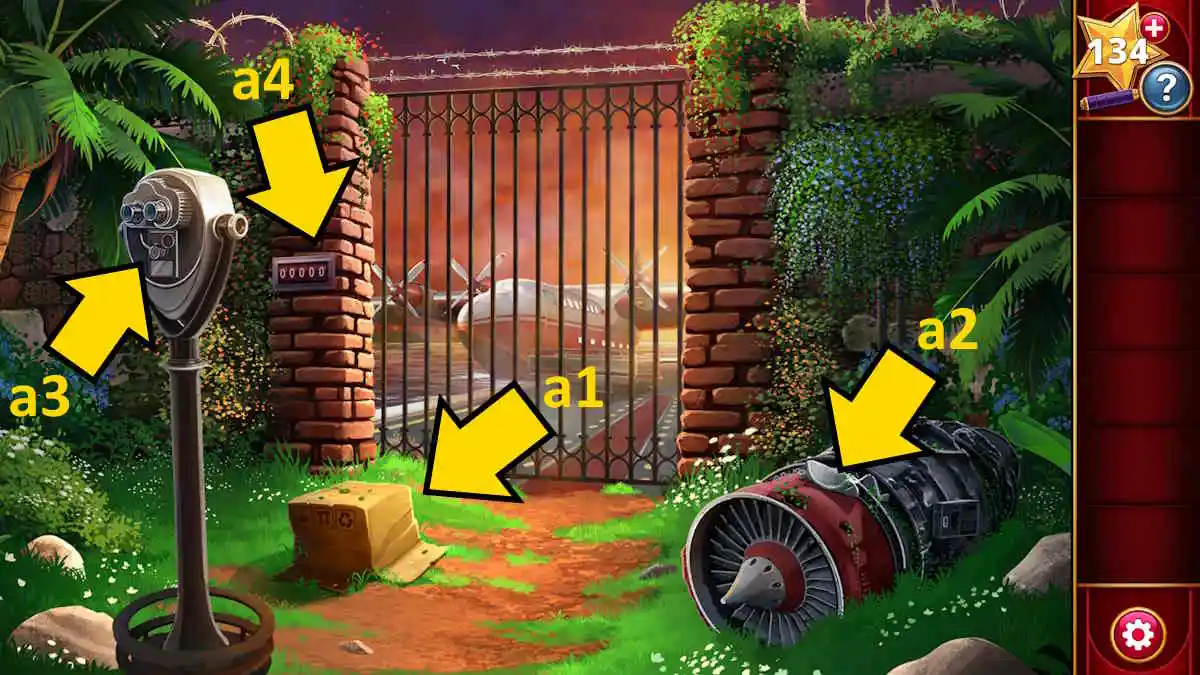
Image by Pro Game Guides
apply the extinguisher to put it out , then take theSocket Wrenchfrom the box ( a5 ) and use it on the bolts ( a6 ) to get someWire . Use the conducting wire on the box ( a5 ) and the logic gate will open , allowing you to head through .
Getting to the plane
Move the thenar ( b1 ) to find aPuzzle Piece , and cluck the ruffled carpet ( b2 ) to find asecond Puzzle Piece . Now note the bit of colored plane window ( yellow 7 , blue 3 , black 1 , and white 6 ) . practice this code ( 7316 ) on the padlock on the tarpaulin ( b3 ) to remove it , unveil the luggage underneath and make a camera appear .
Take athird Puzzle Piecefrom the side of the camera ( b4 ) , then click the unexpended pile of case ( b5 ) to discover aNail File , the middle pile to get threemore Puzzle Pieces , and then pull in the last of the luggage . Now you could move the cart to find aNewspaper , Flattened Pipe , and yourseventh Puzzle Pieceunderneath .
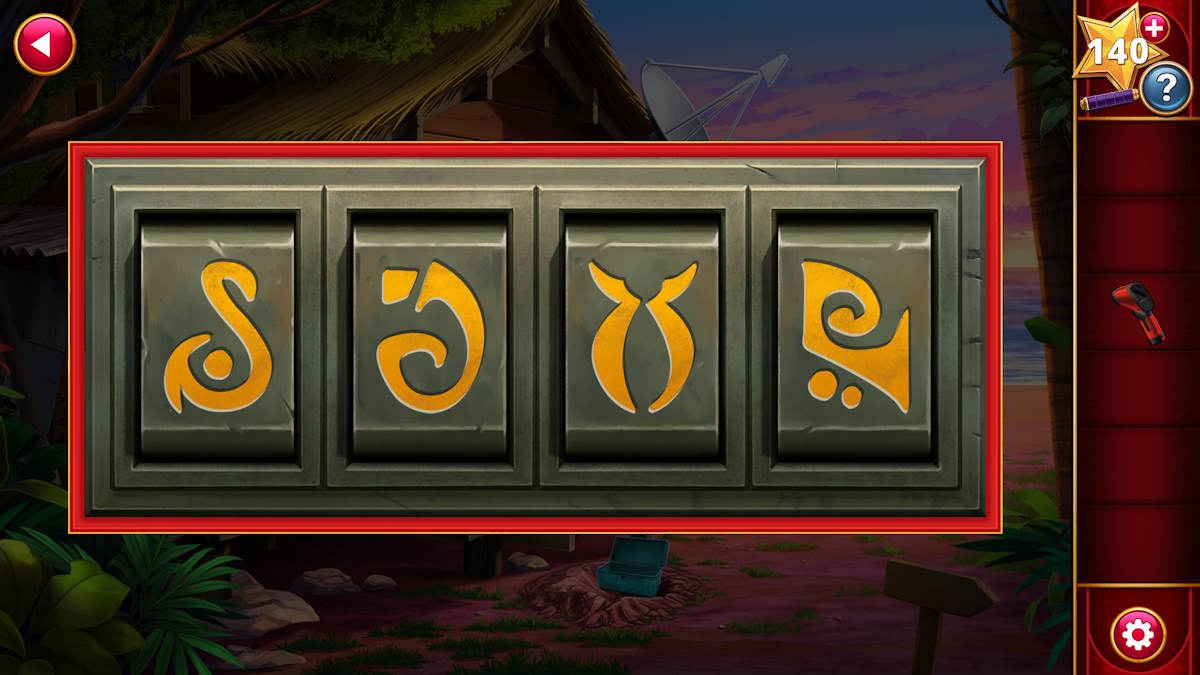
apply the pipage to start the floor grate ( b6 ) and find yourfinal Puzzle Piece , before selecting the mechanically skillful stairs ( b7 ) and using the nail file cabinet to open up the side panel . Add the eight puzzle pieces to start a connection puzzle ( see the solution below ) . Finally , you take one more code to board the aeroplane ( dawn the now - invoke steps to gain access code to it ) . To line up it , look at the lights in the sky being made by the limelight and depend the beams from left to right wing ( 3243 ) .
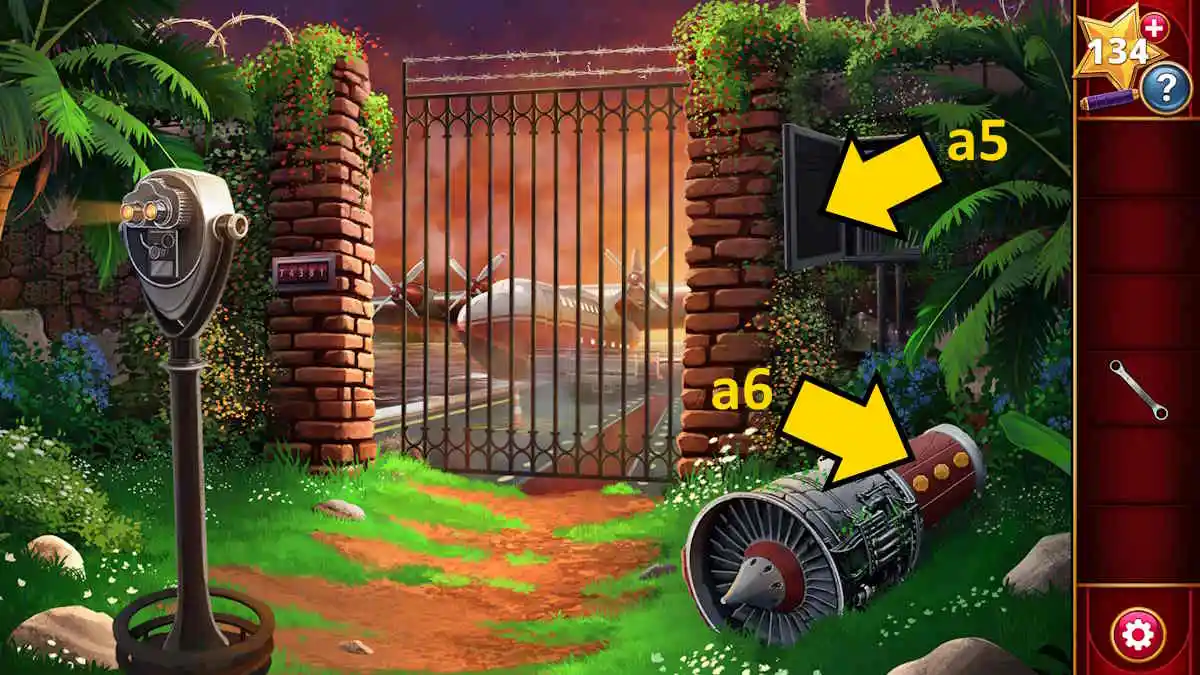
Image by Pro Game Guides
Jake asks if you want to make asecret alliance . I choose to keep my options exposed , as it felt too ahead of time to make a decision , but again it is only plump to strike dialogue selection .
Onboard the plane
You ’ll fulfill Alex and Mo when you get onto the woodworking plane and have a few more RP inquiry to answer . I articulate the show was cancel , just for fun , and almost befool them . Xia then give you achecklist to completethat you may prove in your inventory . flick the two bunches of flowers behind Mo ( c1 ) to reveal a red button ( c2 ) and take theStaple Remover(c3 ) . Also , press the reddish buttonto retract the ceiling pall .
Take theBox of Chocolates(c4 ) and then clack Mo ( c1 ) and Alice ( c5 ) for a New World chat with each . practice the staple remover on the heart rug ( c6 ) to regain aMusic Keyand use it on the right overhead storage locker ( c7 ) to get theLegendary Guitar . Now give Alice the paper so she can see to it the chess results , and give Mo his guitar . They ’ll both leavel exit the cabin and you ’ll be joined by Ofeibia .
you may now take theChampagnefrom the pail ( c8 ) and move the purple cushion ( c9 ) to find aGold Heart . public lecture to Ofeibia once more and then give her the burnt umber . This will also advance you theMovie Key , while you may pluck up asecond Gold Heartfrom the level when Ofeibia tries to launch the plane door . Use the gold nitty-gritty to launch the table ( c10 ) to get hold aHuge Wrench , give it to Ofeibia , and she ’ll get Ivy in from outside .
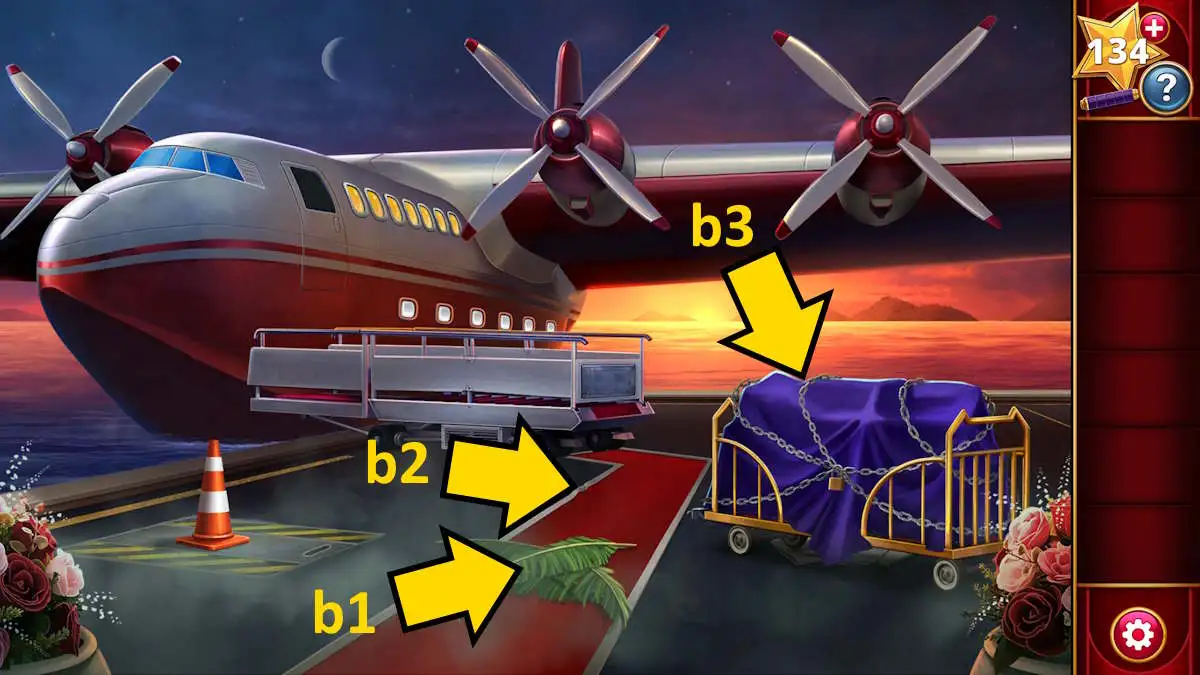
Image by Pro Game Guides
Meet the contestants
Use the key to give the odd baggage locker ( c11 ) to notice aSuper-8 photographic camera , and give it to Ivy . She ’ll give you aRemote Controlin return . flick the undefendable door and Jake will seem from outside . After talking to him , give him the bubbly and he ’ll leave .
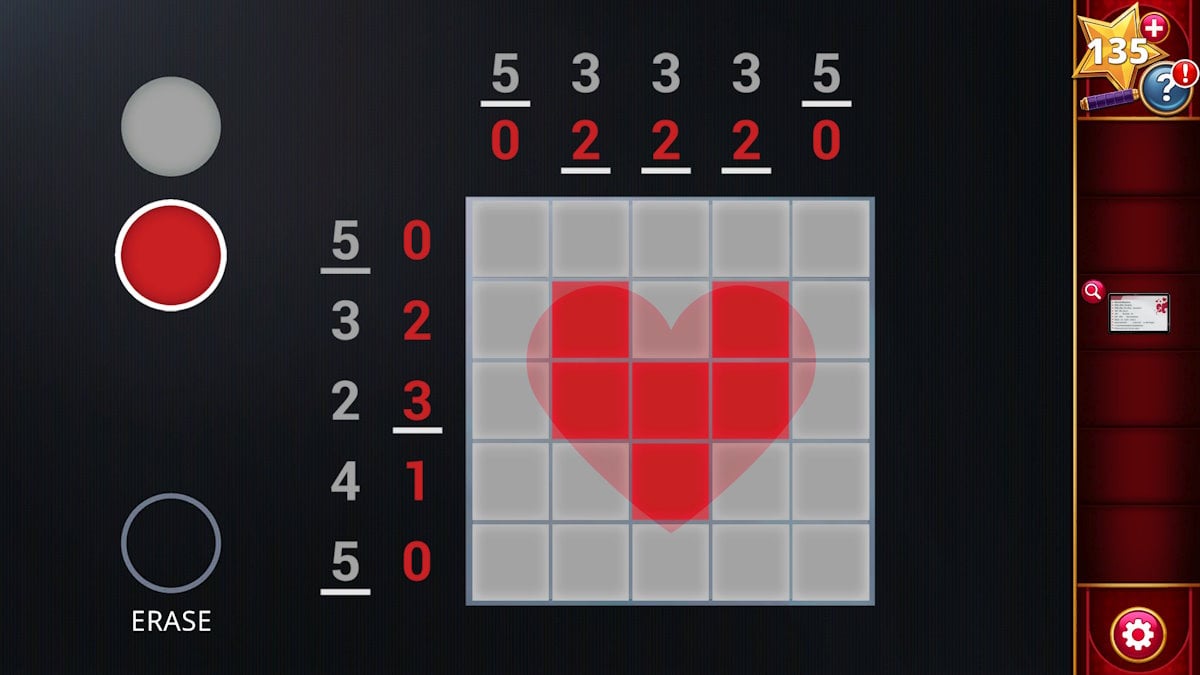
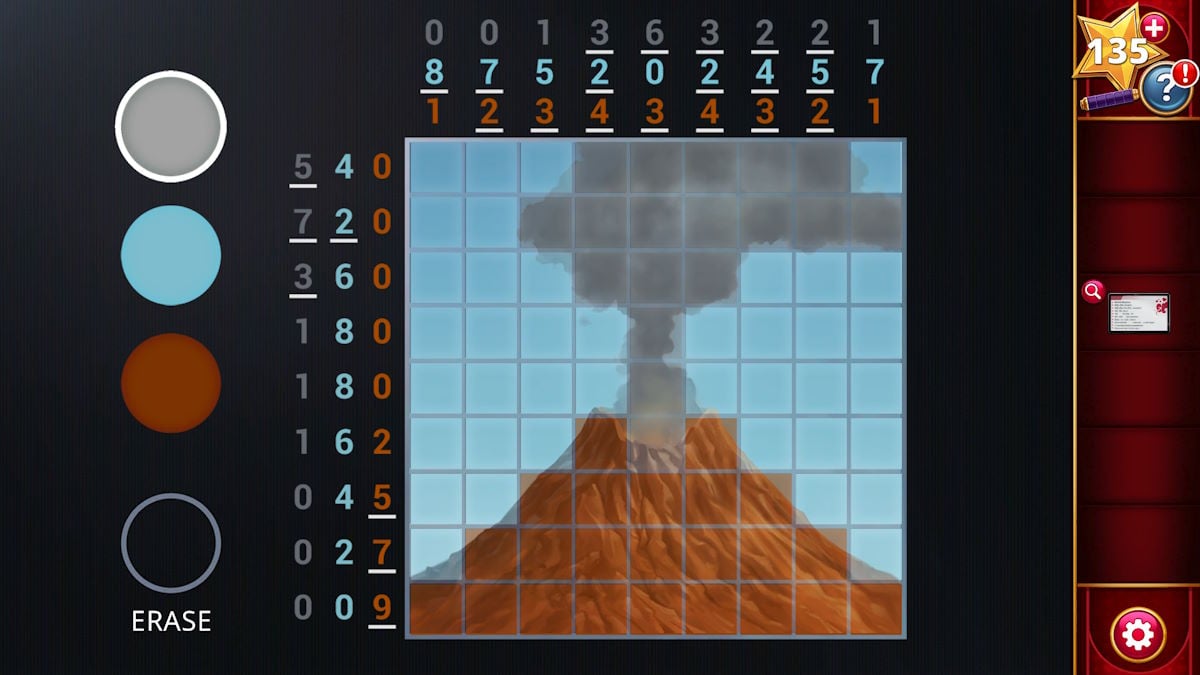
Click the ice pail ( c8 ) again to knock it over and find someWire Cutters . Use them to bump off the picture from the wall ( c12 ) and use the remote control on the screen behind to set out a nonogram puzzler . Once complete , you ’ll have to complete a 2nd one . The solutions are above and below .
after , you ’ll play Jon . Take theCoordinate Printoutfrom below the screen ( c12 ) that appear after you completed the nanograms . Give it to Jon , close any overhead compartments that are heart-to-heart , answer another RP question ( I enjoin I ’m here for the money ) , and you ’ll havecompleted Chapter 1 .
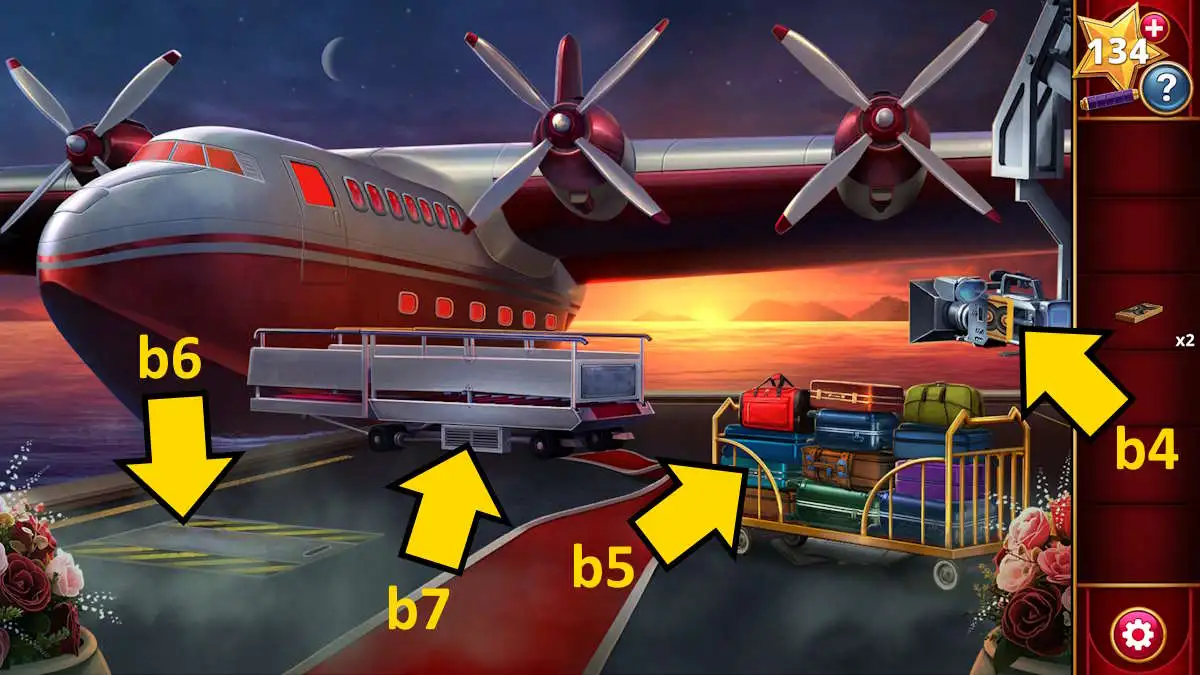
Image by Pro Game Guides
Puzzle Lovers Chapter 2 walkthrough - Mystere Island
You first necessitate to decidewho you want to partner withon the island . cluck Xia and she ’ll explicate this to you . you could then take each graphic symbol to have a chat with them , or merely flick Xia once more to make your pick . I chose Ivy , but once again it is just an RP conclusion . Once you ’ve chosen , the cabin will be empty .
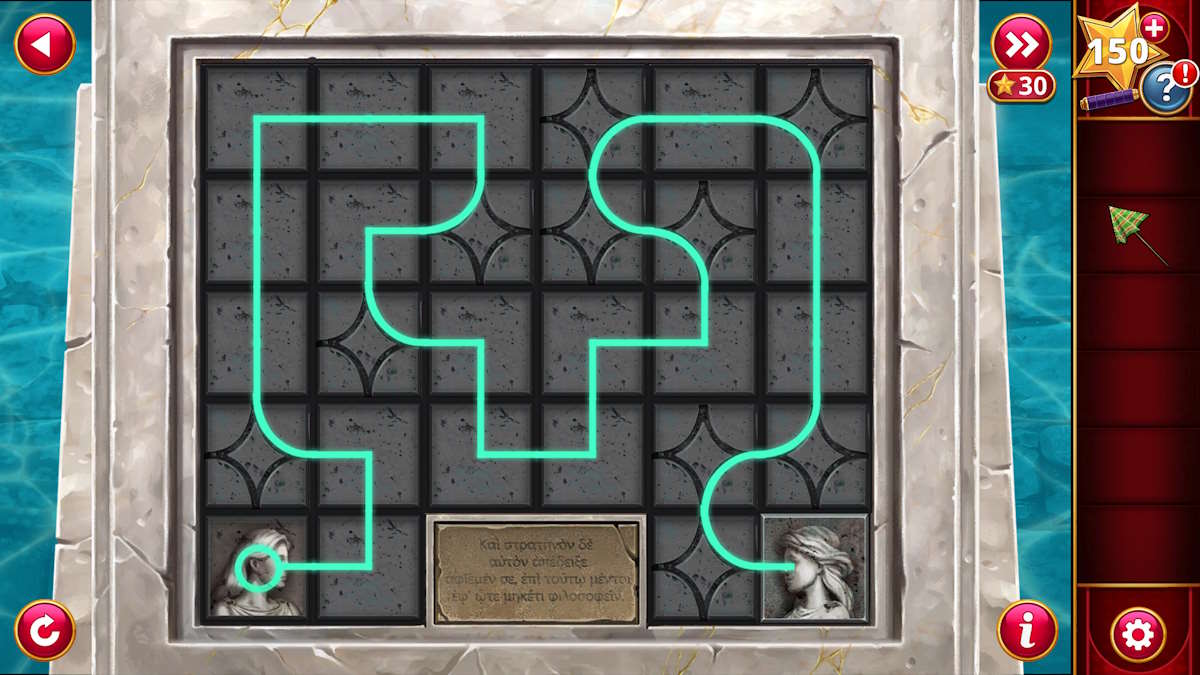
Move the core shock ( d1 ) , take theSmall Key , and use it to reach the suitcase ( d2 ) to find aHandle . Now move the blossom covering part of the luggage rack ( d3 ) to reveal a turn ringlet that has four colouration ( red , green , yellow , and blue ) .
snap the screen look-alike of the island ( d4 ) for a last - up and reckon for the numbers in the image that check the colors on the lock , give you8523 . Use this code to launch the luggage rack and take aParachute . Finally , use the grip on the hatching ( d5 ) to open it and click the hole to jump !
Screenshot by Pro Game Guides
The parachute puzzle
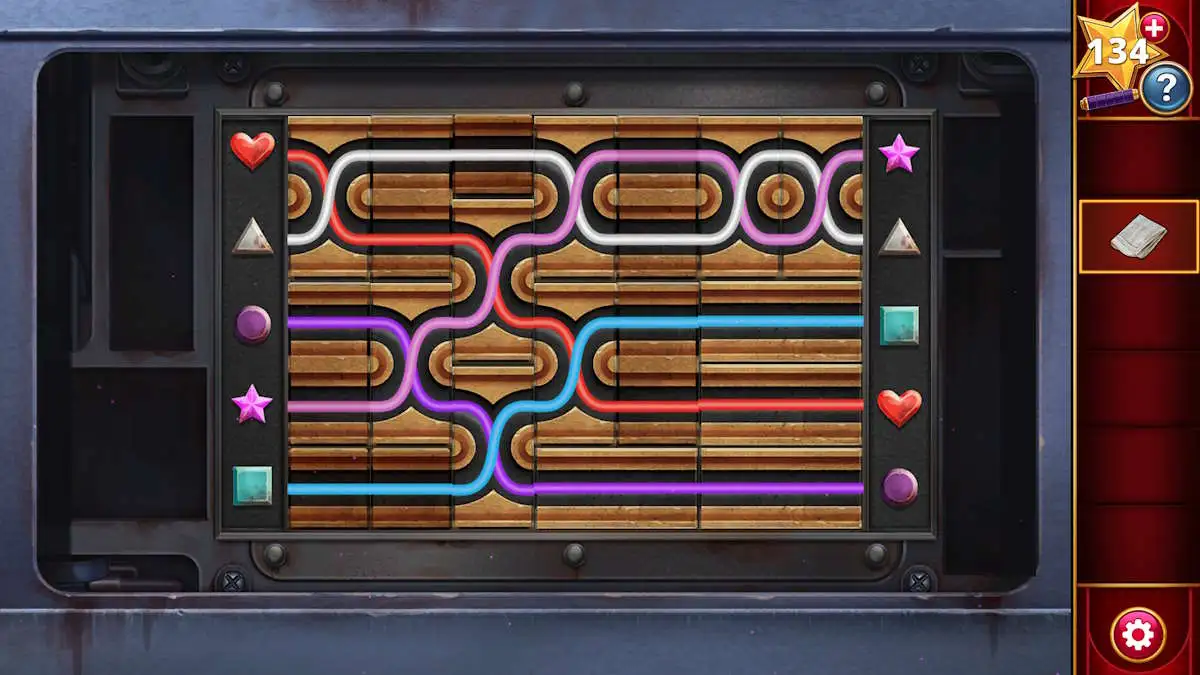
This begin a cord arrangement puzzle . You want to keep dragging the connectors until all of the connectors and the ropes turn from red to white . Once you do , you ’ll land safely on the island ( if you ’re stuck on this one , I ’ve include a gallery of work - in - forward motion images above ) .
Move the parachute from the walkway ( which gets you aParachute Cord ) and then move the rock candy ( e1 ) to find aWooden Ring . Move the leaf ( e2 ) to get aBranch , and apply the branch to knock the cocoanut down ( e3 ) to get someCoconut Oil . Use the oil to tease apart and then take theMachete(e4 ) .
Use the matchet to chop back the bush ( e5 ) and take theWooden Dowel , and again on the far wall ( e6 ) to find aWooden Disc . Click the gate you discover here for a stopping point - up , chatter the leave to move them , and take asecond Wooden Dowel . Now utilize the matchet on the leafage covering the other room access ( e7 ) , add the wooden ringing , wooden disk , and the two dowel pin , and the gate will unfold . Unfortunately , this also destroys the rope bridge ! Click the open gateway ( e7 ) to move ahead .
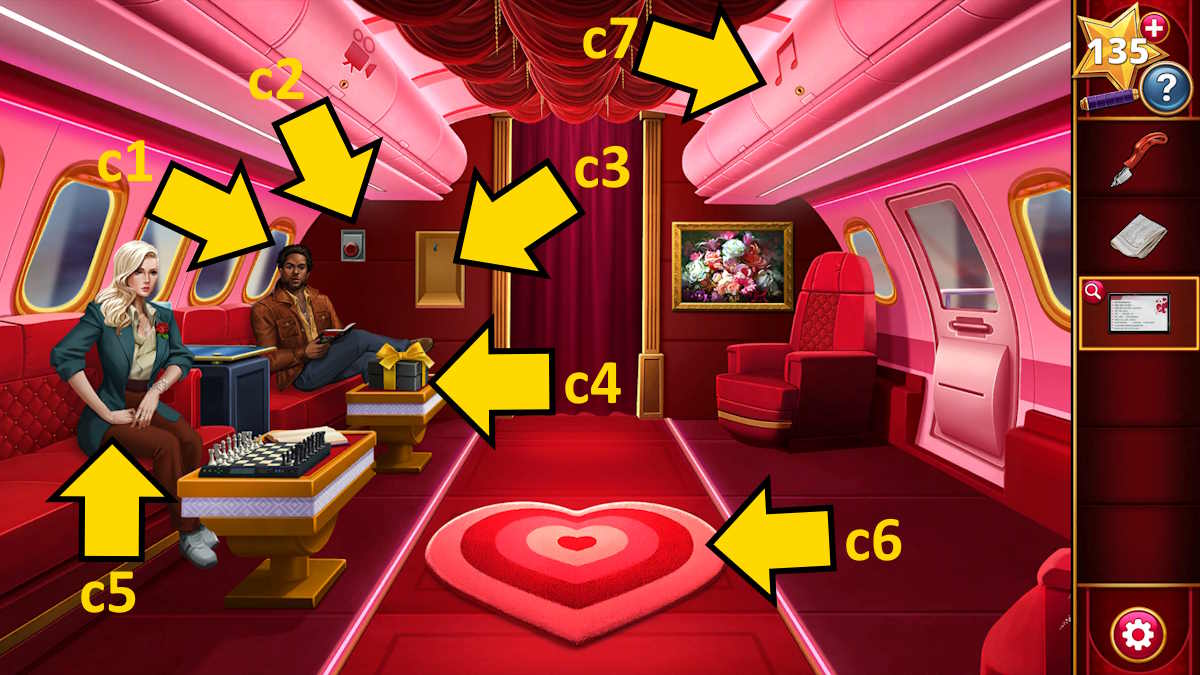
Image by Pro Game Guides
Entering the cabin
practice the panga to get someVinesand then click the tree diagram ( f1 ) to uncover a codification . On each line , from top to bottom , bet the phone number of mate hearts to get the code3121 . Look at the threshold ( f2 ) which tell ‘ couples only and utilise this computer code to try out to enter . The door open , but a tree diagram falls , damaging the cabin . Will nothing go mightily today ?
After your latest calamity , click the tree to remove it , and then click any of the planks ( f3 ) to get somePlanks . Click the satellite dishful ( f4 ) to knock down a rod cell , then add the cord in your inventory to it to be capable to collect aFishing Rod . Move the debris ( f5 ) to get theComputerand add it to the desk next to the monitor ( f6 ) . Also , take theWooden Heartyou uncover on the floor that was under the computer ( f5 ) .
chatter the signpost ( f7 ) to return to the broken bridge and add the vine and plans to repair it . employ the sportfishing rod to get yoursecond Wooden Heart(e8 ) , add them to the far door ( e6 ) , and then proceed through the new gate ( e6 ) .

Image by Pro Game Guides
The lava pools
Move the photographic camera ( g1 ) to take aShovel , then click the tone ( g2 ) to give back to the rope bridge circuit . Looks like you ’ve got ship’s company ! Click the pants that have appeared on the bridge to find aSilver Key . render to the lava , utilize the key to enter the coolbox ( g3 ) , and take theDehydrated Soupand anEmpty Thermosfrom inside .
render to the roach bridge and expend the thermos bottle on the falls ( e8 ) to get aThermos of Cold Water . Now you could add the soup powder and weewee to the toilet by the lava ( g4 ) , and then pick the thermos bottle up once more and use it in the soup to get aThermos of Hot Soup . Go back to the bridge , put the soup in the bowling ball on the bridge deck , and the animate being will leave .
Head to the hut and use the shovel to dig up the spate of stones ( f8 ) , open up the blue boxwood you find underneath , and take theThermal Scanner . retort to the lava and use the scanner on the volcanoes ( g5 ) to reveal four symbol .
Screenshot by Pro Game Guides
Getting the solar panel
Now transfer more rubble back at the hut to reveal a safe ( f9 ) . Enter the four symbols you saw in the lava and it will open , allowing you to take theHeat Resistant Gear . Use the gear to get past the poisonous plants that have appeared by the righthand gate and then also use it to take theSolar Panel(g6 ) . Return to the cabin ( using the protective gear to get past the Hydra ) to set off a cutscene .
You get some more RP conversation decisions ( I chose I cogitate that pig eat them , and suggested partake in the hammock ) . In the aurora , click anywhere in the setting to join the solar control panel and then pick up theCloth Napkin(where the deal of stones was , f8 ) . Use the napkin to clean the solar board and the calculator will power up , so tick it to set about an electric mystifier .
mark that when you get to 19 , you take to go back to 18 , and then return to 19 , before you could go to 20 . After going from 21 to 22 , you postulate to return to 21 before going to 23 . Once you ’re done , there ’s another cutscene before you get back on the planer . Choose someone to vote off of the show ( I picked Jon ) , do another RP question , and you ’ll havecompleted Chapter 2 . I also note thatI’d gain a fondness with Ivy .
Screenshot by Pro Game Guides
Puzzle Lovers Chapter 3 walkthrough - Frijonya
Again , you need to choose a collaborator ( I picked Ivy again ) before the cabin clears of contestants . Click the cup ( h1 ) to find aFun Straw , move the cushion ( h2 ) to get aGarter Belt , and chatter the loose drapery ( h3 ) to gaintwo Velcro Straps . pick out the skidoo ( h4 ) to find it is not work and pop the hood for a close - up .
Remove the belt and exchange it with the garter ; use the straw to replace the lose hose ; and use the velcro to finish the two unit from shake . Now you just need to click the skidoo once more to lead off to the logic gate at Frijonya .
Opening the gate
Click the skidoo that belongs to two of your rivals and then pick up theRune Documentthat ’s leave in their backwash ( i1 ) . Take theReplica Shield , aRunic Disc , and aScarffrom the snowman ( i2 ) , and then practice the shield to dig through the raft of nose candy ( i3 ) to discover asecond Runic Disc . Use the carapace once more to remove the Baron Snow of Leicester in front of the gate .
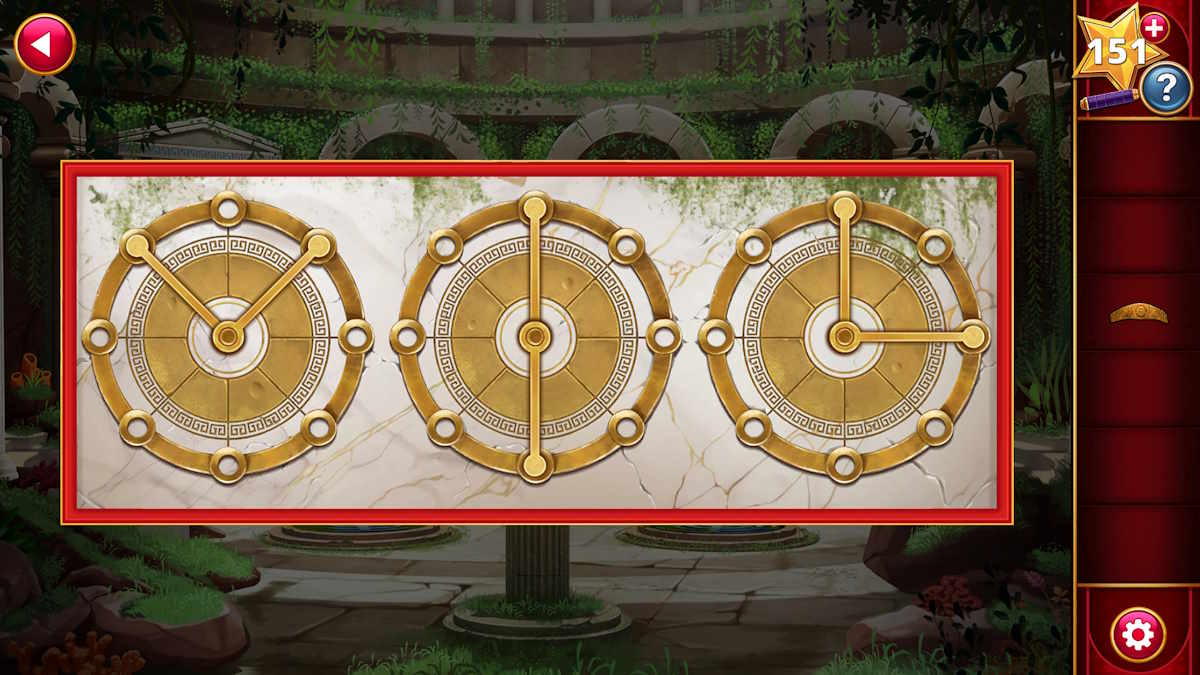
beak up theEmpty Bottleby the camera ( i4 ) , then click the skiddo to come up it ’s leak out rock oil . Click the oil slick with the bottle select in your inventory to get aBottle of Oil . Now click the gate itself ( i5 ) to get aStriped Barand habituate it in the four holes in front of the gate to get a code ( take care at how many chevron you may see on the bar when placed in each hole . The 4 is pictured above),3546 .
practice the cuticle to poke the snow to the left of the tree ( i6 ) to find thefinal Runic Discand sum up all three to the logic gate . Use theRune Documentto find oneself the symbol you need that couple your code ( see above ) , come in them on the discs on the gate , total some oil colour to its hinges , and channelize indoors .
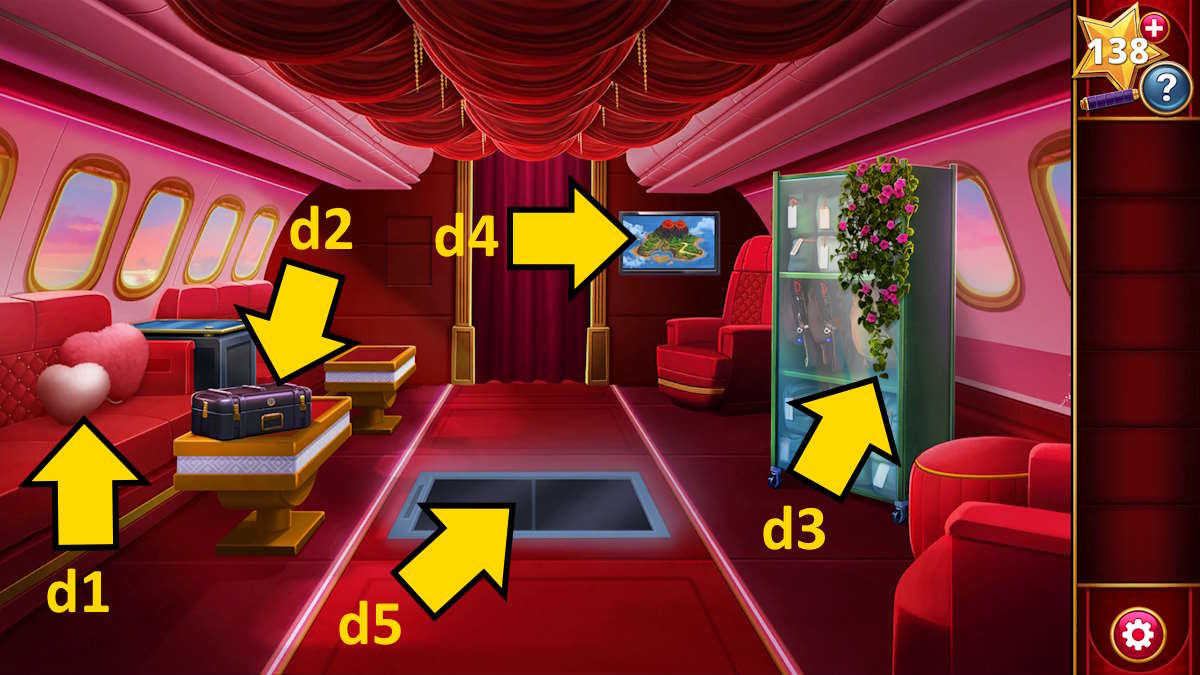
Image by Pro Game Guides
Inside the cave
Click the camera ( j1 ) and it will catch fire . take the standard candle selection ( j2 ) to get aCandle , employ it in the fire to get aLit Candle , and then habituate the lit standard candle to light the other candles so that you may see the rest of the way . Take theFrozen Axe(j3 ) and use it in the fire ( j1 ) to acquire aBurning Axe , which you could now use to ruin down the ice wall ( j4 ) .
Click the sheet cover the center of the room to bump off it and observe the drill . Remove the two stools ( k1 ) to findtwo Wooden Levers , take theViking Knife(k2 ) from the judiciary , and then withdraw the cloth it was concord down to grab athird Wooden Lever .
withdraw the snow from the restraint jury ( k3 ) , click it for a conclusion - up , and then use the knife to dislodge and then take theMysterious Crystal . Light the taper in the blue holder ( k4 ) with your own candle , place the crystal on top , and point out it swan a lighting on the portrayal on the wall ( k5 ) . Select the portrait , take thefinal Wooden Lever , and note the spot the pinkish lights highlight .

Image by Pro Game Guides
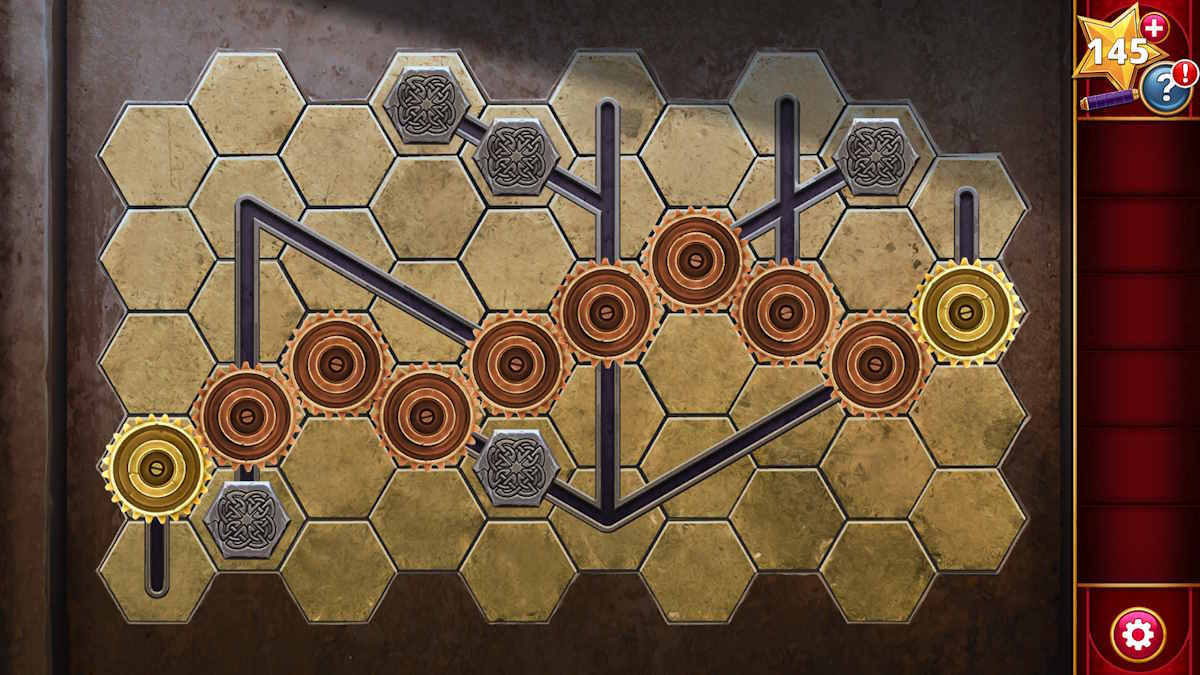
Add the level to the control panel ( k3 ) and then localise the lever tumbler as fall out ( with 1 meaning the top muddle , and five the bottom , from left to right):15342 . This opens the side panel on the practice session ( k6 ) , which you now demand to click to begin a geared wheel puzzle . I ’ve show the right geartrain sequence above .
The drill will break through the ice wall , so take theLadderthat was leaning against it ( k6 ) before clicking the debris behind where the ice wall was ( k7 ) to remove it . Add your piece of music of the ladder to the part above and then take your choice from the RP dialogue chives ( I wanted another heart , so I go for ‘ Let ’s make out ’ ) .
The cabin
Once you click the trope once or twice the storm will clear . Pick up theShovel Handle(l1 ) , select it in your stock , and then fall into place the shovel blade ( l2 ) to get aSnow Shovel . take it and use it to move out the snow on the right ( l3 ) to reveal a logarithm ; on the room access to reveal the door ( l4 ) ; and on the left ( l5 ) to find someBBQ Tongs .
apply the tongs to reach theTapestry Piece(l6 ) and then click the doorway to discover the compounding lock has four different symbol above each phone number . These check various portion of the cabin ’s outside , as follows :
Inside the cabin
The threshold will now open , so manoeuver inside . Use the shovel to off the snow from the decrease beam ( m1 ) and then penetrate the electron beam to prop it up and repair the gob in the wall . Take theReplica Axethat is revealed behind the piece of bulwark you just pay back ( m2 ) and start the book on the board ( m3 ) to take hold of aHeart Token . Click the book once more to remove it , revealing a game table underneath . you could also now stand up the storage locker that had topple over ( m4 ) .
Select the low section of the storage locker ( m5 ) , take aCandle Lighterfrom in spite of appearance , and then take asecond Tapestry Piecefrom the middle section ( m6 ) and athird Tapestry Piecefrom the top section ( m7 ) . Add the art object to the picture framing ( m8 ) and then sweep and splay the piece to complete the image ( see below for the completed tapestry ) . It ’s pretty straightforward , as when a small-arm is in the correct place it can no longer be moved . Once concluded , it flips to reveal aGame Boardwhich you may take .
point back out of doors and utilize the ax on the log ( l3 ) to get someFirewood . Put the firewood in the fireplace ( m9 ) , utilise the candle lighter to light the fire , and then enjoy some red-hot burnt umber . Afterward , pick up yoursecond Heart Tokenthat degenerate on the floor by the cabinet . Move the rug to chance a third and utilize the BBQ tongs to get thisfinal Heart Token .

Image by Pro Game Guides
How to win the board game
Put the plot table on the table ( m3 ) , add the heart tokens , and play the game .
I take for granted the game always plays out the same fashion but if not , you may simply re-start . Once complete , you canclaim the Keybelow the tabular array and apply it in the curl underneath the arras . This drops a bed down from behind the bulwark , so click the phone on the bed to let Xia know you ’re all right . After enjoying the Northern Lights out of doors , I decided to go for the option , I love seeing this with you .
Go back inside , click the bed , make one final RP decision , and then you ’ll be back on the plane . I voted Mo off this time , also noting that I now had two nitty-gritty with Ivy . And with that , Chapter 3 is complete .

Image by Pro Game Guides
Puzzle Lovers Chapter 4 walkthrough - Ancient Greece
When you ’re alone on the airplane ( I partner with Ivy again ) , grab theVolleyball(n1),Volleyball Net(n2),Beach Umbrella(n3 ) , and theBronze Facefrom the chest ( n4 ) , before clicking the plane doorway to exit .
Once the tabernacle has risen from the water , give the volleyball to the octopus ( n5 ) to bring out the top of the footstall . Click the blue dish ( n6 ) to encounter aHand Crankunderneath , and use the net income in the pond ( n7 ) to witness asecond Bronze Face . Place the two face on the plinth ( n5 ) and you ’ll be capable to remove the top to bring out a keypad for a codification .
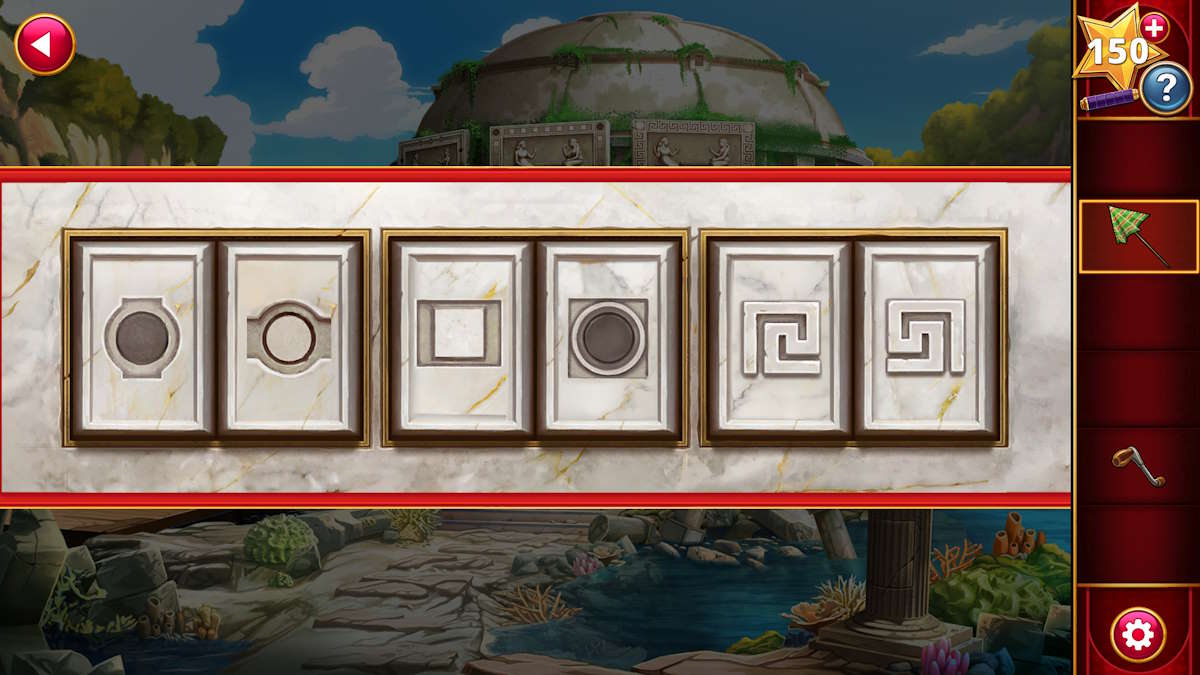
Now employ the umbrella to remove the seaweed around the top of the tabernacle ( n8 ) . Note the patterns of the frames around each of the three images you ’ve disclose and use them as the codification to enter the synagogue . ( disgraceful and whitened circles;white squares and black circles;opposing circle formula ) .

Image by Pro Game Guides
I ’ve pictured it above if you get stuck . When you get it correct , a compartment with gears inside will appear at the bottom of the pedestal . Use the crank on the gear and the threshold will open , let you into the temple .
Inside the temple
Once in spite of appearance , snap the pinkish plants on the central plinth ( o1 ) to reveal a puzzler . I ’ve pictured the completed mystifier below . If you ’re stuck on this one , observe the blue linein the image by snap the next tile it goes through , from bottom leave to bottom right hand . Once done , the water will run out out of the room , leaving you with the scene you see above .
utilize the umbrella to slay the seaweed from the three statues ( o2 ) , take theBronze Keyfrom the plinth ( o1 ) , move the shells on the remaining ( o3 ) to findtwo Bronze Rods , and then go back to the plane and use the bronze key to open up the breast ( n4 ) . Take theBelt of Aphroditeandtwo Bronze Rods .
Return to the temple and add the four rod to the plinth ( o1 ) to begin another puzzle . The key to solving this one is thepositions of the arms you’re able to see on the three statuesyou unveiled . The one on the left is in a V shape , the middle two arms are face down , while on the right the one limb you’re able to see go down and then proper . think about a clock grimace , this think you involve to set the three dial ( from left to right wing ) at roughlyfive past 11,6 - o - clock , and3 - o - clock . See below for the answer .

Image by Pro Game Guides
More cogs are now revealed in the basis of the plinth . lead back out of doors , retrieve the Crank from the plinth there ( n5 ) , and use it on the plinth within . Thisopens the two grates(o4 ) . Click one of the grates to trigger a abbreviated RP conversation with your partner , and then manoeuvre down !
Below the temple
This set about your next puzzle . Both you and your better half ( represented by the hearts ) haveeight move eachto get to prophylactic and you have to figure out together to make it . Take the following steps to get through if you ’re stuck ( the red heart is the one on the left ):
Aphrodite’s shrine
Click the mess ( p1 ) to pink it over and collect aPlate . pick out the red sheet ( p2 ) to remove it and take theFlint Kityou can now see under the bed . Click the gloomy flowers ( p3 ) twice to unwrap and take aTriangular Piece , and then come home the trellis ( p4 ) twice to take it and also find aMarble Arm .
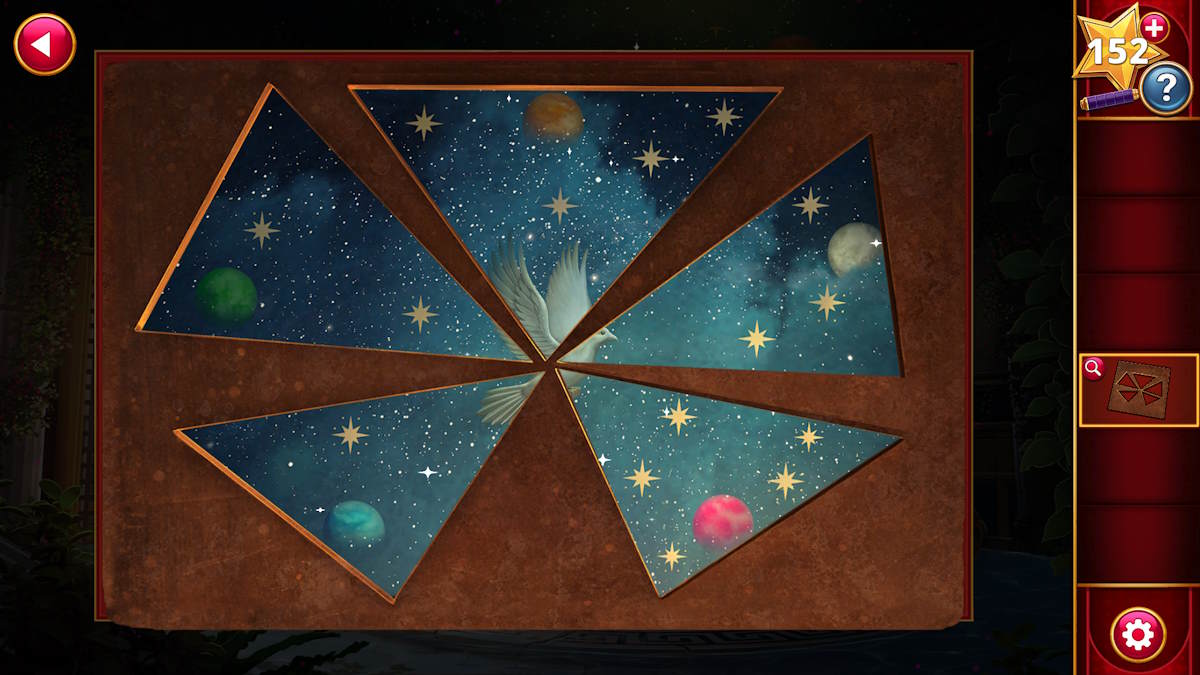
Use the trellis on the statue of Aphrodite ( p5 ) to get the height you need , and then add the marble branch and the knock to the statue . When you add the belted ammunition , a level panel will open up next to the bottom . Also use the Flint River to get off the candle in the hand of the statue , whichilluminates the ceiling above . Click the ceiling for a stopping point - up , which reveals a dove fence by five planets . utilize the plate on the trope ( pictured below ) and observe the number of hotshot now framed next to each colored planet .
Come out of the closing - up and add the triangular art object to this panel to bring out a mystifier . cluck the treasure in the monastic order bespeak by the paradigm you just saw ( dark , green , whitened , orange , and thenpink ) , and a doorway will appear at the back of the way . This spark off another RP mo , which I used to get closer to Ivy once more . Then it ’s back to the plane for the next right to vote . I reluctantly voted off Jake , to get rid of the only other manly competition ! And with that , you ’ll havecompleted Chapter 4 .
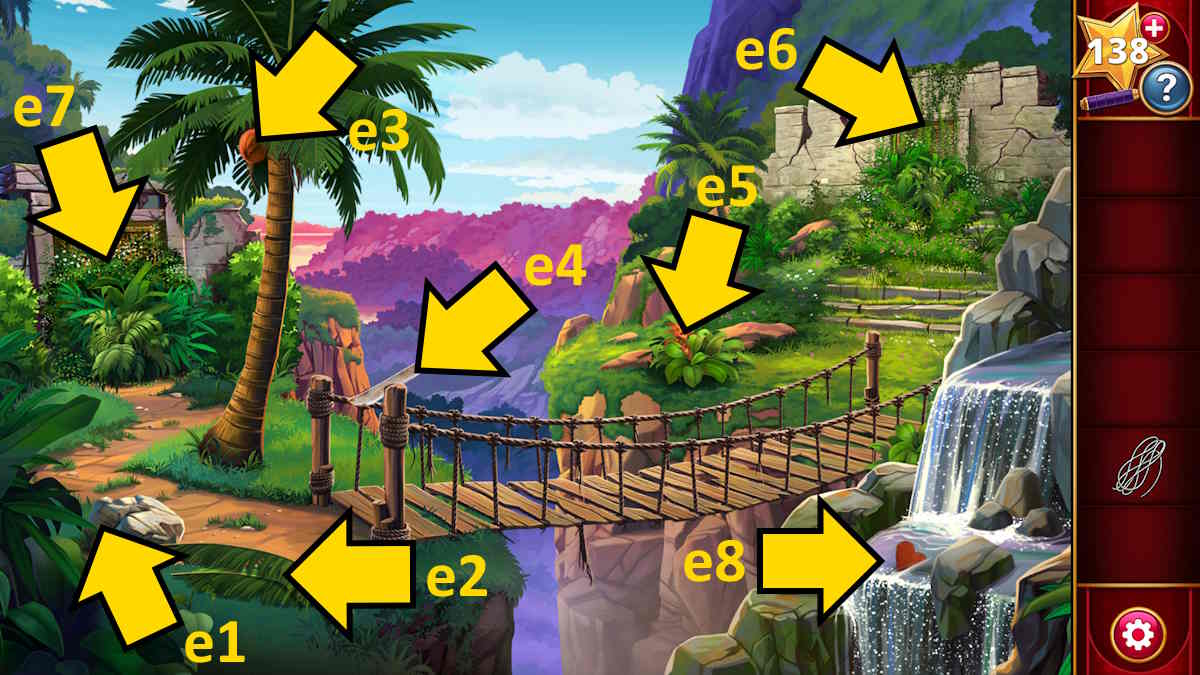
Image by Pro Game Guides
Puzzle Lovers Chapter 5 walkthrough - The Serengeti
Once you ’ve gone through the common partner - picking parade ( yup , you pretend it ; I went for Ivy again ! ) , it ’s prison term to devise for the bike ride ahead . Select thecrash helmets(q1 ) , then thecable charge the bike(q2 ) , and then dawn theemergency supplies box(q3 ) to place it on the back of the bike . Now click the planing machine threshold to open it and you ’re away .
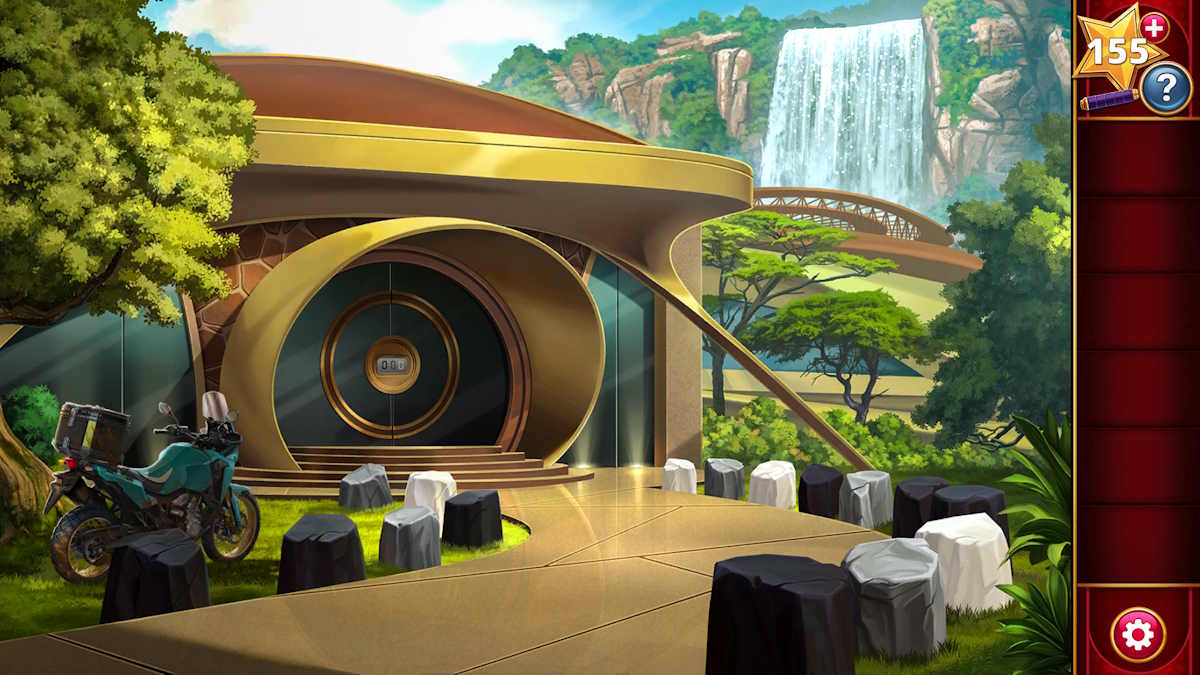
When you arrive at a futurist - looking museum to witness it locked , observe the bit of rocks of each color line the nerve pathway ( 7 black , 5 grey , 4 ashen ) . Use this as the code for the door ( 754 ) and be greeted by Khadija . Click the entrance to head inside .
The first museum challenge
Once your partner is taken to another area of the museum , you ’ll be left to listen to a narrator . Once they ’re done the odd side of the showing will be lit up ( r1 ) , so click it to enter the display .
Move the bombastic primal fall tree by clicking it , and then click the leaves on the board ( s1 ) you find behind it to slay them and then pick up thePigment Chunk and Stonethey were covering . in conclusion , penetrate the board ( s1 , aHand Painting ) to pile up that too .
Go back out to the hall and fall into place the screen ( r2 ) to see that you take torecreate the talent from the tribe across the river . you could now clack the country on the correct ( r3 ) to figure the shop .

Image by Pro Game Guides
set the manus painting on the work bench ( see above ) and sink in the plate ( t1 ) to total the paint to it . snap theKnife(t2),Grinding Stone(which appears below the eggshell once you ’ve position the pigment ) , andGourd(t3 ) to collect them , and then utilise the Harlan Fisk Stone on the pigment in the shell ( t1 ) to reduce it to powderise .
Return to the river scene and employ the tongue on the tree diagram ( s2 ) to get someBarkand on the plant next to it ( s3 ) to get someBushy Reeds . Also , use the gourd in the river ( s4 ) to get aGourd of Water . Use the weewee on the shell in the shop ( t1 ) to make a paste and place the while of bark on the workbench . Add the reeds to the stick on the workbench ( t4 ) to make aBrush , apply the brush on the paint ( t1 ) to get aBrush With Paint , and then utilize that on the bark to finish the hand house painting .
The second museum challenge
You ’ll find that both the sieve ( r2 ) and the scene on the left over ( r1 ) have now changed . The screen says that you now need torepair the gift from the kin across the river , so get back to the left display . expend the tongue to get someThin Vinefrom the tree diagram ( s5 ) , move the branch ( s6 ) to find anUnfinished Necklace , and move the leaves by the same arm , and take theAnimal Teeth .
fall into place the dust on the left of the screen ( s7 ) to reveal some sand , then do the same on the Baroness Dudevant to find and amass someLittle Shells . Now you canreturn to the workshop(r3 ) and place the uncomplete necklace on it , before using the knife to untie it . At this point you must add the petty shell and animal teeth to the bench , followed by the thin vine . This completes the challenge .
The third museum challenge
The blind ( r2 ) now require you to recreate the weapon from the federation of tribes across the river . Go back to the river scene ( r1 ) and peck up theSpear Thrower(s8 ) . Next , move the branches ( s9 ) before using the knife to cut back the vine ( s9 ) . This allows you to take theV - form Branchthey were hanging on .
Return to the workshop ( r3 ) andplace the spear thrower and v - shaped branch on the workbench . Use your knife on the v - shaped branch , first on the left end and then on the right . in conclusion , practice the brush with paint to make the lower spear front the same as the pilot . You then get an RP question . I went with , ‘ We should trade with them ’ .
Afterward , a plinth come up from the floor of the museum , which you’re able to click to begin the next puzzle . You postulate tomove the logarithm so that they form a pathyou can use to get from one side of the river to the other . To complete the puzzle , do the following :
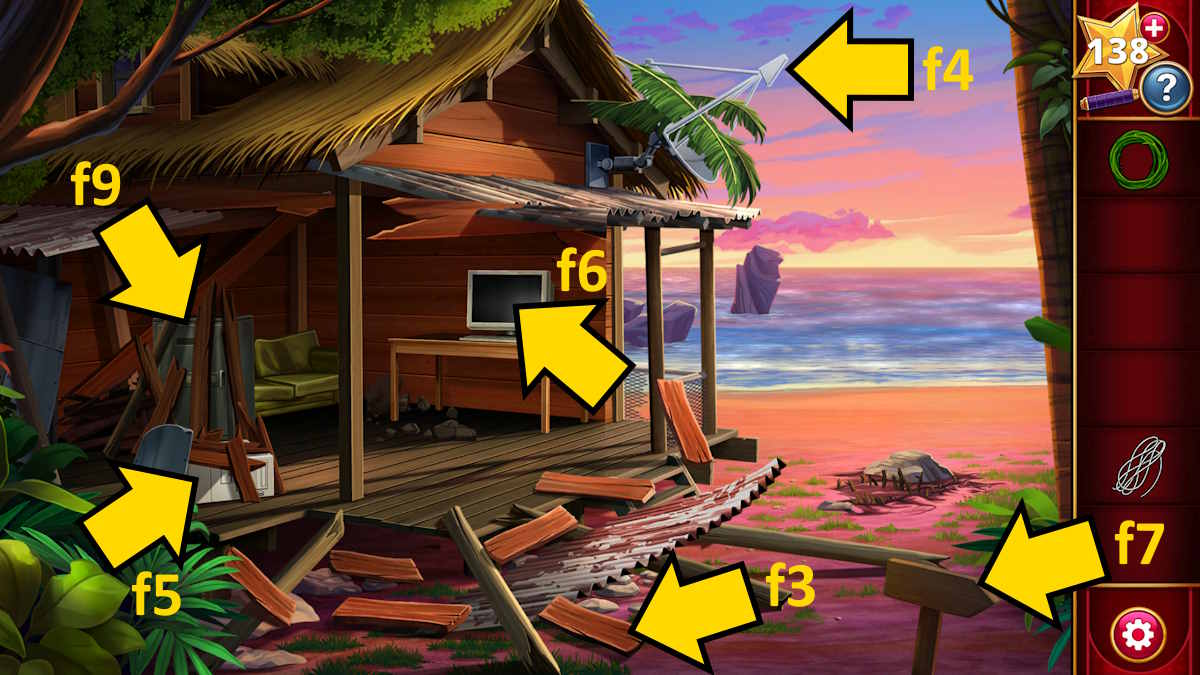
Image by Pro Game Guides
Your tribespeople will now cross the river . Your associate returns , as does Khadija , and you ’ll get another RP question . I chose that the first coming together was all business , after which the blind live blank andtwo ladders appear from the ceiling . Click either run to begin the 10 ladder job .
The final cave painting
You postulate toplace and rotate 10 laddersby clicking the reddened superman . You and your companion can be assure at the bottom left and right of the screen . The ladders involve to be direct so that you could both attain the top . The trick is to reunify with your mate as quickly as potential to conserve ladders . I ’ve pictured the answer above .
You ’ll now arrive in the final cave . Take the spear ( u1 ) and apply it to launch the crateful ( u2).Click all six token inside the crateto beak them up , and then add up the four while of figurer equipment to the desk ( u3 ) , direct the yellow wheels on the ground ( u4 ) , and add together the light to it . You ’ll end up with the picture below .
choose the desk ( u3 ) for a close - up and drag each of the computer piecesuntil you see lights show up when their screens come on . If you note the amount of light proportional to each piece of equipment you end up with , 4,6,7 , and 10 .
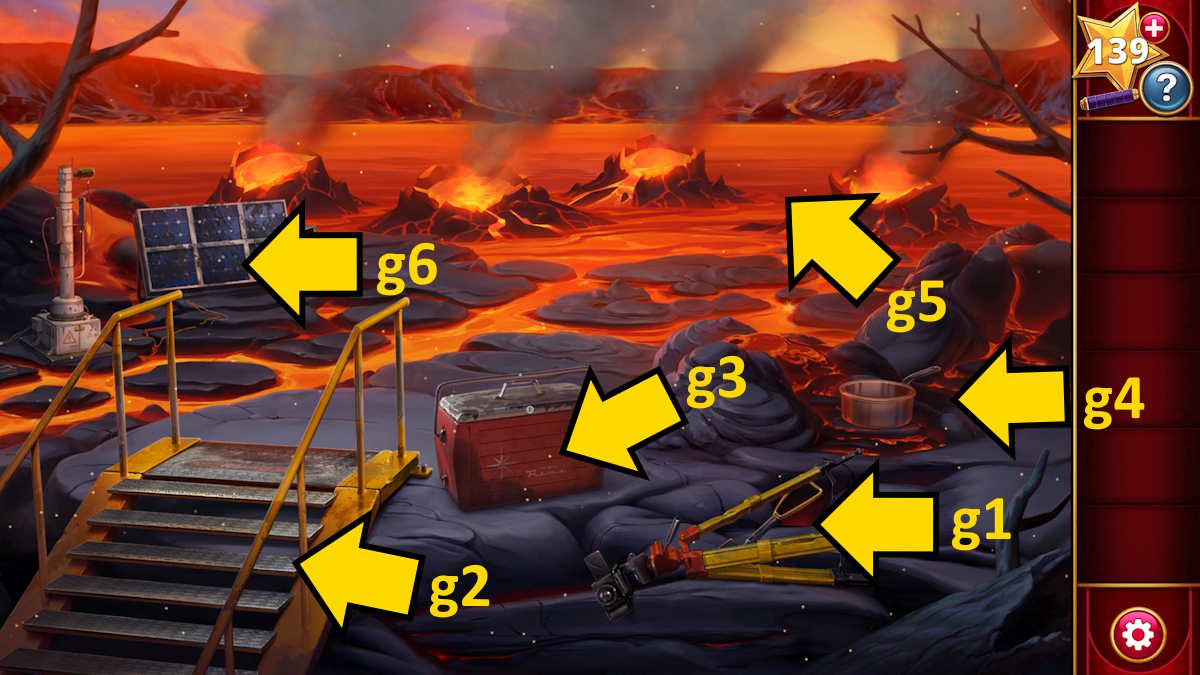
Image by Pro Game Guides
Now choose the back bulwark ( u5 ) , which is light by the lamp , for a close - up . Select the four fleur-de-lis that fit the monitor lights ( 4,6,7,10 , in that specific lodge ) and the final cave painting will be revealed . After another RP question , you ’ll have fill out all the museum tasks .
Your tent for the night
When you get at your destination for the night , take thePliersfrom the stove ( v1 ) and move the emergency supply ( v2 ) off the back of the motorbike . You need a code to open up the supply box , douse the pliers to fix the zipof the collapsible shelter and open it up .
Take theHedge Clippers(v3 ) and apply them to cut back someBranchesfrom the tree diagram ( v4 ) , which you’re able to total to the stove ( v1 ) . Now click the table and electric chair in the tent to move them outside . To open up the padlock on the supplying ( v2 ) , get a close - up of the lock and count the marks on the ribbon around its bound to get the code ( 3443 ) . Now you could take theEasy - Cook Meal , Air Compressor , Pan , andCamping Firestarterfrom inside .
utilize the compressor to pump up the airbed ( v5 ) , and then fire up the stove ( v1 ) with the firestarter before adding the pan and the repast . Once you ’ve enjoyed the meal and taken another bunch of RP conversation decision , you ’ll beback on the plane . Vote the next contestant off and you ’ll be at theend of Chapter 5 , This time I roll farewell to Alex .
Screenshot by Pro Game Guides
Puzzle Lovers Chapter 6 walkthrough - The Vineyard
It all changes at the start of Chapter 6 as you direct off to try and save Carmela and the vinery ! Once you ’ve pick out your partner for the final chapter ( English ivy for me ) , click the sheet hachure to go far down at your mob vineyard . clack the chute to hit it from the barrier and then take theTruck Keyfrom the mailbox ( w1 ) . Click the grim roadblock to absent it , and then the box ( w2 ) to spread out it and feel aScrewdriver .
choose the headlamps ( w3 ) next to remove and pull in theDuct Tape , then click the headlamps once more to remove them and take theWiresunderneath . Take theFruit Pickerfrom the side of the motortruck ( w4 ) , then expend the motortruck key to open up the truck door ( w5 ) and take theExtinguisherandCleaning Clothfrom the cabriolet .
habituate the cleanup fabric on thepuddle(w6 ) to reveal the image above and then use the extinguisher toput out the fire(w7 ) and use the fabric once more to reveal two more clues on the ground . Use the canal tape to repair theoverhead wire(w8 ) and then habituate the fruit picker to call down the same telegram back into its proper seat .
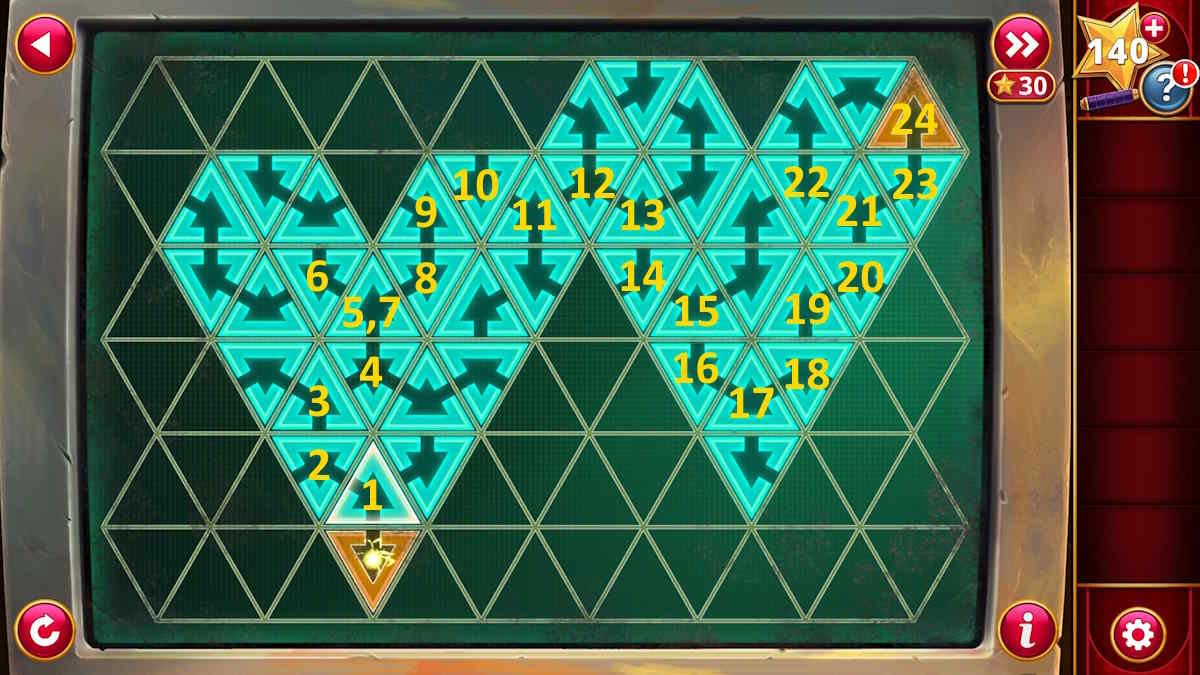
Image by Pro Game Guides
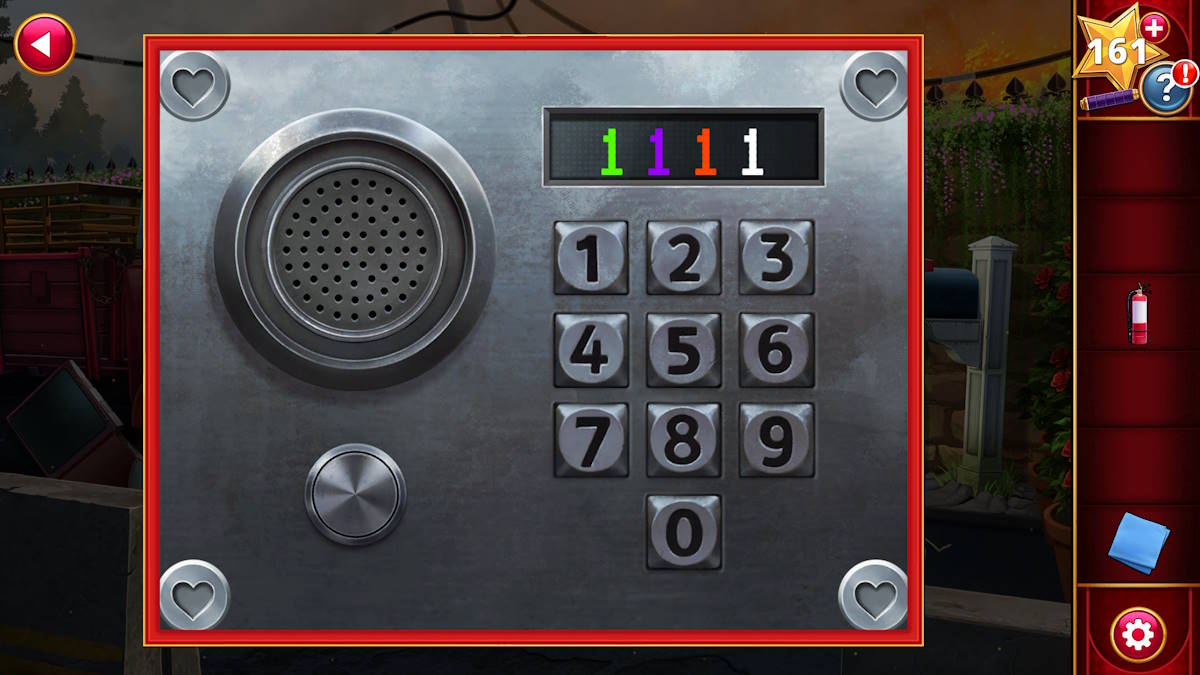
Use the screwdriver to remove the front home base of theintercom(w9 ) , add together the wires , and compact the button totalk to Camila . She does n’t have the code , so you require to work it out from the images tie on the ground . If you click the buttons on the launch pad , you ’ll see the numbers that appear are in different coloring match the clue ( gullible , purple , cherry , and finallywhite ) .
Enter2178into the keypad and the gate will open . apply the fire extinguisher on the gate to beat back the flames and then click the logic gate once more to maneuver inside .
Turning on the sprinklers
open up the backpack ( x1 ) to get someCablesand then enter the top crateful ( x2 ) to find aWrench . Now clack the crates once more to dispatch them , and take the Antenna you ’ll find on the floor ( x3 ) at the al-Qaeda of the unit that the crates were hiding .
Get a ending - up of the box ( x4 ) and take theSafety Clipthat ’s keeping it closed . observe the pigment color on the top of the box , and the ones on the inside when you open up , which gives you red , light-green , puritanical , and yellow .
start the wine press ( x5 ) to discover aRouter , and use the safety clip to readjust it ( see below ) . add together the cables and the antenna and it will be ready to go .
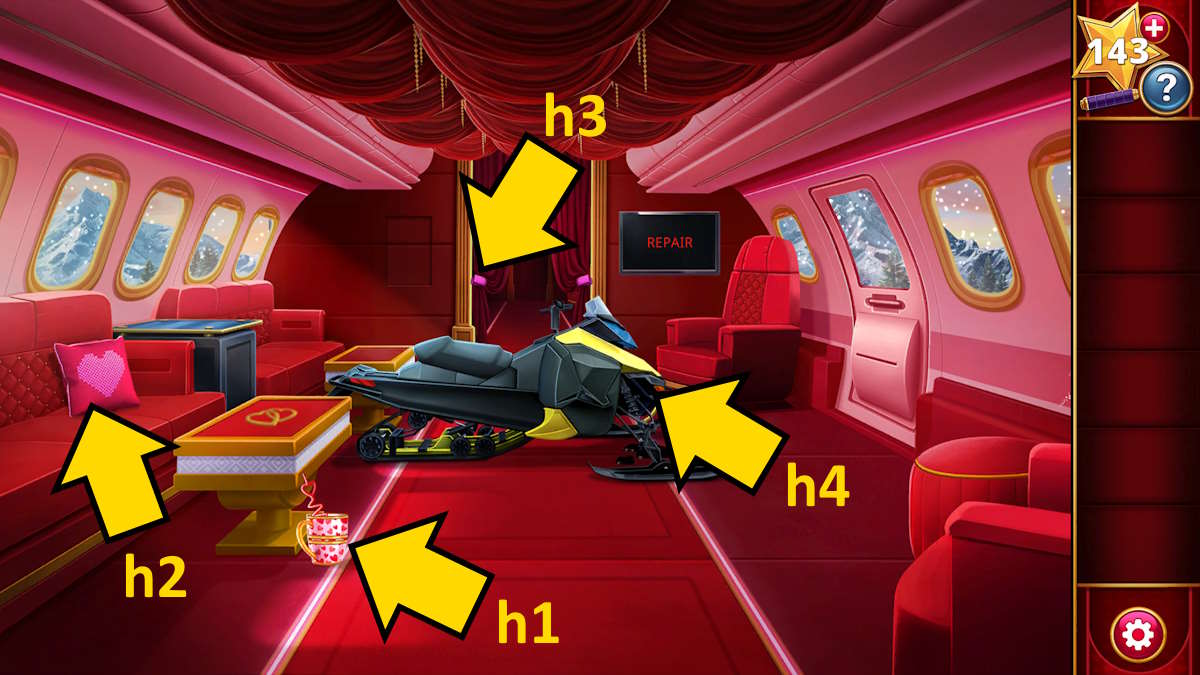
Image by Pro Game Guides
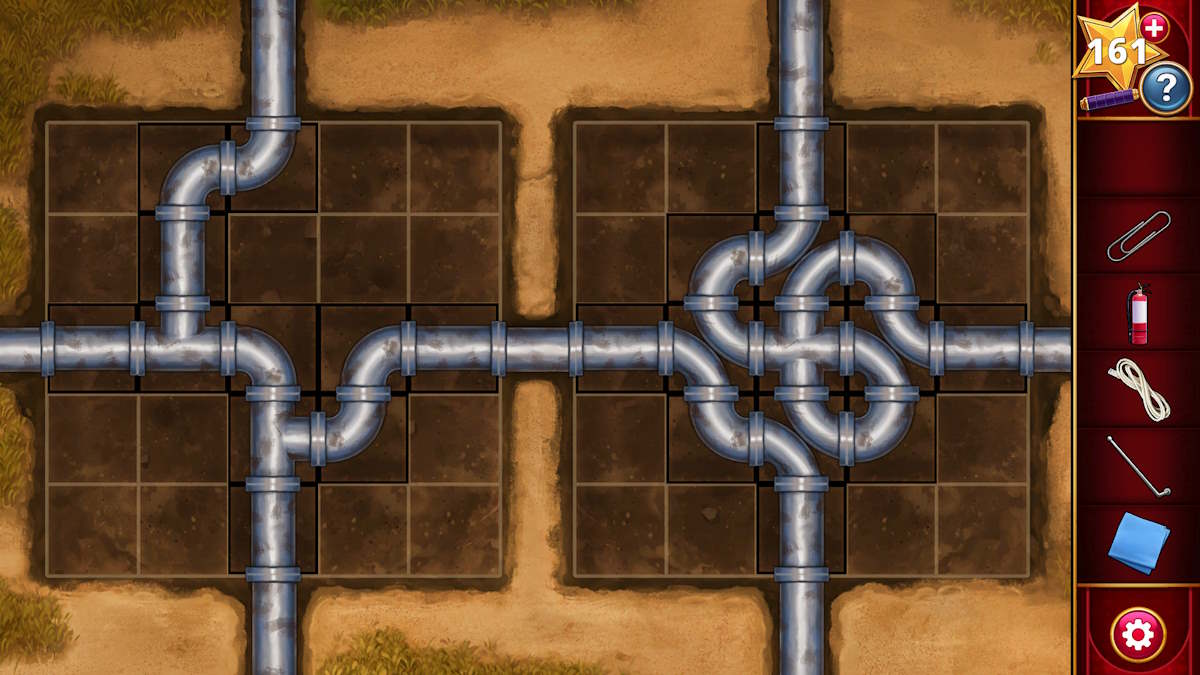
Now use the twist on the silver dollar ( x6 ) and then push the go-cart away and remove the tarpaulin , revealing the sprinkler pipe . Click the pipes to start a puzzle .
You but require to make it so that all the pipes connect with each other and also to one of the pipes that comes in from the four sides , mean there areno loose ending . All the pipe piece are already at the right slant and on the correct side of the image ( left or right ) , so youjust need to move them around . See the completed teaser below .
To get the sprinklers going you need a codification . face at thefour sets of grapes(x7 ) to see that , from leave behind to right . They have 4,6 , 5 , and 3 stems respectively . Now click each set of grapes to find their color , and agree that to the paint colors on the code box ( x4 ) .
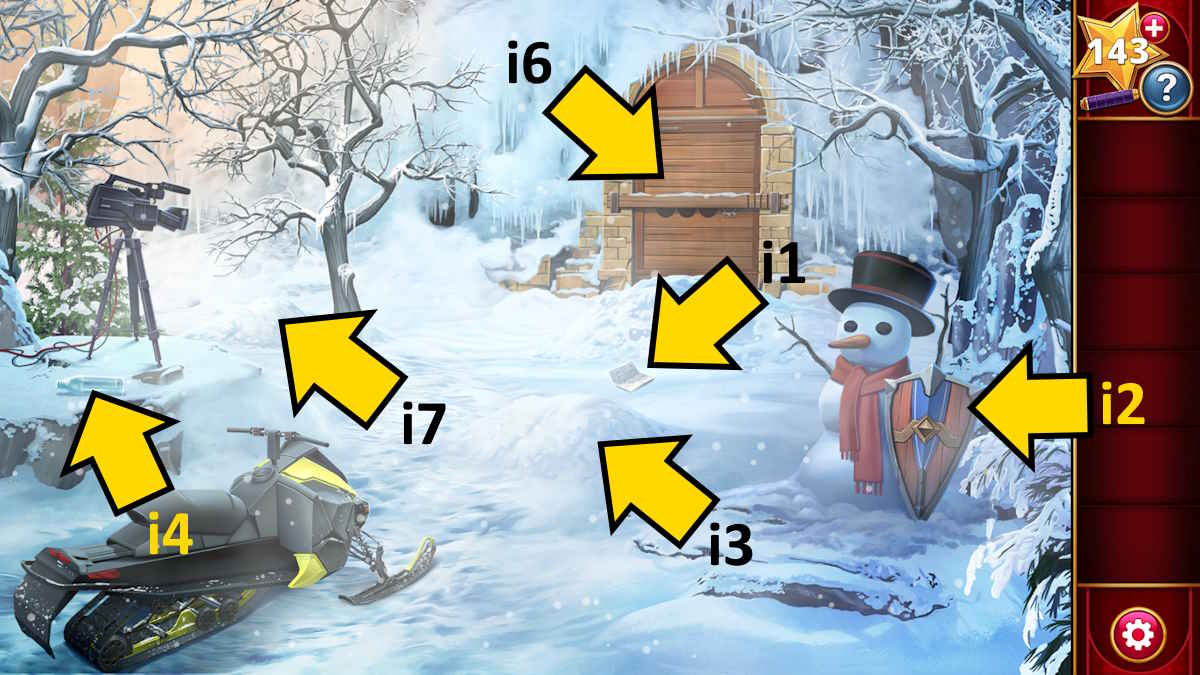
Image by Pro Game Guides
This give you3645 , so enter that into the box to turn on the sprinklers . squeeze the red push button , and you ’ll put out the fires ! Click the wine cave entrance to move forward .
The wine cave
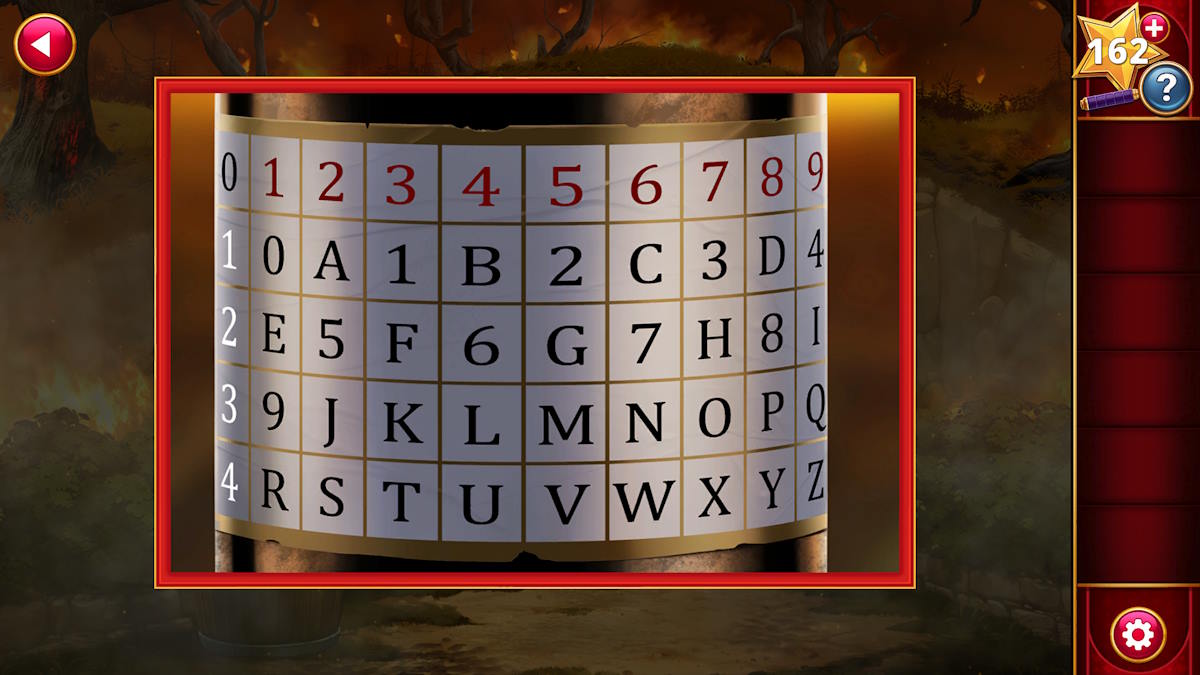
Use the extinguisher to put out the fervour outside the cave and then tick the smoking wood to move out it . snaffle Carmela’sScarffrom the door ( y1 ) and thenuse it on the wine-colored bottle(y2 ) to reveal a puzzler hint .
If you click the numbers on the lock ( y1 ) you ’ll see that each of the four dials hasone red number and one blank number . mark these turn down and use them as cross source point on the wine label to find the codification . You ’ll get :
Now ( ignoring the colors ) you’re able to enter the code7849to open up the William Henry Gates . Thankfully Camila is alive , so you get her back on her foot and head off towards the lake to try and avoid disaster .
Screenshot by Pro Game Guides
Heading for the lake
For this teaser , you need toeither move or utilize your asphyxiator . Note that when you move the fire move , but that the fire does not move when you expend the asphyxiator . The fires do n’t automatically move toward you , so follow how they react when you move . Also , when you go through a stone gateway , any fires behind you will not abide by . Do the pursuit :
Nowback at the truckyou’ll have to make another RP decision about the character reference you ’re with before you ’re rescued by the carpenter’s plane . There ’s time for one more RP decisiveness afterward before the show ’s finis .
The finale
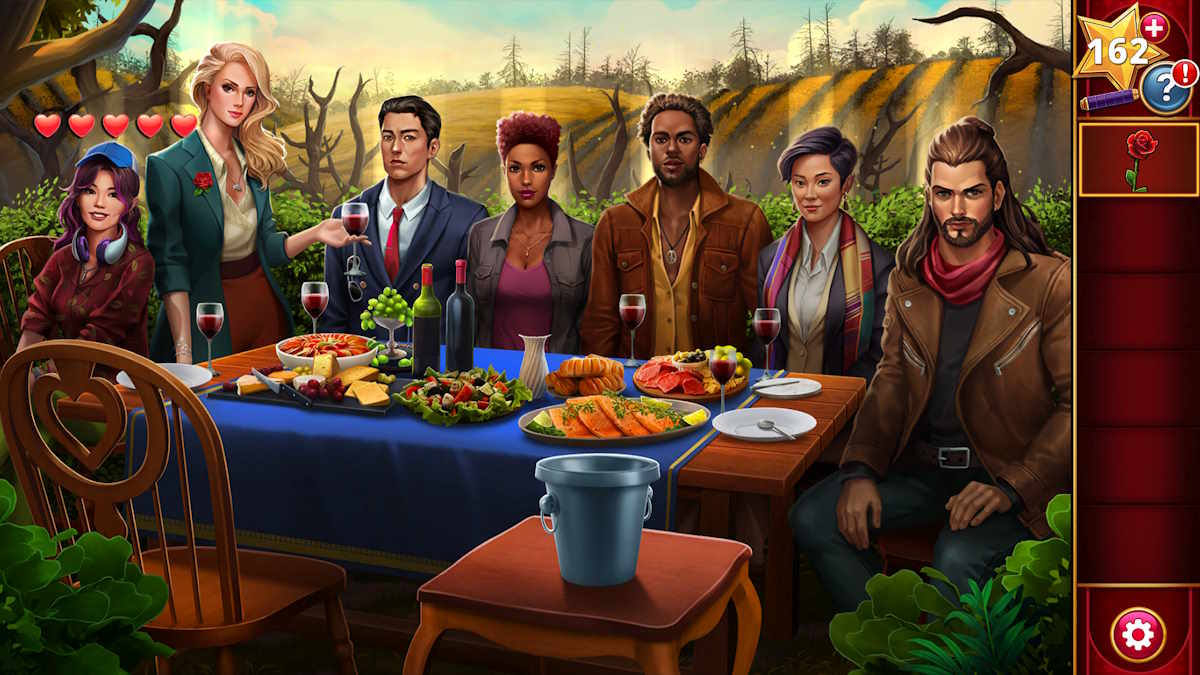
The whole stamp is reunitedfor the finale , during which you need to take the rose wine from the table and give it to the person you want to share the prize with ( include Xia ) . you may talk to everyone once more but again , it ’s a roleplay decision so pick out whoever you want . The ending will slightly change , but only in term of the dialogue . You ’ll alsosee nerve above character , depending on who you complete each chapter with .
I of course of study chose Ivy to be my co - winner . You then utter to that someone one more fourth dimension and with that , congratulations , you ’ve discharge Puzzle Lovers!you could even restart the leveljust before the end to see some other outcomes ( or diddle through the last chapter again ) .
For more Adventure Escape Mysteries walkthroughs here at Pro Game Guides , check outAE Mysteries Picture Perfect walkthroughandSweet Dreams walkthrough – Adventure Escape Mysteries !

Screenshot by Pro Game Guides
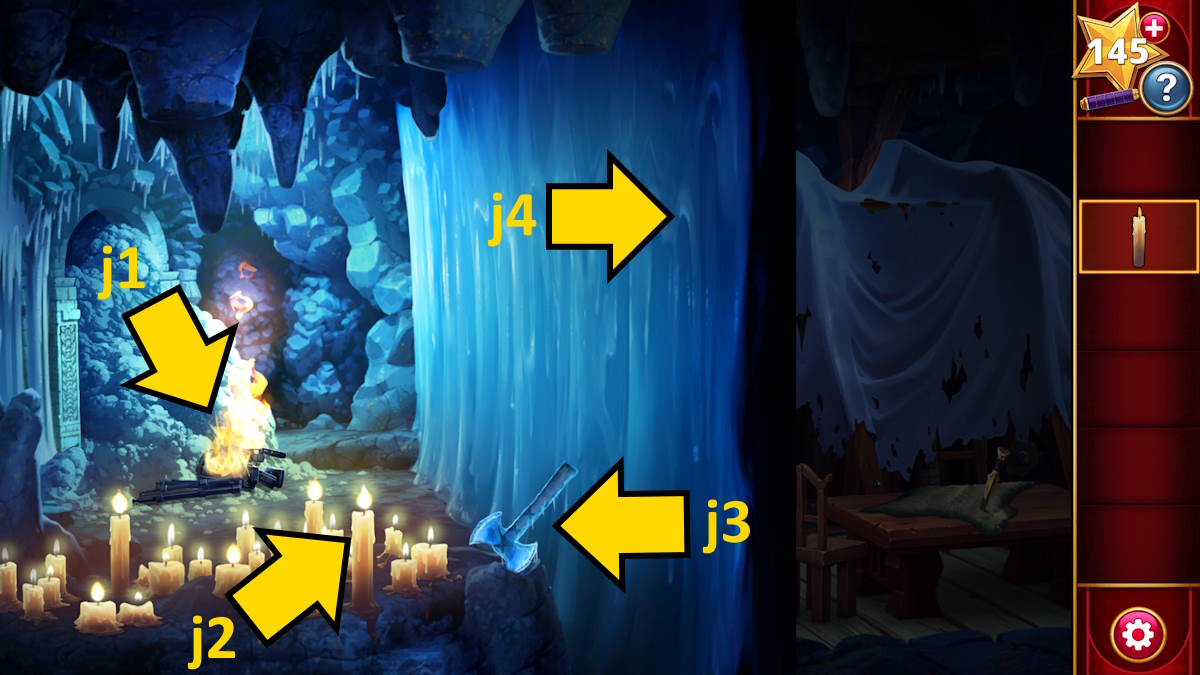
Image by Pro Game Guides
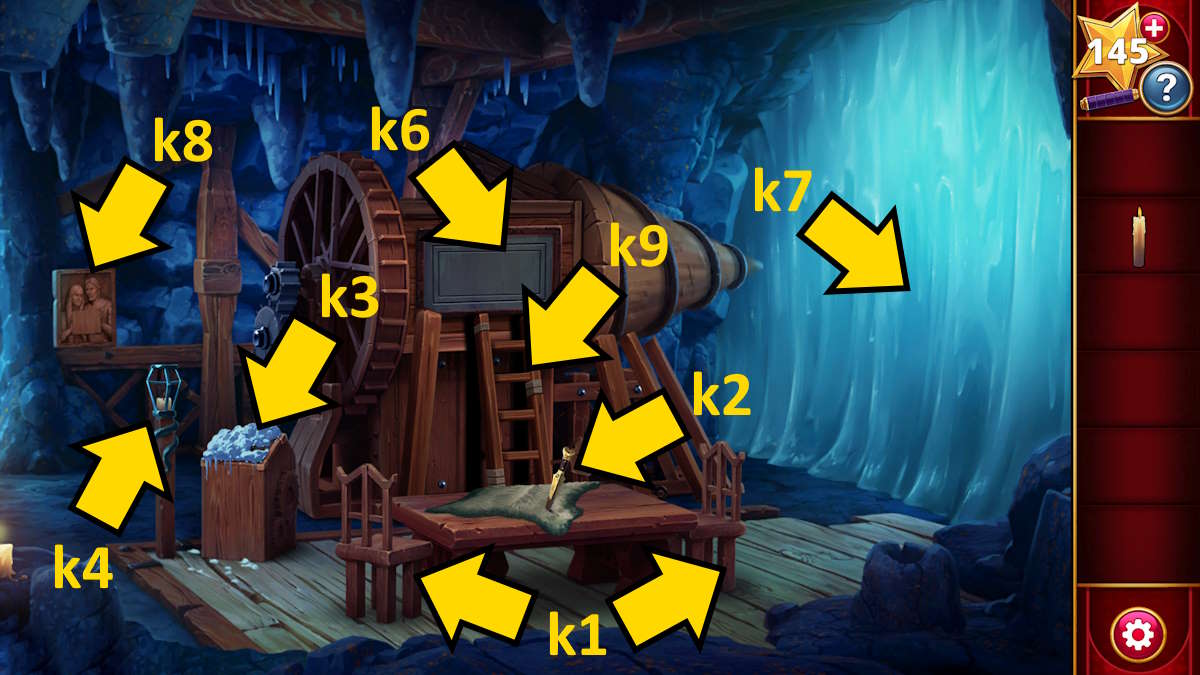
Image by Pro Game Guides
Screenshot by Pro Game Guides

Image by Pro Game Guides
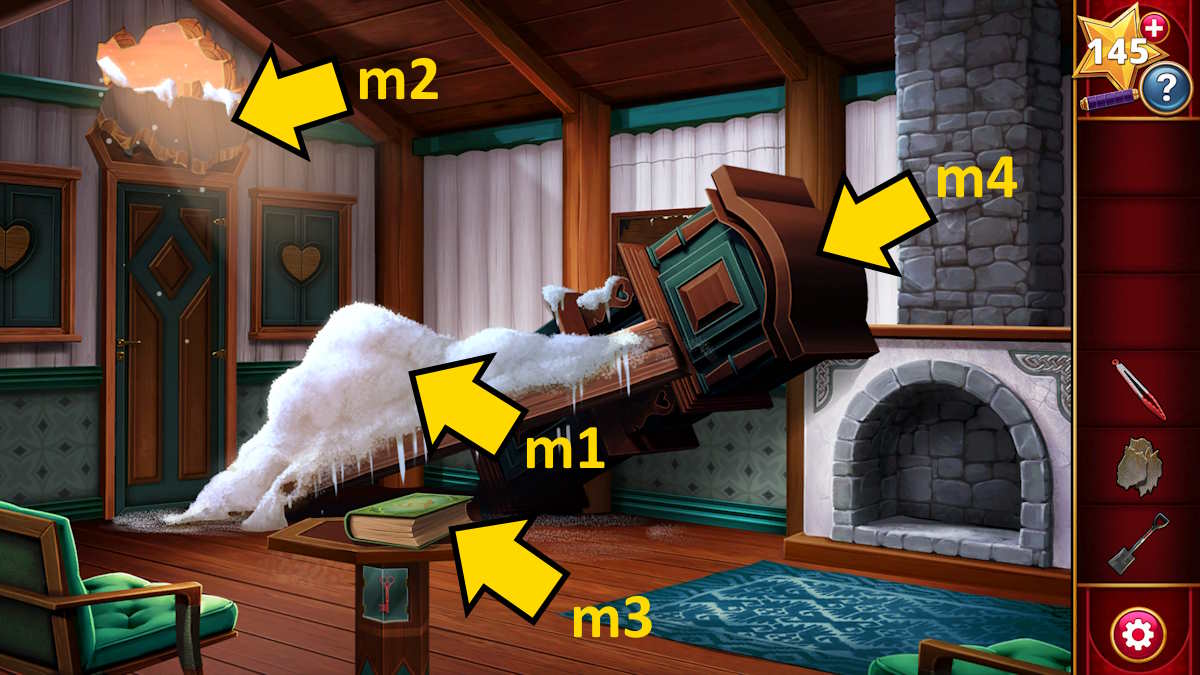
Image by Pro Game Guides
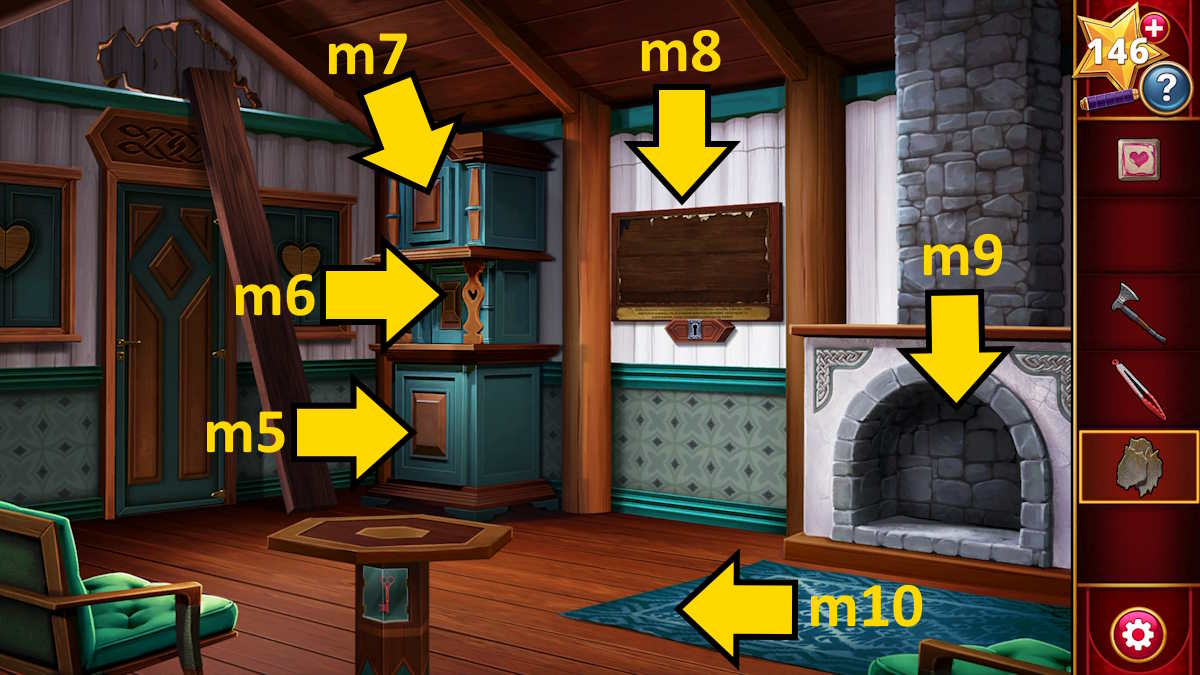
Image by Pro Game Guides
Screenshot by Pro Game Guides
Screenshot by Pro Game Guides
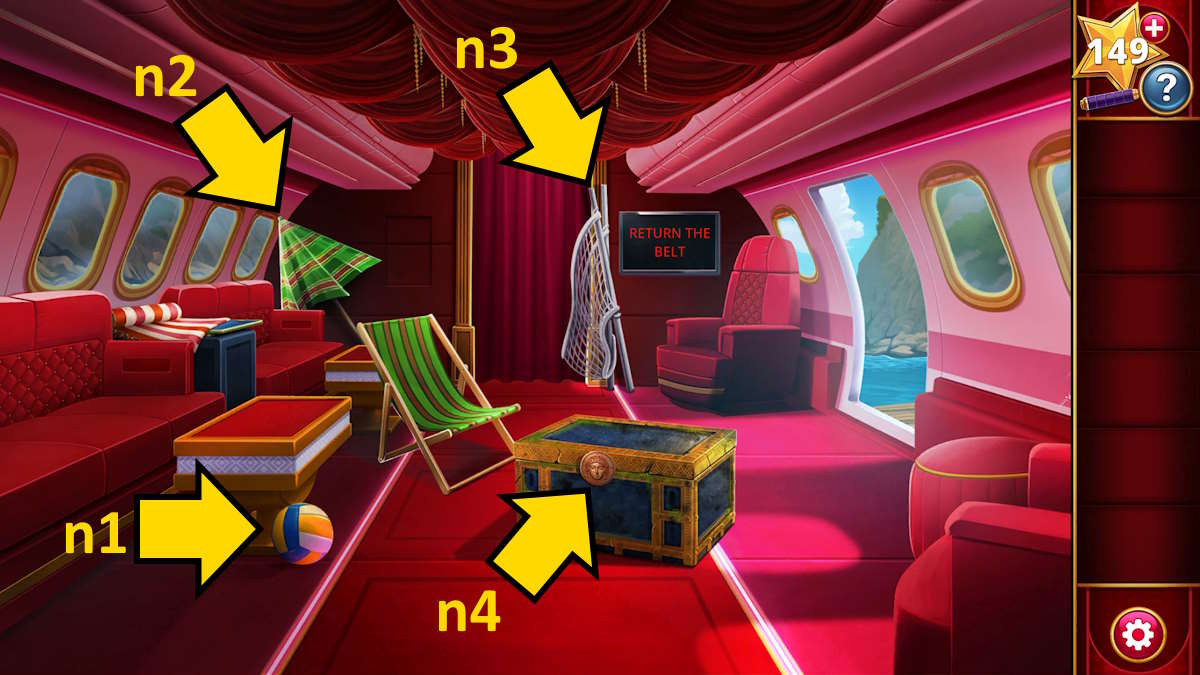
Image by Pro Game Guides
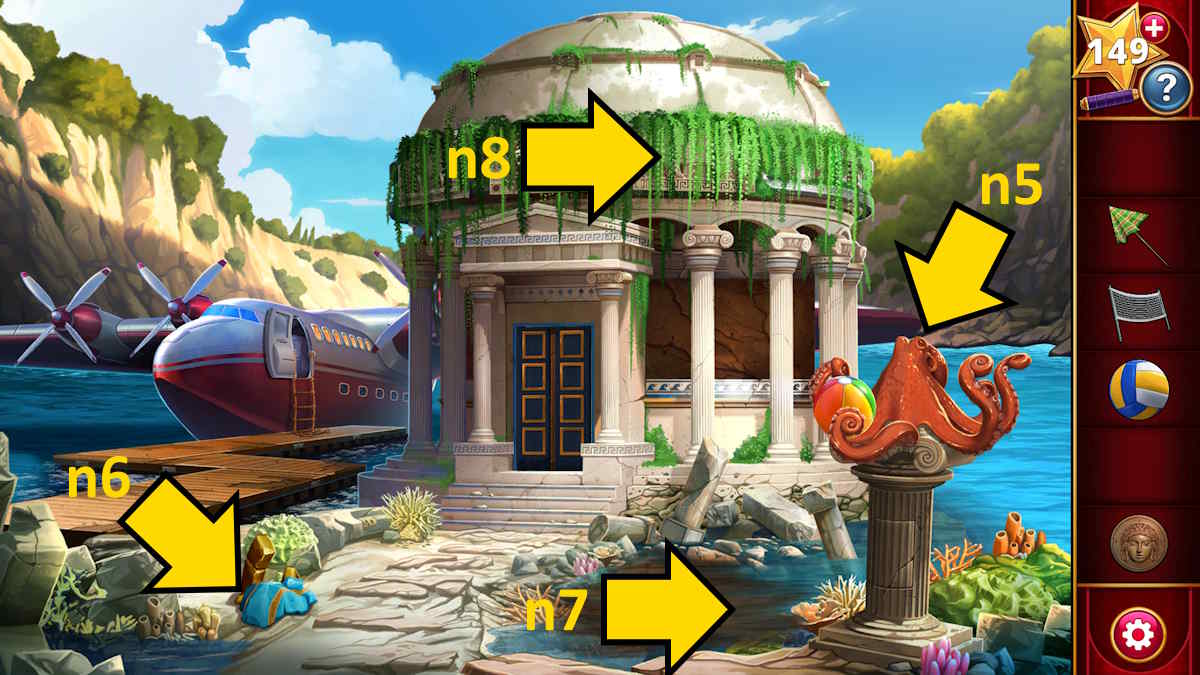
Image by Pro Game Guides
Screenshot by Pro Game Guides
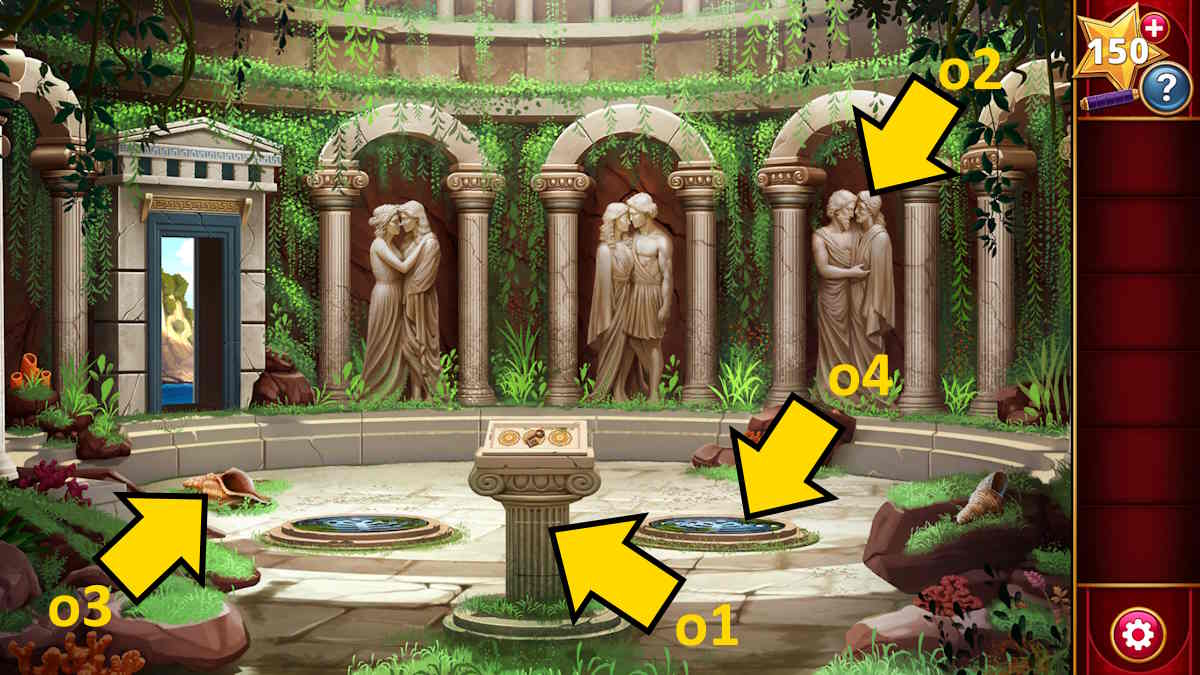
Image by Pro Game Guides
Screenshot by Pro Game Guides
Screenshot by Pro Game Guides

Screenshot by Pro Game Guides
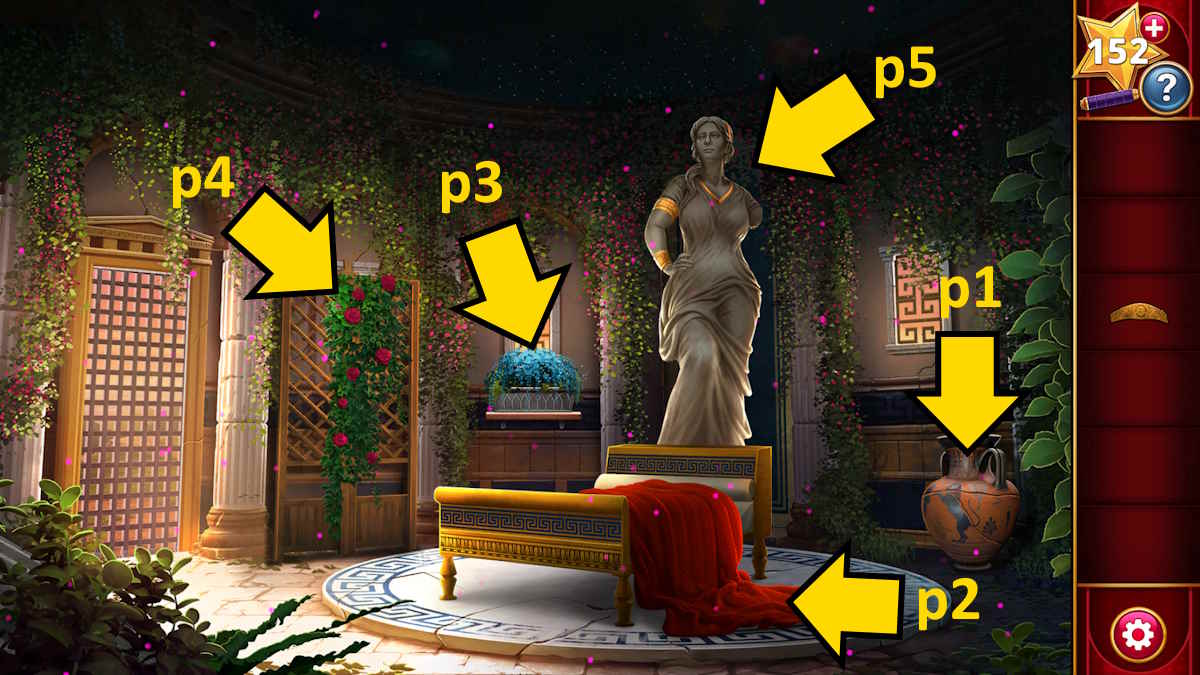
Image by Pro Game Guides
Screenshot by Pro Game Guides
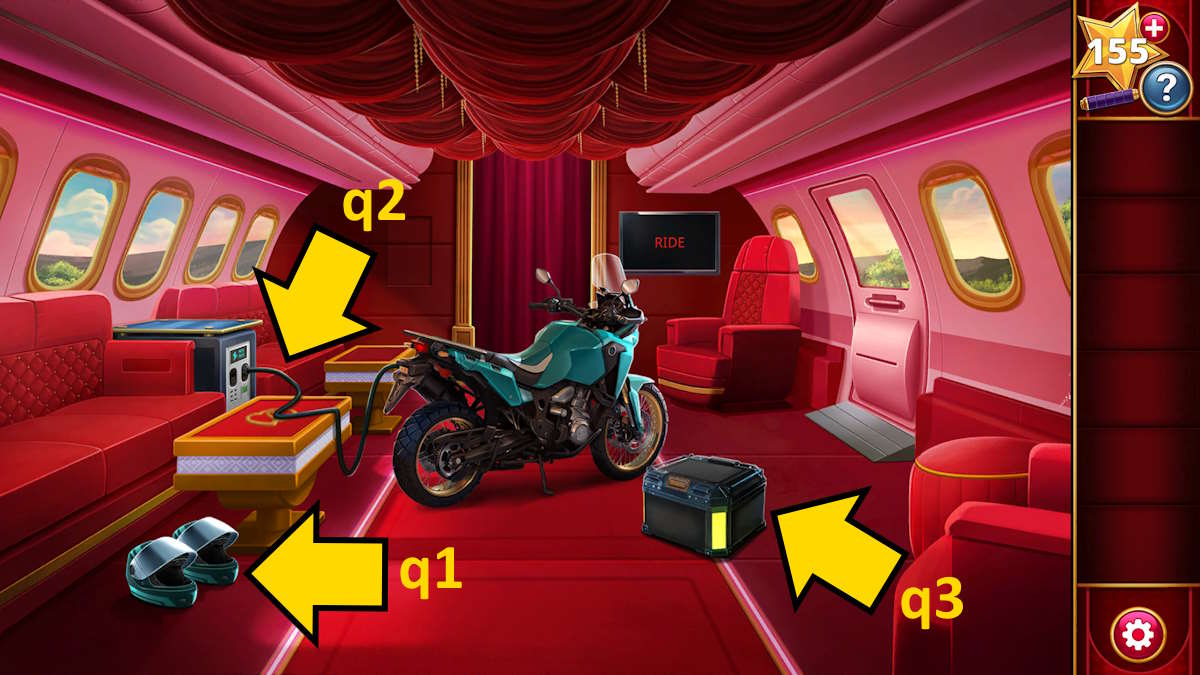
Image by Pro Game Guides
Screenshot by Pro Game Guides
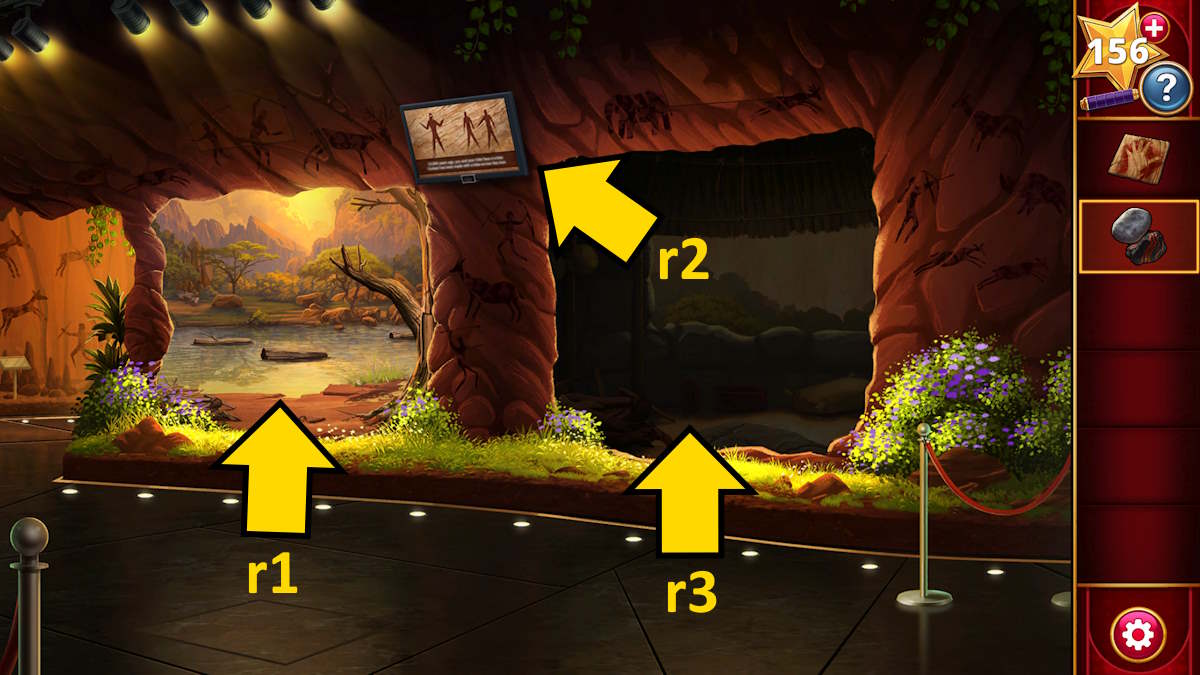
Image by Pro Game Guides
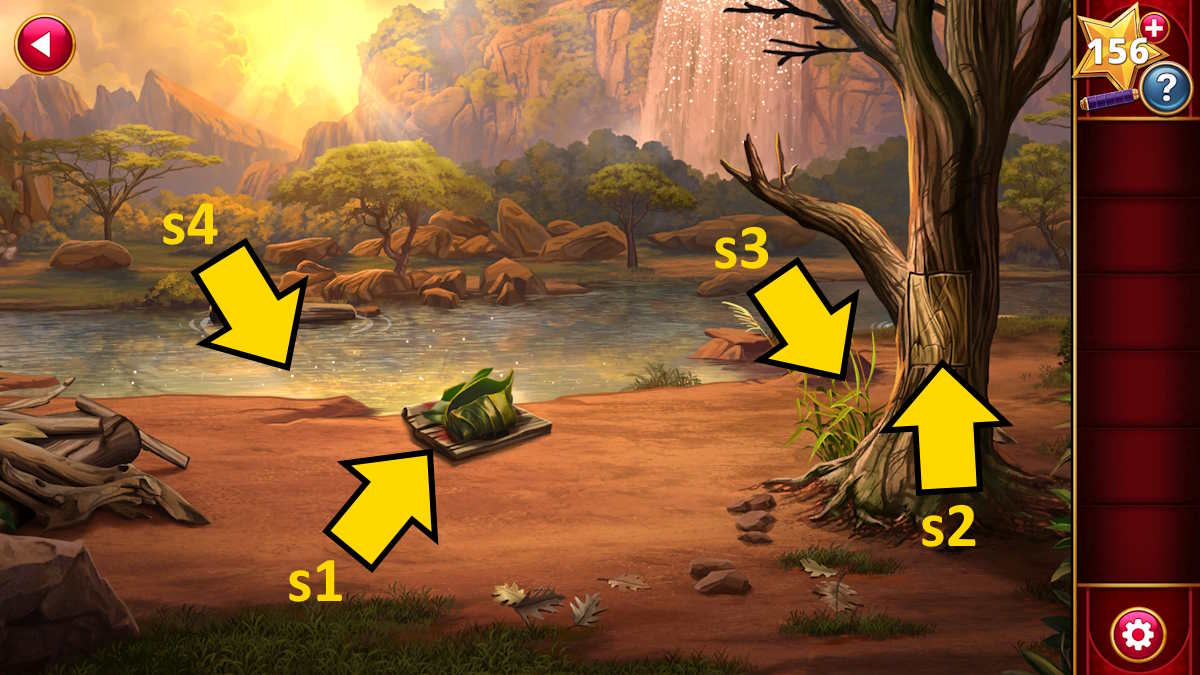
Image by Pro Game Guides
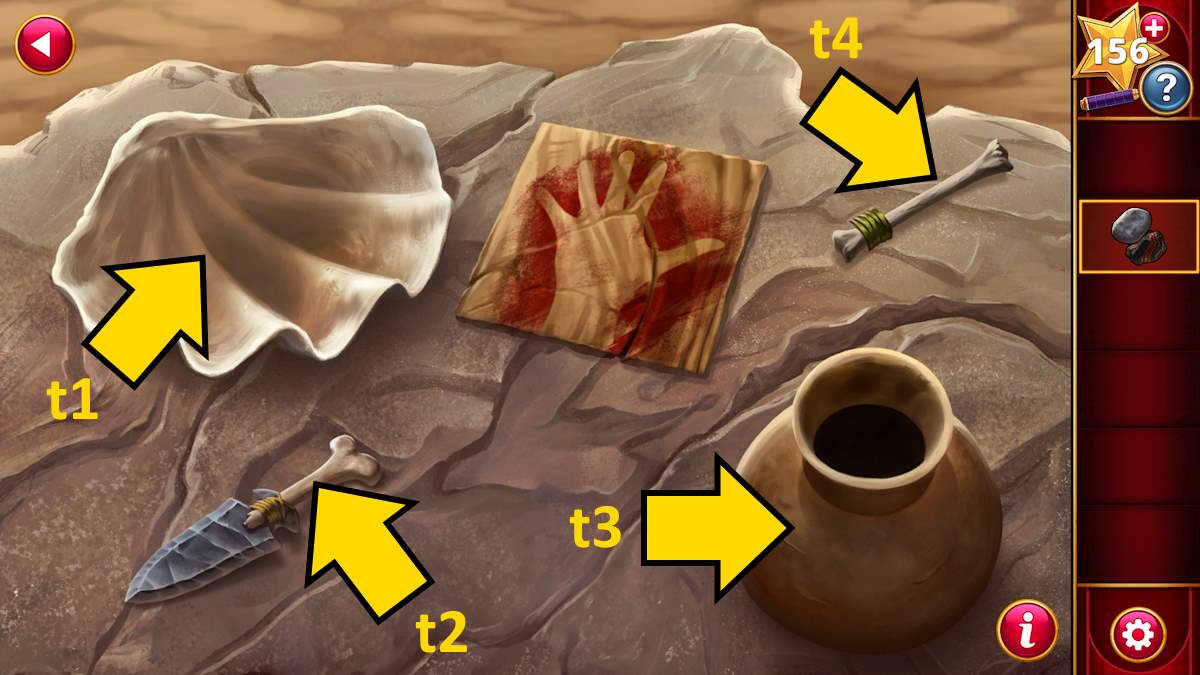
Image by Pro Game Guides
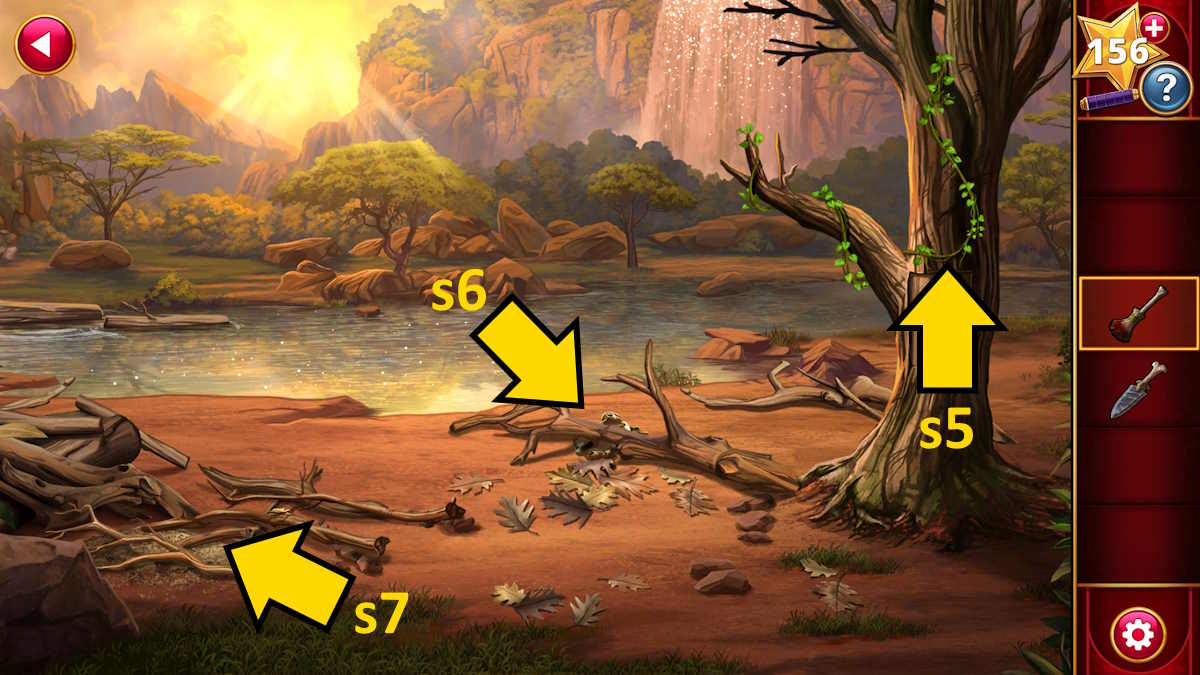
Image by Pro Game Guides
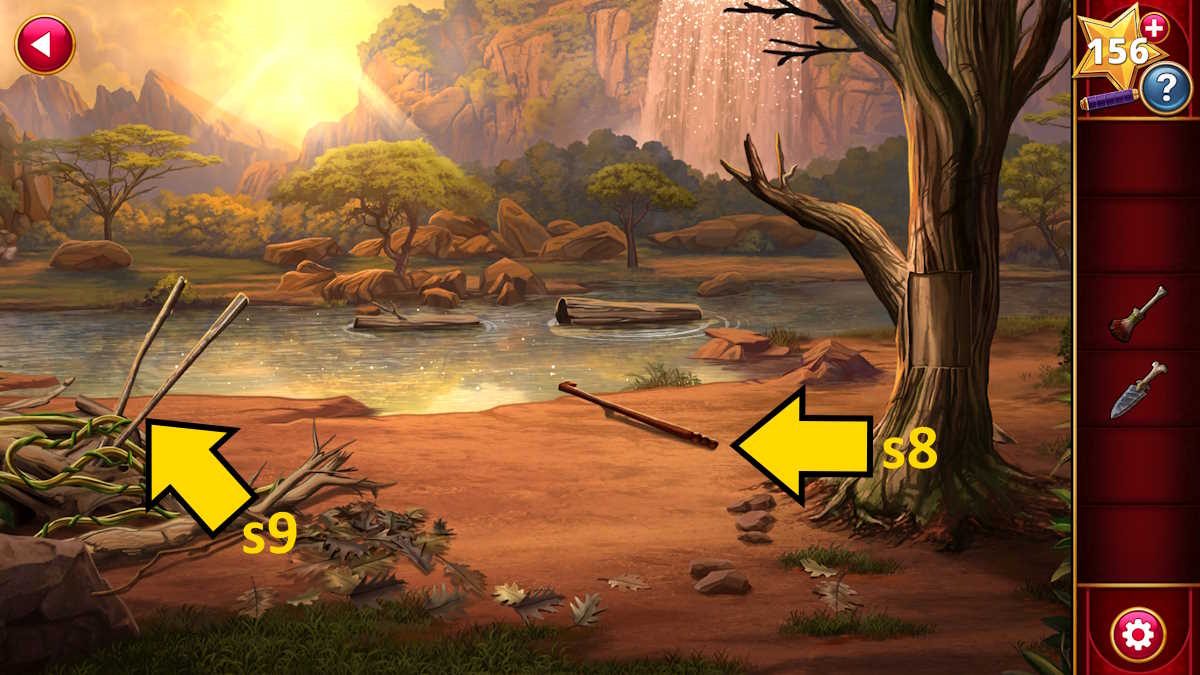
Image by Pro Game Guides
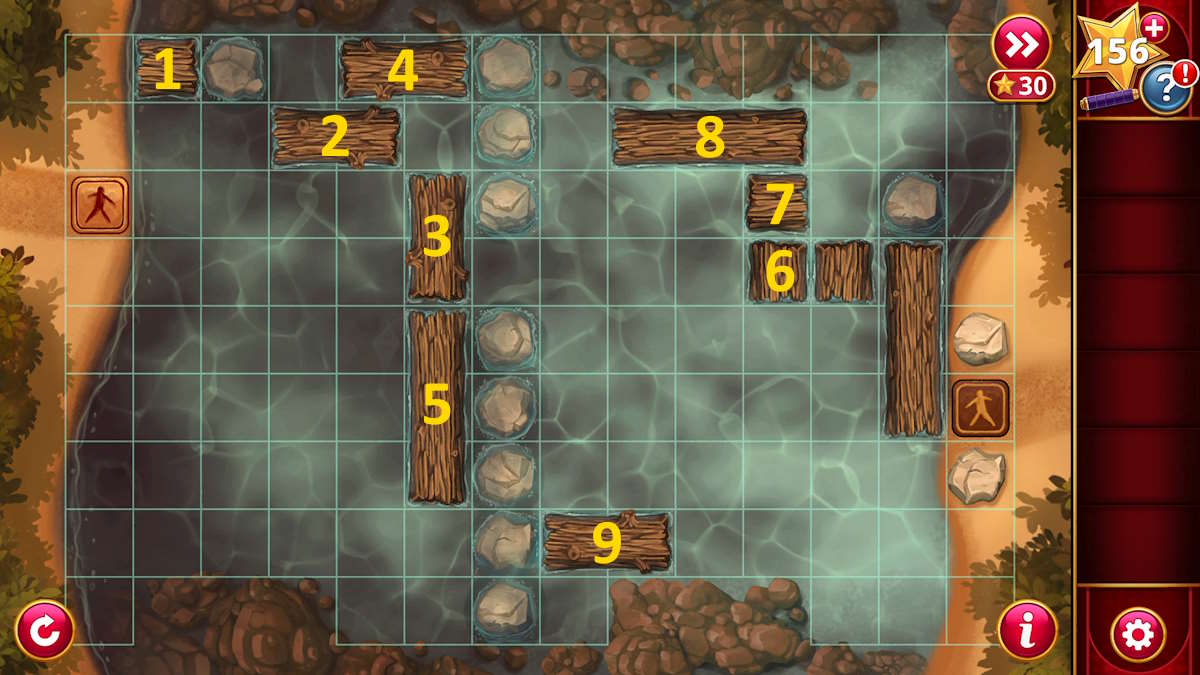
Image by Pro Game Guides
Screenshot by Pro Game Guides
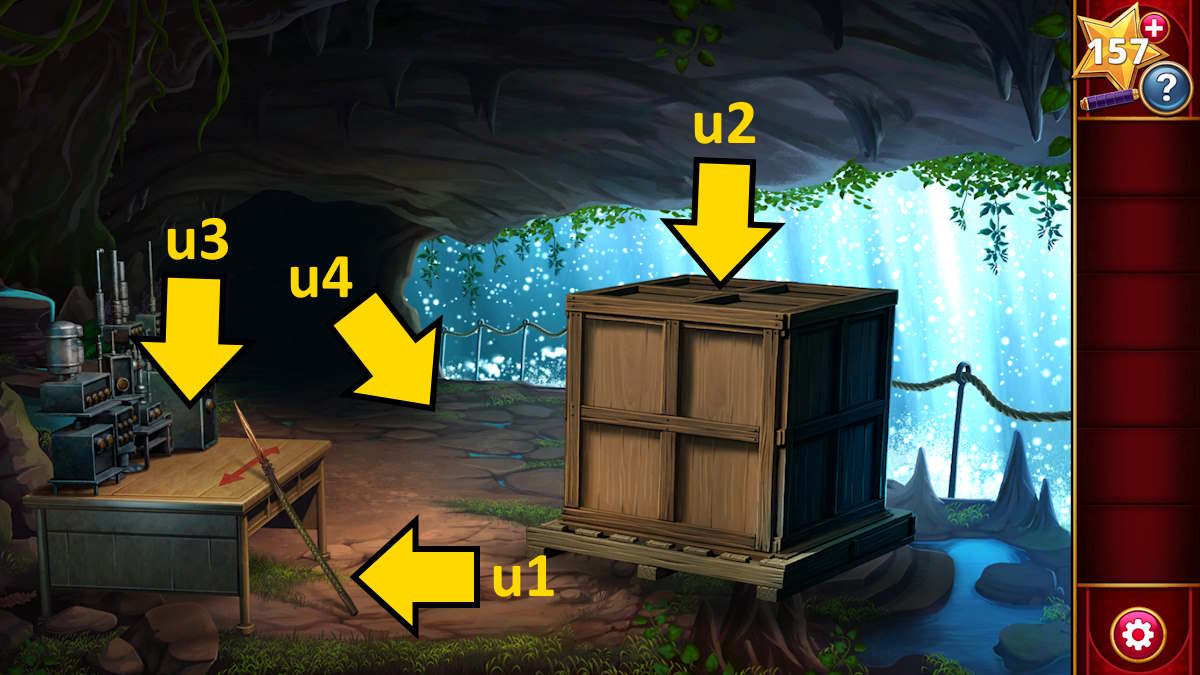
Image by Pro Game Guides
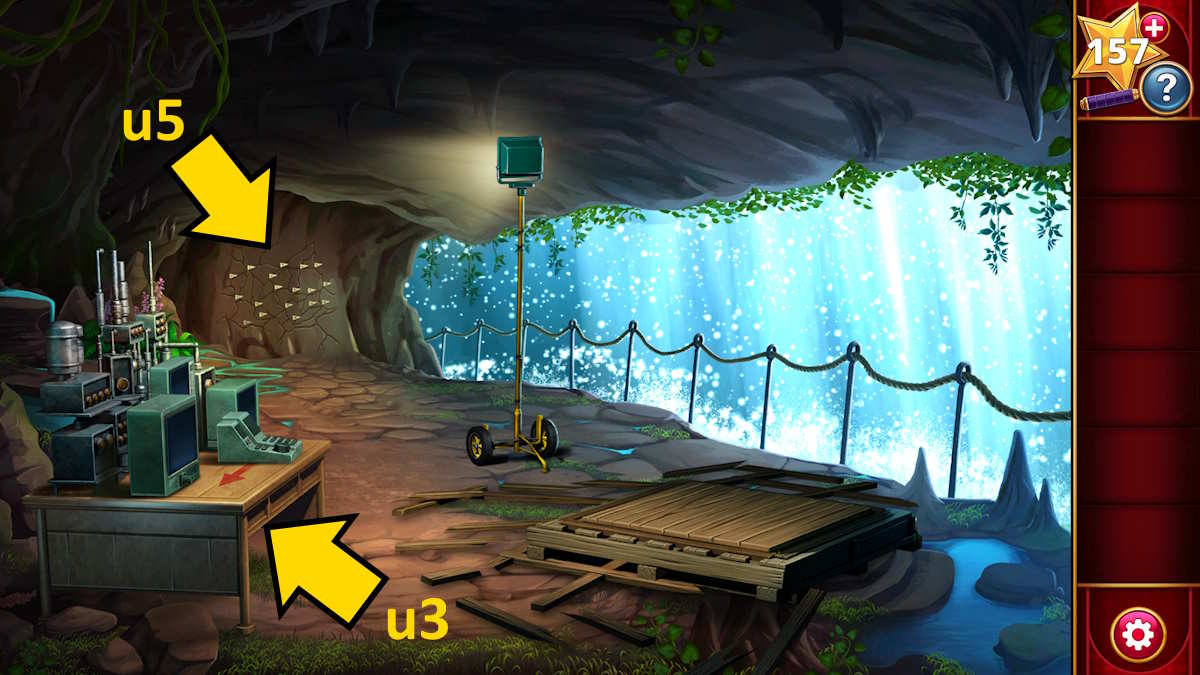
Image by Pro Game Guides
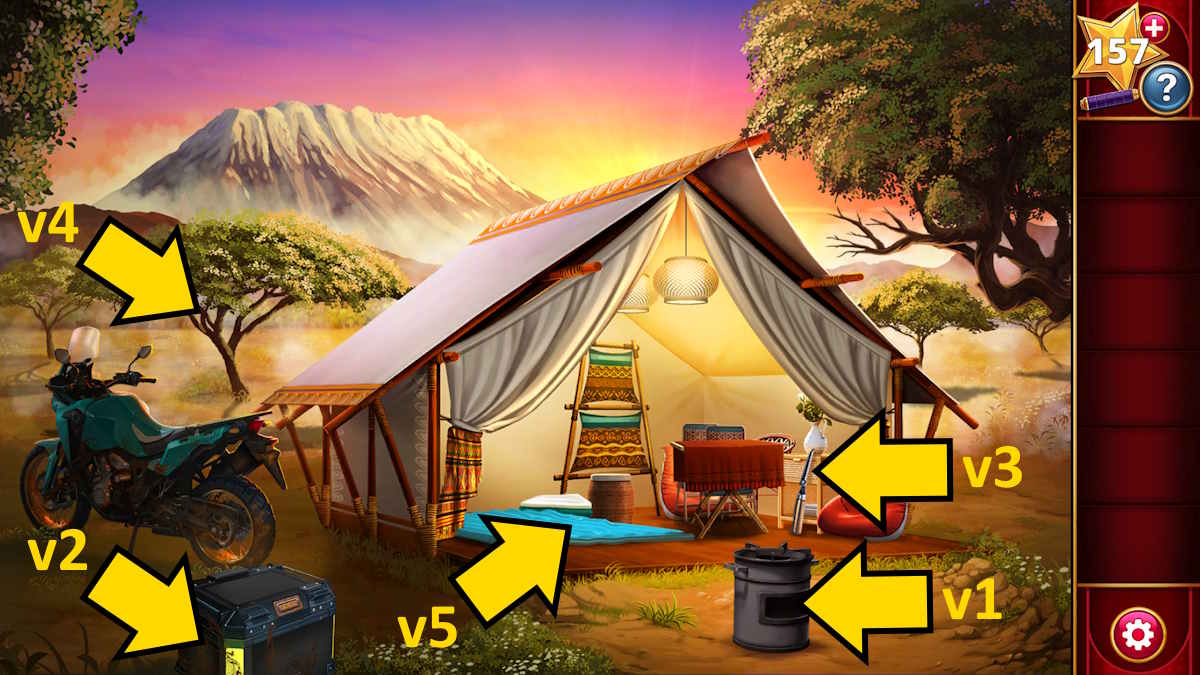
Image by Pro Game Guides
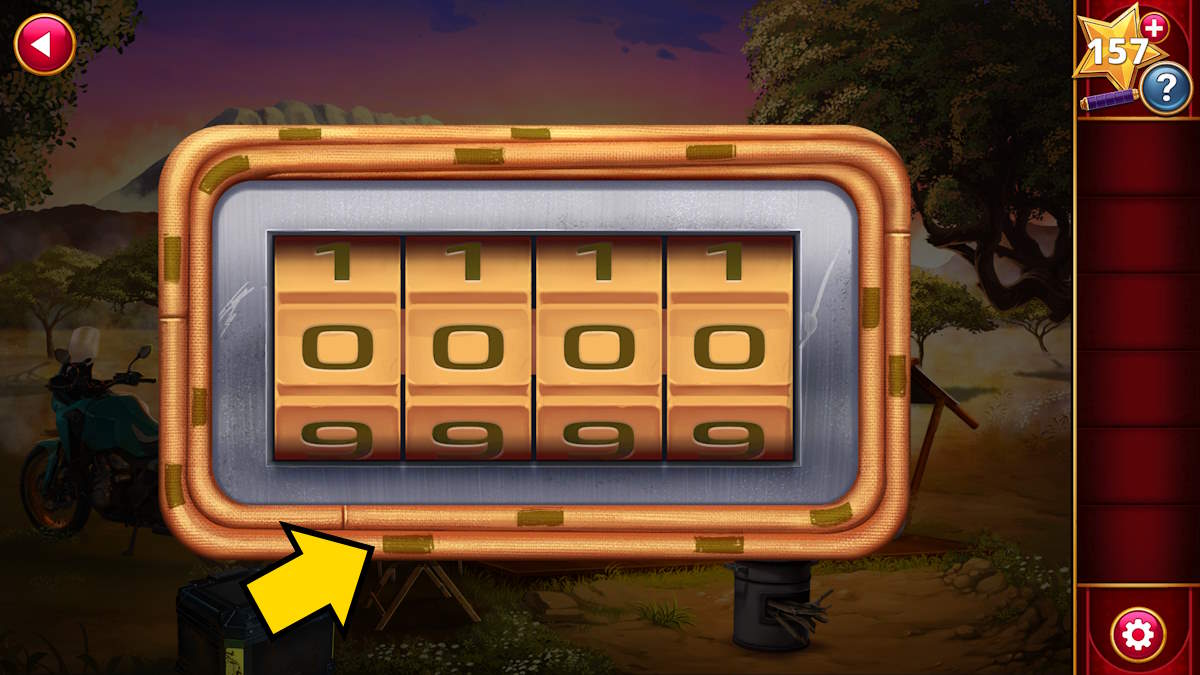
Image by Pro Game Guides
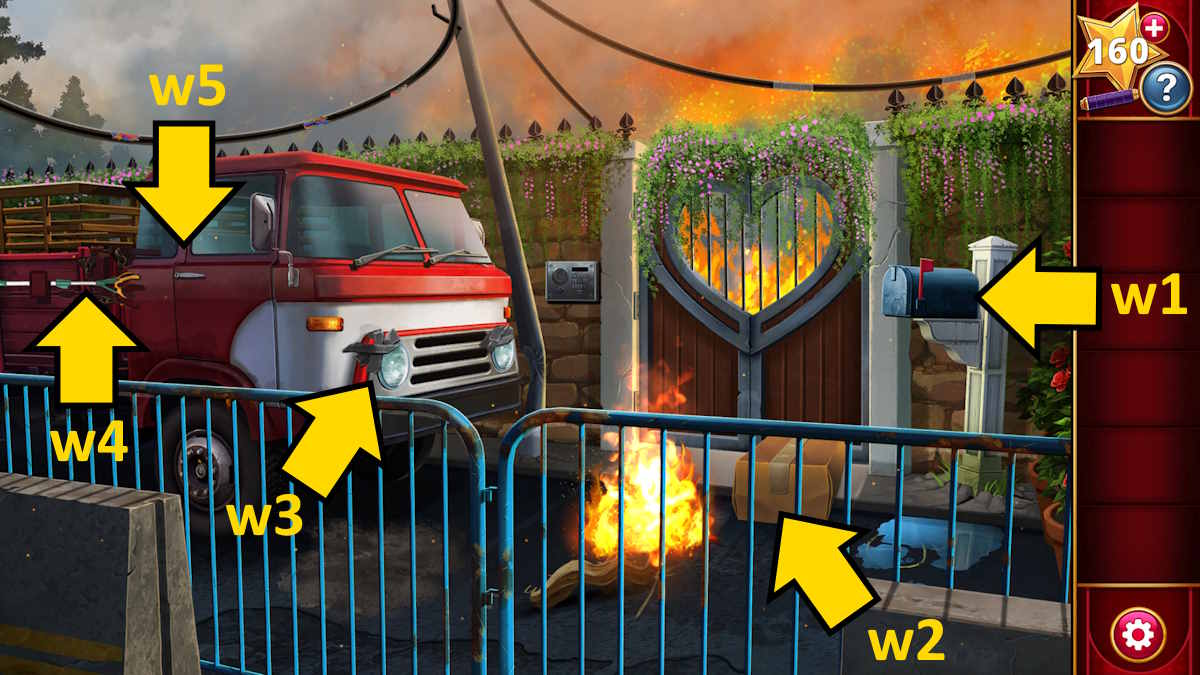
Image by Pro Game Guides
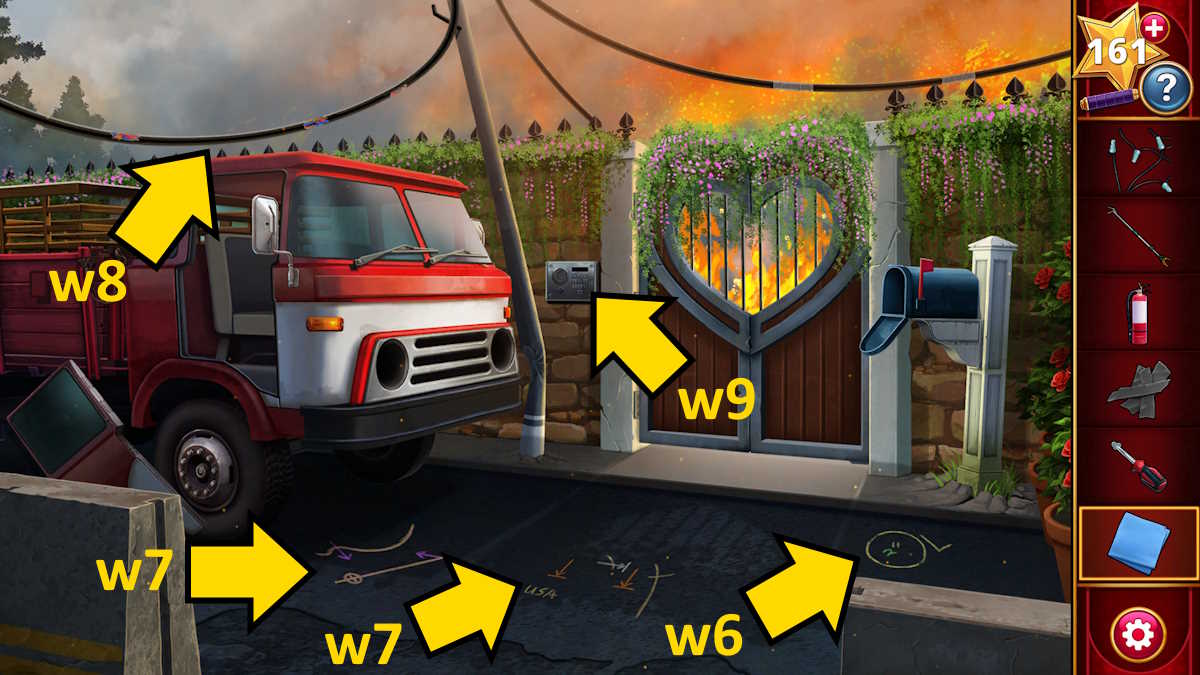
Image by Pro Game Guides
Screenshot by Pro Game Guides
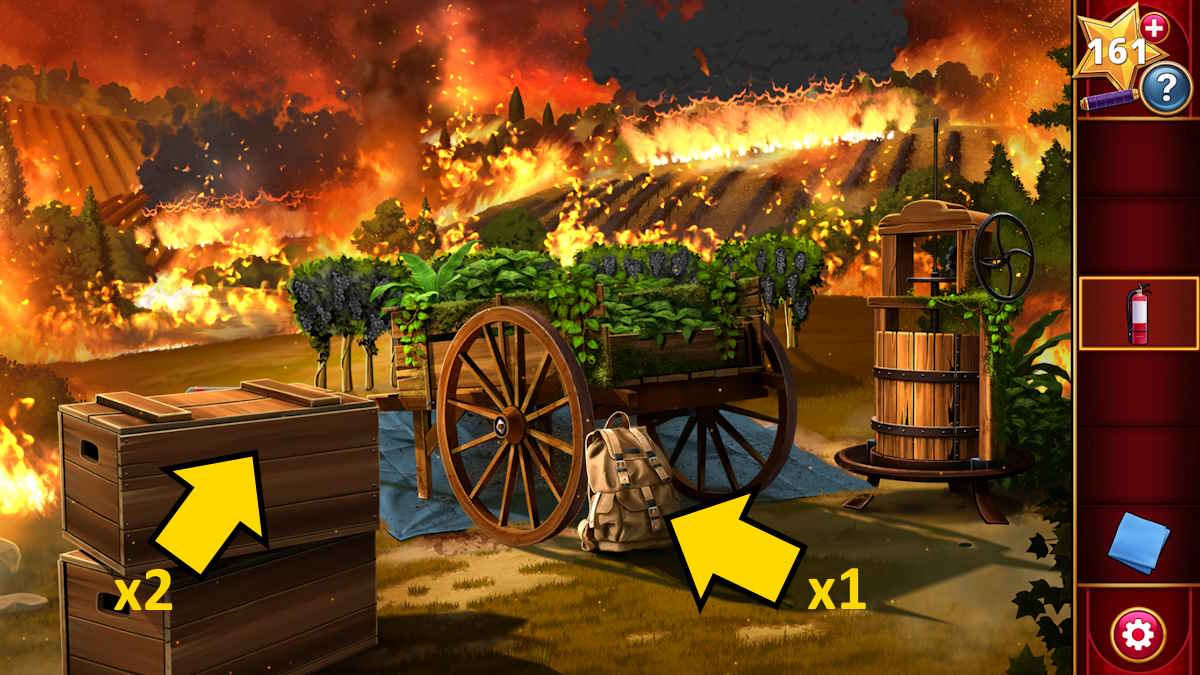
Image by Pro Game Guides
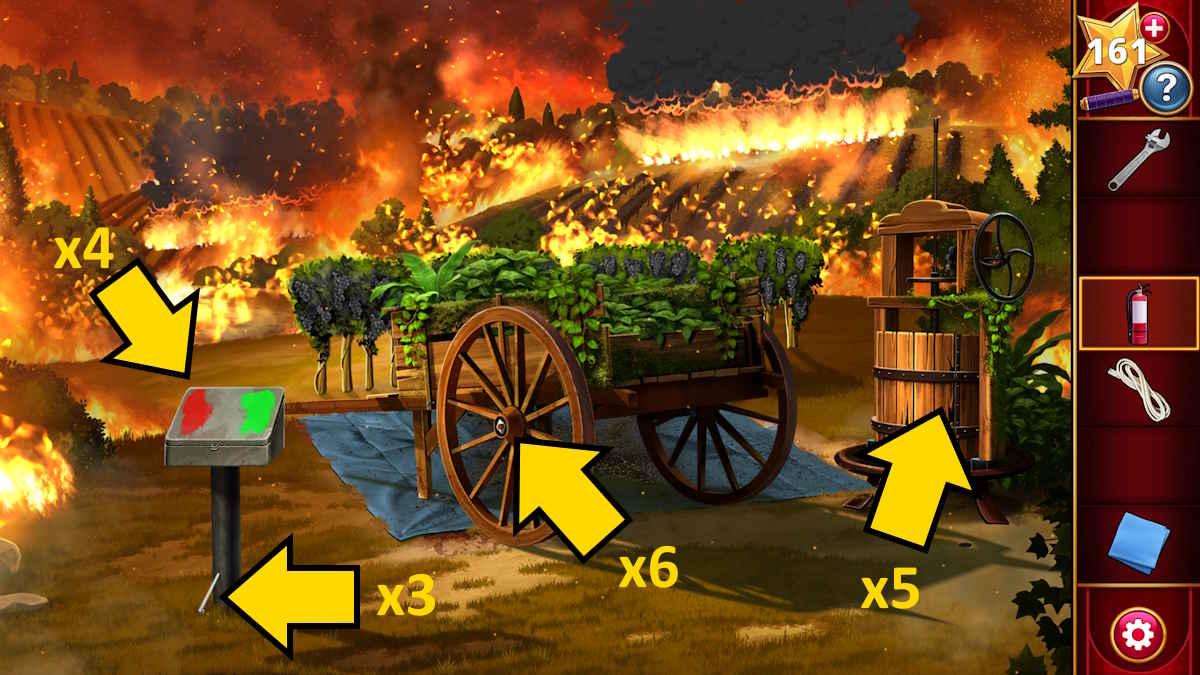
Image by Pro Game Guides
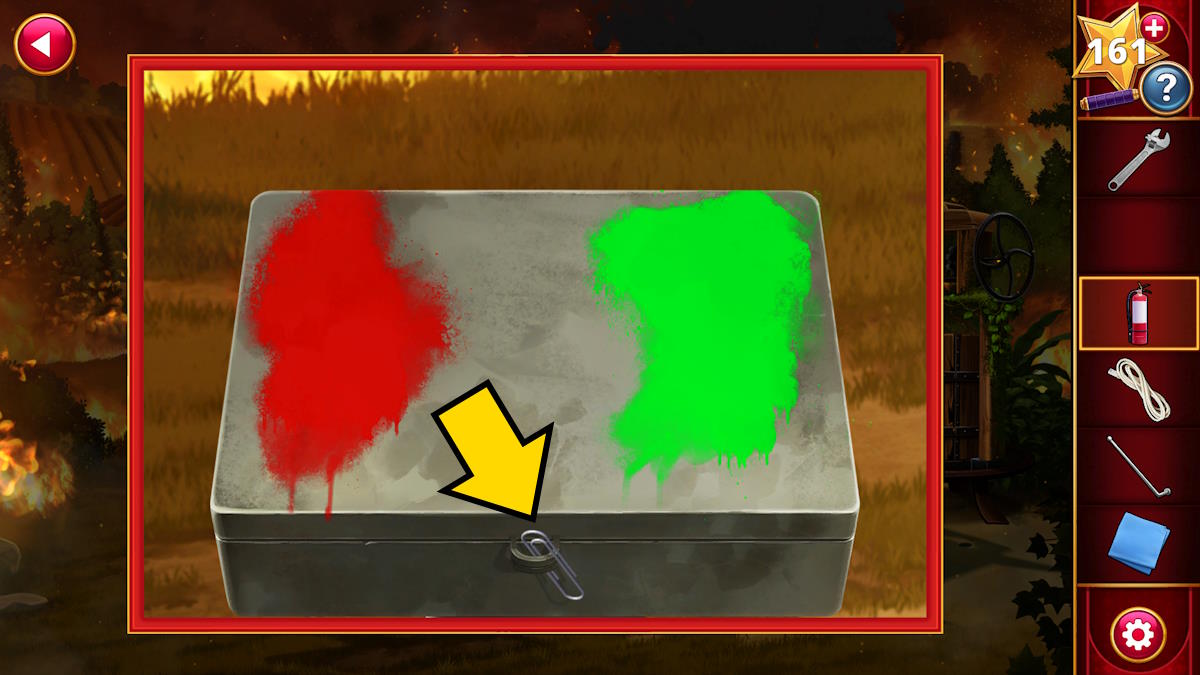
Image by Pro Game Guides

Image by Pro Game Guides
Screenshot by Pro Game Guides
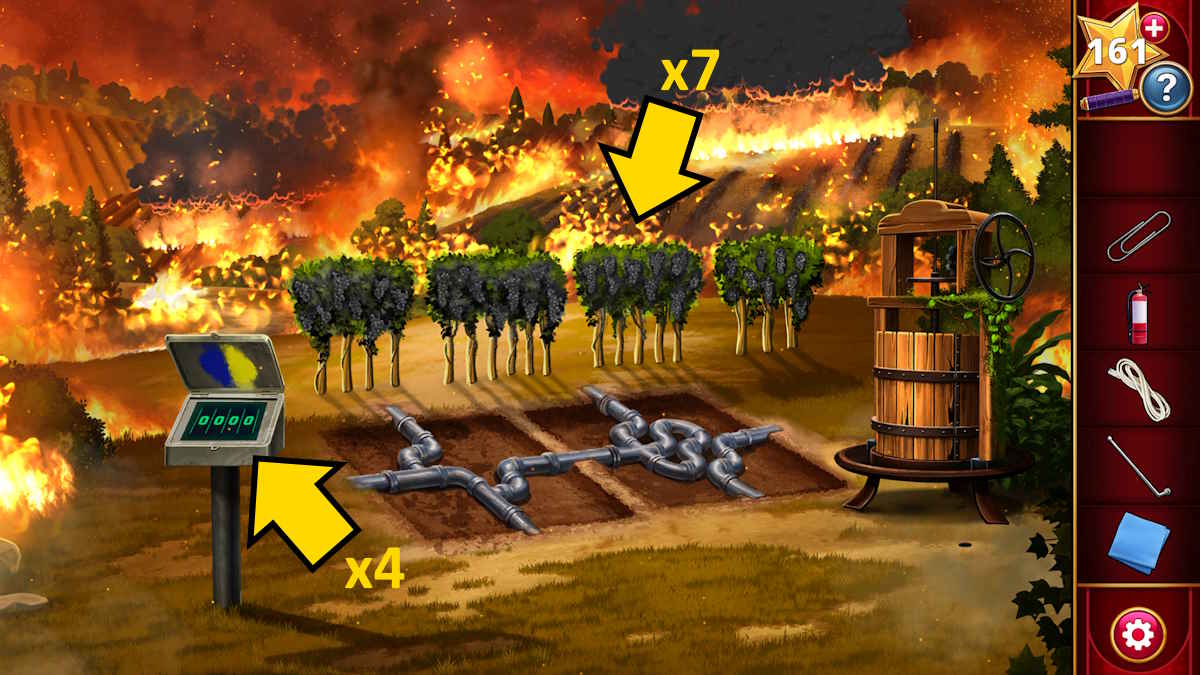
Image by Pro Game Guides
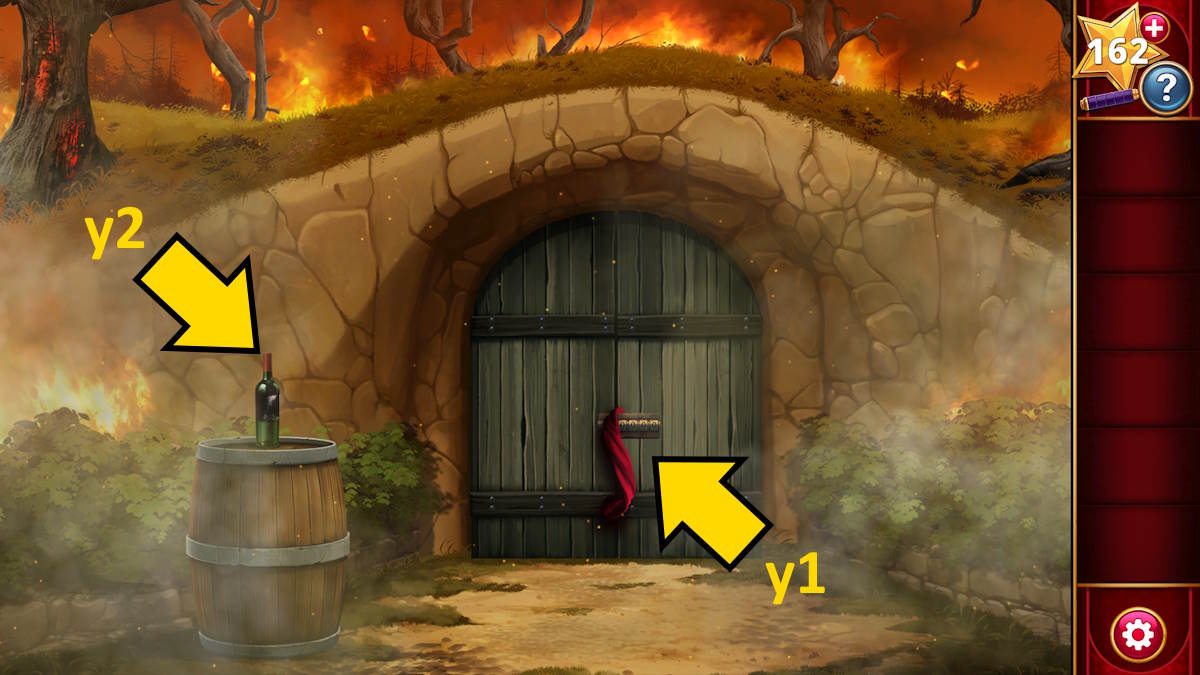
Image by Pro Game Guides
Screenshot by Pro Game Guides
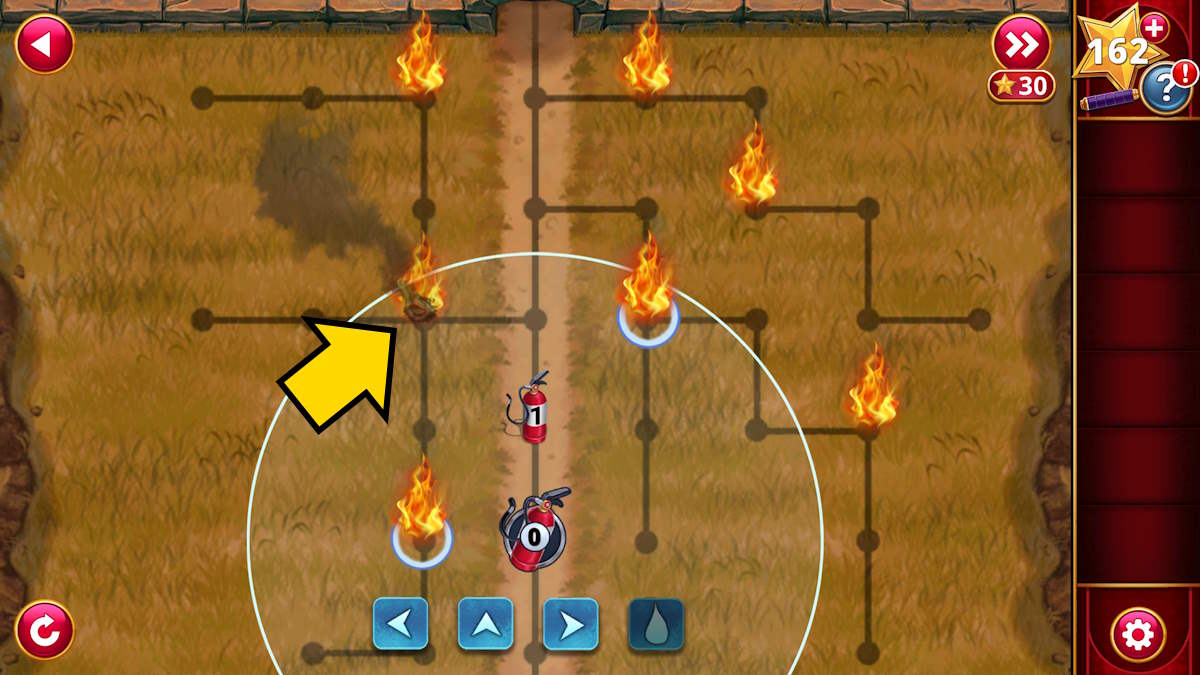
Image by Pro Game Guides
Screenshot by Pro Game Guides
