Every Key to every Door .
Open 50 Doors is a point - and - come home puzzle game you’re able to find out and play for free atCool Math Games . As the name suggests , you ’ll need to complete 50 increasingly tricky teaser to unfold the door and finish the secret plan .
This involve clicking , dragging , and otherwise wangle particular on the screen . I get it on this manner of secret plan but did find a few of the levels particularly tricky , so if you ’re stuck , read on for my full loose 50 Doors walkthrough .
Open 50 Doors Guide - Cool Math Games - Full Walkthrough
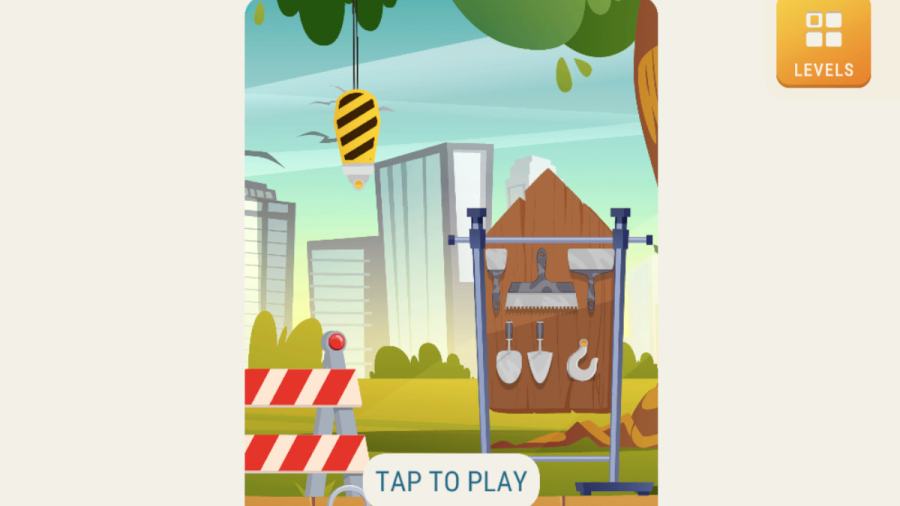
The game itself actually walks you throughLevel One(pictured above ) while also explaining the basic mechanism of the secret plan in the process . Simply do what the hand on - CRT screen tells you to do , which isclick the hook(which adds it to the rope ) and thendrag the rope and hook down to the ground . This pulls up the first door , which you simply need toclick to complete story one .
Open 50 Doors - Levels 1-10
Level 1 : See above .
Level 2 : chatter the can ( 2a ) which will spray the key into creation . snap the second can ( 2b ) to do the same with the door , then click the threshold to fill in the tier .
Level 3 : Select the streamer , and they ’ll drop down . plainly draw the word Key ( 3a ) onto the door to open up it .
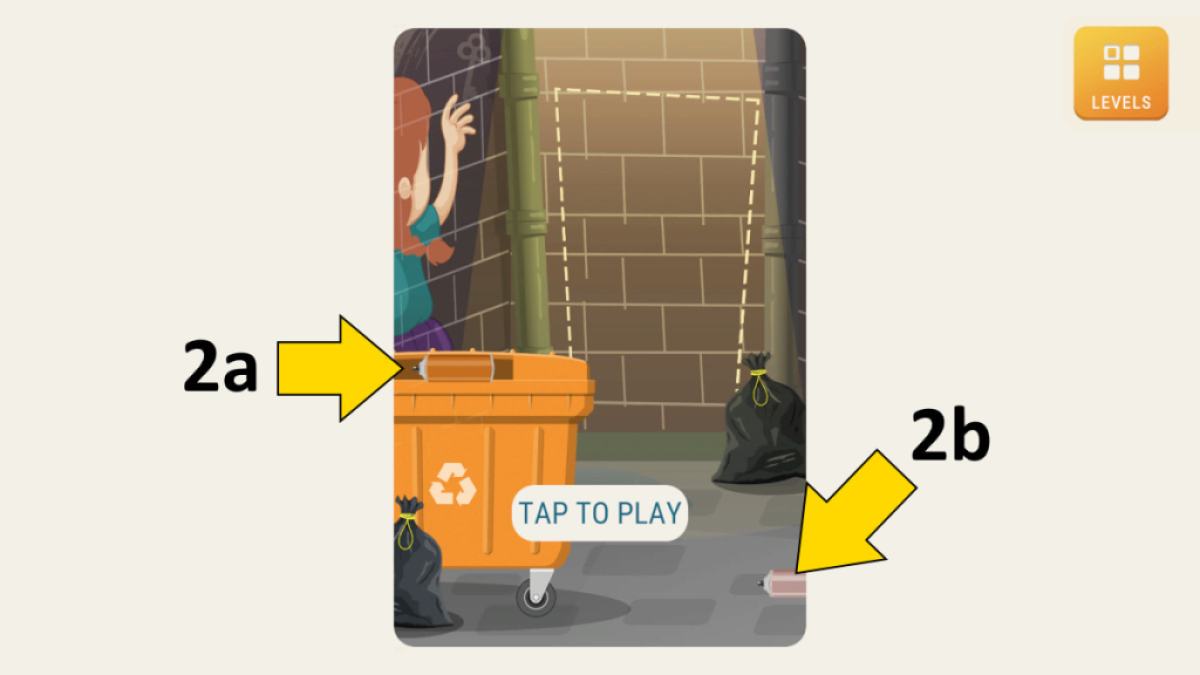
Image by Pro Game Guides
Level 4 : Click each of the seven gnome in any order ( 4 ) , and they ’ll stand on each other ’s shoulders . hold off a few moments , and a paint will come out from the top gnome , who will start the door .
Level 5 : collapse every balloon by clicking it , after which a key will appear on the basis , and the spirit level will be complete .
grade 6 : Click the elevator release ( 6a ) and go to point 2 . embroil the picture down ( 6b ) and click the paint to take it . snap the lift button again to get to charge 3 , then click the lever tumbler ( 6c ) . iron the button once more , and you ’ll go to level 1 again , where the laser have disappeared . apply the Francis Scott Key in the curl to make out the grade .
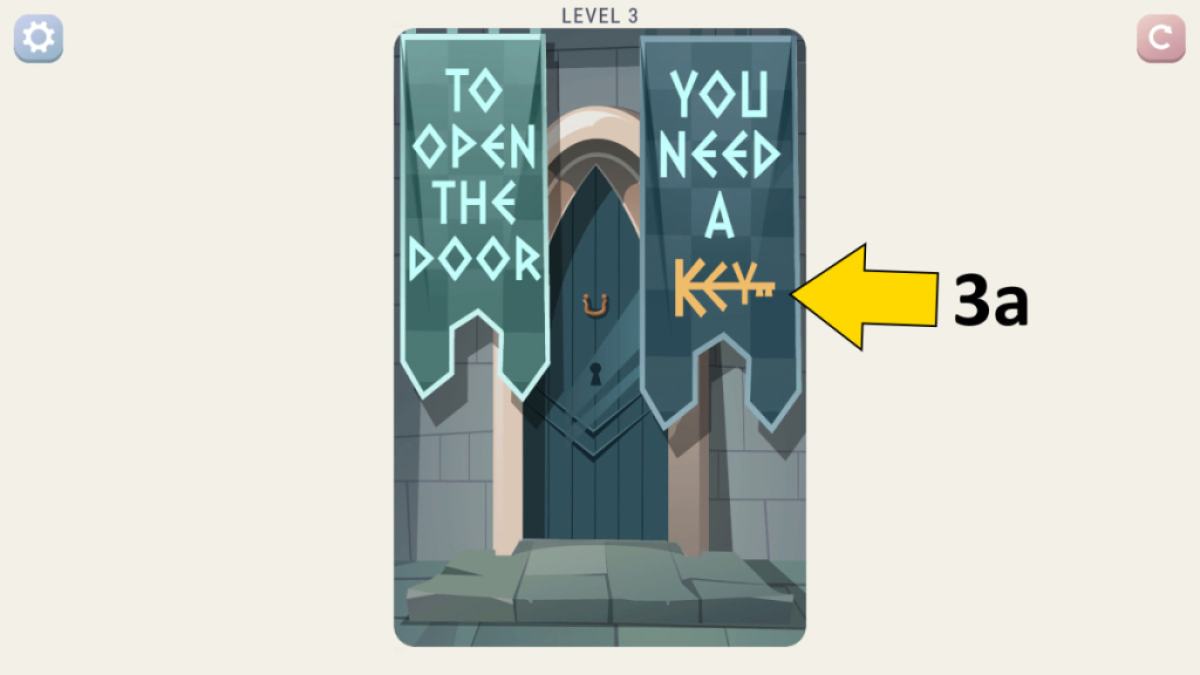
Image by Pro Game Guides
Level 7 : Select the rugged bulb ( 7a ) to remove it , then click the bucket ( 7b ) to pink it over and reveal a working medulla . Click the electric light , which will go into the visible radiation , then select the bbl ( 7c ) to move it and use the sluttish permutation behind it . With the chicken conk out , dawn the testis to hatch them and get the key , which you’re able to come home to get to the room access .
stratum 8 : Click the buccaneer hat to bring out the hook , then embroil the draw onto the cable ( 8a ) . cluck the confiscate hook , which drags the boat to the door . fall into place the door to open it .
Level 9 : pick out the lamp ( 9a ) to place it on the halo above , then fall into place the matches ( 9b ) to light it , revealing a lever tumbler ( 9c ) . dawn the lever tumbler to fix it to the mechanism ( 9d ) , then again to finish the level .

Image by Pro Game Guides
Related : Best Games on Cool Math Games
degree 10 : Click the boomerang ( 10a ) , which will fly up and remove the nut ( 10b ) . Click the left - side bushes ( 10c ) to reveal the nut , then the correct - side bushes ( 10d ) to reveal a squirrel . snap the nut ( 10e ) to give it to the squirrel and take the blade it drops , opening the tent .
Open 50 Doors - Levels 11-20
Level 11 : chatter the shower curtain ( 11a ) to move it entrust , then click the red faucet ( 11b ) . penetrate the curtain again to move it back to the right position , click the tap ( 11c ) to fill the way of life , and then take the key from the condom duck’s egg to nail the grade .
floor 12 : pick out the cloth ( 12a ) and drag in it all across the mirror ( 12b ) , cleaning it ( a racket will sound when you ’ve done it enough , and it will look like the image above ) . Click the cleaned mirror , which will skid left , revealing the doorway . Click the threshold to move on .
tier 13 : Choose the centurion ’s helm ( 13a ) to localize it on the soldier . Once he has gone , click the horse - capitulum helm ( 13b ) to site it on the knight ’s body , and then finally cluck the doorway ( 13c ) to complete the level .
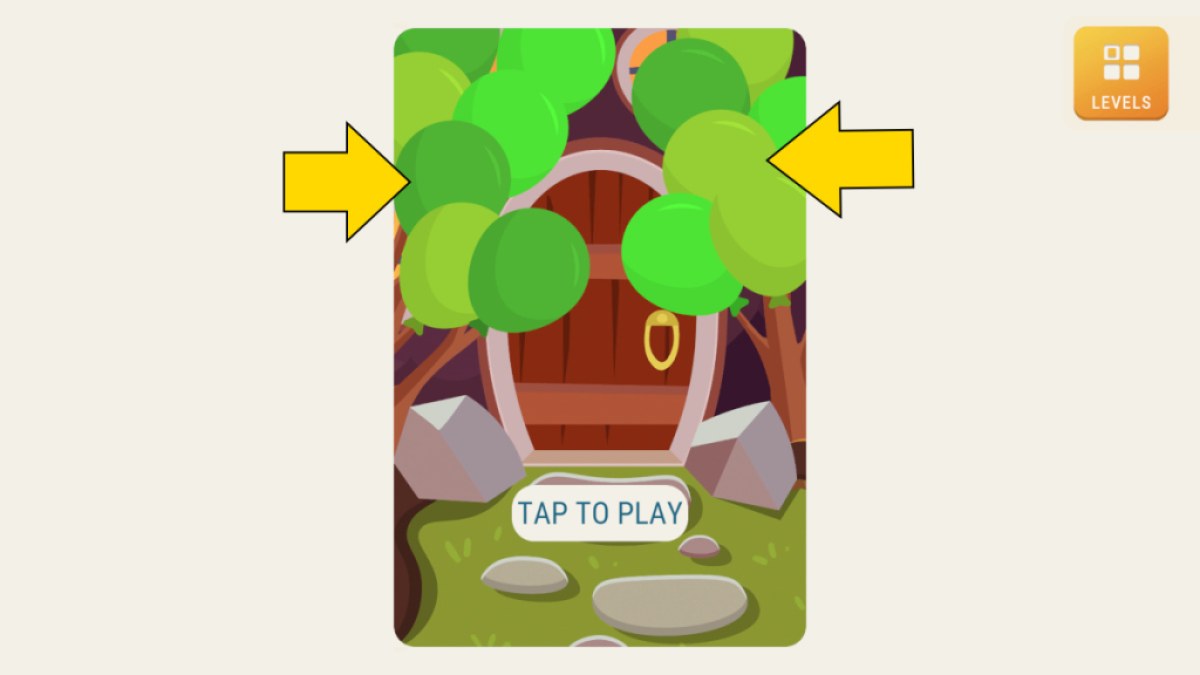
Image by Pro Game Guides
Level 14 : get through the three weights to add together them to the bar , giving you the key . Click the key to move to flush 15 .
Level 15 : dredge the door pieces to the bottom leave ( 15a ) , top right ( 15b ) , and top leftover ( 15c ) to reconstruct the doorway , then click the key ( 15d ) to open it .
Level 16 : come home the anvil ( 16a ) to smash the bottom right pumpkin , then click the saw ( 16b ) to get the wand from the tree ( it swing down from 16c ) . fall into place the wand to make a carriage , then snap the carriage door to complete the stage .
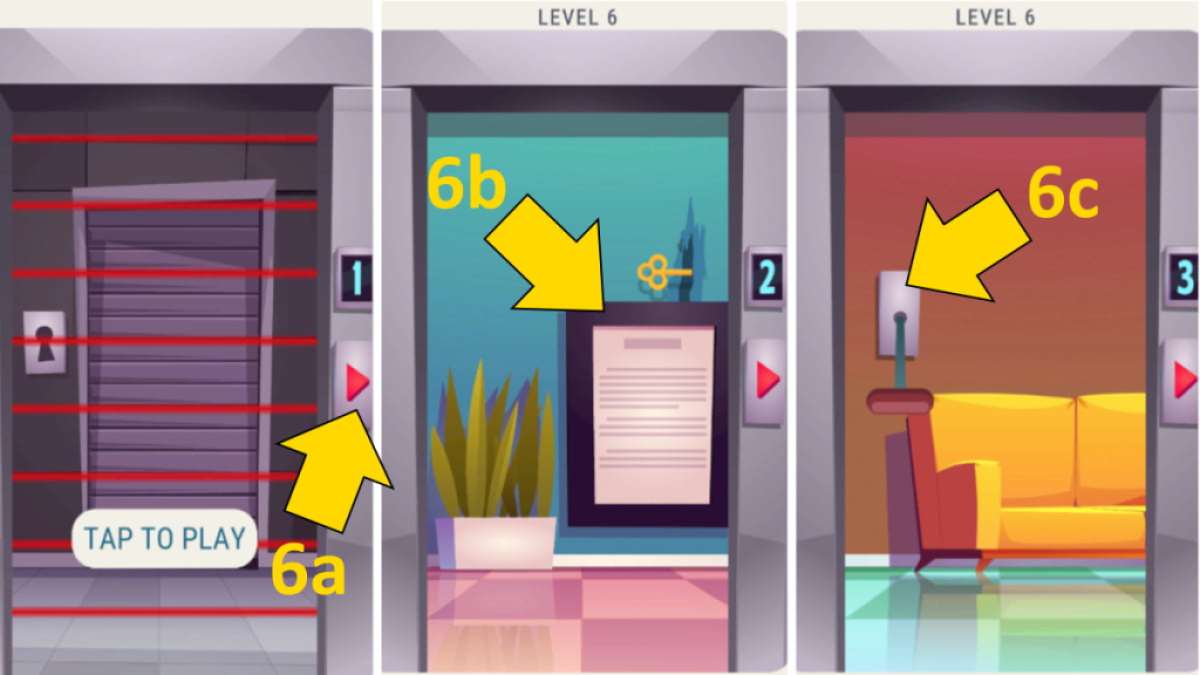
Image by Pro Game Guides
Level 17 : take the wearing apparel basket ( 17a ) to tip it over and expose the key . sweep up all the dress left , revealing the door grip ( 17b ) , which you could click to fix the threshold , and then click the fundamental ( 17c ) to get out .
grade 18 : fall into place every part of the image ( I started with the plants and flora pots , but I do n’t think it count ) until every part of the image is colour in . Select the doorhandle last to complete the level .
Level 19 : Press the mouth ( 19a ) to make it open , then the top nut ( 19b ) to put it in the mouth . chatter the mouth again , destroying the nut , then do the same cognitive operation with the second orchis ( 19c ) , which gets you the chocolate-brown key . Use it to unlock the bottom whorl , then do the egg trick again with the third screwball ( 19d ) , clack the broken nut on the ground to unlock the middle lock .
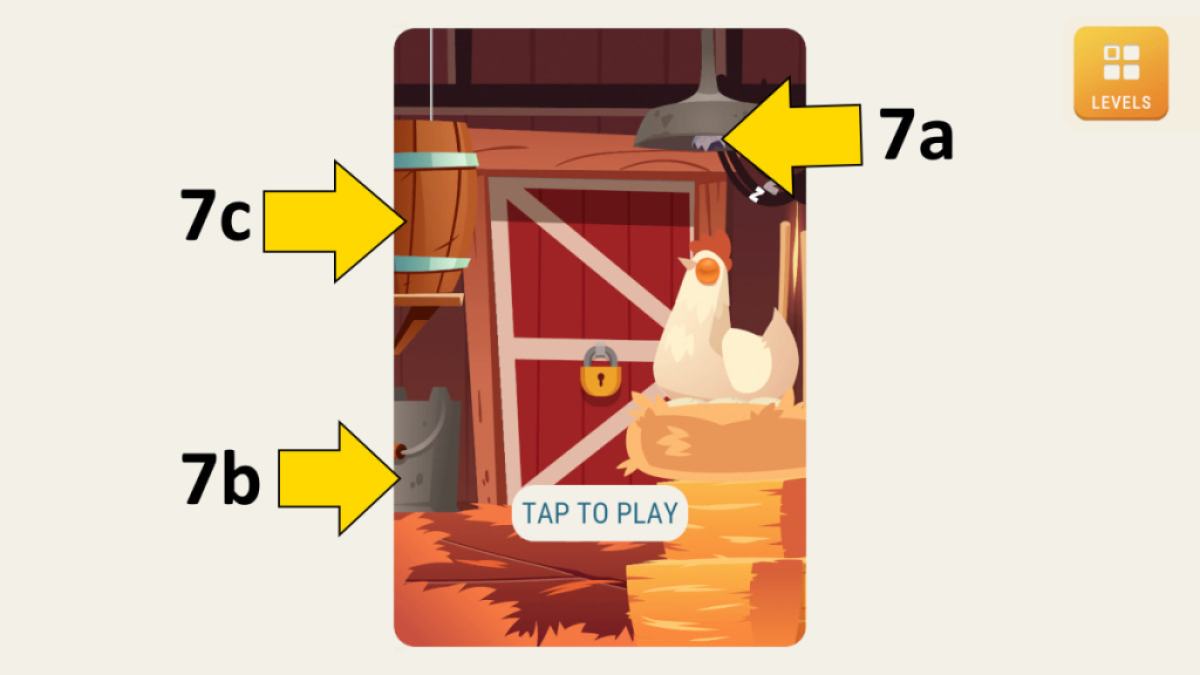
Image by Pro Game Guides
Finally , do the same process ( opened mouth , click nut , sink in mouth , utilise keystone ) on the final nut ( 19e ) to end up the level by clicking the threshold once all three locks have drop dead .
layer 20 : Double - click the leaf convention below the flecked lines , then the top - left , halfway - left over , top - rightfulness , halfway - bottom ( so it looks like the right picture above ) , then at last , the correct side of the pattern to expose the keyhole , then just press the tonality to move on .
Open 50 Doors - Levels 21-30
Level 21 : Click the corduroy ( 21a ) to insert it into the tablet , powering it up . Drag the pointer on screen ( 21b ) to unlock it , then get across the right arrow on each photo until you see a room access . Click it to move on .
Related : Abandoned 2 Walkthrough and Puzzle Solutions
degree 22 : Here , you need to part the colors so that each subway hold a individual colour . I complete it by clicking the tubs in the following order :
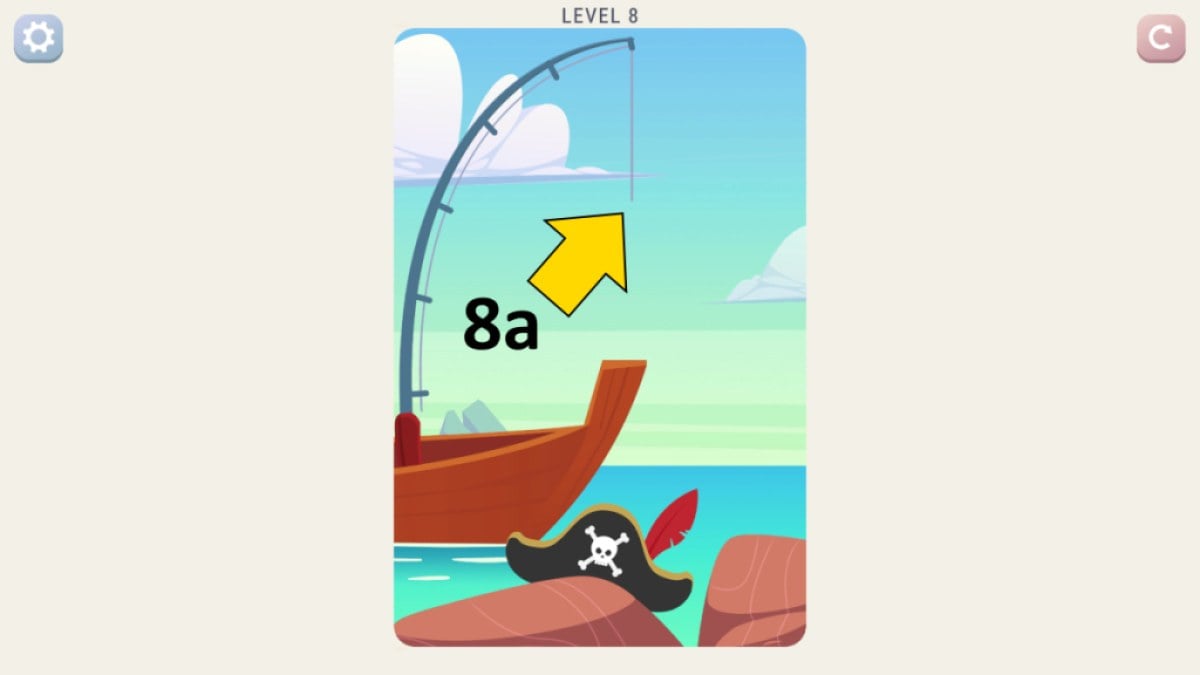
Image by Pro Game Guides
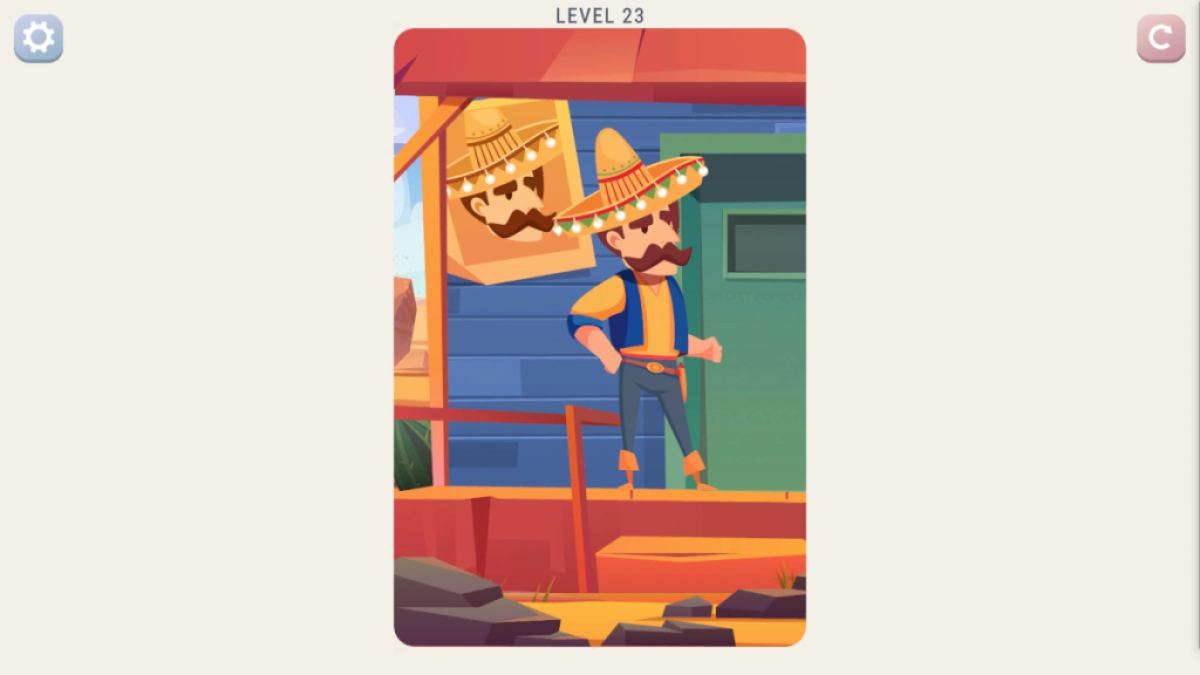
Level 23 : This is blob the difference . Click the man ’s byssus to make it into a moustache , then come home his lid . You need to keep clicking them until they match the poster behind him ( see image above ) . Once you have , snap the door to proceed .
grade 24 : Click the man ’s glasses ( 24a ) , and two workforce will seem on the clock ( 24b ) . Click the clock , and the day will turn to night , then cluck it again to see the shut sign toss to open up . Now , you could merely click the door to complete the level .
Level 25 : Swipe each section of the door leave until they all match . The pattern I completed it with is almost complete in the image above , where all I had to do was get behind the bottom surgical incision to match the rest and discharge the tier .
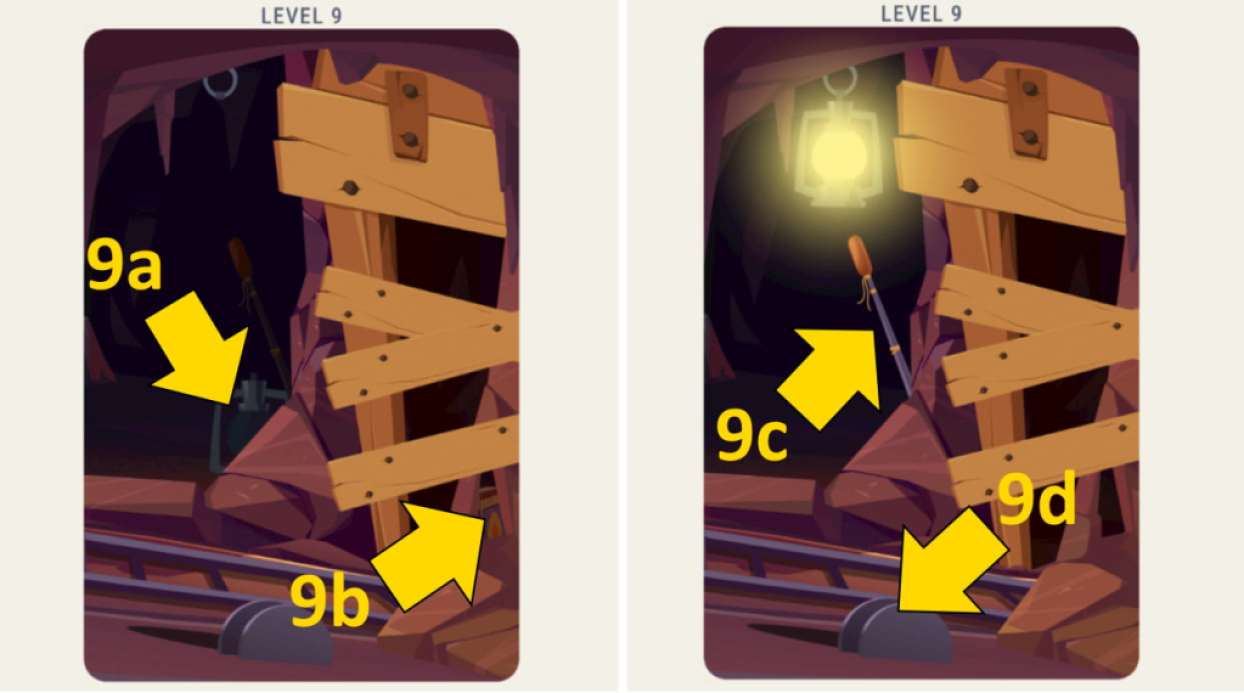
Image by Pro Game Guides
Level 26 : get through the mime double to find he is sad because he has lost his beret . Get his beret from the tree diagram ( 26a ) , then drag him right to reveal the door . get through it , and he will go through , then click it again to complete the level .
Level 27 : Drag the dog up onto the robber , who will take to the woods forth and leave the safe code behind . Now , you just necessitate to flick the button on the safe in that ordination ( NNSWEW ) to open it and land up the level .
tier 28 : hang back each satellite from go forth to right , and they ’ll look on the bowed stringed instrument above . Once you ’ve won all four , the level is complete . The order you do it does n’t weigh ; just be sure to cart each one all the way to the right of its slider .

Image by Pro Game Guides
Level 29 : Click the nigra ( 29a ) to poke a hole , then click the wheelbarrow ( 29b ) to move it fully into the picture . Click the seed bag ( 29c ) to imbed a seed , the watering can ( 29d ) to grow it , then choose the beanstalk to climb it . At the top , come home the hoarded wealth chest to complete the level .
horizontal surface 30 : penetrate the white cloud to flip it around , revealing the cardinal ( 30a ) . Double - dawn the Pteridium aquilinum ( 30b ) to remove it , then click the cloud ( 30c ) to move it off stage . Do exactly the same with the Pteridium aquilinum and swarm behind it , then click the key fruit to finish up up .
Open 50 Doors - Levels 31-40
Level 31 : fall into place the back pack to reveal the peter , then click the looking glass tender ( 31a ) to make a hole and the hammer ( 31b ) to break the subject . flick the Francis Scott Key in the broken case to advance .
Level 32 : This one is about timing . bear the left black eye button to make the drill mo go up , and let go when it is right below the brown line of business . Get it right , and the drill second will move powerful to the next blood line . But if you get any wrong , you ’ll have to bulge out again . Once you ’ve got all six in a row without any mistakes , the key is wind up , and the threshold opens .
Level 33 : Click the potion ( 33a ) to make the knight grow , then click the horse to make him leap out and unwrap the key . Click the key to move on .

Image by Pro Game Guides
stratum 34 : trail the cannonball ( 34a ) up so that it smash up the lantern ( 34b ) , then get through the cd inside it to illumine it . Now dredge the cannonball onto the canon ( 34c ) to shift it to confront the door , and finally , drag the candle down to the primer ( 34d ) to fire the canyon and break down the door .
Level 35 : You ask to click two persona to switch them until you ’ve cheer the correct exposure , a bit like a scroll saw puzzle . The order you switch them does n’t weigh , but the image need to look like the one above to progress before you move one final part ( all that ’s leave to do is switch the top two primal man ) .
degree 36 : fall into place the squat ( 36a ) to jack up the gondola , then click the bicycle ( 36b ) to specify it to the cable car . Click the tires again to drop the cable car down , and click its hood ( 36c ) to open it up . Click the closet ( 36d ) to open it , then click the electric battery in spite of appearance to add it to the gondola , moving the car fore . you may now give the petrol fluttering ( 36e ) , add the funnel shape ( 36f ) , satiate the railroad car with gas ( 36 1000 ) , and tug aside . Job jobbed .
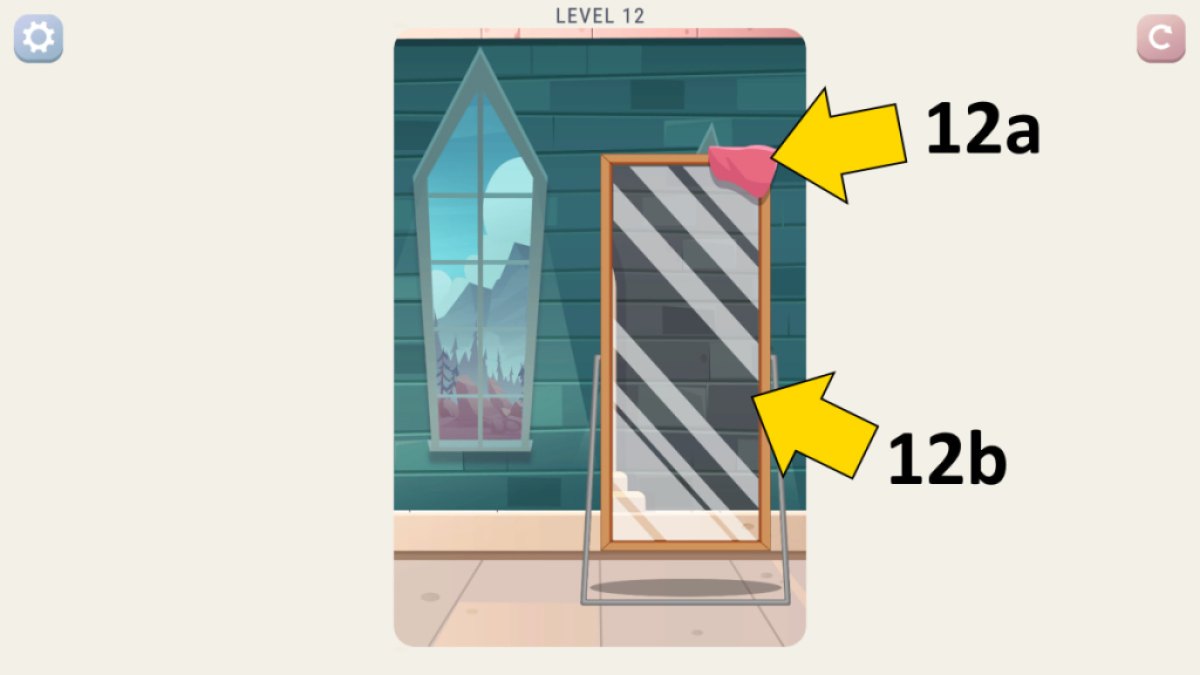
Image by Pro Game Guides
Level 37 : Potter ! set off anywhere on the white-hot dotted ancestry , drag out the computer mouse around the baggage trolley with the left clit hold down to discover the mental image ( I was n’t that accurate , and it still worked ) . You now need to click the bit 9 , then 3 , then 4 , with the 9 being hidden behind the violent bag ( just click the grip , and you ’ll hear a randomness , so you ’ll know you ’ve chatter it ) .
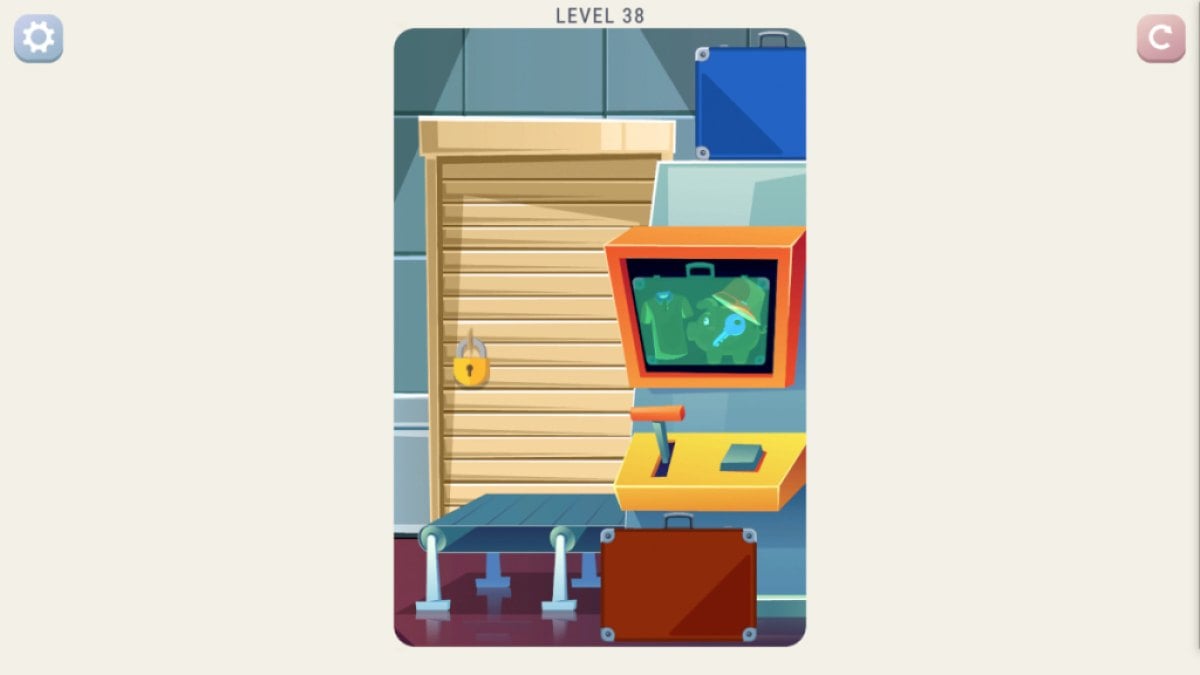
raze 38 : snap the over-embellished suitcase to put it on the convertor belt , pull the handgrip to put it in the machine , and then get through the button for an 10 - ray shot . You should see the key inside , so simply click it to finish the grade . It was majestic for me twice in a row , so I presume it always is . But if it is n’t for you , expend the same process on the other two suitcase to find the key .
dismantle 39 : You require to tell apart all of the differences ( there are eight to press the left half of the picture , all mark above ) . Once you ’ve clicked them all , the two images will become one , and you ’re done .
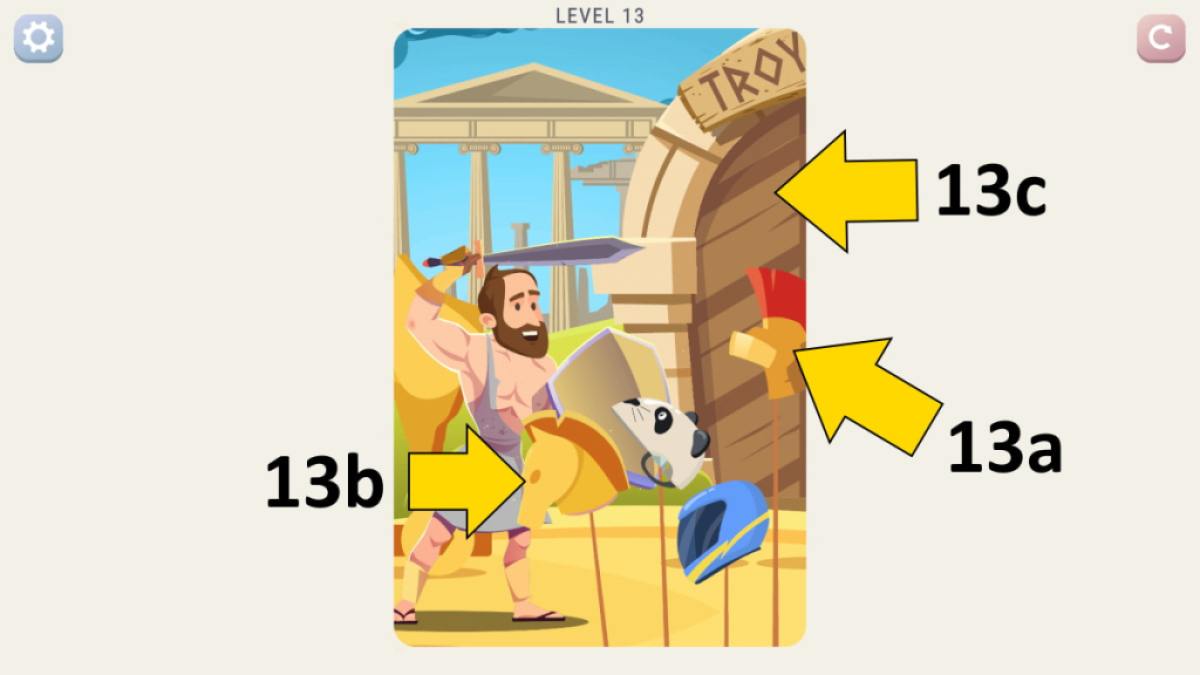
Image by Pro Game Guides
Level 40 : Click the coloured item in the unicorn ’s hired man to get a conclusion - up of it , then press down the buttons on it so that they match the design of apples in the tree . In the persona above , I just need to flick the marked clit to finish up the puzzle .
Open 50 Doors - Levels 41-50
flush 41 : This is a cheeky one ! All you actually have to do is drag out the two doors open to complete the grade . I lost a good while clicking button and levers …
Related : abandon Walkthrough & Puzzle Solutions
Level 42 : Click the trash can to get the cue , then click the halfway door , left door , midway door , and halfway door again to advance .
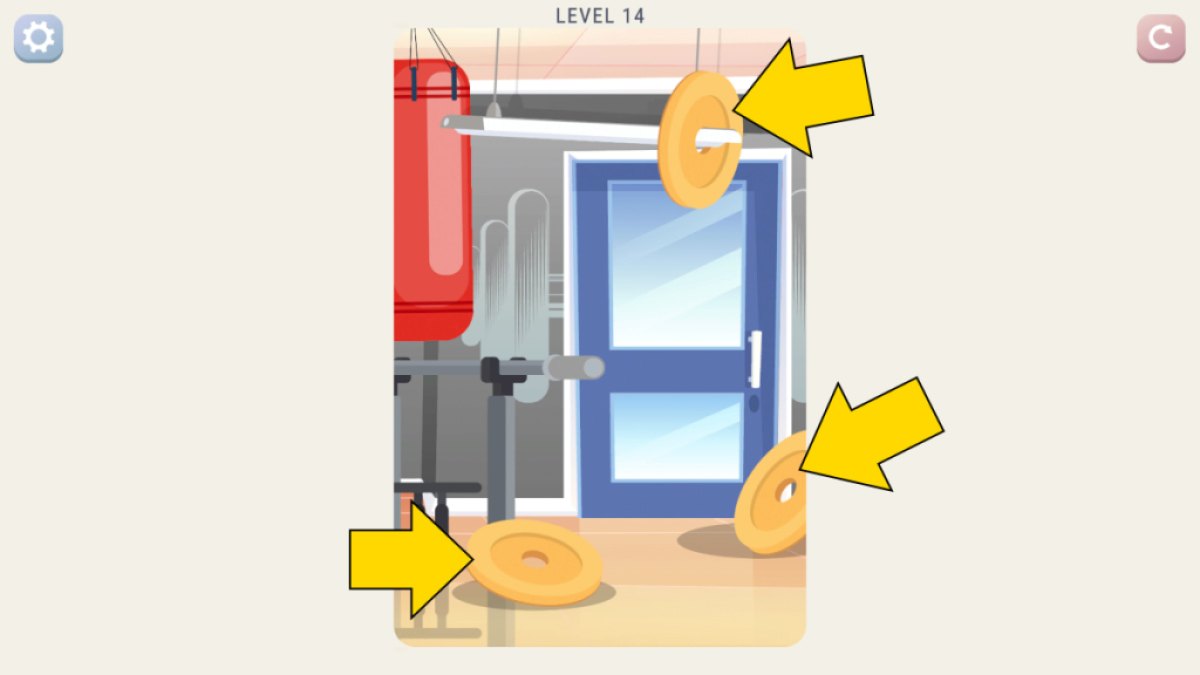
Image by Pro Game Guides
Level 43 : change by reversal the light off by clicking the electric switch ( 43a ) , and then scuff the UV lamp ( 43b ) around the screen to discover all the symbols on the wall . When you move around the light on again , mention the order in which the symbol now disappear . Click the symbols on the door in this social club ( for me , it was diamond , circle , triangle , flat - cornered Triangulum ) to advance .
stratum 44 : First , drag all seven loudness level on the desk ( 44a ) up so they ’re at the top . Now , quickly click all six musical items marked so that they ’re act at once ( the order you click them does n’t matter ) . Get them all going at once , and the glass will smash . come home the chicken feed , and you ’re done .
grade 45 : You demand to build the dinosaur . dredge the first leg ( 45a ) to the center of the systema skeletale , the neck ( 45b ) to the front , the second leg ( 45c ) to below where you attach the neck , and then the promontory ( 45d ) to the neck . Finally , add the tail ( 45e ) to the back , and you ’re done ( just click the door ) .
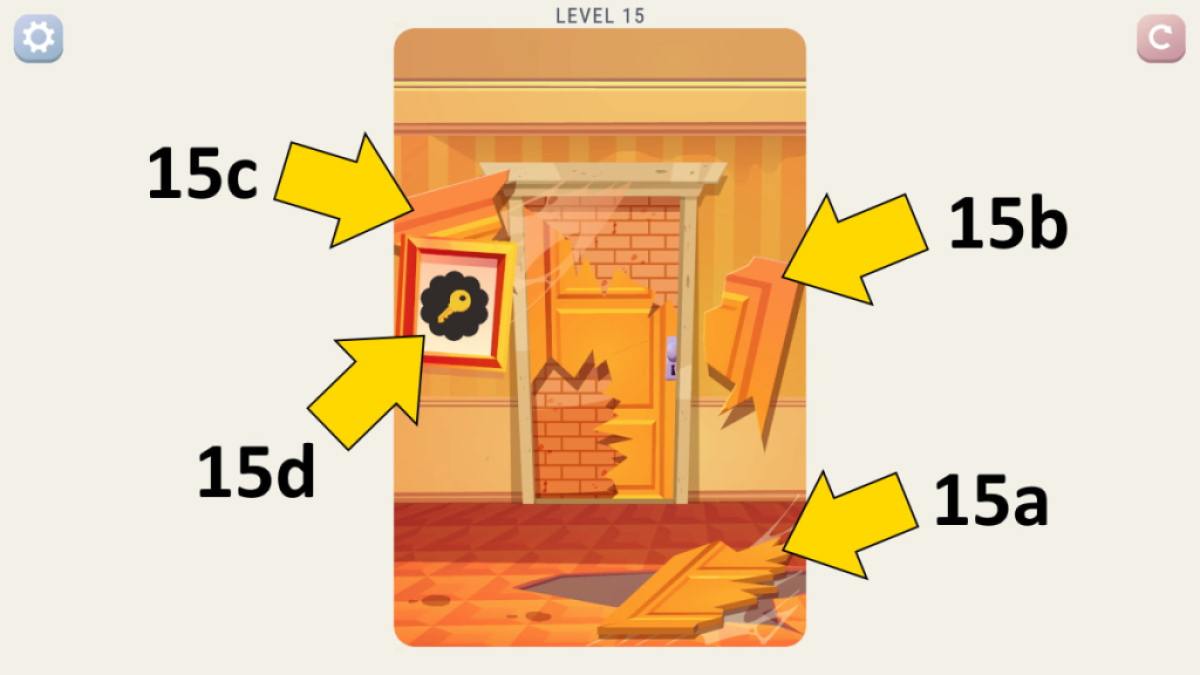
Image by Pro Game Guides
degree 46 : Start by dragging the demodulator ( 46a ) over the rick to find the location of the key ( 46b ) . Click the lamp ( 46c ) to raise it , revealing the magnet ( 46d ) . haul the attraction onto the broken rake ( 46e ) , then double - tick the rake to get the key . Click the lock to advance .
Level 47 : cart the axe ( 47a ) to the tree ( 47b ) to foreshorten it down . Now hang back the felled tree up onto the two silver ring ( 47c ) to depress the drawbridge and make out the puzzle .
Level 48 : Click the mummy to open it , then the body inside to remove it , and ultimately , drag the symbol in the back of the sarcophagus ( 48a ) onto the section of the door with the same symbolization to complete the first part of the teaser .
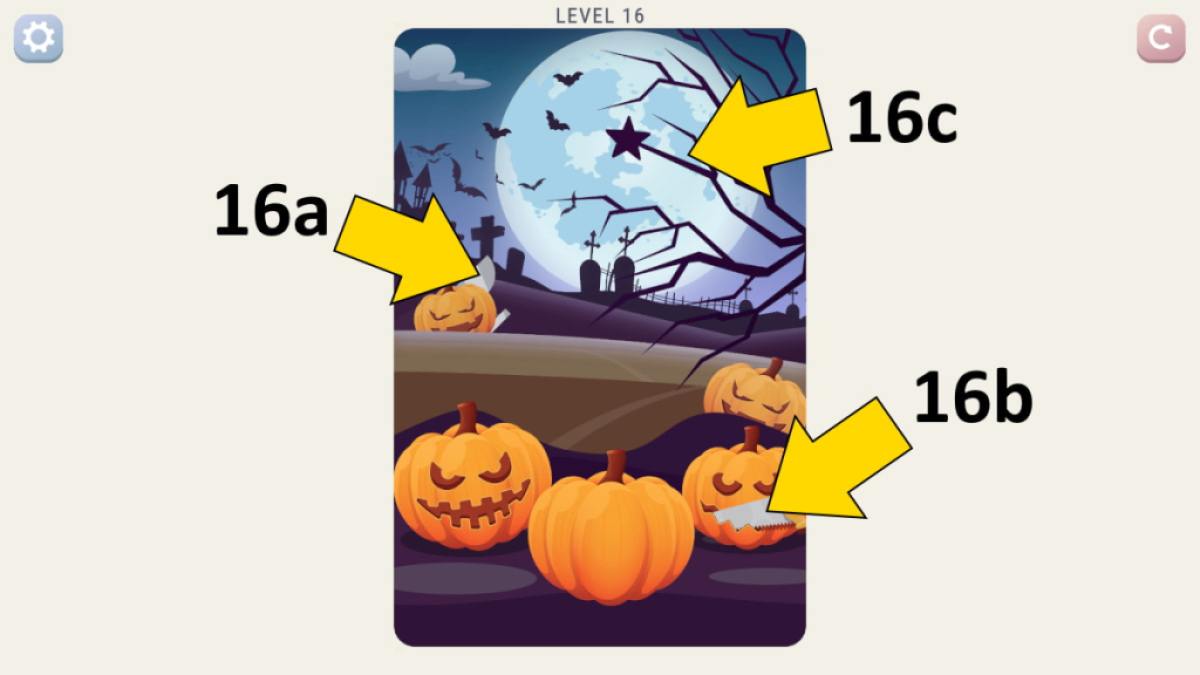
Image by Pro Game Guides
drop back the breast left ( 48b ) , revealing the eye , which you’re able to also drag onto the room access . scuff the bird into place from the Au mound ( 48c ) , and then the net three symbols from either side of the room access ( 48d , e , and f ) to be done .
raze 49 : Add the cape ( 49a ) to the statue by get through it , then also add its sword from where it is hidden behind the torch ( 49b ) . Now drag the barrel ( 49c ) left to reveal the helm , add it to the statue , and move on to the final grade .
Level 50 : I should ’ve known aliens were behind all this ! tick the arrow above the door ( 50a ) to move leave , press the button there , and one alien will be go . Now , you just need to click the air lock lever tumbler ( 50b ) to complete the final floor !
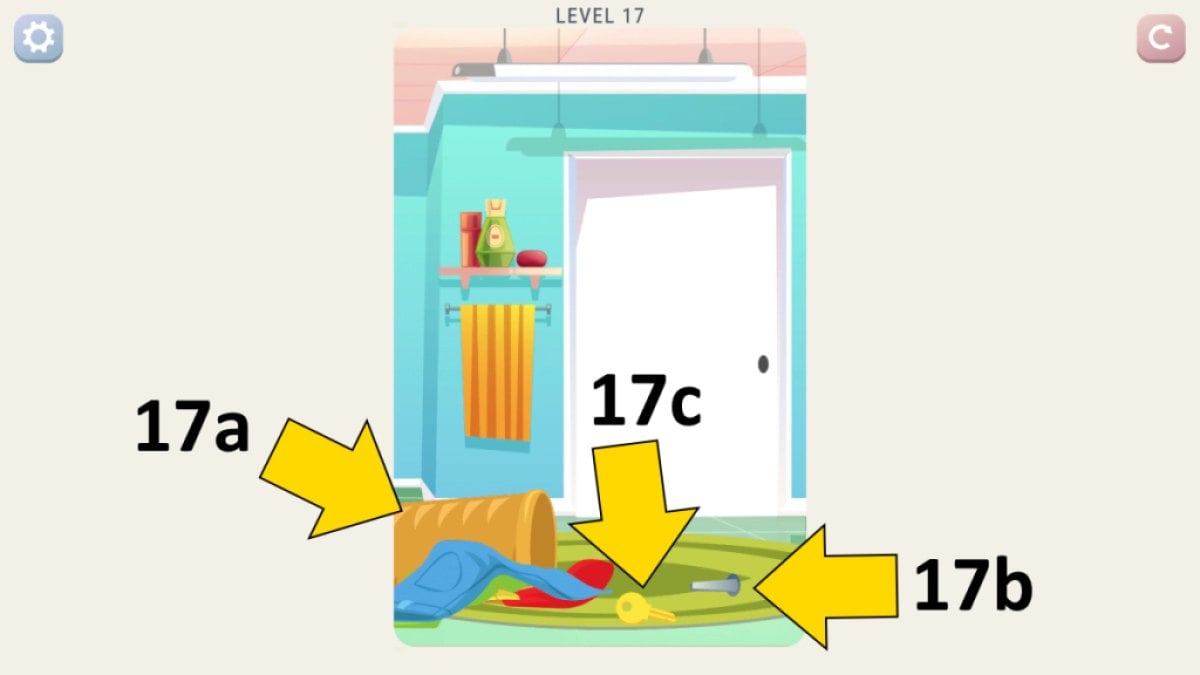
Image by Pro Game Guides
For more walkthroughs of Cool Math Games , check outMust scarper The Wizards Castle Walkthrough – Cool Math GamesandHow to stick Trace Escape Room – Full Walkthroughright here at Pro Game Guides !
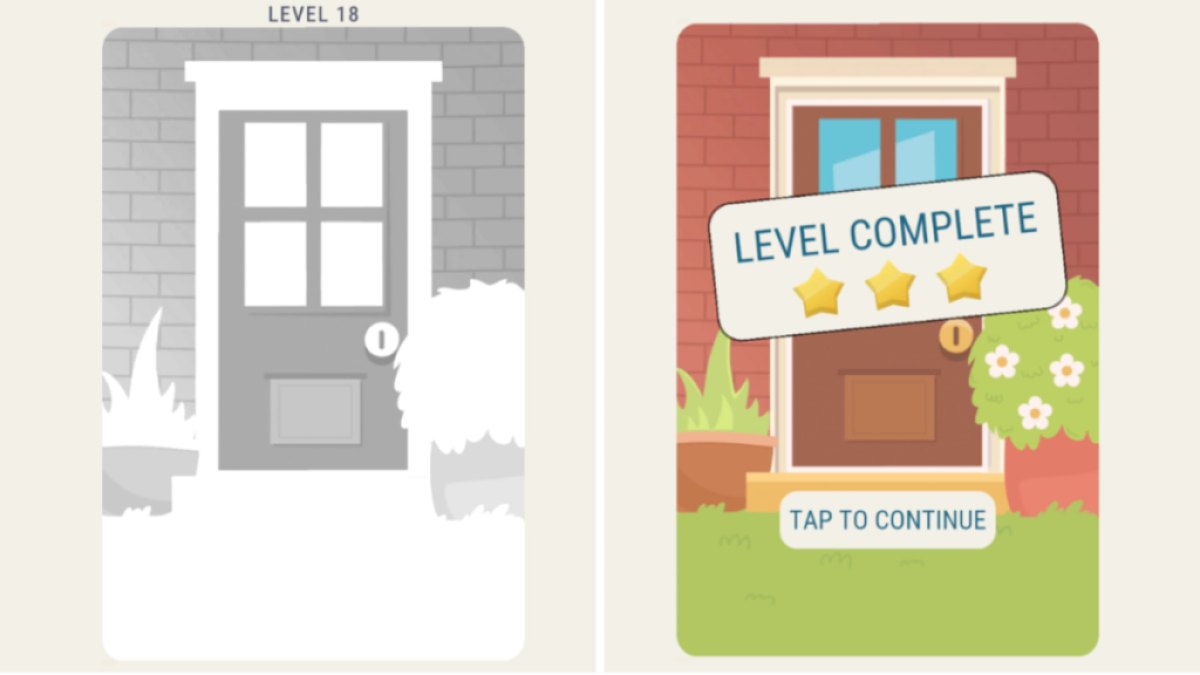
Image by Pro Game Guides
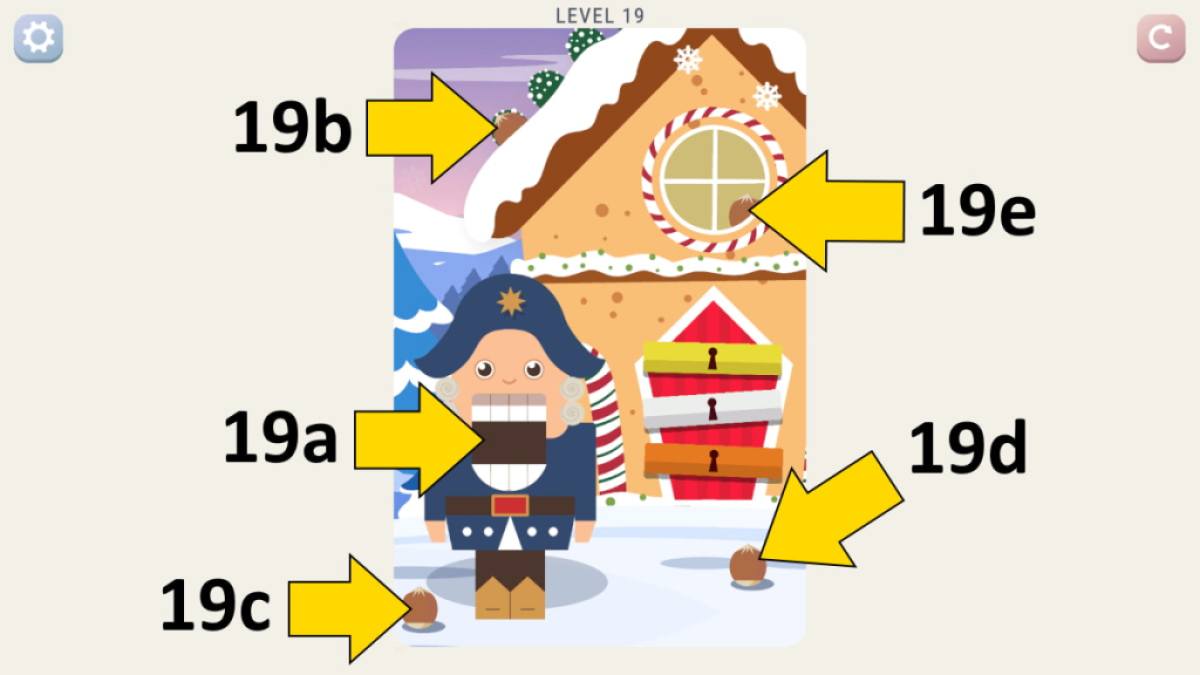
Image by Pro Game Guides
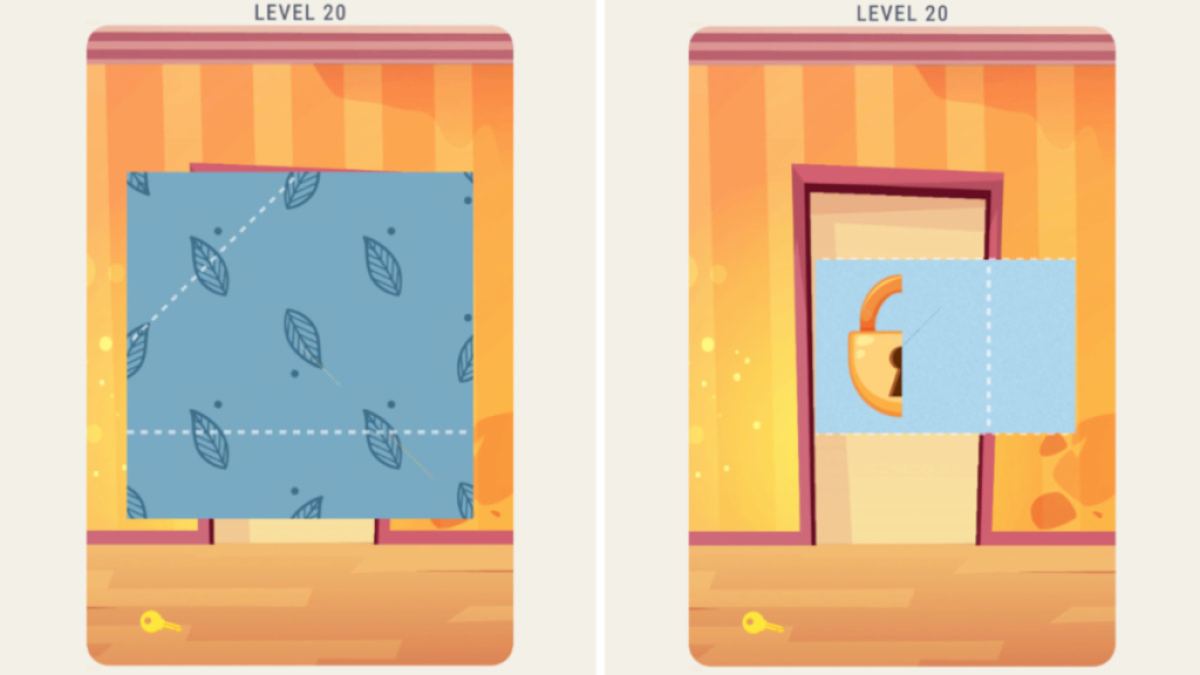
Image by Pro Game Guides
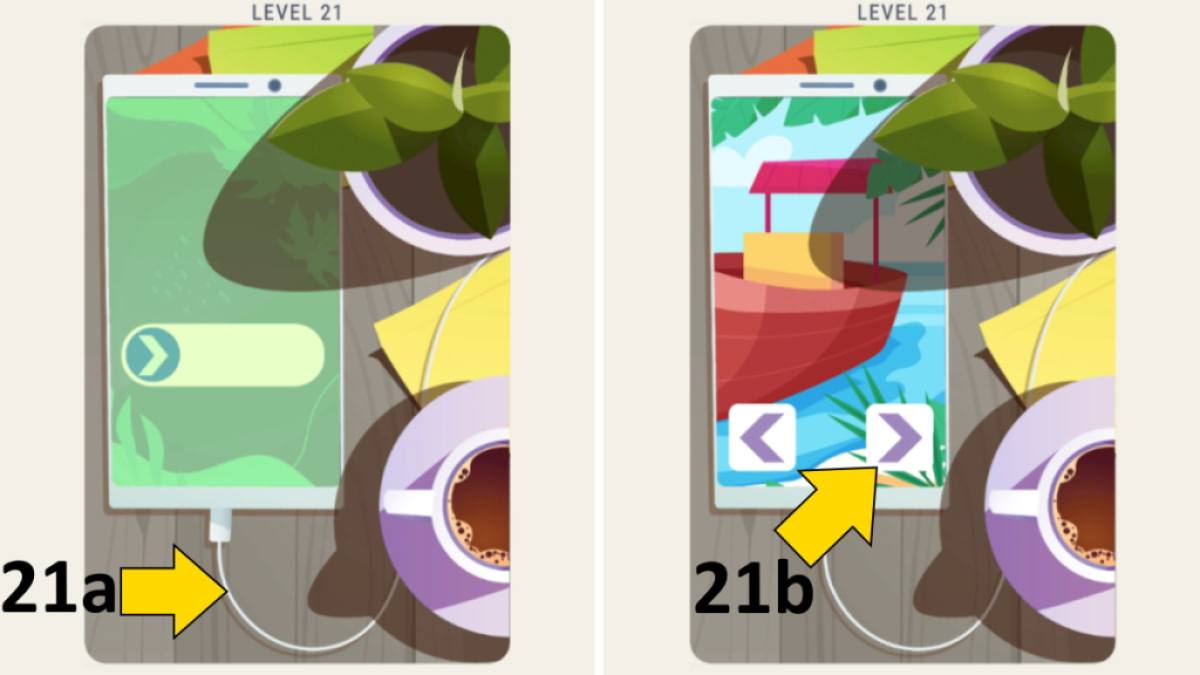
Image by Pro Game Guides

Image by Pro Game Guides
Screenshot by Pro Game Guides
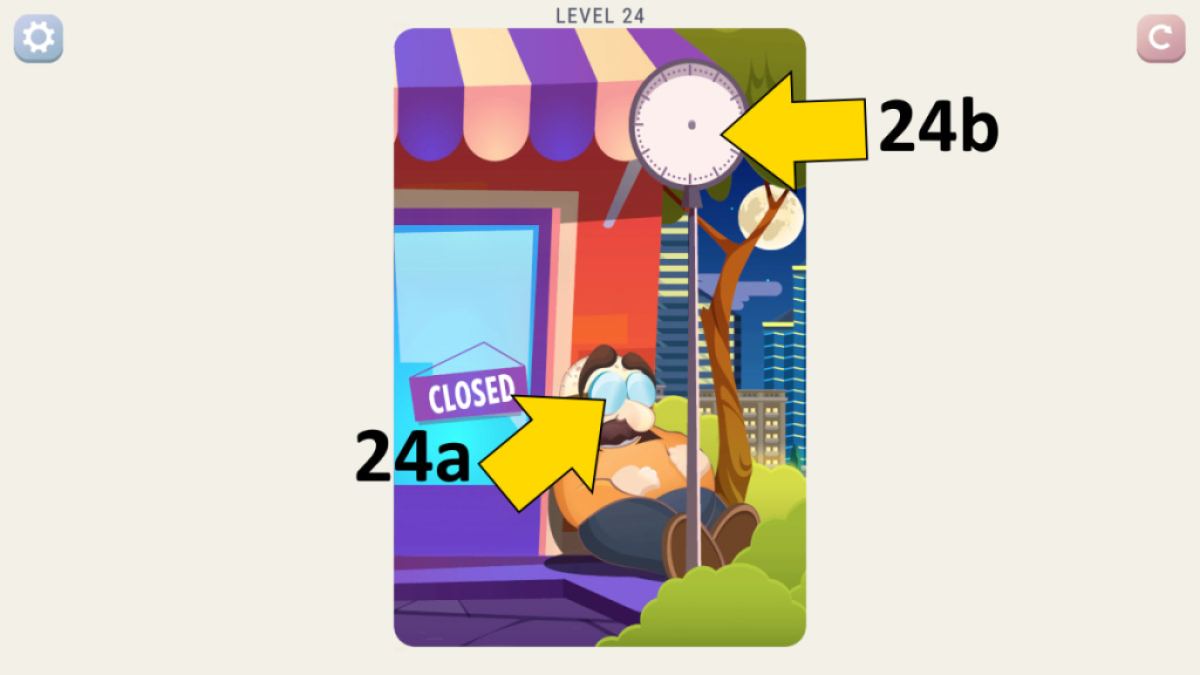
Image by Pro Game Guides

Screenshot by Pro Game Guides
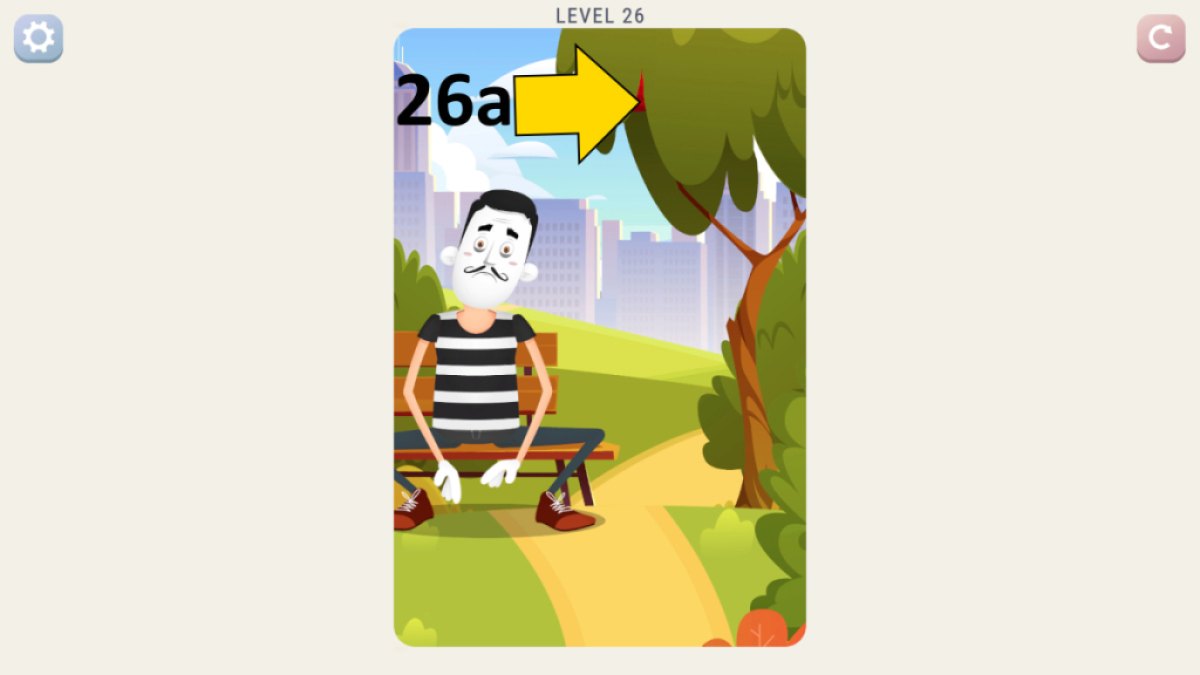
Image by Pro Game Guides

Screenshot by Pro Game Guides

Screenshot by Pro Game Guides
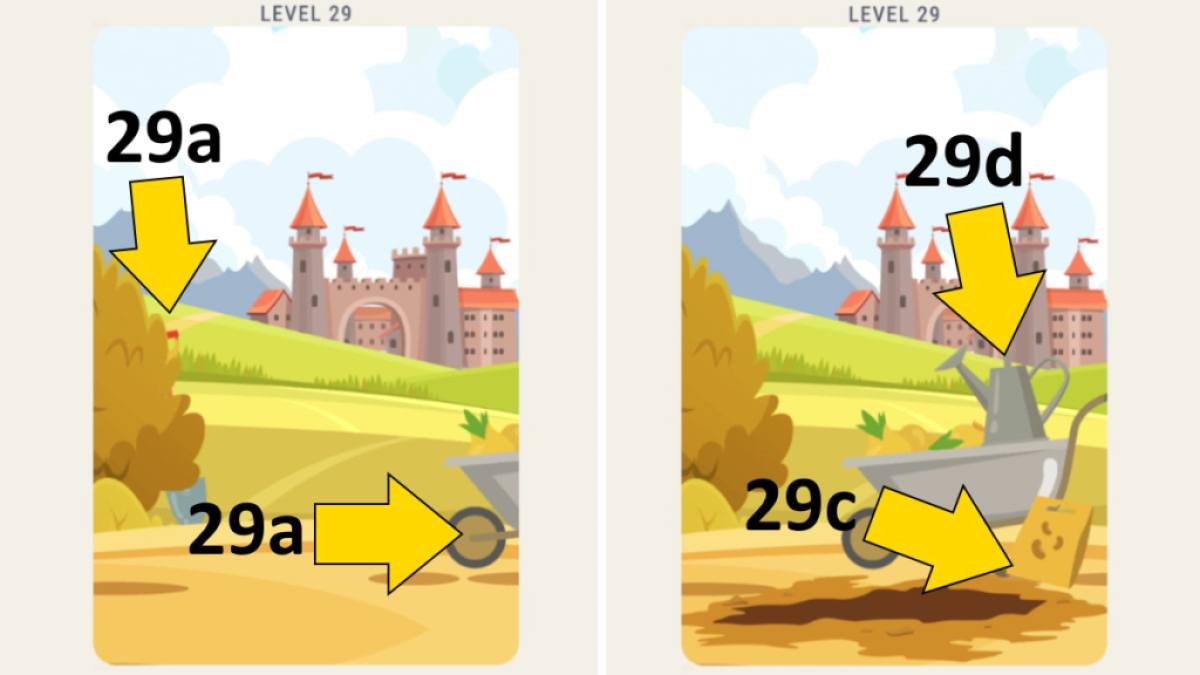
Image by Pro Game Guides
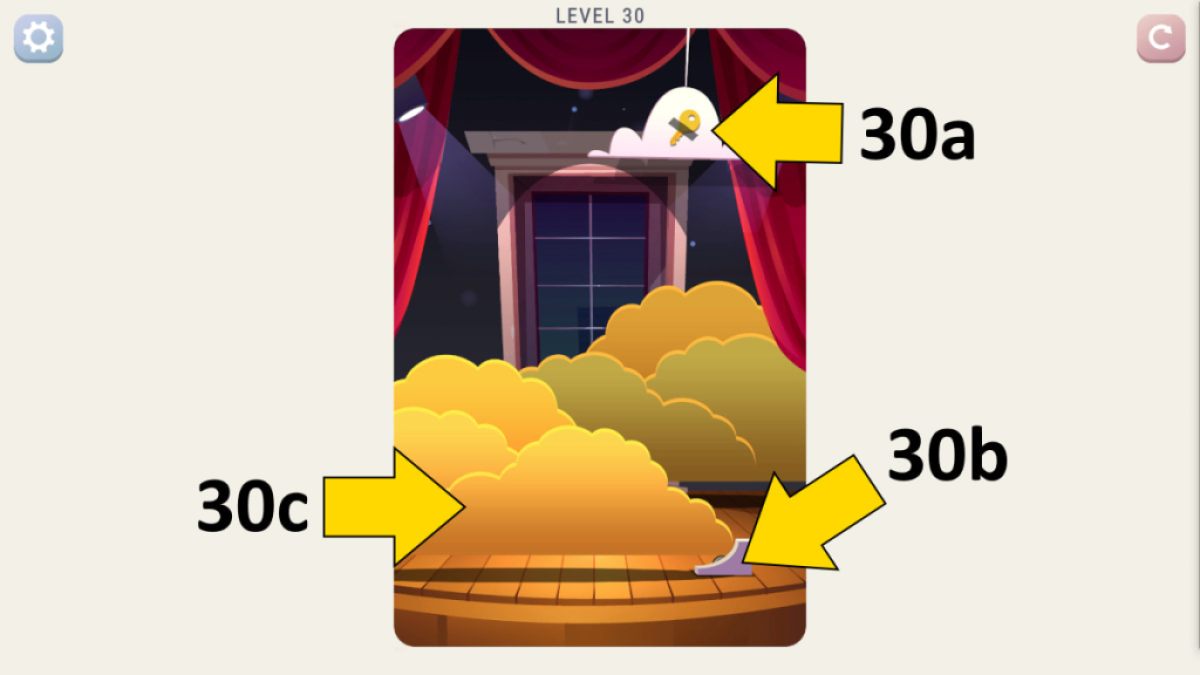
Image by Pro Game Guides
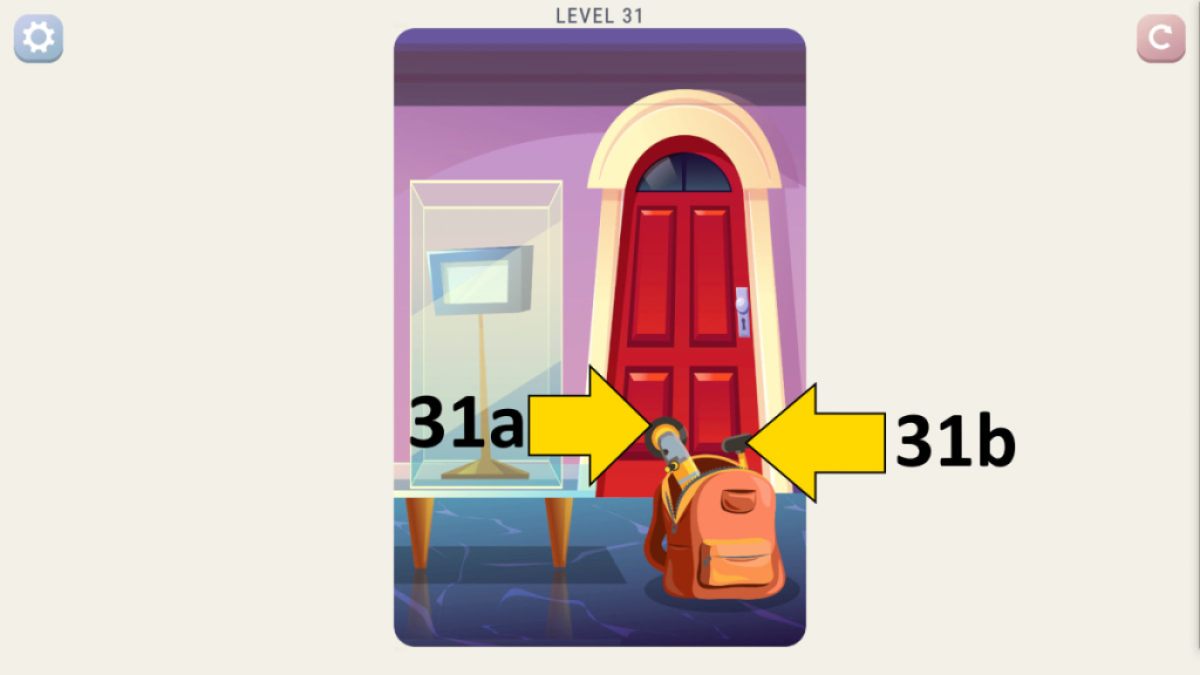
Image by Pro Game Guides
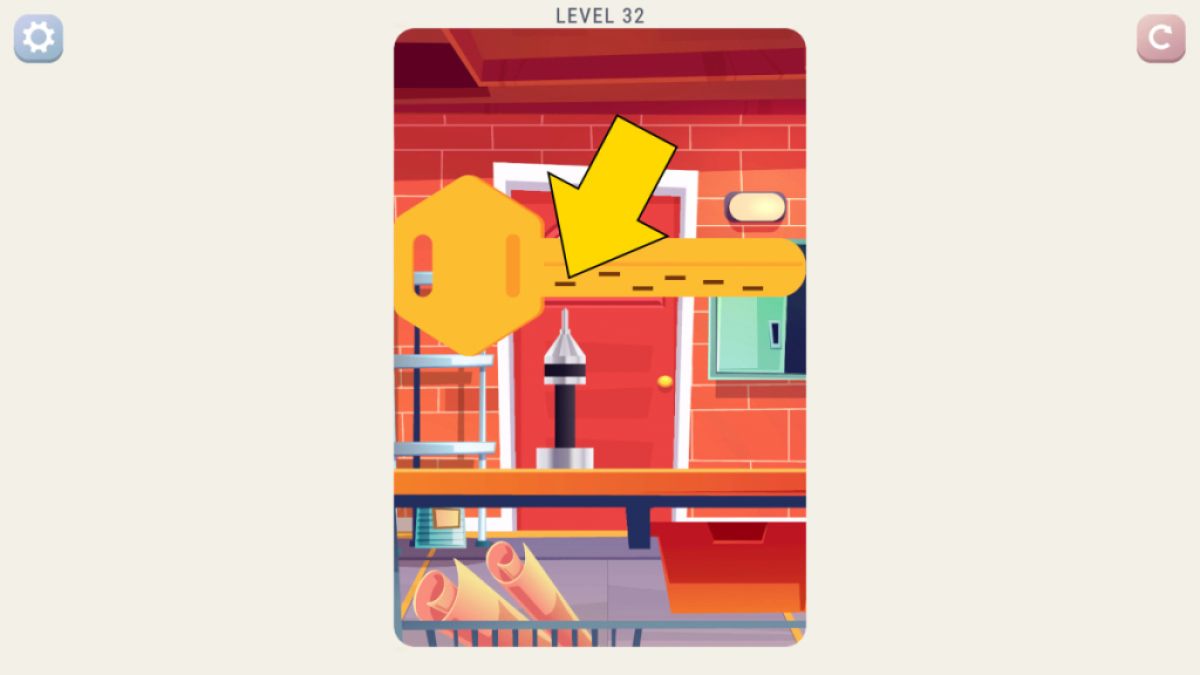
Image by Pro Game Guides

Image by Pro Game Guides
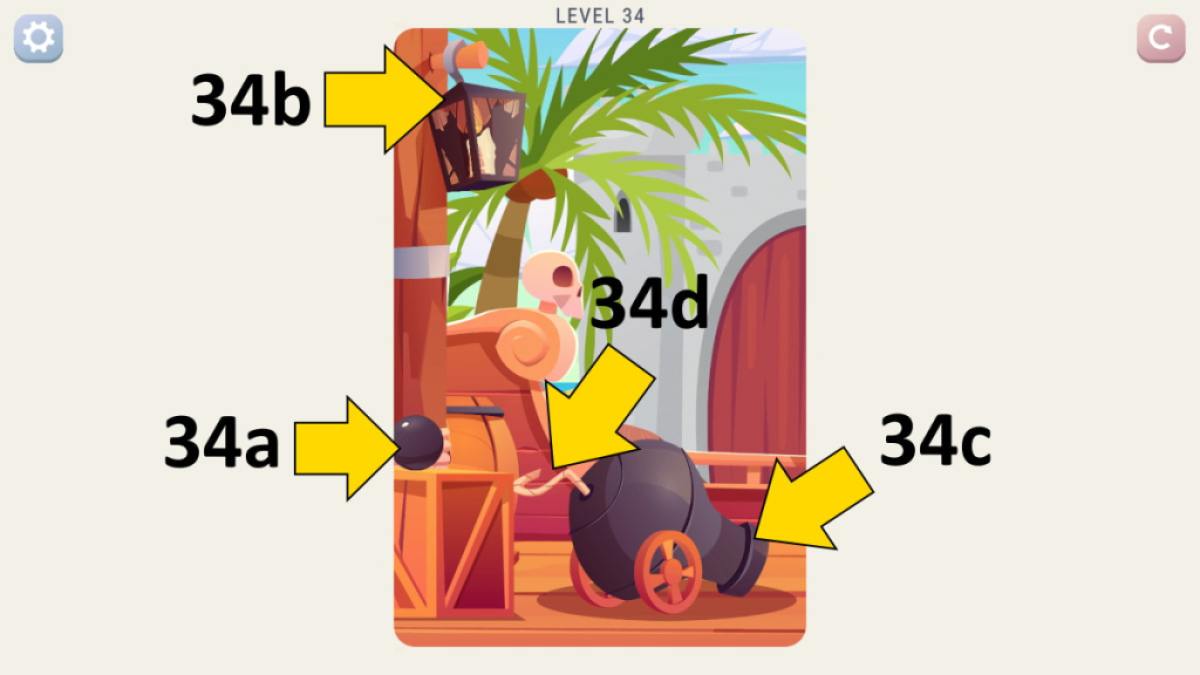
Image by Pro Game Guides
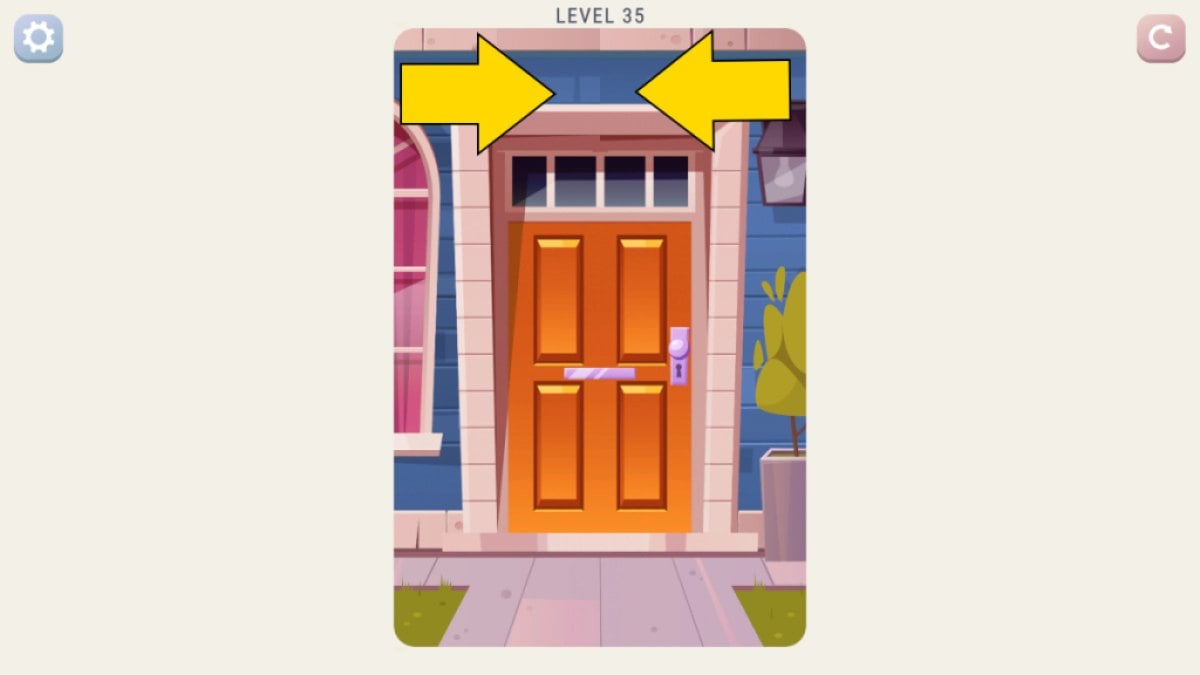
Image by Pro Game Guides
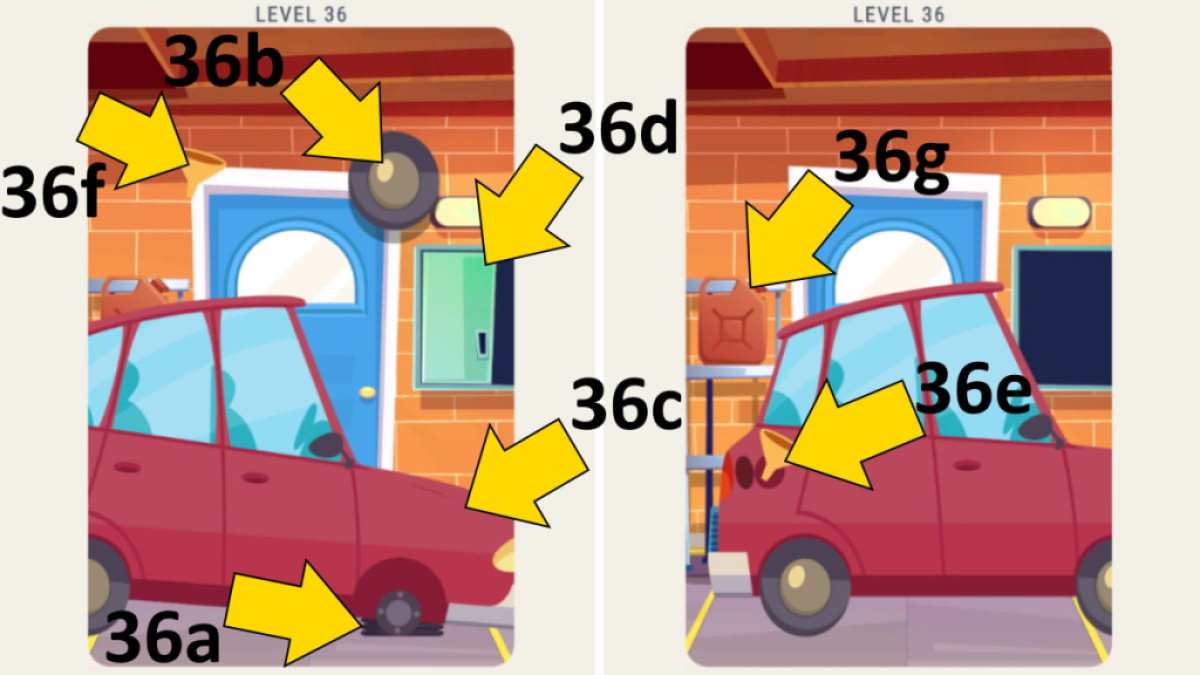
Image by Pro Game Guides
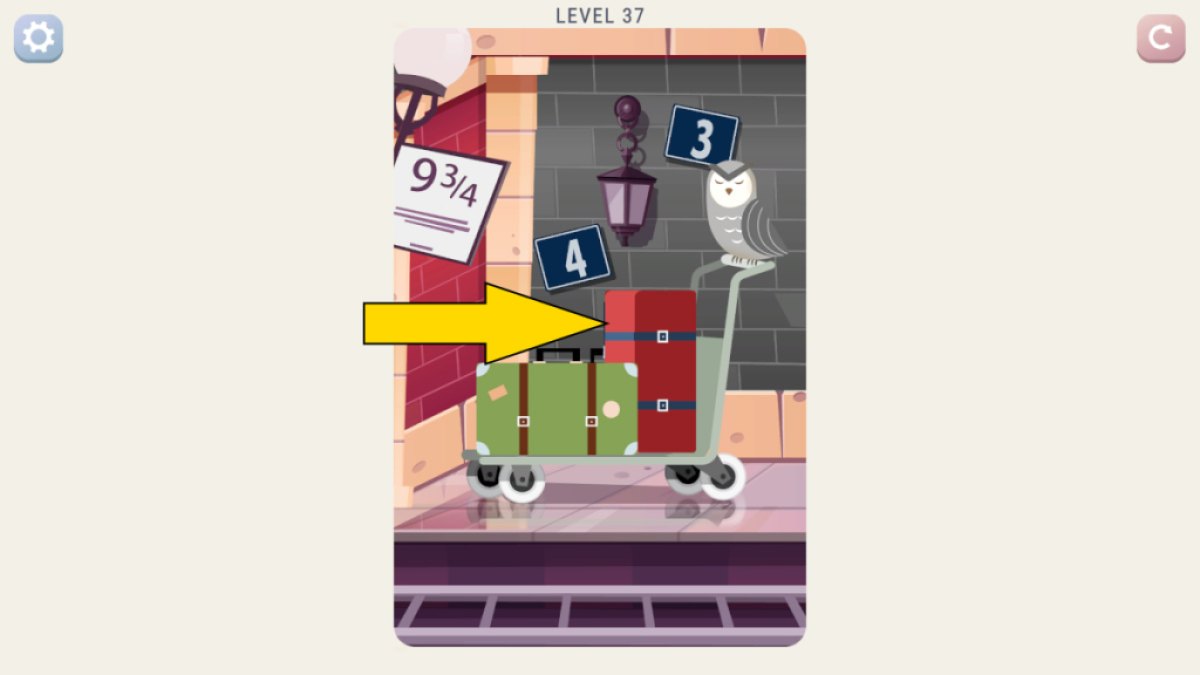
Image by Pro Game Guides
Screenshot by Pro Game Guides
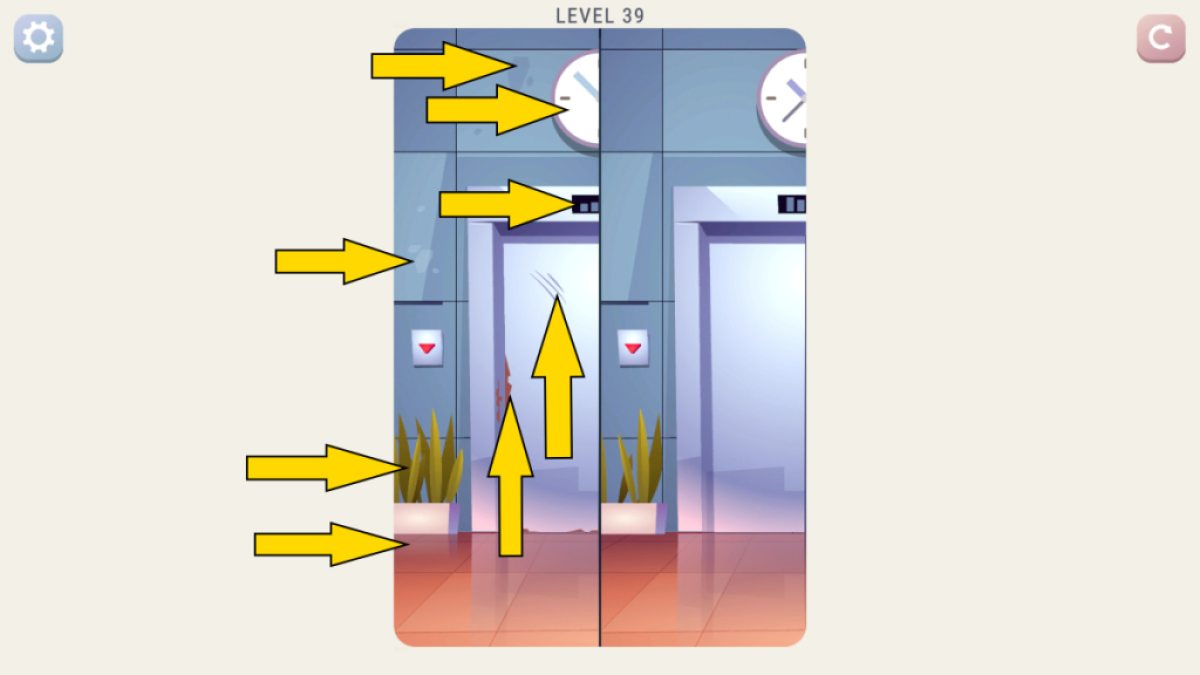
Image by Pro Game Guides
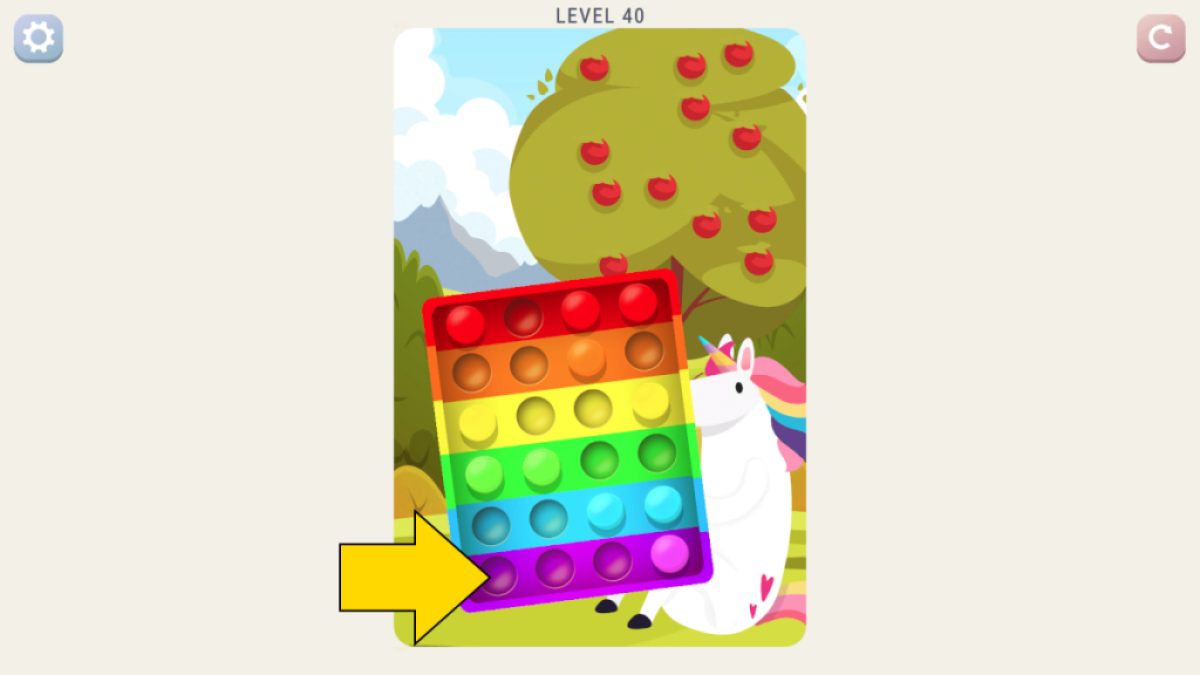
Image by Pro Game Guides
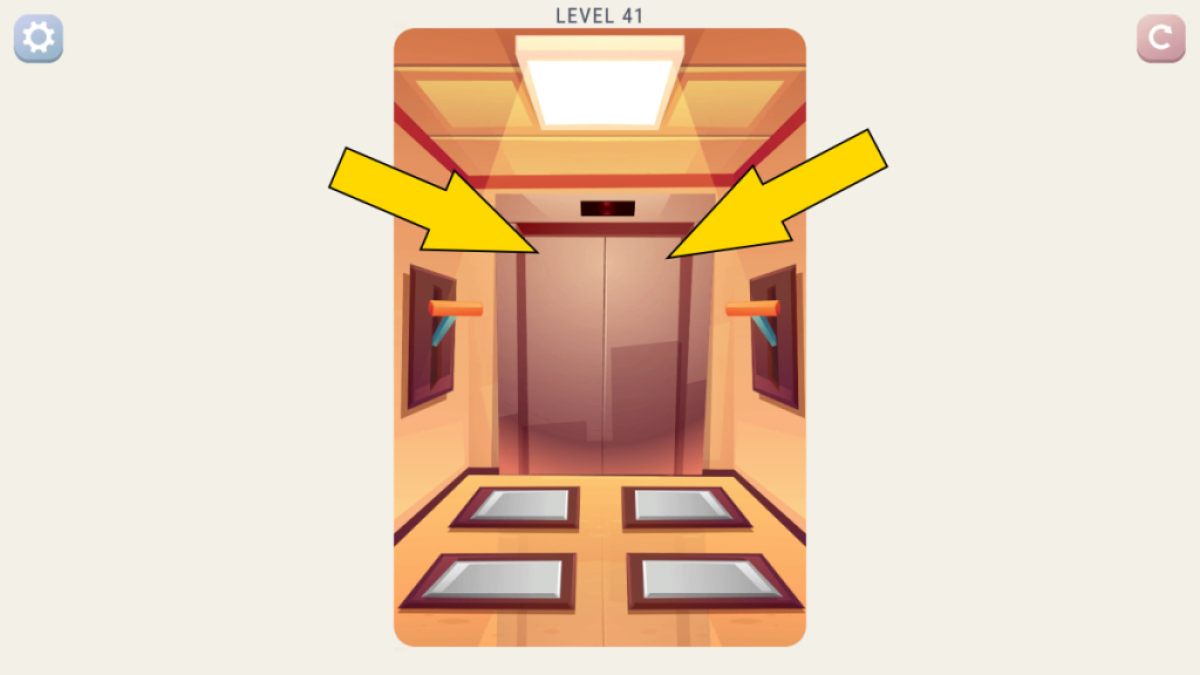
Image by Pro Game Guides
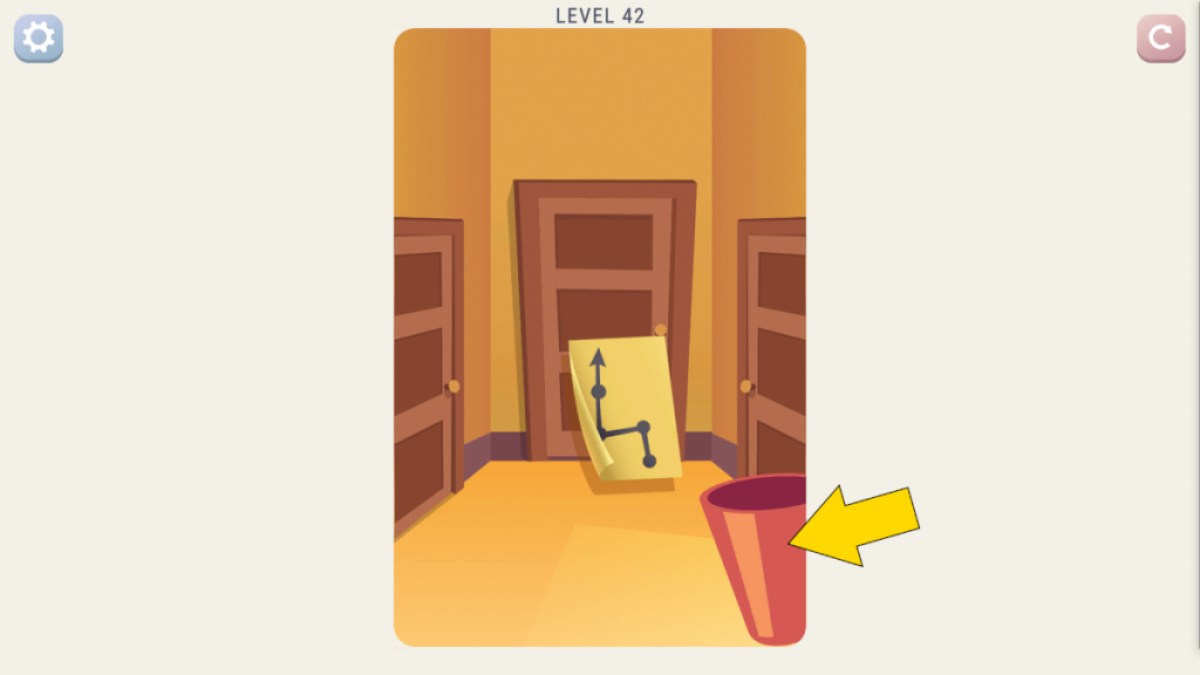
Image by Pro Game Guides
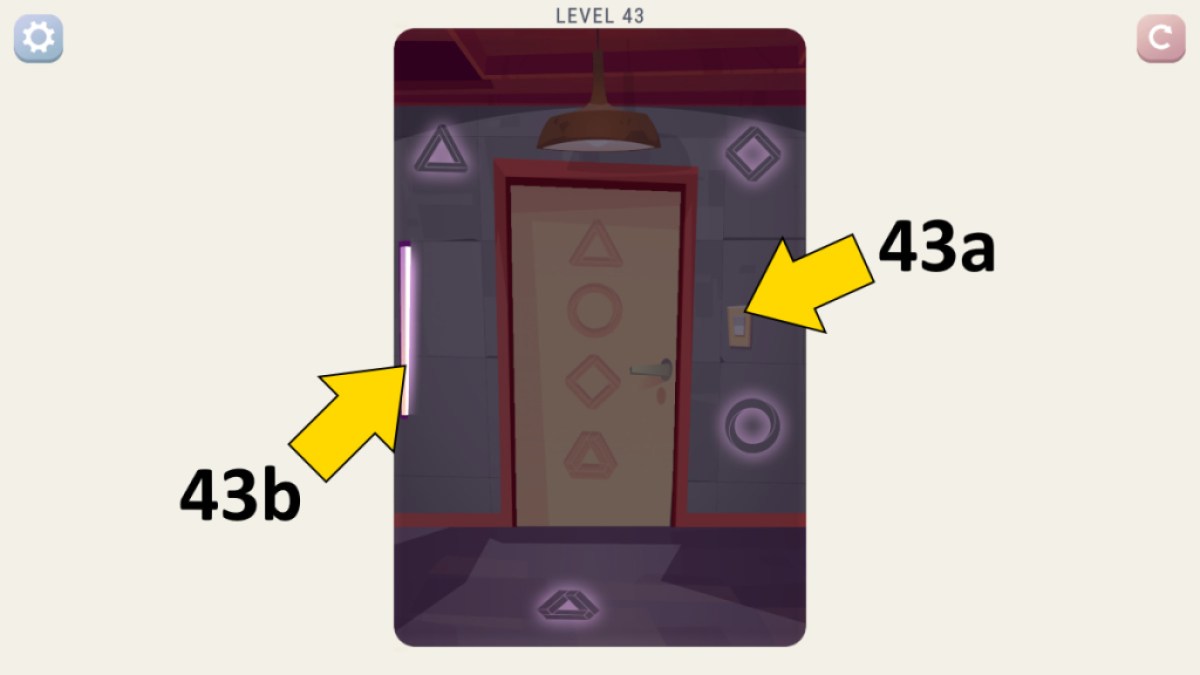
Image by Pro Game Guides
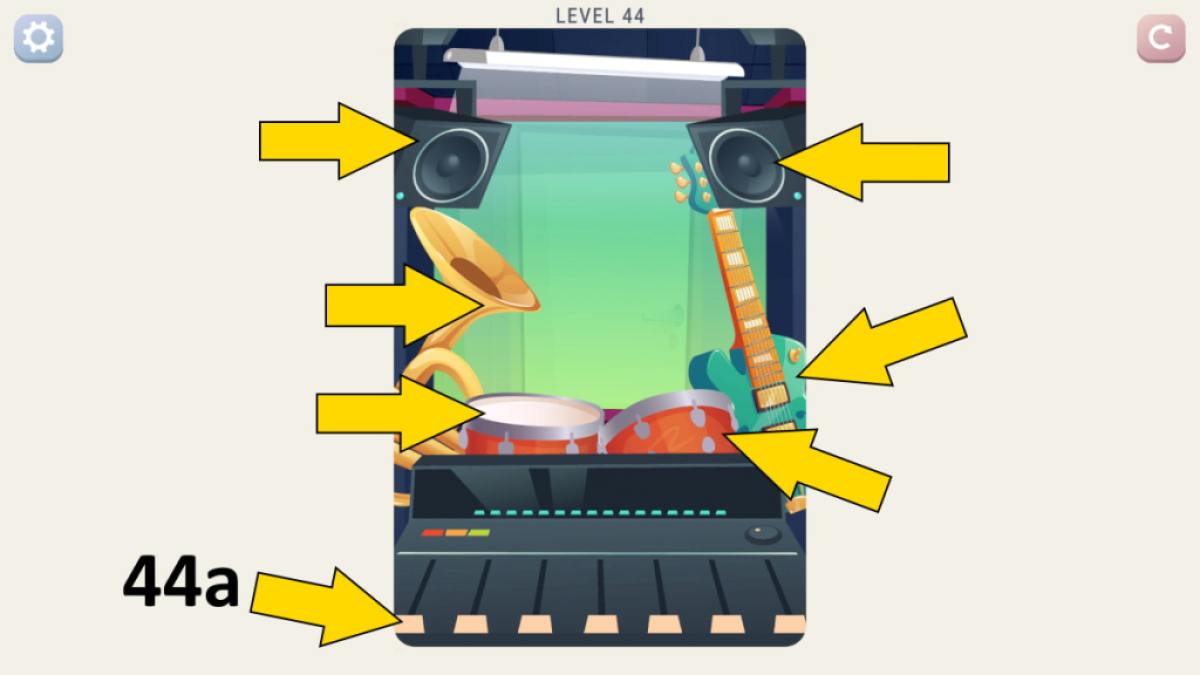
Image by Pro Game Guides
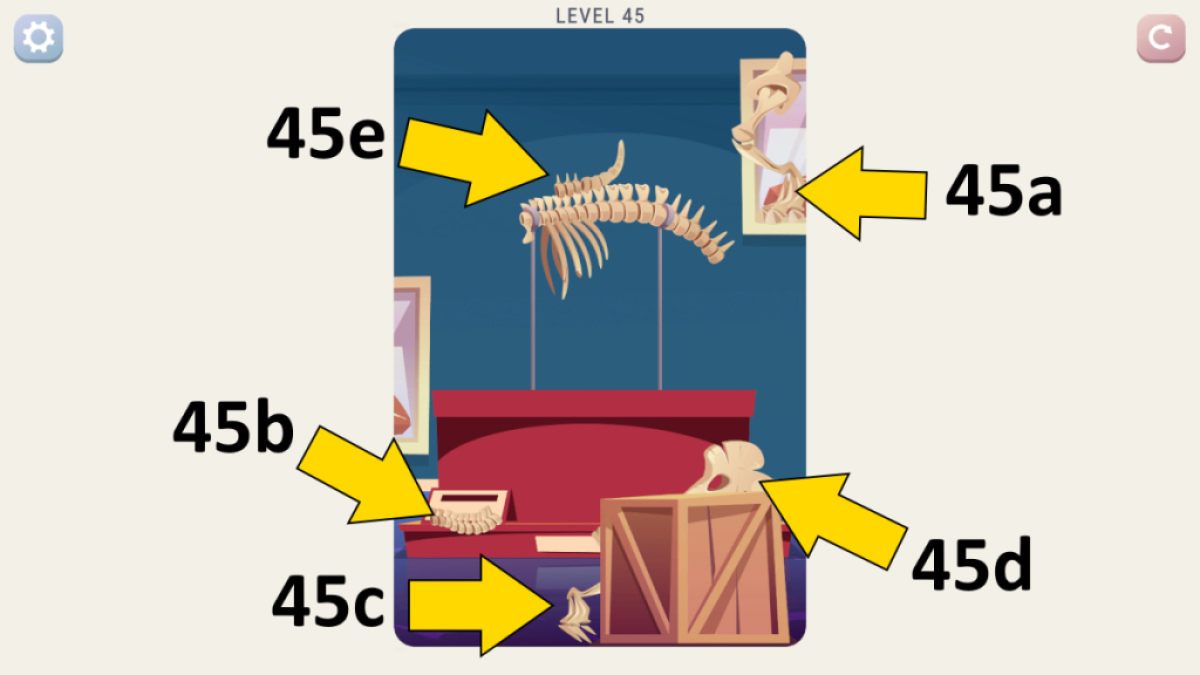
Image by Pro Game Guides
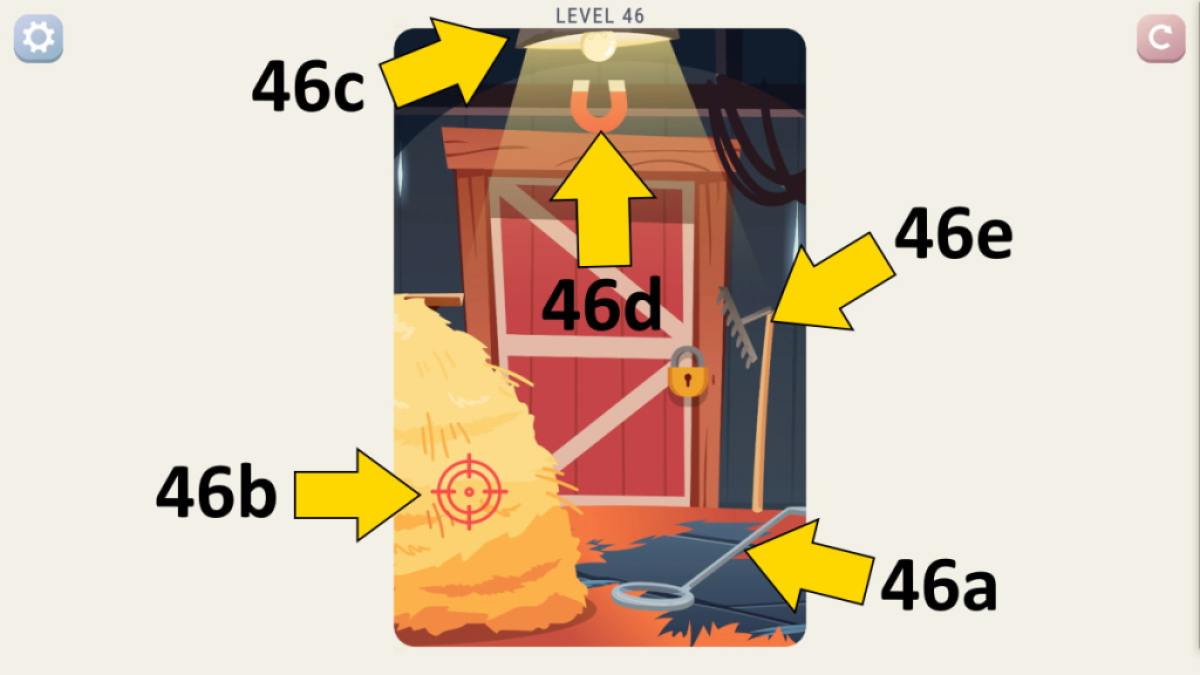
Image by Pro Game Guides
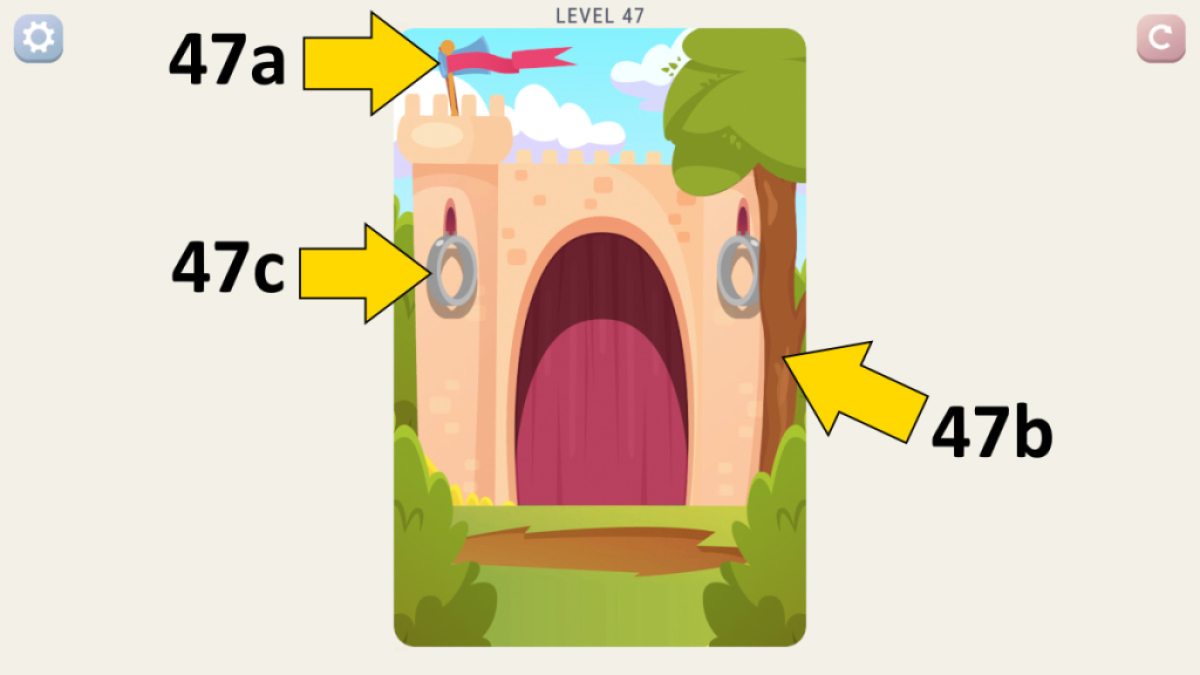
Image by Pro Game Guides
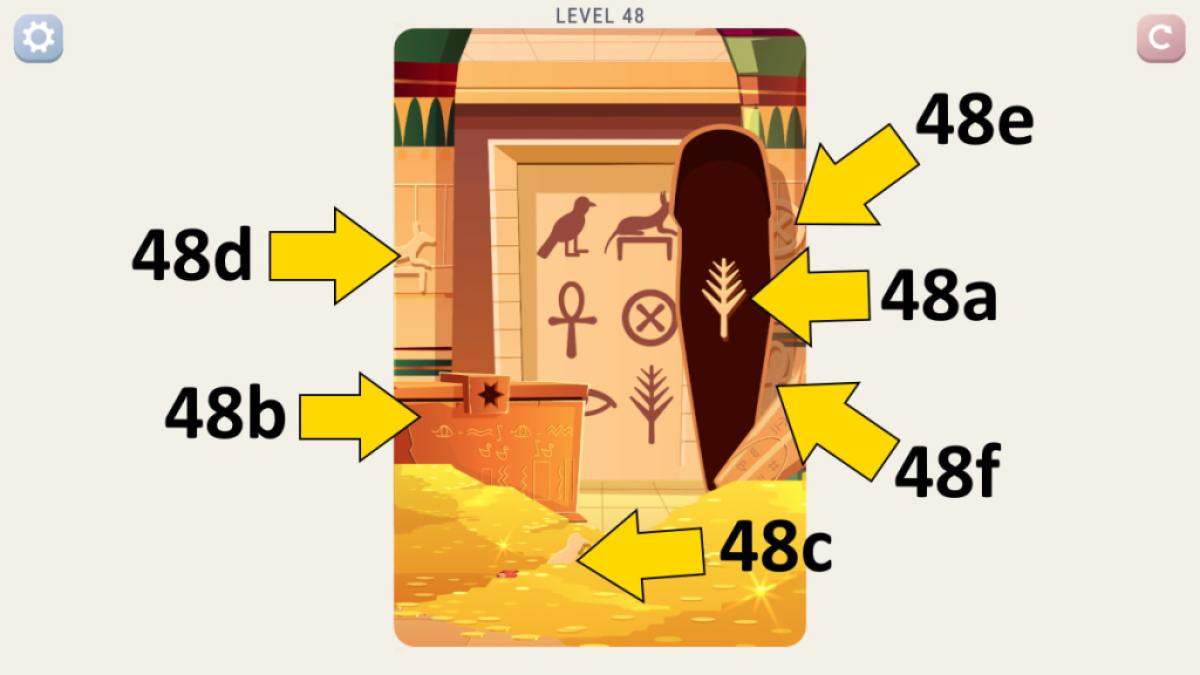
Image by Pro Game Guides
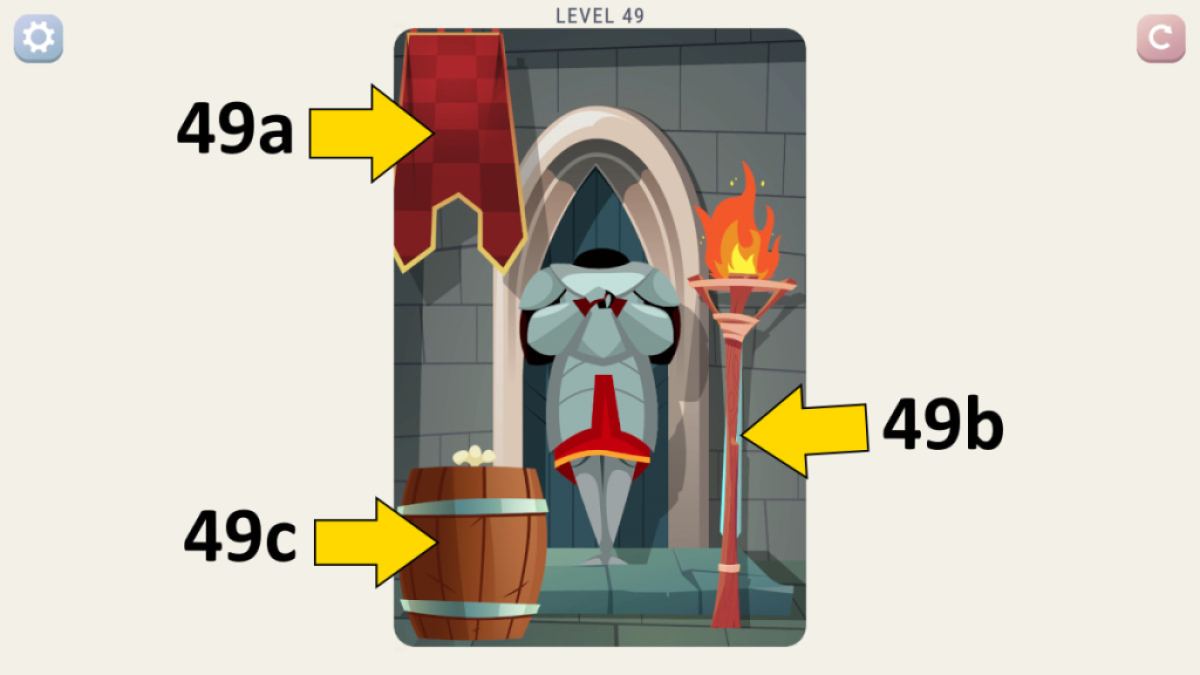
Image by Pro Game Guides
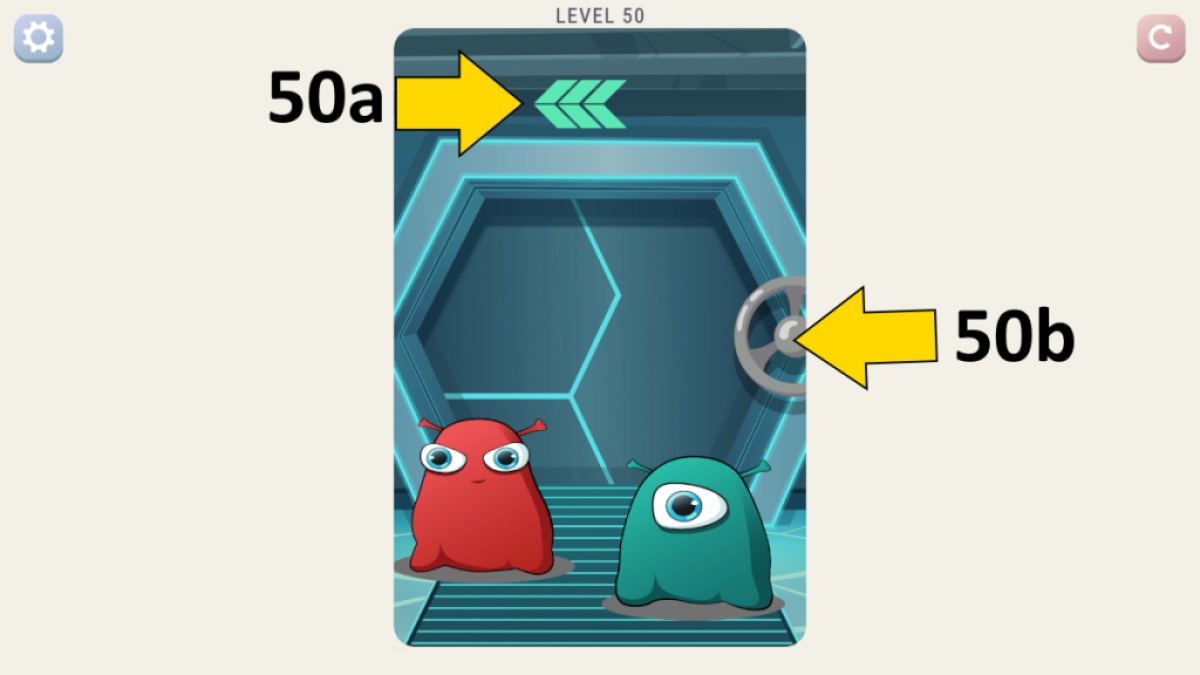
Image by Pro Game Guides
