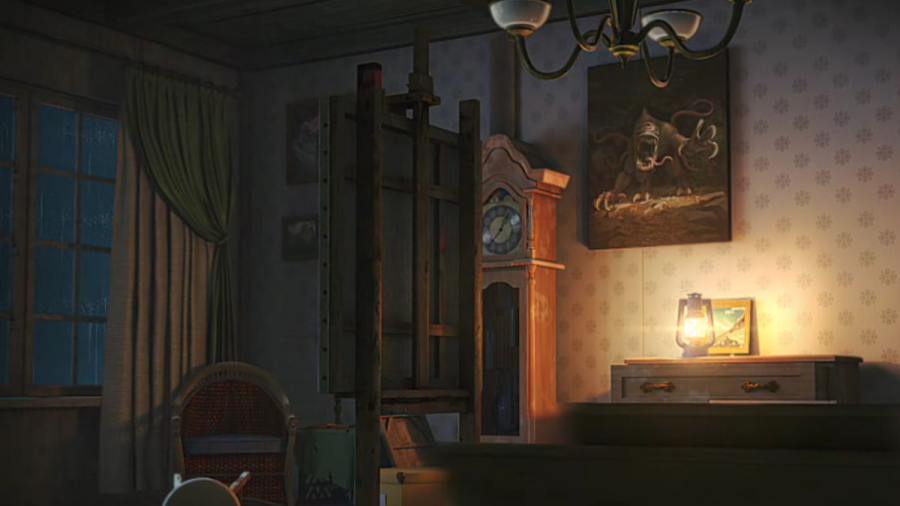
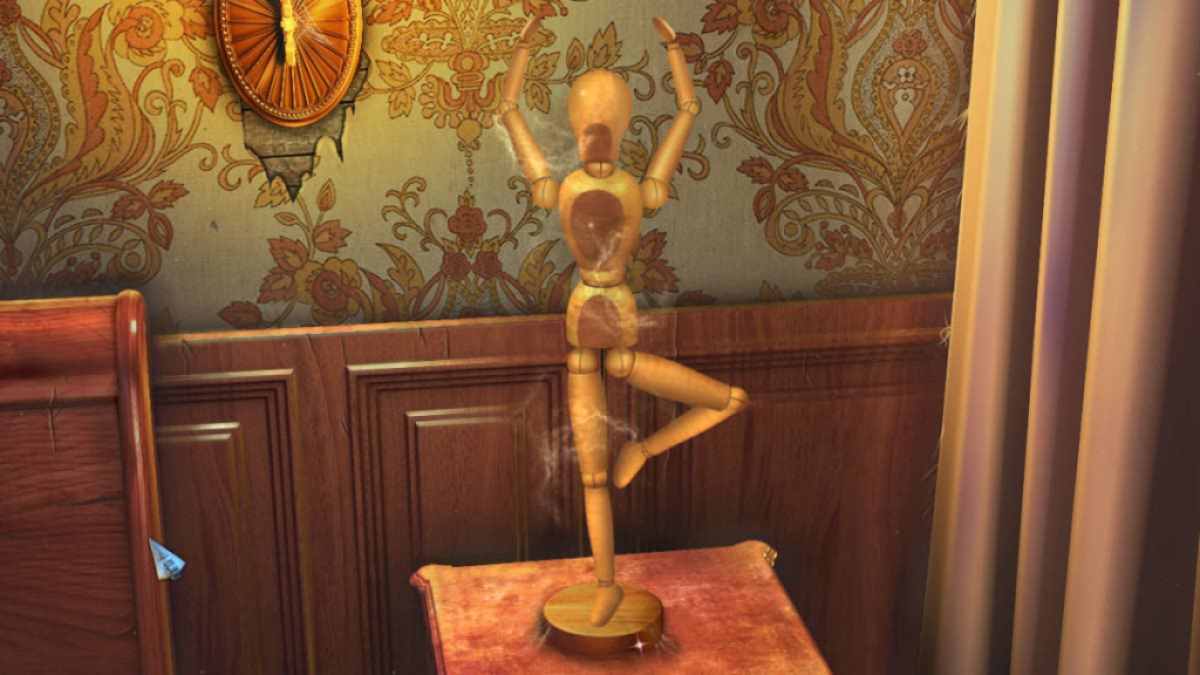
This painting is a piffling too lifelike …
If you get laid puzzle game and noir law-breaking account , particularly with a Lovecraftian wrench , you have to check off New York Mysteries 5 : Power of Art . This full point - and - click RPG - style tale has you explore for hide out objects and completing puzzles as you accompany the story . Here ’s our New York Mysteries 5 Walkthrough .
New York Mysteries 5 Power of Art Walkthrough Chapter 1
We play our hoagie Laura , a journalist investigating a occult incident at a gallery . A monster has disappeared from a painting on showing , but there is no sign of forced entry . You guide off to the picture gallery to look into , and it ’s no surprisal that you arrive in the dark and the pelting , in lawful tec noir style .
I found the map ( bottom right wing of your screen ) very utile , as it allows you to quick - move between locating and also indicates where you presently have actions to do , as well as pointing out where you ’re yet to find any collectable .
Find Michael, the Gallery Director
get across the drift doors ( a1 ) to obtain them closed and the area deserted . Get a conclusion - up of the car ( a2 ) and take theHair Pinfrom the floor on the front rider side . Themorphing objectis in a windowpane on the construction above the car ( a2 ) . Also , look at the Glove compartment to see that you need a hold and the bag under the seat to realize you need to move the rusted car bum forward .
On the independent image , catch thecollectible(a3 ) and then clack the phone booth ( a4 ) to start the room access , taking theMosaic Piecefrom the returned coin slot inwardly . mark that the phone needs a specific token to function it , and look at the advert for the gallery exhibition stay put next to the telephone . Notre , there is also a stave entrance ( a5 ) at the bottom of the steps that looks like it needs a key card to use .
apply the Hairpin to give the fleeceable cabinet ( a6 ) , starting your first puzzle . I ’ve shown the solution above . Once complete , the lights will amount on at the entrance to the gallery , and you could go within ( a1 ) . The green storage locker also has asecond Mosaic Piecejust below the puzzler .
The Gallery Foyer
Collect themorphing object(b1 ) , theFlashlight(b2),collection item(b3 ) , and theFlowerfrom getting a close - up of the damage flooring ( b4 ) . Select the damage bulwark area ( b5 ) to get yourthird Mosaic Piece , then take the door on the right wing ( b6 ) and use the Flashlight in the close - up . Once it is lit , reach the box and take theUtility Knife .
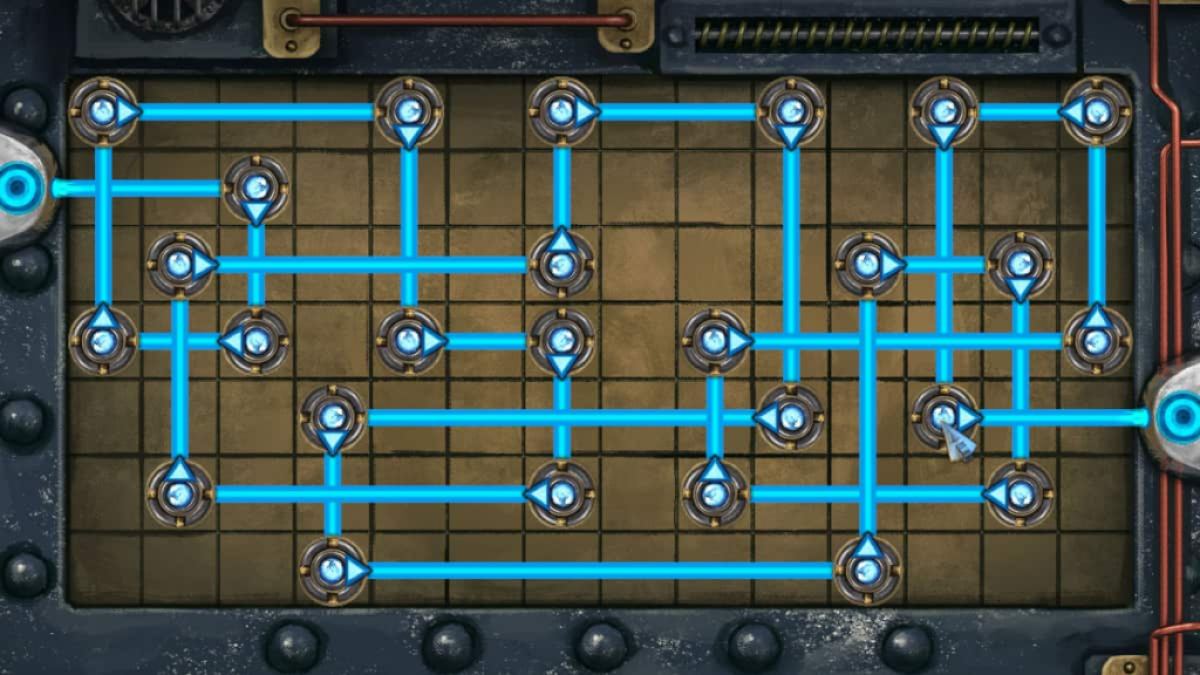
Click the crimson curtain at the end of the hall ( b7 ) for a close - up and use the Utility Knife to cut the pall , taking yourfourth Mosaic Piecefrom the windowpane sill that reveal . Now click behind the comeback ( b8 ) and select the colored mechanism on the bottom rightfulness of the close - up . Add your mosaic pieces to start a puzzle . The corners where each color take to be are betoken just outside the square .
just rotate area until they ’re all right place ( you ca n’t go wrong this one ) . I ascertain the best direction was to do it in same - colour band of three , working from left to right , as once a whole row is complete , you do n’t need to touch it again . Once over , the lot opens . Take theKeyfrom inside and use it on the threshold in the same closing - up to bring in access to the security Room .
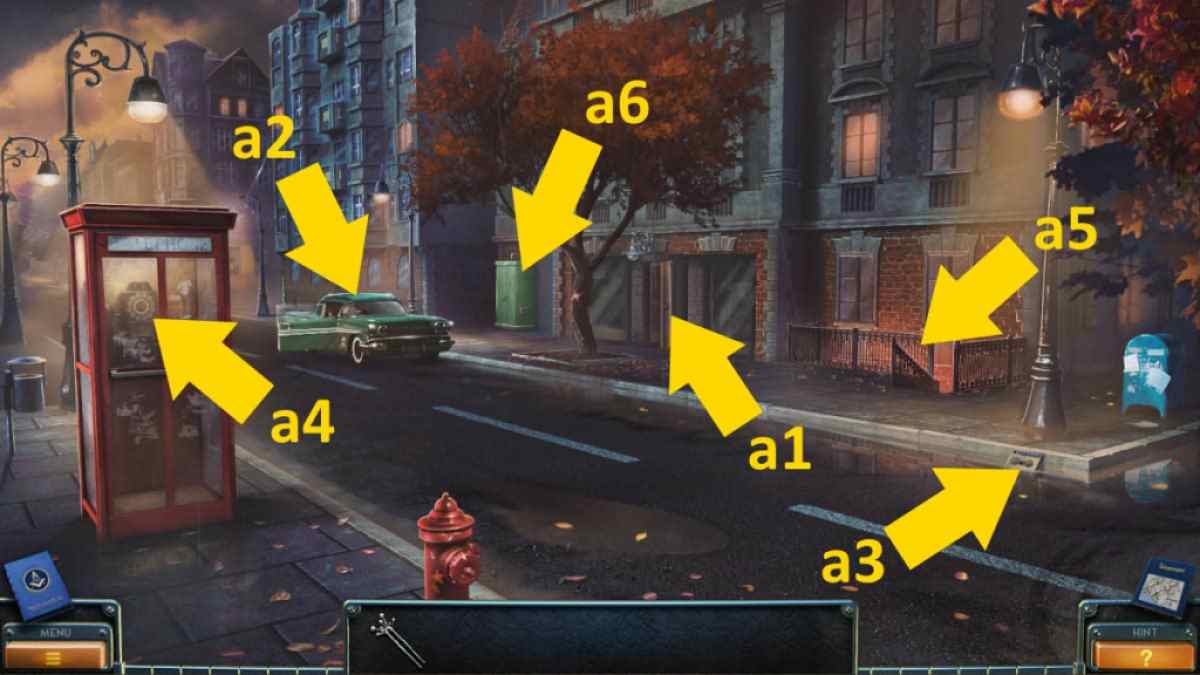
Image by Pro Game Guides
The Security Room
Take thecollection item(c1 ) andmorphing object(c2 ) , move the chair by clicking it , and catch theLadder(c3 ) and theFire Extinguisher(c4 ) . Gwet a stopping point - up of the jackets ( c5 ) and take theStarfrom the pocket .
Get a finale - up of the console ( c6 ) and use the Utility Knife to jimmy launch the key face , occupy theKeycardfrom deep down . Go back outside and utilize the keycard to advance entryway to the stave entrance outside ( a5 ) . Use the card on the door and head into the Restoration Room .
The Restoration Room
After verbalize to Michael ( click the screen background area anywhere near him ) , snaffle thecollectible(d1),morphing object(d2 ) , andCart(d3 ) . Select the workbench ( d4 ) and take theCode ( 3681)from the tabular array , also noting the details on the art director ’s card ( Michael Metaxas 37 00 23 ) .
Next , select the lockers ( d5 ) andenter the code ( 3681)to launch the lock . I constitute this mechanism a small fiddly . You call for to drag the code onto the lock close up , then drag the wheel around to each number in order so it is at the top ( in the 2 - oxygen - clock position ) , and you ’ll hear a chink each metre you leave the telephone dial on the number . Once you ’ve dragged it to all four numbers , it should pop assailable . Any issues , only click reset and try again . Take theWrench , Petal , andStarfrom deep down .
point back to the Security Room and use the two superstar on the storage locker ( c7 ) to open up it and take theFlowerandPicturefrom inside . Step back into the Gallery and use the Picture on the door at the bottom of the step ( b6 ) to start a moving chip puzzler . Again , you ca n’t flush it this one . It just take a bit of patience .
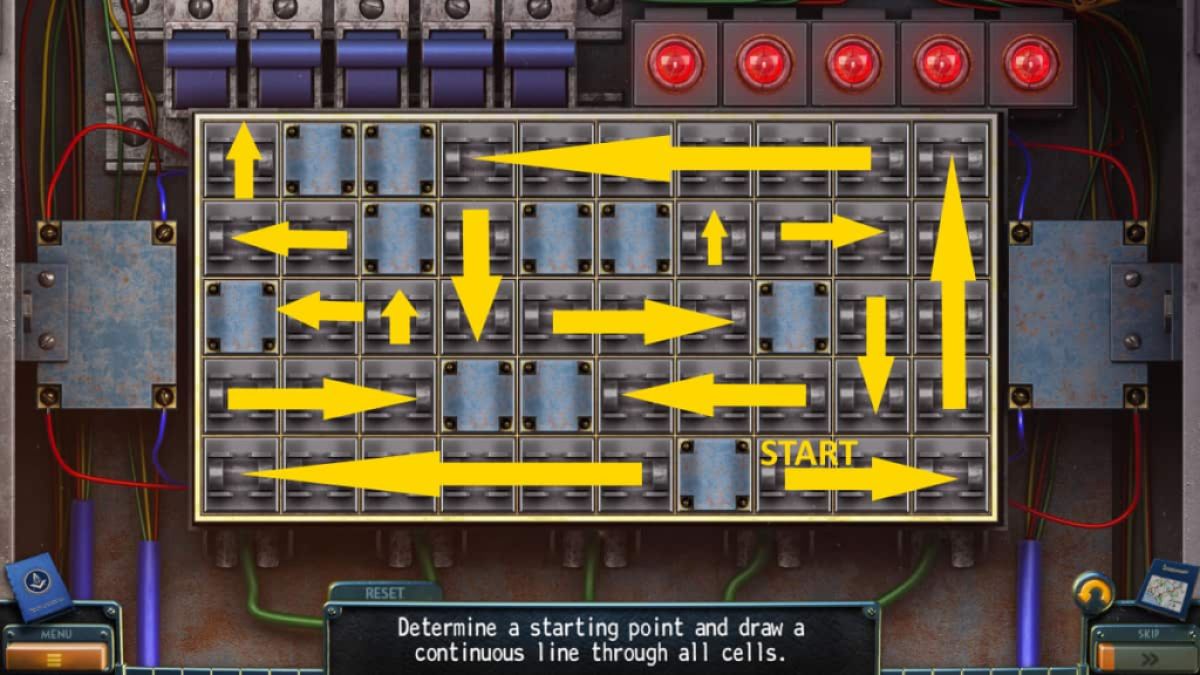
Image by Pro Game Guides
Move each color so that thethree inside pieces are all in place , making sure that thefinal four pieces are in the correct orderso that they can only be rotated into the good spots afterwards ( clockwise that is purple , light-green , violent , yellow ) . Once complete , you have access to the Grounds Floor , so head up inside .
The Ground Floor
penetrate the trapdoor ( e1 ) to open it and take thecollection item(e2 ) from the shelf and themorphing objectfrom the painting ( e3 ) . utilize the Wrench to start the toolbox ( e4 ) and take theInsulating TapeandLubricating Aerosolfrom deep down .
Select the tub ( e5 ) and move the items inside to reveal and pull together aHandle . utilize the ravel on the exposed trapdoor , then penetrate it again for a close - up and begin an item - finding puzzle . Simply snap items to collect them , note that some items can be propel and switched on and that items in red are not available to collect until you ’ve done something to reveal them . Completion will get you theUV Lamp .
Go back to the verandah and place the Cat next to the monster characterization ( b9 ) , then fall into place the picture once more to move it onto the go-cart . at last , come home the cart one final metre to compile thePainting .
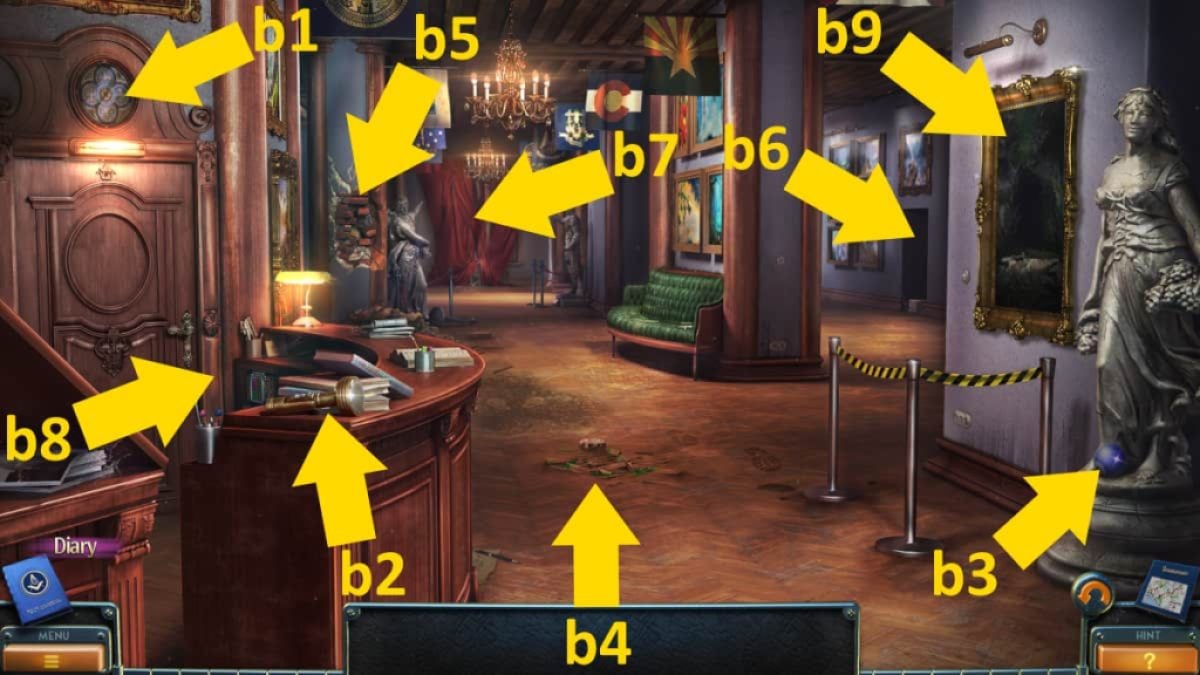
Image by Pro Game Guides
Back outside the gallery , select your car ( a2 ) and use the Aerosol Lubricant on the posterior , allow for you to operate , move the seat forward , and take yourPurse . Now , click it in your inventory , launch the Koran inside , and takeBishop ’s Business Card . Afterward , take theGlove Box Handlewhich is underneath the purse and also under the seat . expend it on the glove box in the same close - up to get theWire Cutters .
Authenticating the Painting
point to the Restoration Room and use the handgrip on the icebox ( d6 ) to get theDeveloperliquid from inside . Place the painting on the table ( d4 ) and add your UV Bulb to the blackened lamp in the same close - up . Also , bring the liquidness to the board , then use the brush next to where it is placed to expose the key signature . afterwards , Michael will give you thesecond Petal .
Down on the ground floor , use the telegram cutters on the conducting wire holding the rack in piazza ( e6 ) , then employ the attack extinguisher on the handle before finally click it once more to plough it off . This impart you approach to the door at the back of the way ( e7 ) . Click it for a close - up and take thethird Petalfrom just above the efflorescence mystifier on the door .
Return to the Restoration Room and add the three flower petal to the ornate wooden box ( d7 ) , unveil a Triangulum puzzle . Simply drop back the trigon around until they drop into the right spots ( you ca n’t fail or get stuck ) . Once complete , you ’ll be able-bodied to take theSpool .
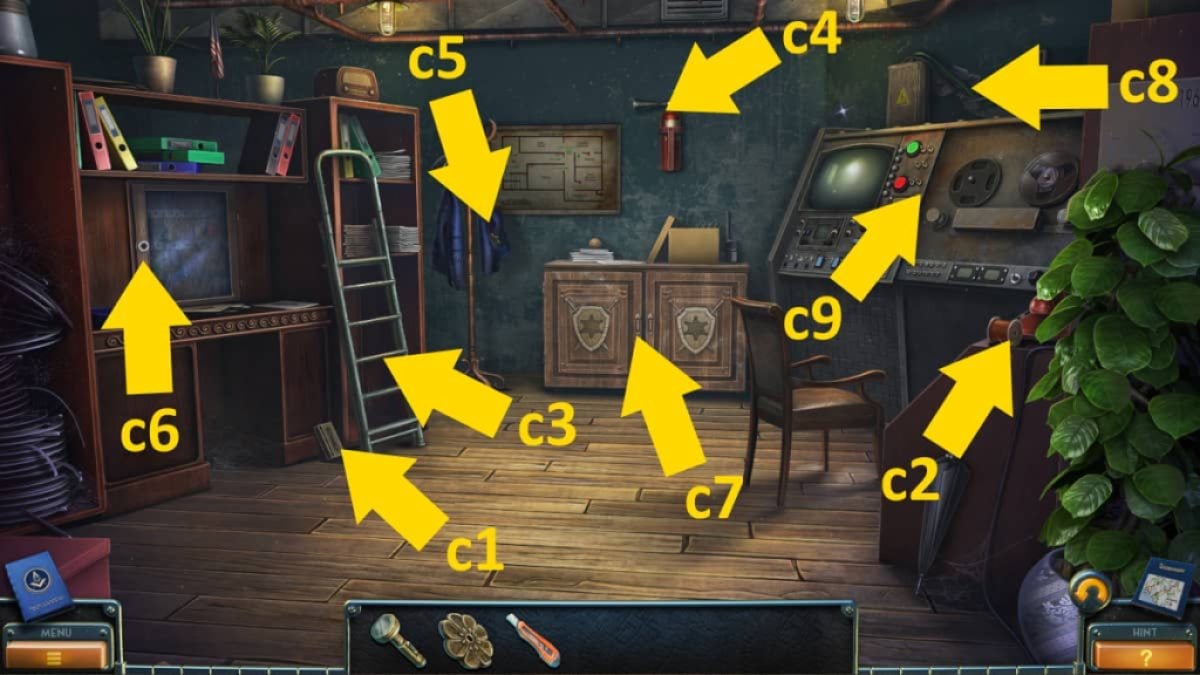
Image by Pro Game Guides
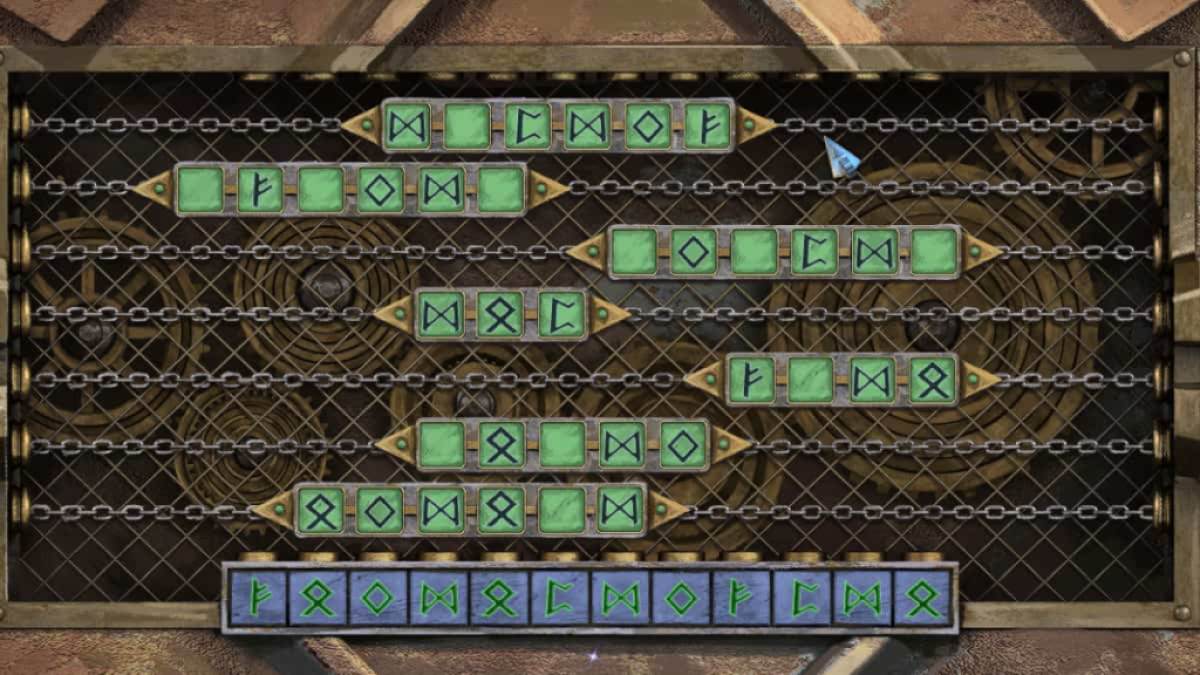
Go to the Security Room spread out the articulation box in the close - up of the arena above the security equipment ( c8 ) , and flip the switch down to off ( the humbled cable television service will hold on spark off ) . Use the insulating tape recording on the telegram here . Flick the shift back on , append the reel to the television equipment(c9 ) , click the green shimmer button , and watch the cut of meat scene .
Go down to the Resotarion Room once more and speak to Michael , who will give you aTelephone Token . guide outside and apply the Token in the telephone box to call Bishop . Use the relic on the phone first , then utilize Bishop ’s Business carte du jour on it before dial his phone number ( 372134 ) . After talking to Bishop , take the Floer Token from the coin issue in the speech sound box . Go back to the Ground Floor and place the three flowers into the doorway ( e7 ) to set out a formal puzzle .
The room access will now open and you may move into the Park Area .
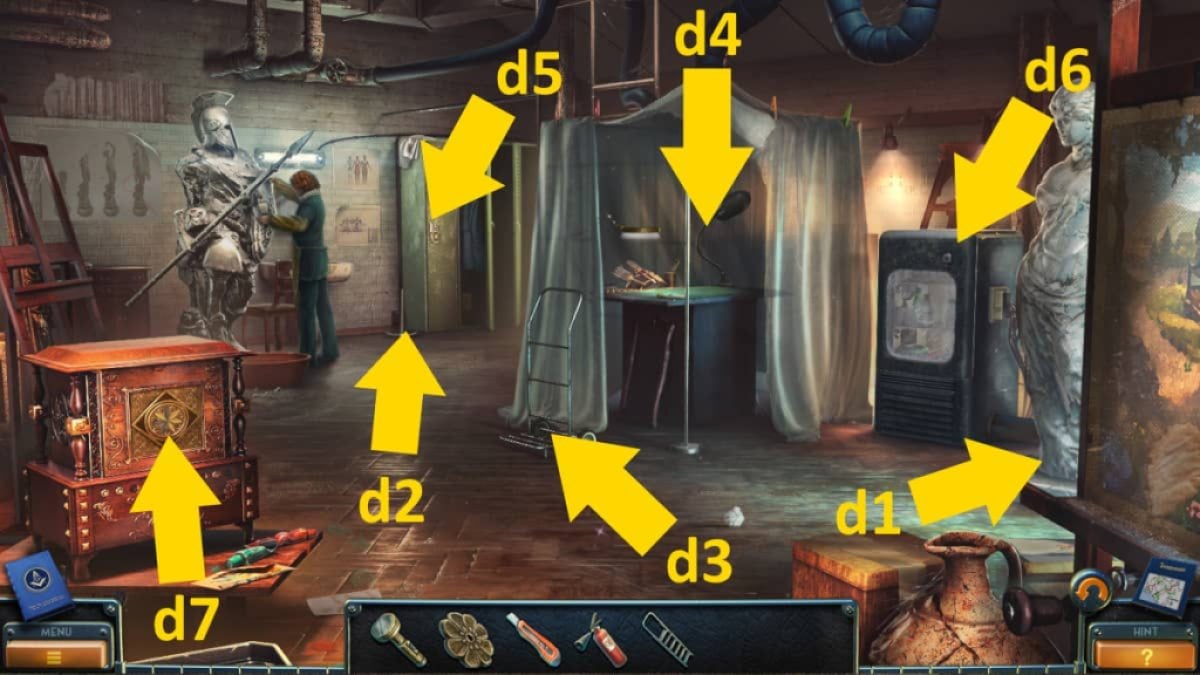
Image by Pro Game Guides
The Yard and the Street
seize thecollection item(f1 ) , then use the Utility Knife on the bin dish ( f2 ) in close - up and take theHoseandWirefrom the bag . Take themorphing object(f3 ) and then pick out the typewriter ( f4 ) for a close - up and take theLever Arm . Use the telegram cutters on the logic gate at the back ( f5 ) to open it up , gaining access to the Street .
Move to the street , take thecollection item(g1 ) andmorphing object(g2 ) , then fall into place the manhole ( g3 ) and take thePipeto the left field of the hole in the stopping point - up . choose the Sir Herbert Beerbohm Tree ( g4 ) for a close - up and keep clicking the leaves to discharge them , taking theSlingshotthat ’s disclose underneath .
Go back to the yard and use the slingshot on the vase ( f6 ) , which gets you theMedallion . Click the bike ( f7 ) and use the palm to open up the satchel on it , make aCluefrom inside . supply the clue to the typewriter ( f4 ) and put in the codification ( BY4AE15 ) . A cloak-and-dagger compartment will be bring out , incorporate aMagnet .
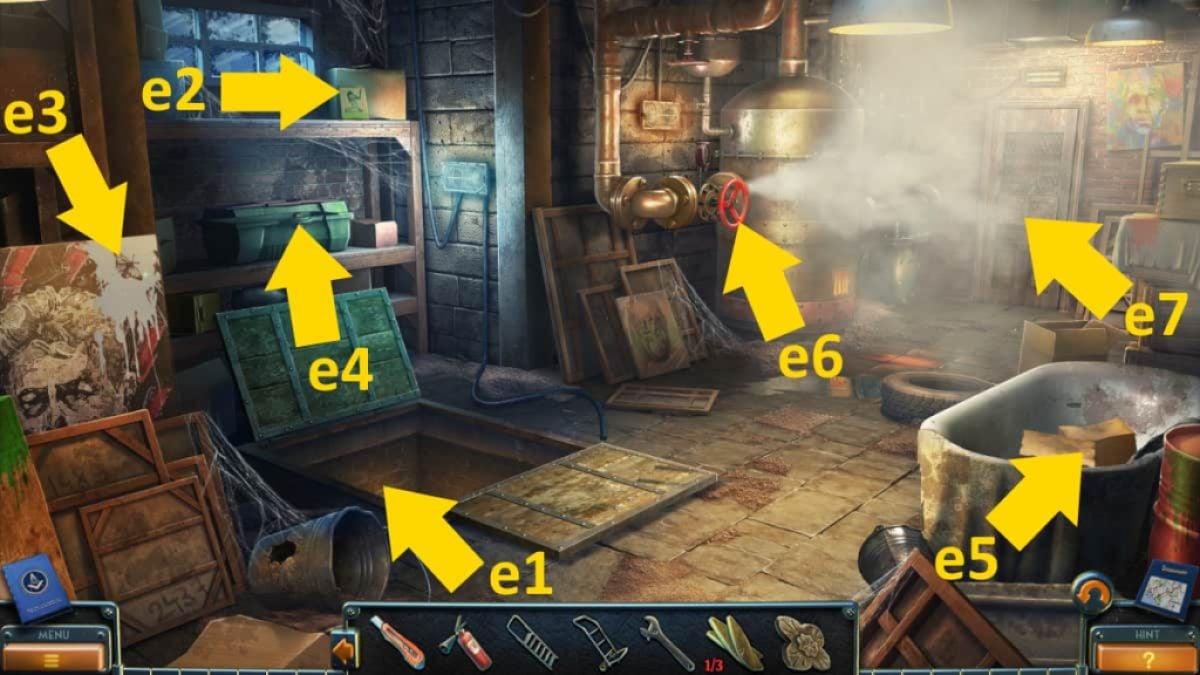
Image by Pro Game Guides
Back in the street use the wire to get access to the construction vehicle ( g5 ) by using it on the windowpane . Take theMatchesfrom inside , bring the Lever Arm to the hollow by the steering wheel , then click the arm to make the vehicle move the pipe blocking the manhole . Once it has finish , chatter the area the scoop had been ( g6 ) for a conclusion - up and take theSkateboard .
Go back to the yard and expend the skateboard to roll up theBoardsleaning on the bins ( f2 ) . Return to the street and practice the circuit card on the water supply ( g7 ) . fall into place the area you just placed the boards to bulge an physical object - finding puzzle .
Now you’re able to click inside the hole to get theLadder(h6 ) . Use the ladder on the manhole ( g3 ) and direct down into the sewers .
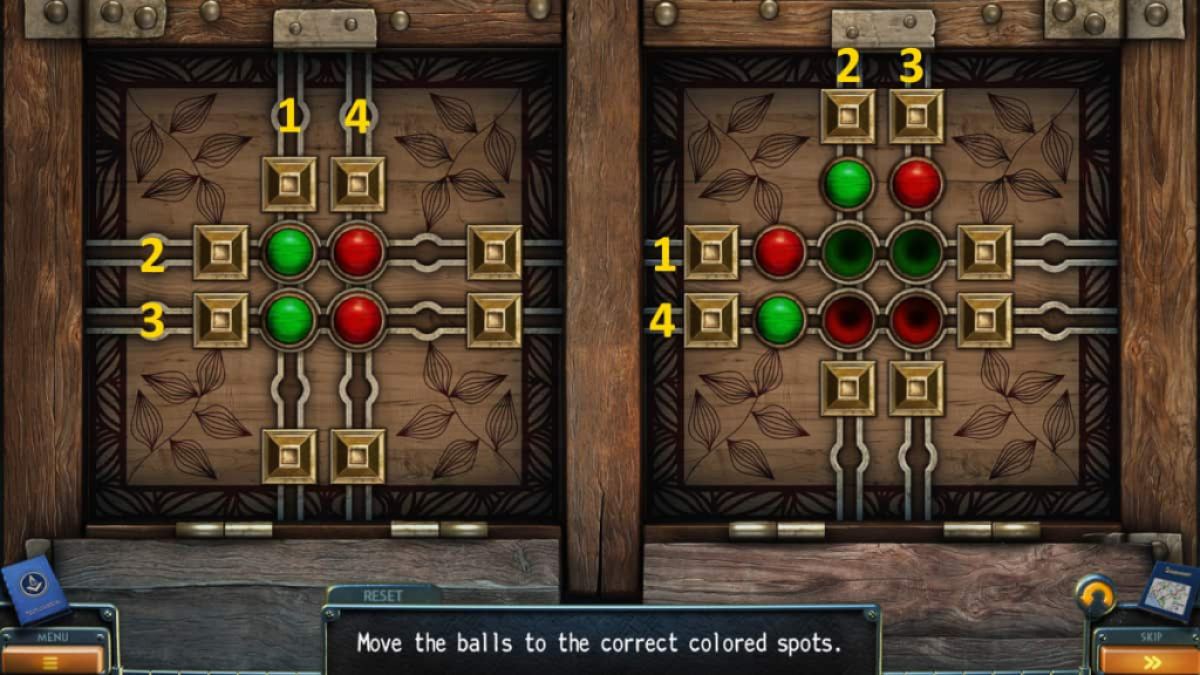
Image by Pro Game Guides
The Sewerage
snap up thecollection item(i1 ) andmorphing object(i2 ) . Select the grating on the left ( i3 ) and utilize the tobacco pipe to tangle theLever Armcloser to you , then pick it up . Attach the lever arm on the door mechanism here , then utilise it to start the grate . you could now take theBoardhere and use it ( i4 ) to make a bridge deck and then practice the torch to get a close - up on the other side .
You require to move the flashlight around the image to discern the next exit ( on the rightfield ) and click through , then do the same again ( the exit is again on the right ) . In the next sour scene , peck up theKey . Your torch will fail at his item , so just get across the bottom of the screen three times to return to the sewer and then back to the street .
Use the key to open up the shed ( g8 ) , move the boxful that is on the middle shelf , and take theKerosene Lamp . you may now head back into the sewage , place the lamp by the fuel drum ( i5 ) , clack the top of the barrel to take the cap off , and then employ the hose to get aLamp With Fuel . Click the lamp in your inventory , click it again to remove the top , then use your matches to light it and get theBurning Lamp . you’re able to now use the lamp on the dark-skinned side of the tunnel ( i4 ) and re - get in the labyrinth of dark tunnels .
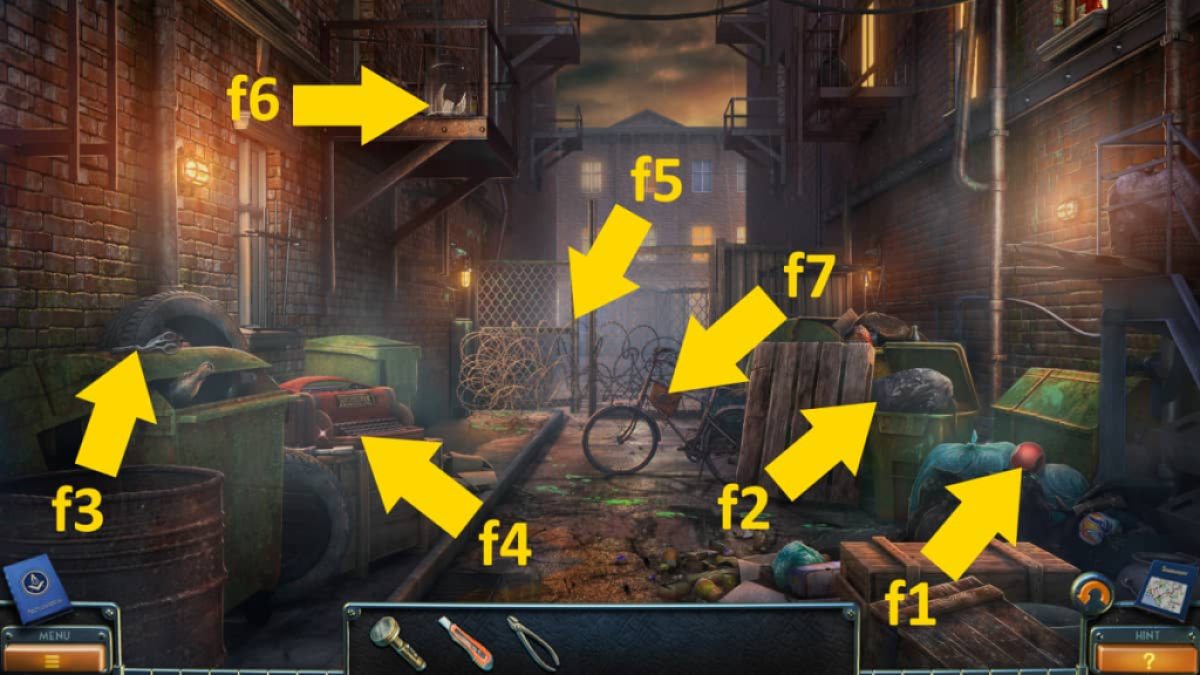
Image by Pro Game Guides
Having followed the creature out of the heading and down the street into the gutter , it seems to have escaped through a maze of tunnel beneath the city . Will you be capable to track it through the sewerage tangle ?
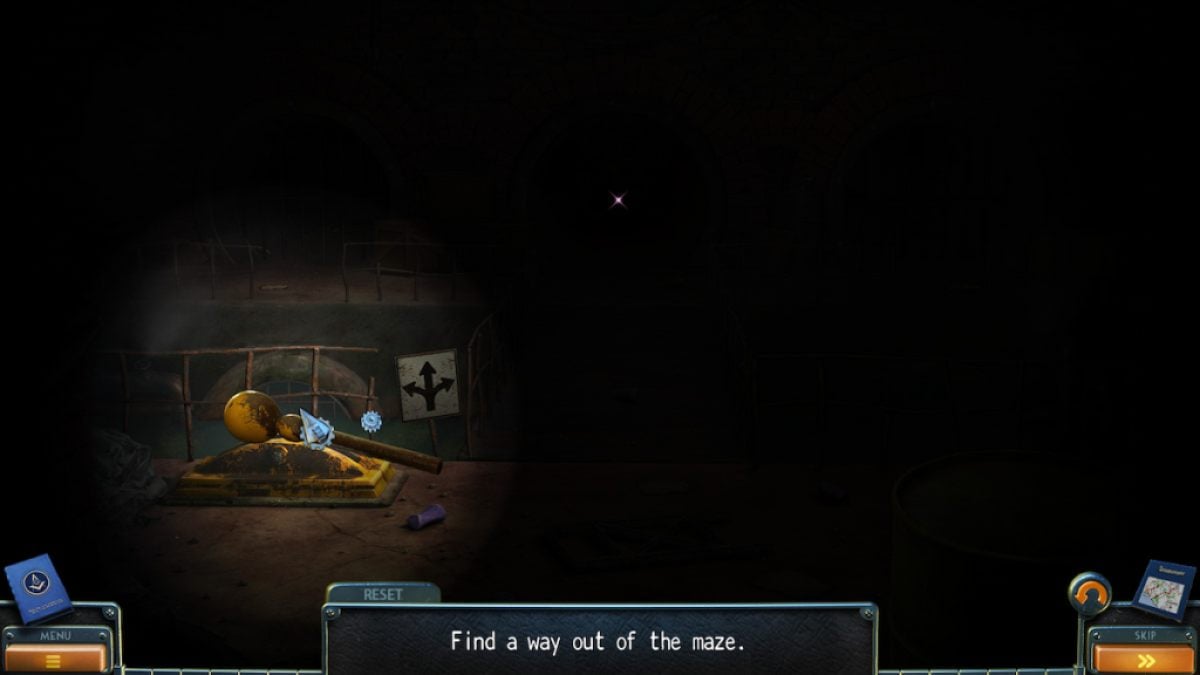
The Maze
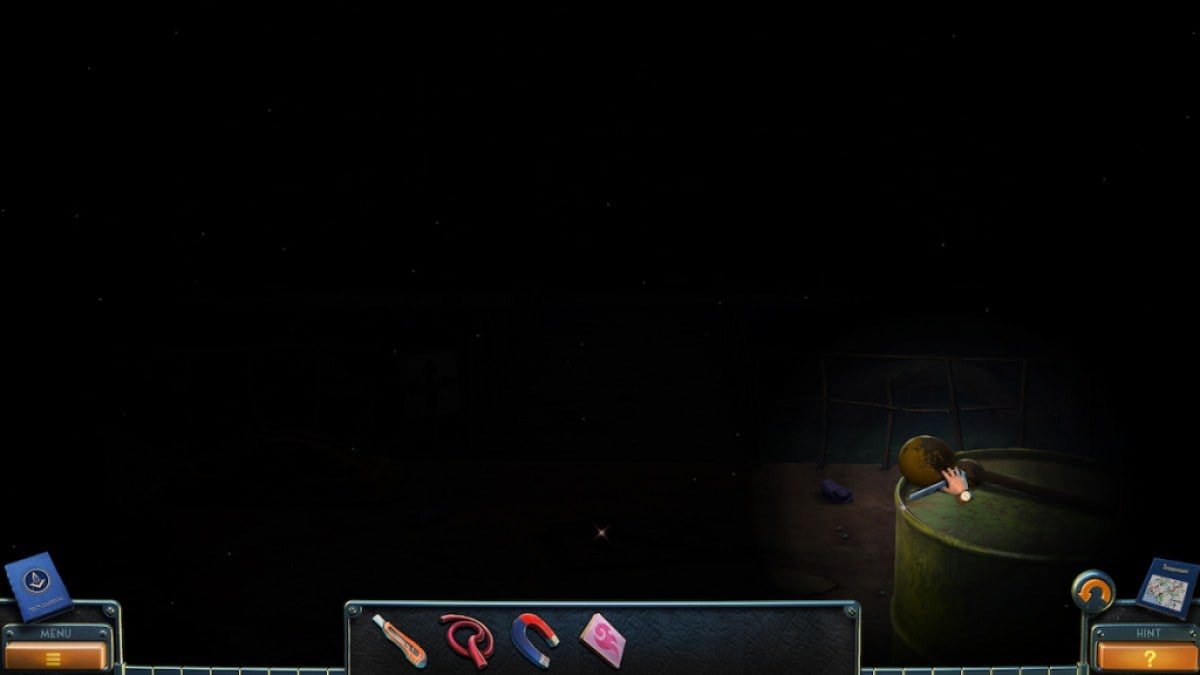
You need to find a way out of the burrow maze . Go back into where you picked up the key and seize theHandlethat is sitting on the same fuel membranophone , and move it to the left of the screen to theswitch twist on the floor . you’re able to now resolve which of the three grate in this room is subject by setting it either to the left , right , or heart and soul . Leave it in the center for now and take the undermentioned route from this switching room :
This takes you to the passing , but the rungs for the run are miss . You take to go back into the tunnels and obtain the 10 ladder rungs . employ your function to go back to the cloaca and re - come in the sewage . Nowcollect the 10 rungs :
Now go back one elbow room , take the high central departure , move onwards to the bottom of the ladder , andattach the stave to make your exitinto the parking lot .
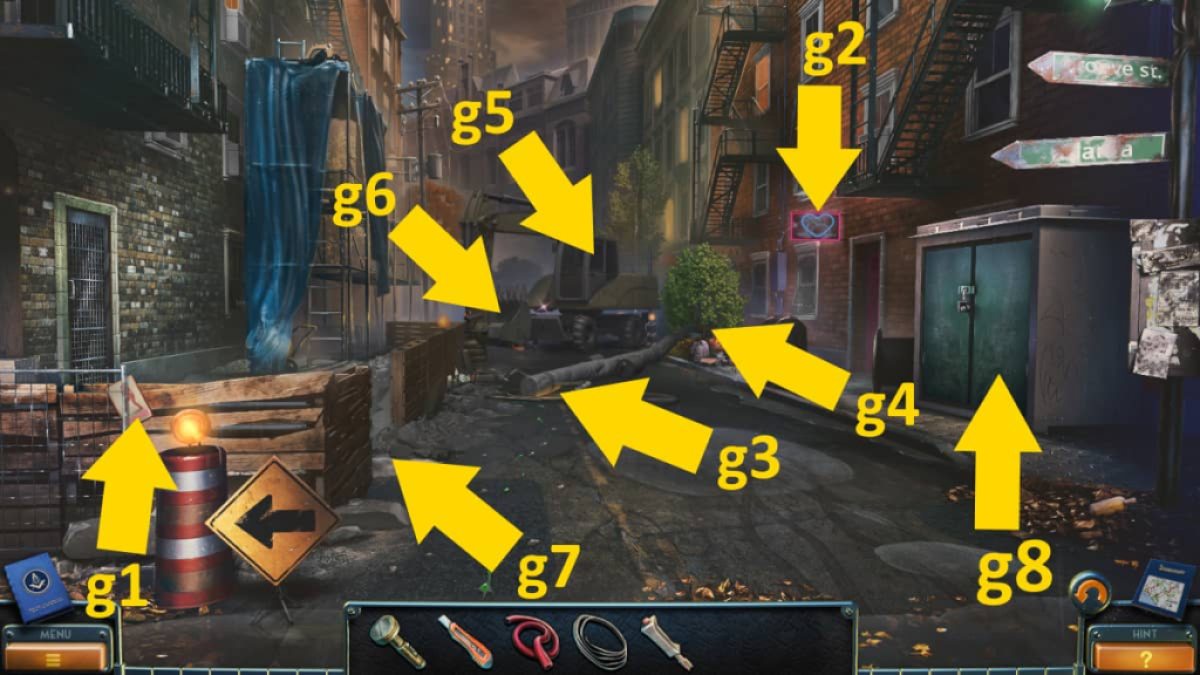
Image by Pro Game Guides
The Park
piece thecollectibleup from the path ( a1 ) and themorphing objectfrom the corner ( a2 ) , then take theFishing Rodfrom next to the viewing binoculars ( a3 ) . Select the bin ( a4 ) and take theReach Extender , Ticket , andBlade . Now flick the machine ( a5 ) and enter the ticket to commence a George Sand - pouring teaser . There is no one way to solve this , you just need to be patient and you ca n’t break down . Once complete , you ’ll receive aToken . employ it on the viewing opera glasses to get a emasculated tantrum .
Attach the magnet to the fishing rod to get aFishing Rod With Magnetand head back into the sewerage . clack the sewer ( b1 ) for a close - up and utilize the fishing gat to fish out theStar .
Return to the park , click the rocks ( a6 ) next , and apply the Reach Extender to grab a 2d Blade . Now select the bandstand ( a7 ) to find your third Blade , then click the wharfage ( a8 ) to get the fourth and net Blade . Attach the four blades to the boat , and you ’ll be transported to the Island .
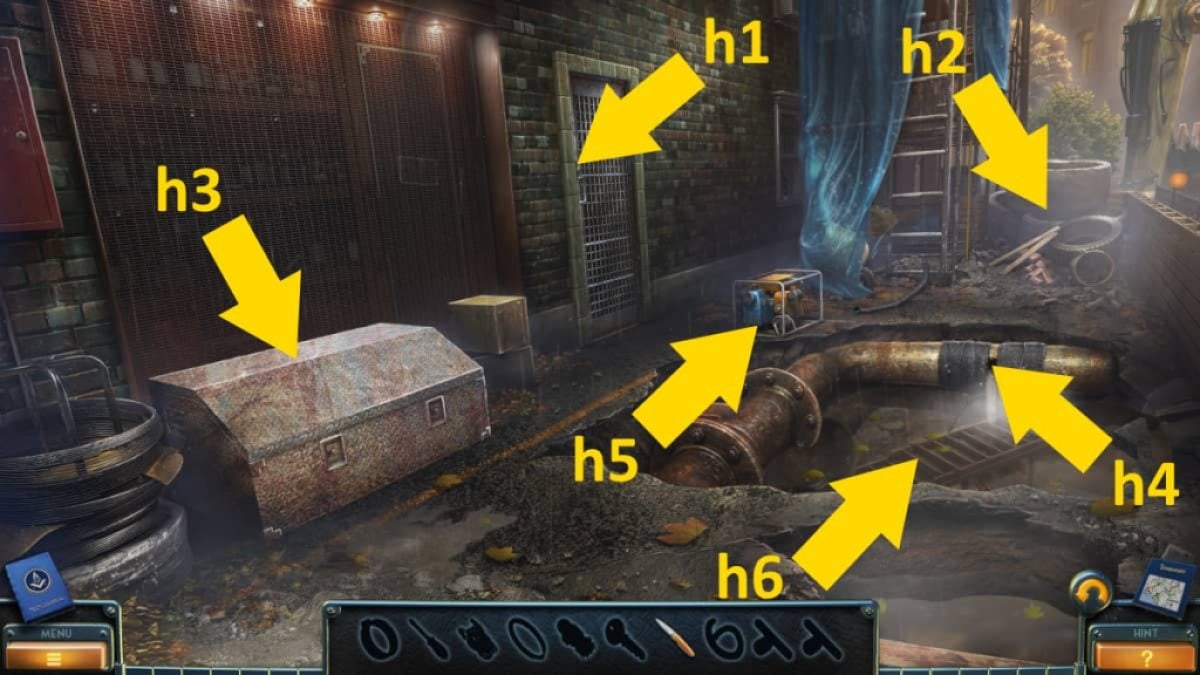
Image by Pro Game Guides
The Island
catch thecollectiblefrom the stairs ( c1 ) and themorphing objectfrom the crateful ( c2 ) . employ your tongue to spread out the sack ( c3 ) and get theWindrose , then take theFishing Netin the same close - up . Click the bouy ( c4 ) and use the sportfishing net to bring it to shore , utilise the tongue on it to geld the rope , and take theKey .
take the canopy ( c5 ) , and in the close - up , use your tongue to rip the canopy and take a secondKey . In the same finale - up . Grab thesecond Wind Rosefrom the top - leave turning point of the threshold frame . Click the threshold next ( c6 ) and use the two key on the two locks to start the door and start anobject - finding teaser .
Inside The Ship
seize thecollectibleby the rooter ( e1 ) and themorphing object(e2 ) from the window next to it .. apply the tongue on the pin ( e3 ) to get theEagle Figurine . Back at the outdoor stage in the parking area ( a7 ) , get a close - up of the wizard on the top of the bandstand and add the star and the eagle figurine . Take theHex Key Setfrom the secret compartment , then return to the ship .
Use the curse key set to unlock the closet ( e4 ) and take thethird Wind Rosefrom indoors . Click the briefcase ( e5 ) , add the wind rose wine , read the tone , then take theTranquilizer GunandCluefrom inside .
Select the auto ( e6 ) , sum up the cue , and thenpress the dyed buttons in the right guild . but follow the clue traffic pattern from top to bottom ( so cluck magenta doubly , dark-green once , yellowish three prison term , blood-red twice , aristocratical four time , aqua once , then purple three times ) . This will begin a ship - move puzzle .
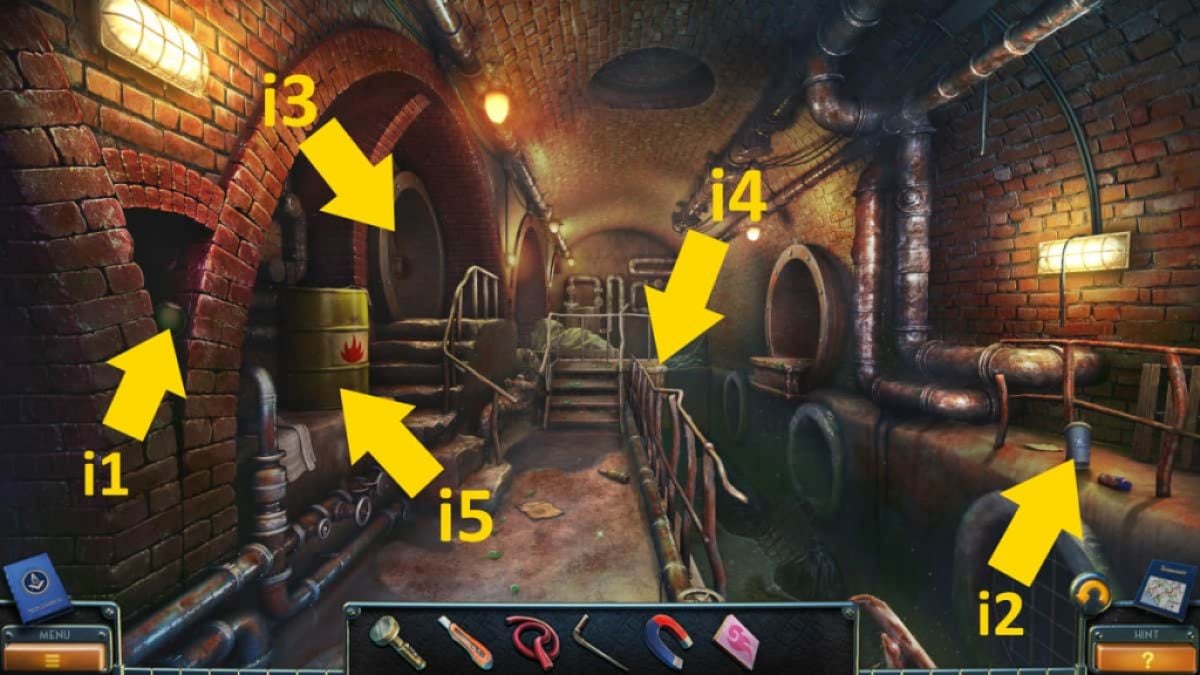
Image by Pro Game Guides
The ship can move one or two spacesandhas to set down on a shaded distance each timefor you to deliver the goods . You need to nail three more and more tricky teaser . The solutions are below . Once accomplished , bask a well - clear deletion scene as you head on a higher floor to confront the monster .
In Front of the Artist’s House
After lecture to the former neighbor of the creative person ( f1 ) , seize thecollectible(f2 ) and themorphing object(f3 ) that are next to him . Select the car ( f4 ) , enter the door by click it , and take theUmbrella . Next , click the ruddy machine ( f5 ) and come home it once more to shake it , then take theSodafrom the machine . Use the umbrella to draw down the flak flight ( f6 ) and head up to the ceiling of the creative person ’s house .
The Roof of the Artist’s House
Take thecollectible(g1 ) on the left and themorphing objectnear the stool ( g2 ) , then take theStool(g3 ) . Click the forte-piano ( g4 ) for a close - up , then cluck the punk to open it and take theBottle Opener . Finally , tick the wish-wash at the back ( g5 ) to enter a simple aim - matching mystifier , after which you ’ll pick up theLatex Gloves .
choose the soda in your inventory and use the bottler undoer to open up it . Give the soda to the neighbor ( f1 ) , and in return , he ’ll give you theApartment Key . promontory back to the ceiling and employ the gloves on the wire blocking the doorway ( g6 ) , use the tonality to start the door , then head into the flat .
The Artist’s Apartment
snap up themorphing objecton the table ( h1 ) and thecollectiblefrom the bed ( h2 ) . Then , move directly through the threshold on the left and into the artist ’s kitchen and once again take thecollectibleon the chair ( i1 ) and themorphing object(i2 ) by the table leg . This should dispatch both of these sets for this chapter .
Place the stool under the closet ( i3 ) , then select it to get the Kitchen Knife and Colander . Use the tongue to cut the textile on the window ( i4 ) and take the Flower and Metal Sponge . Now , you may practice the sponger on the wall ( i5 ) to divulge the code17.45 .
Go back into the main elbow room of the flat and use the flower on the stitching simple machine ( h3 ) , which open a hole-and-corner compartment from which you’re able to take aLockpick . Head back out to the roof and practice the lockpick to open up the grip ( g7 ) and get aButton . Now , use the knife on the laundry line ( g8 ) and pick up theRope .
Screenshot by Pro Game Guides
Clearing The Pests
Back in the apartment , habituate the rope on the fix ( h4 ) and then get a close - up of the safe below . You ’ll ask all five push before you may tackle the mystifier , but take theInsecticidejust above the safe in the close - up . Go back into the kitchen and launch the fridge ( i6 ) , then use the insecticide to remove the insects at heart and take theCanned Food .
pick out the send away food in your stock list and use the opener to get theOpen Food Can . Go back outside and give the intellectual nourishment to the rats ( f7 ) so that you may collect theHarp . Now , you may go to the sleeping room and use the mouth organ to launch the box ( h5 ) and start a figurine puzzler . Once complete , a draftsman will unfold , and you ’ll get anotherButton .
Move onto the roof , use the insecticide on the wasp ( g8 ) , and employ the knife to take theItem in Wax . Go back out the front and invest the colander on the burning bin ( f8 ) , then place the item in wax into it to combust the wax forth . Take theHandle . you could now repay to the bedroom and use the hold to launch the cupboard above the bottom to get theClueand anotherButton .
Screenshot by Pro Game Guides
Go to the ceiling and place the clue on the pianoforte ( g4 ) to begin an prototype association mystifier . You ask to hit the key 14 times , once for each persona . Using the image I ’ve provided , utilize the next sequence : 7 , 1 , 4 , 2 , 5 , 3 , 6 , 4 , 2 , 3 , 7 , 5 , 6 , 1 . Once complete , take theButtonsandClock Handsfrom the compartment that opens . you may now add the hands to the clock in the flat ( h6),set the clock to 5.45 , and collect your finalButtons .
Opening the Safe
take the hole in the flat storey ( h4 ) , click the secure , then lend the five button . There ’s no one agency to do this , and you ca n’t fail . I find it easiest to finish one row ( I did the top red row first ) , then plainly do it one button at a time on the second row , and so on . Take theArtist ’s Diaryfrom the safe . This will actuate the end of the first chapter .
New York Mysteries 5 Walkthrough Chapter 2
Despite having take the monster down with the tranquilizer gun , our hero ca n’t cease the mysterious alien from getting forth with the prize . In chapter 2 , the focus flips to Noah , the artist himself , as we learn more of his back story .
Note that you ’ll bump a lot of images below that containspoilers for both item locations and puzzle . So , if you want to go to a specific piece of information , it may be easier to tap the contentedness tie-in below .
The Yard
Pick up themorphing itemandcollectiblethat are sat next to each other by the statue ( a1 ) , then move now the remaining side of the house into the Yard and take themorphing objectfrom the chair ( b1 ) and thecollectiblefrom the flowers ( b2 ) . you could also read the note on the table for some backstory .
launch the fuze box ( b3 ) and take theNumber , and then the work bench ( b4 ) to get theScrewdriver . While at the work bench , you may fall into place the pieces on the bench to put together and compile theBirdhouse . You require to flick them in the correct order , but they ’re all there . you could also pick up theFirewood Basketnext to the shed ( b5 ) .
Back in the one thousand , use the screwdriver on the front room access ’s mailbox ( a2 ) to open it and get asecond Numberand theBarn Key . Use the key on the shed in the yard ( b6 ) and enter the room access , then fall into place it once more to start an item - finding puzzle .
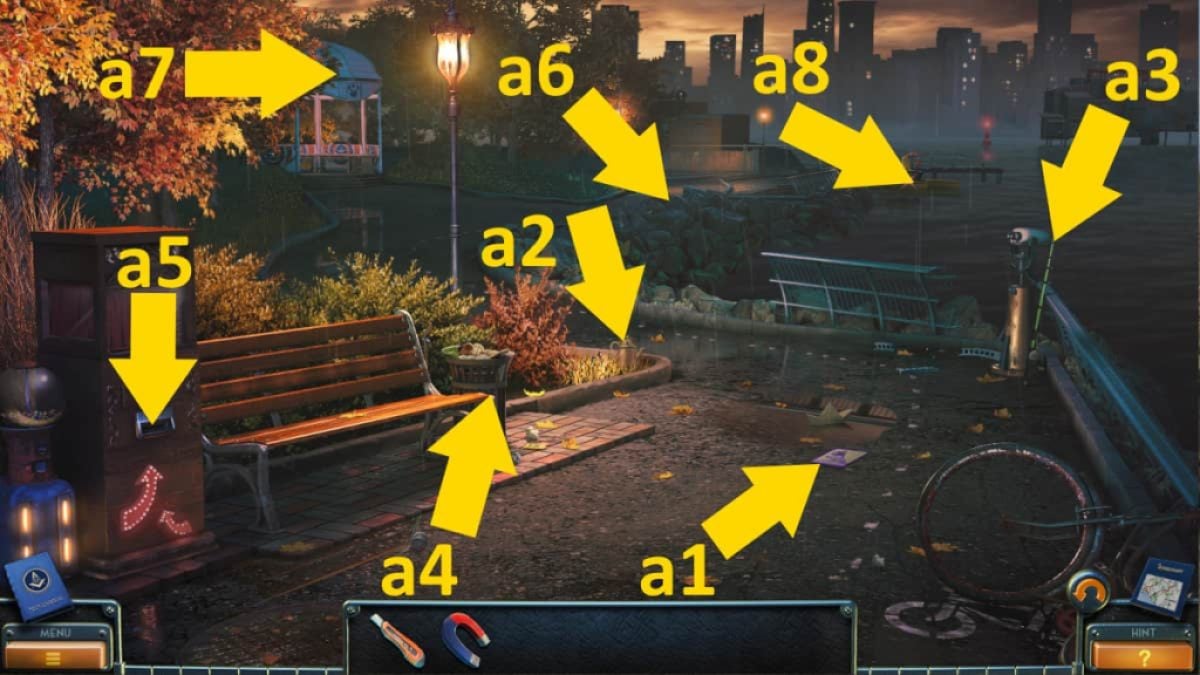
Image by Pro Game Guides
The Shed Puzzle
channelize back out front and practice the ladder on the lamppost ( a3 ) , then get a close - up of it to garner theLegsandDetail . render to the yard and add the detail to the box seat on the story in the workbench close - up ( b4 ) , get through again to open it , and take thePlungerandShears . you could also click the rug by the backdoor ( b7 ) to move it back . There ’s a puzzle you ca n’t try yet , but next to it , you ’ll find out yourthird Number .
apply the shears on the vines ( a4 ) out front to get theFlower , and then use the blossom on the base of the statue ( a5 ) to open up a secret compartment , taking yourfourth and final Numberfrom inwardly . Back in the yard , select the back doorway ( b8 ) and sum the four numbers to start a idle beam of light mystifier . See the resolution above . Once complete , the back door will open , and you’re able to enter the hall .
The Hall
ClickGrandpa Eugenefor a cut tantrum and to move the pursuance along , then collect themorphing objectfrom the tabular array ( d1 ) and thecollectiblefrom the flooring by his feet ( d2 ) . Get theMatchesfrom the coating sac ( d3 ) and click the bedroom room access ( d4 ) for a stopping point - up , taking thePatternthat is cling on the light switch . take the door in the back - right of the elbow room to move through to the Kitchen .
Take themorphing objectfrom the tabular array ( e1 ) and thecollectiblefrom the floor by the kitchen range ( e2 ) . Use the speculator in the bath ( e3 ) . Once the water run out , click the plughole twice and take theDetail . Next , select the cooking stove ( e4 ) and take theMeat , then use the matches to fall the stove and pick up theKettle With Boiling Water . Put the kettle on the table ( e1 ) , then cluck the teapot to pour tea into the cup . Take theTea .
Go back out to the thou and attend the birdbox in the tree diagram by clicking the bird of Minerva ( a6 ) for a close - up , then append the sum to the birdbox . The owl will aviate into the birdbox , allow you to collect theVinyl Recordfrom the Sir Herbert Beerbohm Tree .
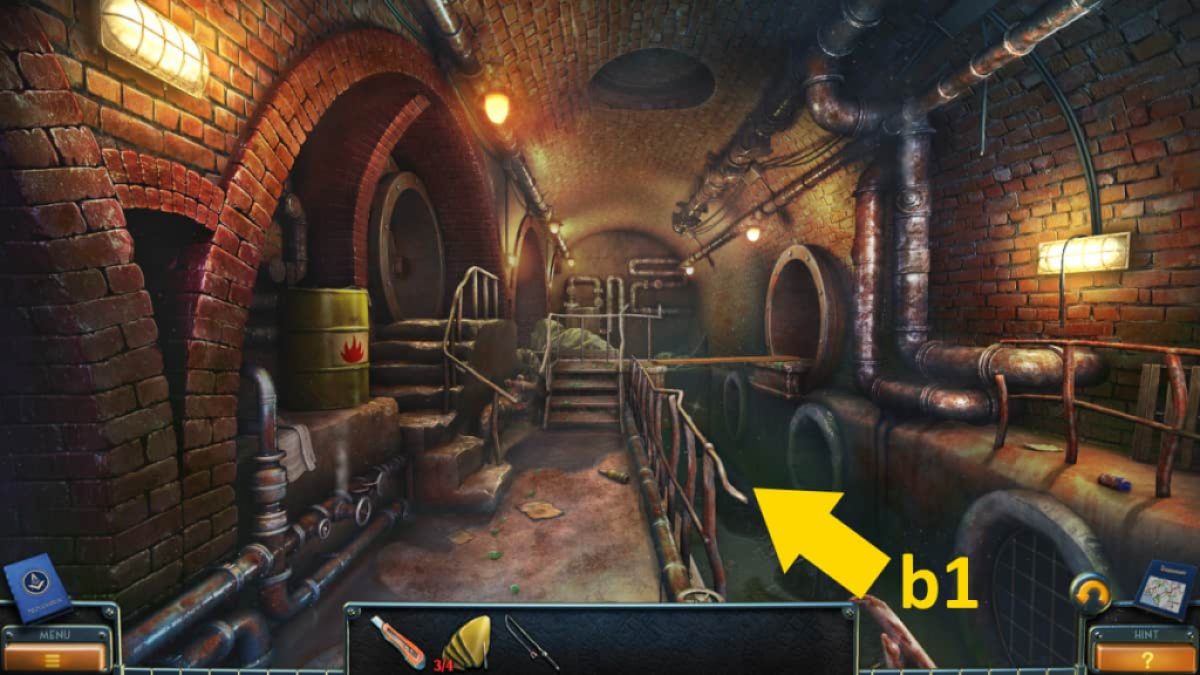
Image by Pro Game Guides
Head into the hallway and give the tea to Grandpa , then order the record on the disk histrion ( d5 ) and click the grip to operate it . When the hatch opens on the side , tot up the pattern to open a secret compartment and take thePaperclipandHeadfrom within . Click the chest of draws ( d6 ) and use the paperclip to pick the lock , getting theFuse Setby click the drawer again to open it .
Now , you’re able to go into the backyard and add the fuse go under to the fusebox . Click the fuse set once rank to pick up a fuzee , then get through the broken fuse to replace it . When you head back into the hall , you could now use the weak replacement ( d4 ) , giving you access code to the bedroom .
The Bedroom
You ’ll observe themorphing objectat the top of the fireplace ( f1 ) and thecollectibleon the seam ( f2 ) , where you may also pick up theBook . Back in the student residence , get a finis - up of the closet ( d7 ) and click the flowery image to launch the central section . Add the Koran to the shelf to open a clandestine compartment and take the Brushes from at bottom . There is also a note on the floor to the left wing of the bed , slightly gather under the rug that you’re able to learn for more back report .
Back in the bedroom , select the understructure of the chimney ( f3 ) for a stopping point - up and collect the Palette before total the firewood basket . tick the wood in the basket to sum up it to the fire , then use the match to get down it . Next , click the doll on the bedside table ( f4 ) and position it to front like the concert dance dancer in the painting on the wall ( see epitome below ) . Once done , the compartment in the table will open , and you could collect thesecond Detail .
With the fire burning , return to Grandpa and click him to get a trimmed scene . Afterward , he ’ll give you thethird and net Detailyou penury . Select the clock ( d8 ) and add the details , starting a numbers puzzle ( see solution below ) . Once the clock opens , take the Key and head into the kitchen , using the Florida key on the door ( e5 ) to bring in entryway to the cellar .
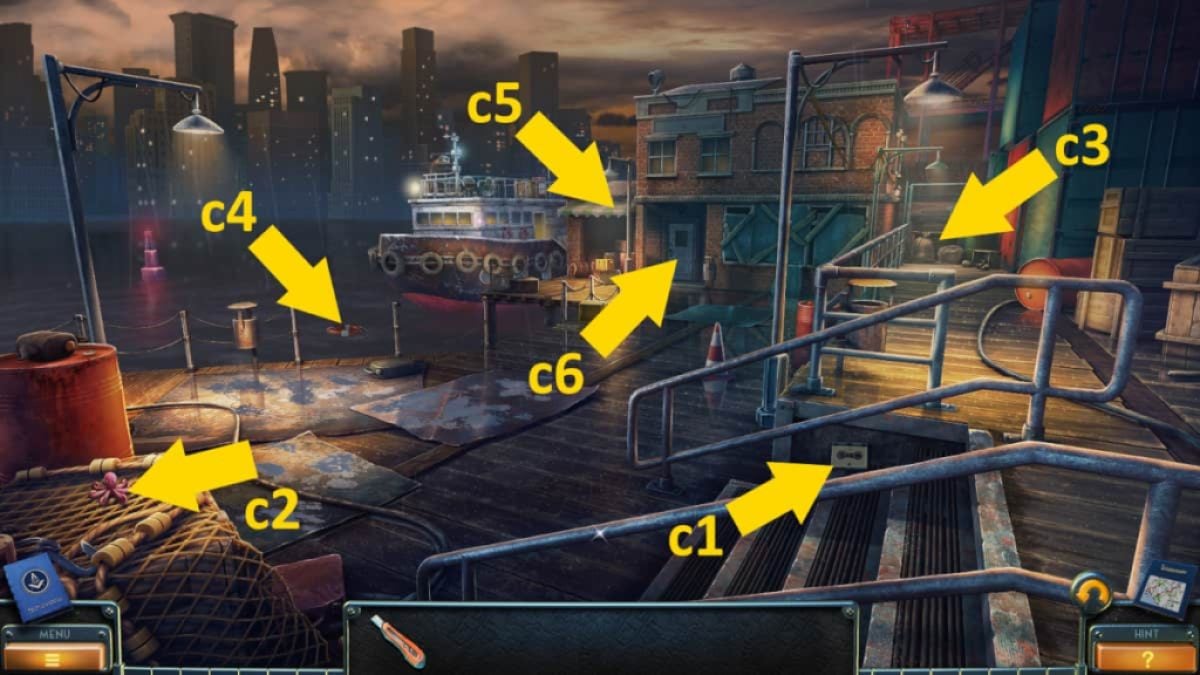
Image by Pro Game Guides
The Basement
Once you ’re in the basement , you’re able to grab themorphing objectat the base of the tall cabinet ( g1 ) and the collectible from the base of the step ( g2 ) . Take theOilfrom the artist ’s stand ( g3 ) and you may add the palette and brushes to it now too , just to get them out of your stock-taking .
Head back upstairs to the kitchen and apply the petroleum on the kitchen stove room access ( e4 ) , open it afterward to get theAntlerfrom inside the oven . Now go to the bedroom and add the antler to the carapace on the wall ( f5 ) , let on a confidential compartment from which you’re able to take aKey . Back in the cellar , utilize the key to unlock the tall storage locker ( g1 ) . Click it again to open up it , get a mystifier to feel Grandpa ’s pigment .
You ca n’t fail here , so just keep fall into place around until you ’ve find all 15 rouge . If you ’re struggling , you need toclick the buttons I , VII , and Xto start the drawer and the tongue in the draftsman ( I find it quite hard to see ) to unfold the box seat inside . Once done , you ’ll receive thePaints . Add the paints to the creative person ’s stand ( g3 ) , which will trip a poor aspect as you complete the painting .
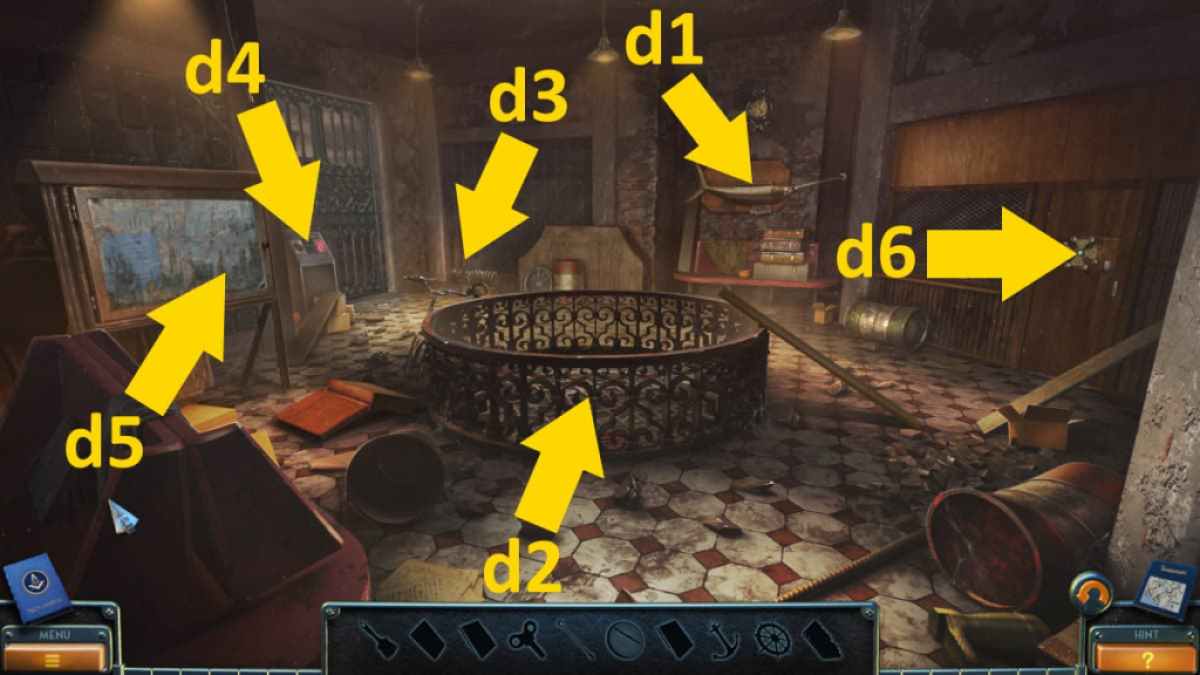
Image by Pro Game Guides
Once you ’ve told Grandpa that you ’ve complete the picture , the light in the bedroom goes off again , so lead to the yard and hold back the fusebox ( b3 ) . Replace the fuse in the same way as you did last time , then come back to the hall to see Grandpa travel .
Another World
Take thecollectibleand theStickfrom the level ( h1 ) and the morphing target from near the logic gate ( h2 ) . Click the cloth on the wall ( h3 ) and flick it once more in close - up to get theFabric , as well as theGemthat is behind it . Select the jet ( h4 ) and pick up yoursecond Gem , then expend the stick to get theSolventthat ’s behind the metal grating ( h5 ) .
take the wall detail ( h6 ) and use the solvent to loosen it , then use the material to remove it and take thethird and final Gem . Now , you’re able to select the shield ( h7 ) , tot the jewel , and part a laser puzzle . The gems will always shoot their light beam in the same guidance , so they want to be in the precise proper spots to complete the puzzle ( see the solution above ) .
Use the crank on the crystalline lens ( h8)twiceto exchange its angle , which will lower the pulley lever ( h9 ) . Now , you’re able to cluck the pulley block to move to the shoring . Once there , find fault up thecollectible(i1 ) from the sand and themorphing object(i2 ) from the top of the wall . You ca n’t do anything else here right now , so click the back - left of the scene ( by the Sir Herbert Beerbohm Tree ) to move forward to the Sir Henry Joseph Wood .
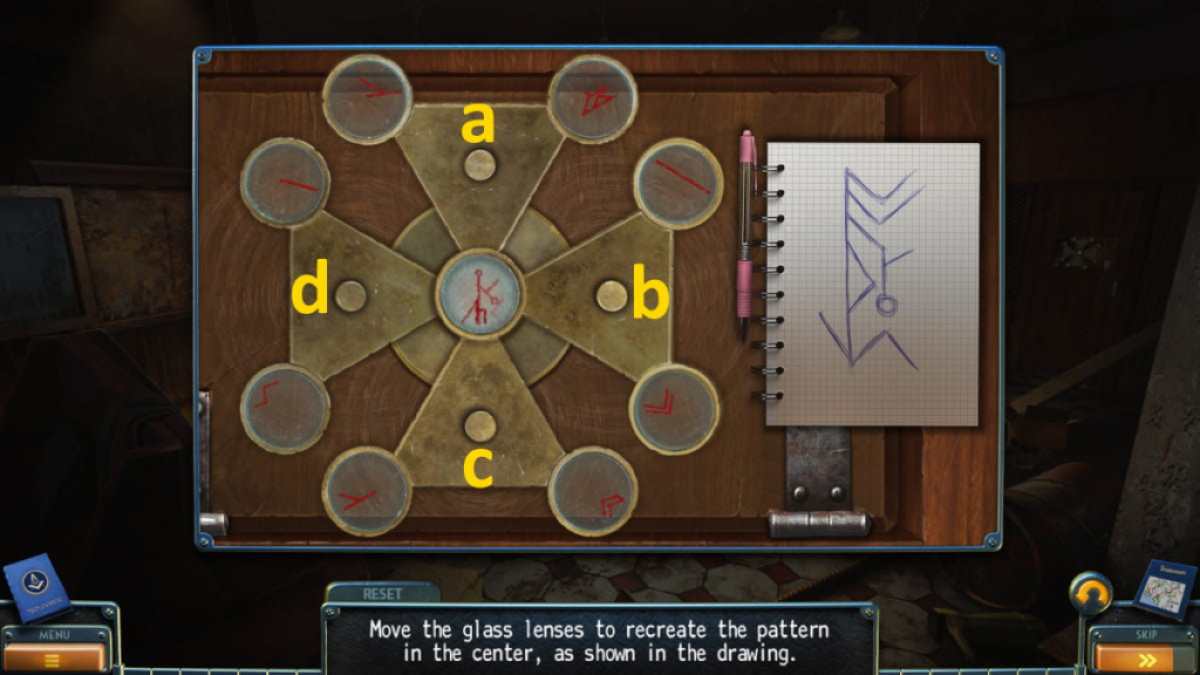
Image by Pro Game Guides
The Wood and the Token Puzzle
Pick up theBung(k1 ) and thecollectiblethat is right next to it , and themorphing objectby the tree roots ( k2 ) . Head back to the ruins and use the bung on the fount ( h4 ) , then collect theSunfrom the mouth of the statue that ’s also in this close - up . Move to the shore and utilise the star on the gates ( i3 ) , starting a token - prompt puzzler .
To complete the mystifier , make the espouse moves by looking at the image below ( do n’t forget to readjust beforehand if you ’ve already pop out to try and resolve it antecedently ): 1 to 2 , 3 to 4 , 2 to 1 , 5 to 6 , 7 to 8 , 9 to 10 , 11 to 12 , 1 to 13 , 14 to 15 , 12 to 16 , 16 to 17 , 17 to 18 , 19 to 20 , 21 to 2 , 22 to 23 , and finally 18 to 24 . Once perfect , the doors tothe lighthouse will afford .
In the prologue to the main story that follow , painter Noah has followed his Grandpa through one of his paintings into another worldly concern . He has just opened the gates to the pharos as he essay to see him while void waken the creature in the woods .
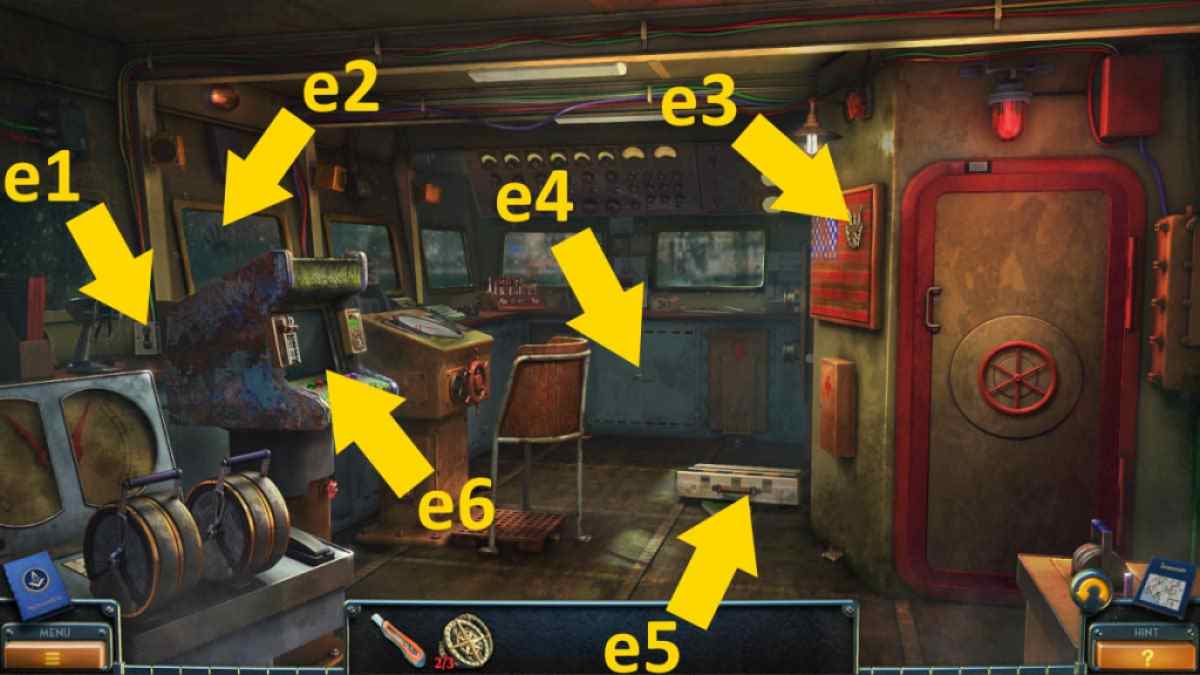
Image by Pro Game Guides
The Lighthouse
From the shore , clack the gates to the lighthouse ( a1 ) to begin a teaser tofind 15 devilfish . I see it a little plaguey that once you ’ve found all the octopuses in a close - up , you’re able to still fall into place it , but none of them are well secret , so just keep click around until you ’ve got them all . I find the only tricky single were theone on the blood-red plant(keep clicking leave until it is revealed ) , onein the pond(keep clicking shells until it is break ) , and one in theside air hole of the art udder .
Once everlasting , the stairs to the lighthouse will appear . Click the lighthouse to move indoors . After speaking to your Grandpa , take themorphing objectfrom the window ( b1 ) and thecollectiblefrom the top of the steps ( b2 ) . Pick up theHandleto the right of the Inner Light ( b3 ) before heading back down to shore .
clack the harpoon gun ( a2 ) and add the handgrip in the close - up , pull together theHarpoonandRopeafter using the attached handle . Now select the sauceboat ( a3 ) and use the harpoon to hoard theBucketfrom the water .
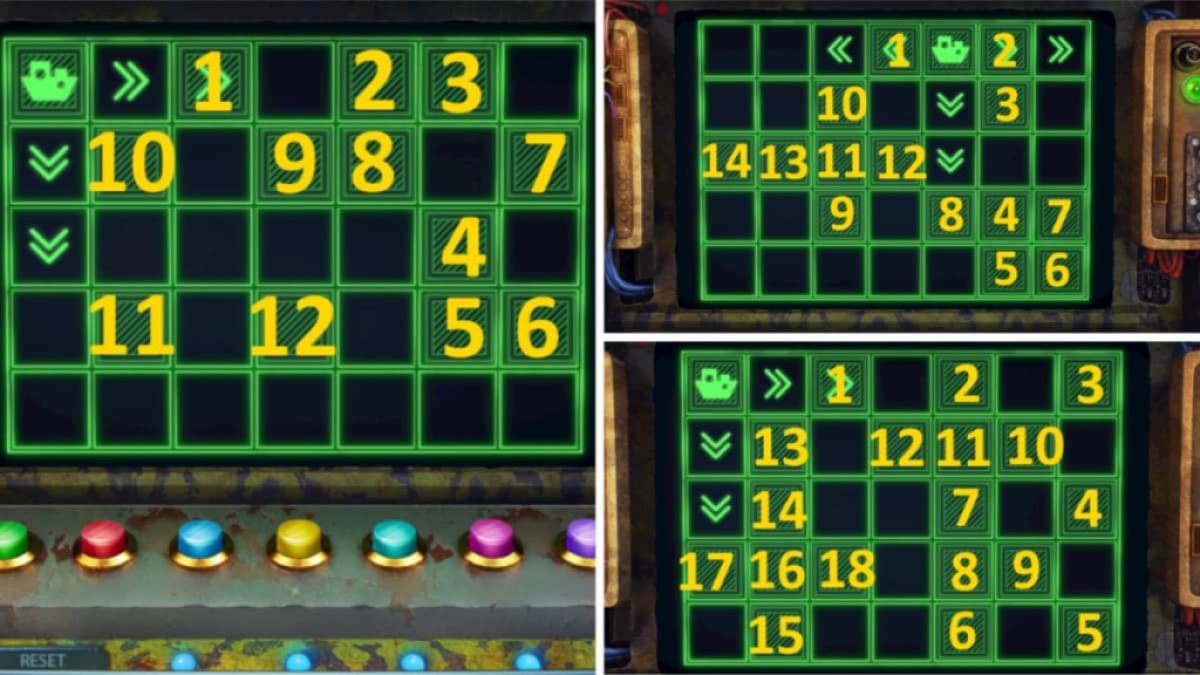
Image by Pro Game Guides
Recovering the Crystal
Go to the wood and use the pail to get past the spike trap ( c1 ) . You ’ll be assault by the monster , but after defeat it in a cut scene , you ’ll have theDetail . Add it to the pillar holding the crystal ( c2 ) to uncover and then begin a slideway puzzle . I found that the trick here is only the exact symbol or blanks can be in a given words . See the solution below if you ’re stuck . Once terminated , you may take theCrystal .
Click the left side of the tree diagram roots ( c3 ) for a ending - up , click the roots to reveal an item , and then pick up theRose . Go back to the shore and place the go up in the manpower of the statue ( a4 ) , which will open up a surreptitious compartment . Take theDetailfrom Inside , then head back to the lighthouse .
Add the detail to the mechanics at the top of the Inner Light ( b4 ) , which spread the panel . Click the panel once more to start a light beam puzzle . You call for to rotate the template so that all of them are pass by through . If you ’re stuck , you ’ll see the solution above . Once consummate , take theFishandBroken Crystalfrom inside the panel and then put in the new quartz glass .
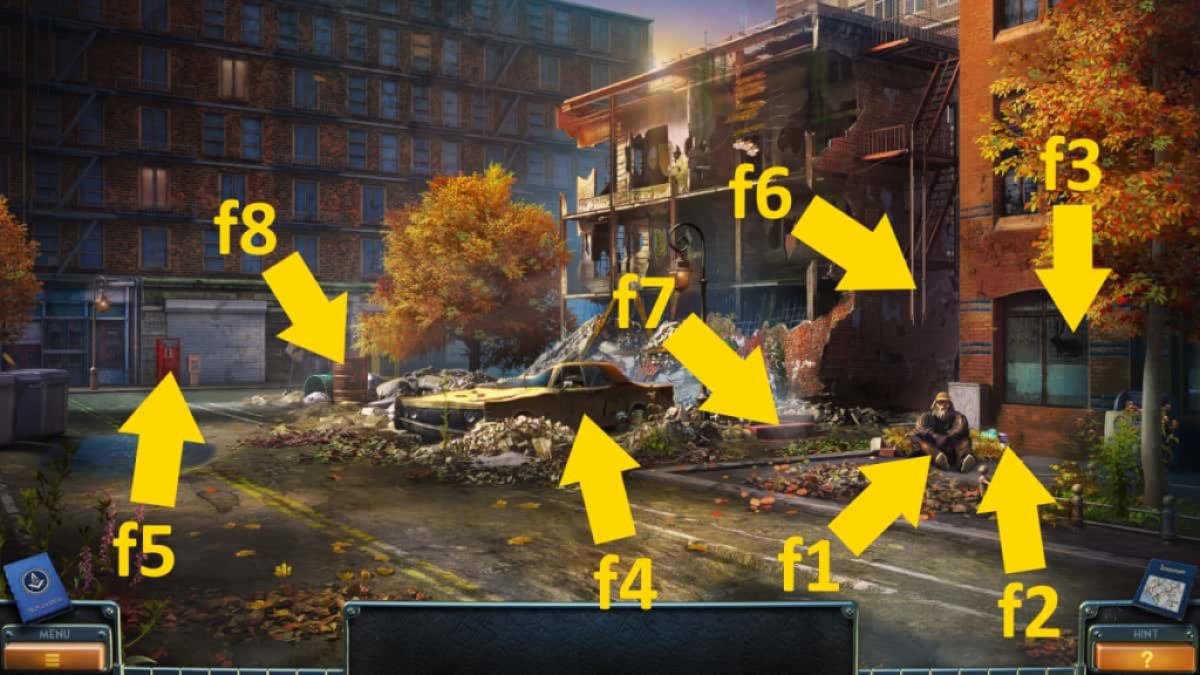
Image by Pro Game Guides
Returning to the Real World
After a cut scene with Grandpa , he ’ll give you aMacheteand reveal the locating of the portal back home . Go to the shore and use the machete on the dark-green material of the gravy holder ( a3 ) , accept theTorchfrom deep down before adding the fish to therotating ball puzzleand complete it . If you ’re struggling , after a reset , you need to click leave twice , right three time , left twice more , and finally correct . This clear you theHexagonsand aWrench .
Head back to the beacon and use the spanner to launch the damaged floor board ( b5 ) , take theStatuetteandEngraved Discfrom underneath . Use the machete on the window mechanism ( b6 ) to open up it . In the same finis up , select the packsack and use the engraved phonograph recording to afford it and get theBoltsand aDoor Knocker . you’re able to also now attach the legs and lead to the statuette , which get your stocktaking less littered . Similarly , you may use the matches on the common mullein to light it .
Go to the wood and use the matchet on the tree origin ( c4 ) , then attach the rope , giving you access to the cave . Head deep down and get thecollectibleon the left ( d1 ) and themorphing objectbehind the beetles ( d2 ) . apply the common mullein to daunt away the beetles , then fall into place the traveling bag they were on ( d3 ) to start a mere object - rule puzzle . Once complete , you ’ll get theShovel .
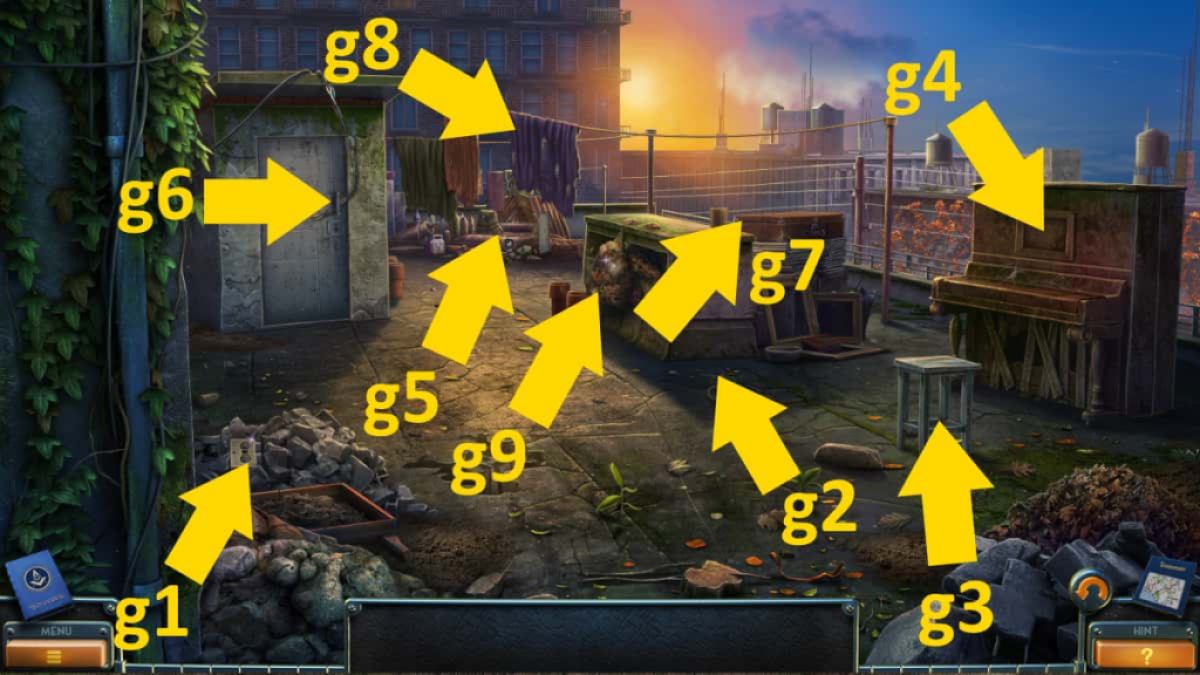
Image by Pro Game Guides
Use the shovel on the pile of dirt ( d4 ) to reveal the main part of the doorway . cluck it again and move it into the door frame ( d5 ) , then click the metal sections on the side and shut up them all into position with your dash . Add the door knocker , and the portal will be complete . you’re able to now return home .
Collecting the Valuables
maneuver into the hall and gather thePainting(e1 ) , then move to the bedchamber and take thesecond(f1 ) and ( f2)third Paintings . You ’ll find thefourth Paintingin the kitchen next to the stove and thefifth Paintingin the cellar ( h1 ) .
While in the basement , use the machete on the chez lounge ( h2 ) to get thePlanet . Next , lend the hexagons to the radiation diagram on the paries of the stairs here ( h3 ) , then tick it once more to bug out a part - matching puzzle . This is very simple , and you ca n’t actually run out . Just note thatsome roofing tile switch over to give away a new one when you match them , so do n’t ghost over one friction match , as it may not be there from the showtime . Once everlasting , you ’ll find the condom behind the puzzle . pull together theHammer , plus theContents of the Safe , from at heart .
Move back to the sleeping room and habituate the hammer to collect the largesixth Painting(f3 ) , revealing a cupboard behind it . Take theLampshadefrom inwardly . Go back to the lobby and add the lamp shade to the lamp ( e2 ) , which reveals a pattern you ’ll need for a puzzle .
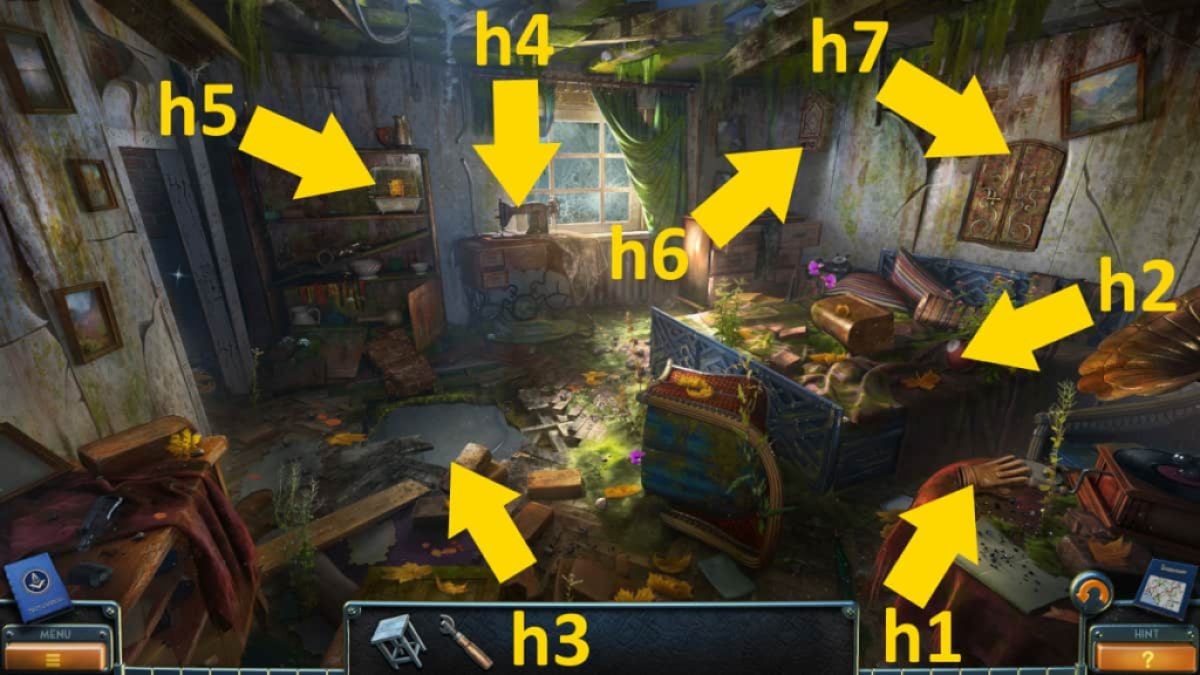
Image by Pro Game Guides
The Garden Puzzle
Head to the yard and click the backdoor mat , then get a close - up of the figure on the floor . I institute this puzzle really tricky , and it is quite knockout to name due to the mechanism , but here function . use the picture above for steering , with the three numbers being push or rend rows and the two letter of the alphabet represent the spinning circle .
Once complete , the instrument panel will cast down , and you may amass theWingfrom below . Add this to the rest of the statuette slice , and you ’ll receive thecompleted figurine .
steer back to the bedroom , get a close - up of the little room let on behind the large painting ( f3 ) , and tally the completed figurine to the base there . A run will look , give you access to the dome .
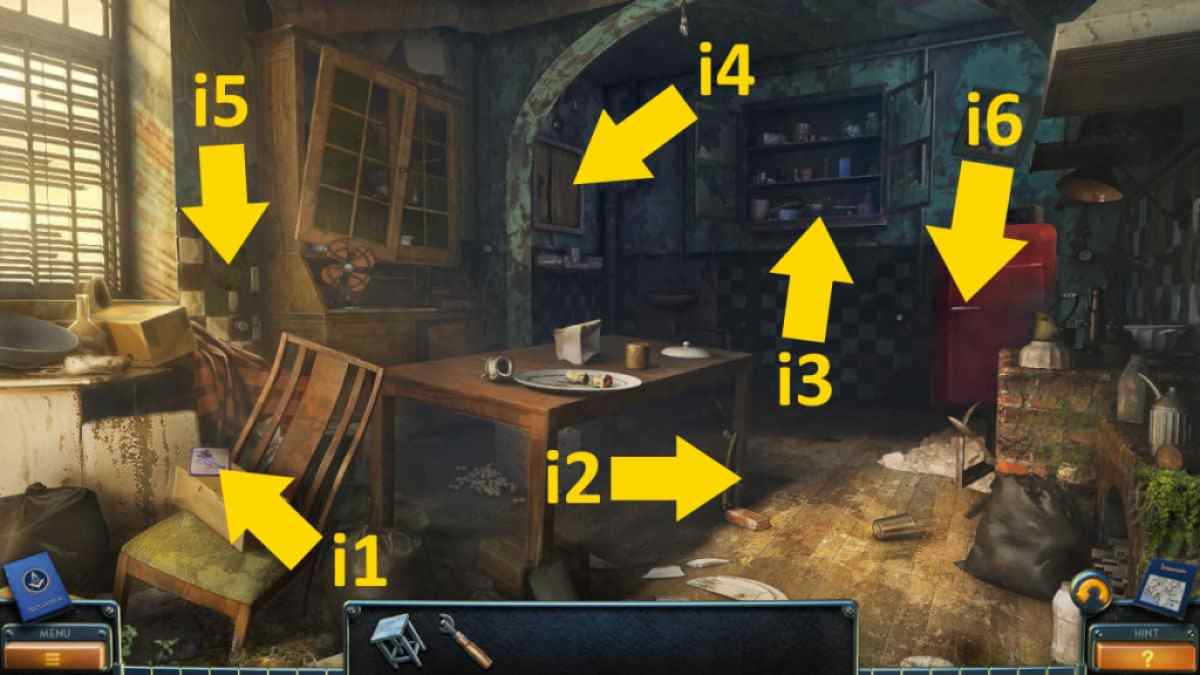
Image by Pro Game Guides
The Attic
Collect themorphing objectfrom the box ( k1 ) and thecollectiblefrom the shelves on the odd ( k2 ) , which should complete all of your collectibles for this chapter ( annoyingly , the hat bugged out for me ) . Click the globe ( k3 ) and once again in the close - up to open it . tote up the planet and click the world once more to begin a ring puzzle .
Each ring can go clockwise or counterclockwise , and each halo you select will move itself and at least one other ring ( highlighted in puritanical as you hover over them ) . You demand to adjust the gaps . There ’s no specific way to do this , and you ca n’t die , so trial and error will get you there . Once all over , take theHint ( 2974)from the compartment in the globe .
Select the telephony ( k4 ) , add the intimation , click the phone for a closer close - up , and put in the number 2974 ( you have to drag from each number clockwise , as with a traditional old telephone ) . Once done , the corner will open to reveal a compartment . Take theKeyfrom inside .
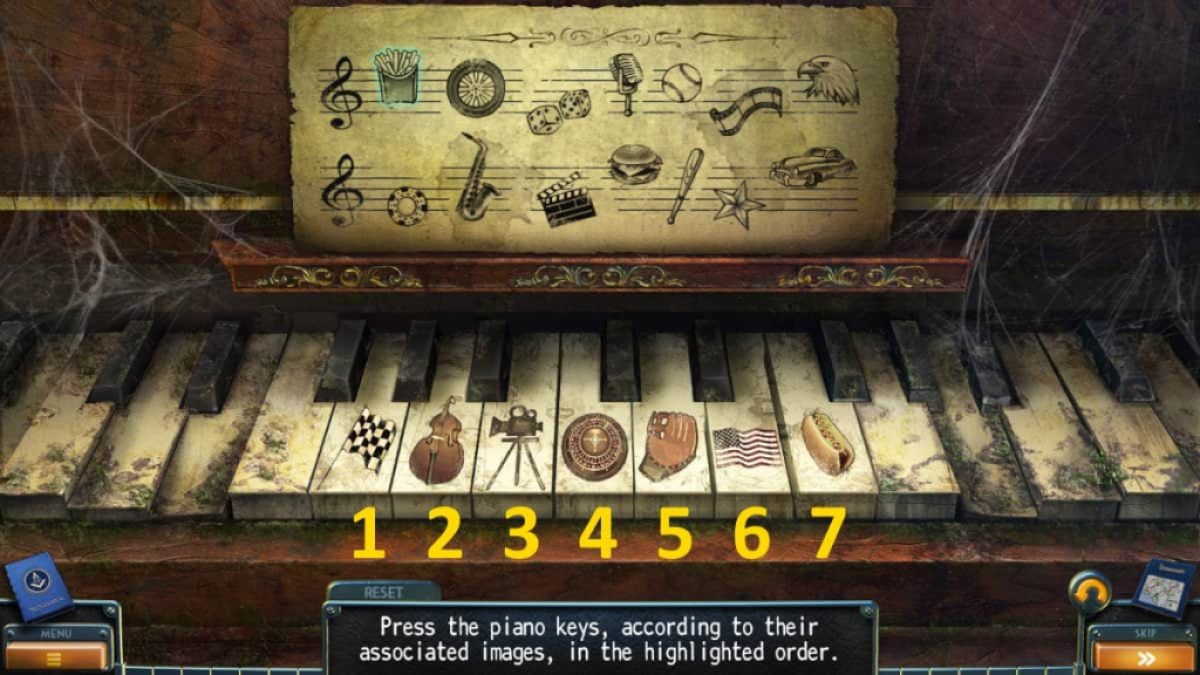
Image by Pro Game Guides
Now click the red box ( k5 ) and apply the key fruit to open it , taking theNails . In the same finale - up , click the wrap point once to peel off a layer . utilize your machete to cut the string , then strip off another layer by clicking to bring out a picture . record the note on the picture for some more backstory , then snap the depiction to get yourseventh Painting .
take the infract picture ( k6 ) and add the nails . Then , use the hammer to fix the inning . you may now collect thefinal Paintingand everlasting Chapter 2 of New York Mysteries 5 : Power of Art .
New York Mysteries 5 Walkthrough Chapter 3
After chapter two fills in the backstory from creative person Noah ’s diary , including his trip to the other world , Laura steps up her investigation to try on and track him down . You ’re now heading off to the address of the investor who grease one’s palms the paintings .
Getting into the Base
Take thecollectible(a1 ) by the crashed car and themorphing object(a2 ) from the treestump it hit . Get a close - up of the suitcase ( a3 ) and take theKeyfrom the jacket pouch , then snap the bridge to the rightfield of the screen to move to the desolate village .
Once there , grab theBell Clappernext to the room access on the left ( b1 ) , themorphing objectfrom the bulwark above it ( b2 ) , and thecollectiblefrom the leaves on the right-hand ( b3 ) . Use the Francis Scott Key to open up the door ( b4 ) , then get a conclusion - up of the door to start an physical object - finding puzzle .
Use the adjustable wrench on theLadder(b5 ) and then take it . Also , take theGlass Cutterfrom the handcart ( b6 ) , then head back to the crashed car ( a1 ) and utilize it on the windowpane , then unfold the auto door . This start a simple scurvy collection puzzle , after which you ’ll receive theMatches(they’re detect by end the box on the trading floor in the front seat ) .
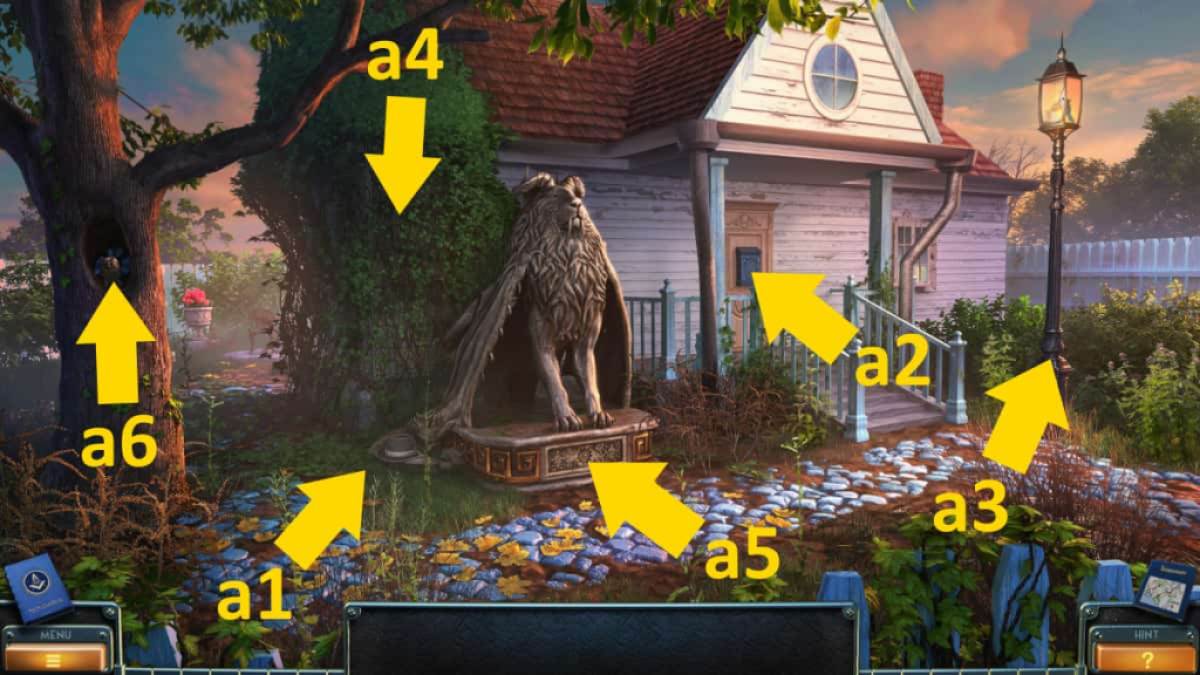
Image by Pro Game Guides
Use the item to unfold the suitcase ( a3 ) and take theBandage . Go back to the abandoned village and get a finale - up of the bell column ( b7 ) , and add up the run . Now you may climb up to the gong , take theDetail , and add the Vanessa Stephen clapper to the bell . seize the bandage , then light it with the match to give yourself time to get back to the van before the bell reverberate , distracting the driver .
take the front of the van ( a4 ) , take theKey , then come home the back ( a5 ) of it to unlock the boot with the key . Put the keys back in the front of the van , then climb into the back for a cut setting .
Escaping the Hanger
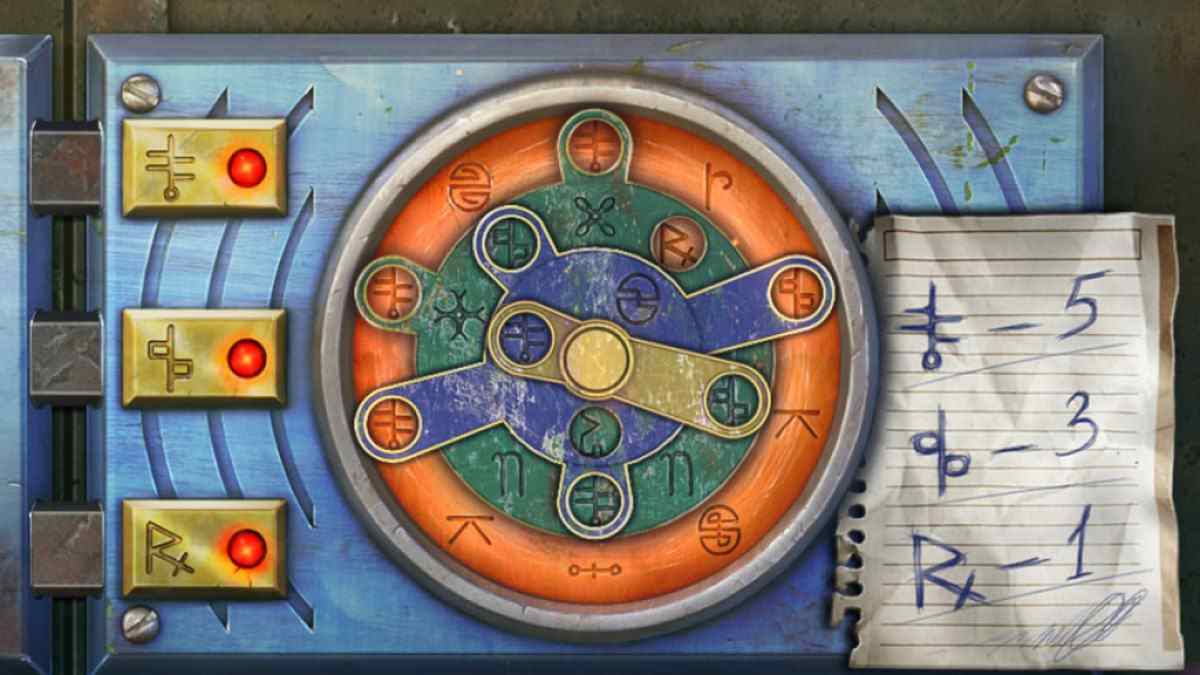
Take themorphing objectfrom the tires ( d1 ) , and thecollectiblefrom the top of the van ( d2 ) , then move the cloth on the toolbox ( d3 ) to get theHint . Click the threshold ( d4 ) , supply the hint in the close - up , then rotate the telephone dial to match the symbol to break out of the hangar ( see the trope below for the puzzle solution ) .
Outside the base , take thecollectiblefrom the box seat on the left ( e1 ) and themorphing objectfrom the roof ( e2 ) . Click the prevue ( e3 ) and move the cloth in the close - up , taking theHandlefrom underneath . Go back into the hangar , use the handle to start the toolbox ( d3 ) , and take theScrewdriverandWire .
manoeuvre back out of doors and apply the wire to pluck theKeysout of the drain ( e4 ) , then use them to spread out the hand truck in the repair shed ( d4 ) and take theMagnetic Key Cardfrom the hind end . In the same close - up , click the baseball mitt compartment and take theBall . Go outside once more and use the keycard to launch the shed ( e5 ) , taking theMagnetfrom near the floor and theHandlefrom the draftsman .
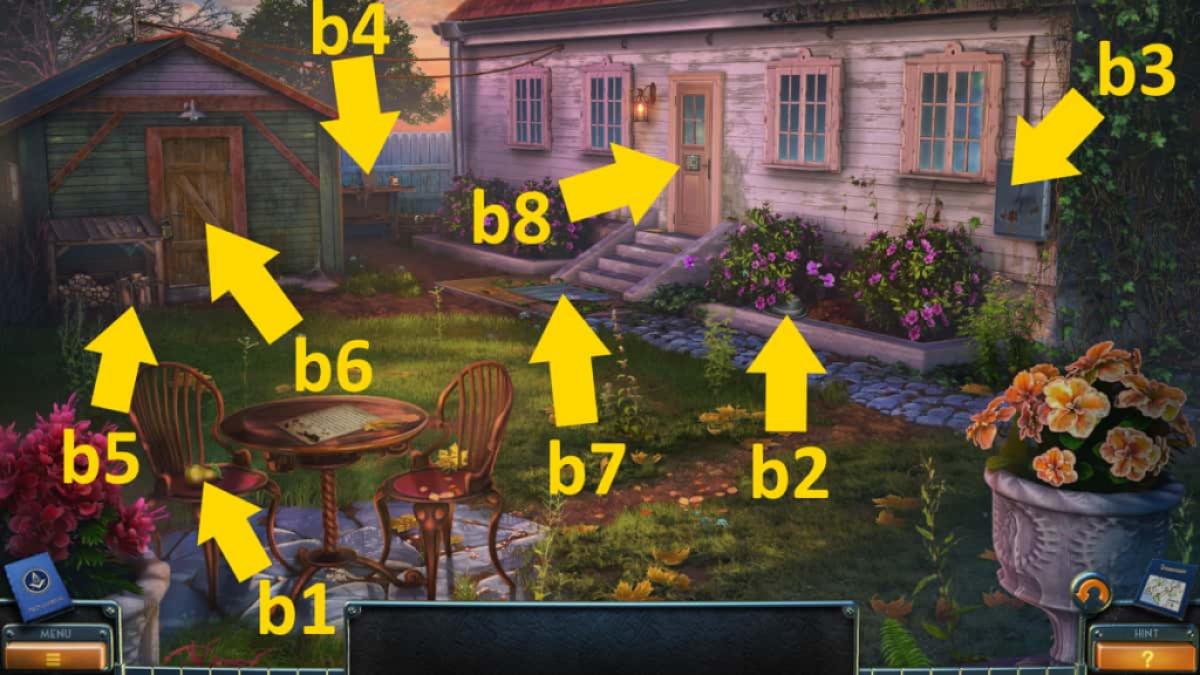
Image by Pro Game Guides
Tile-moving Puzzle
While still in the caducous close - up , click the sieve twice to bulge out a tile - moving teaser . If you ’re stuck , move the tile in the watch over order ( see image for key ) . I notice this quite guileful , but this answer does lick . You just call for tokeep a close eye on which roofing tile is which onceyou bug out moving them .
Once complete , the alarm system will be switched off . Select the windlass ( e6 ) and add together the handgrip , then click the conducting wire to automatically bond it to the prevue . Click the windlass close - up again and click the handle to move the trailer to below the balcony . choose the balcony , use the screwdriver on the window , and insert the basis .
Inside the Base
Take thecollectiblefrom the table ( f1 ) and themorphing objectfrom the headboard ( f2 ) , then use the magnet on the fishtank ( f3 ) to extract theEngraved Detail . pick out the door at the back of the room and head out into the hall .
After get themorphing objectfrom the wall ( g1 ) and thecollectiblefrom the level ( g2 ) , take theKnifefrom the trolley ( g3 ) and the secondEngraved Detailfrom under the dish that ’s also on it . you may now head back into the bedroom and add the two grave details to the trunk at the ending of the bed ( f4 ) , guide theFlowerandSlidesfrom inside . In the same close - up , utilize the knife on the pouch to recall theWooden Detail .
Add the wooden detail to the portrait above the seam ( f5 ) , taking theHexagon TileandGolden Elementfrom the secret compartment that opens up . Head back out to the hall and snap the red box on the table ( g4 ) , supply the golden component to open it and start a tile - slide puzzle . It ’s childlike , you ca n’t fail , and there are many shipway to complete it ( I suggest doing the nook early on , or you ’ll have to backtrack ) . Once done , you ’ll get aKeyand yoursecond testicle . Exit the residence through the arch on the left into the library .
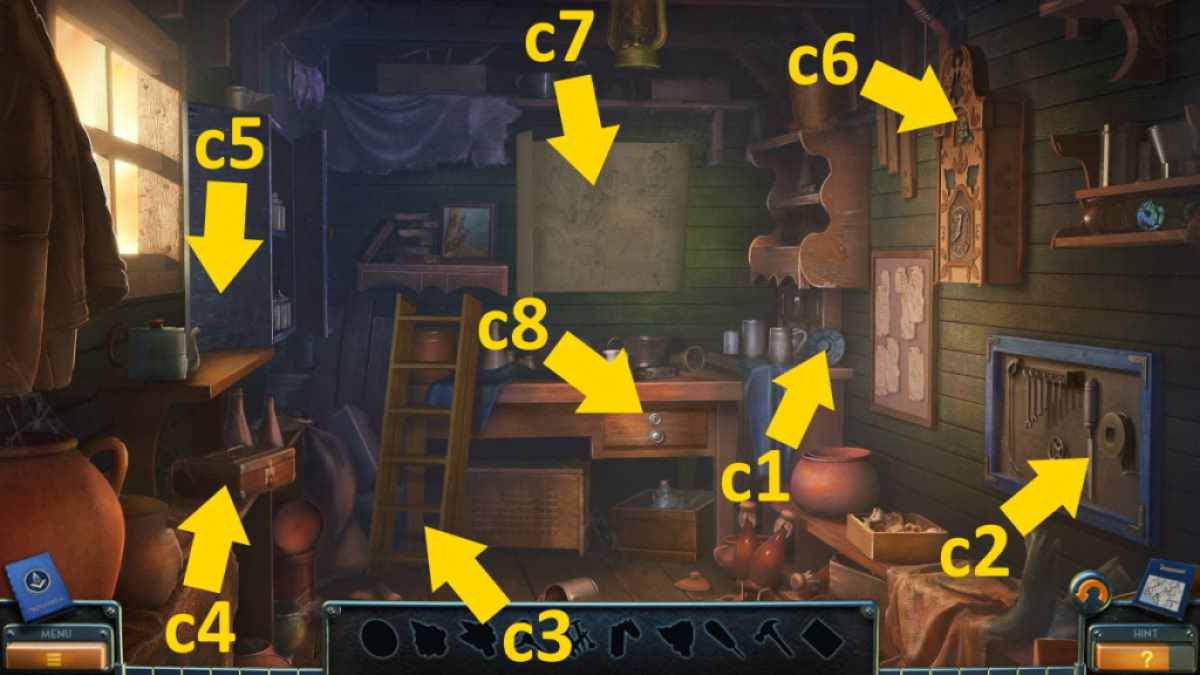
Image by Pro Game Guides
The Library
you may find acollectiblein the vase on the right ( i1 ) and amorphing objecton the pendant ( i2 ) . Click the mechanism on the right wall ( i3 ) to draw back the mantle , click the elbow room beyond for a close - up , and take yoursecond Flowerfrom next to the slide projector . Now add the slide to the projector , penetrate the green button to switch it on , then riffle through the slides until you get thequest update to get through Bishop .
While still in the program library , pick out the ornate flooring and tally the hexagon roofing tile to start a revolution puzzle . If you ’re stuck , reset and do the pursuit :
you’re able to now pick up theLensand yourthird Ballfrom the compartment that open on the right of the close - up . impart the genus Lens to the telescope ( i4 ) and then use it to honor the pattern on the diametrical roof . fall into place the wall on the left ( i5 ) , duplicate the design ( see image above ) , and the door will open up . You ca n’t get access yet , though .
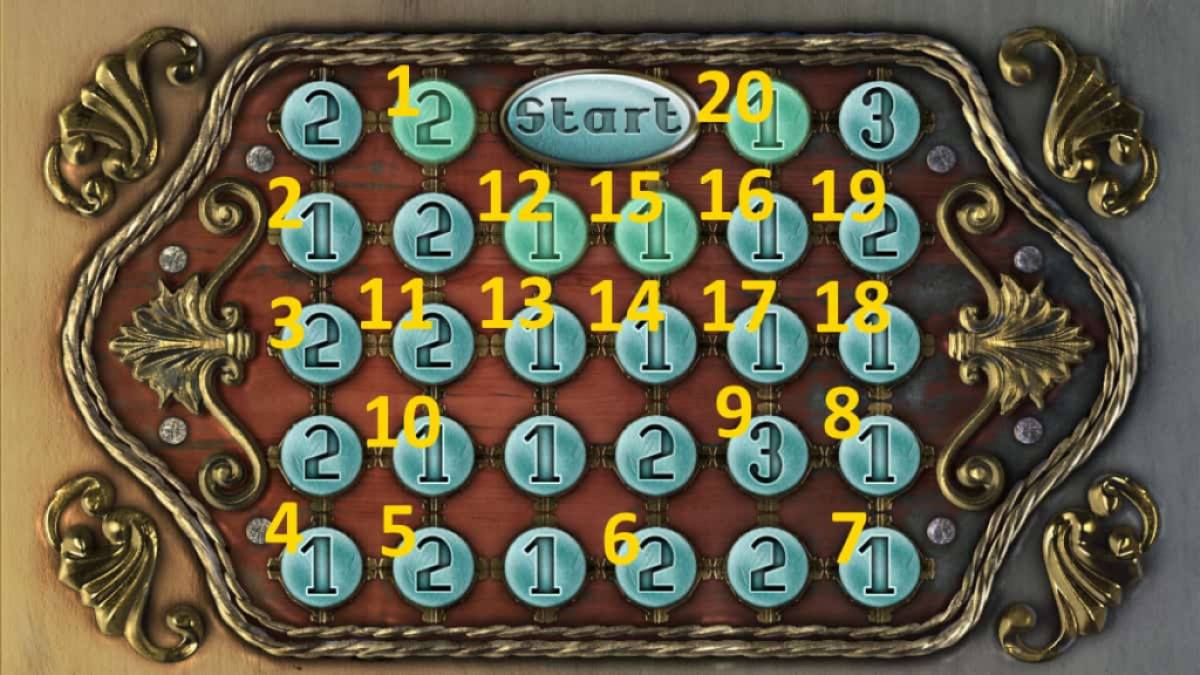
Image by Pro Game Guides
The Cabinet
Use the paint to give the room access on the rightfulness of the antechamber ( g5 ) , gaining entry to the Cabinet . Grab themorphing object(h1 ) andcollectible(h2 ) from the table , then click the telephone ( h3 ) and use the screwdriver to launch the box behind it . Take theMiniature Shieldfrom inside , then reconnect the red wire of the telephone set to call Bishop .
After the cutscene , click the single-valued function on the back wall ( h4 ) and take thesecond Miniature Shieldfrom the gimmick . Move back to the program library and select the tabular array ( i6 ) , adding the buckler to the deoxyephedrine display case to open up it and get theFigurine .
Back in the cabinet , add the statuette to the diorama on the chairman ( h5 ) , then examine it in the close - up to start an item - moving puzzler ( see range of a function above ) . Note some item ca n’t be moved until the station they need to go has been clear . Once staring , you ’ll receive theLens .
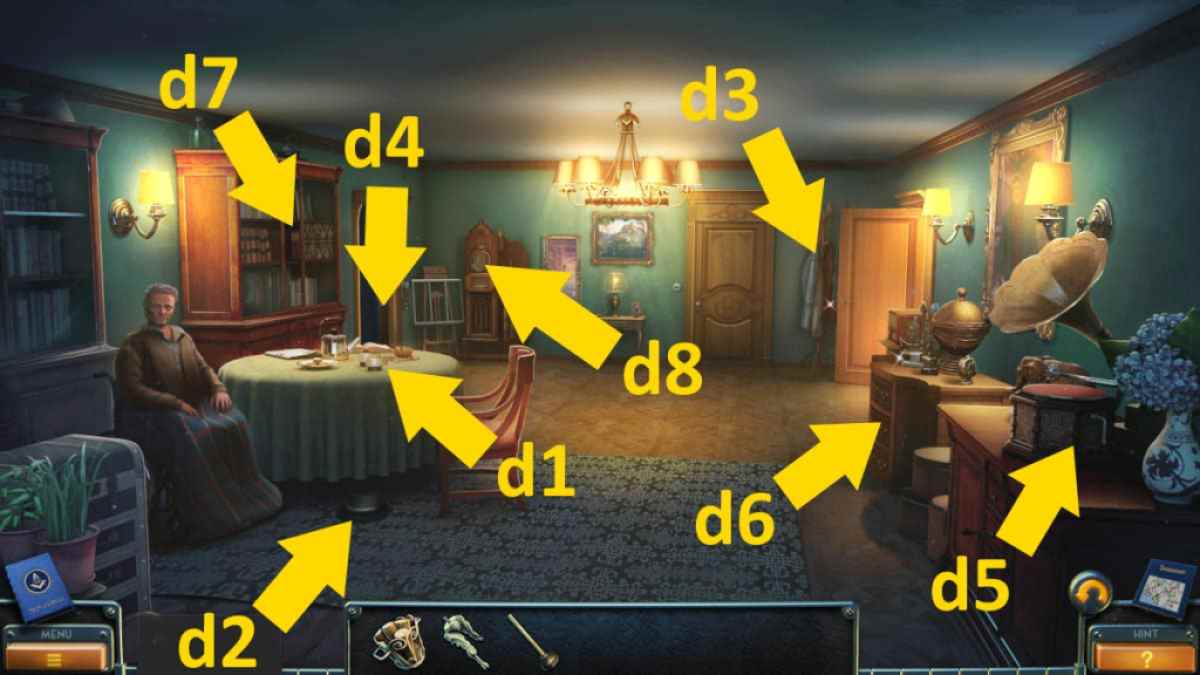
Image by Pro Game Guides
Add the lens to the witness on the map ( h4 ) , revealing the wordNiagra . pick out the Newton ’s cradle ( h6 ) and add the three balls to it . exchange the balls until they write Niagra , and you ’ll get theGraphite StickandHourglass Symbol . Select the lodgings on the desk ( h7 ) , flip-flop the page , then use the graphite to reveal a clue .
The Last Door in the Hallway
Back in the library , select the tabular array ( i7 ) and click the hourglass to flip it over . lend the hourglass symbol to it , and it will open up up , allowing you to take yourthird Flower . Head to the hallway and add the flowers to the remaining closed doorway ( g6 ) . Open it to start an detail - finding puzzle .
Go into the bedroom , use the nigger on the plant ( f6 ) , and take theAmulet . Go back to the library and use the talisman on the gimmick by the door ( i5 ) , arrive at approach to the elevator .
Next , at the start of the conclude part of the news report , Laura has break into the base of the shadowy group that has been collecting the painting . It seems they have been luring the creatures from the painting and storing them in the basement . But how can you get down there to put together the final pieces of the puzzle ?

Image by Pro Game Guides
The Dungeon
You ’ll find acollectibleon the flak extinguisher ( a1 ) and themorphing objecton the wire on the back wall ( a2 ) . Click the hatching on the floor ( a3 ) and utilize the screwdriver to unlock it , have theHandlefrom inwardly . Now use the tongue on the box ( a4 ) and take theBattery . Press the scarlet button ( a5 ) to air the elevator down , which start the threshold on the right hand , giving entree to the dungeon .
Take thecollectiblefrom the green cloth on the right ( b1 ) and themorphing objectfrom the paries ( b2 ) . Select the forklift ( b3 ) for a close - up , click the storey control panel , and sum the battery . touch base the two wires , then draw the lever to conjure the pallet . Take theBolt Cuttersfrom under the pallet , then go back into the elevator and use them on the chain on the back paries ( a6 ) . Take theDetailfrom the top of the loge behind the logic gate . Add the item to the mechanism by the door ( b4 ) , and the room access will open . It looks like you find the monsters …
Recovering the Varnish
After picking up thecollectiblefrom the tree stump ( c1 ) and themorphing objectfrom behind the fencing on the left-hand ( c2 ) , grab thePattern PartandFire Ironfrom the barbeque ( c3 ) . Use the fire iron on the planks on the front door and head inside the house .
Take themorphing object(d1 ) andcollectible(d2 ) from the floor , then get theWaxnext to the receiving set ( d3 ) . expend the fire iron to move the beam of light ( d4 ) and collect theBucket , then take theMatchesfrom the kitchen stove ( d5 ) , launch the oven in the same close - up to also get theOil . Head back out to the barbecue ( c3 ) , use the matches to light it , and add the wax . Once it has thaw , you’re able to click the wax once more to take thesecond Pattern Part .
While still out front , use the bucket on the puddle ( c4 ) to getWater , then use the water on the drain ( c5 ) to purge out and pick up theStone Tile . Use the Stone Tile on the statue ( c6 ) to start a roofing tile - matching puzzle .
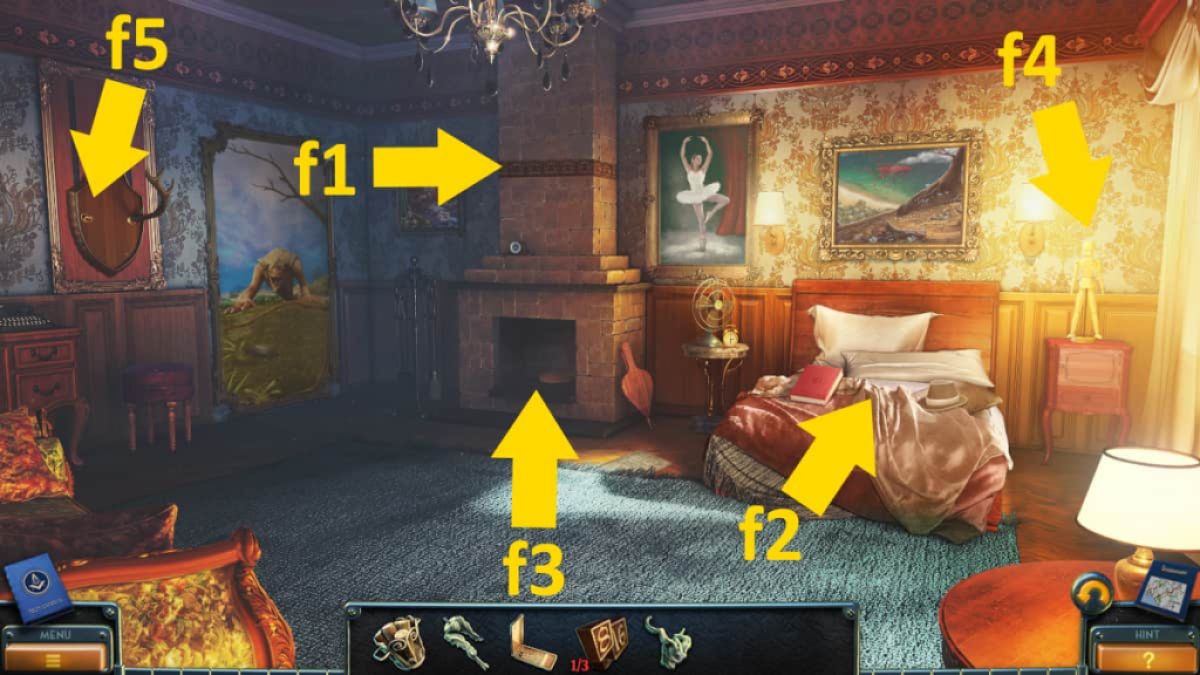
Image by Pro Game Guides
The Tile and Flask Puzzles
This is a footling clock time - use up , and there ’s no correct way to do it , andyou ca n’t fail . It just takes solitaire . My tactics was to move the tiles on the left so that the insect was to the leftfield of the Dominicus , then move those into their correct slots on the left . Then , use the same tactic to put the rest in place . Once complete , you ’ll get theRadio Reciever Knoband aHint .
Add the thickening to the radio ( d3 ) , which will open so you could collect thefinal Pattern Partand aKey . tot the pattern parts to the wooden box ( d6 ) to start the flasks mystifier . Use the image above as a reference , then click the button in the next social club : 1 , 5 , 1 , 1 , 5 , 1 , 5 , 2 , 5 , 5 , 5 , and at last 2 . The boxwood will give , and you may take theHandleandTweezers . apply the key on the clean door at the back of the way and manoeuvre downstairs .
After have thecollectibleon the storey by the press ( e1 ) and themorphing objectfrom the cloth ( e2 ) , use the handle on the hearth ( e3 ) , then bestow the oil to loosen it , afford the grating to take theCorkascrew . utilize the corkscrew to unfold the vino bottle in the winerack ( e4 ) , then expend the pair of tweezers to get the secondHint .
Screenshot by Pro Game Guides
Bring Back the Monsters
Take thecollectiblefrom the trolley car on the left ( f1 ) and themorphing objectfrom the piping ( f2 ) . choose the motorcar ( f3 ) and take theButtonon it in the close - up , then use the grip on the store locker ( f4 ) and take theHosefrom inside .
Move back to the dungeon sphere and then move down the corridor at the close to the Pier . Take your finalcollectiblefrom the barrels ( g1 ) and the lastmorphing objectfrom next to the box ( g2 ) . If you ’ve followed all of my guidebook to this full point , you should now have all the extra items to unlock all the supernumerary puzzles and content .
Click the boat ( g3 ) for a close - up and take thesecond ButtonandCannister(you may also click the hole to get ready to fill it with petrol ) . Take theCrystalfrom the boxes ( g4 ) and utilise the knife on the ropes in the same conclusion - up to get thePainting . Click the office ( g5 ) , click the travelling bag for closing - up , and take theKey .
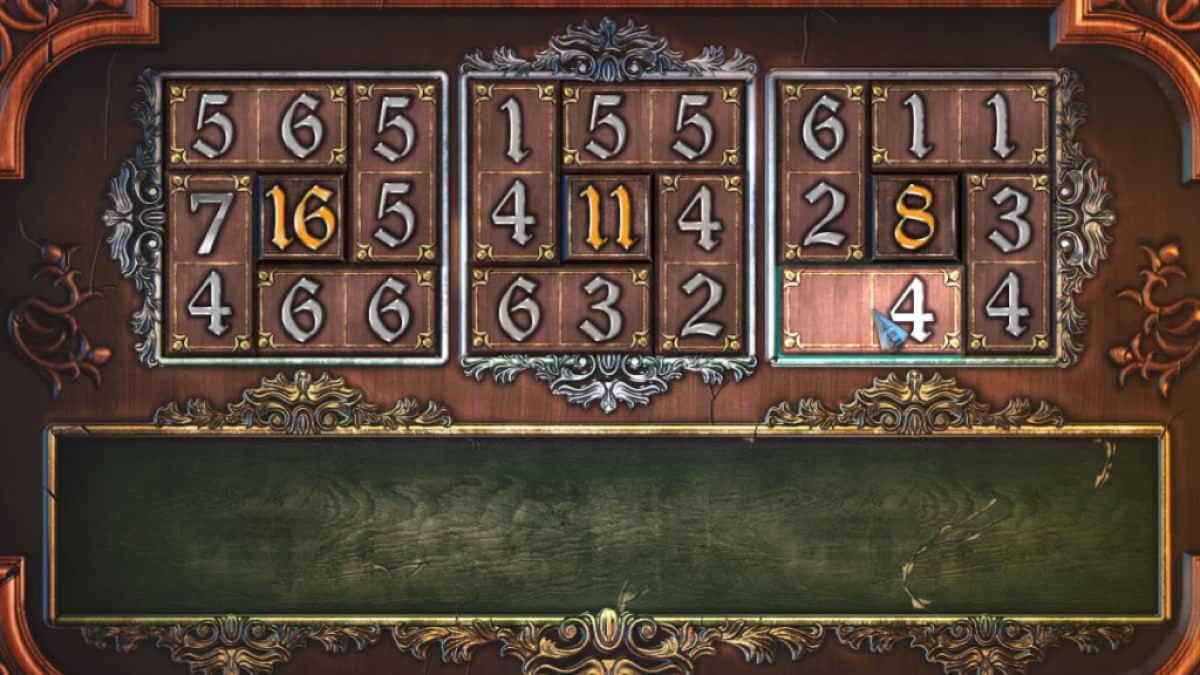
Image by Pro Game Guides
Back in the dungeon , pose the canister next to the fuel gun barrel ( b4 ) and fill the canister to get theGasoline . Go back to the pier , summate the gasoline to the boat , then click the office once more and add the clit to the suitcase . Open it and take theFuse . choose the grate first step chemical mechanism ( g6 ) , click the silver door in the close - up , and replace the fuse . Switch the motorcar on , open up the gate , and your escape route is secured .
Now guide to the goliath cave and add the picture to the streetcar ( f5 ) then employ the key in the machine ( f3 ) to turn it on . supply the varnish to the house painting and enjoy the cut scene . Congratulations ! You have completed New York Mysteries 5 : Power of Art .
For more percentage point - and - come home walkthrough guides , check off outVictorian Mysteries The Yellow Room WalkthroughandRoyal Legends 1 Walkthroughright here at Pro GameGuides !
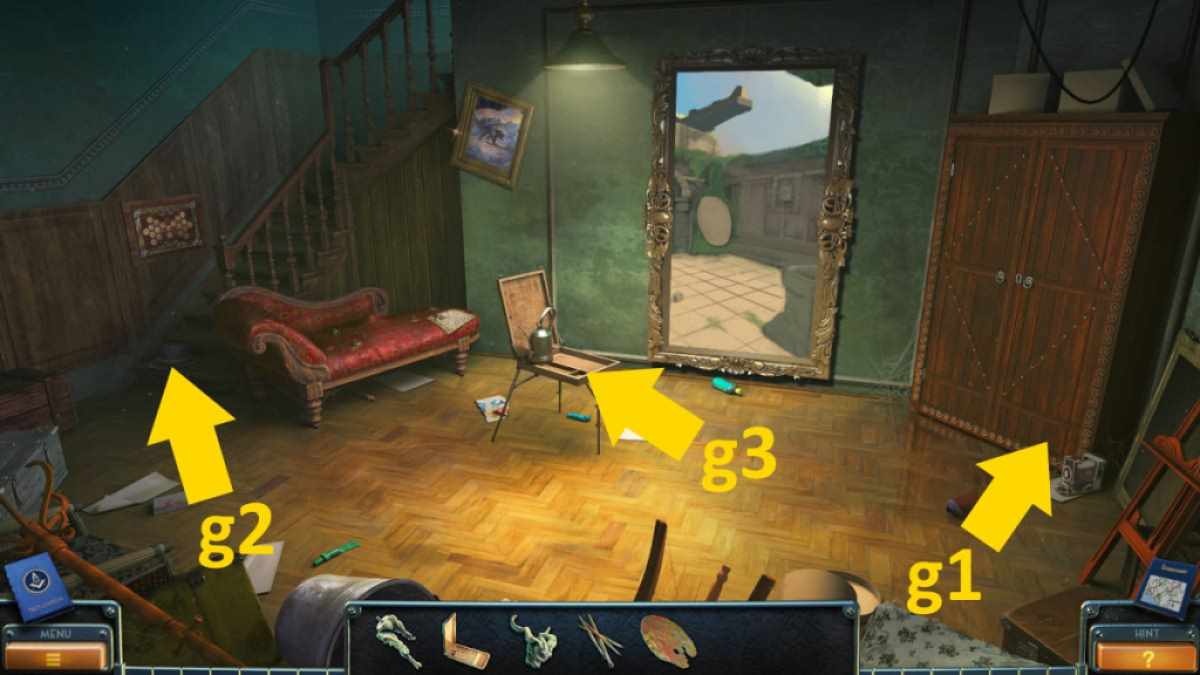
Image by Pro Game Guides
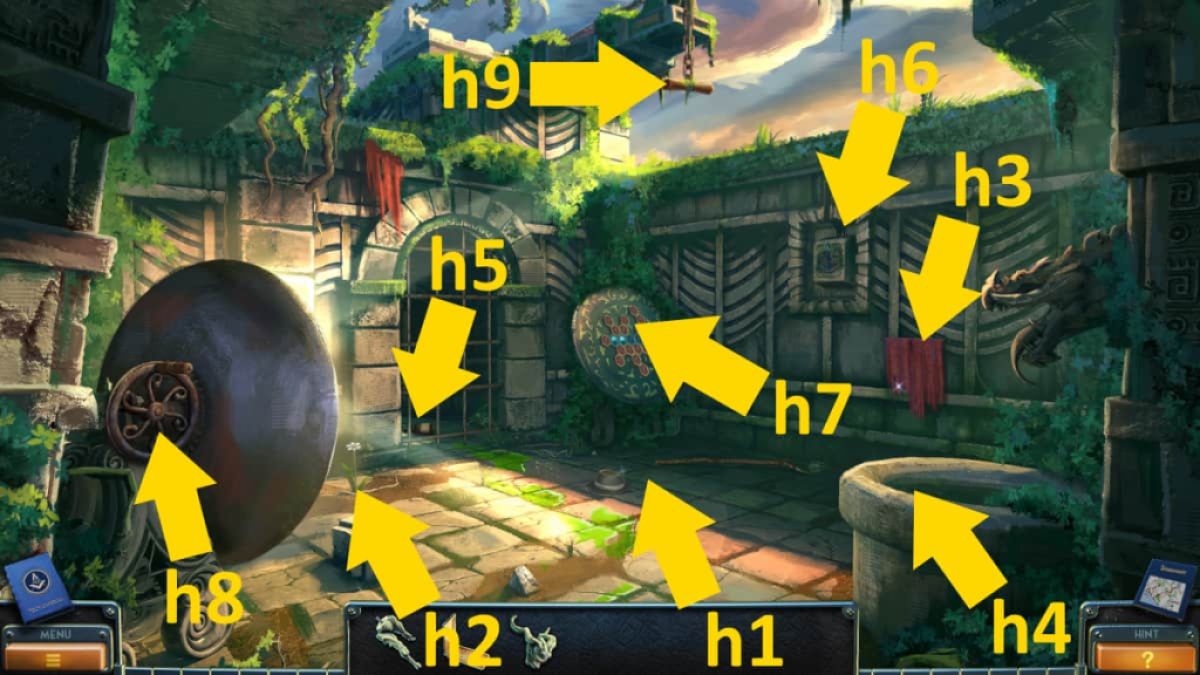
Image by Pro Game Guides
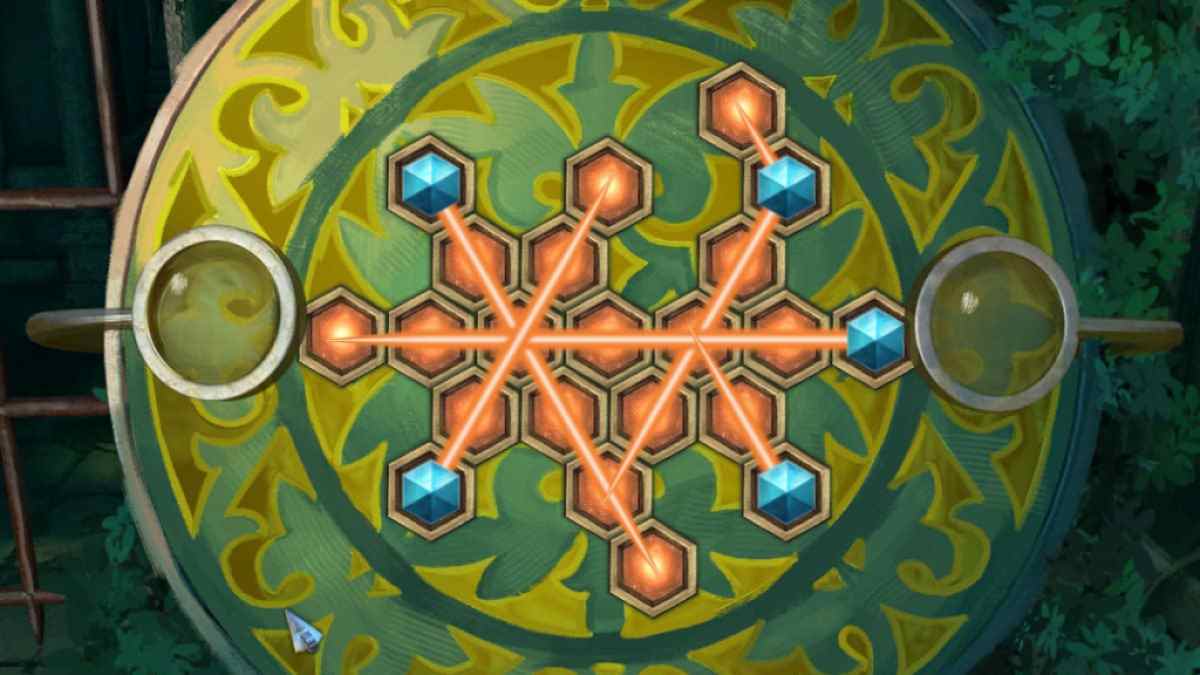
Image by Pro Game Guides
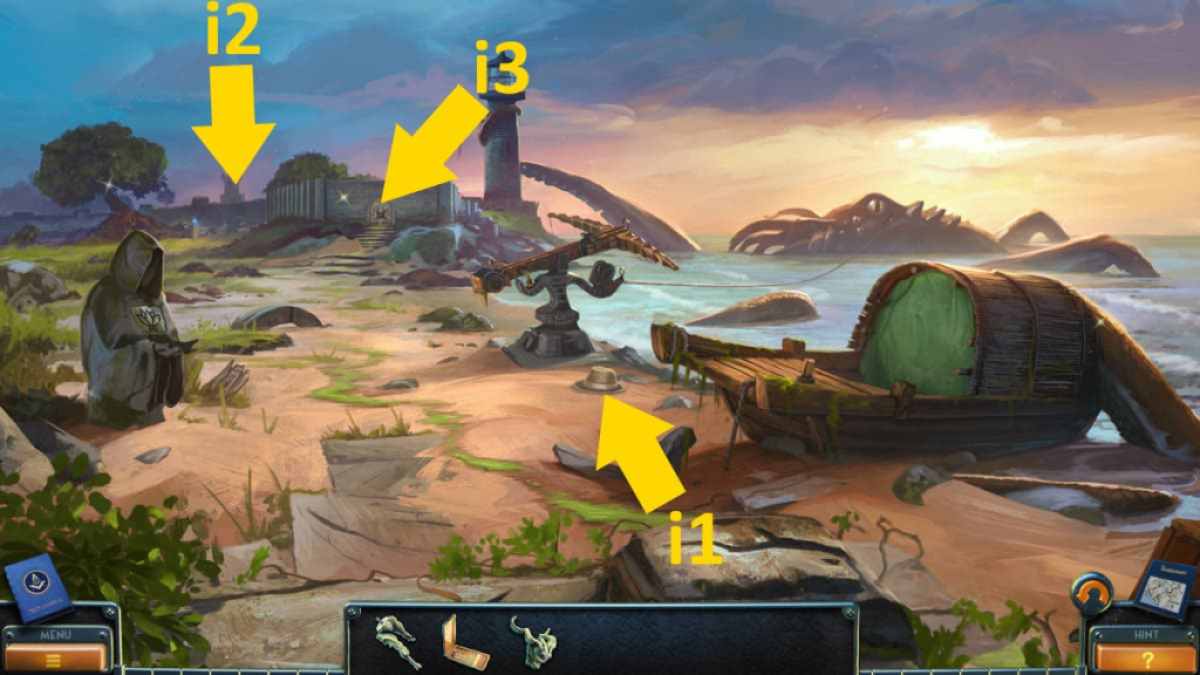
Image by Pro Game Guides
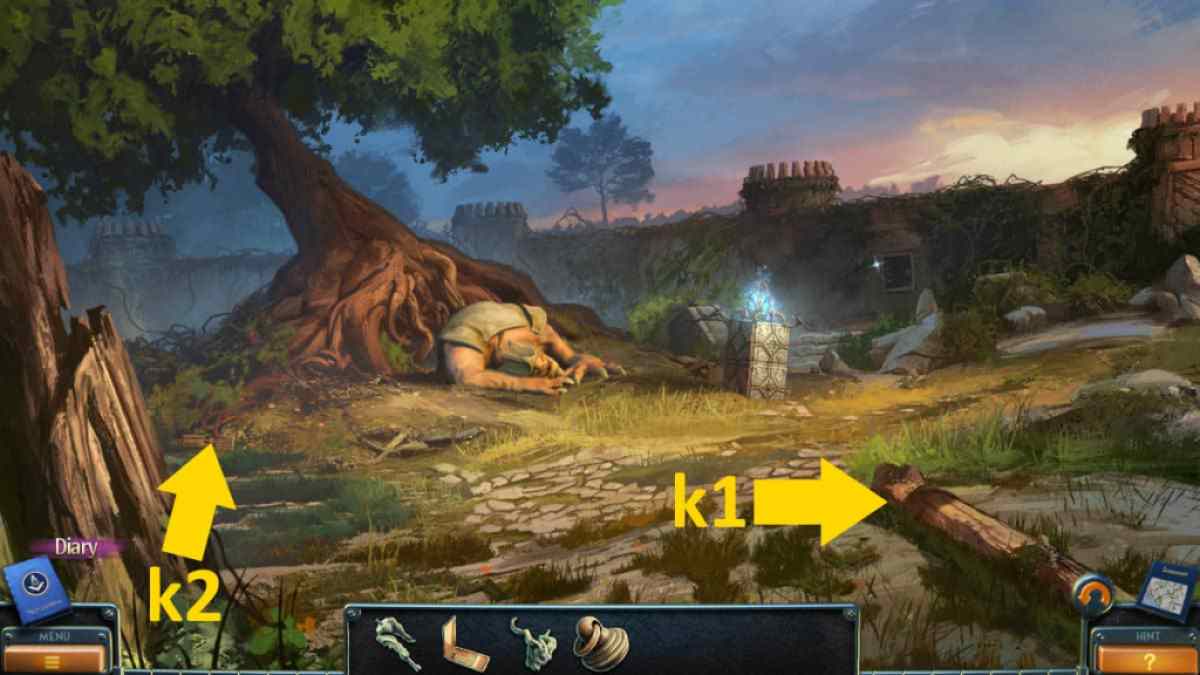
Image by Pro Game Guides
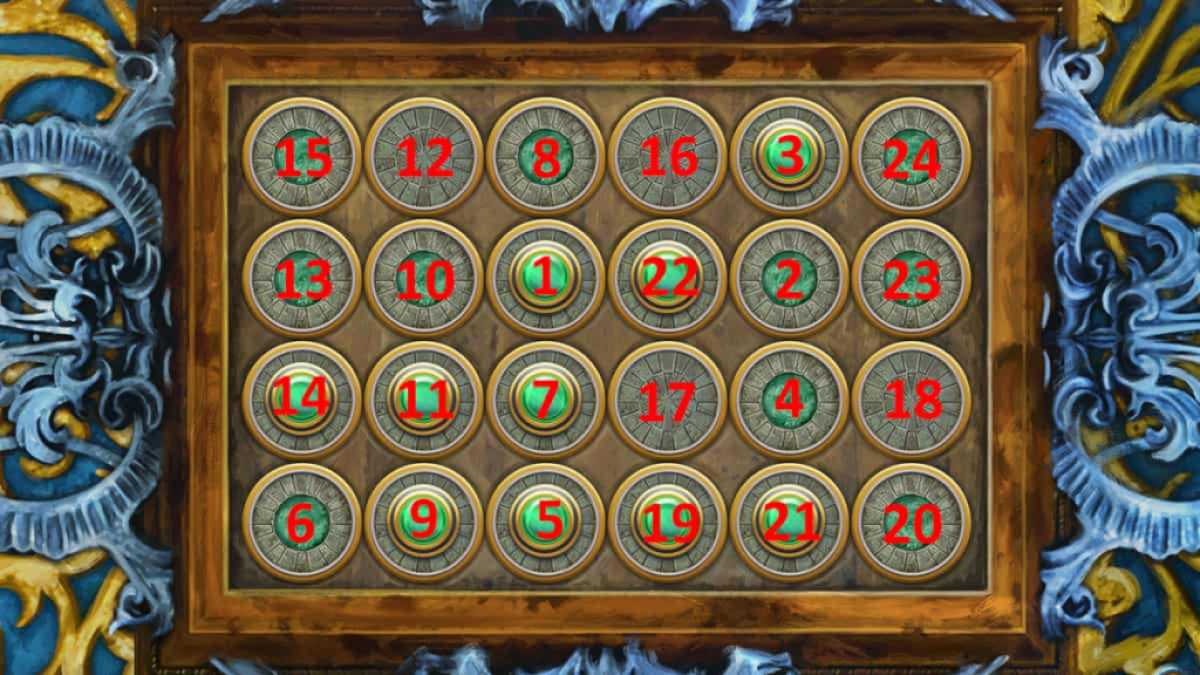
Image by Pro Game Guides
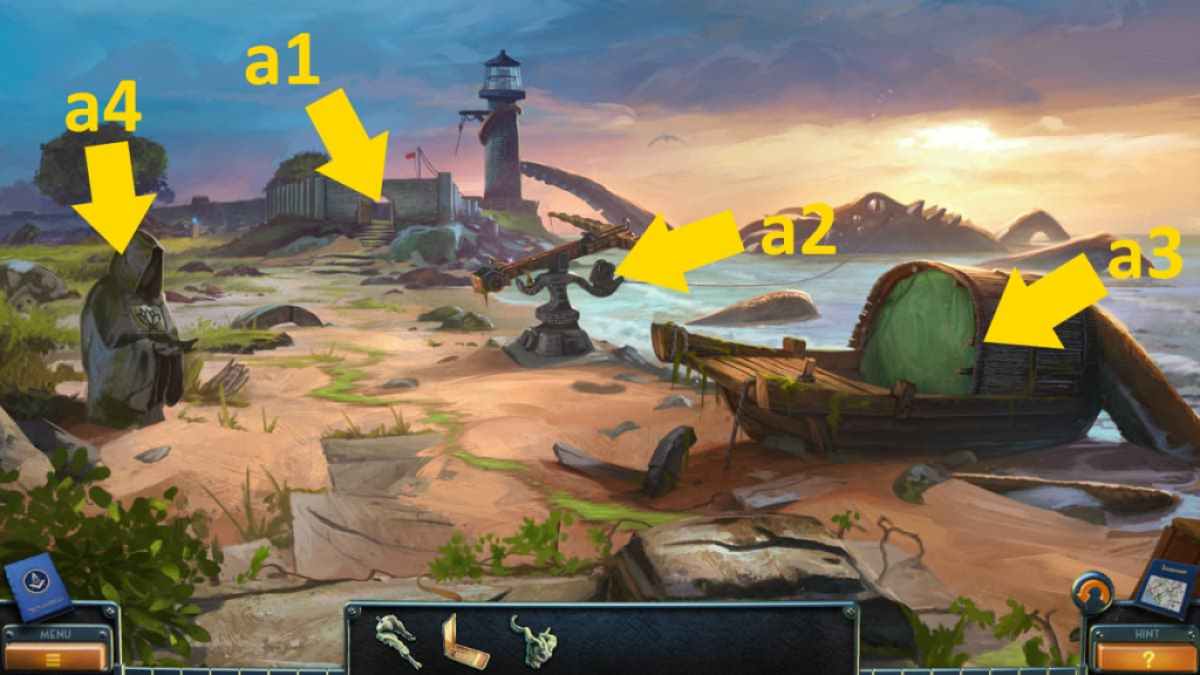
Image by Pro Game Guides
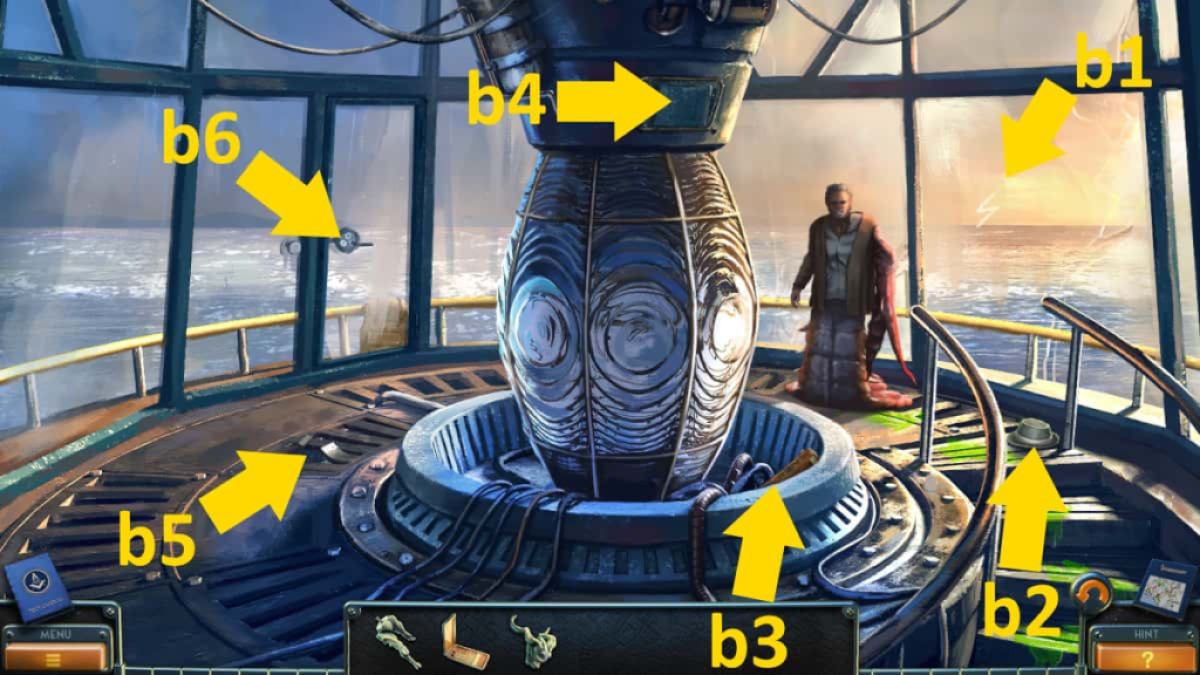
Image by Pro Game Guides
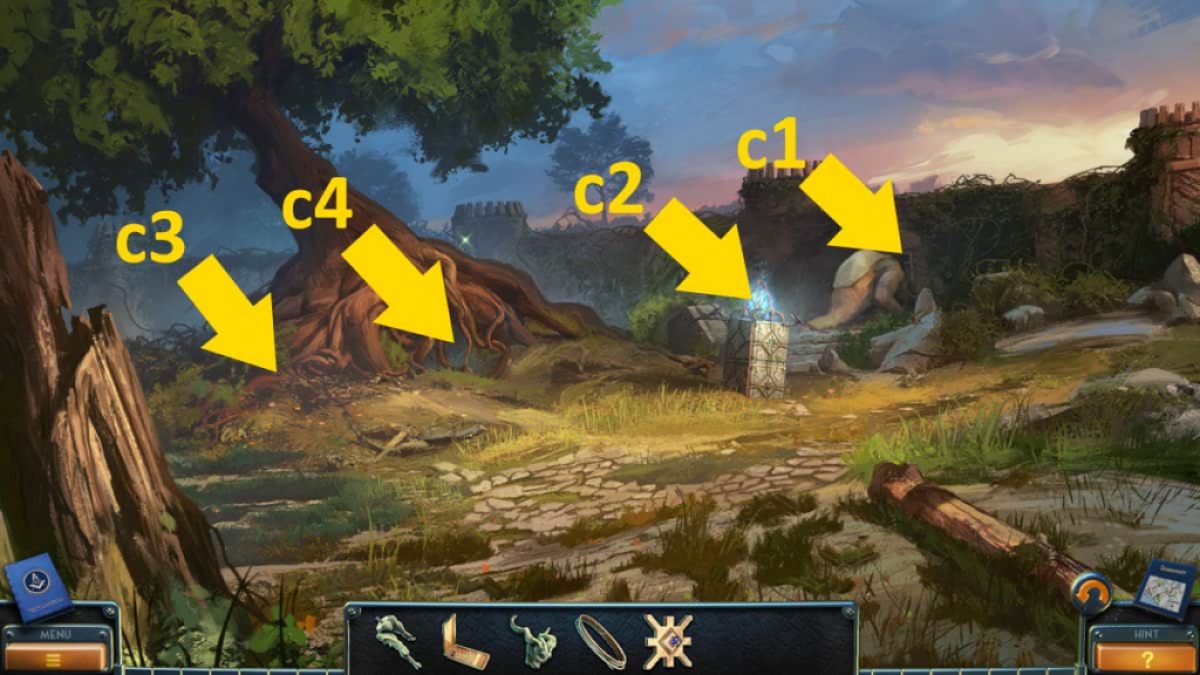
Image by Pro Game Guides
Screenshot by Pro Game Guides
Screenshot by Pro Game Guides

Image by Pro Game Guides
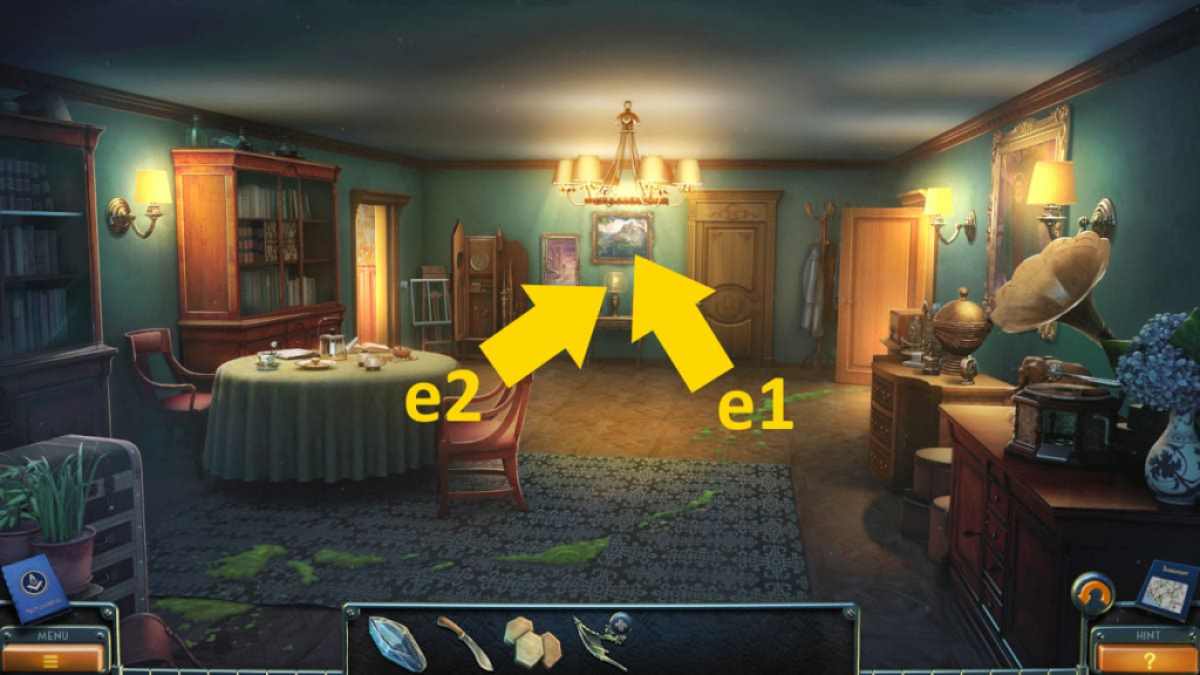
Image by Pro Game Guides
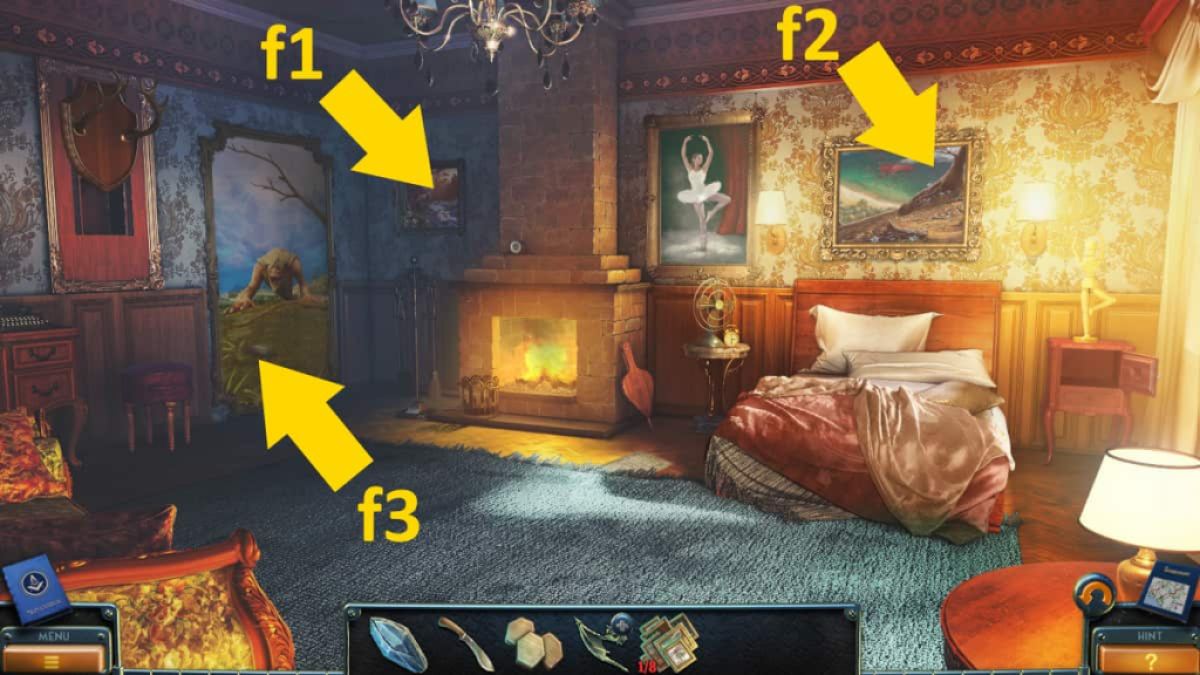
Image by Pro Game Guides
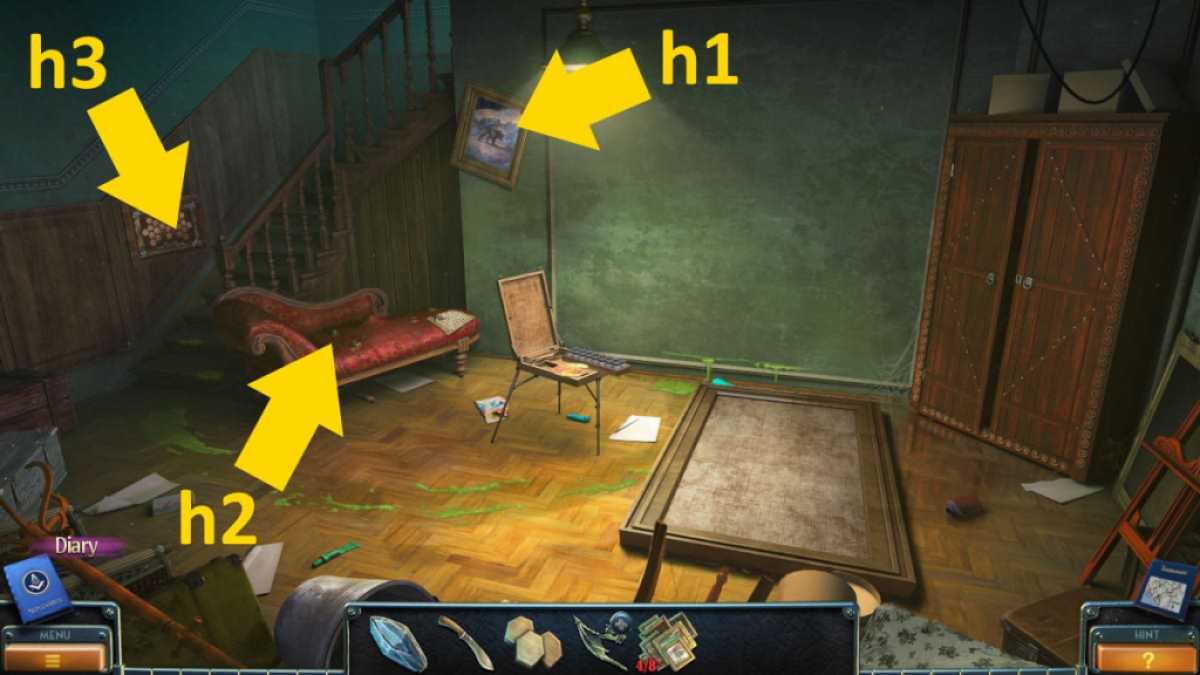
Image by Pro Game Guides
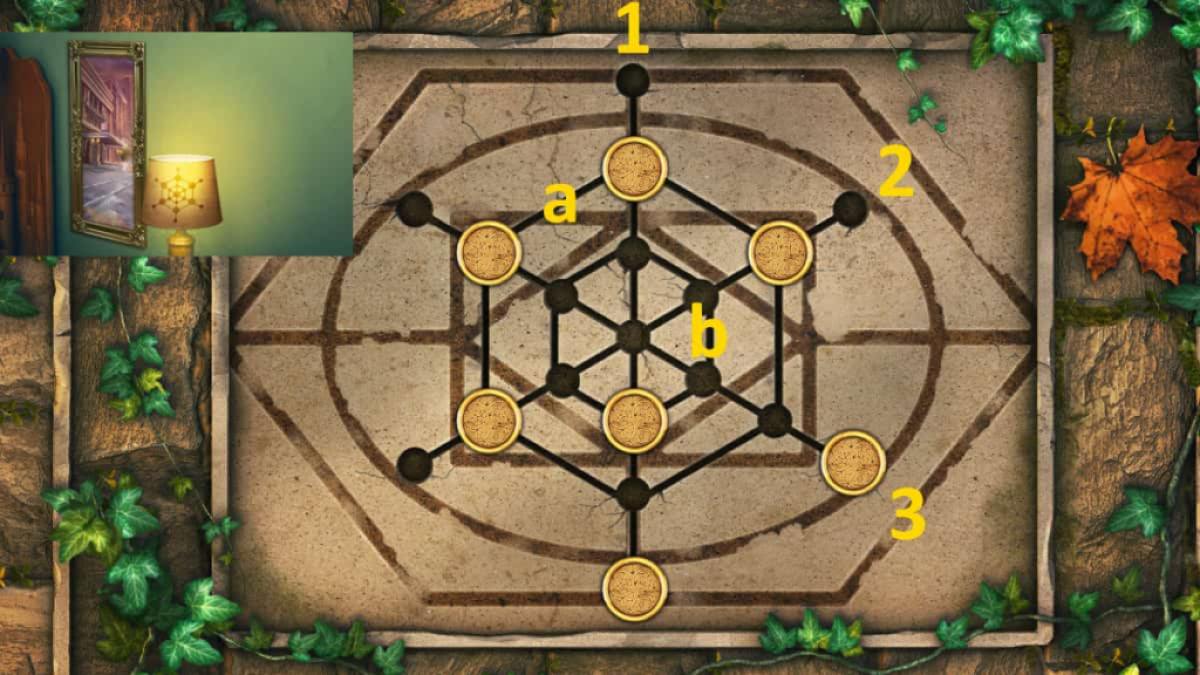
Image by Pro Game Guides
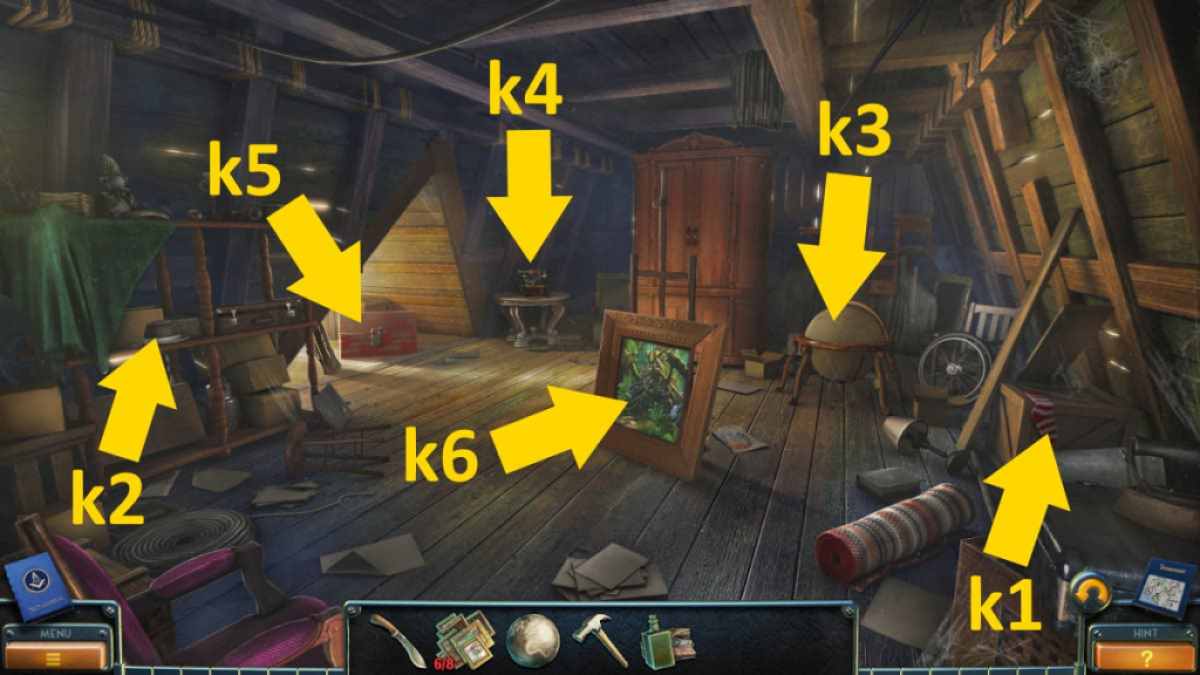
Image by Pro Game Guides
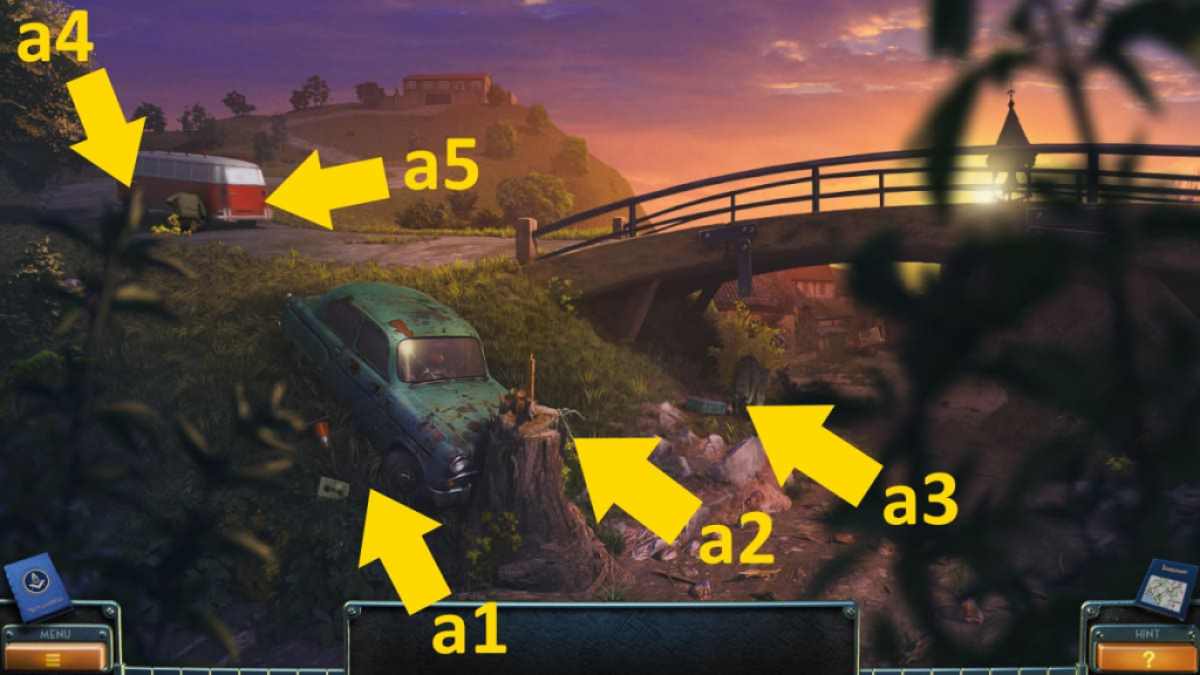
Image by Pro Game Guides
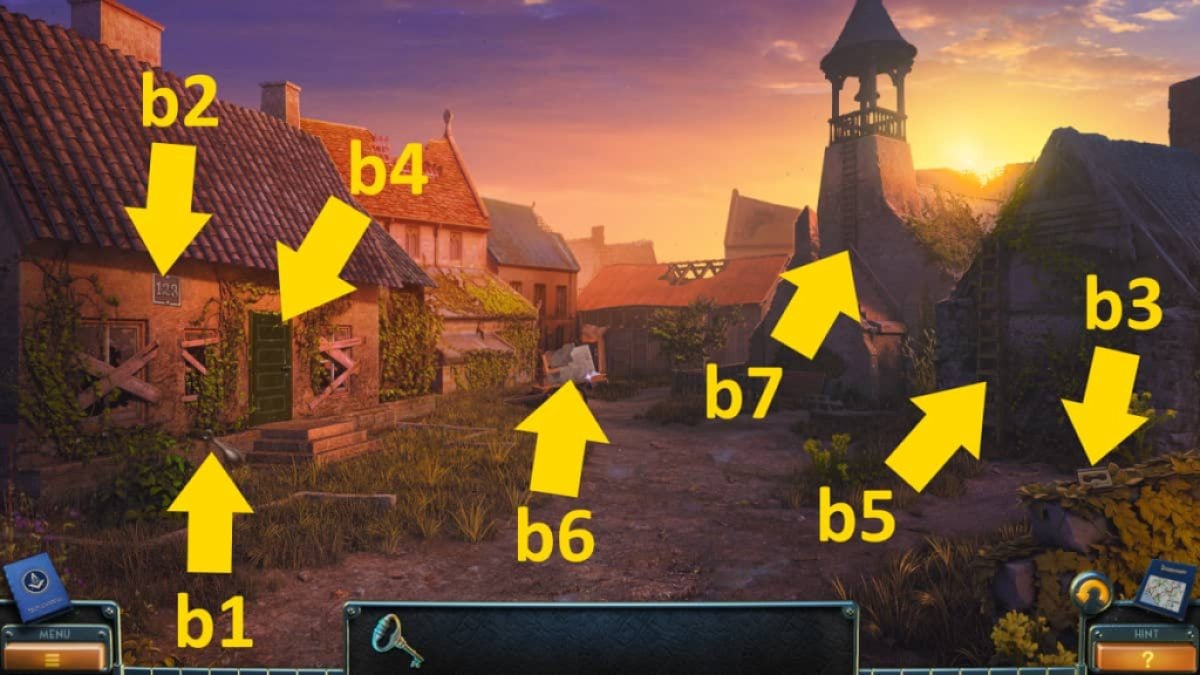
Image by Pro Game Guides
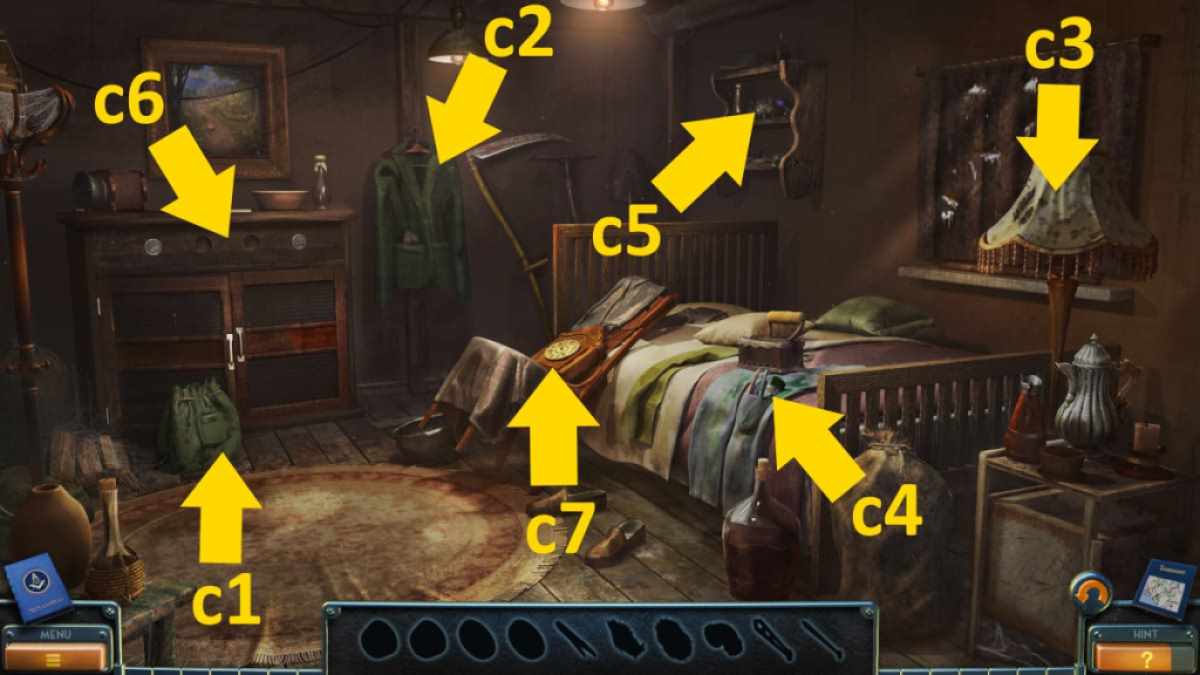
Image by Pro Game Guides
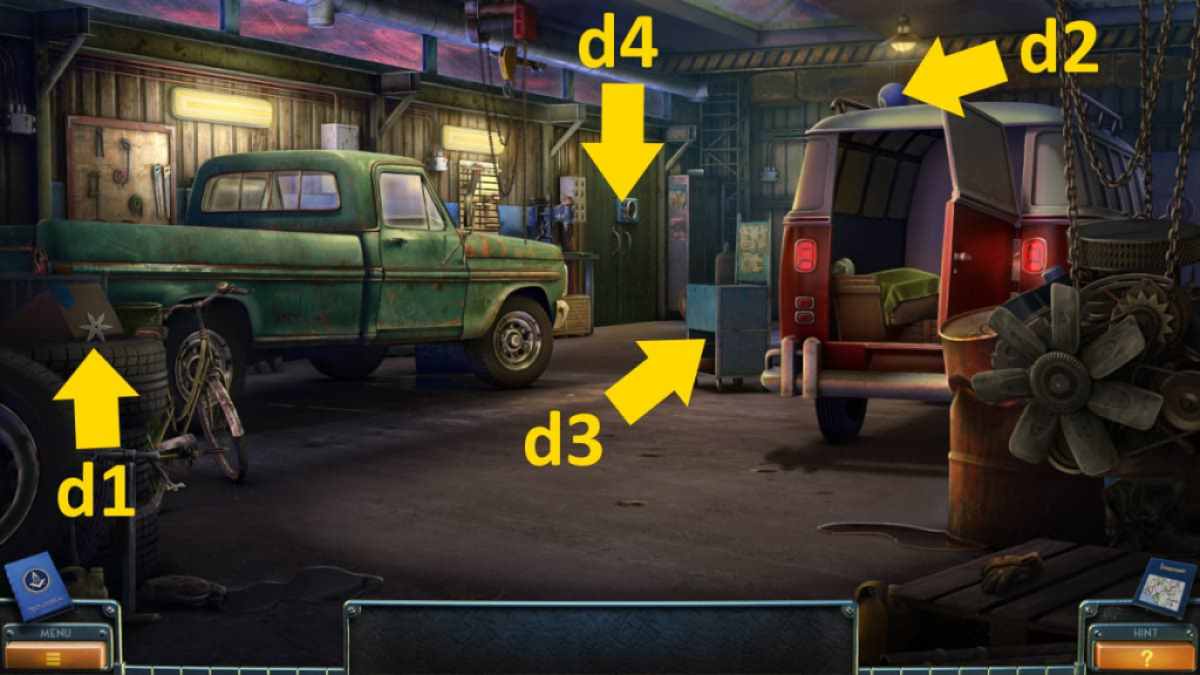
Image by Pro Game Guides
Screenshot by Pro Game Guides
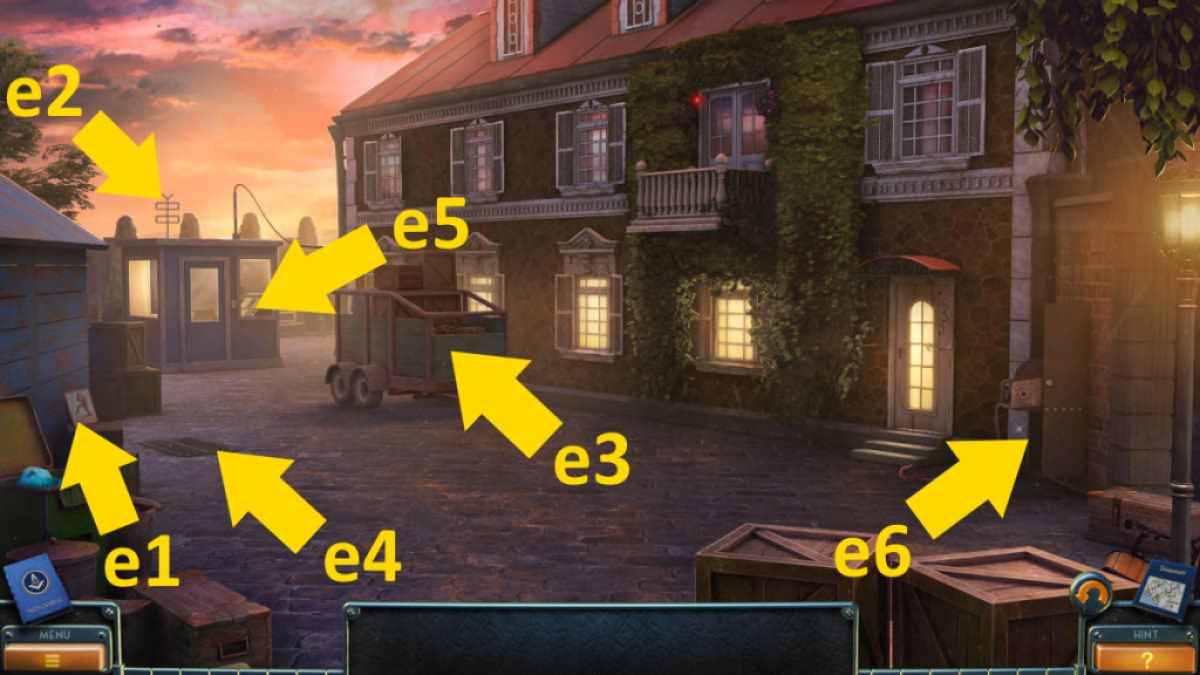
Image by Pro Game Guides
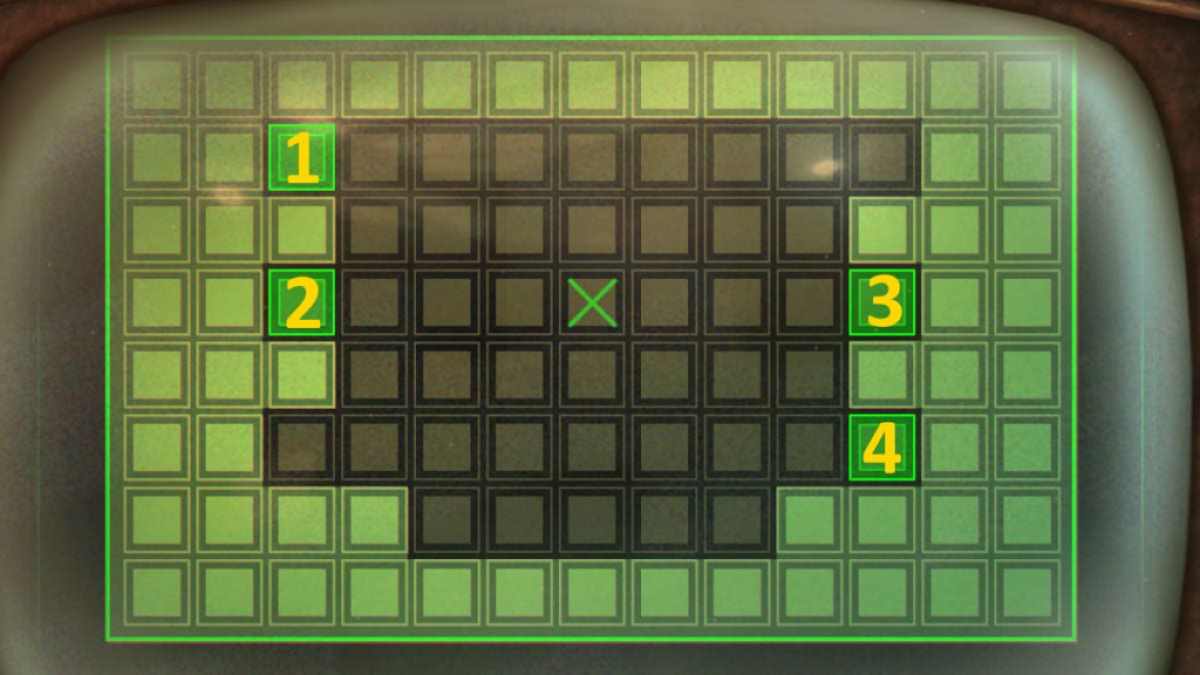
Image by Pro Game Guides
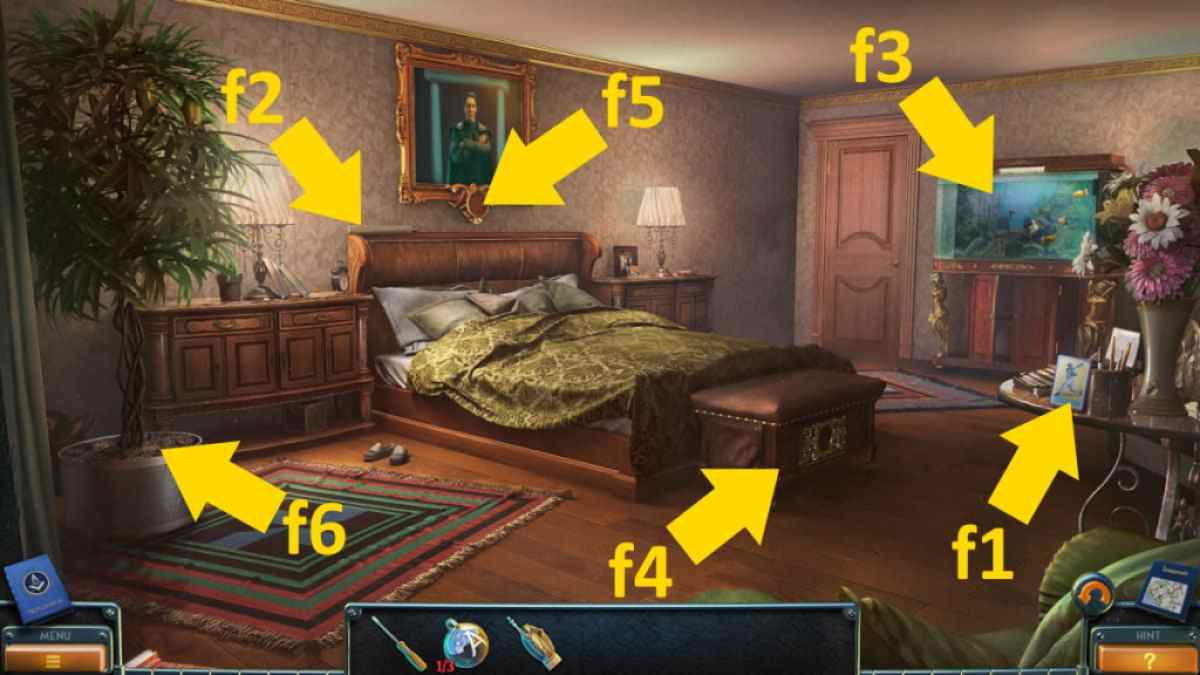
Image by Pro Game Guides
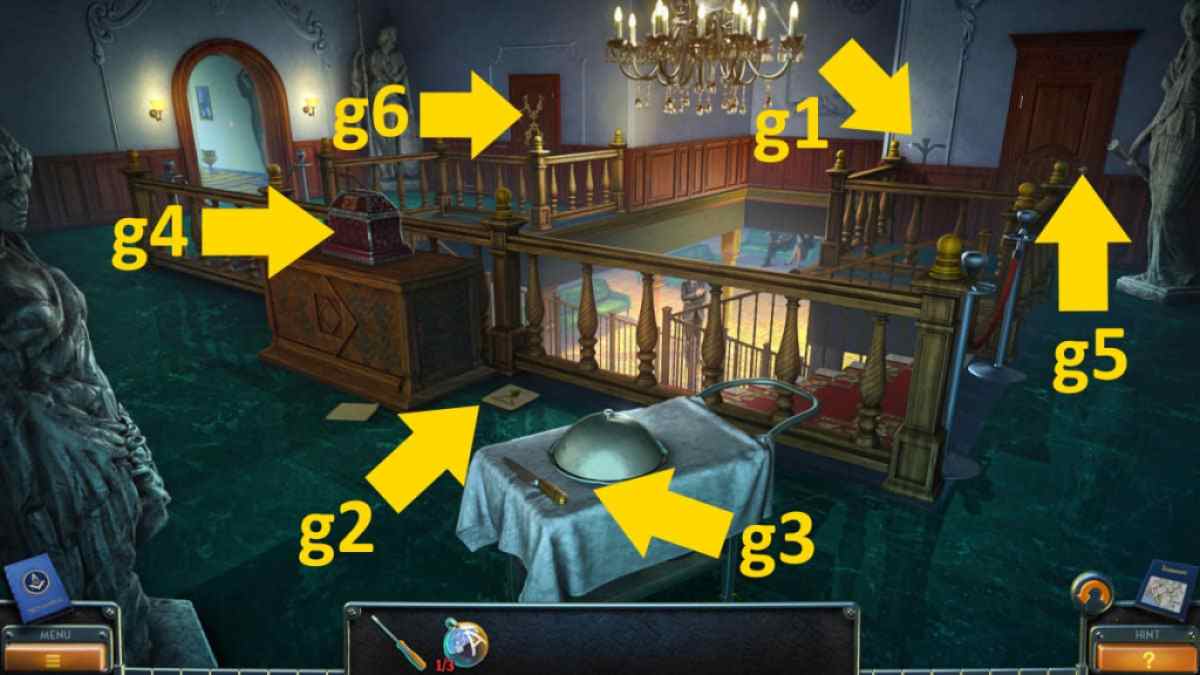
Image by Pro Game Guides
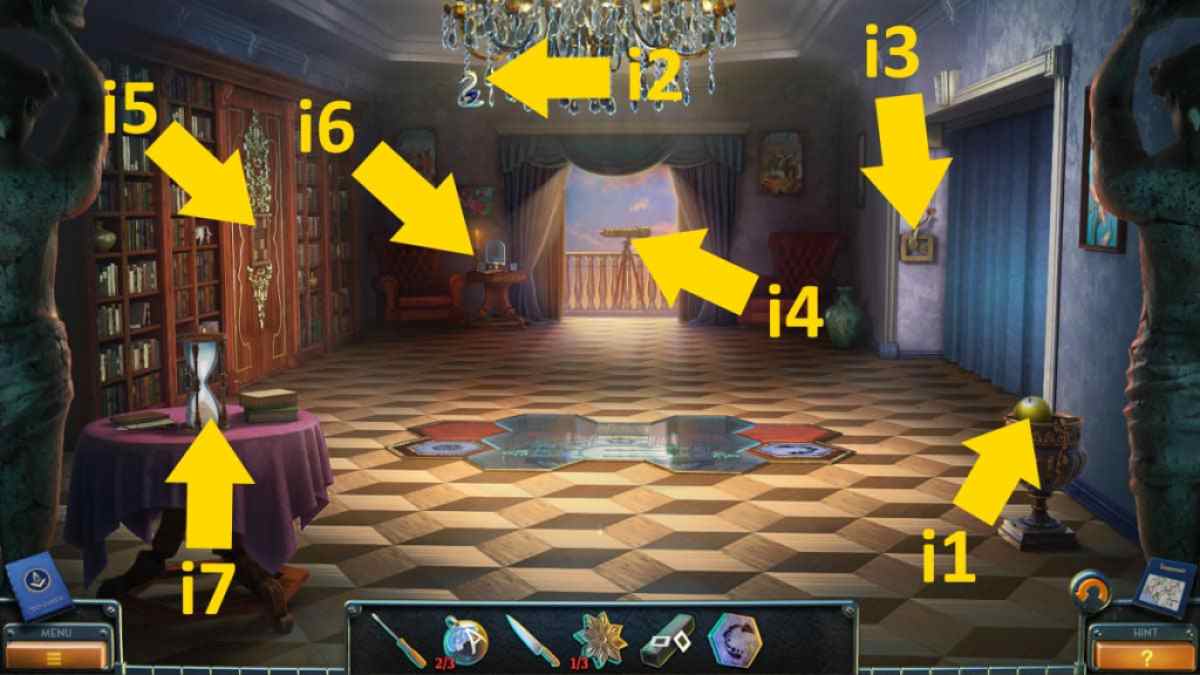
Image by Pro Game Guides

Screenshot by Pro Game Guides
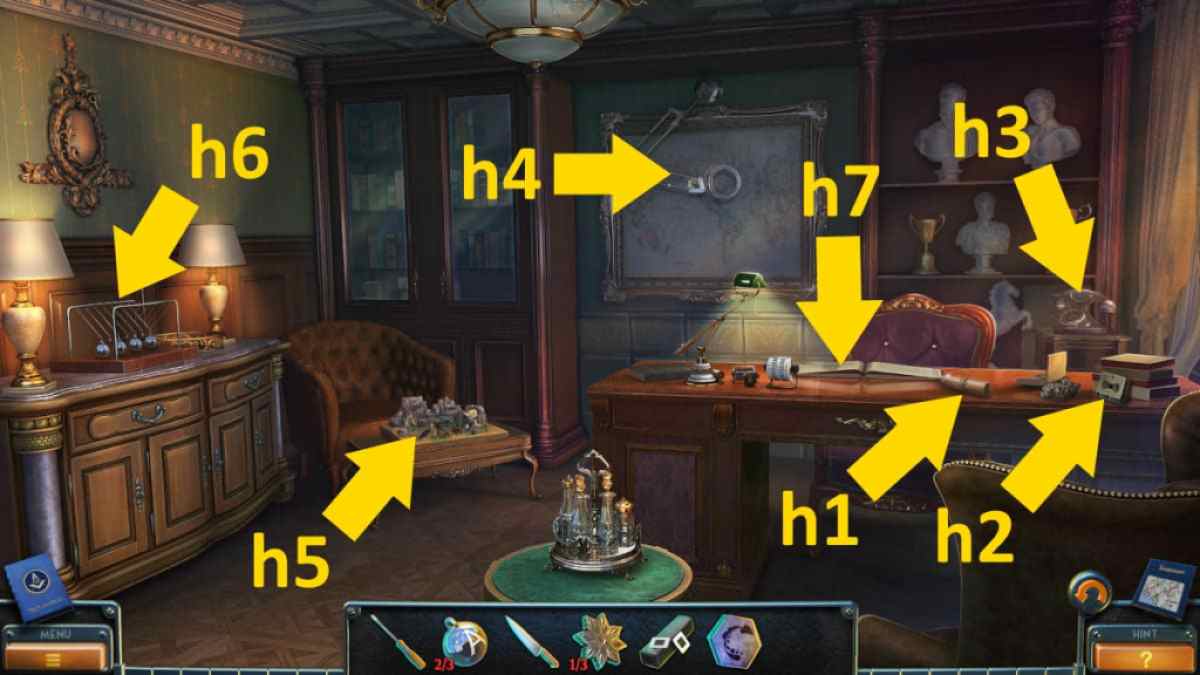
Image by Pro Game Guides
Screenshot by Pro Game Guides
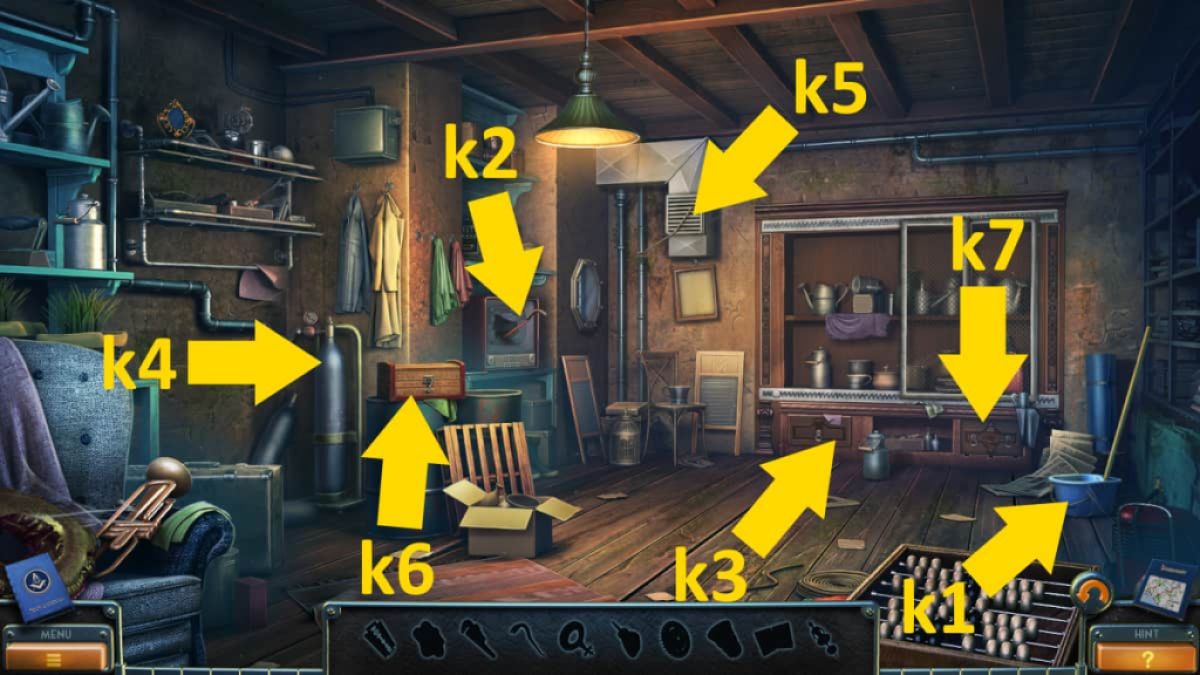
Image by Pro Game Guides
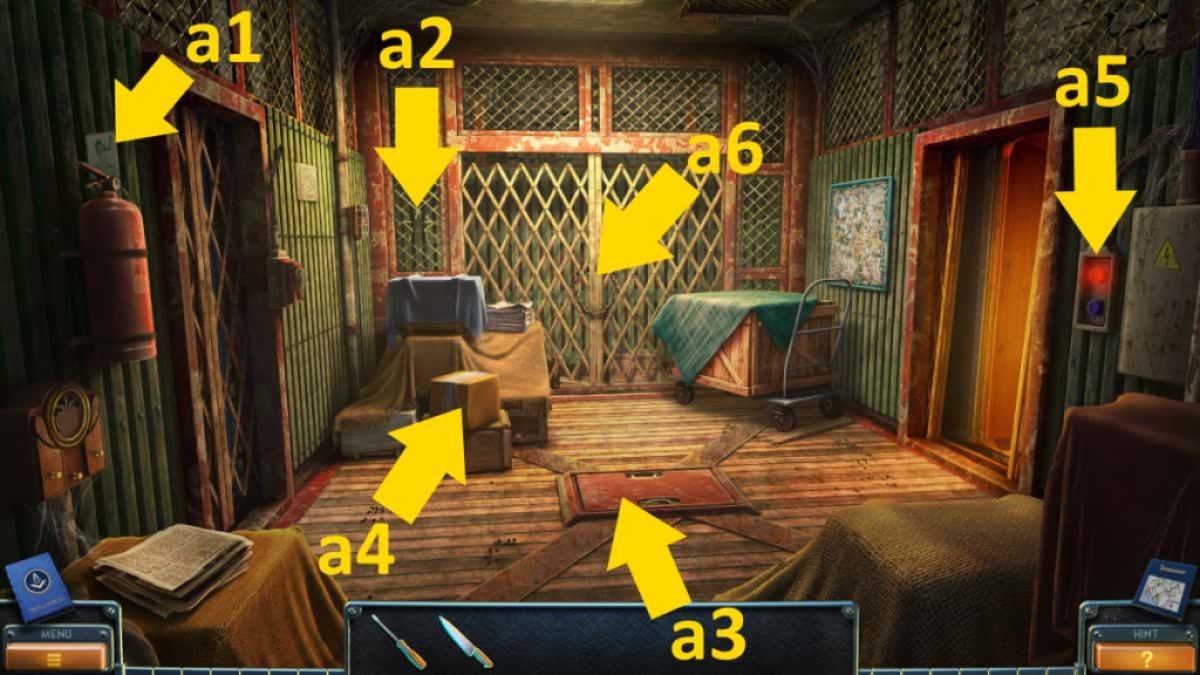
Image by Pro Game Guides

Image by Pro Game Guides
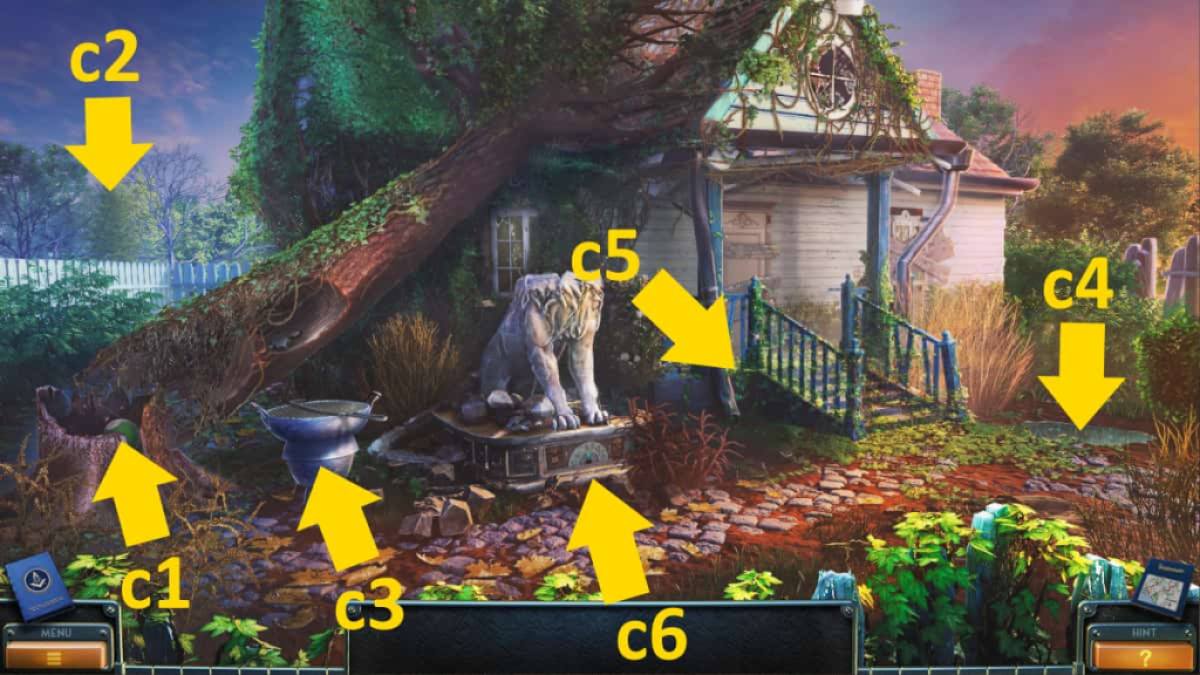
Image by Pro Game Guides
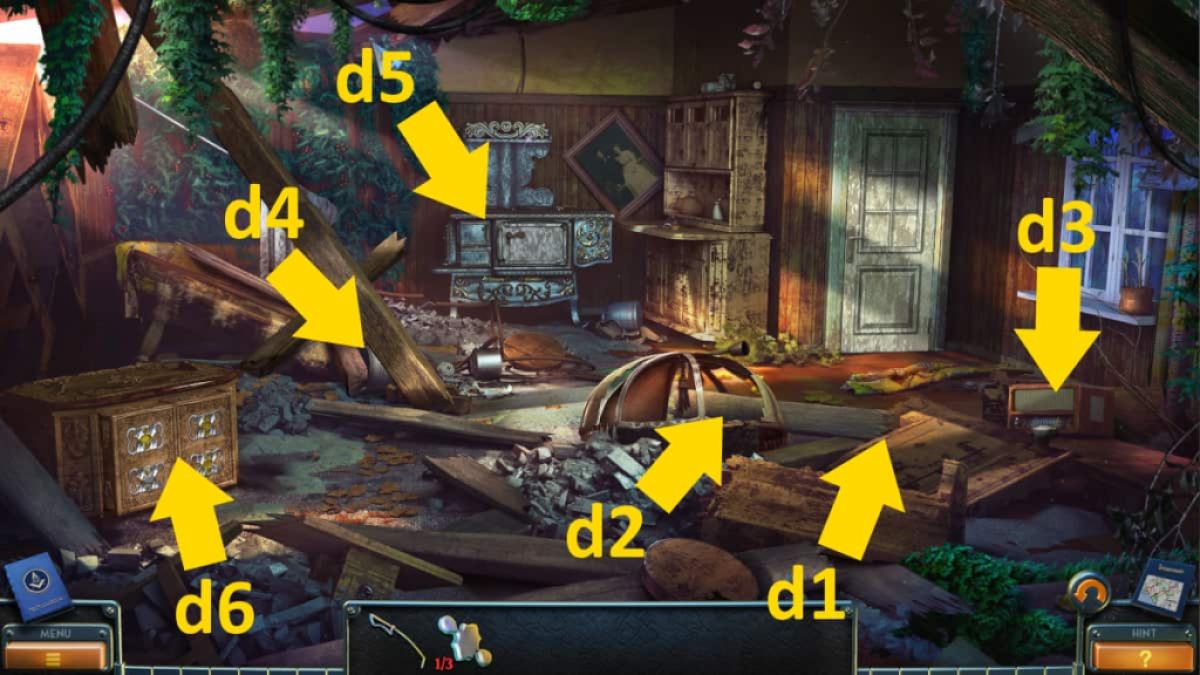
Image by Pro Game Guides

Image by Pro Game Guides
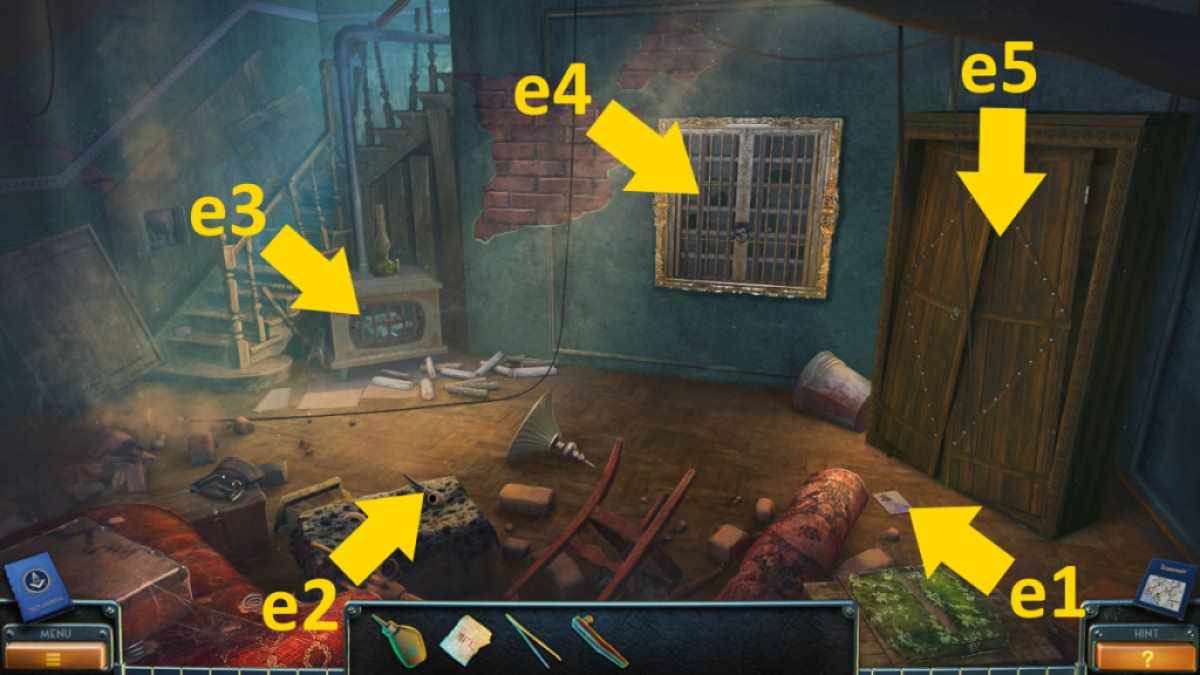
Image by Pro Game Guides
Screenshot by Pro Game Guides
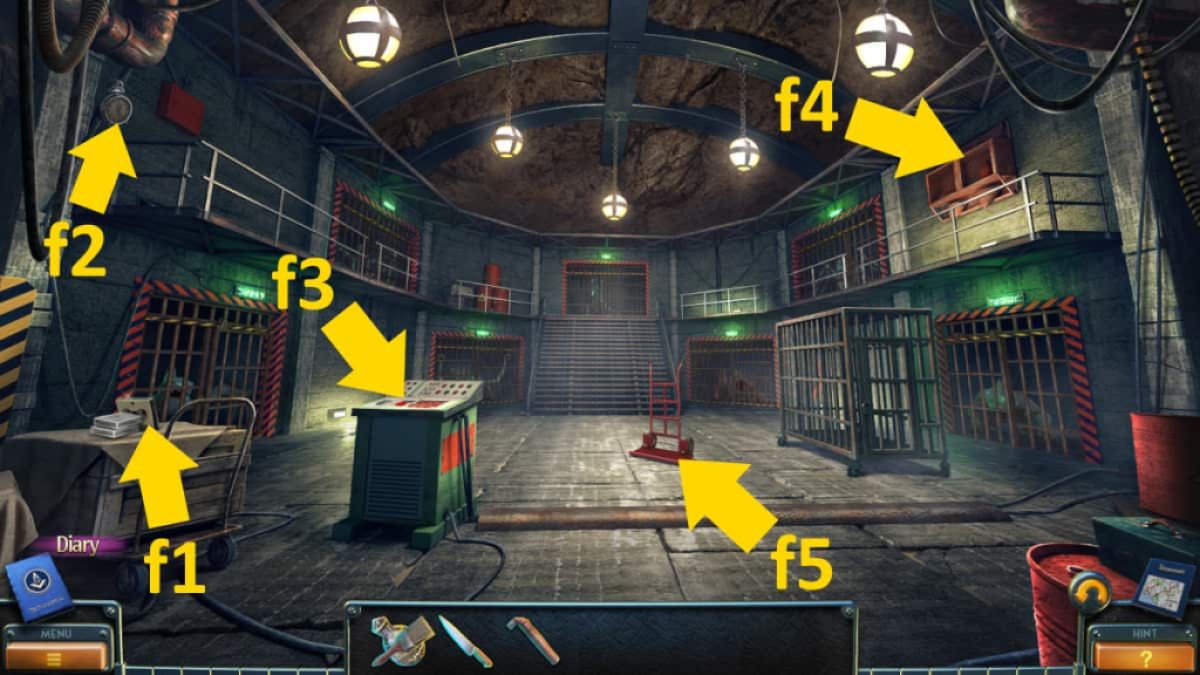
Image by Pro Game Guides
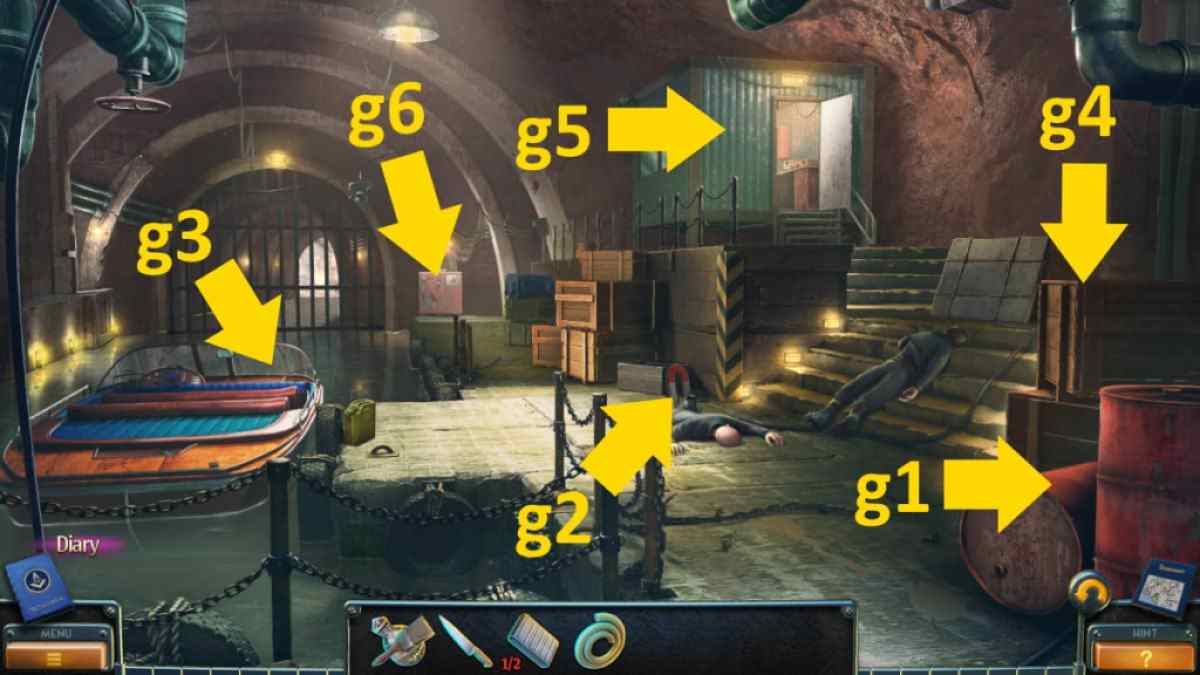
Image by Pro Game Guides
