Laura ’s back at it again in the New York Mysteries 3 walkthrough .
TheNew York Mysteries seriesof percentage point - and - click puzzle adventures is a well - prove favorite . If you ’re working through the third installment , The Lantern of Souls , understand on for a full walkthrough covering all the hidden aim and puzzles .
New York Mysteries 3 The Lantern of Souls Full Walkthrough
You act Laura James , a professional diary keeper who investigates supernatural secret as part of the White Stone Order . A rich lawyer , Thomas Martell , has died . His widow woman then drop dead in a brutal murder the mean solar day after , prompting you to be slay to investigate .
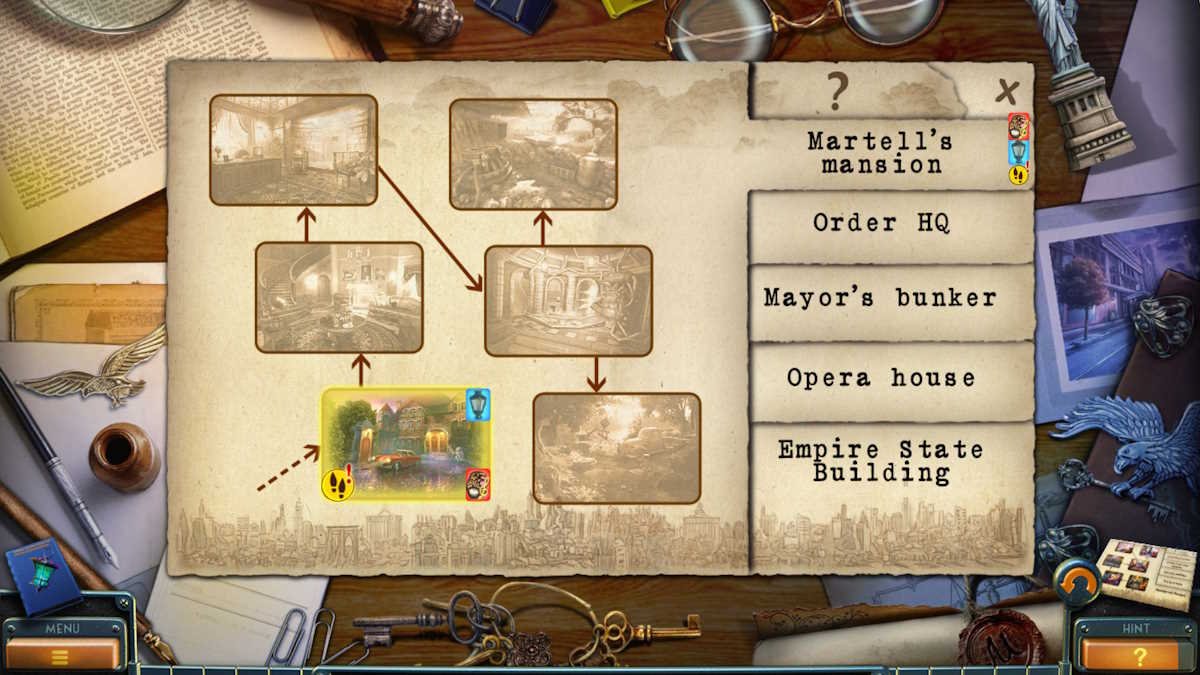
If you ’re new to the series , you’re able to get through themap at the bottom rightof the concealment to show a inclination of all the plot ’s locations ( see above ) . This is super utilitarian as it works as afast travelmechanism , allowing you to get through a location and instantly move there .
In addition , you ’ll find yourdiary at the bottom leftof the screen . This is useful for checking all the selective information you ’ve learn about the case . This can be skilful for hints on what to do next and images that potentially helpsolve puzzles .

Chapter 1: The Martell’s Mansion
After the tutorial , you ’ll receive yourself at theMansion Entrance . Take theCollectiblefrom next to the guard tower ( a1 ) and theMorphing Objectnext to the front room access ( a2 ) . Click the car door ( a3 ) to unfold it and again for a close - up of the interior of the car .
Take theNewspaperandBagfrom the seat , and then start the bag in your inventory . Take out thePowderandPress Pass , show the straits to the sentry go ( a4 ) , and he ’ll give you theMansion Key . Get a closing curtain - up of the front room access ( a5 ) , use the key on the lock , then click the door handle to head in spite of appearance .
TheMorphing Objectis on the mantelpiece ( b1 ) and theCollectibleis on the table in the background ( b2 ) . Examine the plant at the bottom of the steps ( b3 ) to find aTie Pin , and tidy up it out in your inventory . pick out the mesa ( b4 ) and take theBucket of Iceand aFork , noting a headstone is needed to open a mysterious cache you regain under the bucketful .
Screenshot by Pro Game Guides
utilise the pail of glass to put out the fire ( b5 ) and take theMedallion . Move the cushions on the sofa ( b6 ) to take aNeedleand aCardfrom the knitting . Slide the newspaper publisher under the doorway ( at b2 ) , employ the needle on its handle to push the Francis Scott Key through , then come home the newspaper publisher once more to retrieve theKey . Now you could use the key in the room access to move through to the Study .
Take theMorphing Objectfrom the trading floor by the desk ( c1 ) , theCollectiblefrom the side of the desk ( c2 ) , then take theZipper , Thomas ’s Diary , and theGavelfrom the top of the desk ( c3 ) . add up the medallion to the journal in your armory to open it , and tick the page that opens to remove theHint .
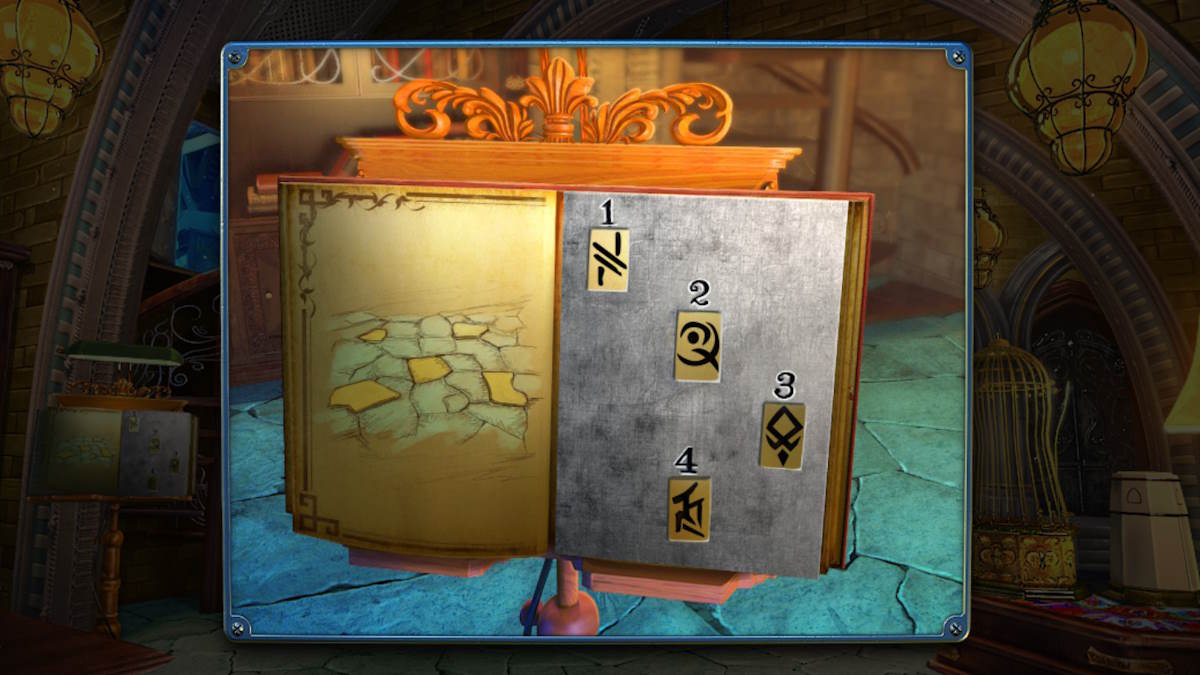
Select the globe ( c4 ) for a closing - up , come home it to unwrap a compartment , and constrict that to begin a puzzle . summate the hint you got from the diary , then click the numbered buttons ( marked below ) so that you turn the hand to tag the symbol in the correct succession . flick the numbers in the undermentioned order :
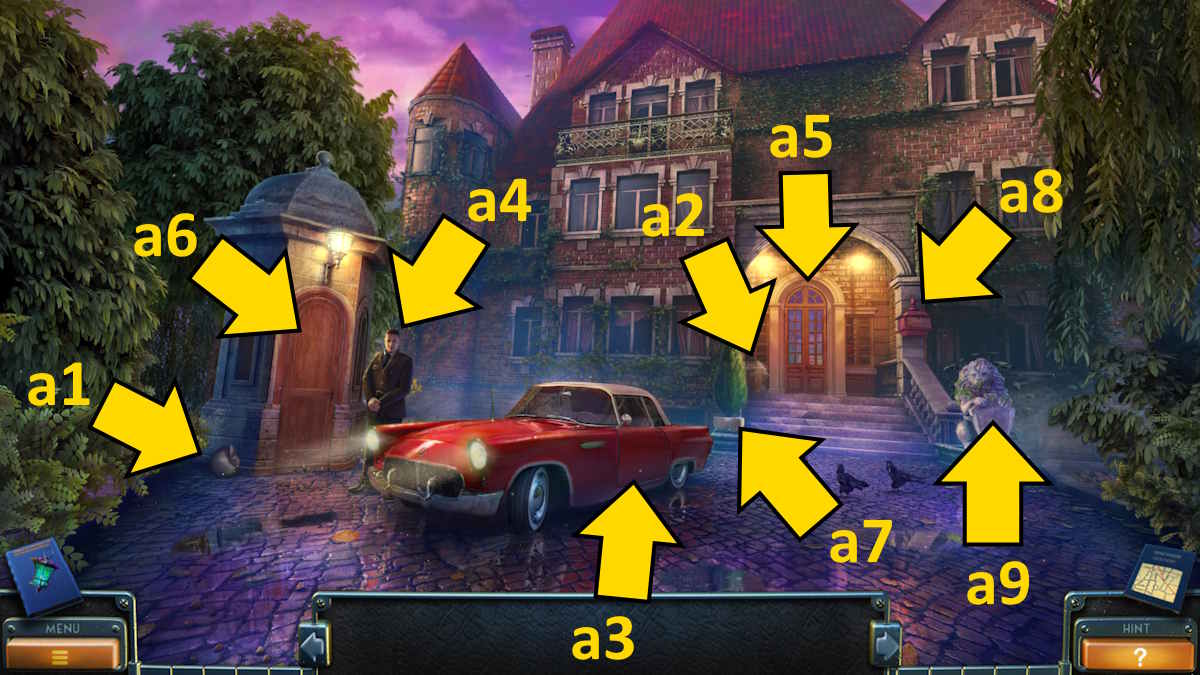
Image by Pro Game Guides
The globe will open , allowing you to take theBottle . utilise the gavel on the bottle in your stock list to smash it to get aSheet of Paperwith a candle on it . Use the piece of report on the candle ( c5 ) to reveal that there ’s a mystical cache outside in the garden . Also , take theBroken Staplerfrom the box on the chairperson ( c6 ) .
Move back to the living elbow room and use the zipper on the suitcase on the couch ( b6 ) to open it and take theGlue , anUmbrella(extend it in your stocktaking by clicking it ) , and aKey . Now go alfresco and utilize the key you just found to unlock the guard post ( a6 ) . clack the door again for a finish - up and take theShovelandFlashlight . apply the shovel on the plant by the front doorway ( a7 ) and take theFire Symbol .
Return to the living room and use the fire symbolisation on theplaque above the fire(b5 ) to reveal a puzzler . You postulate to recover the shapes that together make up the 16 images that appear in the middle of the concealment ( X , above ) . If you ’re stuck on this one , the reply are :
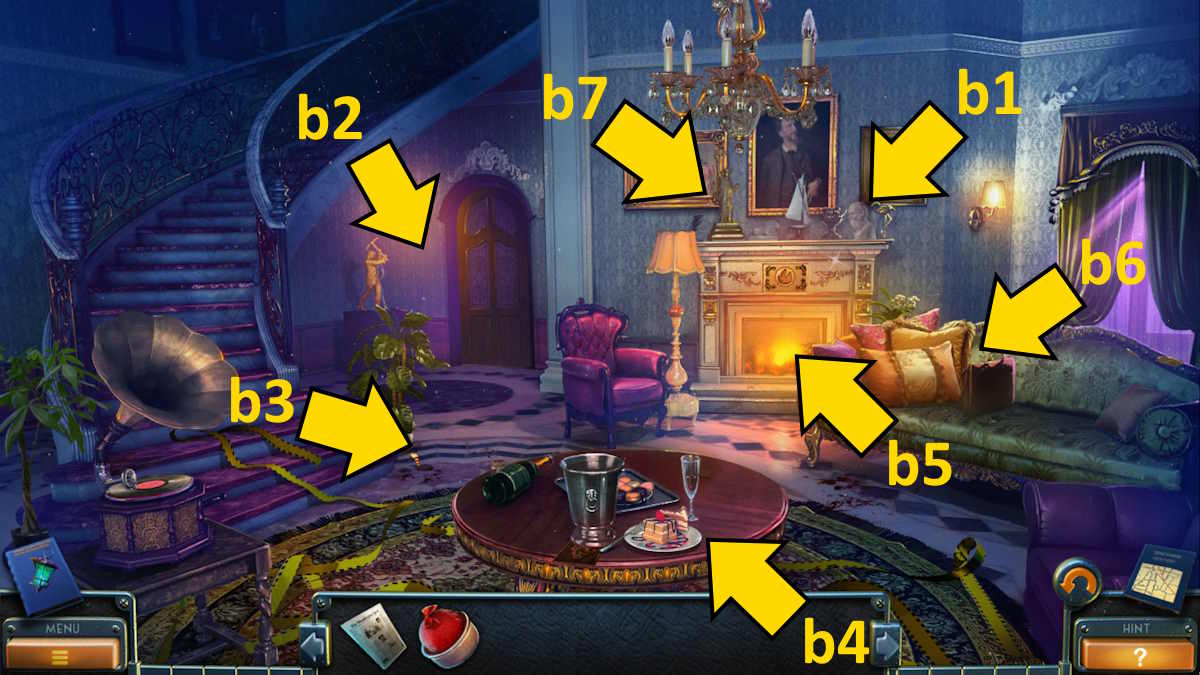
Image by Pro Game Guides
Once pure , take theFigurine Parts . pick out the figurine part in your stocktaking , add the gum , then patch the section back together to get theAngel Statue . Move to the discipline and place the angel statue in its place on the back wall ( c7 ) , opening up a hidden corridor . Use the flashlight to find thefusebox(above ) , and then chatter it to turn the lighter on in the corridor . You now have approach to thesecret passage .
You ’ll see theMorphing Objecton the ground ( d1 ) and theCollectibleon the machine ( d2 ) . expend the umbrella to pull down the lamp ( d3 ) , use the tiepin to unlatch it , and take theHandle . Select the machine jury ( d4 ) and expend the ramification to remove the screws .
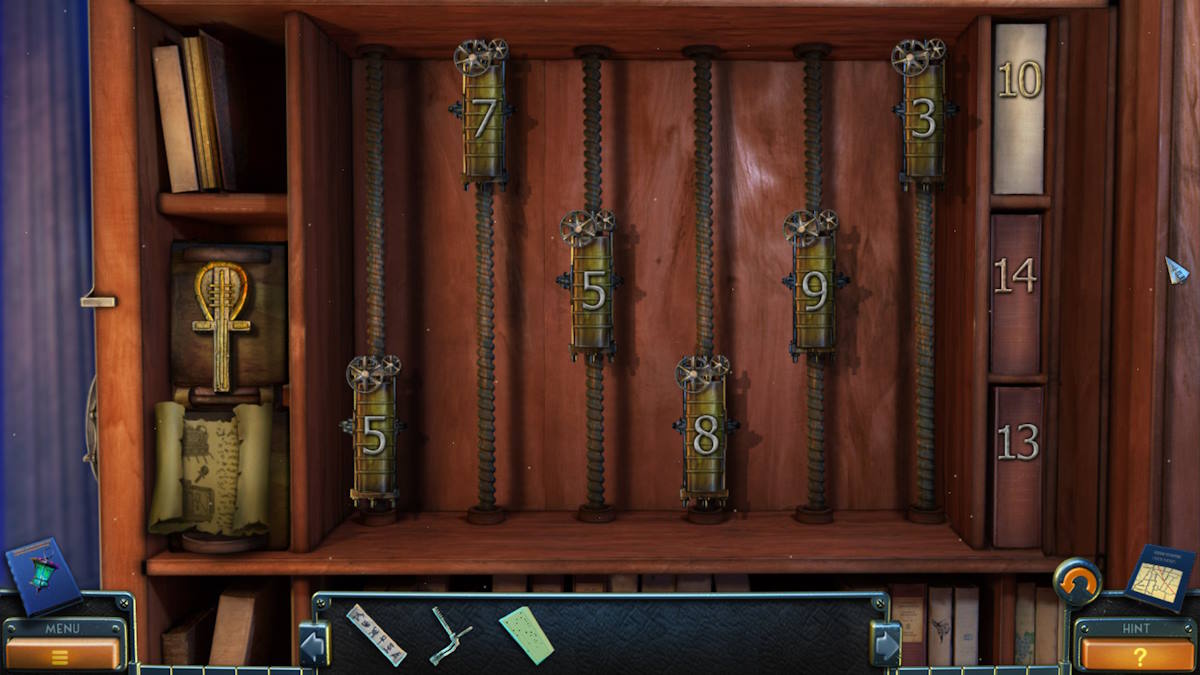
penetrate the panel again to hit the grate , take theMatches , and then add the grip to the chemical mechanism behind to begin a mystifier . You need to find match pairs of hold , which I ’ve marked with matching numbers above . Now move up the stairs ( d5 ) to theRock Ledge .
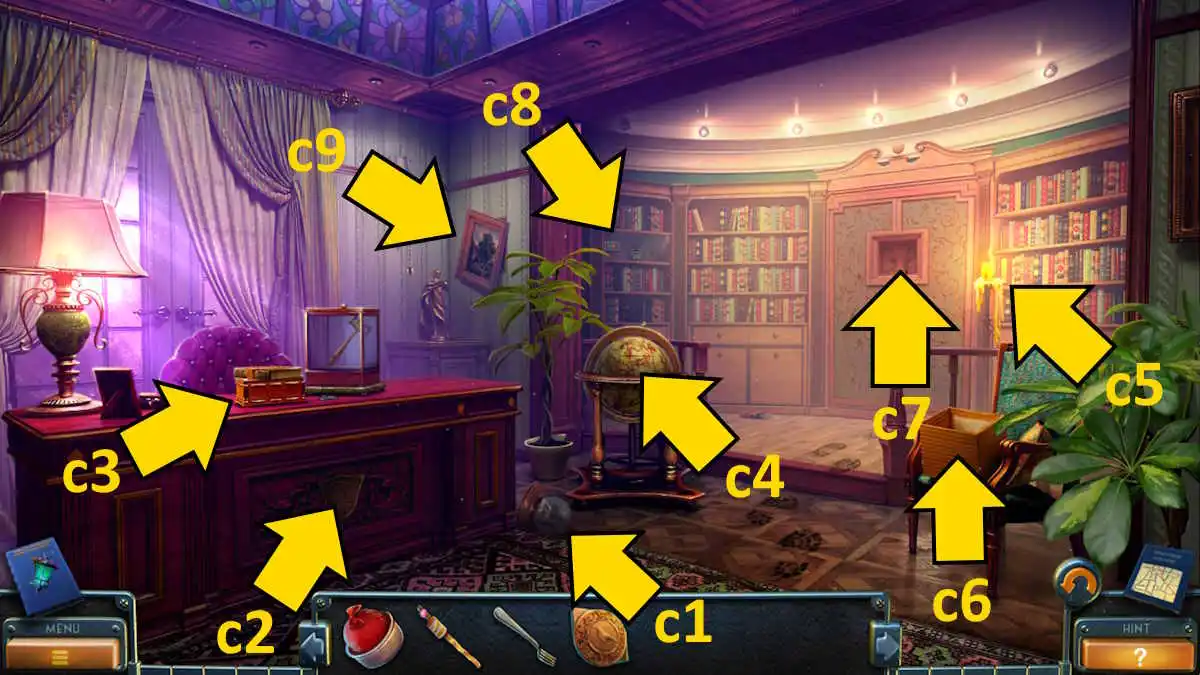
Image by Pro Game Guides
TheCollectibleis next to the crate ( e1 ) , while theMorphing Objectis on the machine ( e2 ) . Click the branch ( e3 ) to snap it , then click again to take theRopeand aTwig . pick out the chest ( e4 ) for a close - up , take theCandle , and then return to the secret passageway . practice the branchlet to empty the cobweb ( d6 ) and take theAxeandShovel . Place the candle below where you just took the shovel , use the matches to illumine it , and snap the bear to move it out of its cubby muddle ( d7 ) . Click the bear again to take theScissorsand aScales Symbol .
Go back to the ledge and use the ax to fail the crate ( e5 ) , taking theHammerandHookfrom indoors . Combine the rope and hook in your inventory to get aHook and Rope , which you’re able to attach to the concrete slab ( e6 ) . Come out of that close - up , and dawn the remainder of the rope on the trading floor , which will tie it to the machine ’s lid ( e7 ) . Use the shovel on the slab to pink it off the ledge , which removes the machine lid .
Return to the subject area and use the scissors on the note inside the box on the chairwoman ( c6 ) to find theMailbox Keyand a Hint ( see above , you ca n’t pick it up ) . Use the scale symbol on the box on the desk ( c3 ) and take theStamp RingandJewelry Magnifier .
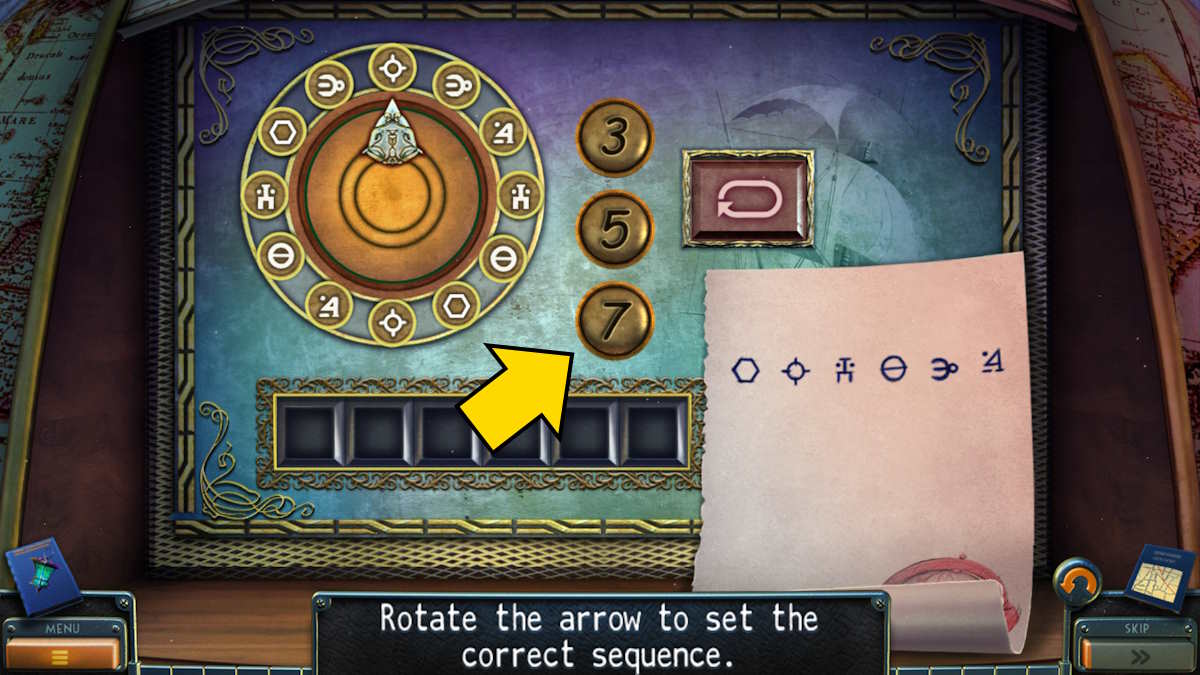
Image by Pro Game Guides
Head to the living way next , get a close - up of the Statue of Liberty on the mantle ( b7 ) , and click the arm to unfold a secret compartment . practice the images on the hint you just saw ( above ) in the discipline to open up it and take theCog . Also , use the scissor grip on the sewing corner ( b6 ) and take theMitten .
Now go out of doors to the mansion ingress and use the cay to open up the postbox ( a8 ) , taking theParcelfrom inside . Remove the paper from the portion in your inventory , and then use the stamp ring to launch the box . Take theEagle Figurinefrom inside .
Go inside to the secret passage and use the mitten to afford the burner on the auto ( d8 ) . Use the shovel to remove some coals , furtherreducing the imperativeness in the machine , and the spicy steam will stop flowing out of the damage pipe . you’re able to now go through the door ( d9 ) for a cutscene .
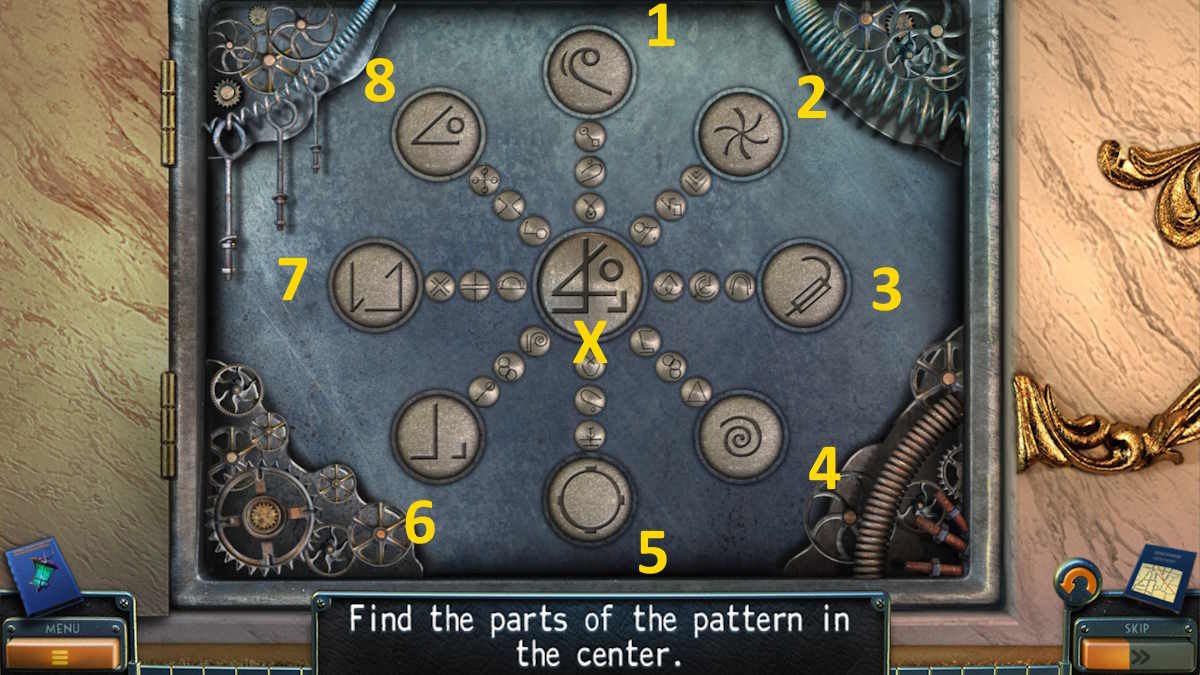
Image by Pro Game Guides
TheCollectibleis by the drainpipe ( f1 ) and theMorphing Objectis by the caducous door ( f2 ) . Take theCardfrom the drain ( f3 ) , remove the folio ( f4 ) to find aStickand aCog , and you’re able to then snap the Mexican valium ( f5 ) to impound it to the manhole natural covering ( f6 ) . expend the hammer to remove the boards from the door ( f6 ) , but that ’s all you could do here for now . It ’s prison term togo back to your car(a3 ) and report your finding to the order by clicking the paint in the ignition in the close - up .
Chapter 2: Order HQ
When you arrive in the hall , speak to Professor Bishop ( g1 ) to obtain that he ’s stuck in the Hall of Fame due to a rust-brown curl . He ’ll give you aCodeto help you get into the lab where you should be able to get hold some help to get him free .
TheCollectibleis high on the bulwark ( g2 ) and theMorphing Objectis on the left near the spiral stairs ( g3 ) . you could also take aCard , Gold Mouse , andGlass of Juicefrom the tabular array ( g4 ) , and theLetter Rfrom the lectern ( g5 ) . Now penetrate the door at the top of the stair ( g6 ) for a finis - up , add the codification , and type4513(then make enter ) into the keypad to go at heart to the science laboratory .
After talk to Will , you ’ll find out theCollectibleon the Scripture ( h1 ) and theMorphing Objectis on the bound of the table ( h2 ) . Remove the fabric on the table ( h3 ) , click the cage , and add the gold mouse to the mechanics on its lid to begin a puzzle . The solution is below if you ’re stick . Once arrant , take theRatfrom the John Milton Cage Jr. .
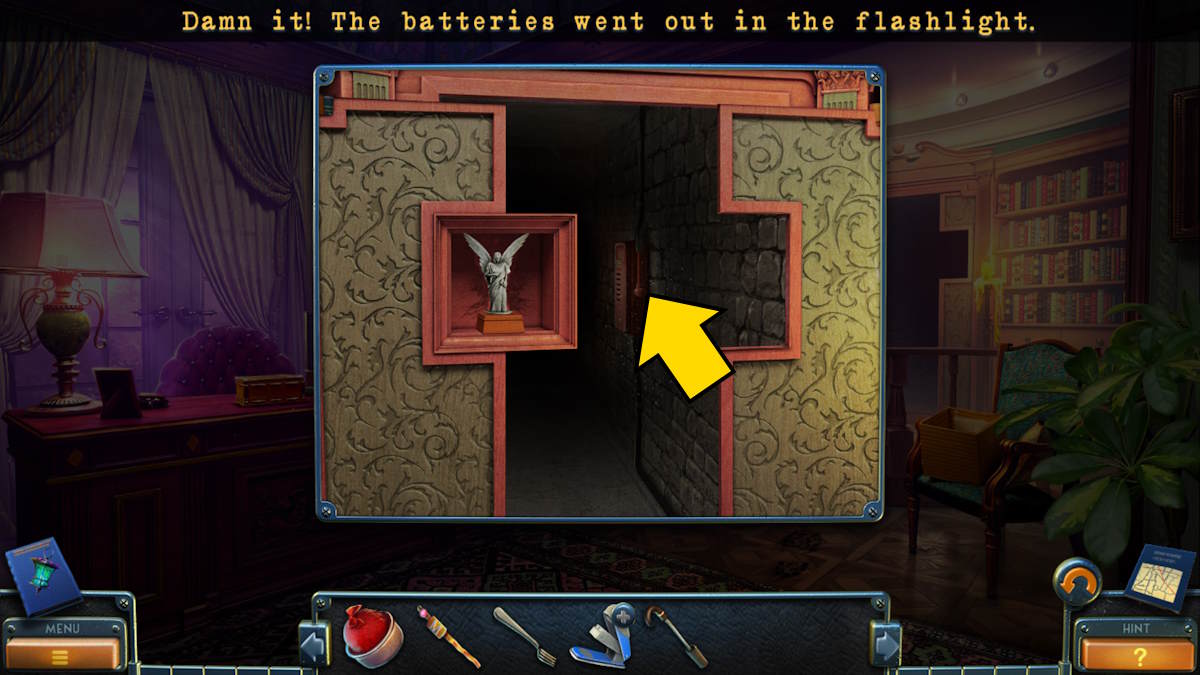
Image by Pro Game Guides
Take theAlkalifrom the cabinet ( h4 ) , and use the sink ( h5 ) to empty the Methedrine in your inventory . Afterward , use the rap with the glass to gain aGlass of Water . Select the door next ( h6 ) and put the rat into the door mechanism to open it and begin a missing objects miniskirt - biz . Once complete , take theCatalyst .
clack the bench ( h7 ) next , and lend the alkali , glass of pee , and accelerator to the mesa . To fill out the anti - rusty do the pursual :
riposte to the mansion , use the rusting remover on the door ( g1 ) , and guide into theHall of Fame . talk of the town to Bishop once more , then catch theCollectiblefrom above the fireplace ( i1 ) and theMorphing Objectfrom the wall ( i2 ) . Select the fireplace ( i3 ) and take theFireplace TongsandRag , then resist up the chairwoman ( i4 ) and get theLetter Jfrom the curtain rail ( i5 ) .
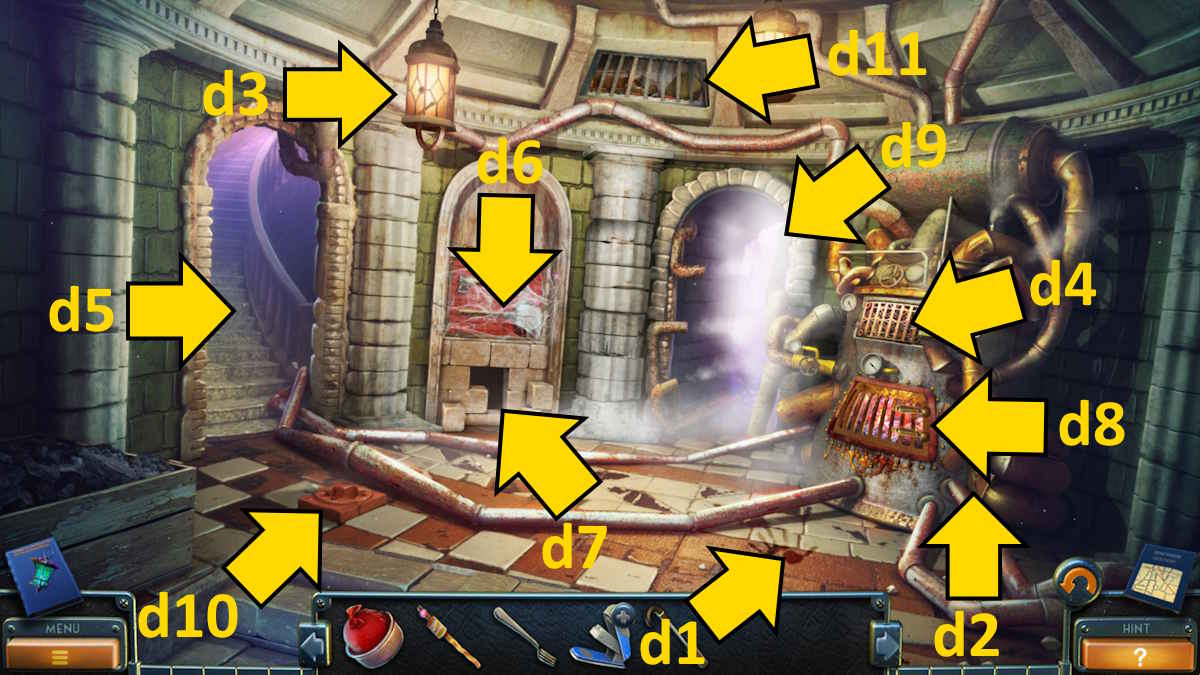
Image by Pro Game Guides
Select the picture ( i6 ) , add the missive J and R , and take theBunch of Lockpicksfrom behind the painting . take them in your stock-taking and clack the metal annulus to get aLockpickand aScrewdriver Handle . you’re able to now utilize the handgrip to get theForked Screwdriverfrom the back of the fireplace ( i3 ) . you could also add the eagle figurine to the eagle statue ( i7 ) before lead back into the lab .
Use the forked screwdriver on the wall cabinet ( h8 ) to get theEngine Chartand aVacuum Diode . total the junction rectifier to the simple machine on the table next to the rat cage ( h2 ) , which opens , allowing you to take theTap Handle . Now , utilise the hearth tongs to blame up theDirty Funnelfrom the bowl of alkali ( h4 ) , and wash it in the sink ( h5 ) to receive aFunnel . Add the funnel to the reddened gas can ( h8 ) , impart and habituate the tap on the barrelful there , and take theJerry - can .
apply the lockpick on the draftsman in the guard ’s hut ( a6 ) to get theRemote Control . Move into the study and use the remote ascendency to spread the bookcase ( c8 ) , take on theCardandShape Keyfrom inside . riposte to the rock shelf and practice the rag on the oil color barrel ( e4 ) to get anOily Rag , before moving on to the cliff . Use the oily rag on the barbecue ( f7 ) and open it up to get someWooden Tongs .
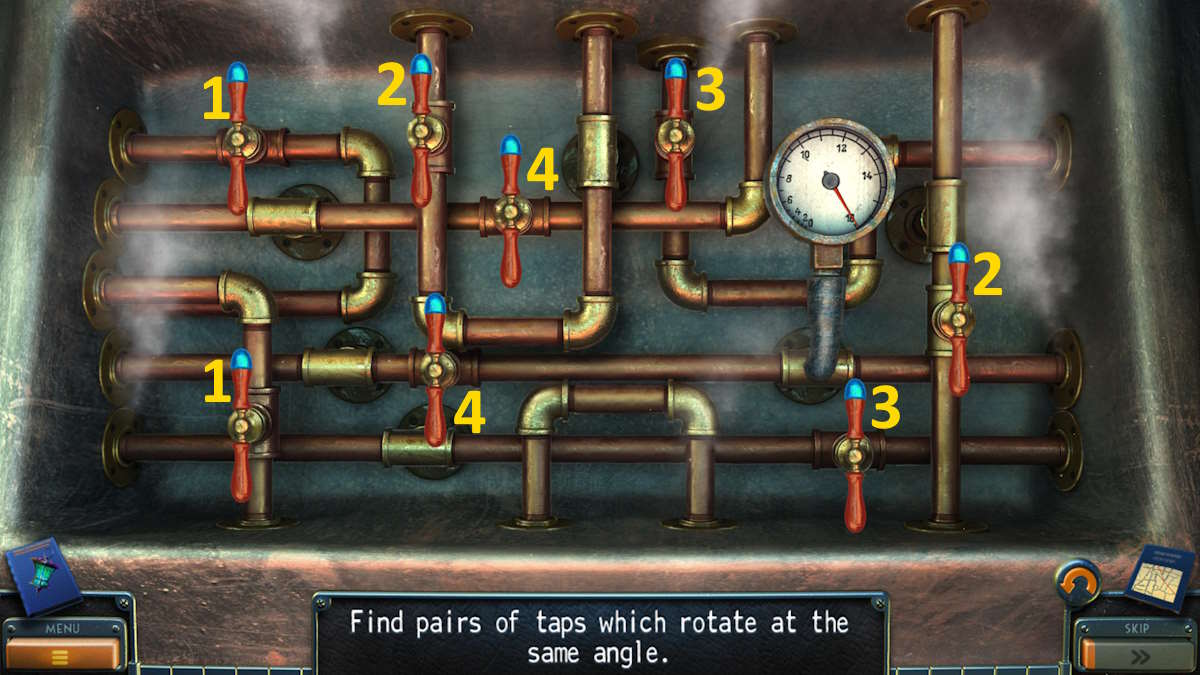
Image by Pro Game Guides
Go to the stone shelf again and use the tongs to get the last sprocket you need ( it ’s stuck in the rampart , pictured above , by the tool chest ( e8 ) . append the two cogs on the floor to the corner , plus the ones in your inventory . The box will open and you’re able to take theKeyand aCard .
Back at the cliff , use the key to gain entry to the shed ( f6 ) and start up another missing object miniskirt - secret plan . Once complete , you ’ll receive theValve . Add the valve to the hydrant ( f3 ) and fly the coop the H2O , which allows you to take theCar Keyfrom the grating here .
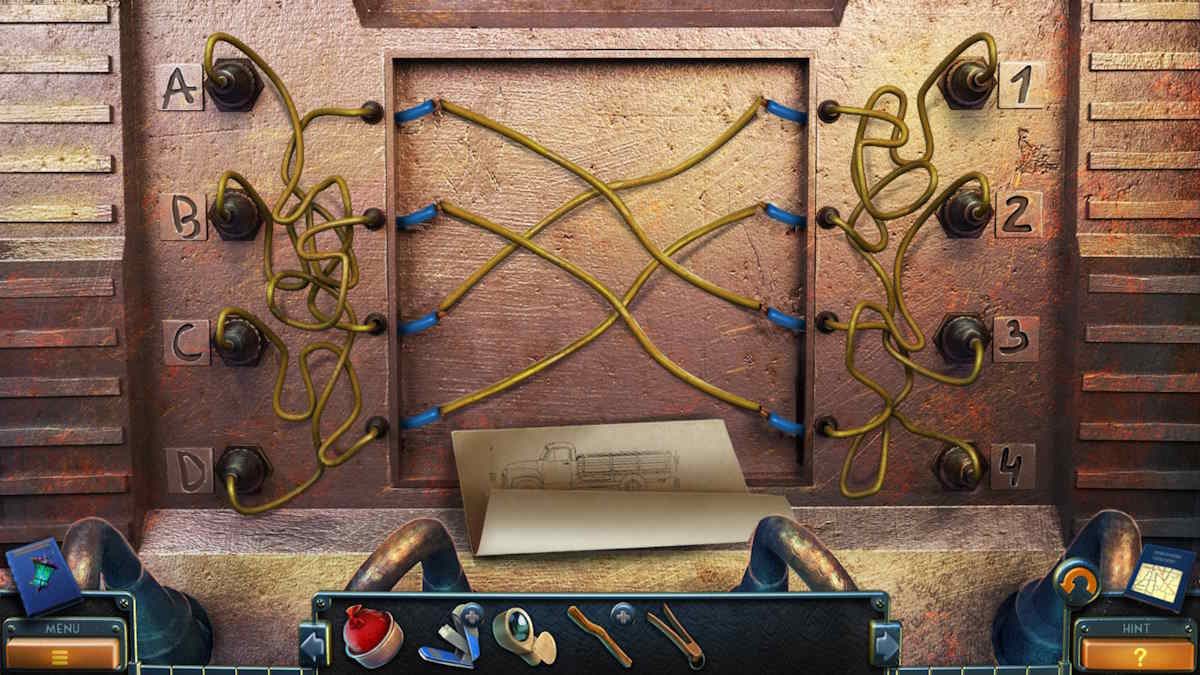
Click the back of the motortruck ( f8 ) and spread the valve to pour out in the gas from the jerry can , then click the hood ( f9 ) and then the engine inside . Now you could add the locomotive engine chart to begin a connections puzzle . I ’ve shown the connection required above .

Image by Pro Game Guides
choose the truck ’s door ( f10 ) for a close - up of the inside and utilise the car key ( see above ) to embark on it up . Press the indicated pedal ( it will beam blue ) , then the hand break ( marked above ) , and then the other indicated pedal point until the truck invert . Click the now - undefended manhole ( f4 ) for a cutscene , and you will head into theBunker Entrance .
Chapter 3: The Mayor’s Bunker
Take theCollectiblefrom the pipework ( j1 ) , theMorphing Objectnear the box seat ( j2 ) , and theLamp(j3 ) . Grab thePickaxe(j4 ) and habituate it to compile a piece of music ofBlue Mineral(j5 ) . absent the rocks from the skeleton ( j6 ) to take theFancy Discand theSpeleologist ’s Diary . launch the diary in your inventorying to read it , taking theChartfrom inwardly .
set the fancy disc on the box ( j7 ) to open it , grabbing theStone Detail , Cutters , andBattery Packfrom inside . add together the battery coterie to the lamp and click it again to get aUV Lamp . Head back to the cliff and habituate the cutter to get someBarbed Wire(f11 ) , then add together the wire to the pin in your inventory to get aHomemade Brush . Return to the bunker and use the brush on the boxful on the wall ( j8 ) , then penetrate the box again to begin a puzzler .
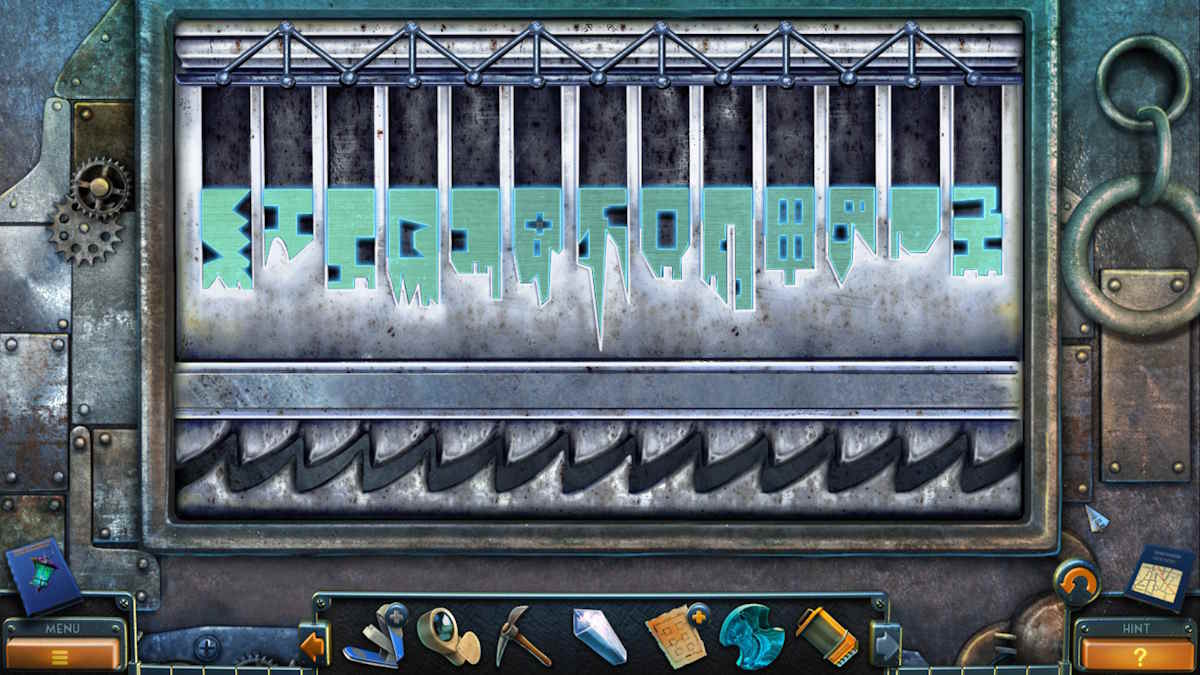
All you need to do isswap the piecesso that the detail fit the shapes behind them . I ’ve put the complete puzzler above for reference . When done , you ’ll gain access code to a missing objects miniskirt - game . Once that ’s complete , take theLadder .
Screenshot by Pro Game Guides
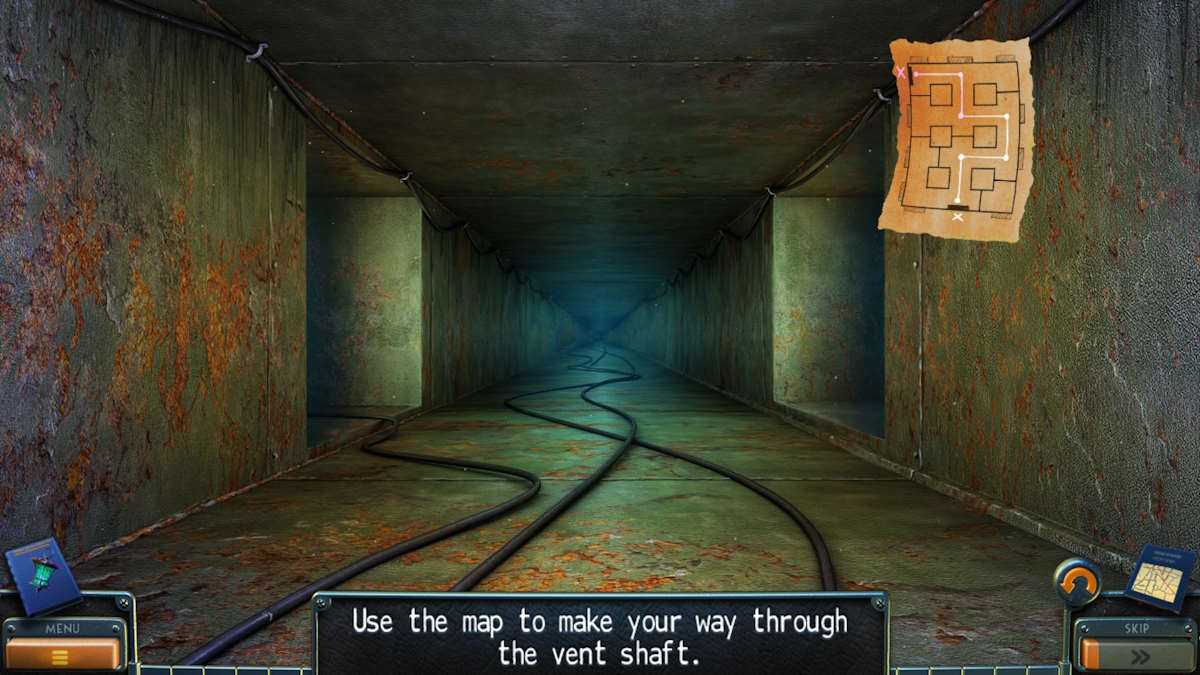
Now you’re able to use the run on the accession piping ( j9 ) to accede some ventilation channel . Once you ’ve climbed up , open up the chart and use the ultraviolet illumination lamp on it ( you ’ll have to switch the lamp on ) . This yield you theVent System Chart , allow you to follow this way through the maze of tunnels :
After a cut scene you ’ll get in thecentral donjon . Take theCollectiblefrom the bird of Jove ( k1 ) and theMorphing Object(k2 ) from just below it , by the eagle ’s feet . catch theStonefrom the altar ( k3 ) , and add your stone item in the same stopping point - up ( although you ’re still drop one composition ) . Select the rotary doorway ( k4 ) and take theRebaryou encounter in the conclusion - up . Use the stone on the window of the door ( k5 ) to give away it , start the door , and move into thegreenhouse .
TheMorphing Objectis near the pool ( l1 ) and theCollectibleis by the books ( l2 ) . Use the rebar to prop launch the grand pianoforte ( l3 ) , then take theRubber Glovefrom inside it . sink in the glass dome ( l4 ) for a ending - up and take thePot , then look at the greenish pattern behind the wall ( l5 ) to get a warning about rays protecting it . Use the pickaxe on a highlighted area ( see below ) and then take the threeYellow Crystals .
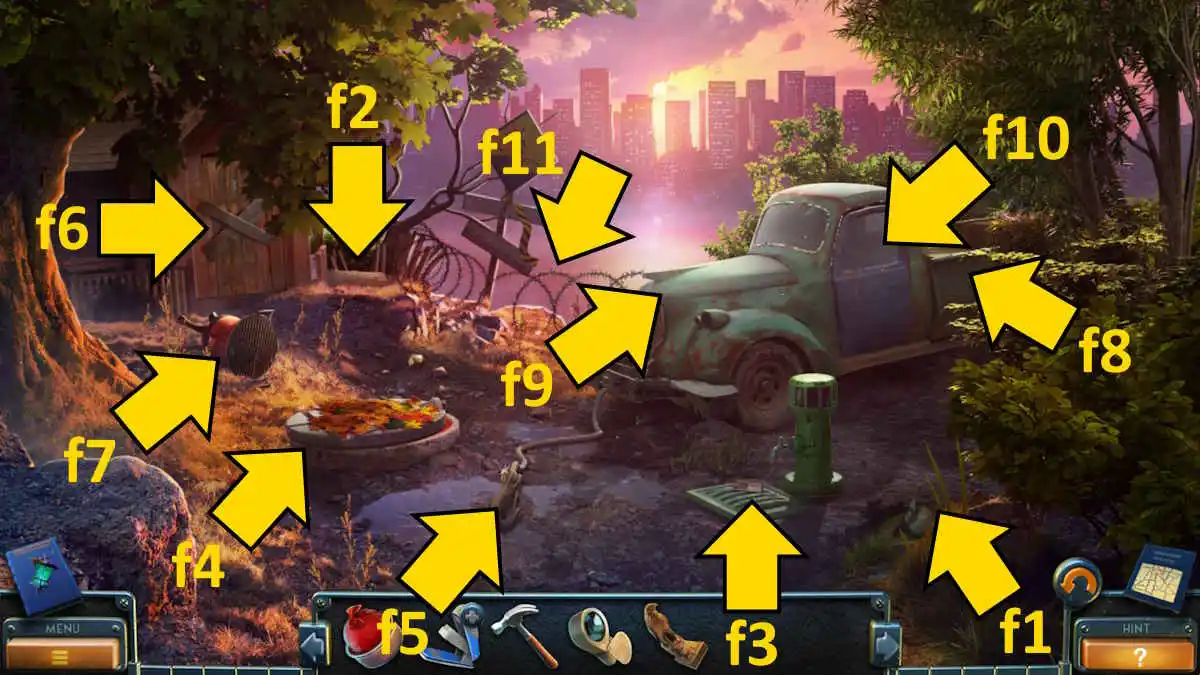
Image by Pro Game Guides
Return to the central dungeon and pose the gloomy mineral on the political machine ( k6 ) . Also , bestow the industrial plant pot , then use the synthetic rubber baseball mitt so that you could press the red push button in the close - up safely . Click the powder afterward and you ’ll scoop it into the crapper , addingBlue Powderto your armory .
Go back into the greenhouse and add the blue pulverization to the generator ( l6 ) . Click its chapeau to close it , then pull the switch to power it up and get a cutscene ; during which Will is trap . The looking glass dome was smashed in the accident , so take aPiece of Armored Glassand theStone Flowerfrom the wreckage ( l4 ) . Now , use the flush on the dark-green wall ( l5 ) and take theStone Detail .
you could now render to the primal donjon , add the 2nd point to the altar ( k3 ) , and take thePyramidthat appear from inside . Add the Pyramids of Egypt to the round room access ( k4 ) for another cut tantrum , during which you are capture and remand . thing could be going better !
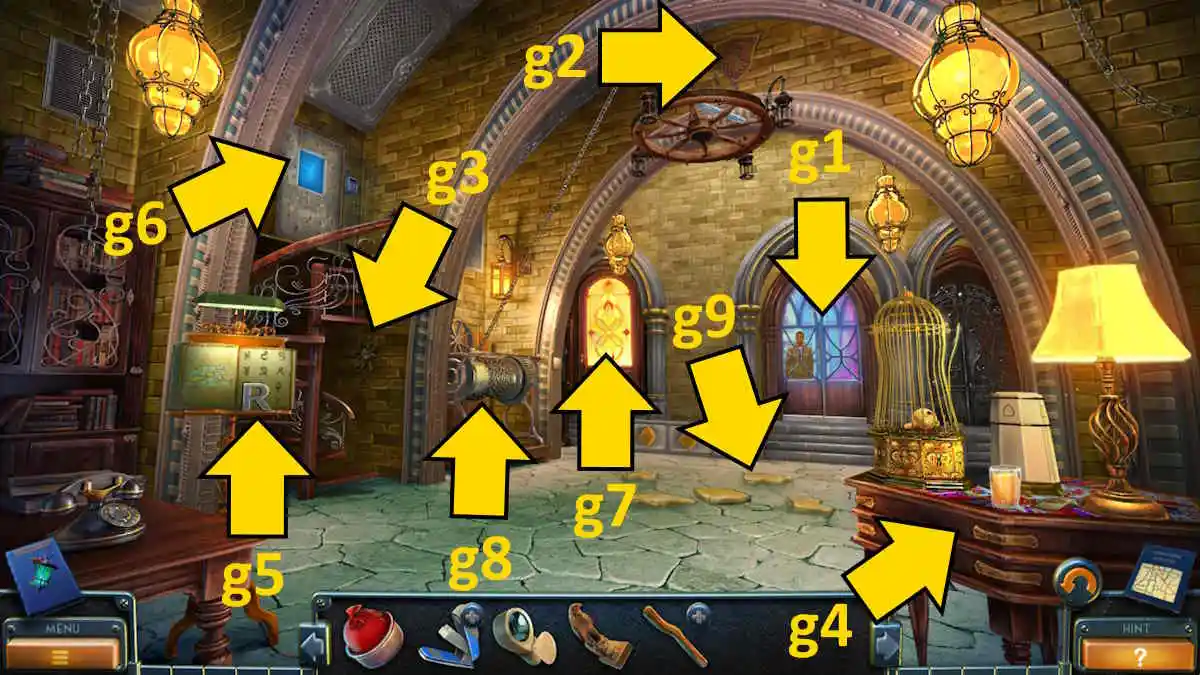
Image by Pro Game Guides
As you ’re being captured , you manage to grab aPocket Watch . Once you may move , expend the glass to get to the boxful ( m1 ) and take theGas Mask . Also take theFlare Gunfrom the box , before taking theDoor Handlefrom the control instrument panel ( m2 ) . In the same panel close - up , click the button with the gasolene mask to turn off the gasolene ( see below ) .
After a cutscene in which you’llmeet the Reaper , grab theCollectiblefrom the street corner ( m3 ) , and theMorphing Object(m4 ) from above it on the pipe . Move back to the nursery , utilize the room access manage on the room access at the back of the room ( l7 ) , and move through to theInfirmary .
TheCollectibleis on the shelves ( n1 ) and theMorphing Objectis on the trolley ( n2 ) . Remove the cloth from the gurney ( n3 ) , take theStethoscope Part , and then use the glass to cut the international nautical mile on the notes and take theFolder . unfold the folder in your armoury , click through and take it , and take theSurgical Clampyou discover at the back of the folder .
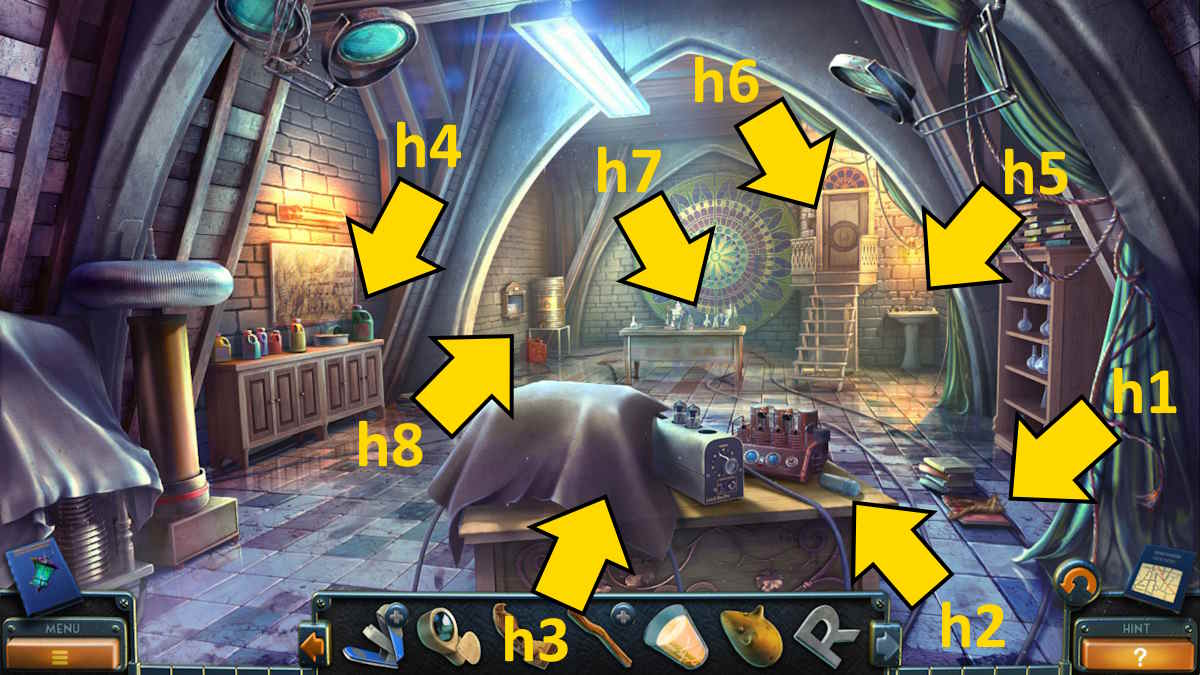
Image by Pro Game Guides
Select the medical training dummy next ( n4 ) , take theKnob , and then take back to the greenhouse . utilize the surgical clamp to get theTokenfrom behind the piano wire ( l3 ) , and then practice the token to spread the roadblock at the top of the ladder ( l8 ) . This gives you accession to a missing object mini - biz , which rewards you with aKey . If you ’re struggling to start the green box , leave the first door latch as it is , tug the 2d down once , and the last ( on the rightfulness ) fully down ( hit it twice ) .
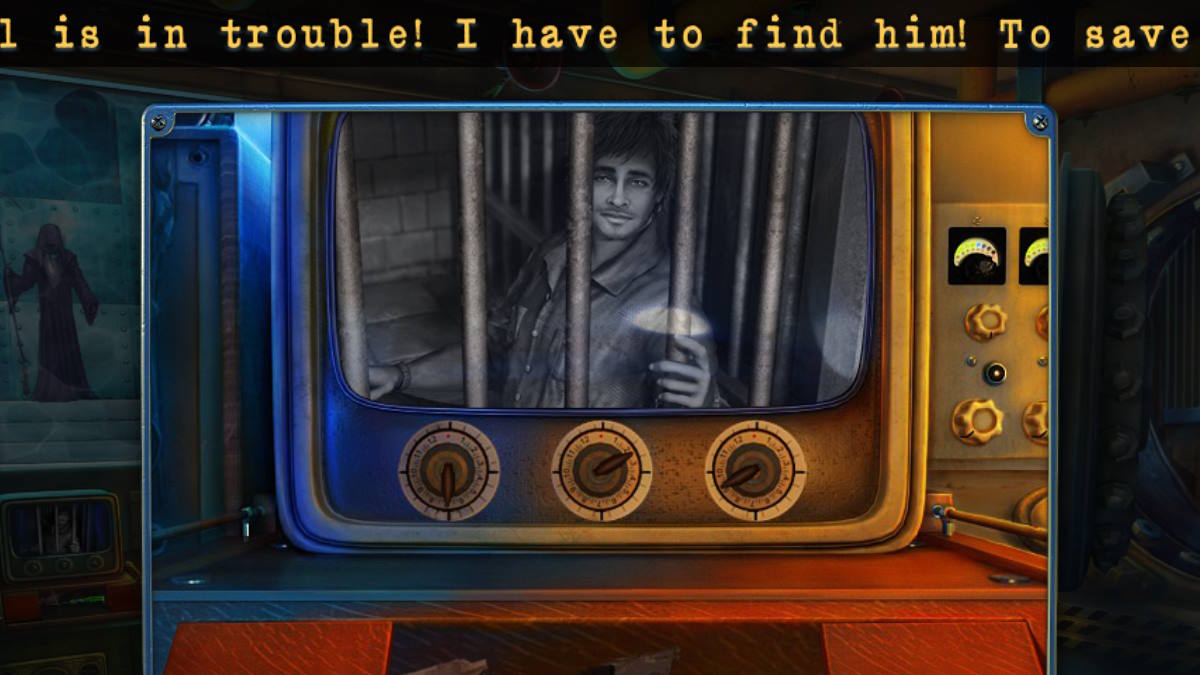
Back in the control centerfield , add the thickening to the TV silver screen ( m5 ) and then click each of the three knobs until they ’re in the positions shown above . It seems Will has been captured ! Take theScrewdriver , and then expend the key to start the unripened closet next to the TV ( m6 ) , taking theRope and Hookfrom at heart . lead back to the cardinal keep once more .
sprout the flare gun into the orchestra pit ( k7 ) , then expend the R-2 and hook to fish up the lawsuit and take theKeyfrom the pocket . Go to the ascendancy centre next , and apply the key on the cabinet where you twist off the throttle ( m2 ) . You now have access to theoffice .
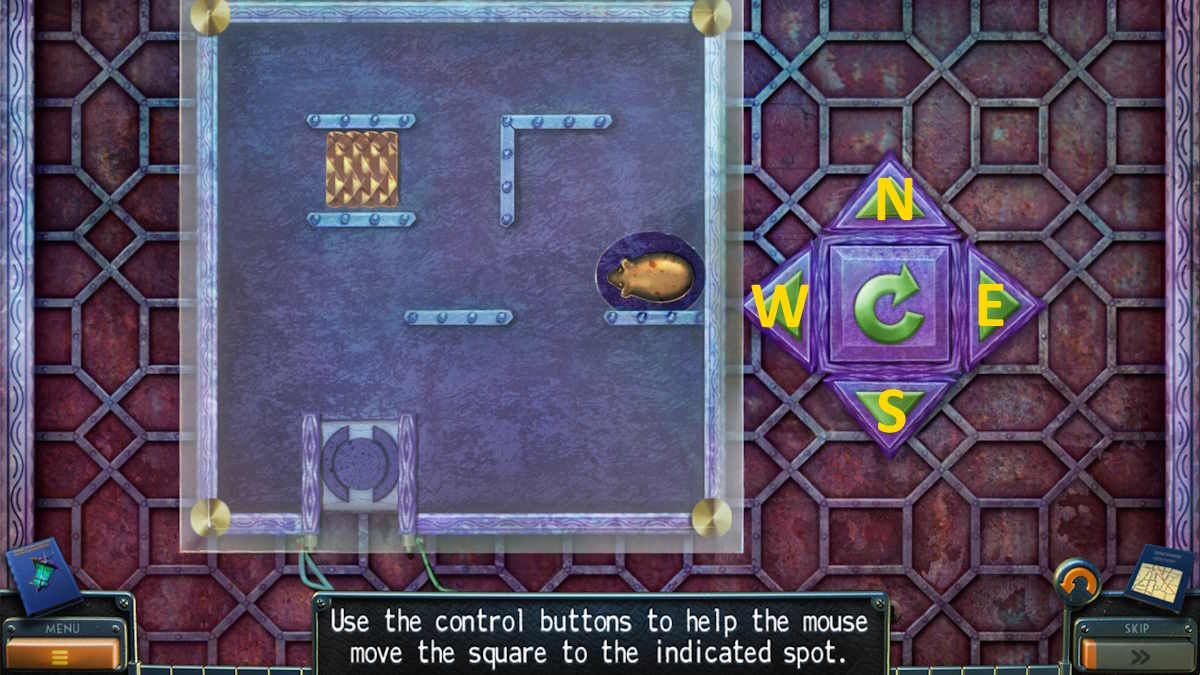
Image by Pro Game Guides
Take theCollectiblefrom the back bulwark ( o1 ) , and theMorphing Objectfrom the tabular array ( o2 ) , then twist the fan on by pulling the cord and collect theSoldier Figurine(o3 ) from the storey when it drops . launch the wallet on the table ( o2 ) , take theID Cardfrom inside , and then add the soldier figurine to the diorama on the desk ( o4 ) to start a puzzler . Move the soldier as indicated in the image below . When you get to the last , take theSpringand theKey .
spread out the fusebox on the wall next ( o5 ) , thrust the shift on the left , and use the screwdriver on the red wire to get theScrews . unite the spring with your broken stapler to specify it , gain you theStapler , and then go back to the infirmary and mend the screen ( n5 ) . This will start a cutscene showing the Reaper being captured . Afterward , the camera ( n6 ) breaks , allowing you to use the screwdriver to get aTerminal Connector .
Return to the situation , sum the terminal connector to the fusebox , put the screw back in with the screwdriver , and throw the electric switch back up . The doors ( o6 ) will now open , give you access to theprison cubicle . Head inside andtalk to Will .

Image by Pro Game Guides
you may now take theCollectible(p1 ) and theMorphing Object(p2 ) , then use the Francis Scott Key to spread the cabinet ( p3 ) to witness someHandcuffs . Move the rocks ( p4 ) to find someCoins , then head back to the key dungeon . Use the handcuff to repair the mountain chain ( k8 ) , turn the reddish grip , and take theOil Can . Use the can on Will ’s handcuffs in the prison cellular phone ( p5 ) to free him . He ’ll give you aMechanical Arm .
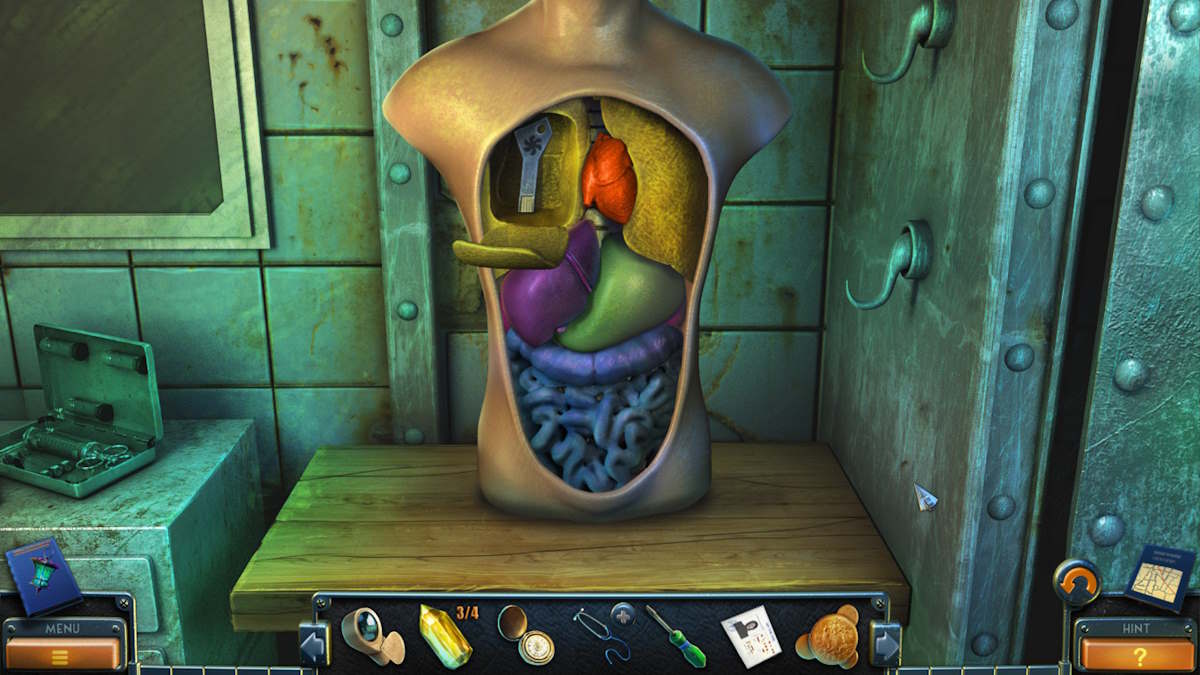
Go back to the hospital and use the arm to get theFaucet Handlefrom the scorpion John Milton Cage Jr. on the gurney ( n3 ) . utilize this handgrip on the liquid container ( n7 ) , click it again to drain it , unfold it by pressing the lid , and take thePlastic Heart . Adding the fictile substance to the grooming dummy ( n4 ) begin a puzzle in which you must put all the body part in the correct places .
you could see the root above . Once done , take theKey . Move to the control center next and use the key in the last slot on the console table ( m2 ) , which plow off the fans and allows you toescape the bunker .
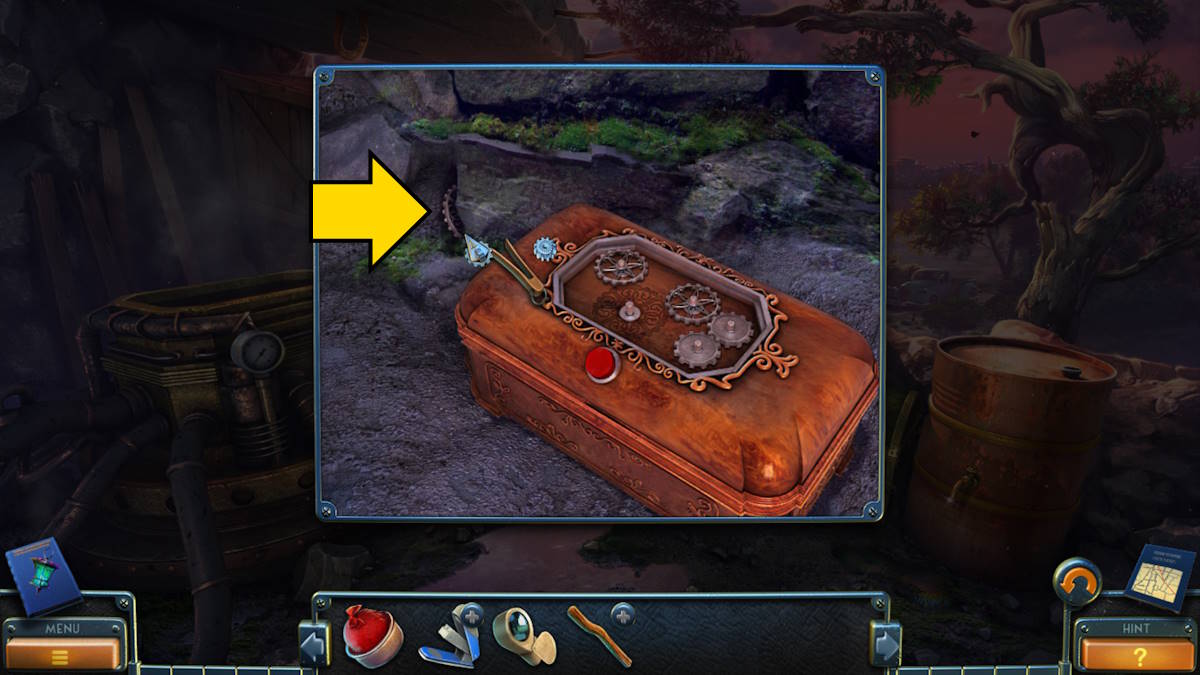
Image by Pro Game Guides
Chapter 4: Repairs at HQ
riposte to the hall in HQ and give the ID card to Bishop , who will hand you aKeyto his study . channelise to the Hall of Fame , use the screwdriver to fix the curtain perch ( i5 ) , then click the drape ( i4 ) to open them and unveil a portrait gallery . To complete this mystifier you need to identify each picture in its correct frame ( the resolution is above ) . Once stark , you could take theWinch HandleandLeverfrom behind one of the portrayal .
Return to the hall and habituate the windlass handle on the windlass ( g8 ) to lour the chandelier and take theHandle . Use Bishop ’s key to enter his cogitation ( g7 ) , and take theMorphing Object(q1 ) , theCollectible(q2 ) , and aJack(q3 ) . impart the lever to the political machine you took the collectible from ( q2 ) , employ the lever , and then unfold the released envelope to win aPunchcardgiving you access to the opera planetary house . you may also take the palm display next ( q4 ) and take theHandle .
Now go to the secret passage in Martell ’s planetary house and use the shape key on the story pattern ( d10 ) , turning it to make some steps up to the ceiling vent ( d11 ) . Use the jack to pry get to the stripe of the release and take theSawplus aCard .
Screenshot by Pro Game Guides
Move to the mansion entrance and utilize the byword to cut the vines cover the lion statue ( a9 ) , allowing you to recuperate someMetal Grapes . Now move into the livelihood room and use the grapes to launch the compartment on the mesa ( b4 ) , tolerate you to find a secondStethoscope Partand moreCoins . Combine the stethoscope parts in your armoury to gain aStethoscope , and head to the subject area .
get across the picture on the wall ( c9 ) to put on access to the secure and then apply the stethoscope on the safe to start a puzzle . rick the telephone dial to the follow number to check it assailable and take theEagle Figurine . If you get a number wrong and go back a space , you ’ll call for to repeat the previous number in the succession to get back to where you were .
Go to the dugout entrance next and add the stay coin to the green box ( j7 ) , taking anotherEagle Figurinefrom inside . Now you may return to the Hall of Fame at HQ and add the remaining bird of Jove figurines to the eagle statue ( i7 ) , giving you access to the subway tunnel . manoeuver down and collect theMorphing Object(r1 ) , plus theCollectible(r2 ) .
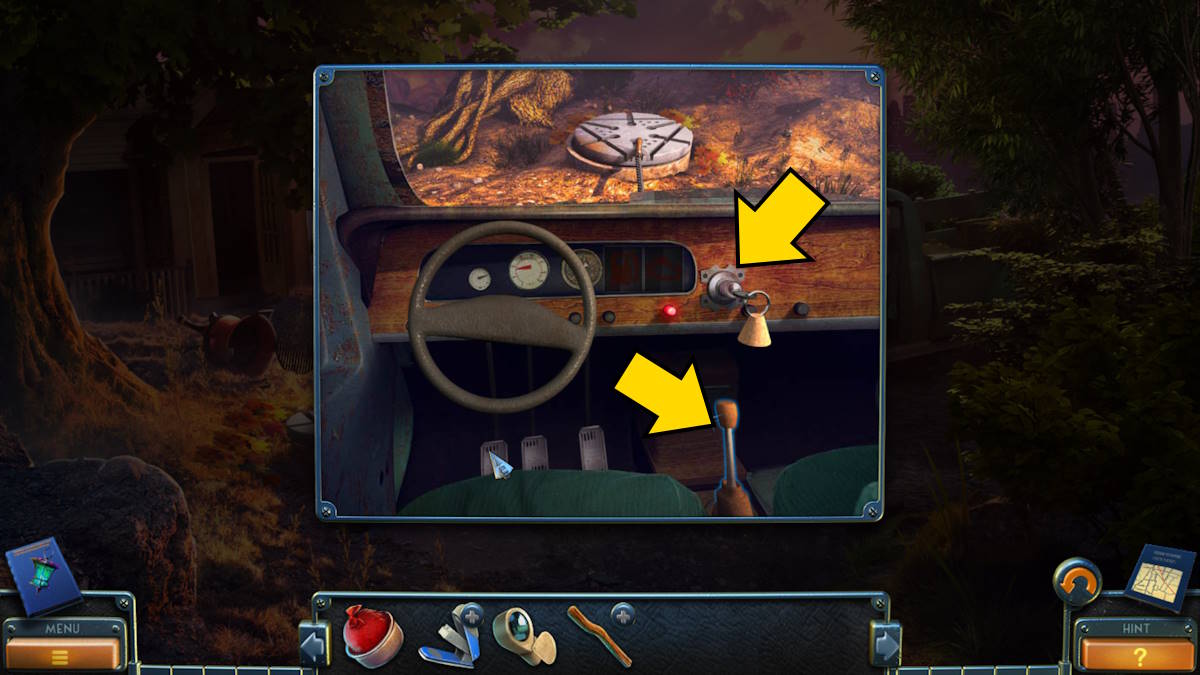
Image by Pro Game Guides
take hold of theSledgehammerby the door ( r3 ) , then supply the two handles you still have to the safe ( r4 ) to open up it and get aWelding Lamp , plus aCard . Return to the rock shelf at Martell ’s mansion next , and use the welding lamp and maul to discover the chain on the green chest of drawers ( e4 ) . spread out it up and take theChain .
Add the chain to the operating mechanism in the tube ( r5 ) , close its eyelid , sum up the punchcard , then click the left - side subway string ( r6 ) to move on tothe opera house .
Chapter 5: The Opera House
After speaking to the opera house household worker ( s1 ) , you ’ll chance both theCollectible(s2 ) and theMorphing Object(s3 ) by the tree diagram . Grab theCanefrom the workbench ( s4 ) , then talk to Henri ( s5 ) . Use the cane to get theTicketout of the tree ( s6 ) , give the ticket to the employee ( s1 ) , and then lead inside to theopera hall .
Take theCollectible(t1 ) and theDust Brushnext to it , along with theMorphing Objectfrom the paries above them ( t2 ) . popping back outside and use the encounter to remove the insects from the terrace ( s4 ) , allowing you to take theThin Wire . Click the conducting wire in your stock list to plow it into aHook , and apply the hook to get theKeyfrom the ticket stall ( t3 ) .
Get a finale - up of the locker surface area ( t4 ) , click box 7 , and practice your winder to open up it and take theCode . Now flick the clothes and you ’ll put on an operastaff member ’s uniform , allowing you to get at otherwise restricted field of the opera house . fall into place the step ( t5 ) to maneuver up to thebuffet .
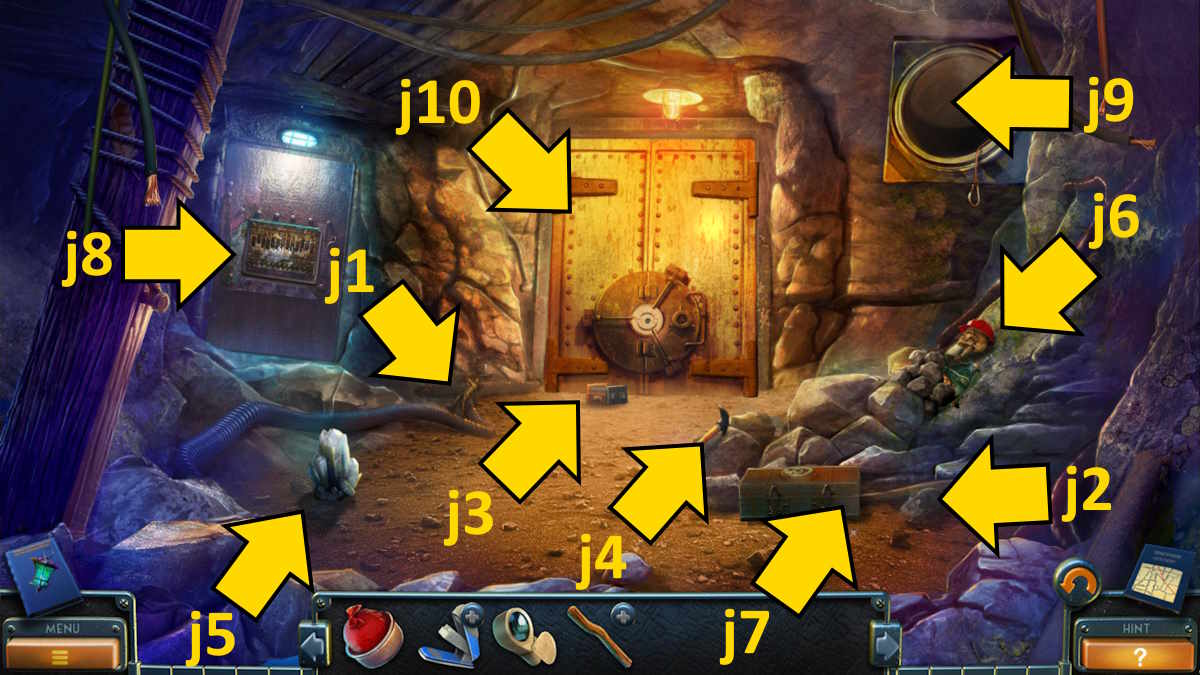
Image by Pro Game Guides
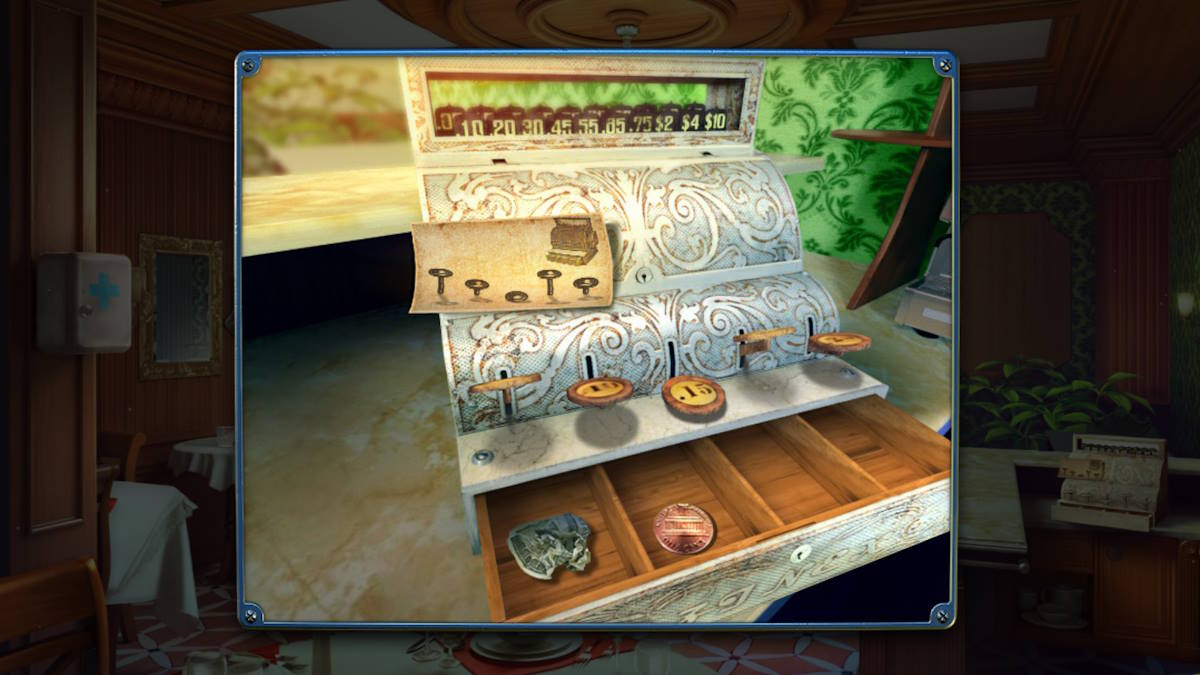
TheCollectibleis on the side of the heel counter ( u1 ) , while theMorphing Objectis on the story ( u2 ) . Add the code to the cash cash register ( u3 ) , copy the sequence to open it , and take thePenny . See the open registry with the correct button advertise below .
Take theMaskfrom the table ( u4 ) , then click the staff - only doorway ( u5 ) to start up a missing objects miniskirt - game . Once gross , take thePatternand add it to the back wall of the snack bar area ( u6 ) to startle a puzzle .
You need toremove all the glassesfrom the right side by using the patterns on the left field . This is simpler than it may first appear . Use the bottom of the three radiation pattern ( A ) first and remove all of the pinkish specs with it . It will only remove items in the hole , so make trusted to match each set exactly so that you canalways remove complete sets of three . So in the instance above , once I remove those three pink cups , I can move the figure one space to the rightfulness and remove the next three pinkish cup .
Screenshot by Pro Game Guides
Once that is done , use Bto remove all of the white cups in the same style , and finallyuse Cto hit all of the browned cup . Once done , click the now - open sideboard ( u6 ) and click the cups on its top row to reveal and then take theBell . retort to the hall , get a end - up of the locker area , and restore the bell shape there . Ring it for a cutscene , after which the staff door will be leave capable , set aside youbackstage .
TheCollectibleis on the floor below the flame coop ( v1 ) and theMorphing Objectis the image on the plant pot ( v2 ) . Knock on the door ( v3 ) to regain out that the lady on the other side has a headache ; she will only suffice your questions if you find her some painkillers .
clack the fire cage ( v4 ) for a close - up and take theHandlethat ’s on top of it . dawn the room access on the left ( v5 ) , remove theSuction Cup Hook , and then head back alfresco to the entrance . utilize the hold to open up the poster box ( s7 ) and take theSolventyou find inside . Return to the backstage area and use the solvent on the spilled paint on the floor ( v6 ) to be able to pluck up theKeyand aCard .
Screenshot by Pro Game Guides
Go back into the snack counter and habituate the suck cup hook on the closet behind the buffet ( u7 ) , allowing you to open it and take theSiphonand aFlour Sack . Use the key to unfold the first aid box ( u8 ) , taking thePainkillersand aKnifefrom inside . Add the siphon to the water flask on the table ( u4 ) , then employ the cup that ’s already on the table on the siphon to pour a glass of water . Add the painkillers , and pick up thePainkillersin the glass of body of water . Go backstage , apply the anodyne on the central door ( v3 ) , and Elisabeth will get you in .
You ’ll line up theMorphing Objecton a mannequin ( w1 ) and theCollectiblehanging on a peg ( w2 ) . snap up theCardfrom the table ( w3 ) , then move the chair aside from the doorway ( w4 ) to give it and start a miss objects miniskirt - game . Once complete you ’ll receive theDress . Head out to the hall where Elisabeth is waiting . Give her the wearing apparel , and she ’ll give you a piece ofJewelry .
Go back into the make - up room and use the jewelry to spread the boxful on the table ( w3 ) , taking theAir HornandWire Cuttersfrom deep down . Move backstage and apply the conducting wire cutters to open up the fervidness cabinet ( v4 ) , taking theAdapterandGaff . Now you’re able to use the gaff outside the entrance to open up the manhole ( s8 ) and get theWrench .
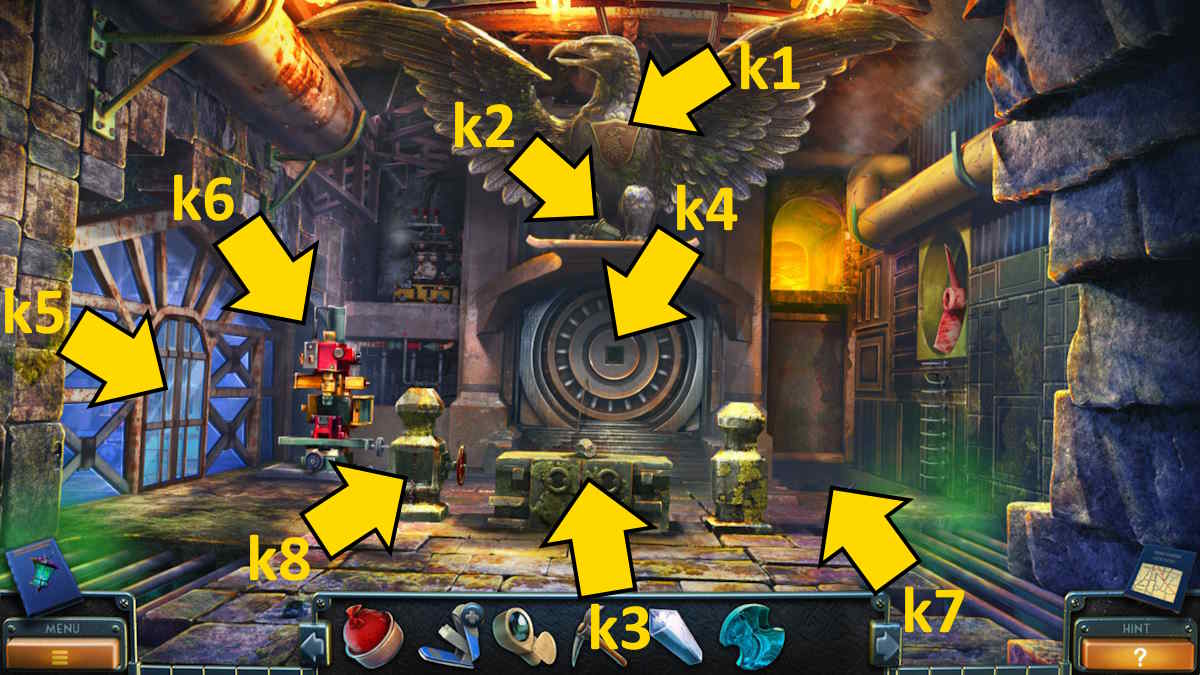
Image by Pro Game Guides
Now go backstage once more and employ the righthand doorway ( v7 ) to enter the props elbow room . It ’s obscure , so click the sparking plug on the floor ( x1 ) , add the adapter , and then plug it in to put the light on . You ’ll find theMorphing Object(x2 ) and theCollectible(x3 ) on the wall .
Remove the empty bag from the pall ( x4 ) and replace it with your flour bag , start the stagecoach curtains . Now flick the light control ( x5 ) for a finale - up to begin a puzzle . You need to lower the paints by setting the levels as pictured above . Once you have , collect thePainter ’s Set(x6 in the double above ) .
Go outside and give the paint to Henri ( s5 ) to set forth apainting mini - game . You just need to copy the house painting in the image to come after . Aside from the basic colors , you ’ll need to utilize clean and then black ( 3 and 4 ) in the foreground to make grey ; blue and icteric ( 1 and 5 ) on the trees to make green ; ruby-red and yellow ( 2 and 5 ) on the seashore to make orangish ; dingy and white ( 1 and 4 ) on the Statue of Liberty ; and crimson and white ( 2 and 4 ) on the sky . The completed image is above . Once done , Henri gives you aMask .
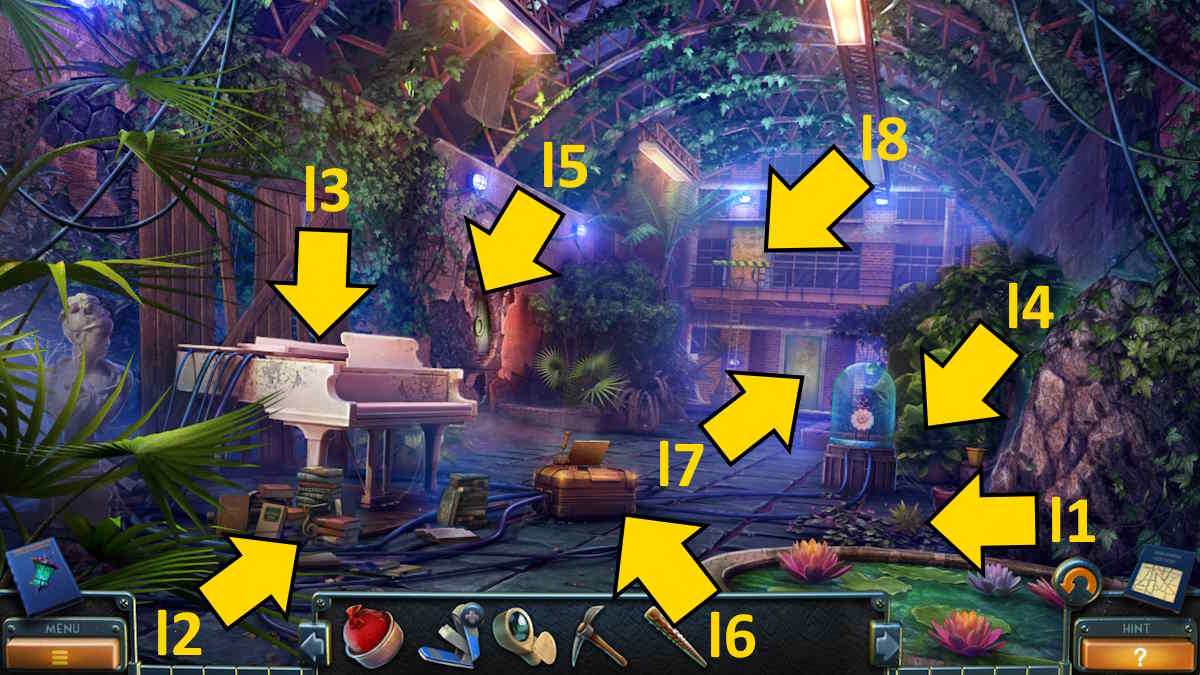
Image by Pro Game Guides
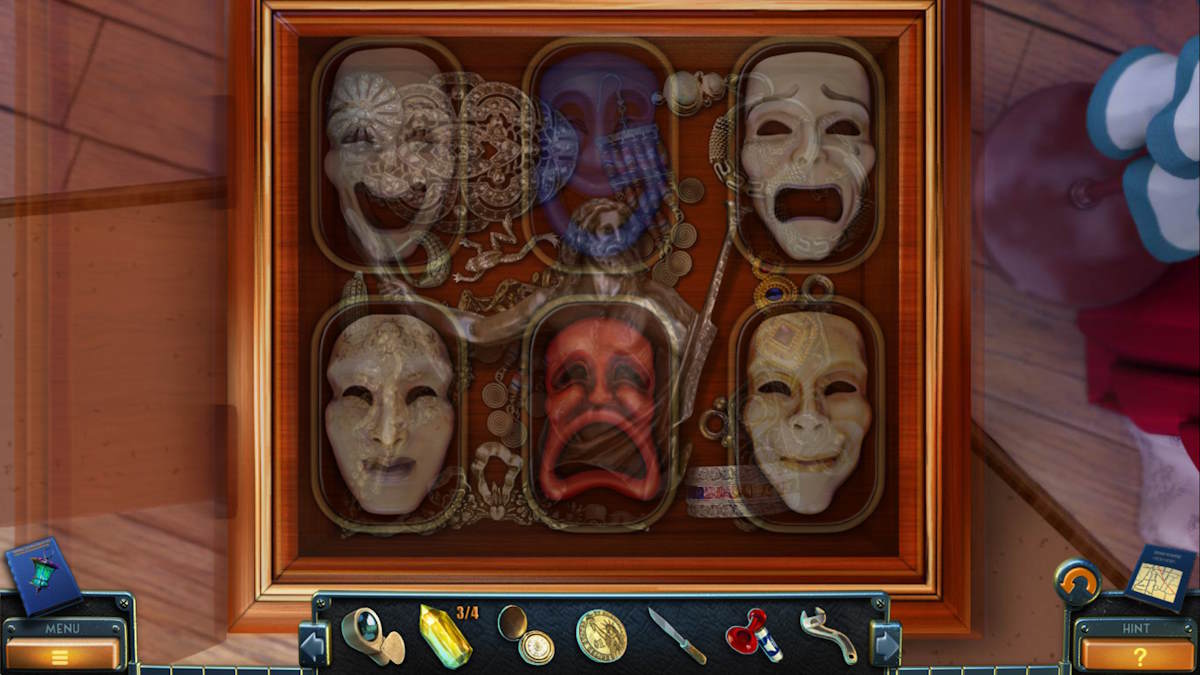
Return to the make - up room and tally the two masks to the box ( w5 ) to bulge out a puzzle . You need the masquerade to be in the correct place , which I ’ve shown above . Once complete you ’ll be able to take aPiece of Pattern . Go back to the airscrew store and bestow the spell of pattern to the property box ( x7 ) , acquire theWooden Swordfrom inside . you could now move to the backstage orbit and practice the wooden sword to give the door on the remaining ( v5 ) to record thetuner ’s elbow room .
TheMorphing Objectis on the side of the cabinet ( y1 ) and theCollectibleis on the stool ( y2 ) . apply the knife to cut unfold the chairperson fabric ( y3 ) and find aMusic Box Drum , get a close - up of the guitar case ( y4 ) to take theFile , and then move back to the make - up room and total the metal drum to the music box on the tabular array ( w3 ) to find aFragmentandTwo Cents .
Use the two penny in the vending machine in the opera residence ( t6 ) , then press its immature button and collect aSouvenir . Move back to the wireless ’s room , add the fragment to the guitar case ( y4 ) to open it , and take theWheel . Now you may go back to property storage , add the steering wheel to the barrow ( x8 ) , and move it to gather admittance to theback courtyardvia the door behind it .
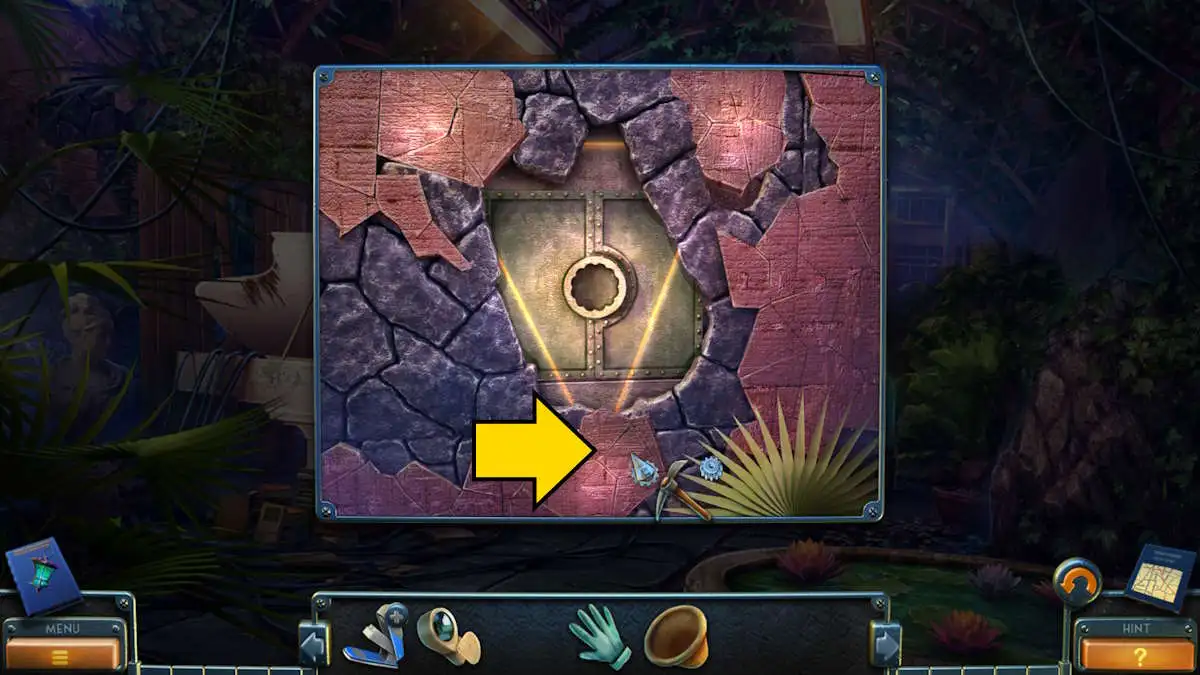
Image by Pro Game Guides
You ’ll notice theCollectibleon a windowsill ( z1 ) and theMorphing Objectby the drainpipe ( z2 ) . employ the wrench on the bike ( z3 ) to bump off the foot lever , and then take theChain . Stack the boxes ( z4 ) to be able-bodied to get in touch with the balcony ( z5 ) , and grab theGlass Cutterand aBrickfrom it .
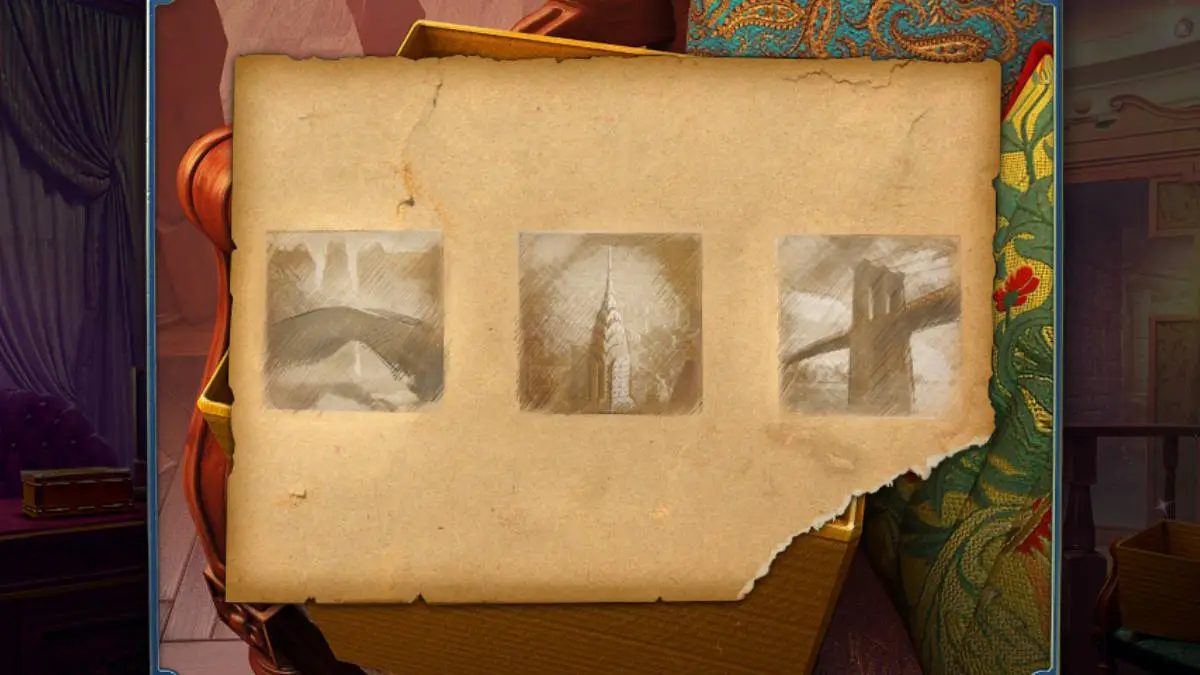
Return to the radio ’s room , add the chain to the doorway ( y5 ) , and then turn it to arrive at access to a ski lift that will take you to asecret way . Once inside , you’re able to take theCollectiblefrom under the chair ( 1a ) and theMorphing Objectfrom the level on the right of the room ( 1b ) . Drop the brick out of the window ( 1c ) to get theDecorative Tileto bounce up to you , then add the souvenir to the box ( 1d ) and , when the secret compartment give , take theKeyfrom behind the Empire State Building .
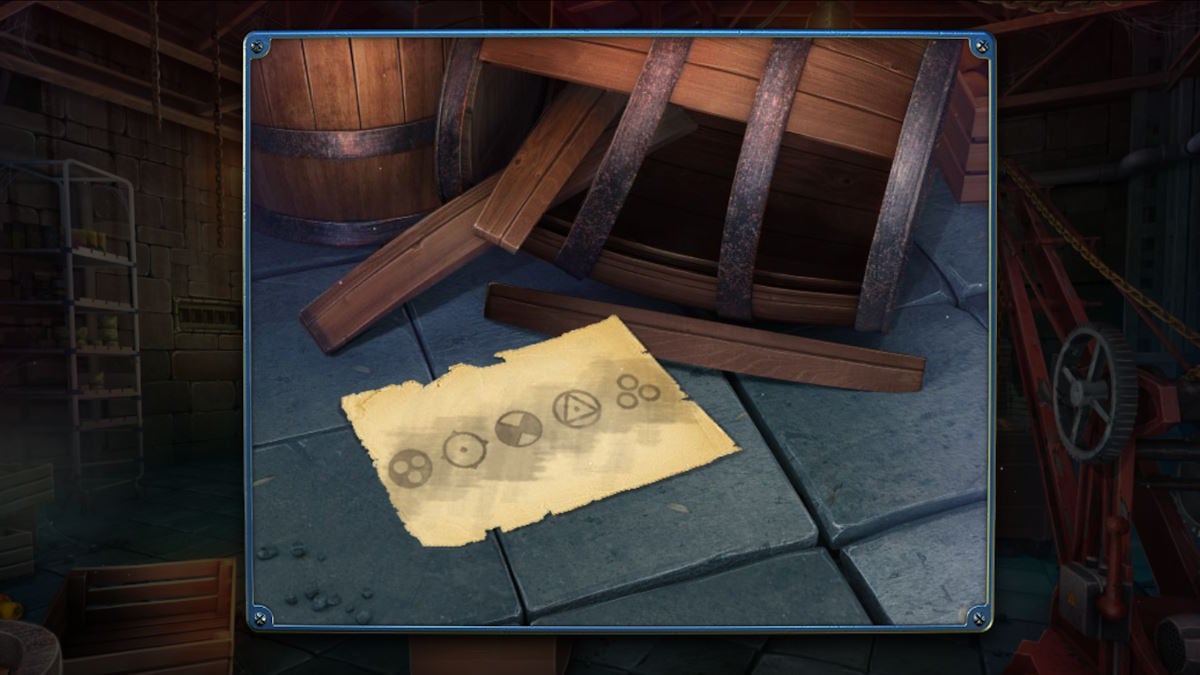
take the desk ( 1e ) to get aCardand add the pocket watch to the clock to find a cue withSymbolson it . Go down to the courtyard , add the decorative roofing tile to the wall ( z6 ) , and then click it once more to reveal aReaper Figurine . Return to the tuner ’s room once more , use the tonality to reach the other door ( y6 ) , and make out another missing object mini - plot to get theViolin . Go to the undercover room , place the fiddle in the machine on the mesa ( 1e ) , and the safe ( 1f ) will unfold . Take a secondReaper Figurinefrom inside .
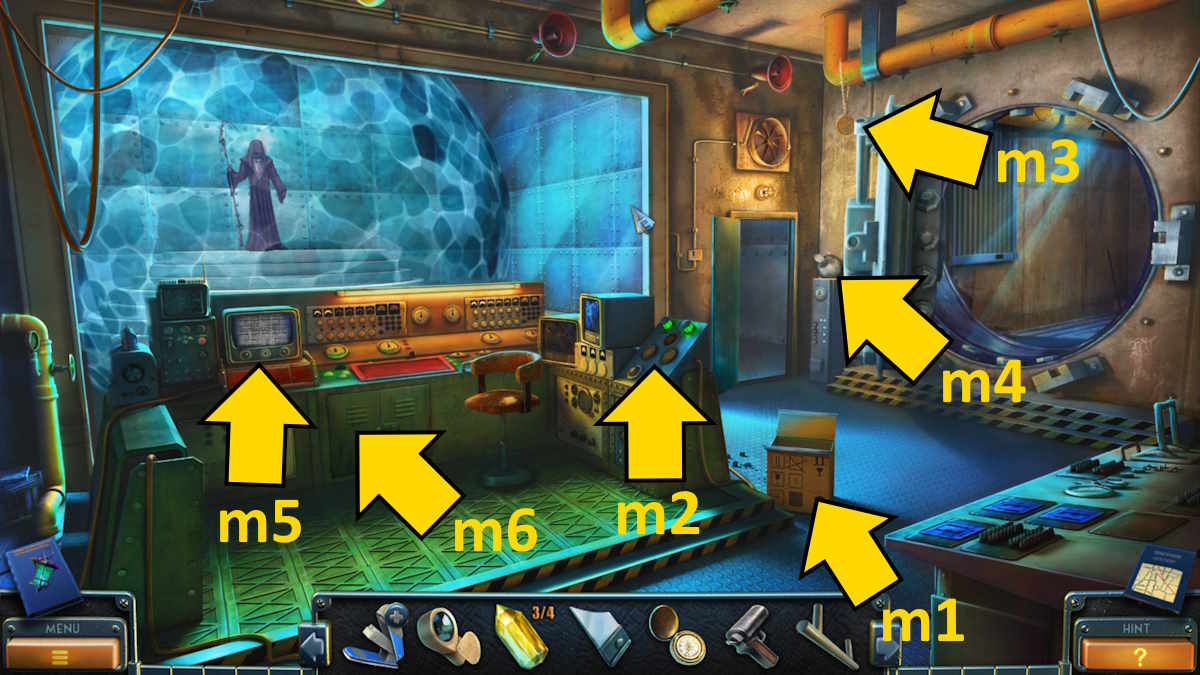
Image by Pro Game Guides
Chapter 6: Making the weapon
Go across to the prison cell in the sand trap and apply the file cabinet to saw through the bars ( p6 ) to unlock the door and start a missing object miniskirt - plot ( I ’ve include the code you call for for the brick episode above ) . Once staring , take theSafe Handle . Take it to the bunker entrance and use it to start the safe ( j10 ) , and then chatter the undefended safety for a cut scenery .
Click the door again afterward for a close - up and record the note on the wall . Take theTank of B12 , and then the finalReaper Figurineyou find behind it . Move to the role and tote up the three reaper figurines to the chart on the wall ( o7 ) to begin a movement puzzle . The put-on here is to keep the bowed stringed instrument in triangles while moving all the figurine to the lefthand side of the chart ( see the paradigm above ) . Take theTelescope Lensand read the harum-scarum ’s diary !
Back at the opera house house , you may return to the secret room , contribute the lens to the scope ( 1 g ) , and look through it to see that the equipment is being dress up on theEmpire State Building . It ’s time to devolve to social club HQ with your latest finding .
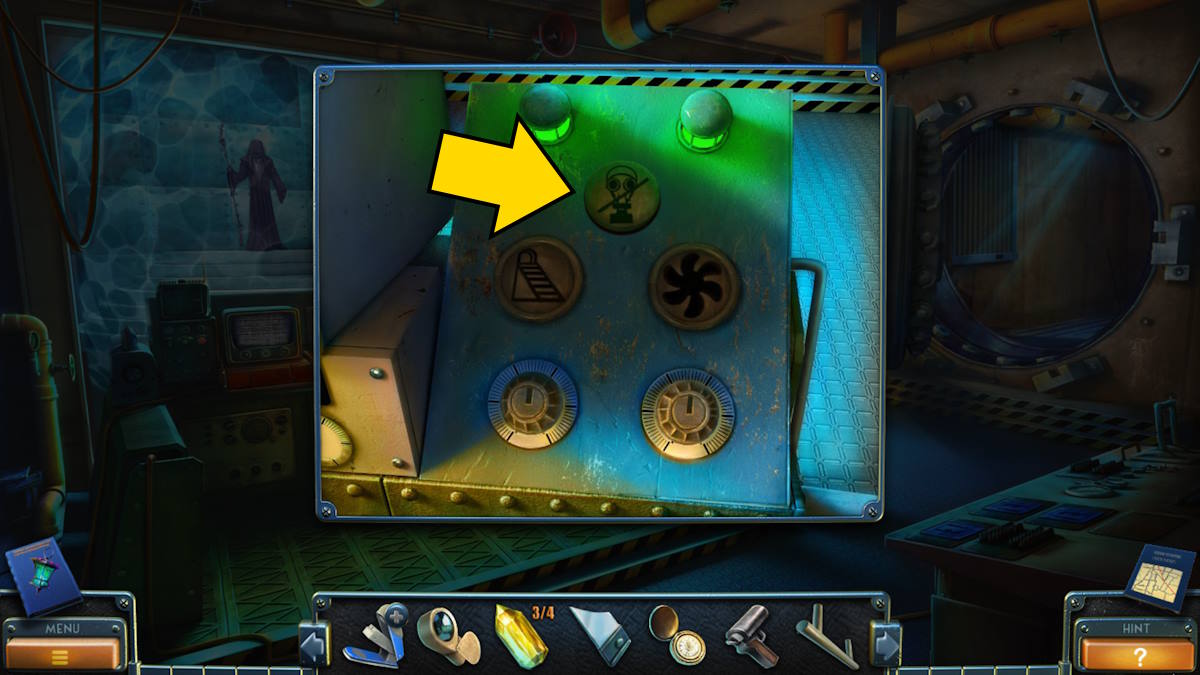
Image by Pro Game Guides
Go down to the subway tunnel at HQ andspeak to Will , who ’ll give you aKey . Move to the Hall of Fame next , habituate the glass cutter to launch the majestic piston chamber ( i8 ) , and take theHelmetfrom inside . Now go to Bishop ’s federal agency and use the air horn to scare away the owl , giving you access code to the desk ( q5 ) . Take aCardand aRulerfrom the desk .
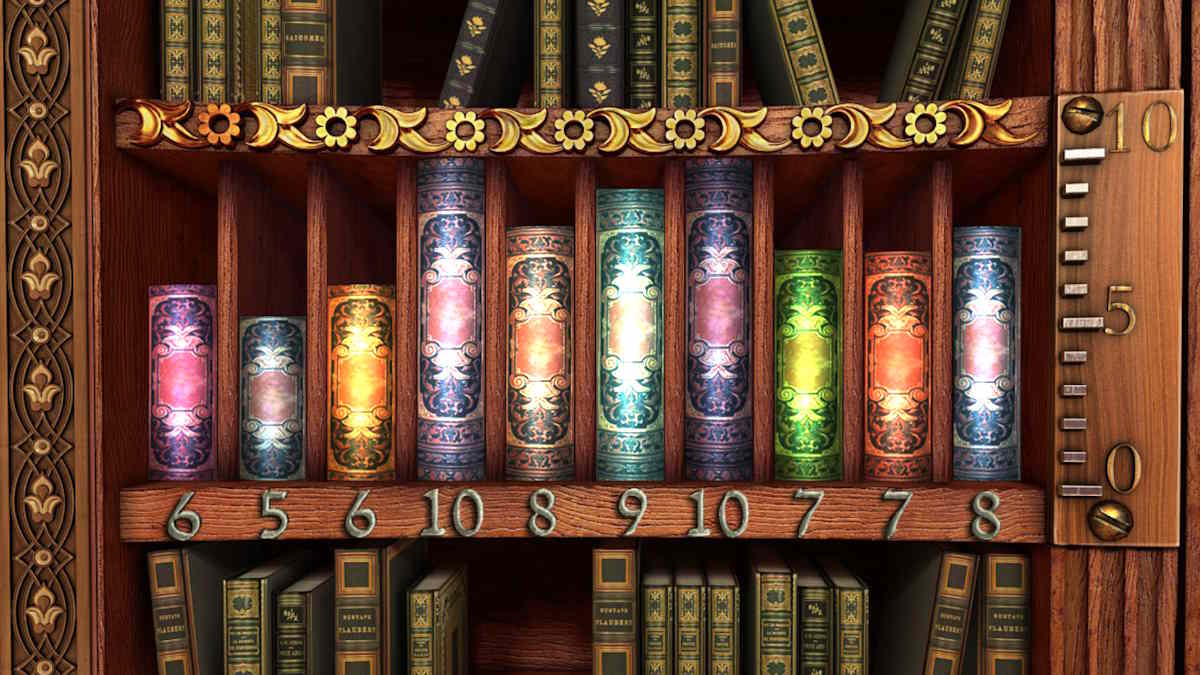
Select the bookshelf next ( q6 ) , tot up the ruler , and rearrange the books in the order project above ( by height , consort to the scale to the ledge ’s ripe and the numbers racket under the Book ) . This gives you accession to theArchives , so head on through the secret door behind the bookshelf to check it out .
Take theCollectible(that ’s one ready down ! ) from the foot of the curtain ( 2a ) and theMorphing Objectfrom the central window ( 2b ) . Select the table ( 2c ) , take thePattern , and then move to the mansion . Put the blueprint on the right side of the al-Qur’an on the lectern ( g5 ) to highlight four symbols , but you ca n’t do anything more here for now .
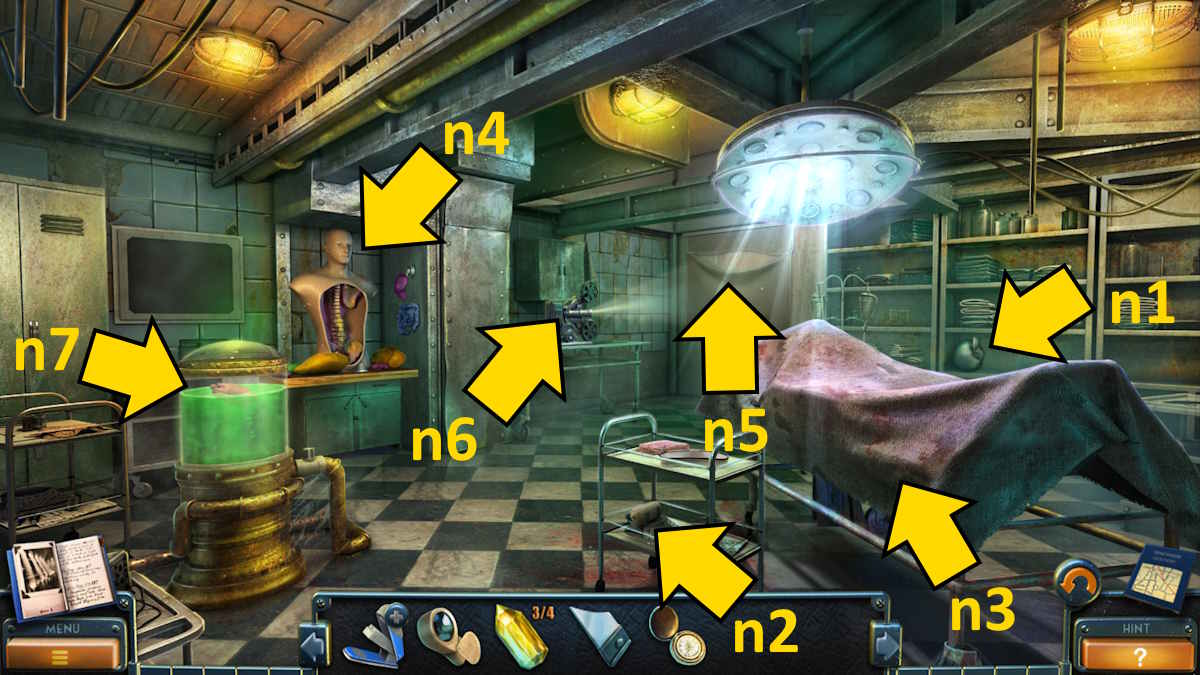
Image by Pro Game Guides
Move to the office staff in the mayor ’s bunker next and use the headstone to launch the tall closet ( o8 ) , then take theMedalfrom the uniform at bottom . Go back to Bishop ’s office at HQ , supply the medallion to the display ( q4 ) , and take theKeyfrom inside the box . Use this key to launch the wall cabinet ( q7 ) , take thePowder Sackfrom at bottom , and then go down to the subway tunnel .
contribute the pulverisation to the large rock blocking the door ( r3 ) , then penetrate the detonating equipment in the same close - up to muff it up . Move through the now open door and into thearsenal . Take theCollectiblefrom the bulwark ( 3a ) , theMorphing Objectfrom the bottom of the bench ( 3b ) , and tot up the helmet to the suit of armour ( 3c ) to open up up the dresser crustal plate and take aBoomerang .
Select the work bench ( 3d ) for a close - up , take aLambda Symbol , aWheel , and aCard , and then add the storage tank of B12 to the crossbow here . Go to the subway and use the boomerang to rap down and collect theExpander(r7 ) . Go to the archives and fix the ravel ( 2d ) with the wheel , cluck the run to move it toward you , and then employ the magnifier to learn the book of account at the top of the shelves ( 2e ) . This gives you the code9872for the Empire State Building . figure this code into the motorcar on the mesa ( 2c ) , click the handle , and take thePunchcard .
Screenshot by Pro Game Guides
Now move to the Hall of Fame and employ the lambda symbol on its corresponding threshold ( i9 ) . When the shelf opens , snap it to start a series of six very simple jigsaw teaser . Once complete , you ’ll be able-bodied to take your fourthYellow Crystal .
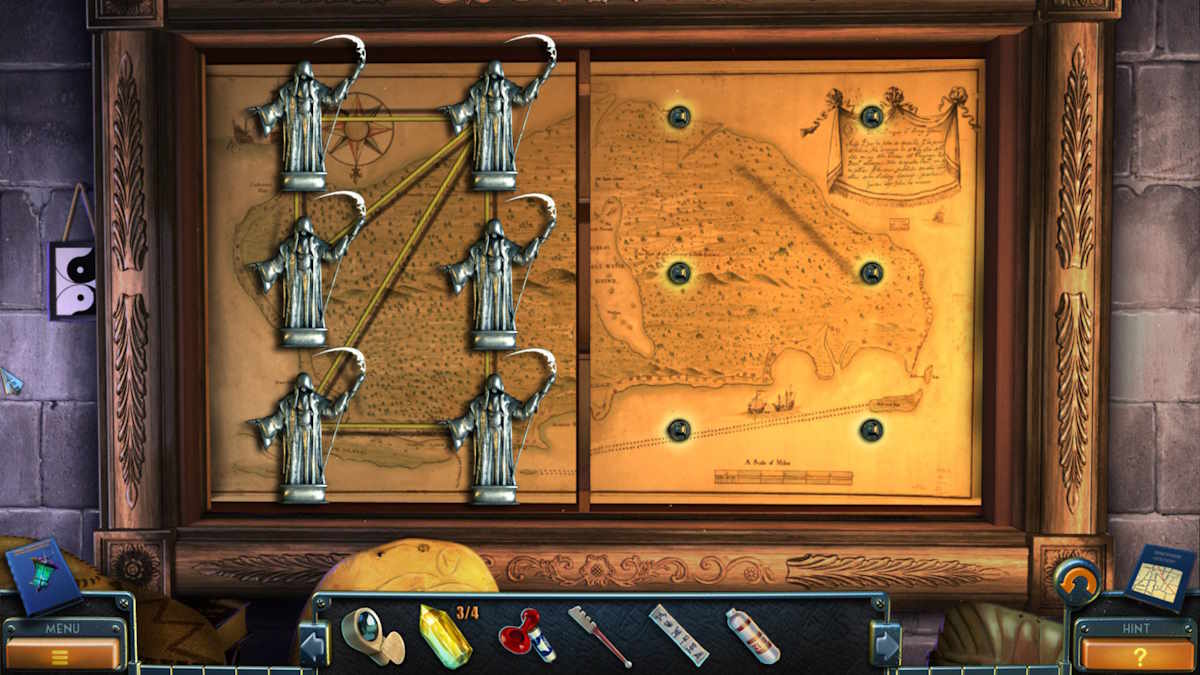
Move to the hall and add the crystal to the chandelier ( g2 ) , which will now light the stones below ( g9 ) . Use the nut ( g8 ) to put the pendent back up to the ceiling , press the stones in the order from the clue you have before ( see above ) , and then take theOmega Symbol .
Back in the Hall of Fame , expend the Z symbol to start the next bookcase ( i9 ) and begin a numbers puzzle . The numbers at each level want to equal the number on the right hand ( see the resolution below ) . Once complete , take theActivation Key . Return to the arsenal and use the expander to afford the tiger ’s mouth ( 3e ) and take theTower .
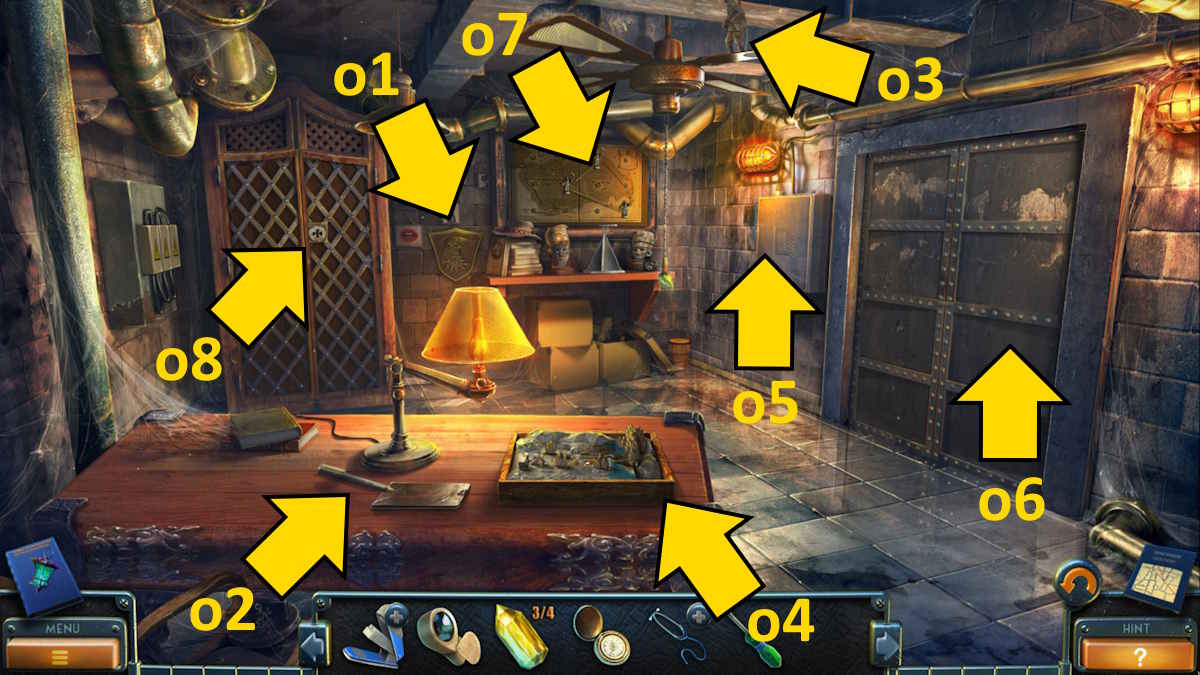
Image by Pro Game Guides
Back in the hall , tote up the tower to the model on the table ( g4 ) and take theStone Lion Head . utilize the lion head in the archive to nail the wall painting ( 2f ) , taking theMedallionfrom in spite of appearance . Use the decoration to get to the nook in the Hall of Fame open fireplace ( i3 ) to get theTank . Add this to the crossbow on the work bench in the armoury ( 3d ) , and take theWeapon .
Now you ’re countersink to take on Hardstein ! Move to the subway burrow , use the punchcard ( r6 ) to fire up the second subway car ( r8 ) , and choose it to head up toward theEmpire State Building .
Chapter 7: The final showdown
When the subway gearing crashes , take theMorphing Objectfrom the pile of newspaper publisher ( 4a ) and theCollectiblefrom below the train restraint board ( 4b ) . clean up thePipe(4c ) and localise it between the doors ( 4d ) to squeeze them assailable , allowing you to move out onto thesubway station .
You ’ll find theMorphing Objectby the coffee bean machine ( 5a ) and theCollectibleunder the terrace ( 5b ) . Grab theBolt CuttersandPliersfrom the bench ( 5c ) , then go back into the beach wagon . utilise the pliers on the source ( 4e ) to power it down , allowing you to reclaim theWeaponin the same close - up . employ the weapon system on the zombi at the top of the stair ( 5d ) in the place , use the thunderbolt ship’s boat to unlock the logic gate , and move out of doors .
TheMorphing Objectis on a post to the right ( 6a ) , while theCollectibleis near the tree to the odd ( 6b ) . Take aWrenchfrom the back of the police car ( 6c ) and then head back into the station . utilize the wrench to unhook and take theFire Extinguisher(5e ) , use it to put out the fire in the estate car ( 4f ) , and take theCrowbar .
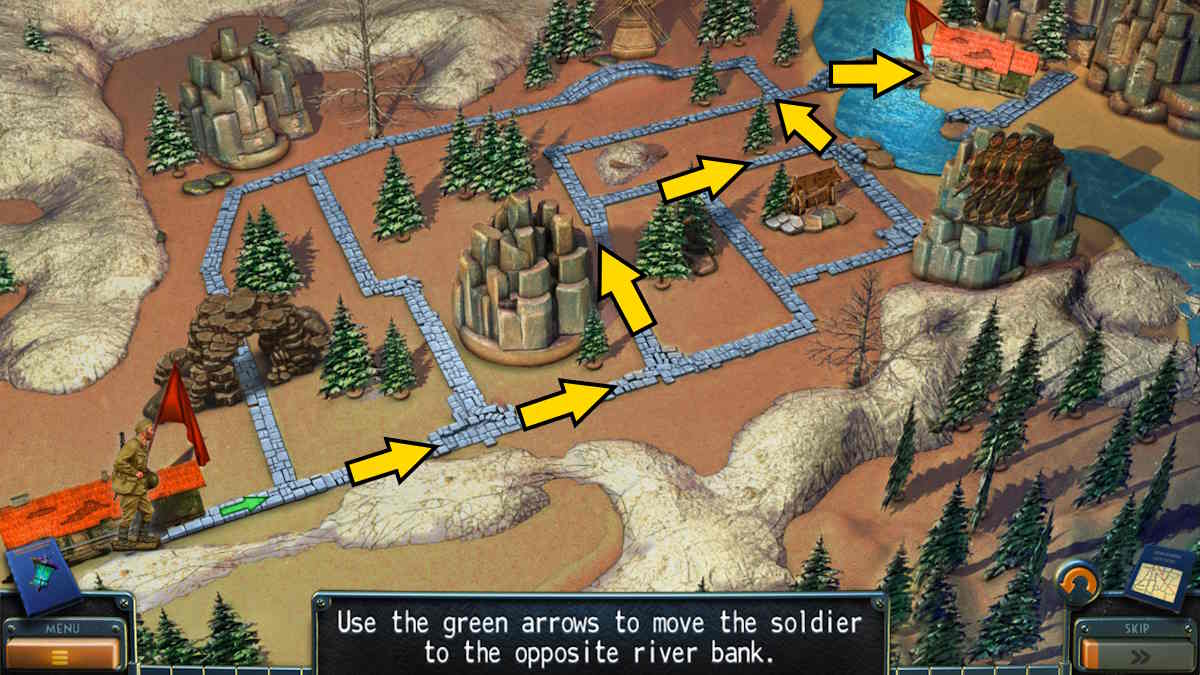
Image by Pro Game Guides
Now go back out front and use the crowbar to get into the body of the police railroad car ( 6c ) to gather up aPatternand aCard , and pop the previous bombardment out of the police radiocommunication . Select the front of the construction ( 6d ) for a close - up , penetrate what looks like a bomb , and add the form to get a connections mystifier . link up the wires as usher above to realise access to the Empire State Building .
make out another accumulation with theCollectibleby the red door ( 7a ) , and seize theMorphing Objectfrom next to the desk ( 7b ) . Take thePiercing Toolfrom the lift control panel ( 7c ) before affect back to the station .
Use the pierce dick to remove theCorkfrom the nursing bottle in the trash ( 5f ) , then apply the cork to enter the red box in the coaster wagon ( 4f ) to find someRubber Bootsand aBelt . Use the rubber boots to get past the piddle in front of the red doorway ( 7a ) and move through to the security room .
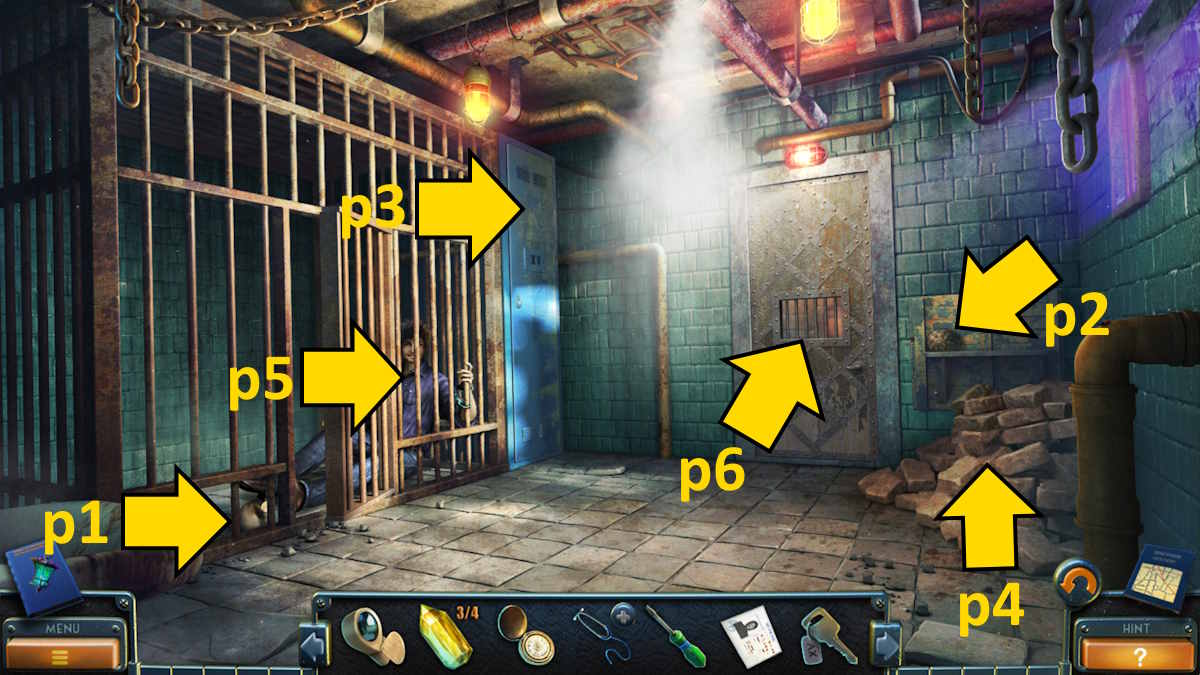
Image by Pro Game Guides
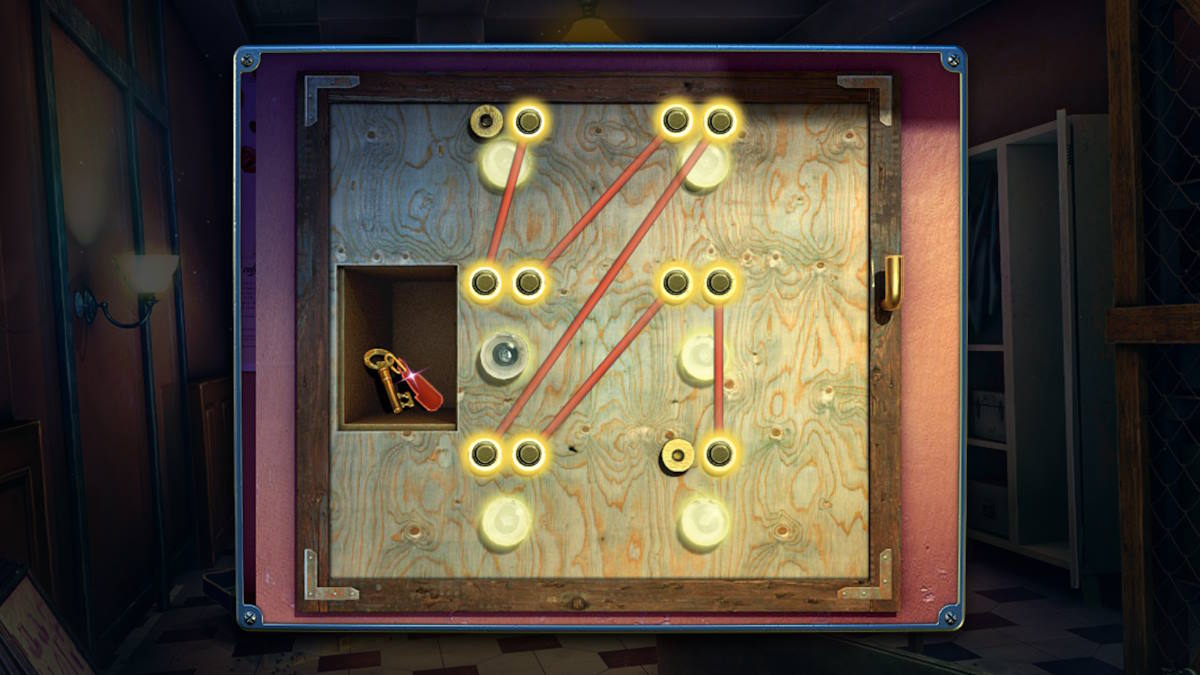
Finish another aggregation with theCollectibleon the wall ( 8a ) , and grab theMorphing Objectfrom the lounge ( 8b ) . Take theLassofrom the threshold ( 8c ) and use the wirecutters here to break the range of mountains and reveal a missing object mini - plot ( I ’ve shown the conducting wire puzzle incision below ) . Once terminated , take theKey . Select the desk next ( 8d ) and click the papers until you detect theElectric Prodand aCard .
Return to the hallway , use the Francis Scott Key to open up the fire cupboard ( 7d ) , and take theFire Hose . Go outdoors , remove the cap from the flame hydrant ( 6e ) , and then attach the hose . Remove the batteries from the prod in your inventory , add them to the police radio in the police car torso ( 6c ) , and employ the computer code that the radio gives you ( 653 ) to enter the box in the bole and take theJack .
Go down to the post , use the squat to prop up the bench ( 5c ) , and take theCoffee Machine Handlefrom inside the case there , along with your finalCard . Add the handle to the burnt umber machine ( 5a ) , use it , and pour a coffee . Take theHot Coffee .
Screenshot by Pro Game Guides
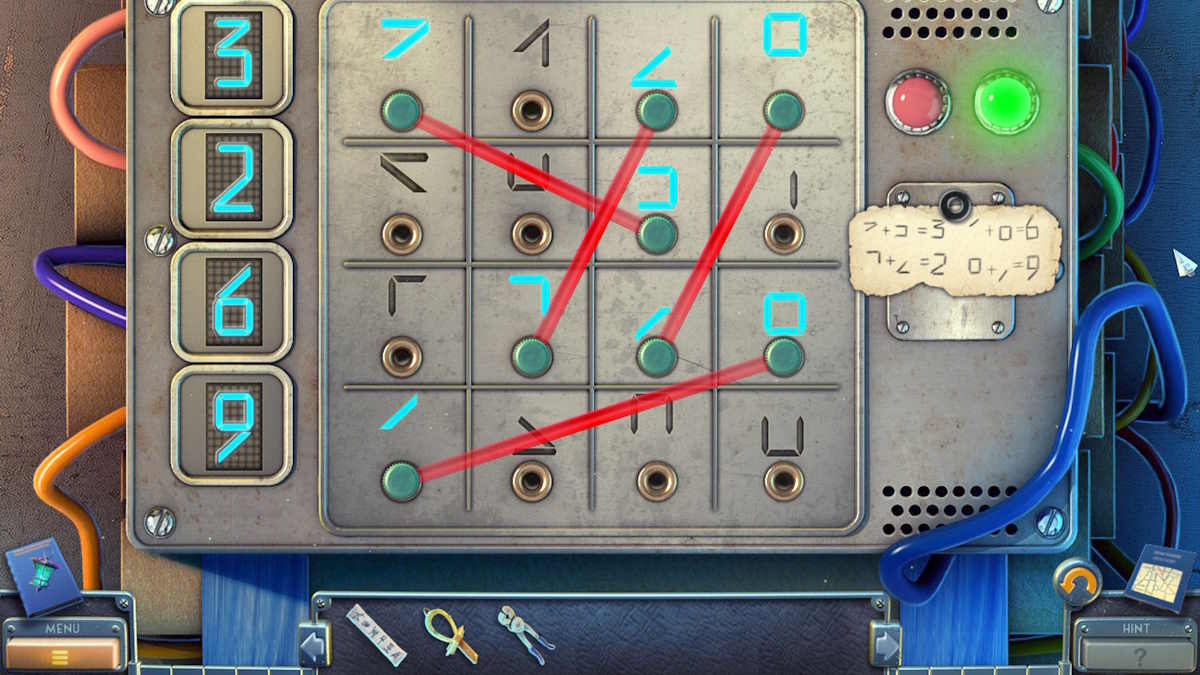
lead back to the security way , open up the freezer ( 8e ) , and use the deep brown to disappear the ice and get theMagnet . summate the magnet to the prodding in your inventory , and fasten it in seat with the belt to get aMagnet on a Stick . Use the reefer to get theFusefrom the back wall in the G. Stanley Hall ( 7e ) , and then tally it to the elevator mastery ( 7c ) to start a puzzle . Put the safety fuse in the next order :
Once done , chatter the five replacement in the top - right of the close - up and the mystifier is complete . Press theup release on the elevatorto open it , go inwardly , and head up to the observation deck .
You ’ll get hold the lastCollectibleon the railing ( 9a ) , and the finalMorphing Objectnext to the amplifier ( 9b ) . Use the lasso to pull the transmitting aerial down ( 9c ) andelectrocute Hardsteinin the process . He ’ll miss the missing key off the side of the building , so head up back to the entry to collect it by using the hose ( 6a ) to lap it down from the signpost ( 6f ) . Take theActivation Key .

Screenshot by Pro Game Guides
Go back up to the notice pack of cards , impart the two keys to the amplifier(9d ) , summate the symbols diagram , and then rotate the discs to equate the symbolic representation . utilize the following decree to match them all up :
The lamp will grow dull and the Reaper will be release . Congratulations ! You ’ve completed New York Mysteries 3 - The Lantern of Souls !
For more tips and stupefy solution here at Pro Game Guides , check out myNew York Mysteries 3 Bonus Chapter Walkthroughor myNew York Mysteries 5 Walkthrough !
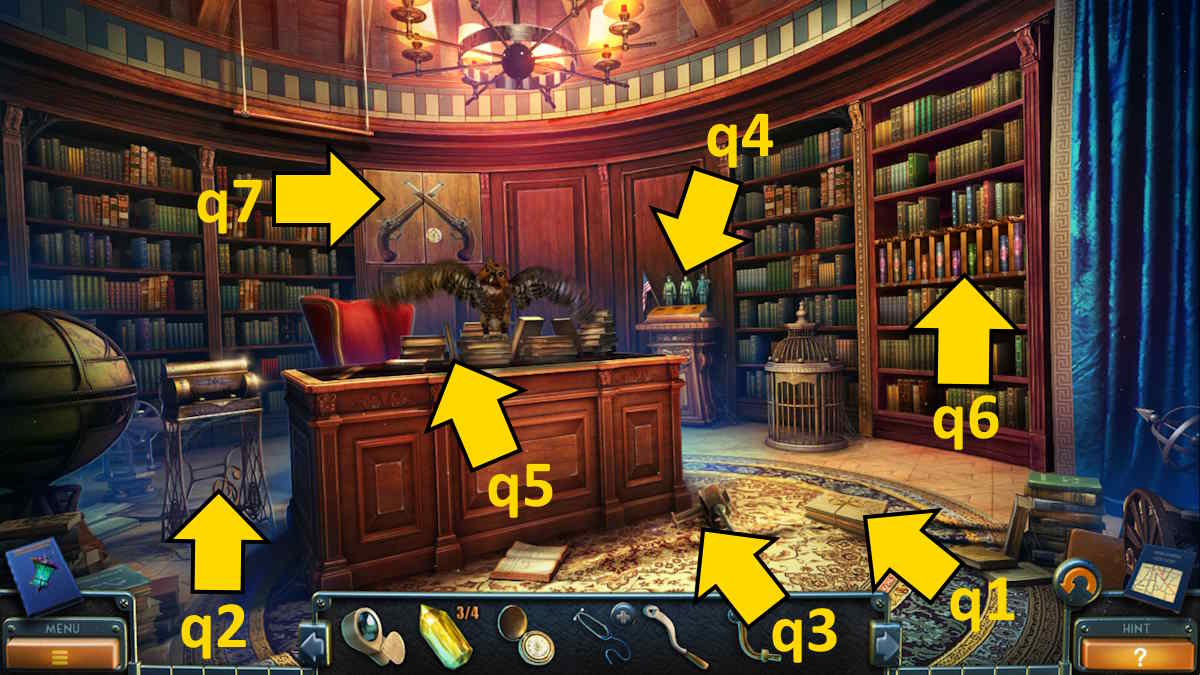
Image by Pro Game Guides
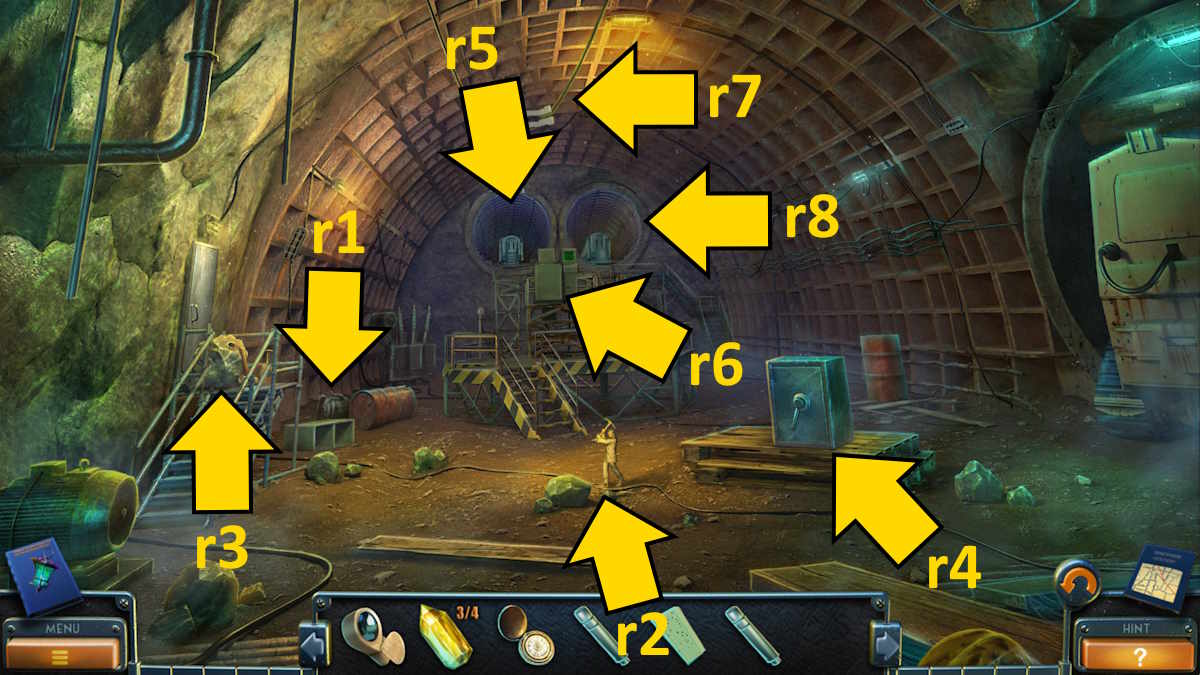
Image by Pro Game Guides
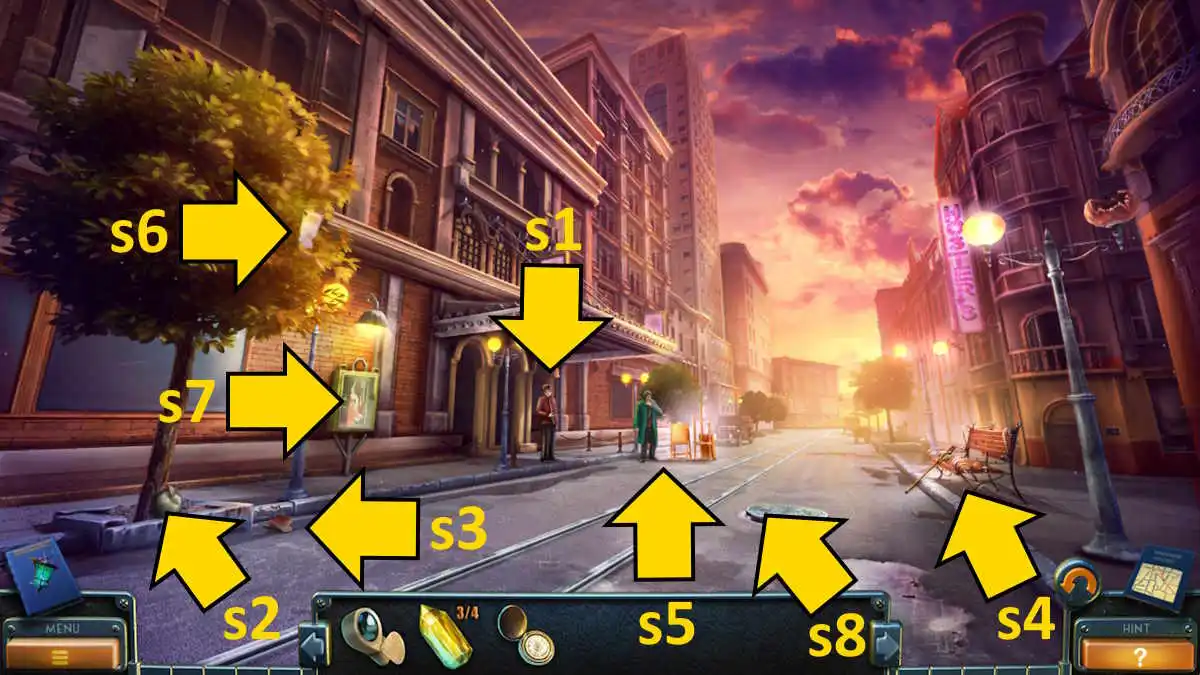
Image by Pro Game Guides
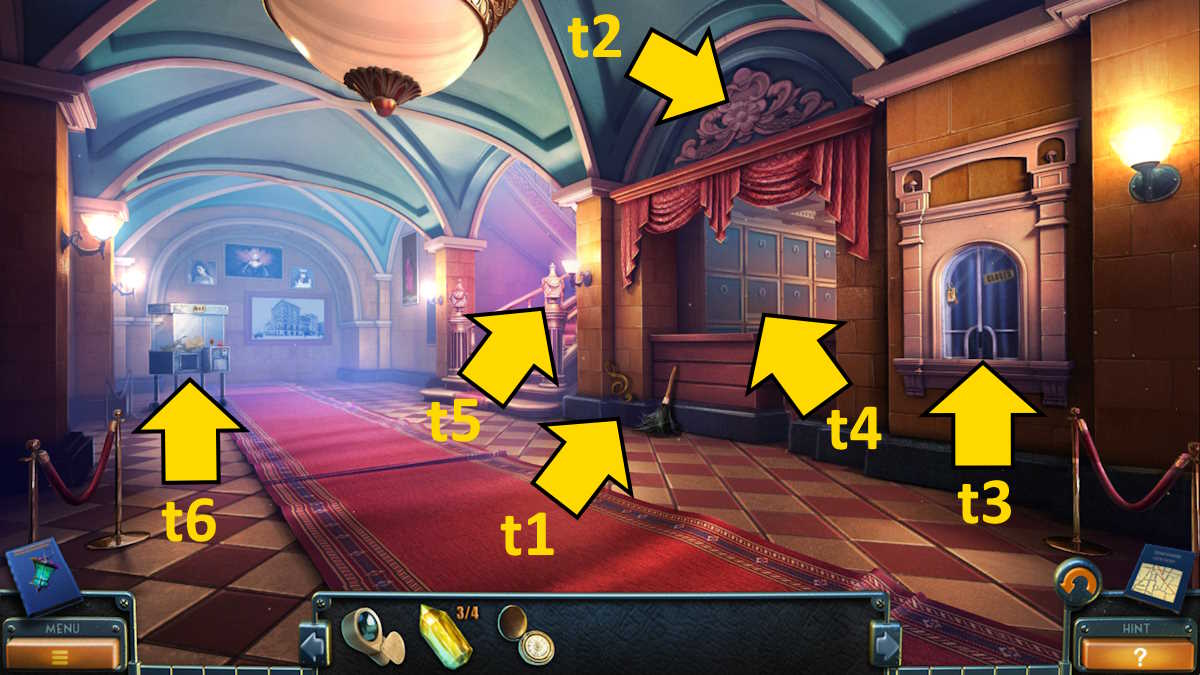
Image by Pro Game Guides
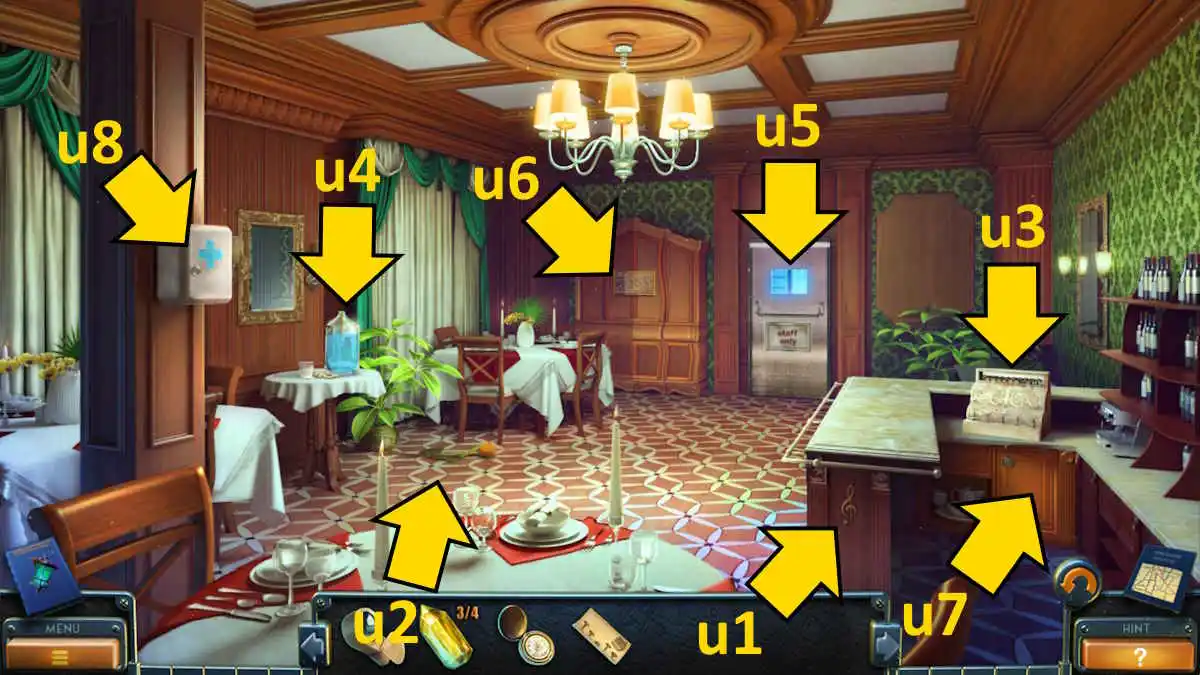
Image by Pro Game Guides
Screenshot by Pro Game Guides
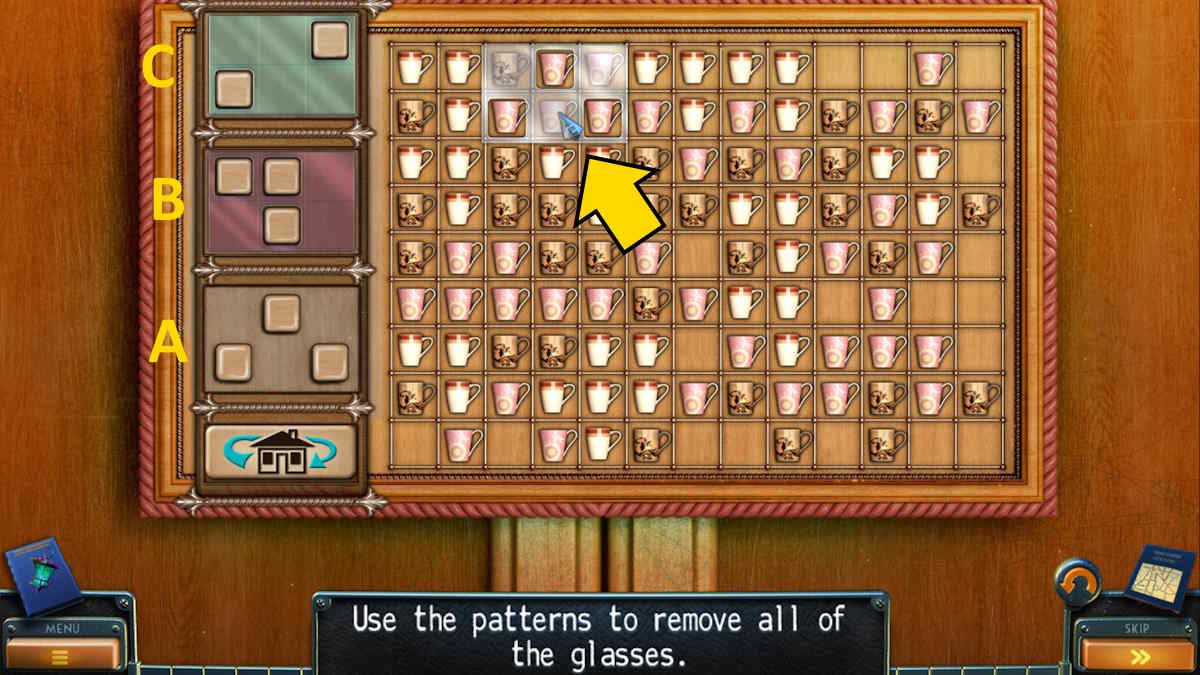
Image by Pro Game Guides

Image by Pro Game Guides
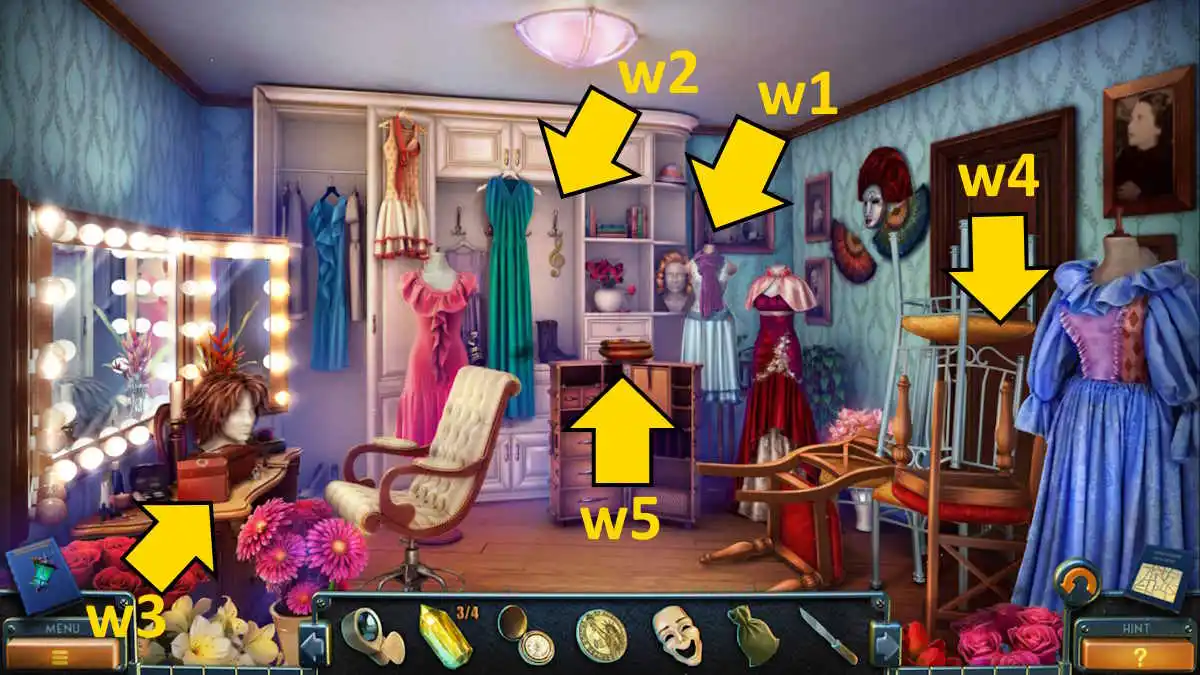
Image by Pro Game Guides
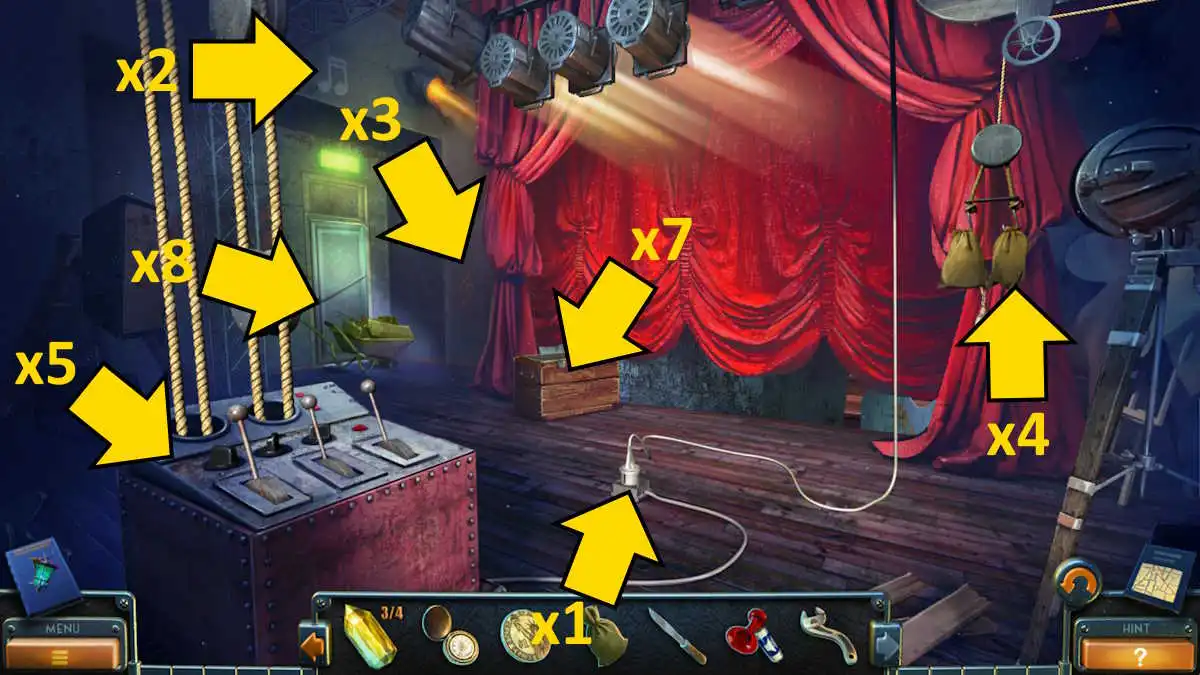
Image by Pro Game Guides
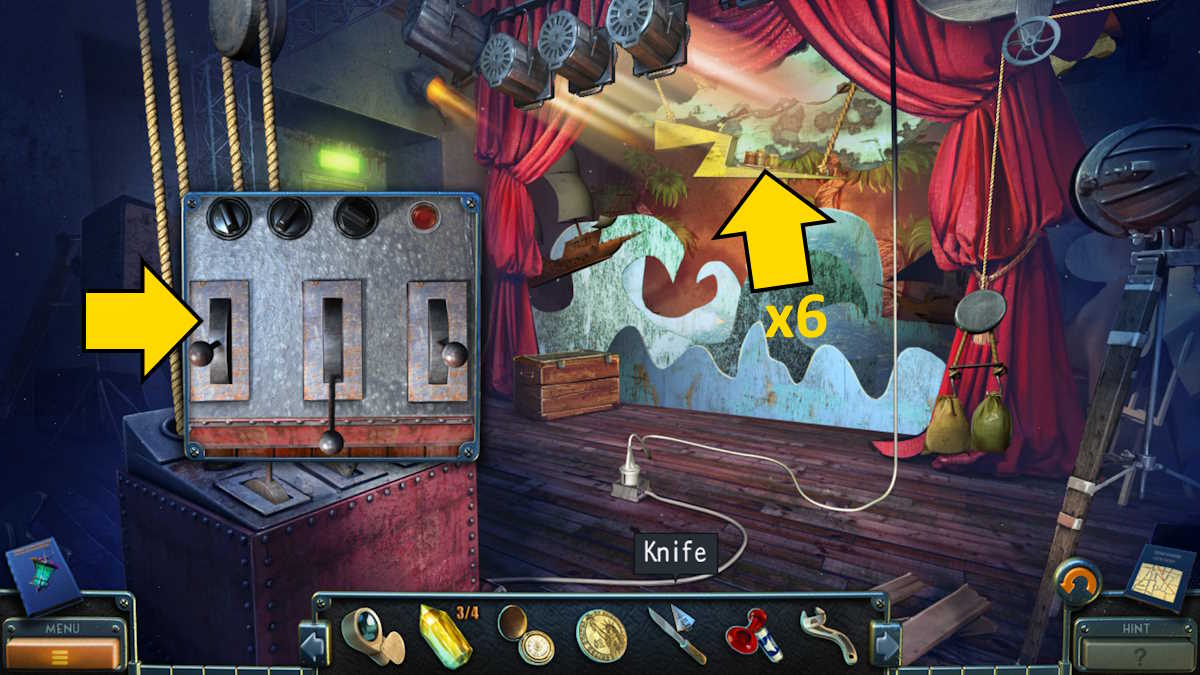
Image by Pro Game Guides
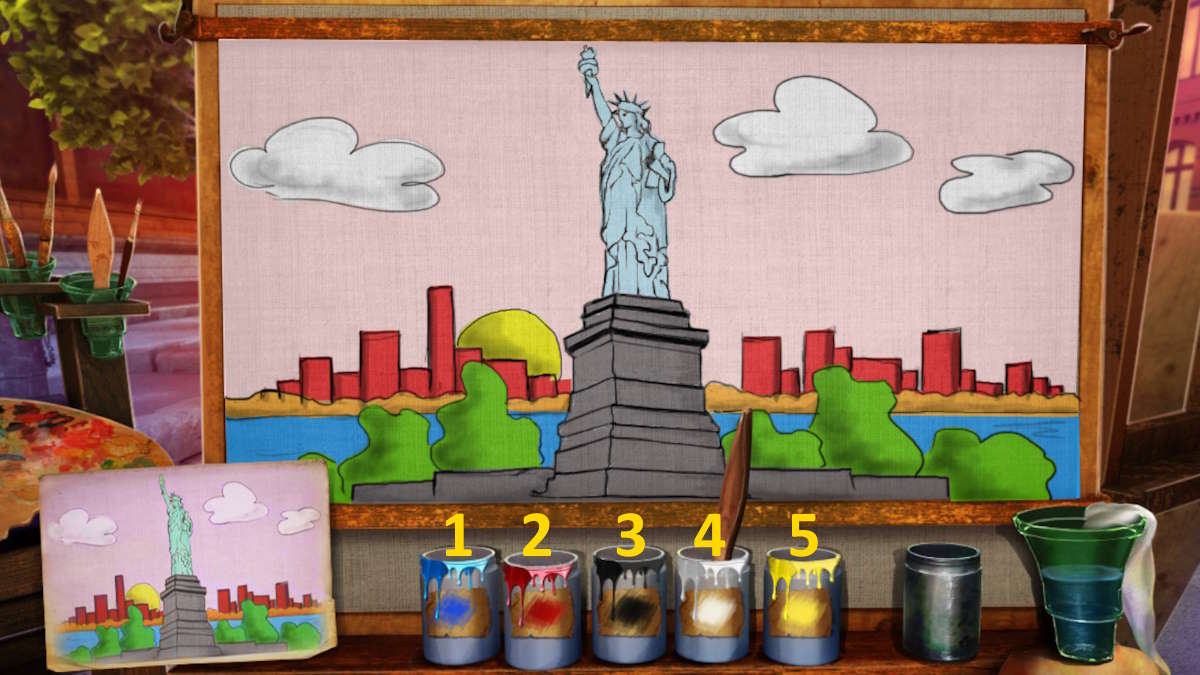
Image by Pro Game Guides
Screenshot by Pro Game Guides

Image by Pro Game Guides
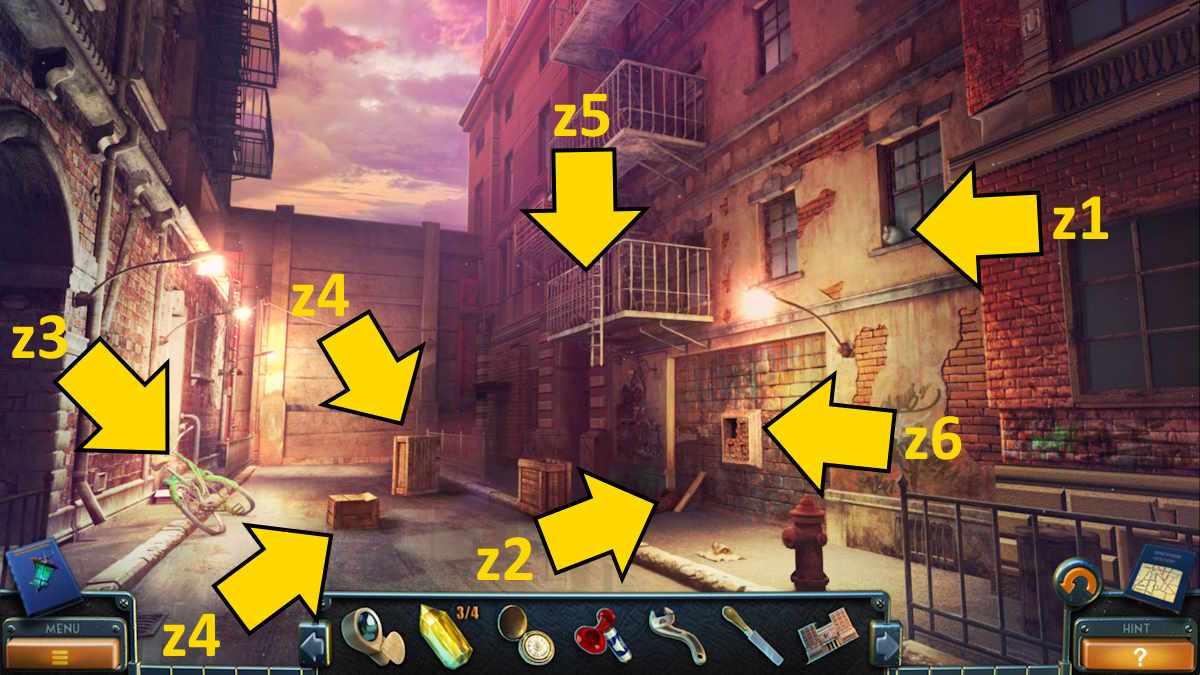
Image by Pro Game Guides
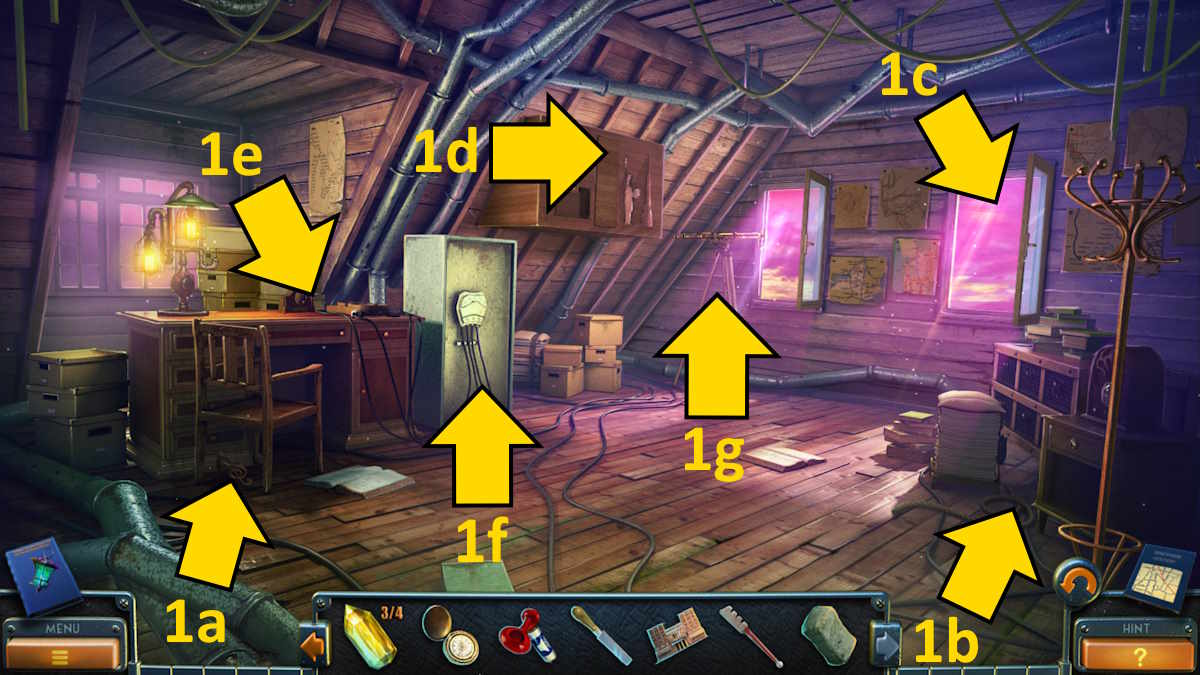
Image by Pro Game Guides
Screenshot by Pro Game Guides
Screenshot by Pro Game Guides

Screenshot by Pro Game Guides
Screenshot by Pro Game Guides
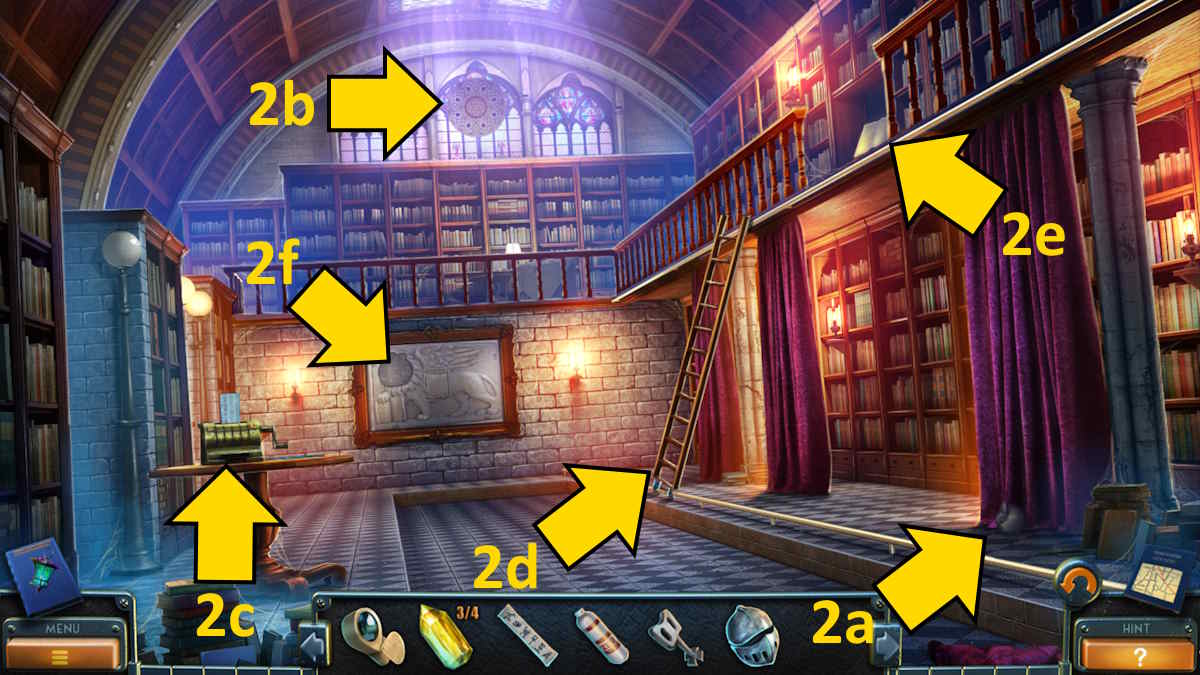
Image by Pro Game Guides
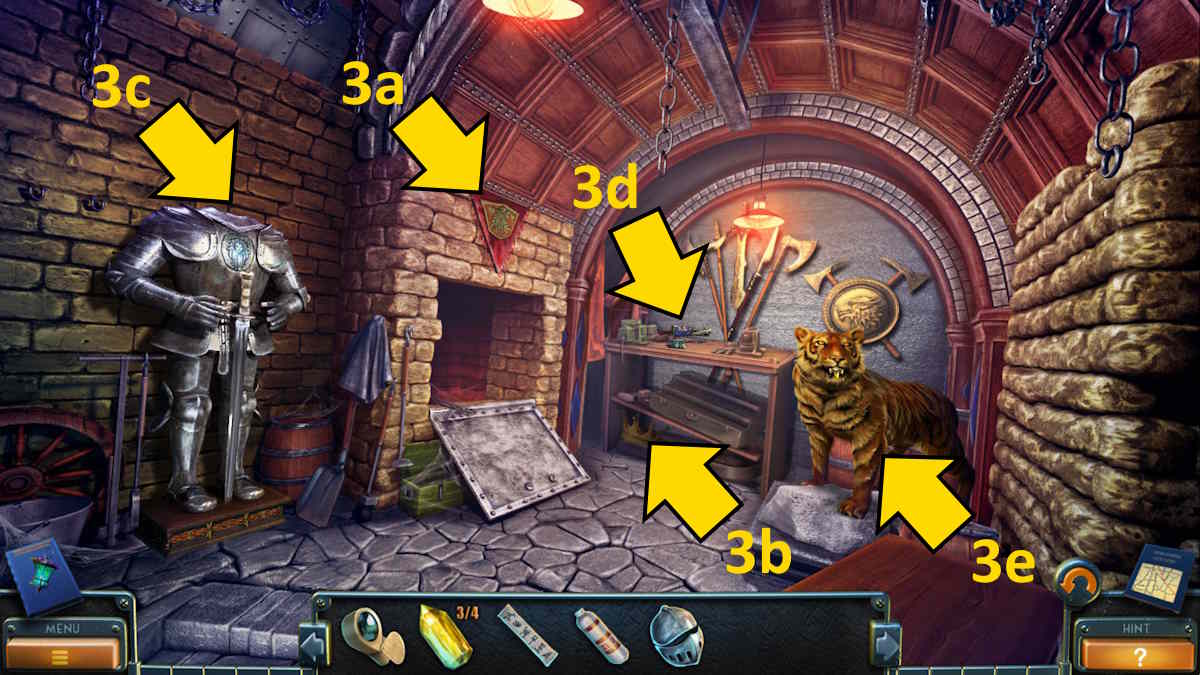
Image by Pro Game Guides
Screenshot by Pro Game Guides
Screenshot by Pro Game Guides
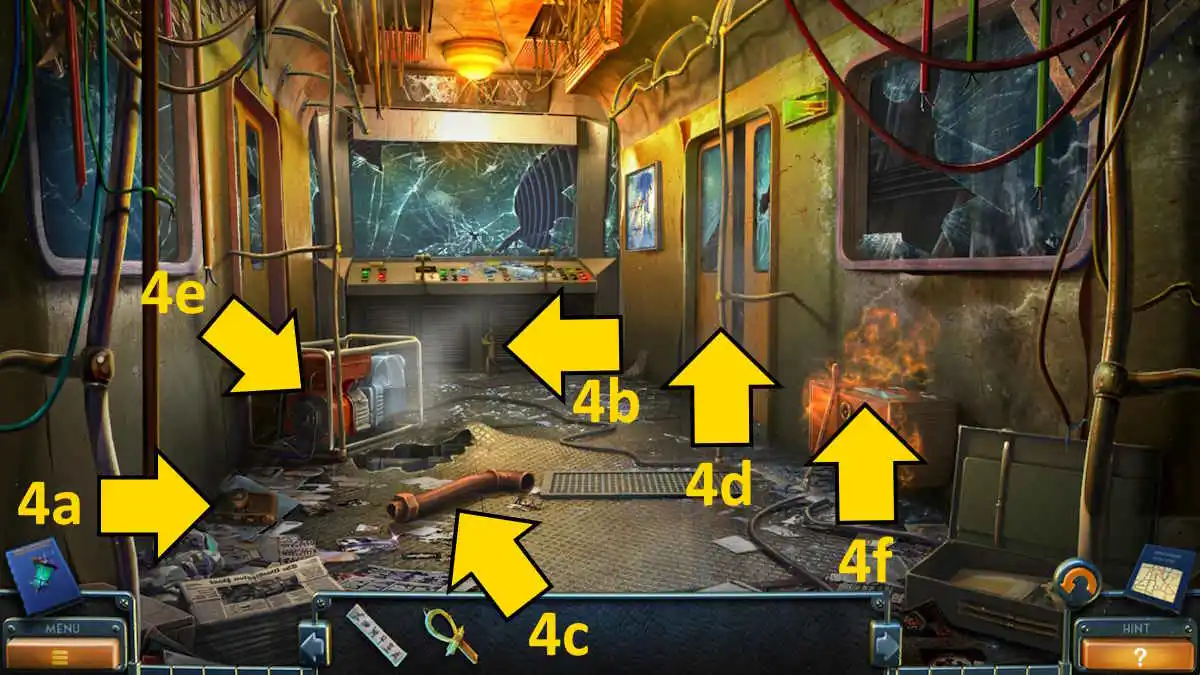
Image by Pro Game Guides
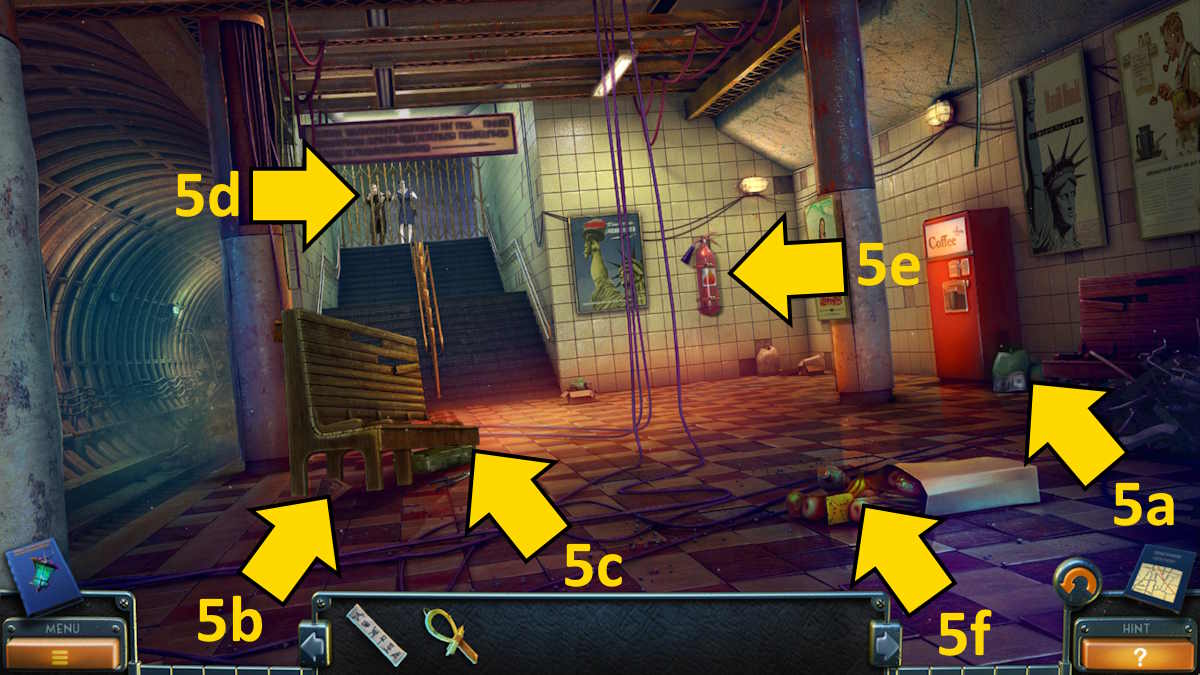
Image by Pro Game Guides

Image by Pro Game Guides
Screenshot by Pro Game Guides
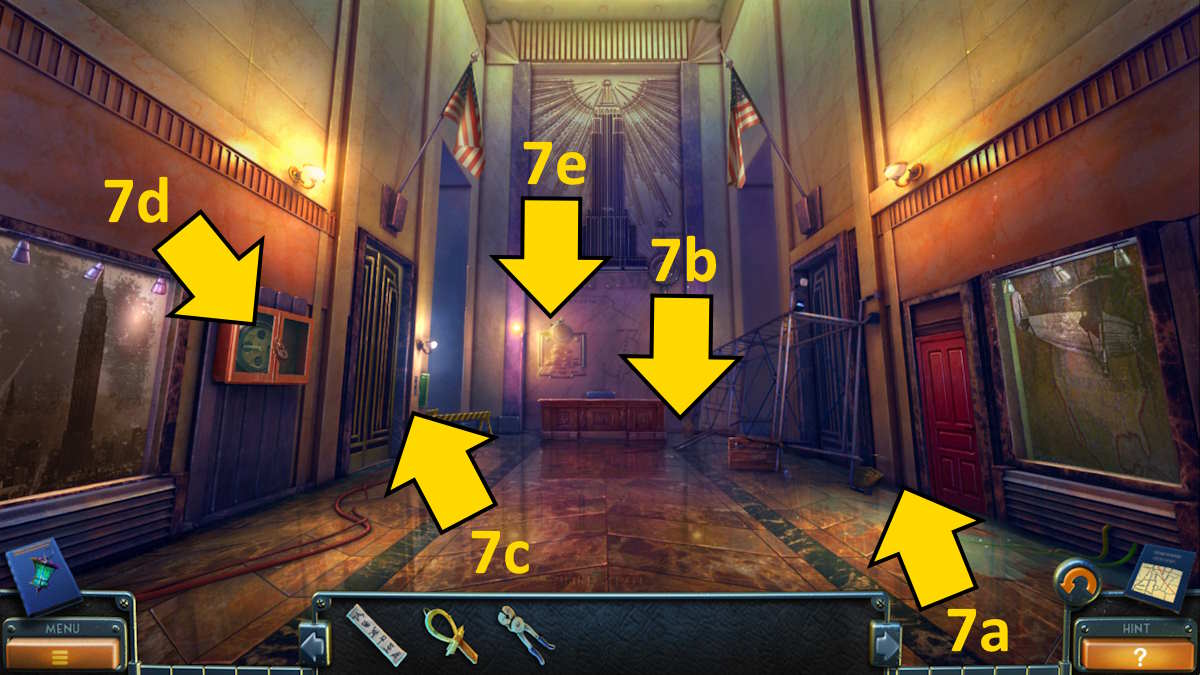
Image by Pro Game Guides
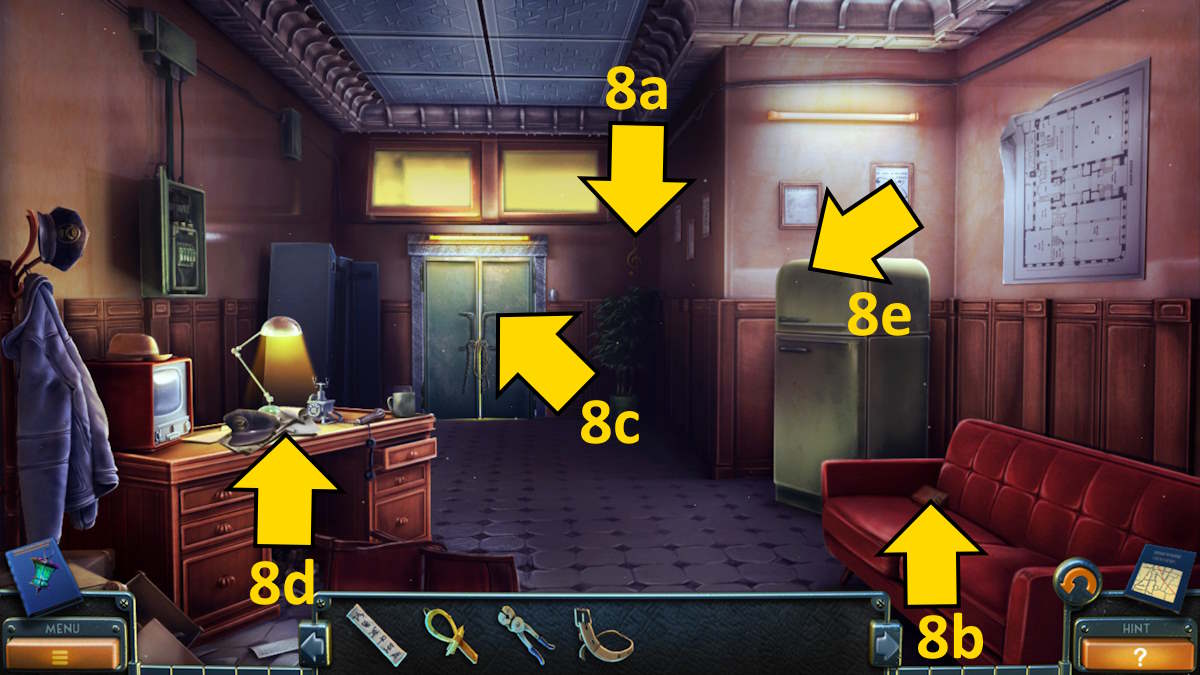
Image by Pro Game Guides
Screenshot by Pro Game Guides
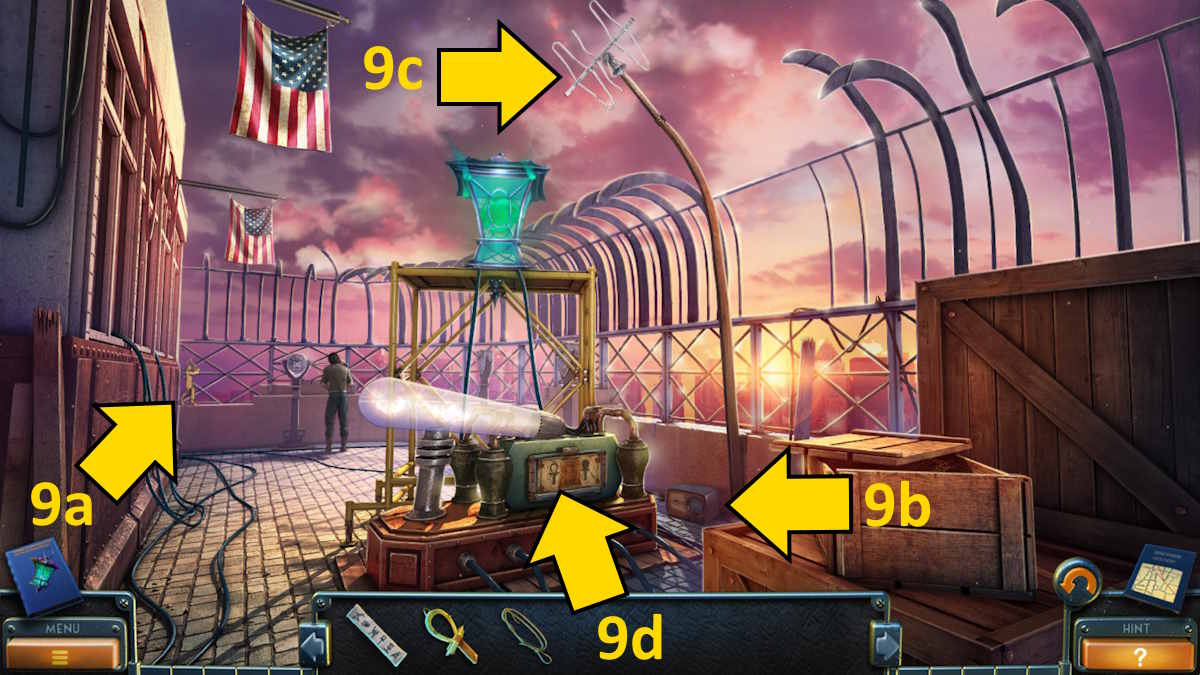
Image by Pro Game Guides

Image by Pro Game Guides
