The tautness is electric in our New York Mysteries 2 walkthrough …
I really savour point - and - snap teaser and physical object - witness RPGs , and the collector ’s variant of the New York Mysteries game are some of the best ones out there . If you ’re have trouble with New York Mysteries 2 : High Voltage , keep say this walkthrough .
New York Mysteries 2 Walkthrough - All Puzzle Solutions
Our diacetylmorphine Laura has been called out to anothermysterious case . Aseries of unusual murdershave taken berth in and around the urban center , each preceded by a ball of light witnesses equate to lightning . Youhead to Central Park , the scene of the previous attack , to see what you may spy out .
This walkthrough has been done in normal modality , so take into consideration some puzzles may be a little different if you use a different musical mode , but noteyou can shift difficultness at any timevia the menu button ( bottom left ) . Also , call back you canuse the map to quick move between locations(bottom right of the screen ) . The function also clarifies where you are still looking for collectibles , which I bump super useful .
The murder scene
Take thecollection itemnext to the police tape ( a1 ) , then get across the back of the scene ( a2 ) to move along the way of life to the hot dog stand and click the officer to talk to him and get your case file . Take the collectible from the bench ( b1 ) and then click the trash can ( b2 ) . Click the newsprint in it once it has fallen over to get theRazor Bladethat ’s wrapped inside it .
take the umbrella patch ( b3 ) for a close - up and take theWire . In your armory , click the wire several times to twist it into aLockpick . While in the same close - up , use the razor blade on the speckle to remove it , taking theFish Figurine Fragmentthat ’s underneath .
Click the red-hot dog bucket ( b4 ) and use the lockpick to blame the lock , taking theTongsfrom inside . Do n’t miss themorphing objectbetween the back two benches ( b5 ) . Go back to the criminal offence scene and get a close - up of the sidewalk crack ( a3 ) , then use the pair of tongs to get thesecond Fish Figurine Fragmentfrom inside the cranny . choose the sauceboat ( a4 ) , then apply the Pisces fragments on the box in the close - up to get your first puzzle .

It ’s a puzzler that you ca n’t fail , but if you ’re sputter , you require to move the top - left piece right and then the bottom bequeath two pieces to be able-bodied to move the puritanical section about halfway ( see above ) . From there , move the first slice you act back to the leftfield and it should be easy from there . Once complete , take theOilcan . take the grip under the bench ( a5 ) for a close - up , click the top of it several times to remove the leaves , then use the oilcan on the clasp to open up it to take and learn a alphabetic character . Do n’t lose themorphing objectby the bush ( a6 ) .
Finding Bishop
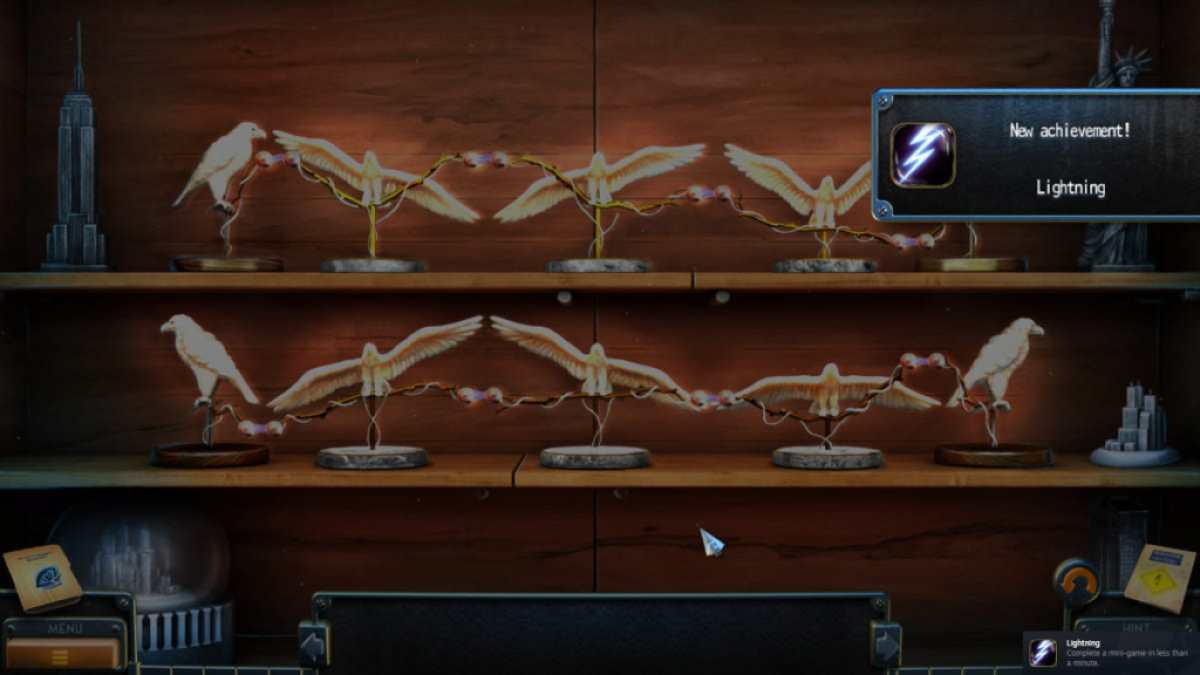
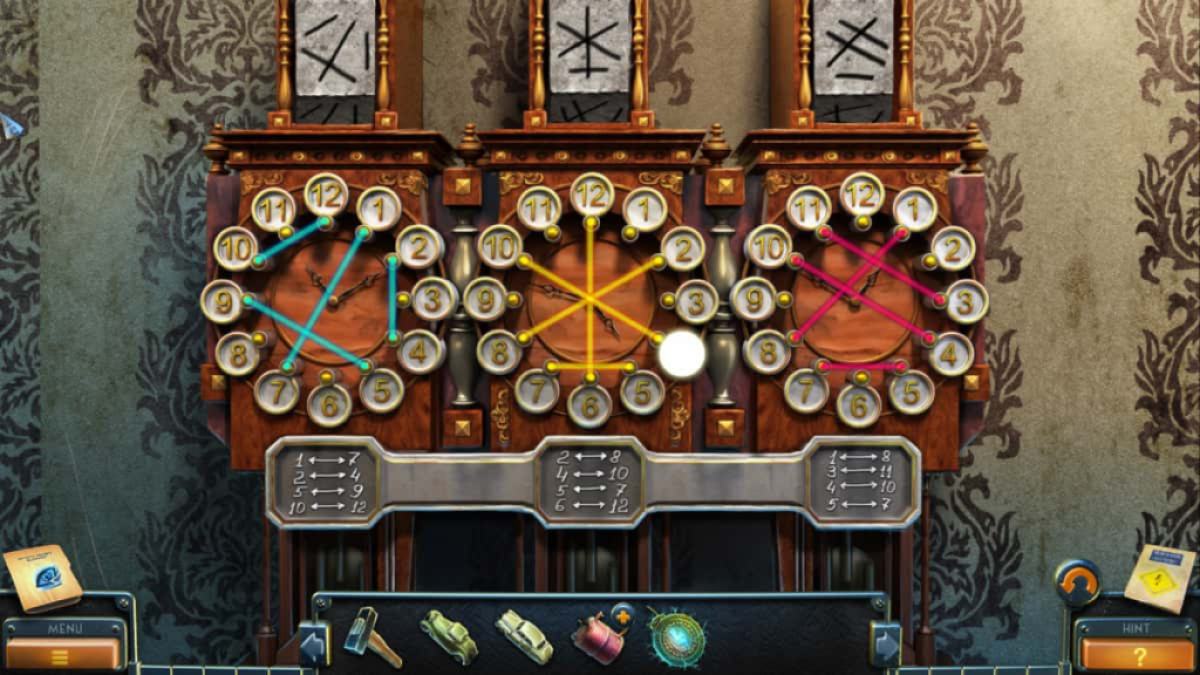
Once in the keepsake shop , click the rug ( c1 ) and commit it back to unwrap a trapdoor , then click it for a stopping point - up and take theEagle Figurine . Take themorphing object(c2 ) by the hat and thecollectiblebelow it ( c3 ) , then snap the top of the serve counter ( c4 ) for a finish - up . get across the item on the desk until thesecond Eagle Figurineis available to take from underneath the mess . you may now add the two figurines to the shelf ( c5 ) to start an electricity mystifier .
All you need to do is switch the eagles around to make a complete circuit . Again , you ca n’t break here — just click two eagles to switch them until you ’re done ( see above ) . Once perfect , the compartment will open , and you’re able to take theStringandEagle Key .
take the front of the serving rejoinder ( c6 ) and tot up the train to the central flag . Now click the left flag twice and the right pin once to open up a secret compartment , taking theToy CarandHookfrom inside .

Image by Pro Game Guides
Use the eagle winder to spread out the trapdoor ( below c1 ) and head down . Grab thecollectibleon the right ( d1 ) and themorphing objectfrom below it ( d2 ) , then dawn the bill sticker ( d3 ) to take asecond CarandRazorfrom behind it . pick out the boxes ( d4 ) and pick up theNails . Go back upstairs and get a finish - up of the backdoors ( c7 ) and expend the razor to cut the rophy holding them closed . Click the door again to move into the backroom for a leave out object secret plan .
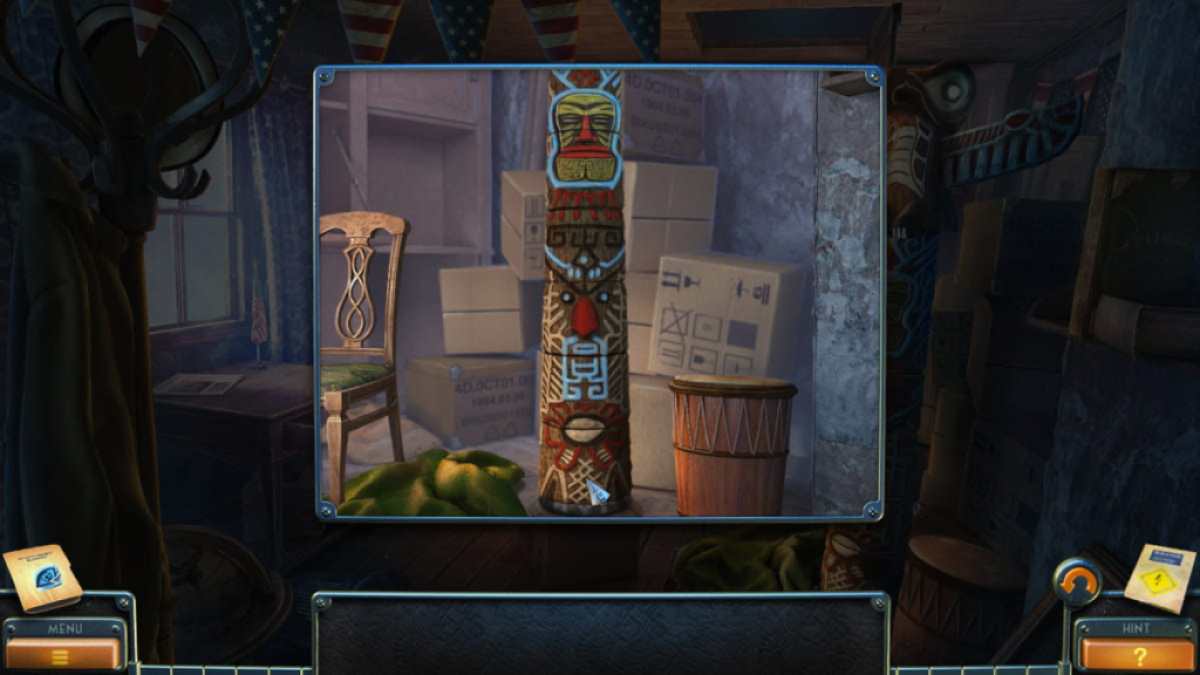
If you ’re a niggling stuck on this , some well-fixed thing to miss are having to target the lamp on the board and alight it , using the key to wander the clock ( top unexpended ) to get the spring , using the robot code to enter the hachure ( top of the sieve ) , using the suck cup to enter the drawer , and line up the totem Pole ( see above ) .
Once you ’ve done that , you ’ll get theLift Key Card . Go back downstairs , select the lift chemical mechanism ( d5 ) , and use the keycard on it , then click the greenish release to deign further . At the bottom of the lift shaft , get across the foreground to go into the vestibule .

Image by Pro Game Guides
Speaking to Bishop
Click Bishop to talk to him about the case and he ’ll give you theBusiness Card Holder . cluck this a few times in your inventory to get thePass . Take the picture on the wall ( e1 ) and thethird Carfrom the yap leave behind behind it . I choose to impart the toy railcar I ’d already collected to the box on the table ( e2 ) to clear some armoury space , but you do n’t have to yet . Take thecollectiblefrom above the unexpended door ( e3 ) and themorphing objectnext to the good chair ( e4 ) .
Go back up to the souvenir workshop ( remember you’re able to use the map to libertine - travel ) , click the picture on the wall ( c8 ) , and add the picture you just got downstairs to start a matching puzzle ( see above ) . Once all over , take thefourth CarandFishing Linefrom behind the picture . Combine the line and hook in your inventorying to get aHook on Fishing Line . Now go justly back downstairs and click the door ( e5 ) to go into the study .
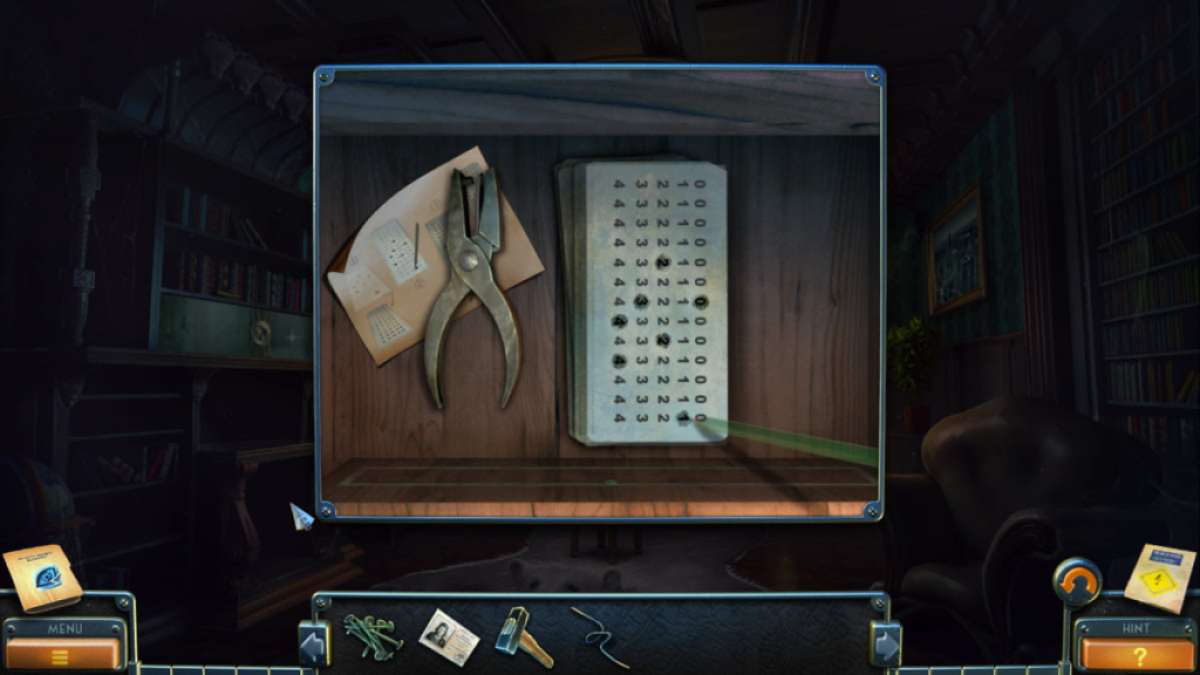
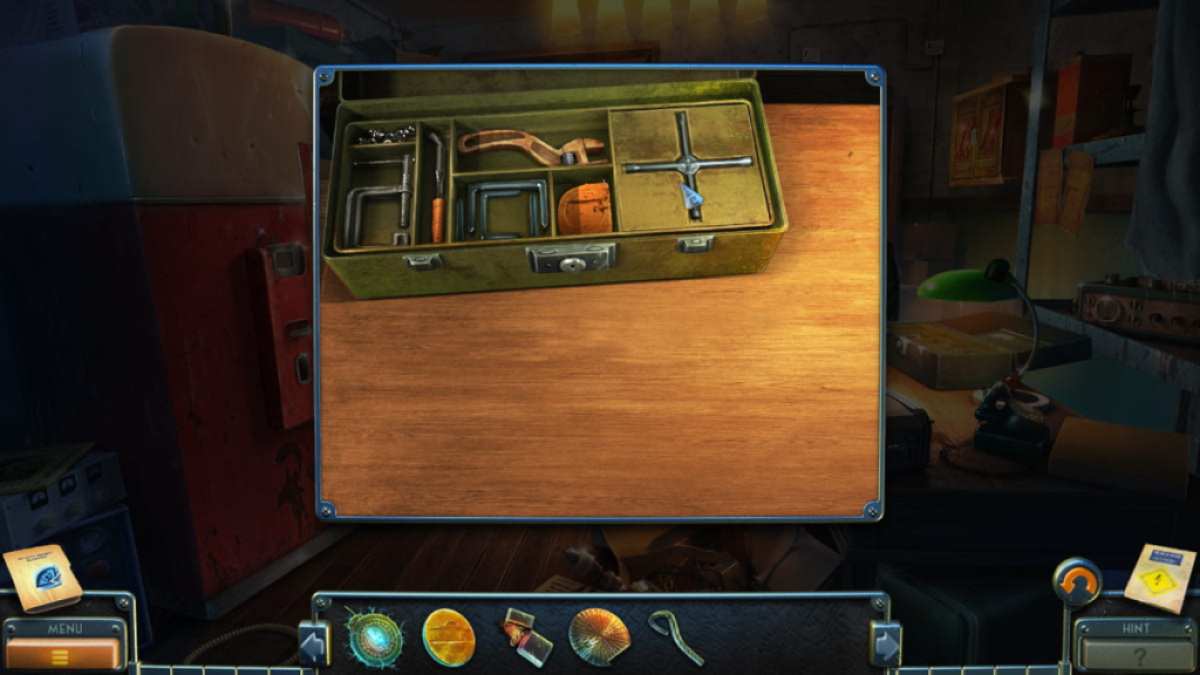
pick out the Pisces tank ( f1 ) for a close - up , take theSlide , and employ the claw and line to angle out theKey . Also , snap up themorphing objectfrom the bookshelf ( f2 ) and thecollectiblefrom the desk ( f3 ) . take the desk ( f4 ) , click the lax panel of Natalie Wood in the close - up to let out a keyhole , and use the key to launch the drawer and take theStencil , Hammer , andWire . Add the stencil to the figure launching pad in the drawer , then habituate the pencil in the drawer to label off the numbers . Use the puncher that ’s also in the draw ( see below ) on the launchpad and you ’ll get thePunch Card .

Image by Pro Game Guides
From the hall , apply the passageway on the correct side ( e6 ) to go to the intersection . Take thecollectiblefrom the gangway ( g1 , below ) and themorphing objectfrom the auto on the correct ( g2 ) . Select the orbit in front of that machine ( g3 ) for a close - up and take theShort Planks . Click the room access ( g4 ) and take theLong Planks , merge them with the poor single in your inventory ( and using the hammer and nail ) to get theLadder . Use the run to enter the high level ( g7 ) .
Select the central control area ( g5 ) for a close - up and take afifth motorcar , then use the punch lineup to start the machine . This turns a light on in the top - left tunnel ( g6 ) . you may now take that area , so do so to select the train there and go inside the carriage . Click the control area inside the carriage for a cut scene . When you exit the secret gearing , you ’ll find yourself in the prison yard .
The prison
Select the pass from your inventory to spill the beans to the prison guard , who will then reserve you debut into the prison . Before you go in , take thecollectiblefrom the tire ( h1 ) and themorphing objectfrom the wall ( h2 ) . Get a close - up of the fusebox ( h3 ) and take theStar Fragment , then click sacks ( h4 ) to take asecond Star Fragment , aSlide , and theFunnel .
Click the hand truck threshold ( h5 ) for a finale - up and pick out the handle to open it , taking thesixth Carfrom inside . Still in the close - up , click the left - side sun eyeshade and thelorry Keyshould drop onto the seat . Pick up the key fruit and put it in the lighting . you may seek to change state it over , but the fuel storage tank is empty . Head into the prison house hall .
You ’ll find thecollectiblehere at the radix of the stairs ( i1 ) and themorphing objecton the upstair far - right lamp ( i2 ) . Select the top - provide prison cell ( i3 ) for close - up and take thethird Star Fragmentand theRag . go back alfresco and select the camion ’s fuel tank ( h6 ) , expend the tag end on the wooden panel in the close - up , and you ’ll receive a four - digitcode,3197 .
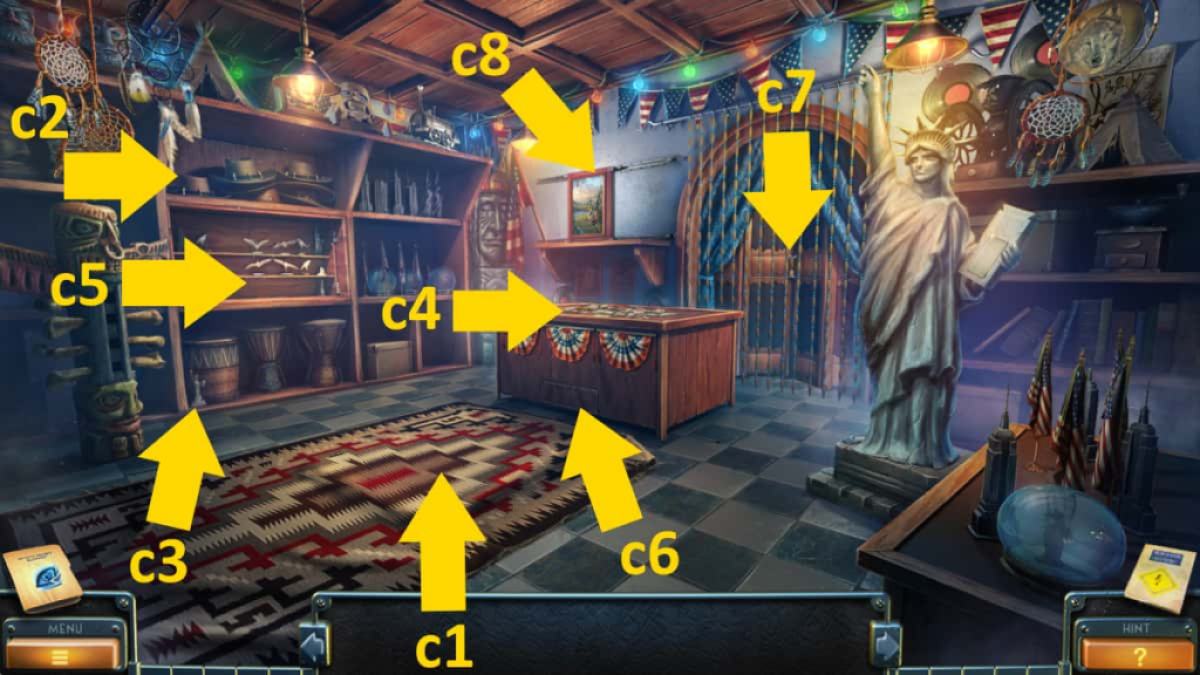
Image by Pro Game Guides
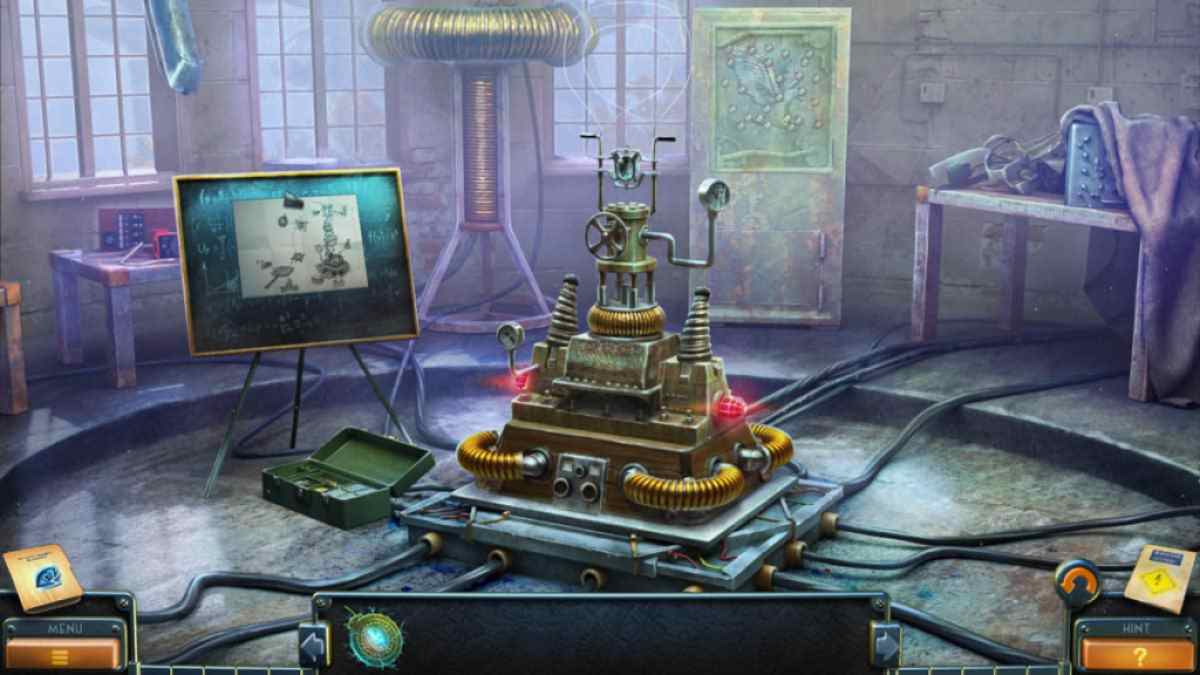
Go back into the prison house hall and choose the back - right field door ( i4 ) . introduce 3197 and then weight-lift the enter push button ( bottom right on the keypad ) to unlock the door and head into the prison archives . Thecollectibleis on the cabinet ( k1 ) , while themorphing objectis on the right - side filing cabinet ( k2 ) . Grab thePush Broom(k3 ) , then select the filing cabinet ( k4 ) for a close - up . Click the file cabinet inside until you open theHenry Tyler file . Take theIron Applefrom the open file .
Return to the study and habituate the iron orchard apple tree on the console below the bookshelf ( f5 ) , not forget to take thesixth Carin the same close - up . With the storage locker outdoors , pick out the street diorama to begin a mystifier to fix the example . All you require to do is flick items that are out of place and then penetrate the spatial relation they should be in ( see below ) . You ca n’t die , but note that if you snap outside the prototype , you ’ll postulate to start again . Once perfect , you’re able to collect theEmpty Film Reeland anEagle Figurine .
Back in the prison archive , select the table ( k5 ) and click the mapping to turn it on in the close - up . add together the eagle statuette to the boxwood in the same finale - up , take on theTapeandLever Handle . fall into place all the ripped piece of paper in the corner , too , as they ’ll come together on the desk . Use the tape to put the photo back together and then cluck it for a cut picture plus anothercode , 462 . you may also penetrate the TV camera ( k6 ) and sum up the reel , taking aSlide , Star Piece , and yourseventh Car .
Screenshot by Pro Game Guides
Back in the prison one thousand , you’re able to add the grip to the fuse box ( h3 ) , which spread the service department and pop an objective - matching mystifier . Once consummate , you ’ll apply the auto extension mirror to beam on the circuit table to start a jigsaw - style teaser . You need to join all the edge connectors to the one on the exterior of the puzzle . Again , you ca n’t break here and the section will go drear and be locked in once in the proper smear . Once complete , you ’ll receive theJerry Canfrom inside the closet .
bestow the funnel shape to the lorry furl tankful ( h6 ) , then use the Boche can to summate some gas . Now re - infix the lorry ( h5 ) , bend the key in the ignition , and the lorry will move backward . you may now employ the combination you got from the archive ( 462 ) to get to the briefcase ( h7 ) and get thelast Star Pieceand aFlashlight .
The star puzzle
piece the star in your inventorying and then return to the archive . Use the star on the secure ( k7 ) to commence the star puzzle . You need to move the slice around until they ’re in the spaces that match the pattern on each . If you ca n’t do this one ( I detect it very annoying ! ) , here ’s a solution :
Once staring you ’ll get theBlowtorch Part , Prison File , andLoaded Film Reel . lend the loaded movie gyrate to the projector ( k6 ) and press the red-faced push button for a cut scene of the execution you check earlier . Once gross , note the image leave on the covert . Go back into the camion in the prison house yard and follow this shape on the room access mechanism to launch the glove compartment and take theScrewdriver .
Move to the prison hall and utilize the push broom on the top - left cellphone door ( i3 ) to sweep the radio towards you . Click it again to pull it through the bars and then use the screwdriver to remove the back and take theBatteries . Add them to your torch in the inventorying , then use the flashlight on the dark passage at the back of the hall ( i5 ) , then click the door at the conclusion of the entrance hall in the closeup to gain access code to the execution chamber .

Image by Pro Game Guides
After the snub vista , you ’ll find theMedallion . Is this what gave our condemned captive some form of special ability ?
The execution room
Once you ’ve watched the cutscene and received the medal , grab thecollectiblefrom next to the fire asphyxiator ( a1 ) and themorphing objectfrom the wire above it ( a2 ) . habituate the screwdriver on the four shtup and remove the grating ( a3 ) , take theCrowbarandSlidefrom inside .
Use the mapping to move back to the elevator and apply the crowbar to enter the box ( b1 ) and take theTorchfrom inside . Go upstairs to the souvenir store , add the torch to the Statue of Liberty ( c1 ) , and take theBarfrom its undercover compartment .
Now you’re able to return to the bailiwick and add the cake to the clock gimmick on the rampart ( d1 ) and take on the connections stick there . Simply drag the coloured lines to match the link on the measure , then click the patterns above until they match ( see image above ) . Once done , take theMagnetand aBlowtorch Part .
Screenshot by Pro Game Guides
revert to the room with the execution bedroom ( or way with stool on the mapping ) , use the attractive feature to get theZipper root for Tabfrom the shot in the ground ( a4 ) , then connect that to the bag ( a5 ) to open it and get theJackknife . Head to the prison railway yard , use the tongue on the sack ( e1 ) to take theGrappling Hook , then lead into the prison hall and practice it to get at the rooftop ( f1 ) .
The rooftop
Take themorphing object(g1 ) andcollectible(g2 ) from the flooring , then get through the fans ( g3 ) for a closing curtain - up . Click the green coating to move it and take aToy Car . Click the upper part of the metal column ( g4 ) for a close - up and take theStone . miss the stone off the ceiling ( g5 ) , which will recoil up theHandwheelto you . expend it on the pipework at the bottom of the metal tower ( g6 ) to fill the water tower , then click the top department once more and take theStick .
Put the stick into the fans to stop them , which give up you to reach in and get thefinal Toy Car(if you have n’t collect all the others , check my previous guide link above for the other locations ) . After you take the car , don’t bury to take the stick back .
At this point , you’re able to return to Bishop in the Hall and try his narration about the execution . After the cutscene , add the remaining railcar to the box on the table ( h1 ) , which will afford up and take into account you to take thefinal Blowtorch Part . Put all three together in your inventory to get theBlowtorch(again , if you ’ve overlook the first part , consult to my previous template ) .
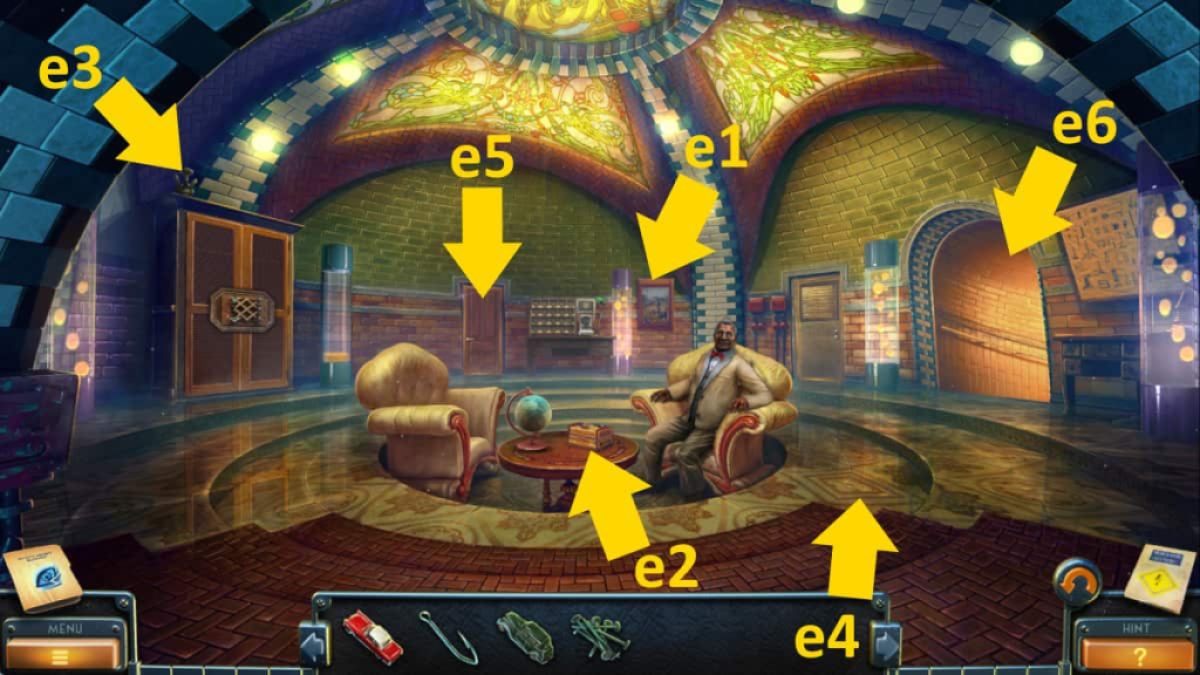
Image by Pro Game Guides
Use the blowtorch on the padlock door ( g7 ) to heat up the curl , then use the malleus to break it once it is hot . This earmark you to move into the abandoned substation ( after a cutscene ) .
The abandoned substation
cluck the skeleton ( i1 ) for a close - up and take theMed Station Key . Also , take thePipefrom the floor ( i2 ) . Now , you could move to the prison hall and apply the key to open up the door to the Med Station ( f2 ) . manoeuvre inside .
You ’ll find acollectibleon the ledge ( j1 ) and themorphing objecton the correct - side poster ( j2 ) . open up the purse ( j3 ) and keep removing fruit until you could take theNailat the bottom . Now choose the bed for a close - up ( j4 ) , click the sheet to move them , and take theSlide . at last , use the jackknife on the mattress to find someWire . In your inventory , summate the stick to the pip and then secure them together with the wire to make aPipe And Stick .
yield to the abandoned substation and employ the pipe and stick you ’ve made to turn on the lights in the close - up of the junction box ( i3 ) . Take thecollectible(k1 ) and themorphing object(k2 ) from the control board , then click the skeleton for a close - up and pick out the photo to find that the body was that of Samuel Brodiem Hugo ’s Father-God .
Screenshot by Pro Game Guides
Now you ’ll need to click the glowing expanse ( k3 ) for a missing token mystifier . It is comparatively straightforward , although if you want the order to throw the switch once you add the safety fuse to them , it is4 - 7 - 1 - 8 - 2 - 9 - 10 - 3 - 5 - 6(see below ) . The final computer code you need ( top to bottom ) is358 , which is written on the hanging ceiling panel once you tote up the lightbulb to the ignitor . On pass completion , you ’ll get aSwitch .
Add the substitution to the panel ( k4 ) , after which a control panel opens . you’re able to take someRubber Gloves , aChandelier Part , and bump information about when Samuel Brodie was charter .
The chandelier puzzle
Pop back to the hall to get another update from Bishop , who ’ll give you aPunch Card . Now , use the wire and rubber gloves to restore the broken lava lamp ( h2 ) and flip it on , noting the pointer symbol you may now see on the glass ( pointingright , entrust , down , down , right , up ) .
Head to the study , stand the feces up ( d2 ) if you have n’t already , and add the chandelier part to the chandelier ( d3 ) to begin a clean puzzle . You need to even out the light , which can be frustrative , so if you ’re struggling , see my image above for how you need to run along up the cords . On completion , you ’ll get theMagnetic Key .
Go to the intersection next and use the punchcard in the central control board ( m1 ) to summon a train to the bottom left tunnel ( m2 ) . Select the dark-green door ( m3 ) and practice the magnetic key to afford it , then go into the hallway .
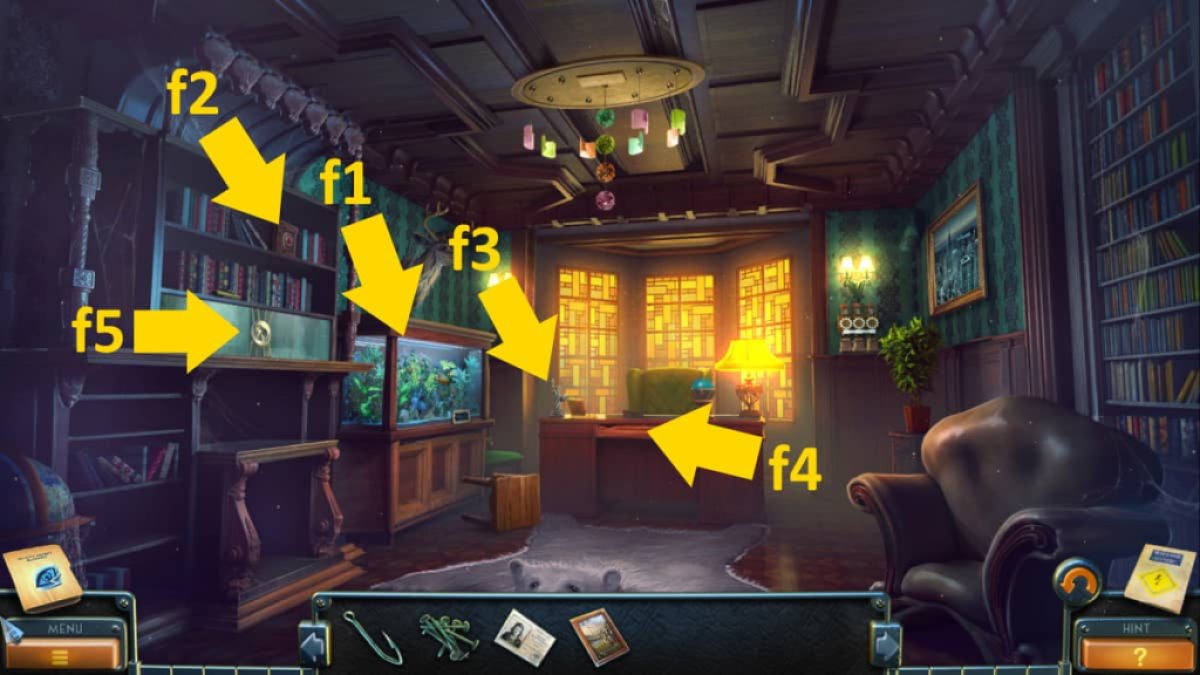
Image by Pro Game Guides
Grab thecollectibleon the steps ( n1 ) and themorphing itemon the rampart ( n2 ) , then click the plate on the bulwark ( n3 ) for a stopping point - up . Add the nail to it , then employ the hammer to remove the plateful and take thePigeon Figurine . take the loge on the leftover rampart ( n4 ) and click the successiveness you discover on the lava lamp ( right , left , down , down , right , up ) to open up it and get theSlideandGreen Pebbles(you may add the pebble to the mosaic ( n5 ) now if you like , to get them out of your stocktaking , but you ca n’t do the puzzle yet ) .
The pigeon puzzle
direct back to the mansion and add the pigeon to the paries brass ( h3 ) , which ask you to switch all of the pigeon from one side to the other . If you ’re stuck on this one , you’re able to copy the pursual :
Once sodding , the cupboard will open . Click it for a close - up and take theKey , aSlide , and theProtective Suit . take the only unopen door left here ( h4 ) and use the tonality to open it , turn over you accession to the storeroom . headway inside .
Grab thecollectible(o1 ) and themorphing object(o2 ) from the ledge , then click underneath the chair ( o3 ) to find someGloves . Select the chair cushion ( o4 ) for a close - up and then click it again to move it , take theNailpullerfrom underneath . come home the dress rail ( o5 ) next to take aHangerand someYellow pebble .
Screenshot by Pro Game Guides
Select the attracter ( o6 ) next , then the know , which will fall off and roll under the chair . choose the bottom of the chair once more ( o3 ) , and use the hangar to retrieve theKnob . link up it back onto the drawer ( o6 ) , open it , and take theSlideandGas Mask . Now , you could head back to the hall and add the pebbles to the mosaic ( n5 ) to begin another puzzle .
The train mosaic
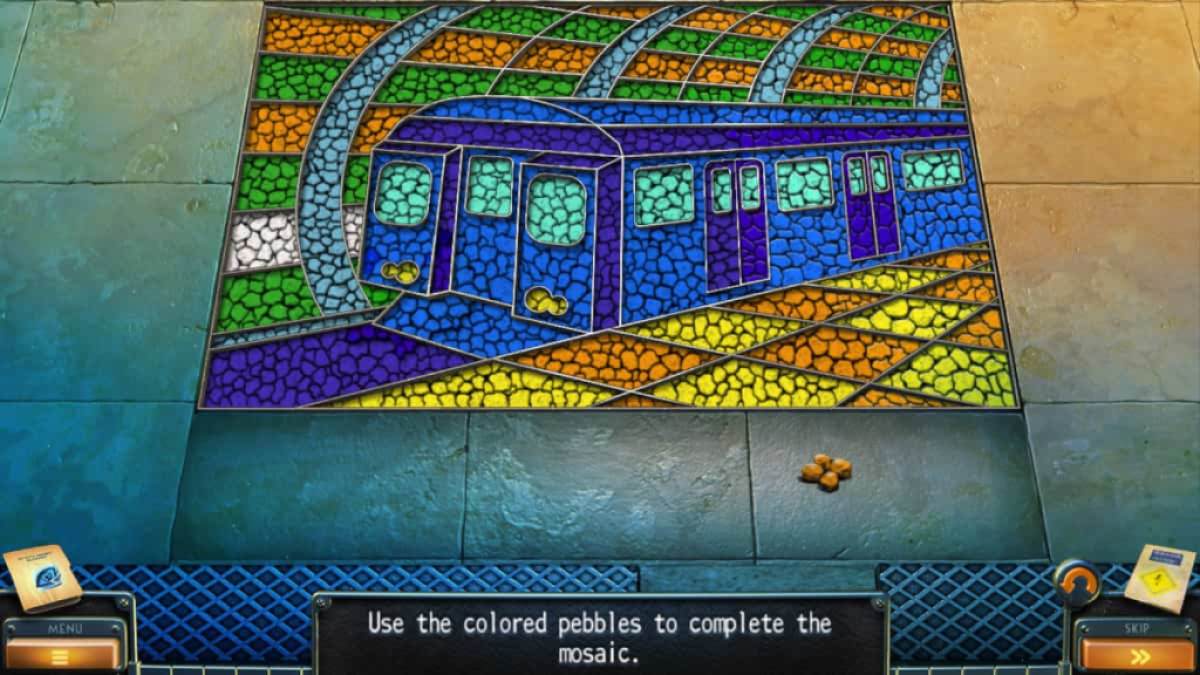
This is just a color - matching exercise ( if you ’re unsure , see the picture above ) , which will get you theBootsyou need to complete your suit of clothes once complete . Once you have them , commingle the suit , mask , gloves , and kick in your armoury to get the Hazmat Suit . While in the hallway , you may also take away the metallic element plaque ( n6 ) with the nail puller , taking theLight BulbandDiagramfrom the hole behind it .
point back into the storeroom and put the bulb in the lamp ( o7 ) , which start an object - matching puzzler . This one is quite straightforward , although it took me a while to understand I needed to utilise the screwdriver on the plughole to remove it and the key from underneath . On completion , you ’ll get aDrill Bit .
Back in the hall , pick out the hazmat suit , and with it in handwriting , click the room access ( n7 ) to go inside the pump elbow room . break up up theShovel(p1 ) and grab theKnobandPiece of Metalin the close - up of the violent valve ( p2 ) . Select the fan ( p3 ) , add the knob to the telephone dial , and get across it again to make the fan work .
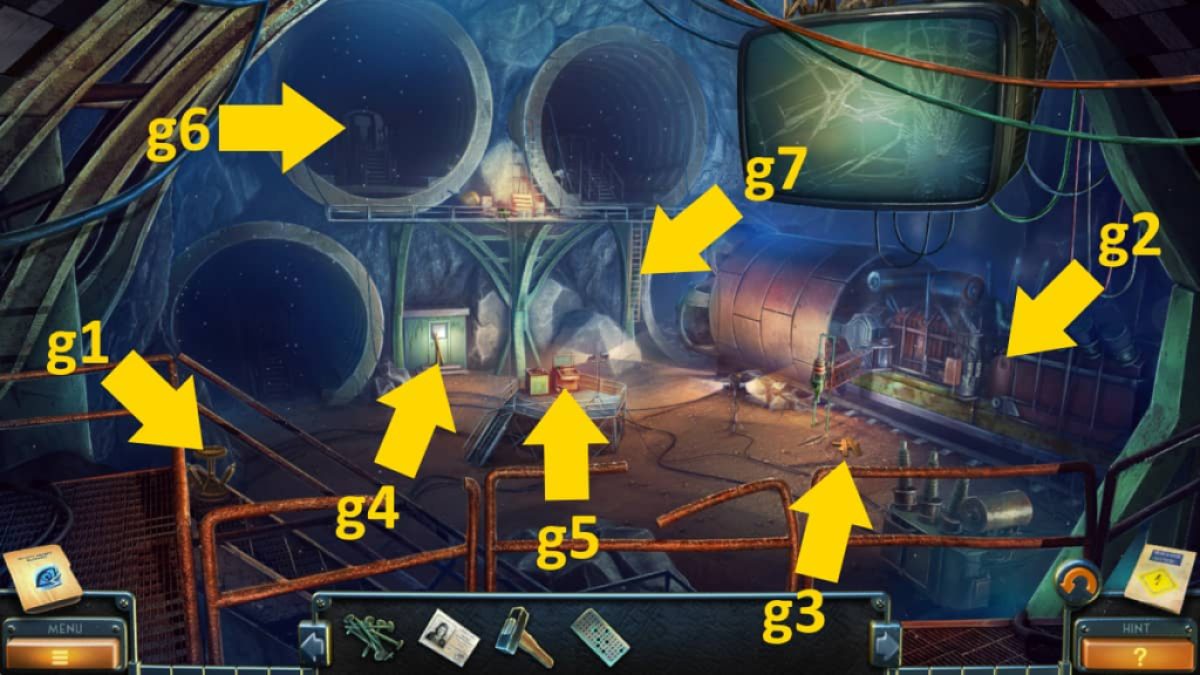
Image by Pro Game Guides
Go back to the point of intersection , add the exercise bit to the practice session ( m4 ) , and get through it again to practice a hole in the land . utilise the shovel on the drilled earth and take theMonkey Wrench . Back in the heart room , you may use the wrench to turn the red valve ( p2 ) , which demists the other half of the room . Now that you have a clear thought take thecollectibleto the left hand of the wooden crate ( q1 ) and themorphing object(q2 ) from just above it .
Hallway door puzzle
Select the mask ( q3 ) for a close - up and take aWelding equipment Part , aSlide , and aKnob . you could now lend the part of metal to the pickle where the knob was , but you ca n’t weld it yet . Go back into the hall and click the doors at the bottom of the stairs ( n8 ) , and add the knob to start a switch puzzle . To complete , click leave twice , correct six times then left once . With that , the door swing candid , and you could enter the wine-coloured cellar .
Grab the collectible by thewine barrel(r1 ) , theInsect Repellanton the barrel ( r2 ) , and themorphing objecton the high ledge on the right ( r3 ) . you may now go back to the storeroom and use the dirt ball repellant on the box ( o8 ) . Once exculpate , click inside until you find theHand Wheel .
fall to the pump room and take the welding gadget in your inventory . Put together the pieces to get aworking Welding machine , then use it to seal off the metal piece in home on the gob ( q3 ) . Select the orbitual area of the same machine just above it ( q4 ) , supply the hired man wheel , and click them to turn and let out a pipe puzzle .
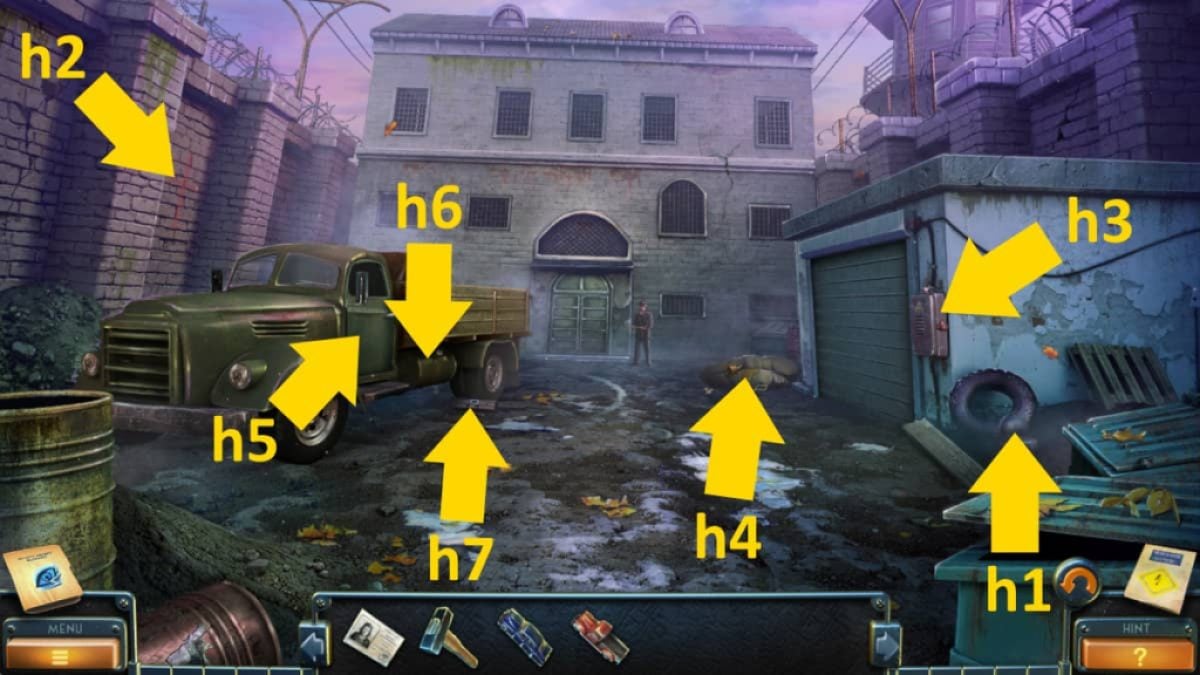
Image by Pro Game Guides
The pump room pipe puzzle
You basically necessitate to make a single flowing tube throughout the system . If you ’re stuck , see my complete pipe above . Once done , click the blue machine ( q5 ) , tally the diagram , click the two dials to agree , and thenclick the red buttons in the orderliness 2 - 4 - 1 - 3(numbers from top to bottom ) . This clears the flooded burrow , permit you to select the wagon train in the bottom right of the intersection ( m2 ) . Select the train , fall into place the doorway , then penetrate the controls in the finis - up for a weakened tantrum and move on to Samuel ’s House .
Samuel’s house
story thecollectiblefrom the right of the menage ( a1 ) and themorphing objectfrom the window on the white building ( a2 ) . Select the bicycle ( a3 ) for a finis - up and click the store pocket to get anEnvelope . Now cluck the plantation owner to the left ( a4 ) and take aSlide , then click the stones in it to reveal and take aNote .
Click the front door ( a5 ) and add the annotation to the close - up of the door combination puzzle . The answers to themath equations are 5 - 2 - 3 - 4 , meaning you pick out the ( from top)fourth , first , first , and fourth buttonson the panel . Once complete , you may click the threshold and point into the hall .
Thecollectibleis on the second bookshelf from the top ( b1 ) , while themorphing objectis on the banisters above it ( b2 ) . Take theSlidefrom the third bookshelf ( b3 ) , along with thePen and Paper , andPin . Also , not the clock here that is fix at1.55 . Now click the upstairs door ( b4 ) and head into Hugo ’s room .
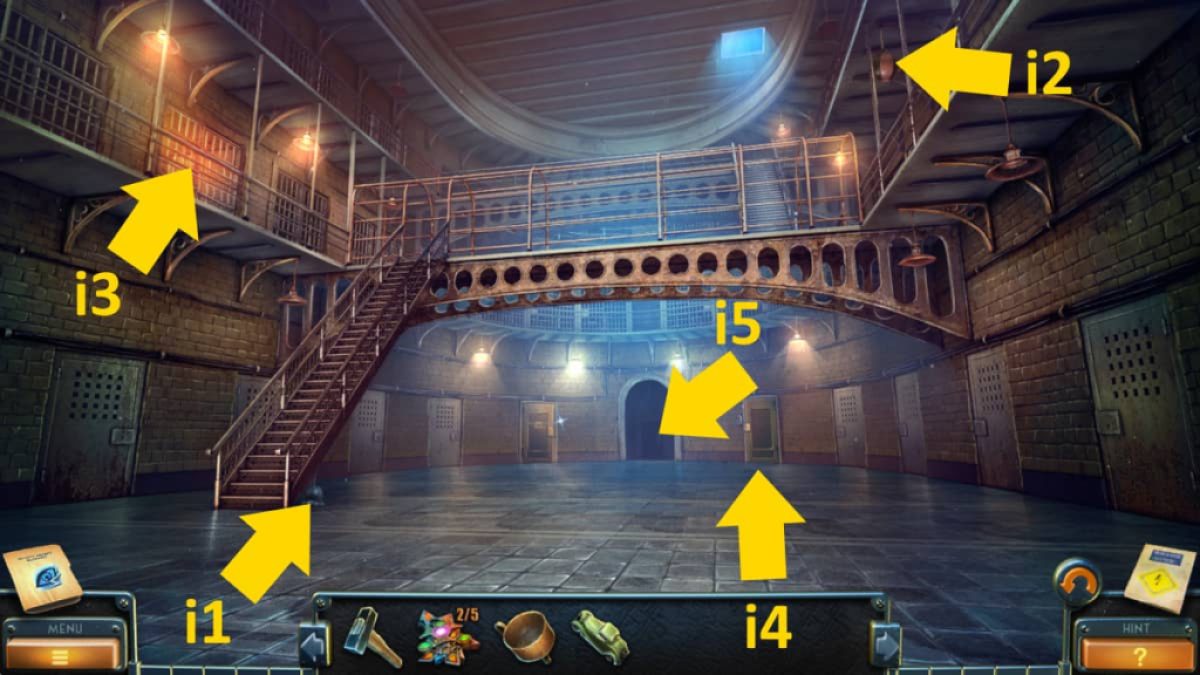
Image by Pro Game Guides
Hugo’s room
seize thecollectiblefrom the level at the conclusion of the bed ( c1 ) and themorphing objectwhich is under the far console ( c2 ) . get through the continental quilt to remove it ( c3 ) and then the bedsheet underneath for a close - up and take asecond Envelope . penetrate thePoster(c4 ) to collect it , which also reveals a chilling dying wall that points the digit square at Hugo . chatter the death wall for a cutscene , after which you ’ll receive a bangle ( but it does n’t go into your stocktaking ) .
Select the bookshelf ( c5 ) to regain you necessitate to take it back up with books . Seven of them are here on the floor ( just drag each one to the ledge ) and pile up them will also reveal and allow you to pick up aCordfrom the floor . But you still require one last book .
manoeuvre back downstairs , click the bottom of the looking glass doorway ( b5 ) , and place the poster on the storey there . Come out of the close - up , click the lock of the same door , and use the pin to push the key through . Now select the bottom of the door again , apply the notice to pull the winder under the door , and pick up theKey . reach the glass doorway and move through to the kitchen .

Image by Pro Game Guides
The kitchen
catch the most obviouscollectibleso far from the table ( d1 ) and themorphing objectfrom the top of the brownie ( d2 ) . snap the oven ( d3 ) to open it , then click the oven again and translate the bank bill within for a cutscene . Also , take theBulb . snap up the stepladder ( d4 ) , then click the kettle ( d5 ) for a close - up , take theSlide , and impart the cord to the table which will get you theKettle .
Select the sink ( d6 ) , lend the kettle , click the tap to fill it , then collect theKettle of Water . Return to where you picked the kettle up , grade it back on the counter , then tick the corduroy on the counter twice to plug it in at both ends . Once done , you could clack the kettledrum once more to get aKettle of red-hot water supply .
launch the freezer door ( d7 ) by penetrate it and place the tympanum inside . Take theCoinfrom inwardly . Now click the glowing country ( d8 ) for a missing object puzzle . Do n’t miss the key that ’s in the torpedo ( you need to click the handle to become it ) , and the mosaic is a bit annoying to complete ( I find once you have all the colors , you have to invest each slice in ordering , but it ’s just a cause of flick ing each matching space until one go in ) . Once done , you ’ll receive aPitcher .
Screenshot by Pro Game Guides
Next , select the washing auto ( d9 ) and use your clasp knife to remove the gum on the button . Press the unripe push to block the machine , then take theMetal Brushfrom inside the drum . Return to the hallway and place the step ladder on the stairs ( b6 ) . you could now click the clock for a closeup ( b7 ) but still want a hand for the clock .
Return to the abandon substation in the prison and add the electric-light bulb to the large machine there ( e1 ) for a cutscene explaining more of the back level . Once the scene is over and the auto is broken , click it again for a close - up and take theSwitch .
Now , direct up to the prison rooftop and use the metallic element brush on the corroded pipe ( e2 ) to reveal a diagram . Once revealed , utilize your pen and composition in the conclusion - up to re-create it and receive theNote with diagram . Next , return to the hallway at HQ and snap Bishop to move the news report along further , after which he ’ll give you yourthird Envelope .
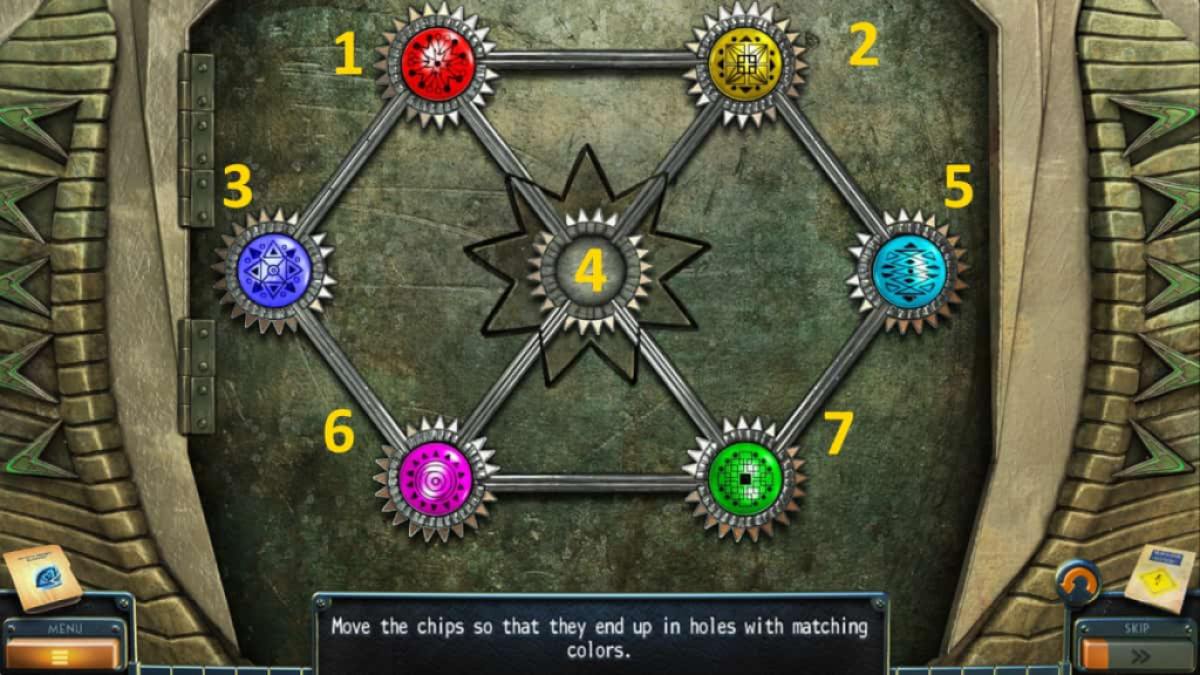
Image by Pro Game Guides
Head back to the lobby in the Brodie house , click the room access under the steps ( b8 ) , and bestow the electrical switch and note to start a wires puzzler . All you call for to do is follow the bottom part of the diagram , drag the conducting wire from the holes . The gild is irrelevant . Once all over , the door will open and you could move down into the cellar .
The cellars
You ’ll observe thecollectible(f1 ) on the blue locker on the right wing and themorphing object(f2 ) justly next to it . Take thePickaxe(f3 ) , too , but that ’s all you may do for now . Go to the intersection , select the walkway ( g1 ) , and utilise the pick to split up up the content of the bucket to get theRubber Boots .
riposte to the cellar now and use the boots to go up the desk ( f4 ) for a close - up , then take theSlideandCorkscrew . With that , move to the wine cellar and range the pitcher by the wine barrel ( g2 ) in the close - up , then apply the corkscrew on the plug to make and collect aPitcher of Wine . take the board at the back of the wine basement next ( g3 ) , where you may begin a swarm puzzler .
To win , you need four measure of wine . The simple room to do this is to fill the large mug on the left field and then use the large mug to fill the small one . Empty the small one into the bucketful , then swarm what ’s leave in the orotund one into the lowly ( 2 units ) . Fill the prominent once more , and rain buckets that into the small ( so the minor has 2.5 and the big 4 ) . The box seat on the table opens and you may take theLockpick Set .
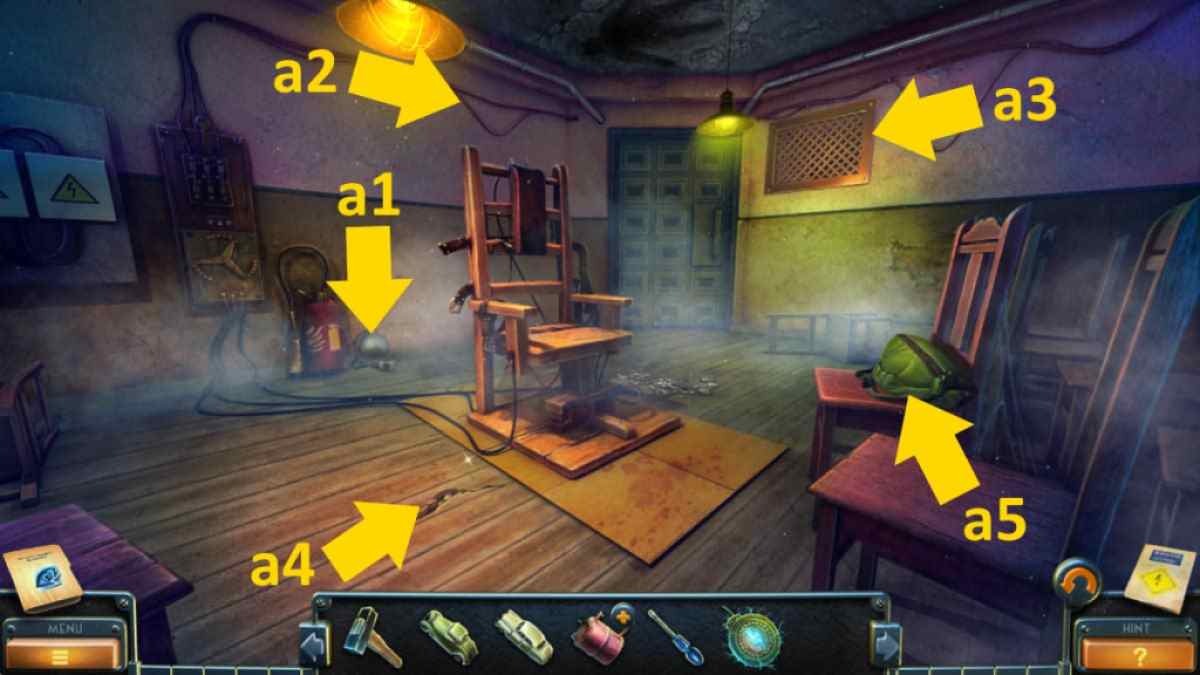
Image by Pro Game guides
Back in Hugo ’s room , use the lockpicks to launch the boxwood on the bottom ( c3 ) . This is straightforward , but each woof does have a specific lock ( there ’s no puzzle ; it ’s just visitation and computer error ) . When it opens , take theNoteand return to the root cellar here . take the machine on the odd ( f5 ) and add the note . rig the three dials to the positions on the eminence and a compartment will open , pass on you afourth Envelopeand theHand to a Clock .
Go upstairs to the Charles Martin Hall and add the hand to the clock ( b7 ) , moving the hand so that they ’re at the time1.55(I needed to be quite precise , so if it does n’t form justly away , make the hand on 11 exact and move the hand on two a little until it crop ) . The clock pops undetermined , giving yourfifth and last Envelope .
The envelopes' identity puzzle
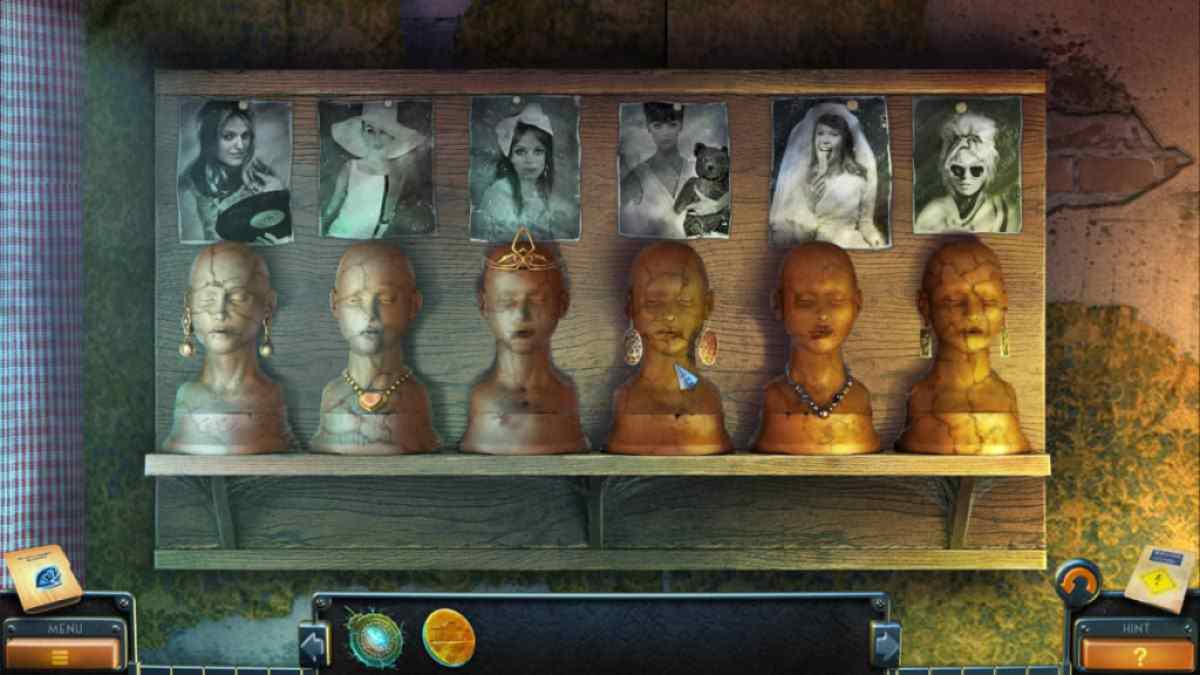
Head up to Hugo ’s way and take the creepy-crawly head and photo collection ( c6 ) , append the envelope to start out a matching teaser . Now click each gasbag and read the clue , then click the piece of jewelry to take it and select the appropriate mannequin head to place it . When you place all of them right ( see photograph above if you ’re stuck ) , the heads will release to dust and you ’ll be able to collect aTurning Mechanism .
Go properly downstairs to the cellar and use the turn mechanism on the good ( f6 ) , clicking it once more to open it and then clicking the open safe for an object - finding puzzle . There ’s a switch on the large political machine ( that you bind the lightbulb to ) that I found severely to spot , but otherwise , it was square . Once done , you ’ll findSamuel ’s Photo . Take the photo to the Marguerite Radclyffe Hall and order it in the empty picture blank space on the stairs ( b9 ) , scan the journal in the compartment that opens , and take theBottle .
Use the nursing bottle in the wine cellar ( g4 ) to begin a puzzle that involves twin the bottles on the ledge to their diagram ( see the complete image above if you ’re stuck ) . This opens a compartment from which you could take some more case selective information and , from behind it , aHand Switch . Take your newfangled noesis to Bishop at the hall in HQ and he ’ll give you anotherPunch Cardfor the surreptitious railway . Head to the intersection , use the central mechanics ( g5 ) to call the next railroad train ( g6 ) , and then use it to head towards the research lab .
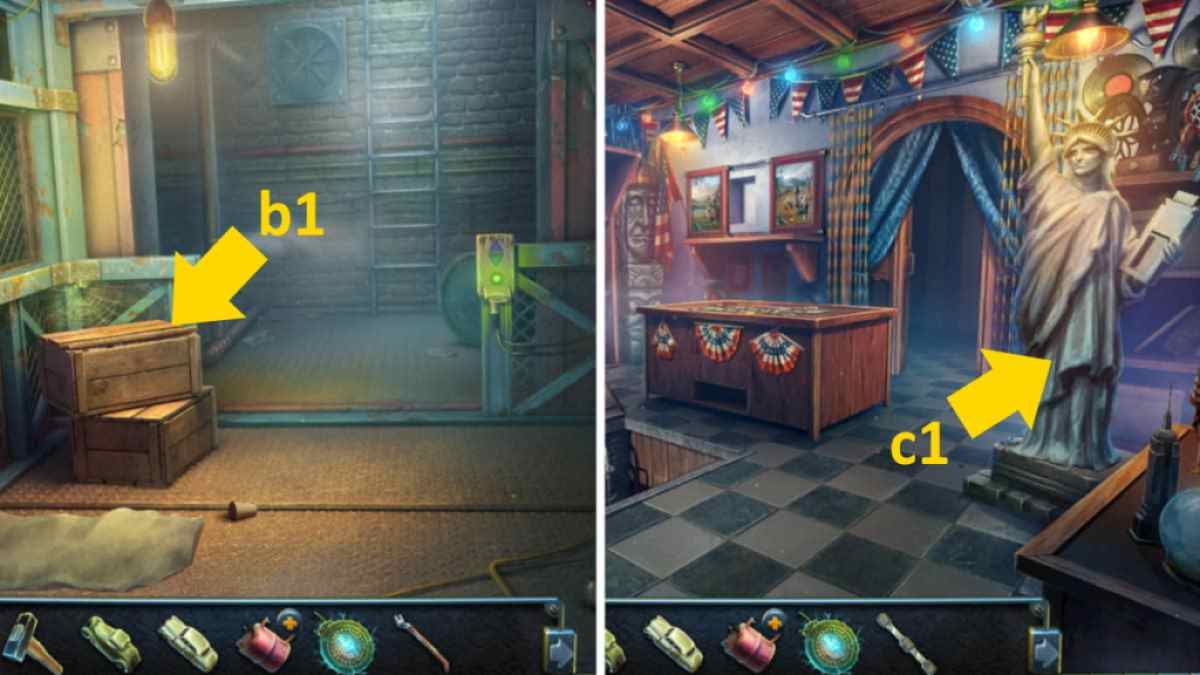
Image by Pro Game guides
The lab
You ’ll come up thecollectibleby the bush on the left of the route ( h1 ) and themorphing objectat the top of the telegraphy pole ( h2 ) . pick out the gate mechanism ( h3 ) for a close - up , add the switch , and power it down by clicking the attached switch . Click an object on the route ( h4 ) and haul it onto the logic gate to verify it is no longer electrified . you could now click the gates to open them and move in spite of appearance to the lab ingress .
Take theFishing Rod(i1 ) and thecollectiblebehind it , as well as themorphing objectfrom the ceiling ( i2 ) . Head back to the road and habituate the road on the pool to fish out theSaw(h5 ) . you’re able to now apply the proverb at the laboratory entree to prune the branches blocking the cellar entrance ( i3 ) . Grab theHandlehere , and click the cellar entrance to gain access to the laboratory .
Go down into the lab and click William to speak to him . Afterward , you’re able to catch thecollectiblefrom the desk on the right ( k1 ) , theBookfrom the story ( k2 ) , and theLong Plank(k3 ) . Return to Hugo ’s elbow room and sum up this final ledger to the bookshelf ( c5 ) , starting a pattern - matching puzzle ( see image below for solution ) . The ledge orbit and allows you to take aSlide , Banknotes , aLighter , and aNote .
Screenshot by Pro Game Guides
you could also now go back to the front of Samuel ’s house and use the retentive plank on the roadworks ( a6 ) to hit access to Chinatown . To conclude this section of the guide , move to the med bay in the prison house and add the note you just pick up to the cabinet with the colorful shape on it .
The orderliness in which you ask to press the buttons is :
The door will pop open and you’re able to take aStethoscope . turn back to the basement in the Brodie home and habituate the stethoscope on the good ( f7 ) . release each thickening on the secure until you hear a pawl ( from impart to right field , it is 9 - 5 - 3 ) , then take theFigurine Partfrom inside .
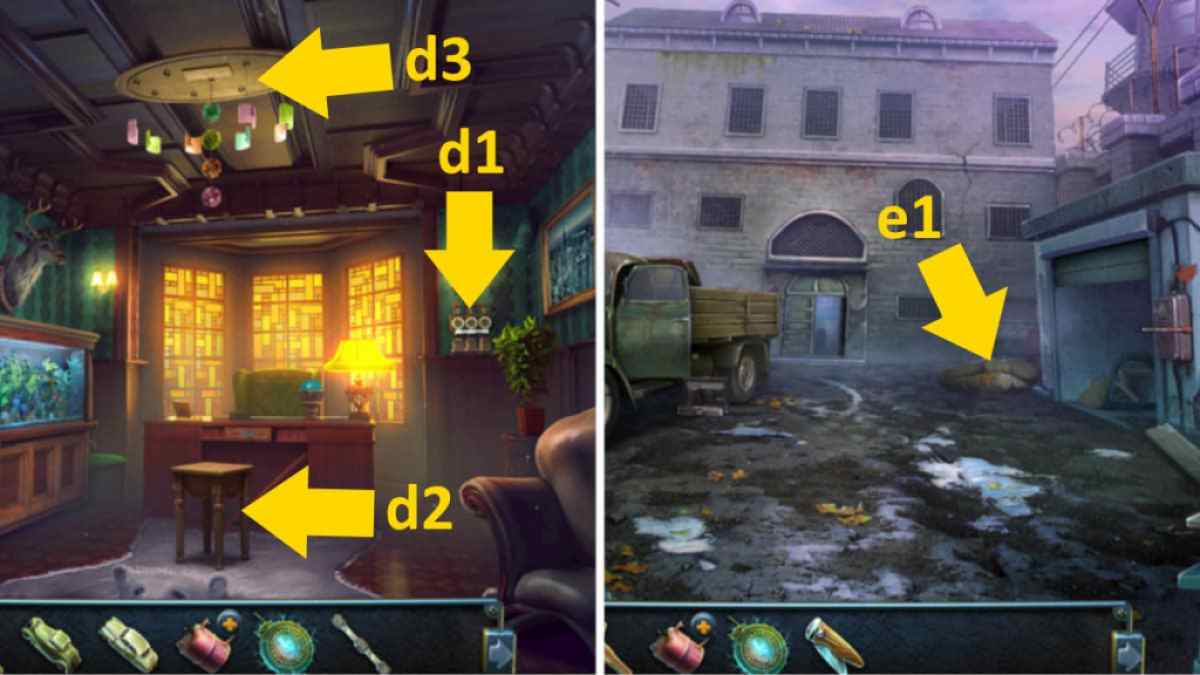
Image by Pro Game Guides
Chinatown
Once in Chinatown , grab thecollectiblefrom the balcony ( a1 ) , themorphing object(a2 ) from the shutter , and theGaffing Hook(a3 ) from the wall . choose the shop class on the right ( a4 ) to move to the coffeehouse .
Thecollectible(b1 ) is on the table on the left and themorphing object(b2 ) is on the menu sign . Get a end - up of the coffee shop salesman ( b3 ) and he ’ll ask you for some money . Give him your banknote and you ’ll get aSquid Kebabin return .
Move back to Chinatown , give the kebab to the wienerwurst ( a5 ) , which will make a shine orbit next to it where you could start an aim - matching puzzle . The only annoying part for me was realise you have to practice the tape ( on the shelf above the prime ) to fix the poster before you’re able to reorganize the plants on the shelf . Once completed , take theFever Pill .
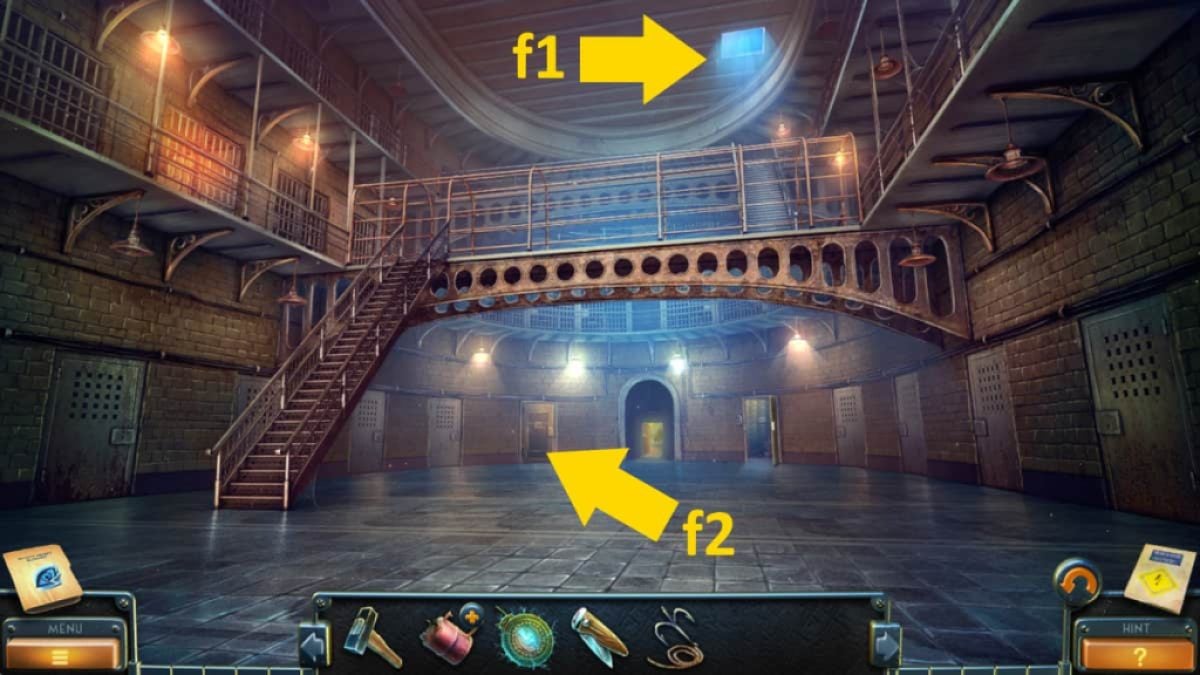
Image by Pro Game Guides
Back in Chinatown , take the gate ( a6 ) for a closing - up next , adding the hold to start a orchis - maneuver puzzle . Turn the handles in the following orderliness :
This win you access to Near the Workshop , so move there . You ’ll automatically talk to the son here ( c1 ) , who asks for some paper . afterwards , thecollectible(c2 ) is on the floor on the left wing and themorphing objectis by the trashcan ( c3 ) . Now practice the hook to start the manhole top ( c4 ) and take theHose . Head back to the research laboratory .
The laboratory
Get a close - up of the table ( d1 ) and the feverishness contraceptive pill to the glass in the close - up . cluck the know on the burner here to heat the jugful , use the jug on the glass , and take theFever Medicine(don’t forget to also take theSlidefrom the table ) . Now give the fever meds to William ( d2 ) for a cutscene , after which he ’ll give you aBell .
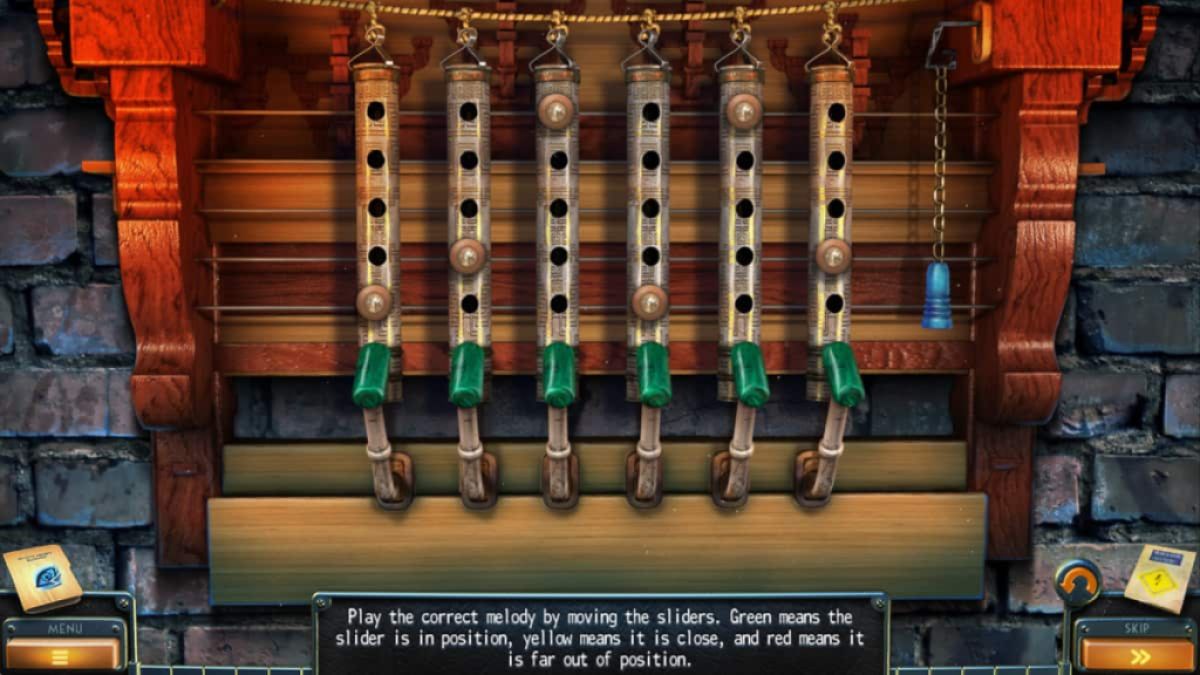
Return to near the workshop , pick out the twist on the rampart ( c5 ) , and add the gong to bulge out a melody puzzle ( see image above for solution ) . Once done , the shutter will give and you could go into the workshop . lecture to the guy there to find his hands have been ache , then snap up thecollectible(e1 ) andmorphing object(e2 ) from the shelf .
Select the tabular array ( e3 ) and place each item into its slot in the tool case ( see below ) . Once double-dyed , you ’ll receive theWrench . bestow it to the toolbox on the wall ( e4 ) and click the wrenches in the right order ( 4 - 2 - 3 - 1 ) to open it and take aSlide , plus aDevice PartandReinforced Clippers . Do n’t bury to penetrate the table again ( e3 ) and take theTool Box .
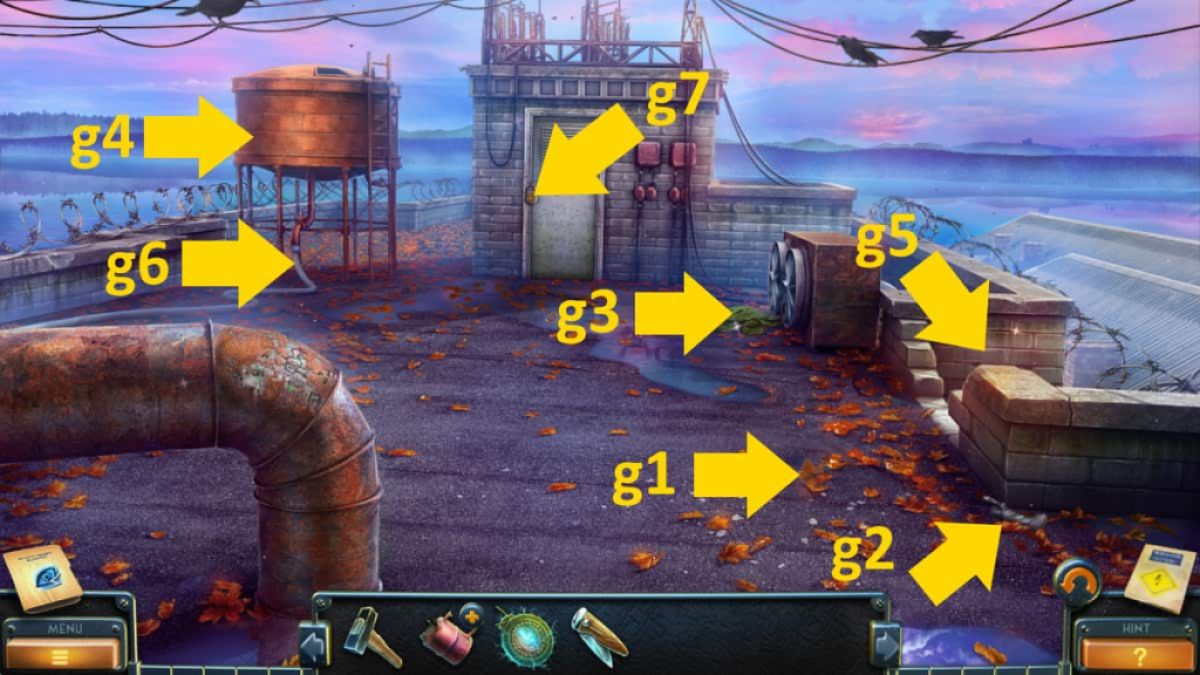
Image by Pro Game Guides
choose the flushed car ( e5 ) for a close - up , append the coin , then click the lever followed by the handle to get to the glass instrument panel and take theGramaphone Handle . Move back to the cafe and use the clippers on the range of mountains on the panda coop ( b4 ) . Take theGrain . Return to near the shop and give the grain to the pigeon ( c6 ) . When it fly to the land , click it for a close - up and take theFaucet Handlefrom its leg .
Finding the origami paper
Back in Chinatown , add the spigot handle to the barrel ( a7 ) , use the attached faucet to empty it , then click the drum again to twine it across the street . you could now get theTroweland aSlidefrom the awning ( a8 ) . Next , go to the Charles Martin Hall in the Brodie planetary house and use the clippers to cut the wire on the ceiling ( f1 ) . Click the hatch again to gain memory access to an objective - finding puzzler . Once complete , take theWine Press Handle .
Move to the wine cellar and add the handle to the imperativeness ( f2 ) , take theSlide , then utilize it to put forward it and take theColored Paper . Go to near the shop and give the paper to the son , starting an origami example . This is n’t a puzzle , as all you require to do iskeep dawn the section that are highlightedwhen you oscillate over them . Once complete , the son will tell you his mystery and give you aWheel .
Head back to the workshop , bring the cycle to the tumulus ( e6 ) , click the barrow to move it , then choose the doorway behind for another missing - object puzzle . There ’s nothing guileful here , and the safe code is9 - 2 - 3 - 4 - 7 - 5 - 1 - 8 - 6 . you may then take anotherFigurine Part .
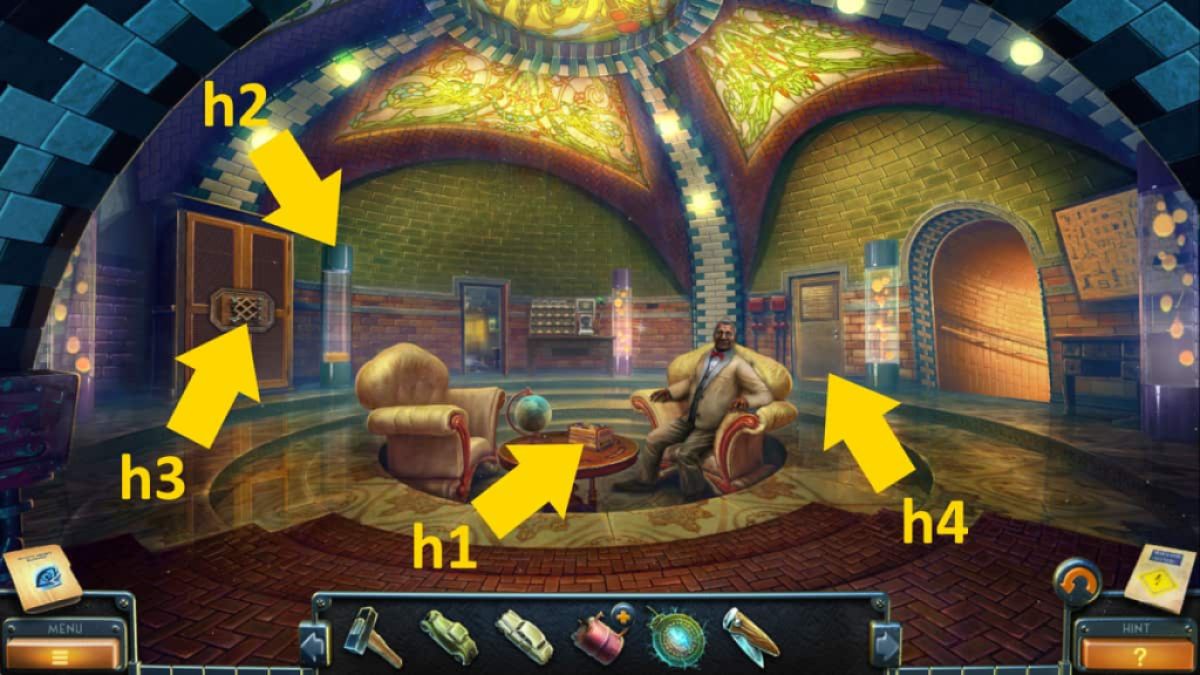
Image by Pro Game Guides
At the lab , sum up the handle to the gramophone ( d3 ) and take theFigurine Partin the closing curtain - up . Select it in your stock list , then total the other two parts from your inventory to it to get theFigurine . Go to the route to the laboratory and apply the digger by the signpost . impart the statuette to the corner you dig up there , opening it afterward to take aSlide , aVinyl Recordand to read about the substation .
Back inside the lab , add the phonograph record to the gramophone , use the handle to spin it , then click the phonograph needle to play it and see the message5 - 2 - 7 - 1 - 3 . Use the computer code on the machine in the laboratory ( d4 ) to unlock it , open a figure - fit puzzle . There are six dials to turn ( see above ) . To fill in the puzzle snap 2 - 4 - 1 - 5 , then take theMapfrom in spite of appearance . William will reappear in the lab , so tap him for a cutscene . Finally , cluck the room access ( d5 ) to gain entree to the tugboat and the route to the substation .
The road to the substation
Go to the road to the substation , collect themorphing objectby the well ( h1 ) andcollectible(h2 ) by the shed . Now pick out the backcloth ( h3 ) and apply your mapping to follow the itinerary and get to the give up substation K . Get theFruit Picker(i1),collectible(i2 ) , andmorphing object(i3 ) , then choose the glowing door ( i4 ) for an target - matching puzzle ( you ca n’t fail ) . On completion , take theJerry Can .
Back on the main screen , come home the bushes ( i5 ) and penetrate the leaves , reefer , and stone on the right of the close - up until you get aStone . take the room access ( i6 ) , use the stone to dash the window , and then click the handle to open up the doorway to the abandoned substation .
Back on the route to the substation , choose the farming vehicle ( h4 ) . In the close - up , grab the finalSlideand then click the eyelid of the yellow petrol tank to spread it . Use the jerrycan and hosepipe on it to get aFull Jerry Can . Now , you’re able to manoeuvre to the substation .
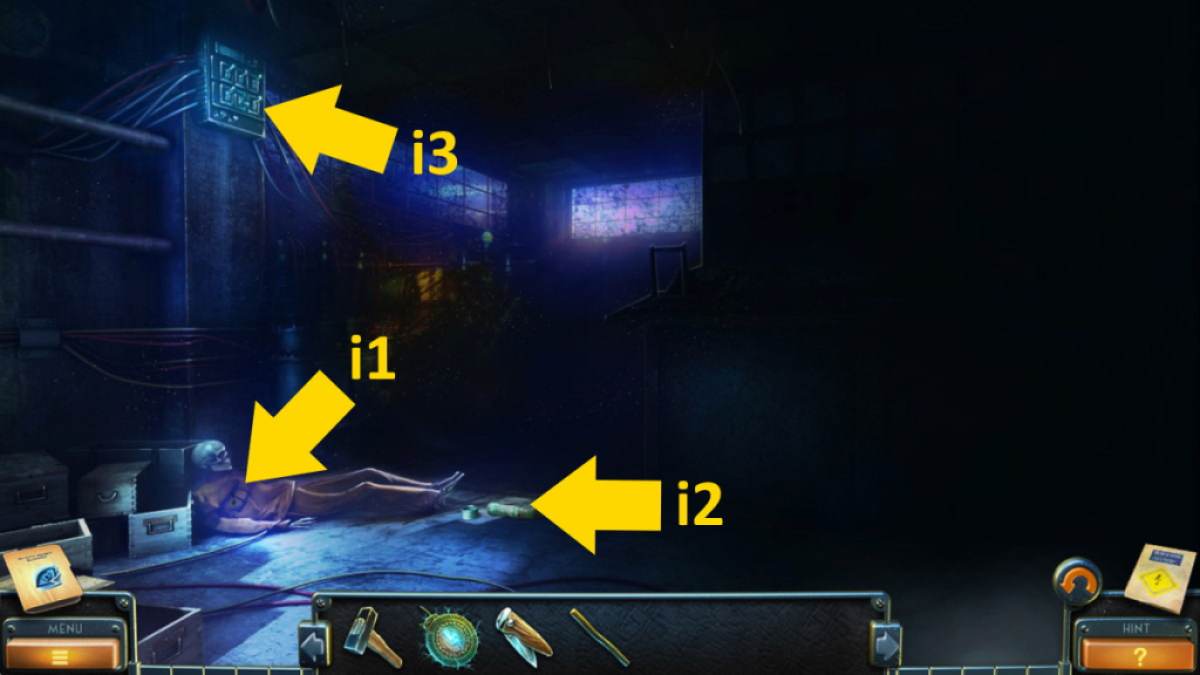
Image by Pro Game Guides
The substation
Thecollectibleis to the left of the blackboard ( k1 ) , where you’re able to also take theCrank Handle(k2 ) . Also , foot up theMetal Nugget(k3 ) and themorphing object(k4 ) under the desk . At this point , you’re able to bulge back to the road , utilise the crank on the well ( h5 ) , and get theInsulating Tapefrom the bucket .
Back in the substation , take the oven ( k5 ) , use the jerrycan on the wood in the close - up , then utilise your wakeful to start a fervor . With that , it ’s metre to move to the tugboat ( at the tug on the single-valued function ) , where you may grab acollectible(m1 ) and amorphing object(m2 ) . Get a finale - up of the damage fusebox ( m3 ) and use the insulating magnetic tape to start a telegram - matching mystifier ( just click wire matching colour and/or pattern . The order does n’t matter ) .
Once gross , the ladder will dribble down . you’re able to now select the bird ’s nest ( m4 ) and take someChalkfrom inside , then use the selector to cut the branch ( m5 ) to get theElectrode . Now , you’re able to climb the column by tick the ladder .
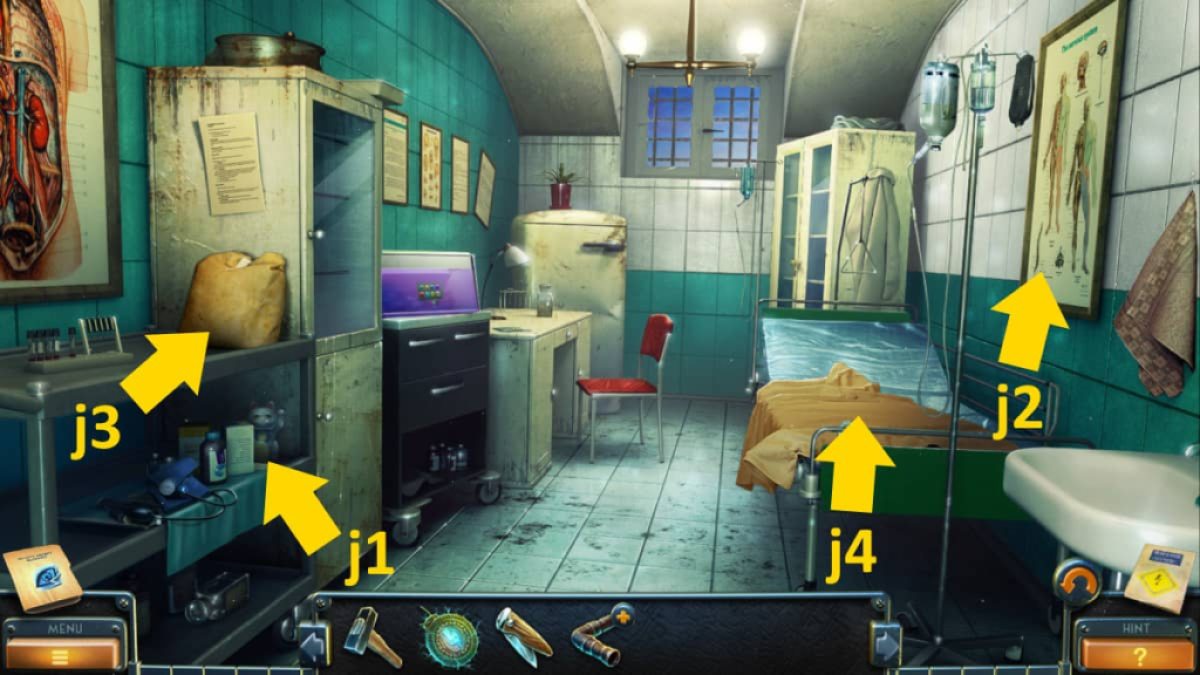
Image by Pro Game Guides
The tower
Here you should get your finalmorphing object(n1 ) andcollectible(n2 ) ( if you ’re missing any , please refer to my earlier scout join on this page ) . Also , take theTemplate(n3 ) andSledgehammer(n4 ) . tot the electrode to the car ( n5 ) , and the tower will power up . Select the holes in the floor ( n6 ) , add the guide , apply the chalk to punctuate out the pattern , and then foot up theDiagram .
Head to the laboratory entrance and use the sledge in a stopping point - up of the threshold on the right to open it , starting an object - matching puzzle . Once complete , take theRope . Back at the tower , click the gap in the rails ( n7 ) and use the rope to get theStone with Drawingin the close - up . Move outside the abandoned substation and add together the brick to the bulwark ( i7 ) . In the close - up , snap the middle brick , then the bottom , and eventually the top . Take theDevice Partfrom inside .
Return to the substation to find William work on the chalkboard . After speaking to him , select the green cabinet ( k6 ) and add the diagram . Copy the light normal by clicking the correct bulbs , then take theMolding Form . Select the oven once more ( k5 ) , add the nugget to the mold in the end - up , and put them in the oven . Once melted , absent it and apply the bucket of water there to cool it . Take theDevice Part .
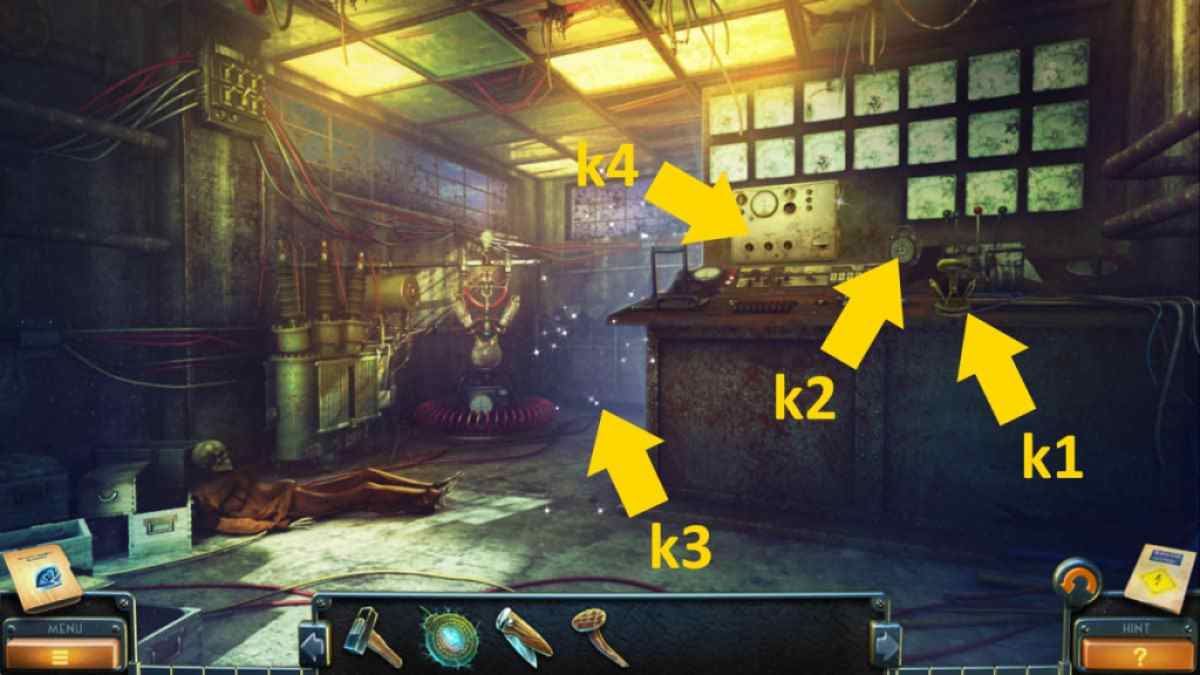
Image by Pro Game Guides
Click the car ( k7 ) for a close - up to see what you need . bring the toolbox and then your three gimmick parts to the political machine , along with the other pieces scattered around the close - up to build the simple machine ( see completed machine above ) . lay the decoration to dispatch it , then savour the last cutscene . congratulation , you ’ve completed the game !
lust more puzzle game coverage ? Check outAll Myst Games Ranked from Easiest to Hardesthere on Pro Game Guides .
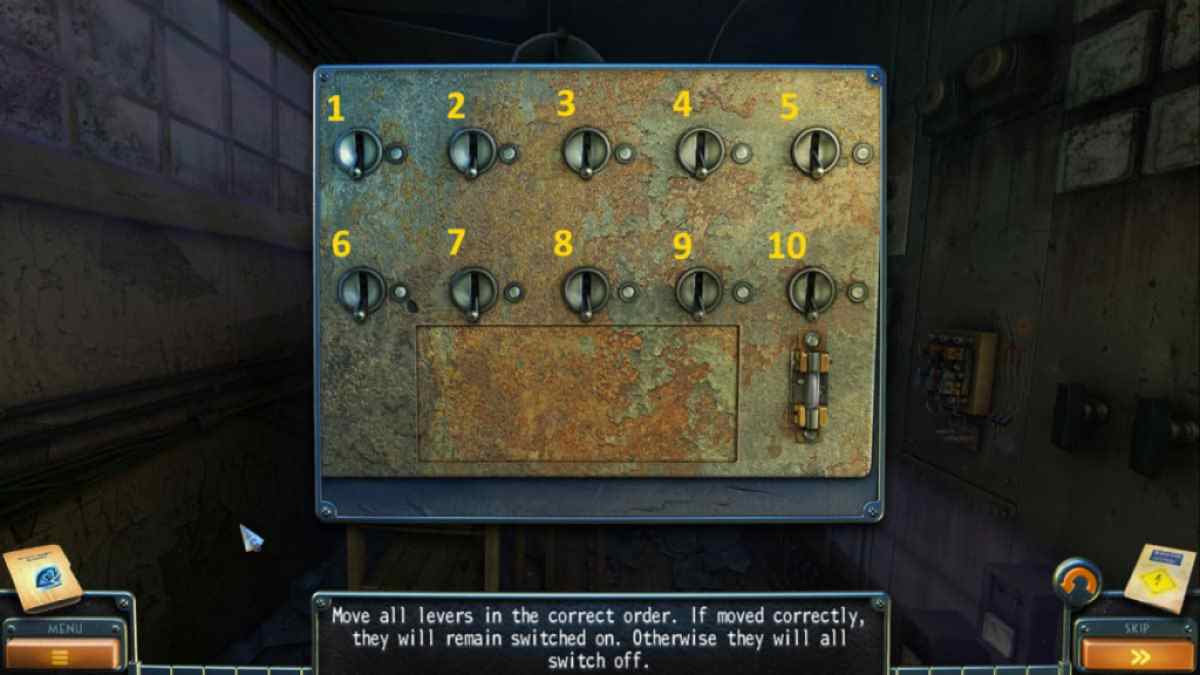
Image by Pro Game Guides
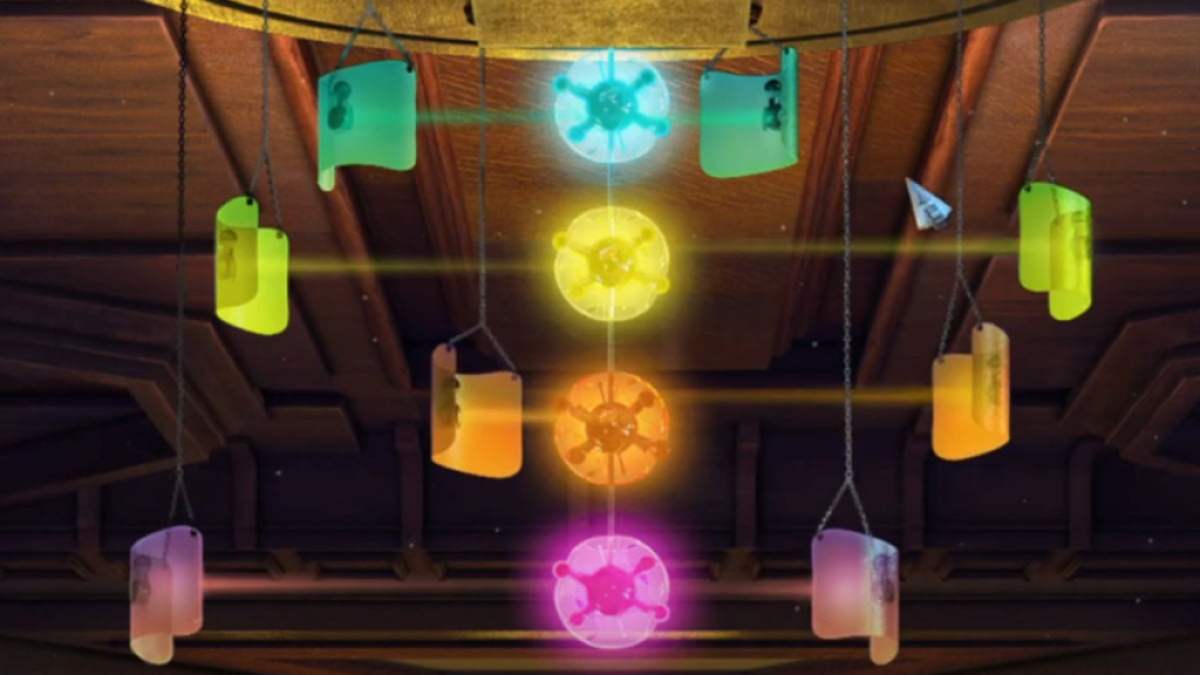
Image by Pro Game Guides
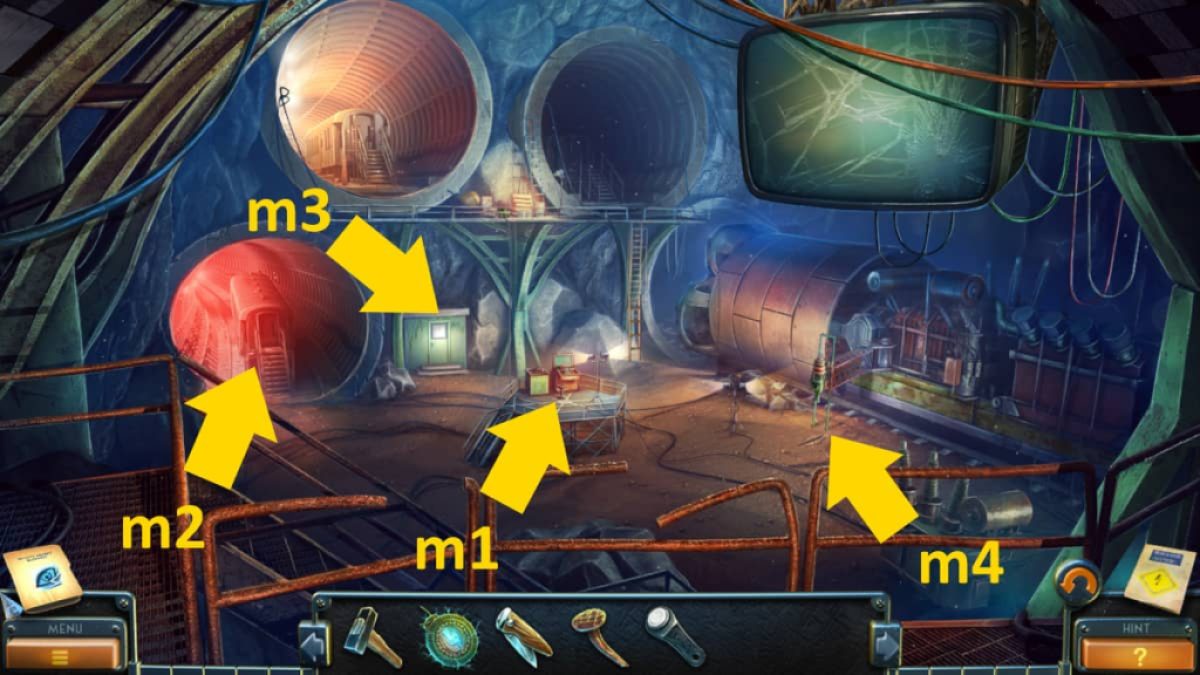
Image by Pro Game Guides

Image by Pro Game Guides
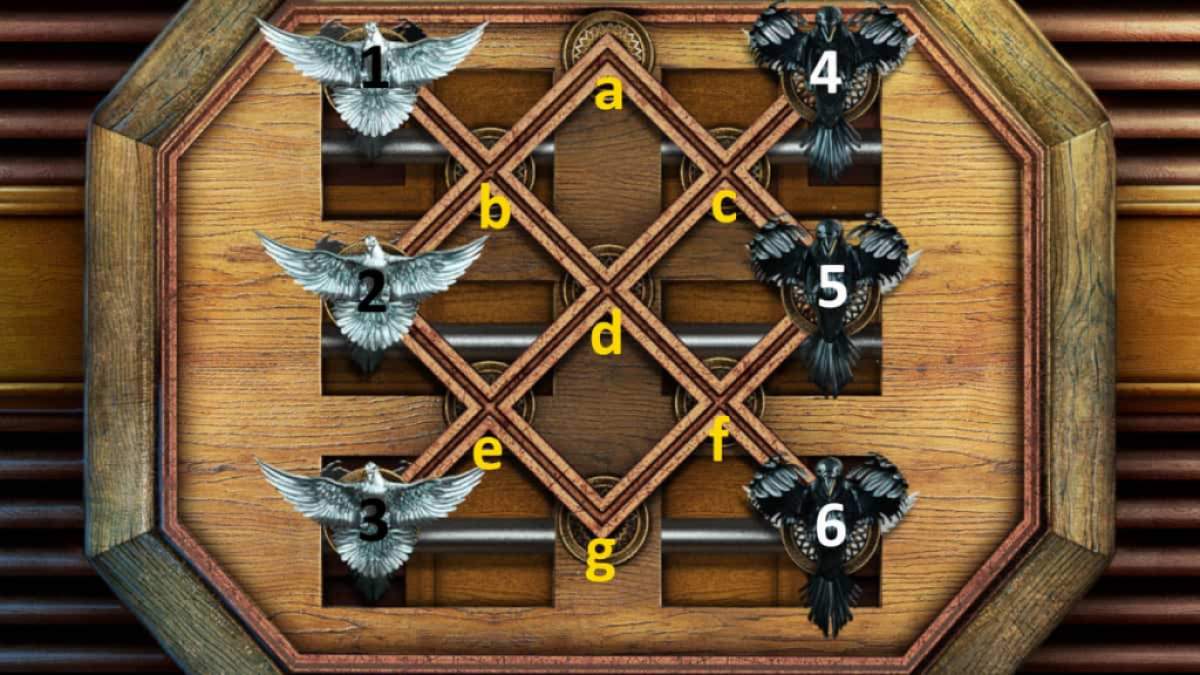
Image by Pro Game Guides
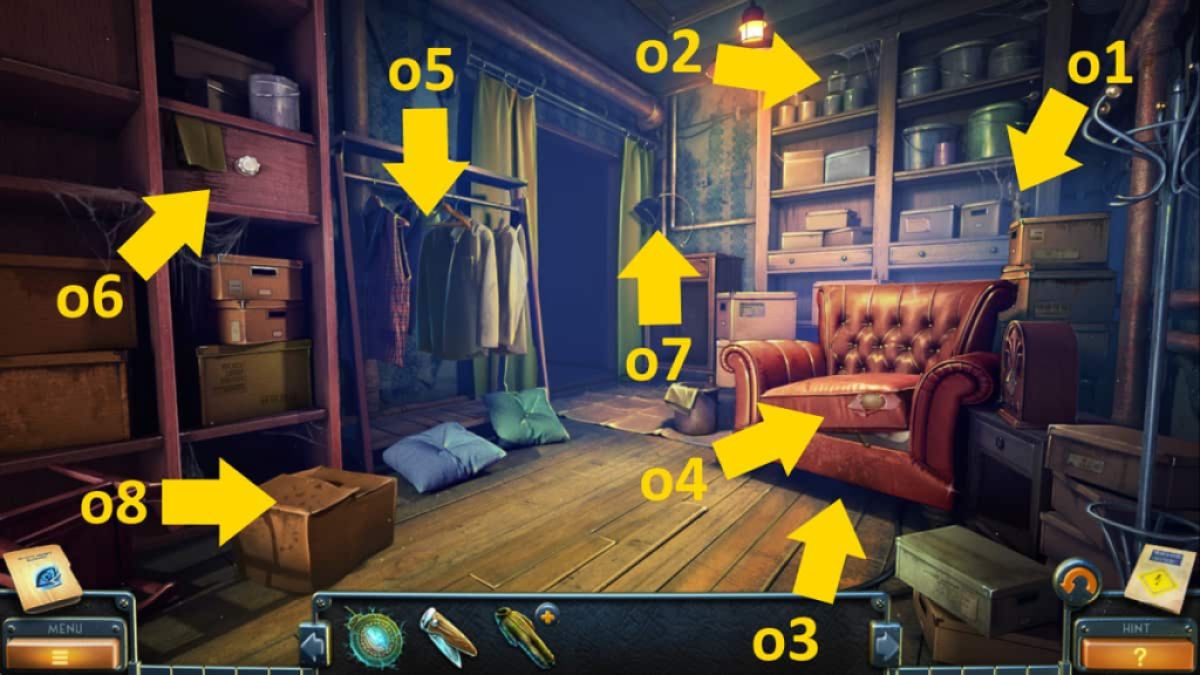
Image by Pro Game Guides
Screenshot by Pro Game Guides
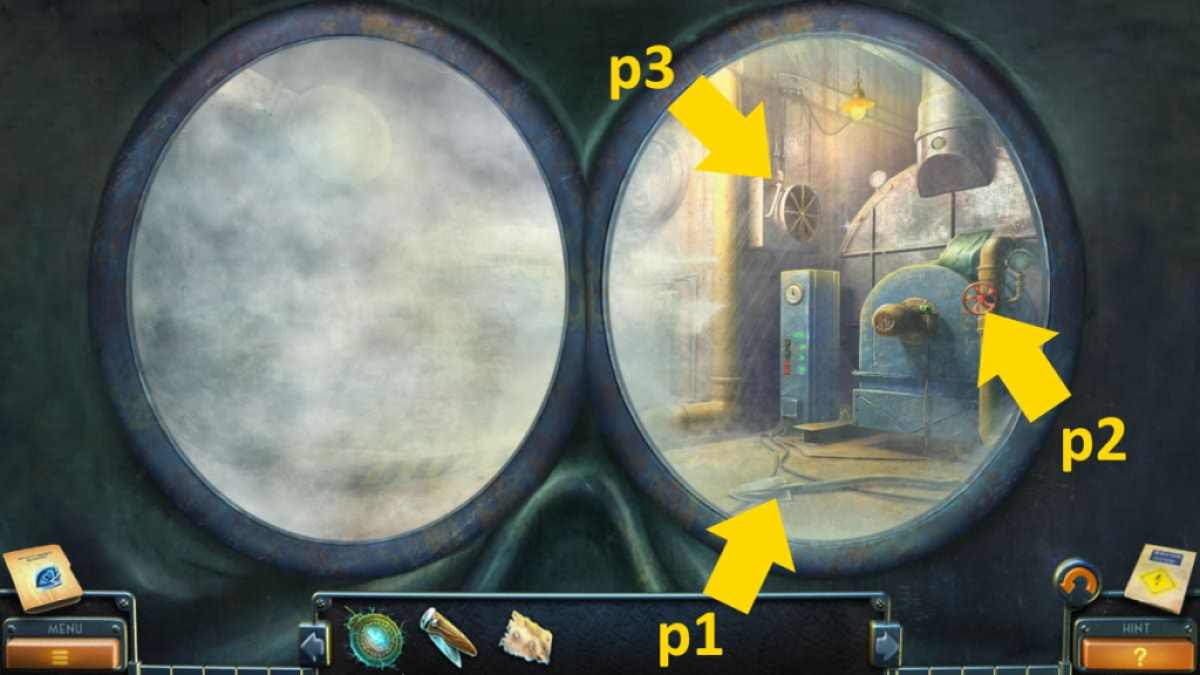
Image by Pro Game Guides
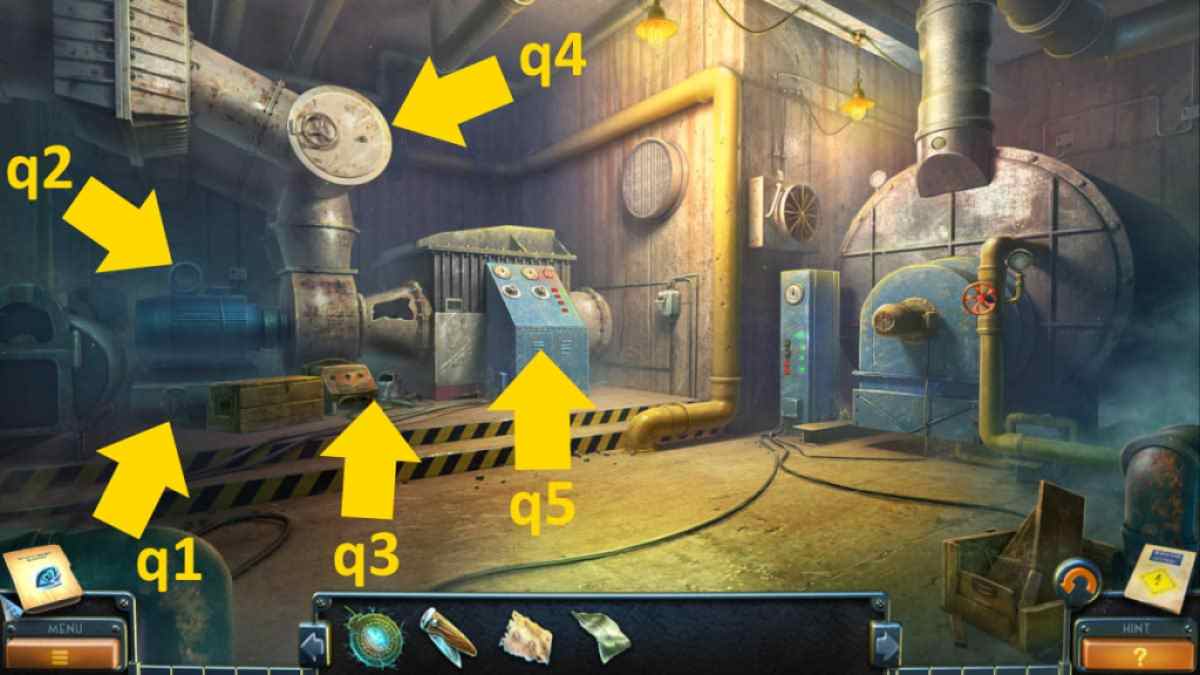
Image by Pro Game Guides
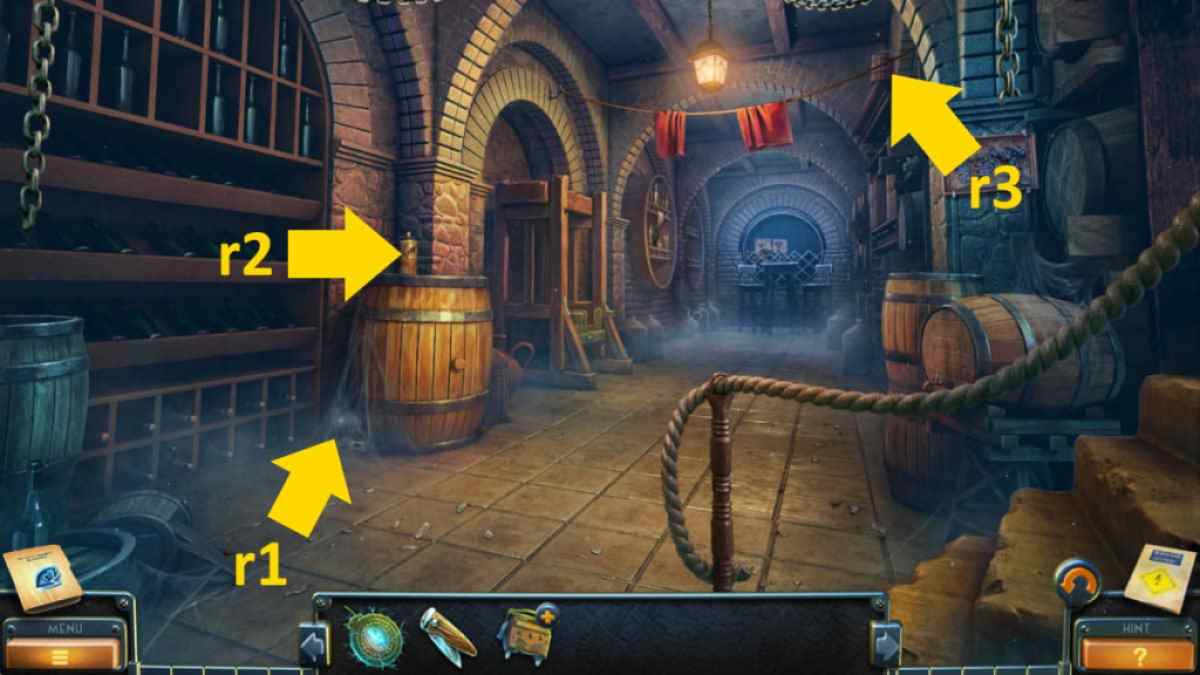
Image by Pro Game Guides

Screenshot by Pro Game Guides

Image by Pro Game Guides
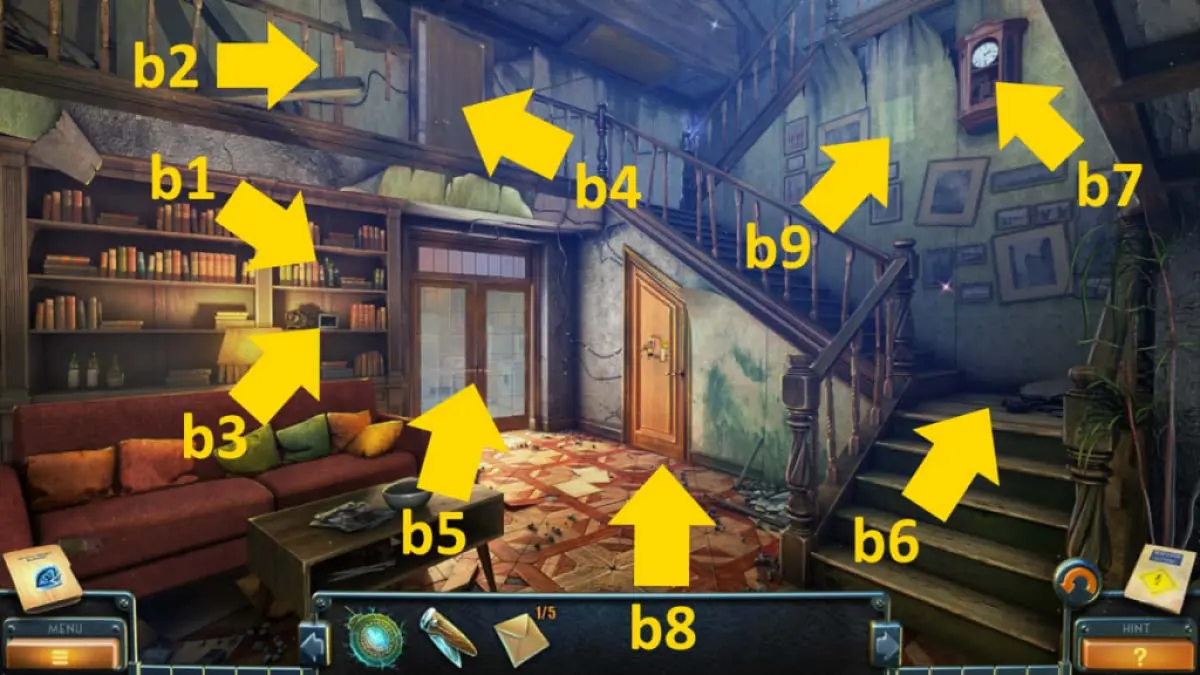
Image by Pro Game Guides

Image by Pro Game Guides
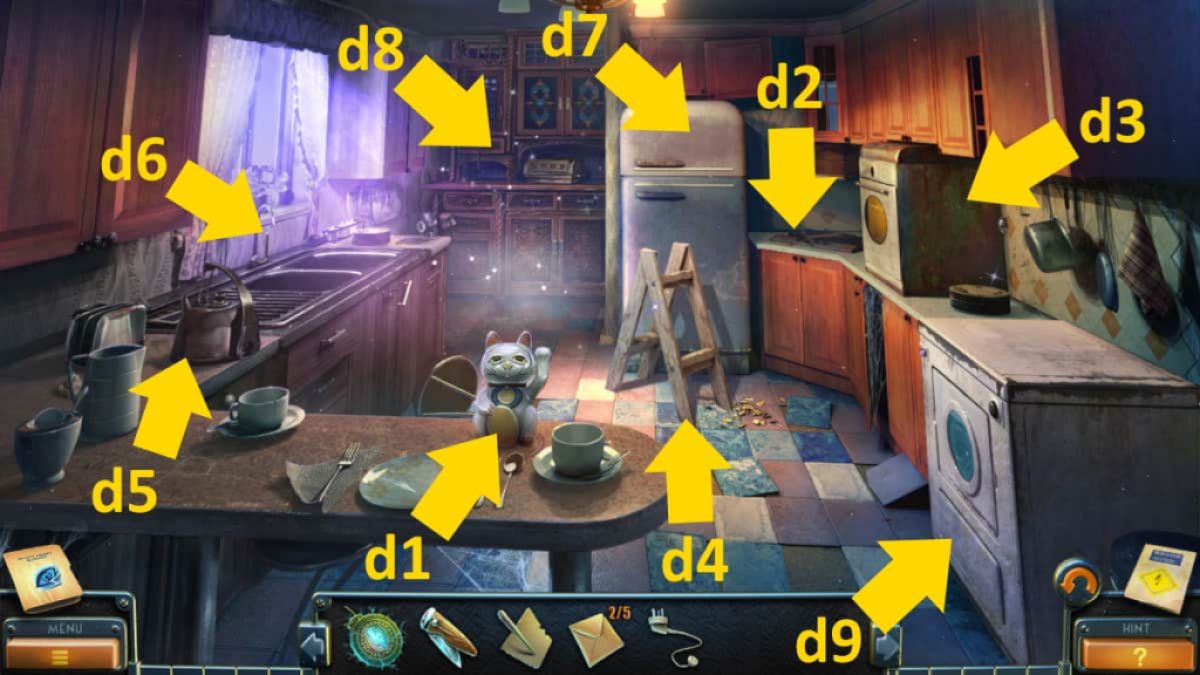
Image by Pro Game Guides
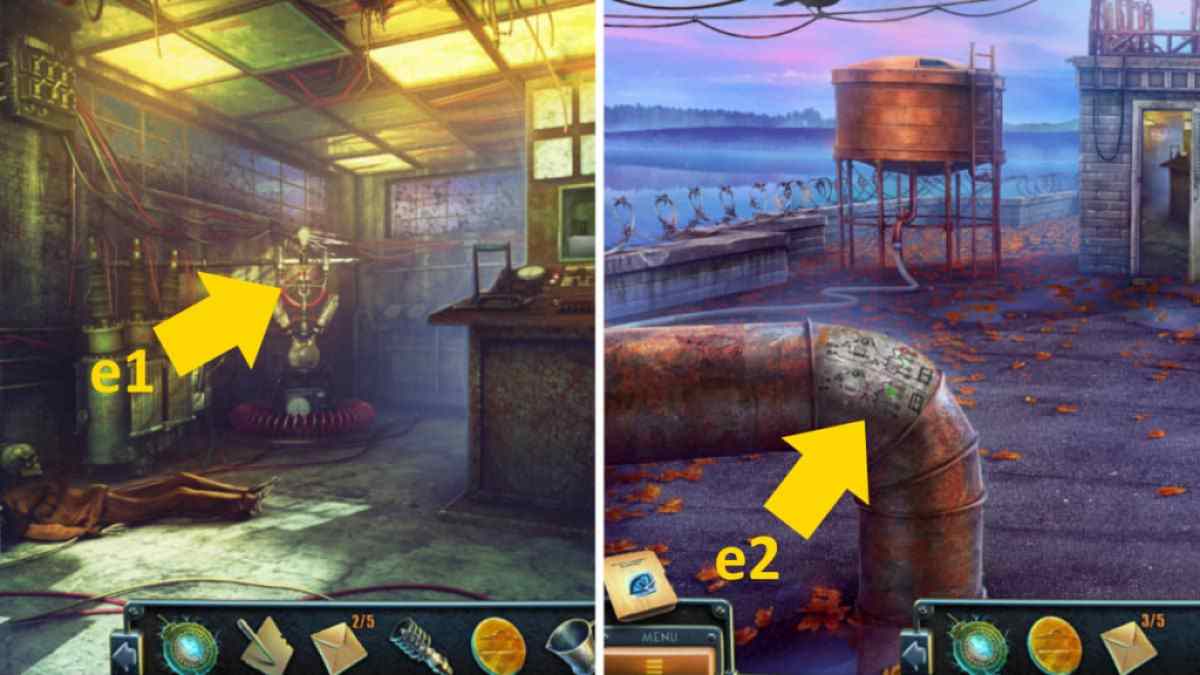
Image by Pro Game Guides
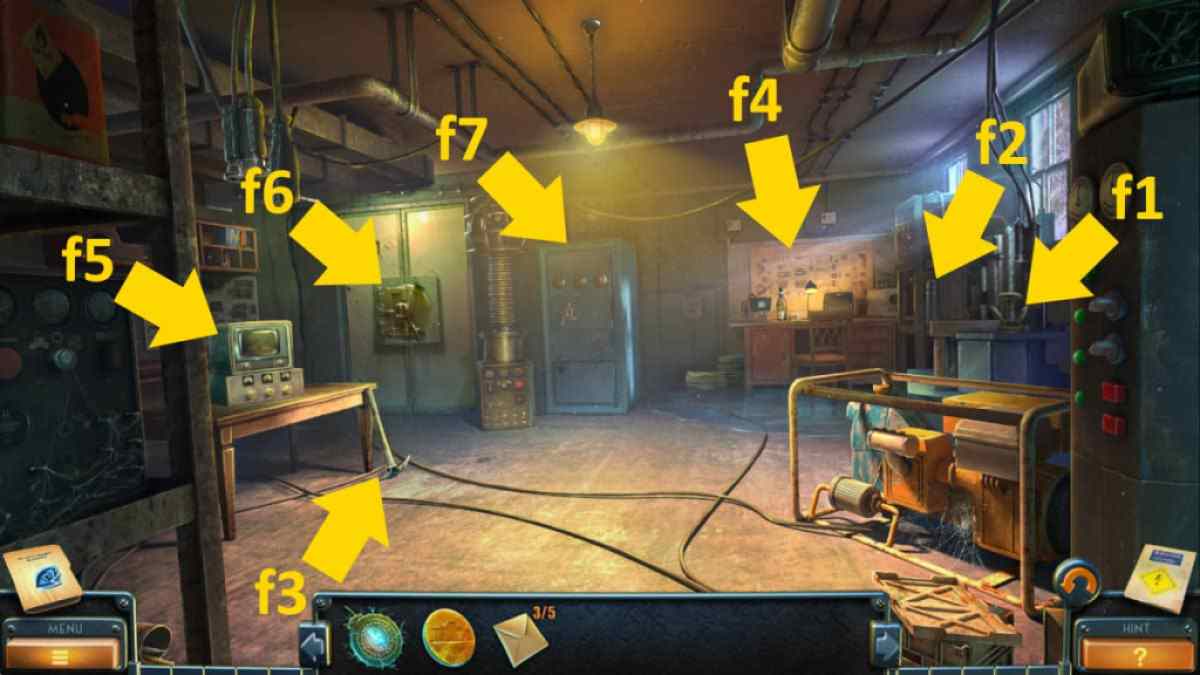
Image by Pro Game Guides
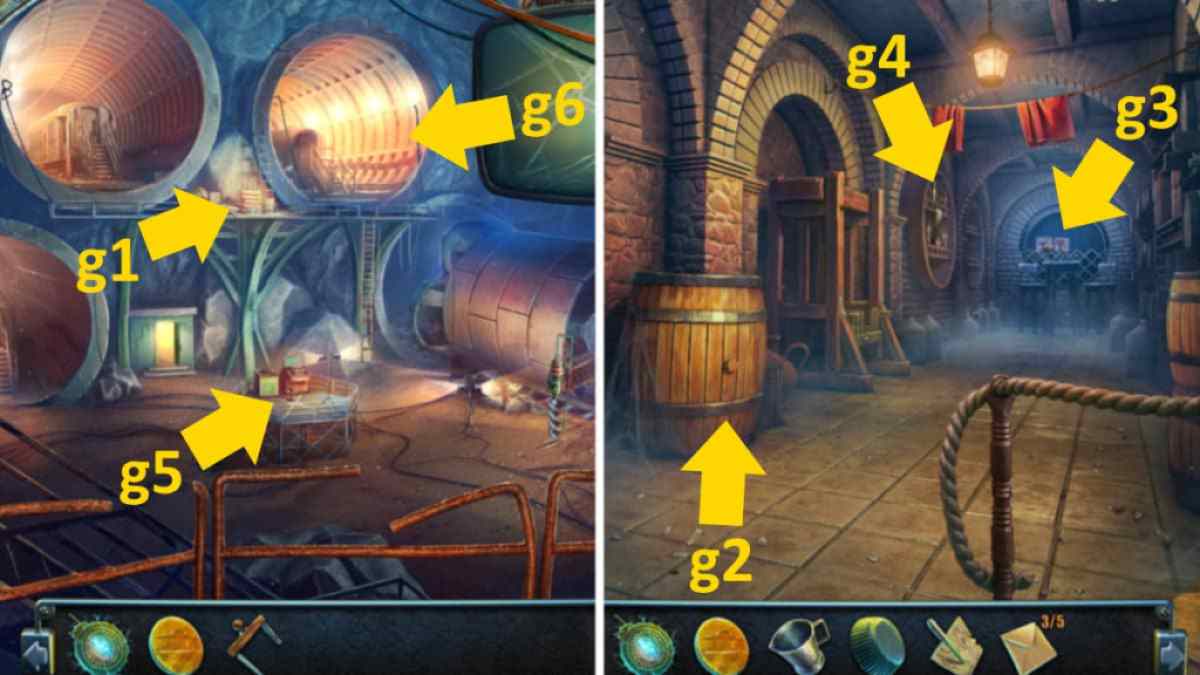
Image by Pro Game Guides
Screenshot by Pro Game Guides

Screenshot by Pro Game Guides
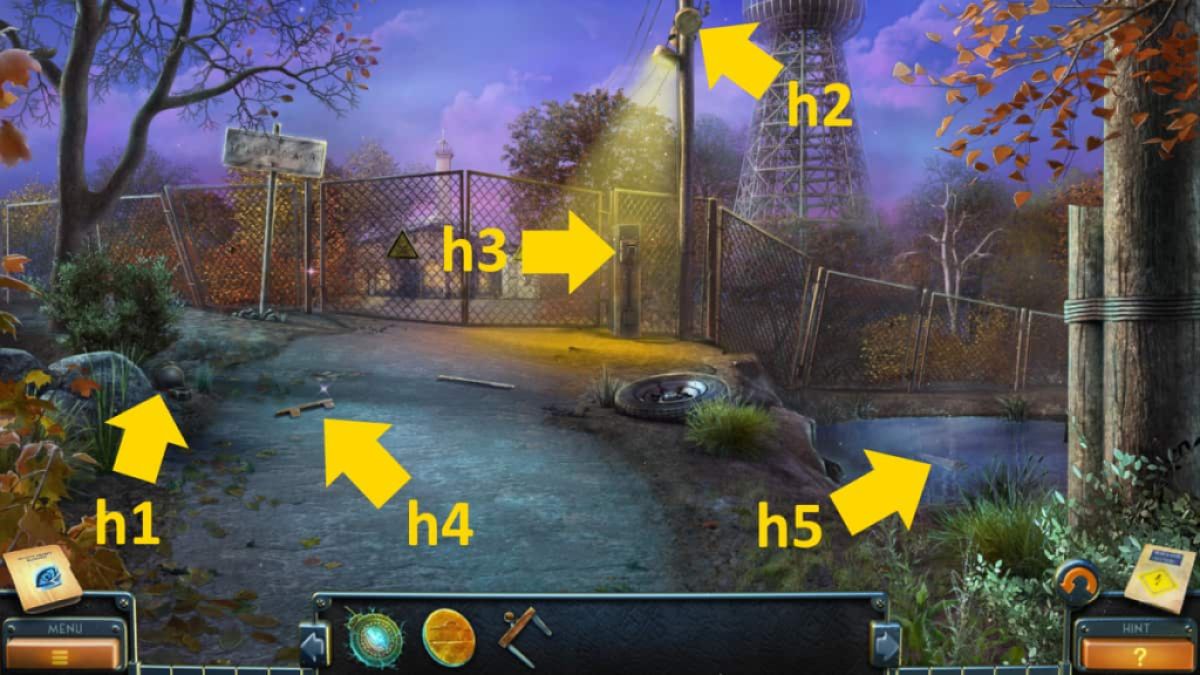
Image by Pro Game Guides
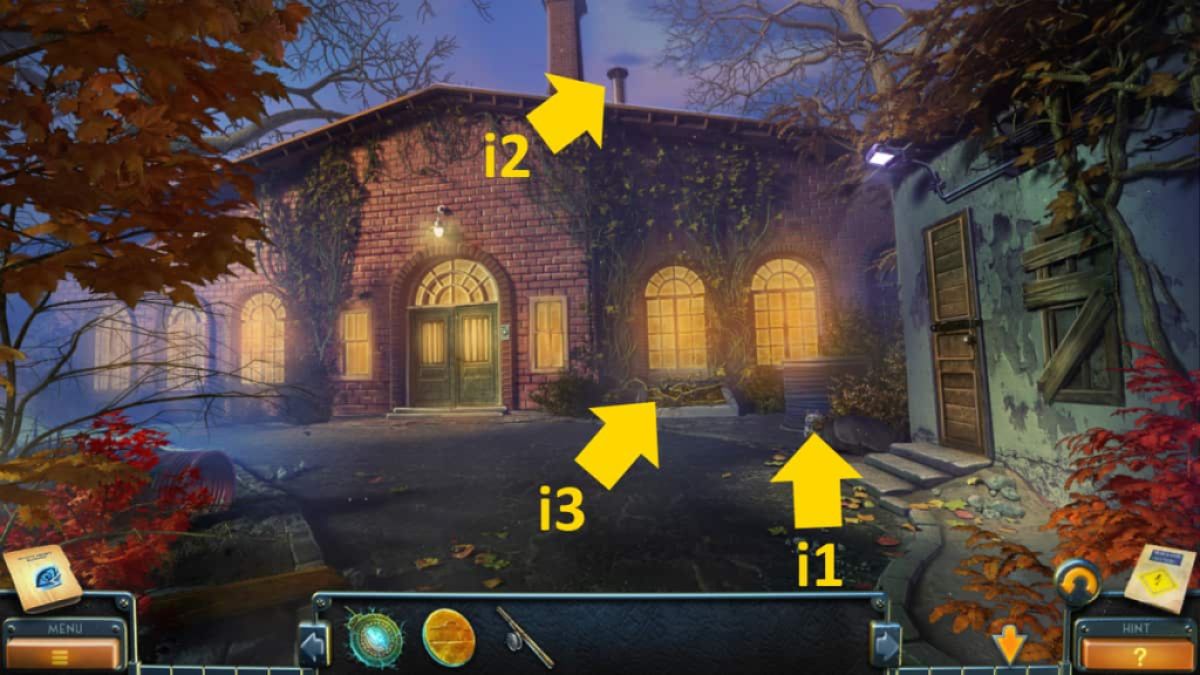
Image by Pro Game Guides

Image by Pro Game Guides

Screenshot by Pro Game Guides

Image by Pro Game Guides
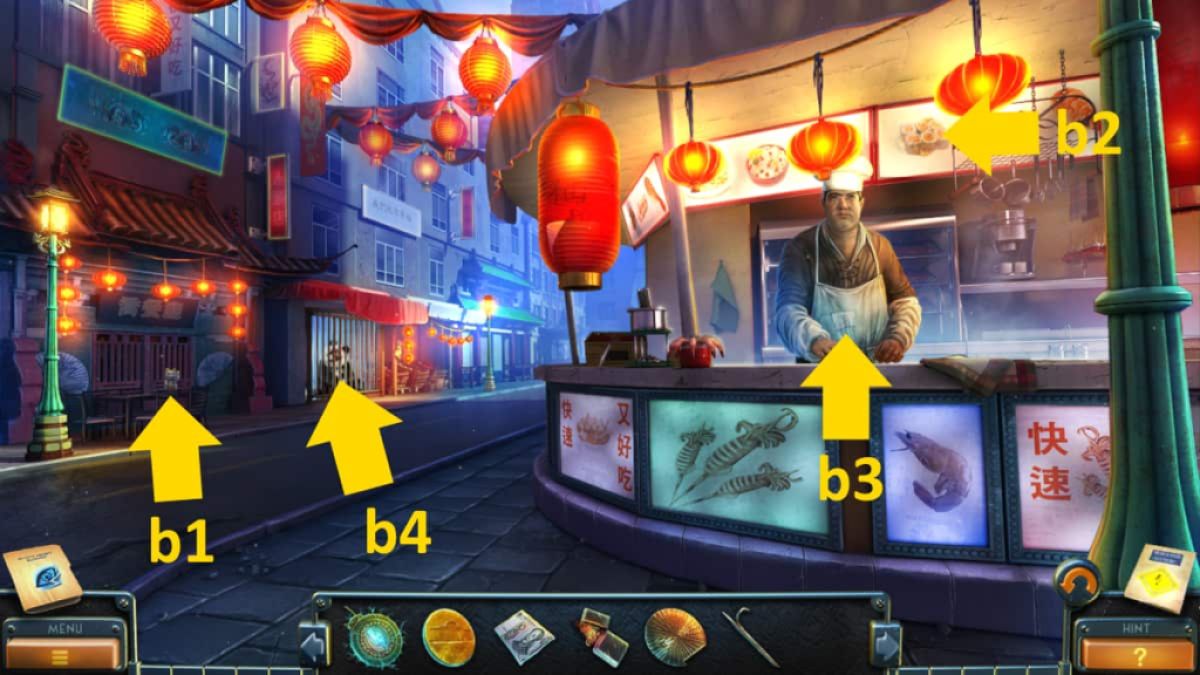
Image by Pro Game Guides
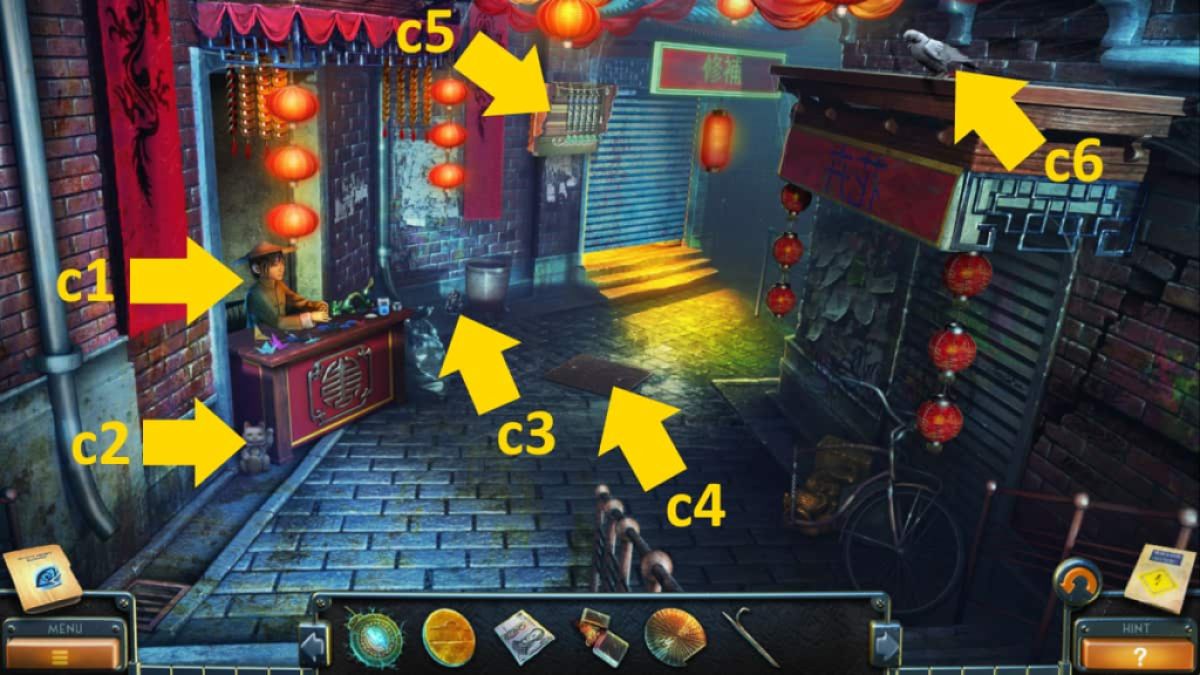
Image by Pro Game Guides
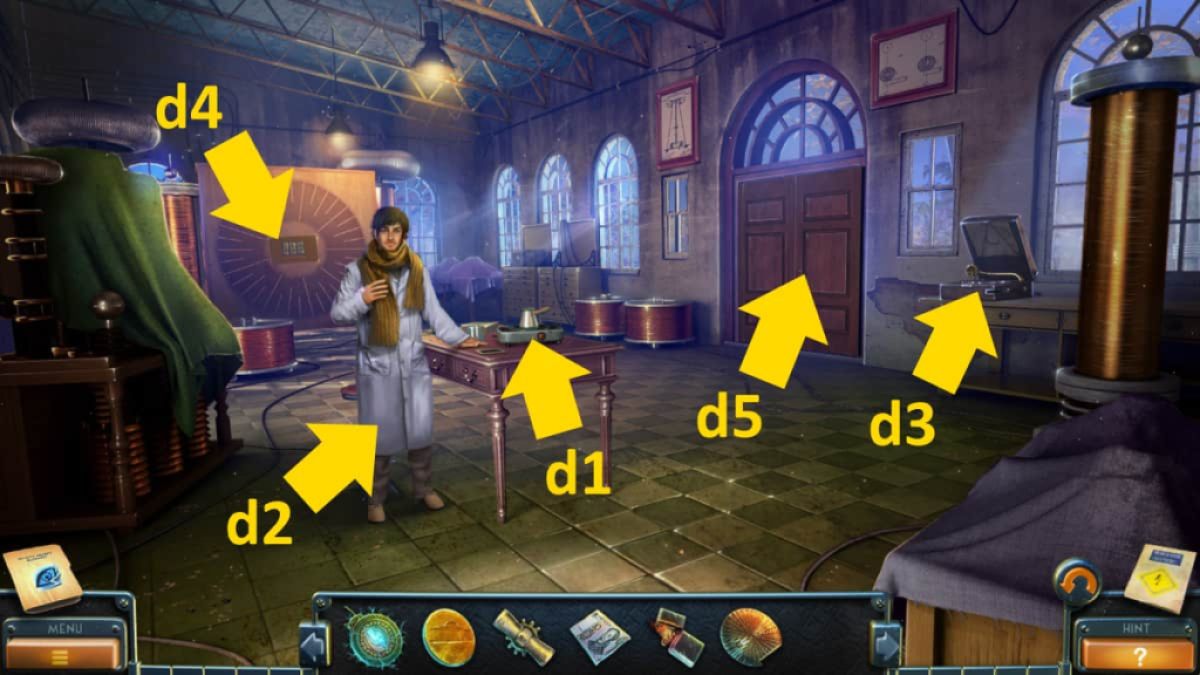
Image by Pro Game Guides
Screenshot by Pro Game Guides
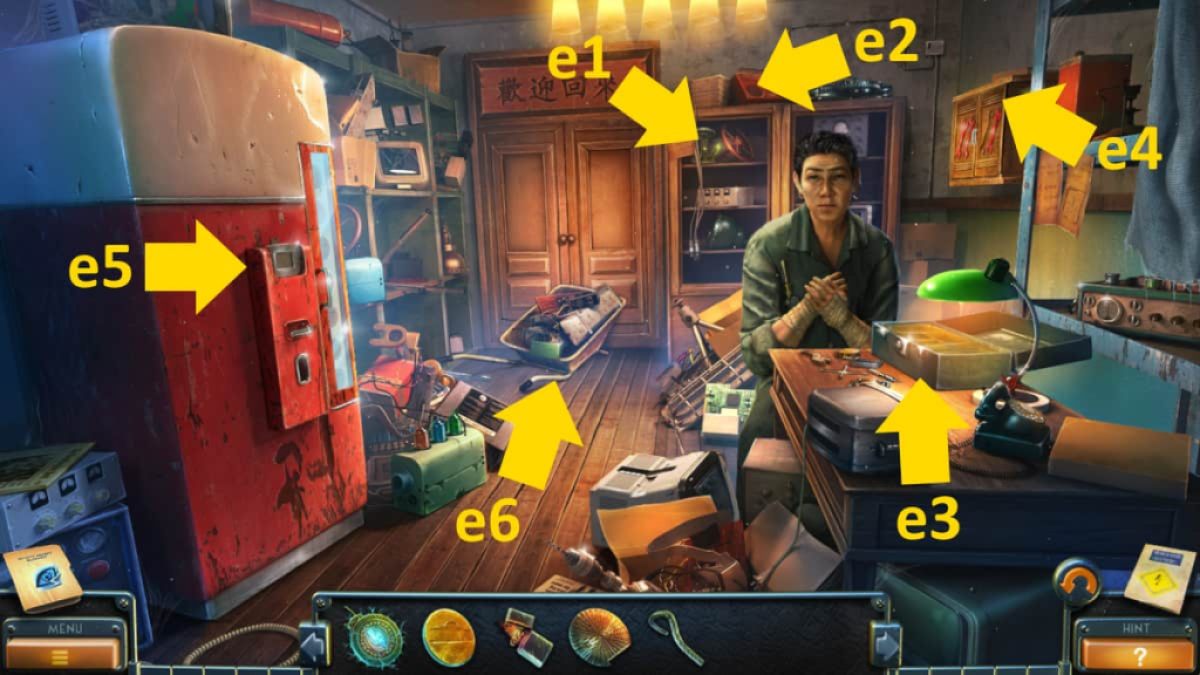
Image by Pro Game Guides
Screenshot by Pro Game Guides
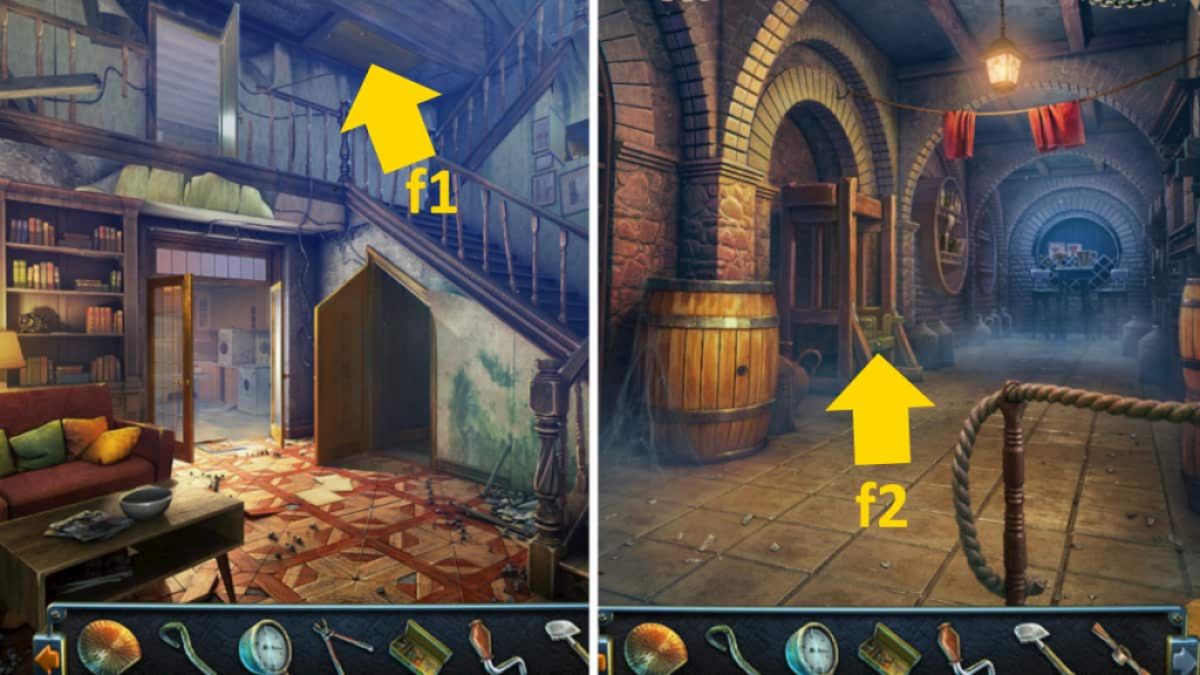
Image by Pro Game Guides

Image by Pro Game Guides
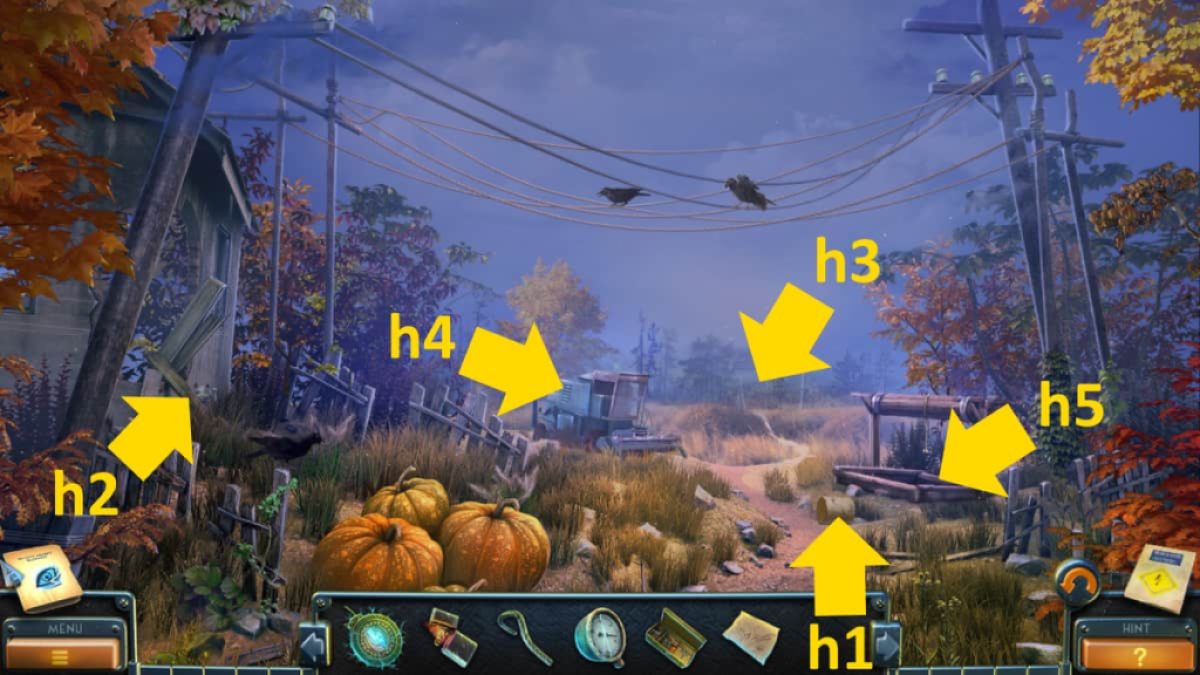
Image by Pro Game Guides
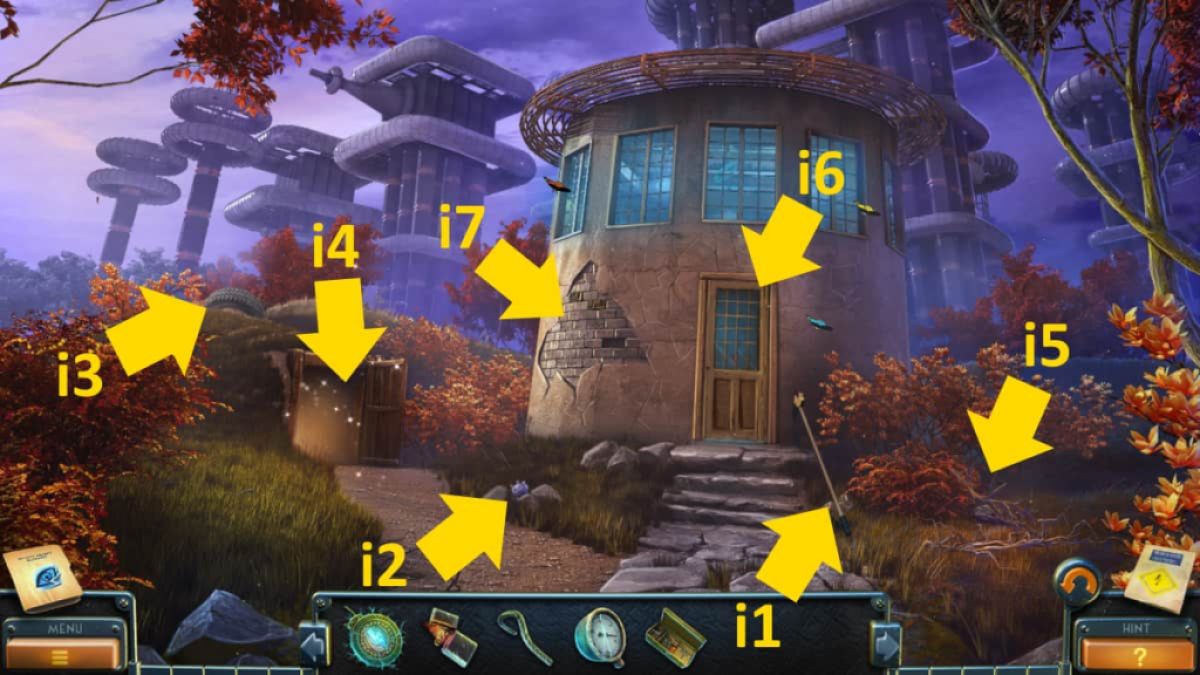
Image by Pro Game Guides
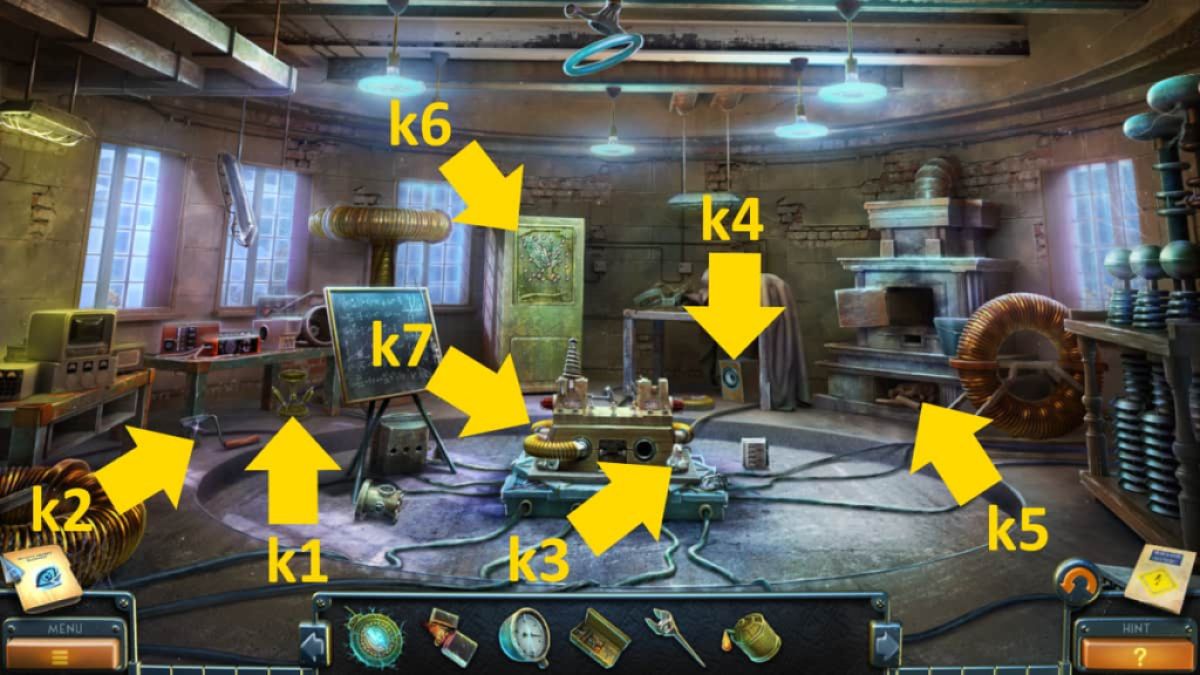
Image by Pro Game Guides
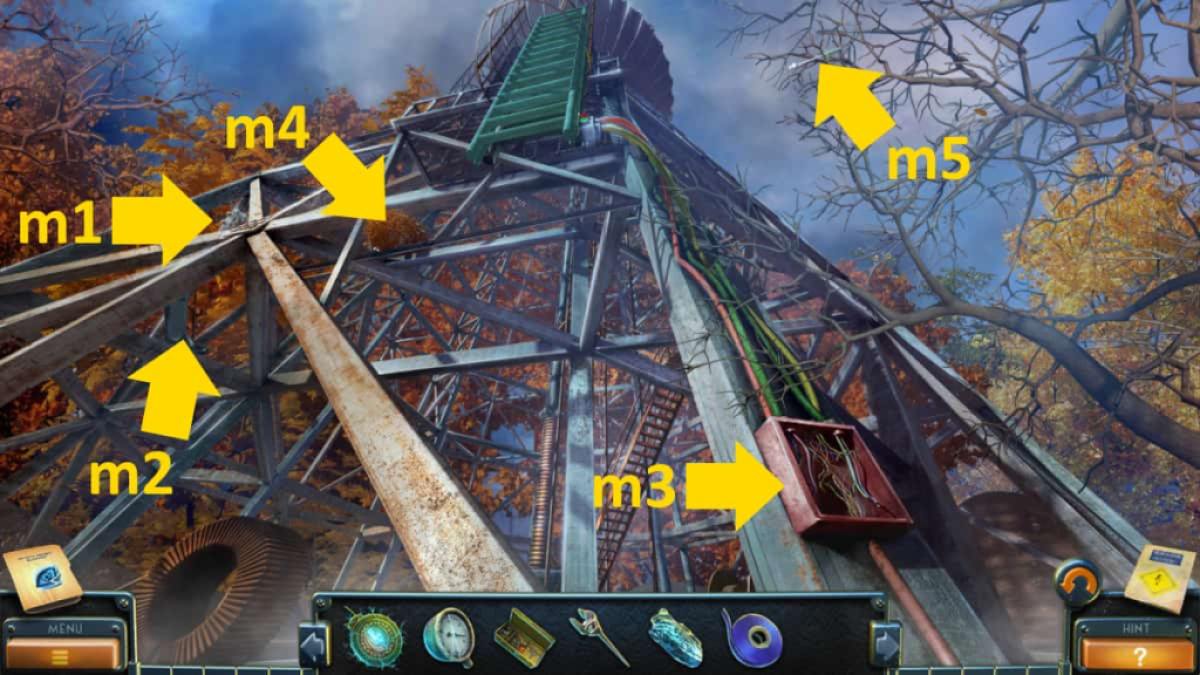
Image by Pro Game Guides

Image by Pro Game Guides
Screenshot by Pro Game Guides
