She can figure out any case , and we ’re also here to assist with our Mystery of the Seven Keys walkthrough !
The Nancy Drew Mystery games are an excellent serial publication of puzzle adventures with big storylines . If you ’re toy Mystery of the Seven Keys , show on for my full walkthrough and all the mystifier root you need .
Nancy Drew Mystery of the Seven Keys complete walkthrough guide
In thisadventure , Nancy is chat the beautiful city of Prague for the first time . After verbalise to Adela and Patricie in the coffeehouse ( ask who the gems were stolen from , and then blue-ribbon theblonde noblewoman who is standingas the genuine Adela ) you may begin the main game . This walkthrough compensate the puzzles innormal modality . Note that some puzzle are more or less different in strong mode .
Explore the cafe
talk toPatricie(a1 ) again ( she is now behind the serve counter ) to regain out where the postcards are . Take thePenfrom the counter ( b1 ) , and thethree Postcardsfrom the other end of the comeback ( a2 ) , and then mark those items off your task list Next , you need to forecast out theWi - Fi countersign , which isIBRIK1708(you will find this on the paries ( a3 ) near the door ) . Now you just need to select a postcode in your inventory and apply the playpen on the post card to dispatch the task .
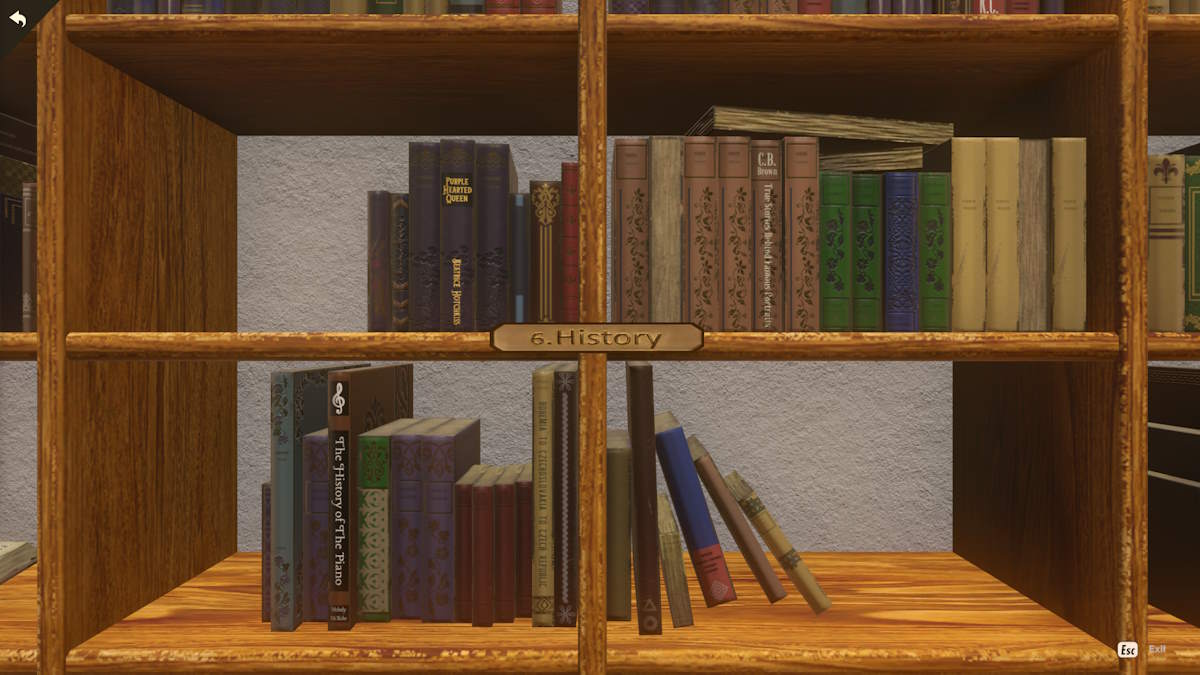
As you re - enter the cafe afterward you ’ll get atext from Unknownwith an nameless file . The subject matter readsfall in love with our past , discover your own elbow room . This is referencing thenames of the book sectionsaround the wall of the cafe ( see the History illustration below ) . The answer to the riddle is :
Enter thepasscode 1169into the content and it will open up to unwrap a map . This leads you to abookcase in the cornerof the coffee shop ( b2 ) where a close - up of the shelf reveals aclickable book .

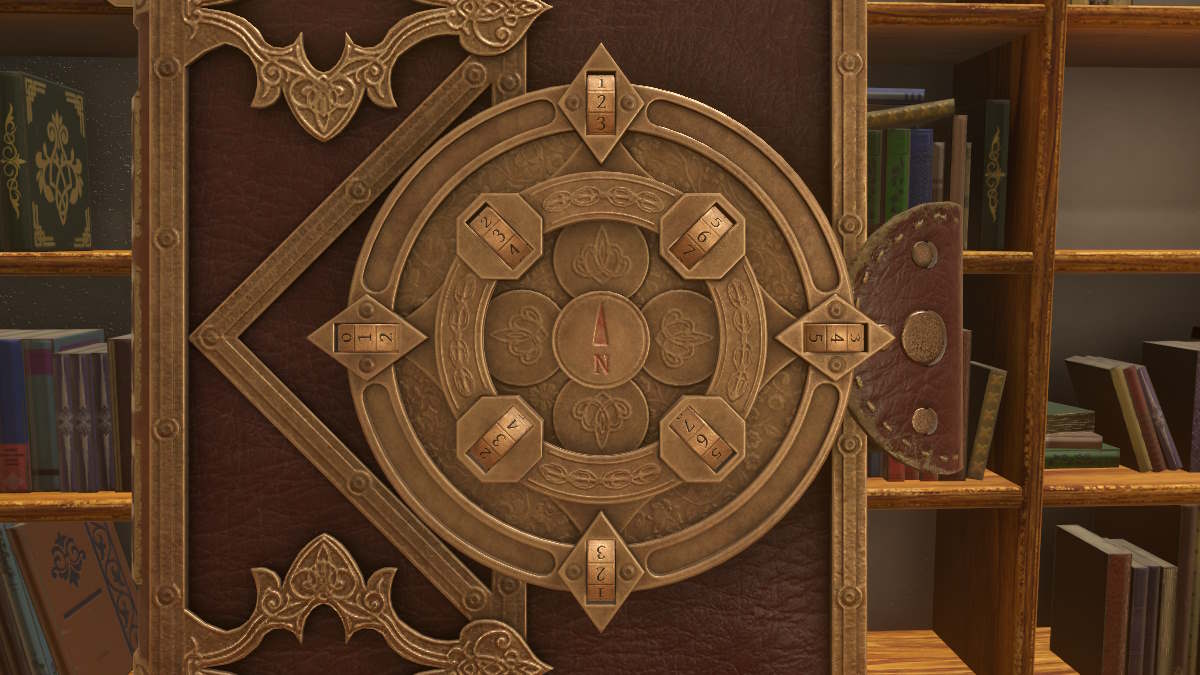
The key to the solvent is that the number on the map match the intimate and outer sections of the Scripture cover bet on whether they ’re on the inside or the outside of the walls of the cafe . Also , note that the compass is upside down . This means you have :
Each pair of outer numbers adds up to the inner act between them . So , as we have 1 at W and 3 at SW , this means the S number must be 2 ( 2 + 1=3 ) . The full solution is below . Once the numbers are in topographic point , click the N in the middle of the Koran to open it andtake the key .
Speak to Patricieand ask what java she would recommend . After the conversation move to thetable by the window(a5 ) , snap the seat tosit down , andAdela will come . Run through all the conversation choice and take her list of suspects .
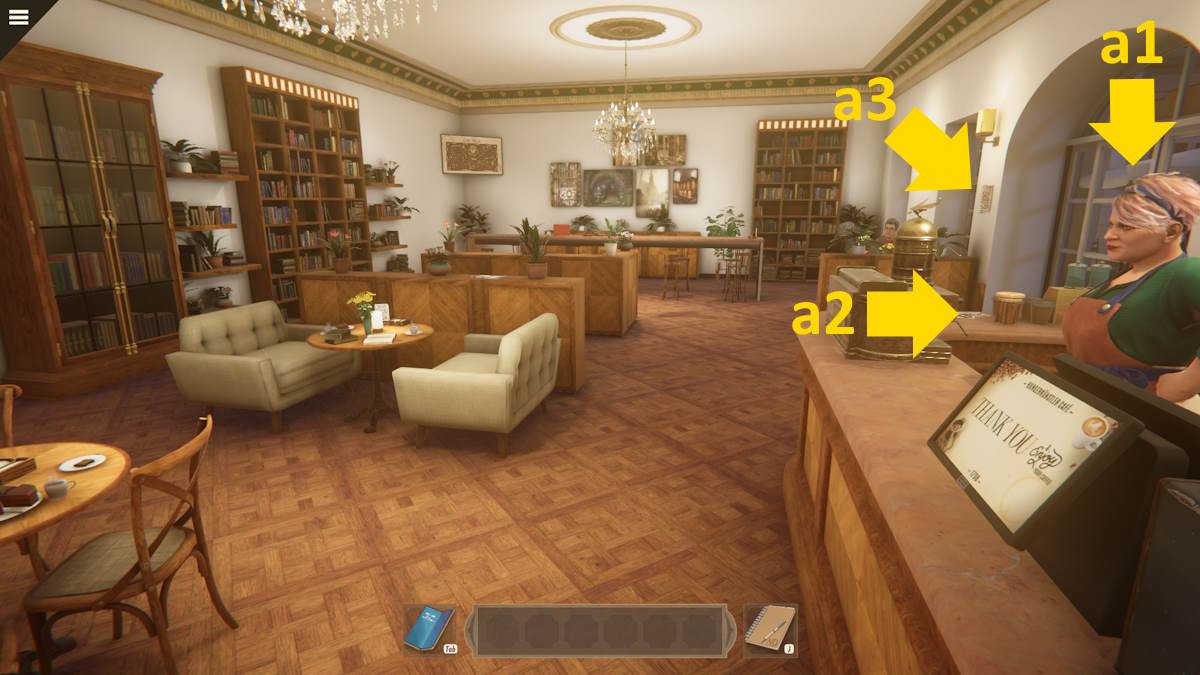
Image by Pro Game Guides
Speak to Patricie once more to incur she needs some help around the cafe . The three point she require are in the simulacrum above .
Return to Patrice and talk to her again . She ’ll take the item and you ’ll bug out a coffee - making mini - secret plan . You ’ll need to machinate the following drinks :
Note that you do n’t need to put the ingredients into the cup in any finicky edict and that once you ’re done decorating , the wordServewill appear ( see above ) . Once you ’re done aid her , Patrice will give you aSnow Globe .
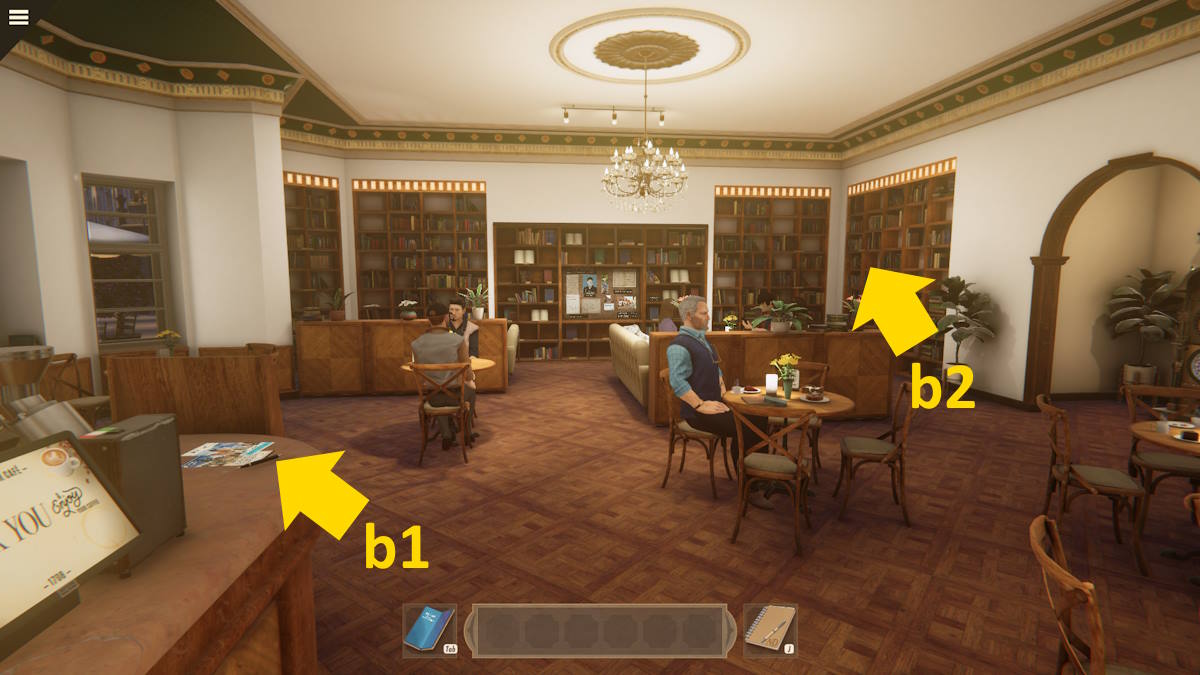
Image by Pro Game Guides
Investigate Adela’s list
Select the greenback from Adela in your inventory and unfold it up .
Click the web name and address , accept the Wi - Fi popup ( protect by Loutkari ) , and scroll to the bottom to get a identification number for Hans Feirsinger , and call . He will severalise you the precious stone are firmly put in in Germany using DEGAS .
You ask to obtain Zlaty Custom Jewelry . Leave the cafe , turn in good order , and succeed the rampart until you get to the store ( c3 above ) . you’re able to only head inside once you ’ve examined the note . Once inside you ’ll talk to Vladena . Go through all the chat options to find she had to change the DEGAS entry after getting the jewelry back from SecondShine .
Screenshot by Pro Game Guides
tick his telephone bit to add it to your telephone set , and then call him . He will bid you to the exposition . take the air through the back of Vladena ’s shop ( rather than drop dead outside ) and you ’ll find yourself in the exhibition . Go through all of Oscar ’s dialog question to find he trusts DEGAS , and then take a look around the exhibits .
Now useMessengerto try andcall your pop . When you ca n’t get through , subject matter Ned . now you need togo back to the cafeand call him . He has nothing concrete , so you need to call the Hardy Boys next . Call Frank and Joe Hardy , who say they can get you the DEGAS Indian file you need but that you ’ll ask a laptop to get at it .
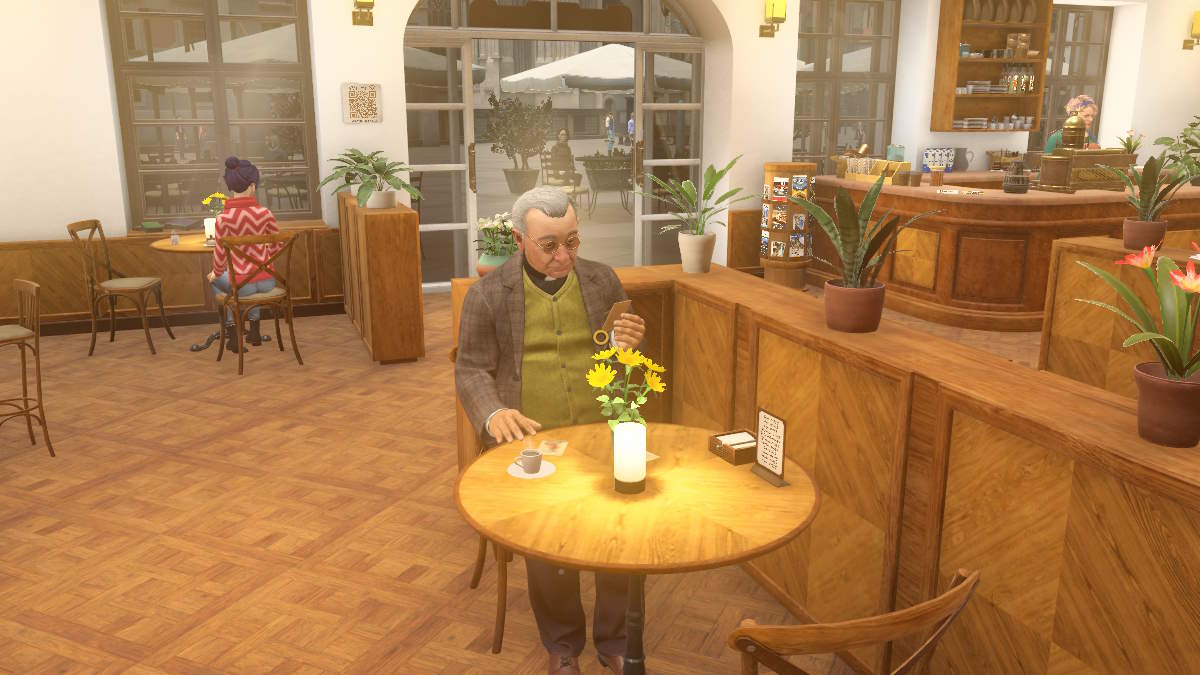
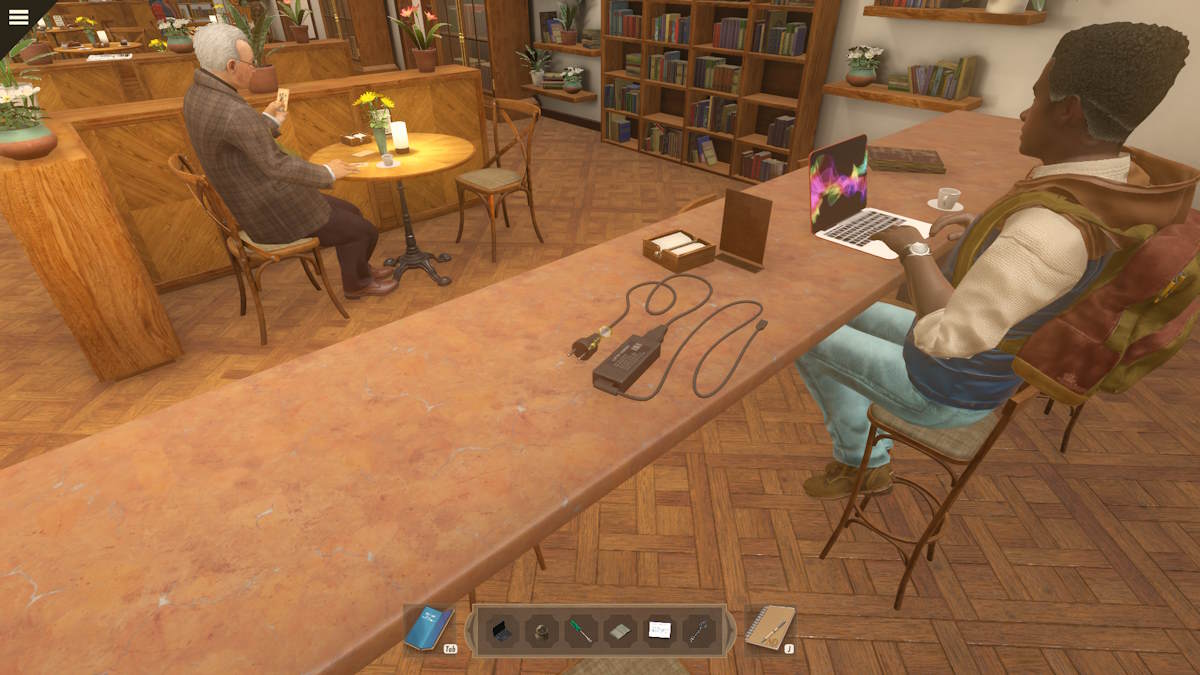
Speak to Patricie in the coffeehouse and she ’ll tell you thelocation of a storeto visit to get a laptop computer . At the goal of the conversation , she ’ll also give you acoffee to deliver to a customer . The potable is for Leo ( above ) , who came over to the table when you were speaking to Adela . Give him the coffee and run through the schmoose options to find he is a priest at the duomo ( he ’ll invite you to visit him there ) .
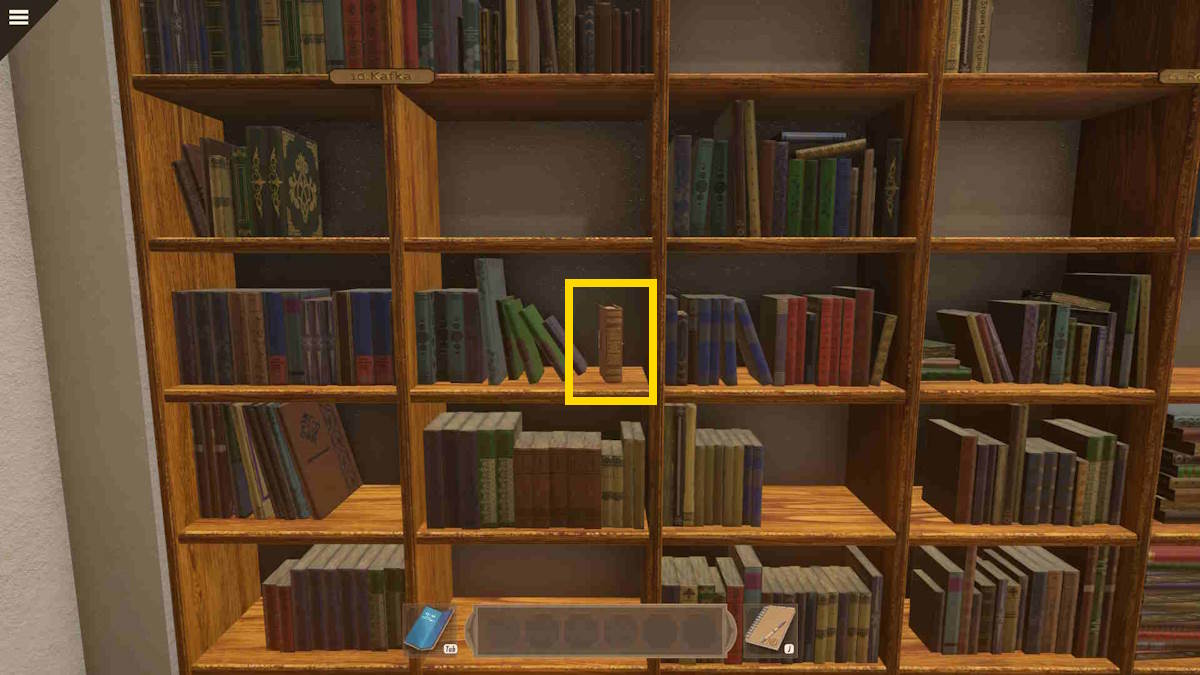
Image by Pro Game Guides
Leave the cafe , work correctly , go to the diametrical recession from the jewellery shop ( see above ) , and through the gate there into theOld Town Square . The computer store is on your left wing when you arrive . Head inside and speak to the assistant , Elka , behind the counterpunch . You ’ll find out she is learning about cyber security while she sell you a laptop computer , but also that it ismissing its charger .
After speaking to Elka , walk through intoMarek ’s storenext room access ( you do n’t call for to go outdoors ) . He ’ll state you the key you get hold isone of the seven keys of Prague . As you leaveRadek(a puppeteer ) comes into the storage and talk to Marek . He suggests you check out his marionette show in the public square . This allow you to tick off the visit Aparat task .
The marionette show
Go back toward the coffee shop and talk to Radek at the marionette stage ( C2 , above ) . He needs you to avail him set up the operation . You need to set up seven scenes by put together the correct puppet , prop , and contrast . Once you have a scenery set correctly , click Action to see if you ’ve obtain it right and can move to the next scene . take down that there is always a tool ( A ) and a line ( C ) , but not always a airscrew ( B ) .
After that , you could watch the performance and thenspeak to Radek . He ’ll excuse that the seven keys are what , according to legend , keep the Crown Jewels safe . A mortal wouldneed all seven keysto enter the vault and they are all adjudge by unlike important mass .
Getting the DAGAS file
Goback to the exhibition(next to the jewelry store and where you met Oskar ) . There is no one there , sohead up the staircaseand take after the corridor . After a shortsighted walk , you ’ll get to a room access andoverhear a conversation involve Oskarand the Dean ’s secretary . When it finishes , check yourmessage from the Hardy Boystelling you they ’ve send you the DAGAS file .
Leave the exposition area and go back to the coffee bar . Take the charger from the table ( see above ) , afford the laptop in your stock list , turn it sidewise so you’re able to see the baron port , and add the courser . You ’ll now get a picture of the laptop computer silver screen .
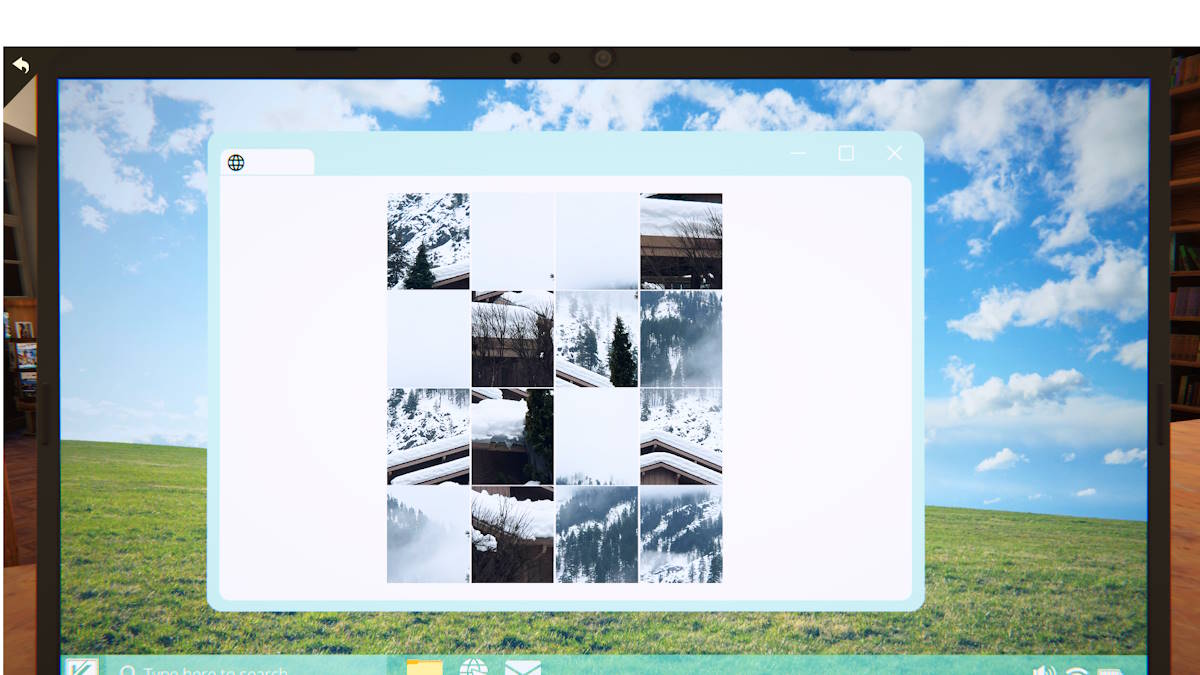
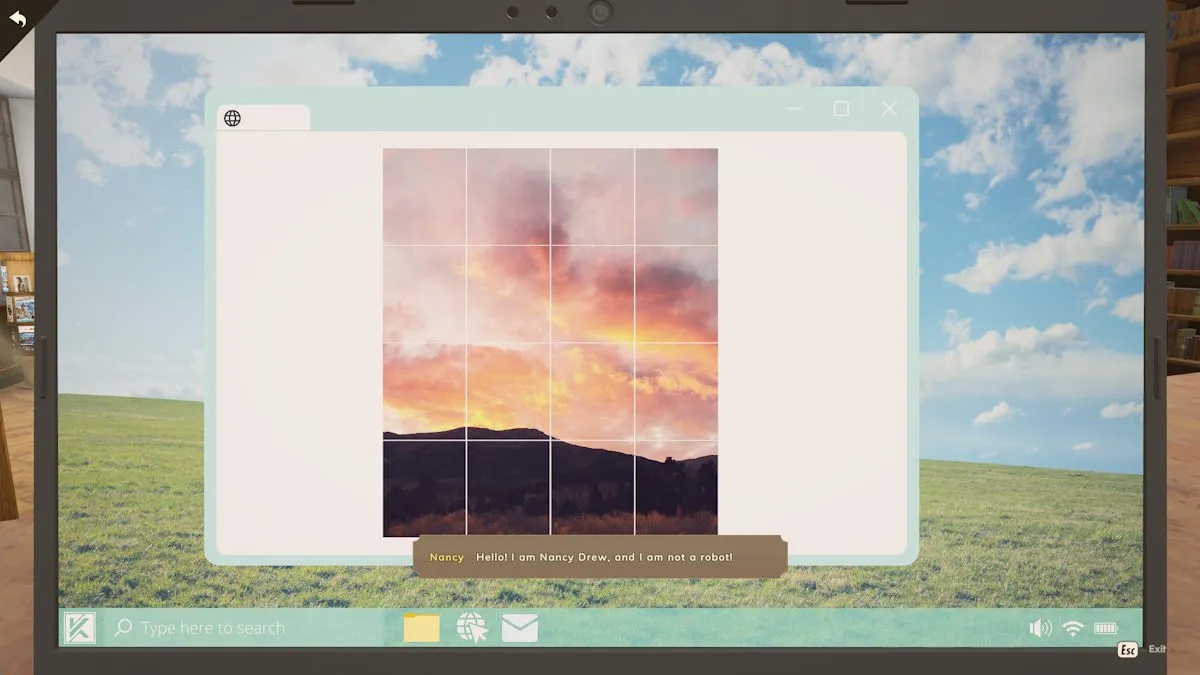
Click the email icon , introduce the Wi - Fi watchword ( IBRIK1708 ) , and download the DAGAS attachment . exit the electronic mail app and the DEGAS file will be in the eye of the covert . dawn it to open it and then seek to complete the fretsaw puzzle . You ’ll get hacked before fill in it , so Patrice evoke you take the laptop back to Elka at Aparat Computers .
Screenshot by Pro Game Guides
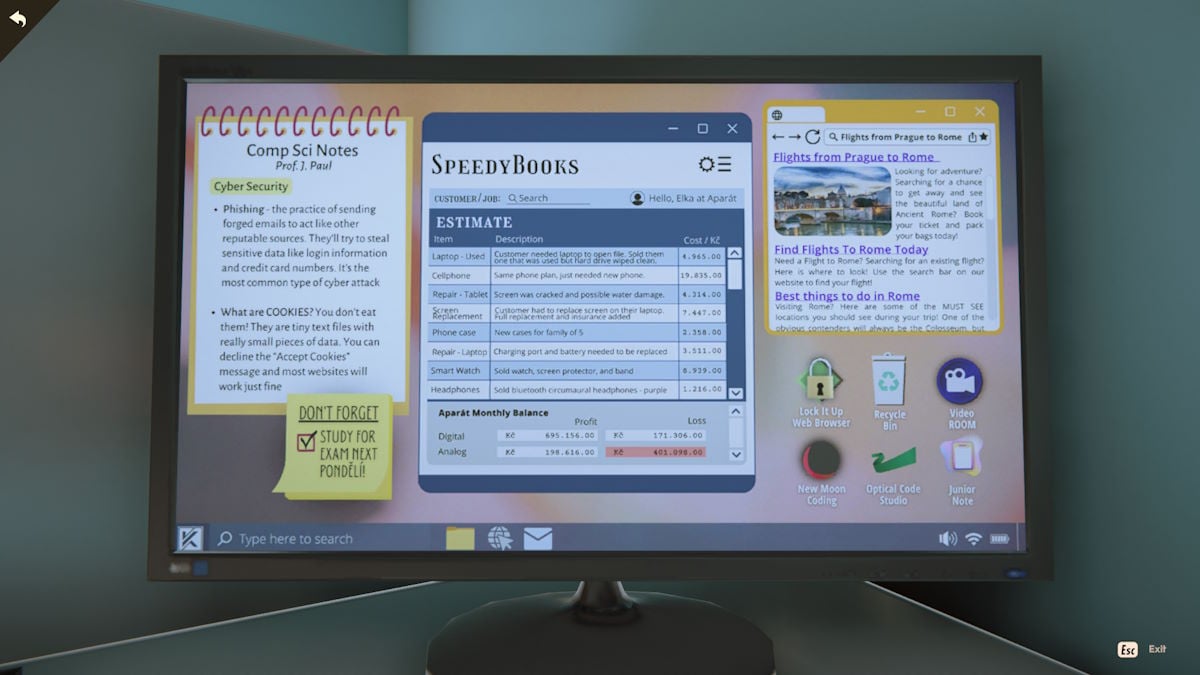
When you arrive , the entrepot is close but Elka lease you in . Yougive her your laptop computer and phoneand she takes them away to check them . While she is gone , go behind the counter and examine the desk . Select the keyboardto turn the computer screen on ) see above ) . you’re able to take care at everything else on the desk ( the colored playpen , cyber prophylactic piece of paper , and the pic of Elka with her mother ) but you do n’t need to remember anything specific .
Now go next doorway and await at the areabehind Marek ’s desk . afford the draftsman ( d1 ) and use the paint on the desk ( d2 ) to open up the box in spite of appearance ( d3 ) . notice the will ( d4 ) on the desk ( giving everything he has to Elka ) , the former damage lock ( d5 ) , and the eggs and stamp in the box ( d3 ) . Nothing is useful yet and you ca n’t take anything from either location .
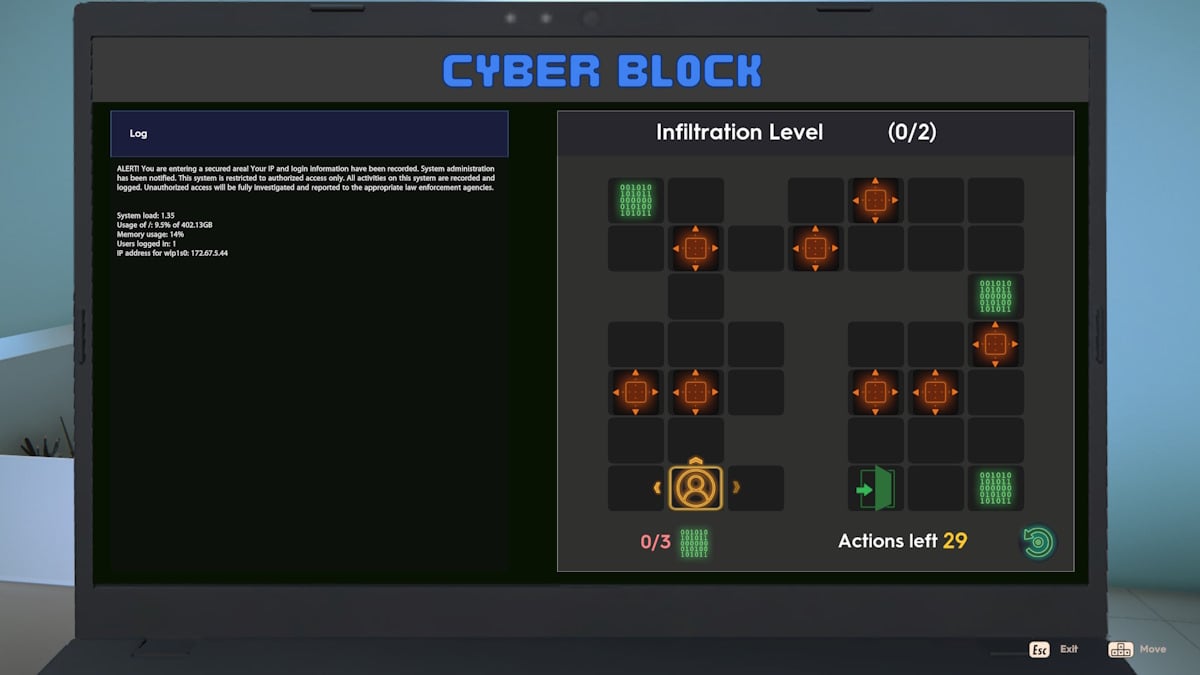
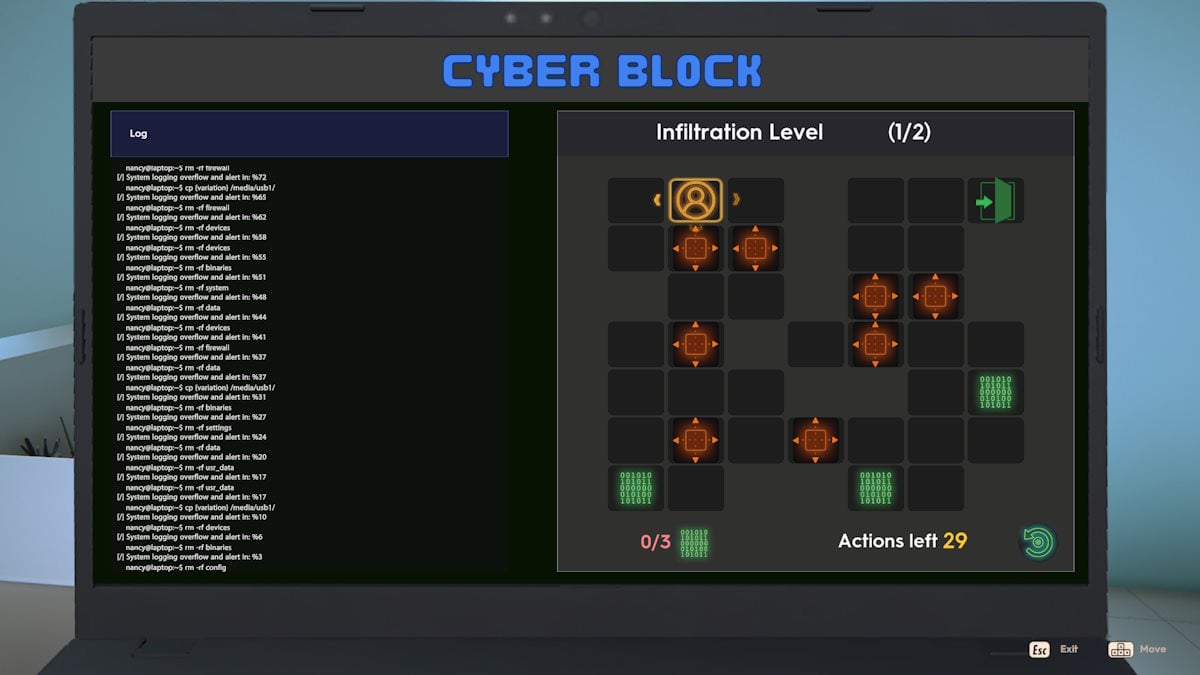
As shortly as you go back into the figurer shopElka will returnwith your equipment . After utter with her she ’ll give you some cyber surety breeding ( in the shape of a puzzle ) . The puzzle has two levels to beat , each of which has to be beaten in 29 turns .

Screenshot by Pro Game Guides
Move orthogonally ( up , down , left , ripe ) around the power grid . you could crusade red roofing tile out of your means and need to pull in all the green tiles on each point to bewilder it . The full root are below .
Once completed , you ’ll get acall from Agent Zane Garrettabout the DAGAS filing cabinet . He read to look at the dates when the item was transferred . This ends the day .
A morning visit to the Marionette Theatre
After a abbreviated cutscene during which you ’ll get a warning to shed the case , you ’ll be back outside the coffee shop . Ned song , but just to tell you about deadends . Next , Adelacalls for an update and lets you have a go at it thatshe visited Marek ’s storebefore she sent the jewellery by . Head over tospeak to Radekonce more across the square .
After speaking to him , climb into the box where he does the show and take a look at the desk ( see above ) . The clipboard ( e1 ) shows ahuge cash contribution from Loutkan , the cyber surety house . Use the chisel ( e2 ) to pry enter the red box ( e3 ) and recover out his new carrying out will beRezidente ’s True Tale .
Speak to him afterward about how many puppets he has and he ’ll say 10 . When you refer the fact he said he was waiting for his twelfth marionette from Marek , he gives you a panicked reply . direct back to the coffee bar andspeak to Patricie . She ’ll tell you that the Rezidents are a secluded group of surreptitious criminals who haunt the vestige of Prague .

Screenshot by Pro Game Guides
Now refund to Vladena inZlaty Custom Jewelry . She confirms Marek is a skilled artificer who would belike have the know - how to fiddle with the necklace . She then leave behind to utter to Oskar , permit you to try and crack her safe . To do this , you first need toassemble a instrument . You ’ll find the first part of the tool on theround table in the box , the second in thepenholderin the desk close - up , and the third next to thelarge white gemstone(see above ) .
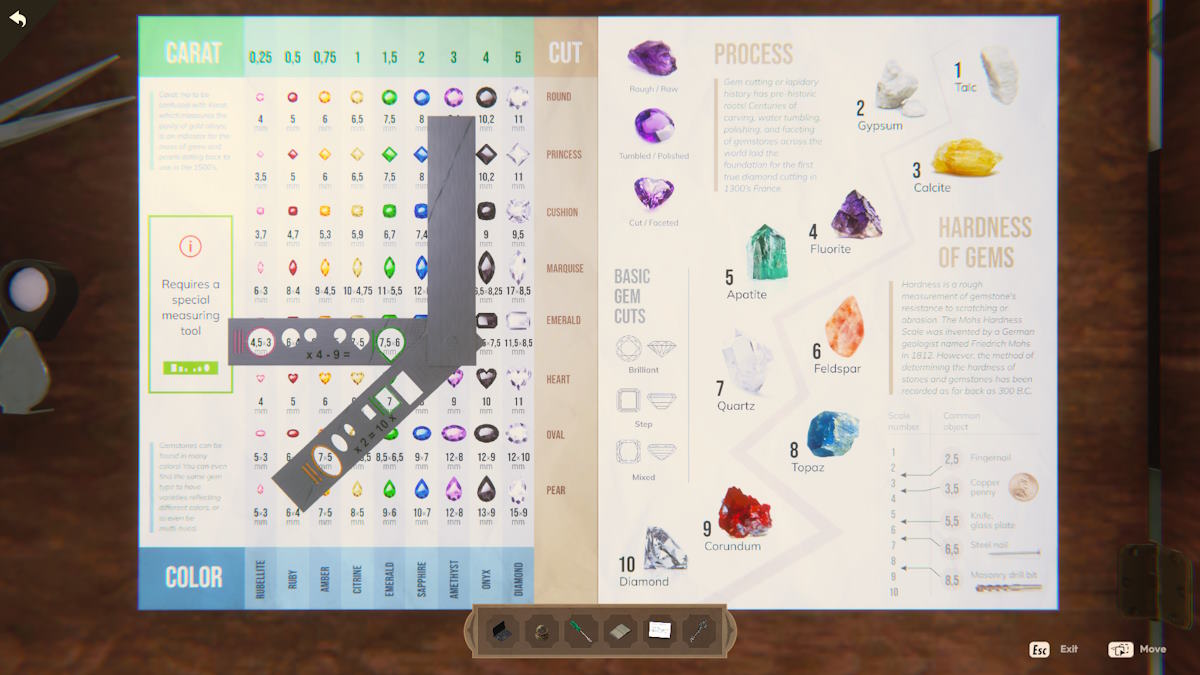
blend the three firearm in your inventory so that the scratch in the metallic element in each small-arm lines up ( see above ) . Now move tothe posteron theother half of the desk(see below ) and line the machine up in the close - up so the four numbers create the par on the two metal pieces . Also , note that each hole hasa number of linesnext to it showingthe digit in the episode that is part of the code(so three occupation next to 4.5x3 will give you 3 ) .
Finally , note the purchase order of the sun and moon symbolisation above the safe and how they liken to the diagrams on the desk ( see below ) . This leave you with thecode 5457 . utilise this to get into the safe and take the document inside . As you step back out from behind her desk , Vladena returns . Before you leave , she tells you Oskar was an assistant when the treasure were stolen in London .

Screenshot by Pro Game Guides
Checking the DAGAS files
shortly pop next room access from the jewelry shop to the exhibition andask Oskarabout his controversy with Vladena . It turns out Vladena ’s family were once the assessors of the jacket jewels before being oust .
This begins aspot - the - difference puzzle . Move the cursor over the images until the symbol changes , get across the detail to foreground it , and then bump the comparable info on the other document . similarity will show with greenish contrast and discrepancies with red . There areeight details to match upin total but the significant one is the date , which is unlike ( see above ) .
Take this novel info back to Vladena atZlaty Custom Jewelry . After she separate you she should have been the only one able to blue-pencil the online variant of the DAGAS file , you ’ll get a content from the Hardy Boys . Nowcall Agent Zaneat DAGAS with all this raw information . After tell apart him about Rezidente ’s potential amour , secernate him about the DEGAS file timestamp variant . You also find out that the Dean of St Vitus may be in danger , as the odds are someone is plan to slip the cap gem .
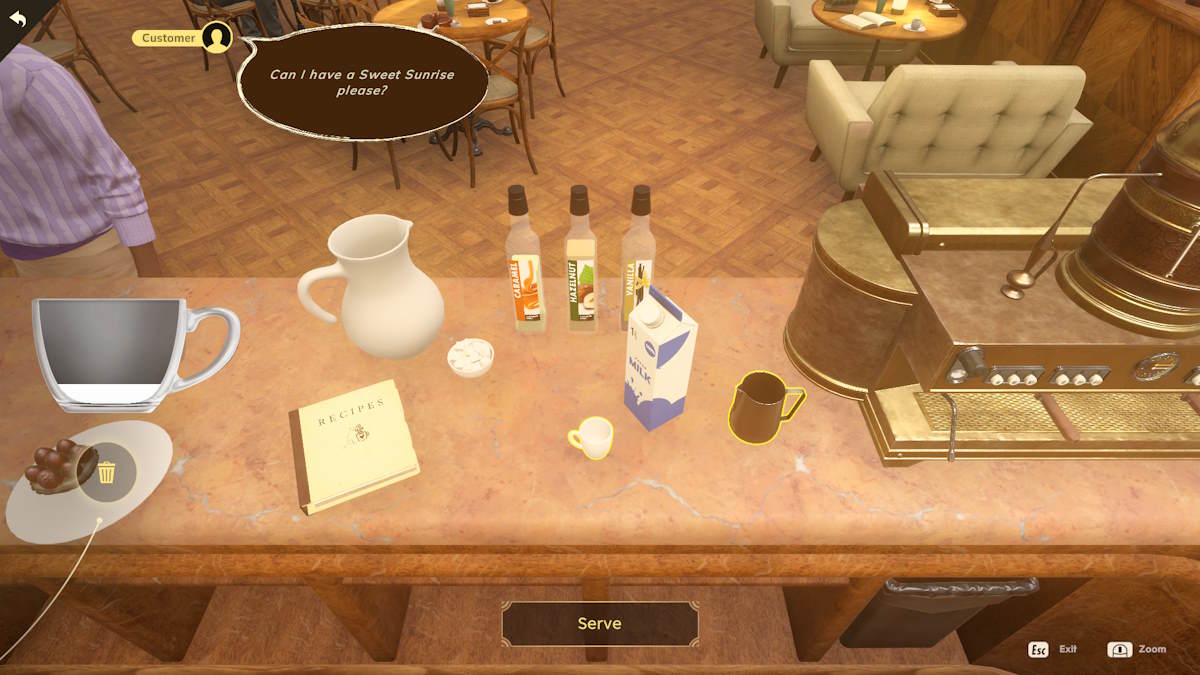
Image by Pro Game Guides
Searching for the Dean of St Vitus
Go back into theexhibition room(where Oskar remains ) and head up the steps and along the corridor toward the Dean ’s office .
When you go far at the Dean ’s secretary ’s desk , there is no one around . Click the ‘ lead for coffee ’ noteon the desk and you ’ll get the secretary ’s contact details added to your telephone set . you may optionally use the knife on the secretary ’s desk to open up the newspaper file there . It shows a note from Leo , saying he is off to Rome . You ’ll also see the Dean ’s office doorway is opened , so head at bottom .
When youenter the Dean ’s officethe door will keep out behind you and you ’ll learn another frustrated conversation between Oskar and the Dean ’s repository . You ’re trapped ! Head over to the Dean ’s desk and analyse it . tick the phone ( a1 ) to listen to Leo ’s messages , open up the folder ( a2 ) to find a pen capable , and put it in the playpen holder ( a3 ) to open a secret draftsman ( a4 ) .

Screenshot by Pro Game Guides
Check the calendar inside , read the Faith Weekly cartridge ( a5 ) , and then flex your attention to thewall behind the desk .
The trick to this mystifier is making certain that all the symbolisation sets carved into the Ellen Price Wood out of doors of the central practice are stage in the middle byswapping the symbolisation . The paradigm above shows the completed pattern .
Entering the tunnels
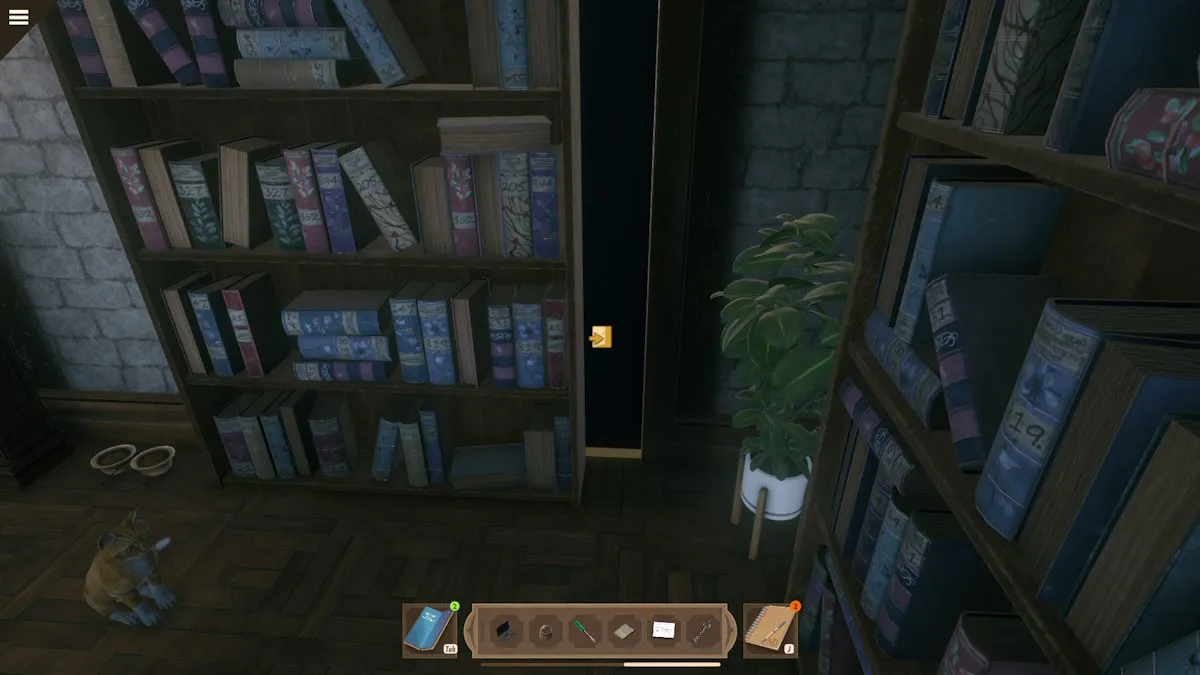
Once done , a bookcase will move on the rampart next to you , giving you an exit . Do n’t blank out to pet the cat on the way out . However , it ’s also significant to note thatthe next section is a maze in which you ’re being chased .
As shortly as you go far in the tunnel you ’ll start to bechased by apparitional fantasm . If they catch you , you miscarry , and you have to start again . you’re able to do this as many sentence as you like so there’sno need to panic . The map above should help you make it out without too much trouble . However , while you could get out safely in the terminal , it looks as if the Dean may not have head to Rome as planned .
Once you ’re out and have spoken to the police you ’ll find amessage from Adela , so go and meet her in the coffee shop . you’re able to also call the Dean ’s repository , but he does n’t have much light to shed on matters .

Image by Pro Game Guides
Adela and the hackers
Once you baby-sit down withAdela in the usual patch in the coffee bar , you ’ll feel she has been hacked . as luck would have it , it is a like Cyber Block program to the one Elka learn you to beat . This time there are three levels to beat and an increase act of turns .
Speak to Adelaonce you ’ve cleaned up the plug and give her a case update . Once you ’ve exhausted all conversation options with her , also have acatch - up with Patriciebehind the cafe counter . While in the cafe , also head to the Alchemy section ( right as you make out in through the door , in the corner , see above ) and take the bookAlchemy ’s Golden Historyfrom the ledge there .
Investigate Oscar’s artifact
Go back to the museum expo andspeak to Oskarabout the Dean , the Rezidente , and alchemy . you may check out the exposition , but what you necessitate to do is get into Oskar ’s artefact ( visualize above ) . To get anywhere you first need to solve the lid teaser .
Examine the object and click the top to get a face - on view of it . First , drag the planet(A ) clockwise around the circle back to its start point . Nowslide the sun(B ) across from left to right . Finally , drag the planet(C ) entirely around the ellipses . This open up the rest of the puzzle .
You now need toline up the correct four symbolsto launch the gadget . See the image above for the convention postulate and the clit to press once you ’ve aligned the right symbols . When you try and test the artefact further , Oskar will intervene . get out of the close - up and he will excuse where the artefact was found .
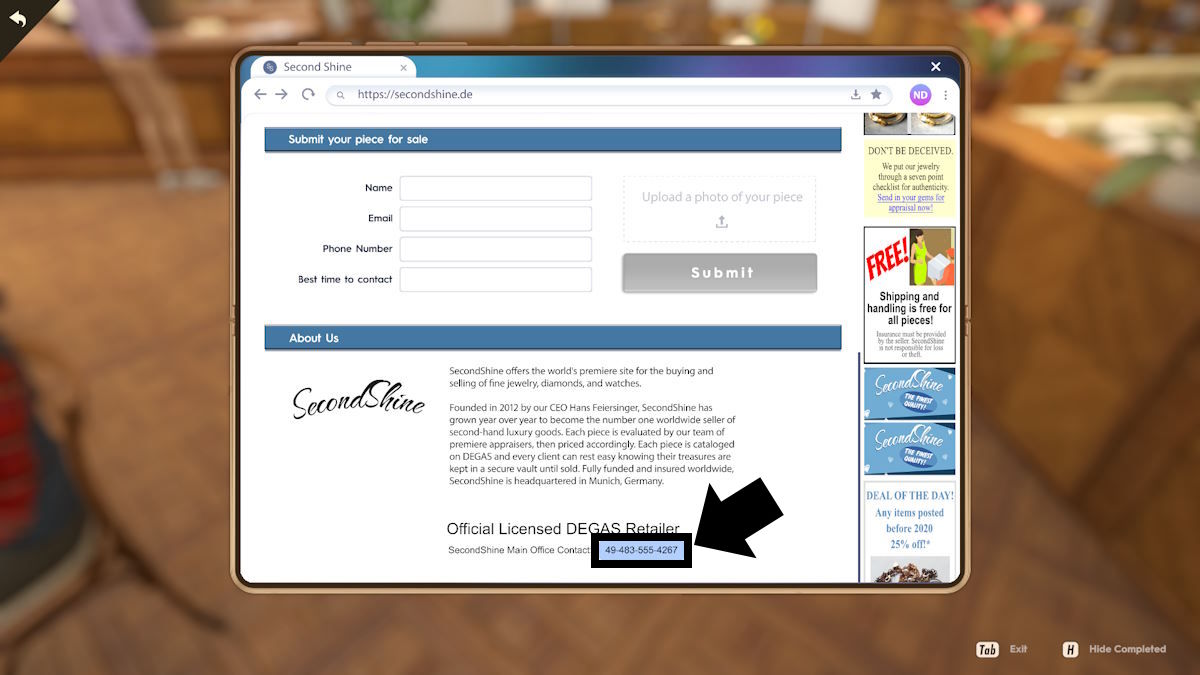
Image by Pro Game Guides
Learn more about alchemy
Head outside and babble out toRadekin the satisfying ( in his usual spot at the marionette caravan ) about the Rezidente and alchemy . Now take back to theOld Town Squareand talk first to Elka and then Marek inAparat Computers .
After exhausting all the conversation topic with Marek , you ’ll be able-bodied to examine the oldalchemist ’s caseon the windowsill in his section of the storehouse . When you test it , click the left-hand arrow to look at the left side andclick the buttonthere . Now click the good arrow twice andclick the buttonyou’ll now find on the opposite last of the box ( both push button are shown above ) .
You ’ll automatically be taken back to thefront view of the boxand the eight thunderbolt holding it together are now clickable . fall into place them in the order shown above and the top of the box will spread , revealing a puppet . Click the marionette to remove it , noting the symbolic representation underneath ( a circle in a square in a trigon in another forget me drug ) .
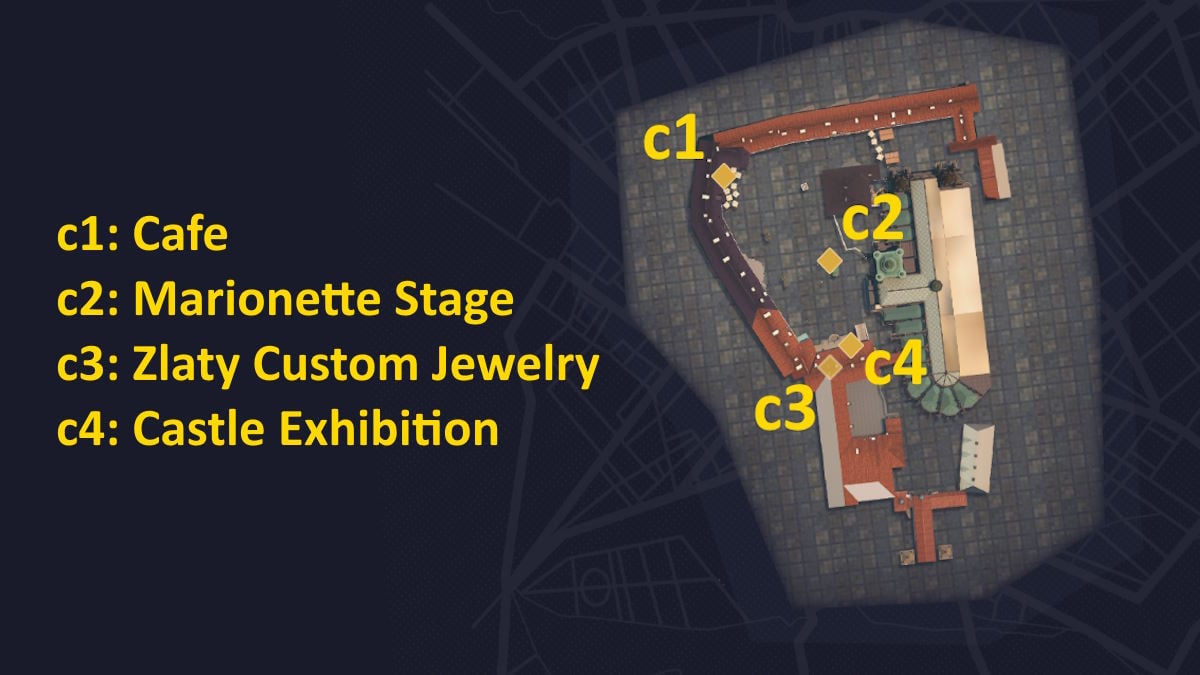
Image by Pro Game Guides
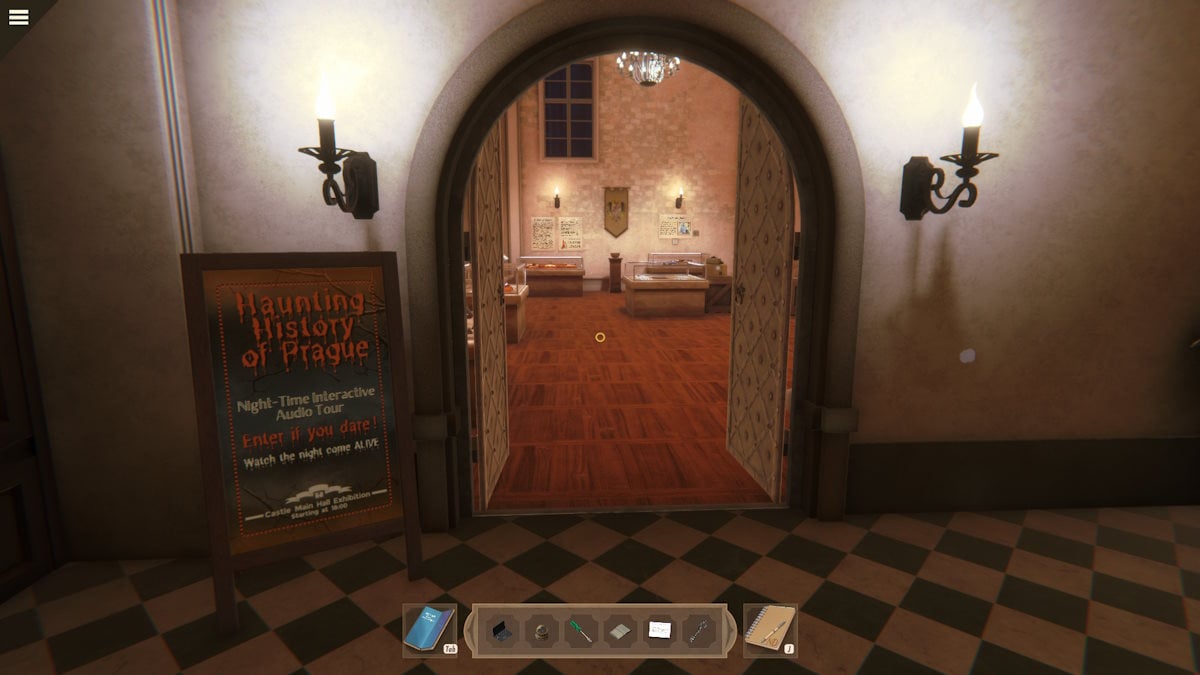
come back to the exhibition but instead of run at heart , flick the posterfor the Haunted Tour outside ( pictured ) to start the tour . you could do this originally , but there ’s a reason to do it now . As Oskar is n’t here , you could select the artefact you ’ve recently open up and take the jewels ( you ca n’t do this until you ’ve see the symbolic representation in the old case ) .
you could optionally take the go itself by click the draw tour button next to each of the five numbered pictures on the walls ( you ’ll have to do it today to get along anyway).Click the Haunted Tour poster again to passing .
Return to Marek ’s workshopand look again atthe older case . You ’ll note the three gem you ‘ borrowed ’ from Oskar ’s artifact are now on the left of the close - up ( see above ) . Place the dispirited precious stone ( A ) in the empty one-armed bandit ( B ) and the top stratum of the puzzle will be absent . Place the remain two gemstone into the slot matching their flesh on the next horizontal surface to get to the existent puzzle below . Tofinish opening the corner , do the pursual :
Screenshot by Pro Game Guides
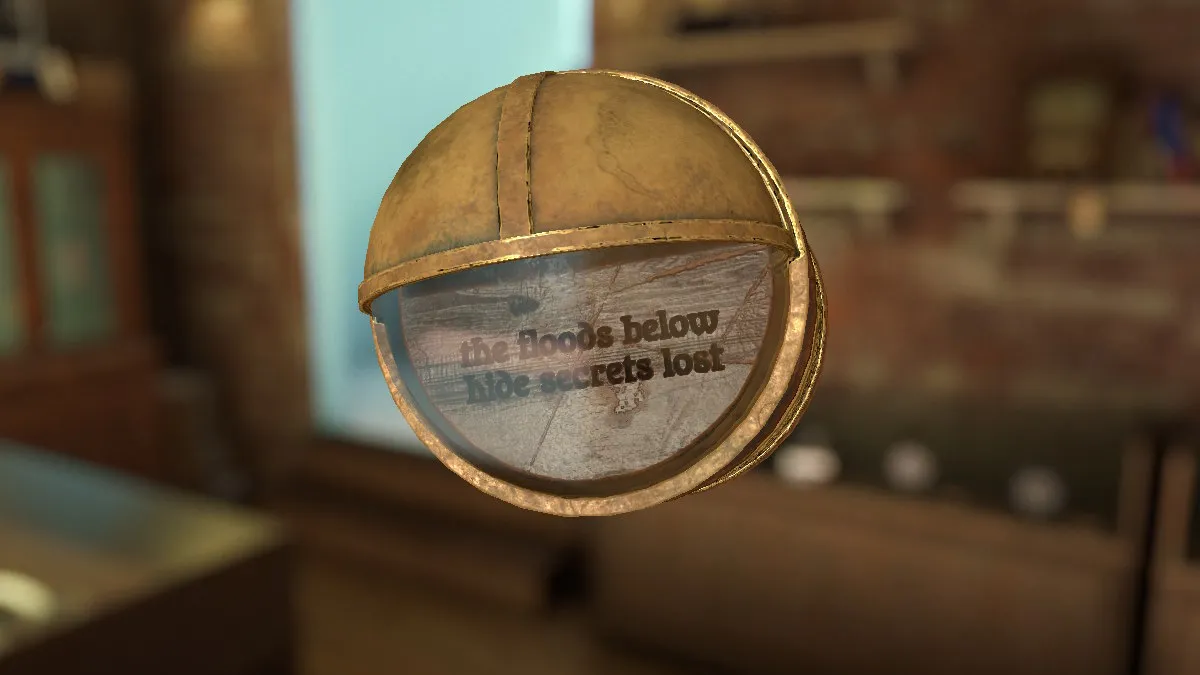
A tray will now slither open allowing you to take aSmall Key . This complete the Marek ’s Trunk labor . The small key can be used at thebottom of the Snow Globe , revealing some kind of larger key and the messageThe rising tide below hide secrets lose .
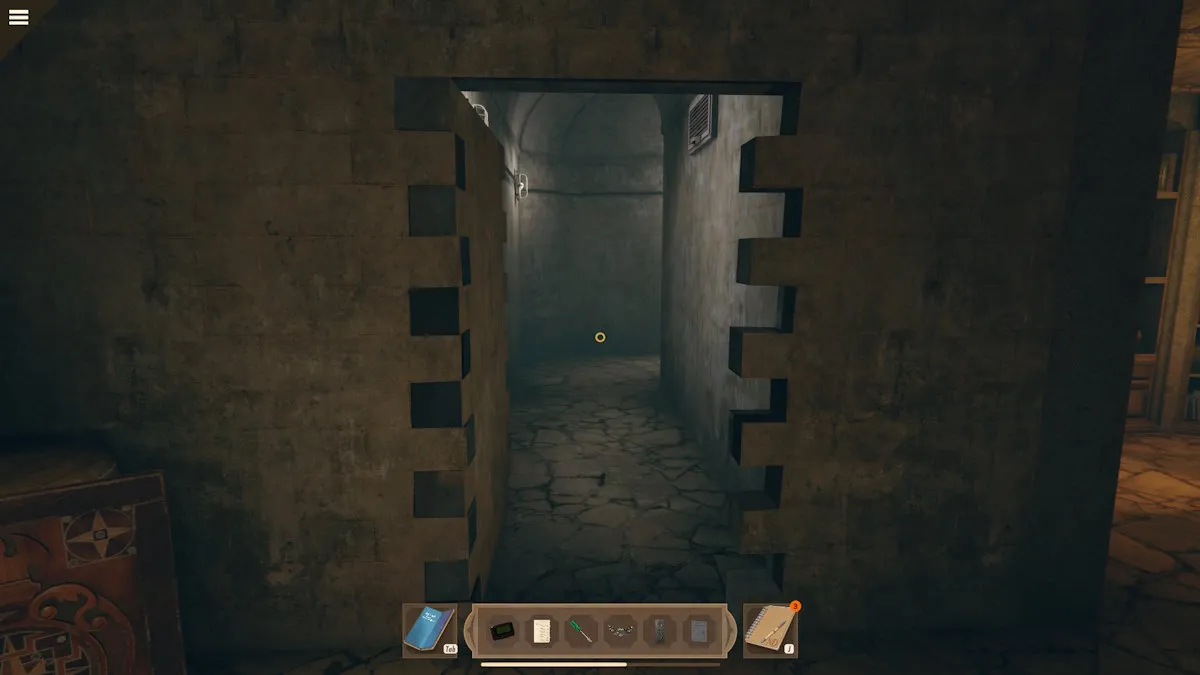
Go back to Castle Square , bear outside the exhibition , and go down the slop ( pictured above ) back into the burrow below Prague . Do n’t worry , you ’re not going to be attacked this time !
take the air forward , take the first left , and at the oddment of that passage , you ’ll see anengraving on the wallto your right ( depict above ) . Walk over to the engraving and examine it for a closer feeling and then apply the Snow Globe in the slur score above to start a light puzzle .
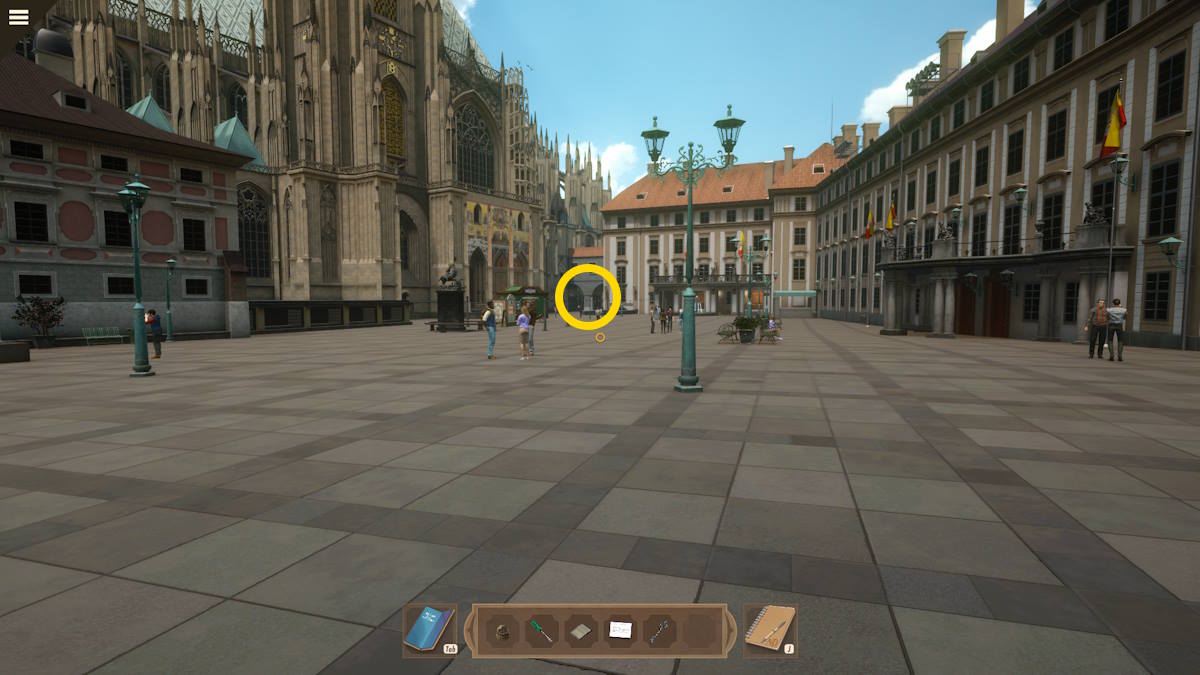
Image by Pro Game Guides
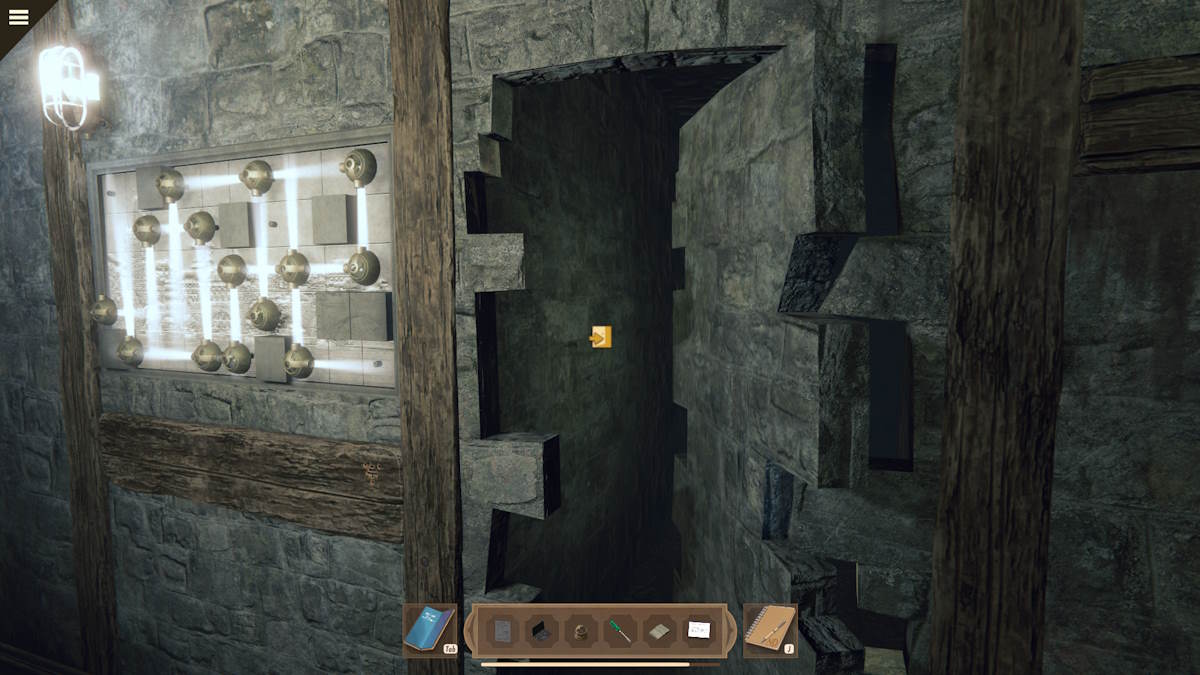
sweep the piece from the bottom onto the engraving so thatevery space on it is lit up . you’re able to see the solution above , as well as the threshold it opens next to it . remark that pieces with two or three refractors can be rotated . Once the room access opens , head through .
take the air across to the desk opposite where you come in and try it for a skinny - up ( above ) . Pick up theBlack Stone(b1 ) and then get to the Quran ( b2 ) .
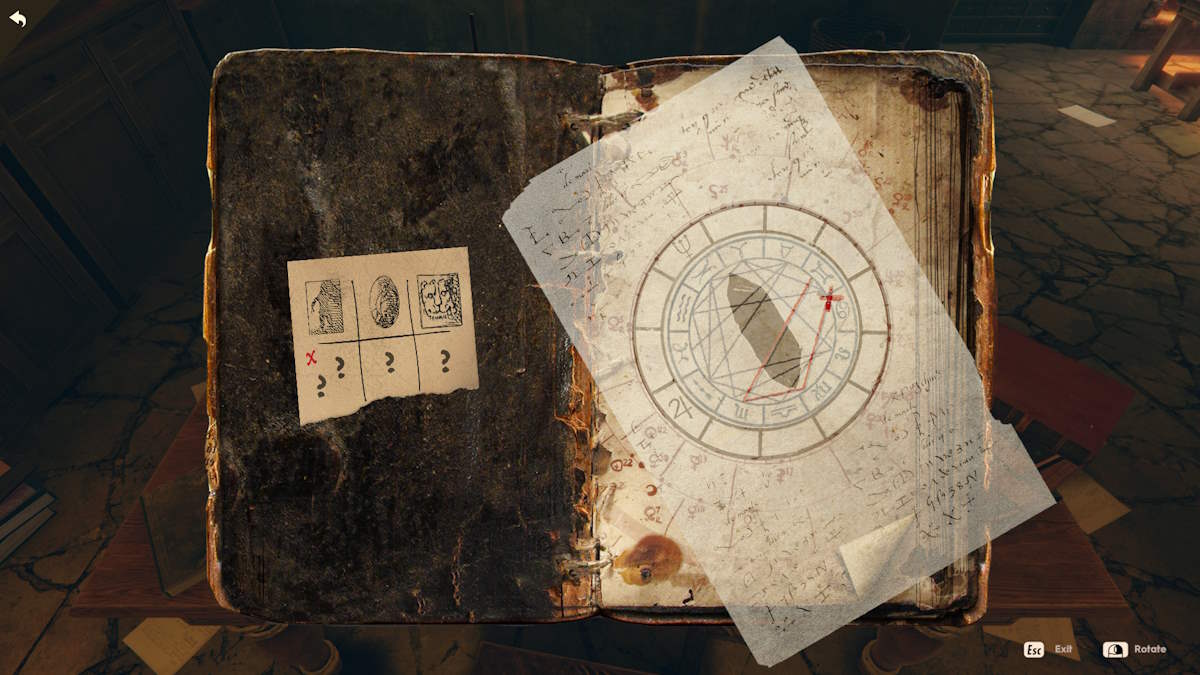
When you open it you ’ll find thepage on the left is n’t attached . Move it over the righthand varlet and it will confiscate itself to it . Now click this at large page to rotate it until it slots into the right situation above ( you ’ll know when it can no longer be moved).Working from the Xon the informal opus of paper , you could see it mark four symbolisation from the X to three more points along the crimson line .

Screenshot by Pro Game Guides
Flip the ledger page to the right , see the four symbols on the unexpended column of the diagram , and take down the symbols ( and ordering ) they compare to in the right editorial ( see above ) . Also , note thateach symbolization on the potson the right half of this page has a corresponding triangle normal at the bottom . If you now flip out the rule book back to the first page and front at the unexpended side of it , you ’ll see you now have a triangle pattern to match each top row symbol and a symbol to match each question mark on the bottom row .
Now move over tothe alchemy tableitself ( on the other side of the room , pictured above ) . try the mesa to get a closemouthed - up and do the following :
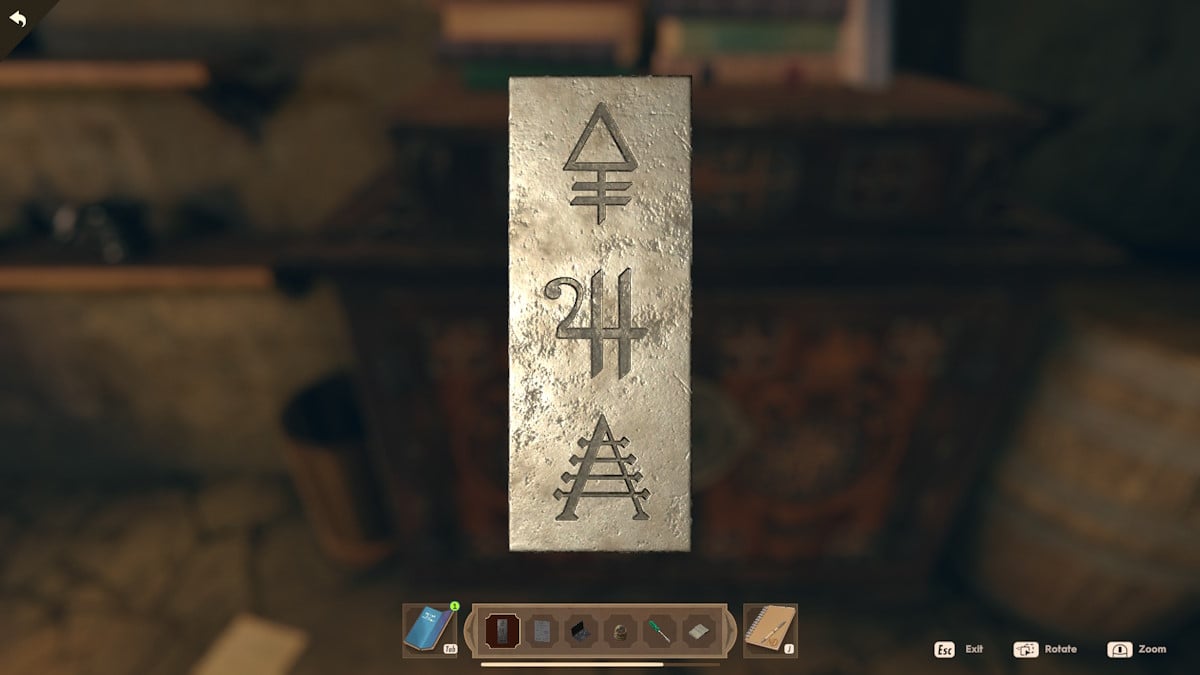
you could now take theLock Combinationfrom D. Note the three symbolic representation mark on it ( above ) , turn to the cabinet next to the alchemy board , and examine it . Align these three symbols on the front of the cabinet and it will unfold . You need to do thisin a specific order(otherwise the lock will readjust ) .
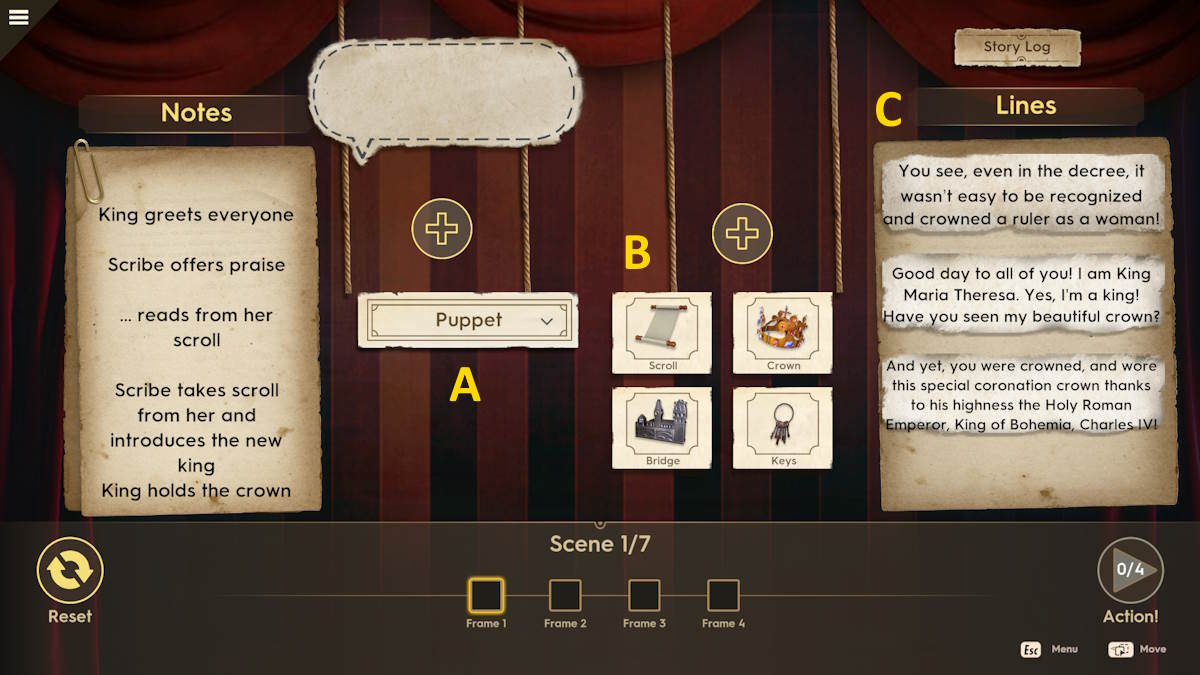
Image by Pro Game Guides
Once the cabinet is open , examine the jewel in the bottom - left corner for a close - up and move them until youreveal a Coin(marked on the prototype above ) . Take the Coin .
Now pick out the draftsman in the middle of the top half of the storage locker andtake the bookfrom inside . you may look at the other artefact in the console , but ca n’t take them .
The way you occur into the tunnels has been operate behind you so you ca n’t go that way . number go out out of the doorway , reverse left again , watch that corridor as it turns to the right hand , and then go left again to give this part . you could however explore this section at your leisure time if you want to .
Screenshot by Pro Game Guides
You need to make out theLearn more about the Rezidentetask before the Clarence Day ends . Go to your earphone and message Ned about it if you have n’t already . You also need tocomplete the Haunted Tourand get the journal update . After this , go andspeak to Radekby the marionette carriage about the Rezidente .
Investigating Adela
It ’s time to see if Adela ’s calls get just after you run away the tunnel , twice , is a coincidence . inscribe the cafe andtalk to Patricie . She ’ll agree to help you distract Adela , so now you’re able to go and sit with Adela at the usual table . When Adela allow for to help Patricie , you cansearch Adela ’s bag .
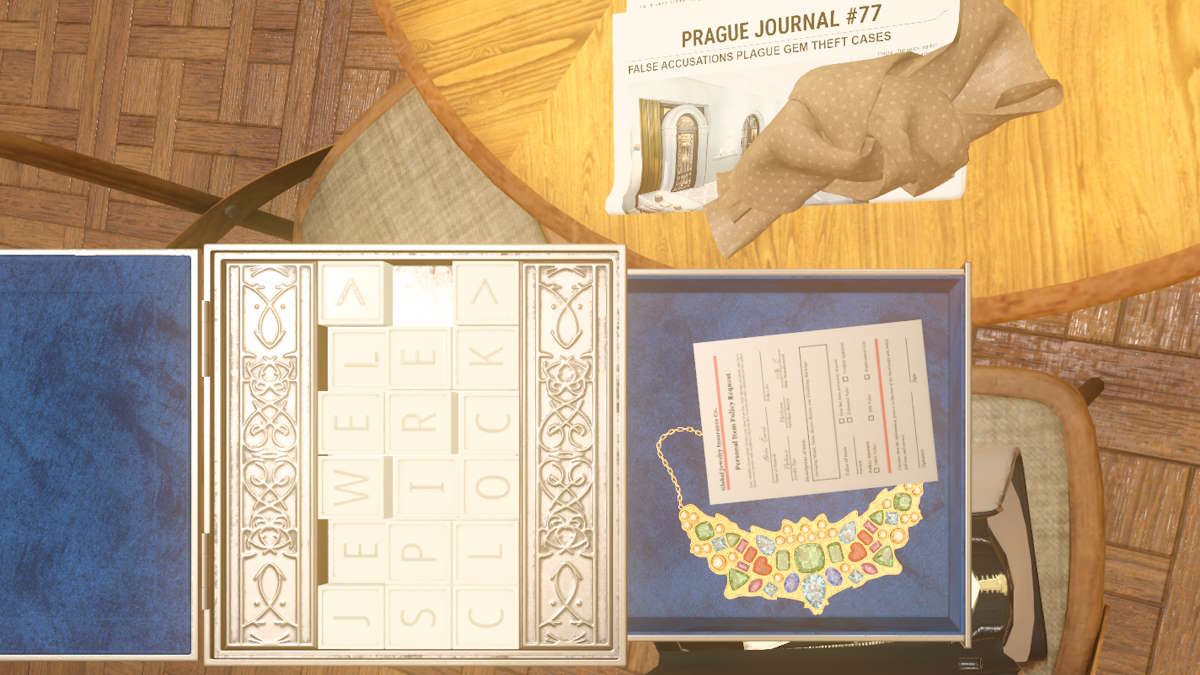
This section is time , so you need to be fast ( do n’t worry though , as you ’ll always get straight-out second chances).start the metallic element boxyou find at bottom and slide the letter to make the words ( top to bottom)jewel , steeple , andclock . Inside you ’ll find the necklace and proof she ’d flunk to ensure it . As long as you have looked at the necklace and insurance document before she gets back , you ’ll be OK .
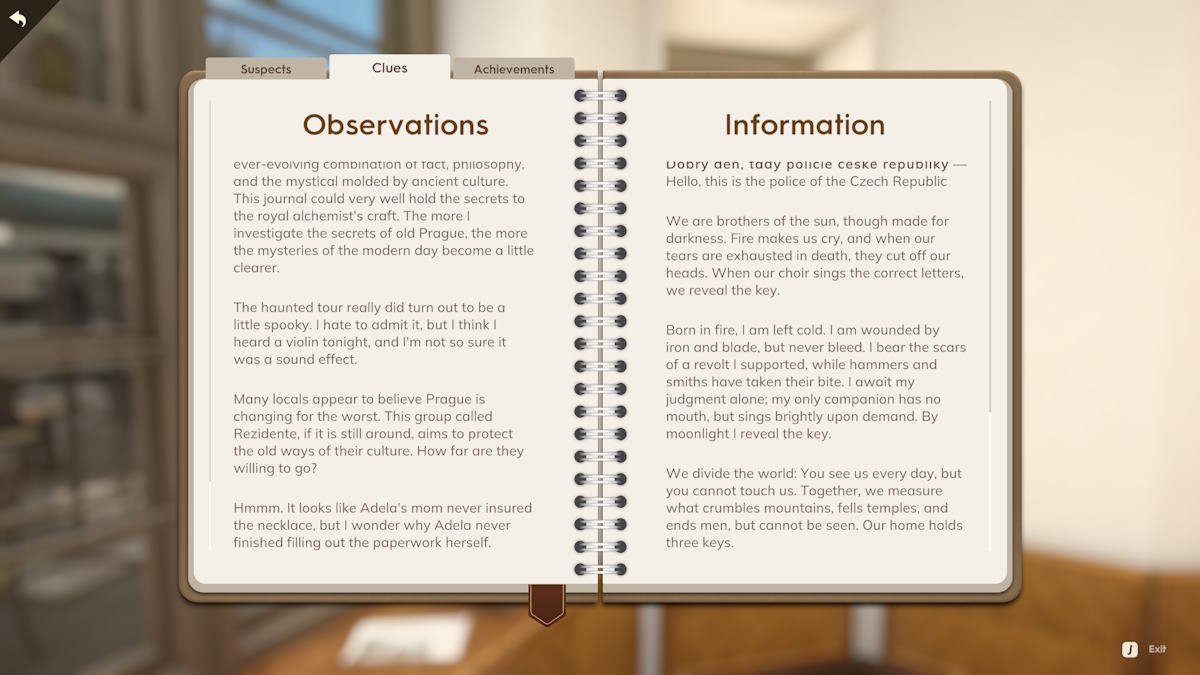
Once you eat up snooping , Adela will regress and give you the translationsyou demand for yesterday . She has find threeriddlesinside , which you’re able to discover on the Information page of the Clues subdivision of your Journal . Talk to Patricie about the riddles too , as she cangive you hintsabout each one .
Screenshot by Pro Game Guides
Solve the journal’s riddles
Head over to theexhibitionandenter the Haunted Tourby clicking the bill as you did previously . Head over to the courtship of armor . You need toclick the dots(see above ) so that the flowing lily-white production line of twinkle that moves across the armor flow uninterrupted .
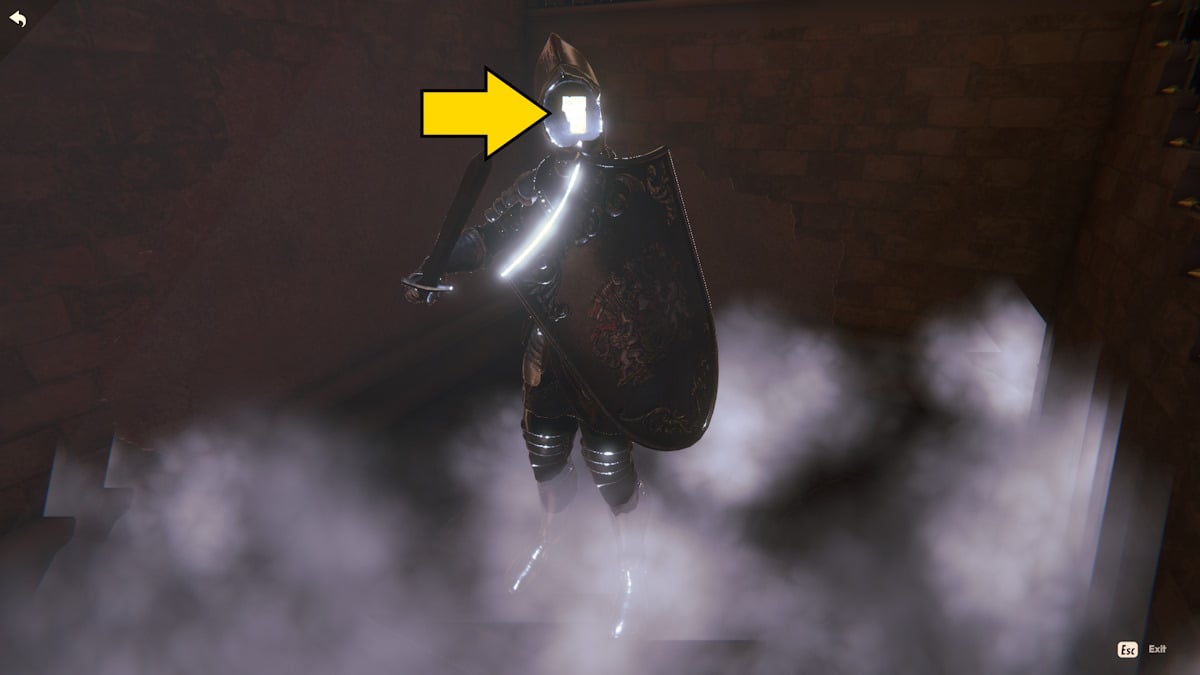
The bit of time you call for to click each spot is shown above . You ’ll know when you have it right because the five Department of Transportation will go away , leave behind just one on the helmet . dawn it toopen the faceguardand takeone of the missing pages .
follow out of the haunted go and go up the stairs towardsLeo ’s position . As you go through the door towards his office staff , you ’ll see a tabular array covered in candles on your rightfield . Select thecoinin your inventory ( that you got from the closet in the alchemy lab ) and use it in the slot scar above to get a closelipped - up look at the table .
Screenshot by Pro Game Guides
You need toselect the right candlesby clicking them until only the letter that make the Latin wordCuprumare pull up stakes highlighted . Each candle will light up , or dim , the four letters around it . I ’ve indicated the correct order to clack the candles in the image above . Once done , you’llreceive another missing page(see the pointer above ) .
Head over to thecafeand analyze the model of theastronomical clock(above ) . Start by messaging Ned give you a lot of selective information on the clock . It needs to be ready to the date and time Rudol II was coronated , onNovember 1 , 1575 , at 6 o’clock .
The bottom section of the clock shows the months in images , with thewoodcutter(A , above ) describe November . Set this in the top spot by click the figure on the left with the carapace ( B ) . Click the human body on the far right ( C)until the day marker is on 1 , and a halcyon gimmick will appear . Line up the sectionsas they appear above ( D ) and this part of the puzzle is solved .
Screenshot by Pro Game Guides
Now examine the top section of the clock andset the particular date here too(see the positions of the two hands , E and F , above , as well as the calendar month G ) . This is tricksy and just a pillow slip of trial and error as you move the clock hands . You ’ll know when you have it exactly right as the clock boldness will open up , allowing you to take akey .
Now zoom along in onthe top of the clock , where two doors have open to revealtwo keyhole . snap one of the keyholes and you ’ll automatically use the keystone . This opens a doorway at the bottom of the clock ( above ) , allowing you to collect amissing diary Thomas Nelson Page .
You’re being followed…
Call the policeon your telephone to see that , as far as they ’re touch on , he get on the escape to Rome . Nowcall Zanefor an update . He is on his means to Rome to verify if Leo really did take the flight of steps and make it safely .
The next meter you switch between Old Town Square and Castle Square , you ’ll get a brief cut scene in which it appearsyou’re being followed . Message Ned to let him eff before forge a ambuscade for whoever is following you . From outside the coffeehouse , head straight off onward to the food huts ( see above ) . Look to the right to see a stilt of rubbish and then try it to find out and take aScrewdriver .
Now seem right from where you are anduse the screwdriver to pick the lockof the gate there . This involves a bit of timing , as you have to block off the slider in the unripened areafour timesin a row to succeed . Once it ’s subject , head through .

Image by Pro Game Guides
Pick up the cock and the boxes , and thenhead up the stairs . Place all theboxes into the transparent spacesat the top , then expend the cock toremove the boltsholding the gangboard in lieu ( ensure to do this from the boundary or you ’ll fall ) .
Finally , snap the transparency of yourphone on the boxhere to localise the trap ( the slideshow above shows all the steps ) .
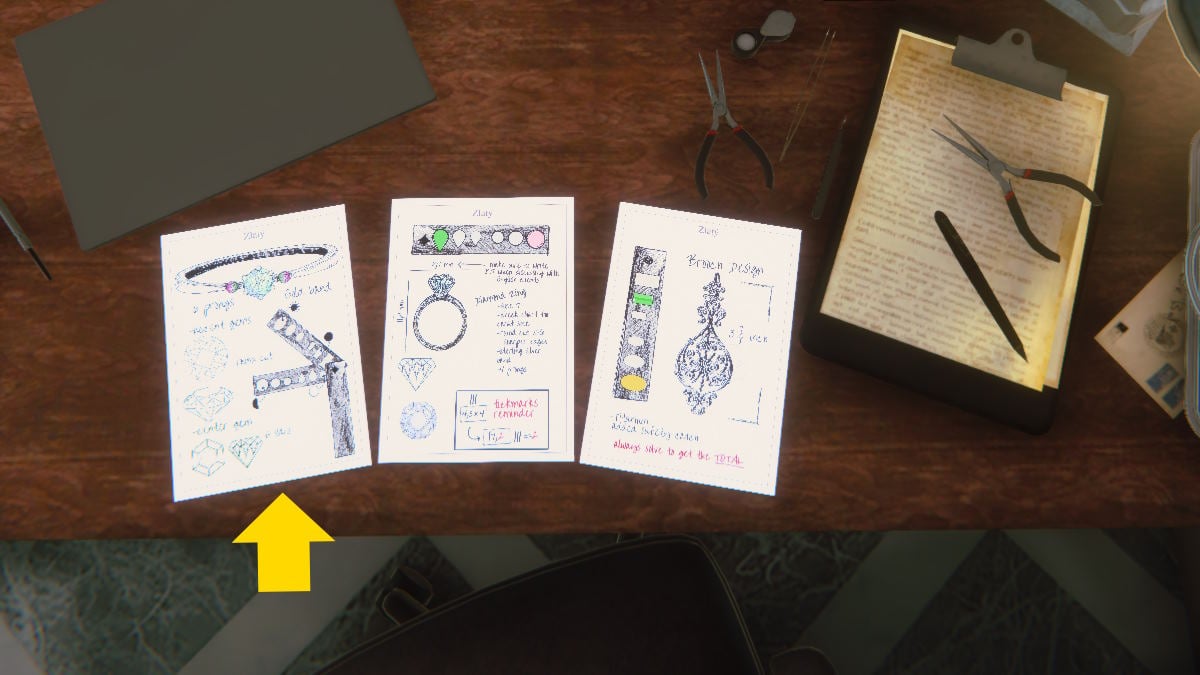
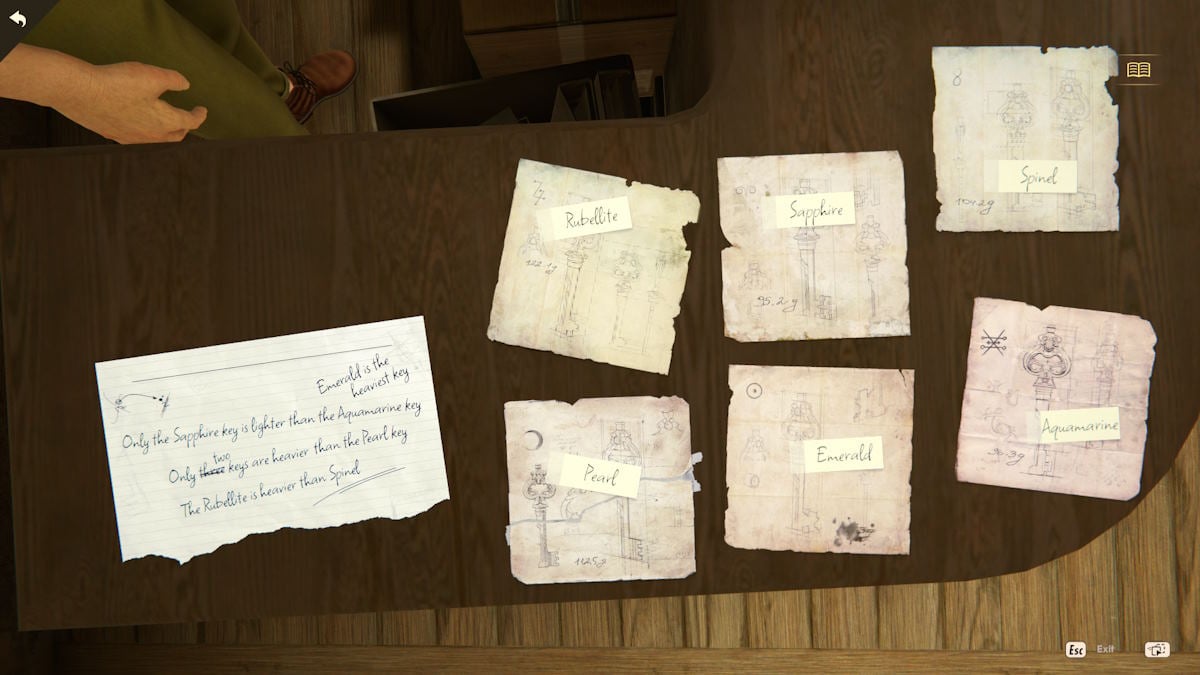
After verbalise with Marek and Radek , Marek will give you aRezidente Pinand you ’ll head back to Aparat Computers and utter to them again . To make the keys you ’ll first need to match the corect gems to the primal diagrams . The riddle will give you the following , from entrust to right :
Screenshot by Pro Game Guides
Talk to Marek to organize a plan , and he ’ll give you theKey SketchandRadek ’s Bagwhich comprise a tracker . channelise to thestatue next to the marionette trailerand throw off the dish as instructed ( see above ) . Once you ’ve dropped the bag , point back to Aparat Computers and talk to Marek again . He will give you aTrackerso that you may follow the movement of the key .
Go back to where you placed the bag for the drop and the staple gun will automatically start mold . Move around until the beeps get closer together These are the spots :
You ’ll find yourself in some tunnel . The ghost is easy to follow in the tunnels and , despite content saying you must hurry , there is no time limit . You ’ll go throughthree sets of tunnelsand eventually go far back at the entrance to thealchemy laboratory . Use the snow Earth to afford it and lead indoors . bump out who the culprit is !
Screenshot by Pro Game Guides
After the perpetrator poisons you and escapes you need to utilise the alchemy table to trump up an counterpoison for the toxicant she has throw at you . find fault up the poison bottlefrom the floor ( see above ) and then see the formula hanging above the interpersonal chemistry table ( the one you need is the third one down ) .
Now use the alchemy table to make the potion as you did previously , using the poison in your stock on the tableto be able-bodied to examine it and start the process . remark that if you ’re too slow to make the counterpoison you ’ll die ( but as always , you have limitless second luck ) . The purchase order for making the antidote is as follows :
Now you canclick the completed potion on the table(where you placed the poison ) to cure the poisonous substance .

Image by Pro Game Guides
There ’s adoor opposite the alchemy tablenext to the alchemy locker . Click it to reach the door and follow the passageway .
In the room at the remnant , you ’ll findAdela ’s gems . cull them up and thenclick the laptopto call Elka and Malek . Now you could impart the elbow room through the wooden door .
The seven keys puzzle
You ’ll now find yourself next to an flowery door . cull Marek ’s bag upfrom the floor to the left of the door , and use it on the threshold to commence a lock - matching puzzle . you’re able to see the solution above , but you must do this puzzle in the undermentioned Holy Order :
This willopen the door , so head through to the next doorway .
You ’ll bejoined by Elka , who wants to help . After mouth with her about the police , take the fuse box on the door to get power track down back into the lock on the threshold ( both marked above ) .

Image by Pro Game Guides
You ’ll first need to solve thefuse box puzzler . To complete this you call for to click the dial on either side of the fusebox to turn over the associated dials . I ’ve mark how many times each dial need to be tick above , but do them in the following order of magnitude :
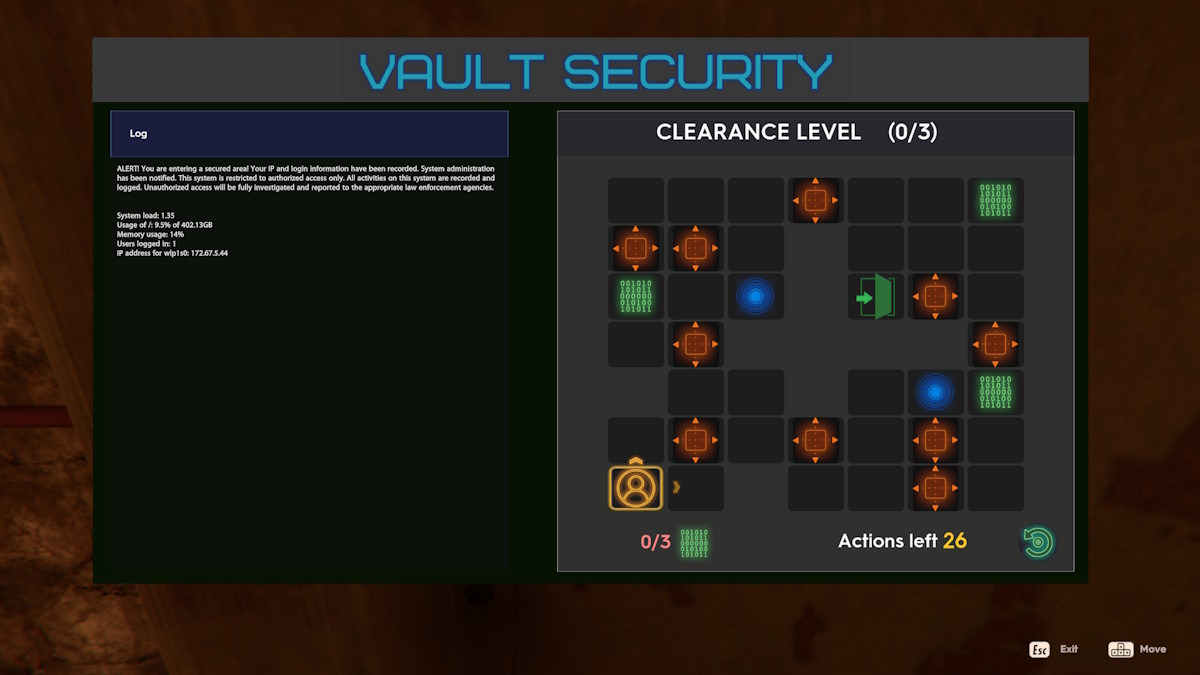
Now you’re able to break thebiometric lock . This is another rise in the difficulty of the cyber locks but the precept remains the same . There arethree levels of securityand the full solution is below :
dawn the room access lockonce more to set off a conversation with Elka . It seems she is n’t as she seemed and is out to gain revenge for her mother ’s death , by frame Malek for the crime . She has been work with the defendant !

Image by Pro Game Guides
After the conversation , you ’ll find yourself inside the vault with Vladena and also Leo , who is on the storey handicap . Vladena has a knifeand force you into switch the gems on the crown . On the positive side , you took Elka ’s taser ring as you pushed her away and spring into the vault .
localise each of the gems into its correct place on the cap ( see an exercise above ) and then rotate each of the treasure until they ’re at thecorrect angle . You ’ll know each one is done when youcan no longer falsify its position .
Once you ’ve cease setting all five gems into their right perspective , examine the missile of the crown and bulk large over the section I ’ve highlighted above . You now need toplace the taser ringthat ’s in your inventory into this spot . However , bank note theeye at the top left of the projection screen . This represents Vladena watch your every move , but she does get distracted .

Image by Pro Game Guides
You have to hold back until the highlighted sphere from the eye is turned aside from the top before you place the taser ring . Otherwise , you ’ll get catch and have to bug out the jewel - place process again .
Vladena will endeavor to put the crown on once you ’ve post the pack , and she ’ll be ball over unconscious . talk to Leowho will inform you there is another means out of the vault that you may escape through while Vladena is invalid . notice thatthis subdivision is also time , but you ’ll get the usual unlimited number of second chances .
To escape the room , you need toactivate five of the candle holdersin the elbow room in sequence . The gild is square off bythe act of candles in the top section of each one , bulge with the one holding just one ( pictured below ) and then using the ace with two , three , four , and five candles respectively . Thisopens a surreptitious doorway . manoeuvre through , speak to Leo , and then go down the corridor next to the staircase . Use the screwdriver to blame the lock chamber ( just as you did earlier ) and get away .

Screenshot by Pro Game Guides
For more on Nancy Drew here at Pro Game Guides check outBest Nancy Drew game of all timeandAll Nancy Drew Game Abbreviations – Acronym List !
Screenshot by Pro Game Guides
Screenshot by Pro Game Guides
Screenshot by Pro Game Guides

Image by Pro Game Guides
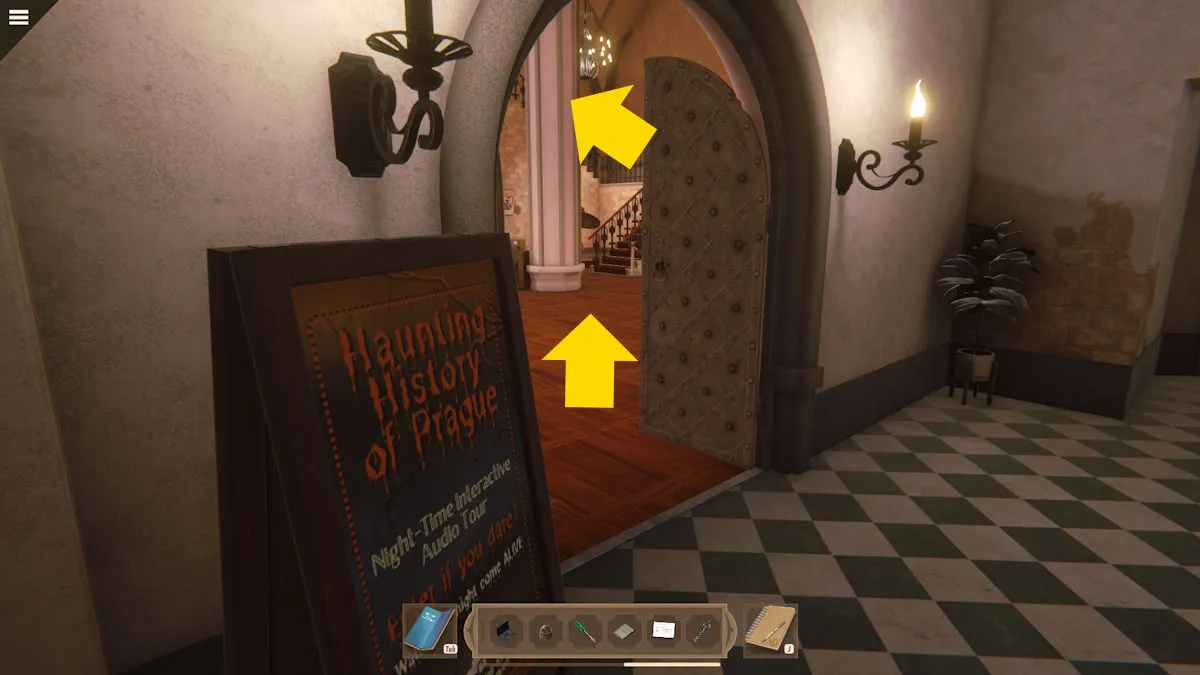
Image by Pro Game Guides
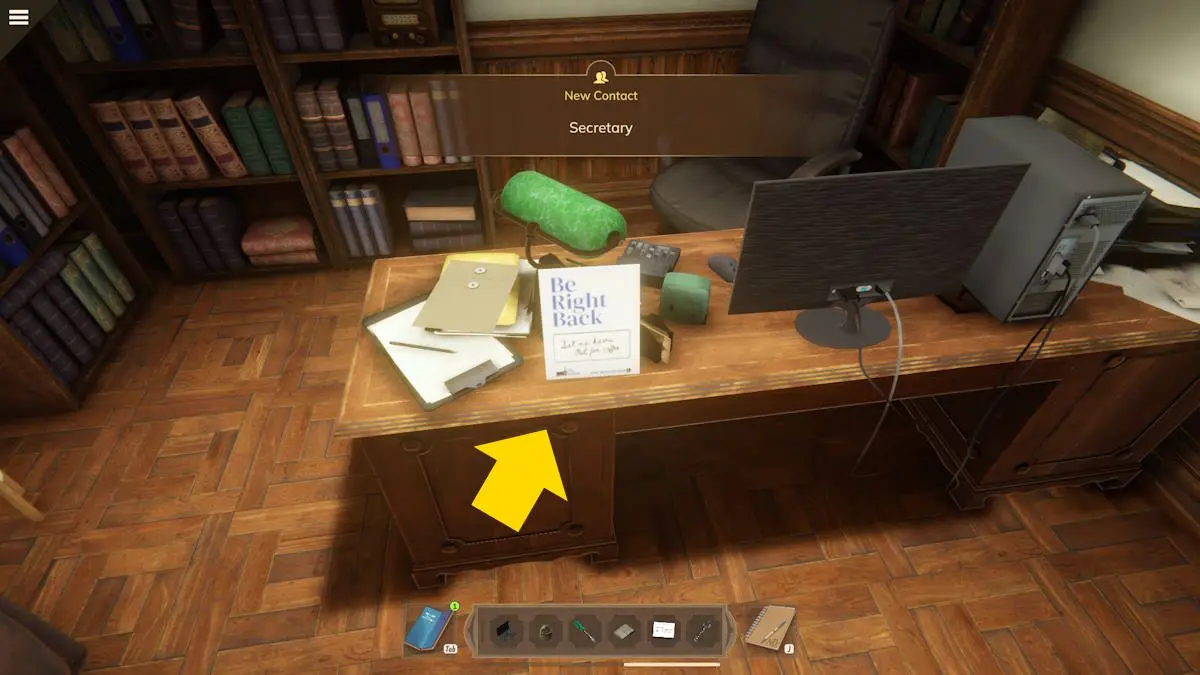
Image by Pro Game Guides
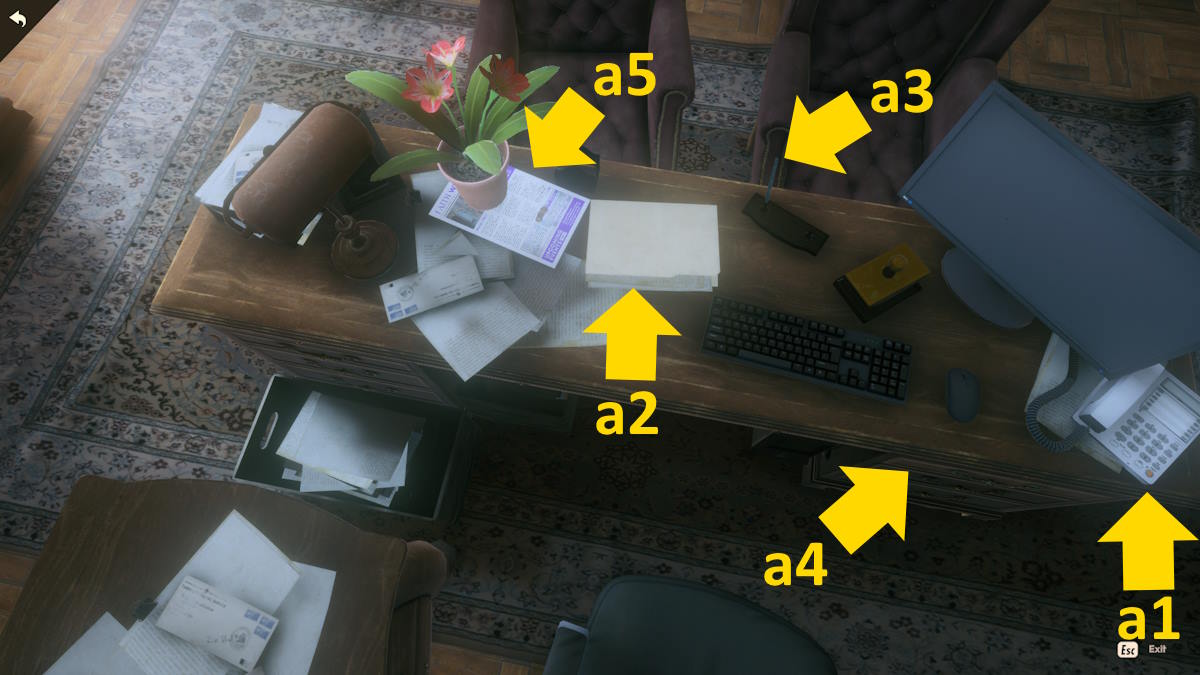
Image by Pro Game Guides

Screenshot by Pro Game Guides
Screenshot by Pro Game Guides
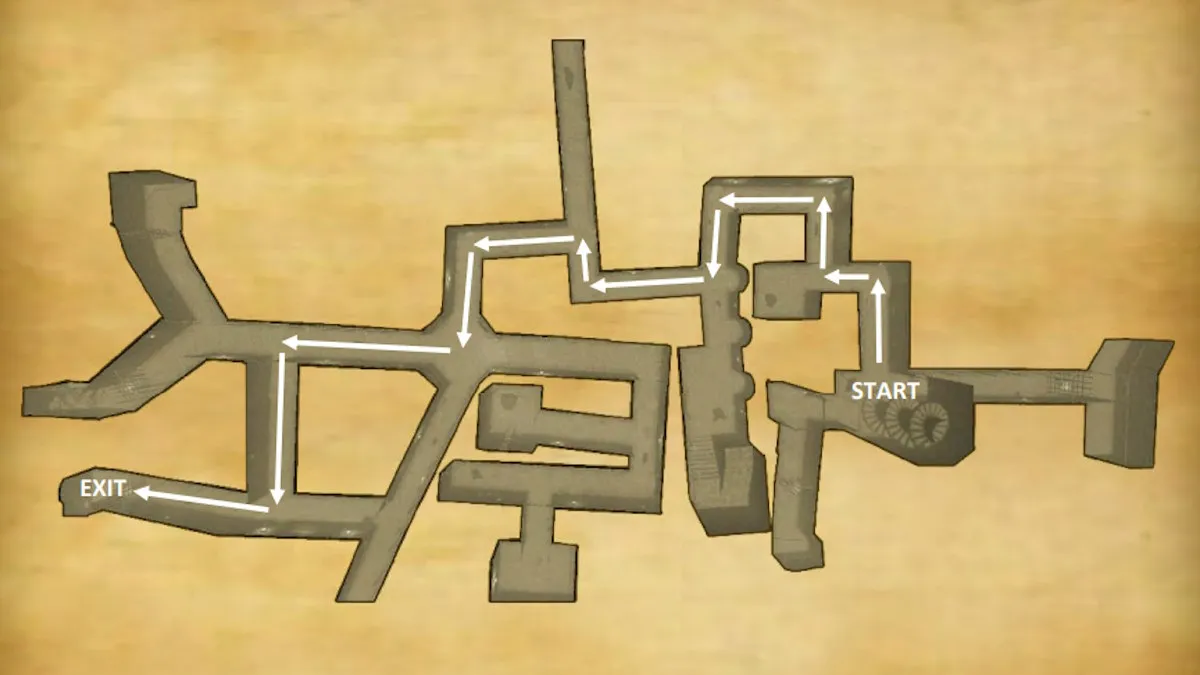
Image via HeR Interactive

Screenshot by Pro Game Guides
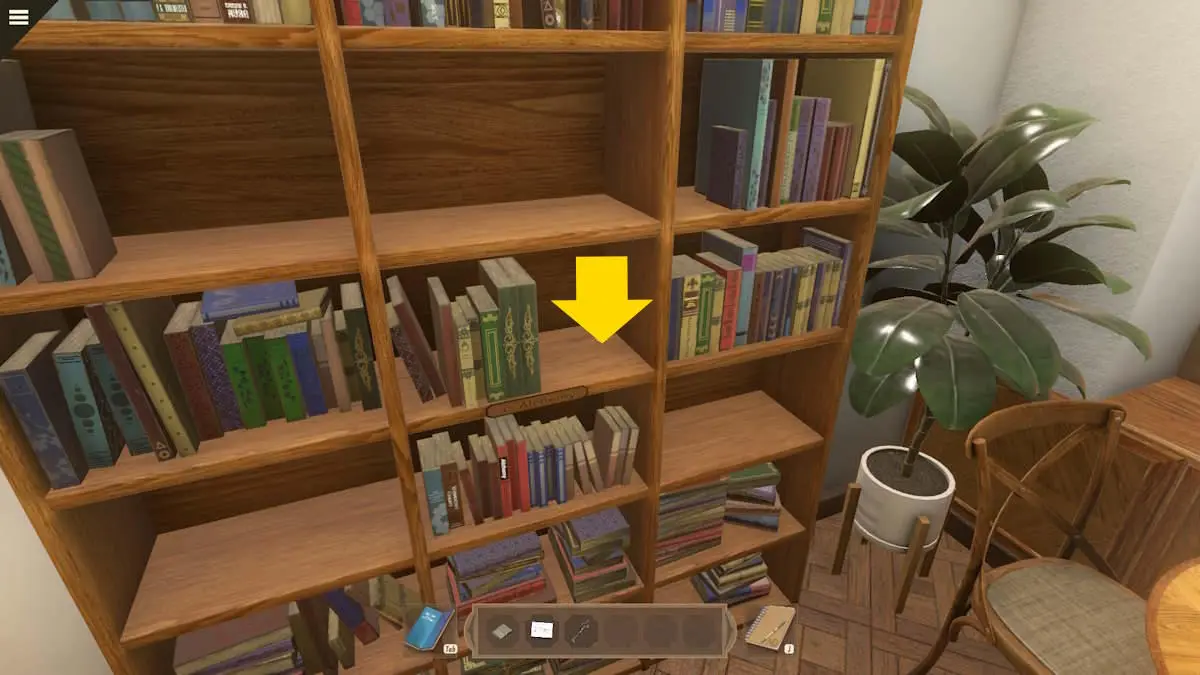
Image by Pro Game Guides
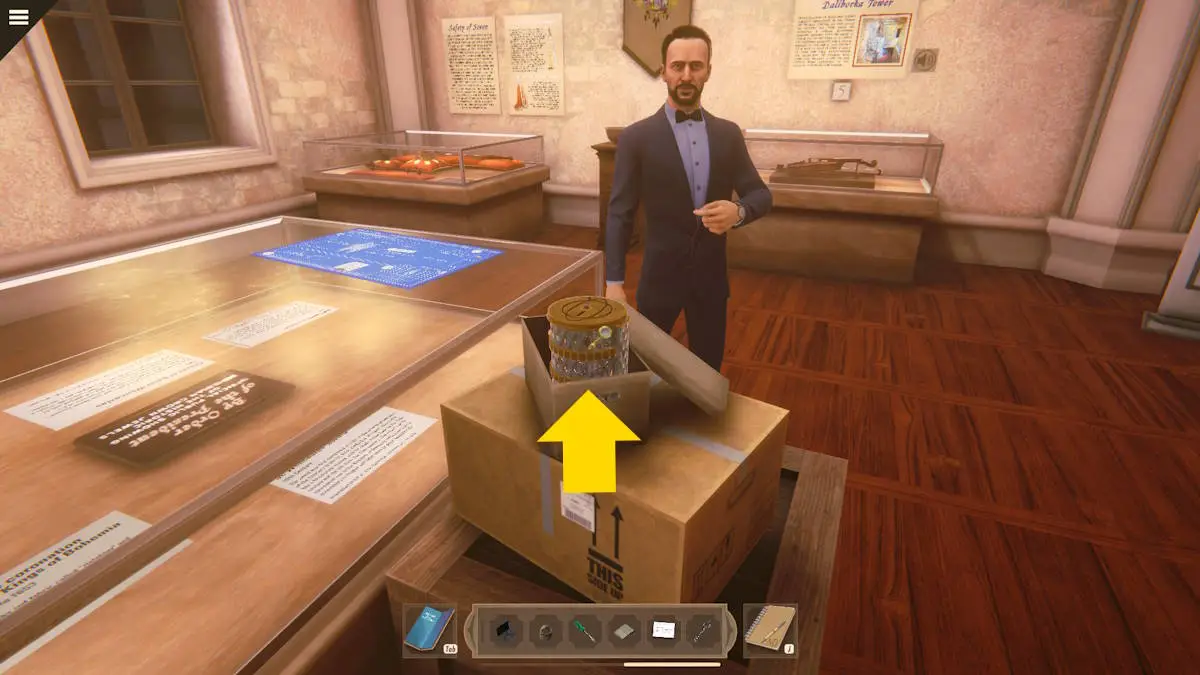
Image by Pro Game Guides
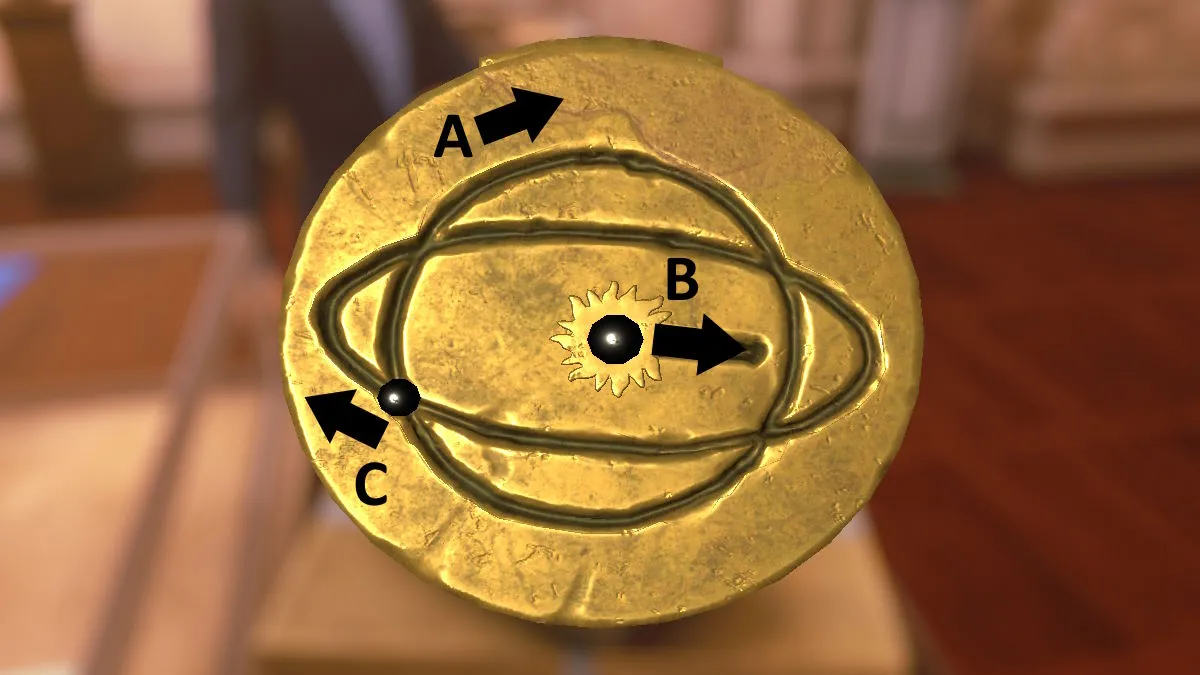
Image by Pro Game Guides

Image by Pro Game Guides
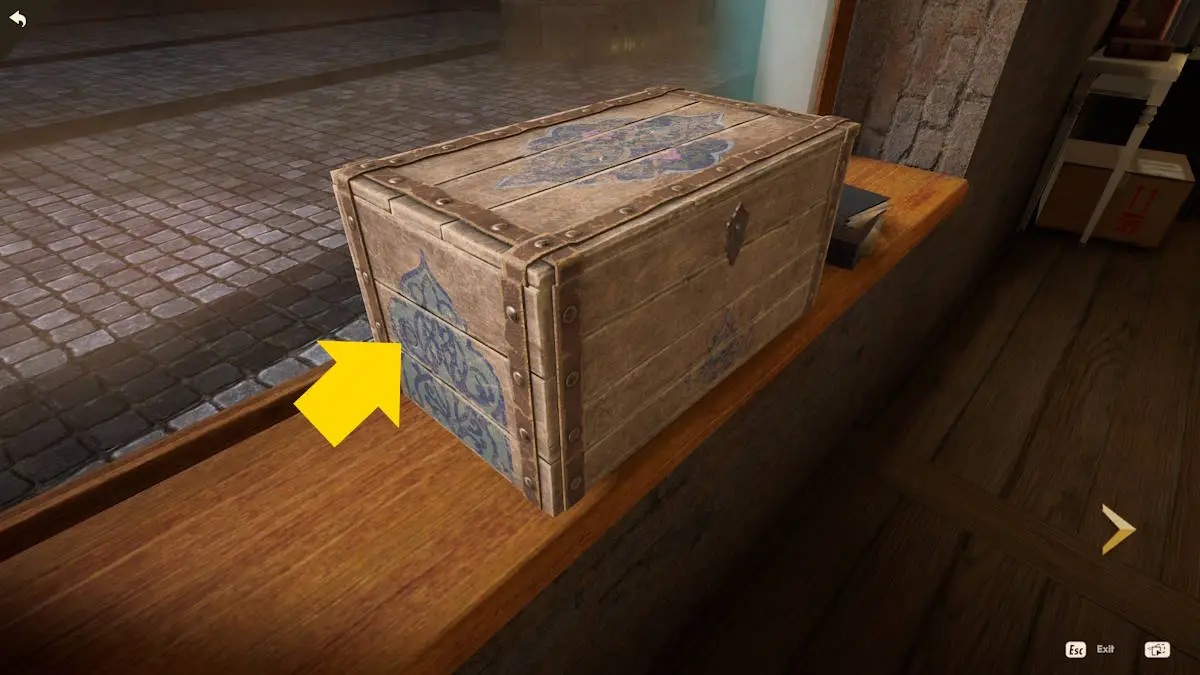
Image by Pro Game Guides
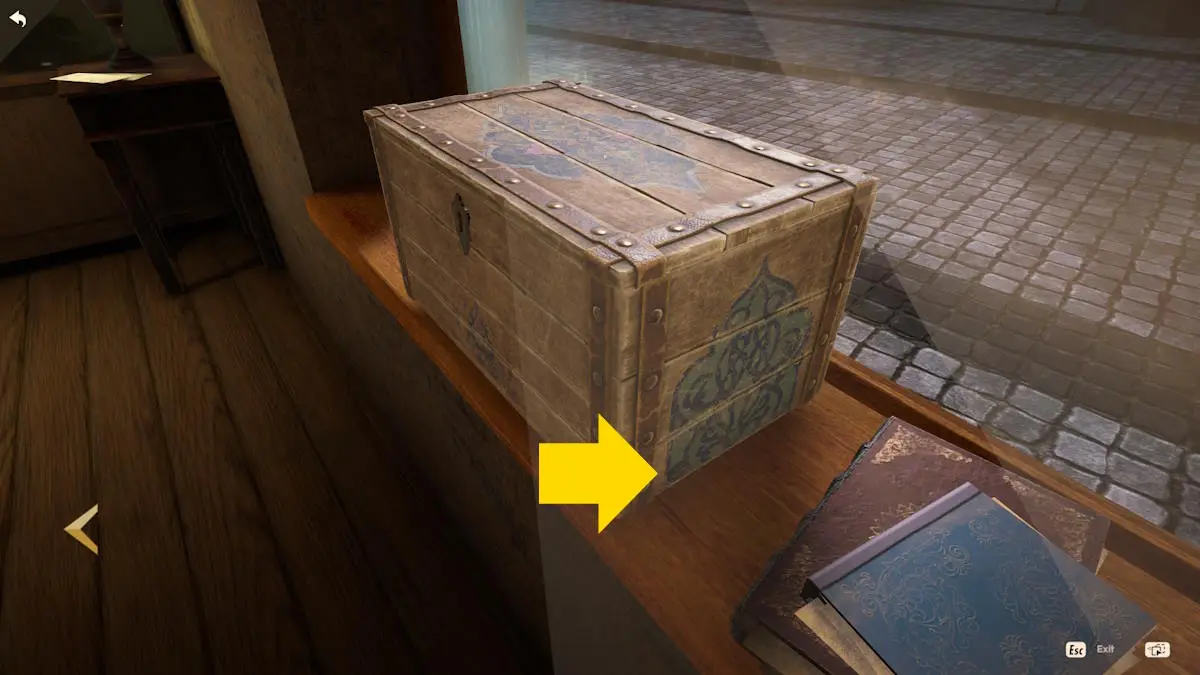
Image by Pro Game Guides
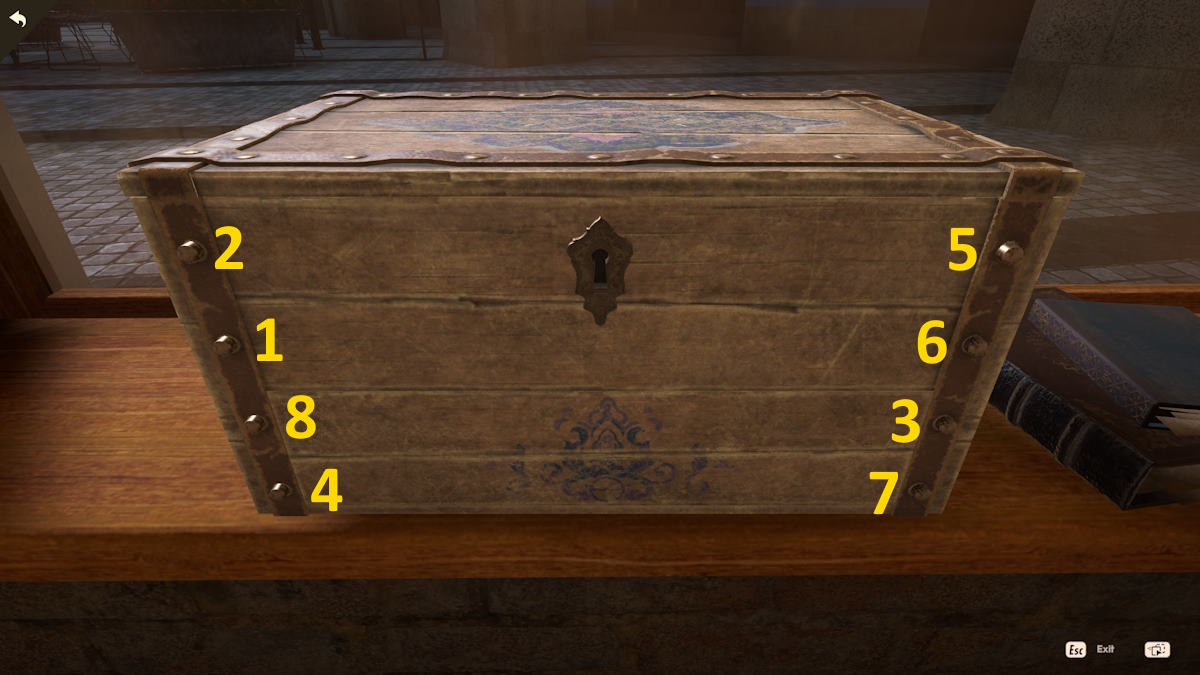
Image by Pro Game Guides
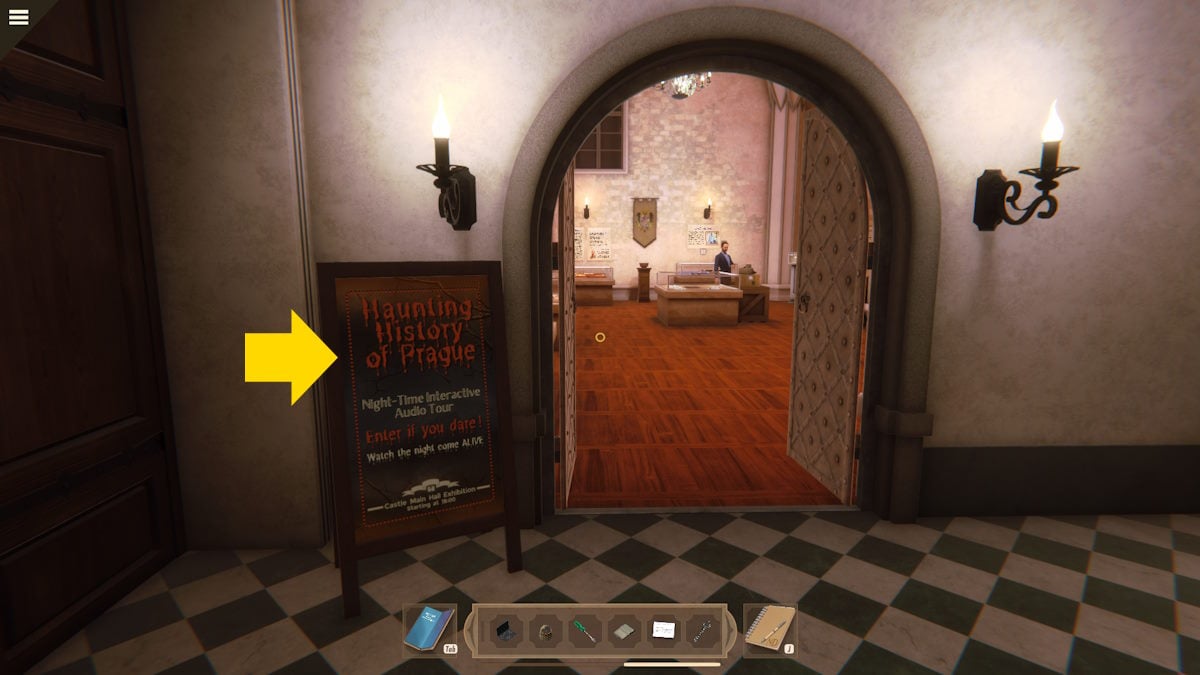
Image by Pro Game Guides
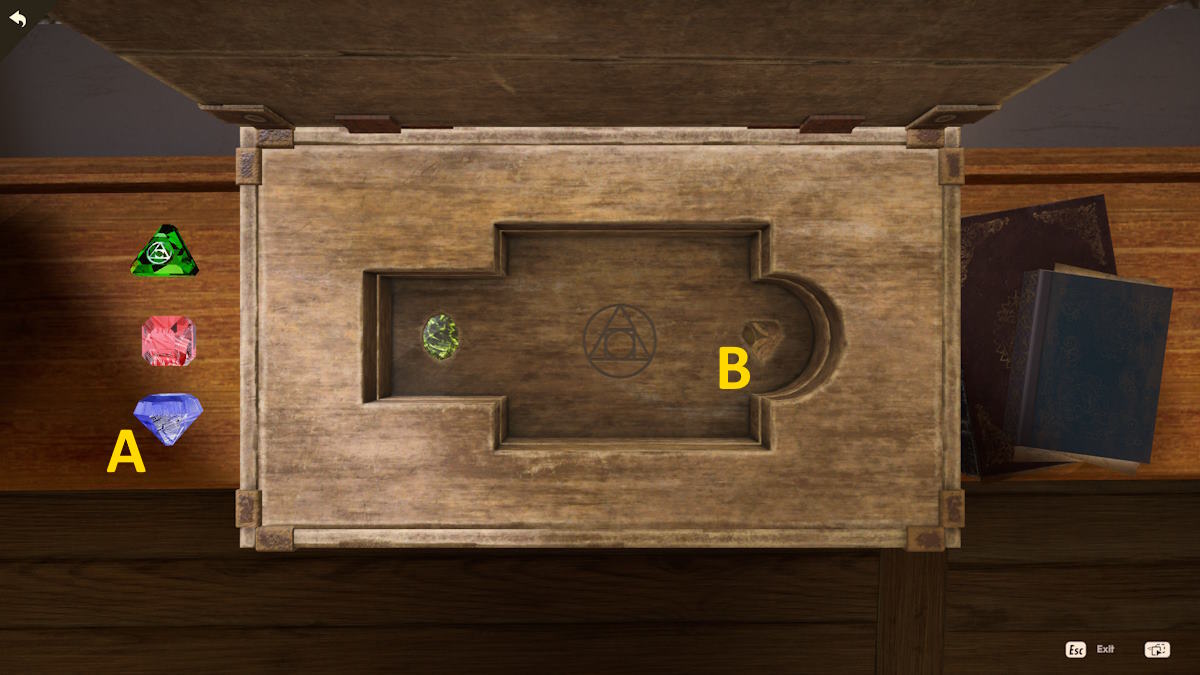
Image by Pro Game Guides
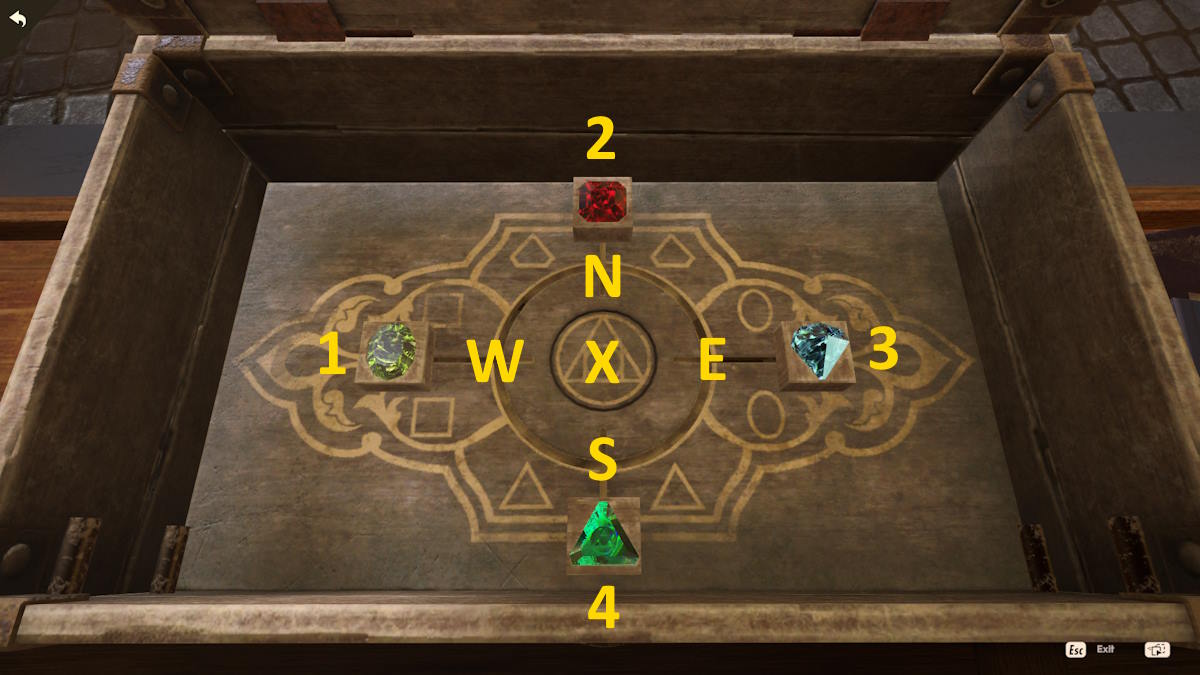
Image by Pro Game Guides
Screenshot by Pro Game Guides
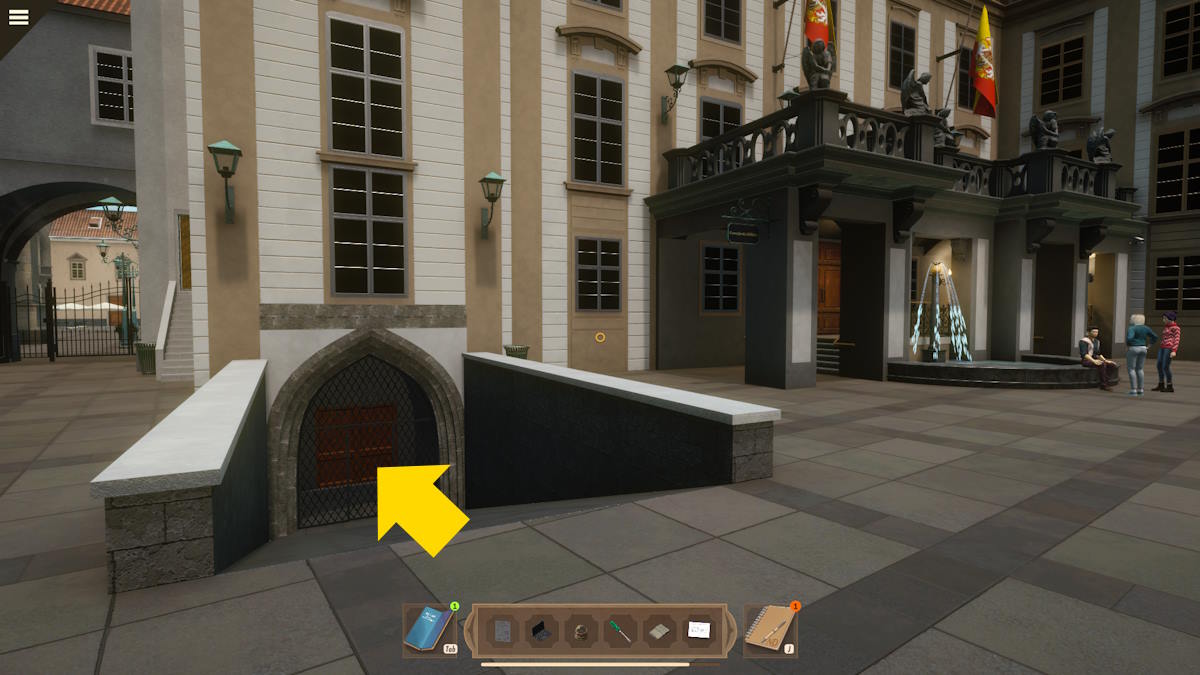
Image by Pro Game Guides
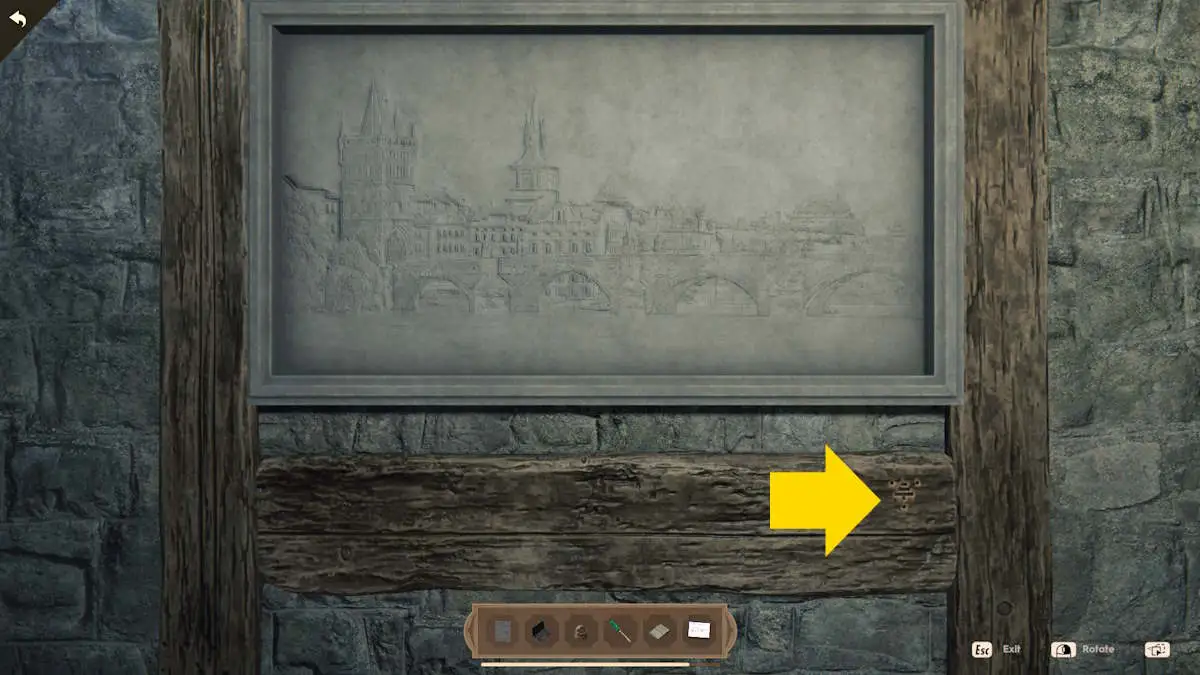
Image by Pro Game Guides
Screenshot by Pro Game Guides
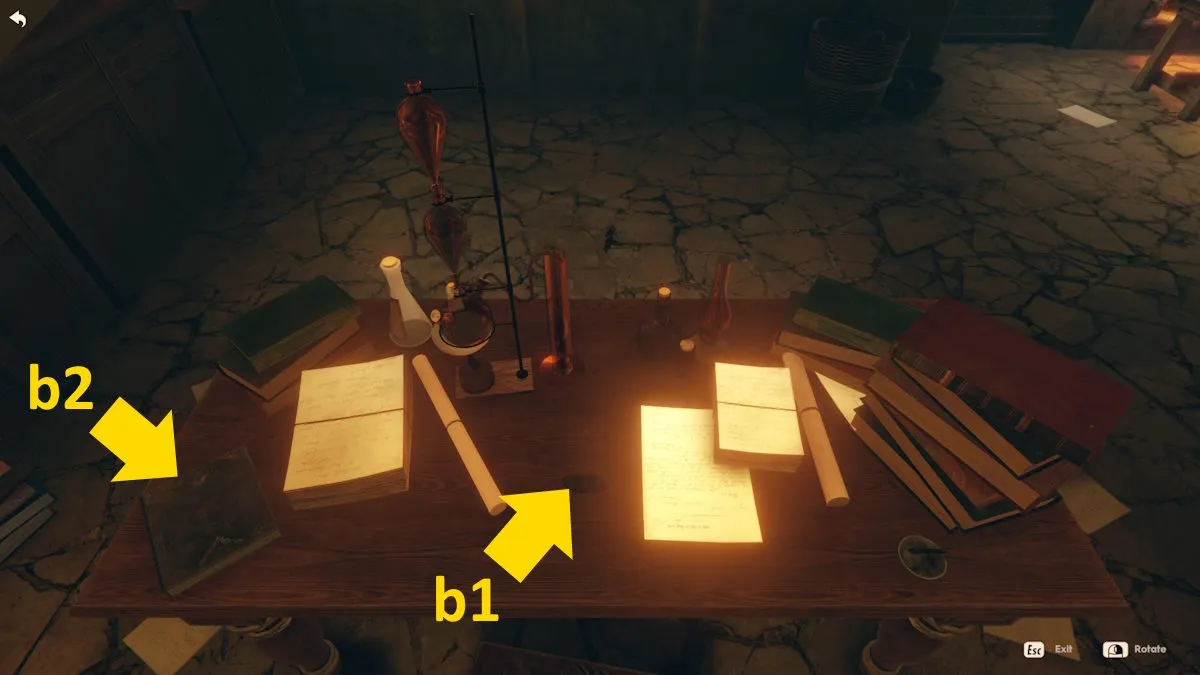
Image by Pro Game Guides
Screenshot by Pro Game Guides
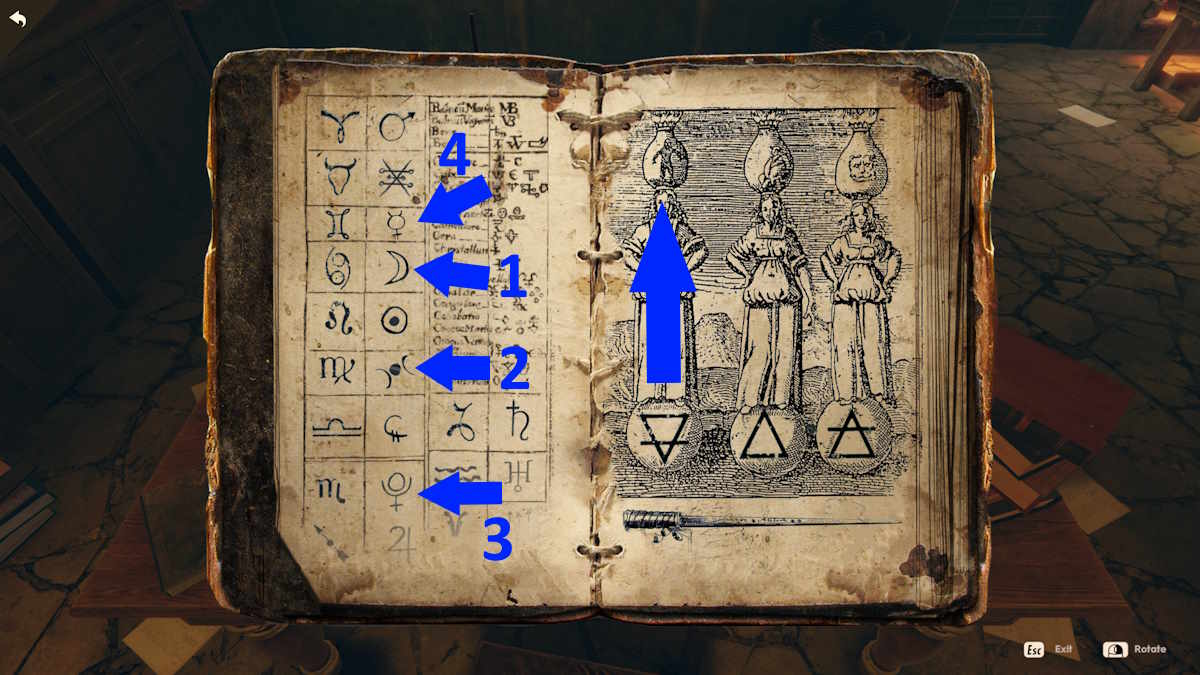
Image by Pro Game Guides
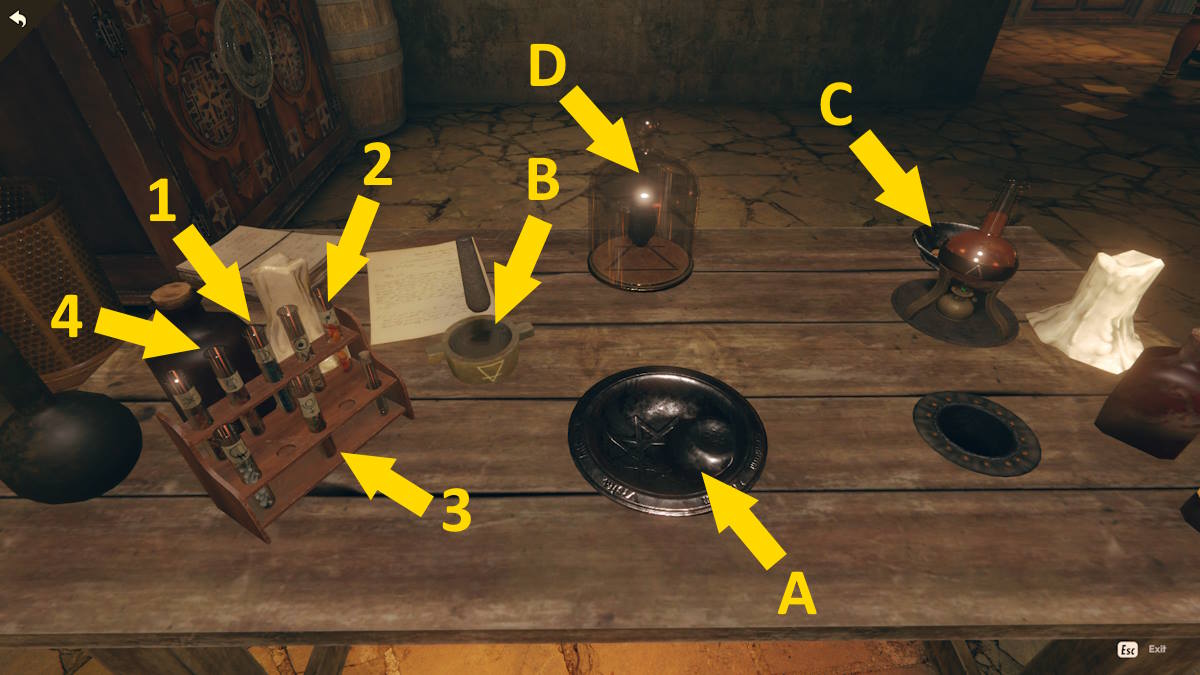
Image by Pro Game Guides
Screenshot by Pro Game Guides
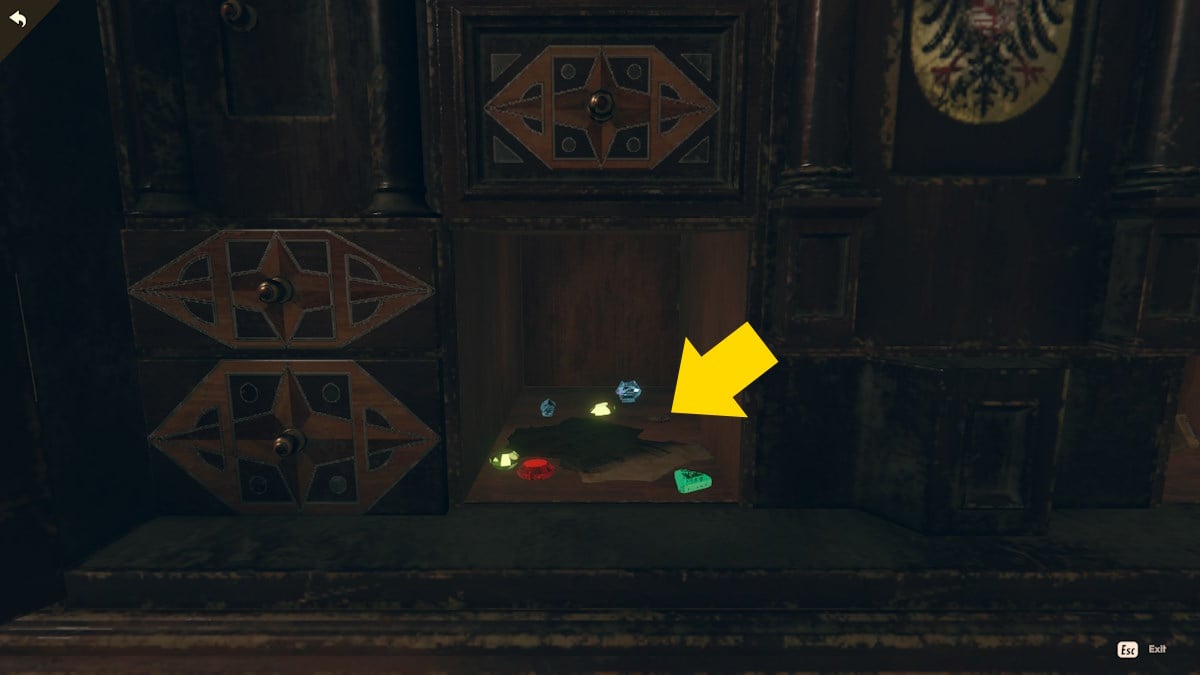
Image by Pro Game Guides
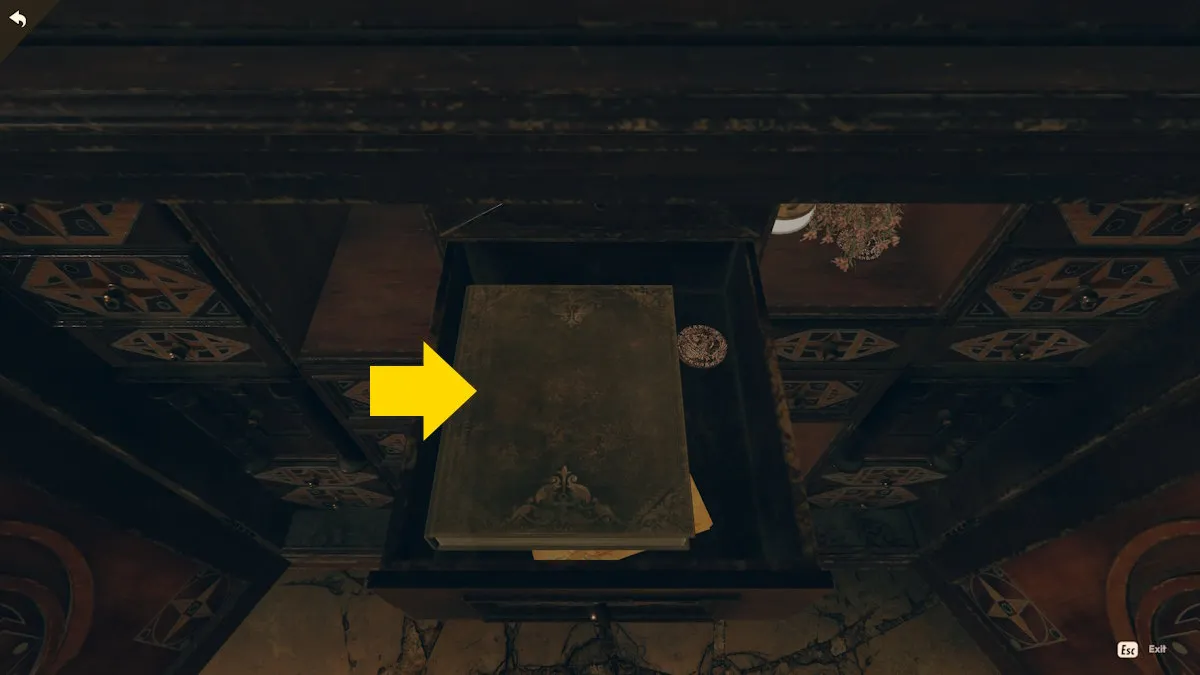
Image by Pro Game Guides
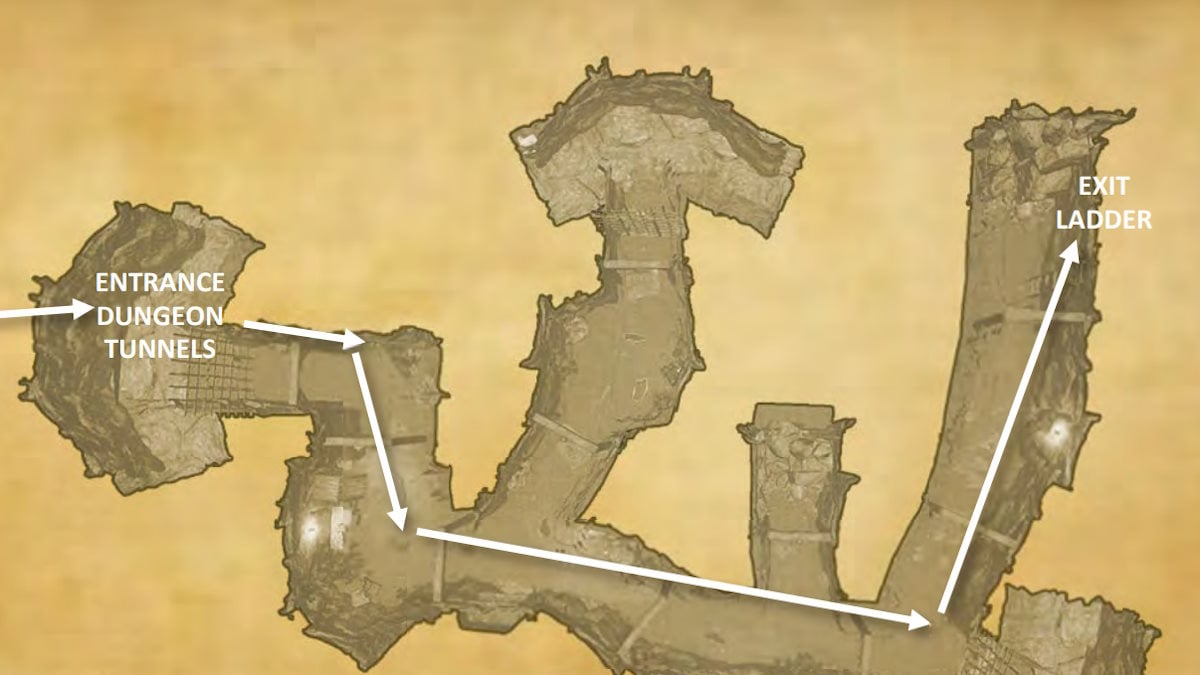
Image via HeR Interactive
Screenshot by Pro Game Guides
Screenshot by Pro Game Guides
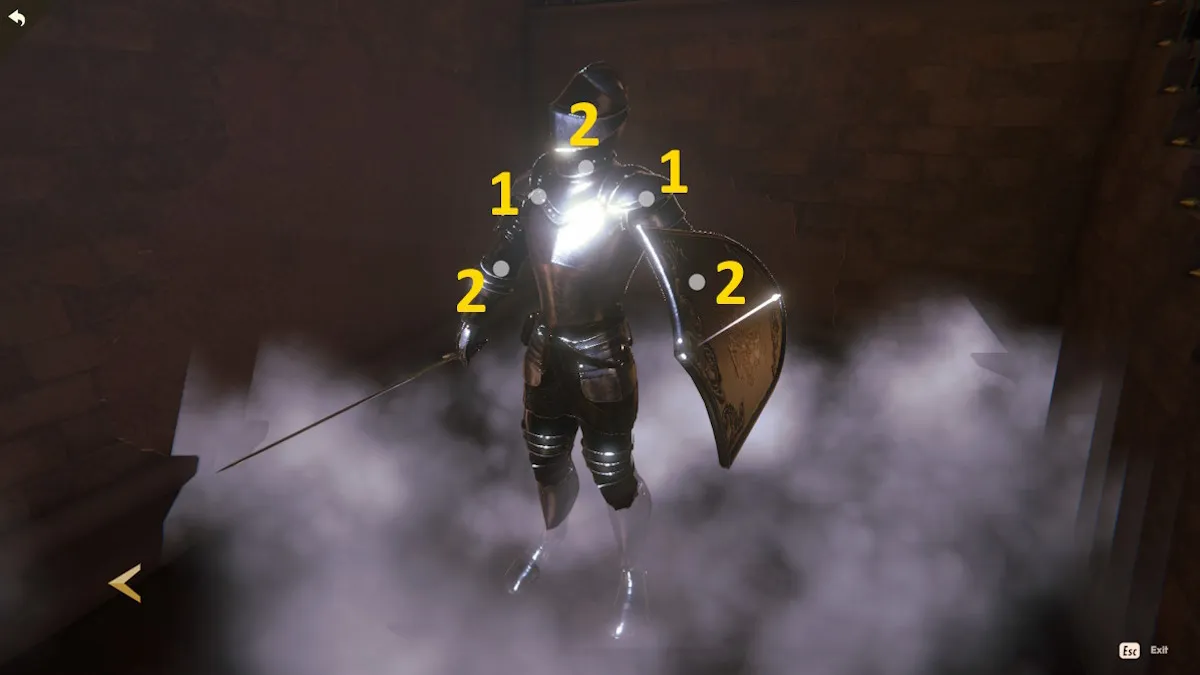
Image by Pro Game Guides
Solving the knight puzzle in Nancy Drew: Mystery of the Seven Keys
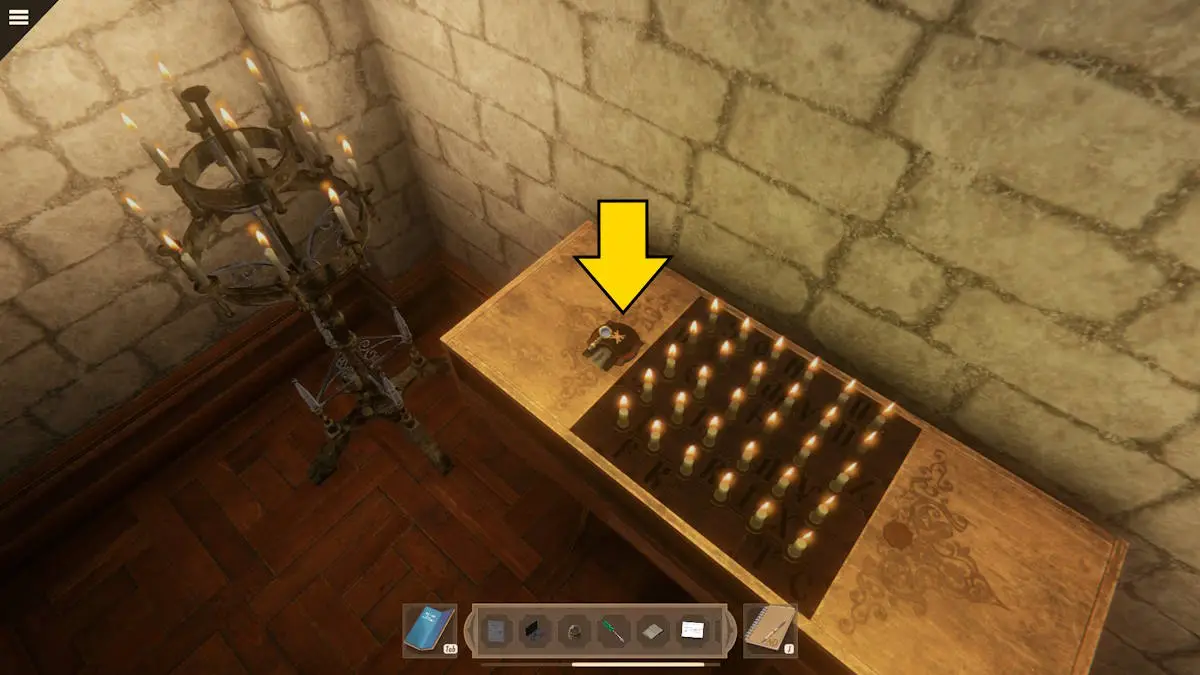
Image by Pro Game Guides
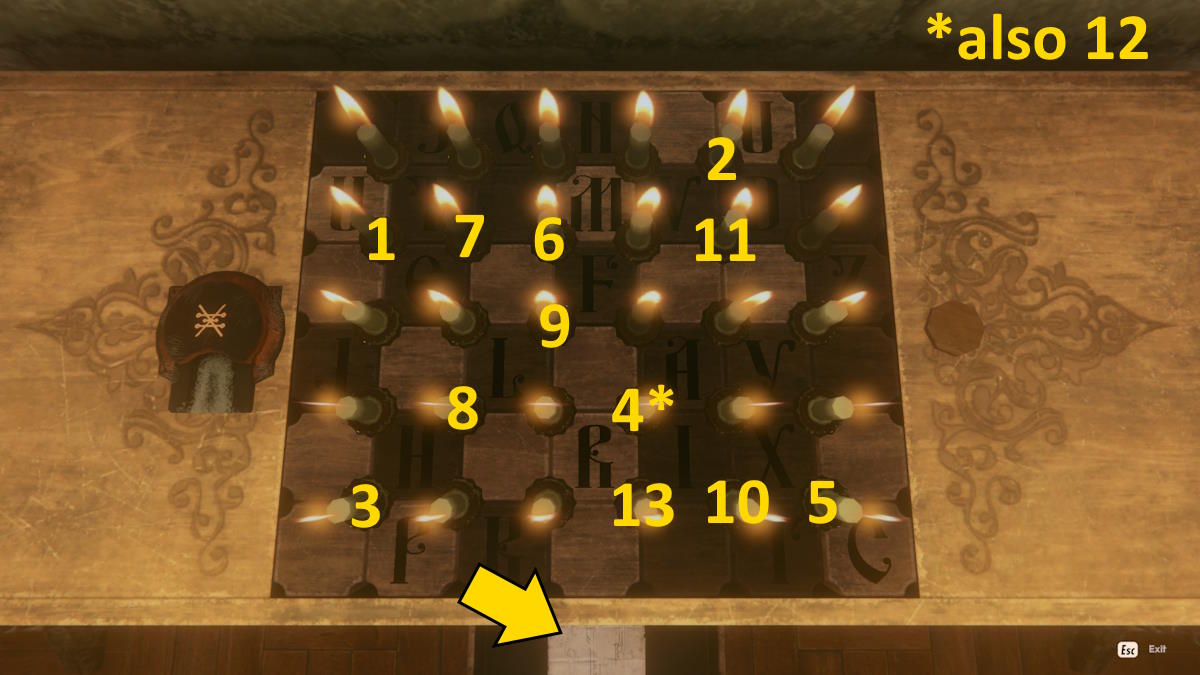
Image by Pro Game Guides
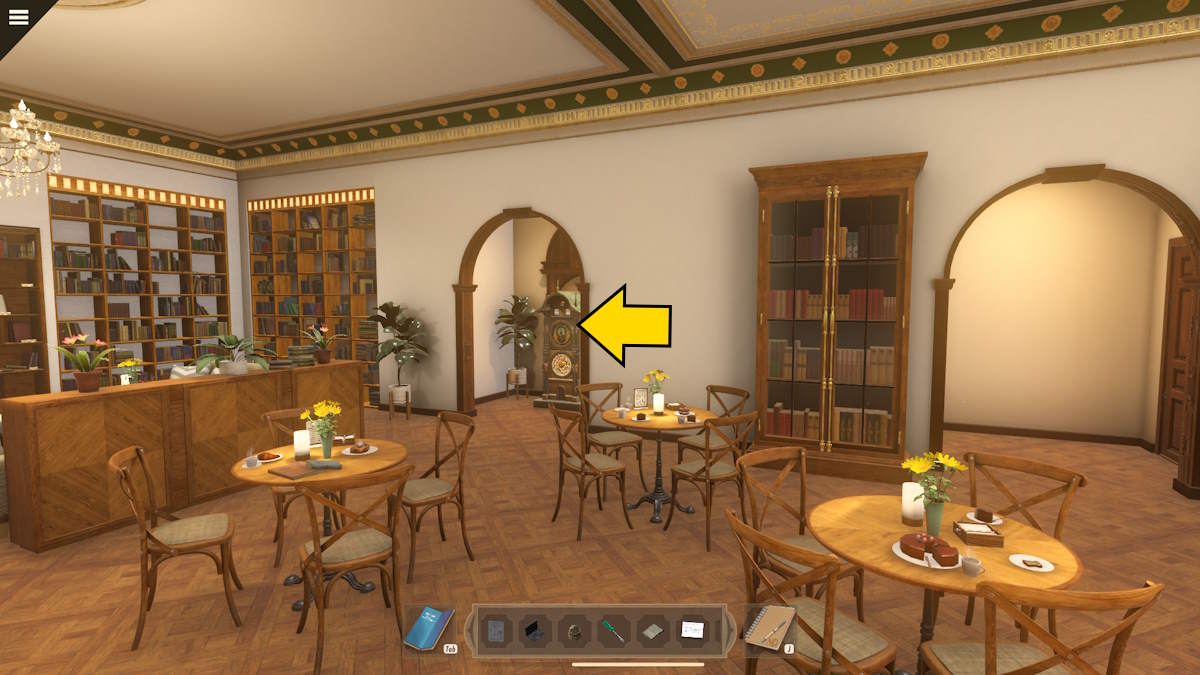
Image by Pro Game Guides
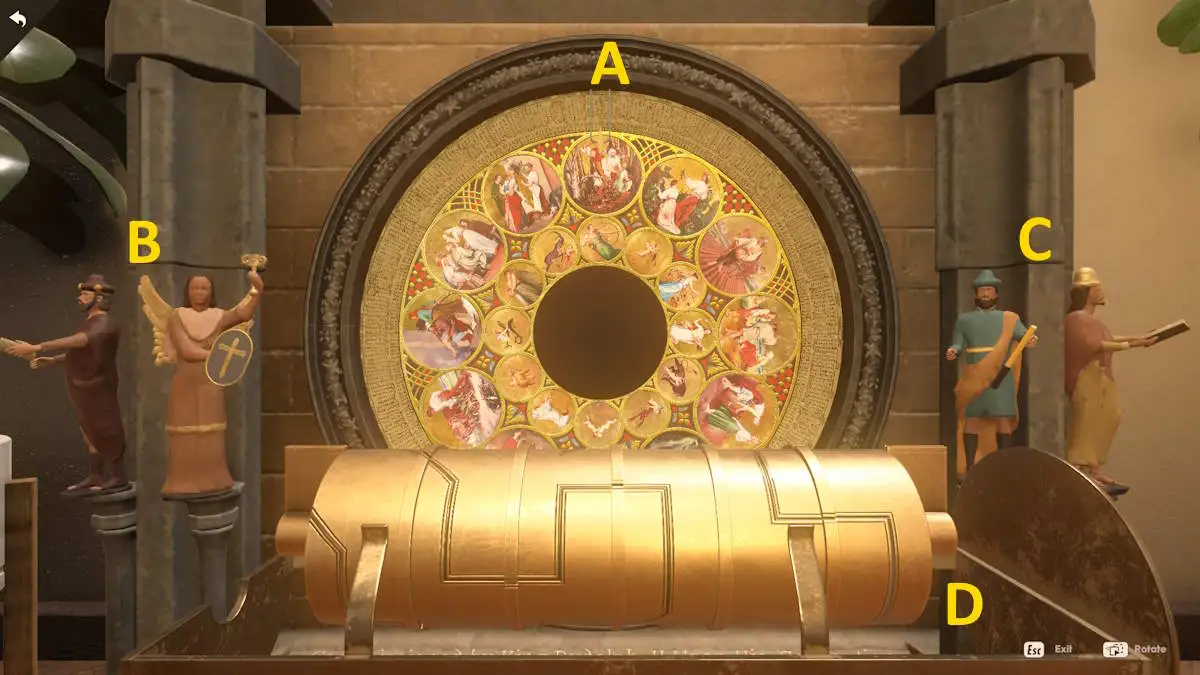
Image by Pro Game Guides
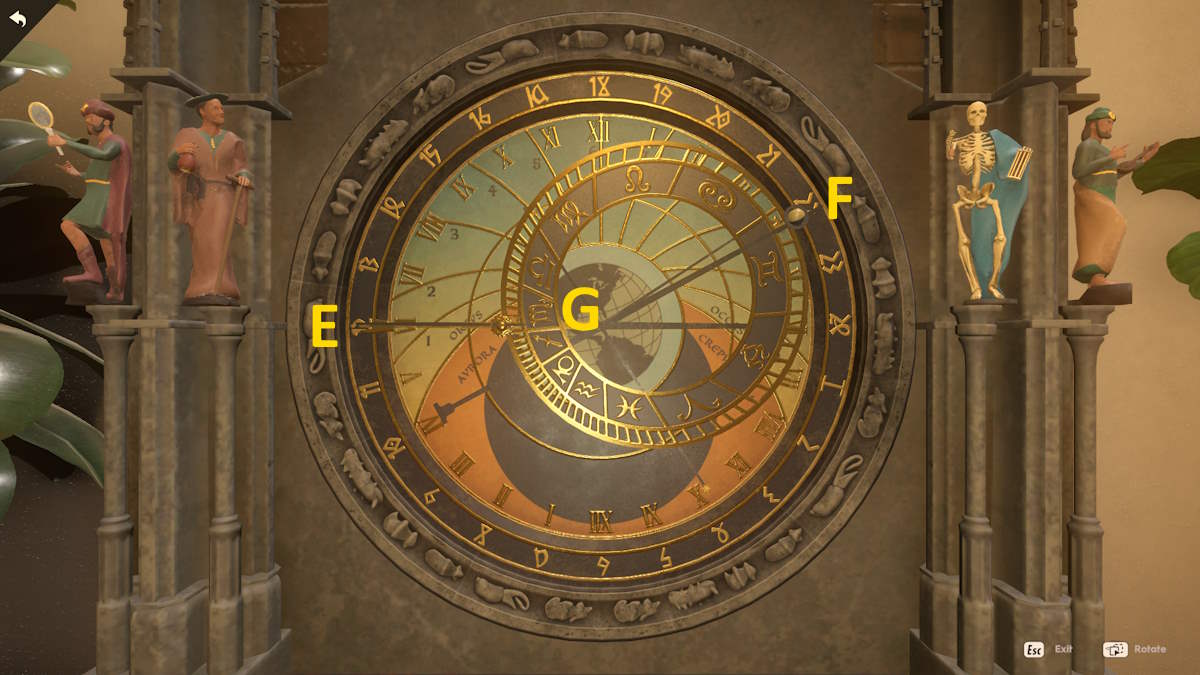
Image by Pro Game Guides
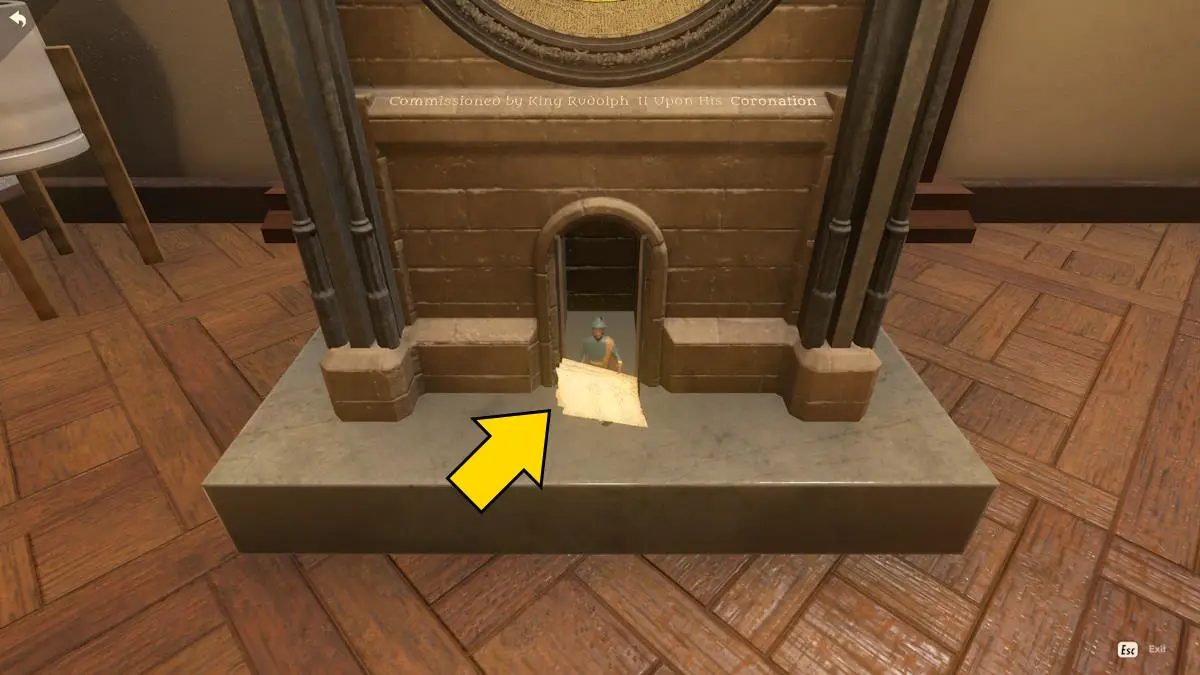
Image by Pro Game Guides
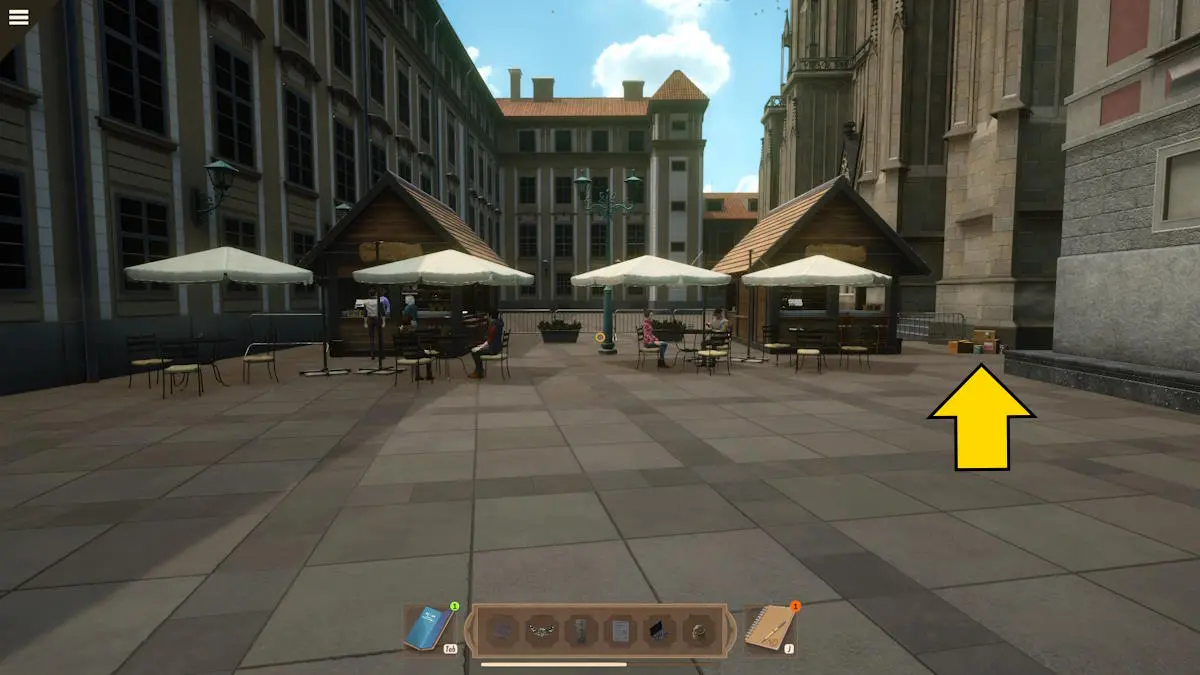
Image by Pro Game Guides
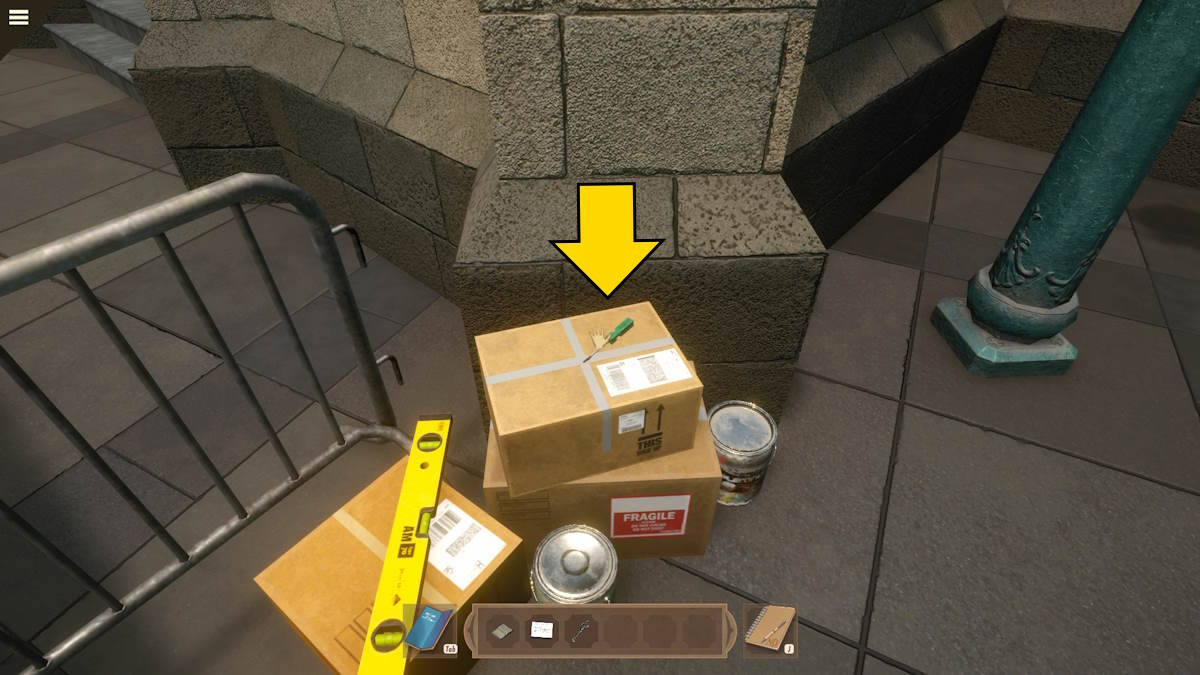
Image by Pro Game Guides
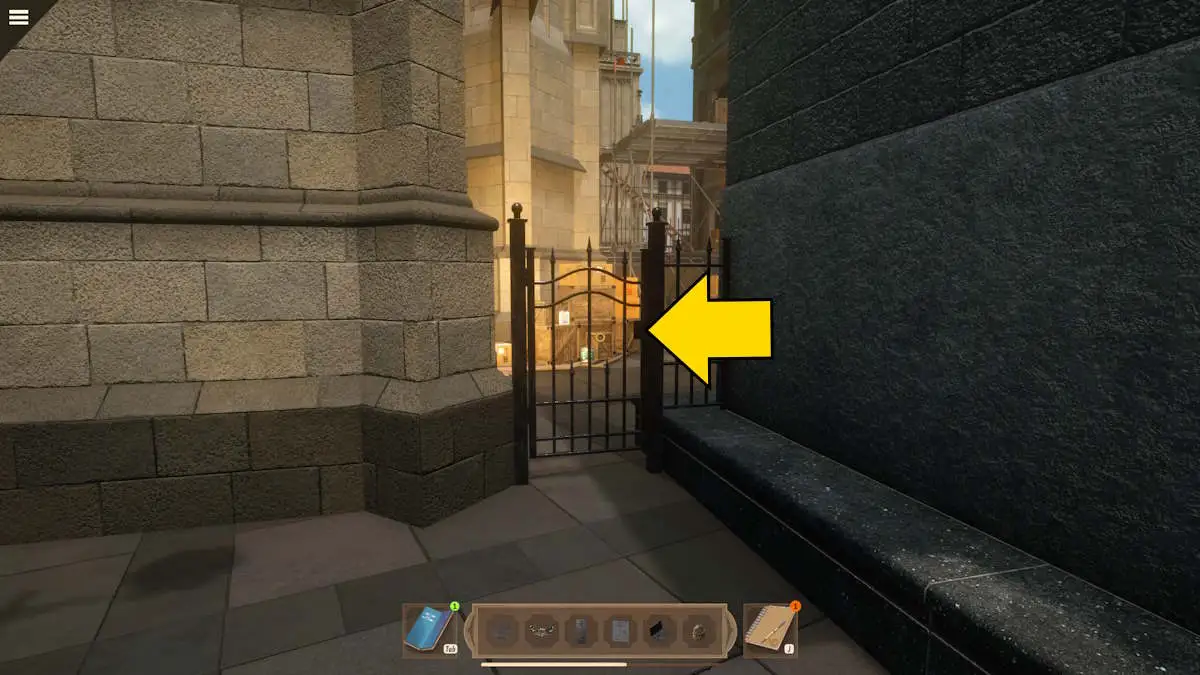
Image by Pro Game Guides
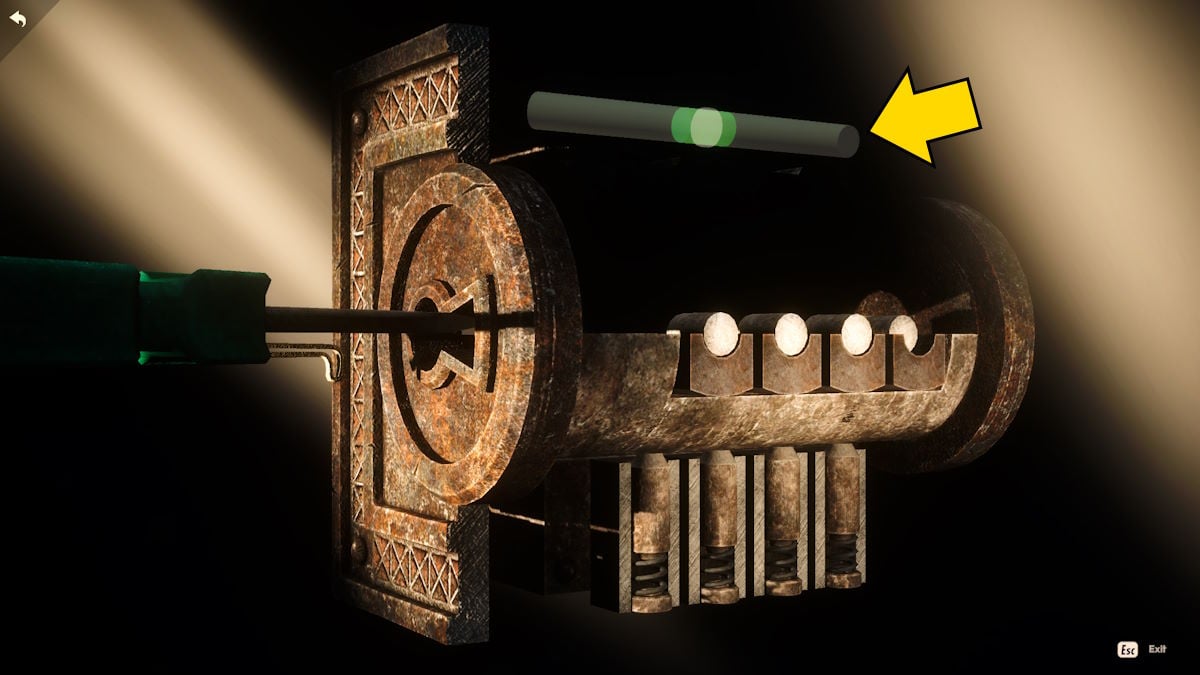
Image by Pro Game Guides

Image by Pro Game Guides

Image by Pro Game Guides

Image by Pro Game Guides

Image by Pro Game Guides

Image by Pro Game Guides
Screenshot by Pro Game Guides
![]()
Image by Pro Game Guides
![]()
Image by Pro Game guides
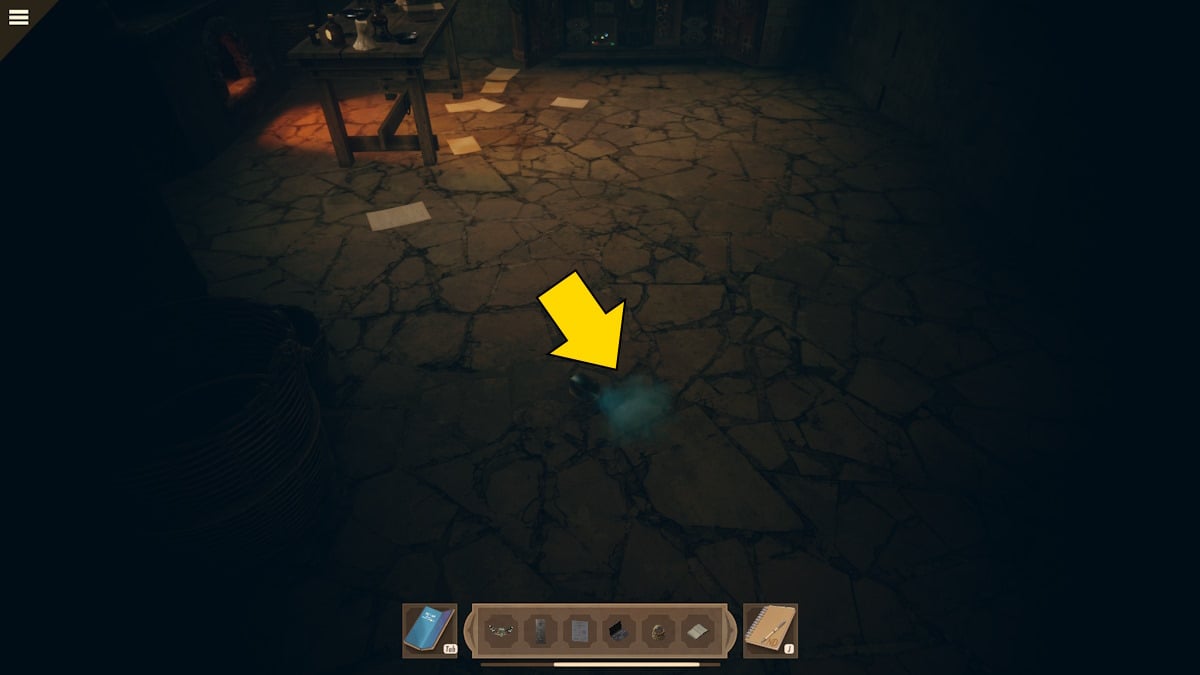
Image by Pro Game Guides
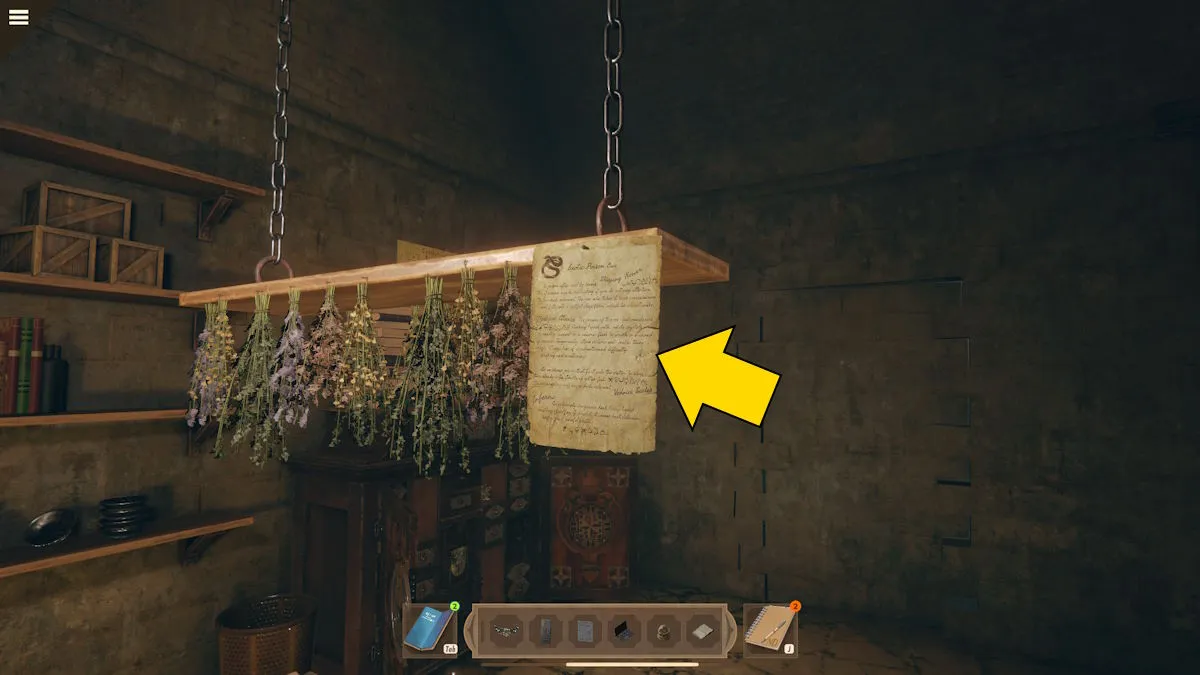
Image by Pro Game Guides
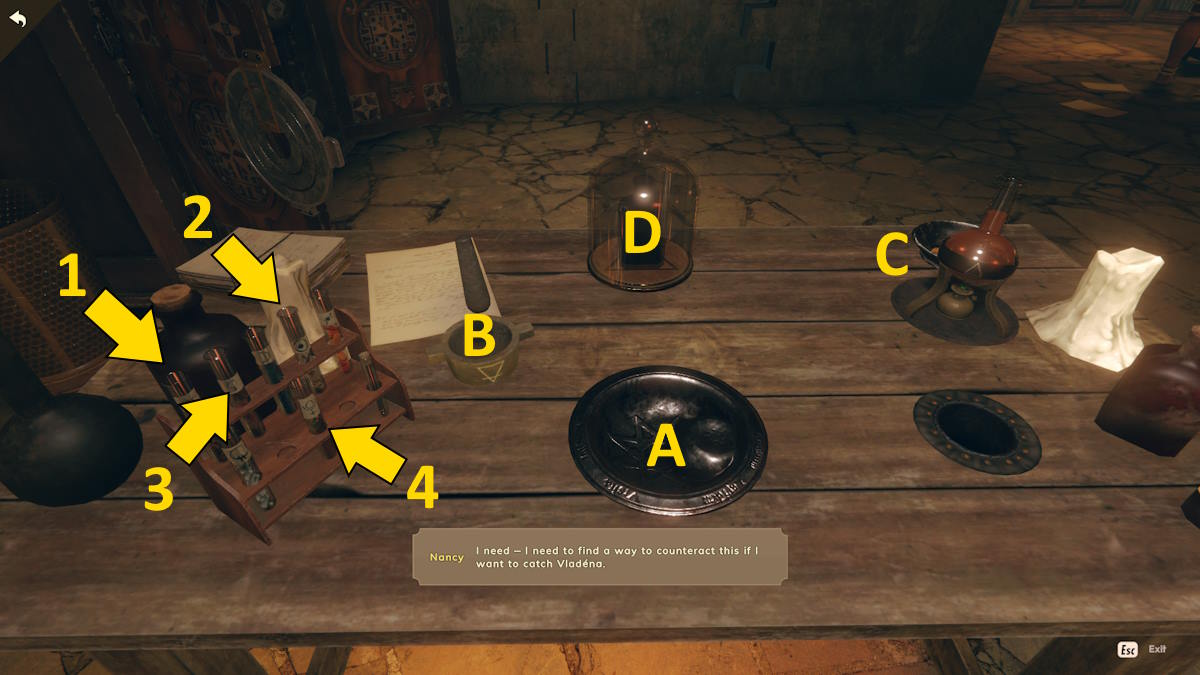
Image by Pro Game Guides
Screenshot by Pro Game Guides
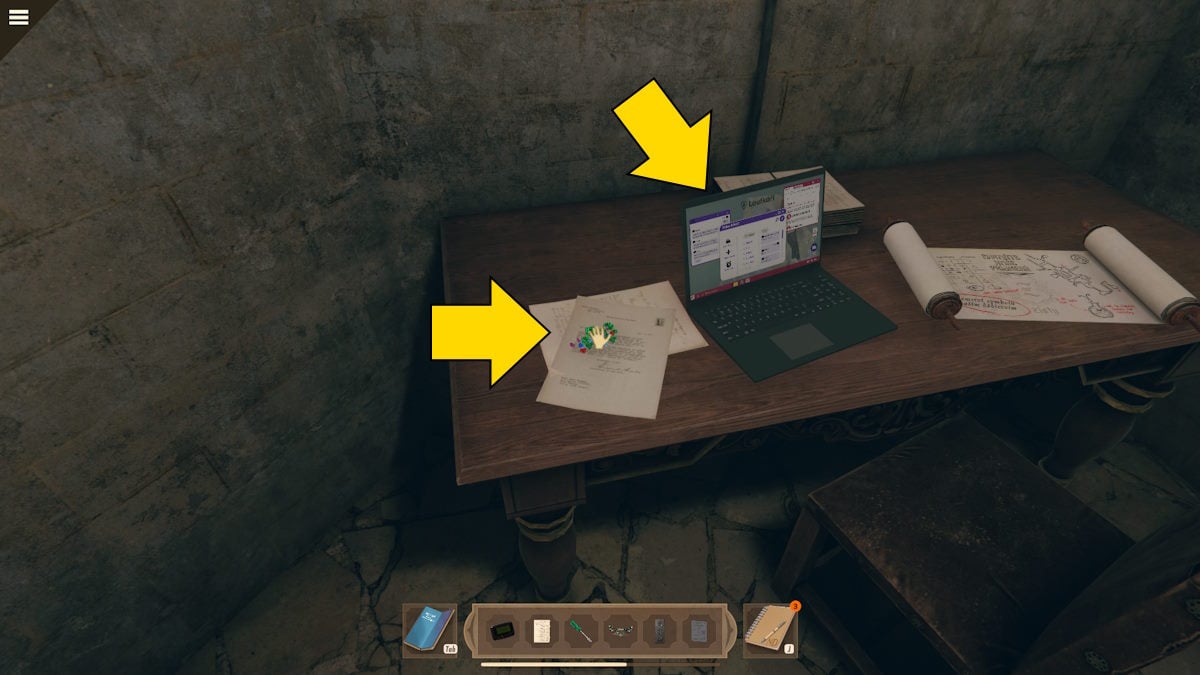
Image by Pro Game Guides
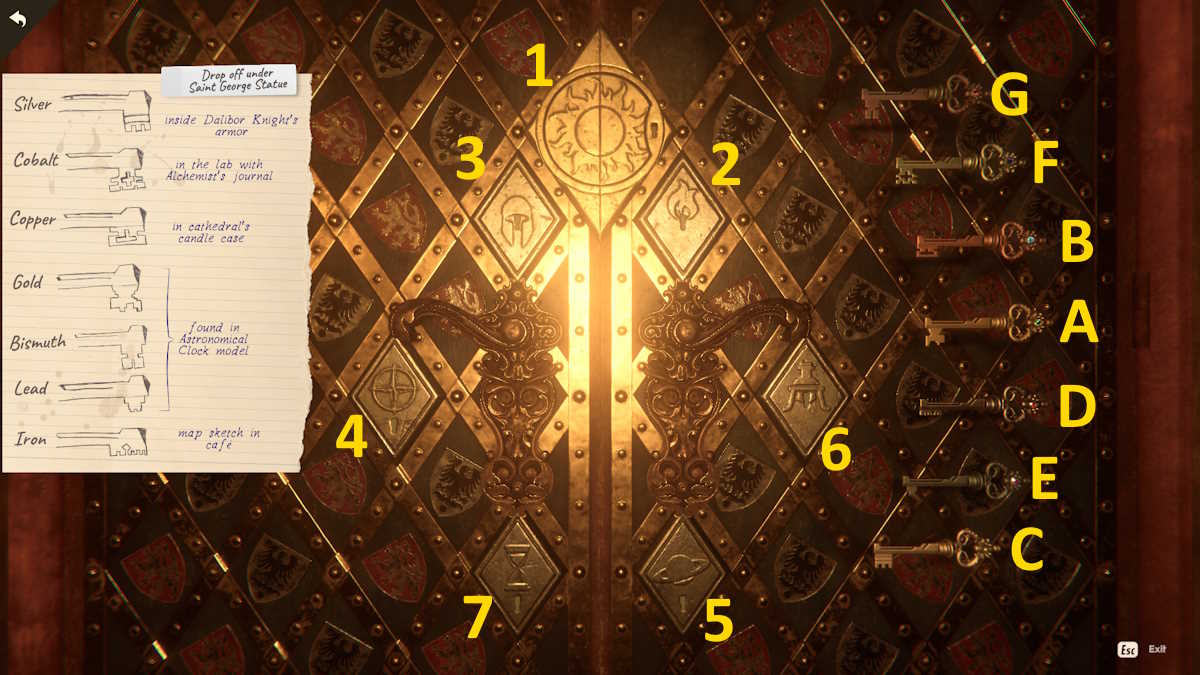
Image by Pro Game Guides

Image by Pro Game Guides
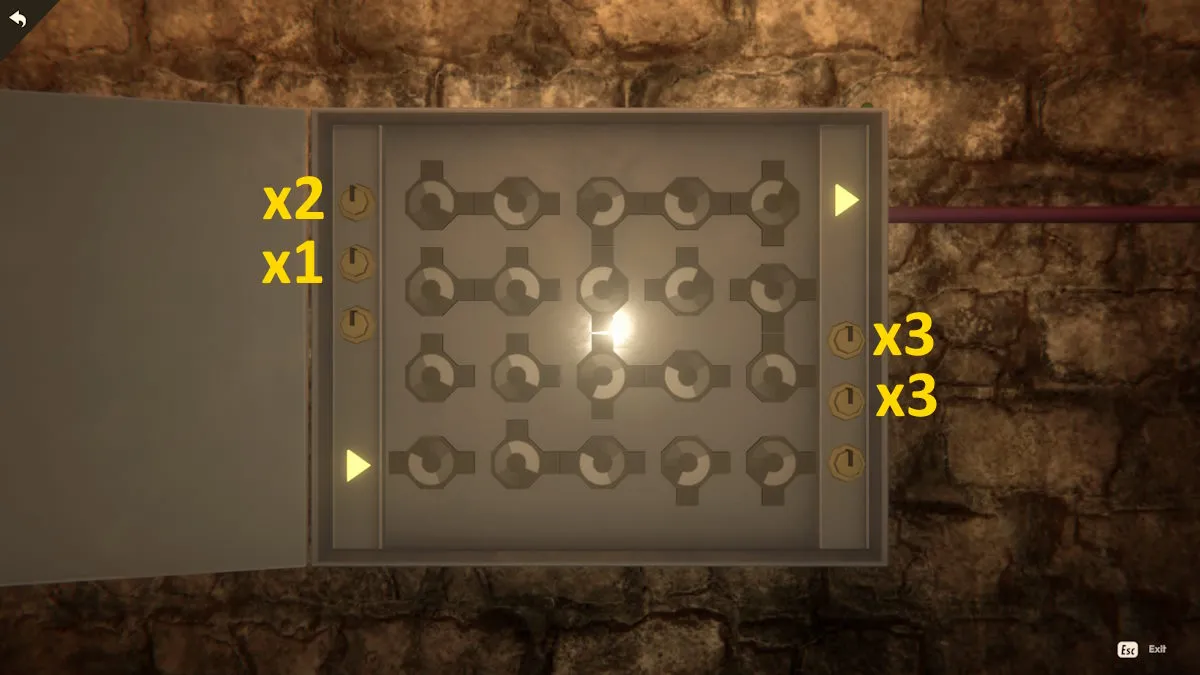
Image by Pro Game Guides
Screenshot by Pro Game Guides
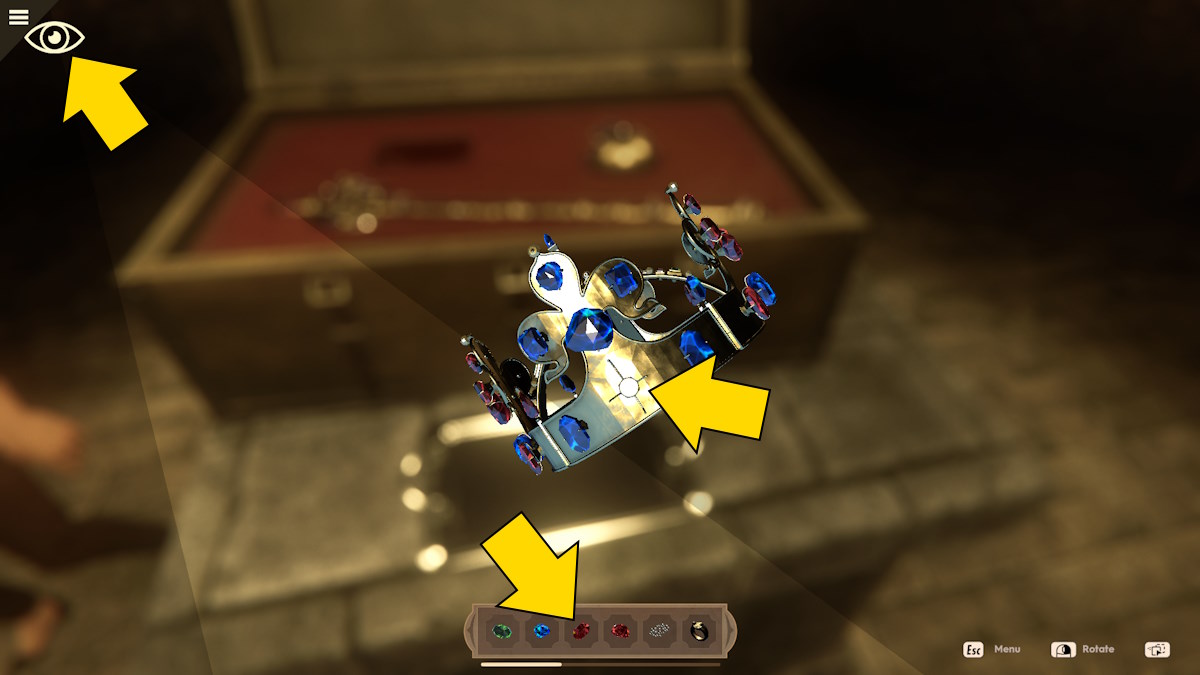
Image by Pro Game Guides
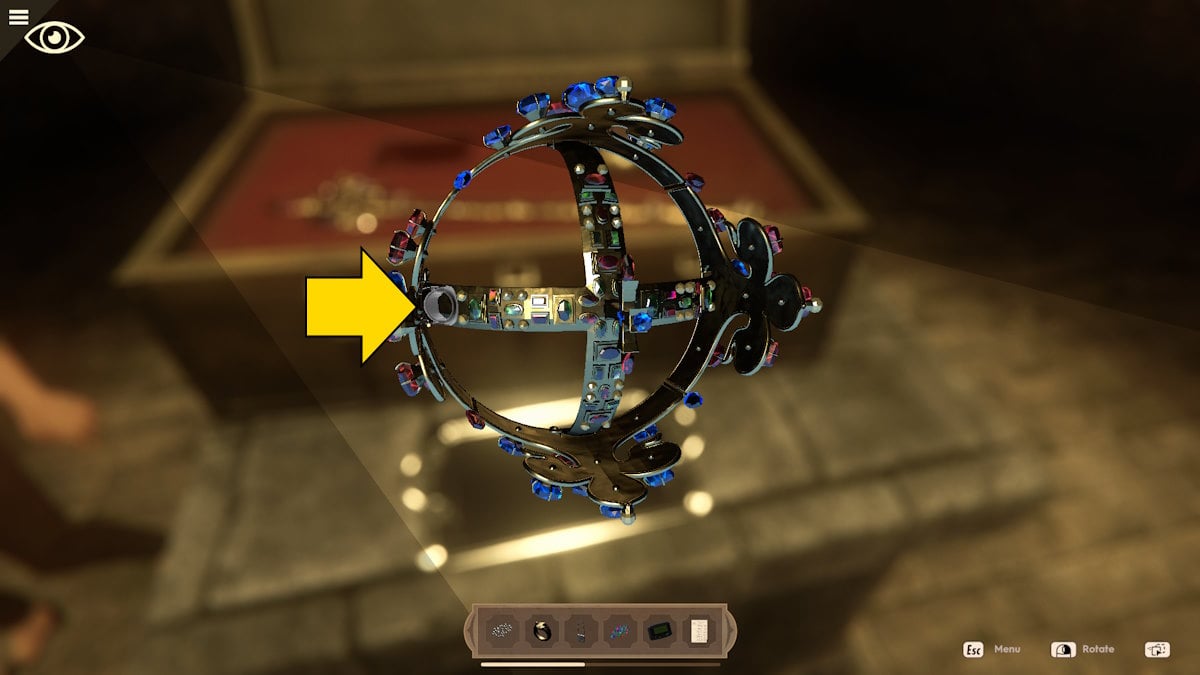
Image by Pro Game Guides
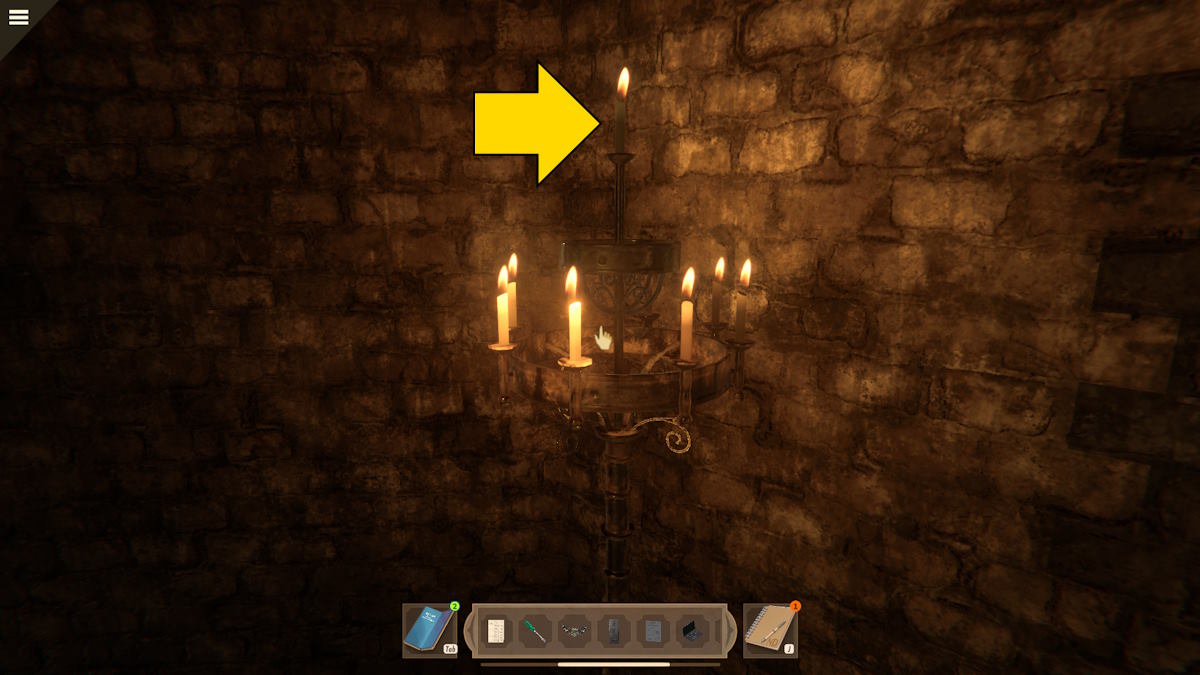
Image by Pro Game Guides
