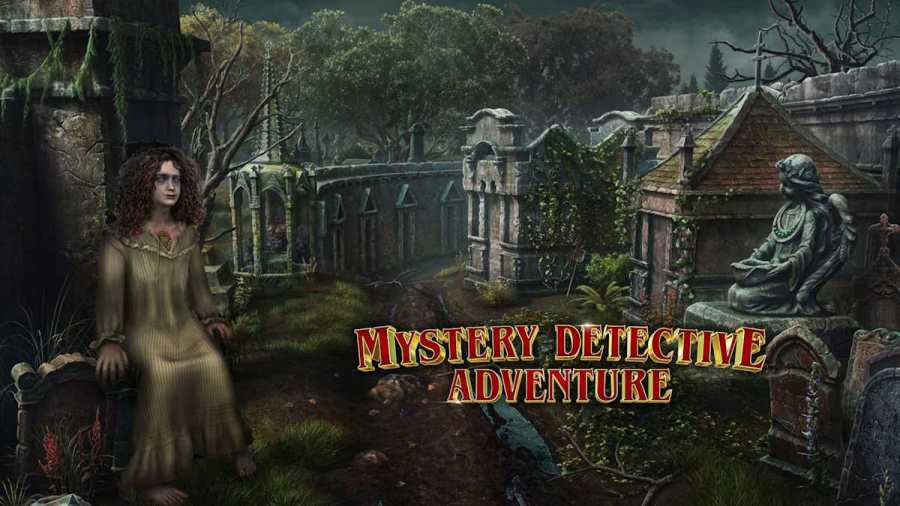
Mystery Detective Adventure is a quality puzzler secret biz with some challenging puzzle . If you ’re having trouble with them , understand on for our full walkthrough of Case 2 .
If you ’re front for the residue of the game , we ’ve got you covered here :
Mystery Detective Adventure Walkthrough - Case 2 Improbable suicide
In the next case , we will attempt to assist a house of ill repute owner whose son died lately . The constabulary harness the death as a felo-de-se , but the female parent does n’t believe this is the cause . She suspect a local businessman is the culprit , but you ’ll need to ascertain proof .
You start this adventure in downtown , where you ’ll speak to the mother . She ’ll tell you where the criminal offence scene is so you could investigate . She ’ll tell you to take the stair across from our baby buggy to thetown ’s central square . First , however , there are several places around this business district area we ’ll need to take note of :
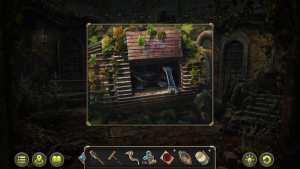
Downtown Square
The first location is the Downtown Square . There is amorphing objectabove the door of the Brothel . It switches back and onward between a clock face an a decorative Harlan Fisk Stone object . verify to pick that up before you get bug out .
Use thekeyto unresolved yourcarriage . Inside the carriage is the portable experiment table , where you could essay samples . On the left field is abagthat we can open to garner some useful supply : tweezersand aknife . Also pick up theoilerfrom the board , then pick up a chess game pieceChess Collectible 1/8on the correct side of the screen . Now that you have pick up the items needed from the perambulator , you’re able to head back into the street . Click thebrown doorwhere the mother of the at peace was located before . This is theBrothel , and it will take you into the lobby .
Brothel - Lobby
Now that you are in the lobby , you’re able to interact with several item . There is a locked threshold the left over and a locked room access to the right , a grandpa clock , and some other objects . The only things you’re able to actually do anything with at the moment are :
Central Square
After you have arrest all the items in the Brothel ’s Lobby , go back into the street and lead up the stair by theAntiques Shop . This will lead you to theCentral Square . There are several objects to pick up or take greenback of , so I noted them all below .
First , look inside thedrain grateon the earth and apply thetweezersto retrieve theScrewdriver . This will be useful subsequently on . You wo n’t be able-bodied to interact with much of Central Square aright now . Take the path in the distance to the left as your make your way to thegazebo .
Gazebo
This is thecrime scene , so you ’ll desire to be very thorough in your investigation and pluck up as much grounds as you could .
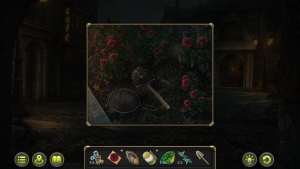
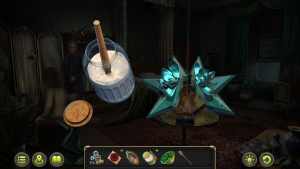
There are several evidence item in this arena . First , look at thebody outlineon the ground and spot the torn push button beneath the leaves . Then , check theweedsbeside the precis to rationalize some forth with yourknifeand smirch the ticker . Look at thestatuein the center of the gazebo and use thebrush(found in the sporting house ) on the low right recess to spot the carve initials ( cut the lack of interact ikon ) . Finally , look at the crack in the I. F. Stone on the ground in front of the statue . deep down , you may sweep away some leaves , then pull out a smallbottleusing thetweezers .
This nursing bottle might have poison in it , which could be the real cause of the son ’s death . We can test it in our baby buggy lab to see out . Before we manoeuver all the mode back , stop in the Central Square and look at thedoghouse .
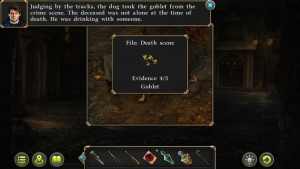
How to take the goblet from the doghouse
TheDoghousehas a chalice that match the one underneath the bench in the gazebo . However , the wiener wo n’t let you look at it without anitem in exchange . To get something to switch with the dog , manoeuvre back business district and accede thebrothel . Next to Diana on the counter is asandwichyou can take . get it back to the dog , and you’re able to getEvidence 4/5- Goblet . Then , we can stay on back to thecarriageto test the toxicant .
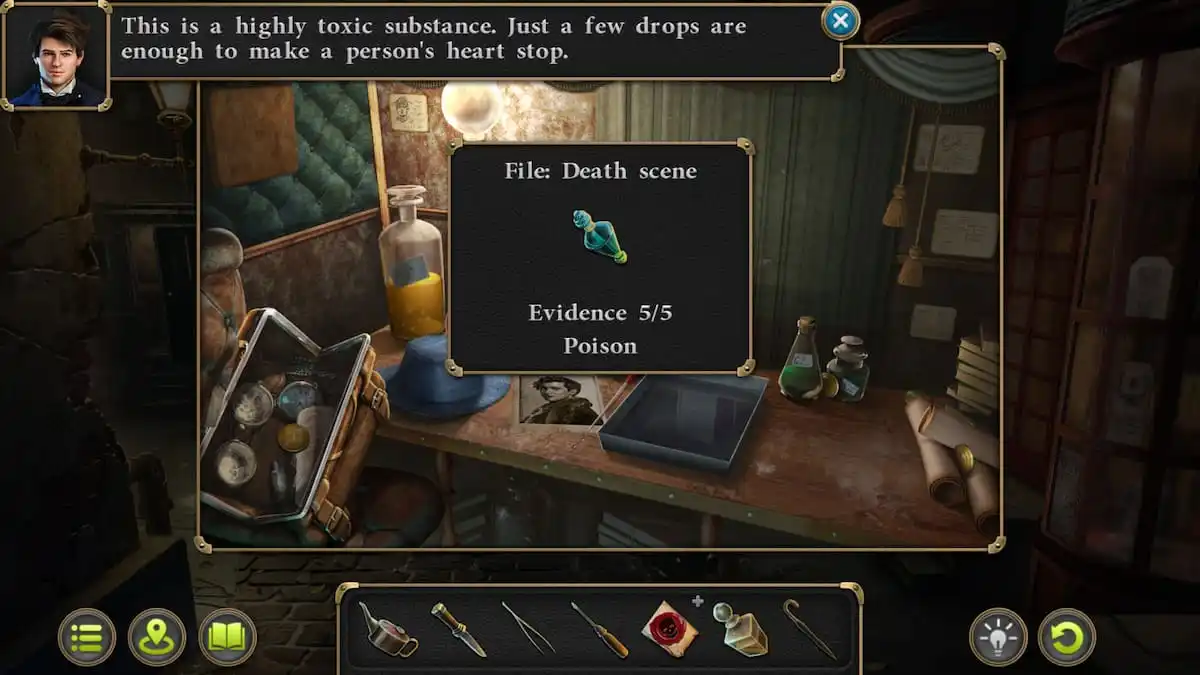
How to test the bottle of poison (Evidence 5/5)
Bring the vial you get in the fracture of the level of the murder fit to your carriage . Inside your portable science lab , you may figure out just what it is . All you have to do ispick up the nursing bottle from your stock-taking and clack it on the science lab ; the game will take fear of the quietus . Turns out , it ’s a nursing bottle of very potent poison , so it looks like this was a murder after all . You will require to bring this grounds back to Diana .
After speaking to Diana , you ’ll want to take a look at her son ’s elbow room . However , the key to the room is handily lost . Diana say you to talk toOscar Brown , the man she believes murdered her son . He is located outside the cafe inthe fundamental part of townsfolk . Diana will also give you apuzzle doorpiece to help you get into the billiards way .
How to solve the brothel billiards door flower puzzle
The goal of this puzzle is to slide the flowers into their right colored slots . However , whenever we slide a flush into another slot , all the slot will turn out clockwise . We ’ll have to move them in the right order to get them to end up where they belong to . While the puzzle is random , here ’s one model of how it ’s done :
The trick is basically not to think of get down the flowers into the right slot but arranging them such that your next move will send everything into the correct slot ( and then making the move ground on that decisiveness ) . Once you solve your own version of the puzzle , you may start the door and head through to the billiard room .
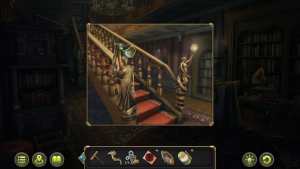
Brothel - Billiard Room
There are more objects we can collect and things to look at here .
When you insert the billiard room , look at thebilliard tablefirst and click it to notice aDetailpiece stuck in the mesh . Then , front up above thelights , and you ’ll see something on top of the lamp shade . You ca n’t reach out this commonly , but thankfully , you could snaffle theumbrella from the brothel lobbyand practice it to knock it down . Up in the balcony orbit of the elbow room , you’re able to grab thepowdersitting on the shock to the right hand and make banker’s bill of the other token around .
Oscar Brown and his apartment
Head outside to the central part of town , and talk toMr . Brown at the cafeoutside the Square ( where you took the goblet from the dog ) . After speaking with him , grabKeyandNutsand a collectable from the tabular array afterward . get to the gate left of the cafe with the Key you took from the coffee shop board , then you may enter Oscar ’s apartment .
render to the Street and assay to insert the Antler onto the deer ’s head only to find the connector is rust . UseOileron the head , then test again . start the object in front of the door to give away three telephone number : IX - III - VII . Return to the flat and enter the code into the safe ( 9 left - 3 right - 7 leave ) . afford the rubber to collect Director ’s Johnny Cash receipt ( grounds 4/4 ) . canvass the safe again and takeCase . Insert the Comedy masquerade party and Tragedy masquerade party onto the caseful and open up it to acquireBinoculars .
Theater
Return to Square and utilize theBinocularson theblue flagsto the upper left wing of the magnanimous brown theater door to observe a pattern of numbers and animals . Examine the theater door and then cluck the animal as comply : Lion , Deer , Rhino , thenBear .
Inside , speak to Scott Roth and get a Key . Before using the key , grab theMorphing Objecton the signal flag as in the screenshot above . Then , use the tonality on the back right door and maneuver up the stair , where you ’ll be tasked with find 15lenses . Back in the theatre of operations , use the genus Lens on the corner on the right to begin a fresh puzzle .
How to solve the theater box puzzle
The goal of this puzzle is to end up with just one ruddy part on the board . To do this , you have to jump a red piece over another red-faced piece ( checkers dash , though no diagonal movement is permit ) . The whoremaster is to fundamentally design a move or two onwards and to try and keep the pieces as closelipped together as you’re able to to maximize your next moves and to assure you always have a next move ( if they become too far away , you ’ll have to readjust ) .
After completing the puzzle , takeNeedle and Threadas well asCasefrom the box . Examine the photographic camera on the left side and open it withScrewdriver , then useCaseon it to acquireFilm . Return to your baby buggy ( Street field ) and swop thewhite luminousness with the red one , the add Film to the table . Interact with the Film to direct the picture in the tray then test it to find Photo(Evidence 1/5 ) .
recall to the Theater and expend thePhoto on the director , who will direct you to the field lobby . canvas thebalcony above . TakeFan Collectibleitem from beneath the sum hindquarters , then take a look at the violent bag to find Women ’s clutch(Evidence 2/5 ) . Inside , find personalised tickets of the choke +1(Evidence 3/5 ) . There is also aFan Collectibleunder the behind .
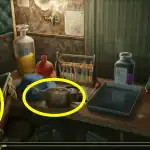
Image by Pro Game Guides
Deceased’s room
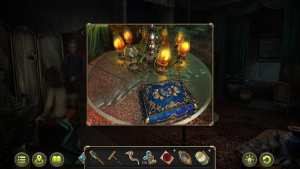
take back to Brothel Hall to talk with the mother ( Diana ) to receive Key . employ the paint to spread the door on the right side ( near the deer head ) . Takenotebookfrom the desk on the right and warm up pan from the bed . afford the pan to win Charcoal and use it on the Notepad , yielding Clue .
Examine the symbolization on the desk handle drawer on the right and select Clue to deem it up against the mystifier . Your goal here of trend is to arrange the symbolisation as seen in the Clue . To do so , apply the grey " k " symbols to line up a route for the symbols to move along , direct them to the rectangular slots for storage . Naturally , you ’ll desire the middle and bottom parts out of the way first . Once the puzzler has been figure out , show the Love Letters in the desk ( Evidence 4/5 ) and takeToken . This way also contains aMorphing Objectand aChess Collectible .
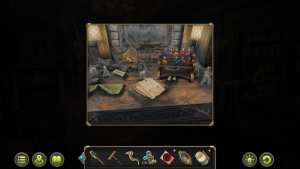
Return to the Game Room ( aka Billiard Room ) and useTokenon the machine on the good desk ( with the three drinks and pipe ) to develop Joker . expect to the left and up the step and use the Joker on the painting on the wall .
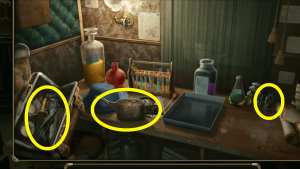
Image by Pro Game Guides
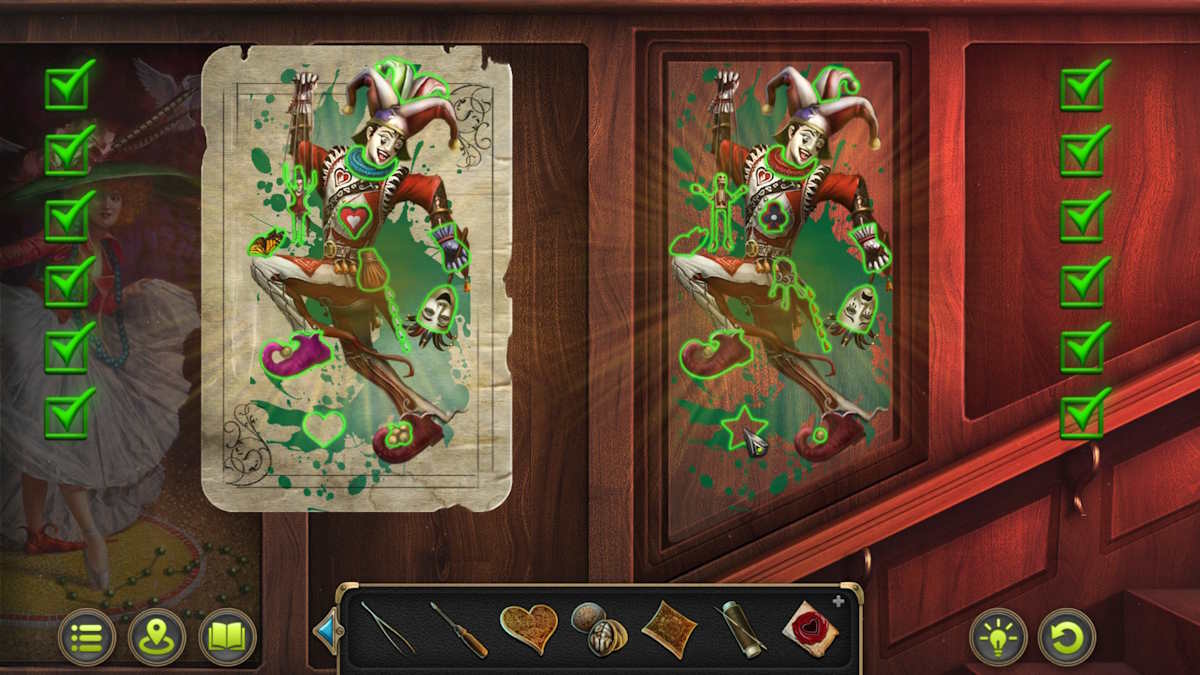
Joker puzzle
The goal here is simple : make out the 12 things that are different between the Joker card and the picture .
After completing the puzzle , takeFigurineandKeyfrom behind the painting . Return to the Deceased ’s bedroom and insert the statuette into the heart of the closing mesa next to the bed . TakeHeartfrom the desk , then expend Key to unlock the chest at the ft of the layer . TakeWeight for clockandPart of boxfrom the thorax , then move the sheet and useTweezerson the crack to uncover Medallion for a relic ( grounds 5/5 ) . Return to Diana , then practice Weight for clock on the clock left of the silver screen . Behind the clock , grabLock pick , hammer , and acollectible Fan .
Return to Street , this time take the route in the length toward the house at the top of the J. J. Hill ( click the top part ) . Grab theFan collectiblefrom the Sir Herbert Beerbohm Tree on the left and theMorphing Objectabove the logic gate , then check out the squirrel . Give itNutsto acquirePart of the lock , then insert the part into the logic gate before clicking it . With that , a new teaser appears .
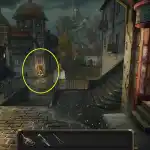
Image by Pro Game Guides
How to solve the gate puzzle
This one is on the simpler side . The destination is to have all symbols adjacent to match symbolisation ; the trick is to put all the central triangular pieces in order except the last two . swop the final two piece ' guild , then put in the other triangles , as prove in the picture below . you’re able to put pieces back from either the centre or the right at any time , and there is also a reset release on the bottom in the middle .
Estate
Approach the door on the left-hand side of the menage to talk with Lord Brian Shaw , who wo n’t let you in . flick the threshold on the correct side to acquireTorch , then use Screwdriver to launch the door . inwardly , plunk up theFanCollectiblefrom the bed , theBoardfrom in front of the bed , andCorkscrewfrom the floor .
Back in the chiliad , take the odd road ( see arrow in top image above ) . UseLockpickon the left doorway . Inside , add theBoardto the ravel , takeNailsfrom the table and add them to the run , then forge the nails in with theHammer . Take theLadder(and the collectible from the top correct turning point of the image ) , then head back out .
Set the ladder up against the lit up window , then climb up . There will be aTone Armholding the windowpane open ; take it , then rise into the windowpane . A cutscene will wreak , and then you will be able-bodied to mouth to the father .
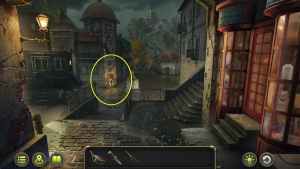
Image by Pro Game Guides
Go downstairs ( depend for the doorway in the proper corner ) to the Estate . InsertTone armonto thephonographon the rightfield . release the phonograph using the handle on the correct side and takeKey . There is also aMorphing Objectby the books on the remaining side , as well as aChess Collectiblenext to the phonograph . This is all you could do in this room for now , so it ’s clock time to head back to the backyard .
utilise Key on the birdcage , then look at the greenhouse room access . There will beGrainthere ; pick some up . Use Grain to distract the birdie , then takehandlefrom the left shelf . While you ’re at it , launch the loge to findBas - relief ( 1/6)andKey . If you head back into the Foyer , you’re able to now interact with the cupboard on the left side of the screen ; there is a locked threshold at the top of it that contains a Modern teaser .
How to solve the Estate cupboard puzzle
A misleadingly simple puzzle , this is one of the more unmanageable 1 in the biz ( or will be for some , anyway ) . There ’s no put-on per se , just line up the blocks as seen in the video . As usual , the puzzle is random , so you may get a dissimilar version , but the end result of course should take care the same .
subsequently , takePortraitfrom the closet and assume Portrait of the nan with a brooch ( Evidence 4/8 ) . While you ’re at it , takeGlueandWrench . maneuver back to the bedroom , and useHandleon the armoire ( to the right of Shaw ) to regain unsporting Boots ( Evidence 5/8 ) .
Using the map , dawn on thePlace of Deathin low-down city . utilise theWrenchon the equipment on the correct side of the filmdom , then takeGear . This can be used in the Girl ’s Bedroom to fix the ice with a missing geartrain in the back of the elbow room by the door . After putting the train in place , crank the light down and take thelampthat is n’t lit up .
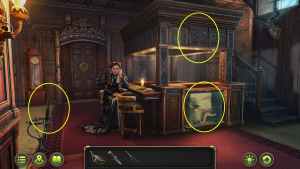
Image by Pro Game Guides
Go back downstairs and put the Lamp on the banister to open up a underground room . Check out the letters on the desk to find Grandma ’s notes on poisons ( Evidence 6/8 ) ; bear on the rack to discover Poison stand ( Evidence 7/8 ) . Pick upBellfrom the center of the desk ( below the painting ) .
Return to theBilliards Roomin the Brothel , and canvas the upper balcony . UseNeedle and Threadon the shoot down textile with the different color flowers , then Knife to take it with you . Back out of the Billiards Room and into theLobbyof the Brothel . Use the light candle on the bar to light the Torch to acquireBurning Torch . After that , you need to devolve to the Girl ’s way , and it ’s time to solve the Blue pump puzzle .
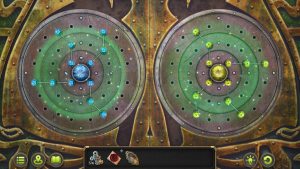
How to solve the Blue Heart puzzle
utilize Clue to celebrate the last intended pattern ( you could keep clicking it to polish off and add it to your opinion ) . The pointedness is to get the colors lined up by impress the lines vertically and horizontally . The best way to work out this puzzle is to get the spell line up in one vertical line , then scooting the lines to verify that the horizontal order is correct . begin in the upper correct - manus street corner and satisfy in the right colors as you go . see out the video if you need more supporter . This will realize you anotherBas Relief ( 2/6 ) , and some more negotiation with Shaw .
How to unlock the cemetery
Shaw will separate you to head to the cemetery , but it is interlock up tight this time of night . To get into the cemetery logic gate , you ’ll need15 metal rosiness . All the metallic element roses are available in theAntique shop(enter it through the ruby door in the Street ) . After asking the woman running the workshop how much they are , you will call for tocollect seven coins from your carriage . You wo n’t be able to collect the coins until after you have interacted with the charwoman and asked how much they are .
Head to your coach and you ’ll find the coins scattered around in these locations :
Now that you have seven coins , you will demand to find all the roses in the shop . While some are located out in the undefended , several require that you interact with boxes , bags , and other objects in the shop to regain them .

Image by Pro Game Guides
As shown in the screenshot below ; there is abox next to the John Cash register . You require to put the two red gems from the counter into the loge to give it up and take the blush wine .
Once you have collected all 15 metallic element roses , you need to put those rose into theCemetery Gate . This will unlock the Cemetery Gate puzzle .
How to complete the Cemetery Gate Puzzle
If you are stuck on this puzzle , I have included a quick video to help you through it . You will necessitate to line up the roses on the left and the right so none of the rose overlap when you pull them together with the lever at the bottom of the puzzler . you’re able to discharge the puzzle by displace just one bar on the left , then delineate up the right roses to match .
Inside the Cemetery
Once the gate is unsecured , you could head into the burial site localization . There are several screens to this place , and the first one has a whole lot to look at . The following tilt will start with the object on the left of the screenshot below .
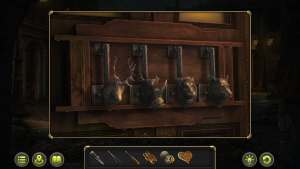
Now that you have theHand Net , you’re able to use it on the little pond next to Oscar Brown ’s flat . This will give you thebilliards ball . expend theBilliards Ballin the Billiards Room in the Brothel on the pool tabular array . This will knock theStar Pieceout of the netting of the pool board .
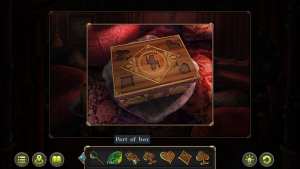
All Part of Box pieces for the Billiards Room box
Now that you have broken the stone and taking theBox Piece , you should have all the piece for the corner ’s top in the Brothel ’s Billiards Room . But the part you get hold of from the Lucy Stone is dirty , and you require to wash it before using it . to lap it , steer back to theEstate Front Yard , and flick on theFountain . Use theCork Screwto remove the bobfloat in the fountain , and you will haveclean pee to wash the boxful opus off with .
How to complete the Billiards Room box puzzle
The Florida key to this puzzle is to start by completing the edges so they draw up . Make indisputable all the lines are connected , and keep spinning the pieces until they are no open conclusion leave . You ’ll bring in anotherBas Relief piece ( 3/6 ) for your trouble .
Deeper into the Cemetery
Now that you have done all you may do in the first part of the Cemetery , it ’s time to go deep in . You will have several items you could interact with here , but some of them you will involve other objects for that have n’t been available to you yet . Here ’s the breakdown :
lead back to the Square in Lower City , and interact with the rose George W. Bush to the left of the Theater door and the right hand of the kennel . There are someEmeraldsin the filth ; use theColanderand theShovelto strain the gems from the dirt . Go to theBackyardof the Estate , and take theOarfrom the workroom . Last , head to theGirl ’s Bedroomin the landed estate , and expend theShovelon the disturbed dirt in thePotted Plant . This will get you the secondStar Piece . Use theGlueto put theStarback together .
The Greenhouse Door puzzle solution
Now that you have theStar , you may open up the Greenhouse , which is located in the middle of the backyard in the Estate . Interact with the door , place theStarin the door , then lick the mystifier . You will need to rotate the vines so none overlap .
Inside the Greenhouse
There are a gross ton of different objects to interact with in the nursery , so I made a numbered tilt to aid you through it . You ’ll demand to find several objects and employ them to pick up other objects .
How to complete the Greenhouse Tree puzzle
This one is reasonably simple ; you just require to delineate up the tree diagram pieces to make a picture . This will give you theMacheteto use in theCemetery .
Return to the Cemetery
Head back the Cemetery and use theMacheteyou just get to cut down the duncical vines . There will be a computer code as well as anotherBas Relief ( 4/6).On this same CRT screen , you’re able to now use all theEmeraldsyou have collect on theAngel Statueto get yet anotherBas Relief ( 5/6 ) . Now move to the next concealment in the Cemetery and put theOaryou picked up from the Estate in theBoat . you’re able to now head over to theCrypt , but there is a teaser hold back for you there .
How to solve the Crypt Door puzzle
If you still have theBellin your inventory from theSecret Roomin the Estate , you need to put that campana in the coat of arms over the hearth in the Foyer of the Estate . This will play up the reply for the Crypt Door Puzzle , like below . Interact with the base of each subdivision by clicking the bottom or middle jewel , and twist the arms by clicking the top jewel .
In the Crypt
Once inside the Crypt , you ’ll have several things to interact with , include a Collectible , a Morphing objective , and a puzzle . Here are all the hotspot to look out for . First , penetrate on the three in the upper right ; it is aMorphing Object . Below it on the work bench is aFan Collectible ; if you have been collecting them all , this should be the lastFan Collectible . It should also be the finalMorphing Object . Next , you need to interact with the tomb at the back of the room . you could wait on the tomb to the right hand .
Tomb Portrait Puzzle
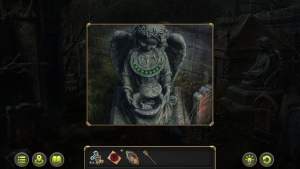
In guild to get into the granny ’s grave , you necessitate to tap the tomb at the end of the room . Then , lay thePortrait of the Grandmotherover the tomb . snap on all the objects that are in both the portrayal and the carving on the tomb . The item areAcorns , Butterfly , Sword , Dove , Rose , Heart , Earring , Amulet , Seahorse , Grapes , andBug . This will give you aBas Relief ( 6/6 ) .
Crypt Bas Relief Puzzle
so as to puzzle out this mystifier , you will need to have collected all sixBas Reliefpieces and put them into theBas Reliefin theCryptof the Cemetery . You will also need to have uncovered the code from the cemetery wall with theMachetefrom the Greenhouse . Here ’s how to solve it .
Once the grave is opened , interact with the Scroll inside . After that , the secret plan will prompt you to spill to both Shaw and Diana . This will wind up up the Case with all the collectibles .
All collectibles and morphing objects in Case 2 of Mystery Detective Adventure
There are another solidifying of 16 morphing objects to discover in Case 2 , along with eight Chess pieces and eight fan . They are spread out around the mapping , and some of these are incredibly challenging to find . Here are all the locating of each .
All Chess Collectibles in Case 2
All Fan Collectibles in Case 2
All Morphing Objects in Case 2
For more indie game 100 % walkthrough guides , check outBotany Manor Walkthrough ( All achievements)on Pro Game Guides .
Image by Pro Game Guides
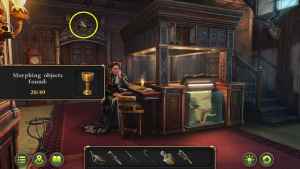
Image by Pro Game Guides
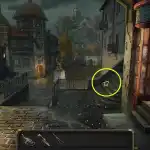
Image by Pro Game Guides
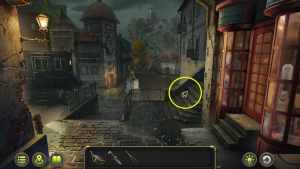
Image by Pro Game Guides
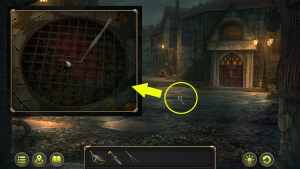
Image by Pro Game Guides

Image by Pro Game Guides
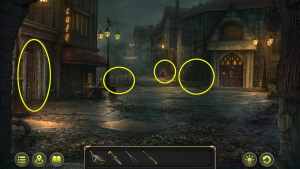
Image by Pro Game Guides

Image by Pro Game Guides

Image by Pro Game Guides

Image by Pro Game Guides

Image by Pro Game Guides

Image by Pro Game Guides

Image by Pro Game Guides

Screenshot by Pro Game Guides
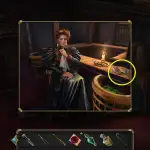
Image by Pro Game Guides
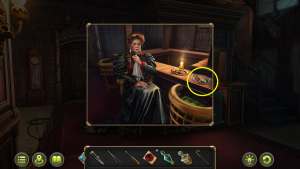
Image by Pro Game Guides
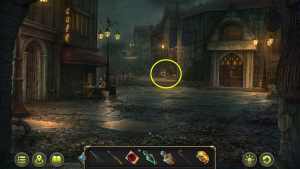
Image by Pro Game Guides
Screenshot by Pro Game Guides
Screenshot by Pro Game Guides
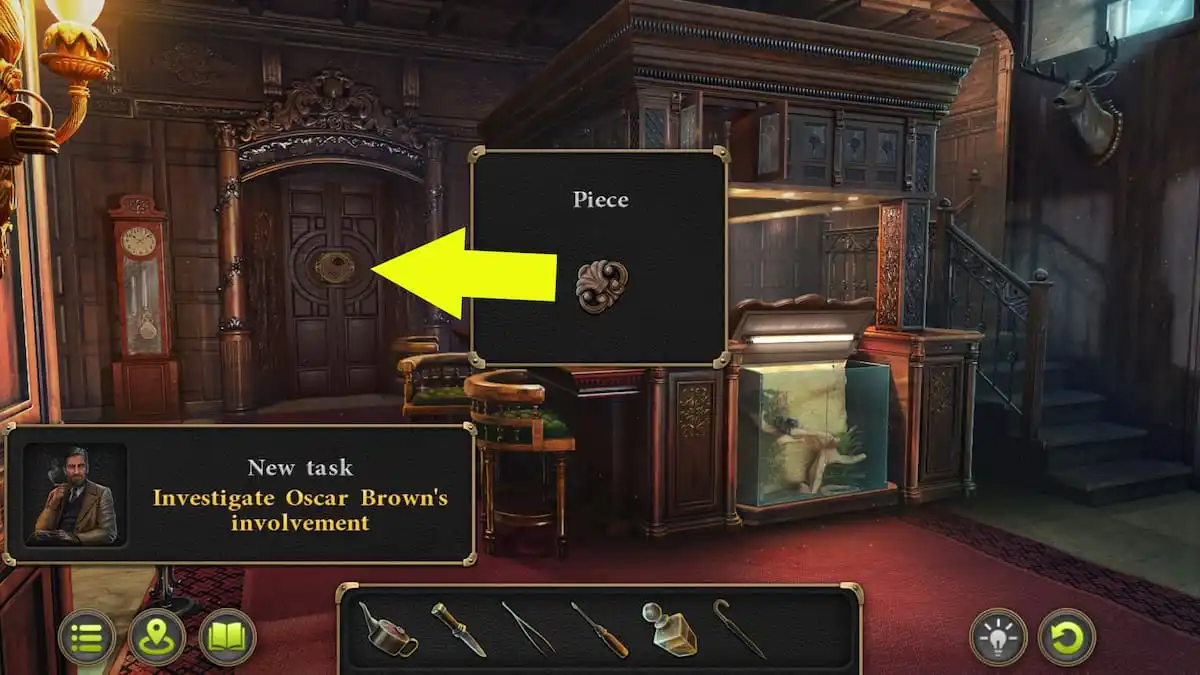
Image by Pro Game Guides

Image by Pro Game Guides

Image by Pro Game Guides

Image by Pro Game Guides

Image by Pro Game Guides
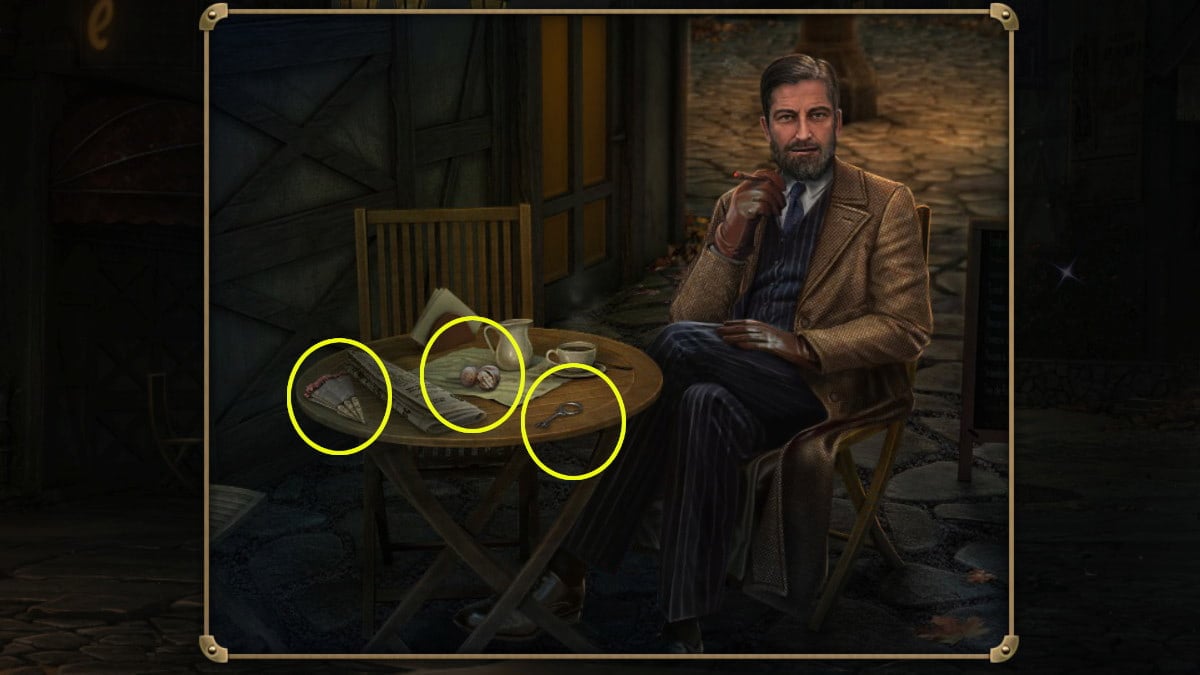
Image by Pro Game Guides
Image by Pro Game Guides

Image by Pro Game Guides
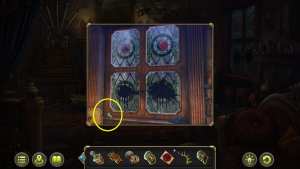
Image by Pro Game Guides
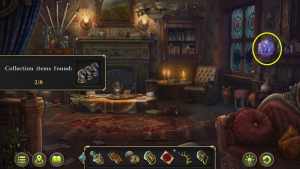
Image by Pro Game Guides
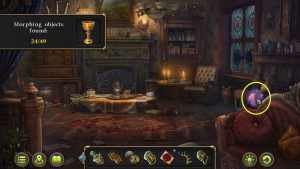
Image by Pro Game Guides
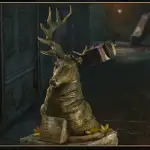
Image by Pro Game Guides
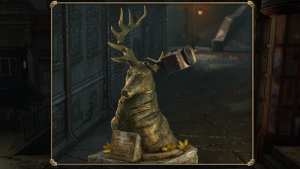
Image by Pro Game Guides

Image by Pro Game Guides
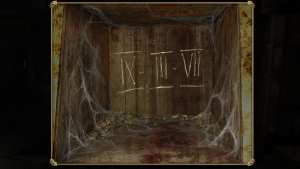
Image by Pro Game Guides
Image by Pro Game Guides
Image by Pro Game Guides
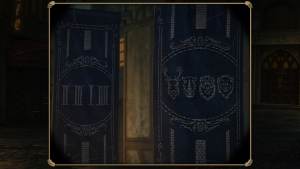
Image by Pro Game Guides
Screenshot by Pro Game Guides
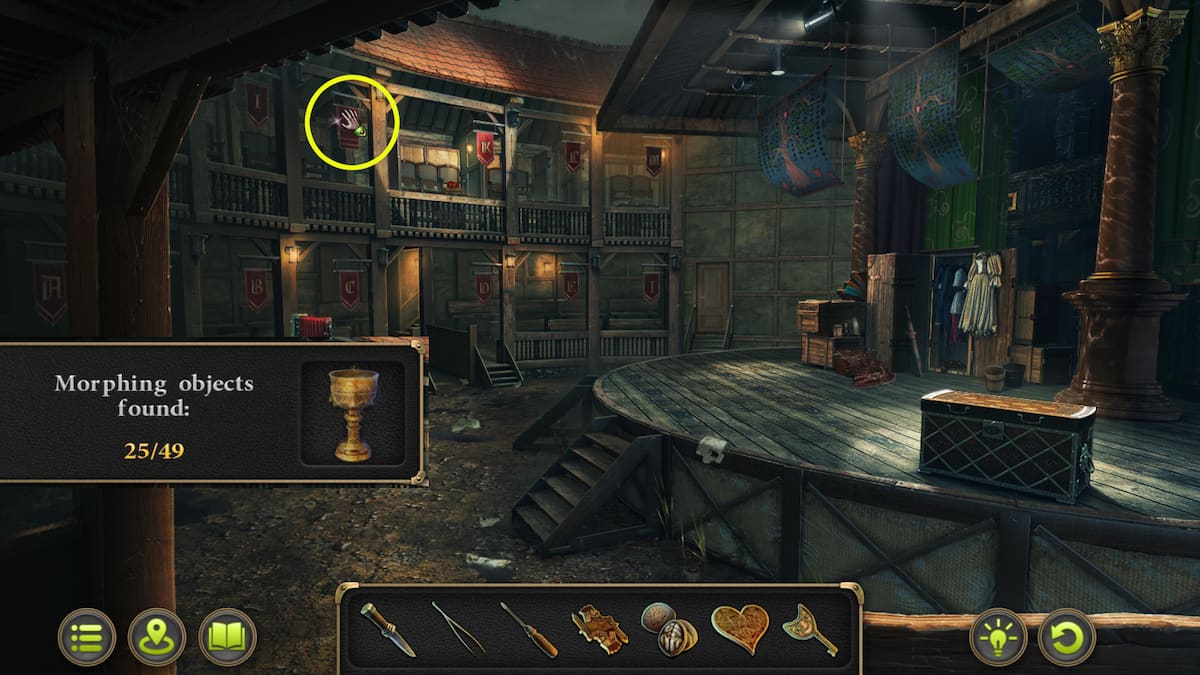
Image by Pro Game Guides
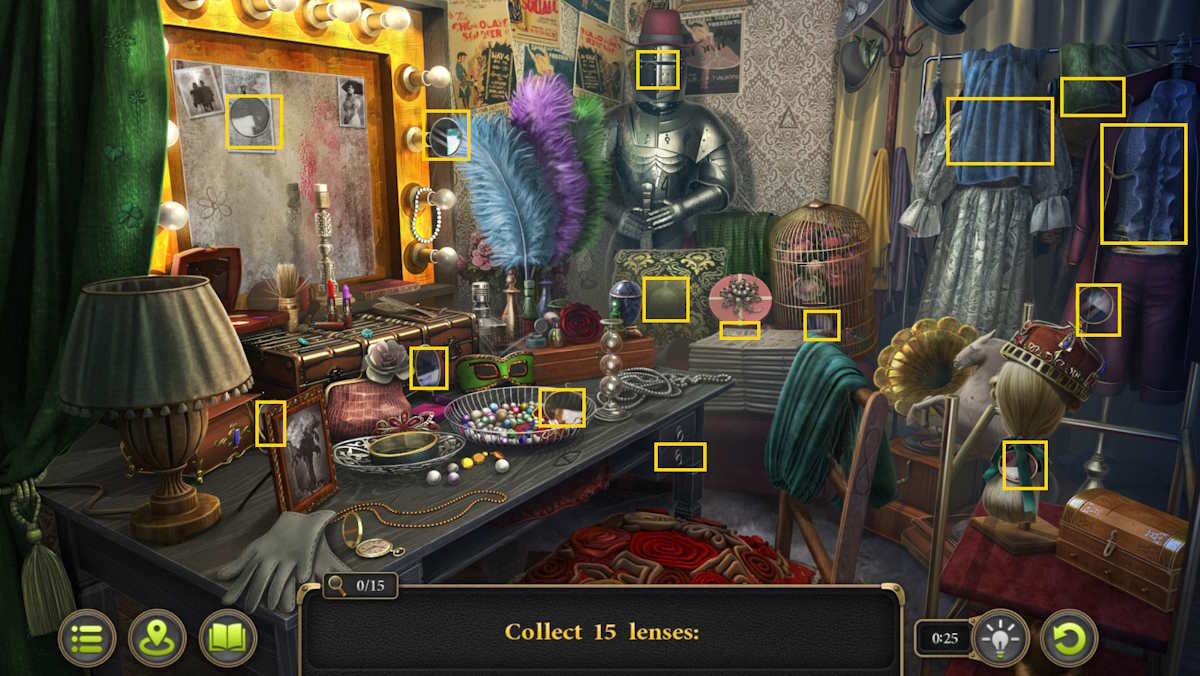
Image by Pro Game Guides
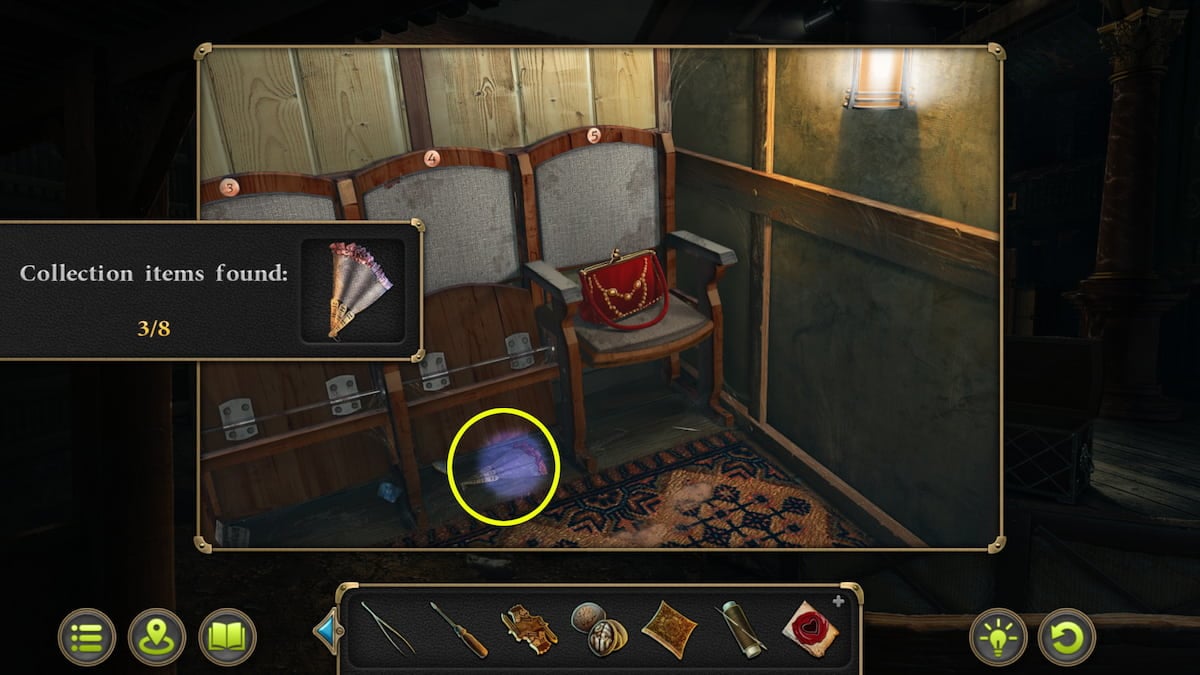
Image by Pro Game Guides
Image by Pro Game Guides
Image by Pro Game Guides

Image by Pro Game Guides
Image by Pro Game Guides
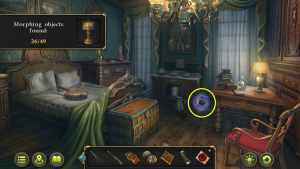
Image by Pro Game Guides
Screenshot by Pro Game Guides
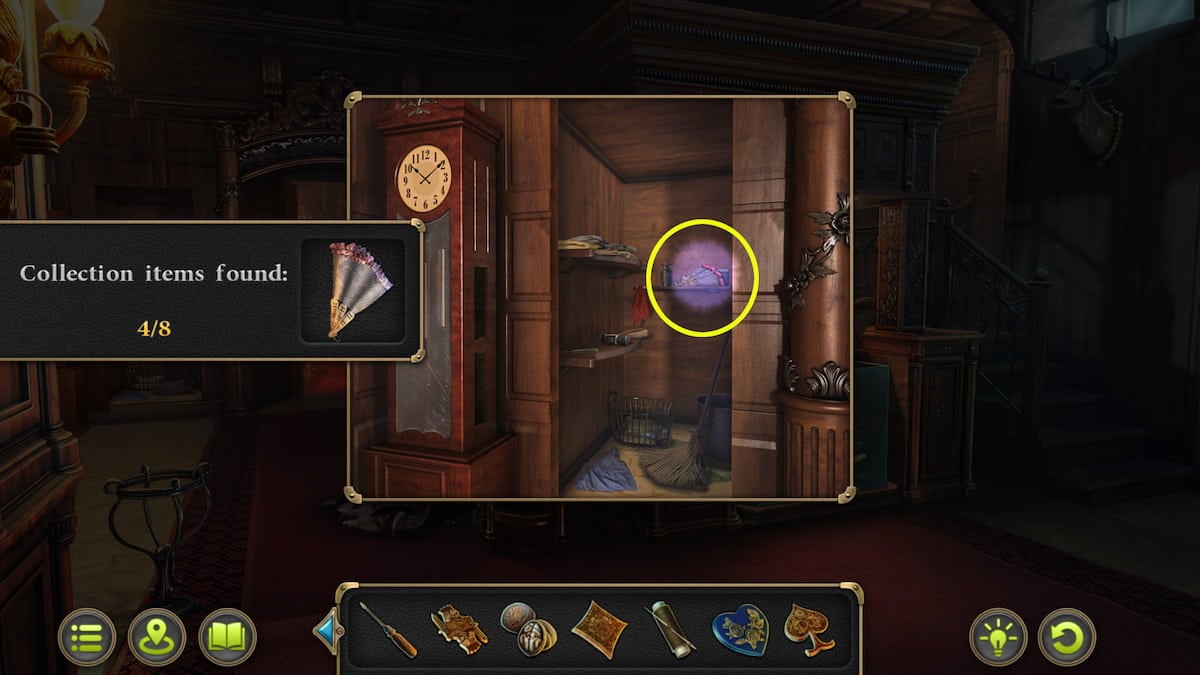
Image by Pro Game Guides
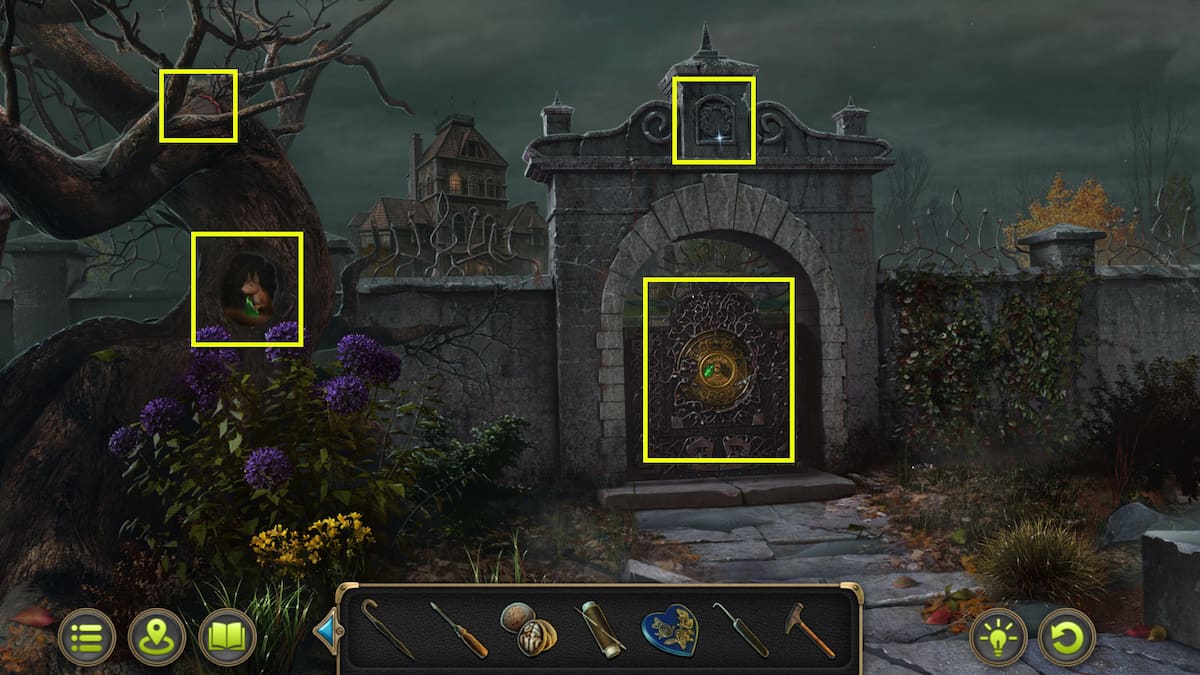
Image by Pro Game Guides
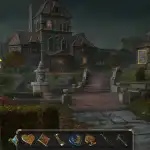
Image by Pro Game Guides
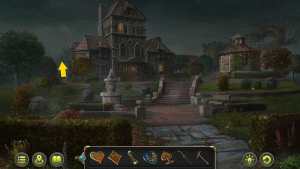
Image by Pro Game Guides
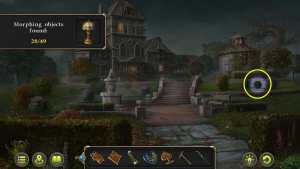
Image by Pro Game Guides
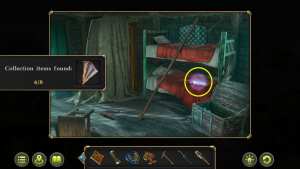
Image by Pro Game Guides
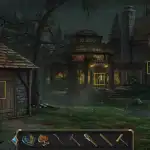
Image by Pro Game Guides
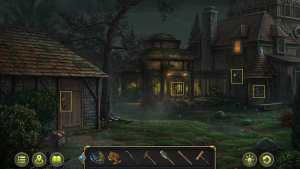
Image by Pro Game Guides
Image by Pro Game Guides
Image by Pro Game Guides
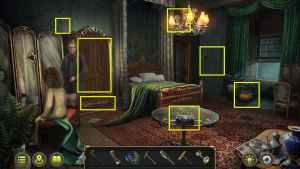
Image by Pro Game Guides

Image by Pro Game Guides
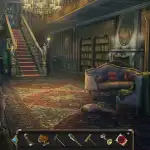
Image by Pro Game Guides
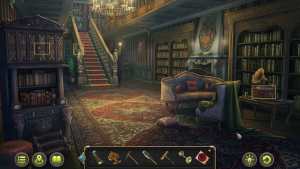
Image by Pro Game Guides

Image by Pro Game Guides
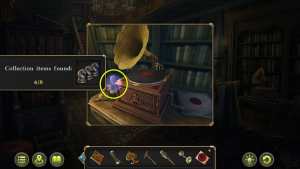
Image by Pro Game Guides
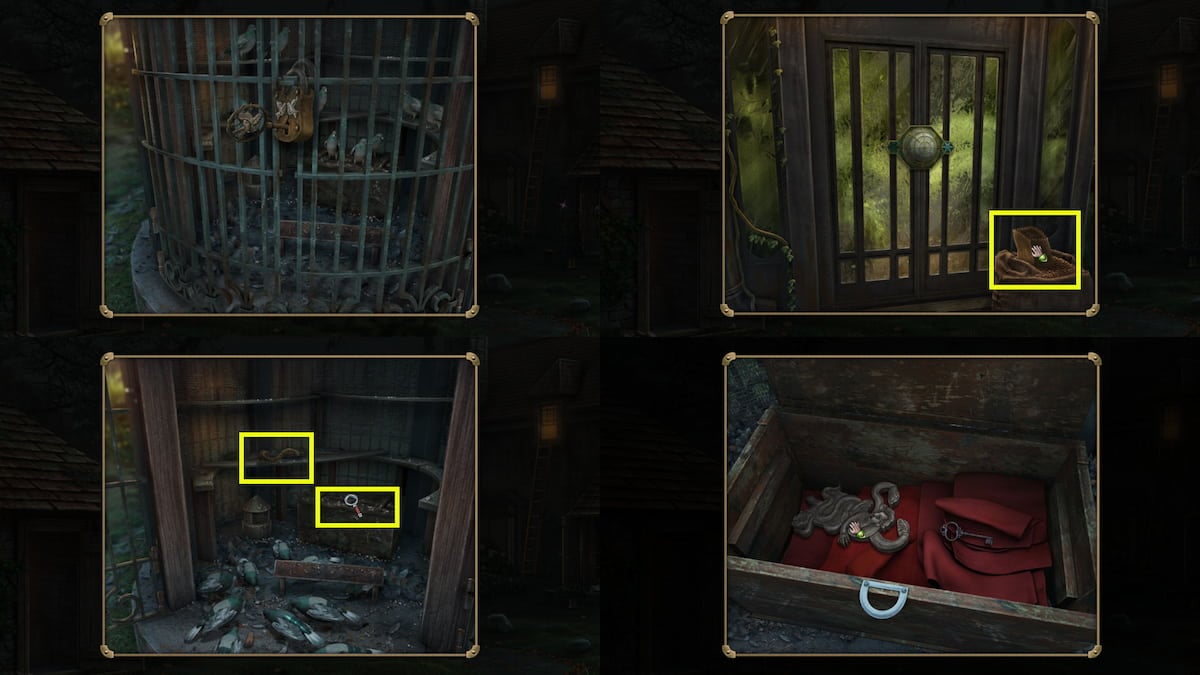
Image by Pro Game Guides
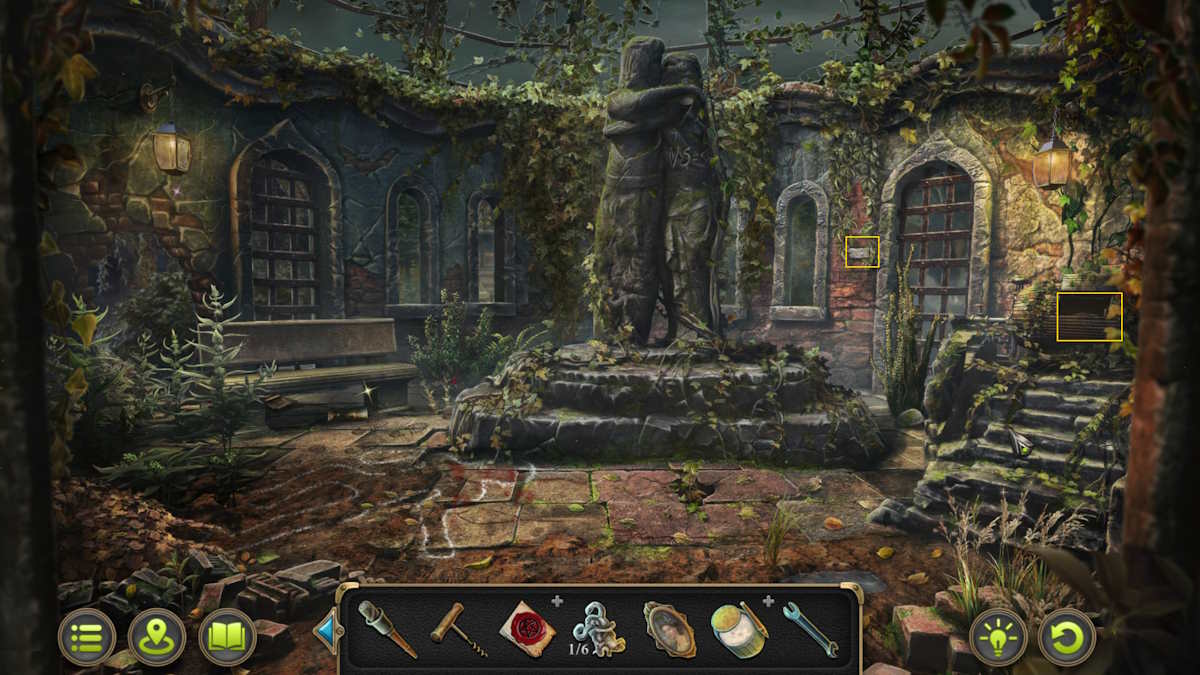
Image by Pro Game Guides

Screenshot by Pro Game Guides
Screenshot by Pro Game Guides
Screenshot by Pro Game Guides
Screenshot by Pro Game Guides
Screenshot by Pro Game Guides

Screenshot by Pro Game Guides

Image by Pro Game Guides
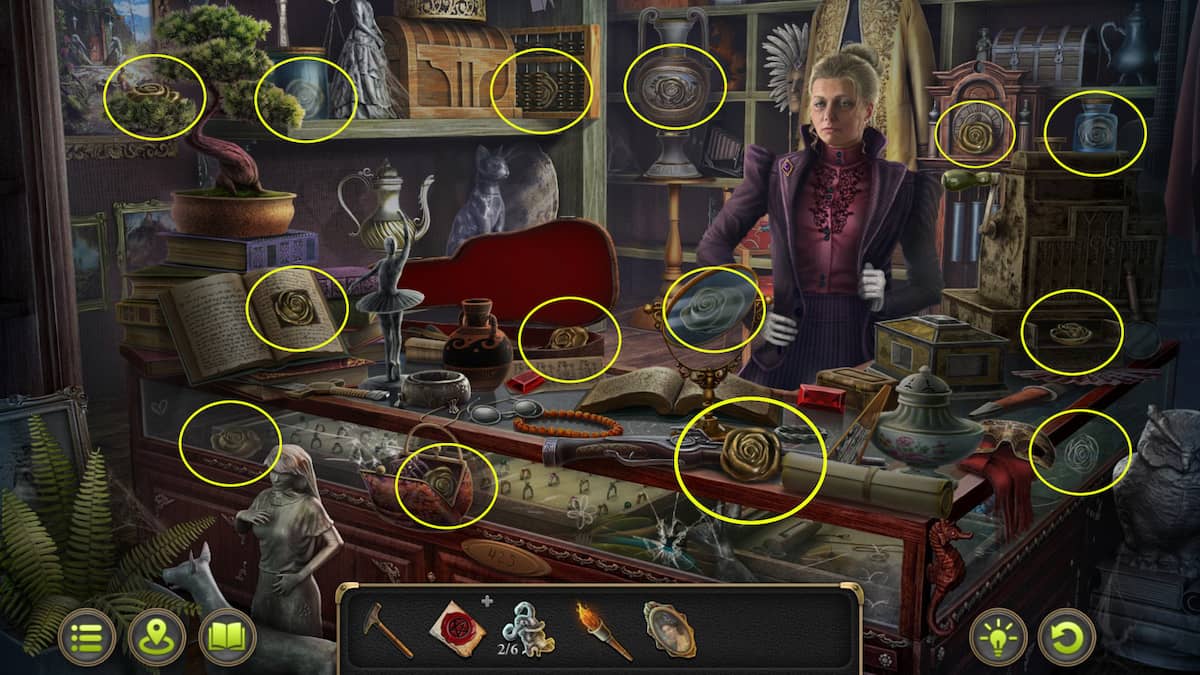
Image by Pro Game Guides
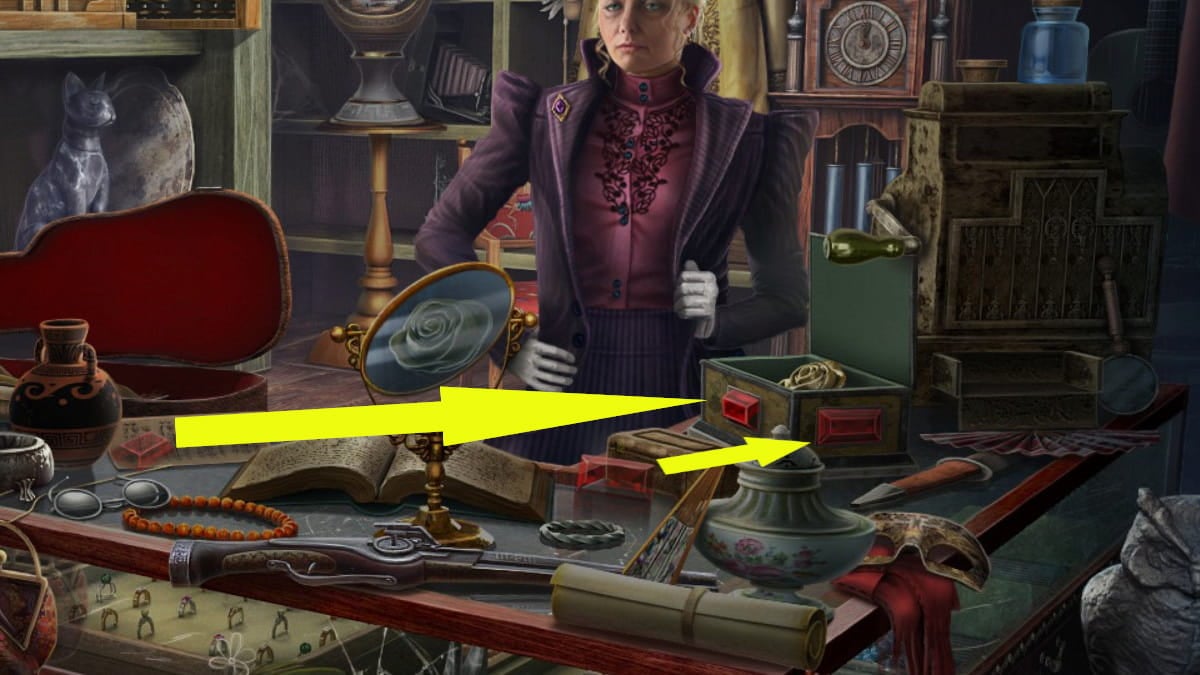
Image by Pro Game Guides
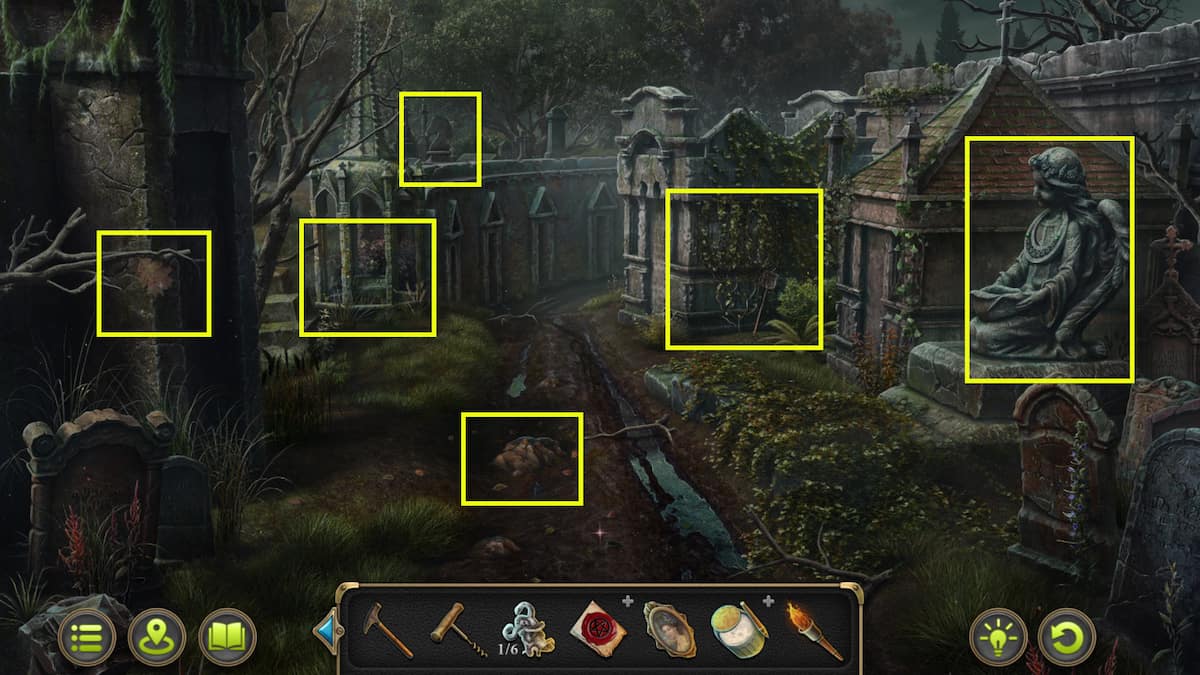
Image by Pro Game Guides

Image by Pro Game Guides
Image by Pro Game Guides
Screenshot by Pro Game Guides
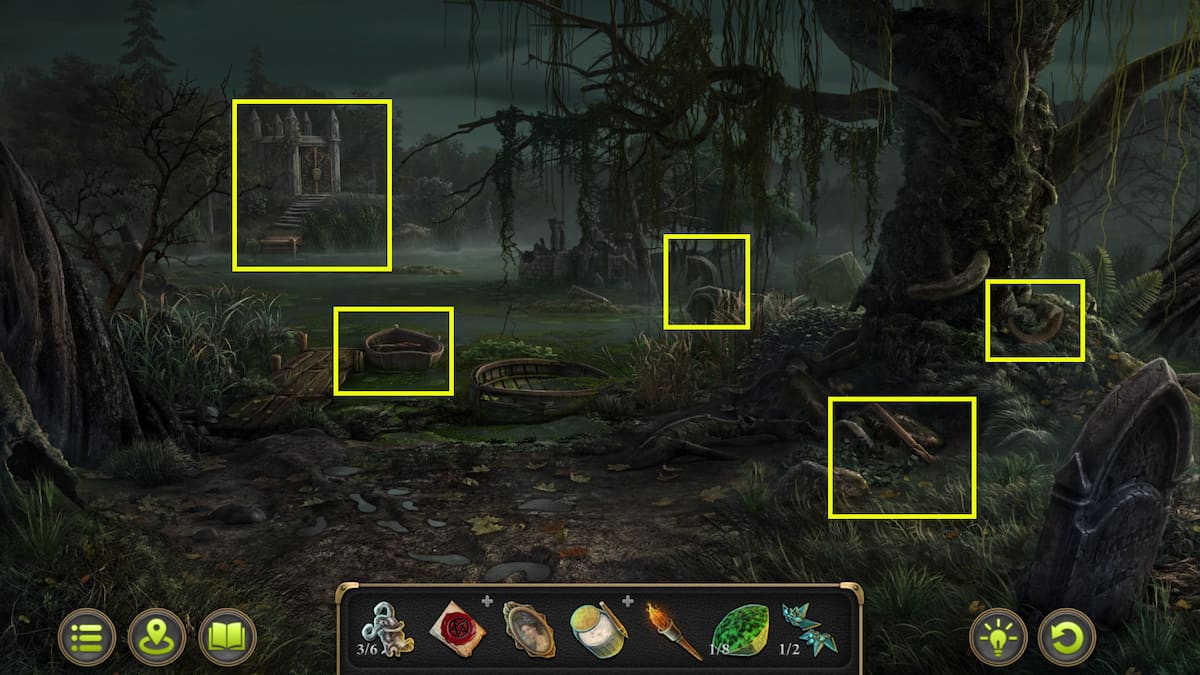
Image by Pro Game Guides
Screenshot by Pro Game Guides

Screenshot by Pro Game Guides
Screenshot by Pro Game Guides

Screenshot by Pro Game Guides
Screenshot by Pro Game Guides
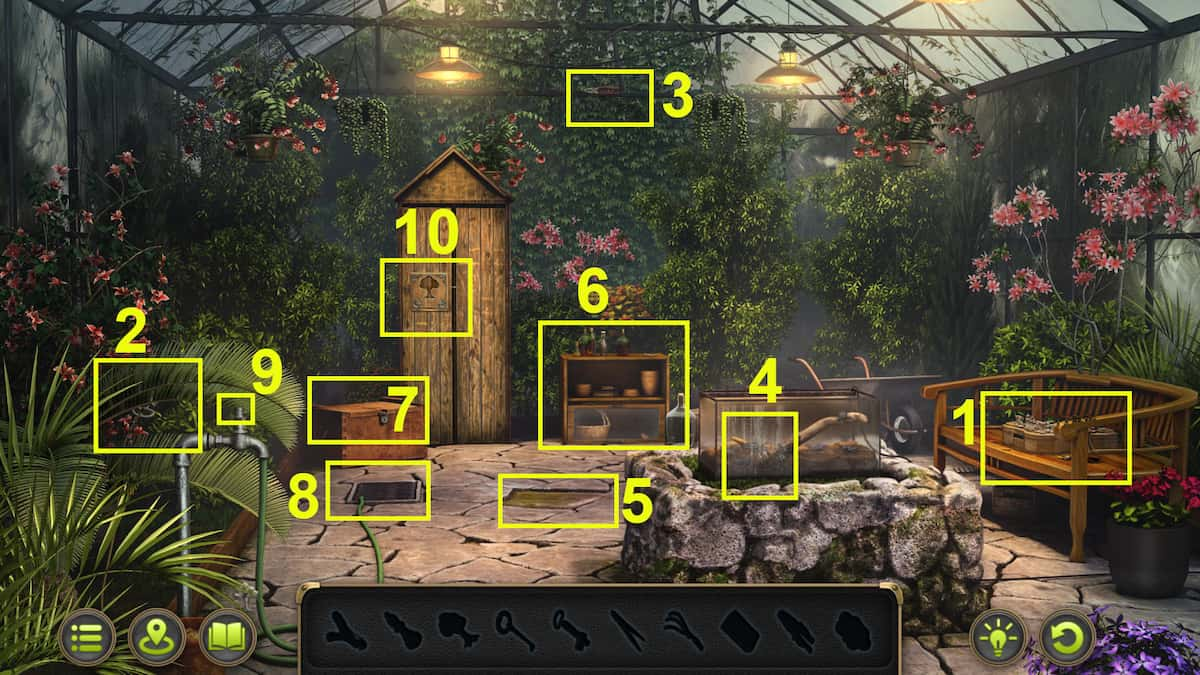
Image by Pro Game Guides
Screenshot by Pro Game Guides

Screenshot by Pro Game Guides
Screenshot by Pro Game Guides
Screenshot by Pro Game Guides
Screenshot by Pro Game Guides
Screenshot by Pro Game Guides
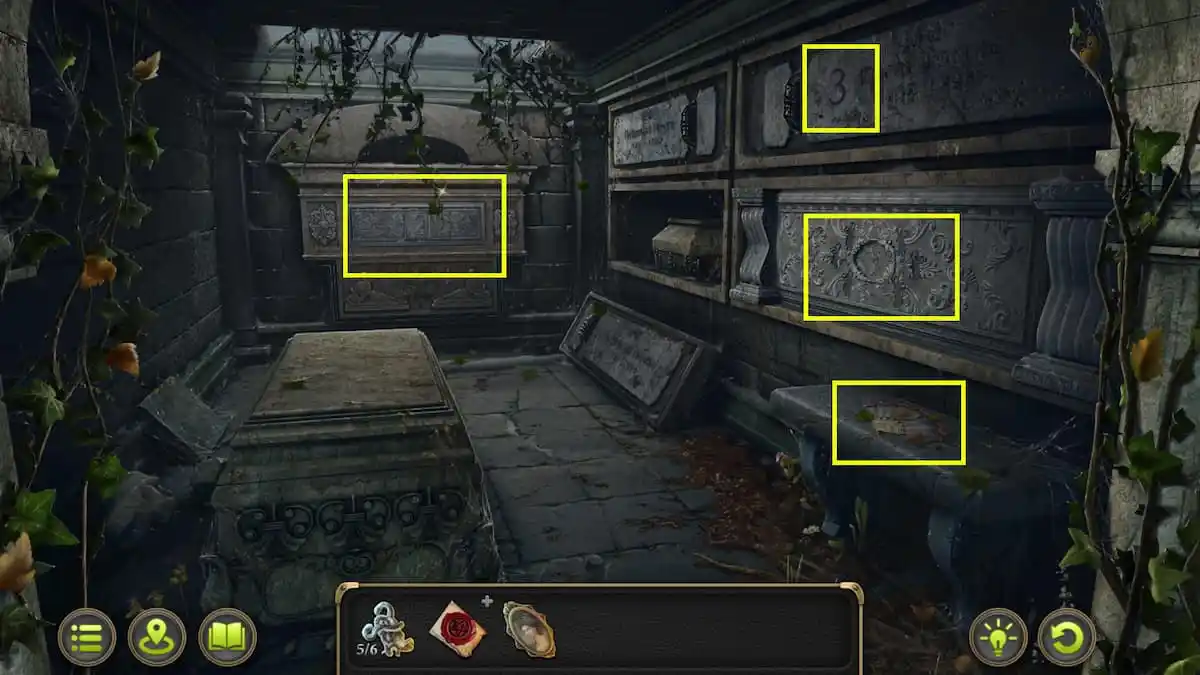
Image by Pro Game Guides
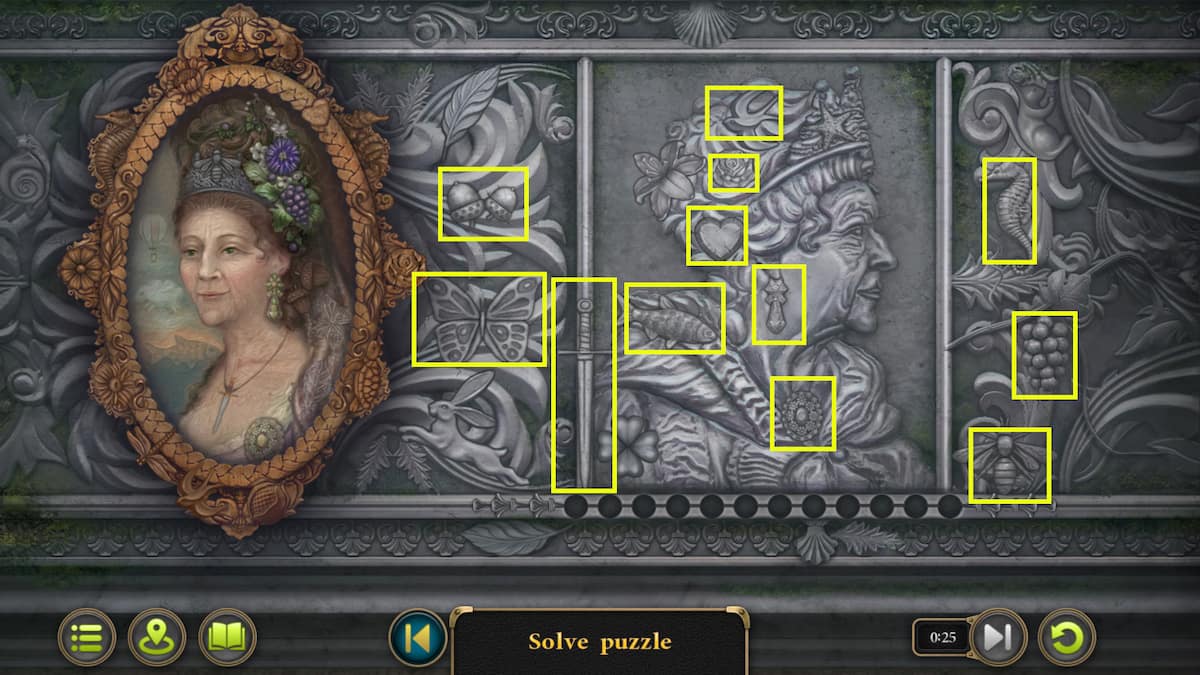
Image by Pro Game Guides
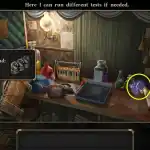
Image by Pro Game Guides
Image by Pro Game Guides
Screenshot by Pro Game Guides
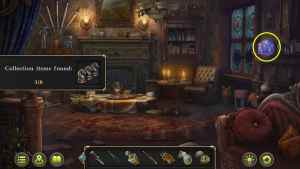
Image by Pro Game Guides
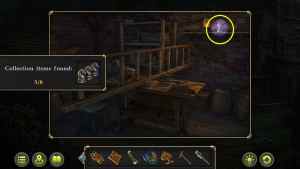
Image by Pro Game Guides
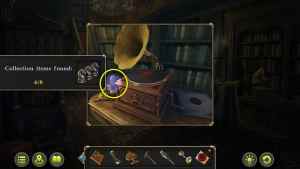
Image by Pro Game Guides
Image by Pro Game Guides

Image by Pro Game Guides
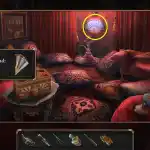
Image by Pro Game Guides

Image by Pro Game Guides

Image by Pro Game Guides
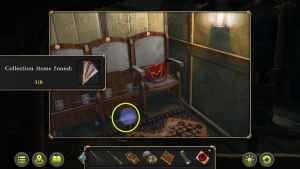
Image by Pro Game Guides

Image by Pro Game Guides
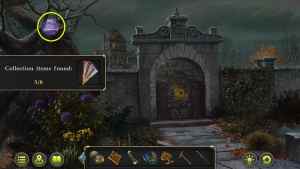
Image by Pro Game Guides
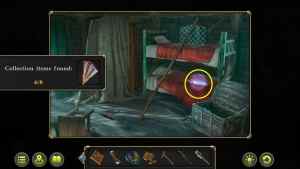
Image by Pro Game Guides
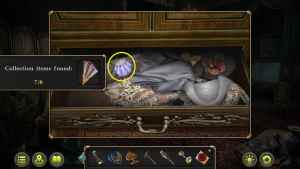
Image by Pro Game Guides
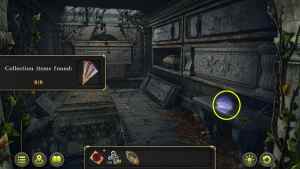
Image by Pro Game Guides
Image by Pro Game Guides
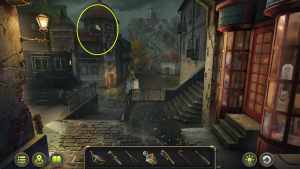
Image by Pro Game Guides
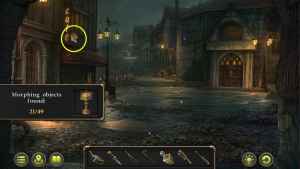
Image by Pro Game Guides
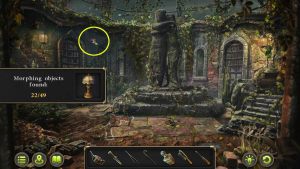
Image by Pro Game Guides
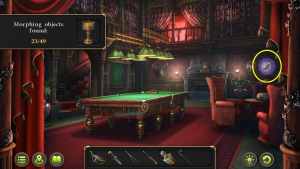
Image by Pro Game Guides
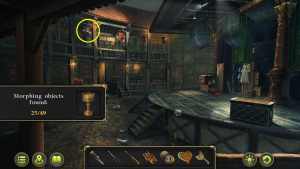
Image by Pro Game Guides

Image by Pro Game Guides

Image by Pro Game Guides

Image by Pro Game Guides
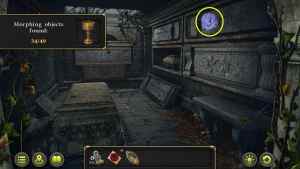
Image by Pro Game Guides
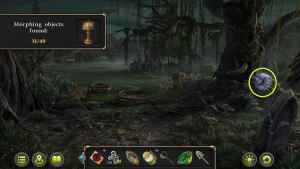
Image by Pro Game Guides
