If you ’re a fan ofpuzzle mystery games , Mystery Detective Adventure is a nifty one to essay . This casual game is filled with hidden objects and puzzles to clear in a electrifying , secret - theme investigator tale . Here ’s some aid working your way through the first case .
Mystery Detective Adventure Walkthrough - Case 1 Troubles on the farm
The first caseful will start with us traveling to Easttown , where strange things have been happening at the local farm there . We ’ll come at the farm , and we can address to the nearbyfarmerto get some basic entropy on the case . The James Leonard Farmer states that someone has stamp out all his wimp . He believe someone is behind the crime and is trying to pin it on the mythical fauna of the town ’s folklore .
Before we start investigate , the farmer tell us we can drop off our items in the house . indoors , we can verbalize to the farmer ’s wife . Unlike the farmer , the married woman believes it is a puppet because she saw it with her own centre , name it as " huge and creepy . " She ’ll grant us to place our suitcase on the desk to the right .
Farm House
tap thedeskto place thesuitcaseand then catch all the point from inside it ; you should stop up with aknifeandlighterin your inventory . Then , look around the room and catch the conform to items :
Also , make note of the small-scale loge on the shelf to the left of the stove . We can put items on the top of the lid to open up it , but we ’ll take to get back at another time to do this . After grab these items , we can point back outside to the farm yard .
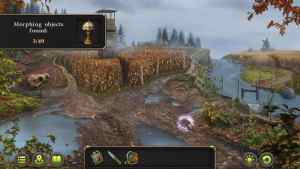
Over the line of the three cases , you will regain 49 morphing objects hide around . In the first display case , there are 18 amount to chance . you could can make out them as they change shape between two or three different things , so keep an middle out for these . There is one inside the Farm House , at thebase of thepillarleading into the kitchen .
Farm Yard
There are a few different points of interest you’re able to look into in the farm yard . Head to each one to look for clues and item you could apply .
The morphing object here is on theporch roof of the farmhouse ; it is the decorative eaves at the top corner of the cap , where the blue glow is in the screenshot above .
In the yard , tap the windowpane on the left over side of the sign of the zodiac , where the farmer ’s wife mentioned she get wind the brute climb up . you’re able to find some evidence here .
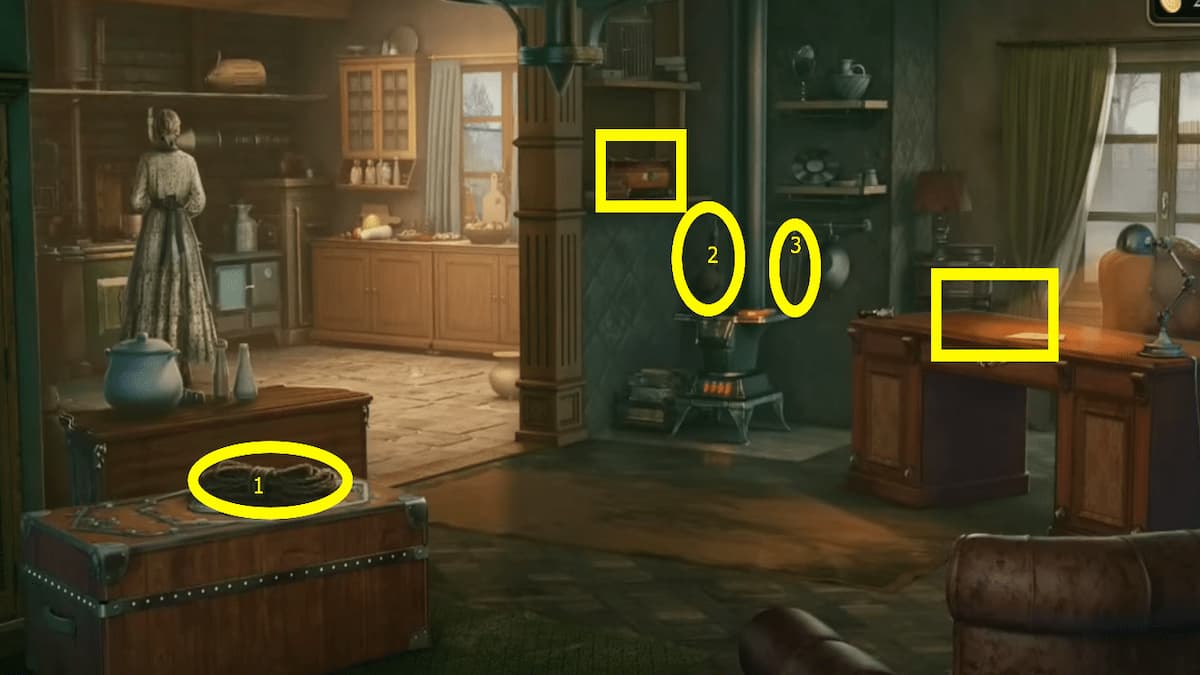
Image by Pro Game Guides
In the yard , you ’ll also notice a dog house on the right side . sink in on it to approach and search it .
Now , back up to the curtilage again and dawn on thebroken barrelbetween the coop and the barn . You ’ll find thekeyto the coop door . you’re able to habituate it to get inside the henhouse and enquire the farmer ’s chicken .
After you enquire the coop , look at thebroken ladderon the ground next to the granger . you may habituate the point you ’ve collected to repair it . retarding force theboardsand theropeover to it to make it running again .
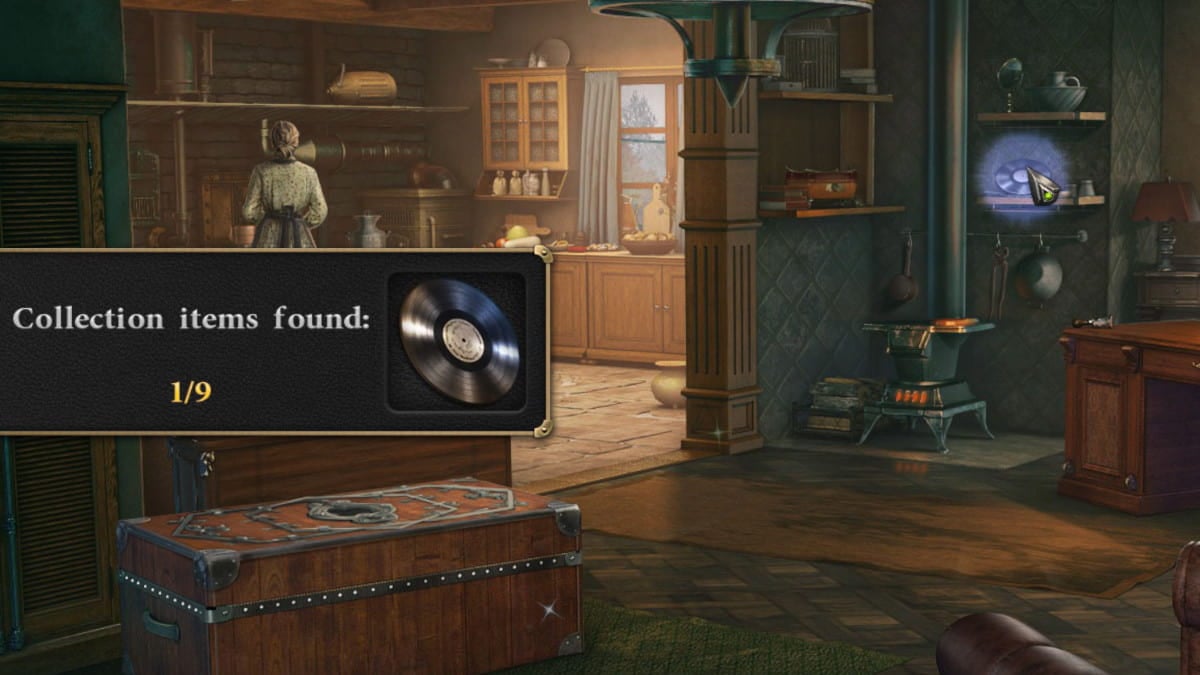
Image by Pro Game Guides
Now , you’re able to press it to prop it up against the side of the house and inquire the roof of the family .
Make note of the barn on the right side of the wimp hencoop in the yard , There ’s a strange gear - like mechanic on the doorway . We ’ll total back to this at a former point . For now , point back inside the farm house to test the substance sample distribution we collected from the window .
How to test the sample substance
With those items put into the ladle , take it over to thestovein the farm house to inflame them . Select the ladle from your inventory and penetrate on the blood-red stove top to start heating it . It will foam up and deform ruby-red . Once the corporation is taken off the heat you could pick up it as your last piece of evidence for the farm inspection : grounds 7/7- Strange dark-skinned blood .
Once we have all seven bit of evidence for the inspection , we can return to thefarmerto discuss our initial conclusion . He ’ll tell us about the fields dying and other troubles the town has face due to these unnamed creatures . The subject area seem like a keen station to continue our investigating , so he ’ll give us the cay to the gate .
Dead Fields
To go forward to the Dead Fields , approach thegate on the right-hand side of the barnand use the key the farmer gave us to begin unlocking it .
The goal of this teaser is tosort all the flowers so they are in matching color containers . For representative , all the red bloom within the red second power on the top entrust , all scandalmongering flowers within the yellow-bellied square , etc . Clicking a flower will go around all the flush around it . So we ’ll need to be careful which ones we ’re rotating and practice the gyration to move them where they require to be .
Since they go around clockwise every time , it ’s good to work from the edges inward . essay to rotate the pieces so that the colour are all describe up together ; that way , you could just keep rotating them into the right fix together . Once it ’s all put in the proper spots , the gate will unlock and we can stay on through .
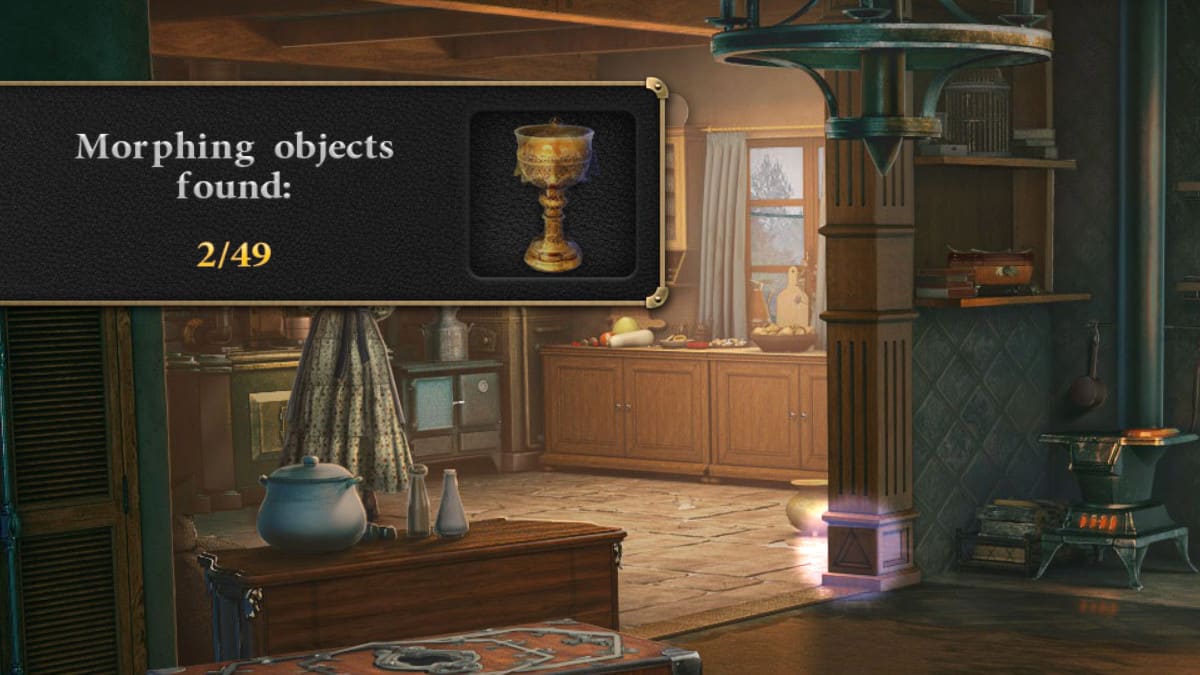
Image by Pro Game Guides
There are plenty of point we ’ll want to look at here in the Dead Fields .
There is anothermorphing object here , located in the clay . It ’s an animate being rails that switches between a bear manus and a deer hoof track . There is another lookout man collectible on the land next to theTotem that has descend over .
First , come on the tree trunk on the right side of the area . There ’s a chest covered in vine at the base of the stump .
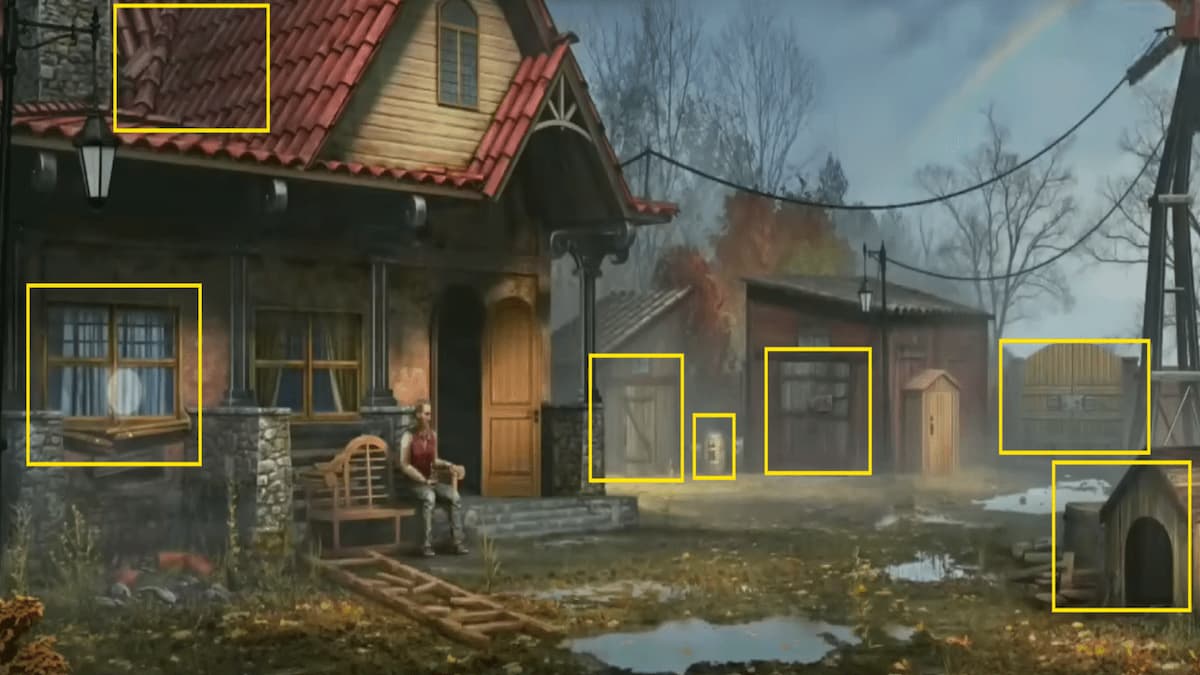
Image by Pro Game Guides
After grab the chest , take the itinerary to the left of the tower toward thesawmill in the woods .
Woods - Sawmill
convey the left path from the Dead Fields will lead us to the sawmill wood region . Here there are some more point of interest you will want to note . Plus , you may conglomerate some useful detail that you will necessitate .
You wo n’t be able-bodied to do too much in this region decently now , but head to the sawmill ( 2d image above ) and do the following :
Now , head back to the Dead Fields ( i.e. go back double ) and take the right path towardtown .
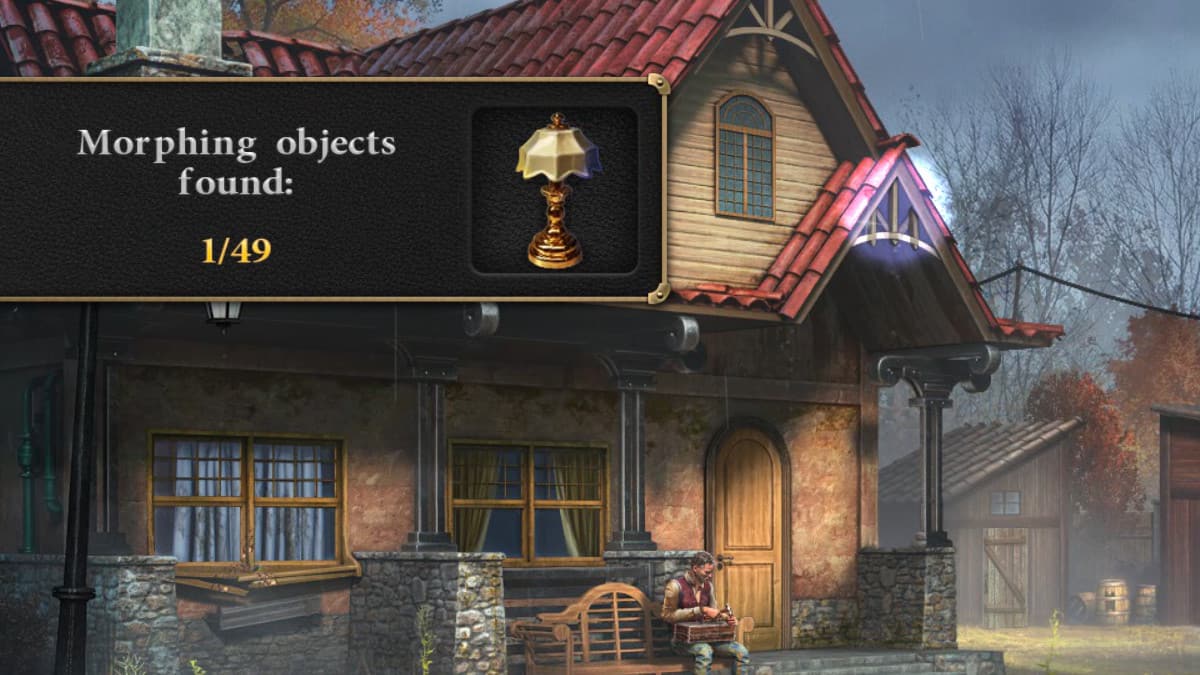
Image by Pro Game Guides
Town
Using the itinerary to townsfolk , we can channelise down and view a bunch of more items , and gather some useful tools we can use later . Here ’s what you ’ll want to depend at :
The farmer advert we could mouth to the Cleric for more information about the mystical beasts . However , the ecclesiastic does n’t require to spill anymore information until the totem has been by rights restored , protect against the vicious spirit .
check that to essay the following in the Temple ( take hold of the Lampada and Totem book in the unconscious process ):
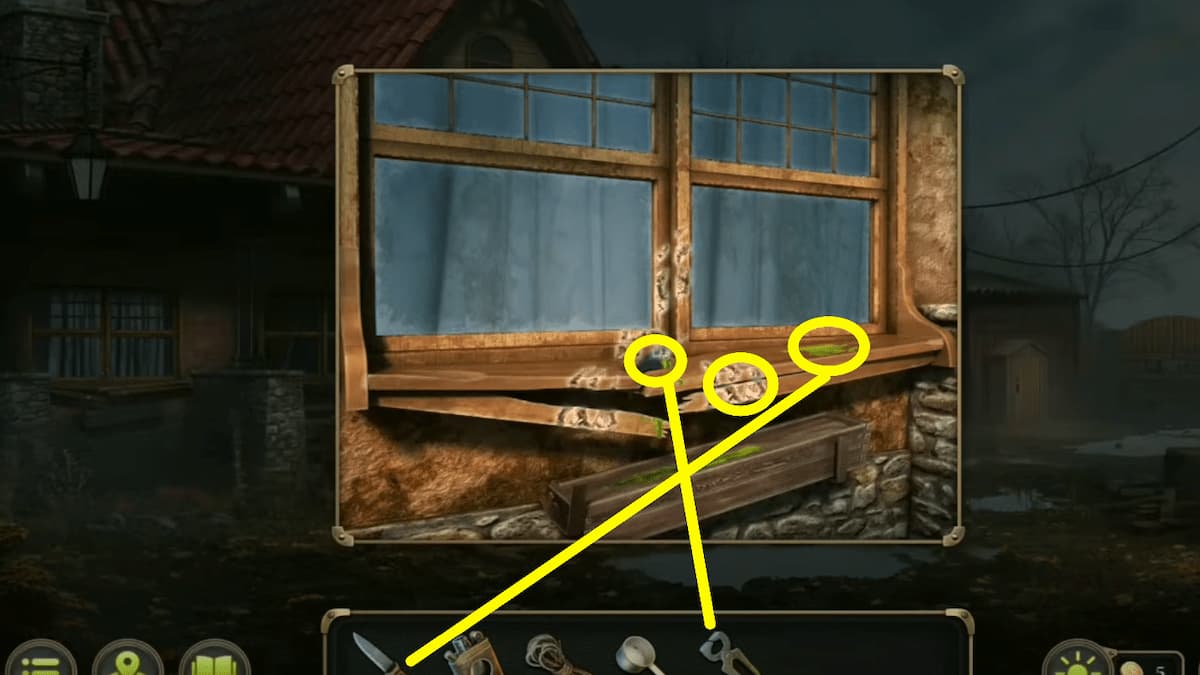
Image by Pro Game Guides
On the correct side of the Temple , there is adoorway with cylinders . You wo n’t be able to start dispersing the liquid state in the cylinder until you have both valve pieces . revert to town and cut the Sagebrush with a knife to encounter a 2d valve ( look to the left of the bill card to find the Sagebrush ) .
At this point , you should have thevalve from the sawmilland thetown plantation owner . refund to the Temple and place the valve on the miss blot at the bottom , and you’re able to commence lick the puzzle .
The goal of this puzzle is to fill the in-between cylinder with all the liquidness by turn on the valves and enkindle and lowering the presses in the belittled cylinders . Lowering one insistence will raise another , so we ’ll need to do everything in the right order .
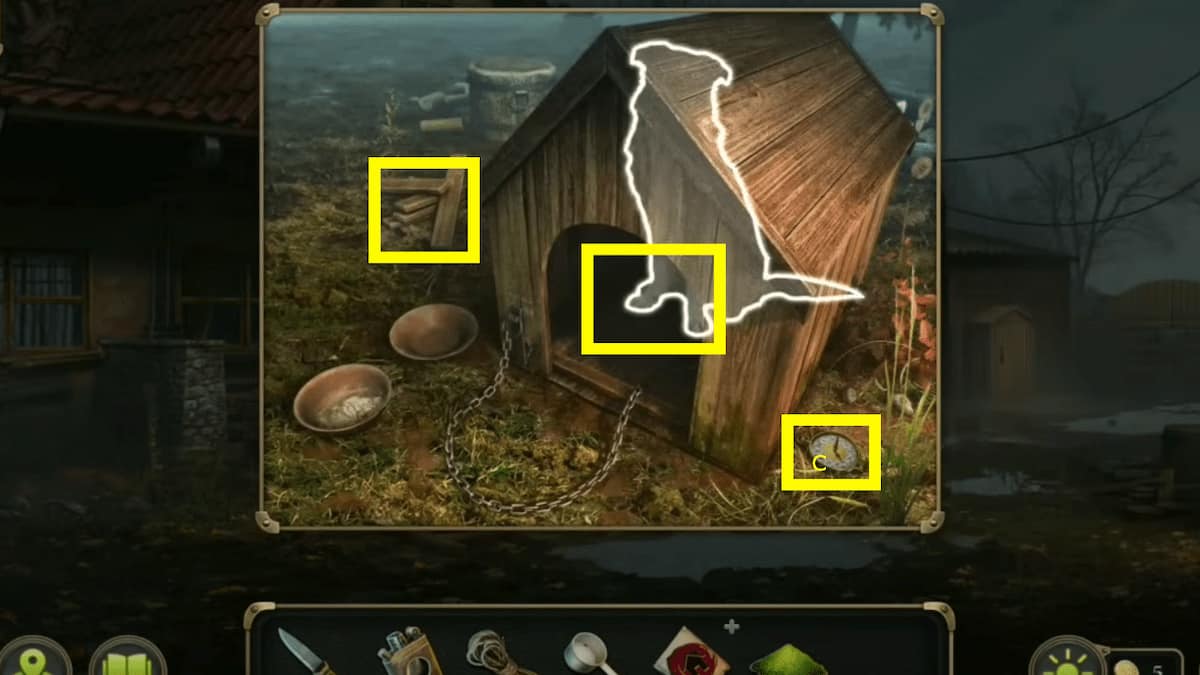
Image by Pro Game Guides
If we label all the valves as A , B , C , and D , we can better keep racetrack of them . Keep this in mind : A is unattached to the others , lowering B raises D , bring down D raises C , andlowering C raises A. When any of the presses weightlift down on liquidness at the first marker , it will dispense into the center piston chamber . With that in mind , we ’ll hit the valves in this monastic order :
This will start the door to some stairs leading further up into thecleric tower .
go up the stair up into the cleric tower , and you ’ll see a spicy brazier . There are a few thing you ’ll want to wait at here .
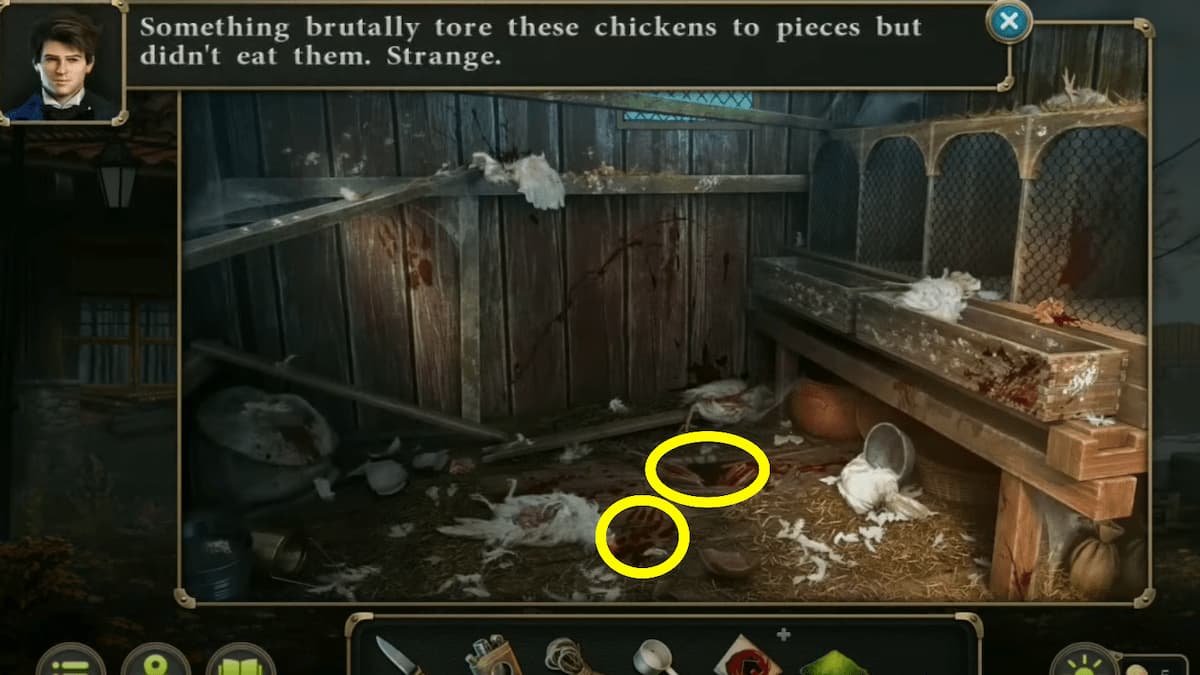
Image by Pro Game Guides
Now that we have the handle , we can apply it to get at thetowerin the Dead Fields . Backtrack through the town , back to the study ( the area with two roadstead ) . Then , draw end the tugboat to interchange thehandleon the door .
Head up into the tug to look out at theinfection spotin the crops . This will allow us to approach the transmission office by backing up out of the tower and heading through the field .
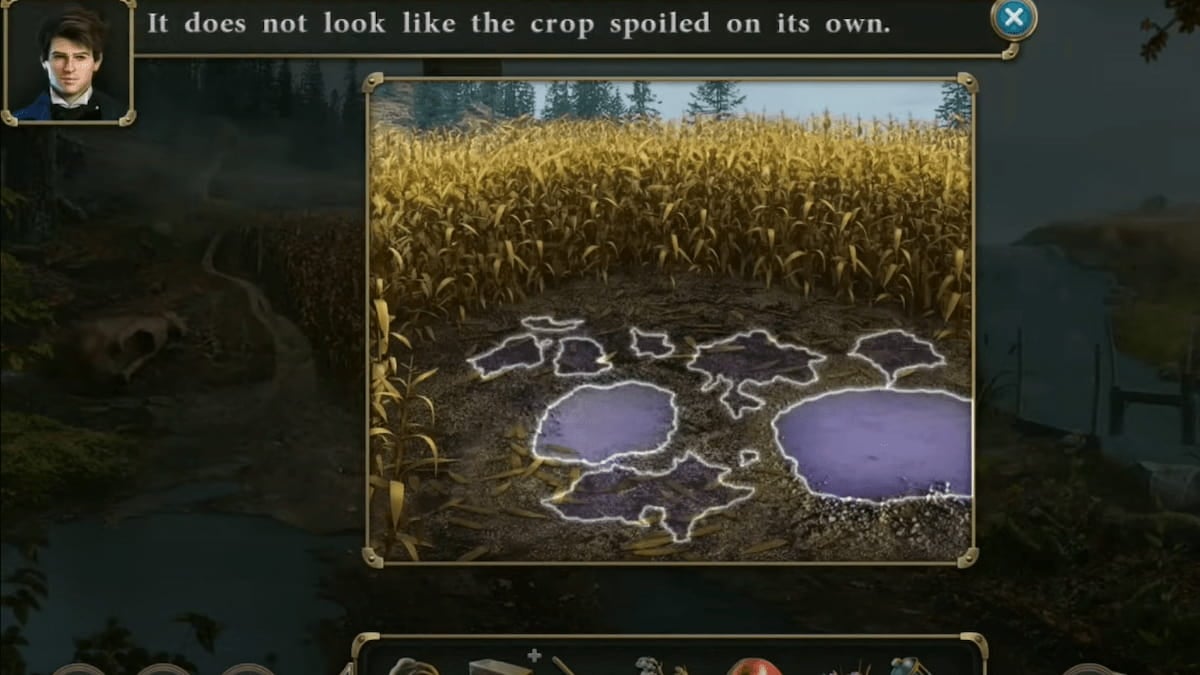
At the contagion spot , we can get across on the empurpled pool to seeEvidence 1/2- The place where the harvest died . However , you ’ll need ameasuringcylinder from your suitcase(the large physical object on the left side of the suitcase ) to collect thesoil sample distribution . We can bring this back to oursuitcaseto test it like our other sample distribution .
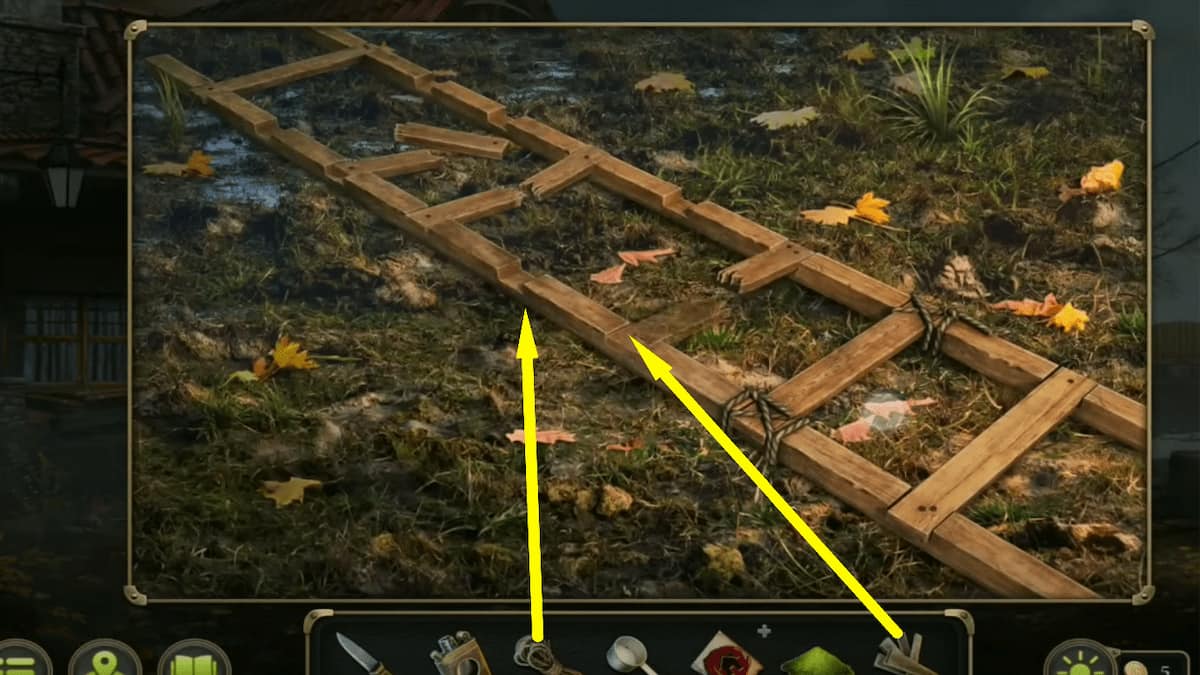
Image by Pro Game Guides
How to test the soil sample
Bring back the grease sample to the farm menage and place it on the desk next to our travelling bag . Drag the soil sample onto the desk and then total the follow other items into the sample :
The grime will dissolve into something else . From the tone of it , it ’s not mystical at all . Now get across on the measure out cylinder to collectEvidence 2/2- Herbicide sampling .
This leads us to another conclusion for our case . We ’ll need tospeak to the farmeragain to explain our discoveries . The husbandman is n’t too surprised that someone could be sabotaging him . Now , we can focalise on learning more about the Cleric . To do this , we ’ll want to do the offer at the totem as he request .
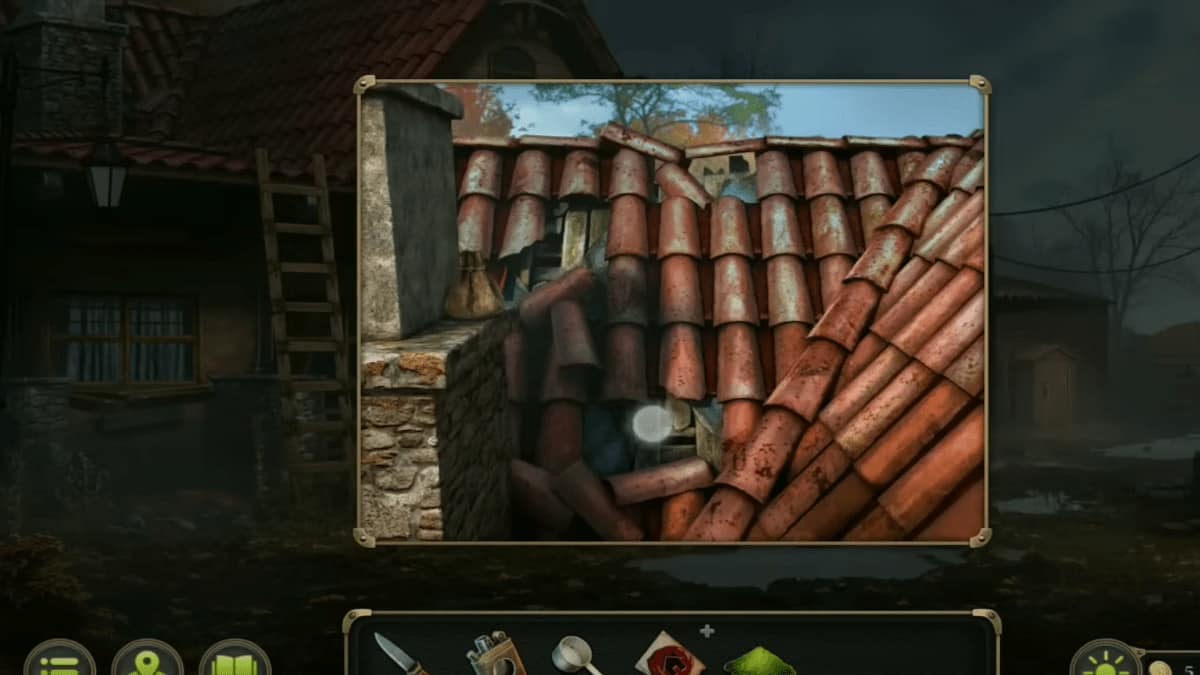
Image by Pro Game Guides
According to the Scripture in the Temple , we ’ll need to gather a few items we can use at totem offer . The detail you involve aresagebush , Malus pumila , crocuses , cinnamon , andwheat .
Here ’s where you’re able to find them all :
To get the wheat , we ’ll postulate accession to the barn . We can utilise thePartwe peck up fromunder the crocusesto get inside it . Head back to the farm yard and range the part in the middle of the mechanically skillful mystifier piece on the doorway . We can now pop fix the puzzle to unlock it .

Image by Pro Game Guides
The end of this puzzle is to move all thegreen symbolsso they arelined up with their matching pinkish symbols . In the center key mechanic , you’re able to grab two symbol at a time , then slide lead or correct and push the symbols to a new slot .
You ’ll need to try and figure out a way to delineate up the green symbol so you could pick them up together and place them in their correct slur . Your basic scheme should be to sharpen on the red symbol and delineate up one correct symbol at a sentence until eventually there are only two to line up and they agree the green symbolisation in your possession . you’re able to also pick up one firearm at a time if there is n’t anything else directly beside it .
Inside the barn , you ’ll take to complete a hidden target puzzle to find all the pieces of straw you ask . Just call up you’re able to zoom along in and move the television camera as needed . Here ’s where you may get them all :
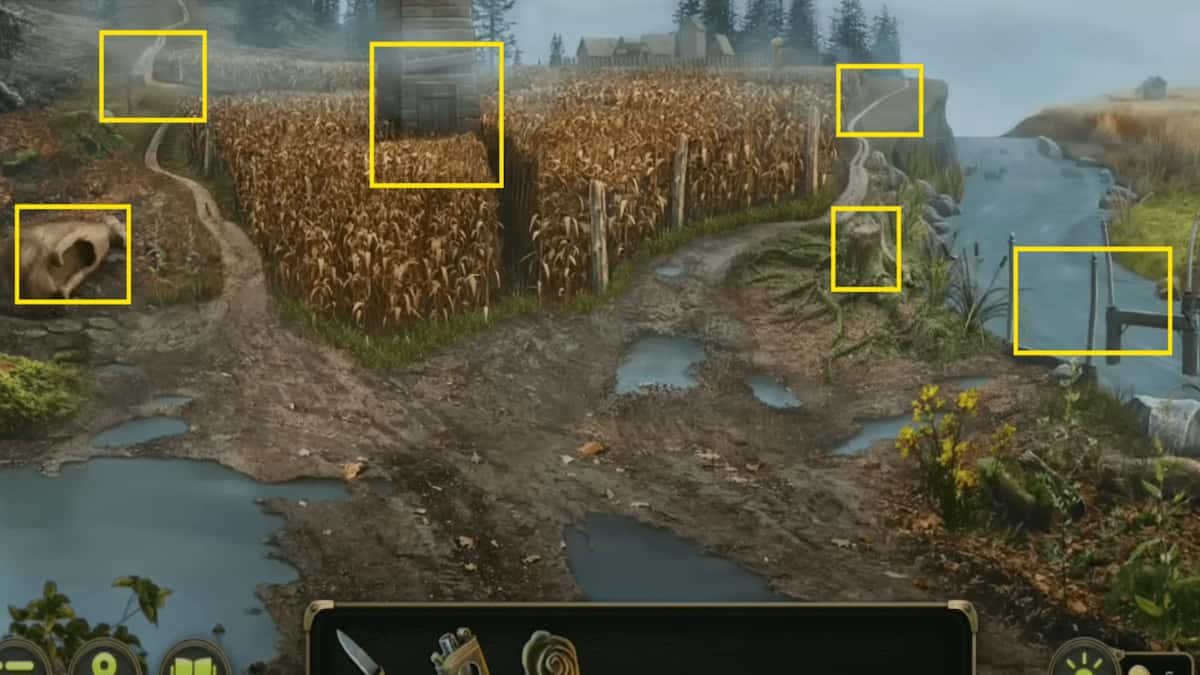
Image by Pro Game Guides
How to prepare the offering at the totem
With all the pale yellow , you could exit the barn and put together the basket of oblation . Select thebasket of wheatfrom your inventory and sum up all the other offering item ( the Malus pumila , the sagebrush , cinnamon , and the crocus ) . It will become combined objects calledOffering .
Now give back to the Dead Fields and approach thetotemthat is tap on its side .
Use theshovelto dig out a smirch for it , and collect theFlower 4/7from the digging spot . you’re able to also grab thecollectibleoff to the remaining side of the grind spot . Now , you place the totem up and tap the shovel to fill in the hole .

Screenshot by Pro Game Guides
After the totem is stand again , place theBurning Lampadaand theOfferingat the base of the totem . The totem will start to glow , signaling you ’ve completed it right . The Cleric will now be more willing to talk to you ; return to theTempleto do so .
The cleric tells us of another incident that happen at the Mill nearby , and he give us a protectiveamulet . We can continue on to theMillto reveal more evidence in our investigating . To get there , we ’ll need tofix the broken bridgein the Dead Fields .
How to fix the broken bridge to the Mill
To gear up the bridge , we ’ll need the proper materials . Thankfully , the talisman that the ecclesiastic give us can facilitate us get them . steer to thestorage shedat the woods lumbermill area . localize the talisman inside thestrange chestto open up it up .
Inside the chest , there ’s another puzzle to solve . The end of this ( random ) mystifier is to slide all the animal tiles onto their matching locating on the board . However , moving one piece will move all the pieces . Your canonical strategy should be to match 2 - 3 pieces at once , then take reward of the silver roofing tile to block movement of tiles you do n’t desire moved as you endeavor to match the final tile or two ( you may want to jam the whitened symbol tiles in this process ) .
Inside the now unlocked pectus , you may see a paper about the beast and take in theAxe . Take the axe over to therootson the left-hand side of the woods sawmill surface area . apply it to chop out the roots and collectFlower 5/7 .
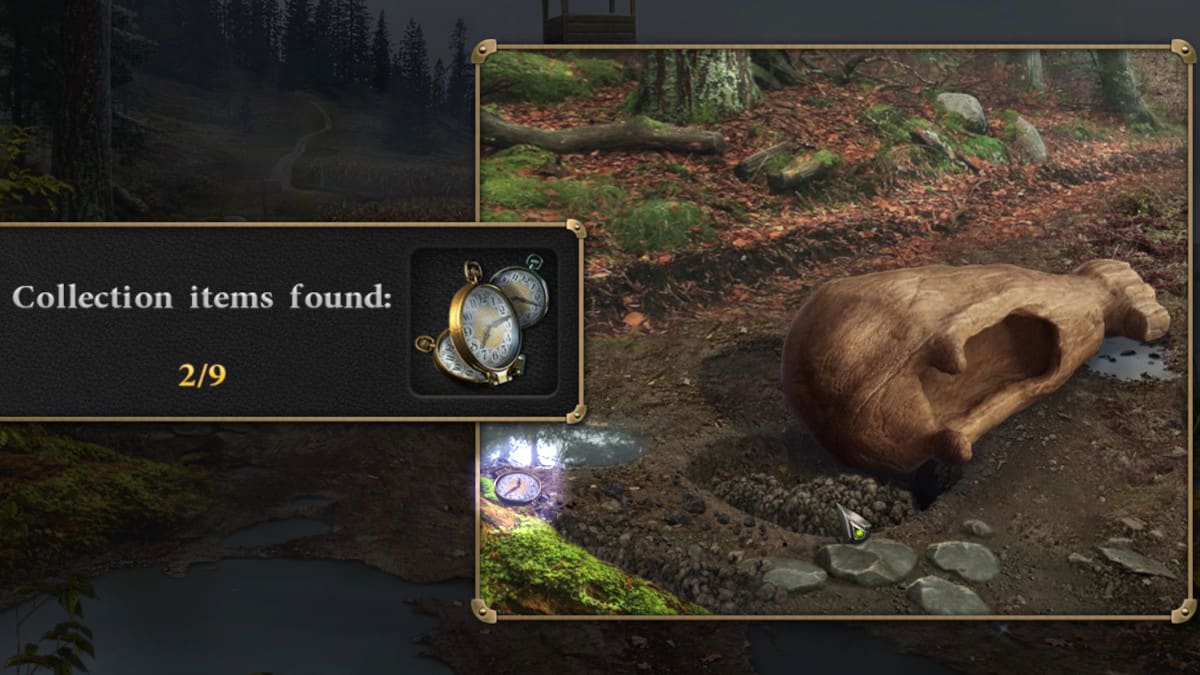
Image by Pro Game Guides
Next , go to thetree with the eyeon it to the right of the lumbermill area and use the axe to make a muddle . Inside the hole , you ’ll collect a redbundle . you could give it up via your inventorying and collect a few more dissimilar pieces : astatuetteand ahandle . ( you could also go back to townspeople and utilise the axe on thewellto retrieve anotherstatuette . To do so , use the wheel after using the axe . ) Now , bear on into thesawmill .
We can utilise the sawmill to make planks to repair the bridge . However , there are a few steps we ’ll need to do to get the lumbermill up and running again .
You ’ll get the board from the sawing board , which you may use to repair the span . First , look inside thepadlock boxwhere you found the cogwheel and snap up somenails . Then , take them to the broken bridge deck in the Dead Fields to lead off repairing .
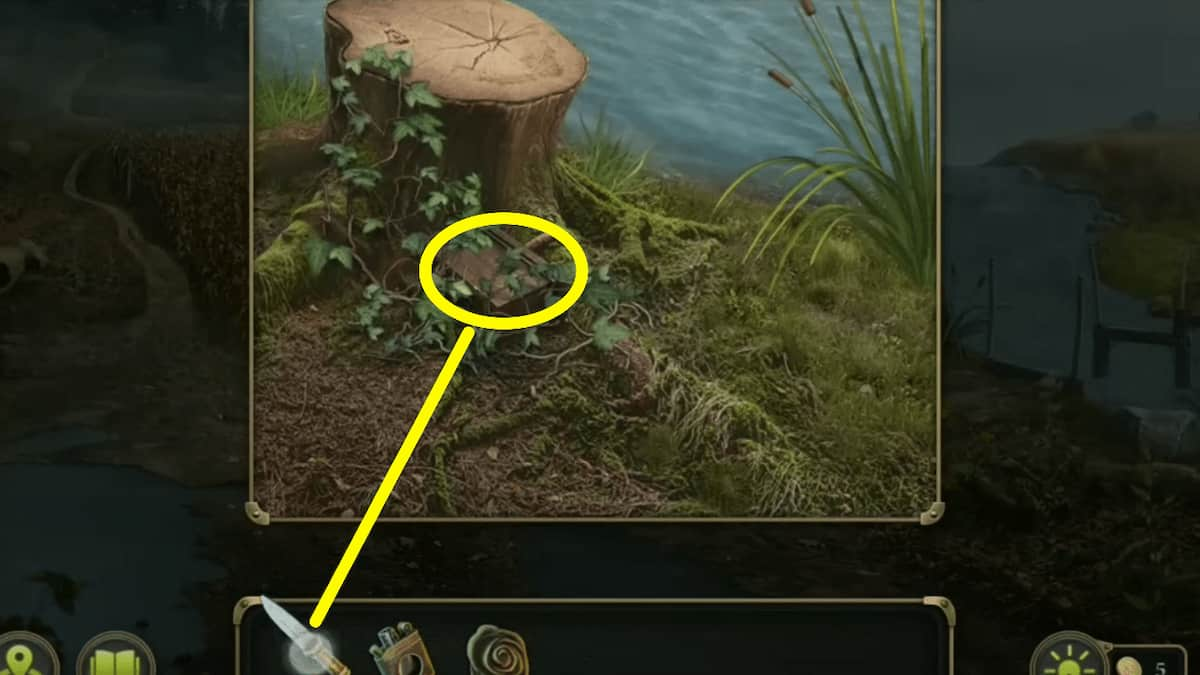
Image by Pro Game Guides
Place the boards down on the foundation structure first , and then place the nail . Then , you may use the back of theaxeto nail them down . With this little improvised bridge , we can continue to the Mill .
The Mill
The mill has experienced a unusual fervency that has only burnt the wind generator and none of the surrounding structures . We ’ll require to inquire the points of interest in the sphere to cipher out more .
First , collect some evidence by look at the burnt soapbox on the proper side of the yard . Then , look at the supplies under the thatched cover on the shed to the left . you could open up a udder and collect theChain with bait . Then , head forward toward the burnt mill ( on the right side ) , and you ’ll descry a trap room access with a light beam on top .
To uncover the trap door in the mill wreckage , sequester theChain with hookto the fallen beam . Then , use thecrankbehind it to pull the beam up off the threshold . With the shaft take away , you may start the hole door and climb down .
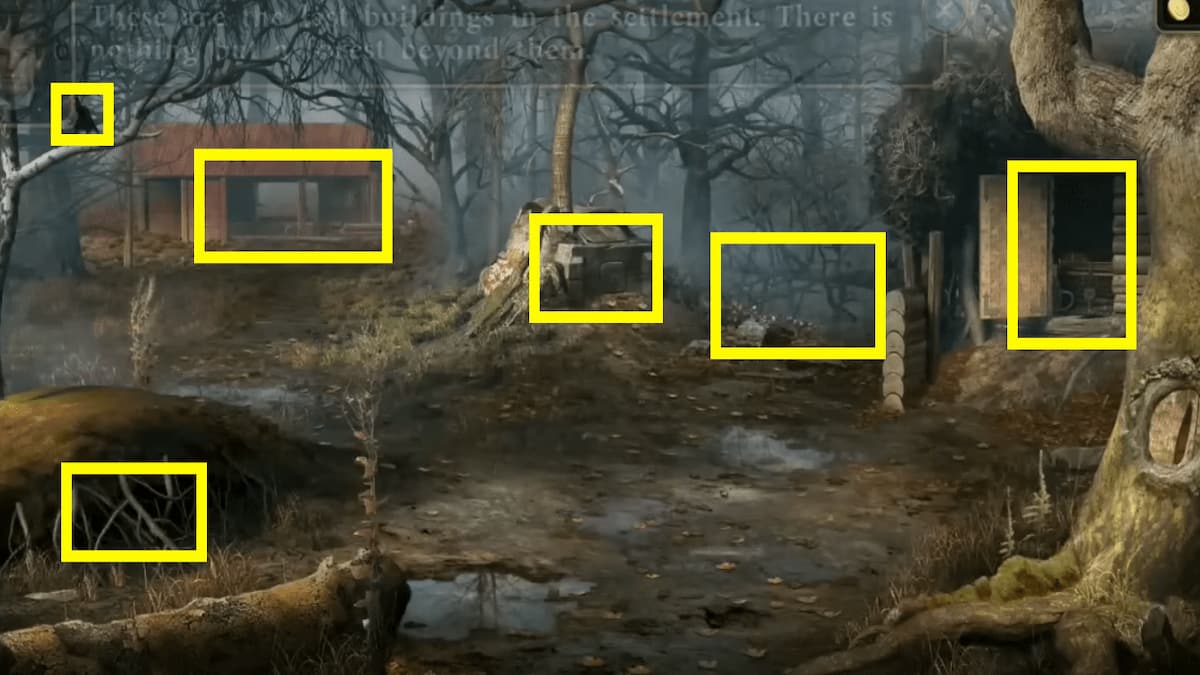
Image by Pro Game Guides
The cellar below the mill looks very much like it ’s still a crime panorama as obvious from the organic structure lie in on the earth . We ’ll want to look around the arena to nibble up any items or evidence we can get .
First , wait over the miller ’s body to find fault up akey . you could use this central tounlock the gatein the back correct box . Then , snaffle thebrushfrom the top of the dynamite crates . This brush will assist you brush away thesooton the wall inside the cage with the frank fur . drop a line down the codification .
We now have access to two different sets of numbers : the one near the miller ’s dead body and the one write on the cage wall . We can use these issue to unlock the safe on the ripe side of the basement .
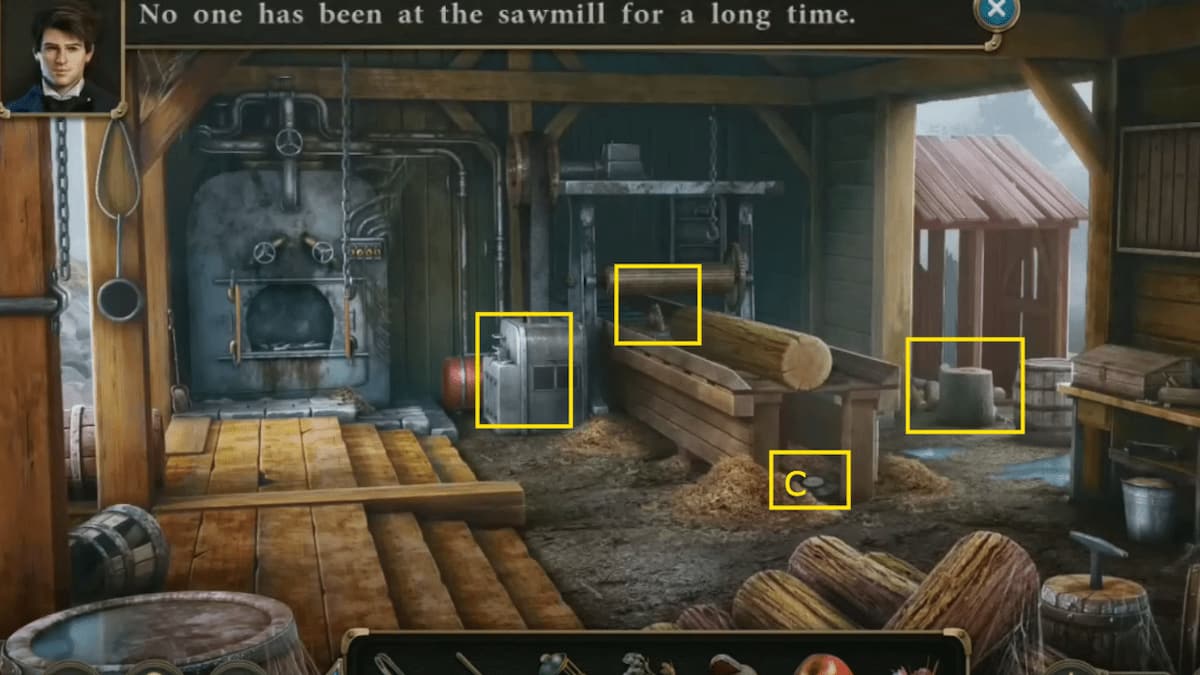
Image by Pro Game Guides
call on the dial to adjust the number on the front of the safe . You ’ll want to enter the numbers found on the body first and then the ones written on the wall . ( These are random , so do n’t just utilize the ones in the image below . If you encounter the number 0 , simply click 0 to ' enter ' it . )
Inside the safe , you ’ll find another key and some information about the mill breeding dog , which you’re able to collect asEvidence 4/4- document on the dog ’s sales agreement .
The document suggest the miller was illegally breeding dogs in the basement of the pulverization , all for sale to Count Babington . We can take in the granger with this fresh entropy and ask him about the count to further our probe .
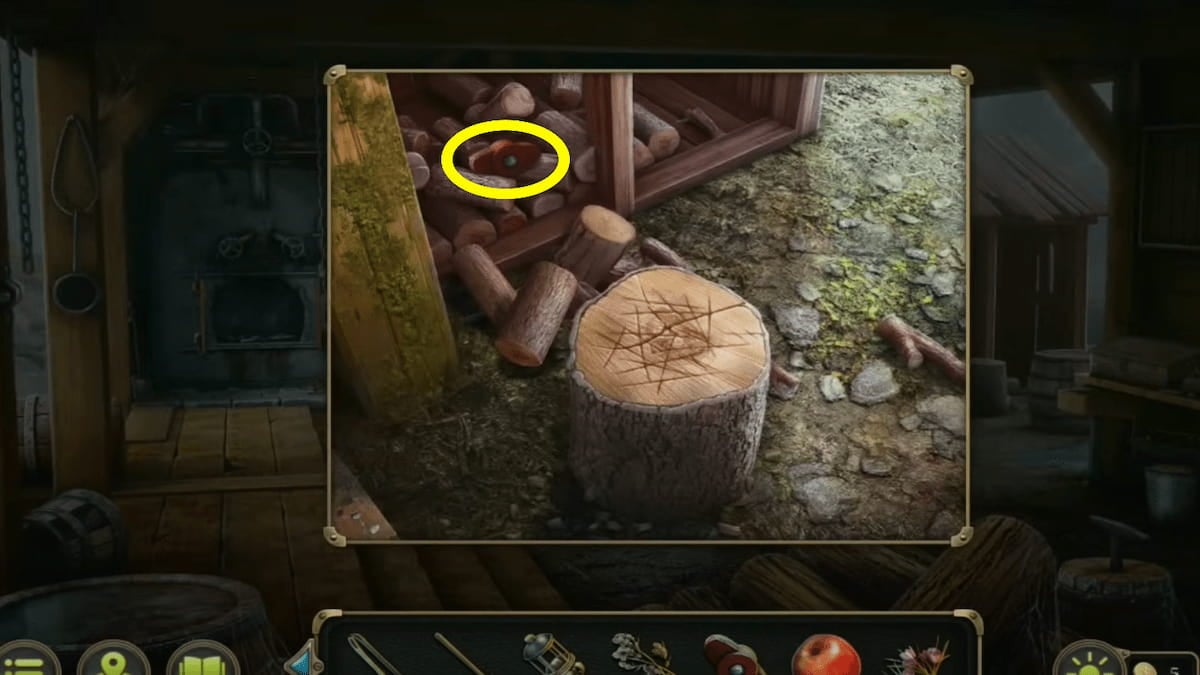
Image by Pro Game Guides
How to solve the bird box puzzle
Before we go back to the farmer , take the newkeyyou received from the secure and open thechest you collect from the tree stump . Inside is another puzzle for us to lick .
The goal of this teaser is tofill in each circle with the proper colored gems(e.g . dismal gem in the downcast circle ) . you could switch all the internal edge pieces by pressing the bird rotation button in the center . you’re able to also revolve each circle in its own spot .
A great room to easy figure out this puzzle is to note that the piece will allrotate clockwiseeach meter you press the bird button . To keep the pieces in the ripe spots , rotate each circle so that the veracious colouring material stay on the forbidden slots ( i.e. the ones not facing the doll button ) and only the inner turning point has the piece you require to change out .
Image by Pro Game Guides
Additionally , always keep in mind you require the ' odd ' 4th treasure in each circle to be ' correct ' for the next Mexican valium ( for instance top left left over gem should be red , top proper odd gem should be light-green , and so on ) . In other words , stage it so each circle has three ' correct ' colours not facing the push button , then hit the push button to complete the puzzler .
Once you start the bird box , you could take hold of theDog figurinefrom inside it . Hang on to it for a late time .
Now , deliver to the farm yard to speak to the farmer . He will advert that the count wanted to grease one’s palms commonwealth from him mightily around the fourth dimension incidents started happen . He ’ll also tell us that the numeration lives in theestateat the top of the Alfred Hawthorne , which we can reach by hazard through the town .
Image by Pro Game Guides
The Estate
To get through theestate gatefrom townspeople , use theDog figurinethat we collected from the shuttle box puzzle . Past the gate , the butler will be waiting for us in the railway yard . Before we go at bottom to meet the reckoning , we ’ll want to take a good look around .
Here in the garden , you ’ll discover some grounds and set forth take in some pieces to another teaser that you will use down the route . First , attend at thefountain drainto collect grounds and use thecrowbarto pry bar launch the drainpipe . within , you’re able to collect a detail piece and a screwdriver . Now , see at thegargoyle statueand theflower potin the garden and collect two moredetail pieces(look in the bottom right corner of the peak bay window picture to find the contingent piece ) . ultimately , look at thegarden benchbeside the stairs and grab the branding iron prime with thescrewdriver . Now , we ’re ready to head inside to speak to the reckoning .
When we go inside , we can speak to the counting sitting in the room . He will tell us that his grandfather was obsess with tracking down the demon dog and that he disappeared into a ' secret room ' to research it . We can look for this mystic way in an effort to learn more . After the count leaves , we ’ll want to explore this room further .
Image by Pro Game Guides
First , correspond out thecoffee tablein front of where the numeration was sit . There is anewspaperyou can move to the side to grab thelast branding iron flowerpiece . Then , look at thechina cabinetin the back correct corner . There is a keyhole , but we ca n’t open up it yet . Instead , take thedetail piece . Then look at the hearth . you may look at themantleabove the fireplace first and grab thelast point piece . Then , inside thefireplace , use thepokerto get theOrange Stonefrom within the coal . Now we can head a little ways up the stairs to bet at the library room access .
We ’ll have to figure out the puzzler on the door to get inside the library . Luckily , we ’ve been collectingdetail pieceswe necessitate this whole time . You ’ll need five slice whole . locate them in the slot in the essence book to get started .
The end of the puzzle is to open up all the books . However , open up some books will make other leger close . That intend we ’ll need to open them in the right order to get them all open at the same metre .
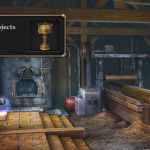
Image by Pro Game Guides
The ' illusion ' here is to observe that when you brood over a script , it demonstrate you which other books will be flip over when you chatter . As such , simply render to plan ahead . Done properly , you may puzzle out the puzzle in a handful or so of short moves .
Once all the books are afford , the doorway to the program library will unlock and let us enter . Here , we ’ll front for the journal that belonged to the count ’s granddad . It should be in the exhibit vitrine that the reckoning mentioned , but we can look around the sphere for more items as well .
To launch the show case and think the dairy , use your tongue to slide the lock barren . Then , you ’ll take to complete a mystifier about hidden object . You ’ll ask to locate all the symbols shown on the loops on the proper side . Here ’s where to get them all ( commemorate you could zoom in and out and move the television camera ):
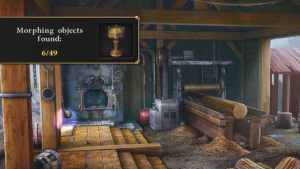
Image by Pro Game Guides
( remark : The top blue marking in the first image above refers to an object on the edge of the image . )
When you find all the pieces , the display case will open . There are a few things you ’ll want to do inside the display grammatical case .
The diary page showsthree unlike molding pieces . These moldings are within themounted candlesin the library . One of them is missing , however . To bear on , we ’ll take to locate the last piece .
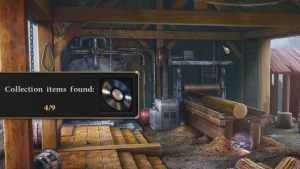
Image by Pro Game Guides
Where to find the stucco molding piece
The last stucco moulding is within the gargoyle in the land garden . To get it , we ’ll habituate thegargoyle statuetteson thegargoyle fountain .
We ’ve collected two statuettes as we ’ve move on , but we can backtrack to get the final two in thewell in townand in thefarm house iron flower boxwood . Here ’s a straightaway monitor of where to encounter them all :
Now , add all the statuette to the acres garden to get started . Approach thegargoyle fountainin the center of the garden . You ’ll notice there are four slots around the outside of it . you may position all the gargoyle statuettes in these slot . This will open up the jet and give you another puzzle to clear .

Image by Pro Game Guides
The finish of this puzzle is to slide and spread out all the form art object so they are in the proper positions . You ’ll want all thelight risque spiralsto be on the outer ring , then thedark down circles , thepurple squares , and last , thepink trinities(go for it in this ordering ) . Use the rotate circles to promptly move piece around or temporarily store piece out of the way .
Once all the symbols are in the right spots , the gargoyle will begin to beam and interact with the other gargoyle near the stairs . The other gargoyle will turn and confront you ; try out it to collect aStucco moulding .
How to solve the Stucco molding puzzle
With the final stucco piece , you may turn back to the estate depository library and position the piece on the rightmost candle where it belongs .
Now that we have all the stucco moldings on the candles , we ’ll necessitate torotate them so that they match the pagefound in the diary ( curb the display case on the right side of the elbow room from earlier ) . select each of the mount taper to view them and splay them consequently ( the correct positions will variegate for each participant ) .
A mysterious opening will be unveil on the left side of them room once all the modelling are facing the correct counselling . In this opening , there will be a slot to put theOrderwe pick up . Doing so will reveal another teaser to fill out .

Image by Pro Game Guides
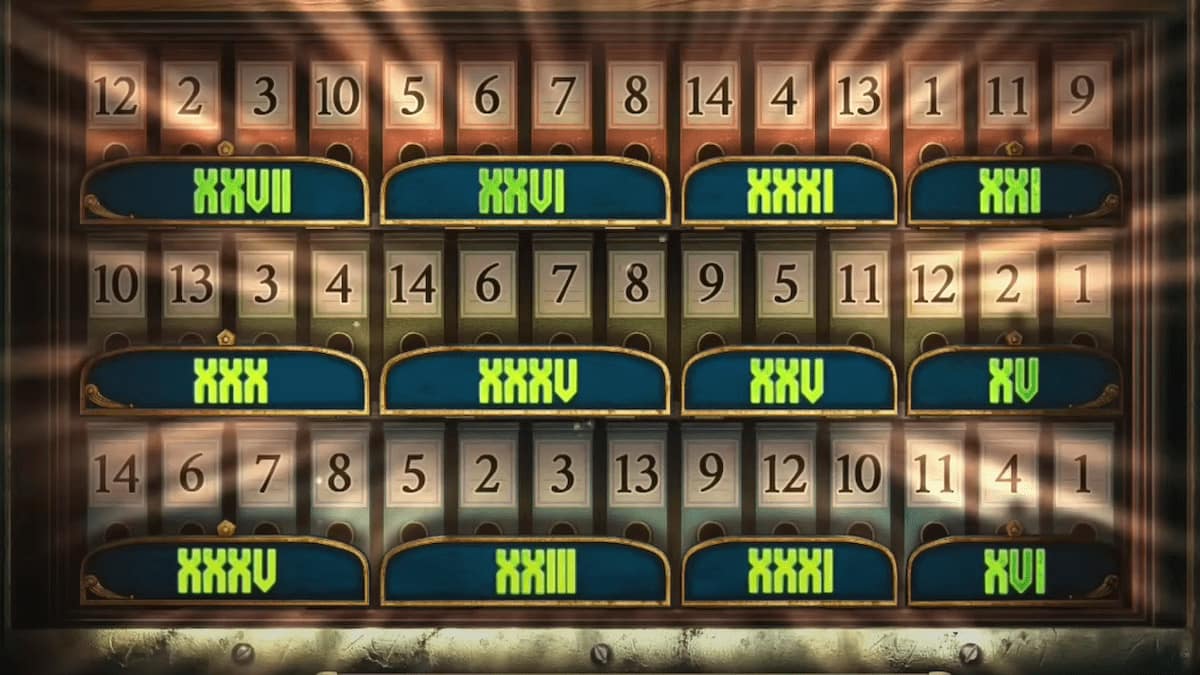
How to solve the Order Roman numeral puzzle
The end of this ( random ) puzzle is tosort all the numbers so they make up all the Roman numeralsin each discussion section . Just press the number and the situation you want to move it to ; when you have the correct set in a given section , that section will light up . you could only move bit across wrangle ( e.g. you ca n’t move a number from the first rowing to the third or vice versa ) .
An easy way to figure out which number to move is to add the current ones in a division up then picture out how much is missing ( for example if you ’re at 23 and postulate 27 , swap a 4 for an 8 , as you need 4 more ) . Also , it ’s honorable to start with the sections with only three figure , as you ’re left with more options afterward for the more complex four number plane section .
Solving this puzzle will completely open up the bookcase on the left side to discover the occult room the count mentioned briefly before . We can proceed through to enquire .

Image by Pro Game Guides
Estate Secret Room
This room screams fixation with this demonic dog creature . We can take a flavour around to prove and find some more entropy about it , and collect some other utile items .
In this secret room , use theknifeto prune thependantfrom the stuffed Canis familiaris ’s neck and the chair shock to retrieve there 500 stone . Then , inquire the desk , rotating the wiener statue , to collect a key . you may use this key in the drawer above the desk . indoors , you ’ll get hold a daybook detailing a specific position in the forest where the demon dog is supposed to go back to . We can essay to site it . Take note of the demon dog painting on the wall ; we ’ll desire to come back and inquire this after finding the tree stump face .
How to find the tree stump face
agree to the journal in the desk drawer , the demon dog will direct back to a specific area in the woods . We can attempt to follow the course to it by heading to thewoods near the sawmill . When you get there , head up toward the right where the fall tree is , then snap to continue further into the woods .
This area is a mo of a tangle . To feel the track to the tree diagram stump , you ’ll want to comply thebright green tree .
You ’ll come to a large debar span that is drop down into the swamp . To continue forward , you ’ll ask to lift the bridge using any consignment parts that you may find as weight . This is another hidden objects puzzle , but you could backtrack through the woods to locate them all , making it a bit more complicated .

Image by Pro Game Guides
The location of the weight unit is moderately random ; above are images of the potential localisation . For the weight stick in the bird ’s nest , snap up the peg from the bottom leave corner of the image and use it to knock the weight down ; for the weight stuck in the tree ( the stuffy - up shot ) , knock it down with the three rocks then snap around the sphere below where the weight was .
Once we have all of them , we can heap them on the front of the bridge deck to raise it up . Now we have a clear path fore . This will initiate a small cutscene where we ’ll see the cleric performing some kind of ritual . When the cutscene ends , we can look into the area more tight .
Woods - Ritual Site
You ’ll desire to speedily look at theRitual stonein the center field of the area to snap up the grounds . Then , open thesatcheljust to the right of it to pull in afigurine . In the distance , you may see a small , shiny juicy target hang from the tree . seize thestick on the right sideand use it to knock it down , compile theBlue Stone .
Now go to thecarriage carand pry start the threshold with yourcrowbar . Inside is a red dish where you’re able to find thekey to the carriage chest . utilise the key on the chest , and you ’ll unlock another minuscule puzzle to complete .
The goal of this puzzle is to slip the tokens along the track tomatch up the range with like items . For example , the horseshoe and the footprint would go together .
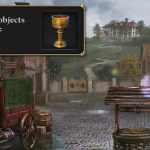
Image by Pro Game Guides
Tokens move counter - clockwise and can only move along one of two unlike tracks count on the posture they ’re in . See below for the track ( in jaundiced and white ) ; the item that move alongside the others are marked in pink ( i.e. clicking a given keepsake will move the other two tokens it ’s pointing to ) .
Do n’t overthink this mystifier , though ; mainly , just keep experimenting , remember you may revert your determination at any fourth dimension by clicking the same token .
Inside the chest , you ’ll collect aDetailand aGarden trowel . We found the first piece of evidence about the ritual site here , and we can collect the second by heading back to theTempleand using the new detail we found .
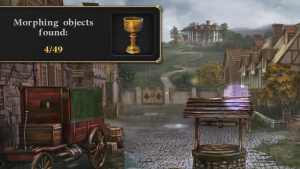
Image by Pro Game Guides
How to solve the model set puzzle
First , analyze themodel set in the displayon the left side of the Temple . We can now open it using theFigurinewe found in the satchel at the ritual site . Once we do , we ’ll want to rearrange the framework set back to its correct scene . This means snap on the objects in the faulty place and placing them in the correct place . Here ’s where everything needs to go ( we numbered the patch to make it easier ):
When all the pieces are put back into their right spots , the example will open up up and give you aSignet . Now , you ’ll want to examine thestone archwayon the far wall with therune symbolic representation .
How to solve the rune archway puzzle
The goal of this archway is to push the runic letter in the correct order so that they open up . We ’ve seen runes like this before back at the ritual site stone . We can practice that to enter out what rescript to press them in . Here ’s how :
take care at the intricate - lookingjournalinside on the shelf , and expend theSignetto candid it . In the journal , you may come up the RitualEvidence 2/2- Ritual of protection and purification .
Now that we ’ve found the location mentioned in the journal and found enough grounds of the rite to make another case conclusion , we can backtrack to the Estate and search more closely at thedemon dog house painting in the secret way .
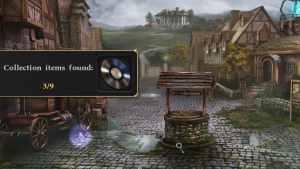
Image by Pro Game Guides
How to solve the demon dog painting puzzle
Underneath the painting are three strange - bet symbols . you may change them by clicking on them . To work the puzzle , we ’ll need to know what three symbol they ask to be change to . We can figure this out by heading back into thelibraryand look at thepainting on the bulwark above the display case(on the correct side ) .
The symbols below this house painting are the same character as the ace in the clandestine office . We ’ll need to make the demon dog picture symbolsmatch the symbolsin this picture ( notice : this is a random puzzle , so what you see in the images below may be different in your biz ) .
Once you do this , the painting will open up and disclose an even more extravagant teaser . This puzzle has very standardized symbolisation to the ones on the outside of the painting . To figure out how to figure out it , pick up the clue paper that give away thelocations of the symbols .

Image by Pro Game Guides
The hint shows pictures of the locations where you ’ll need to check for symbols . Once you observe one , it will automatically fill in your clue sheet with the symbol found at that location . These position are :
To get the last symbol at thealtar in the woods , you ’ll need to use thependantpiece we come up on the stuffed demon dog . However , the pendant wo n’t be complete without all the coloredstone piecesinside of it . We ’ve found three of the Lucy Stone firearm already , but to get the last one , use theDetailpiece found in the baby buggy chest to open thefarm house breast . Grab thedog statuetteand bring it to theestate fireplace . localise the statue to open up the house painting and grab the green stone .
With all the Harlan Stone , you may canvas the pendent from your inventory and place all the gem pieces inside of it . Now , it ’s quick for you to set on the front of the altar at the Edge of the Forest ( look in the center of the Forest image to find the Lord’s table ) , where you ’ll get the last symbolic representation you need for the demon dog painting .

Image by Pro Game Guides
Before you’re able to get the symbolization from the altar , you ’ll have to complete another puzzle . This need getting the four season pieces in their correct berth on the far veracious side of the circuit card . However , they can only move to the spots onto their designate spots on the board ( meaning the flower can only move on top of flower pieces ) . Each piece can depart behind a lead of a unlike season , provide them to leave the others to the right spot , but you must create the proper path .
Beyond that , the trick when you ’re approaching the right side of the board is to direct the slice behind you to their correct one-armed bandit as you land in yours ( e.g. flower lands in the flower spot while simultaneously leaving a itinerary to the Sunday for the sun piece ) .
Once the seasons are in the correct spots , the altar will open and reveal the last symbol you require for the demon dog picture . With our clue flat solid fully filled in , we can yield to the secret room in the estate library and start solving the ogre dog painting puzzle .
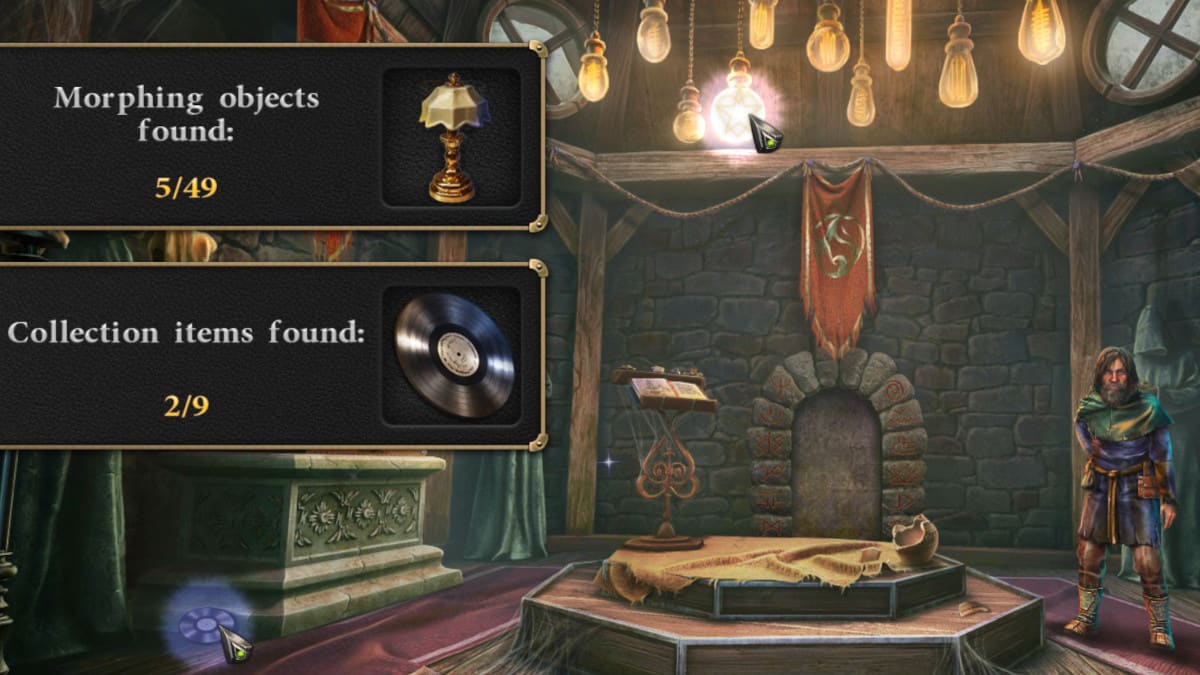
Image by Pro Game Guides
Thankfully , our cheat shroud is right on the top left of the puzzle for us to look at as we need . The goal is to replicate all the symbols we found in the right order . The screens will show us what the final shape of all the combination look like and lock in if it ’s correct . Here ’s how to recreate all of them :
When all the symbols are enter correctly , we can launch the vault behind the demon dog painting . in spite of appearance , another journal depicts a hole-and-corner entrance to some desert mine from theGlade . We ’ll want to head back there now and look closely at the tree with red flowers .
How to get rid of the poisonous ivy
The tree shown in the daybook epitome ( the one with carmine flower ) is covered in poisonous English ivy . We ’ll need to get rid of it before we can venture into the mines . The James Leonard Farmer may bonk a way to do so safely .
After speaking to the farmer , he ’ll give us akeyto open thesmall shed attached to the barn . Inside , we can grab aSyringe . We can practice this to inject herbicide into the poison Hedera helix . We can also grab aLantern , which we ’ll need once we get into the mines .
fortunately for us , we already have an herbicide , which we test earlier . Go into the farm house and approach yoursuitcase at the desk . Thevialshould still be fill up with some liquid there . Use theSyringeto get some herbicide from it . Bring that syringe to the ritual site toinsert the weed killer into the poisonous ivy .
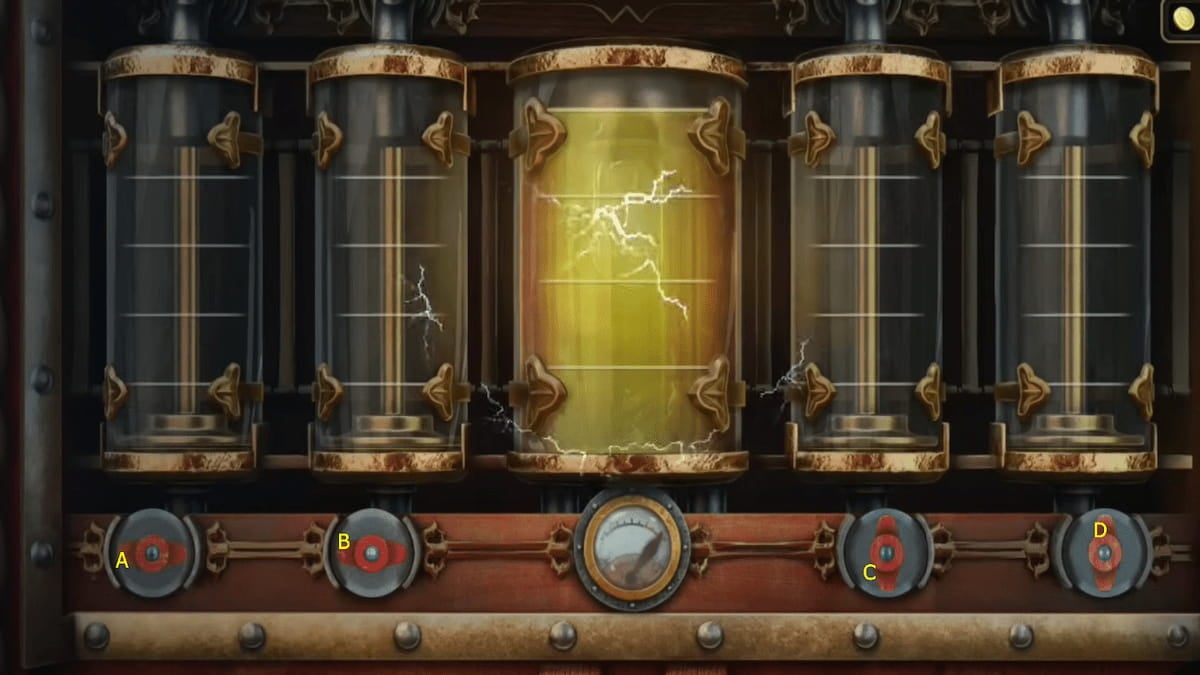
Image by Pro Game Guides
Once the weed killer is administered , we can use theknifeto cut up away the branches to create an hatchway . you’re able to hang thelanternat the top of the cave entrance so you’re able to see . unluckily , we wo n’t be able-bodied to continue moving ahead until we remove the big stone . We saw someexplosivesearlier in themill basementthat we could utilize to do so ( just use the crowbar to open up the crate of it ) .
Place the explosive against the large stone ( it may require some pixel hunting , but it does work ) and then use yourLighterto ignite it . This will definitely do the trick . Hang your lantern again ; you may now get into into the desert mine , which will trigger another brief cutscene .
Abandoned Mines
There are plenty of thing we ’ll desire to inspect here .
First , prove thecovered barrelson the right side of the mine and use theknifeto cut theropeoff of them . Take the forget me drug , then collectevidenceof herbicide ( bring out the barrel first then press them ) . fetch theropeover to the body of work table tocombine with the hook(click the bait despite the lack of interact ikon ) . After combining , pick the two detail up ( which are now combined ) .
We can apply thishook and ropeto pull out down thesuspended ladderat the top of the mine ( again , click it despite the lack of interact icon ) . When we attempt to go up , we will see two people talking , the count , and one other material body . This proves the count is the one creating the illusion of the beast , but we ’ll need to prove his guiltiness .

Image by Pro Game Guides
The doorway on the left side of the mine is shut up , but we can unlock it with the right item . maneuver through the trap door at the top of thesuspended run , and you ’ll participate theestate summerhouse . On the table to the left wing , you ’ll see aringon the table ( you’re able to also grab thecollectibleamong the plants on the rightfield ) .
Take the tintinnabulation inside theestate living roomand use it on thechina display cabinetin the remaining corner . indoors , you may grab aring of keys(when you back off from the cardinal claw you may also find anothercollectibleinside the china cabinet ) .
Now go back to the mine and employ the bunch of keys on the door on the left side . This will open up the puzzler for you to solve .

Image by Pro Game Guides
The goal of this puzzler is to form all the correct images by rotating and moving the three pieces you are given . The piece of paper on the top leftfield will show you all the images you need to form and keep track of which ones you ’ve discharge as you go along . You only need to do one at a metre , so just pick an image from the sheet and go from there . Rotate the midway section of the puzzle first and then slide the down in the mouth ' button ' on the left over or right side to align the pieces as needed ( many will not require any sliding ) .
Once you unlock this room access , you may go in the final area of the investigation . Here , you may chance all the respite of the evidence you need to solve the case .
Abandoned Mines - Attacker’s Lair
Once we regain all these points of grounds , we ’ll have enough to prove the criminal offence of the numeration . It ’s plain that the Count pretended to be the brute to scare the hoi polloi of the town . An elaborate hoax in the hopes that he could take over their land . The first case is closed !
All collectibles guide for Case 1 of Murder Mystery Adventure
If you are just here for the collectable , you may encounter all of them below . There are three types in this subject , including the watches , the records , and the Morphing Objects . There are nine total watches , nine records , and 18 morphing objects .
All records collectible objects in Case 1
All watch collectibles in Case 1
All 18 Morphing Objects locations in Case 1
await for more closed book game coverage ? learn out5 good mystery television game that make you experience like a detectivehere on Pro Game Guides .

Image by Pro Game Guides
Image by Pro Game Guides
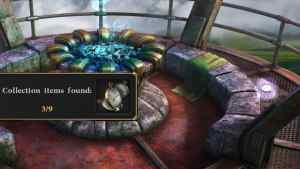
Image by Pro Game Guides
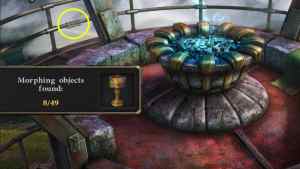
Image by Pro Game Guides
Screenshot by Pro Game Guides
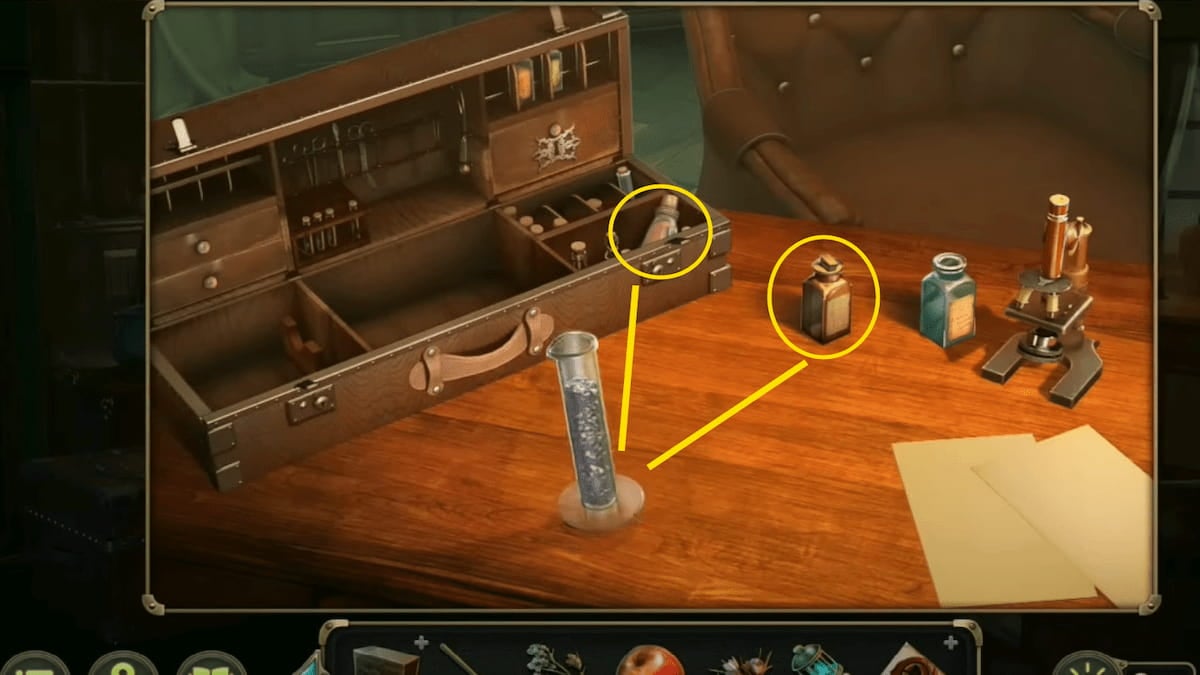
Image by Pro Game Guides

Image by Pro Game Guides

Image by Pro Game Guides

Image by Pro Game Guides

Image by Pro Game Guides

Image by Pro Game Guides

Image by Pro Game Guides
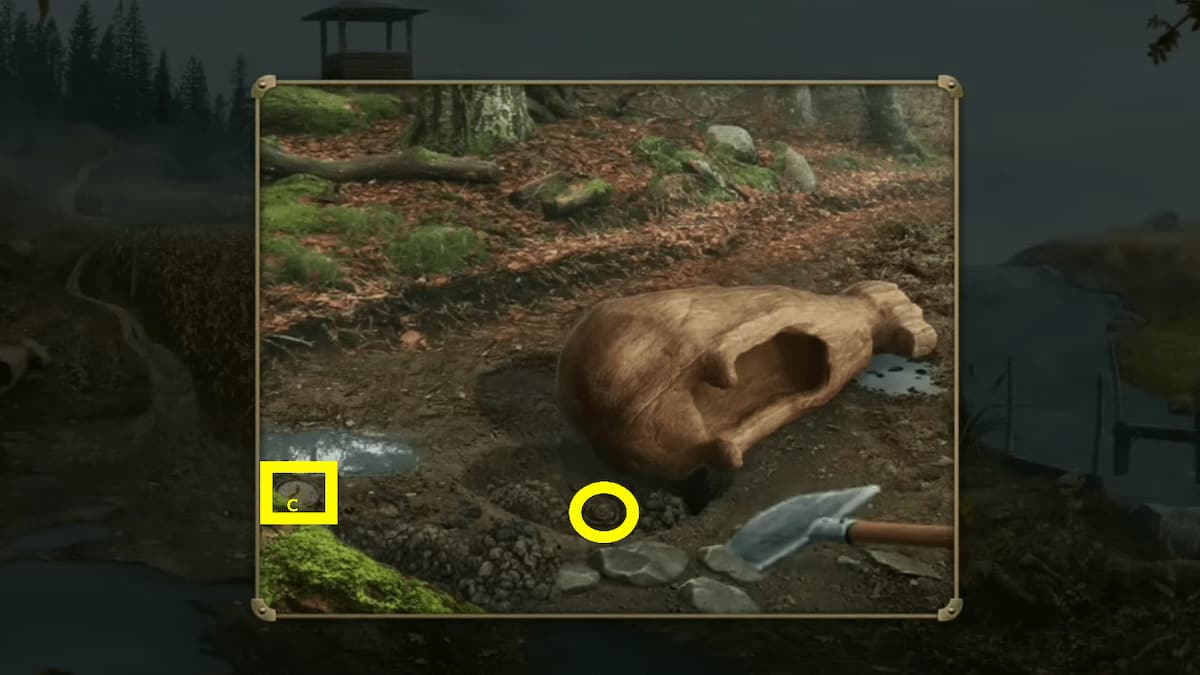
Image by Pro Game Guides

Screenshot by Pro Game Guides

Image by Pro Game Guides

Image by Pro Game Guides

Image by Pro Game Guides

Image by Pro Game Guides
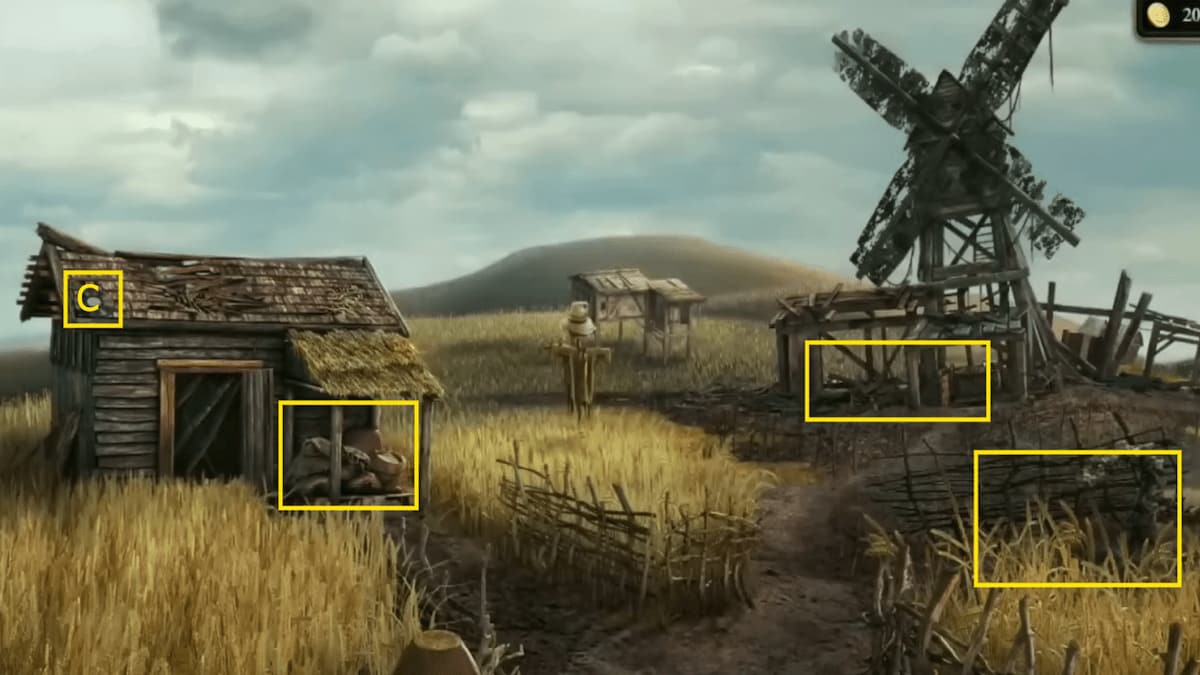
Image by Pro Game Guides
Image by Pro Game Guides
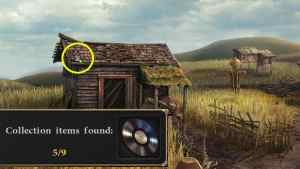
Image by Pro Game Guides
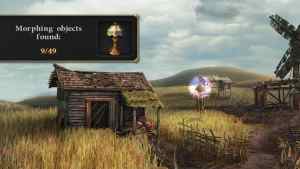
Image by Pro Game Guides

Image by Pro Game Guides

Screenshot by Pro Game Guides

Screenshot by Pro Game Guides
Image by Pro Game Guides

Image by Pro Game Guides
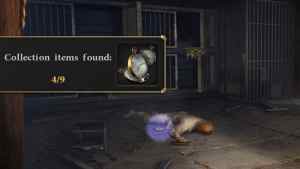
Image by Pro Game Guides

Screenshot by Pro Game Guides

Image by Pro Game Guides

Image by Pro Game Guides

Image by Pro Game Guides

Image by Pro Game Guides

Image by Pro Game Guides
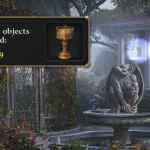
Image by Pro Game Guides
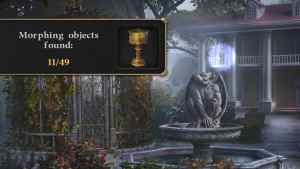
Image by Pro Game Guides
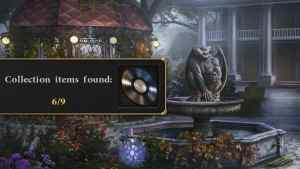
Image by Pro Game Guides
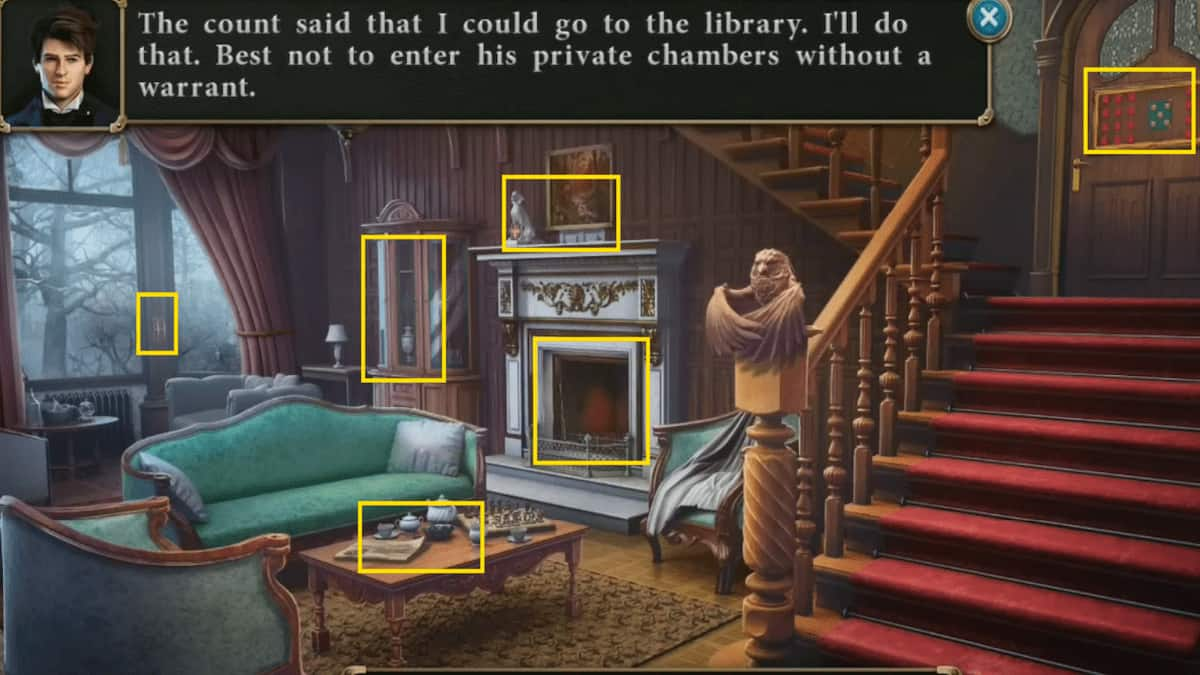
Image by Pro Game Guides
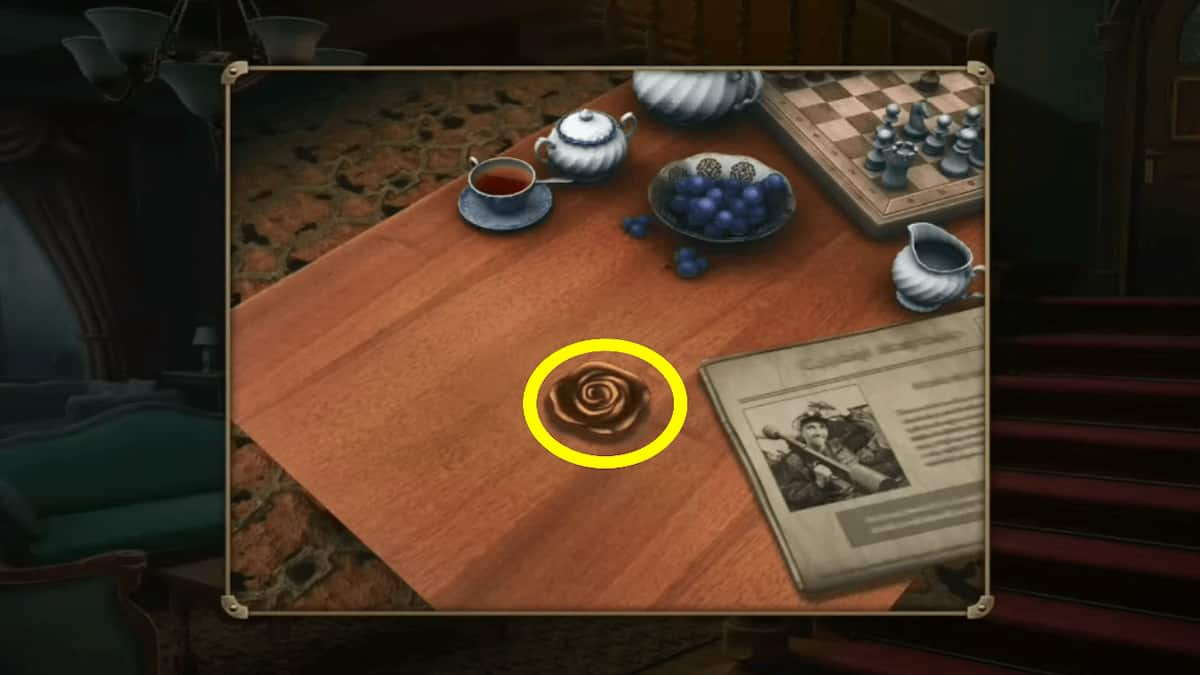
Image by Pro Game Guides
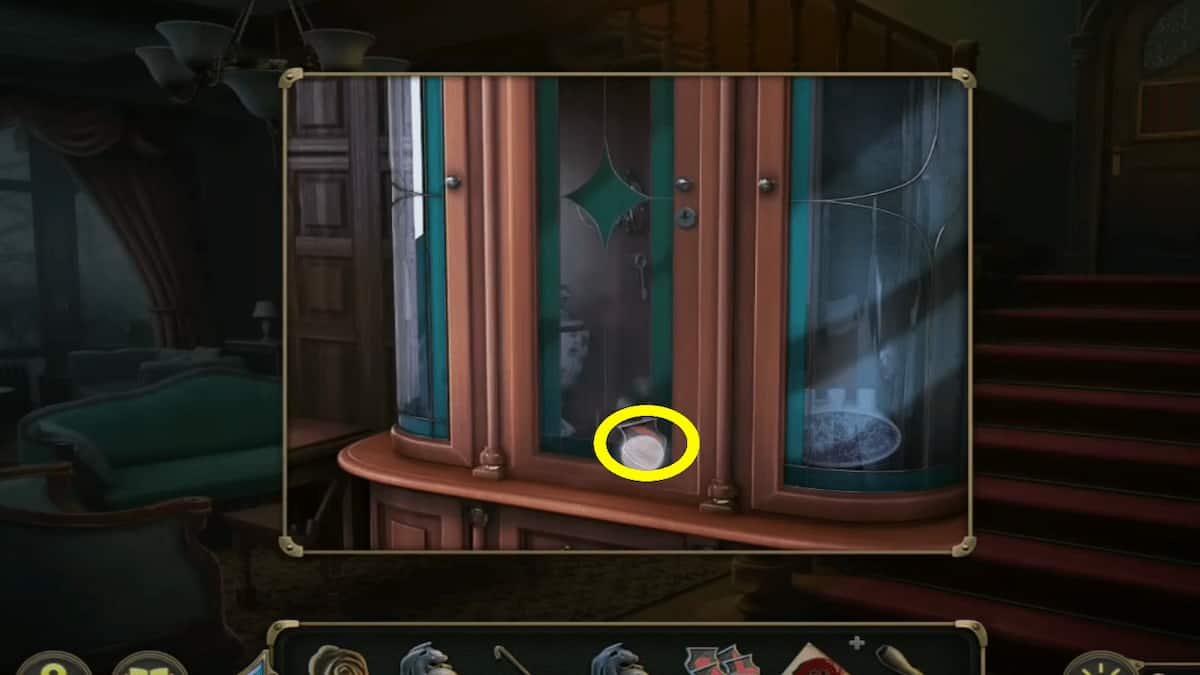
Image by Pro Game Guides
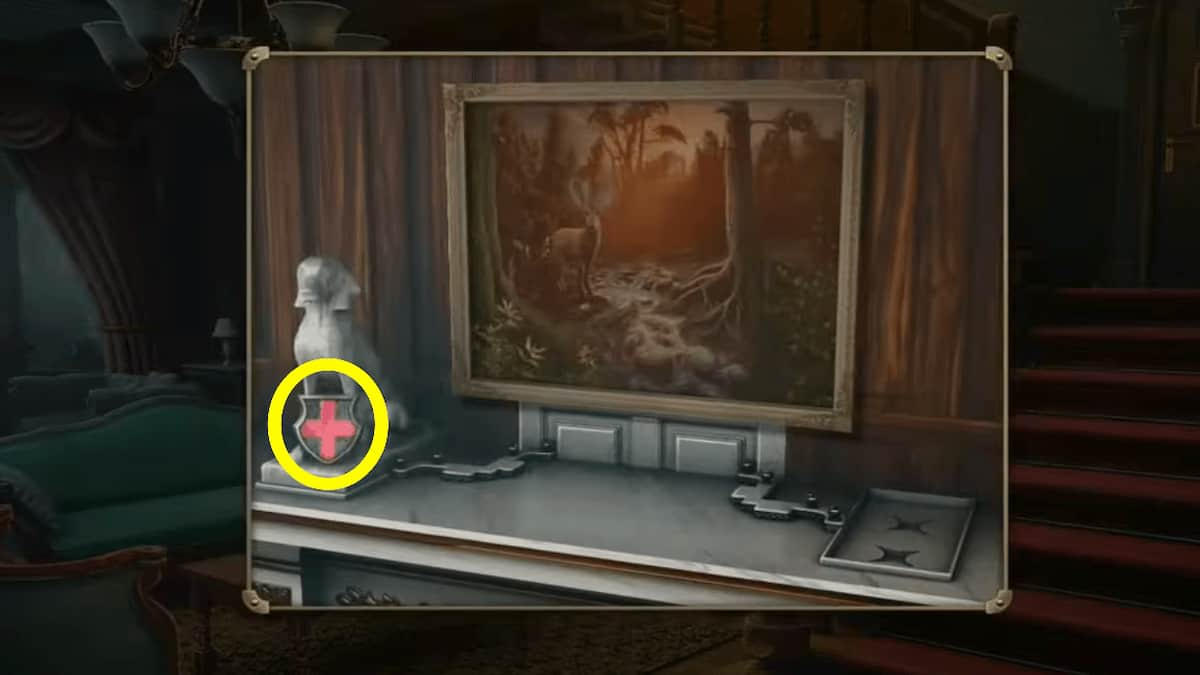
Image by Pro Game Guides
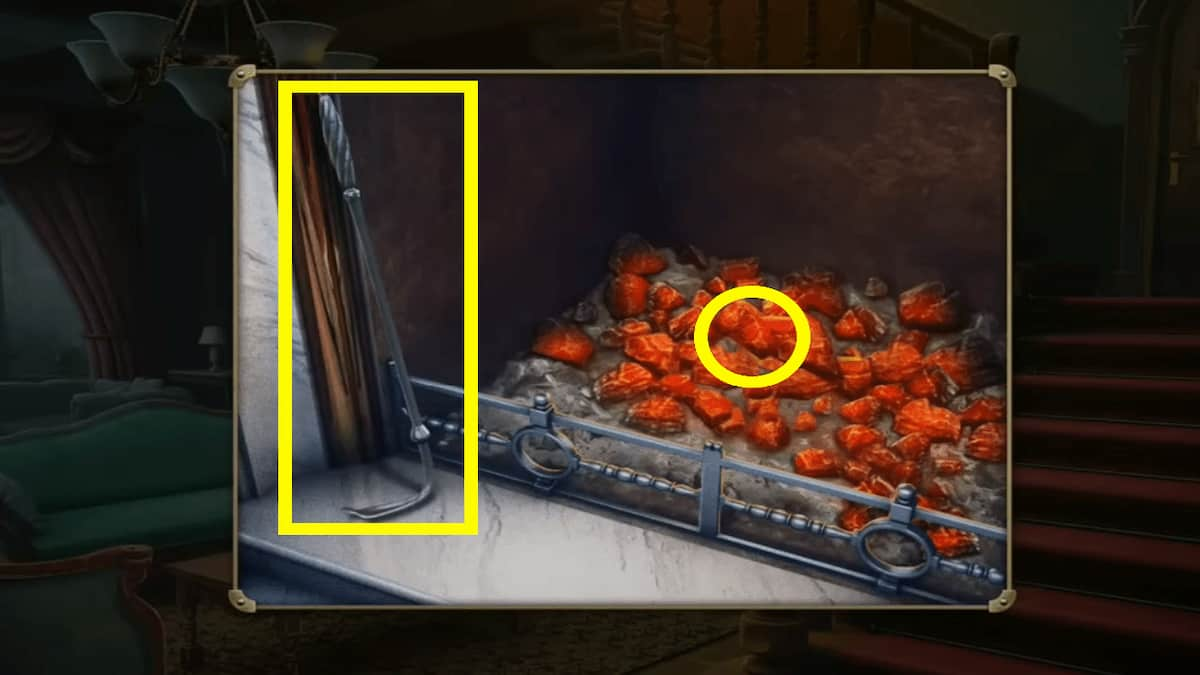
Image by Pro Game Guides
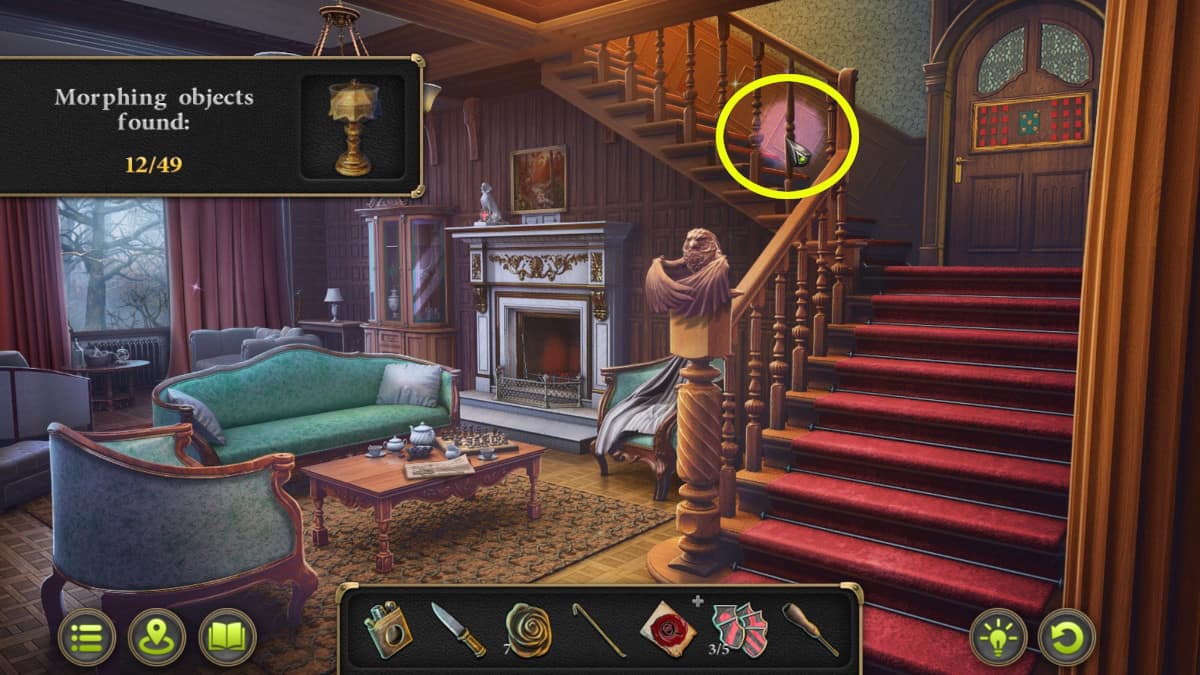
Image by Pro Game Guides
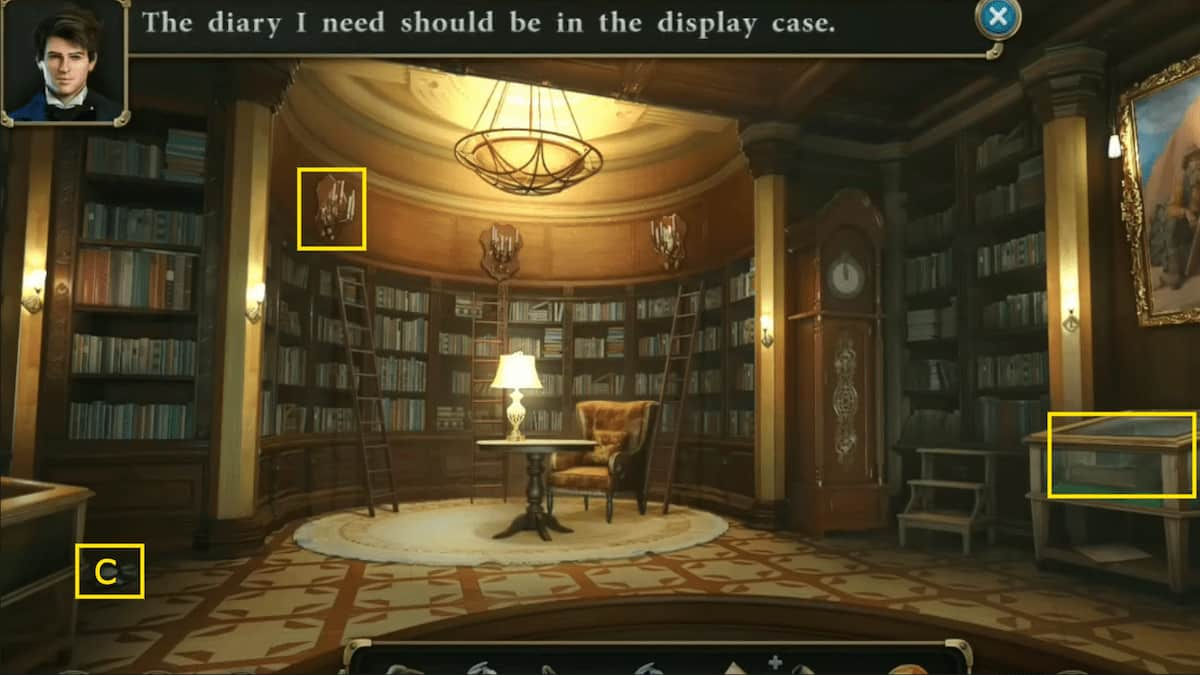
Image by Pro Game Guides
Image by Pro Game Guides
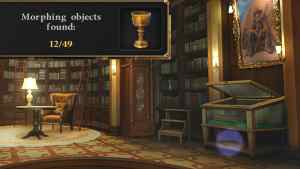
Image by Pro Game Guides
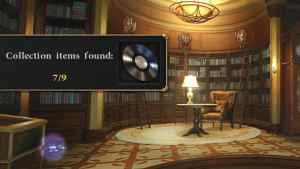
Image by Pro Game Guides
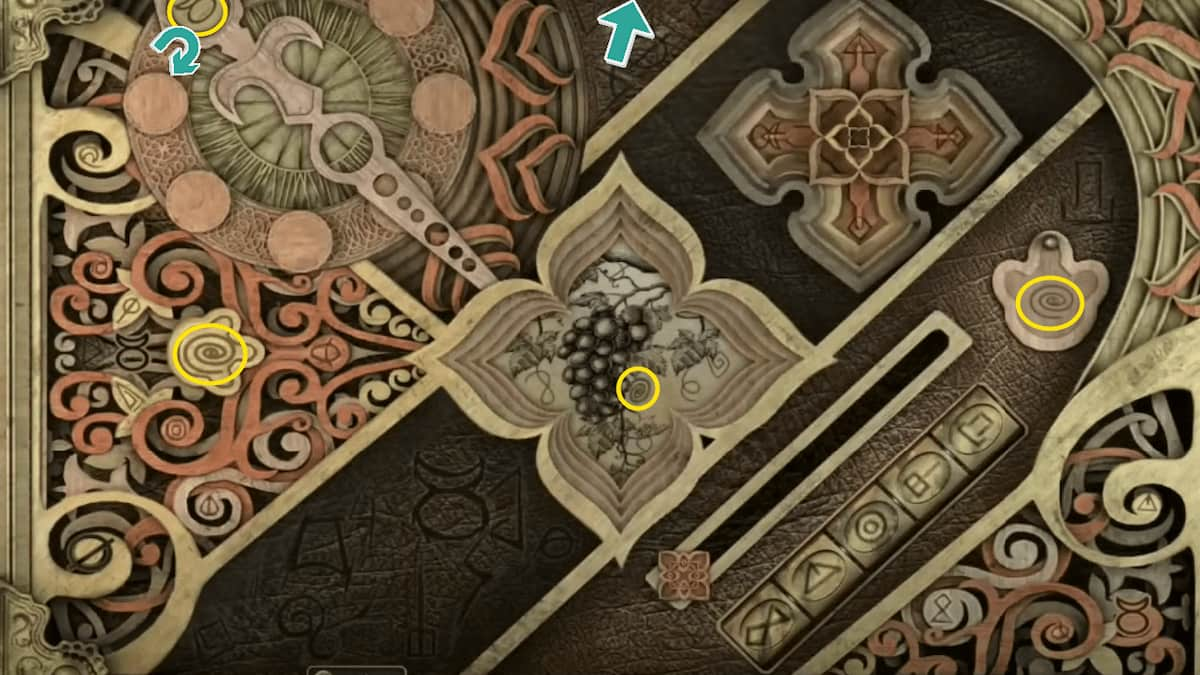
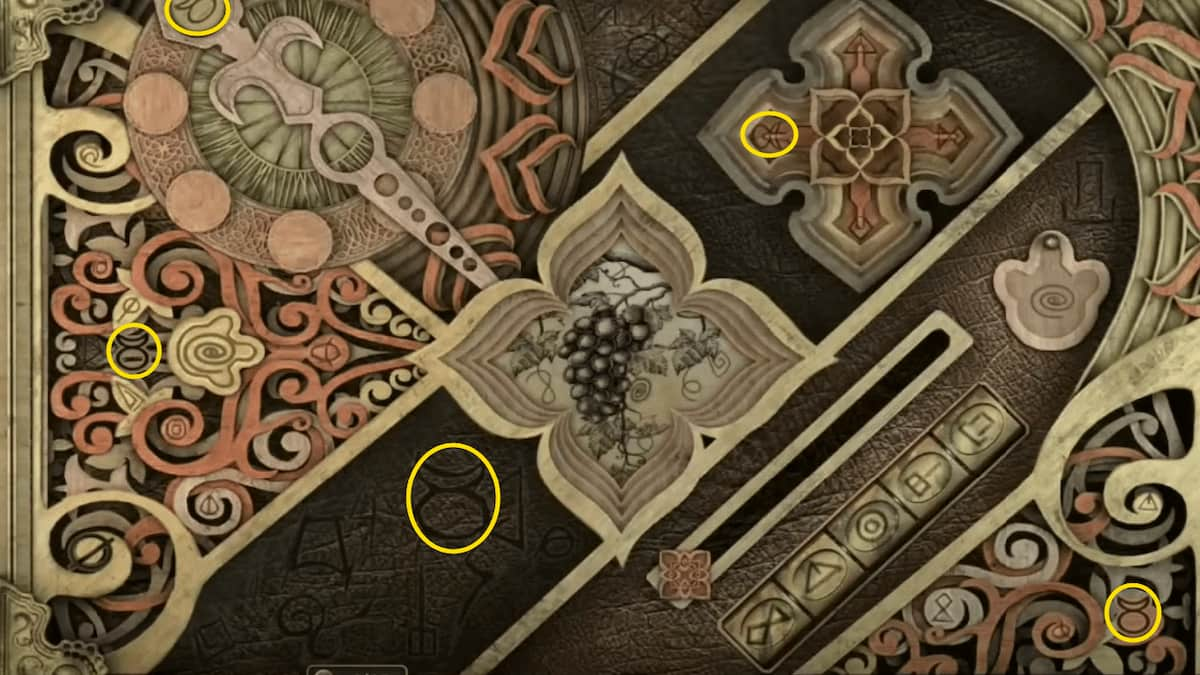
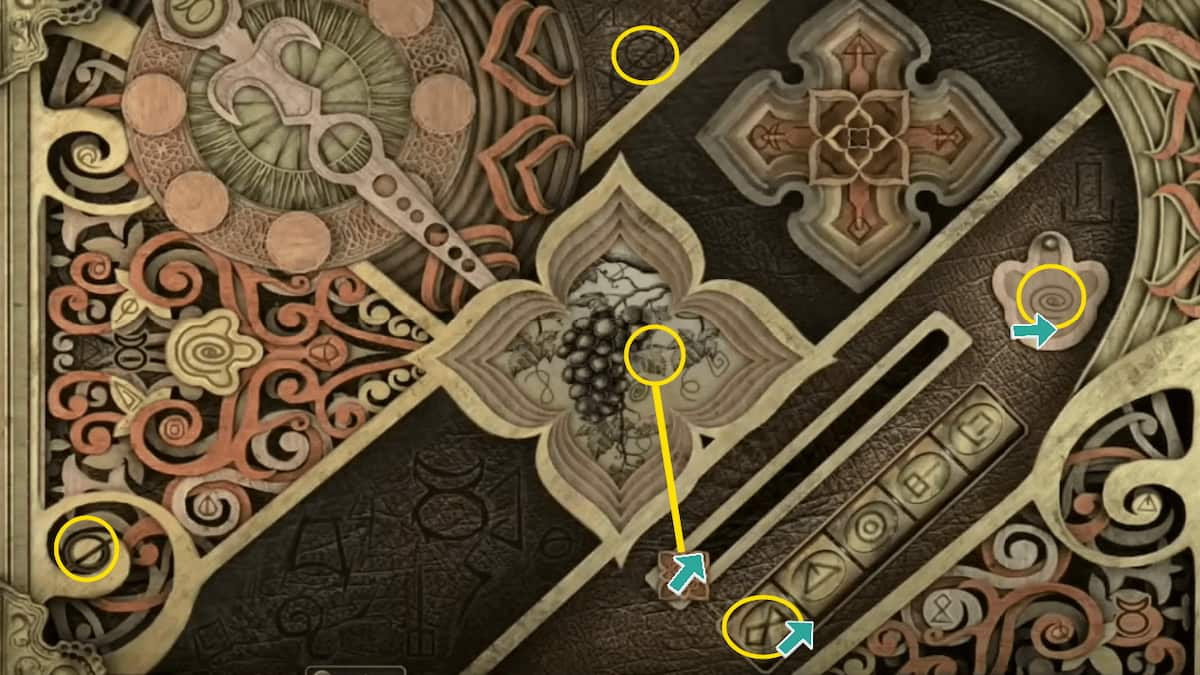
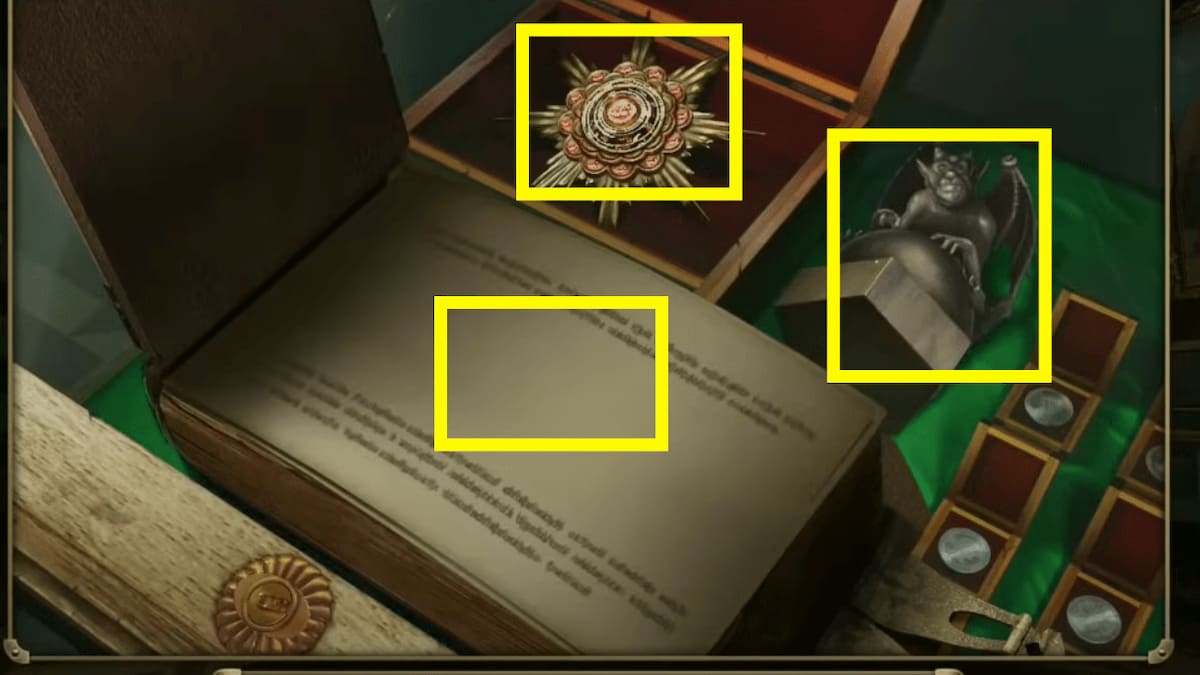
Image by Pro Game Guides

Image by Pro Game Guides

Screenshot by Pro Game Guides

Screenshot by Pro Game Guides

Screenshot by Pro Game Guides

Screenshot by Pro Game Guides
Screenshot by Pro Game Guides
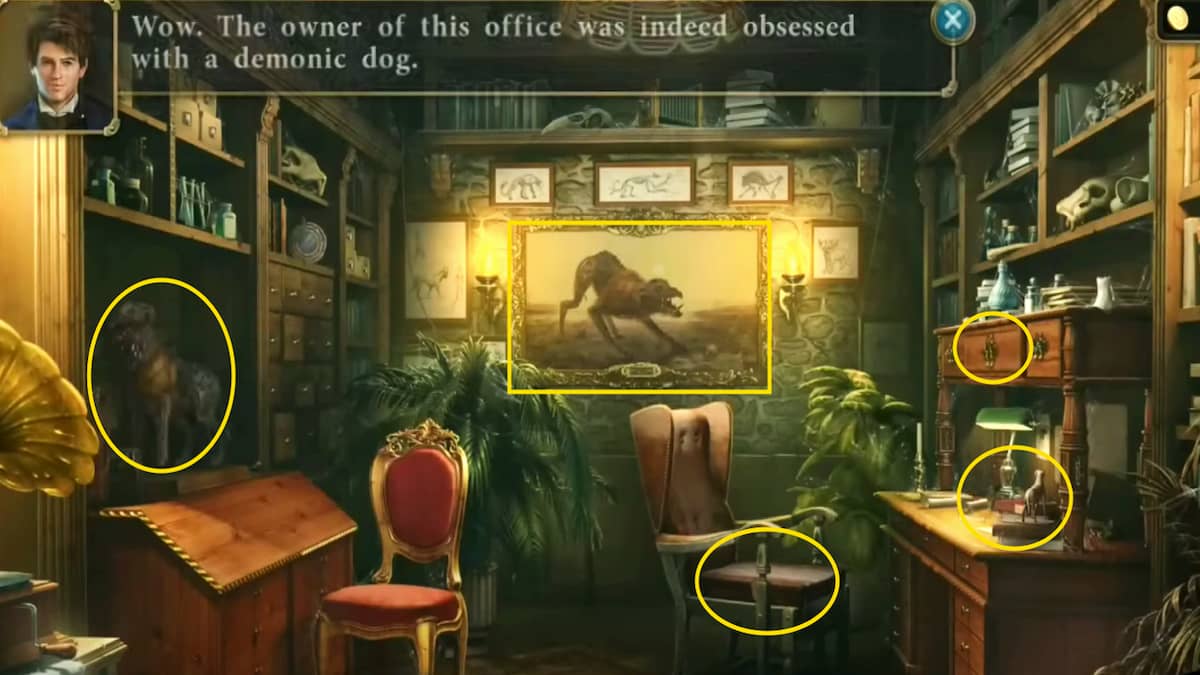
Image by Pro Game Guides
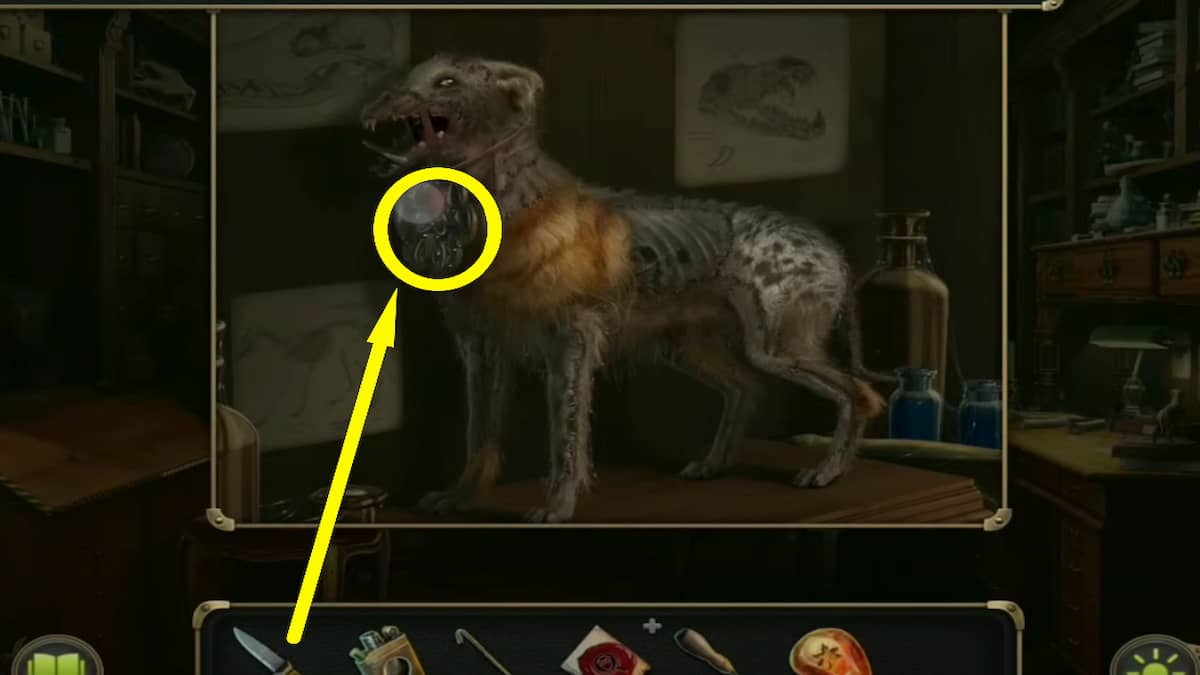
Image by Pro Game Guides
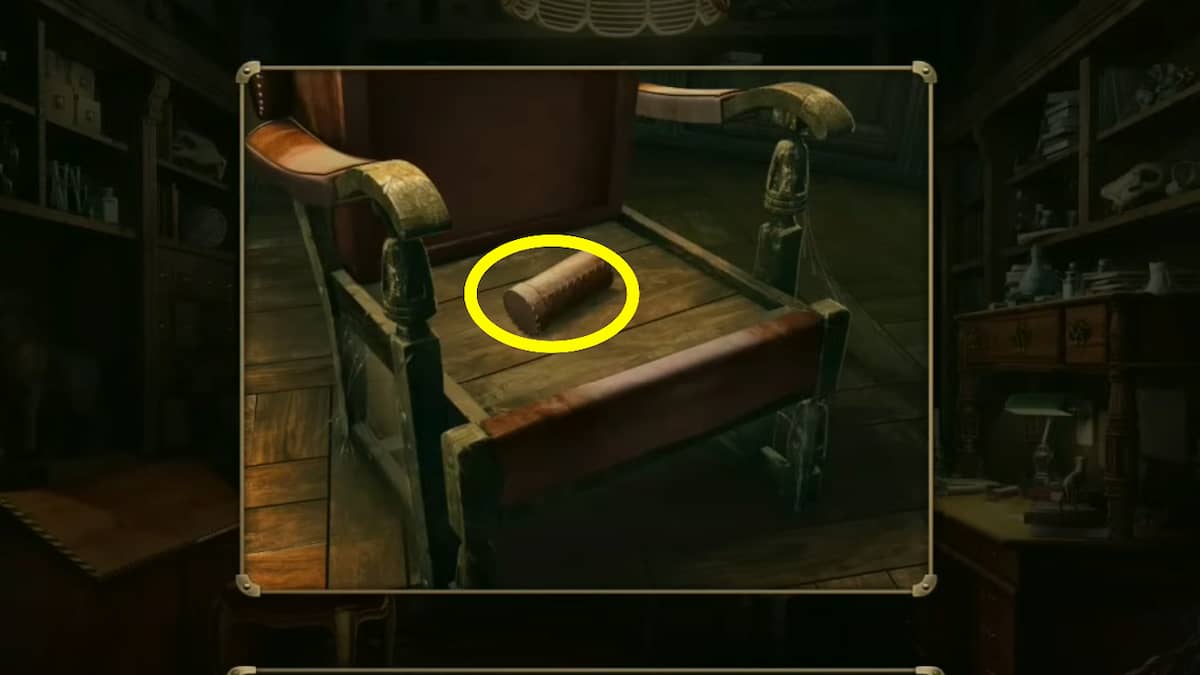
Image by Pro Game Guides
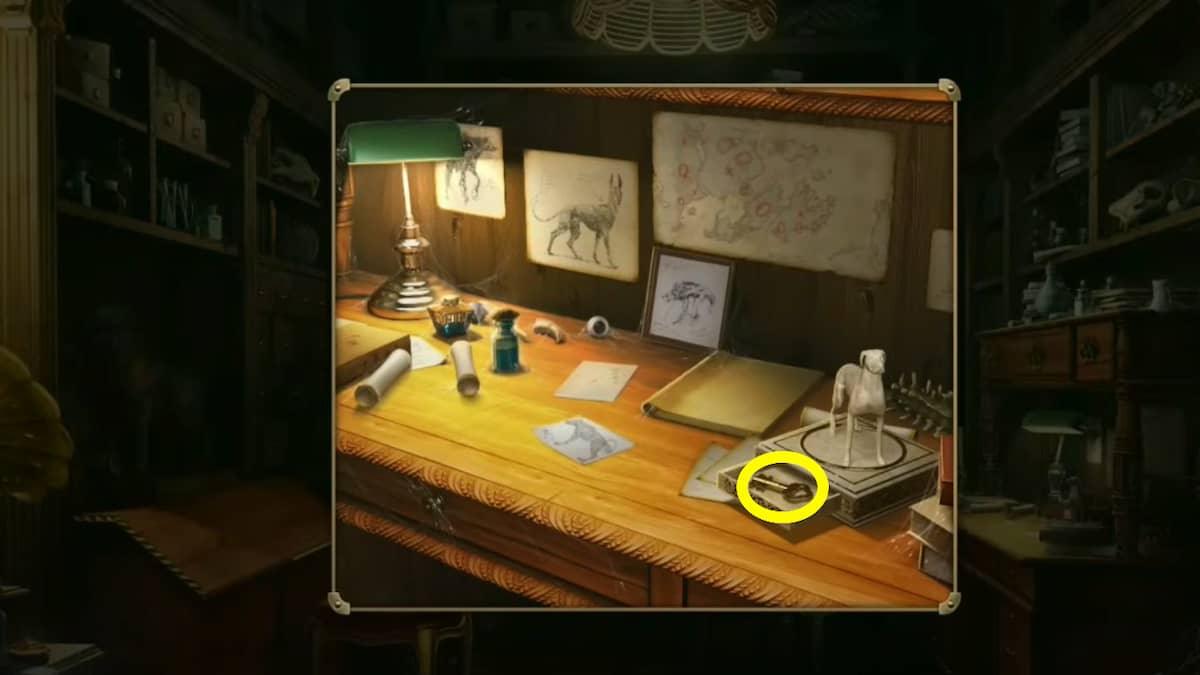
Image by Pro Game Guides
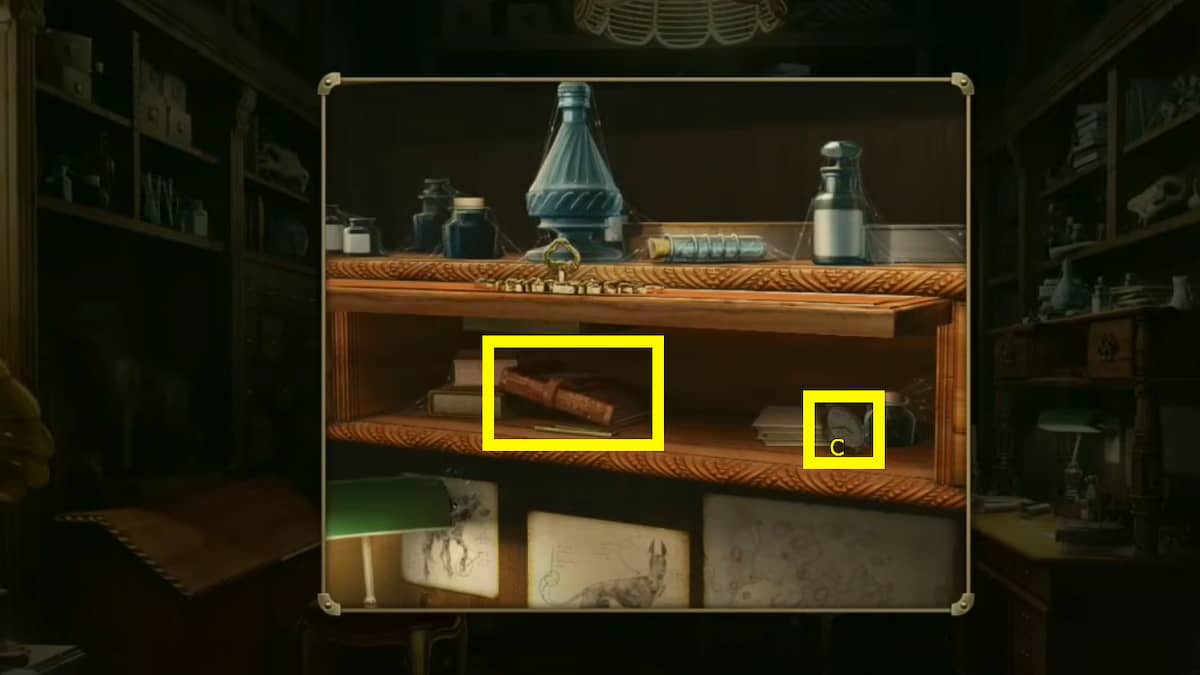
Image by Pro Game Guides

Image by Pro Game Guides
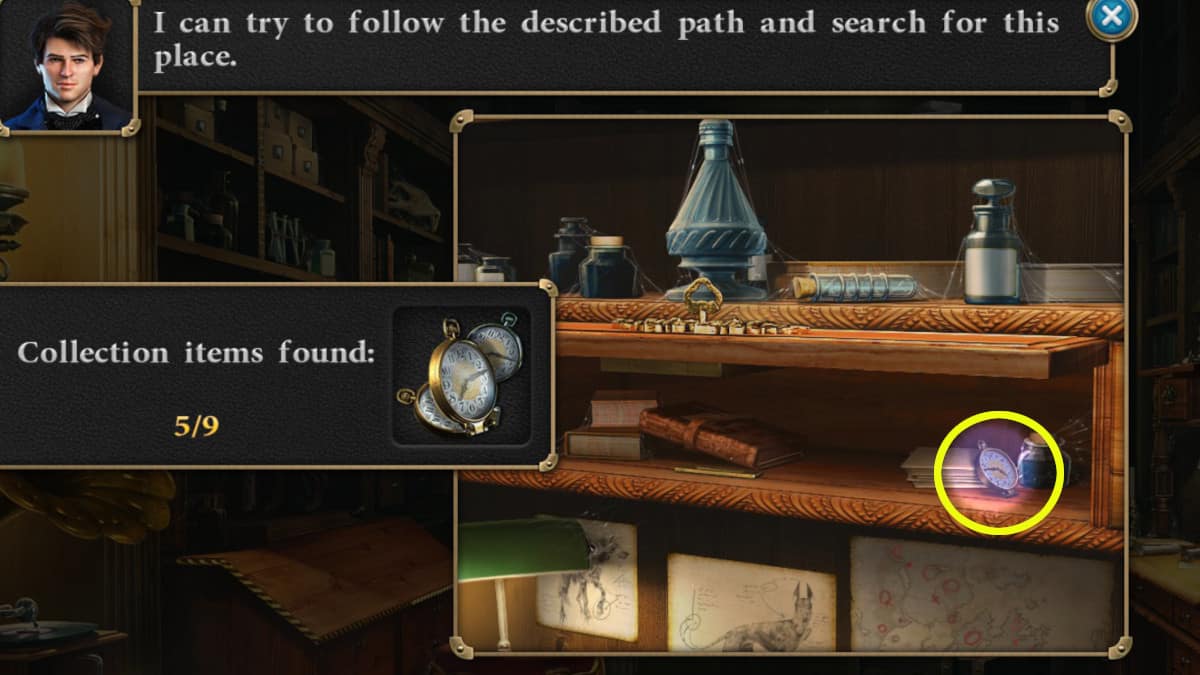
Image by Pro Game Guides

Image by Pro Game Guides

Image by Pro Game Guides

Image by Pro Game Guides

Image by Pro Game Guides

Image by Pro Game Guides

Image by Pro Game Guides

Image by Pro Game Guides

Image by Pro Game Guides

Image by Pro Game Guides

Image by Pro Game Guides

Image by Pro Game Guides

Image by Pro Game Guides

Image by Pro Game Guides

Image by Pro Game Guides

Image by Pro Game Guides

Image by Pro Game Guides

Image by Pro Game Guides

Image by Pro Game Guides

Image by Pro Game Guides
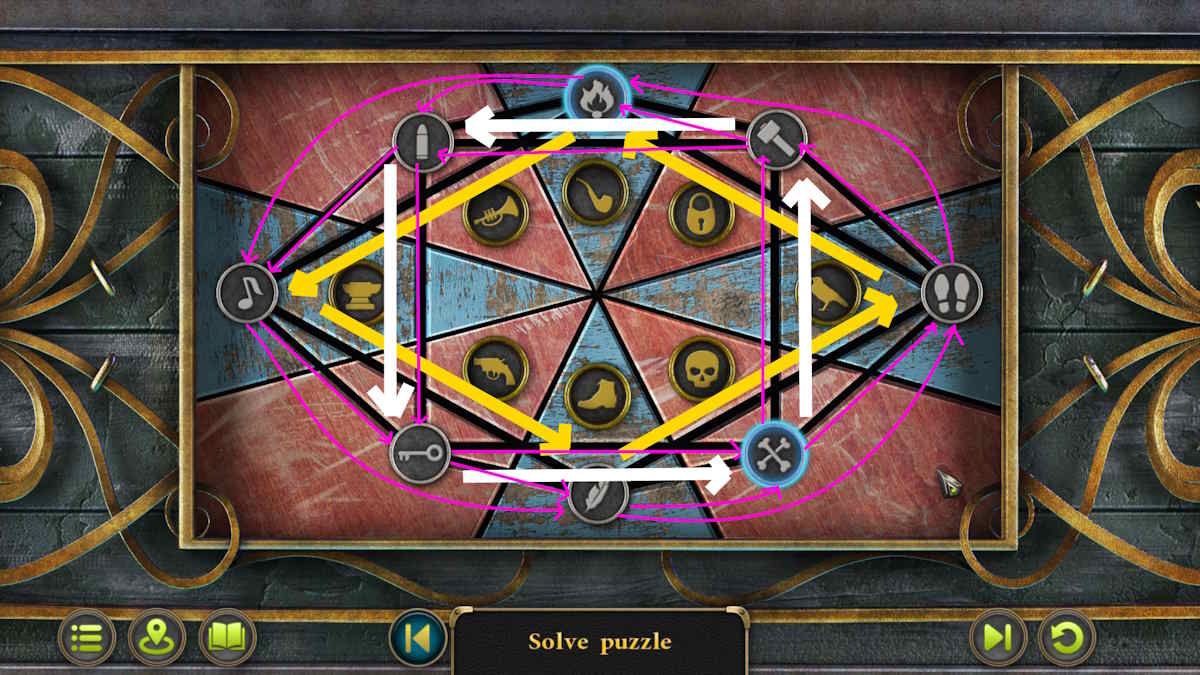
Image by Pro Game Guides
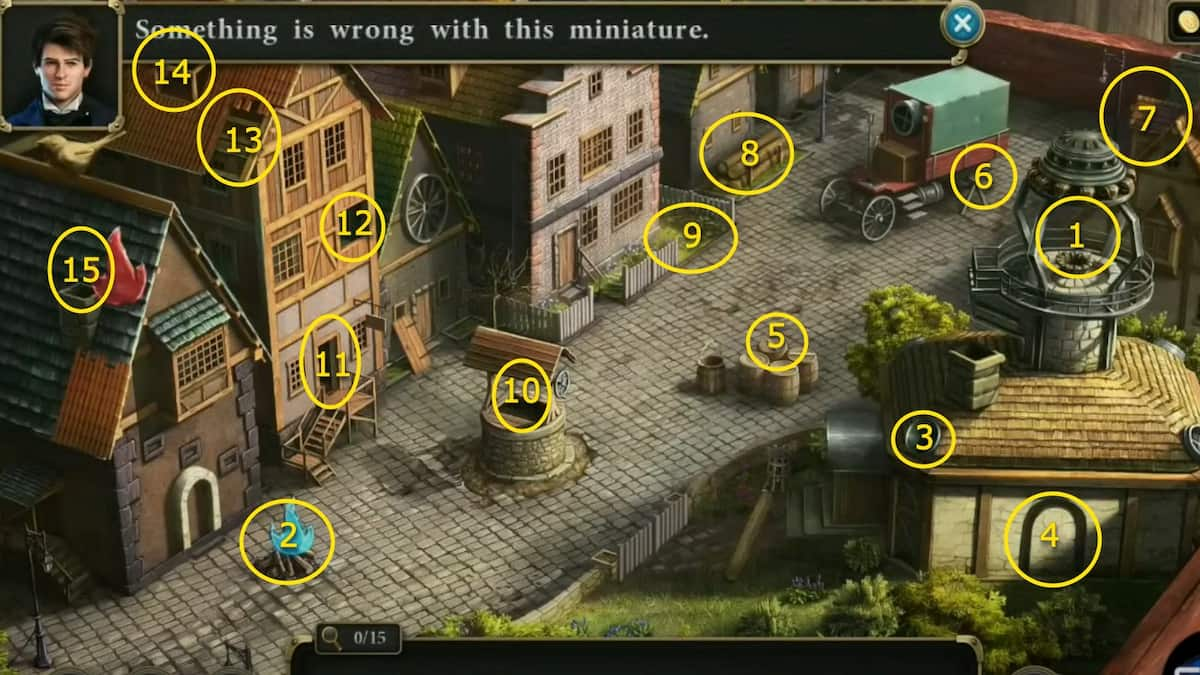
Image by Pro Game Guides

Image by Pro Game Guides

Screenshot by Pro Game Guides

Screenshot by Pro Game Guides

Image by Pro Game Guides

Image by Pro Game Guides

Image by Pro Game Guides

Image by Pro Game Guides

Image by Pro Game Guides

Image by Pro Game Guides

Image by Pro Game Guides
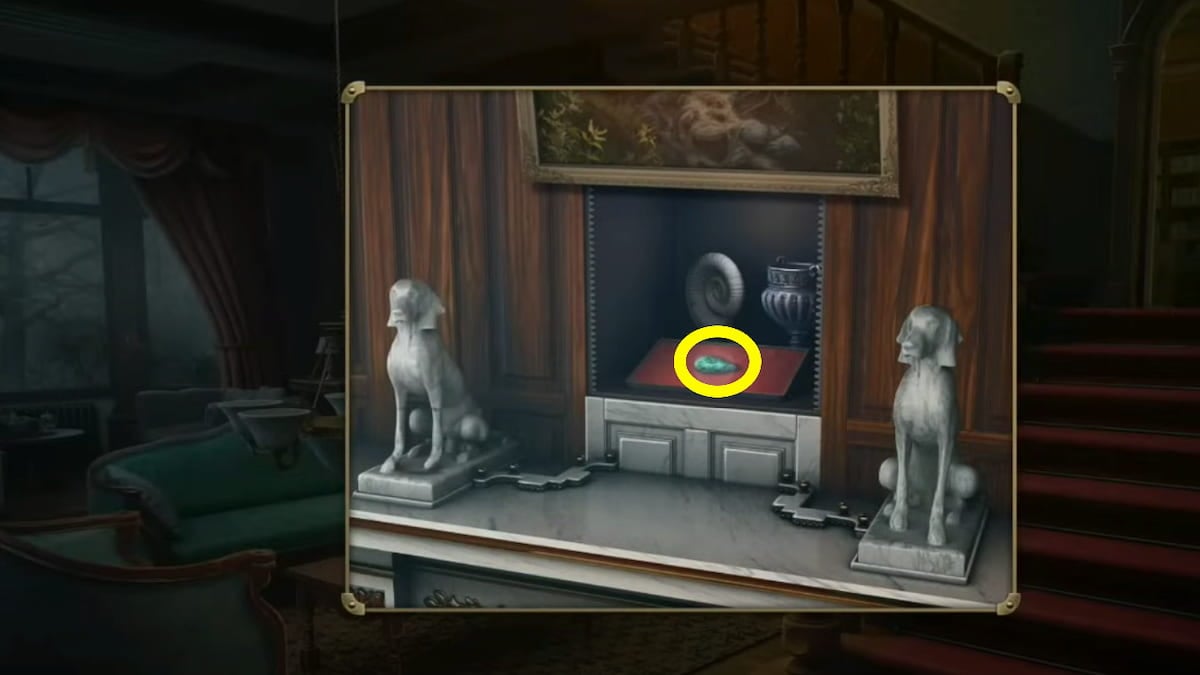
Image by Pro Game Guides

Image by Pro Game Guides

Image by Pro Game Guides

Image by Pro Game Guides

Image by Pro Game Guides

Image by Pro Game Guides

Image by Pro Game Guides

Image by Pro Game Guides
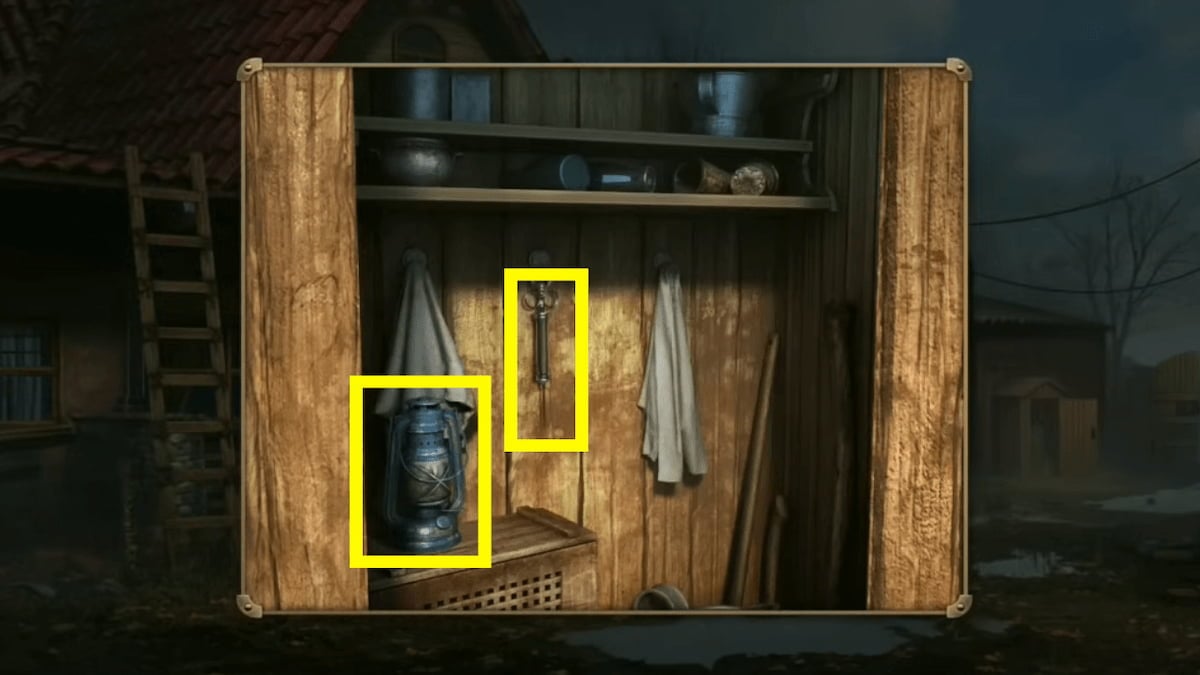
Image by Pro Game Guides
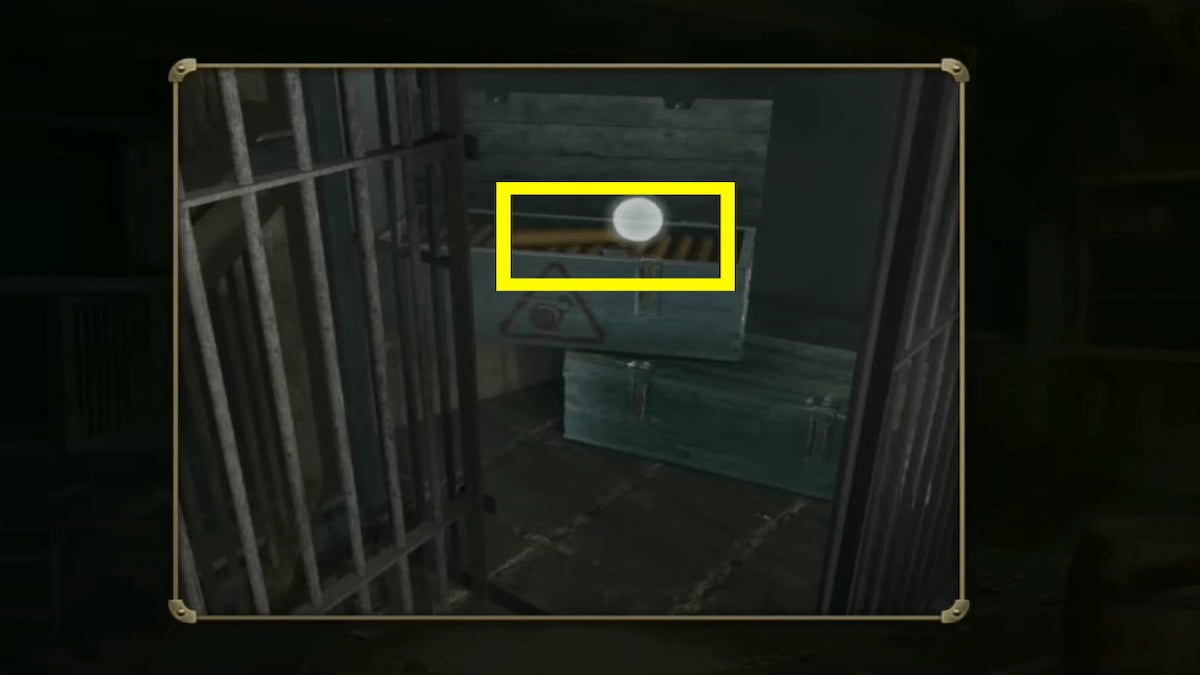
Image by Pro Game Guides

Image by Pro Game Guides

Image by Pro Game Guides

Image by Pro Game Guides

Image by Pro Game Guides

Image by Pro Game Guides


Image by Pro Game Guides

Image by Pro Game Guides

Screenshot by Pro Game Guides

Screenshot by Pro Game Guides

Screenshot by Pro Game Guides

Screenshot by Pro Game Guides

Screenshot by Pro Game Guides

Screenshot by Pro Game Guides

Screenshot by Pro Game Guides

Screenshot by Pro Game Guides

Screenshot by Pro Game Guides

Screenshot by Pro Game Guides
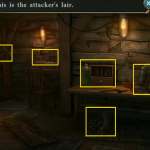
Image by Pro Game Guides

Image by Pro Game Guides
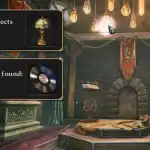
Image by Pro Game Guides
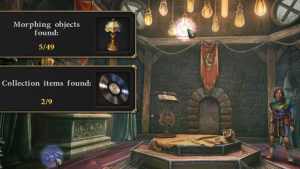
Image by Pro Game Guides
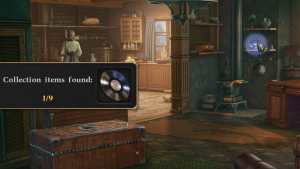
Image by Pro Game Guides
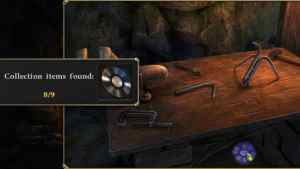
Image by Pro Game Guides
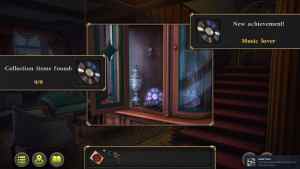
Image by Pro Game Guides
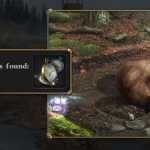
Image by Pro Game Guides

Image by Pro Game Guides
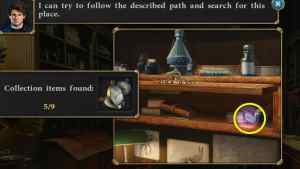
Image by Pro Game Guides
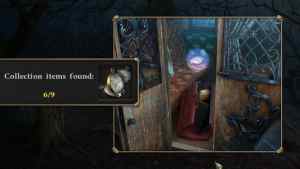
Image by Pro Game Guides

Image by Pro Game Guides

Image by Pro Game Guides
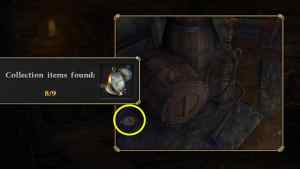
Image by Pro Game Guides

Image by Pro Game Guides
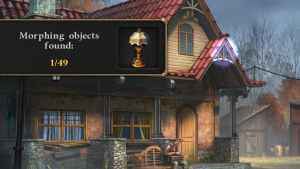
Image by Pro Game Guides
Screenshot by Pro Game Guides
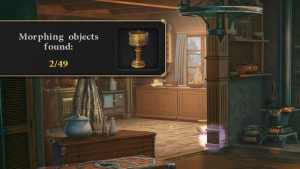
Image by Pro Game Guides

Image by Pro Game Guides
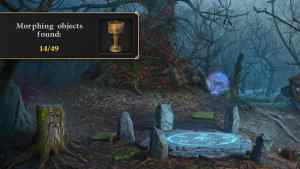
Image by Pro Game Guides
Image by Pro Game Guides
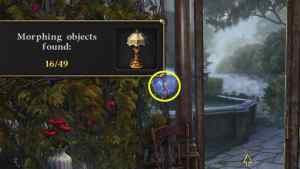
Image by Pro Game Guides
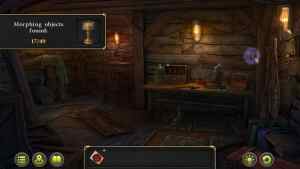
Image by Pro Game Guides

Image by Pro Game Guides
