We are the robot .
Some game transcend time much more easily than others , and Machinarium is certainly one of them . If you ’re experiencing its charm for the first time , study on for my full Machinarium walkthrough .
Machinarium Walkthrough - All Puzzle Solutions
As a general rule , talk to all the robots you find . They ’ll all want something and will then aid you , so these hints are always utile . Also , give tending to anycut view that happen as you get in on a new screen , as these often give you hints about what to look or how to proceed . in conclusion , I suggest yousave when you get to each new scene . I ’ve found that several of the puzzles can become bugged if you seek to readjust them , have in mind you have to reload an old secret plan to go on . This is very thwarting if you have to retread former soil .
The scrapyard
As signal by the tutorial school text , cluck the tubto remove it and reveal your automaton ’s dead body . flick your body double , and it will bounce down to the floor next to your caput . Click the head and it will attach itself to your consistency . Now , we ’re in business .
Click thescuttling mouse - like robot(a1 ) and it will show you that it desire the miniature mouse above you ( a2 ) . Click your head to extend your cervix upwards , click theToy Mouseto beak it up , then select it in your inventory ( at the top of the concealment ) and give it to the robot shiner . It will give you your leg in issue .
Walk to the right wing and take theMagnet(a3 ) and theRope(a4 ) . Combine them in your inventorying , walk right , extend your headway up , and select the top of the pole ( a5 ) . This should bend the pole out across the pool . Now you may use the magnet and circle on the remnant of the magnetic pole , fishing outyour Armand completing this area . Walk off the covert to your right .

The Drawbridge
lead your head up and pull the cable length ( b1 ) to ask for the drawbridge to be depress . You wo n’t be grant in . Take aCone(b2 ) and then keep clicking the cones , throwing them forth until you find someBlue key . Add the gloomy paint to theWhite Paint(b3 ) , then douse the retinal cone into it to make it blue .
Walk across to the lamppost ( b4 ) and flick it to rise up . When you ca n’t go up anymore , click theBottom Rung of the Ladder(b5 ) to take it , then use it in your inventory to add it to the hole above you on the ravel . Do this a 2d prison term , then keep mount up until you ’re on the top rung . Now , you may extend your organic structure and hand across , taking theLightbulb(b6 ) .
Add the lightbulb to the cone in your inventory and then habituate it from the inventory on yourself toput it on as a hat . you may now talk to the sentry go once more , and this time , it will allow you across the drawbridge . see out for that patch of vegetable oil …
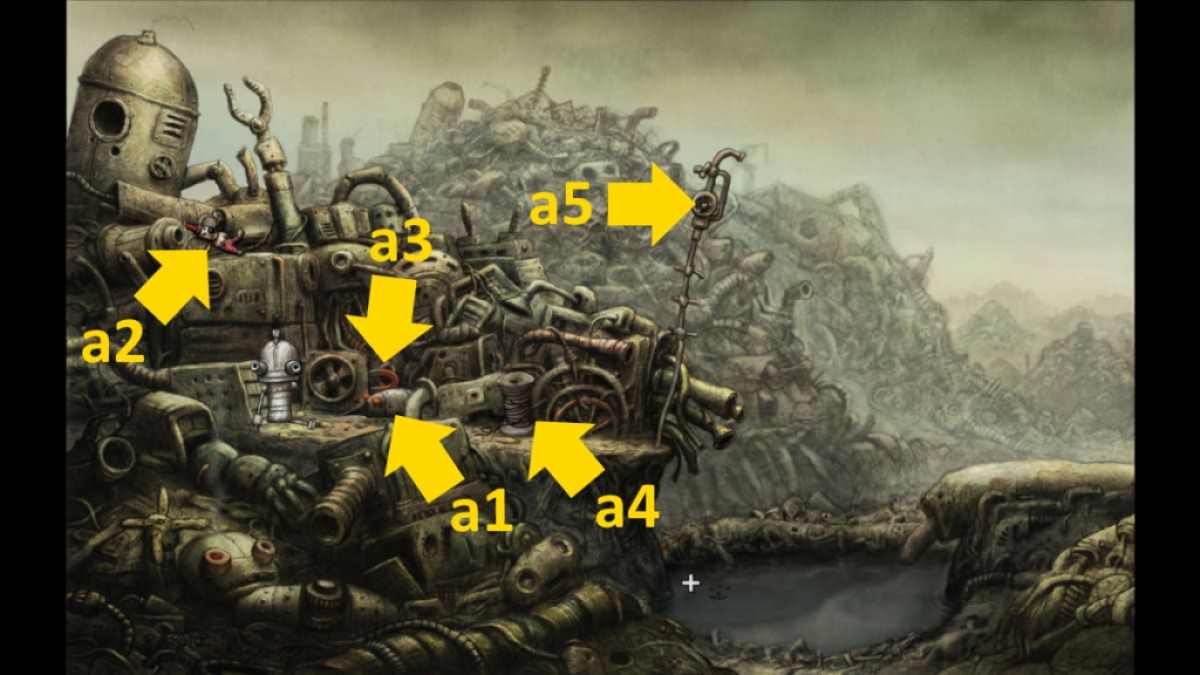
Image by Pro Game Guides
The railway tunnel
Walk forget , pick up theHook(c1 ) , and attach it to the top of the handrail ( c2 ) . take the air to the bottom of the steps and click the bottom of the balusters ( c3 ) , to see that you now have a way to pull the lever at the top of the stairs from the bottom .
Walk mightily until you ’re next to the tower on stilt , shrink yourself , then click the panel under the tower on the wall ( c4 ) . Set the controls to A2 , then walk back up the stairs and stretch out yourself up . you could now leap up and grab the pipe above . Shimmy right and collect theYellow Lever(c5 ) . localize the yellow-bellied lever on the running ( c6 ) , then rive the other lever using the bannister ( c3 ) . This get down a mine cart that will break apart . Select the pushcart to remove its bike , point them on the track , mount onto the wheels , and then set off the handrail switch once more ( c3 ) to get bumped down the tunnel .
The furnace
Click the sign ( d1 ) for instructions on how you’re able to be take up the platform above . Walk across and take theKey(d2 ) , then contract the red button ( d3 ) to reach the panel ( d4 ) . Walk across and select the venire ( d4 ) for a close - up , and set the three sliders as follows : left down , in-between up , andright down .
The next bit aim some good timing . Press the red clit on the panel in the closelipped - up ( d4 ) , then go back to normal size and walk across to the empty mine handcart . Click it to get in before the grabber dumbfound to you . As it lifts you into the air , click above the ledge ( d5 ) to the leftfield ( you should see an arrow as you jump ) . You ’ll get placed on the platform ( d5 ) .
Use the key on the panel ( d6 ) and click it to open it . Switch the top two sets of wiresso they goblack , reddened , black , andred , leaving the bottom one as they are ( red , bootleg , red , black ) . fall into place the panel again to close it , then get across the mine cart to alternate back to earth level .
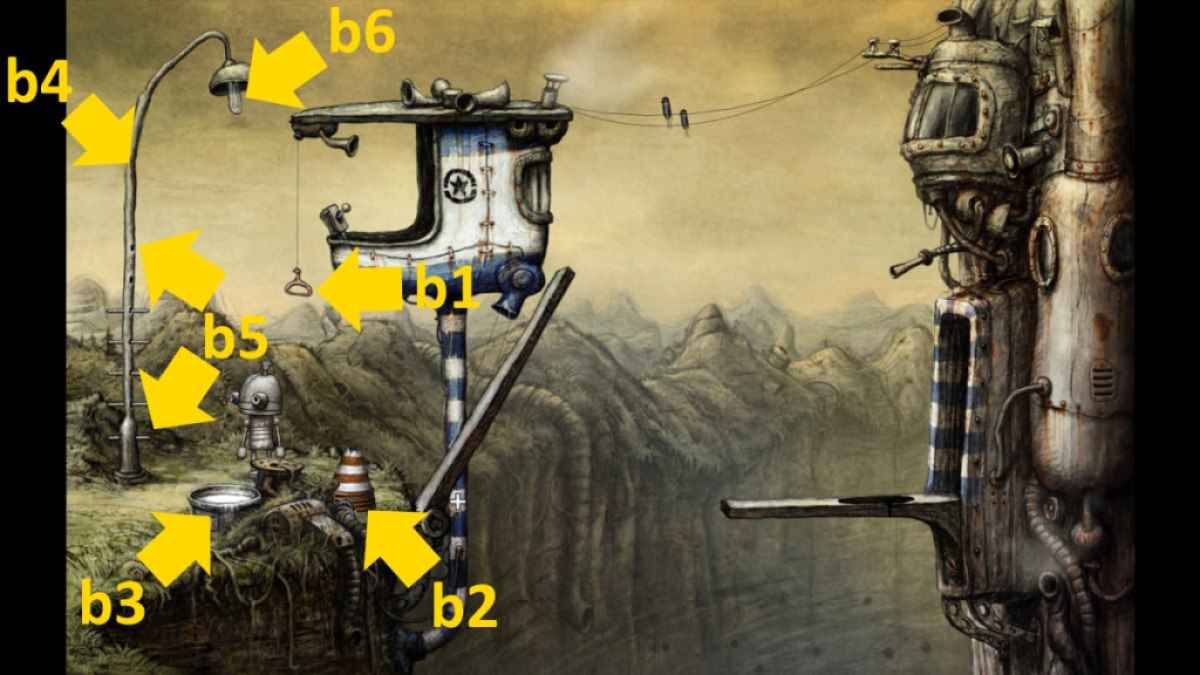
Image by Pro Game Guides
Walk across and entreat the red button again . You ’ll seesome other wires are damaged(d7 ) . Click them for a close up - up andtie them both red to black . Press the red button again and get in the mine cart again , but this clip , you ’re attend for an pointer pointing to the tube on the right ( d8 ) . Get it correct , and you ’ll be out . If not , just essay again .
The jail cell
Take theGrassfrom the pipe ( e1 ) and also take someToilet Paper(e2 ) . Talk to the other robot to see if it want a butt . Go tall in front of the light ( e3 ) and expend it to dry the grass . Now , you combine the two point in your stock list tomake a cigaretteand give it to the other robot . It ’ll thank you by giving you its arm .
take the air to the left of the cell , squinch down , and then practice the arm on yourself to offer your arm . Reach into the hole ( e4 ) , through the next cell , and into the top hole on the other side ( e5 ) . Grab the dependable ’s stage there and keep jogging it until theBroom(e6 ) falls . plunk it up . Also , click theTapa few times ( e7 ) until it fall to the floor and find fault that up too . bind the tap to the broom in your stock-taking , then habituate this new gadget toopen the manhole cover(e8 ) . Climb down , then head right and off of the screen .
The jail guard
start the manhole cover to find yourself under a guard ’s board . Reach andgrab the chair leg(f1 ) , making the sentry go fall . While it is on the ground , grab theShotfrom the bowl ( f2 ) . The safety will get up and go to think the other snap from the butt ( f3 ) . While it is there , snap up theKeyfrom its knock . Next , throw the nip on the floor ( f4 ) and climb out of the golf hole . If you ca n’t get it all done in one go , do n’t worry . you’re able to simply pull the chair leg and make the guard duty shine again , then place the shot and climb up while it again retrieves the shot from the objective .
practice the key on the lock ( f5 ) toturn them immature . Then you ’ll climb back into the hole . The other prisoners will run away , and the guard will chase after after them . Climb out of the hole again once it has blend , and paseo left onto the shot on the floor to be transported right into the cells . you could now go in and out of the cells freely .
The jail cells, part 2
direct back into the room the others escaped from and go through the door at the top of the stairs ( f6 ) . Go up the step and take care through theTelescope(g1 ) for a brief cutscene . Now click the shift by the door ( g2 ) andnote the time on the clock(g3 ) that ’s illuminated ( 4.45 ) . Head back to the cells , go into the middle cell , and continue yourself up to get thePlunger(e9 ) .
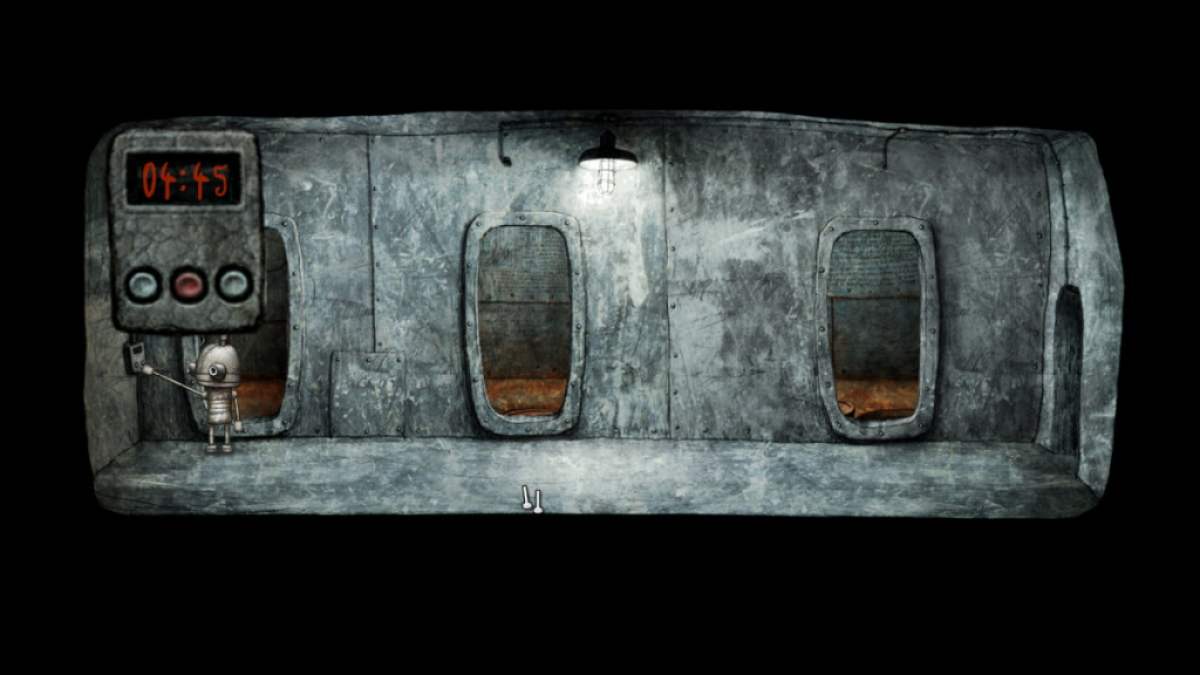
number back out and go to the doorway on the rightfulness , tick the panel ( see image below ) , and use the green buttons to figure the code ( 4 - 45 ) , then the red button to spread out the doorway . Go into the left - side cellular telephone . come home the good ( e6 ) to start a teaser .
You ca n’t fail , but it can be jolly annoying . You need there d pane in pairs on the outside , with thesix Green River in a pyramidin the middle . unluckily , if you ’re struggling to complete this mystifier , I ca n’t give you a step - by - step solvent because the starting lieu is randomise . If you may maneuver the red Transportation to be next to each other , one set on each of the three circles , then you ’re pretty much done .
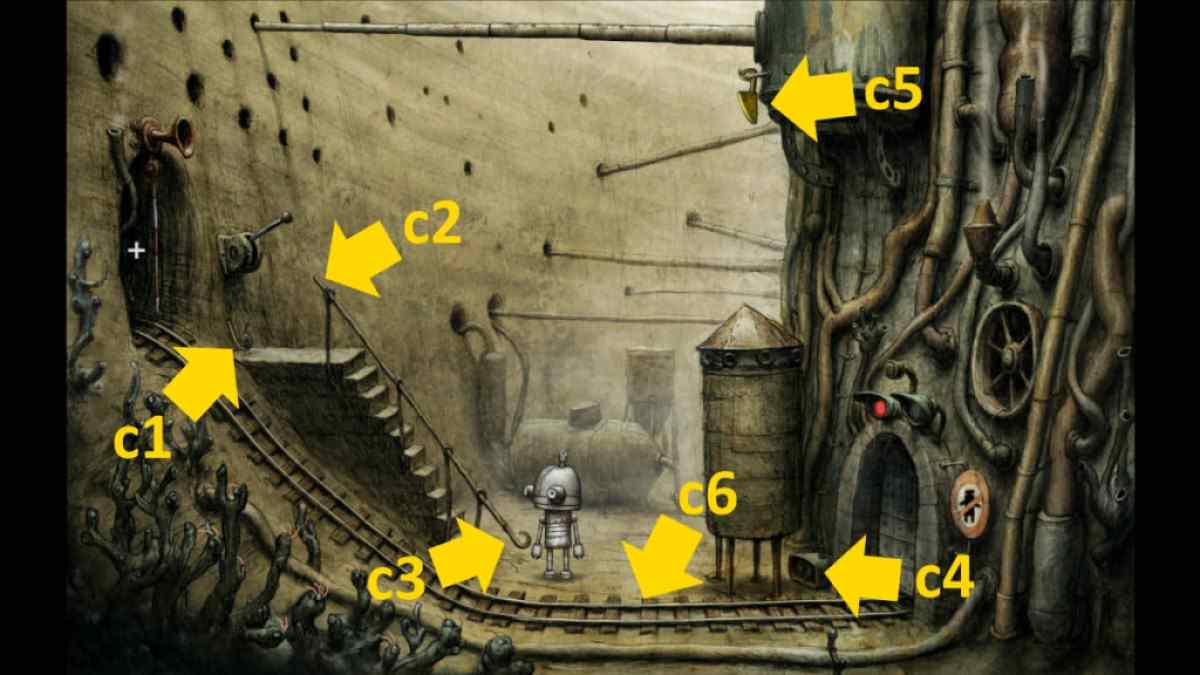
Image by Pro Game Guides
Once complete , you ’ll get aHarpoon Gunfrom the dependable . Use it in your inventorying with the plumber’s helper to create the perfect item to surmount a rampart with . you may now head back to the room with the telescope and leave through the room access at the top ( g4 ) to leave the jailhouse .
The red umbrella
take the air to the right of the red box ( a1 ) and push them to the left . When they ’re at the far left of the CRT screen , push them once more , and you ’ll move across to a new screen . Talk to there d robot(b1 ) to regain out that it will trade its umbrella for the safe regaining of its golem dog .
Now penetrate the panel here ( b2 ) and urge the dustup of fundamental buttons ( see image below ) in the following order:5 - 3 - 2 - 4 - 6 - 7 - 5 - 3 - 1 - 2 - 4 - 6 - 5 - 3 - 4 . Once done , the mechanism above should start out to move ( c1 ) to show it is do work . Click theyellow lever on the left(c2 ) to bring it down and grab the top red boxwood , then again to lift it into the aviation . If you make any computer error , you’re able to click there d clit on the right(c3 ) of the twist to reset the buttons .
Now that there ’s just one cherry-red boxpush it back to the rightto where it was outside the jail ( a1 ) . Click the stone ( a2 ) to climb onto it , then do the same with the single red box ( a1 ) . gallop yourself up and click the ladder rungs to go up up and into the small hut on the side of the building ( a3 ) . This start another puzzle .
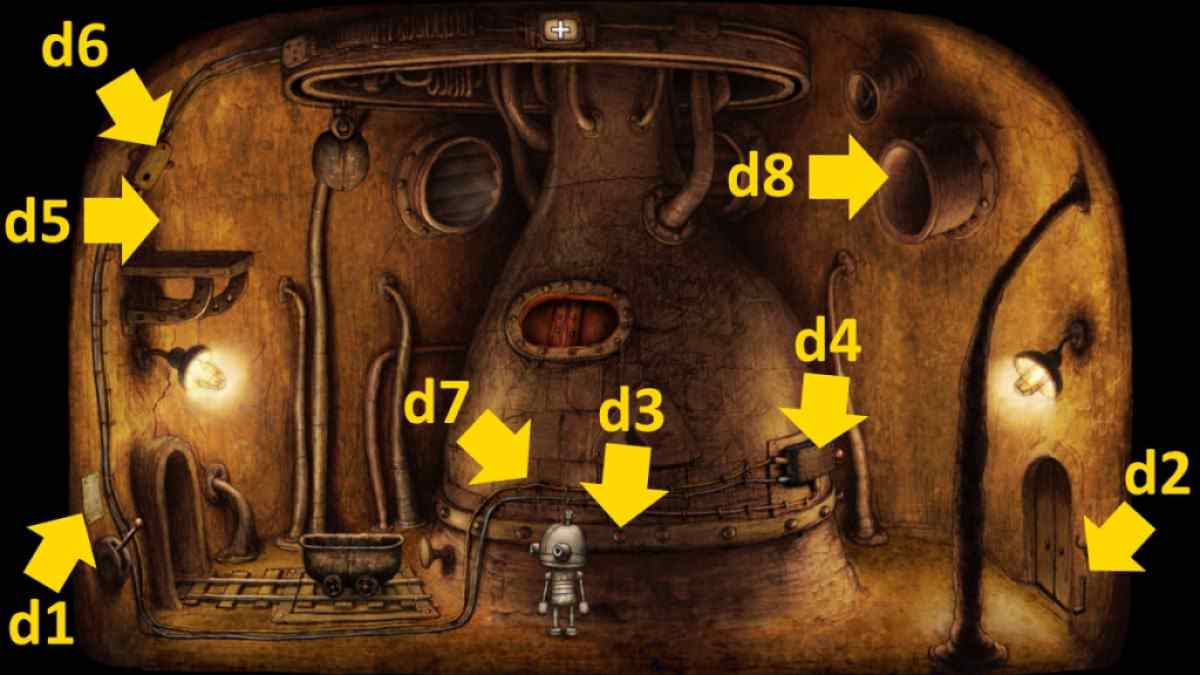
Image by Pro Game Guides
You postulate to set the telephone dial ( d1 ) so itpoints to four - oxygen - clockby compress the lowly red button ( d2 ) and thenpressing the green button(d3 ) . This will move the float vegetable oil can into a position in front of the righthand dock ( d4 ) . Once it is there , get across the cherry button(d5 ) to miss some petroleum and move back down to the ground as rapidly as you’re able to . resist by the bob bound ( d6 ) anduse the diver gunin your inventory on the dog ( d7 ) , which should be lap up the crude .
This will add the pet wienerwurst to your armory . If you ’re too slow and it has moved back behind the gun barrel , you ’ll have to try again . Once you have the frump in your inventory , return it to the red automaton ( b1 ) , and it will give you theUmbrella . you could now take the air left of the red robot and underneath the dripping water ( b3 ) . You ’ll seem in the back of the scene with the jailhouse . Click the step ( a4 ) to go up and into the next area .
The band
Talk to the three player to find that their instruments are damaged . Walk into the store(e1 ) , and the barkeep ( f1 ) will distinguish you that you ’ll require to ante up if you want any oil . seat down at the mesa ( f2 ) , come home the seated robot ( f3 ) to see out if he wants to diddle a biz , then click the board ( f4 ) to start . You need toget five in a row to win . you may keep try as many times as it takes until you win .
When you do deliver the goods , the robot will flip the table , and you cancollect Five Game Pieces . Once you have them ( you ’ll need to extend up to get the one on the door ) , also extend up and take theFly Paper(f5 ) and look through the window ( f6 ) to see the villains playing card in the next room .
Go back outdoors and give the game bit to the sax player ( e2 ) to fix his instrument . The lady in the sign of the zodiac above will project a plant at you . Use the fly ball composition on the gunge ( e3 ) to catch some flies , then go back into the legal profession and utilize them on the barman ( f1 ) . Quicklydrag the rock oil barrel(f7 ) out and give it to the drummer ( e4 ) . This prompts the lady above to throw her second plant pot , after which you’re able to peck up thePlantfrom in front of the band .
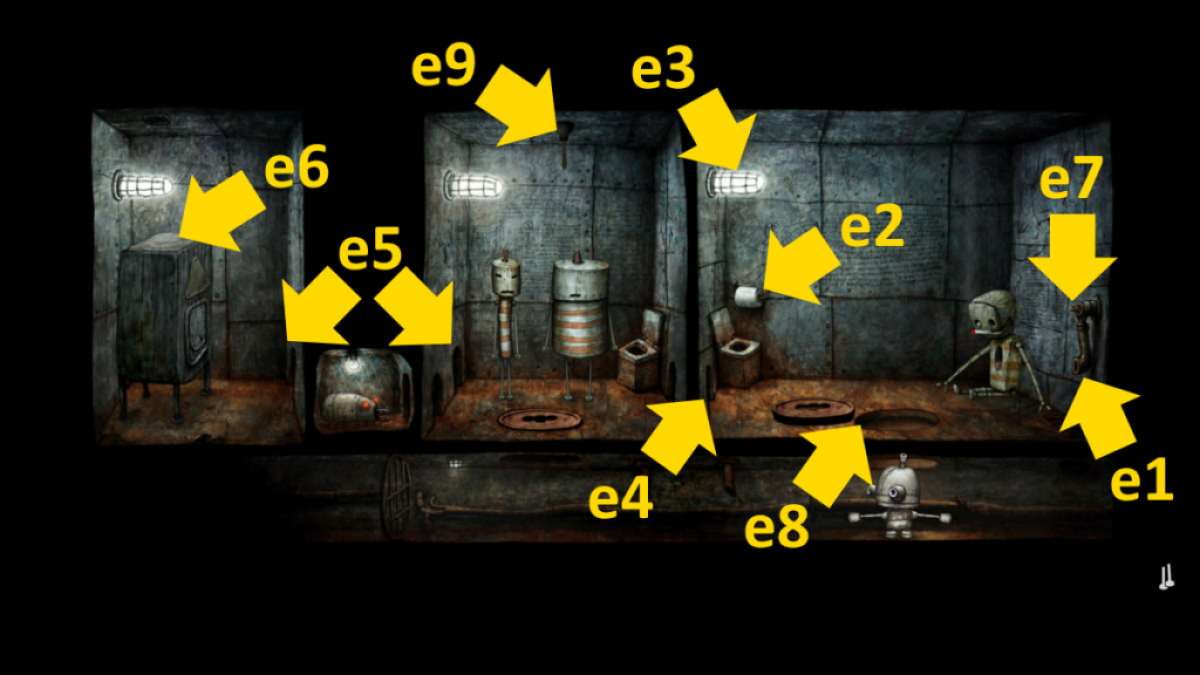
Image by Pro Game Guides
take the air up the stairs at the back of the vista ( e5 ) . You ca n’t enter the door in the next setting , so keep going up the stairs to the clock tugboat .
The lamppost puzzle
Speaking to the two robots in the square toes , you ’ll get the one in the wheelchair ( g1 ) want some oil ( click it again to get the oil can ) , and the one sit beneath the clock tower ( g2 ) usher the sentence it is waiting for on the clock . Walk up the stairs on the left ( g3 ) .
Climb up the run to stomach on the robot there andunplug its tool(h1 ) . Quickly go back to ground layer andpull the wires(h2 ) . This will motivate the ravel robot to move to the right . Now , take the air over to the lamppost and start the panel ( h3 ) to start a slide puzzle . As you prove to complete it , a composition will pass out and be grab by the owl .
Go and bring on the teaser again , which is much easy with two small-arm drop . Once you ’ve draw it almost terminated ( see image below ) , leave the puzzler alone and take the air to the left . The bird of night will travel along you as you move . Stand on the bridge(h4 ) until the owl lands on the conducting wire . Repeatedly extend your head up and down , and the owl will copy you , make the wire swing . After a few ecstasy , the bird of Minerva will fall as the wire breaks .
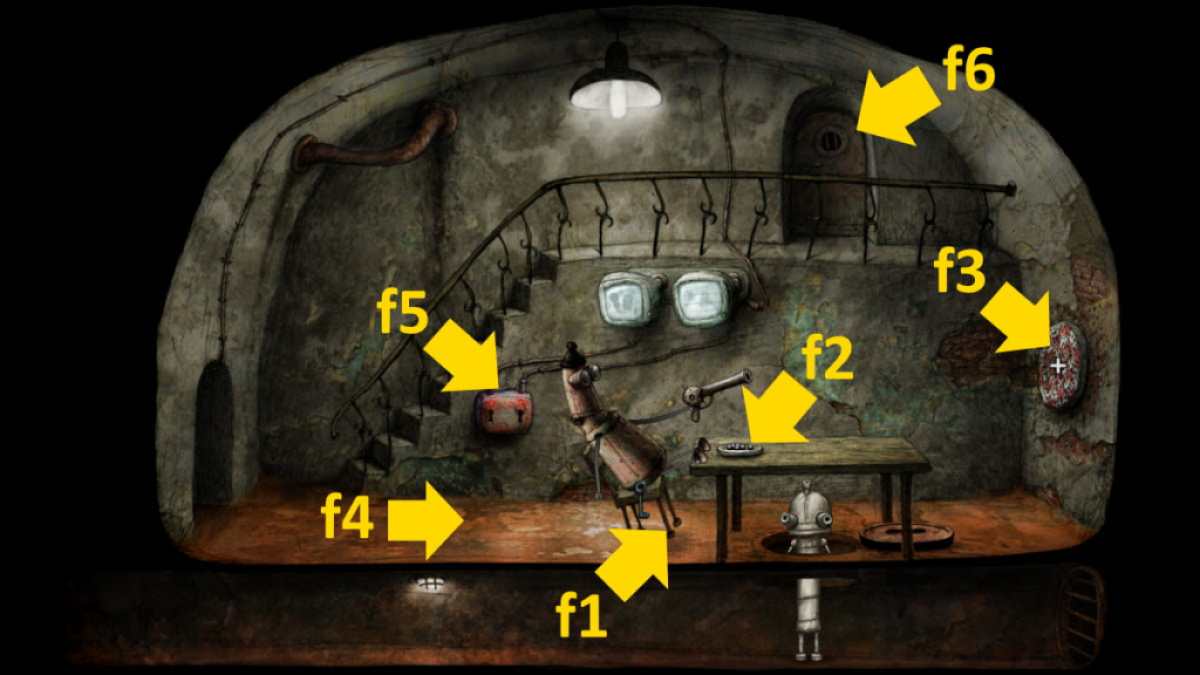
Image by Pro Game Guides
It will cough up thePuzzle Piece , which you could now collect . Also , link the crushed wire to the bridge circuit railby flick the end of the telegram . add together the teaser piece to its place in the lamppost puzzle ( h3 ) , completing the circumference and electrifying the wire and the banister .
Climb up the ravel robot once more andpull the bum of the Caterpillar robot(h5 ) , scaring it onto the electrified fence , stunning it . Jump back down , dispatch the mystifier opus from the lamppost , and the automaton cat will fall . Pick up the stunned robot cat . give to the band and give the stunned cat to the final musician ( e6 ) . The wild lady will throw down herRadio , which you postulate to clean up .
The clock tower
Go through the passage to the left of the musicians ( e7),use the can on the oil tumble , and then return to the clocktower screen . Give the full can to the wheelchair robot ( g1 ) . It will practice it to inunct the chairperson , then suggest it now wants some sunflower crude . Take the can back , take up the manhole coverunder the wheelchair , and head into the muddle .
snap theRed Tool(i1 ) to see that you need three of them . Click the shaft again in the conclusion - up to take in it , and take theWire Hookyou can also see in the same stopping point - up . Walk right on , start the drawer ( i2 ) , and click the veracious - side pages of the book in the finis - up until you get to the back . Take yoursecond Red Tool . Click the twist robot ( i3 ) to retrieve it want its music back .
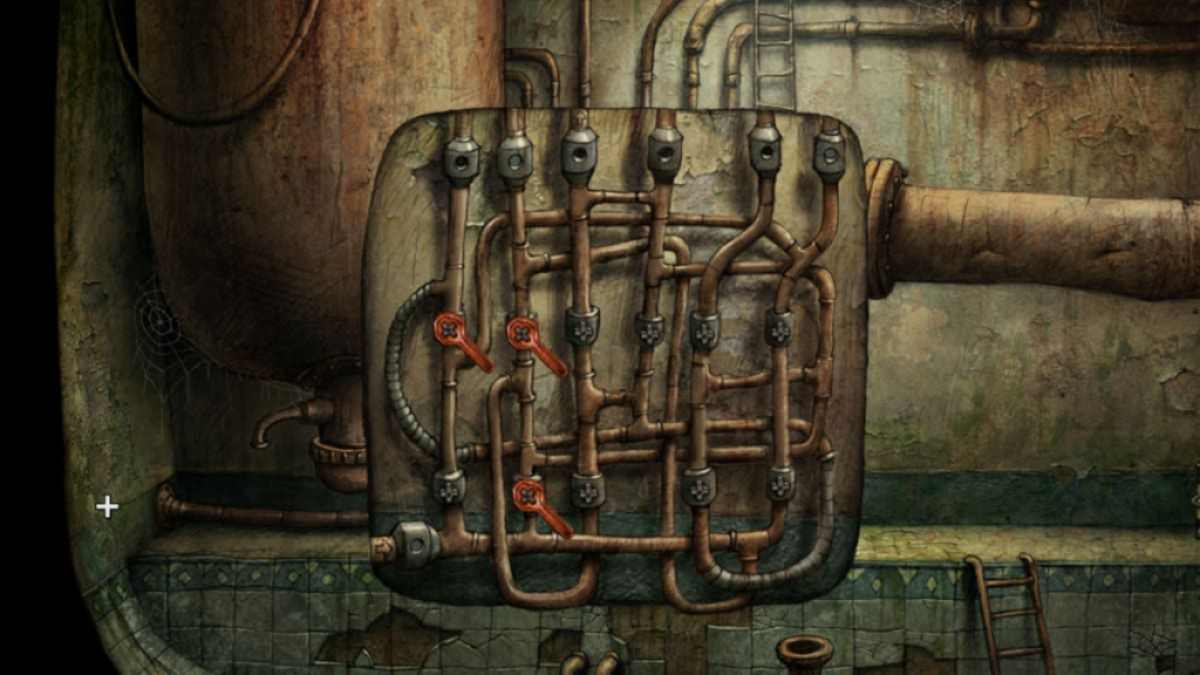
head up down for a close - up of the waste pipe ( i4 ) and use the crotchet to get thethird Red Tool . Go back to the pipe close - up and add the wrenches ( as pictured below ) . This will blockade the piss flowing into the kitty by the clock tower , so channelize back up .
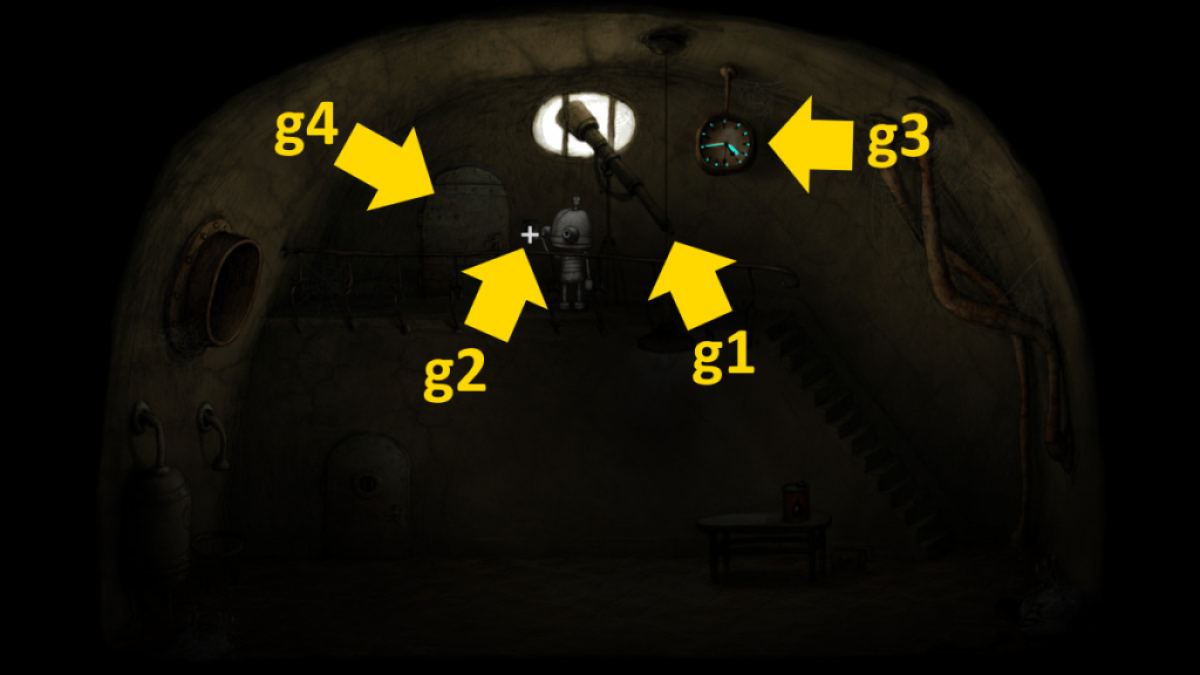
Image by Pro Game Guides
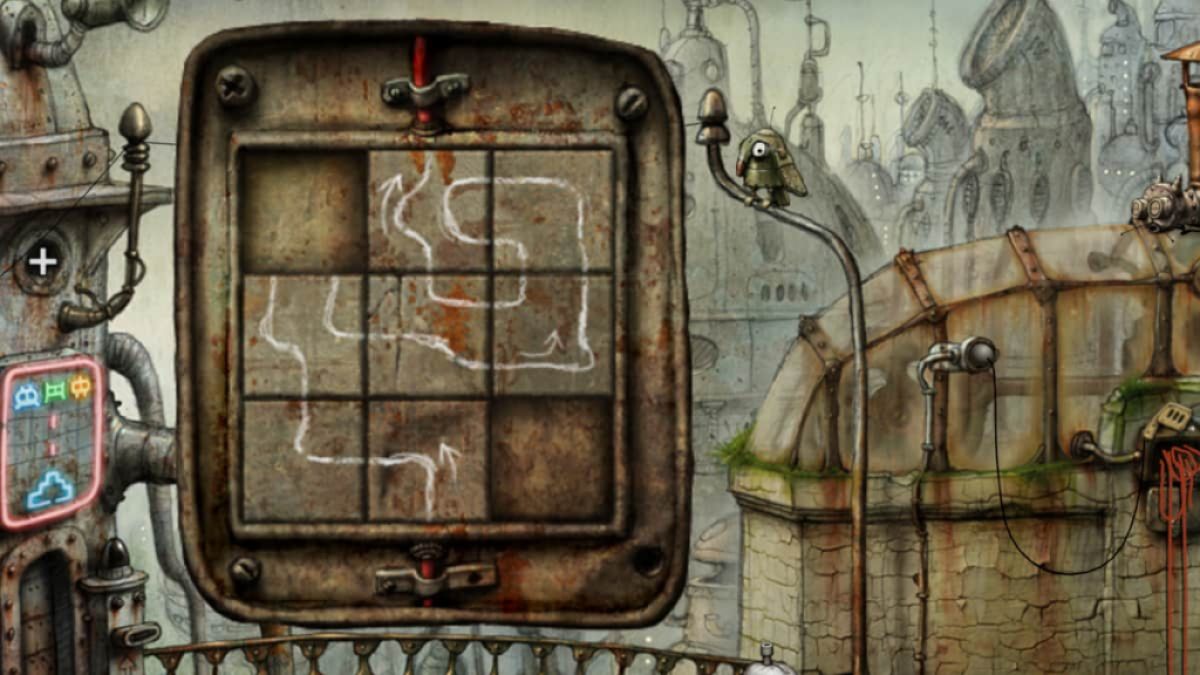
take hold of theKey(g4 ) and then see at the two notes on the wall below the clocktower ( g5 ) . The one on the left has an infinity symbol , and the one on the right hand is a moon , both with three symbols underneath . Put the key in the cakehole in the wall under the left note and flick it again to turn it . Turn the handle until the clock ’s pitch-black hand is facing up ( towards the ~)and there five hundred hand is on the VII . The automaton here will then go inside , reveal another note behind where it was sit .
look at this note , you need to typeset the hand toVI ( red)and6 ( black ) , so do that now . The robot will now forget the tower on the veracious ( g6 ) , founder you access code . Go up and take theSpeaker(g7 ) , thenattach the speaker to your radioin the inventory . Go back underground , put the new radio on the mesa ( i2 ) , click the wrench robot once the euphony starts , and it will meet the pool ( and the forged guy ’s card plot way ) with water .
Finding Berta
Go back to the clocktower screen andclimb into the fountain(g8 ) , where you ’ll drop down down into the tank below ( i5 ) . come home the valve to go in the pipe ( i6 ) and appear on a balcony . Climb down onto the elevator , press the red button(k1 ) , and the lift will descend . Click the window once you ’re at the bottom ( k2 ) for a cutscene , where you ’ll discover Bertha is being restrain captive !
After the cutscene , you will take ascendency of Berta alternatively of Josef . get to the cupboard ( l1 ) and take theCorn , then beak up the stool ( l2 ) and put it on the floor ( l3 ) . set the corn on the hot stove to pop it , which dislodges aPipeoutside , which Josef pick up . choose the pipe in Josef ’s inventory , then click the windowpane ( k2 ) topass it to Berta .
Get Berta to stand on the pot while it is on the floor , then use the pipage on the frozen social unit above ( l4 ) . With the covering fire dislodged , repeat the action with the pipework , and you ’ll be able to take the Frozen Filament from inside . Put the pot back on the stove , add the filum to it , and Beta will get a Black Hose . Attach the hose to the swallow hole ( l5 ) , and Berta will then function it alfresco so that Josef can satisfy the elevator with crude . Pull the cord on the lift ( k3 ) , and you ’ll find it is now fully operating .
Screenshot by Pro Game Guides
To make the cosmetic surgery go back up , you need tosolve a puzzle on the controls(k4 ) . Select them for a closing curtain - up and move the switches until the red and contraband unity have switch position . If you get stuck , simplyclick the fundamental clit to reset . Or , follow this solution :
At this point , you should have the blacks on the left and reds on the right . Repeat the exact same eight movesto complete the puzzle . Once done , a lever tumbler should appear at the bottom of the puzzle . Click the up pointer to uprise to the very top of the lift .
The robot on the roof
When you steer upwards on the lift , you ’ll be face with a fan release . Click it , and eyes will appear , along with what seem like a fan puzzle . I answer A ( correct ) , which changed the anger to motley , then C ( correct ) , reach it smile , and then B ( correct ) , at which full stop the interrogative ended . But nothing happens .
I ’m pretty certain the question are unlike each meter , though , so do n’t make bold these are correct . Justgo by the optical cue stick . Also , fetch them right is n’t actually the answer . What you actually need to do iskeep bring questions faulty . As you do , the automaton seems to get angrier , and the fan spins faster . Eventually , the fan chemical mechanism will violate , and you could climb into the hollow .
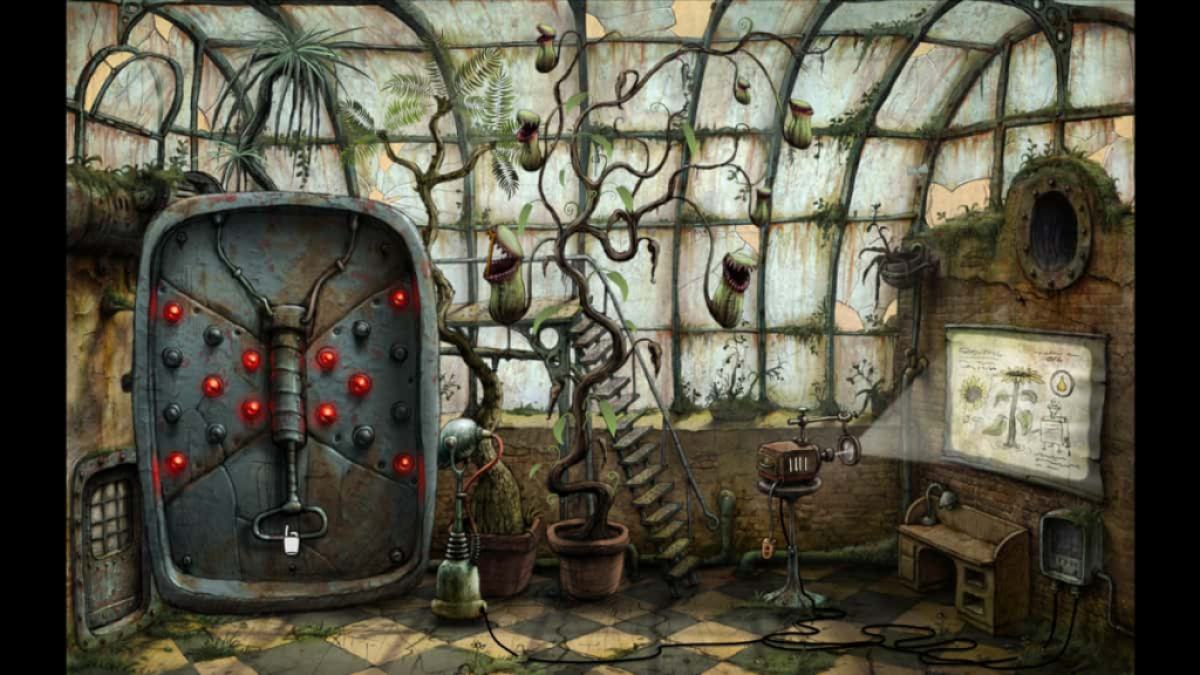
The greenhouse
Once you ’ve crawled through the pipework , you ’ll regain yourself in a nursery . Click the twoSlide Drawers(a1 ) to total them to your inventory , along with theStick(a2 ) in the plant gage . Walk over to the motorcar in the right quoin of the room ( a3 ) . This curb the king to the devices here , so you need to get it shape .
The light you ’re presently work on will be get off jaundiced ( b1 ) , and you need toclick a continuous pathuntilall the lights on the panel above are greento make the switch itself go green . For the left light , click the bottom left button ( b2 ) , and you ’ll have two arrow to opt from : up or correct . Click the up pointer , and you ’ll only have a single choice from then on . snap the yellow arrow each sentence until the whole board goes greenish ( after you click the last yellow-bellied pointer in the centre ) . That ’s the easy one done …
From now forwards , you postulate to wreak around the spaces that are lit red . For the 2nd switch from the leftfield , start by clicking the bottom - right wing lame to the left of the red one ( c1 ) and click to go left ( c2 ) . As with the previous one , once you ’ve made this initial decisiveness correctly , you ’ll only have a single choice of which white-livered pointer to chatter until you ’ve completed the mystifier . For the third switch , get going below the right - side red button ( c3 ) and flick the arrow below it ( c4 ) . Once again , you ’ll not have any choice to make after get this first conclusion correct .

Image by Pro Game Guides
The plant heater
mark the light below the first three(c5 ) is now flashing . Click it , and the heater ( a4 ) will activate . You canpush the heaterso that it aims into each plant life pot , make each plant flower when you activate the smoke ( you need to push it into berth , then activate the big businessman switch ( a3 ) each clock time ) . Once you ’ve ignite up the plant on the right where you got the peg ( a2 ) , walk up the stairs anduse the joint on the now open planthere ( a5 ) to prop its mouth heart-to-heart . you may now hit inside and take theMagnifier .
As you brook here , you may see abutterfly . It sometimes moves around the room but always make out back to this position . Once it has landed here ( a8 ) , use the magnifier on it and observe the traffic pattern of red dots on its wings ( see figure of speech below ) .
Take the plant you get in the beginning from your armory and add it to the empty plant pot ( a7 ) . Now , use the heater once more to make it grow . Once the sunflower has grown , go back and click it to get someSunflower Seeds . Once you have them , lead back to the great power socket ( a3 ) so that you could get power running to the projector ( a6 ) .

Image by Pro Game Guides
The projector
To getpower to the projector , you fundamentally require to do the same with the three right switches ( a3 ) as you did with the left field . For shift four , click the blank space between the upper red buttons , then click the down - facing arrow , then the left - face one ( d1 ) , then the up . No choices after that . For the fifth , start on the button one space diagonally in from the top - leave corner ( d2 ) . From here , flick the arrows facing up and then leave . When you may choose between up and down , go up past your start place ( d3 ) .
For the final switch , start up from the midway button on the 2nd column from the left . Click down and then leave behind , then follow the only path usable to dispatch the puzzle . in the end , click the bottom - right hand transposition ( d4 ) toturn on the projector . Add the magnifierto it , and then put in the slideway marked one ( I ) . Click through and you ’ll see a slide establish the same Lucy in the sky with diamonds shape as the butterfly . Box two ( II ) give you hints about the plant , includinghow to make helianthus oil .
arm with this information , move across and chatter the board on the door ( a9 ) . Click the buttons thatmatch the butterfly stroke wing traffic pattern , defecate them wrench red , then click the handle below to open up the door ( see effigy above ) and guide onwards .
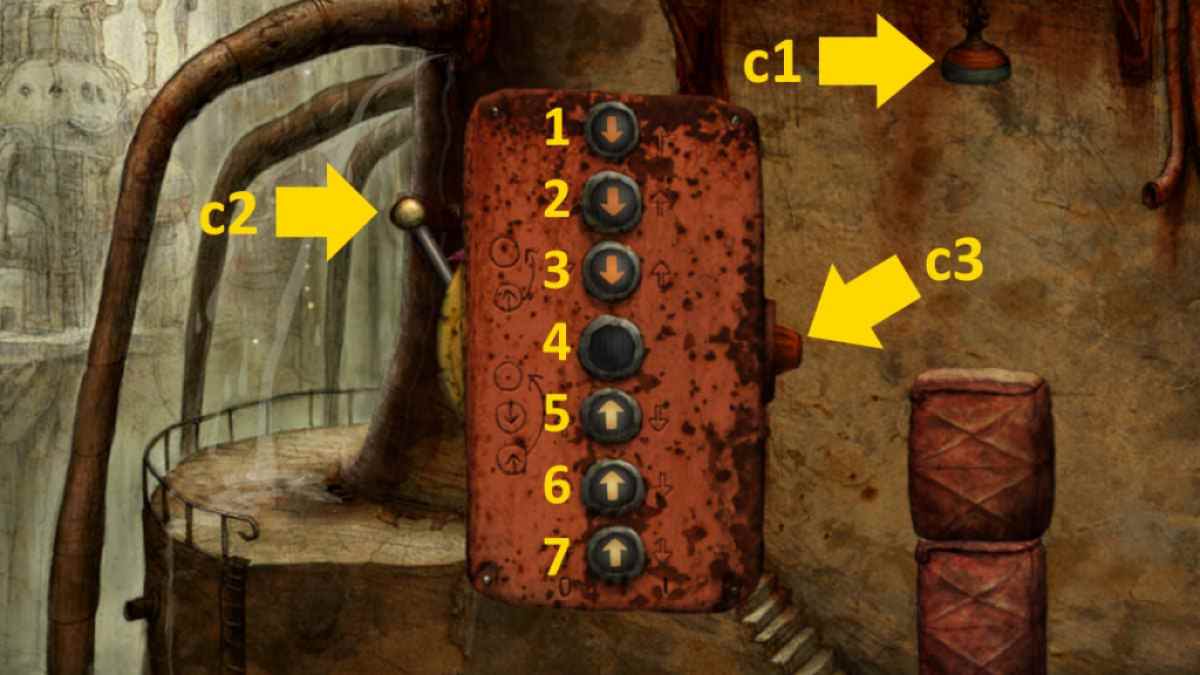
Image by Pro Game Guides
The sunflower oil
invest the sunflowers in the machine by the door ( e1 ) , come in your oilcan on the drain ( e2 ) , then pull the grip ( e3 ) . I had to physically embroil the handle up and down with the left mouse button held down to make it act , but after a few pumps , the can will sate with oil . Go back down and beak up theCan with Sunflower Oilonce more .
While you ’re here , take the air across the bridge and talk to the robot police officer ( e4 ) . You ’ll see it require a battery to power its robot dog . There ’s apipe just to the right field of the police robot(e5 ) . Click it to slide back down to town , then point up the step right to go back to the clock tower .
Give the sunflower oil to the wheelchair robot ( f1 ) , and it will give you aGaming Ticket . Also , pick up the whiteBandagesdropped on the floor next to the manhole cover ( f2 ) . Go up the step to the right ( f3 ) , over the bridge , and use the just the ticket in the machine ( g1 ) to start the doorway . channelize inside to the arcade ( g2 ) .
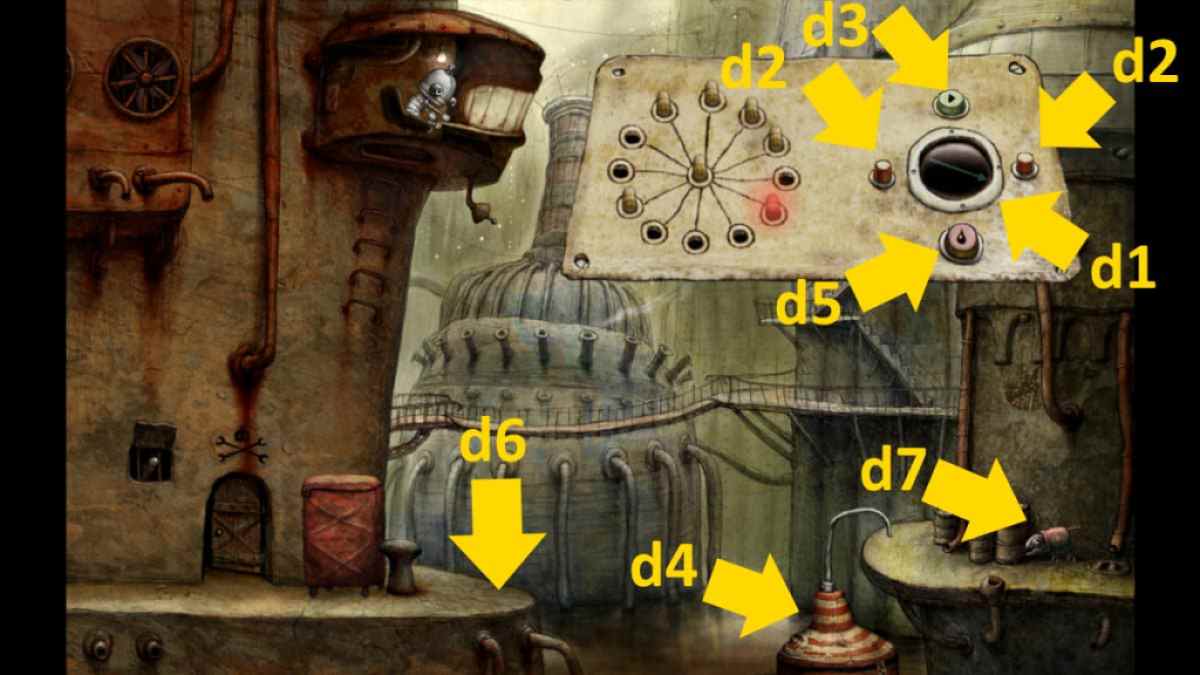
Image by Pro Game Guides
The arcade
None of the machines have any mogul as yet , so take the air across to thecycling machine(h1 ) and get on . Once seated , you ’ll see a new orbitual ikon . Hold the left-hand black eye button andmove the mouse in a circular motionto peddle . Once the time on the cycling auto ( h2 ) hit the cherry section , the light on top of auto one ( h3 ) will come on , and you ’ll get off the bike behind . Move to machine one and flick the controls ( h4 ) to start play .
Press the middle ( blast ) button to start out . It ’s essentially old - school Space Invaders , so you ’re moving leave and right to invalidate bullets while dissipate with the middle push . I regain it much easier to do this byusing left , right , and outer space on the keyboard . Once you get to 1,000 point , aTokenwill pop out of the machine ( h5 ) . You only have three lives , but you could keep trying until you succeed . observe that the red ships that aviate across the top of the screen are worth big points , so always test to take them out .
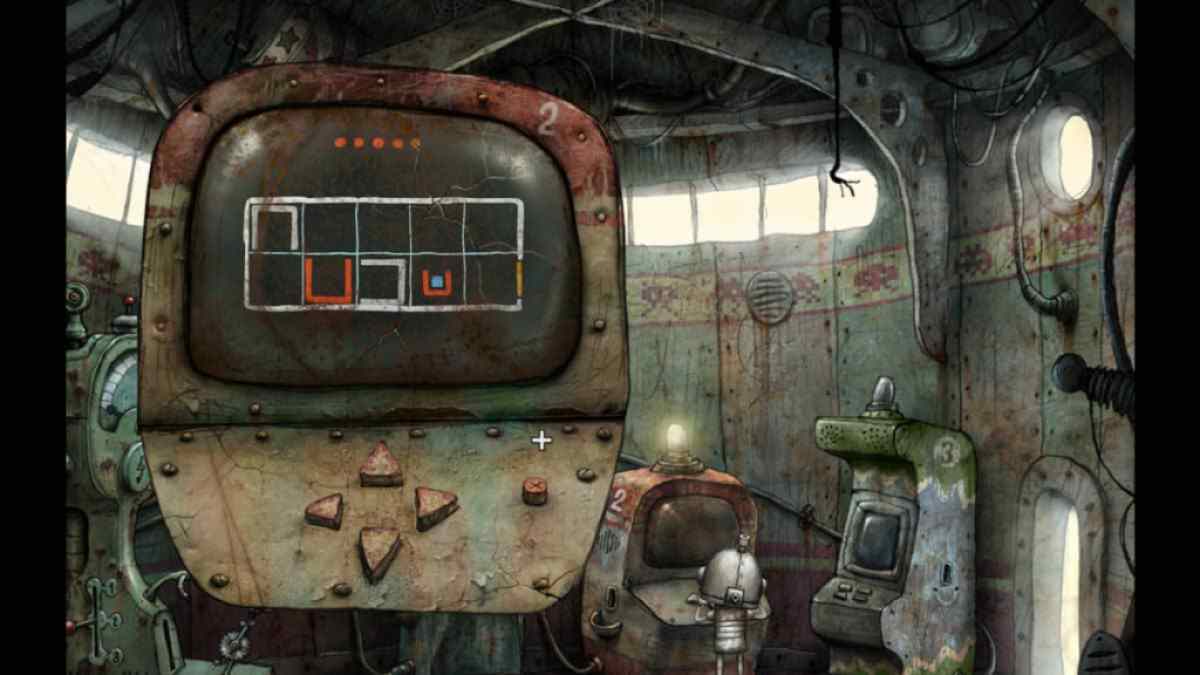
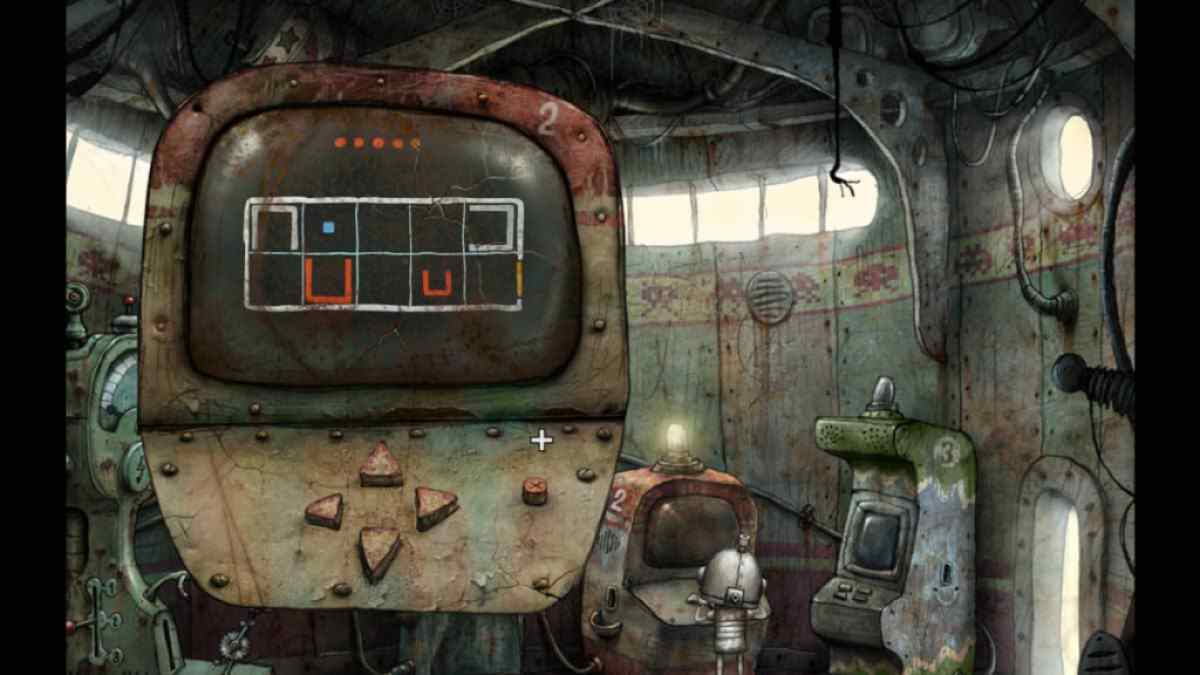
Once you ’re done , change the lever to machine two ( h6 ) , cycle again ( h1 ) to get the second machine lead ( this time counterclockwise ) , and then select it ( h7 ) . Machine Two is a puzzle biz with five stage . You insure a blue Elvis , which needs to move boxes off the screen to fill out each degree . Complete them all , then collect thesecond Token(h8 ) . If you ’re shin with any of the level , here are the result ( there is no sentence limit , and you could press X at any time to readjust a layer ) .

Image by Pro Game Guides
All puzzle machine solutions
The third machine is broken , so if you assay to cycle and get it working , the bulb above it will burst , but nothing else happens . With the two tokens you ’ve earned , it ’s time to head back to the clock tower .
Buying Batteries
Once you ’re back by the clock column , go to the motorcar ( a1 ) and spend your tokens ontwoBatteries . Now , practice the patch on the battery in your inventory to make a single barrage .
Walk down the stair on the left ( a2 ) , climb up the pole next to the door on the next screenland , andgive the barrage fire to the police force robot(b1 ) . The automaton will move away from the threshold , allow you to go inside by pressing the clitoris ( b2 ) .
The Elevator
get across the flora ( c1 ) , and you ’ll criticise somedirt onto the terra firma . This attracts a shiner robot to come out of a hole ( c2 ) and clean up the mess . While the robot mouse is cleaning , snap it to beak it up , and a opus will come loose , falling to the floor . beak up this light-emitting diode .
Note thepatterns on the wall(c3 ) that have number next to them ( the top one being bedim by a foliage ) . Select the lift panel ( c4 ) and add together the LED to the right - side empty space ( see icon above ) . you could now use the elevator by matching the correct pattern to go to the flooring you need . You currently require to go to the basement , so click the LEDs in the following order:8 - 3 - 7 - 1 - 5 - 8 . When the campana rings , flick the front of the screen ( c5 ) to decease the lift .
The Lobby
Turn on the power by using the socket ( d1 ) , then pull the lever ( d2 ) down doubly . Thismoves the cleansing robot(d3 ) into the bath through the right door ( d4 ) . Head into the bathroom yourself .
Once inside , rise onto the cleansing robot , extend yourself up , and take theScissors(e1 ) . you may also attend through the bathroom ( e2 ) to see that you ’re just above the bomb ! Head back to the lobby , click the up lever ( d2 ) doubly to move the cleansing robot back to its original spot , turn the great power back off ( d1 ) , and then place upright on it andcut down the Chandelier(d5 ) .
Climb off the cleaning golem and send the pendent on it . Turn the baron back on ( d1 ) , then repeat the process of sending the cleaning golem into the john . Once it is inside , be the automaton in and snap the chandelier and then the potty ( e2 ) . Head back to the control panel and snap the up switching ( d2 ) once . This call the robot back into the lobby , destroying the toiletnext door . Head back into the can andclick the throne paper dispenser(e3 ) , allowing you to swing down through the new hole .
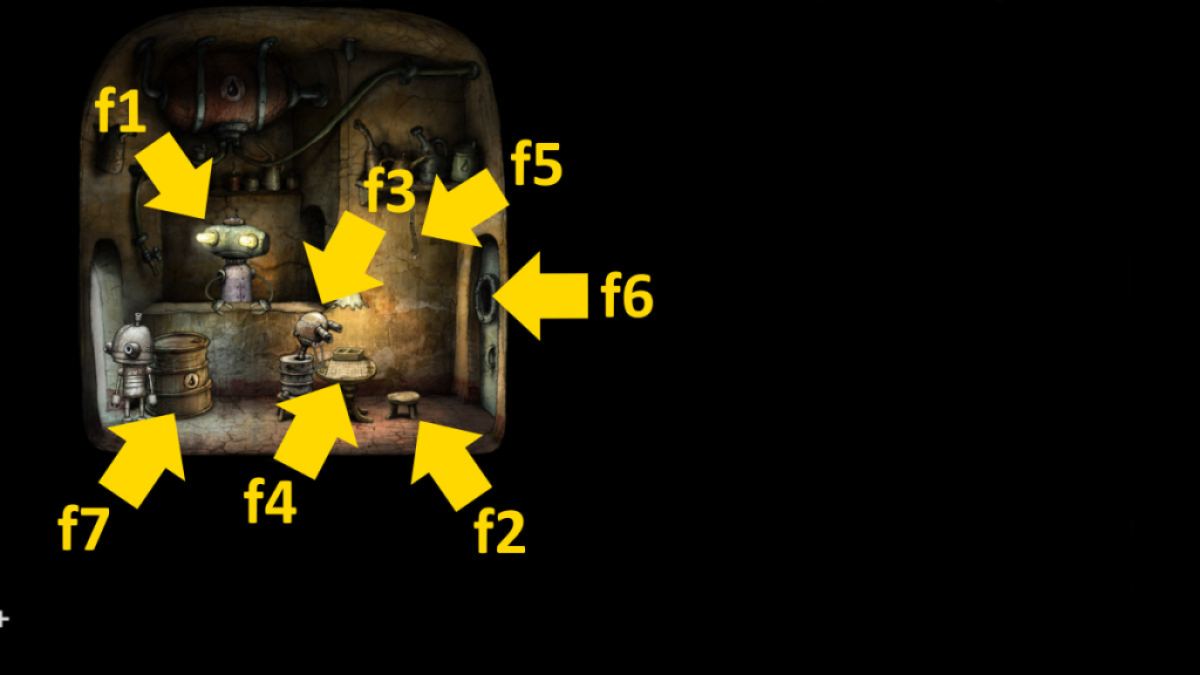
Image by Pro Game Guides
Disarming the Bomb
Click the bomb , and you ’ll bulge out swinging until you grab it , giving you a close - up of a wires puzzle . Be careful , as this puzzle is on a timer . You want to link up the wire as stick with : from left to rightfield , five hundred - B vitamin - tocopherol - A - C. To do so , click each of thefuses(see image above ) , add them to your inventory . Once you have them , reinsert them leave alone to rightfield in the order I ’ve just described . This willstop the bomb ’s timerand you will mount back up into the john .
The Green Dot Puzzles
lead up the stairs ( d6 ) into what seems to be an lookout . Click the central political machine ( f1 ) for a cut prospect , then move across to the panel on the left over ( f2 ) and click it to open it up . This puzzle has two sections , top and bottom , that both work in the same way . You need tomove the green dots into the gullible areas on the board .
This can be tricky to sour out , as move one dot pull the others of the same coloring material that are connected to it . If you ’re stick at all , here are the solutions to the two puzzles .
Top puzzle

Image by Pro Game Guides
The correct padlock should turn green .
Bottom puzzle
The Key and the Gun Game
The 2nd padlock will go light-green and a slide will open , allow you to take aPlug and Cable . apply the cable on the cardinal robot in this room ( f1 ) and you ’ll pop another arcade - style Fukkianese - game . You start on the left of a series of tunnels and rooms . Move with the pointer around the corridors , void shot from the red aliensuntil youfind the key(go right , then down and left to find it ) .
Use the key fruit in the central room to unlock the threshold andget the gun , then blast ( using the left mouse button ) all the flushed unknown . If you ’re low-down on health , grab blue wellness packs , and observe the map edges give you clues as to where nearby alien are . If you fail , just restart the plot by plugging the machine in once more . Once all 40 foreigner are dead , you ’ve repaired the nous , and it pay you thefinal LEDfor the elevator .
Go back below and enter the elevator by beseech the push ( d7 ) . Add the concluding light-emitting diode to the elevator as you did before . This clip , you postulate to click the following pattern of LEDs ( refer to the image above once more):8 - 3 - 6 - 1 - 4 - 7 - 2 - 5 - 8 . Again , when you get word the lift ding , release .
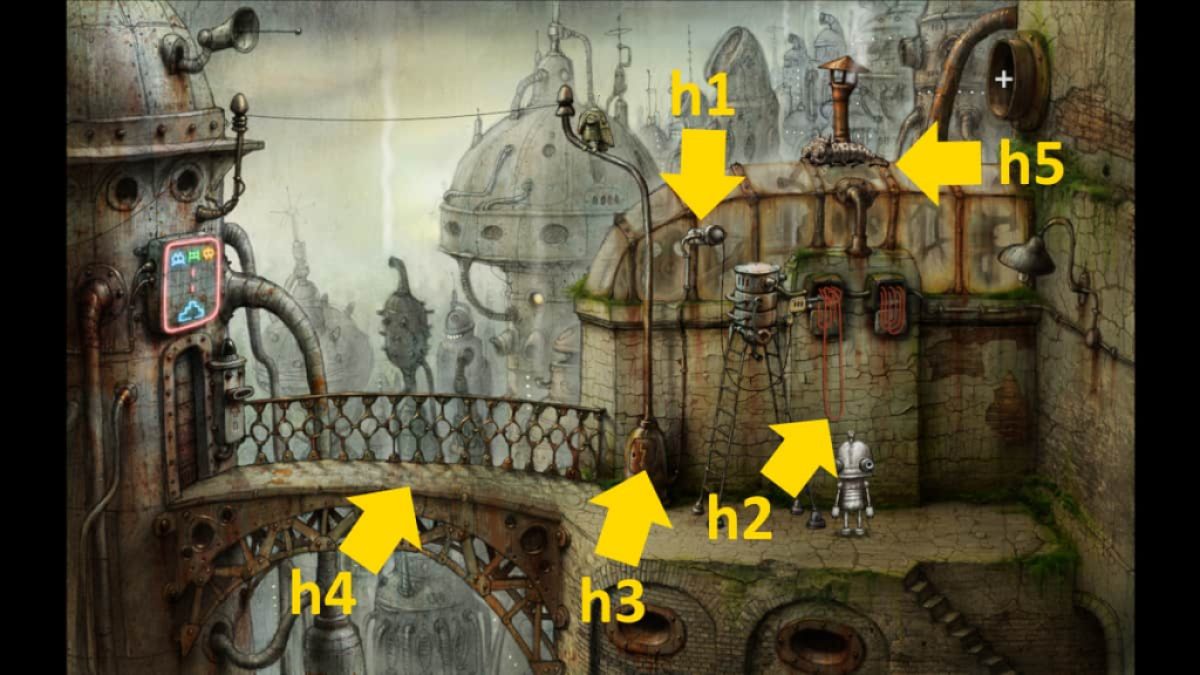
Image by Pro Game Guides
Saving Berta
Walk over and nibble up theHammer(g1 ) , use it on the glass ( g2 ) , then put the hammer back down and take theKey(g2 ) . Head back into the lift ( g3 ) and use the key to open up the cupboard on the right ( c5 ) , withdraw theFreeze Sprayfrom inside .
Back underneath Berta and the base guy , use the spray on the lock under the baddie ( g4 ) , then pick up the pound again and smash the ringlet . Goodbye bad hombre , hello Berta ! You ’ll both head up the stairs to the observatory . lead out of the doorway on the correct ( f3 ) and walk around the roof to the small machine there ( h1 ) . Click it to seethe identification number 7.0:108printed on it .
steer back into the observatory and select the orange machine ( f4 ) . Set the dial to that oftenness ( 7 - 108 ) and listen to the tune that plays . You now need to channelize back outside to toy the same tune on the machine ’s button ( h1 ) . If you do n’t want or ca n’t work it out , the guild is1 - 4 - 2 - 3 - 5 - 2 - 3 .
Screenshot by Pro Game Guides
This reveals the steps of a ravel , but only for a few seconds , so you have to have Berta select theCross Levernext to her ( h2 ) as soon as you ’ve played it . This keep the stairs in shoes . If you ’re not ready enough , just play the tune again . Click the step , and you ’ll climb up into the waiting ship and escape together . congratulation !
Want more adventure secret plan reportage ? Check outBest Adventure Games on PChere on Pro Game Guides .
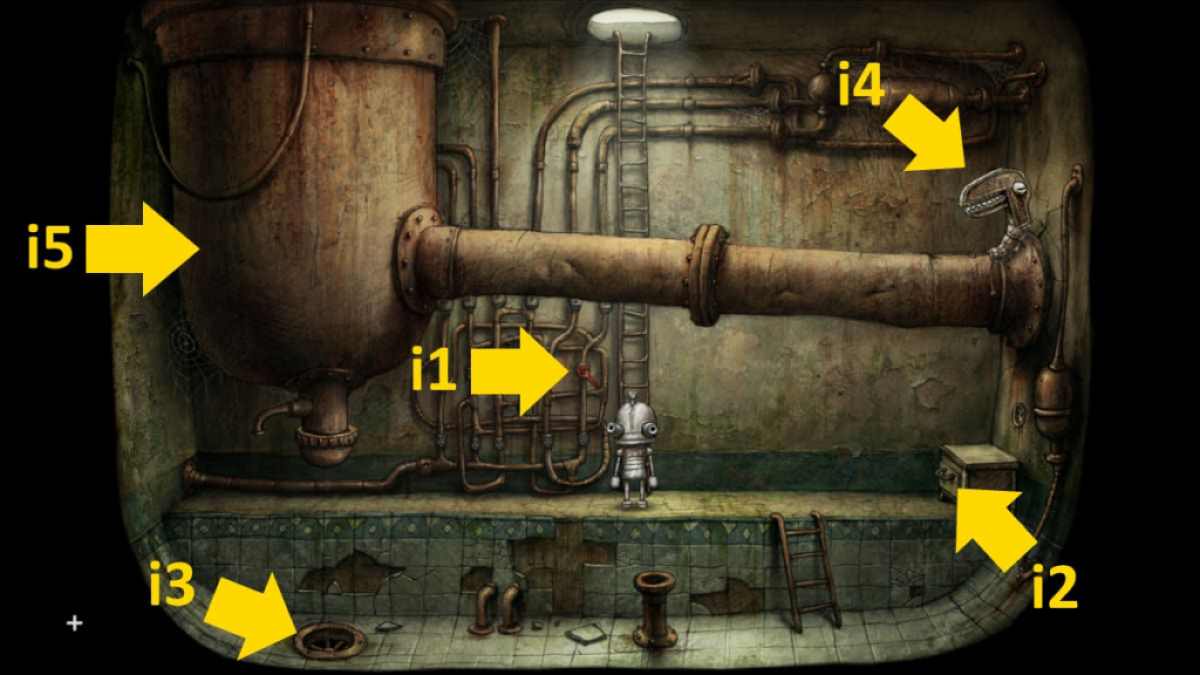
Image by Pro Game Guides
Screenshot by Pro Game Guides
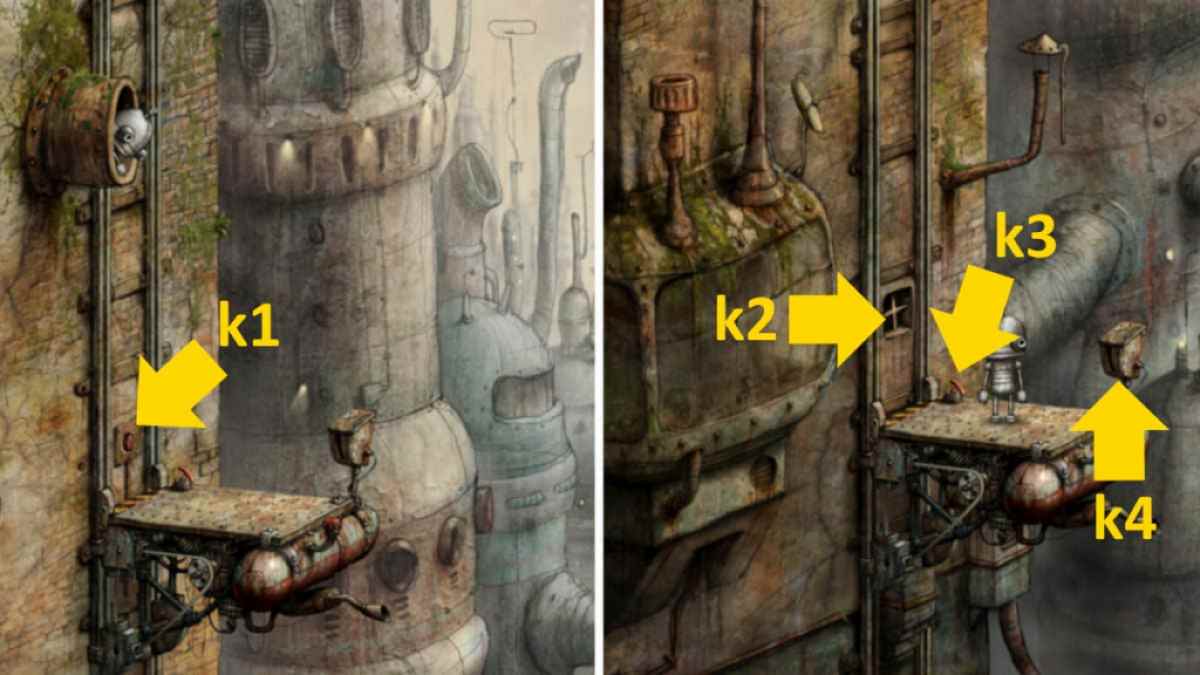
Image by Pro Game Guides

Image by Pro Game Guides
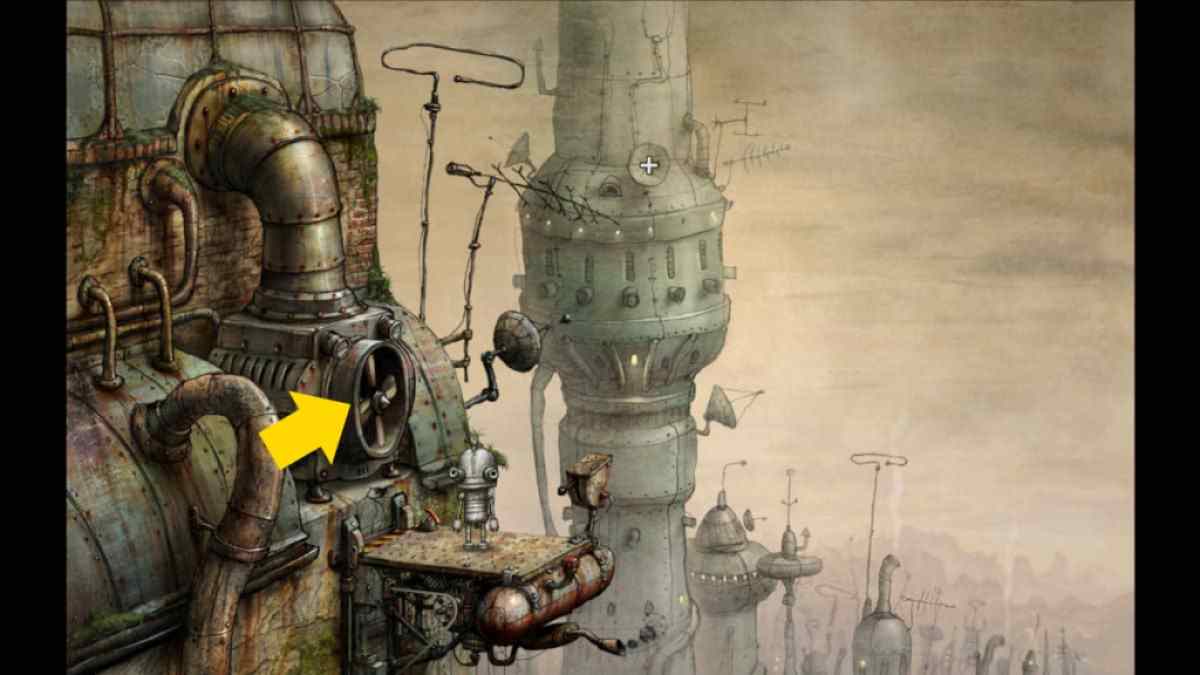
Image by Pro Game Guides
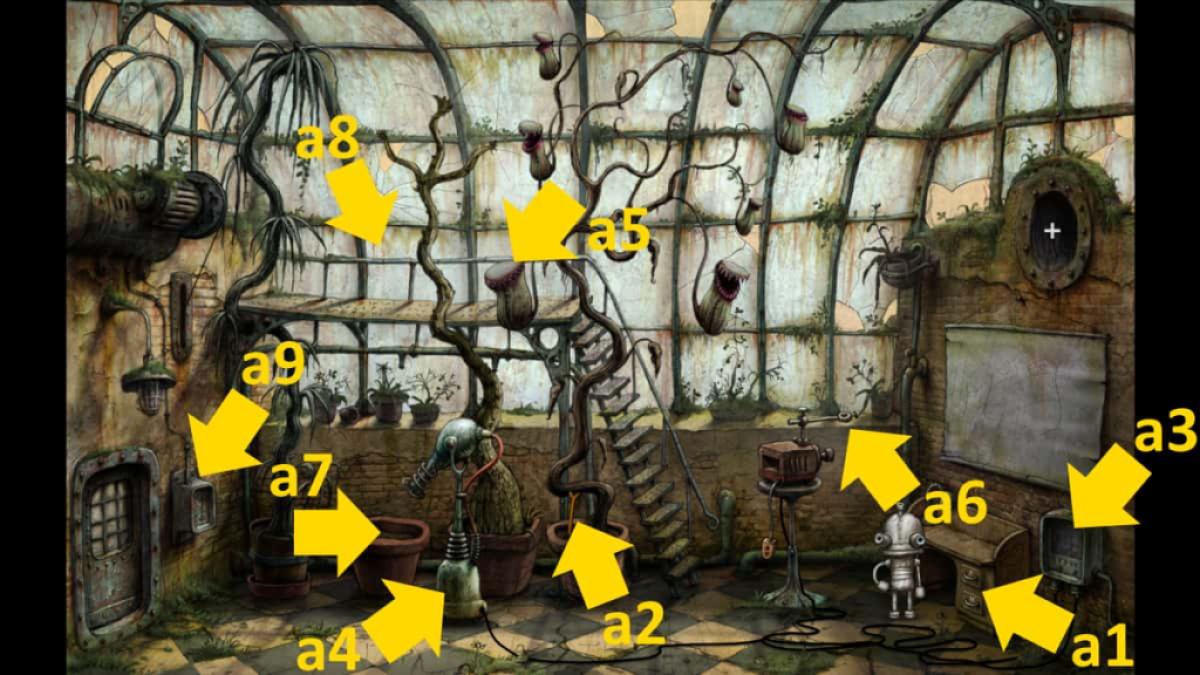
Image by Pro Game Guides
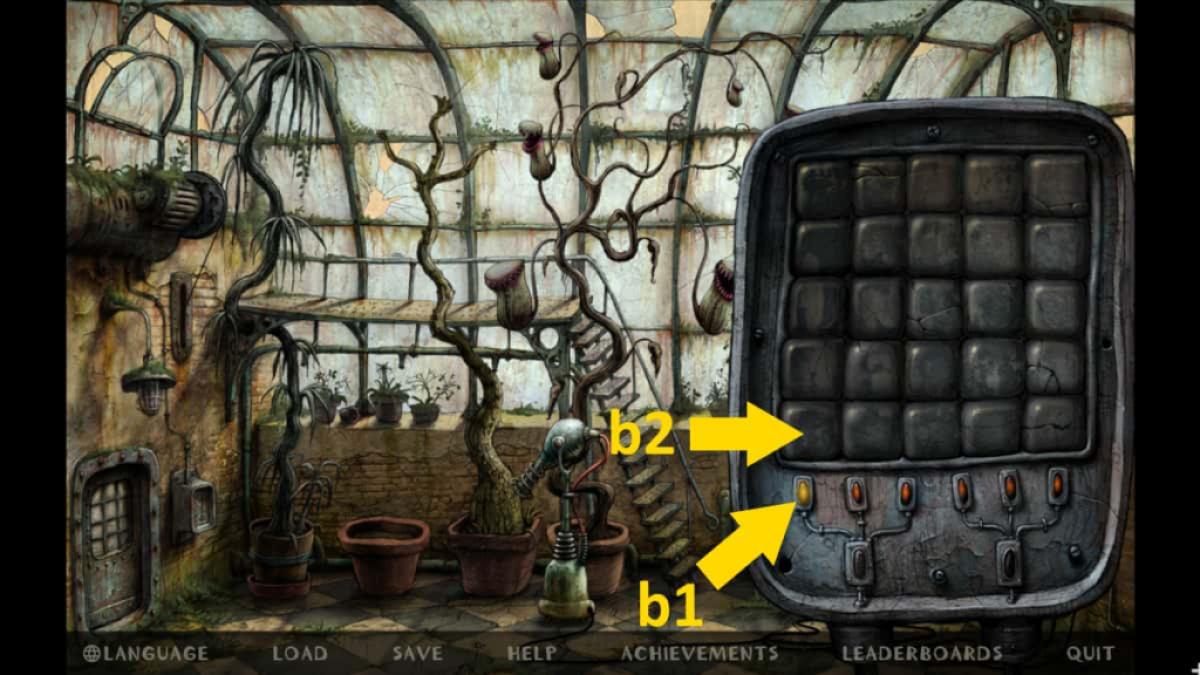
Image by Pro Game Guides
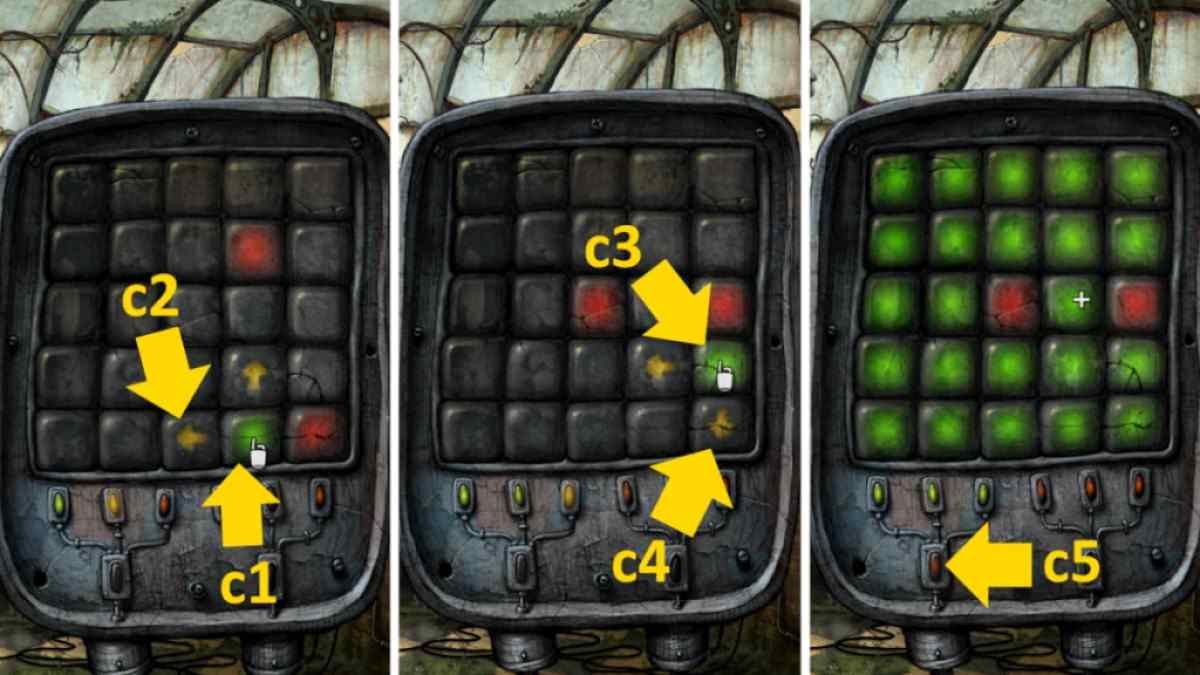
Image by Pro Game Guides

Screenshot by Pro Game Guides
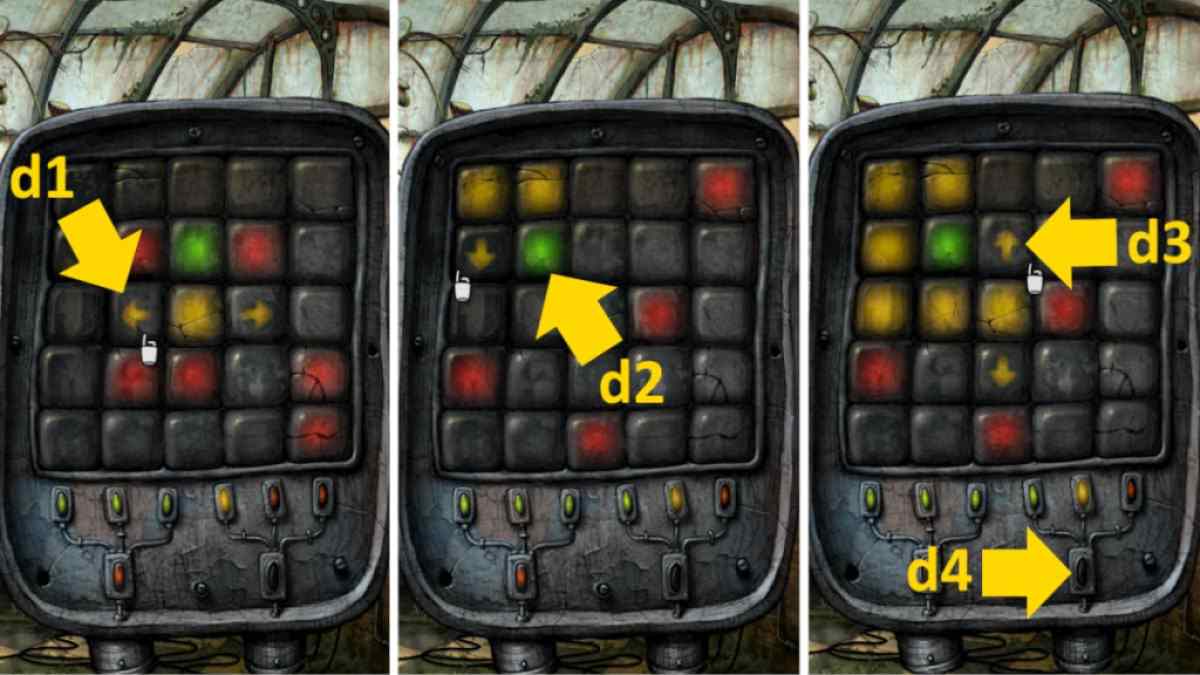
Image by Pro Game Guides
Screenshot by Pro Game Guides
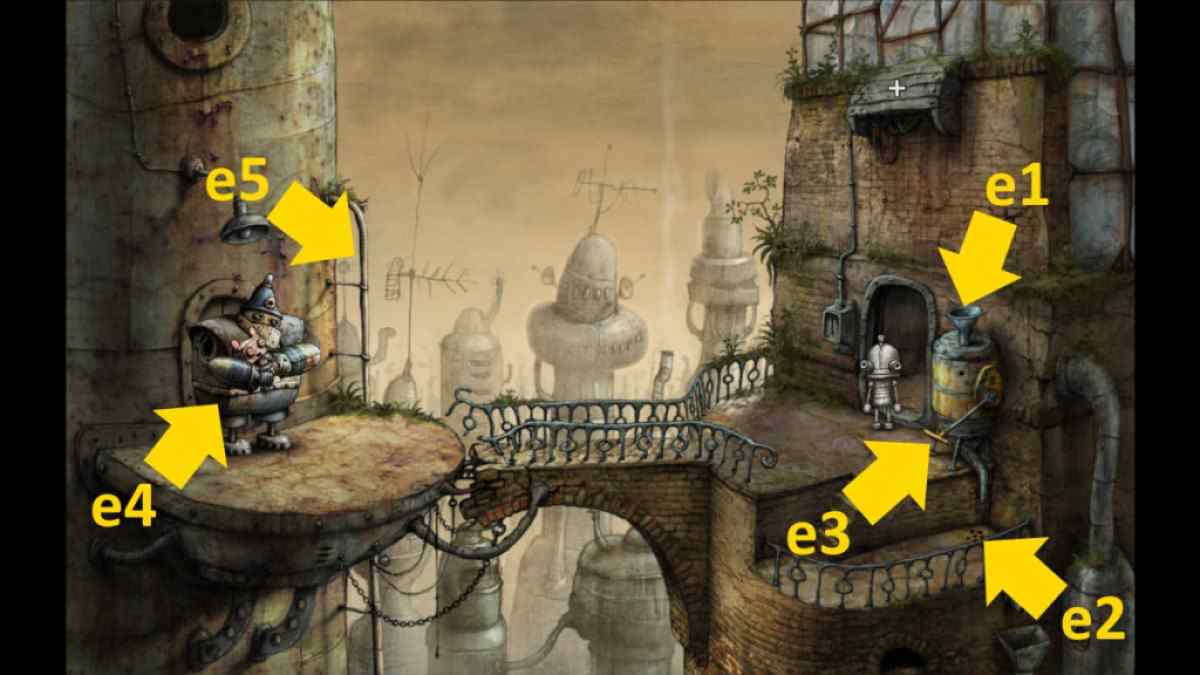
Image by Pro Game Guides
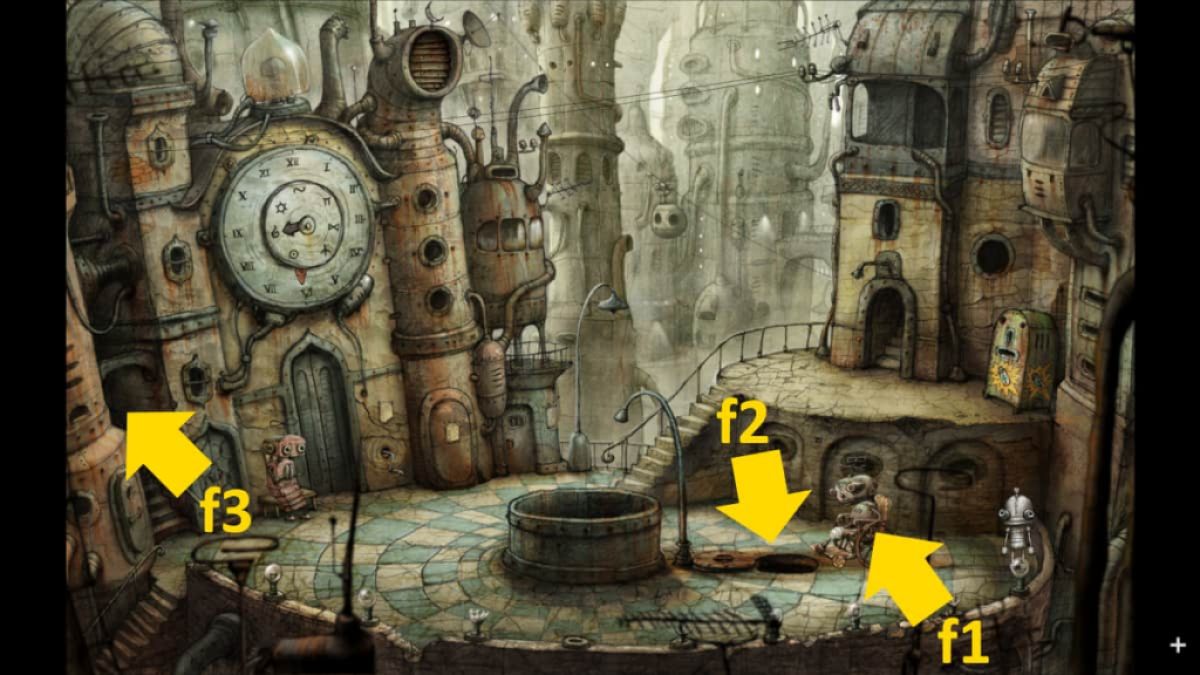
Image by Pro Game Guides

Image by Pro Game Guides
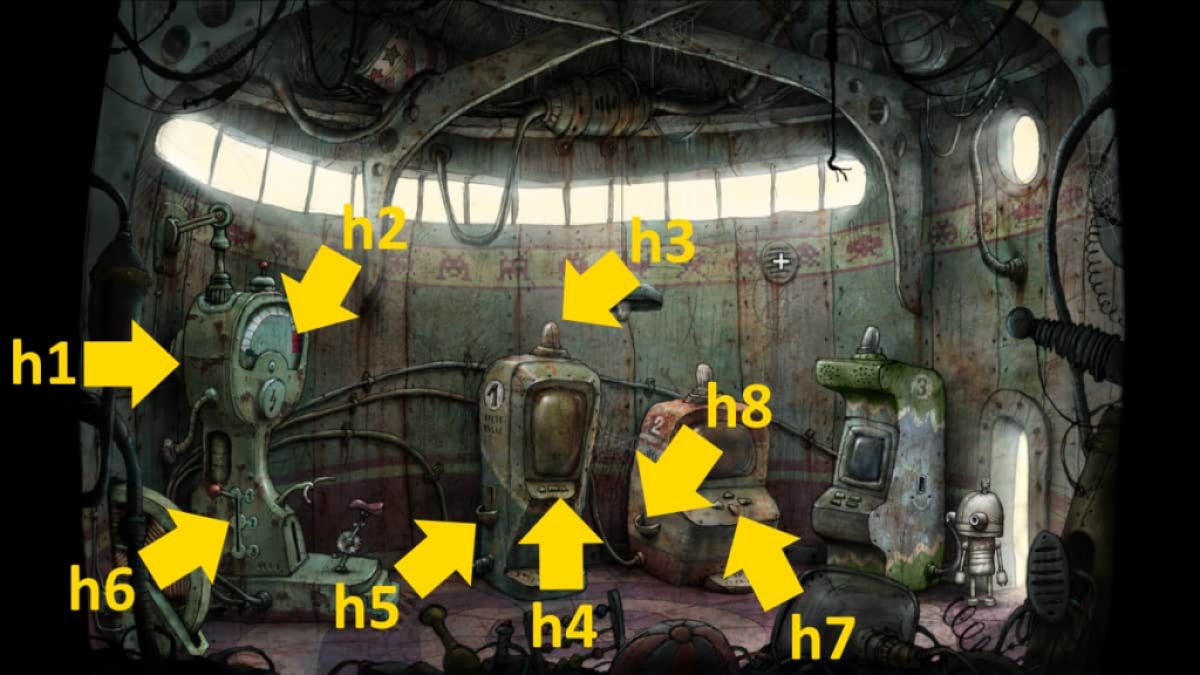
Image by Pro Game Guides

Screenshot by Pro Game Guides
Screenshot by Pro Game Guides
Screenshot by Pro Game Guides
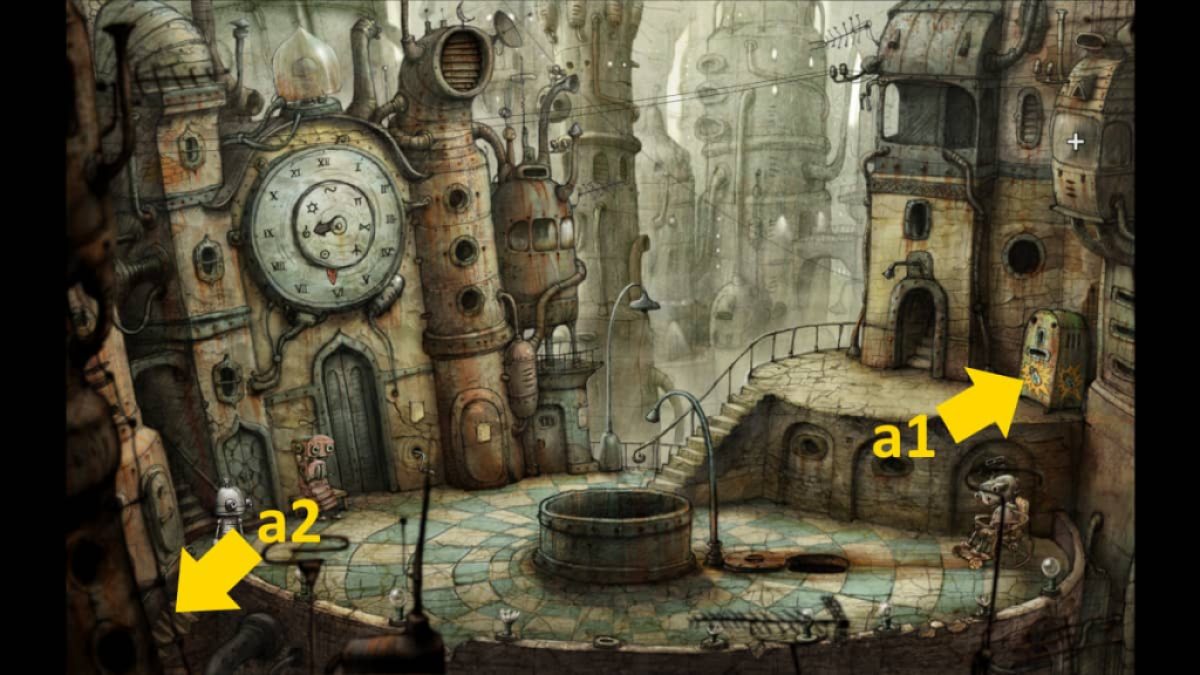
Image by Pro Game Guides
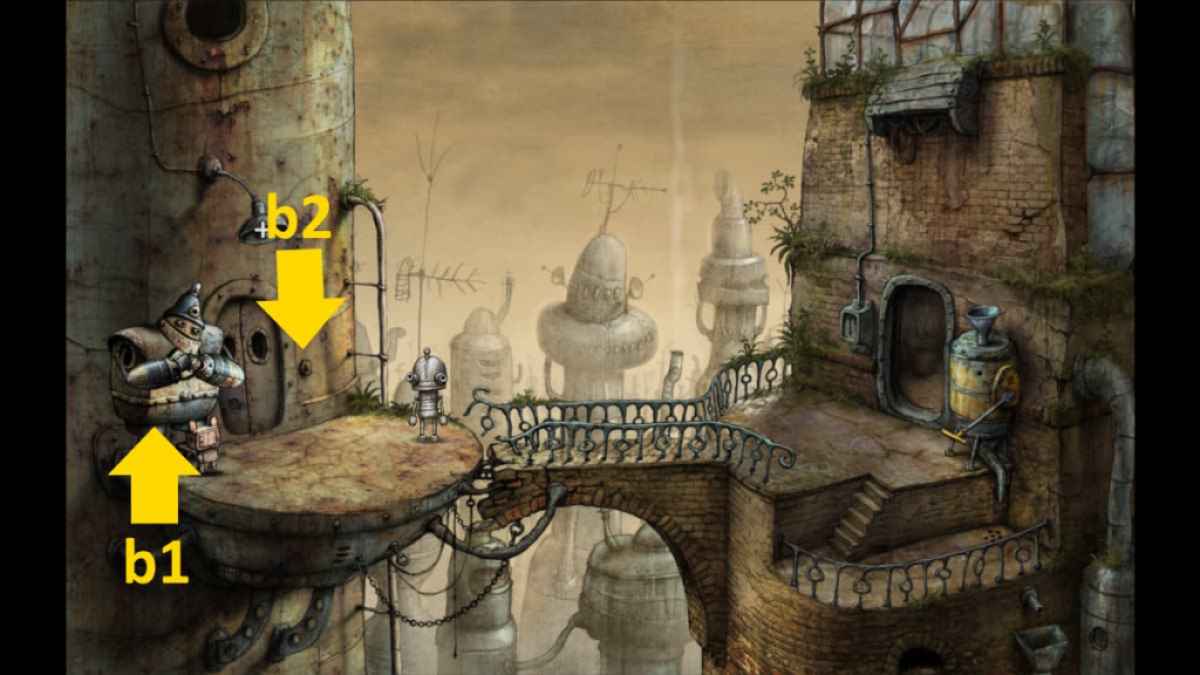
Image by Pro Game Guides

Image by Pro Game Guides
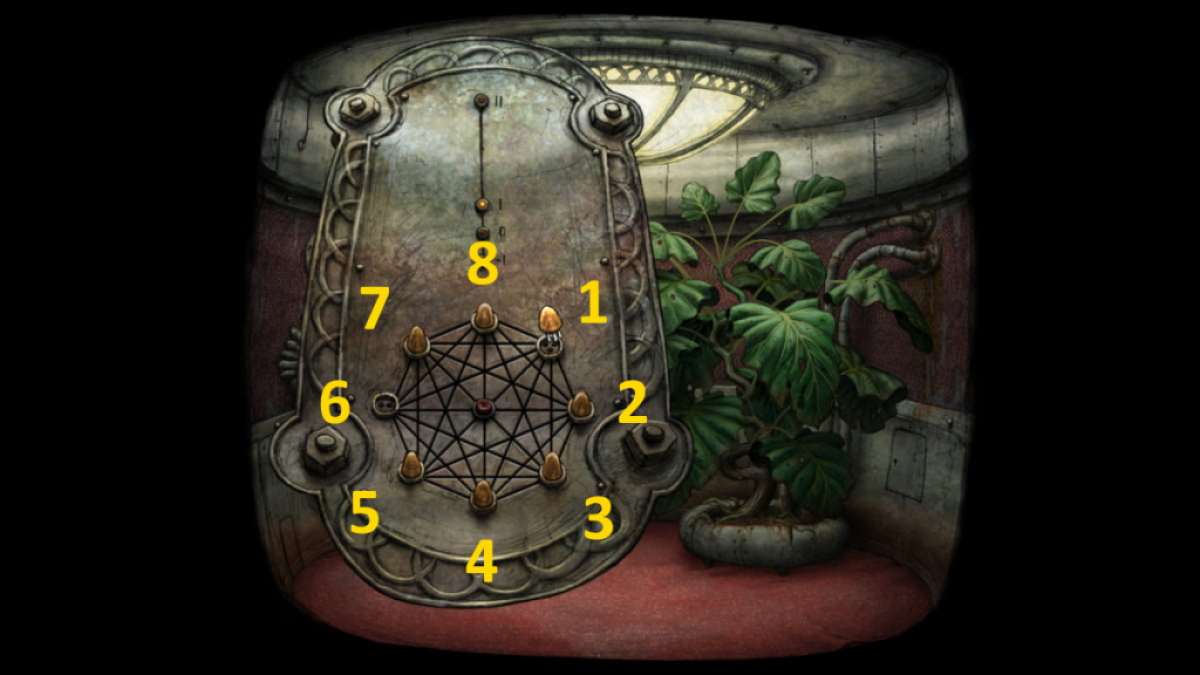
Image by Pro Game Guides
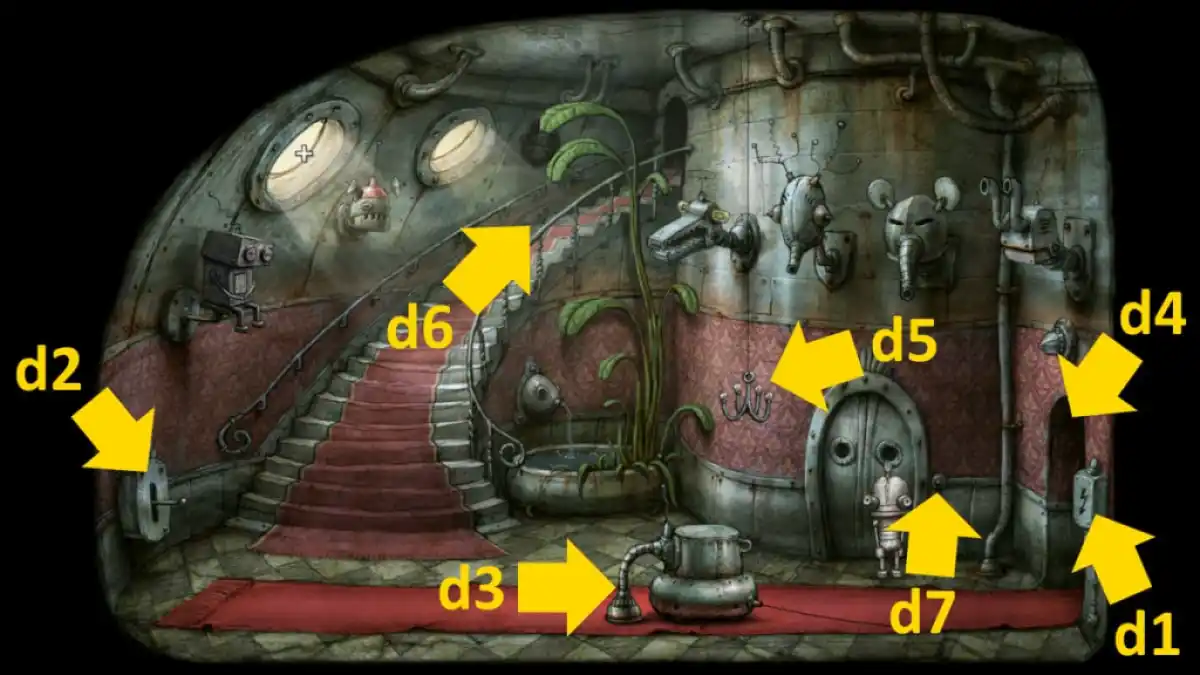
Image by Pro Game Guides
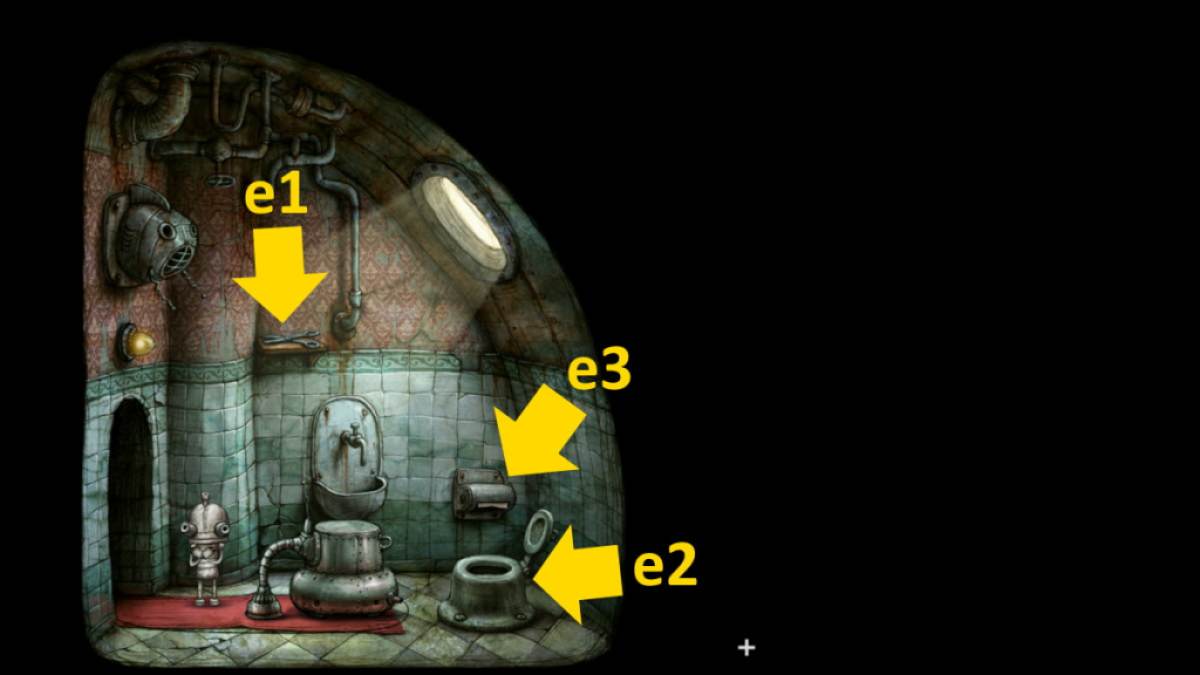
Image by Pro Game Guides
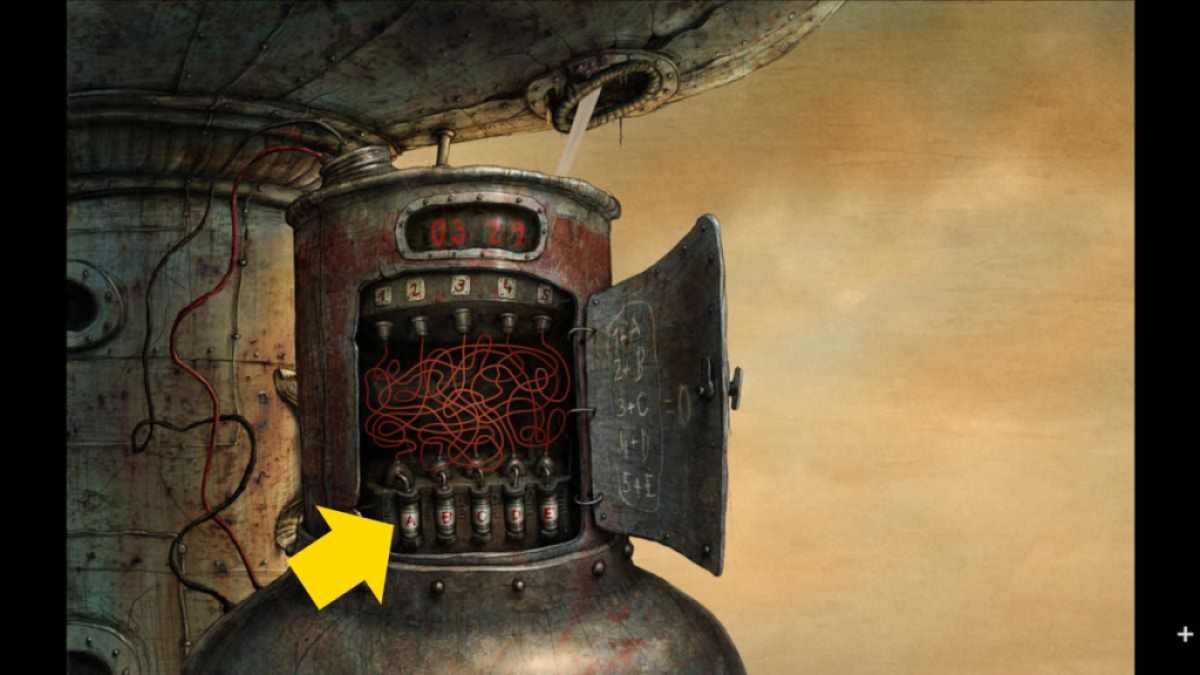
Image by Pro Game Guides
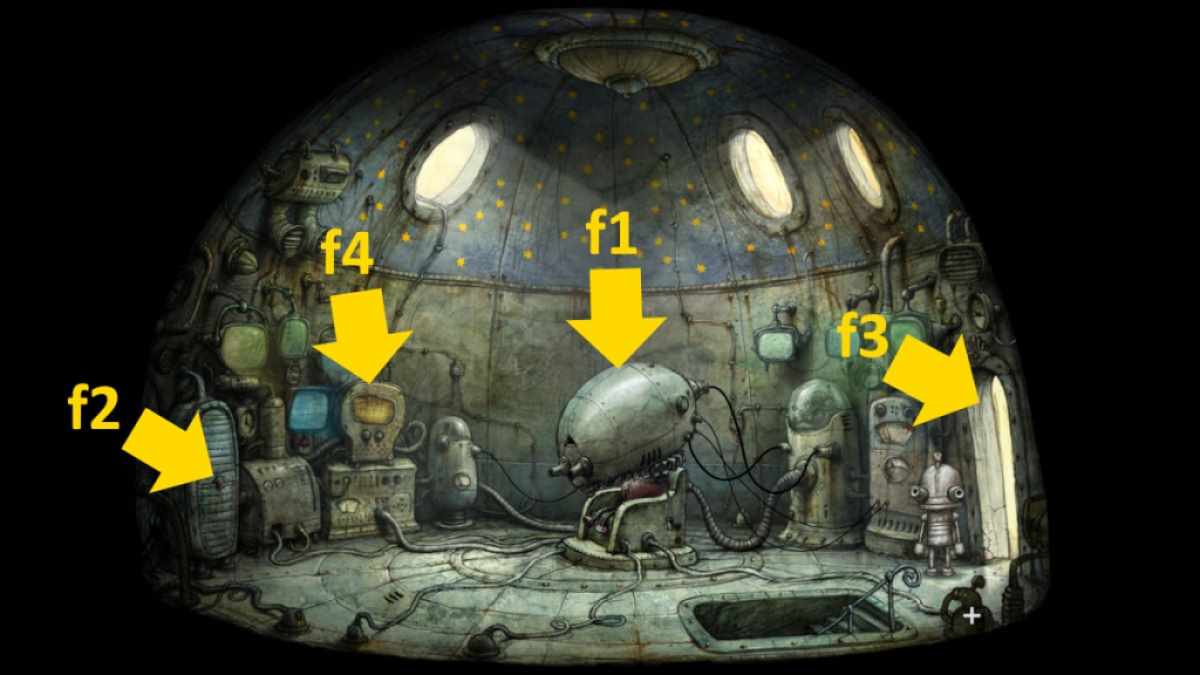
Image by Pro Game Guides
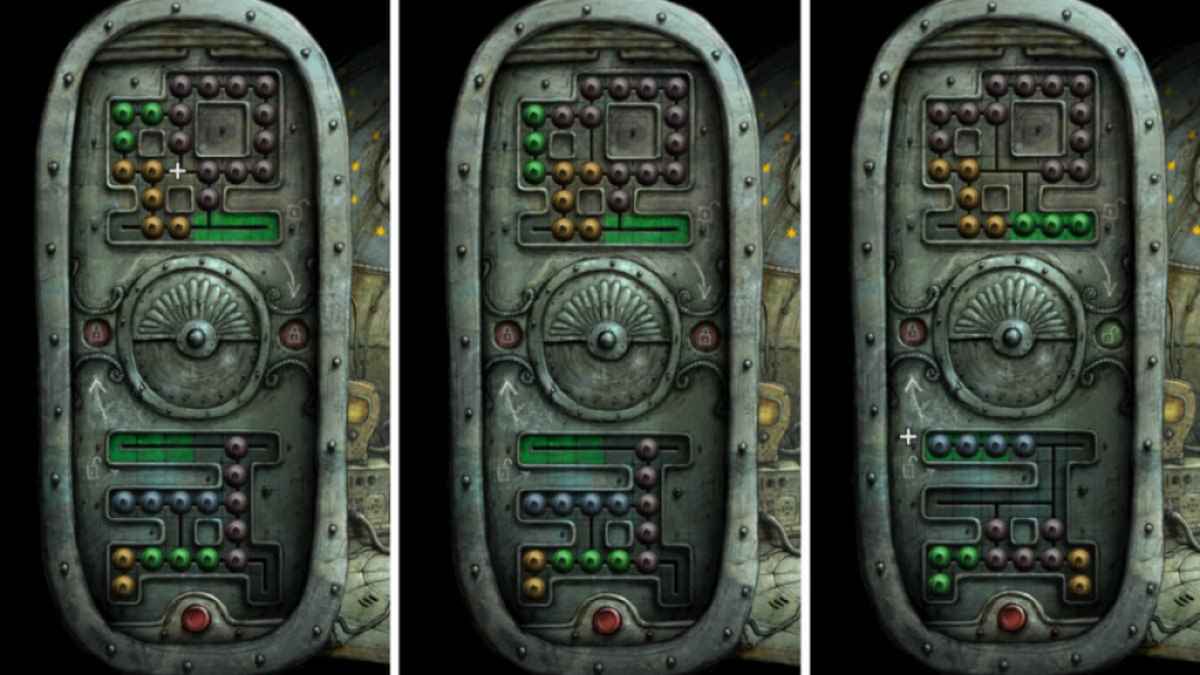
Image by Pro Game Guides
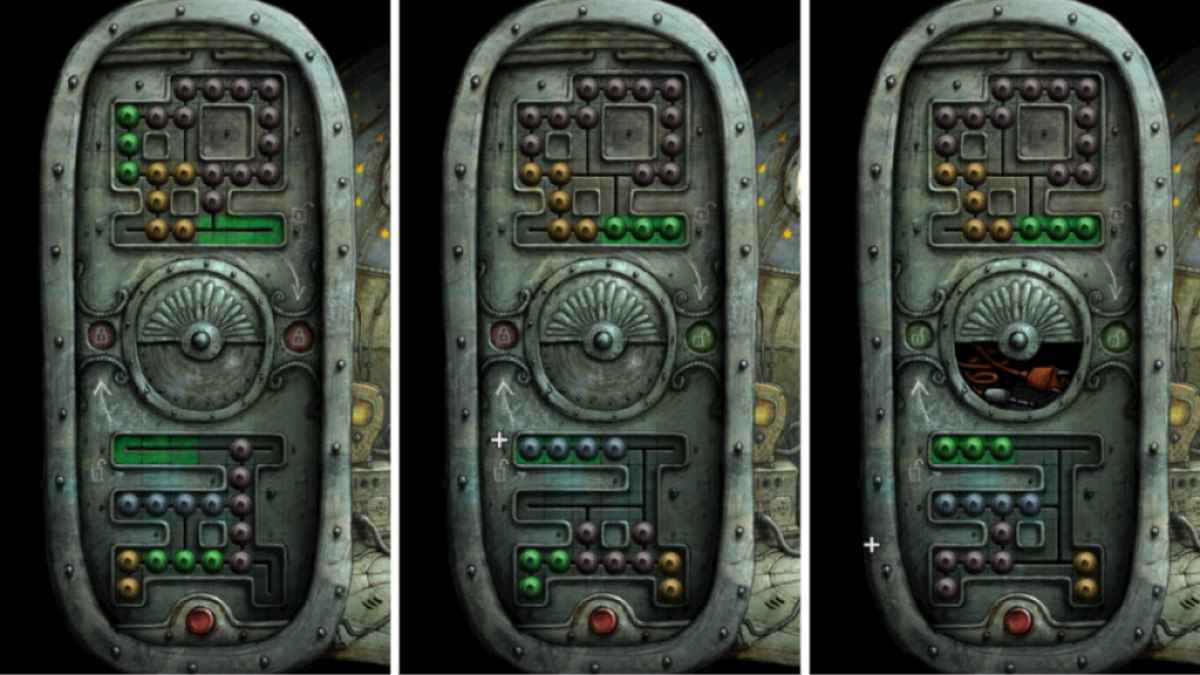
Image by Pro Game Guides
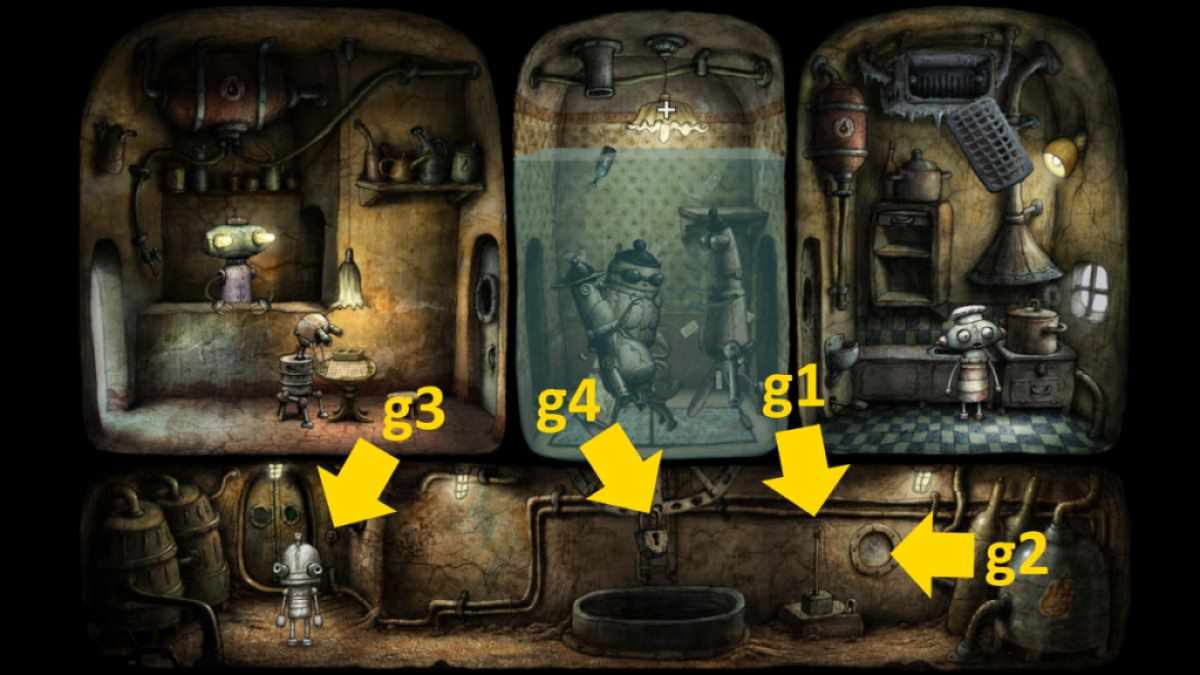
Image by Pro Game Guides
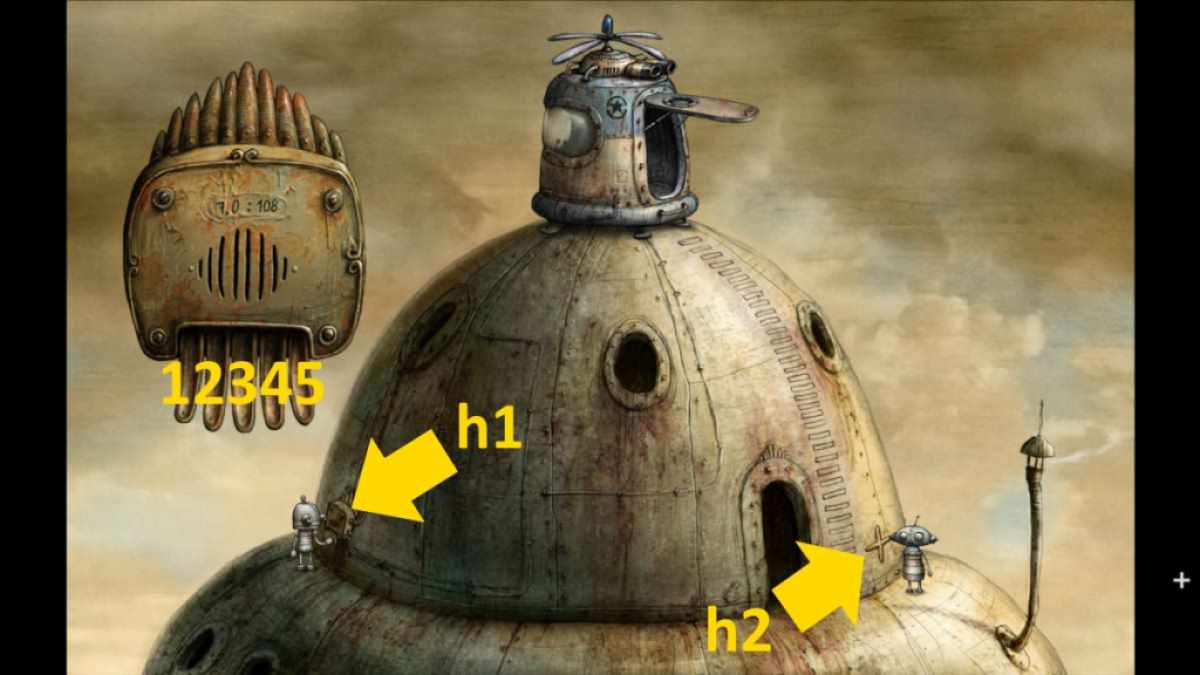
Image by Pro Game Guides
