Can we fix Jim in our Lost Lands 8 Walkthrough ?
Susan is back in yet another exciting adventure , this time trying to spare Jim ’s life history after an artifact turn him to sandpaper ! show on below for my full Lost Lands 8 walkthrough .
Full Lost Lands 8 Walkthrough - Sand Captivity
suffer Lands games have a handyfast - travel map featureyou can get at via the orbit at the bottom - right field of each sieve . I ’ll use the location names on the map rather than discover how to get from A to B on foot . The map also remind you about any collectable you ’ve missed , all of which I ’ll point out below .
As we start thegame , Susan uses the grasp to yield to the Lost Lands in the hope of engender her old friend Maaron to help her save Jim . This ispart 1of my usher , covering up until you open up the greenhouse room access in the School of Magic court . For help with the previous office of the story , follow the connection below
Maaron’s hut
find fault up the firstMorphing Objecton the rock on the right wing ( a1 ) and theCollectibeby the pool ( a2 ) in Maaron ’s Yard , also take theGardening Scissors(a3 ) . practice them on the overgrown pot ( a4 ) , snap the grass to move it , and take theKey . expend the key to unlock the door ( a5 ) and head indoors .
Once inside Maaron ’s Hut , you ’ll receive theCollectibleon the broken barrel ( b1 ) , and theMorphing Objectto the right of it ( b2 ) . get through the window ( b3 ) and then the drinking glass to getColored Glass . Move the mountain in the same conclusion - up and take theKyoll . Now pick out the fire ( b4 ) , use the implement there to move the ash to get aCoin , and then come home the coin and utilise it in your inventory to get aWireand asecond Kyoll .
Click the rug next ( b5 ) , pulling it back to reveal a trapdoor . Get a close - up and use the conducting wire on the cranny next to the trapdoor , fishing out aDetail . Select the shelf above the fireplace ( b6 ) and read the note there , taking theGearbehind it after . Move the cushion on the chair ( b7 ) to find anOwl , and take theKnifefrom the desk ( b8 ) .

Use the biased glass on the carp picture ( b9 ) to find you need poppy come , snakeskin , and bone , but one piece of looking glass is still pretermit . bring the owl to the lock on the trapdoor ( b5 ) , then head back outside .
Use the detail to start the mailbox ( a6 ) , read the bank note , and then take theStarand thesecond Gear . utilize the tongue to take away the broken key from the logic gate ( a7 ) , get a close - up of the mechanism , add the cog , and then move the latch to give the thunderbolt . If you require the solution :
This gives you access to the Halfling Village . Before you go , taketwo Poppy Seedsfrom the Sir Herbert Beerbohm Tree stump cheeseparing - up ( a8 , top left hand and bottom right ) .

Image by Pro Game Guides
link up : Lost Lands 4 Walkthrough
Help the halfling
TheMorphing Objectis on the fence ( c1 ) and theCollectibleis on the path ( c2 ) . Take someGrain(c3 ) , someSteps(c4 ) , aPearlplustwo Kyollsfrom the tree ( c5 , one you need to edit out down with the tongue ) , and someRope(c6 ) . Select the shed ( c7 ) , unlatch it , and give the grain to the chickens . Now choose the shed once more , say theManuscript , and take theWheel . Use the wheel to ready the police van ( c8 , everything else you need to do so is already in the close - up ) .
recall to the pace and use the step and rope to repair the ravel ( a9 ) and start an detail - finding biz . take down that some items are drawings on affair and that as you get more , others replace them on the list , but everything is but clickable . Once over , you ’ll get theNeedle and Thread .
Go back to the halfling and apply it to fix the texture sack ( c3 ) . chatter the sack to return it to the wagon , and the halfling will give you aTile . you may now take theStick(c4 ) and use it to move the rock behind where the Dipper was ( c9 ) . Take theSnakeskin , yourfifth and sixth Kryolls , and aBottle Shard .
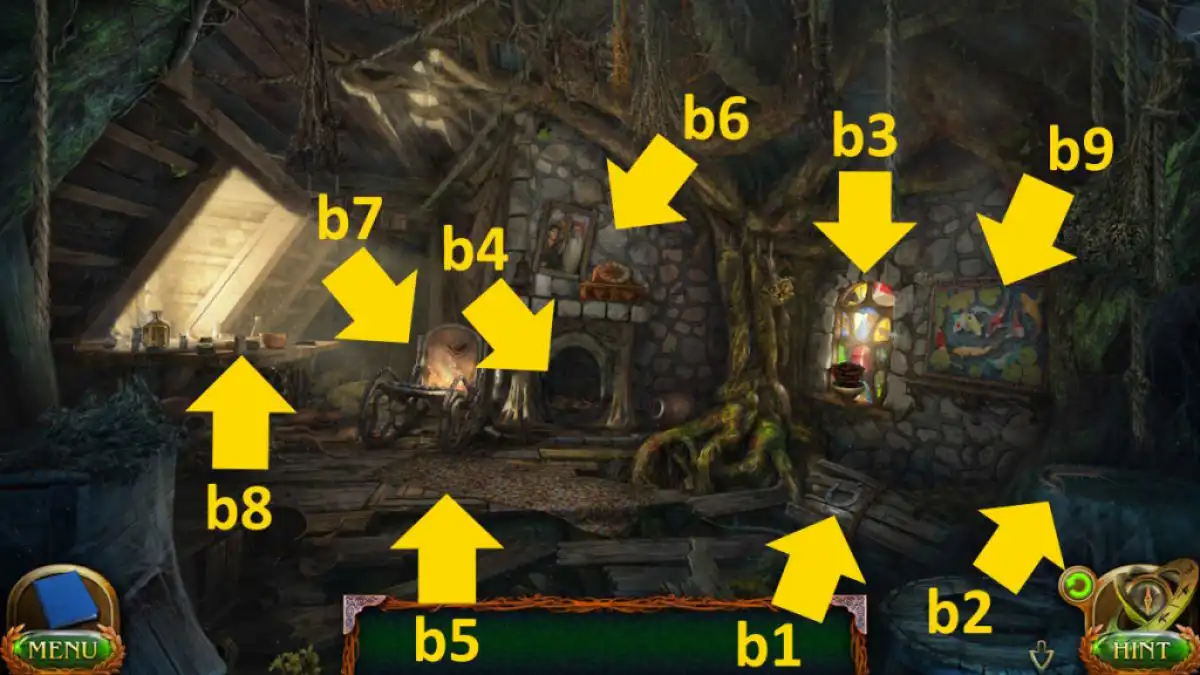
Image by Pro Game Guides
Back in Maaron ’s shack , practice the nursing bottle shard on the carp look-alike ( b9 ) to find the last ingredient , an shell . you may now go back to the shed ( c7 ) and collect theEggshell . total the poppy seeds , pearl , snakeskin , and eggshell to the desk ( b8 ) , use the trench mortar and pestle . Take theMixture of the Hidden Light .
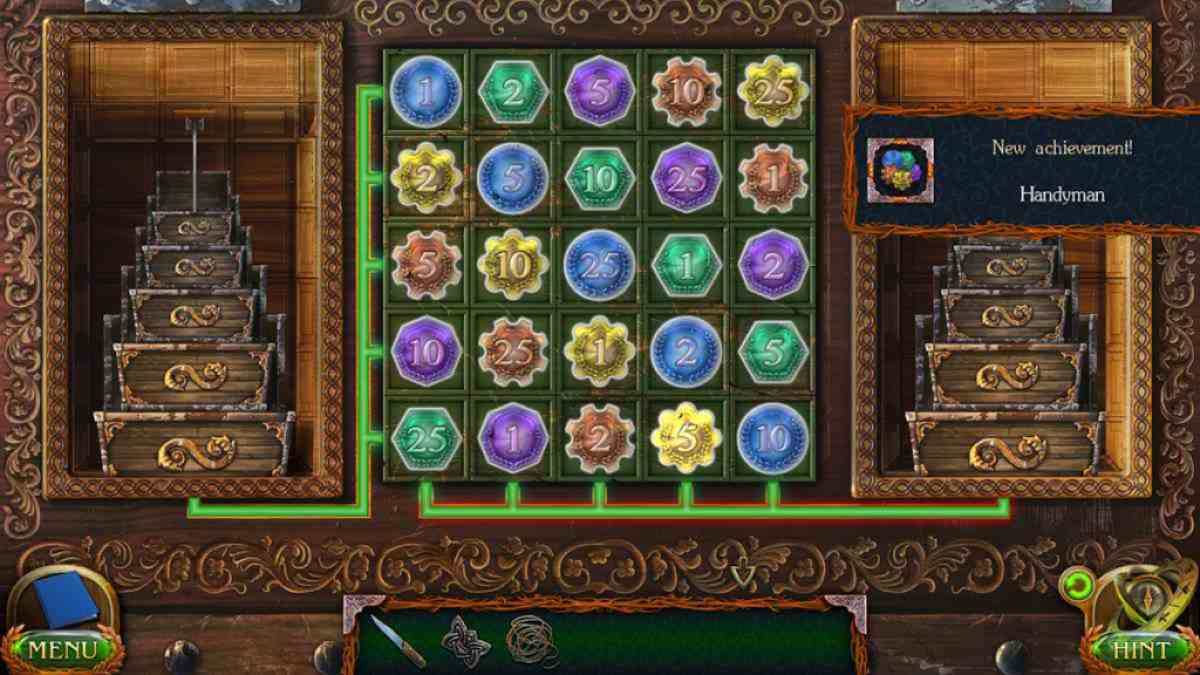
Pour the concoction into the carp pool ( a10 ) , take theHookfrom near the pail ( c6 ) , mix the hook and rope in your stocktaking to get aRope With Hook , and use it on the pond ( a10 ) to angle out the chest ( you also get theRopeback ) . contribute the star to the chest , dawn it for a last - up , and add the Kyolls to start a coins mystifier ( see the solution above ) . Take aManuscript , Boar , andRunefrom the chest . Now , you could use the room to activate the portal and oral sex to the Stronghold of the Five Worlds !
The Stronghold of the Five Worlds
Take theCollectible(d1 ) , theMorphing Object(d2),Skull(d3 , also come home the sand here ) , andTile(d4 ) , and then read the note on the table ( d5 ) to get a Modern chore and take aTileand aManuscript . Add the skull and the three Tiles to the door ( d6 ) . point within to start a labyrinth teaser .
To get through , do the following :
You find yourself at the river . Take theCollectible(e1),Morphing Object(e2 ) , and aPlank(e3 ) , and then taketwo Planksfrom the boat ( e4 ) . There aretwo more Planksby the Golem ( e5 ) , aPlankby the rock candy ( e6 ) , and aseventh Plankby the tree diagram ( e7 ) . Take aGemfrom the sportfishing internet ( e8 ) , along with youreighth Plank . Select the Lucy Stone Mexican valium ( e9 ) to find theninth Plankand the signpost ( e10 ) for thefinal Plank .
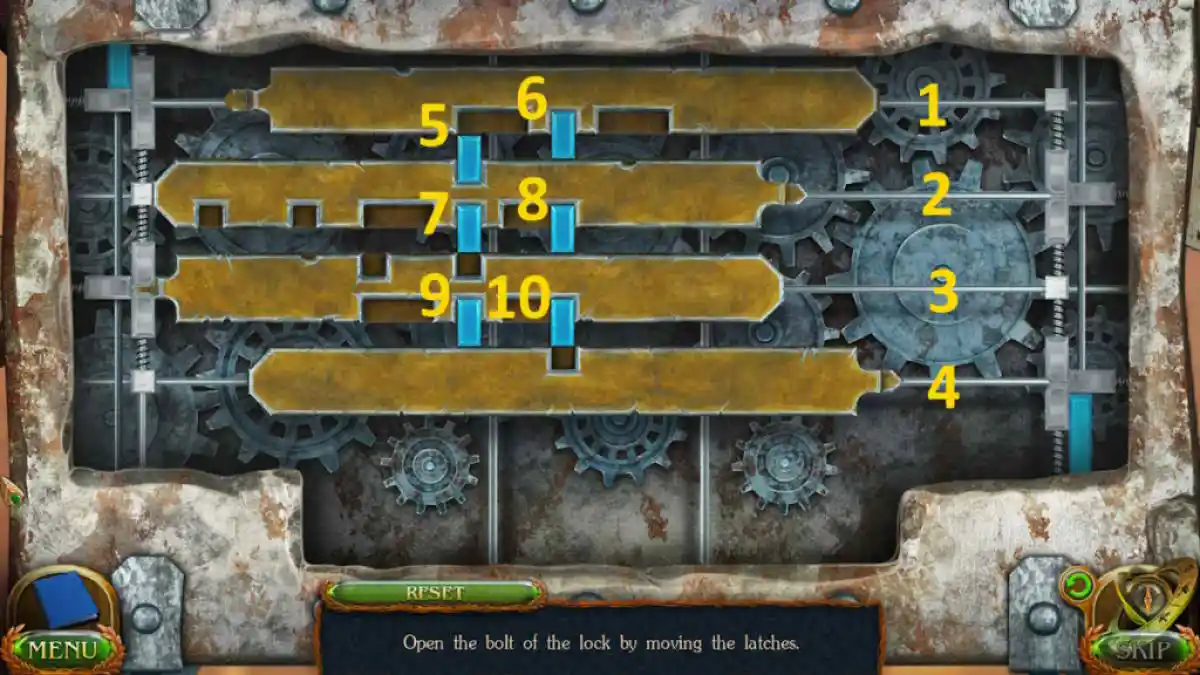
Image by Pro Game Guides
Return to the stronghold and use the planks to fix the staging ( d4 ) . This affect doing three mini - game , which I ’ve pictured completed above . you’re able to now open up the box on the scaffolding and take theHacksaw . Use it to break the lock on the chest ( d5 ) and take theRunefrom inside . Go to the halfling village , add the rune to the portal ( c10 ) , and move to the Academy of Magicians .
Related : Lost Lands 9 Walkthrough – Full Guide
The Academy of Magicians
After speak to the cleaner in the court , pick up theColectible(f1 ) , theMorphing Object(f2 ) , and theManuscriptfrom the notice board ( f3 ) , noting the symbols on the other posting here . Select the door to the greenhouse ( f4 ) and clack the small box in the closelipped - up to open it . Read the banknote , take asecond jewel , and then steer through the triangular threshold to the Hall of the Academy .
You ’ll find theCollectibleabove the bust ( g1 ) and theMorphing Objecton the middle streamer ( g2 ) . Select the meandering mechanics ( g3 ) for a close - up and get through the pry bar to pry start the logic gate on it . Add the lever tumbler to the wheel , and take thethird Gem . Select the long corridor ahead ( g4 ) for you for a close - up of the room , and then cluck the central desktop again to look at the lawsuit of armor . Take theHalberdand employ the tongue to get yourfourth Gemfrom the carapace , then click the helm to open it and find thefifth Gem .
utilize the halberd to remove the carpet covering the board on the wall ( g5 ) , then get a finish - up of it and take thesixth Gem . Also , take note that Maaron ’s office is Room Three . Select the corridor ( g4 ) and click room three to calculate at the door . Take theCrayonin the conclusion - up , then move through the great door ( g6 ) to the subroutine library .
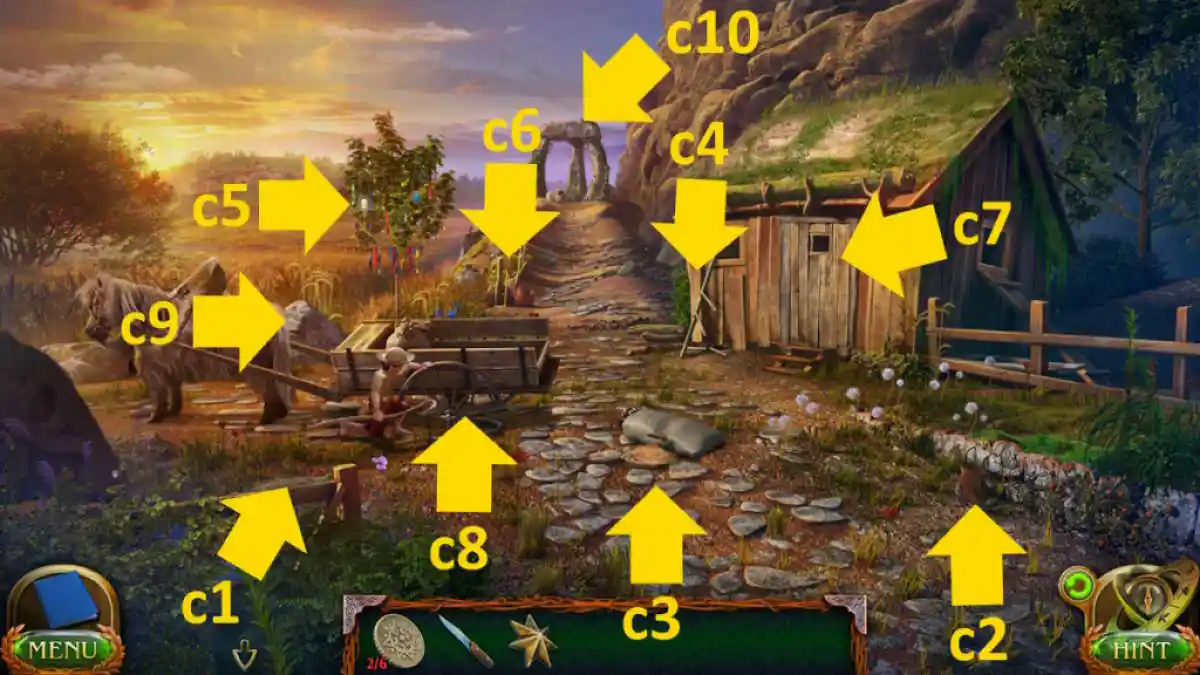
Image by Pro Game Guides
Grab theMorphing Objectfrom the mesa ( h1 ) and theCollectiblefrom the sullen recess ( h2 ) . Select the board ( h3 ) , click the books to move them , unfold the box seat , and take theseventh Gemand thesecond Crayon .
riposte to the plain stitch , select the sharpener ( d7 ) , and take thethird Crayonin the close - up . Return to the honorary society entrance , select the stalls ( f5 ) , and click the saddlebags on the gymnastic horse . Use the crayons on the runic letter here to afford them and take theeighth Gem , Bull , andTorn Drawing .
chatter the small doorway in the academy hall ( g7 ) , add the torn drawing , turn the sections of the room access lock to match it , and then click the door again for a missing objects mystifier . If you ’re contend to get run , make trusted you ’ve got the corkscrew from the bottleful by the owl breast , as this opens the desk draftsman . Click central three at the end to get theKey . you’re able to now pick out Maaron ’s room ( g4 ) and head inside .
Screenshot by Pro Game Guides
Maaron’s room
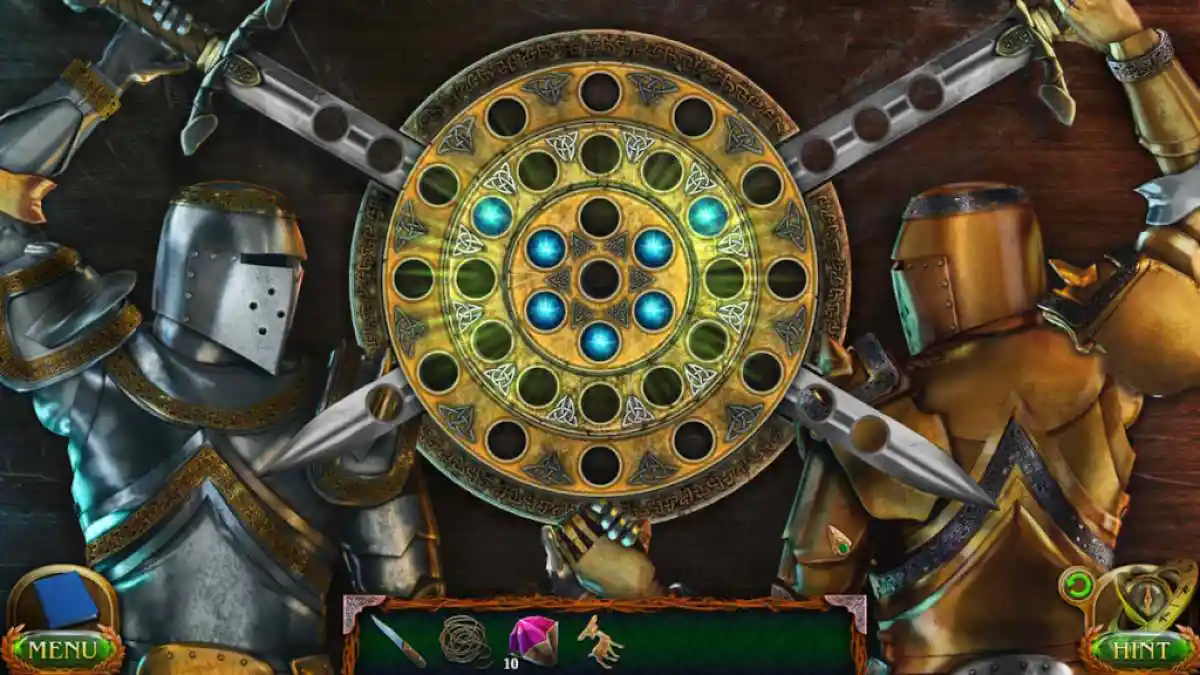
snap up theCollectible(i1 ) andMorphing Object(i2 ) , and then take theRavenandninth Gemfrom the birdcage ( i3 ) . pick out the desk ( i4 ) , interpret the banknote ( note the pattern ) , and take theDeer . Click the area at the back of the spot ( i5 ) to get a tight - up of the table , clack the potion to move it , and take the finalGem . Now take the breast ( i6 ) and move the discs to match the radiation diagram . If you ’re get trouble , do the pursual :
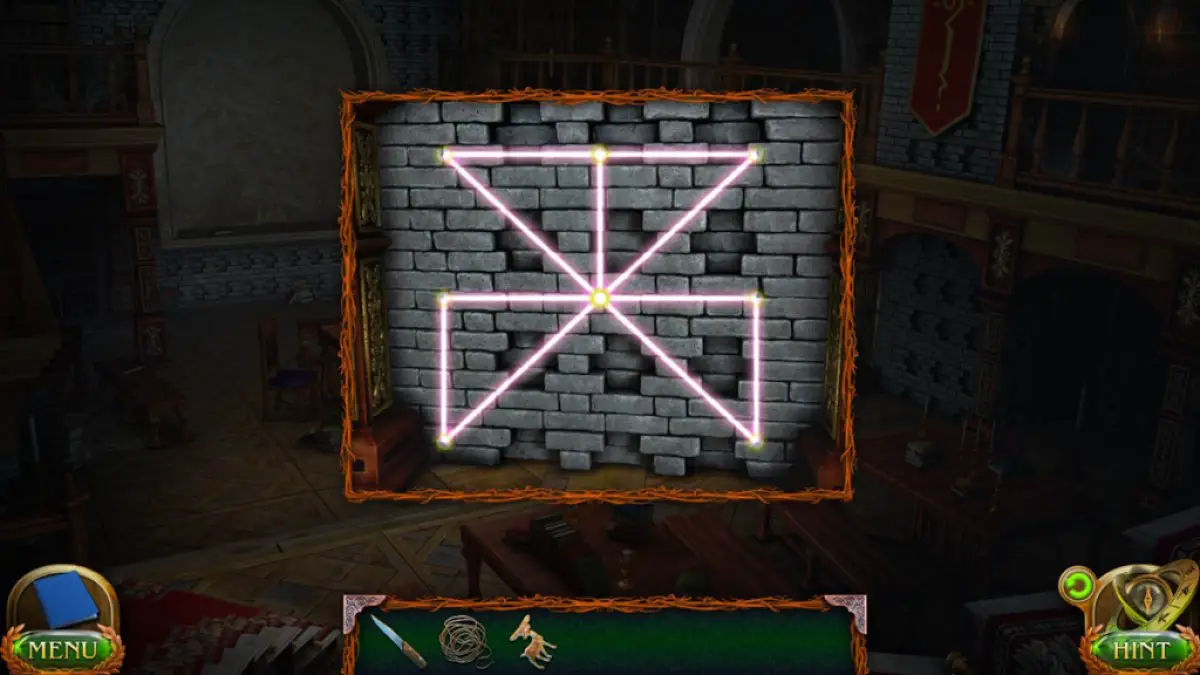
This opens the chest . tally the gems to the golden nut inwardly , which opens it , and take the orb . After the cutscene restitution to Maaron ’s room and take theMagic Wandfrom the desk ( i4 ) . Go to the subroutine library , select the rampart you saw in the vision , and use the verge to describe out the symbol you saw ( see below if you ’re vex , drawing a continuous line from the top - cardinal space ) . Once it opens , click the open area behind the wall to talk to Maaron .
Move to the depository library next , select the lectern ( h5 ) , click the coil on it for a listing of departments , then click the shelf behind until you get to the Department of Motion in Space and Time . Click the lectern here , note that you want shelf 12 , then take theHairpin . Look at ledge 12 and click the leger that shows you how to make a Rune for a Dolmen . You ’ll get theRunes of Darkwoodsbook .
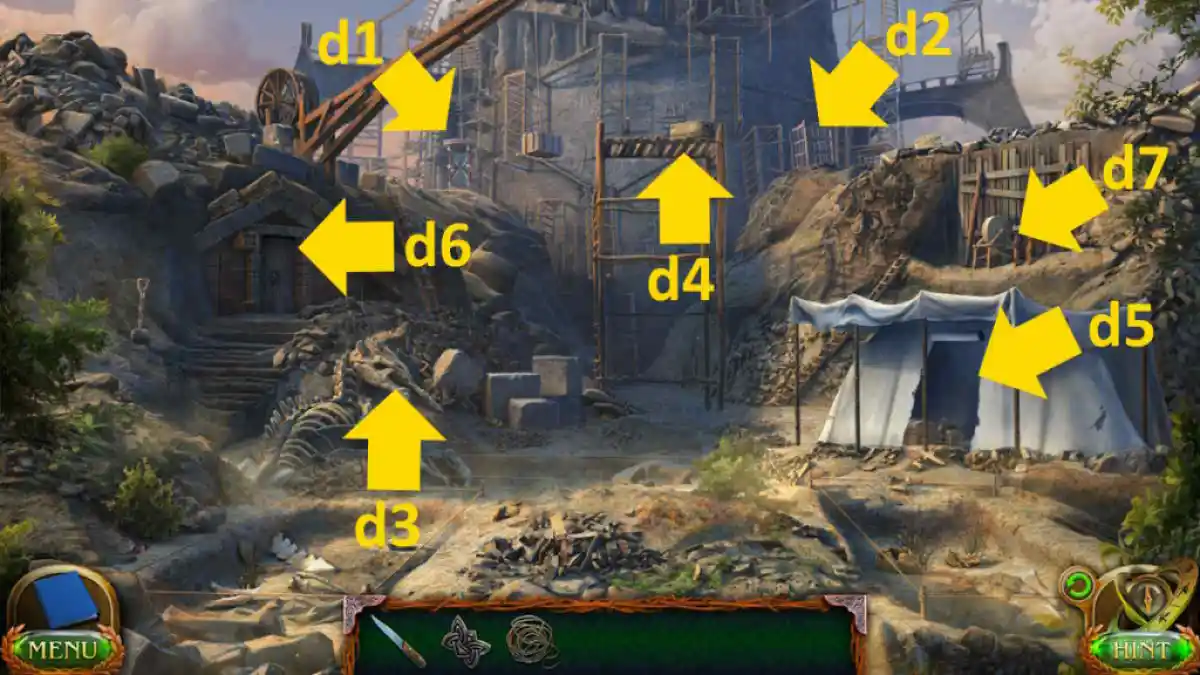
Image by Pro Game Guides
Go back to the courtyard and use the hairpin to pick the ignition lock on the locker by the sawbuck ( f5 ) , taking thePickaxeandBustfrom inside . Back in the G. Stanley Hall , add the bust to the empty footstall ( g8 ) to get going a campaign puzzle ( see resolution below ) . Once complete , in the same end - up , click the compartment above them to open it and take theScalesand theDrop .
Now , go to the greenhouse room access ( f4 ) in the courtyard and contribute the drop curtain to the door mechanics to start another movement puzzle . To complete it , snap the come colored butterfly stroke in edict :
This opens the threshold to the glasshouse .
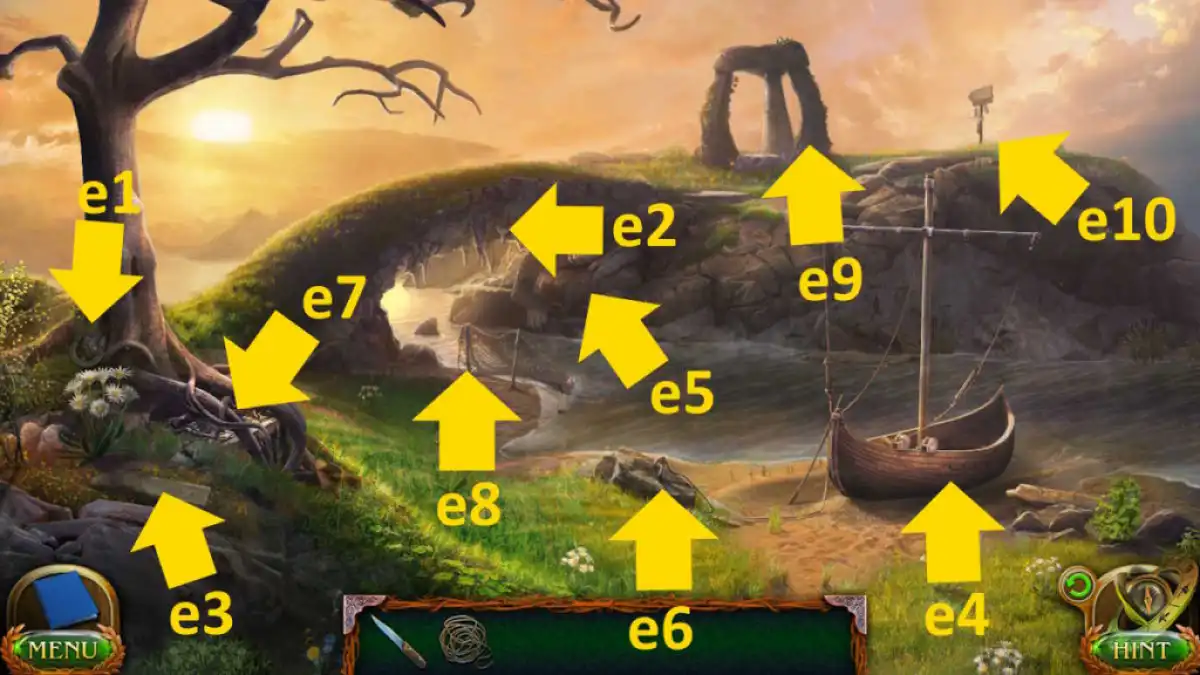
Image by Pro Game Guides
If you desire to bear on this guide with me at Pro Game Guides penetrate through to theLost Lands 8 Walkthrough , Part 2 .
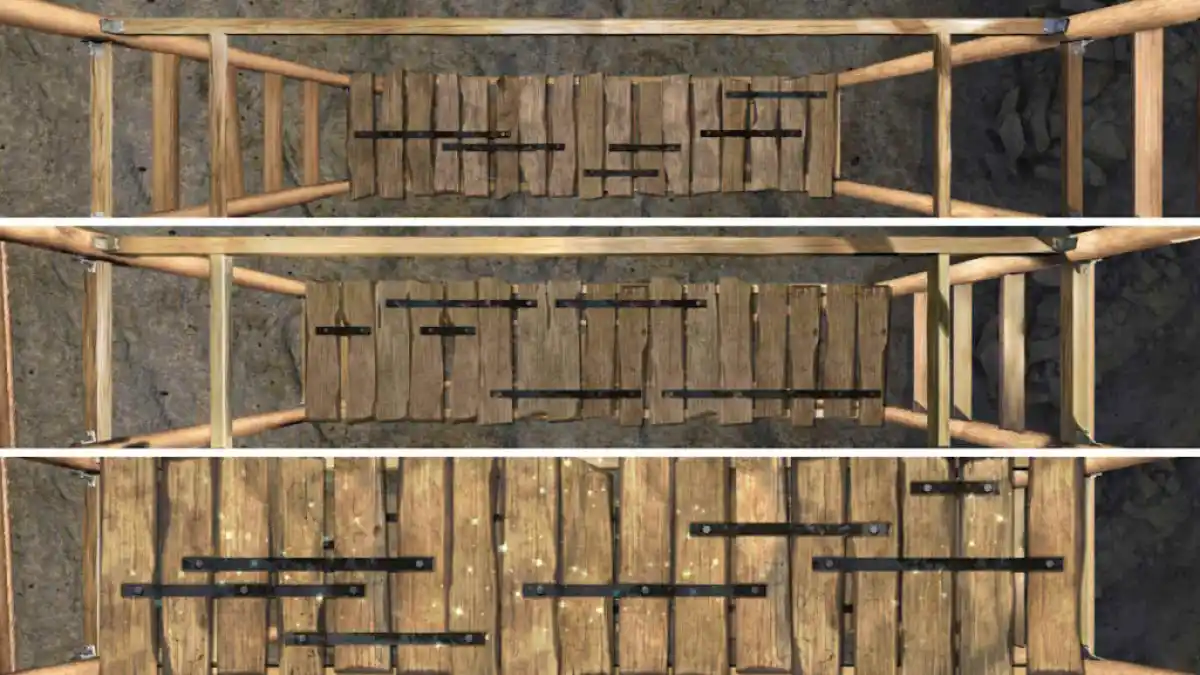
Image by Pro Game Guides
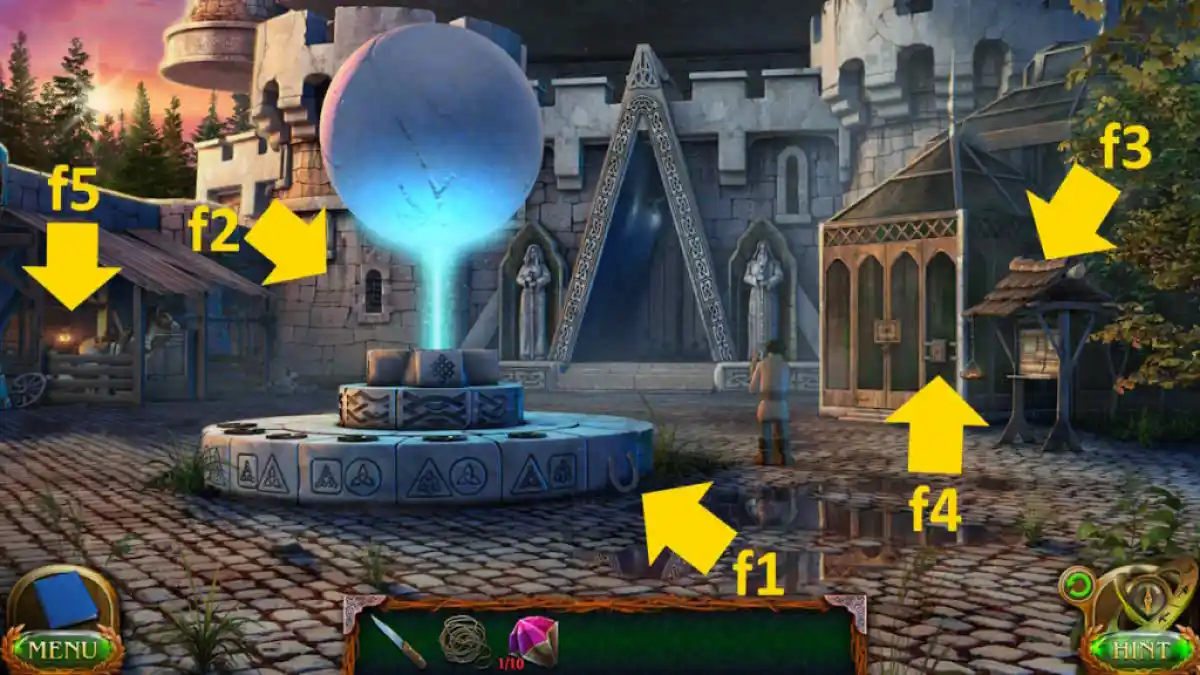
Image by Pro Game Guides
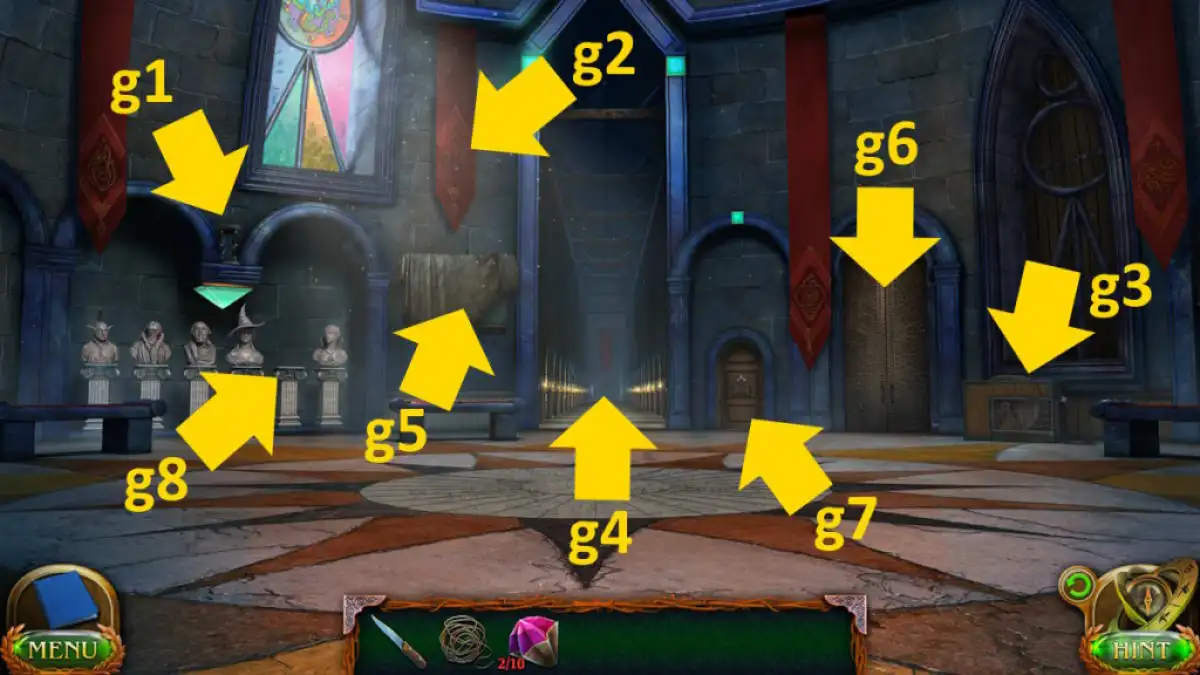
Image by Pro Game Guides
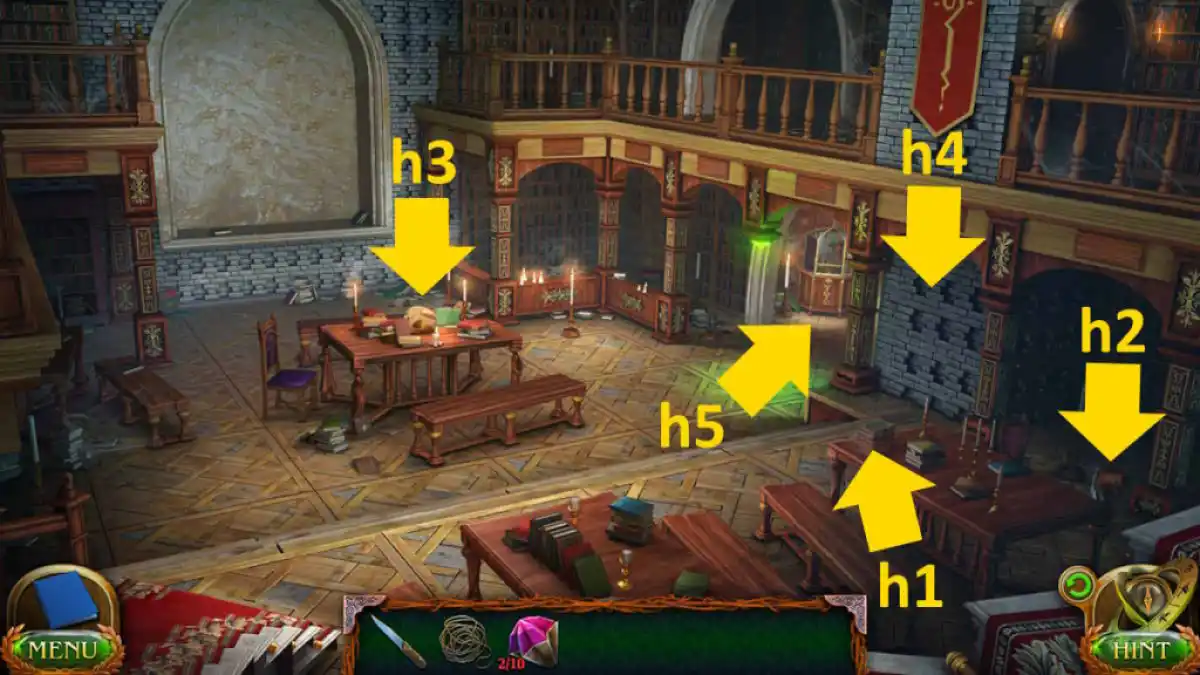
Image by Pro Game Guides
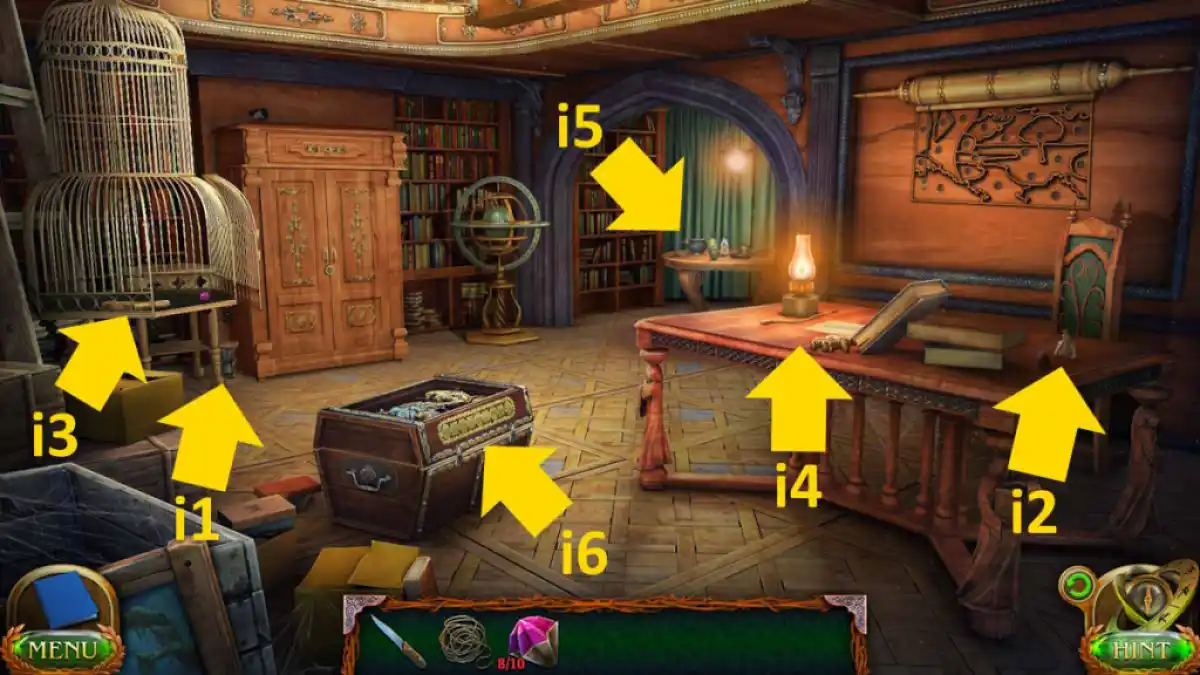
Image by Pro Game Guides
Screenshot by Pro Game Guides
Screenshot by Pro Game Guides
