Completing the adventure !
Lost Lands is a pop , long - black market series of fancy - theme point - and - flick puzzle RPGs . This is the last incision ( part four ) of my complete walkthrough of Lost Lands 8 , Sand Captivity , covering all the hide out particular and tricky puzzle solution .
Lost Lands 8 Walkthrough, Part 4 - Sand Captivity
This usher begins just after you ’ve put out the fire in the chief ’s hut in the centaur village and continue to the death of the chief game . If you need answers for earlier or later parts of the game , let me direct you to theLost Lands 8 Walkthrough hubhere at Pro Game Guides . You ’ll happen links there to solution for all the puzzles in the game , let in the incentive chapter !
The centaur village
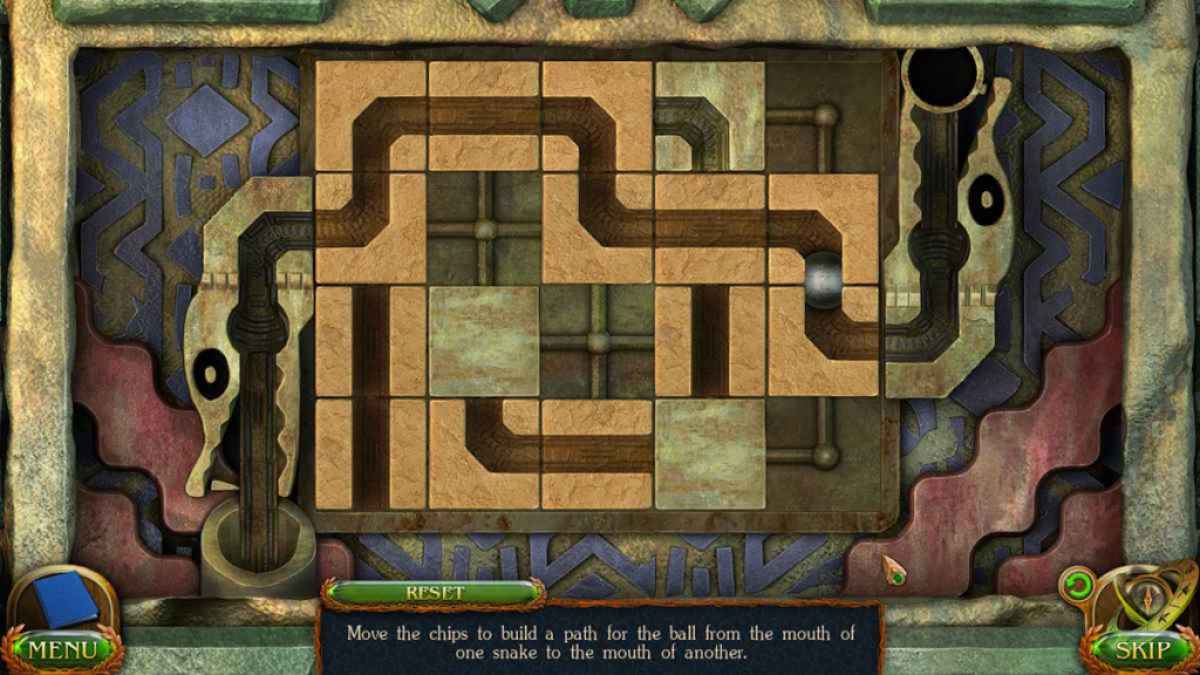
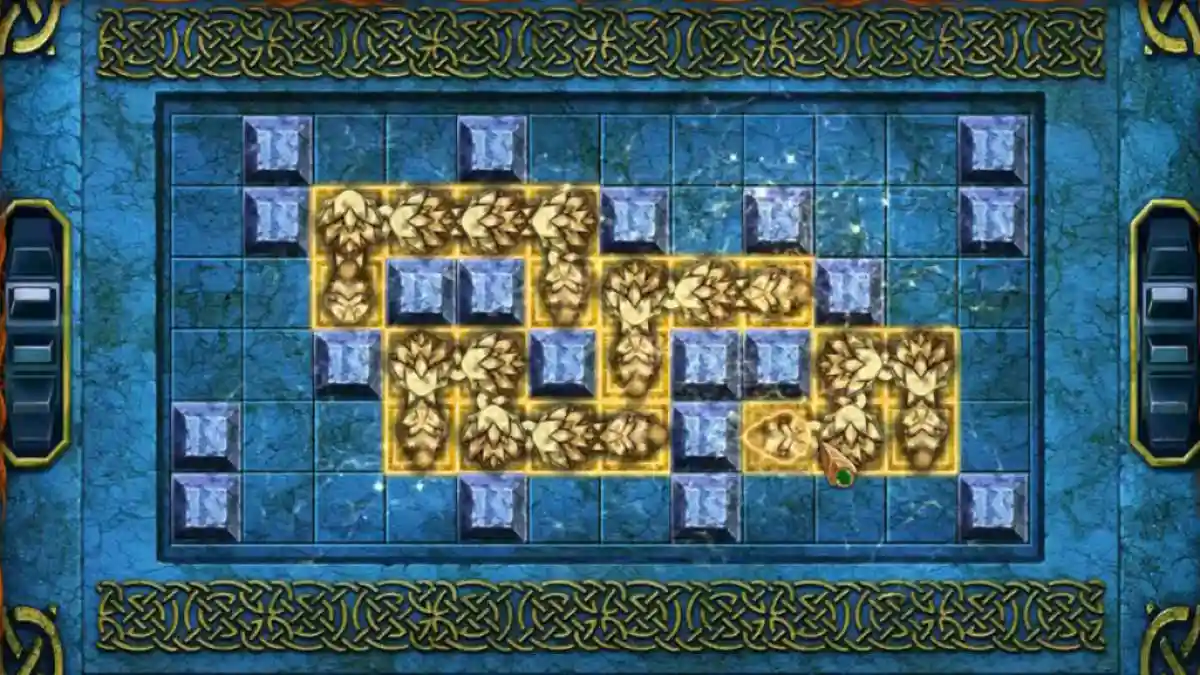
Grab theCollectible(a1 ) andMorphing Object(a2 ) from the smithy , then click the mesa ( a3 ) and take the Fang . bring the rune to the lizard carving on the wall ( a4 ) , which opens up to let on a formula . Click the traffic pattern to begin a potato chip - moving puzzle .
Once you ’ve moved the atomic number 79 chip from the left-hand side to the right field ( see the solution above ) , take theAmulet Center .
head up into the chieftain ’s army hut to encounter the headman take a flower to revive him . While you ’re here , take theMorphing Object(b1 ) and theCollectible(b2 ) . Head to the swamp , pull in theAmmonia Flower(c1 ) , and then use it on the chief ( b3 ) to vivify him .

After the cutscene , add the claw to the bridge and ( b4 ) cluck it once more to attach the rope . Click the winch ( b5 ) to levy the bridge , then choose the loft ( b6 ) to start a hidden object biz . Once you ’ve collect all of the horseshoe ( there are three on the potful ) , habituate theHorseshoeto unfold the chest ( b7 ) and take theBook of Ritualsand theMold . The chief will give you aKey .
Related : Lost Lands 3 Full Walkthrough ( Golden Curse )
Making the arrow
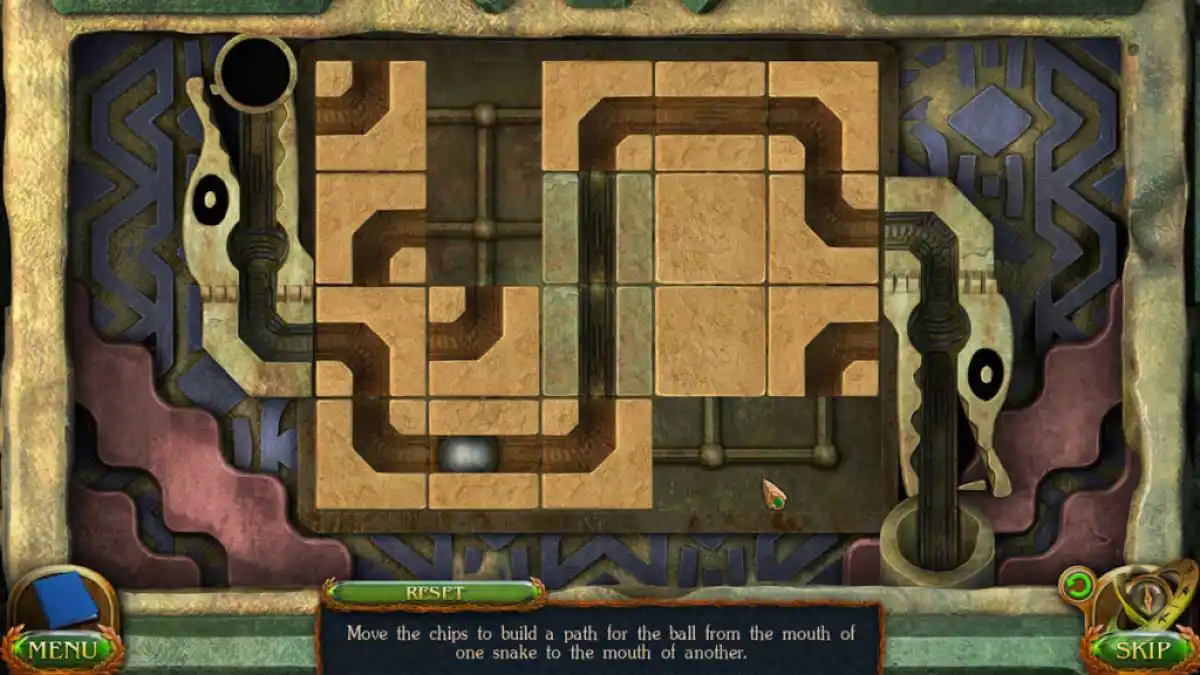
Head out to the court , append the fang to the wolf ’s chief ( d1 ) , and complete the lines puzzle . Once everlasting ( see the resolution below ) , take theAmulet Part .
Now move to the village and collect someFlash Cones(e1 ) before returning to the forge .
Use the key to open up the box seat ( a5 ) to get aShovel With Coaland theSchemefor a shank . add together the ember to the furnace ( a6 ) , then apply the bellows ( a7 ) to wake it . Take theCruciblefrom the table ( a3 ) and locate the mold there . set the crucible in the furnace ( a6 ) .
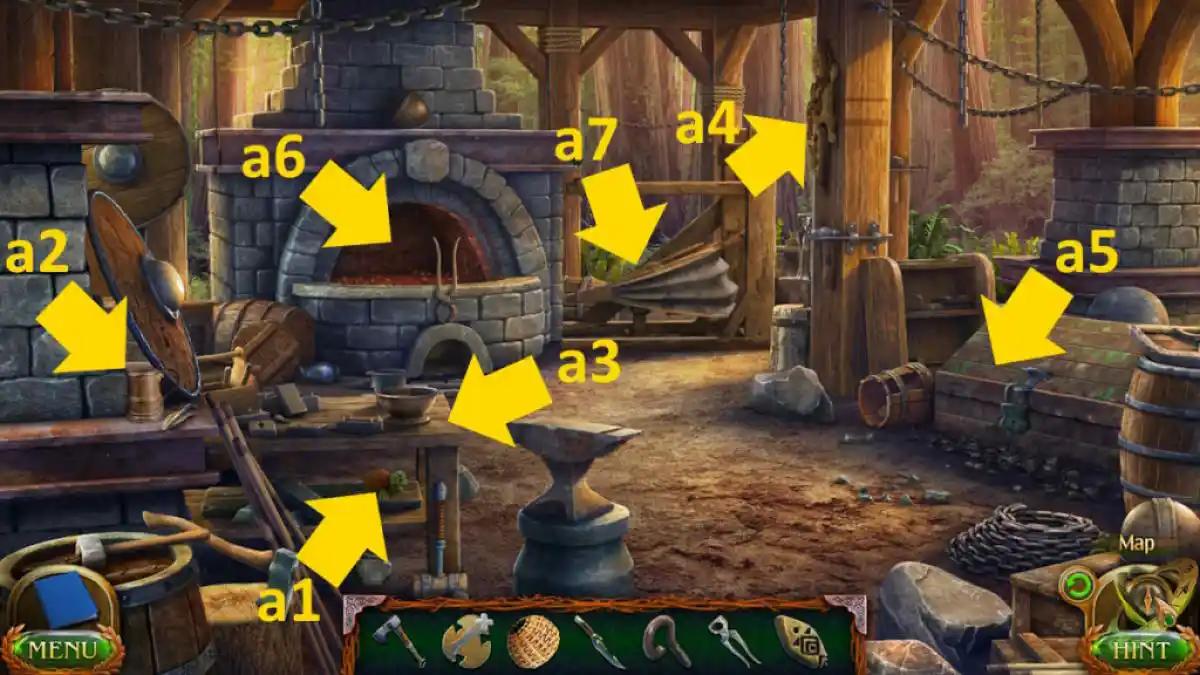
Image by Pro Game Guides
maneuver right back to the river in the champaign and take thePickaxefrom the troll under the bridge deck . Go to the ritual mansion house at the Academy of Magicians next and use the pickax on the metal on the right to amass someIndigo Metal . you may now retrovert to the forge .
Put the metallic element in the melting pot on the furnace ( a6 ) , then use the tongs in the closing - up to get theMolten Metal . practice the molten metallic element on the mold on the table ( a3 ) and practice the weewee that ’s already on the table on the arrow wind . Take theTip .
Now , move back to the hunter camp , select the tent at the back ( f1 ) , and add the schema to the stopping point - up . meet the cannon by follow the instructions , then take theGrappling Canon . render to the Ziruk courtyard , select the passel perspective ( d2 ) , and practice the grappling cannon in the close - up to give yourself access to the cave .

Image by Pro Game Guides
Take theClawin the cave conclude - up , then utilize the axe on the Sir Herbert Beerbohm Tree to get aSequoia Branch . utilize the flash cones on the cave ingress to start a movement puzzle . You ca n’t fail here , as you get inexhaustible arrangement of the cones ( just get them into corners ) . Once you ’ve come after three times , you ’ll getLizard plumage .
You ’ll be moved back to the courtyard . Select the workbench ( d3 ) , sum the branch , then follow out of the close - up and turn the cycle . When the knock breaks , go back to the manticore ’s cave , snap the central treasure pile ( g1 ) , and take theBelt .
Return to the court , fix the chemical mechanism ( under the bench at d3 ) , penetrate the hold again to begin the political machine , and take theArrow Shaftafterward . Select the gibe in your inventory , and then summate the top and the feathering to nail theRitual Arrow .
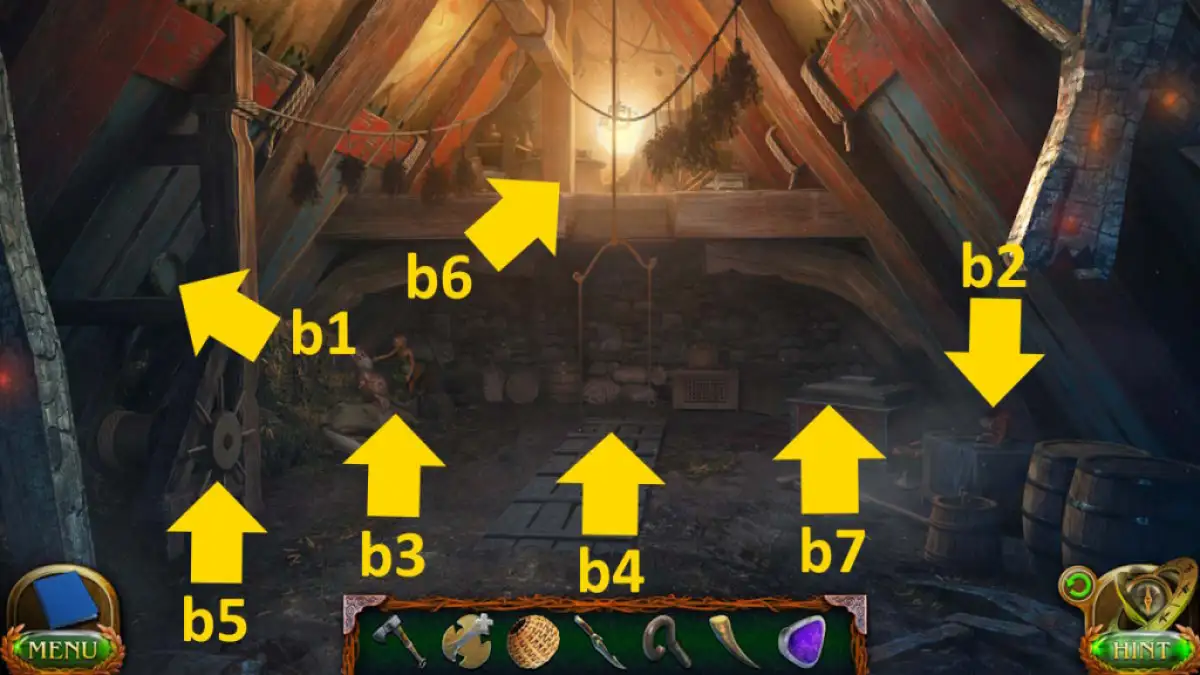
Image by Pro Game Guides
Next , fountainhead into the centaur small town and habituate the claw on the bear head ( e2 ) to unveil a beetle moving puzzle . You require to fill in this double , and I ’ve put the solutions below . Once double-dyed , take theAmulet Partand note the blue promontory .
you’re able to now put the three piece of the talisman together in your armory ( you have to add them in the correct order ) and get theAmulet .
Return to the courtyard , select the stone wall ( d4 ) , and use the amulet to reveal an prototype behind it . Remember you ’ve seen a gullible sword , a red headdress , and a blue head , plus the streamer on the wall outside the village point four blue , three green , and two red circles . Therefore , click the head ( x ) 4 time , the brand ( y ) 3 meter , and the headdress ( z ) twice to obtain theShield of Valor .
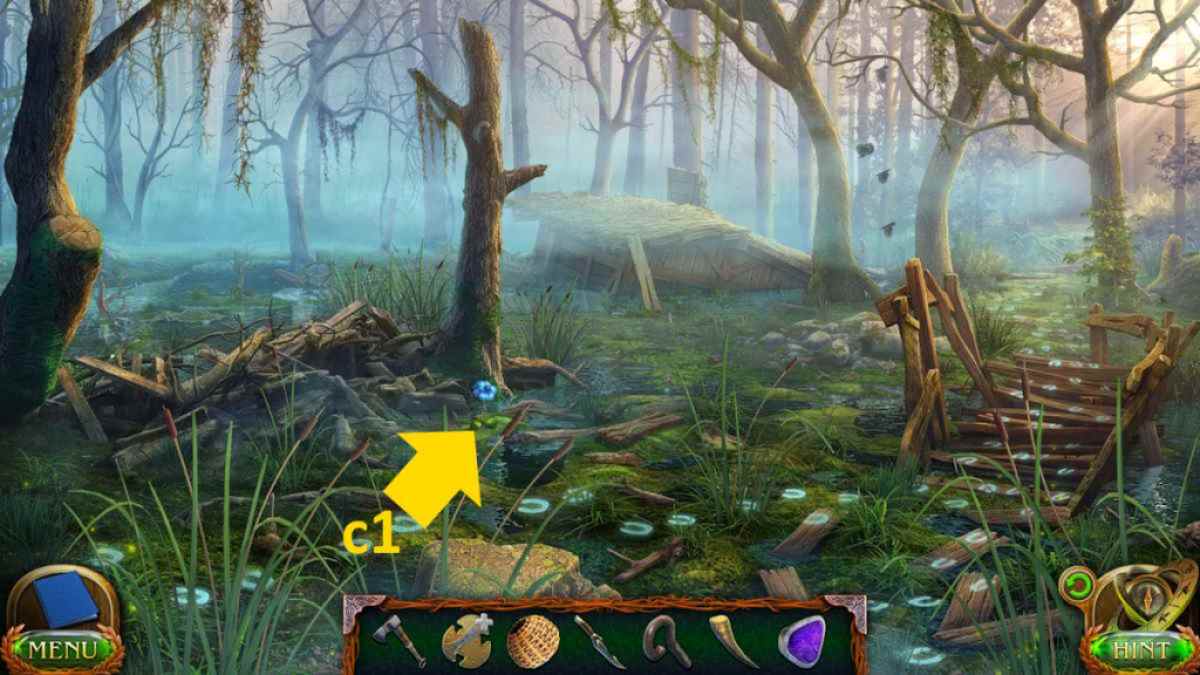
Image by Pro Game Guides
Go to the Centaurus village next , select the fire pit ( e3 ) , and add the shield , follow by the tobacco . Now add the arrow and you ’ll get theFamily Arrowback . Give the pointer to the captain ( b3 ) , and enjoy the cut shot .
Related : Lost Lands 9 Walkthrough – Full Guide
Karemos
Grab theMorphing Object(h1 ) and theCollectible(h2 ) , then get a close - up of the temple base ( h3 ) and take theKey . utilise the paint to afford the door ( h4 ) and get a close - up of it to depart a miss objects mini - game . Once complete , you ’ll find theHorse Tail ( as well as aManuscript ) . tot up the tail to the wall painting ( h3 ) , then move on to the cave ( h5 ) .
TheCollectibleis on the paries ( i1 ) and theMorphing Objectis at the base of the cactus ( i2 ) . Use the axe on the branch ( i3 ) to get the Bundle , then utilize the obelisk on the parcel in your stock list to get theRitual KnifeandBreastplate . Click the sand ( i4 ) to incur theBow , then click it again to unveil a teaser . Also , take asecond Ritual Knifefrom the skull ( i6 ) .
Select the teepee ( i5 ) next to find oneself yourfinal Manuscript , theStronghold of the Five Worlds , and theHeaddress . Also , make a banker’s bill of the image on the function underneath it . you could now return to the sand city square and add the remaining pieces to the mural ( h3 ) , which reveals a young mystifier ( h6 ) . detect the solution below .
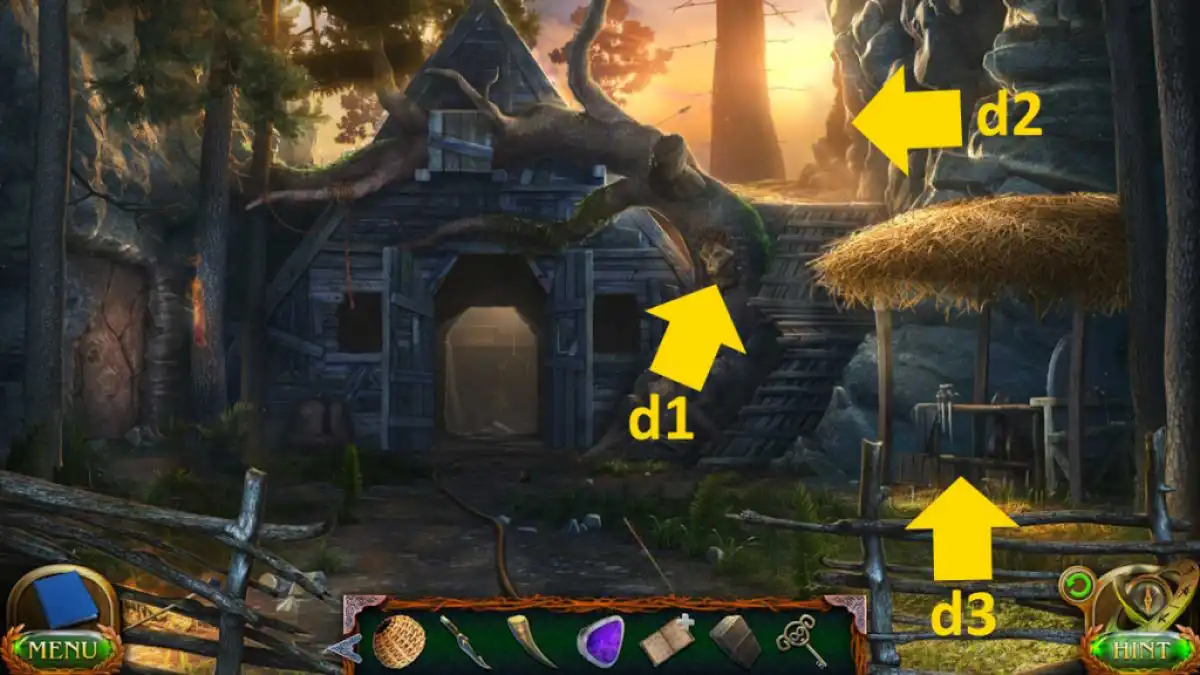
Image by Pro Game Guides
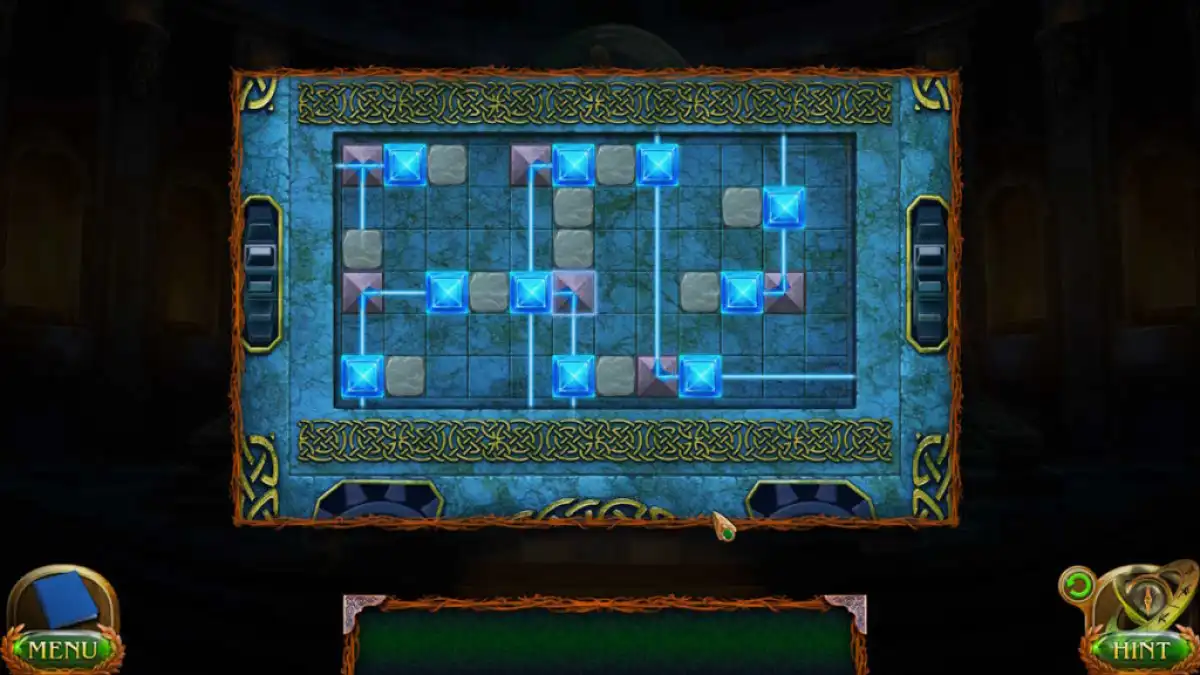
Once complete , a raw teaser pillar appear ( h7 ) . Move the tile to create the traffic pattern below .
The first pillar ( h6 ) will rise once more , so dispatch the follow puzzler .
The 2nd mainstay rises again ( h7 ) , so complete the next puzzler .
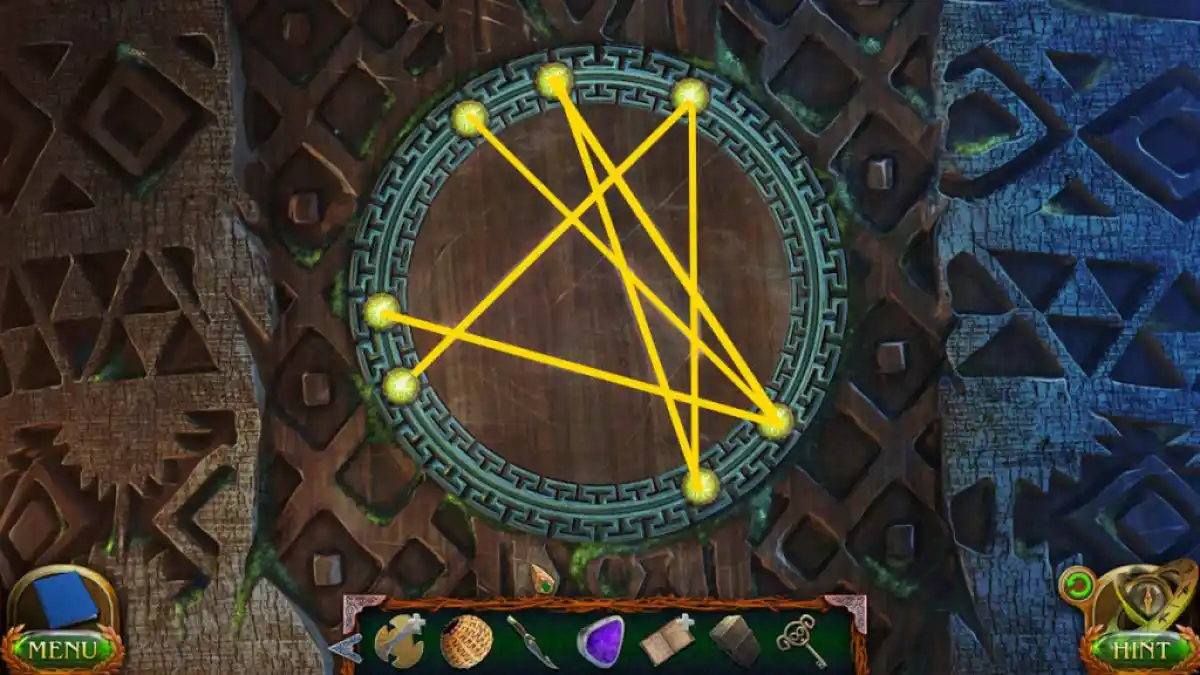
Image by Pro Game Guides
reduplicate this once more with each pillar ( the solution are below ) .
The steps will now seem , giving you access to the pyramid .
Select the pendulum ( j1 ) and use the ax on the planks to get some light into the room , allow you to notice theCollectible(j2 ) andMorphing Object(j3 ) . Take thethird Ritual Knifefrom the plinth ( j4 ) , and then keep clicking the dust ( j5 ) until you expose theBrush . employ the obelisk to prune the final ( j6 ) and take theHorse ’s foreland , then go back out to the square .
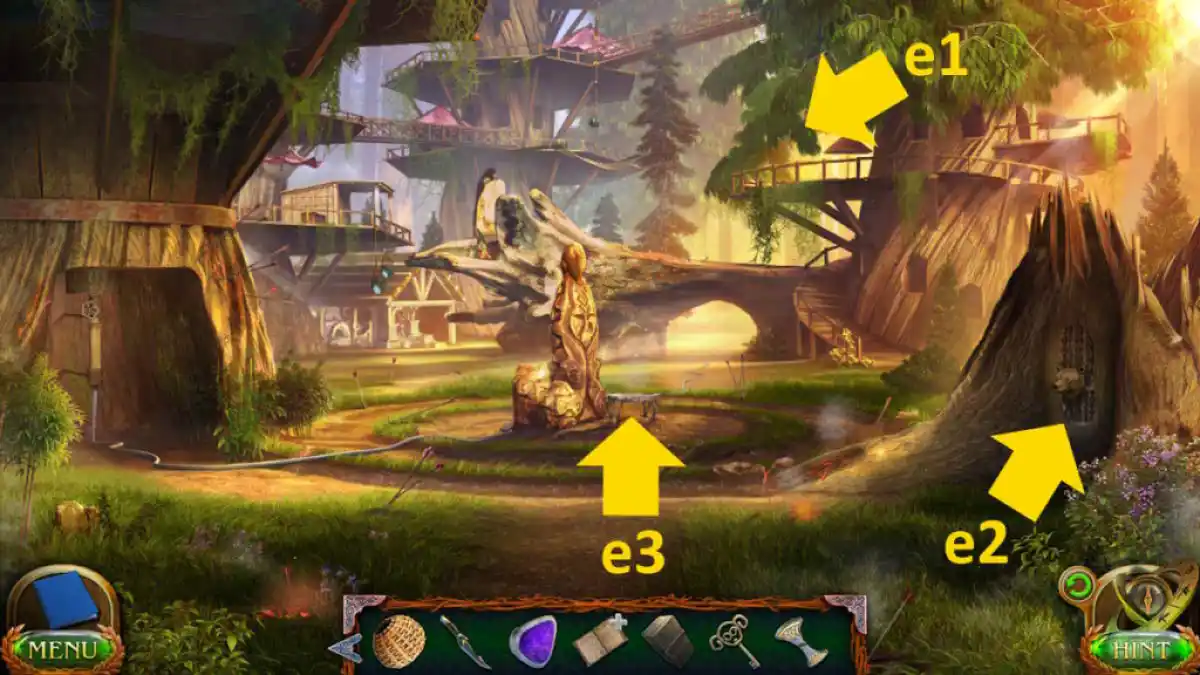
Image by Pro Game Guides
Select the altar ( h8 ) , tot up the ritual knives , and take theFlute . Go back into the synagogue , take the back rampart ( j7 ) , add the champagne flute , and then chatter the fluting reeds in the right order to open up the jury . From left to right , the chronological succession is5,7,2,3,6,4,1 . Take theSealand theTarsas . Now append the seal to the book on the pedestal ( j4 ) , and read what ’s inside .
After the cut scene , snap the base where the sand centaur was standing ( j8 ) and note the approach pattern . Return to the cave entrance , take the grid you uncovered on the floor ( i4 ) , and entreat the matching panels to disperse the whirlwind . you could now enter the treasury .
Grab the Collectible ( k1 ) and the Morphing Object ( k2 ) . Use the brush on the brass ( k3 ) and then read it , noting the hint ( horse west , dolphin east , owl S , wolf north ) . Select the skinny obelisk ( k4 ) , add up the horse , and then splay it so that the owl faces inwards . Set the other three pillars as per the clues above .
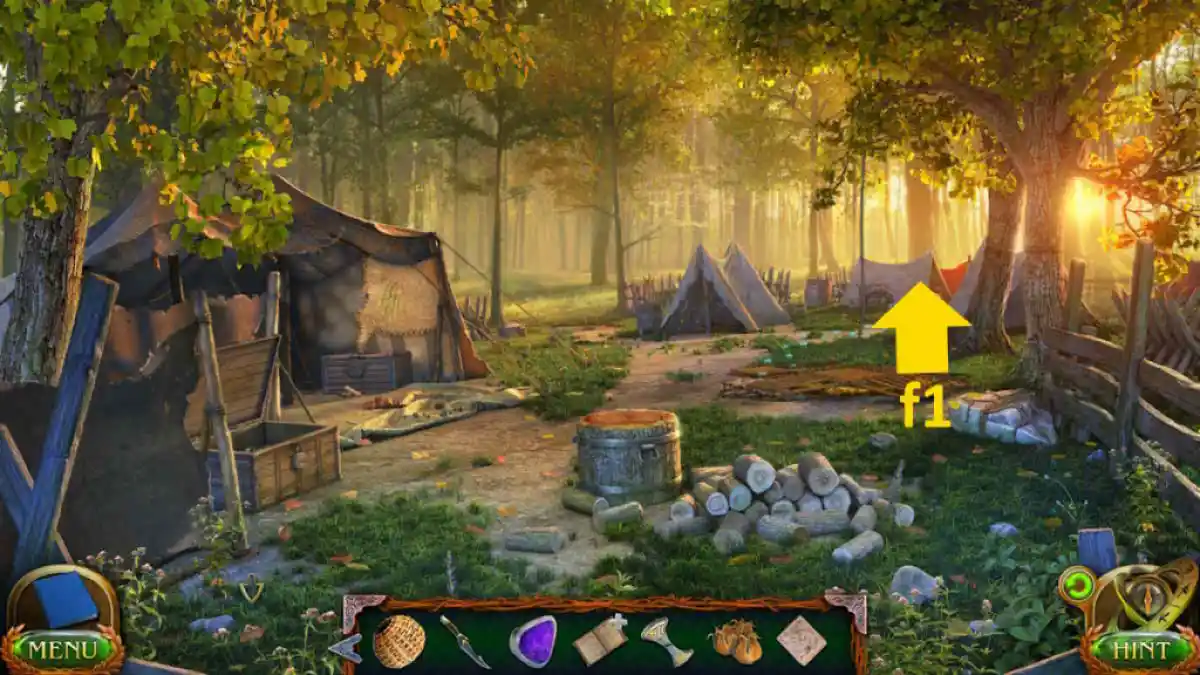
Image by Pro Game Guides
This give a secret area with an altar on the right wing ( k5 ) , so pick out it and take the Orb Of Memories . repay to the program library in the Academy of Mages , add the eyeball to the skull on the table ( l1 ) , then cluck it once more to check the cutscene .
lead into the bookshelves ( l2 ) , retard the logo for the Department of Supernatural Beings , and snap the scroll there to find the shelf you need , ledge 10 . sink in ledge 10 to get the Clue and then come back to the cave at Karemos .
Select the skeleton ( i6 ) and add the clue in the close - up to protrude a miniskirt - game , follow the directions on the cue ( see above ) to complete it and take a Key . reappearance to the treasury , use the key to spread the doorway ( k6 ) , and go through .
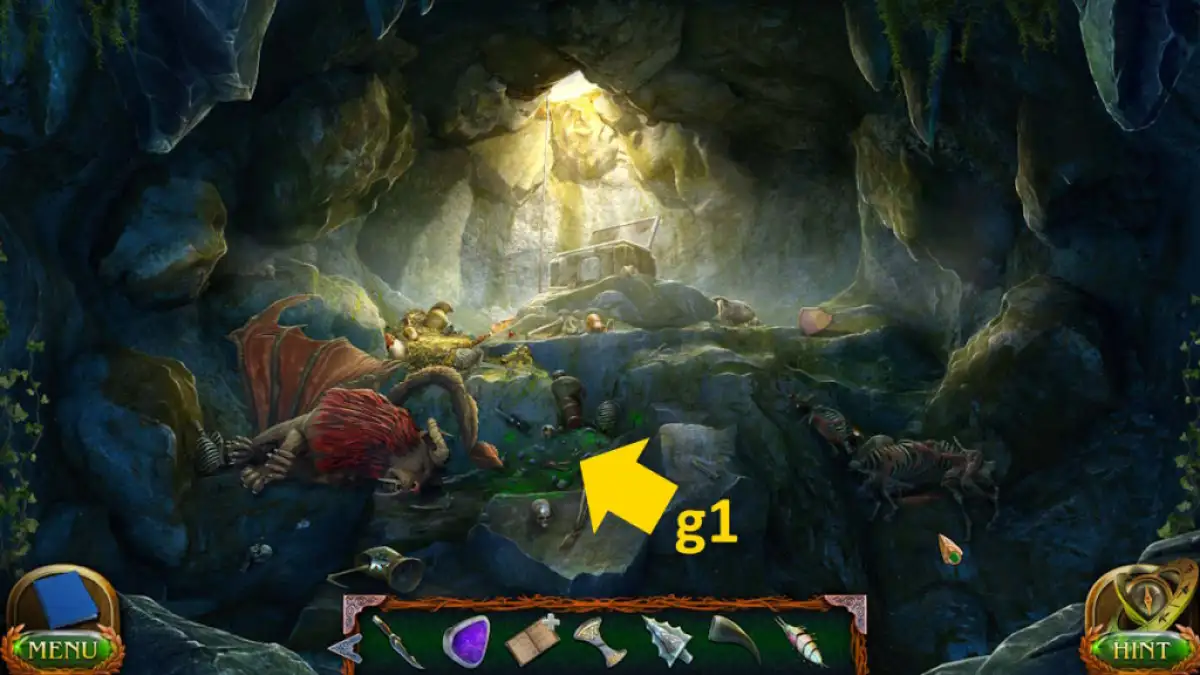
Image by Pro Game Guides
The sand timer puzzle solutions
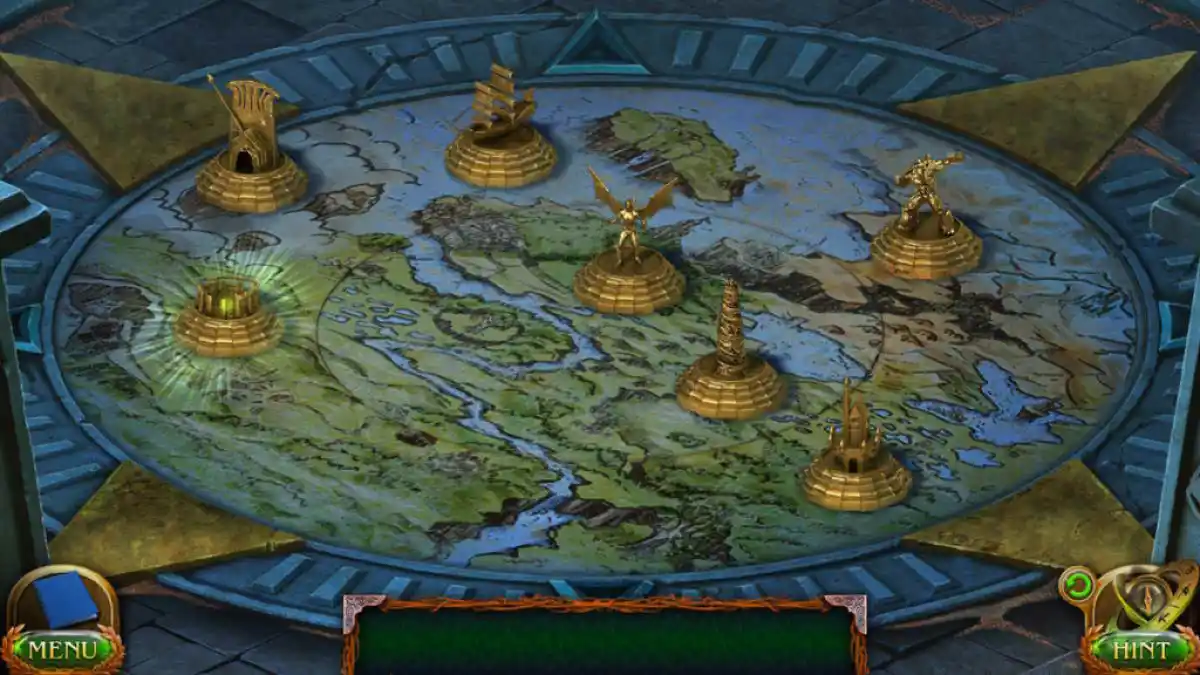
Take the final Morphing Object ( m1 ) and Collectible ( m2 ) , and then get the Great Metronome from the 2d pedestal ( m3 ) . Go back outside and add the three figure of speech to the map ( k7 ) . Arrange the figure as they were on the function ( see below ) . When the map rises , click it for a conclusion - up and take theSkull .
Return to the grave and expend the skull on the 2nd pedestal ( m3 ) to get going a light puzzle . See the solution below .
Once complete , a second puzzle will start on the pedestal to its right field , and so on . You ask to do these quickly , asyou’re on a timer . For the second puzzle , select the skulls in the undermentioned order .
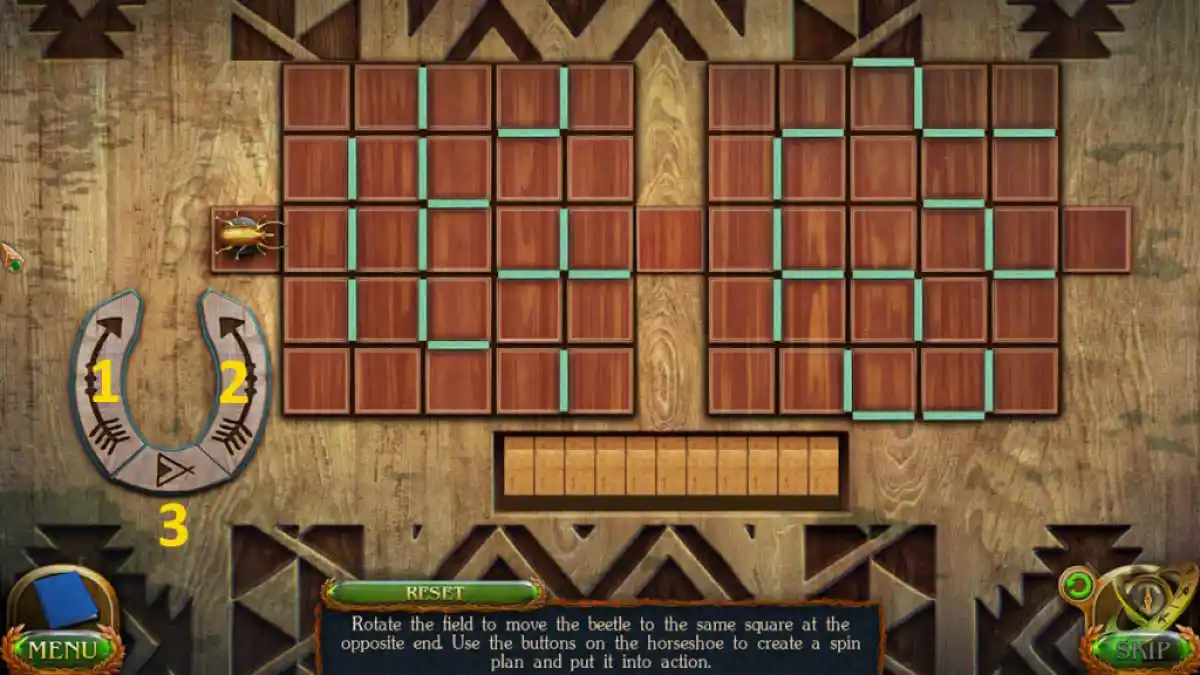
Image by Pro Game Guides
For the third mystifier , move the pursual :
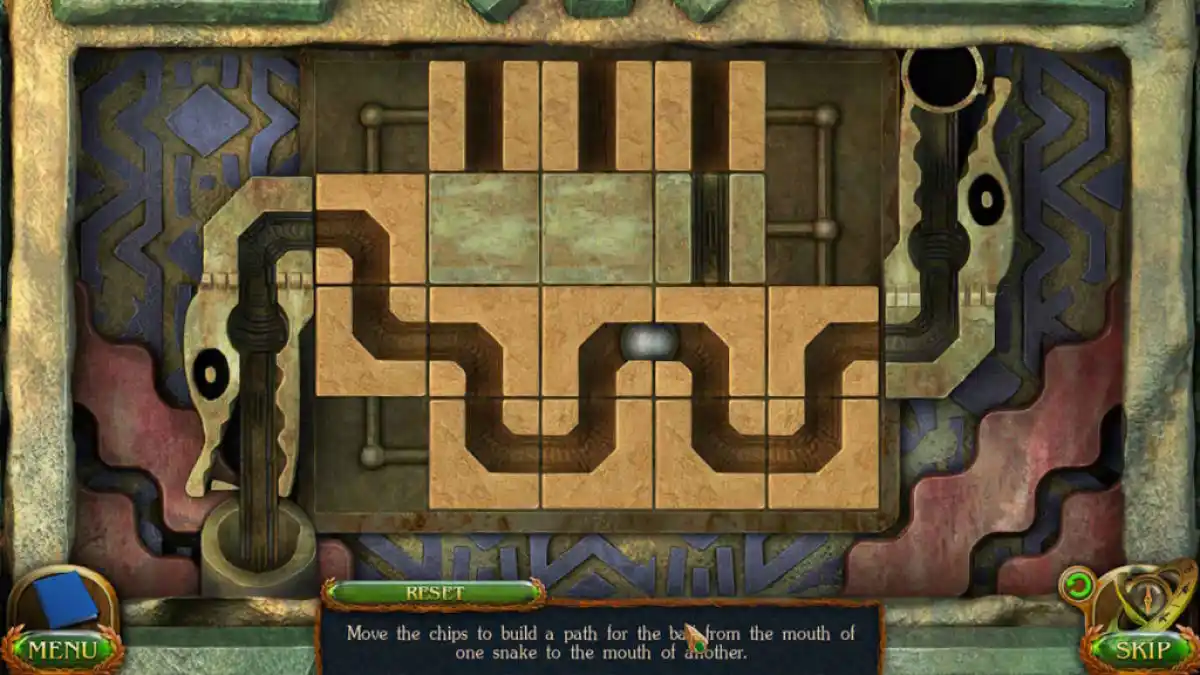
For the fourth puzzle , see the completed image above for where to get the snakes . Once all four dyed streams have been broken , the body will fall to the ground . prove the consistency , and Kiana will give you theAmulet .
habituate the amulet on the shackles holding the body in stasis , and the body will disappear . After a cutscene with Maaron , you ’ll havecompleted Lost Lands 8 Sand Captivity . congratulation !
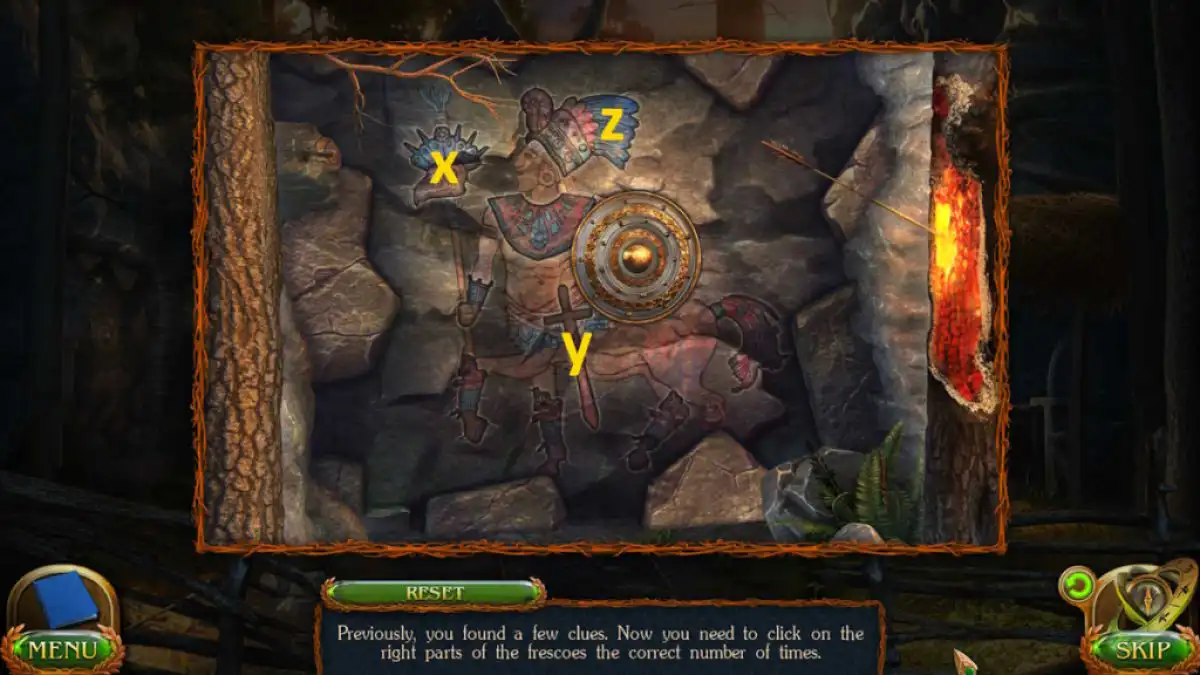
Image by Pro Game Guides
You should now have approach to some supernumerary message , so uphold the game with us here at Pro Game Guides with myLost Lands 8 – Bonus Chapter Walkthrough & Solutions !

Image by Pro Game Guides
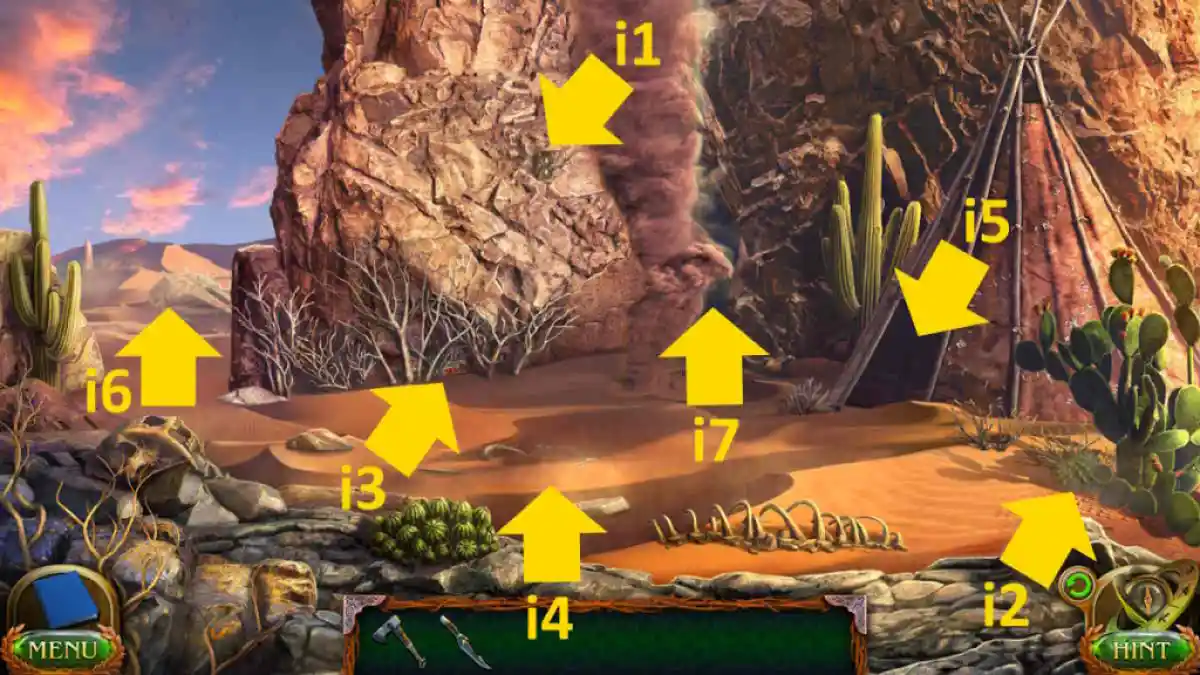
Image by Pro Game Guides
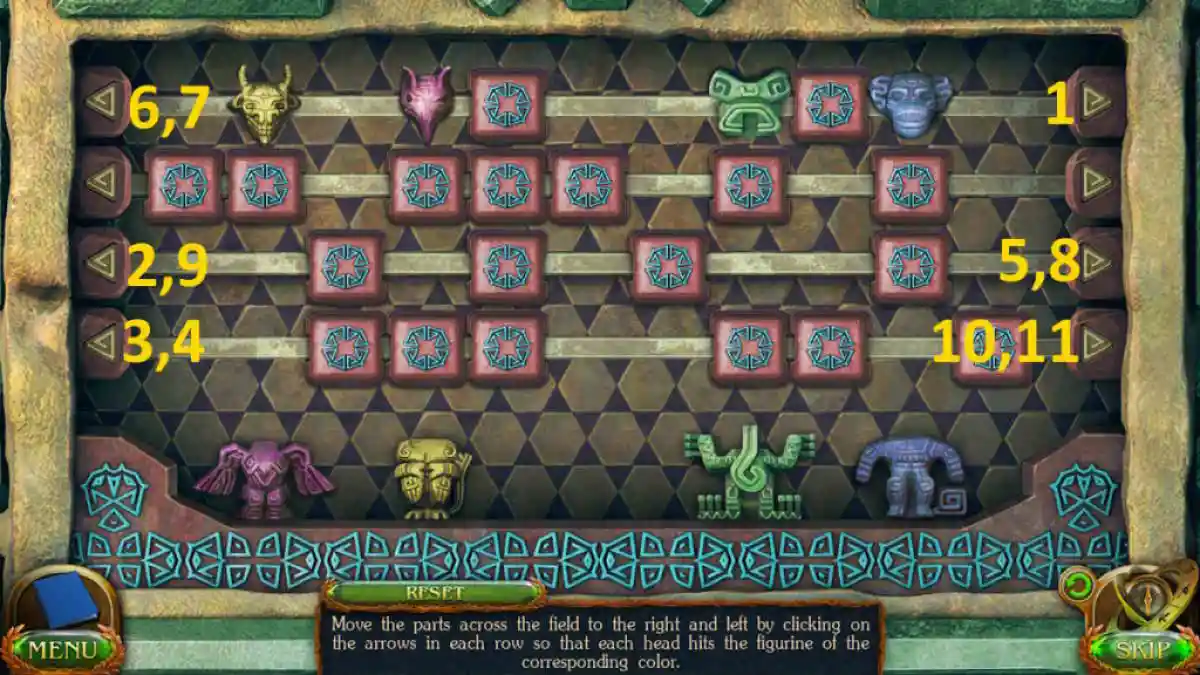
Image by Pro Game Guides
Screenshot by Pro Game Guides
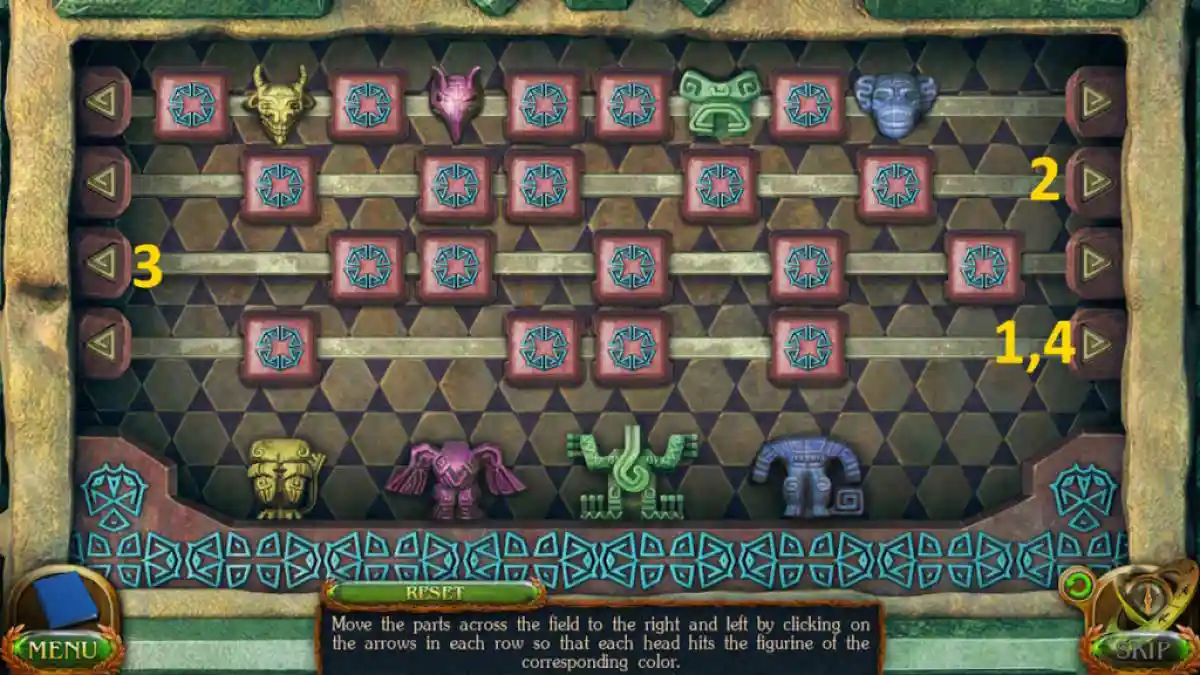
Image by Pro Game Guides
Screenshot by Pro Game Guides
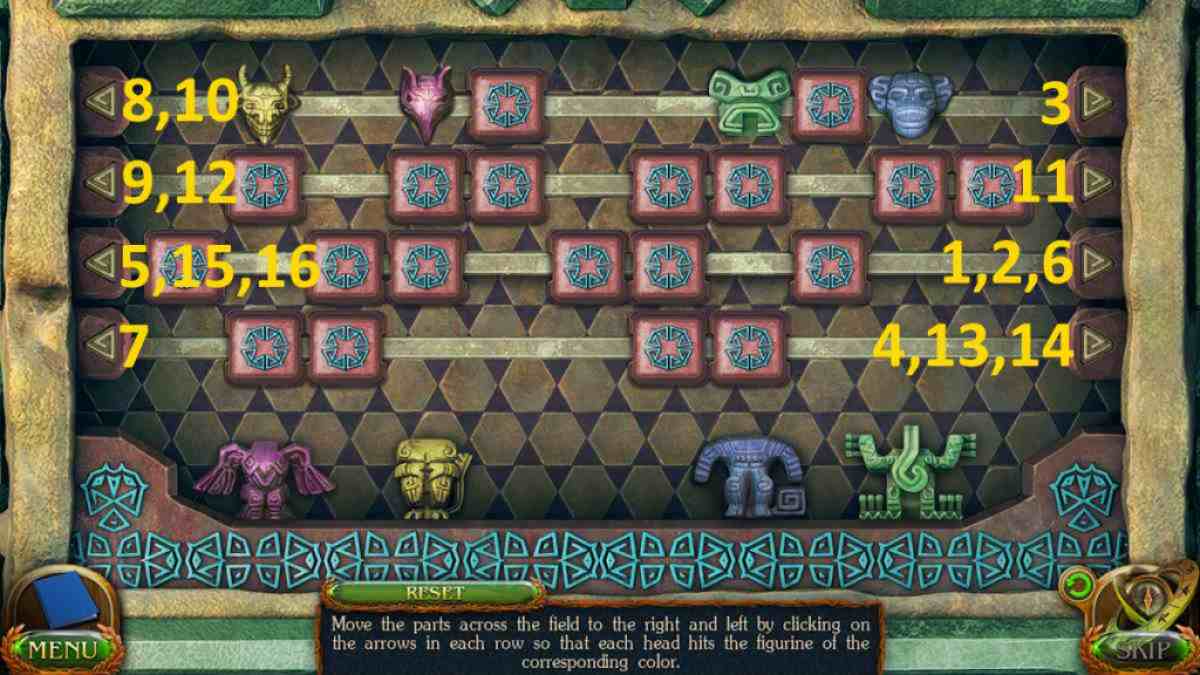
Image by Pro Game Guides
Screenshot by Pro Game Guides
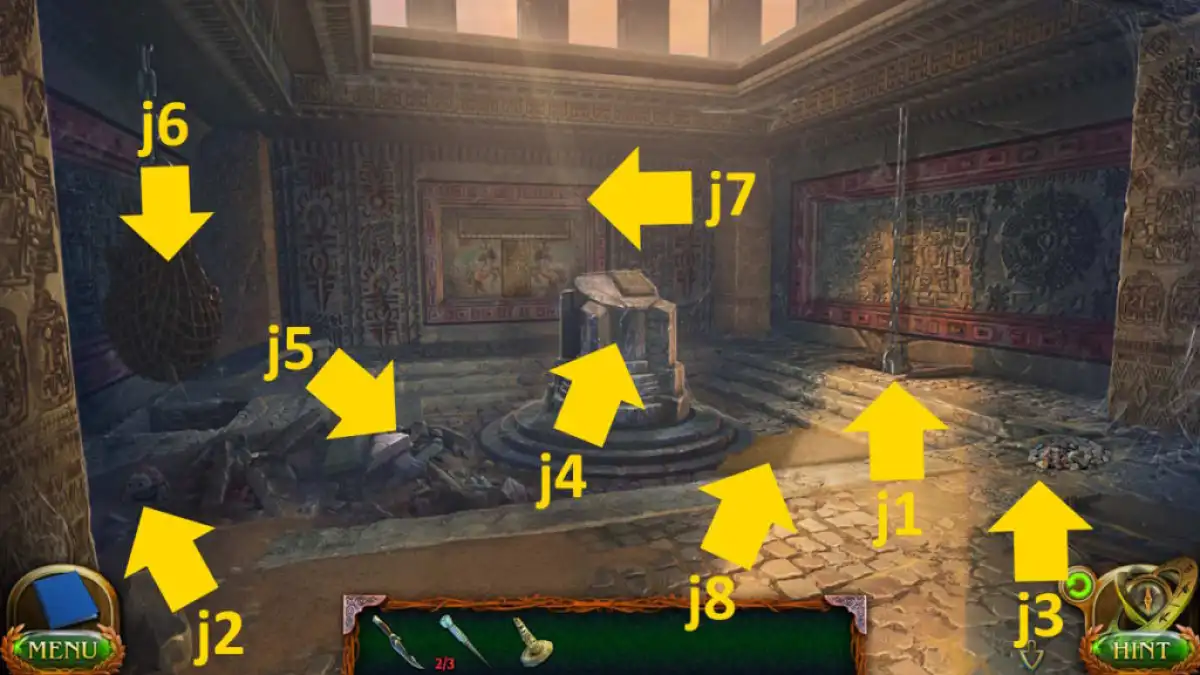
Image by Pro Game Guides
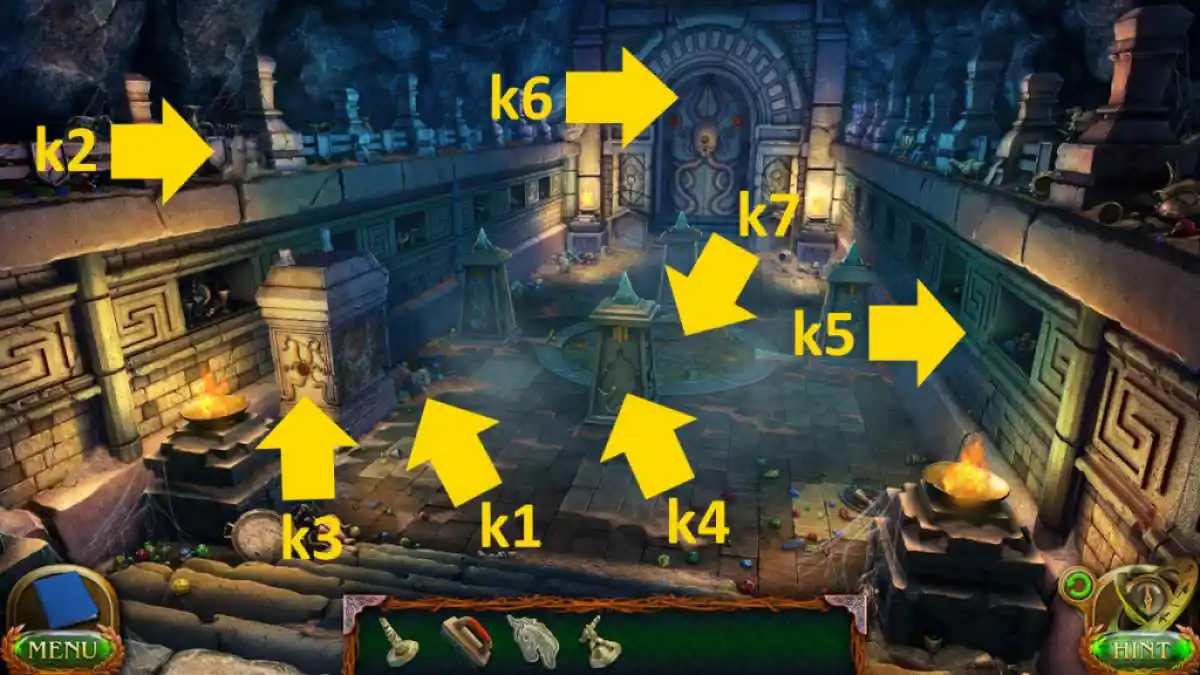
Image by Pro Game Guides
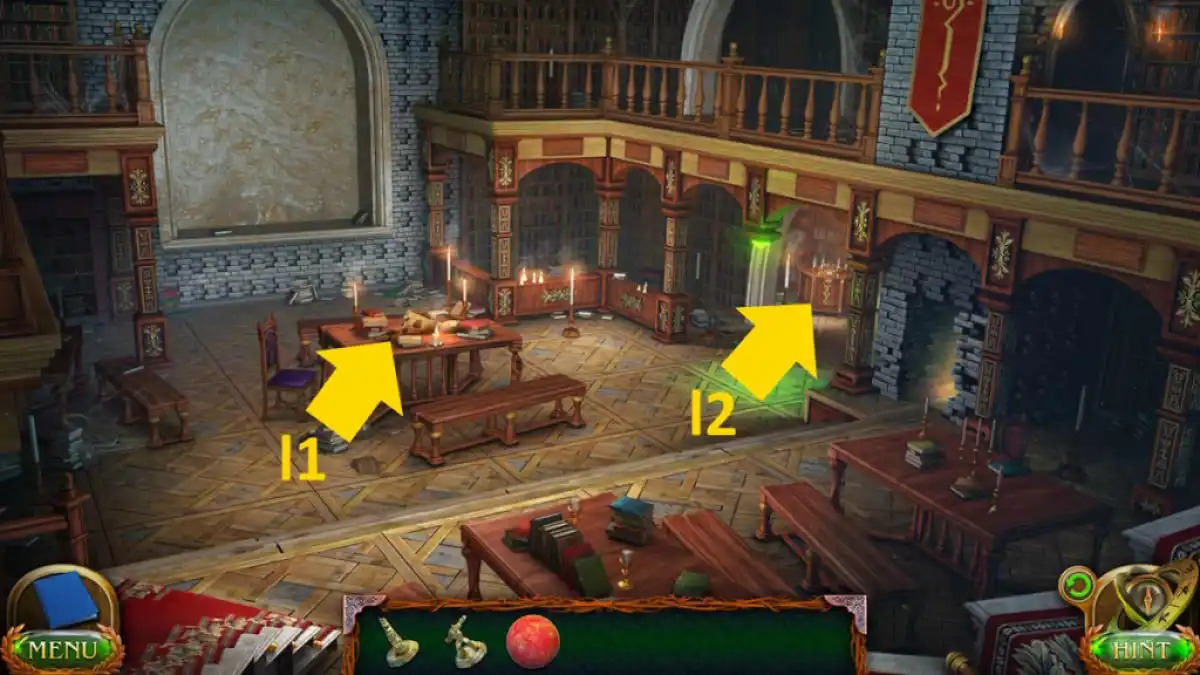
Image by Pro Game Guides

Screenshot by Pro Game Guides
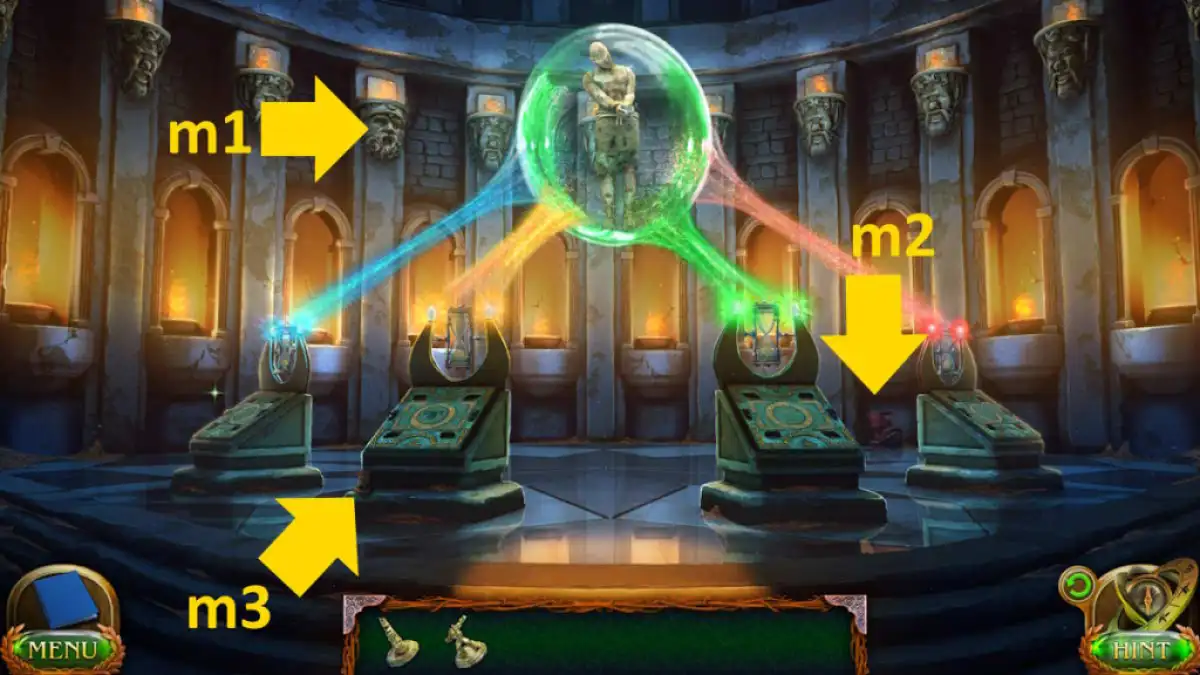
Image by Pro Game Guides
Screenshot by Pro Game Guides
Screenshot by Pro Game Guides
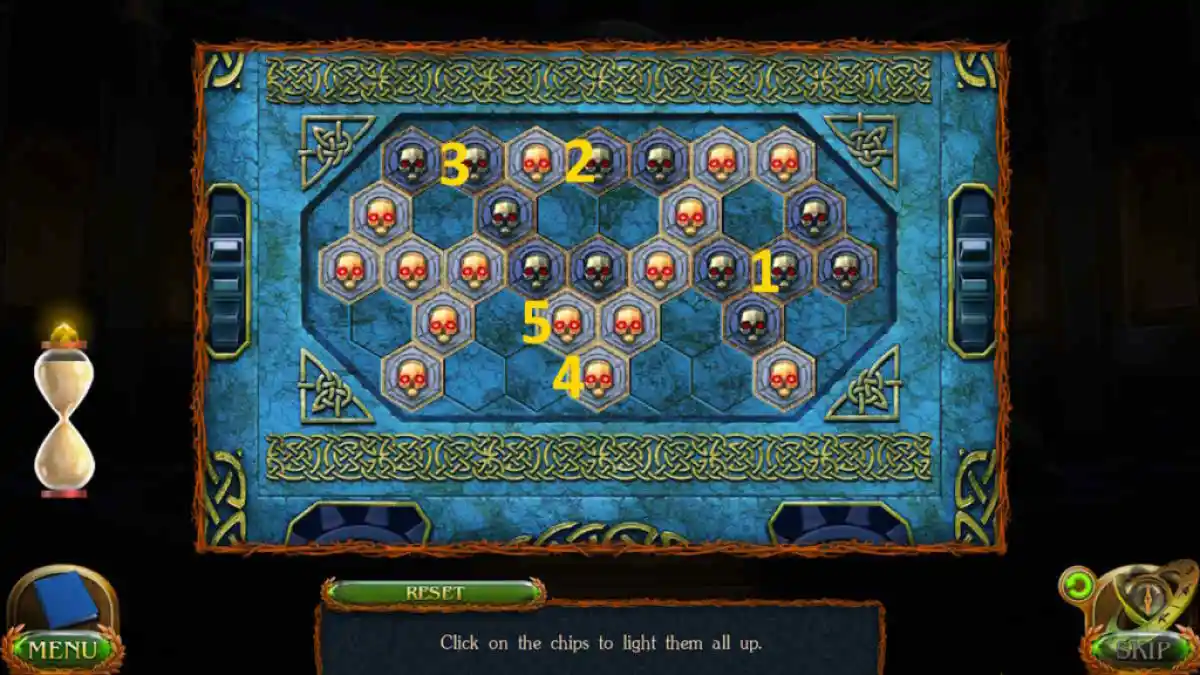
Image by Pro Game Guides
Screenshot by Pro Game Guides
