Finding the centaurs .
Each Lost Lands secret plan accept you on a rich dangerous undertaking full of knavish mystifier to solve and object to rule . If you ’re savour Lost Lands 8 right now , study on for part 3 of my full walkthrough .
Lost Lands 8 Walkthrough, Part 3 - Sand Captivity
I ’ve broken up my Lost Lands 8 Sand Captivity walkthrough into several parts . This one takes us from when Susan is face for the ingredients to make the underwater potion to when she puts out the attack in the centaur village . If you ’re looking for puzzle solutions that happen before or after this , or else head over to myLost Lands 8 Walkthrough hubto come up the relevant information .
Making the underwater potion
Select the lake ( a1 ) , plunk somePurple Seaweed , and seize aBox With Numbers .
Head to the academy glasshouse next and clean aLemonfrom the lemon Sir Herbert Beerbohm Tree ( b1 ) .
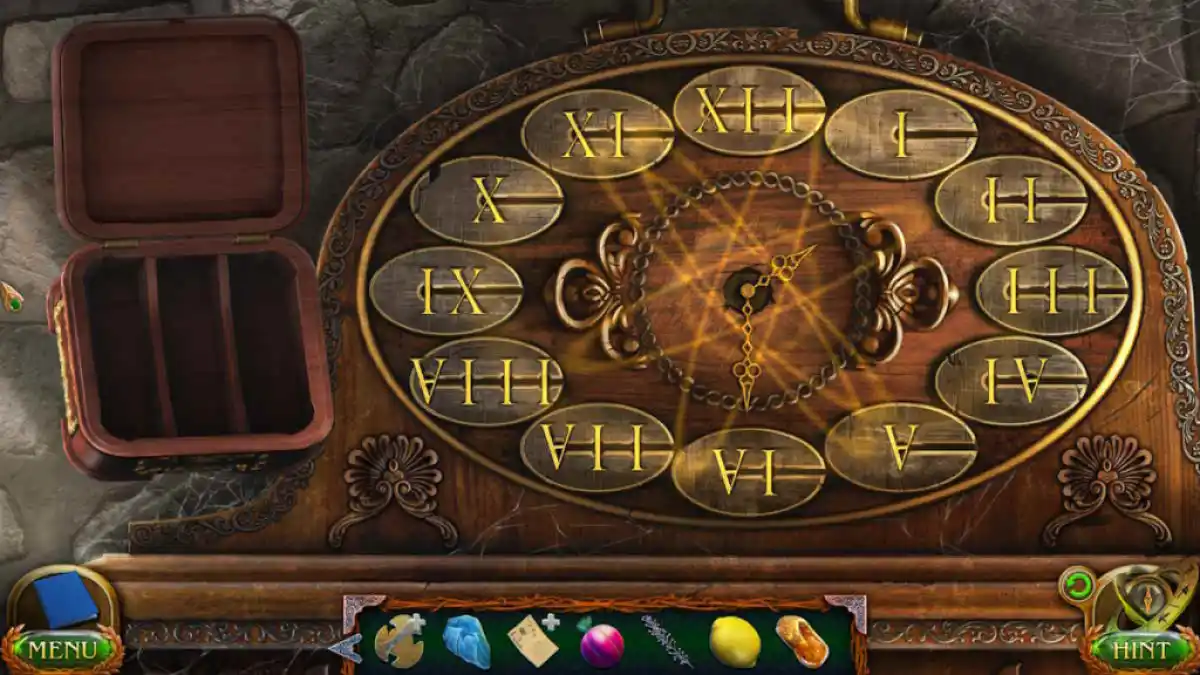
in the end , deliver to Maaron ’s hut and get theLava Flower Juicefrom the plant on the windowsill ( c1 ) . Select the clock next ( c2 ) and add the box with number . Click the boxwood again to open it and take up a Romanic numerals puzzler .

You just have to remake the clock ’s number from the letter piece and add them in the correct order ( see above ) . Once done , a compartment will open to the left of the clock ( c3 ) . Click the items inside until you find theDragon Vessel .
pick out the recipe in your inventory and drag the vessel onto the note . Next , add the purple seaweed . Now bestow the maize and cut it with your knife . summate the lava succus and murmuri berry , and you ’ll receive theUnderwater Potion Ingredients . fall to the lake and append the ingredient to the wizard well ( a2 ) .
Lowering the island
After the cut scene , head to the library ( d1 ) . Check the roll at the entrance to retrieve the symbolization for the Department of Crystals and Artifacts ( a gemstone ) , move to that discussion section , and analyse the scroll there to see that you need ledge 6 . Click ledge 6 to readCrystal Unio .
Go out to the courtyard and mouth to the janitor ( e1 ) , who will give you aCarabiner .
Move into the hall and use the karabiner on the chain to ready the voluminous mechanism ( f1 ) , which unfold the windowpane and shines a form onto the floor ( f2 ) . Get a close - up of it and add the allegory to bulge out an odd - one - out puzzle .
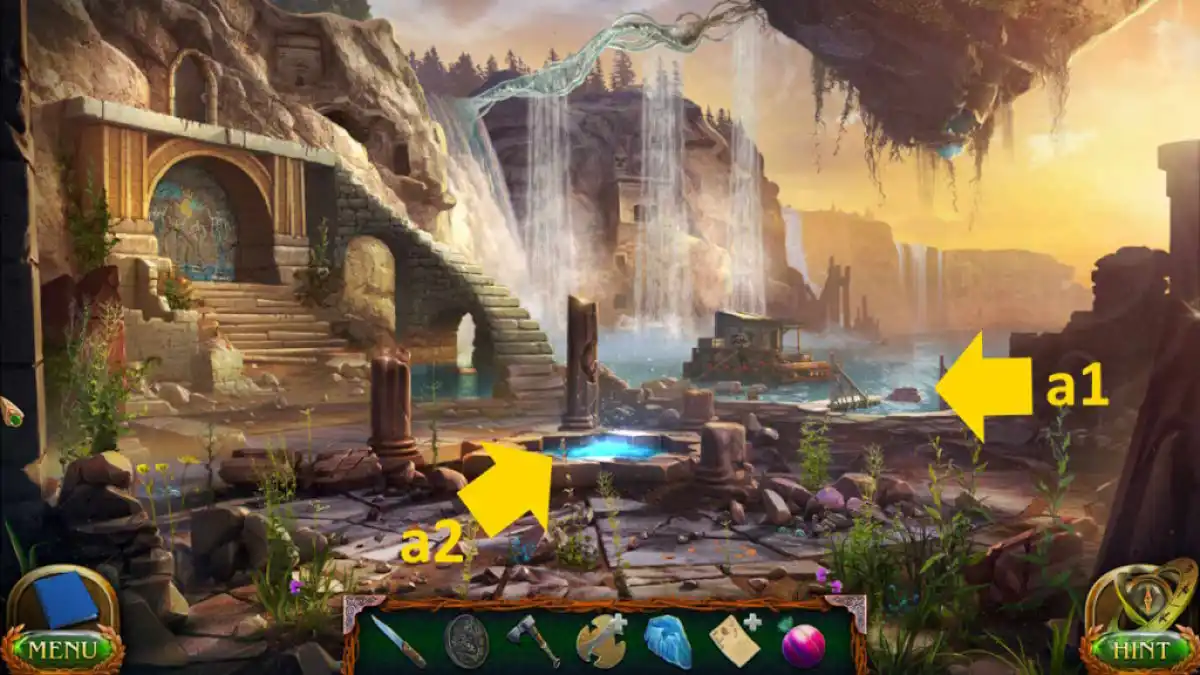
Image by Pro Game Guides
There are 10 sections that you need to foreground . See the persona above for the solvent . Once complete , the floor will open up , give youaccess to the ritual mansion house .
Before entering the Radclyffe Hall , return to the fortress and place the crystal on the rocks ( g1 ) . Now take the crane ( g2 ) and use your tongue to cut the rope in the finis - up . The rock candy will fall , crushing the crystal and permit you to break up up theCrystal Powder .
Now go to the ritual hall . Grab theCollectible(h1 ) and theMorphing Object(h2 ) , fall into place the fundamental field ( h3 ) , and take theKey(in the bottom right of the end - up ) . Return to the program library and utilize the key to launch the township cyclorama ( d1 ) .
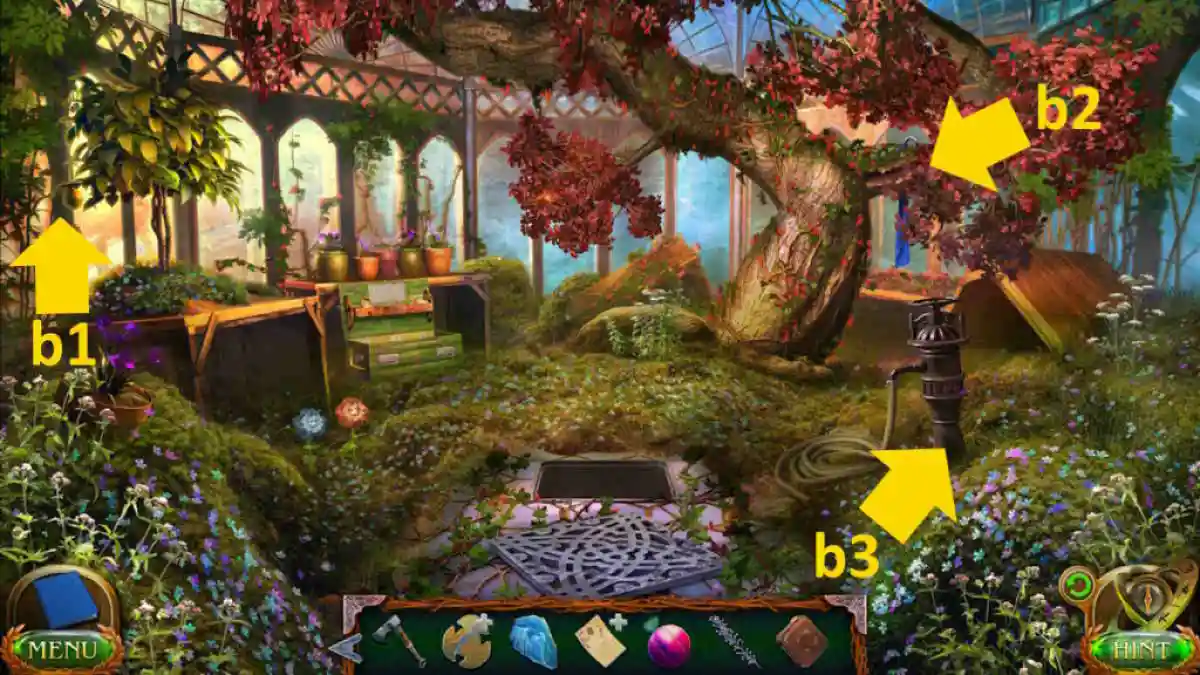
Image by Pro Game Guides
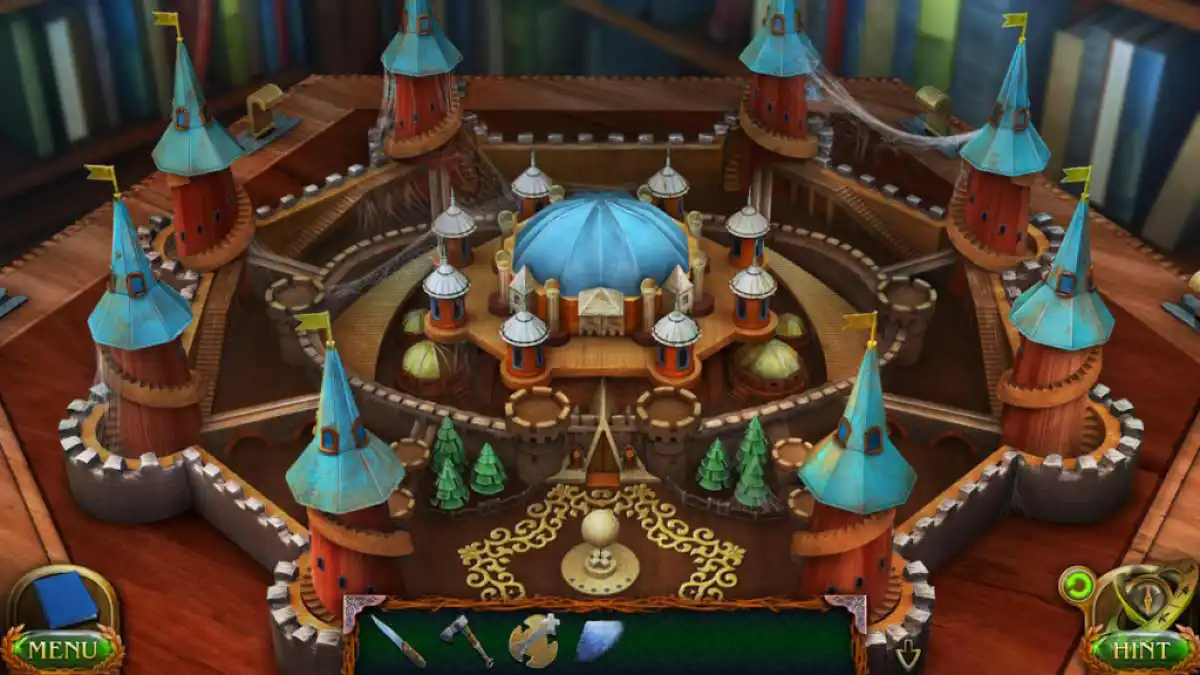
Click it once more to bug out an item - arranging puzzle . There are 11 pieces to move , after which the town will look like the range above . Take theSignet .
Go to Maaron ’s office and use the signet to launch the cupboard ( i1 ) , and then click the chemical mechanism deep down to lead off an animal roofing tile - moving teaser . Each animal needs to be in its correct environs . To complete it , press the central X once , the out-of-door arrow once , the left X once , and then the proper X once ( yes , it ’s that simple ! ) . Take theLollipopand theBox With testis .
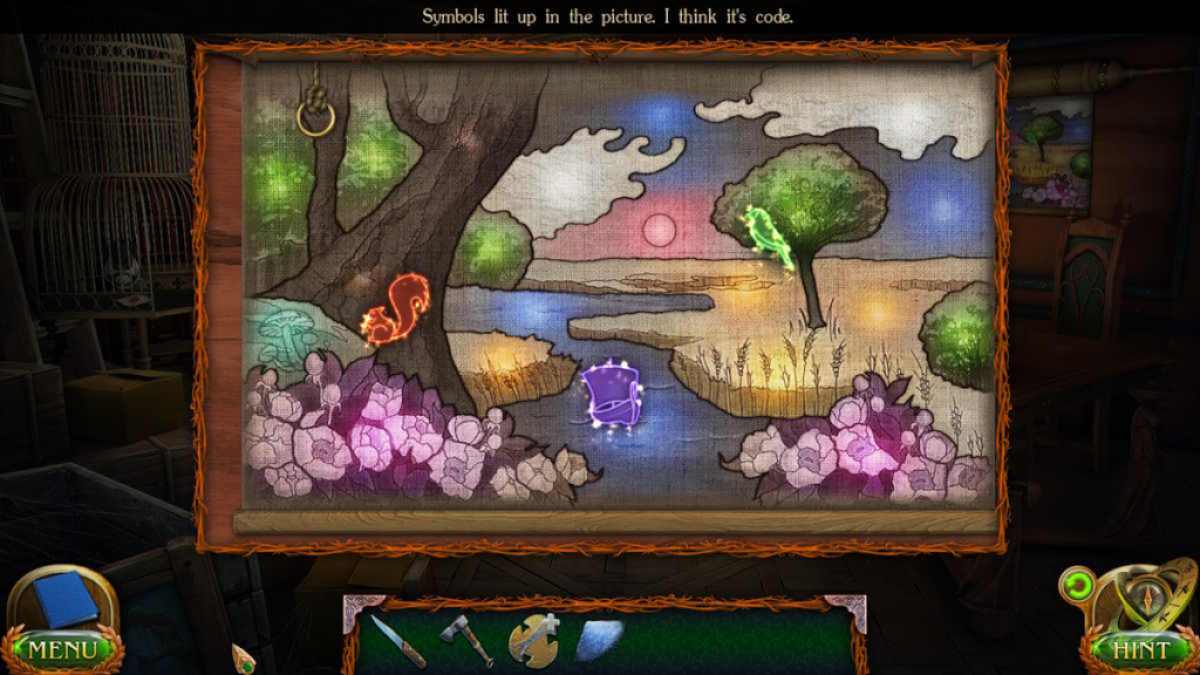
Now take the chart on the bulwark ( i2 ) and sum the loge with balls to it to find that one ball is missing . Go to the glasshouse and use the lolly on the insects on the tree ( b2 ) to getAnts . Back in the office , impart the ants to the bird cage ( i3 ) , which attracts the bird down from the top of the closet . Click the bird in the coop for a stopping point - up and take the missingRed Ball . impart it to the wall chart ( i2 ) and you could begin a color - matching teaser ( I ’ve pictured the right ball position below ) . Once done , notice the highlighted symbols .
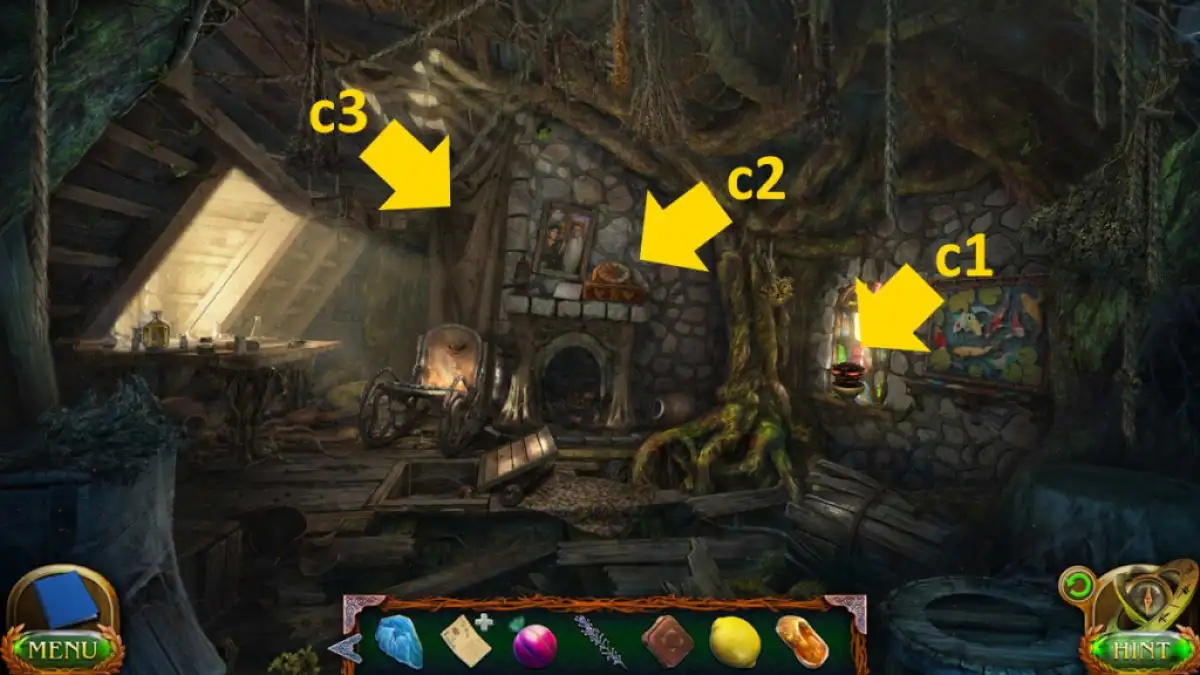
Image by Pro Game Guides
Select the closet ( i1 ) once more and get a ending - up of the metal box inside . Turn the dials to match the figure you control on the wall chart ( see below ) and it will unfold .
Take thePlate , go back to the ritual hall , and add it to the stone ( h4 ) . This reveals a pool in the center of the room ( h3 ) . sum up the crystal powder to the consortium to lower the island .
Related : Lost Lands 7 Walkthrough – Full Guide
Screenshot by Pro Game Guides
Free the young centaur
You determine yourself back at the river , so flick the portal ( j1 ) to move on to the timberland in your hunt for the centaurs .
TheCollectibleis on the rocks ( k1 ) and theMorphing Objectis on the tree ( k2 ) . choose the skeleton ( k3 ) , study the note , and take theDrawing . Click the hole in the same closing - up and seize theSapphire . Click the firefly ( k4 ) to find asecond Saphire , then click the President Bush ( k5 ) and move them to discover a cave entrance and direct deep down .
Grab theMorphing Object(l1),Collectible(l2 ) , and theHair Of Centaur(l3 ) . You ’ll also findTobabbo Of Spiritsin the gem down ( l4 ) and you’re able to add the draftsmanship to the altar ( l5 ) . Go back outside and move forward ( k6 ) to the swampland .
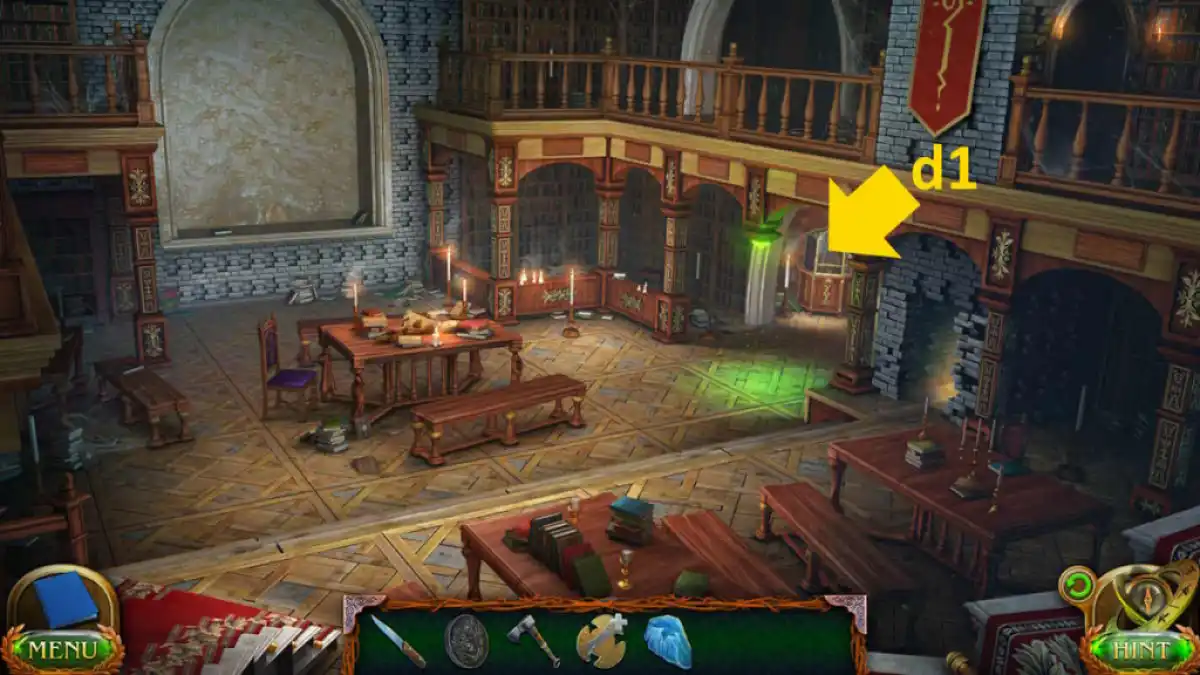
Image by Pro Game Guides
Take theCollectible(m1 ) , theMorphing Object(m2 ) , theRake(m3 ) , and thePlank(m4 ) . Use the plank to get to the hut ( m5 ) and get a finish - up of the roof . Click the trapdoor in the close - up and open up the crates to find that all the rum bottles are broken . While you ’re here , take athird Sapphirefrom the roof .
Return to the forest now and take the other way ( k7 ) to the hunter pack . TheCollectibleis in the woodpile ( n1 ) , while theMorphing Objectis on the side of the tent ( n2 ) . Select the Hammock ( n3 ) and use the knife to collect it .
Now , put the hammock in the grass ( n4 ) and expend the rake to start a gathering teaser . See the solution below .
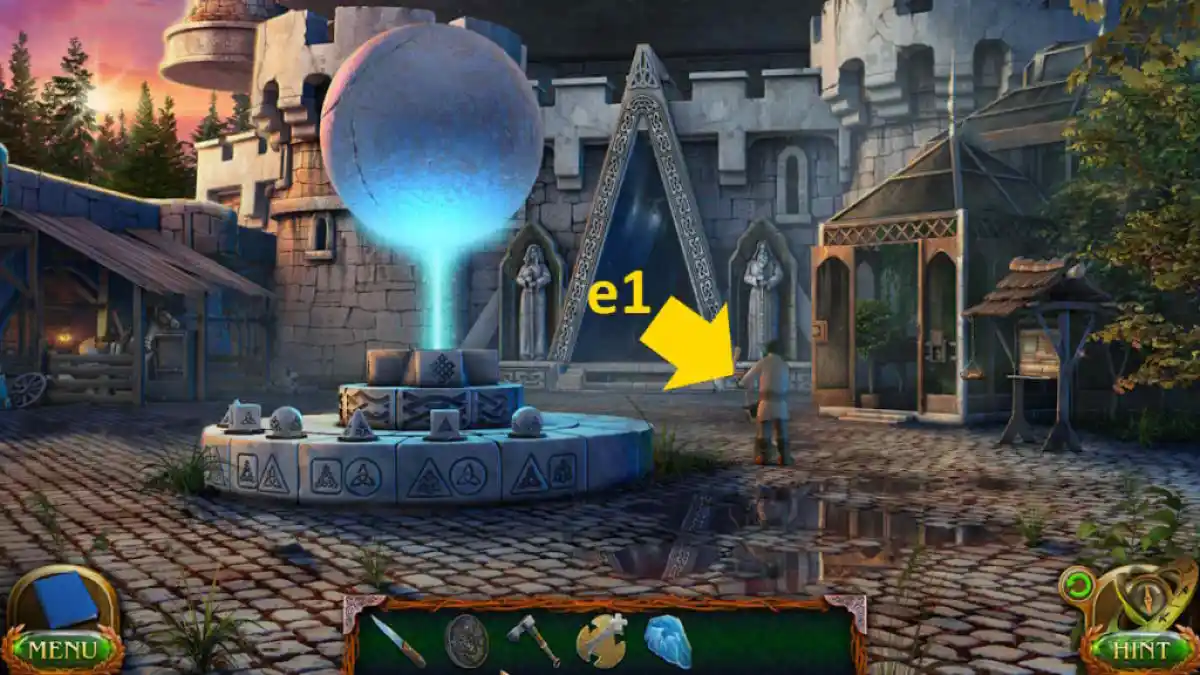
Image by Pro Game Guides
pull together the Pile of Leaves and localize them below the batting cage ( n5 ) . choose the rock ( n6 ) , cut the R-2 , and free the centaur . snap where the cage broke ( n5 ) and collect your fourth Sapphire .
Making the sleep bomb
Select the tent ( n7 ) , get a close - up of the desk , click the book to read thesleep bomb calorimeter recipe , and afterward , take thefifth Sapphirethat was underneath it . Return to the cave and tote up the sapphires to the altar ( l5 ) . Use the drawing off to find which ones you need to light up up ( see result below ) , then dawn the Lord’s table again to open it .
After the gash view , pick out the hanging skeleton ( k8 ) , take theKeyfrom its pouch , and apply your knife to cut someResinfrom the branch in the same close - up . Take aConefrom the close - up of the other skeleton ( k3 ) and asecond Conefrom the entryway to the cave in the same close - up . Get athird Conefrom the bottom - right of the fireflies ( k4 ) end - up , and then move back to the swampland .
Take afourth Conefrom the field hut close - up ( m5 ) , afifth Conefrom next to the blue prime ( m6 ) , and asixth Conefrom the Grant Wood in the bottom - right corner of the swampland close - up ( m7 ) . Click the midsection of this close - up to bulge out a move mini - game . Once complete , take theRumand return to hunter camp .
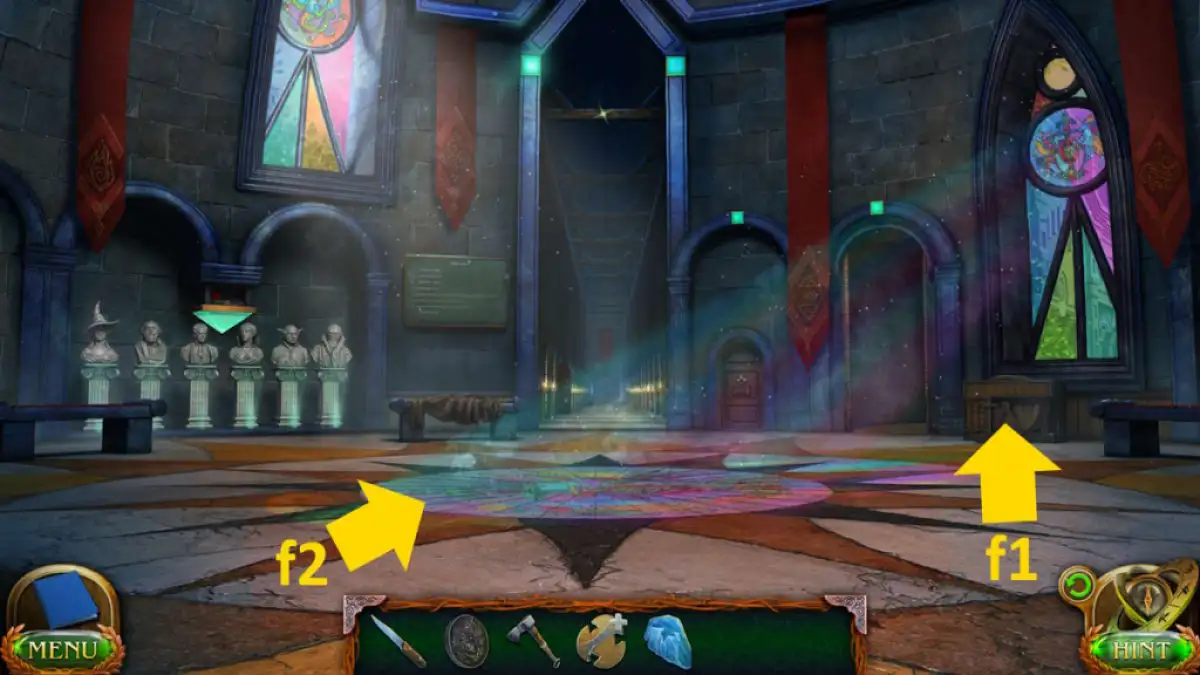
Image by Pro Game Guides
Use the key to start the crate ( n8 ) and take theHand NetandWaterskin , along with aseventh Cone . Taketwo Coneseach from the rock ( n6 ) , the hammock ( n3 ) , and the coop ( n5 ) . Take theCauldronfrom the other collapsible shelter ( n9 ) , along with aManuscriptand aCoil of Rope , plus yourfourteenth Cone . utilise the ax on the occlusion ( n10 ) and garner someFirewood , which also reveals afifteenth Cone . Thefinal Coneis in the timber close - up ( n4 )
Return to the woods and use the net to catch someMagnetic Fireflies(k4 ) , and then head to the swamp and use the waterskin to pull together aBag With Mushroom Gasfrom the hut roof ( m5 ) . Return to camp , enroll the tent ( n7 ) , and prepare the potion :
This starts a take on the usual miss objects puzzler .
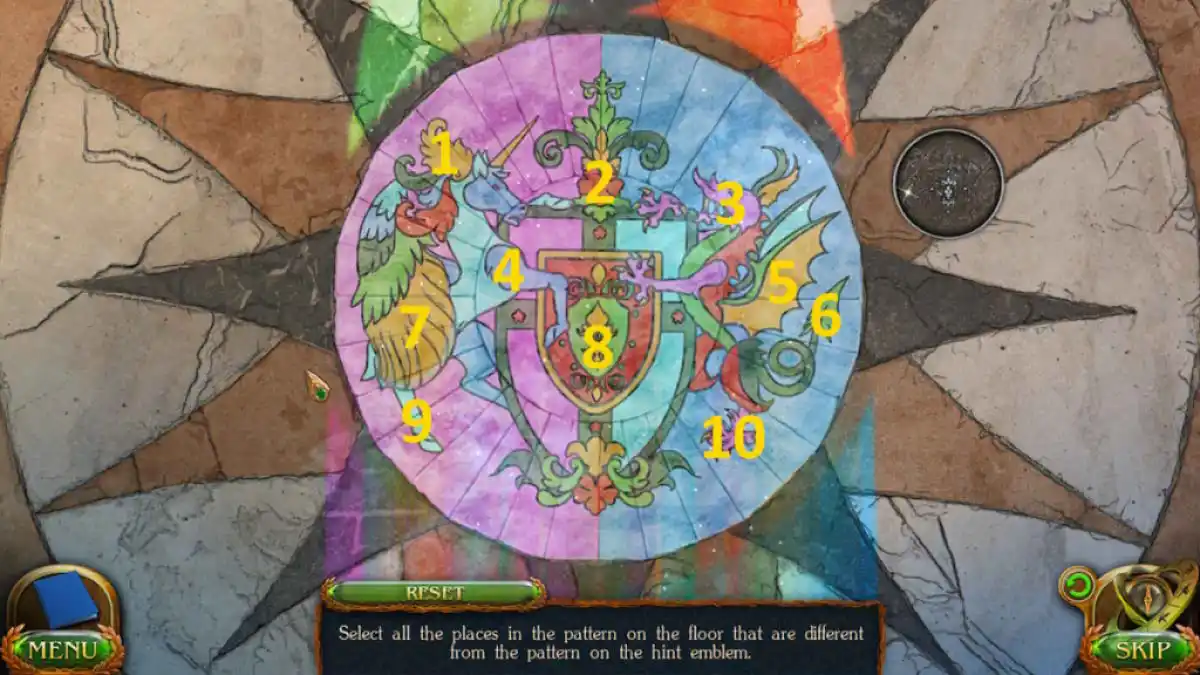
Image by Pro Game Guides
you’re able to now come back to the forest , select the skeleton ( k3 ) , and take itsBelt . Select the potion in your inventory , add up the rummy , and then practice the knock to make aSleep Bomb . Drop it into the hole in the same skeleton finale - up and you ’ll knock out the manticore .
Related : Lost Lands 6 walkthrough ( error of the Past )
The centaur village
Use the rope on the hole and head back into the cave . Click the altar to open it , chatter the lamp , sum the centaur hair , and find fault up theSearch Lantern . Return to the camp and use the lantern on the path the centaur take ( n11 ) to reveal her hoofprints . get across them to follow the path to the swampland , then select the footprints there ( m8 ) to move on to the village logic gate .
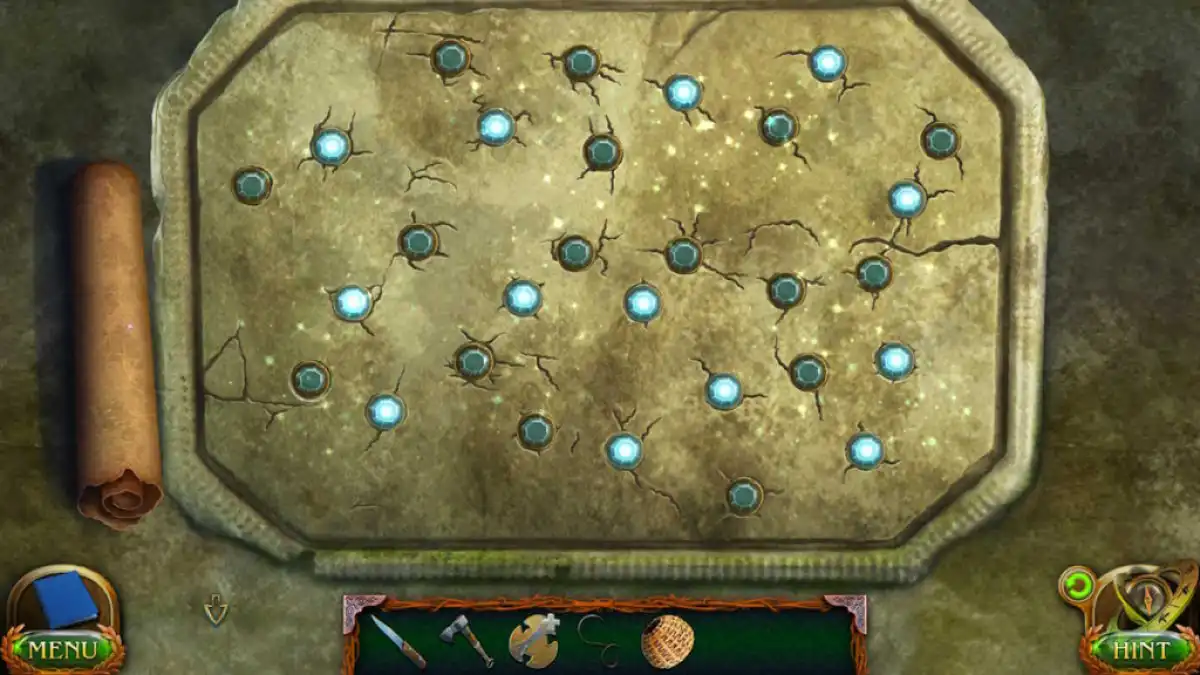
Take theCollectible(p1 ) and theMorphing Object(p2 ) , and then apply the ax to cut the root ( p3 ) and garner theManuscriptonce you bring out the light puzzle . employ your knife to essay to pry give the shield ( p4 ) , but it breaks in the procedure . Take theDaggerfrom the door ( p5 ) , read the connected banker’s bill , then use the dagger on the carapace to find aClue .
generate to the hole under the rampart ( p3 ) , add the clue , then complete the wakeful mystifier . flip the light colors by tick them to make the pattern on the report ( see above for the solution ) . Once utter , the gate will spread out , so move on to the Centaurus village .
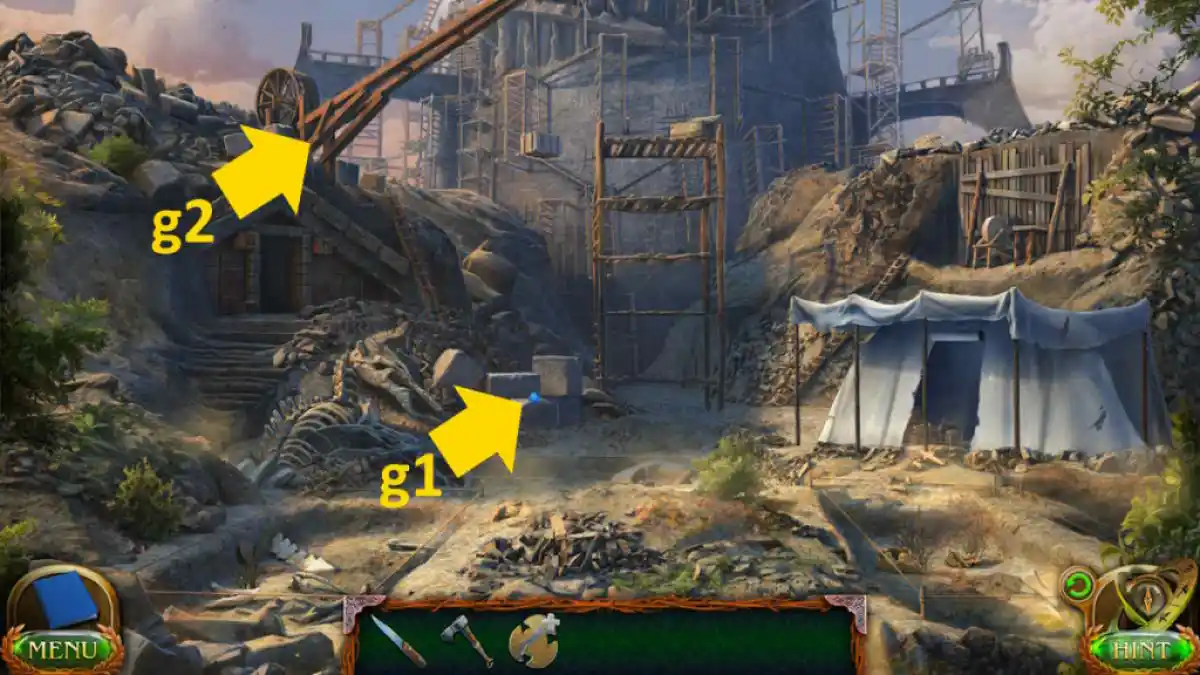
Image by Pro Game Guides
Once you ’ve collected theMorphing Object(q1 ) and theCollectible(q2 ) , choose the tree diagram ( q3 ) and collect theHook . Move forward to Ziruk court ( q4 ) to determine the chief ’s hut ablaze . Return to the small town , select the mechanism on the left-hand ( q5 ) , and remove the confused pipe . manoeuvre back outdoors and apply the axe to cut aBamboo Trunk(p6 ) , which you may utilise to supersede it ( q5 ) .
Move back to the Ziruk court and seize theStick(r1 ) and theMorphing Object(r2 ) . Use the stick to prop up the ceiling ( r3 ) , which reveals theCollectible(r4 ) . Now penetrate the doors ( r5 ) and get a close - up of the fervour . Select the bench ( r6 ) , take thePincers , and grab theRunefrom the gem wall ( r7 ) .
Go decently back to the nursery , use the chela on theHose(b3 ) , and then pick up it . Return to the Greenwich Village and attach the hose ( q5 ) , then click the hose on the soil to cover it to the Ziruk court . Click the valve where you attached the hosiery ( q5 ) and you ’ll put out the fervour .
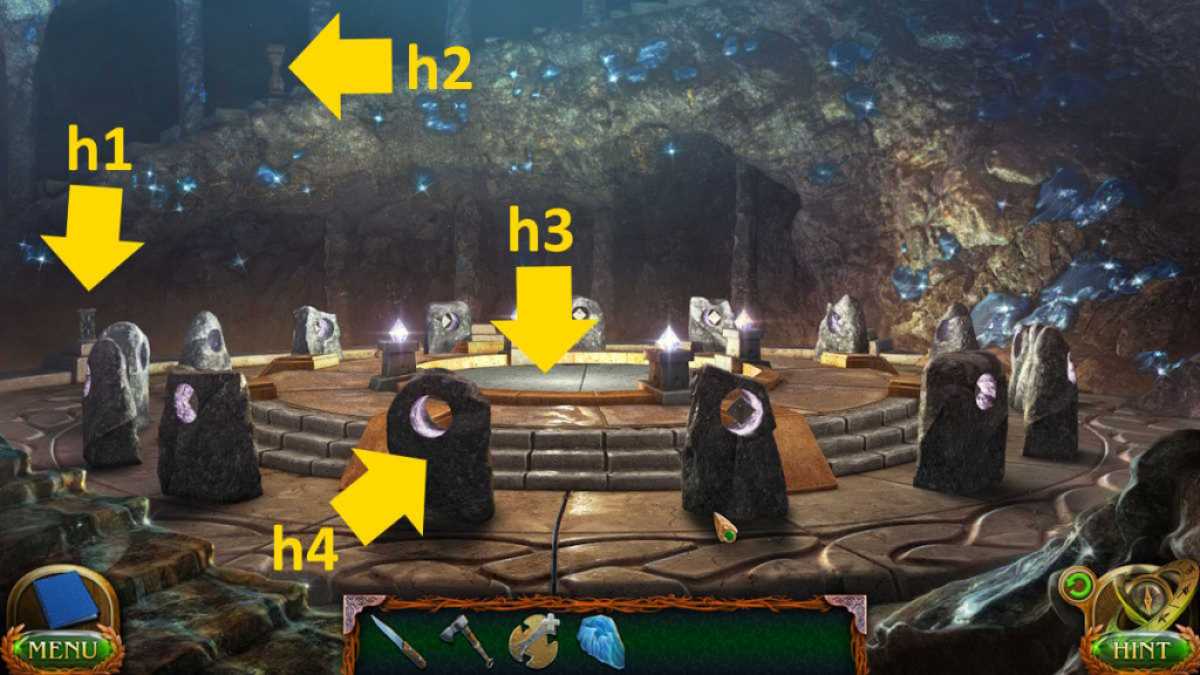
Image by Pro Game Guides
For the conclusion of this walkthrough here at Pro Game Guides , fall into place through to myLost Lands 8 Walkthrough Part 4 !
Screenshot by Pro Game Guides
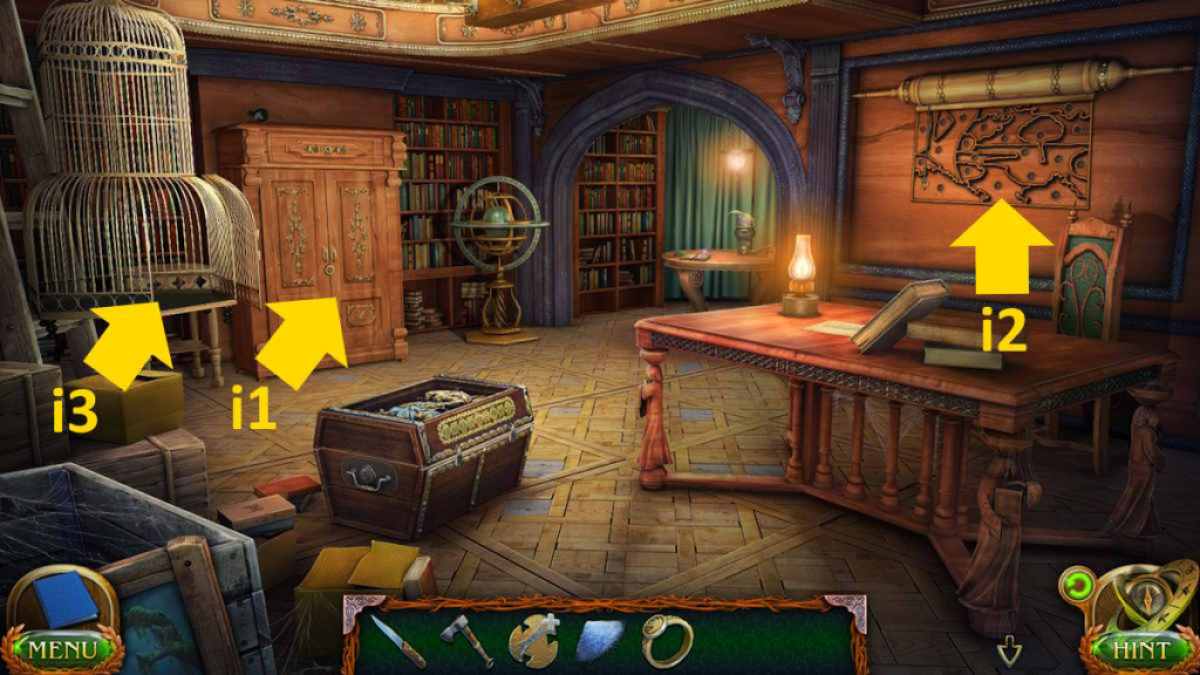
Image by Pro Game Guides
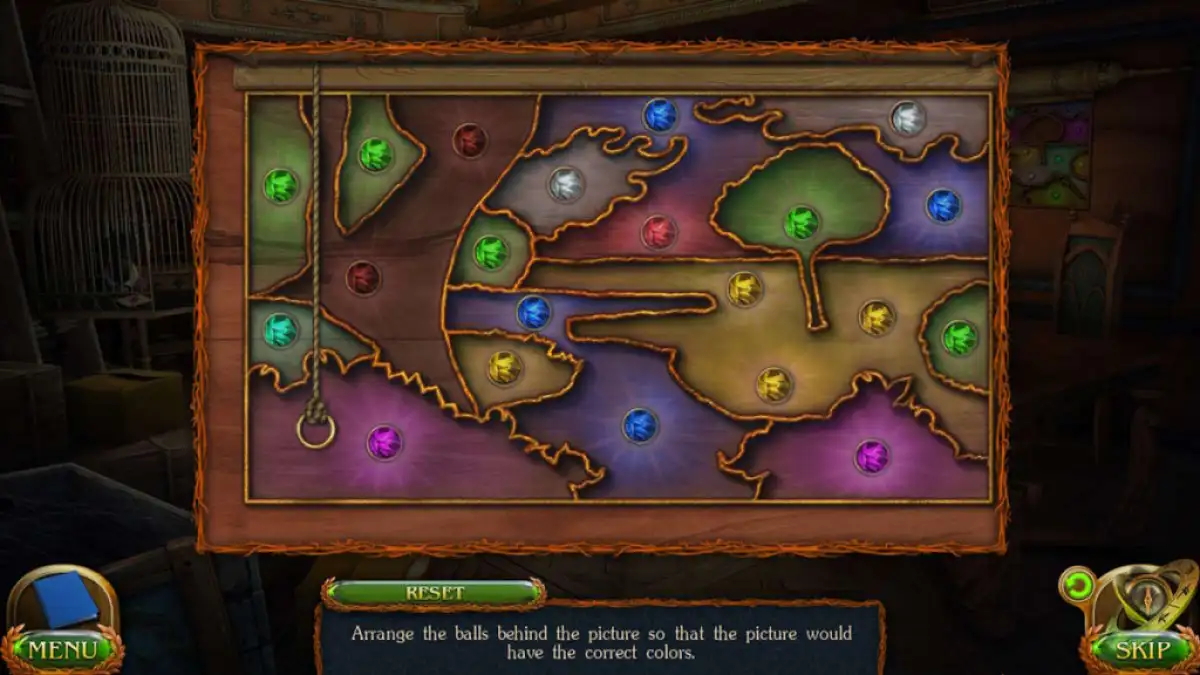
Image by Pro Game Guides
Screenshot by Pro Game Guides
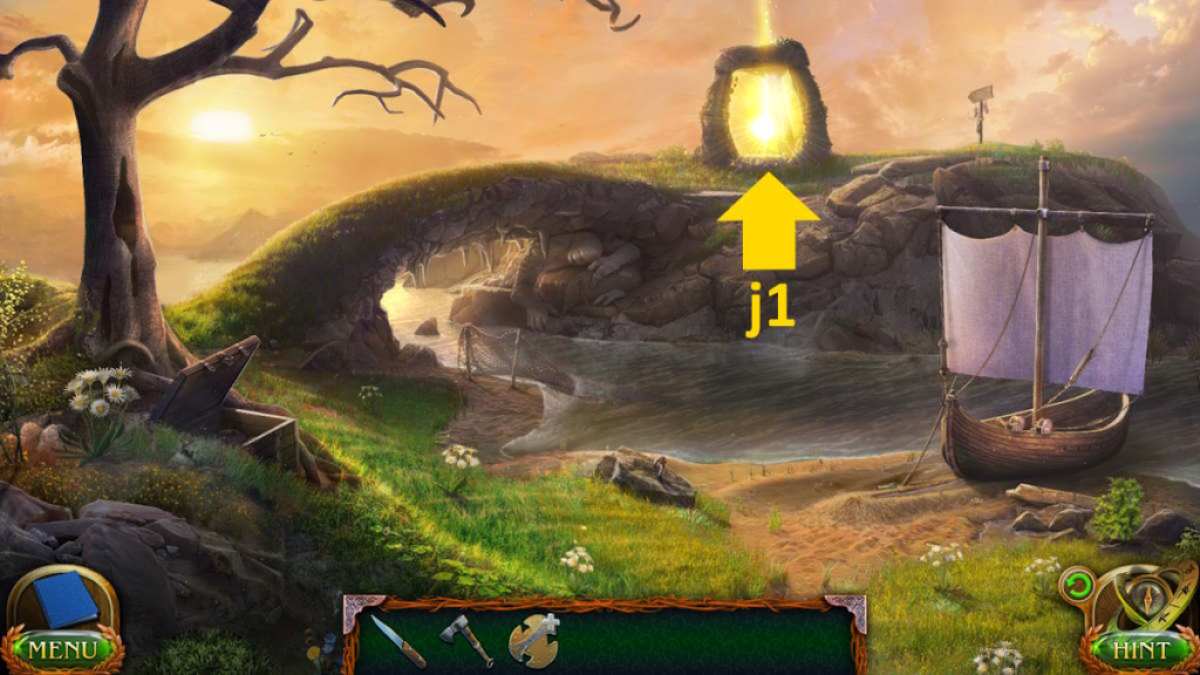
Image by Pro Game Guides
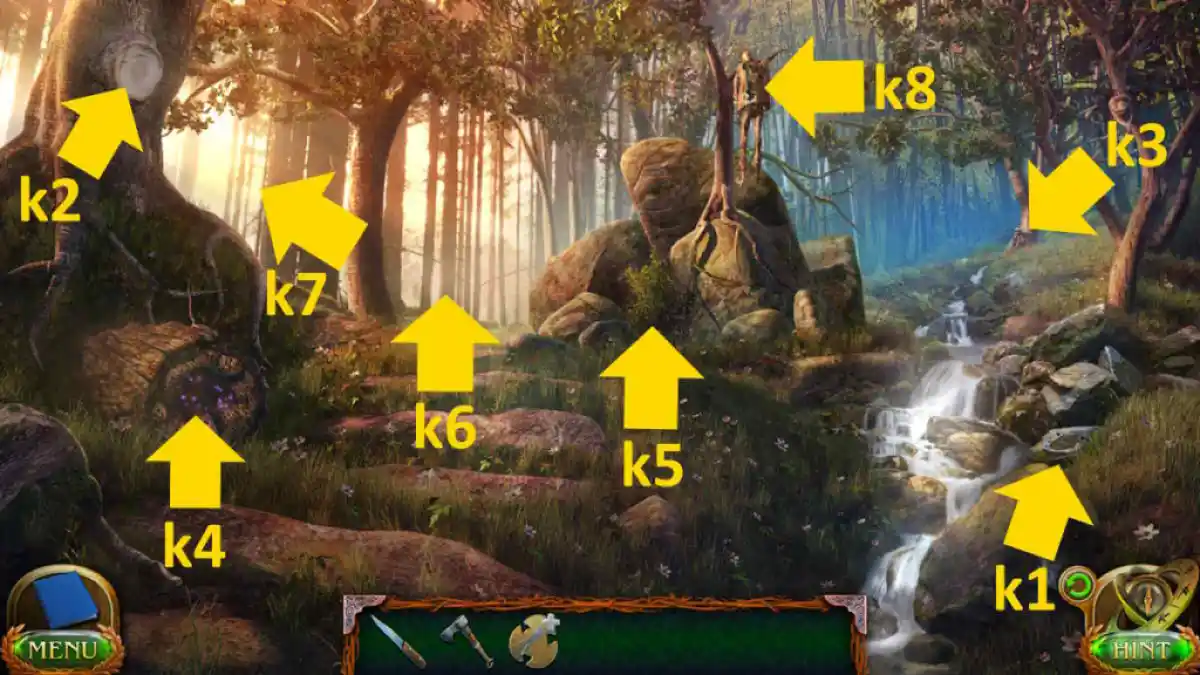
Image by Pro Game Guides
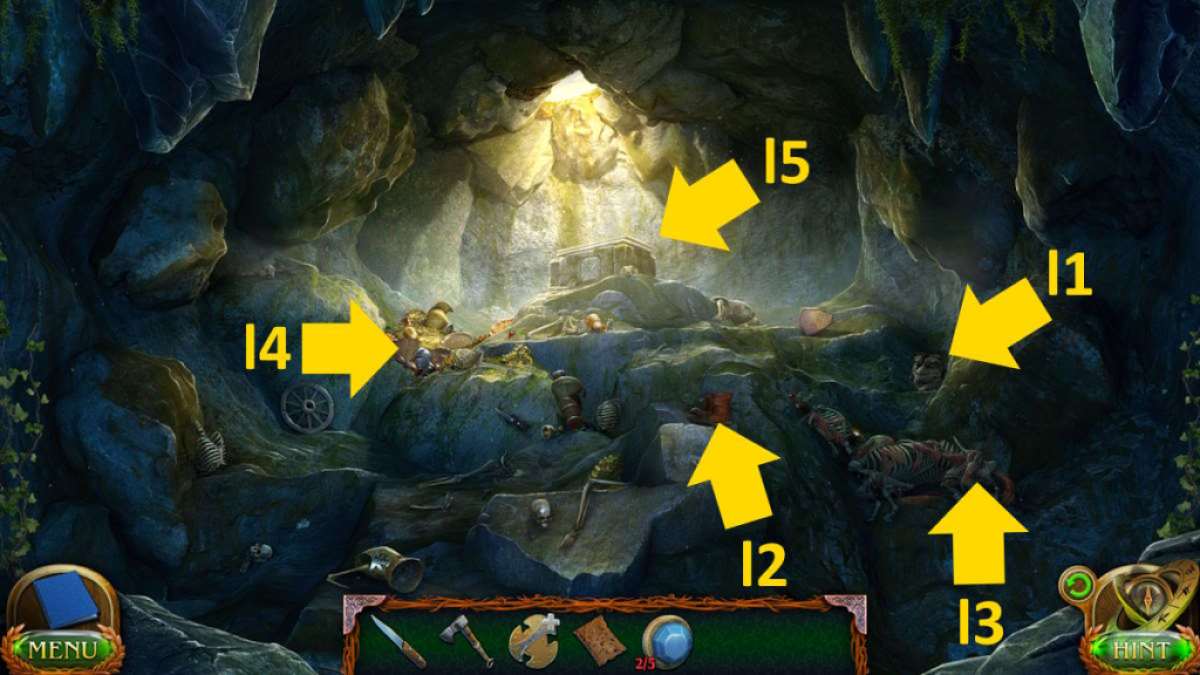
Image by Pro Game Guides
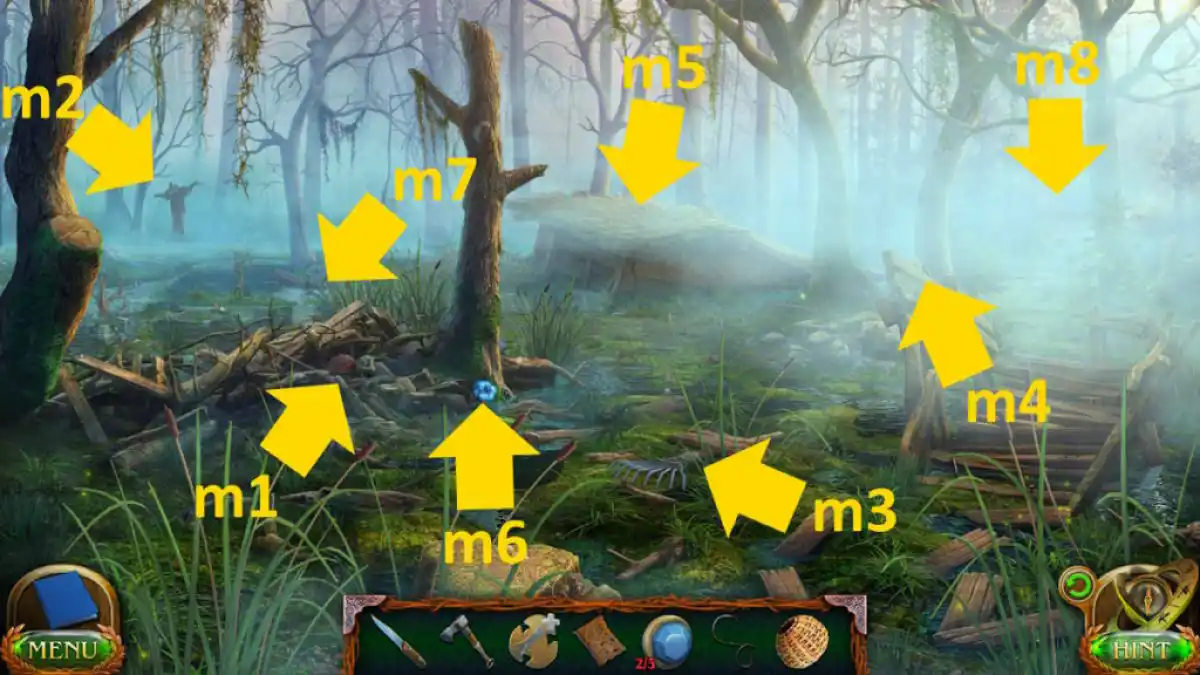
Image by Pro Game Guides
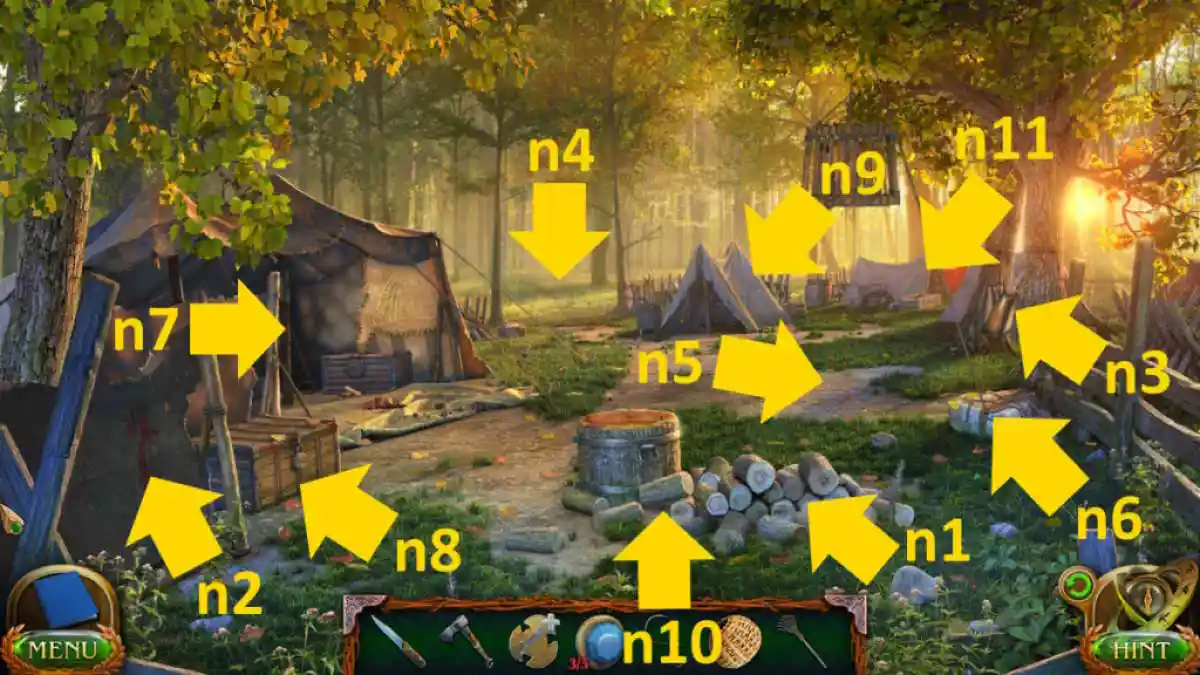
Image by Pro Game Guides
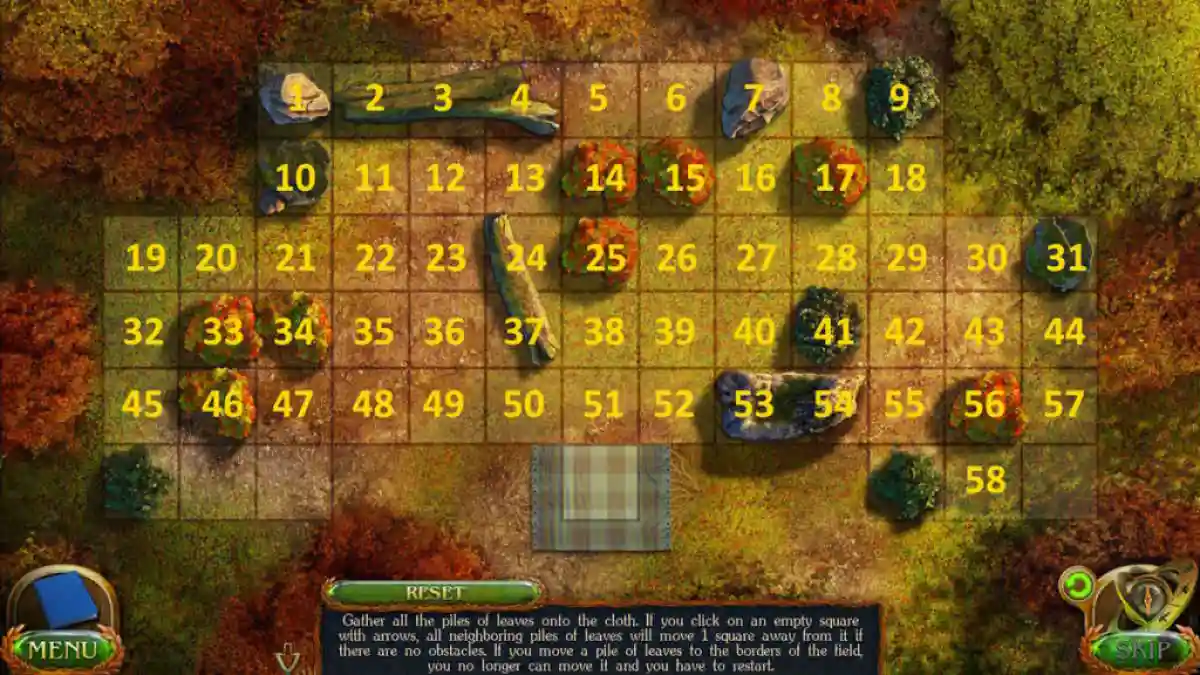
Image by Pro Game Guides
Screenshot by Pro Game Guides
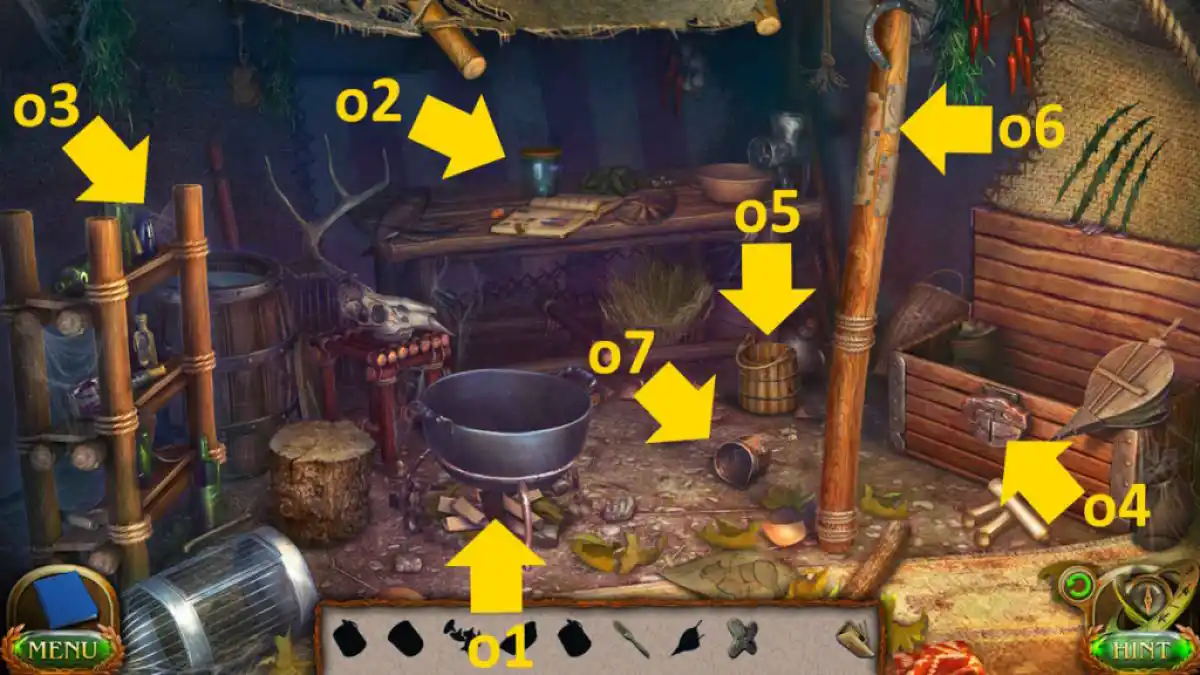
Image by Pro Game Guides

Image by Pro Game Guides

Screenshot by Pro Game Guides
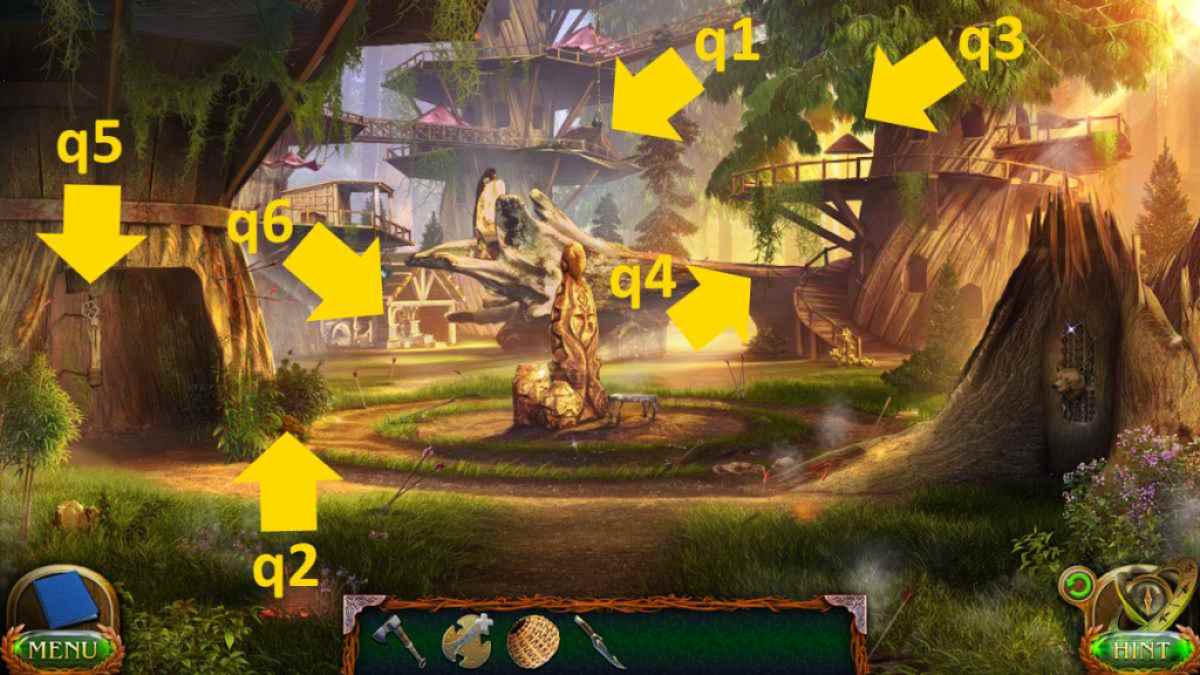
Image by Pro Game Guides
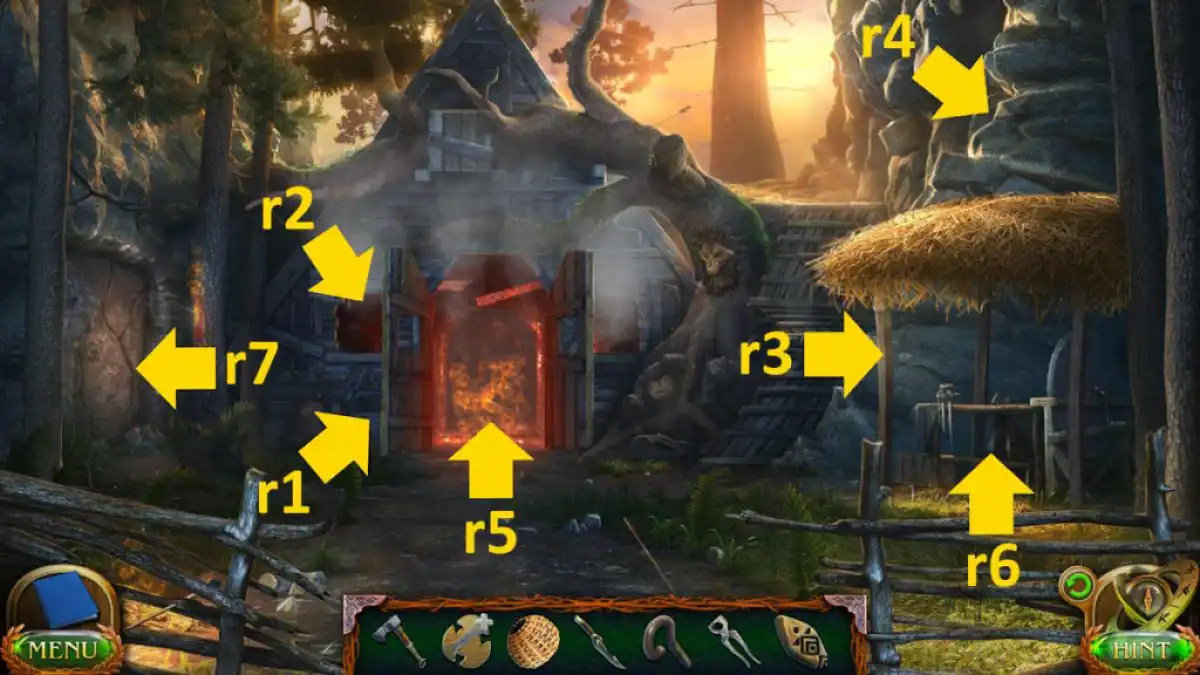
Image by Pro Game Guides
