From the greenhouse to the temple .
Lost Lands is a series of point - and - tick puzzle risky venture with a fantasy feel on mobile and microcomputer . If you ’re enjoying Lost Lands 8 , read on for part 2 of my full walkthrough and templet .
Lost Lands 8 Walkthrough, Part 2 - Sand Captivity
This guide piece up Susan ’s story just after she has crack the puzzle on the glasshouse door in the Academy of Magicians and is about to go at bottom . It extend until you receive the subaquatic potion recipe . If you ’re seem for an earlier or recent part of the news report , I suggest you break out myLost Lands 8 walkthroughhub page , which has links to guides for the total game , including the bonus chapter .
Entering the greenhouse
Enter the greenhouse and blame up theMorphing Object(a1 ) andCollectible(a2 ) . Click the flower ( a3 ) and mouth to it , then see at the works cause the problems ( a4 ) and pick up theSmall Leafin the finish - up .
lead out to the court and take theGloveshanging by the noticeboard ( b1 ) , along with thePaper and Pencil . Use the gloves to dispatch the plant ( a4 ) , and then bump the other 15 infected branches as a hidden aim game ( you ca n’t go wrongly as you just demand to click around the filmdom until you have them all . There ’s no prank to it ) . Take theInfected Branch .
Move to Maaron ’s authority , click the table at the back ( c1 ) , and site the offset on the microscope in the close - up . In order ( from pass on to right field ) click thefourth , third , and thenfirstlensto identify the pest .

Now go to the library and school principal to the Department of Biology section ( find the Sir Herbert Beerbohm Tree symbolization at d1 , right at the back ) . await at the scroll on the lectern there to see you require section 4 , garden pests , and then select that ledge number to say about the crack - winged aphid . Take thePest Book .
Deal with aphids
You have to return to the plains to collect all of the ingredients involve . Go to Maaron ’s Yard and keep clicking the tree ambo , the flush , and the rock ( all in the e1 close - up ) to find theBig Leafand all10 Mystical Mushrooms . Add the mushrooms to the pest Quran in your inventory .
Go back into the greenhouse and take the box ( a5 ) . Pick up theManuscript , and then click the box to move it and add the two leaves to the lid . flick it again to set forth a cow chip - moving puzzler . This one can be tough , so if you ’re stuck on it , use the image below to solve it with the following sequence :
Once done , click the instruction canvass in the box to find out the belladonna come are in section 2 , so take theBelladdon Seeds .
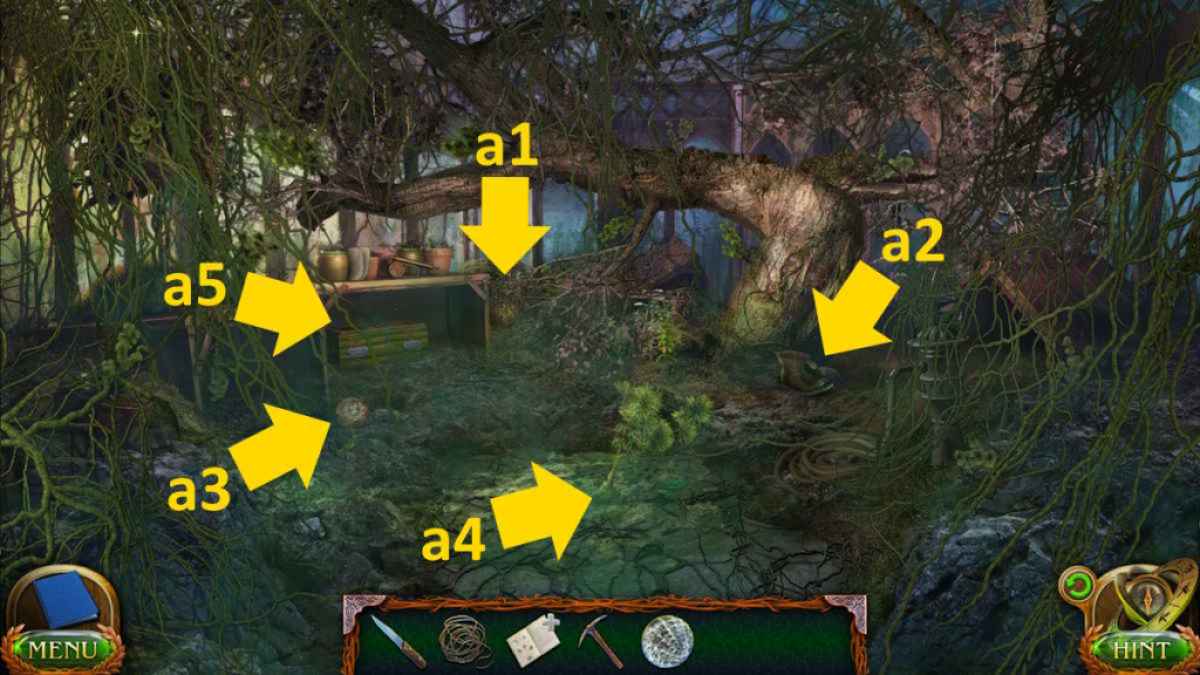
Image by Pro Game Guides
Go to the stronghold of the five domain and take theAlcoholfrom the mesa in the tent ( f1 ) . you may now bring both the belladonna seeds and the alcohol to the pest book too .
Move to Maaron ’s field hut and choose the plant on the windowsill ( g1 ) . It ’s too hot to pick up , so return to the stronghold and pick up someTongsfrom the box on the scaffolding ( f2 ) .
Now , you may use the pair of tongs on the plant on the windowsill in Maaron ’s hut to get theVolcanic Flower Petals . Add them to the pest Holy Scripture to obtain the Insecticide Ingredients .
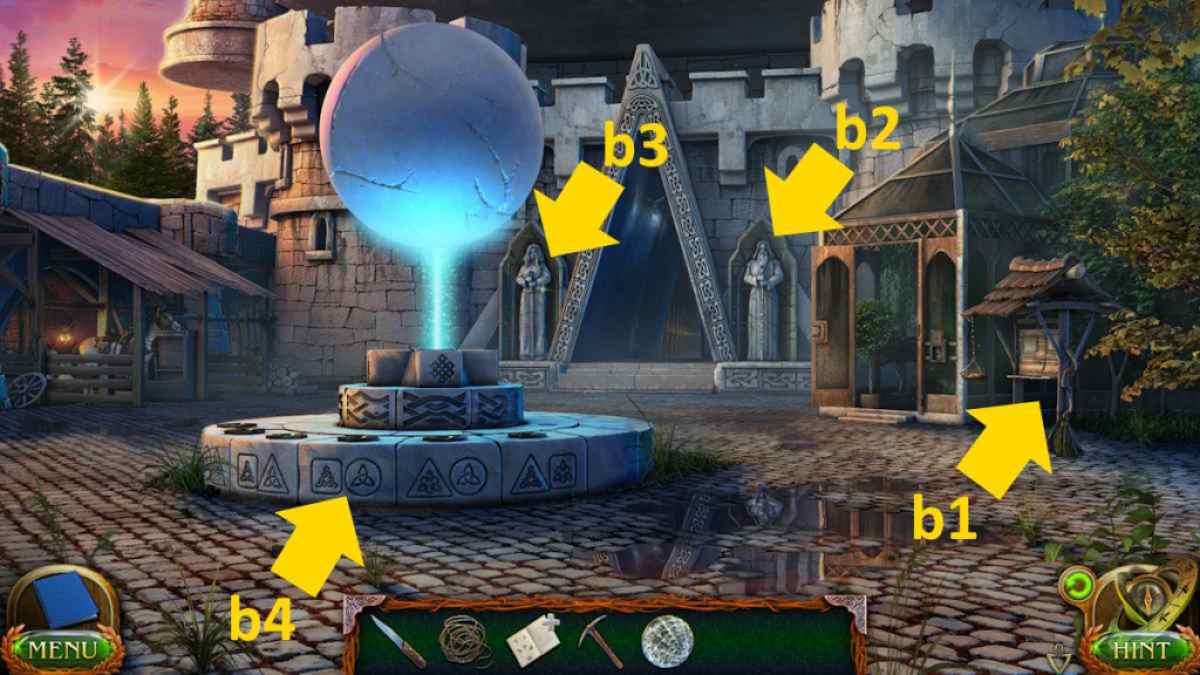
Image by Pro Game Guides
This allows you to go to Maaron ’s office and practice the table ( c1 ) to make the recipe . append the recipe to the board , then follow the instructions ( everything you need is on the table now ) . Once done , you ’ll get the Insecticide . Go to the nursery , select the box close - up ( a5 ) , add the insect powder to the Sprayer , and then find fault it up . Use it anywhere on the screen to save the flora and then take thePortal Fruit .
Making the portal rune
Go to the river , select the golem ( h1 ) , and apply the pick to get aTrollstone . Now select the standing stones ( h2 ) for a close - up and use the paper and pencil to make aRune Drawing . pass to the stronghold and apply the trollstone on the sharpener ( f3 ) . apply the runic letter drawing off on the gemstone in the same close - up later .
Go back to the greenhouse , select the tree diagram root ( i1 ) for a close - up , and move the grass to get thePommel . Also , wait at the grate ( i2 ) to see that you ’ll need a crowbar to move it .
Now go inside to the Asaph Hall , take the wind machine ( j1 ) , and pick up theCrowbar . Go to the greenhouse and practice it to spread the grating , taking asecond Pommelfrom deep down . Return to the courtyard and add the low pommel to the statue on the right ( b2 ) and the red one to the statue on the left ( b3 ) . Take theBearfrom the private cache that opens up , along with theAchaeologist ’s Set .
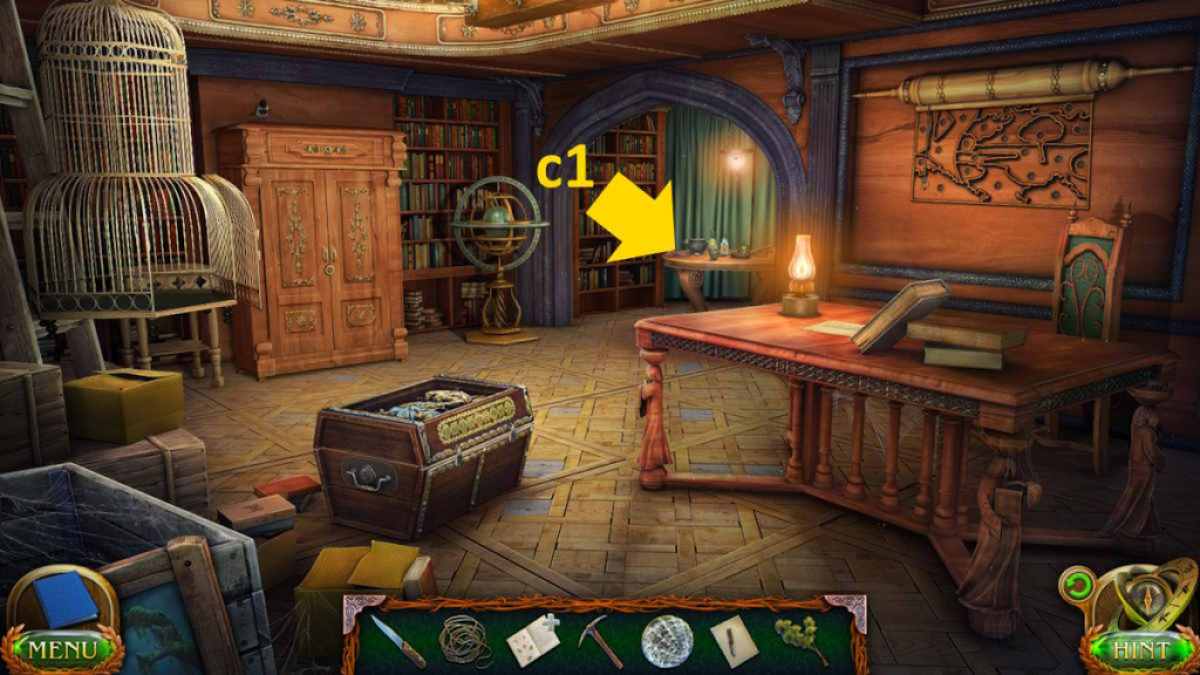
Image by Pro Game Guides
you’re able to now hark back to Maaron ’s army hut and sum up any remaining animals to the trapdoor ( g2 ) . If you do n’t have them all , refer to the Part 1 guide you ’ll find linked above for all the earlier locations . Take theEmblem .
Back at the fastness , practice the archeologist ’s set on the skull ( f4 ) to dig up aDragon Tooth . expend the flying dragon tooth at the sharpener ( f3 ) , then add the portal yield to complete and then collect theRune . Move to the river and , after a cut scene , add the portal stone ( at h2 ) .
Related : mislay Lands 7 Walkthrough – Full Guide
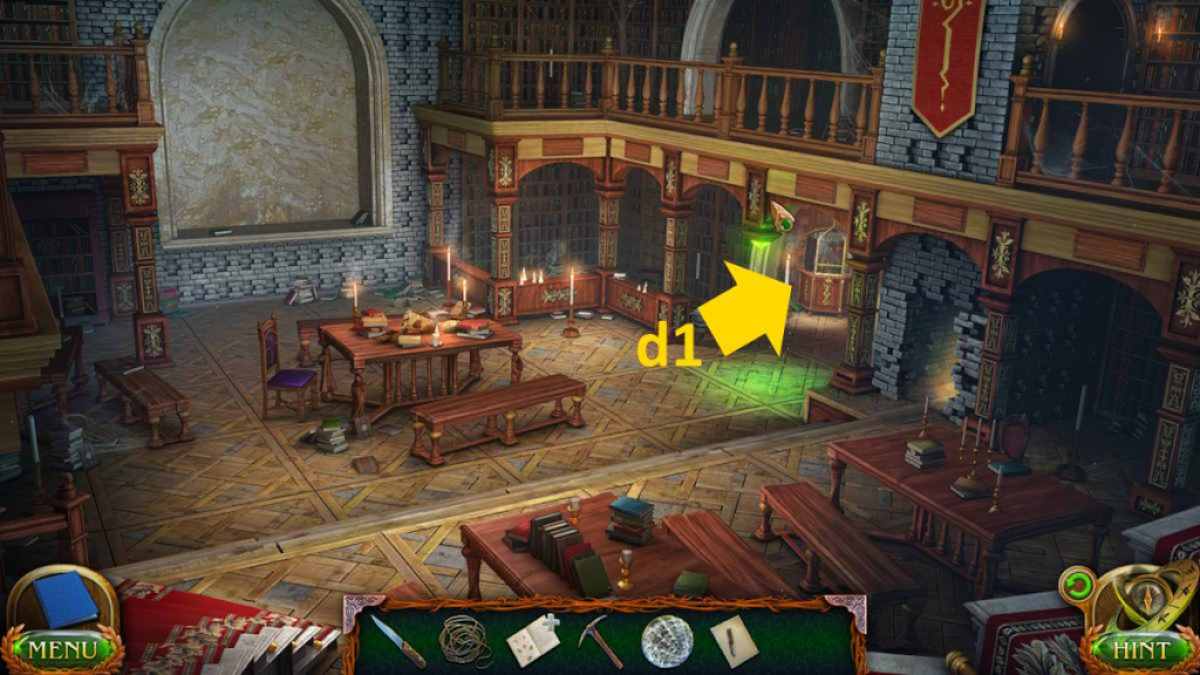
Image by Pro Game Guides
Click the gravy boat ( h3 ) to move it into the H2O , then penetrate the sand where the boat was . come home the bottle to open up it , read the note within , and take theKey . Look inside the gravy boat and use the key to give the compartment . Take theBattle Ax . Select the Sir Herbert Beerbohm Tree ( h4 ) , and use the ax to chop the roots . Afterward , something will descend from the tree diagram , uncover a hole ( h5 ) . Take theBoatandOarsfrom inside .
Select the pectus ( h4 ) for a close - up and add the boat to depart a movement mystifier . To complete it you need to tangle the pieces ( they move as one ) to commit all four ship in their respective positions at once . If you ’re stuck , there ’s a root below .
Take theSailfrom the bureau , and use the knife to cut the rope ( h6 ) . tote up the canvas to the mast of the boat , put the oars inside it , attach the sterling ropes inside the gravy boat , and off you go .
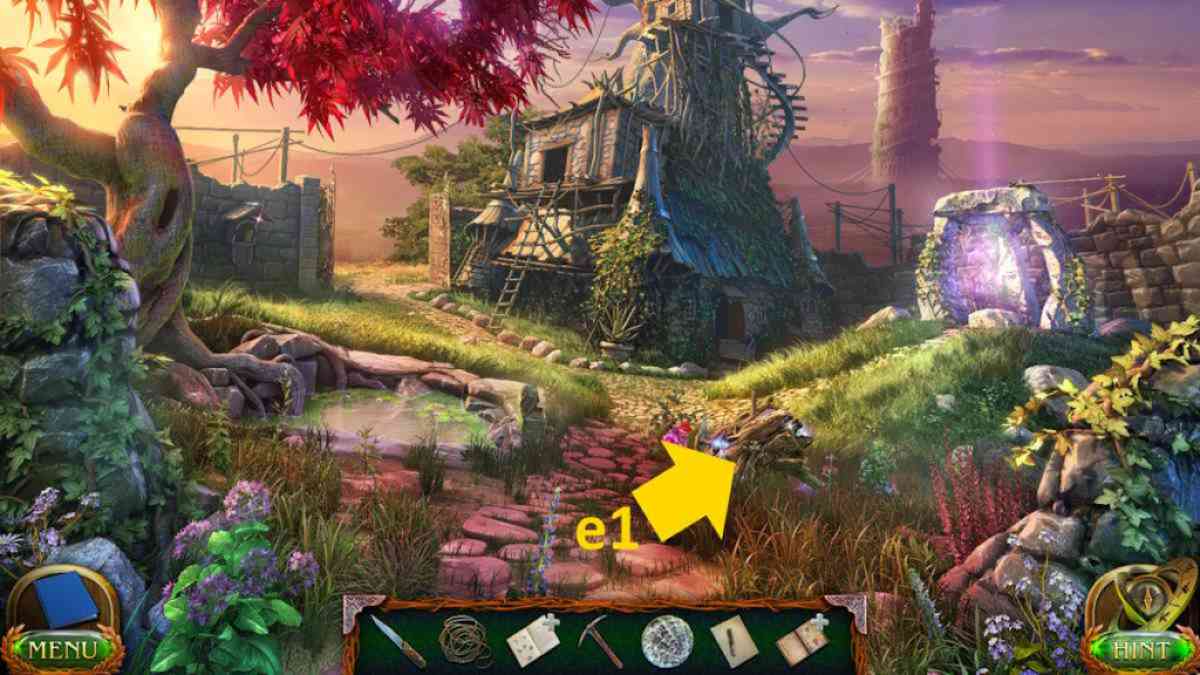
Image by Pro Game Guides
Opening the gate
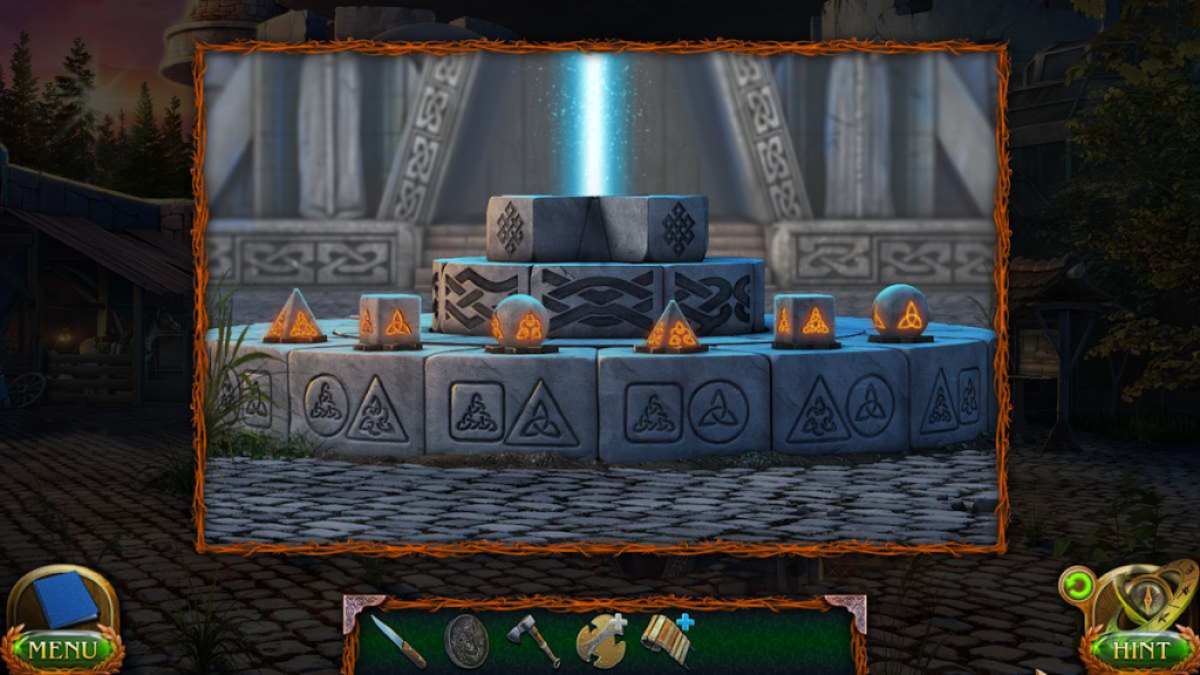
TheMorphing Object(k1 ) andCollectible(k2 ) are both above the logic gate . Select the pool ( k3 ) for a close - up and select the chest of drawers to set out a roofing tile - flip puzzle . If you ’re struggling with this , from a reset , keep an eye on the figure of speech below , click the tile in numeral order .
Once sodding , you ’ll win a plate . The other 14 shell can be found just by clicking around in the pool . Just note that some look from behind rocks , and one is inside a flower . Once you have them all , you ’ll get aScallop Shell .
tot up the scale to the idol ( k4 ) , then apply the rophy to tangle the root of the island ( k5 ) across to make a bridge . you may also add the scallop shell to the gate ( k6 ) before moving across to the island ( k7 ) .
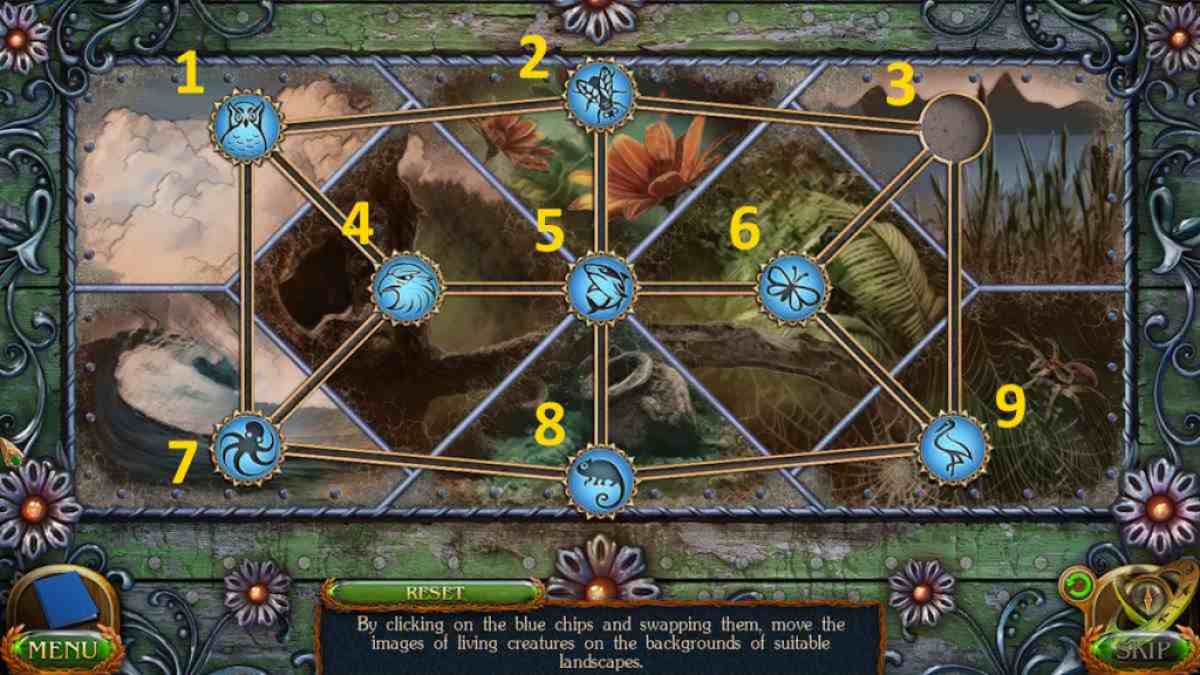
Image by Pro Game Guides
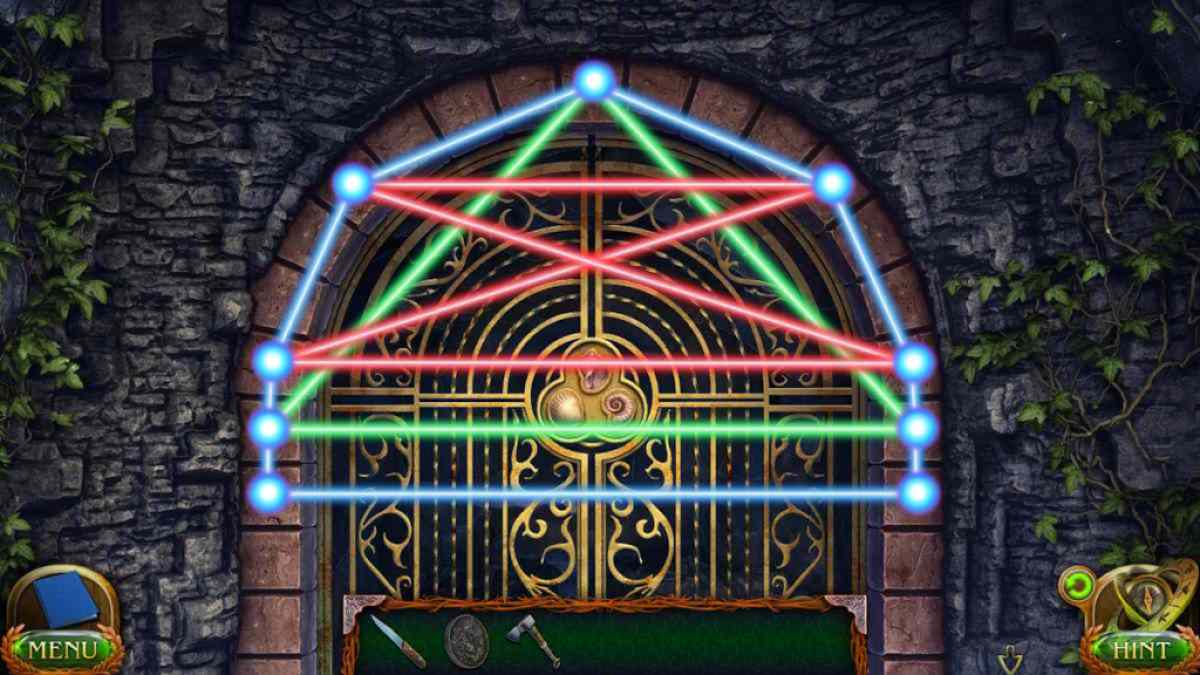
You ’ll detect theMorphing Objectin the tree ( l1 ) and theCollectibleon the careen ( l2 ) . Select the tree where it is cover the Lord’s Day ( l3 ) and utilise the axe to get aBranch . turn back to the gate and observe the pattern you’re able to now see through the circuit in the god ( k4 ) . Select the stone pile ( k8 ) and use the arm on it to get aClam Shelland aBird Figurine . add together the case to the gate ( k6 ) , then return to the island .
reset the weed to find a backpack ( l4 ) and utilize the bird statuette to open it and get theSnail Shell . Return to the gate ( k6 ) , add the final shell , and trigger a tripping teaser . You call for to move the occupation so that they match the pattern you see through the idol ( see completed puzzle above ) . Once done , the gate will open . Head on through .
The ruined city
speak to Kiana for a gash scene , then grab theCollectible(m1 ) andMorphing Object(m2 ) from above the golden gate . Select the gate ( m3 ) for a close - up to find out you need to find some tiles to progress ( you must do this otherwise , you ca n’t get the tiles ) . Select the fissure above the gong ( m4 ) and use your ax to get theTile From The Well .
reelect to the island , select the knoll ( l5 ) , and click the tile stay here to discover you ca n’t dig it out . generate to the stronghold , take theShovel(f5 ) , then turn back here and dig to get asecond Tile From The Well , as well as anAmulet . You ’ll also heat the pitcher’s mound , which is a huge turtleneck !
retort to the temple to find you take to cultivate the turtle to shape up . Use your tongue on the prominent piddle lily here ( m5 ) to get someStamens . render to the turtle ( l5 ) , give it the stamen , and it will take you to the city ruins .
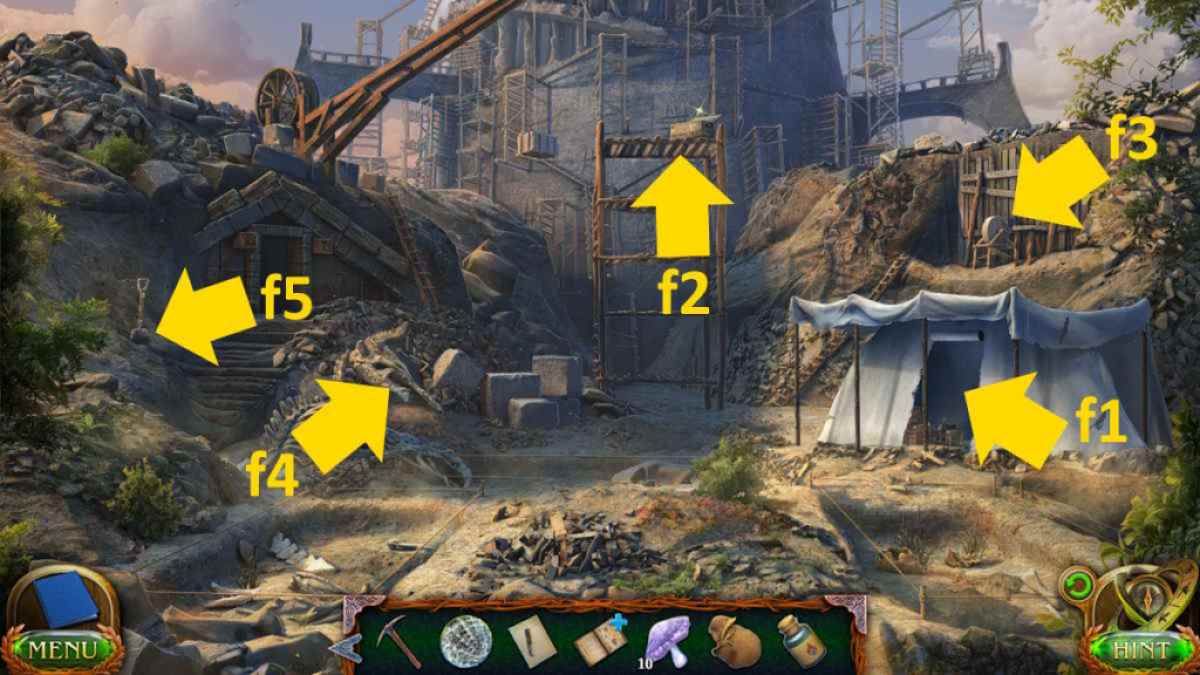
Image by Pro Game Guides
TheMorphing Object(n1 ) is by the steps and theCollectible(n2 ) is to the rightfield of the magic well . chatter the witching well ( n3 ) to find aSnake Skull , the incoming ( n4 ) to find aTiara , and then return to the floating island . Add the tiara to the tree statue ( l6 ) and take itsStaff .
Back in the ruined city , practice the faculty to reach the doors ( n5 ) and take theBeater , Wolf Skull , and aManuscriptfrom the plinth . Use the beater on the gong ( m6 ) and four statues will go up from the lake .
link up : lose Lands 6 walkthrough ( Mistakes of the Past )
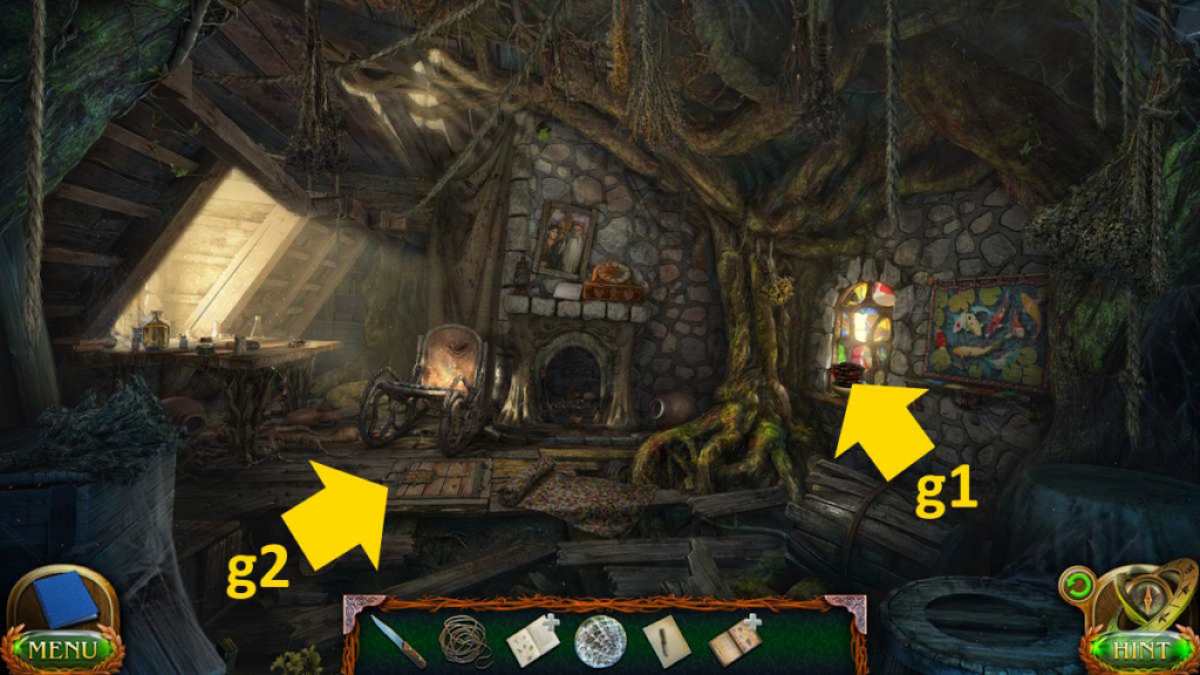
Image by Pro Game Guides
Entering the temple
Take theBellsfrom the left statue ( o1 ) and theBookfrom the good statue ( o2 ) . Also , click one of the statues again to find you need to know their right positions . Return to the ruins , add the book to the pedestal ( n5 ) , and take theSet of Figures . Now click the entranceway below ( n4 ) and complete the detail - match puzzle to shed light on the rubble . Once done , you ’ll have the simulacrum you need to set the statues .
Return to the floating island and add together the bells to the Sir Herbert Beerbohm Tree ( l7 ) . This opens the shell ( l8 ) , allowing you to take theEagle Skull . Go back to the temple entry and click each statue so that their arms match those in the ruined metropolis image .
Once done , penetrate on the spot where the light radiate , use your knife on the Mary Jane there , and set out a missing objective puzzle . On completion , you ’ll get thethird Tile From The Well . Return to the temple ingress ( o3 ) , contribute the tiles to the well , and get into the temple .
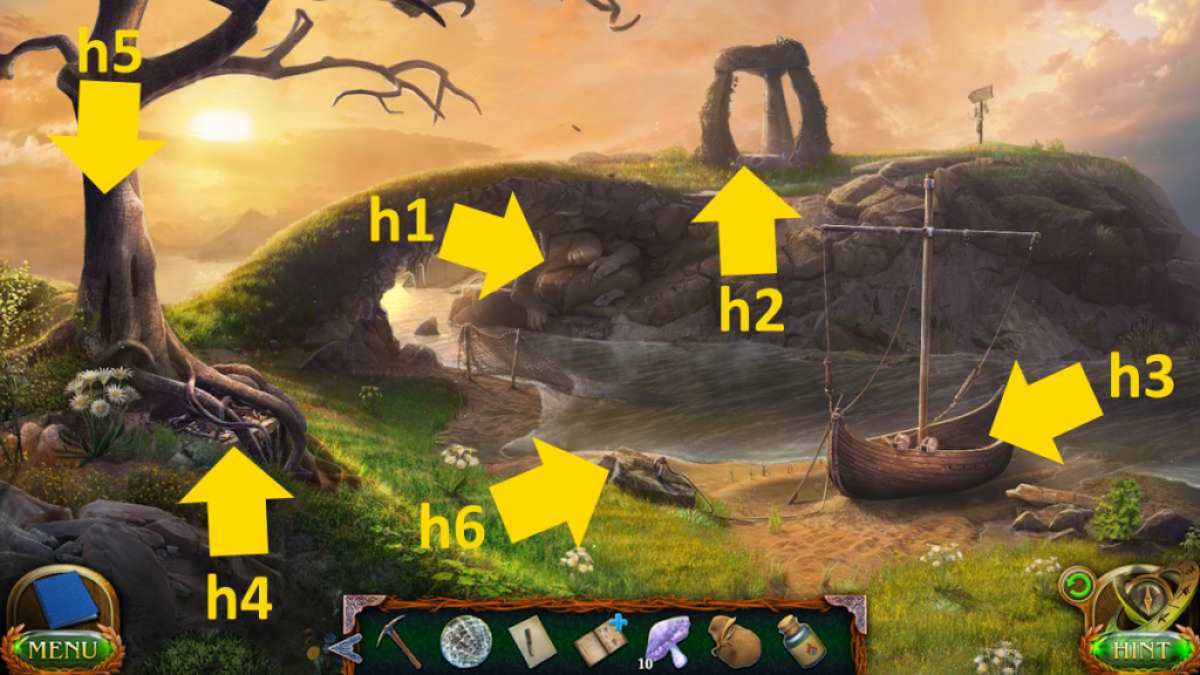
Image by Pro Game Guides
Grab theCollectible(p1 ) and theMorphing Object(p2 ) , then click the snake-head ( p3 ) and tote up the snake skull . Do the same with the wolf skull ( p4 ) and eagle skull ( p5 ) , and then look at the break section ( p6 ) to see that you could get there with a run .
Return to the island and use the knife to roll up theRope Bridge(l9 ) . Now go to the academy entrance and , after a brief cut scene , add the set of figurines to the spring ( b4 ) . Once in the right places ( see below ) , click the float globe above the fountain and find all the missing objective . Note that ant currently on screen will have their name in white , which makes things easy . Take theHorse Skull .
Use the knife on the bridge deck in your inventory to make aLadder . pass to the temple and use the ladder to get at the horse statue ( p6 ) and add the skull . Once the forcefield is transfer , click the central endocarp ( p7 ) for a close - up , examine it , and takePart of the Crystal .
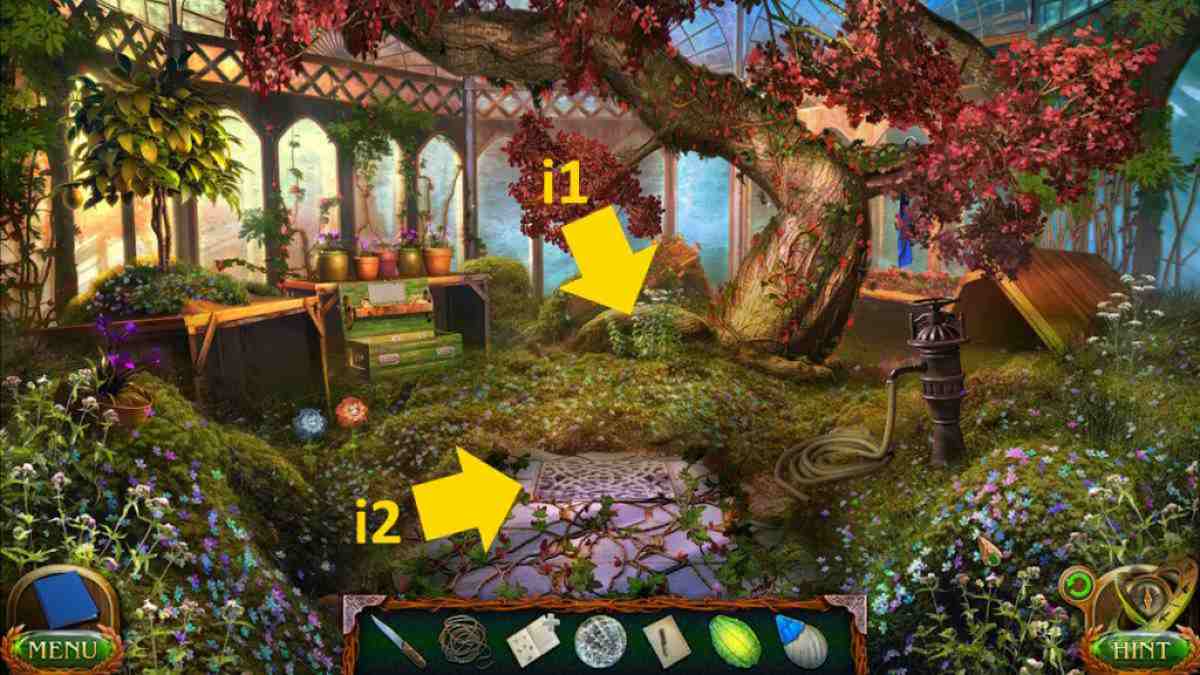
Image by Pro Game Guides
Head to the ruin to find a boat has get . tick the boat for a cut scene , and experience theUnderwater Potionrecipe . After attend at the recipe , return to the gate and snap up someMurmuri Berriesfrom the bush ( k5 ) .
To continue on the journey with me here at Pro Game Guides , click through to myLost Lands 8 Walkthrough Part 3 !
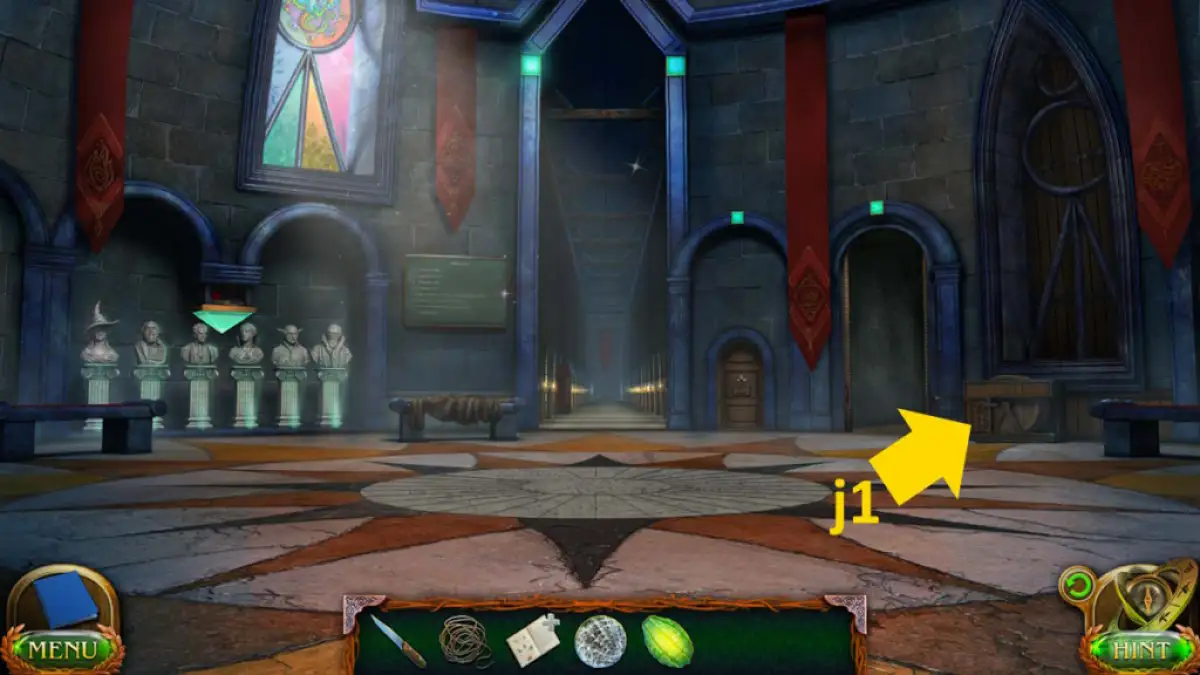
Image by Pro Game Guides
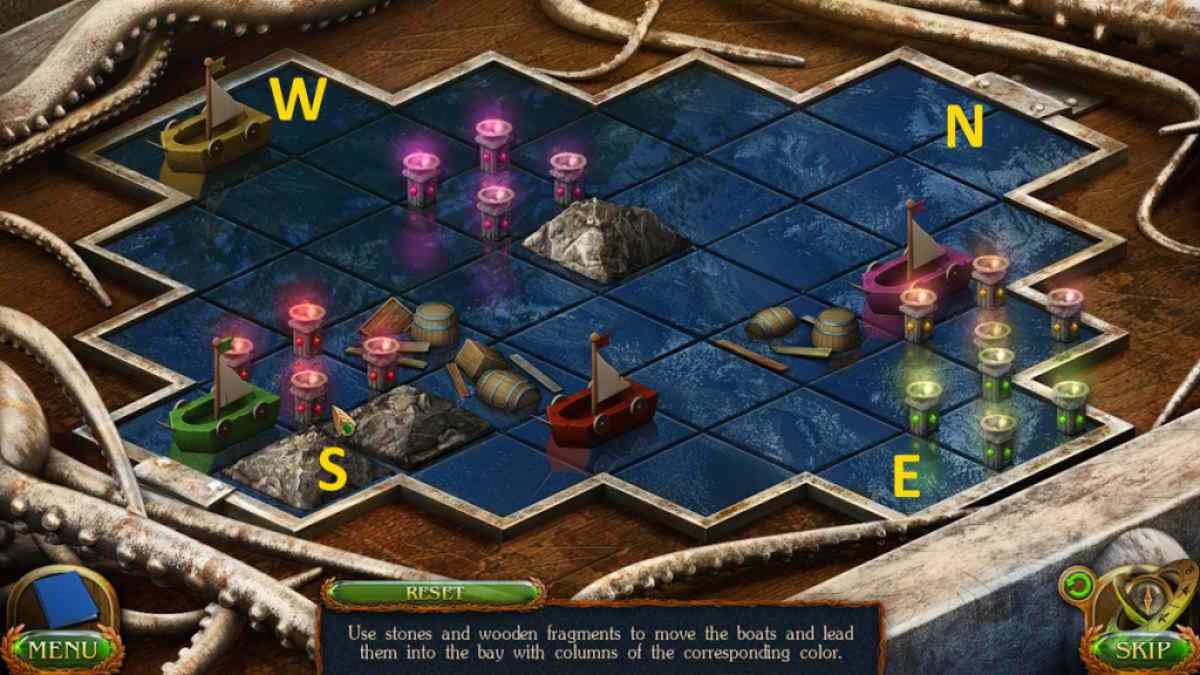
Image by Pro Game Guides
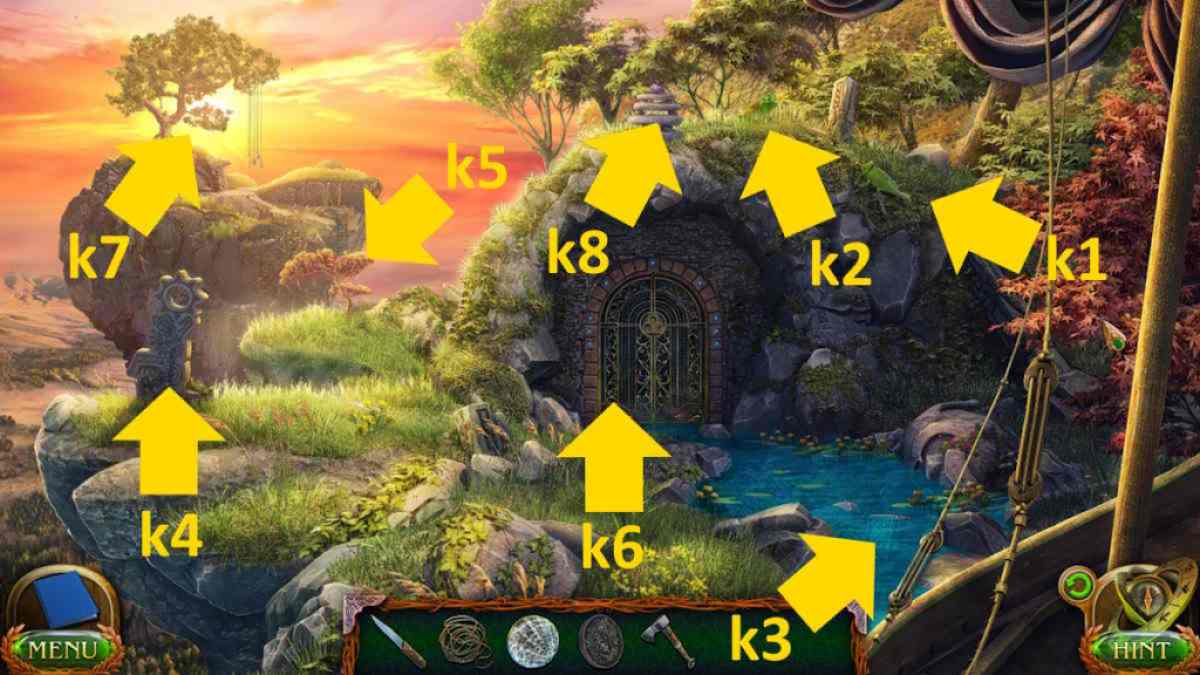
Image by Pro Game Guides
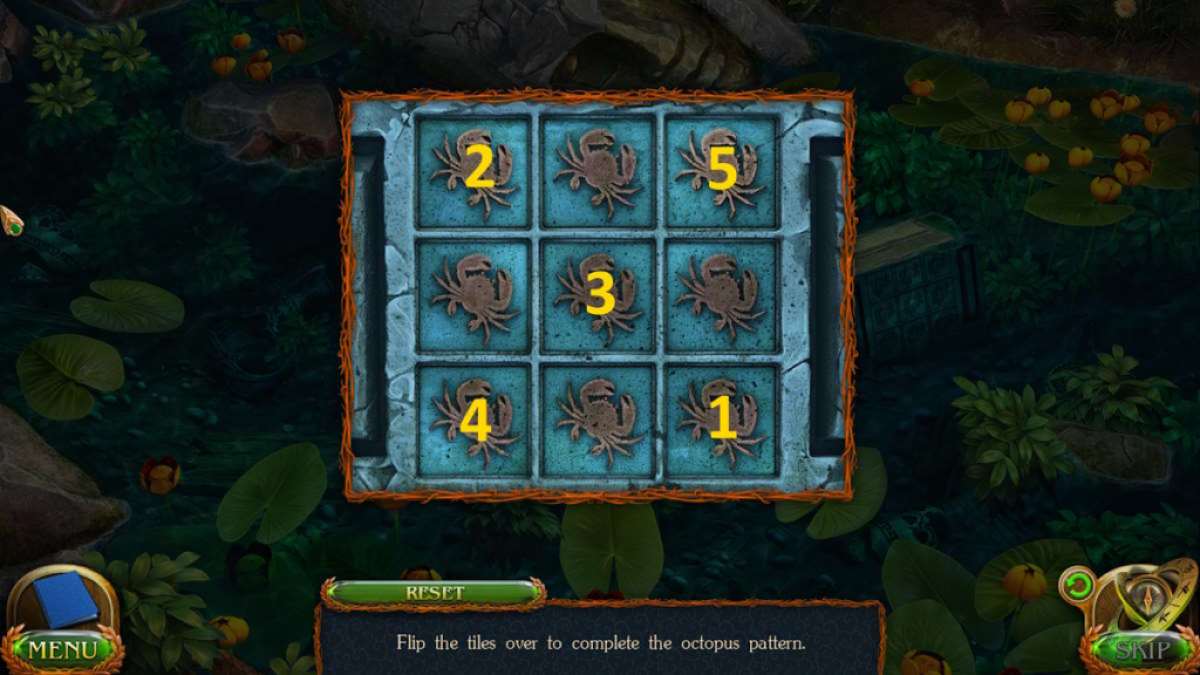
Image by Pro Game Guides
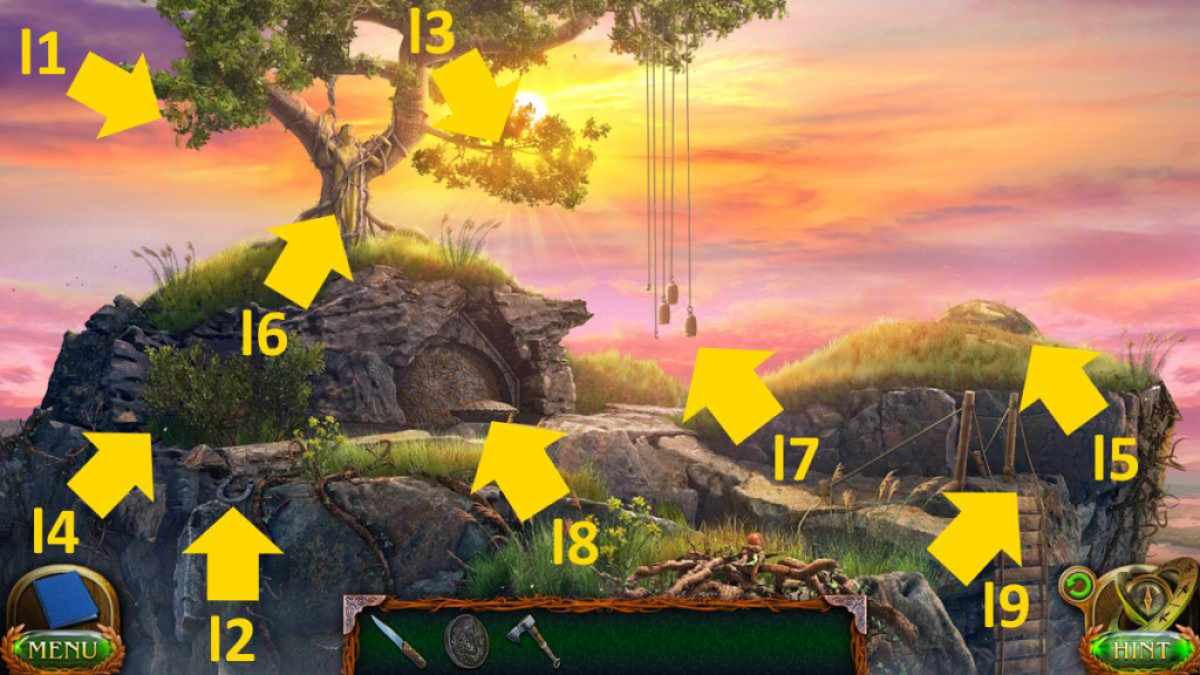
Image by Pro Game Guides
Screenshot by Pro Game Guides
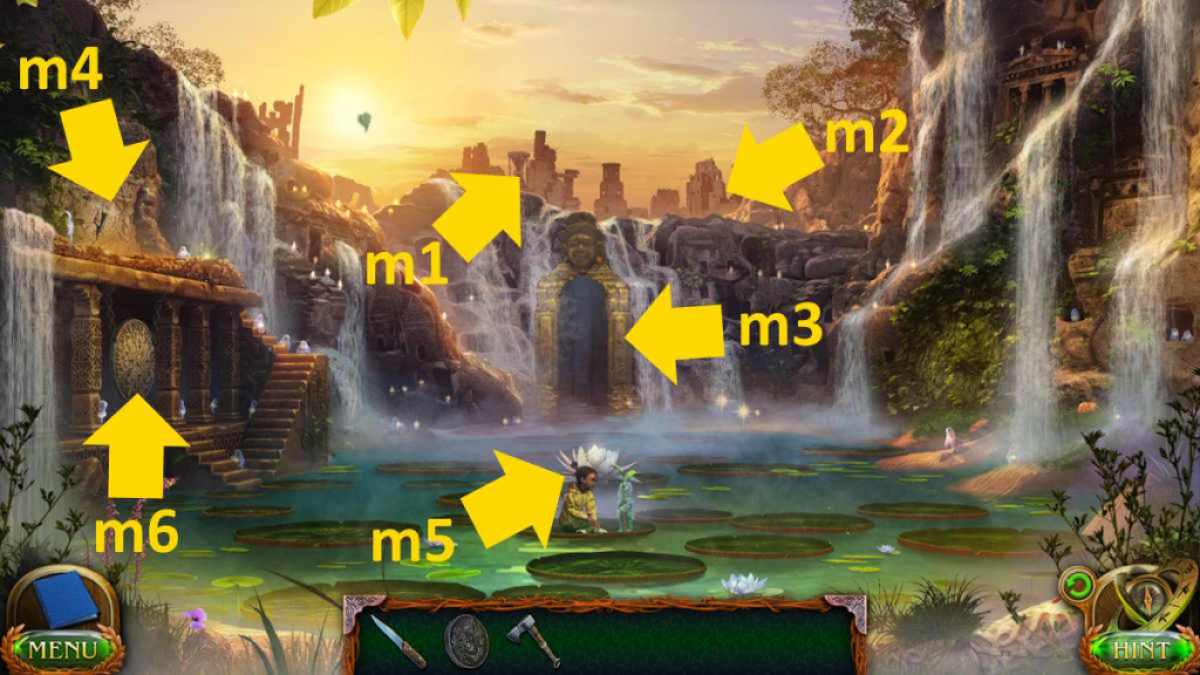
Image by Pro Game Guides
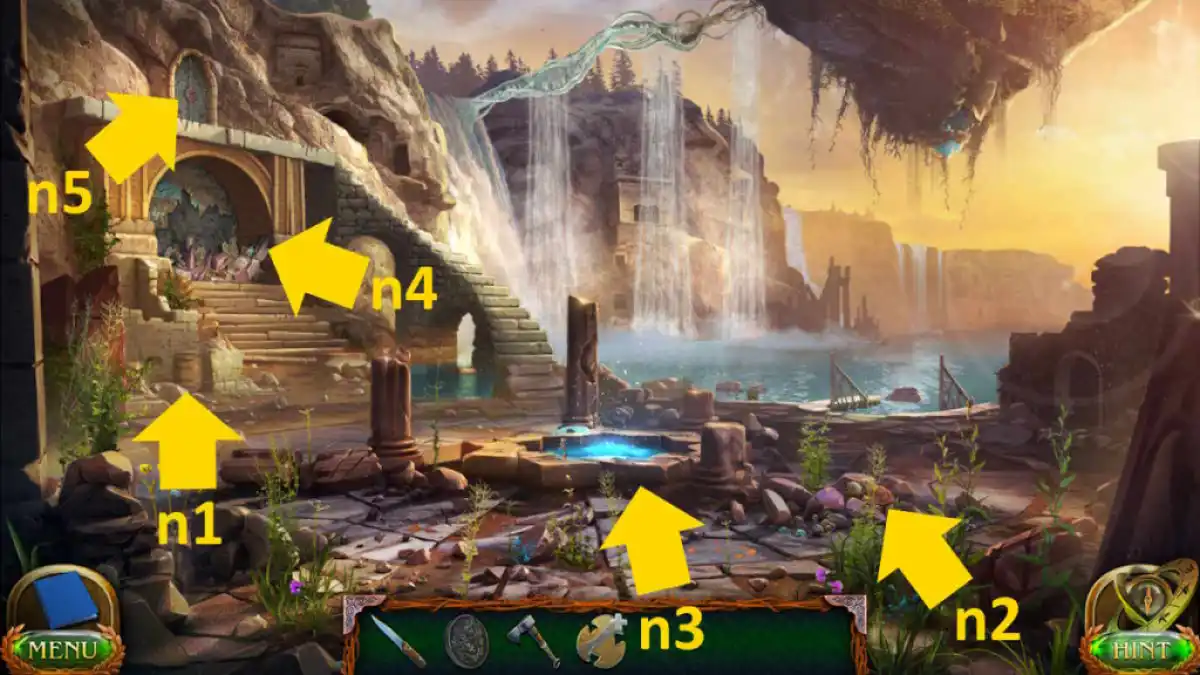
Image by Pro Game Guides
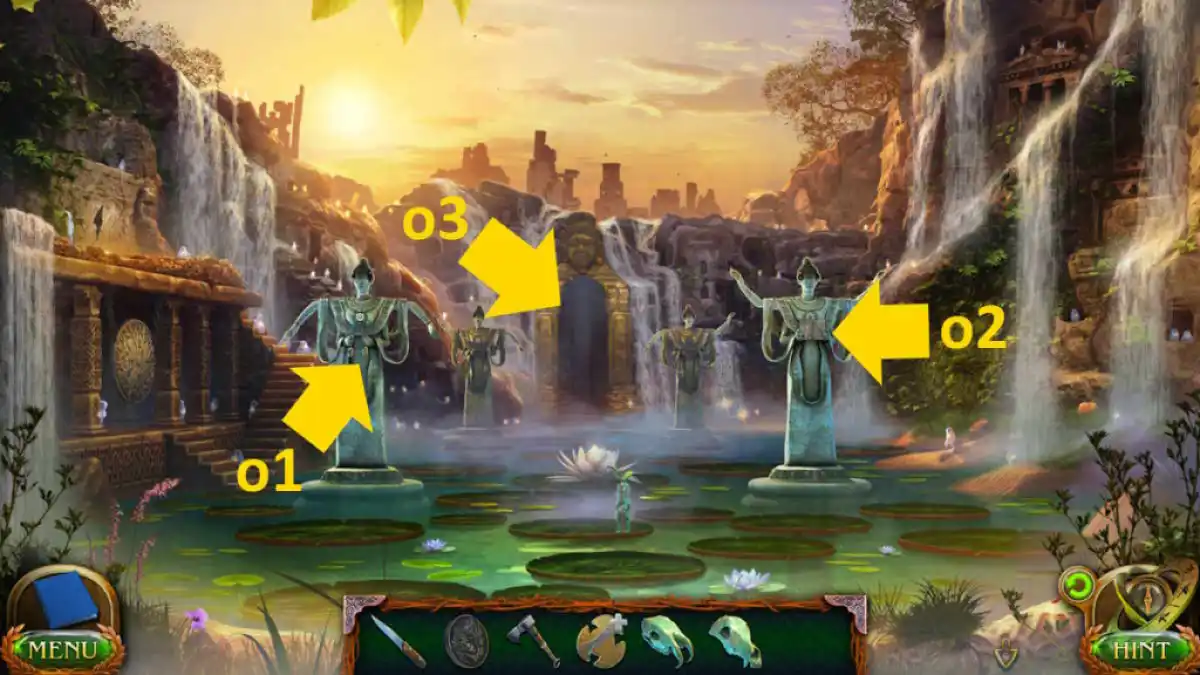
Image by Pro Game Guides
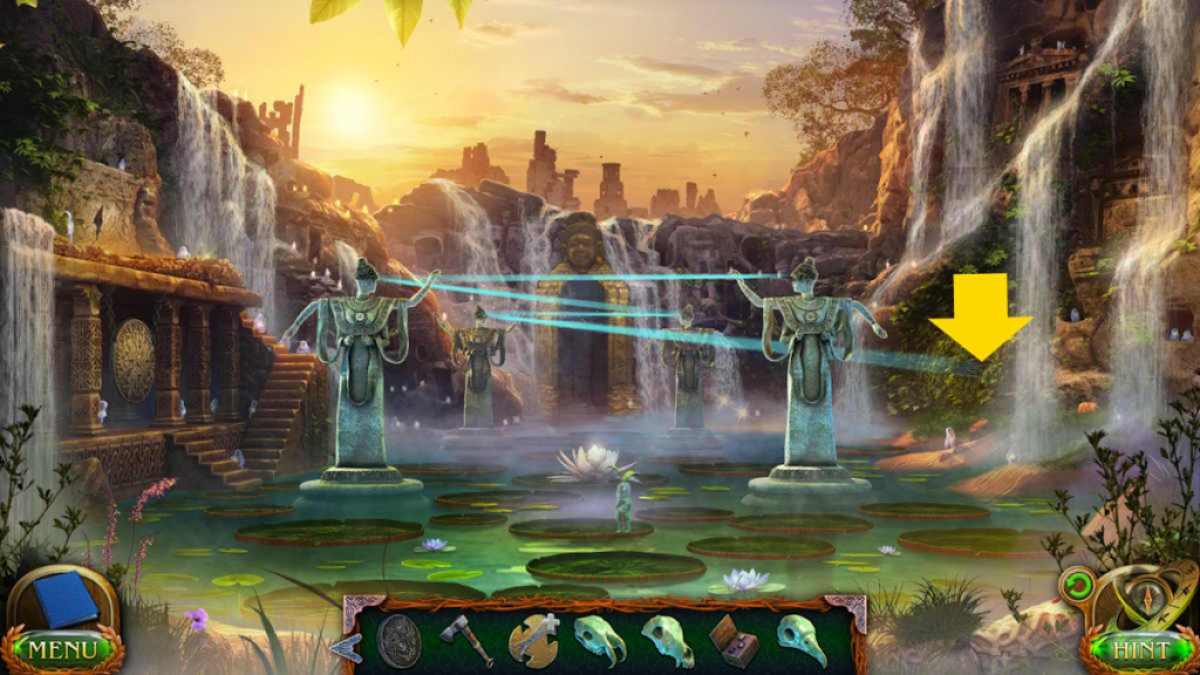
Image by Pro Game Guides
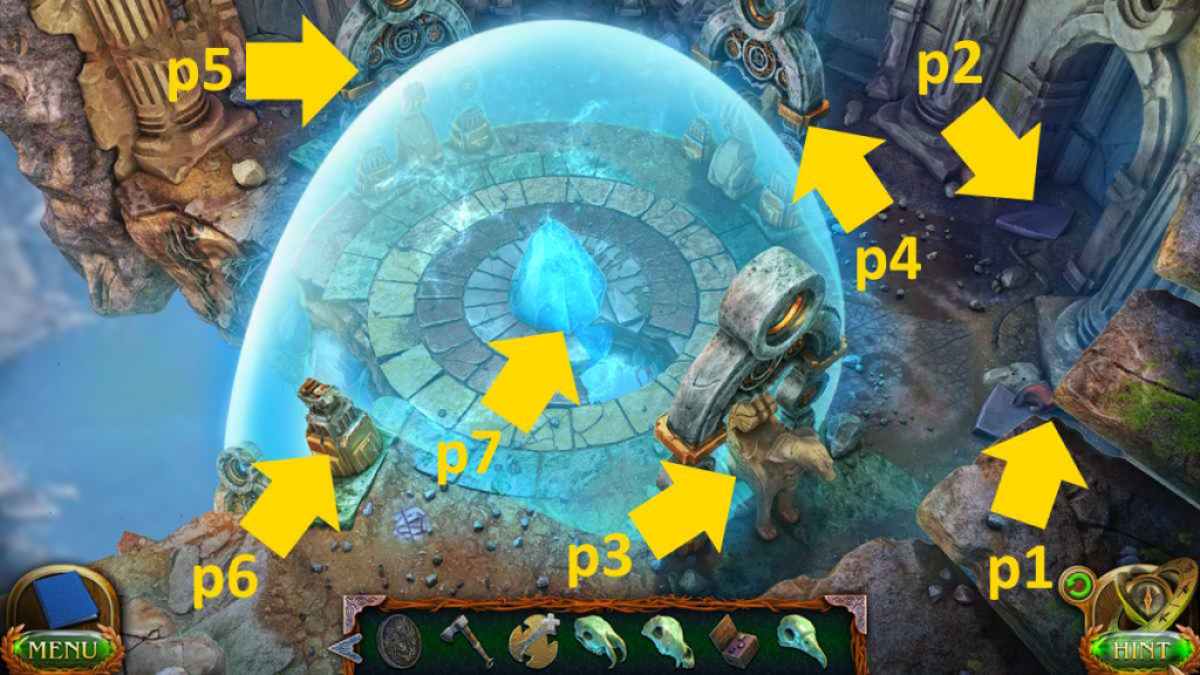
Image by Pro Game Guides
Screenshot by Pro Game Guides
