explore the yesteryear .
lose Lands is one of the most popular point - and - cluck puzzler series around decent now and rightly so . If you ’re a lilliputian stuck anywhere in Lost Lands 6 , fault of the Past , read below for my full walkthrough .
The serial follow our hero Susan as she heads back in time to try and right some wrongs that will hopefully put matter right in the present . This is done by puzzle out tricky puzzles while finding and combining objects to set up together clues .

Full Lost Lands 6 walkthrough - Lost Lands Mistakes of the Past
This is the first part of my full Lost Lands 6 walkthrough . This guide goes from the start of the biz up until you find Maaron ’s Diary , which should convince the crone to talk to you . If you ’re already further through the game , surveil the links below to get the section of the game you need :
You do n’t need to have play previous games in the Lost Lands series to revel this one . However , it does includereferences to characters from previous games . commend you’re able to use the in - game pinch organisation ( bottom rightfield of the cover ) if you get stuck or commute the difficulty . Finally , there ’s a handymap featureyou can get at by click the compass above the hints clit . Use this tofast - travel between locations .
The secret room
The account begins when you meet Fiora , the grandaughter of your old friend Maaron . She has summoned you because Maaron has been taken wrapped by an malefic witch , Cassandra . Maaron was work on a weapon to defeat her but Fiora is unsure of the locating of his secret workshop in the old forest .
After the initial conversation with Fiora , grab theCollection Item(a1 ) andMorphing Object(a2 ) , plus theShovel(a3 ) . Get a close - up of the broken threshold ( a4 ) and take theHinge . Use the shovel in the fire ( a5 ) to get aShovel with Coal , then use it on the puppet ( a6 ) in closing - up . you’re able to now expend the flexible joint on the puppet too to defeat it .
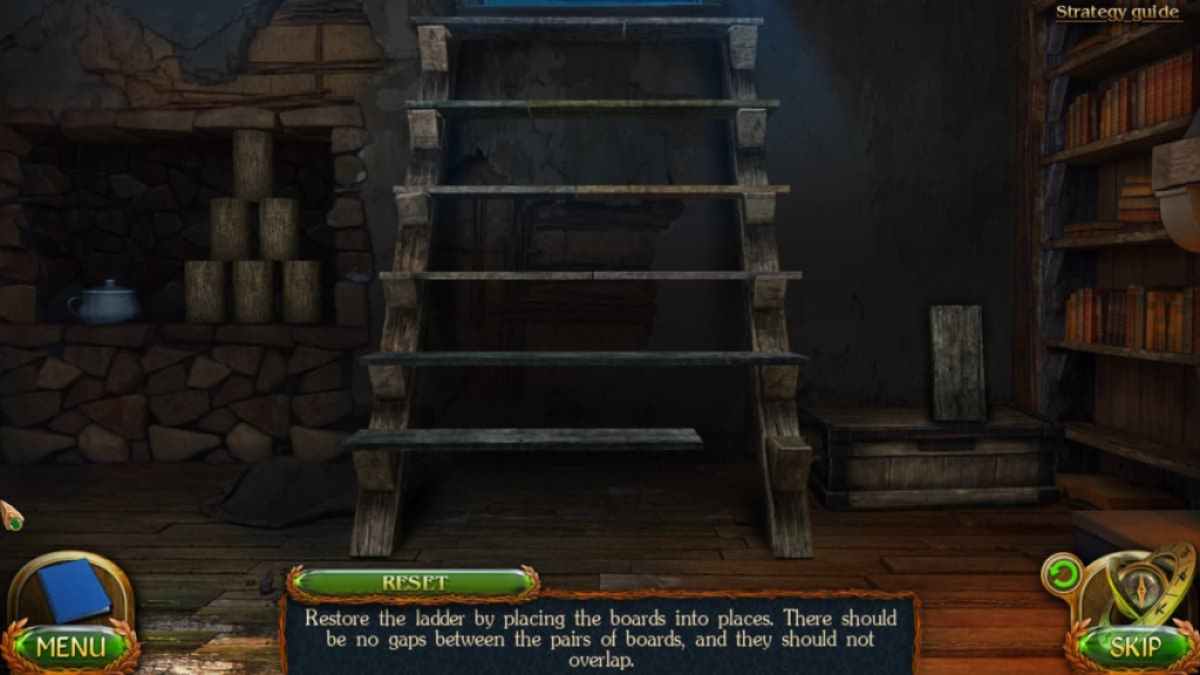
Click the stairs ( a7 ) to tidy up the broken steps , then get a faithful - up to start aboard puzzle . You ca n’t go wrong here because it is just trial and error . If you sample to drag and drop a board in the wrong place , it will either overlap , take back to the pile , or look wonky . It require to look like the persona above , with the final piece quick to go bottom - right . Once done , you may clack the threshold above to run away .
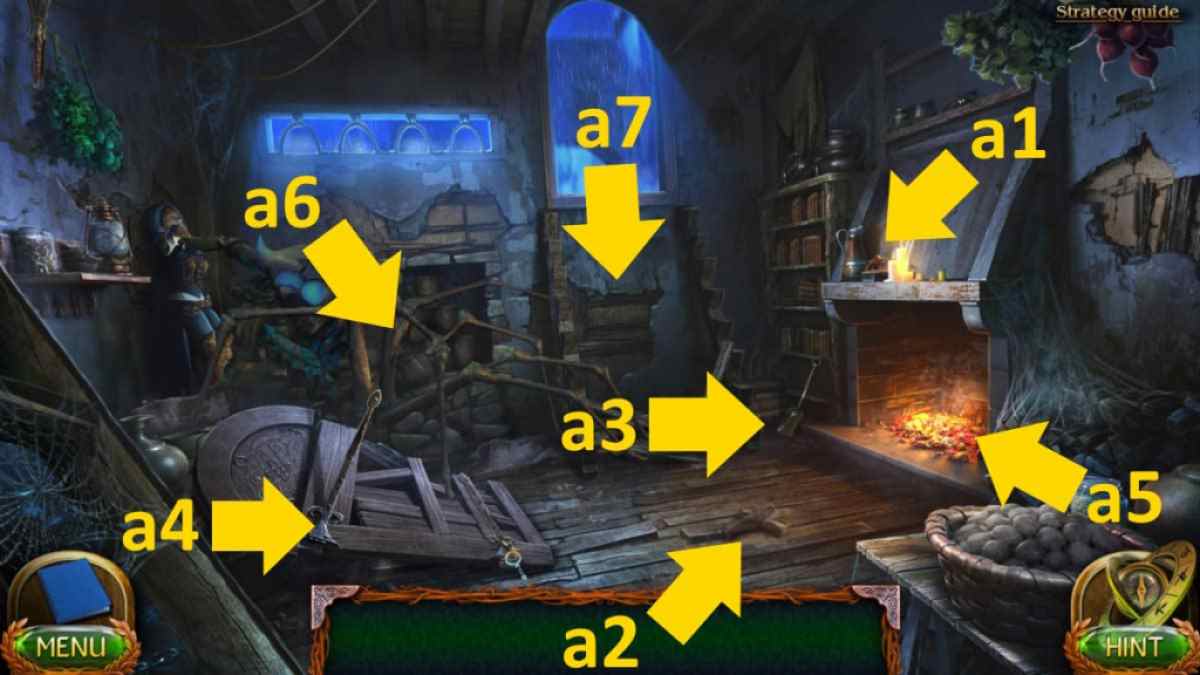
Image by Pro Game Guides
The old cemetery
Take theCollection Item(b1 ) andMorphing Object(b2 ) . If you now get a close - up of the grave in the center ( b3 ) you ’ll see it need a total of six letters . Select the three gravestones to the left of it ( b4 ) and get a close - up of each , finding the letters you involve .
supply them to the close - up of the grave accent and then rearrange the letters to spellMaaron . This open a way down into Maaron ’s undercover workshop . Before you go down , also accumulate theStone of the Moonand theFigurine of a Manfrom the tomb at the back ( b5 ) , where you’re able to also find aManuscript .
Maaron’s laboratory
Take theMorphing Objectfrom the floor ( c1 ) and theCollectible Itemfrom beneath the cupboard ( c2 ) . penetrate the table ( c3 ) for a close - up to find that you want to determine the Mirror of Memory by take a special hourglass with enchanted sand , then turn it .
associate : Lost Lands 3 Full Walkthrough ( Golden Curse )
Once you ’ve read the note , chatter it again to unveil and take aKey . Then click the middle of the table once more to move the papers and cluck the push button in the centre of the mesa that ’s revealed , allow you to take theSand of Timeand asecond Figurine of a Manfrom the secret compartment .
Screenshot by Pro Game Guides
Select the closet ( c4 ) next and employ the key to open it . Once open , click the bottle on the bottom shelf to get athird Figure of a Man , and then all the bottles on the middle shelf to get theEmpty Hourglass . Now you’re able to combine the hourglass and the sand in your armory to get theHourglass . fall into place the top of the mirror ( c5 ) for a close - up , sum up the hourglass , and watch the cutscene .
take the threshold ( c7 ) and enter the correct computer code ( see above ) to arrive at access to a simple object - finding anditem - matching puzzle . If you ’re skin , once you need a broken halo you ask to use the vice to make it using the power hammer .
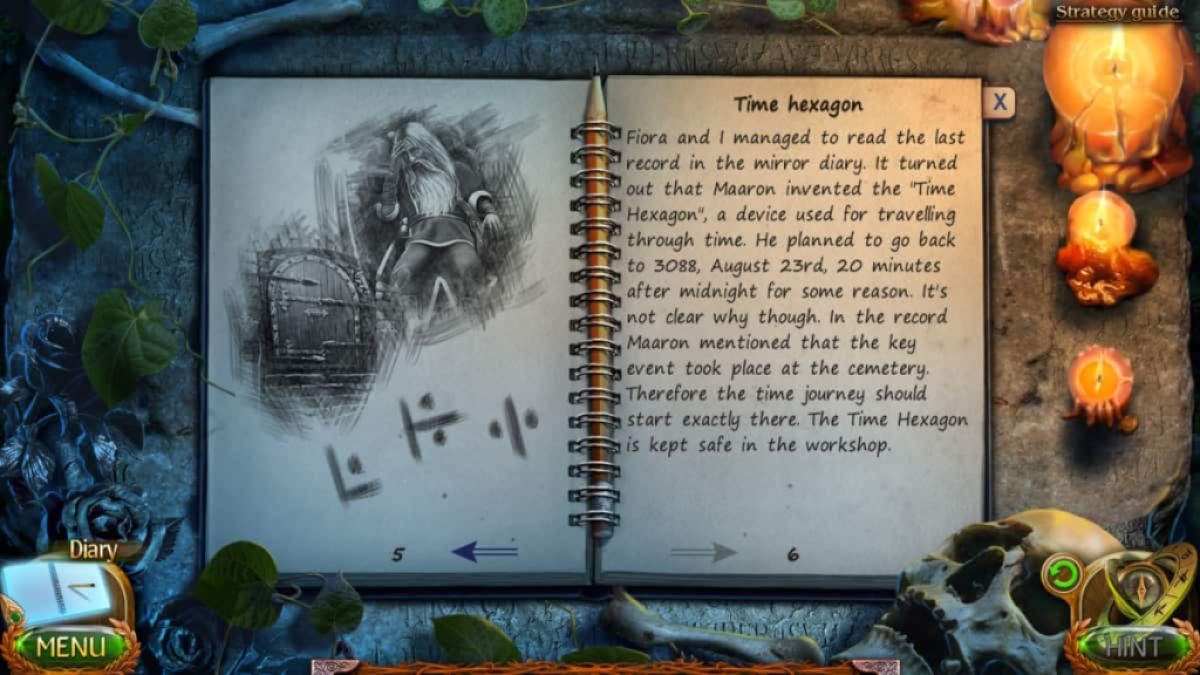
Completing the Time Hexagon
Once you have the samara you need , you take to move the clamps in the correct order to free the objective . The order is bottom right , bottom left , top right , top left . Now you may take theTime Hexagon .
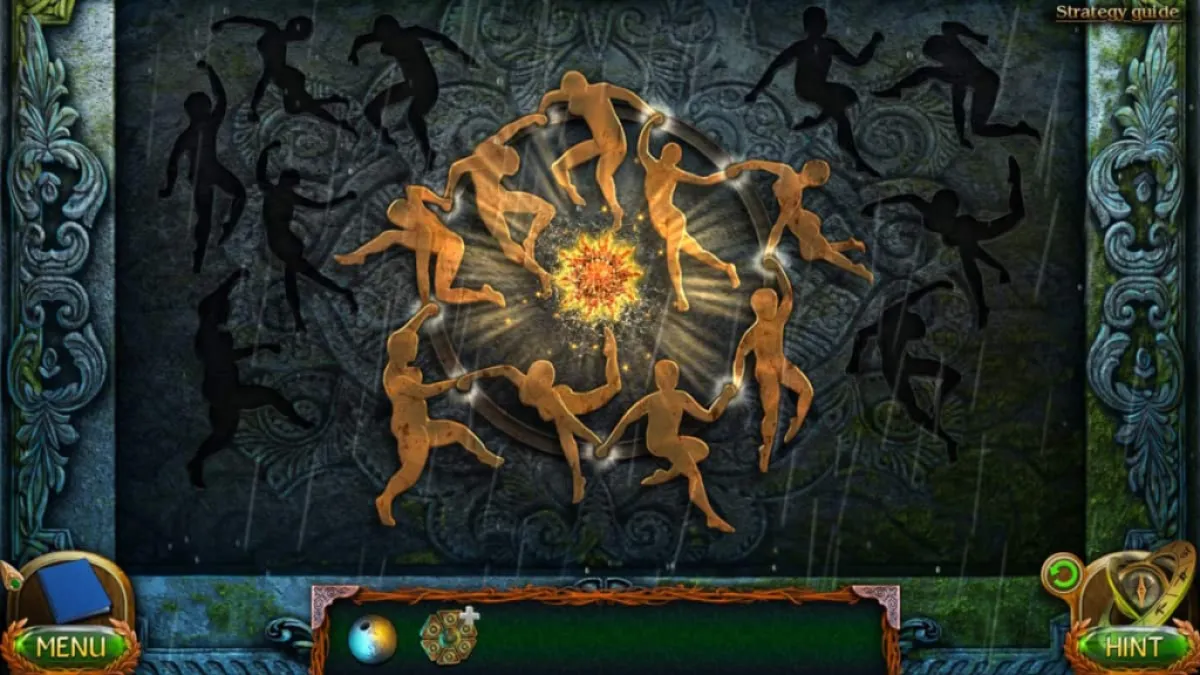
Back in the previous cemetery , take the crypt ( b6 ) and sum the three figurine to begin a jigsaw - style mystifier by build all the hands of the figurines pertain the circle . You ’ll know you ’ve perplex two correctly lay next to each other if theirhands touch and create a white incandescence . However , they may not be in the correct place around the circle . See the completed icon above .
you’re able to now click the open crypt door for a close - up . Take theUrn with Ashes . Select the Time Hexagon in your inventory and contribute the ash . You ’ll now be prompted to enter the correct date Maaron wanted to go to . Starting from the top central telephone dial , going clockwise , set the dial as follows:30 - 88 - 08 - 23 - 00 - 20 . Once done , flick the center of the Time Hexagon for a cutscene .
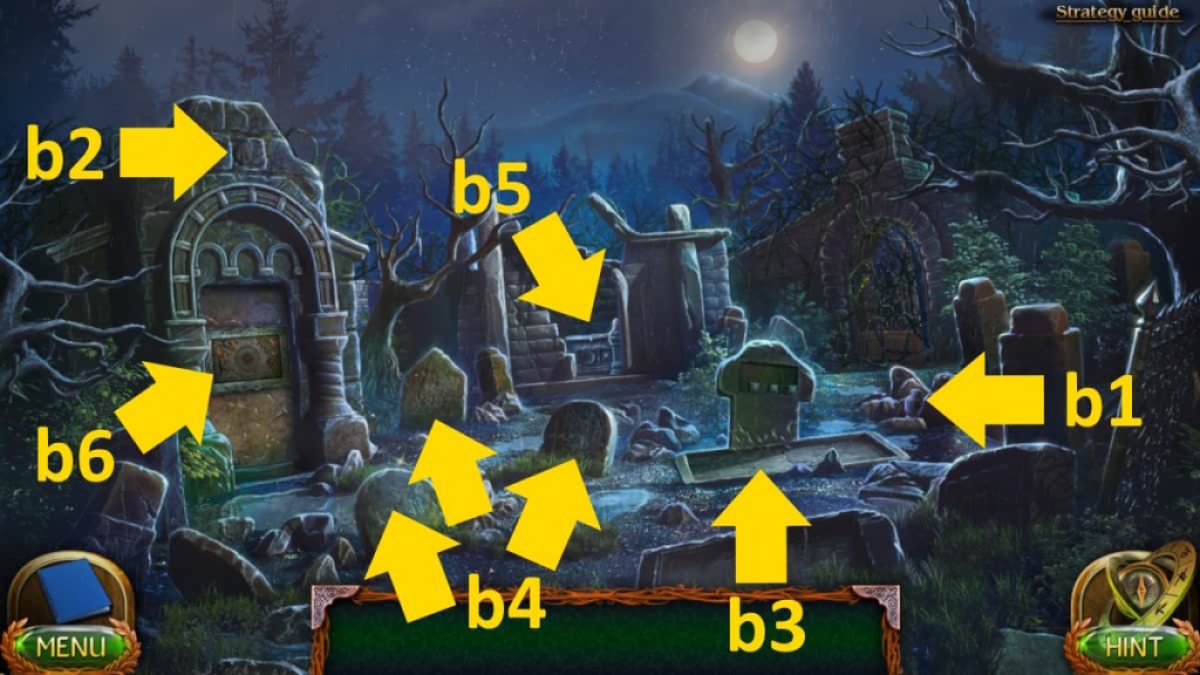
Image by Pro Game Guides
Past-time - The new cemetery
Collect theCollectible Item(d1 ) andMorphing Object(d2 ) , then get theSpadein the close - up of the locked room access ( d3 ) . foot up thePackage(d4 ) then pick out it in your armory and unwrap it to get theStone of the Sun .
The dried swamp
Take theMorphing Objectfrom the tree ( e1 ) and theCollectible Itemfrom the grass ( e2 ) . Now dawn the get on - up yap ( e3 ) , use the spade to move the earth , then click the boards again to dispatch them and take theBoards .
snap the fix once more after to unwrap a package hold a note about the hideaway . Take theMap with a Placemark . When you shut the book , click the material it was enwrap in to get aRag , then take thePiece of Swordthat is underneath it .
Related : Echo Bay Murders – Chapter 1 Walkthrough
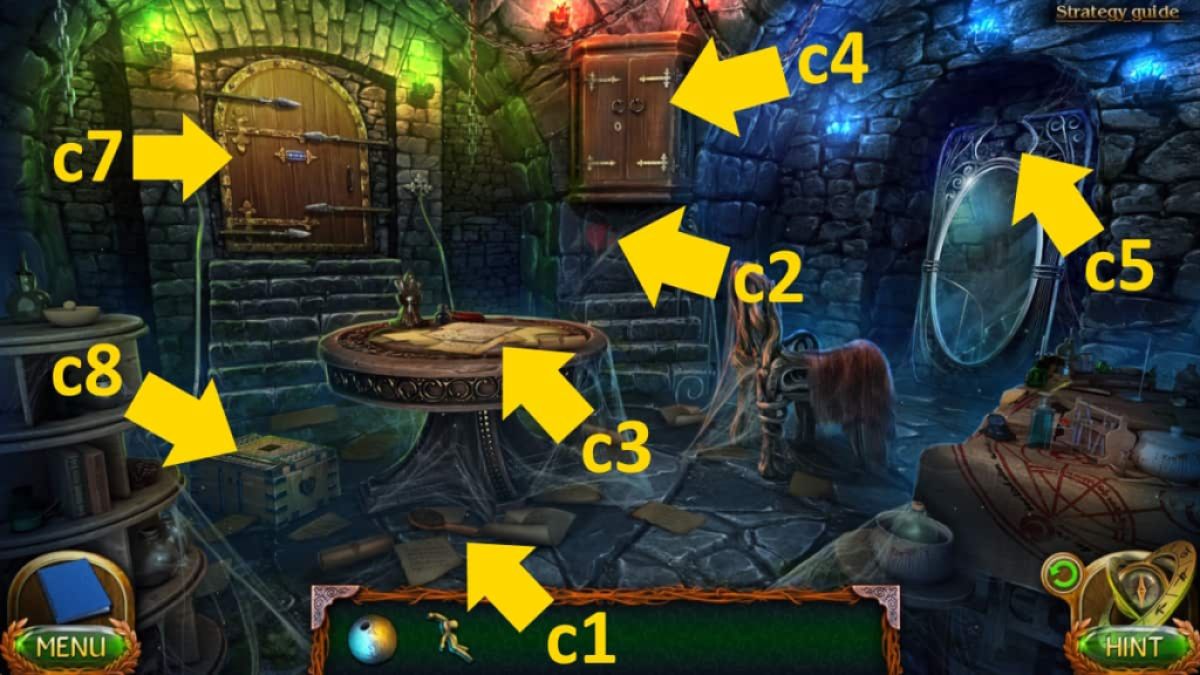
Image by Pro Game Guides
Once the hole conclude - up closes for skillful , select the control board in your stock-taking and click anywhere on the screen to start up apath - do puzzle . Note you’re able to pick up longer boards when you get to them , so pursue the ordination I ’ve noted above to collect all the board . Then just move board 5 to put 7 , then board 6 to status 8 ( which will become uncommitted once you place 7 ) .
You now have a few extra areas you could reach . Select the weewee ( e4 ) for a close - up and use the rag on it to get aWet Cloth . Also , get a finis - up of the tree diagram ascendant ( e5 ) where you ’ll get aManuscriptand aShaft .
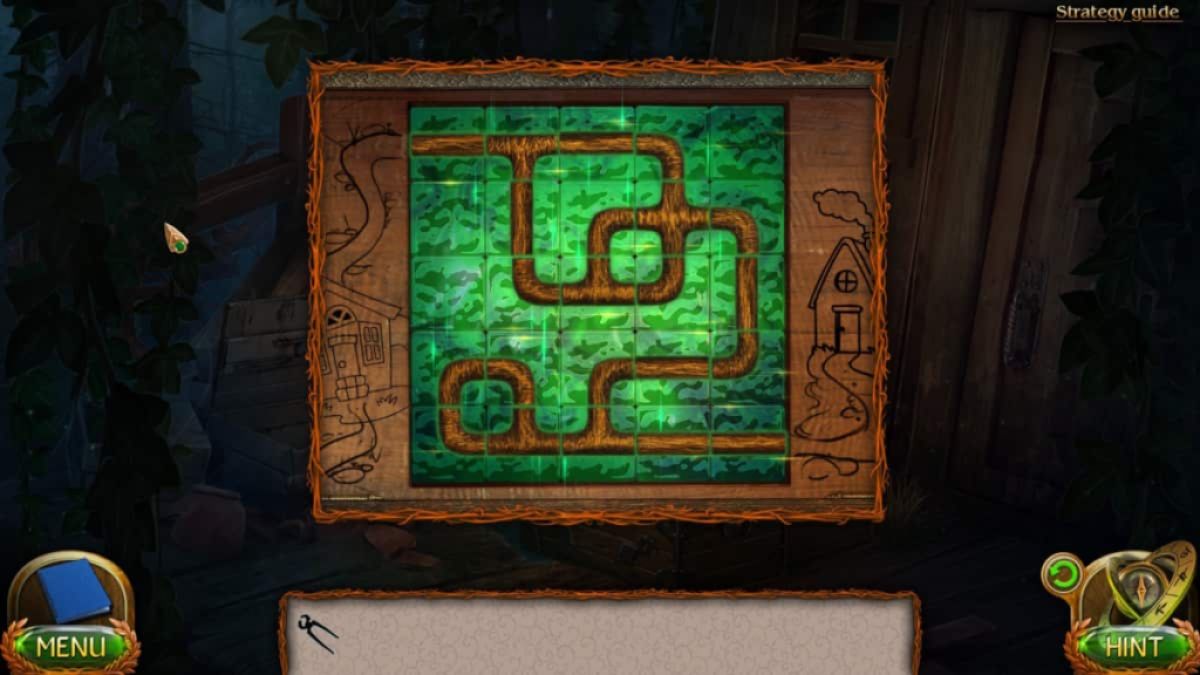
lastly , expend the patch of brand on the hut entrance ( e6 ) to start another basicobject - finding puzzle . The potentially catchy second is the cart track puzzle ( see above ) . Once done , take the Key to the Hut and use it on the door in the close - up to gain access code to the hut ( e6 ) . Head inside .
Screenshot by Pro Game Guides
The deserted hut
Take theCollection Itemfrom the rampart ( f1 ) and theMorphing Object(f2 ) from the confused crate . Use the patch of sword on the mattress close - up ( f3 ) and take someStraw . Get a closeup of the fireplace ( f4 ) and sum the moist material to the bars , using the prick after on the tag end to bend the bars . Click the witch to get theKey to the Padlock .
utilise the key to launch the padlock on the crate ( f5 ) , get theManuscript , and then take theBottle of Rumthat ’s underneath . Now put the straw over the witch in the open fireplace . choose the rummy in your inventory and bump the top off with the sword , getting someUncorked Rum . tot the uncorked rummy to the shuck on the witch , add the fire steel , then apply the sword on the fervidness sword to activate it .
Next , use the goop that ’s already in the hearth close - up to collect someWitch ’s Ashes . After doing so you will appear back outside the hut in the dried swamp . take the Time Hexagon in your inventory , add the witch ’s ash tree , and you ’ll be transport to the yesteryear once more .
Screenshot by Pro Game Guides
Past-time - The witch’s swamp
TheMorphing Objectis in the puddle ( g1 ) , while theCollectible Itemis by the open crate ( g2 ) . Grab theFishing Scoop(g3 ) , then click the hut doorway ( g4 ) for a finish - up and take theShaft of the Door Knocker . However , when you adjudicate to take the other point , it falls through the floor board .
Click under the hut ( g5 ) for a close - up , then select the attractor from your inventory and fall into place anywhere on the screen . you could now pull the attractor around trying to retrieve theDoor Knocker . You ’ll find it roughly in the low middle of the screen , but ca n’t die to find fault it up .
Select the hut door ( g4 ) for the close - up once more , tote up the threshold knocker , and then add together the shaft of the door detractor to it . Click the detractor to strike hard on the room access , incite a cut aspect with the beldame . Unfortunately , she is not in a gossipy mood .
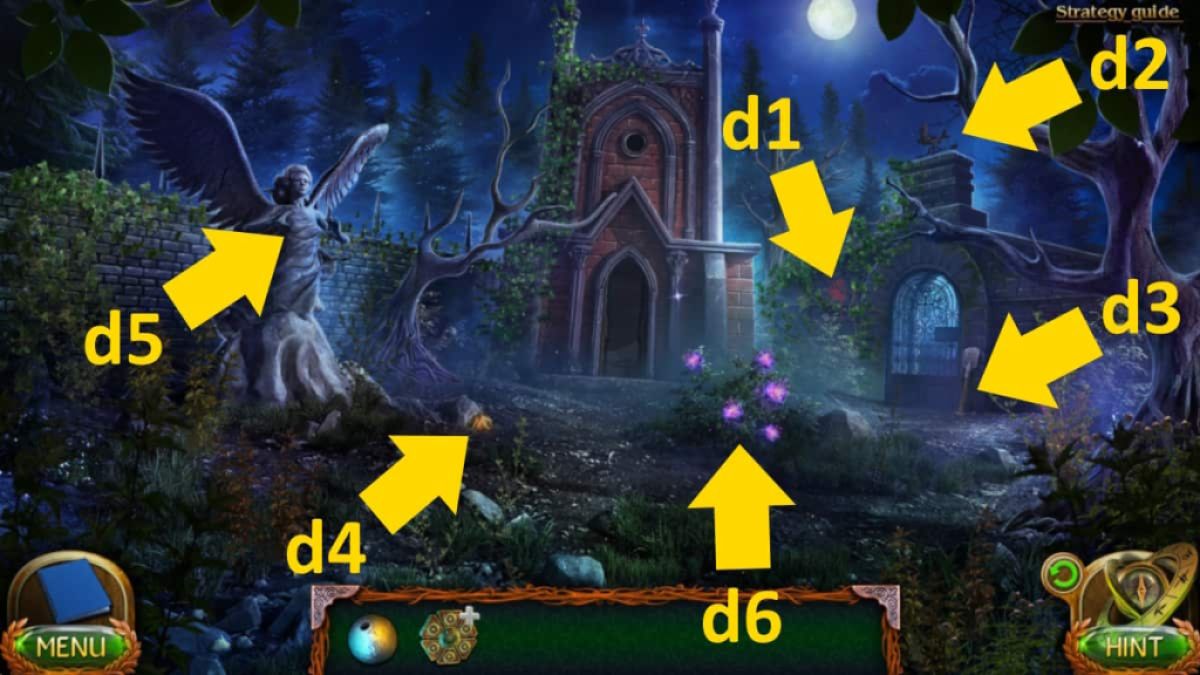
Image by Pro Game Guides
Go to yourmap and select Maaron ’s Labto be transport back to the present daylight . Select Fiora for another gelded aspect where you’re able to fill her in on your progress . She will give youPart of the Puzzle . Select Maaron ’s chest ( c8 ) for a close - up , then add the teaser part to start arotating puzzle .
You need to create a radiation pattern that has no informal end . See below for the solution . Once dispatch you ’ll see yourfourth Manuscript , asecond Magnet , andMaaron ’s Diary . That concludes part one of my walkthrough . For Part 2 of my Lost Lands 6 Walkthrough , get through the tie-in at the top of the page .
For more puzzle RPG walkthroughs here at Pro Game Guides , why not check outHow to beat Trace Escape Room - Full WalkthroughandOn Thin Ice Walkthrough Guide ( chapter 1 - 4 ) !
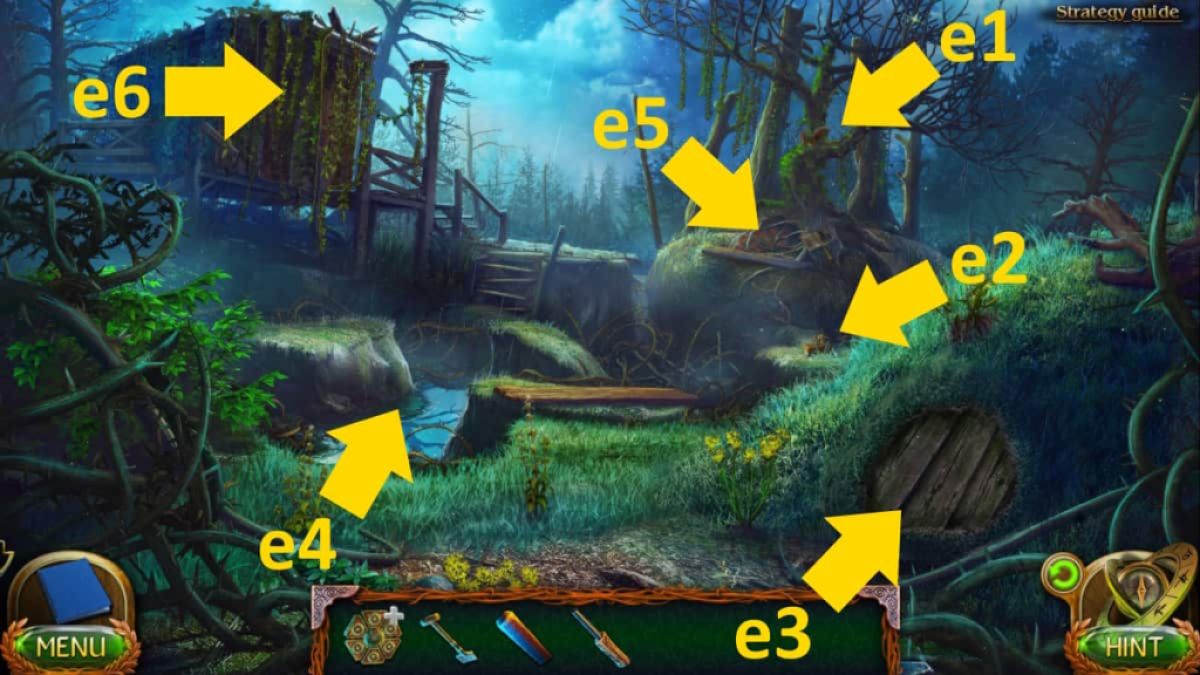
Image by Pro Game Guides
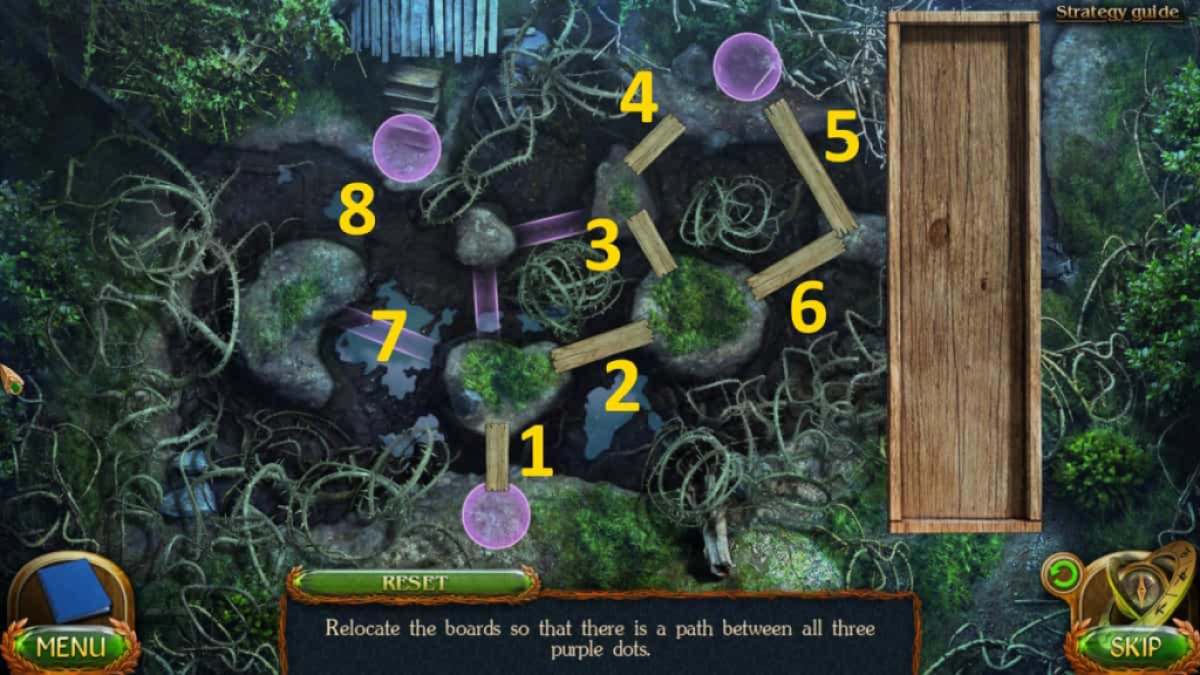
Image by Pro Game Guides
Screenshot by Pro Game Guides
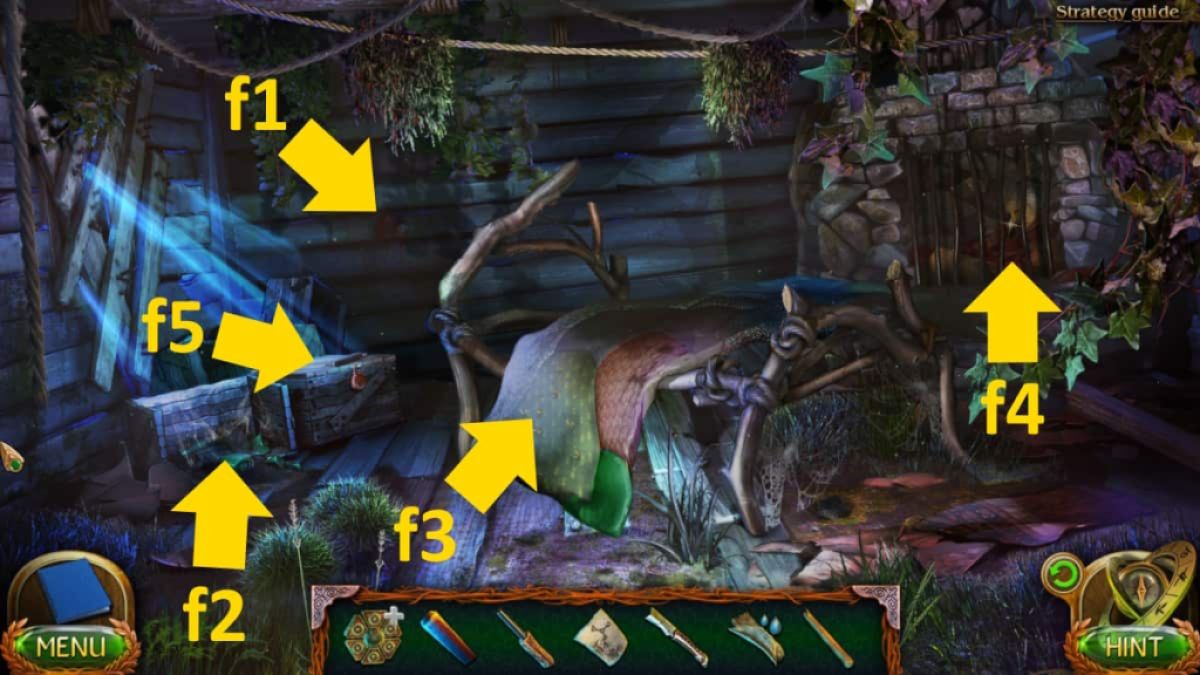
Image by Pro Game Guides
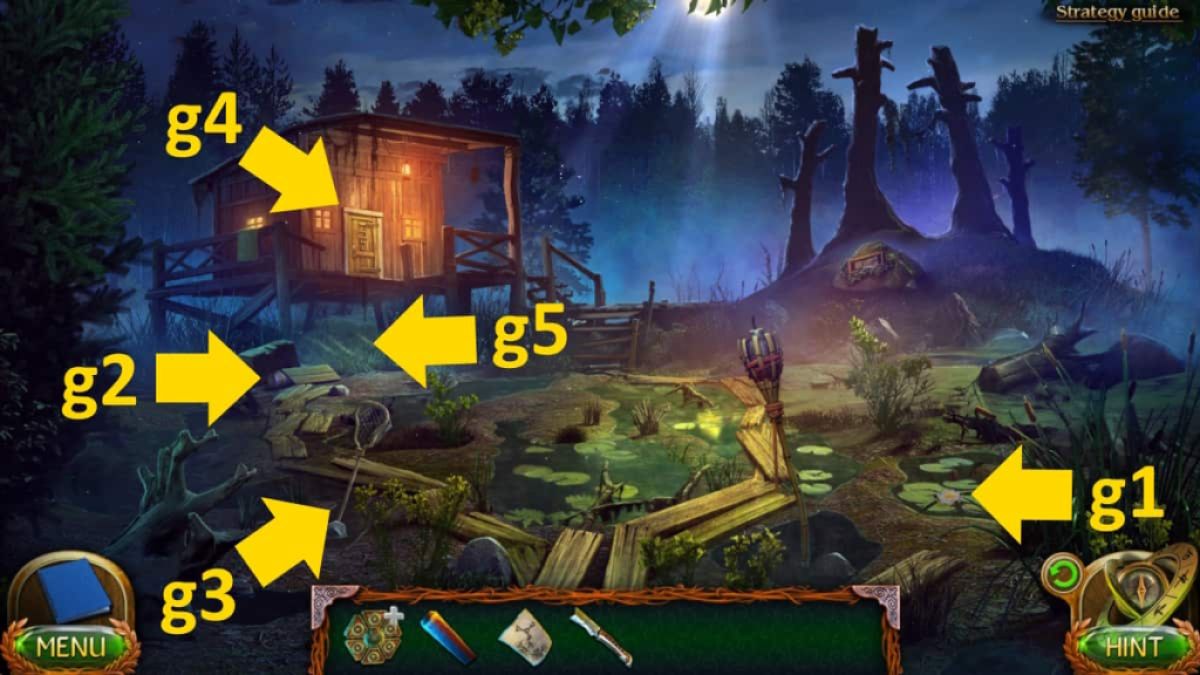
Image by Pro Game Guides

Screenshot by Pro Game Guides
