Maaron ’s misunderstanding to be a part of our Lost Lands 6 fillip chapter walkthrough .
Once you complete the main story of a Lost Lands aggregator ’s Edition plot , it opens up Modern subject matter , include a Bonus Chapter to complete . Below is my walkthrough and solution to the Lost Lands 6 fillip chapter .
The Lost Lands detail - and - snap puzzler plot series is one of my favorites in the genre . The bonus chapter are a lovely part of this , as they volunteer insight into part of the unseen narrative that run alongside the main one .

How to complete Lost Lands 6 Mistakes of the Past bonus chapter
In the Lost Lands 6 bonus chapter , we come up ourselves play as Maaron just after Cassandra has been poisoned in battle . However , you may only get to the bonus chapter after finish the main story . If you ’re looking for service and information on that , head over to myLost Lands 6 Walkthrough hub page .
Finding the ingredients
TheCollectibleis at the top of the steps ( a1 ) . snap Cassandra ( a2 ) for a close - up and take theEmpty Mug , then take the desk ( a3 ) and take theReaping Hookwhile noting theportal patternsin the book there . Select the door ( a4 ) to go outside intoMaaron ’s chiliad .
Take theCollectiblefrom the forage by the police van wheel ( b1 ) , then click the cooking stand ( b2 ) to remove the eyelid and take theEmpty Pot . Take theGrindstonefrom the chopping block ( b3 ) , use it to get out start the back gate ( b4 ) , and head out to theForest Glade .
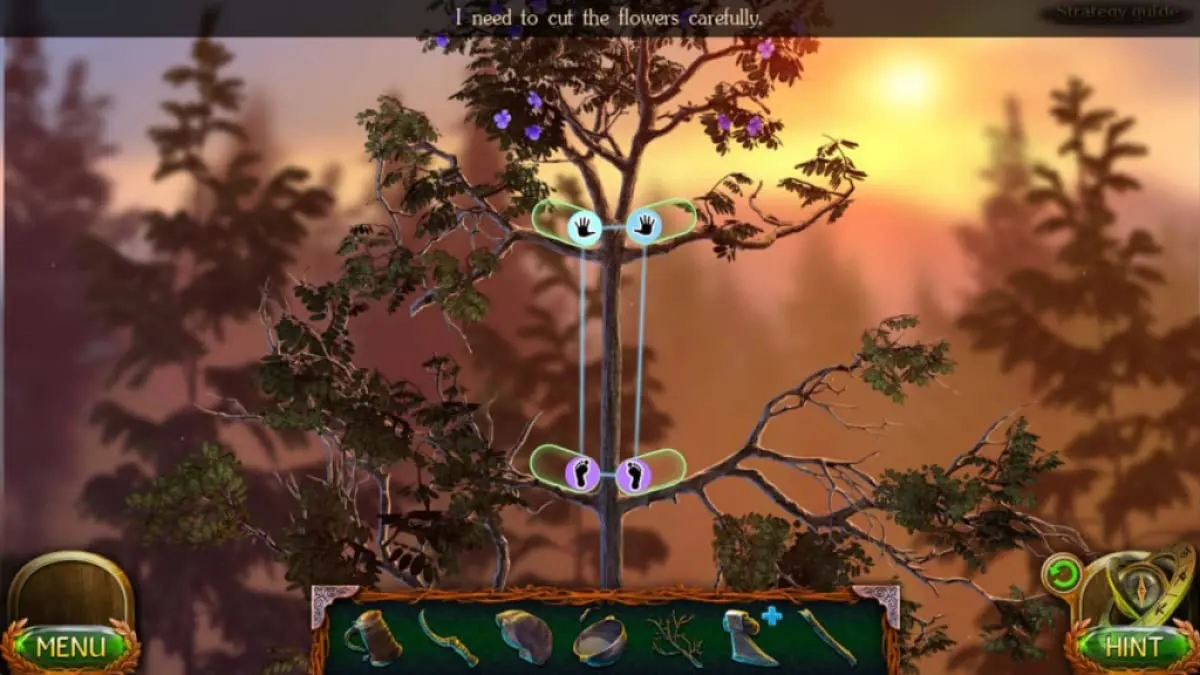
TheCollectible(c1 ) is to the left of the watercourse . Use the empty heap in the current ( c2 ) to take in aPot with Water , then take theStick , Axe Head , andDry Branchfrom the tree ( c3 ) . Now pick out the tree at the back ( c3 ) to begin atree - climbing puzzle . Just drag the feet and bridge player from one box to the next . You ca n’t go wrong , as a symbolic representation will show scarlet if it is invalid . Once at the top , use the reaping hook on theTranquility Flowers .
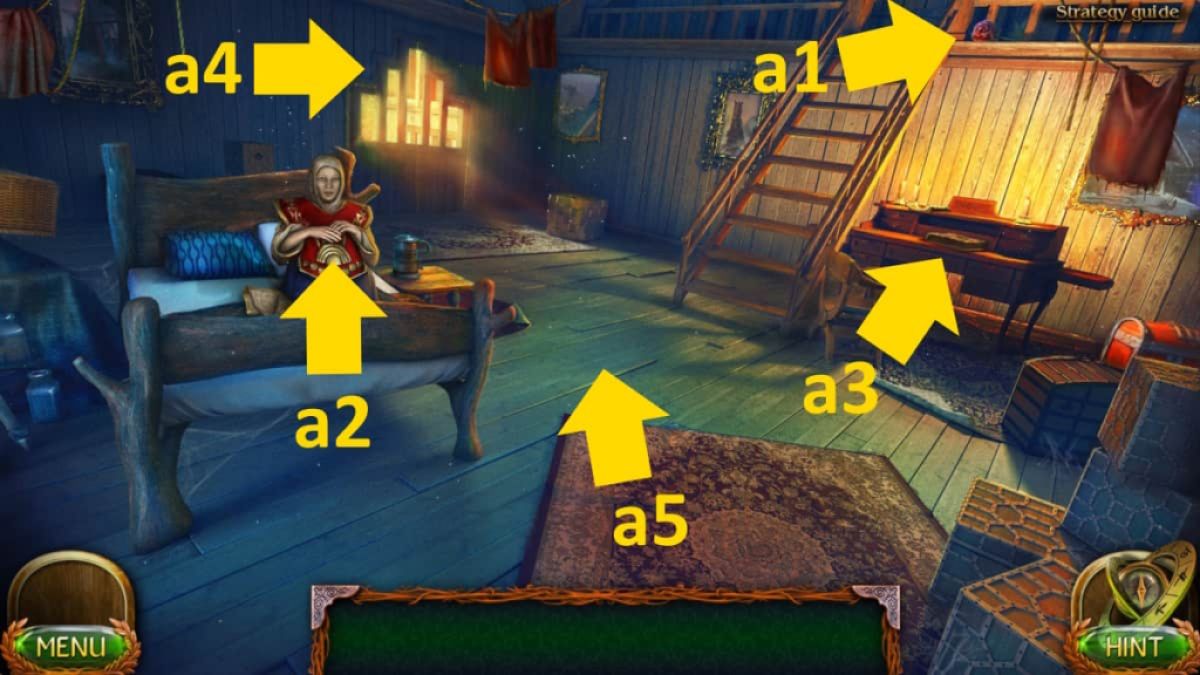
Image by Pro Game Guides
Making the potion
Move back to Maaron ’s yard . Select the axe head in your inventory , click the confused Ellen Price Wood in it to remove it , and add together the stick to the image . utilize the reap hook on the joint in this icon to trim down it down , add the whittled stick to the axe head , and then utilize the grindstone to sharpen the axe point . You ’ll now have anAxe .
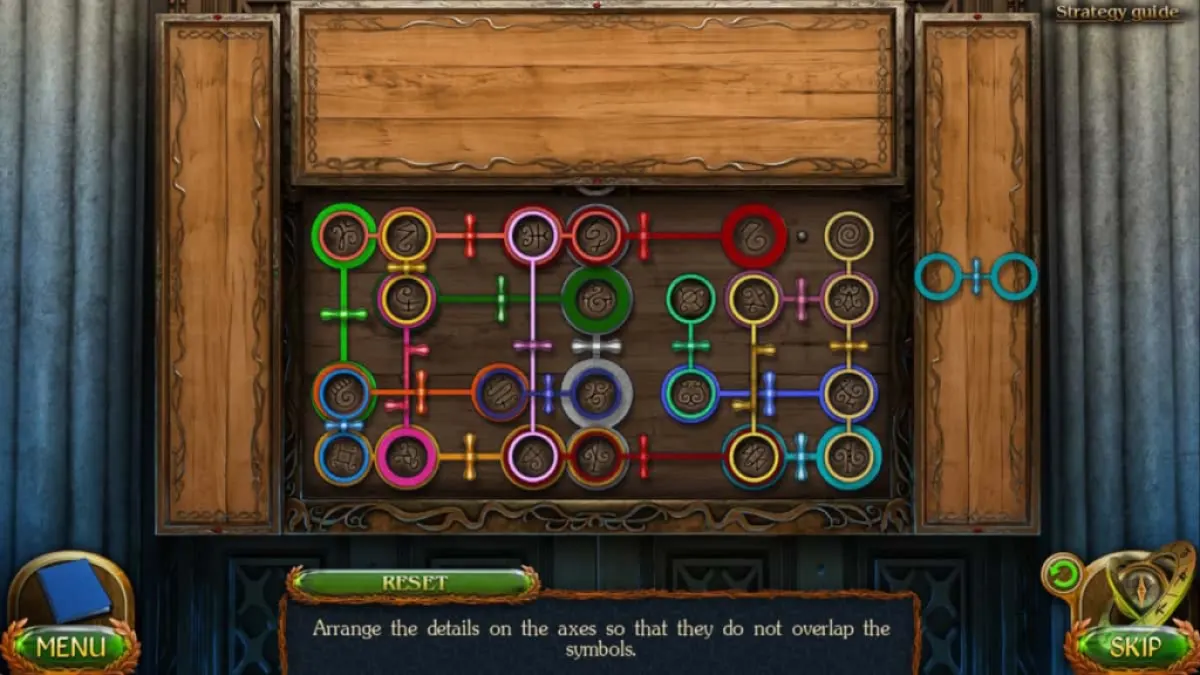
add up the dry branch to the chopping mental block ( b3 ) , employ the ax in it , then collect theBrushwood . Put the brushwood under the preparation bandstand ( b2 ) to begin aline - association puzzle . You need to flick the dots in the right lodge ( see the range above ) . Once done , the flaming will light . Add the pot with urine and the placidity flowers , then apply the mug to get theDecoction of Tranquility . Give it to Cassandra ( a2 ) , and she ’ll give you theKey to the Cellar .
Lighting the cellar
Back in the yard , use the Francis Scott Key on the cellar door ( b5 ) and head into the storeroom above thecellar . Take theCollectiblefrom the potshards ( d1 ) , then click the chest ( d2 ) several metre to unfold it , and take theCable with Carabinersand someCandles .
relate : On Thin Ice Walkthrough Guide
Select the candle in your stock to startanother credit line - connexion teaser , using exactly the same line as you made to light the fervidness ( see above ) , then click them once lit to get theLit Candles .
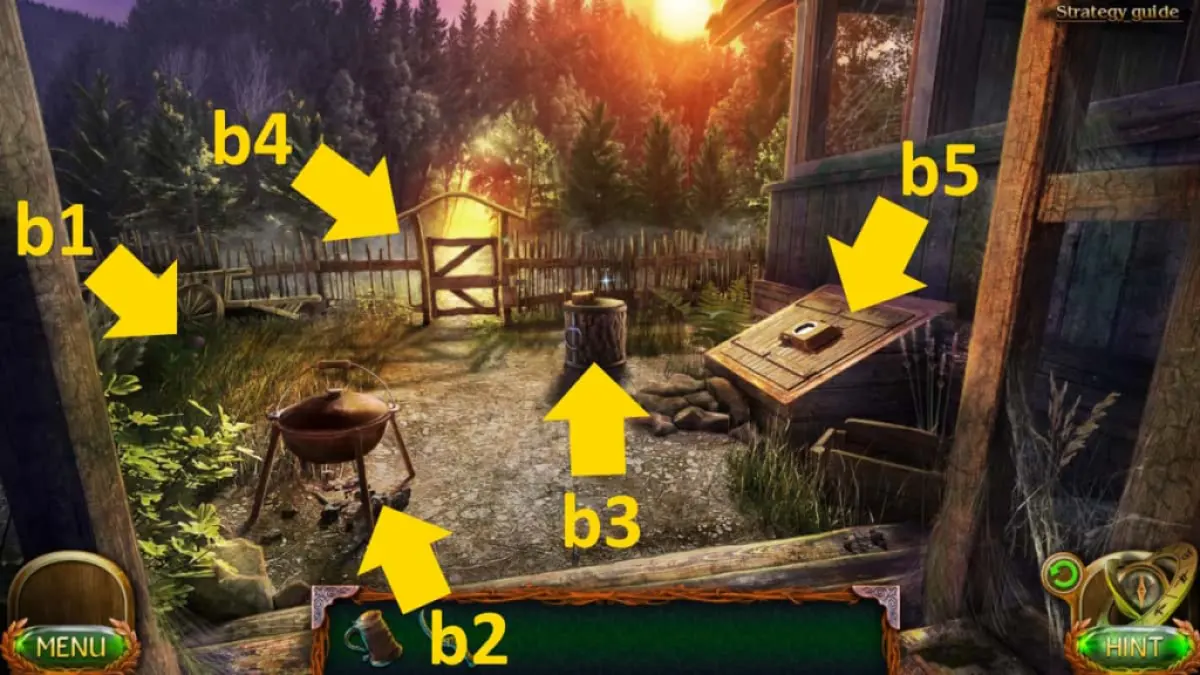
Image by Pro Game Guides
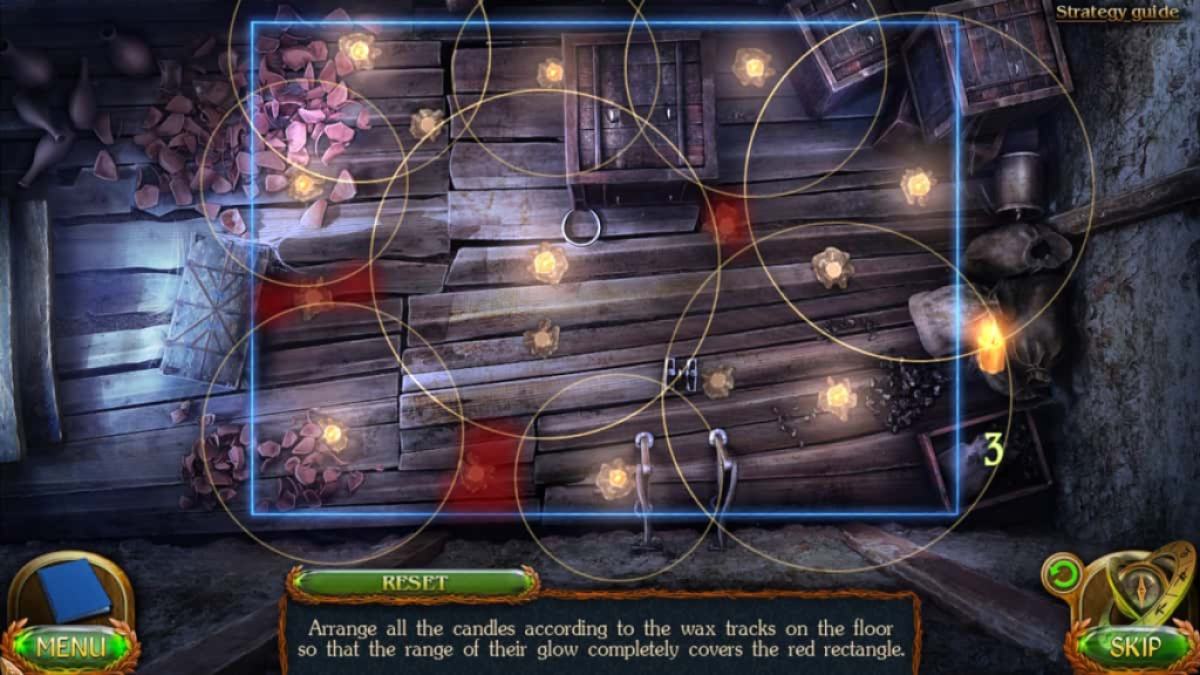
Now pick out the perch candles in your stock list and click anywhere on the ( d ) image to start awax - track puzzler . You need to light the intact orbit with the correct location of the wax light , noting the cd are dissimilar sizes . See the range of a function above for a solution , which shows the situation when just the smallest candle still need to be placed . Once done , you may see the back of the elbow room .
The portal disc
Add the cables to the hook ( d3 ) , which extract the boxwood away and gives you admission to the cellar entrance ( d4 ) and anitem - agree teaser . apply the jar and spoon to call for the termites , and use them to gain access to the wooden boxful . employ the metal saw and clamp to halve the size of the atomic number 79 weight , giving admission to the secret scale compartment . Make the image pictured above for thetree puzzleto get thePortal Disc .
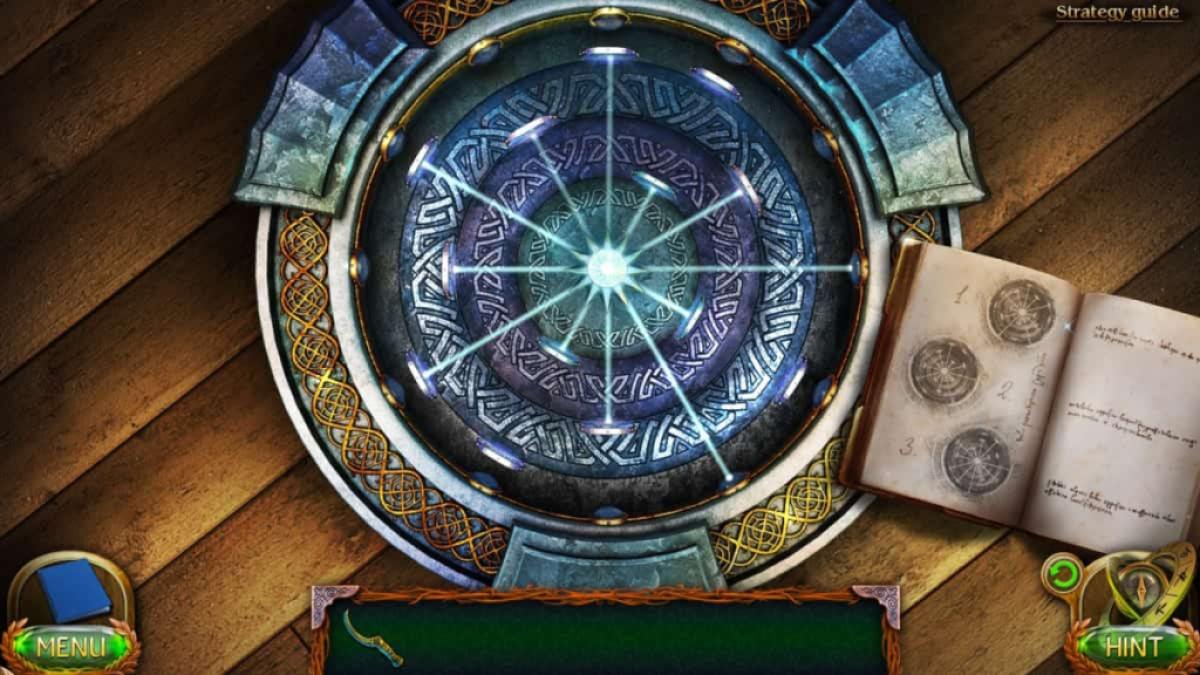
turn back to Cassandra and order the portal disc on the floor ( a5 ) . try the disc once put and move the rings to match design 2 in the book ( see above ) . Now click the portal site to transport yourself to the swampland .
The Swamp
Take theCollectible(e1 ) and theRope(e2 ) from the walkway and theLong Boardfrom the finish - up of the room access ( e3 ) . clack the doorway handle to try out to rap , then sink in the lower doorway flexible joint to launch the door . channelize inside .
TheCollectibleis in the industrial plant on the cap ( f1 ) . Click Helma ( f2 ) for a close - up , take herMedallion , and add the decoration to the boxwood ( f3 ) to open it . register the note , and then click the pulverization box to start hallucinate . clack the Wiccan again , and this time , you ’ll see ashapes mystifier . Make all the coloured patterns on the sides at the same sentence to solve each one . You need to do this three times . The solutions are below :
Once complete , you will enter Helma ’s mind .
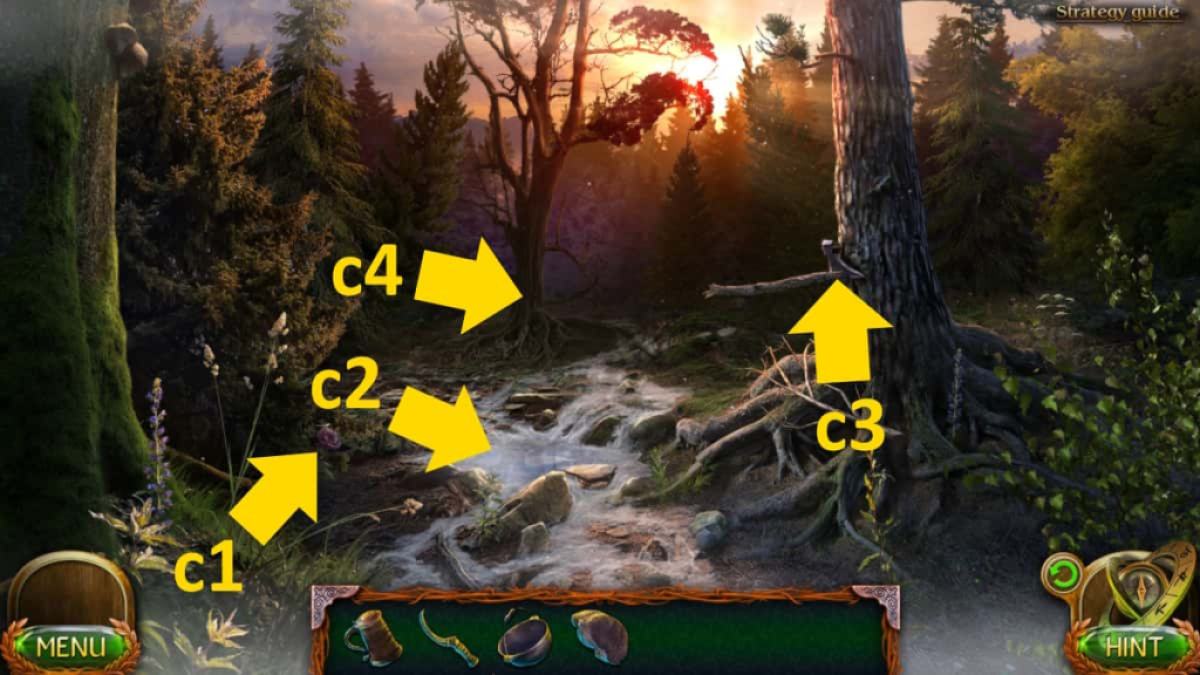
Image by Pro Game Guides
Helma’s consciousness
After a cutscene with Helma , take theCollectiblefrom the right balcony ( g1 ) and then gather all the black and white Stone you need . Grab theBlack Stoneon the floor ( g2 ) , and asecond Black Stonefrom the hammer unaired - up ( g3 ) where you could also put theWedgeinto its maw .
snap the right scale ( g4 ) to gettwo White Stonesand asecond Wedge . From the left-hand scale ( g5 ) , take athird Wedgeand athird Black Stone . Add the cuneus to the remaining holes near the pounding ( g3 ) , then click the hammer to use it to knock the torpedo in . Once the floor collapses , get a stopping point - up of the pickle , chatter the forget me drug to drop it into the maw , then click it again to go down . Take a quick look at the doorway mystifier here , then head back up .
tick the bell ( g6 ) for a close - up to start another point - joining puzzle ( see the solution above ) . Once everlasting , you ’ll see thegate mystifier solutionin the image of the interior of the bell . Head back down and reach the logic gate ( see below ) .
Screenshot by Pro Game Guides
Helma’s subconscious
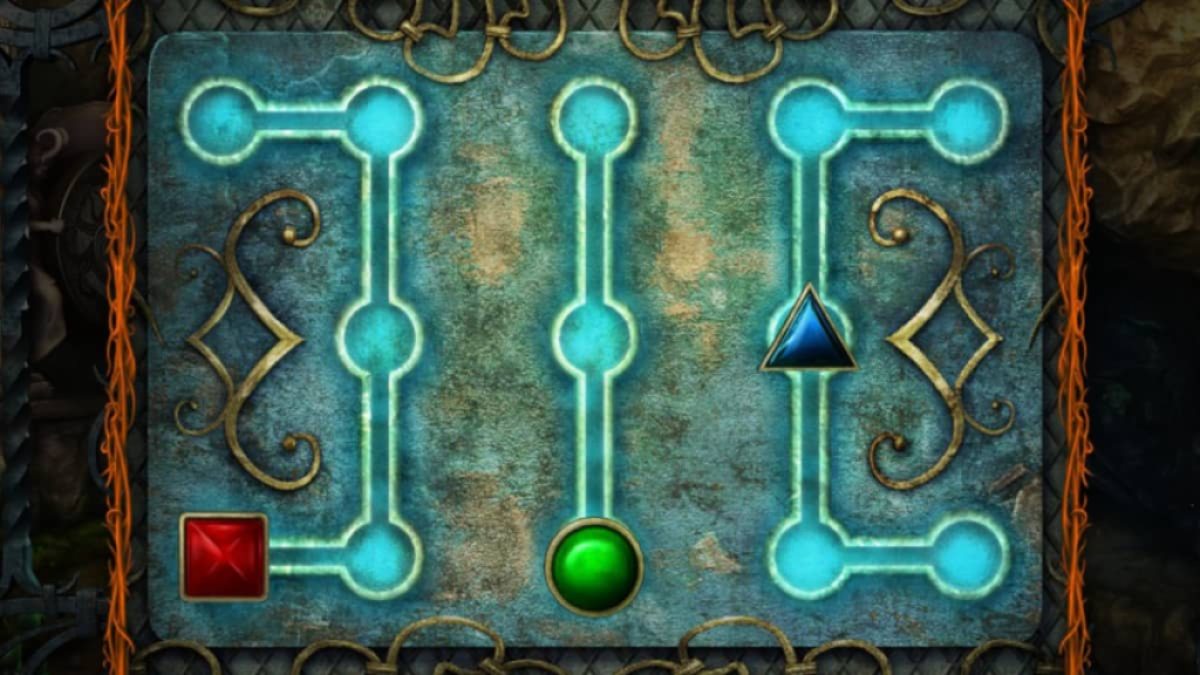
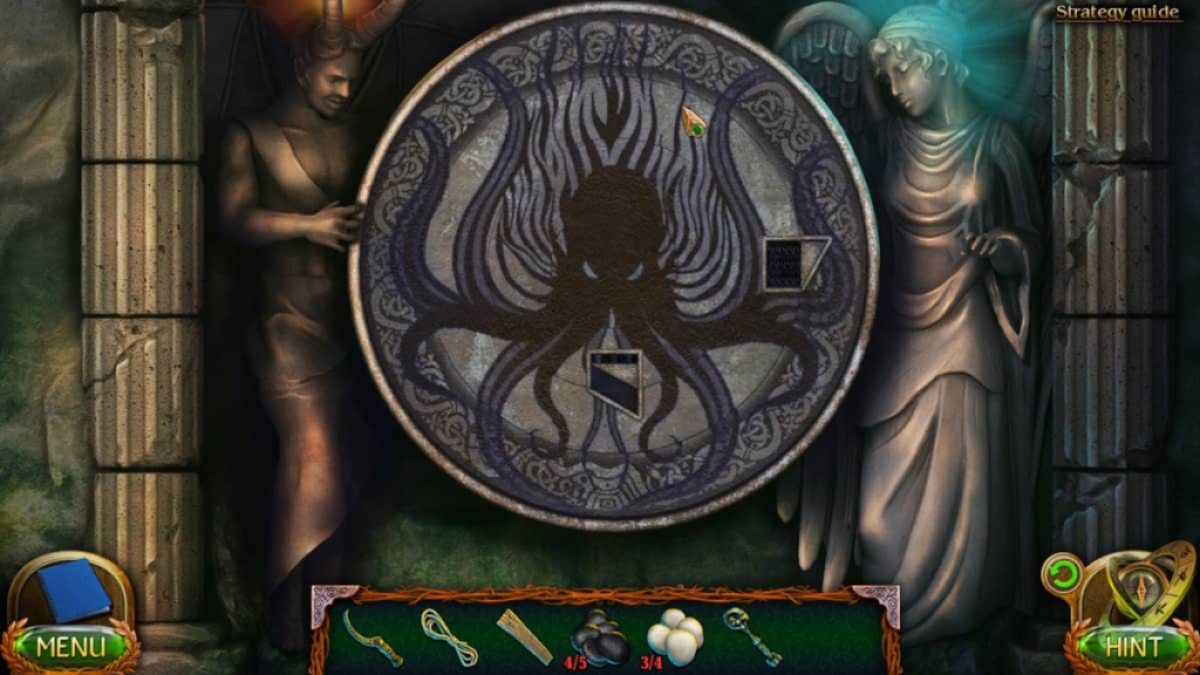
Take theCollectibleandthird White Stonefrom behind the hole ( h1 ) , as well as thefourth Black Stone(h2 ) and theKey(h3 ) . Click the monument for a close - up ( h4 ) and move the circle to make an figure ( see below ) . Once complete , the pool ( h5 ) will meet with weewee .
Clicking the pool start out yet anotherline - connection puzzle(see result below ) . Once terminated , you ’ll have a missing - physical object puzzle to complete in the pool . Take theChest . Select the chest in your stock and utilize the samara to open it , taking thefifth Black Stoneand theKey to the Cabinet . Use the key on the cabinet ( h6 ) and take thefourth White Stonefrom the skeleton ’s mouthpiece .
Go back on a higher floor , add the bloodless Stone to the left scale and the black to the right , and the meditation will terminate . Click Helma , who will give theKey to the cemeteryafter a cutscene . Back out in the swampland , add the plank to the path ( e4 ) , click the burial ground gate ( e5 ) for a conclusion - up , use the key to spread it , and manoeuver inside .
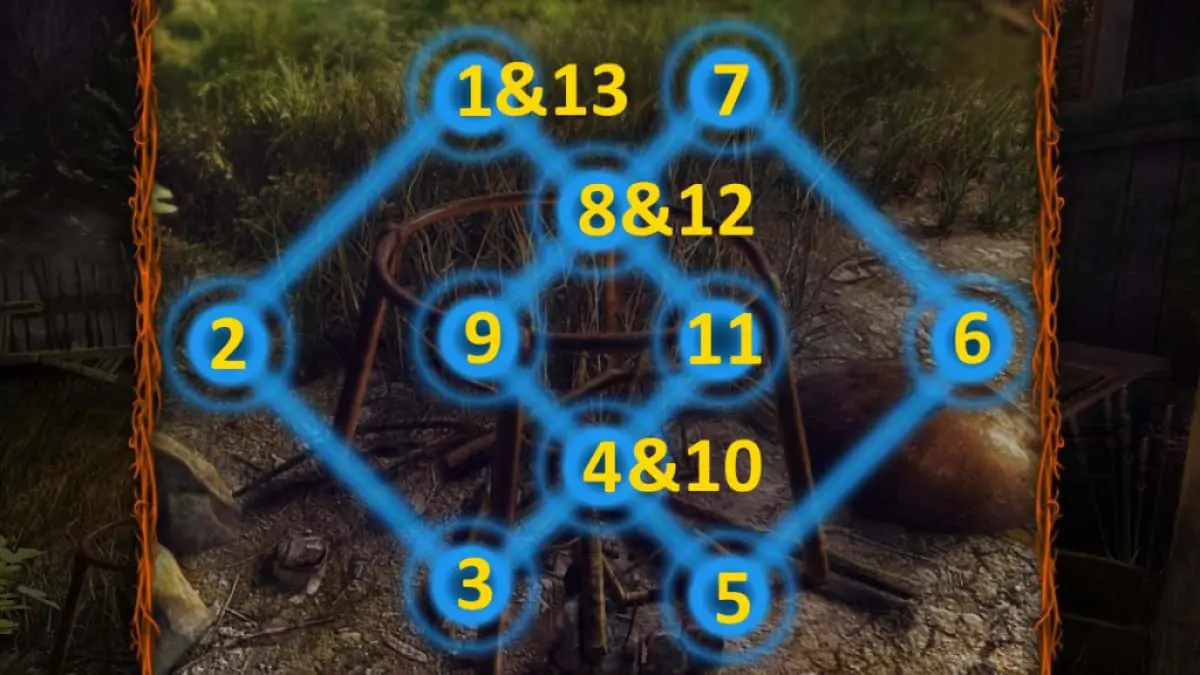
Image by Pro Game Guides
The cemetery
TheCollectibleis in front of the crypt ( i1 ) . choose the crypt doorway ( i2 ) for anaxes mystifier . If you ’re struggling , in the paradigm below , there ’s just one grim ax leave to place ( into the top - correct outer space ) . The order in which you position them does n’t matter .
Related : Haunted Hunt Walkthrough – Adventure Escape Mysteries
cluck the opened crypt threshold for a close - up and take theBrushandMask . click the material to lay it on the crypt , then guide back alfresco . expend the reaping lure to take in two flowers ( i3 ) , then add the masquerade party to the statue ( i4 ) to reveal asecret passage(i5 ) . Go down the transition .
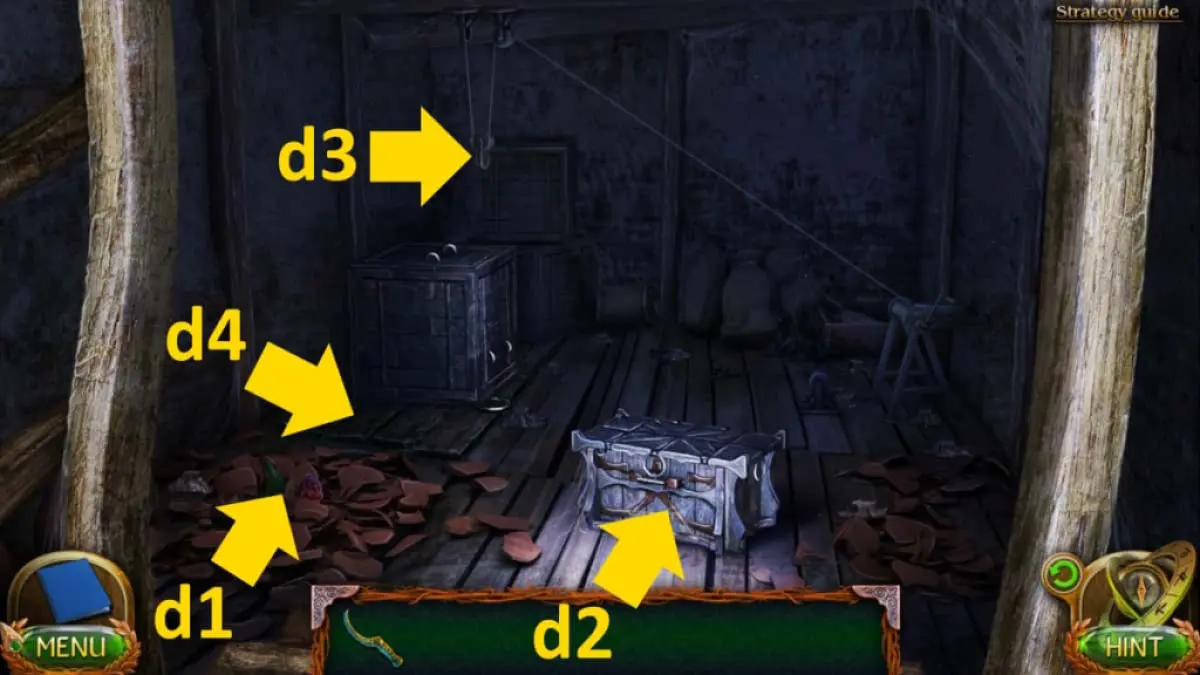
Image by Pro Game Guides
The tower ruins
Take theCollectibleat the top of the run ( k1 ) , then use the reap bait to collectfive more Flowers(k2 ) . Once you ’ve pick them up , also take theSoiled Stone Ringin the same close - up .
When you chatter the ladder ( k3 ) , it break . Click the piece in the tight - up afterward , lend the rope , and foot up theShort Gangway . Put this in front of the tower ( k4 ) , click the threshold ( k5 ) to take aSpear , then click it again for a cutscene .
The tower dwelling
After babble to the arachnoid , you ’ll find theCollectiblein the top - left of the scene ( l1 ) . Take theSpearheads(l2 ) , theBowl with Water(l3 ) , and theHammer(under the twig at l4 ) . pick out the ring in your inventory , bestow the water , and then use the light touch on it to get theOuter Part of the Pattern .
Move back to the tower ruin and select where the ladder was initially ( k3 ) for a close - up . Add the spearheads , then habituate the pounding to make a mounting rampart of spike . you could now choose the top of the cliff ( k6 ) and channelize to the gravesite .
The arachnid gravesite
Take theCollectible(m1 ) and practice the harvester to cut and collect theeighth Flowerat the same spot . Get a finale - up of the ruins ( m2 ) , then clack the rubble to find a boxwood . Open it and take thePackagefrom deep down . Open it in your stocktaking , and you ’ll getLeather , aGouge , andBlacksmith Tongs .
Now tick the grave entrance ( m3 ) for a positioning puzzle to reestablish the labyrinth drawn in it . You ca n’t go incorrect , as it ’ll colouring sections immature once they ’re in the correct piazza . Once done , summate the spear to the canopy ( m4 ) to stand it up and get a close - up of the window behind . snap the shutter to slay it and take aPiece of Glass .
Back at the tug habitation , get across the cave ( l5 ) and add the leather to the fire in the close - up . Add the glass to the image , then use the tongs to smoke the glass in the flak to getSmoked Glass . you may now go to the grave entrance once more ( m3 ) and use the glass to take off alabyrinth puzzle . The central crystal must be gloomy when it will through the bottom exit . To do this , click the green dots in the order you ’ll see above .
Screenshot by Pro Game Guides
Once done , you’re able to click the entry once more to start anobject - matching mystifier . Once complete , you may take theArachnid Bloodas well as theCentral Part of the Patternfrom the Arachnid corpse .
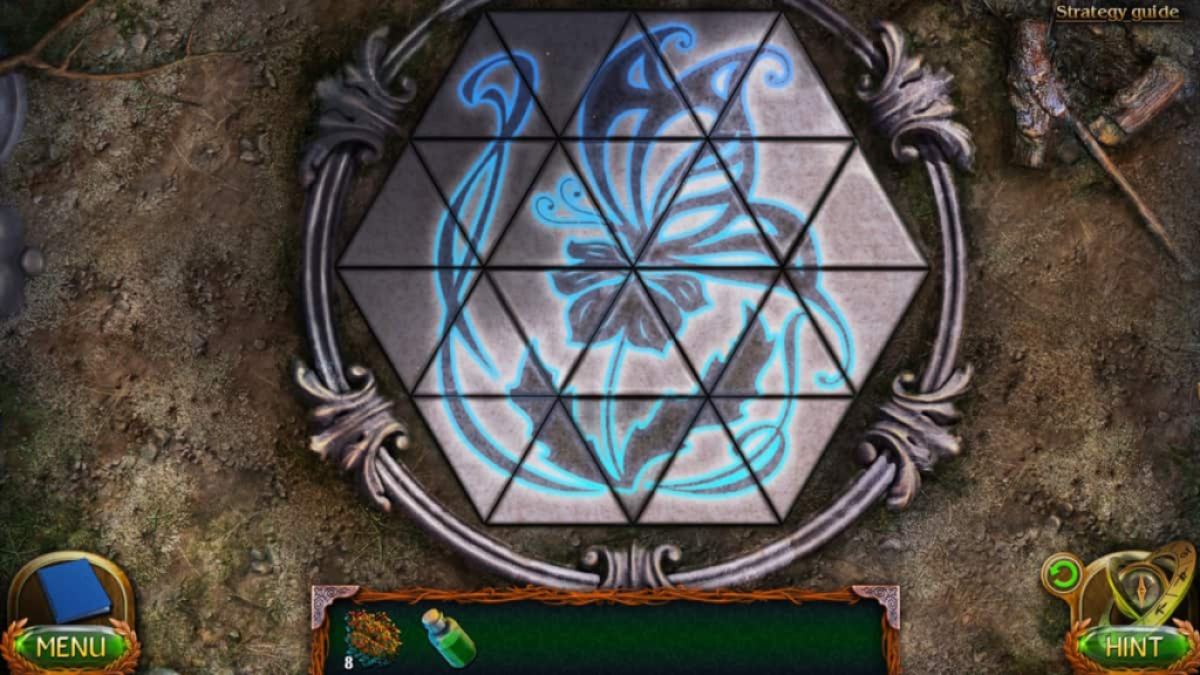
riposte to the column smash and use the ding on the bulwark ( k7 ) to reveal a pattern . Add the two portion of the band to it and the paries will move by , where you’re able to take aside of the Puzzle . revert to the tower dwelling and tote up the piece to the floor practice ( l6 ) , then become the piece to make the icon above . Once done , you ’ll receive theSting of the Queen .
Return to Helma ’s hut , put the sting and parentage into the pot ( f4 ) , and apply the watercraft in the bottom - right field of the pot close - up to get theSleeping Potion . Add the flowers in the crypt ( i2 ) , return to Maaron ’s sign of the zodiac , get the Pillow ( in the Cassandra finale - up ) , and add that to complete the bed in the crypt . Give Cassandra the sleeping potion and delight the net track aspect .

Screenshot by Pro Game Guides
For more at sea Lands walkthroughs , check outLost Din Land 8 – Bonus Chapter Walkthrough & SolutionsandLost Lands 3 Full Walkthrough ( Golden Curse)here at Pro Game Guides !
Screenshot by Pro Game Guides
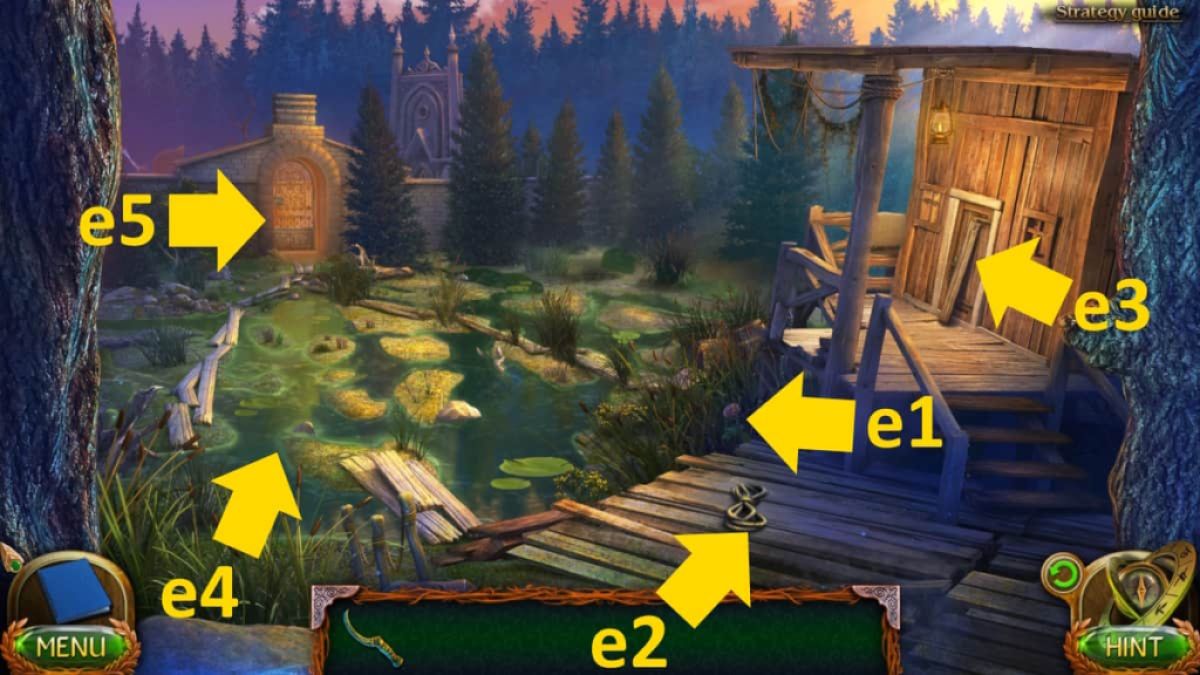
Image by Pro Game Guides
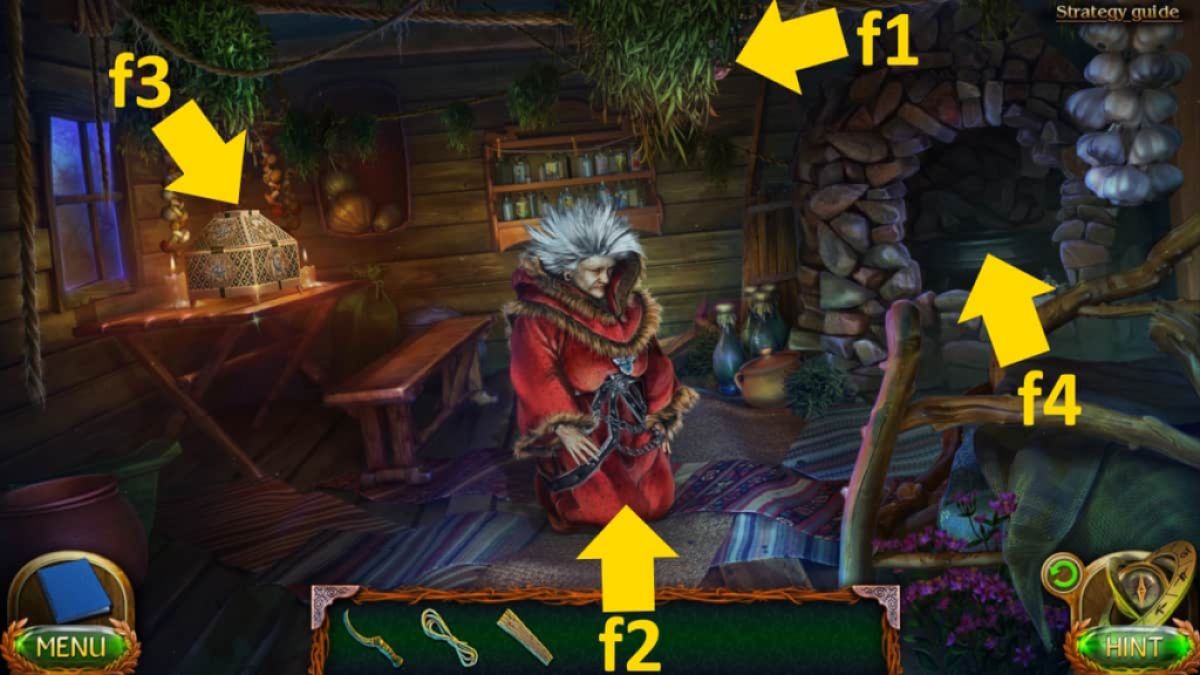
Image by Pro Game Guides
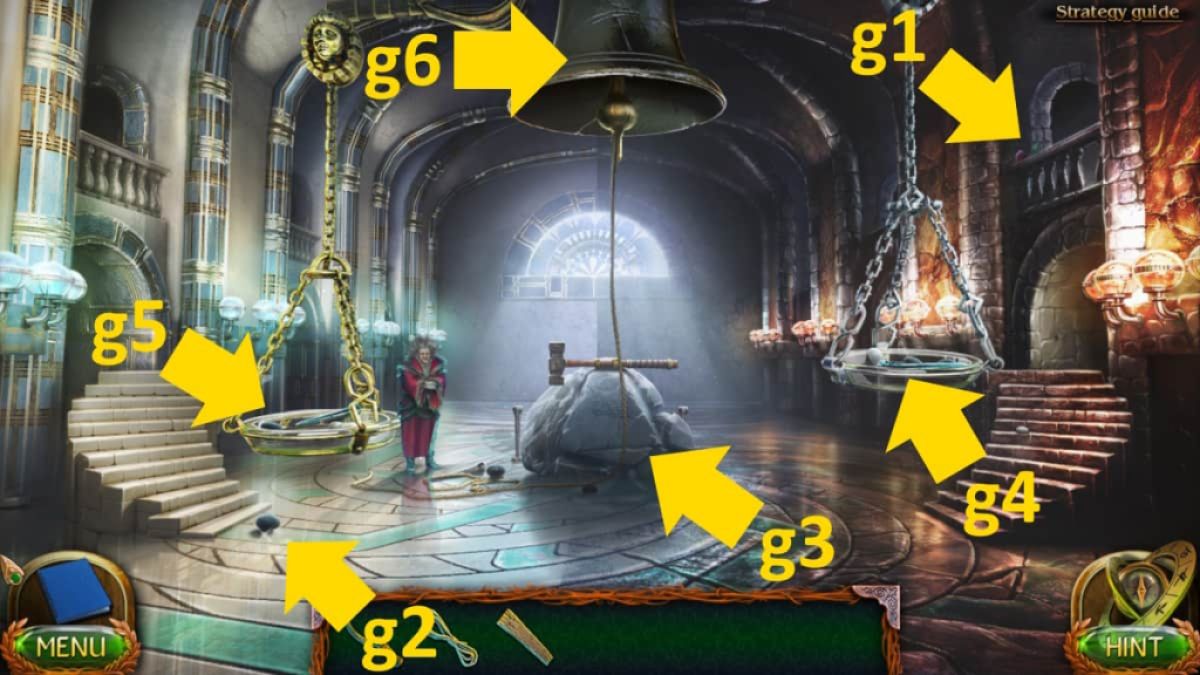
Image by Pro Game Guides
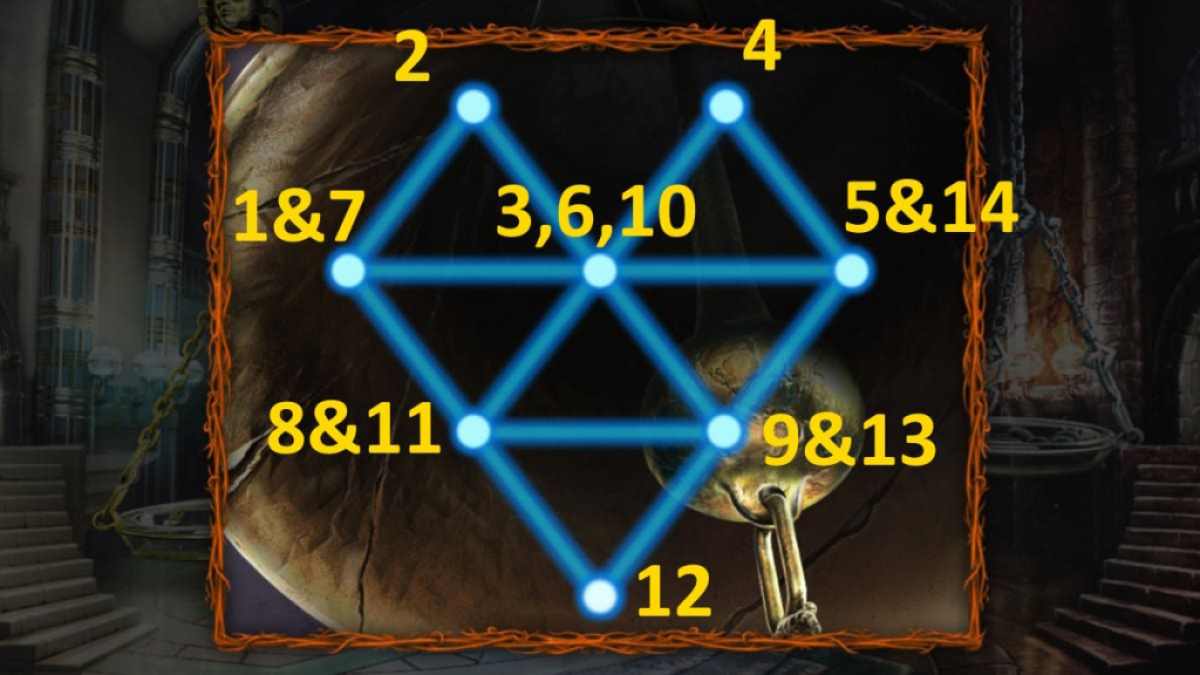
Image by Pro Game Guides
Screenshot by Pro Game Guides
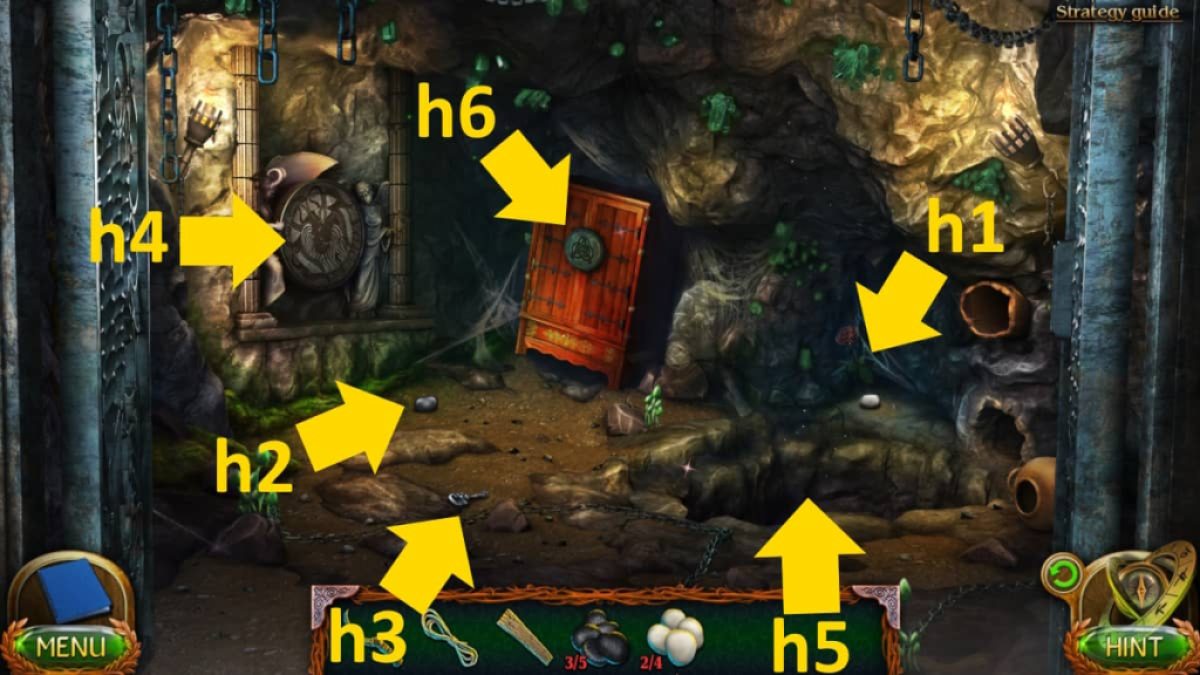
Image by Pro Game Guides
Screenshot by Pro Game Guides
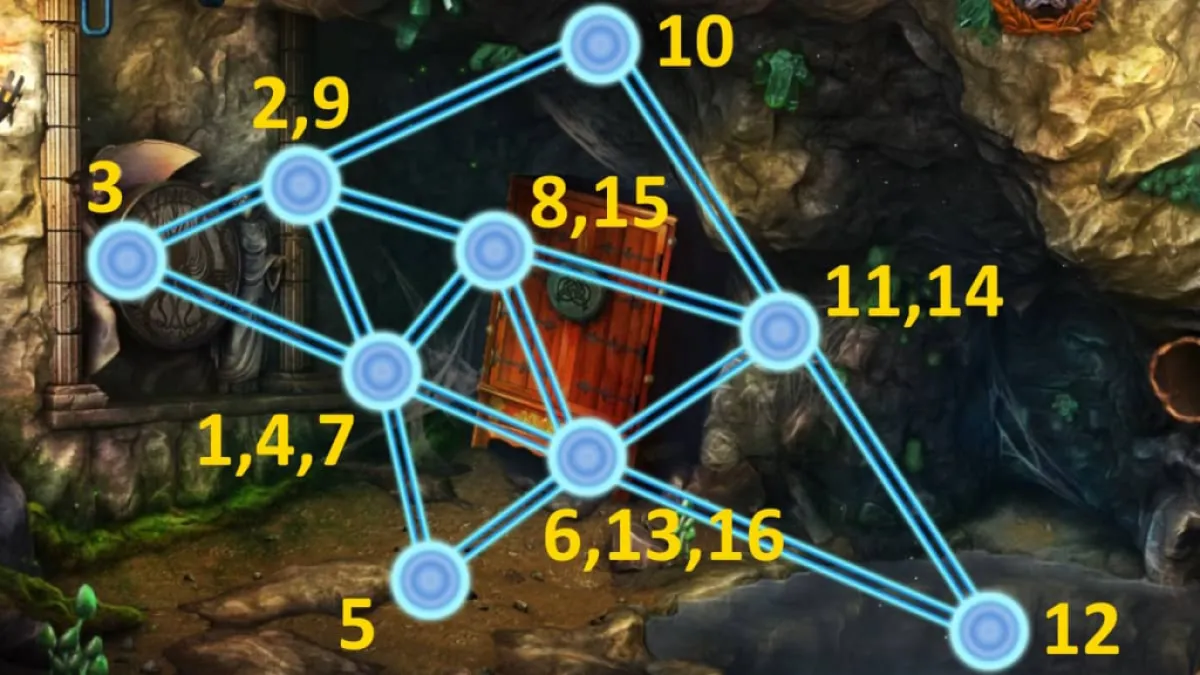
Image by Pro Game Guides
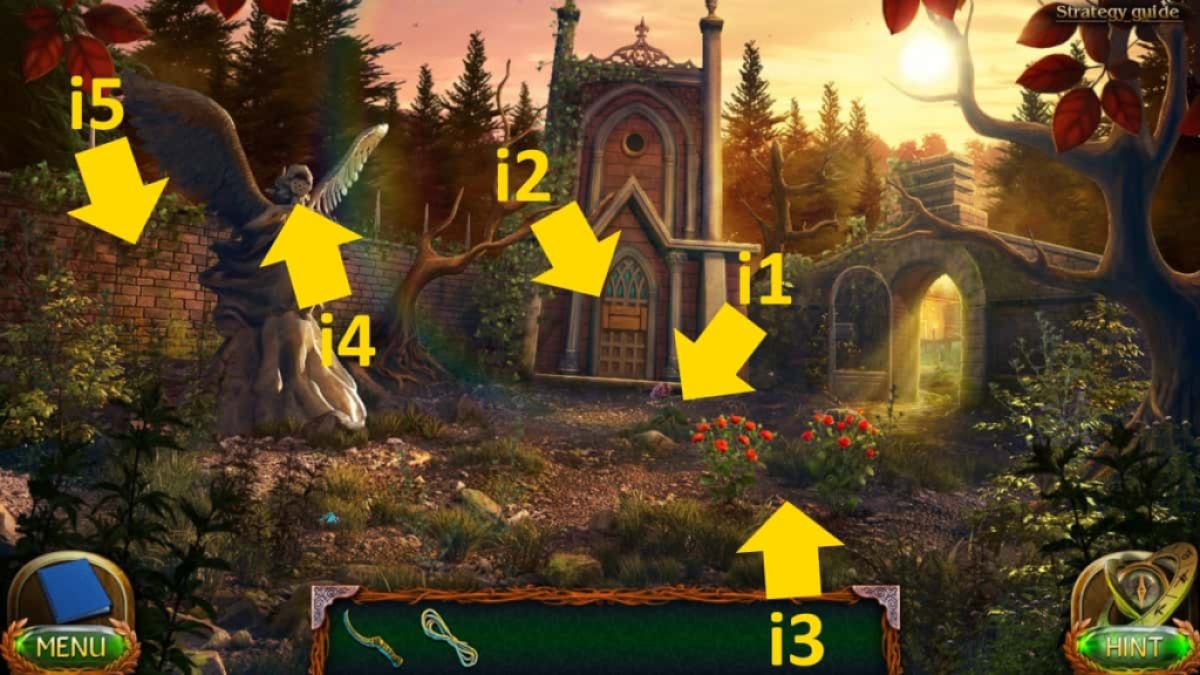
Image by Pro Game Guides
Screenshot by Pro Game Guides
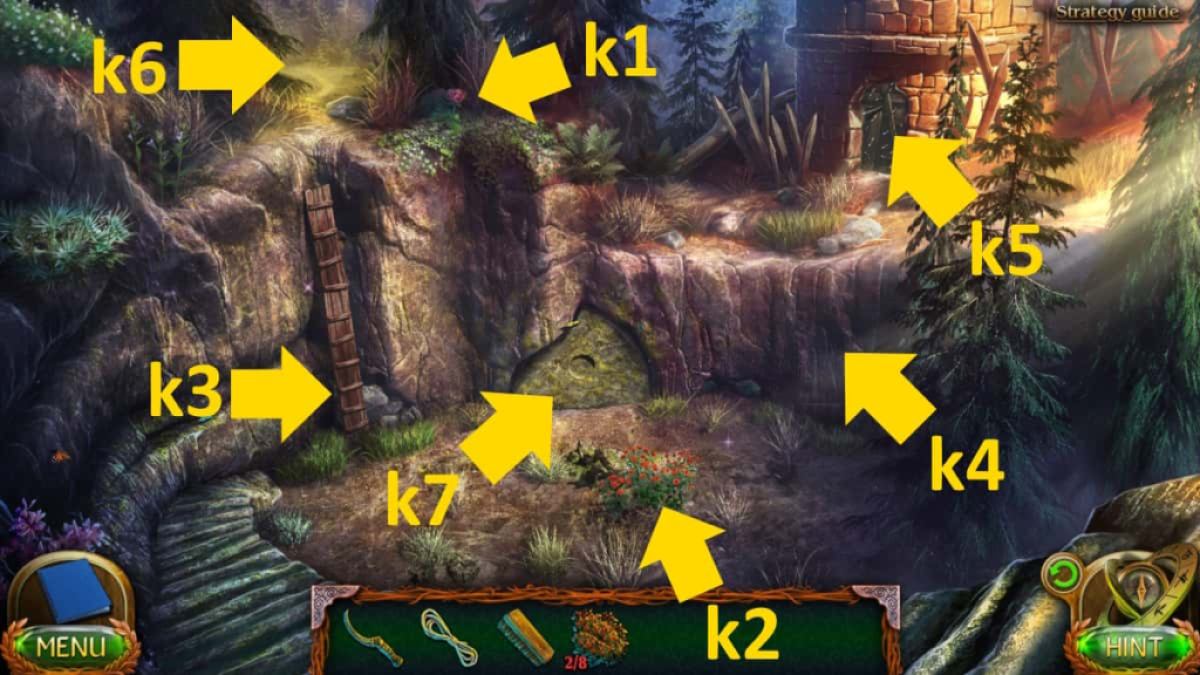
Image by Pro Game Guides
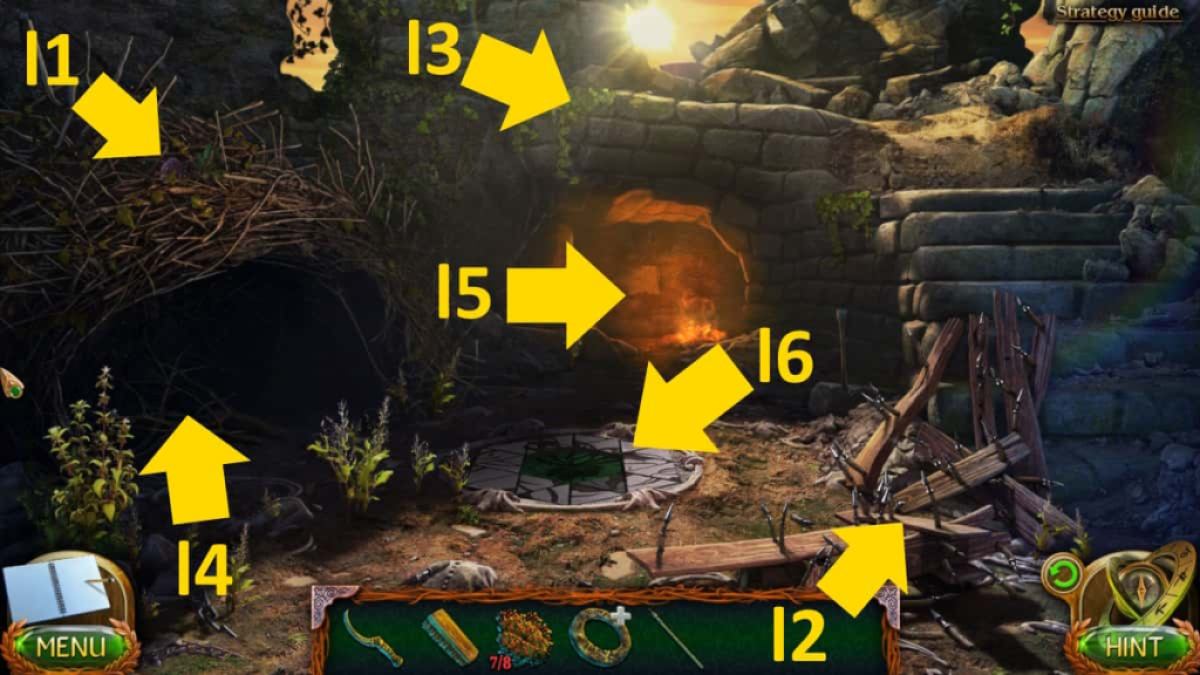
Image by Pro Game Guides
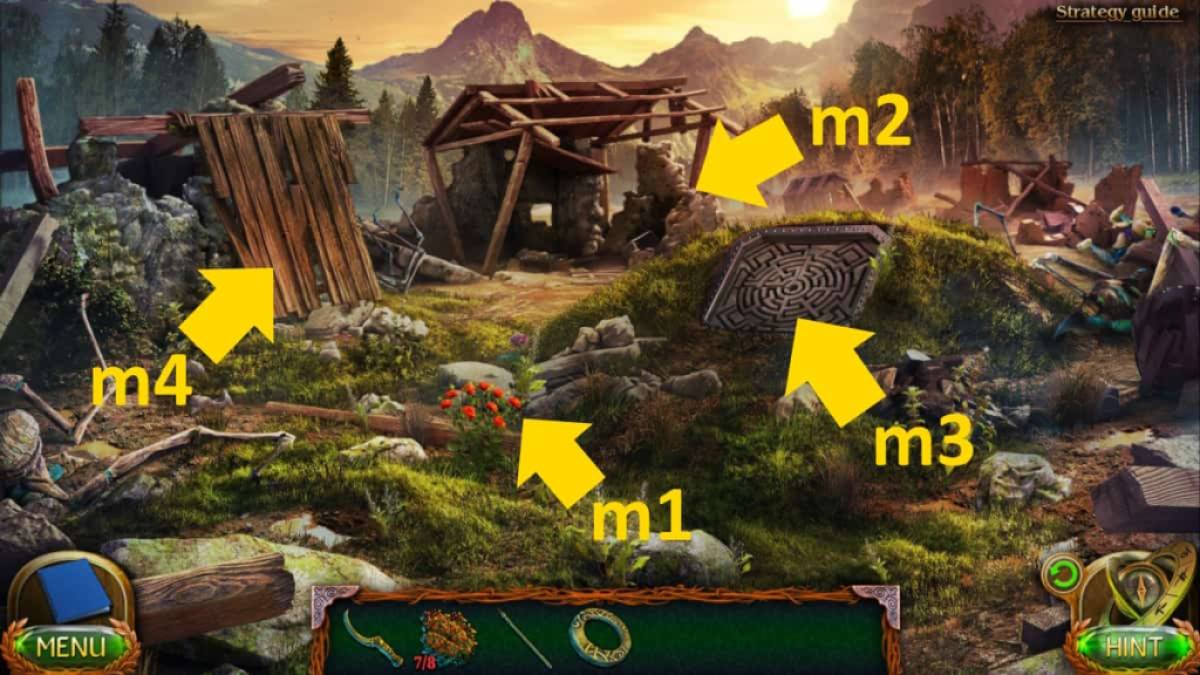
Image by Pro Game Guides
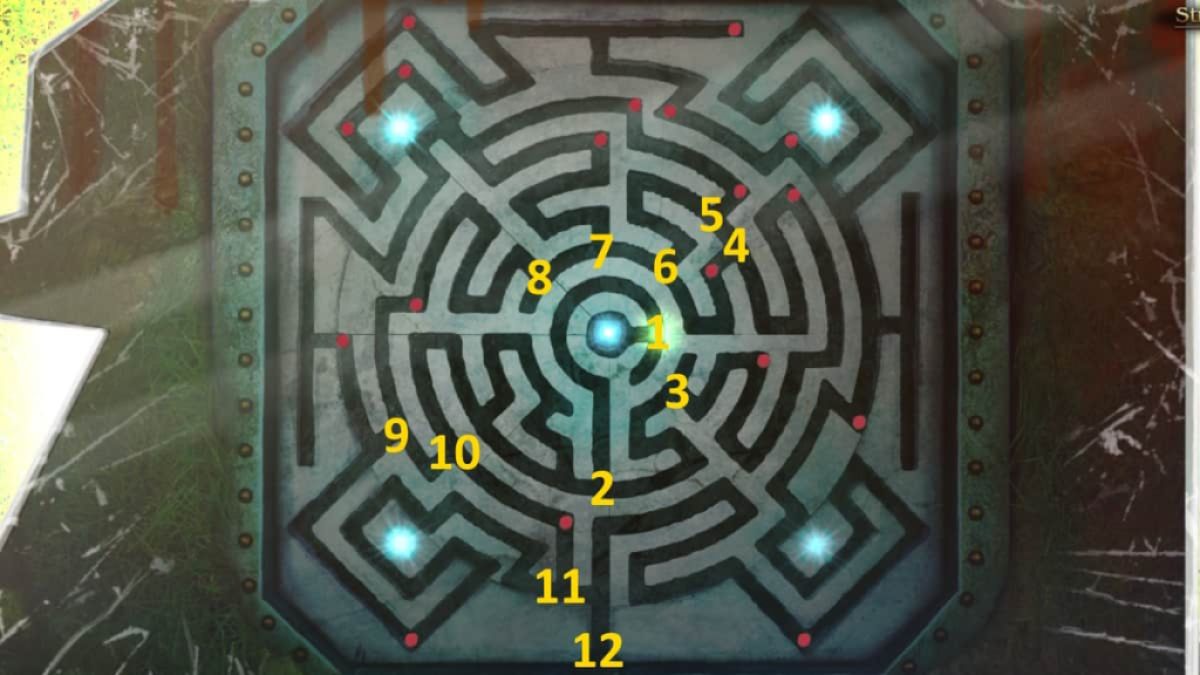
Image by Pro Game Guides
Screenshot by Pro Game Guides
