Tarsas versus Tarsas !
I roll in the hay a good phantasy - themed teaser RPG and the Lost Lands serial is one of the best around . If you ’re play Lost Lands , Ice Spell , but need some help getting through it take on for my full guide and Lost Lands 5 walkthrough .
Lost Lands 5 Walkthrough, Part 4 - Ice Spell full guide and puzzles
The guide below begins just after you have gone through the portal to the museum and covers you decent up to the ending of the master plot line . If you are looking for assist with earlier parts of the adventure , or the bonus chapter , point to myLost Lands 5 Walkthrough . You ’ll discover links to all the information you may need there .
Outside the museum
You ’ll find theMorphing Objectin front of the bench ( a1 ) and theCollectibleon the wall ( a2 ) . Empty out the bin ( a3 ) to find aTicket , read the paper on the bench ( a4 ) to find aPaperclip , and utilize the clip to start the circuit corner ( a5 ) . Take theLight BulbandCrowbarfrom at bottom .
substitute the weak lightbulb on the lamp ( a6 ) , use the pry bar to take out the windowpane grate ( a7 ) , and climb through to theArchives . Before you’re able to do anything more , you ’ll need to switch on the light source ( b1 ) .
TheCollectibleis on the flooring ( b2 ) and theMorphing Objectis on the shelf ( b3 ) . Shove the dagger into the grate ( b4 ) to stop the fan , then dawn the grating again to start a bowel movement puzzle .

You need to channelize Flylena to the exit . If you ’re stuck on this mini - biz , reset and simulate the following :
Once done , she ’ll open up the door from the other side and give you admittance to theFirst Floor , so head up .
The Security Room
Grab theCollectible(c1 ) theMorphing Object(c2 ) , and then click the camera ( c3 ) to have Krickar wad with it . Select the flick on the wall ( c4 ) to find aKey , then click it again to recover out that the exhibition you want to visit is on the 2d level . take the end of the corridor ( c5 ) , take aRunein the ending - up , and then use the key to open theSecurity Roomdoor ( c6 ) and direct inwardly .
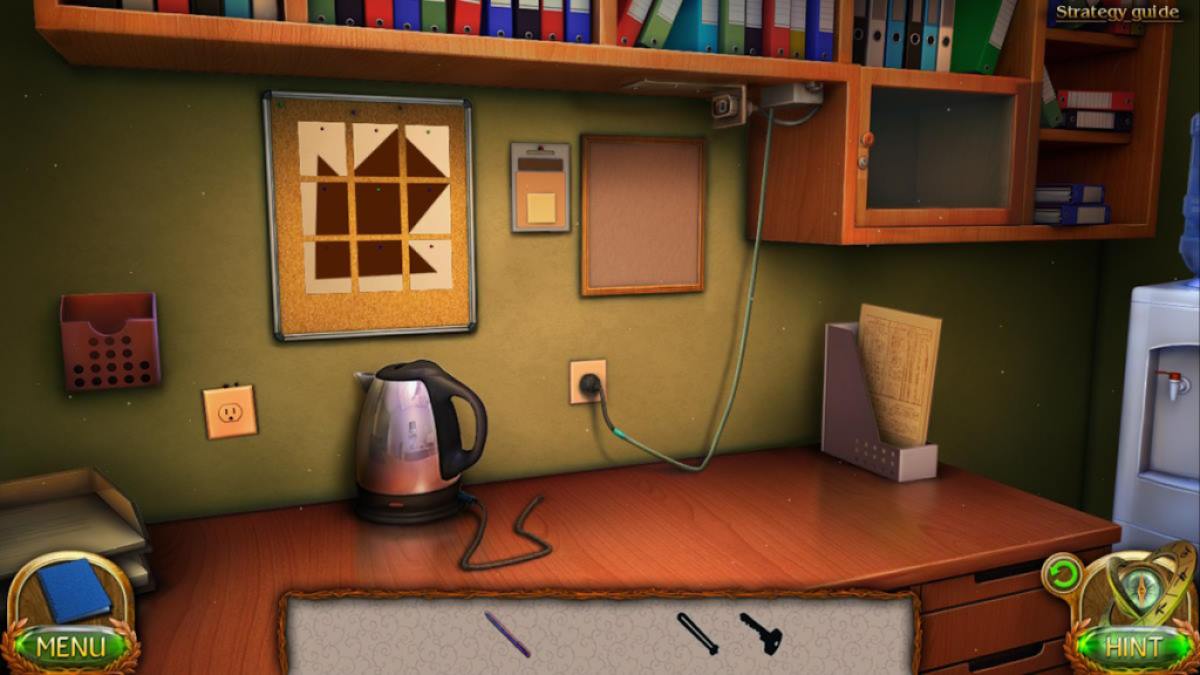
Click the camera ( d1 ) so that Krickar can take it out , move the chair ( d2 ) , and then switch over on the light source ( d3 ) . Now you may take theMorphing Object(d4 ) , and theCollectible(d5 ) , and complete the missing objects mini - secret plan on the desk ( d6 ) . If you ’re stuck making the image , I ’ve render it below ( then adopt the arrow to get a key ) . Once complete , you ’ll get theNote With Code(4852 ) .
Add the code to the dependable ( d7 ) and take theDollar BillandMint Candyfrom at heart . In the same good close - up , click the telephone to mind to the answer phone and find out the last surveillance video will be mark August 23 ( at 11.52 ) , while there are fuses in Box 23 . afford the primal holder ( d8 ) and take theKey Numbered 23 .
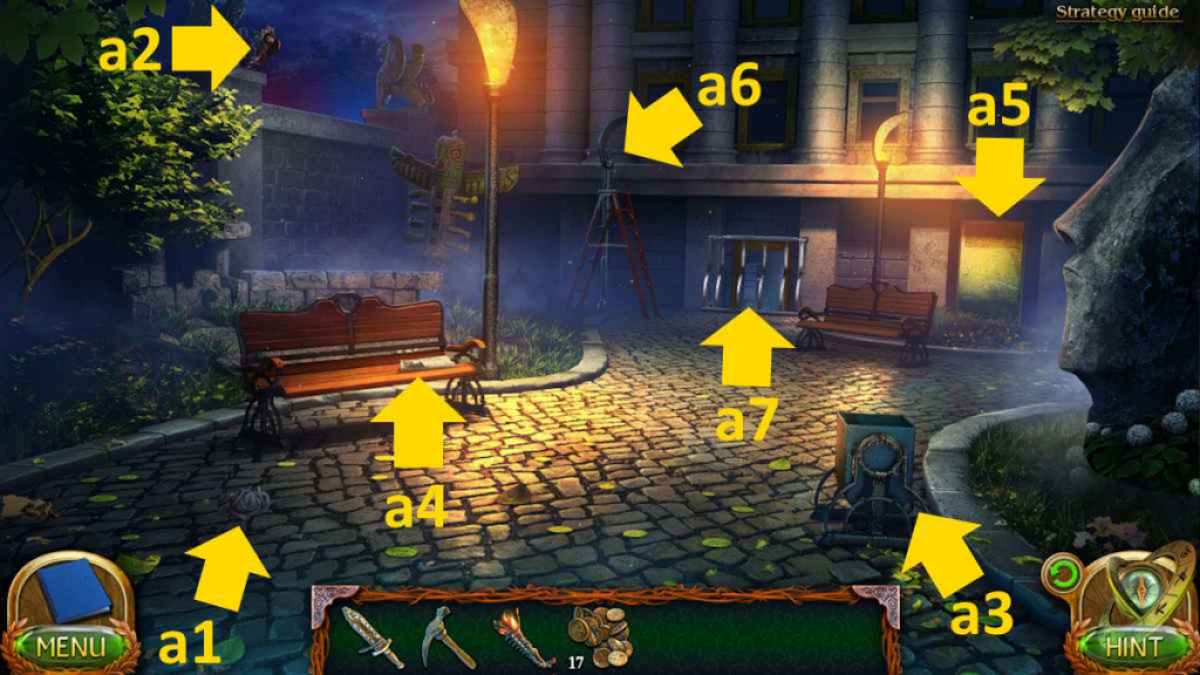
Image by Pro Game Guides
Fixing the elevator
head up back down to the archives , use the key to open Box 23 ( b5 ) , take theFuses , then take thefile mark 08.23.2017from the shelf ( b6 ) . launch the file , read it , and then take theCDfrom within .
Now return to the museum court , pick out the fuse box ( a5 ) , and sum the fuses to set off a math mystifier . It does n’t matter what sequence you use , but each row needs to summate up to 30 . So , for example , you’re able to do :
Once complete you ’ll be able to work the ski tow , so head back inside to the first floor and use it ( c7 ) to go to theSecond Floor .
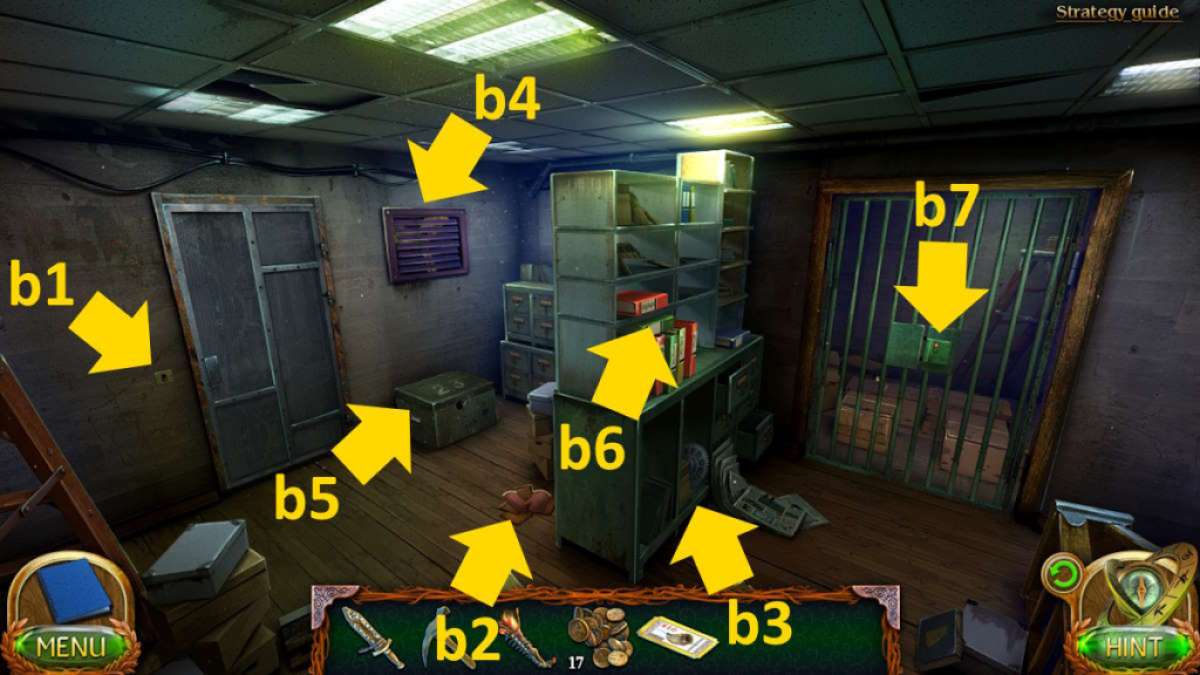
Image by Pro Game Guides
colligate : Lost Lands 4 Walkthrough
The second floor
Have Krickar take out the camera ( e1 ) by clicking it , then take theMorphing Object(e2 ) and theCollectible(e3 ) . Select the vend auto ( e4 ) for a close - up , stop up it in , and then apply the dollar bill to seek to get a drink . When it betray take the placard back , straighten it in your inventory , and try again . This prison term , take aSoda .
Select the soda in your inventory and click it to remove the gum that ’s attached . open up the gum tree , add the confect to the same last - up , and open its wrapper . Take the palpebra off the soda nursing bottle , add the gingiva to the palpebra , then add the candy to the gumwood . Put the lid back on and you ’ll get theSweet Bomb .
Take theRune(e5 ) , and then try the window handle in the same finale - up to notice it stuck . Pull the good pall in the closemouthed - up across to the handle , then hit it with the hammer . Now you may spread out the window . Click theWrenchin the open windowpane close - up to happen it is too noisy to practice . Use the soda bomb calorimeter on the fuzz , then use the wrench to take theBoard .
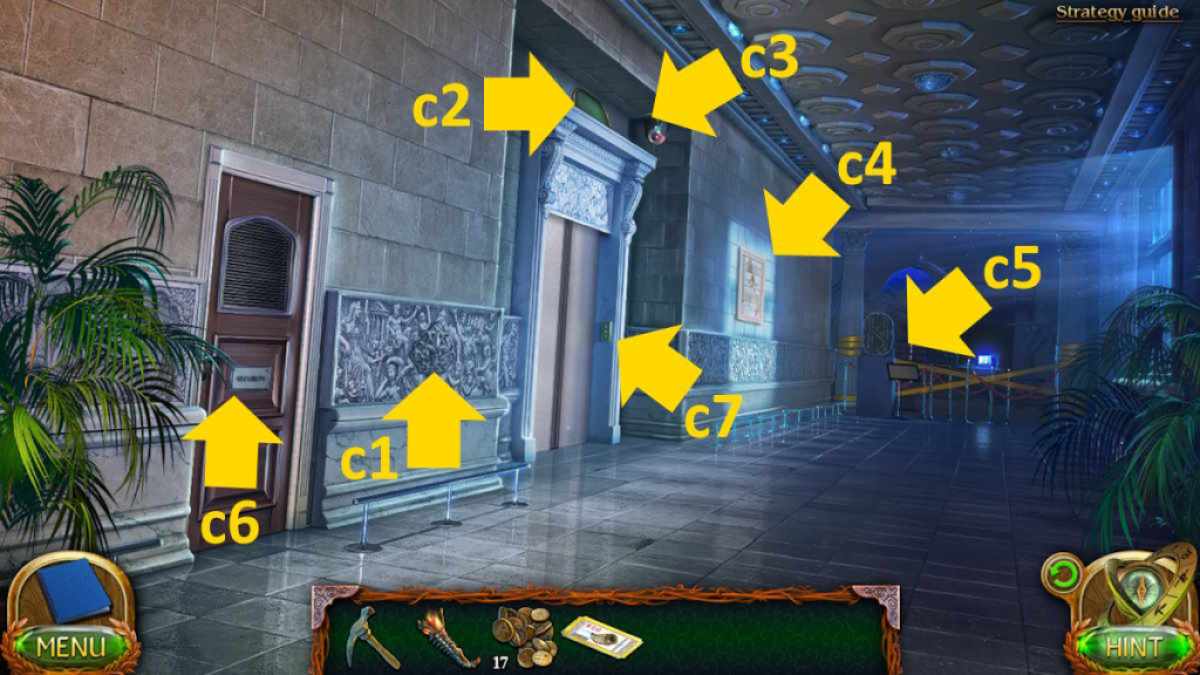
Image by Pro Game Guides
apply the board on the bare display ( e6 ) to get past it , then come home the background ( e7 ) for a close - up of the display and expend the tag to enter the barrier . Select the background once more ( e7 ) to move through to theExhibition Hall .
The exhibition hall
When you get to the exposition dormitory , you ’re faced withlaser security . flick anywhere on the screen and let Flylena get to workplace . You need to get Flylena ( the gloomy dot ) powerful across the covert to the reddened dot to take it out . you may simply fly flat across the eye , give up at the three compass point I ’ve marked above ( Flylena is at the first of the three points ) .
Get Krickar to deactivate the camera ( f1 ) , then collect your final mittenCollectiblefrom the painting on the odd ( f2 ) and theMorphing Object , which is the little painting on the right ( f3 ) . Take theKey Card(f4 ) , afford the briefcase ( f5 ) to happen and take theForensic Set , and then also take theHorn of Frost(f6 ) .
Head down to the archive once more , use the keycard to give the locked gate ( b7 ) , and reach the case on the right to find aRune . Now deliver to the security situation and employ the forensic outfit on the keyboard to find the security guards practice the numbers 9 , 4 , and 3 in the passcode ( 943 ) . Click the CD hook in the close - up to open up it , remove the disc there , add your compact disk , fill up the tray , and then watch the footage to see the lodge in which the precaution pressed the runic letter ( from left , it was1 , 4 , 3 , 2 ) .
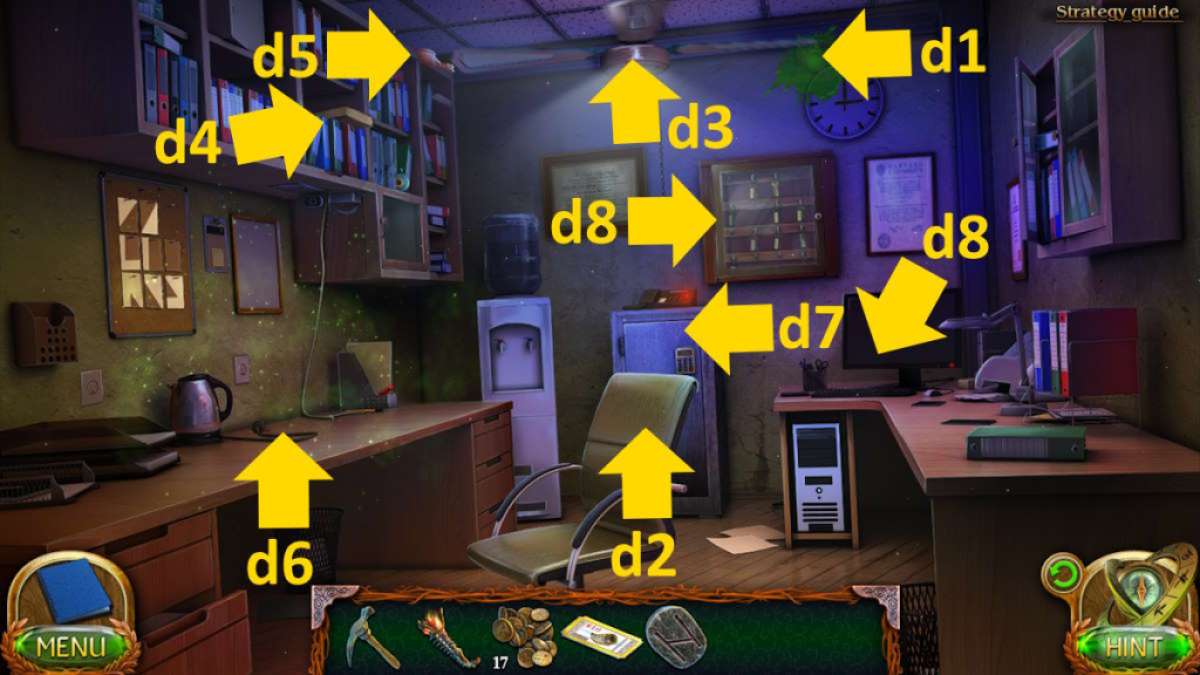
Image by Pro Game Guides
The frozen mountains
deliver to the rampart of the first giving birth in the Frozen Mountains and bring all the remaining runes to the wall ( if you ’re drop any , refer to my early guides linked above ) . When the wall is utter , click it once more ( g1 ) to retrieve thePhantom Blade .
Now go to the Peak of Death and use the blade to remove theHorn(h1 ) .
You need to go to the temple in the dwarf dungeons next . talk to Buldan ( i1 ) , and then click the crystal ball ( i2 ) to note the image you need to enter the shop . Move to the crypt , select the doorway on the left wing , and arrange the button so that they equate the range of a function in the quartz clod ( which you ’ll find in your banker’s bill ) .
Screenshot by Pro Game Guides
If you need help with this mystifier , from a uninfected reset pressure the followers ( using the ikon above):1 ( twice ) , 3 , 2 , and 5 ( double ) . The room access will unfold , allowing you to enter theWorkshop .
Related : lose Lands 7 Walkthrough – Full Guide
The workshop
The final glassCollectibleis on the wall ( j1 ) , while your very finalMorphing Objectis on the opposite wall ( j2 ) . choose the modest altar ( j3 ) to also find your finalManuscript , under which you ’ll find aKey . choose the furnace ( j4 ) , utilize the firing wand to trip it , and then impart your continue Kyolls to the furnace to gain access to the actual workshop .
employ the key to start the doors ( k1 ) and bring out a missing objects mini - game . The only potentially dodgy fleck here is coiffure the tiles to match the mental image . From a clean reset , use the image below to set them correctly :
Once done , take theCrystals . Select the area above the teaser ( k2 ) , add the horns and the crystals , add the top and bottom pieces to the right horn , and then tote up the circle of crystals to the trump in the right order . The antic here is that a ring can only be tote up ( declamatory first ) if it is the only one on its cone cell . If you ’re stuck on this , see below .
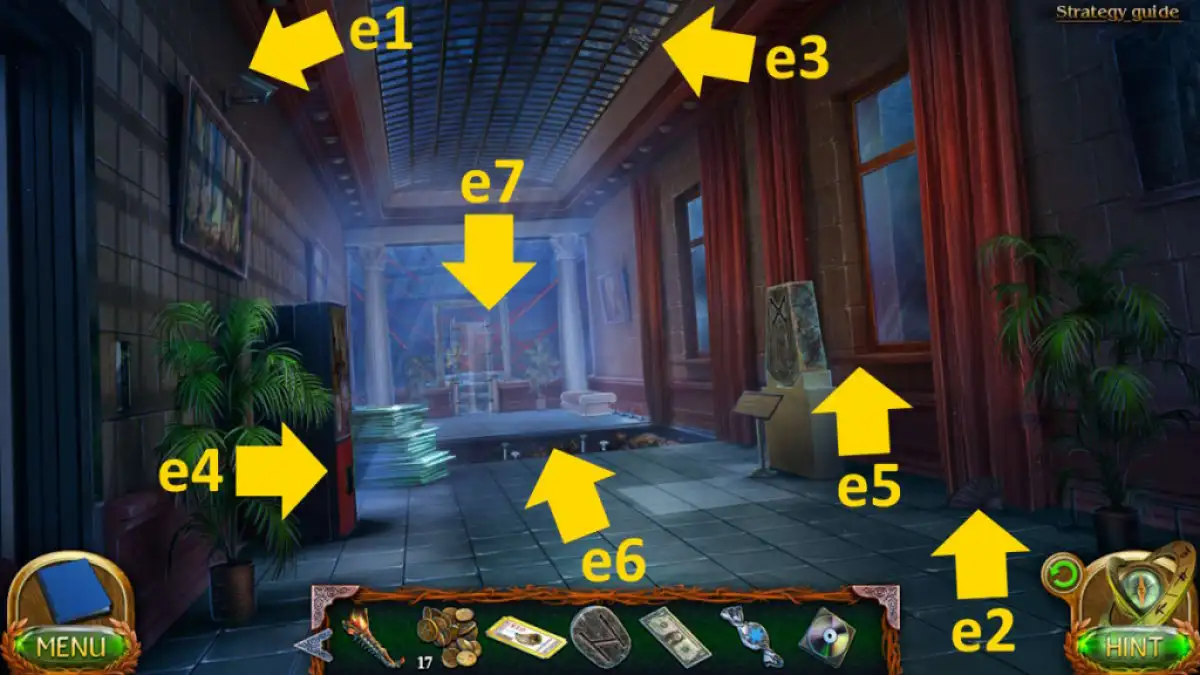
Image by Pro Game Guides
Take the completedHorn of Fire .
Summoning the Fiery Tarsas
After the cut setting , return to the expo hallway in the museum . Select the central exhibit , lend the car horn of attack , and then come home the rune in the correct order ( from left,1432 ) . Click the hooter once more to begin the last cut scene . Congratulations ! You ’ve exhaust the main storyline of Lost Lands 5 , Ice Spell .
If you want to continue the risky venture with us at Pro Game Guides , click through for myLost Lands 5 Bonus Chapter Walkthrough . or else , you could instead move on to myLost Lands 6 walkthrough ( Mistakes of the Past ) !
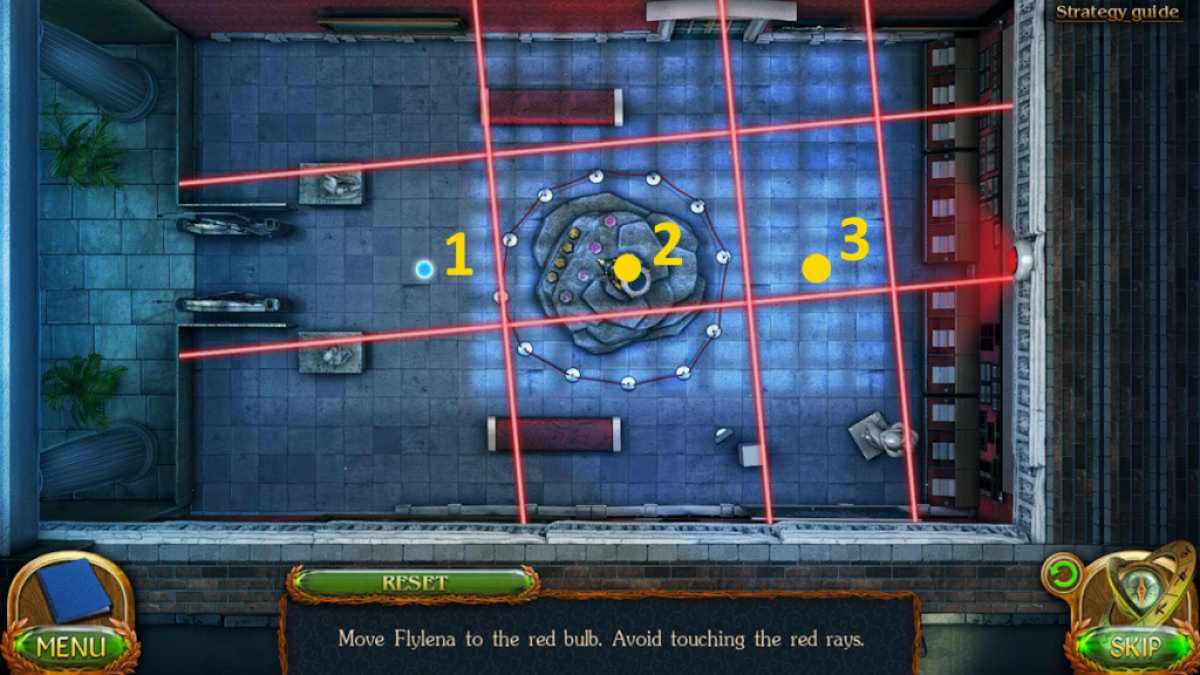
Image by Pro Game Guides
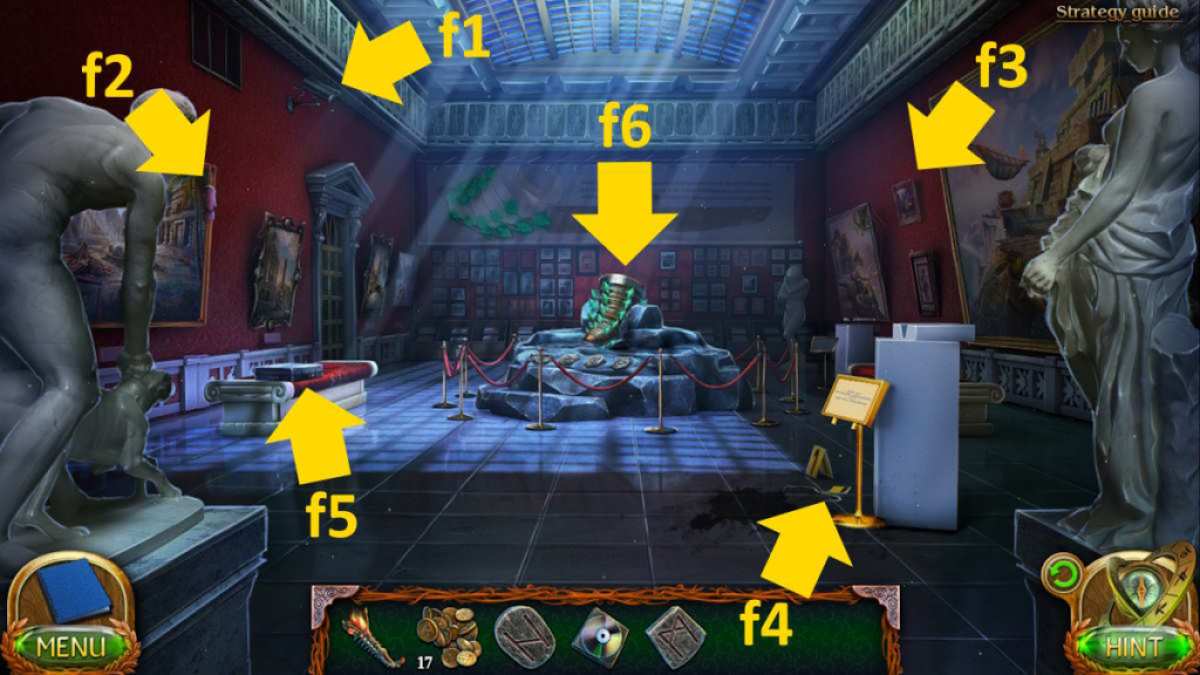
Image by Pro Game Guides

Image by Pro Game Guides
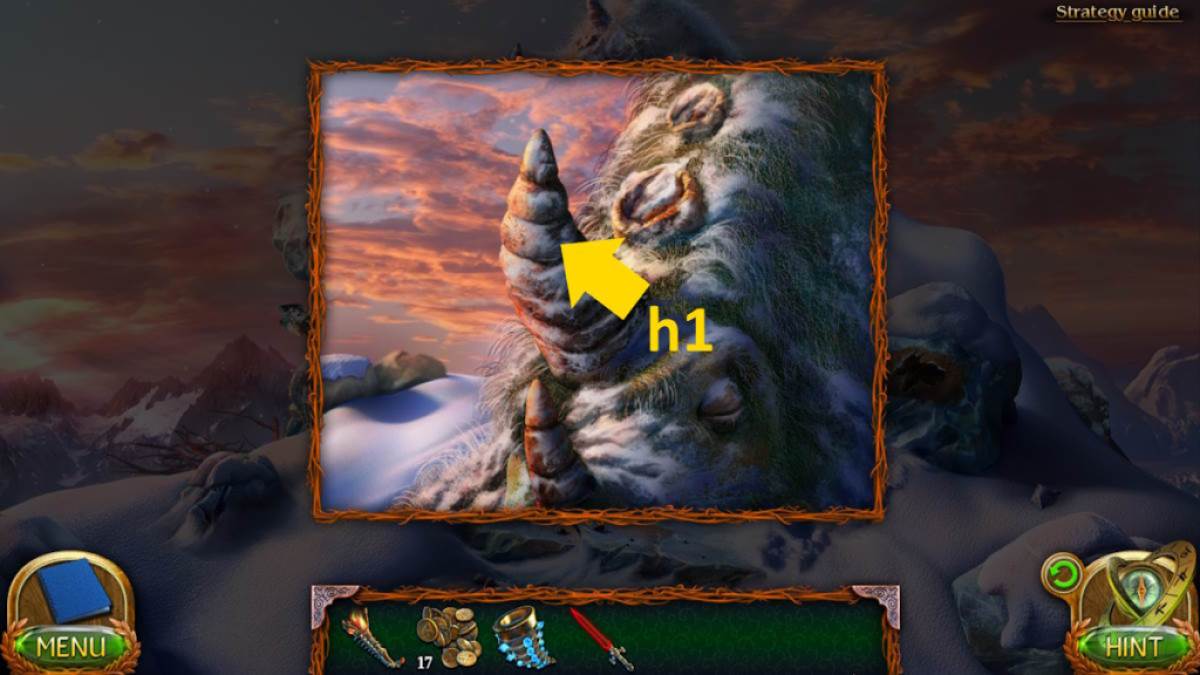
Image by Pro Game Guides
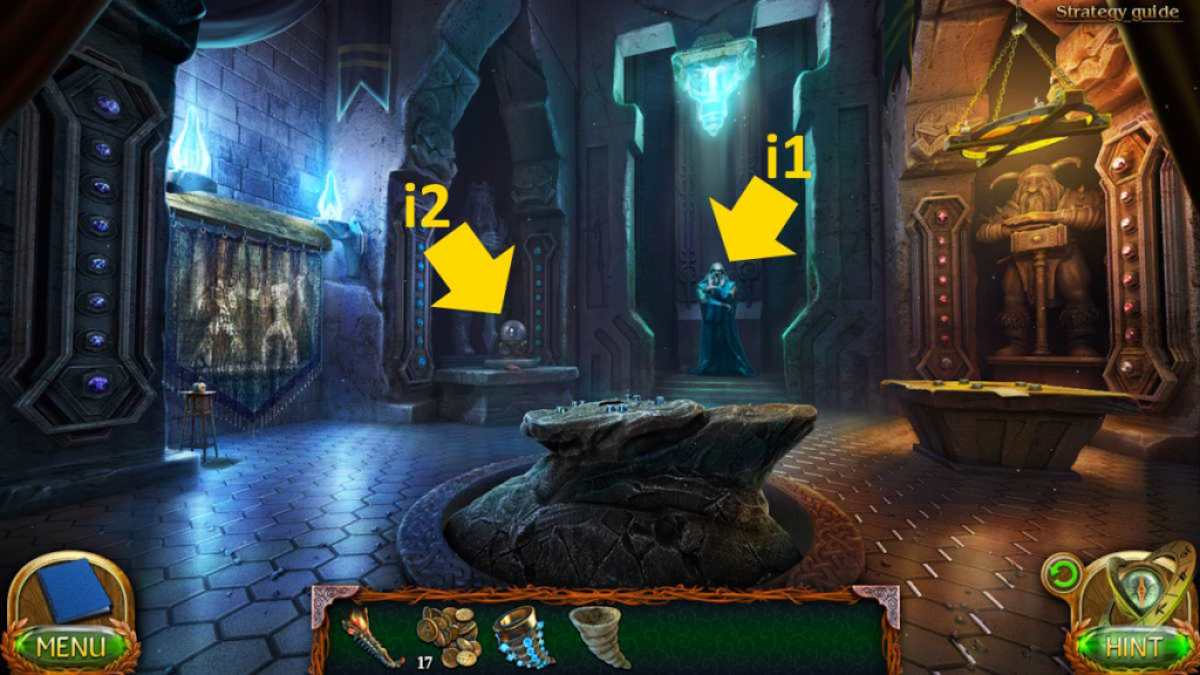
Image by Pro Game Guides
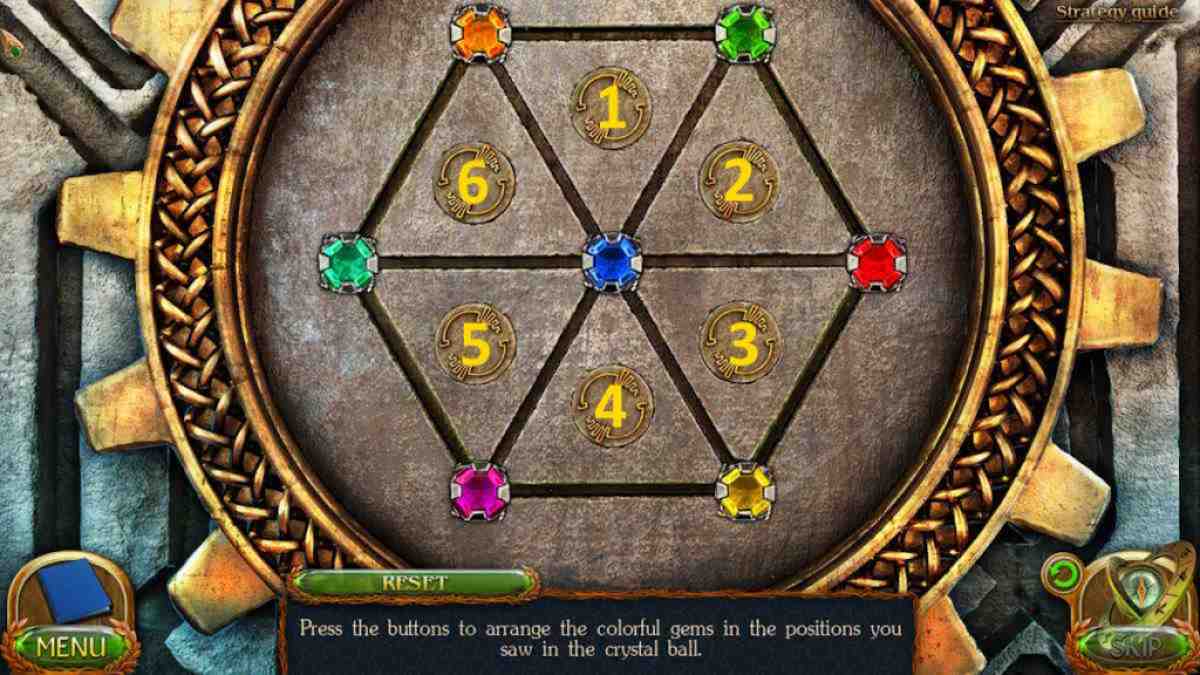
Image by Pro Game Guides
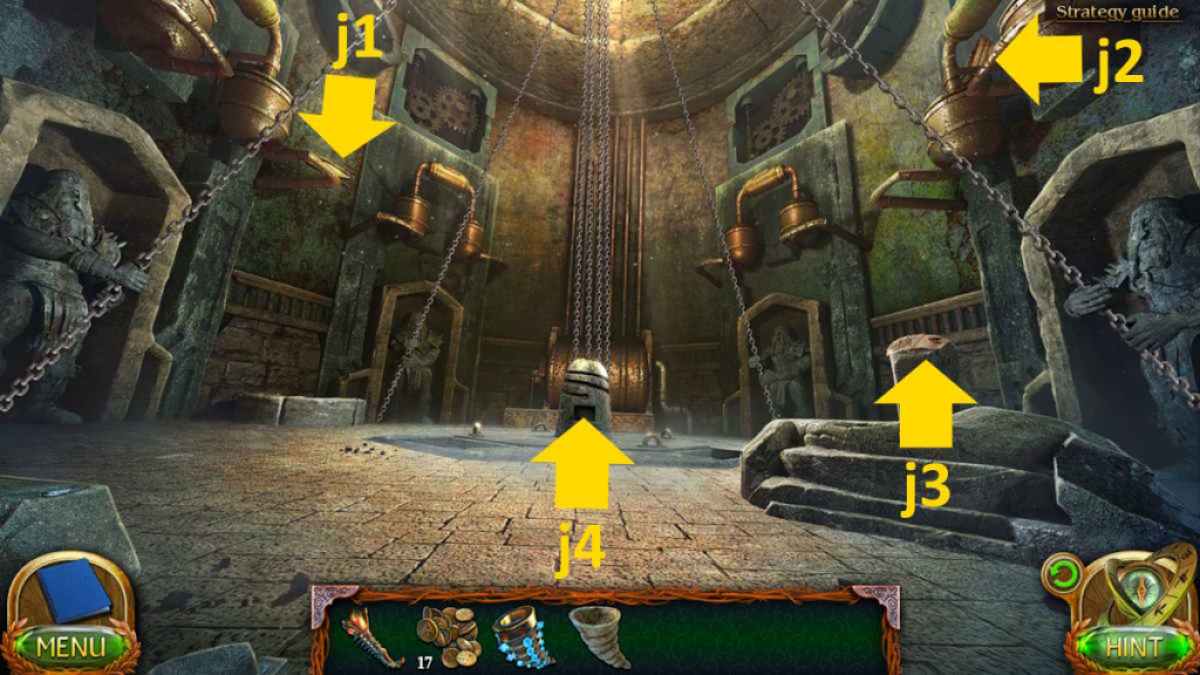
Image by Pro Game Guides
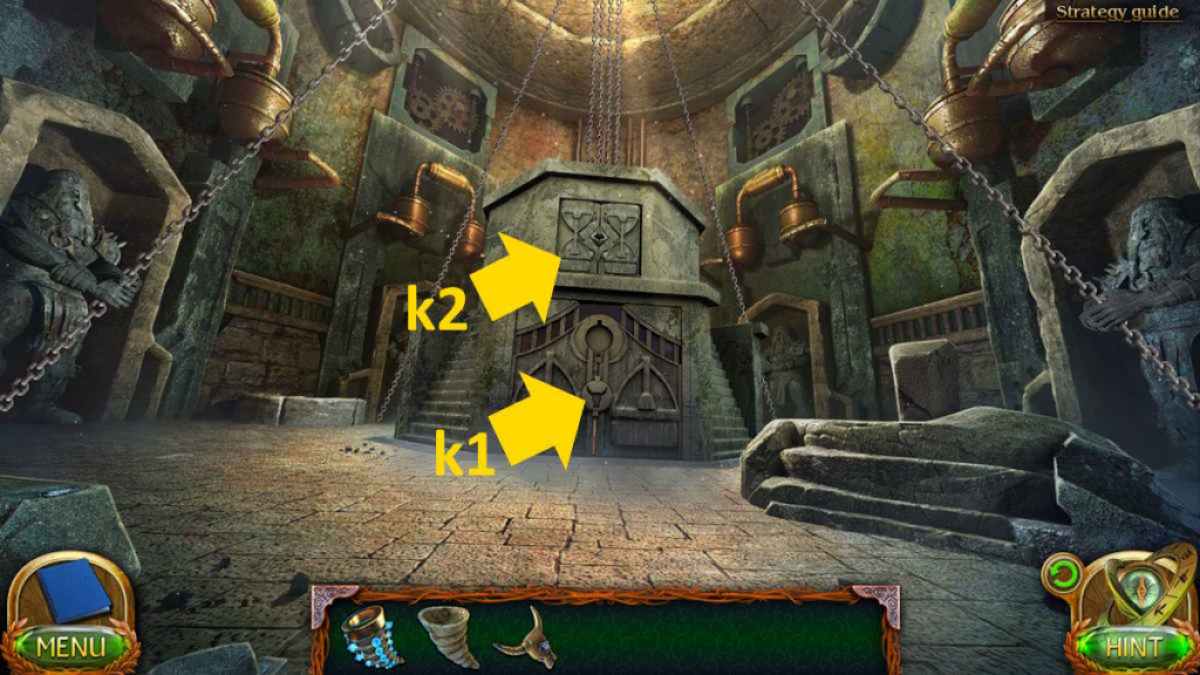
Image by Pro Game Guides
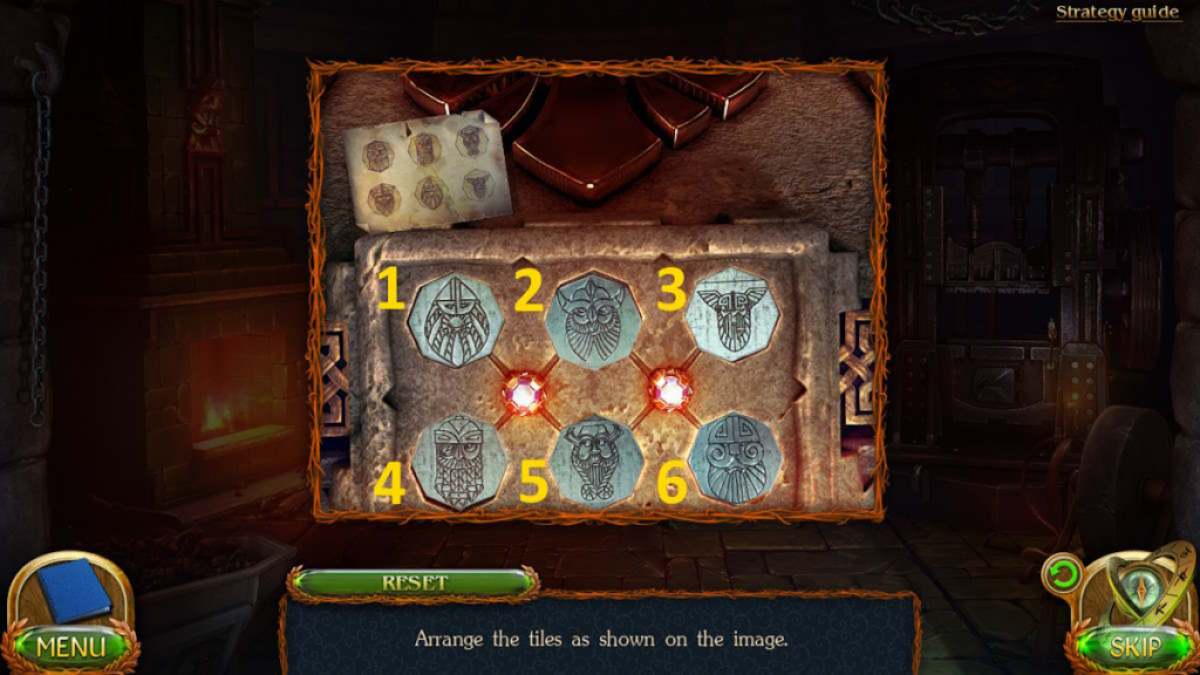
Image by Pro Game Guides
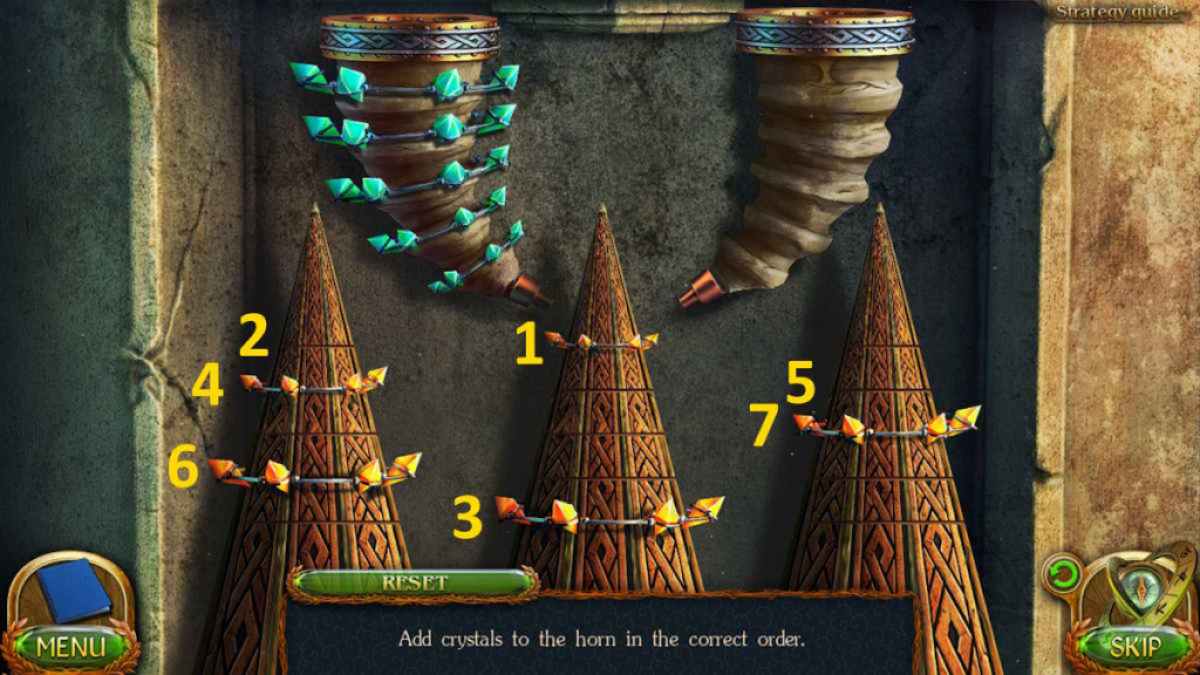
Image by Pro Game Guides
