pose the squad together .
Point - and - click mystifier RPG suffer Lands 5 sees our wedge Susan teaming up with Maaron once more , this clock time in a glacial wasteland . If you are playing through mighty now , read below for Part 3 of my full template and walkthrough to Lost Lands 5 , Ice Spell .
Lost Lands 5 Walkthrough, Part 3 - Ice Spell full guide and puzzles
This part of my Lost Lands walkthrough guide track from when you start to make the Cold Blood Elixir in the temple and stay on up to when you go through the portal to the museum . For originally and later persona of the storyline , headland to myLost Lands 5 Walkthroughhub page for all the teaser hints and token localisation information you ask .
Heading into the gorge
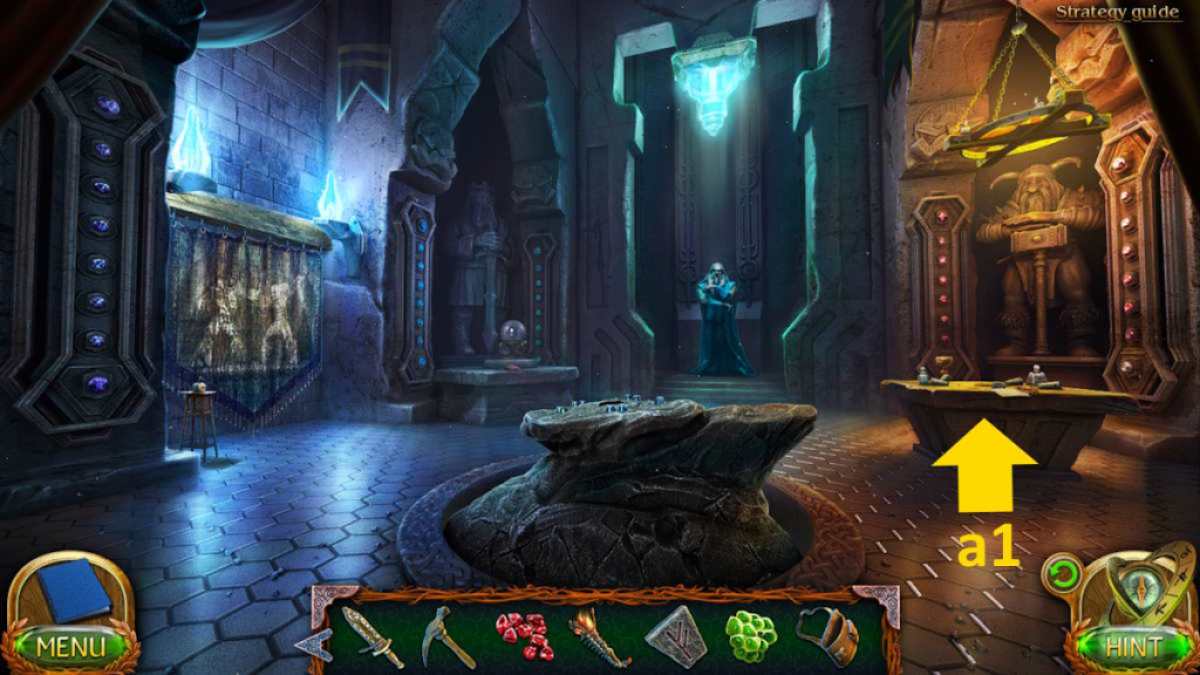
take the alchemy mesa ( a1 ) , add the woman chaser rip , and eggs , then put all the ingredients on the mesa into the five golf hole . Use the hammer to secure all of the bungs and then use the bottle to pick up theCold stock philosophers' stone .
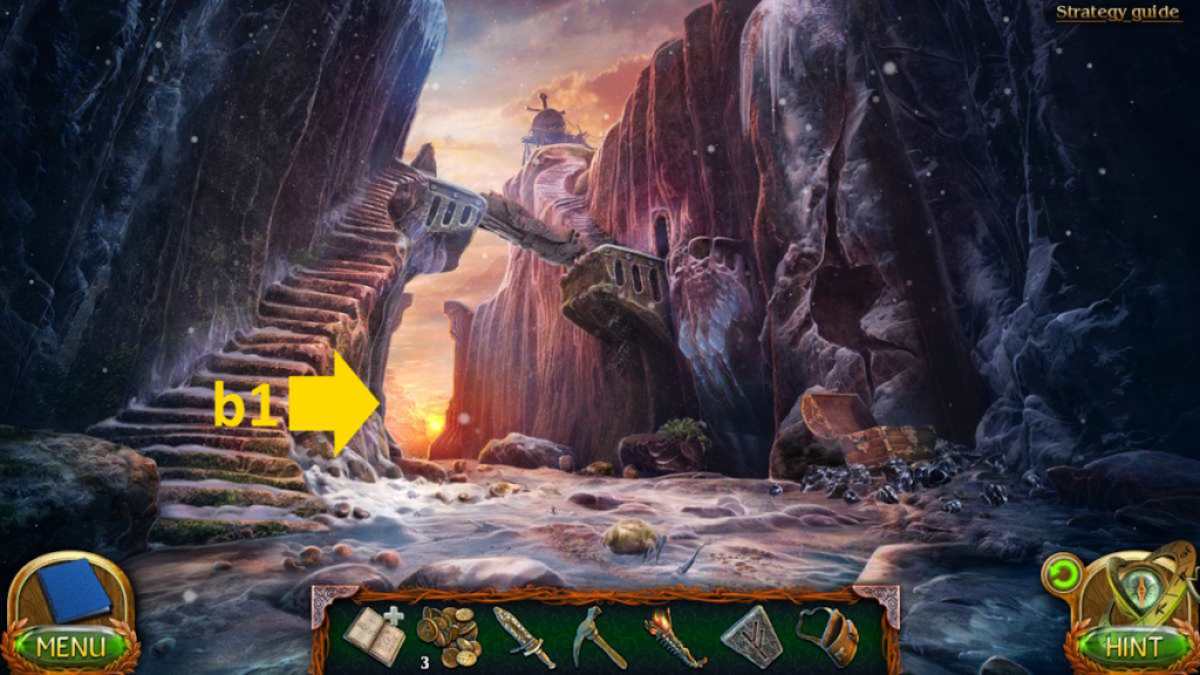
Move to the gorge in the flash-frozen mountains , select the roadblock ( b1 ) , and utilize the philosophers' stone to go through to theWall of First Birth .
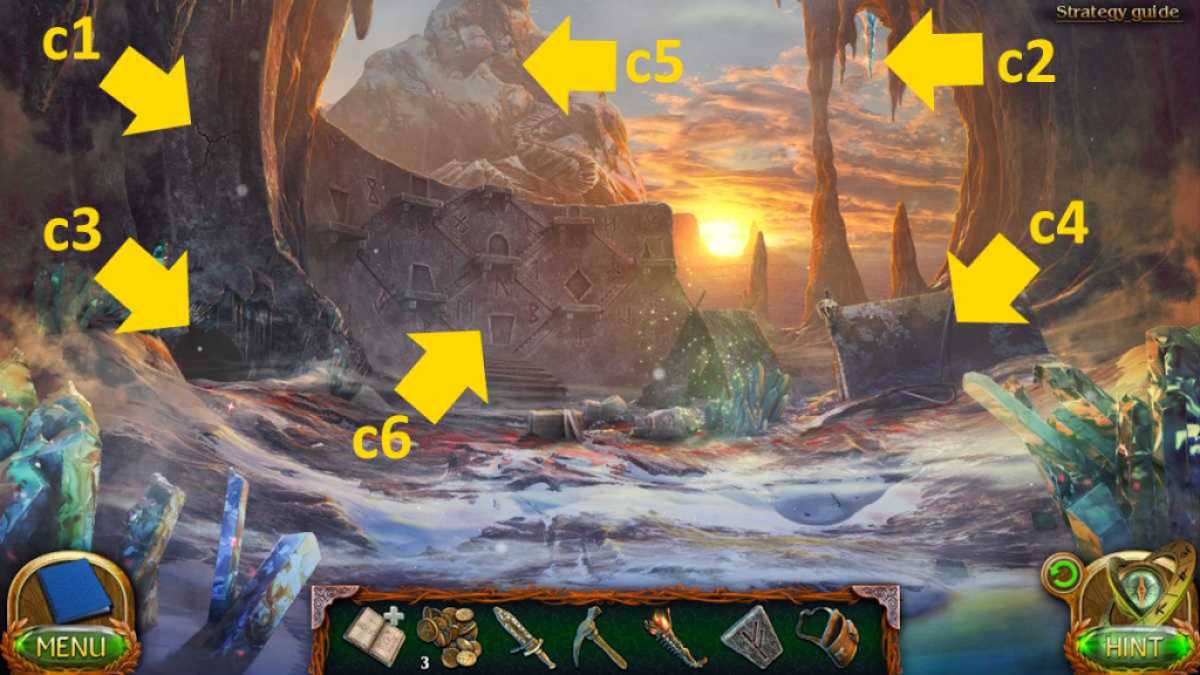
TheMorphing Objectis on the left ( c1 ) and theCollectibleis on the right ( c2 ) . see in the cave entrance ( c3 ) and move the bones to encounter aProjector Seal , then canvas the summer camp ( c4 ) to pop a missing objects puzzle .

If you ’re struggling with the lamp buttons , the direction pointer shows the ordering of the buttons while the number are how many time you have to press each one . So it ’s :
Get aManuscriptas you search , plus theRuneonce you ’re done . Now head up the mountain in the background signal ( c5 ) .
The Peak of Death
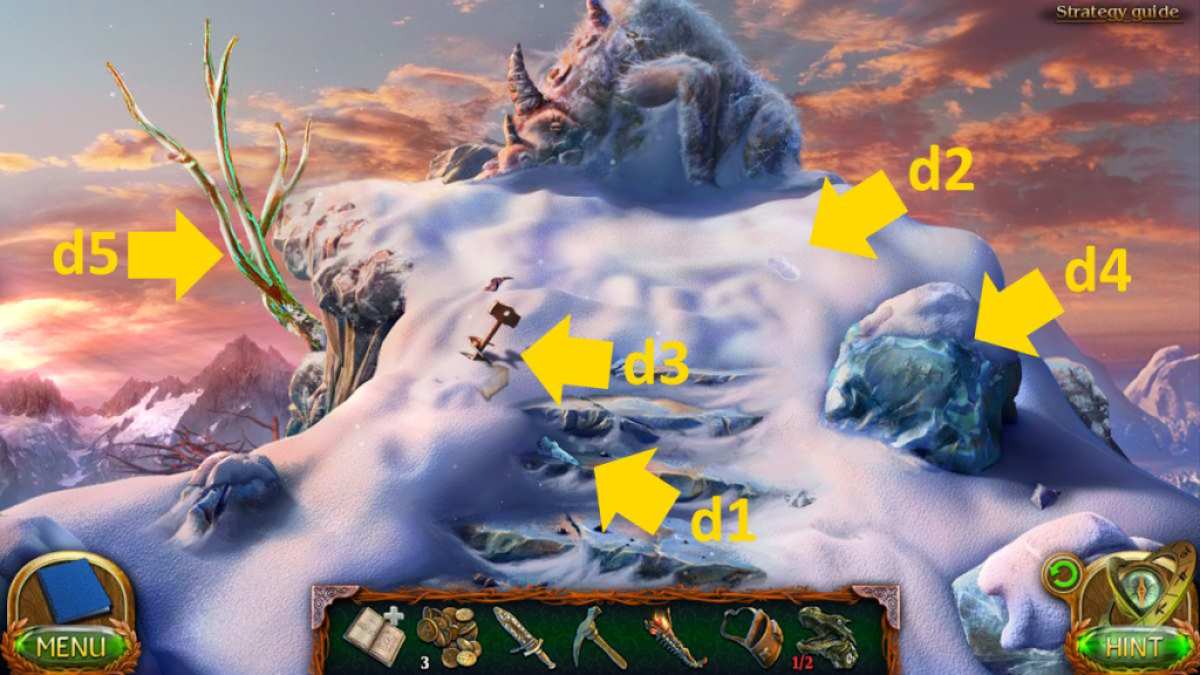
You ’ll find theCollectibleon the steps ( d1 ) and theMorphing Object(d2 ) in the nose candy . Take aManuscriptand theDrill(d3 ) , and then use the fervour scepter to evaporate the ice ( d4 ) and take yoursecond Projector Seal . Use the hammer to adjudicate and get someCharcoal Crystal(d5 ) , then use the bag to accumulate it when it falls .
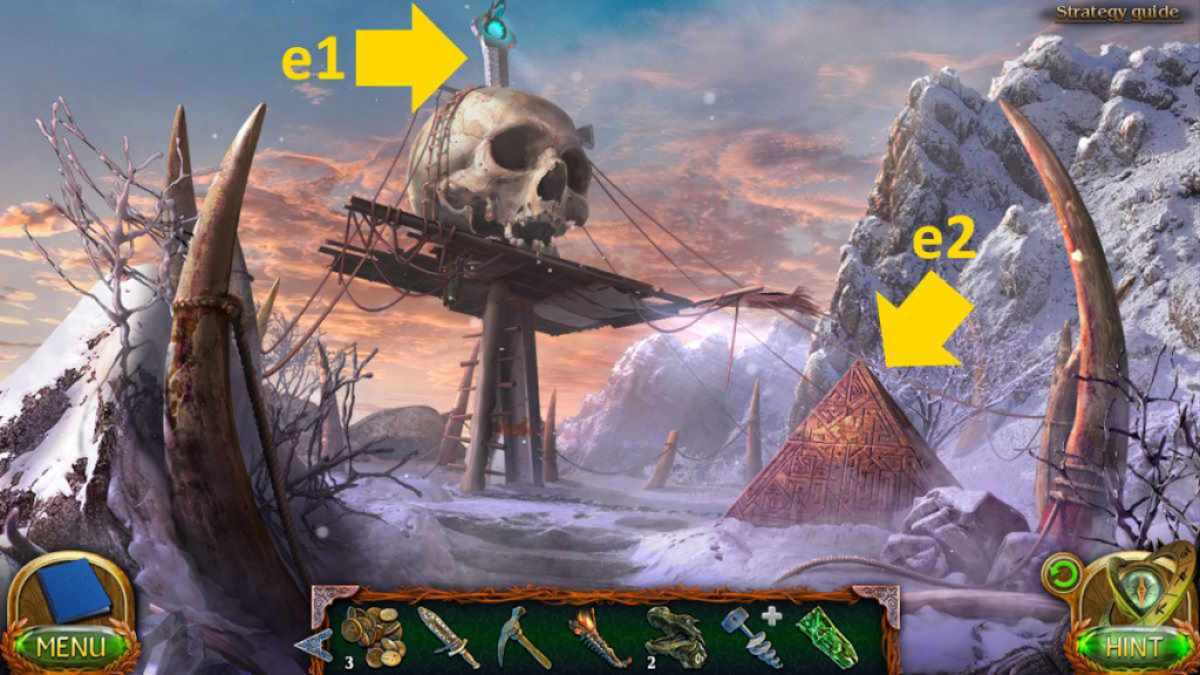
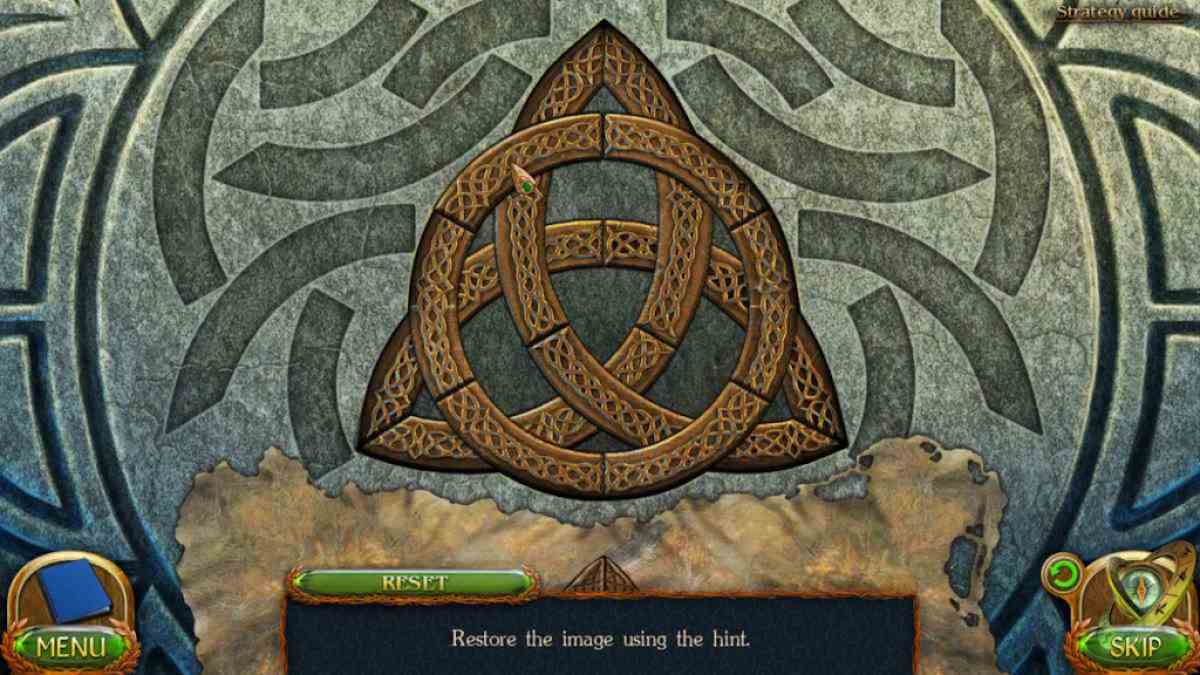
Move to the giant site , utilise the projector seal on the sword pommel ( e1 ) , and then select the pyramid ( e2 ) for a finis - up . Click it again to start a mosaic puzzle . This one is a piffling time - down , but not really a puzzle , as you ca n’t fail . I ’ve let in a moving-picture show of the nail image below .
Once complete , the pyramid opens up and you’re able to take thePuzzle Cube . Afterward , click Maaron for a cut vista and he ’ll give you aKey .
Screenshot by Pro Game Guides
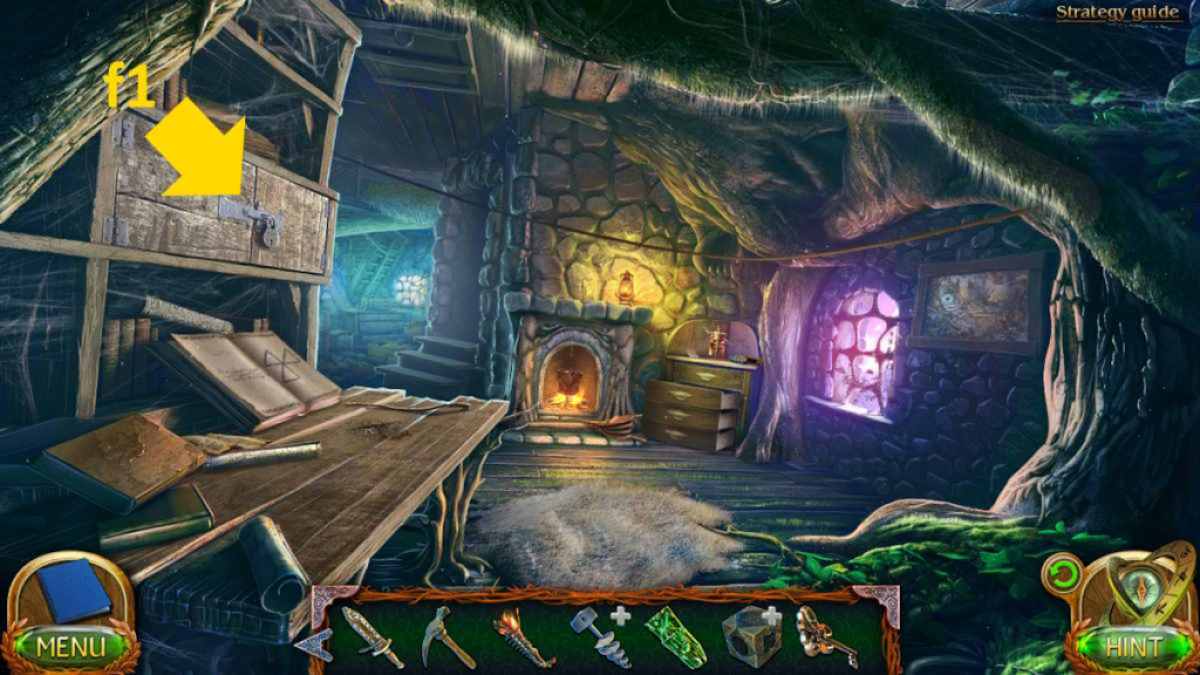
Go to Maaron ’s hut , select the desk ( f1 ) , and use the key to enter the drawer above it . Take thePlank On A Rope .
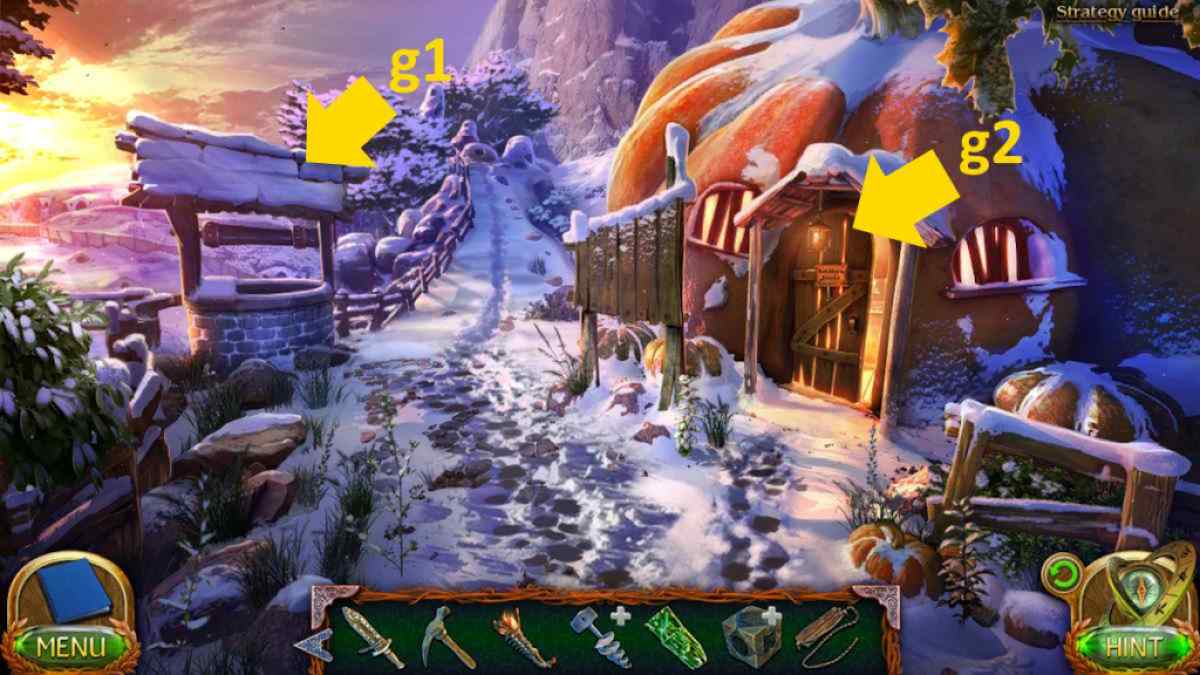
Move to the halfling village and use the rope on the well ( g1 ) to get aStick . expend the pin on the drill part in your inventory to make aDrill , then utilise it to get to the box in the well . Now expend the hammer on the shabu , and take theCasket . open up the jewel casket in your stock to find43 Kyollsand then take backMaaron ’s Chest .
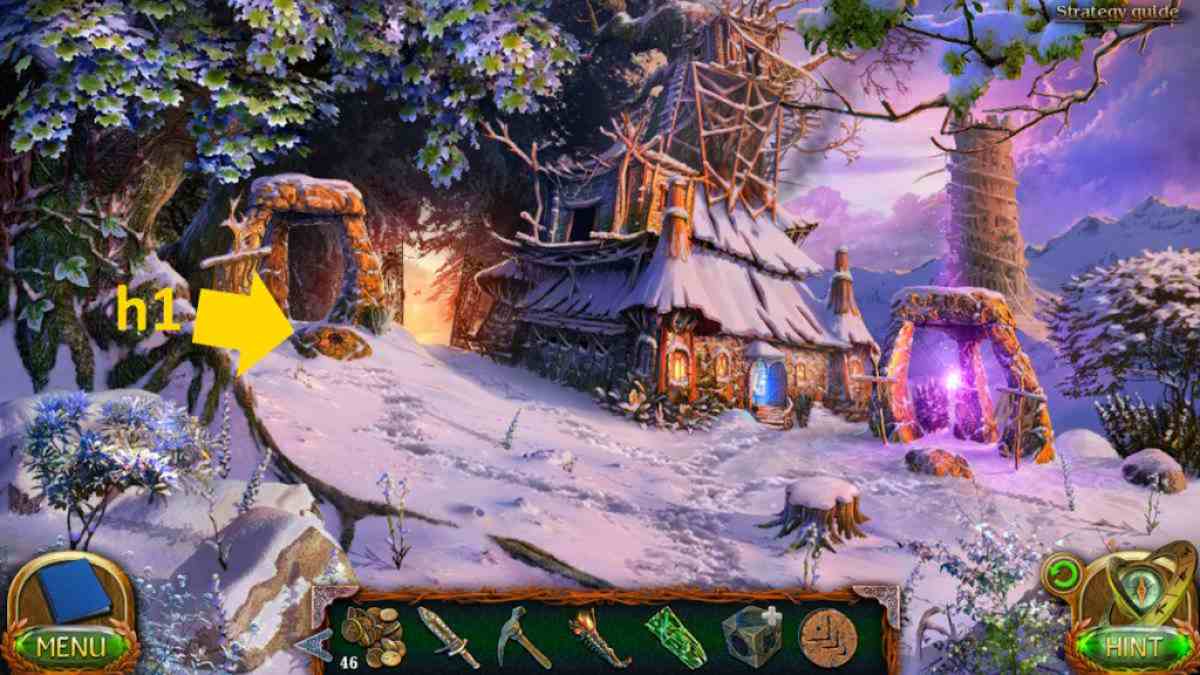
Select the book of go in your armoury , put Maaron ’s chest on the table , and then detect theRevelation Spellin the book . open up the boxwood , use the wand to replicate it , and then take theRune Stonefrom the box . Head to the wood ’s border , use the rune stone on the vena portae on the left ( h1 ) to power it up , and then head to theforest thicketin the Darkwoods .
Screenshot by Pro Game Guides
Related : Complete Lost Lands 8 Walkthrough
To the Darkwoods
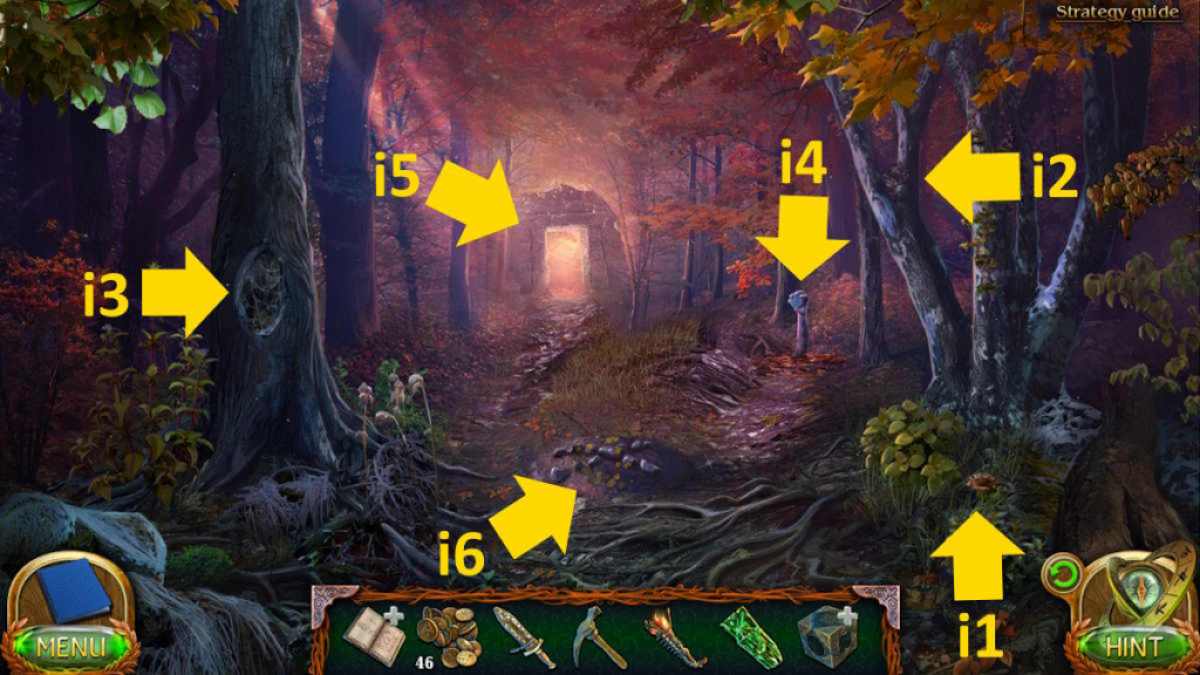
TheMorphing Object(i1 ) is at the al-Qa’ida of the tree , while theCollectible(i2 ) is above it in the same tree diagram . Use the dagger on the cobwebs ( i3 ) to take theCones , then snap the hand ( i4 ) . Take theKey PartandCrossbow , then apply the crossbow on the tree diagram ( by clicking the top of the pit first ) to climb out . Move frontwards down the path ( i5 ) to theAncient Ontus .
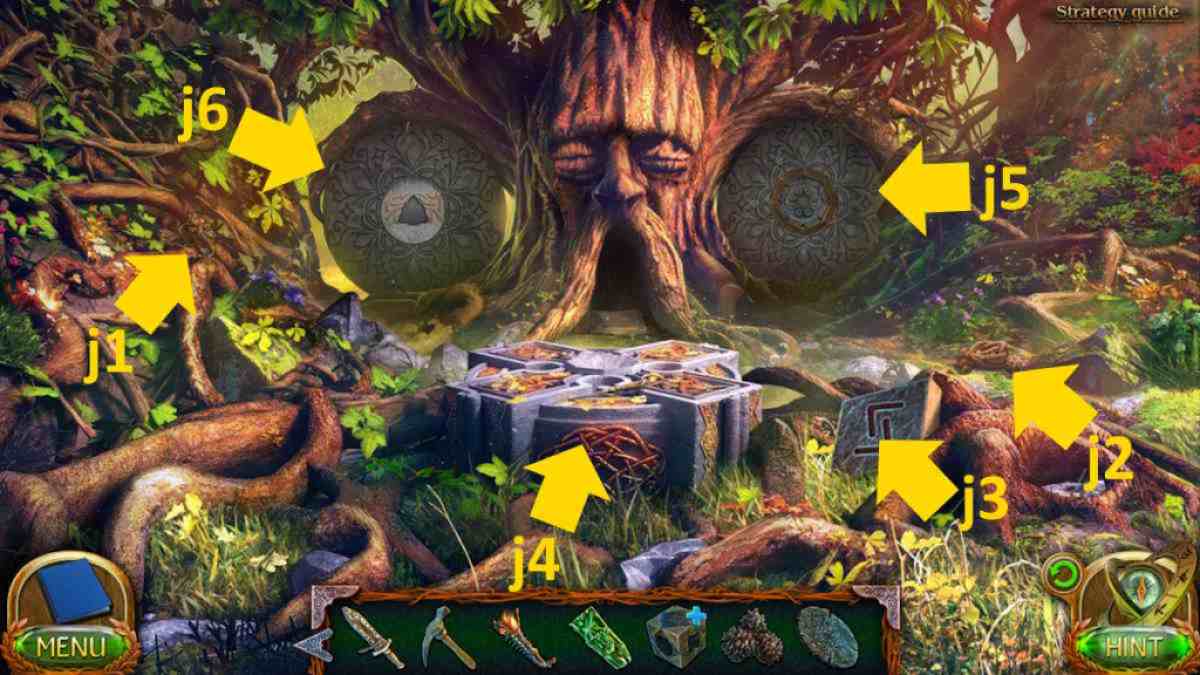
Take theCollectible(j1 ) , theMorphing Object(j2 ) , aRune(j3 ) , and theNail Pullerfrom the tabular array ( j4 ) . Place the charcoal watch crystal on the board next , and you ’ll receive asecond Key Partfrom the Ontus .
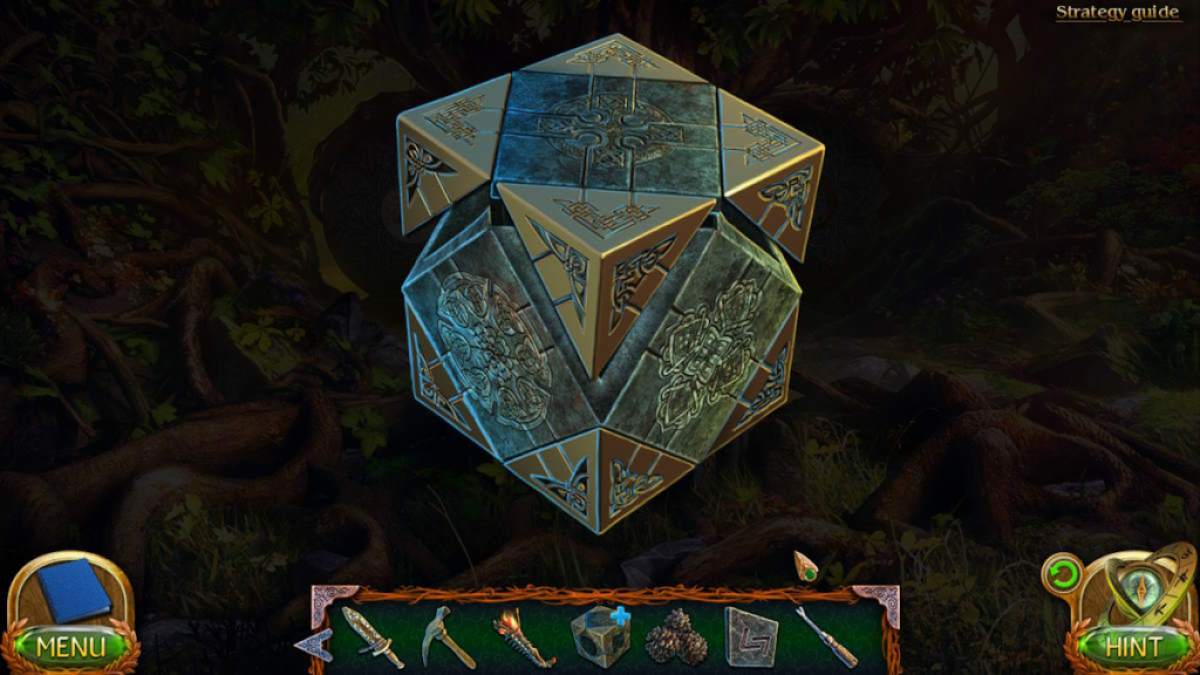
start the puzzler regular hexahedron in your inventory and add the two cardinal parts . This begin a mystifier in which you necessitate to set up its corners into the right positions ( see above if you ’re having difficulties with this puzzle ) . Once subject , take theFragmentfrom inside .
Screenshot by Pro Game Guides
Now examine the doorway on the right ( j5 ) and place the sherd in its heart and soul . You need to press the three inner circle tiles which equal to the highlighted plate on the outer one . The answers are as follows :
Once complete the door will open , so head up through to theLonely Rock .
The lonely rock
Grab theCollectiblefrom the branchlet ( k1 ) and theMorphing Objectfrom the dope ( k2 ) . throw away your cones at the raven ( k3 ) and it will drop the Medallion into the piss below ( k4 ) . You ca n’t get it yet though .
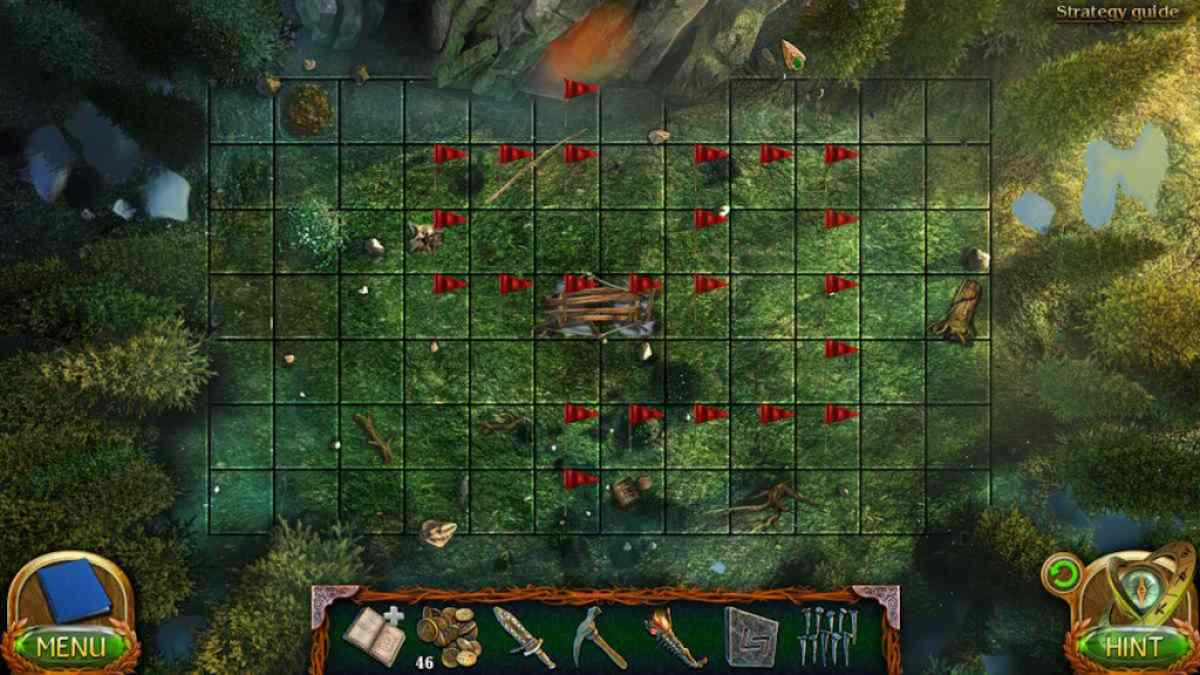
Use the dagger to cut and take aLong Pole(k5 ) , then use the nail puller to launch the barrel ( k6 ) and take theNailsandRed Flags . come home anywhere in the background with the long magnetic pole , and then the flags , to be able-bodied to move forward , then fall into place the background once more to start a change of location miniskirt - game ( see the solution below ) .
Select the bridge next ( k7 ) and take thePlanksand aRune . open up your inventory and choose the planks , clicking them twice to lay them out . Add the nail , and then habituate the hammer to make aTemporary Bridge . Now you could snap the cave entry ( k8 ) , add the bridge deck , and move into theGoblin Cave .
Screenshot by Pro Game Guides
After speaking to Krickar , grab theMorphing Object(l1 ) from the bottom step of the steps and theCollectible(l2 ) from the cavern roof . Take thePike Pole(l3 ) , then move some rubbish ( l4 ) to notice aGarden Trowel .
you could now head back outside and habituate the pike perch to fish out theMedallion(k4 ) . Go to the forest coppice next and apply the trowel ( i6 ) to find6 Kyollsin a bury skull . you’re able to also pop back to the wall of the first birth ( c6 ) and add the runes you have collect to the wall there . I like to do this just to free up my inventory space a bit .
Go back into the goblin cave and take theRodsfrom the table ( l5 ) . Now you could add the perch to the tone ( l6 ) , giving you access to a simple ( as in you ca n’t go improper ) missing objective miniskirt - mettlesome upstairs ( l7 ) . Once complete , you ’ll findKrickar ’s Belt . Give it to Krickar and , after the deletion scene , Krickar will give you aDrawing .
Screenshot by Pro Game Guides
touch on : miss Lands 4 Walkthrough
Finding the fairy glade
Return to the Ontus and apply the drawing on the unexpended door ( j6 ) to start a jigsaw - elan teaser . Once you ’ve complete it ( see the root above ) , move through the door to theMist Lake .
You ’ll find theMorphing Object(m1 ) at the edge of the lake and theCollectible(m2 ) above the bell . enter the trap ( m3 ) to release the Erinaceus europaeus and find aNote . Now telephone the bell ( m4 ) to marshal the gravy holder . Put 50 Kyolls into the pot on the boat in the close - up to bring in access to the rest of the view .
Use the freeway to pull out the tackle down ( m5 ) , giving you access to the brag ’s nest . Take theMedallion Handlethere , and then combine it with the laurel wreath in your stock to get theKey .
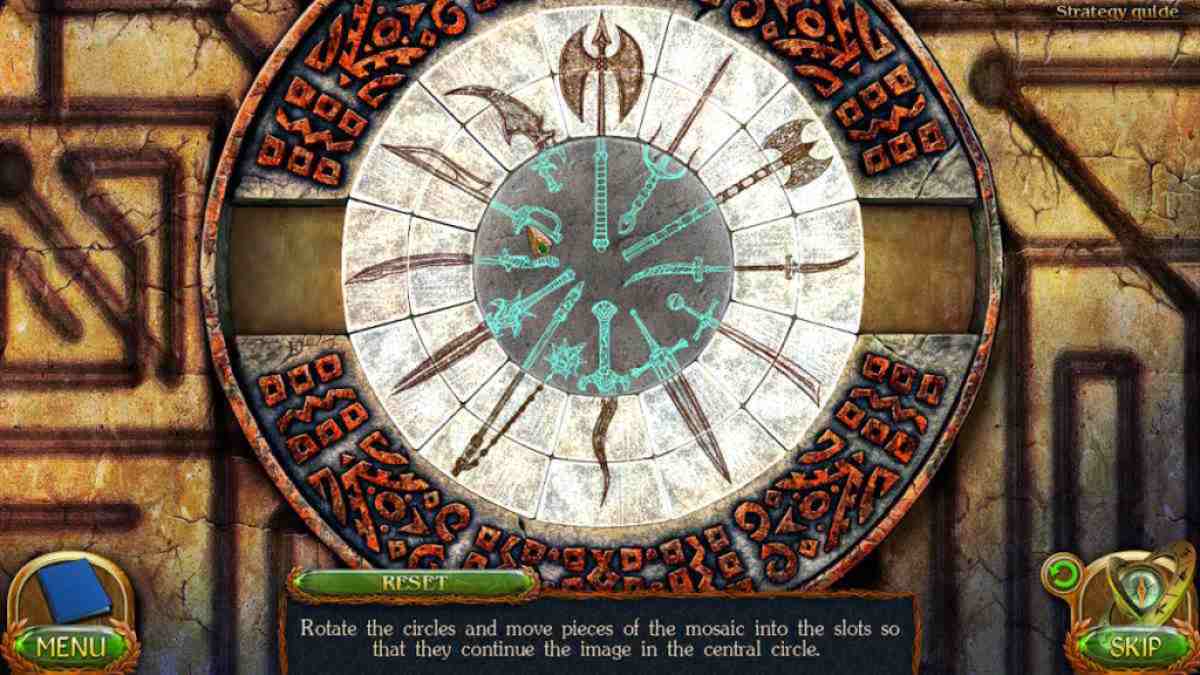
Image by Pro Game Guides
you could now go back to the goblin cave , empty the moss from the chest ( l8 ) , open up it with the key , and take theLeather Bag . afford the pocketbook in your stock-taking to find aMagnifying Glass , Tweezers , and70 Kyolls . Also , pop back to the pumpkin store ( g2 ) and buy the last point there , the jar of mushroomBugs . steer back to the lake , and snap the backdrop to move on to theFairy Glade .
Healing the tree
You ’ll find theCollectibleunder the footmark ( n1 ) and theMorphing Objectin the leaves ( n2 ) . Take theDevice Base(n3 ) , then seize theTreble Cleffrom the gate close - up ( n4 ) . append the ternary clef to the stone pad ( n5 ) , then clack the tab once more to collect theSet Of Pipes .
Now take the domain you took the base from ( n3 ) and sum up the note , pipe , and base in the close - up . Hang the pipe as shown in the notation ( see below ) and you ’ll encounter theWind Chime . Hang the bell ( n3 ) and the gates will open up ( n4 ) . choose them , click the fagot , and peach to Flylena . Afterward , she ’ll give you theTiny Fairy Book .
Look at the tree ascendant ( n6 ) , then await at the playscript of spells in your inventory and add the tiny book to the table . Select theEnlarge Spelland imitate it to obtain a note and a key . Now find theReduction Spelland copy that to wince the key . Use the magnifying chicken feed to detect the key on the table and then use the tweezer to pick up theSmall Key .
Screenshot by Pro Game Guides
come back to the fag glade and use the bug on the moss ( n6 ) to cure the Sir Herbert Beerbohm Tree . Pick up theRunethe pigeon drop underneath the fart chime ( n3 ) , and Flylena will give you aSleepy Flower . employ the heyday on the bird in the crowing ’s nest ( m5 ) , take theChest , and then go in good order back to theAncient Portal .
choose the thorax in your armory and use the overstate glass to observe the keyhole . utilise the key to open it and take theChest of Dust . Add the runic letter to the portal ( o1 ) , summate the rubble , and the portal will open . Select it to move toThe Museum .
To conclude the principal story here with us at Pro Game Guides , click through to myLost Lands Walkthrough , Part 4 !
Screenshot by Pro Game Guides
Screenshot by Pro Game Guides
Screenshot by Pro Game Guides
Screenshot by Pro Game Guides
Screenshot by Pro Game Guides
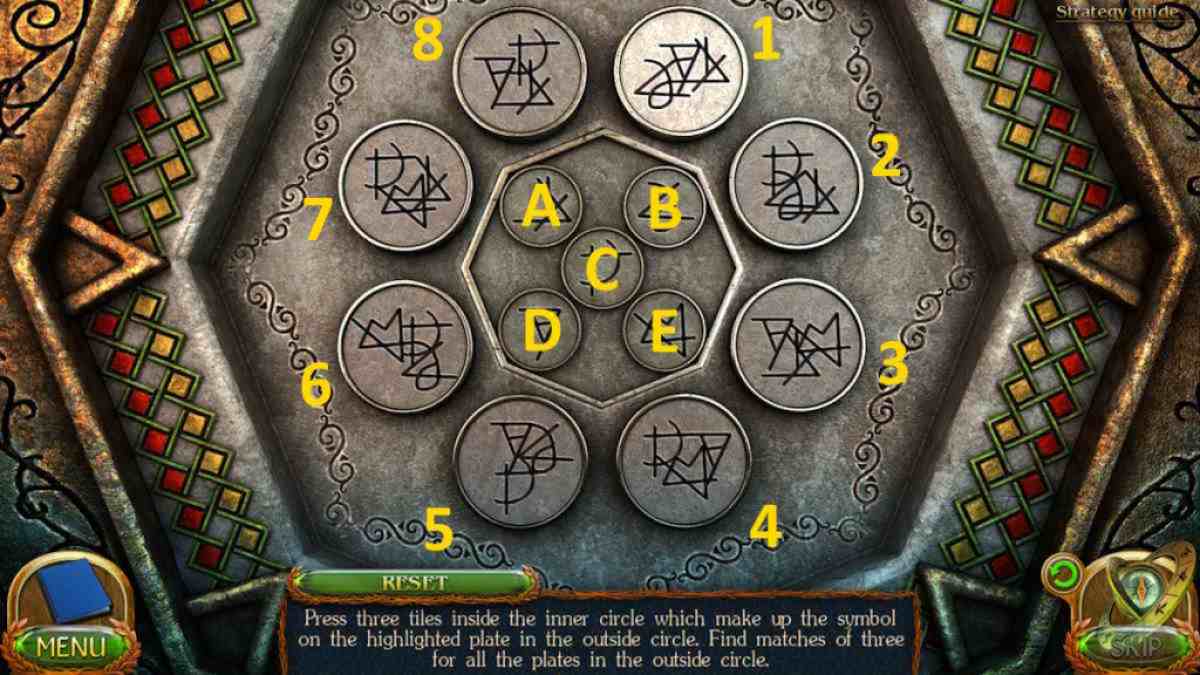
Image by Pro Game Guides
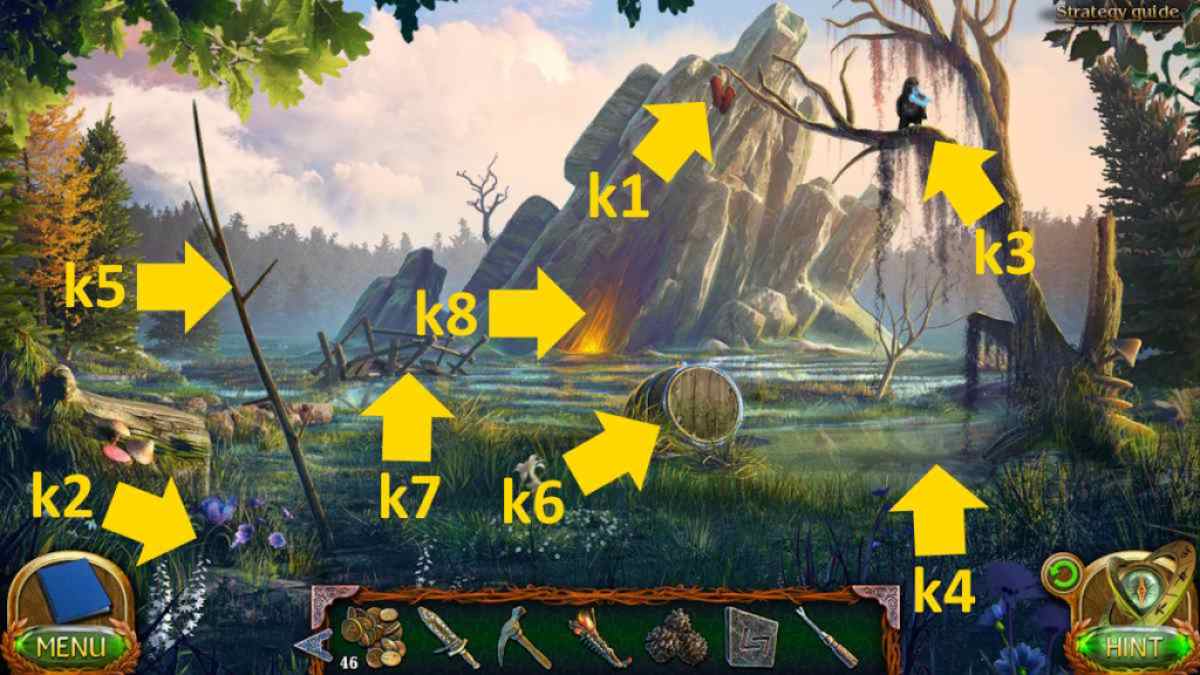
Image by Pro Game Guides
Screenshot by Pro Game Guides
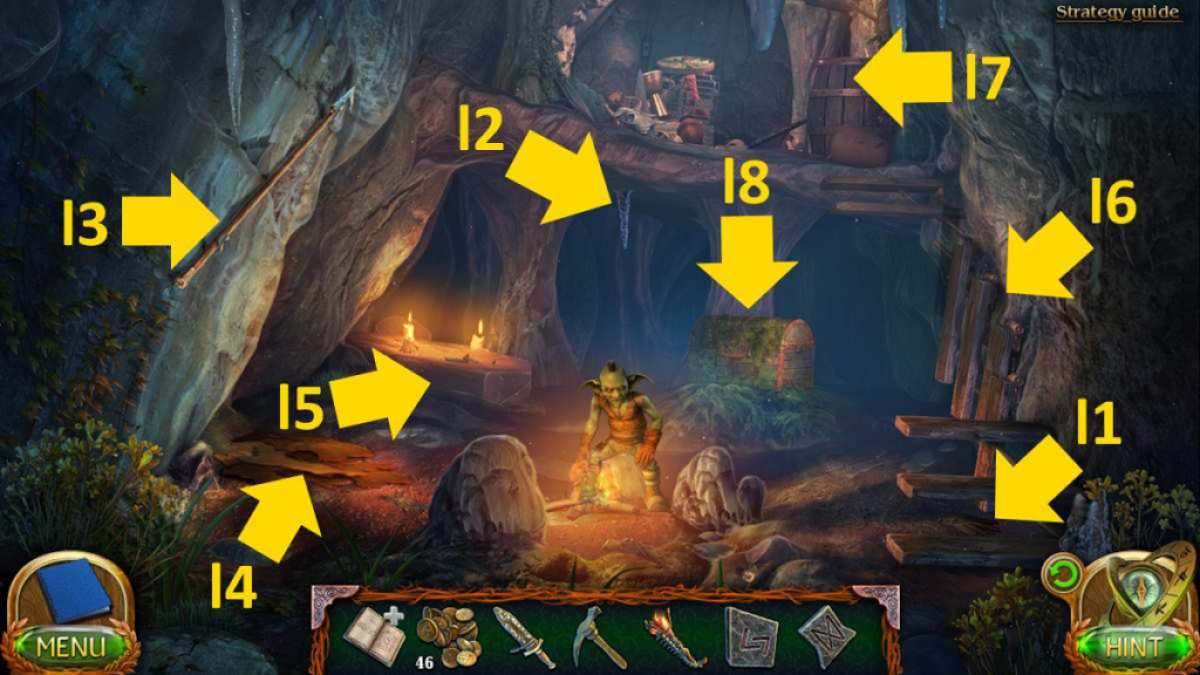
Image by Pro Game Guides
Screenshot by Pro Game Guides
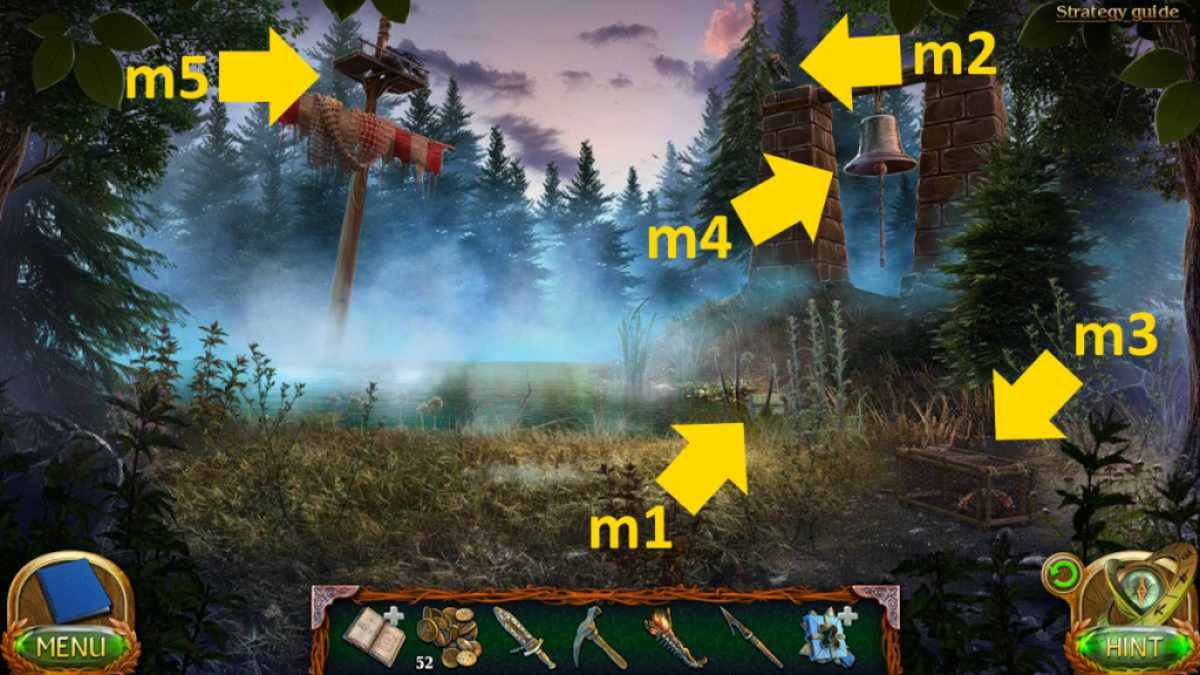
Image by Pro Game Guides
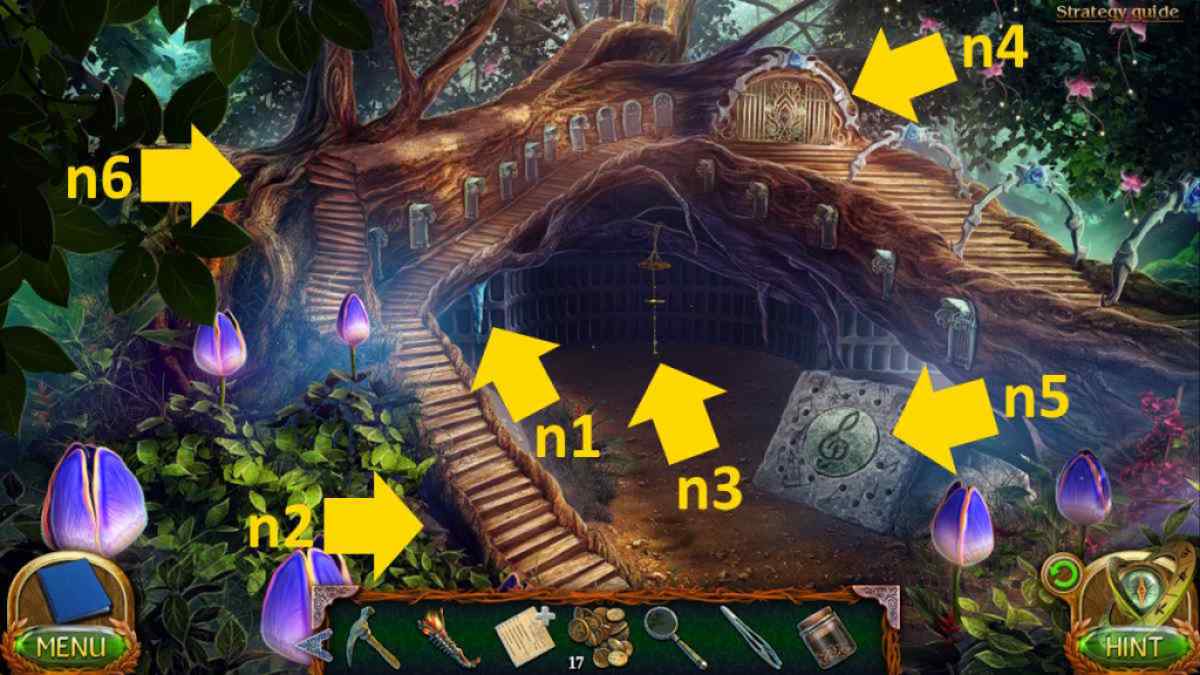
Image by Pro Game Guides
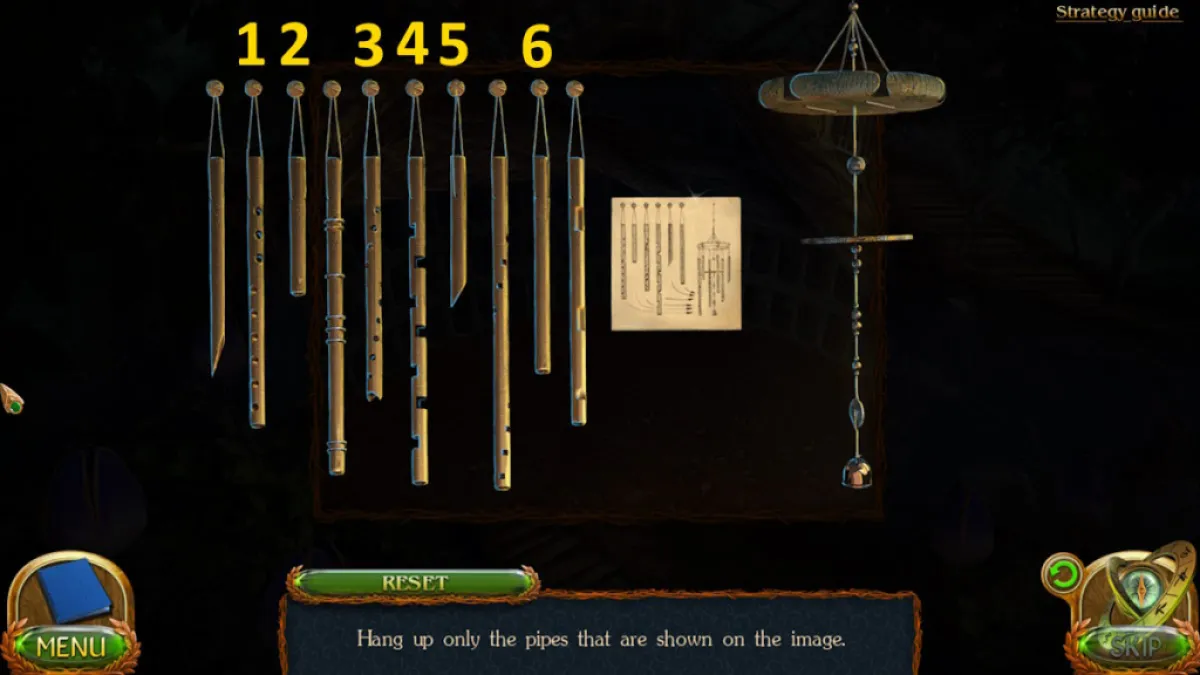
Image by Pro Game Guides
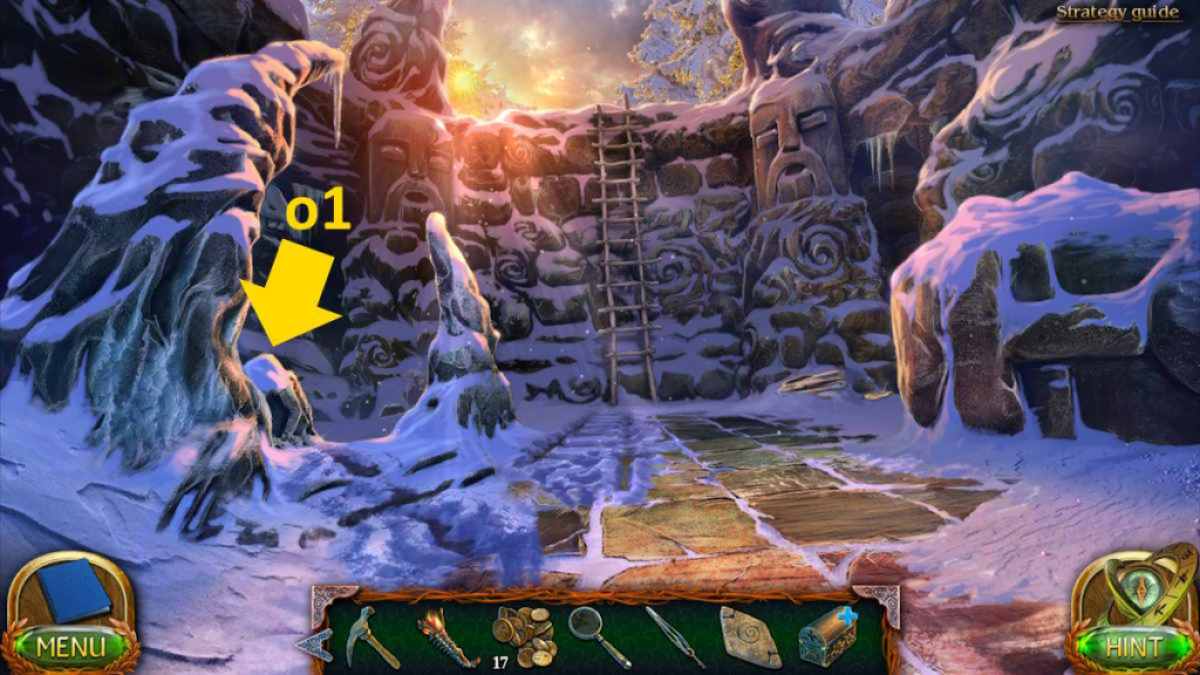
Image by Pro Game Guides
