necessitate on the Tarsus !
Lost Lands continues the pop series of puzzle RPGs , with Susan once again lead off in hunt of escapade in a far - off fancy kingdom . If you ’re see for any hitting and clear to beat the puzzle in the secret plan , read on for the 2nd part of my Lost Lands 5 walkthrough .
Lost Lands 5 Walkthrough, Part 2 - Ice Spell full guide and puzzles
This guidebook takes up the action after you ’ve receive with Maaron in Mounthor ’s Plateau and he has given you the Flames Element . It continues until you fill in the tapestry in the temple . If you ’re looking for counseling in parts of the biz that happen earlier or by and by do n’t worry , we ’ve take you insure . snap through to myLost Lands 5 Walkthroughhub page for links to all the other surgical incision of the biz .
Heading into the gorge
Take theMorphing ObjectandCollectible , which are next to each other on the left hand of the screen ( a1 ) . Select the dead goliath ( a2 ) , take theManuscriptandSulferfrom it , and use the sticker to get aHook . confiscate the hook to the rope in your stock list and dawn it again to get aHook On A Rope . Also , take a look at the standard to see a clue ( a3 ) .
Go back to the mountain entry and use the crotchet and R-2 in the mountain pass ( b1 ) to gain accession to theGorge .
TheMorphing Objectis on the odd steps ( c1 ) and theCollectibleis on the rock’n’roll ( c2 ) . Take theHalberd(c3 ) and click the statue in the finish - up to take in aCannonball . Click the cannon ball in your inventory to uncork the direction from it . You ’ll see that you also need to detect coal powder and saltpetre ( you may add the sulphur to the cannonball now and the teaching will act as the wick ) .

Use the halberd to free the chest of drawers ( c4 ) , click the ignition lock in the close - up , then open it to receive aManuscript , Hammer , Small Sack , and35 Kyolls . Take a lump ofCoalin the same close - up .
Making the bomb
turn back to the forest path , take the statue ( d1 ) , and use the code you saw earlier on the banner ( a3 ) to spread it and reveal a puzzle ( you need to push the top and bottom - good buttons on the statue to open it ) .
The solution is above if you ’re stuck on this one . Once over , the statue will open and you could take aKey Part .
While you ’re in the valley , also head to the pumpkin shop class ( e1 ) at the Halfling Village and purchase theJar Of Niter , which you’re able to add directly to the cannonball in your stock . She ’ll also give you some freeMittens .
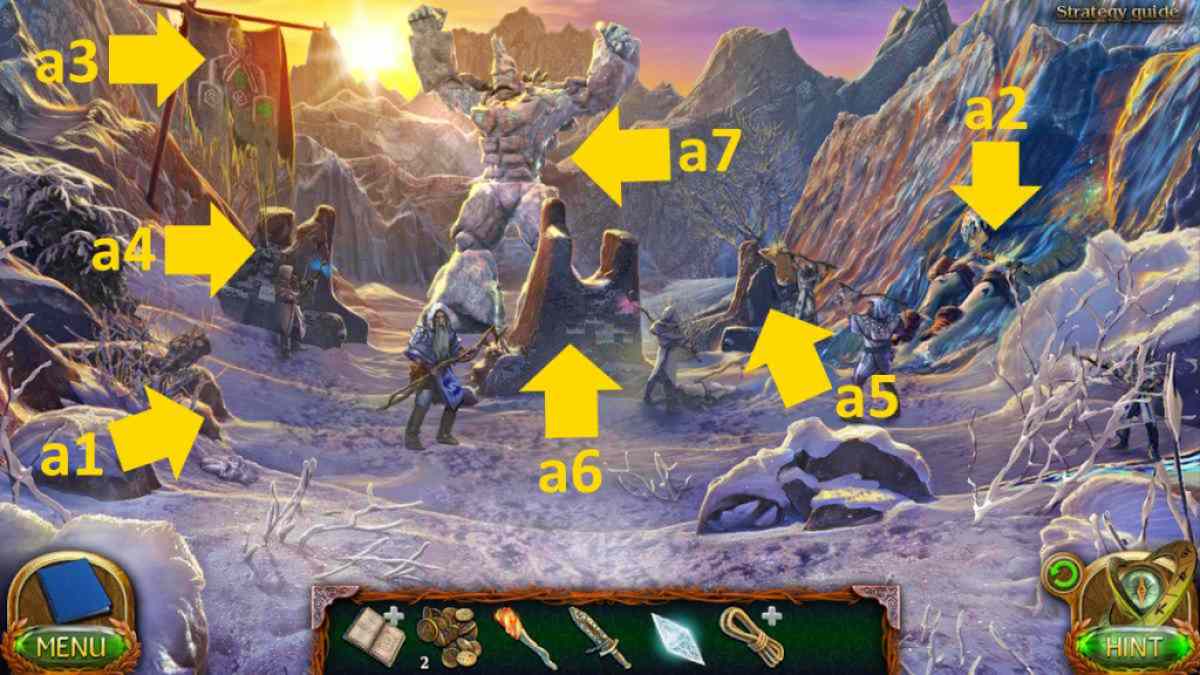
Image by Pro Game Guides
Move to Cave End and get someFrost Wolf Bloodby using the power hammer on the dead wolf ( f1 ) .
From there , move to Folnur ’s Dwelling and put the coal in the grinder ( g1 ) . Remove the blood-red Harlan Fisk Stone powder in the drawer to close it , use the hero , and then use the sack and spoon on the drawer to take theCoal . Add the ember to the cannon ball , follow the command , and you ’ll get theBomb .
Related : lose Lands 7 Walkthrough – Full Guide
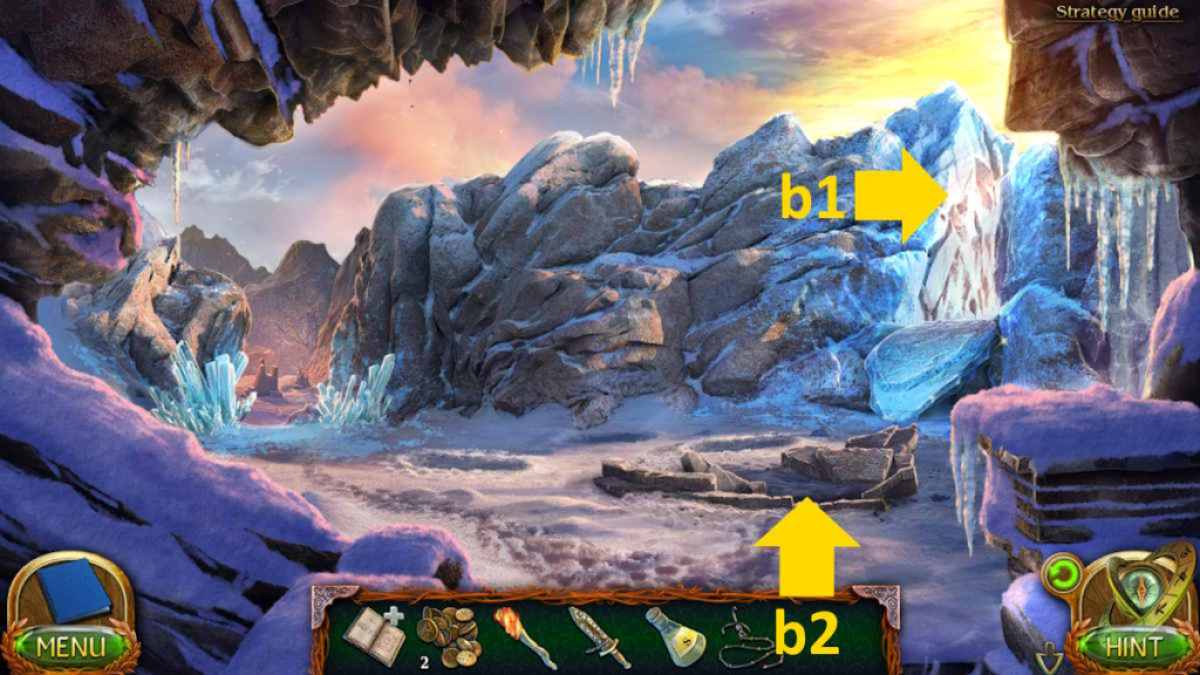
Image by Pro Game Guides
The giant’s site
Return to the defile and use the bomb on the statue ( c3 ) , lighting it with the flashlight to create a bridgework . Check out the uncover prison lock - up ( c5 ) , make a musical note of the drawing off on the paries , then head up to the giant ’s internet site ( c6 ) .
take hold of theCollectible(h1),ManuscriptandMorphing Object(h2 ) , aFangand3 Kyolls(h3 ) , plus three moreFangsand aKey Part(h4 ) . Also , take4 Kyolls(h5 ) and attach the two fundamental role in your inventory to gain ground theKey To The Book .
Add the fangs to the ravel ( h6 ) , use the hammer to knock them in , and then flick the run once more to set about a lock puzzle . This can be slick , but what you ’re point for is the picture above . As long as you squirm the bottom part to the angle you see there , you then just require to edge it left and aright until it clicks into place .

Image by Pro Game Guides
Once complete , you could do a simple missing objects miniskirt - game at the top of the program ( h7 ) to get theDome Element . While you ’re here , also appear at the top of the brand ( h8 ) to note that it moves but is miss an element .
Trapping the tarsus
Head to the expiration to the mountains and apply the al-Qur’an key to afford the book in the heavyweight ’s grave ( b2 ) , and take aManuscriptplus theHint . Now you ’re quick to refund to the gorge .
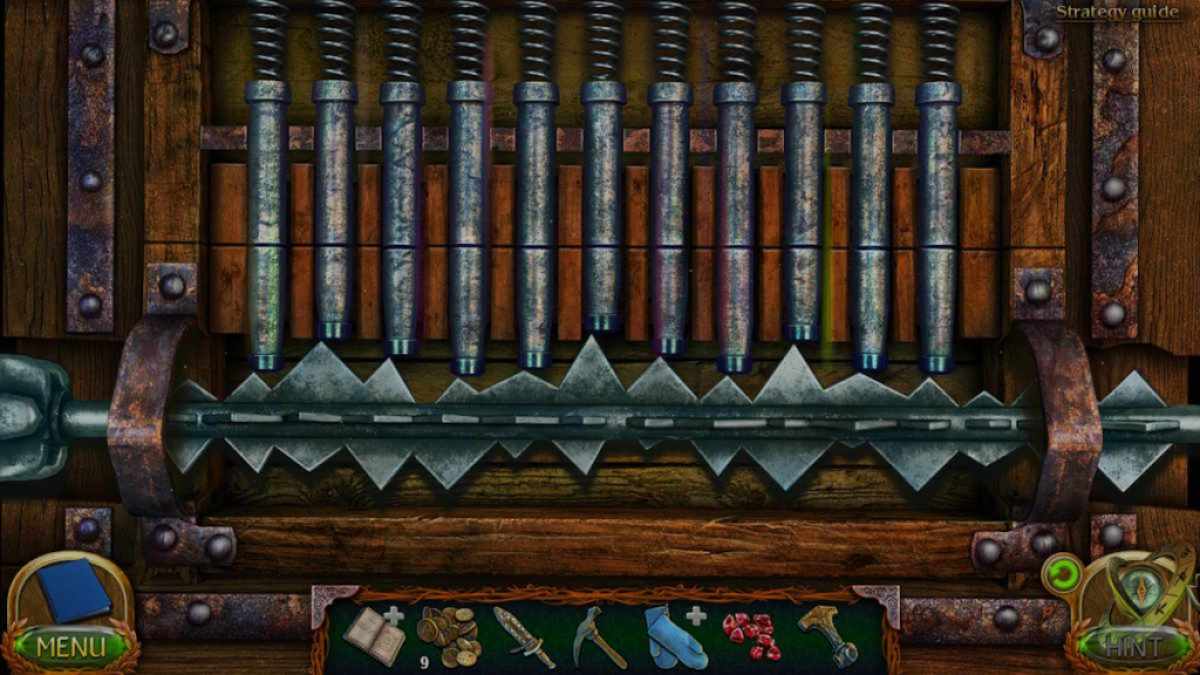
Add the lightning symbol to the left pedestal ( a4 ) , the flaming to the right one ( a5 ) , and the dome to the substance ( a6 ) . Each time you do , you ’ll make the pedestal ’s mystifier become available . expend the mite you experience to complete each one . If you need a deal with these , the solvent are below :
Select the trap tarsas ( a7 ) for a cutscene once the three puzzler are solved . You ’ll receive thePiece of Folnur ’s Chestand theFire Scepter .
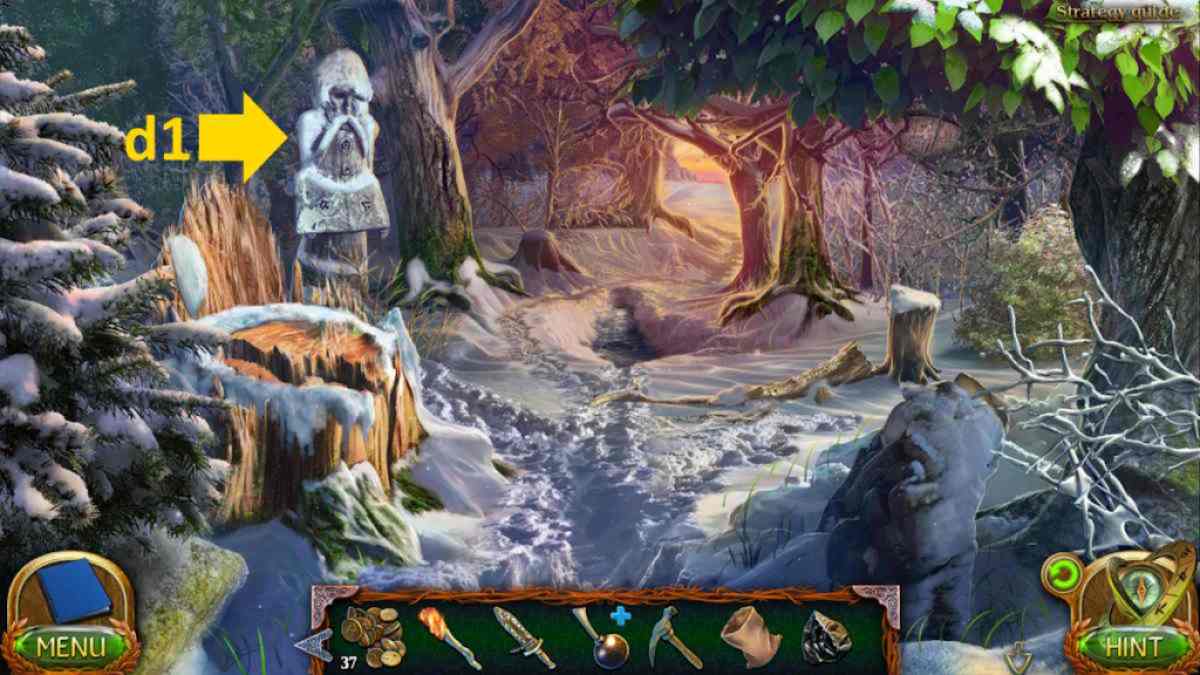
Image by Pro Game Guides
Finding the temple
Return to Folnur ’s domicile and utilize the piece to reach the chest ( g2 ) , taking theKey Part , Hint Plate , and11 Kyollsfrom inside . Go to the catacombs next , add the intimation plate to the wall puzzle ( i1 ) , and complete the mini - biz . You need to move the parts so that the three shapes seem in the order on the plate , so yellow on the left over , red in the middle , and blue on the rightfield . If you require a hired hand with this puzzle I ’ve put a verbal description and image of how to complete it below :
Once complete the door here will open , so point through to theCryptand apply the blast scepter to begin a movement puzzle . Unfortunately , the movement of the scorpion is random , so I ca n’t post the solution here . Just drive it into corners and fence it with light three time to progress . You have unlimited attempts , so you ca n’t flunk
Take theCollectiblefrom the left central column ( j1 ) and theMorphing Objectfrom the right ( j2 ) . Take theRune(j3 ) , then dawn the eggs ( j4 ) and take theHandsawand someScolopendra Eggs(using the obelisk ) . expend the saw to get aScolopendra Stinger(j5 ) and use the cut on the paw ( j4 ) to get theBag .
Screenshot by Pro Game Guides
spread the handbag in your inventory to find16 Kyollsand aPattern Part , and then take back theEmpty Bag . Use the pattern part on the pattern ( j6 ) to open up the doorway ( j7 ) to theTemplebut before you go through , also pick up asecond Key Partfrom the instrument panel below in the same pattern close - up ( j6 ) .
Related : Lost Lands 6 walkthrough ( Mistakes of the yesteryear )
Inside the temple
Grab theCollectiblefrom the column ( k1 ) and theMorphing Objectfrom the dwarf statue ( k2 ) . take the bulwark for a nigh - up ( k3 ) , click the rune , read the note , and then take theManuscript , Powder of Prophecy , and12 Kyolls . Add the pulverization to the altar ( k4 ) and enjoy the slice scene .
Afterward , you ’ll receive theKey Base . Add the key groundwork to the altar ( k4 ) , and impart the other two key parts you already have . Take theSpoolfrom the vitreous silica ball close - up ( k5 ) , along with aNeedle , and then head back to the halfling village store ( e1 ) and bribe theDwarf Dungeons Souvenir .
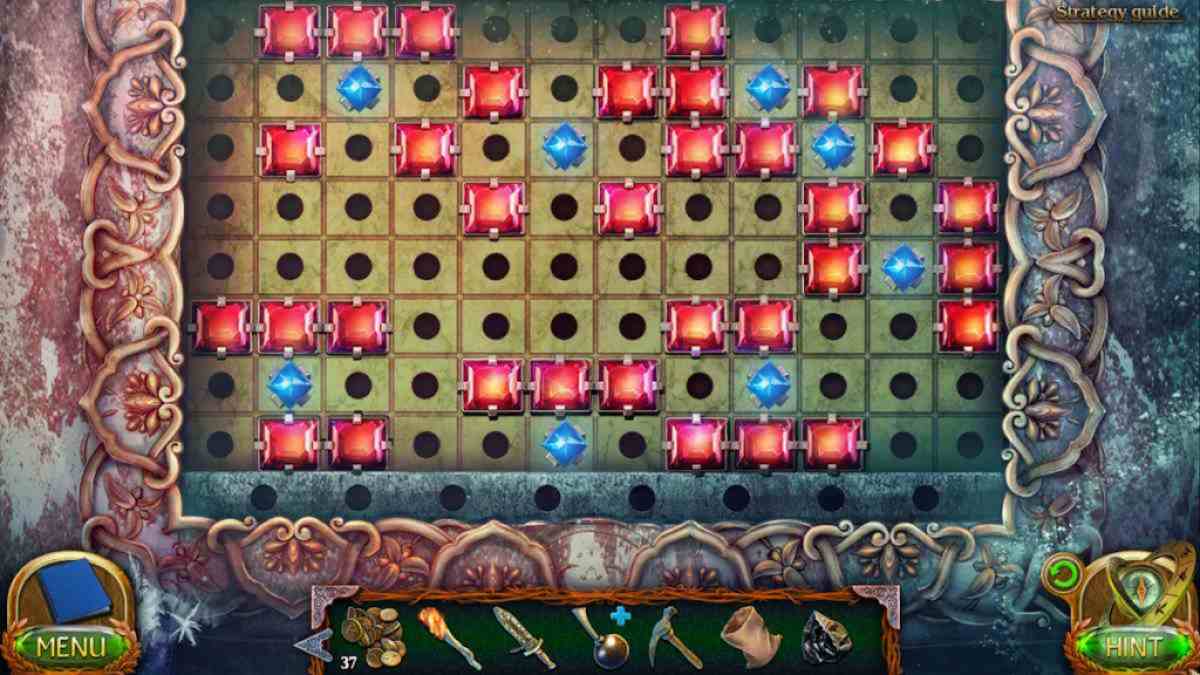
start the book of spells in your stock-taking and add the relic to the table . Find the Destruction spell in the book , click the sceptre , and copy the pattern to take away the diamonds and take theKey Part . Return to the temple and add up the final primal part at the communion table ( k4 ) , fall into place it to fill in it , then take theSarcophagus Part .
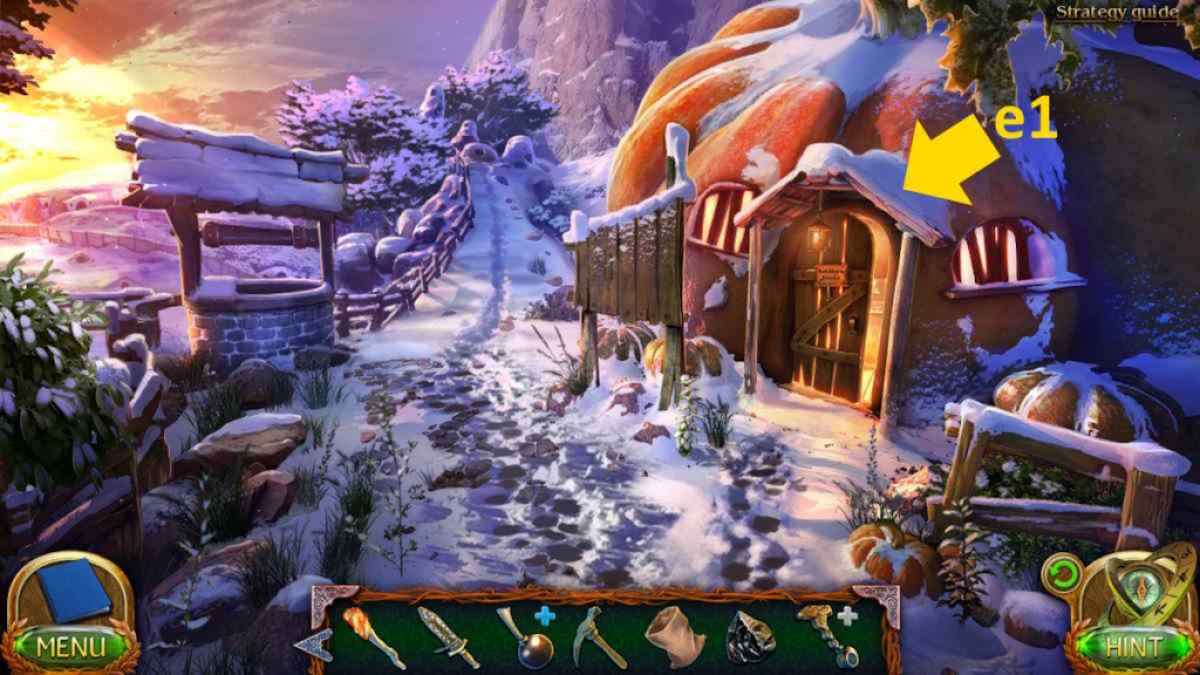
Image by Pro Game Guides
Go back out to the crypt and use the sarcophagus part on the board ( j6 ) to start a bleached chips puzzle . Once everlasting , you ’ll receive aManuscriptand theTapestry Fragment . If you ’re stuck on this one , see the solution below . A is twisting the circle , B and C and pressing the switches , and D is dragging the fundamental bar :
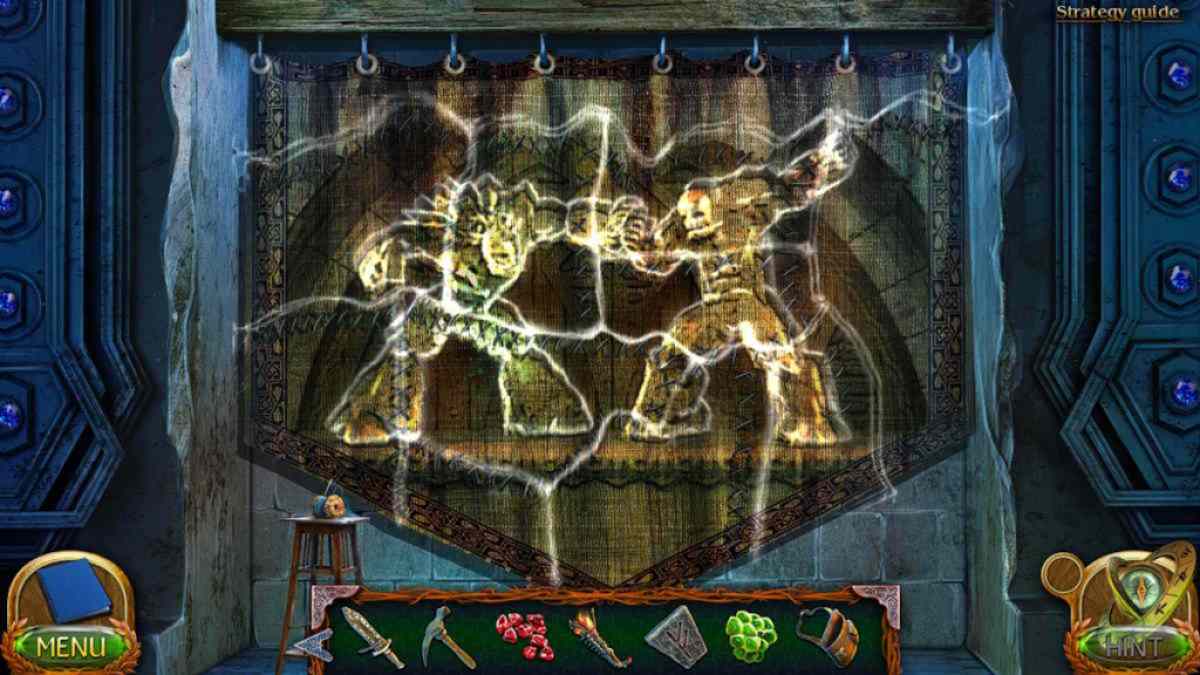
Select the mitten in your armory , add the spool , and then use the dagger to add the thread to the bobbin . Now you may bring the acerate leaf and receive aNeedle And Thread . Return to the temple , add the tapestry fragment to the wall ( k3 ) , add the needle and train of thought , and then reconstruct the arras .
Once accomplished , it will look like the image above . I found it quite annoying , as you have to be very precise , but stand by with it . Once done , you ’ll receive the Cold Blood Elixir Recipe .
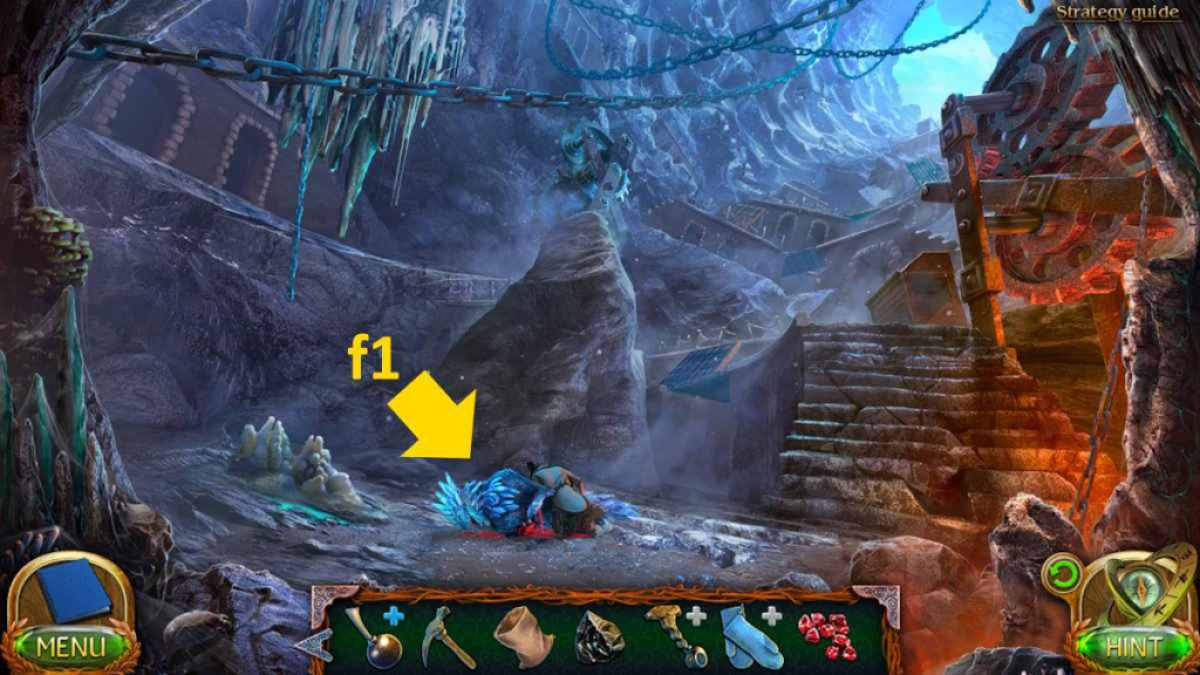
Image by Pro Game Guides
That concludes Part 2 of my guide . ClickLost Lands 5 Walkthrough , Part 3to continue with me here at Pro Game Guides !
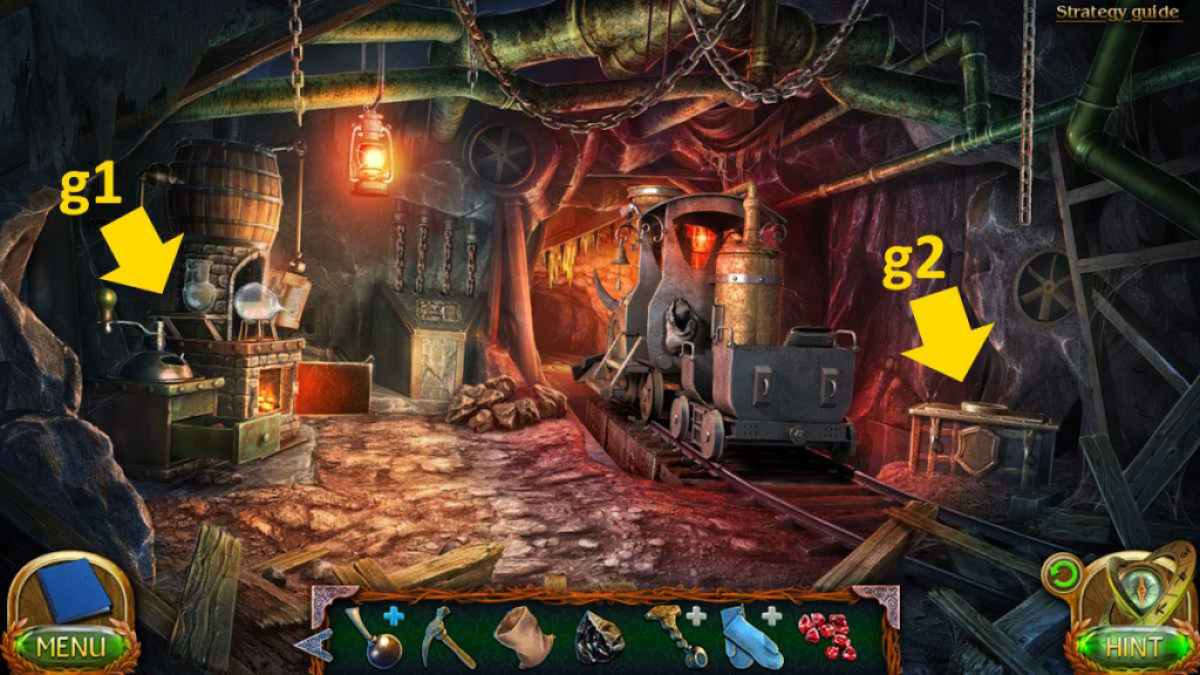
Image by Pro Game Guides
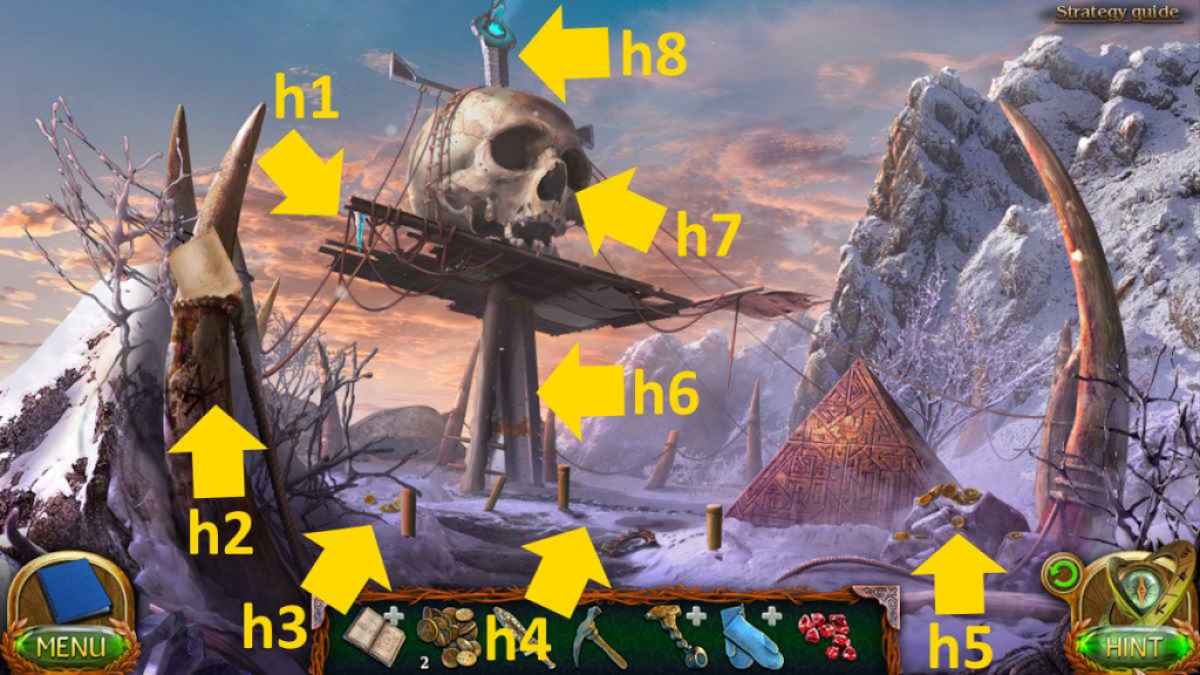
Image by Pro Game Guides
Screenshot by Pro Game Guides
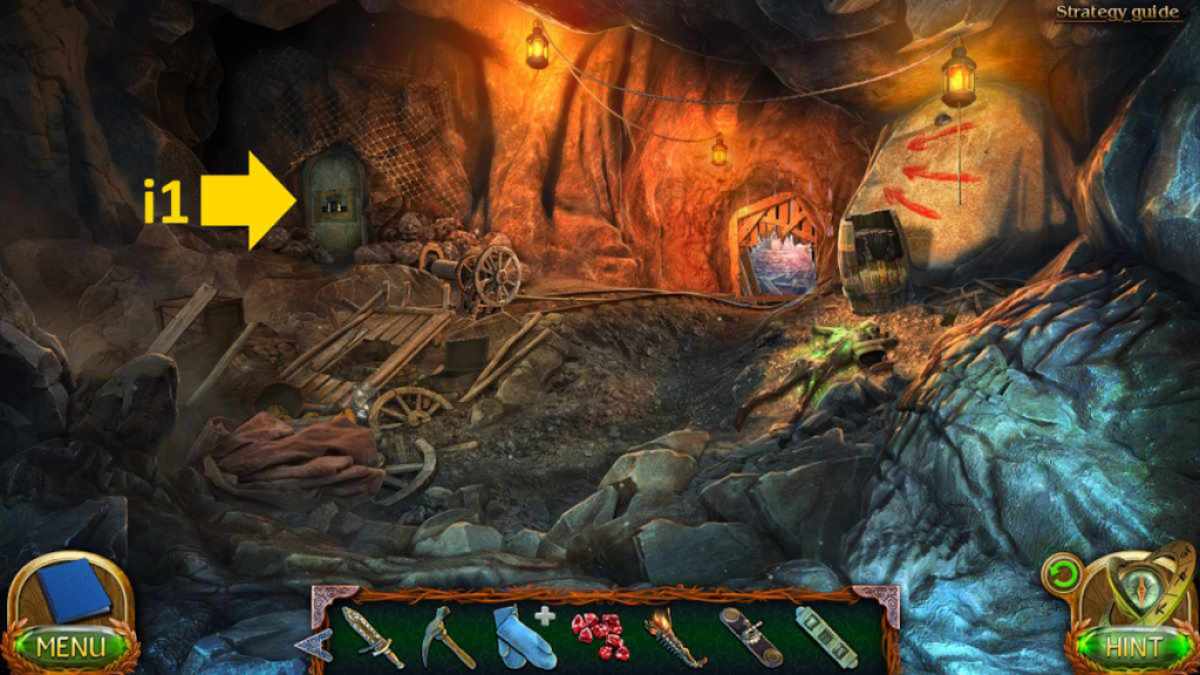
Image by Pro Game Guides
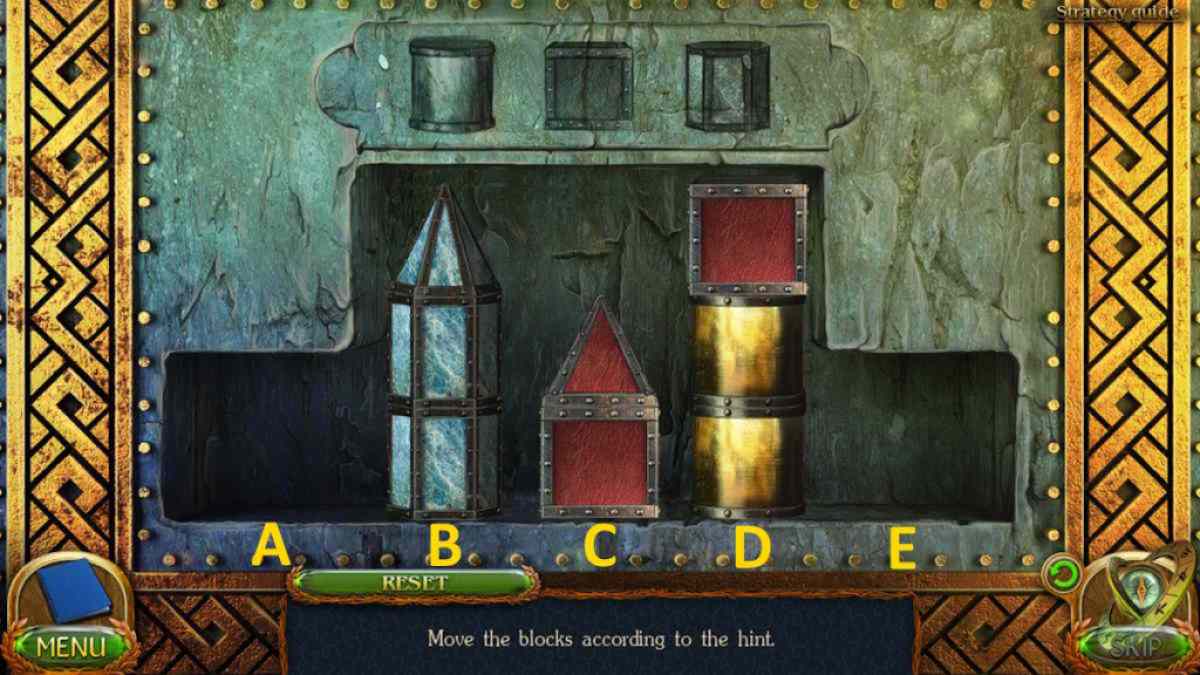
Image by Pro Game Guides
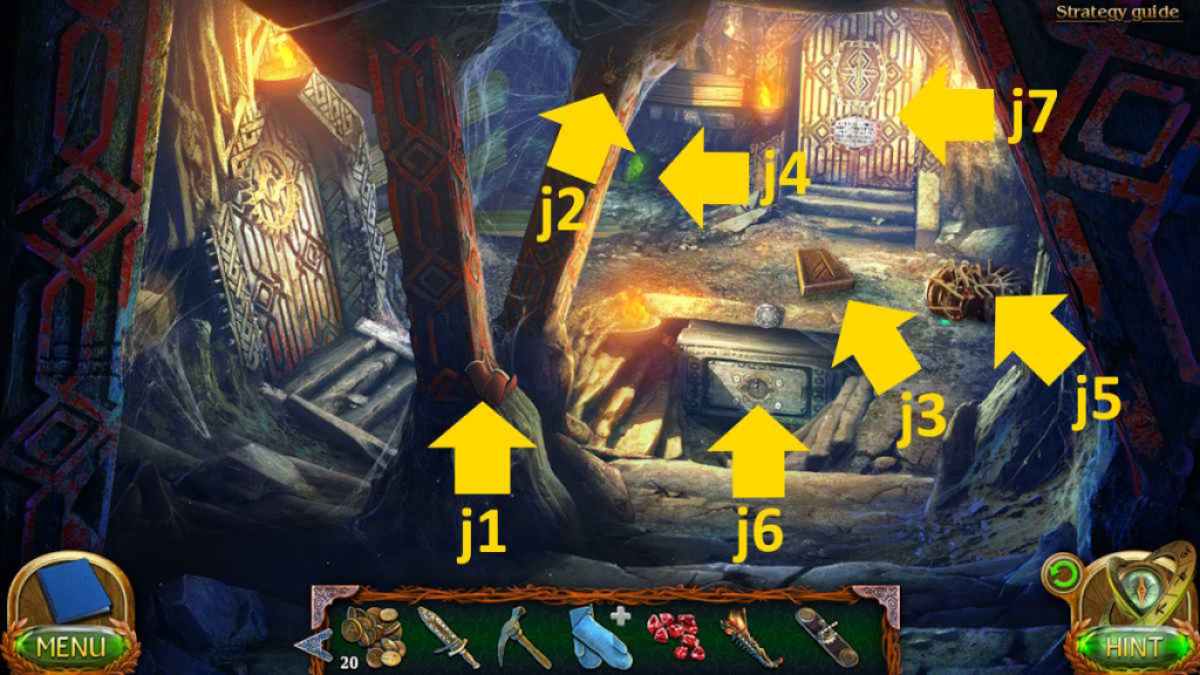
Image by Pro Game Guides
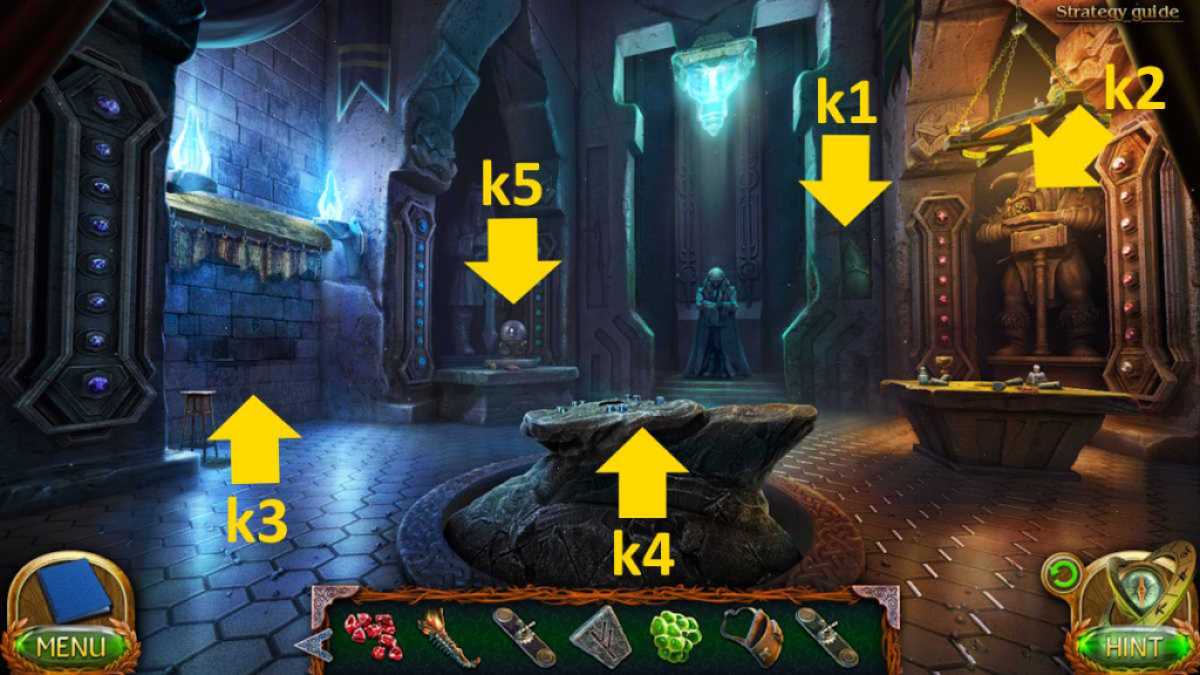
Image by Pro Game Guides
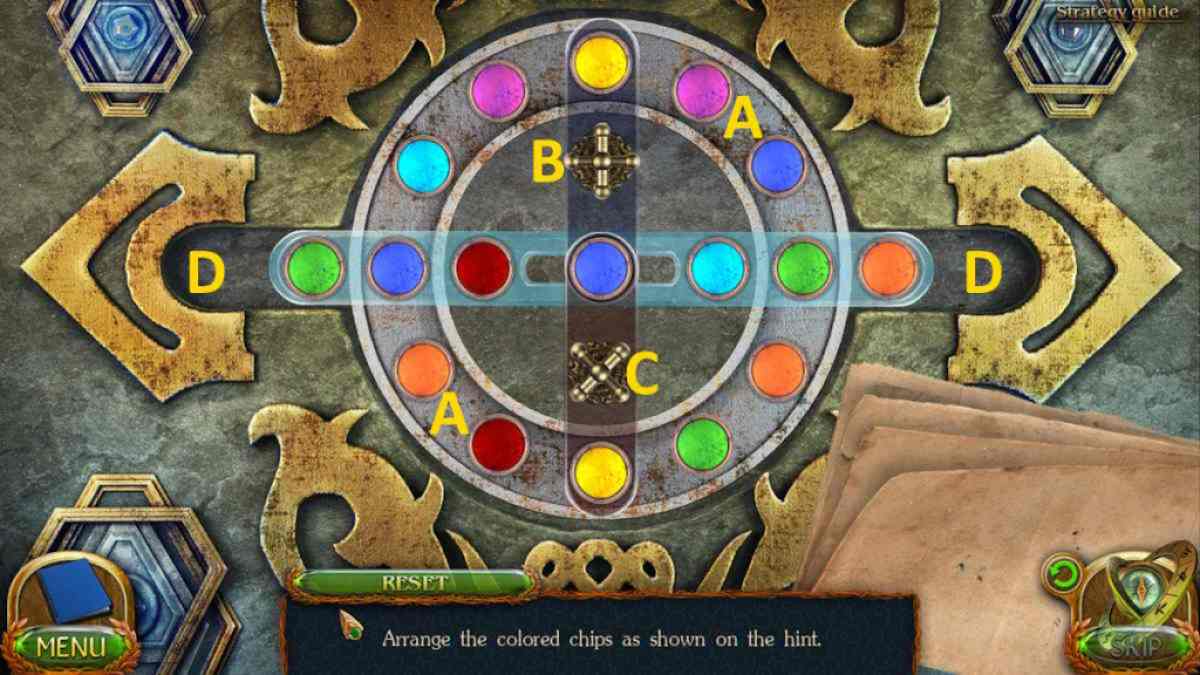
Image by Pro Game Guides
Screenshot by Pro Game Guides
