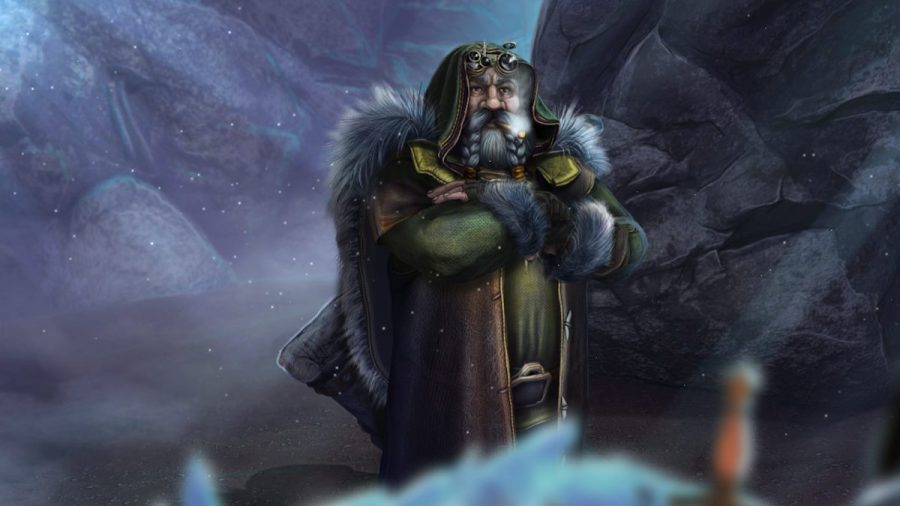
Begin your arctic adventure walkthrough in Lost Lands 5 !
degree - and - fall into place mystifier RPG suffer Lands 5 see Susan returning to the fantasy world once more . Read on below for my full walkthrough and conduct to all the collectable , task , and puzzles .
Lost Lands 5 Walkthrough - Ice Spell full guide & puzzle solutions
I wo n’t be describe how to get from A to B in this guide , as I ’ll alternatively use the location names on the fast change of location mathematical function that ’s approachable in the bottom - right of the screen door . This guide covers the first part of the adventure up until you join up with Maaron in Mounthor ’s Plateau . If you take later parts , you ’ll observe links to my other walkthroughs below the board of contents .
The journey begins
When you get in at the ancient portal take your firstCollectible(a1 ) andMorphing Object(a2 ) , and take theSharp Stone(a3 ) . Use the stone to launch the bag ( a4 ) to find a note , Key , andShovel . Use the shovel to grind out the ladder to begin your first teaser . You need to move the nose candy into the cavity to complete it . See the answer below .
Now you may dawn the ravel to stand it up . Also , cluck the portal ( a5 ) to see that you take a special stone to trigger off it , then click the top of the ladder to move on to theforest track .
Take theMorphing Object(b1 ) , theCollectible(b2 ) , and theRag(b3 ) , then keep click the snow under the rag to get hold someSnow Shoes . choose the shoes and then click the tree diagram ( b4 ) so that you could take the air in the deep snow , give away some firewood ( you ca n’t take it yet ) . attempt to stay on down the way ( b5 ) for a cutscene , take note the key trapped under the methamphetamine hydrochloride , and move forward once more .
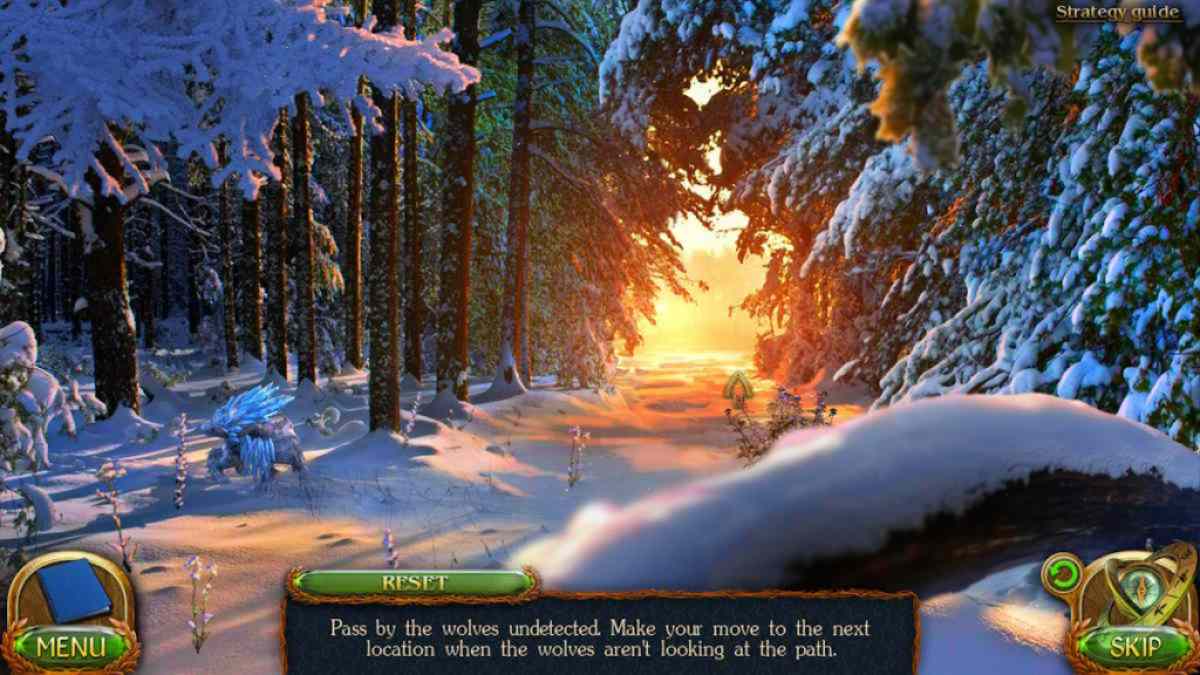
Passing the wolves
To move past the wolves you have to clickwhen the Wolf are n’t looking . For the first one , waitress until it is depend right over its shoulder ( see above ) . For the next two , it ’s the same for the savage on the leftfield but you need to expect until the one on the right is looking properly at the same time .
For the next two , hold off until they ’re both attend behind them together . Then , for the final set of three , again wait until they ’re all calculate over their shoulder in different direction . You ’ll come at theforest edge .
Find theCollectible(c1 ) andMorphing Object(c2 ) , and then take theClub(c3 ) . coalesce the nightclub and rag in your inventory to get aHalf - finished Torch . pick out the two portals ( c4 and c5 ) to see that you also need runes to operate them , and then apply the headstone to openMaaron ’s hutand go inwardly .
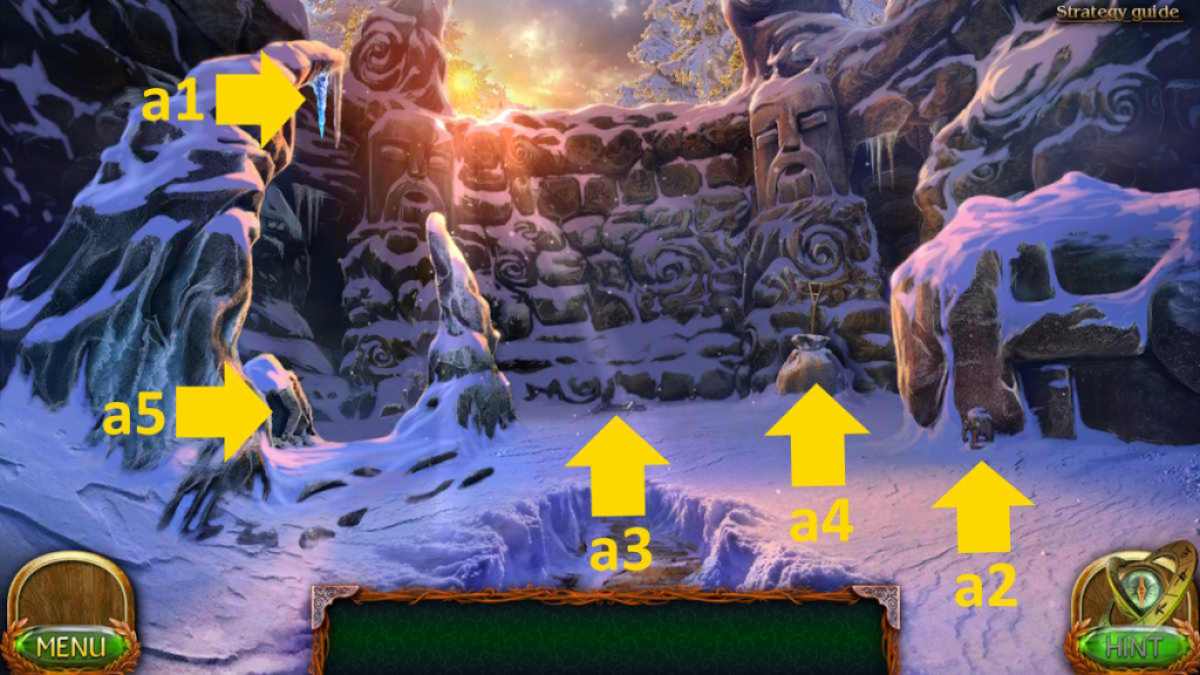
Image by Pro Game Guides
Related : Lost Lands 9 Walkthrough – Full Guide
Maroon’s hut
TheMorphing Objectis on the ledge ( d1 ) and theCollectibleis under the windowpane ( d2 ) . Take theAxe(d3 ) and theWooden Pole(d4 ) , then click the boxershorts ( d5 ) to find your firstManuscript . Keep opening the drawers until you discover theSack of Coins(open it in your inventory to get12 Kyolls ) , while also discover that the top draftsman wo n’t spread out . Note the symbolization carved on the top by the bronze statue .
Select the desk ( d6 ) for a close - up and click the paper to get a new labor . Take theMittenand look at the go Holy Writ . in the end , pick out the back of the elbow room ( d7 ) for a unproblematic overleap object puzzler . Once complete , you ’ll have theMagic Wand . Put it on the desk ( d6 ) for now .
Head outside and use the wooden pole to get theCauldron of Snow(c6 ) . Now return to the forest path and use the axe to roll up someSplinters(b4 ) . Back in Maaron ’s hut you could add the caldron to the fireplace ( d8 ) , impart the splinters , and then use the bellowing in the finale - up to begin the fire burning at the stake . utilize the mitten to take aCauldron of Hot Water .
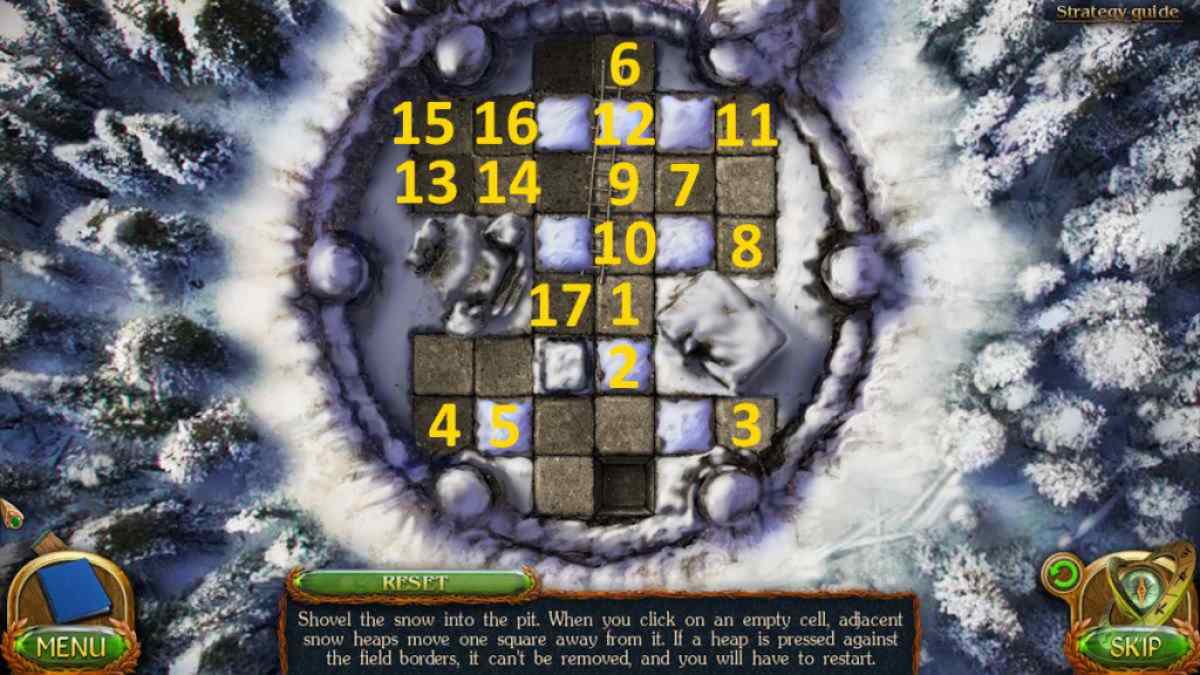
Image by Pro Game Guides
Go back to the timber way and use the cauldron on the frosting ( b5 ) , which allows you to take theKey . Use the key to enter the gate at the forest ’s edge ( c7 ) and move through it to thehalfling small town .
The halfling village
You ’ll find theMorphing Object(e1 ) by the rock music and theCollectible(e2 ) on the fencing . Select the content board ( e3 ) and get aManuscriptand anAwl , along with a note . Select the portal ( e4 ) for a close - up to find aRune Stone Shard , then knock on the room access to the pumpkin workshop ( e5 ) and head inside . After a chat , you ’ll receiveMaaron ’s Cryptexbut you ca n’t afford to buy anything in the shop class yet .
give back to Maaron ’s hovel and append the cryptex to the top of the drawers ( d5 ) . Copy the symbolization on the desk on the cryptex and it will open up , revealing aStatue Drawingand aMechanism Piece . Now you may arrange the statue ’s arms ( also at d5 ) to match the drawing , opening the draftsman so you may take theRune Stone Shard .
Put the shards on the desk ( d6 ) , find theMend spellin the spell Koran , and expend the wand to get out it in a continuous line . Take theRune Stone , head outside , and use it to power up the portal ( c5 ) and head through to thestronghold ruin .
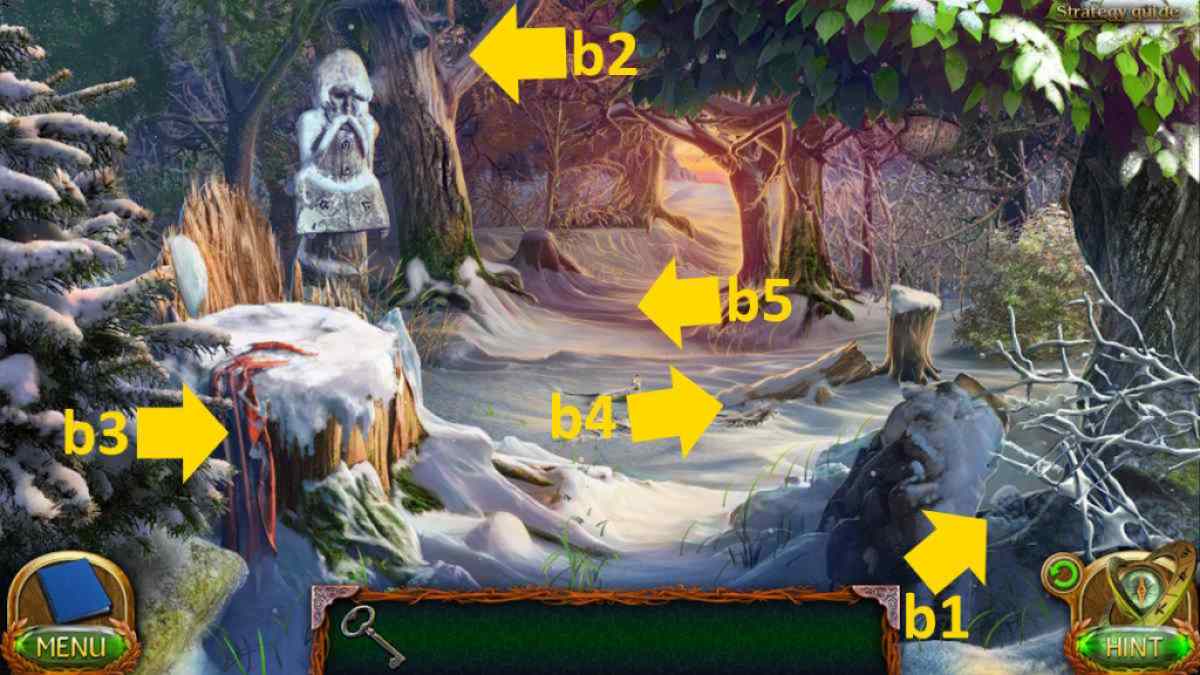
Image by Pro Game Guides
Take theCollectibe(f1 ) and theMorphing Object(f2 ) , then cluck the pedestal to remove the snow and take anEnergy Orb(f3 ) . Place the orb in the statue ( f4 ) to open a compartment and take theFlask Of Essence . pick out it in your inventorying and remove the attached Federal Reserve note , to get word what you have isBasilisk Venom .
Now use the awl to untie the knot ( f5 ) in the canvas and reveal a hole underneath , clicking the reddened cloth in the close - up to give you memory access to thecatacombs of the midget dungeonsbelow .
The dwarf dungeons
Take someGlowing Mushrooms(g1 ) and unfold the air pocket in the same close - up , taking the10 Kyollsinside . Select the bbl ( g2 ) for a finish - up and click it until it give way , give away some icy tar .
Go back to the pumpkin workshop ( e5 ) , corrupt thePickaxe , then return to the cave and mine yourself a bucket full ofTar(g2 ) . deliver to Maaron ’s army hut , melt the mariner in the fire ( d8 ) , and utilize the half - finish blowtorch in it to make aTorch . Now you could go back to the dungeons and use the blowtorch to light the lamp rope ( g2 ) and reveal the rest of the catacomb .
TheCollectible(h1 ) is on the back wall , while theMorphing Object(h2 ) is in the foreground . Take theCart Wheel(h3 ) , then assay to get out through the threshold with the trolley ( h4 ) . After you fail , take theCutting Pliersfrom the winch close - up ( h4 ) . Now click the sheet ( h5 ) to reveal and then finish the dewy-eyed lack objective miniskirt - game ( the code is857 ) . TakeNomianna ’s Box .
Screenshot by Pro Game Guides
tote up the silver dollar to the tram mechanism ( h4 ) and use it to wind the trolley back to you . Click the rocks in the end - up to add them to the trolley , also ingest theCrimson Stonethat is underneath them . liberate the trolley once more and this time it will smash through the door , give you access toFolnur ’s dwelling . After talking to Folnur , he ’ll give you6 Kyolls .
Grab theMorphing Object(i1 ) and theCollectible(i2 ) , then pick out the pile of rock by the minecart ( i3 ) . Move them to regain a lever tumbler and tot up it to the maw in the same conclusion - up to unwrap the young improved mine handcart .
Related : Lost Lands 3 Full Walkthrough ( Golden Curse )
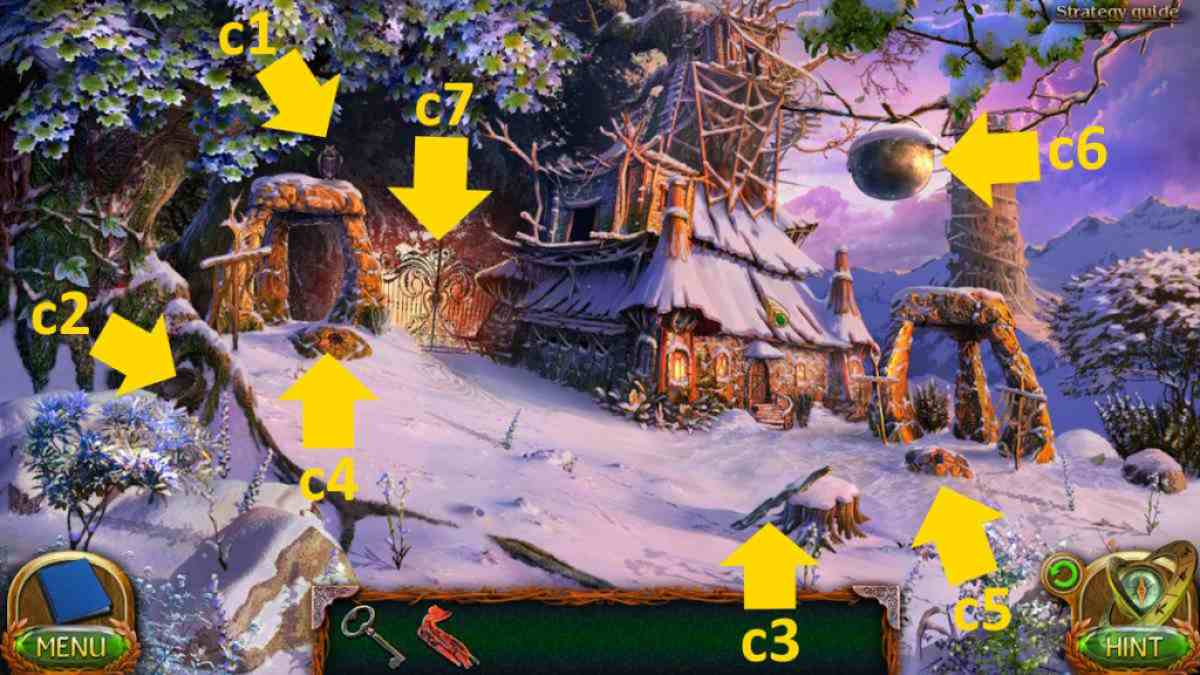
Image by Pro Game Guides
Making the omnivorous acid
Take theBlacksmith ’s Tongs(j1 ) , find you need some heatonite to launch the mine go-cart ( by pressing j2 for a close - up ) , then take anEmpty Flaskand aManuscriptfrom the stove ( j3 ) , also noting what you require to make the omnivorous acid . you could do the first few stages now ( all in the stove close - up ) . I like to do this to free up room in the inventory , so it ’s easy to manage :
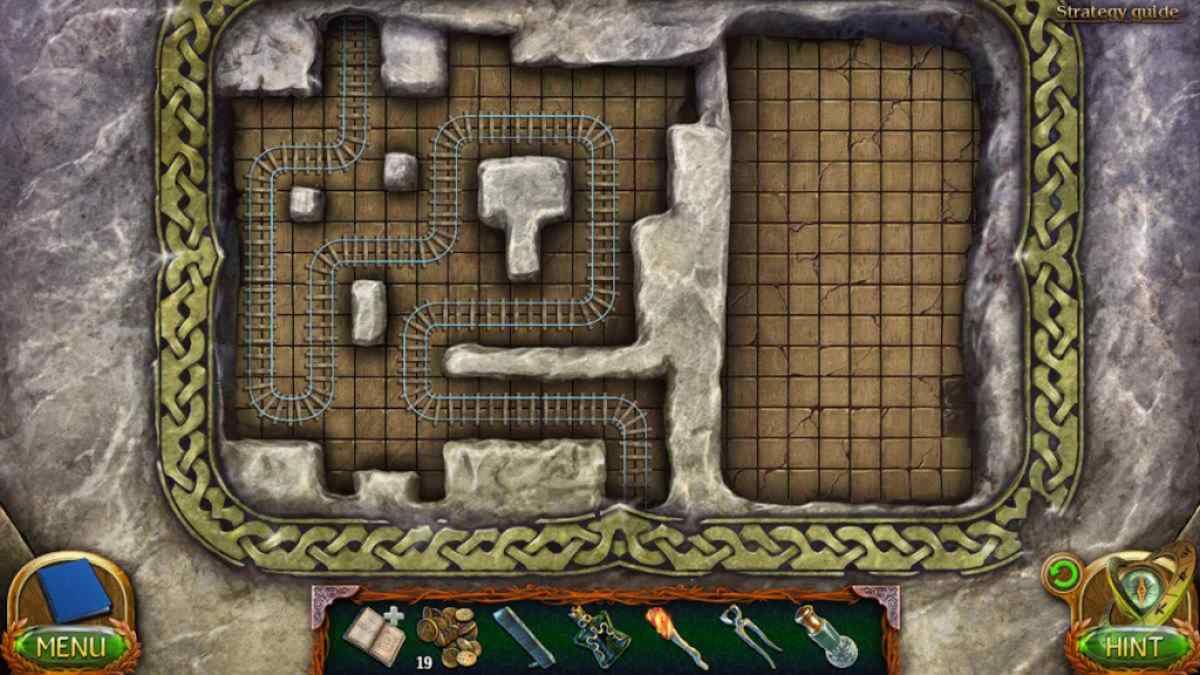
Now select the motorcar to the leftfield of the mine cart ( j4 ) to begin a trail puzzle . Once unadulterated ( see the solution above if you ’re stuck ) , select the region just behind that cart ( j5 ) and utilize the flask to collect someCave Tears . Put the cave tears by the oven ( j3 ) , remove the cork from the glass beaker that ’s on the stove , then add the basilisk venom . you may now take theOmnivorous Acid .
maneuver up to the stronghold and expend the Elvis on the wire report the pickle ( f6 ) then select the uncover fix to start a missing object miniskirt - game , after which you ’ll receive theHeatoniteyou need . give back to the dungeon , add it to the cart ( j2 ) , light it with the torch , and move on to the cave closing .
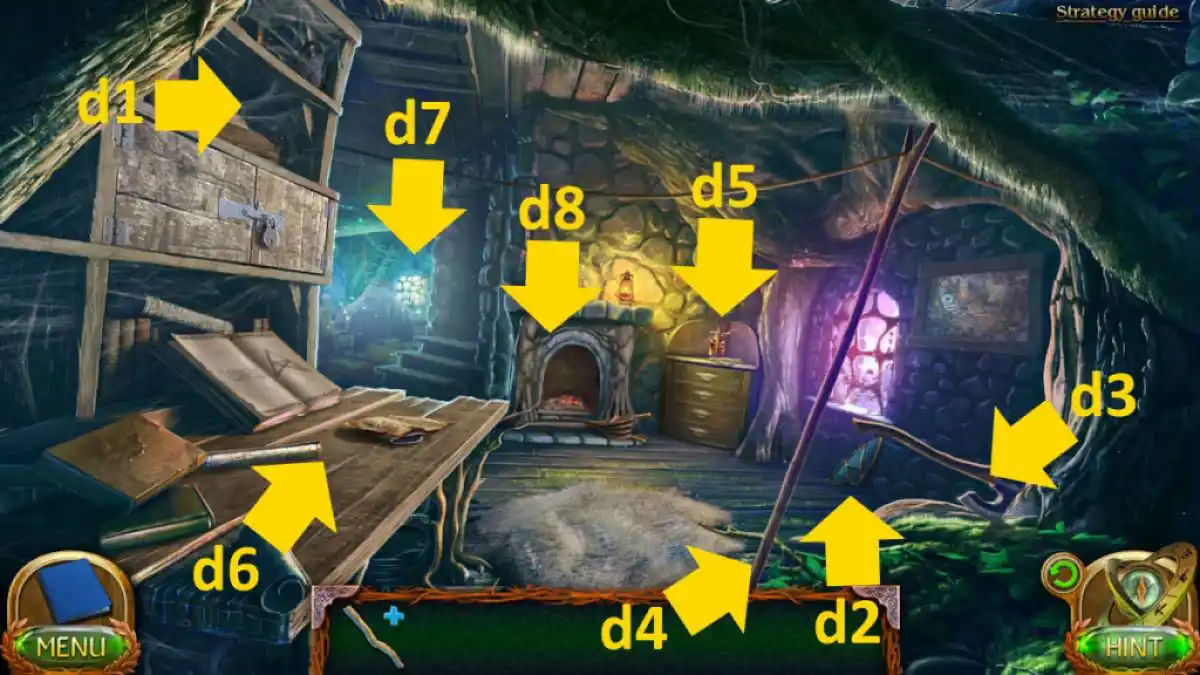
Image by Pro Game Guides
The cave end
try out the bodies ( k1 ) to find8 Kyolls , aMechanism Piece , and aDagger . TheCollectible(k2 ) is in the arch and theMorphing Object(k3 ) is on the rock . Take anotherMechanism Piecefrom the snow ( k4 ) , and then click the broken stairs ( k5 ) to start a emplacement puzzler ( you ca n’t go wrong here ) . Once complete , snap the army hut above ( k6 ) to find aManuscript . Add the three mechanics piece , click the four switching , and root for the lever to lower the bridges .
render to the shop ( e5 ) , give Nomianna her box seat and she ’ll give you6 Kyolls . This gives you enough to get theWinter Clothing Set , so buy it and head back to the cave final stage . Now you may choose the top of the bridges ( k7 ) and move on to the expiration to the mountains .
TheCollectibleis hang from the rock-and-roll ( l1 ) , while theMorphing Objectis in the foreground ( l2 ) . Select the frozen passenger ( l3 ) and use the woolly mullein to mellow the ice . Click them again for a close - up , take theKey , and use it to open up the pack in the same close - up . Take theLightning ElementandFlaks of Rumfrom inside the clique , utilise the rummy to warm up up the fallen rider , and then take hisCharged Staff .
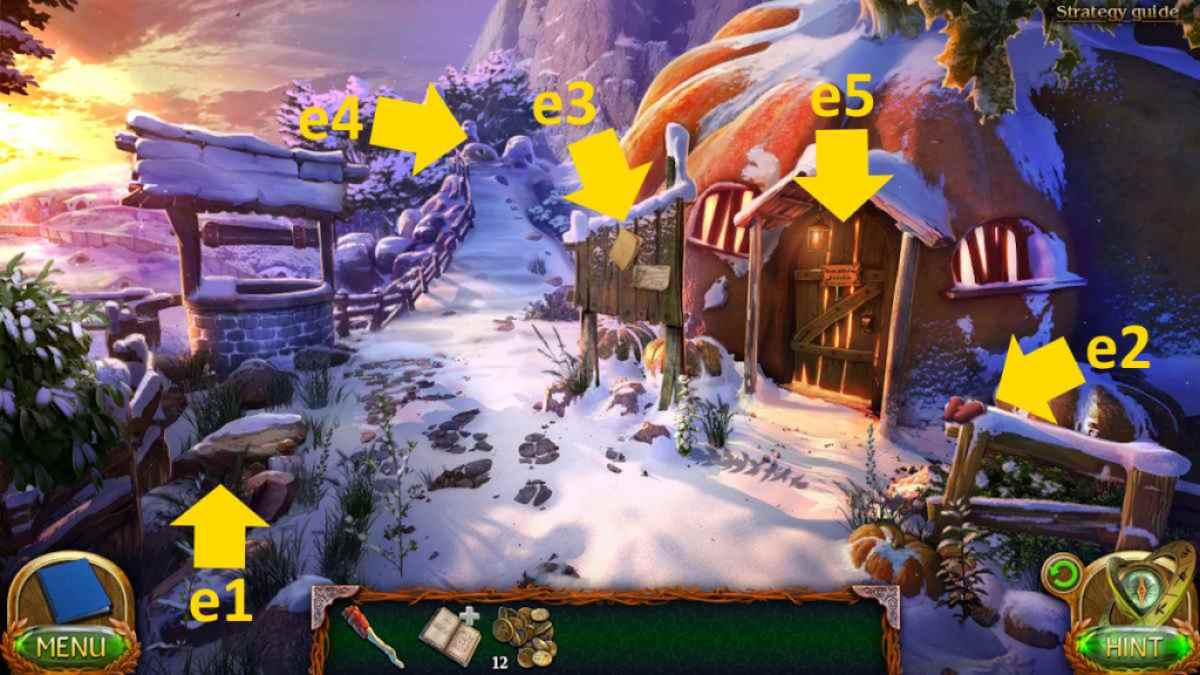
Image by Pro Game Guides
Now select the ice barrier ( l4 ) and use the staff to break in through . After the cut scene , select the area on the basis that was bring out ( l5 ) and click the rocks a few meter to unveil a forget giant stiff . You ca n’t take the book yet , but click the skull and habituate the tongs to take away aGiant ’s Tooth . While you ’re here , you’re able to also examine the possible pass through the rocks ( l6 ) , but you do n’t have the right gear to get through yet .
come back to the pumpkin store and sell the monster ’s tooth for 30 Kyolls . Which gives you enough to bribe the Rope . Go back to the mountains and move through the pass behind where the barrier stood ( l4 ) , arriving at the Mounthor ’s Plateau . After another cut scene Maaron gives you theFlames Element .
To keep on the dangerous undertaking with me here at Pro Game Guides , click through to myLost Lands 5 Walkthrough , part 2 !
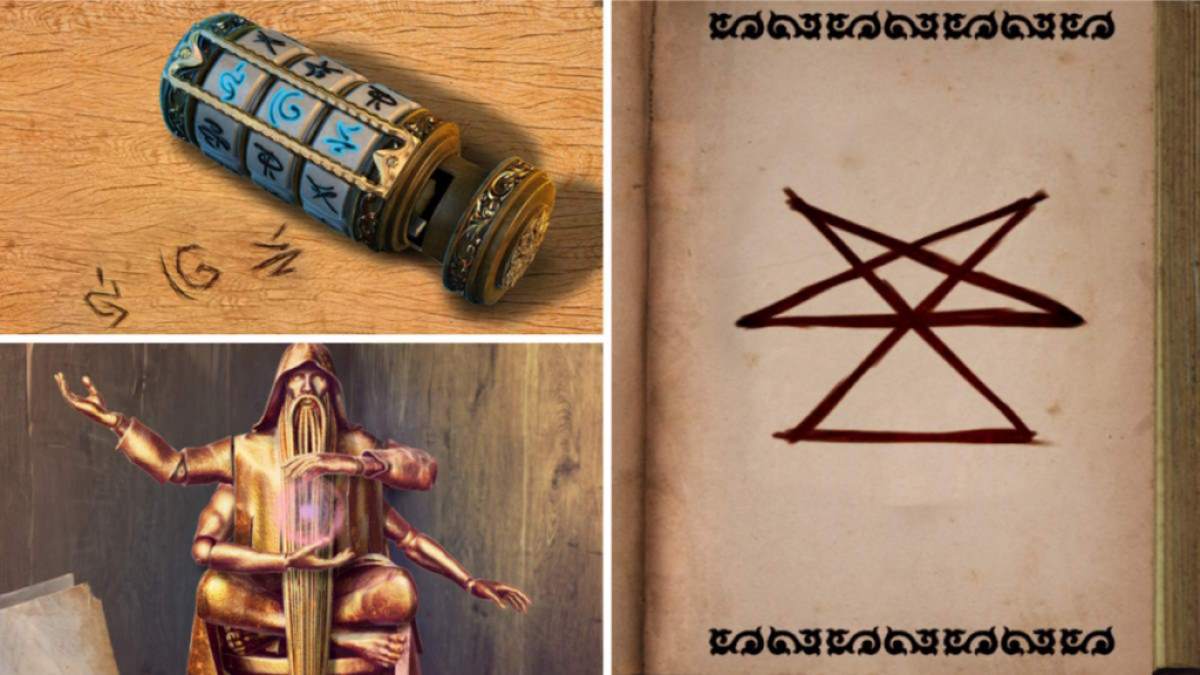
Image by Pro Game Guides
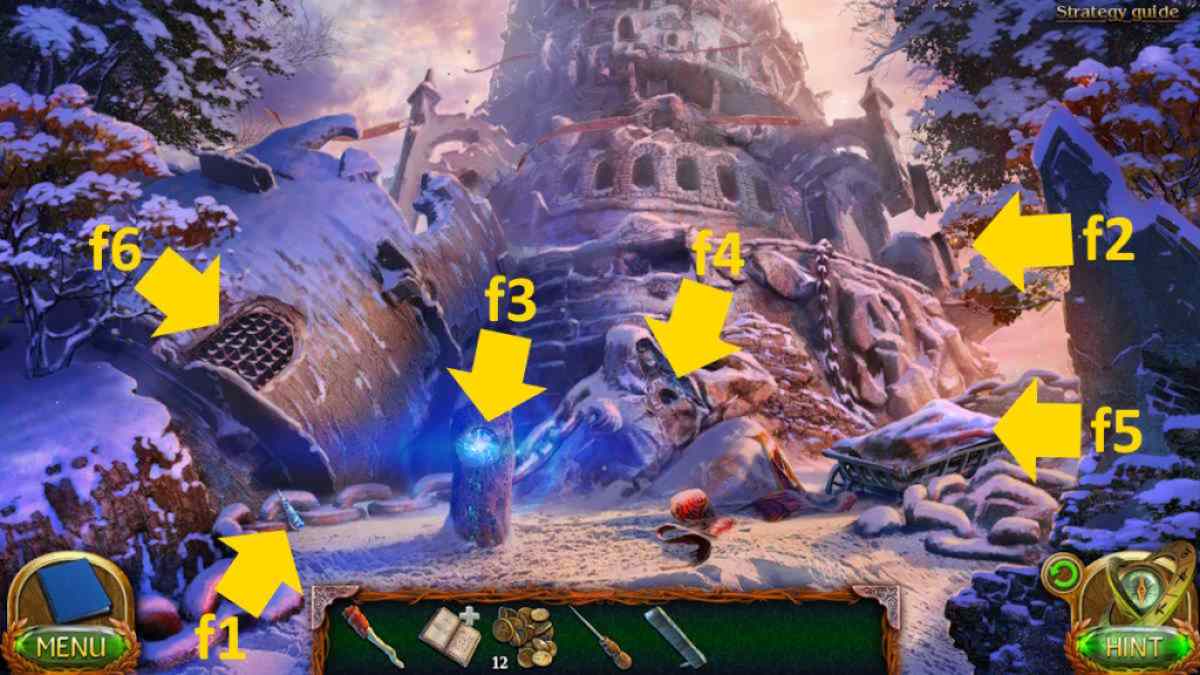
Image by Pro Game Guides
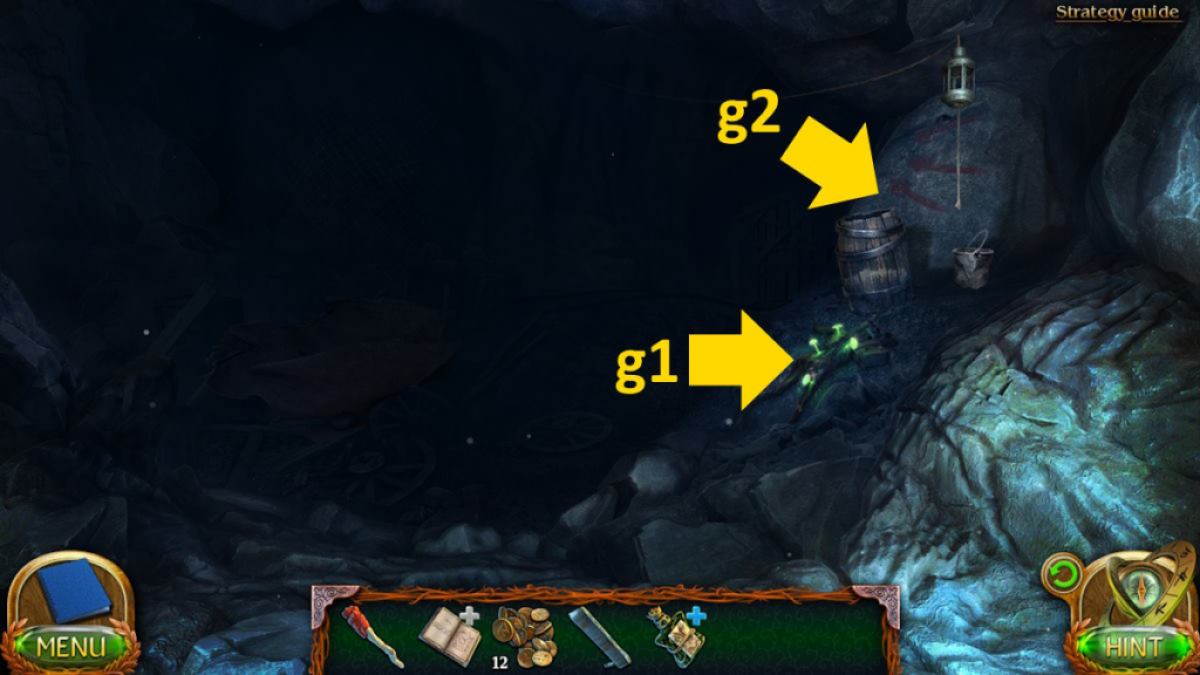
Image by Pro Game Guides
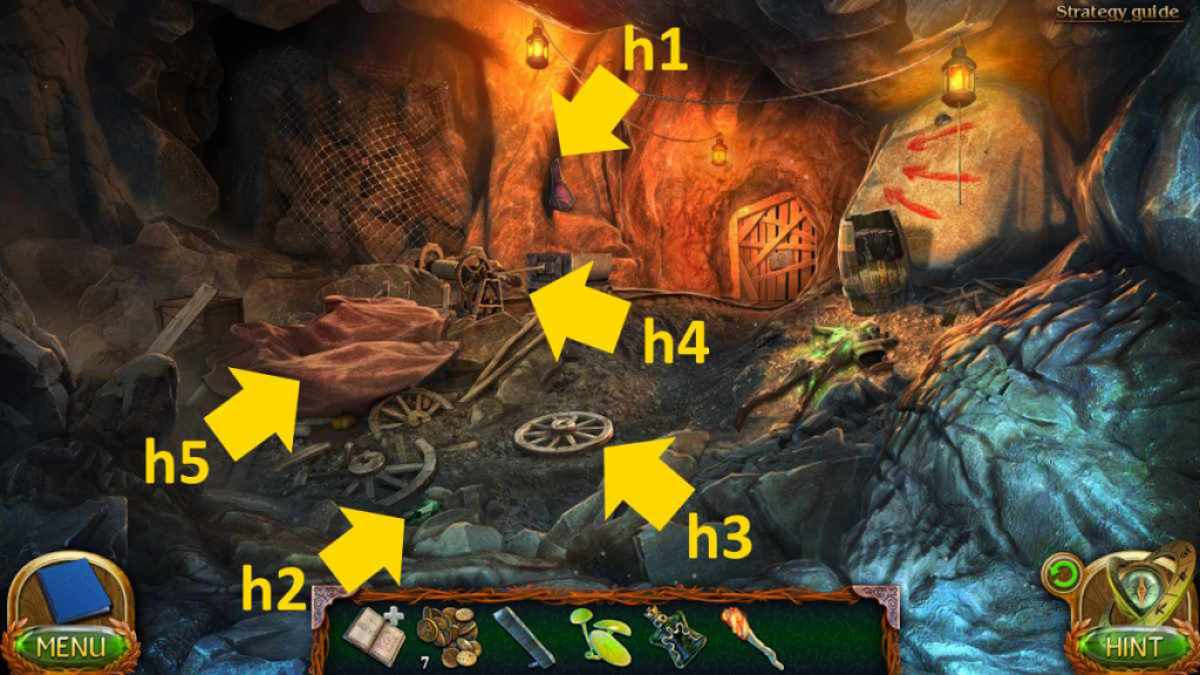
Image by Pro Game Guides
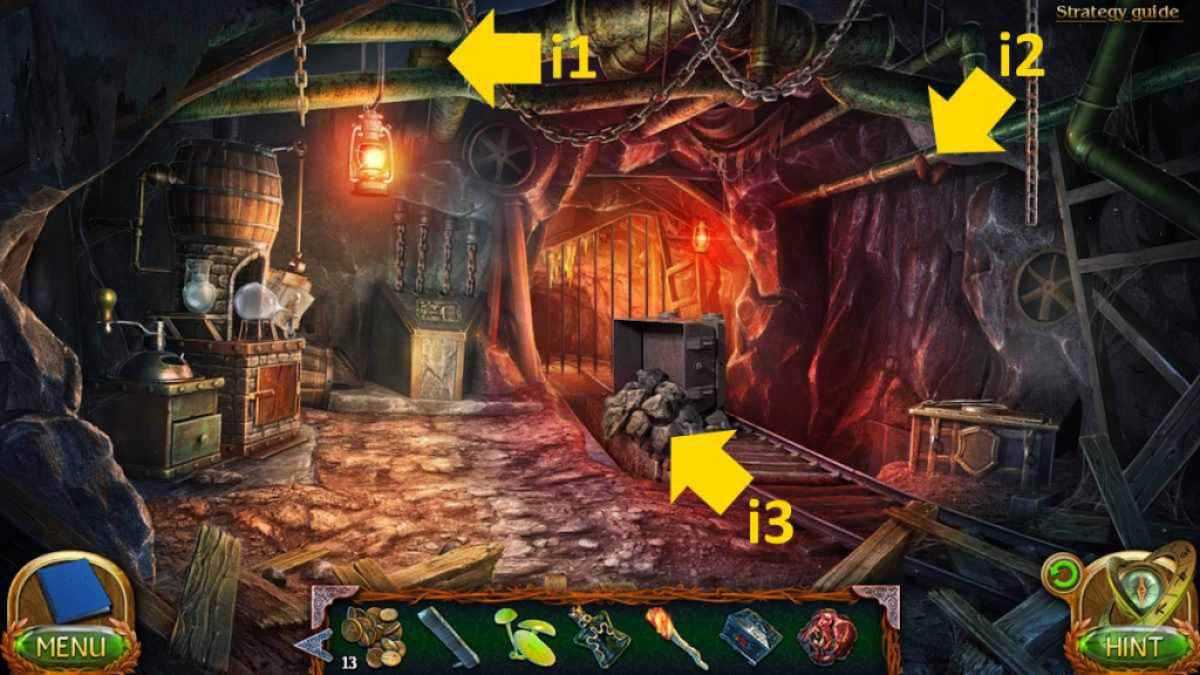
Image by Pro Game Guides
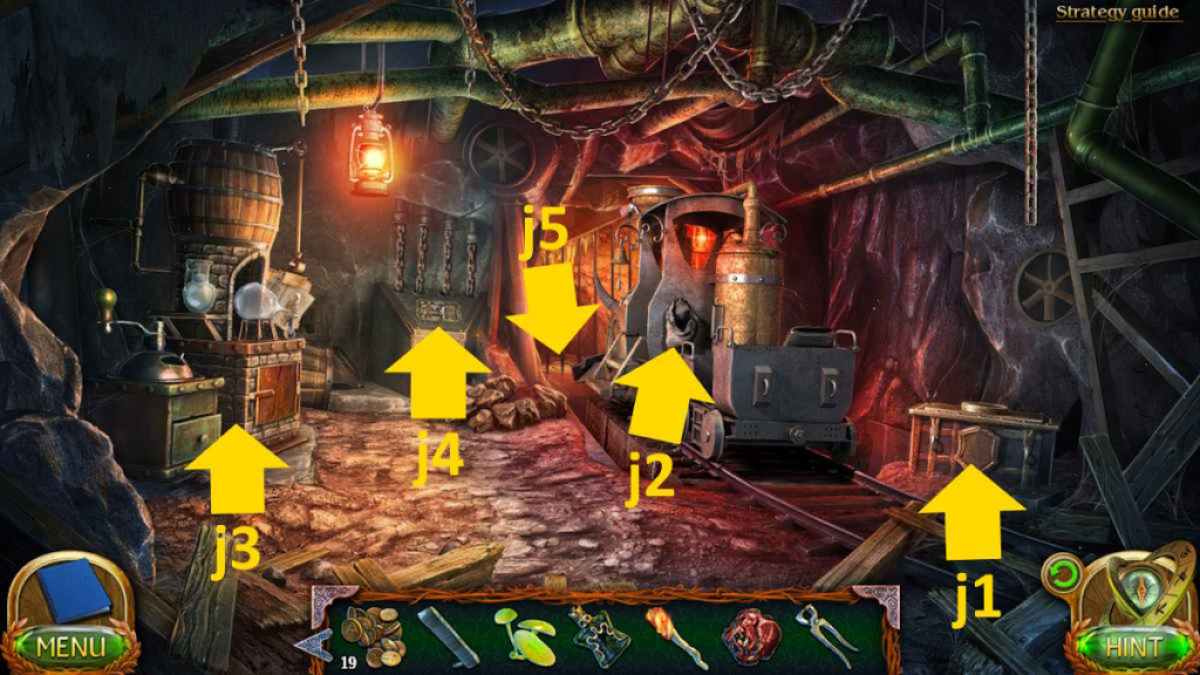
Image by Pro Game Guides
Screenshot by Pro Game Guides
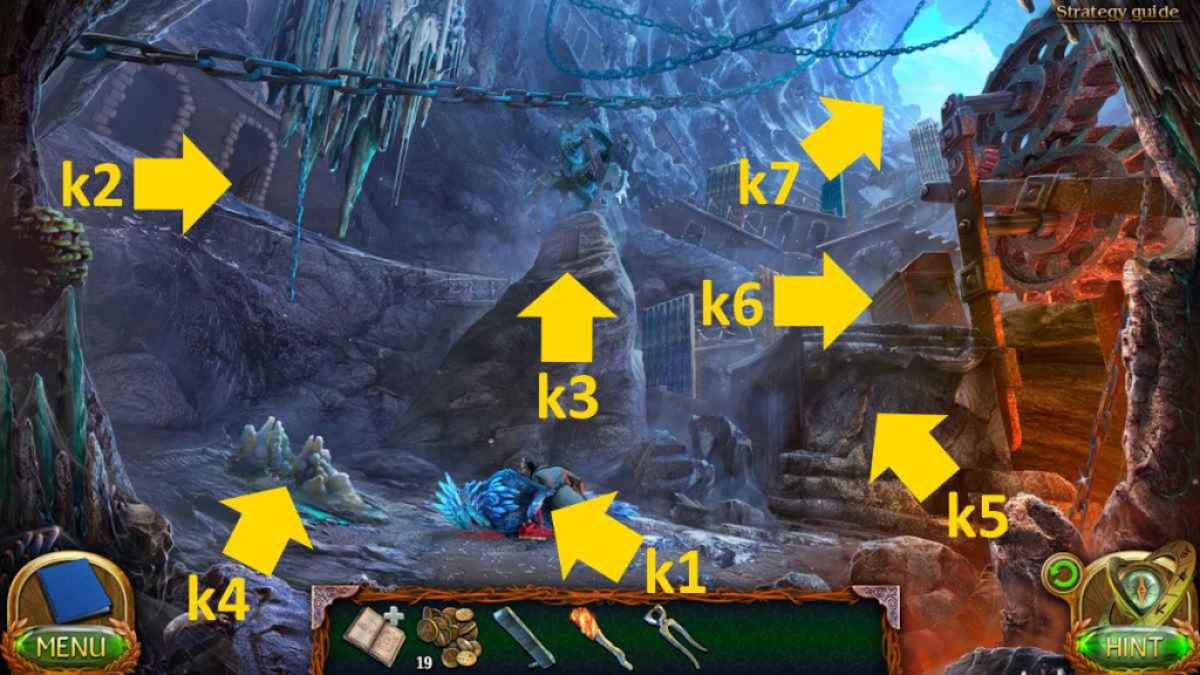
Image by Pro Game Guides
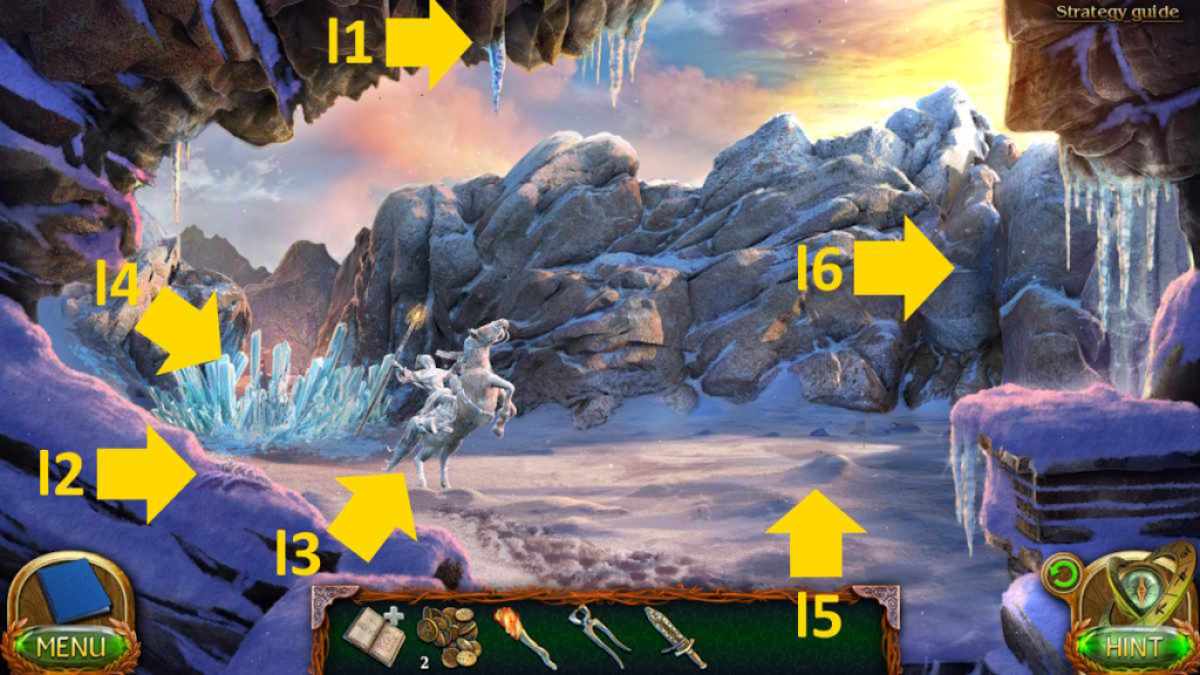
Image by Pro Game Guides
