The thrilling end !
Lost Lands is a democratic series of point - and - flick mystifier dangerous undertaking stick with our heroine , Susan , as she save the public . This is part 4 of my Lost Lands 4 , The Wanderer , walkthrough .
Lost Lands 4: The Wanderer Full Walkthrough, part 4
This part of the guide ask you from when you restore the Water of Life near the Pangonian ’s household to the last of the story . This part of the guide does not include the bonus chapter .
If you ’re front for an earlier part of the story , click through to myLost Lands 4 Walkthroughhub varlet , where you’re able to detect links to all the former parts , which have full puzzle solution and all the collectable locations you ask .
The pantheon ritual
Get a close - up of the large tilt ( a1 ) to move it and take theNeedles , then click the bag and take thePlanet ModelandSmall Boxfrom inside . dawn the treestump ( a2 ) next , and put the box on the floor by the dirt ball in the hole . tick the box again to open it , then employ the phonograph needle to catch some creepy-crawly crawlies . in conclusion , nibble up theThermite Casket .
Move to the crypt and use the Water of Life in a pot on the clover ( b1 ) patch up to take up a memory puzzle . You need to observe all nine four - leaf clovers to fill in the undertaking .
To make it easy , I ’ve put an image of the trefoil above . Once done , you ’ll receive aHandful of Clover .
Move to the Pantheon and put the thermite casket and trefoil on the communion table ( the rummy and gigantic brain too , if you have n’t done so already ) . You ’re now quick to prepare the rite :
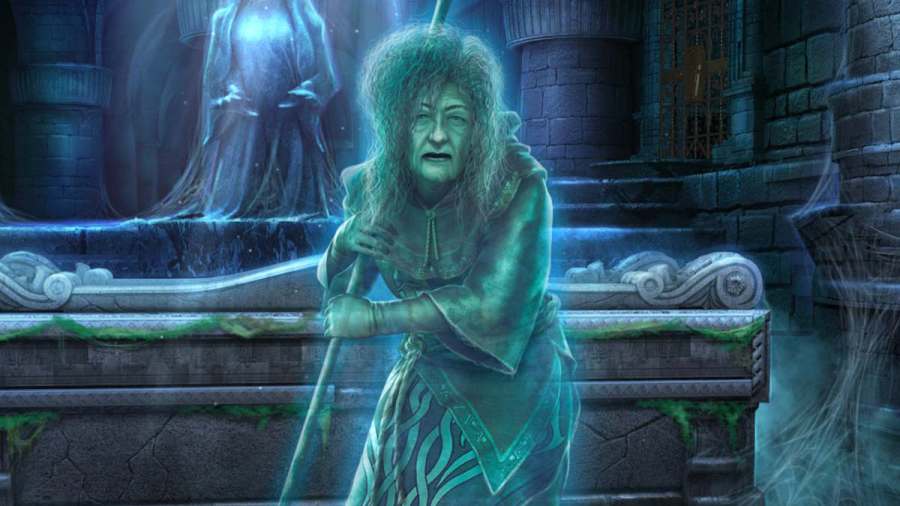
Once done , several spirit will appear around the communion table . Go back to the crypt , and the witch ’s spirit will be float above the trefoil plot of ground ( b1 ) . get across the witch Fahira for a cut scene , after which you could click the crypt itself ( b2 ) , which is now open . TakeFahira ’s Handfrom the casket , along with aRung .
The Oblivion Stone
Head to the Earl ’s castle residence hall , utilise Fahira ’s handwriting to open up the door on the leftover ( c1 ) , and manoeuver inside .
TheCollectibleis on the shelf on the right ( d1 ) , while theMorphing Objectis on the floor on the left field of the desk ( d2 ) , where you also need to pick up asecond Rung . Select the subject ( d3 ) to get your finalManuscript , then fall into place it again to open it . Take theKeyandSnake Figurinefrom inside and learn the note about the chest ’s ignition lock . Use the key on the door at the top of the step ( d4 ) to start up a missing objects puzzle .
If you ’re struggling with the weighing section , you need to count each color until it balances , after which it will move into the loge on the left field of the scales ( 4 yellow , 7 greenish , 16 red ) . You need to wait for the scales to settle each prison term , then the Oliver Stone will move mechanically . Once complete , you ’ll get theGlass .
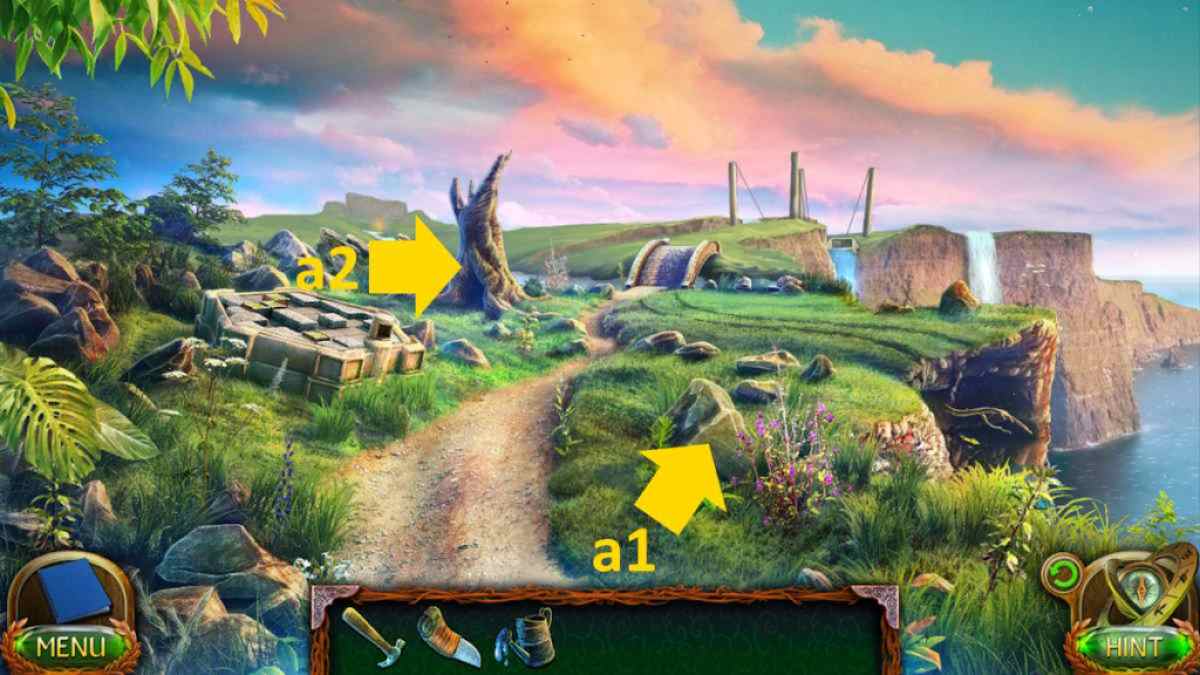
Image by Pro Game Guides
Go to the secret passage , select the statue on the right ( e1 ) , and tot any remain figurines you have in your stocktaking ( Snake , Owl , Elephant ) . tick the statue again afterward to get thePrism of Spellsand theOblivion Stone .
Now go to the pot room and snap the window ( f1 ) , add the glass to start a jigsaw puzzle ( see the solution below ) . Once accomplished , expend the Prism of Spells on the window and note the highlighted sections ( they get score in your journal for loose access ) .
come back to the lab , select the chest ( d5 ) , dawn the copy of the window , and press the five sections you saw in white on the window .

Image by Pro Game Guides
This begins a fragment regaining mystifier , where you need to move the section to make the prototype below . Once complete , click the now open bureau , take theUnusual KeyandVile , and read the banker’s bill .
connect : Lost Lands 7 Walkthrough – Full pathfinder
The Earl’s ship
Go to the main refuge and use the ampul in the fountain ( f2 ) to get theWater of Death . Now move back to Pangonian Island drop descent and utilise the water of decease on the fountain ( g1 ) to receive theWater Vial . you’re able to now go to the vitality reservoir for a cutscene with Maaron , after which you’re able to use the strange samara on the pillar ( f3 ) to open up a compartment . Take theHand Figurineand athird Rung .
guide up to the Pangonian ’s house and use the hand figurine to open up the trunk ( f4 ) , take theTracing Paper , Skull Pieces , and afourth Rung . Use the paper in your armoury to get aWrench .
Now go to the corridor of tribulation , pick out the skull statue ( h1 ) , pick up your finalMap Piecein the close - up , and add the skull pieces to begin a jigsaw - style puzzler ( completed mystifier below ) .
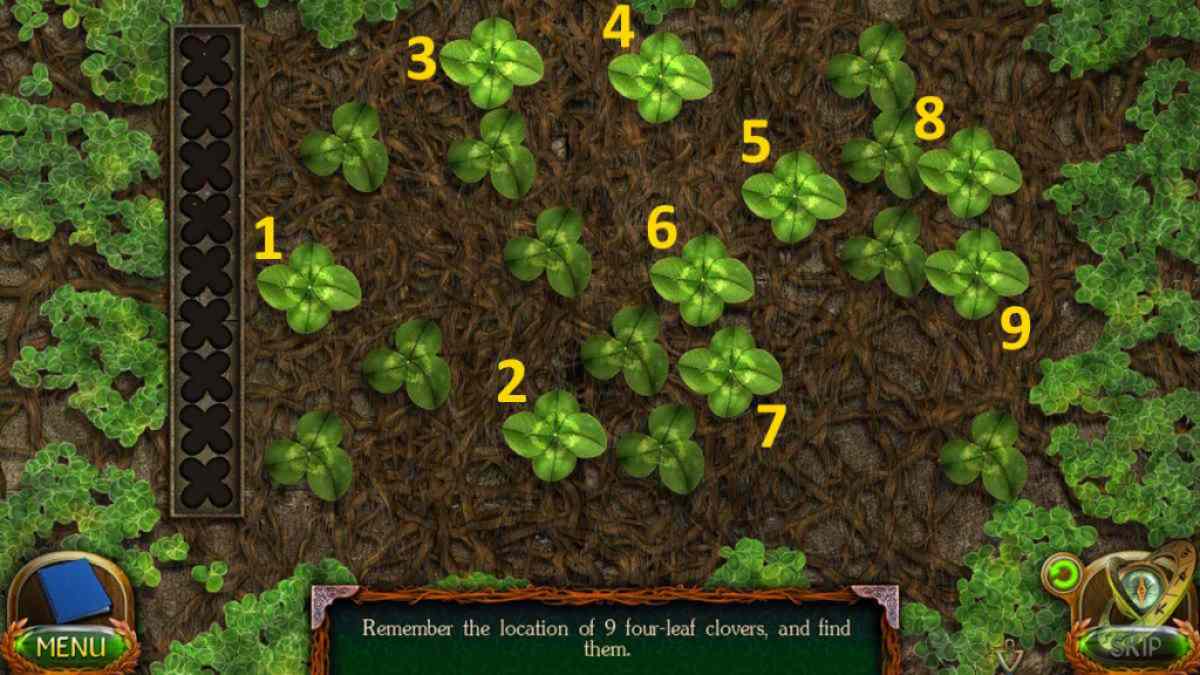
Image by Pro Game Guides
Once complete , pick up theMan Figurinethat drops from its mouth .
Move up to the lighthouse , choose the get on telescope ( i1 ) , and use the wrench on the lens to get theBroken Lens . Back in the lab , pick out the chalkboard ( d6 ) , use the mallet on the chalk to jam it , and then click it again to transfer it to the board . Now , you could apply the tracing newspaper on the chalkboard , then click the charcoal control stick on the trace paper to get thePunch Card .
lead to the secret passage and use the punchcard on the book in the closing curtain - up of the ripe statue ( e1 ) , whichmarks the runes you take to knowin your diary .
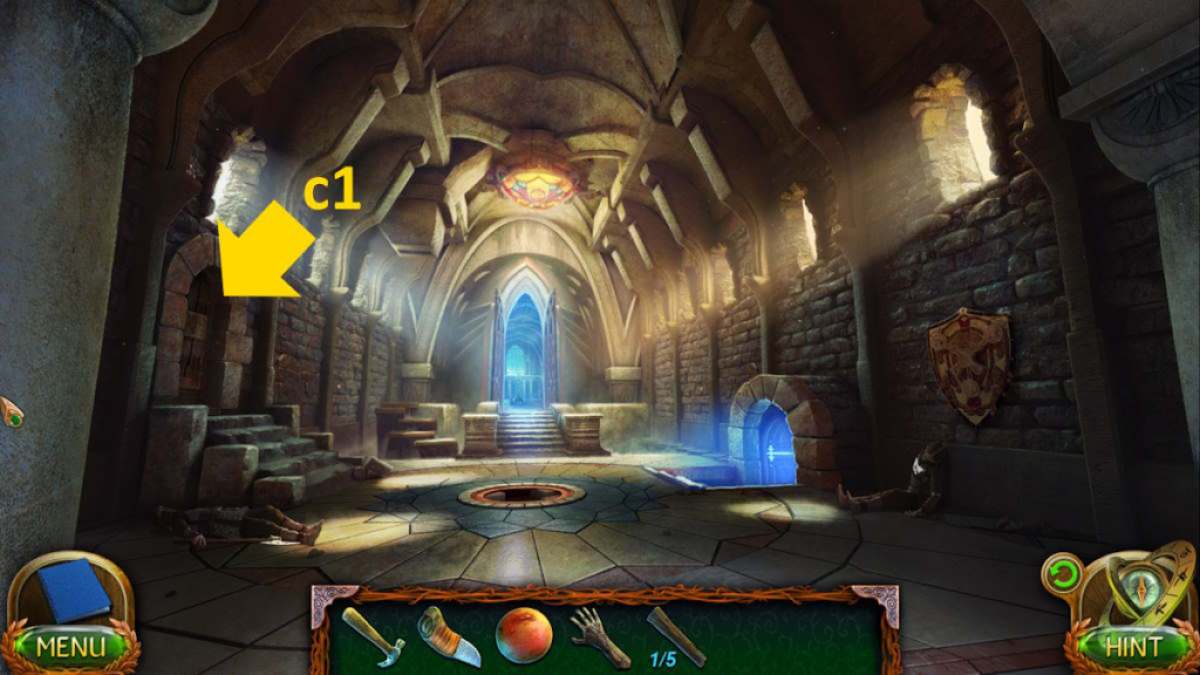
Image by Pro Game Guides
Go to the wall next and use the man figurine on the blocked cave entrance ( j1 ) . Take theOar . you’re able to now go to the cliff lineage and expend the oar on the boat ( g2 ) . you’re able to now pick out the gravy boat to head out to the Earl ’s ship .
Firing the cannon
Select the cabin door ( k1 ) for a ending - up , use up theKey Ring , and then clicking the board on the right in the same close - up to bar the doorway . TheMorphing Objectcan be encounter on the handrail ( k2 ) and theCollectiblebehind the pail ( k3 ) .
Now pick out the bole ( k4 ) , take thefifth and final Rung , and then add the keyring . employ the fourth key to enter the bole and take theWire Cutters . Select the hold ( k5 ) , use the wirecutters on the chains , take theGloves , then cluck the lift to enter the barrel here and take theFlint . choose the cannon ( k6 ) and use the flint to dismount the flannel mullein in the close - up .
repay to the drop bloodline and use the gloves to collect theWeed(g3 ) . you may now go back to the paries and append the weed to the fire ( j2 ) , make smoke to mark the wall ’s position . Now , you’re able to devolve to the ship and take out the wall with the shank ( k6 ) . You ’ll involve to do the pursuit :
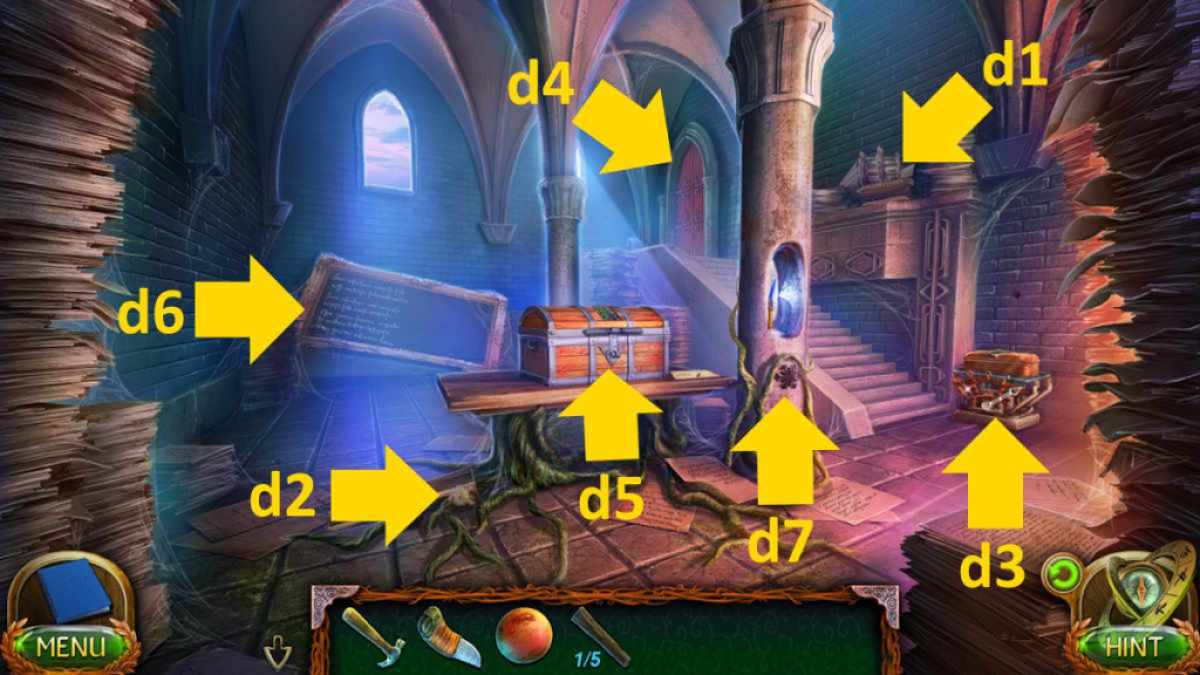
Image by Pro Game Guides
You need to hit the wall three sentence to take it down ( you ’ll see your progress on the leftfield of the filmdom , with green ticking denote hits ) . To fire again , simply echo this five - step operation . I get I always hit if you snap the butt as it is in its down track from its top right locating , moving down toward the bottom bequeath . Once complete , you ’ll get a cutscene .
Awakening the captain
Go back to the energy reservoir and cluck the rear cube ( l1 ) for a close - up , need the greenTile . bring the tile to the pillar ( l2 ) to go a tile - campaign puzzle . If you need a manus with this one , habituate the figure of speech below as a citation :
The door to the square block are now open , so select it ( l2 ) and expend the water vial on the chieftain and then the oblivion stone . Nine glow dots seem . Trace the form of the three runes you catch by using the punchcard ( they ’re in your journal ) . You need to do them in society , as mark in the image below . Once done , you ’ll get a cutscene . Click the captain later on , and he ’ll give you aKey .
Related : Lost Lands 6 Walkthrough – Mistakes of the Past
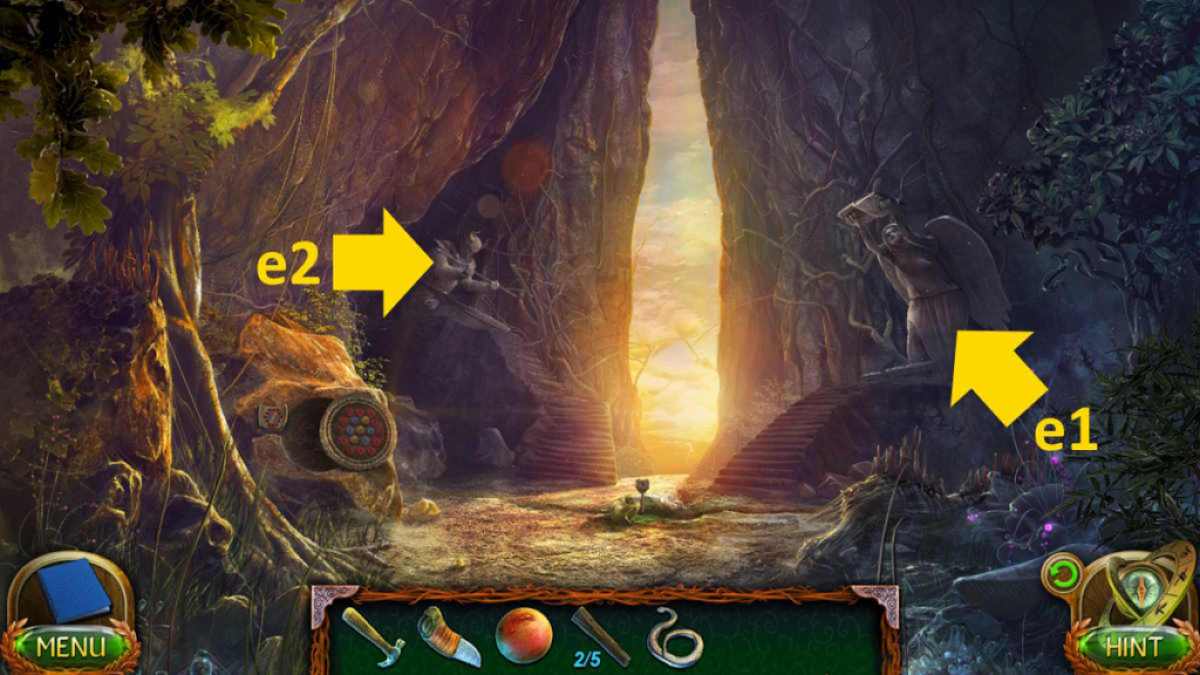
Image by Pro Game Guides
The potion and the sword
Return to the captain ’s house and apply the key on the desk ( m1 ) , opening it to get theKnob , also noting the time ( 10.10 ) carved inside the desk drawer . Set the clock ( m2 ) to 10 - yesteryear 10 and the face will open up , giving you a newKey . Use the rungs ( and the hammer ) to repair the ladder ( m3 ) , then click the trapdoor above for a close - up . apply the knob to unlock the loft door , starting a simple object - find game . Once complete , take theSmall Box .
Move to the wreck , use the key to launch the cabin room access ( n1 ) , and head inside . The finalMorphing Objectis on the ground ( o1 ) and the lastCollectibleis on the windowsill ( o2 ) . Select the mesa ( o3 ) , take theMusic Schematics , and move the methamphetamine to find aKey . Use the key on the modest box in your inventory to get aComponentand aDog Figurine .
open up the dresser ( o4 ) and take theClothesand theDeer Figurine . Add the component to the globe ( o5 ) to open it and take theLion Figurine . Next , select the organ ( o6 ) , append the euphony schematic drawing in the close - up . Play the notes in the correct order ( the click the gambol button on the pipe organ ) and you ’ll get theStone Pieceand aPlanet model .
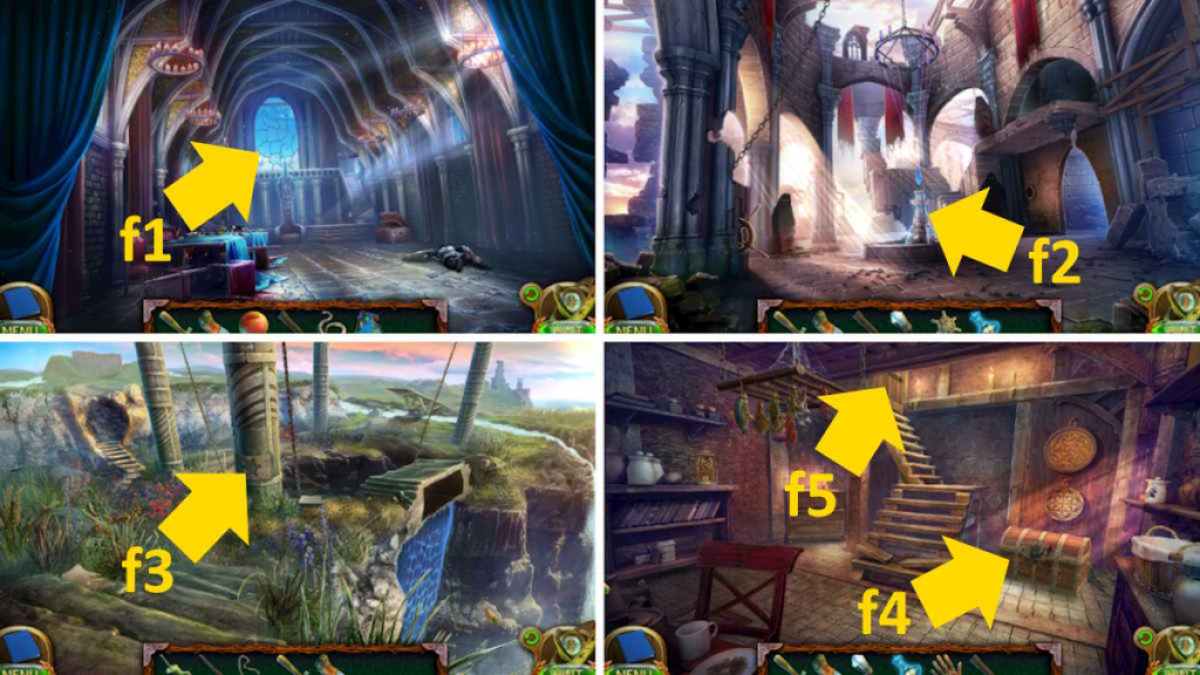
Image by Pro Game Guides
Go to the secret passage , select the statue on the left ( e2 ) , add up the three statuette , and take theHalf Moonand theSword . Move to the castle entry and add the rock bit to the fountain ( p1 ) to create a boiling pool of lava . Return to Maaron and the captain ( at l2 ) next , and give the clothes and the blade to the captain .
The last request
Go to the Pangonian ’s house , speak to her , and she ’ll give you a brush . Move to the cliff descent , habituate the brushing on the headstone ( g4 ) , and make a note of the symbolic representation you unveil . Return to the Pangonian and she ’ll give you herFishing Net .
guide over to the ferry and use the net in the pool ( q1 ) to getFishand aSnowflake . Now you’re able to go to the wreck , give the fish to the sea gull ( q2 ) , then utilise the tongue to dig out aMollusk . apply the tongue on the mollusc in your inventory to also get aShell . Back in the laboratory , expend the snowflake on the pillar ( d7 ) and take theSting of Frost(also note the symbols carve on the column ) .
Go back and give the mollusk to Maaron ( l2 ) , who will give you aSkull . Take this to the archmage ’s grave , use it to open up the iron gates ( b3 ) , and take theWhale Oil . Also , click the burner in the close - up , which will illuminate the wooden box . Add the half - moon to it and the box will open , allow you to take thePick Axe .
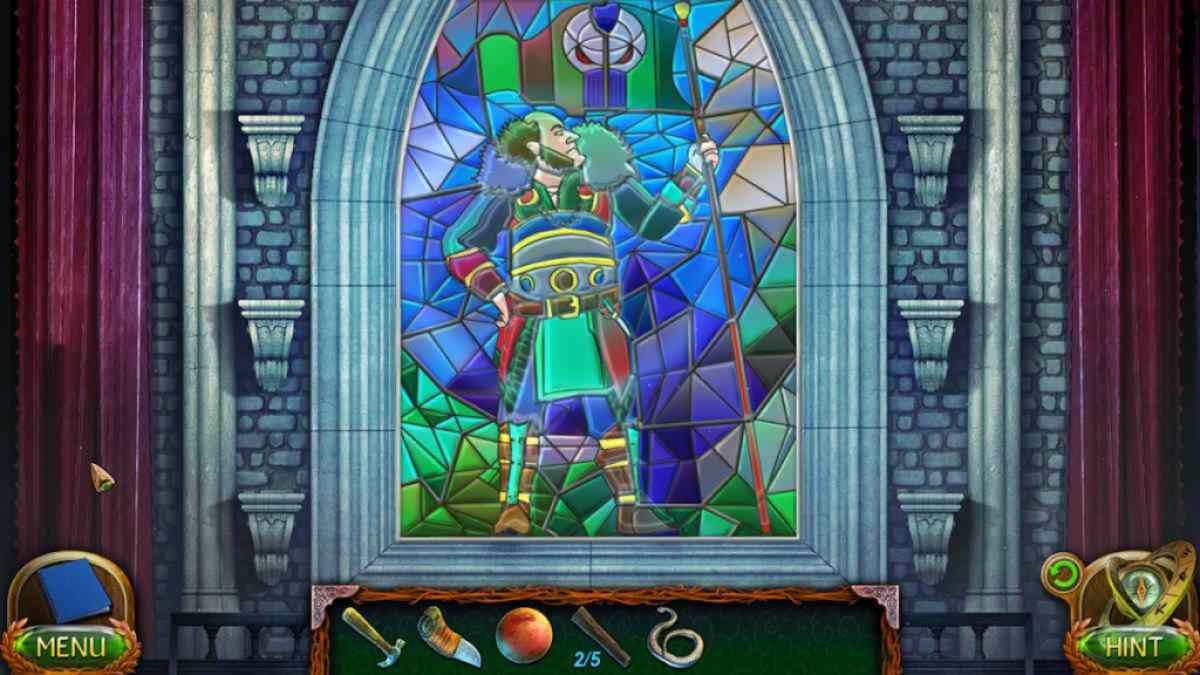
Image by Pro Game Guides
Move to the wall , expend the pick axe on the slope ( j3 ) , and take someClay . pick out the Lucius Clay in your stock-taking and add the busted lens . Once you ’ve added all the pieces , you ’ll receive theGlass in the Clay .
Return to the lava fountain at the castle entree ( p1 ) , append the methamphetamine in the clay , then use the sting of frost on it . You now need to trace the runes you saw when you pick it up ( d7 ) incisively as you did when you opened the block . Once done , use the hammer on the mold and take theLens .
Go to the Pangonian ’s mansion once more , use the whale oil on the ringlet ( f5 ) , and then enter the code to reveal a final missing physical object puzzle . Once complete , take thePlanet Model . Go to the portal and add any continue major planet fashion model to the display ( r1 ) there . Move the planets to the correct positions ( see below ) , and take theLight .
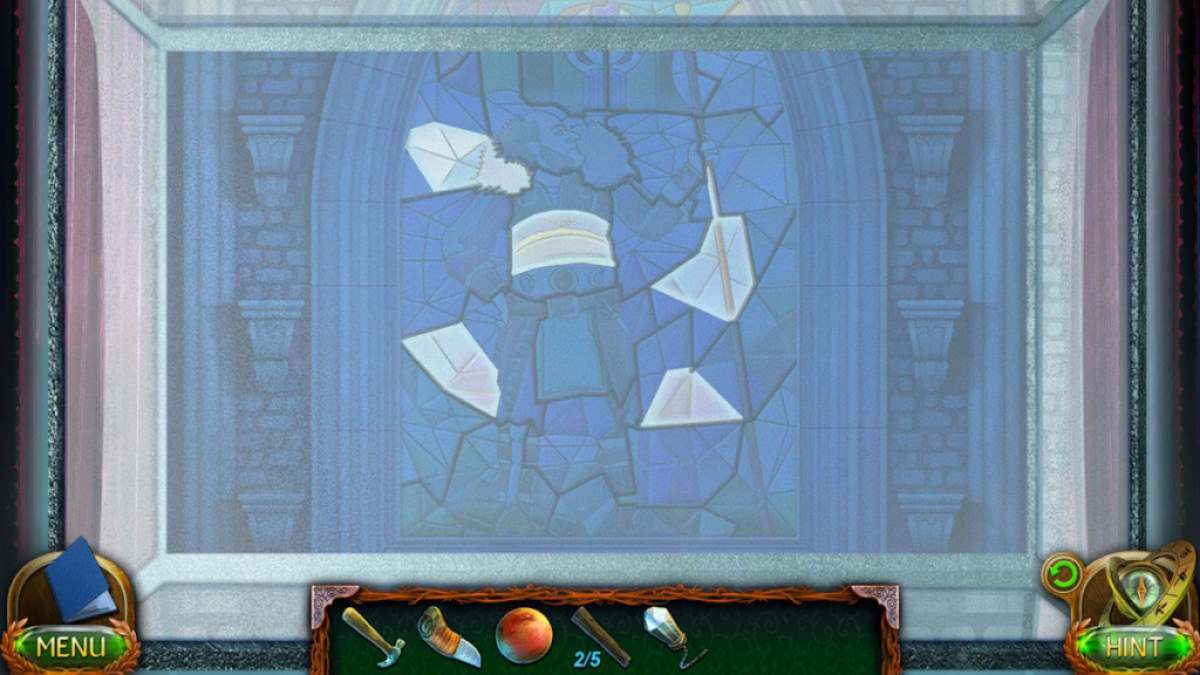
Image by Pro Game Guides
Now go to the lighthouse , append the racing shell to the ring ( i2 ) , add the lens to the telescope ( i1 ) , and add the Christ Within to the central mechanism ( i3 ) . Click the telescope ( i1 ) to come out a light teaser . First , splay the three discs until they look like the trope below . Next , cluck the directing arrow to fire up the political machine .
This will center the Earl ’s ship in your sights , set off the final swing scene .
Congratulations ! You ’ve completed Lost Lands 4 . If you want to continue with Pro Game Guides , you could click through to myLost Lands 4 Bonus Chapter Walkthrough !
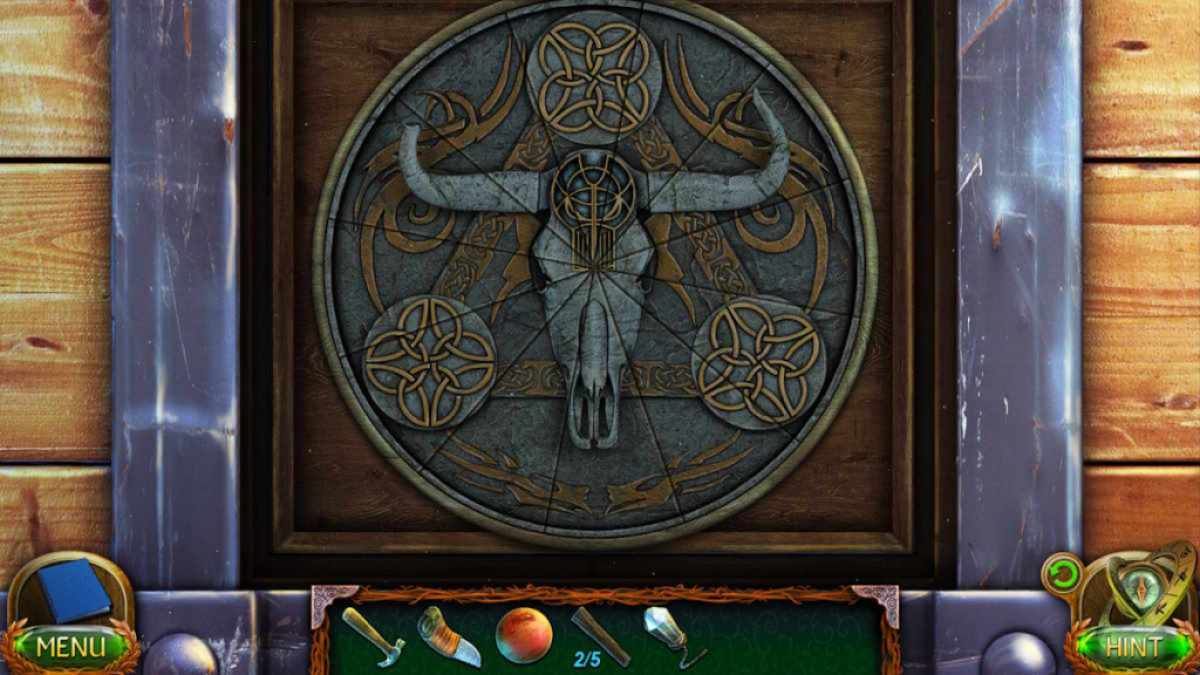
Image by Pro Game Guides
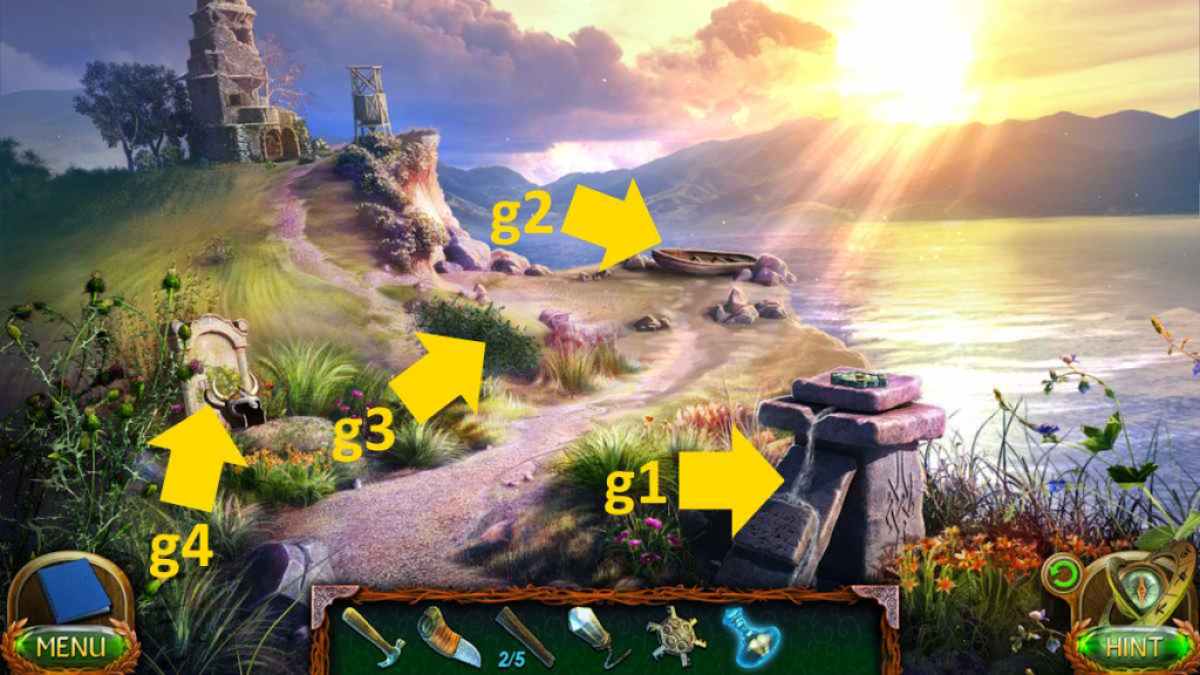
Image by Pro Game Guides
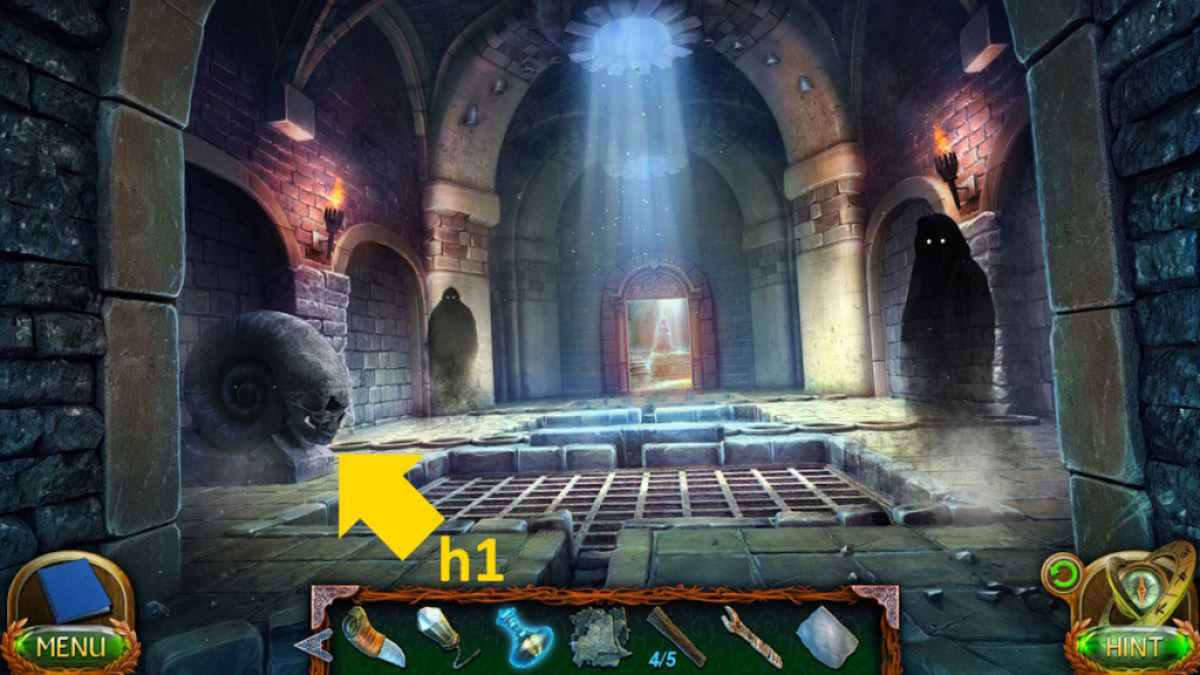
Image by Pro Game Guides
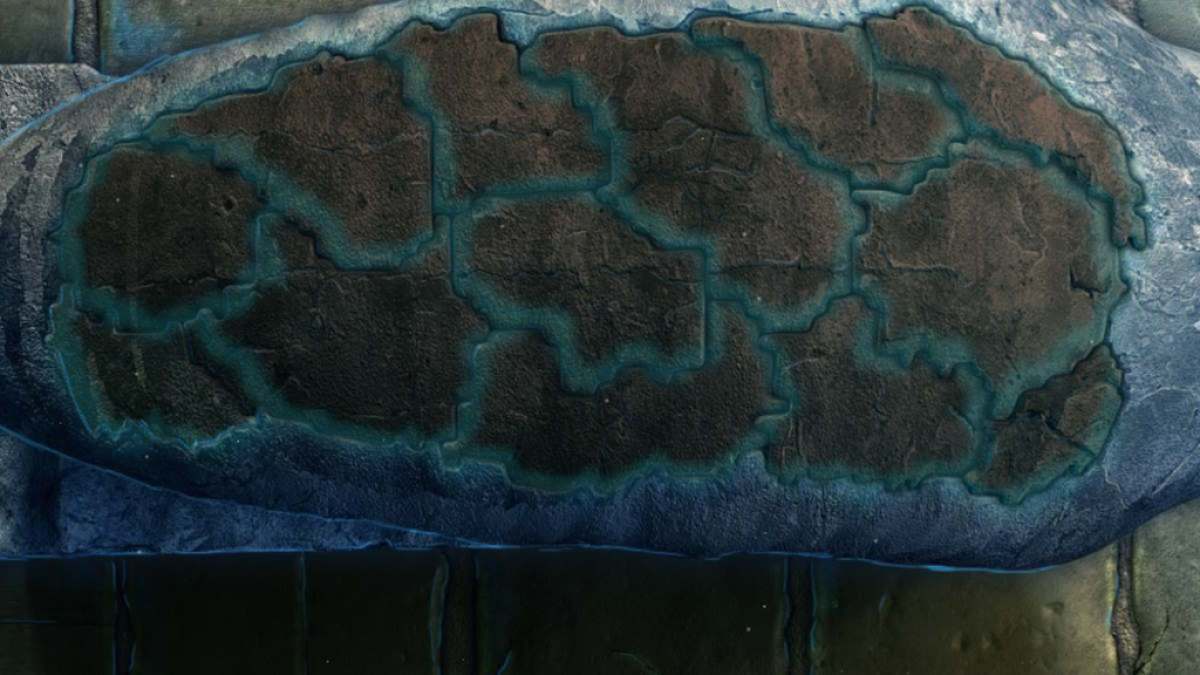
Image by Pro Game Guides
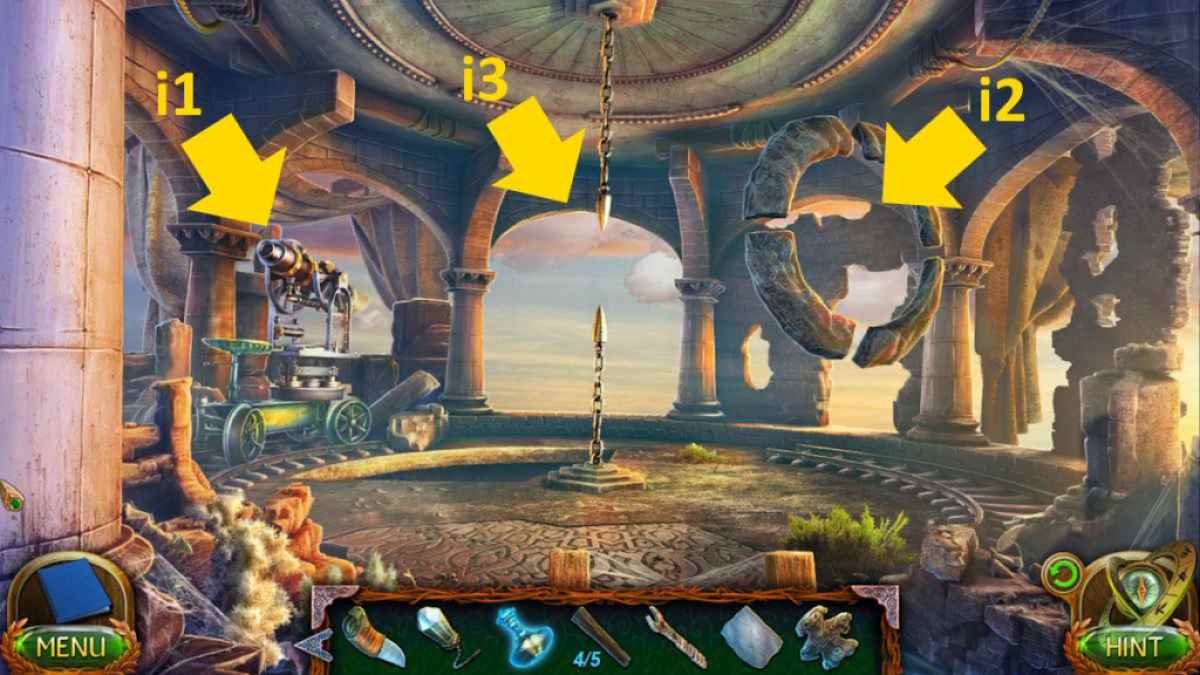
Image by Pro Game Guides
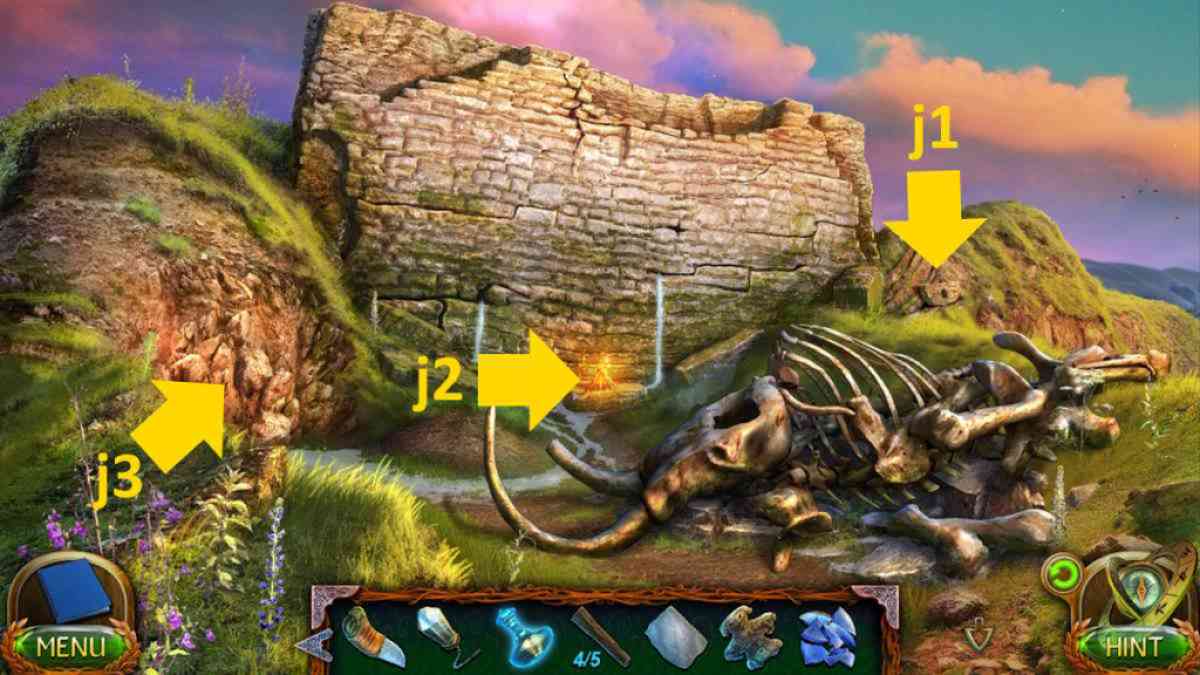
Image by Pro Game Guides
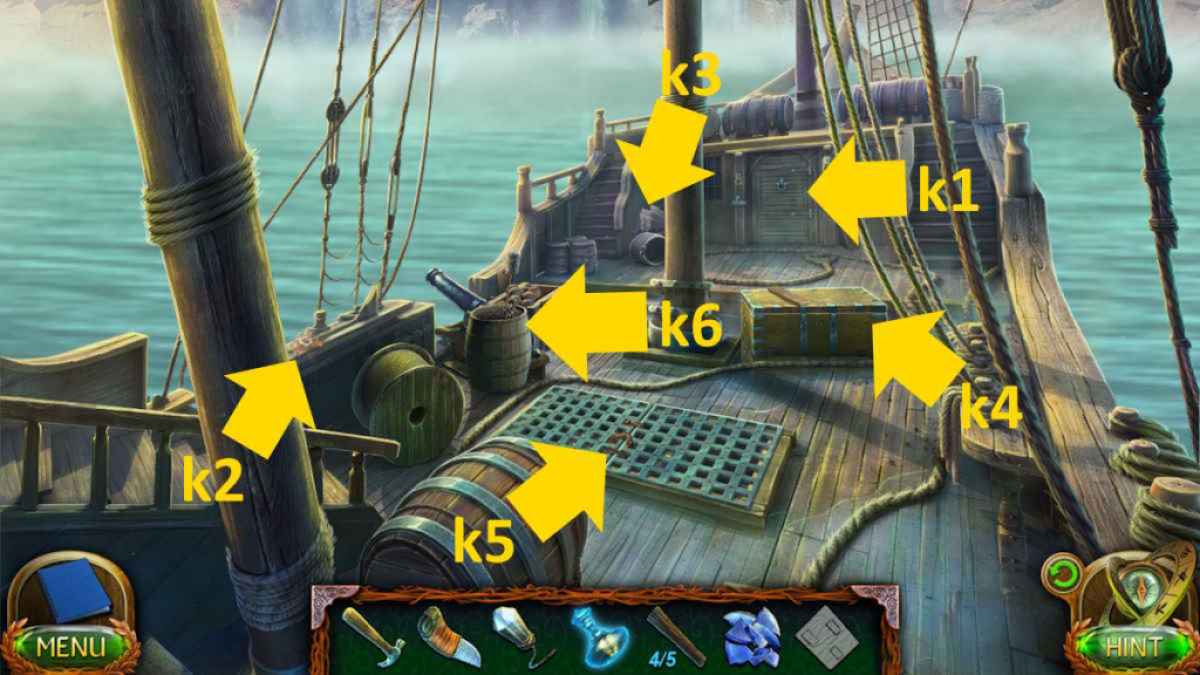
Image by Pro Game Guides
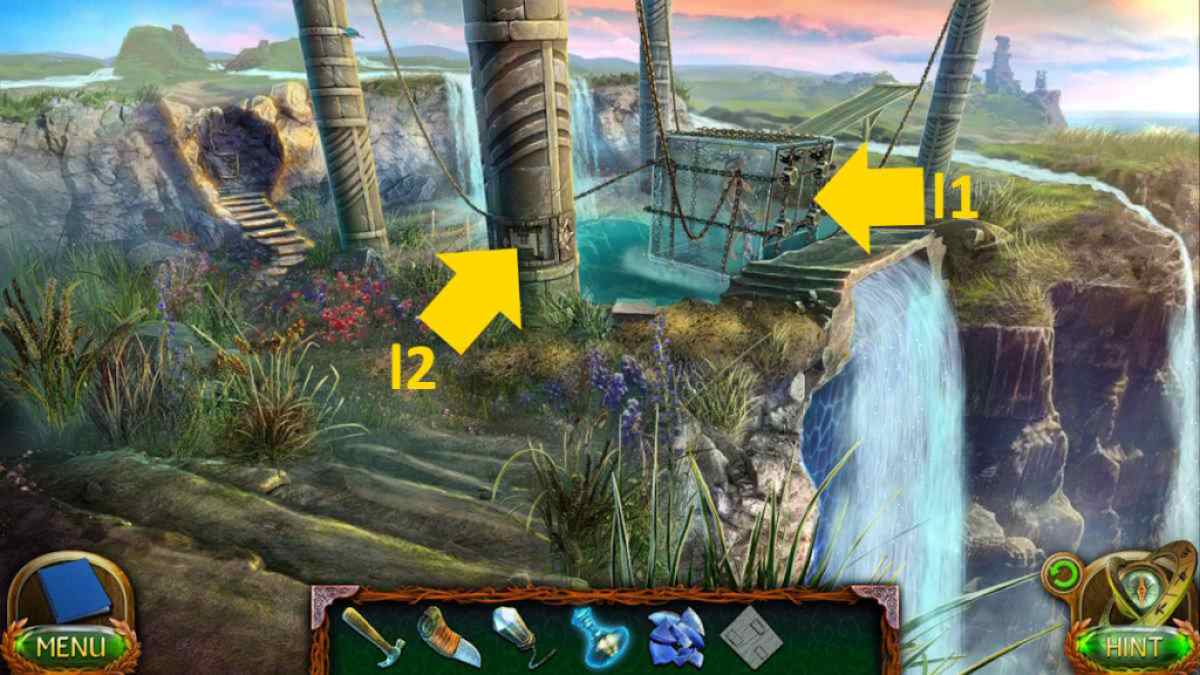
Image by Pro Game Guides
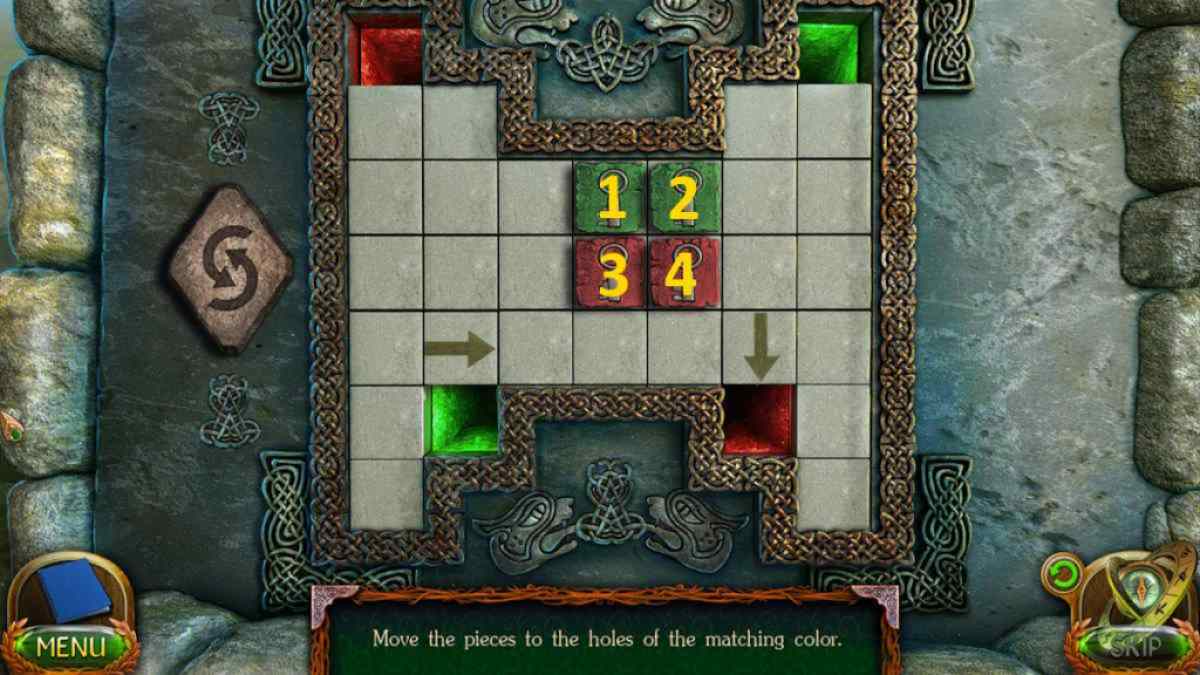
Image by Pro Game Guides
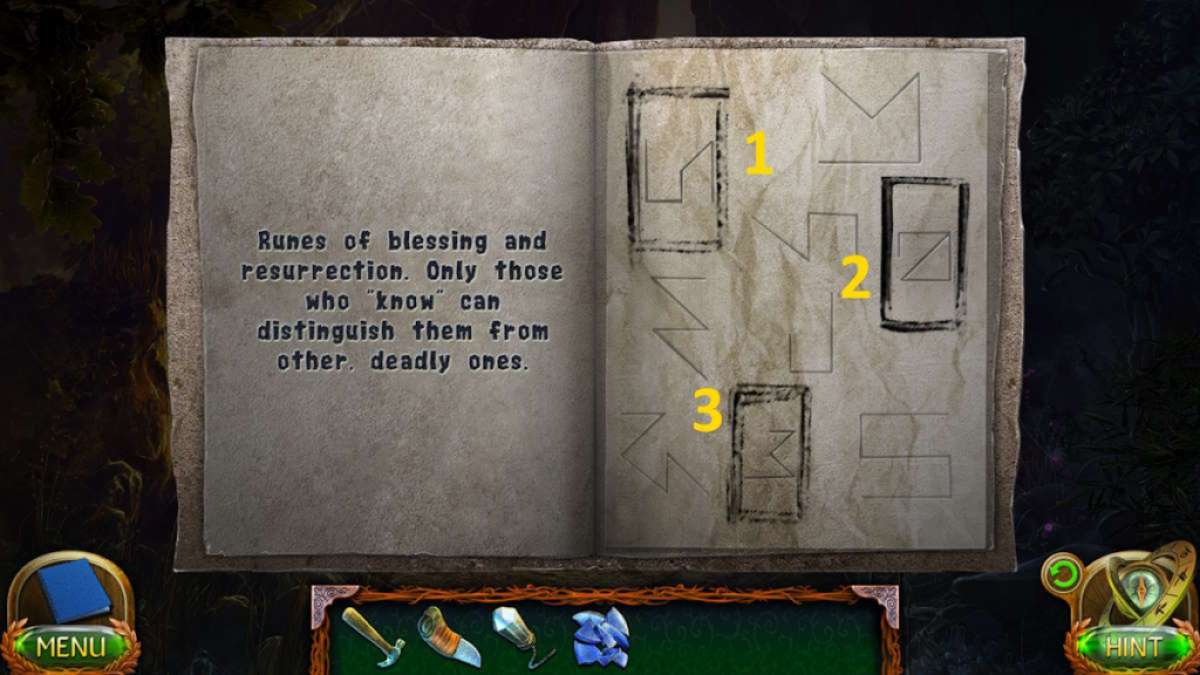
Image by Pro Game Guides
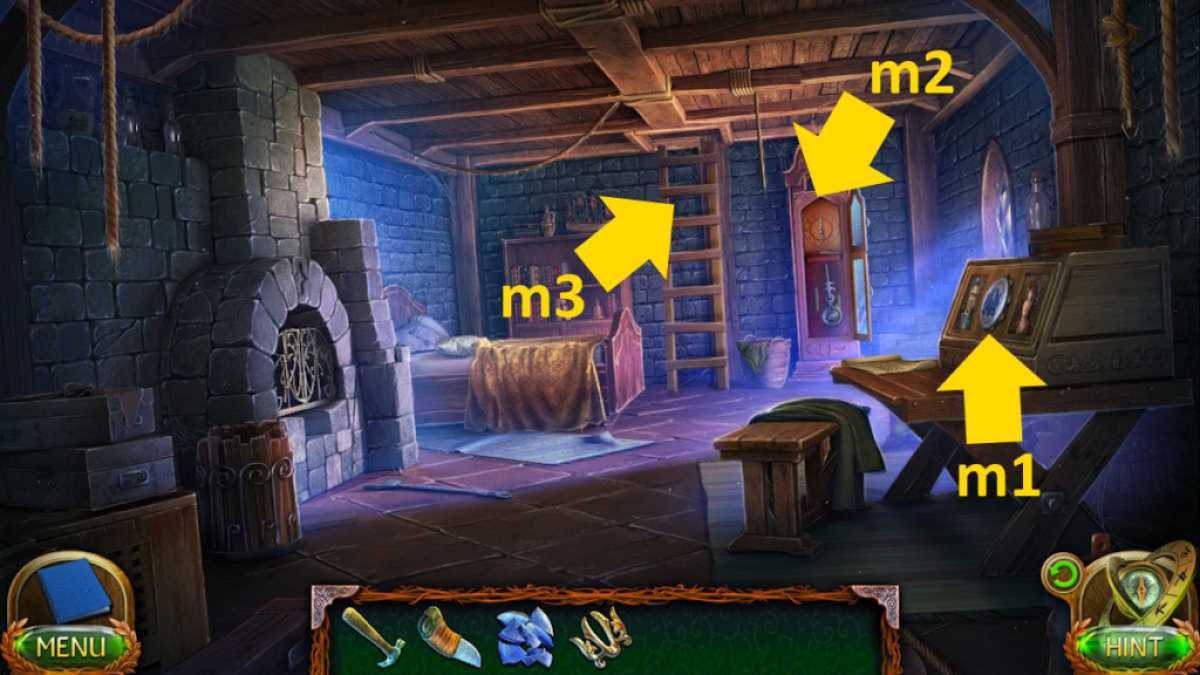
Image by Pro Game Guides
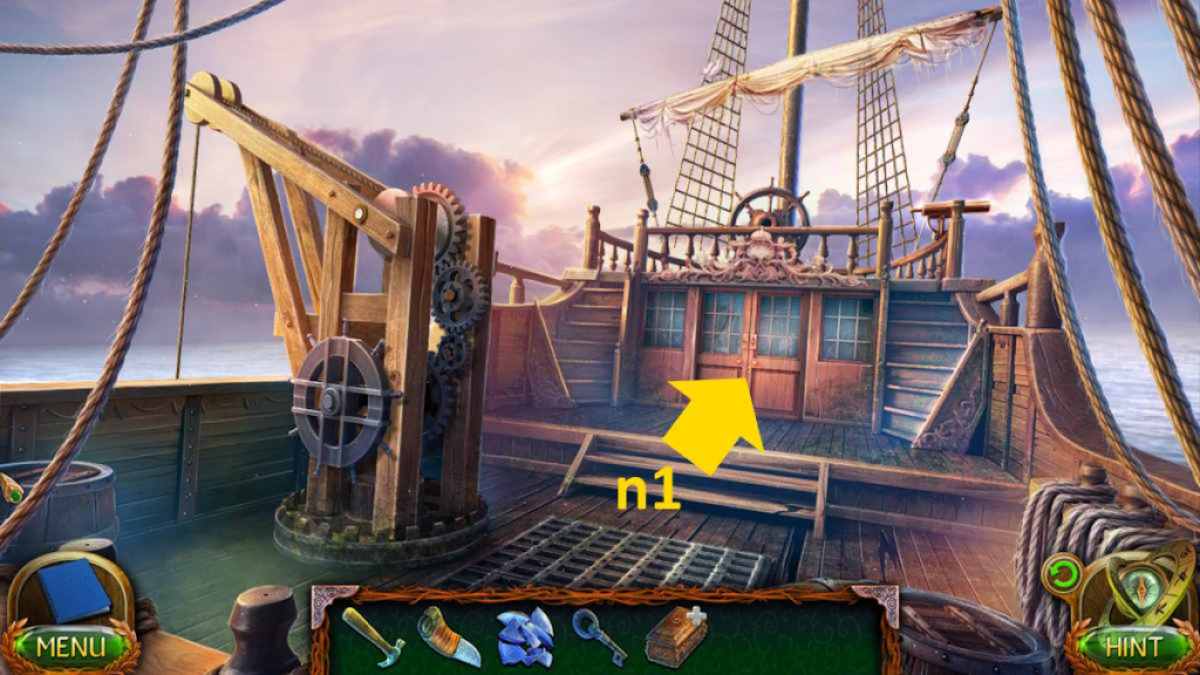
Image by Pro Game Guides
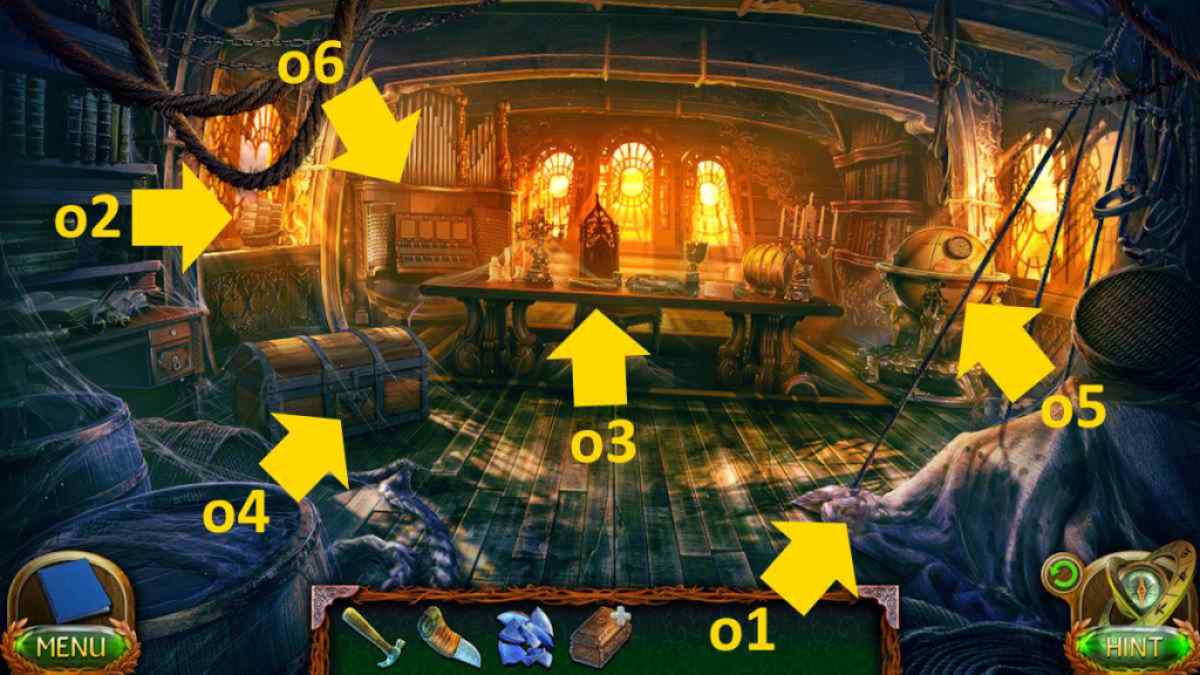
Image by Pro Game Guides

Image by Pro Game Guides
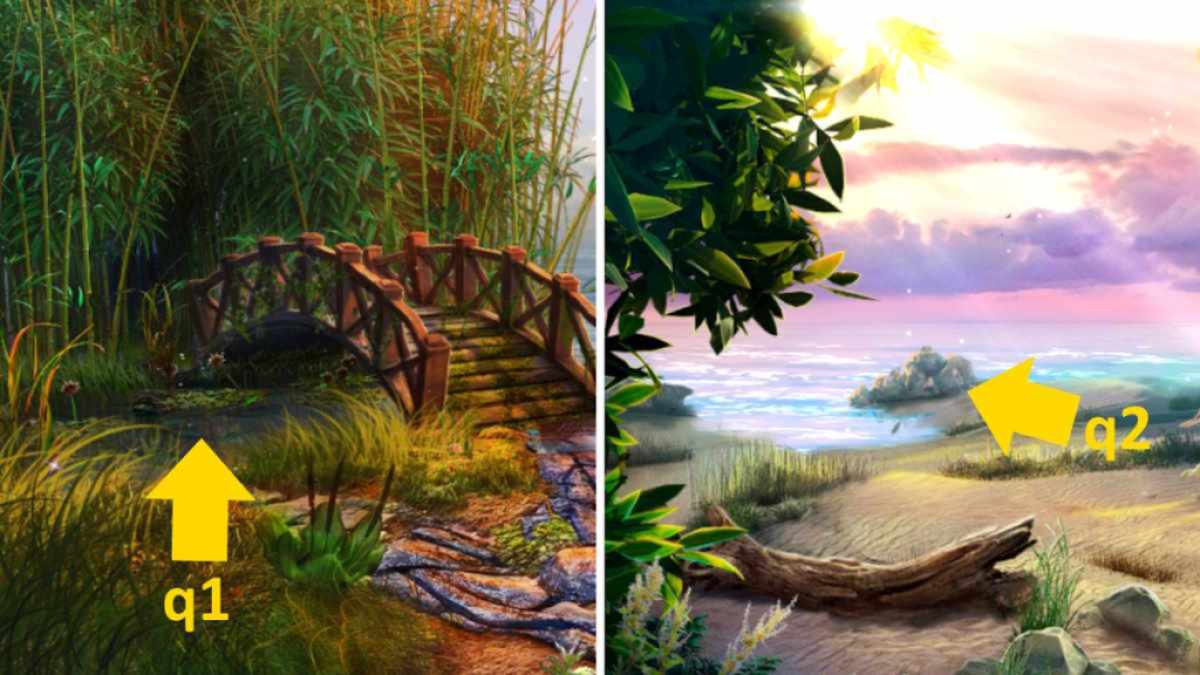
Image by Pro Game Guides
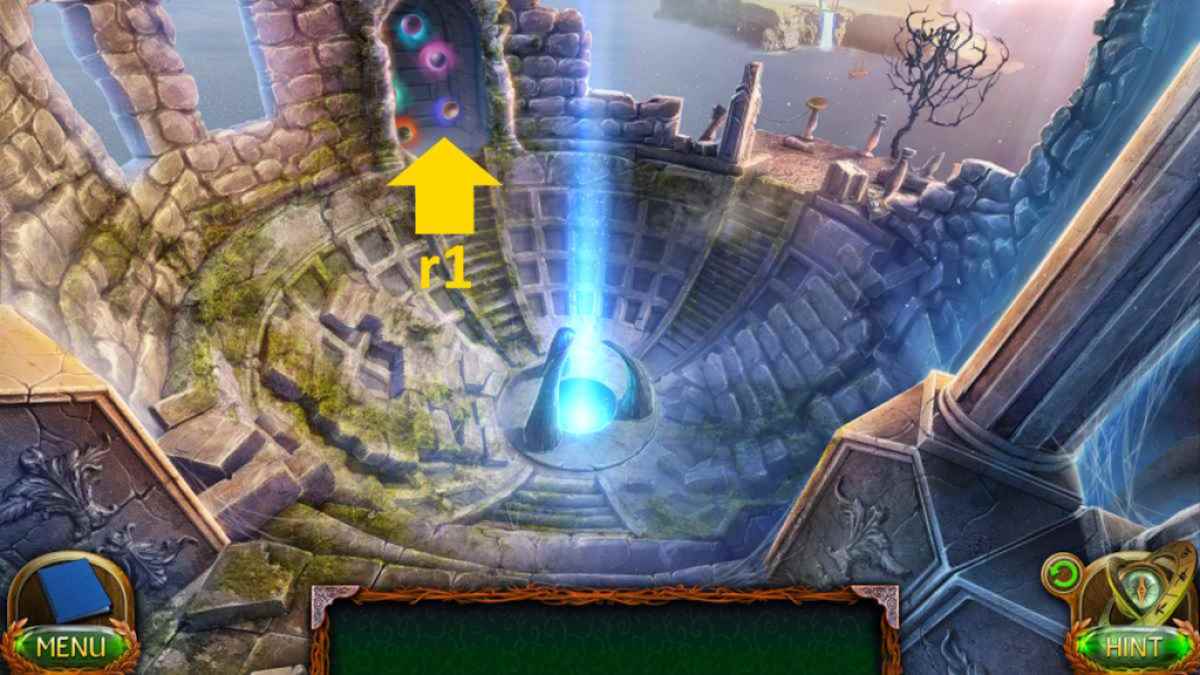
Image by Pro Game Guides
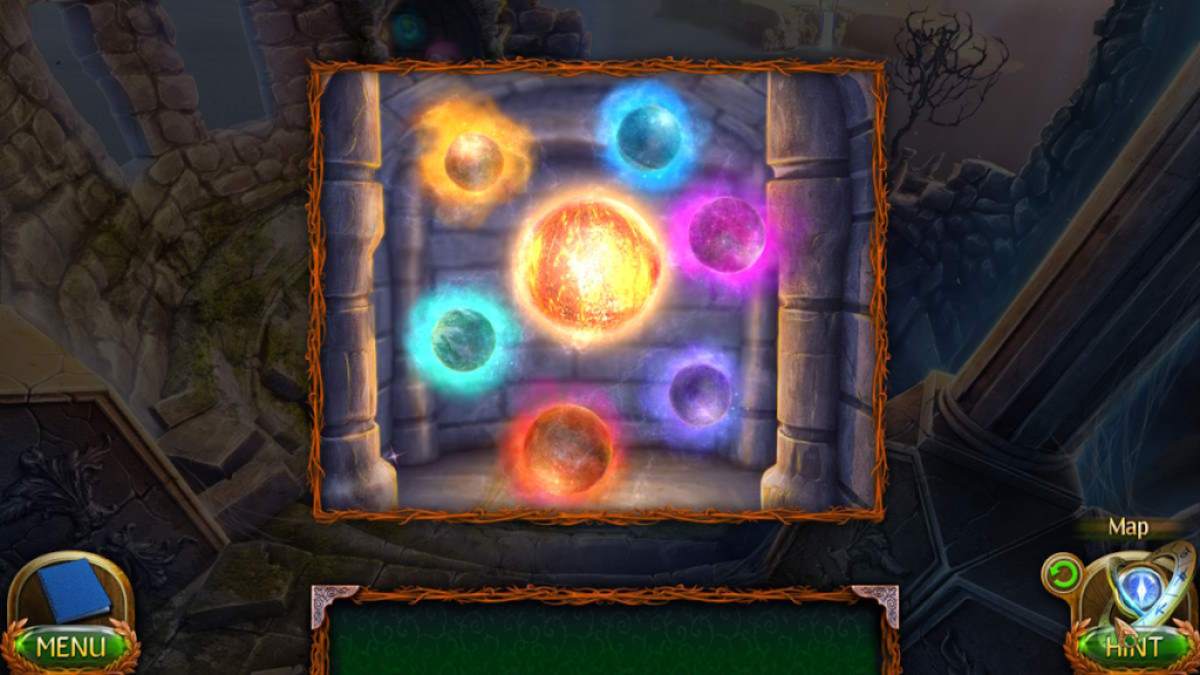
Image by Pro Game Guides
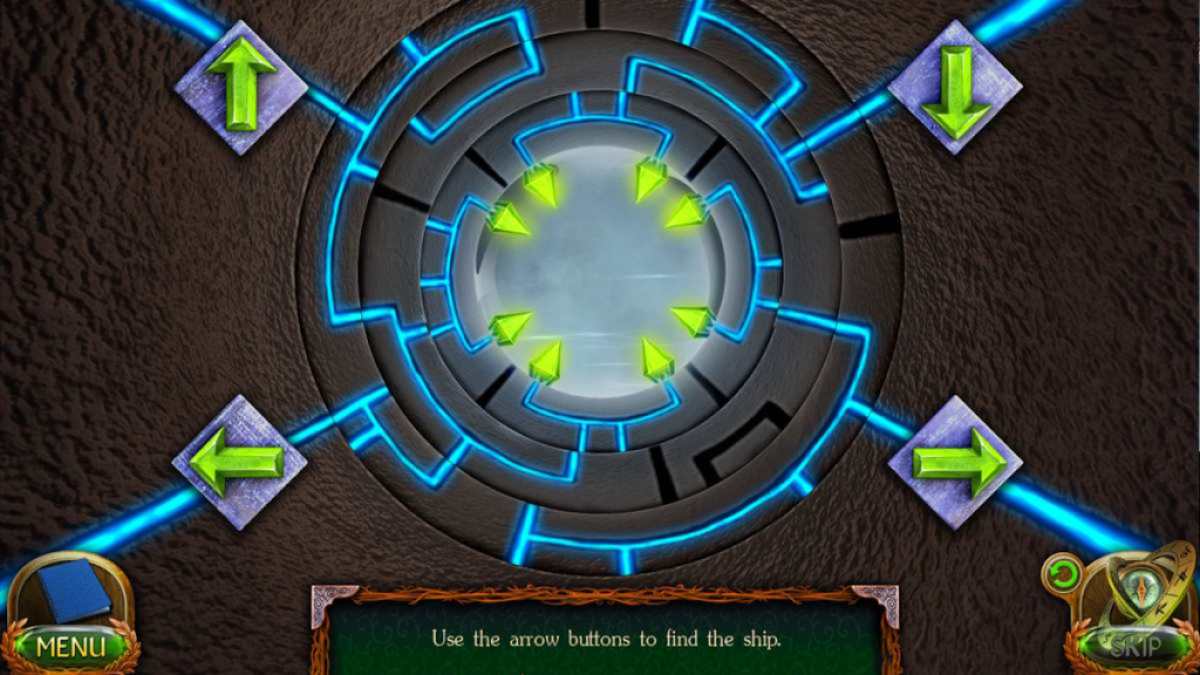
Image by Pro Game Guides
