Pacifying the Pangonian .
Susan is one of the great hidden object game heroine and she ’s back for stage business in Lost Lands 4 ! Below , you ’ll feel part 3 of my full walkthrough of this classical period - and - click RPG .
Lost Lands 4: The Wanderer Full Walkthrough, Part 3
Part 3 of my Lost Lands 4 walkthrough picks up just after we ’ve completed the poison flit recipe and used the blow perch to take out the guard in the Earl ’s crapper room and follows the story until you restitute the Water of Life near the Pangonian ’s home .
If you necessitate help with the puzzle in an earlier part of the biz or nearer the ending , instead click through to myLost Lands 4 Walkthroughhub varlet , which has links to each part of the guard and what is treat in each . All the puzzles are covered , as well as the locations of all collectible items .
The way to the island
prove the guard ( a1 ) and take hisKey , then use it to start the box ( a2 ) and take aManuscriptplus yourRope , Hammer , Sharp Knife , andShackles . pick out the burn table ( a3 ) to start a missing objects puzzle . Once over , you will encounter theFlower Figurine . practice this in the base of the boxful ( a2 ) and , in the false bottom of the box seat , you ’ll find theElephant Figurine .
Move to the pantheon at the Necropolis and add the shackle to the tower ( b1 ) , knock them in with the hammer to make a run . you could now go up them to the lighthouse .
After pick up theMorphing Object(c1 ) andCollectible(c2 ) , also grab theTile(c3),Map Piece(c4),Manuscript(c5 ) , andPortal Part(c6 ) .

Add the tile to the mechanics on the floor ( d1 ) in the castle hall to start a tile - alignment mystifier . To complete it , do the following :
Once complete , take thefinal Portal Part . come back to the portal ( e1 ) and add the remaining portal portion , opening the hepatic portal vein . you’re able to now take the portal to move to Pangonian Island .
Pangonian Island
When you come , theCollectible(f1 ) is by the puzzle on the left wing , there ’s aManuscript(f2 ) just below it , and the Morphing Object ( f3 ) is on the route . take the dead Sir Herbert Beerbohm Tree ( f4 ) for a close - up and use the pound to get theHook .
pick out the hook in your stock and add the rope to get aRope with a Hook . Now select the offshoot sticking from the cliffside ( f5 ) and use it to get theMedallion . pick out the medallion in your inventory and keep chatter it until you get theTurtle Figurine . clack the bridge ( f6 ) to move on .
Now you ’ve arrived at the Energy Reservoir . Take anotherManuscriptfrom the steps ( g1 ) , theCollectible(g2 ) from the rock , and theMorphing Object(g3 ) from the drop-off cheek . Click the bridge ( g4 ) so you observe the codification painted underneath it in your journal , then take back to the entrance to the Earl ’s castle .
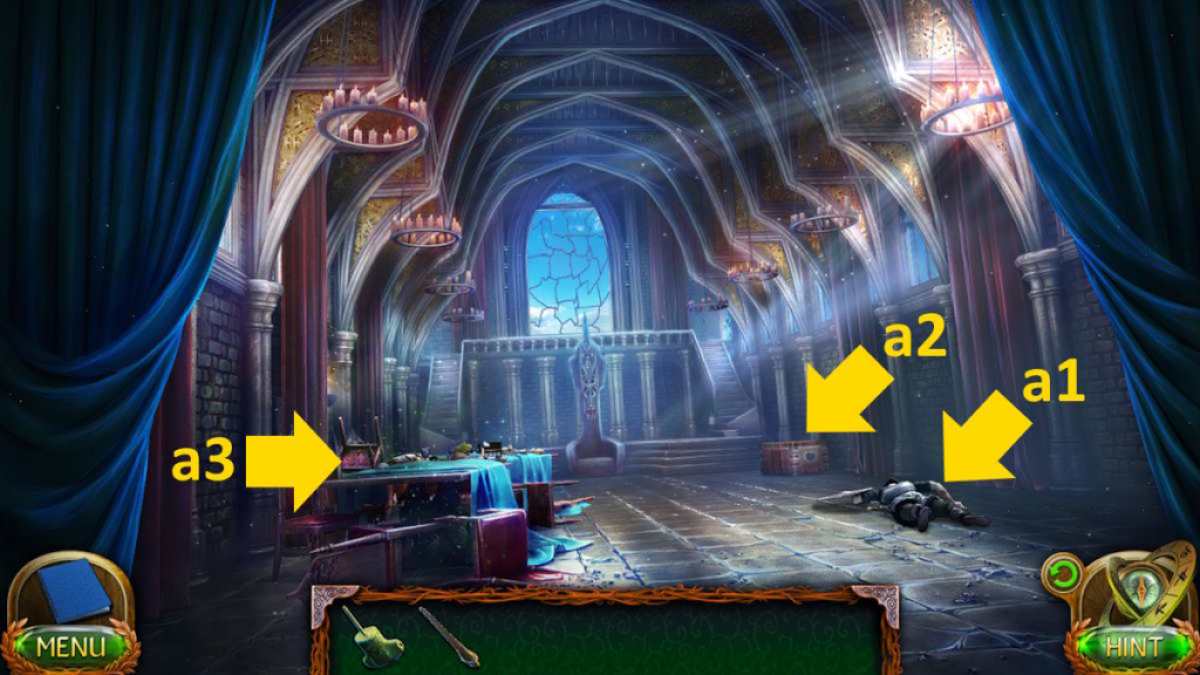
Image by Pro Game Guides
Select the horse ( h1 ) for a finis - up and use the computer code ( inset above ) to launch the bag and take theApple . You just need to rotate the arrow to each of the three symbols in the right order ( you ’ll hear a click each fourth dimension ) . get across the orchard apple tree in your inventory repeatedly until you get theSeedsandApple Core .
touch on : Lost Lands 3 Full Walkthrough ( Golden Curse )
To catch a rat
Return to the road to the castling next and put the cum in the hand of the tree statue ( i1 ) in the finale - up , then roll up theSnake Figurinefrom its roots . Move to the bridge deck outside the Necropolis next , select the island on the unexpended ( i2 ) , and add the two beast statuette ( turtle and snake ) to the pillar to begin a chip - arrangement puzzle .
You need to draw the row and tower , being mindful that everything in it will move when you sweep one from either death . If you ’re stuck , do the following from the start position , pictured below . The number shows the parliamentary procedure to do it , and its place on the image shows the direction to drag it in ( towards the number and only one space each sentence ) . Once complete , take theStone Plate .
Go back to the ship , select the final ( i3 ) , use the stone plate to start the corresponding box , and take theJar of Sand . Take the eyelid off in your inventorying to get anEmpty Jarand aStone Crown .
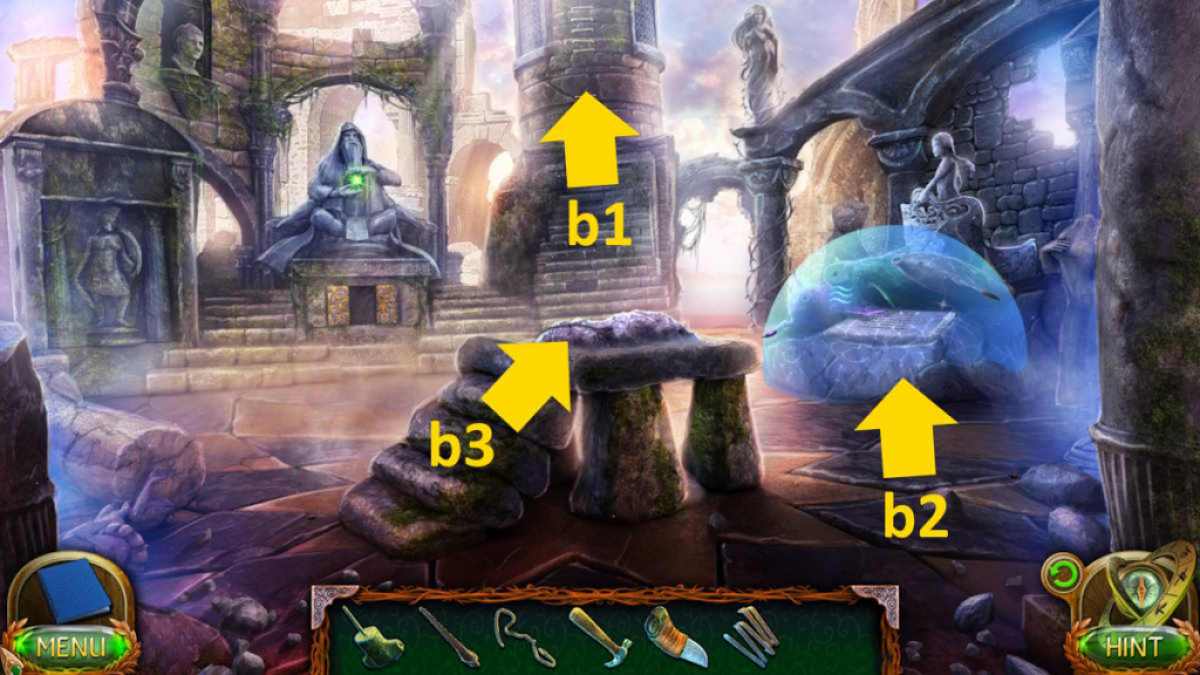
Image by Pro Game Guides
Move to the wine cellar and get a stopping point - up of the blabber ( i4 ) . Put the jar down , supply the apple core to it , then peck up theRat in a Jarand theStone Sickle .
you’re able to now move back to Pangonian Island , take the I. F. Stone mystifier ( f7 ) , and add the squealer in a jar to begin a slide puzzle , which will get you theStone Book . If you find these difficult , use the image above and follow this parliamentary law ( using the pad on the right of the screen ):
Back in the castle hall , select the shield on the rampart ( d2 ) , impart the three stone items ( jacket , sickle , and book ) , and take theSkull .
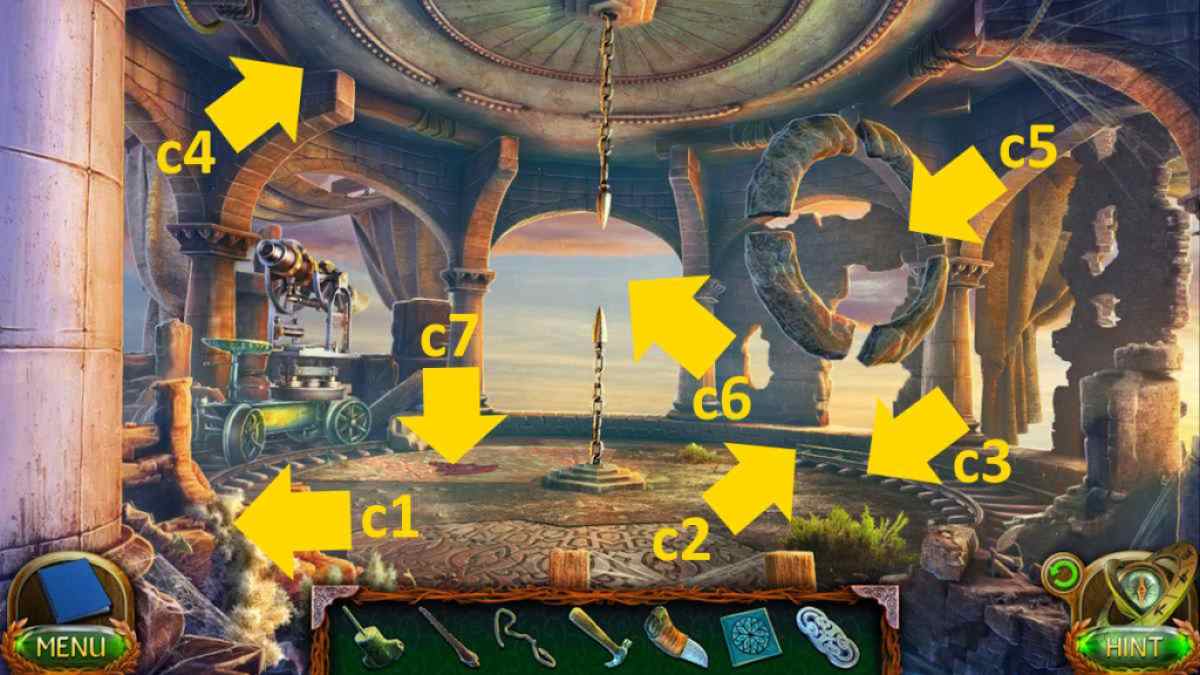
Image by Pro Game Guides
Helping the Pangonian
Go to the crossroads outside the castle and tot up the skull to the ship mast signpost ( j1 ) . This permit you to climb to the crow ’s nest and take theGaffand aManuscript . Go back to the DOE reservoir , use the gaff on the bridge ( g4 ) , and head across .
TheCollectibleis by the tomb ( k1 ) and theMorphing Objectis on the path ( k2 ) . Take theManuscriptfrom the gravy holder ( k3 ) , then move on to the Pangonian ’s menage ( k4 ) .
Take theMorphing Objectfrom the treestump ( l1 ) , theCollectible , and theRakefrom against the paries ( l2 ) , then knock on the doorway to talk to the Pangonian . After the slash scene , take theIron Cubefrom the course ( l3 ) .
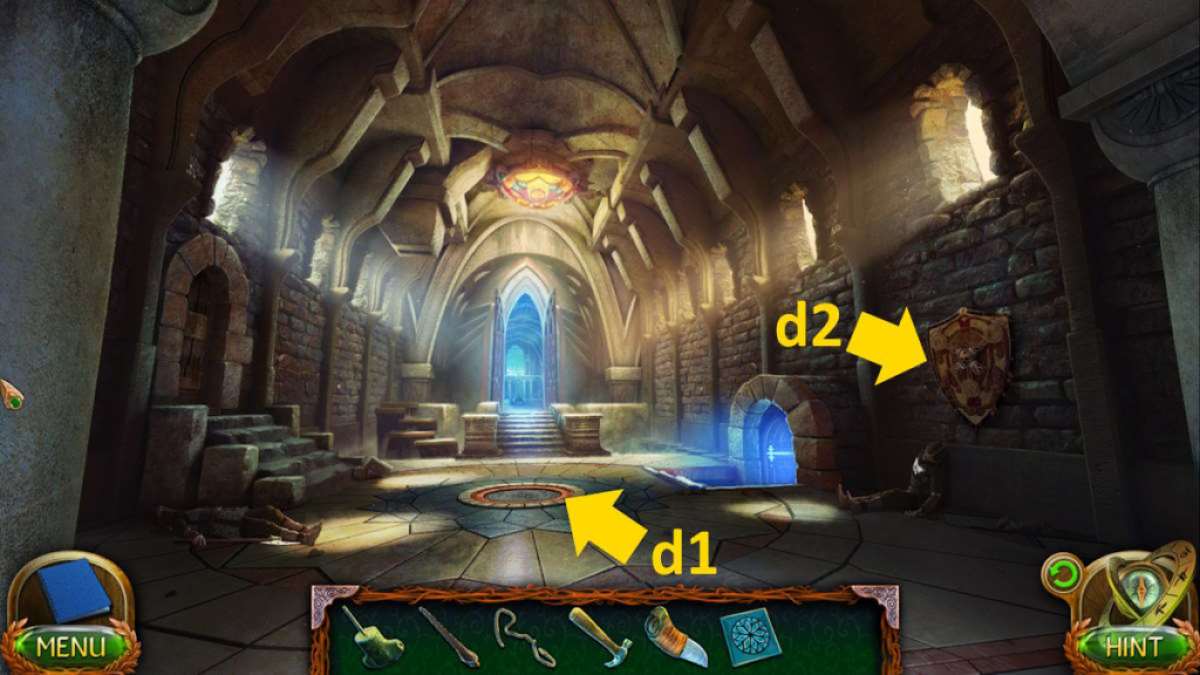
Image by Pro Game Guides
Return to the ship , use the cube on the final close - up ( i3 ) , and get theStone Sword . Head to the business firm again , use the sword on the stone sharpener ( l4 ) to get theSwordand then use the sword to rationalise the thistles ( k5 ) . apply the rake to pull in the thistle to get thePieceand aHose .
manoeuvre to the lighthouse next and put in the slice into the floor ( c7 ) . This opens a passageway in the ground that is a concealed objects puzzle . Once complete , you ’ll have theHelmet . Go to the path to the Pagonian ’s sign and localise the helmet on the grave ( k1 ) .
Return to the Pagonian ’s sign and attach the hose to the water silo ( l5 ) , which also gets you theFaucet Nut . piss will start to flow into the holes in the gnawer - infested field of honor ( l6 ) . Select the theater to come out a mini - game in which you need to catch 10 rodents . This is a timing dexterity game , but there ’s no meter limit , so you may just hover over one maw and enamor them there if you receive that gentle . Once done , thefront doorway to the family will unfold .
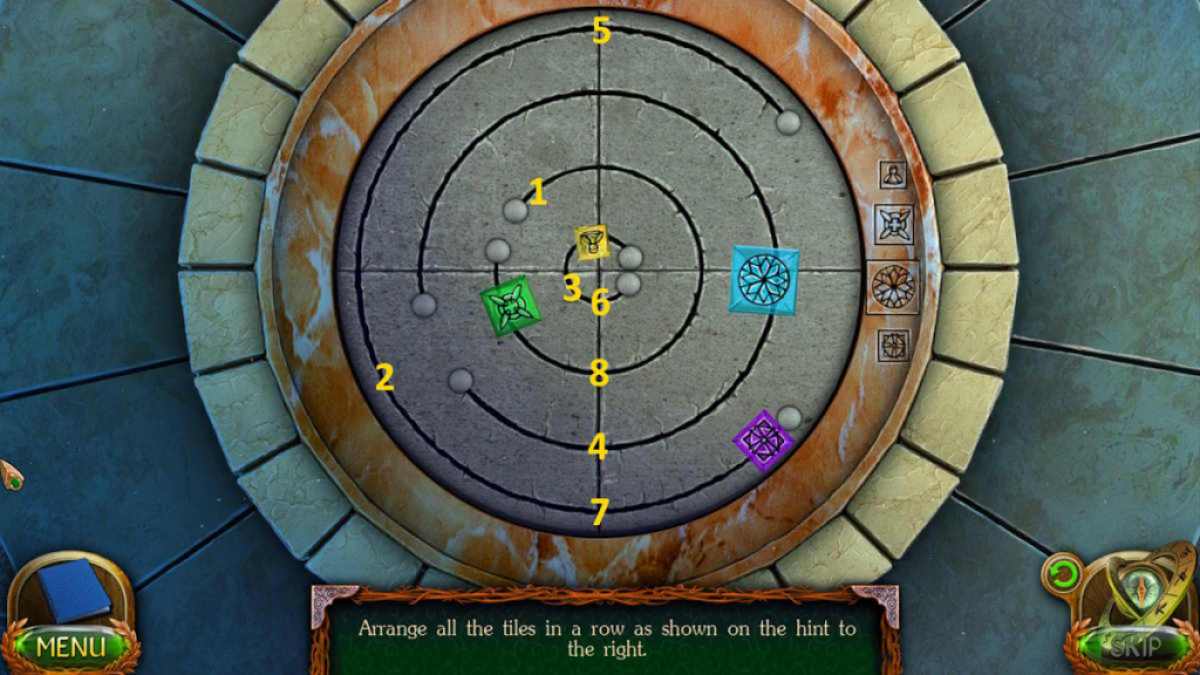
Image by Pro Game Guides
Related : Lost Lands 9 Walkthrough – Full Guide
The sorceress’s sarcophagus
Go inside and click Sheeleesa for a cutscene . Afterward , snap up theMorphing Objectby the candles ( m1 ) andcollectibleon the ledge ( m2 ) before remove the cover from the automobile trunk ( m3 ) . Also , take the blueCrystalfrom the top of the ledge ( m4 ) and theManuscriptfrom the thorax of drawers ( m5 ) .
come back to the cellar , utilize the faucet nut on the barrel ( i5 ) , use it , and collect theMug of Rum . Now lead to the Necropolis and add the quartz to the fountain ( n1 ) , opening a new passage on the right-hand ( n2 ) . Head deep down .
Pick theWooden Cube(o1),Collectible(o2 ) , andMorphing Object(o3 ) off the floor , then click the cellphone door ( o4 ) to get an objective - matching puzzle . You need to match figure of speech that are opposites in some way . If you need the answer , check the double below .
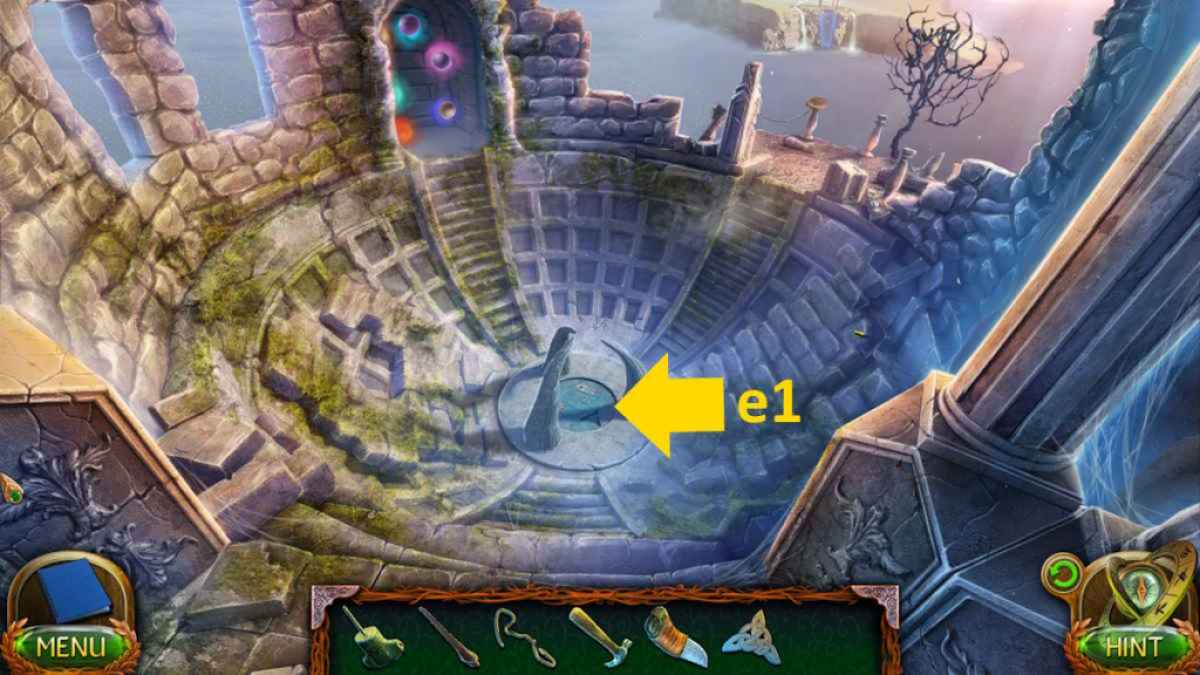
Image by Pro Game Guides
Once pure , a new challenge will come out on the other side of the bars ( that will now have dropped down ) . choose it to start a roofing tile - arranging teaser . You take to move the tiles from the right into their respective positions in the central and odd pillar . See below for the solvent . That ’s all you may do here for now .
retort to the net at the ship ( i3 ) one net time , and start the last box with the wooden square block to get theFigurine . You now require to go into township , snap the landing place at the top of the stairs above the cellar entering ( p1 , below ) , and add together the statuette to set off a jigsaw teaser ( you ca n’t go wrong ) . Once finish , you ’ll get theTablets With Numbers .
you’re able to now return to the secret room and add the roofing tile to the doorway ( o4 ) , trigger another mystifier . The riddle on the door interpret , How many legs does a man use in the morning , good afternoon , and evening ? The solvent is423(it refers to the stages of life , so it is 4 as a baby crawl , 2 as an adult , then 3 with a cane in sometime geezerhood ) . The door will now be open , so guide in .
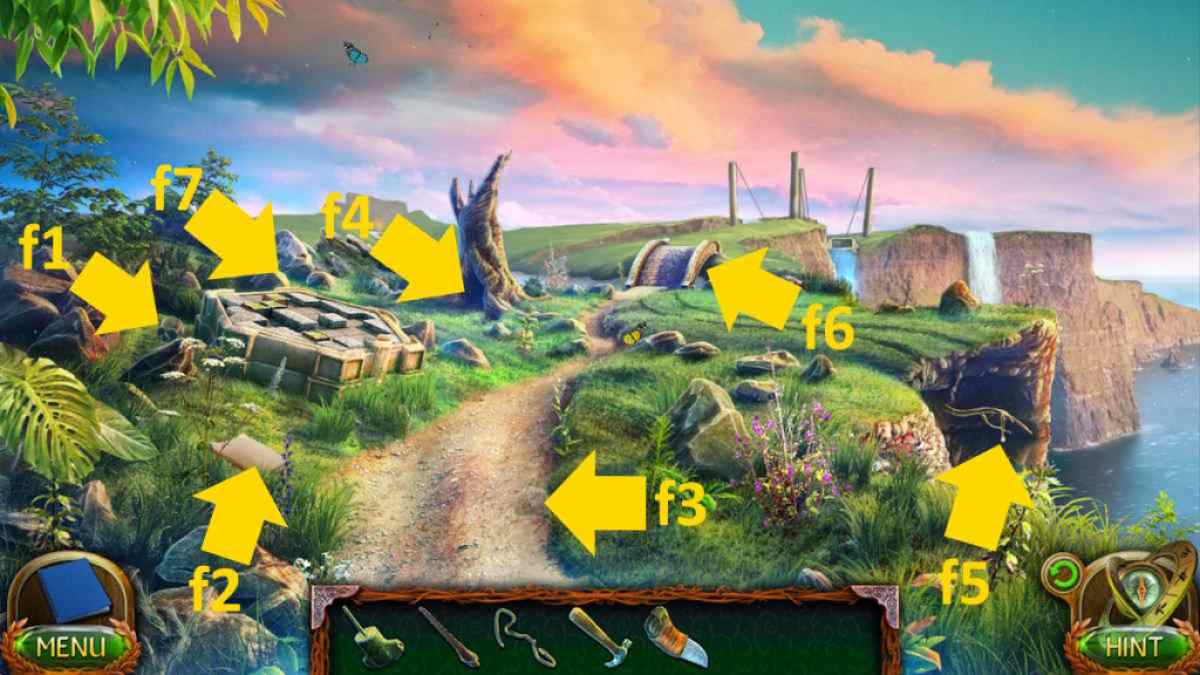
Image by Pro Game Guides
Looking for clues
Inside the witch ’s crypt , catch theCollectiblefrom the top of the footfall ( q1 ) and theMorphing Object(q2 ) from the top of the archway . Select the nook ( q3 ) for a close - up and take aKeyand aManuscript . notice that a page is missing from the script here .
render to the Pagonian ’s house and practice the headstone to get to the chest of drawers of drawers ( m5 ) to get theMountain Gearand missingPage . Go to the energy reservoir and employ the spate gear mechanism on the cliff boldness ( g5 ) , using your hammer to tone the rope . Go up to the next region .
At the dam , you ’ll find theCollectible(r1 ) amongst the bones and theMorphing Object(r2 ) on the rock on the leftfield by the flowers . Also , pick up theWatering Can(r3 ) , take aManuscriptfrom the bones airless - up ( r1 ) , then use the hammering brain to collapse unfold the skull here to get theMammoth BrainandWater Symbol .
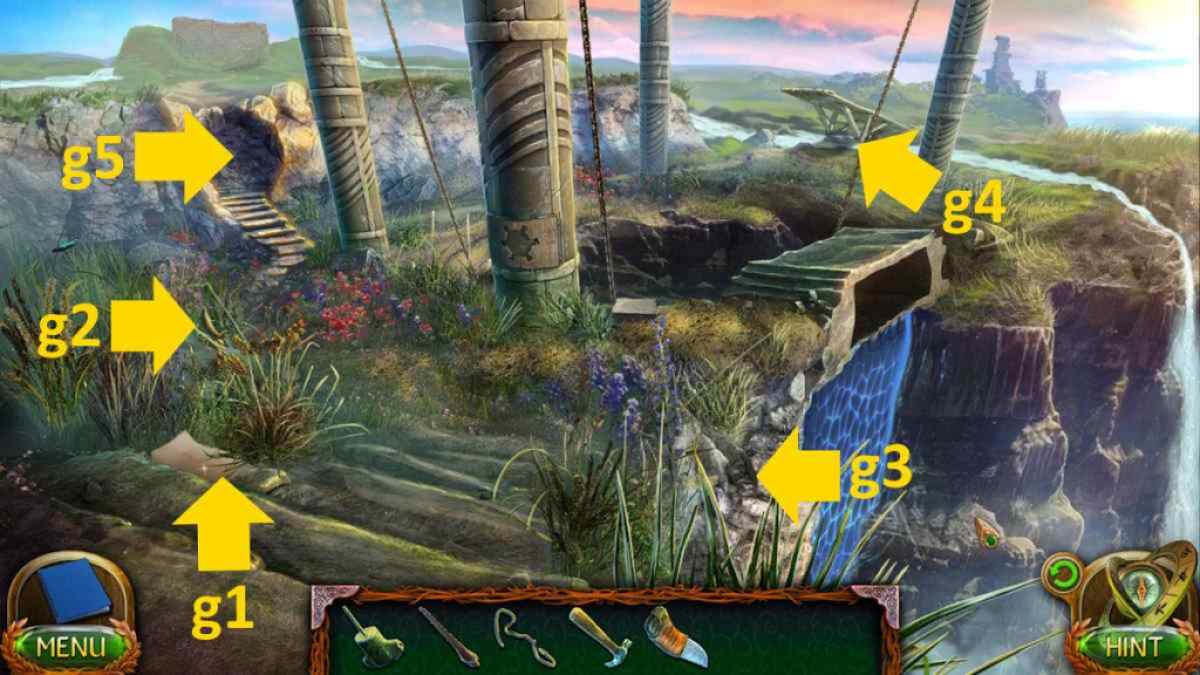
Image by Pro Game Guides
Go to the crypt and add the page to the Koran ( q3 ) to retrieve out how to summon the witch ’s ghost , then maneuver back to the pantheon . Get a finis - up of the magic buckler ( b2 ) and expend the water symbol to remove it .
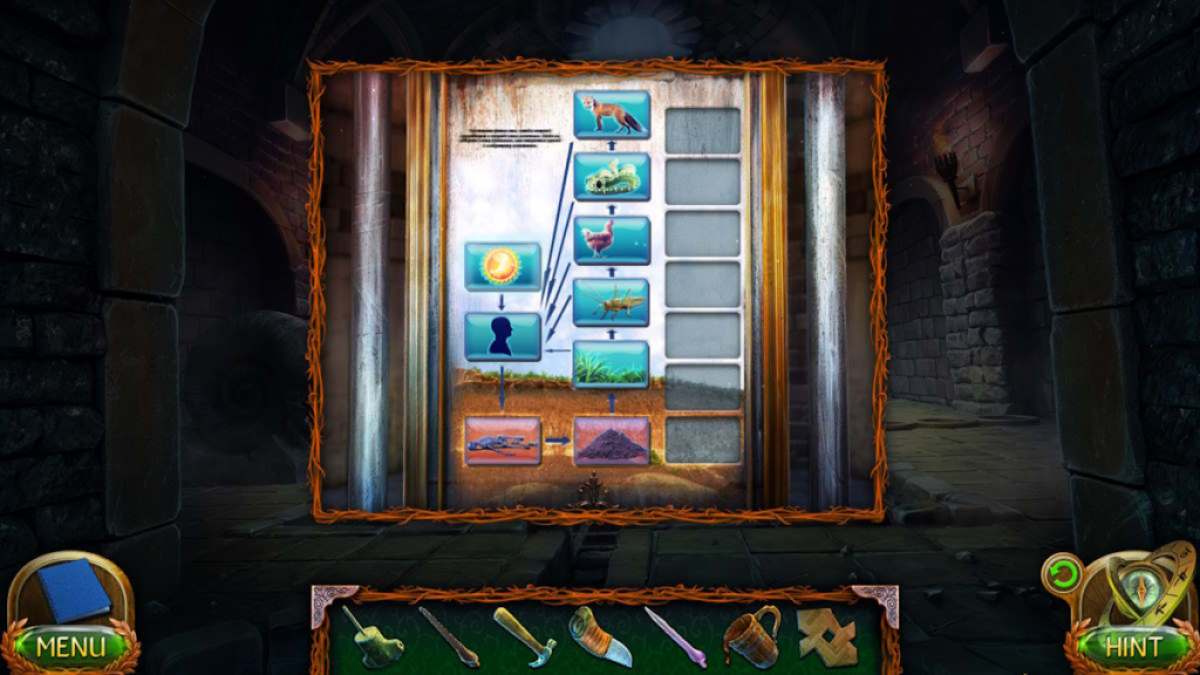
Once down , contribute the Hammer Head , Sword , and Saw to the statue to get aPatterned Tile , and also look at a drawing to see where you require to go next . While you ’re here , you’re able to add the mammoth brain and mug of rum to the stone tablet ( b3 ) to get them out of your inventory .
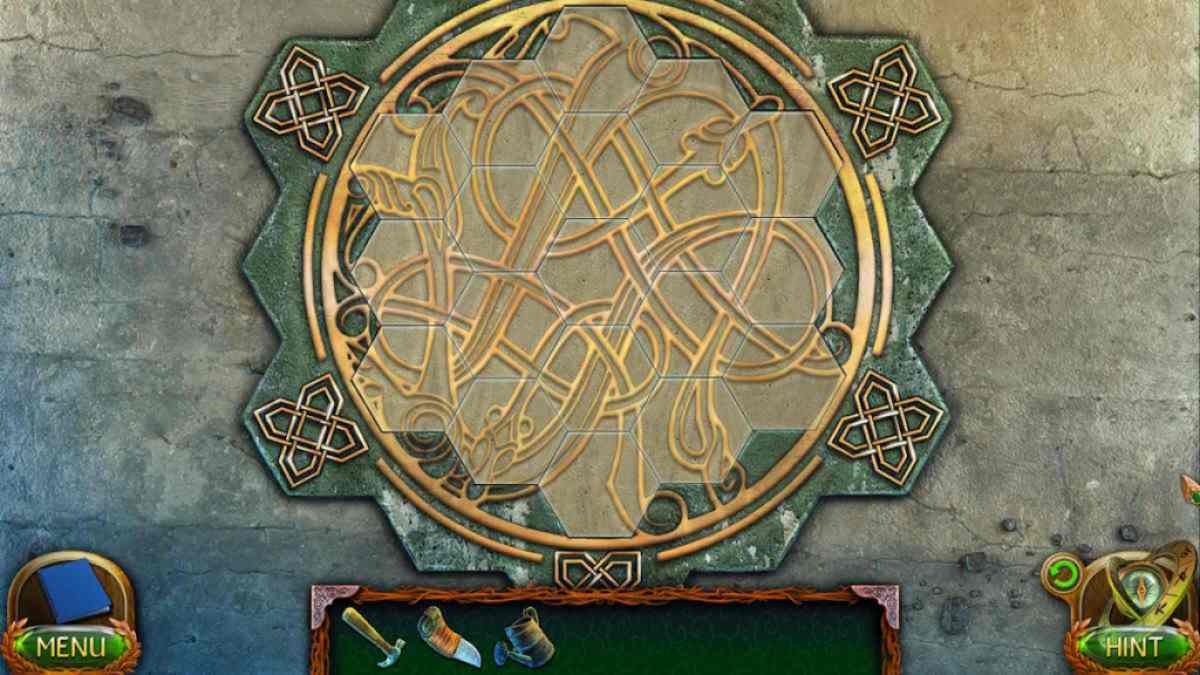
Head to the route to the Pagonian ’s house next , select the altar and sum up the patterned tile to start a pattern - restoration mystifier . Move the pieces around to finish the convention , which will look like the image above once complete ( the pieces go drab once they ’re in the right place , so you ca n’t go wrong ) . This will start the water hang here , so use your watering can on the body of water to get theWater of Life in a Pot .
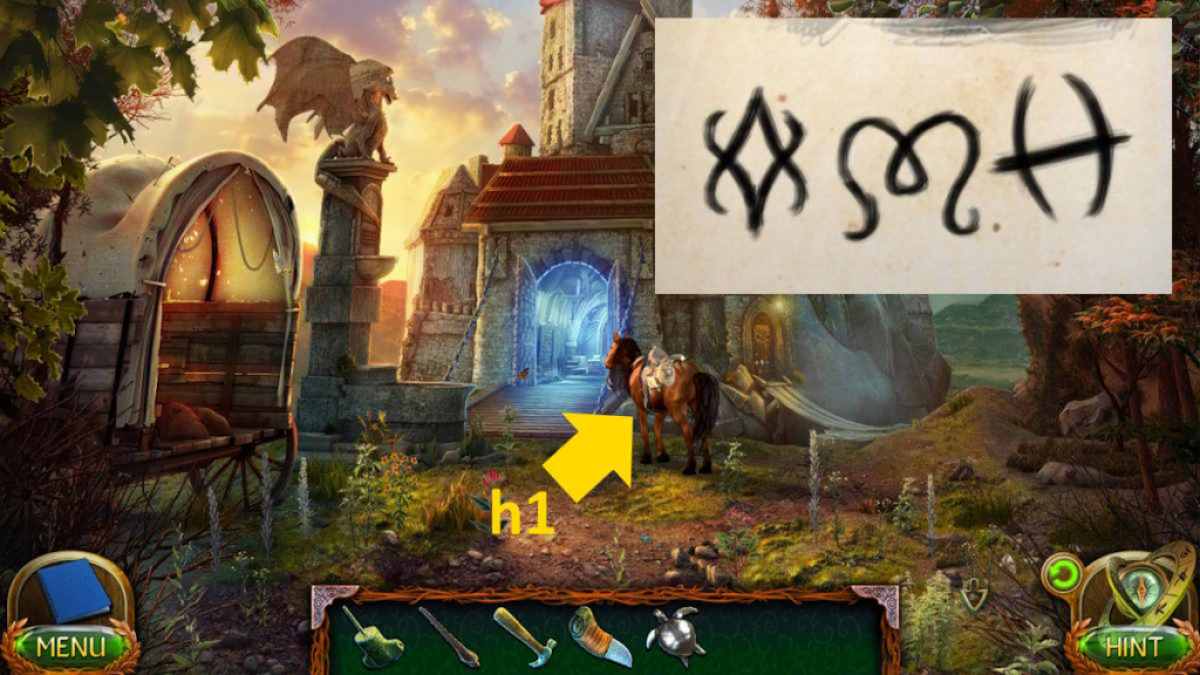
Image by Pro Game Guides
To continue to the concluding part of this guide here at Pro Game Guides , click through to myLost Lands 4 Walkthrough , part 4 !
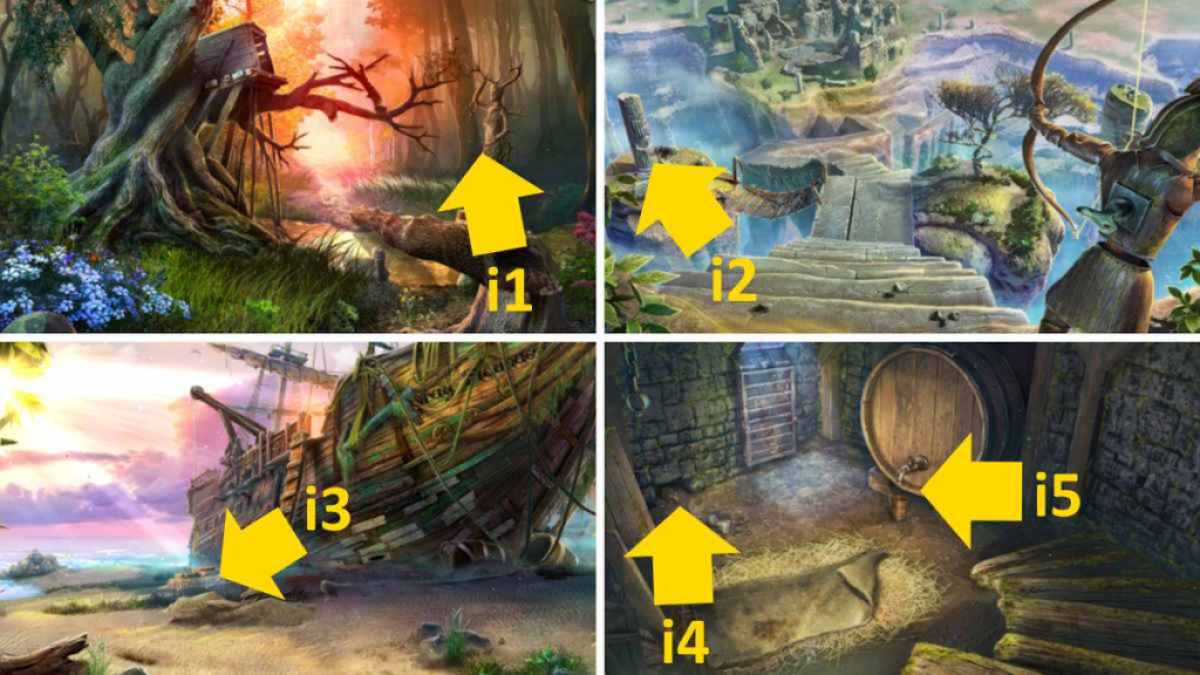
Image by Pro Game Guides
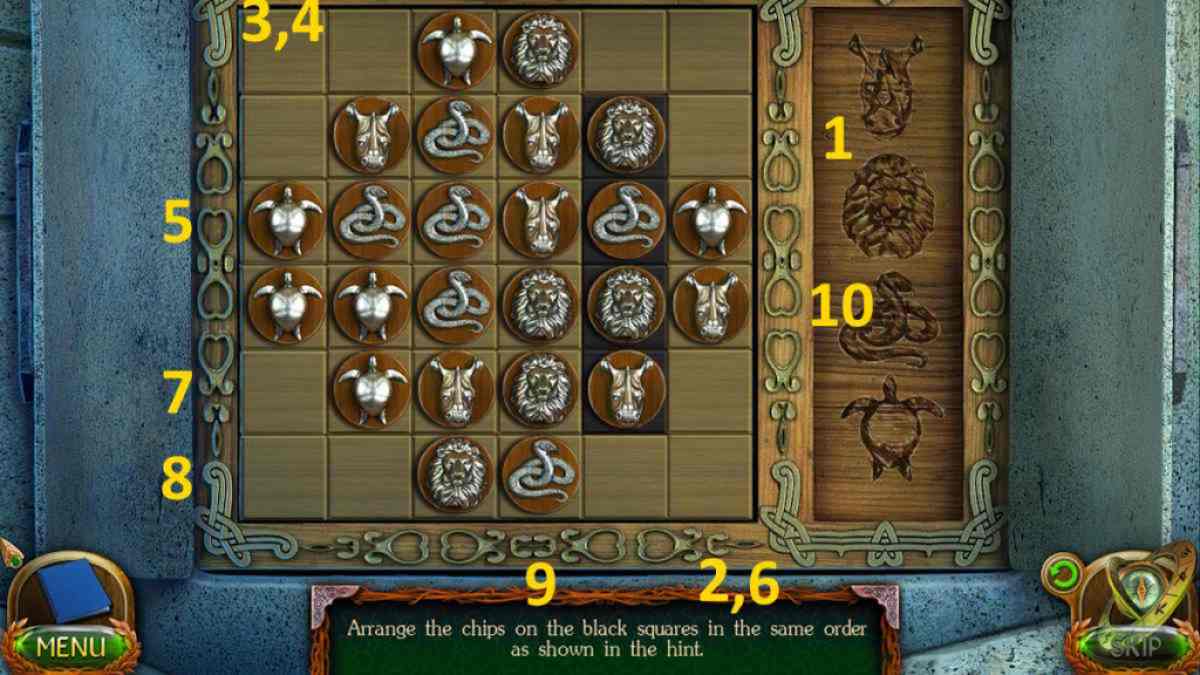
Image by Pro Game Guides
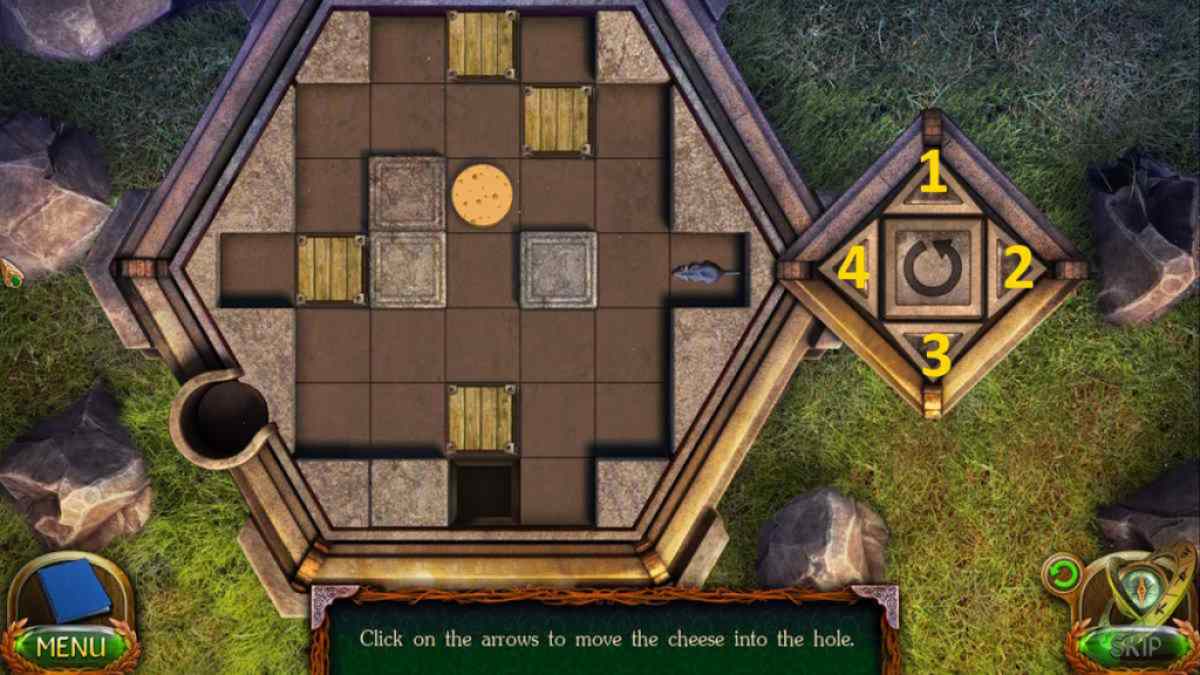
Image by Pro Game Guides
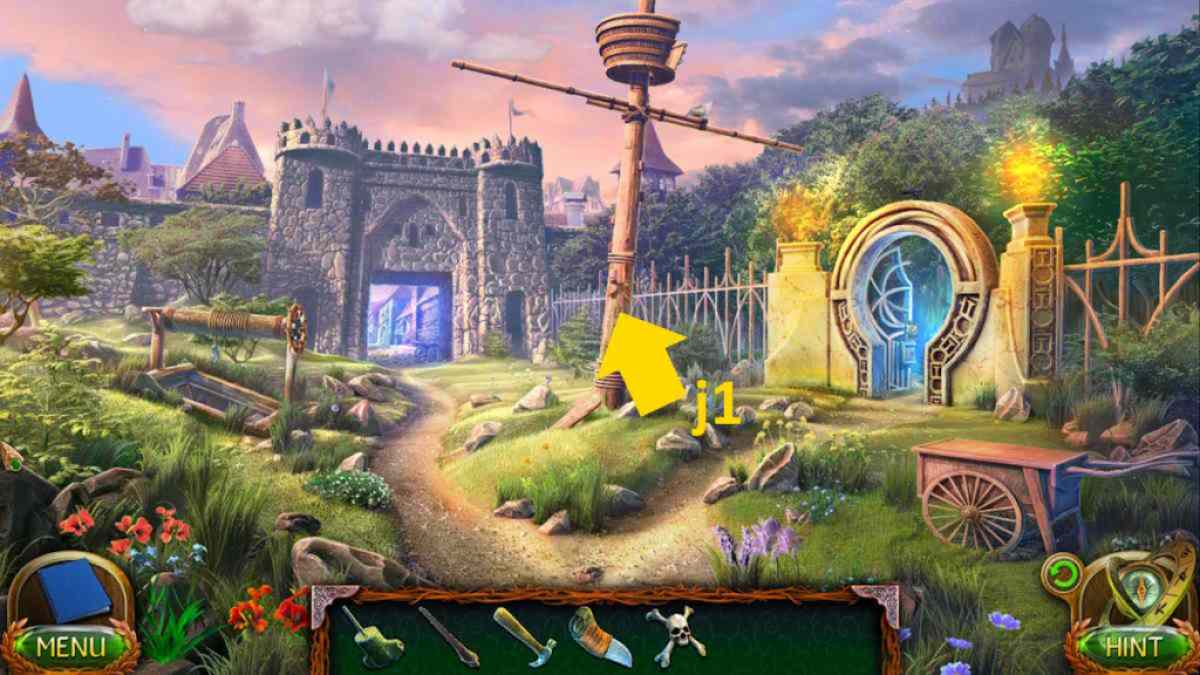
Image by Pro Game Guides
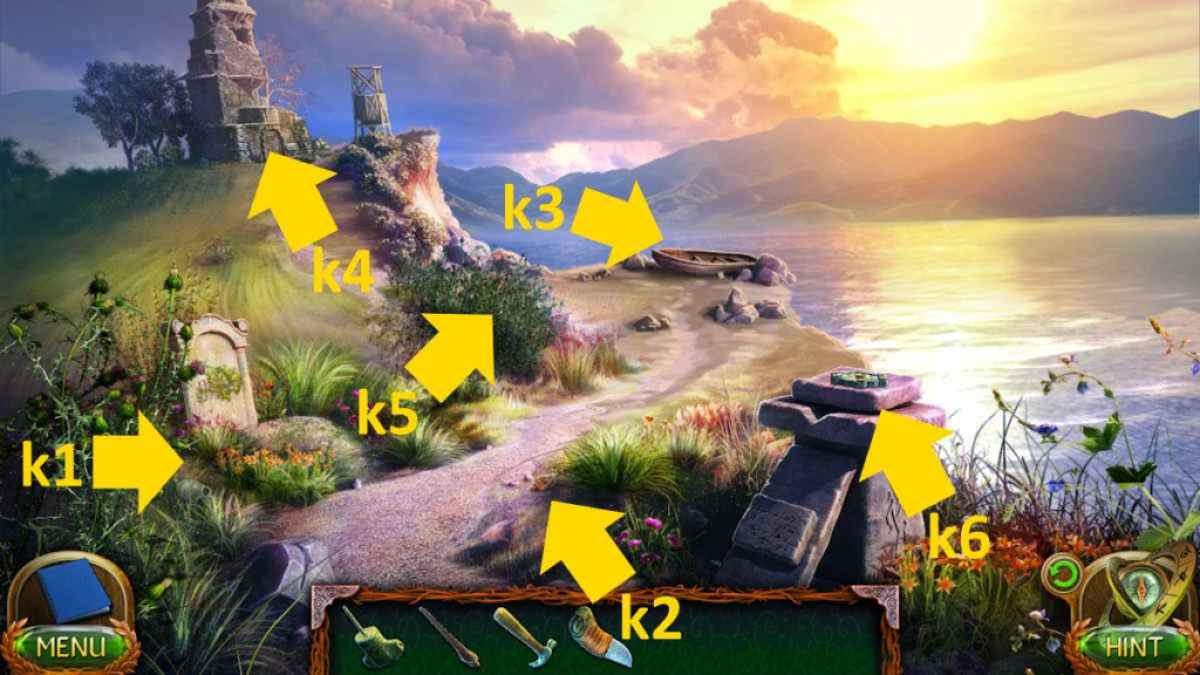
Image by Pro Game Guides
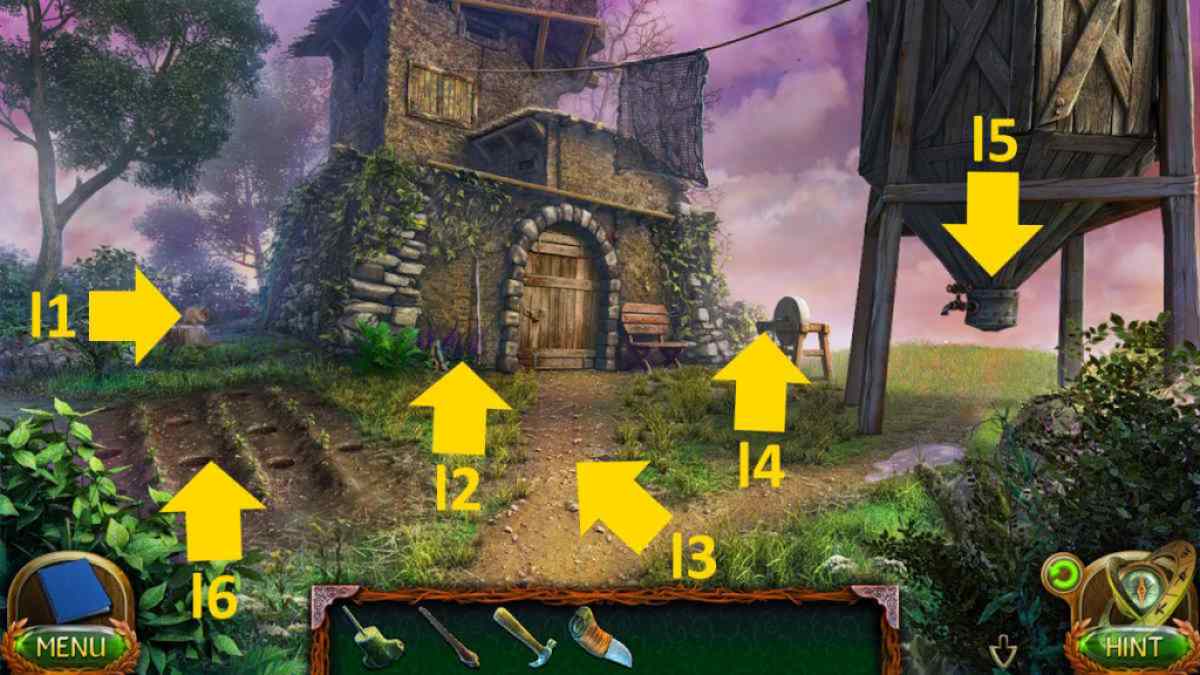
Image by Pro Game Guides
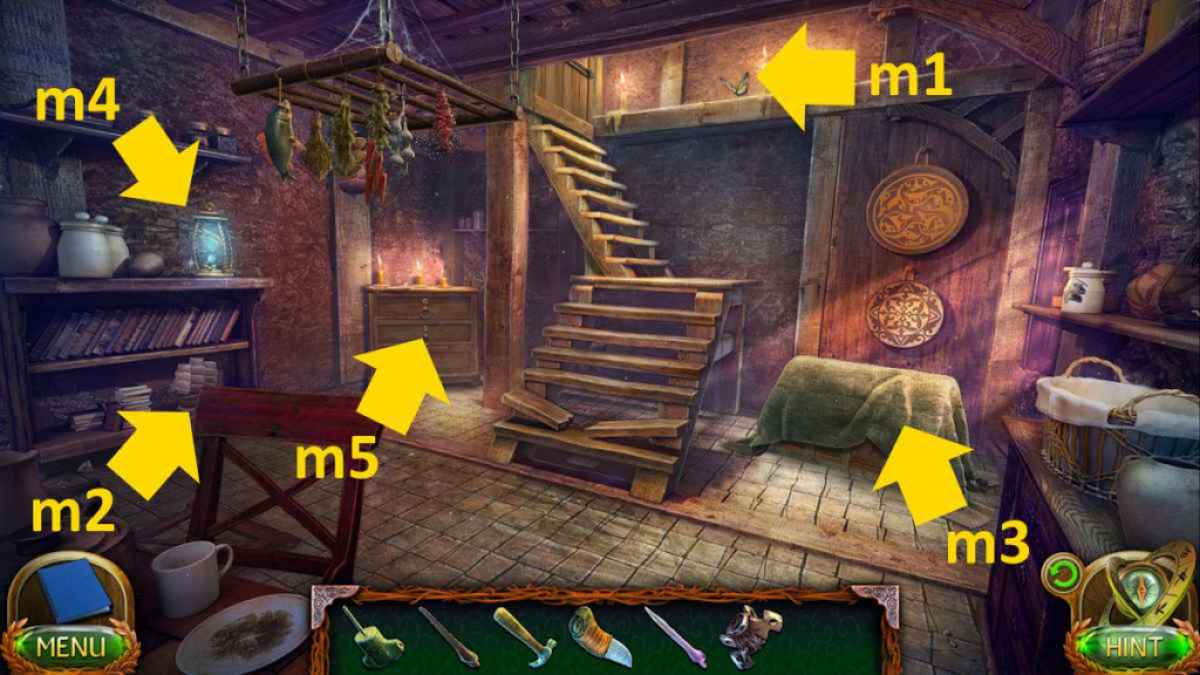
Image by Pro Game Guides

Image by Pro Game Guides

Image by Pro Game Guides

Screenshot by Pro Game Guides
Screenshot by Pro Game Guides
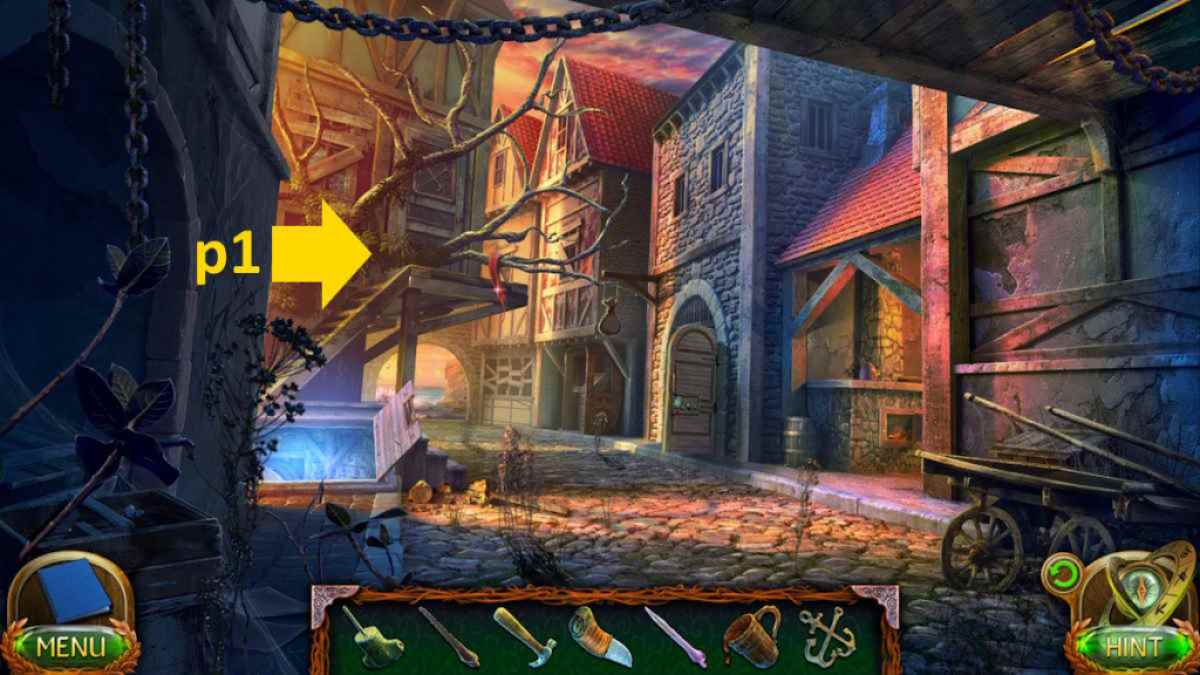
Image by Pro Game Guides
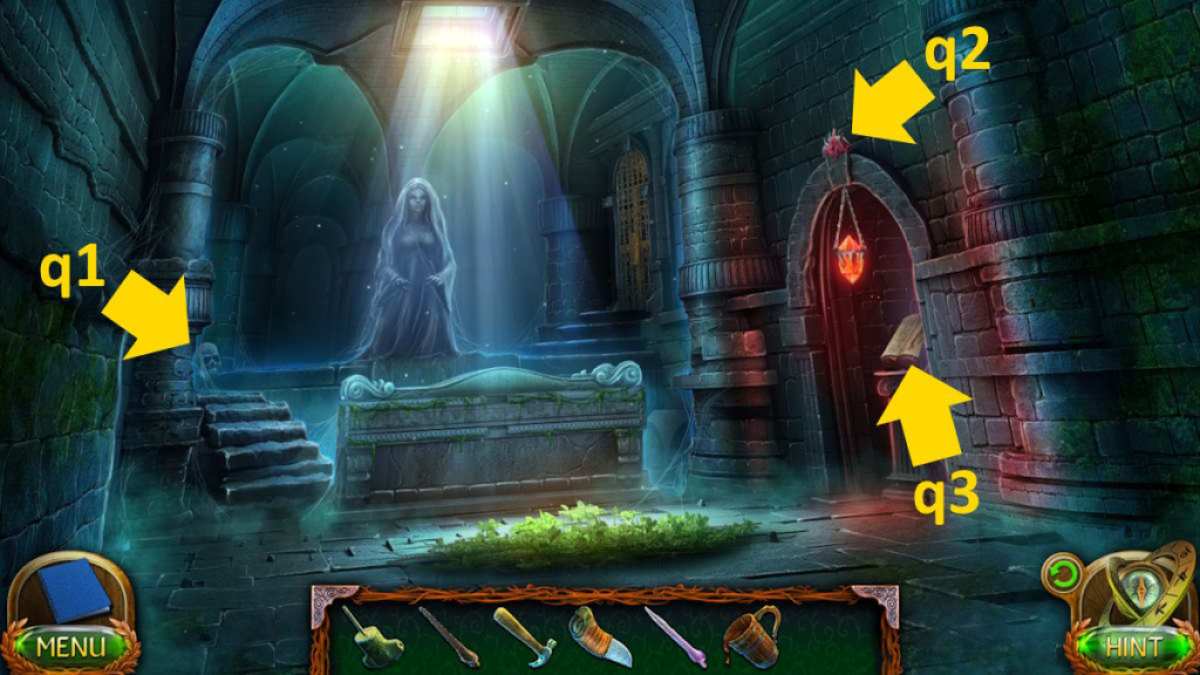
Image by Pro Game Guides
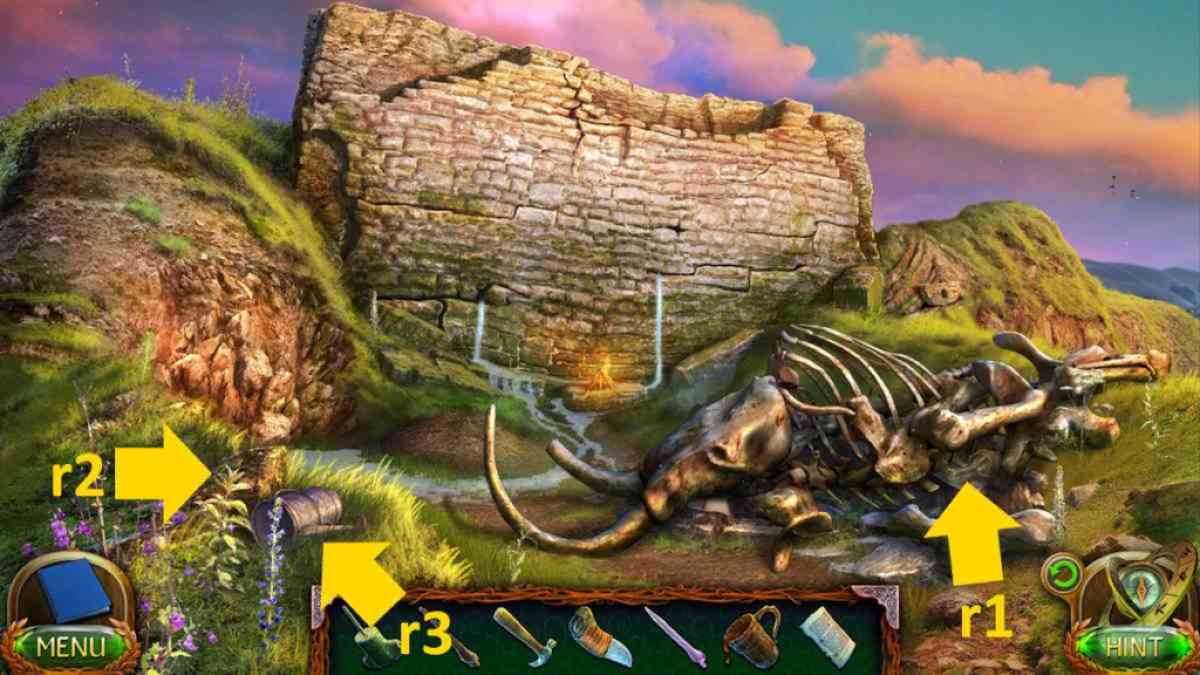
Image by Pro Game Guides
Screenshot by Pro Game Guides
