face up the evil Earl !
The sacking of the Lost Lands mystifier game serial publication as special editions has opened it to a novel army of fans . If you ’re make for Lost Lands 4 , read on for part 2 of my full walkthrough .
Lost Lands 4: The Wanderer Full Walkthrough, Part 2
This walkthrough pick up the legal action as our heroine Susan is about to enter the grounds of the Earl ’s rook . It follow the storey until you make and use the slumber Dart on the guard in the Earl ’s Throne elbow room .
If you ’re see for help with puzzle or finding objects in earlier or later parts of Lost Lands 4 , The Wanderer , tick through to myLost Lands 4 Walkthroughhub page for all the information you demand .
The road to the castle
Take theCollectiblefrom the tree ( a1 ) and the Morphing Object from the path ( a2 ) , then use the axe near the home of the tree on the right ( a3 ) .
Get a 2nd look at the felled tree ( a3 ) to collect theMap Pieceand then click the tree house ( a4 ) for a finale - up . employ the symbolic representation you get word carved into the ship mast ( a5 ) to unfold the boxful and get theButton .
you could now get at the carve wooden statue behind the tree diagram you chopped down ( b1 ) . cluck it , take thesecond Clock Hand , watch a brief cutscene , then extend down the path .

You ’ll find theCollectiblebehind the beach wagon wheel ( c1 ) and theMorphing Objecton the lower window of the pillar ( c2 ) . Use the tongue on the Dipper ( c3 ) to get someRope , then fill in the physical object - finding mystifier in the back of the waggon . The nine - satisfying twisting puzzle can be wily here . From the position visualise above , tick the following :
It also take me a while to find the last plaything , which is in the top - left of the image ( you take to disembarrass it with the tongue ) . Once complete , you ’ll get thePendulum .
Return to the captain ’s house , add the hands and the pendulum to the clock ( d1 ) , click the connected pendulum , and the doors at the top of the clock will open . Take theNoteand thesecond Button , then come back to the castle entrance .
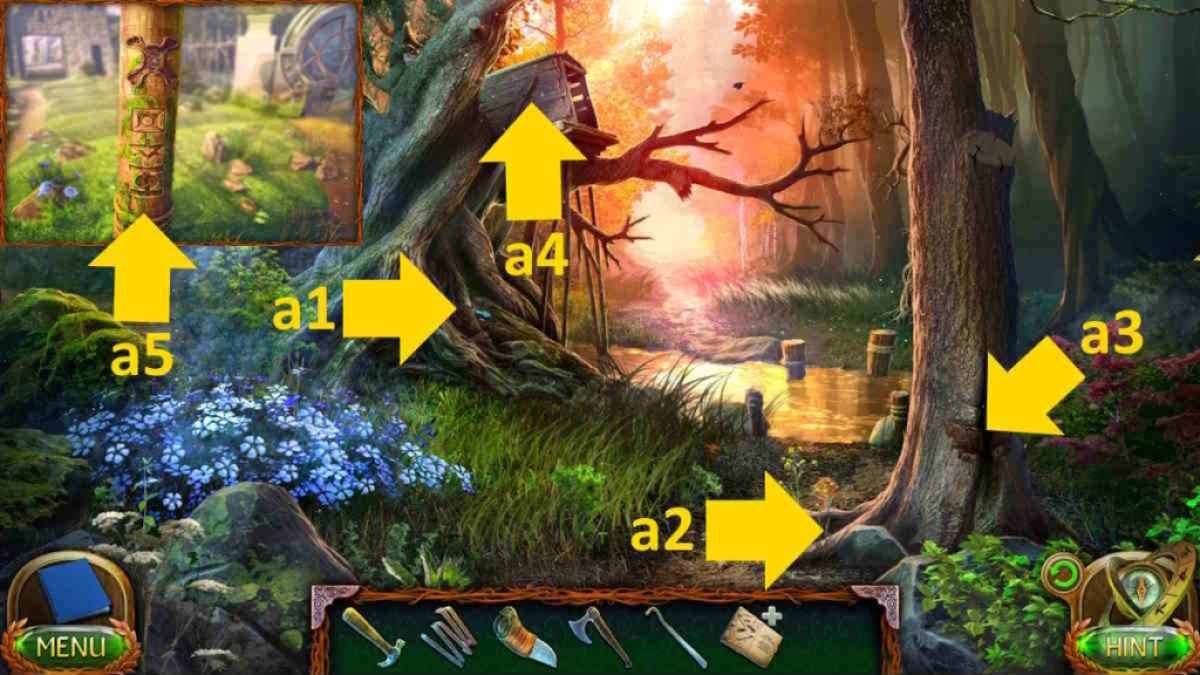
Image by Pro Game Guides
Click the threshold ( c4 ) and tot up the two buttons to the room access mechanics to bug out a sliding puzzle . If you find this one problematical , follow his solvent ( fifty is the left button , R is the right hand ):
Once complete , click the door to open up it and delight the cutscene , then click the Earl to mouth to him once you ’ve been captured .
tie in : Lost Lands 3 Full Walkthrough ( Golden Curse )
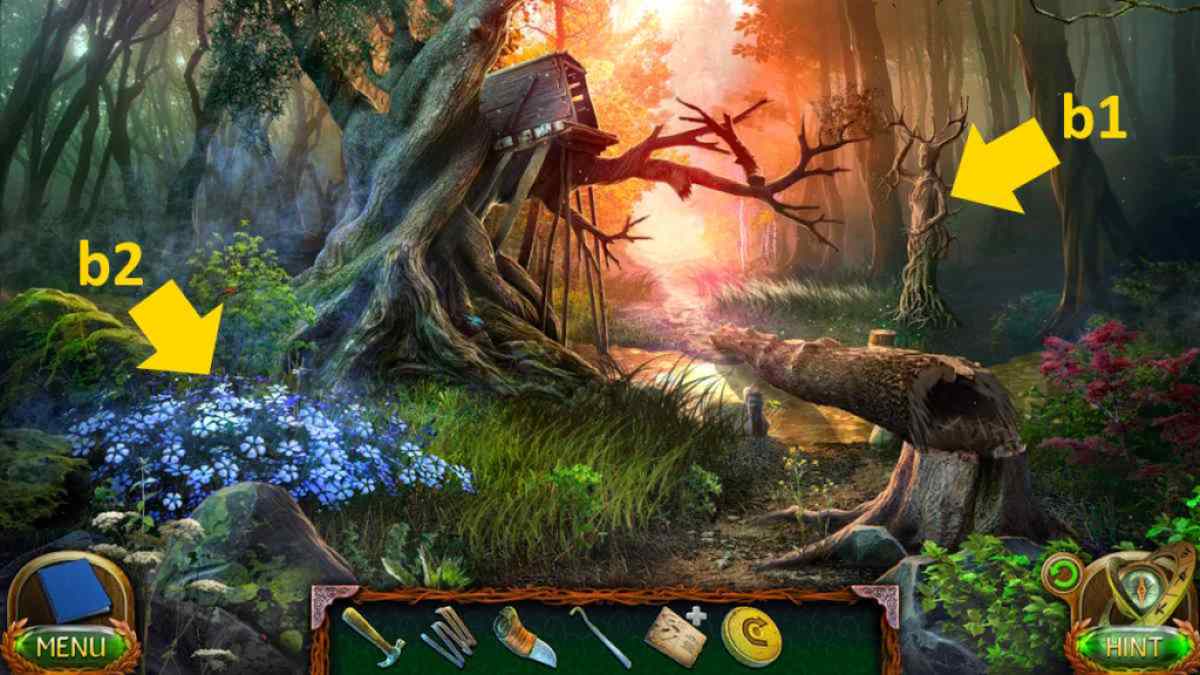
Image by Pro Game Guides
Locked up
Take theStone Tablet(e1),Manuscript , andRag(e2 ) , and try out the infract stool ( e3 ) to get someGlass . blend the rag and the chalk in your stock to make aHandmade Mirror , and then habituate it on the room access ( e4 ) to see the keyhole . employ the lockpick on the image of the keyhole , and you ’ll get to the door .
Click the cell at the back ( f1 ) and speak to the captain ’s wife , Nitielle . TheCollectibleis on the left shelf ( f2 ) and theMorphing Objectis just below it ( f3 ) . blame up theManuscript(f4 ) , thePlank(f5 ) , and theLog(f6 ) , then click the cell room access ( f1 ) for a close - up . tally the board , then the logarithm , and click the board again to open up the cell door .
Take aStonefrom the sculpture ( f7 ) , then replace it with the stone tablet from your cell . take the correct clitoris to press ( they ’re in your journal on page 17 , or bet at the inset trope above ) and you ’ll open up asecret escape transit . Head out .

Image by Pro Game Guides
Take theMorphing Objectfrom the left tree diagram source ( g1 ) , theCollectiblefrom just above it ( g2 ) , and theSpear(g3 ) . tick the element - arranging puzzle ( g4 ) and nail it to encounter aKeyand stop the maw . This is pretty tricky , so if you ’re feature trouble with it , do the follow from the position pictured below :
clack the valley ( g5 ) to advance to the Necropolis Entrance .
The Necropolis
Collect thePrimitive Knife(h1 ) from the story , plus theCollectible(h2 ) andMorphing Object(h3 ) from the step below it . channelize back to the cellular telephone and use the tongue on the target ( f8 ) to fag out theArrow . Select it in your inventory to also get theOwl statuette .
render to the Necropolis entrance , add the arrow to the statue ( h4 ) , add the key to its back ( h5 ) , and click the tonality once again to fire the arrow . This raise the island on the right field ( h6 ) . Click the island and use the fizgig on the kite in the close - up , taking asecond Crystaland then using the knife on the kite . Once done , select the island once more ( h6 ) and utilise the knife on the tree diagram to take aThorn(add this to the recipe in your inventory ) .
you’re able to now reckon at the rope bridge ( h7 ) that appeared by the island on the leftfield . Click the bridge for a finish - up and take theLever . Select the Necropolis ( h8 ) to continue forward .
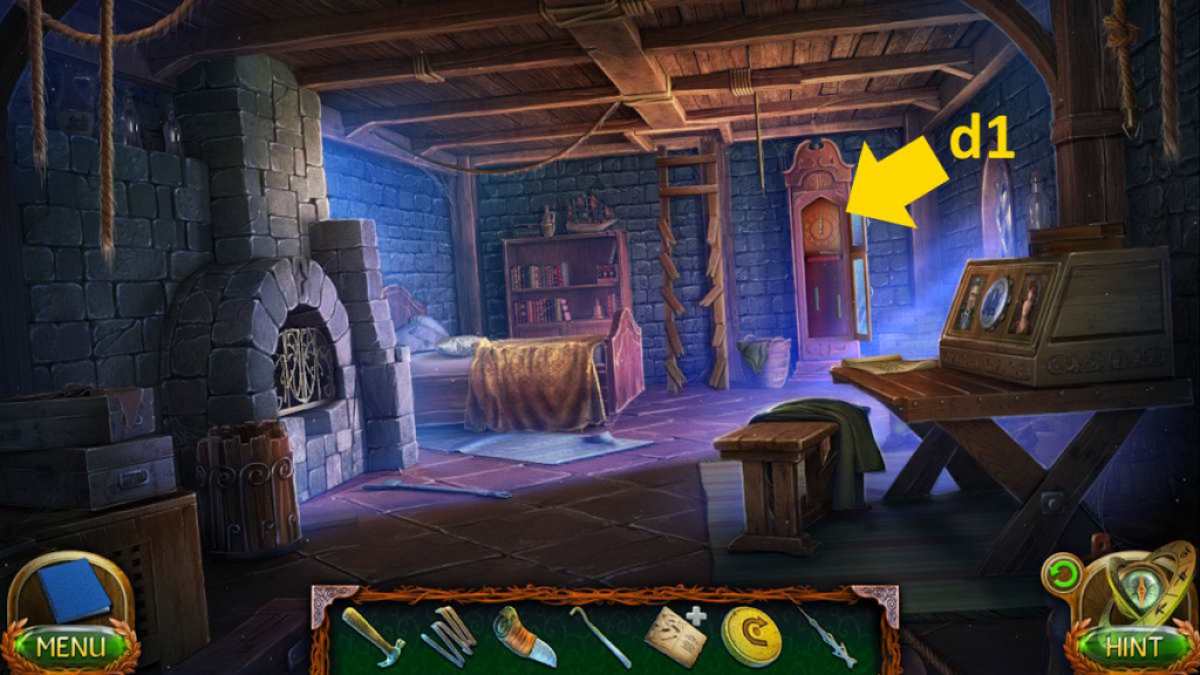
Image by Pro Game Guides
TheMorphing Objectis by the wall on the right field ( i1 ) and theCollectible(i2 ) is under the arch . Take thethird Crystalfrom the hole in the bulwark ( i3 ) , thesecond Leverfrom the outflow ( i4 ) , and aManuscriptfrom the wall ( i5 ) . Now pick out the glowing area ( i6 ) to start an object - observe puzzle . Once complete , you ’ll get theEnergy Sphere . Click the stairs ( i7 ) to continue up .
After grabbing theMorphing Object(j1),Collectible(j2 ) , andManuscript(j3 ) , get a close - up of the ritual tabular array ( j4 ) and take yourthird Lever . Click the statue ( j5 ) , take yourfourth Crystal , then replace it with the vim heavens . This opens the compartment below the statue , allowing you to take theHammer Head . choose the statue on the right ( j6 ) for a close - up and take theTwo - Pronged Fork . Click the arch ( j7 ) to move forwards .
Pick up thefourth Lever(k1 ) , then collect theMorphing Object(k2 ) andCollectible(k3 ) . Get a close - up of the tree diagram ( k4 ) and use the fork to get the hoot nest , select theFeather(which you could bestow to your recipe in your armory ) and yourfifth Crystal .
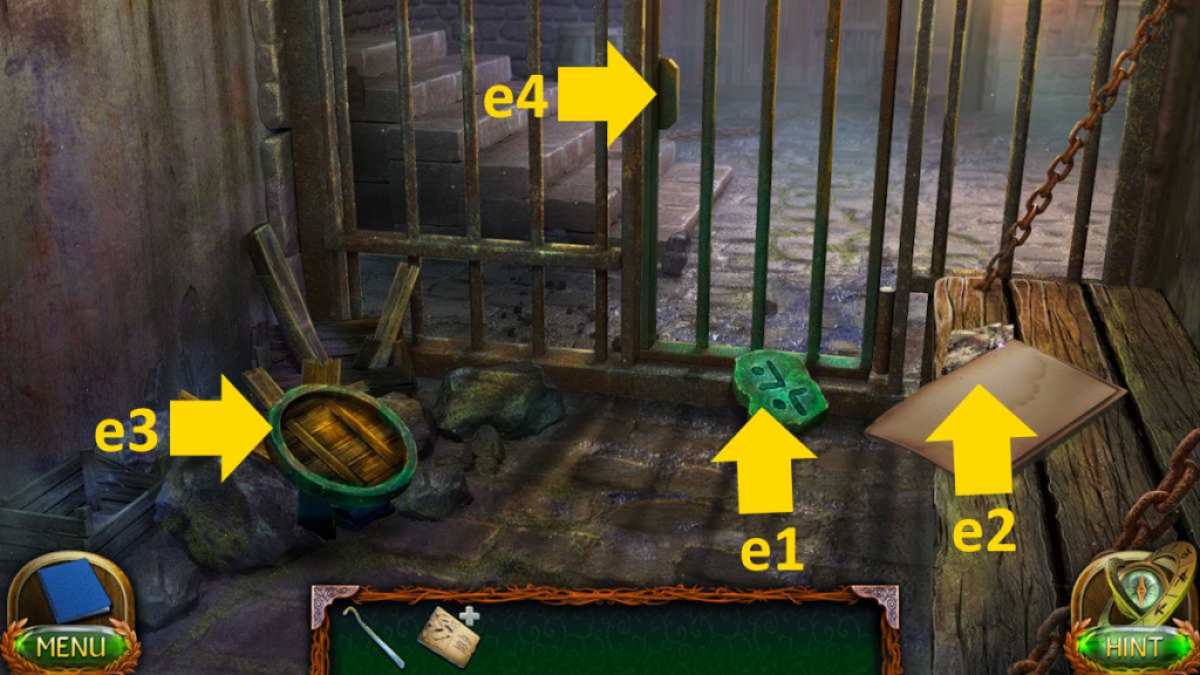
Image by Pro Game Guides
Return to the main sanctuary , select the chandelier ( i8 ) , and bring the crystal . Now take the wheel ( i5 ) , add the lever tumbler , and click it again to turn it and raise the chandelier . you may now come home the area where the floor gap ( i9 ) and find theSymbol .
manoeuver to the portal , click the groundwork of the tower ( k5 ) , and add the symbol . When the compartment here opens in the close - up , click it to start a coin - move teaser . Once complete , you ’ll actuate the portal . If this one show unmanageable , change state the following levers using the numbers in the icon below ( note that both the 5 and 9 repeat ) .
Related : Lost Lands 6 Walkthrough – misapprehension of the past tense
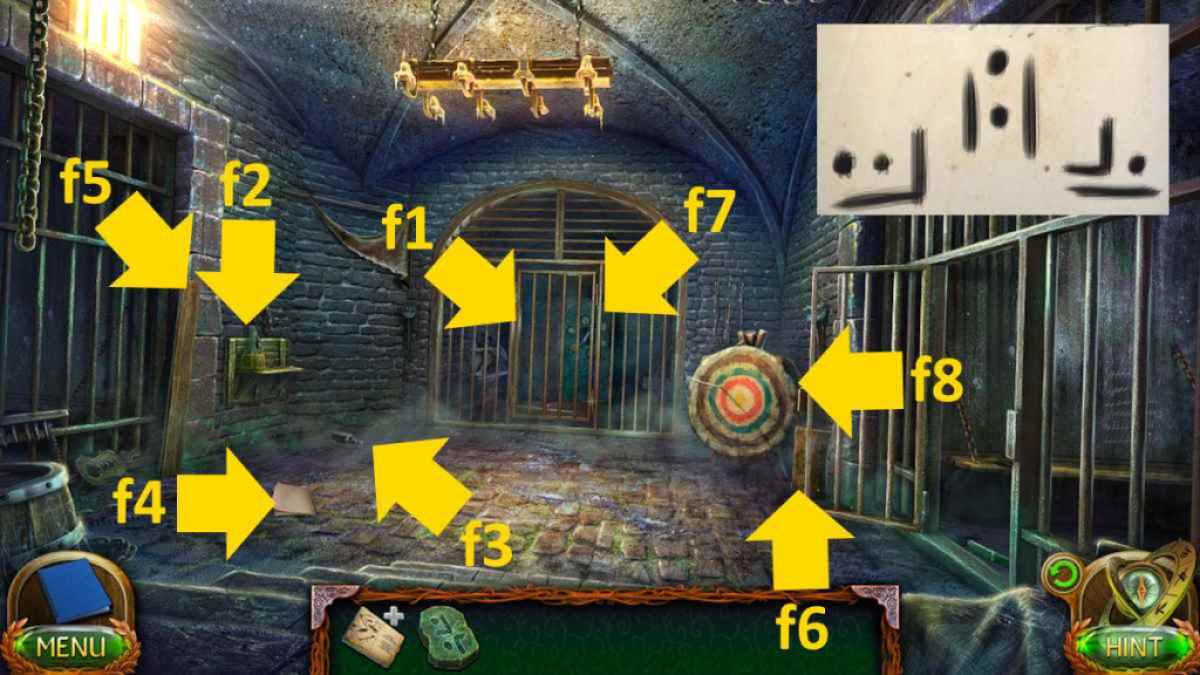
Image by Pro Game Guides
Completing the recipe
choose the portal ( l1 ) for a close - up and take theManuscriptandPlanet Model , which triggers a cutscene . It ’s about time Maaron express up ! Afterward , chatter Maaron ( l2 ) again to bear on the conversation and he ’ll give you aKey . While you ’re here , you’re able to add the planet example to the others here ( l3 ) to keep your armoury healthy and pluck up theMap Piece(l4 ) .
utilize the map to go to the castle hall and pick up theMorphing Object(m1 ) andCollectible(m2 ) . Use Maaron ’s key to launch the threshold ( m3 ) and go through to the stool room , taking anotherMorphing Object(n1 ) andCollectible(n2 ) for your collection along with theGlass Sphere(n3 ) .
Move back to the bay shore , dawn the net for a close - up ( o1 ) , and practice the glass sphere on the bottom - forget box to get theAdrenaline Vile . Also , recall to the secret passage , get a close - up of the sand trap ( g6 ) , and pick up aGoblin Hair(add this to the formula in your inventory ) .
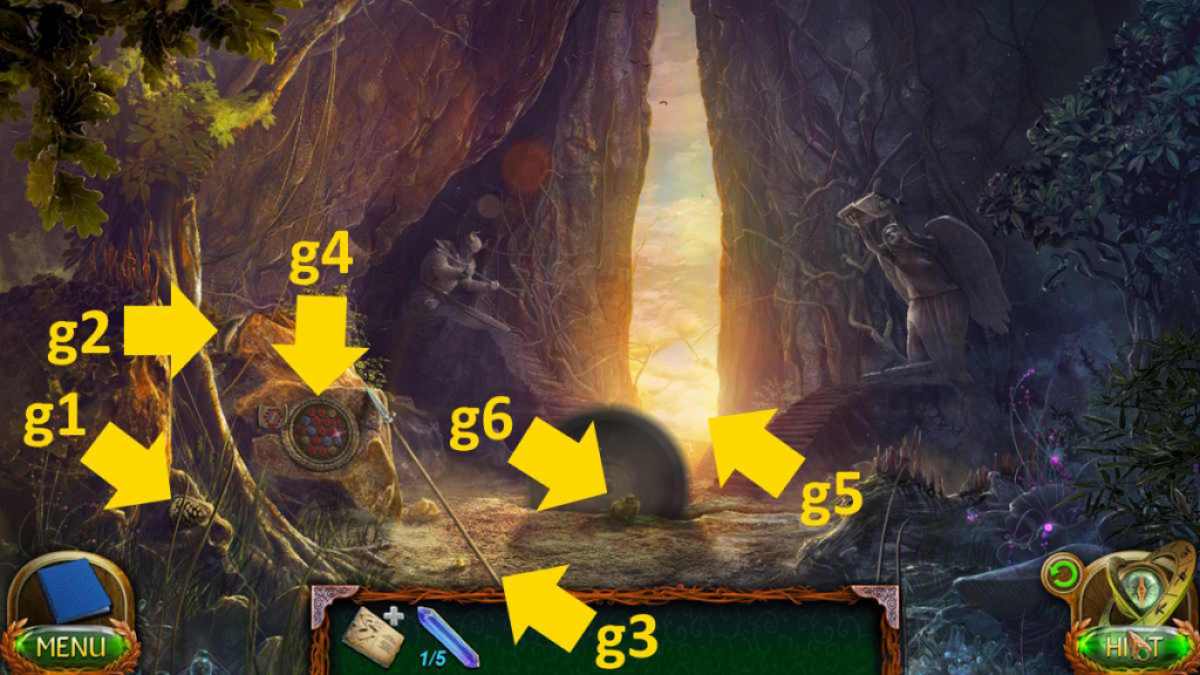
Image by Pro Game Guides
Go back to the road to the castle and apply the adrenaline vile on the flowers ( b2 ) . After the cut shot , click the efflorescence once more to collect aDrowsy Flowerand aFragment . Use your tongue on the flush in your inventory to get theDrowsy Flower ’s Rootand theSleeping Flower , then add the root to the recipe in your stock list .
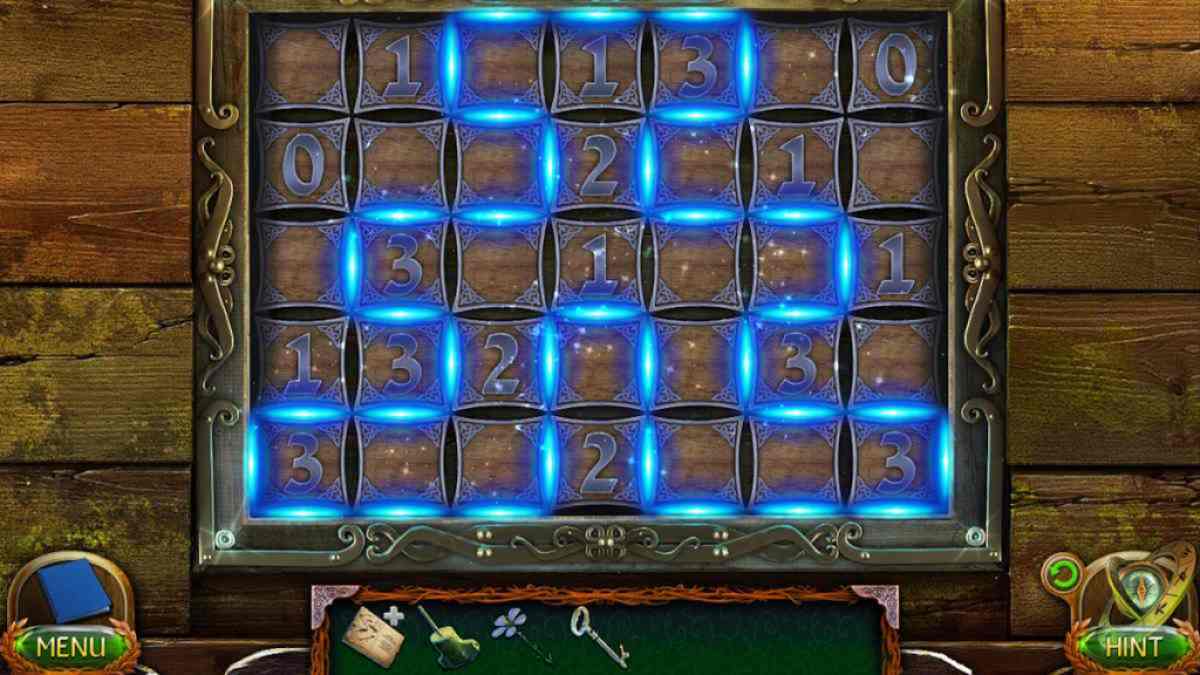
Go right back to the beaverling burrow and blab out to Corko , who will give you aKey . Also , click the dresser here ( o2 ) , then add the fragment to start a issue mystifier . If you need an reply to this one , I ’ve shown myself completing the puzzle below . Once done , the chest will open and you may take theEmpty Flask .
Move alfresco , get a close - up of the wolf ( o3 ) , and expend the log Z’s flower on it . Take theLard , get across the wolf ’s bandage to remove it , and then use the flaskful on the bandage to get aVial of Wolf Blood(add this to your recipe ) . Use the key to reach the shed ( 04 ) and head inside .
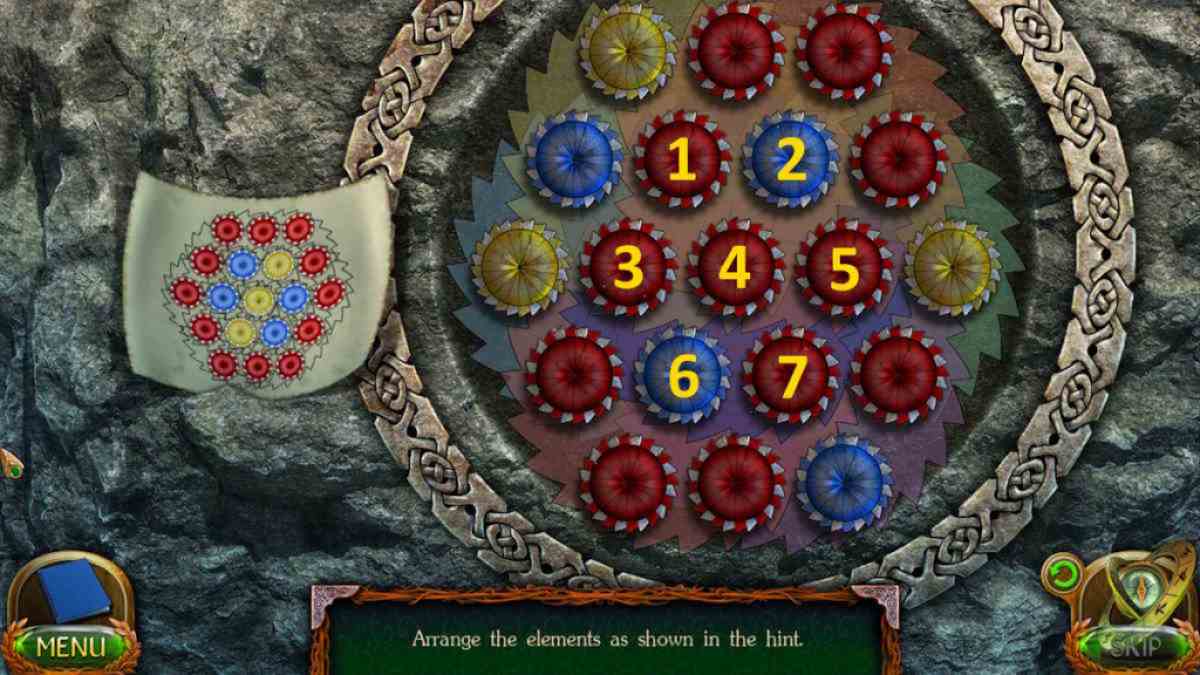
Image by Pro Game Guides
TheCollectibleis on the roof ( p1 ) , and theMorphing Objectis on the floor ( p2 ) . Select the saw ( p3 ) and take theTongs . Click the pull in the same last - up and use it on the circular saw blades to remove one .
get across the gimmick at the back of the shed ( p4 ) and grease it with the lard to get it working . you could now foot up theJuicerthat falls from the simple machine in the same close - up . Now choose the logarithm mechanism ( p5 ) , and click the twist several times in the close - up to secure the logarithm .
come back to the private passage , click the saw steel trap ( g6 ) , and use the tongs to break the saw brand free . Pick up theDisk Saw . Go back to the shed , add it to the simple machine ( p3 ) , fix it in place with the wrench , and then click the hold in the same close - up to prep the motorcar . Now you could deplume the declamatory lever ( p7 ) and after , take thePlanks(at p6 ) .
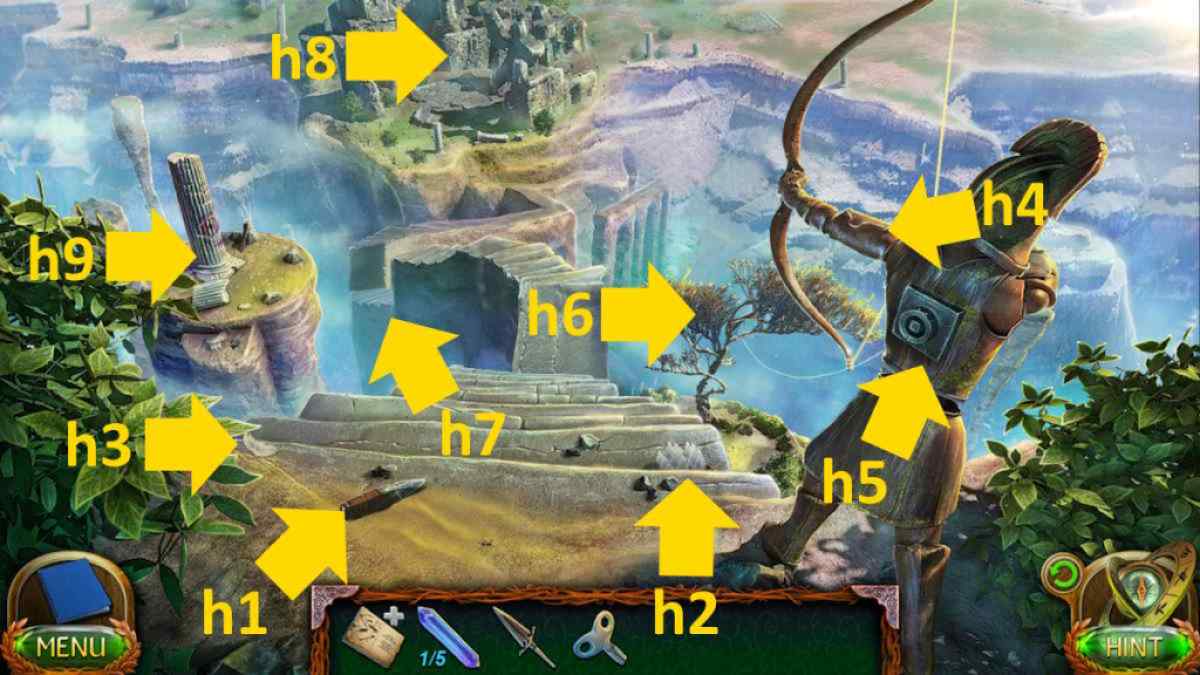
Image by Pro Game Guides
Move to the Necropolis entry and add the planks to the bridge circuit ( h7 ) , giving you access to the pillar on the left ( h9 ) . Click the column for a close - up and take theSaw . Now you need to go to where you got the ferrying , tick the other side of the bridge ( o5 ) , and utilize the proverb to get aBamboo Rod .
bring the rod and imbiber to your recipe in your stocktaking , which is now quick to be make . Use the juicer on the root , the feather on the thorn , the roofy on the feathering - and - thorn to make a dart , the dart on the potion , and last , the dart on the bamboo pole . TheSleeping Dartwill be added to your armory . Go back to the can room and use the flit on the sentry go ( n4 ) , allowing you to further search the way .
To continue the game with us here at Pro Game Games , click through to myLost Lands Walkthrough , part 3 !

Image by Pro Game Guides

Image by Pro Game Guides
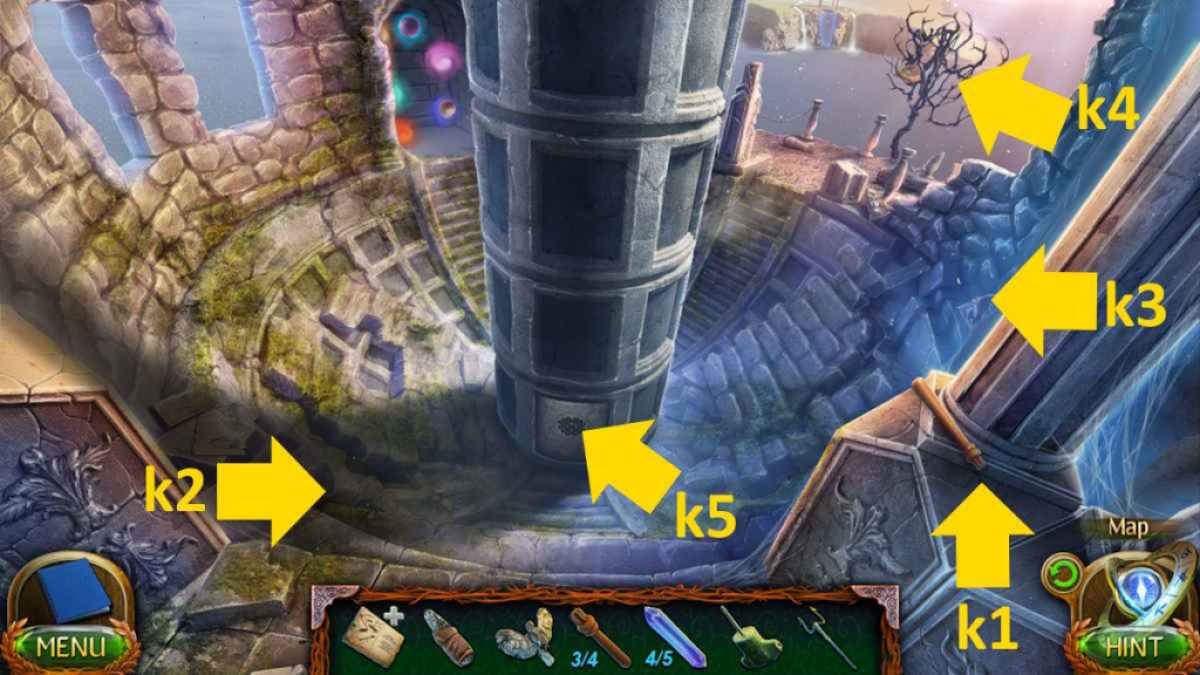
Image by Pro Game Guides
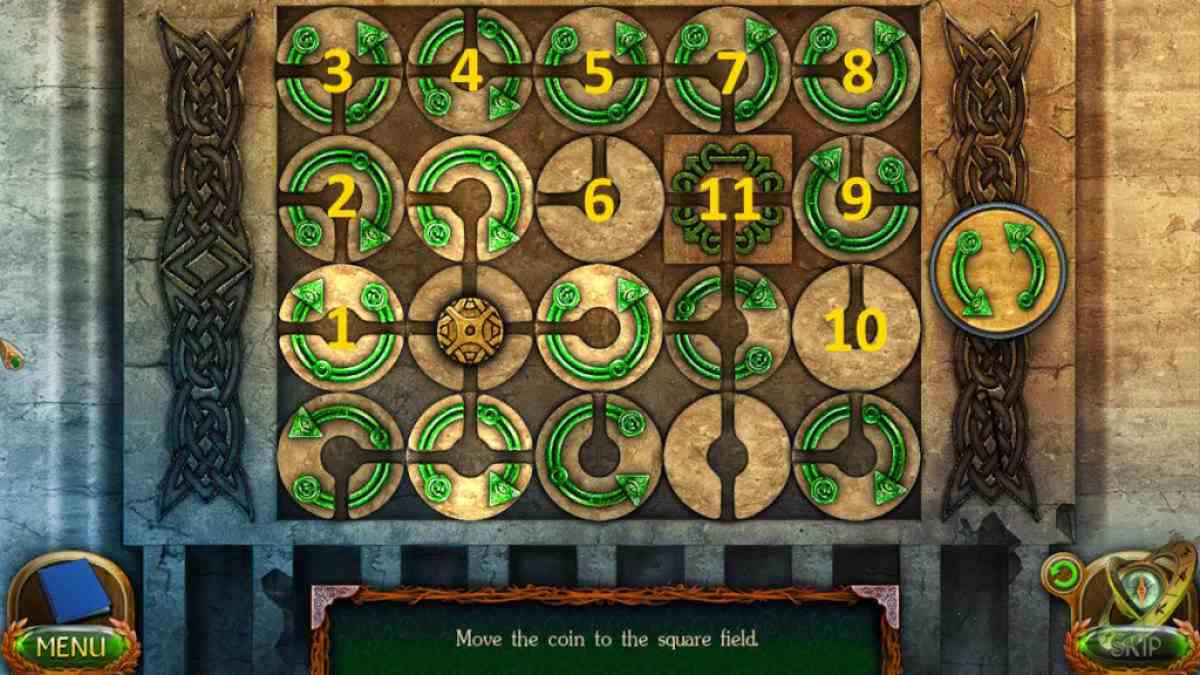
Image by Pro Game Guides
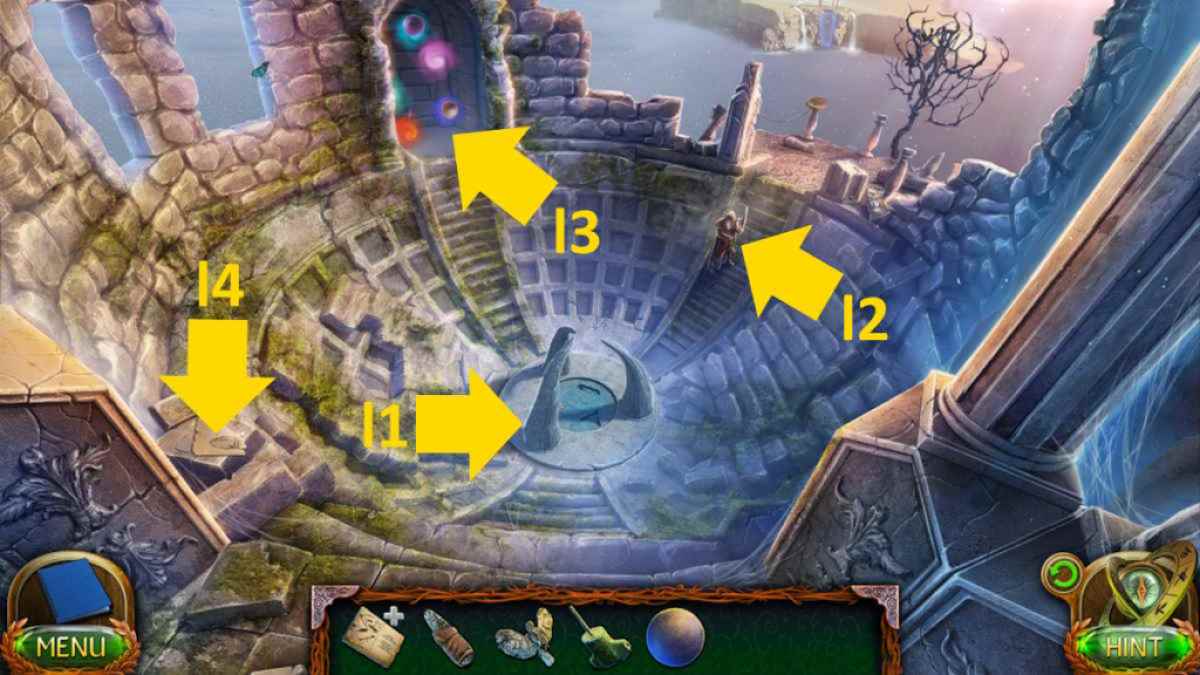
Image by Pro Game Guides

Image by Pro Game Guides
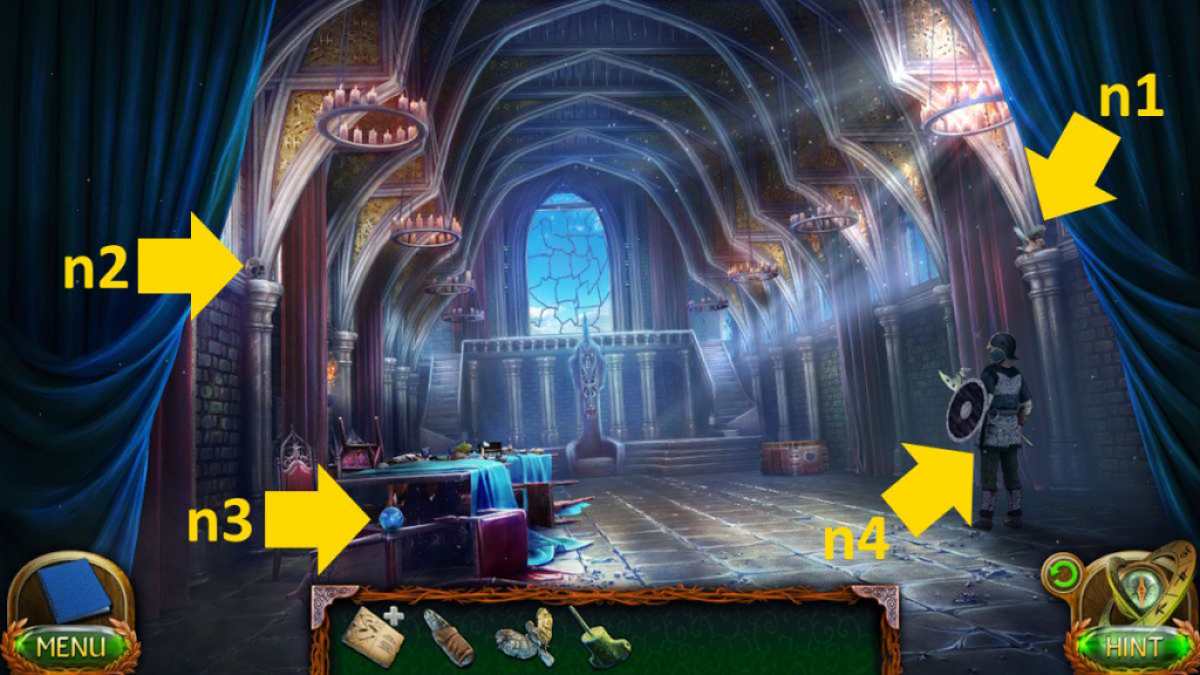
Image by Pro Game Guides
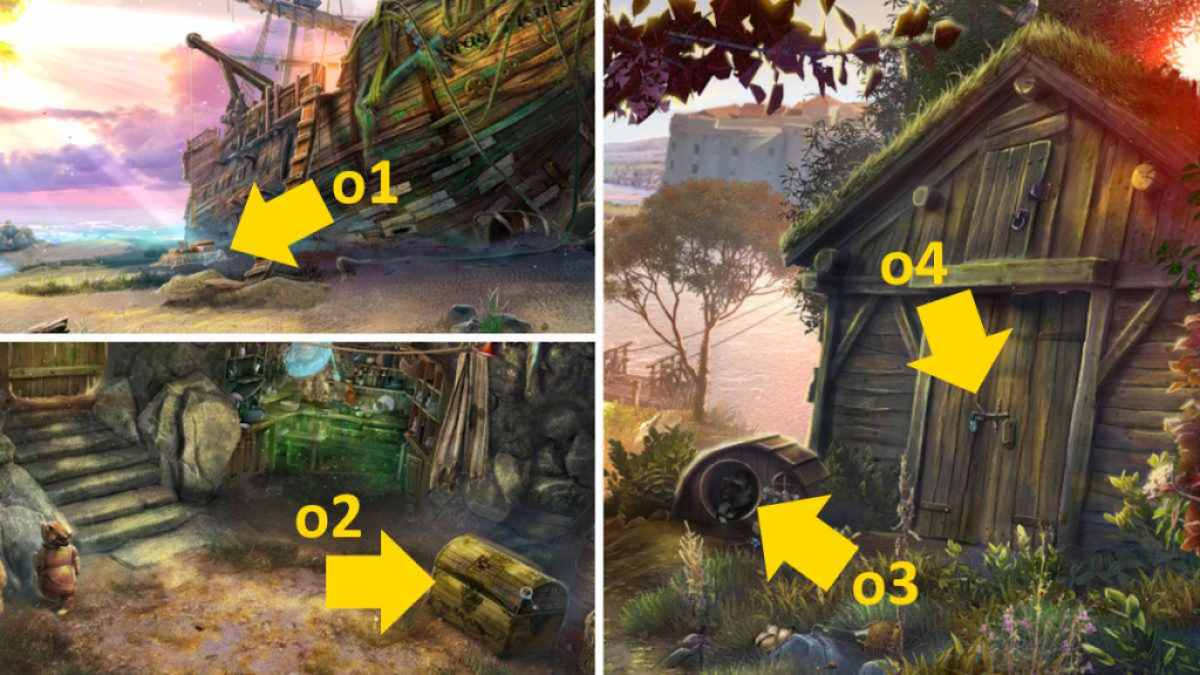
Image by Pro Game Guides
Screenshot by Pro Game Guides
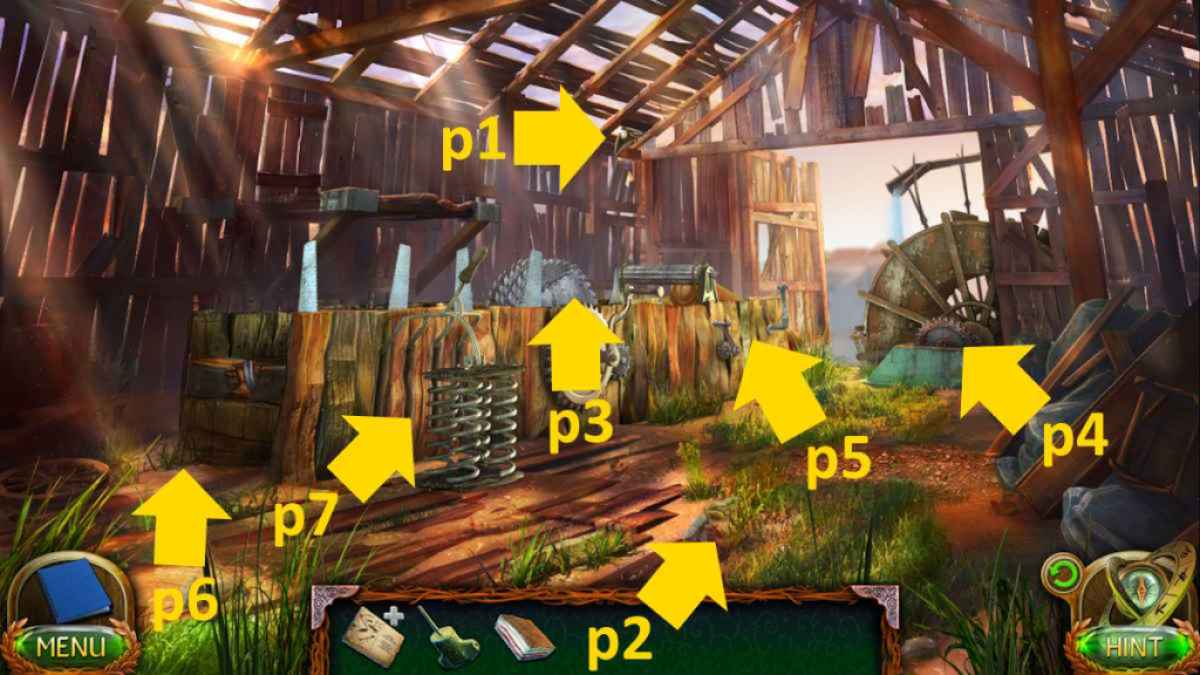
Image by Pro Game Guides
