Get on the ghost ship !
lose Lands is one of the most popular point - and - click puzzle and object - determine series around . I fuck leading Susan into each newfangled adventure and if you do too , take on for my full walkthrough for Lost Lands 4 , The Wanderer .
Lost Lands 4: The Wanderer Full Walkthrough
mention that once you reach the Lost Lands , you may use the map ( bottom right field of your screen ) to dissolute - travel between areas you ’ve confabulate . For this reason , I wo n’t sing about how to get from A to B in this guide . Also , note the mathematical function will prompt you of any scenes in which you have n’t yet accumulate the Collection Item ( payable ) or Morphing Object .
At the start of the game , our wedge Susan returns home to find a mystical beam crate in her rest home . This is part one of my full walkthrough for Lost Lands 4 : The Wanderer and it will take you up to the light mystifier , which opens the gate to the Earl ’s estate , include all puzzle solutions . If you require to find help for later constituent of the game , use the connectedness below .
A mysterious box
snap the idiot box ( a1 ) for a conclusion - up to grab yourDiary , then the beam dresser ( a2 ) to understand the Federal Reserve note telling you that to launch the chest , you ’ll need the Anti - Magic Gloves you bring back from your last adventure . Take theBallpoint Pen(a3 ) and yourCell Phone(a4 ) , then check the TV close - up ( a1 ) once more to charge up your phone . Once it is plugged in , chatter the telephone to chequer your messages and take down the new good code,4 8 15 16 23 42 .
pick out the photos on the wall ( a5 ) and utilise the playpen to open up and bring out the safe . Input the code and you ’ll get theAnti - Magic Gloves . utilise them to launch the dresser , take theCompass of the Worlds , and head out . When you go far on the ship , click the cabin doors to ping on them and they ’ll open up . Click the entrance to go at bottom .
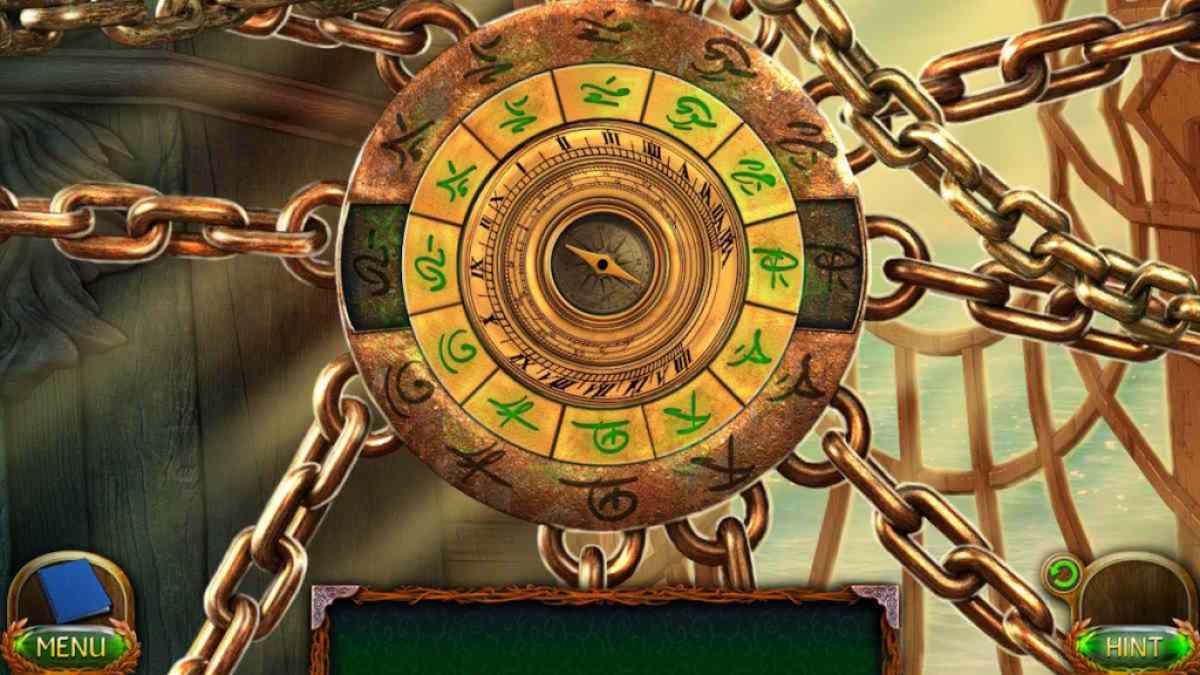
Click Captain Finuer Stulburn for a abbreviated conversation that triggers a symbol - matching puzzle . To complete the mystifier , use the gap on either side to drag slice out of the centre circleso that you’re able to rearrange them . Keep doing this until they all match the internal roofy and the puzzle is solved . You ca n’t give out , so just keep switching pieces until the circle is complete ( see above ) .

link up : Lost Lands 9 Walkthrough – Full templet
The Cave
find fault up theCollectible(b1 ) andMorphing Object(b2 ) , then fall into place the curtain ( b3 ) to startle an object - finding challenge . mark you need to get down the candle on the stool to burn the wax to get the knob , and you need to use the chisel and weight to start the clasp on the windowpane to find the bottle screw . Once complete , you ’ll get theBlunt Knife . Use the knife on the door ( b4 ) , and channelize alfresco .
Click Corko ( c1 ) to move to the next fit and lecture to Corko by clicking him there to find out you need to aid him fix the ferrying so you’re able to head to the Ithiel Town across the river .
Go back to the scene outside the room you were in and find theCollectibleand theMorphing Object(c2 ) , which are right next to each other on the ground , as well as taking theMap PieceandWood Shavingsby the tree stump ( c3 ) . Head back to Corko .
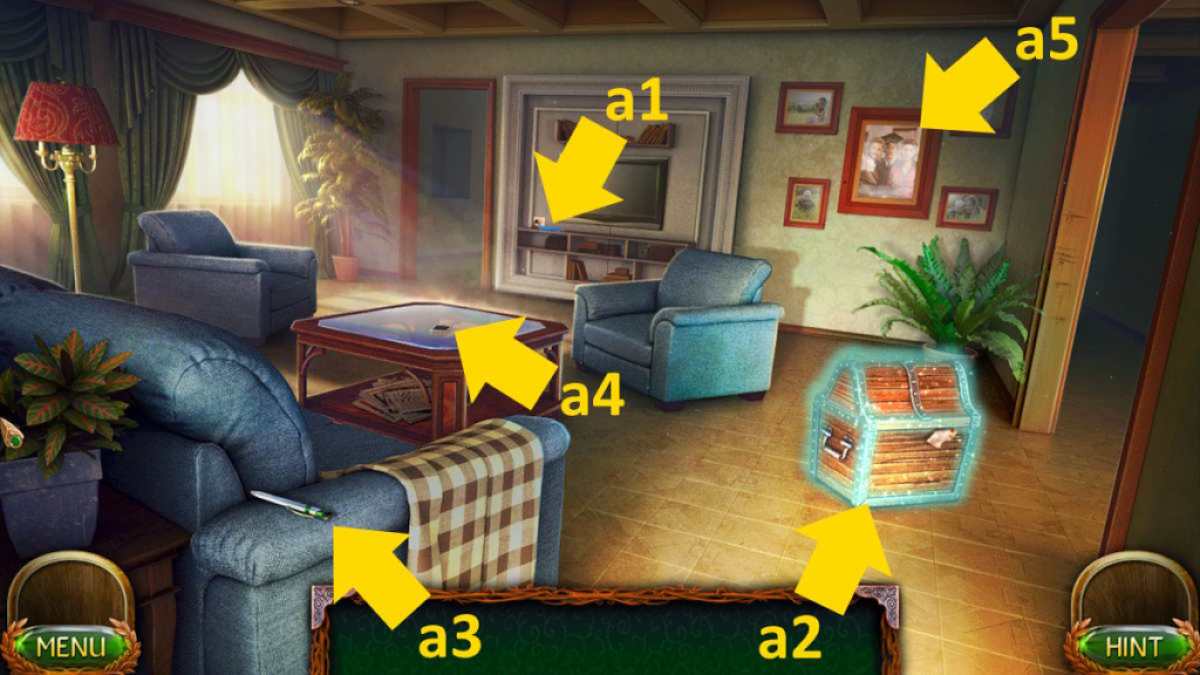
Image by Pro Game Guides
TheCollectibleis by the nosepiece ( d1 ) , while theMorphing Objectis on the path near Corko ’s human foot ( d2 ) . Take someTea Leaves(d3 ) and theHammer(d4 ) , then move back up the hill . Use the pound to remove someBent Nails(c4 ) and then clack the boxwood again to open it , taking aManuscriptandFirestarterfrom at heart . take the bent nail in your inventory and utilise the hammer on them to createNails .
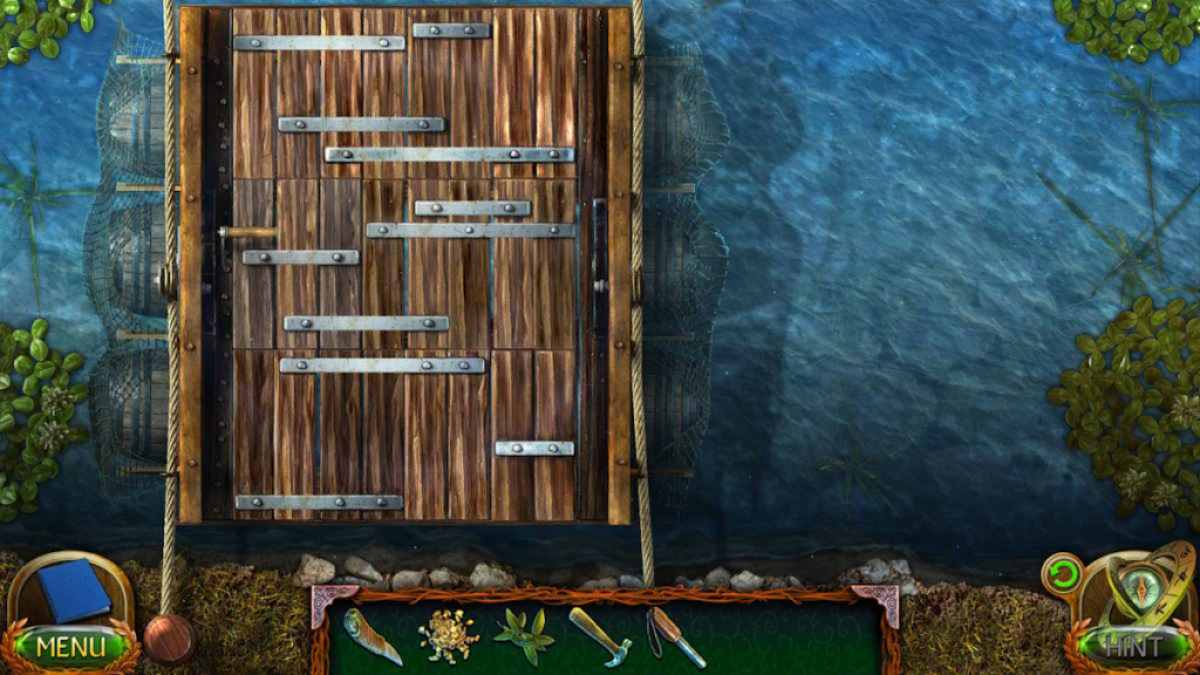
Now you could give the nails to Corko to start a board locating puzzle . Each of the three puzzle levels has three pieces that go on it , add together up to eight board on each . If you get stuck , use my picture above and note the placement of metallic element supports to head you . Once double-dyed , you canuse the ferryto go to the Bay of Sorrows .
The Bay of Sorrows
TheMorphing Objectis by the well ( e1 ) and theCollectibleis by the ship mast ( e2 ) . apply the power hammer to off the two signs on the signpost ( e3 ) , uncover some symbol . There ’s nothing else to do here yet , so snap the gate ( e4 ) to channelise into the town .
You ’ll find theMorphing Objectin the middle of the road ( f1 ) , and theCollectibleby the cartwheel ( f2 ) . The area at the top of the stair ( f3 ) will get you aManuscriptand aLong Club . reset the remainder of the rubbish here to reveal a symbolic representation , then click the arch ( f4 ) to move on .
Take theBucket(g1),Collectible(g2 ) , andMorphing Object(g3 ) from the beach , then get a close - up of the forward ship area ( g4 ) and penetrate thePry Barto pick up it ( do n’t miss theKindlingandMap Piecein the same close - up ) . Use the long club on the net ( g5 ) to get theSteering Wheel .
Screenshot by Pro Game Guides
Move to the outskirt of Ithiel Town and use the guidance bicycle on the well mechanism ( e1 ) , which will resurrect the rope . sum the bucket , click the equipment to drop down it , and pull it back up to get a Bucket of Water . Do n’t neglect theMap Piecein the well close - up .
relate : Lost Lands 7 Walkthrough – Full Guide
Releasing Jepp
Head back to townspeople and use the pry barroom to release the man in the wine cellar ( f5 ) , which also gets you theMetal Bars . Now click the kitchen orbit ( f6 ) for a conclusion - up . Put the Ellen Price Wood shaving and kindling in the oven , and use the tongue and fire neophyte to light it . Put the afternoon tea in the saucepan , then remove it once dried and put it in the cup . Use the bucketful of piss on the kettle , sum up the eyelid , then put the kettle on the cup to get aCup of Tea . Give it to the man in the cellar ( Jepp ) and after a cutscene , you ’ll have admittance to the cellar .
TheCollectibleis by the chaff seam ( h1 ) and theMorphing Objectis on the steps ( h2 ) . Click the bottom for a close - up , then cluck its recess to find aManuscriptand take aShovel Blade . Also , take aCrystalfrom the stairs ( h3 ) and theWhetstone(h4 ) .
pick out the stark knife in your inventory and use it on the whetstone to get theSharp Knife . Now select the blade in your inventory , total the long club , and then use the sharp-worded tongue on it . Click the taper club and you ’ll have theShovel .

Image by Pro Game Guides
Move to the ship and habituate the shovel to move the sand ( g6 ) , after which you’re able to pick up theFish Figurine . Then click the circle ( g7 ) , which raises the gangplank , give you access to the ship . Go back into Ithiel Town and use the figurine on the door ( f7 ) to gain access code to a missing aim puzzle . Once completed , you ’ll get theFragment .
On the ship
Head back to the beach , go up the gangboard onto the ship , and click Jepp for a cut scene . Click Jepp afterward to get more details , then snaffle theMorphing Object(i1 ) andCollectible(i2 ) . Get a close - up of the spyglass ( i3 ) and take asecond Crystal , also note the symbolisation cut up into the wood .
Click the guidance wheel ( i4 ) next , impart the fragment to it to take up a lightsome mystifier . If you scramble with this one , one solution is 4,6,1,3,6,8,2,7,4,2,5,8,3,5,7,1,2,3,4,5,6,7,8,1 ( see image above ) . Once complete , you ’ll get aClock Handand aKey .
Go back to the cellar , use the key fruit to open up the unavowed handing over into the captain ’s house ( h5 ) , and channelise inside . Grab the run ( j1 ) and place it under the trapdoor ( j2 ) , take theAxe(j3 ) , then click the bed ( j4 ) to find aManuscriptand athird Crystal(after cutting the pillow undefendable with the tongue ) . Take theCandleandLockpickfrom the desk ( j5 ) , then read the note . This will trigger a brief thin view with Jepp , after which he ’ll give you the Berserker’sRecipe . Click the desk again subsequently and take theGear .
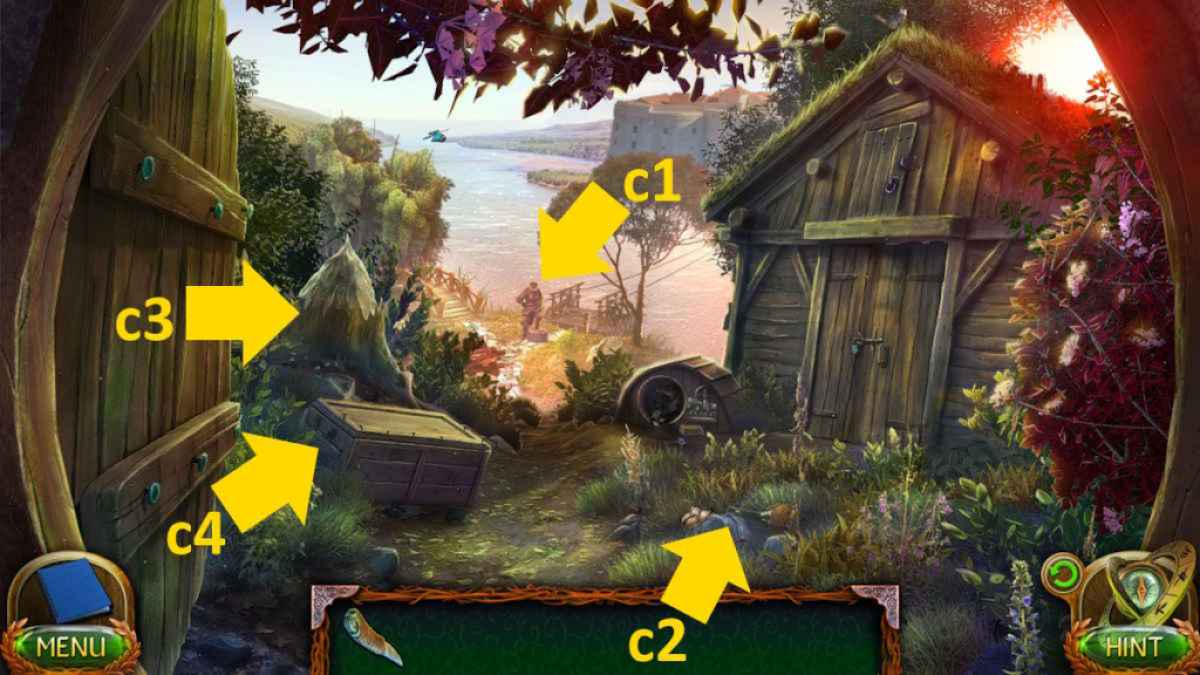
Image by Pro Game Guides
Select the clock ( j6 ) and get to the bottom section to find aMap Piece . you could add the clock hand to get it out of your inventory , but it wo n’t do anything yet . Both theCollectibleand theMorphing Objectare on the shelves behind the bed ( j7 ) .
associate : Lost Lands 6 Walkthrough – Mistakes of the past times
Opening the gate
Move to the Ithiel Town , use the wax light in the oven ( f6 ) to get aLit Candle , then generate to the police chief ’s mansion and use the lit cd in the sullen field leading to the loft and take theBeaver Tail . When you do , the footmark will break .
Go back to the cave where you protrude , add up the beaver tail to the beaver legislative act ( b5 ) , and get across it once bind to spread the mouth and take afourth Crystal .
Back at the ship , fall into place the winch ( i5 ) for a close - up and get aManuscript Partbefore add together the gear to the mechanism . Click the windlass again to lower it . If you now go back to the beach you’re able to get to the meshwork ( g5 ) . utilise the knife to cut it open and take thefinal Crystal .
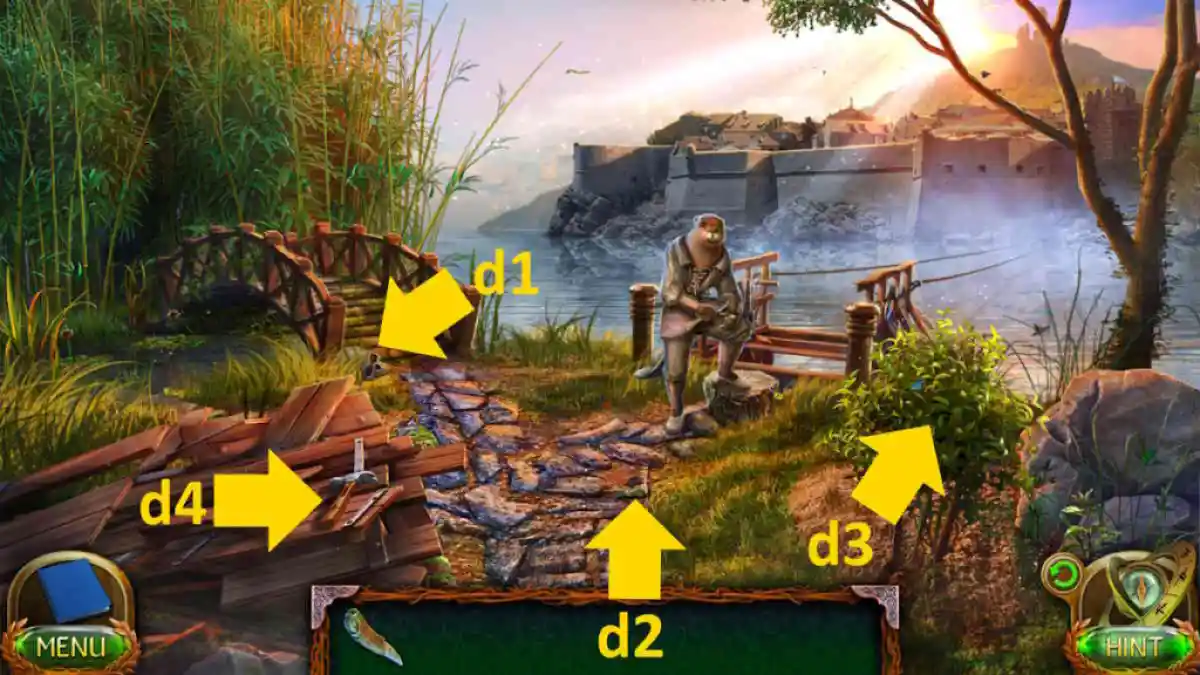
Image by Pro Game Guides
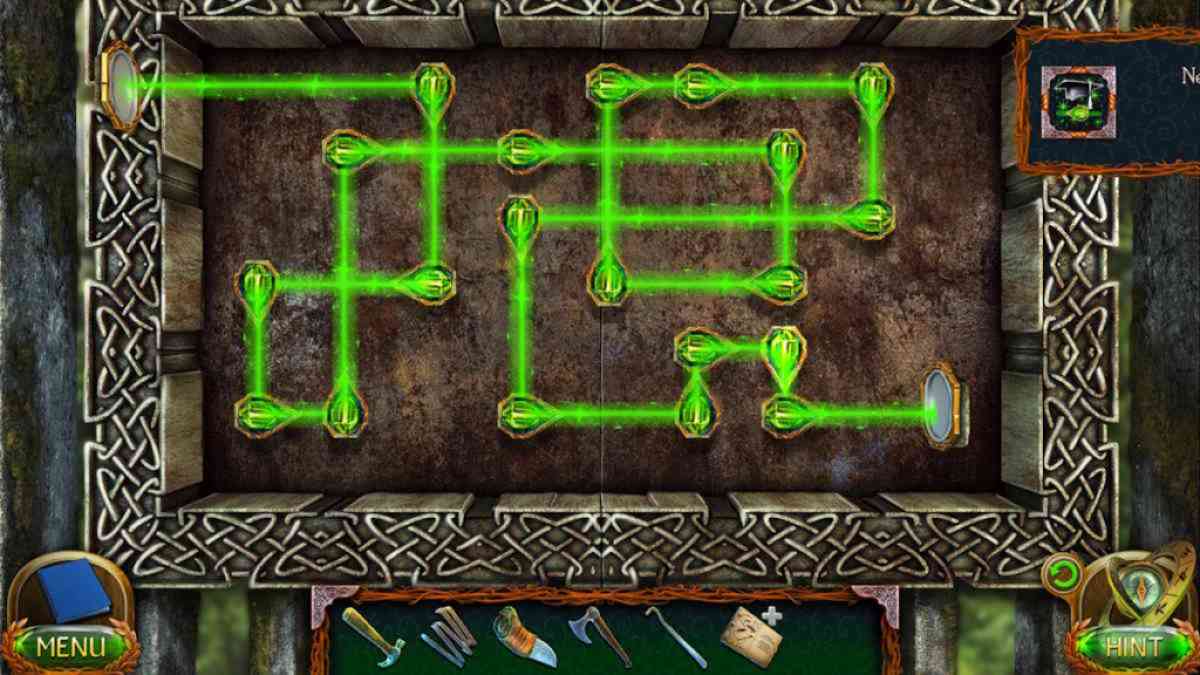
give to the arena outside town where the ferry dropped you and select the gates ( e5 ) , adding the five crystals to start a light - way teaser . You involve to rotate the crystals so that the light from the top left hand is redirect through all of them and hits the gadget in the bottom rightfulness . Once consummate ( see above ) , the gate will spread out and give you access to the third region of the game , The Earl ’s Castle .
If you want to extend the walkthrough with us here at Pro Game Guides , click through to myLost Lands 4 walkthrough , Part 2 !
Screenshot by Pro Game Guides
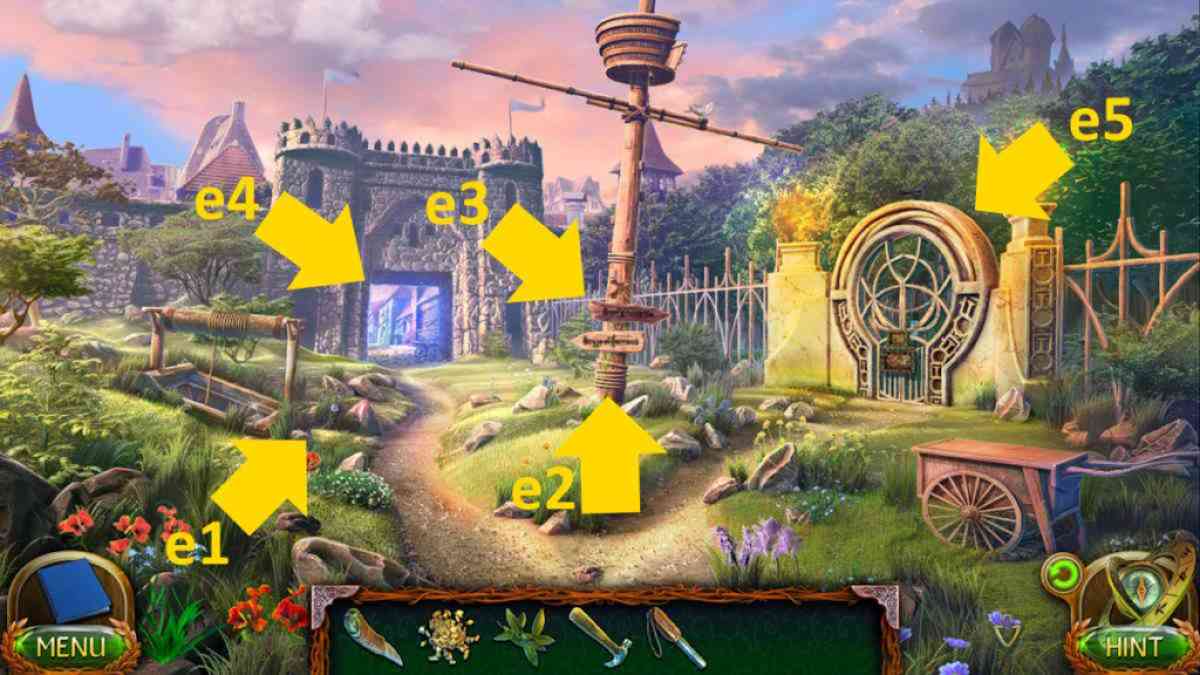
Image by Pro Game Guides

Image by Pro Game Guides
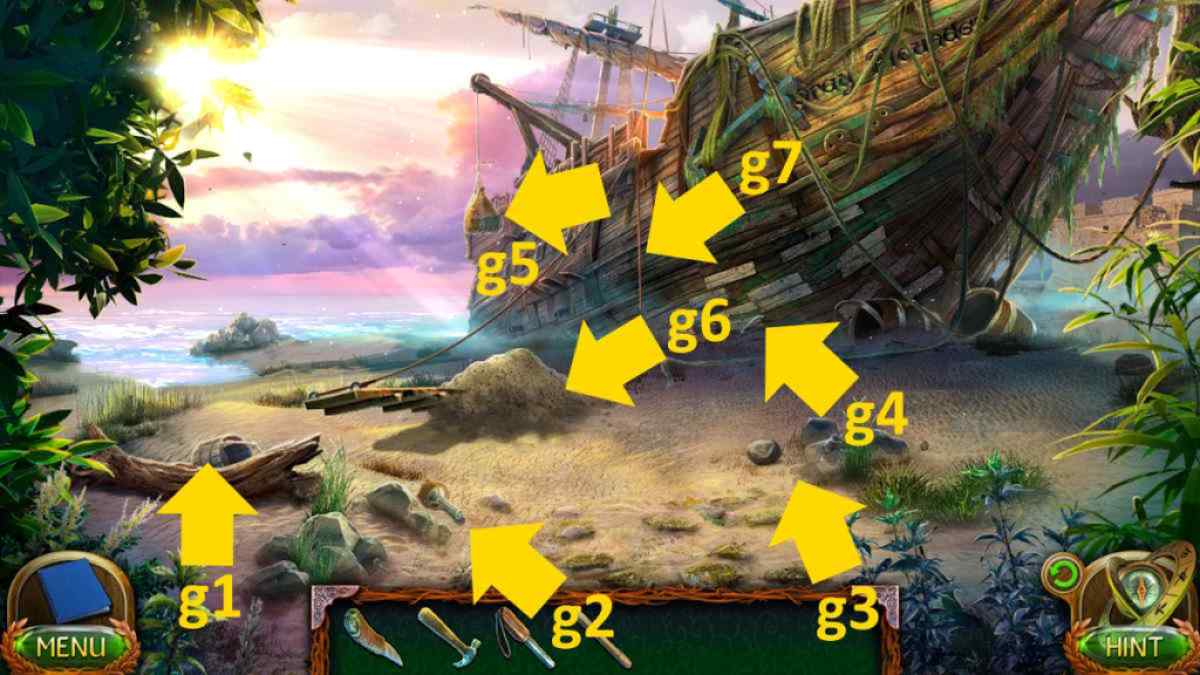
Image by Pro Game Guides
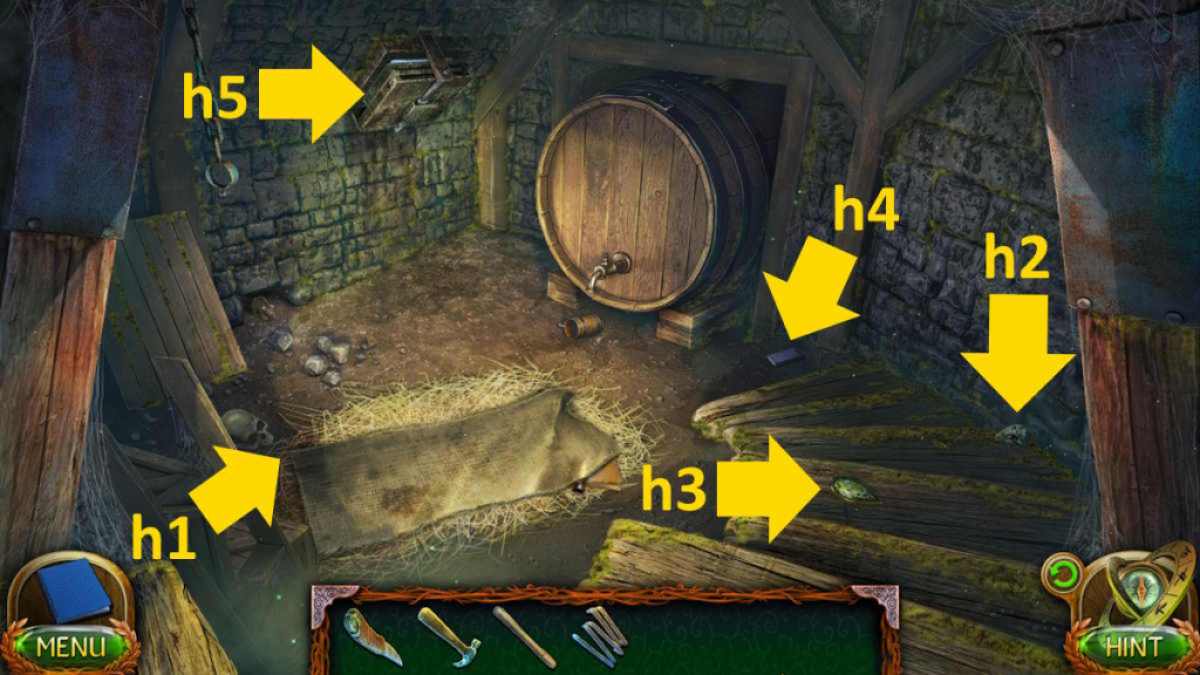
Image by Pro Game Guides
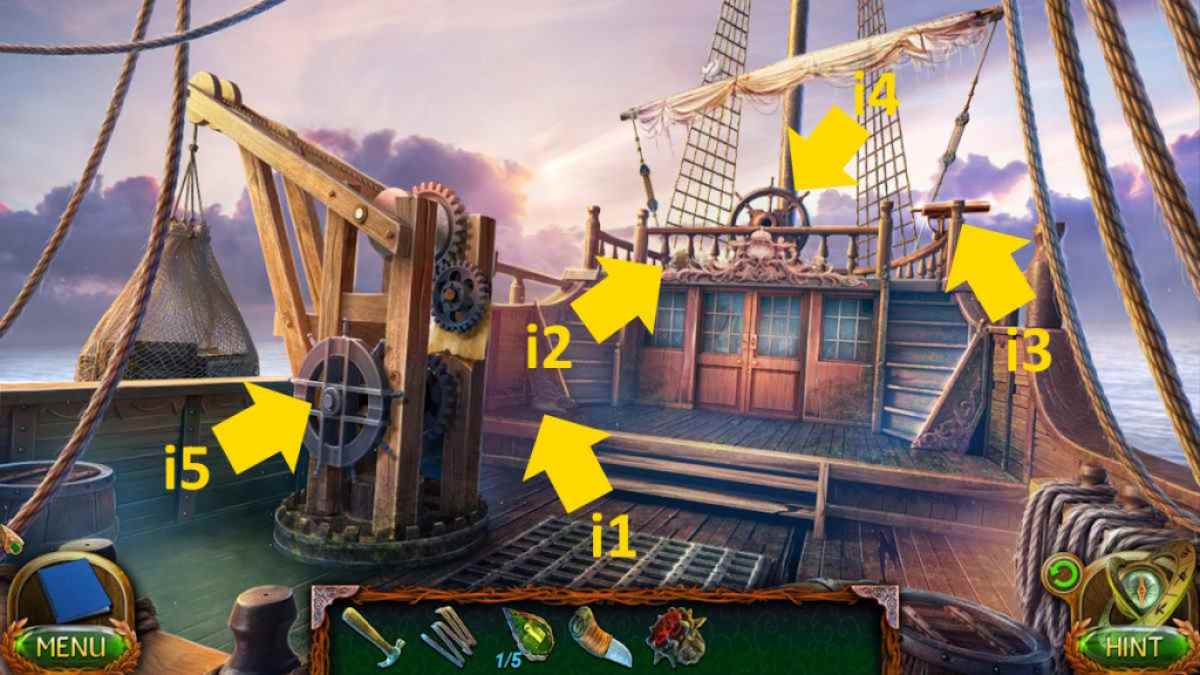
Image by Pro Game Guides
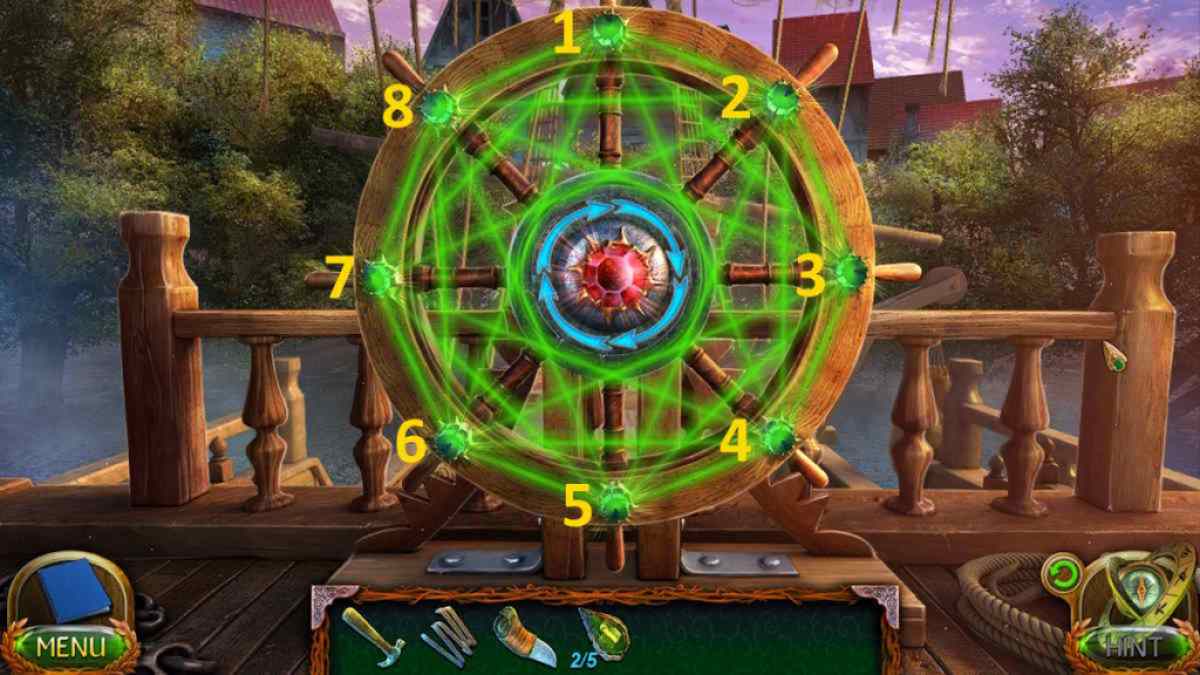
Image by Pro Game Guides
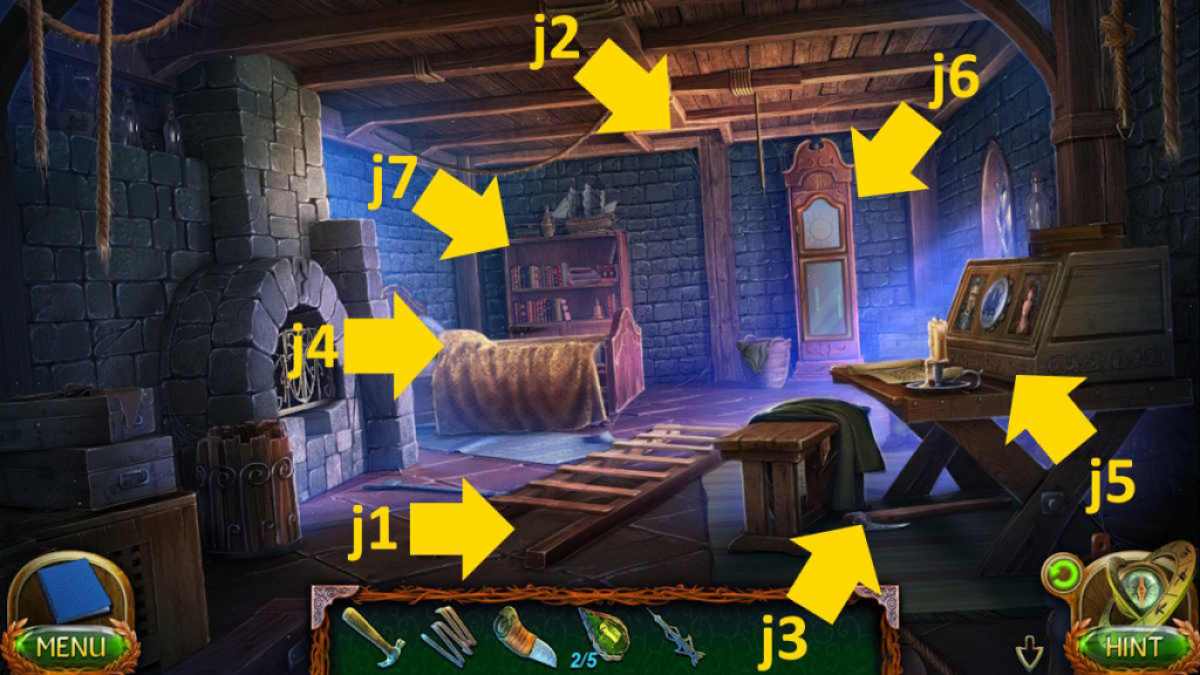
Image by Pro Game Guides
Screenshot by Pro Game Guides
