Corko the hero !
The Lost Lands reprint offer great note value thanks to the bonus chapter in each game . If you ’re attend for some guidance in the Lost Lands 4 bonus chapter , read on for my full walkthrough .
Lost Lands 4: The Wanderer Full Walkthrough, bonus chapter
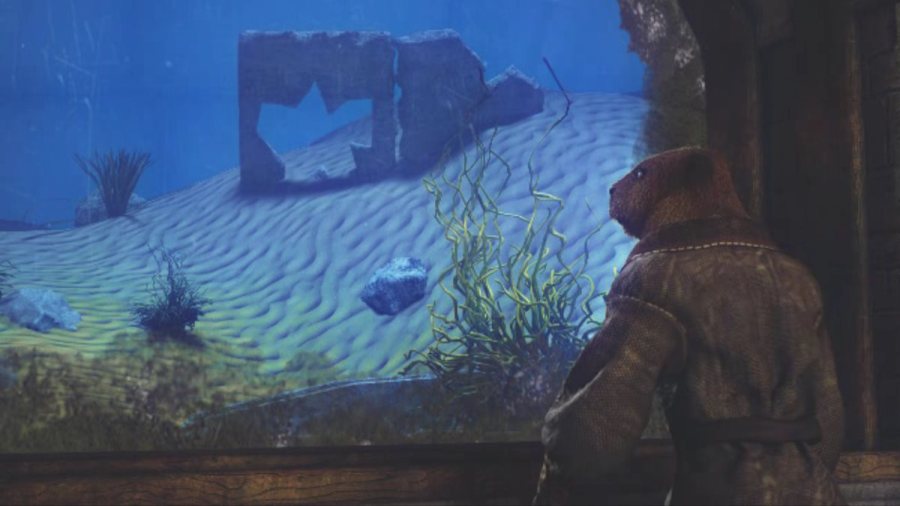
Each Lost Lands fillip chapter take a facial expression at an adjacent tale that helps meet in some ground . In the Lost Lands 4 bonus chapter walkthrough , we take the role of Corko , who makes a scary uncovering while judge to extend his burrow .
If you arrived here reckon for the master part of the game , do n’t concern . Simply chatter here to go to myLost Lands 4 Walkthroughhub , which has full solutions to all the puzzler in the main plot , separate into four parts .
The way home
Take theCollectible(a1 ) and theClub(a2 ) , then take theMachetteandBeltfrom the skeleton ( a3 ) . In the same skeleton close - up , cluck its sleeve to remove a slab and determine aFin . tally the fin to the shark on the paries ( a4 ) , then click it once attached to unwrap a secret room access and go through to the ancient bagnio .
Grab theCollectibe(b1 ) , then select the room access on the left ( b2 ) to startle a unproblematic miss objects mystifier . Once complete , take theKey . Now , expend the golf-club on the pulley ( b3 ) and rick it . It will break , so use the belt to fix it . After the cut scene , spread out the suitcase ( b4 ) and take theFragment . tax return to the tabernacle complex , use the fragment to complete the wall image ( a5 ) , and then move into the corridor .
TheCollectibleis on the wall on the rightfield ( c1 ) . Take theRope(c2 ) , then snap the wood ( c3 ) to start a timing game . You just need to click right when the slider is near the green line of merchandise . You ca n’t go unseasonable , as there is no limit to attempts . Once complete , move the wood pieces and then the rope bit until you get theLadder . apply the matchet to grab someMoss(c4 ) , then utilize the ladder ( c2 ) to move on .
Releasing Susan
After pick up theCollectible(d1 ) , apply the machete to afford the bag ( d2 ) and take theGarden ShearsandNails . Select the box ( d3 ) and take aLock Part , then head outdoors ( d4 ) .
Take theCollectible ( e1 ) from above the shed threshold , but there ’s nothing else to do here mighty now . alternatively , get across the backdrop ( e2 ) to move on to the river bank .
You ’ll find theCollectibleon the way ( f1 ) . pick out the earth ( f2 ) and get across it again to dig up asecond Lock Part . Now head into the river ( f3 ) .
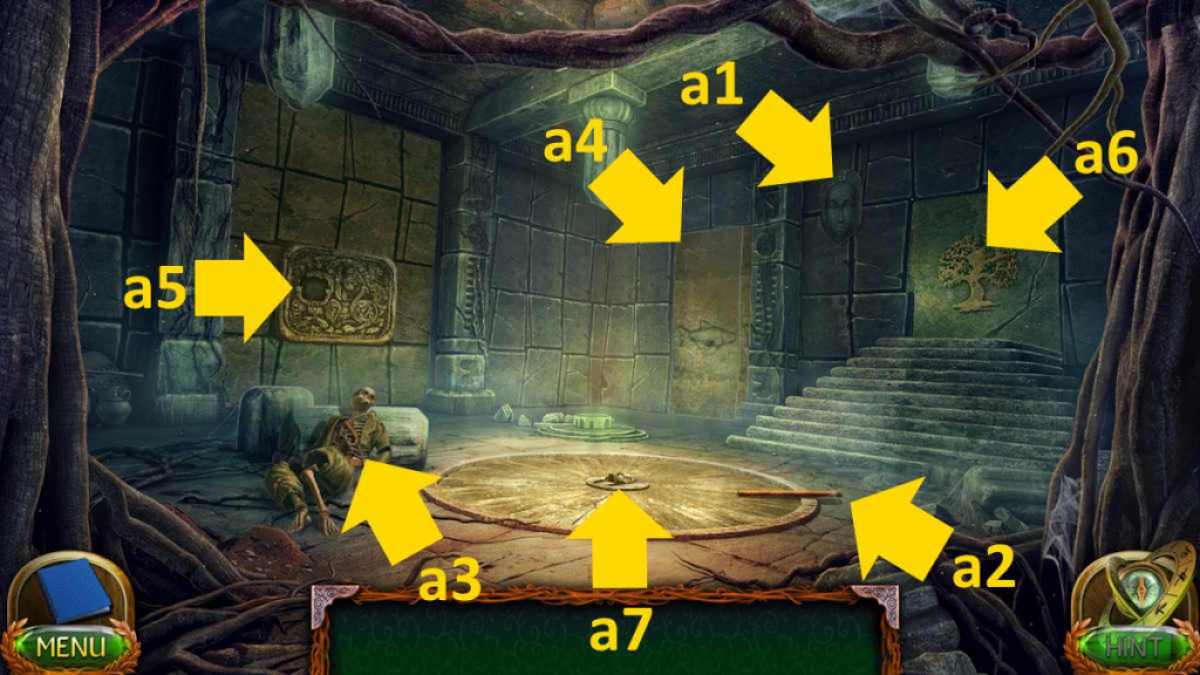
Image by Pro Game Guides
Grab theCollectibleabove the window ( g1 ) , then click the sand around the chest ( g2 ) , take theWeight , and then move on to the diametrical shoring ( g5 ) .
you may come upon theCollectibleat the base of the ship mast signpost ( h1 ) . Use the garden shear to get someHot Peppers(h2 ) , then get a closing curtain - up of the well ( h3 ) and take thethird Lock Part .
Return to the burrow , get across the box ( d3 ) , and start a placement puzzle using the lock chamber parts . Get the firearm into the ordering shown above , then click the padlock . Take theBall of Yarn . take the pepper in your inventorying , add the thread , and then add the weight to get aPepper and Weight .
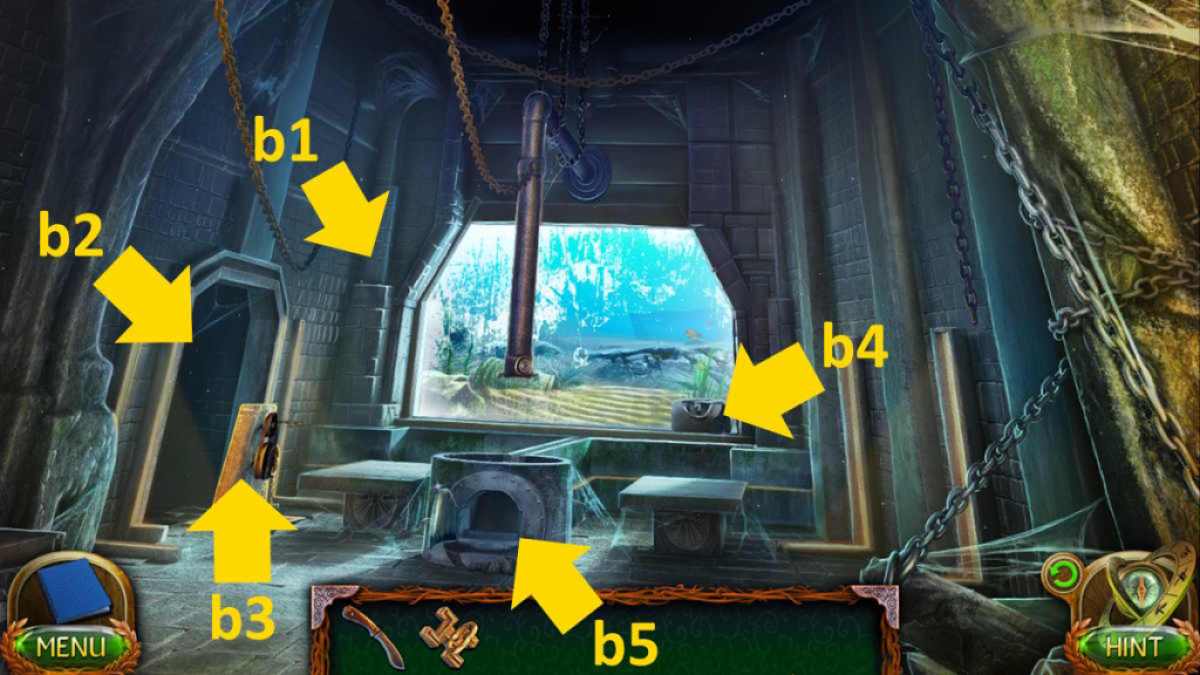
Image by Pro Game Guides
turn back to the sea , use the pepper and weight on the creature ’s mouth , and it will unloosen Susan ( g4 ) . Click her to takeSusan ’s Bodyinto your inventory , and also take theCompass . getting even to the tunnel and place Susan on the hammock ( d3 ) . Now let the cat out of the bag to Loon , after which she ’ll give you theBas - stand-in Part .
tie in : Lost Lands 3 Full Walkthrough ( Golden Curse )
Ancient Civilization
Go back into the temple corridor and add the bas - relief part to the design on the storey ( c5 ) , then take theBranch . Now head up to the temple building complex and use the branch on the flick of the tree diagram ( a6 ) , click it again to reveal a new room access . Head through it to the swamp .
nibble up theCollectible(i1 ) , and theHammer(i2 ) , then select the tree diagram ( i3 ) and contribute the nail . forge them in , then click the hang rock ( i4 ) and use the machete to cut the rophy , replacing the rock ‘n’ roll with a bureau . utilise the Florida key to launch the chest and take theMosaic Part , tasking aVinein the same stopping point - up .
Now , you may take the gate ( i5 ) and tote up the mosaic part to the door chemical mechanism , protrude a puzzle . The completed image is pictured above . You need to move sections into the left and right slots to rearrange their ordering on the two out circles to complete the range of a function correctly . Once done , the gate will unfold . Head through to the Elogan small town .
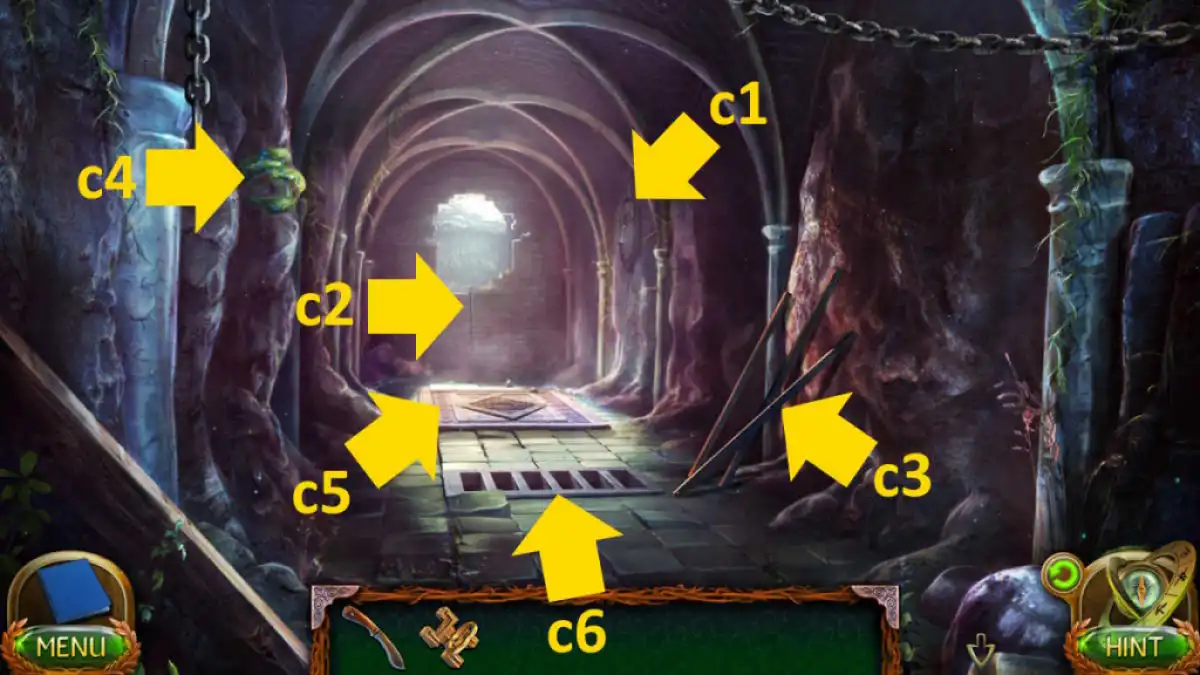
Image by Pro Game Guides
Take theCollectiblefrom the tree ( j1 ) and theLever Keyfrom the wooden statue ( j2 ) . Move forrad into the chief ’s home ( j3 ) .
The magic meadow
Speak to Taulinn , show him the compass , and he ’ll give you theChieftan ’s Staff . Now take theCollectible(k1 ) , move the cushions ( k2 ) to take theMortar , then utilize the lever key on the tach below the cushion and take theHook . Now get a close - up of the record ( k3 ) , take theSnake , then snap the book and observe the three symbols . To free up space in your inventorying , you’re able to add together the snake to the chair ( k4 ) while you ’re here .
channelise outside and use the chieftain ’s staff on the forcefield ( j4 ) . Trace out the three symbol you saw in the book ( k3 , paradigm above ) to start the forcefield . It does n’t weigh where you take up as you thread each one , but you do need to go top to bottom in the rune image order . Once accomplished , move through to the wizardly hayfield ( j4 ) .
Pick up theCollectible(l1 ) , get theShip Figurinefrom the bowl ( l2 ) , then get a close - up of the ancient slab ( l3 ) and chatter it again at the top to read the inscription . You ’re going to need some magic dust .
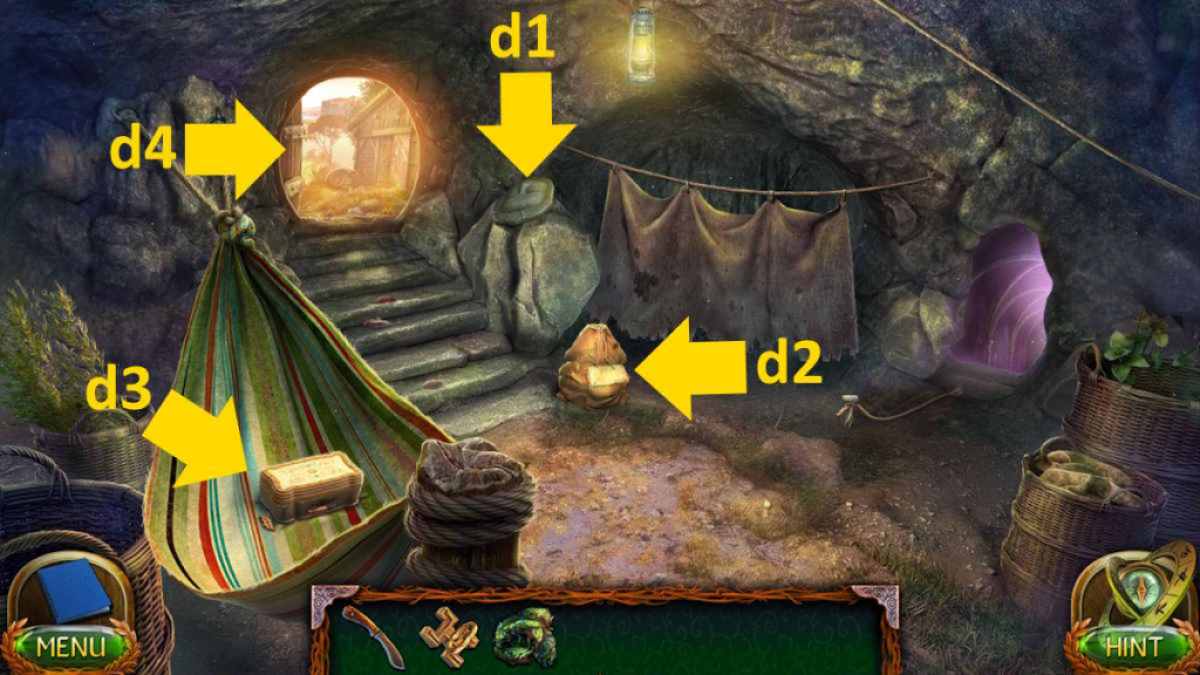
Image by Pro Game Guides
Return to the river bottom and apply the ship figurine to pen the pectus ( g2 ) , claim thePrecious Battle Axefrom inwardly . Read the bank bill that ’s also inside , then take theStardust . Go to the riverside next and use the axe to get someBamboo(f4 ) . take the bamboo in your armoury and use the ax to bowdlerise it . Now add the hook and the vine to make aStaff . steer to the swamp and use the staff in the pool ( i6 ) to collect theLotus .
Making the ritual ointment
Go back to the Elogan hamlet and place the white lily in the downcast paw of the wooden statue ( j2 ) . The wooden genus Lotus , on the other hand , will spread out , allowing you to take theEagle(don’t block to take back theLotus Petals ) . Head back to the magic hayfield and use the stardust on the undulation symbol on the ancient slab ( l3 ) . It will offend open , allowing you to take theRecipeand theWolf .
Go back inside the chieftain ’s home and append the remaining symbols ( eagle and wolf ) to the back of the chair ( k4 ) , revealing a configuration teaser . only drag the constellations on the right hand to the matching shapes on the left to complete it ( you ca n’t go wrongly ) . Once done , take theElixirand theSickle . Put the formula on the formulation table ( k5 ) and add the moss and the white lily petals to the bowls in the same close - up .
Head to the magic hayfield , select the magnanimous tree ( l4 ) , then add the mortar before using the sickle on the tree to collect aCup of Resin . Also , go back to the ocean and pick up someSeashells(g6 ) .

Image by Pro Game Guides
Return to the preparation tabular array ( k5 ) , add the cup of rosin , then click the hot plate and then each sports stadium to add them to the rosin . bring the seashells to the howitzer , employ the stamp on the board to squash them , and then stir the mixture with the spoonful . supply the elixir , then pick up theRitual Ointment .
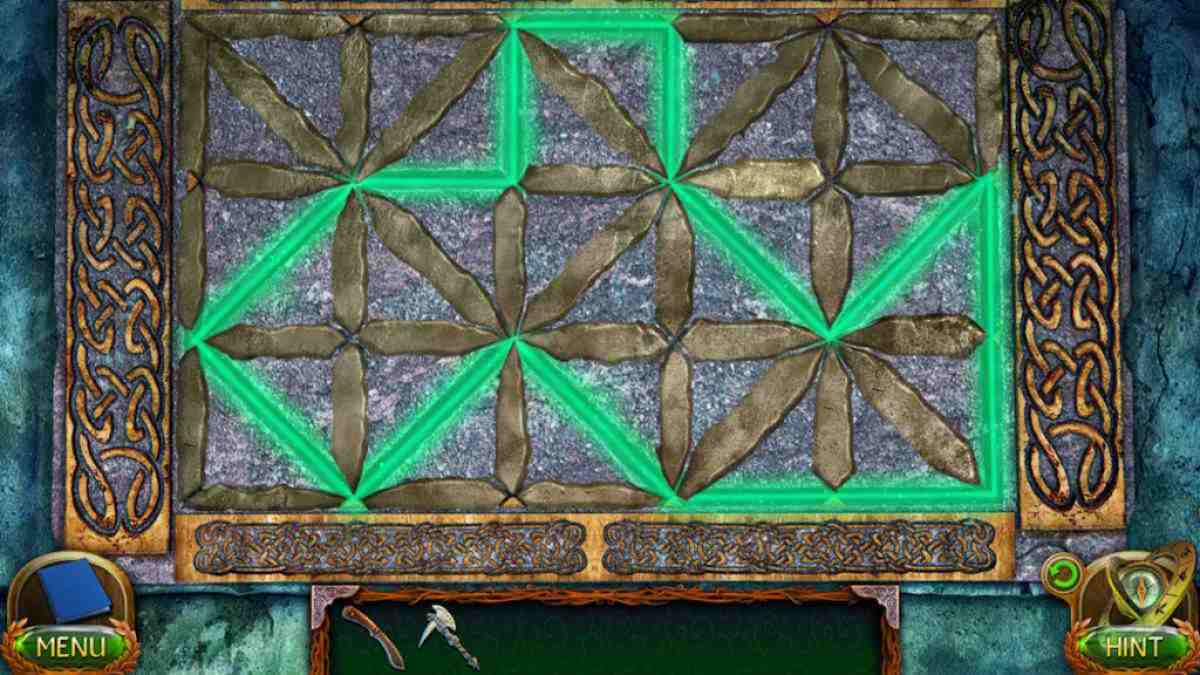
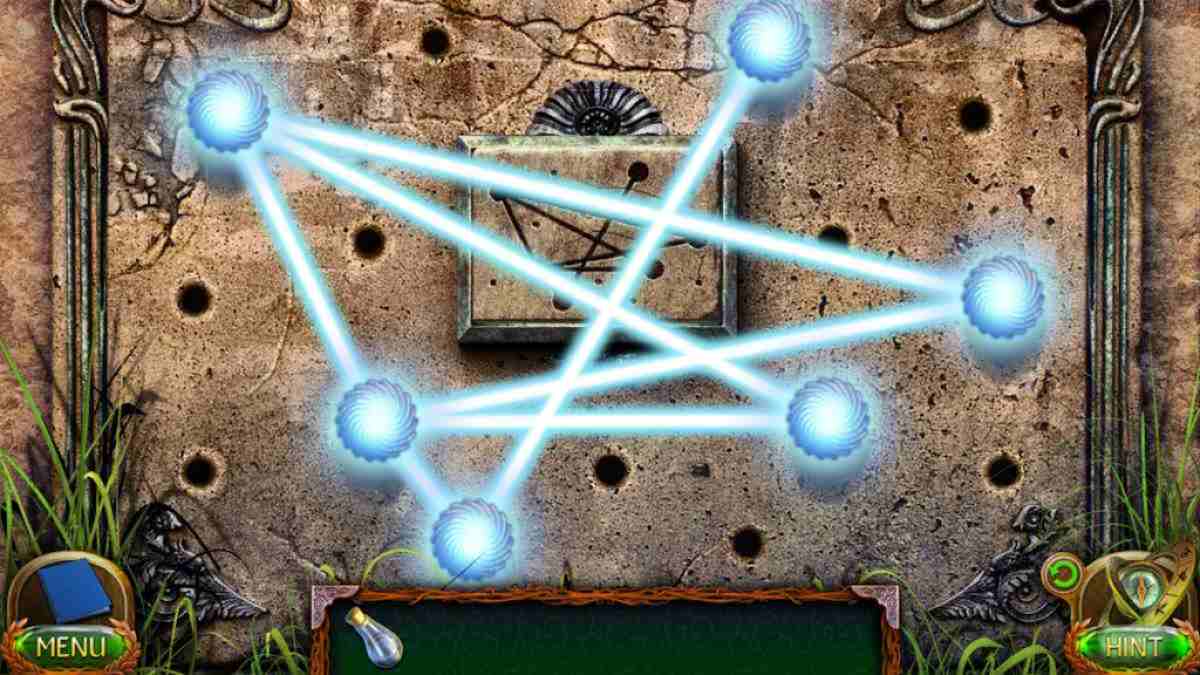
Go to the ocean , select the commode for a close - up ( g7 ) , and use the ointment to start a puzzle . Click cable to fill them in , leaving out only the lines on your rule ( see the beam line of credit of the completed puzzle above ) . The water liveliness will then look on the throne , so click it for a mown scene . Afterward , take theFish Figurinefrom the throne .
Related : lose Lands 9 Walkthrough – Full scout
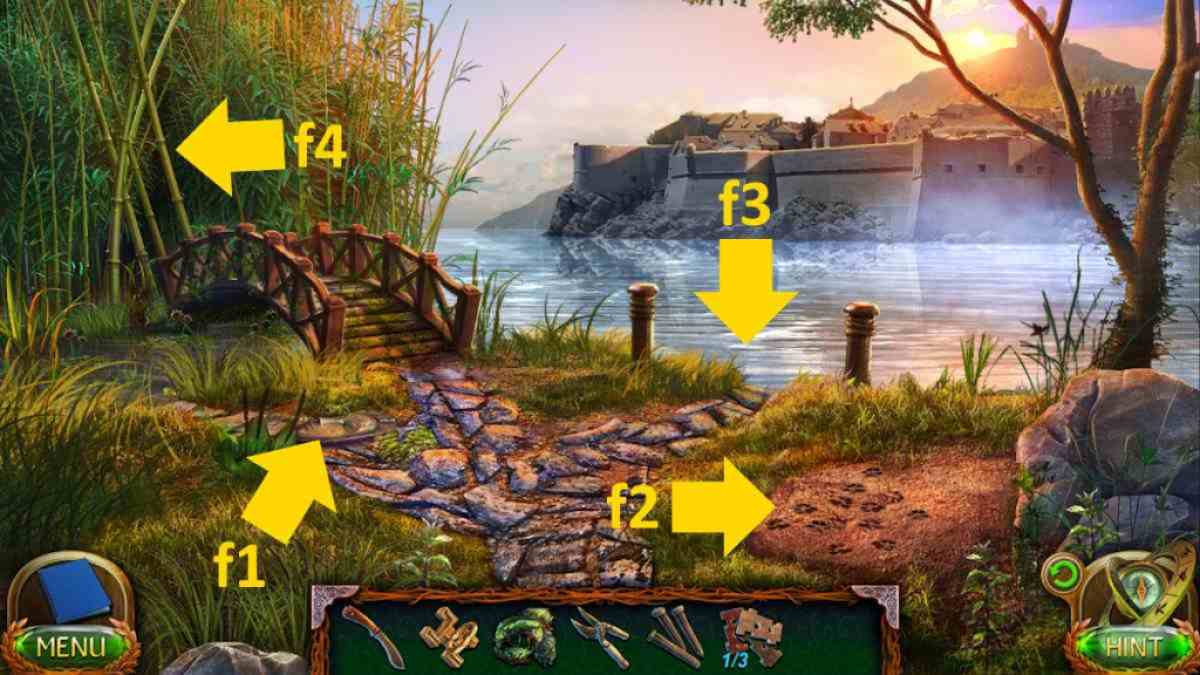
Image by Pro Game Guides
Healing the pond
Head to the river bank and use the fish figurine to enter the chest of drawers behind the bamboo ( f4 ) , take theMalletfrom deep down . Go to the magic hayfield , use the beetle on the gong ( l5 ) , then select the cave that give up under the pedestal ( l2 ) to start a simple item - matching puzzle . Once complete , you ’ll be capable to take aCrystal .
Use the crystal on the door blocking the cave entrance ( j5 ) and head up into the dragon mouth cave . Grab theCollectibe(m1 ) , use the axe on the stones ( m2 ) to get aMagnet Stone , then use the ax again on the John Rock over the attack ( m3 ) to knock it down , giving you an entrance into the pond . clack it ( m4 ) , take theHandlein the close - up , and also move the rock there into the mess . Once you click out of the close - up , talk to Taulin and he will give you theJaw .
render to the temple coordination compound and apply the jaw on the skull on the flooring ( a7 ) to reach memory access to the tomb . Head down , take theCollectible(n1 ) , and theTorch(n2 ) , and then use the knife to unstrap the box ( n3 ) and take theCart . Go back to the pool ( m4 ) and use the torch in the close - up to get aLit Torch .
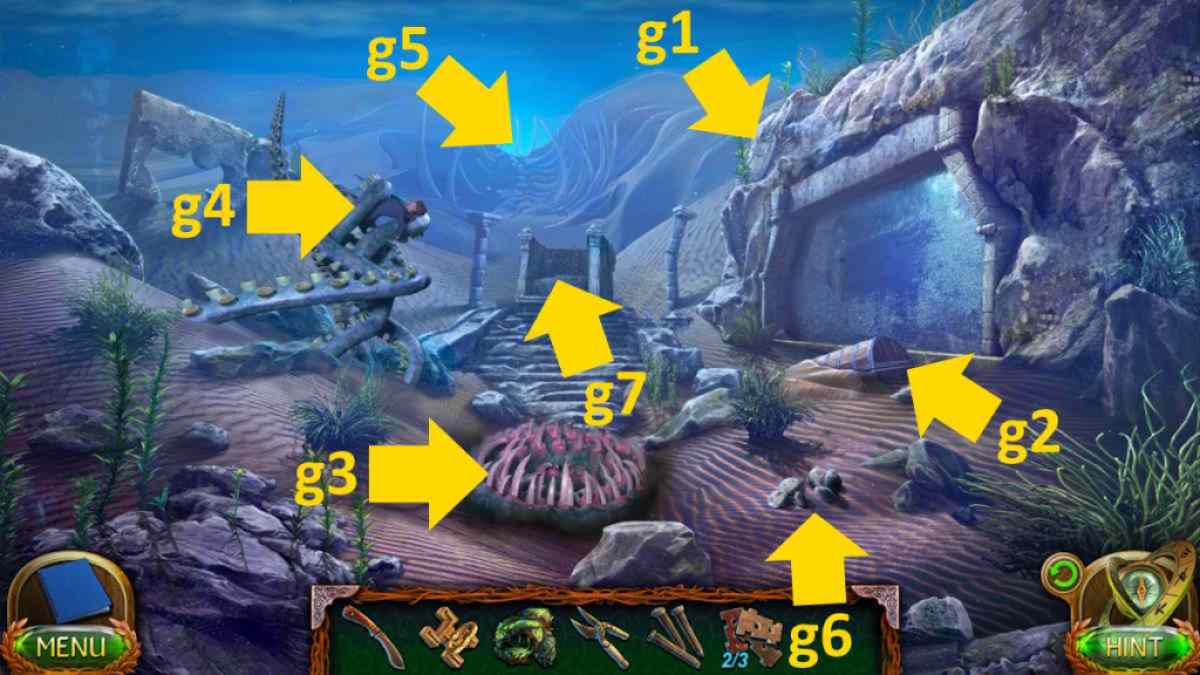
Image by Pro Game Guides
summate the handle to the pipe ( b5 ) in the ancient bathing machine , replete the trough with hot oil colour . employ the lighted torch to light it , noting the symbol that seem on the shabu ( above ) . Go back to the tomb , get a close - up of the sarcophagus , and come in the symbolic representation to open it . Click it again to get theIron Medallion . Select it in your stock and add the attraction stone to create aMagnet on a Chain .
Finding the Ruler’s Helmet
Move to the corridor and use the attractive feature on a chain on the grate ( c6 ) to get theKey . Now head to the yard and utilize the cart on the transgress wagon ( e3 ) . Put the station waggon together ( all the pieces are in the paradigm ) and then click the completed cart to move it out of the way and gain access to the barn .
Take the finalCollectible(o1 ) , cluck the ravel ( o2 ) to stand it up , and habituate the Francis Scott Key on the door at the top ( o3 ) to initiate a hidden objects puzzler . To free the blade , fall into place the bottom blade double , then the right brand twice , then the top blade double . Once you have the stencil , you involve to employ it to block the ceiling hatch . Once complete , you ’ll get theTongs . Also , click the bench ( o4 ) to find you ask crybaby egg shells and George Sand to make the cementum you need .
Go to the outskirts , use the tongs on the chain on the well ( h3 ) , and then chatter the doorway to give it . Wind the rope up and take theBucket . Now go to the yard and utilise the becket on the sand ( e4 ) to get aBucket of Sand , also accept theTree statuette . Return to the tabernacle , use the statuette on the throne ( n5 ) , and take theRuler ’s Helmet .
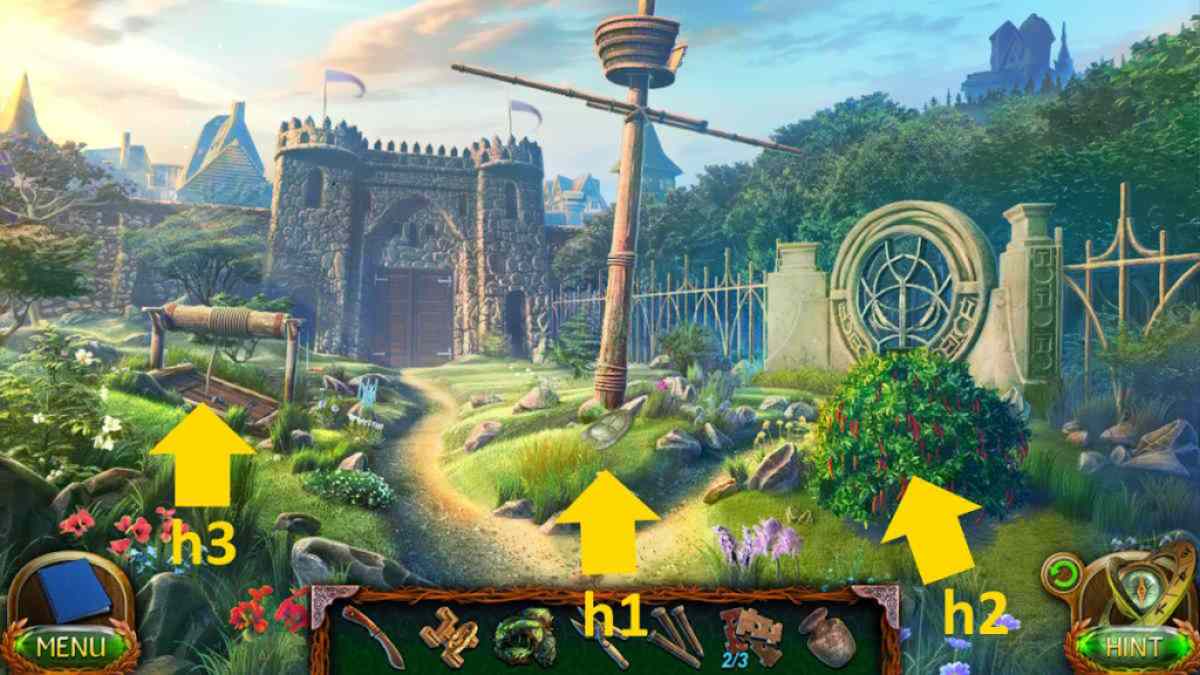
Image by Pro Game Guides
Saving Susan
Give it to the chieftain in his house ( k4 ) and you ’ll receive theSeal . habituate the seal to start the chest ( k6 ) , take theKeyfrom inside , and read the note . After depend at the note , take theMourner ’s Tears . Go outside and use the samara to launch the volaille coup ( j6 ) , penetrate all the eggs , and then take theBasket . Select the bucket in your inventory , add the egg , and make theCement .
Go to the kitty and use the cementum to block the hollow ( m4 ) . Move to the sea , speak to the water flavor ( g7 ) , and take theChipfrom the throne . Return to the magic meadow , sink in the pedestal ( l2 ) , and tote up the poker chip to its side to start a light puzzle . You need to copy the image on the buffalo chip ( see the solution above , noting the different identification number of furrow coming from each tile ) . Once staring , take thePhilosopher ’s Stone .
Add the tear to the bowl here , then the philosopher ’s stone , and take theEnergy . Return to your burrow , utilize the zip on Susan ( d3 ) , and congratulations ! You ’ve finish the bonus chapter of Lost Lands 4 .
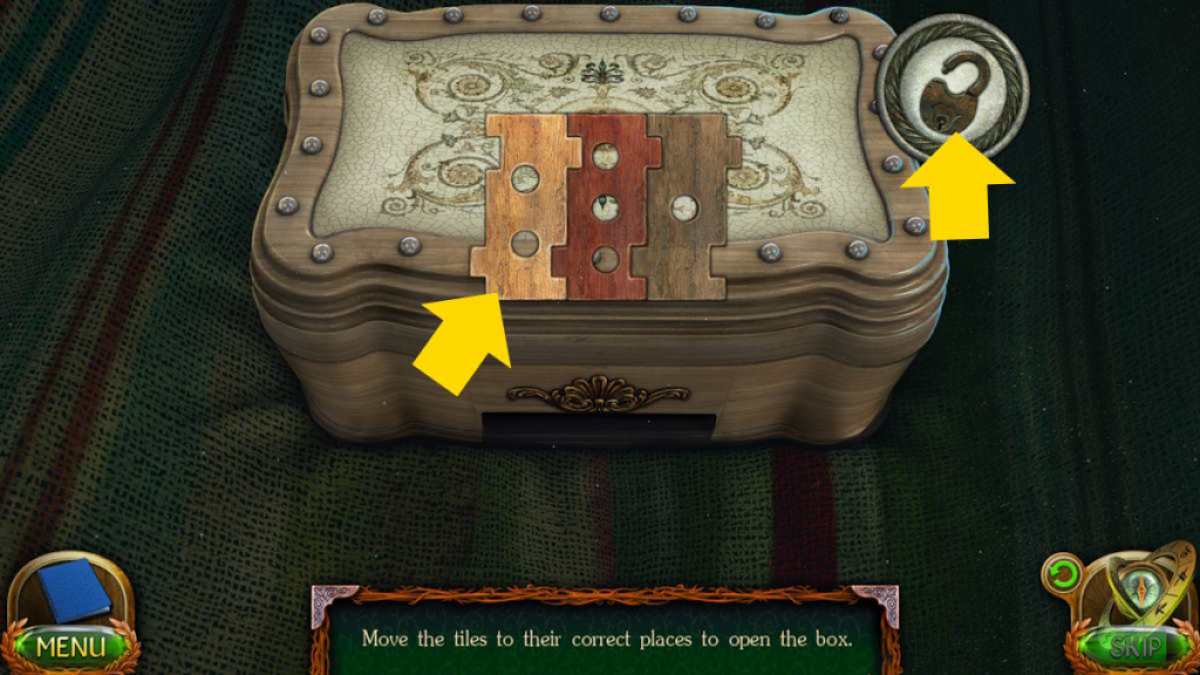
Image by Pro Game Guides
For more Lost Lands guides here at Pro Game Guides , ensure outLost Lands 6 Walkthrough – Mistakes of the PastandLost Lands 7 Walkthrough – Full Guide !
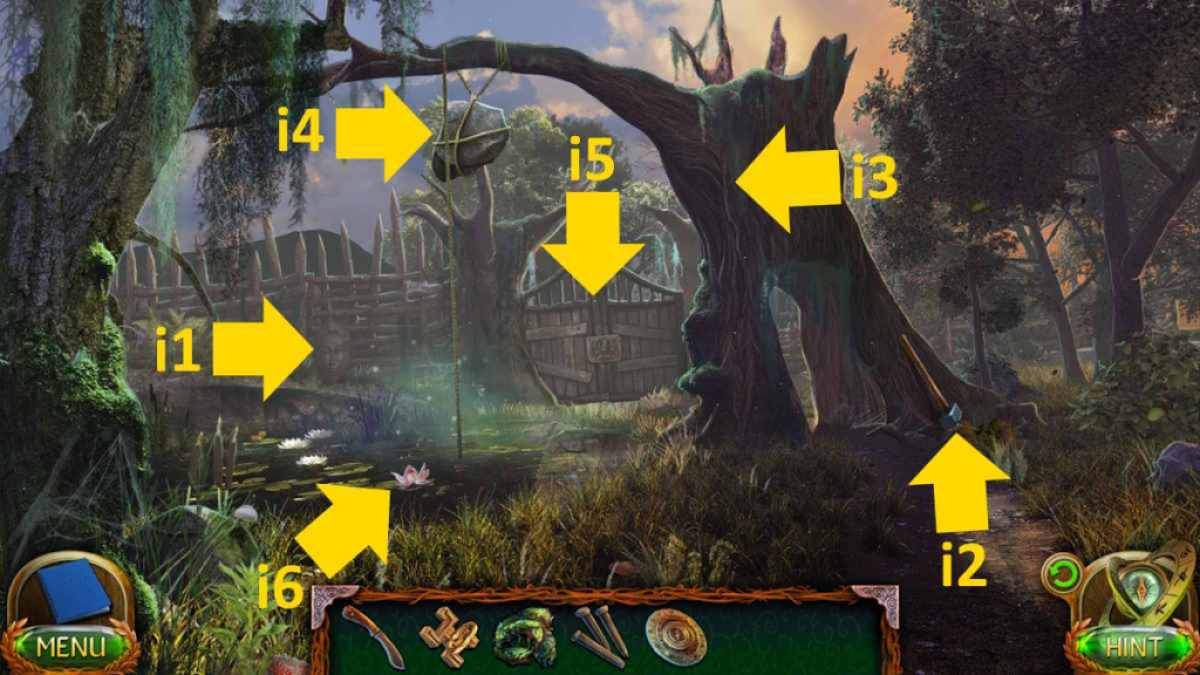
Image by Pro Game Guides
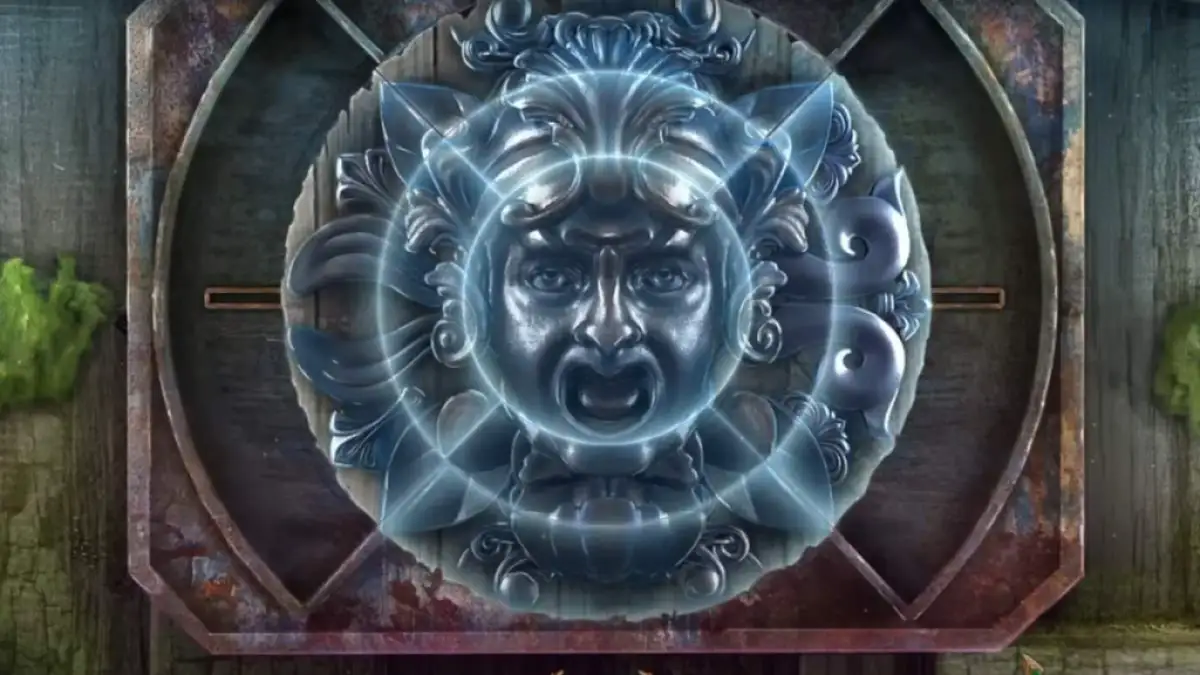
Image by Pro Game Guides
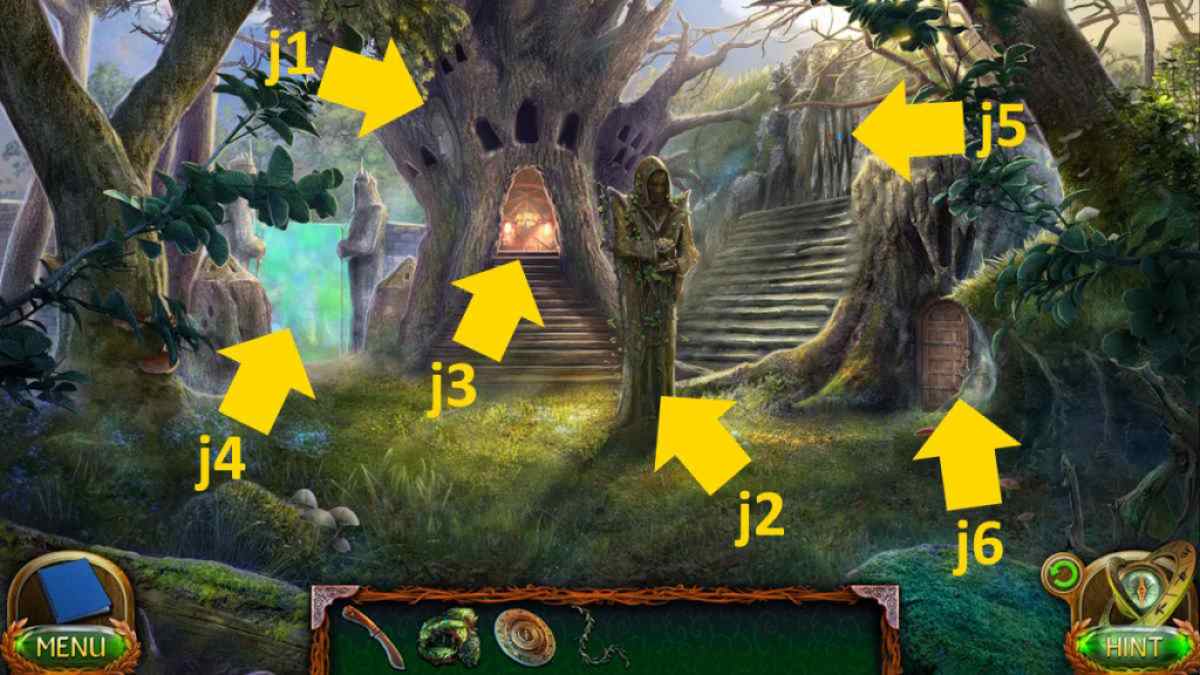
Image by Pro Game Guides
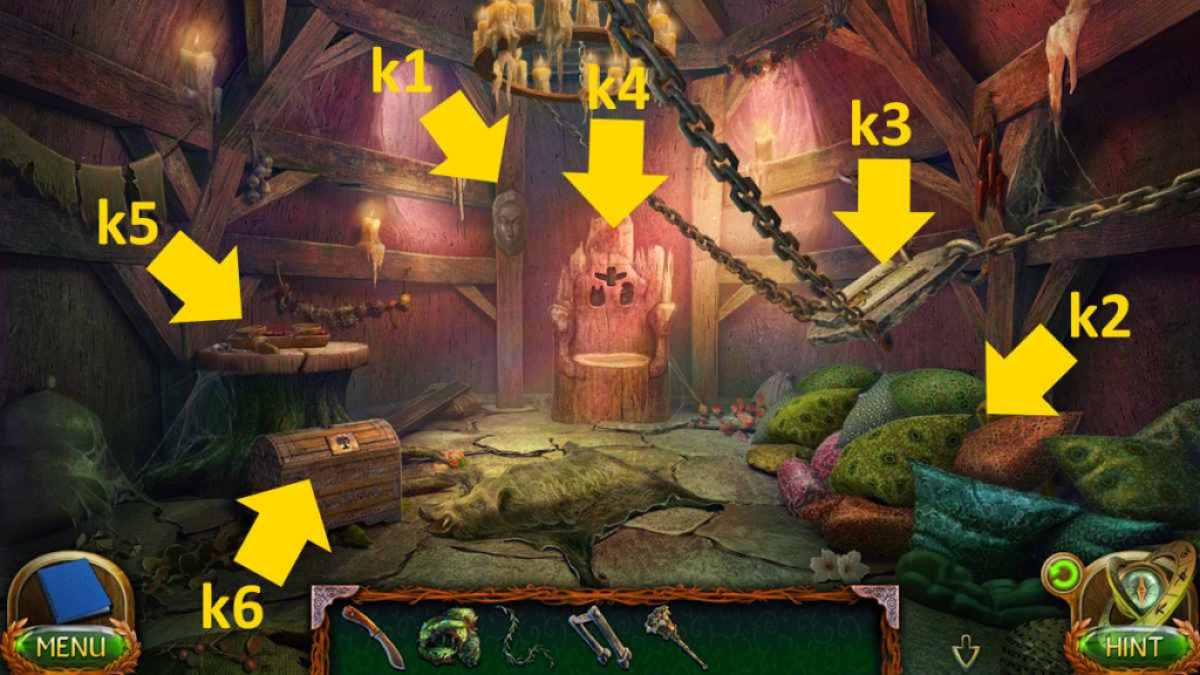
Image by Pro Game Guides
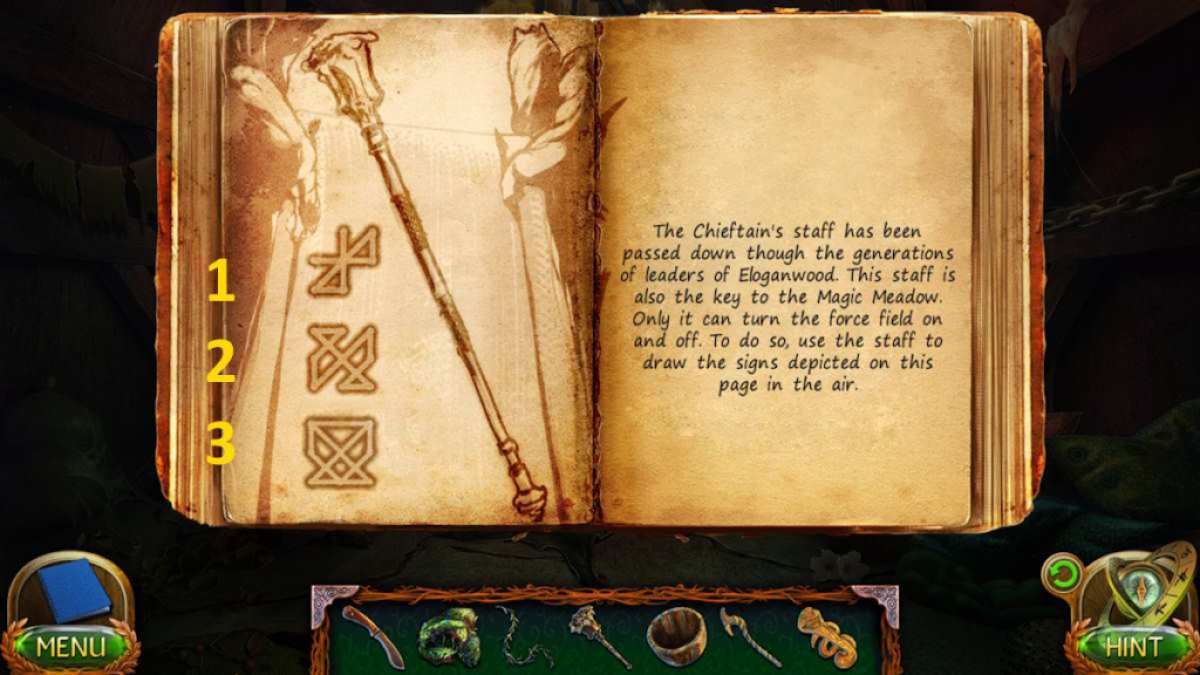
Image by Pro Game Guides
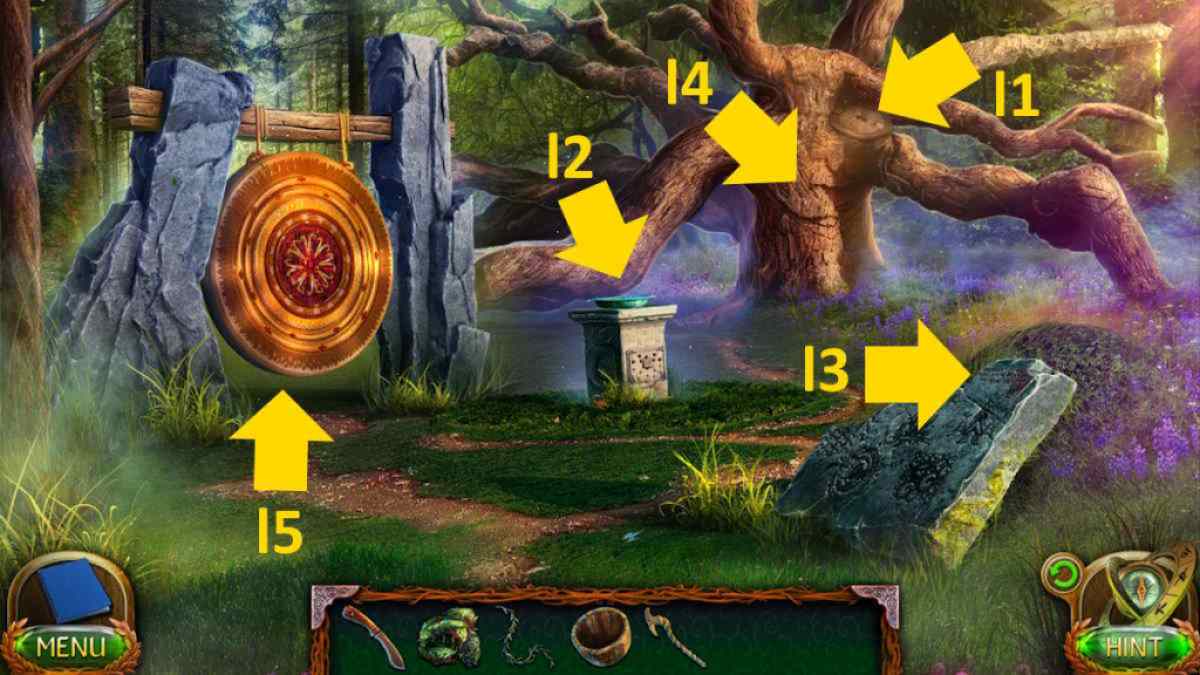
Image by Pro Game Guides
Screenshot by Pro Game Guides
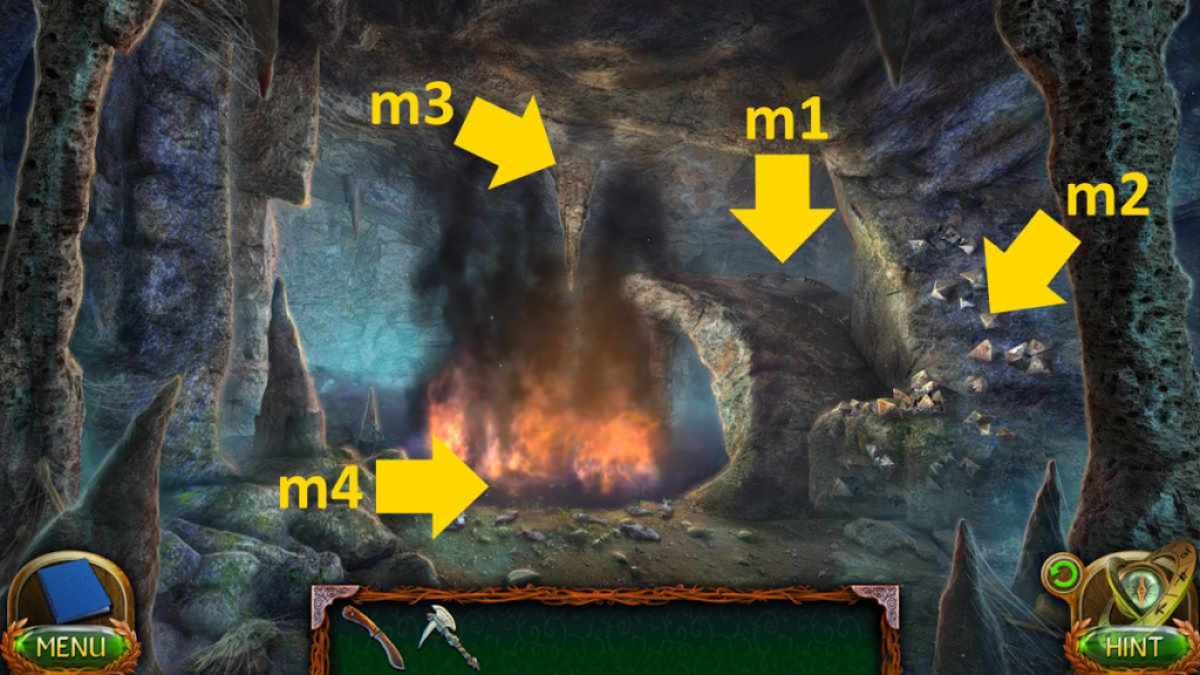
Image by Pro Game Guides
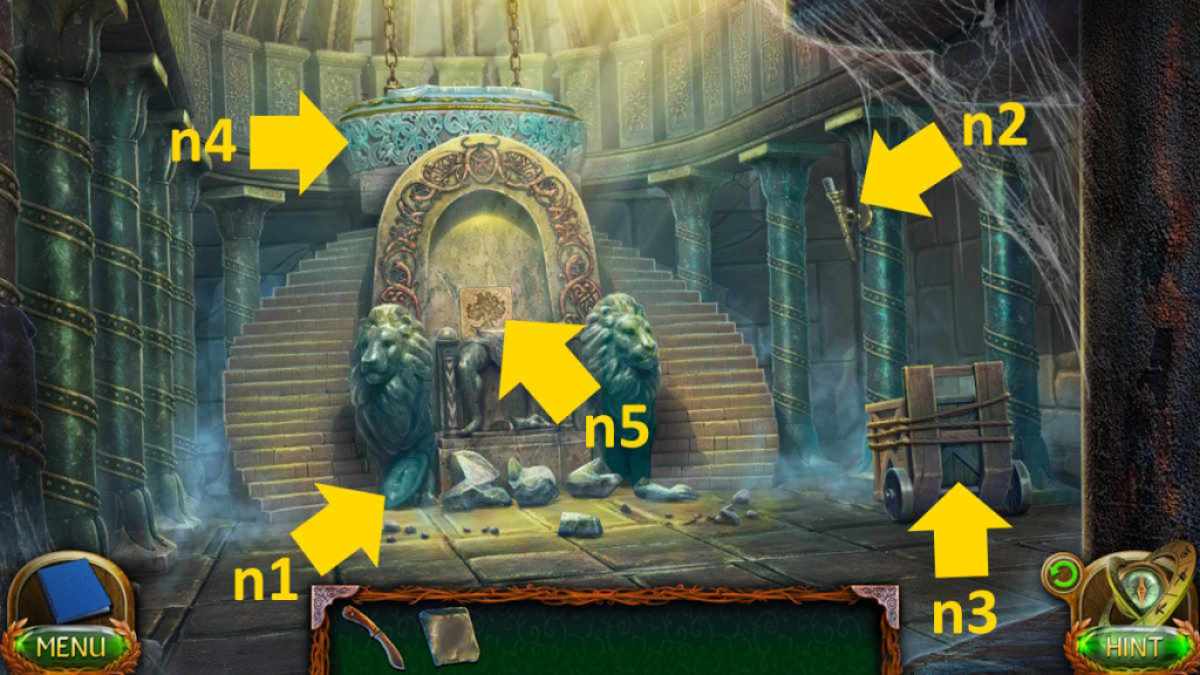
Image by Pro Game Guides
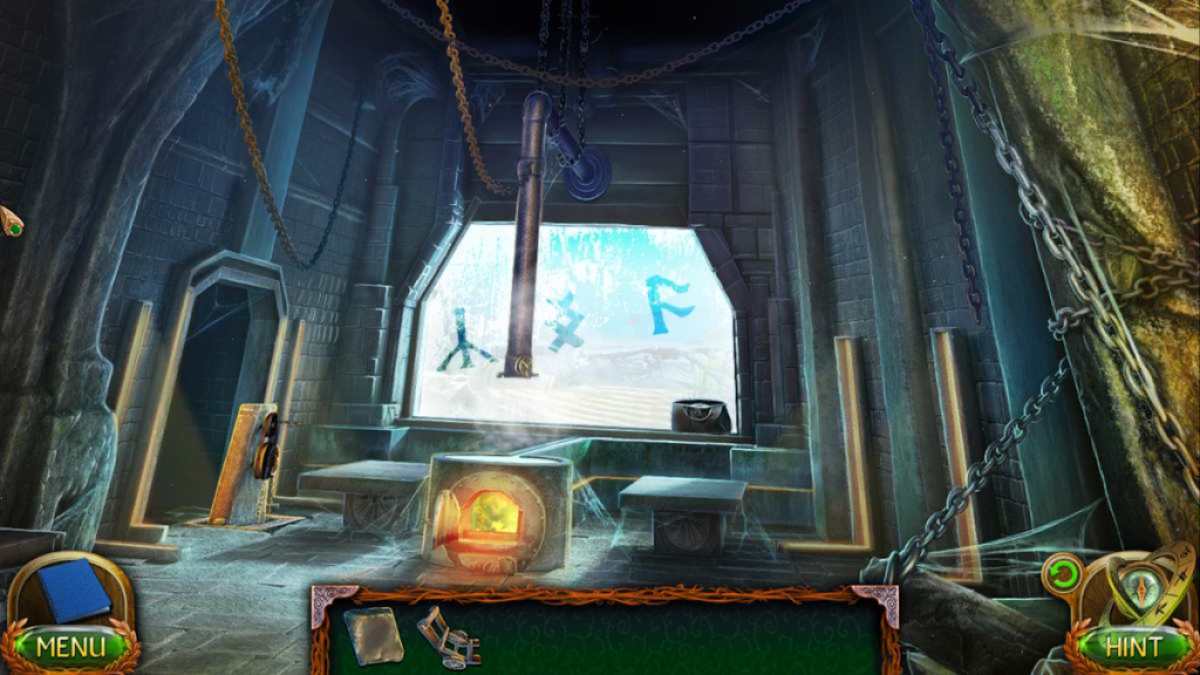
Image by Pro Game Guides
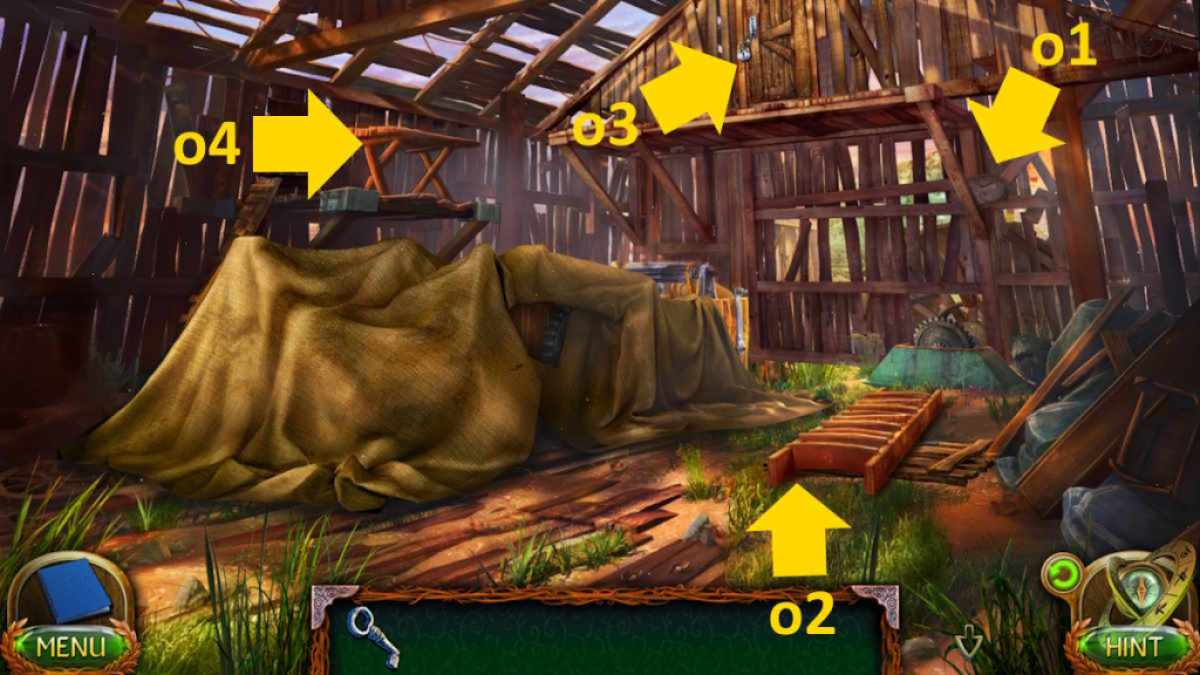
Image by Pro Game Guides
Screenshot by Pro Game Guides
