have us serve you reverse that torment !
TheLost Landsseries of fantasy - themed games mix a phratry - friendly story with hide out objects and puzzle - resolve elements . In the serial ’ third instalment , The Golden Curse , Susan returns to the Lost Lands after a number of terrible beasts are unleashed . She must first return the lands to their peaceful state , before returning home . This is no easy affair , so if you ’re struggling with spotting any of the objects or work out any of the puzzle solutions , read on below for our Lost Lands 3 Golden Curse walkthrough .
If you just require aid for one specific mystifier or chapter in the plot , you may use the table of contents below to navigate to the specific part of the walkthrough you need .

How to complete Lost Lands 3 Golden Curse (Walkthrough) - Part 1: Druid Village
You ’ll first need to prefer yourdifficulty level . Botheasyandnormalmodes have a tutorial , while on - CRT screen glitter on your map will show locations with possible action , dynamic area and objectives , obscure object scene , and collectibles . tip and Puzzle Skip will reload in 15 and 30 seconds severally , with this take place twice as slowly in normal way . Hardmode remove the tutorial and all in - secret plan sparkles , while hints and fast - omission timers take twice as long again to reload .
Once you ’ve watched the introductory scene , and if you skip the tutorial , tick the branches covering the middle of the screen three time and collect theNotebook , then clack them once more to let out the first main screen . beak up theHammer Handle(1a ) , then get a conclusion - up of the span ( 1b ) . Grab the Manuscript on the bottom left field of the closing - up , then theHammer Headthat was underneath it . Connect the two hammer pieces in your inventory to get theHammer .
Back on the main screen , click the standard on the wall ( 1c ) to get a close - up , then click it again to move it apart . Use your hammer on the plank that were behind the streamer to get someNails , then tap thePlanksto pull together them too . Take theKnifeandPickaxe Handlefrom the hole behind the plank . Go back to the span and use the planks on the disruption to lay them down , add the nail , then apply the pounding to pay back the bridge . you may now head across the bridge , so do so .
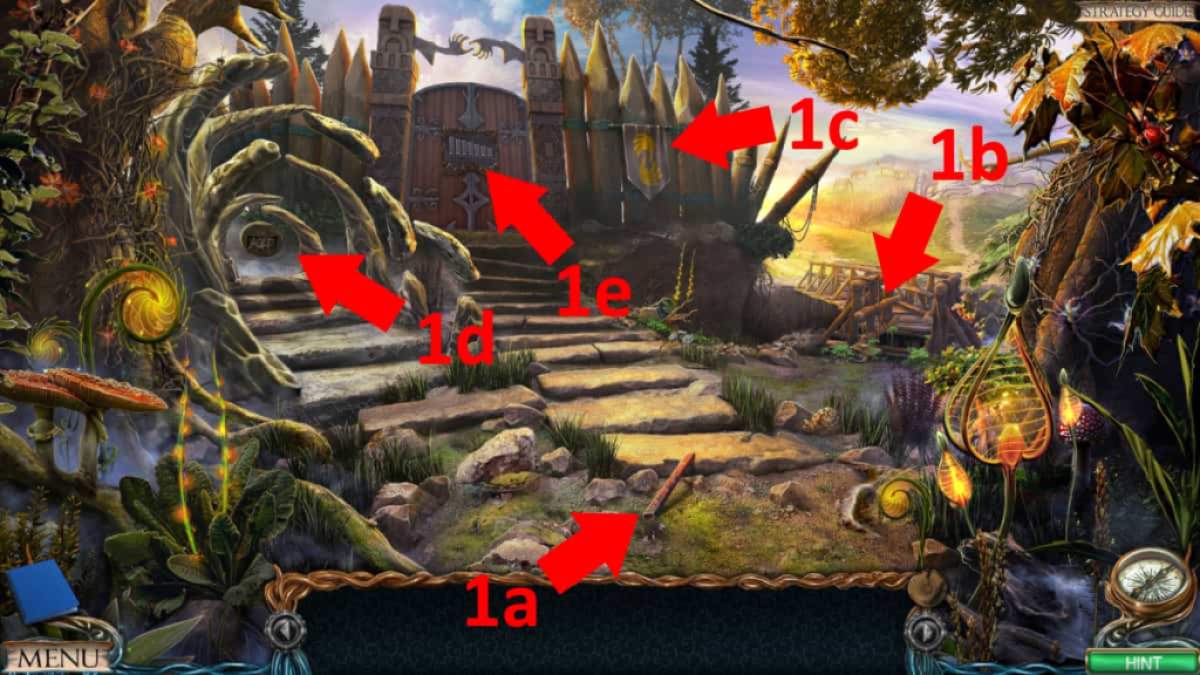
Image by Pro Game Guides
Lost Lands 3 Walkthrough: The Well in Druid Valley
After speaking to the girl ( Fiora ) stuck in the well , click the wooden trough ( 2a ) to pile up theManuscriptand theXylophone Hammerunderneath it . Next , get a closing curtain - up of the solitary horse ( 2b ) and use the tongue to switch off spare theRope with Hook . sequester it to the horse saddle by click the metal stud poker at the back , then look at the well ( 2c ) . impound the forget me drug hook to the winding machine by click the hook , then go back to the horse and click it on the hand practice on its side . The horse extract the rope , freeing the girl from the well .
Clicking the well again will start a cut scene with the young lady . Afterward , she ’ll give you someSheet Music . Click back on the well and fall into place the tiddler ’s lottery . Underneath it , you ’ll bump a secondXylophone Hammer , while there is alsoHalf a Pair of Clippersin the well ’s bucketful to collect . Return to the first scene , click the portal ( 1d ) , and pick up a thirdXylophone Hammerand theMap Fragment .
Back on the main first scenery map , snap the doors ( 1e ) to view your first puzzle . supply the three Xylophone Hammers and the Sheet Music to begin . Simply follow the code on the rag music ( 74251364 ) , with the leftmost note being act 1 , to launch the door . sink in the door to enter the small town .
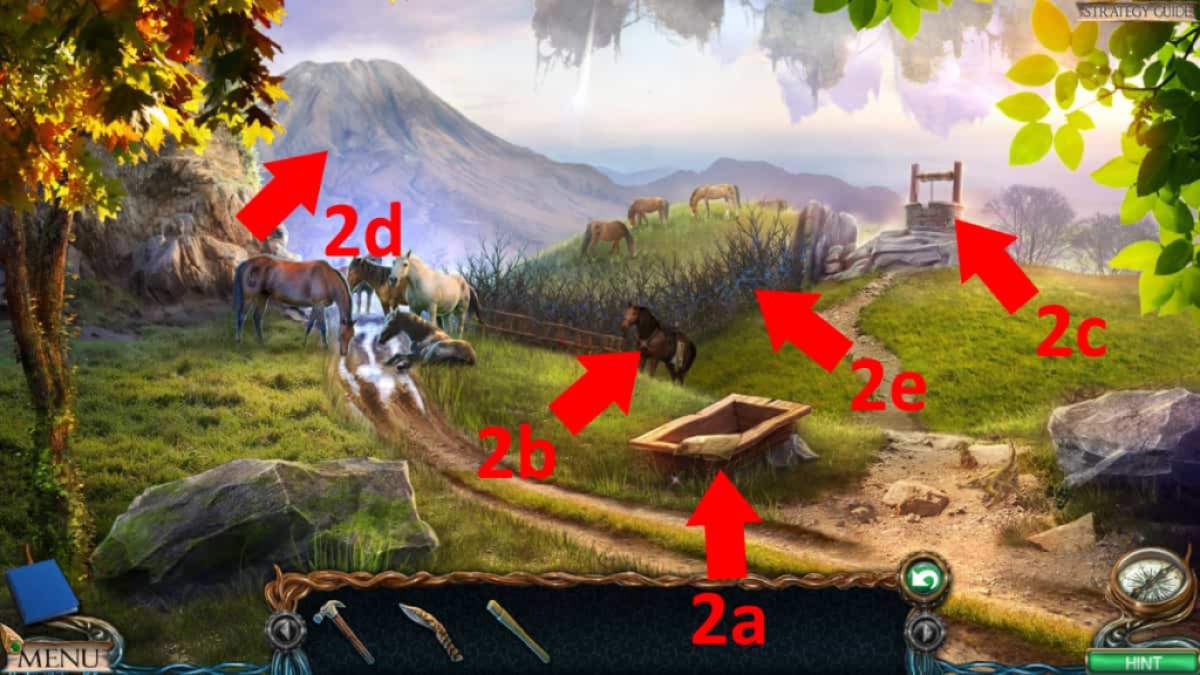
Image by Pro Game Guides
Lost Lands 3 Walkthrough: The Druid Village
Click the miss ’s grandfather , Maaron ( in the center of the screen ) , for a scant cutscene . Afterward , collect the stick to items :
Use the two halves of clippers in your armory to make Clippers . Click back on the fountain and then on the metal plaque at its theme . Add the brackets to it to begin a mystifier . You need to place the brackets so that a ball drops from the top into each of the four holes at the bottom . Work from leave to right field , dropping a ball once you have its path lined up . There are unlimited balls , so do n’t panic . Once completed , the fountain is fixed .
Lost Lands 3 Walkthrough: Plains of the Dead
Go back to the well and utilise your fixed limiter on the chemical chain and then pick up theBucket . Go back to the fountain , fill the bucket with H2O , then take it back and use theBucket with Wateron the wooden bowl . The horses move from the path , earmark you to move to the Plains of the Dead ( 2d ) . Once there , amass aManuscriptandCannonball(4a ) , then get across the pick file in the stone ( 4b ) twice to get aBroken Pickaxe . utilise the Hammer on the busted pickaxe to off the wood in it , then use your pickaxe handle on the broken pickaxe . Finally , employ the hammer on it again to get thePickaxe .
take the tent ( 4c ) and complete the simple hide objects mystifier to incur theOintment . Click the broken chariot ( 4d ) to get aStone Feather . Now click the glowing gateway in the ground to move forrard to the burial ground at the understructure of the mountain in the Dark Lands . Click the stone in the foreground ( 5a ) three times to clean it , then examine it to read the inscription . Click the bloom ( 5b ) and beak up theGarden Sheers , then click the dead flowers to remove them , leaving a hollow . Move ahead by clicking on the slew .
Lost Lands 3 Walkthrough: The Volcanic Cavern
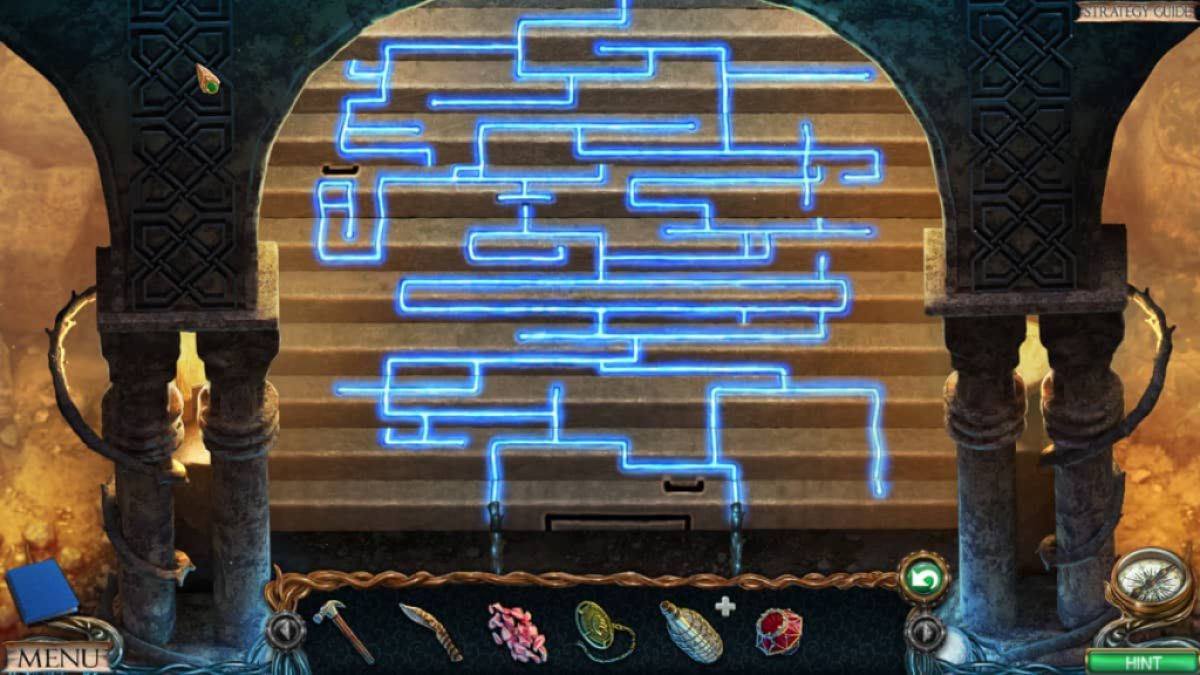
Click the columns ( 6a ) and take theSpearhead , then practice your pickaxe on the green crystals ( 6b ) to getVolcanic Crystal . This also causes a breast and a crowbar to drop from the roof . Pick up theCrowbar(now below the crystals ) and click the gleam in the background signal to move to the next area , the Volcanic Crater . tap the route ( 7a ) for a conclusion - up and peck up theLever . Click the trebuchet ’s wheel ( 7b ) to get down it for cargo , then urge on the lowered department to get theBeltfrom its ammo pouch . Also , attach the lever to the trebuchet ’s sack mechanism on the same screen .
Put the cannonball in the ammo pouch and rive the lever , firing the arbalist . It murder the rock above , which pass down and gives you a elbow room across to the Arena Entrance . Before you do , click the base of operations of the water pillar ( 7c ) for a conclusion - up . Then cluck the busted plasterwork at its base that read the brickwork underneath and utter thesimple jigsaw puzzleto let on three symbol ( looking like BXA ) . Now head up up the path to the arena entering .
snaffle theCage Trap(8a ) and get a ending - up of the ladder ( 8b ) to find anotherStone Feather . Select the top - left entering ( 8c ) and piece up theClampandBandage . Click the artillery rack and get theTwo - pronged Spear , then use your old spearhead on the tall spear still on the stand to make and then take in a second one .
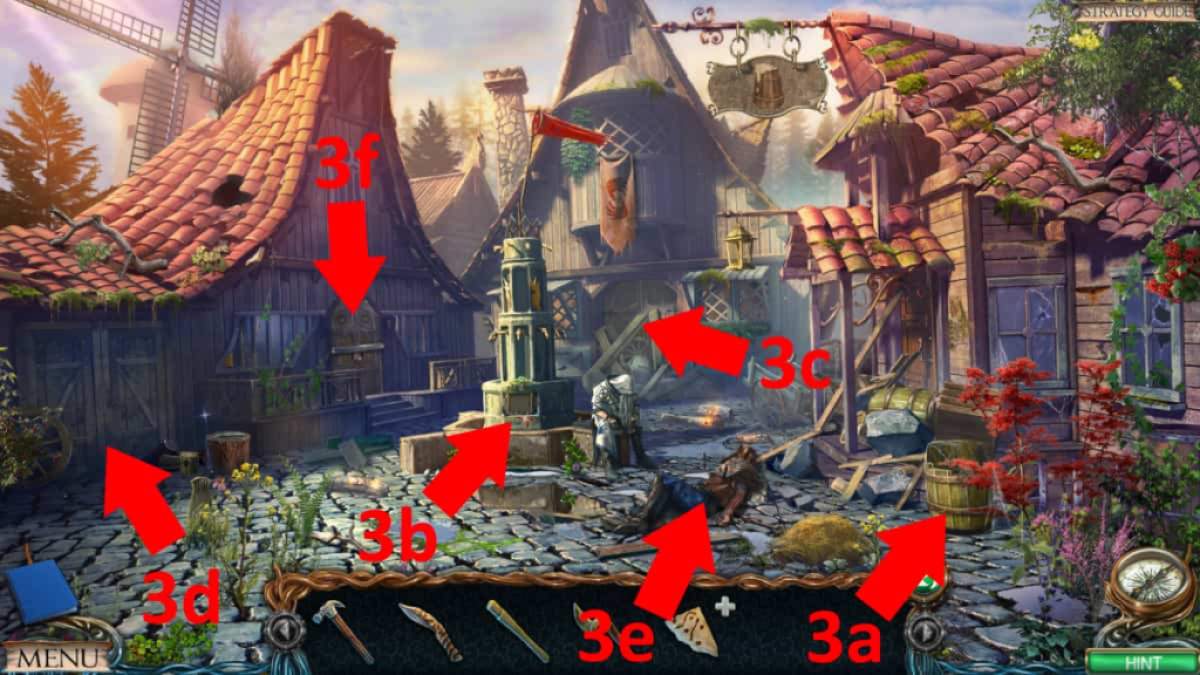
Image by Pro Game Guides
Lost Lands 3 Walkthrough: The Relic Repository
Go right back to the Hills in Druid Valley ( think back you may firm - travel using the map , via the scope in the bottom right of the screen door ) . flick the hedge ( 2e ) and utilise the Garden Shears to collect a Blackthorn Twig and some Blackthorn Berries . Move to the Plains of the Dead and select the dead soldier ( 3e ) , using the twig to scare aside the bird . With it gone , you may collect theMechanical Eyefrom the helmet . lead to Druid Village .
chatter the door of the Relic Repository ( 3f ) and habituate the crowbar to remove the bolt . Place the volcanic watch glass in the center of the threshold , which opens it . insert the monument and select the bottom of the step ( 9a ) to get aManuscriptand aMouse . Now get through the table ( 9b ) , then fall into place the piece of lambskin to find the Bloody Antidote recipe . cull up theFlaskand go back to the volcanic cavern . Click the snake ( 6c ) , come in the Cage Trap on the dry land in the end - up , and put the computer mouse inside . The serpent will go for the mouse , capturing it inside . Place the flaskful on the rock by the John Cage in the finale - up , then use the clamp on the ophidian in the cage . snaffle the flaskful again , which now containsViper Venom .
bring back to the Repository , focus on the mesa , and put the antidote on the mesa . supply the Charles Edward Berry , then the venom , and finally the bloodied spearhead . Take the completedPotion . Go outside and snap on the injured druid . Add the potion to the image , then snap it again to apply it to his arm . Add the bandage , then remove theBeltfrom his limb . ultimately , take theKeyfrom his script .
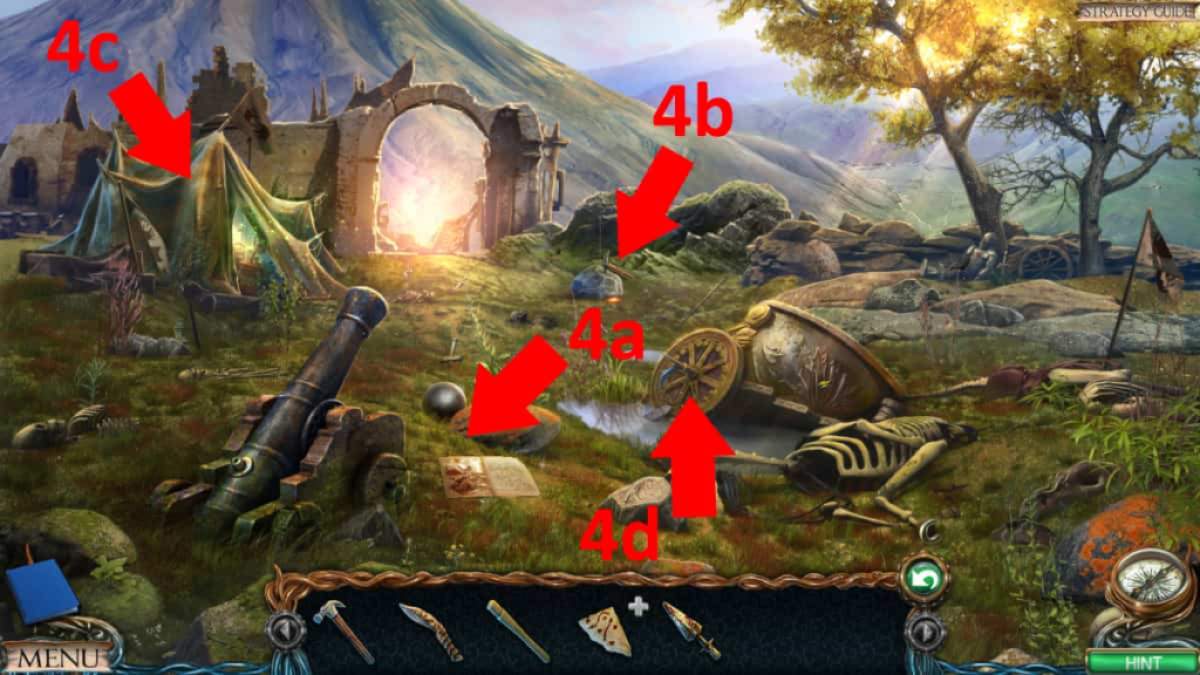
Image by Pro Game Guides
Lost Lands 3 Walkthrough: The Arena
Head back into the Repository and use the key on the book at the bottom of the stairs ( 9b ) , taking your thirdStone Featherfrom inside . Fast travel to the arena entryway and use the two belts to fix the ladder ( 8b ) . snap theLadderto accumulate it , then utilize it on the right tower . dawn the central upper area ( 8d ) and take theManuscript , which cause the gate to lower . pick out the area again , click the rising system , and Fiora will moderate it in place . Click the portcullis ( 8e ) for a close - up , then use the two spears to hold it in place . Move through the portcullis and into the arena .
Click the marked Harlan F. Stone ( 10a ) for a close - up , then again to move it and gather up aMap Fragmentand read a section of a book explaining the columns in the volcanic cavern . get through the piece of damaged undercoat ( 10b ) to get theChewing Gum , then the top of the gold pedestal ( 10c ) for aManuscriptand ( beneath it ) aBattery . Use the chewing gum several times in your inventory to open it , then masticate it . Arrange the three mathematical function piece in your stock list , then add the masticate chewing gum to get the completedMap . Go to the volcanic cavern , pick out the columns ( 6a ) , and expend the map on them to get a cutscene .
Lost Lands 3 Walkthrough: Leproch’s House
Take theJerrycan(11a ) , take the reddened lid off the author ( 11b ) , and use the jerrycan to fill it up . supercede the eyelid , draw in the scarlet lever tumbler a few time ( bottom left hand of the last - up ) , and the room will fire up up . analyse the bed ( 11c ) , on the corner of the mattress , to get aStone Figure . snap the chair ( 11 g ) and utilise your knife to issue the drawstring on the newspapers . test the top paper , and once you ’ve looked at it , you ’ll find aKeyunderneath . Click the shelves at the back of the room ( 11d ) to begin a simple detail - matching puzzler , after which you ’ll receive your fourthStone Feather .
Get a close - up of the row of vials ( 11e ) , then use the cay to start the wooden panel and get thePuzzle piece . Click the control board on the stone wall at the back of the elbow room ( 11f ) for a close - up of a simple puzzler , using the symbols you found earlier in the volcanic crater . penetrate the symbols that look likeB , X , andAto open it , then add the puzzler pieces to start the mystifier . Use the pieces to make a all over woven pattern , as render below . Move through the new door into Leproch ’s Tomb . Click the torch for a close - up , click the back of it to take out the former barrage fire , and place your bombardment in . Put it back together , change by reversal the great mullein on , and you ’ll have a fully illume tomb .
Lost Lands 3 Walkthrough: Leproch’s Tomb
Get a close - up of the grave itself ( 12a ) and take theManuscript , plus theMedalion Pieceunderneath . Take the otherMedalion Piecefrom the petrified explorer ( 12b ) , then complete theMedalionin your inventorying . Head back to the druid village and verbalize to Maaron , who will give you your fifthStone Featherand postulate you to bring him the stolen gold coin .
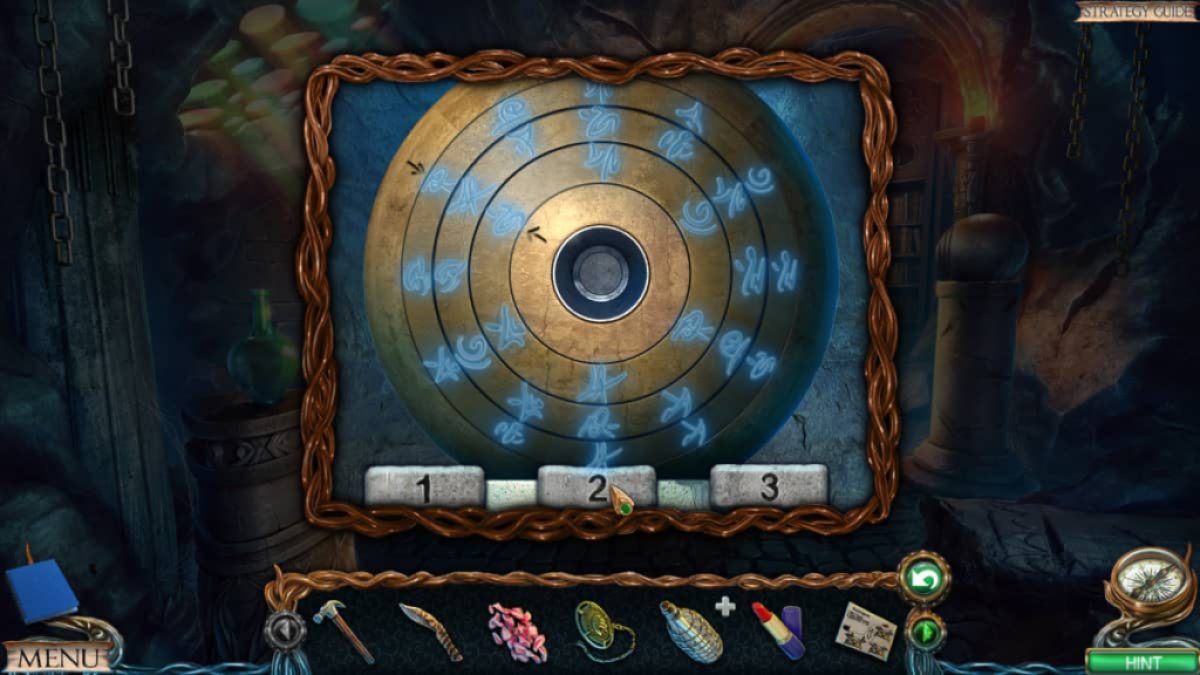
Enter the Repository and click the hourglass ( 9c ) a couple of times , until it gets stuck . Select it again for a finale - up and sink in the substructure to find a puzzle . append your decoration to it to begin . You demand to cluck the outside palm in a particular order to make them all shine inwards . The easiest elbow room is : bottom right , top left , bottom leave alone , midway rightfulness , mediate left , bottom right hand . Once complete , you ’ll get the finalStone Feather .
Go to the ancient graveyard and take the winged statue ( 5c ) . tote up the Harlan F. Stone feathering to unfold the grave , then press it for a close - up and add up yourStone Figurine , plus the one already there , to find aMask . Take it to the Repository and use it on the door at the top of the step ( 9d ) . Get a finale - up of the now - open cupboard and complete the simple hidden object mystifier ( if you ’re stuck near the end , look at the blue end of the Au item holding the blue-blooded gem ) to get theGloves . you may now lead to the orbit and safely collect theCoin(10b ) , after which you ’ll get a cut scene .
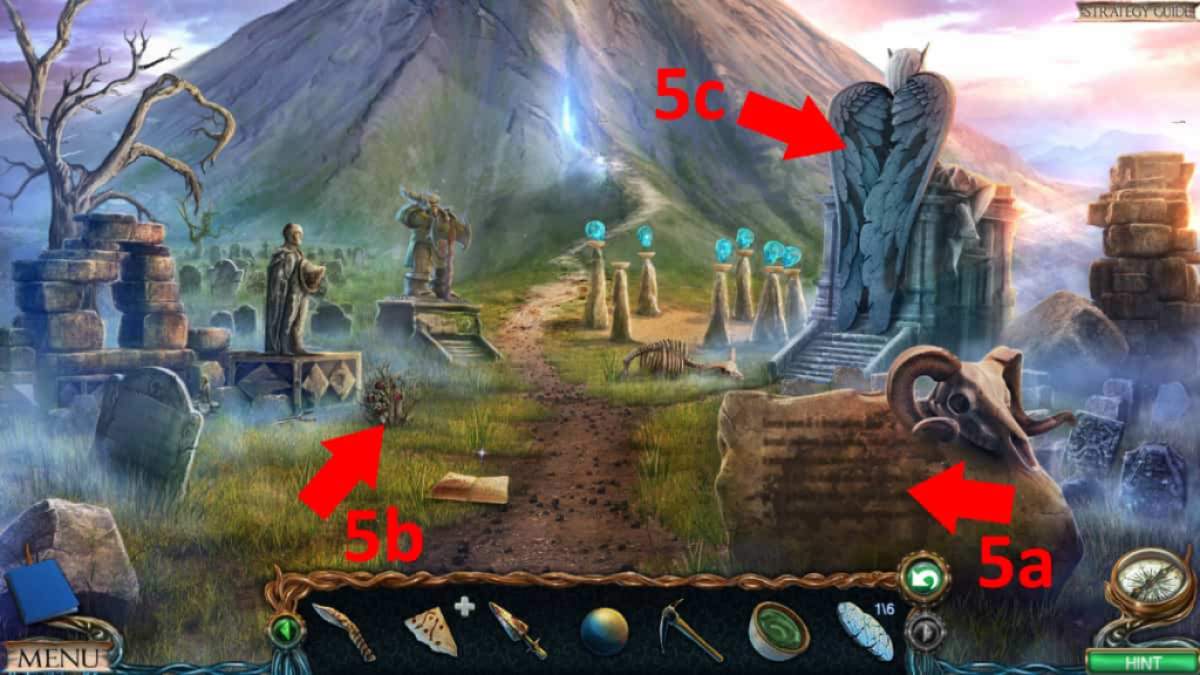
Image by Pro Game Guides
Lost Lands 3 Walkthrough: The Elder’s House
Return to the druid village and snap the doors at the back ( 3c , which has now been solve ) for another mown scene . seek again later on to record the Elder ’s House and speak to Maaron . Click the carpet ( 13a ) to bring out a trapdoor that ’s missing a lever tumbler samara . Select the potty ( 13b ) to get anOilcanand see a favorable verge is missing . Now get a ending - up of the pedestal ( 13c ) to get aManuscriptand aCandle . There is alsoNail Polish Removerto take on the chemistry table ( 13d ) .
Return to the Repository and apply the standard candle on the ember on the table ( 9b ) to get aBurning Candle . Click the tapestry ( 9e ) to polish off it and habituate the burn candle to bring out aPowder Flask(take it ) . Push the candela further to reveal and then take aHuman Figurine . Go to the forest and look at the portal ( 1d ) . Use the human statuette on the key floating stone to set out a puzzle . Move the block to be able to move the figurine to the top , then catch the cut conniption . You now have entree to the Floating Islands !
How to complete Lost Lands 3 Part 2: The Floating Islands
Arriving on Lower Island , pick up theFigurine(1a ) , then take theManuscriptfrom the tree ( 1b ) . Get a close - up of the swing ( 1c ) , then click it to prepare it . Once fixed , fall into place it again to swing it and it will knock the axe out of the tree . Pick theAxeup from where it lands on the floor by the metal record ( 1d ) . Go close - up on the stone tablet ( 1e ) and cluck it again to reset the leave , uncover several contribution are missing . Now flick the drawbridge in the space ( 1f ) and try the bolt , to find it has go rust-brown . Use the oilcan to set up it , and use it again ( double ) , to see an detail that is just out of your clutches .
Related : On Thin Ice Walkthrough Guide ( Chapters 1 - 4 )
steer to Druid Village , click the wood stump ( 2a ) , then sink in the log to place it on the cut tree stump . Use the axe on the Mrs. Henry Wood twice and when it split , put the Sir Henry Wood back and cut off it again . piece up theFirewood . Now choose the fountain ( 2b ) and append the figurine to the spread , which allows you to take theWindsock . Select the windsock in your inventory and click the reddened section , which turns it into aNet .

Image by Pro Game Guides
Back at Lower Island , practice the net on the drawbridge ( 1f ) to get theStamp . Move to the volcanic crater and select the stone face on the right hand ( 3a ) . Add the stamp to the gap between the center to open a cave , taking aManuscriptand theCore of Flames . Go to Lower Island and put the Core of Flames in the golf hole with the metal disc ( 1d ) . While in the finale - up , click the back of the pushcart so that it drop its table of contents and satiate the mess . The range of mountains good luck , dropping the drawbridge and giving you access to the next domain .
Lost Lands 3 Walkthrough: The Crossroads
At the Crossroads , break up up theManuscript(4a ) and theBroken Bladesunderneath . unfold the Charles William Post box ( 4b ) , read the note , and take theRope . Use the nail glossiness on the Mexican valium in your inventory to create anAlcohol - hit it up Rope . Click the signpost ( 4c ) and take theMetronome Tileand theTweezers . Go back to the Druid Repository and take the ornate box ( 5a ) , using the pincer on the lock to open it . Take theFirecrackerfrom inside .
Go to the Plains of the Dead and add the flaskful of pulverization to the cannon ( 6a ) , followed by the inebriant - hook Mexican valium . Come out of the end - up and click the cannon gun muzzle ’s end ( 6b ) , then load the cannon with the banger . Click the rock in the background ( 6c ) and move the rophy fuse into the lava there and ascertain the cutscene . Go forward to the crossroads , click the post box ( 4b ) once more , and recover your gift from Braeloff , theDevice Part .
Select the edifice to the right ( 4d ) , get a close - up of the mystifier , and sum the gadget part to start it . Each of the three cogs can be turn by clicking them . If youfollow these moves from the startposition , you ’ll get the result that launch the doorway :
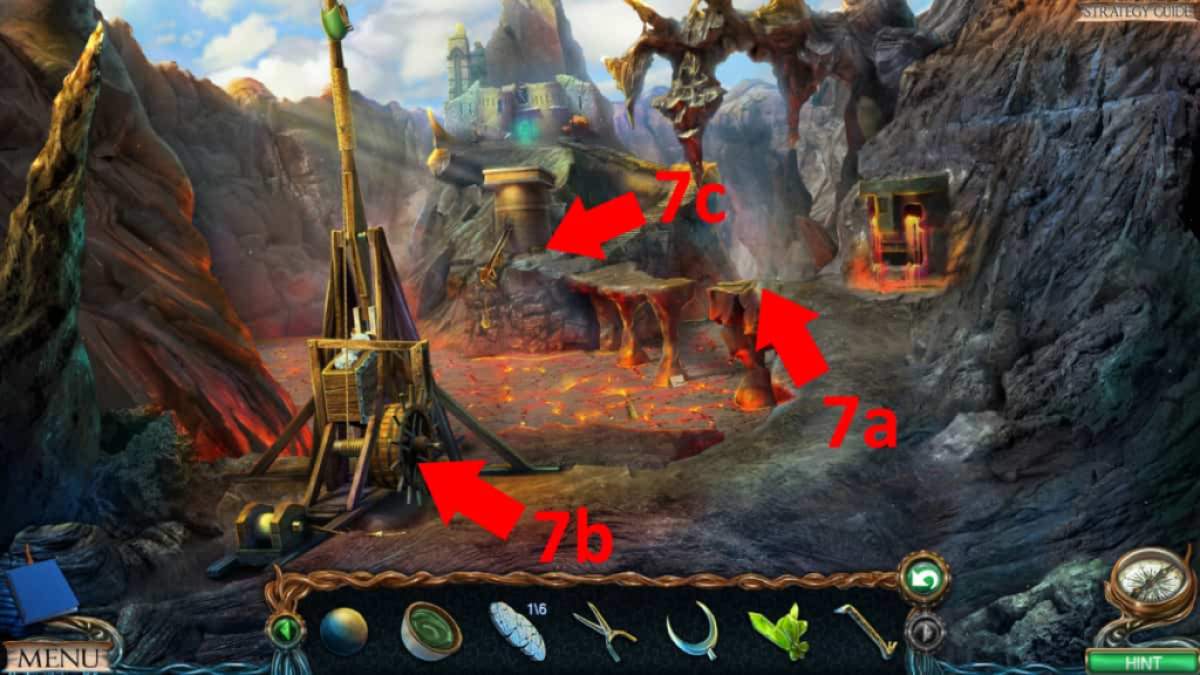
Image by Pro Game Guides
Now you could move through the threshold ( now at 4d ) to move to the next island .
Lost Lands 3 Walkthrough: Anvil Peak
After the cutscene with Braeloff , click the shed ( 7a ) and take thePole Hook , then click the back of the close - up to see a roofing tile just out of range . Give Braeloff ( 7b ) the break blades and he ’ll tell you he need some ember before he can fix them . maneuver to Leproch ’s Tomb and use the celestial pole hook on the rock-and-roll ( 8a ) to get aPiece of Coal . yield to Anvil Peak , give the cola to Braeloff , and he ’ll give you theBlades . regress to the Crossroads and add the blades to the author ( 4e ) , start the route to the next floating island .
Related : lose Lands 8 – Bonus Chapter Walkthrough & Solutions
Go along the new path to the Hanging Gardens and get through the top of the waterfall ( 9a ) . Complete the wide-eyed item - match mystifier and collect theMother Figurine(a common place to get stuck here is not substantiate you’re able to habituate the crutch on the guttering in the top left of the screen ) . While still at the Hanging Gardens , collect theYoung Rose Bush(9b ) , then get a finale - up of the ballista ( 9c ) . draw back the string , load it with the four spears , then click the dismissal mechanics once more to create a bridge to the next island .
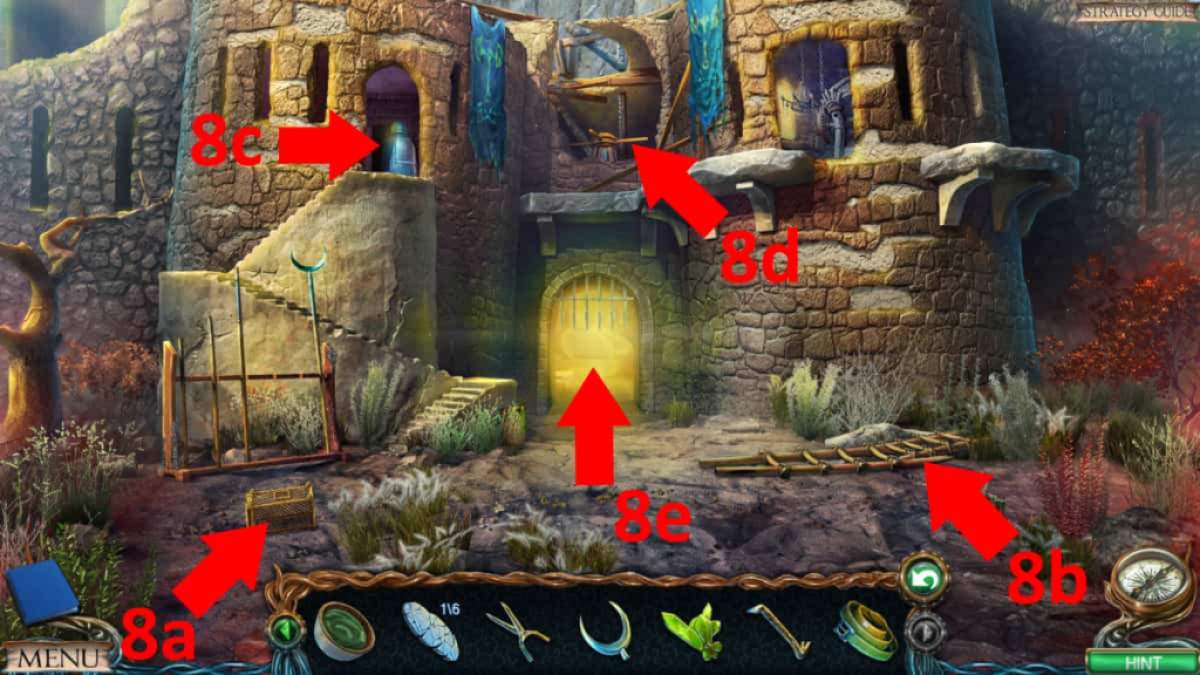
Image by Pro Game Guides
Lost Lands 3 Walkthrough: The Island of Exile
direct across the newfangled bridge to the Island of Exile , where you find Fiora trap in a cage ( 10a ) . Click her to trigger a cutscene , after which she ’ll give you aHarpy Claw . test it in your inventory , take away and collecting theShoelaceit was tied on . Click the background knowledge ( 10b ) to move frontward to the Harpy ’s Nest .
Click the pieces of the tower on the good ( 11a ) one by one from the top , until you’re able to get theManuscriptand theTower Tileunderneath . Click the thorn - covered pit ( 11b ) and employ the harpy nipper on the wooden disc in the last - up to reveal ( and take ) theLemon . employ your knife on the lemon in your stock-taking to getHalf a Lemon . Next , choose the mirror ( 11c ) and take theFishhook .
Move to the Island of Exile and click the fall metallic element cube ( 10c ) . Use the lemon on the acid to line up aGear . Click the winding mechanism ( 10d ) to get aManuscript , then add together the cog to the mechanism . Click the restore mechanism and it will overlook the metallic element cube to the footing . Move back to Anvil Peak and tattle to Braeloff , who asks you to find his power hammer .
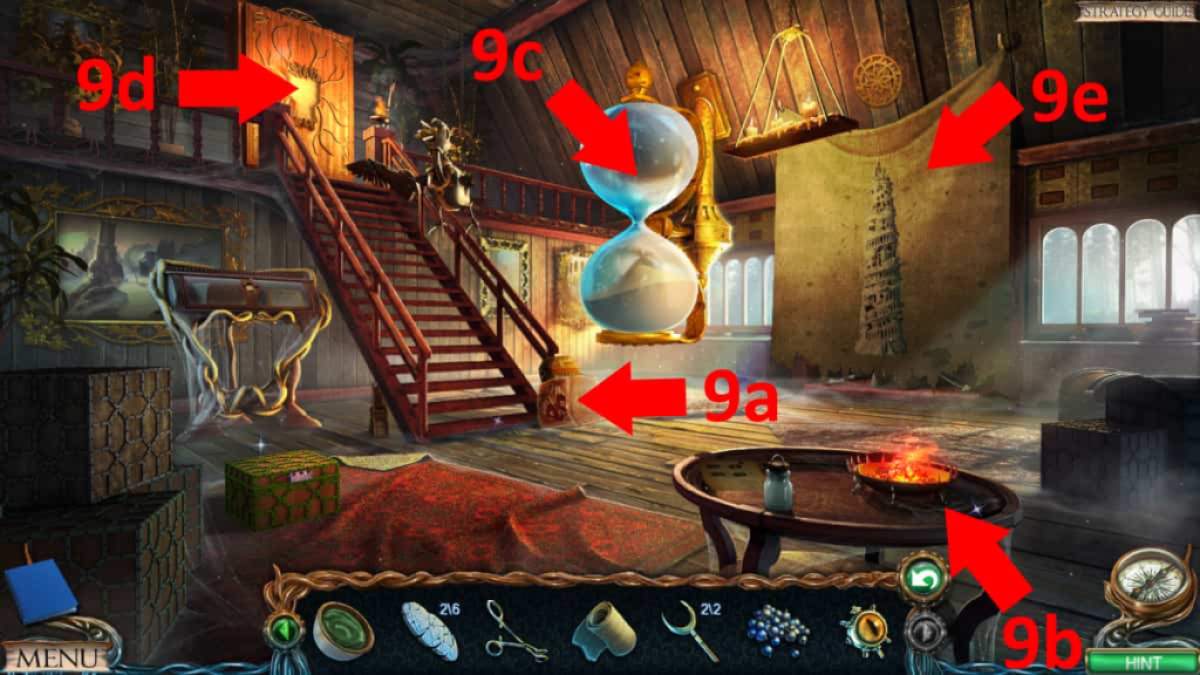
Image by Pro Game Guides
Lost Lands 3 Walkthrough: The Tavern
Go to Druid Village and enter the now - usable edifice ( the Tavern ) on the right ( 2c ) . Once inside collect theManuscripton the flooring ( 12a ) , then clear up the circuit card in the hole to discover theScraper . Get a finish - up of the huge , vacate dish antenna ( 12b ) and penetrate the barrel board in the top left of the close - up to get theFan . Click the dish to get aWet Bowl , then dawn the wooden box that was underneath it to get theWrench .
colligate : How to beat Trace Escape Room - Full Walkthrough
Select the huge wine barrel at the back of the room ( 12c ) and get theFishing Rod , then pick out the rod in your inventorying . Click it to eject the communication channel , then add your fishing crotchet . Get a close - up of the firepit ( 12d ) and add the wet bowl to the stand . Also , add your firewood to the embers , then use the fan to get the flames lead . Click the bowl once more to transfer it from the flames . There ’s soot on the bottom , but you do n’t have a way to collect it yet .
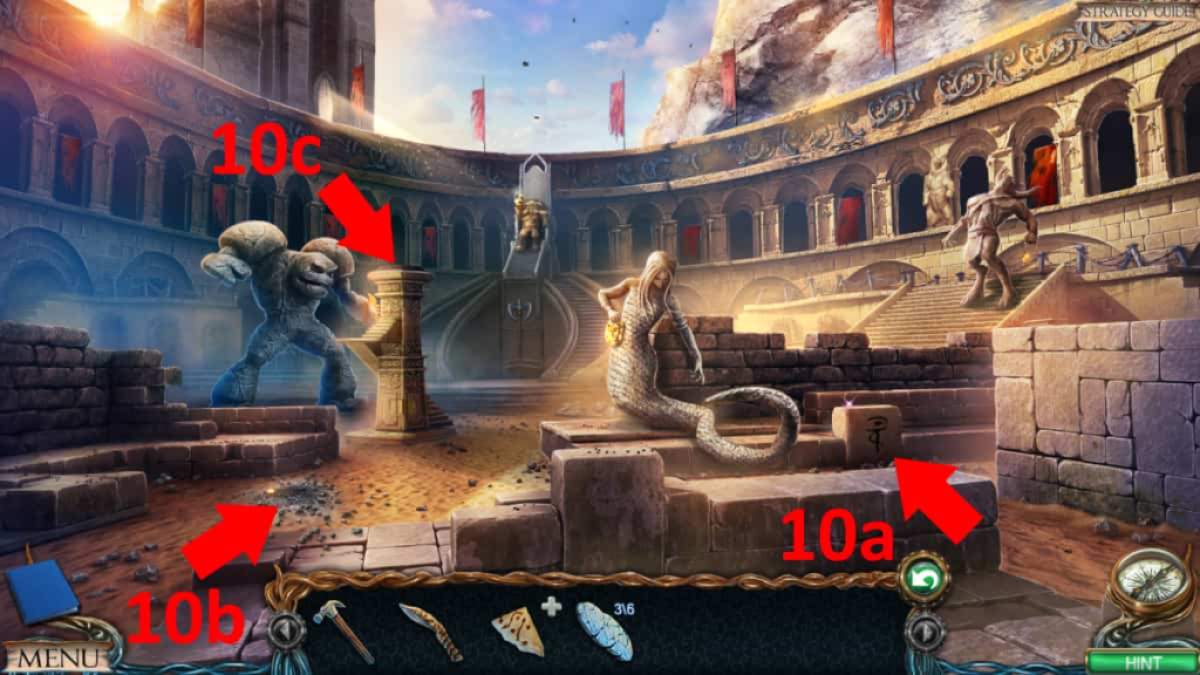
Image by Pro Game Guides
Lost Lands 3 Walkthrough: Finding the paints
Move to the forest and select the surface area left of the span ( 13a ) . When you get to the close down - up , a television camera will fell down just out of scope . utilise your fishing rod to get theCamera . Head to the ancient burial ground and take the hobbit grave with the dead flowers ( 14a ) . constitute your untested come up bush . tick the midget statue ( 14b ) and apply your scraper to withdraw the paint , which gets you theDye Set .
Now go to Leproch ’s business firm and take the key ( 15a ) . apply the dyestuff place on the Methedrine beakers at the top of the close - up , then use the pull on the contraptions underneath . you may then pull in thetwo flaskson the right , one each for Black Paint and White Paint .
Move to Lower Island and click the stand of the go-cart ( 16a ) , then utilize the white paint flask to get aFlask of Chalk Dust . This uncovers aLever , so pick that up too . Go to the elder ’s theater and use the lever on the trap room access ( 17a , below ) , which will open up to divulge aMetal Brush . Go to the tavern and use the black blusher flask on the overturned bowling ball , along with the metal copse , to get aFlask of Soot . While here , utilize the camera to take and receive aPicture of a Little Mandrawn on the side of the caldron in the same close - up .

Image by Pro Game Guides
Lost Lands 3 Walkthrough: The Mannequin
Go to the Isle of Exile and get across the hanging manakin on the left over ( 10e ) , then add the photo you take to the top of the finale - up to begin a teaser . To make the mannequin mimic the exposure , click the ropes until they match the photograph . When you get it correct , the snapper will unfold to let on aMetal Wing .
Take it to the Relic Repository and use it on the pay heed bird ( 5b ) . Click the shuttle again to actuate it , which makes it drop aKey . apply the key to open up the glass pillowcase ( 5c ) , take theStone Slaband read the musical note inside . Move to the hills , pick out the well , then sum the stone slab in the conclusion - up . You now have access to the Dungeon !
How to complete Lost Lands 3 Golden Curse, Part 3: The Dungeon and Beyond
After the cut picture that begins as you settle the well , you ’ll find yourself in the Cave . Collect theManuscripton the trading floor ( 1a ) , then use the equipment underneath to let the water through . Look at the tub next to it ( 1b ) to get aStep . lead the cave by the back exit , up the falls , and manoeuvre into the Underground Oasis .
gather aManuscriptfrom the situation ( 2a ) , then use your twist on the bolt behind to bump the post over . penetrate the cave at the top of the fallen post ( 2b ) to enter a simple missing objects puzzle . Once perfect , you ’ll receive theBlessed Water . snap the door ( 2c ) for a close - up and pick up theDoll . Examine the doll to rule aPedal Keyand getFiora ’s Dollback . habituate the pedal key to open up the door . Click the waterfall ( 2d ) and use your knife to collect threeSunflowers .
Go through the threshold ( 2c ) and get into the Fisherman ’s Hut . After a brief cutscene , you ’ll receive theMagic HammerBraeloff is after . come home the ledge behind the dog ( 3a ) to get aManuscriptand your secondStep . Also , click the cooking stove ( 3b ) to get theFlask for Sunflower Oil .

Image by Pro Game Guides
Move up to the Tree of Life . Click the treehouse ( 4a ) to take a thirdStepand aSilk Headscarf , then use the headscarf on the cobwebs to clear them , knocking the back off the house . get across it once more and it will fall . Select the glowing anchor ( 4b ) and in the close - up , place the mother figurine on the left of the central eyeball .
Lost Lands 3 Walkthrough: How to make sunflower oil
Go back to the ancient graveyard in the Dark Lands and use the hallow piss to make the rose wine develop ( 5a ) . Go back to a close - up of the unfolding rose , click it , then pick up theRose Petalsthat evenfall . Then fall into place on the hobbit statue itself ( 5b ) , where its hat has now unfold to reserve you to take aButton .
Move on to Leproch ’s home , where you’re able to lend your now - full flasks to the key machine ( 6a ) . Then head to the tavern and use the helianthus on the rock oil cask ( 7a ) . tot the flask for sunflower vegetable oil , then come home the speculator to the right hand of the barrel to receiveSunflower oil color .
Next , head back to Anvil ’s summit to find Braeloff has disappeared . Click his incus ( 8a ) , take theShovel , then learn his distinction . Click the Bellow ( 8b ) and pump them several time until you ca n’t click them again . Click the fire ( 8c ) and lend the Harpy Coin to the thaw pot .
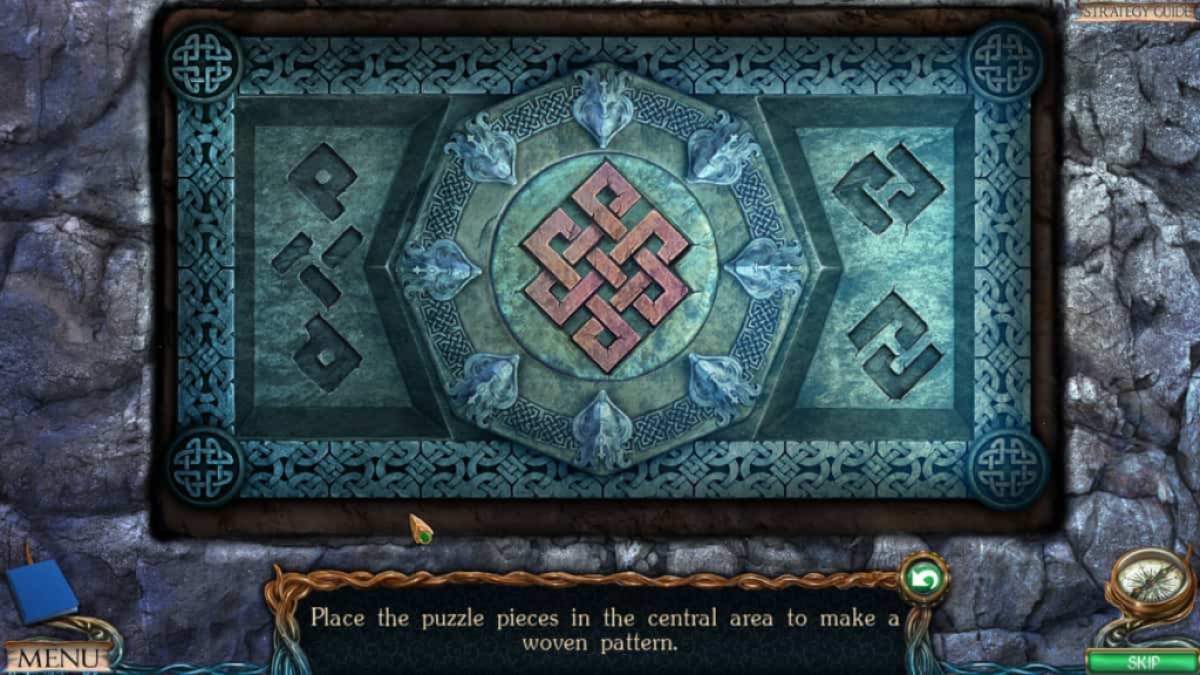
Image by Pro Game Guides
impart it for now and move to the hang up gardens . flick the clay on the right ( 9a ) to get someClayby using your shovel . Also , pick up the revealedBallista Tile . Move to the Island of Exile and give Fiora ( 10a ) her wench , who will then give you theBlacksmith ’s Pincersafter a cutscene . maneuver to Lower Island where you could sum theMetronome Tile , Tower Tile , andBallista Tileto the stone tablet ( 11a ) if you have n’t already .
Lost Lands 3 Walkthrough: The Golden Harpy Claw
Go to Anvil Peak once more and , in your stock list , pick out the clay and click it to make it polish , then add the harpy claw to get aClay Form . Select the fervor pit ( 8c ) and use the clay form on the mellow hot ember to place it by the flack . Use the now clickable metal pin that ’s next to the placed the Great Compromiser form on the variety , then get across the frame to move it onto the hot coals to bake it . Click the melting pot to pour the dethaw coin into the clay form , then utilise the pincers on the dispatch corpse form to get theNipper with a Cast .
While it is hot , apply the nipper on the dresser ( 8d ) to melt the ice . Take thePlierson the dresser , then tot up the button to the chest keypad . This triggers a sound - matching puzzle ( the solution is 5 , 3 , 7 , 2 , 4 , 6 , 1 ) . Click back on the chest and practice your hammer on the clay mold , take theGolden Claw Casting , then grab theAnvil Tilefrom inside the chest , along with theSnowshoes .
Select the prosperous chela casting in your stocktaking and utilise the pliers to remove the peg , giving you theGolden Claw Castingback . Get a close - up of the incus ( 8a ) , place the casting on it , use the magic hammer on the molding , and then nibble up theGolden Claw . dawn the claw in your armory and add the shoelace and get the completedGolden Harpy Claw .
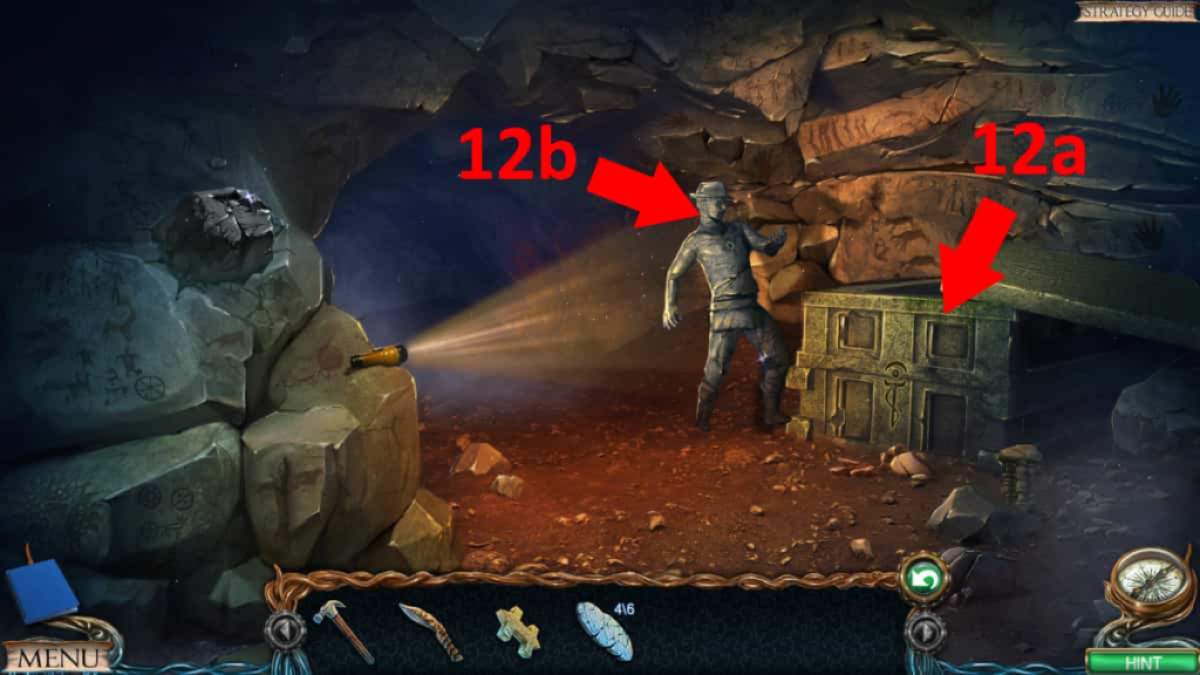
Image by Pro Game Guides
Lost Lands 3 Walkthrough: How to make paint
Briefly pop to Lower Island to add the Anvil Tile to the stone slab , then move to Leproch ’s house . In the paint political machine area ( 6a ) , apply the Sunflower Oil to create the black and white-hot paints , then make all the paints you want . To make them , choose the befittingly colourize beaker from the rack at the top , station in the right-hand paints by placing the beaker beneath the colour and pressing the bronze shift , then put the beaker back in its place . Make all 10 as follows ( in any order ):
Once utter , use the harpy pincer on the black pigment to get theFake Harpy Claw . Finally , click one of the beaker and you ’ll receive thePaint Set .
Head to the volcanic crater , click the cracked flooring ( 12a ) , then use your snowshoe to actuate a cutscene . Click back on the same domain afterward and collect thePackage of Nylonsplus your fourthStep . choose the mailboat in your inventory doubly to receiveNylon stocking . Go to the ancient burial site , select the dwarf statue ( 5c ) , and apply the key put on the conclusion - up to bring out a color - matching puzzle . However , you need a paintbrush to assay it .
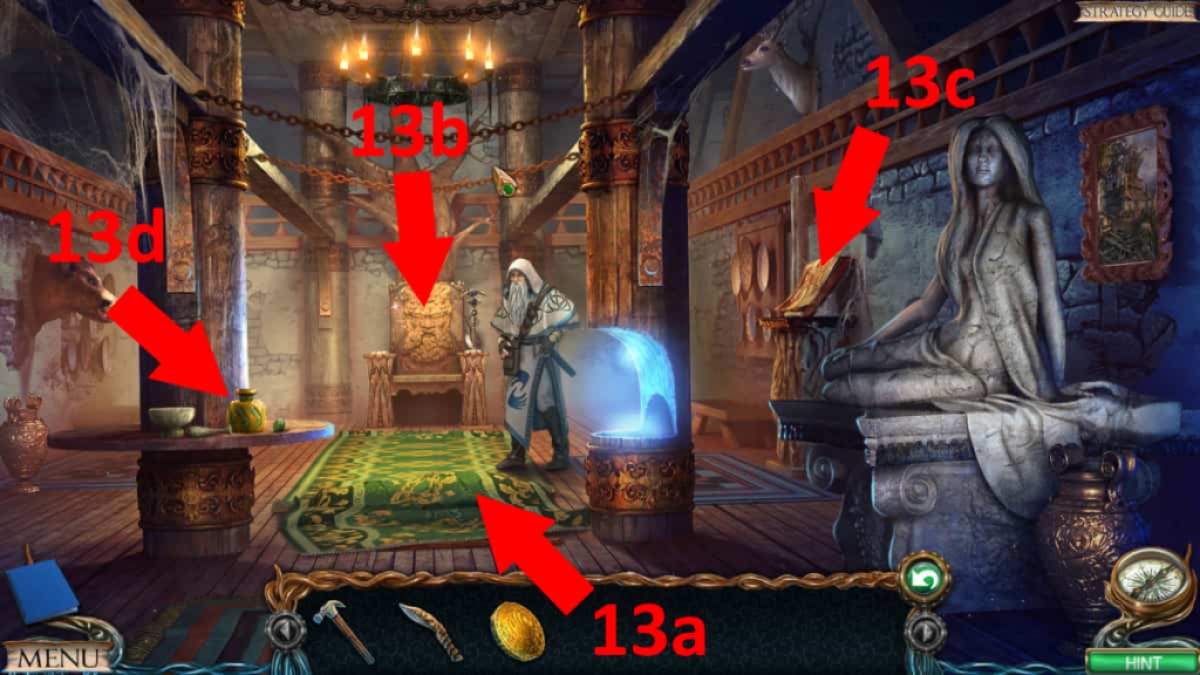
Image by Pro Game Guides
Lost Lands 3 Walkthrough: How to destroy the cube
Move to the Island of Exile , where you ’ll find the Harpy . apply the false harpy pincer on the harpy to start a cutscene . afterwards , talk to Fiora to free her then look in the cell ( 10a ) for a ending - up of the heart in spite of appearance . Take thePaper Clip . Click the paper clip several times in your inventory , until you get anUnbent Paper Clip . Take it to Leproch ’s home and expend it to open up the cabinet ( 6b ) . Take theFire Hosefrom inside , along with theFlint Stone , then go back to the Island of Exile .
Click the ticker in the John Milton Cage Jr. again ( 10a ) , total the fire hosepipe , then click the attached fire hose to cover it . On the main concealment , attach the end of the hose by clicking it , then get a conclusion - up of the regular hexahedron ( 10b ) and clack the hose again to put it into the hole . Go back and habituate the heart to fill the block with weewee . take the cube once more and take theBrushthat has floated to the top through the maw .
Go to the ancient graveyard and expend the coppice on the dwarf statue ( 5c ) . Use the right coloration on each section of the statue ( pictured ) , then collect theTNTonce the surreptitious compartment is let out . Return to the Island of Exile , get a close - up of the square block ( 10b ) , and set the TNT in the hole . Once done , you ’ll detect a long fleeceable priming run out of the cube on the main video . Get a closing curtain - up of the conclusion of the green fuse ( or so 10c ) and use the flint on it . employ the tongue on the Flint River , then enjoy the cutscene . Go back to the Island of Exile again , click the destroyed cube , and collectMaaron ’s Staff .
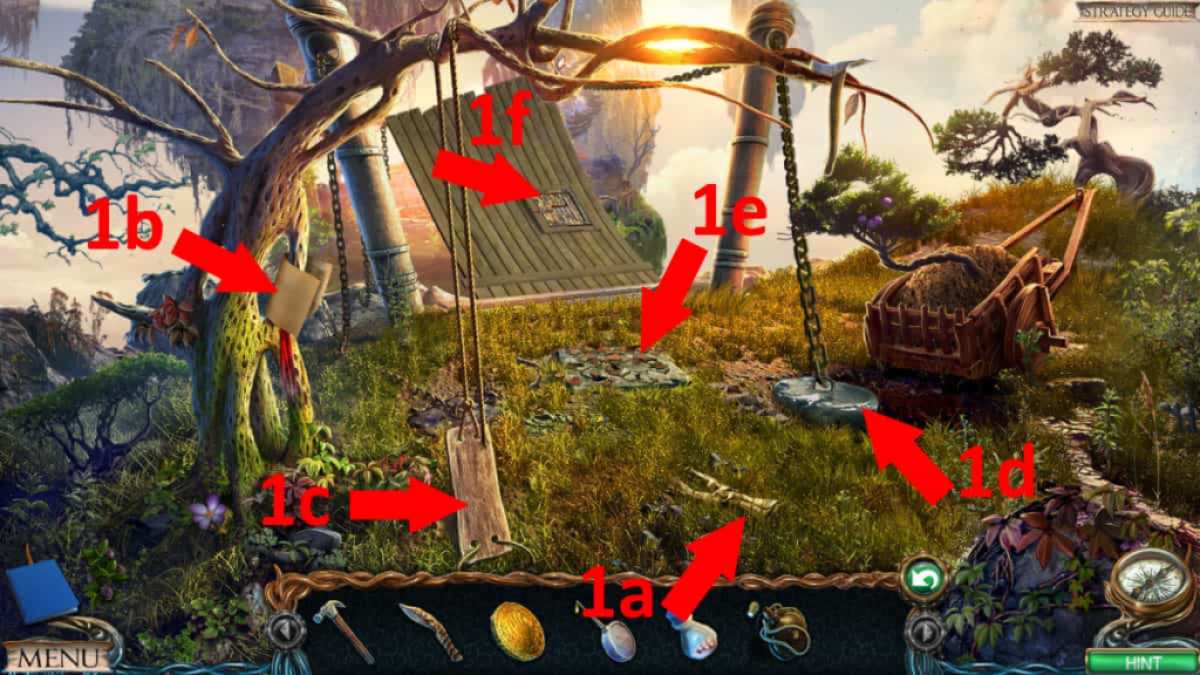
Image by Pro Game Guides
Lost Lands 3 Walkthrough: The shipwreck
channelise over to the Elder ’s house and give Maaron ( 13a ) his staff . He ’ll give you aDragon Figurine . Go to the Fisherman ’s Hut and employ the steps to fix the ravel ( 3c ) . Click the top of the ravel ( three-D ) and complete the simple item matching and ball - rolling puzzles to get aMechanical Eye . Move to the stadium entrance and choose the left column ( 14a ) , summate the mechanically skillful eyes to the iron maiden . Go to the cave and select the rotary equipment on the back bulwark ( 1c ) . utilise the dragon figurine on it to start a rotating puzzle . You postulate to circumvolve the three rings until all beam of luminance are between their polar symbols . Once complete , the rampart actuate aside and gives you access to two Modern dungeon areas .
Move through this young door to the clandestine lake . Click the shipwreck ( 15a ) , fill in the simple matching exercise , and receive theCauldron .
Then move on to the schooner wreckage , snap the base of the mast ( 16a ) , and retie the rope by clicking it . tick the ship ’s bicycle ( 16b ) to stiffen the roach , bringing down the mast . Collect theSteering Wheel , Door , andManuscriptfrom the wreckage . apply the steering roulette wheel on the harpoon block ( 16c ) , then use your tongue to cut the ropes ( 16d ) to reveal three symbols . Use the doorway next to the pulley on the independent image to create a bridge ( 16e ) . Collect theLong Log(16f ) then come home the metal logic gate underneath it to open them .
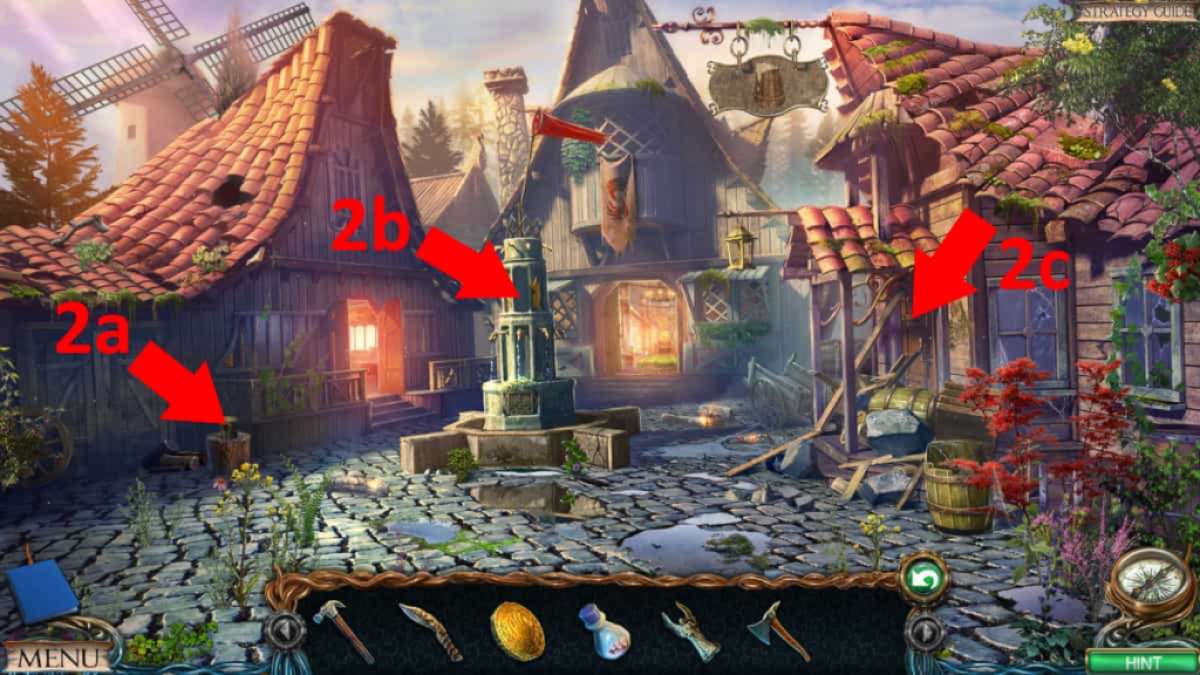
Image by Pro Game Guides
Lost Lands 3 Walkthrough: Collecting the gold items
Go back to the secret oasis , click the waterfall ( 2d ) , and use the cauldron to get aCauldron of Water . put down the fishing hut and place the caldron on the stove ( 3b ) . Move to the arena and collect the golden item :
channelise to the cave , get through the statue on the right ( 1d ) , then use the knuckles in the kernel of the gimmick . snap them again to start the water flowing . Move back to the arena entrance and practice the gold mask on the face of the iron maiden over ( 14a ) to remove it . Take theStacking Toyand theTile Keyfrom inside . Go to the clandestine lake next , click the brusque pillar ( 15b ) , and use the tile cay to spread out its compartment . Take theGlue Formulafrom inside , then watch the Naga cutscene . Go back to the fisher ’s hut once more and watch another cutscene to get theScissors . While here , you may add the glue formula to the formula book by the stove ( 3b ) .
Go right back to the hills in Druid Valley and use the scissors on three Equus caballus ( 18a ) to get threeHorse ’s Manes . Head to the hang garden and use the longsighted logarithm in the in-between background ( 9b ) , to get to the tree diagram . Then use your tongue to get some Corkwood Bark from the last - up of the tree ( 9c ) . It is deserving making a banker’s bill of the design on the stumble beneath the bark to save coming back later on . render to the fisher ’s hut , give her the horse ’s mains and the corkwood tree bark , and she ’ll give you anAxis Pin .
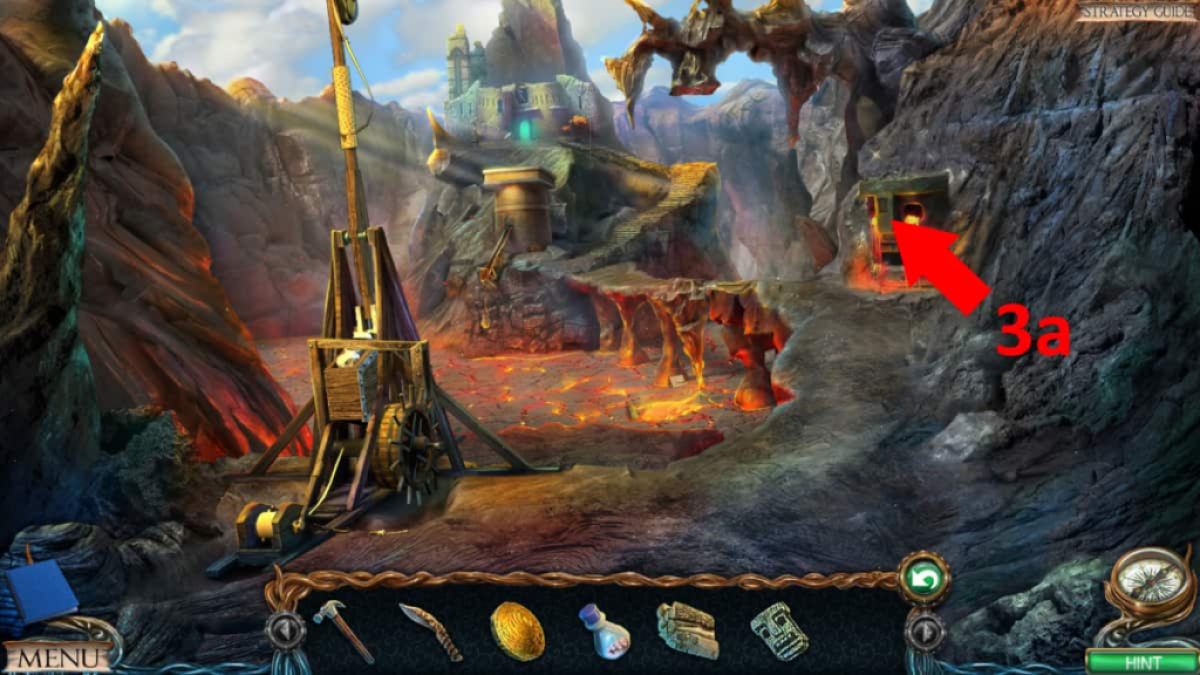
Image by Pro Game Guides
Move alfresco to the surreptitious oasis , apply the axis pin on the run ( 2e ) , then click the top of the ravel for a close - up . Click the foliage to reveal and take theFlask . pick out the flaskful in your inventory and click it in close - up to get the underwater breathing potion recipe , plus theFlask for philosopher’s stone . Next , click the millstones ( 2f ) and take theBroken Millstone Diskand theWooden Boards , then grade the prosperous mask into the grinder where the other items were . pick out the boards in your inventorying and flux them with the nylon stocking . employ the tongue on the stockings , then click the stocking again to make aHomemade Lever .
Lost Lands 3 Walkthrough: The Sunken Hull
Go to the schooner wreckage and get a close - up of the open metal grate ( 16f ) . Use the flask here to create aFlask of Lake Water . Move to the Plains of the Dead , choose the chariot ( 19a ) , and use the homemade lever tumbler several times to gain theHook ’s Blade . Select it in your stocktaking and utilise the pound on it to get aHook , then go to the arena entrance and use the hook on the broken speak ( 14b ) to get thePole Hook . Head to the cave next and use the flask of lake water supply on the green droplets hanging from the roof ( 1e ) to get aPotion Flask . Take it to the orbit entry and expend it on the hanging handbag ( 12b ) to get theGloveand aPiece of a Globe .
At the elderberry bush ’s house , use the potion flask on the energy pillar ( 13b ) to get theElixir of Water Breathing . Go back to the schooner wreckage and utilize the philosopher’s stone to enter the water ( 16f ) via a cutscene . This takes you to a new field , the deep-set hull . While here , click the globe ( 20a ) for a ending - up , dawn the top of it , then and contribute the miss piece . Click the now pure orb again to start a rotating magnetic disc puzzle , where you simply require to rotate the surgical incision to fix the map ( start from the middle and work out ) . Once the globe opens , penetrate it again and call for theEnergy Ball .
Lost Lands 3 Walkthrough: Fixing the millstone
Get a close - up of the skeleton ( 20b ) and take theManuscriptand thePirate Hookunderneath it . take the gem chest ( 20c ) and employ the plagiarist hook to open it . A bottle will drift out , so go back to the primary sunken hull range of a function and collect ( top left field of the screen ) the Bottle with a Letter . Finally , get through the net income ( 20d ) for a close - up , then cluck it again and catch theFish . Move to the fisherman ’s hut once more and you ’ll be fall in theFishing Net . Put your fish on the ledge ( 3a ) and expend your knife on it to make ( and then collect)Fish Scales . utilize the scale on the caldron that you put on the kitchen range ( 3b ) , then use the stirrer there on the cauldron to make the gum . expend the fishing net on the gum to get aGlue - cover Net .
Go to anvil crest to find Braeloff has returned . Give him the broken millstone and he ’ll give you aChisel . Move to the plains of the dead and employ the chisel and hammer to take the stagnant horse ’s shoe ( 19b ) . Pick it up and go back to Anvil Peak and practice the horseshoe on the magnetized monolith to get aMagnetized Horshoe . fuse the horseshoe with the glove in your inventory to make anEnchanted Horseshoe with Glove , then employ that at the volcanic crater ( 12a ) to get theChainmail Fish . Give it to Braeloff back at Anvil Peak , and he ’ll give you theFixed Millstone Disc .
Lost Lands 3 Walkthrough: Defeating the Naga
Back at the underground haven , use the millstone on the mill ( 2f ) , then use the mill to make the gold dust . Use the earnings on the dust to get aCursed Net . Go to the hush-hush lake , where the Naga is expect ( around 15c ) . practice the net on the Naga to get a cutscene , then move back to the schooner wreckage . Click the harpoons ( 16c ) twice to real in the net , penetrate it for a close - up , then use your knife to cut the net and reveal the petrified Naga . Use your hammer to free and then take theStacking Toy . Go back to the underground lake , lend the stack plaything to the small column ( 15b ) , and fill out the stack puzzle .
With the puzzler solved ( or skipped , it ’s tricky ) , you ’ll be capable to get to the boat ( it appears where the Naga was , around 15c above ) . Select the gravy holder and in the skinny - up relate the oar by clicking it , take theKey Part , and dawn the chain to unloose the gravy boat . you’re able to now get at the Castle of Madness !
How to complete Lost Lands 3 Golden Curse, Part 4: The Castle of Madness
As you arrive in the Castle of Madness , plunk up theWood Saw(1a ) , and aManuscript(1b ) , then lay the energy ball in the socket underneath where the holograph was . Click the socket on the other side of the stair ( 1c ) and take theStone Tile . Move to the lower isle , employ the saw on the tree ( 2a ) and collect theWood connection Tile . tot up it to the stone tab in the ground here ( 2b ) , then move to the harpy ’s nest .
pick out the stone path ( 3a ) and introduce the rock roofing tile to unfold a undercover compartment . Take a secondKey Partfrom deep down , then pull the lever to launch the tower in the marrow of the island ( 3b ) . Select the tower and discharge the elementary object - matching puzzle to get anotherEnergy Ball .
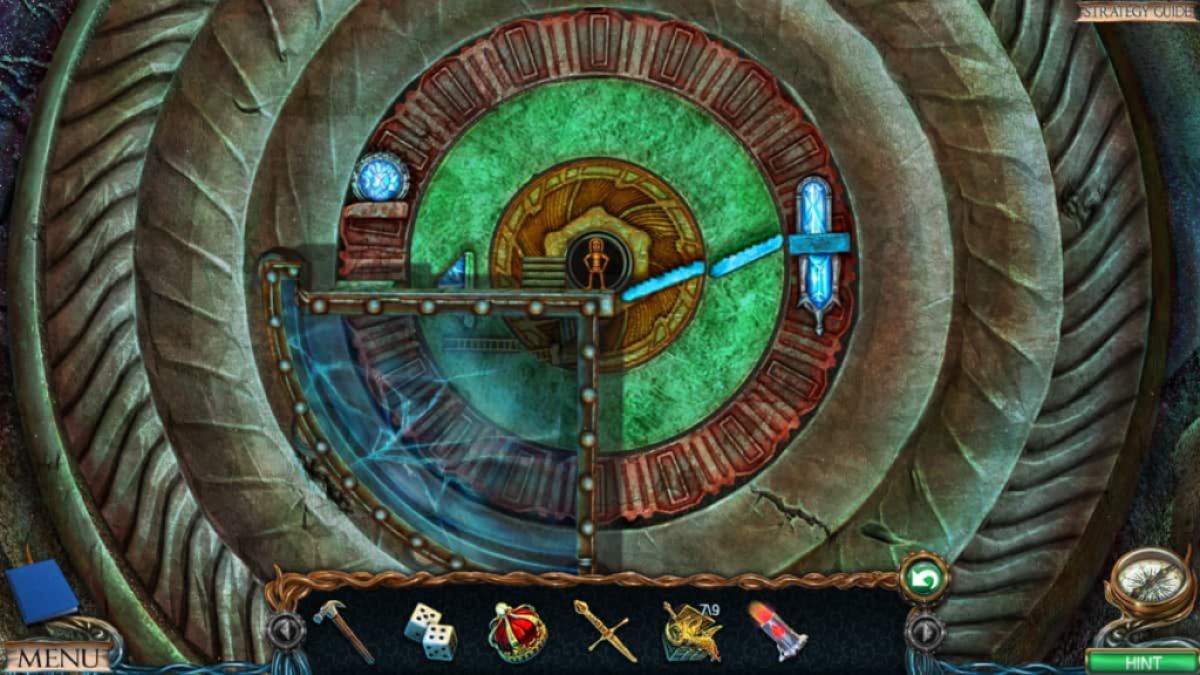
If you ’re contend with the final part of the puzzle ( the RGB rope , where you want to make the white wing visible . See below for an image ) . Move back to the Castle of Madness , employ the energy ball on the left socket ( 1c ) , then join the two key parts in your inventory to make aKey .
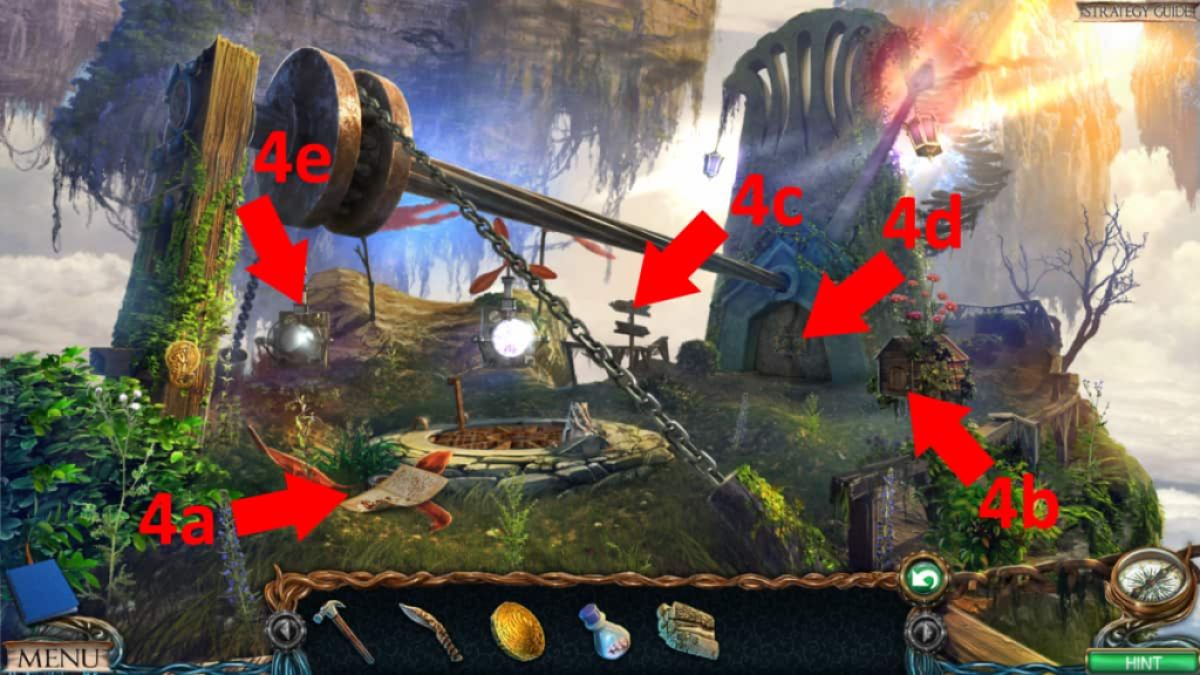
Image by Pro Game Guides
Lost Lands 3 Walkthrough: Atlas’s Arms
Go to the arena entranceway and employ the key fruit to spread the iron maiden ( 4a ) . TakeAtlas ’s Armfrom inside , then select the arm in your inventory and remove theKeyfrom its hand . Move to the schooner wreck , select the skipper ’s chest ( 5a ) , and use the headstone to open it . Take the secondAtlas ’s Armfrom inside and again cluck it in your inventory , this meter remove aDiamond Keyfrom its hand .
Return to the Castle of Madness , add the two Atlas arms to the double room access ( 1d ) , then come home the bottom of the steps ( 1e ) and complete the steps puzzler ( image below ) . Move forward through the now - open doorway to the labyrinth .
Take the Piece ofPattern(6a ) and add together it to the rampart ( 6b ) , which prompt away . you may now take theManuscript(6c ) and theLipstick(6d ) . When you take the lip rouge , place the diamond cay on the pedestal it was on . This start the door at the back of the room giving you admission to the Room of Riddles .
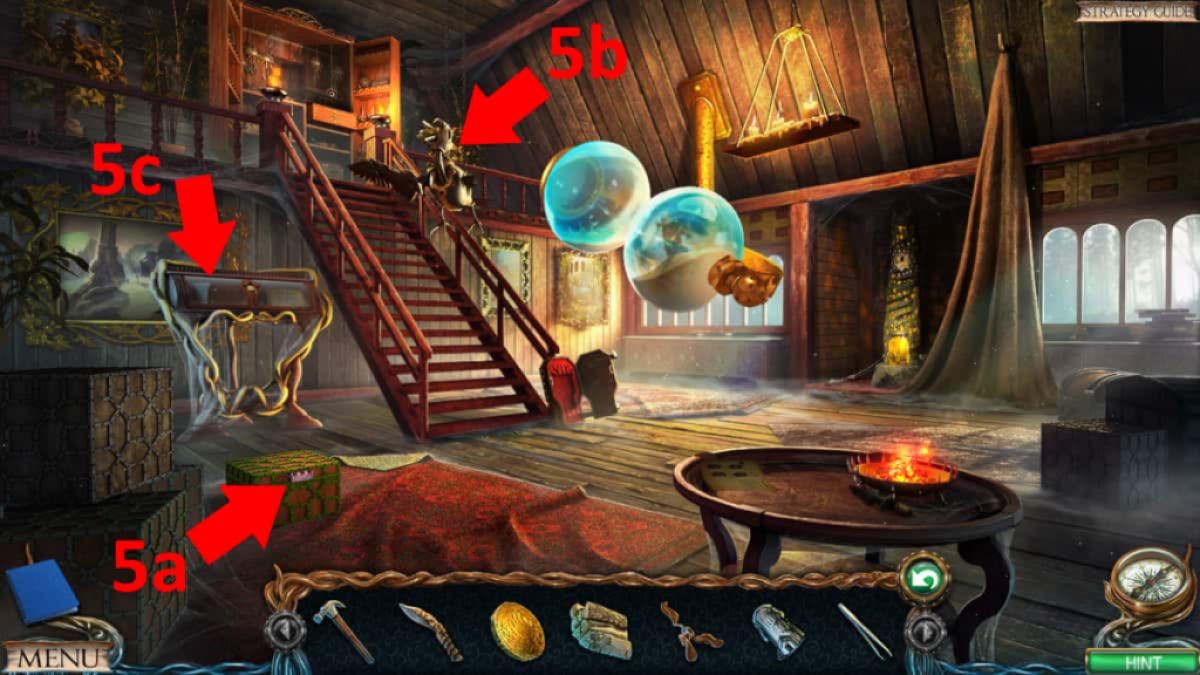
Image by Pro Game Guides
Lost Lands 3 Walkthrough: Room of Riddles
Click the gadget on the left wing ( 6e ) and clack its cylinder doubly in the close - up to get theInk Formula . While in the same finis - up , click the alloy plaque on the left wing and click the button to raise the compeer . Take theEverlasting Match . Finally , click the stone in the last - up to create a solidification of steps lead up the side of the paries to the top left exit ( 6f ) .
Move to the room of riddles and pick up theSunglasses(7a ) , then click the pedestal on the left ( 7b ) for a close - up and take theLens . Now flick the pedestal on the right ( 7c ) and turn the roulette wheel to line up the symbols you saw originally , carved in the wood at the schooner wreckage . The symbols need to be between the arrow on the left of the equipment ( see the epitome below if you ’re unsure ) . Once over , add the lens to the center of the equipment .
sink in the glass screen ( 7d ) and complete the line disembowel by using the lipstick ( itlooks like a snail ) . Once depict , click the back bulwark where you need to choose a brick to labour ( 7e ) . Press the spot in the middle where the snail ’s shell helical ends , which open up a secret passageway to another area .
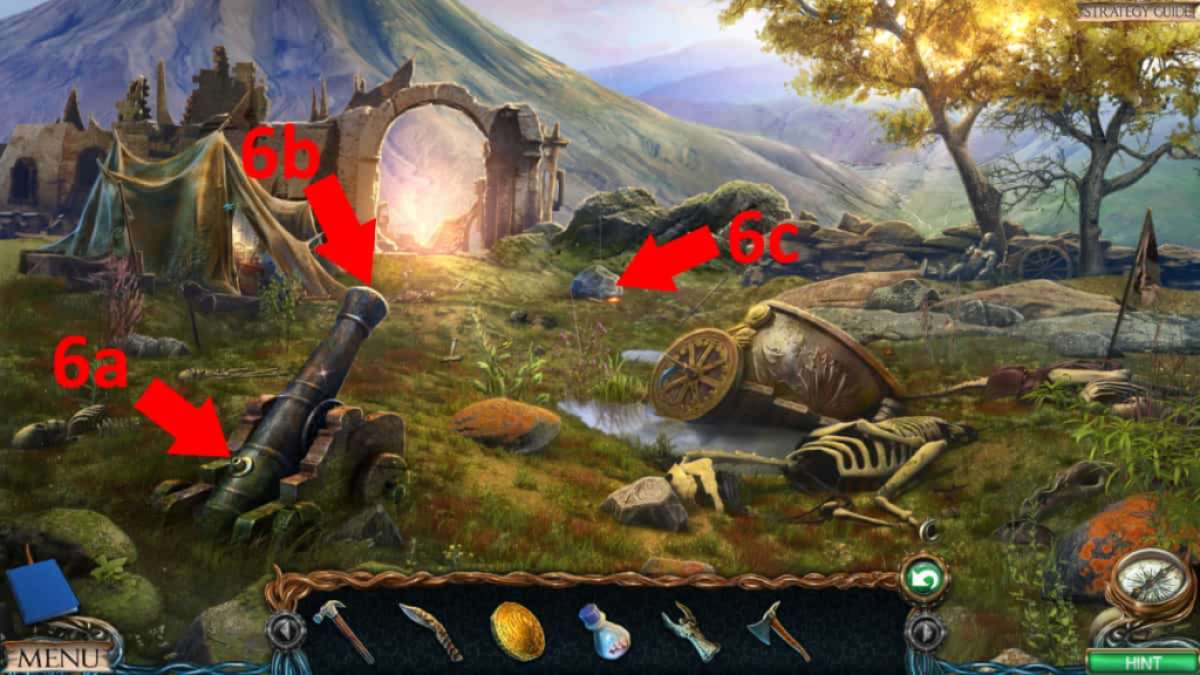
Image by Pro Game Guides
Lost Lands 3 Walkthrough: Room of Insanity
Head on through to the way of insanity and call for theSpoon(8a),Stone Block(8b ) , andManuscript(8c ) . Now go to the tree diagram of life and rank the stone block on the others ( 9a ) , allow you to get at the chick ’s nest ( 9b ) . Take anEggfrom the nest . give back to the Castle of Madness and identify the egg in the simmering pool ( 1f ) , then remove it from the kitty with your spoon . Select the egg in your inventory and click it to take away the case , gaining aBoiled Egg .
manoeuvre to the way of riddles , utilise the match on the bottle on the left footstall ( 7b ) , then place the eggs in the bottle . Take theCrystal Pyramidfrom the drawer that pops open . Move forward to the elbow room of insanity and pick out the Pyramids of Egypt ( 8d ) . Add the crystal to the top of it in close - up and use the minotaur amulet to open up a secret compartment on it . Take the Hand Wheel Key from inside . apply the hand - bicycle key on the round metal doorway ( 8e ) to gain access to the secure .
Lost Lands 3 Walkthrough: The Safe
Enter the dependable and check the cutscene after which Yudzhit will give you a pile ofDiamonds and Grain . snaffle theBottle of Cologne(10a ) ( completing your target collection ) , and take thePiece of the Statuefrom on top of the chest ( 10b ) . Next click the steps ( 10c ) , which need to be pressed in a specific society : Natalie Wood ( top ) , marble ( mediate ) , bronze ( bottom ) , silver ( quaternary down ) , and atomic number 79 ( second down ) .
Click the passage that open and complete the item - matching puzzle at bottom . Once complete , take the Empty Cartridge . Examine the bellows ( 10d ) , snap them once to see that they do n’t work , then again to remove them . Select the car horn ( 10e ) , take the Manuscript , and note that what you ’re miss for the statue ( 10f ) are a treetop and a hired man .
Lost Lands 3 Walkthrough: Talking to Braeloff
Move to Leproch ’s sign of the zodiac , select the pigment country ( 11a ) , and take theBlack Paint . Go to the tap house and place the ink recipe on the mesa ( 12a ) . you may also put the bottle of cologne on the table , along with the black pigment .
head up to the fisherman ’s hut , pick out the boo cage ( 13a ) , and add the diamond and grain , closing the hatch afterward . Once the bird has eat the grain , reopen the hachure and retrieve the Diamonds . Move to the cave and add the piece of the statue to the statue on the left ( 14a ) .
Go to Anvil Peak and talk to Braeloff , who gives you aMetal Saw . Give him the sunglasses , then go to the Island of Exile . utilise the saw on the metal grate ( 15a ) , then take theCube Tileand theKeyfrom the skeletal frame in the maw .
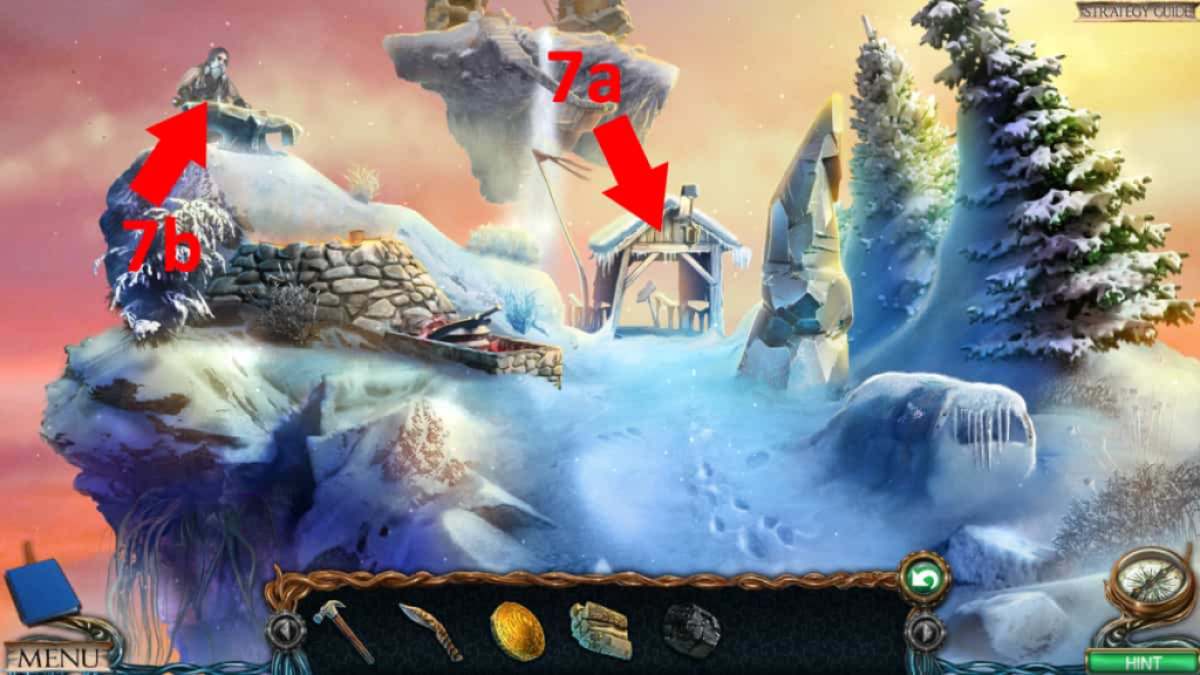
Image by Pro Game Guides
Pop to the lower island and tally the cube tile to the stone slab ( 2b ) , and then go to the Castle of Madness . Select the boat ( 1 1000 ) and use the key to reach the small compartment , taking theCorkscrewandLeather Rollfrom inside .
Lost Lands 3 Walkthrough: How to make the cartridge
Give the leather role to Braeloff at Anvil Peak ( 16a ) , who gives you theSliding Bolt Key . Click the holler ( 16b ) and use the key double , then take theBellows . In your inventory , select the Bottle with a Letter and use the bottle screw to open it , receiving anEmpty Bottleand aNote .
bear on : Echo Bay Murders – Chapter 1 Walkthrough
Back at the tavern , apply the empty bottle on the vino barrel ( 12b ) to get aBottle of Wine , which you’re able to add to your ingredients on the table ( 12a ) . you’re able to now make your ink , send weight on the left scale and the cups and sometimes weight on the right :
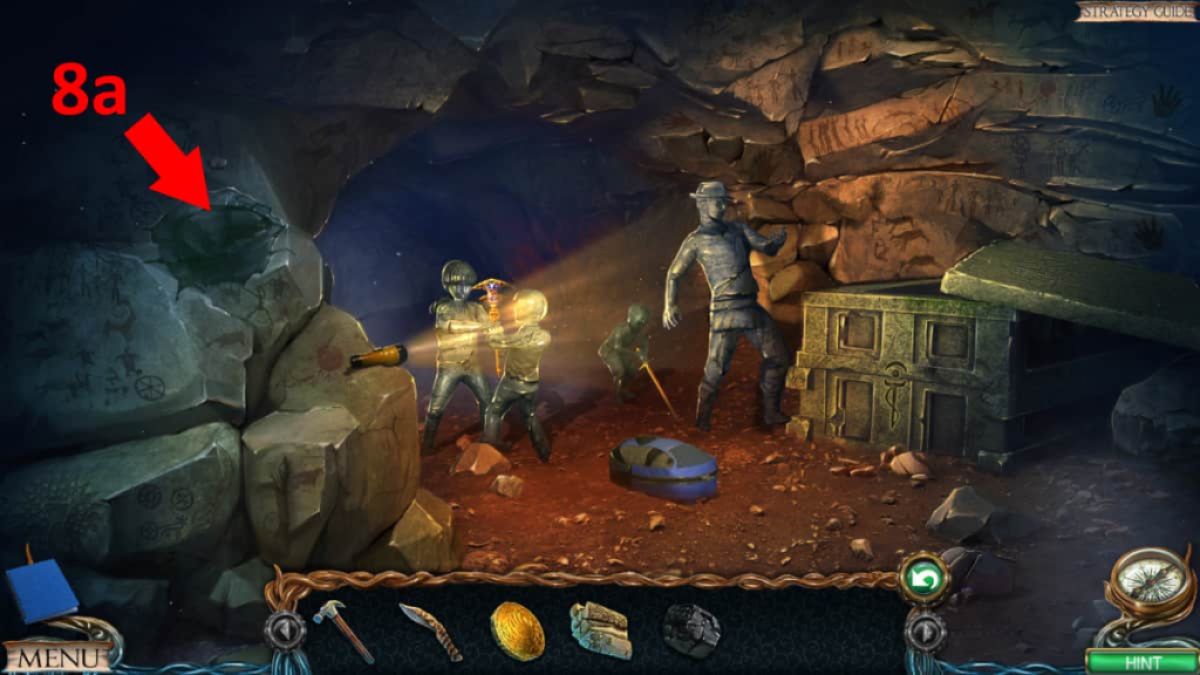
Image by Pro Game Guides
Once accomplished , click the table once more to collect theInk Ingredients . Select the empty pickup in your inventory , then add together the ink ingredients to welcome theCartridge .
Move to the hanging gardens and click the tree in the backdrop ( 17a ) . apply the note in your inventory to pin it to the tree , give you the whole circular pattern . Go to the schooner wreckage , click the red tube ( 5b ) , and press the correct section on its palpebra to get theTracing Paper . The order you click does n’t count ( see the image below for which sections to push down ) .
Lost Lands 3 Walkthrough: The Air Element
Go to the labyrinth , utilize the cartridge on the pendulum equipment ( 6e ) and then close it in , unveil aKey . In the same close - up employ the key on the silver plate next to where you put the pickup , resign the pendulum . Once the pendulum has land up drawing its radiation diagram , employ the tracing paper to make a transcript and then take back theTracing Paper .
Head to the volcanic caverns and utilise the trace newspaper on the convention on the bulwark ( 18a ) , which gives you the code3,6,9,12,15,18,21,24 . Look at the large loge ( 18b ) and enter the code on the top to open it and get theAir Element .
Now move to the elbow room of insanity and click the pedestal ( 8c ) to get a close - up , then again to seem at the miniature figure of speech of the elbow room . Move the circles so that the path take a way of life to the left-hand - side doorway ( see the image above ) . snap the door ( 8f ) and place the air component on the shelf to afford it . Click the space behind the door for a close - up and take theVacuum Container .
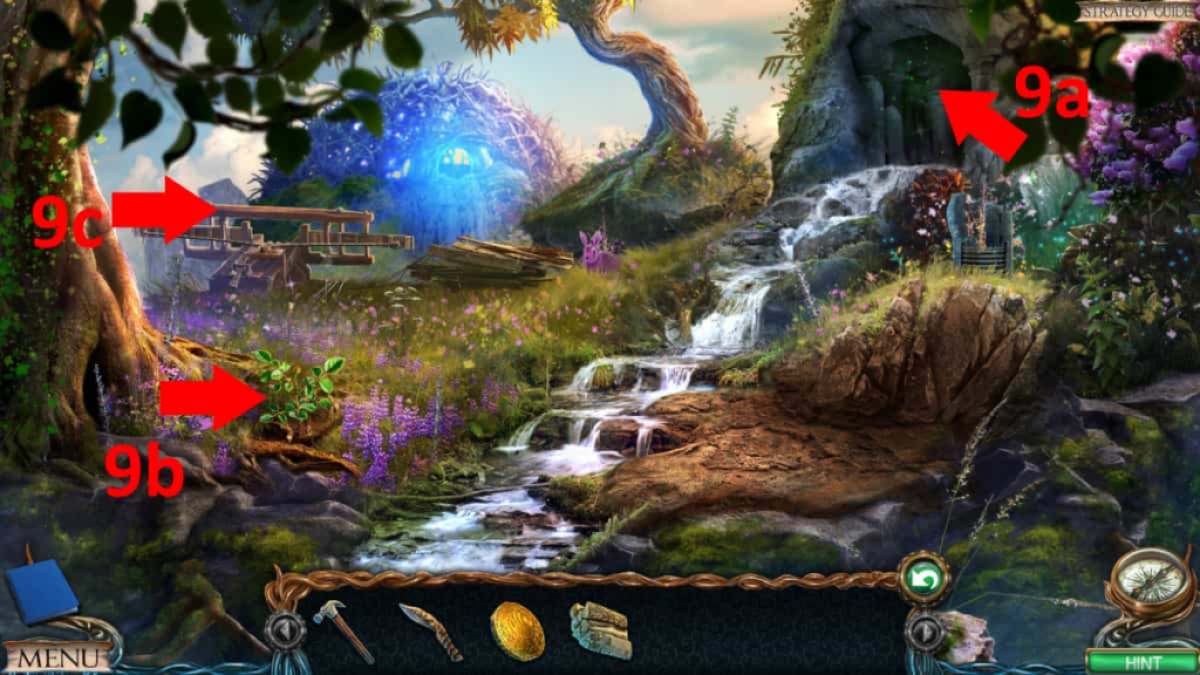
Image by Pro Game Guides
Lost Lands 3 Walkthrough: Finding a Pearl
At the abject island , utilise the vacuum container on the violet cone in the Sir Herbert Beerbohm Tree ( 2c ) to collect theCones of Paralysis . Move to the sunken hall and press the red coral to the left ( 19a ) and habituate the strobile on the insect , allowing you to apply your tongue on the precious coral to take aPearl .
Go back to the safe , bond the bellows to the horn ( 10d ) , then give the drop and the diamond to Yudzhit ( 10 g ) . He will give you theWhistlein return . Attach it to the bellows ( 10d ) , then use them to collect theLever . practice the yowl again for a cutscene , during which the Minotaur is summoned , and you ’ll automatically move to the labyrinth .
Click the top - left elbow room ( 6f ) and add the lever tumbler to the fix in the wall in the close - up . Activate the lever tumbler to use the ram and then pick theBull Head Keyup from the floor of the labyrinth . sum up the bullhead key to where you earlier placed the diamond key ( 6d ) , click it again , and the back threshold will open . You now have access to the Minotaur ’s Lair !
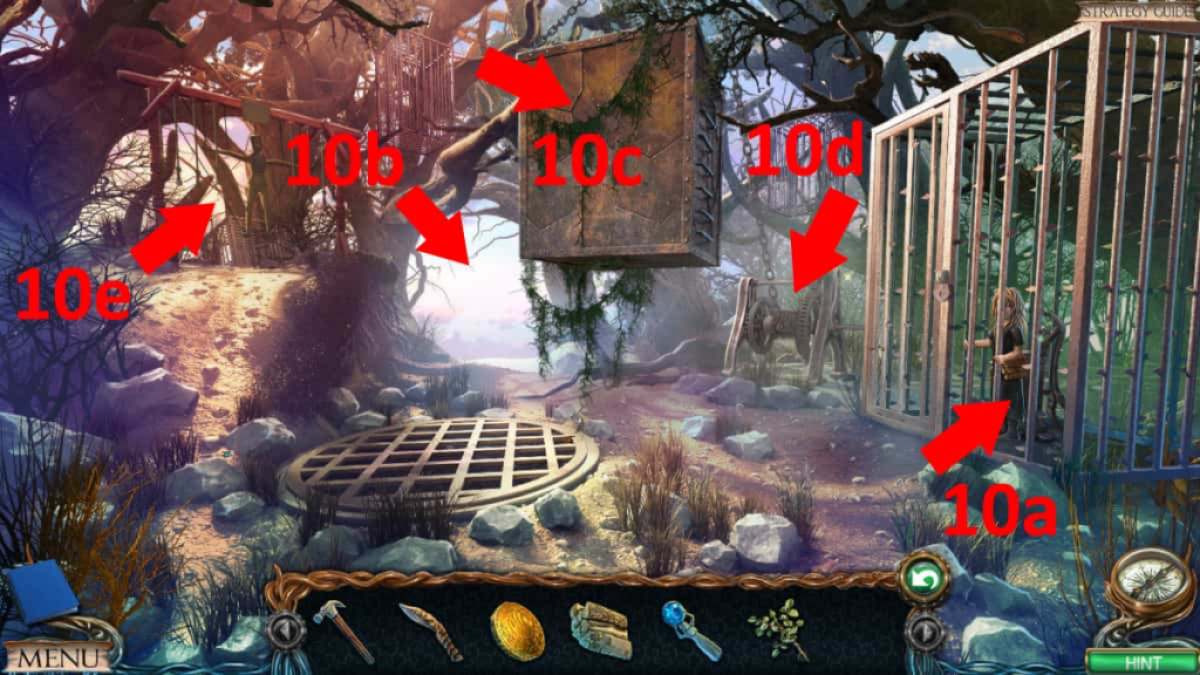
Image by Pro Game Guides
How to complete Lost Lands 3 Golden Curse, Part 5: The Minotaur’s Lair
Once in the Minotaur ’s Lair , pick up theRail(1a ) and then click the corpse on the right hand ( 1b ) for a close - up . Click the shield to move it , then take theTrident . Select the straw back right ( 1c ) , take theJug of Water , then use the trident on the chaff to find and then open a wooden loge . Take theTilesfrom inside the corner . Come out of the close - up and select the cellphone ( 1d ) and take theManuscript .
Go back to the room of riddle and pick out the bookcase ( 2a ) . lend the tiles you just found , then move them to create the calculation2÷2 + 2=3on the bottom quarrel . This opens a secret sphere behind the bookcase leading to the Great Library . lead indoors .
Lost Lands 3 Walkthrough: The Great Library
take the plant potbelly on the leftover ( 3a ) , which makes it fall and go . Click it on the ground to take theHanging Bucket . Now choose the book ( 3b ) and get across it in finish - up to turn the varlet and find aCasket Button . nibble up the secondRail(3c ) , then click the primer coat in front of the bookcase ( 3 g ) at the back of the way for a close - up and add the rail to fix the ladder moon-curser . get across the ladder ( 3d ) to skid it to the right .
Move back to the room of riddles and use the jug of body of water on the vase in the center of the way ( 2b ) , which opens a compartment from which you could take aRope Ladder . Next , go to the tree life , click the fall treehouse ( 4a ) , click the owl now indoors , then click the owl once more to begin a straightforward feather matching puzzle ( fault are n’t a problem ) . Once sodding the hooter will fly forth , allow you to find a box seat in the hole the bird of night was in . Use the casket release on the loge and take theDisk Knifefrom inside .
Head to the sunken hull , click the door at the back ( 5a ) , and use the disk tongue to give it . dawn the undecided room access , make out the item - equalize mystifier inside , and take theBench Piece . Go to the underground lake and use the bench piece ( 6a ) on the large plate , then take theMetalworking Scissorsfrom underneath . Also , note thesigns on the bottom of the scale .
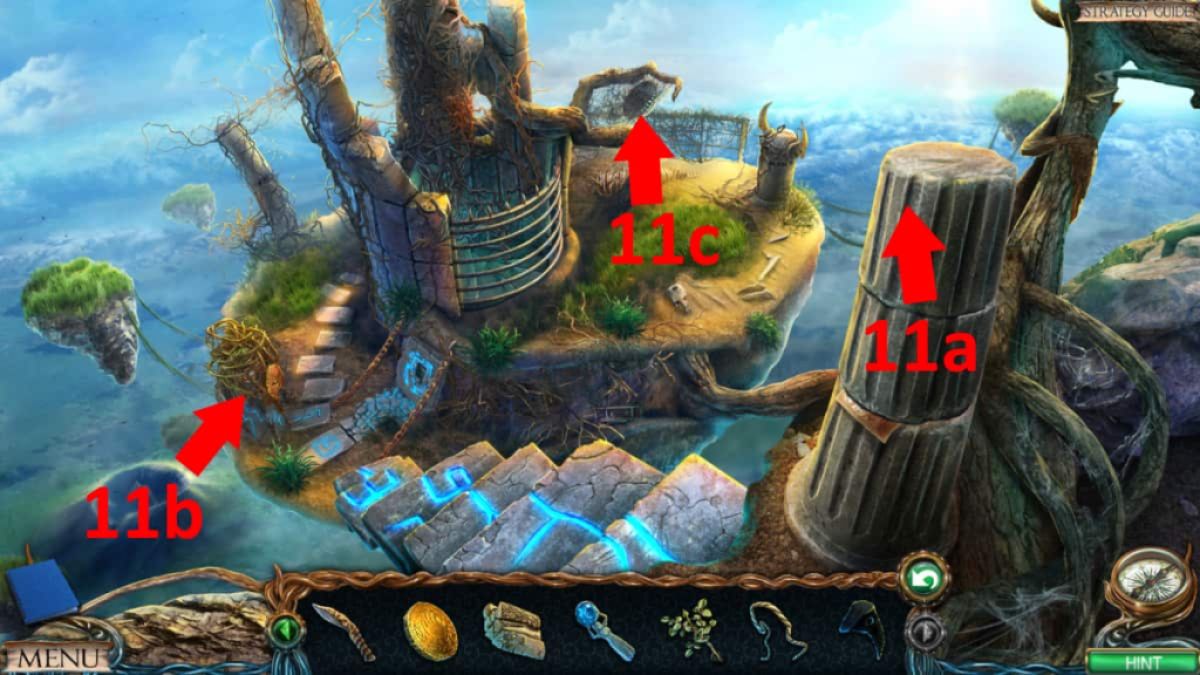
Image by Pro Game Guides
Lost Lands 3 Walkthrough: How to defeat the Minotaur
Back at the minotaur ’s lair , use the scissors on the corpse ’s breastplate ( 1b ) and take thePiece of Patternfrom behind it . Move to the great library once more and select the area above where you moved the latter to ( 3e ) and add the pattern slice to the lid there , then click the plan again to open a grave . Take theEmpty Beaker , and your finalManuscript(after moving the arm ) from the frame inwardly , as well as theKeeper ’s Manuscriptunderneath it .
Go to the secure and give the keeper ’s manuscripts to Yudzhit ( 7a ) . After a cutscene go back to the minotaur ’s lair , pick out its muckle of amber ( 1e ) , and use the rose flower petal . Take theCursed Bull Ring , then follow as you kill the minotaur ! Click the foot of the pillar ( 1f ) and use your hammering to break the stone finger and amass theSignet Ring . Now take higher up the column , where a mechanics has been revealed ( 1 g ) . deplume the handle , and light will swamp into the cellular telephone in the corner .
point to the cave , click the statue on the remaining ( 8a ) , and utilize the signet mob in the superstar - shaped gob , then click it again to make the piss run through it , pop out the jeweled eye . Now get through the large bowlful in its hands ( 8b ) for a close - up of it and take the Ruby and the Sapphire from the piddle . Finally , select the mechanics in the nitty-gritty of the cave ( 8c ) and sink in the top of it . It will now spread out , and you’re able to take theEmeraldfrom inside .

Image by Pro Game Guides
Lost Lands 3 Walkthrough: How to find the Spell Book
Move to Anvil ’s Peak and click the shed at the back , where you could now use the hang bucket at the back of the shed to claim theHalf - eclipse Tile . Go back to the good and pick out the hoarded wealth bureau ( 7b ) . Use the three jewels on it in close - up and it will afford , allow you to take theJade Skullfrom deep down .
Take it to the ancient burial ground in Dark Lands , clack the henge ( 9a ) , and add the skull to the empty pillar . watch the henge once more to lead off a loose teaser . switch over the skull by first clicking one and then another until they ’re all facing into the middle . you could secernate where each one can be swapped ( each has two options ) by looking at the lines on the ground . Once make out , take theWater Elementfrom the ground in the center of the area where all the skeletons repoint .
Go to the room of insanity and use the pedestal ( 10a ) to make a path to the doorway as show above . come home the door once the itinerary is made ( the lights will do on , 10b ) , add the water element to the shelf on it , click the desert view behind the room access , and take theBooks . Move back to the nifty library . you could add together your roofing tile to the floor by the dome ( 3f ) while you ’re here , then snap the odd bookcase ( 3d ) . Add the miss book , which open a secret panel . snap the buttons marked4,12 , and17and the ledge discover a doorway . Click it to move to a simple miss objects teaser , after which you ’ll receive theSpell Book .
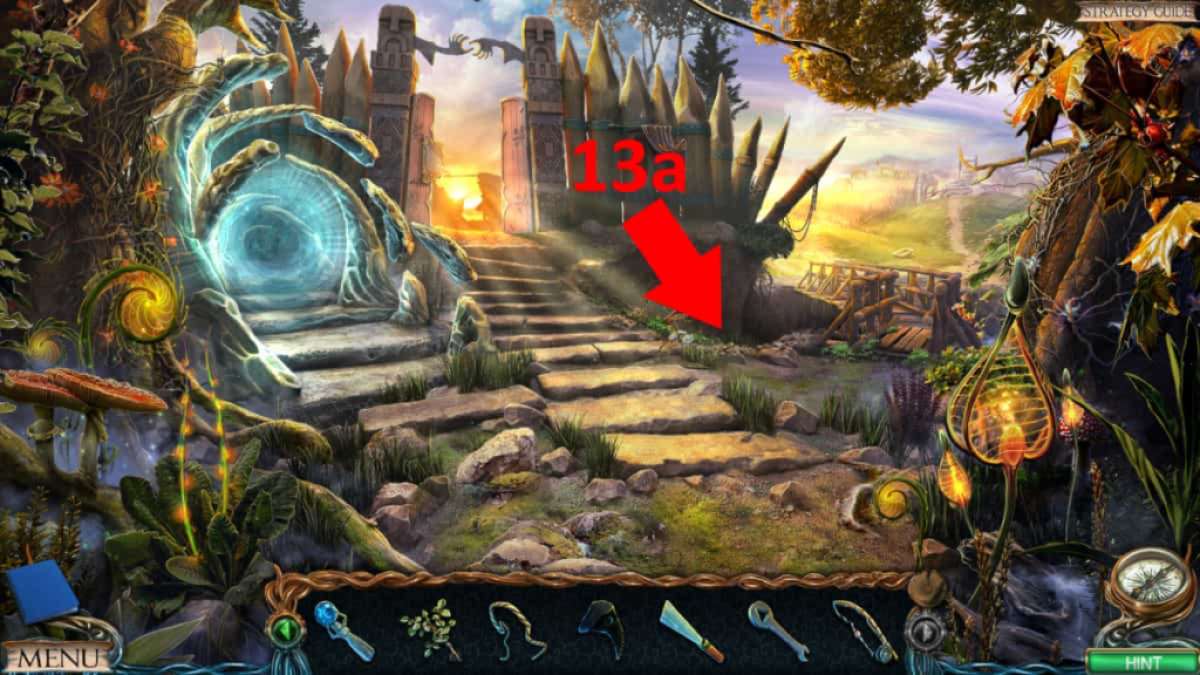
Image by Pro Game Guides
Lost Lands 3 Walkthrough: Finding the dragon shells
Move to the Elder ’s house , take theBroom(11a ) , then give the spell book of account to Maaron . After a cutscene , you ’ll receive aLeverand theElixir of Animation Formula . Put the expression on the table ( 11b ) , then snap the formula once pinned to see what you necessitate to make it . Click the nymph statue ( 11c ) and use the empty beaker to pile up theNymph ’s Tears . Add them to the yellow pot on the board ( 11b ) .
While in Druid ’s Valley , go to the hills and use your hammer on the skull ( 12a ) to get the firstChest of Gold . Now go to the crossroads at float Islands and apply the lever tumbler on the grating ( 13a ) to open it , then click the undetermined hole and bestow the rope ladder . Click the golf hole once more and you’re able to grab theFull - eclipse Tile . While in the same close - up , practice your knife to cut away the Hedera helix on the pendulum . Keep click and you ’ll spread out a hatch , revealing a mechanism that need a replacement .
Move back to the cave in the Dungeon and take back the knuckleduster as the 2nd dresser of Gold item ( 8d ) . At the underground lake , use the Calluna vulgaris on the buried ballock ( 6b ) , then get a close - up of them . Keep penetrate the eggs to intermit them all , then pick up the dragon eggShellsand the revealedSwitch .

Image by Pro Game Guides
Lost Lands 3 Walkthrough: How to enter the Ruined Temple
Go to the schooner wreckage next . Select the Naga ( 14a ) and collect the golden net as the thirdChest of Golditem . Back in the minotaur ’s den , click the minotaur wreckage ( 1f ) and hoard back the nose ring ( Chest of Goldfour ) .
Next move to the outstanding subroutine library , tally the full - eclipse tile to the floor ( 3f ) , then click the dome above ( 3h ) to start a tile - move teaser . The roofing tile with the smallest black region on its left side require to be on the far left , actuate through bleak in the center to the roofing tile with the smallest disgraceful rotary on its right side being on the far right . There ’s no trick to it . Once completethe dome open . get across it once more and snap the island on the right wing , moving it in the diorama and real life .
You now have admittance to the Ruined Temple on the Floating Islands , so move there . Here you ’ll find your concluding morphing target and concluding statuette if you ’ve been collecting them . Pick up theFather Figurine(15a ) , then click the ball on the pillar ( 15b ) for a close - up and cluck it again to open up it up . Take theDicefrom at bottom . clack the water burrow on the left ( 15c ) and take theCrown Piece , then get a close - up of the left tower ( 15d ) for a dewy-eyed object - matching teaser . Once complete , take theCrown Pieceand connect the two summit pieces in your armoury to make theCrown .

Image by Pro Game Guides
Lost Lands 3 Walkthrough: How to make the Elixir or Animation
Head back to the Tree of Life and add the founder figurine to the others ( 4b ) , then click where the light is glint on the reason ( 4c ) . you could now click the pit button in the center close - up , which put up a enceinte monolith in its place . Examine it to apply it to attain and collect theTree of Life Fruit .
Go to the Elder ’s firm , select the table ( 11b ) , and supply the yield to the white-livered weed by putting it on the table and then cut it with your knife . Add the dragon shells to the bowl , use the crusher to crush them down , then tote up those to the white-livered bowl too . Put the lid on the jackpot , then pick up theElixir of Animation .
Lost Lands 3 Walkthrough: Finding the cursed items
Move back to the juncture , get through the pickle ( 13a ) , bond the switch to the twist , and switch the machine from plus to subtraction to contain the pendulum . channelise to Leproch ’s Tomb in the Dark Lands next and examine the two struggling children ( 16a ) . habituate the hammer on their hired hand to free theCursed Scepter .
Click the small fry at the back next ( 16b ) and use the knife on the floor where the blade is taper to make a hole , then take theCursed Swordby clicking it . Also , click the statue of the Isle of Man ( 16c ) and take theCursed Keyfrom his hand , then select the coffin ( 16d ) and habituate the philosopher’s stone on the corpse of Leproch . After the cutscene , you ’ll have aKey . Use the Francis Scott Key back in his coffin ( 16d ) to get the fifthChest of Gold .
Back at the crossway , examine the blockade pendulum ( 13b ) , fall into place the hand of it to reveal a doorway , then use the cursed key to open it and get the sixthChest of Gold . Once you ’ve convey it , click the door once more to get anotherKey . Move back to the break temple and select the ruined pillar on the good ( 15e ) , click the gimmick with the Sir Ernst Boris Chain come from it , and use the key to trigger it . This lowers a ladder to the top of the left tug ( 15f ) , so select that for a last - up and keep clicking the image until you get theHandle .
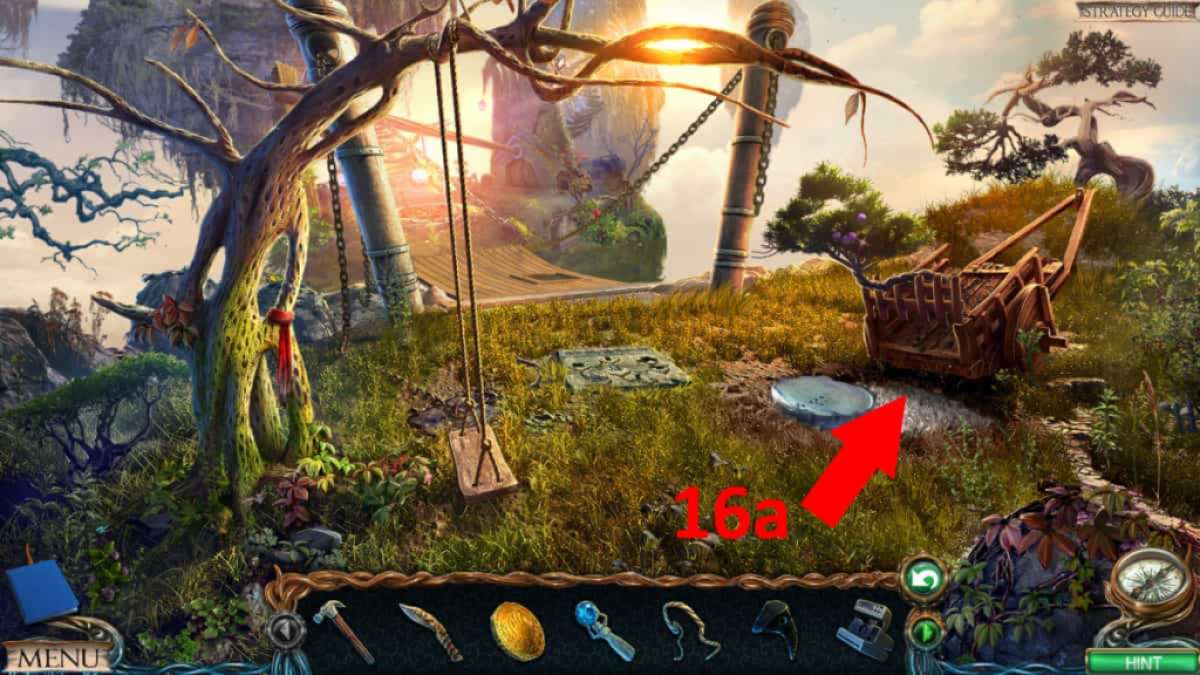
Image by Pro Game Guides
Go to the Elder ’s house , click the throne ( 11d ) , and add the cursed scepter to the leftover armrest . The lip on the back of the chairwoman will open , unload aGlass Punchcard . Take the scepter back , and it will become your seventhChest of Gold . Go back to the great library and apply the handle on the organ ( 3i ) , dawn it once more to operate it . ASpringdrops to the floor , so pick it up . Get a last - up of the base of the globe ( 3j ) and use the give on the gadget there , then get through the globe itself to open it and get theFire Element .
Lost Lands 3 Walkthrough: Snakes and Ladders
Move to the room of insanity and use the pedestal once more , this time lining up the door beneath the last one you open ( see the figure of speech above ) . Examine the now - light door , add the fire factor to the door ’s shelf , tick the frigid background , and take thePlank .
Go to the safe and add the crown to the statue ( 7c ) , which unwrap the statue ’s hand . Take theStone Tabletfrom it . Select the pill in your inventory and use your hammering on it , finally revealing aWooden Punchcard . Go to the minotaur ’s lair once more and practice the two punchcards on the cell door ( 1d ) to open up it . Select the now heart-to-heart door again to begin a simple conceal objects puzzle , then receive theSpreading Tool . Back at the cell , use the tool on the eye of the statue ’s caput ( 7d ) and click the oculus until it turns and give way up theLens .
channelise to the harpy ’s nest , take the statue ( 17a ) and attach the electron lens . Click the lens to move its slant , then select the smirch on the earth the light is betoken to ( 17b ) . Push the sword into the ground , click the hill that rise to get a close - up , and click the dirt to bring out a box . Back on the main screen , click the boxwood to open a dining table game , and tot your die to it . Select the die cup to start a secret plan of Snakes and Ladders . You have no agency at all , so just have to keep trying until you win . This can be very frustrating , but it is what it is ( you’re able to always hop-skip it ) . When you do come through , you get the Ratchet Strap . The hill go away once more , so take back the sword as your eighthChest of Gold .
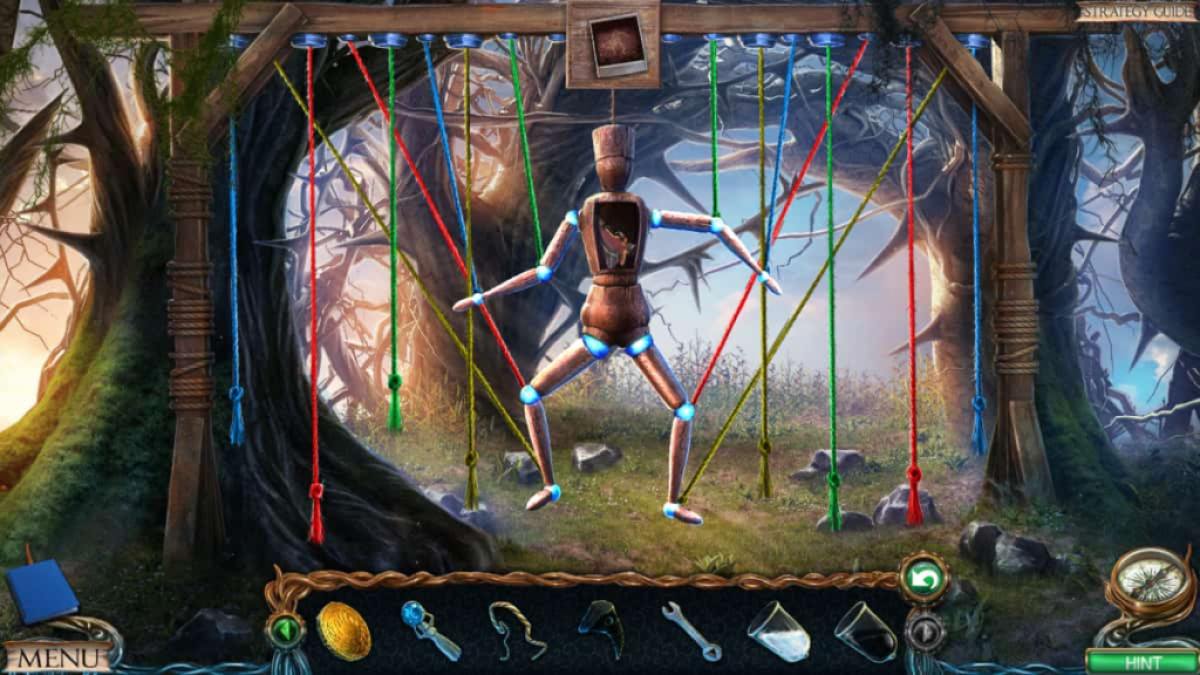
Image by Pro Game Guides
Lost Lands 3 Walkthrough: The final battle
Go to the ruined tabernacle and practice the shoulder strap on the grating on the right tunnel ( 15 g ) . snap again to bend the bar , click the twist behind the grating , and then add your plank to begin a symbol - matching puzzle . You ’ve seen the symbol on the al-Qa’ida of the shell earlier ( 6a ) , so just copy the design . This opens a compartment , and you ’ll receive theSanctuary Tile .
Head to the lower island , where you could at long last fill in the tile on the Isidor Feinstein Stone slab ( 18a ) . Take the concluding Chest of Gold from the open compartment , then move to the orbit . Click the top of the pedestal ( 19a ) and add the chest of amber to get a cutscene and have aTilefrom Leproch . Click the base of the pedestal ( 19b ) and add the tile to begin a duad - find puzzler . There ’s no trick to it , and no prison term terminus ad quem , but the mental image below will speed things up . You ’ll receive aKey .
Still in the area , use the keystone on the ax in close - up ( 19c ) , then click it again to claim thePole Axe . Use the axe on the dwarf statue ( 19d ) to get theGolden Cupand add it to the chest of gold point ( 19a ) to trip another cutscene .
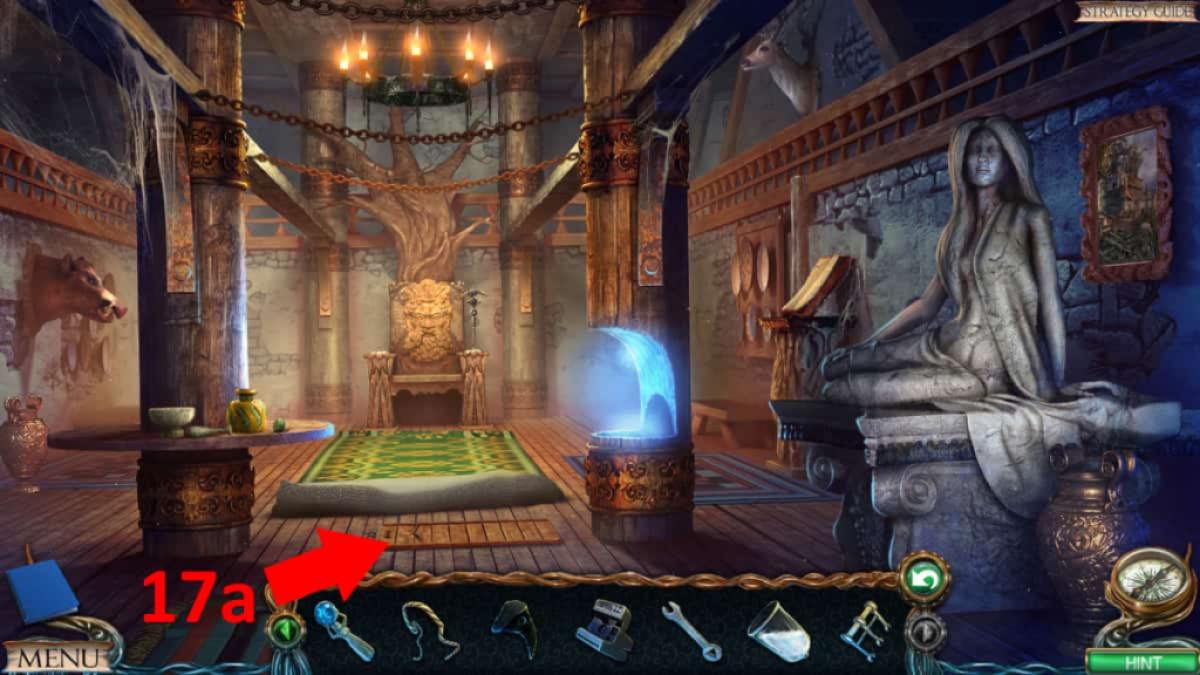
Image by Pro Game Guides
congratulation ! You ’ve completed the chief plot , but there ’s still theLost Lands 3 Bonus chapterto go .
Looking for more mystifier secret plan walkthrough guides ? Check outAbandoned Walkthrough & Puzzle SolutionsandEcho Bay Murders – Chapter 1 Walkthroughhere at Pro Game Guides !
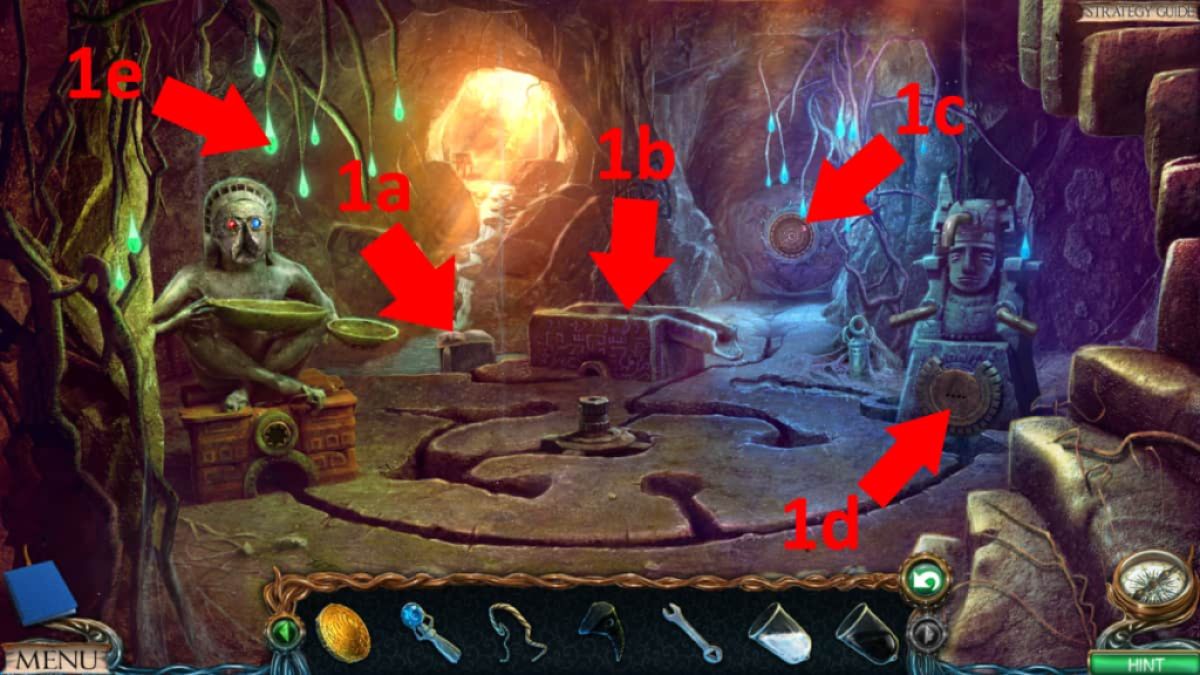
Image by Pro Game Guides
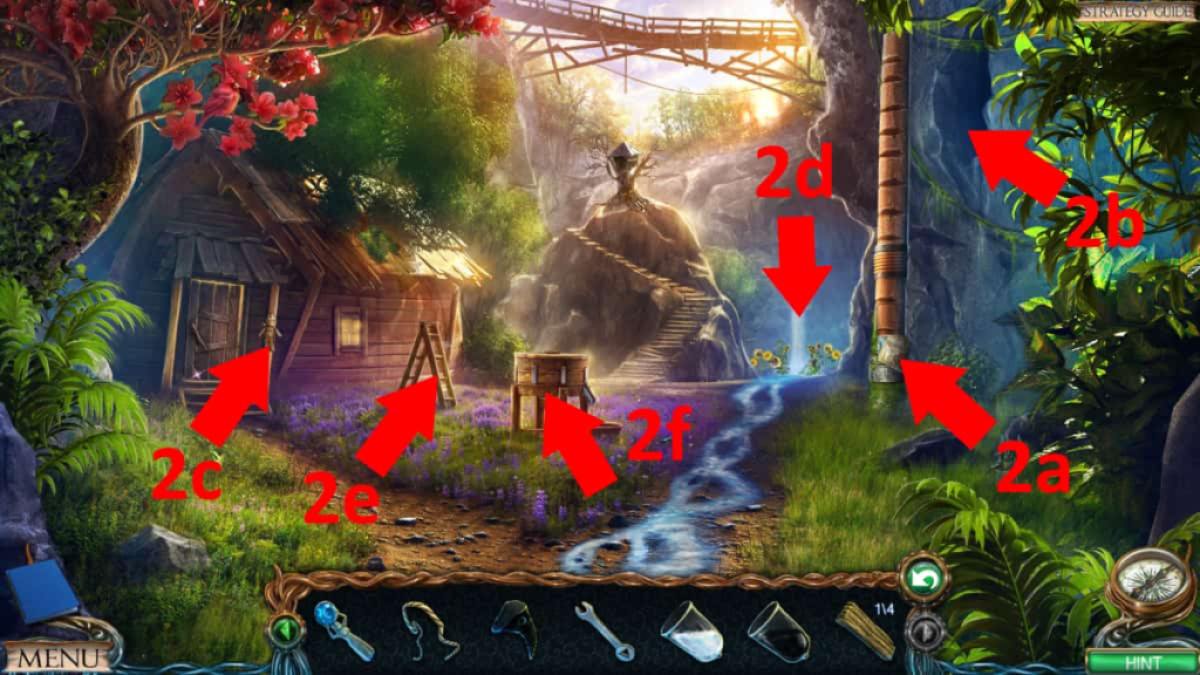
Image by Pro Game Guides
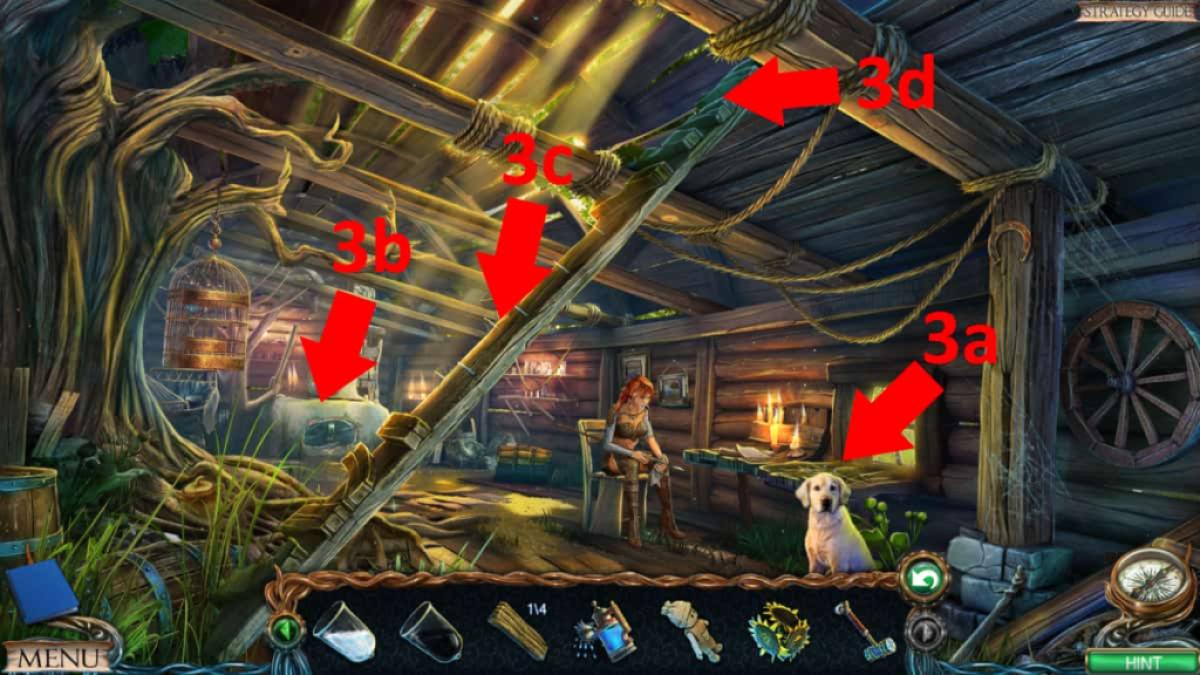
Image by Pro Game Guides
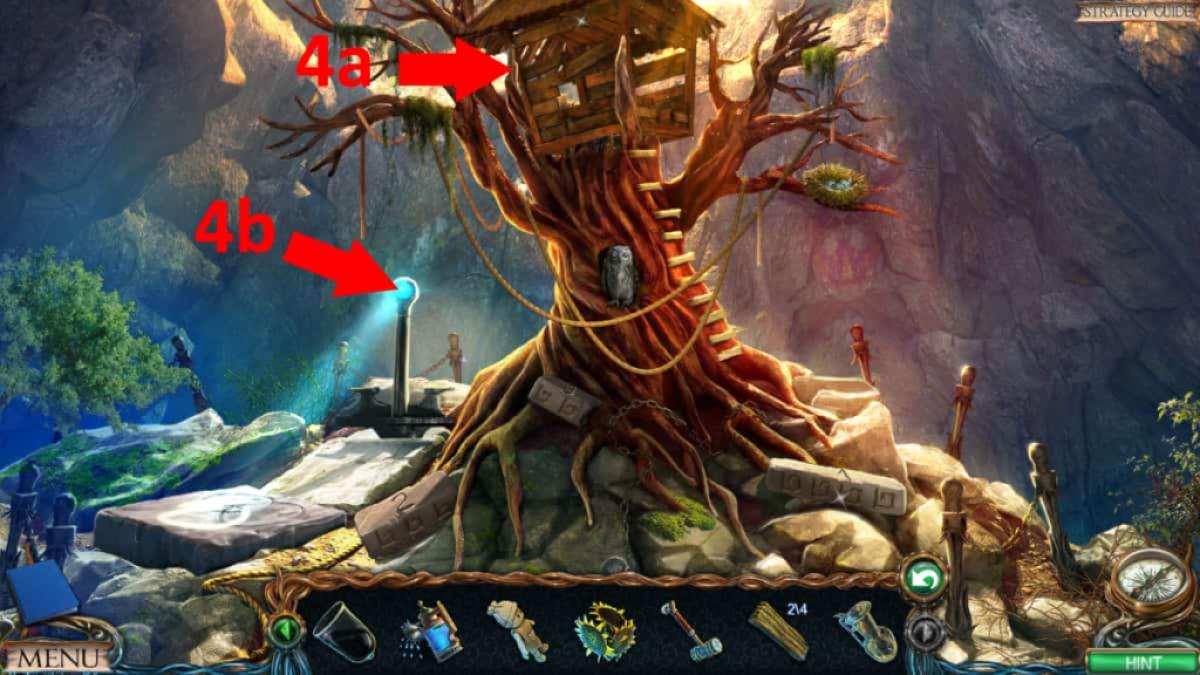
Image by Pro Game Guides
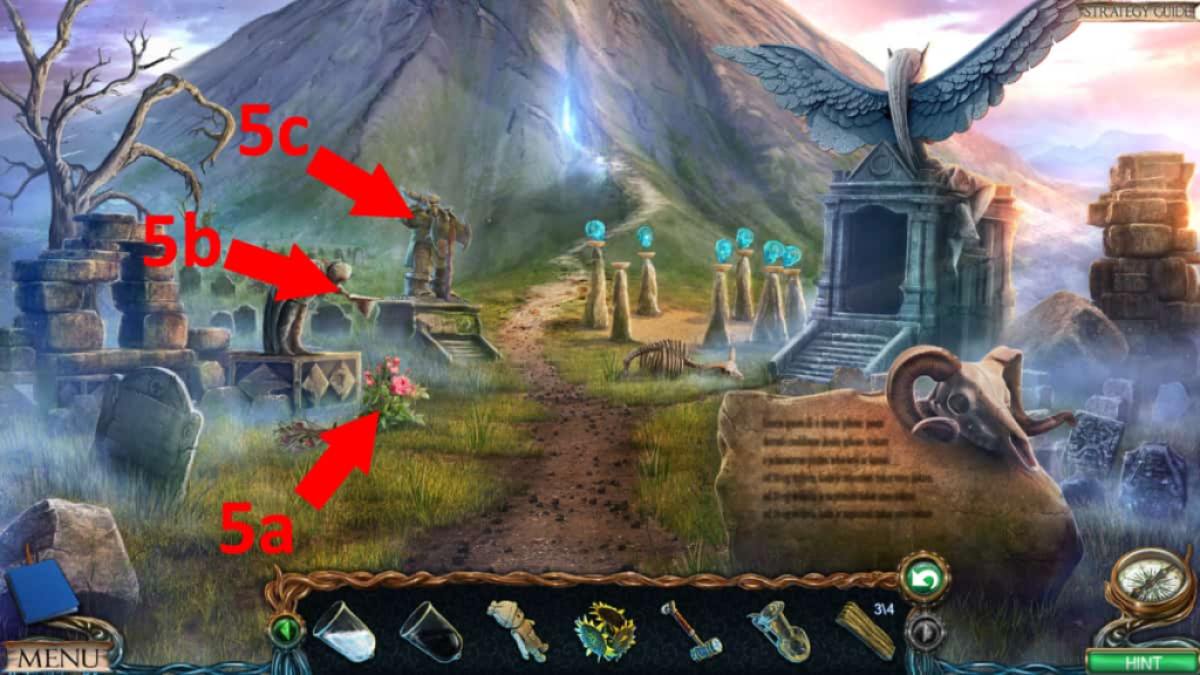
Image by Pro Game Guides
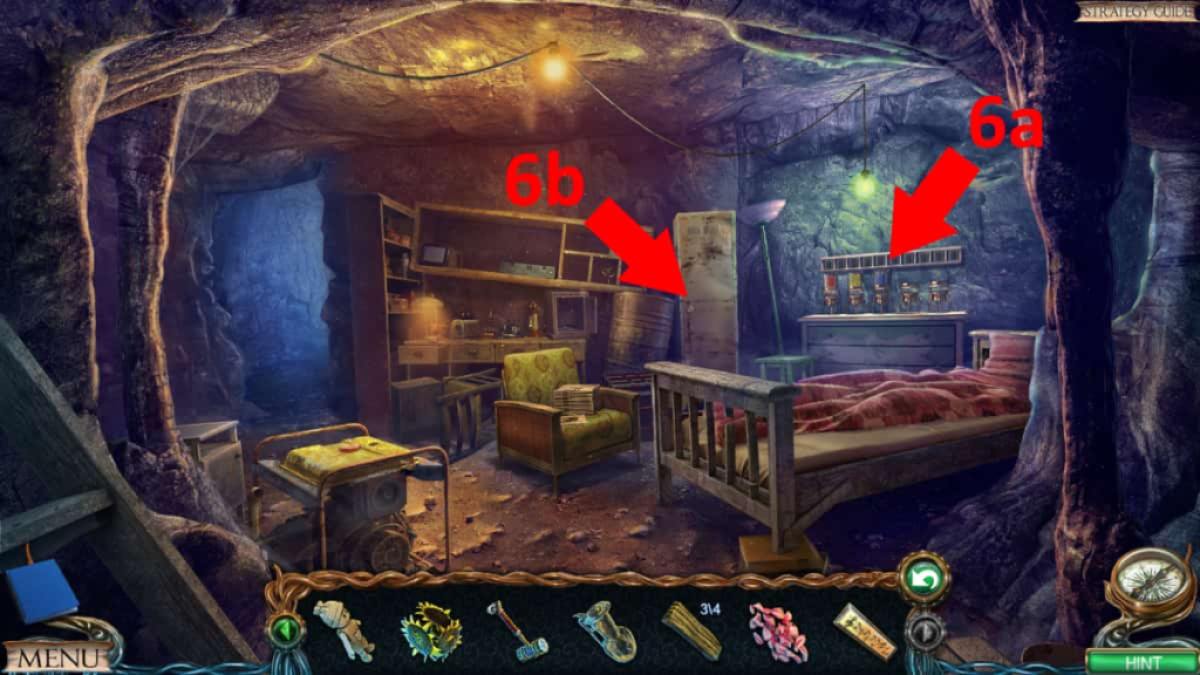
Image by Pro Game Guides

Image by Pro Game Guides
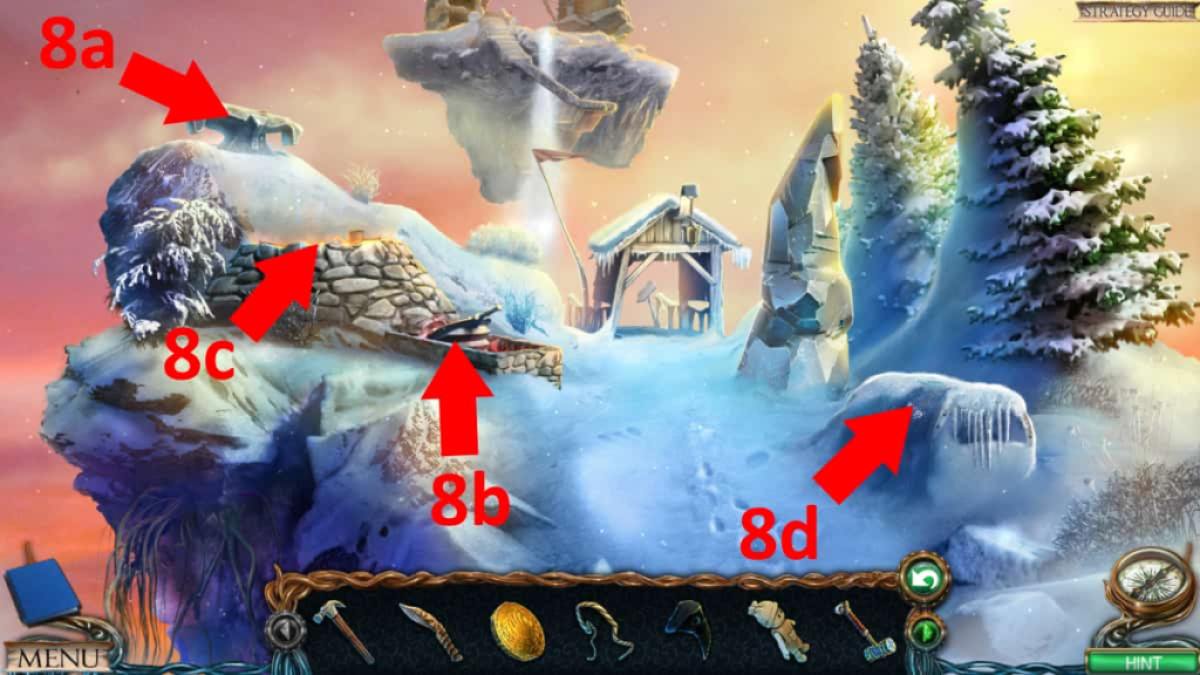
Image by Pro Game Guides
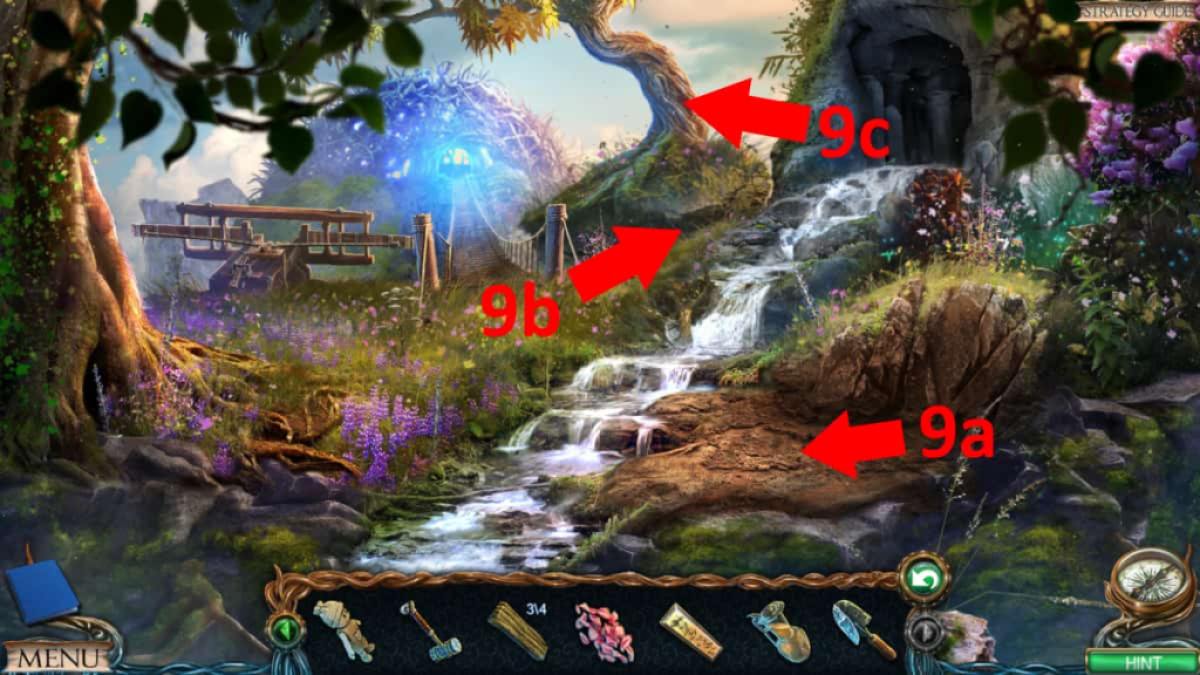
Image by Pro Game Guides
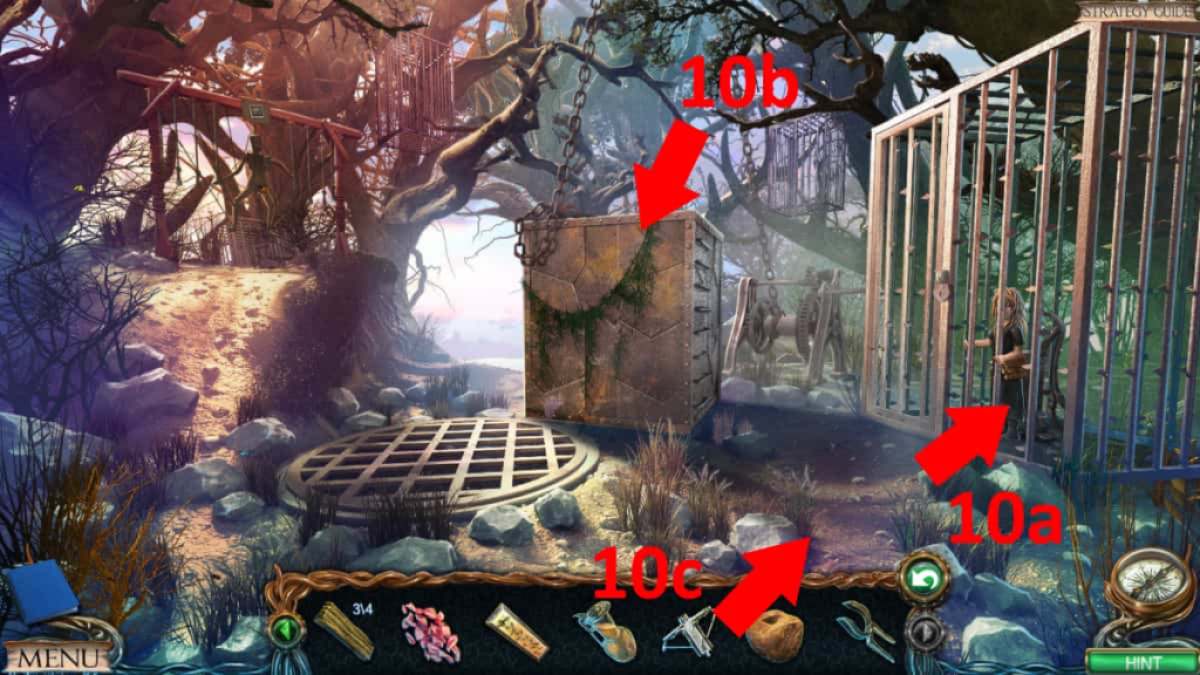
Image by Pro Game Guides

Image by Pro Game Guides
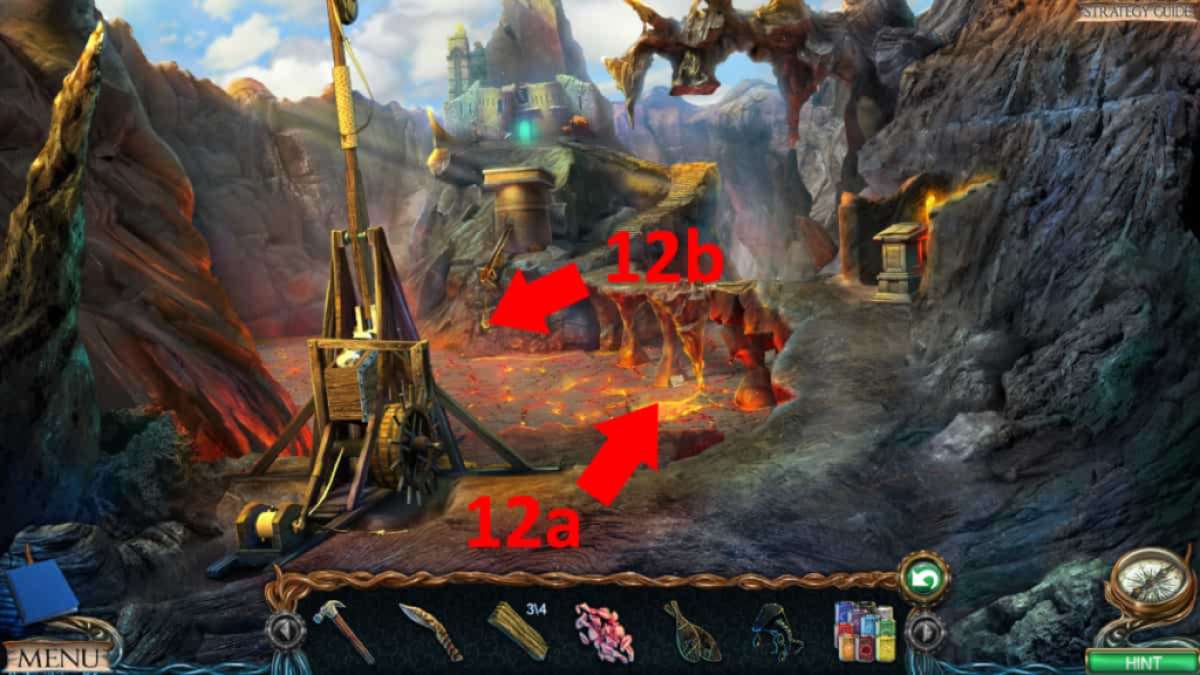
Image by Pro Game Guides
Screenshot by Pro Game Guides
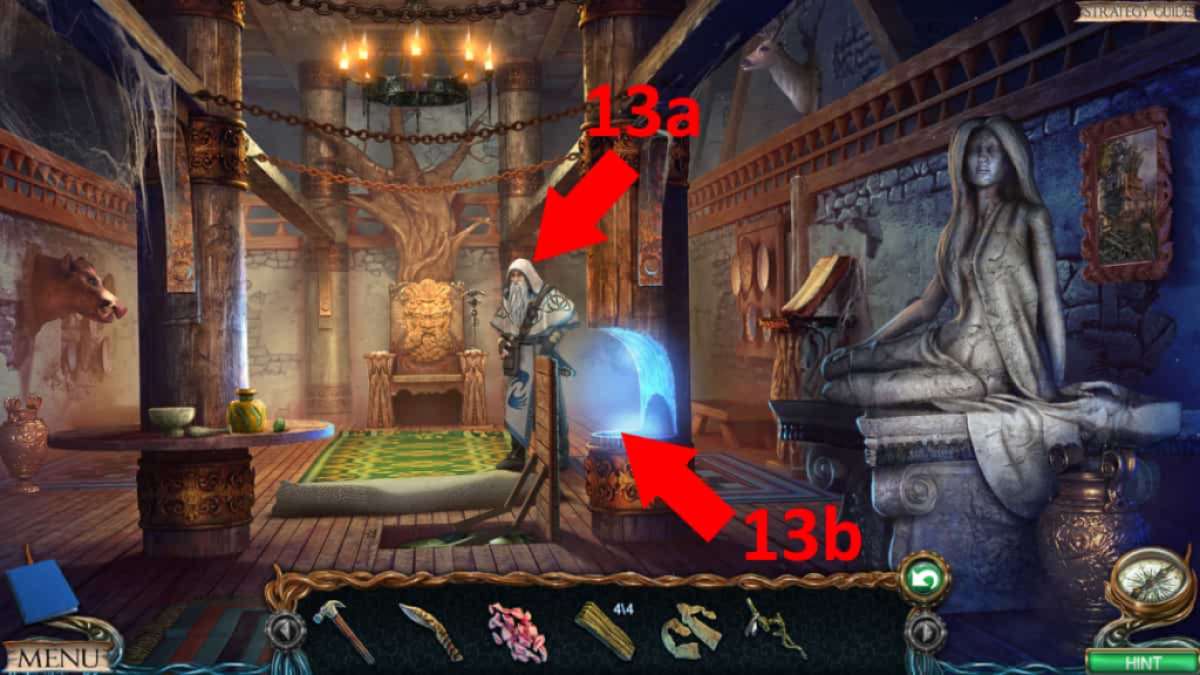
Image by Pro Game Guides
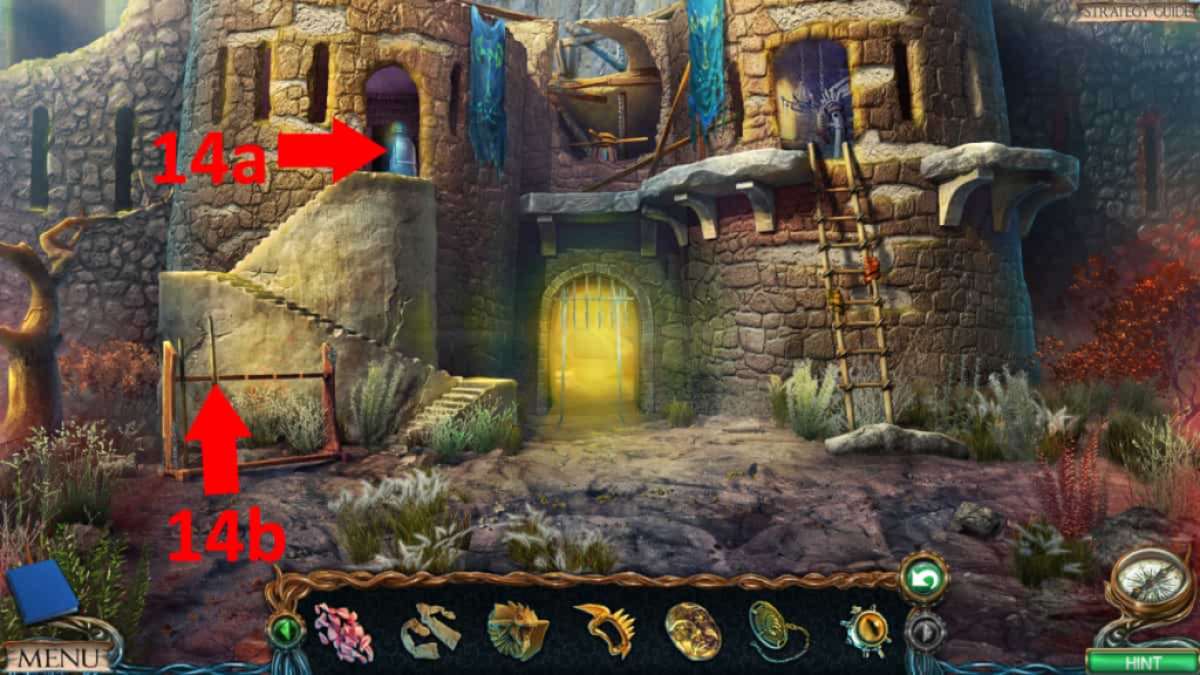
Image by Pro Game Guides
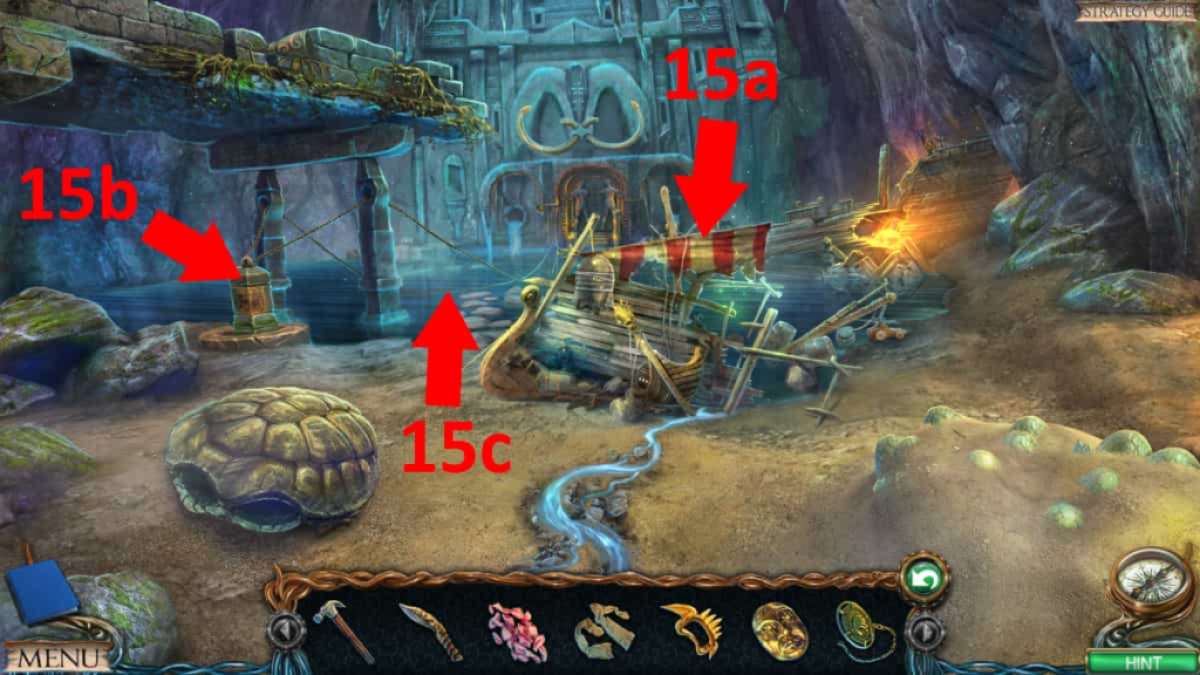
Image by Pro Game Guides
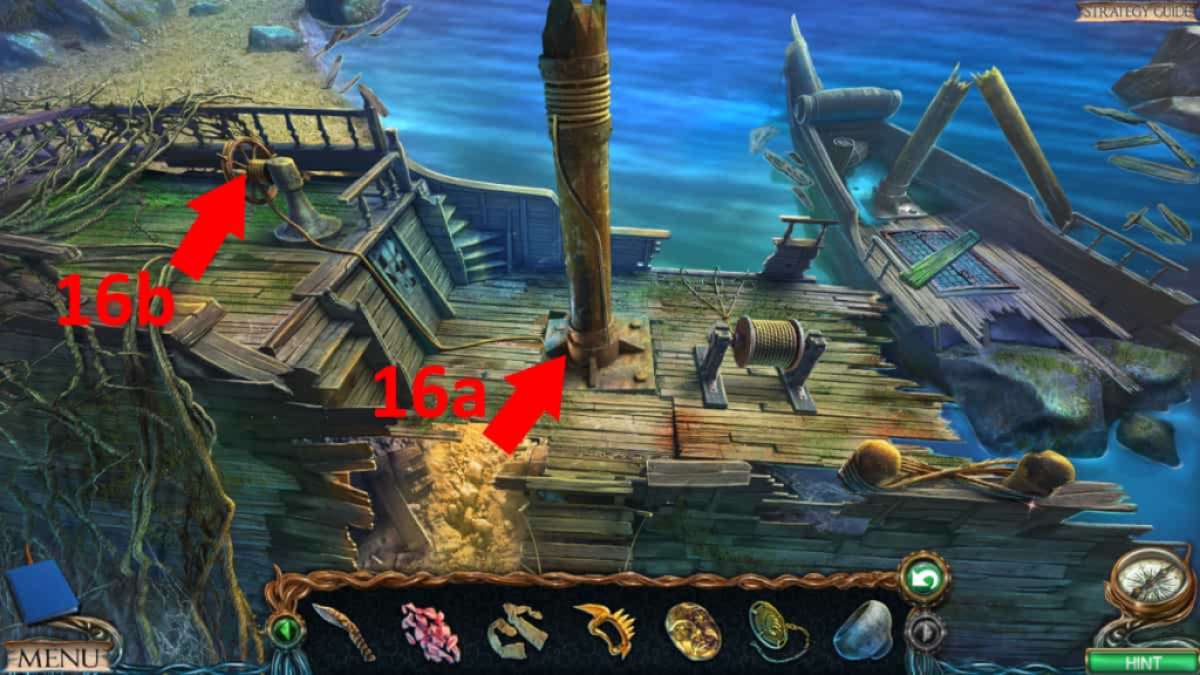
Image by Pro Game Guides
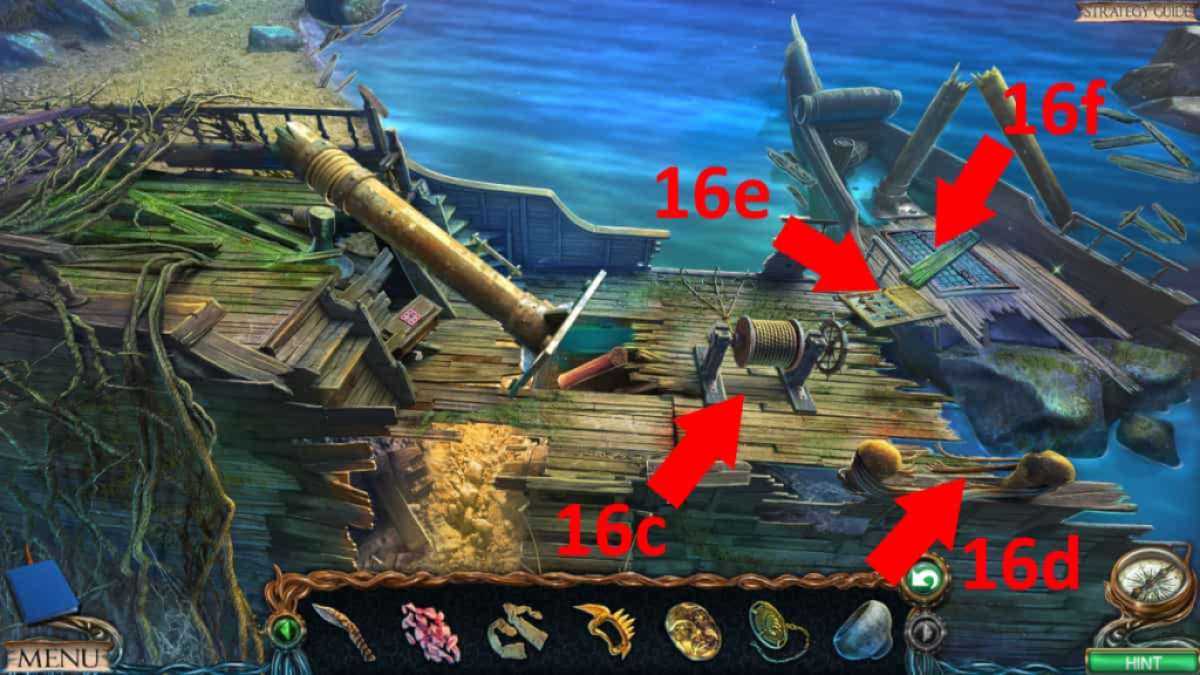
Image by Pro Game Guides
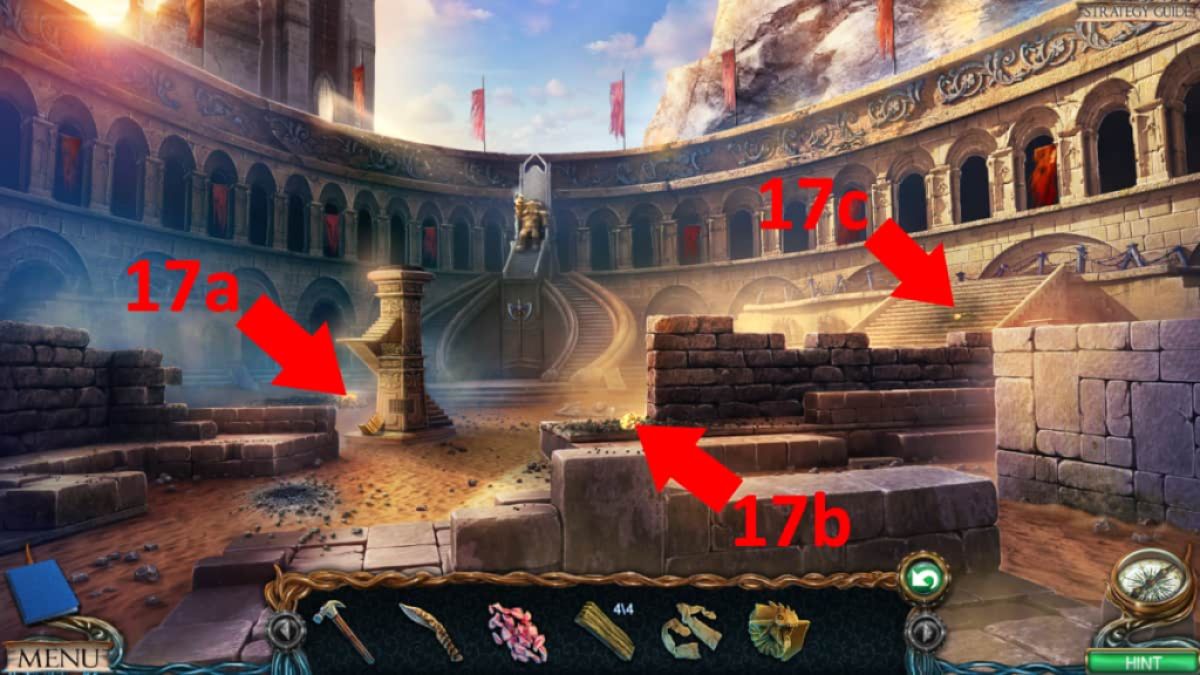
Image by Pro Game Guides
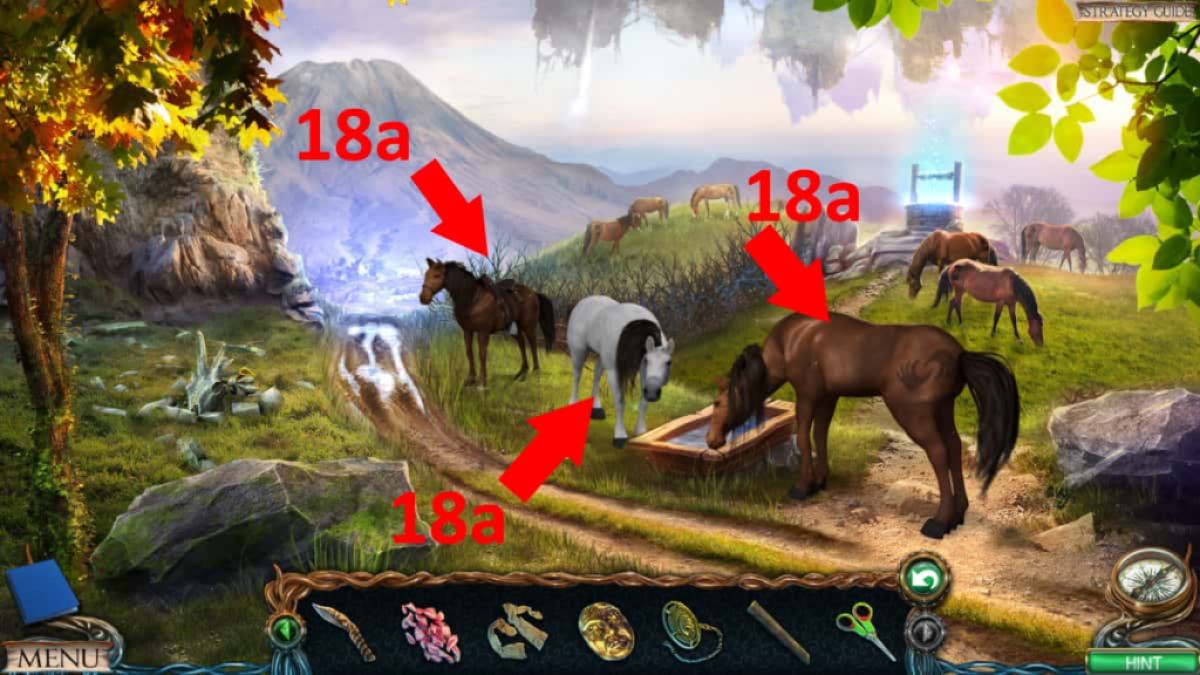
Image by Pro Game Guides
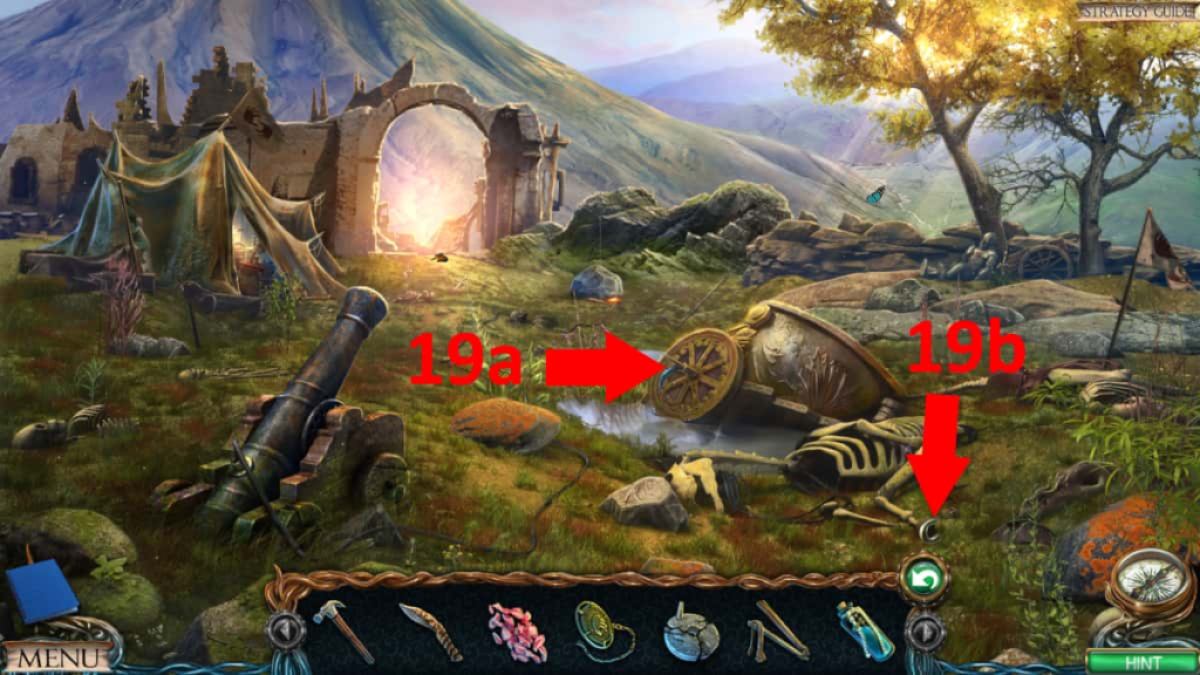
Image by Pro Game Guides
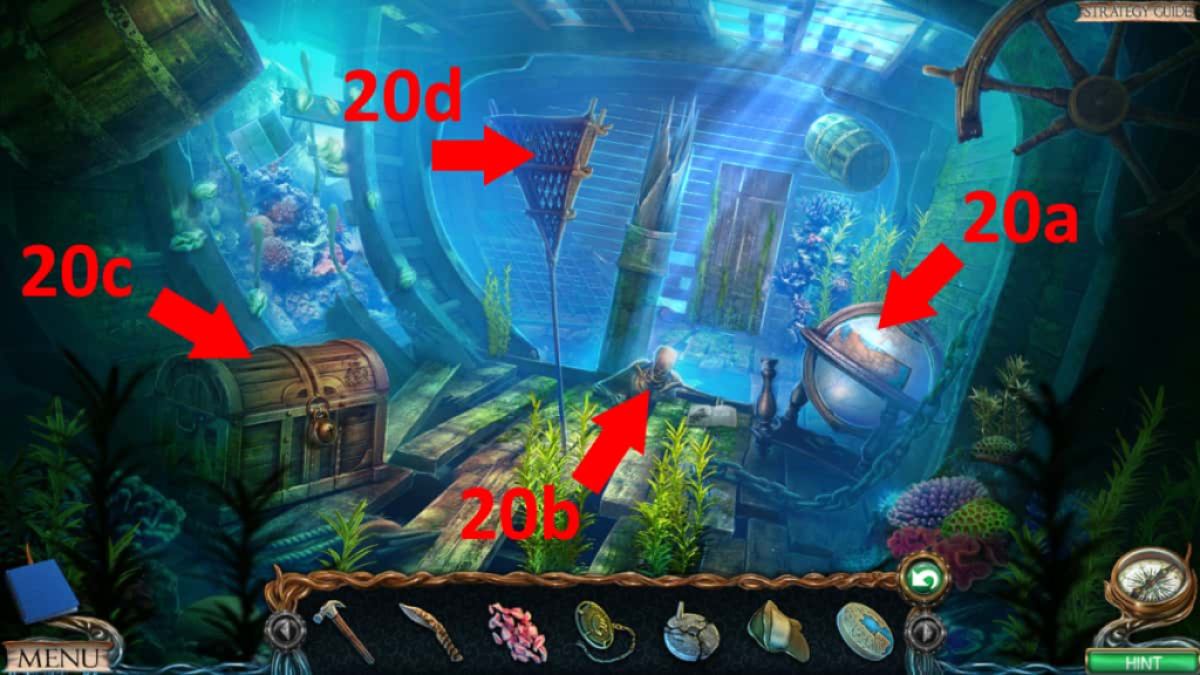
Image by Pro Game Guides
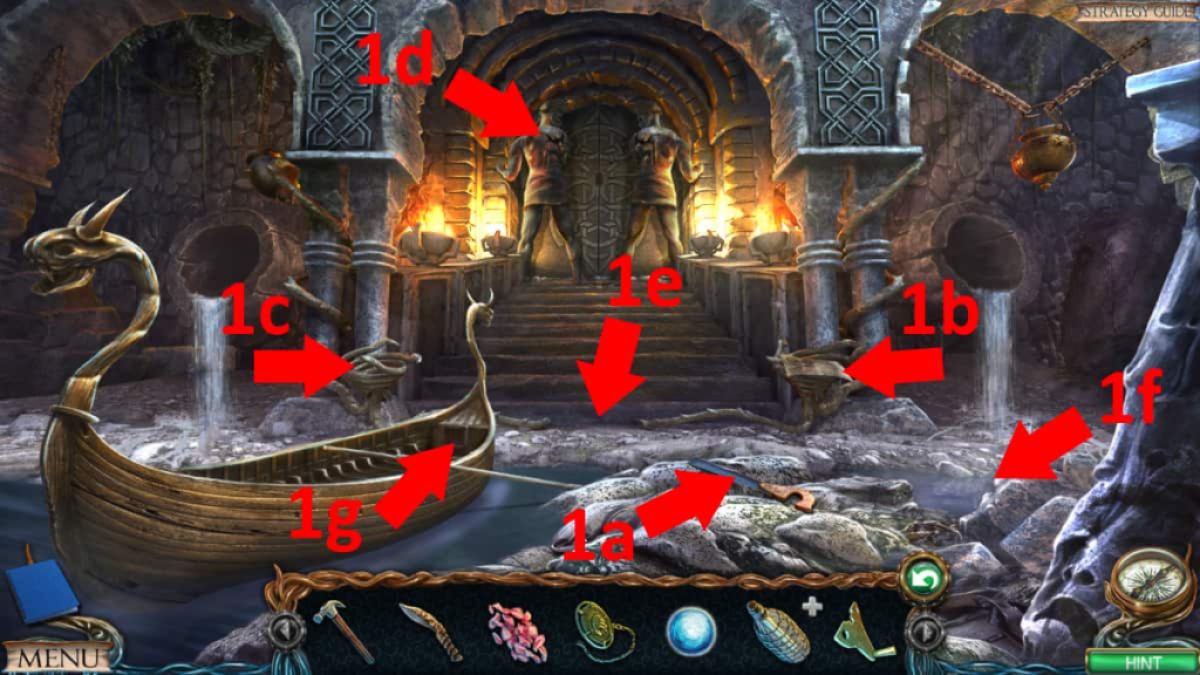
Image by Pro Game Guides
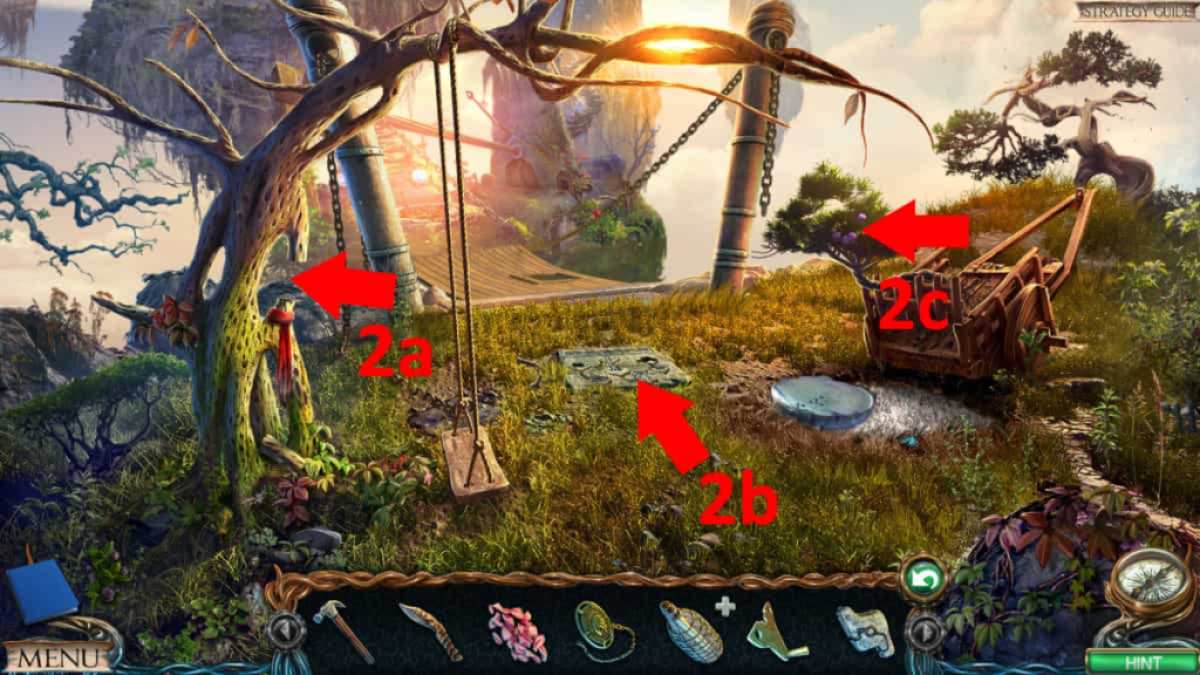
Image by Pro Game Guides
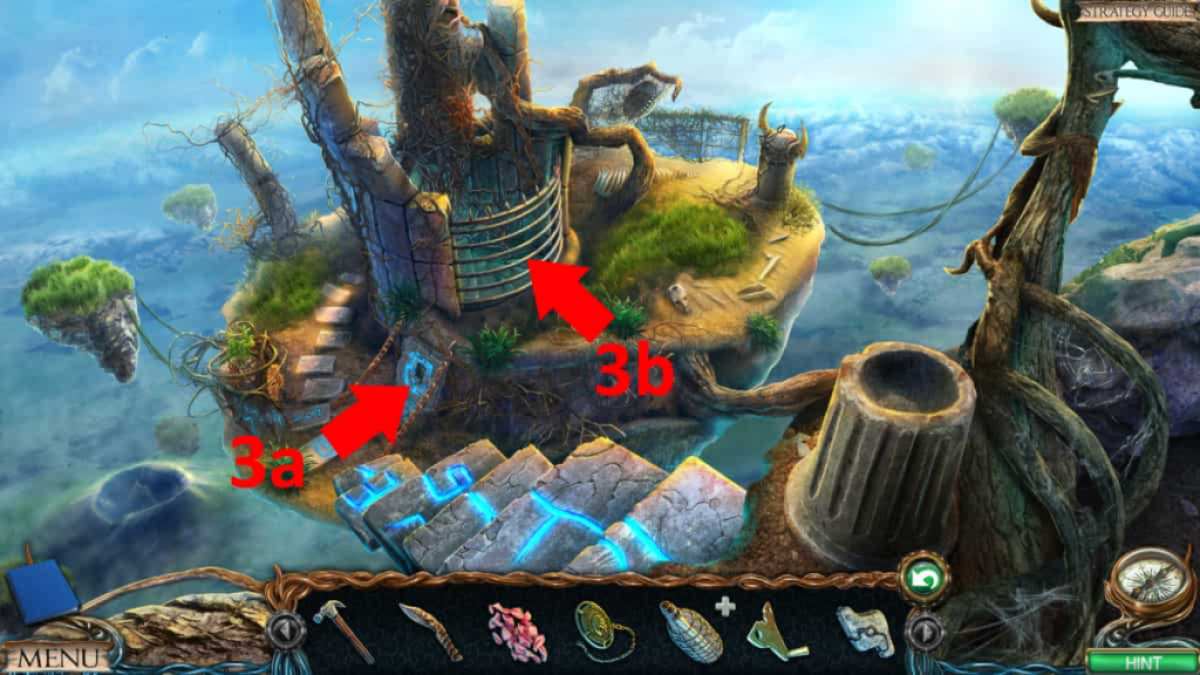
Image by Pro Game Guides
Image by Pro Game Guides

Image by Pro Game Guides
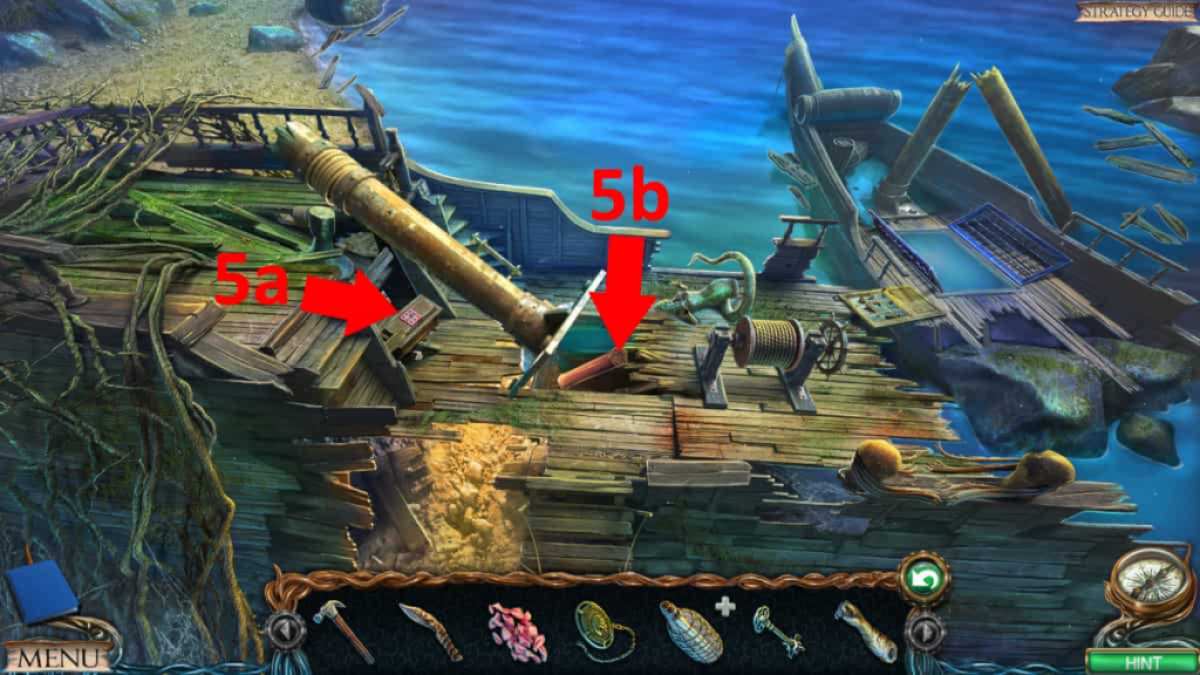
Image by Pro Game Guides
Screenshot by Pro Game Guides
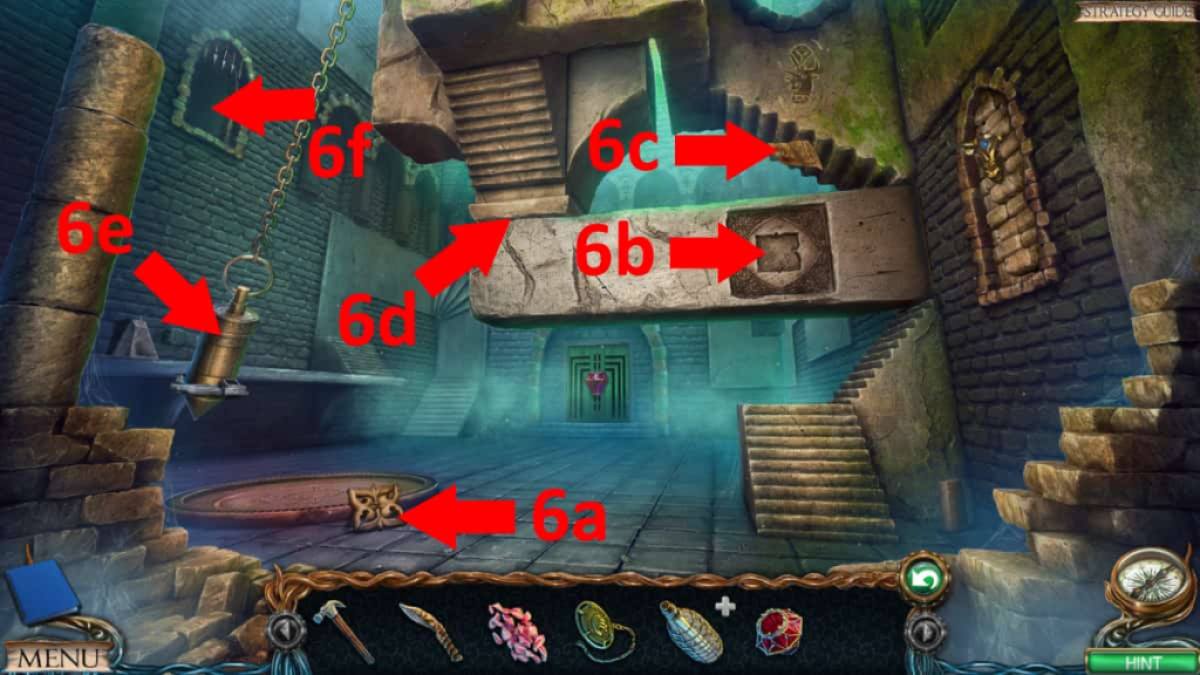
Image by Pro Game Guides

Image by Pro Game Guides
Screenshot by Pro Game Guides
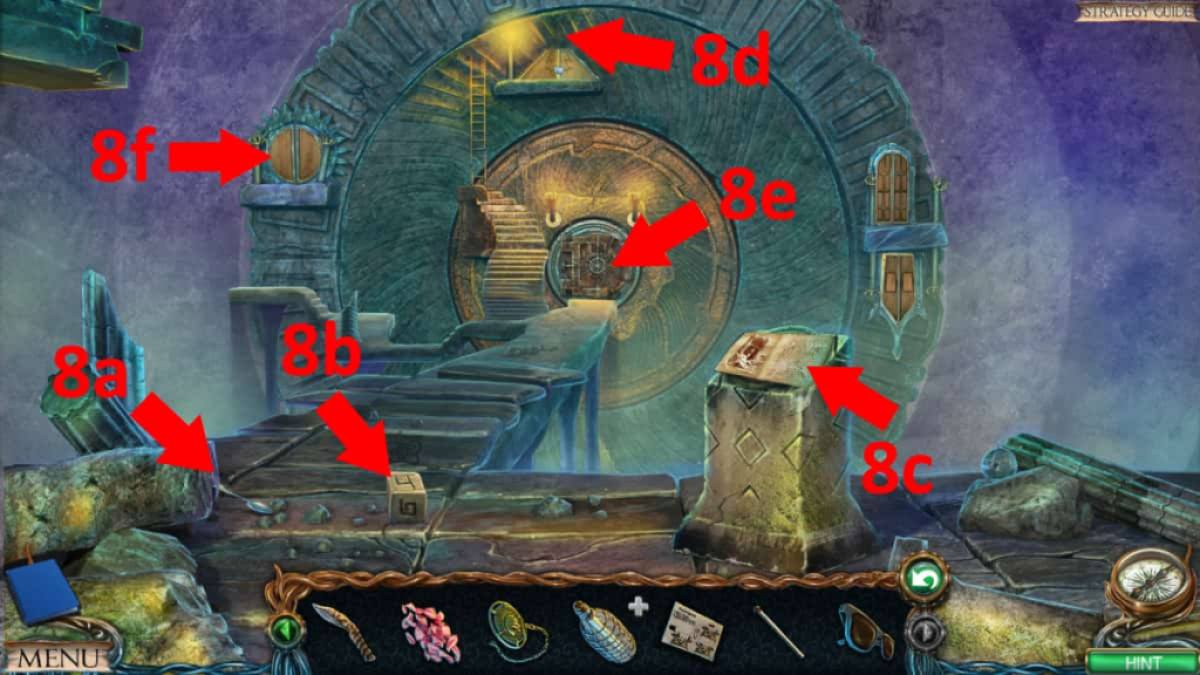
Image by Pro Game Guides
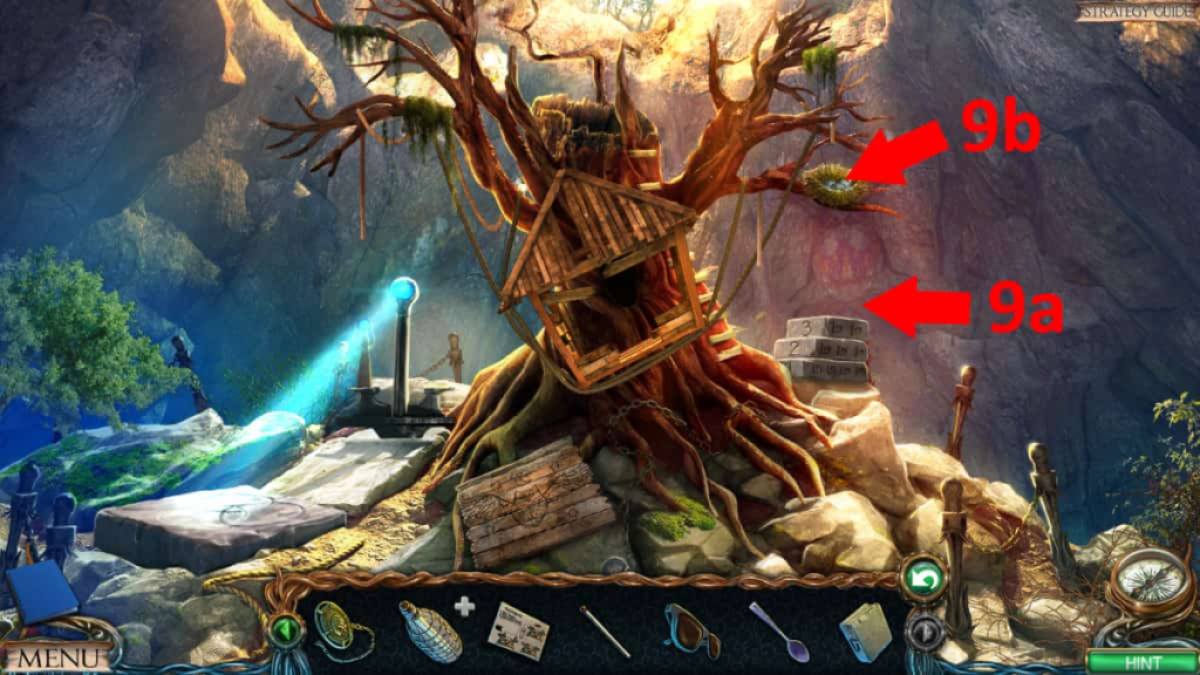
Image by Pro Game Guides
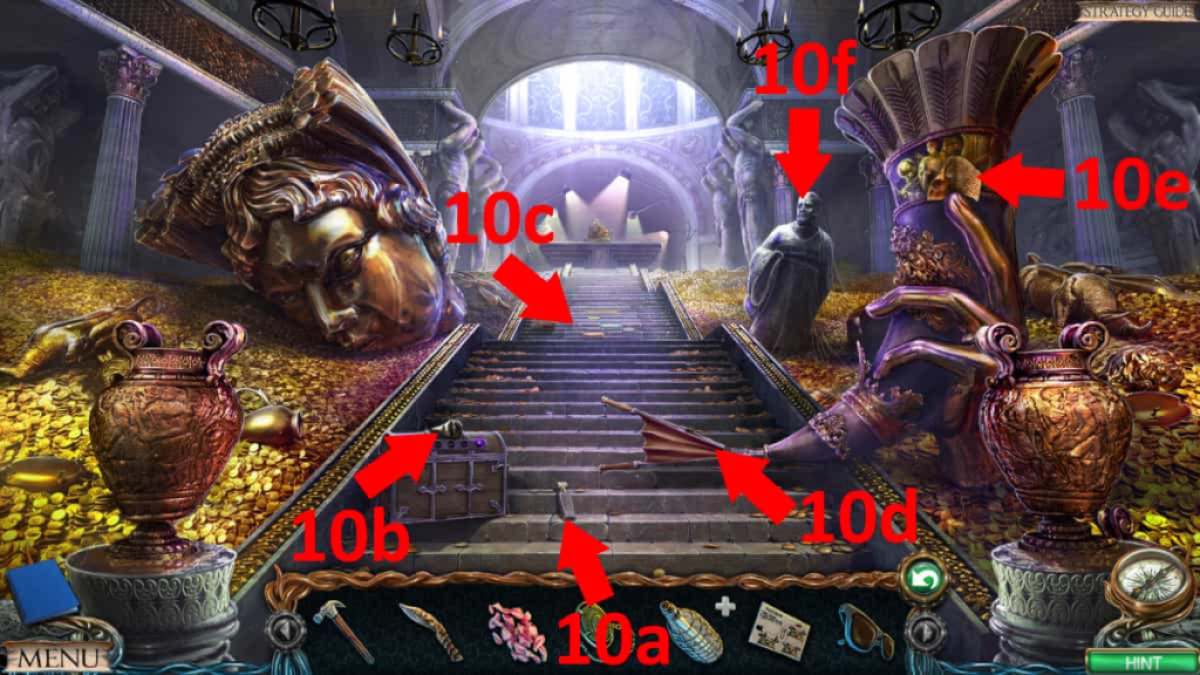
Image by Pro Game Guides
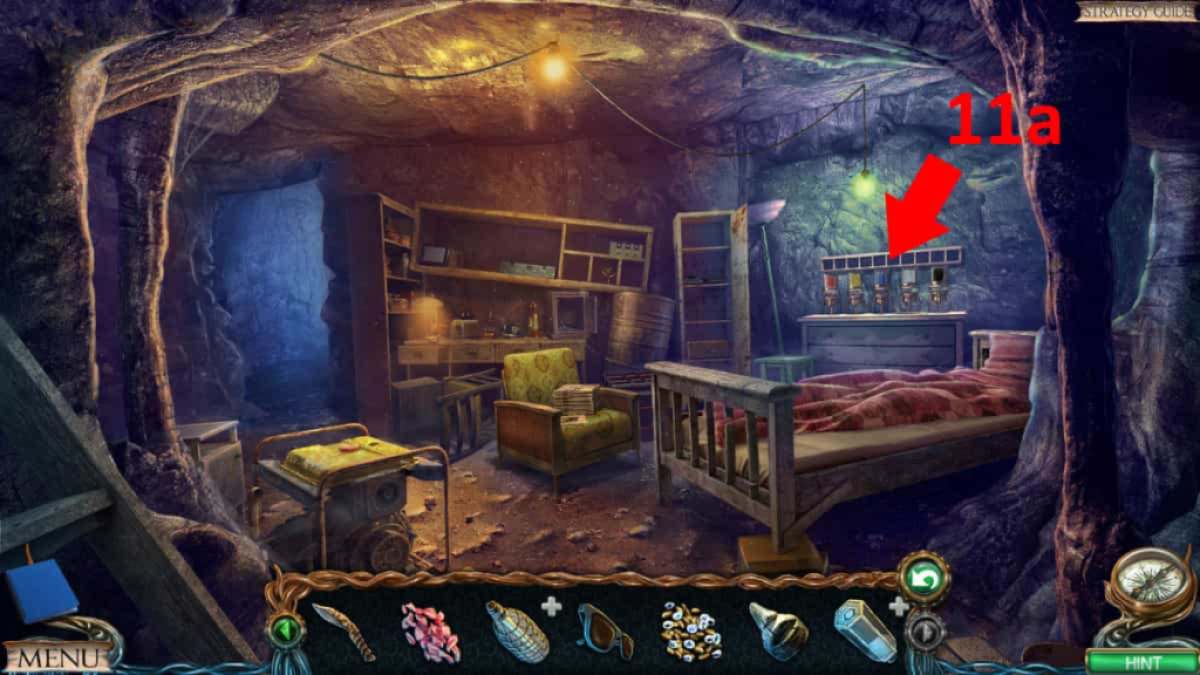
Image by Pro Game Guides
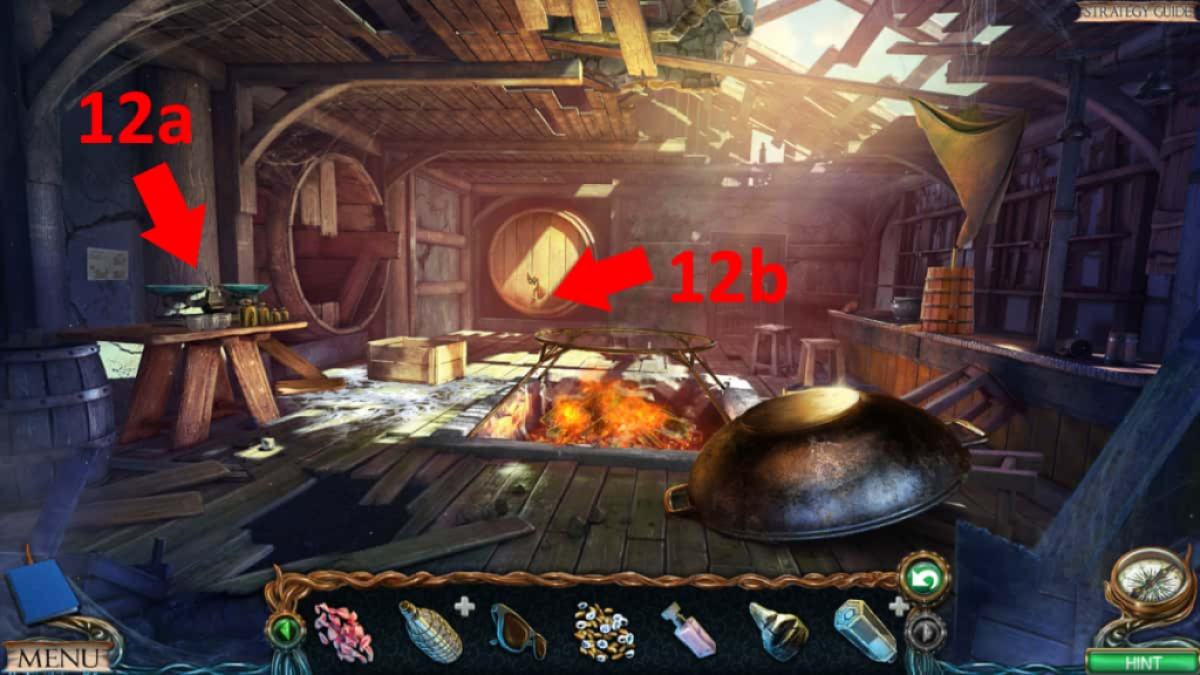
Image by Pro Game Guides
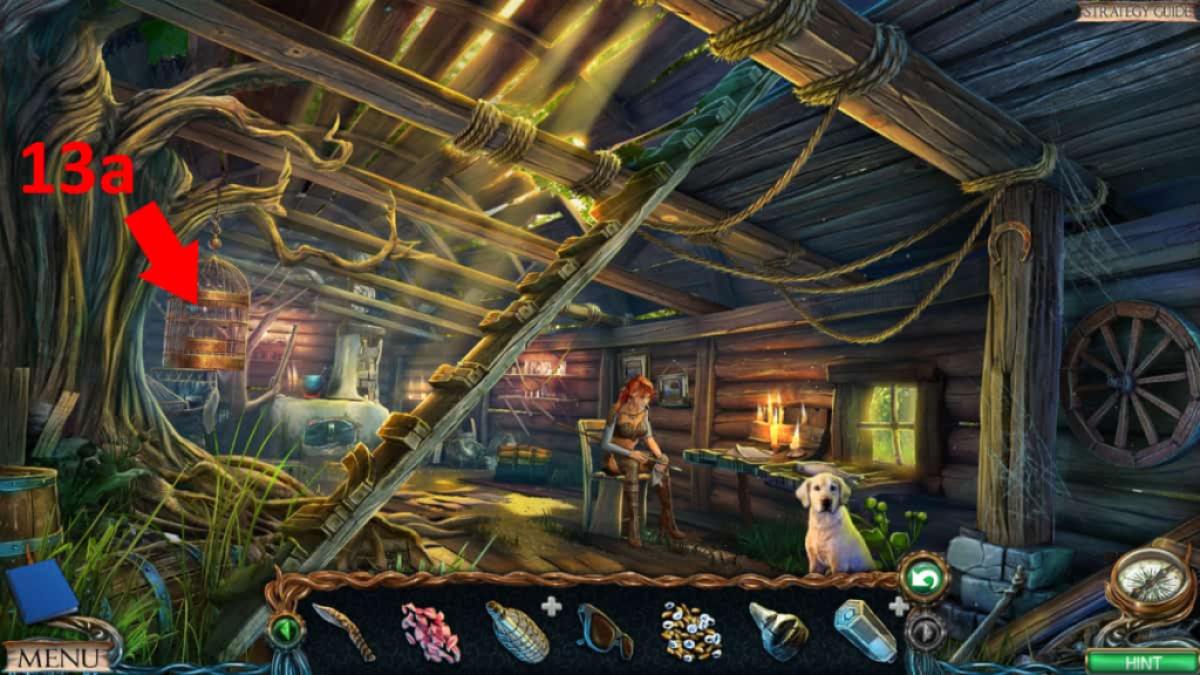
Image by Pro Game Guides
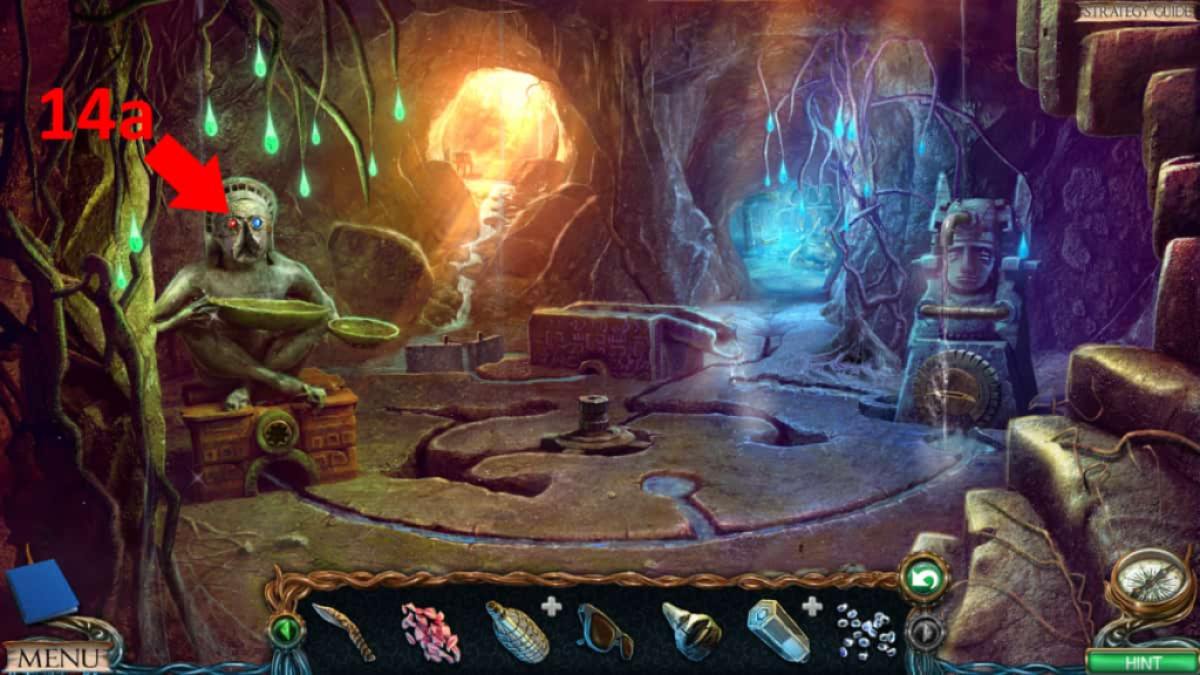
Image by Pro Game Guides
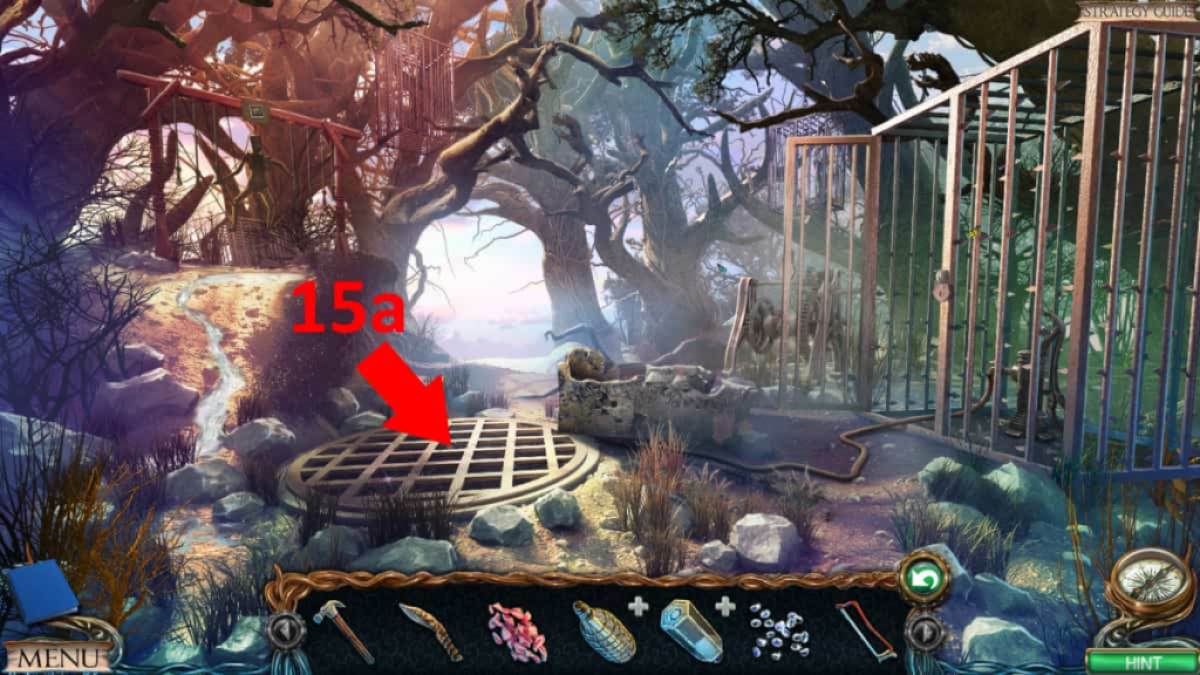
Image by Pro Game Guides

Image by Pro Game Guides
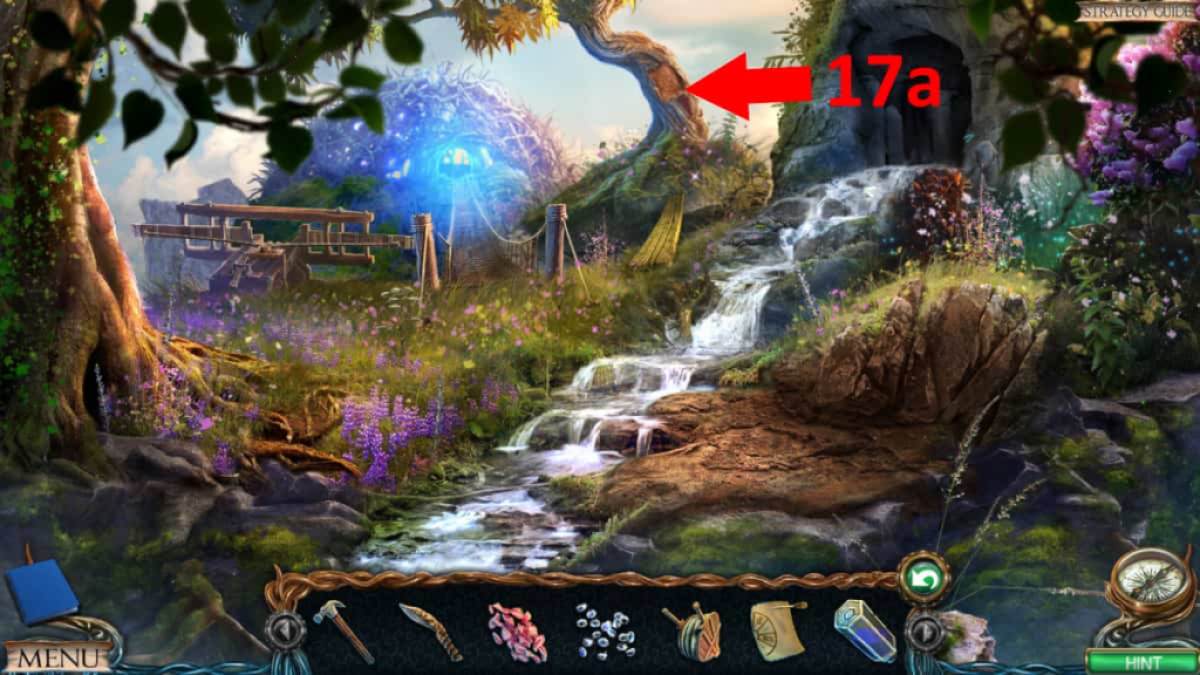
Image by Pro Game Guides
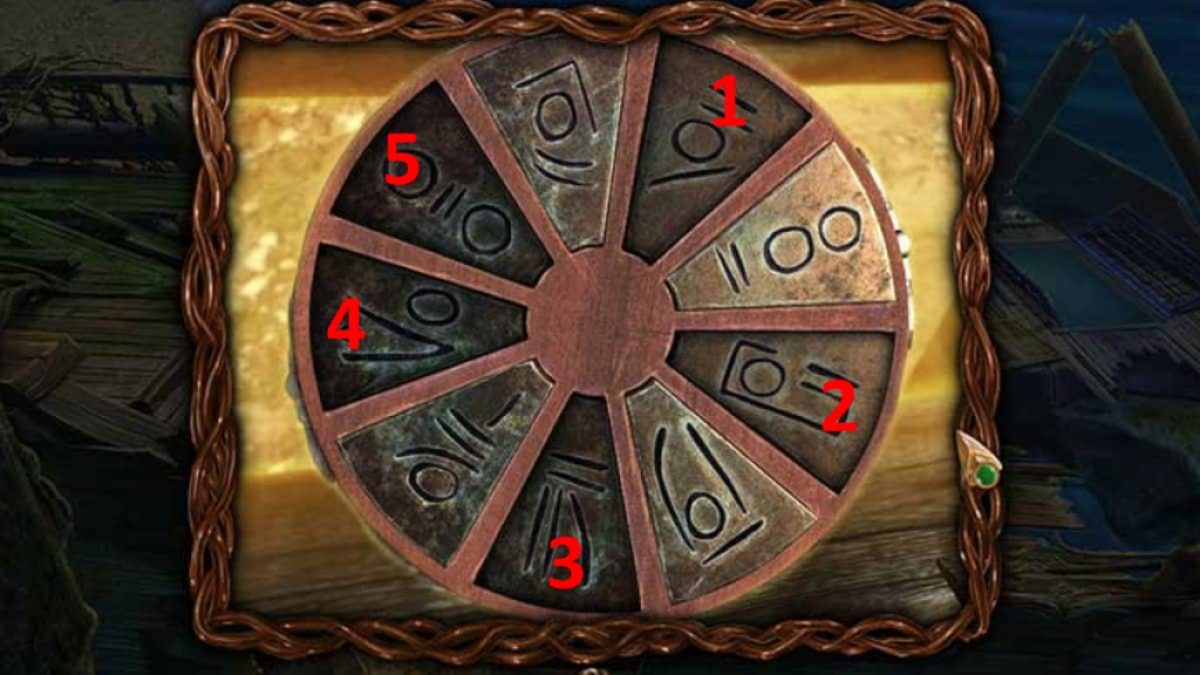
Image by Pro Game Guides
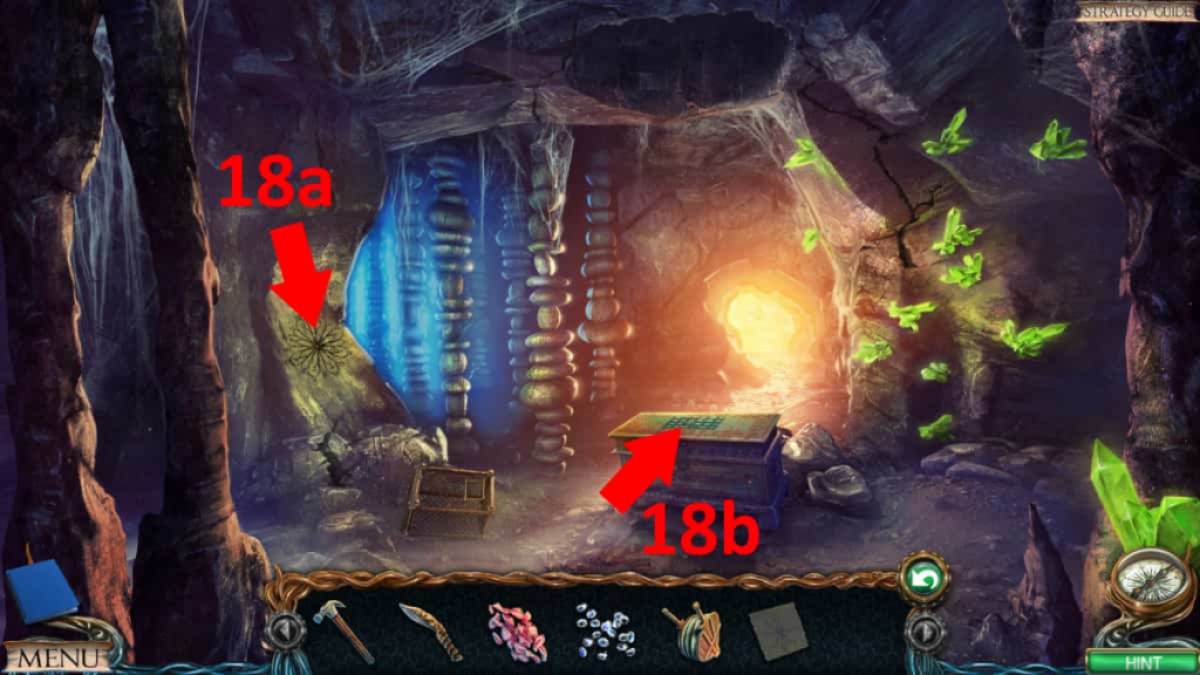
Image by Pro Game Guides
Screenshot by Pro Game Guides
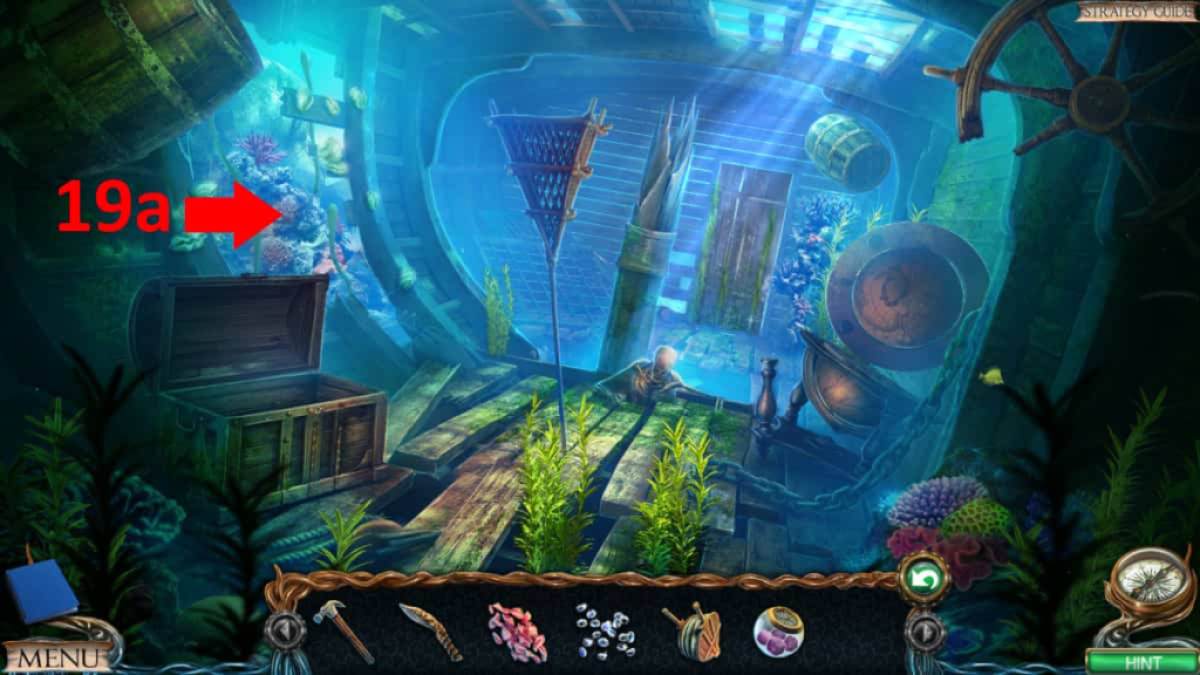
Image by Pro Game Guides
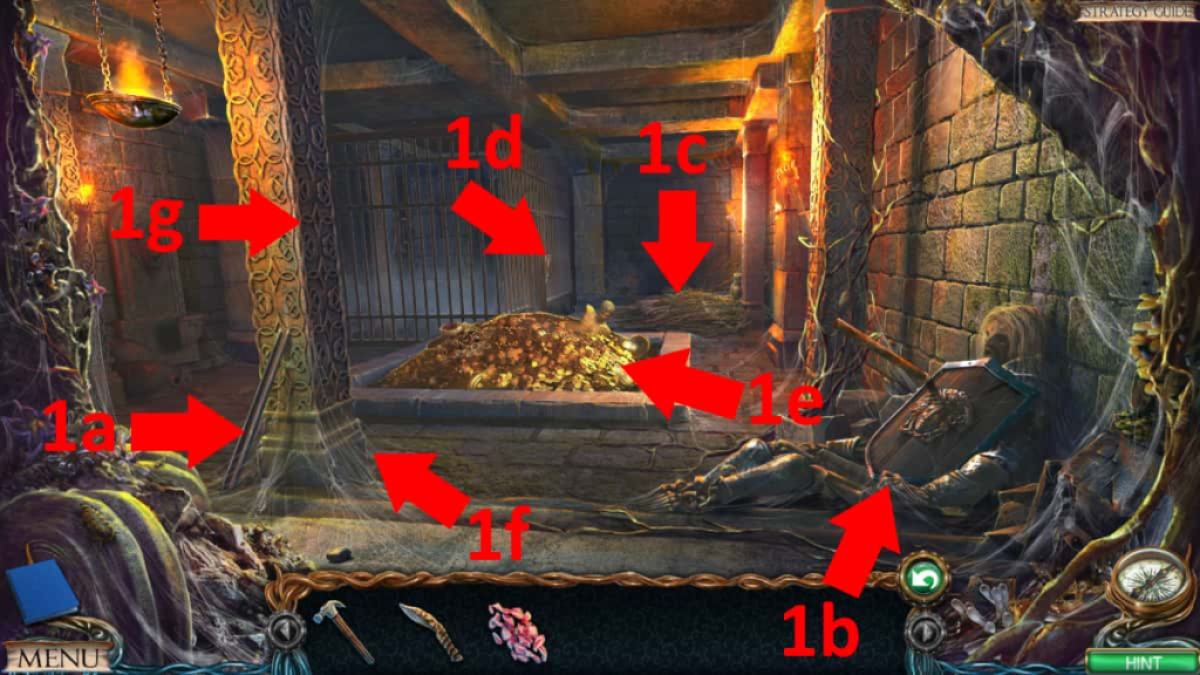
Image by Pro Game Guides

Image by Pro Game Guides
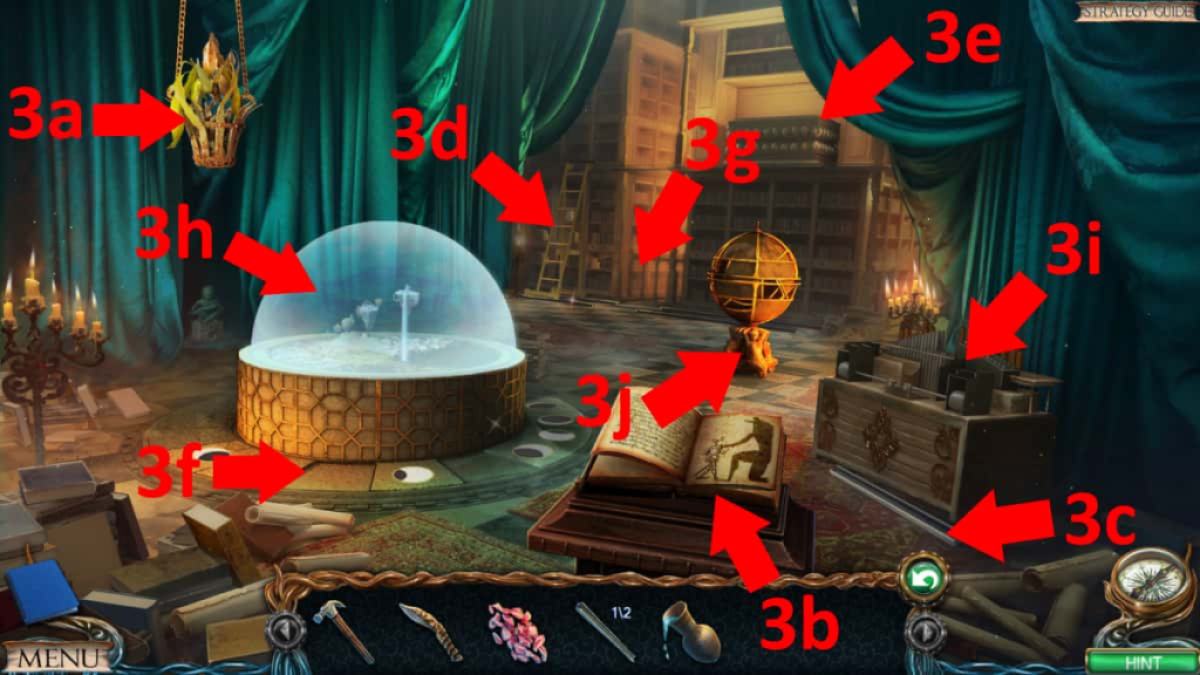
Image by Pro Game Guides
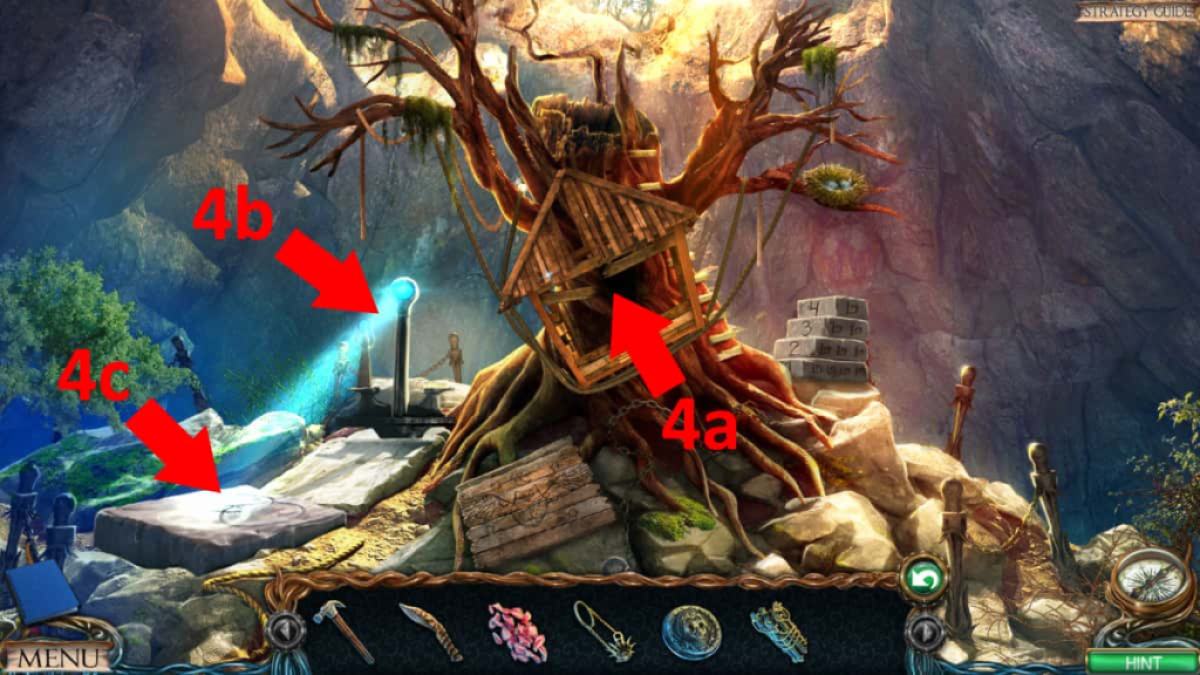
Image by Pro Game Guides

Image by Pro Game Guides
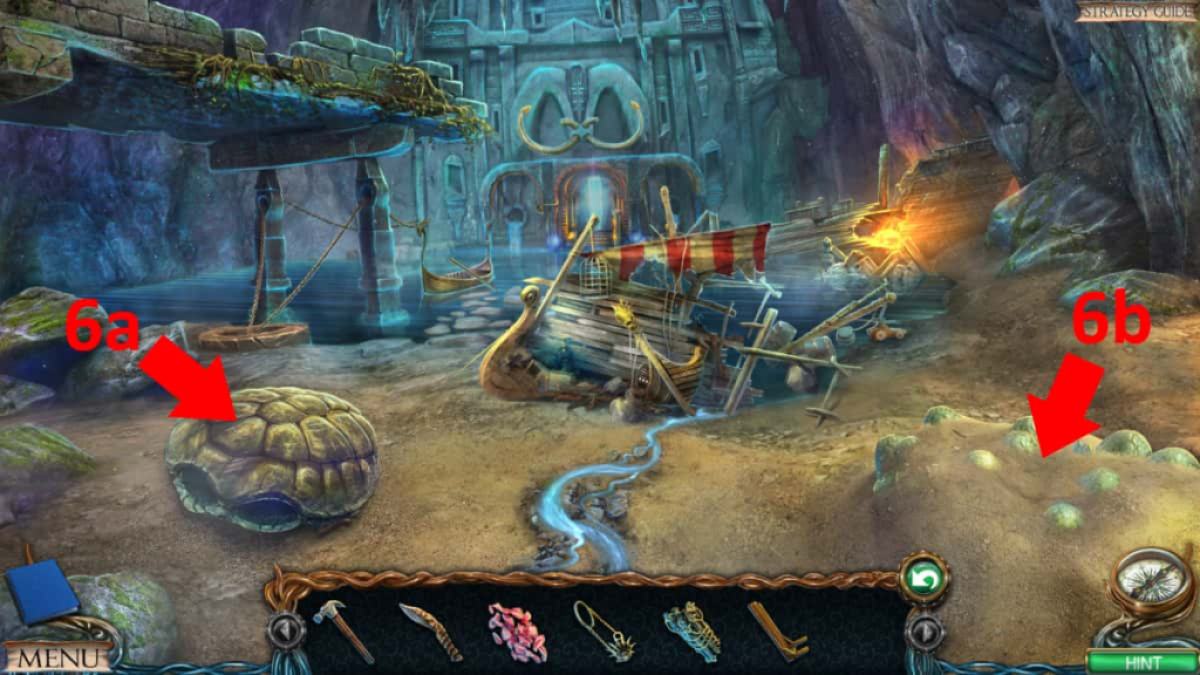
Image by Pro Game Guides
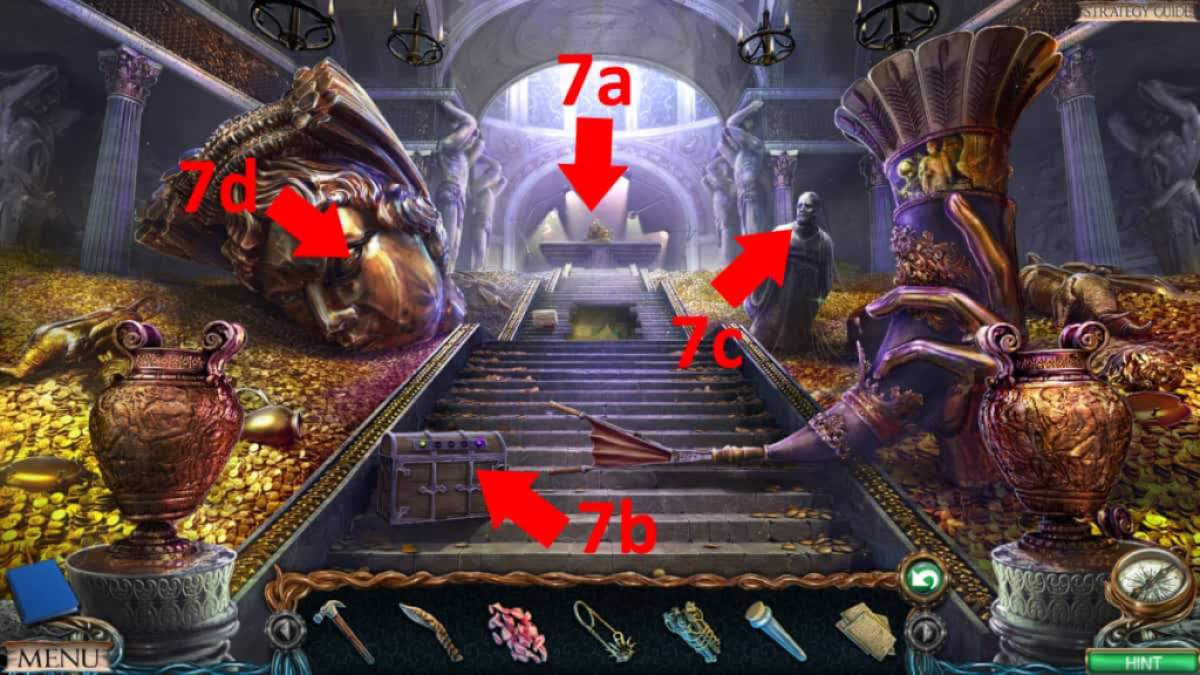
Image by Pro Game Guides

Image by Pro Game Guides
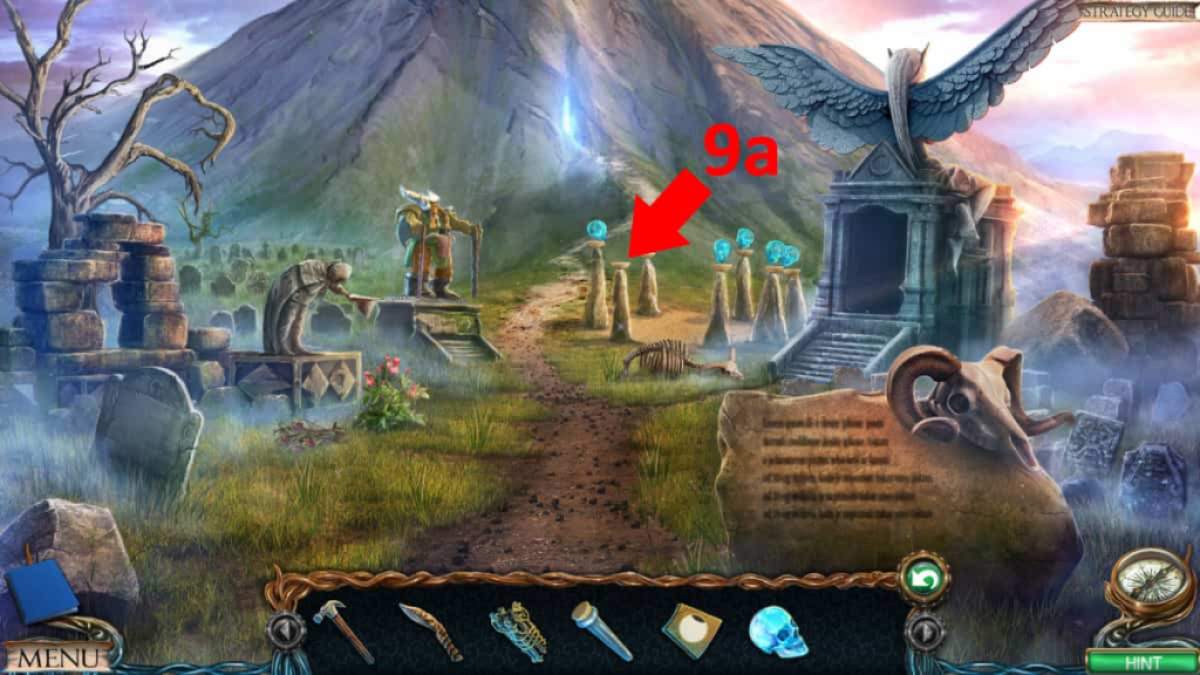
Image by Pro Game Guides
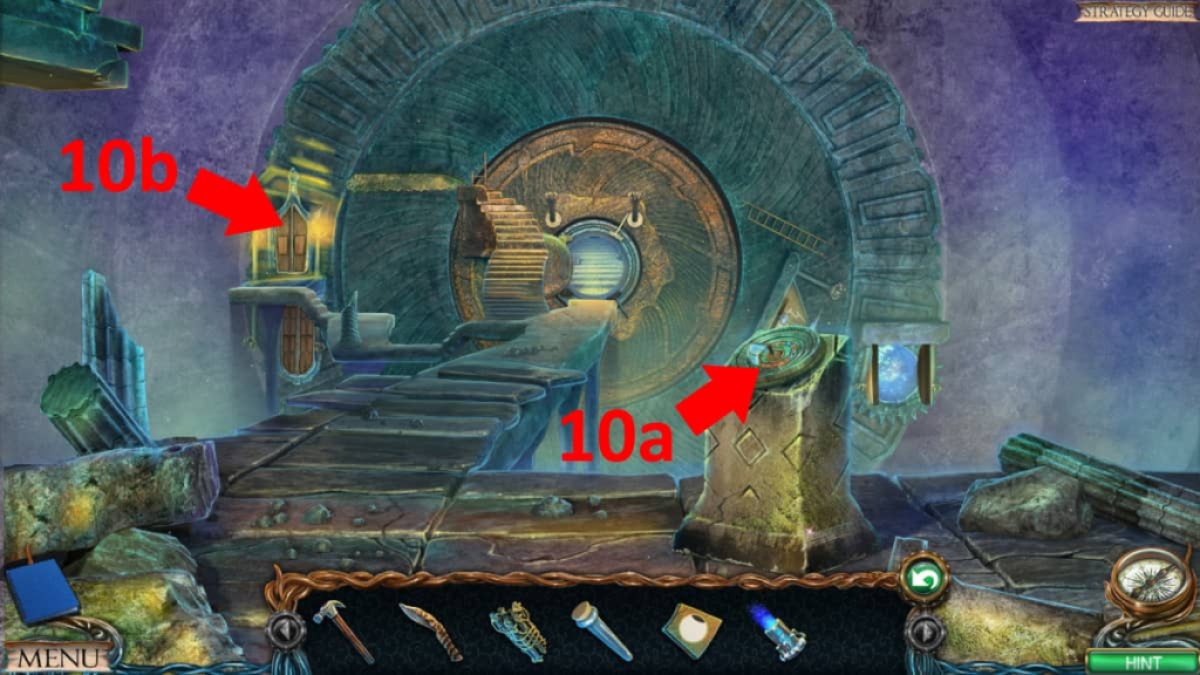
Image by Pro Game Guides
Screenshot by Pro Game Guides
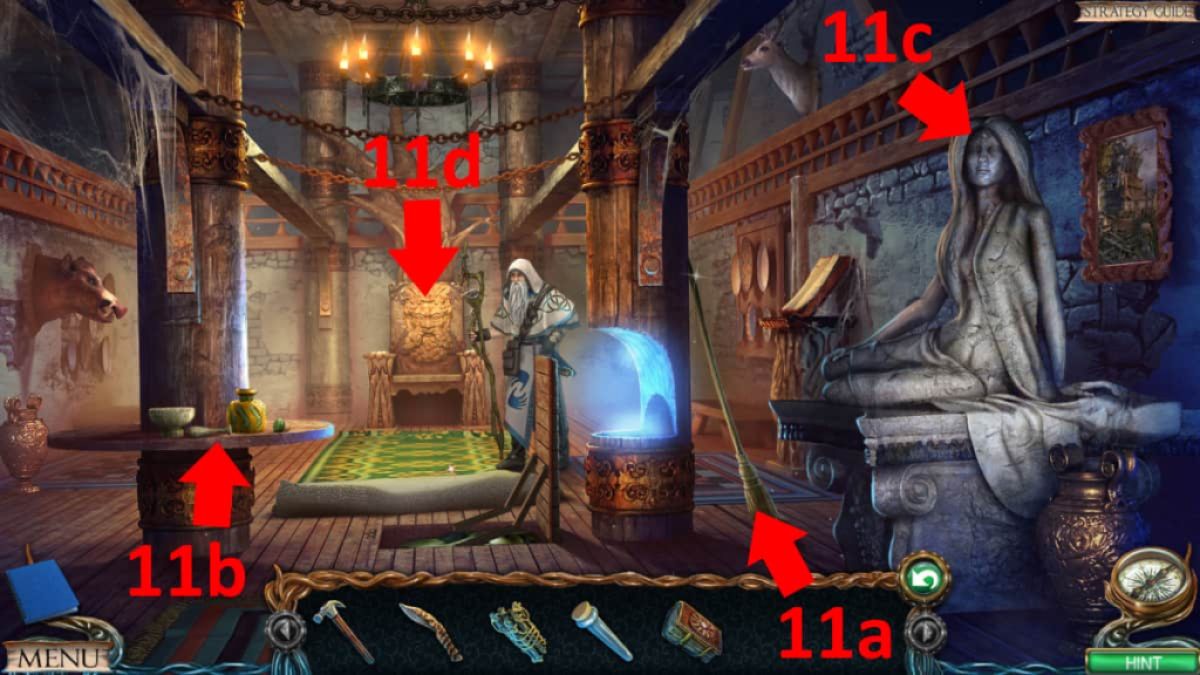
Image by Pro Game Guides
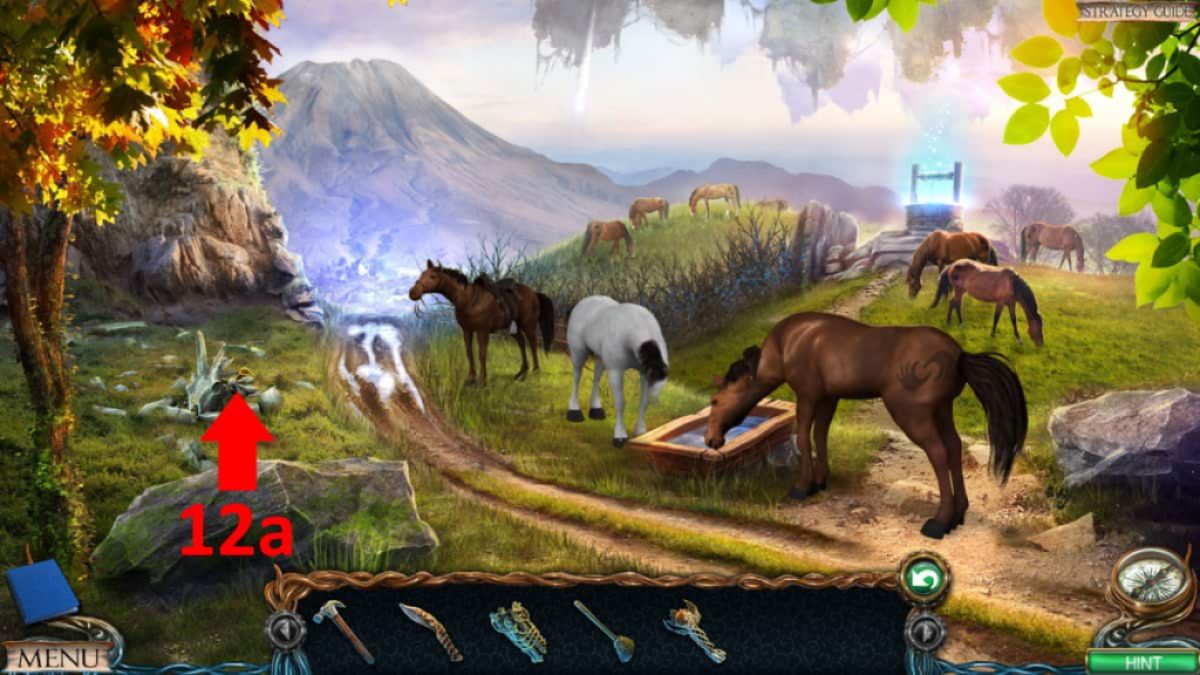
Image by Pro Game Guides
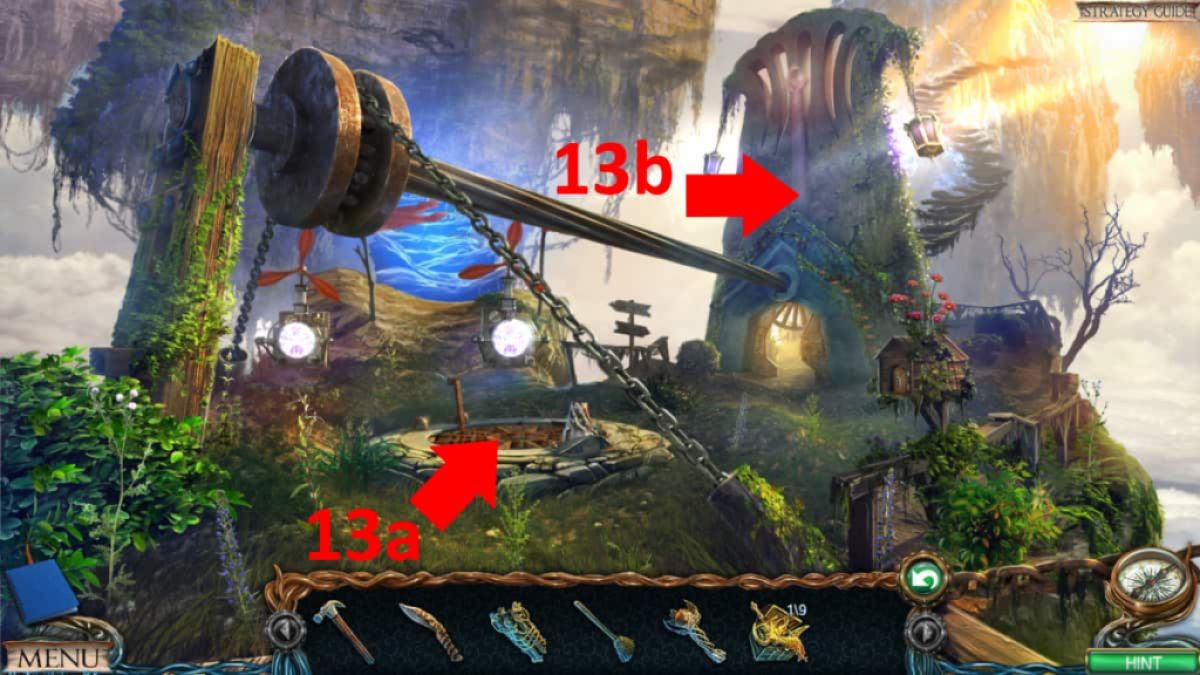
Image by Pro Game Guides

Image by Pro Game Guides
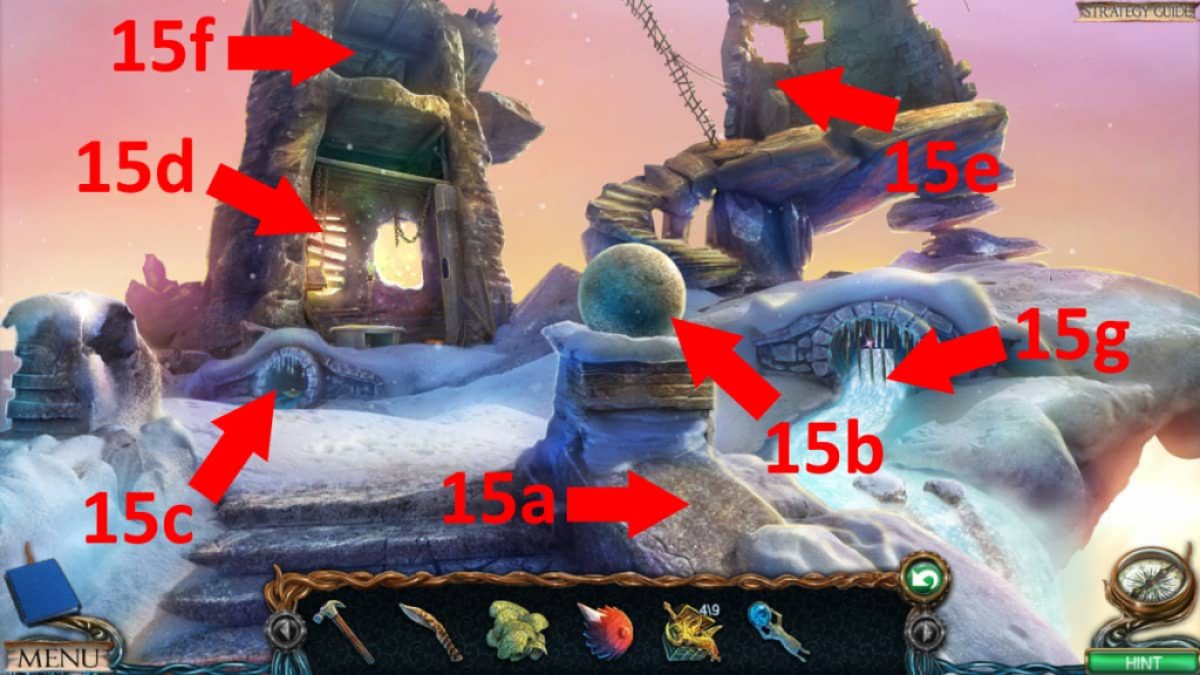
Image by Pro Game Guides
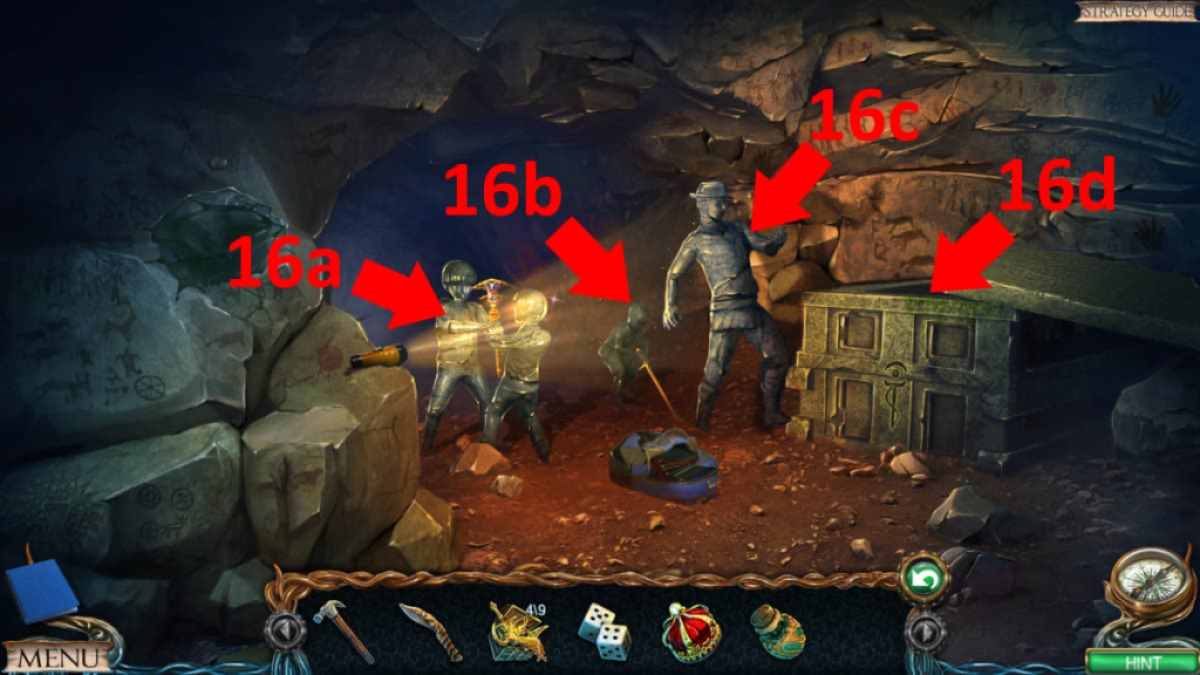
Image by Pro Game Guides
Screenshot by Pro Game Guides

Image by Pro Game Guides
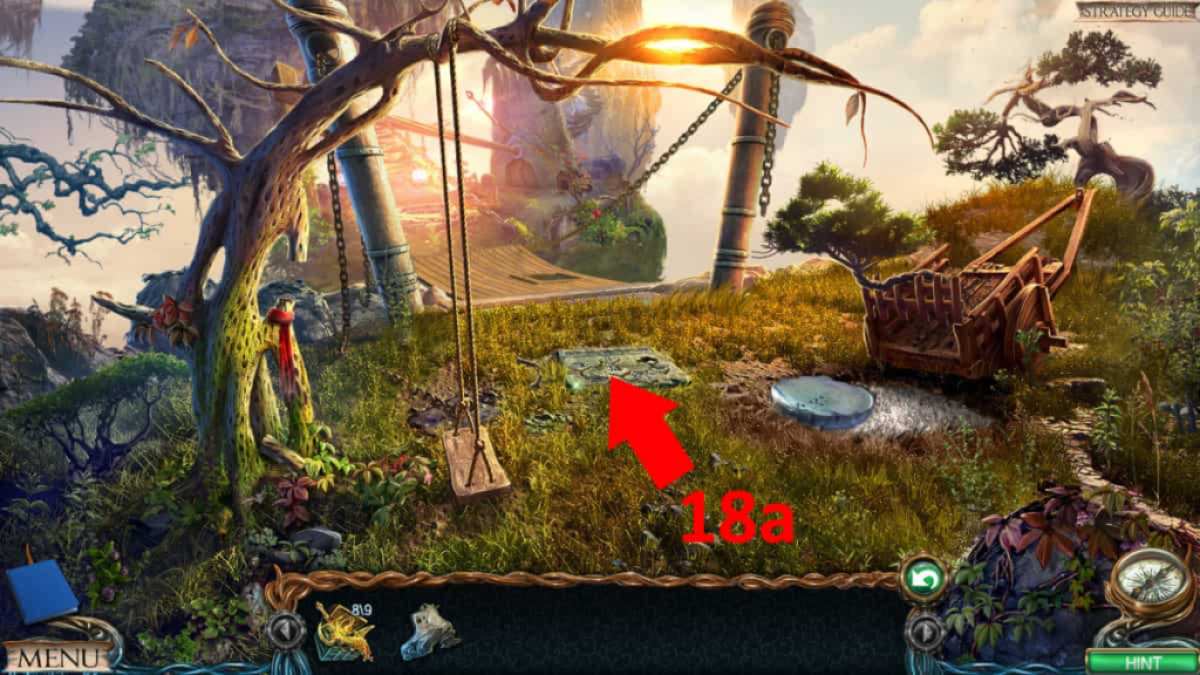
Image by Pro Game Guides

Image by Pro Game Guides
Screenshot by Pro Game Guides
