Puzzled ? We ’ve got your back .
The Lost Lands serial publication of biz put up hours of challenging pattern matching and puzzler , with Lost Lands 3 : The Golden Curse . well still , once you ’ve completed the main storyline , a incentive chapter is opened up , offering up some backstory for one of the raw friends you made in the main quest . If you ’re look for a bit of help complete it , study below for our full Lost Lands 3 bonus chapter walkthrough .
Lost Lands 3 walkthrough - Golden Curse Bonus Chapter
Starting Lost Lands 3 Golden Curse Bonus Chapter
The incentive chapter begin with your ship being pull out into a terrible vortex . The next affair you know , you wake up inside the Isaac Hull of the ship , surround by debris . Get a close - up of the woodpile ( 1a ) , click it twice to hit some scrap wood , then catch theHammer . you could see your pup but ca n’t help it yet .
Next , click the broken desk ( 1b ) to find your first puzzler . You demand to invest the gears to make a chain , as visualise . Or , to put to work it out well , work from the top left clockwise , as each added gear will move if placed correctly . Once open , collect theFur Capefrom inside the desk . Click the ceiling ( 1c ) and use the hammer to force it open . Select it again to open it and once more to go onto the beach you are lave up on , which reckon very familiar .
There ’s nothing you may do here yet , so move on to the Cave via the map . Take theShawl(2a ) , then move to the Underground Oasis . prove the waterfall ( 3a ) for a finis - up and employ the hammer on the ice to gain access to some clean water .

Related : How to beat Trace Escape Room - Full Walkthrough
How to enter Druid Village
Go forward once more to the Tree of Life and use the fur mantle on the man there ( 4a ) . He ’ll ask you for water , then afterward , get a close - up of him and take theDoor Key . Go back to the boat clench , use the key to start the doorway ( 1d ) , then infix the memory room and finish the dim-witted aim - matching puzzle to get theLadle .
Go to the Underground Oasis , use the ladle on the waterfall ( 3a ) to get aLadle Full of Water , and give it to the human at the Tree of Life ( 4a ) , who we now encounter out is your father . Go nigh up on him again after the cutscene , penetrate his wooden branch , and take theKnife .
apply the tongue on the jack ( 5a ) to dislodge the net , giving you access code to the mechanism above it ( 5b ) . Go close-fitting - up on it , put the grip into the chemical mechanism , and use it to go up to the Market in Druid Village .
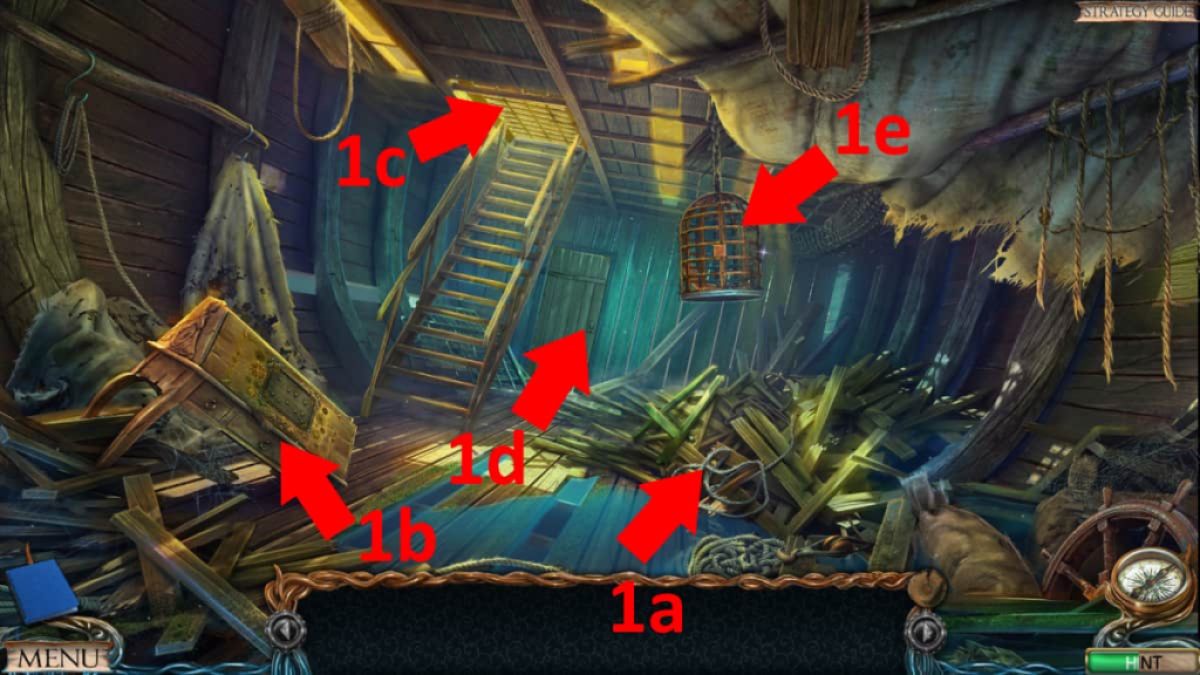
Image by Pro Game Guides
How to open the belt buckle
snap the tent on the left ( 6a ) , canvas the dough recipe , then take theHatchet . Select the mess of boxes next ( 6b ) and check out out the leather boot sole instructions and machine . Choose the watch tugboat ( 6c ) and click the railway line to getPieces of Blueprint . Now fall into place the windmill ( 6d ) and take theScrew Hookfrom the trapdoor .
Move forward to the departure from the Village and select the Druid ( 7a ) , taking theCork with a Corkscrewfrom his hand . practice it in your stock list to gain theCorkscrew . you may also test the belt crumple to see that a patch is miss . Take theBroken Broom(7b ) , then pick out the gantry ( 7c ) and click the telescope . snap the blurred image to expose what the upshot is .
Go back to the marketplace and expend the corkscrew on the door as a hold ( 6e ) , then click it again to reach the door . choose the door to enter the Tavern . Look at the large barrel ( 8a ) to get a breath for later , then click the counter ( 8b ) for a loving cup - and - ball puzzle . On completion , you ’ll incur aForged Piece .

Image by Pro Game Guides
How to access the windmill
Go back to the druid at the outlet to the settlement and use the bad piece on his belt to get aKey . Now expend the key on the door ( 7d ) to arrive at access to the Field Hospital . Go inside and ascertain the cutscene with your sometime friend , Maaron ( 9a ) . Afterward , click the basket ( 9b ) and take theNail Puller , look at the book to find it has a art object missing ( 9c ) , then move back to the securities industry .
relate : On Thin Ice Walkthrough Guide ( Chapters 1 - 4 )
pick out the wind generator and use the nail puller to get someNails , then flick the bod and crank while to gain memory access to the Mill . Take theFlour Scoop(10a ) , then use the screw lure on the ground where one is lose ( 10b ) . Click the equipment above ( 10c ) , and it will drop down , completing the scales . Next , select the diagram on the rampart ( 10d ) and impart the design piece to start a jigsaw puzzle . It should look like the image below .
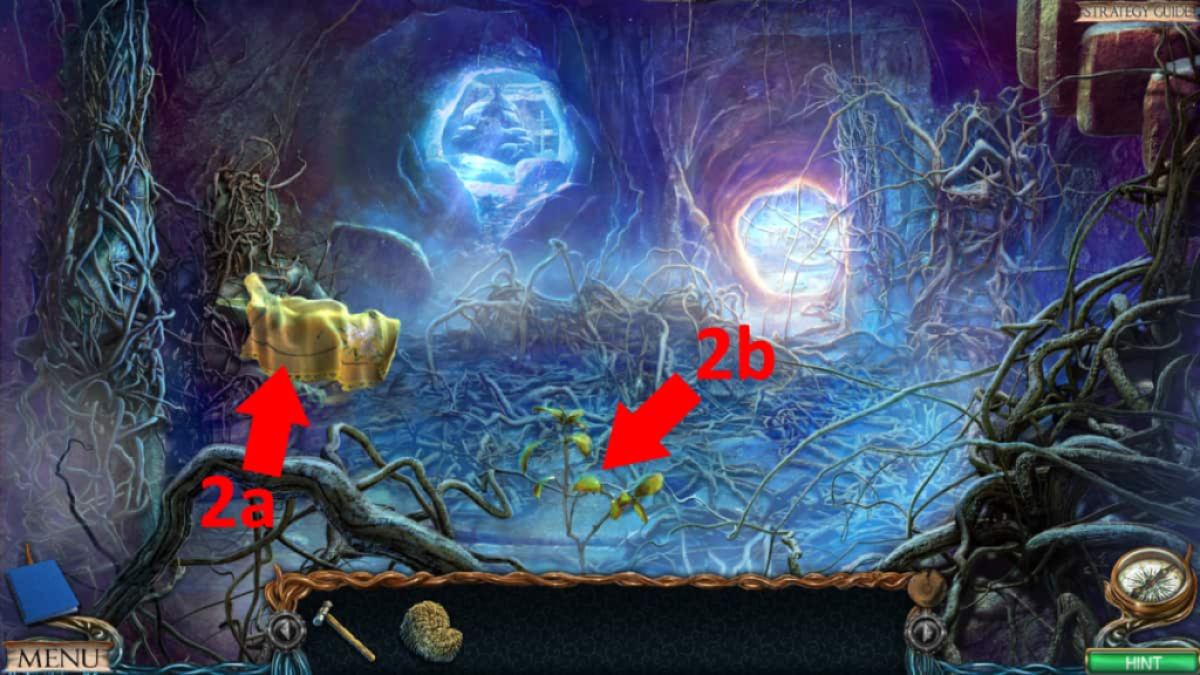
Image by Pro Game Guides
Get a close - up of the top of the ladder ( 10e ) and habituate the hatchet to break the board , dropping a cup of tea of metric grain down to the ground . penetrate the pocketbook ( now at 10b ) to move it onto the scurf , then once more to secure it . You now have admission to the top of the grind , so sink in the top of the stairs once more to go up .
How to find Maaron’s Bag
afford the wooden lid ( 11a ) and take theAmulet , then get a stopping point - up of the wooden equipment above it ( 11b ) and take the redCircle . Click the back of the large cog where it cope with the wall ( 11c ) and take theWedge , which activates the mill ’s blade . apply the wedge on the cog steering wheel ( 11d ) , then move back to the loss from the Greenwich Village .
Use the amulet on the breast ( 7c ) and takeMaaron ’s Bagfrom inside . Give it to Maaron ( 9a ) in the bailiwick hospital , and after a cutscene , he will give you theLight of Hope . Next , select the door under the gauntry at the Exit to the Village ( 7e ) , click the lock , and move through it to the Path Through the Forest .
apply the low broom to get theHolder(12a ) , then use the two pieces and your shawl in your stocktaking to get theBroom . Click the Sir Herbert Beerbohm Tree on the right ( 12b ) for a close - up and use the Calluna vulgaris to dislodge ( and collect ) theRoller . at last , use the Light of Hope on the statue ( 12c ) to lighten the area .
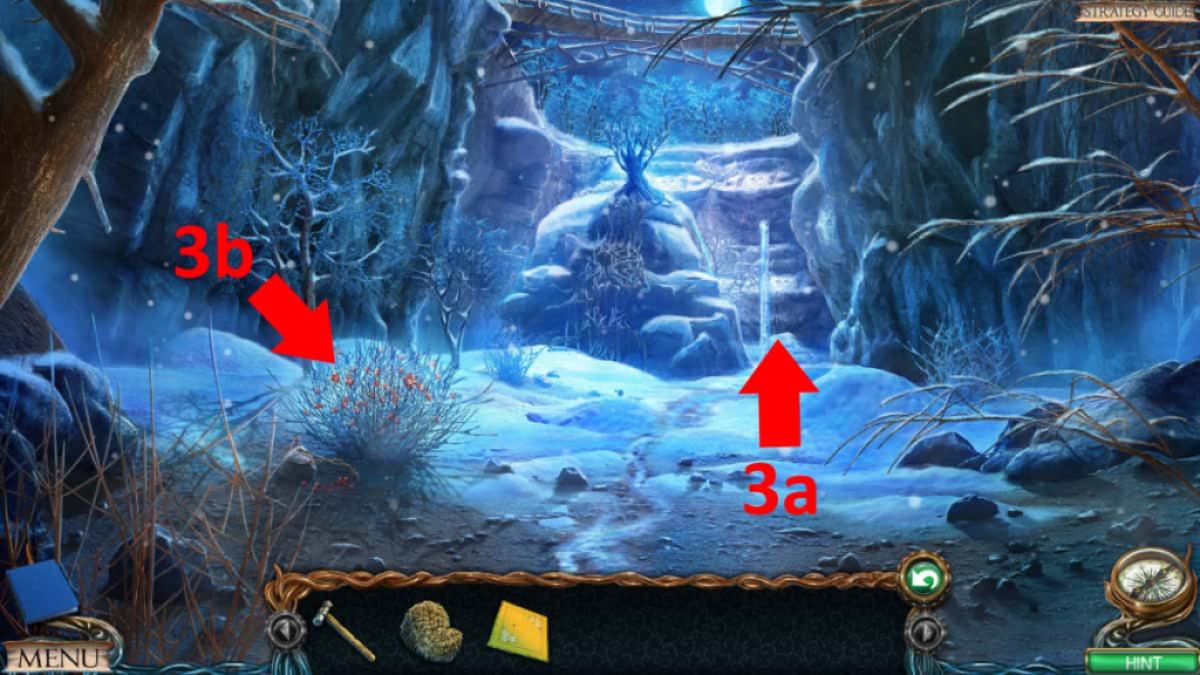
Image by Pro Game Guides
How to find the five-digit code
Go back to the loss from the small town and penetrate the scope ( 7c ) and make a note of the image you’re able to now see through it . Move to the ground floor of the mill and use the rolling wave on the diagram ( 10d ) , revealing code34715 . Go to the top floor , select the machine on the left ( 11e ) , click it once more , and then enter the code to afford the gimmick .
Go to the route through the timberland , fall into place the stone statue on the right twice ( 13a ) , and add the red circle to pop a roofing tile - move puzzle . You but need to move tile to their right colors , match the background . The Francis Scott Key is to have the final four piece in the right ( clockwise ) social club before you place the third piece of the final color . Once you have , you ’ll receive theWood Dustfrom the top of the statue .
take the marked snow ( 13b ) and pick up theNeedle , then select it in your inventory and keep clicking until you have made aHook . Click the tree diagram ( 13c ) and employ your tongue to get someGluebefore manoeuvre to the clearing in the woods .
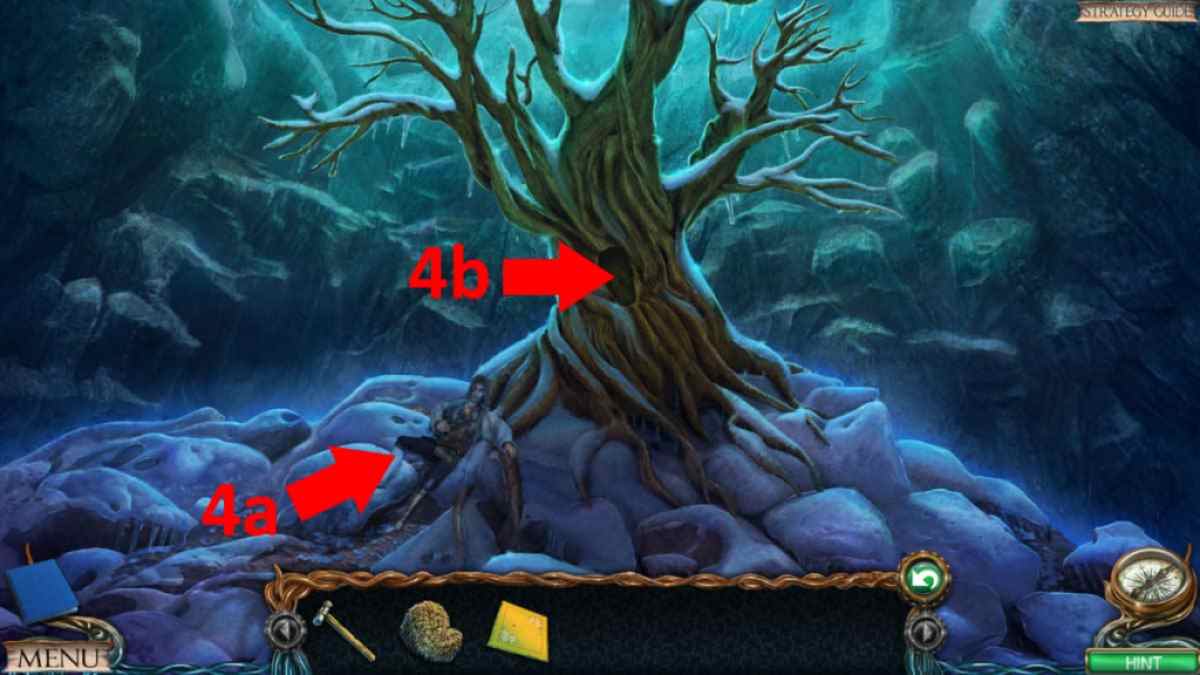
Image by Pro Game Guides
How to defeat the spider
Take theScythe Bladefrom the wooden bandstand ( 14a ) and read the placard behind it . Get a close - up of the small window ( 14b ) and employ the hook to get theLockpick . apply the lockpick on the front door ( 14c ) to gain access to the Goblin ’s Hut and go at heart .
Related : Echo Bay Murders – Chapter 1 Walkthrough
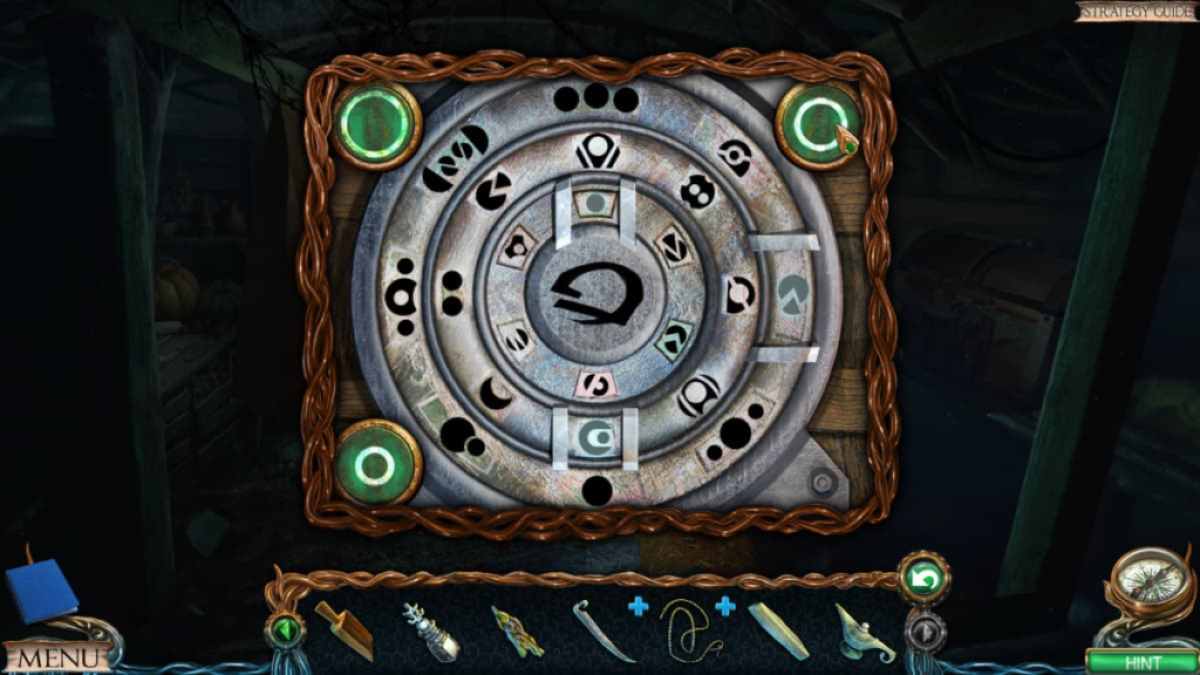
Take theRope with a Hook(15a ) and reveal a puzzler , then remove the cloth ( 15b ) to start a mere point - matching puzzle to have theWhetstone . Take theOil Lamp(15c ) , and underneath it , take down the final part of the circular puzzle drawing you need . you’re able to now complete the puzzler ( 15a ) to open up the path to the Cell ( image below ) . Before heading down , get through the rope in your inventory several times to create aKnotted Rope with a Hook .
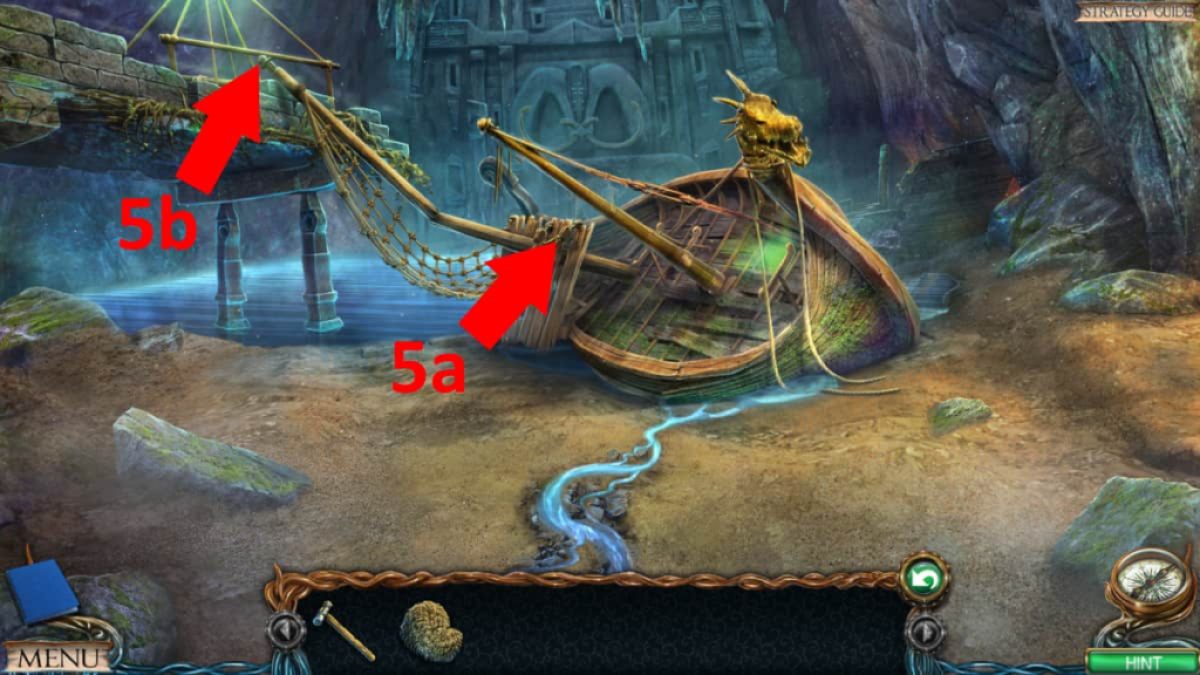
Image by Pro Game Guides
In the cell , after the cut of meat scene , take theTorchfrom the wall ( 16a ) and move back up the stairs . start the oven ( 15d ) and get down your torch inside to get aLit Torch . Go back into the cellular telephone and use the common mullein to scare off the spider ( 16b ) , then click your mother for a cutscene .
How to make flour
Take theHolder(16c ) and combine it in your stock with the steel , then use the whetstone on it to make theScythe . Move outside to the clearing in the forest and use the scythe on the plant ( 14d ) , then take anEgg .
Go to the Tree of Life and talk to your father , who gives you the Cage Key . Move to the gravy holder hold and practice the paint on the John Cage ( 1e ) to get the Leather . You now need to come back to the druid hamlet . Go into the grind and use the knotted rope to get access to the chopine ( 10f ) , then click the rope for a close - up and snaffle the Lever before moving the system of weights onto the scale of measurement . This moves the sack of flour up onto the pulley organization , ready to go up to the top of the mill .
channelise back up to the top floor of the mill and use the lever tumbler on the left twist ( 11e ) , then pull the lever to fetch up the sack . While in the same close - up , take theWeightsand then get through the hook to attach it to the sacking . Get a close - up on the diametrical gimmick ( 11b ) and tot the weight . This moves the sack over the cakehole ( 11a ) , so sink in the sack to drop it . Go near - up on the hollow , utilize your knife on the sack to open up it , then take theEmpty Sack .

Image by Pro Game Guides
Back on the ground floor of the milling machinery , practice the empty sacking on the shoot ( 10 gee ) to attach it . Click the small wooden lever tumbler above the swath in the close - up to sate the sack once more , take the smash to untie the sack , grab theTrowelfrom inside the sack , then at last , use the easy lay on the flour to get someFlour .
How to open the goblin’s chest
Move to the marketplace and add the flour to the bowl of water in the tent ( 6a ) , add the eggs , then also add the oil and salt ( both already on the board ) . Click the mixture to mix it , then collect theMortar in a Bowl . While here , you may also select the brake shoe sole - making machine ( 6b ) and add the leather to it , along with putting the mucilage in the dish .
Go to the prison cell next and press the jam the spider went into ( 16d ) . total the mortar in the close - up , then habituate the trowel to start out a simplebrick placement mystifier . This can be quite frustrating but start with the spell that ’s front - right and slot it in bottom - right hand , then add the bit that ’s 2nd from the right at the back next to it . From there , it should be straightforward . This will trigger a cut picture with your mother , after which you ’ll find anote with the code984on it .
Use the knife on the mummified goblin ( 16e ) , use the code to unfold its purse , and take theKey . Once done , click the government note in your inventory once more to get theBlueprint . Head outdoors to the clarification and habituate the key to spread and remove the padlock ( 14e ) and gain admission to the chest . Take theHookin the same finis - up , then click the dresser to open up it and get theRed Stone .
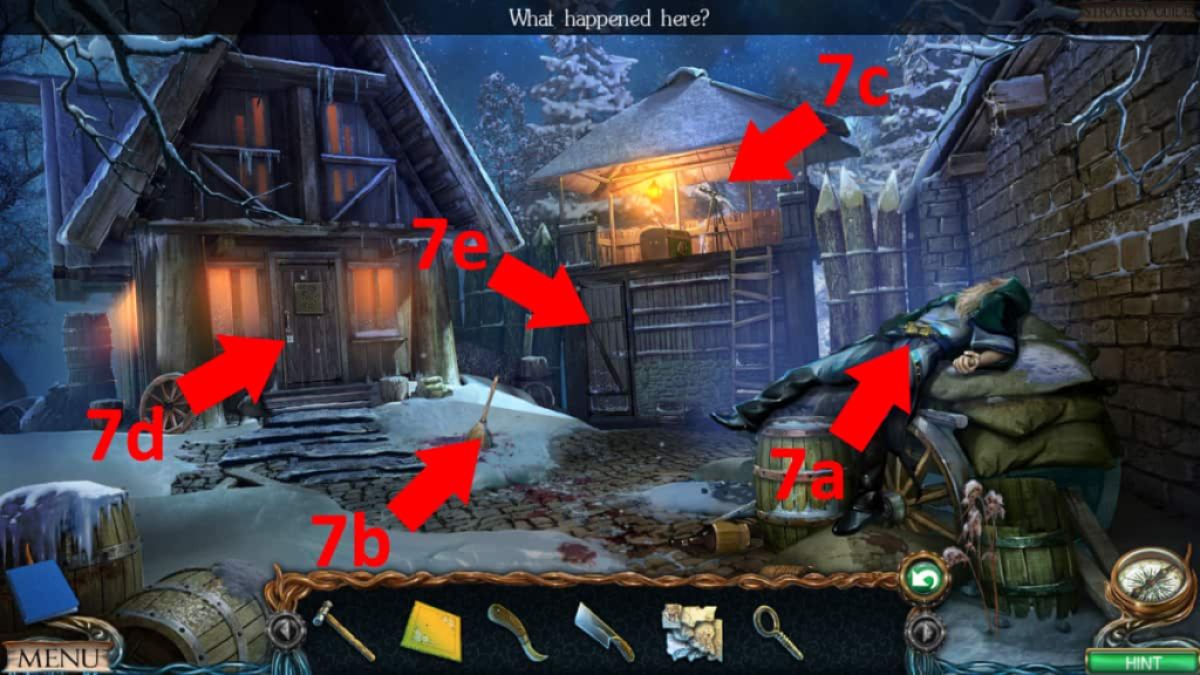
Image by Pro Game Guides
How to fix father’s prosthetic
Back in the cell , supply the red stone to the skull image ( 16b ) and take theCage KeyandBottle Openerfrom the mysterious compartment . Use the cage key on the whorl ( 16f ) , but it breaks .
Return once again to the druid Greenwich Village and summate the absent part to the blueprint ( 9d ) , trigger a dim-witted puzzle . If confusing at first , each peg can be broken down into three part , and you require to use the spare peg to make space to shift the other parts around . Once you have this cognition , it is an easy process . Once done , click the adult male leg to advance theIncomplete Prosthetic gadget .
touch on : vacate Walkthrough & Puzzle Solutions
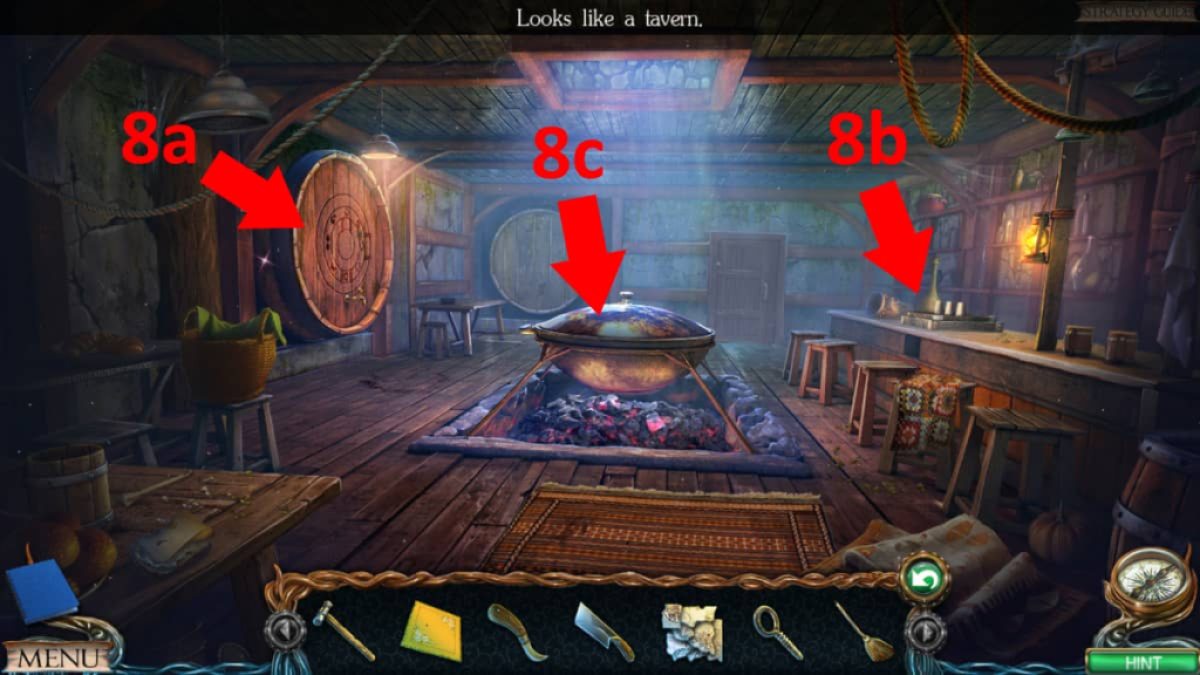
Image by Pro Game Guides
Go to the tavern and utilize the crotchet on the pan lid ( 8c ) , then take theBlowtorchfrom inside . Go to the market and use the blowlamp on the mucilage in the bowl ( 6b ) , then flick the bowl to impart the glue to the leather . cluck the leather to fold it , then the car to press it , and dawn once more to get theInsole . confiscate the insole to the prosthetic in your inventory , then add together the nails and forge them in to get theProsthetic equipment .
Take it to the Tree of Life and confiscate it to your begetter ’s leg . After a cutscene , he ’ll give youPart of a Page , which you need to take to the domain hospital . Add it to the Word of God ( 9c ) to complete theStunberry Antidote Recipe . Go to the cell and speak to your female parent , then utilize the tongue to roll up aGlowshroom(16 g ) .
How to make the stunberry medicine
Next , go to the cave and get theDrop - Sir Herbert Beerbohm Tree Leaf(2b ) , the underground haven to get someBerries(3b ) , and then to the Tree of Life . Use the bottle unfastener on the tree ( 4b ) to receive someWood Chips . Also , take theSymbolthat is enshroud underneath them .
In the goblin ’s hut , add the symbol to the chest ( 15e ) and fall into place inside the chest of drawers to start a movement puzzler ( see image ) . Once complete , take theShelf LockandMatchesfrom the bureau .
Go to druid Greenwich Village and into the market place , accede the tent ( 6a ) , and tot up the oil colour to the burner before using the matches to get down it . Put the folio in the tray above the burner , then remove it to get the Dry Leaf . Head into the field of force infirmary . Use the mushroom on the gadget on the board ( 9e ) , bring the wood scrap , Berry , and dry leaf to the bowl , use the Mrs. Henry Wood debris on the small green vial , click the bowl to integrate the factor , and collect theMortar for Heating Liquids . Select the shelves above Maaron ( 9f ) and add the shelf interlock to open them , take in theElixir of Wellness .
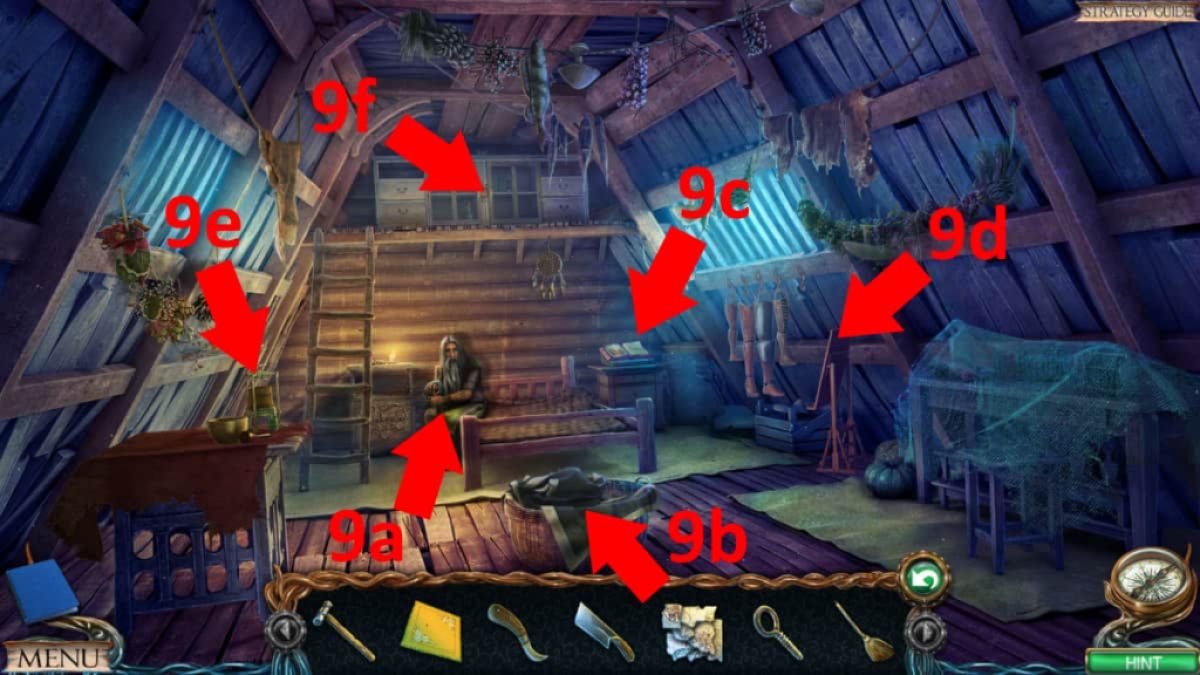
Image by Pro Game Guides
Go to the goblin ’s hut and put the mortar and the philosopher’s stone in the teapot ( 15f ) , then put the lid on it . Click the teapot again to pour it , then take theTea in a Mortar . Go to the theater of operations hospital once more and use the tea on the green ampoule ( 9e ) , finally pick up theMedicine . Give the medicine to your father at the Tree of Life , then take him to the electric cell to help free your female parent .
How to free you mother in Lost Lands 3 Bonus Chapter
appear at the lock to clear you wo n’t be able to break it . Move to the line of business hospital and peach to Maaron , who will give you a Tile . Take it to the market and it to the caravan ( 6f ) to set out a wide-eyed pattern - check mystifier . Once complete , the side of the train drops down , starting an point - matching puzzle . On completion , you ’ll receiveMaaron ’s Staff , which you could take back to the cell .
Use the stave on the cubicle door ( 16f ) to free your female parent . guide back to the gravy holder hold , break the residue of the plank blocking your weenie ’s going ( 1a ) , and you ’ll complete the bonus chapter !
Looking for more puzzler secret plan guides ? chink outHow to stupefy Riddle School 2 – Full WalkthroughandHow to beat Riddle School 5 – Walkthrough Guidehere at Pro Game Guides !
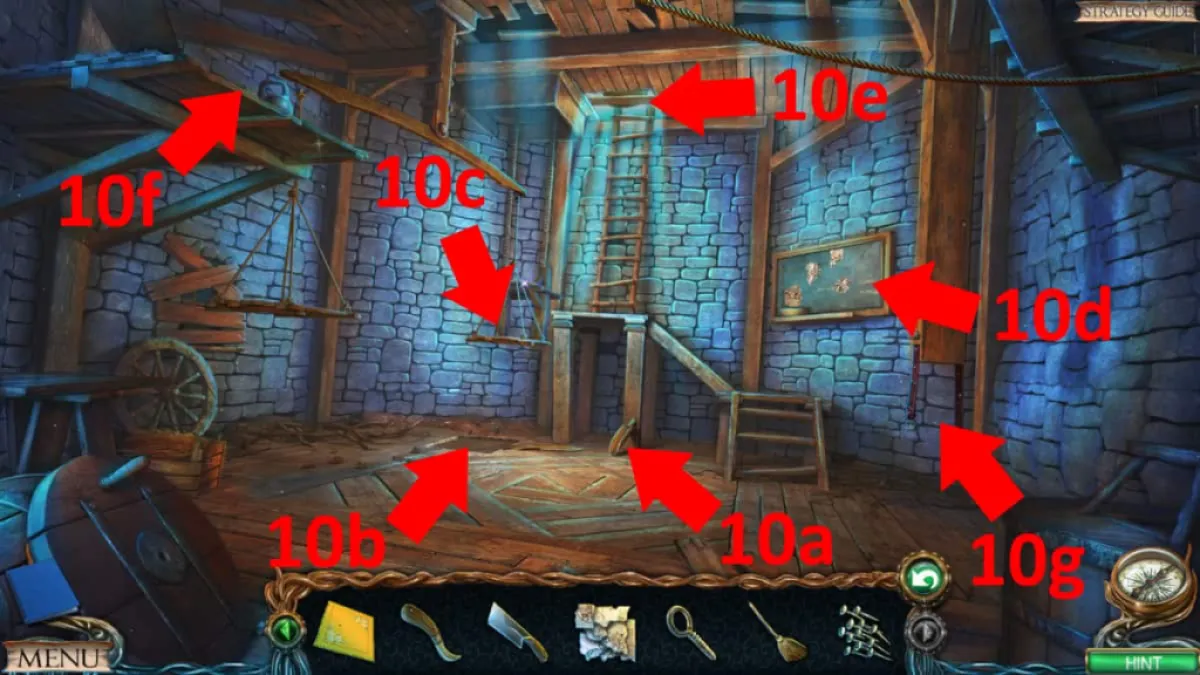
Image by Pro Game Guides

Screenshot by Pro Game Guides
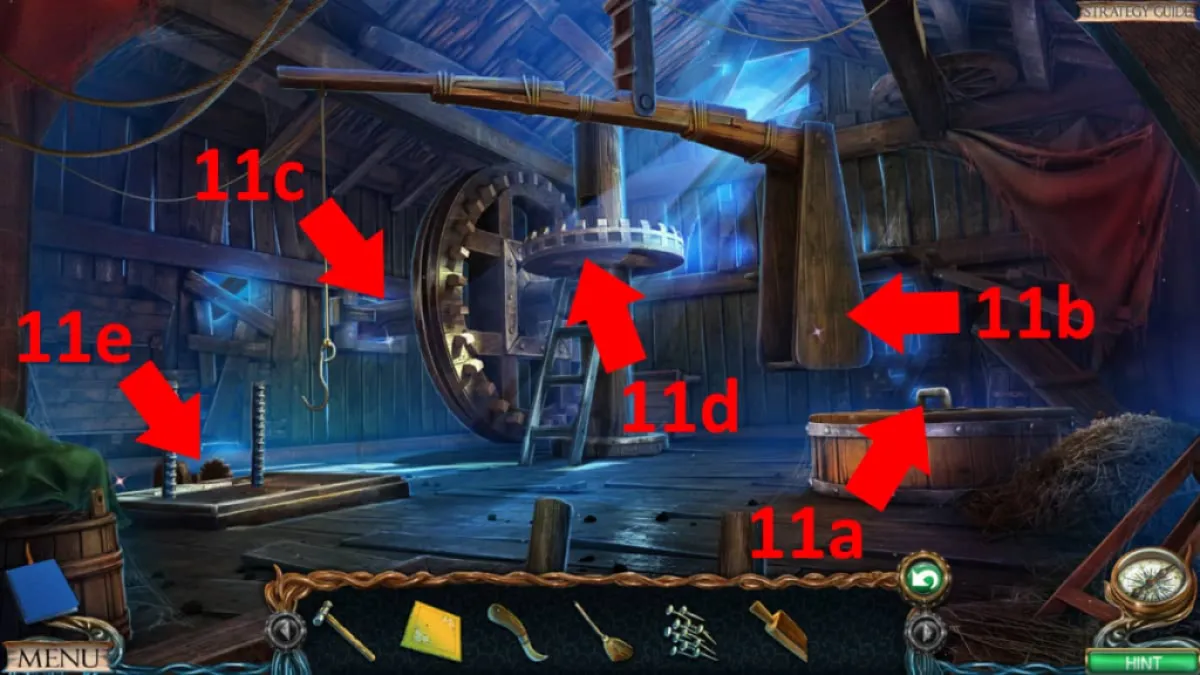
Image by Pro Game Guides
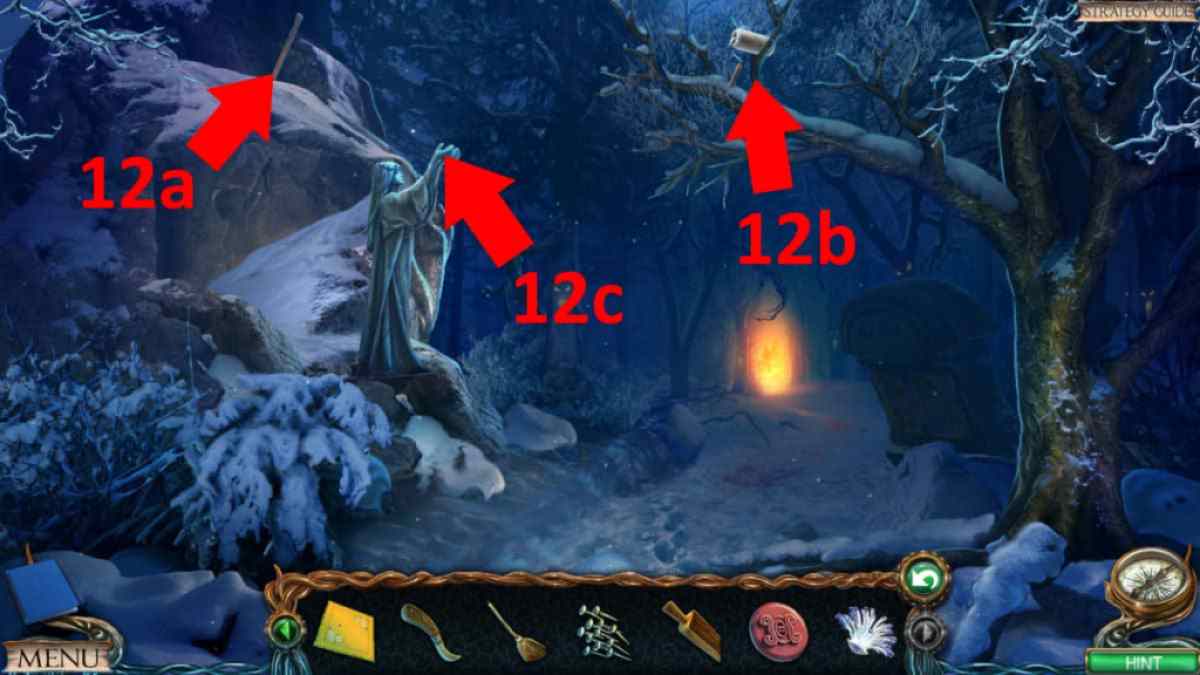
Image by Pro Game Guides
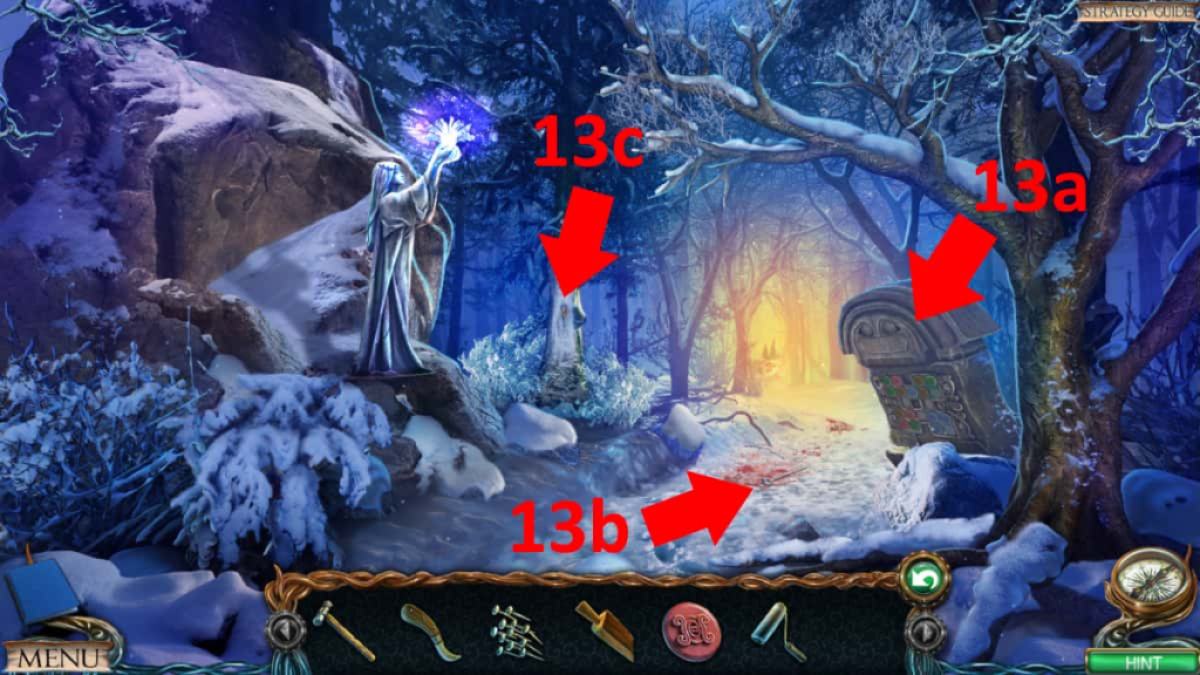
Image by Pro Game Guides
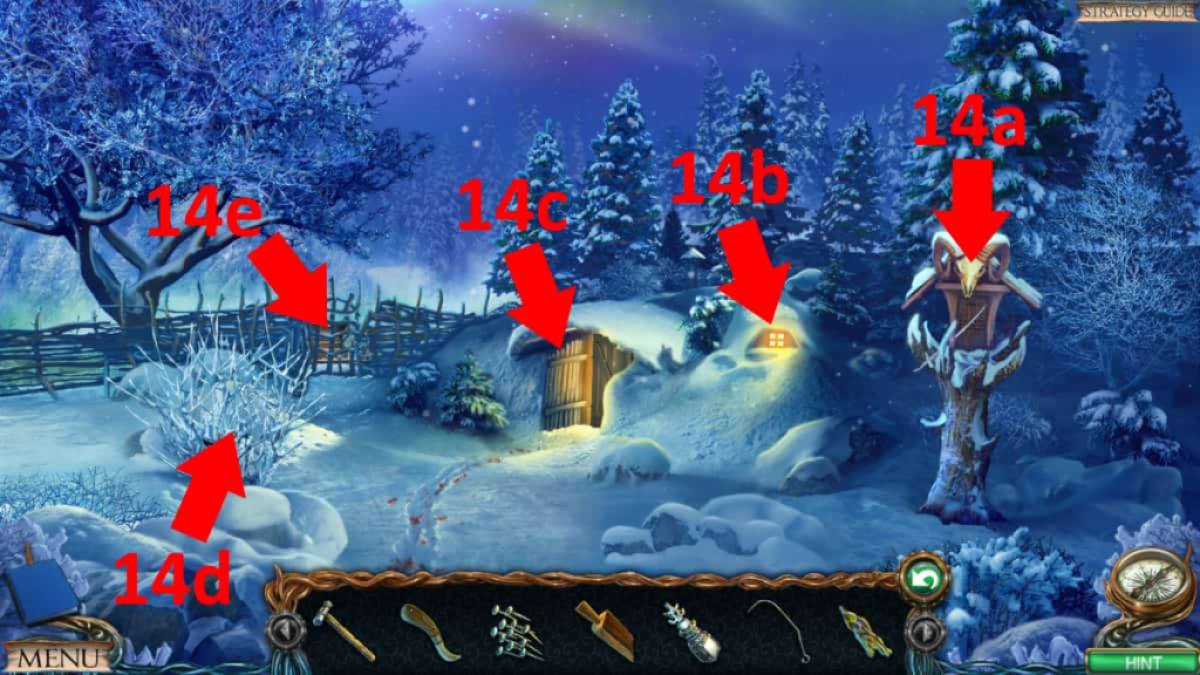
Image by Pro Game Guides
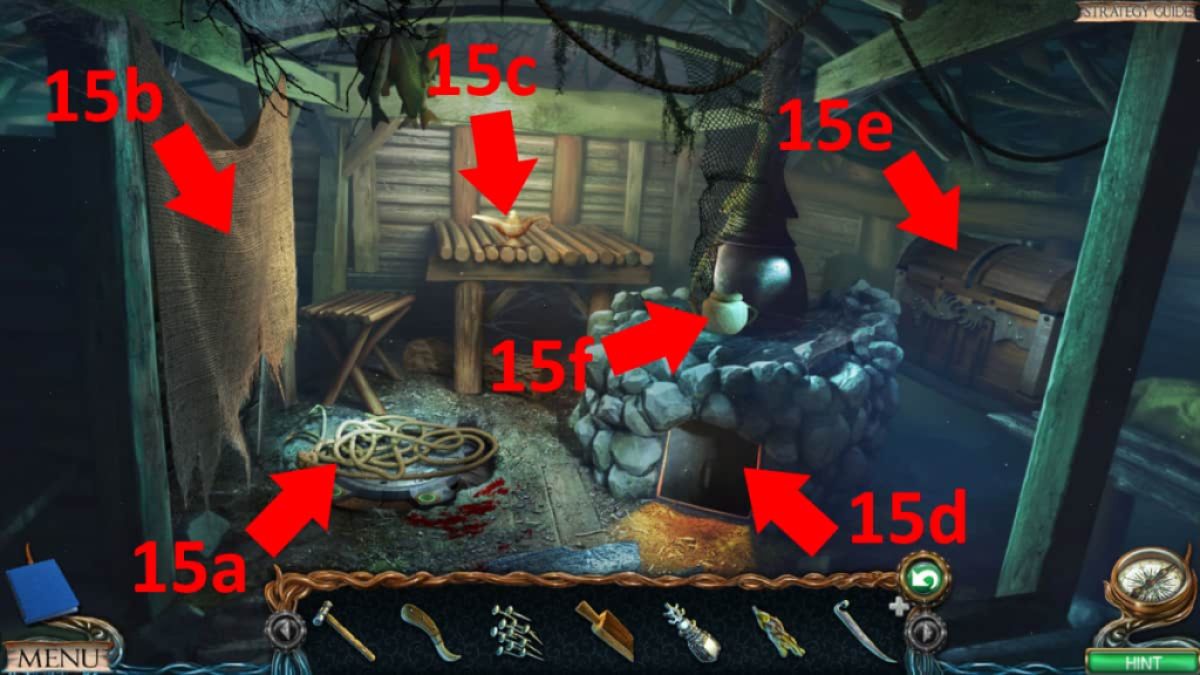
Image by Pro Game Guides
Screenshot by Pro Game Guides
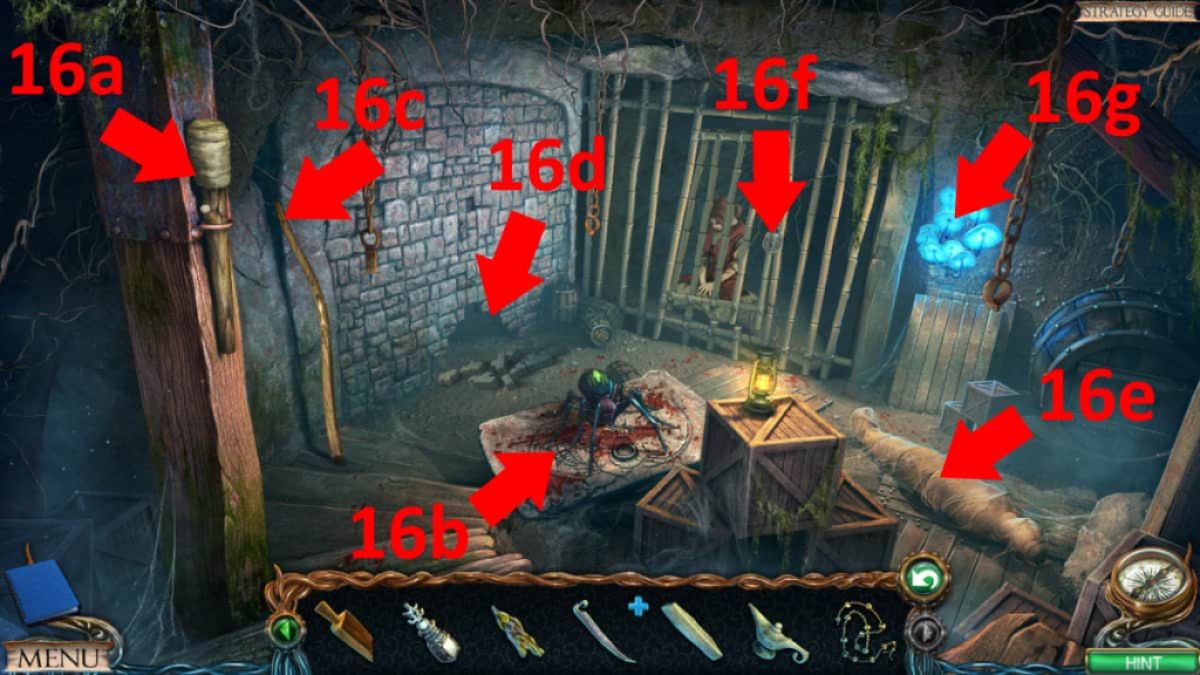
Image by Pro Game Guides

Image by Pro Game Guides
