The epic finale !
not bad puzzling and storytelling combine in the Lost Lands serial publication of point - and - flick puzzle RPGs . If you ’re draw end the conclusion of Lost Lands 2 , The Four Horsemen , read on for Part 4 of my full pass walkthrough .
Lost Lands 2 Walkthrough, Part 4 - Full guide and puzzles
This walkthrough overcompensate the concluding part of the main biz in Lost Lands 2 , The Four Horsemen . It start out after you ’ve just met the centaurs but they ’ve reject to help you until you find them a genuine dwarven shield , and it continues to the destruction of the main storey .
If you ’re looking for supporter with earlier parts of the game or with the bonus chapter , you ’ll discover all the link you need on myLost Lands 2 Walkthroughhub Sir Frederick Handley Page . At Pro Game Guides , you ’ll also find nexus to walkthroughs of all the later secret plan .
Befriending the centaurs
lead to the dwarven cemetery and use the pair of tongs to transfer the shield ( a1 ) from the pillar and then pick up theDwarf Shield .
retrovert to the centaur ’s settlement , give the shell to the centaur Ziruk ( b1 ) , and ascertain the cutscene in which he tells you to find him a twig from a red tree in the Ontus Glade . subsequently , he will give you aCrystal Key . you could give him the boar tegument now , as he needs that . Plus , it neaten up space in your armory .
Go to the woods Orion district next and utilise the key to spread the case ( c1 ) , strike theStafffrom at heart . Use the staff to raise the orb on the pedestal ( c2 ) up into the statue ’s workforce . This will cause a cage to lower , admit you to take aBirdfrom indoors .
Move to the conjugation and rate the birdie on the root that make a face ( d1 ) , opening up a passage that leads to theOntus Glade . Head through .
The Ontus Glade
TheCollectibleis in the tree diagram on the left ( e1 ) , and you ’ll find theBeyond Objectin the tree diagram just to the right hand of the path ( e2 ) . Place the decoration in the I. F. Stone ( e3 ) and a rock music will rise from the flat coat on the left field of the path ( e4 ) . There ’s nothing more you may do here now , so tap the way of life in the scope to move on to thewaterfall .
seize theCollectiblefrom the red Sir Herbert Beerbohm Tree ( f1 ) , theBeyond Objectfrom the dead tree ( f2 ) , and then take aManuscriptand someVenomfrom next to the piss ( f3 ) . In the same finale - up , you postulate to take a leaf and apply it to enclose the fish , which allow you to take theFishinto your backpack .
You need to go to Mountgore ’s Temple next and use the venom on the common ivy ( g1 ) around the skeleton to take it . This give up you to open up the leather satchel and take thePattern Fragmentfrom inside .
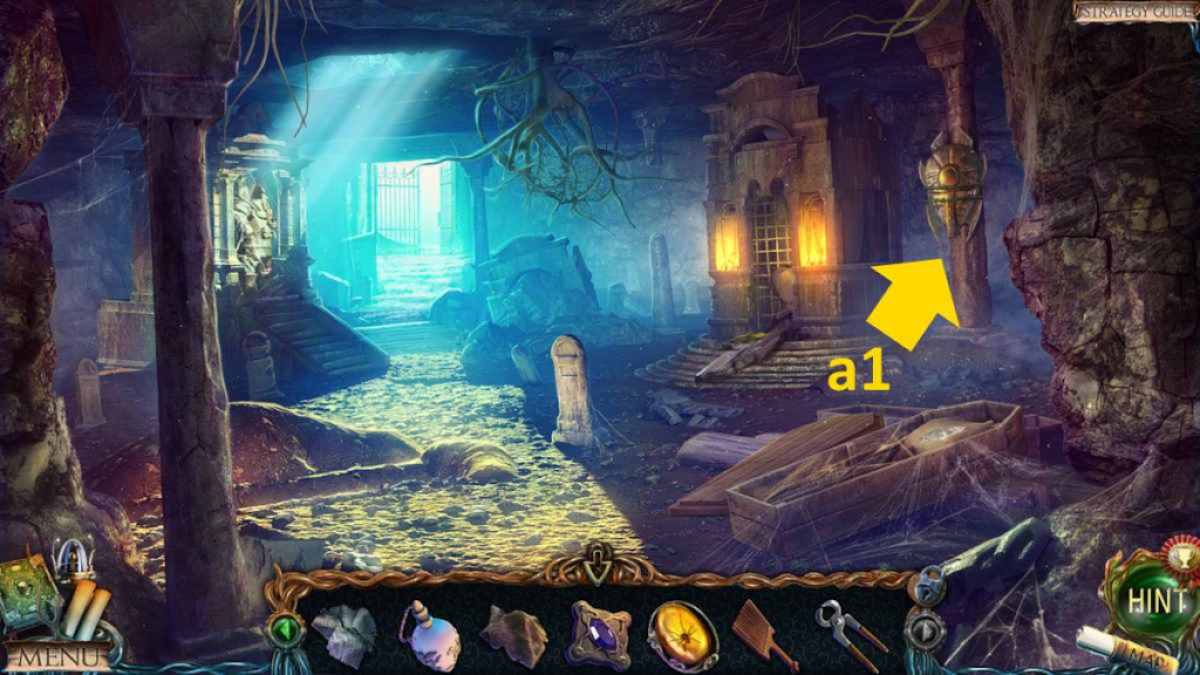
Image by Pro Game Guides
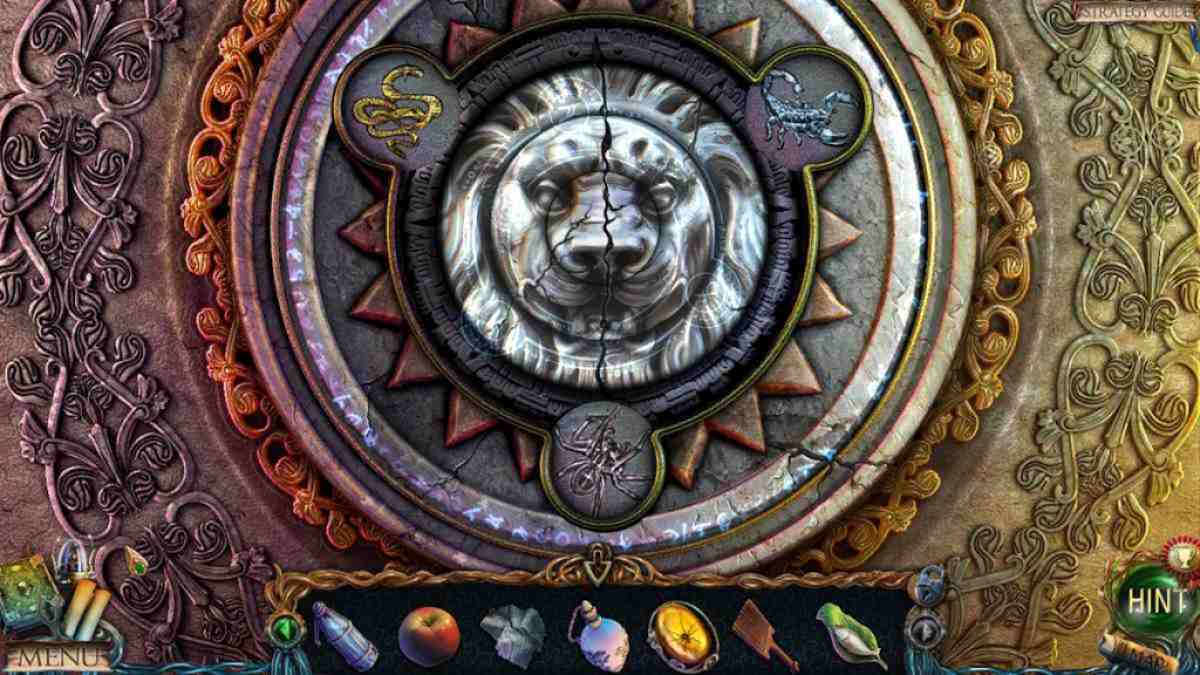
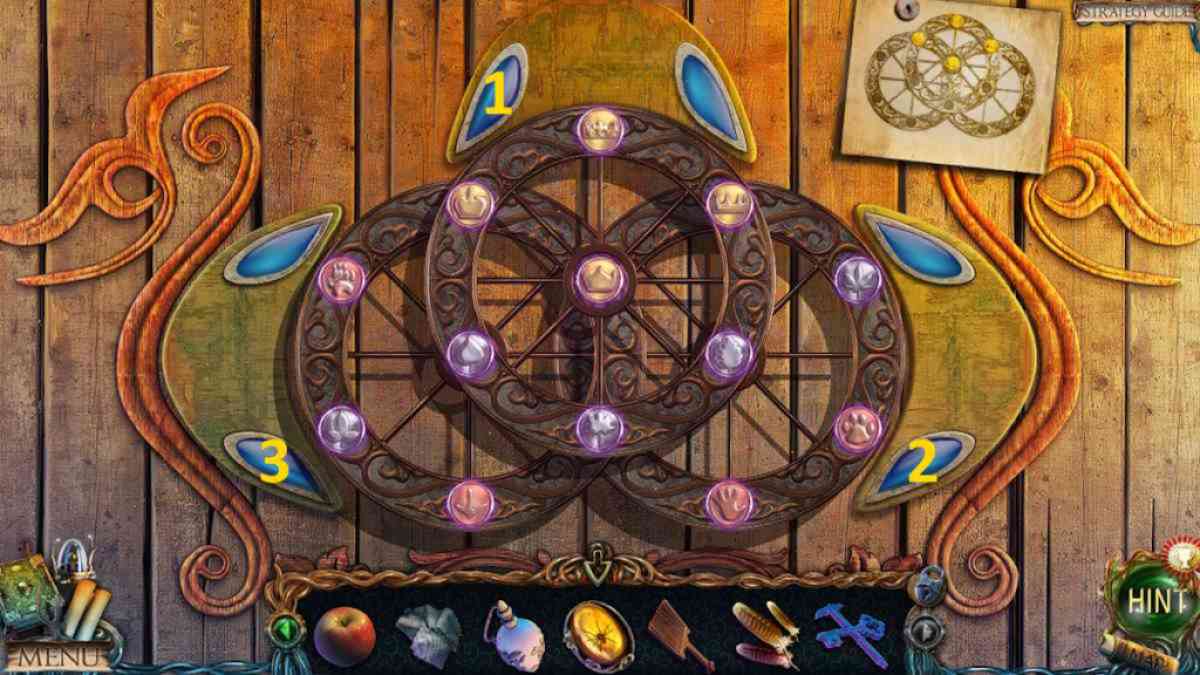
tot the design sherd to the communion table beneath Mountgore ( g2 ) will start a go around disk puzzle . This one is easy than it may ab initio look and a lot of the solutions you ’ll see online are misleading .
Make the three images around the bound first by spinning the single images and the extraneous gang . Once they ’re done , make the king of beasts face up in the center of attention and you ’re done . See the completed image above to know what you ’re direct for . On completion , you ’ll incur theOntus Figurinefor your fuss .
RelatedLost Lands 9 Walkthrough – Full usher
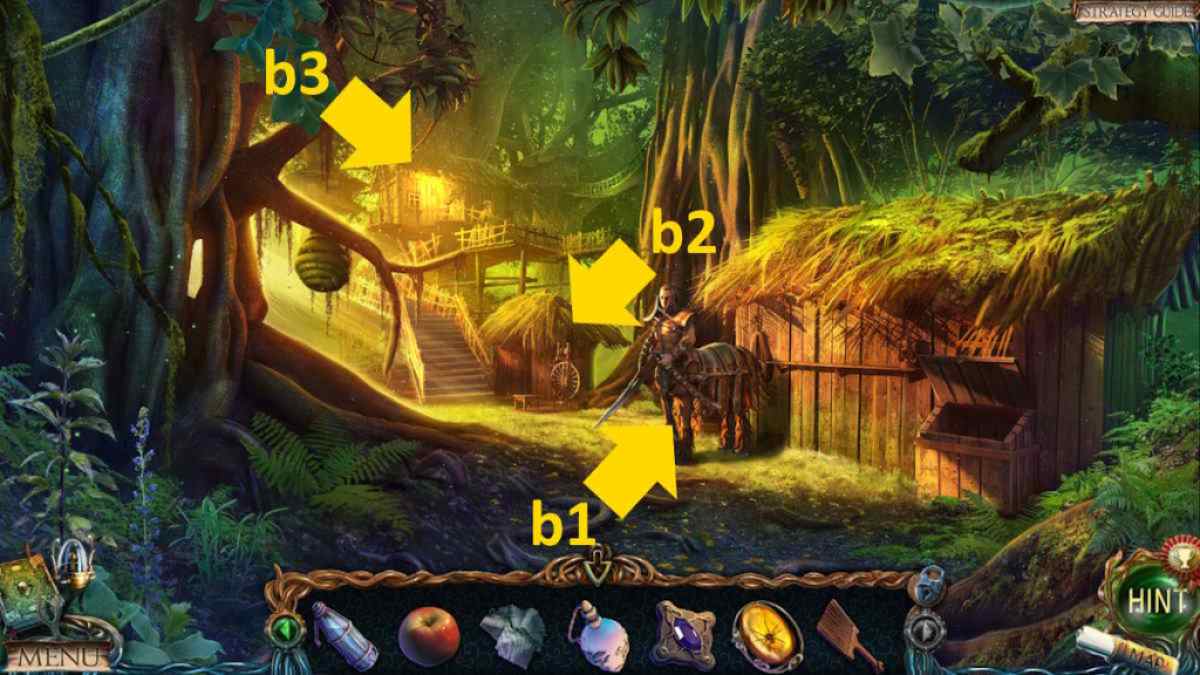
Image by Pro Game Guides
The red tree twig
Go to Maaron ’s cottage next and put any remaining figurine you have on the shelf ( h1 ) on the veracious paries ( you should have all four now ) . This let on a secret compartment from which you may take aManuscriptand aKey .
Move to the dead lake in the swamp , use the key to start the compartment in the boat ( i1 ) , and take theHookfrom inside . you may now return to the falls and use the hook to pull down the tree branch ( f4 ) . get through the rope once it is connect in the close - up to move to theRed Tree Top .
It ’s amazing what you may find at the top of trees ! TheCollectibleis on the arm to the left ( j1 ) , while theBeyond Objectis in the boat ( j2 ) . Also , take theSword Hilt(j3 ) , use the Pisces on the bird of Jove to make it forget its nest ( j4 ) so you take theFeathersand theSaphire Symbol , and practice your knife to cut and then take theRed Tree Twig(j5 ) .
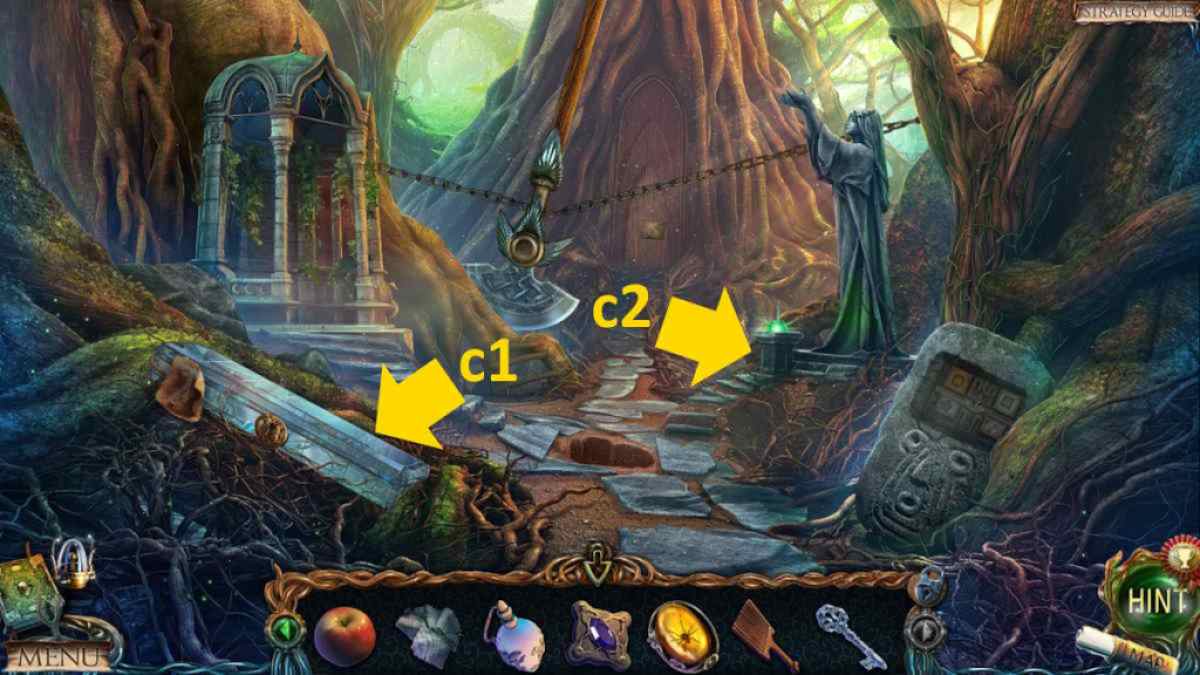
Image by Pro Game Guides
Return to the centaur ’s small town and give the twig to Ziruk ( b1 ) . While he ’s making the bow , he tasks you with defecate a bowstring and some arrowhead .
Making the bowstring
channelise to the falls and use the sword hilt on the systema skeletale stuck to the tree ( f5 ) to get theSword . Move to the Ontus Glade and place the brand in the Harlan Fiske Stone ( e4 ) to crack it open , submit theChipfrom in spite of appearance . Take the chip back up the tree diagram and introduce it into the gimmick there ( j6 ) to set about a rule restoration puzzle . If you ’re stuck on this one , use this solvent ( make certain the teaser has readjust before you begin by clicking out of the closemouthed - up ):
This gives you access to the treehouse above ( j7 ) , so cluck it for a finale - up and take someCheese . Also , front at the spyglass to realise you involve a screwdriver to take the lens .
Head back to the Ottus Glade and give the cheese to the computer mouse on the Ottus ( e5 ) . When it come down to the cheese to eat , take theMouse . Go to the wood path next and use the computer mouse to scare away the insects on the entanglement ( k1 ) .
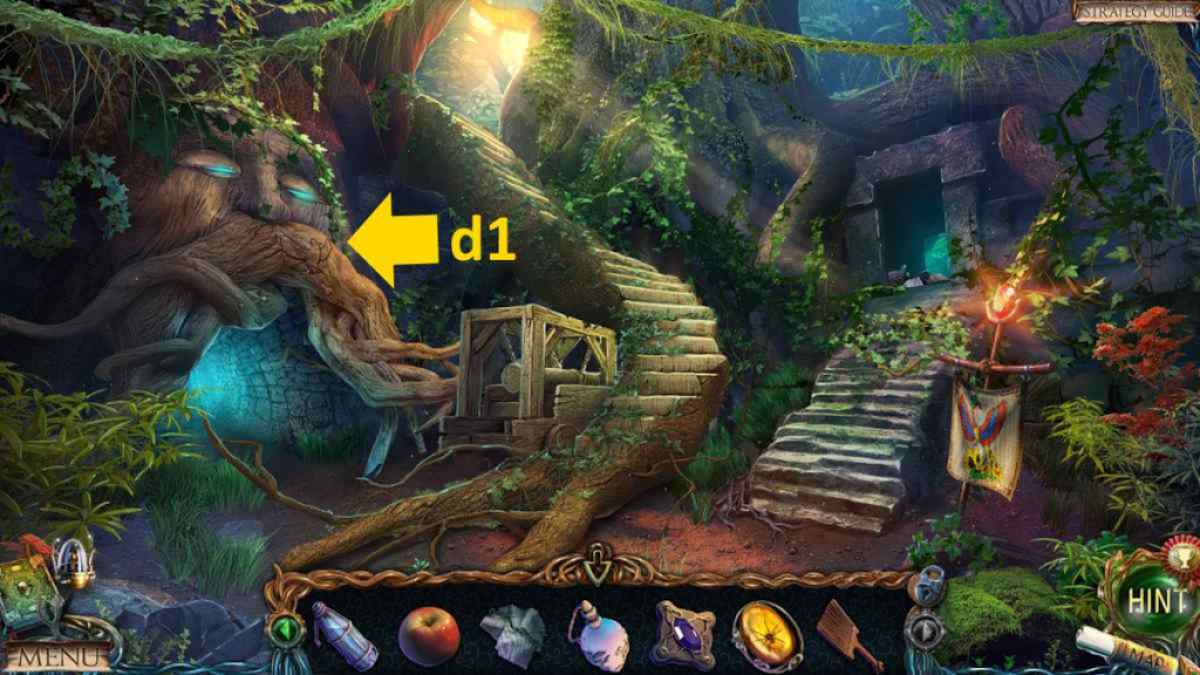
Image by Pro Game Guides
habituate the comb on the web to get aComb With Thread . hark back to the Centaurus ’s village , add the comb to the weaving machine ( b2 ) , click it again to lock it , and then take theBowstring .
Making the arrowheads
While you ’re back in the centaur ’s small town , remark that the armory room access ( b3 ) is now open . Go into the close - up and take your finalStone of Fireand theDoor Knocker . you may also click the table in the finale - up to see what ’s required to finish this task . you could add the plumage and bowstring now to get them out of your armoury .
Move to Fire ’s Dwelling and supply the three rock of fire to the statue ( l1 ) . When the torch is lowered , click the wick to bump off it and add the alcoholic drink - soaked cloth to make a new taper . Take theTorchand then expend it in the fervour here ( l2 ) to get aBurning Torch .
Head to the square in the Frozen Mountains next and pick out the dwarven statue in the background ( m1 ) for a close - up . Add the symbol to the axes there and then take the remainingKey .
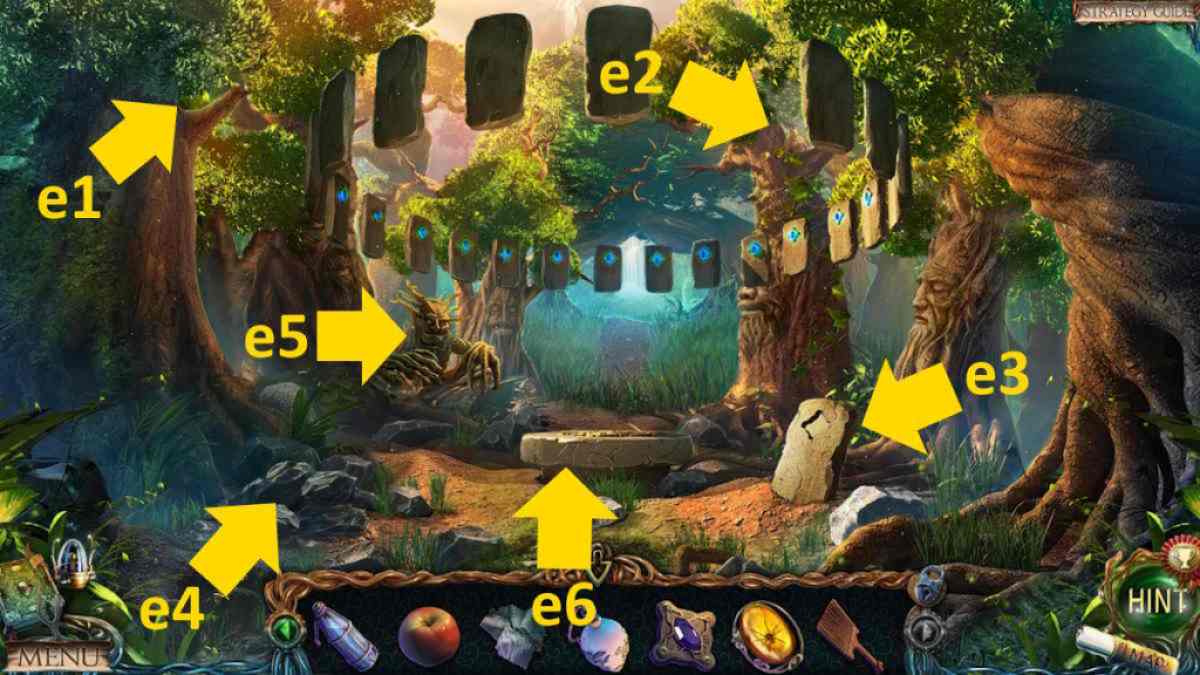
Image by Pro Game Guides
Go back to Fire ’s Dwelling , practice the key on the bureau ( l3 ) , and take thePickaxe . Now you may use the pickaxe on the sway here ( l4 ) to gain someMetal .
Go the the dwarf slums next and expend the door detractor on the drum on the scaffold ( n1 ) to open up the chest there . Take theScrewdriverand open up the box inside the box seat to find aRoller - form Seal .
Select the smithing area ( n2 ) for a close - up and follow the instructions there to make the arrowhead . Put the rum into the furnace , then use the blowlamp to light the fire . Put the metal into the cooking stove genus Pan , take theMelted Metalafterward . Use the unthaw metal in the mould ( on the left of the same close - up ) , and then cluck it to remove the arrowhead .
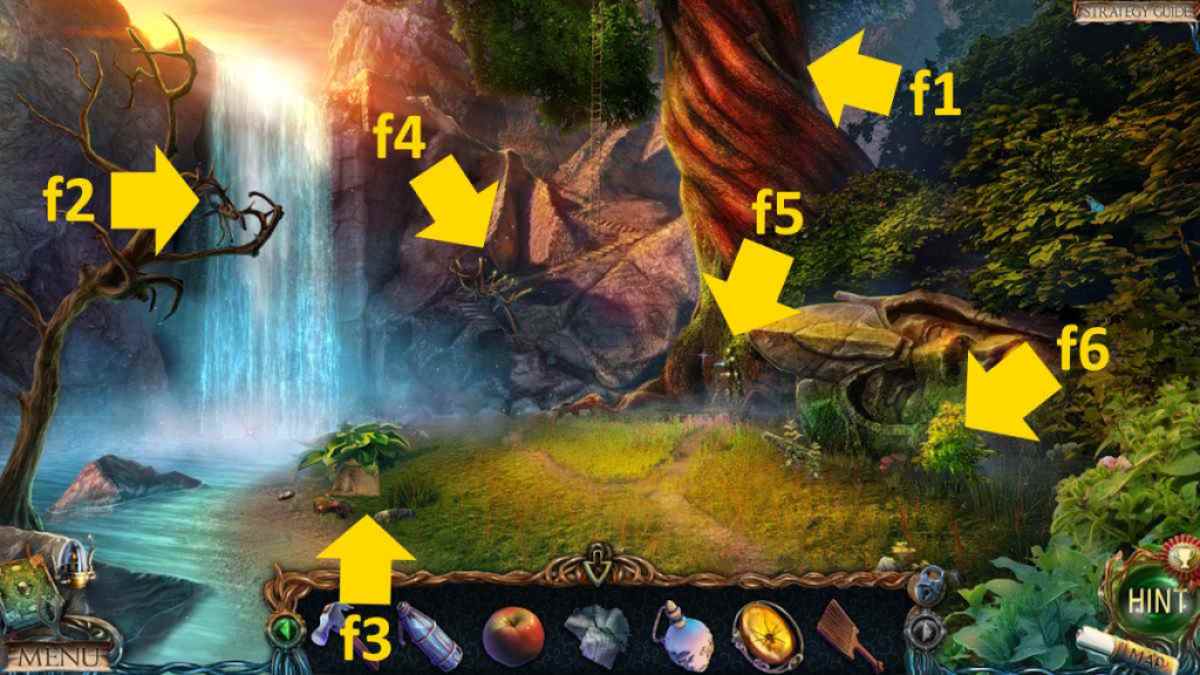
Image by Pro Game Guides
Use the bottle of cold weewee to cool them and then pick up theUnfinished Arrowheads . utilise the heads on the grinder to the right hand in the same stopping point - up and you ’ll receive theArrowheads .
Related : Lost Lands 8 Walkthrough ( Sand Captivity )
Completing the bow
Go back to the Centaurus ’s small town and select the armory table ( b3 ) once more . Add the arrowhead to the table and then click the feathers to add them to the arrow cock . habituate the bowstring on the arc to complete it , add sealant ( already on the table ) to the other end of each arrow shaft , and then add the arrowheads . Pour the live water from your inventory onto the finish arrows , and then you could take theBow and Arrows .
you could now go back to the red tree top and use the screwdriver on the sealed gore in the treehouse ( j7 ) to get theLens . Move from there to the abandon farm in the swampland and lend the lens to the scope ( o1 ) . You see , it is currently orient towards a vacuous wall .
Move back to the dead lake and click the castle in the background ( i2 ) . This will make decease come along in the sky here , so use the bow and pointer to fend it off . After the cutscene , speak to Folnur and then give him Mountgore ’s Malus pumila to bring around his wound . Click the castle once more to move forward toDeath ’s Castle .
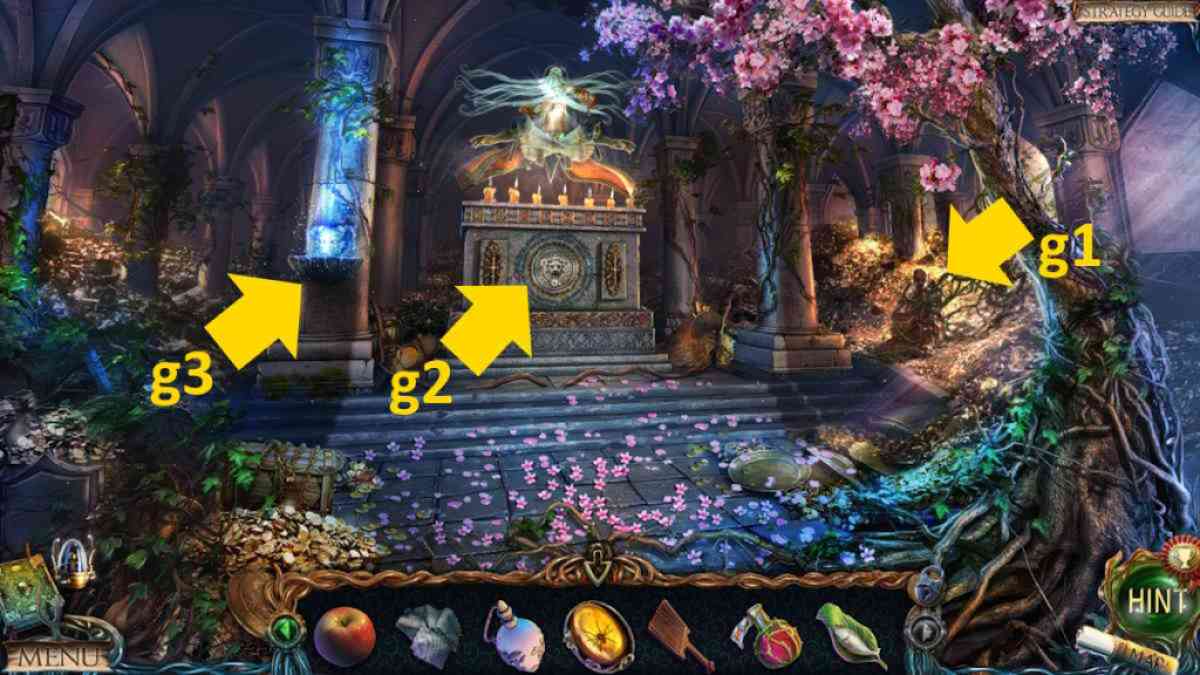
Image by Pro Game Guides
Death’s castle
The finalCollectibleis above the castle gates ( p1 ) , which means you ’ve completed theMagic Machineand now have admittance to 20 bonus teaser . You ’ll also discover the lastBeyond Objecthere , in the tree on the left-hand ( p2 ) . Do n’t forget to pile up theManuscriptthat ’s just next to the gate too ( p3 ) .
Move the rocks to the left of the gate ( p4 ) to find anArmored Glove , and then use the roll seal on the pectus ( p5 ) . start the chest afterward , give the loge inside , and the one inside that , to find out aSpinning Top . penetrate the glow eyeball ( p6 ) , use the baseball glove on it in the close - up , and when it shatter , take theSkull Figurinefrom inside .
Select the chemical mechanism on the gates ( p7 ) and sum the skull figurine to start a reconciliation puzzle , where each skull needs to be along the central product line at the same sentence to finish it . If you ’re stuck , reset the puzzle and come after this sequence to complete it ( with the skulls being numbered 1 - 5 from left to right hand ):
Screenshot by Pro Game Guides
Once complete , the roadblock will be removed from the logic gate . fall into place the now - numb end in the stopping point - up of the area beyond the logic gate ( p7 ) and use the hammer to remove itsStone Heart .
The dragon’s eye
retrovert to the dead lake and place the spinning top on the strange Harlan Stone ( i3 ) . cluck it again and it will set off the Edward Durell Stone , raising stones from the lake and allow you access to the dragon ’s skull ( i4 ) . take it for a close - up and practice the hammer to remove thePetrified Eyefrom the eye socket . target the petrified eye in the guillotine ( i5 ) and operate it to get theDragon Eye .
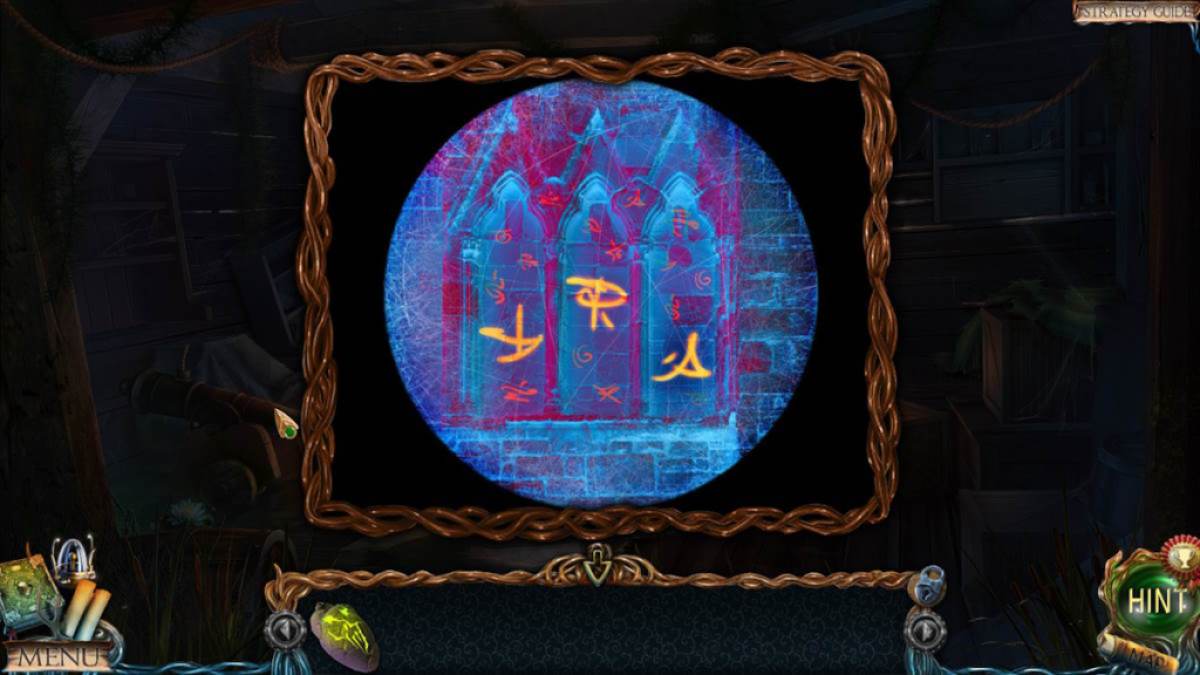
Go back to the abandoned farm and habituate the telescope ( o1 ) once more . This prison term , when you look through , use the dragon eye to make out three symbol ( I ’ve project them above ) . you may now go to the Darkwoods and use these three symbols toopen the ringlet case(k2 ) .
Make a banker’s bill of the ikon that you discover inside ( you’re able to find it in your journal once you ’ve search at it once ) .
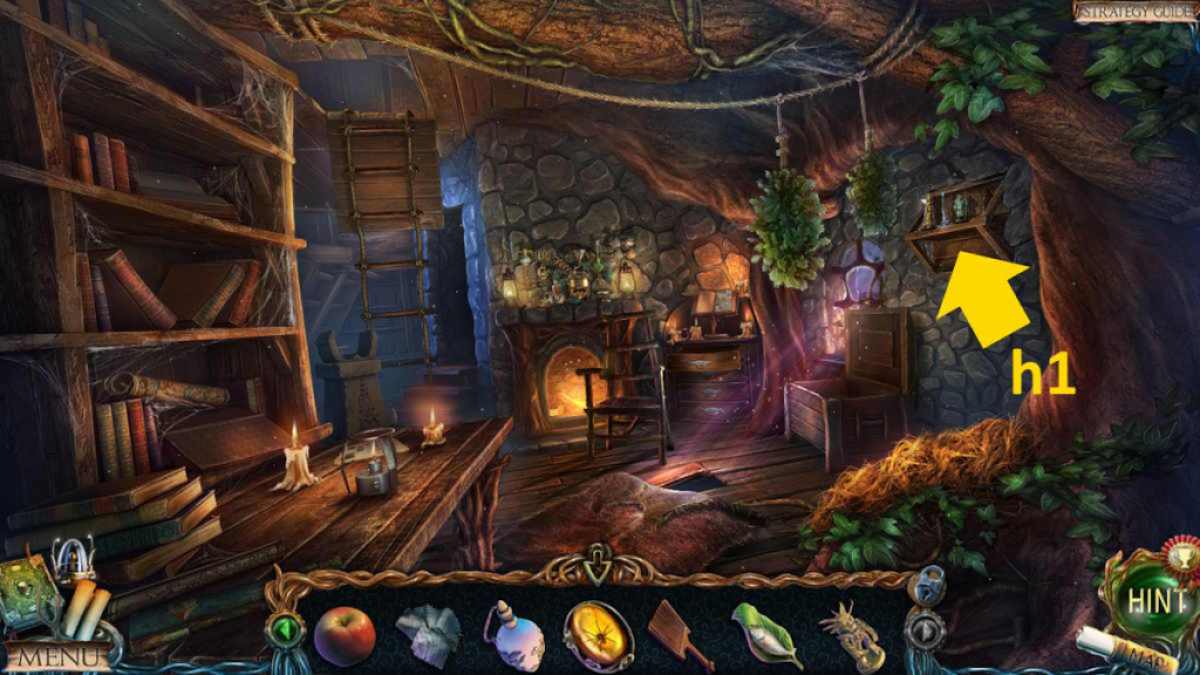
Image by Pro Game Guides
Go to the falls , where you could now investigate the little tree on the right ( f6 ) . Pull it out of the ground , click the haversack underneath , click it once more to give it , and take theT - Wrenchand aWooden Disc . expend the wrench on the panel in the back of the boat at the top of the red-faced tree ( j8 ) to find aBrush , along with yourfinal Manuscript . Also , chatter the book that ’s behind the ms to take aClean Sheet .
Stopping Darkness
come back to Maaron ’s cottage to find him there . Give him the equestrian ’s centre to trigger a cutscene , after which you ’ll receive theSprayand aKey . habituate the spray alfresco on the flower in the glade ( q1 ) to get theFlower , then give the flower to Mountgore in his temple to get theWooden Part . Also , place the fair sail in the pool here ( g3 ) to ferment it into aSpell Scroll .
Back in Folnur ’s refuge , sum the brush to the lens - down machine ( r1 ) and apply the key to reach the door here ( r2 ) and begin your last miss objects mini - plot . Once complete , you ’ll receive theOld Lens . Place the lens on the polishing machine ( r1 ) , apply the simple machine , and take theLens .
turn back to the Ontus Glade and add the wooden disc and the lose sphere to the gem table ( e6 ) to start a puzzle . You need to move the section to fill out the blueprint ( this is an easy one , as the parts go unripe once they ’re in the correct slots ) . Once complete , place the lens on the mesa and then take back theLight - Filled Lens .
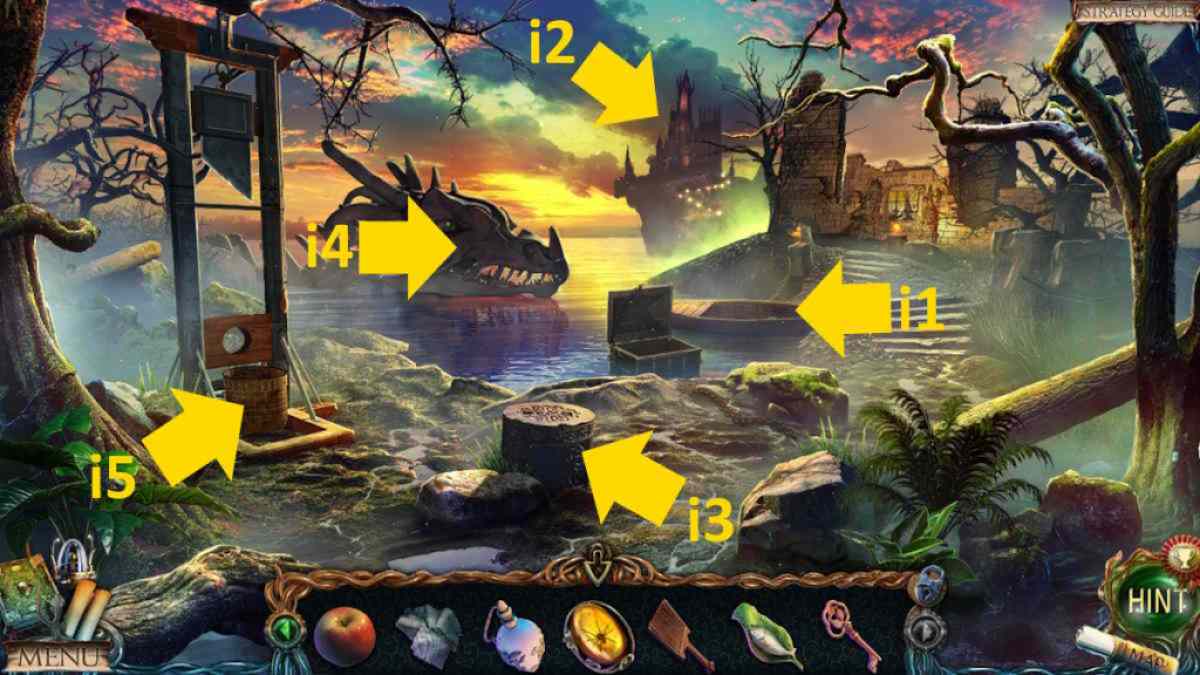
Image by Pro Game Guides
Go to the column hall and talk to Maaron , then move to the upper corridor above . Add the electron lens to the twist there , employ the scroll , and enjoy the final cutscene . Congratulations , you ’ve finish Lost Lands 2 !
If you require to tackle the extra content , stick with us here at Pro Game Guides for myLost Lands 2 Bonus Chapter Walkthrough - The Four Horsemen !
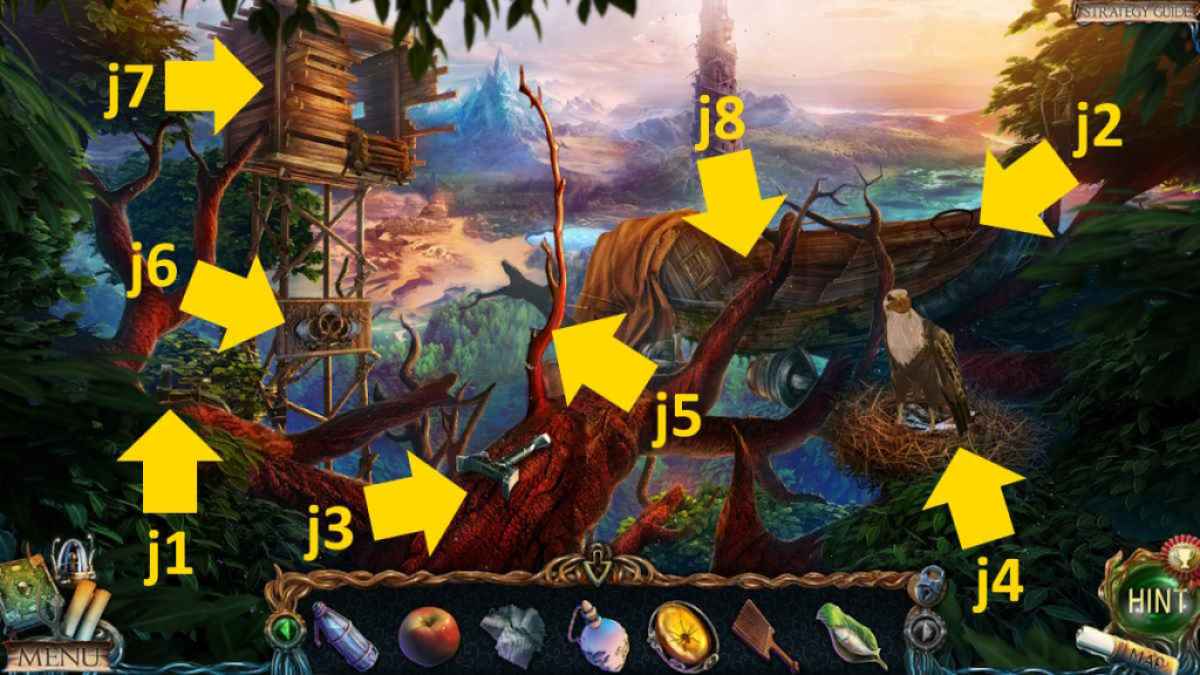
Image by Pro Game Guides
Screenshot by Pro Game Guides
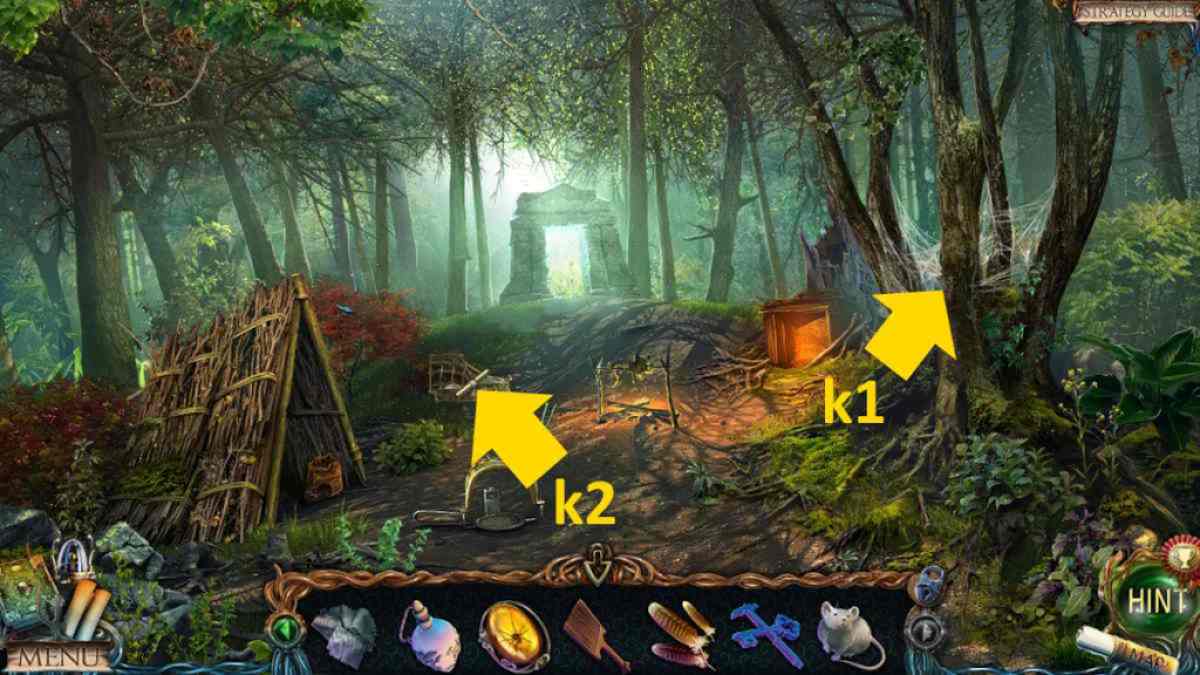
Image by Pro Game Guides
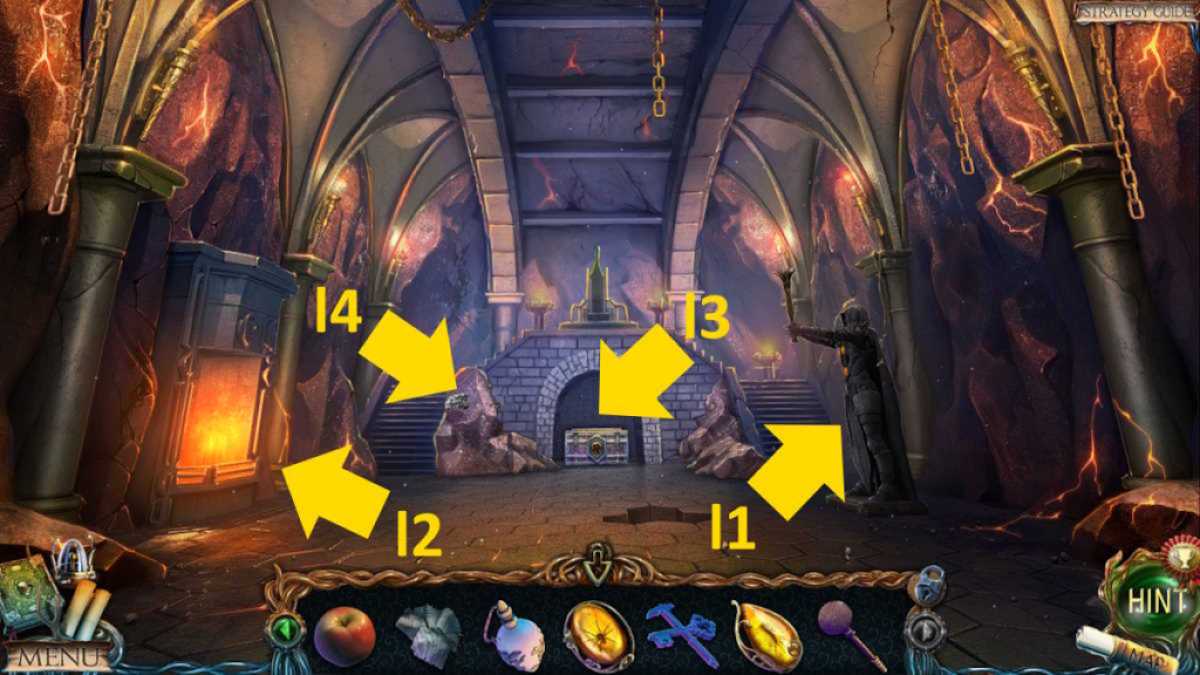
Image by Pro Game Guides
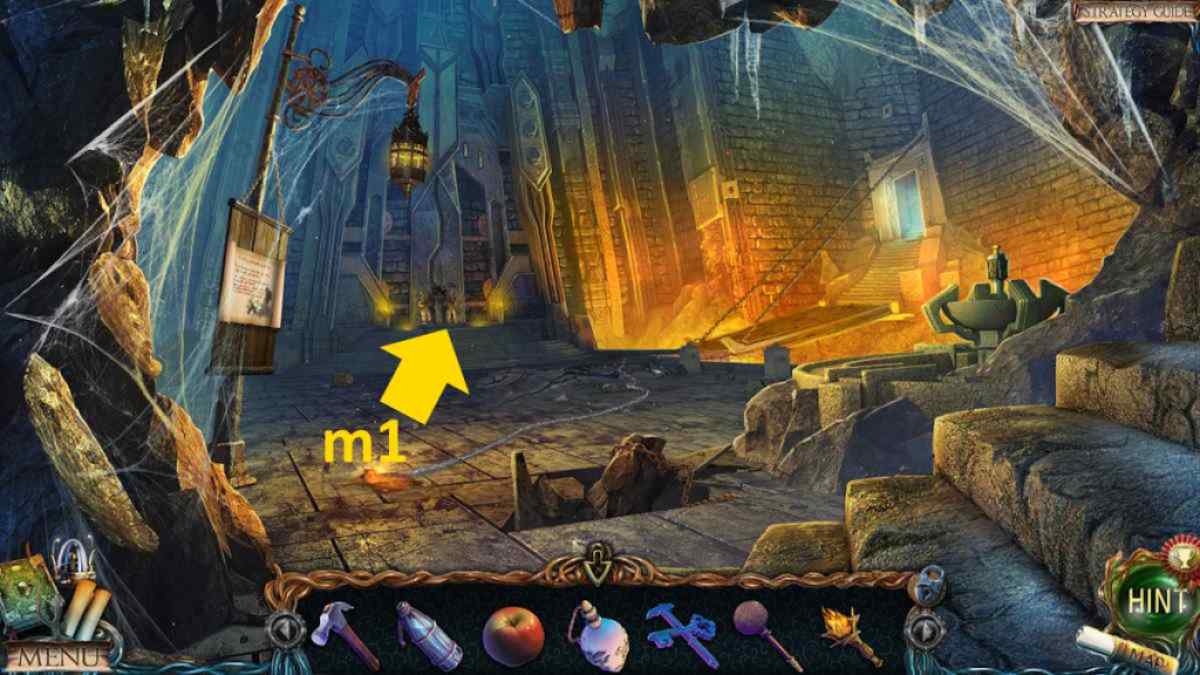
Image by Pro Game Guides
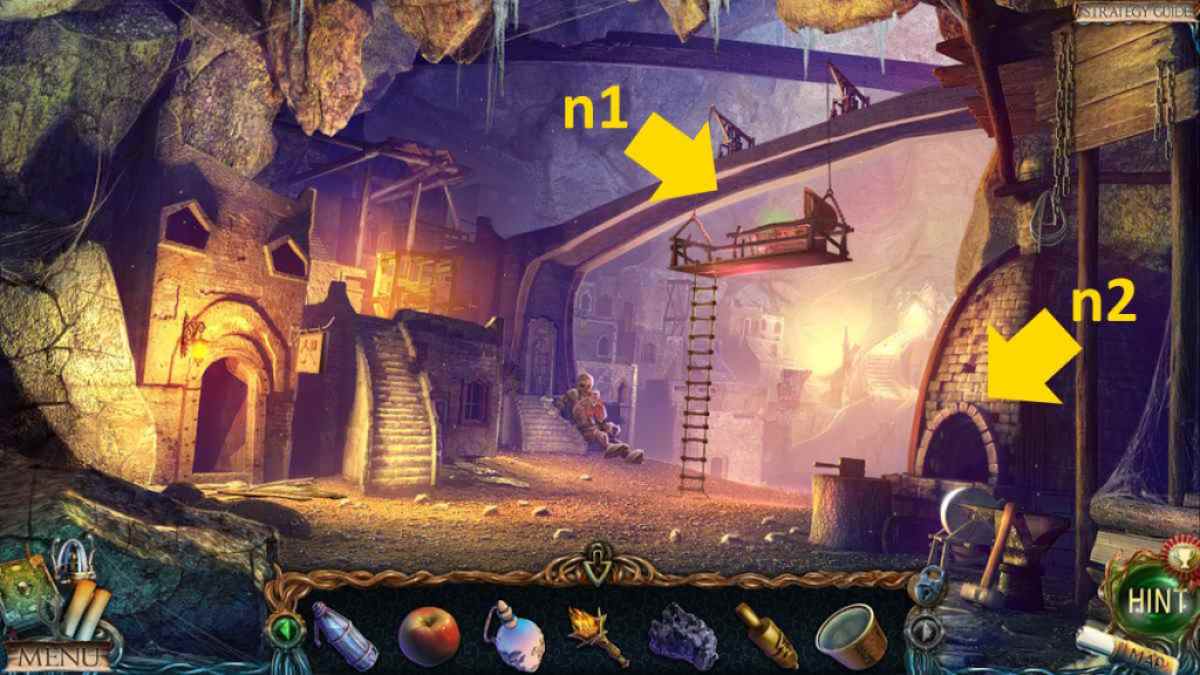
Image by Pro Game Guides
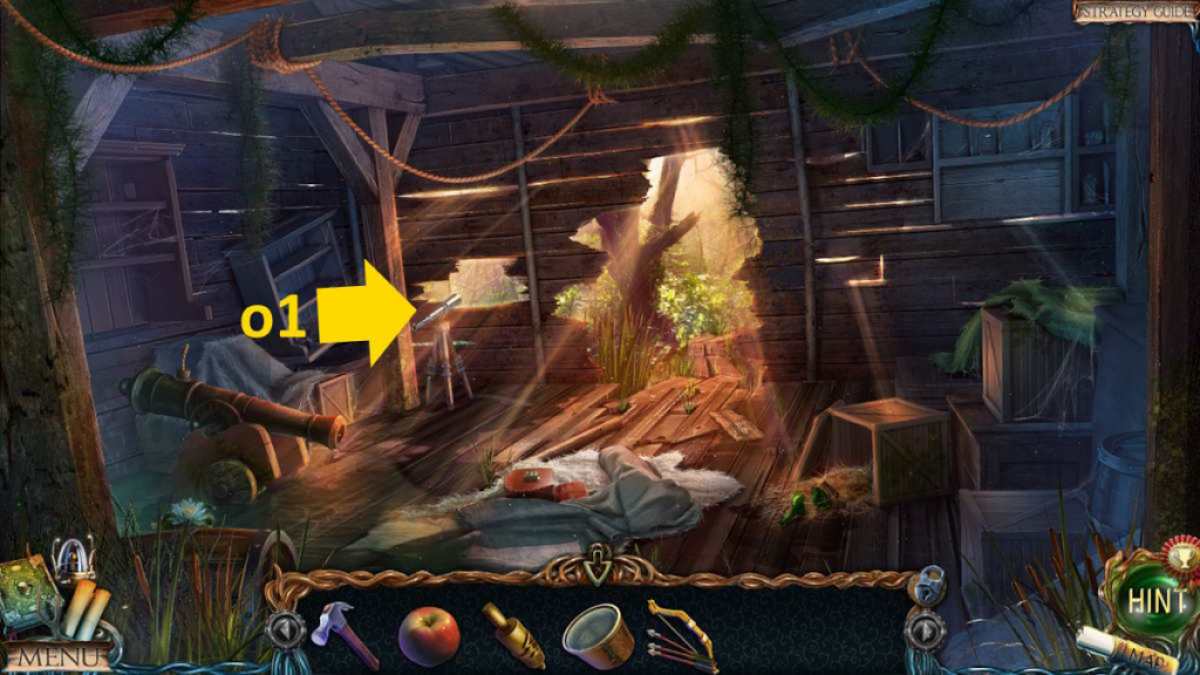
Image by Pro Game Guides
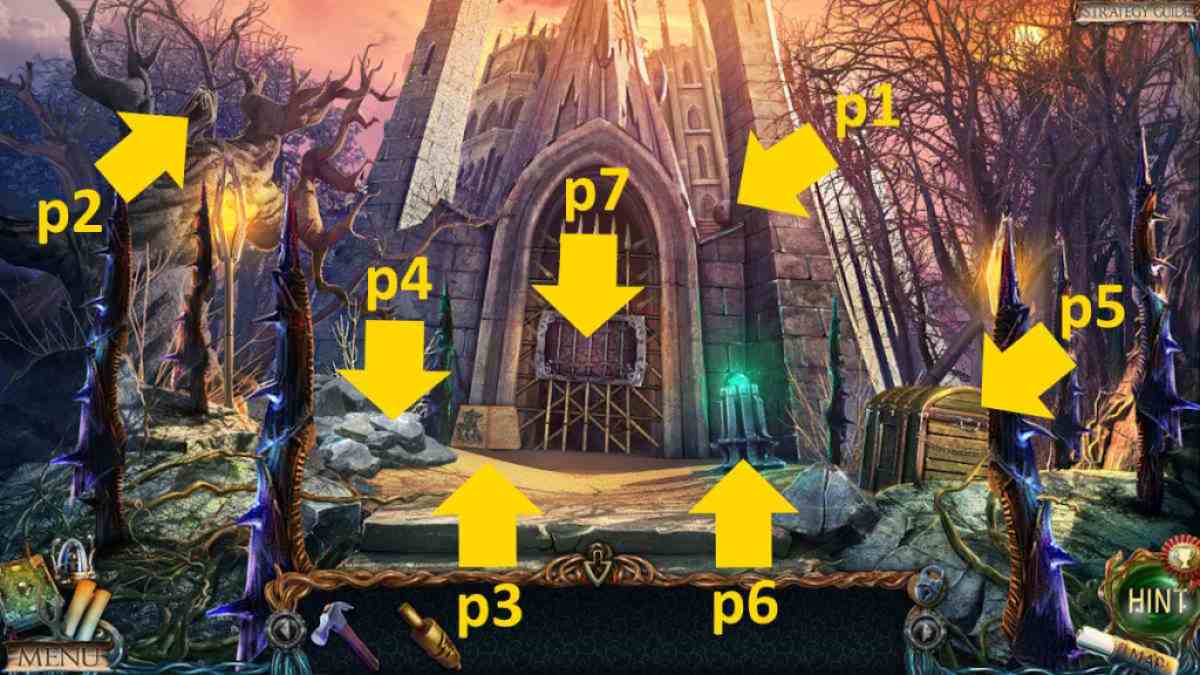
Image by Pro Game Guides
Screenshot by Pro Game Guides
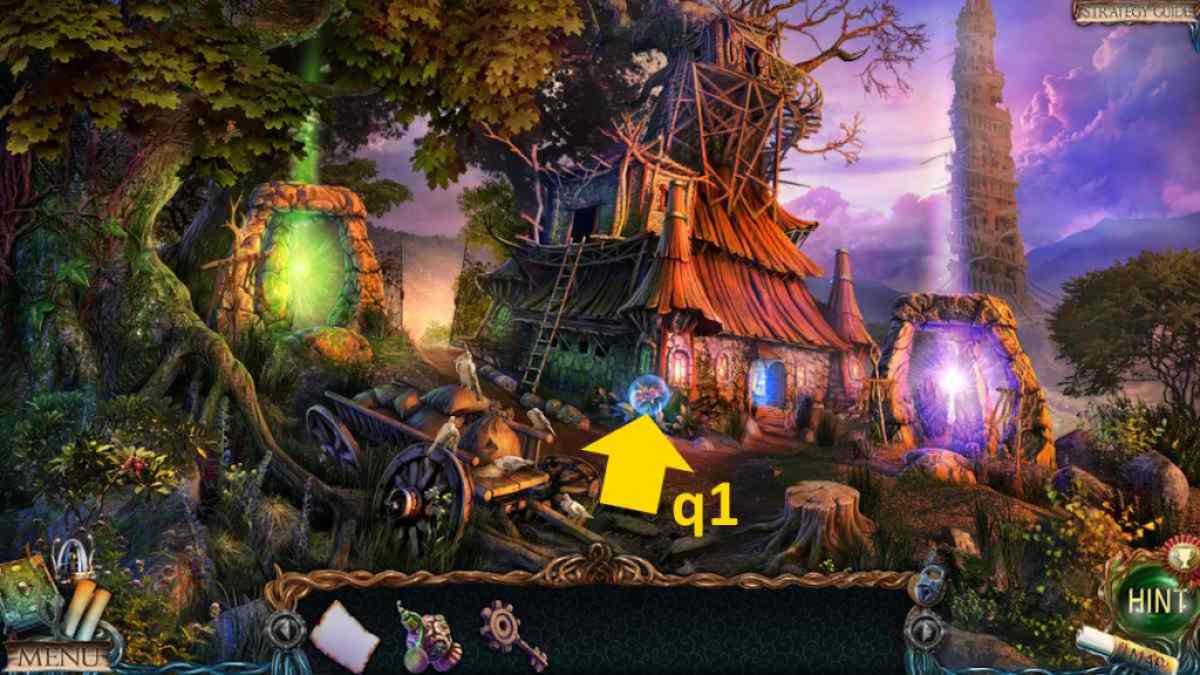
Image by Pro Game Guides
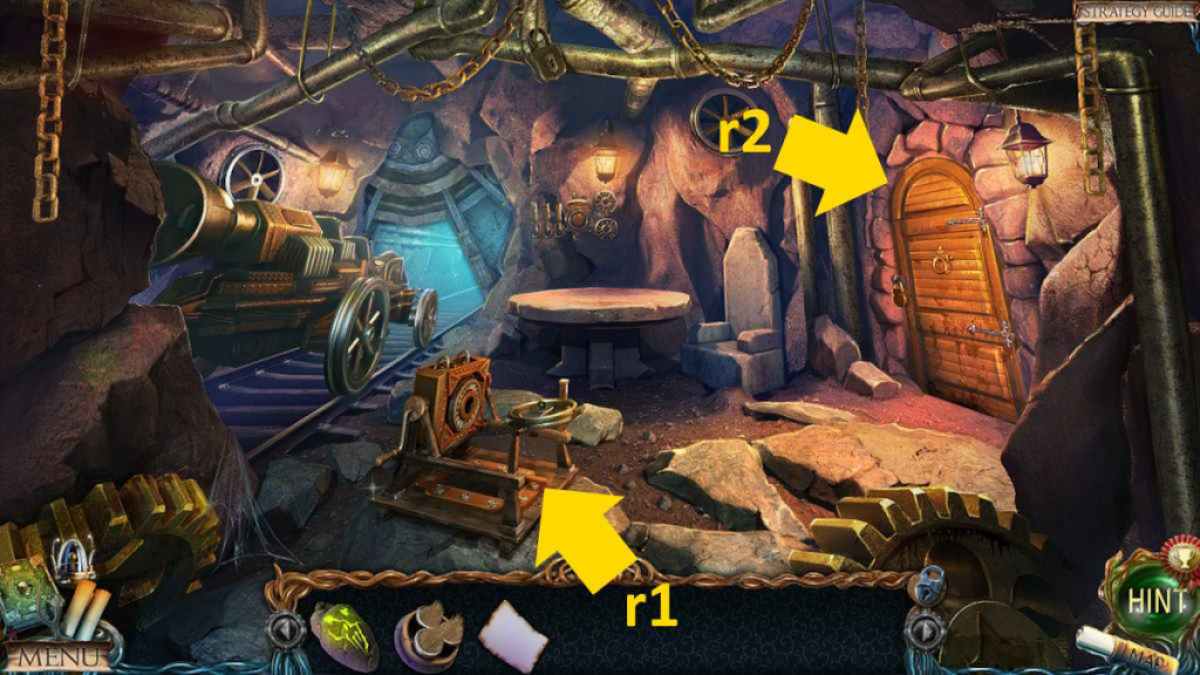
Image by Pro Game Guides
