Searching the swamp .
I love getting mislay in a dot - and - come home fantasy puzzle RPG and the Lost Lands game are some of the good . take on for part 3 of my full walkthrough and puzzler scout of Lost Lands 2 , The Four Horsemen .
Lost Lands 2 Walkthrough, Part 3 - Full guide and puzzles
In part two of this guide , we ’d just open up the gates to the swampland after make the turning potion for the werewolf . It includes exploring Fire ’s dwelling and continues up until your very first get together with the centaurs when you are asked to go and bestow them a real gnome shield .
If you need some selective information about events that happen earlier or later in the game , instead name to myLost Lands 2 Walkthroughhub page which has links to all the other parts of the secret plan , including the incentive chapter .
The lantern potion
launch the door in the mine with the key and go into Fire ’s domicile . TheCollectibleis at the top of the right staircase ( a1 ) , while theBeyond Objectis on the statue on the right ( a2 ) . Take the Dwarf Figurine from the yap in the floor ( a3 ) , then add the teaser pieces to the throne ( a4 ) to begin a shape - arranging teaser .
Note the dour role are towards the bottom of the puzzle as you put it together . I ’ve pictured the fill in puzzle above if you ’re cling . Once sodding , take theMoondustfrom inside the throne .
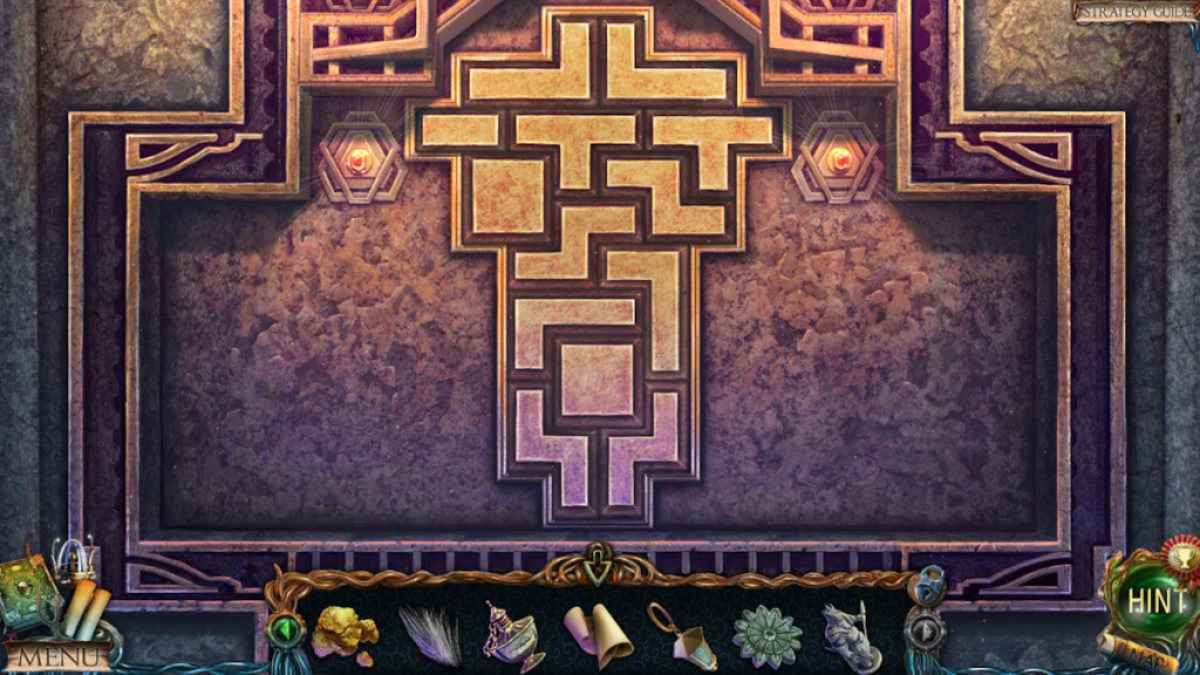
Head to the upper corridor of the tugboat next and insert the stone flower into the DIA ( b1 ) . Take theFlaskandGlass Pipefrom the revealed compartment .
you’re able to return to the forsaken sea next and use the shabu tube on the cactus ( c1 ) , come after by the flask , to gain theCactus Juice .
Move to Maaron ’s cottage next . Add any figurines you have to the ledge ( d1 ) , which at least help clean up your inventory , then select the alchemy automobile ( d2 ) and bestow the lantern potion formula .
Place the vial on the coaster ( e1 ) , add the cactus juice ( e2 ) , then contribute the moondust ( e3 ) , the divine Sir Herbert Beerbohm Tree flowers ( e4 ) , and the gold nuggets ( e5 ) . Make the ice ( 3 to e6 ) , melt the gold ( 1 to e5 ) , zap the flowers ( 2 to e4 ) , and kindle the coal ( 4 to e7 ) . Pull the grip ( on e6 ) , come out the hat on the flask ( 5 to e3 ) , use the crank ( 6 to e8 ) , then connect the final pipe ( 7 to e9 ) and you ’ll be able to take theLantern Potion .
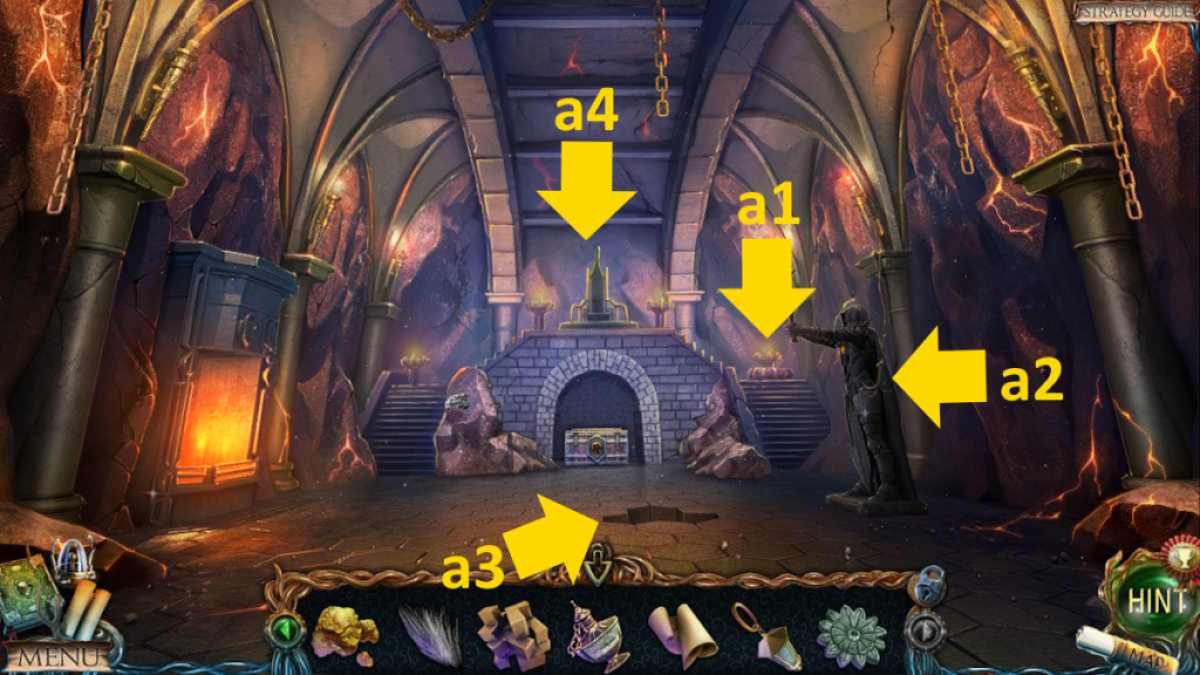
Image by Pro Game Guides
colligate : Lost Lands 3 Full Walkthrough ( Golden Curse )
Entering the swamps
Move to the swampland , grab theCollectible(f1 ) and theBeyond Object(f2 ) , and then take hold of the Stone of Fire from the harp close - up ( f3 ) . Read the note on the tree ( f4 ) , which explains how to make Fanglon ’s Lantern , cling the lantern in the same close - up , then add the fleece and lantern potion to guide your way through the swamp . Now get across the broken police wagon ( f5 ) to originate a aboveboard missing object mini - biz . Once complete , you ’ll get theWeight . get through the screen background to move on to the Abandoned Farm .
TheBeyond Objectis hang on the right shelf ( g1 ) , while theCollectibleis on the confused unexpended ledge . Take theManuscript(g3 ) , utilise the hammer on the cannon ( g4 ) to find aCork , and then grab anAlcohol - fleece Cloth(g5 ) along with aBottle of Rum(once you ’ve put the cork in it ) .
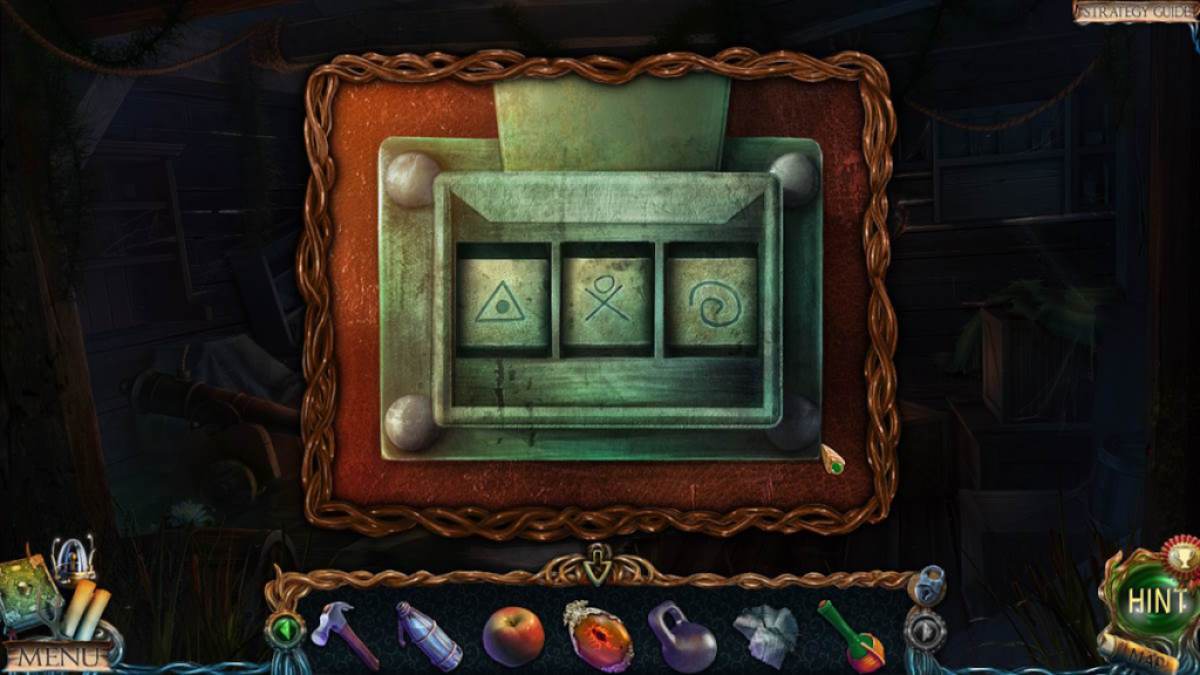
Note the code drawn on the mirror ( g6 , image above ) and use it to afford the leather pocketbook ( g7 ) . Take thePrecious Stonethat ’s deep down , and then click the mirror once more to get a fright . later , chatter theMirrora final time to take it . Try the scope ( g8 ) to determine if a lens is overlook , and then keep through the gob in the wall to the all in lake .
Screenshot by Pro Game Guides
After a brief cutscene with Death , take theCollectiblefrom the rocks in the background ( h1 ) and theBeyond Objectfrom the single in the foreground ( h2 ) . take the boat ( h3 ) next and take theManuscriptandScissorsfrom inwardly . Select the chain ( h4 ) for a close - up and choose it once more to perpetrate it in , cart a chest out of the water . Click the chest , add the cherished stone to the middle on the lid to unfold it , and take theTuning Tablefrom inside .
Completing the fresco
Return to the swamp , add the tuning board to the harp ( f3 ) , and then click the tuning clipping at the top of each string until the drawing string locomote green . There ’s no puzzle here ; simply click each one until they ’re all done . Once done , a compartment give at the bottom of the harp , and you may take theFresco Detail .
retort to the halfling liquidation , add the weightiness to the Sir Ernst Boris Chain in the cervid ’s mouth ( i1 ) , and take in theHandle . Now go to the pavilion , use the handgrip to start the cellar door ( i2 ) , and take theRed Stonefrom inside . Look at the picture underneath the endocarp to find it is the kernel of a golem .
Your next stop is the dwarf slums . Select the better automaton ( i3 ) , add the cherry gemstone in the close - up , and its hand will open . Take theJack . Move on to the dwarf cemetery and use the jack to pry launch the bar of the mausoleum ( i4 ) . Take the software program behind the bars , expend the knife to open it , and take thePunch Card .
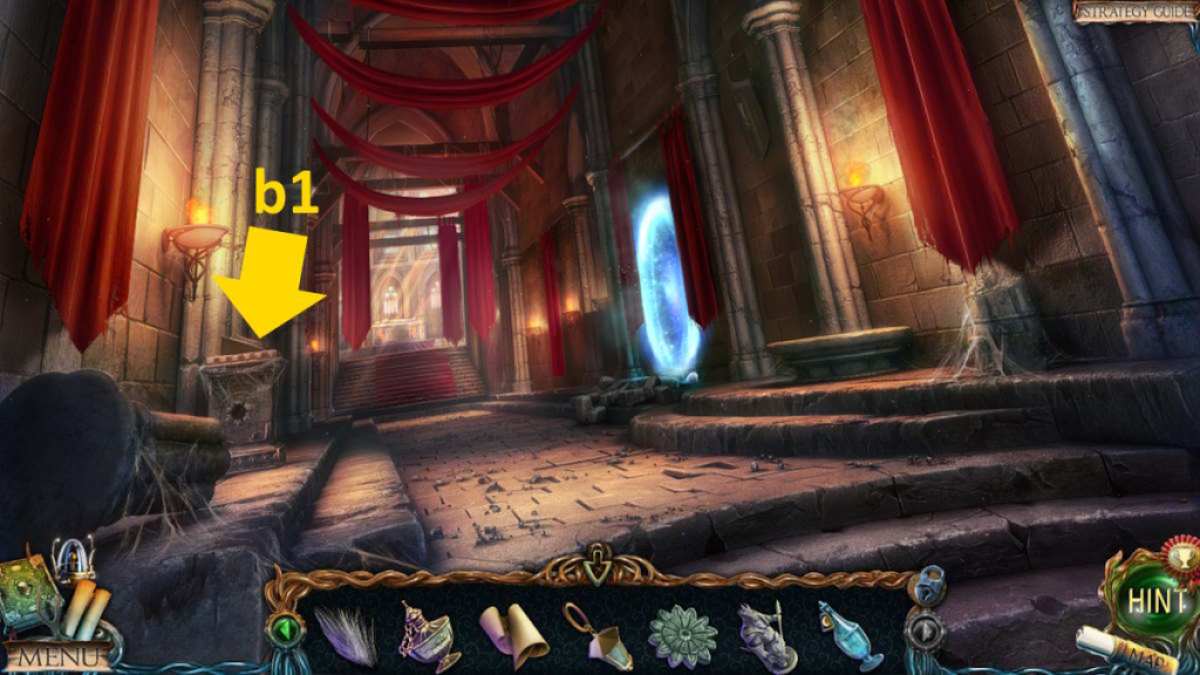
Image by Pro Game Guides
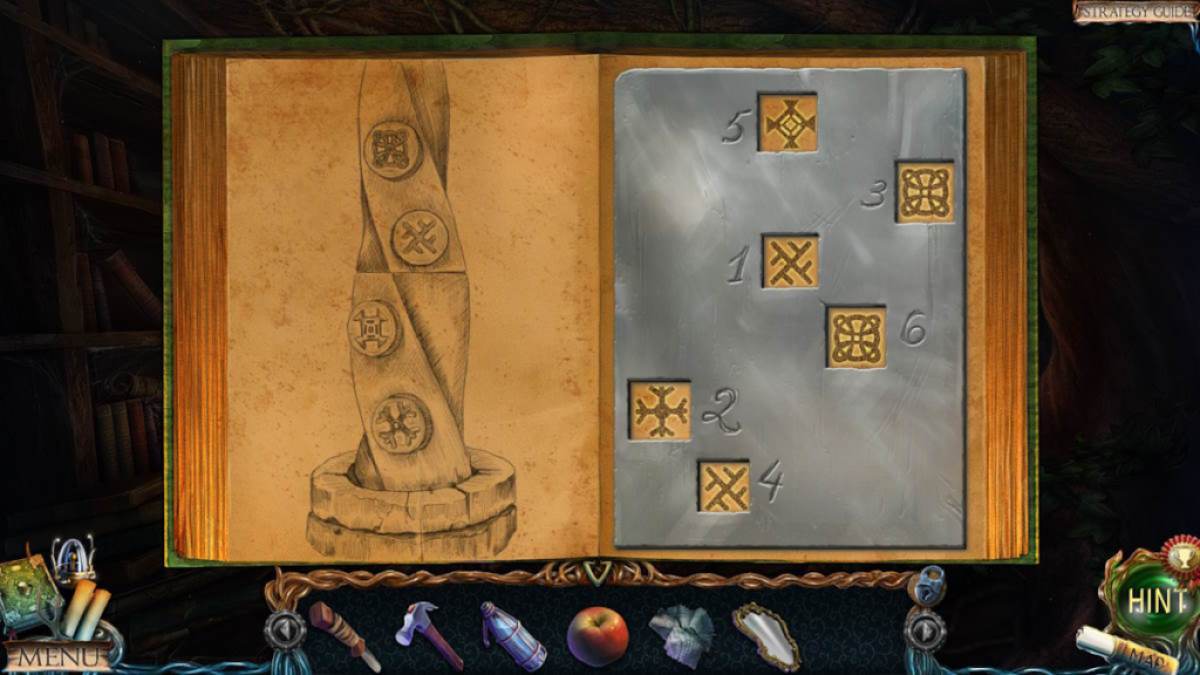
The next piazza you demand to visit is Maaron ’s cottage . pick out the desk ( d3 ) , use the punchcard on the book , and note the symbols in the close - up ( you ’ll find it in your notes but I ’ve included it here ) . Now you could go to the empty halfling colonization and apply this code to trigger off the dagger there ( j1 ) . Once done , take theKey .
Go to the canyon next and use the key to unfold the box in the tent ( j2 ) . Take theChimera Head . Take it to the swamp , add it to the statue ( f6 ) , and take theFresco Detailfrom the statue ’s mouth .
You now have all you need to complete the fresco , so head back to the dead lake , pick out the fresco ( h5 ) , add the piece , and complete the mystifier to get theVial For Living Water . If you ’re stuck on this one , follow this codification using the image below to dispatch it directly from a reset , or just habituate the look-alike as a guidebook to what you ’re aiming for :
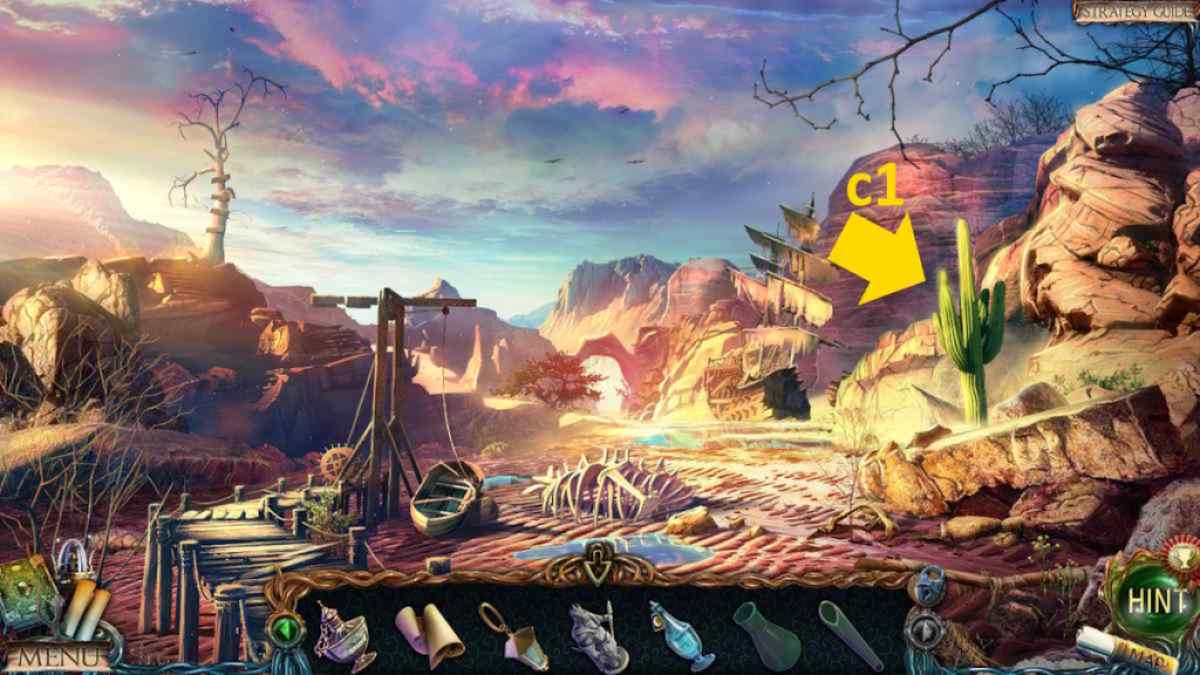
Image by Pro Game Guides
The Lake of Life
When you return to the Lake of Life , you ’ll find that the mermaid has devolve . After speak with her , make a eminence of the symbol on the pill ( k1 ) and then use the Port Vila to collect theLiving Waterfrom the puddle ( k2 ) . Move to the canon , select the puzzle ( j3 ) , and match the symbols with the Snake using the information you just got from the tablet .
Take theBoomerang . Go back to the swamps and utilise the boomerang on the cage ( f7 ) , reading the note and taking theKeyonce it drops to the ground .
Head to the tower hall , select the mirror ( l2 ) , and lay out the easel up in front of the mirror in the finale - up . Put your mirror on the easel , slay the wall mirror cover , and follow the cutscene . choose the now broken mirrors afterward and collect theRune .
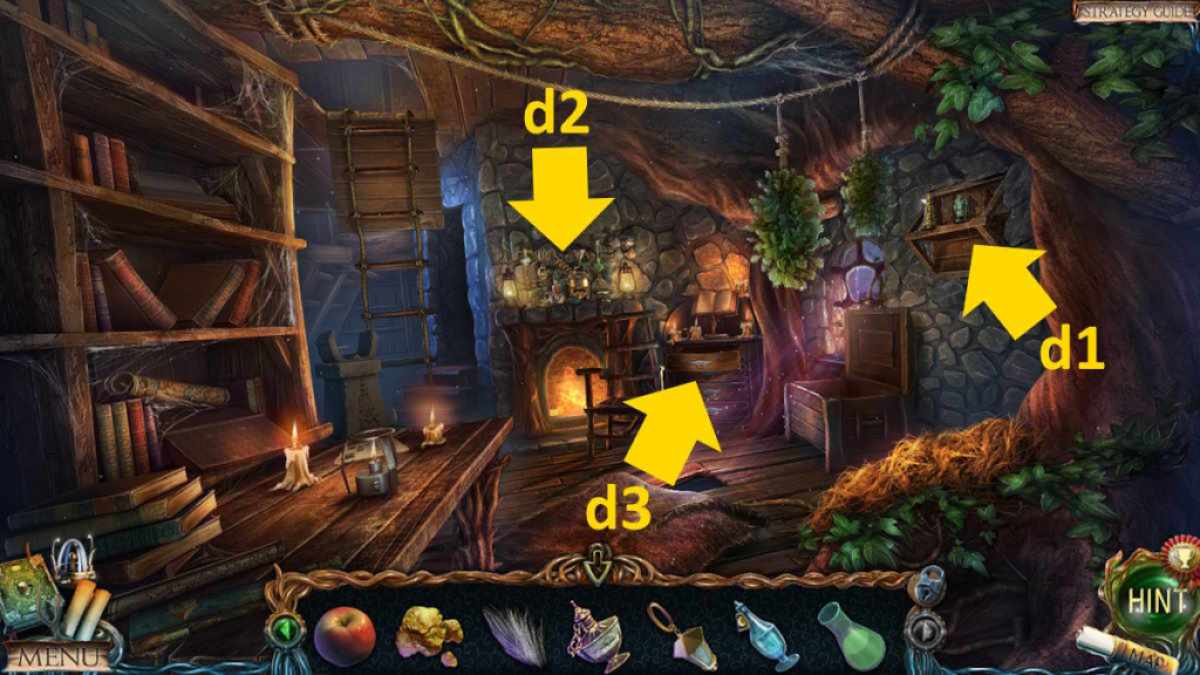
Image by Pro Game Guides
Take the runic letter right back to the clearing outside Maaron ’s cottage and use it to activate the other portal there ( m1 ) . point through for the next part of the risky venture .
Related : Lost Lands 9 Walkthrough – Full Guide
Entering the dark woods
Once you arrive on the forest track , you ’ll find both theCollectibleand theBeyond Objecton the tree ( n1 ) . choose the wooden shelter ( n2 ) to find aRamand aWolf Figurine , then burn the rope here with your tongue to sink the meshing .
Take theBoar Skinnext to the campfire ( n3 ) , then get across the wooden protection ( n4 ) to start a missing objects minigame . Once complete , you may take theColorful Threads .
Return to the loft on the edge of the swamps and use the wolf figurine to open up the thorax ( o1 ) , taking theNeedlefrom within . Go back to the dwarven slum now and sum up the scissors , acerate leaf , and coloured threads to the tapestry ( i5 ) to start a coloring miniskirt - biz . You just need to follow the radiation diagram .
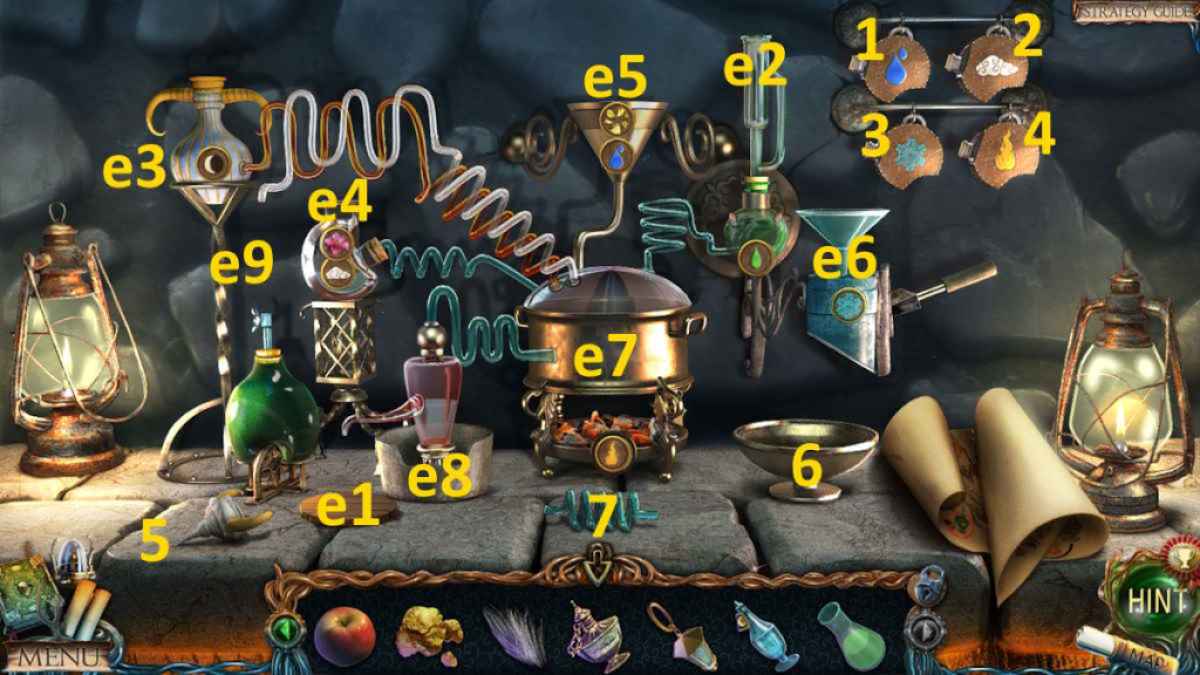
Image by Pro Game Guides
The one thing that confused me was forgetting to fill the synopsis of the frame with brownish thread . Once complete , use the scissors to cut it out and get theTapestry .
Go back to the dark-skinned forest and move on to the adjunction . Pick up theTongs(p1 ) and then click the battering Aries ( p2 ) for a finis - up . Click the hook to unite it to the Aries the Ram , and then add your ram to the Aries itself . measure the rest of the situation by looking at the bell ( p3 ) , then move back to the woods path .
Breaking the magic barrier
Use the tongs to open up the trap ( n5 ) , take theWheel . Go back to the join and select the ram once more , dawn the leg under the Aries the Ram to raise it , and add the bike . cluck the winding wheel on the side of the bell ( p3 ) and then cluck the ram ’s head to reverberate the bell , whichlifts the wizardly roadblock .
you may now line up theCollectibleon the tree rootle to the left field of the stone step ( q1 ) and theBeyond Objecthigh above the steps ( q2 ) . supervene upon the tapestry on the rod ( q3 ) with your tapestry , open up the elbow room forward at the top of the carved wooden steps ( q4 ) . bank note thecarved birdon the facial expression made from roots ( q5 ) , while noting the door ( q6 ) is marked with acentaur .
Head up the steps and into the timberland hunting watch ’s territory .
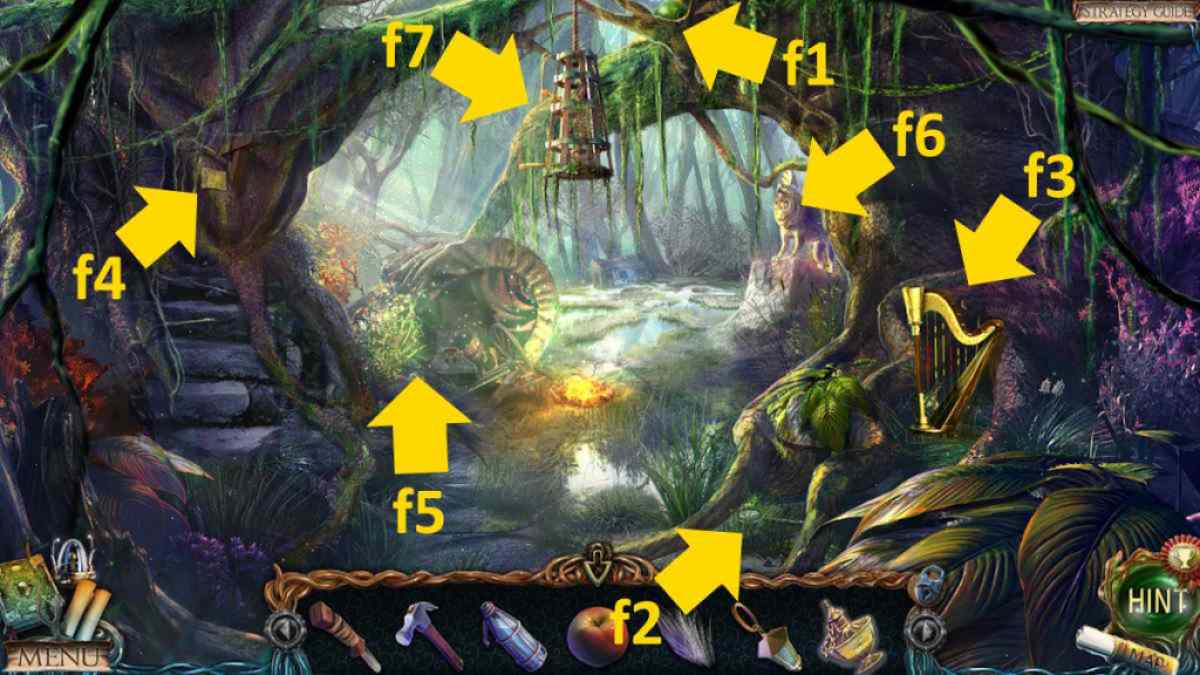
Image by Pro Game Guides
You will discover theBeyond Objectup in the tree diagram on the right ( r1 ) . Take theManuscriptfrom the Sir Herbert Beerbohm Tree ( r2 ) and theMedallionfrom the pickle in the footing ( r3 ) . Then , canvas the picture that is by the encased faculty ( r4 ) to reveal a keyhole underneath .
Stopping the pendulum
Next , select the innate mechanics at the base of the Sir Herbert Beerbohm Tree ( r5 ) to set about four simple placement puzzles . You ca n’t go wrong here , as the pieces in each of the puzzles modify color once they ’re in the right smear . Once you have completed all four of them , thependulum will stop swinging , provide you to examine the whole fit .
chatter the stopped pendulum ( r6 ) and take theForest Hunter ’s Starfrom inside it . you could rate the principal on the base at the foot of the statue ( r7 ) , but unfortunately , you ca n’t raise it to the statue just yet . Take theAxefrom the tree ( r8 ) , and scan the note stick in that was written by the centaurs .
Now click the seats area ( r9 ) to take off an detail - matching miniskirt - game . This one is pretty straight , as all the pieces are gentle to find except for the button , which is on a ledge partially overcloud by some greenery . Once completed , you ’ll be rewarded with thePendulum Figurine . TheCollectiblefor this area is in the roots just below where the pendulum stops swing ( r10 ) .
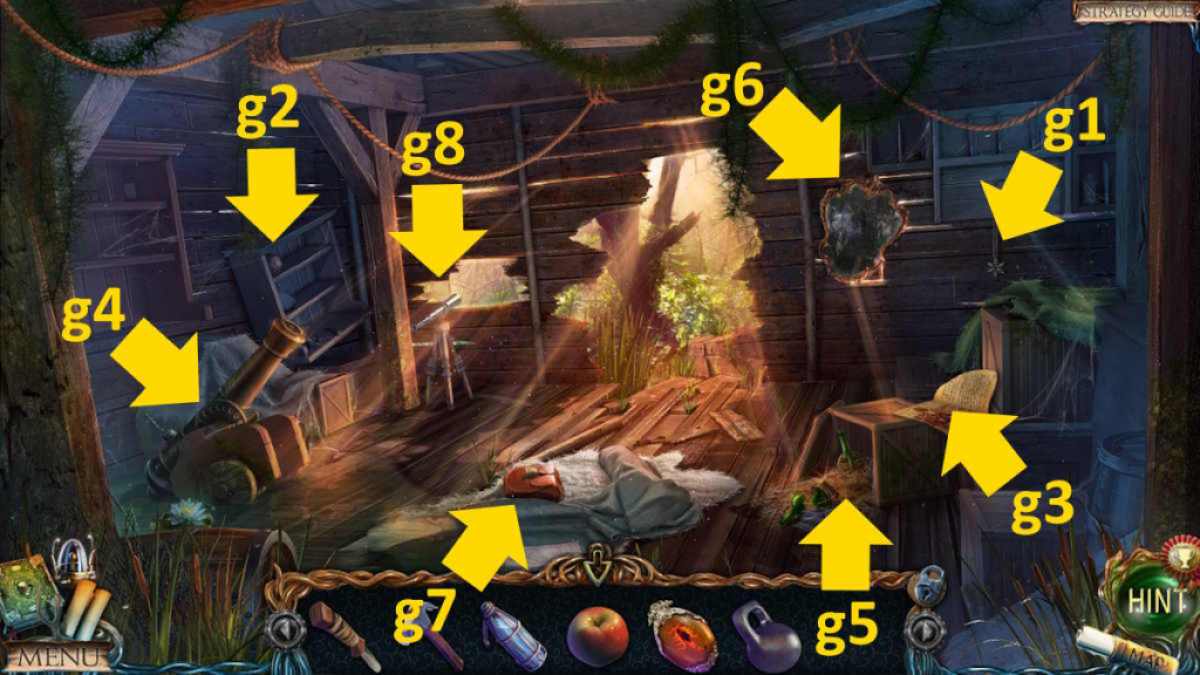
Image by Pro Game Guides
Finding the centaurs
Head back down the steps to the joint and use the axe on the Centaurus ’s room access ( q6 ) . Head through the threshold andclick the centaurto look on a cutscene . He asks you to bring hima real dwarf shieldbefore he will aid you .
Before you head off , open up the loge ( s1 ) and take the Stone of Fire along with a Manuscript . You ’ll find theBeyond Objecton the roof of the hut ( s2 ) , and you may also snaffle the Collectible , which is hidden in the Sir Herbert Beerbohm Tree beginning on the left wing of the concealment ( s3 ) . you may also take the Comb from next to the stitching simple machine ( s4 ) and some Pincers from the hut in the distance ( s5 ) . Before you continue any further , though , you ’ll need to find that shield .
If you ’re looking for the next part of this guide covering the last of the chief story , chatter through to myLost Lands 2 Walkthrough - The Four Horsemen , Part 3right here at Pro Game Guides !
Screenshot by Pro Game Guides

Image by Pro Game Guides
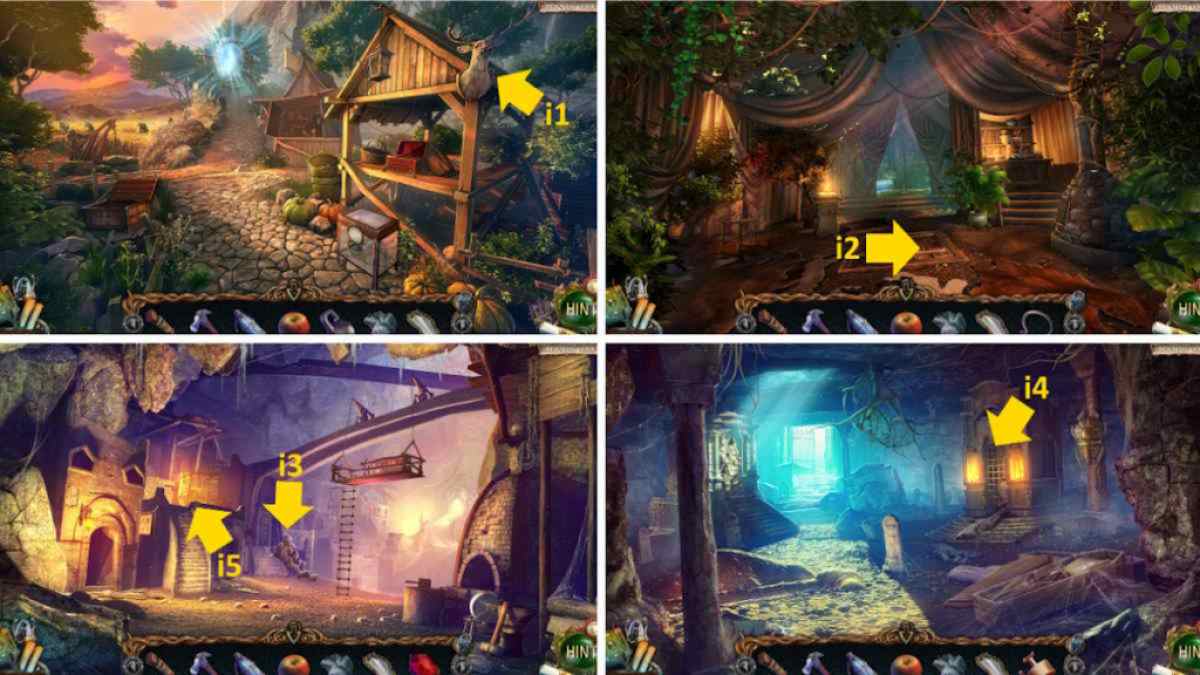
Image by Pro Game Guides
Screenshot by Pro Game Guides
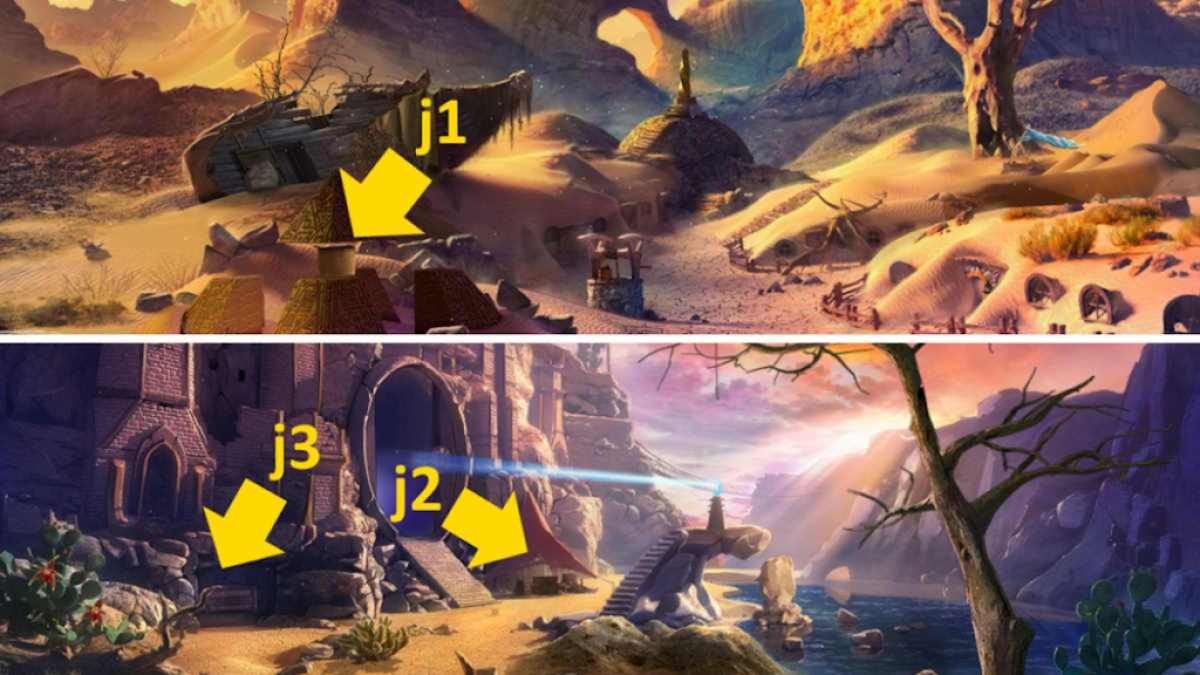
Image by Pro Game Guides
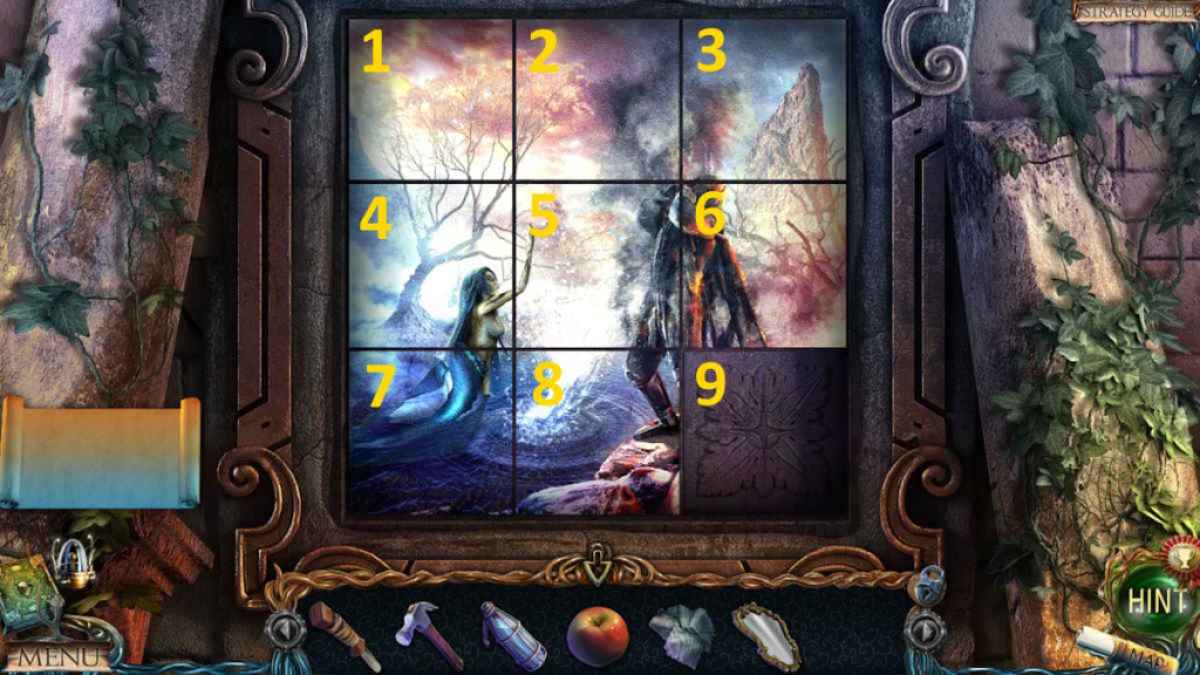
Image by Pro Game Guides
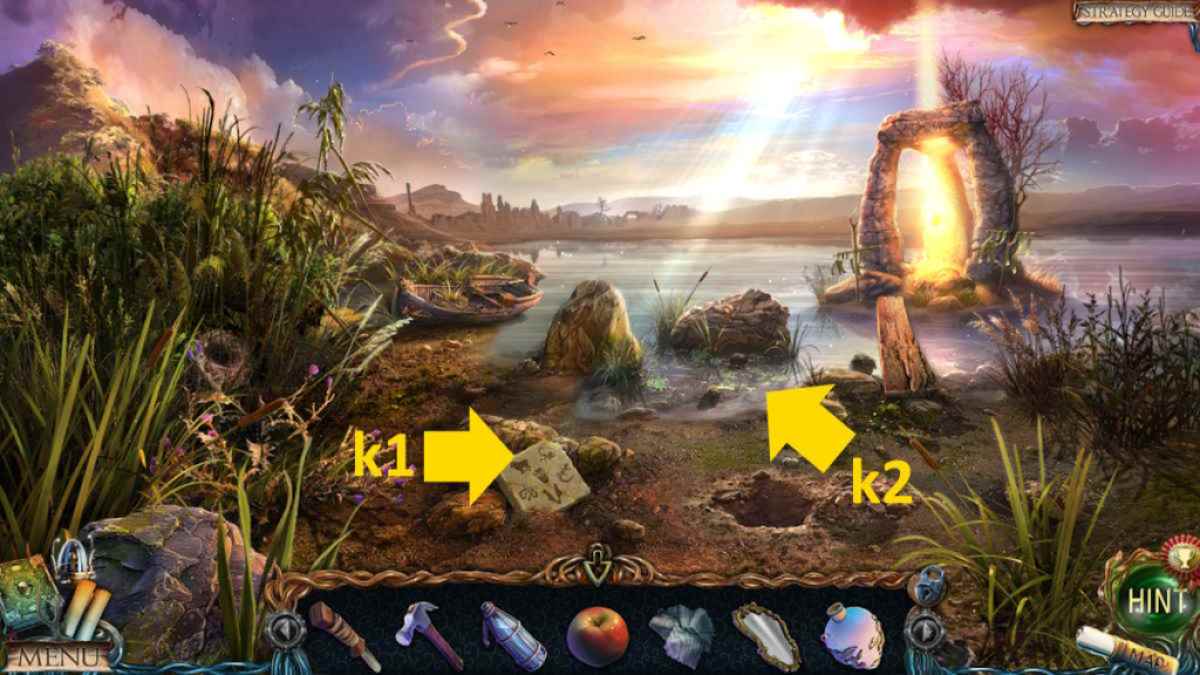
Image by Pro Game Guides
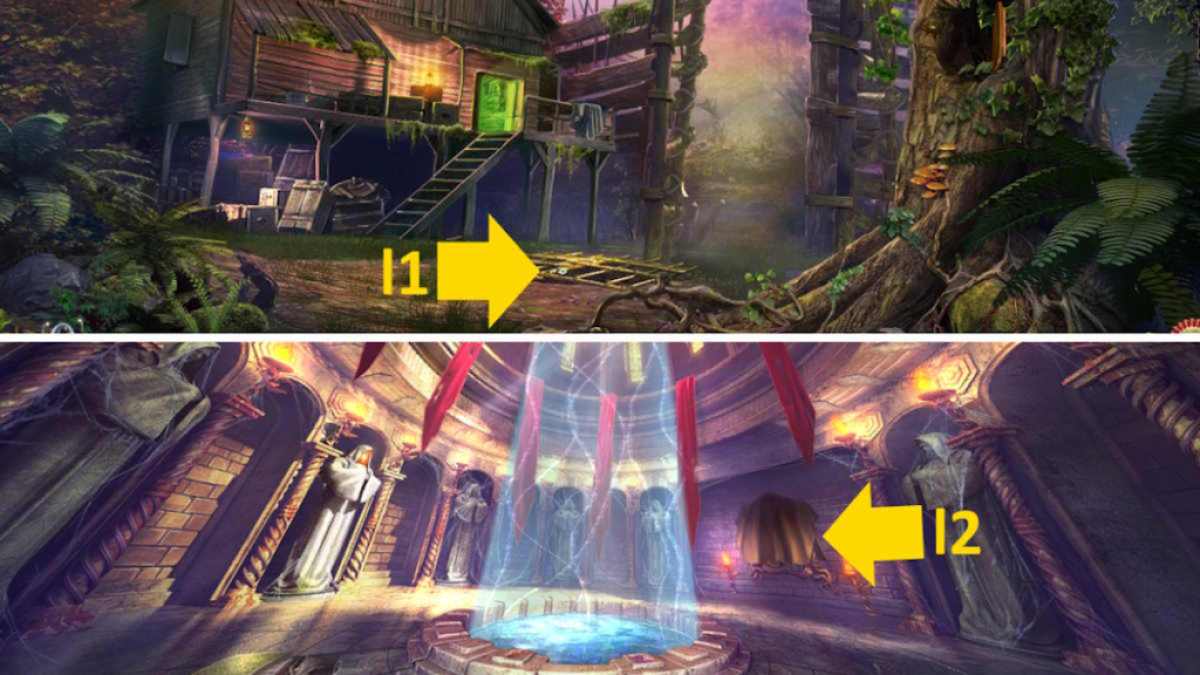
Image by Pro Game Guides
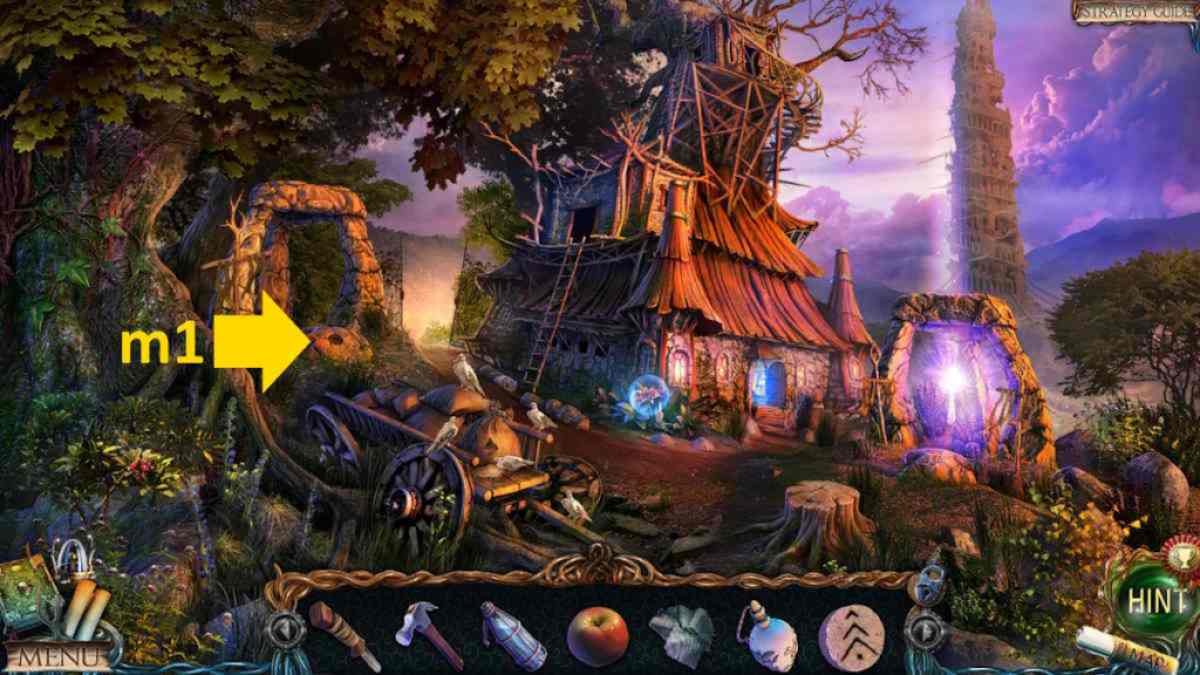
Image by Pro Game Guides
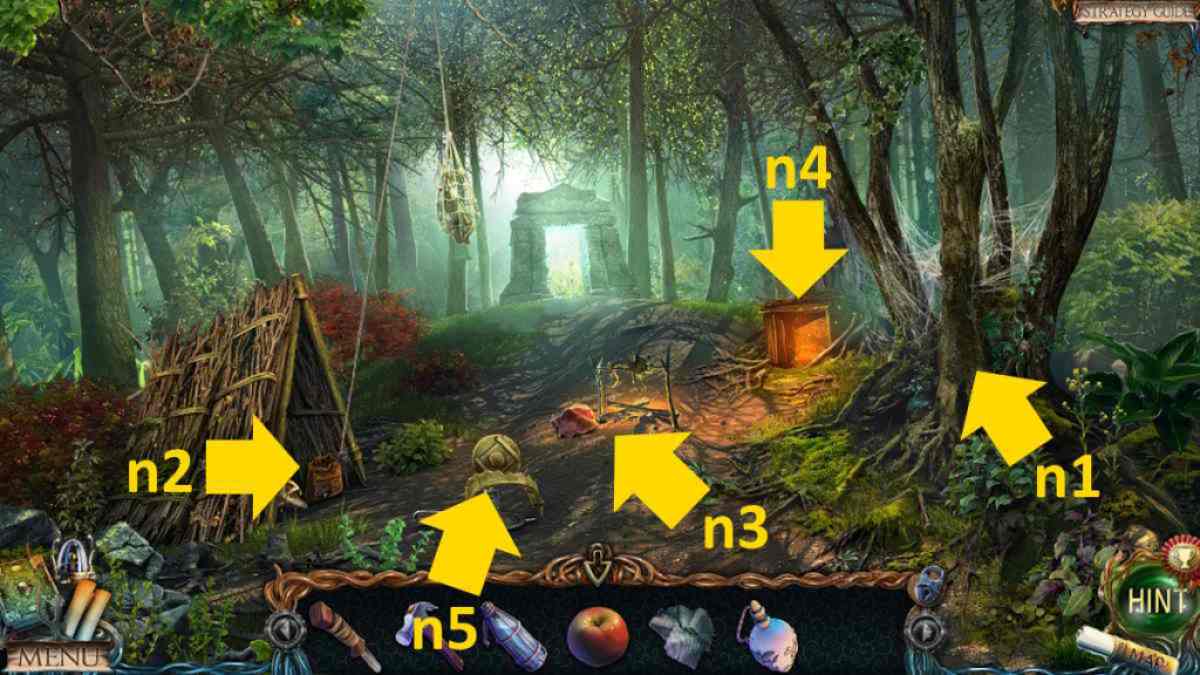
Image by Pro Game Guides

Image by Pro Game Guides
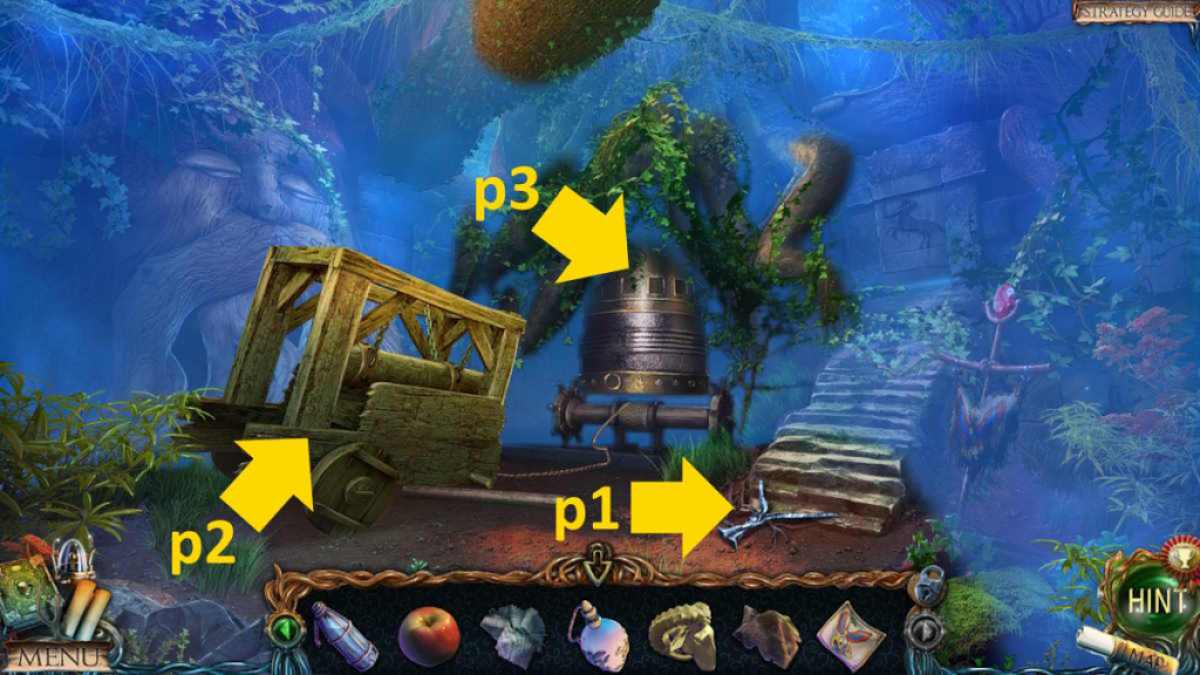
Image by Pro Game Guides
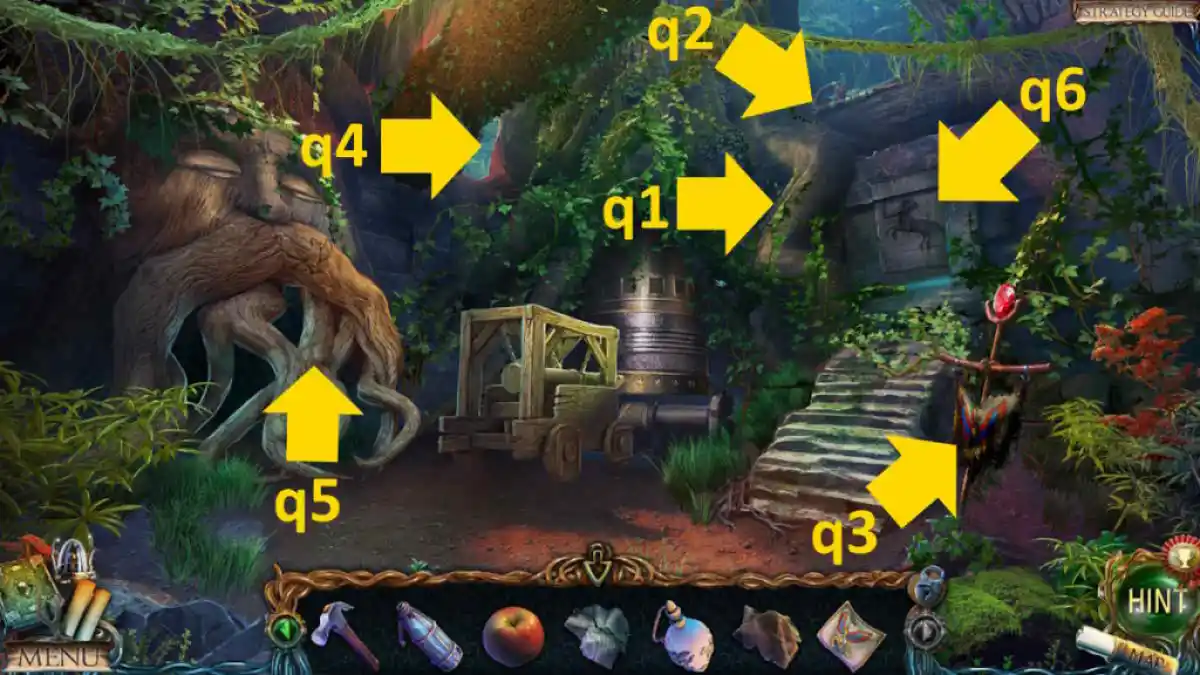
Image by Pro Game Guides
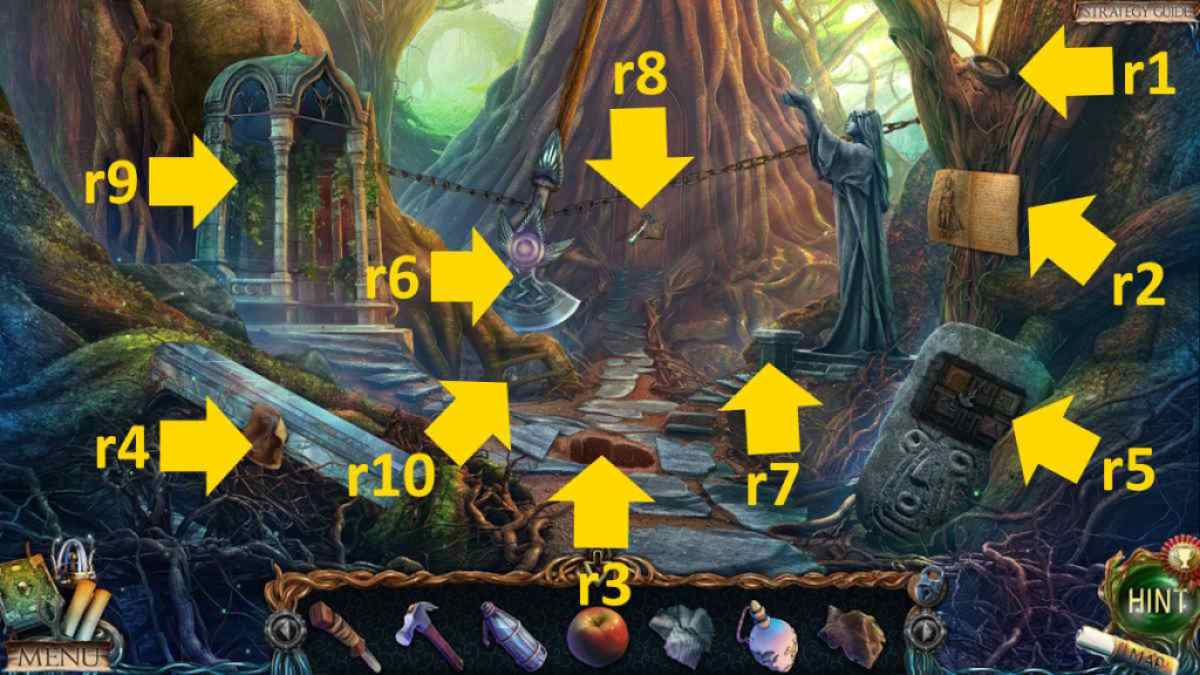
Image by Pro Game Guides
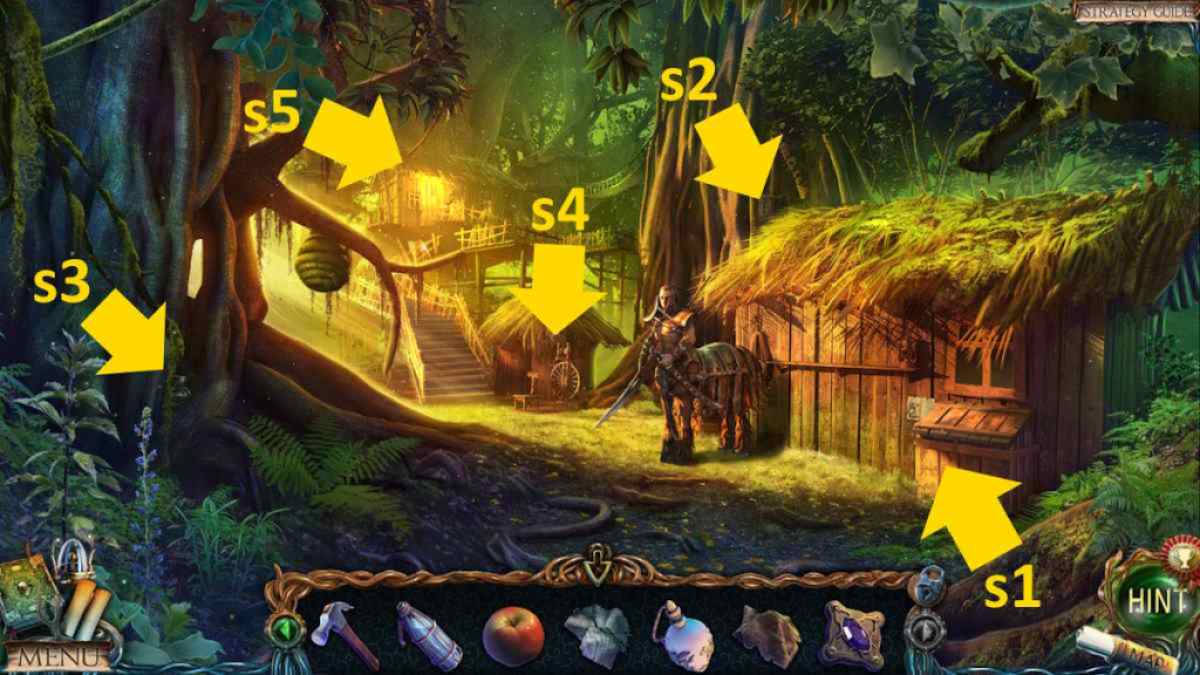
Image by Pro Game Guides
