miss the mines .
If you know point - and - tick teaser with an RPG feel , you ’re likely a fan of the Lost Lands series . If you ’re plating Lost Lands 2 , The Four Horsemen , scan on for Part 2 of my full walkthrough .
Lost Lands 2 Walkthrough, Part 2 - Full guide and puzzles
This scout picks up when you ’ve just been save from the horseman by Folnur after discover the reach . You ’ve just come to after falling into a tunnel , only to find you ’ve lose the reach . It continues until you launch the gates to the swamp after make the lycanthrope its potion .
If you want help and steering with an other or posterior part of the secret plan , click here to bump myLost Lands 2 Walkthroughhub pageboy , which has linkup to all the puzzle solutions and item location you may need .
The mines
TheCollectibleis by the gun barrel ( a1 ) and theBeyond Objectis by the beams on the right ( a2 ) . Take theStep(next to a1 ) , asecond Stepfrom the barrel shut - up ( a3 ) , and theLeverfrom the ladder fold - up ( a4 ) . Take someRope Sections(a5 ) , append the two steps you have to the ravel ( a4 ) , then move down the tunnel ( a6 ) to Folnur ’s Refuge .
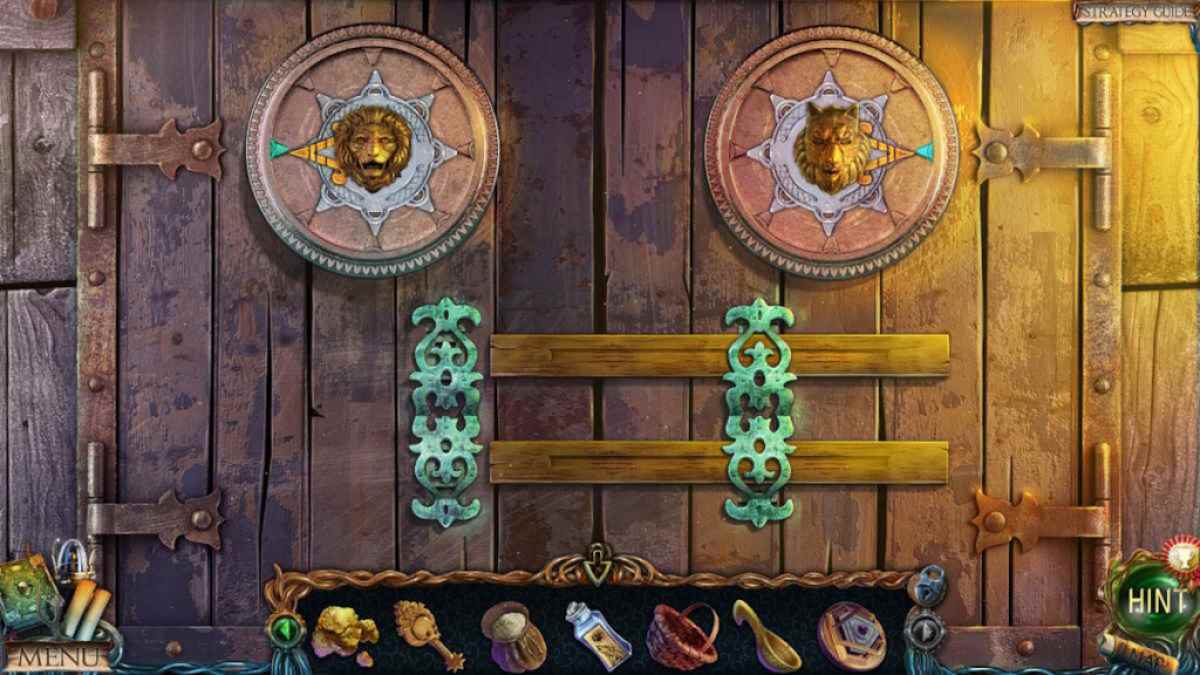
After you ’ve collected theBeyond Object(b1 ) and the Collectible ( b2 ) , catch the Flywheel ( b3 ) before lend the lever to the mechanism ( b4 ) to start a lever - pulling puzzle . If you ’re stuck on this one , use the prototype below and tear the levers in the following parliamentary procedure ( and then press the button ):
This opens the tunnel doors , but if you probe the squirt motorcar ( b5 ) , you ’ll retrieve you involve a limited crystal to get move . take the tabular array next ( b6 ) , take aManuscriptand theGlove , and then head back to the mine . Use the glove to piece up theCrystal(a7 ) , then put it in the jet machine . you’re able to now click the tunnel ( b7 ) and move onwards .

The frozen mountains
Once you ’re in the cave , plunk up theBeyond Object(c1 ) and theCollectible(c2 ) , and then click the Sir Ernst Boris Chain ( c3 ) for a finis - up and the flywheel . Examine the country this opens up ( c4 ) to find aManuscriptand aYield Remover . Use your tongue to cut the rope in the kitty ( c5 ) , take theBottle of Cold Waterfrom the pool , and then head down the stairs ( c6 ) to the square .
Once you ’ve grabbed theCollectible(d1 ) and theBeyond Objecthigh on the wall ( d2 ) , click the hang rock ( d3 ) several time to knock it down and make a yap in the floor . Take aCircle Sectorfrom the cakehole it makes , then click the fount ( d4 ) to start a simple-minded missing - objective minigame . Once complete , lay claim theHammer .
learn the notice ( d5 ) and take theCorkscrewin the conclusion - up before examine the statues ( d6 ) , make theBowl . Next , you need to retrovert to the mines and use the stadium and then the corkscrew to open up the bbl ( a3 ) and get somePowder . Add the gunpowder to the bomb ( d7 ) , which will set off , giving you accession to the midget slum area ( d8 ) .
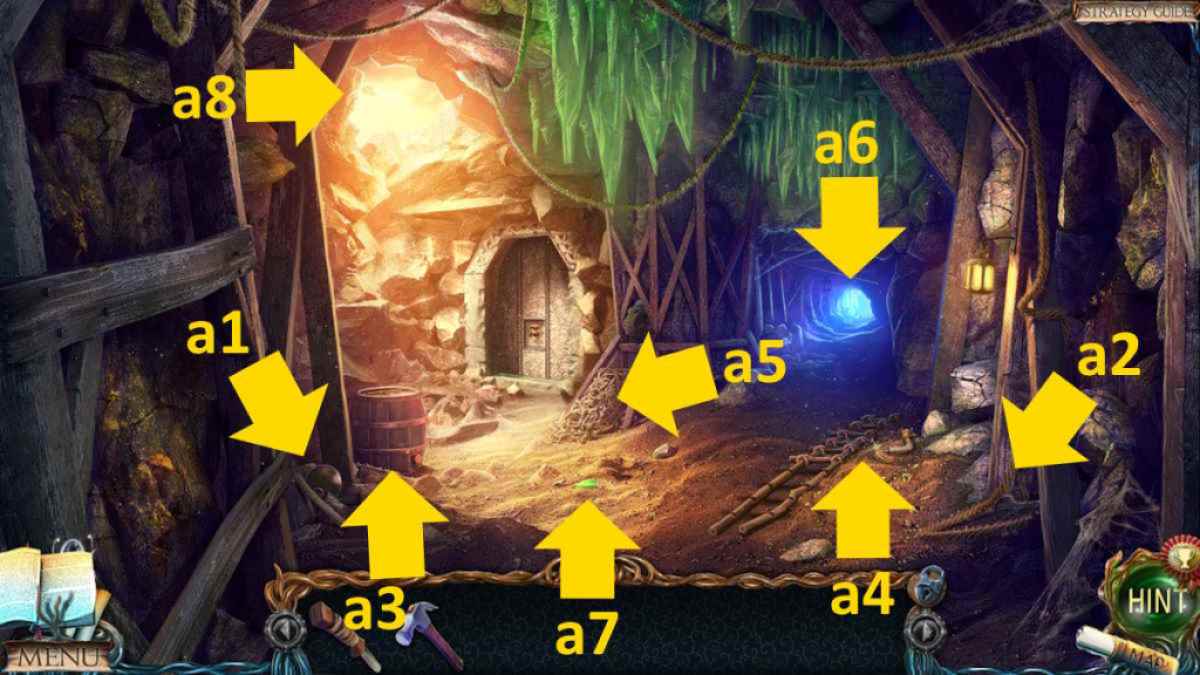
Image by Pro Game Guides
concern : Lost Lands 5 Walkthrough
The dwarf slums
TheBeyond Objectis richly up on the right ( e1 ) , while theCollectibleis on the pipes in the center above the buildings ( e2 ) . There ’s nothing else to do here yet , so move on to the midget burial site ( e3 ) .
You ’ll incur theCollectibleleaning against the grave ( f1 ) and theBeyond Objectabove its gates ( f2 ) . Click the stone on the edge of the grave ( f3 ) in the close - up to tap it into the hole , taking theMedallionthat pops out . Grab theManuscriptfrom the headstone ( f4 ) , and then apply the knife to cut the pillow in the undecided casket ( f5 ) and take theFeatherthat ’s inwardly .
Take theSievefrom the tree roots ( f6 ) and theCrowbarfrom the gate close up - up ( f7 ) , and add your medallion to the dwarven statue ( f8 ) .
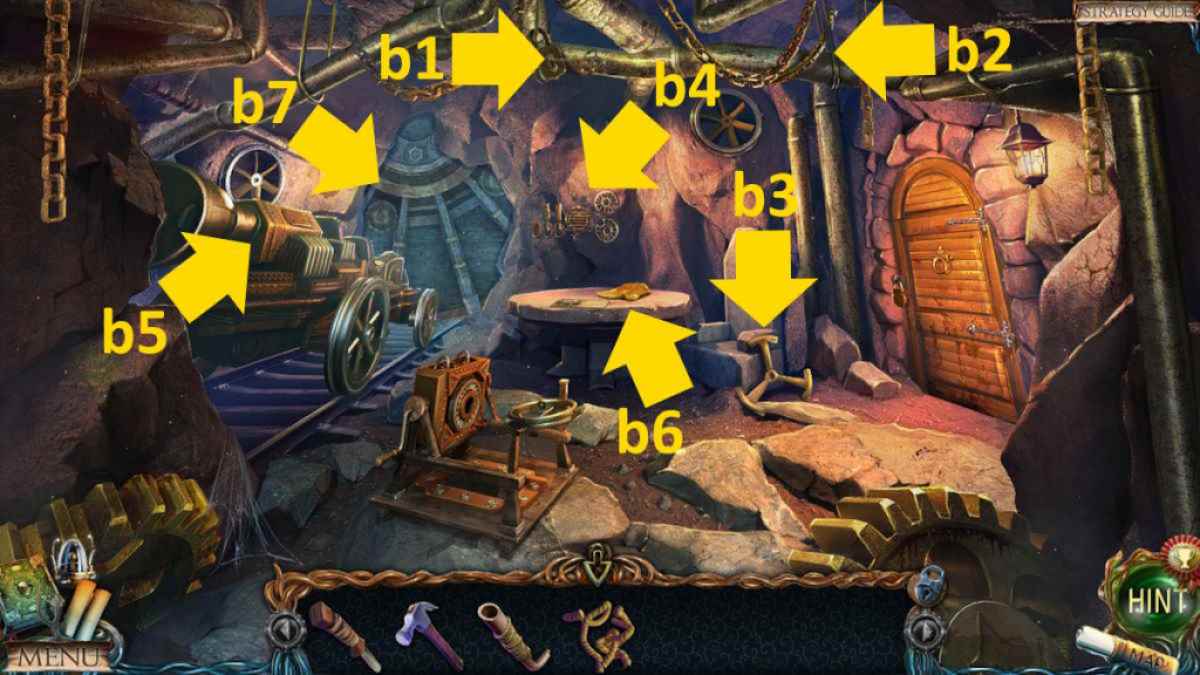
Image by Pro Game Guides
Return to the slums and use the crowbar to take the planks off of the doorway ( e4 ) to start a miss object mini - game . Everything you need is in the moving picture , so you ca n’t go incorrect . Once you ’re done , you ’ll receive theEmerald Symbol .
channelise to the square , total the emerald symbol to the green statue ’s ax in the close - up ( d6 ) , and take theEmerald Key(the top of the axe ) . you could now use the emerald key fruit to spread the William Henry Gates ( f7 ) in the cemetery and channelise through to the mountain giant ' Greenwich Village .
The mountain giants' village
TheCollectibleis by the left tent ( g1 ) and theBeyond Objectis in the tree on the right ( g2 ) . get across the mass giant ’s stage ( g3 ) and use the feathering on its invertebrate foot in the close - up , making it move so you could grab theMeatunderneath ( yum … ) . choose the flag ( g4 ) , use the grip to lower it , and utilise your knife to cut the rophy and take theLeather Sack .
Select the back - right tent ( g5 ) to go another missing object miniskirt - secret plan . This one is again simple , as everything is in the image , and you ’ll be rewarded with aSymbol . Select the unexpended tent next ( g6 ) , habituate the knife to cut the fabric , and head into the marquee .
Give the meat to the wolf to cark it , and then ( after a cutscene ) take theBeyond Objectfrom the lamp chimney ( h1 ) and theCollectiblefrom next to the works corporation ( h2 ) . Grab aStepfrom the ground ( h3 ) , theTroughfrom the lamp chimney ( h1 ) , and then head back to the caves .
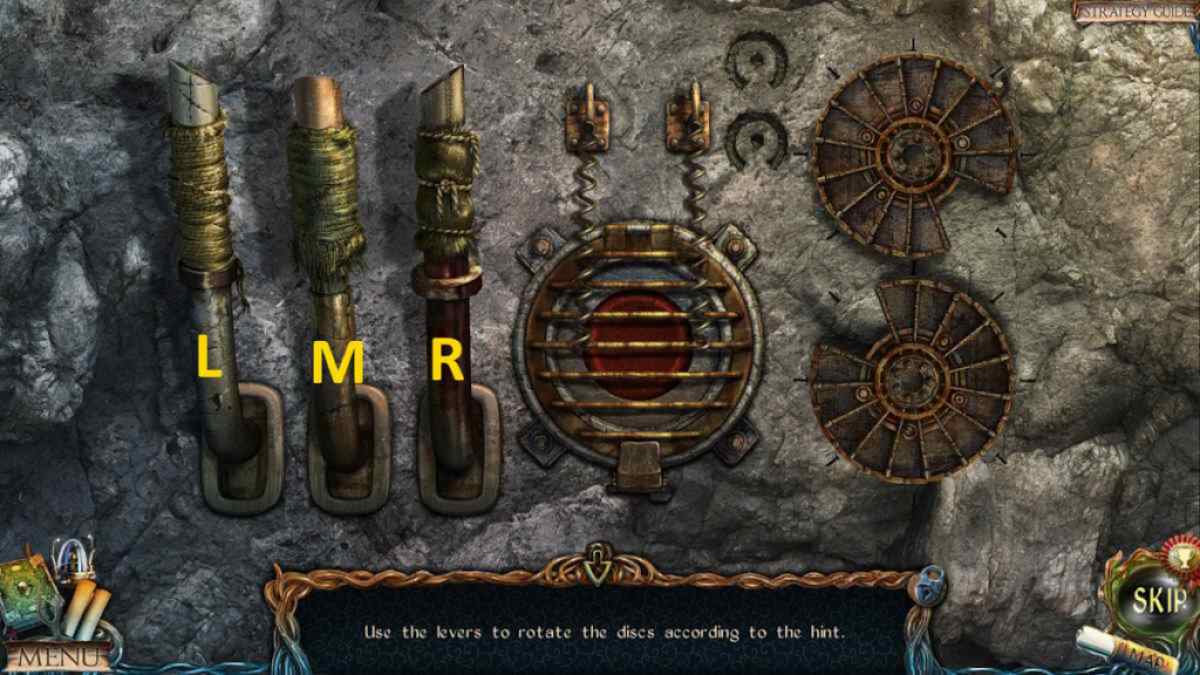
Image by Pro Game Guides
expend the trough to repair the guttering ( c7 ) before click the gadget below it ( c8 ) to begin a stopcock puzzle . You need to press the four numbered buttons in sequence to allow the ball to get up and pop through the hole .
Once you do so , the doorway at the back of the room will open up and you may head through . If you ’re get this crafty mystifier ruffianly the solution is below :
Mountgore’s Temple
After a cutscene , you ’ll be need to get Mountgore the flower that ’s grow in the heavyweight ’ greenhouse . Before channelise off , seize anotherStep(i1 ) along with theCollectibe(i2 ) andBeyond Object(i3 ) . Also , collect theDivine Tree Flowers(i4 ) and the secondCircle Sectorthat ’s underneath them .
Return to the mines , bestow the final steps to the ladder ( a4 ) , use the rope sections to secure them , and take theLadder . Use the ladder on the muddle above the barrel here ( a8 ) to gain approach toall the areas you chatter earlier . For now , though , head back to the marquee and add the two circle sectors to the floor around the flower ( h4 ) to start a roofing tile - moving puzzle .
This is another of those clip - consuming puzzles that you ca n’t go bad because you just need to apply the sections on each side to stash away bit as you move them . Once done , habituate the tongue to veer and take theFlowerand return it to Mountgore ( i5 ) in the temple . After the cutscene with him , use the proceeds remover to getMountgore ’s Apple(i6 ) .
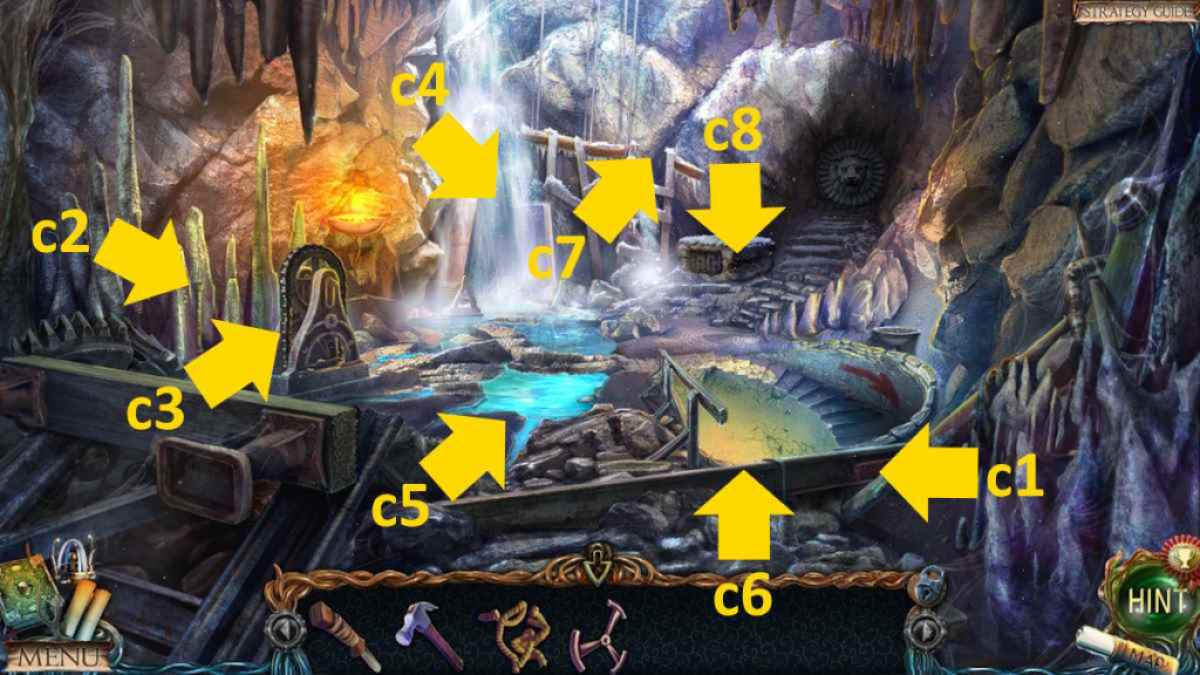
Image by Pro Game Guides
interrelate : suffer Lands 4 Walkthrough
Return to the wasteland
Go right back to the fastness and apply the heavy hammer on the chain ( j1 ) to get theHorn , and then go to the tabernacle and use the leather sack in the bowl ( k1 ) to compile aSack of Ashes .
Now move to the canyon to use the smaller hammer on the two statues ( l1 ) to claim thetwo Stone Hearts , then examine the voltaic pile of junk the statues leave behind to find aKey . While you ’re here , use the screen in the pool ( l2 ) to pan off someGold Ore.
Move to Maaron ’s bungalow and show him the horseman ’s hearts . After a cutscene , he ’ll take the stones and give you aDwarf Figurinein return . you’re able to now go to the halfling colonisation and employ the figurine to complete the statue on the boxwood ( m1 ) , start a gibe biz .
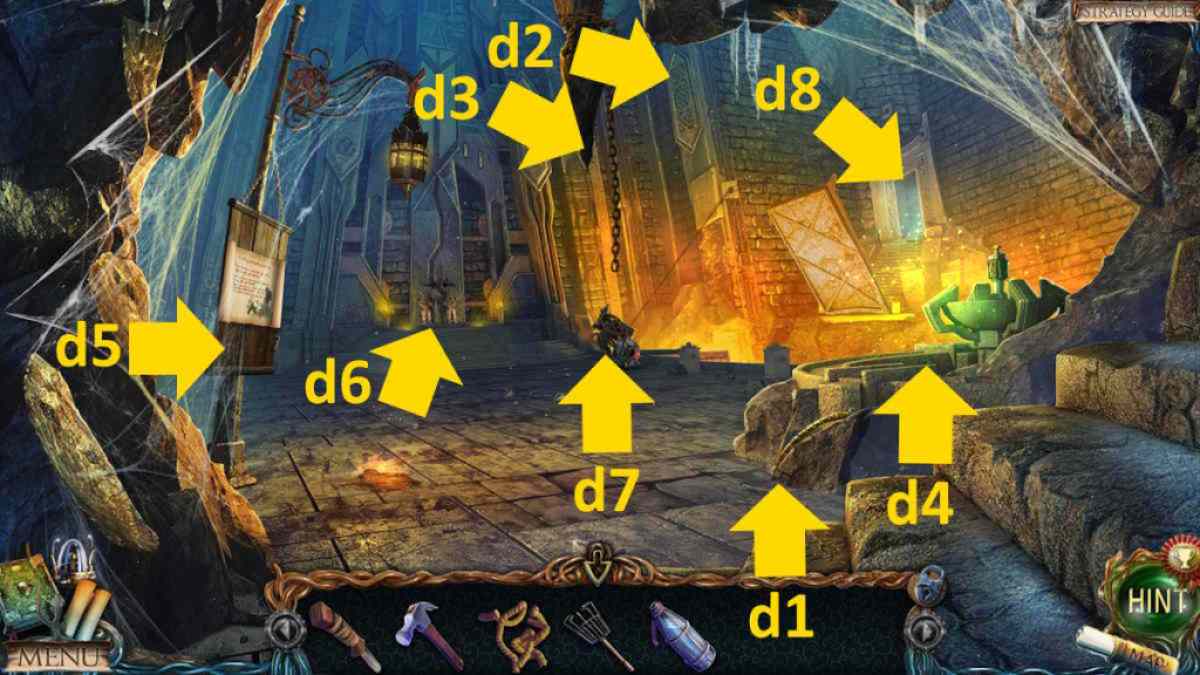
Image by Pro Game Guides
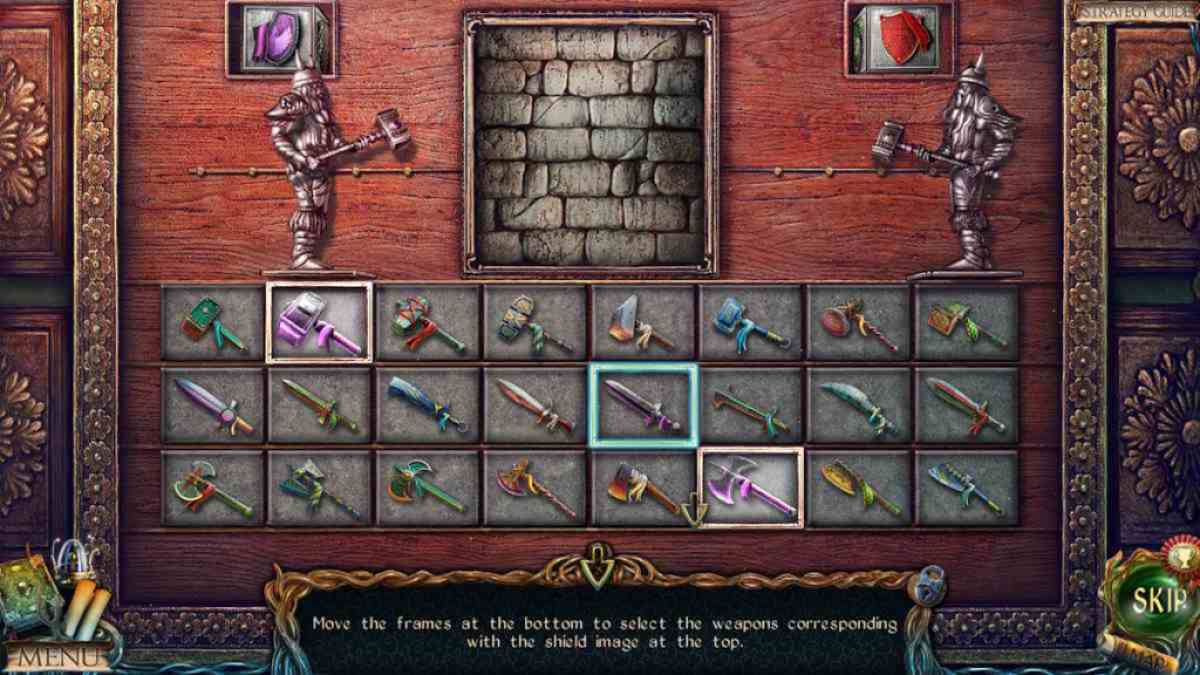
To complete it , simplymatch all three weapon tasselsto the tassel on either of the two shields on the dwarves above to make one of them ill-treat forward one space . In the example below , I ’m matching the unexpended purple tassels . Once complete , you could take add the symbol you have to the box .
Examine it again later and take theRune . apply the rune on the dolmen here ( m2 ) to open up the portal here and journey on .
The swamps
seize theBeyond Object(n1 ) and the Collectible ( n2 ) once you arrive at the Swamps Border , and then clack the William Henry Gates ( n3 ) to observe aManuscriptand a bottle ofBubble . Take theBasketfrom under the business firm ( n4 ) , then select the door ( n5 ) for a close - up and use your knife to toss the latch opened . Head inside the loup-garou ’s hut .
verbalize to the lycanthrope in the John Milton Cage Jr. , who will enquire you to brew up a potion . TheBeyond ObjectandCollectibleare both on the stove ( o1 ) , while you ’ll find the recipe and aScoopon the table ( o2 ) . afford the closet ( o3 ) to grab theMedallion , look in the oven ( o4 ) to find it broken , then select the chemical mechanism on the wall ( o5 ) to start a rotary motion puzzle .
You ’ve seen the solution on theinside door of the ovenhere , but I ’ve pictured it above . Unfortunately , you do n’t have the lever to start the logic gate yet . That ’s it here for now , but commemorate to take someWoolfrom the floor ( o6 ) before you leave .
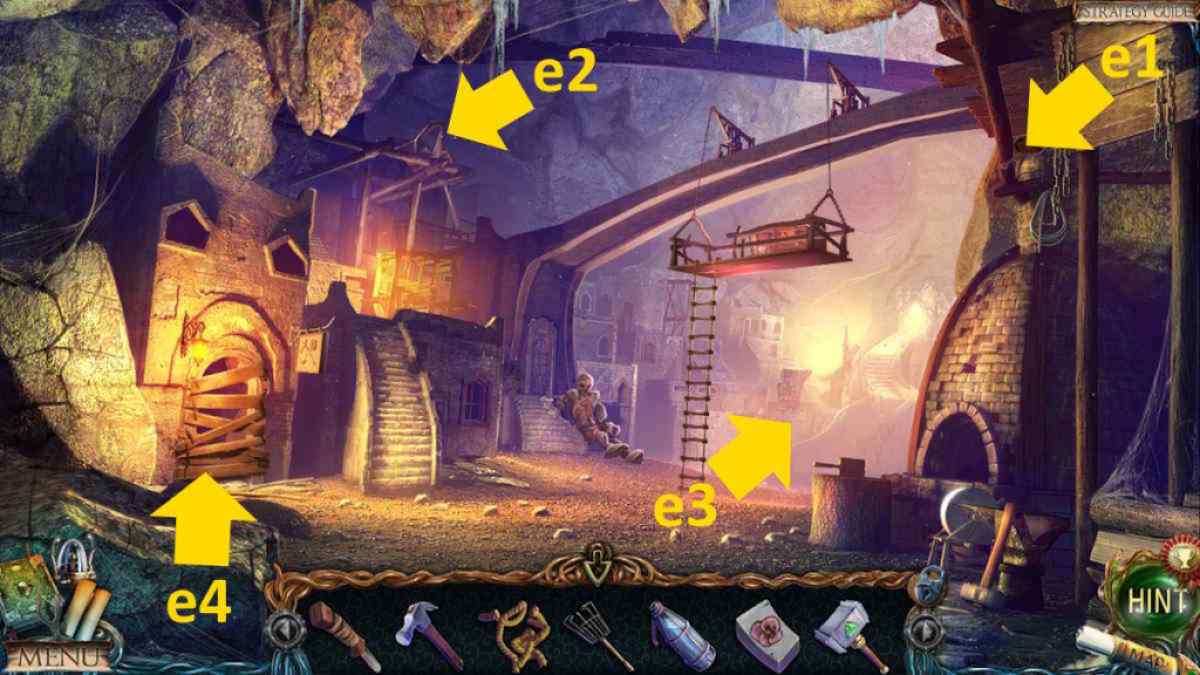
Image by Pro Game Guides
The turning potion
Return to the mountain giants ’ village , employ the scoop in the cauldron ( g7 ) to get aSaucepan of Boiling Liquid , and then habituate it on the statue ( g8 ) . Now add the motor horn to the statue , which will open a surreptitious compartment allow you to take thePuzzle .
Move to the dwarf temple and add the medallion to the floor design ( k2 ) , dawn it again to reveal a stash below . get across the item inwardly to reveal and take anotherMedallion . This can be used back at the dwarf cemetery to open up the statue ( f8 ) , allowing you to take theUrn of Ashes .
Go into the pavilion , add the basket to the berry bush ( h5 ) , click the berries to drop them into the basket , and then pick up theBasket of Berries . Add the basket of berries to the pressing ( h6 ) , add the house of cards , click the top of the press to utilise it , add the chemise of ash , then the urn of ash , pop the hat back on , and take theTurning Potion .
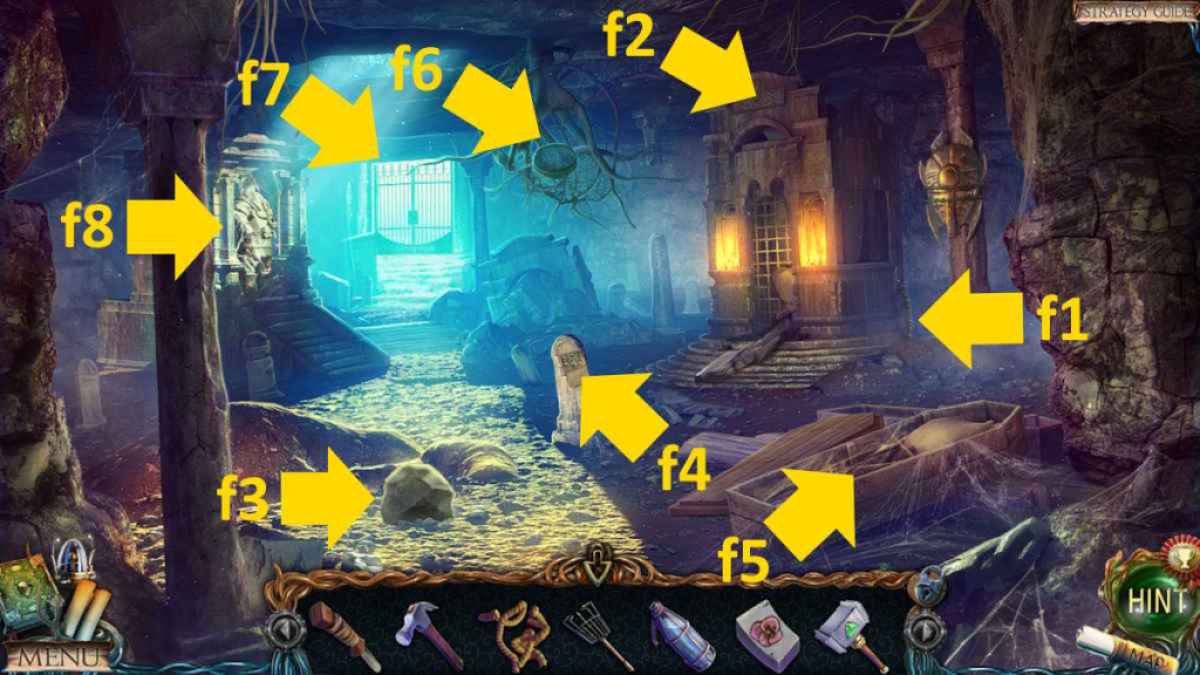
Image by Pro Game Guides
revert to the werewolf , give it the potion , and in return , you ’ll receive aKey . practice it to enter the attic hatch ( o7 ) click it again to open up it , and head up . Take theCollectible(p1 ) , theBeyond Object(p2 ) , the Brush ( p3 ) , and the Latching Mechanism Gear ( p4 ) , then click the hatch ( p5 ) to give it and use the brush to clean house the chimney .
Get a close - up of the cuckoo clock ( p6 ) , click the chimes , and the petty door will open , allowing you to take aVial . get across the chair ( p7 ) and move the cloth to feel theLantern Potion Recipe , and then click the detritus by the window ( p8 ) to start an object - matching plot . If you ’re fight to get going , the hammer is behind the profane material in the top - right street corner . Otherwise , it ’s pretty square . Once complete , you ’ll experience theLantern .
direct back downstairs and seek the interior of the burner ( o4 ) to find aStone Flower . Move outside and add the latching mechanics to the machine on the tree ( n6 ) , penetrate it again to habituate it , and take theLever . you’re able to now go back into the werewolf ’s hutch , sum up the level to the mechanism on the wall ( o5 ) , and rip it to the right hand , which opens the gates to the swamp outside .
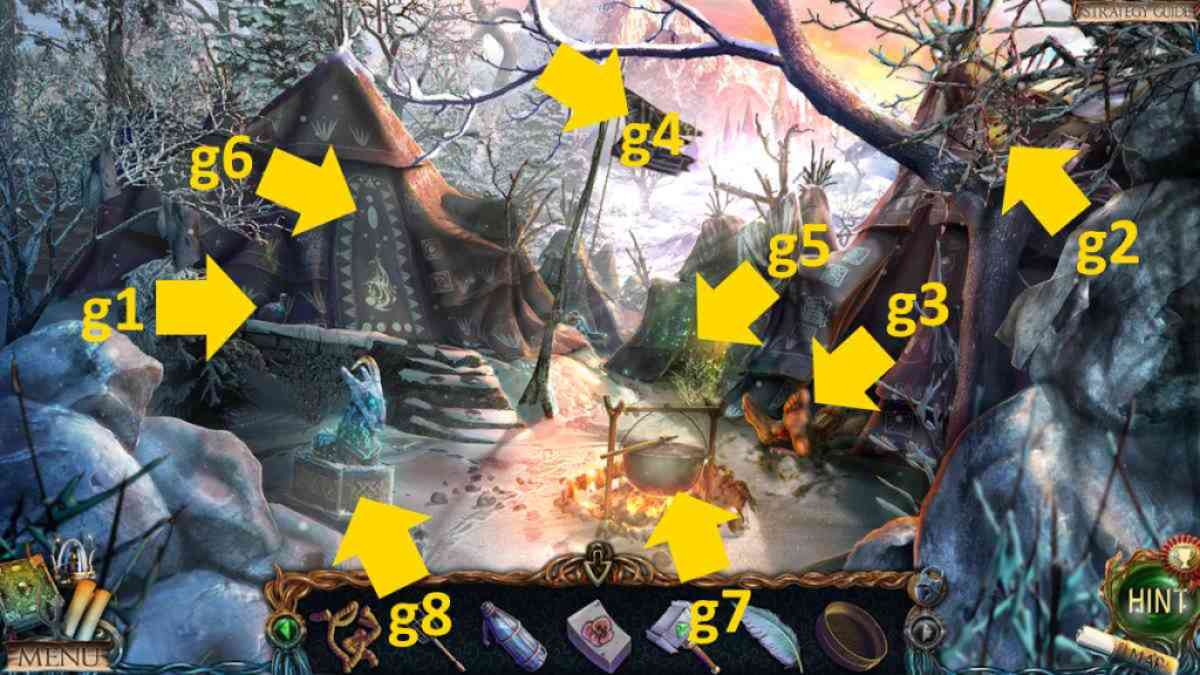
Image by Pro Game Guides
That concludes the second part of my guide . you could continue with me withLost Lands 2 Walkthrough - The Four Horsemen , Part 3right here at Pro Game Guides !
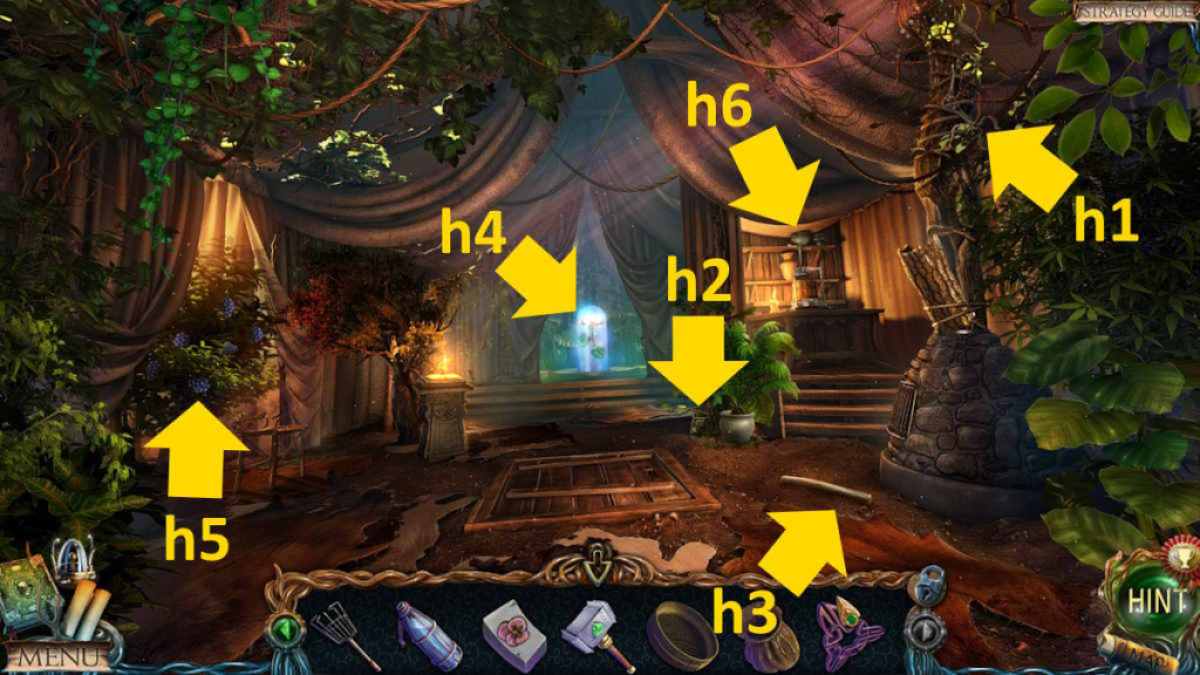
Image by Pro Game Guides
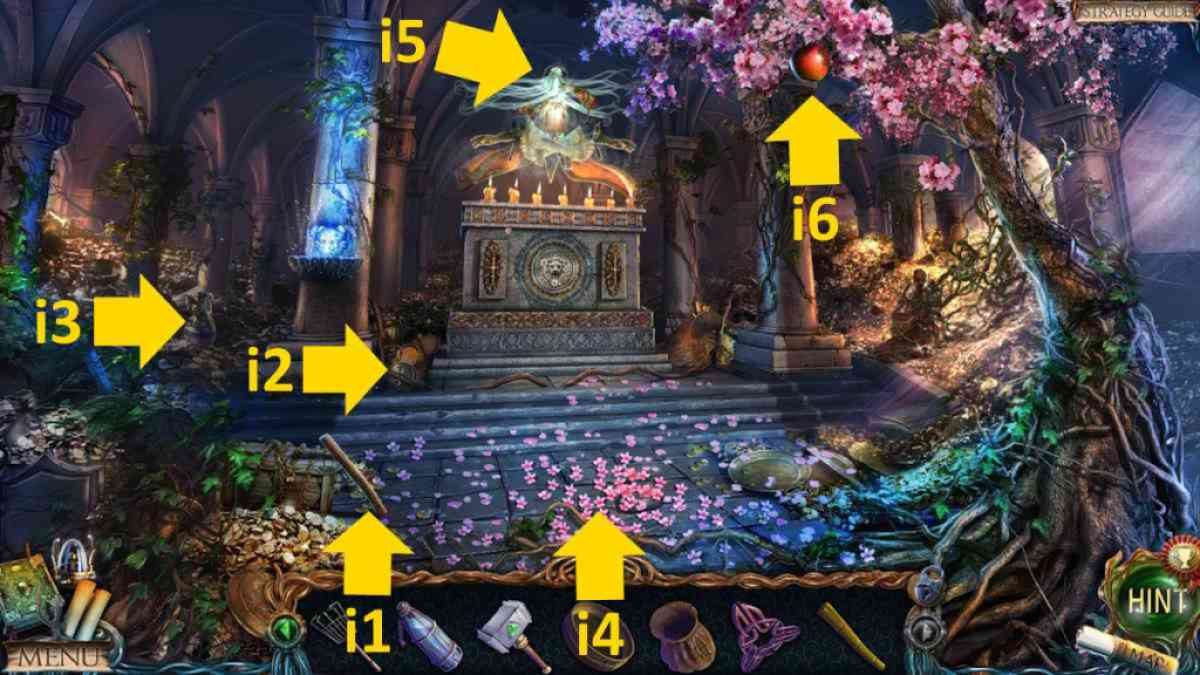
Image by Pro Game Guides
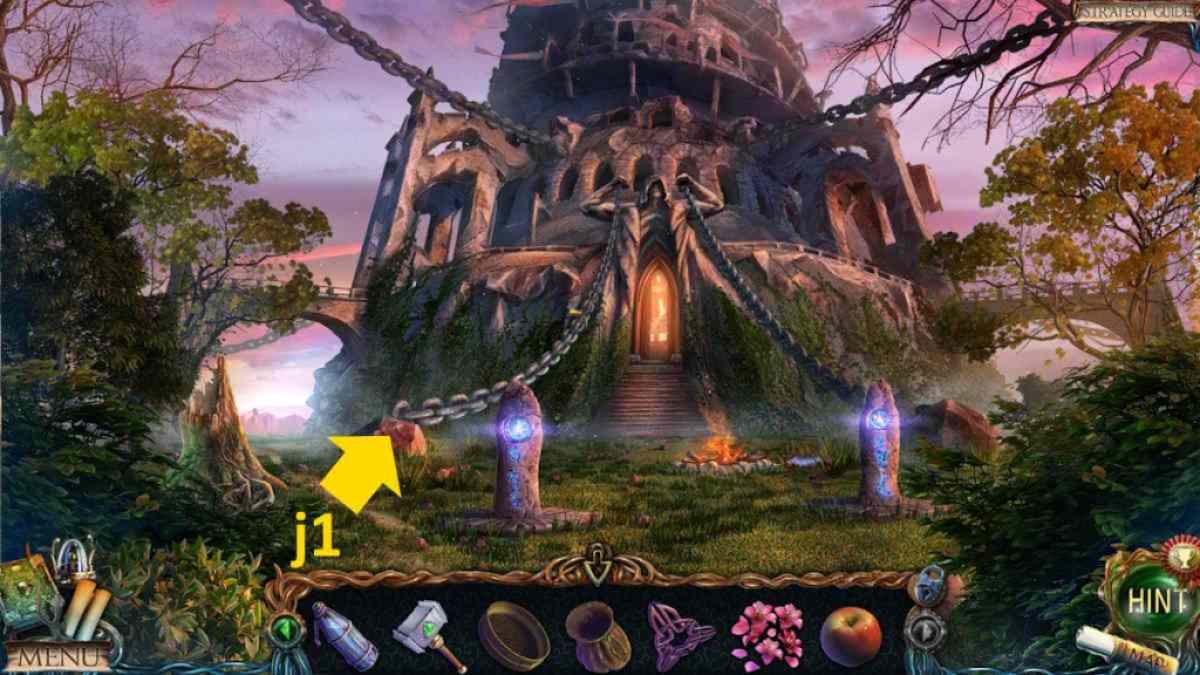
Image by Pro Game Guides
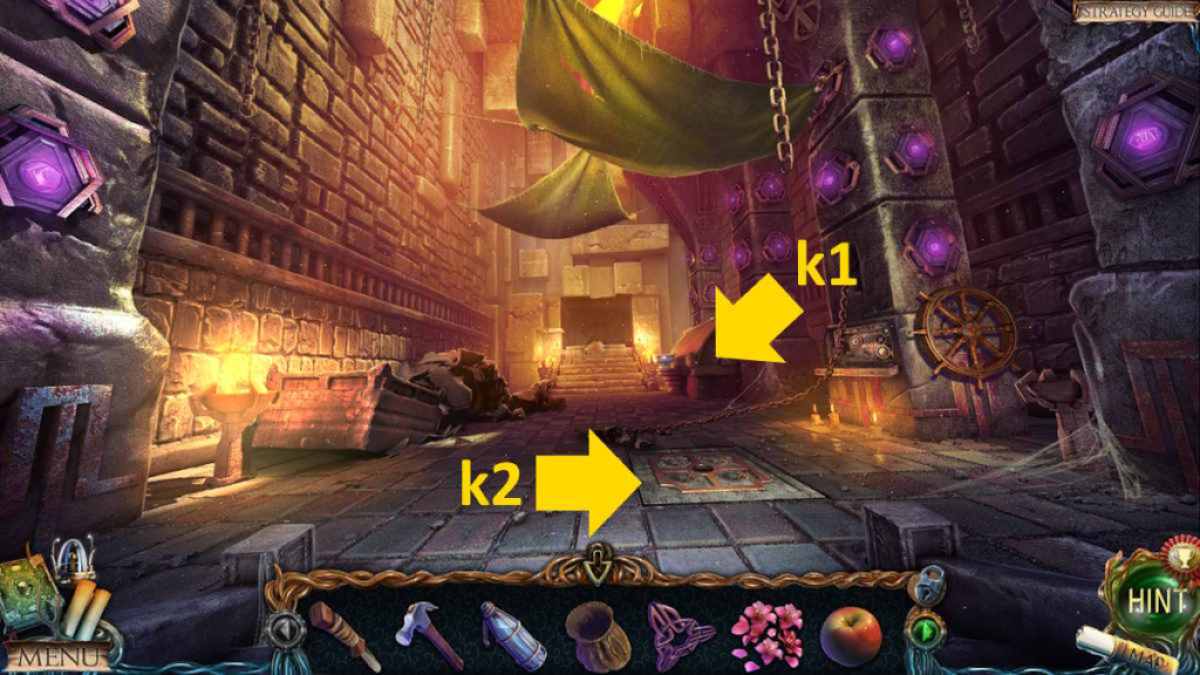
Image by Pro Game Guides

Image by Pro Game Guides
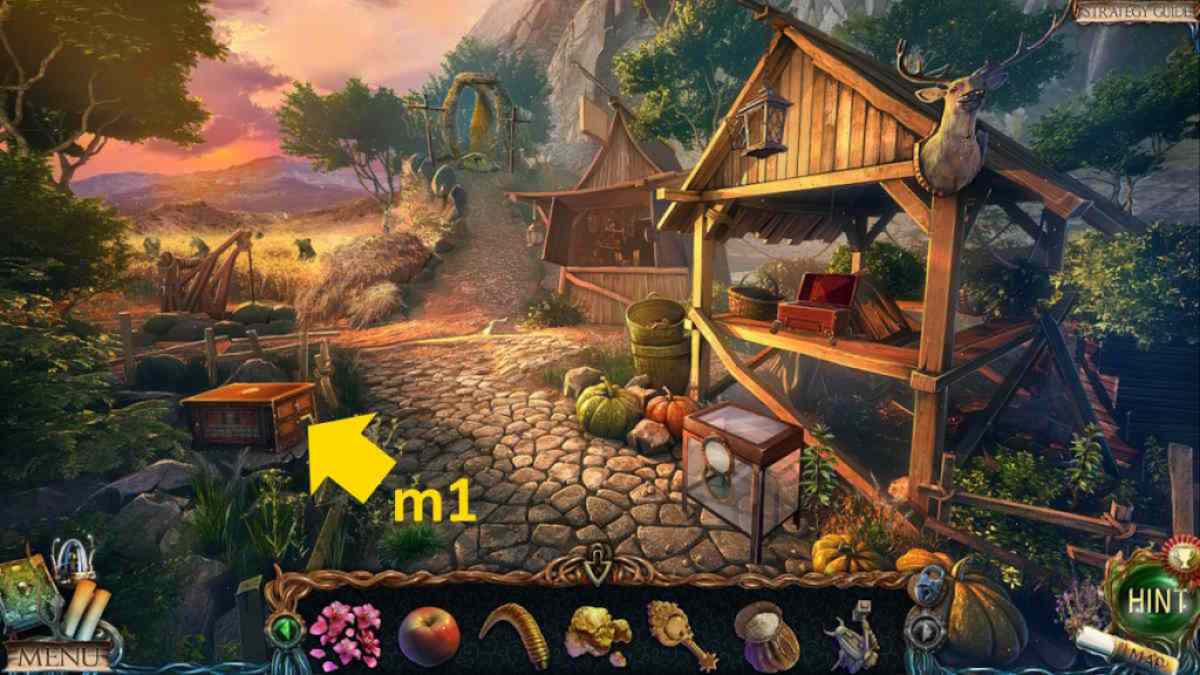
Image by Pro Game Guides
Screenshot by Pro Game Guides
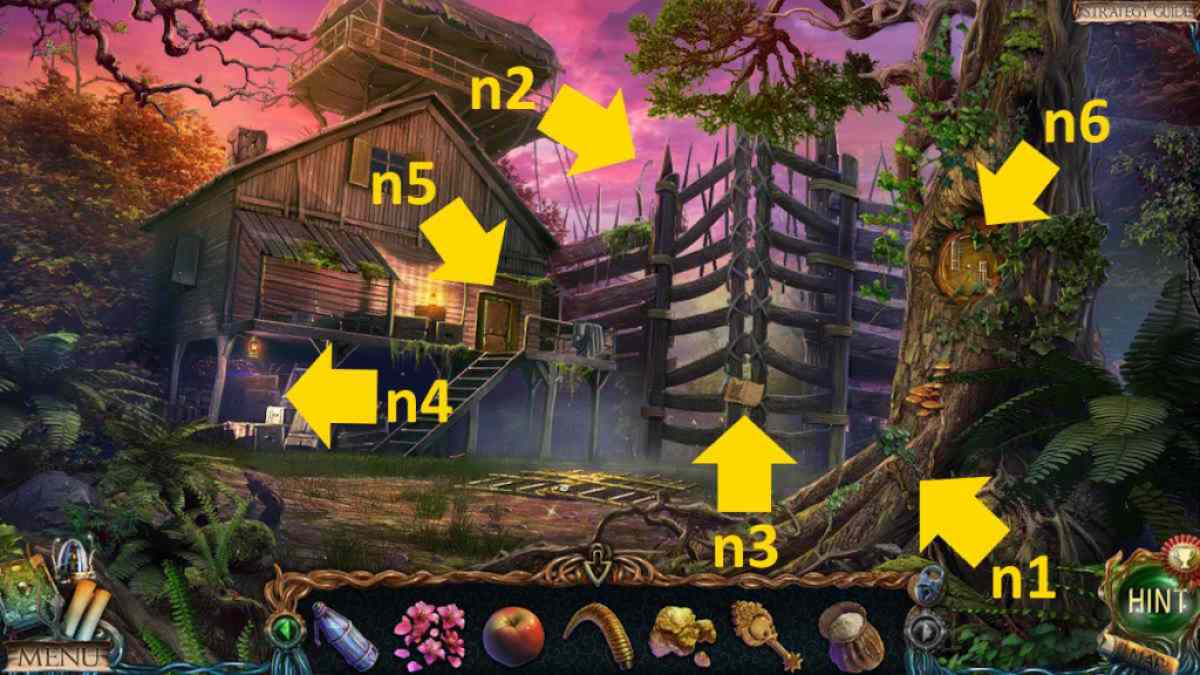
Image by Pro Game Guides
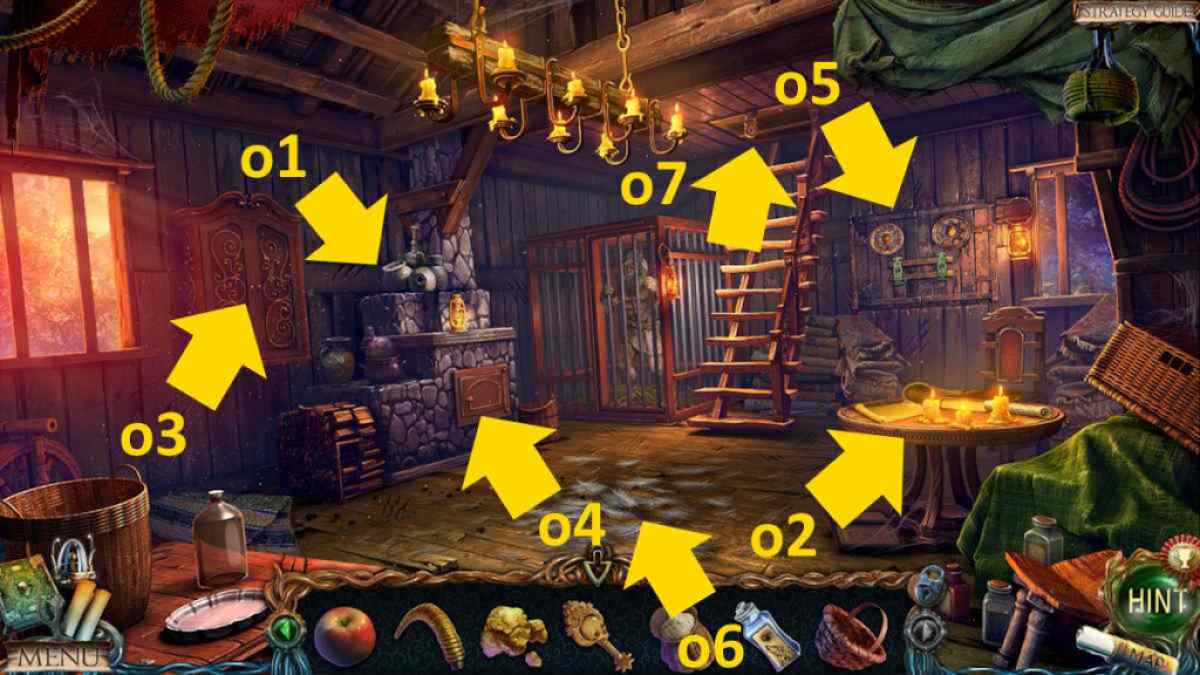
Image by Pro Game Guides
Screenshot by Pro Game Guides

Image by Pro Game Guides
