The risky venture begins !
Susan is back in legal action in the point - and - click puzzle RPG Lost Lands 2 , The Four Horsemen . If you ’re looking for solution to any of the puzzles or items and collectibles fix , follow along below in my full walkthrough and usher .
Lost Lands 2 Walkthrough - The Four Horsemen full guide and puzzles
This guide walk you through the first part of the adventure up until you see Folnur after key the compass . You ’ll find link to my other walkthroughs to afterwards stages of the game below the mesa of contents .
As with all the Lost Lands games , there ’s a great mathematical function and debauched traveling organization ( just get across the icon in the bottom right of the screen ) , so I ’ll use area name throughout rather than describing how to get to location on foot .
The journey begins
After being whisk off away in the parking great deal , you awaken outside Maaron ’s hut . Your firstBeyond Objectis on the roof ( a1 ) and theCollectibleis justly next to it . Take theMonk Figurine(a2 ) , theShovelfrom the blossom snug - up ( a3 ) , and theLadder(a4 ) . Use the ladder to get a close - up of the loft ( a5 ) , take theKnife Handle , and use it on the blade ( a6 ) to get aKnifeand your firstManuscript .
Use the tongue on the sack on the handcart ( next to a2 ) which splatter the grain , attracting the pigeons from the loft . you’re able to now take theKeyfrom the loft ( a5 ) , along with asecond Monk Figurine , and practice the key to get into Maaron ’s hut ( a7 ) . Once inside , clack the glowing orange formal for a cut scene and then talk to Maaron , who will give you aRune .
Take theCollectibleand athird Monk Figurinefrom the bookshelves ( b1 ) , theBeyond Objectfrom the tree ( b2 ) , and afourth Monk Figurinefrom the chair ( b3 ) , then move the husk ( b4 ) to get hold aSickle . Take theManuscriptfrom the chest of bloomers ( b5 ) , as well as aCandle , then launch the top drawer in the same close - up to get aFull Oil Can . Head back outside , use the rune to activate the portal ( a8 ) , and head through .
Stronghold of the Five Worlds
TheBeyond Objectis on a mainstay ( c1 ) and theCollectibeis to the right of the threshold ( c2 ) . Take theHammerfrom the stone ( c3 ) and theManuscriptfrom the left obelisk ( c4 ) , then return to Maaron ’s hut . rive back the carpet ( b6 ) , use the hammer on the nails in the close - up , take out the plank , and take theSaw .
Go back to the stronghold and use the saw on the tree stump ( c5 ) to get theWater Portal Activation instructionsand afifth Monk Figurine . Return to Maaron ’s hut and put the instructions on the mesa ( b7 ) to see what you need to aerate the vena portae . Return to the stronghold once more and move through the arch ( c6 ) to the lake of liveliness .
After verbalise to Aquamarine the mermaid , collect theBeyond Objectrock ( d1 ) and theCollectible(d2 ) . Use the sickle on the thorns ( d3 ) to find yoursixth Monk Figurine , take theKeyfrom the guts ( d4 ) , and then excavate the guts with the shovel to find aMusic Box Drum .
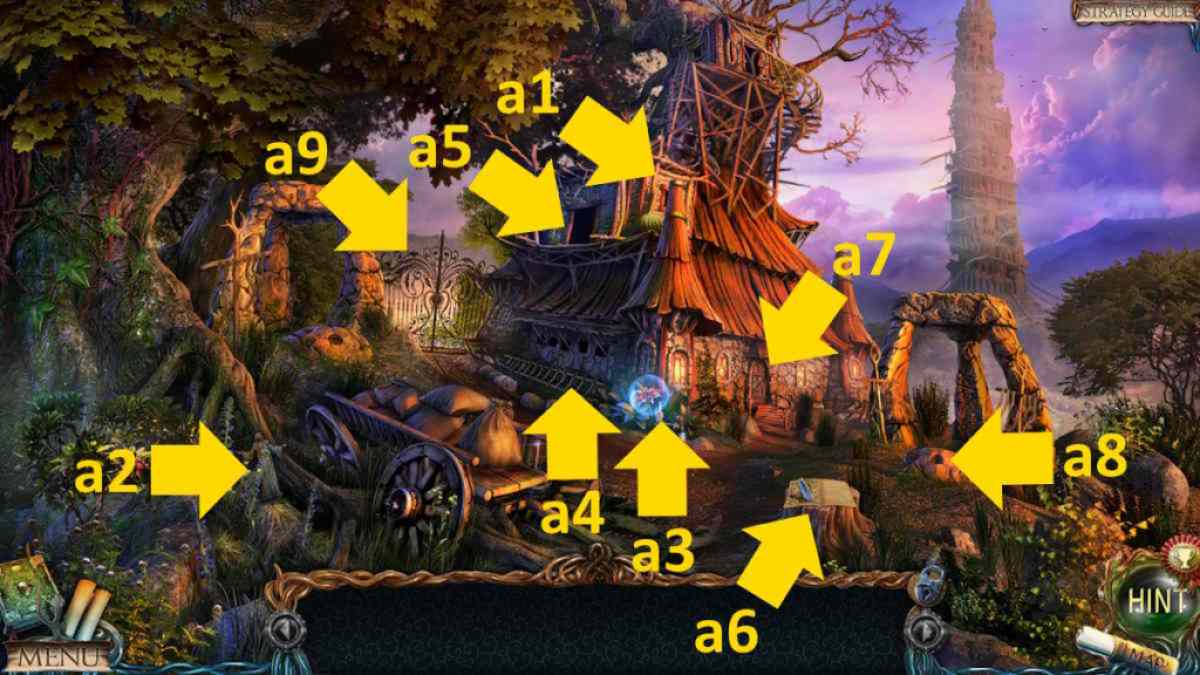
Image by Pro Game Guides
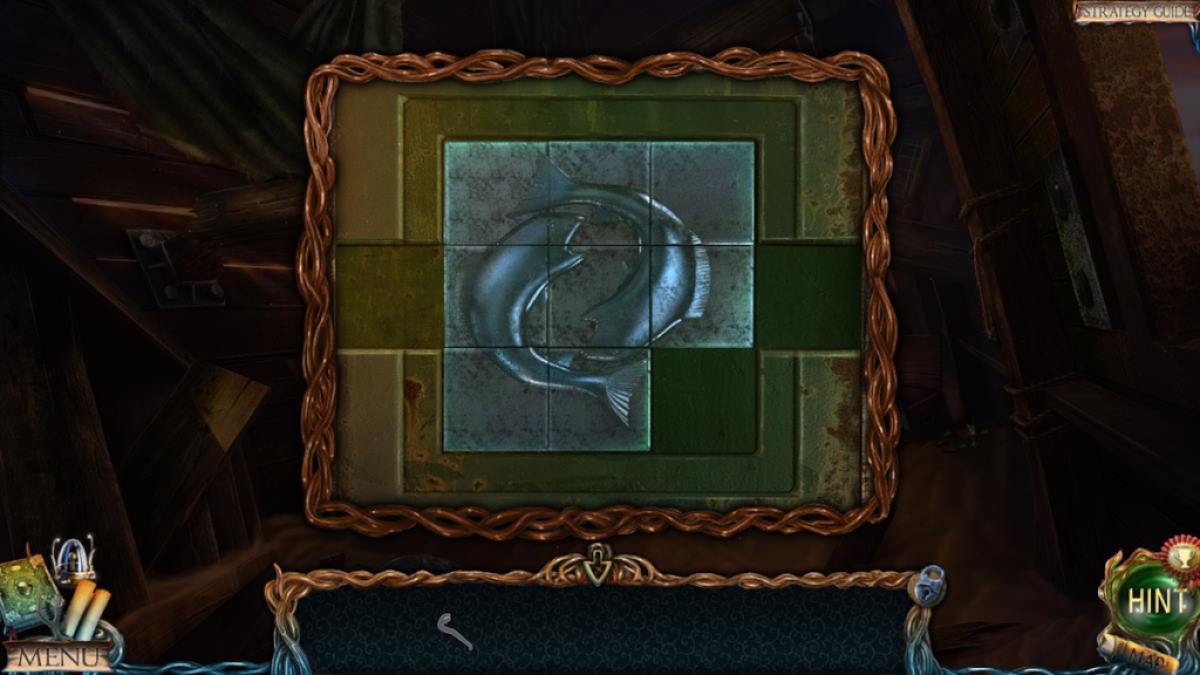
Next , get across the boat ( d5 ) to start a missing objects mystifier , where everything you need is already in the image ( the tartar bod is to the right of the sauceboat ) . Once consummate , you ’ll receive theStopcock .
Return to Maaron ’s hut and use the cock on the chest ( b8 ) to commence arotating animate being puzzle . If you ’re stuck on this one , follow this sequence :
When you ’re done you ’ll incur anEnergy Spherein the box . you could render to the stronghold and invest the orbit into the dagger ( c4 ) , but you necessitate another . Go back to the clearing and use the key to launch the gate ( a9 ) , which give you access to thehalfling settlement .
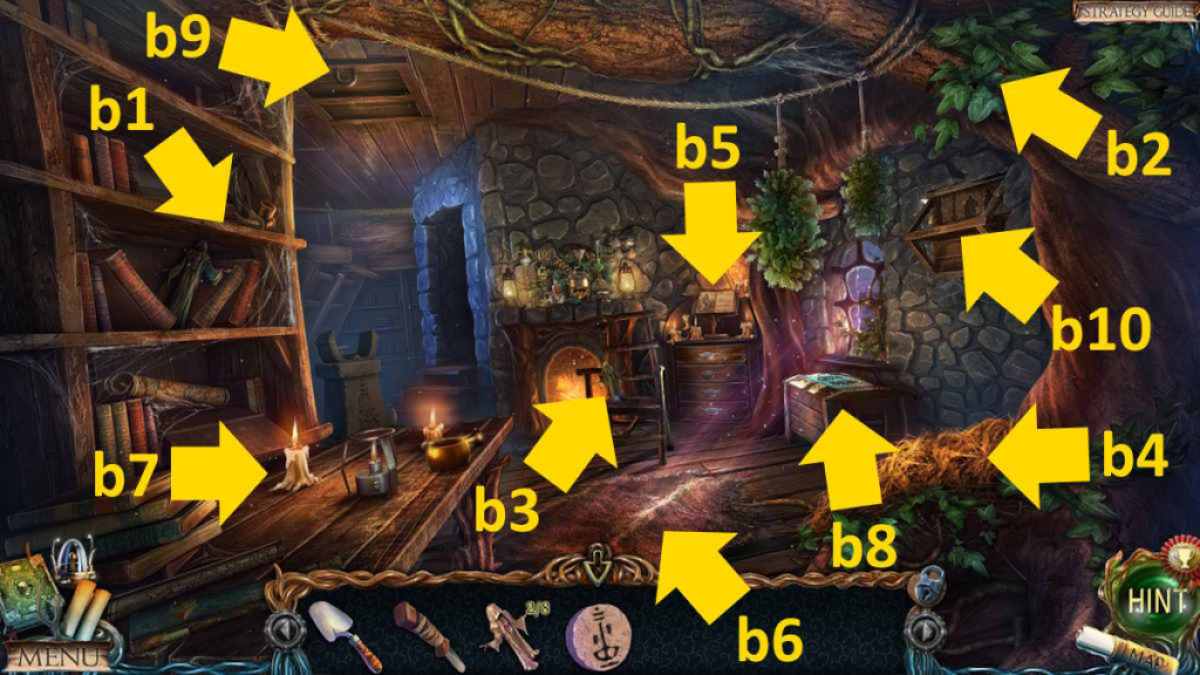
Image by Pro Game Guides
refer : lose Lands 7 Walkthrough – Full Guide
The halfling settlement
You ’ll obtain theBeyond Objecton the ledge ( e1 ) and theCollectibleon the pumpkins ( e2 ) . Also , snaffle theseventh Monk Figurine(next to e1 ) , theNet(next to e2 ) , thePitchfork(e3 ) , aManuscriptfrom the snake box shut down - up ( e4 ) , and theEnergy Spherefrom the lamp ( e5 ) . expend the pitchfork on the rick ( e6 ) to find thefinal Monk Figurine . Get a close - up of the music loge ( e7 ) , turn the handle , then impart the music loge drum . It wo n’t work yet though .
Move to the lake and use the net income on the water ( d6 ) to get someDuckweed . Head back to Maaron ’s hovel and put the duckweed in the mortar on the desk ( b7 ) , apply the pestle on it , then put the mortar onto the oil hummer . However , you still need the purple center .
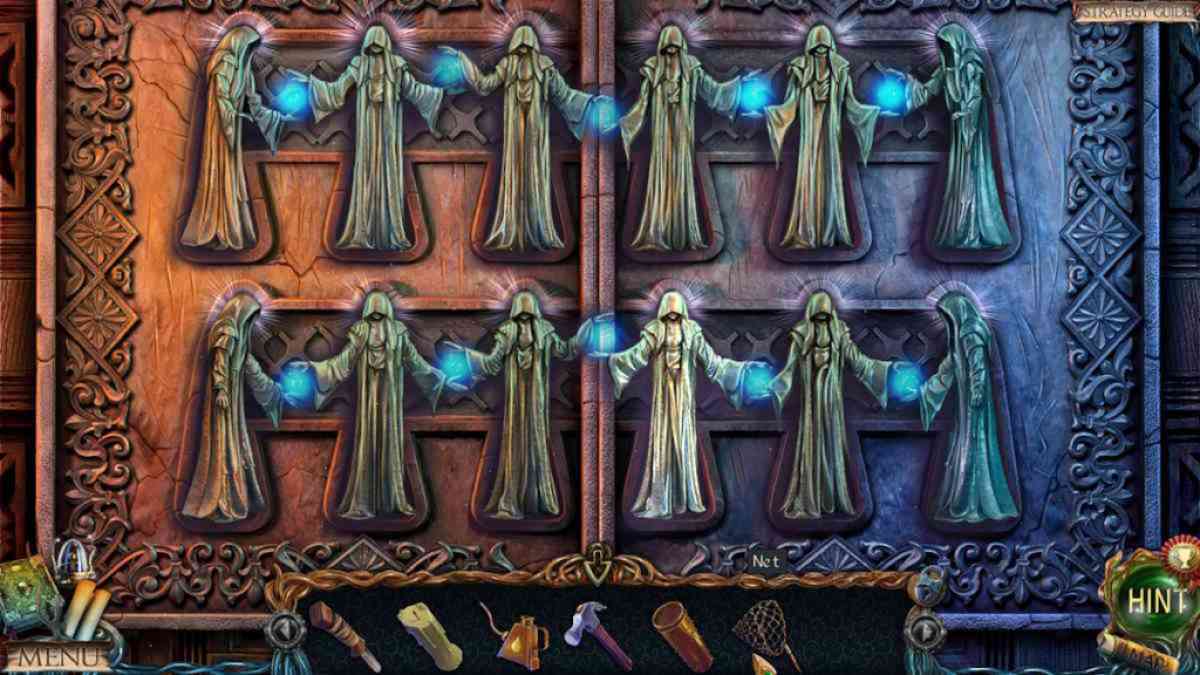
Return to the stronghold and place the 2nd energy arena in the 2d dagger ( c7 ) , raise the step to the door . Click the doorway and then impart the Thelonious Monk statuette to commence an energy Ernst Boris Chain teaser . Once complete ( see look-alike above ) , you ’ll gain access to theTower Hall , so head inside .
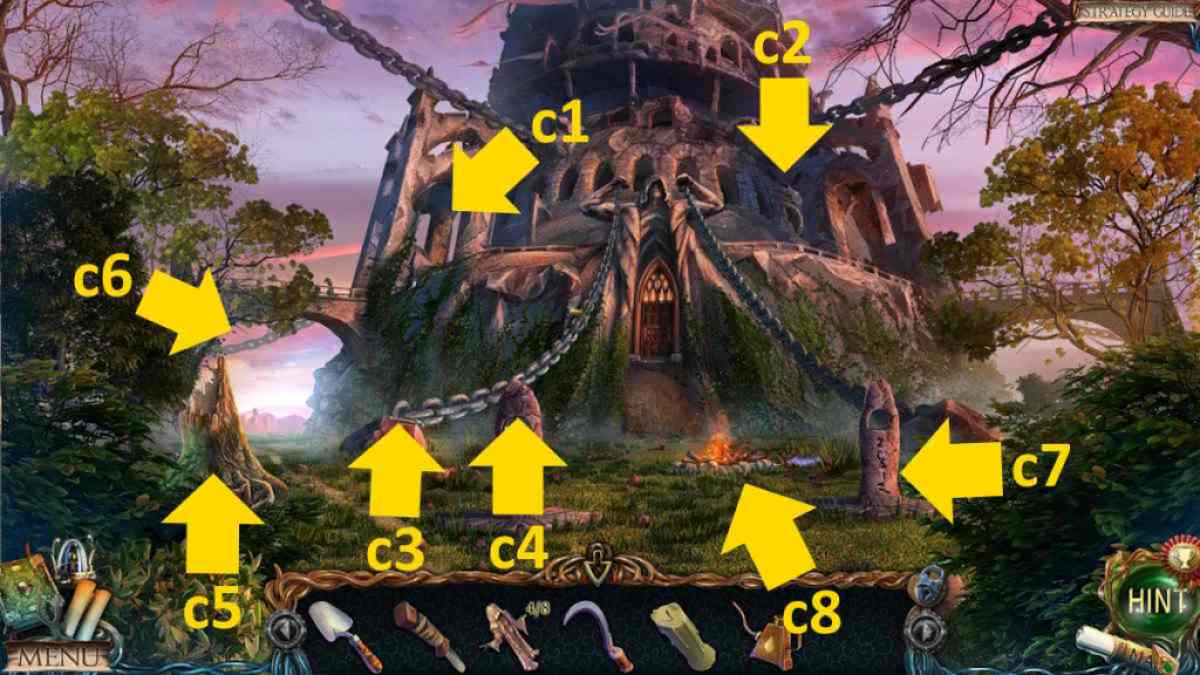
Image by Pro Game Guides
Take the Collectible ( f1 ) and theBeyond Object(f2 ) , and then apply the knife to lift the humiliated floor roofing tile ( f3 ) to regain aMosaic Fragment . Take the matchbox from the edge of the pool ( f4 ) , grade the candle in the broken statue ( f5 ) , and use the matches to light it . Take thePurple Esencefrom inside . Get a close - up of the incubate mirror ( f6 ) , take theManuscript , and use the tongue to thin out off theTassle .
manoeuver to the halfling small town and apply the tassel to make clean the metal drum in the music box ( e7 ) . shut the case , wind it , and it will open to divulge thePhoenix Feather . Back at Maaron ’s shanty , put the purplish essence into the mortar ( b7 ) and take thePowder of Flying . Return to the tower , grade the powder and feather in the kitty ( f4 ) , and the portal will trigger off .
The upper corridor
TheCollectibleis on the leftover pillar ( g1 ) , while theBeyond Objectis by the right mainstay ( g2 ) . Take theWooden Gear(g3 ) , then move the Stone ( g4 ) to find aKey .
Return to the halfling settlement and utilize the key to open up the hut ( e8 ) , set about a missing objects game . Again , you ca n’t go haywire , as everything you need is in the figure .
Once complete , you ’ll get aStone Chip . While you ’re here , append the geartrain to the well ( e9 ) , turn the handle , and take thePlank .
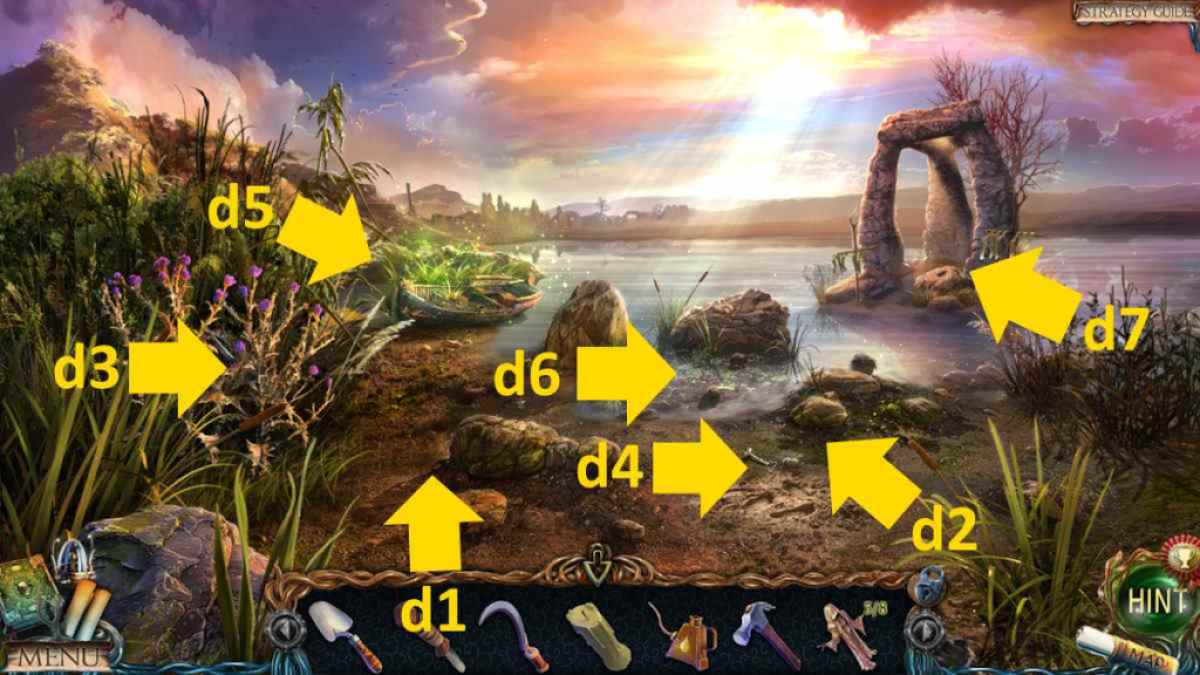
Image by Pro Game Guides
Head back up to the upper corridor and get across the top of the steps ( g5 ) , and then the tomb , sum up the stone chip to the side of it to set out a couplet - matching puzzler . It ’s time - consuming , but you ca n’t give way or go wrong . Once concluded take theManuscriptandRunefrom inside the coffin .
Back at the lake , apply the plank to get to the dolmen ( d7 ) , which will make Maaron appear . After speak to him , he ’ll give you asecond Mosaic Fragment . Use the runic letter to sack up the portal vein here ( d7 ) and move on to theForsaken Sea .
The Wasteland
After you ’ve collected theBeyond Object(h1 ) and theCollectible(h2 ) , take theManuscriptfrom the cactus ( h3 ) , grab aWhale RibandStone Rune(h4 ) , then use the rock oil can to clean the winch ( h5 ) and lower the boat and take theGafffrom inside it . Collect theJar of Fliesfrom the wreck ( h6 ) , take somePlanksfrom the foot of the tree ( h7 ) , and bring them to the tree ( you ca n’t fasten them yet ) .
come back to the halfling settlement and use the jar of flies to capture the ophidian ( e4 ) , receiving aSnake in a Jar .
Now , give back to the desolate sea and click the archway in the distance ( h8 ) to move on to the abandoned halfling small town .

Screenshot by Pro Game Guides
TheBeyond Objectis above the door on the right ( i1 ) , while theCollectibleis just to the left of it ( i2 ) . Select the tree ( i3 ) for a close - up and use the snake to scare away the scorpion , which allows you to take a thirdMosaic Fragmentfrom the skeleton ’s hand . Also , take itsMonacle , then apply the tongue to cut the forget me drug here and take aStone on a Rope .
Examine the well ( i4 ) to find someNails , add the first stone runic letter to the pyramid ( i5 ) , then use the heavyweight costa in the ship skinny - up ( i6 ) to move the boulder and start a miss object game ( see the sliding mystifier image above ) . Once complete , take theHandleyou find inside and use it to operate the well and discover someDynamitein the well pail . last , take a spirit at the statue ( i7 ) to see that you call for a computer code to operate it .
relate : lose Lands 6 walkthrough ( Mistakes of the Past )
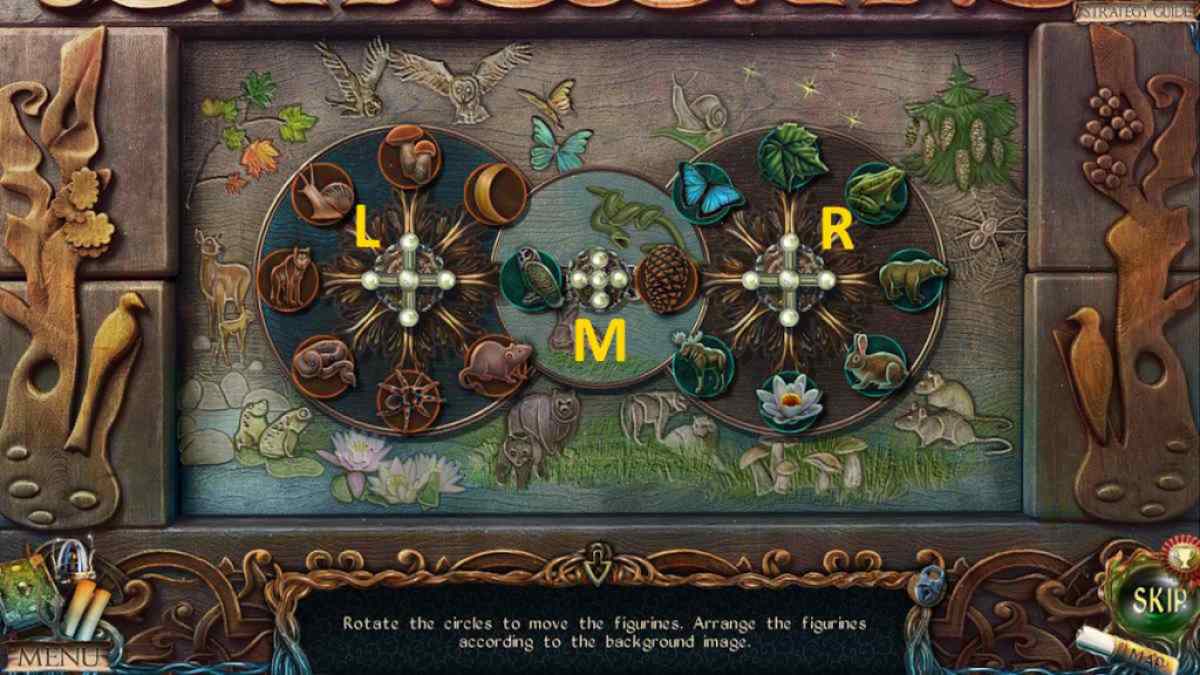
Image by Pro Game Guides
Getting to the canyon
Go to Maaron ’s hut and utilize the gaff to start the loft hatching ( b9 ) , taking theCrystalyou find within . apply the nail and the hammer on the planks ( h7 ) to climb the tree and get theTongs . Place the dynamite inside the ship ( h6 ) .
Move to the stronghold next and use the tongs to take theTower Figurinefrom the fire ( c8 ) . tally the tower figurine to the shelf in Maaron ’s hut ( b10 , it just grow it out of your inventory ) , and then lead back to the forsaken ocean . expend the monocle on the dynamite in the ship close - up ( h6 ) to muck up up the ship , make water sure to take theShip ’s Wheelthat survives the bang .
Click where the ship was to move on to the canyon and snap up theBeyond Object(j1 ) and theCollectible(j2 ) . Use the stone and R-2 to hook the tree and take thefourth Mosaic Fragmentfrom the nest ( j3 ) . Go to the tent ( j4 ) , take theStone Rune , and take theBrushfrom the doorway ( j5 ) .
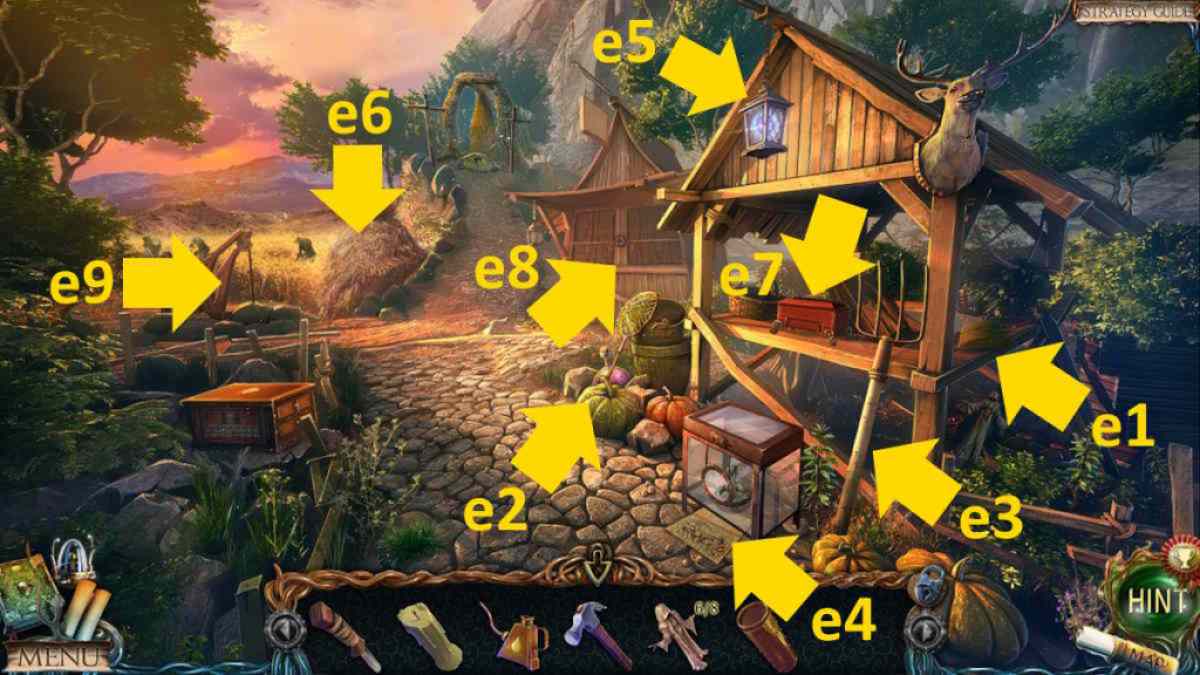
Image by Pro Game Guides
Return to the forsaken sea , go to the cactus close - up ( h3 ) , and employ the brush on the rock next to it toreveal a drawing of a soldier . Return to the canon , add the crystal to the monument ( j6 ) , and turn the objet d’art to couple the trope ( see above ) . This will open up the huge round room access ( j5 ) , so head inside .
The dwarf temple
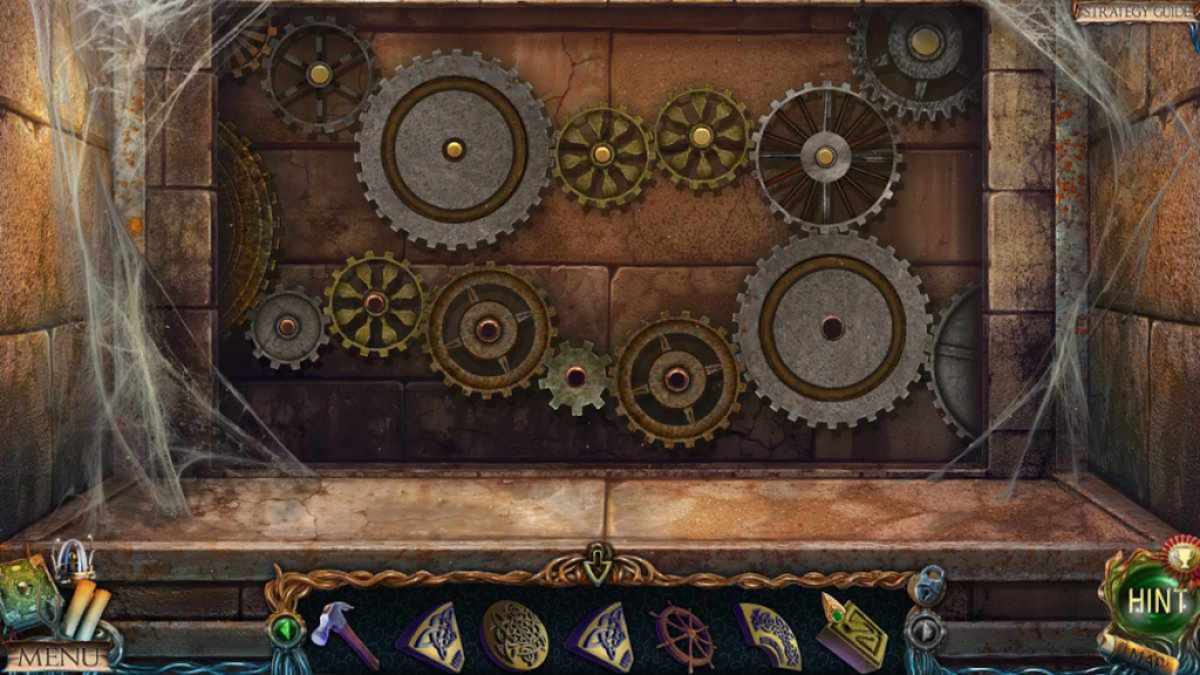
The Collectible is on the tower at the back left ( k1 ) , while theBeyond Objectis on the bulwark on the left ( k2 ) . Take the Gear at the root of the odd statue ( k3 ) , then add it to the chemical mechanism on the right ( k4 ) to start a cog and gears puzzler ( see the solvent below ) . Once complete , you may confiscate the strand to the statue ’s spear .
utilise the ship ’s wheel on the mechanism to pull the statue down and then take theSpear . you’re able to now also take theStone Runein the pocket-size hole underneath the statue , along with a Manuscript ( k3 ) . come back to the abandoned halfling settlement , add the remaining Harlan Fiske Stone runes to the Great Pyramid ( i5 ) , and it will separate . Look at the pillar in spite of appearance to happen you take a computer code to operate it .
Back in the dwarf temple , use the spear to disregard the textile ( k5 ) to find afifth Mosaic Fragment . Select the far end of the temple ( k6 ) , and add all five mosaic fragment to start a mystifier . This one can be nettlesome , so I ’ve print a solution below ( click the symbols in the following order ):
Screenshot by Pro Game Guides
Once you ’ve slid the opus into the correct spots , the back rampart will skid down . dawn it for a close - up , and inside you ’ll come up aNote With The Symbols . Go to the abandon halfling colony , look at the column break by the pyramid ( i5 ) , apply the note to see the successiveness , take the compass it bring out , and then revel the cut scene .
That close Part 1 of this walkthrough . To continue the plot with us here at Pro Game Guides , move on toLost Lands 2 Walkthrough - The Four Horsemen , Part 2 !
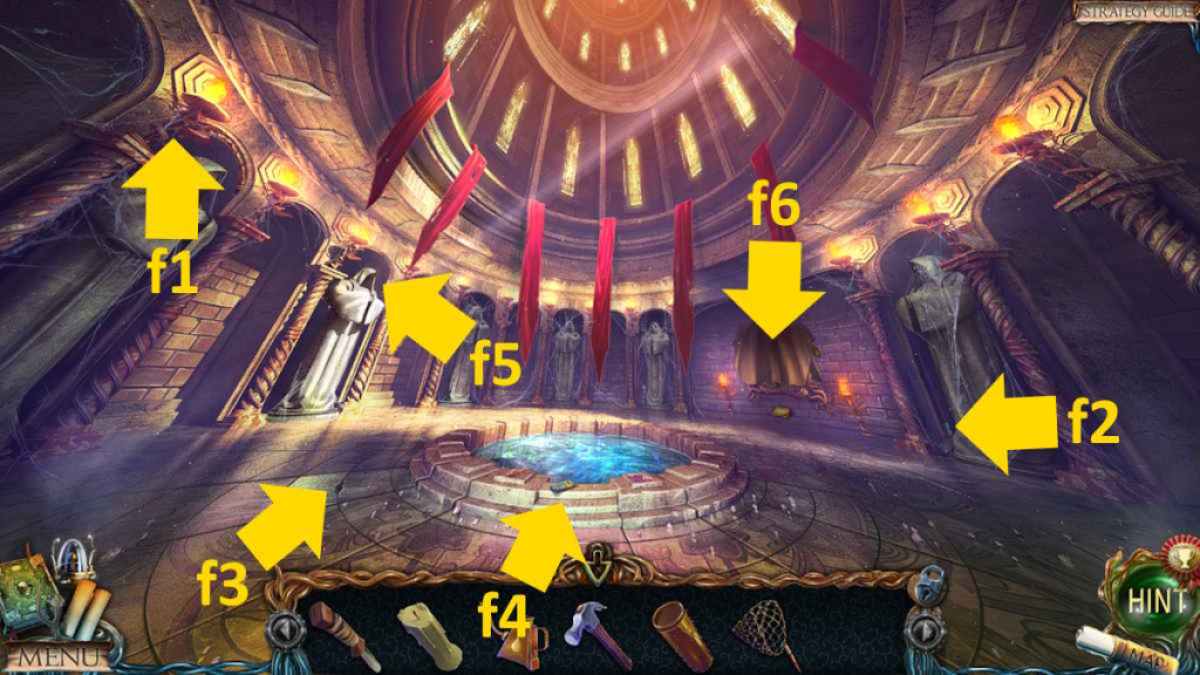
Image by Pro Game Guides
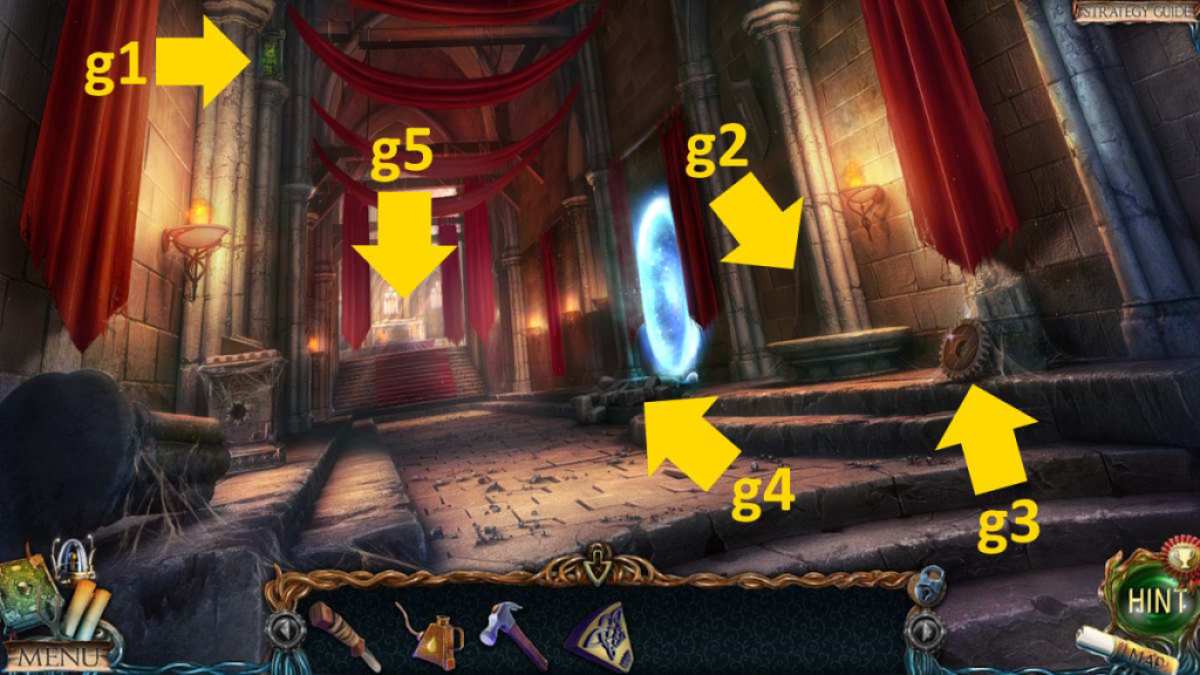
Image by Pro Game Guides
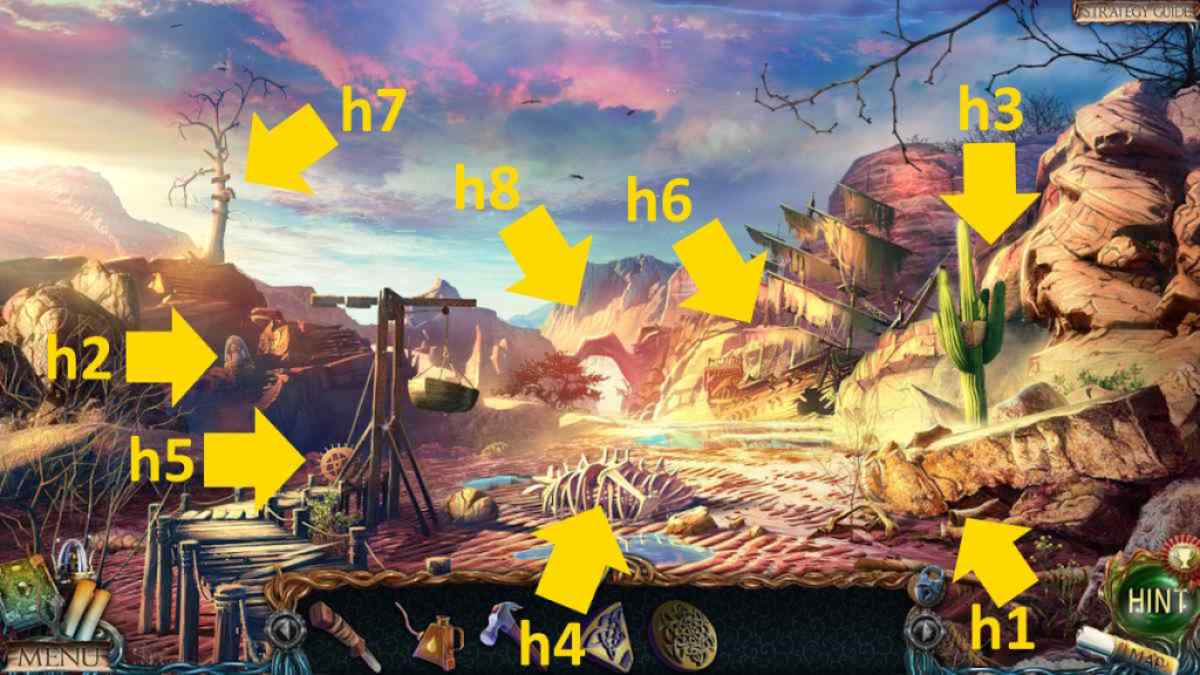
Image by Pro Game Guides

Image by Pro Game Guides
Screenshot by Pro Game Guides
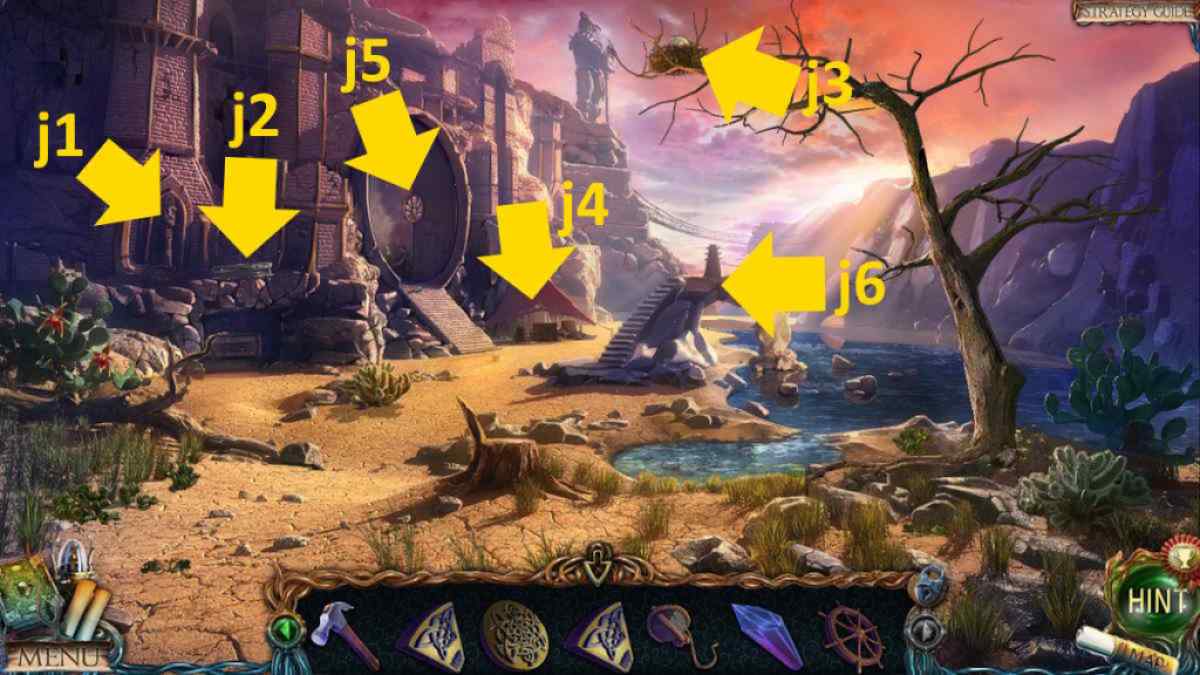
Image by Pro Game Guides

Screenshot by Pro Game Guides
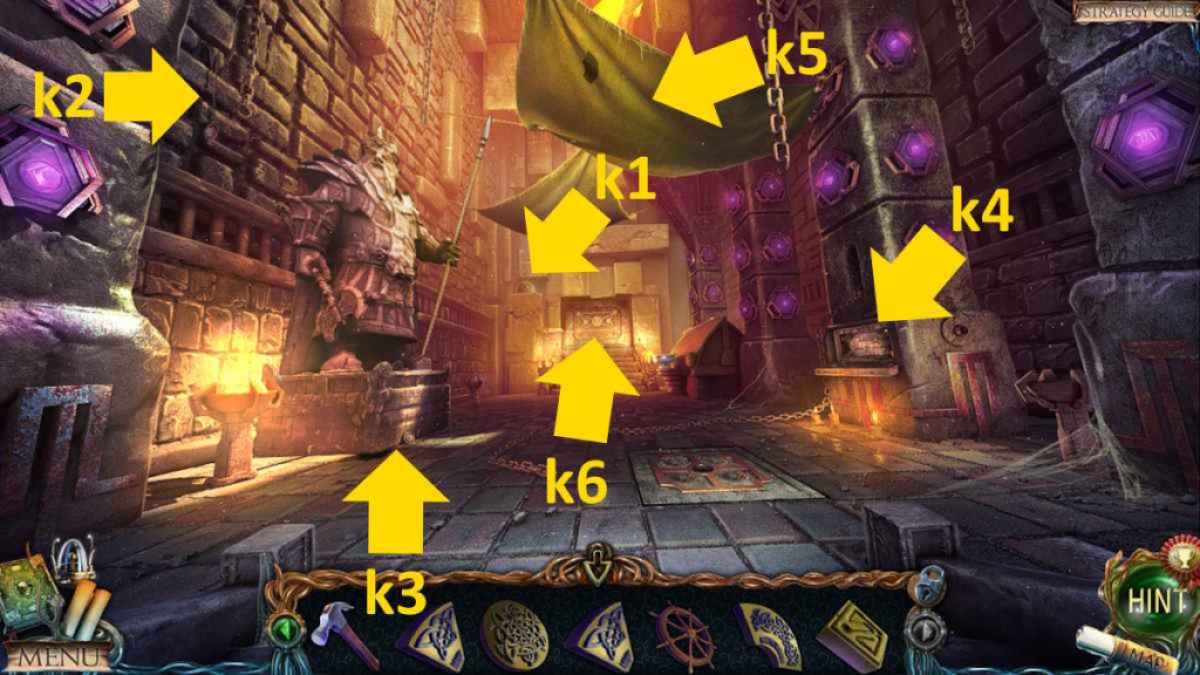
Image by Pro Game Guides
Screenshot by Pro Game Guides
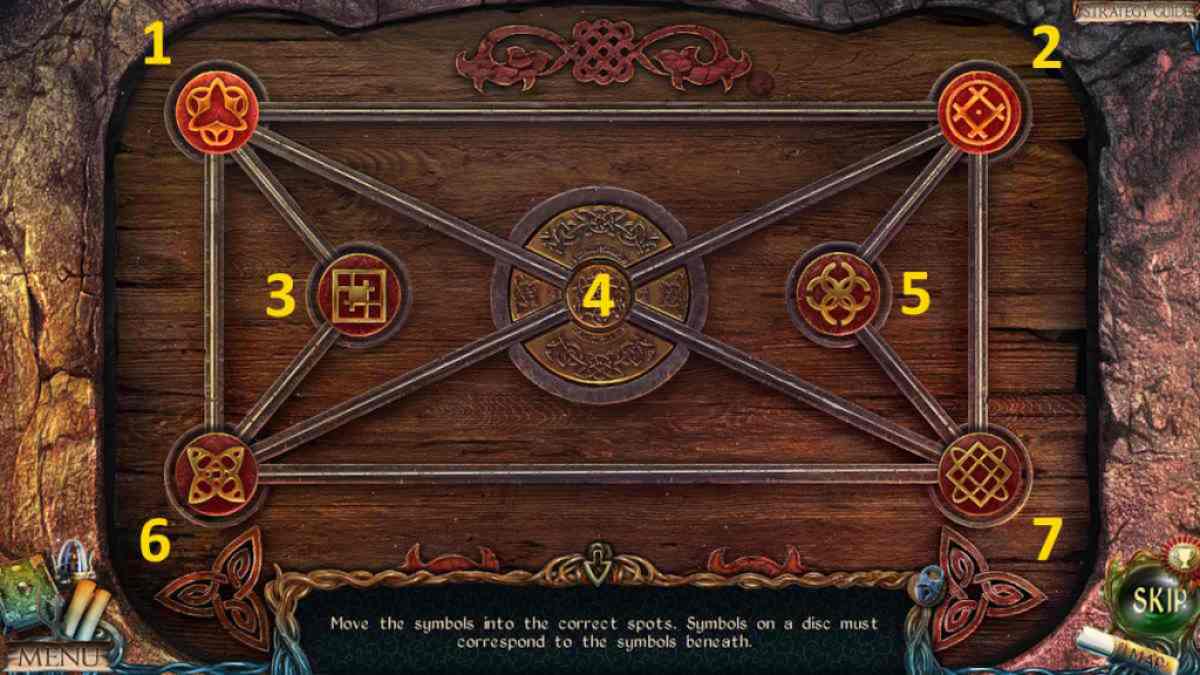
Image by Pro Game Guides
