Folnur to the deliverance in the Lost Lands 2 bonus chapter walkthrough !
make out each of the Lost Lands point - and - click puzzle RPGs opens up extra cognitive content , including a whole extra short story to search . If you ’re about to harness the bonus chapter for Lost Lands 2 , The Four Horsemen , witness my full guidebook and walkthrough below .
Lost Lands 2 Bonus Chapter Walkthrough - Full guide and puzzles
The walkthrough below contains all the information you ’ll involve to fill out the Lost Lands 2 The Four Horsemen Bonus Chapter . If you ’re here calculate for help and entropy on the primary game , do n’t care . Click through to ourLost Lands 2 Walkthroughhub page to find links to all the sections of the game , including puzzle solution and the locations of all manuscripts and other collectibles .
Folnur’s refuge
Once you ’ve have theDoor Sealafter the initial cutscene , pick up theBurner(a1 ) , check out the ingredients leaning for the rapid growth potion ( a2 ) , grab theLabyrinth Fragment(a3 ) , and add the fragment to the wall ( a4 ) to start a ball - rolling miniskirt - secret plan . If you ’re stuck on this one from a reset , dawn the paddles in the following guild :
This launch the expiration toFolnur ’s Refuge , so head up the stairs ( a4 ) .
Take theBowl(b1 ) and theKnife(b2 ) from the level , and then take theKeyon the floor by the track in the wheel conclusion - up ( b3 ) before heading back downstairs .

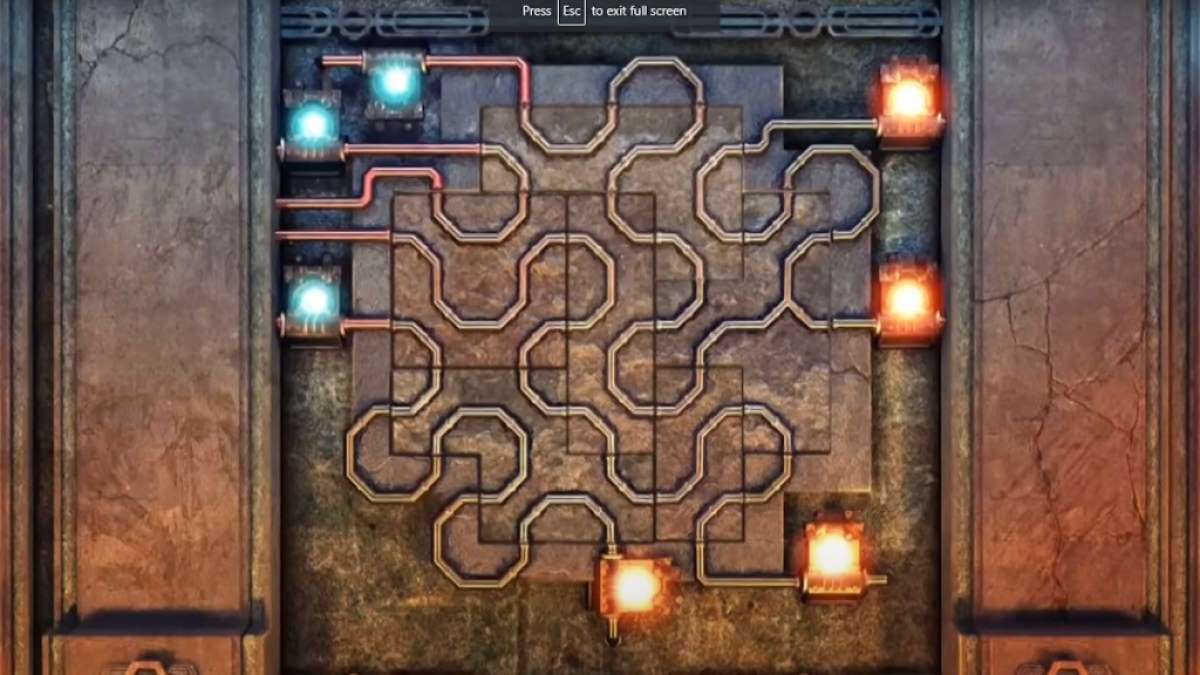
Place the pipe bowl on the floor next to the pump ( a5 ) and deplume the handgrip to get aBowl of Water . Pull back the pall ( a6 ) and use the key to open up the gate behind it . Click the gate once more to start a secret objects miniskirt - game . You ca n’t fail here , as everything you need is in the image . Once complete , take theWheel .
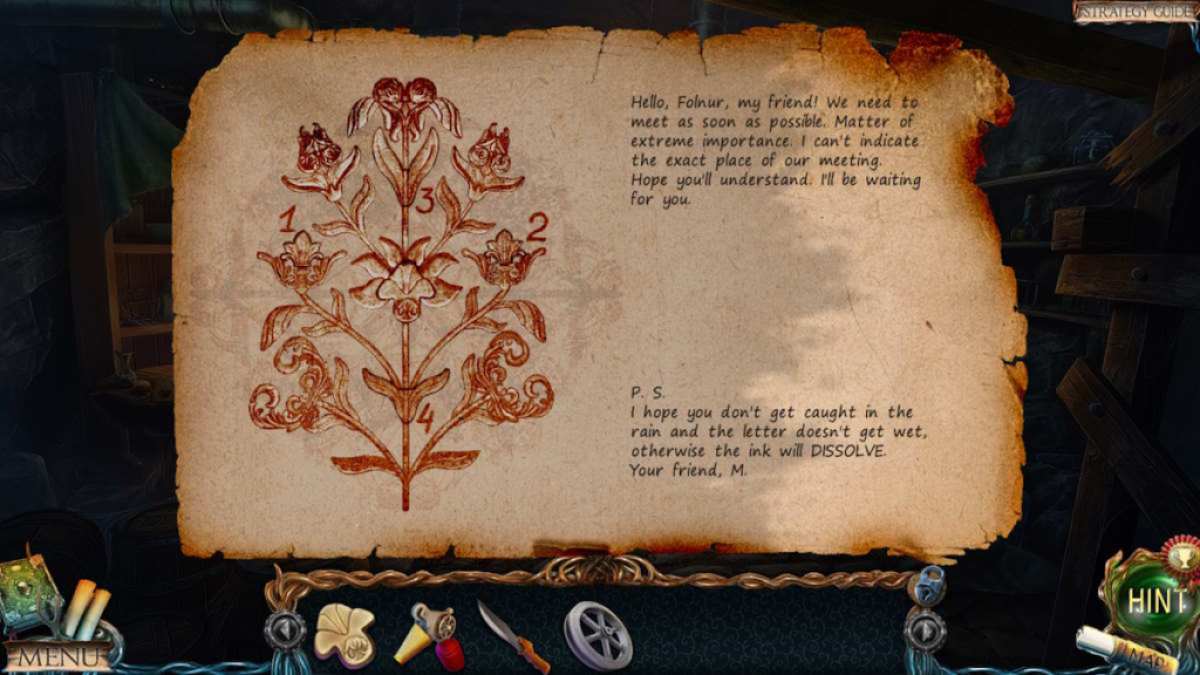
pick out the barrel where the note from Maaron arrived ( a7 ) and habituate the bowl of H2O on the tone in the stopping point - up . fall into place the note again afterward to add the revealedinstructions to your notebook(I’ve image it above ) . Go back upstairs , fix the wheel ( b3 ) , employ the grip in the close - up to lour it onto the track , and then tick the tunnel ( b4 ) to move to thelava river .
Use the waterpipe ( c1 ) to pelt some water onto the lava , which also gets you aHandwheel . habituate your knife on the forget me drug ( c2 ) to lour the bricole ( c3 ) , then take a look at the catapult and take theStone Runein the close - up .
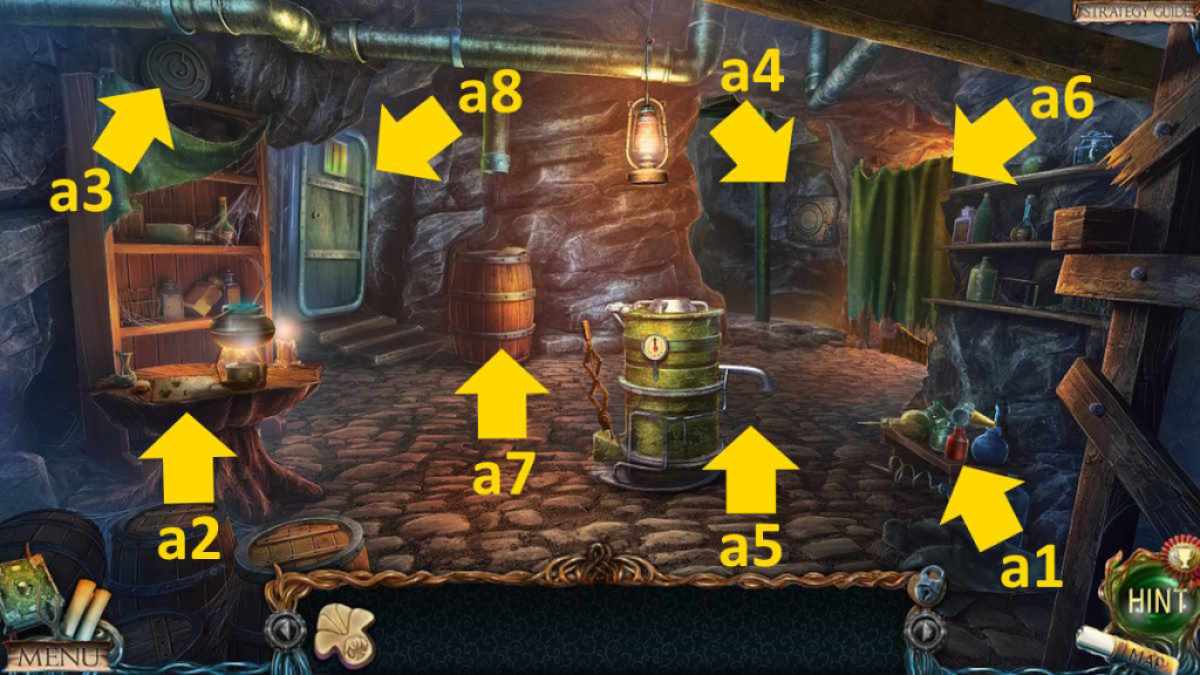
Image by Pro Game Guides
practice the stone rune to open up the chest ( c4 ) and take aCannonballfrom inside . rip back the catapult , load the cannon ball into it , and fire the arbalest to make an expiration cakehole in the wall ( c5 ) . lead through it to thedwarven square .
The dwarven square
Take theLeverthat ’s on the ground by the noticeboard ( d1 ) , and then point back to the lava river . Use the lever tumbler to change the track direction before going back to Falnur ’s lab . impart the handwheel to the room access ( a8 ) and guide through it to theunderground corridors .
Pick up theHammer(e1 ) and theBurning Torch(e2 ) , and then apply the torch on the fossil oil ( e3 ) to light up the way . snap the end of the right corridor to get a close - up of the door ( e4 ) at the close , add the door Navy SEAL , and then click the button in the decree on the persona above ( that ’s in your notebook computer ) . you’re able to now tick the door once more to move on to thehalfling cellar .
Grab aPoppy Fruitfrom the wall on the left ( f1 ) , and then utilize the malleus on the damage wall ( f2 ) to commence a measuring puzzle . If you involve a hand with this one from a reset , use the following chronological sequence :
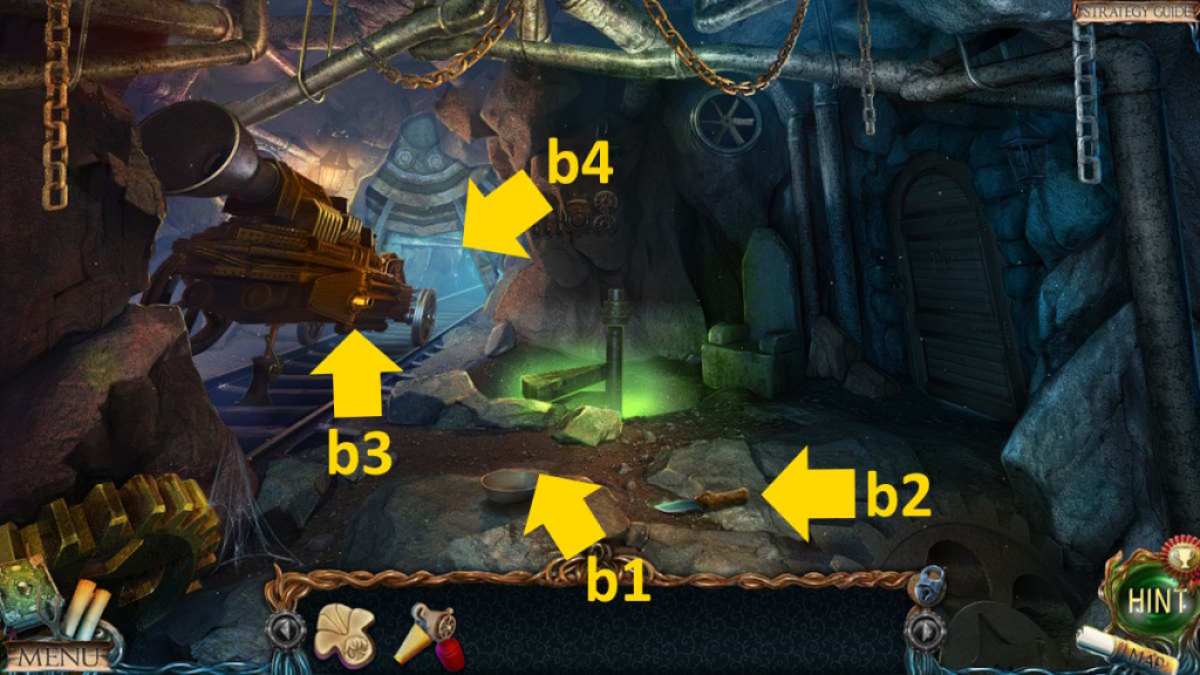
Image by Pro Game Guides
subsequently , you ’ll receiveThree Measures of Sand . localise the sand on the scales ( f3 ) and they will poise , opening a secret compartment . Take theHookfrom inside . Use the hammer on the pumpkin ( f4 ) and take thePyramidthat ’s inside . Move the corner ( f5 ) to the cornerstone of the pile of boxes ( f6 ) , which allows you to get a close - up of the hatching above ( f7 ) . chatter it to open up it and then go through to thehalfling ’s hut .
Related : lose Lands 8 Walkthrough ( Sand Captivity )
Meeting Maaron
talk with Maaron , and he will give you aSymbolafterward . snap the chair he was model on ( g1 ) for a close - up , tick the sloven ’s head chip at on the handrest , and take thePliersfrom the privy compartment that opens up . employ your knife to get anAloe Leaffrom the plant on the windowsill ( g2 ) , and then head back to the foursquare .
Use the symbol on the Oliver Stone paries ( d2 ) , and then snap the image it reveals to start a block placement puzzle . If you ’re stick , I ’ve include an image of the completed puzzle above . Note you postulate to build it from the bottom up as the pieces will knock off down otherwise . Once terminated , the door will spread out and you’re able to move through to theundermountain dwarf empire .
Click the gates ( h1 ) and practice the hook on the roach in the finish - up to insure it loose . Now click the open gate once more to start a lose objects minigame . Once consummate , take thePalm . pose the palm in the stone clenched fist on the right ( h2 ) , which will make a stairway above it , tolerate you to move on through the door ( h3 ) to thedwarf slums .
Screenshot by Pro Game Guides
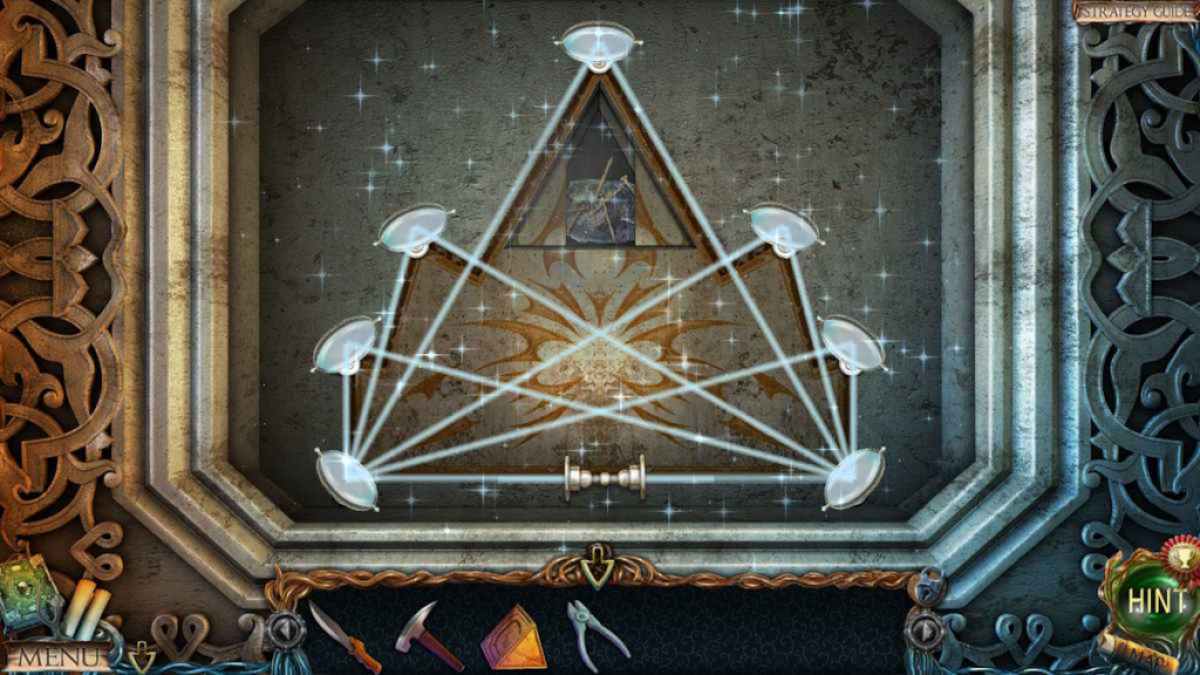
Use the burner on the methamphetamine ( i1 ) and take the revealedMirror . Return to the undermountain , click the statue ( h4 ) for a finish - up , and sum the mirror to commence a puzzle . You need to weight the mirrors until they reverberate the light , as in the image I ’ve envision below .
Once they do , the clandestine compartment opens up and you could take theMagnetic Stone .
Meeting King Durban
Go back to the nanus slums , add up the charismatic stone to the chain ( i2 ) , drop it into the water in the same close - up , and then get through the chain once more to drain the urine from the way . This allows you to move on to thedwarven cemetery(i3 ) .
Use the pliers to enter the coffin ( j1 ) and take theSkeleton Hand . Return to the underground corridors next and practice the hand to start the book ( e5 ) , taking thePalmfrom deep down . Take this to the undermountain and use it on the far Harlan Fiske Stone clenched fist ( h5 ) , giving you admittance toDurban ’s tower .
After speaking with Durban ( k1 ) , pull in theKing ’s Orders(k2 ) and take them to the second power . Put the orders on the message board ( d3 ) , and then return to Durban and speak to him once more . After a cutscene , he ’ll give you aMace .

Image by Pro Game Guides
Put the macer in the paries socket ( k3 ) and then employ it as a lever . Stairs will appear , allowing you to head up ( k4 ) to theIce Mountain peak .
Take theGiant ’s Tooth(l1 ) and theMosaic Fragmentsin the same close - up . Use the power hammer to go the ice ( l2 ) , practice your knife to cut a piece ofRoot(l3 ) , and then fall to the dwarf memorial park . you could now add the sherd to the mausoleum doorway ( j2 ) to start a jigsaw puzzle . This is square , as you may already see the pattern you need to create in the background . Once perfect , you’re able to take theColor Chip .
The mountain peak
Return to the mountain peak , pick out the area where you broke the ice ( l2 ) , and sum up the chip to set out a chip - moving puzzle . If you ’re stuck on this one , I ’ve include a root below :
Once complete , read the instructions and take theBlack Book . Place the black book on the sunburn cup ( l4 ) , which extinguishes the flame , and then take theCup of Blood .
Back in the underground corridors , give the cup of blood to the bat ( e6 ) and fall into place the end of the burrow behind it to find and take theCyclops ’s Eye . Put the pyramid where the middle had been , and stairs will look , giving you entree to thedwarf tabernacle .
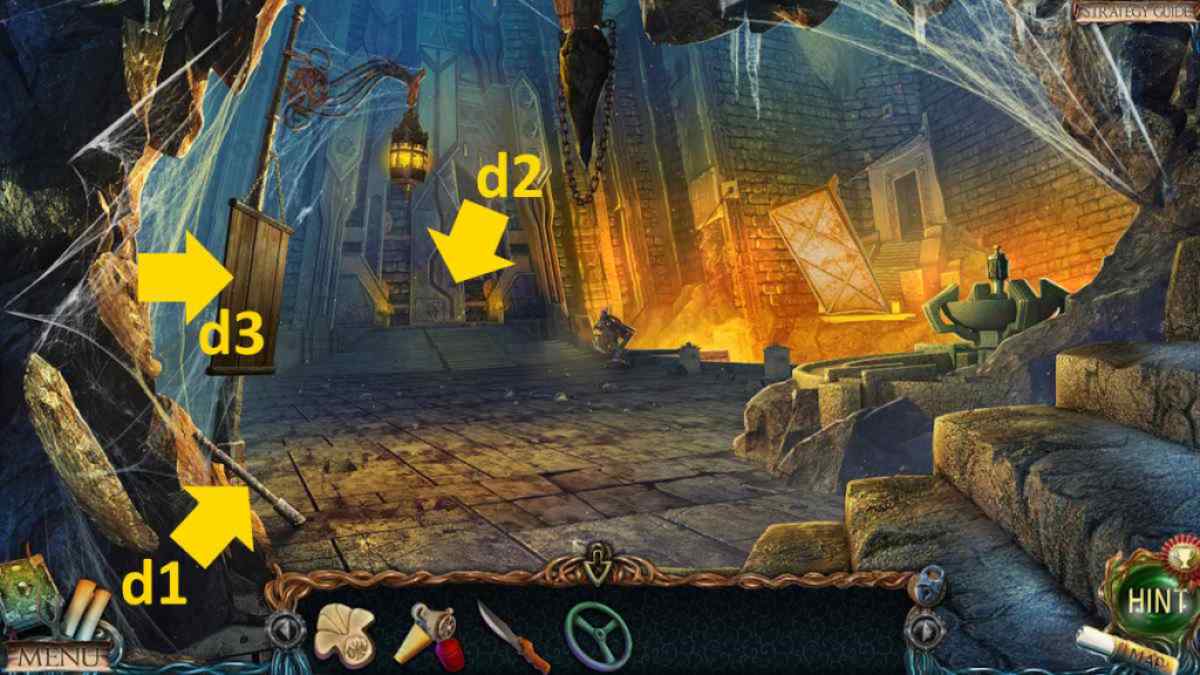
Image by Pro Game Guides
Select the far end of the temple ( m1 ) for a near - up , take thePalmyou find there , and return to the undermountain . This allows you to habituate the palm tree on the left clenched fist ( h6 ) to gain access to themines(h7 ) .
touch on : Lost Lands 9 Walkthrough – Full Guide
Helping Tectonica
snap the work field ( n1 ) for a close - up and then cluck the board and take theLockpick . Click the oven door in the same close - up , use the hammer on the door latch , and then get to the oven and take someCharcoal . Click the hole in the center ( n2 ) to move on toTectonica ’s grotto .
Click Tectonica ( o1 ) for a cutscene , after which you’re able to take theRope With Hooks(o2 ) and theGlove Fragment(o3 ) . Move back up to the mines and confiscate the rope to the lift political program ( n3 ) . Click it again to attach it to the wheel and break the platform , then head back down to the grotto and pick up theBlunt Axethat ’s now on the floor .
Go to the nanus slum and habituate the blunt ax on the sharpener ( i4 ) to receive aSharp Axe . Go to the tabernacle and use the axe on the pulley ( m2 ) to get aWedgeand then click the pulley again to also hit aHandwheel . In the same end - up , click the draught on the rampart to see some program line .
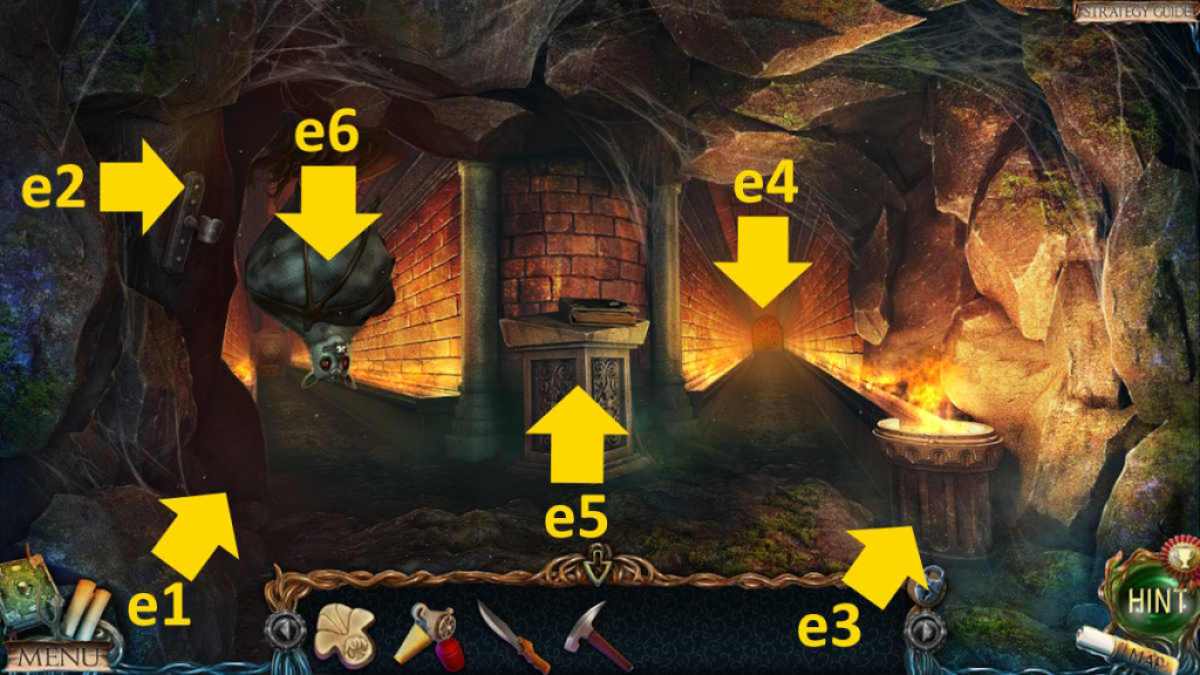
Image by Pro Game Guides
Go to the undermountain . Click the wagon ( h8 ) , then again for a close - up of the box inside it , and use the lockpick to open up it and take theRed Tree Bark Essence . Head back to Durban ’s towboat next , add the boxing glove sherd to the plinth ( k5 ) , and take theRing . Use the gang on the wooden panel ( k2 ) , which allow you to take aSheet of Paper . This allows you to return to the temple , snap the pedagogy on the wall ( m2 ) , and use the paper and fusain to make a transcript of theScheme .
Return to the mine and hang the scheme up in the close - up next to the machine operate the wheel ( n4 ) . Use the ax in the same close - up , add the handwheel , then add the wedge and forge it in . you may now flick the twist andstop the wheel . Speak to Tectonica ( o1 ) once more and she ’ll reward you with theDiamond Thread .
Making the potion and the hammer
apply the baseball field screw thread to take theCrystal Mushroom(o3 ) , and then take back to Folnur ’s lab . put the aloe leaf , poppy yield , rootage , flushed Sir Herbert Beerbohm Tree essence , and watch crystal mushroom in the pot ( a2 ) , click the potentiometer to stir it , then get across it again to pour some into the bottle on the table . Insert the stopper , and then take theSpeed Growth Potion .
Move to the mountain flower and use the potion on the root by the tower ( l3 ) to make them establish a bridge . Click the tugboat entree ( l5 ) , take theMedallionand thePalette , and then maneuver back to Durban ’s pillar . introduce the medallion into the case ( k6 ) to find theHammer Fragment . In the same close - up , dawn the medallion until it shows a disconsolate ray of ignitor . This shines onto the central pillar , launch the throne below ( k1 ) , allowing you to take aFigurine .
Go to the halfling ’s root cellar next and use the palette on the house painting ( f8 ) . flick it once more to draw the entryway onto the painting . you could now go back to the tidy sum peak and click the tower entry ( l5 ) to set off a missing object mini - secret plan . Once complete you may take theHammer Handle .
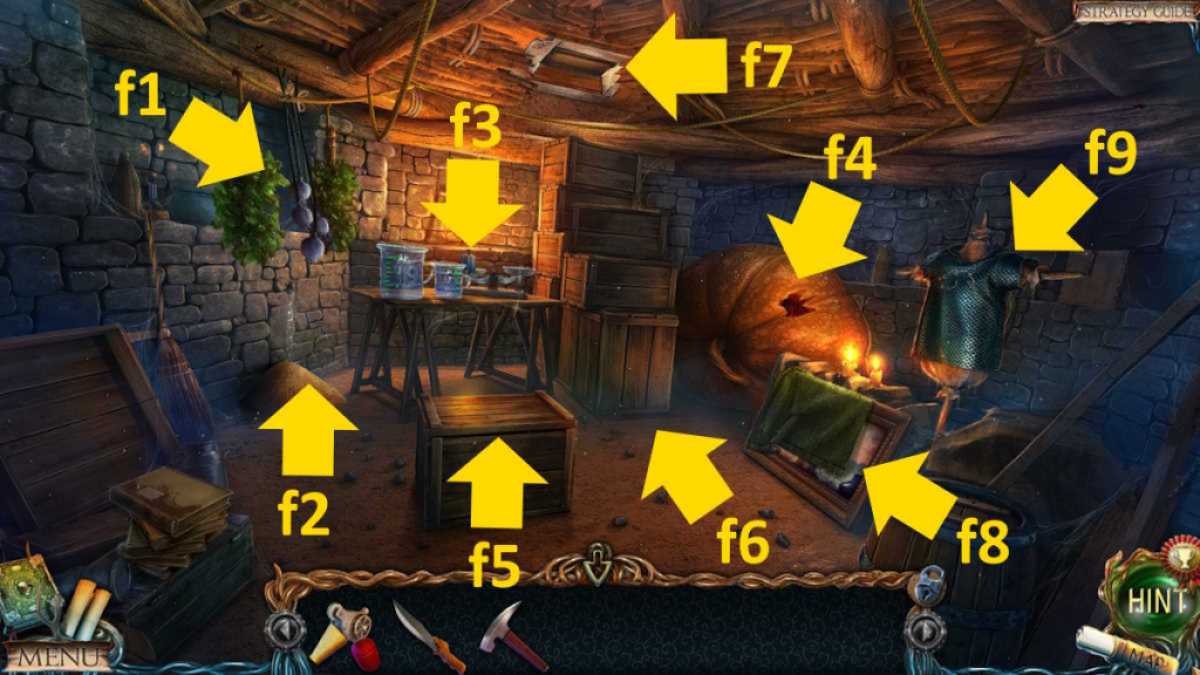
Image by Pro Game Guides
regress to the mine , choose the skull ( n ) , and bring the giant ’s tooth in the close - up , which opens the mouth . add together the statuette to the detail inside to start a sliding teaser . If this one flummoxes you , the solution is below .
A will now slip right out , the box will open up , and you may take a secondCyclops ’s Eye . reappearance to Tectonica ’s grot and add the two eye to the statue ( o4 ) . impart the two pound fragment to the table to make the hammer , then take theHammer .
Saving Suzanne
Move to the lava river and use the cock on the rocks ( c7 ) to take theMetal Cutters . Use the metallic element cutters on the chainmail shirt ( f9 ) in the halfling ’s wine cellar to find aBear Fangand regress to the temple . apply the fang to trace the bear ’s outline on the alcove ’s wall ( m1 ) , shoot theKey .
Now you require to direct to the halfling hut . Use the tonality to get to the loft hatching ( g3 ) , then click it for a last - up and utilize the piece of wood there to remove the occlusion . you could now raise the periscope ( g4 ) , look through it , and see that Suzanne ’s in bother . Click the door ( g5 ) , enter the computer code you see through the periscope ( pictured above ) , and then head off to save her .
congratulation ! You ’ve nail the incentive chapter . If you ’re continuing the serial , why not check outLost Lands 3 Full Walkthrough ( Golden Curse)right here at Pro Game Guides ?
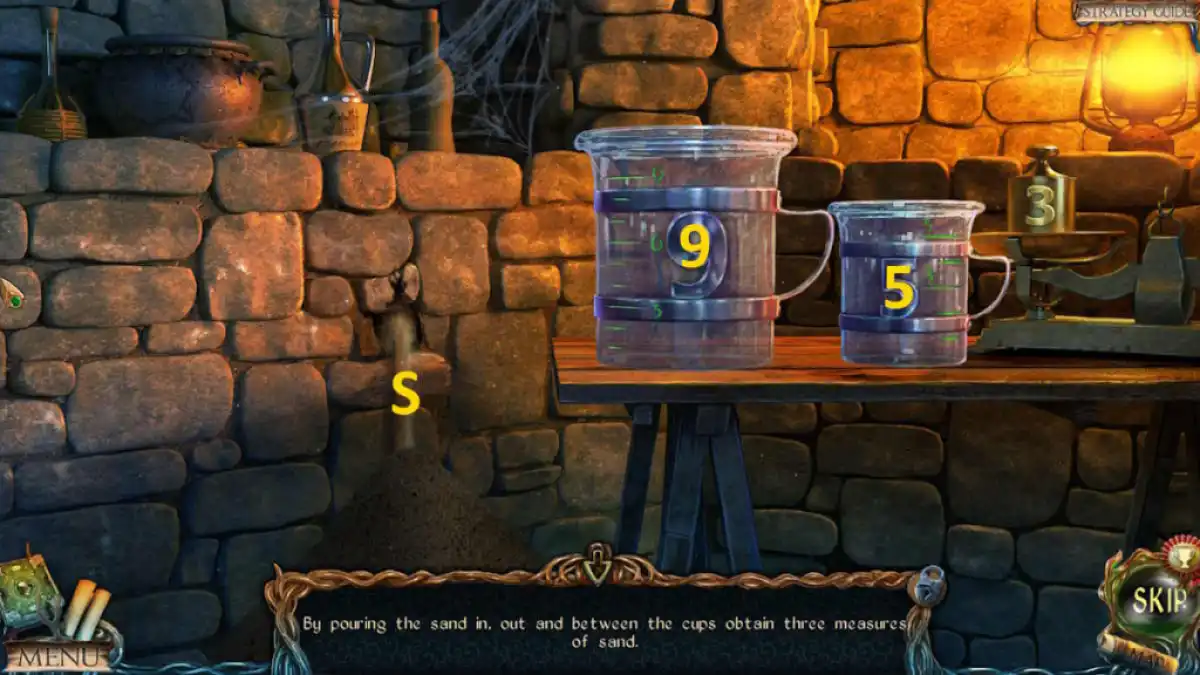
Image by Pro Game Guides
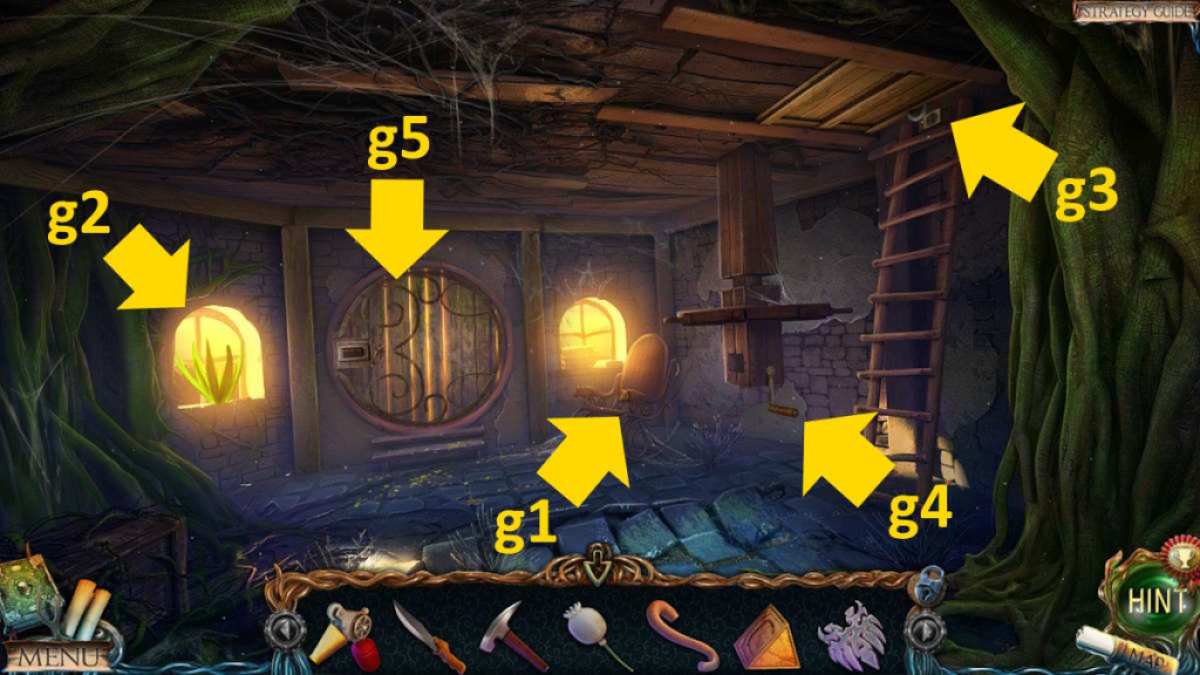
Image by Pro Game Guides
Screenshot by Pro Game Guides
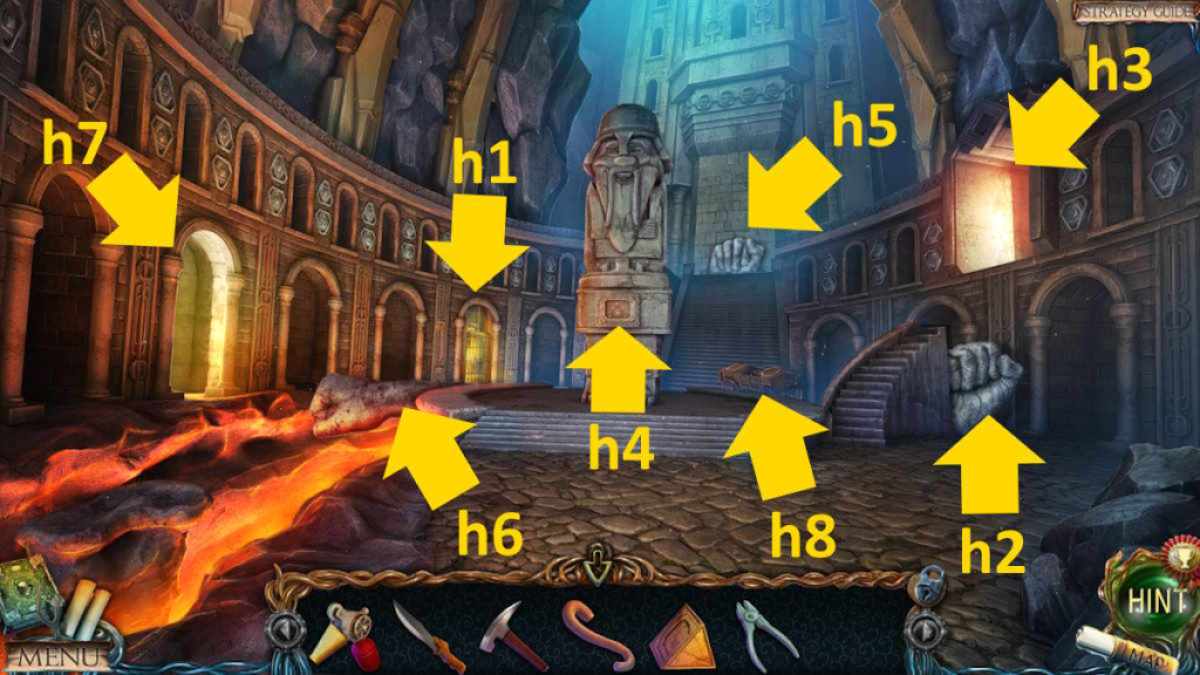
Image by Pro Game Guides
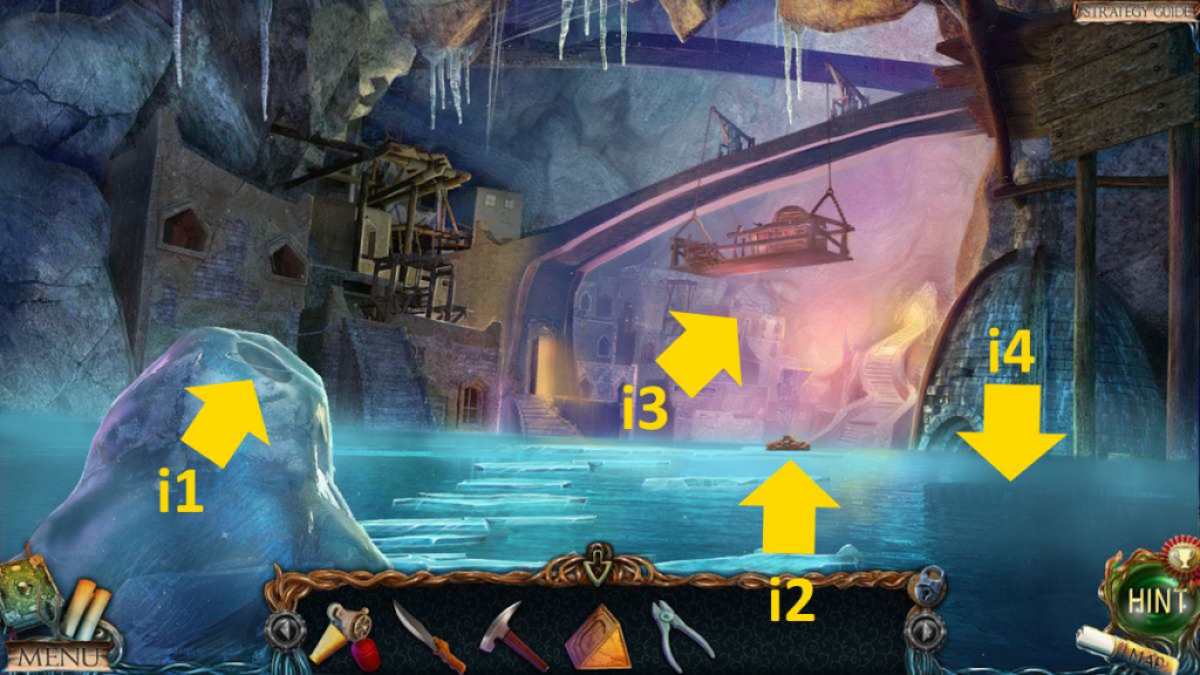
Image by Pro Game Guides
Screenshot by Pro Game Guides
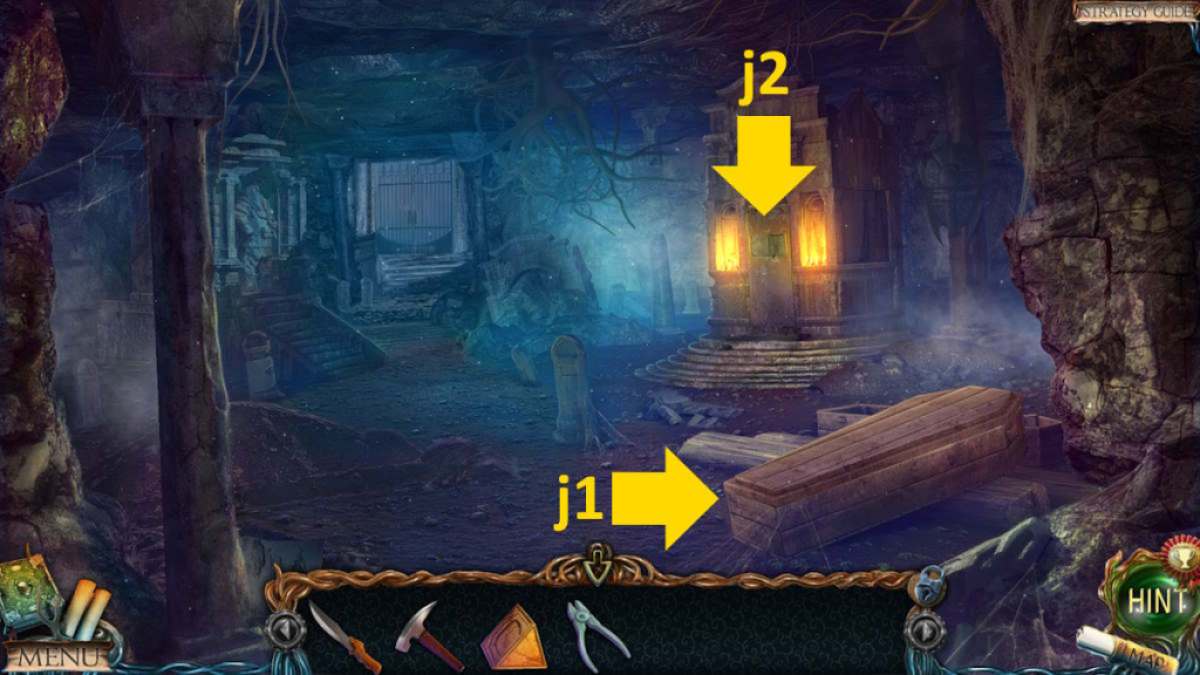
Image by Pro Game Guides
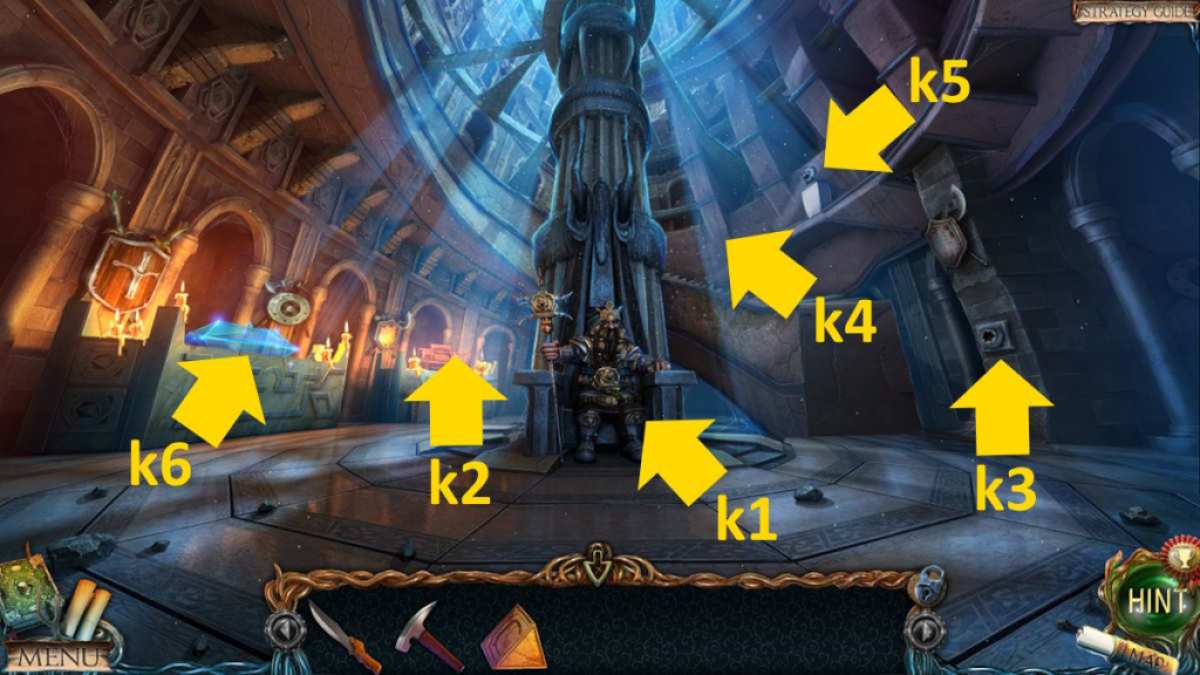
Image by Pro Game Guides
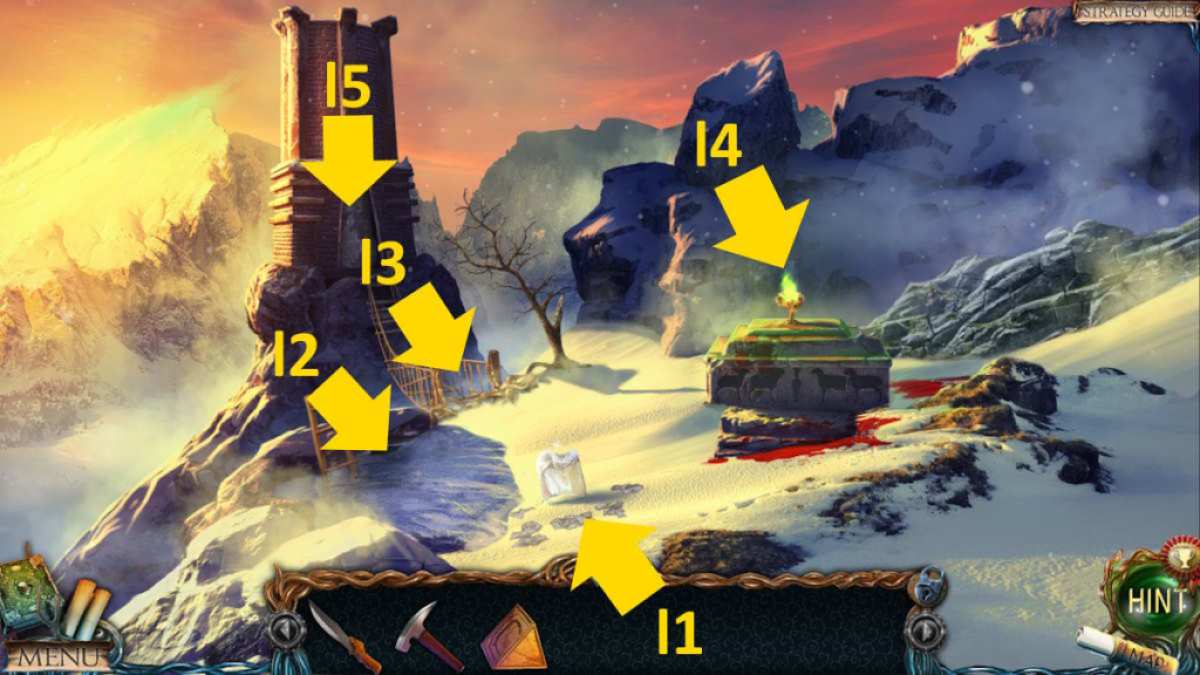
Image by Pro Game Guides
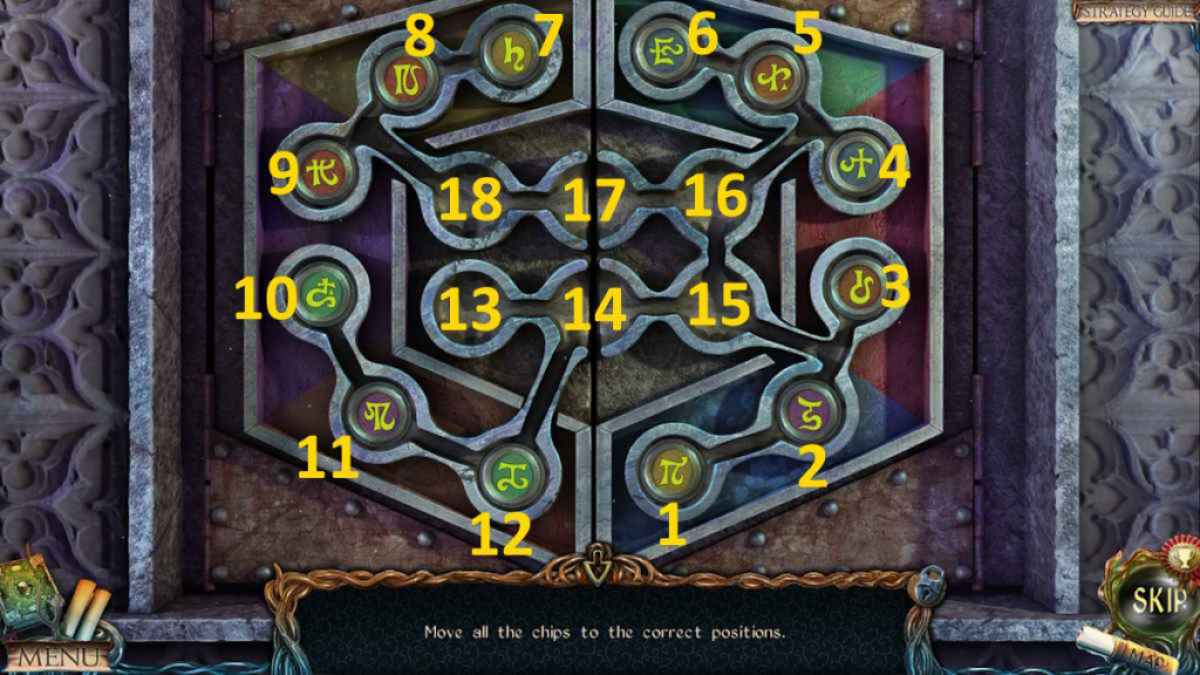
Image by Pro Game Guides
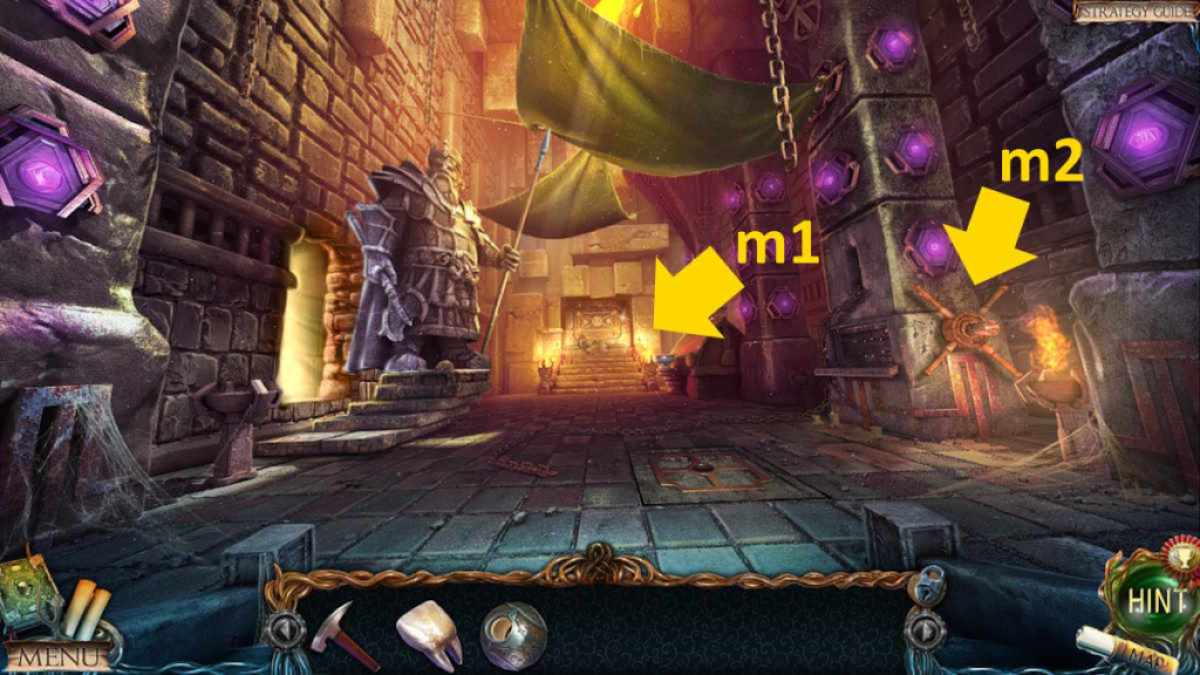
Image by Pro Game Guides
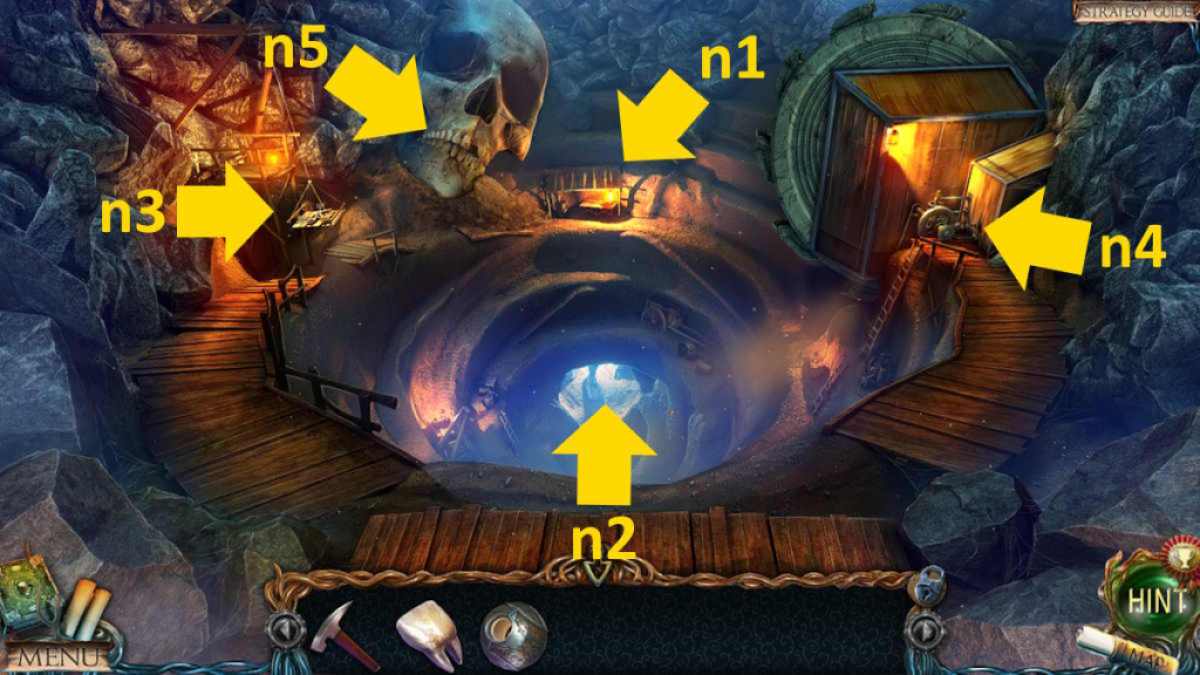
Image by Pro Game Guides

Image by Pro Game Guides
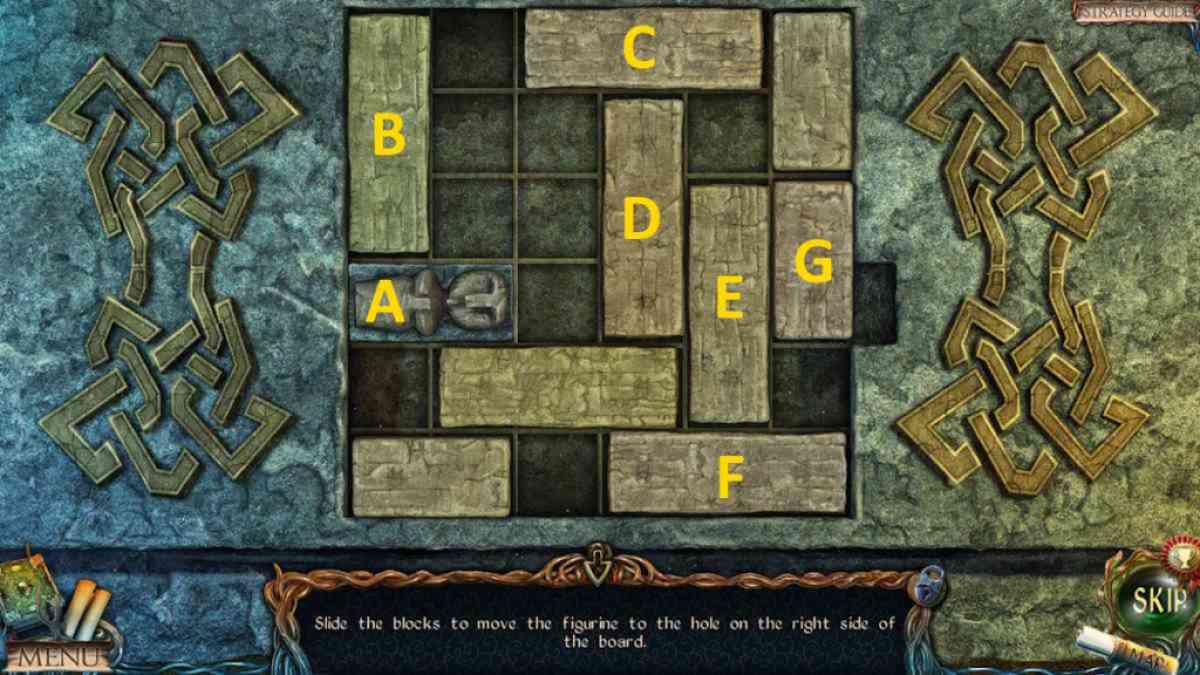
Image by Pro Game Guides
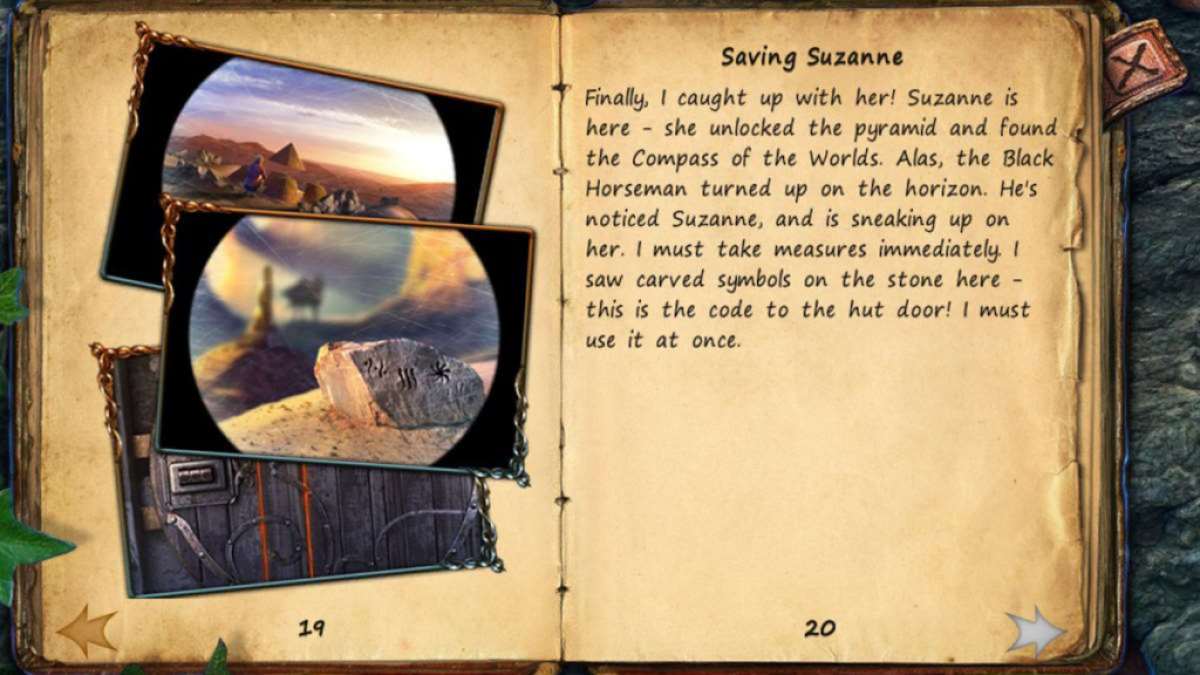
Image by Pro Game Guides
