Can you find and salvage Jimmy ?
If you wish story - drive fancy adventure puzzle games , you ’ll get laid the Lost Lands series . If you ’re starting the serial publication with the original , Dark Overlord , take on for my full guide and walkthrough get across all the puzzles and hidden target .
Lost Lands 1 Dark Overlord Full Walkthrough
In the biz , you play as Susan , a mother whose child , Jimmy , has been snatch by a mysterious force that somehow dragged him into an previous tree . Click the campfire ( a1 ) for a close - up , take theTrowel , and then take theKnifefrom the table ( a2 ) . Use the knife to make out the international nautical mile stopping you from get at the cellar ( a3 ) , unfold it , and take theFishing Rod . Add the rod to the stick by the water ( a4 ) , and you ’ll automatically fish out aWooden Disc . Click the Sir Herbert Beerbohm Tree in the background ( a5 ) to move forward .
Pick up a secondWooden disk , then utilize the trowel to dig in the dirt , and come up a thirdWooden Disc(both mark above ) . pick out the tree diagram for a end - up and then keep clicking the bark to break an ornate carving . bestow the three wooden disk to it to begin a rotation puzzle .
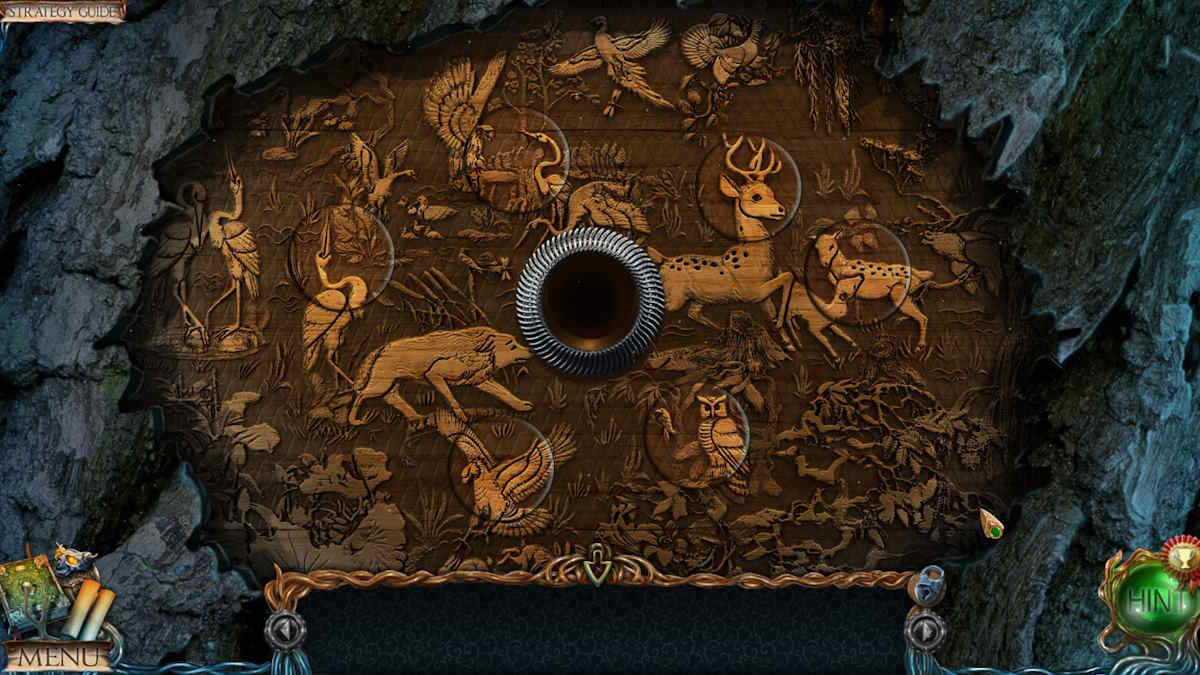
You ca n’t die with this one ; it just takes a bit of patience . Each disc can be swapped by put one saucer in the middle and then make a motion another into its correct spot . Each disk can also be turned to put it at the right angle . You ’ll know one is exactly right as it will briefly light up . I ’ve included the completed icon above . Once done , you ’ll be pulled into the tree andarrive in The Forest .

Lost Lands Dark Overlord Chapter 1 Walkthrough: The Forest
After watching Jimmy be carry by by a ghostly quick material body , select the lantern ( b1 ) and take theDagger . Select the span ( b2 ) to rule aDried Twigand use it to frighten away the crows ( b3 ) , which gets you anOwl . Click the Harlan Fiske Stone plateful it was stand up on to find a note telling you you ’re in Firefly Forest in the Lost Lands ! snaffle theCollectible(b4 ) and then click the townsfolk ( b5 ) to go on toOutside the Tree .
clean up theWeight(c1 ) , select the bird of Minerva in your inventory , and come home theDoor Knockerup in the Sir Herbert Beerbohm Tree ( c2 ) to make the owl fly up and grab it for you . Also , grab theCollectible(c3 ) . Return to the previous silver screen , contribute the boob to the door ( b6 ) , and use the knocker . The room access will open up , so head insideUri ’s Cottage .
Speak to Uri , who will give you aMap . This now appear at the bottom - rightfield of your screen ( see above ) and acts as a super useful dissolute - travel twist . Hovering over a location will show you its name , which I ’ll use throughout the guide to make it easier for you to get to the correct places . Also note that if you ’ve already play other game in the serial , you will regain collectable in this plot but not morphing items ( those were first introduced as ' beyond objects ' inLost Lands 2 ) .

Image by Pro Game Guides
Move the rug ( d1 ) and get a close - up of the story here to find aRed Disc . Pick up theOil Can(d2 ) , theButterfly Net(d3 ) , and theCollectible(d4 ) . If you snap the table ( d5 ) you ’ll observe pedagogy on how to mobilize the Lake Spirit . Once you ’ve look at it , take theWeightfrom the table .
Uri’s house missing object mini-game solution
Now click the curtain at the back of the room ( b6 ) to start a missing objects mini - game .
Move back to outside the tree diagram , sum the head to the door ( c4 ) , click each head twice to transfer the bolts , and then click the door to gain admittance toThe Library . Head inside and take theWeightthat ’s leaning against the reading desk , and then go to the timber . Add the three weights to the bridge deck ( b2 ) to pay back it and then head across the bridge toOutside the Ship .
You ’ll in brief see Jimmy once more , so you know you ’re on the right track ! Take theCollectiblefrom the tree diagram ( e1 ) , use the knife to get someMushrooms(e2 ) , and take somePondweedfrom the anchor ( e3 ) . Move on down the track ( e4 ) toThe Swamp .
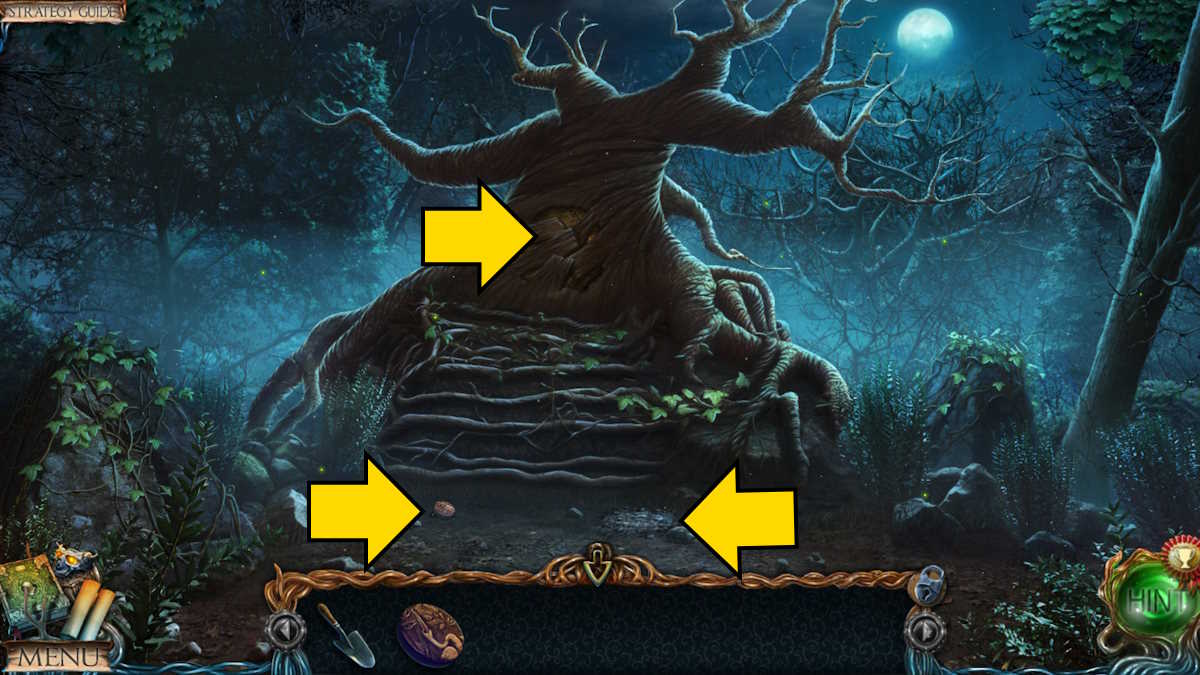
Image by Pro Game Guides
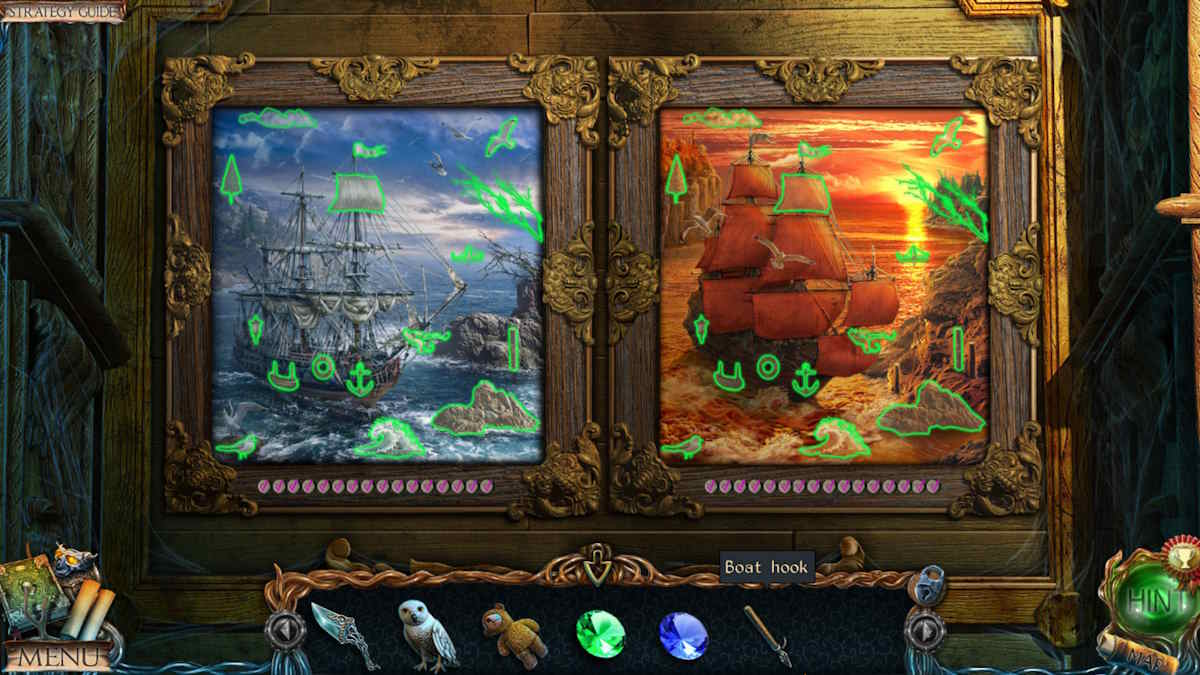
After you watch Jimmy being taken aside in a mountain , Uri will look and tell you it ’s his brother who has taken him . Take someBarkfrom the fall tree ( f1 ) , and then use the tongue to get aFlower Root(f2 ) and the butterfly stroke net to grab someFirefliesin the same close - up . Use the tongue to get aLily(f3 ) , grab theCollectible(f5 ) , then take the sauceboat ( f5 ) for a close - up and snap the box to lead off a puzzle . The answer is below . Once complete , take theRed Discfrom inside .
The lantern placing object mini-game solution
Return to the forest and add the lightning bug to the lantern ( b1 ) to start a station object miniskirt - secret plan . The solution is below if you ’re stuck on this one . Once complete , you ’ll get aClaw Hammer .
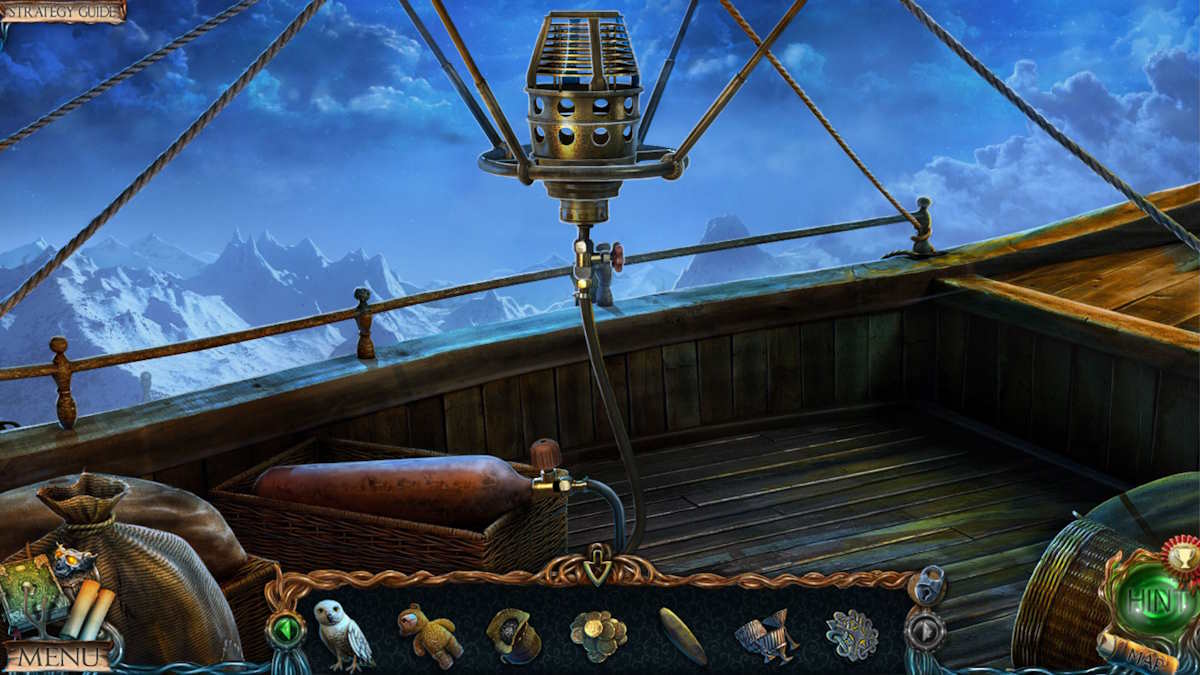
Go to the swampland and expend the power hammer in the sauceboat ( f5 ) to get theOar . Move outside the ship and apply the oar to knock down the coop ( e5 ) and take theEmpty Bottleand aPage with a Constellationfrom interior . employ the dagger on the tree diagram where you get the mushrooms ( e2 ) to make the sap leak and practice the nursing bottle to collect someTree Sap .
Head back to Uri ’s cottage , take the tabular array ( d5 ) , and add the mushroom-shaped cloud , fungus , bark , and pondweed to the bowl ( 1 , above ) . Use the howitzer and pestle ( 2 ) on the mesa to vanquish it up and then add the lily to the metallic element object in the center of the table ( 3 ) . Pour the contentedness of the bowl onto the lily , add the Sir Herbert Beerbohm Tree sap , and take theEnchanted Lily . Return to the swamp , place the enchanted lily in the H2O ( f3 ) , and you’llsummon the Lake Spirit .
Screenshot by Pro Game Guides
Lost Lands Dark Overlord Chapter 2 Walkthrough: Helping The Lake Spirit
Speak to the spirit and she ’ll ask you to get her pearl from the ship . If you do , she ’ll grant you access to the mountains . After speak to her , take theArrow with Ropethat come along just to the left of where you draw the tree barque ( f1 ) . Use this in the crossbow in the gravy boat ( f5 ) to get aLoaded Crossbow . Select the ship ( e6 ) and habituate the loaded crossbow on the gangboard in the close - up , lowering it and giving you admittance toThe Ship .
seize theCollectible(g1 ) from the barrel , theRed Octagonfrom the deck by the barrel ( g2 ) , and theBrushfrom the level by the carom ( g3 ) . Use the petroleum on the windlass ( g4 ) and then use it to take down the cage ( g5 ) . Cut the ropes on the John Cage with your dagger and take theMechanism Partfrom the skeleton inside .
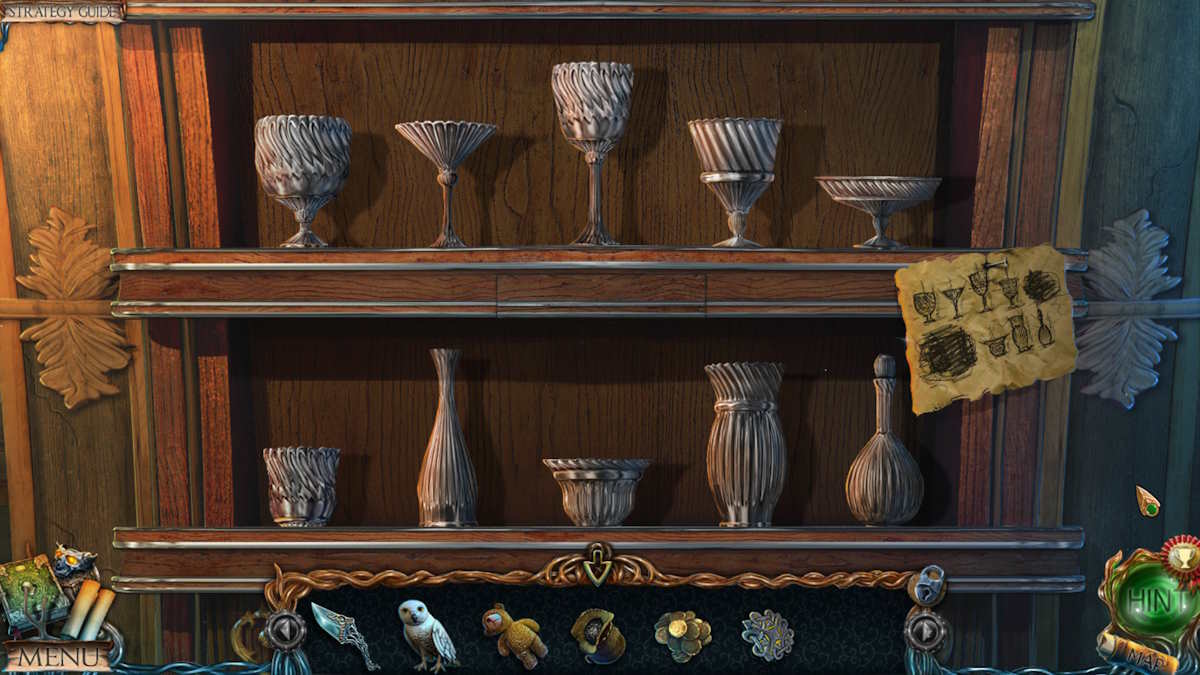
Use the clash back outside the ship on the mossy rock ( e7 ) to bring out aBlue Anchor , and then manoeuver into theCaptain ’s Cabin(g6 ) . You ’ll find theCollectibleon the top shaft of light ( h1 ) . Select the picture ( h2 ) for close - up and remove the rag that ’s hanging up to reveal aGreen Ship ’s Wheel . Also , take aPurple Octagonfrom the chest ( h3 ) .
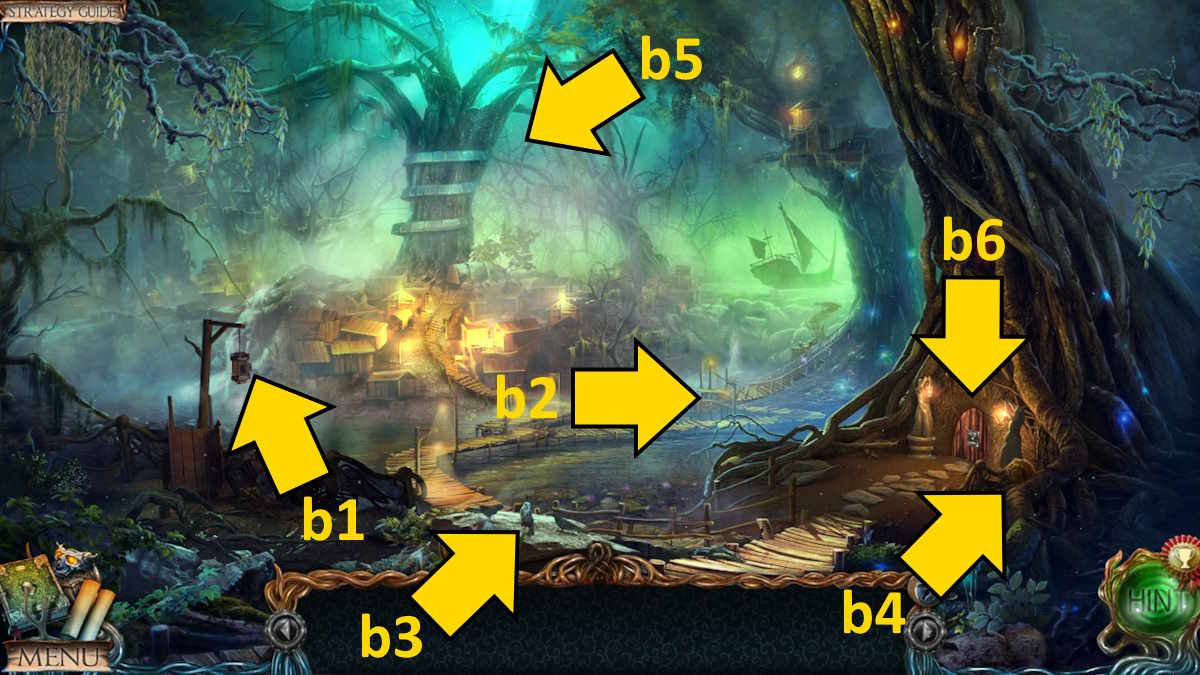
Image by Pro Game Guides
take the lectern next ( h4 ) and add your constellation to it for a lead . Click the button to open them , matching the configuration , and when the book opens take theRed Disc . The solution is above .
The sliding disc puzzle solution
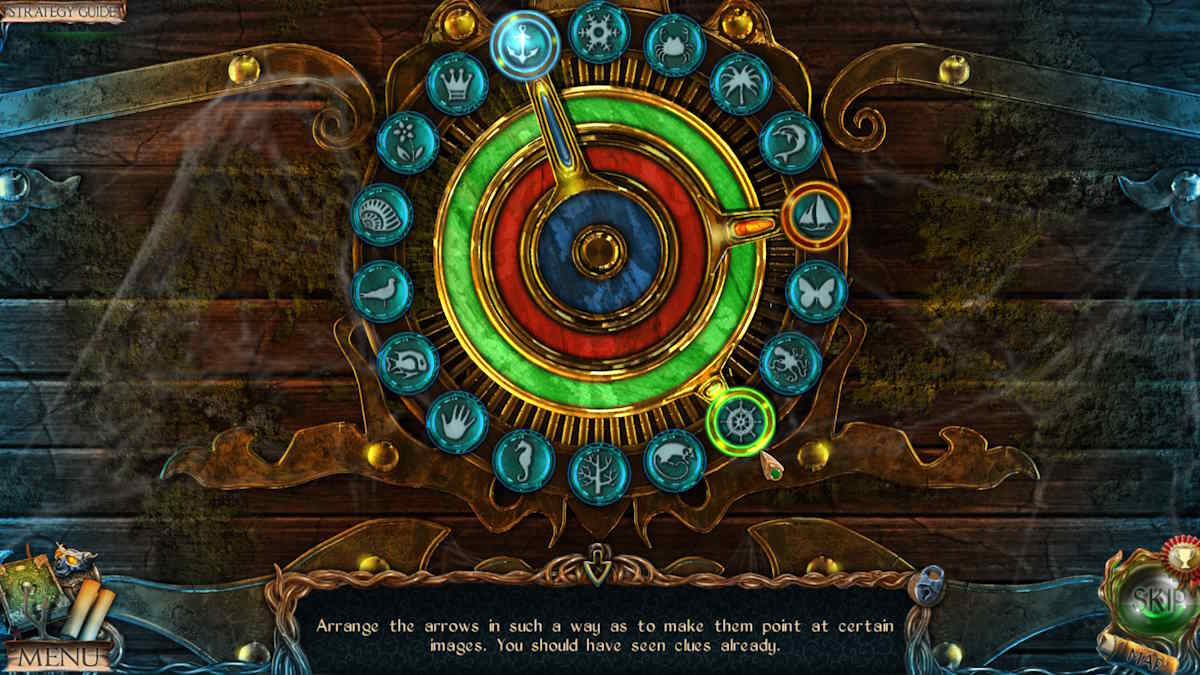
render to outside the tree and tote up the discs to the door ( c5 ) to start amovement puzzle . Each disc need to be put in the area with the correct matching color . The resolution is below ( note the letters on the image below refer to the position , not the disc shown ) .
Once complete , the room access will unfold and give you memory access to theTop of the Tree . Grab theCollectible(i1 ) , read the note ( i2 ) , and then take theStickthat ’s underneath it . Move outside the Sir Herbert Beerbohm Tree , habituate the spliff to move the rock ( c1 ) , and note theRed Shipon the cloth underneath .
reelect to the captain ’s cabin , add the mechanism to the chest ( h3 ) , and put the hands to match the three colored symbols you ’ve seen ( red ship , green roulette wheel , gloomy anchor , as shown above ) . When the chest open up , take thePearlfrom inside . Take the pearl to the swampland , give it to the spirit , and delight the cut scene .

Image by Pro Game Guides
you may now select the area behind where the spirit appeared to move on to theBank at the Cliffs . Take the Stool Leg ( j1 ) , take hold of the Collectible ( j2 ) , and then move forward ( j3 ) to outside theCottage by the Water .
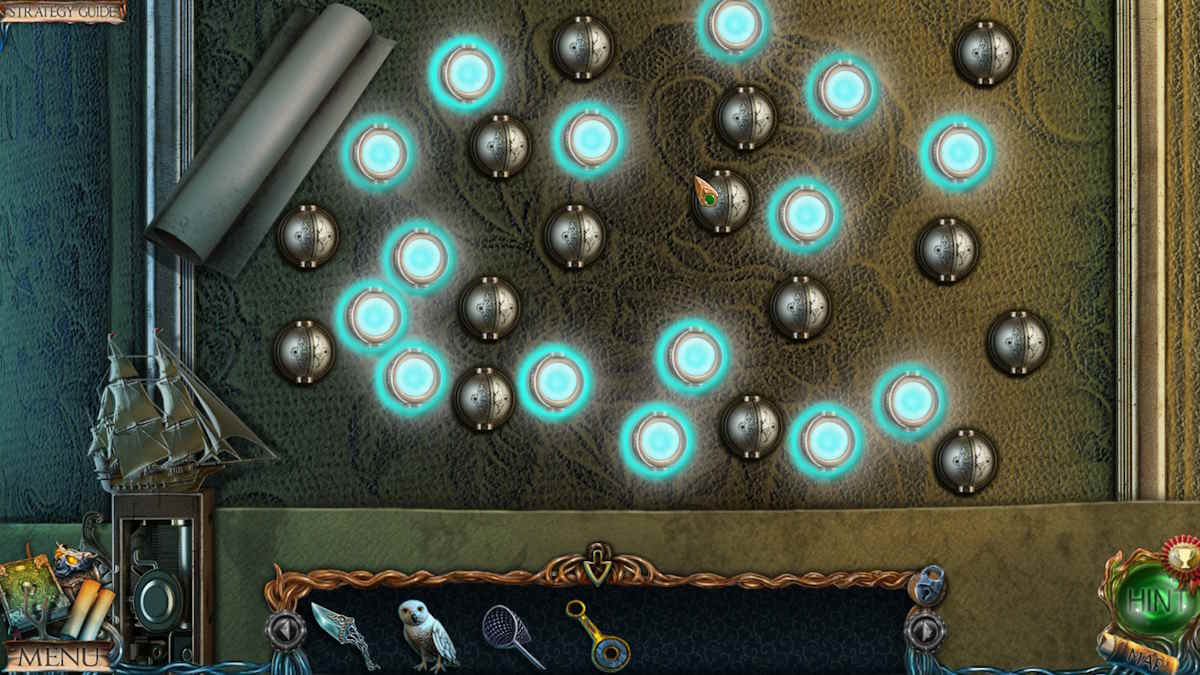
Take theLong Plank(k1 ) , and theCollectible(k2 ) , then click the cart ( k3 ) for a miss target miniskirt - game . You ca n’t go wrong here , as you just need to get across the item when you spot them . Note that some items are score in red . These can only be find once they ’re bring out by picking up something else . The tricky one is the signet ring , which is inside the wooden boxful ( it ’s just very small ) . Once staring , you ’ll experience aCrystal .
Arriving at the gates
retort to the bank , use the plank to traverse the break up bridge ( j4 ) , and move on toThe Gates . address to Uri when you go far , just too late to halt his brother from taking Jimmy into the caves . Take theCollectiblefrom the rock face ( l1 ) ; theTeddy Bearand anEmerald(l2 ) ; and someBreadcrumbsandTongsfrom the fire ( l3 ) . station the owl up to get theSapphire(l4 ) , and then move back to the bank .
make the breadcrumbs in the H2O ( j5 ) , and then use the sportfishing net to catch up with aFish . Give the Pisces to the razz on the roof of the bungalow ( k4 ) and take theKeyit drop on the story outside the door . apply the samara to open up the door ( k5 ) and head into theCottage on the piss .
You ’ll find theCollectibleon the roof beam ( m1 ) , aStool Legunder the tabular array ( m2 ) , and aGold Octagonin the fish ’s mouth ( m3 ) , which you’re able to grab with the pair of tongs . employ the dagger to cut launch the pillow on the bed ( m4 ) to find aMosaic Piece , and take aClock Handfrom the tabular array ( m5 ) , also noting the time scrape onto the table ( 6:10 ) . Add the hand to the clock ( m6 ) , fix it to6:10 , and take theFish Figurine .
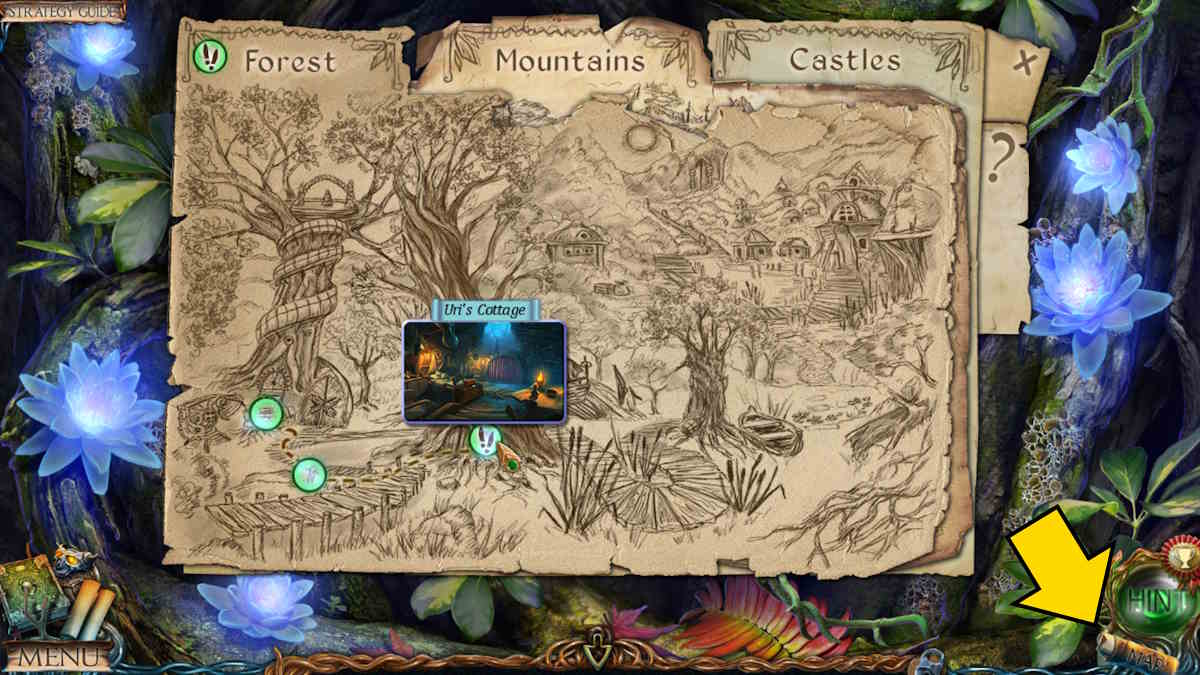
Image by Pro Game Guides
Select the table ( m5 ) and add the fish figurine to the boxful there to start out a placement puzzle . All you need to do is spot each fish on the primal melody . Keep clicking the fish , from the left , until they ’re all lined up . Anytime focus one moves one you ’d already complete , just go back and move that one back to heart and soul , always work from the left . Once done , take theBird Figurine .
The mosaic puzzle solution in Uri’s house
Move to Uri ’s cottage and sum the mosaic piece to the pattern on the story ( d1 ) to set out asegment - swapping puzzle . Once complete ( see the finished mosaic above ) , the ground will give to expose anobject - find mini - secret plan .
Outside the cottage on the weewee , add the two peg to the stool ( k6 ) , then take theStoolback within to gain entree to the loft distance ( m7 ) . Take theStickand aPicture . Go outside once more and use the stick on the hook in the wall ( k7 ) to get aBoat Hook .
Return to the maitre d' ’s cabin and put the picture on the wall alongside the other one ( h2 ) . You need to find all the repetitions on the two images to complete the mystifier . They ’re all cross out below . Once arrant , take theDeer Figurine .
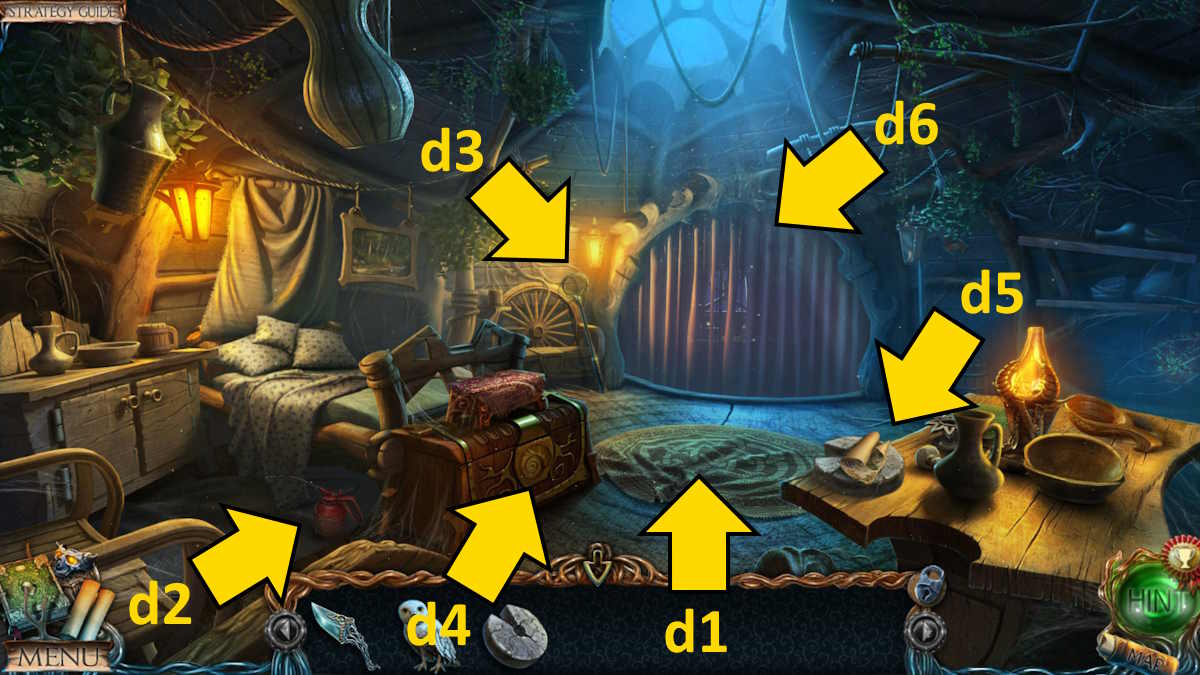
Image by Pro Game Guides
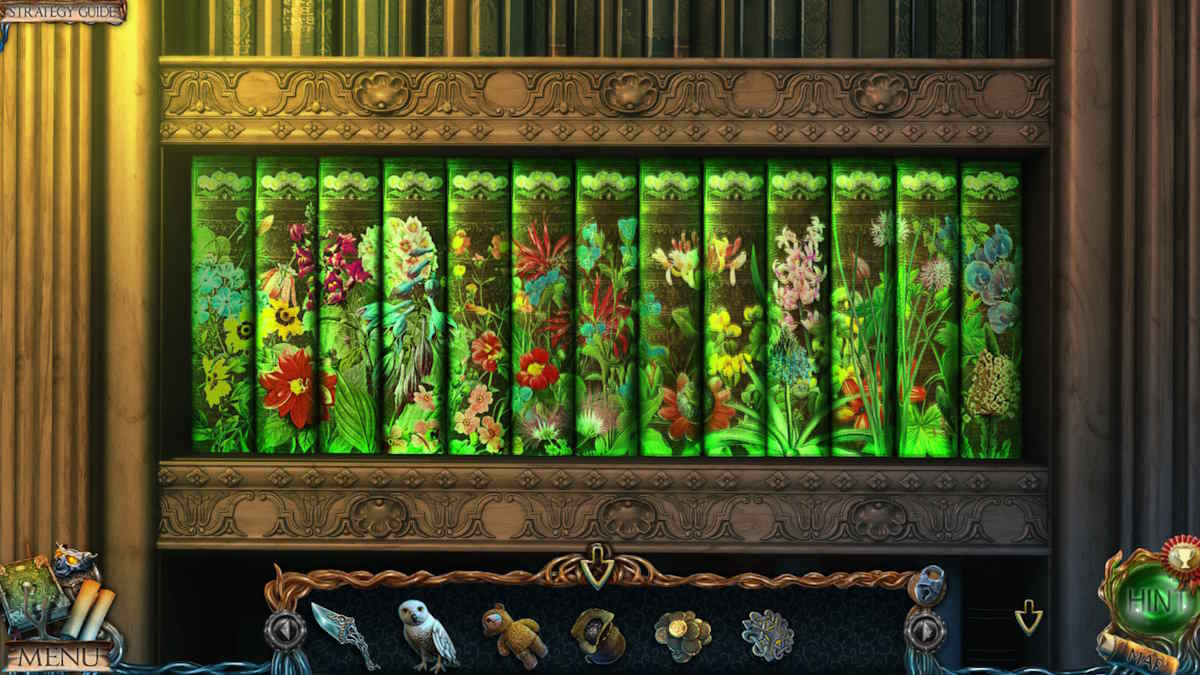
Move to outside the tree and add the vitreous silica to the front of the equipment ( c6 ) . tear the lever ( c7 ) and the gadget will cast light onto the tree diagram , which in turnlights up the libraryinside .
Head inside , take hold of theCollectiblefrom the substructure of the cardinal tree ( n1 ) , and take theCoinfrom the lectern ( n2 ) . habituate the sticker to remove the motion picture from its soma ( n3 ) and take theFish Figurine .
Go to the top of the tree diagram and put the bird figurine on the left pillar ( i3 ) , the cervid statuette on the right pillar ( i4 ) , and the fish figurine on the key pillar ( i5 ) . Nowtwist the sectionsof the pillars to make epitome . You ca n’t go wrong here . Simply go from the bottom of each pillar so the bottom section lines up with the baseborn part of the picture , then do the mediate sections , and finally the tops .
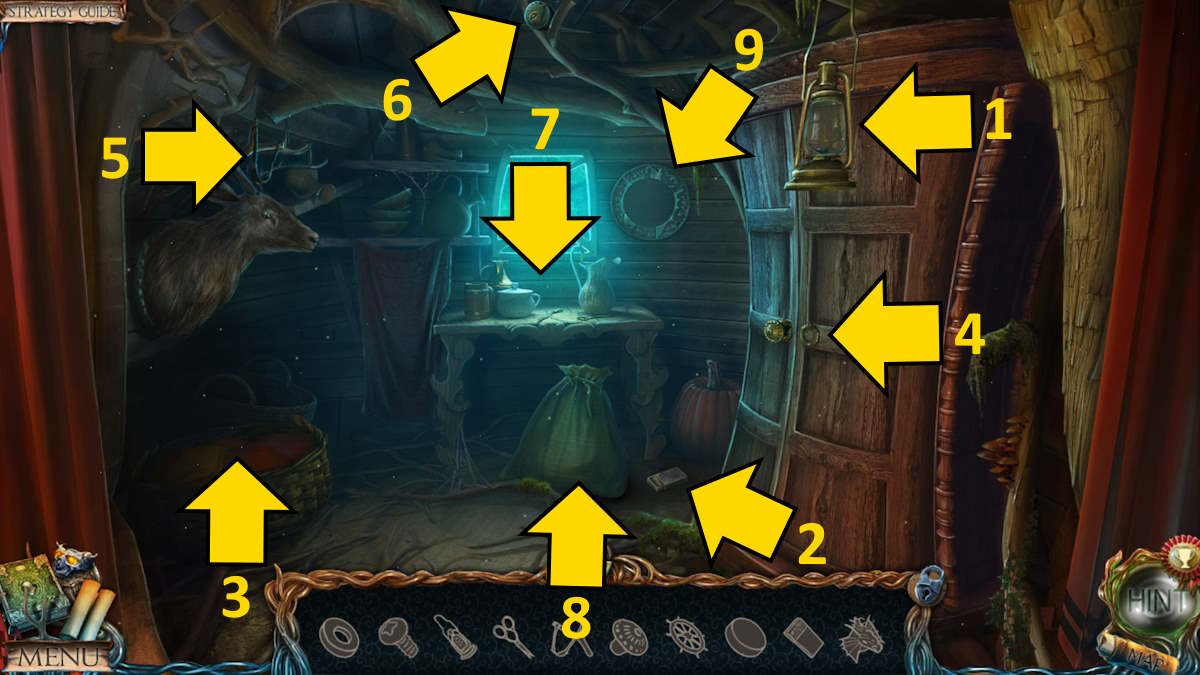
Image by Pro Game Guides
The center column will melt to be replaced with a newfangled one , from which you may take theGate Key . habituate the gate key on the Bill Gates ( l5 ) to open them and continue your journey .
Lost Lands Dark Overlord Chapter 3 Walkthrough: Entering The Mountains
You chance yourself in the caves . You ’ll find theCollectibleby the railing ( o1 ) , aTorchon the bbl ( o2 ) , and aStatue Headin the drum ( just click it to open it after taking the blowlamp ) . you’re able to add the statue drumhead to the statues ( o3 ) , but you still need to find two more . Move out the threshold to the rear ( o4 ) to move to theunderground descent .
Take theCollectiblefrom the rock face , and use the boat bait to knock down and collect theSackand aLever(see above ) . Return to the cave , tote up the lever to the cart ( o5 ) , pull both lever tumbler ( one is already in place ) , and spill the contents of the pushcart . clean up theTar , then manoeuver through the other exit ( o6 ) to theunderground lake .
Select the bridge for a close - up ( p1 ) and collect theHandle . Grab theCollectible(p2 ) , then head back to the Bill Gates . pick out the campfire ( l3 ) , add the tar to the flowerpot to boil it , and then utilise your torch on it to get a litTorch .
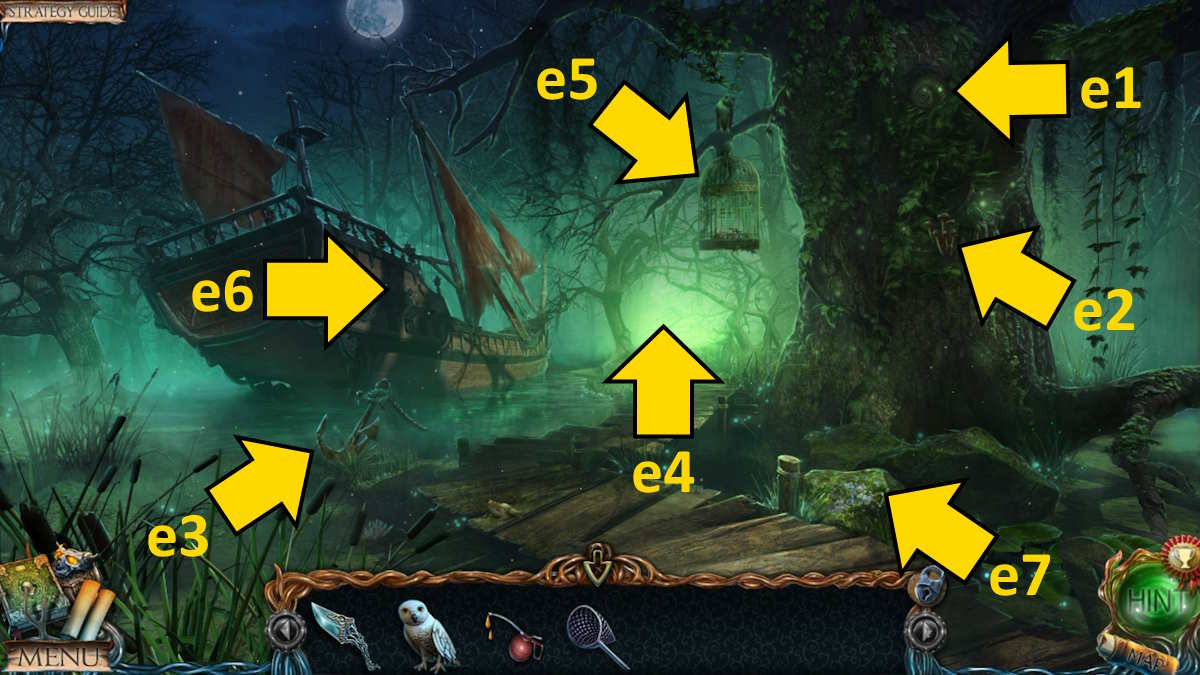
Image by Pro Game Guides
How to light the underground descent
Return to the underground descent , and use your torch on the burner ( q1 ) to light up up the path forwards . Grab theSpadeplus anEmeraldfrom the dig site ( q2 ) halfway down , then click the junk at the bottom ( q3 ) for a simple-minded object - finding miniskirt - game . Once complete , you ’ll be rewarded withDynamite .
Go down the hugger-mugger descent to the demon statue , use your obelisk to curve the rophy on the bag ( r1 ) , and take aSapphire . Also , read the book inside the base to get hold out more about Uri ’s chum . Grab theCollectiblefrom the sway human face ( r2 ) , completing your escargot collection . utilise the spade to dig through the pit ( r3 ) to find aWooden Cog , plus a tapestry that you ’ll make a note of in your journal . Now fall into place the left paries ( r4 ) for a conclusion - up , fall into place the weaken pick hold to remove it , add your handle , and call up thePick .
Move back to the fall and use the pickax to separate through the wall at the dig internet site ( q2 ) and take aCoin . Move back to the underground lake , place the dynamite in the rock music ( p3 ) , unhorse it with the torch , and watch it return . Now impart the wooden cog to the nosepiece ( p1 ) , raising it . You now have access to both theunderground lake shoreandthe hanging bridges .
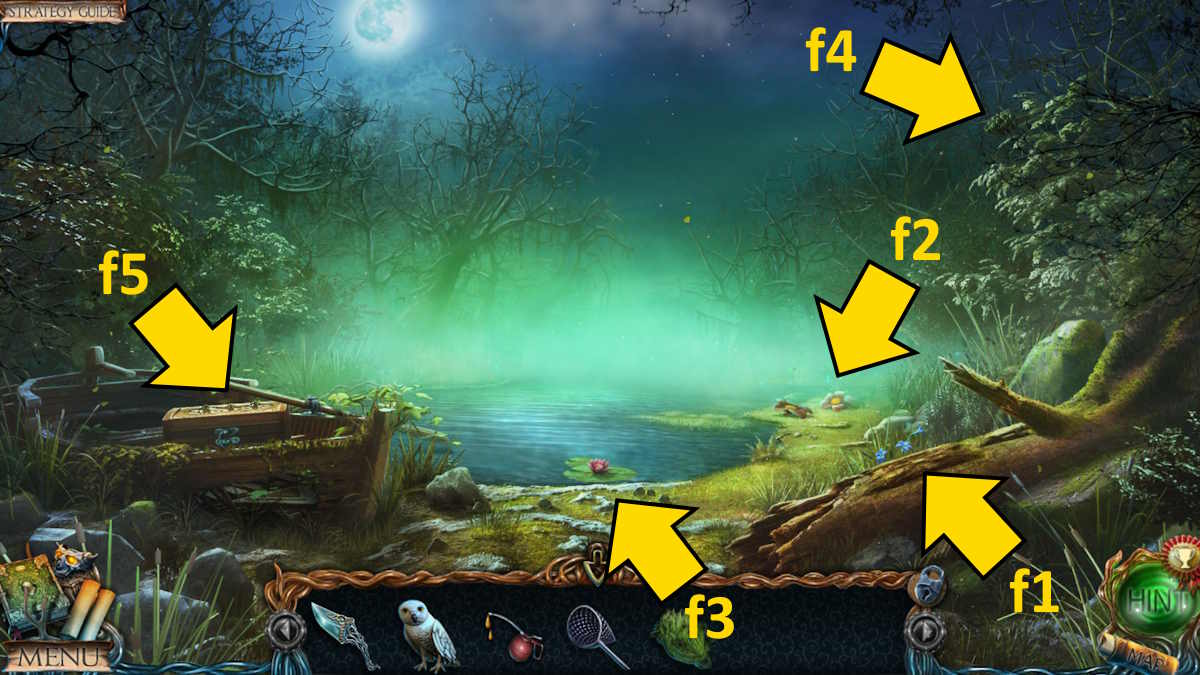
Image by Pro Game Guides
Head to the hanging bridges , take theCollectiblefrom the far cave entrance ( s1 ) , and then take theCorkscrewfrom the statue on the right ( s2 ) while impart a coin to it . you could add the other coin to the statue on the left wing , and flick the coins to move the statues , but you postulate to learn their required view .
Move right back to the ship and use the corkscrew on the cask ( g1 ) to pull together aTorn Page , and then utilise the dismissal to hoard someGunpowder . Move into the captain ’s cabin , choose the lectern ( h4 ) , and tot up the tear page to the book . Rearrange the opus of the jigsaw to complete the drawing , and the completed picture will be summate to your diary .
Hanging bridges puzzle solution
fall to the hanging bridges and pose the statues correctly to launch the bridgework to the middle of the cave ( see above ) and gain entree to anobject - spot miniskirt - game . you could see all the answers marked in the image below .
Once complete , you ’ll receive aSapphire . you could also remove the cloth from the statue on the good ( s4 ) to collect a secondStatue Head , and move the rubble on the go-cart ( s5 ) to arrogate aKey(see above ) .
You now have access to a new area , at the nip and tuck , on your mathematical function ( or via s6 ) . take hold of theCollectiblefrom the cliff face ( t1 ) , plus anEmerald , aBroom , and aStone Hornfrom the hoop ( t2 ) . apply the tonality on the door here ( t3 ) to gain access tothe liftand drumhead inside .
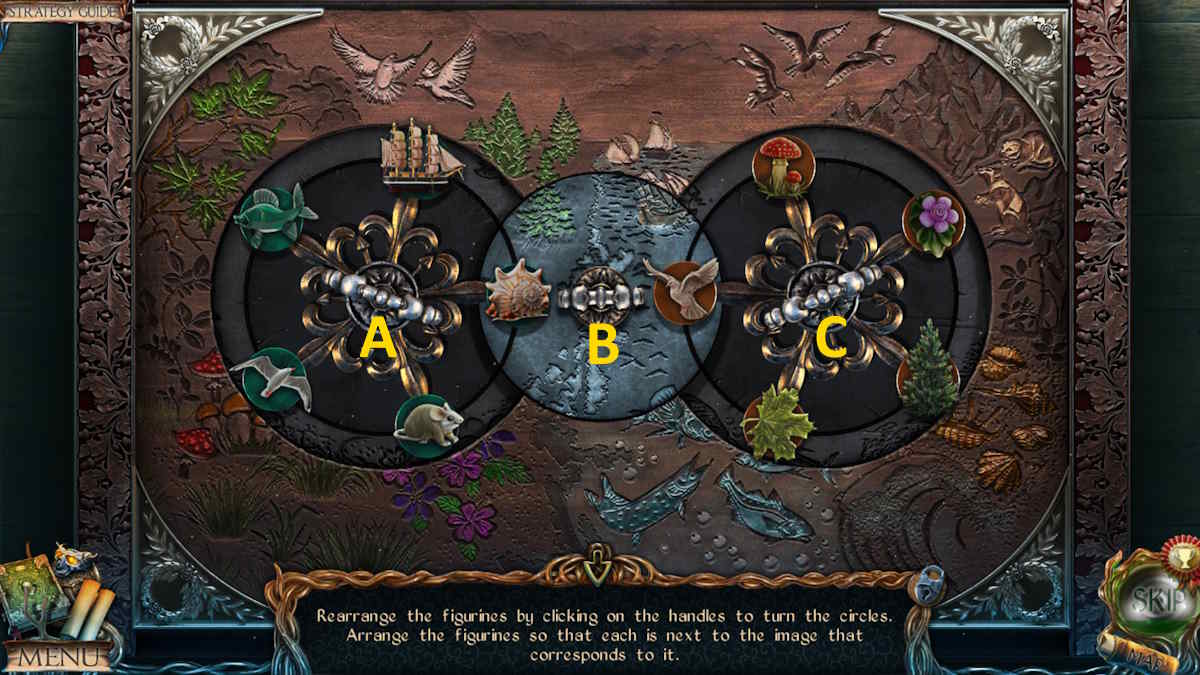
Image by Pro Game Guides
Grab theCollectiblefrom next to the barrelful ( u1 ) , and habituate the broom to reset the cobwebs from the picture ( u2 ) and take theDiagram . Return to the hugger-mugger lake and place the cornet on the dwarf statue ( p4 ) , taking theSaphirefrom its pound ’s secret compartment . Now you’re able to move forrad to theunderground lake ’s shore(p5 ) .
The Lake Shore axe puzzle
TheCollectibleis on the left of the cover ( v1 ) and will complete your cone shape collection . Add the four sapphires to the ax on the left ( v2 ) , also demand theEmeraldin the same close - up . Now you may add the four emeralds to the axe on the rightfulness ( v3 ) to start asymbols puzzle .
The symbols you involve areon the tapestryyou look earlier . Click the symbols as they appear on the tapestry , from top to bottom , and the ground will open . I ’ve mark the order in the trope above and it does n’t count whether you do the left or veracious ax first . Click the raise pedestal for a near - up andread the noteinside to get a journal update . It seems you need to summon the Mountain Spirit to get yourself out of these cave . After reading the note , take theGreen Octagonthat was underneath it .
pass to Uri ’s cottage , remove the cloth from the small box on the dresser ( d4 ) , and sum up all the octagon you have to begin a sliding puzzle . Each octagon take to be in the spot matching its color . If you ’re stuck on this one , I ’ve put the solution above . Once complete the box will open up , admit you to take aContinent FigureandSolvent .
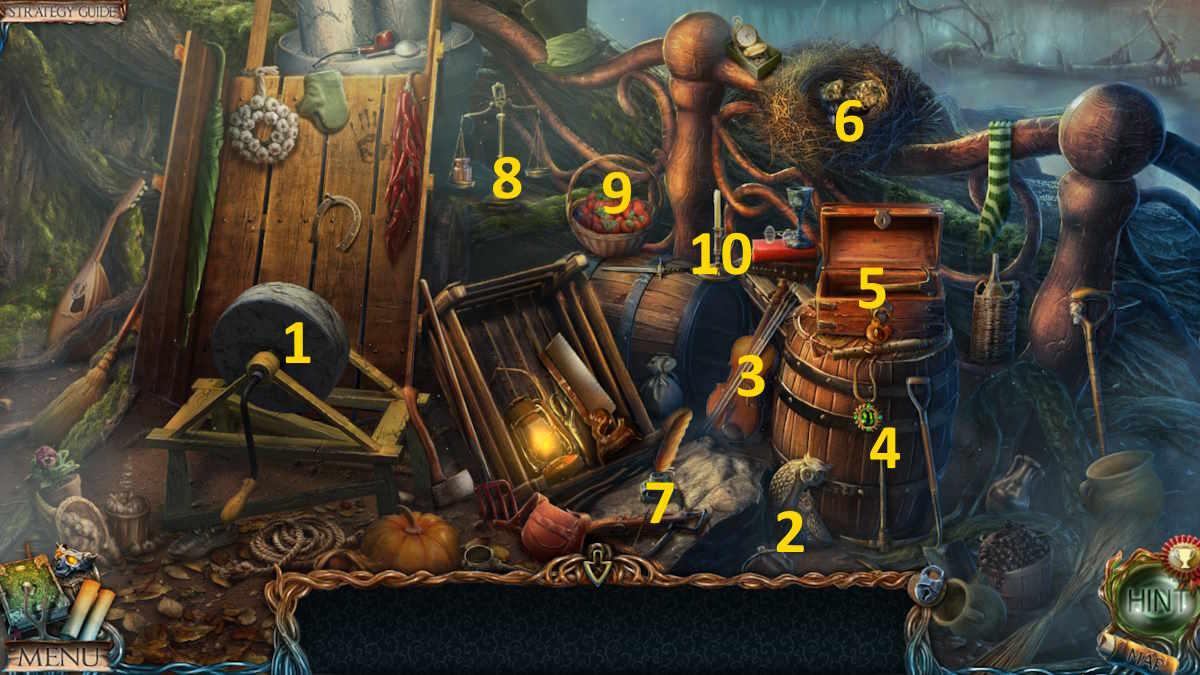
Image by Pro Game Guides
Move to the captain ’s cabin , place the continent on the globe ( h5 ) , and take theCross - Shaped Keyfrom inside . Go to the bank , use the key to get to the green box there ( j6 ) , and grab theMagnet . Head into the bungalow next , and apply the attracter on the hole in the floorboard ( m8 ) to get theStar Medallion .
The next full point is the library . Use the solvent on the lectern ( n2 ) and then click the book to make another note in your diary , this metre bring out a pattern of brute heads . Place the star medallion into the matching blank in the tree roots above the lectern ( n4 ) to receive anOrb .
Helping the Mountain Spirit
Return to the lake shoring and place the globe on the base to reveal the Mountain Spirit ( see above ) . It asks you to bring it apotion to reinstate its durability . Before you leave here , verify to pick up theCog(also marked above ) .
Move to outside the lift and use the pattern you catch in the library to start the system work again , using the pedestal ( t4 ) . I ’ve include the correct order topress the dragon headsabove .
Now move inside the lift and the cog to the surgical process mechanism here ( u3 ) to begin a cog arrangement puzzle . The solution is above ( it’seasy to miss the bantam cog ) . Once complete , the lift will take you to the aerofoil . flick the gates and move frontwards tothe rook .
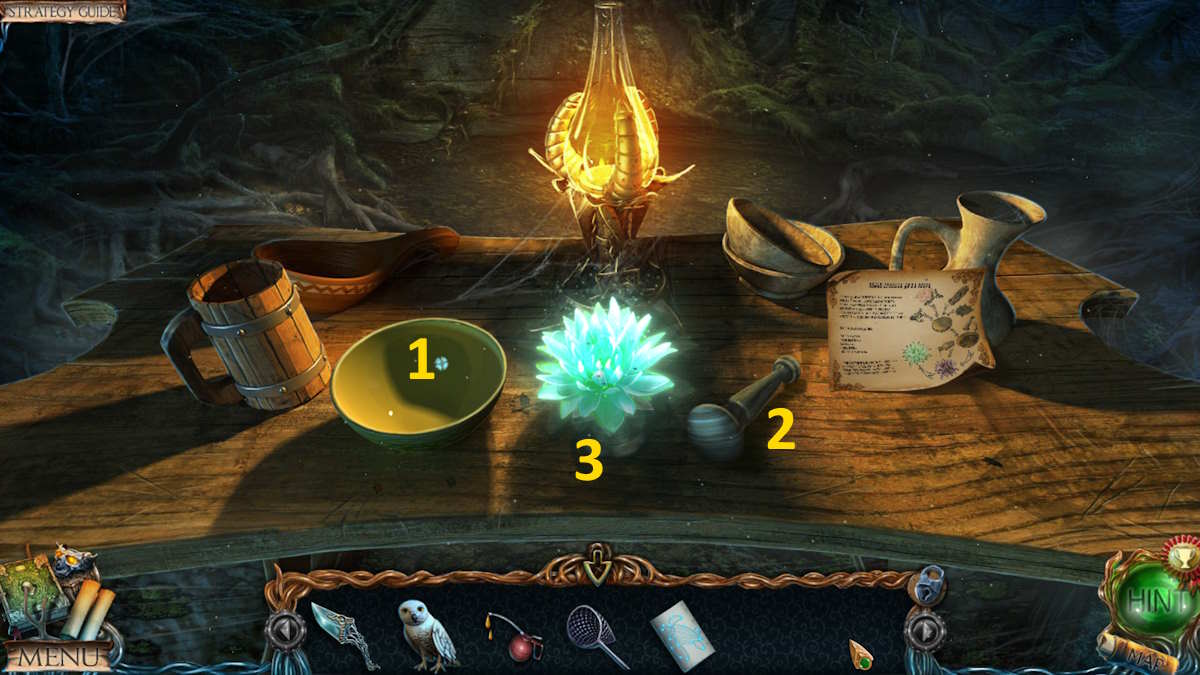
Image by Pro Game Guides
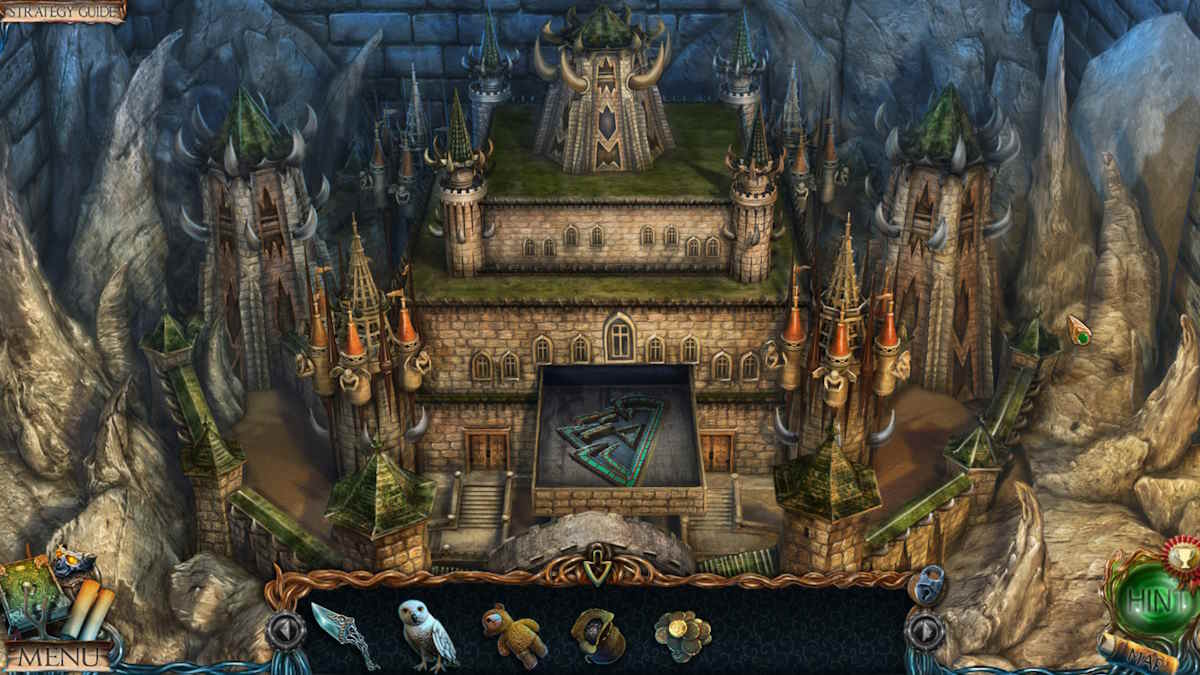
Lost Lands Dark Overlord Chapter 4 Walkthrough: The Castle
Once you ’ve taken theCollectiblefrom the careen on the left ( w1 ) , note the symbols on the glowing column ( w2 ) and take theBas - Relief Piecein the same ending - up . Now move along the way ( w3 ) tooutside the castle .
Take theCollectibleon the paries ( x1 ) , catch theShovel(x2 ) and someCoins(x3 ) , and then click the tent ( x4 ) to divulge a childlike hide - object miniskirt - gamer . Once concluded , you ’ll receive anOven Mitt . riposte to the path to the castle , use the shovelful on the snow ( w4 ) , and take theHammer . Place the hammer in the hands of the gnome statue ( w5 ) and it will topple , revealing a hole from which you may take a thirdStatue Head . You should also station the bird of Minerva down to collect aValvein the same closing curtain - up .
repay to the cave , aim the three statue oral sex on the statue there ( o3 ) , and dispatch the puzzle . You need to move pieces from the three statue ( 1 to 3 above ) and place them on the two footstall ( liter and R ) to help oneself you put all the statute part in ordering ( where I ’ve drop a line x2 or x3 , you need to move several pieces from one place to the same place in a course ) . I ’ve list a answer below . Once stark , take theMosaic Pieces .
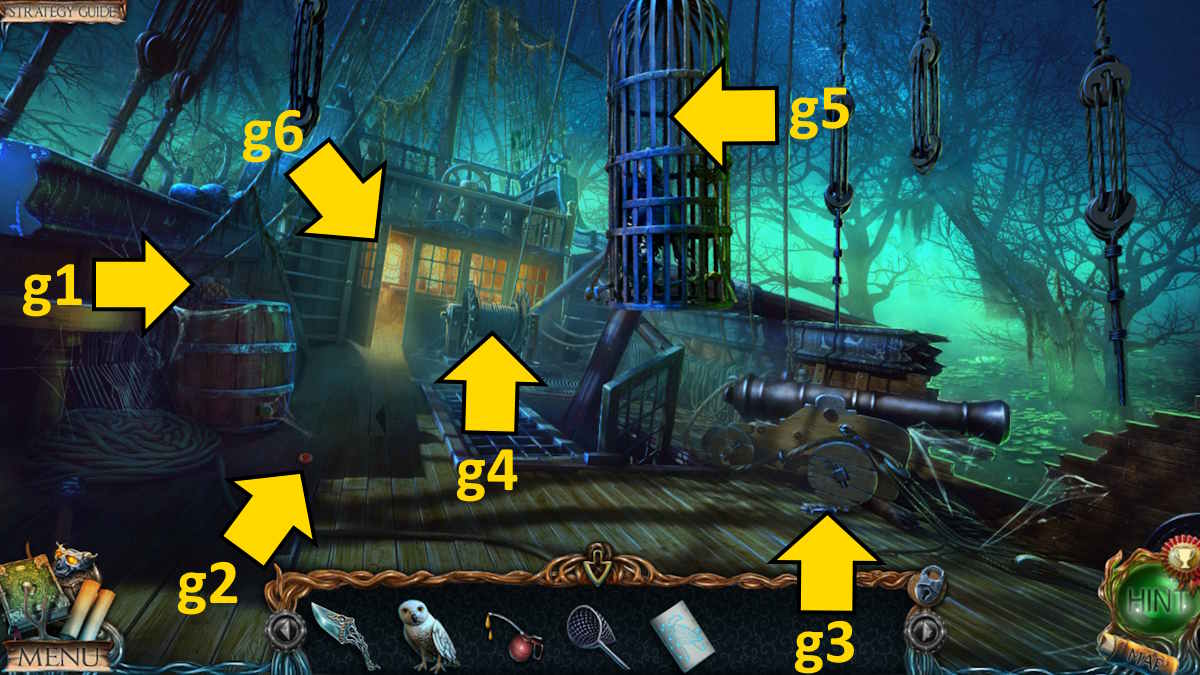
Image by Pro Game Guides
The demon statue room mosaic puzzle
Now go to the fiend statue , supply the mosaic composition to the floor pattern ( r5 ) , and rearrange the pieces until they match the image above . Once complete , it will slide undefendable and set aside you to take someButtons , and read a note about the demon in the statue .
Back at the palace , move up to the screening period , where you ’ll feel aCollectibleby the car ( y1 ) . take the Scripture ( y2 ) to find someCoaland aBlank Piece of Paper . Move back to the face lifting and utilize them on the board ( u4 ) to make a transcript of the picture of aDining Set .
The throne room door puzzle solution
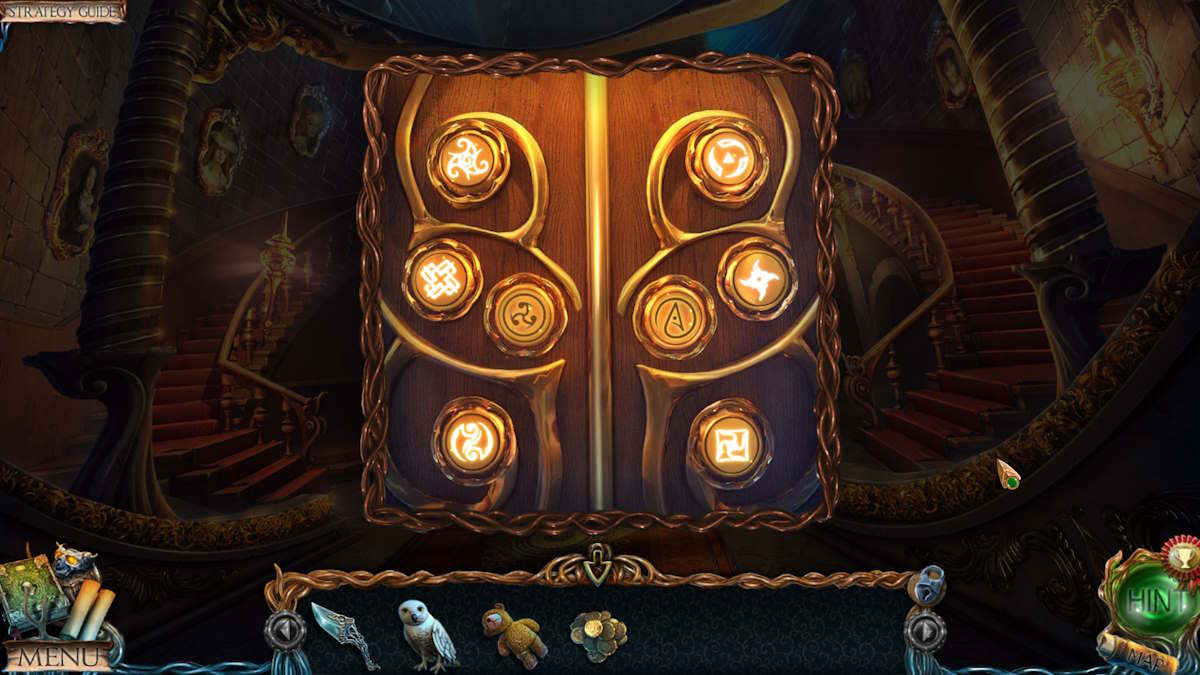
choose the threshold ( x5 ) outside the rook and summate the diagram and the buttons to depart a pattern puzzle . flick the numbered buttons the act of meter each as indicate below , which will make the green and blue squares match the diagram . Once over , you ’ll be able toenter the stool room .
Once inside the throne room , talk to Uri ’s brother(at z1 ) , who will die hard off after giving you aKey . Grab theCollectiblefrom the nap of detritus ( z2 ) , and then use the oven mitt to take theSword(z3 ) from the brazier ( along with theFire Symbolin the same close - up ) . Send your bird of Minerva up to pull together anotherBas - Relief Piece(z4 ) , move the curtain ( z5 ) to bring out thepassageway to the corridors , and move there . you may tot up the bas - sculptural relief slice to the bulwark ( at z1 ) as you go if you like to keep a tidy stock , but it ’s not substantive .
Grab theCollectiblefrom above the room access ( 1a ) and then click each of the two sword in the shield close - up ( 1b ) to make anotherBas - Relief Piecedrop down for you to gather . habituate the key on the right door ( below 1a ) to open it and find Jimmy , but he has had a spell cast on him and wo n’t listen to you . Two animated precaution also kibosh your path . Once you ’ve opened the door , click it again to get alook at the halberdsblocking the doorway andnote the patternon the remaining one .
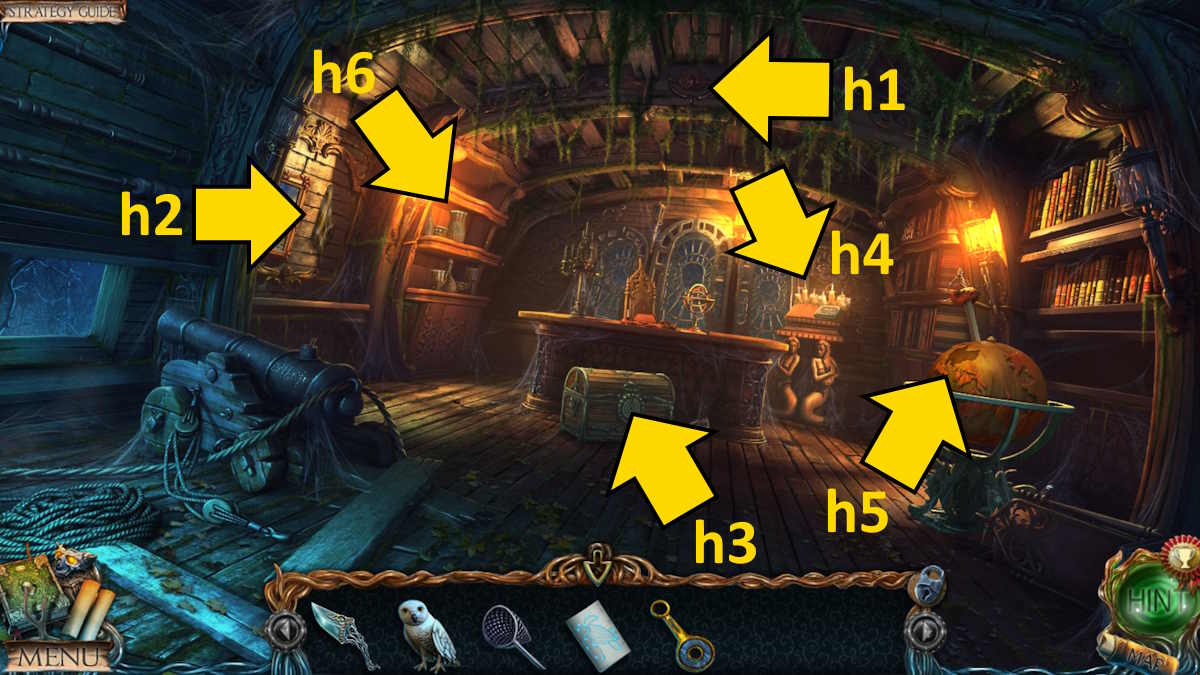
Image by Pro Game Guides
Move to theexit to the steerable , take theCollectiblefrom the wall ( 2a ) , utilise the brand to break the crank on the spring ( 2b ) , take theObject in Ice , and click the pattern in green in the same close - up to note the design .
Return to the corridors , choose the door on the left field , and transcript thegreen and orangish patternsyou’ve recently uncover to keep in line the plates on the door ( 1c ) and open them up ( see above ) , clear you entry tothe dwarf ’s room .
The dwarf’s room object placement puzzle
Head inside and speak to the spirit alchemist , who tells you everything you need can be found in his tower . Take theCollectiblefrom the chandelier ( 3a ) , move the skins on the bed ( 3b ) to find aSymbol , use the sticker to get aPiece of Cheese(3c ) , and then clack the doors ( 3d ) to commence an object - placement mini - plot . The solution is below . Once complete you ’ll receive thePincers .
Put the physical object in crank into the fire ( 3e ) and then remove theStatuettewith the pincers . Attach the figurine to the bed ( 3f ) to let out asecret compartment and take the Pieces from inside , also reading thenote about transfer .
Go back alfresco to the corridors , site the cheese in the kettle of fish ( 1d ) , and catch aRat . Move to the commode room next and contribute the mosaic piece to the mosaic ( z6 ) . Rearrange them to twin the figure above . You ca n’t go wrong here , as the spell go dark as you drop them into the right spots and you may make the range of a function in any order . Once thoroughgoing , take theSymboland aPropeller Blade .
Screenshot by Pro Game Guides
bring out the scum bag near the dirigible and thebig cat(2c ) will furrow it away , leaving you free to get to the flying simple machine . Click it ( 2d ) for a closing - up and follow the instructions ( look for the highlighted expanse on - screen door ) to assemble the burner . Once done ( see above ) , you’re able to amass theCups , as well as anotherSymbol . Come out of the close - up , click the hole in the dirigible ( 2e ) , take theAir Symbol , and then click the propellor ( 2f ) to discover aValve . In the same close - up , click the propeller itself to remove thebroken bladeand then supercede it with the one you have in your armoury .
The captain’s cabin cups puzzle, solved
Go right back to the captain ’s cabin next , select the shelf ( h6 ) , and then bring the cups and the dining mark diagram to start out a emplacement puzzle ( see the solution above ) . Afterward , you may take aBook .
Take the book to the subroutine library , impart it to the shelves on the left ( n5 ) , and finish the book Holy Order as show above . The Scripture will slide aside , allow you to collect aWater Symbol .
retort to the corridor , add the three symbols to the gates ( 1e ) , and examine the model you regain behind them . Reassemble the model ( see above ) and take theEarth Symbol . Move to the showing point , add the four element symbols to the book ( y2 ) , and then reach the Holy Writ .
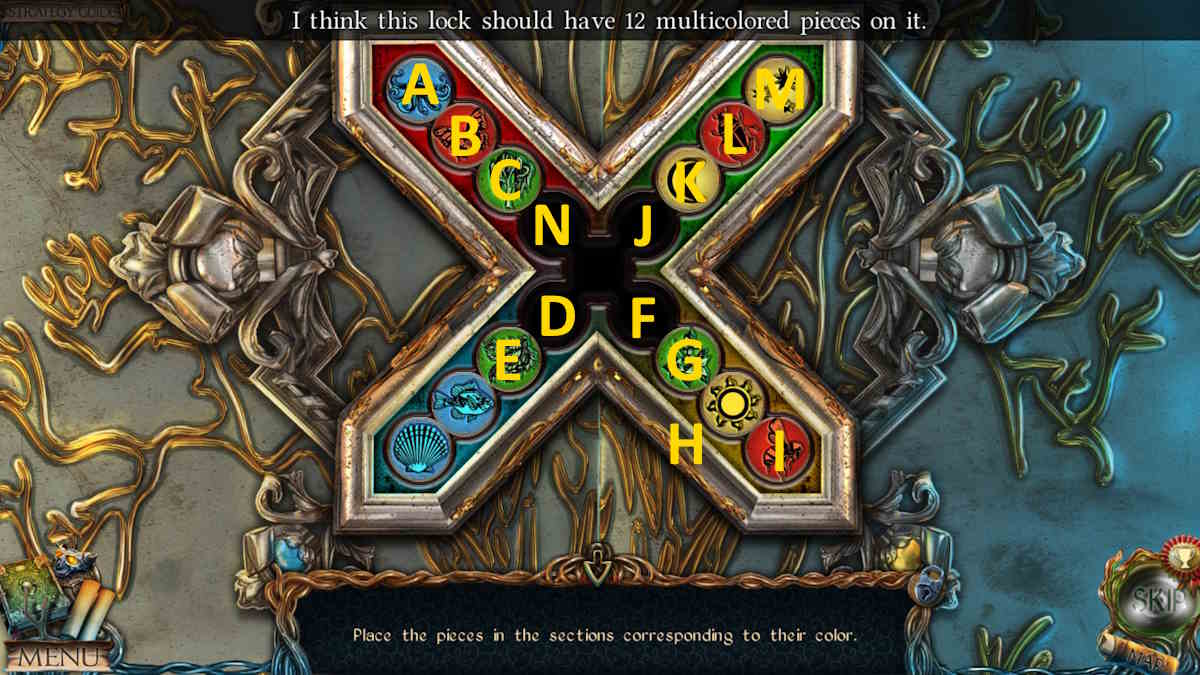
Image by Pro Game Guides
Take theNeedleand note the calibre location in the diagram the needle was in . Set the standard of measurement ( y3 ) as shown ( above ) , and then pull the red hold in the same close - up to fathom the horn , whichscares by the dragonguarding the tugboat . Return to the dirigible , apply the acerate leaf to define the mess ( 2e ) , mount on board ( 2d ) discharge up the tank , and then click the steerable once more to move on tothe alchemist ’s tower .
Lost Lands Dark Overlord Chapter 5 Walkthrough: The Alchemist’s Tower
When you arrive outside the alchemist ’s tower , take theCollectiblefrom the floating rock ( 4a ) and post the owl up to collect theRamrodthat ’s just above it . Take theMalletand a Cannonballfrom the rugged cannon ( 4b ) , using the mallet in the same close - up to criticize off and collect aWheel .
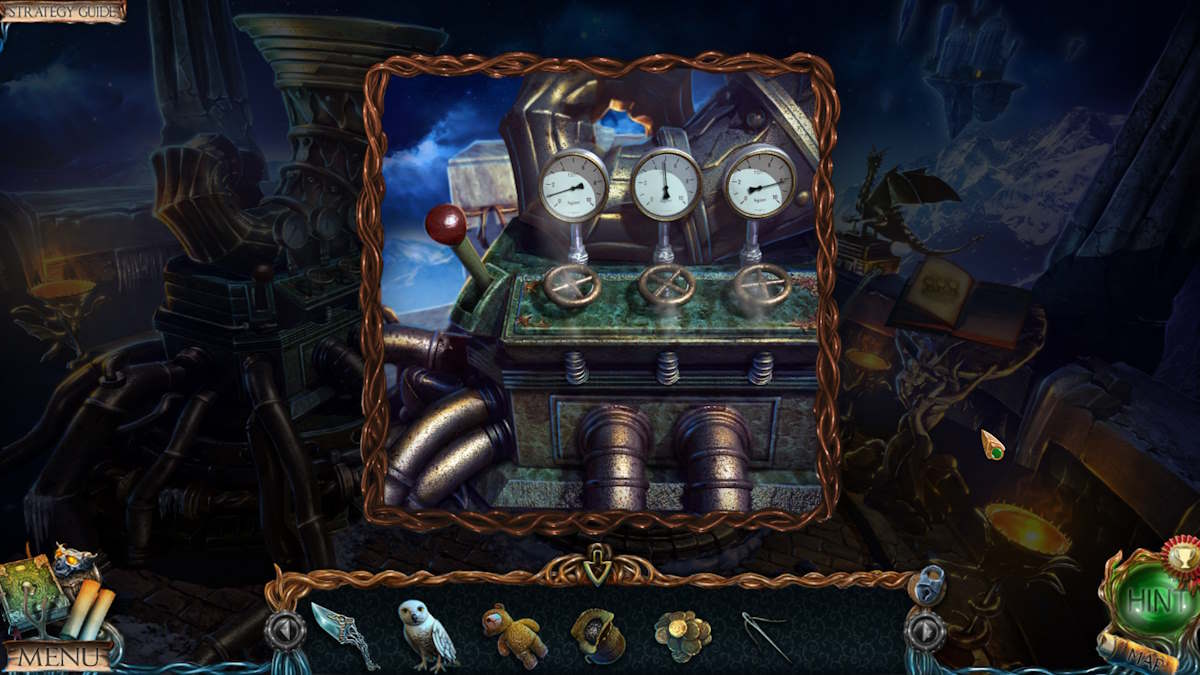
Take theRunefrom beside the cannon ( 4c ) , pour the gunpowder into the cannon , add the cannonball , and use the ramrod to fix it to fire . Add the wheel in the same close - up , attach it using the beetle , and then fall into place the cannon tomove it into situation . tick the carom once more and it will give notice , slay the door ( 4d ) and give you access to thetower halland theobservatory .
Enter the tower hall , take theCollectiblefrom the right of the threshold ( 5a ) , take theBas - Relief Piecefrom the table ( 5b ) , read the note there about make the Lunar Tear , and take anotherRune .
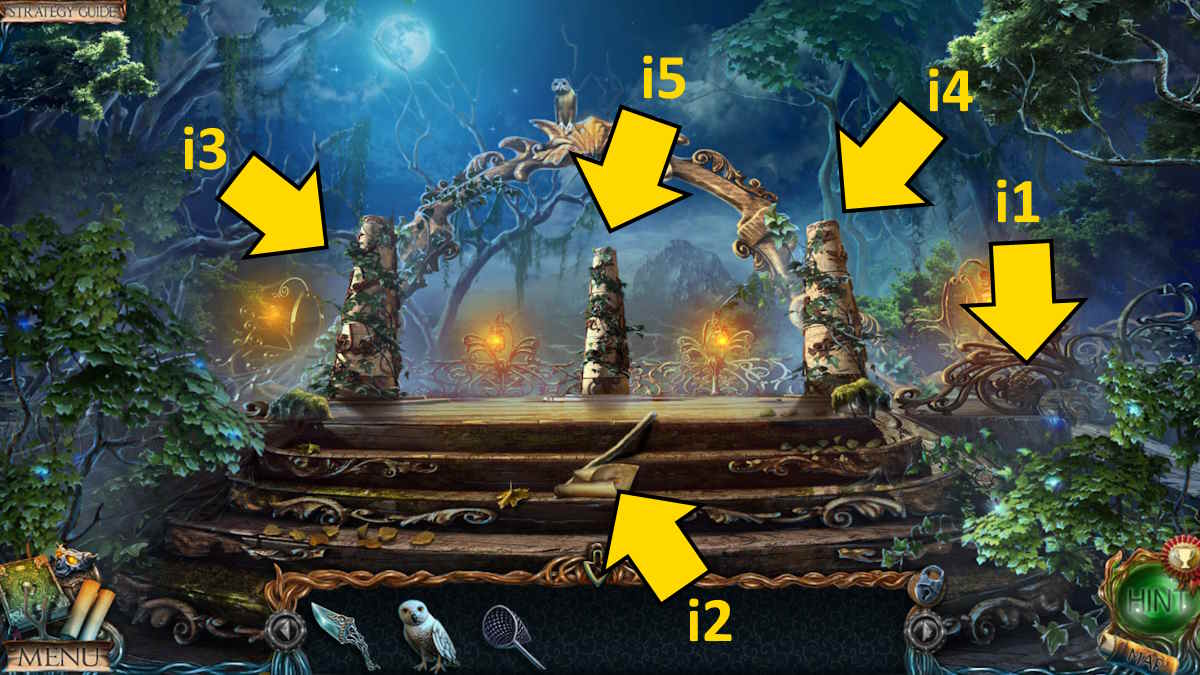
Image by Pro Game Guides
Move to the observatory next , where you ’ll find anotherCollectibleon the central mechanics ( 6a ) . Select the planet twist ( 6b ) for a close - up to find oneself another Rune , as well as anotherBas - Relief Piece .
Completing the viewing point pipes puzzle
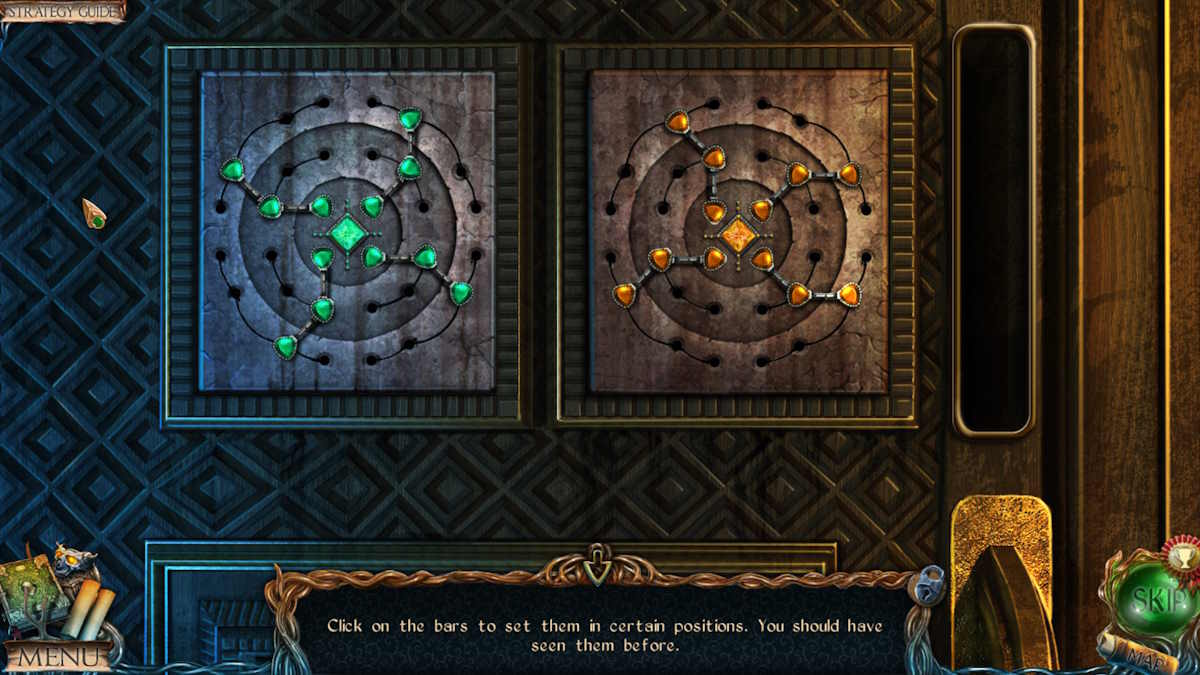
Move to the showing peak , add the runic letter to the photographic plate in the basis ( y4 ) , and pure thepipes teaser . Both the two red and two yellow sections need to be joined to complete it . I ’ve pictured the answer above . Once done , powerfulness will flow to the two Draco on the railing ( y5 ) . deform each flying dragon ’s promontory so they burn away the water ice , and take theGlass Owl .
head up to the path to the castle and add the owl to the broken statue ( w6 ) , powering it up . observe down the symbol revealed . Go back to the tower hall , select the right six symbolic representation on the door ( 5c , see above ) , and move into thealchemist ’s laboratory .
After speak to the alchemist , you ’ll discover the finalCollectiblefor the mystic collection at the base of the pall ( 7a ) . Take anotherBas - Relief Piecefrom the flooring ( 7b ) , take the Aconite from the table ( 7c ) , the Rails plus a Flask from the top of the closet ( 7d ) , and then select the back of the way ( 7e ) to activate an item - collection miniskirt - game .
Screenshot by Pro Game Guides
Go right smart back to the underground descent in the good deal , slay the clothfrom the boxwood there ( q4 ) , and add the rail to the top of the corner to start awagon front puzzle . You need to move the wagon along the rail so that it cover all of them . If you ’re stuck on this one , I ’ve let in a solution above . When the box open up , take theBas - Relief PieceandCircle Segmentfrom indoors .
Take the segment to the tugboat hall , add it to the circle at the top of the stairs ( 5d ) , and then line up all the pieces by using the slots on either side to serve rearrange the segments . See the nail epitome above . Once complete , you could click the door there ( 5d ) to come in thegreenhouse .
You ’ll discover theCollectibleon the paries ( 8a ) , expend the sticker to swerve back the roots ( 8b ) , move the leaves ( 8c ) to find aTroweland send your trusty owl up to get theSun Figurinefrom the Sir Herbert Beerbohm Tree ( 8d ) .
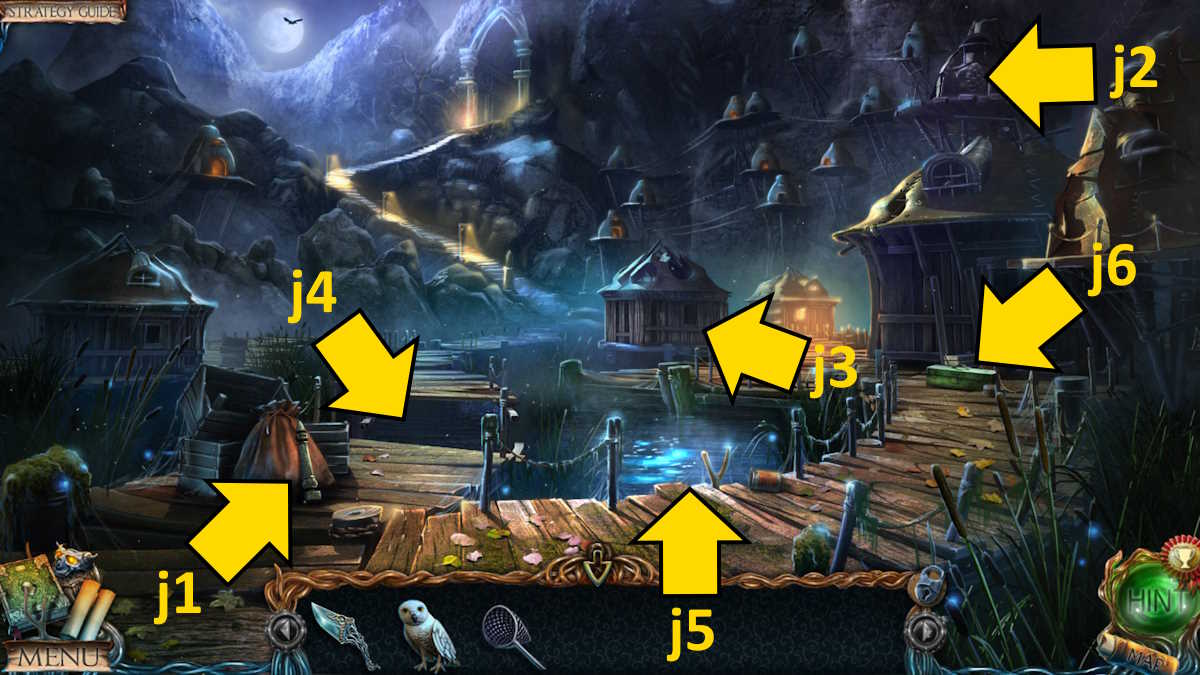
Image by Pro Game Guides
Use the sun figurine on the level in the center of the observatory ( 6c ) to start the automobile and devoid theTablet Piece . Take the piece to the dwarf ’s bedroom , add together it to its other half beneath the shield on the wall ( 3 g ) , and then flick the seven fleurs - de - Li ( express on the tab ) on the shield in the right orderliness ( see above ) . The shield will slither across , allowing you to take aGloveand aBas - Relief Piece .
Return to the greenhouse , use the trowel in the dirt ( 8e ) , and use the boxing glove to piece up theMandrake Root . Also , do n’t forget to take theKeythat this uncovers in the hole . utilise the samara to afford the closet in the alchemist ’s lab ( 7c ) and take thePyramid , Dropper , andRecipefrom in spite of appearance . Put the formula on the mesa ( 7d ) to lastly see the ingredients postulate for the philosopher ’s stone .
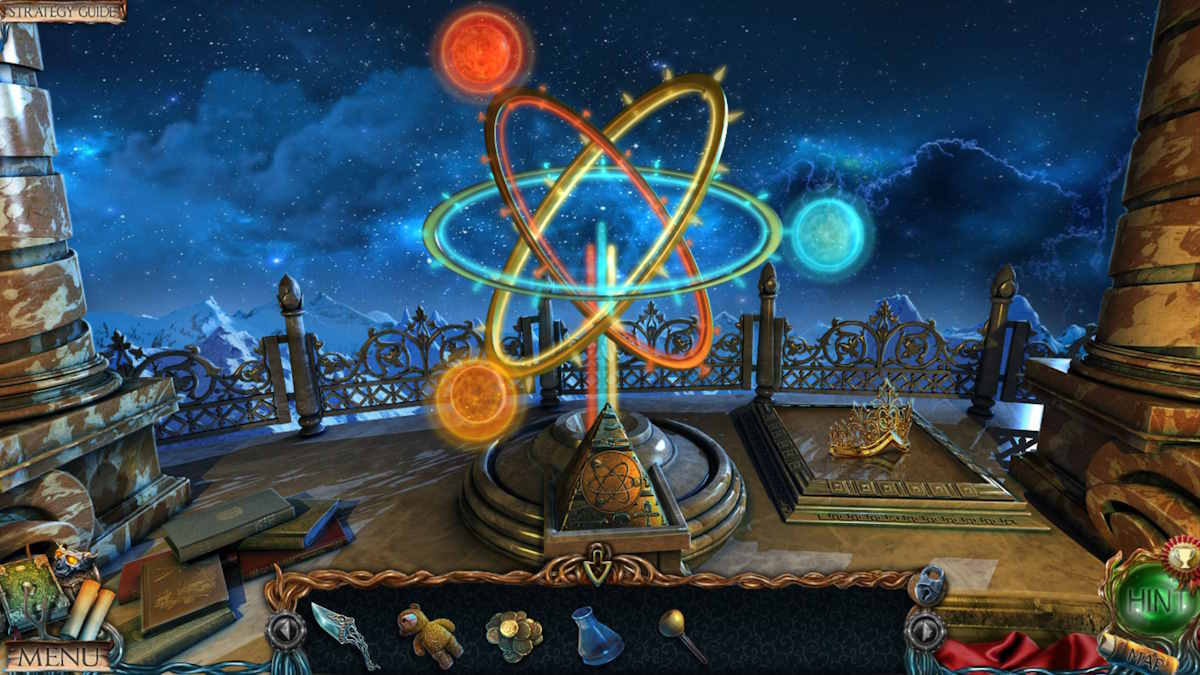
Move up to the observatory , localize the Pyramids of Egypt on the planet machine ( 6b ) , and once it spark off sweep up the planets to their correct locations ( see above ) . ACrownwill come along to the right of the machine , so piece it up . Take the crown to the tugboat manor hall , place it on the statue head ( 5e ) , and you ’ll benefit entry to theindoor patio .
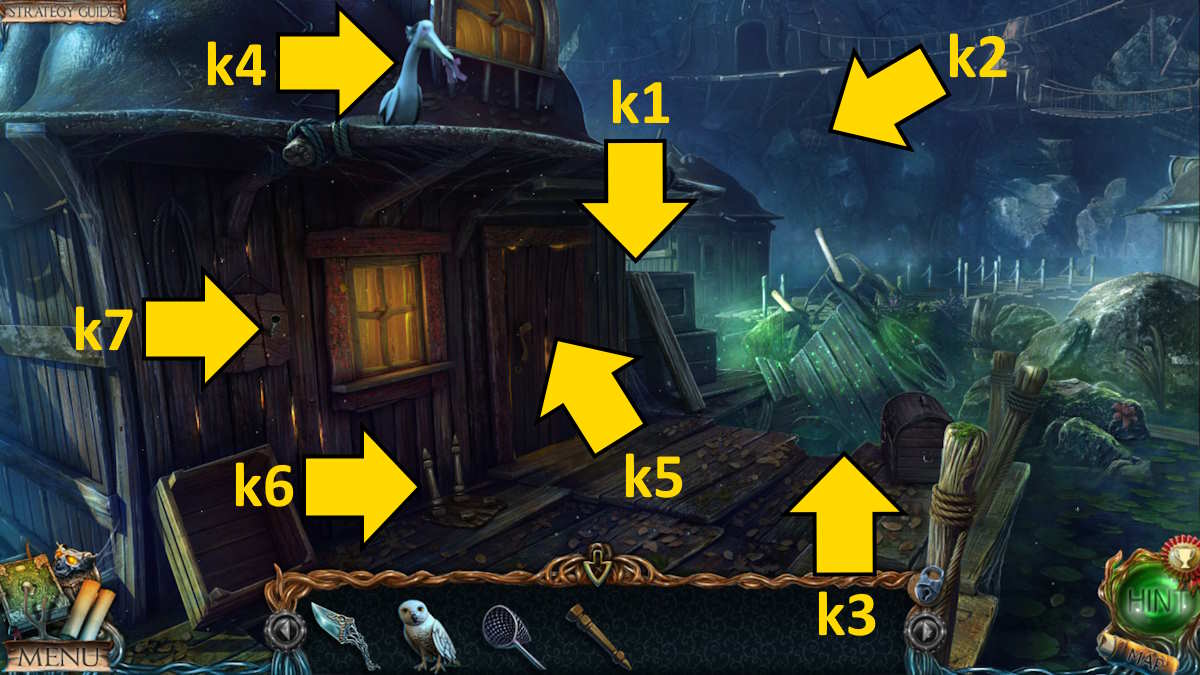
Image by Pro Game Guides
Take theCollectiblefrom the rock on your left ( 9a ) , which should complete your net compendium . Take yet anotherBas - Relief Piecefrom the steps ( 9b ) , aMosaic Piecefrom the pond ’s boundary ( 9c ) , and pick a scale out of the water in the same finis - up . apply your dagger to start the eggshell and take aPearl . Finally , use your flaks here to get aFlask of Water .
snaffle aLensfrom the rose wine ( 9d ) , and then keep clicking and collectingRose Budsin the same conclusion - up until you have seven . Now snap the pergola ( 9e ) to start a simple item accumulation mini - plot . At the remainder , you ’ll receive aScale Dish .
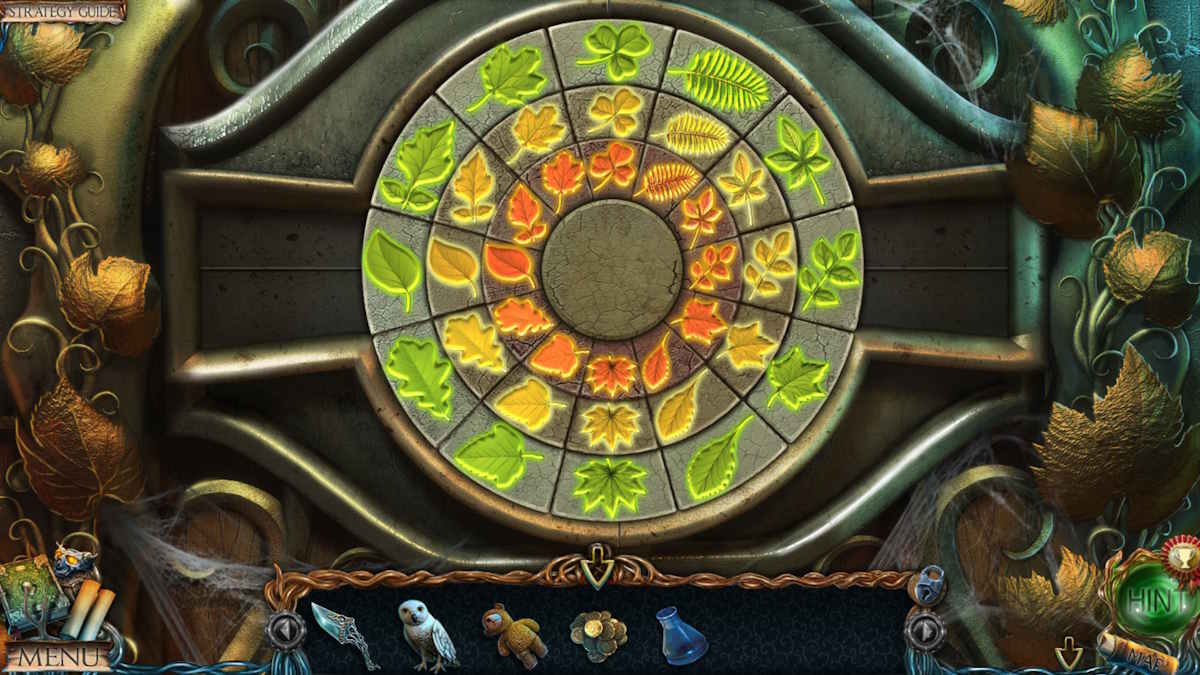
Completing the greenhouse disc puzzle
Head to the glasshouse and use the eye dropper on the orangeness plants ( 8c ) to getPitcher Plant Nectar . Now add the mosaic piece to the pattern you expose beneath the cut ascendent ( 8b ) to start a disc - moving teaser . Click the four segment in the order shown above , then the segment marked 1 three more multiplication to make out it and get the finalBas - Relief Piece , along with aFlute . Now expend the flute to bewitch the Snake River ( 8f ) , allowing you to take someSnake ScalesandCopper Powder . Finally , add all the bas - moderation pieces to the bas - relief ( z1 ) in the throne way to receive theDragon ’s ancestry .
Go to the alchemist ’s lab next . Select the ledge ( 7f ) , place the mandrake on the board , slice it with the dagger , and append it to the mortar ( arena ) . Put the aconite and rise bud in the mortar too , and mix them with the pestle that ’s already on the table . pose the berries in the container on the Bunsen burner , which will drip into the central container . Add the ambrosia from your inventory , and then pour in the contents of the bowl . Take theLife Potion .
manoeuver to the observatory once more , add the scale dish antenna to the scales ( 6d ) , and then contribute the coins to the dish on the left . Move coins one by one from there into the dish on the right until the scale trigger ( see above ) . Add the lens , and then utilise the flask of water where the lens system is beam ( in the same end - up ) to get theLunar teardrop .
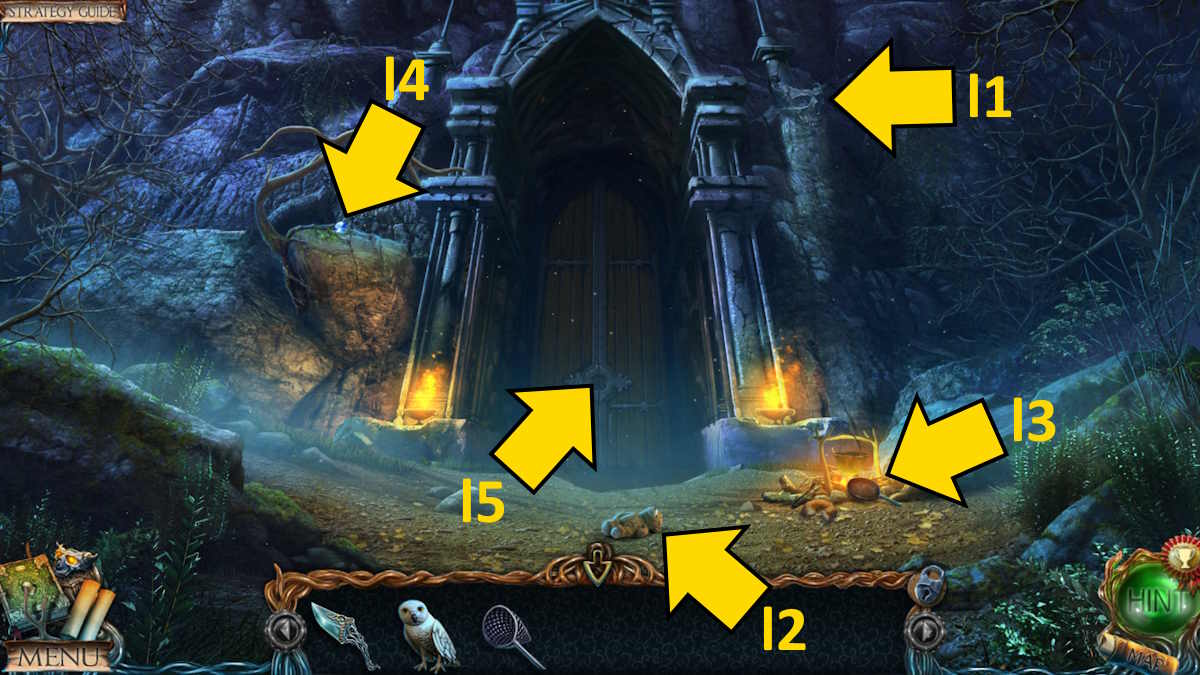
Image by Pro Game Guides
Creating the Antiphilosopher’s Powder
Move to the secret lake shore and give the life potion to the Mountain Spirit , who will repay you by give you aLiving Stone . Return to the science laboratory , select the table ( 7d ) , and follow the instructions :
you may now take theAntiphilosopher ’s Powder . Return to the fiend statue room , add the powder to the statue ( r6 ) , and destroy it forever and a day ! felicitation , you ’ve complete the main game .
To solve the bonus chapter , check out myLost Lands 1 Bonus Chapter Walkthrough - Dark Overlord . If you ’re looking for more teaser adventure walkthroughs here at Pro Game Guides , check outHaunted Hunt Walkthrough ( Adventure Escape Mysteries ) !

Image by Pro Game Guides

Screenshot by Pro Game Guides
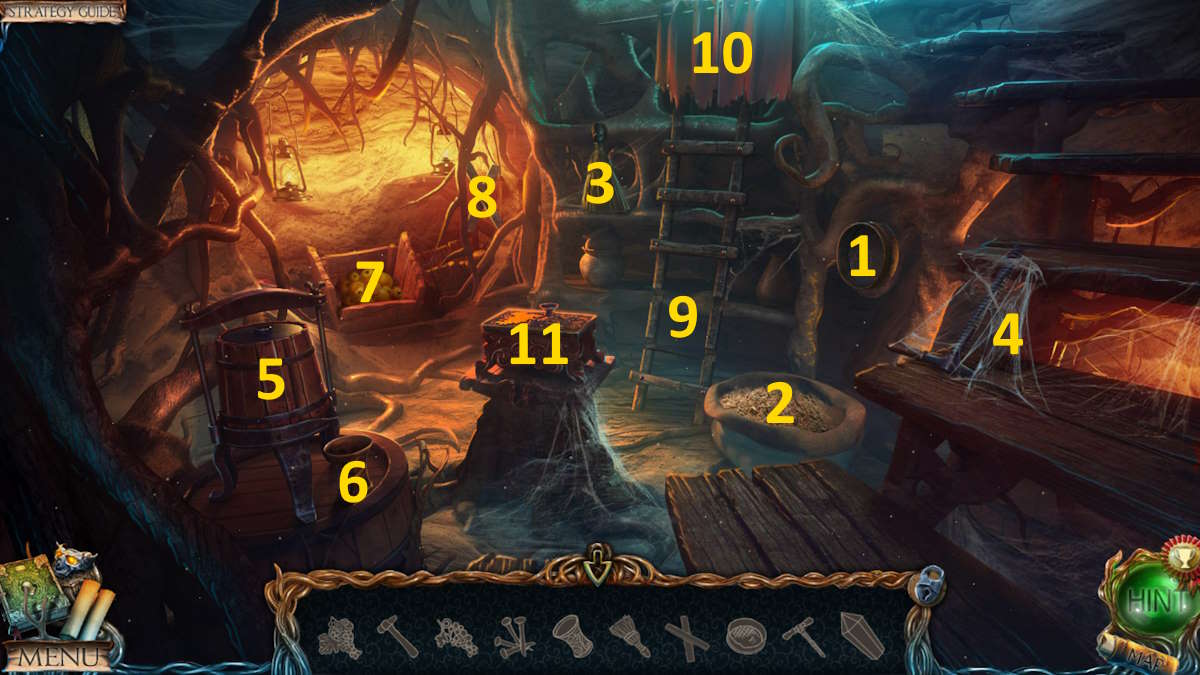
Image by Pro Game Guides
Screenshot by Pro Game Guides
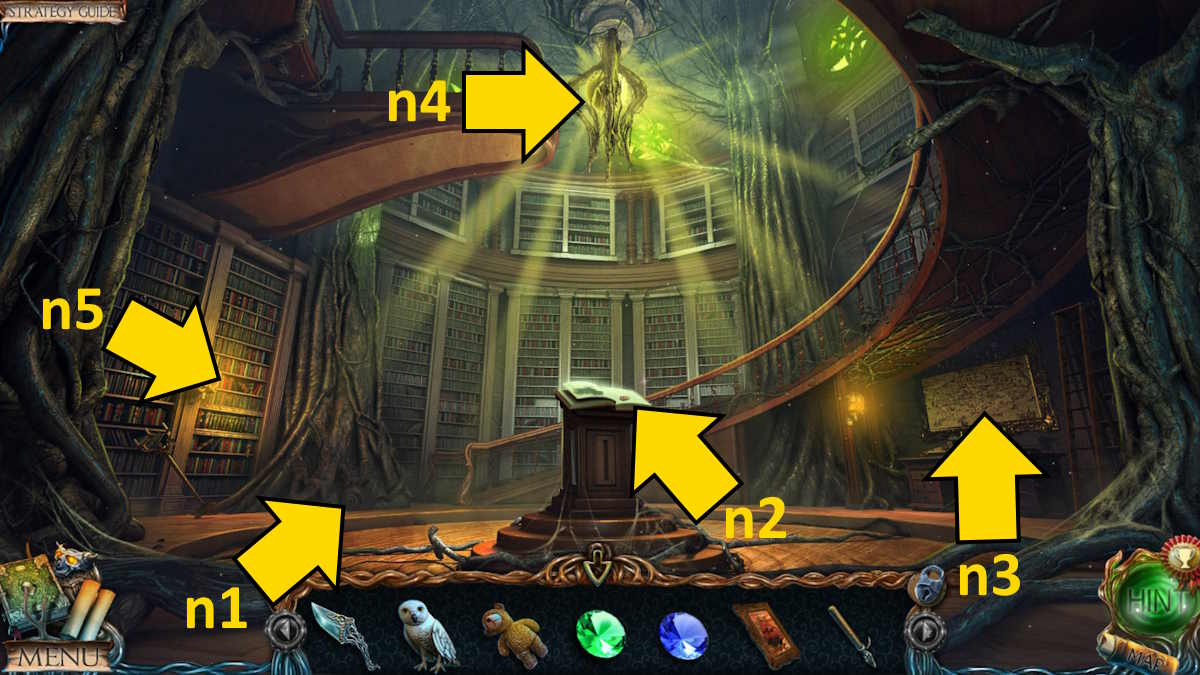
Image by Pro Game Guides
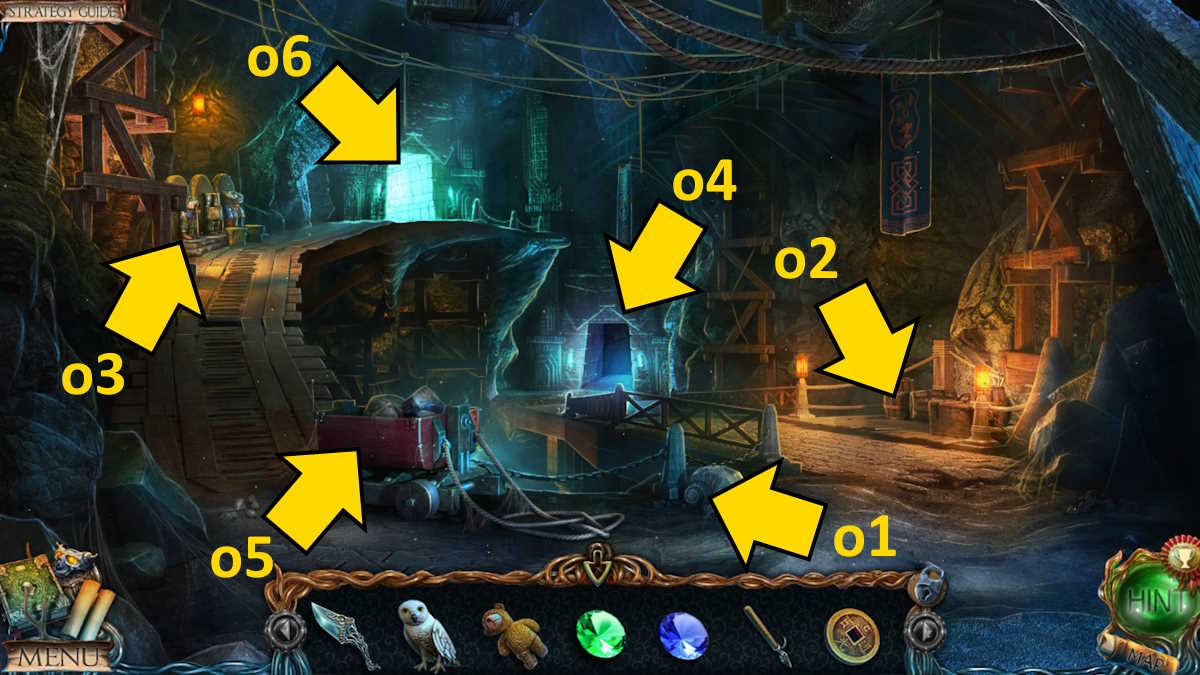
Image by Pro Game Guides
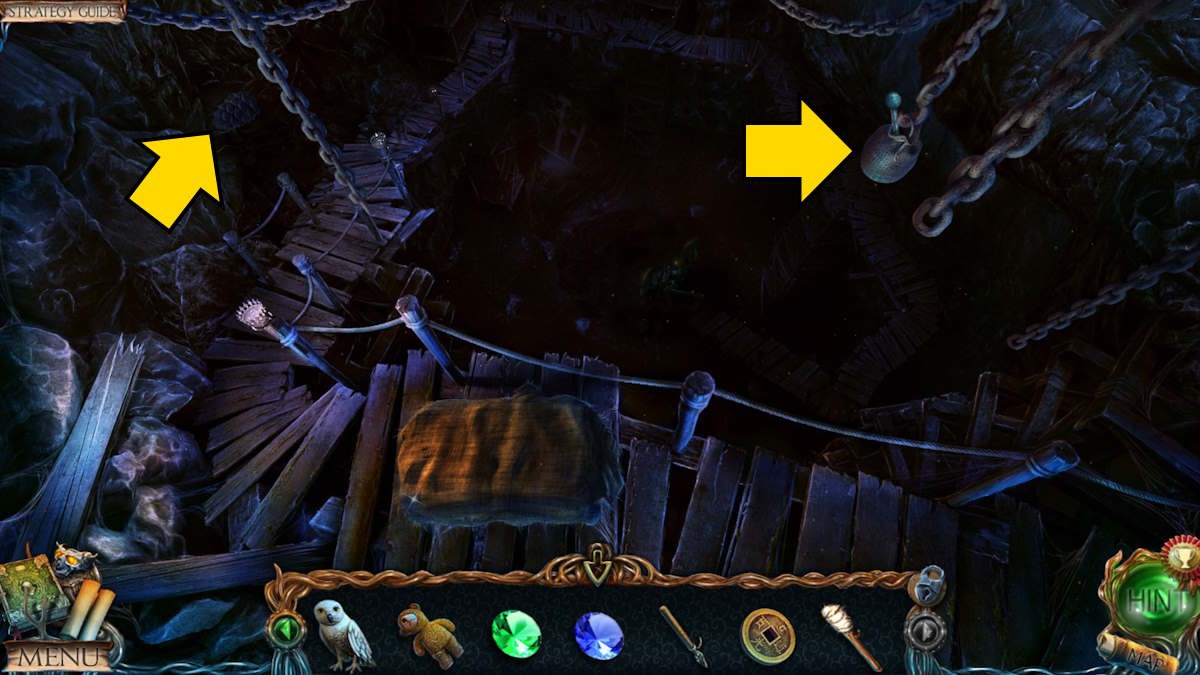
Image by Pro Game Guides
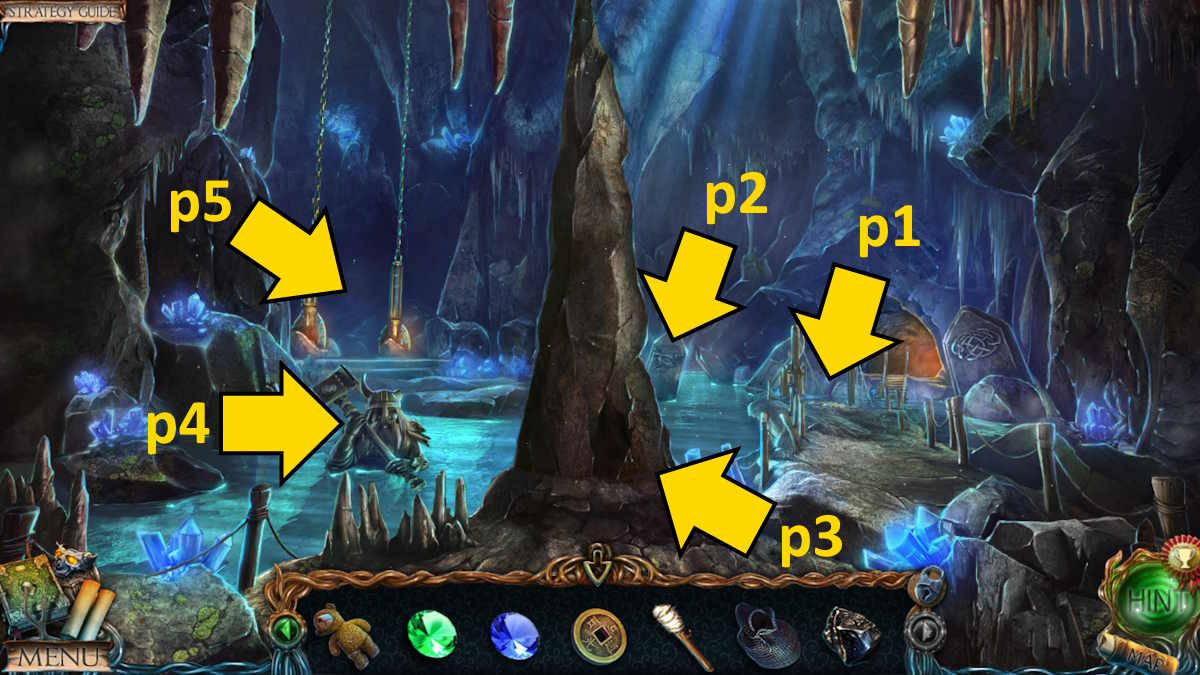
Image by Pro Game Guides
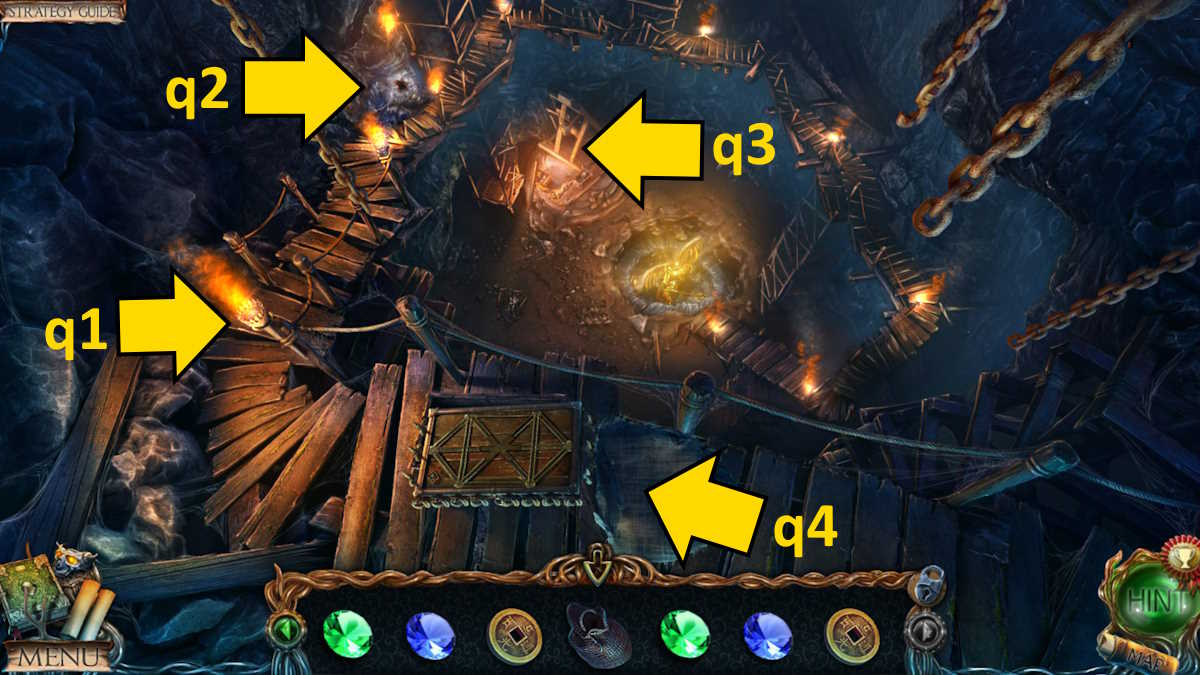
Image by Pro Game Guides
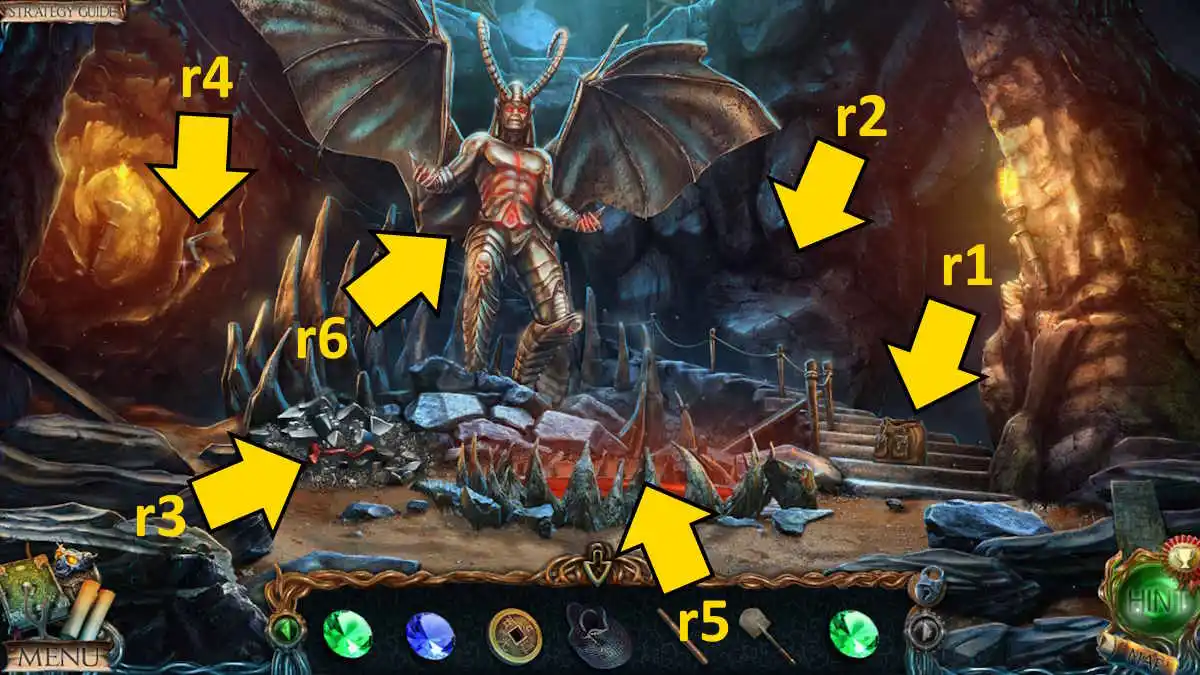
Image by Pro Game Guides
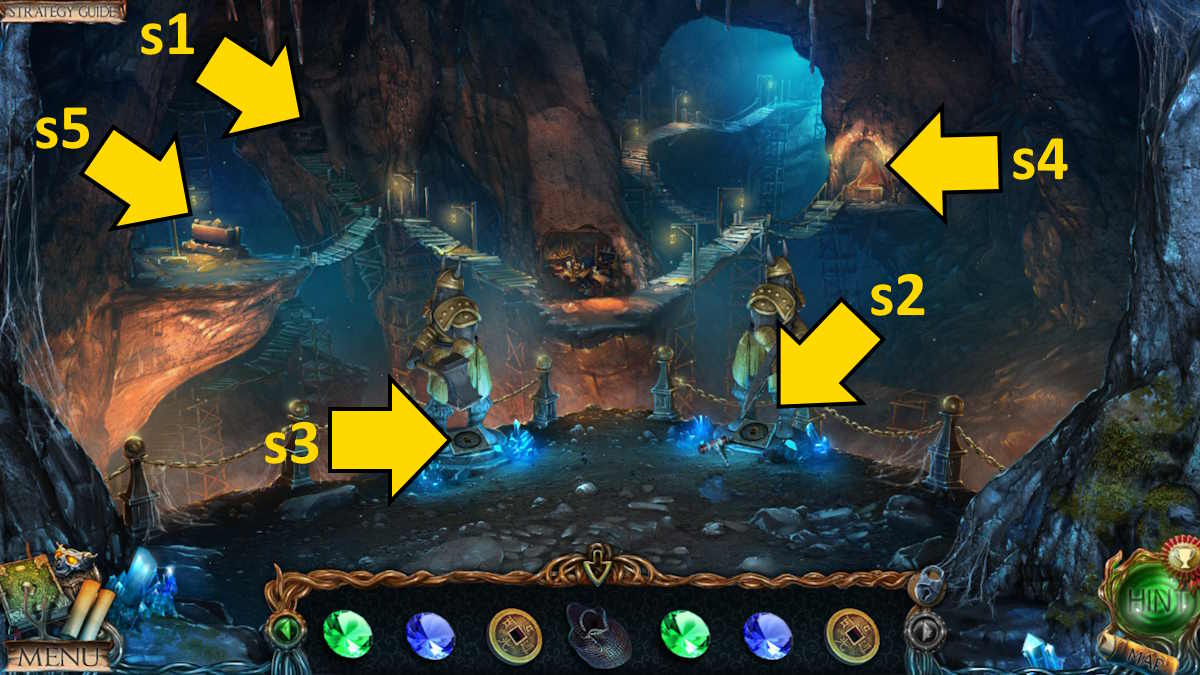
Image by Pro Game Guides
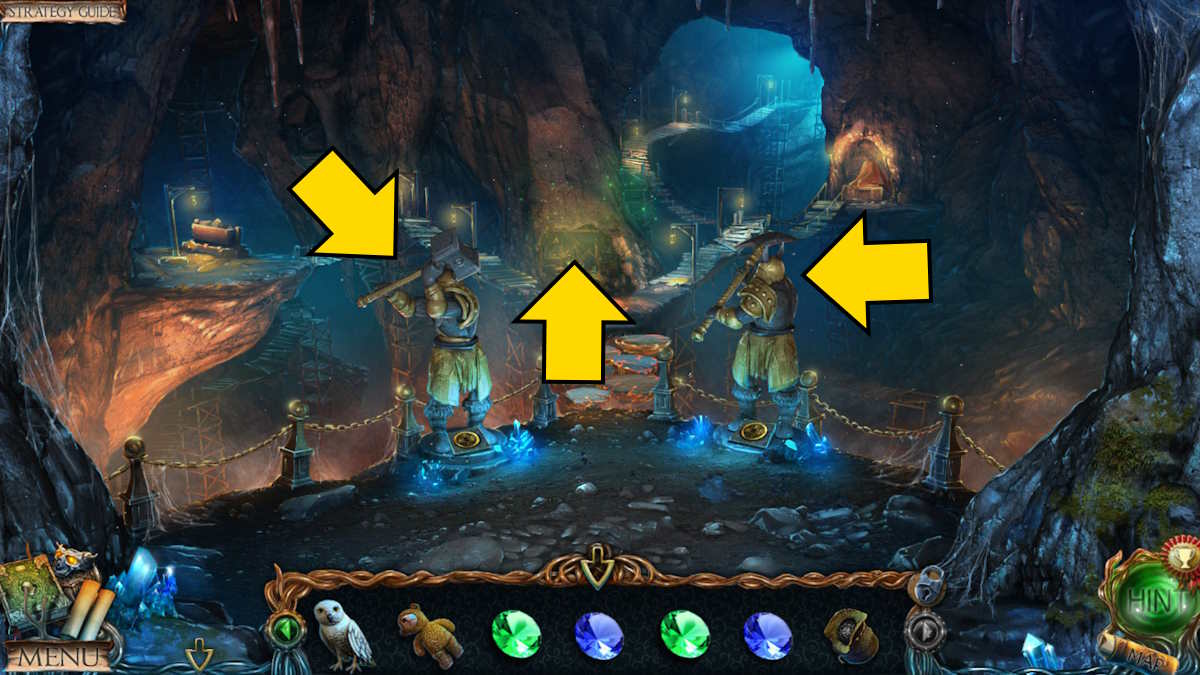
Image by Pro Game Guides
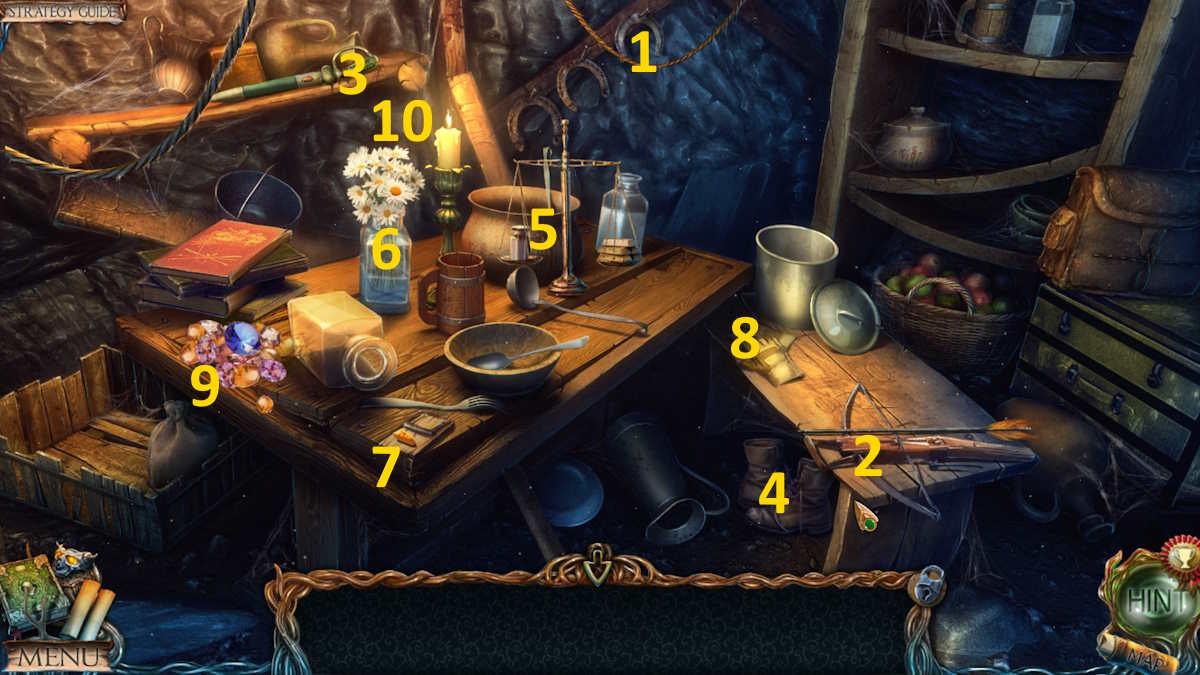
Image by Pro Game Guides
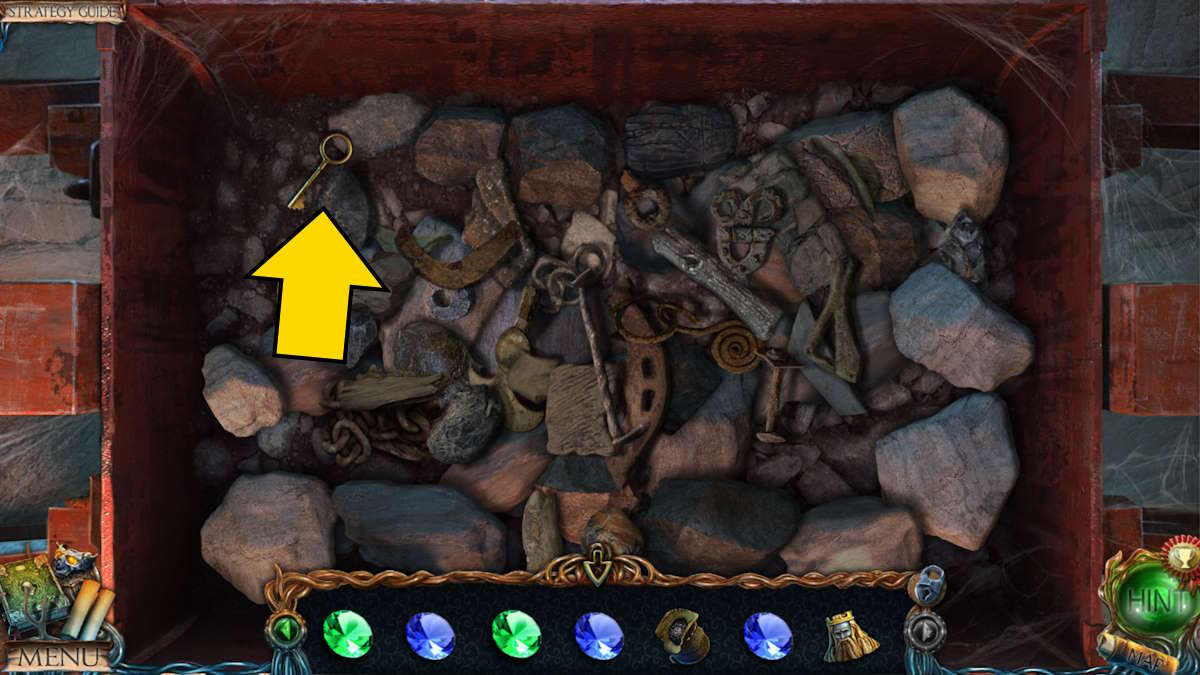
Image by Pro Game Guides
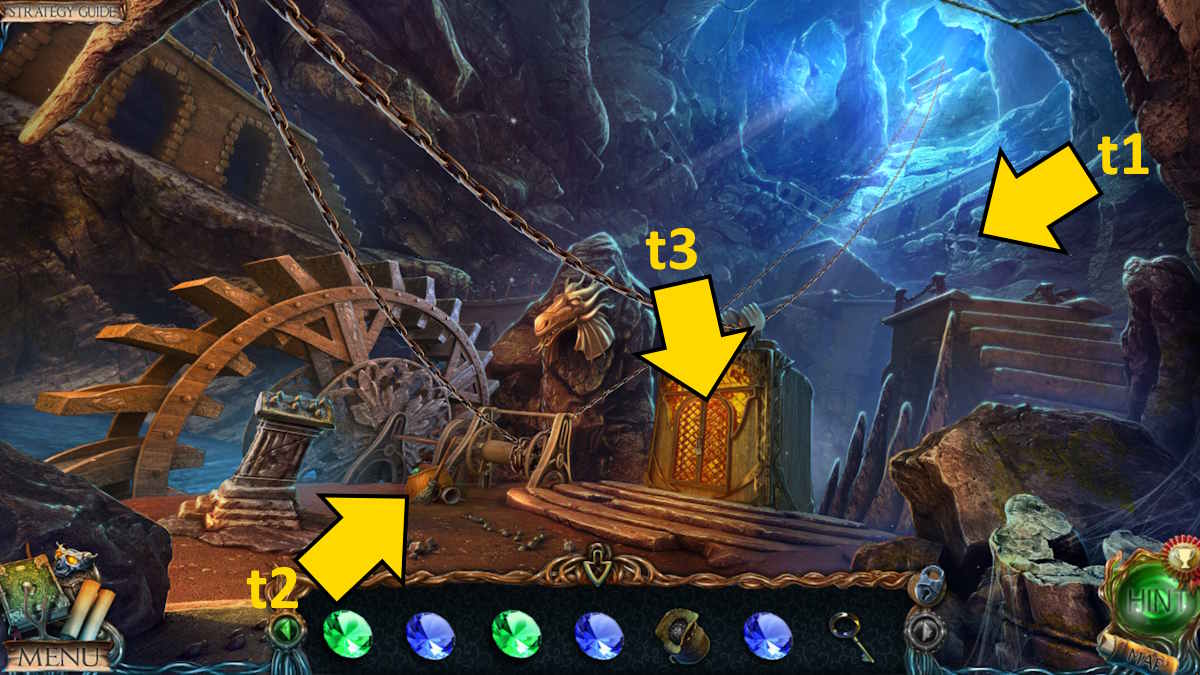
Image by Pro Game Guides
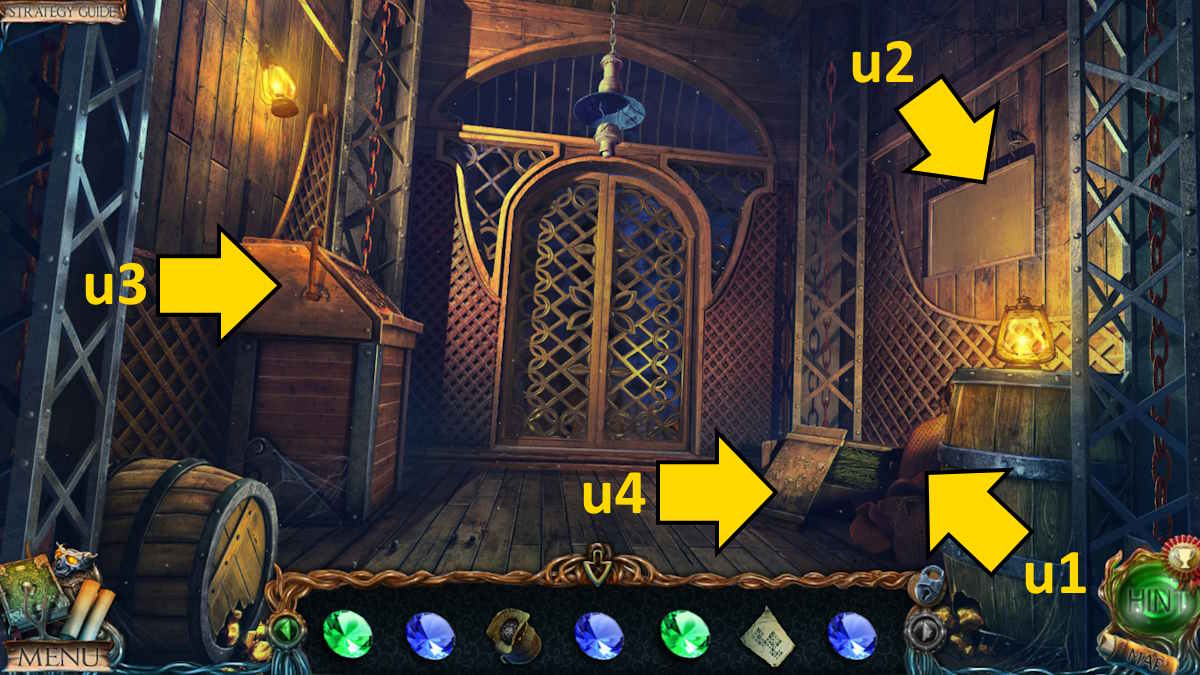
Image by Pro Game Guides

Image by Pro Game Guides
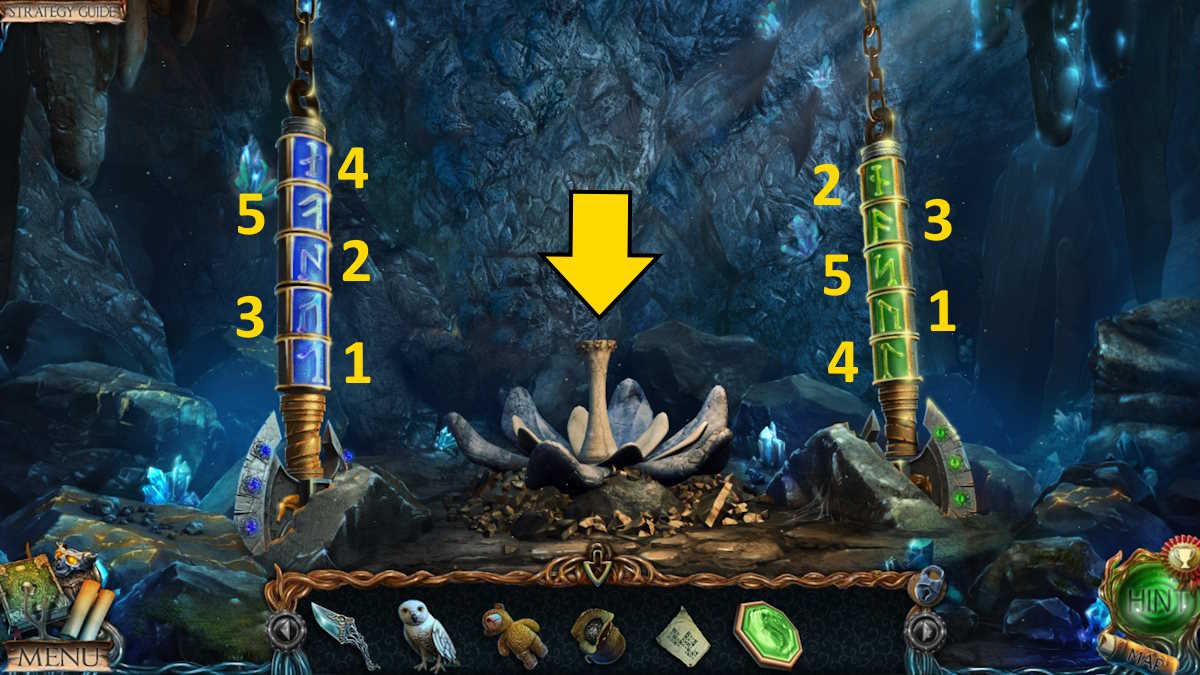
Image by Pro Game Guides
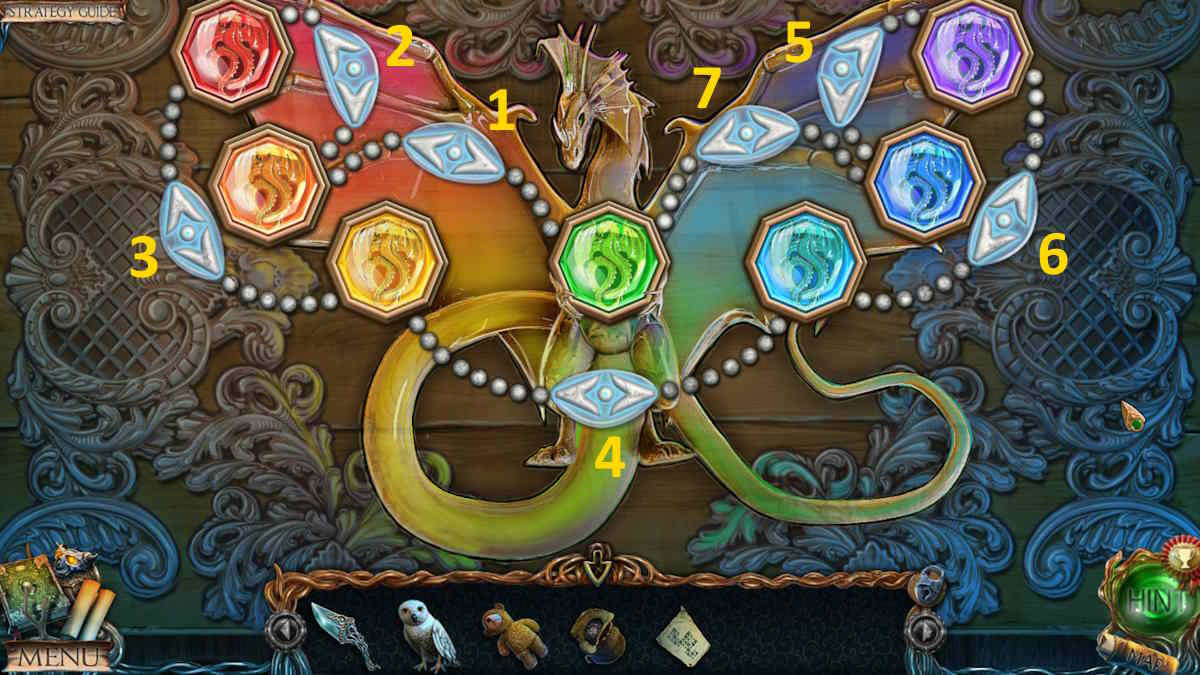
Image by Pro Game Guides

Image by Pro Game Guides

Image by Pro Game Guides
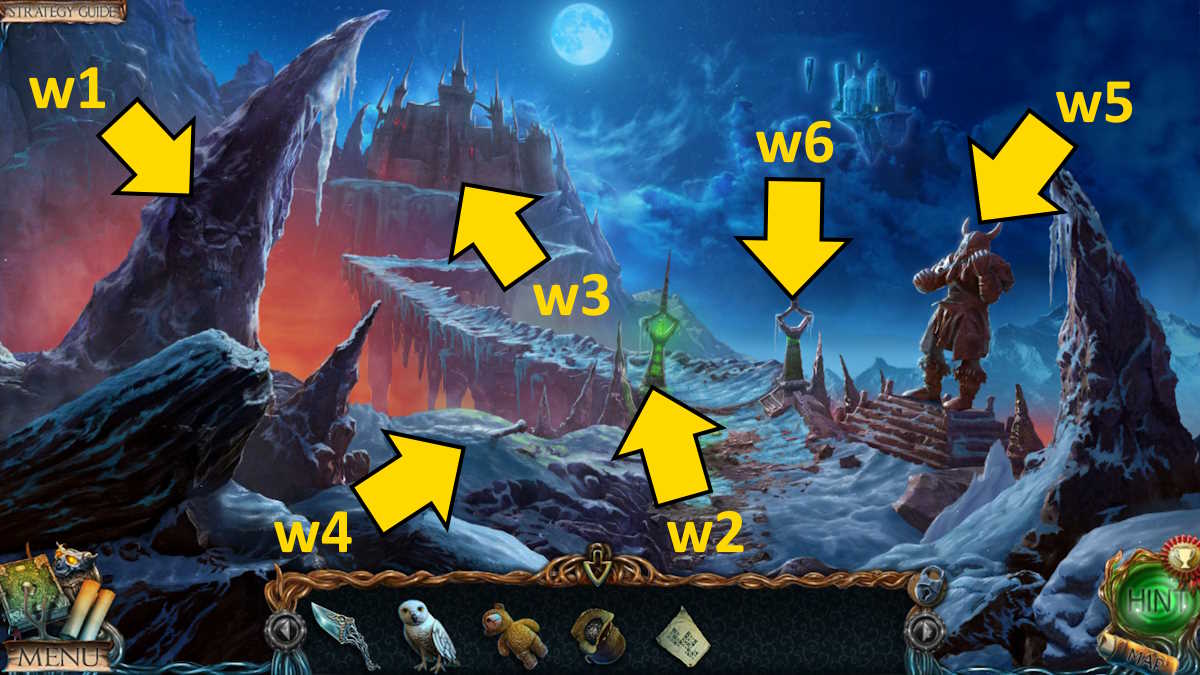
Image by Pro Game Guides
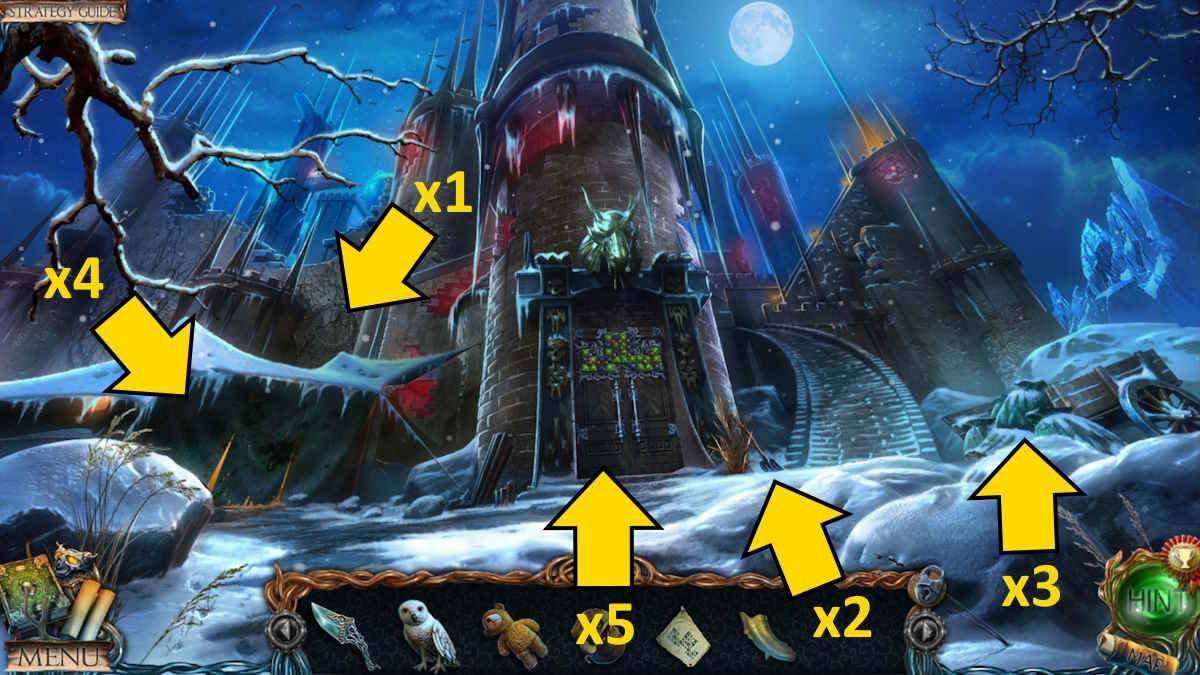
Image by Pro Game Guides
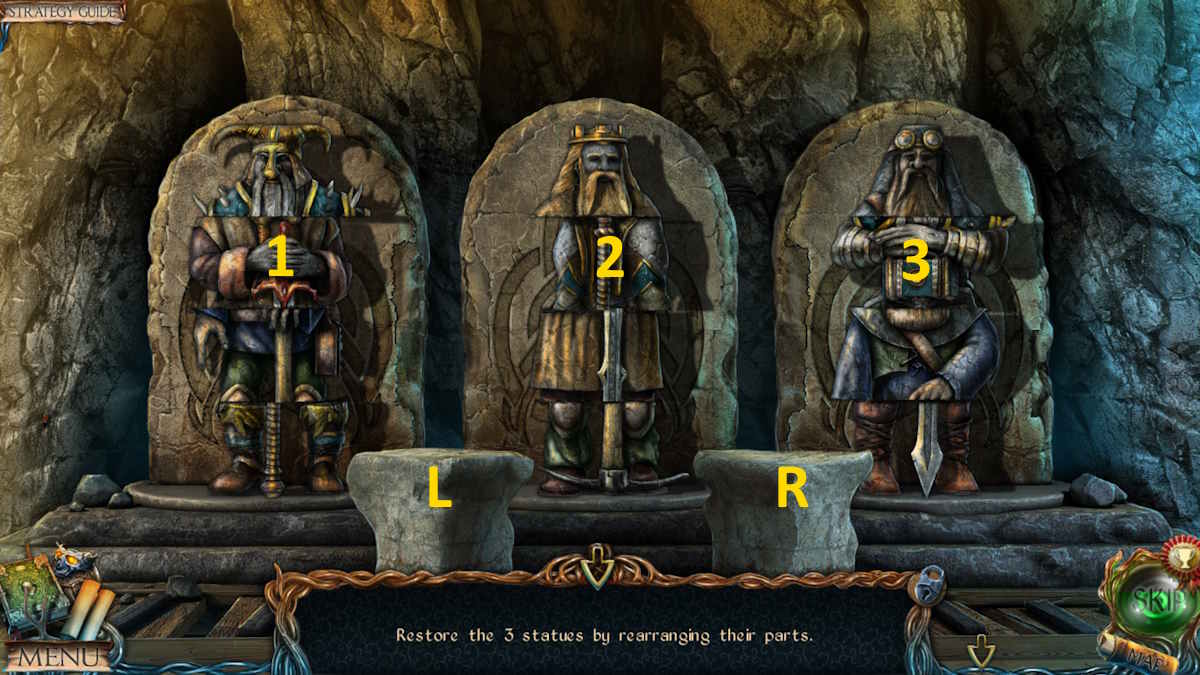
Image by Pro Game Guides
Screenshot by Pro Game Guides
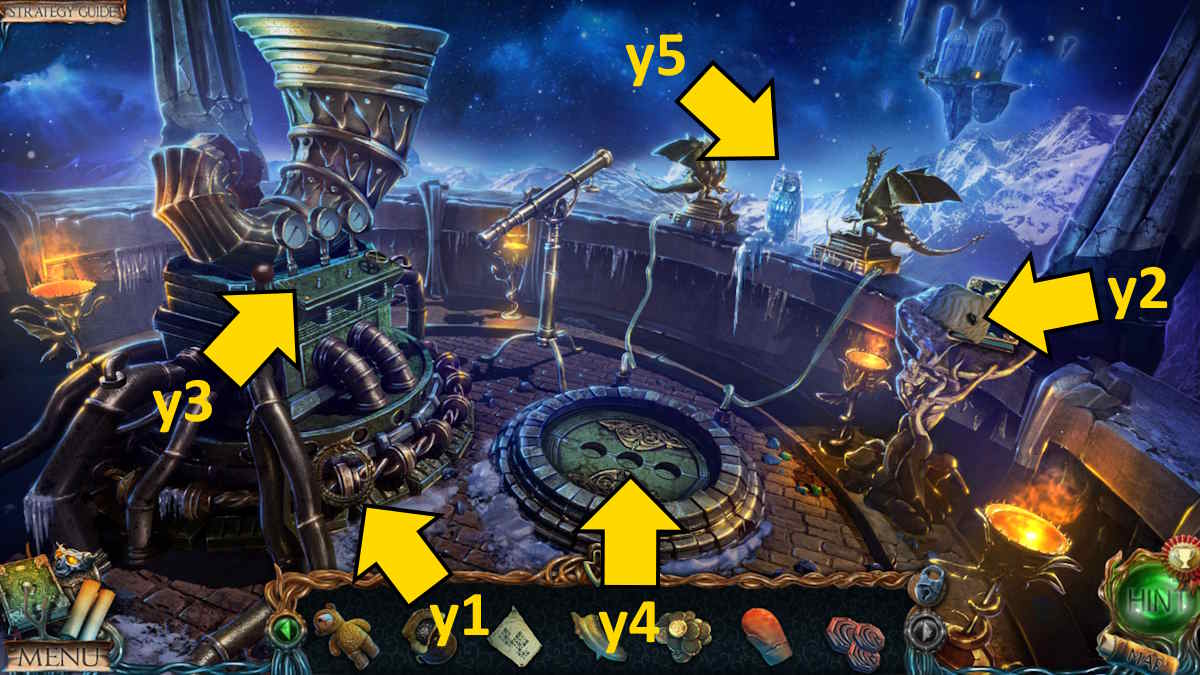
Image by Pro Game Guides
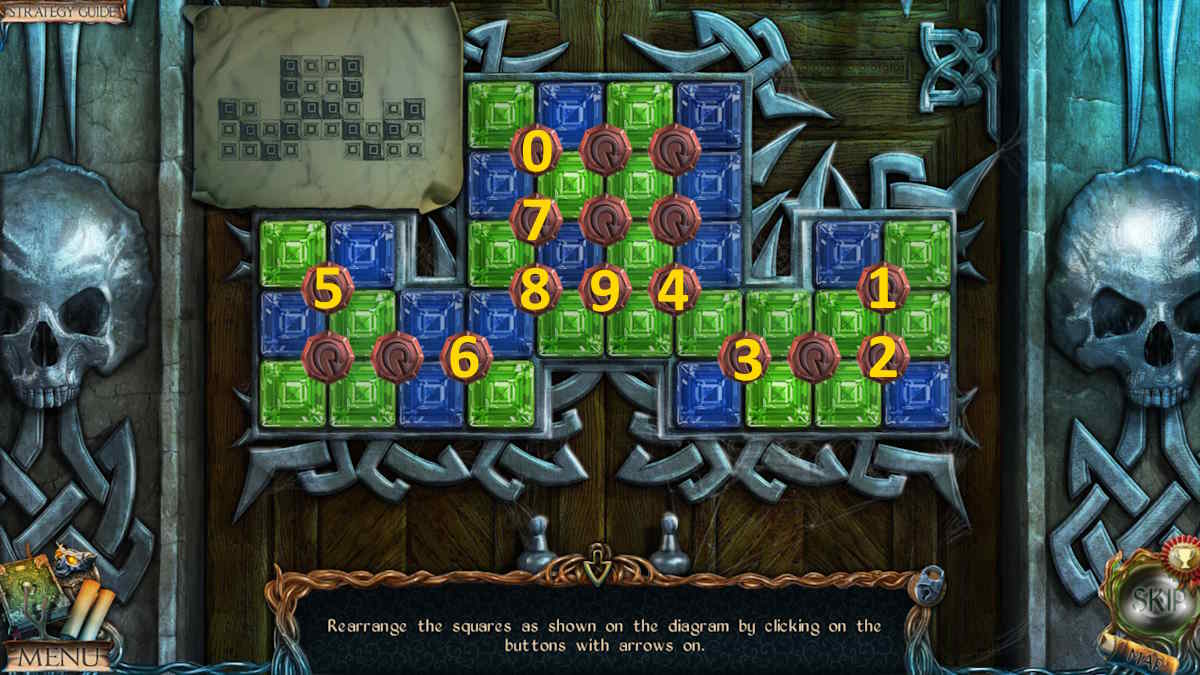
Image by Pro Game Guides
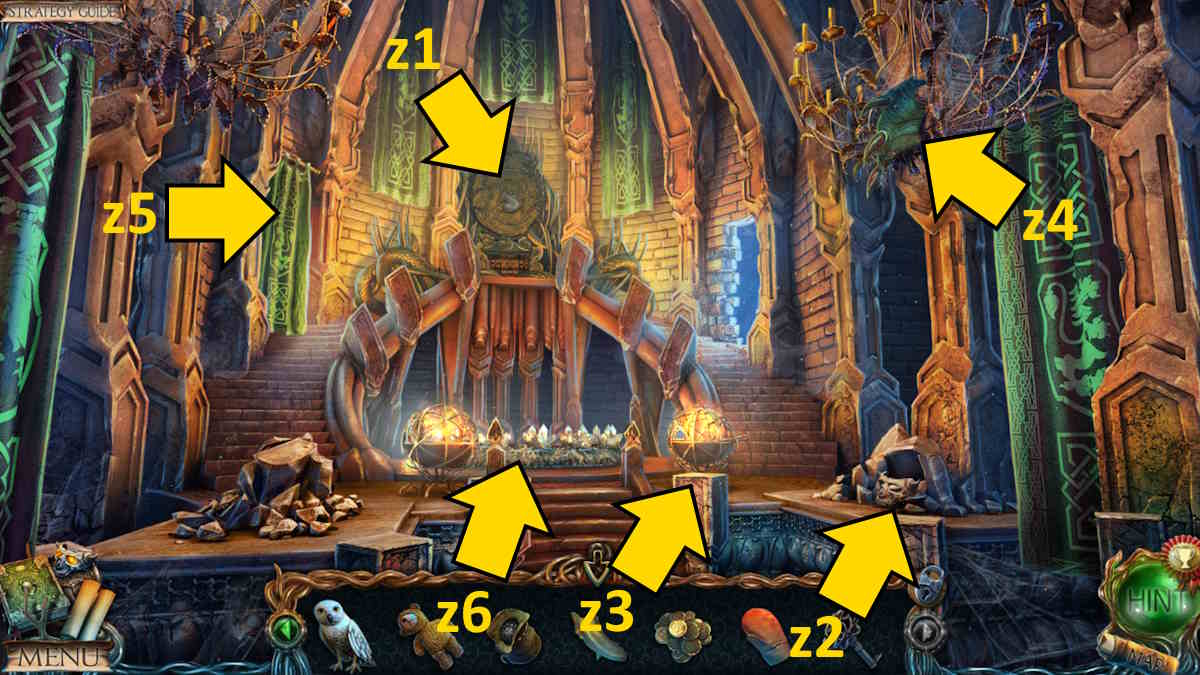
Image by Pro Game Guides
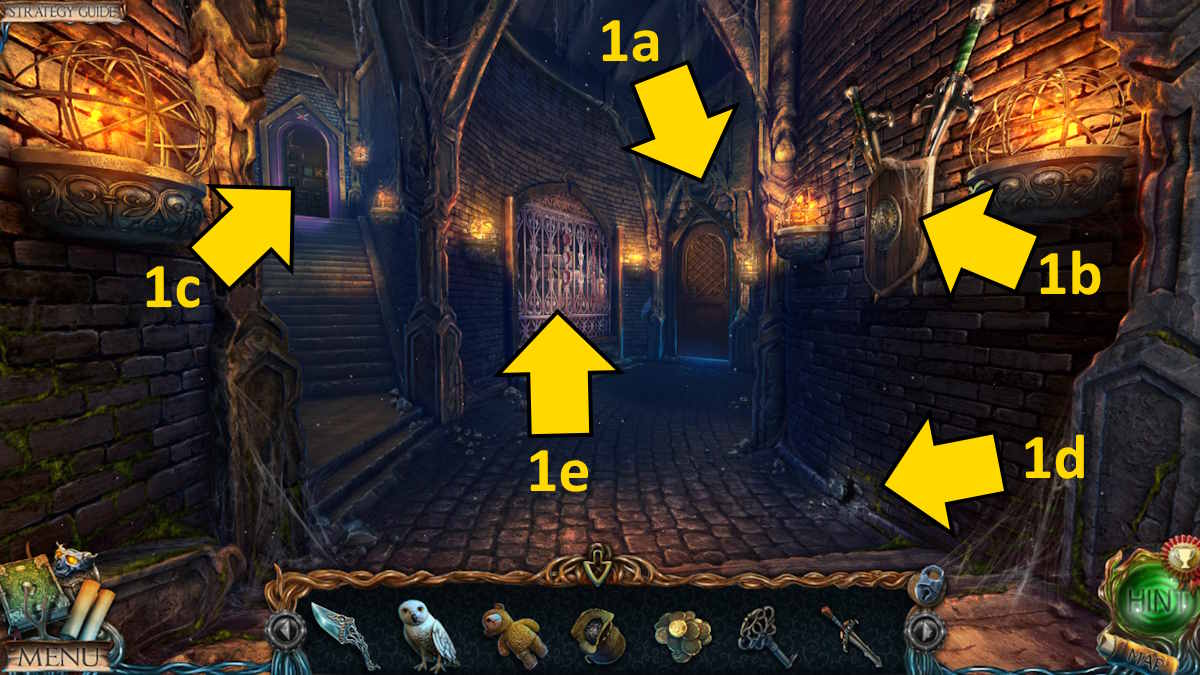
Image by Pro Game Guides
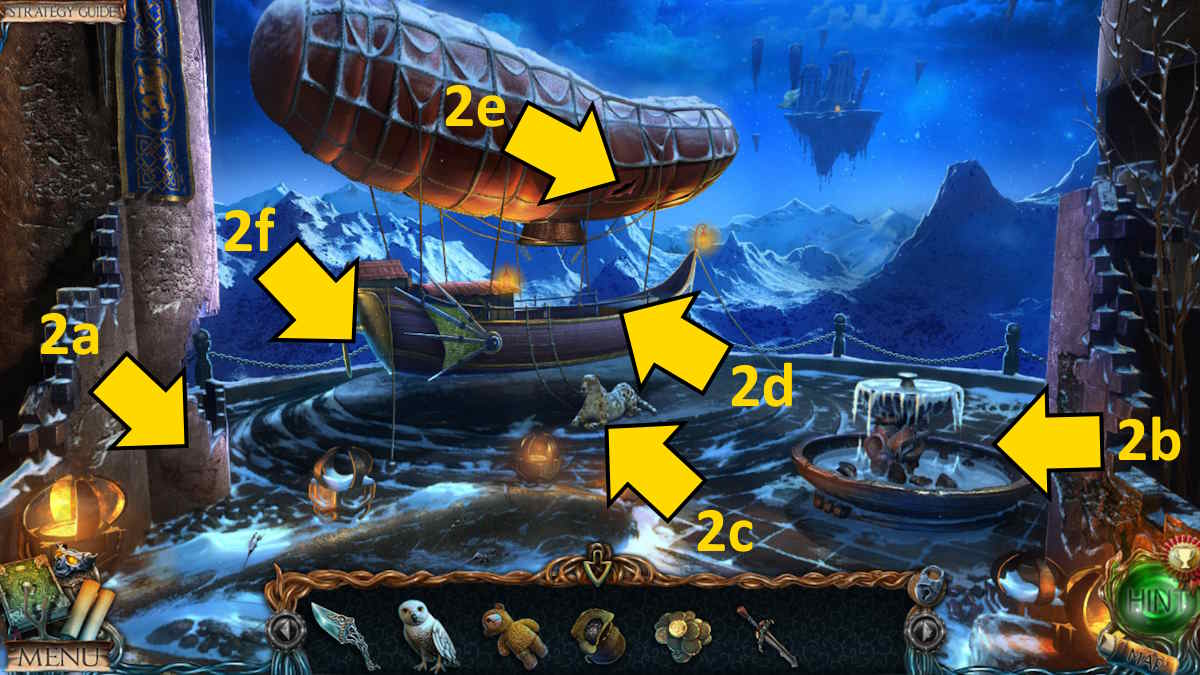
Image by Pro Game Guides
Screenshot by Pro Game Guides
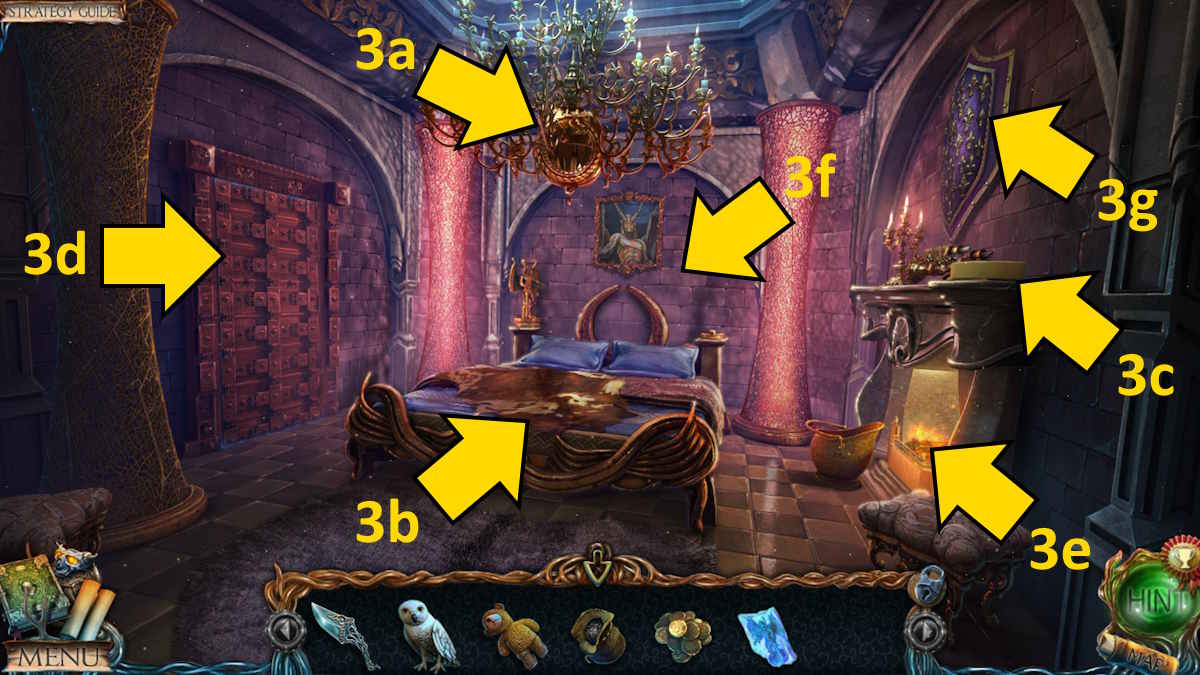
Image by Pro Game Guides
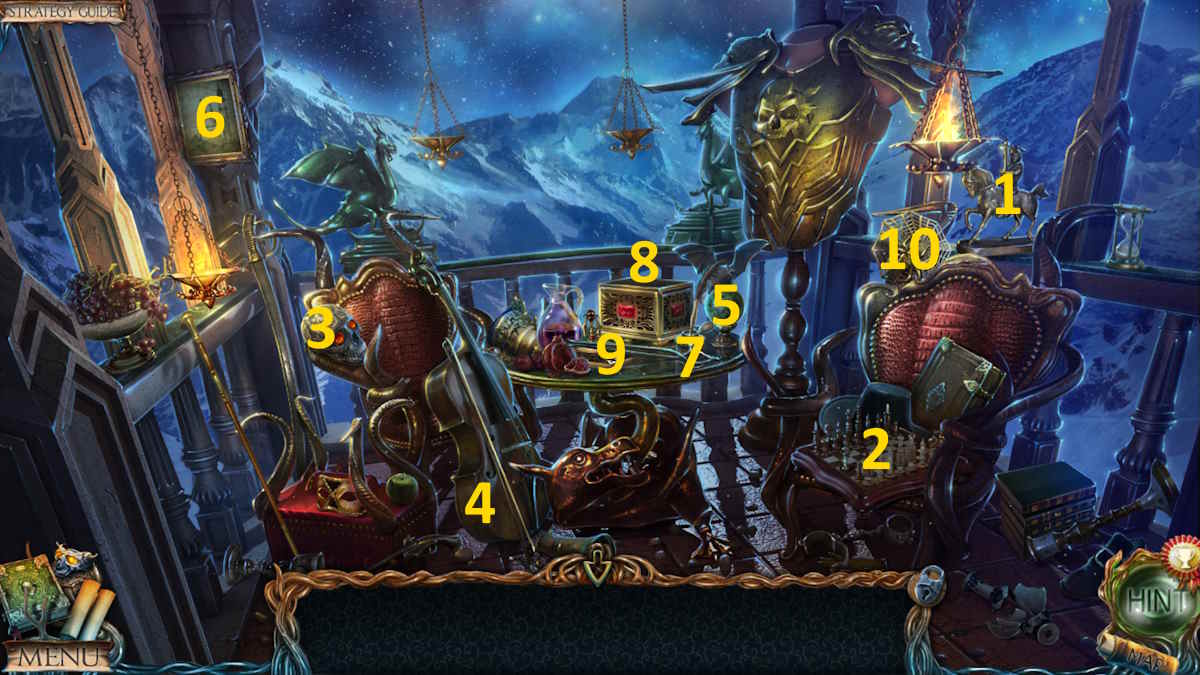
Image by Pro Game Guides

Screenshot by Pro Game Guides
Screenshot by Pro Game Guides
Screenshot by Pro Game Guides
Screenshot by Pro Game Guides
Screenshot by Pro Game Guides
Screenshot by Pro Game Guides
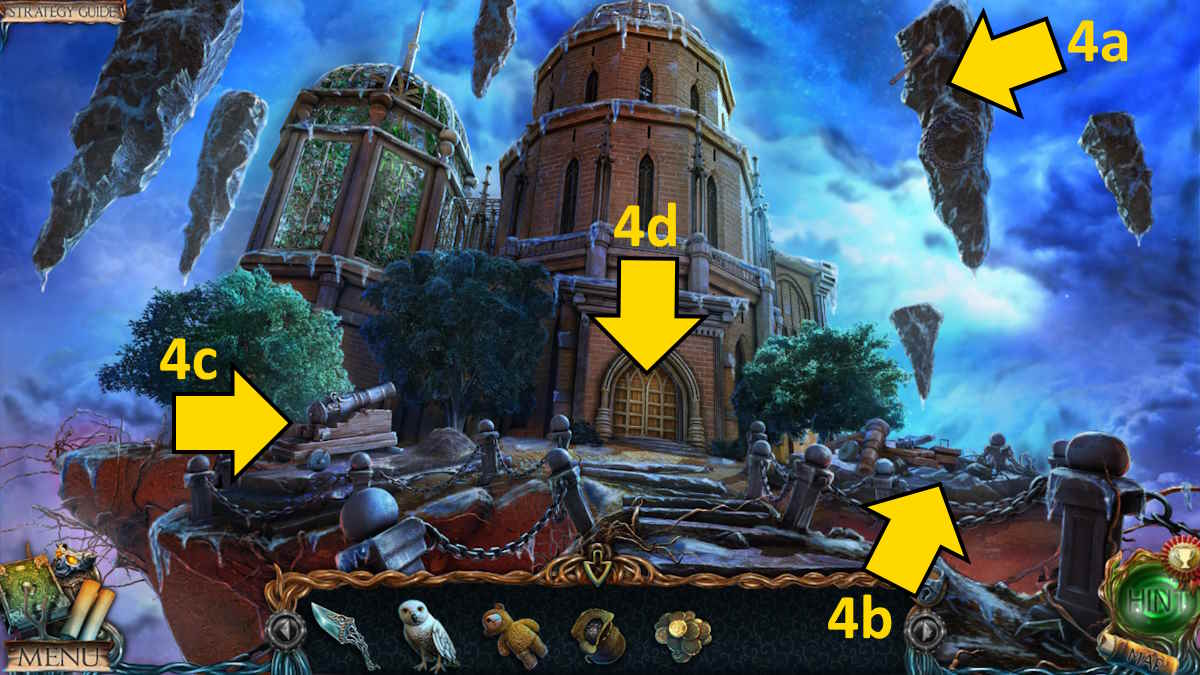
Image by Pro Game Guides
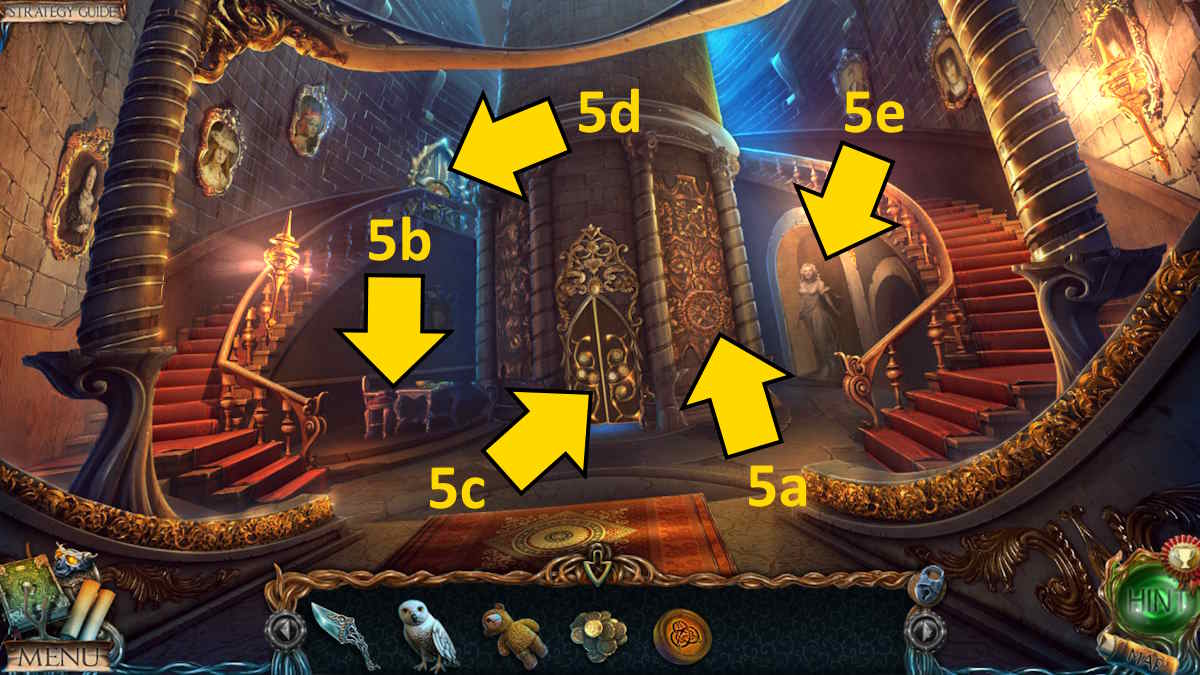
Image by Pro Game Guides
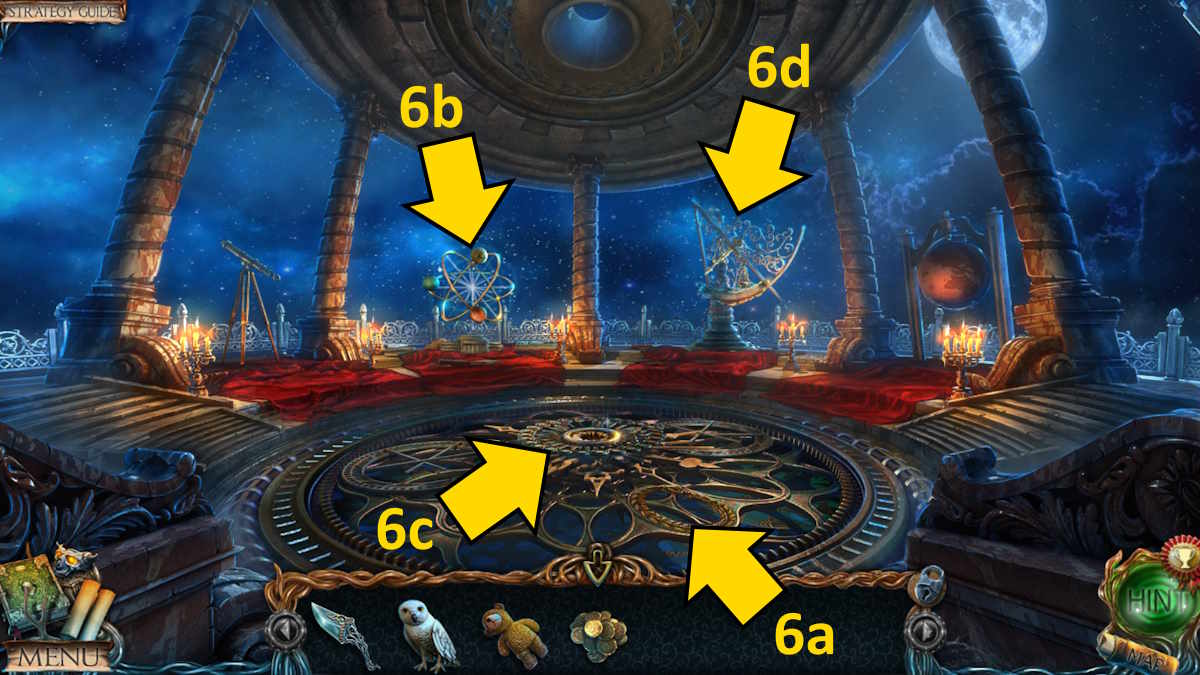
Image by Pro Game Guides
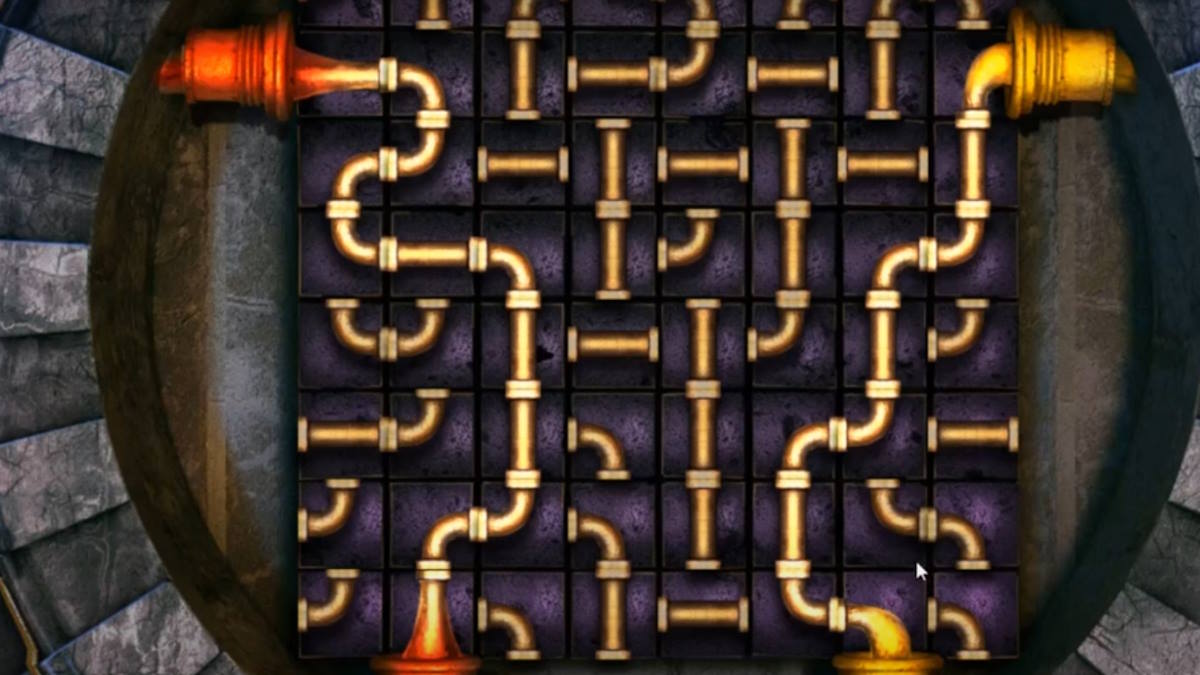
Image by Pro Game Guides
Screenshot by Pro Game Guides
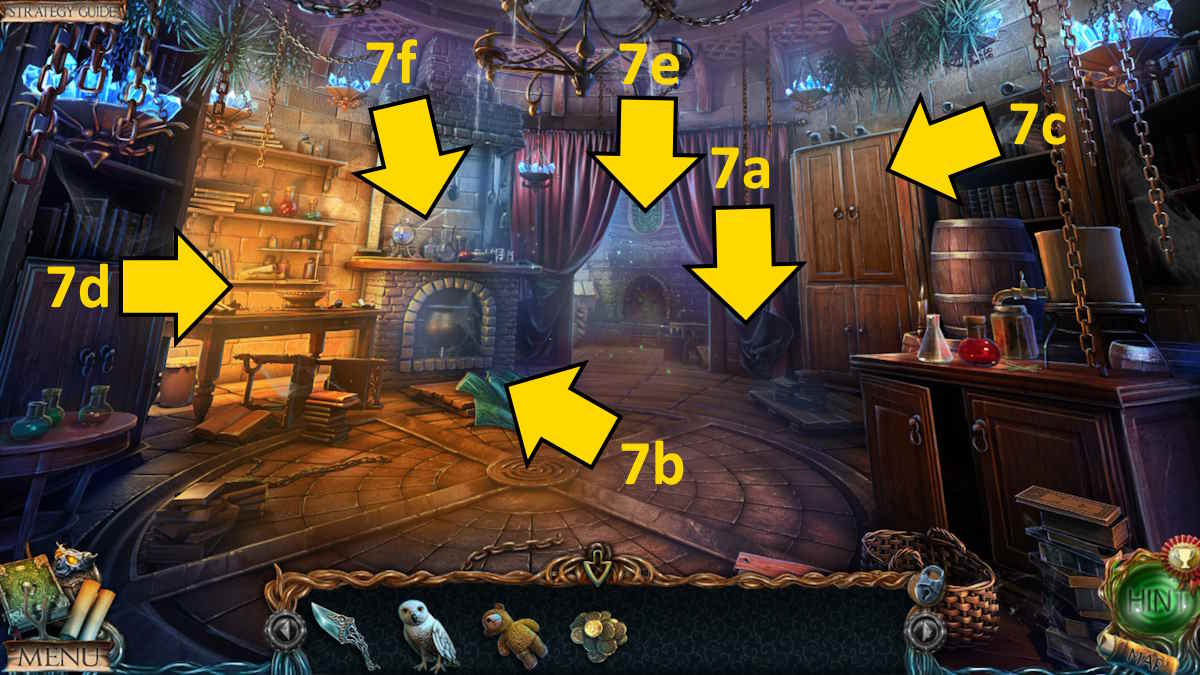
Image by Pro Game Guides
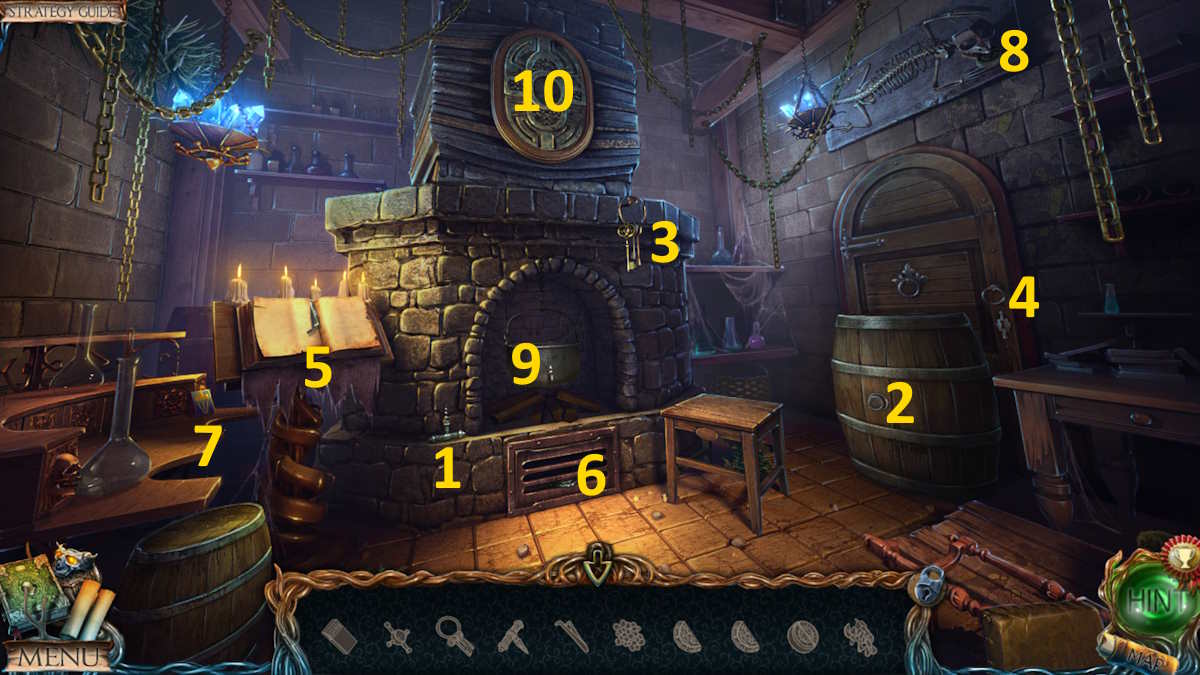
Image by Pro Game Guides
Screenshot by Pro Game Guides
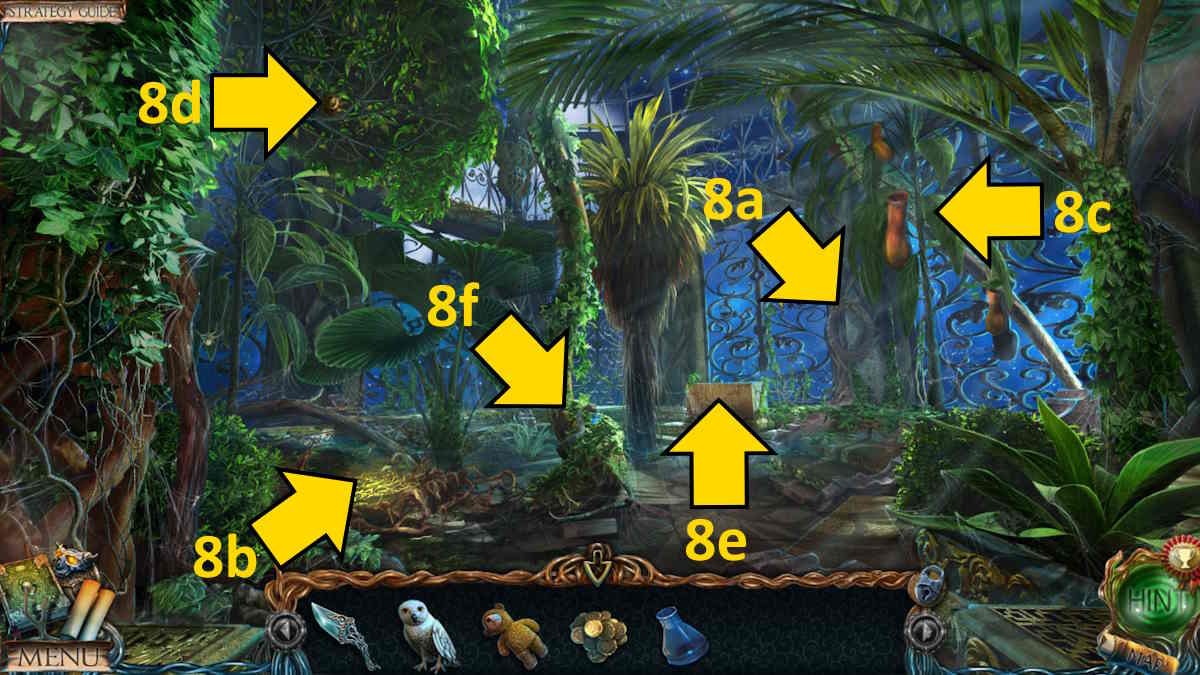
Image by Pro Game Guides
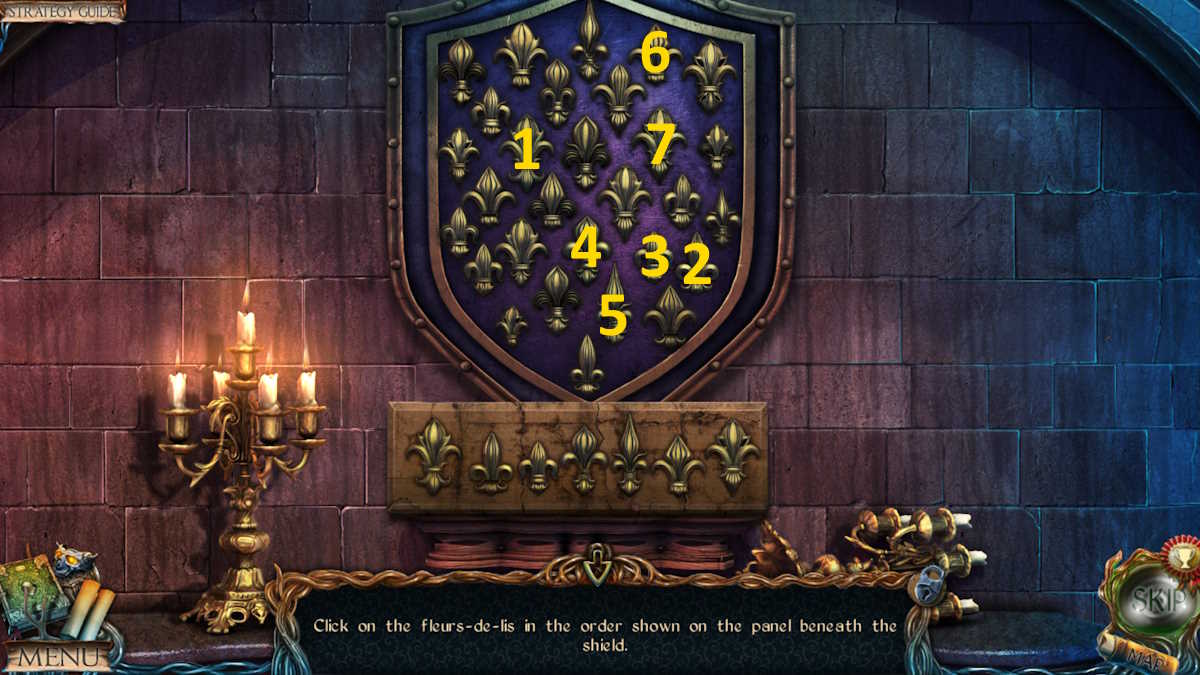
Image by Pro Game Guides
Screenshot by Pro Game Guides

Image by Pro Game Guides
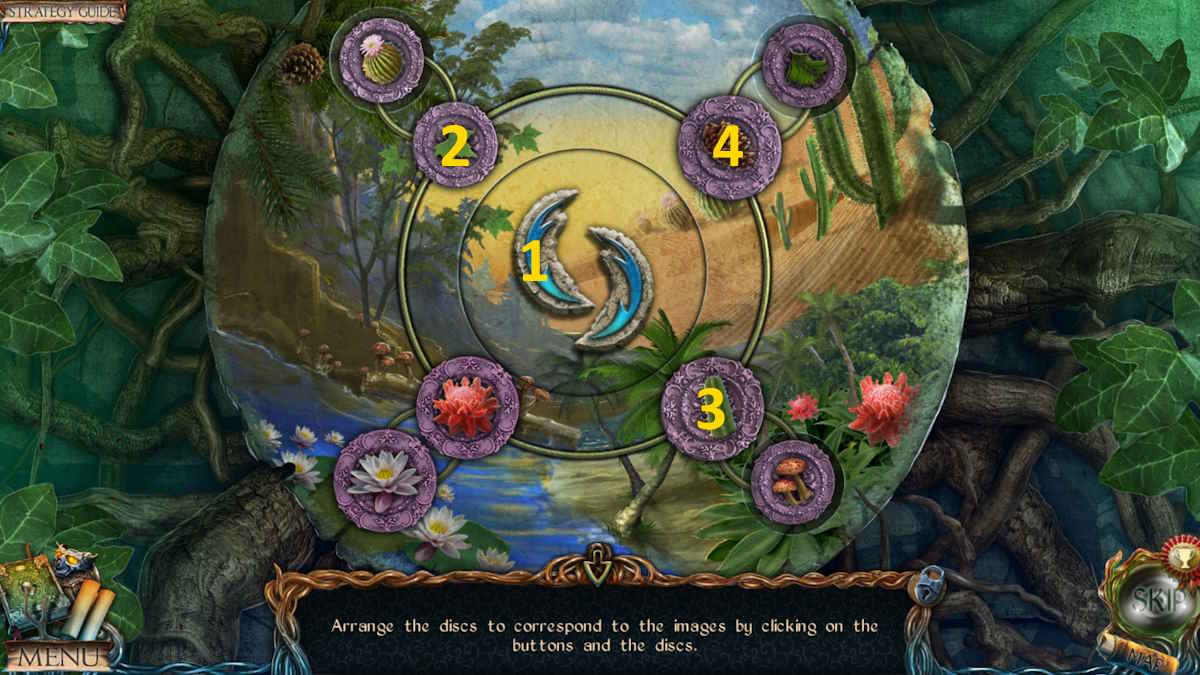
Image by Pro Game Guides
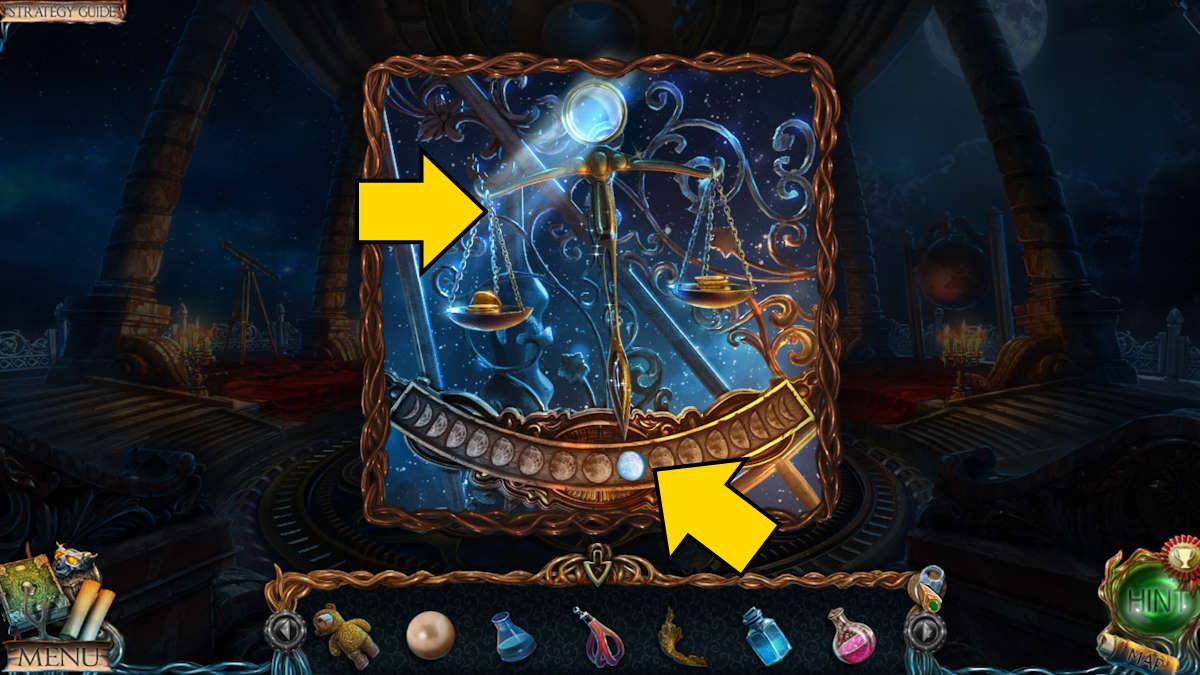
Image by Pro Game Guides
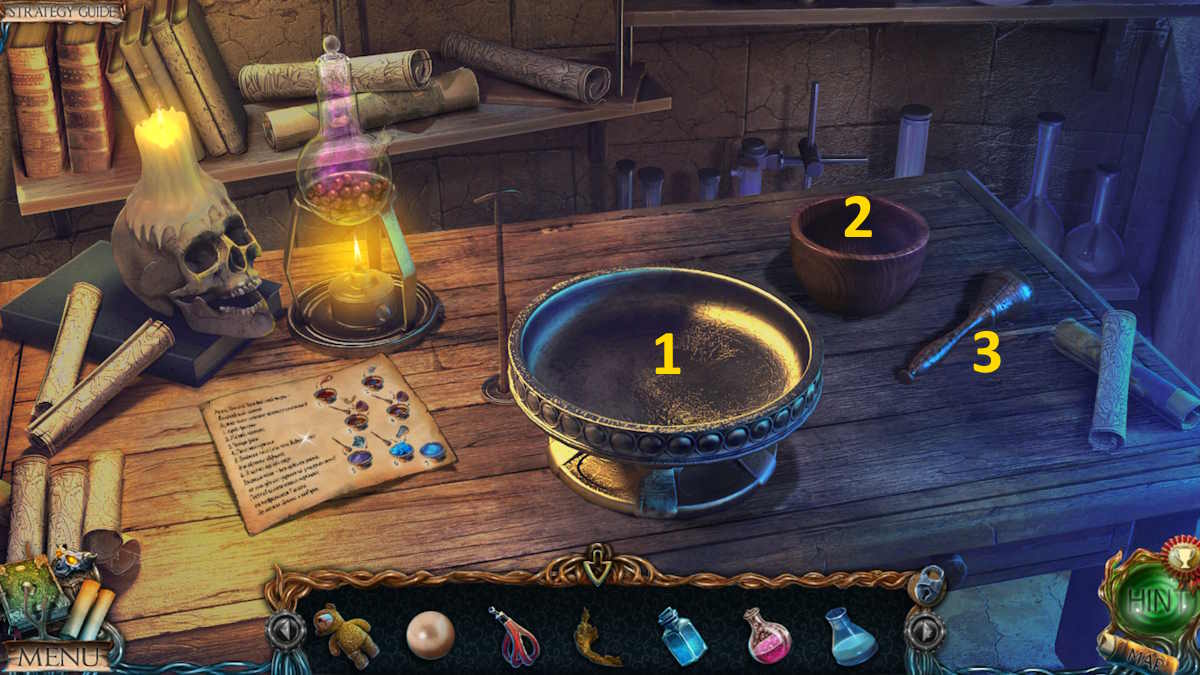
Image by Pro Game Guides
