Can you save the creatures in the lake ?
One of the corking thing about the Lost Lands Special Edition puzzler adventures is that each has a fillip chapter . If you ’re looking for some information about the Dark Overlord bonus chapter , read on for my full walkthrough .
Lost Lands 1 Dark Overlord Full Bonus Chapter Walkthrough
Once you ’ve keep open Jimmy from the dark overlord in the main account of Lost Lands 1 , the fillip chapter becomes useable . If you ’re still playing the primary game , check out myLost Lands 1 Walkthrough - Dark Overlord . mention that there are no collectibles in the incentive chapter .
Susan feels another calling from the lost lands , returns to the Sir Herbert Beerbohm Tree , and is drawn into the forest once more . expend the shear on the endocarp ( a1 ) to make out the leaves in the same close - up to find and take someAntlers . Also , read thenote on the door(a2 ) to find the dwarves have go late into the woodland .
Move to the lake and verbalize to the Lake Spirit ( b1 ) , who gives you anUnfinished Potionthat will allow you to rest underwater when complete . She take for your help in saving the creatures at the bottom of the lake and says the gnome should have the mushroom-shaped cloud ingredient required to wind up the potion . When the spirit disappear , take aSeashellfrom the planks ( b1 ) and theCicadafrom the rock ( b2 ) .

Head to the groundwork of the tree next , look for the bushes ( c1 ) to find a secondSeashelland take aFeatherfrom the machine ( c2 ) . utilize the cicada to lure away the pismire ( c3 ) , allow you to take theTile , and then move into the depository library ( c4 ) .
Add the antlers to the modeling cervid on the ledge ( d1 ) to unfold a secret compartment and take aHammer . Return to the wood , employ the hammer on the room access ( a2 ) , and enroll the midget ’s bungalow .
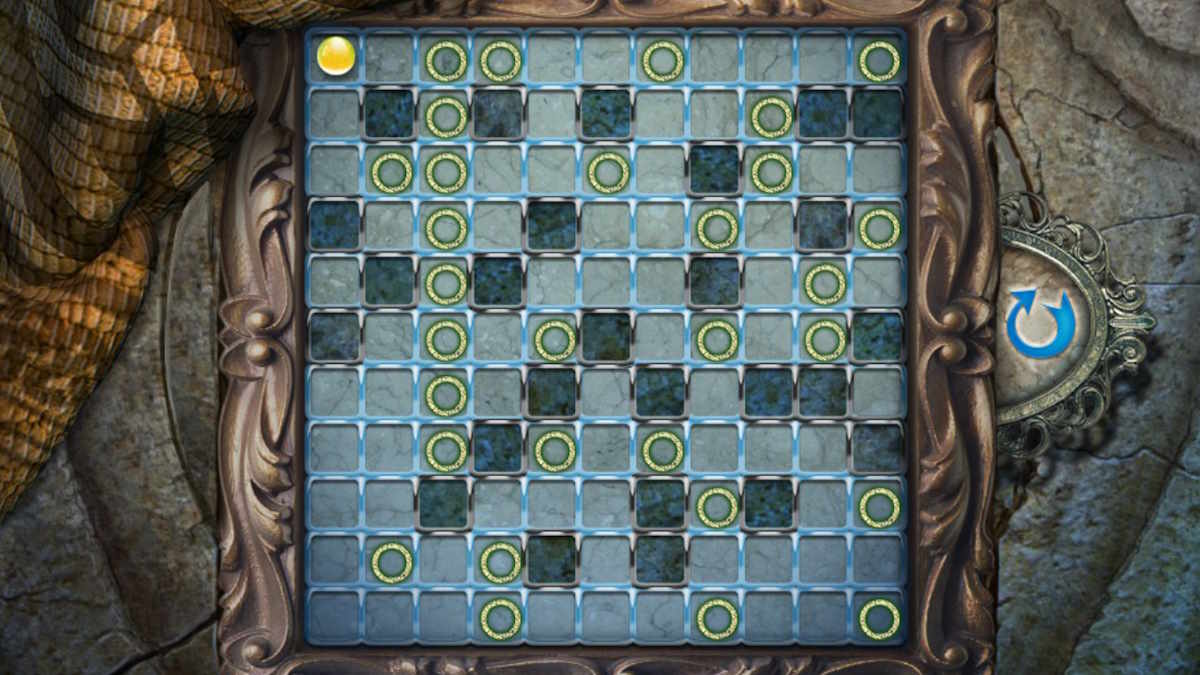
The dwarf’s house grid puzzle solution
Move the rug ( e1 ) to let on a grid on the storey and add the roofing tile to begin a grid motility puzzle . You need to move through every traffic circle to complete the challenge and I ’ve note the order to do this below . Once complete , take theHook .
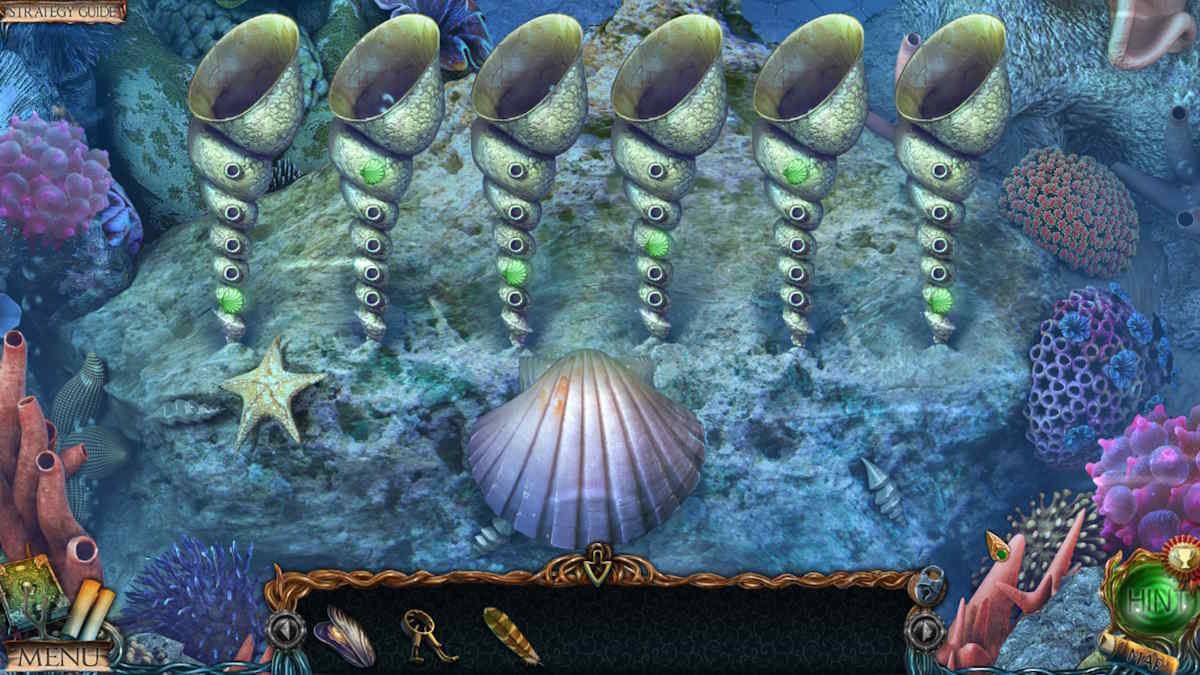
Take theShellfrom the thorax ( e2 ) , get theShearsfrom the ropes ( e3 ) , and add together the three shell you ’ve collected to the boxwood on the board ( e4 ) . You still need plenty more ! Move back to the lake and expend the hook on the profits ( b1 ) , use the shears to cut the net income , and get theTweezers . Use the tweezers on the careen ( b2 ) to get theMedallion , and then hark back to the cottage .
Move the cushion on the bed ( e5 ) to reveal a box , employ the medallion to open it , and take theWax . employ the wax on the bag lock ( e6 ) , start the handbag , and put the unfinished potion on the chair next to the bag . Add the mushroom infusion from the travelling bag to the potion , and take thePotion . Head back to the lake , chatter the water system , and head into the lake .
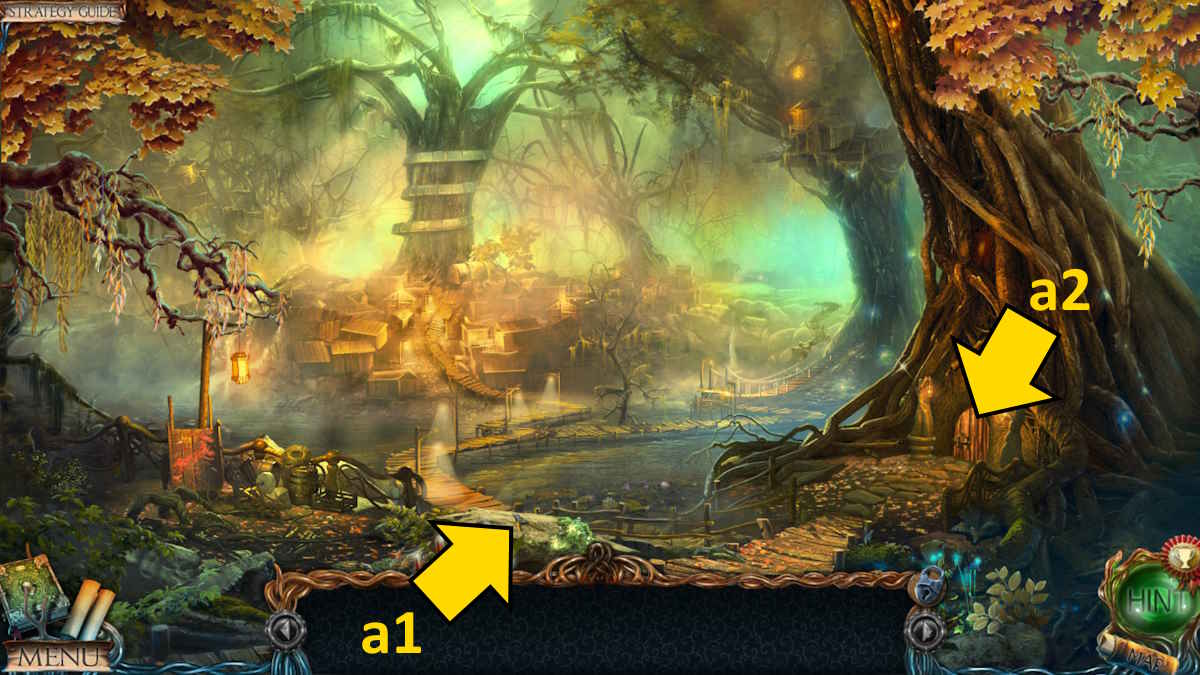
Image by Pro Game Guides
The object placement puzzle at the forest entrance
There ’s nothing to do atthe squarewhere you get right now , so move to theentrance to the onetime forest . Take aSeahelland aShellfishfrom the falls ( f1 ) , anOwl Tabletfrom the well ( f2 ) , theStatue Handfrom the level ( f3 ) , and aBent PipeandMedallionfrom the Sir Herbert Beerbohm Tree rostrum ( f4 ) . Now choose the ruin tower ( f5 ) to begin an object - placement miniskirt - game . The solution is below ; once it ’s complete , you ’ll receive theComponent .
Return to the public square , confiscate the statue hired hand to the statue ( g1 ) , and take theSeashellfrom its now open hired hand .
move on to the cave , pick up theSeashell(h1 ) , use the pipe to move the tilt in the same close - up , and move the shells ( h2 ) to find anotherMedallion .

Image by Pro Game Guides
Now maneuver outside the castle andtalk to Undine , who demand you to discover the troglodyte in the timberland and then gives you a thirdMedallion . Grab theSeashell(i1 ) and then manoeuver inner theunderwater palace .
Take aFeatherfrom the top of the box ( j1 ) and then tally the heavy seashell to the gadget in the centre of the room ( j2 ) . You ’ll know which seashell it is , as it looks like the others on the machine . It ’s also the only one you ca n’t place on the box in the dwarf ’s cottage ( e4 ) , as it will say it ’s too large .
The owl’s feathers puzzle solution
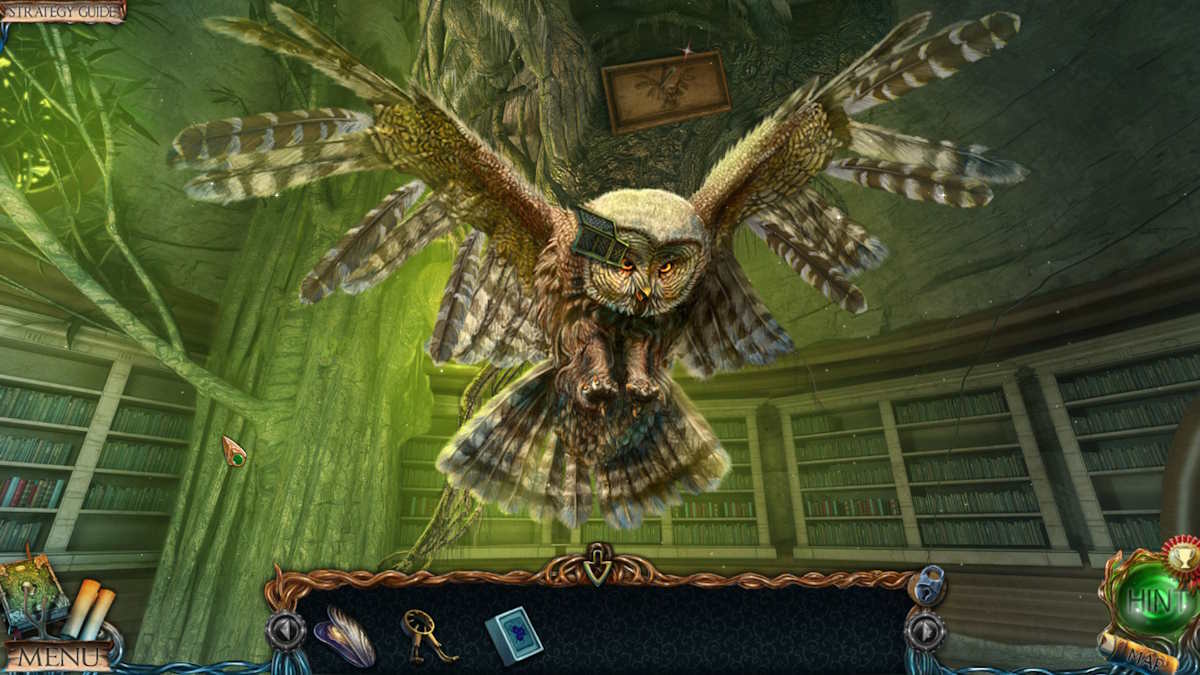
post the cuticle begins a simple placement mystifier , the solution to which is above . Once complete , take a fourthMedallionfrom the shield . Return to the depository library next , and append the owl tablet and the two plumage to the owl ( d2 ) to begin a feather - arrange puzzle . set the feathers as pictured above , and you ’ll get your finalMedallionand aCrab Trap .
Return to the cave , place the crab trap ( h3 ) , put the mollusc inside it in the finis - up , and you ’ll trap the crab . sink in the trap again and take anotherMedallion . This a la mode medallion can be used outside the castle to open up the door ( i2 ) and start a simple hidden objective miniskirt - game . Once ended , take theChest Piece . you could now tote up the chest man to the chest in the underwater rook ( j1 ) to open it and find anotherSeashelland aMosaic .
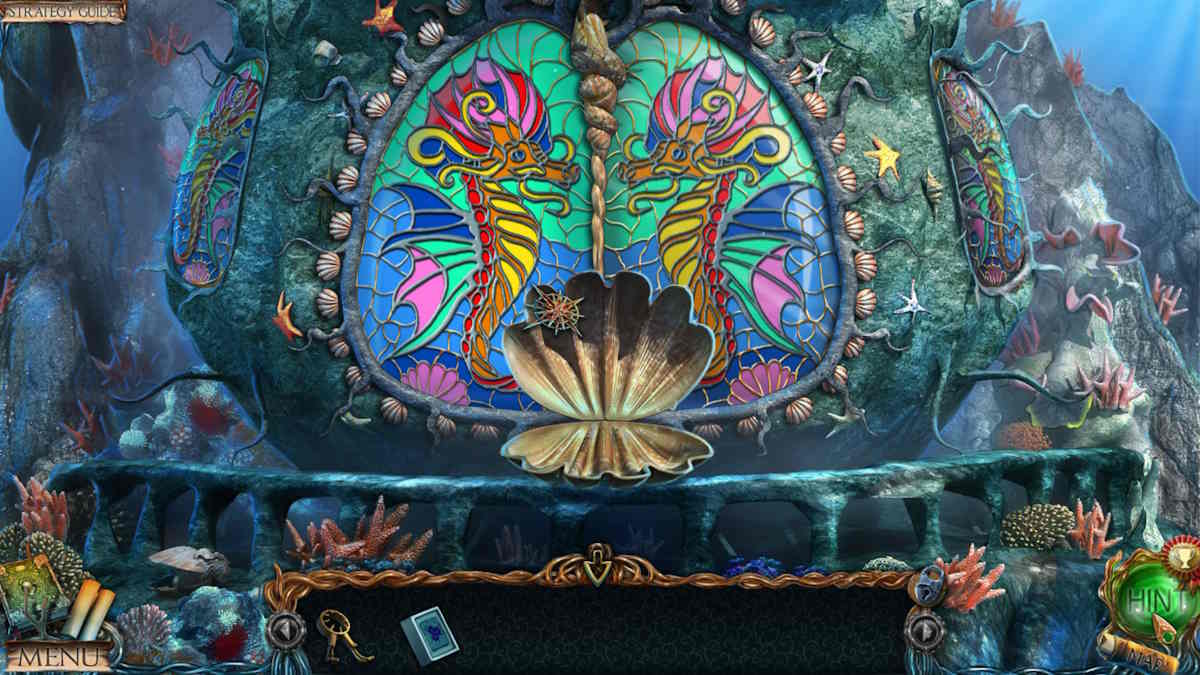
Back outside the castle , select the mosaic ( i3 ) , add the mosaic lives you just received , and start acolor - tally miniskirt - game . All you take to do is place the piece so they precisely mirror those on the mosaic that ’s already complete in the same close - up ( you ca n’t fail here , see above ) . If you have question , each color will go out of small-arm once complete , so do the dewy-eyed colors first . Once you ’re done , take theLock Piece .
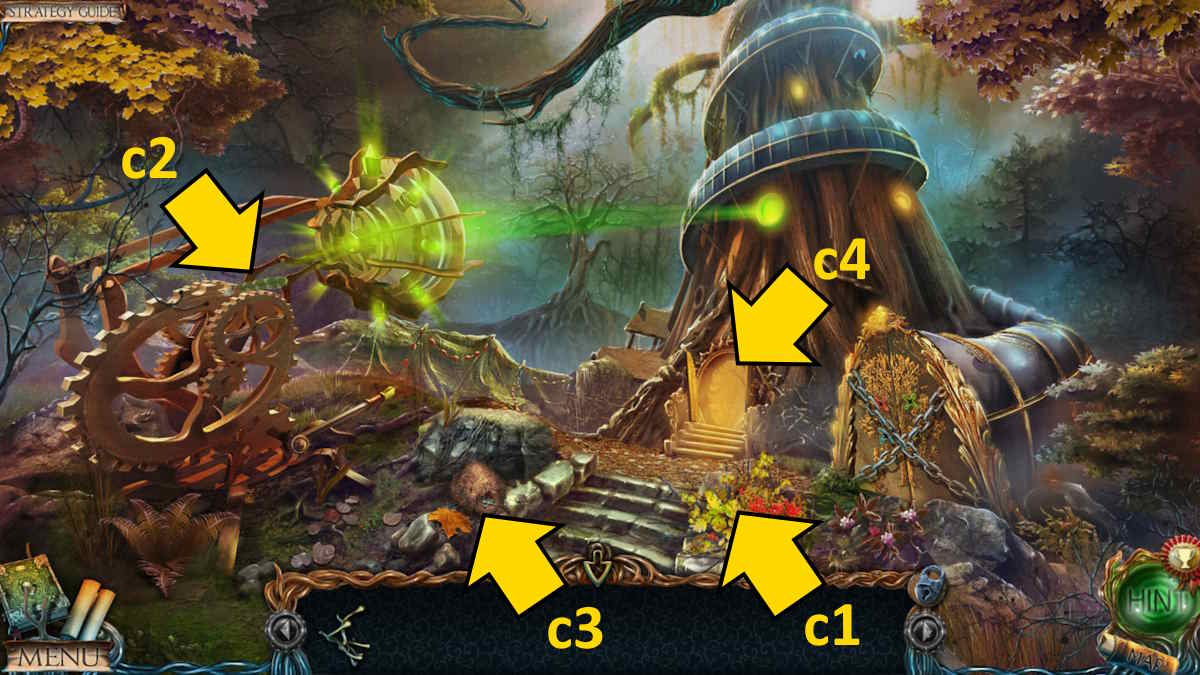
Image by Pro Game Guides
Move up to the top of the castling , tothe gadget . Take theAnimal Figurine(k1 ) and yet anotherMedallion(k2 ) , and then repay to the subroutine library . employ this new medallion to open up the lectern ( d3 ) and take a secondLock Piecefrom inside . Also , be sure to read the note you ’ll bump underneath it , which explains that the hermit built the machine that purified the water .
Go back to theold forest entranceand place the five palm in the logic gate ( f6 ) , giving you memory access to the old forest itself . Take theFish Figurine(l1 ) and add up the creature figurine to the place ( l2 ) , but you still require to discover more .
Keep going up tooutside the solitudinarian ’s hut , give the right lamp ( m1 ) , and take theOil . Move the rug ( m2 ) to find anAnimal Figurineand a note from the anchorite , saying they have left but a friend will be able to see a style in .
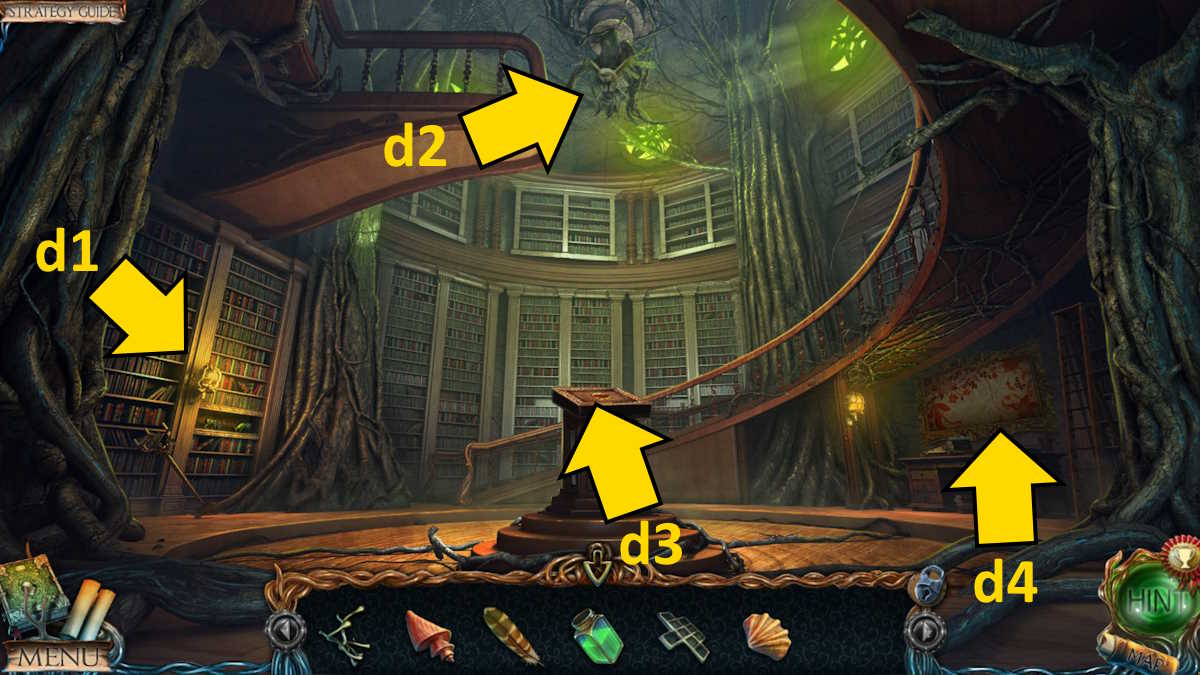
Image by Pro Game Guides
Fixing the lock on the hermit’s hut door
pick out the door(m3 ) , tally the two lock pieces , and then find the right position for the curl . Move the left lock five times , and then the right ringlet six fourth dimension , and the door will open ( see the look-alike above for the correct curl situation ) . Use the doorway to enterthe hermit ’s hut .
chatter the top of the stairs ( n1 ) and take theAnimal Tablet , before open up the draw in the same close - up and finding someScrews , aNut , and aBrush . Select the desk ( n2 ) and examine the note to find the machine operating instructions . you could now put the component on the table , add the slut to it ( it ’s already on the table ) , and then add the oil , but you still want to find the lens .
Move to the caves , add the fish figurine to the thorax that ’s behind the rock you moved originally ( h1 ) , andsolve the slue teaser . You require to move the piece in the slot on the left across to the slot on the right field . To do so , follow the guide below .
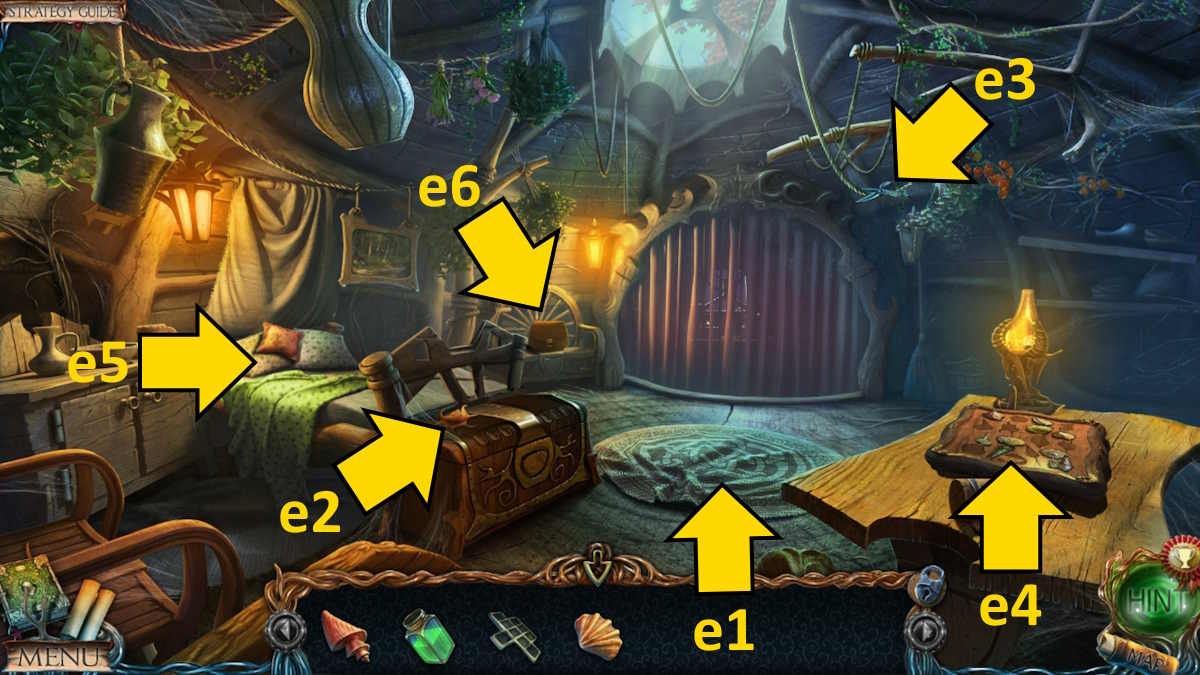
Image by Pro Game Guides
The sliding puzzle in the caves, solved
you could now slide the firearm on the far left right across , launch the pectus , and take anotherAnimal Figurineand aPiece of Pipe . Move outside the castle , use the brush on the windowpane ( i4 ) , and you ’ll note down the blueprint you discover underneath .
Move inside , press these symbol on the machine on the left field of the room ( j3 ) in any ordination ( see above ) , andhead to the Bathyscaphe .
launch the valve on the top of the hero ( o1 ) to launch the hatch and find aHexagon . Move to the second power , add the hexagon to the shine stone ( g2 ) , and complete the matching mystifier . I ’ve put all the match in the effigy below . Once terminated , take theGlass Eye .
Screenshot by Pro Game Guides
Back at the entrance to the forest , give the nut to the squirrel ( f7 ) and take theHookfrom the tree once it leave . Move to the forest itself , tally the figurines and the tablet to the treestump , arrange the animals as pictured on the tablet , and take theSeashell .
Go up to the solitary ’s shack , add the eye to the golem ( n3 ) , and take theScrewdriver . Head to the bathyscaph next and use the screwdriver to remove the panel ( o2 ) to get theShard of Glass . Now you may add the hook shot to the vine in the forest ( l3 ) , and then utilize the glass to cut the vine and make aVine With Hook . Take this to the old woods entrance and use it to angle out theFishing Netfrom the drainage ( f2 ) .
Go to the bathyscaphe once more , use the net ( o3 ) to get aNet Full Of Plankton , and use this to dismount up the hole in the trap ( o4 ) to commence a simple missing - object miniskirt - game . Once complete you ’ll get theValve .

Image by Pro Game Guides
Solving the ball-rolling puzzle in the hermit’s hut
turn back to the troglodyte ’s hutch and add the valve to the simple machine on the wall ( n4 ) to start a ball cause min - plot . To make out it , get across the ripe valve ( shown above ) three fourth dimension , and then the left valve doubly . you could now take theBrush With Paint .
Head to the library and employ the rouge on the painting ( d4 ) to getthe last Seashellyou penury . Go to the dwarf ’s bungalow , add all seashells to the boxful on the tabular array ( e4 ) , and it will slew open , allowing you to take theLens . Back at the hermit ’s hut , you may now sum up the lens system to the component on the mesa ( n2 ) , put the screws into seat , and utilize the screwdriver to complete and then take theAssembled Component .
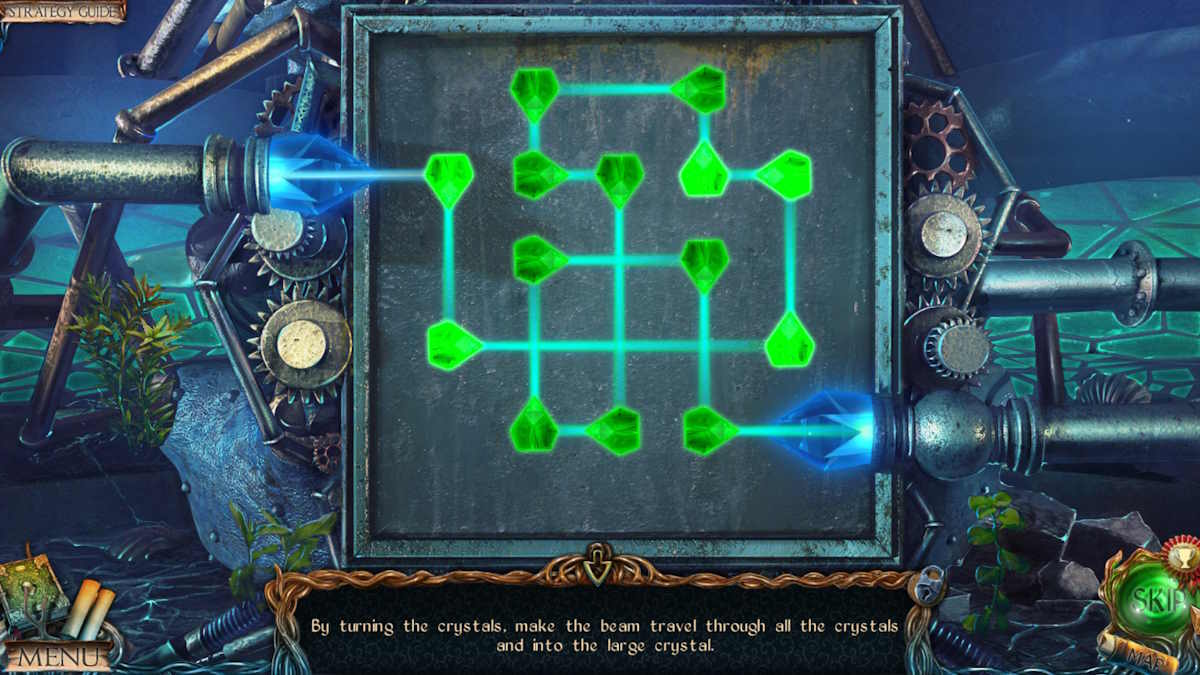
Go to the gadget , add the piece of piping ( k2 ) , total the assembled component ( k3 ) , and get a finale - up of the panel that lights up ( k4 ) to start a lightness and lenses puzzle . I ’ve pictured the completed puzzle above . Once done , the gadget will reverberate back to life , and you ’ll have complete the incentive chapter of Lost Lands 1 : Dark Overlord !
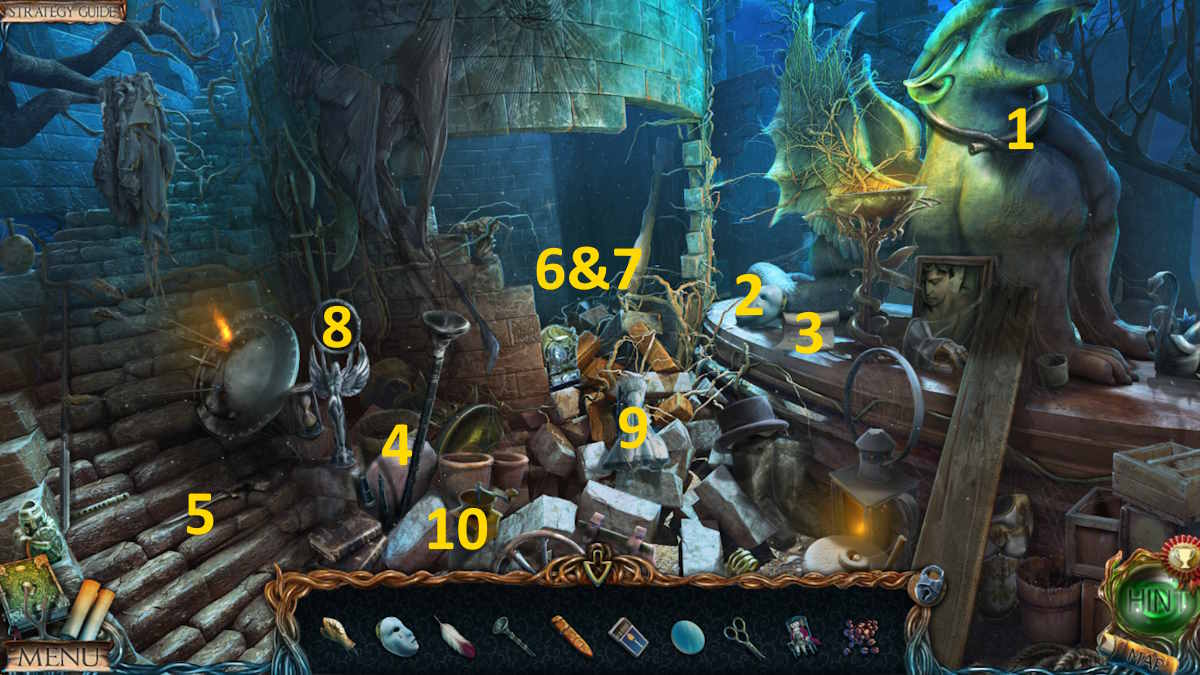
Image by Pro Game Guides
For more confused Lands help and data here at Pro Game Guides , discipline outLost Lands 2 Walkthrough – The Four HorsemenandLost Lands 3 Full Walkthrough ( Golden Curse ) !
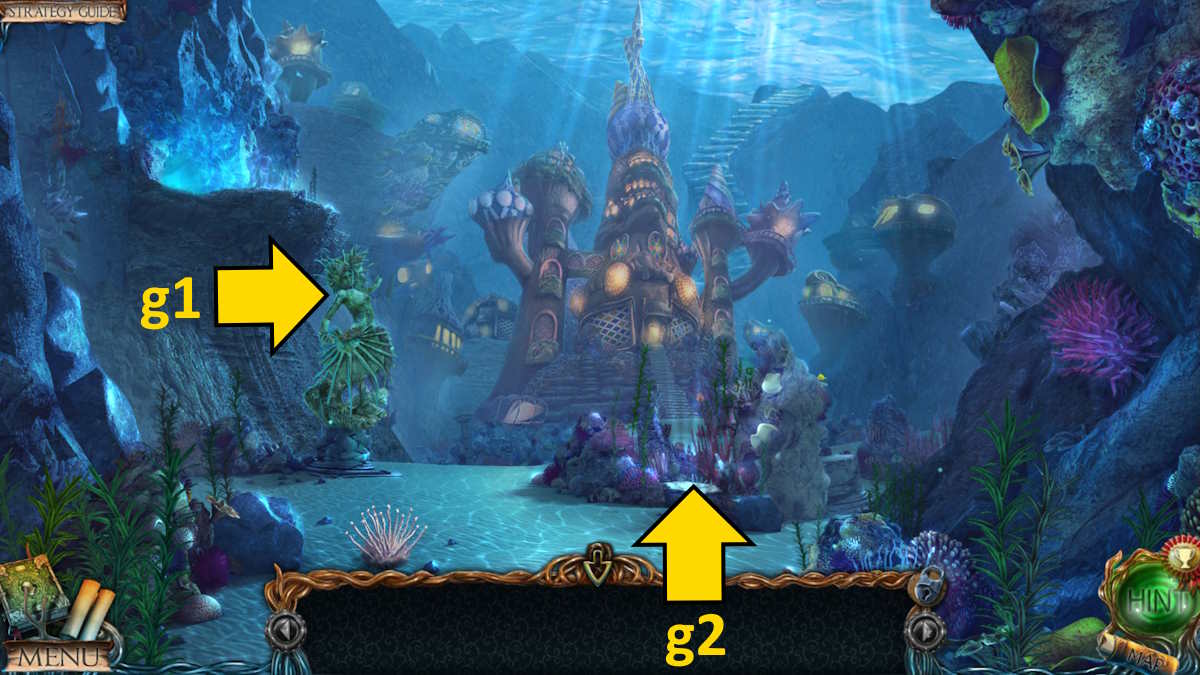
Image by Pro Game Guides

Image by Pro Game Guides
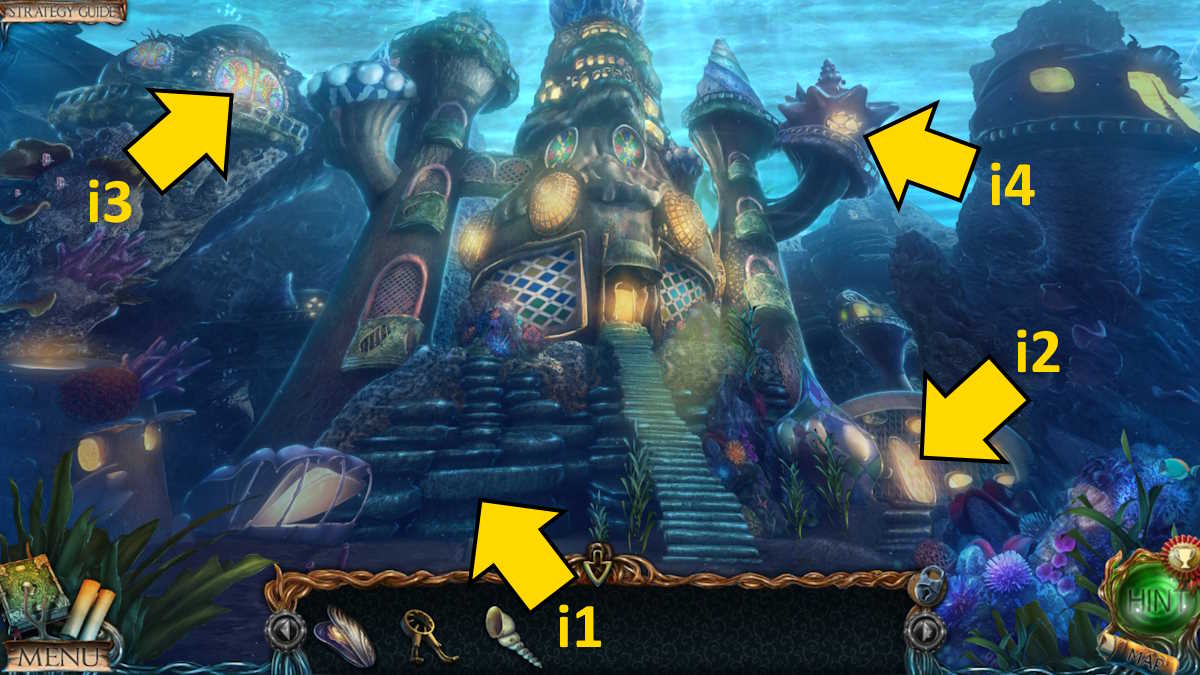
Image by Pro Game Guides
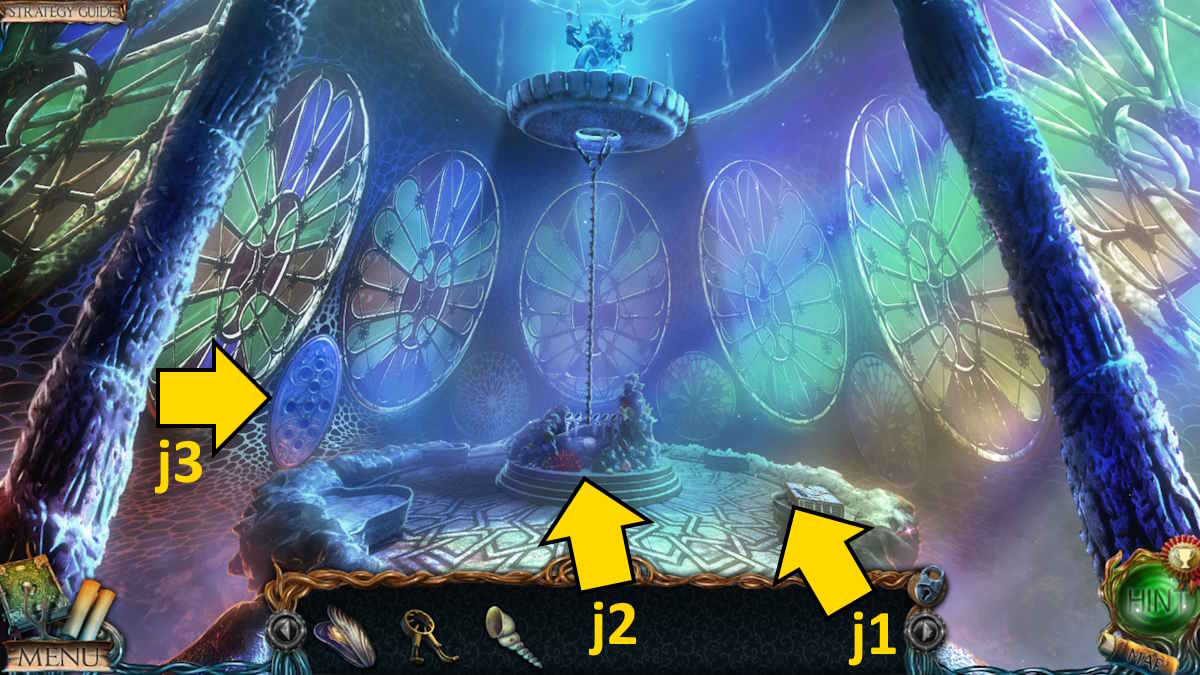
Image by Pro Game Guides
Screenshot by Pro Game Guides
Screenshot by Pro Game Guides
Screenshot by Pro Game Guides
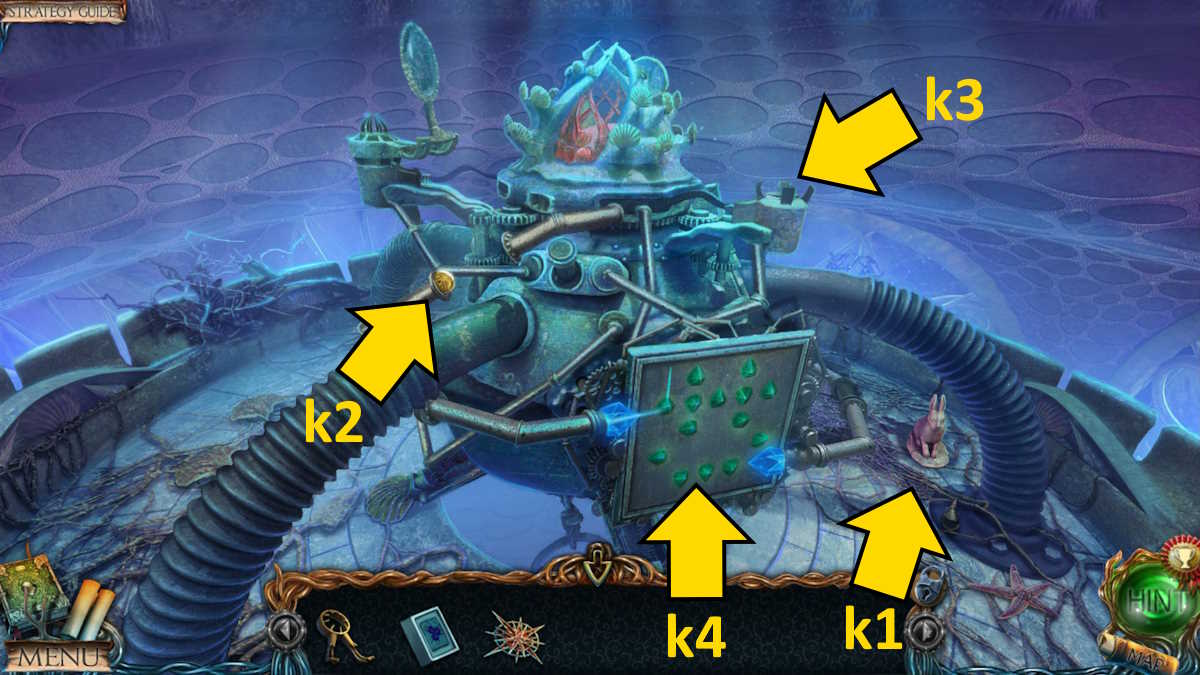
Image by Pro Game Guides
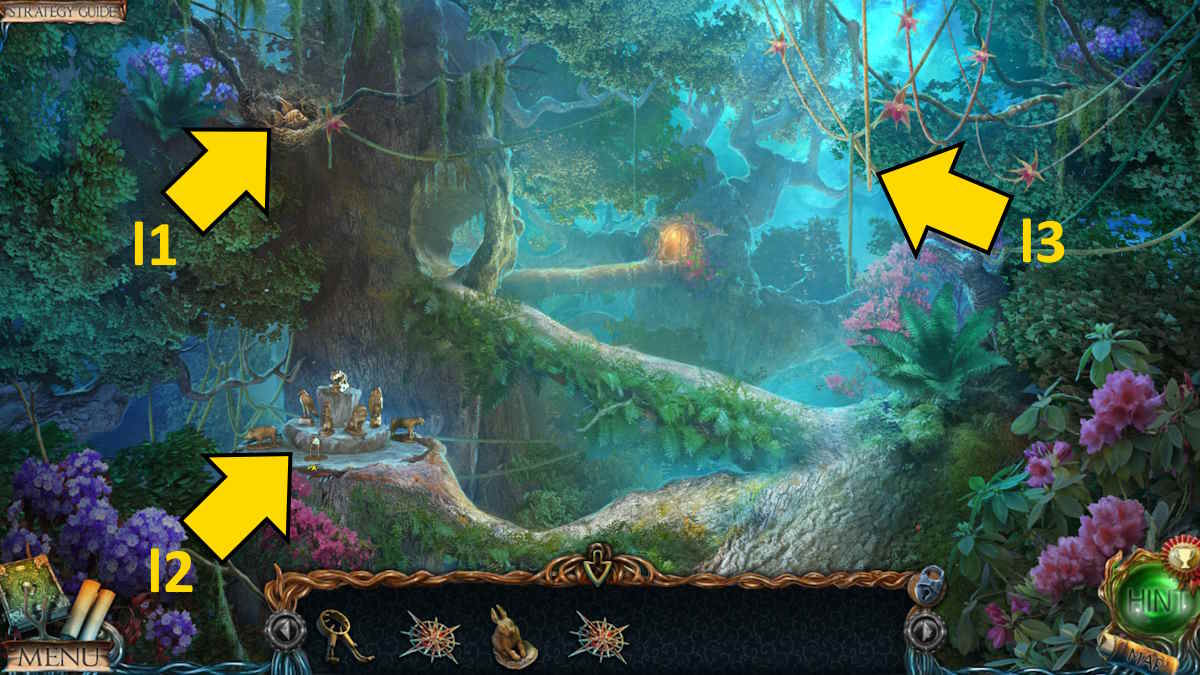
Image by Pro Game Guides
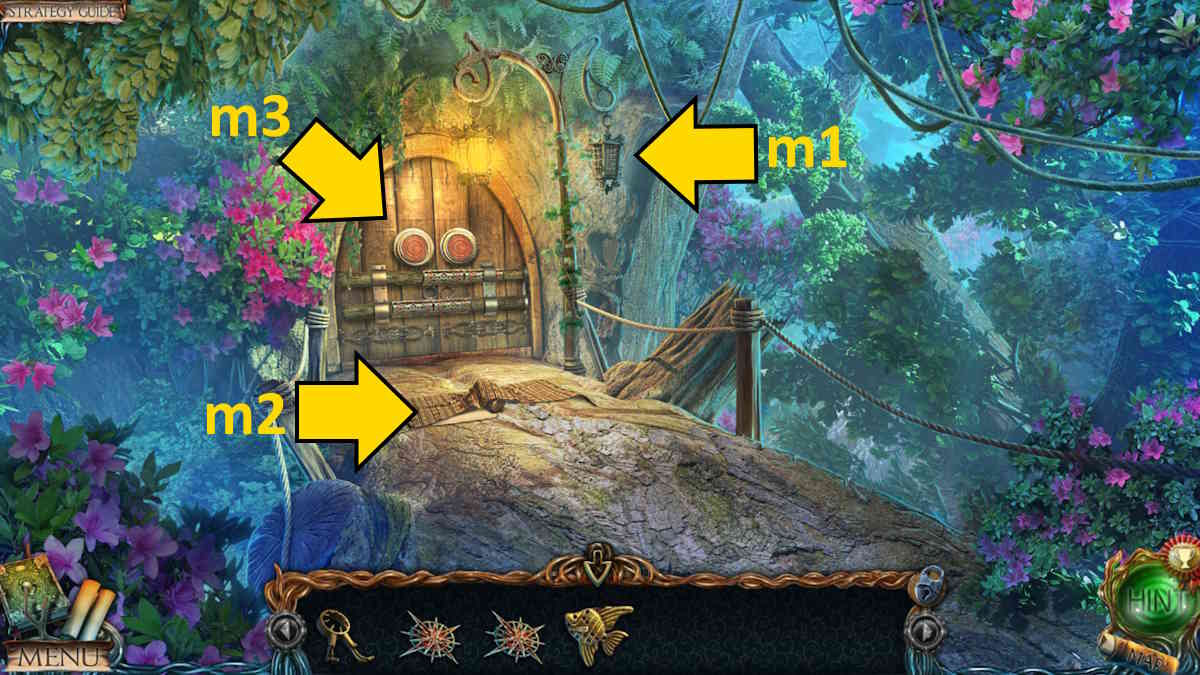
Image by Pro Game Guides
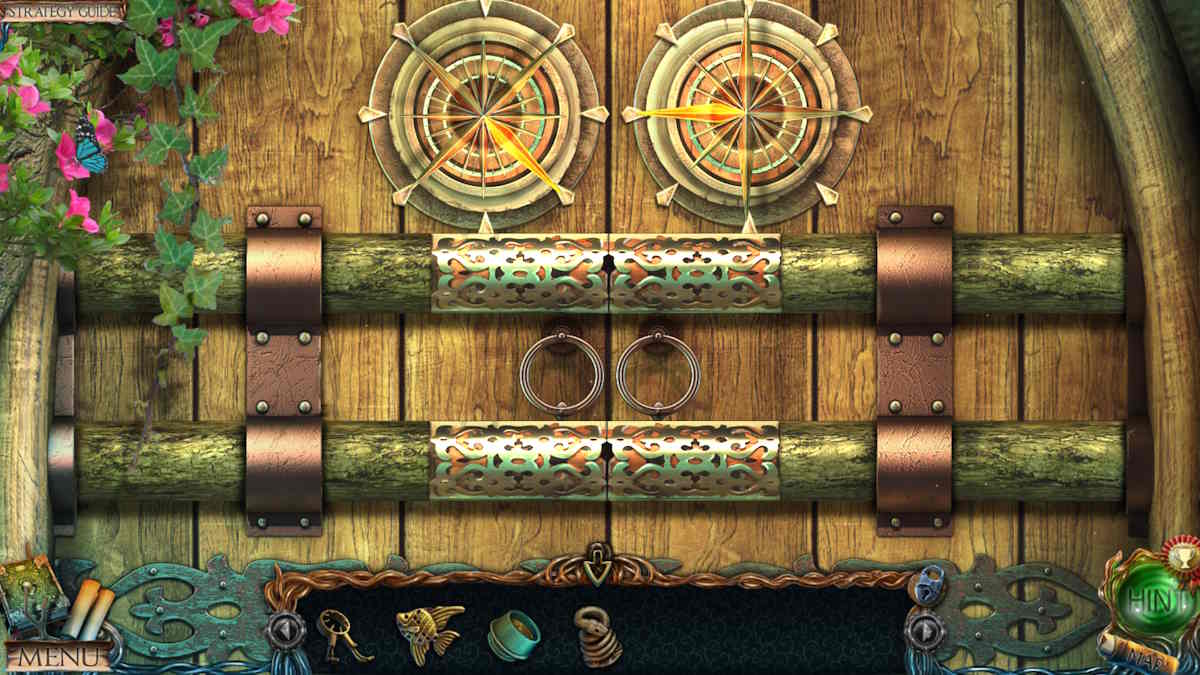
Image by Pro Game Guides

Image by Pro Game Guides
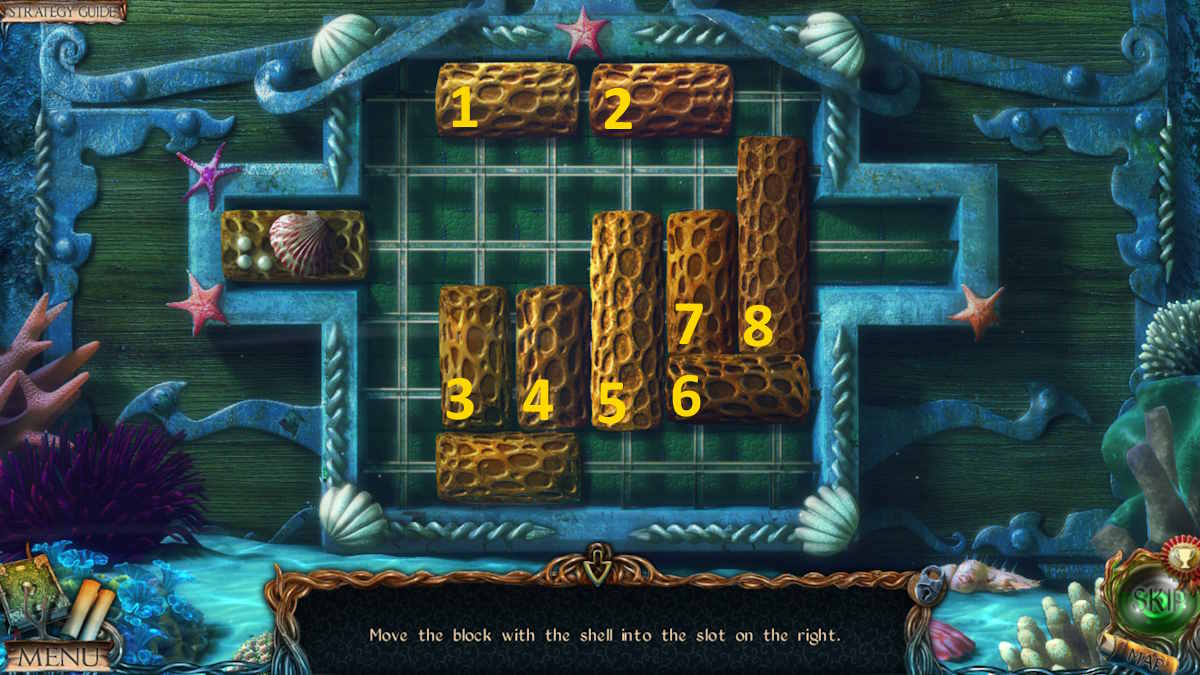
Image by Pro Game Guides
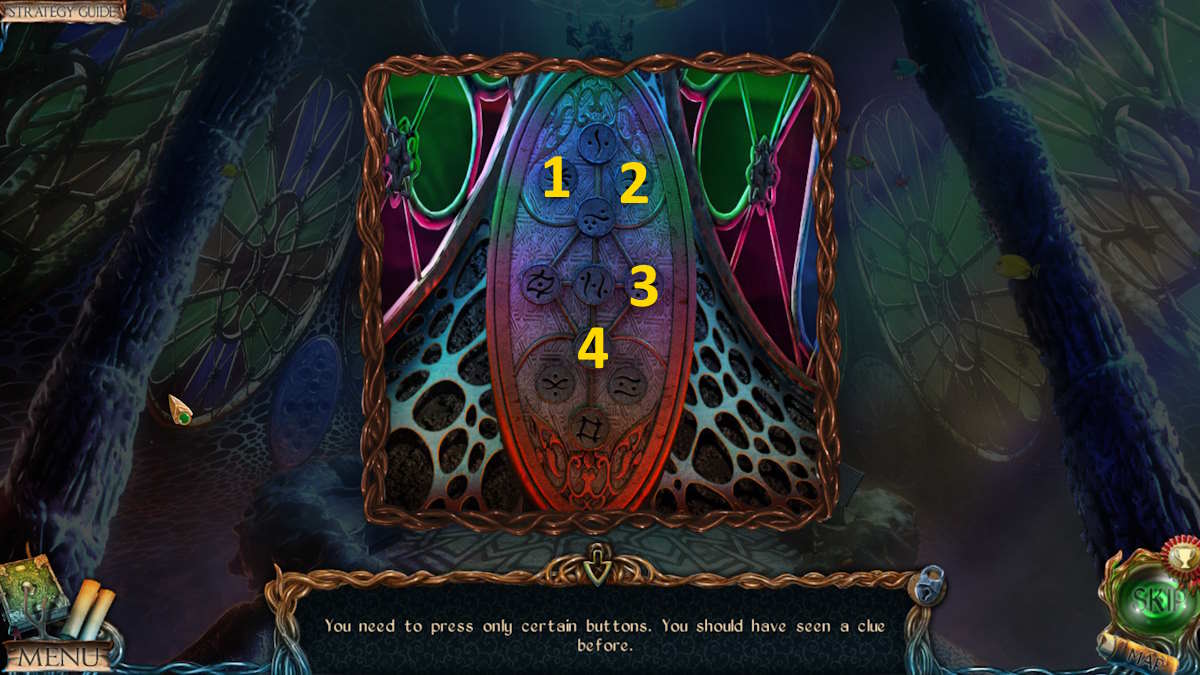
Image by Pro Game Guides
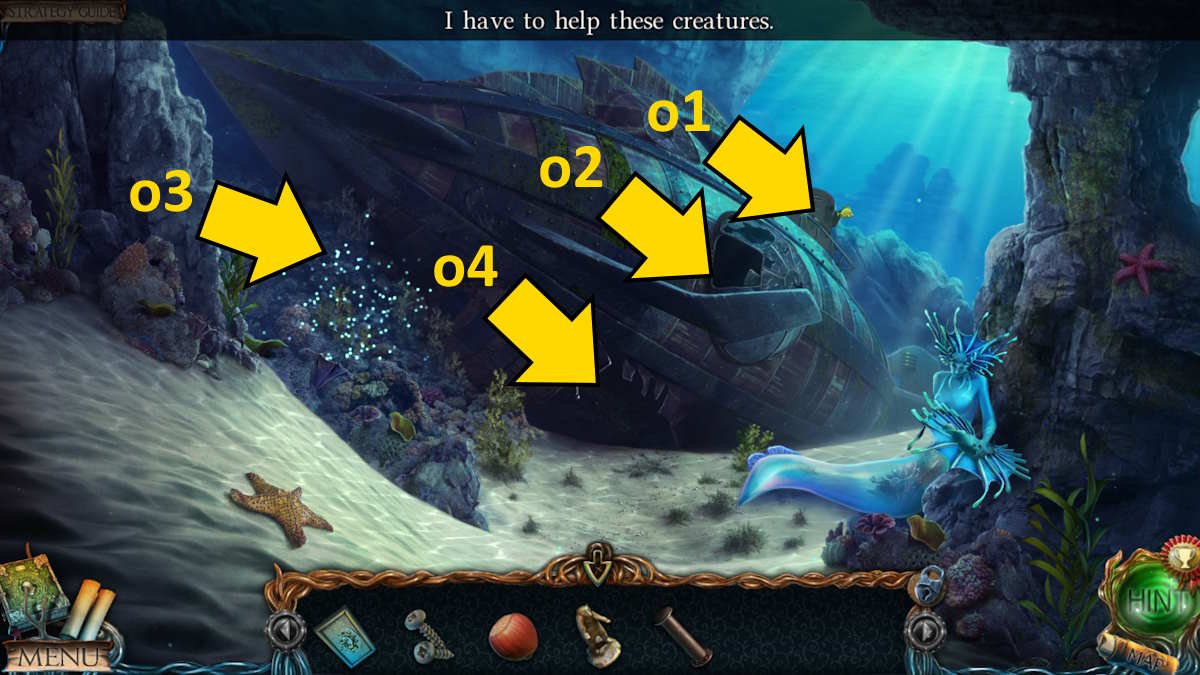
Image by Pro Game Guides
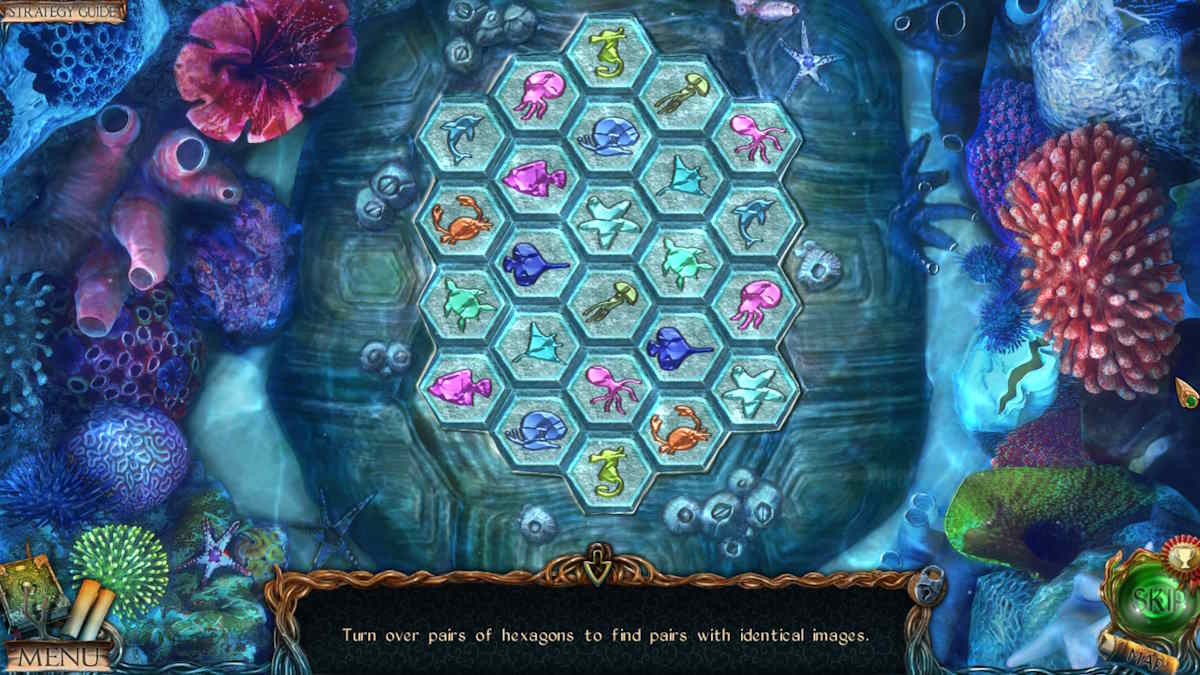
Image by Pro Game Guides
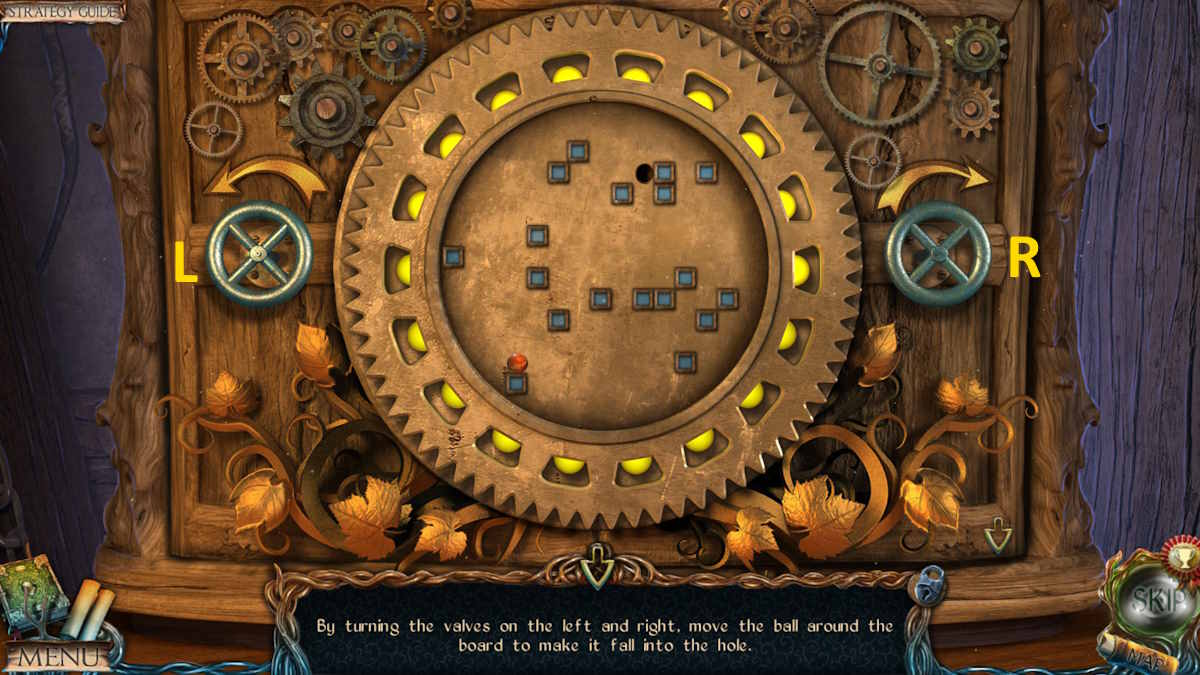
Image by Pro Game Guides
Screenshot by Pro Game Guides
