Milo must be quit !
Legend of the Sacred Stones is one of the most popular title in the Adventure Escape Mysteries series . If you ’re trying to carry through the people of Tempus from the occult growing sickness , read on for my full walkthrough and puzzle pathfinder .
TheAE Mysteries seriesof games are point - and - click adventure where you must regain and combine items , and then staring puzzles and mini - games to advance through the fib . If you want to play theupdated versions on Steam , you plainly need to download the freeAdventure Escape Mysteries appand blue-ribbon Legend of the Sacred Stones once it is install . you may wreak the whole secret plan for free , as long as you ’re willing to wait for new liberal chapter key to become available ( you get one every two 60 minutes ) .
Legend of the Sacred Stones Walkthrough - All Puzzle Solutions
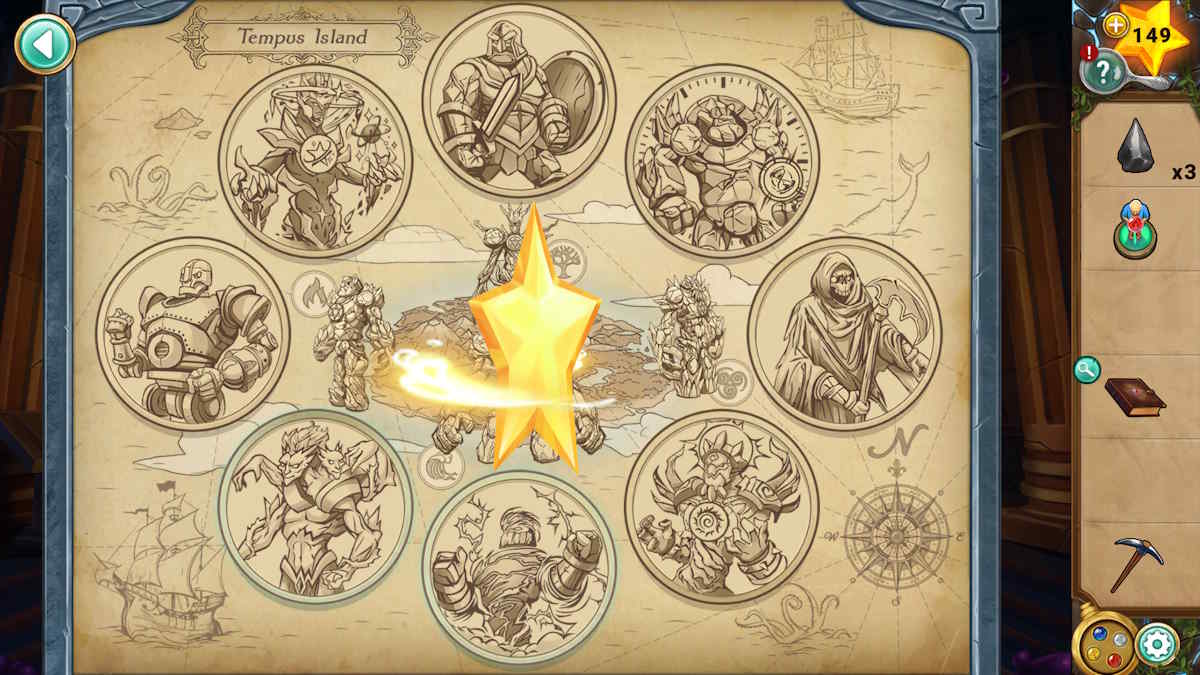
The adventure begins on Tempus Island , where four ancient temples have been sealed for hundred . Each houses a hallowed stone , to blockade one person possessing all four and gain immense mightiness . Playing as Alia , you must attempt to stop Milo from breaking into the temples .
Note you could alsoskip any puzzle you wantto by using the stars you collect during your period of play ( you ’ll see them in the top - right turning point of the screen at all times ) . These stars transfer between AE Mysteries game , so attempt to preserve them for when you necessitate them . You ’ll find solutions to all the puzzle below , but a few are randomise or require focal ratio , so we ca n’t guarantee you wo n’t need an surplus hand !
Legend of the Sacred Stones Chapter 1 walkthrough
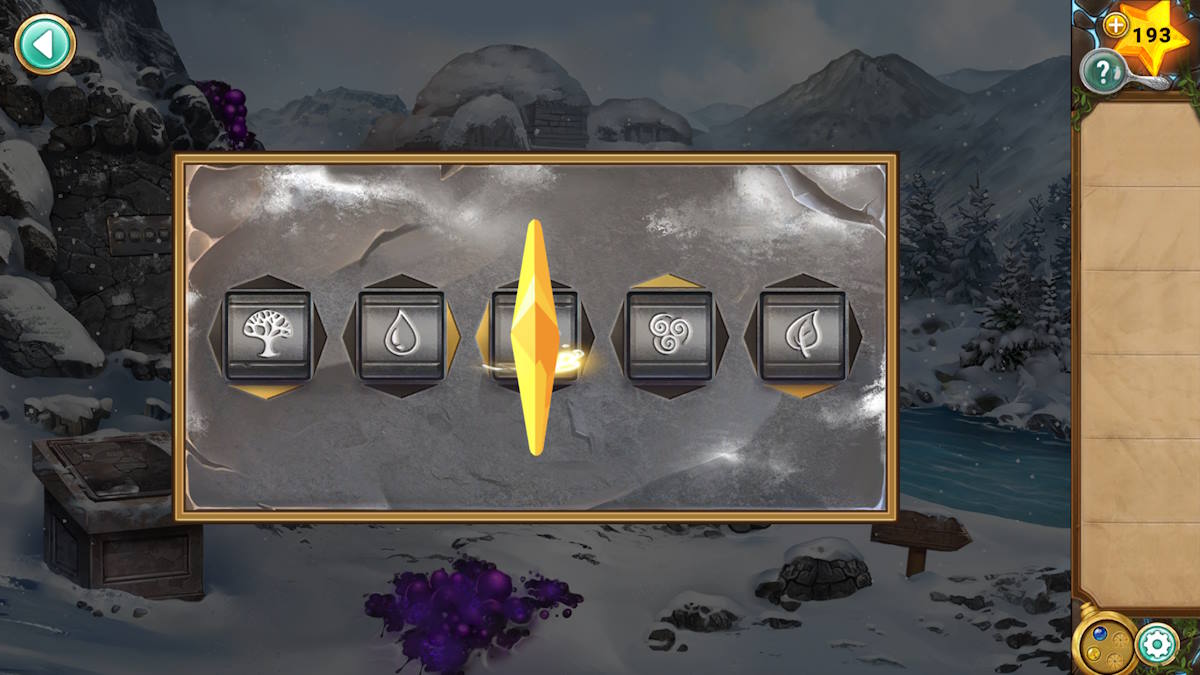
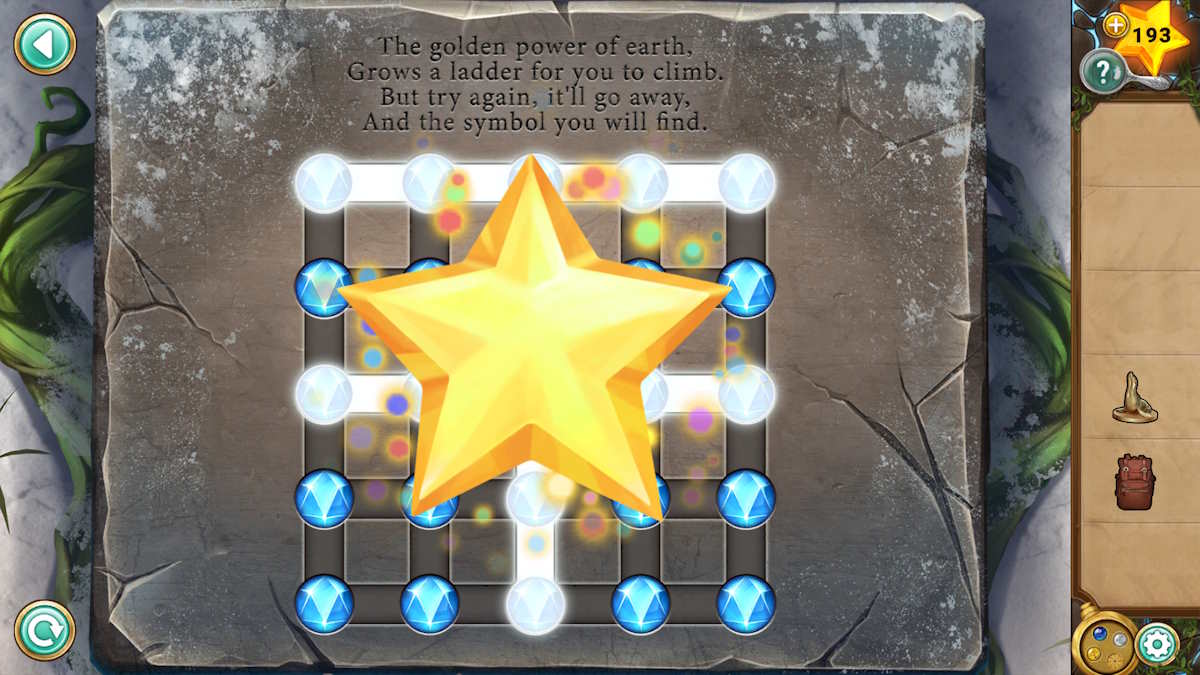
After Arthur leave behind to try and check Milo , you must make your female parent a healing tonic . clack thebook on the shelf(a1 ) for a stopping point - up and once again to open it and get a line about the Oliver Stone . Note that the rules of order of the elements in the book is wind , water , earth , and fire .
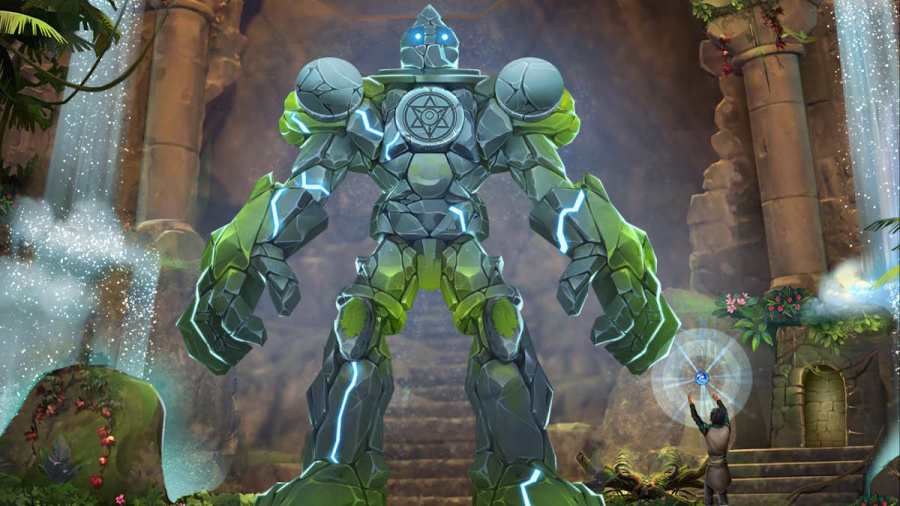
Select thechest at the end of the bed(a2 ) and practice that codification to open it . You ask to move around the dial to each symbolisation in the order figure above ( up to position ' x ' ) . Take theRune BlockandSpell Bookfrom inside .
Take theKnife(a3 ) from the locker and apply it from your inventory to trim back someLeavesfrom the plant on the windowsill ( a4 ) . open up the locker ( a5 ) , take theStep Ladder , and employ that to get someToadstools(a6 ) .

Image by Pro Game Guides
How to complete the hut chest puzzles
Now selectthe other chest(a7 ) , below the windowpane , and add the rune block to begin another puzzle . Each block must be in its right position in the column to complete it , which requires you to use the slot in the middle and the slide region across the bottom to help you rearrange the block . When you move a stoppage into the central mechanism it will deposit it into the space on the other axis ; so from the side to the bottom , or vice versa . However , it will only do so if there is an empty col in the space it would place it .
You ca n’t give way here ; it is just tribulation and erroneousness and once you ’re done you ’ll be able to collect theMoon philosophers' stone . However , if you desire a complete result , do the following :
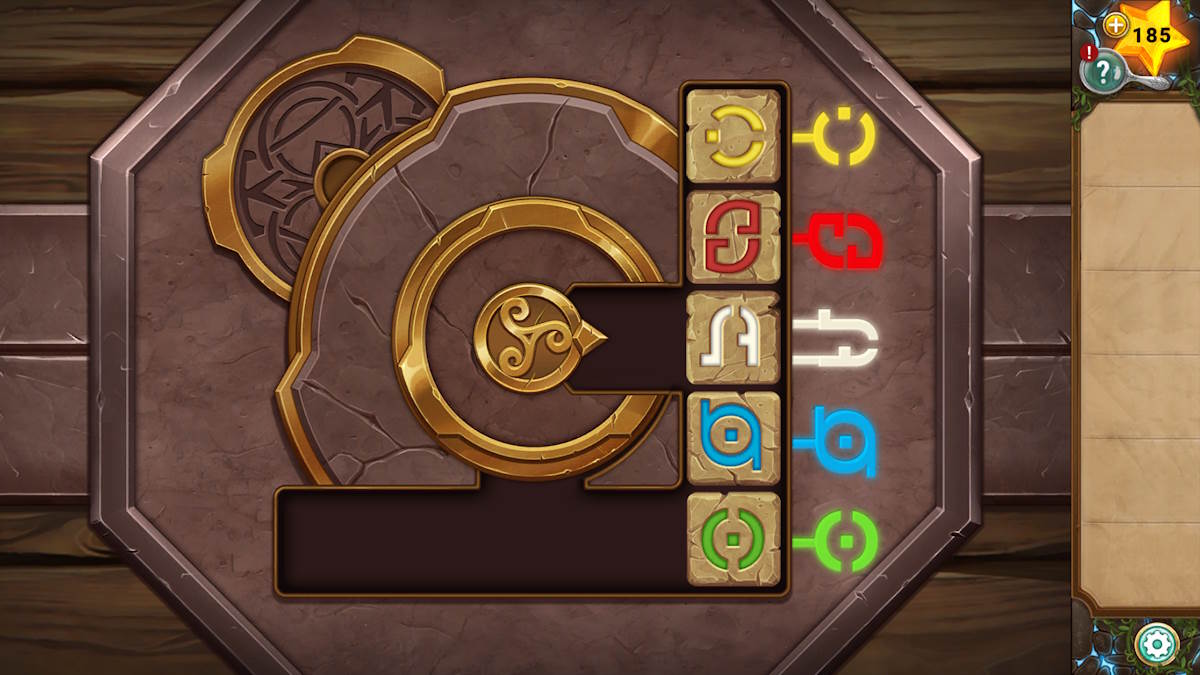
Select the table(a8 ) , and place the spell book on it , along with the leave , moon philosophers' stone , and the toadstools . You need to use the codification in the book ( allow varlet ) to reproduce its five recipe air ( ripe varlet ) . The top symbolisation represents the toadstool , the second symbolisation leafage , the third represent the spoon ( already on the tabular array ) , and the fourth is the moon elixir . You need to drag each factor over the key beaker in the orderliness you may now work out from the book . This order is :
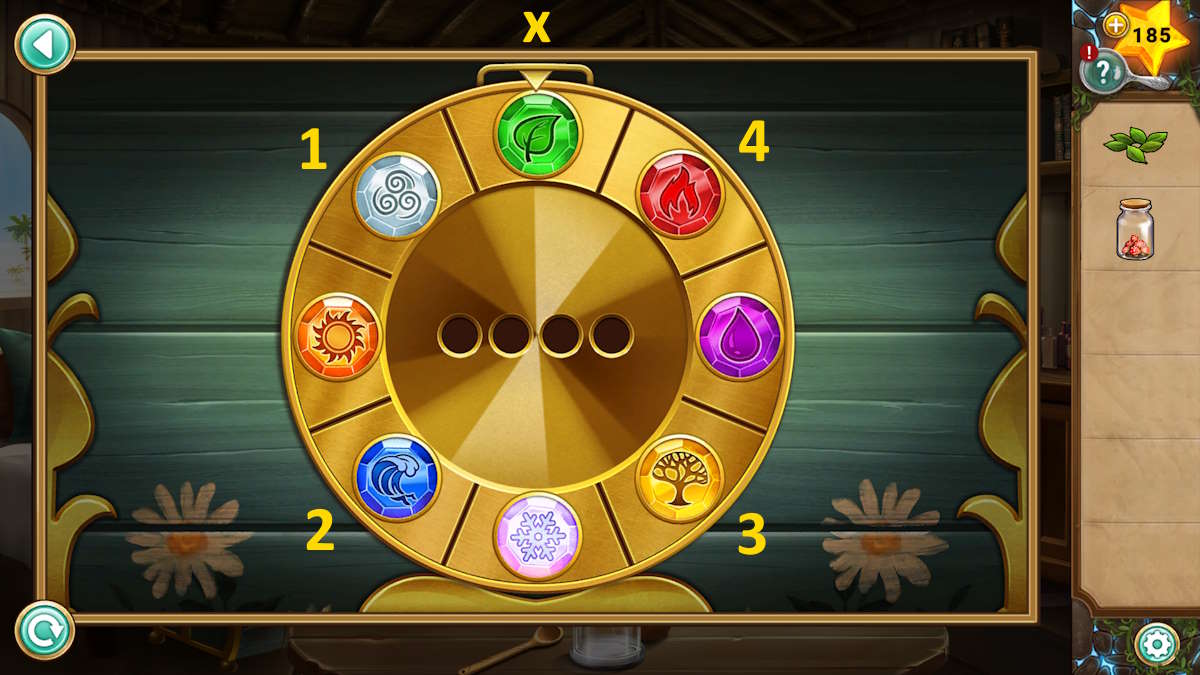
Image by Pro Game Guides
Once done , you ’ll get theHealing Tonic . Give it to your mother ( Selma ) , order her Arthur has belong to the Spring Temple , and she ’ll give you theEarth Pendant . Click the door ( a9 ) to channelize outside .
Digging outside the hut
Take theShovel Blade(b1 ) and then click theboat(b2 ) for a end - up .
Click the drawer ( b3 ) to open it and take theKey , and then use the key to afford the box ( b4 ) to find aScrewdriver . Add the shovel blade to thehandle(b5 ) in the boat close - up , click theScrews(b6 ) to pluck them up , tot up them to the shovel , and use the screwdriver on the power shovel to finally be able to take theShovel . Also read the note ( b7 ) to find it is from Milo , confessing that he will try and take the stones .
Use the spadeful on the loose sand ( b8 ) to uncover awooden box , and then click it to find out some piece are miss . Ollie will appear , tell you Milo is seek to cure the torment that ’s making everyone sick . Now apply the shovel on the X ( b9 ) to discover and take aBucketand use it in the ocean to get aBucket of Water .
Screenshot by Pro Game Guides
Now use the bucket on the bottle in the boat ( next to b7 ) to redden out and take theWater pendent Half . steer back into the house and add this half to the turtle picture on the wall ( a10 ) which take you theWater pendent .
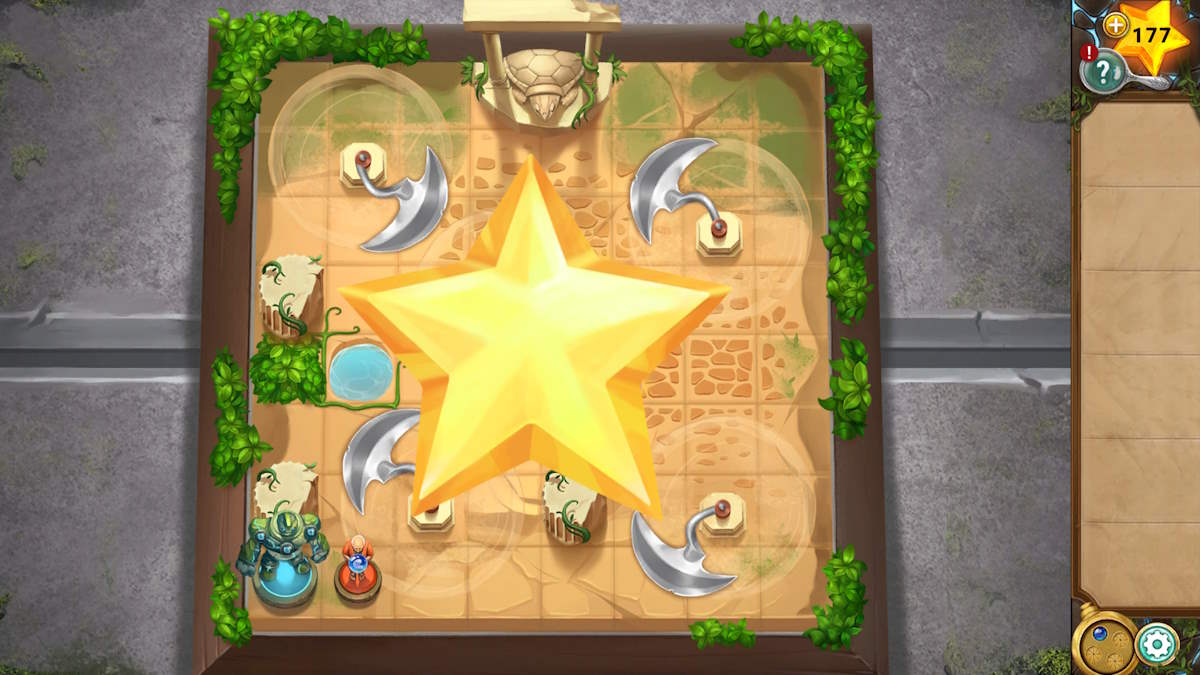
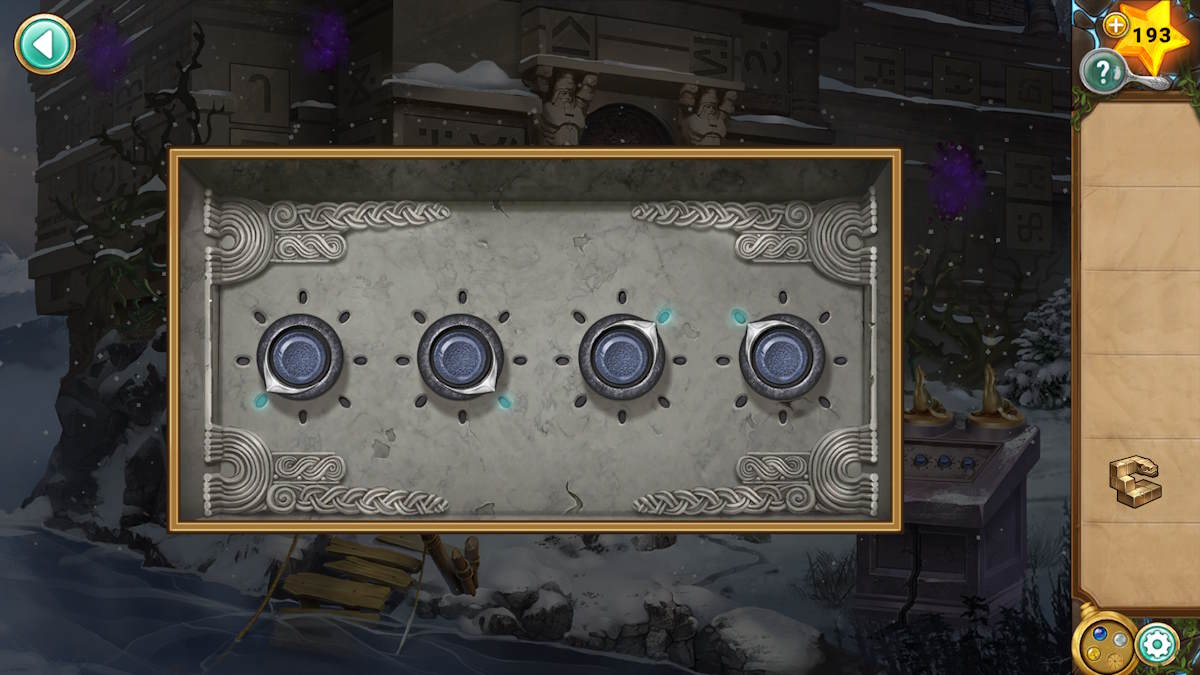
Now use the shovel on the left - side expanse of sand ( b10 ) to find aWind Pendant , and then on the key back area ( b11 ) to bring out alocked box . The answer to the rules of order in which you need to compress the four buttons is about finding the four images in the chief picture :
snap the buttons on the box until the symbolisation match their relative positions in the scene . Once done the boxwood will open up , allowing you to take theFire Pendant .
Screenshot by Pro Game Guides
How to complete the four-pendant puzzle
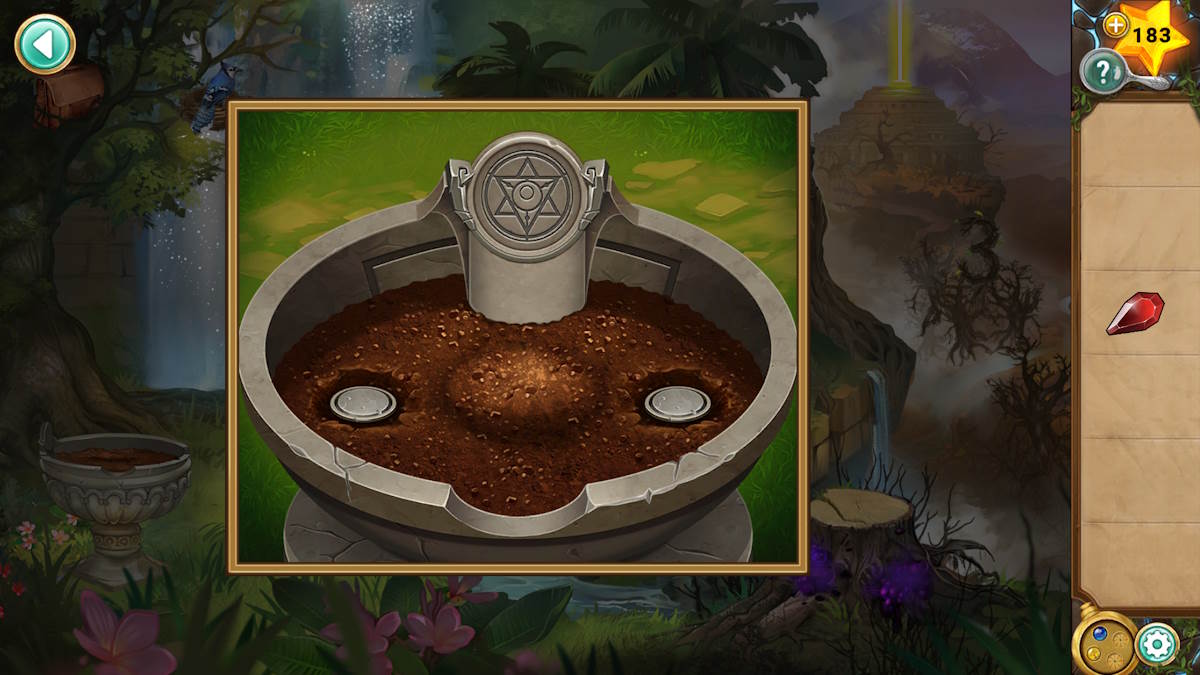
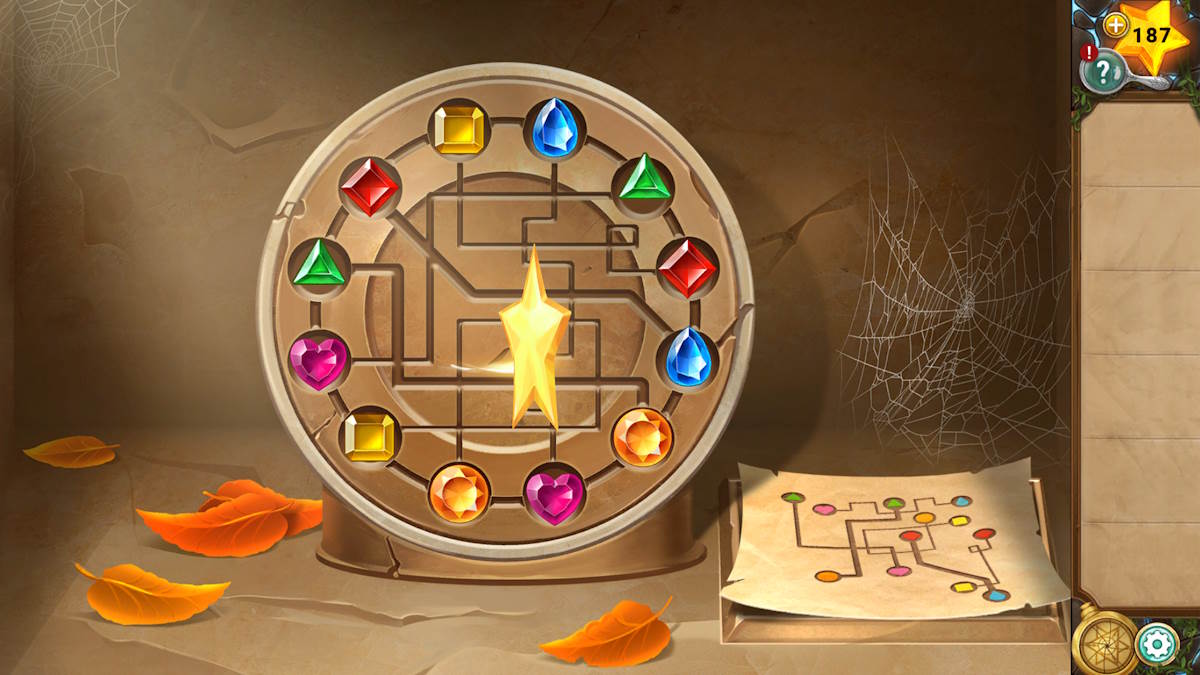
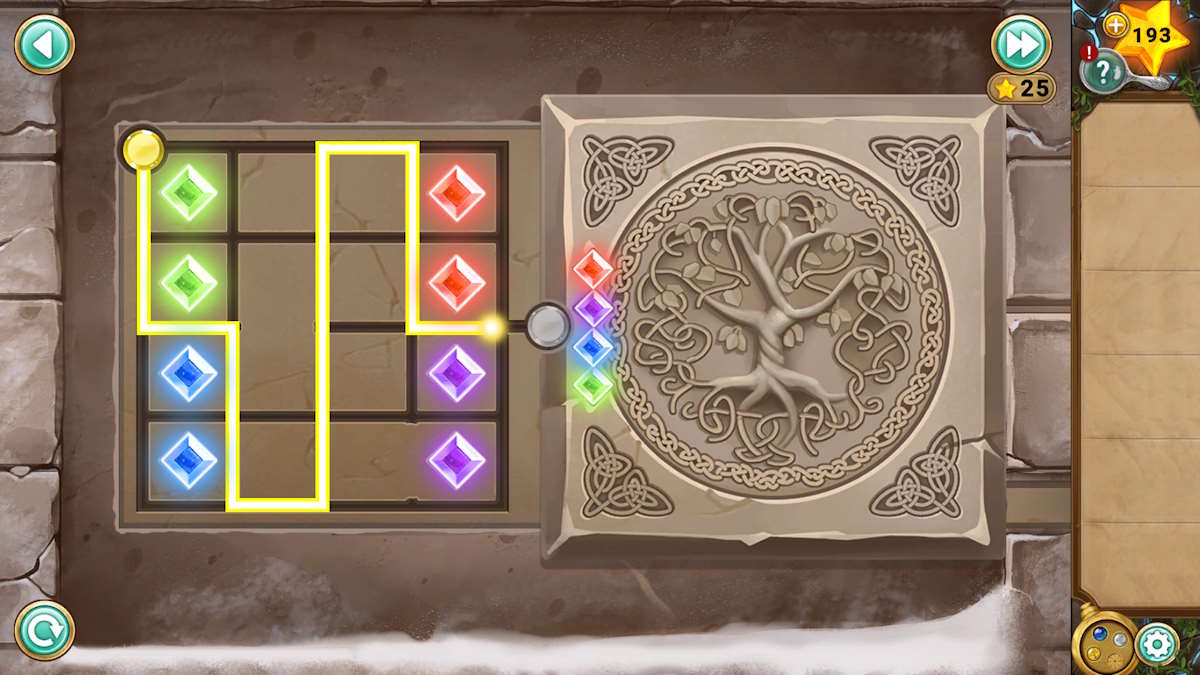
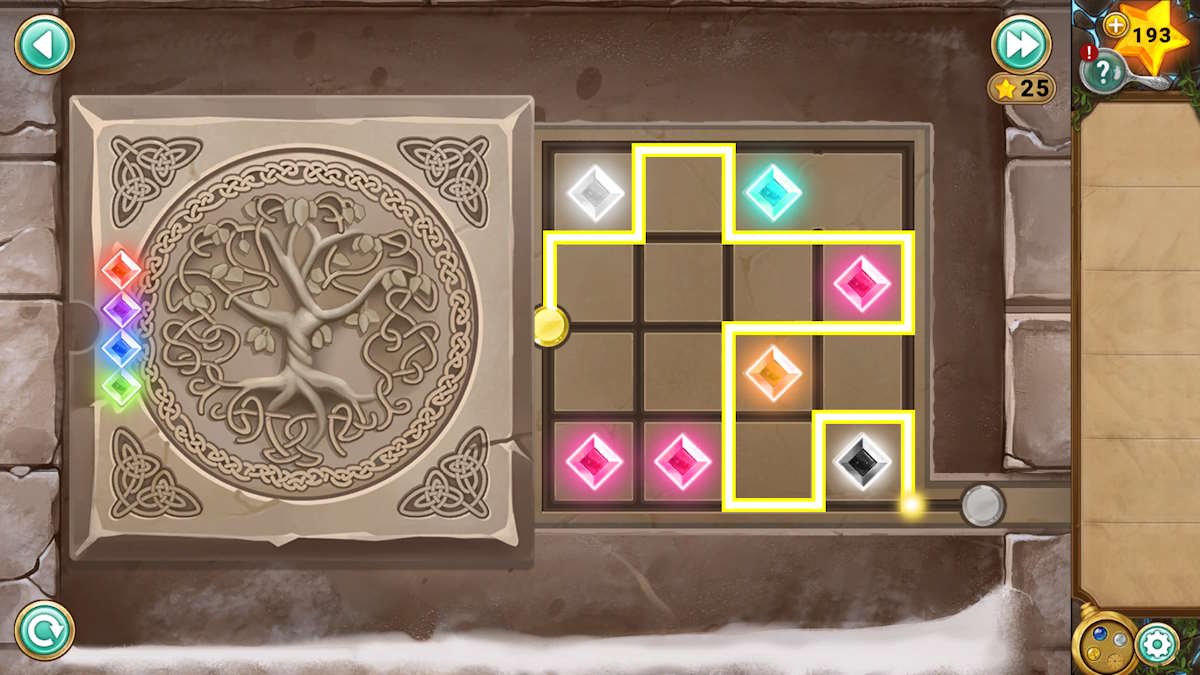
Now that you have the four pendants , tally them to the box ( b8 ) to start out a symbol rearrangement puzzle . Once each pendent is surrounded by the four stones matching its color , you may take theLocketfrom inside .
This can be cunning , but you ca n’t run out , as you just need to keep clicking the green button in the eye to switch the four central stones onto the correct out discs . If you do want a everlasting solution , tick the bottom correct symbol to reset the puzzler and turn the observe platter :
maneuver back into your field hut , give the locket to your mother , and she ’ll bring out the mystery of your past . She’llreturn the locket to you(note that it ’s now in the bottom right of the concealment , below your inventory ) .
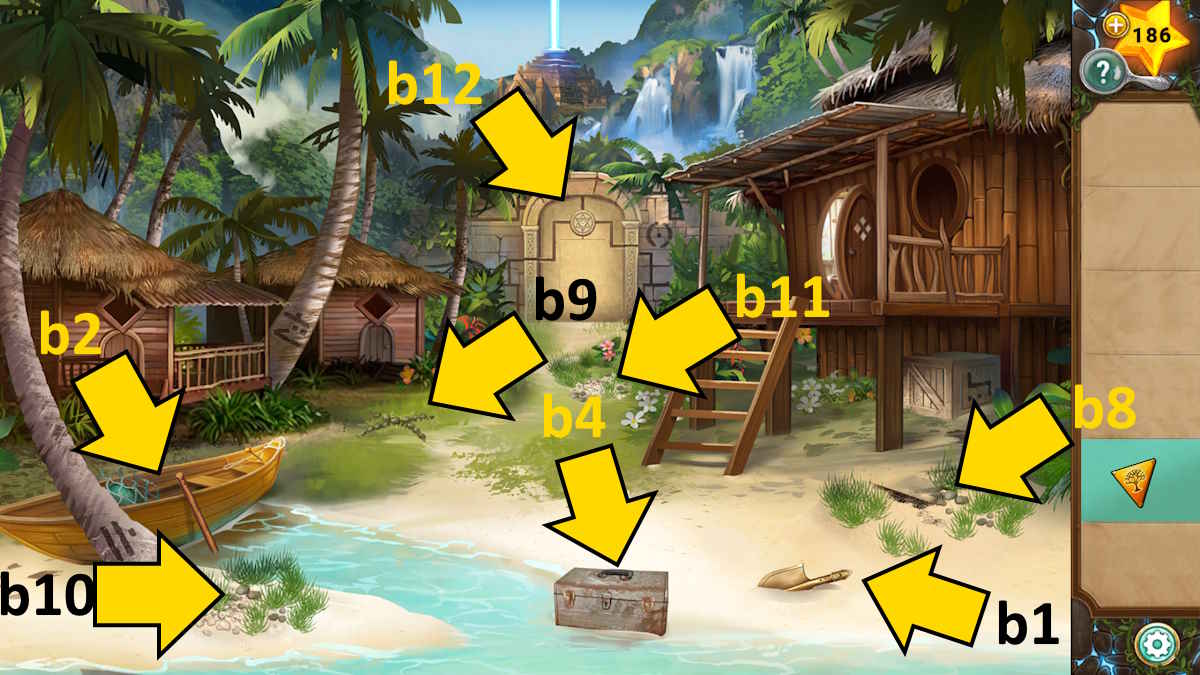
Image by Pro Game Guides
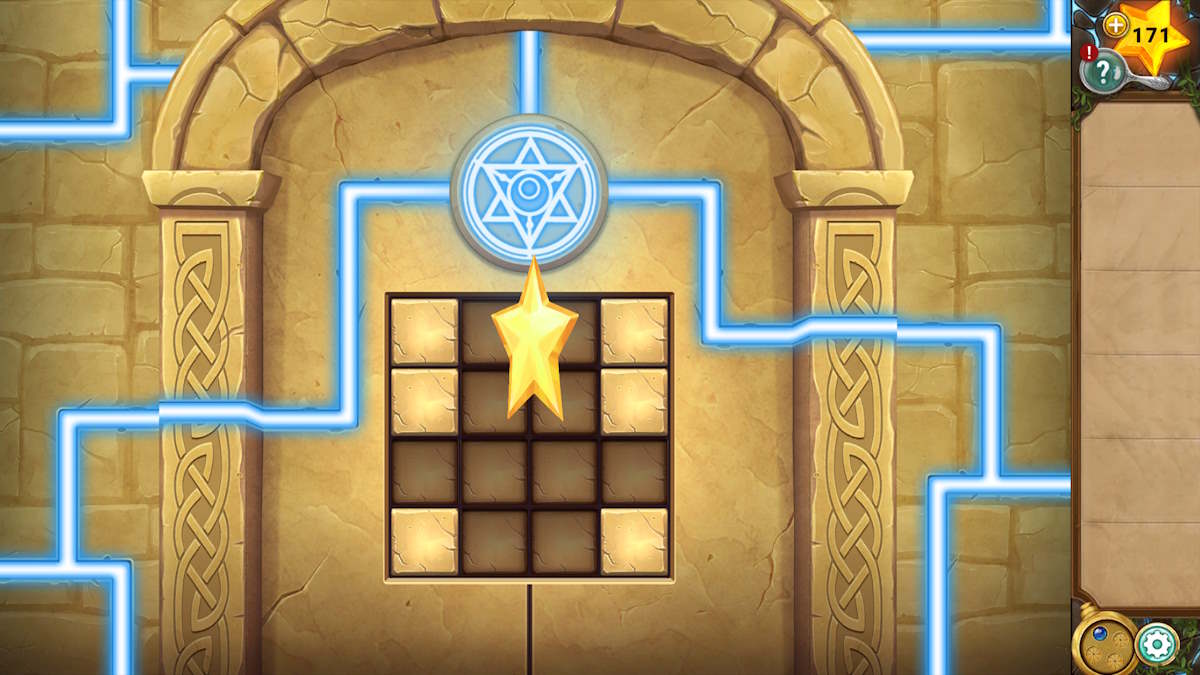
Go back alfresco and the temple will activate the locket , so click the door to the temple ( b12 ) and then flick the locket in the closing - up to trigger a puzzler . This is just a sheath ofcopying the pattern on the front of the bookyou originally looked at in the hut ( see above ) . Click the same squares to copy the pattern and the door will open , allowing you to go through the room access andcomplete Chapter 1 .
Legend of the Sacred Stones Chapter 2 walkthrough
When you notice your father bruise outside the synagogue , he enjoin you Milo has stolen the Book of Tempus , allowing him to insert each synagogue . Take theGate Keyfrom the central floor pattern ( c1 ) and then choose the well ( c2 ) for a close - up ( noting the blue mushroom-shaped cloud in spite of appearance ) . Click its pendent symbolic representation , and then your pendant , to satisfy the well with H2O and take theTorch .
Use the torch in a brasier ( c3 ) to get aLit Torchand expend it to light vine underneath the turtle statue ( c4 ) . Once lit , click the dependent symbol in the polo-neck ’s paws and click the pendant in your inventory to trigger a waterfall that puts out the fire . you may now pile up aWheelfrom the infinite the vine were covering .
Select the gate ( c5 ) , utilize the key to spread out it , and go through . Do the same trick with the lit great mullein , gear up the twigs ( c6 ) on fire and then using the chandelier with the turtle statue ( just to the left field ) to put it out and take theStone Key . Head back to your father and come home the tree branches in the top - right of the scene ( c7 ) to count four orange mushroom .
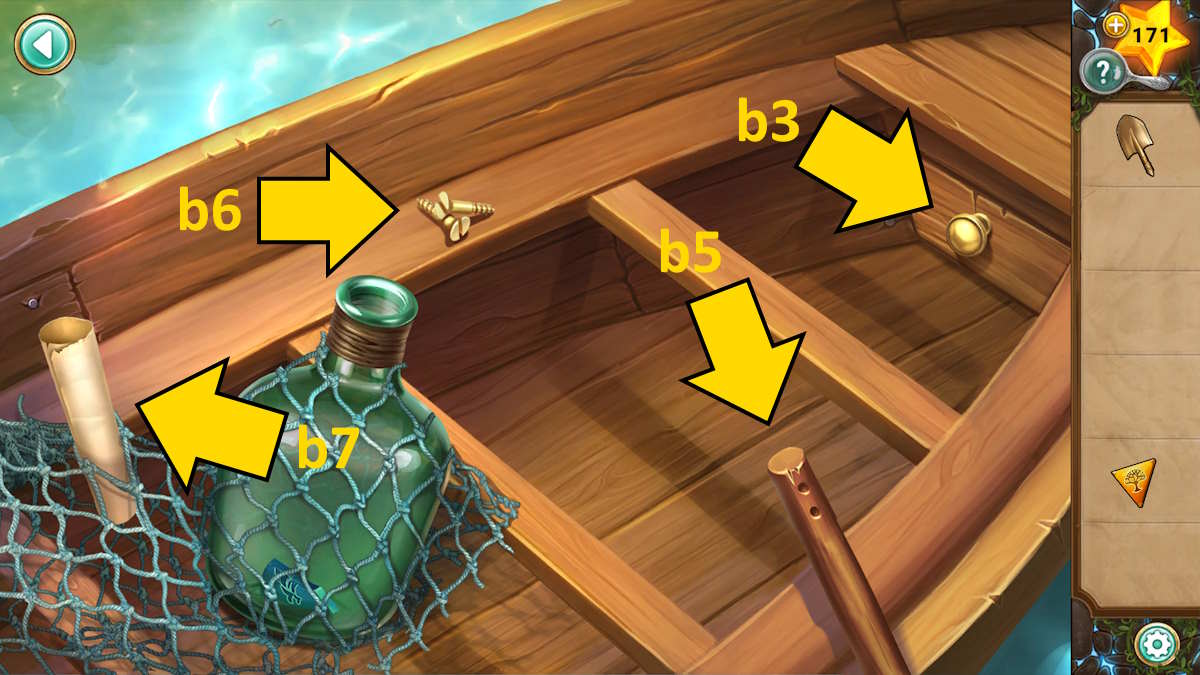
Image by Pro Game Guides
How to open the color-coded chest
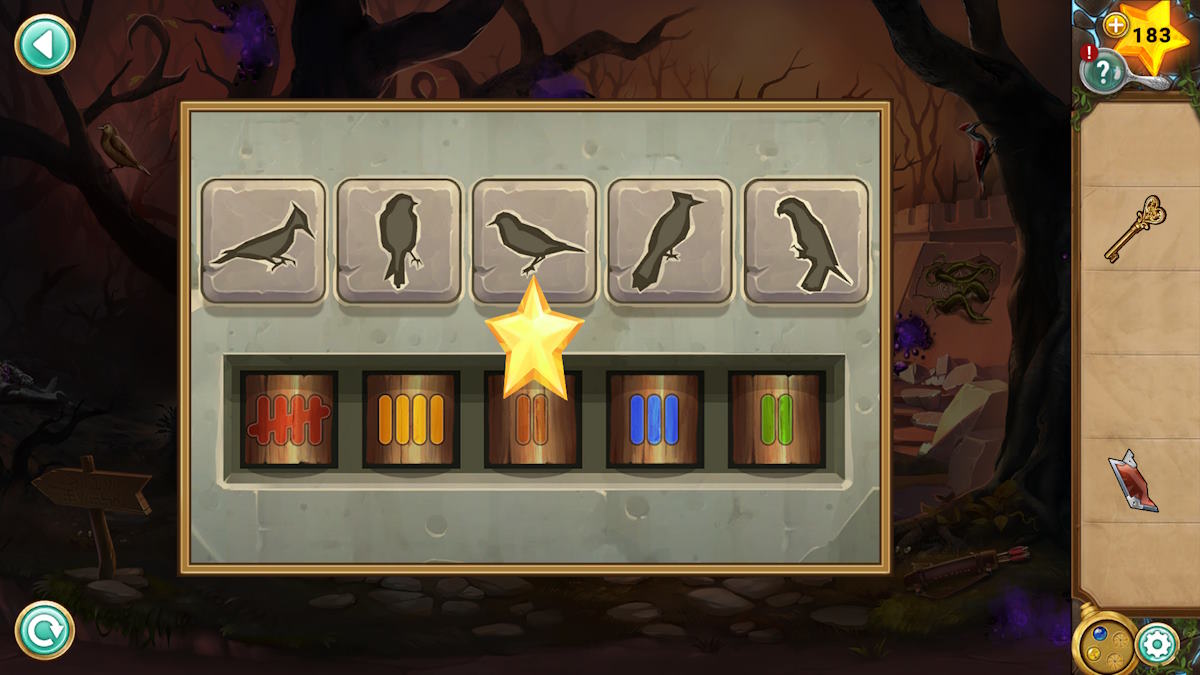
Add the wheel to the chemical mechanism next to the waterfall ( c8 ) and then flex it to stop the menstruation of water here andreveal a chest of drawers . If you look around the main scenery , you ’ll note the colors on the chest whorl match those of the various mushrooms you ’ve found here . The mushroom cloud colors are :
penetrate the button on the pectus so that the amount of pips of each semblance matches these issue and the dresser will open , allowing you to take thesecond Stone Key . Place both keys into the floor pattern ( c1 ) to reveal another pendant symbol . Click it , and then your pendant , to unlock the tower below the left-hand brasier ( c9 ) . observe that you call for the well to be full for this to mold .
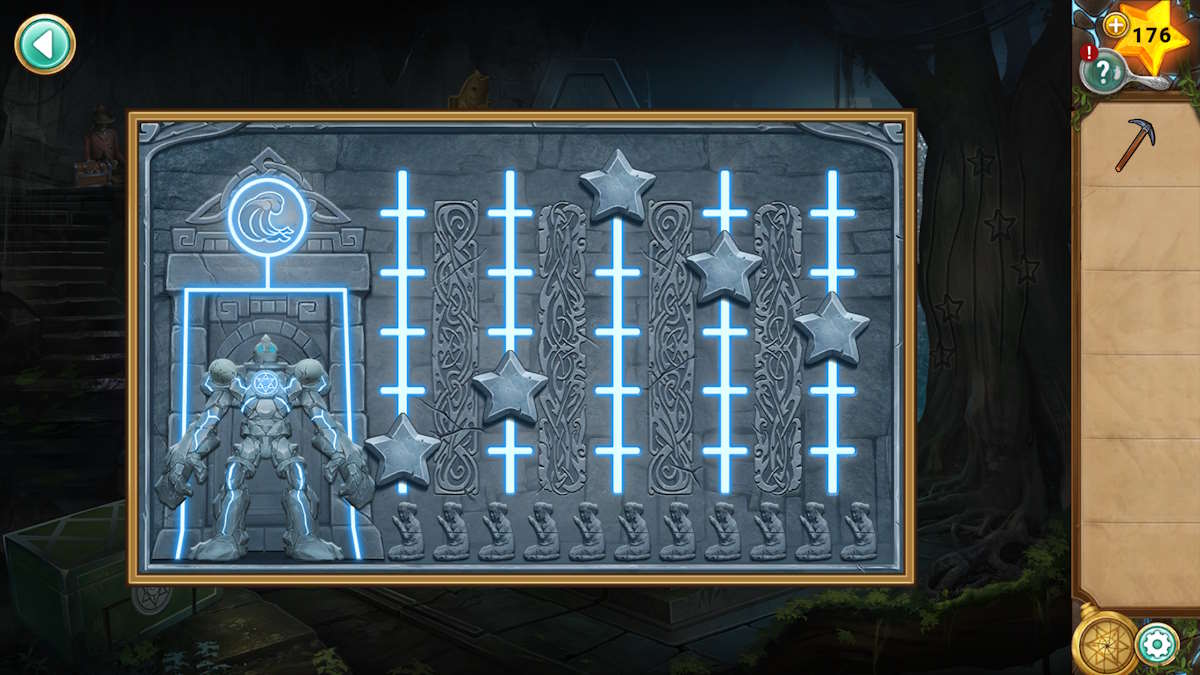
fall into place it for a close - up and thenturn the sections of the pillarso that you’re able to scuff the blue jewel from one side to the other . This is tricky than it sounds , because you have to move backwards and forwards to complete the puzzle . I ’ve included the steps in the gallery above ( they ’re numbered in the top - entrust box ) .

Screenshot by Pro Game Guides
Once complete , the second brazier pillar will open to bring out a similar mystifier , this meter with three gems to move . observe that each must go into the space on the far side that has its matching shape but you could do it one at a time , so it ’s not as daunting as it may appear . Again , the gallery above will walk you through the steps if you ’re stuck . The door will now open up , so flick it to go at bottom .
Inside the temple
Take thePickaxefrom the tree ( d1 ) , noting the traffic pattern ( specifically the heights ) of the hotshot carved into its trunk . expend this pattern on the brass next to the stone turtle ( d1 ) and you’llopen the threshold on the right(d3 ) .
apply the pickaxe to roll up somePink Crystal(d4 ) and then get a finis - up of the frame ( d5 ) and take theLanternfrom its backpack . Now choose the doorway you opened ( d3 ) and channelise through .
Get someOrange Crystal(e1 ) by using the pickaxe , then select the wall with the missing brick ( e2 ) for a close - up . Click the brick that ’s stick out out , which will go in and advertise another out . Keep snap the jutting - out bricks until you may take thePyramidfrom the hollow in the bulwark .
Screenshot by Pro Game Guides
Return to the skeletal frame ( d5 ) and use the Great Pyramid to start the boxwood it ’s holding , taking thePuzzle BlockandLever Handlefrom inside . Return to the elbow room , add the grip to the lever ( e3 ) , and then pull it to take theTorn Pagefrom the chain hook ( e4 ) . you could now add thePuzzle Blockto the chain the varlet was hang from . enhance the puzzle boxwood by pulling the lever once more , and then click the raised flooring stone ( e5 ) . This shoots arrow from the wall , hit and illumine up the block ( see above ) . Lower it once more and take the nowGlowing Block .
Add the glowing occlusion to the jam in the paries here ( e6 ) and it will get down the candles above , revealing aGreen Crystalyou can use your pickax to collect . you’re able to now add the three crystals , along with the lamp , to the mesa which already has a mallet on it ( e7 ) . bankrupt the crystals in the order exhibit on the rampart ( pink then orange then green ) , impart them to the lantern in this order , and you ’ll receive theExplosive .
Add the explosive to the chain hook ( e4 ) and fire it with the lever tumbler once more . Use the floor jury ( e5 ) to fire pointer at the explosives and , after the detonation , you ’ll get yourpendant is working once more ! take the pendant double on the back wall here ( e8 ) , use the pendent to open up the door , and then snap the revealed scenery for a close - up .
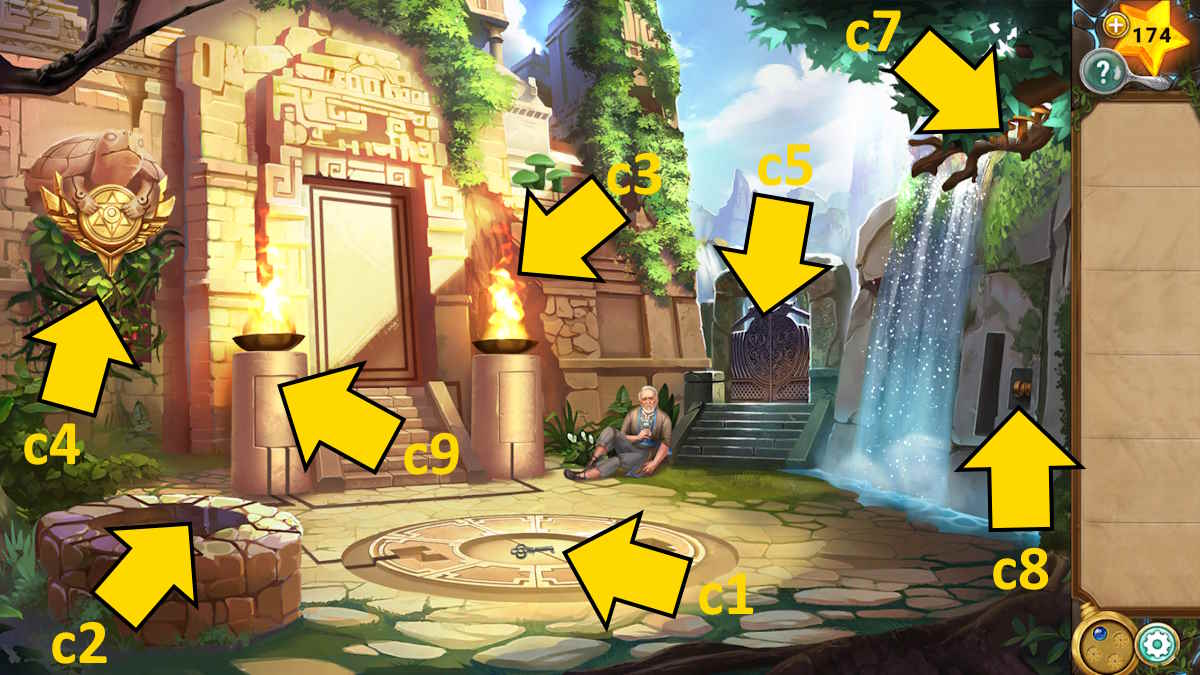
Image by Pro Game Guides
Board game puzzle solutions
tot the torn short letter to expose a code that will help you solve this teaser . Each of the seven symbols on the page need to be put in the right order to make the correct code . I ’ve numerate them ( left to right ) in the image above . Once done , you’re able to garner theFish Tailand theVillager Figurine .
Move back into the primary area , total the fishtail to the fish ( d6 ) , and the gore above it will open to let in the sunlight . you may now use your pendant here too ! utilise the pendent to afford the green box ( d7 ) , take theAquarius Figurine , and then add the two figurines to the plot dining table ( d8 ) to start another puzzle .
You need to move the villager ( top rightfulness ) to Aquarius ( bottom left ) by clicking foursquare while forefend the swinging blades . Each time you move the blades also move , so you take to time your itinerary perfectly to avoid them . If you ’re stuck here , there ’s a solution below :
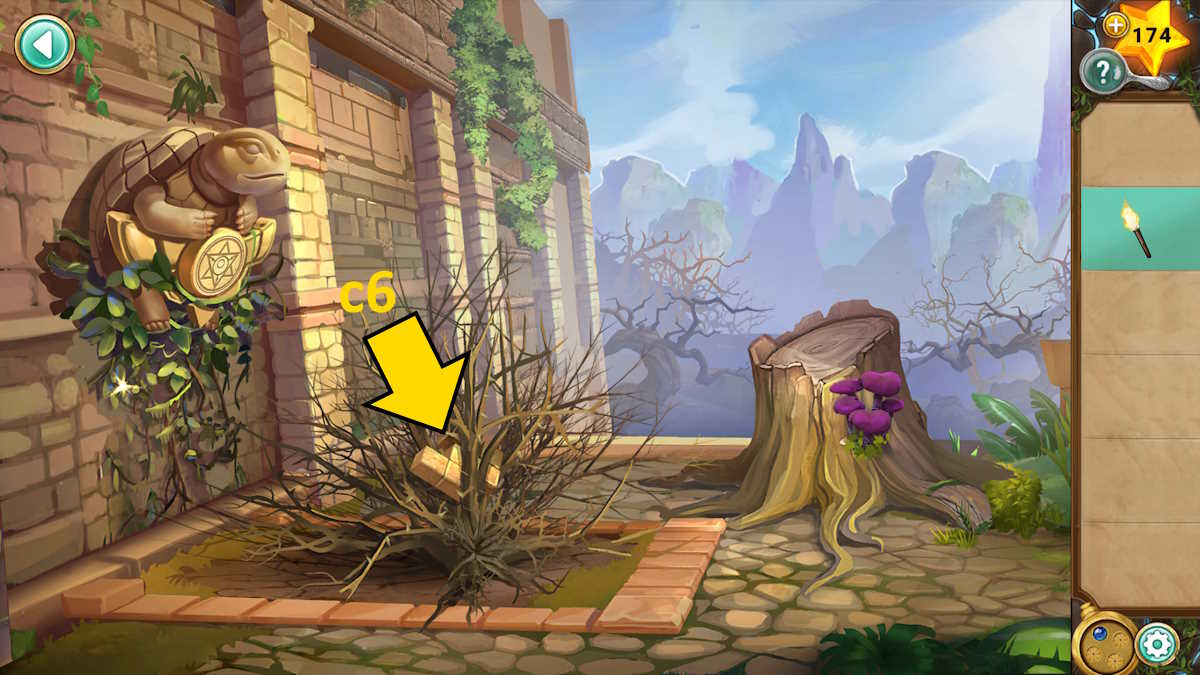
Image by Pro Game Guides
This bring out a dependent design on the base of operations of the plot card , so use your pendant to trigger it . This lights up the turtle , open a threshold in its back talk . tick the room access and head through to findMilo trip the automaton ! chatter him to talk to him , When he actuate the golem , click the pendant image on its chest and use your chandelier to begin another mystifier .
Defeating the golem
This one is aspeed trialin which you need to find two of each of the three symbolic representation that seem on the robot ’s chest . Do this three fourth dimension ( so atotal of 18 symbols ) and the automaton will be get the better of . Clicking an incorrect symbolic representation or direct too long will induce it to strike you , andif it strike you three time , you ’ll have to part all over again . I ’ve include an example of the six symbols that would complete one of the level above .
Note that the timing part is only active when you’re able to see a screen full of symbols , so you’re able to rest in between point . Thesymbols are randomly generatedand also move when you take damage , so I ca n’t send a solution , but if you ’re wedge here remember you could apply your superstar ( top - right ) to hop the teaser if you have enough .
Once you ’ve defeated the automaton , Milo will miss and you ’ll havecompleted Chapter 2 .

Image by Pro Game Guides
Legend of the Sacred Stones Chapter 3 walkthrough
You ’ll find yourself outside the Fall Temple with your father . When he leaves , take theGate Piece(f1 ) , and asecond Gate Piecefrom the plant life raft ( f2 ) , and then add them to the logic gate ( f3 ) to commence a mystifier .
To complete this puzzler , you plainly need to drag the art object around until they ’re all in the right smudge . You ca n’t flunk and I ’ve include the discharge mental picture above . Once donethe gate(f3 ) will swing open , so channelise through .
Note the bird on the left dither its wings twice , while one on the right wing knock five multiplication . Also note that the branches in the trees on the leftmake two numbers : 2 and 8 .

Screenshot by Pro Game Guides
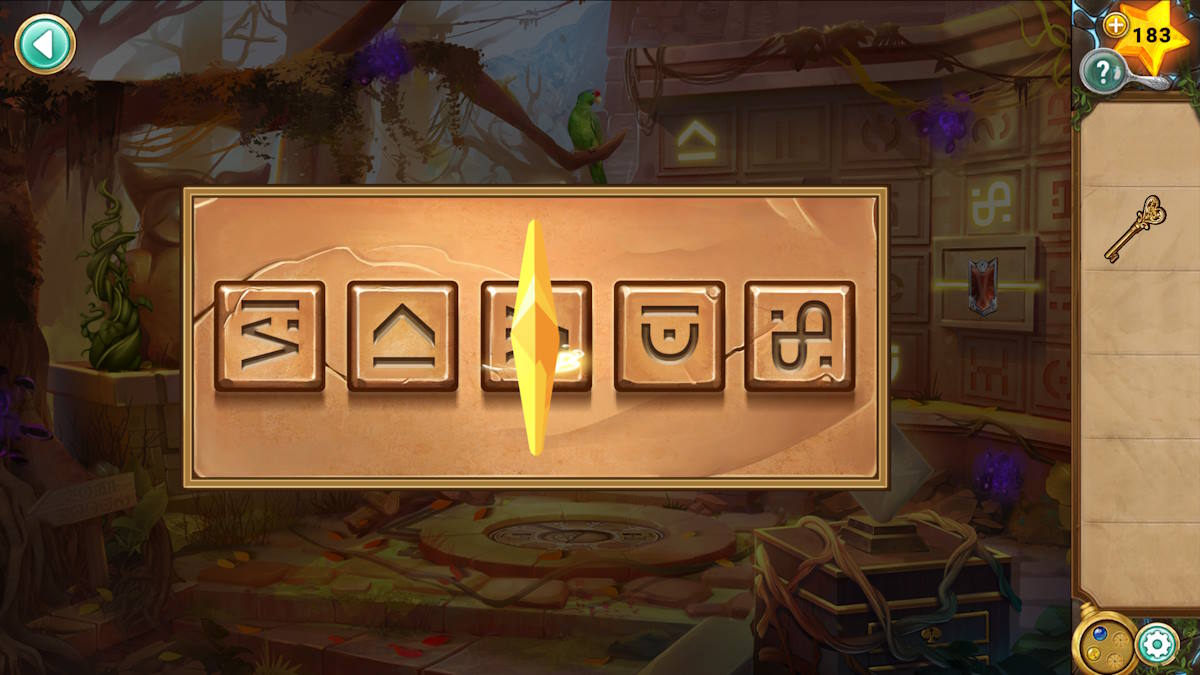
Click the path to the right and you ’ll present Milo once more . After a abbreviated conversation , he go away into the tabernacle . Pick up theChisel(g1 ) , note the bit 4 in the branch , use your chandelier to activate the fountain next to the bird of night ( g2 ) , and that the green parrot squawks twice . Also , take aRed Gemfrom the floor aim ( g3 )
Return to the premature scene anduse the chisel on the wall(f4 ) to reveal a pendant pattern . Now go to the first scene , note the phone number 3 in the branch to the right , and use the combined branch computer code ( 3284 ) to open thehatch on the wall(f5 ) . This firing up the temple in the desktop , adding the earth symbol to your pendent . expend the yellow pendant power on the wall you just uncovered behind the codification ( f5 ) and you ’ll release several falls .
Gaining the earth pendant power
Go back to where you used the chisel ( f4 ) and touch off the yellow power of the pendent . The vines get through , allowing you to take a Seedling . Place the seedling into the plant pot ( f2 ) and click it again to cover it in the dirt , unveil two silvery discs . snap both , and another pendent image will be revealed ( see above ) . employ the blue pendent power on this to fill the bowling ball with piss , and then the yellow world power to grow vines from the pot . you could now use these vine to get theSatchel(f6 ) . Inside you ’ll find aShield Emblemand aHeart Key .
habituate the icteric power of the pendent on the paries again to stop the water system flow . Now , when you move forward , you ’ll retrieve the Red Gem ( f10 ) was wash to just below thequiver(f7 ) . Pick it up , add the two cerise gem to thehawk eyes(f8 ) , and reveal a puzzle at the base of this statue .
You need to put together the numbers that match the skirt by looking at the double here and supply the telephone number that match the sounds they make , while also matching their vividness to the images . From left to right , the answer is54232(see above ) . Once complete , you may take the Bow . fall into place the quiver ( f7 ) for a close - up , add the obeisance , then click them again to pick them up and find the Bow and Arrow . expend it on theShield Emblem(f9 ) to bump it out of the tree diagram and then pick it up .

Screenshot by Pro Game Guides
Opening the draws and finding the pendants
you may now move forward and apply the chicken power of the chandelier on the symbolization next to the bird of Minerva ( g2),opening a puzzle codebelow it . add together the two shield emblem pieces to the wall ( g4 ) and five symbol will light up on the wall . Use this code below the owl and thevines around the pedestal(g5 ) will disappear .
you could now use the winder here to open up the heart draw and take theClub dependent . practice this on the box in the bottom drawer to give it and find theDiamond Key .
conclude all the knickers to notice theSpade Pendanton the story . you could use the diamond winder to start the diamond drawer and apply the spade pendant to open up the box inside , earn you theClub Key . employ this to open up the top drawer , take theDiamond Pendant , and utilise that to launch the box in the heart draftsman , giving you theHeart Pendant . ultimately , use this to afford the heart box in the top draftsman and take theStone Slab .

Screenshot by Pro Game Guides
The door puzzles
Add the stone slab to the floor design ( g3 ) , then use both the yellow and blue pendent big businessman to open thepuzzle in the unexpended - side pillar by the door(g6 ) . Click the puzzle to start , and hale the ballock from left to rightfield and through the hole on the other side . The conjuring trick is that , as you move , the circles in the pattern splay . To complete the teaser , do the pursuit :
Thisopens the right - side pillar(g7 ) for a similar puzzle :
The synagogue door will now be undecided , allowing you to infix andcomplete Chapter 3 .

Screenshot by Pro Game Guides
Legend of the Sacred Stones Chapter 4 walkthrough
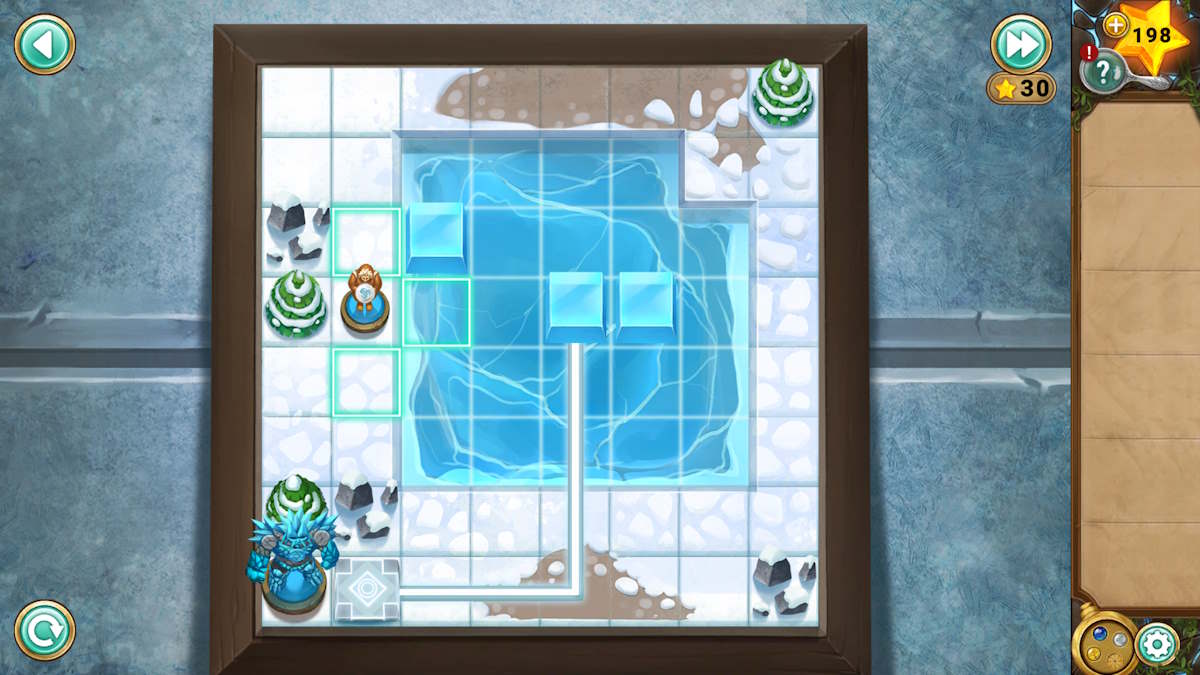
Once you ’re inside the tabernacle get to the rug ( h1 ) to bump anOwl Emblem , snap up theStone Carving(h2 ) and theShield(h3 ) , and get to the box ( h4 ) to get aSquare Key . Add the stone carving to themuralat the back of the room ( h5 ) , and then move through the door on the right wing ( you ’ll need to find three more to finish it ) .
Add the shield to the statue of the warrior ( i1 ) and it will release itsSpear , allowing you to take it . Move the rubble ( i2 ) to find asecond Stone Carving , and the cobweb ( i3 ) to grab aTriangle Key , before adding the owl figurine to the place on the back bulwark ( i4 ) . This opens a hatch where a codification is required , consisting of four colored leafage ( we ’ll amount back to this later ) .
give back to the previous room and use the spear to move the gold floor tile ( h6 ) and blame up theCircle Key . Head out back again and add the three key to the box ( i5 ) , which open . Take thethird Stone Carvingand aBook Pagefrom inside . Back in the first room , add the book Thomas Nelson Page to thecircular object by the stairs(h7 ) to get down a puzzle .

Screenshot by Pro Game Guides
Completing the mural
The idea is to trade gems until they play off the form on the page . I ’ve included the completed mystifier above . This devote you thefinal Stone Carving , so add them all to themural(h5 ) . Once done , this opens a windowpane in the other room , allow you to use your locket there ( by sink in the pedestal at i6 ) .
Head there and use the blue locket power before point back below . You ’ll witness the pool ( h8 ) has fill with water , allow you to take theAutumus Figure . Go back up and use the locket once more , this time on yellow . This blocks your path back down but opens the way up the steps ahead ( do n’t worry , you’re able to utilise the yellow power here to swap which room access is available at any time ) .
You obtain yourself in a room with a large monkey statue . start the satchel ( j1 ) , take theEmpty Canteen , and then study the note in the skeleton ’s hand ( j2 ) . Each personal line of credit gives you a colour , helpfully color - code by play up the tidings in orange on the distinction . This give youyellow , green , orange tree , and red . Return to the previous room and change the foliage color on the venire above the box ( i4 ) to these coloring ( left to right ) and the panel will spread , so take theVillager Figurinebehind it .

Screenshot by Pro Game Guides
Solving the animal wall puzzle
utilise the scandalmongering locket power so you may head back down the stairs and use the canteen in the pond to get aCanteen of Water . Now go right back to the top and apply the full mobile canteen to put out the torch in front of the monkey statue ( j3 ) . Its backtalk will open up , revealing a saber saw - elan puzzle . It ’s quite straightforward , as you ca n’t circumvolve the pieces ( but they do re - angle once you pick them up ) . In the figure of speech above , I only have one piece left to add up . Once complete , you could take thePillar Block .
Click the animal wall puzzle next ( j4 ) . Note that the statue in each way has a sign above it , describing the animate being in full term of its diet :
You now call for to order these animals so that the correct dieting match these levels . So one answer would be ( in any order ):

Screenshot by Pro Game Guides
Go on a higher floor and attach the rope to your Modern hole in the earth . This allows you to utilise the yellow lantern ability here , enter the way to the monkey elbow room , but still have approach to the downstairs . Do this , and then manoeuvre down on the rope to retrieve the vine have been removed from the plot board ( h10).Add the two figurines to set about a puzzle .
Defeating the yellow golem
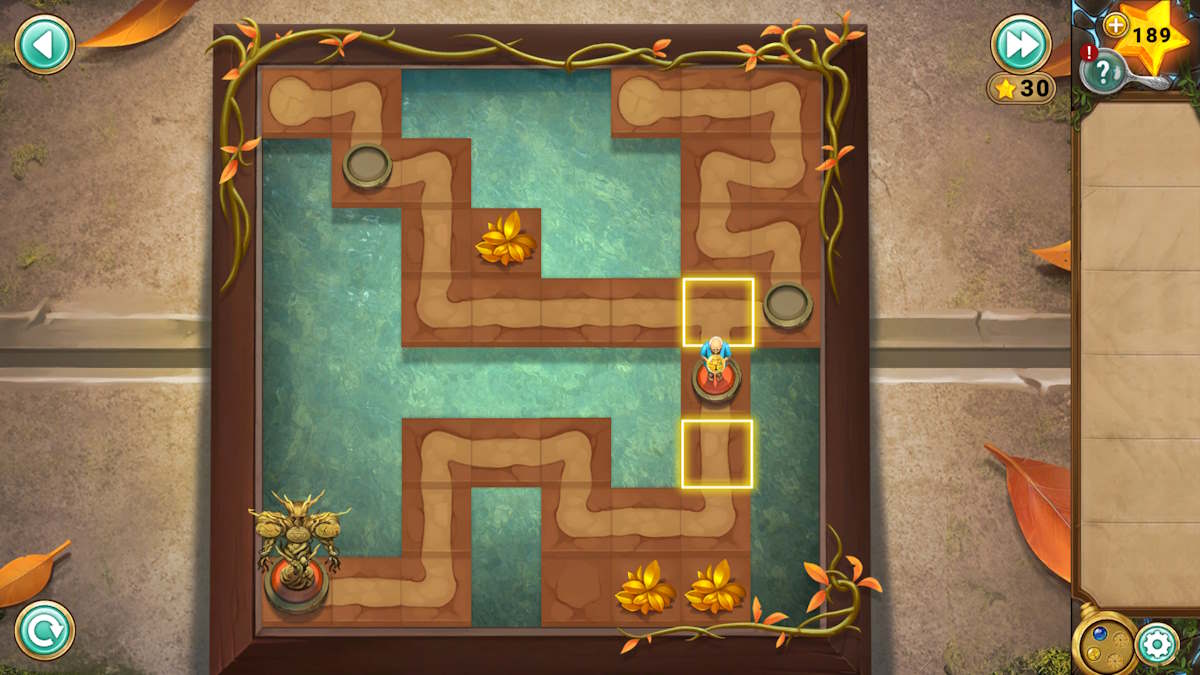
Once again you must move the villager to the god , but this clip you need to rearrange the floor pieces to make it a followable way . The direction you drag a tile moves all the coloured tiles in that row or column . However , with a bit of patience , it ’s a mere job to plot the itinerary ( see the mental image above ) . You ’ll only see the purple space once you ’ve unlock the doorway there with the key at the top .
Once done , select the symbol below the game display board that look , use the yellow locket ability , and fall into place the now - open mouth of the dog to move forward . Once again , you ’re too late , as Milo is already here .
The secret plan is very interchangeable to before , except a small harder . This time the symbols you need to discover rotate , making them a little knavish to place , but the principle is the same ; so either finish the random matching game ( you get unlimited endeavour ) or expend your star to skip it andcomplete Chapter 4 .

Screenshot by Pro Game Guides
Legend of the Sacred Stones Chapter 5 walkthrough
After speaking to Siegfried , pick up theStone Plate(k1 ) and then click the arch to move forward and catch up with him .
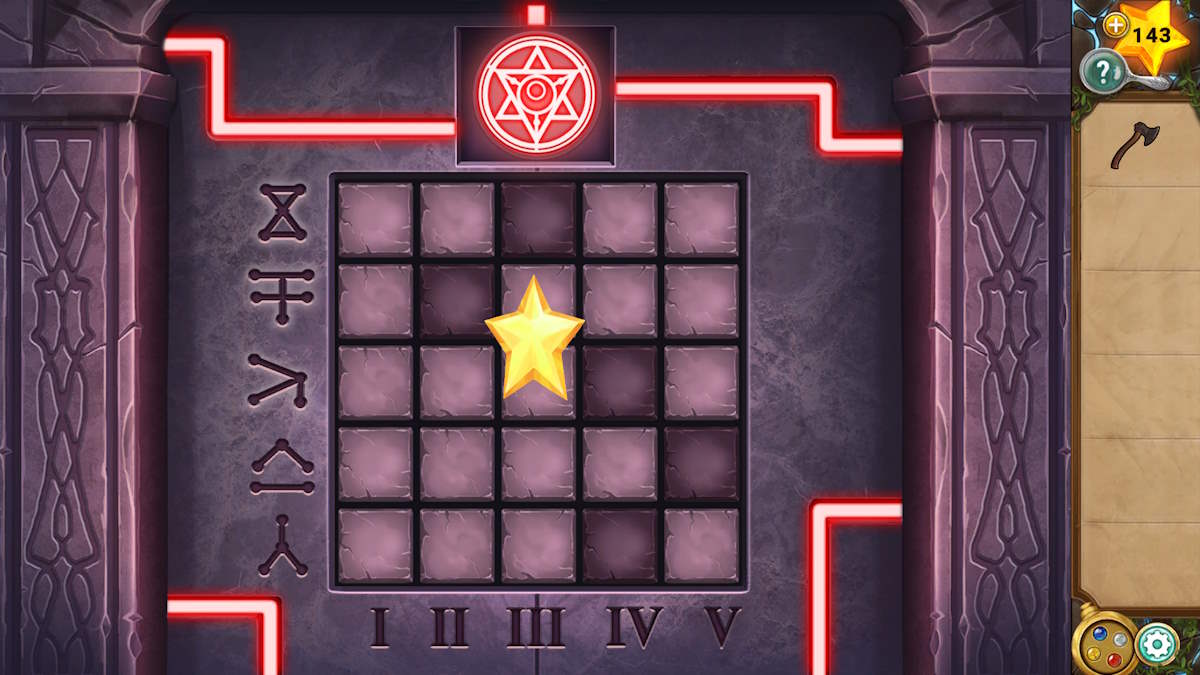
Take theMoon Disc(k2 ) , utilise the blue locket ability to raise the degree of the river , Select thecode lockon the wall next ( k3 ) , and note that each of the five place has one of its counsel arrows lit ( see below ) .
Using this , lead back to the first view and impart the moon disc to thelow pedestal(k4 ) . shape from left to rightfulness using the Romanic numerals on the image on the pillar , work out which weather condition lines up with the charge on the lock . For exemplar , position the humbled ( down ) golf hole of the magnetic disc on the one ( I ) pass on us a tree diagram . The concluded resolution ( pass on to rightfulness ) is :

Screenshot by Pro Game Guides
When you ’re done the panel will open , allowing you to take thesecond Stone Plateand aBear Paw . you could bring the two stone crustal plate to the memorial tablet here ( k5 ) , but you still ask a few more . Move back to the first scene andadd the manus to the bear statue(k6 ) , which reveal another mystifier .
Solving the color rows puzzle
Here you need to coordinate the colors in the correct run-in ( red top , green halfway , blue bottom ) . swing a wrangle up or down ( using the buttons at the bottom of each column ) leaves the ones at the top or bottom ‘ safe ’ ; while using the arrows at the side move the rows . Once staring , takeanother Stone Plate . Plus , even good , the wind ( white ) segment of your locket is now activated !
When you move forward to the bridge once more , you ’ll findSigfried has been buriedin a landslip . expend the white locket ability here and you ’ll stop dead the river , allowing you to move forward toward the temple .
Take theTorch(l1 ) and then utilize the yellow locket power ( l2 ) to raise the vine , allow for you to garner thePenguin Gem(l3 ) . Grabanother Stone Platefrom the base design in front of the temple door ( l4 ) , light your torch in the braziers here ( l5 ) to get aLit Torch , and then head back to Siegfried .

Screenshot by Pro Game Guides
Saving Siegfried
you may apply the torch to melt the frappe that ’s fallen on him , after which he ’ll give you theKeyto his chest . channelize back to the first scene and expend the flashlight tomelt the ice cube(k7 ) , which grow youanother Stone Plate . Use the key to give the chest ( k8 ) and notice aSeal Figurineand aBackpack . Now use the penguin on the pedestal ( k9 ) to give away a locket symbol . Using the jaundiced locket power here willremove the vineson the pulley next to the pedestal , revealing a lines puzzle .
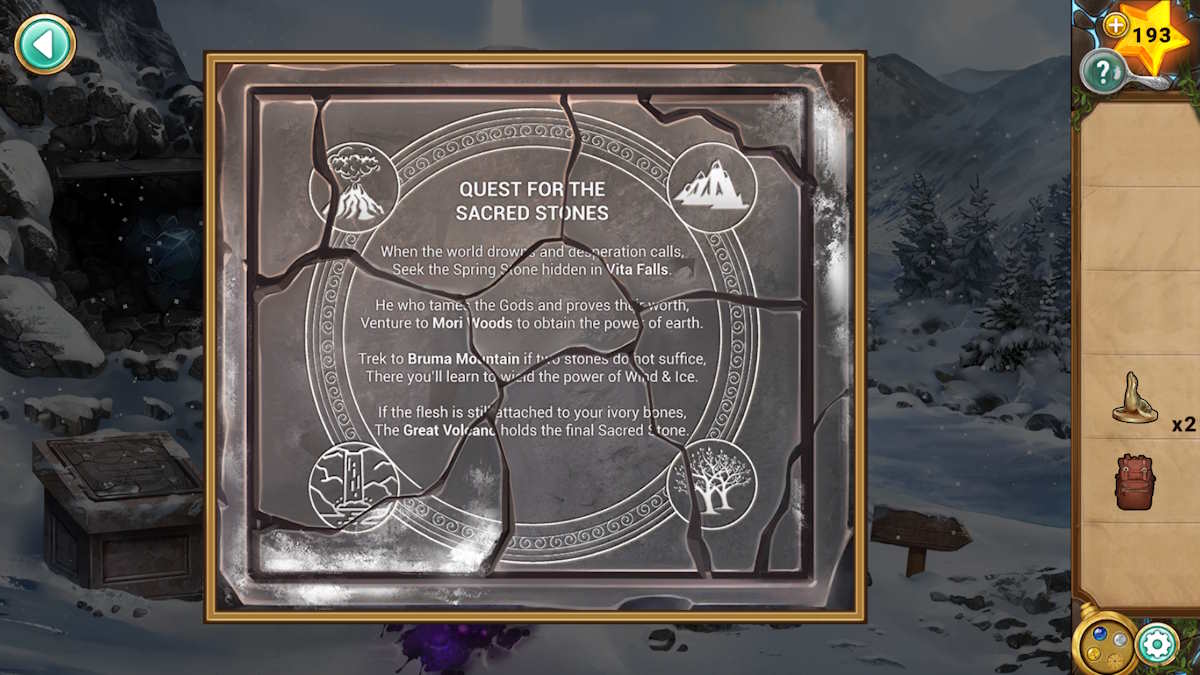
Head forth and add any stay stone plates tocomplete the plaque(k5 ) . The let on poem , Quest for the Sacred Stones , has four highlighted localisation . You need to remember the direction the picture locations are in relation to the words . For deterrent example , the waterfall simulacrum is southwest of the words Vita Falls . This gives you the postdate range steering :
If you read the dedication above the mystifier , it will remind you of acquire the vine up to find the penguin Gem . Return there and use the yellowed locket power once more to transfer the vines . Behind where they wereyou’ll now see a symbol(marked above ) . Go back to the lights puzzle , create this symbol in the lights , and you ’ll find a second Seal Figurine .

Screenshot by Pro Game Guides
While you ’re here , give the packsack to Siegfried . In return , he ’ll give you aStone Key . Move up to the tabernacle , lend the two figurines to the plinth ( l6 ) , and set the revealed dials to the compass direction above ( and pictured below ) .
This unveils a rock roll filled with filth ( at l7 ) , so apply the jaundiced locket power to add a vine ; the blueing to then irrigate it ; the white to plow it to ice ; and finally white-livered again to remove the vine , gaining you theIce Key .
Solving the temple pillar puzzles
supply the two keys to the floor pattern ( l4 ) and then do all three locket powers ( in any order ) to afford a now familiarleft door column puzzle(l8 ) . Here you must use the yellow gem to separate each band of colored gems by tracing crease between them .
The slightly slick right side is revealed when the left side is done .
Once this is complete , the proper - side pillar puzzle will be let out . The principle here is the same , but the board is larger , relieve oneself it trickier . Once complete , you’re able to get across the open temple door toconclude Chapter 5 .

Screenshot by Pro Game Guides
Legend of the Sacred Stones Chapter 6 walkthrough
Pick up theEmerald Eye(m1),Ice Emblem(m2 ) , and theShovel(m3 ) . utilize the shovel on the snow in front of the proper column ( m4 ) to find aTusk , on the left ( m5 ) to dig up asecond Ice Emblemand ( just behind that ) aStatue Head ; and then finally at the back - right ( m6 ) to get aFan Blade .
Add the header to the statue on the right ( m7 ) , which allows you to take theRune Block(also note the clue on the brass below it , shown above ) . Add the pulley-block to the right column ( above m4 ) and a expansion slot will open on the left column , allowing you to take asecond Tusk . Now you’re able to add the two tusks to the walrus header ( m8 ) , make it expend athird Ice Emblem . tally the emblems to the design below the walrus and you ’ll uncover a doorway . Head on through it .
Take asecond Emerald Eye(n1 ) and supply both to the correct leopard statue ( n2 ) , making it drop aWind Emblem . Now use the shovel on the unexpended ( n3 ) to get hold aMural Brick , and the center ( n4 ) to gain aTile .

Screenshot by Pro Game Guides
Finding the code in the mural
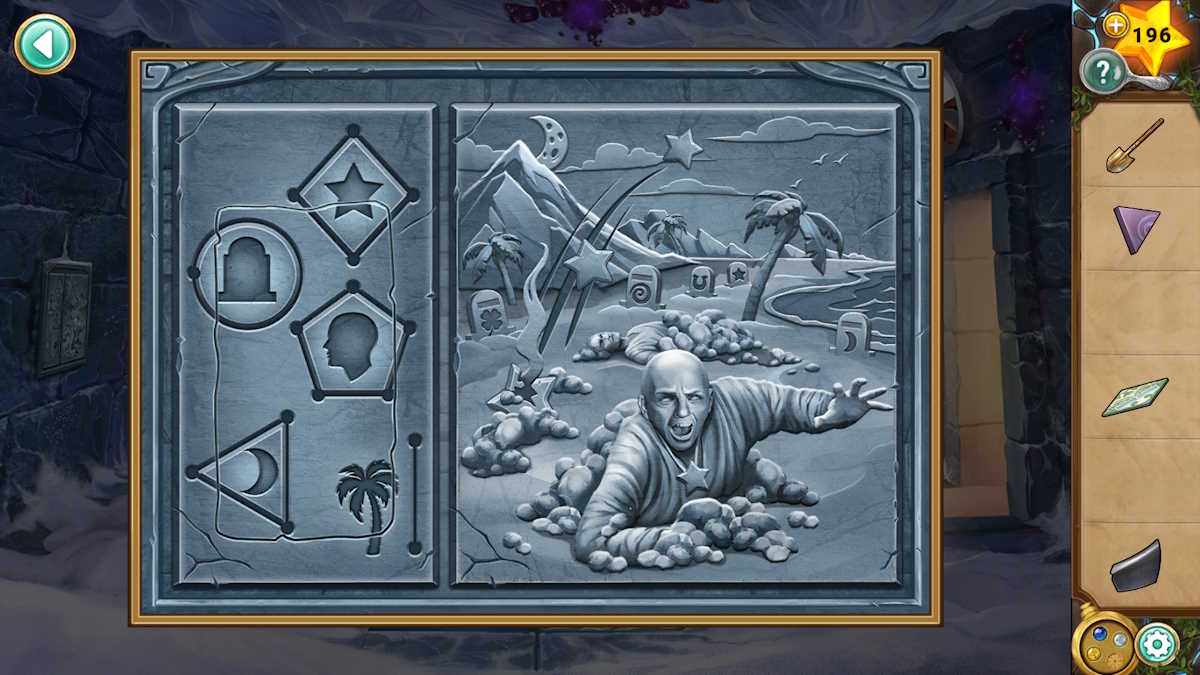
tot the mural brick to themural(n5 ) to reveal the look-alike above , take note the entropy it uncover ( see above ) . Each object on the left has a number of points on the origin around or next to it , while there is a wide-ranging number of each target pictured in the range of a function to the right . Count the amount of each item , using the number of points to get the routine gild ( graves , tree diagram , lunation , stars , people ) to get the code53252 . employ this to reach the chest ( n6 ) to take asecond Wind Emblem .
contribute the trading floor roofing tile to the repose on the floor ( n4 ) to complete the figure , raising the pedestal on the left-hand ( n7 ) . Use the livid locket power to send it skyward , which knocks down athird Wind Emblem(n8 ) for you to hoard . manoeuvre back to the first room , add together the wind emblems to the doorbeneath the penguins(m9 ) , and head through .
Use the shovel to come up aGaunlteton the left over ( o1 ) and aMalletin the in-between ( o2 ) of the room . Now select thefuseboxon the wall ( o3 ) to start a ability meter mystifier . You ask to append tile and then use the electrical switch on the right to see if you ’ve correctly filled the beat to the blue line of products . Once you do ( see below ) , the cube on the ceiling will move across to the right , knocking down aFan Blade(o4 ) for you to amass .

Screenshot by Pro Game Guides
Use the hammer on the right Panthera pardus ( o5 ) and you ’ll collect aLeopard Tail . headspring to the room on the left wing and add together this prat to the leopard on the leftfield , which open a slot below it from where you could collect aDiamond . Take this to the way on the right , add it to the back wall ( o6 ) , and the window will open , allowing you to expend the locket . The yellow office will get rid of the vines ( o7 ) , and then the blue locket major power will cause aPenguin Statuewill rise up in the water inside the fan .
lead back to the fundamental room , add the penguin to those above the door ( m9 ) , and the devotee above will work long enough to drop athird Fan Blade . Also , use the gauntlet on the purplish curse by the left mainstay to get a Sticky Curse . Add the three blade to thefan in the cornerof the room on the left ( n9 ) , use the sticky curse to bind them in blank space , and pick up theRepaired Fan .
Solving the animal heights puzzle
Return to the elbow room on the right and expend the repaired fan toreplace the broken oneon the ground ( o7 ) . Click the stop next to it to place it on the fan , and then utilize the while locket ability to fire it up . This open up a crosshatch to the right ( o8 ) , which has a bunch of fauna figurines at heart . The clue to solving this one is the height of the icicles in the window of this elbow room . From left to right field , you want :
Once you ’ve move the animals into the correct spots , you’re able to take anAncient Curcuit . Take this to the room on the left hand , lend it to the wall(n10 ) , and the block on the roof will move left to its original situation . Use the ashen locket power to air the lower stop up to the top one , bring out a board where you may take aStone Hand . Now utilize the blue locket superpower to start the water through this fan , taking asecond Stone Handwhen it rises to the top .
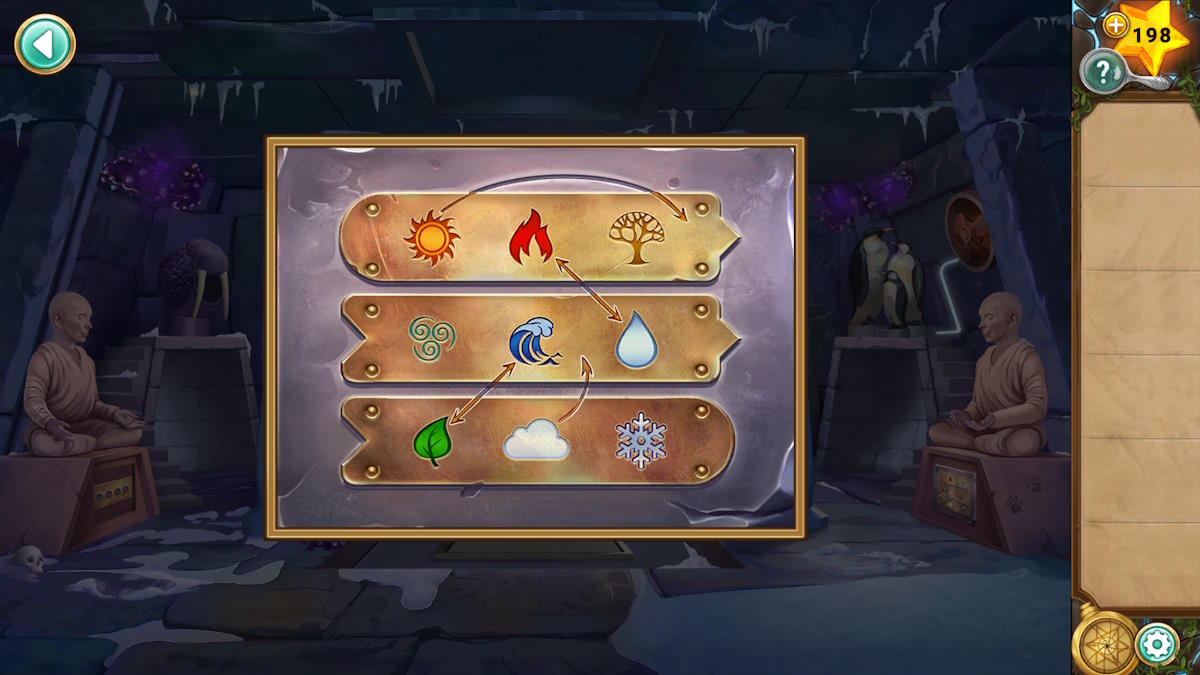
Back in the primal room , you’re able to total the two hired hand to the left statue , disclose acombination lockunderneath . Note it has symbols for ( from left ) nose candy , wind , ground , and fire on it .

Screenshot by Pro Game Guides
Now look back at the panel below the right statue , which will give you the hint you need to lick this teaser . Snow is in the ‘ 9 ’ position , wind in ‘ 4 ’ , earth should be in ‘ 5 ’ ( if you conform to the arrow ) , while fire should be at ‘ 7 ’ ( it switches to 6 with water , but then is promote in advance one by wind ) . Thisgives you the computer code 9457 , so enter it below the left statue .
Entering the temple
you could now expend the locket in the key way of the temple . utilise the white locket magnate on both side to knock down and then call for theVillager and Glacius Figurines(m10 and m11 ) . tot these to the game board that now turn out in front of the cardinal bear statue to begin the nextboard game puzzle . To get the villager to Glacius you need to get an ice block to the red blot in the center . To do so , do the pursuit :
With that , you’re able to move the villager to Gladius and complete the secret plan . Use the white locket power and the threshold will open , allowing you to move through to the automaton and , of course , Milo . Once again the puzzle is largely the same but with the difficulty slightly raise , this time by having the symbol you ’re trying to find also moving around . Once complete , you ’ll bedone with Chapter 6 , despite passing out !
Legend of the Sacred Stones Chapter 7 walkthrough
When you come to , you discover yourself back at home with your parents . After speak to your mother , deplumate back the rug to reveal the trapdoor entrance . seize theCompass HandandMatchesfrom the table ( p1 ) , take theStep Ladder(p2 ) , and give the book you looked at sooner ( p3 ) to find asecond Compass Hand .
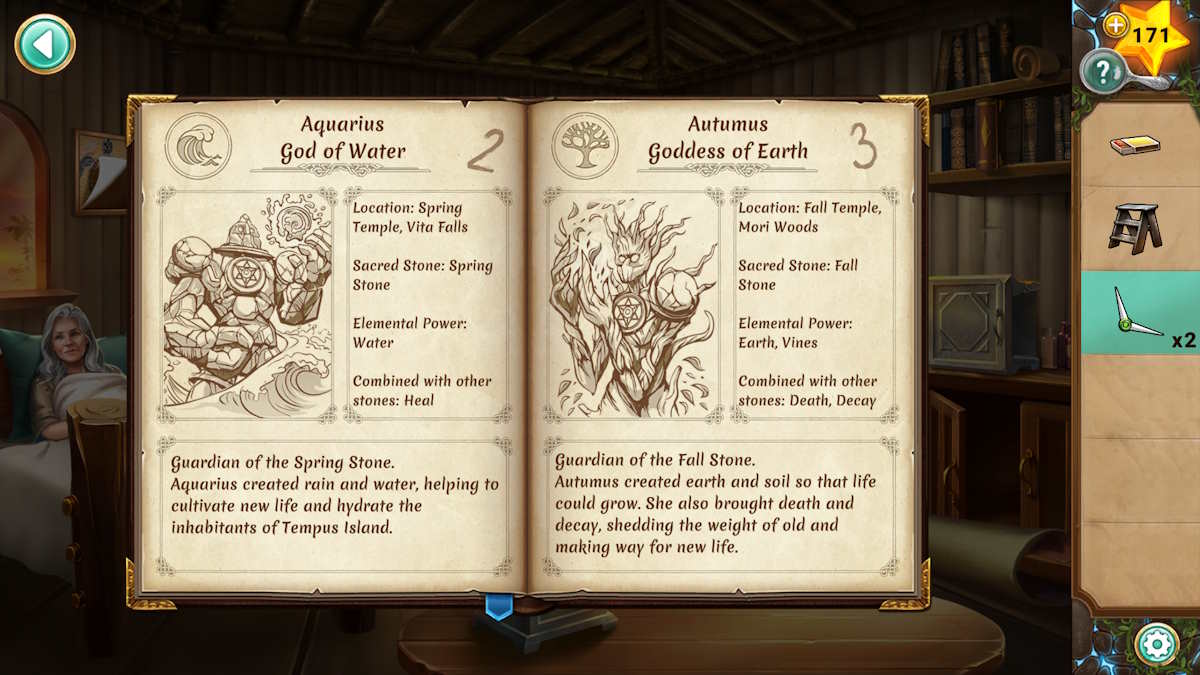
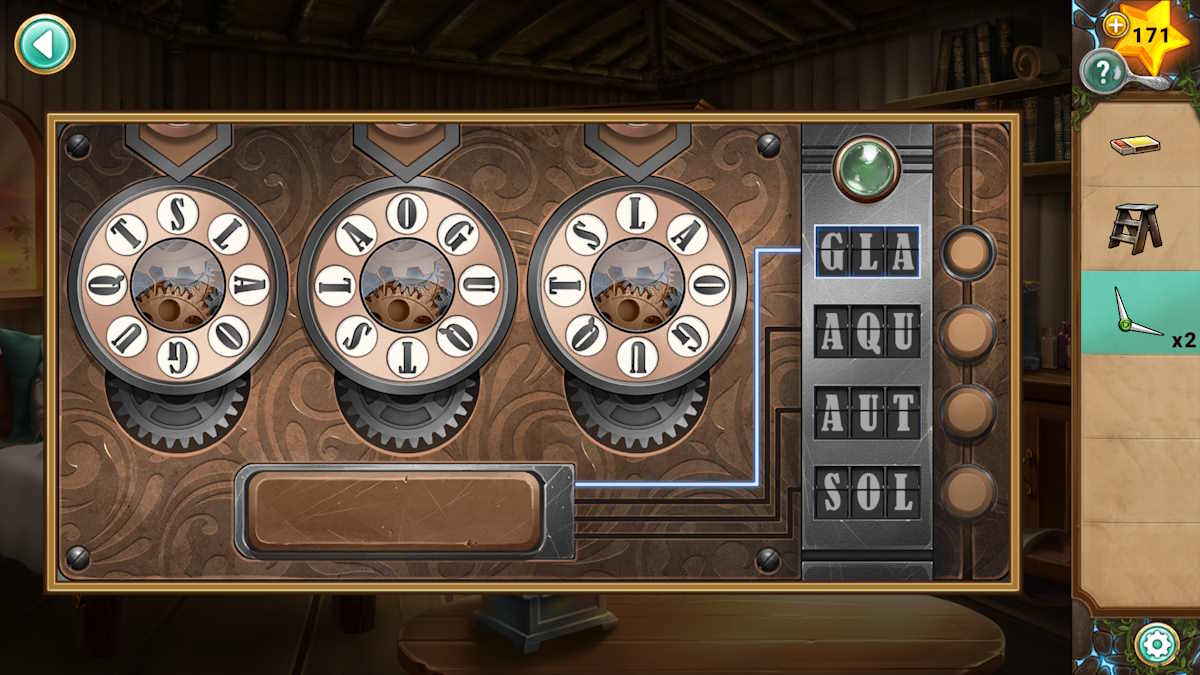
Look in the Holy Writ and remark down the first three letters of each of the gods : GLA(Glacius),AQU(Aquarius),AUT(Autumus ) , andSOL(Solaris ) . Select the trapdoor ringlet ( p4 ) and enter these three - digit codes into the lock to open it and pull in admission to the basement .
Before order down , take thePry Barfrom the closet ( p5 ) and utilise it to start the box above it , taking theTweezersand aGemstonefrom inside . Use the tweezers to commit back the edge of the turtleneck painting ( p6 ) to find asecond Gemstone . you’re able to bestow them to the remaining point on the tabular array ( p1 ) , but you still need to find two more .

Screenshot by Pro Game Guides
Go down into the basement and use the stepladder to get theLantern(q1 ) . give ear the lantern in the drear nook ( q2 ) and use the matches to illume it , taking theFamily CrestandJournalyou can now see there . You ’ll also take down that five bricks are pushed out a trivial from the wall ( mark above ) , crusade each in and a panel in the floor will open ( q3 ) , allow you to take athird Gemstone .
Select the noticeboard next ( q4 ) to find athird Compass Hand , while read the note it is stuck to . Also , note that now the way is fully lit , you’re able to see four colored book with shapes on the front ( risque hexagon , white Triangle , red rophy , jaundiced squares ) .
Head back upstairs and give your mother the daybook . After a longsighted snub scene your sire will give you theCabinet Key , so use it to open up the console ( p7 ) and take theTroweland aBrush . Use the trowel on the pot plant ( p8 ) to rule afourth Gemstone , and then impart them all to the small chest on the table ( p1 ) to find asecond Family Crestinside .

Image by Pro Game Guides
Solving the compass puzzle
summate the brush to the pole incline against the door ( q5 ) , and take theBroom . Now utilize it to clear up the debris on the red carpet hear , revealing afourth Compass Handand yourthird Family Crest . add together the hired man to the scope on the desk ( q6 ) and the door below it will spread , uncover a compounding lock .
Note the symbols match those of the books in the elbow room , while the available compounding number are I , V , and X. Look back at the completed compass ( see above ) on the table and match the script coloration with the rule book colors . For your starting decimal point , utilize the green mark around the edge of the compass . So , for the top ( triangle ) transmission line , you want the white work force ( as it is a white book ) . look to start near the green agate line and go clockwise , the white script are pointing to II , VI , and X. This gives youIIVIXfor the top personal line of credit . The rest are :
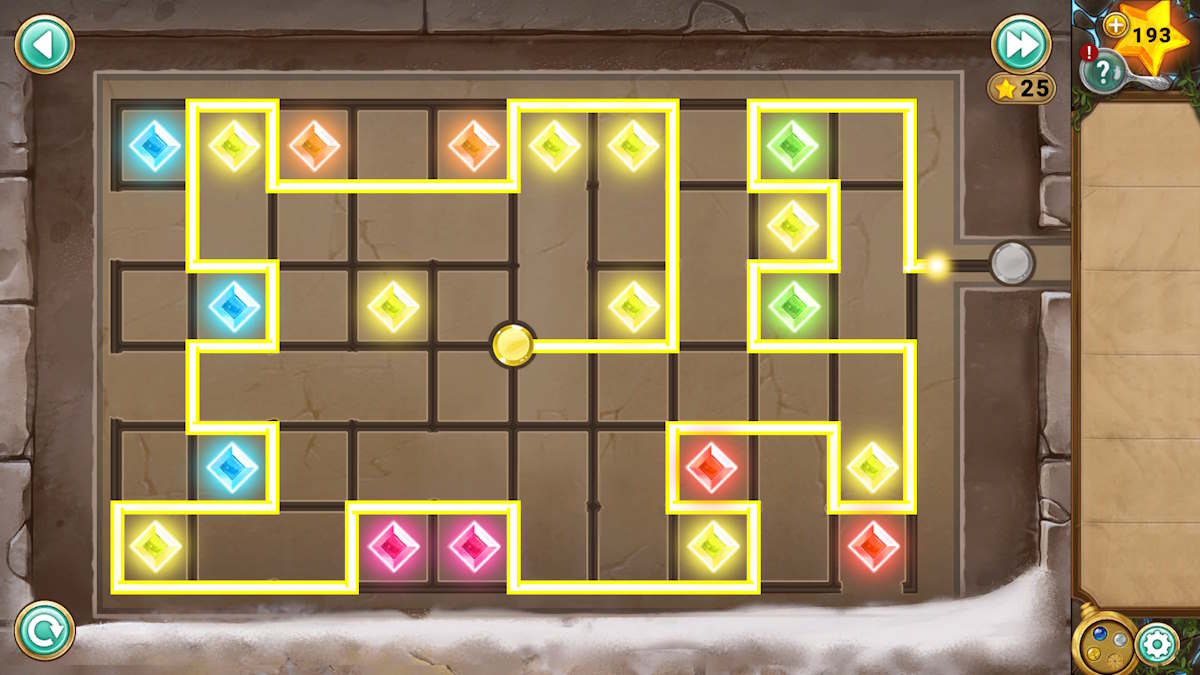
Once unadulterated you’re able to take the quaternary andfinal Family Crest . total these to the room access here ( q7 ) to reveal your next bm mystifier . Each of the colored glob postulate to end up in a infinite of its own people of color and they can be shift sideways by using the empty infinite on the cardinal telephone dial ( which can be turn with the green clit in the middle ) . Once complete the room access will open up , allow youentry to the hidden enactment .
Screenshot by Pro Game Guides
The way to the temple
Once Siegfried has give you back the locket , you ’ll also have access to its final ( red ) power . Check out thescroll(r1 , see below ) , grab theCrystal Bowl(r2 ) and theHammer(r3 ) , and then use the yellow power , watch by the red , to start a ardour ( r4 ) .
Fill the bowling ball with water from the sea ( r5 ) and then order it on top of the fire . When the water changes colouring , use the blue power to put out the flack and take theWater Bowl .
Use the hammer to remove aWooden Plank(r6 ) , place it under the border of the gargantuan handwriting ( r7 ) , and then ask Siegried to help you get theAxefrom underneath it . apply the axe to break the hatching unresolved ( r3 ) to notice theSun Keyand aLens . append the lens to the telescope ( r8 ) and then practice it to begin a magnification puzzler ( see the focused image below ) .
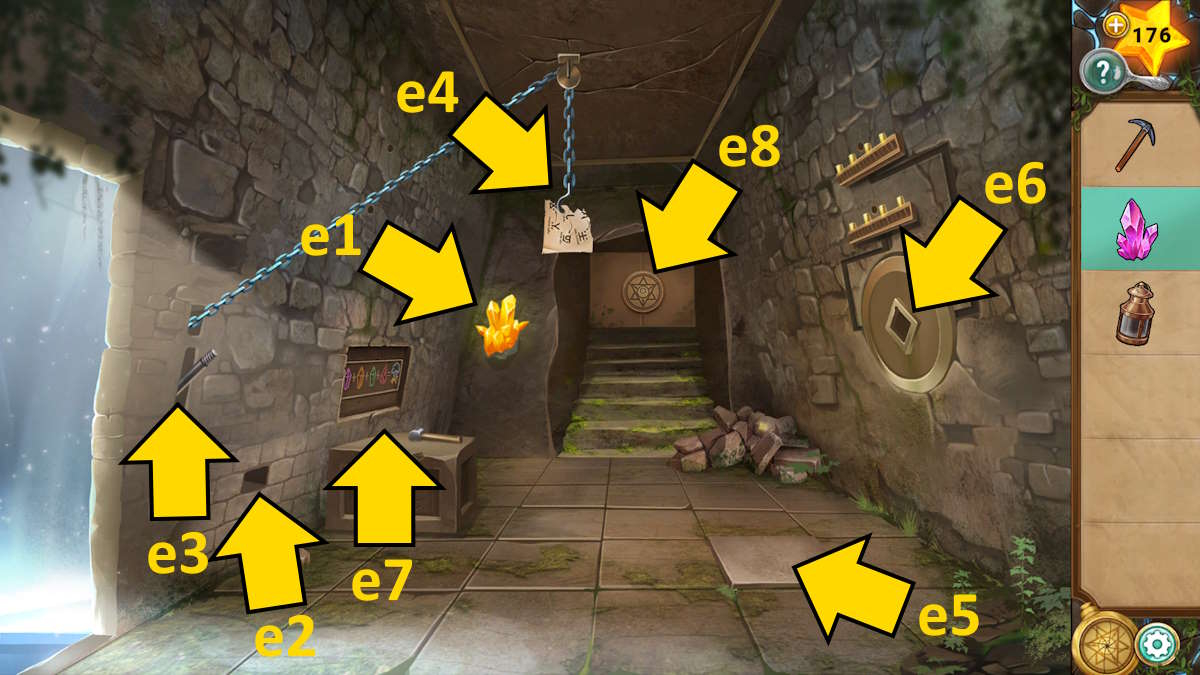
Image by Pro Game Guides
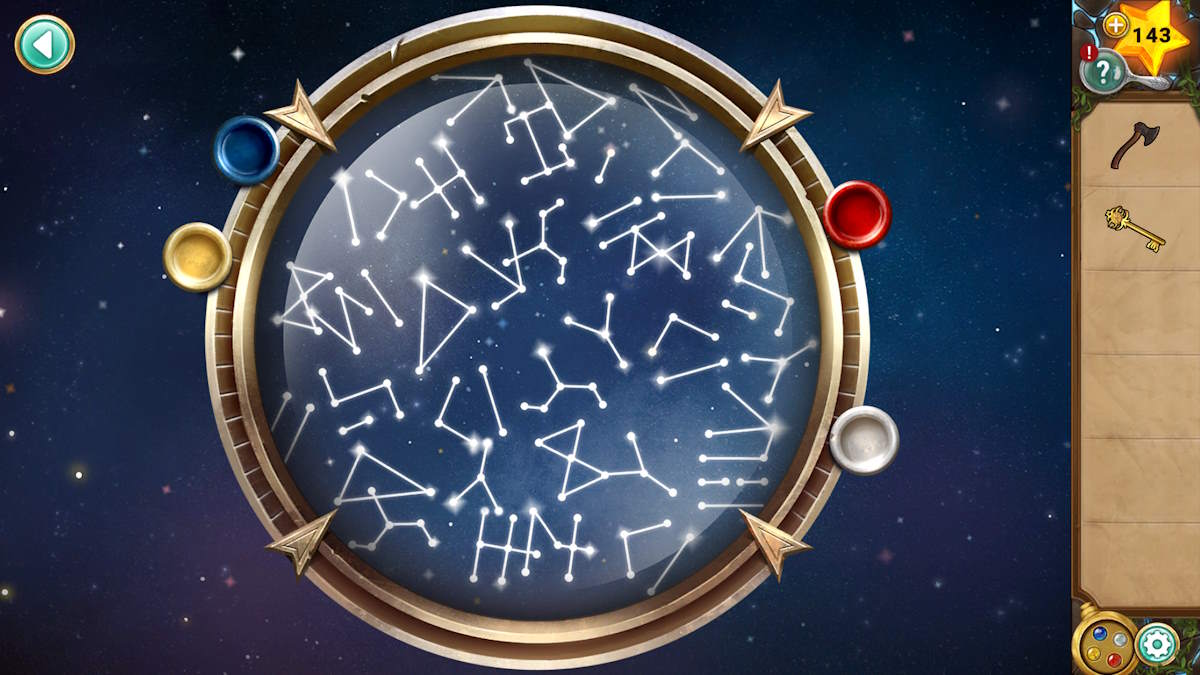
Now choose the temple room access ( r9 ) for a close - up , use the Dominicus samara on it to reveal a locket symbolisation , and activate it with your red locket power . you could now complete the scroll you saw earlier by finding those configuration by looking through the telescope and noting the telephone number of times each distance is visible .
You ’ll line up it is32454 , so dawn that button ( exit to right wing , see above ) on each line to complete the puzzle . flick the door to point through .
The temple entrance offerings
Pick up thetwo Summer Pendants(s1 and s2 ) and theFishing Reel(s3 ) before heading back to the beach . Use the reel on the rod ( r10 ) to get aFishing Rodand then use it in the sea ( r5 ) to ‘ get ’ aStone Slab . you’re able to now move back upstairs and specify the slab on the right ( s4 ) , after which you’re able to employ the locket ’s dreary ability to open up the turtle film above it to find athird Summer Pendant .
If you click the textual matter where you find the third pendent , it says you need to offer piss stainless by the ocean ’s mineral . come out the urine bowl on the water pedestal ( s5 ) and it will set off the right king of beasts ’s head , allowing you to take asecond Crystal Bowlfrom where the bush was below it previously .
duplicate the trick with the arena on the but this time to boot use the white power after you ’ve put the fire out with the sorry power , taking anIce Bowlinstead . Place this on the malarky pedestal ( s6 ) and you ’ll illuminate up the left lion , allowing you to grab athird Crystal Bowl .
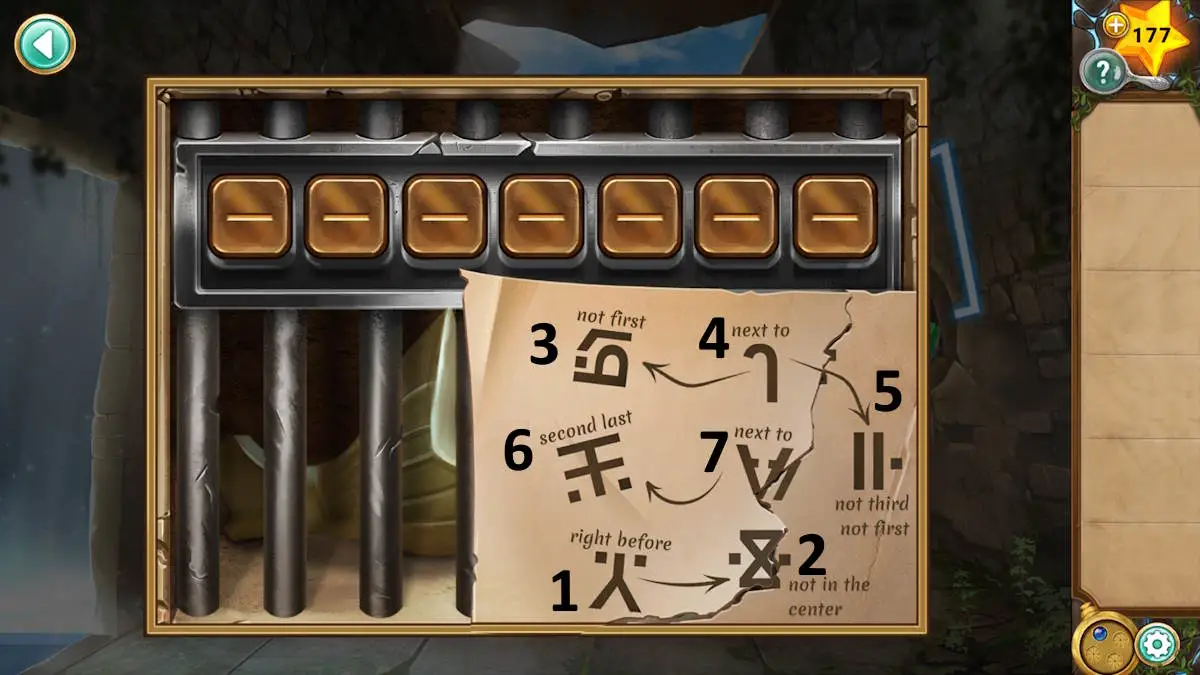
Image by Pro Game Guides
This time when you return to the beach , Ollie is wait for you . After a brief chat , he gives you aStone Slab . Using it tolerate you to complete the double to the left of the tabernacle door ( s7 ) . Once you do , apply the yellow locket ability to open it up and take someGloves . This prison term the content asks for ashes from the tree of life . Now use your roll on the urn here to get aBowl of Ashes .
come in the bowl of ashes on the fire on the beach and this time , while the fire still burns , use the glove to take theFire Bowl . Take this up to the temple entrance , place it on the fire plinth ( s8 ) , and the ground will open up in the centre of the way .
Solving the pilar puzzles
Take thefourth Summer Pendant(t1 ) and use the ax to chop the root inwardly to gain aSacred Root . The brass here allege to offer the root as a sacrifice , so place it in the solid ground roll ( t2 ) to dispatch the sacrifices .
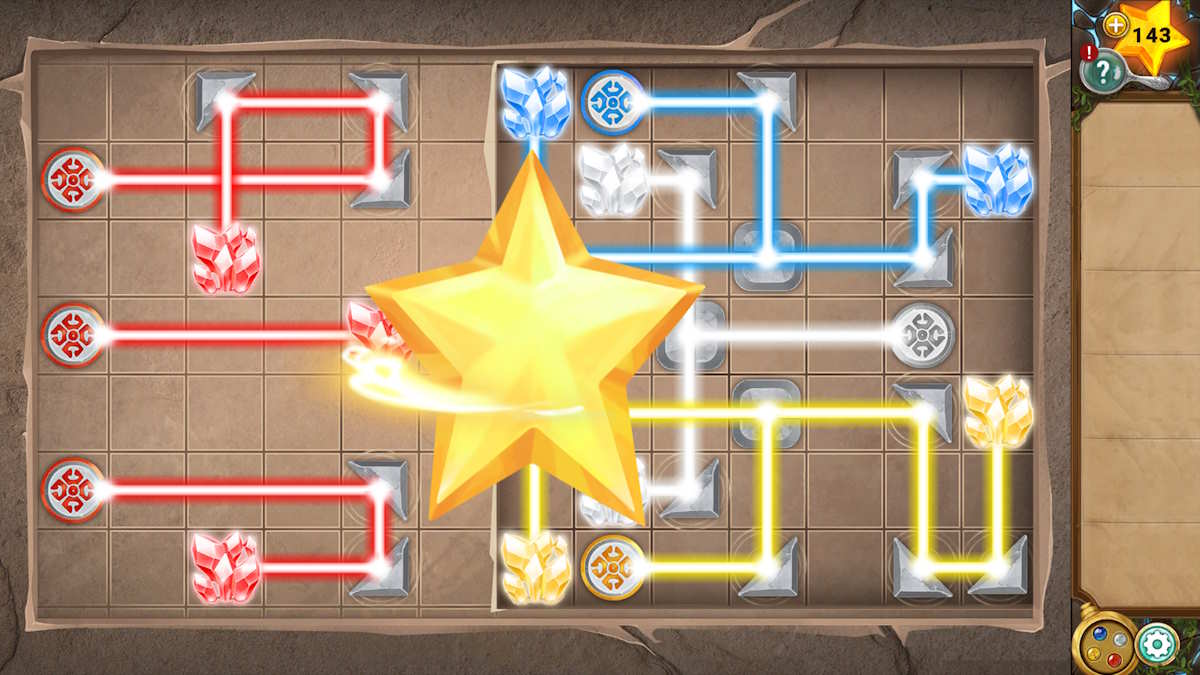
you’re able to now add thefour pendant piece to the door(t3 ) and utilise the fire ability on the central symbolization to open - you hazard it - the left - side mainstay ( t4 ) . This is a light beam puzzle , where you need to angle each target to illume all the crystals . When you have finished crimson , the white , blue , and yellow irradiation will become available .
Once those are concluded , theright - side pillar puzzle(t5 ) offer a exchangeable but more complex challenge . It ’s not bad though ; just concentrate on one colour at a time and you ’ll shortly be done . If you ’re stick , the result is below . I discover iteasier to complete red last , as it ’s the brightest color and its lines run over the others , make it easier to see .
Screenshot by Pro Game Guides
Once you ’re done , your father will give you one terminal peppiness talk of the town before you head into the final synagogue , towards the last chapter , andcomplete Chapter 7 .
Legend of the Sacred Stones Chapter 8 walkthrough
Once Milo retreats into the temple , foot up thethree Ladder Steps(u1 ) and open up the hachure ( u2 ) to feel aStar Shard . Pull back the rug ( u3 ) to find afourth Ladder Step , take thePhoenix Keyfrom the book ( u4 ) , and then add the whole tone to the run ( u5 ) and go up up to the room above .
cull up theStone Scale(v1 ) , take aStar Shardfrom the rucksack ( v2 ) , seize theWheel(v3 ) , and use the key to start the chest ( v4 ) to find aSun Stone . headway downstairs , tote up the steering wheel to the correct bulwark ( u6 ) toopen the ceiling , and then utilise the aventurine on thehole in the unexpended wall(u7 ) to expose a locket design . you could now utilise the yellow locket top executive to make the beginning grow up to the left balcony ( u8 ) , gather youaccess to another way .
Climb the vine and head into the snake room . Use the blue locket top executive on theleft trigger(w1 ) to put the flack out , let you to take thePhoenix Headfrom the chest ( w2 ) . Use the world power on the correct marker ; growing a vine up past the door so you could take theVillager Figurine(w3 ) . Now use the red ability on both side , stopping the lava flowing and provide you to take athird Star Shardand asecond Stone Scalefrom the revealed niches . You ’ll need to trigger off the yellowed ability again to destroy the vine so you may leave the way .
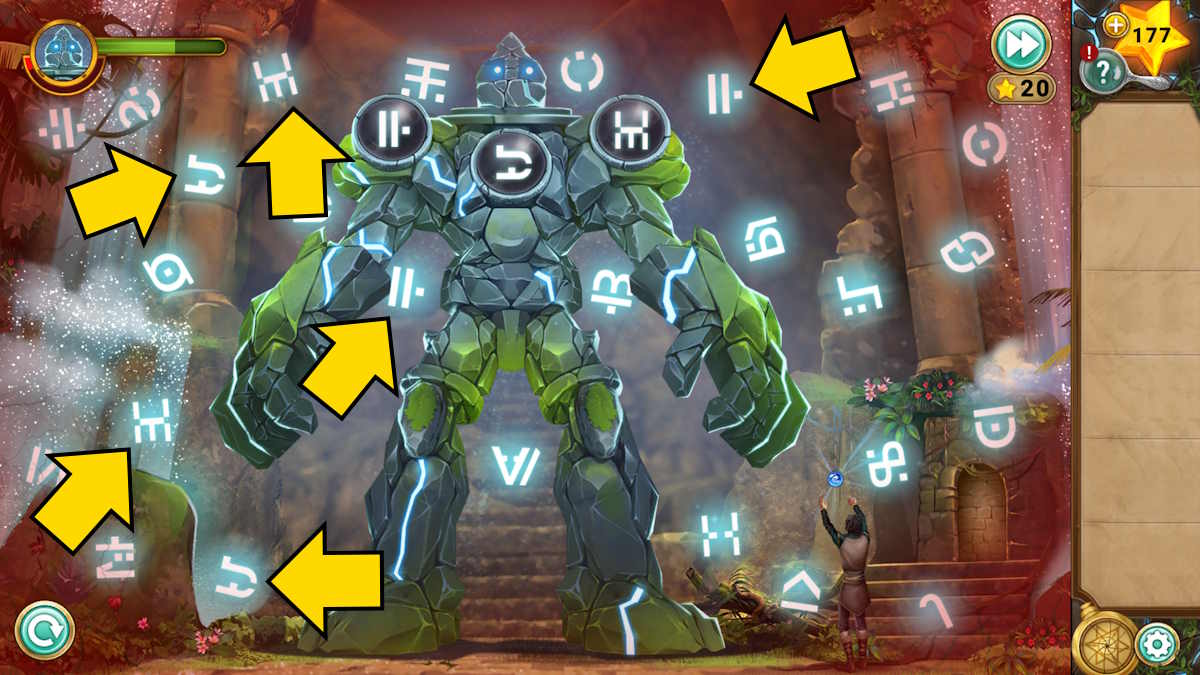
Image by Pro Game Guides
Return to the capital of Arizona room on the right-hand side and add the headspring to thephoenix statue(v5 ) , opening the cap here too so you may apply the locket . Use the yellow power to remove the vines from the rampart ( v6 ) , give away a puzzle ; then use the white ability to blow the trash cube ( v7 ) across to the fire ( v8 ) , melting it . Now use the red ability to put out the fire by the door ( v7 ) , revealing a solid photographic plate underneath , and taking theSnake Key .
How to use the sun lens
Head into the snake elbow room and expend the key fruit to give the snake chest ( w4 ) to get theSun Lensand someGunpowder . touch off the sun crystalline lens in your inventory to note that five suns become seeable that you could n’t see before . Go down into the lion elbow room and apply the lens again , noting there are four Sun , and then again in the genus Phoenix elbow room where you ’ll find three sunlight ( see the lesson above ) .
take the board on the puzzle wall here ( v6 ) and note the images below each circle . add up the turn of suns for each animal to get the code8597 . The hatch open up to break a level , so draw it . A box appears where the chicken feed cube used to be . You now need to use the locket once more :
This give the hatching on the right paries ( v7 ) , set aside you to take someShears . you may also click the barrel here and sum up your explosive , but you need more components . Return to the Snake River elbow room and use the shears to cut theRope(w5 ) . Go back and total the rope and gunpowder to the barrel ending - up ; click the gunpowder again to place it in the gun barrel ; summate the lid ; then add the rophy to get anExplosive .
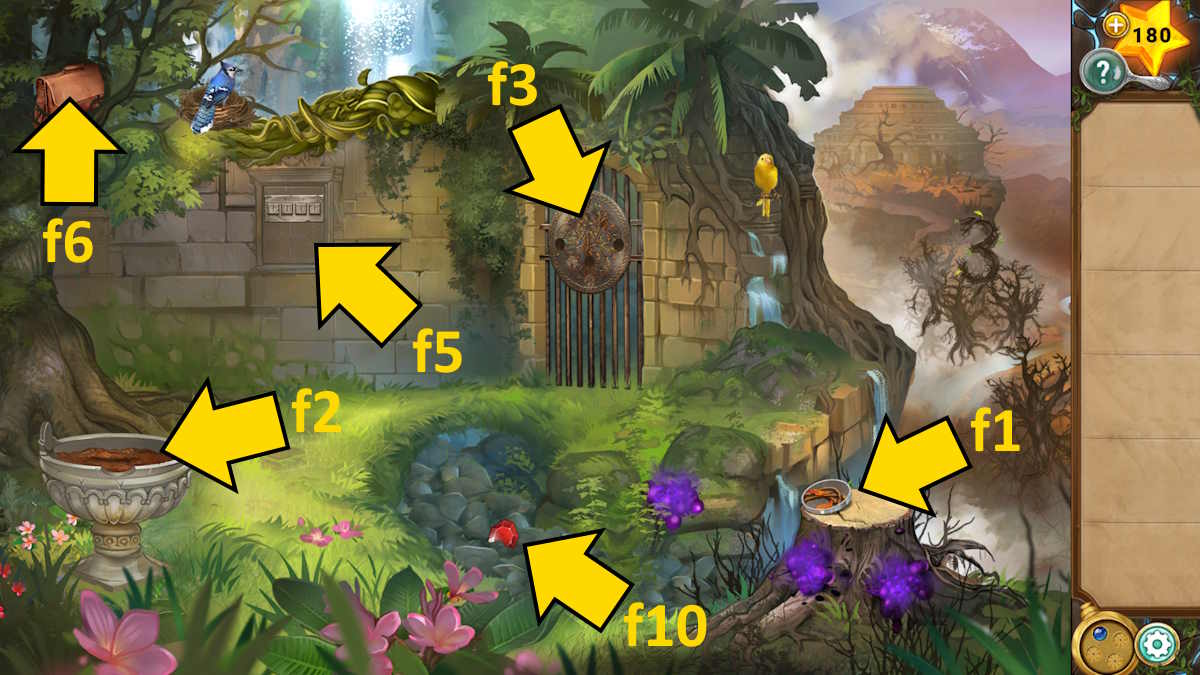
Image by Pro Game Guides
Place the explosive on the left balcony of the lion way , next to theweak wall(u9 ) , and then activate the red locket ability to burn the vine and blow a muddle in the bulwark . You ’ll then ask to trigger off the disconsolate power to put out the fire and originate a new vine with the yellow power before you could collect thePickaxeand theStar Pendant .
Use the star pendant to start the Bible ( u4 ) and open it to feel aGod Tile . Also , note that the book detail positional particular of where and how the God acted , which will act as a hint in a slight while ( luckily you’re able to take the Book with you now ) .
Add the god roofing tile to themural beneath the lion ’s head(u10 ) and arrange the god tiles in the right gild using the Scripture clues ( see above . Once done , take thefourth Star Shardandfinal Stone Scalefrom behind the wall painting .

Screenshot by Pro Game Guides
Completing the star shard puzzle
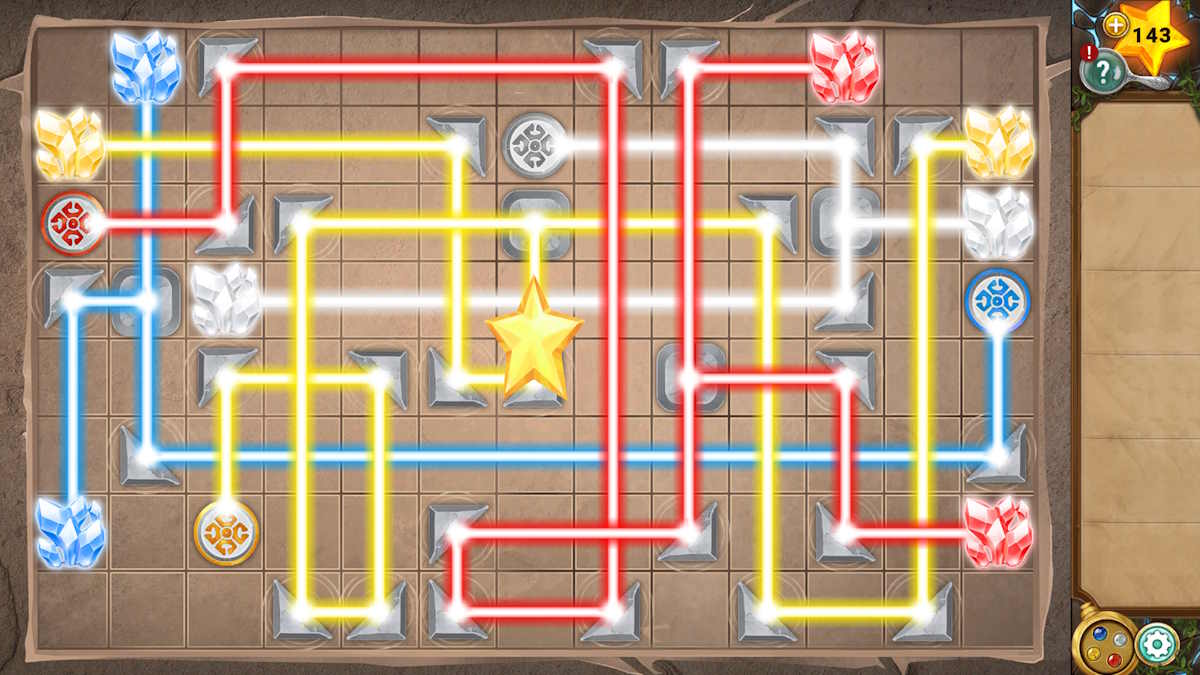
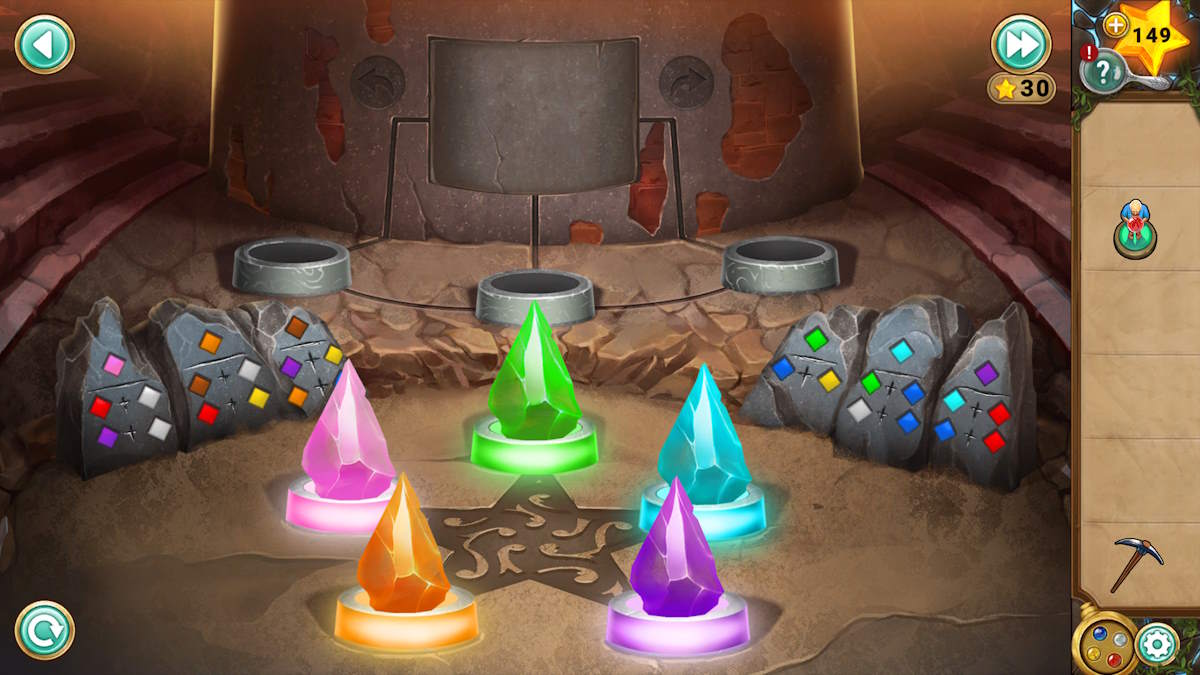
Add the stone scale to the snake(w6 ) and a moat will come along around it . Click it to reveal another puzzle and lend the five star sherd to it to begin . You need to move two or three of the shard into the flowerpot at the back to get to the panel , revealing a locket approach pattern . you’re able to then utilize the locket to change the colour of the shard , with the target being to commute the shard to the colors they ’re seat in ( orange , pink , green , pale blue sky , and violet ) .
The stones around the border show how to create each of the color , as each usher what color the sherd needs to be and which locket power will mix with it to make the colouring at the top . If a shard is in its original grey , it will turn to the color of the baron you use . So , if you put a grey and a depressed shard up and use the blank locket ability , you ’ll end up with a white shard ( from the grey ) and a light bluish shard ( from the puritanic one ) .
It ’s a clever puzzle , if a bite fiddly , so if you desire a dim-witted root follow this pattern ( shards numbered 1 - 5 from bottom left clockwise to bottom mightily ):

Image by Pro Game Guides
Once complete , the snake statue will drop theMoon Stone . Place this in the righthand bulwark of the lion room ( u11 ) and then use the locket trigger that appears to apply your ashen power . This freezes the lava , allowing you to collect theSolaris Figure(x1 ) . ultimately , you’re able to use the pickaxe on the internal-combustion engine you ’ve just create ( x2 ) to knock it down , triggering the floor launch pad below andrevealing the final board game(at x3 ) .
Completing the Solaris board game
Add the Solaris and villager figures to the board game to begin . This time you need topush the colored blocksonto their tally push button to make a path from the villager to Solaris . This time blocks pushedonly move one space , but you need to becareful not to obstruct yourself in , or leave behind a block against a wall where you ca n’t get the right side to tug it . If you ’re stuck , follow these book of instructions :
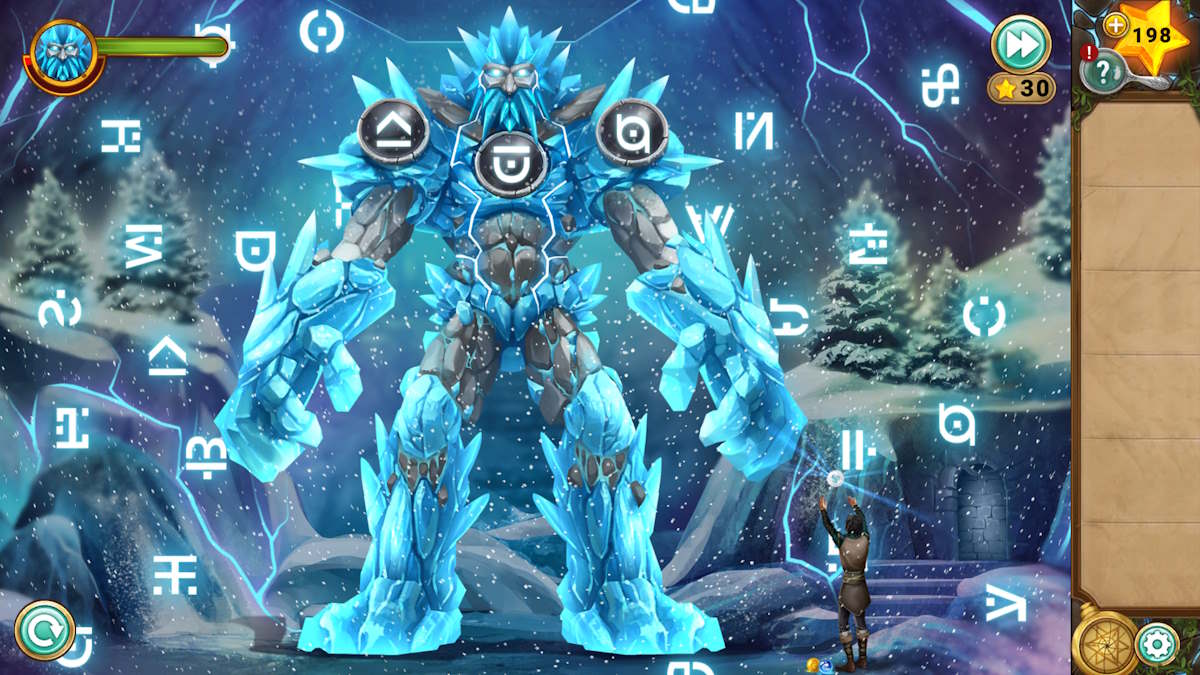
apply the red locket ability on the gun trigger that appears beneath the plug-in game and the king of beasts ’s mouth will open up , giving you access code to thefinal opposition with Milo ! Unfortunately , he is n’t listening to reason , so you ’ll have to take on Solaris . I thought that this time was actually a little easier than the previous one . The symbols wink in and out of sight , but at least they do n’t move around !
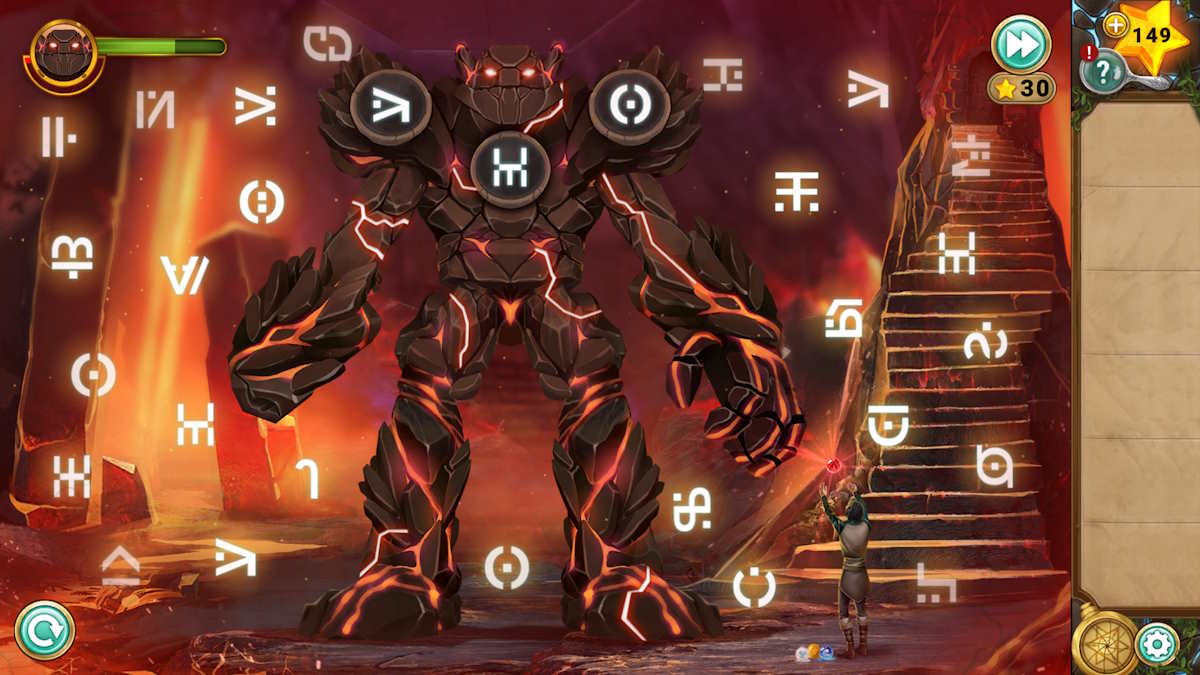
However , Milo is n’t give up that easy ! Once you ’ve spoken to Solaris the struggle now impress outside and is once again timed ; but it does n’t begin until you pick up the book ( marked above ) .
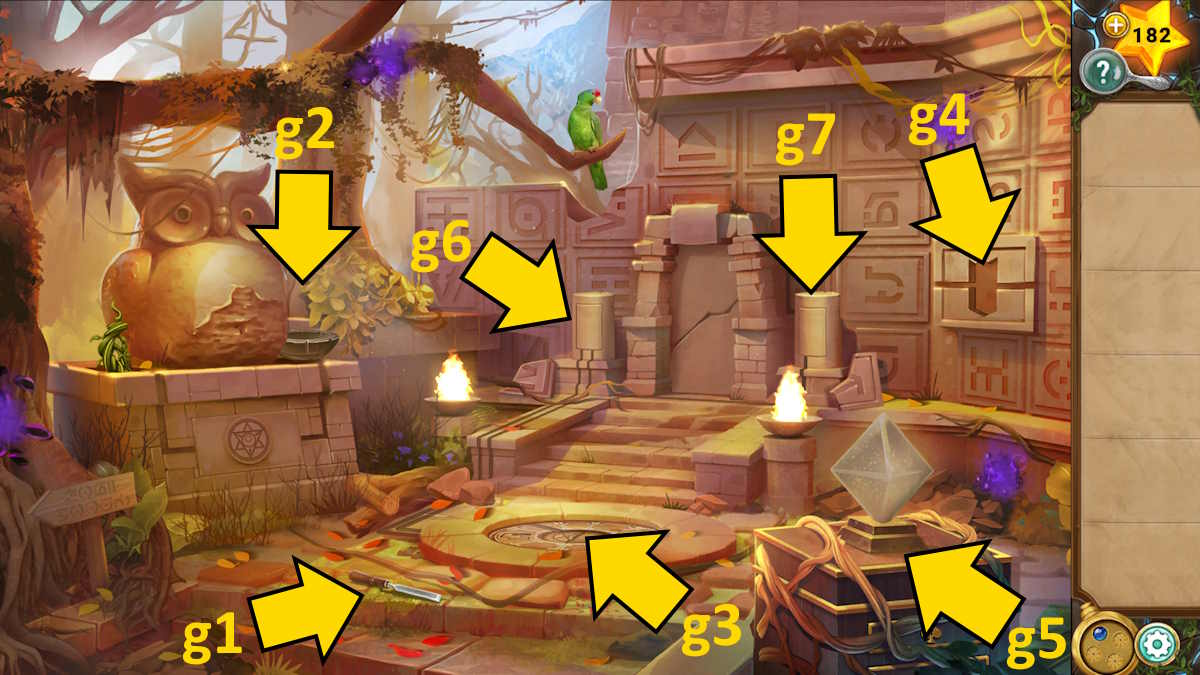
Image by Pro Game Guides
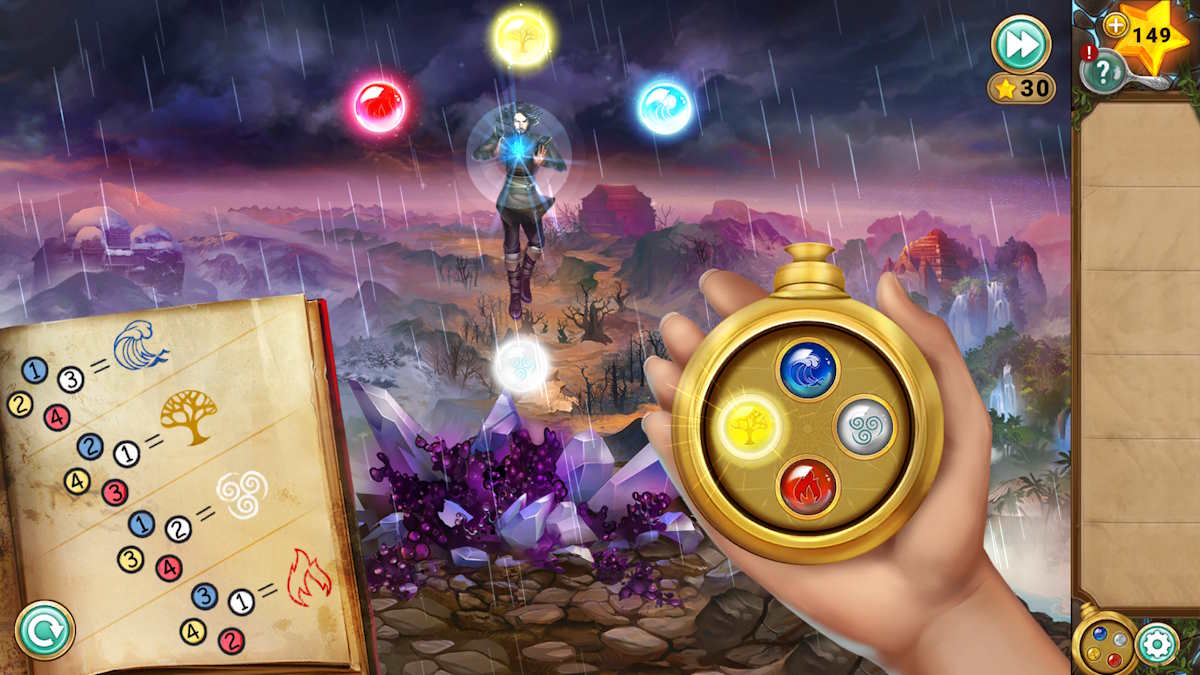
You must expend the rule book to watch over his traffic pattern of spells and select the right-hand one to counter within the al-Qur’an . If you get this proper five multiplication you ’ll be triumphant , but if you take too farseeing to make a conclusion , he ’ll damage you . As always , you’re able to keep strain until you get the better of him , or use ace to decamp the struggle .
However , from my experience , it seems as if Milo ’s attempt follows the same pattern each fourth dimension : water , fervor , earth , wind , and then terra firma again ( soblue , red , yellow , white , chicken ) .
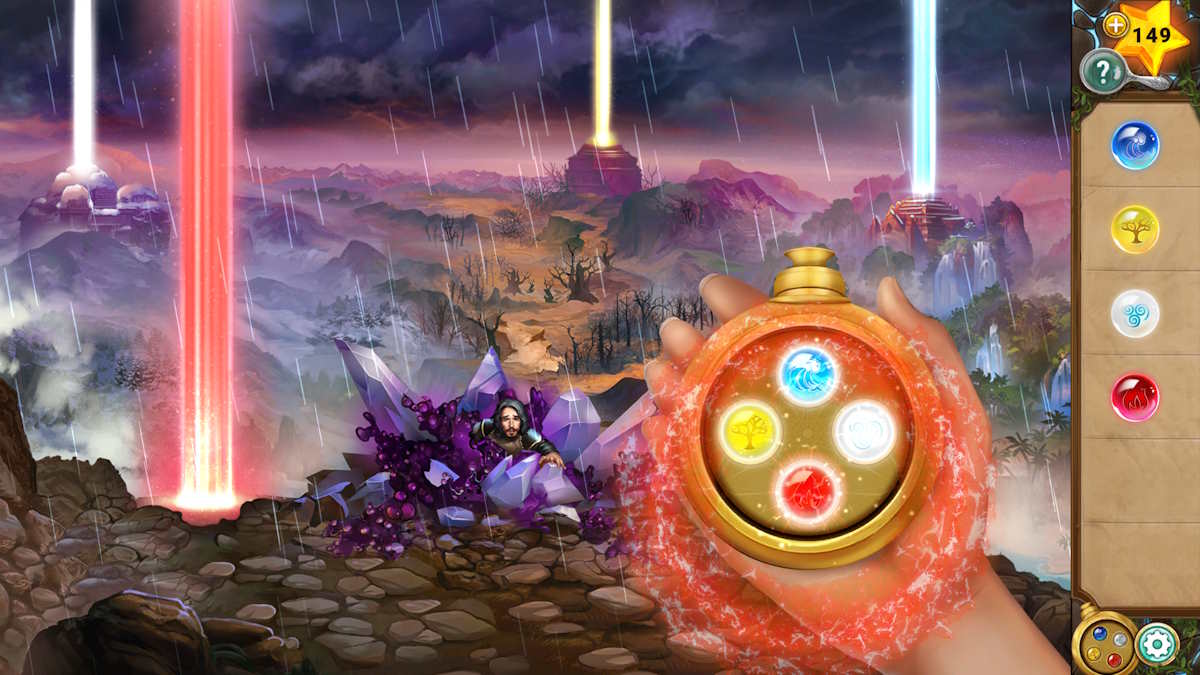
After the conflict , click each of the Stone as they begin to beam . Once the artifact appears in your deal , snap each of the colour and the scourge will be lifted ! Unfortunately , it ’s too belated to save Milo , but you try your best . And with that , congratulations ! You ’ve completed Legend of the Sacred Stones .
Screenshot by Pro Game Guides
Looking for more Adventure Escape enigma here at Pro Game Guides ? We ’ve get you covered ! hold in outHaunted Hunt Walkthrough ( Adventure Escape Mysteries),The Squire ’s Tale Walkthrough – Chapters 1 - 8 , and more !
Screenshot by Pro Game Guides
Screenshot by Pro Game Guides
Screenshot by Pro Game Guides

Screenshot by Pro Game Guides
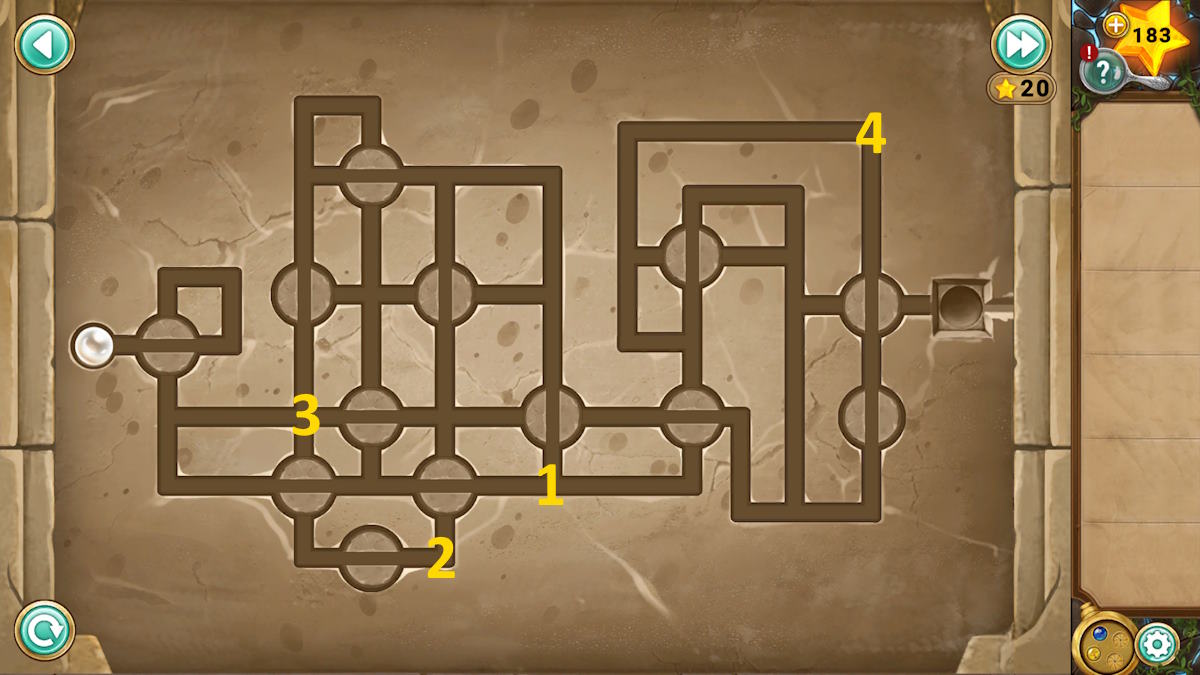
Image by Pro Game Guides
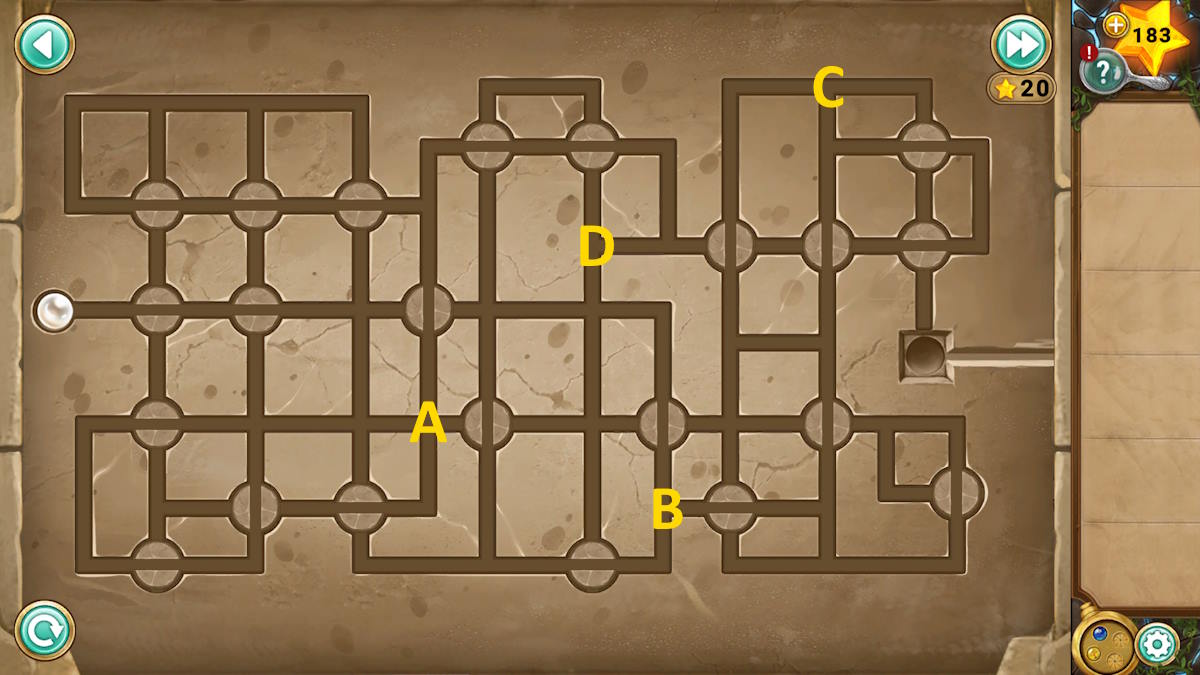
Image by Pro Game Guides
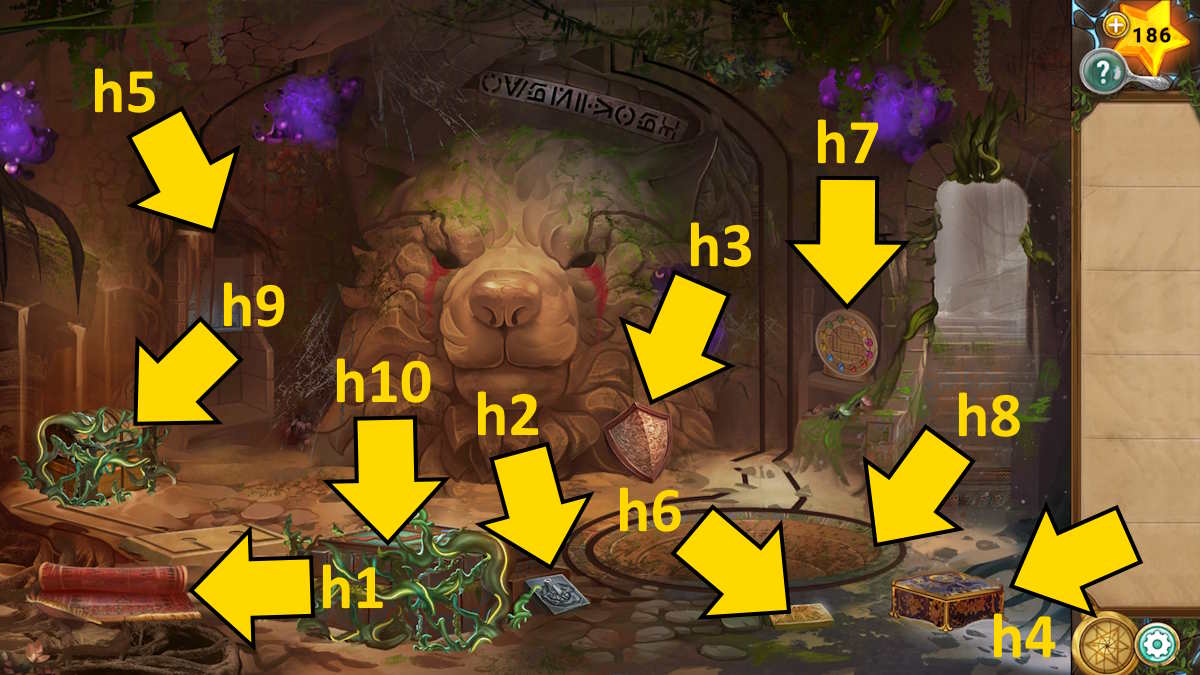
Image by Pro Game Guides
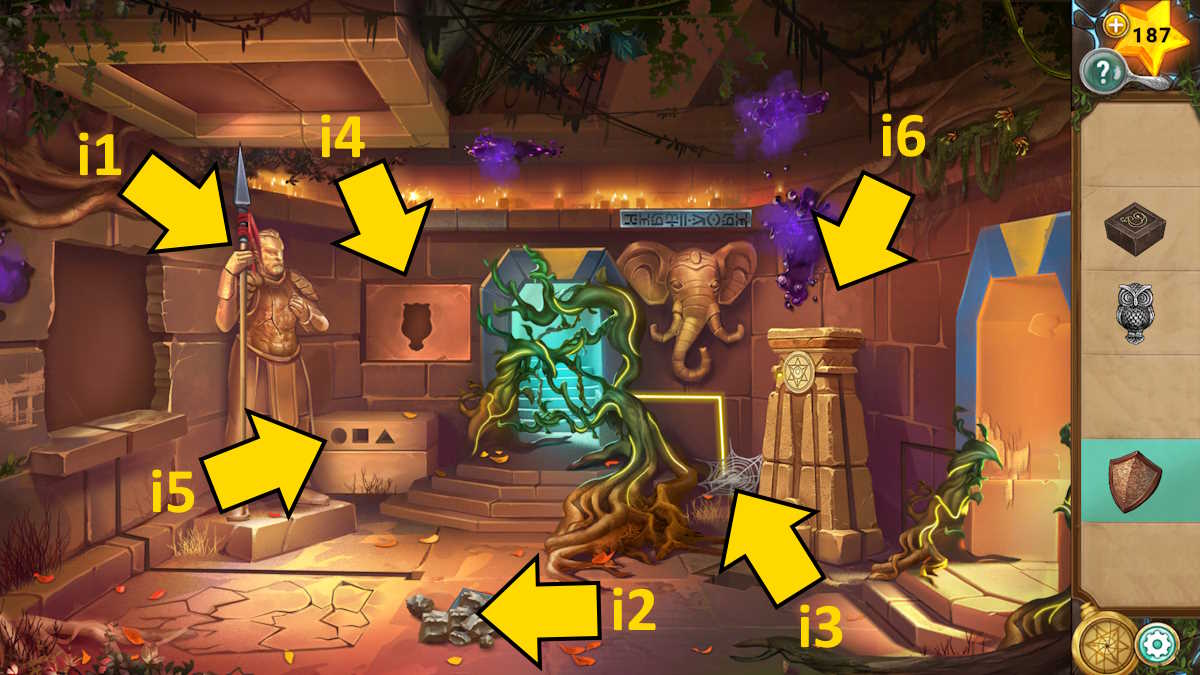
Image by Pro Game Guides
Screenshot by Pro Game Guides
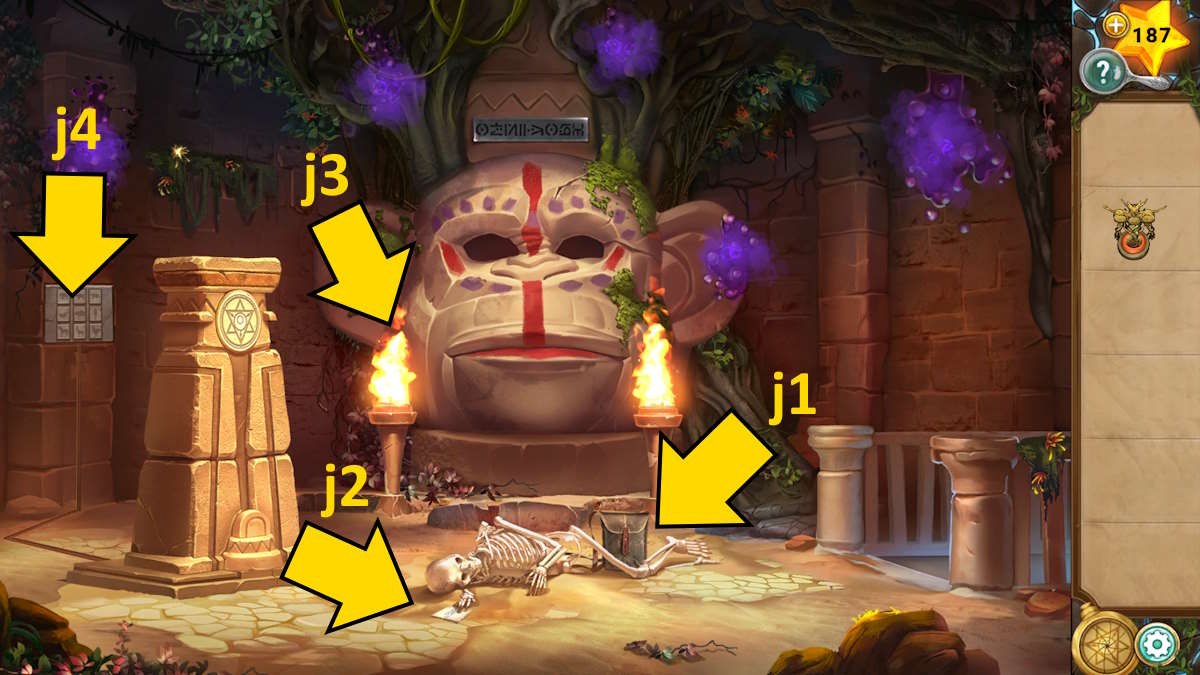
Image by Pro Game Guides
Screenshot by Pro Game Guides
Screenshot by Pro Game Guides
Screenshot by Pro Game Guides
Screenshot by Pro Game Guides
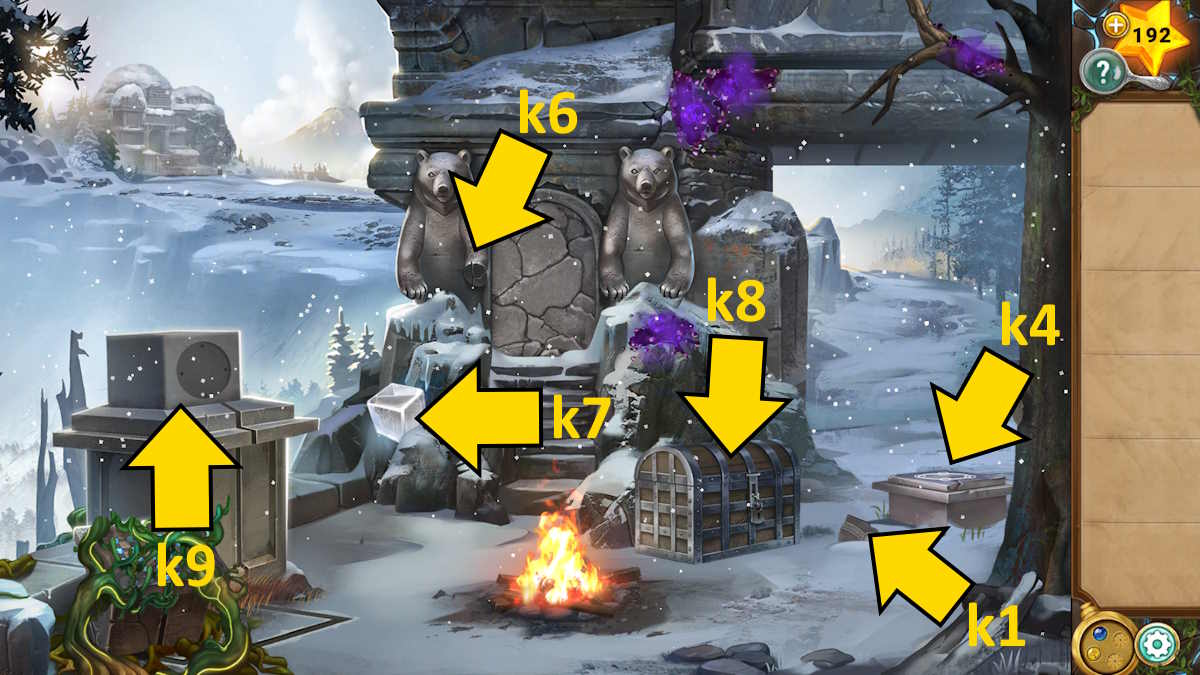
Image by Pro Game Guides
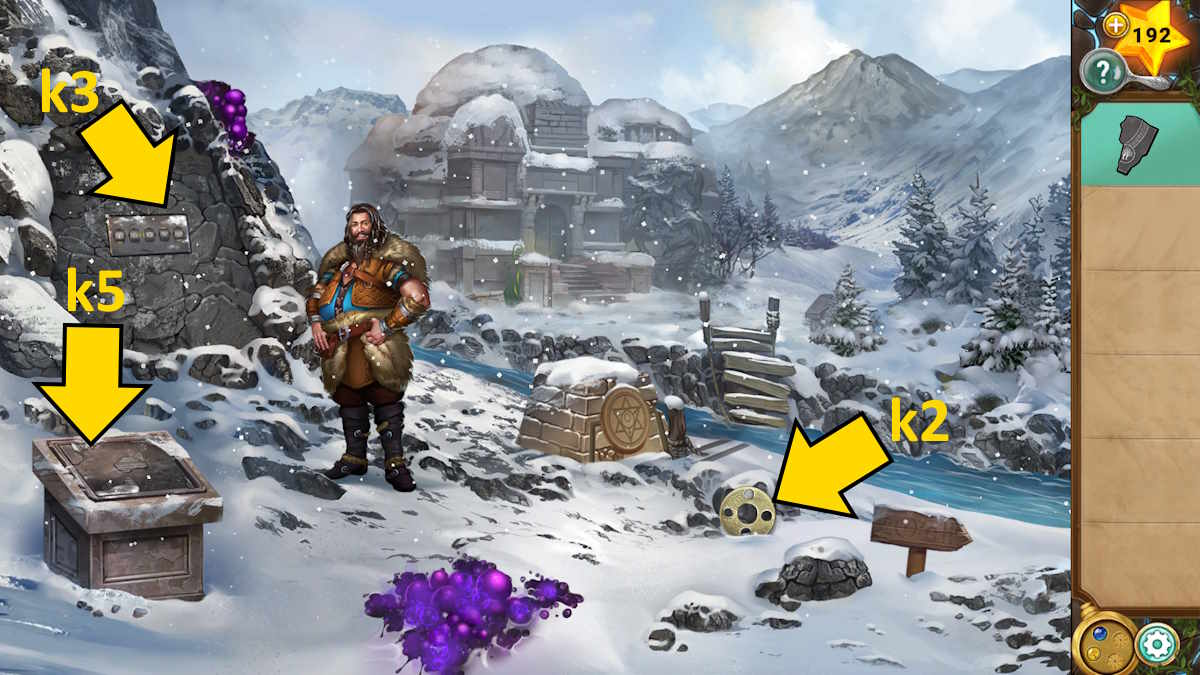
Image by Pro Game Guides
Screenshot by Pro Game Guides

Screenshot by Pro Game Guides
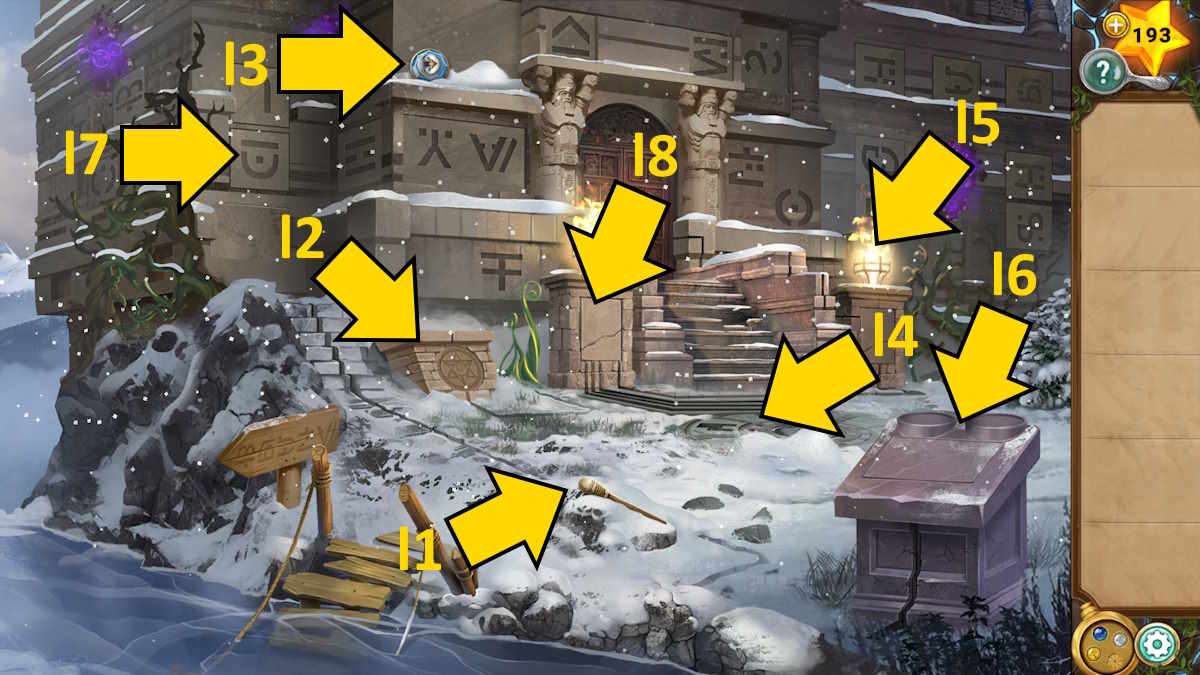
Image by Pro Game Guides
Screenshot by Pro Game Guides
Image by Pro Game Guides
Screenshot by Pro Game Guides
Screenshot by Pro Game Guides
Screenshot by Pro Game Guides
Screenshot by Pro Game Guides
Screenshot by Pro Game Guides
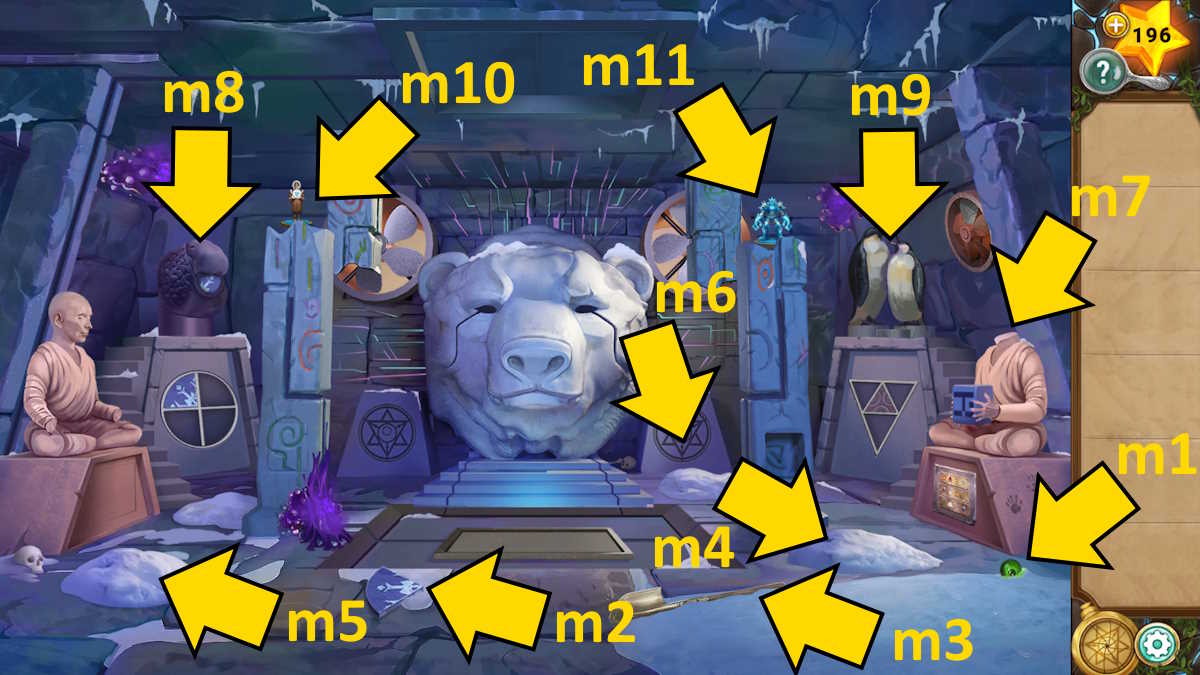
Image by Pro Game Guides
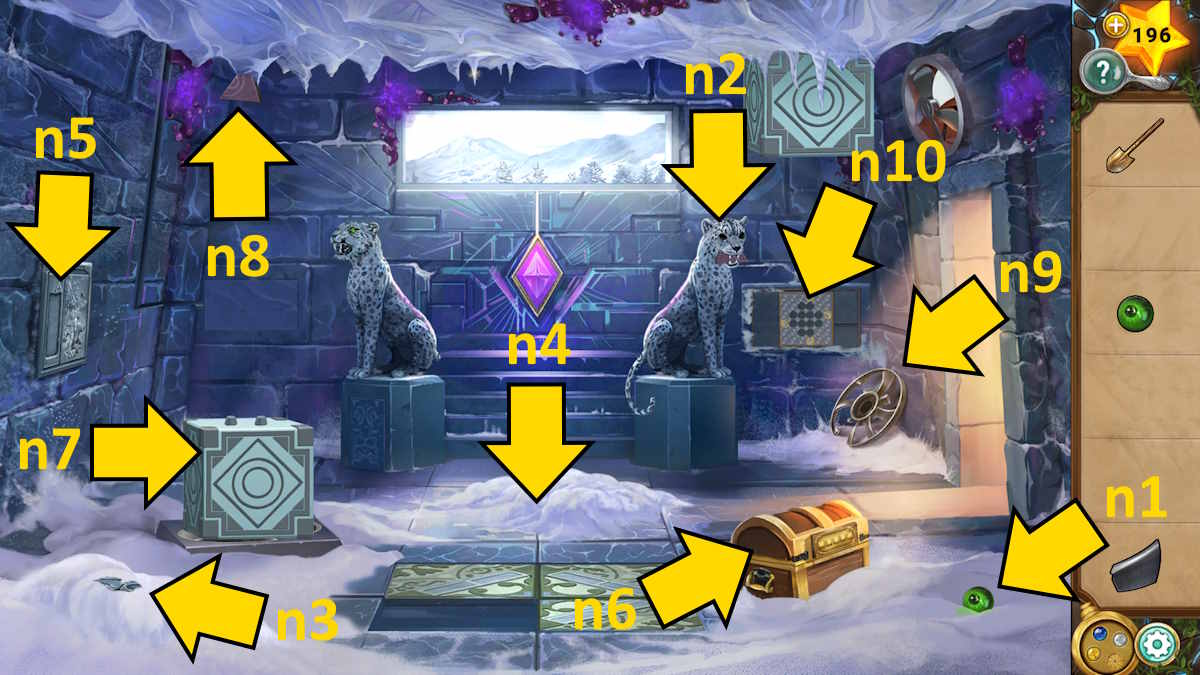
Image by Pro Game Guides
Screenshot by Pro Game Guides
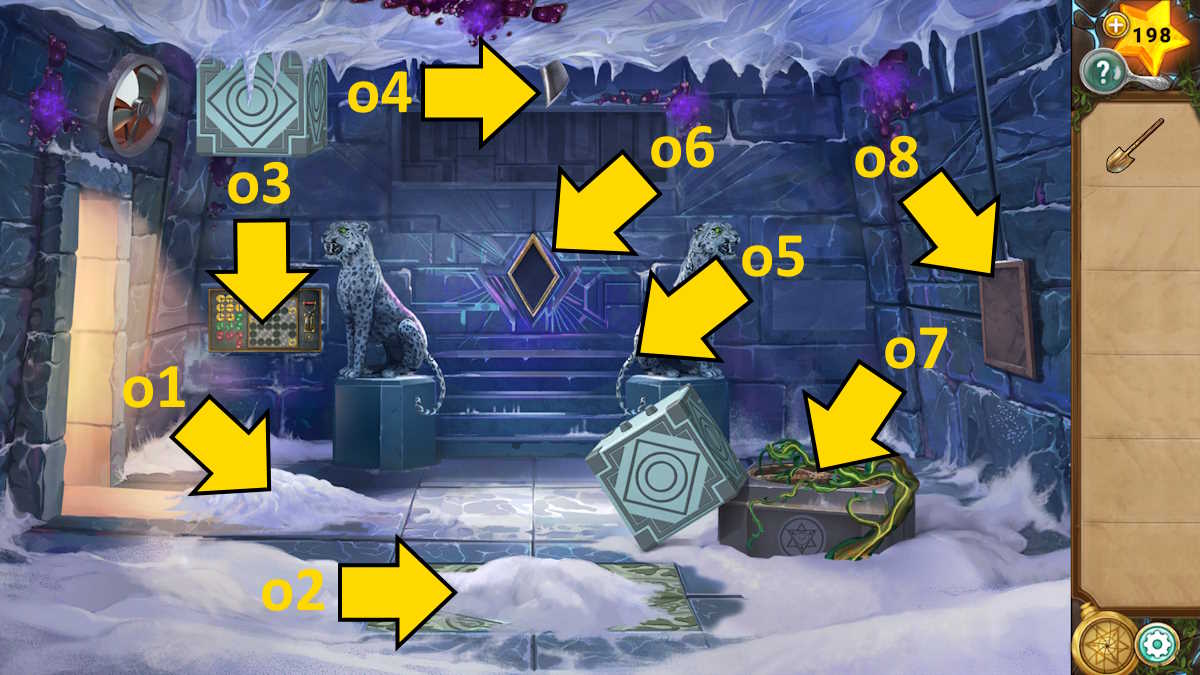
Image by Pro Game Guides

Screenshot by Pro Game Guides
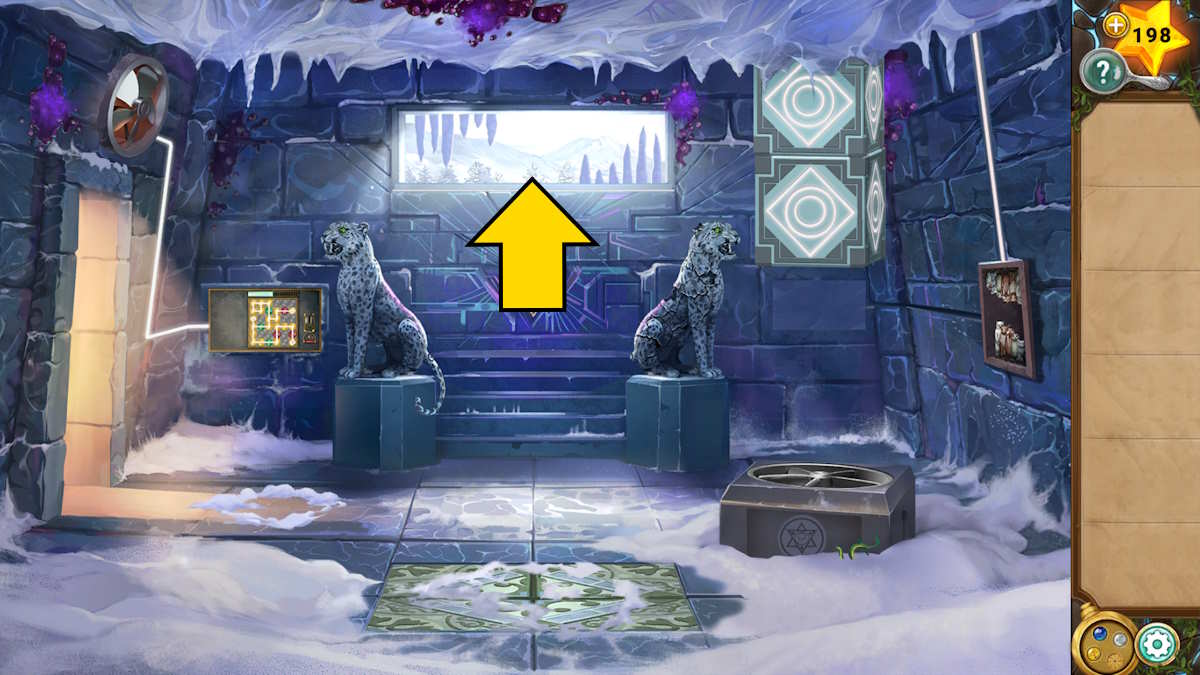
Image by Pro Game Guides
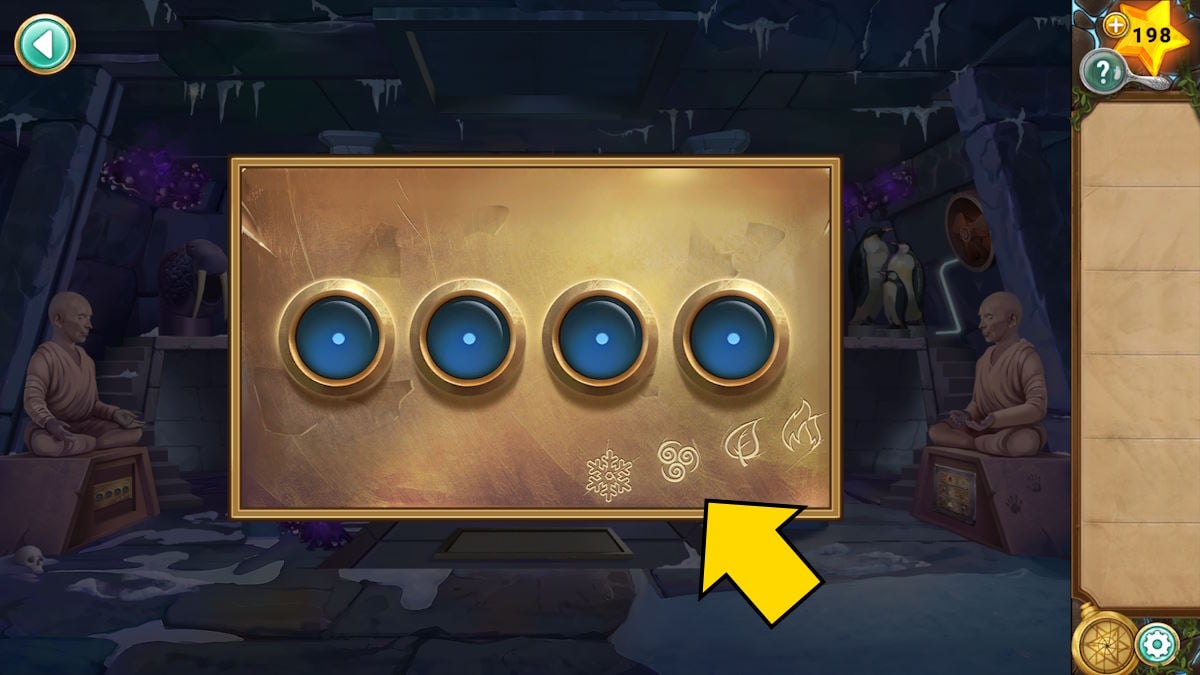
Image by Pro Game Guides
Screenshot by Pro Game Guides
Screenshot by Pro Game Guides
Screenshot by Pro Game Guides
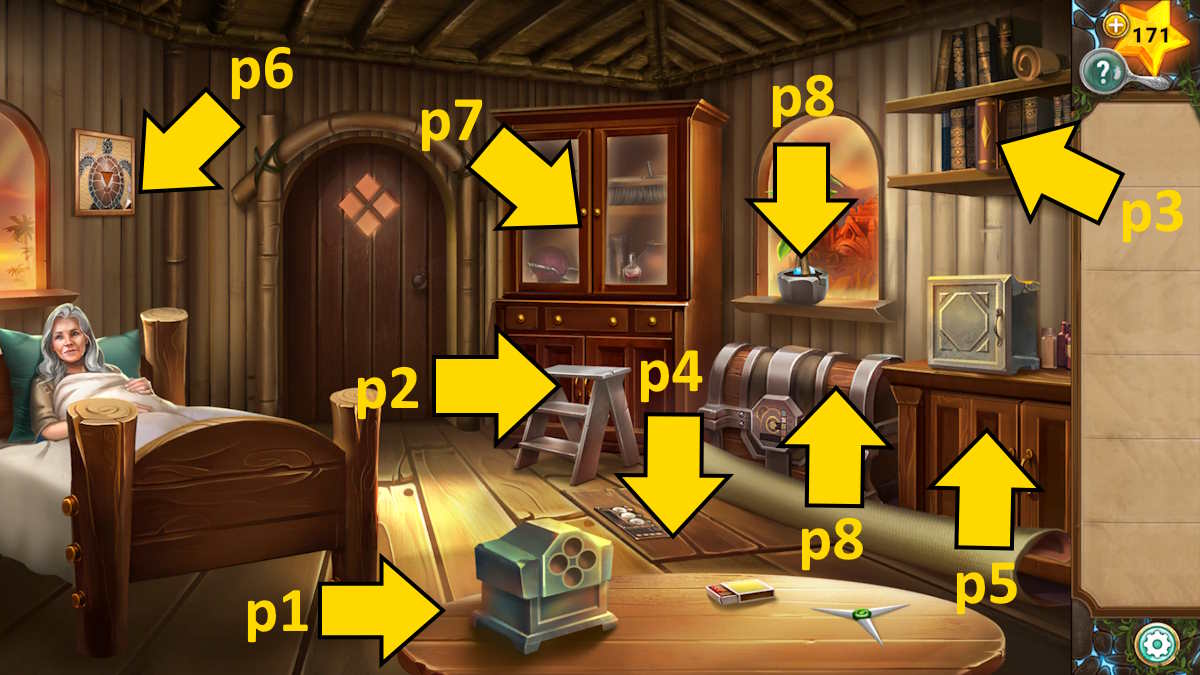
Image by Pro Game Guides
Screenshot by Pro Game Guides
Screenshot by Pro Game Guides
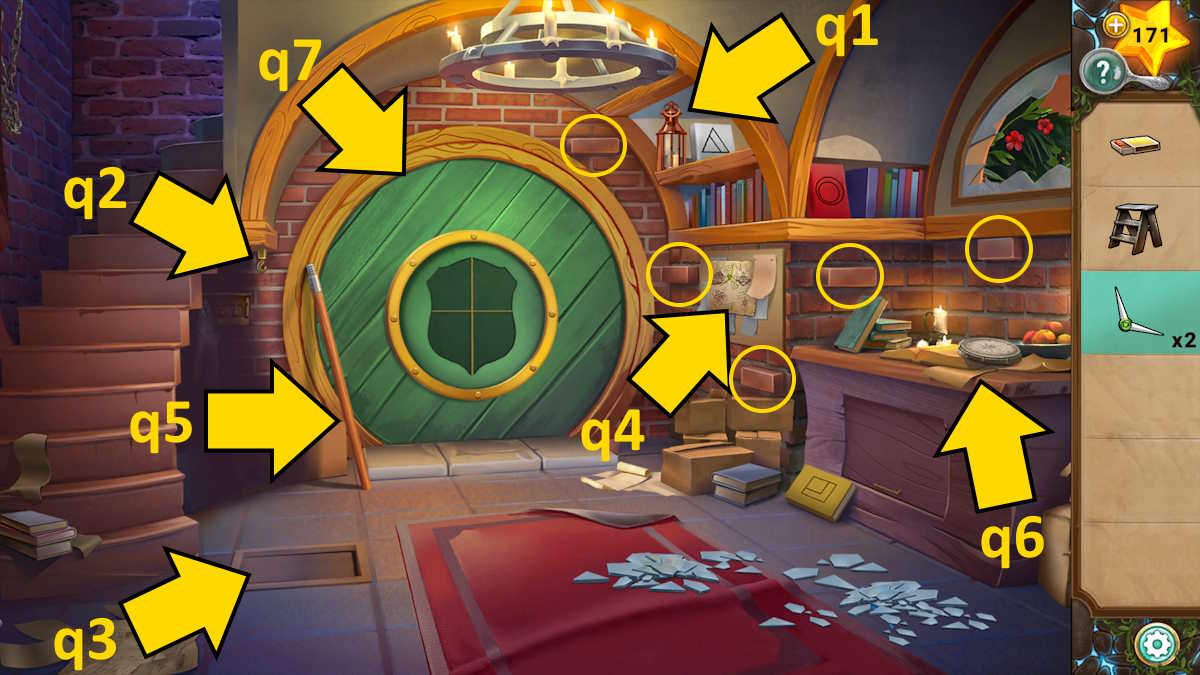
Image by Pro Game Guides

Image by Pro Game Guides

Screenshot by Pro Game Guides
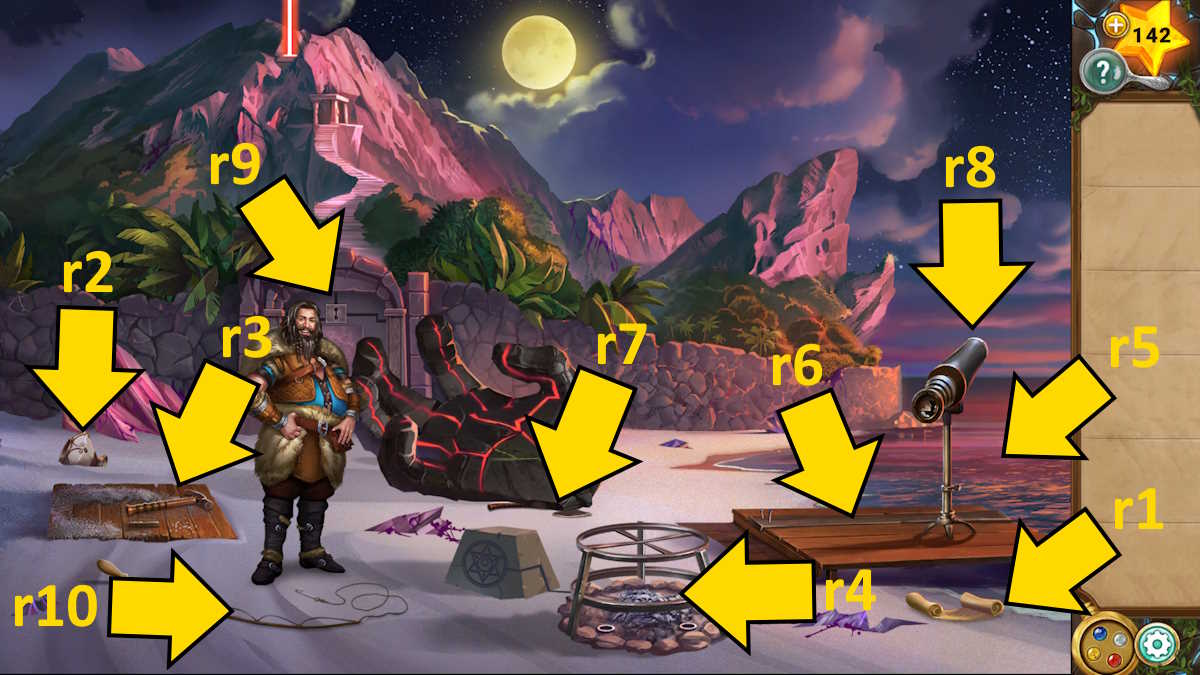
Image by Pro Game Guides
Screenshot by Pro Game Guides
Screenshot by Pro Game Guides
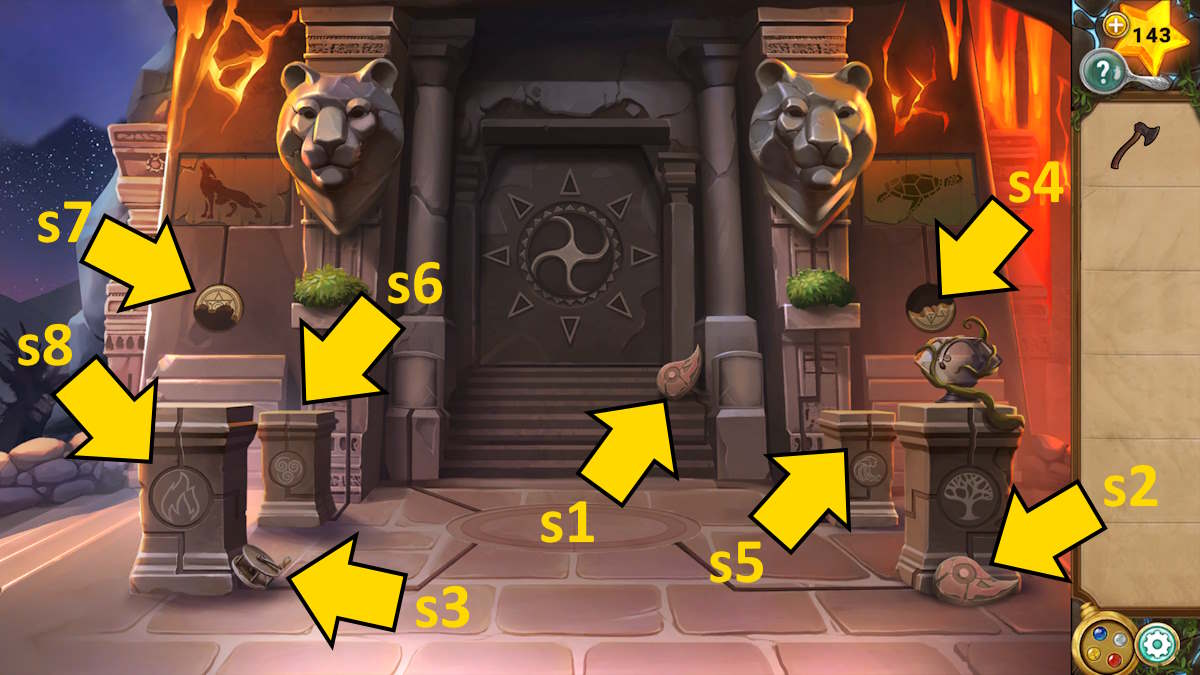
Image by Pro Game Guides
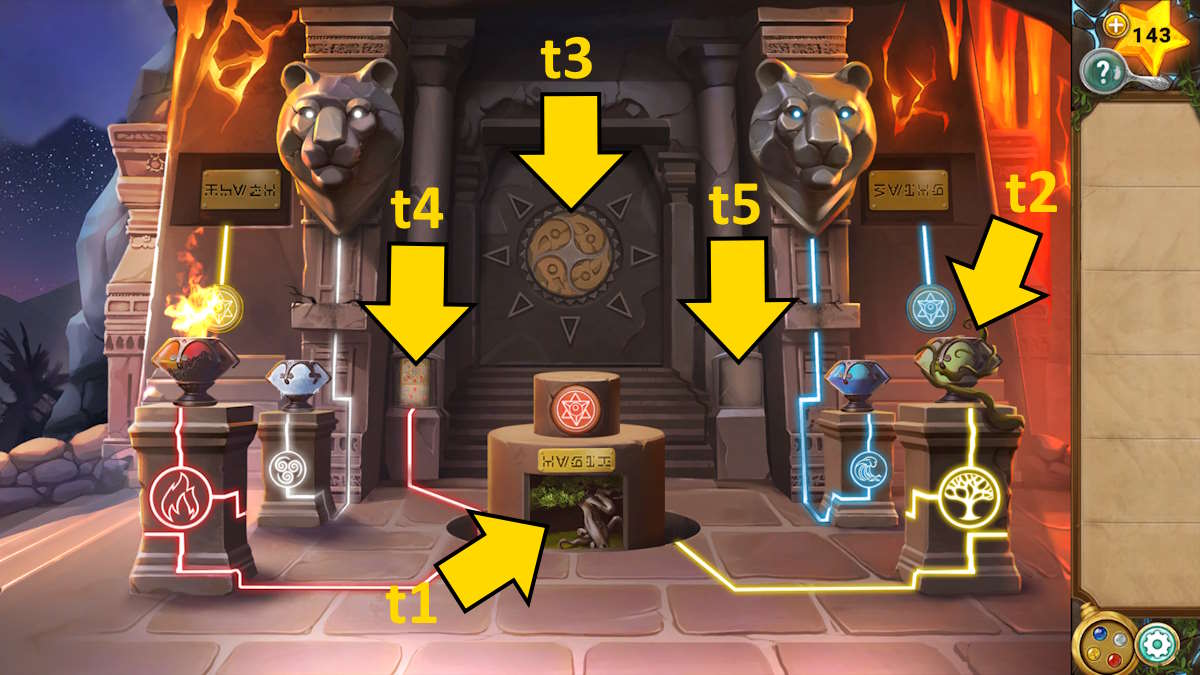
Image by Pro Game Guides
Screenshot by Pro Game Guides
Screenshot by Pro Game Guides
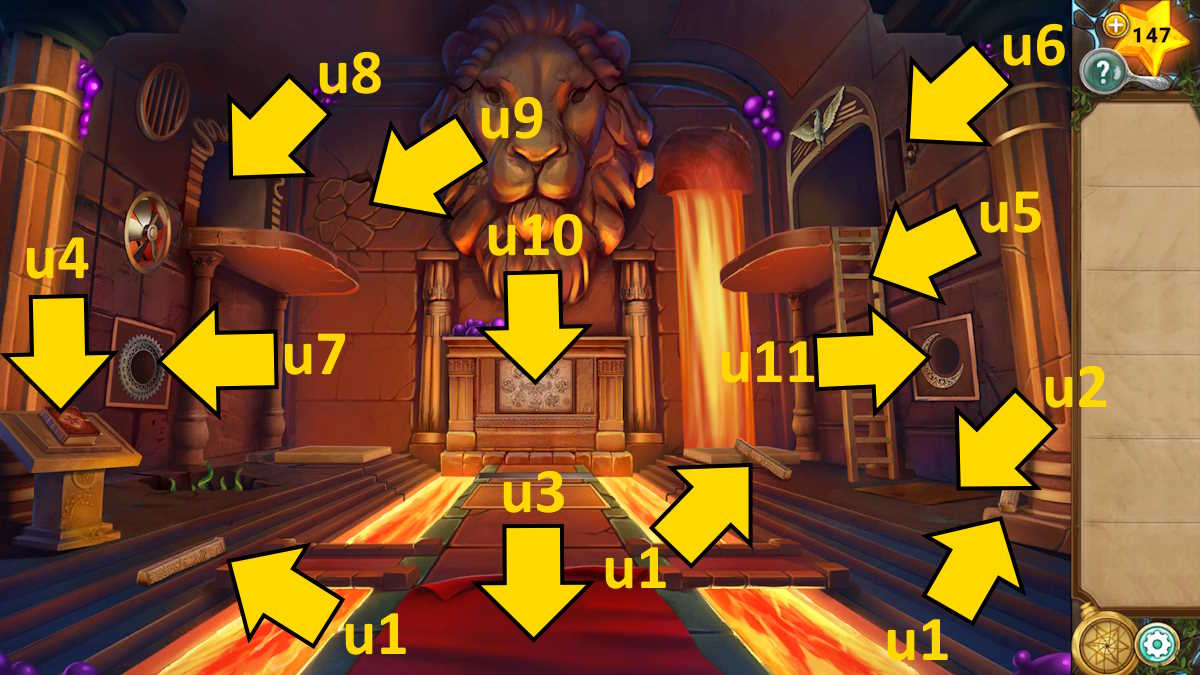
Image by Pro Game Guides
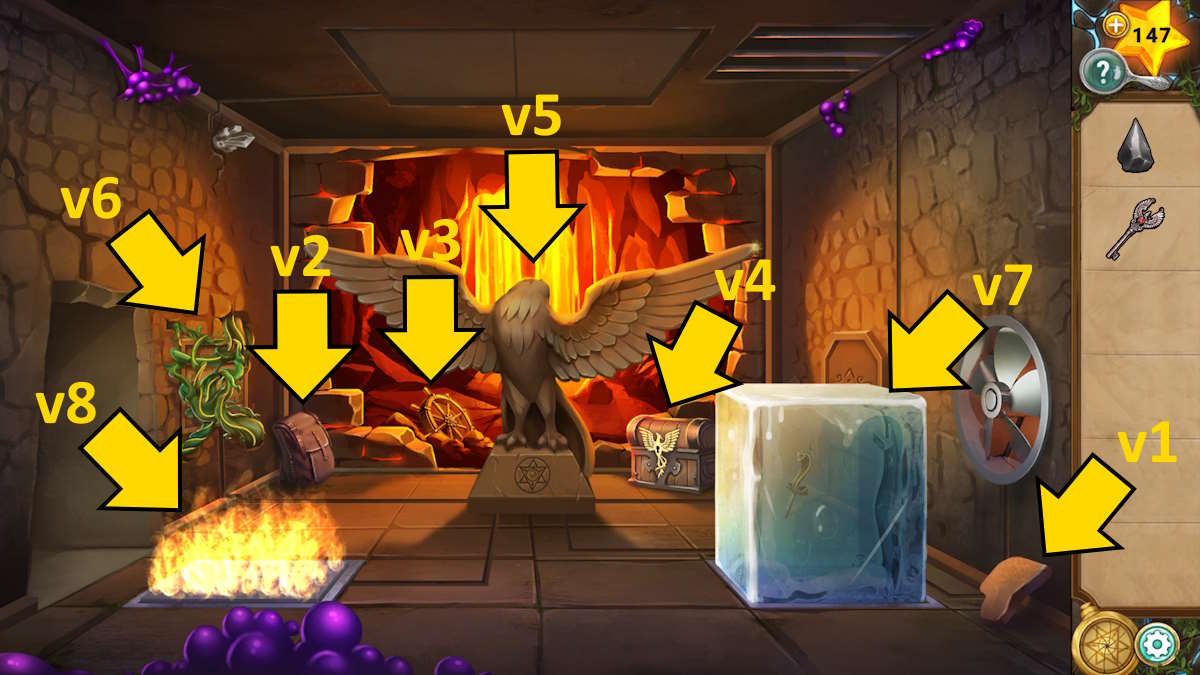
Image by Pro Game Guides

Image by Pro Game Guides
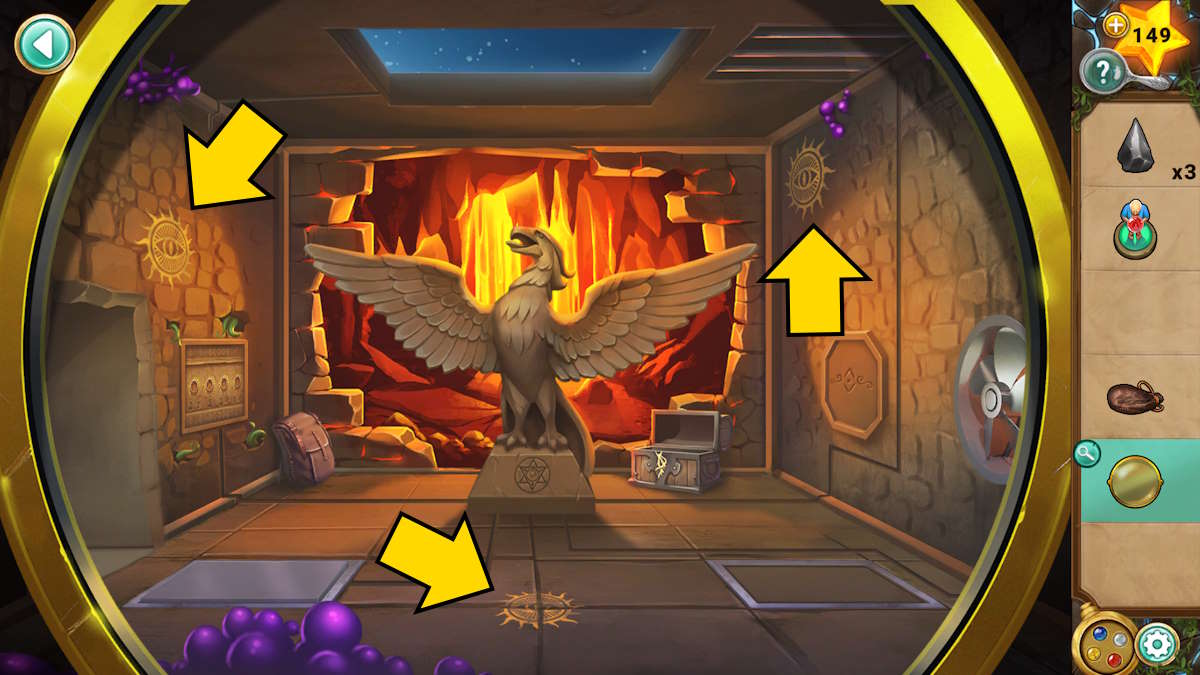
Image by Pro Game Guides
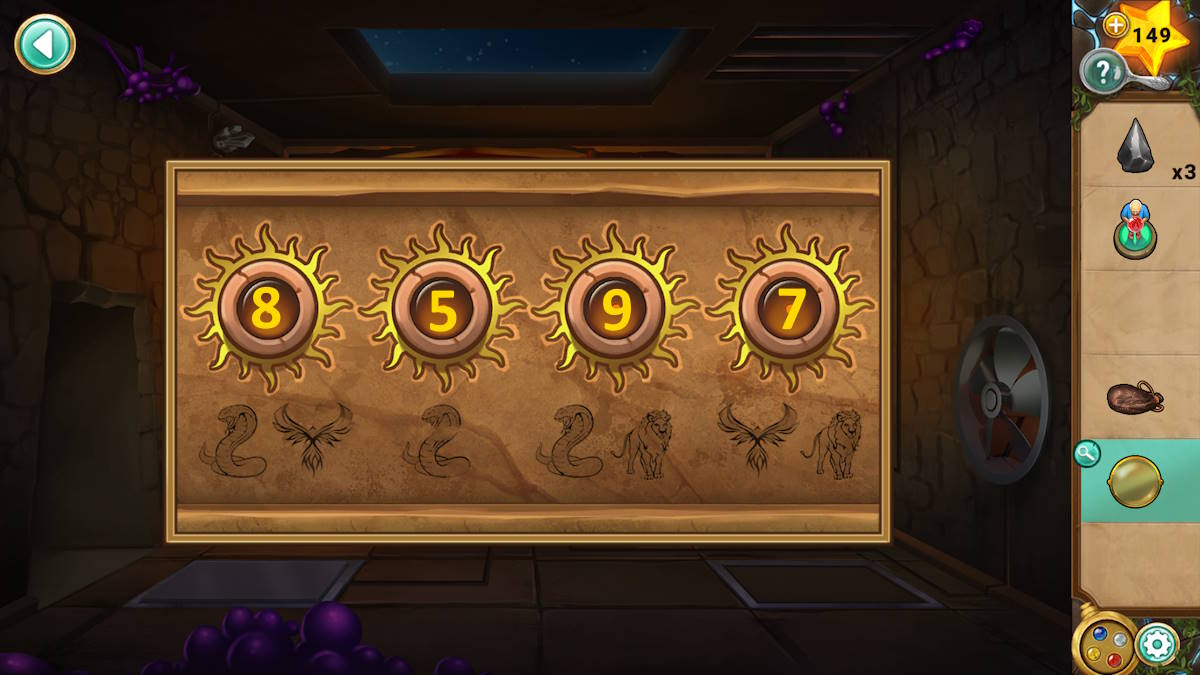
Image by Pro Game Guides

Screenshot by Pro Game Guides
Screenshot by Pro Game Guides
Screenshot by Pro Game Guides
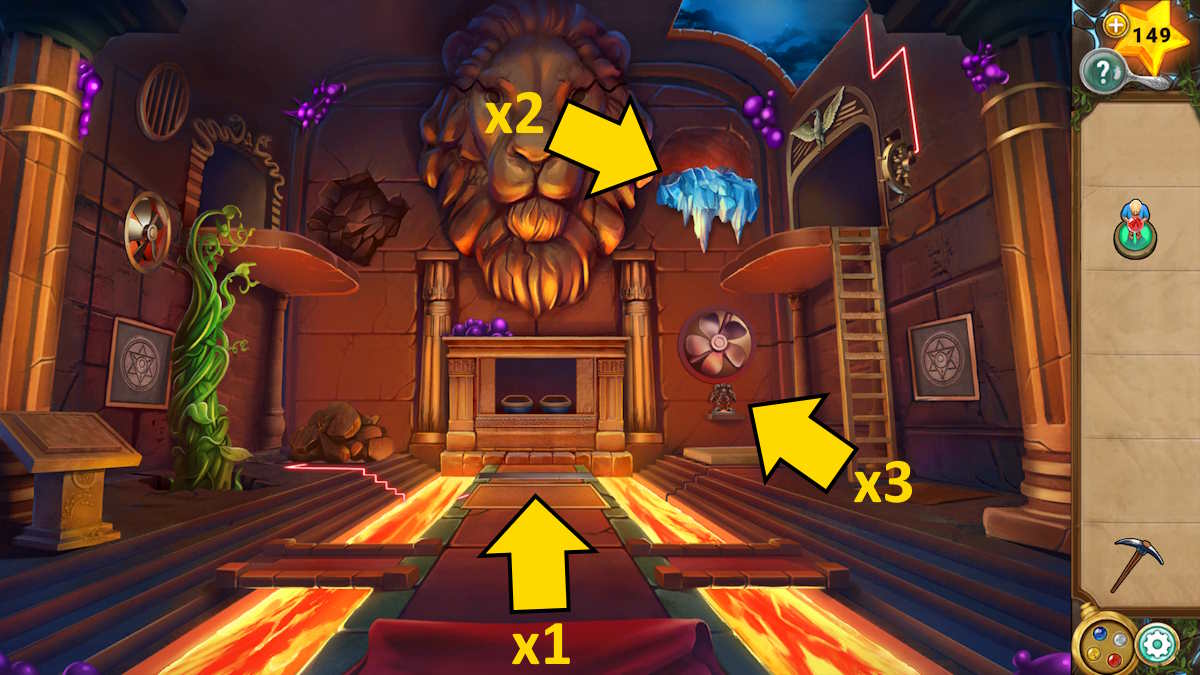
Image by Pro Game Guides
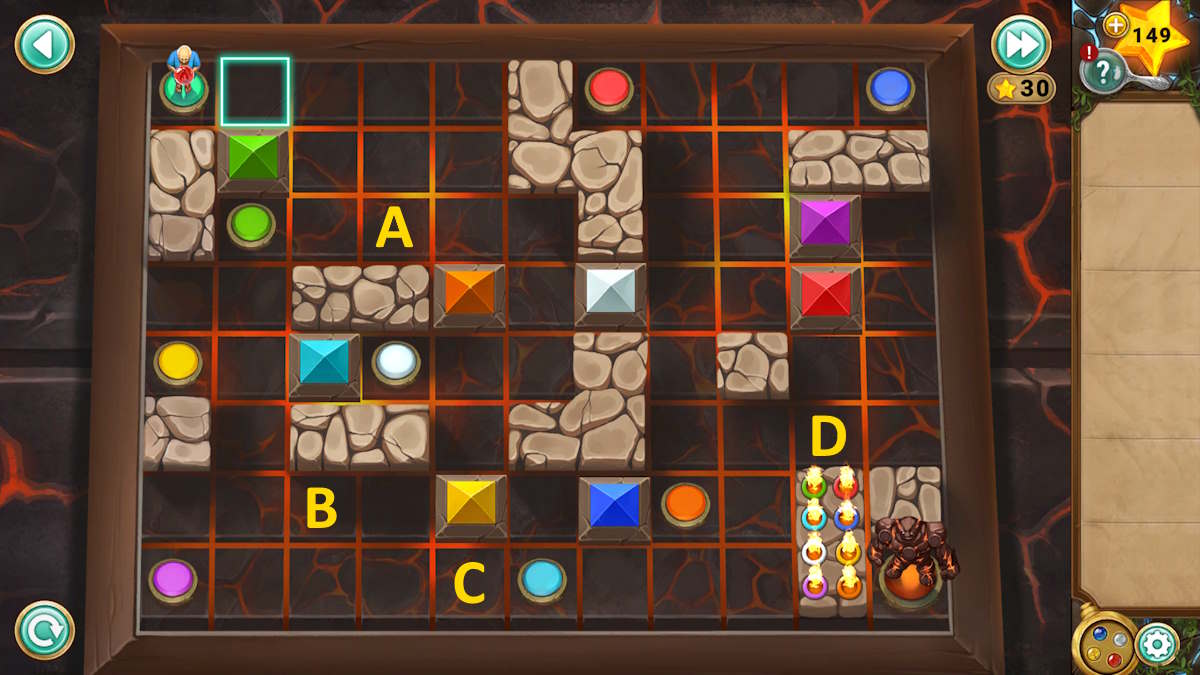
Image by Pro Game Guides
Screenshot by Pro Game Guides
Screenshot by Pro Game Guides
Screenshot by Pro Game Guides
