Solve the concluding mysteries of this quad adventure !
The point - and - click musical style fulfil outer space in Isoland 4 , a cozy enigma game featuring lots of puzzles and prescribed affirmations . If you ’re stuck on any of the teaser in the latter half of the game , this Isoland 4 walkthrough will have you moving ahead in no time .
If you ’re not yet at the second half of the game , or you ’ve already completed the integrality of the plot , the likes for the first half and the second playthrough of the game are include below .

Isoland 4 part 2 walkthrough
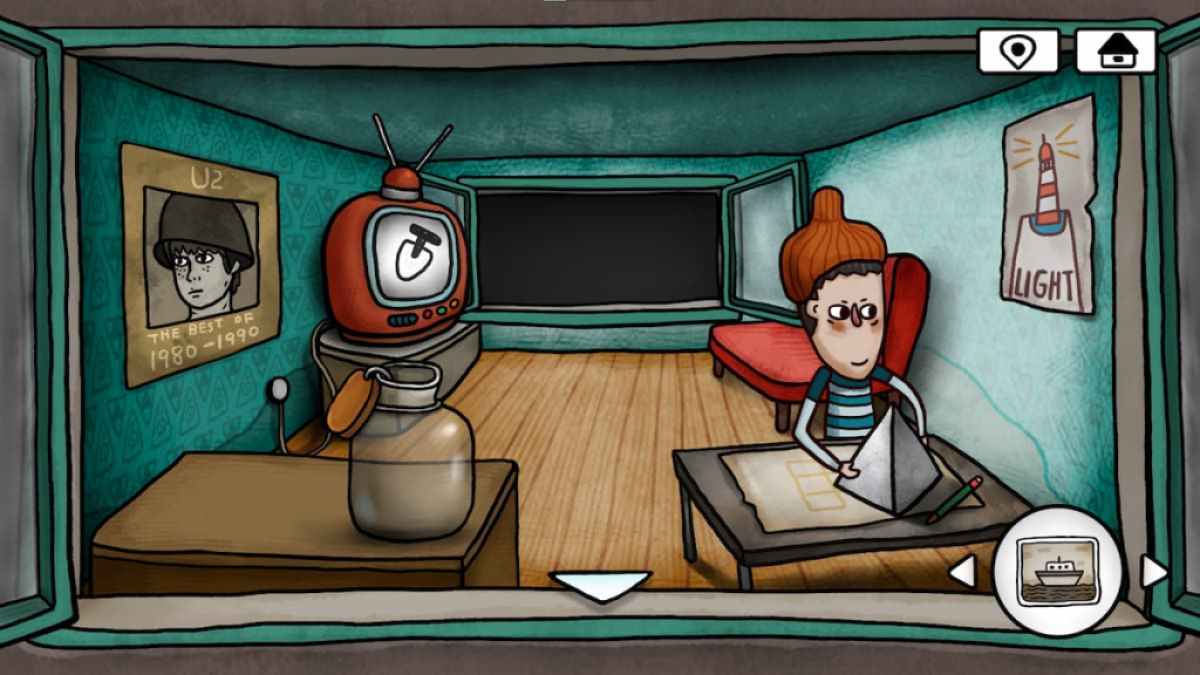
Sticker puzzle
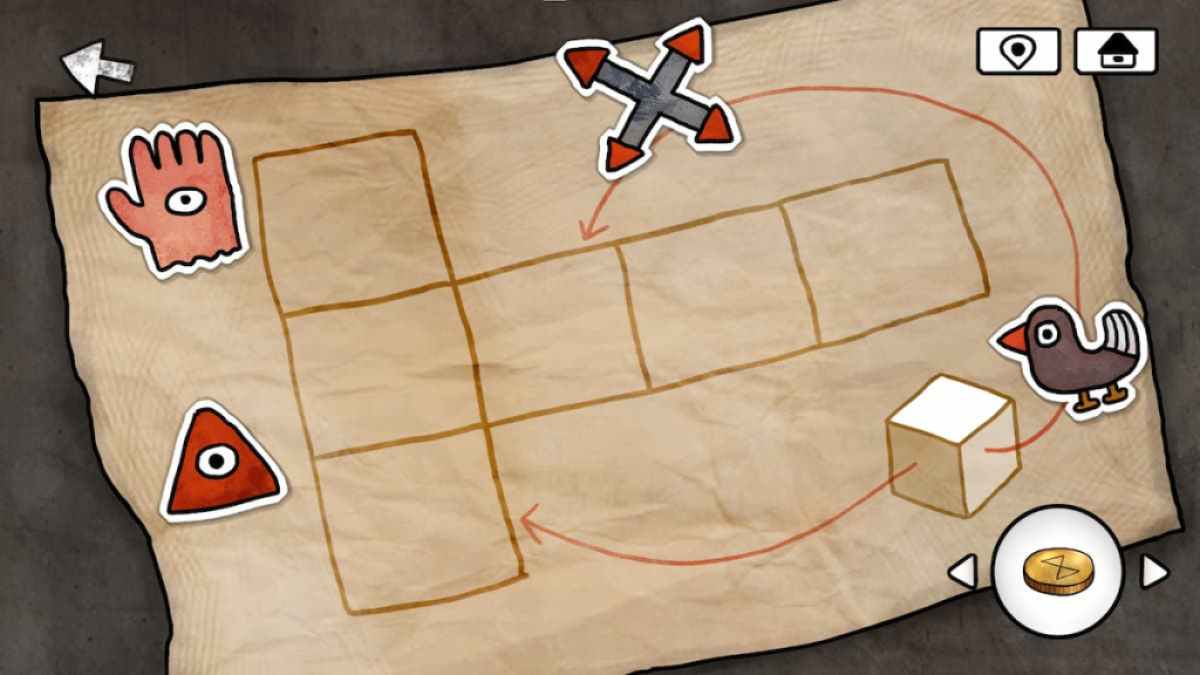
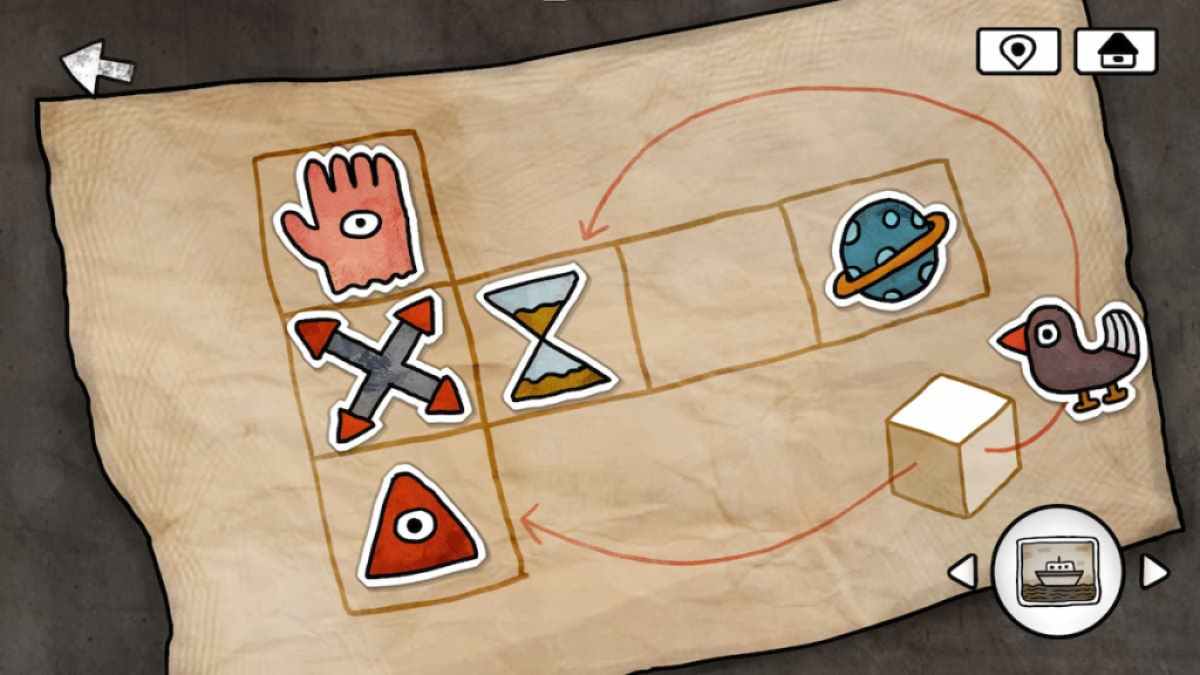
reelect to the room with the TV . tap the piece of paper in front of the boy to see the outline of a square block surround by spikelet .
Start by placing the red trilateral on the downhearted leftover square toes .
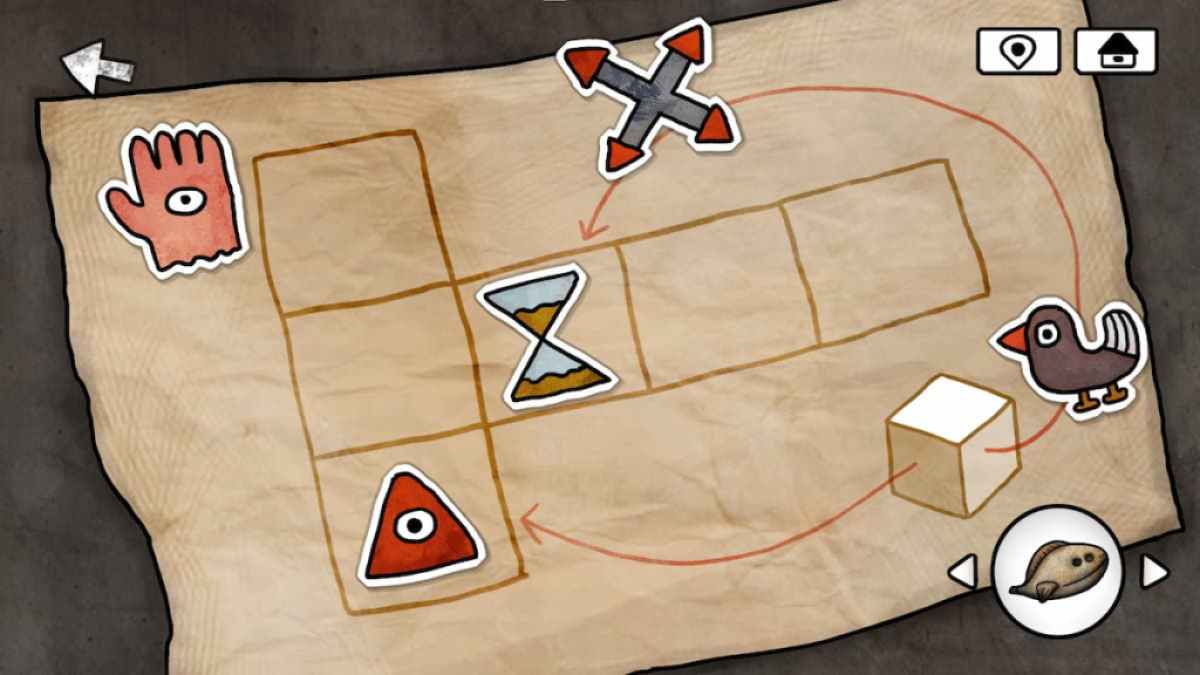
Select the hourglass sticker from your inventory and place it on the box diagonally to the right of the red trigon .
Screenshot by Pro Game Guides
Place the 10 - shaped sticker to the left field of the hourglass .
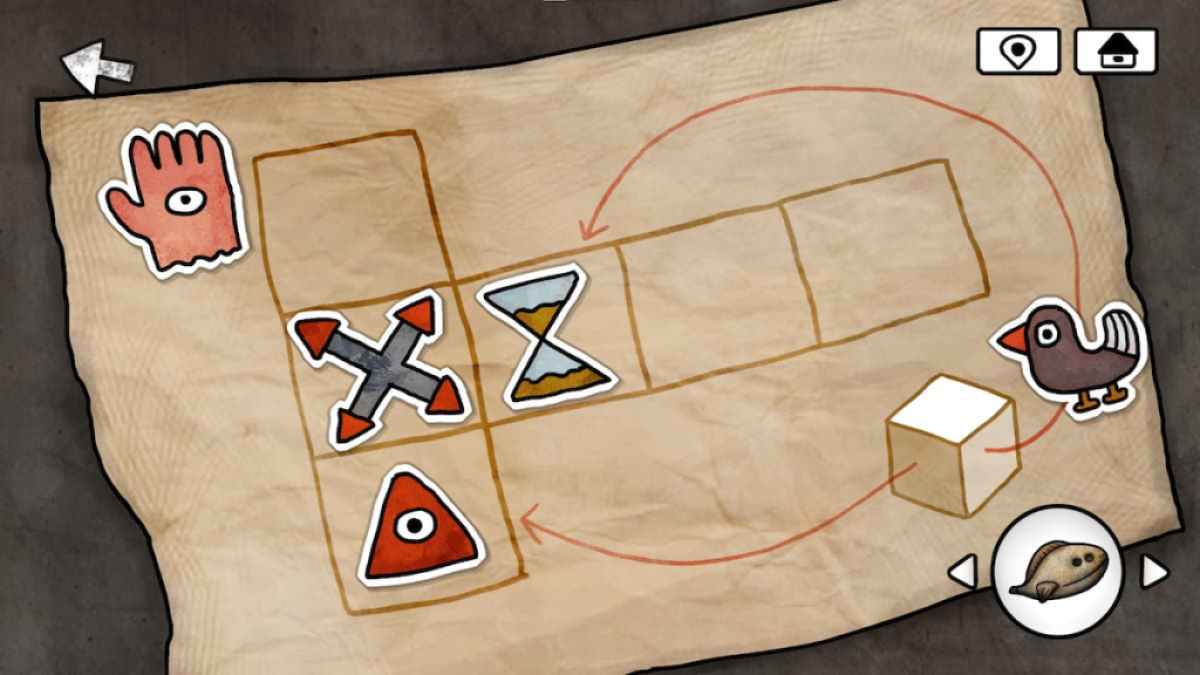
Select the major planet spine from your inventory and place it in the rightmost boxwood .
Place the hand thorn in the box above the x - mould one .

Screenshot by Pro Game Guides
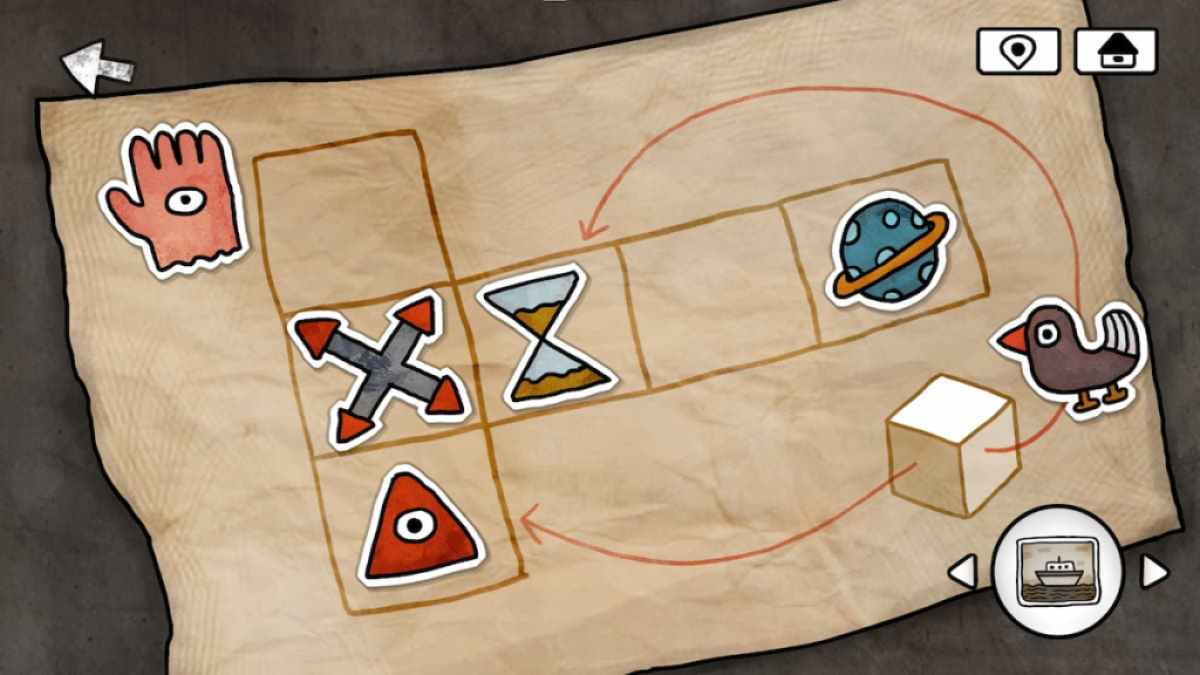
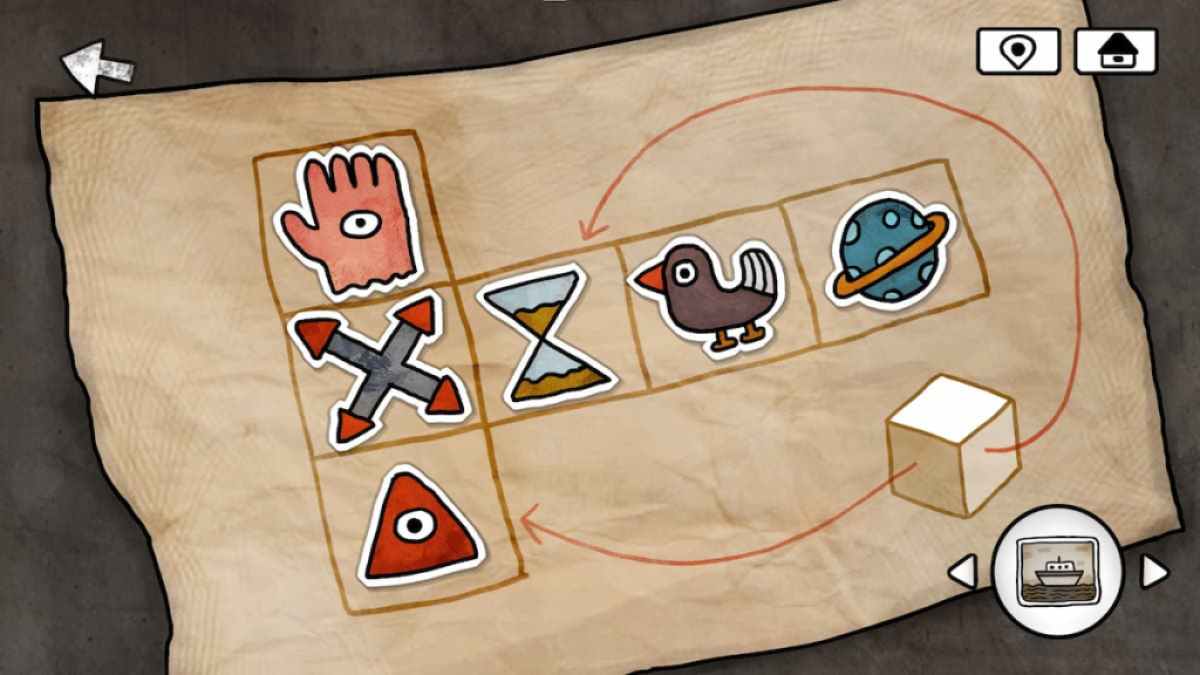
To complete the puzzler , place the razzing sticker between the planet and the hourglass stickers .
Once the dagger puzzle is completed , the boy will root for out a miniature Pyramids of Egypt that can be post into your inventory .
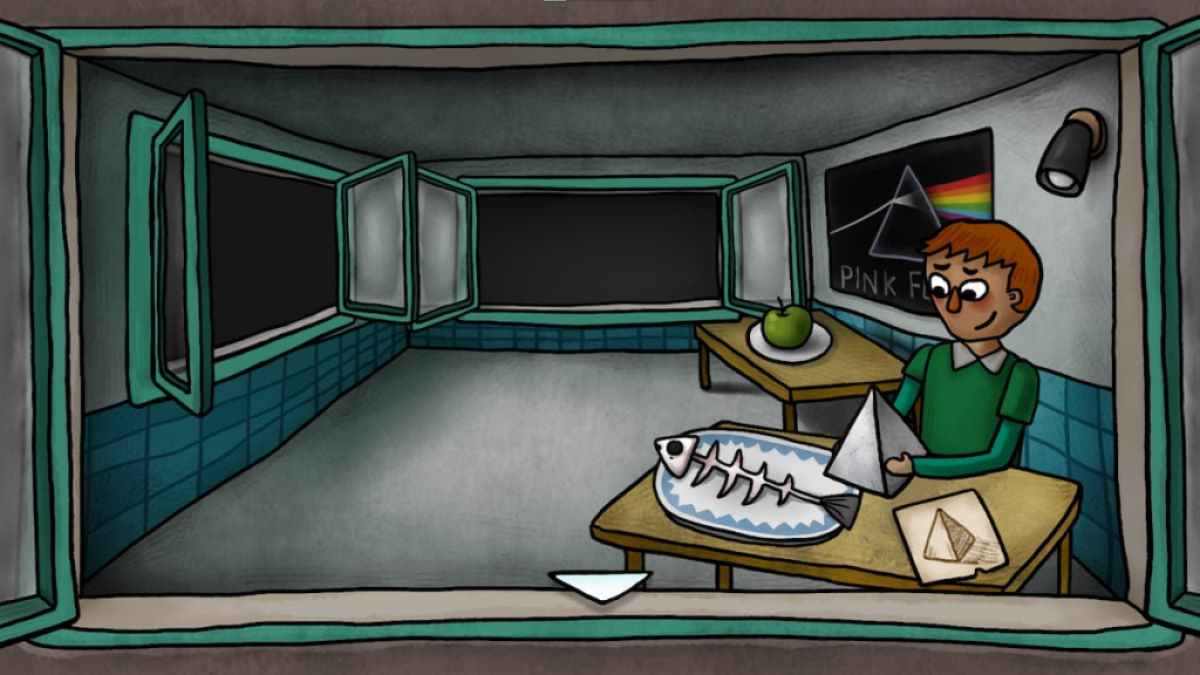
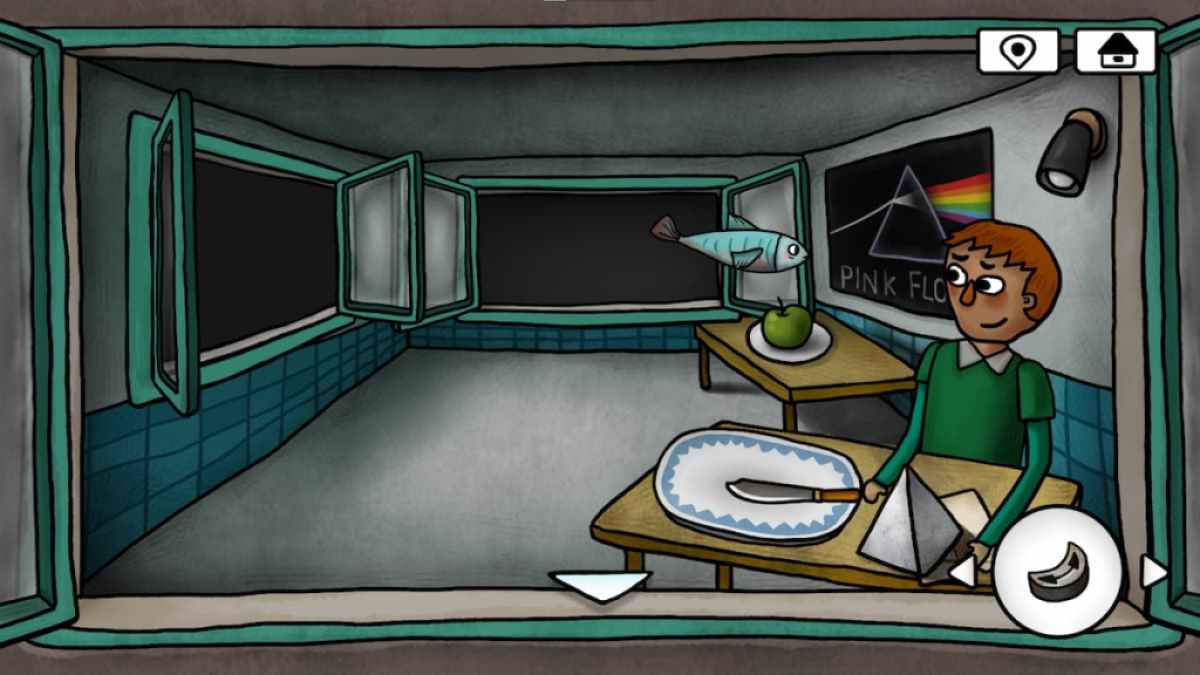
Mini pyramid fish puzzle
In the lunch room , give the mini Pyramids of Egypt to the boy sitting at the table .
This will smoothen a rainbow onto the fish , turning it into a living one . The boy will give the knife on his collection plate , which can be grabbed .
This will also cause the window behind the research laboratory to open , divulge a unexampled room .
Screenshot by Pro Game Guides
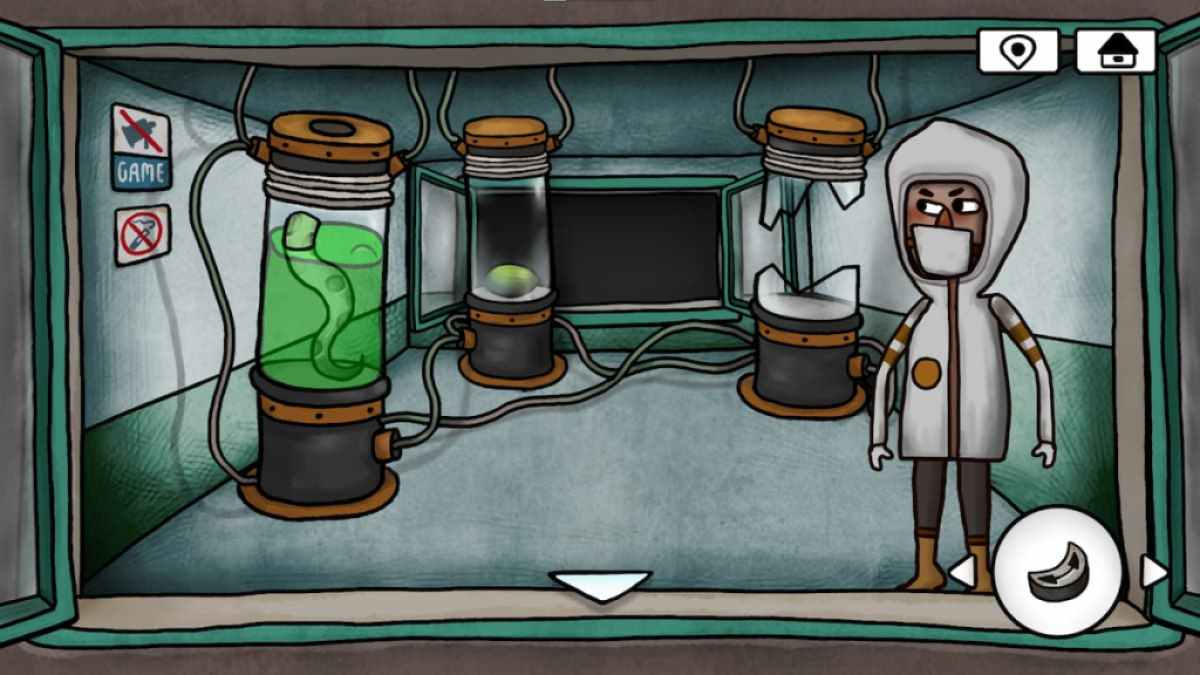
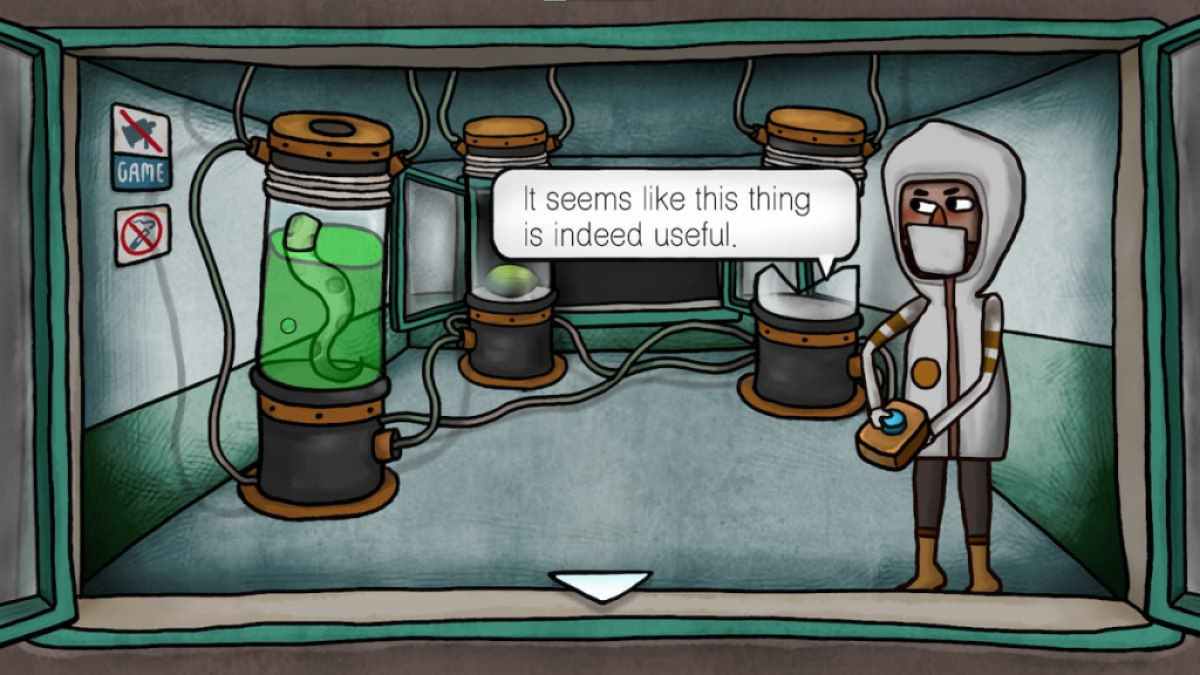
At this time , the brown controller can be afford to the lab assistant .
They will employ it to open up the 2nd container , which arrest a plant seed .
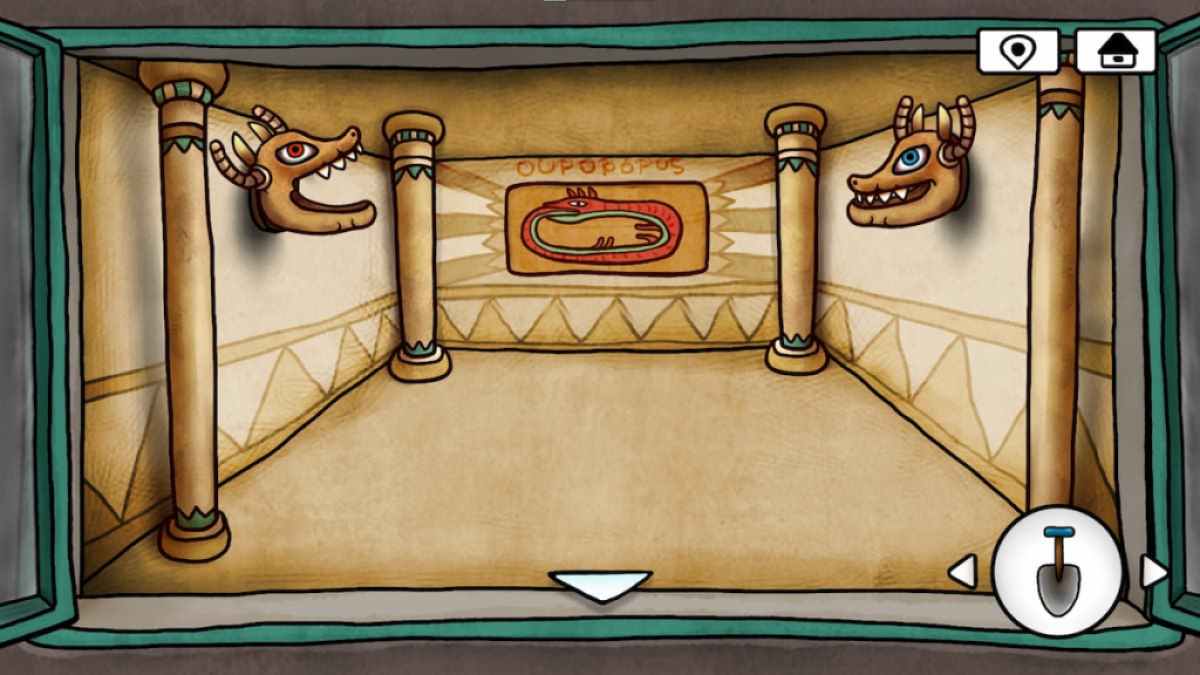
Ouroboros puzzle
The Ouroboros room can be find behind the laboratory .
Select the crimson pearl and localise it into the reddish - eyed dragon ’s mouth .
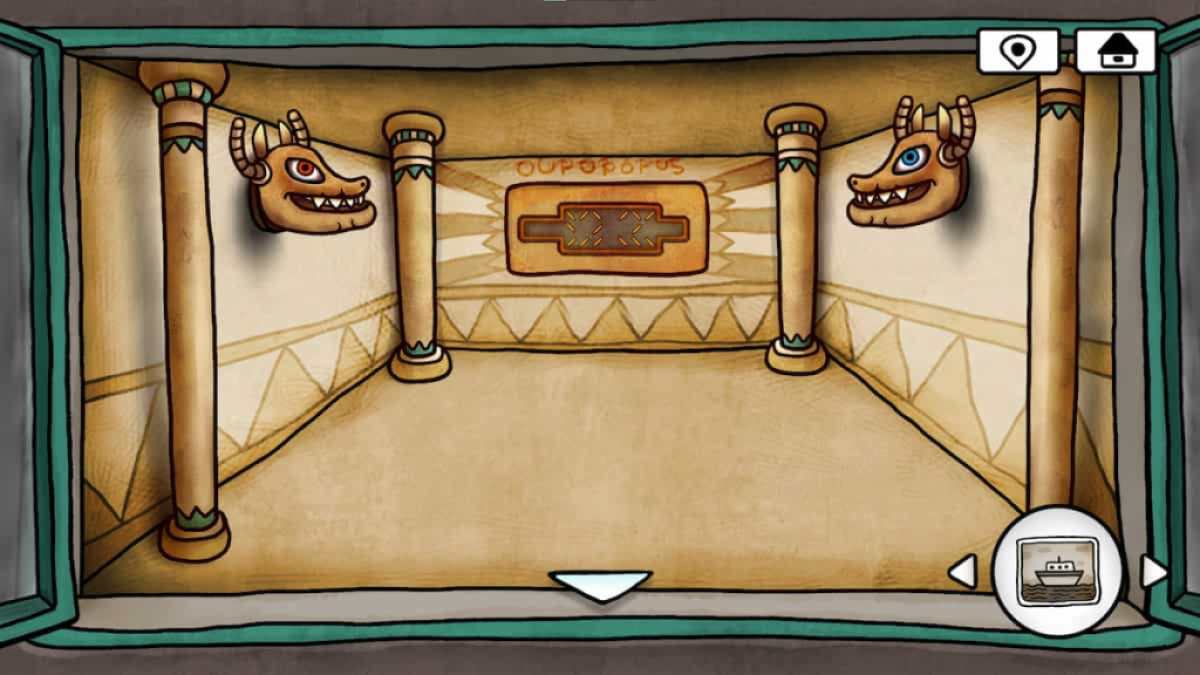
This changes the ouroboros painting in the back into a mystifier .
Screenshot by Pro Game Guides
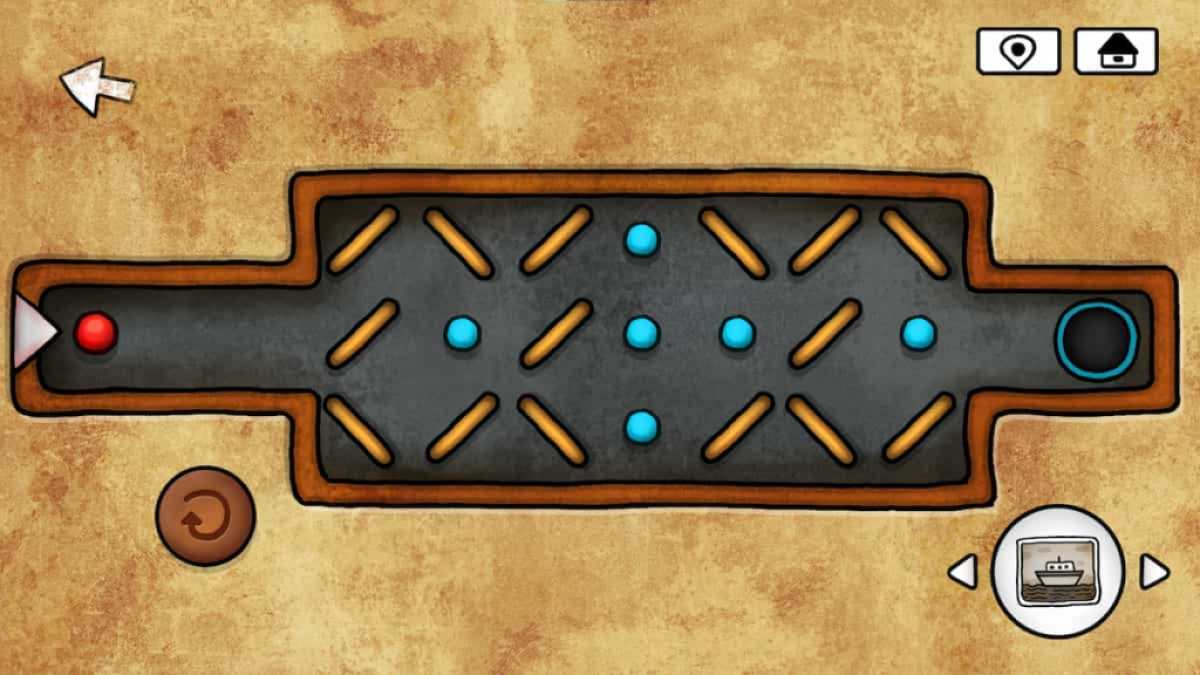
This puzzle need rotating the platforms so that the red ball collects all of the blue ones before landing in the hole .
The resolution to the puzzle is shown in the look-alike below .
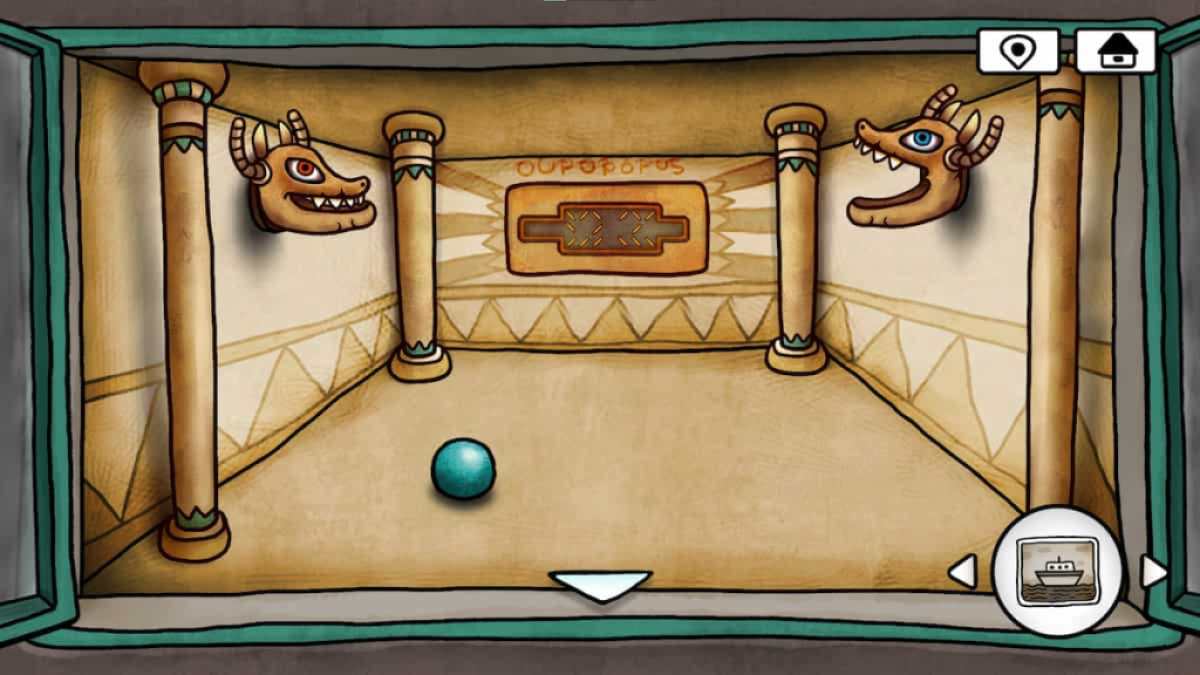
The completion of the teaser do the blue - eyed flying dragon to sprinkle out a gamy pearl .
Screenshot by Pro Game Guides
bear on : Haunted Hunt Walkthrough – Adventure Escape Mysteries
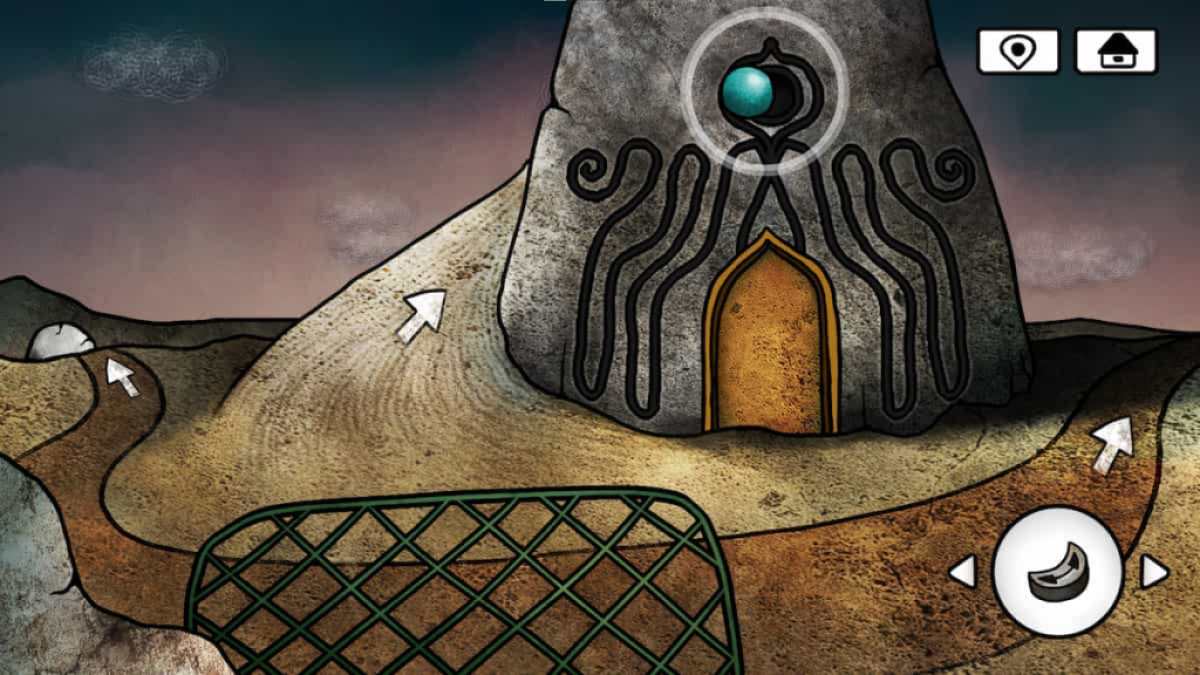
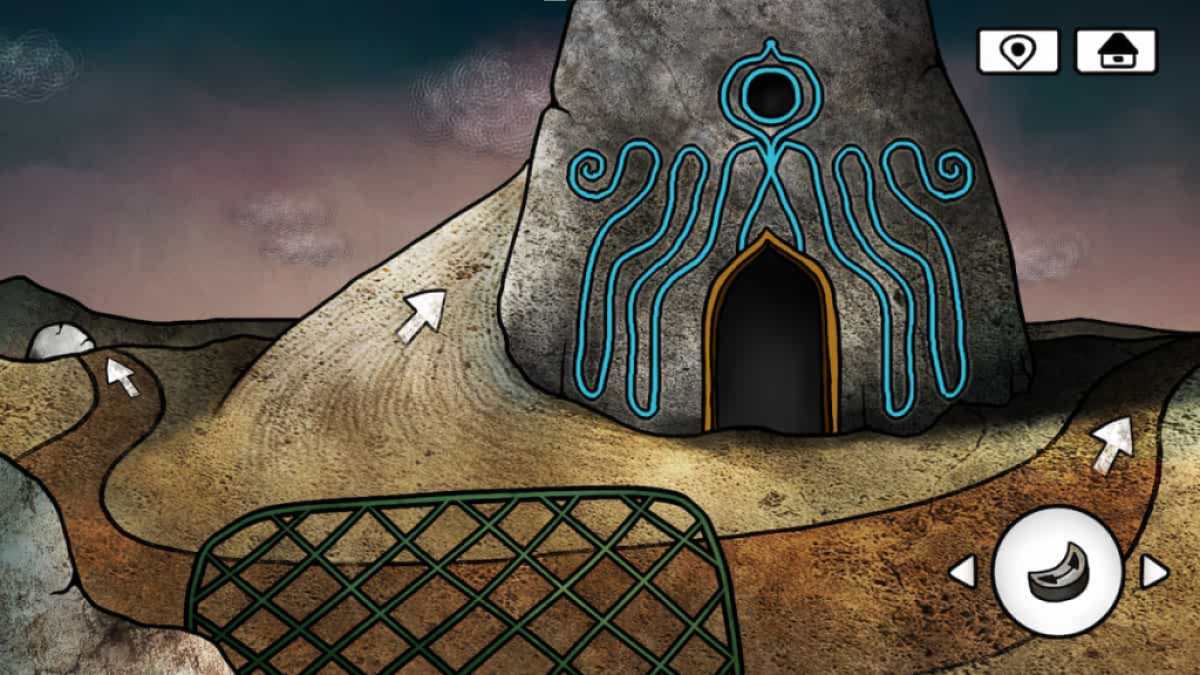
Blue pearl puzzle
The gloomy pearl can be place into the hole on the strange stone Benny Hill .
This will turn the lines on the Benny Hill blue angel and open up the doorway .
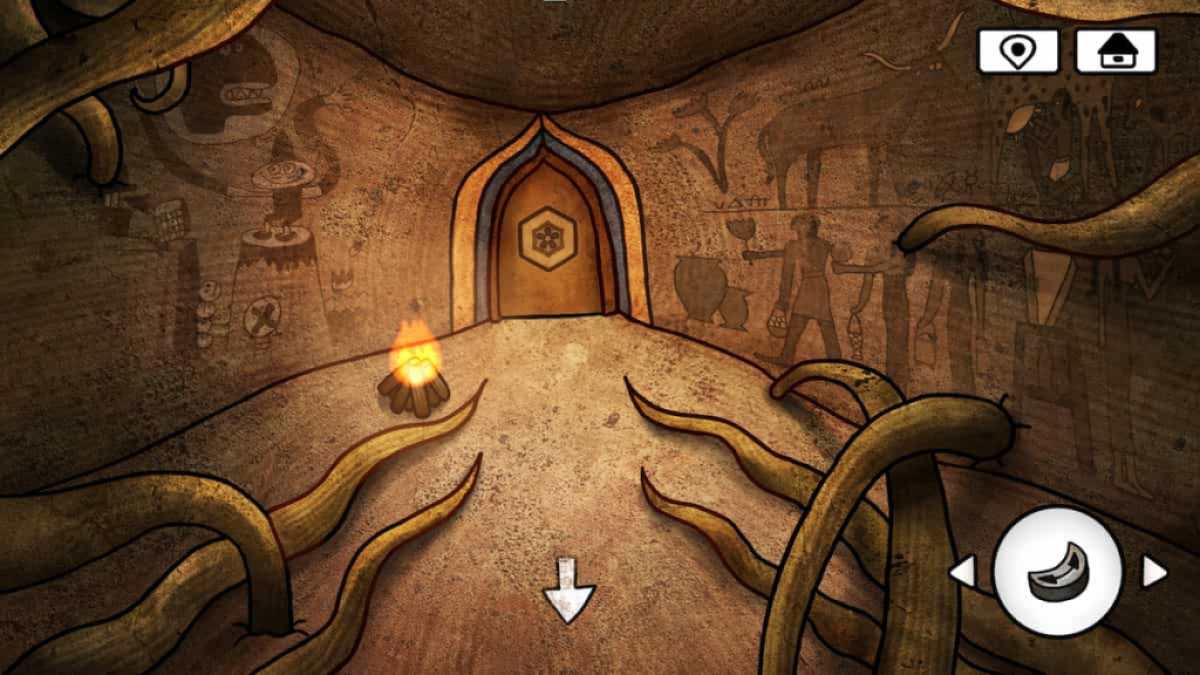
participate it reveals a second door and a campfire , which can be placed into your stocktaking .
Screenshot by Pro Game Guides
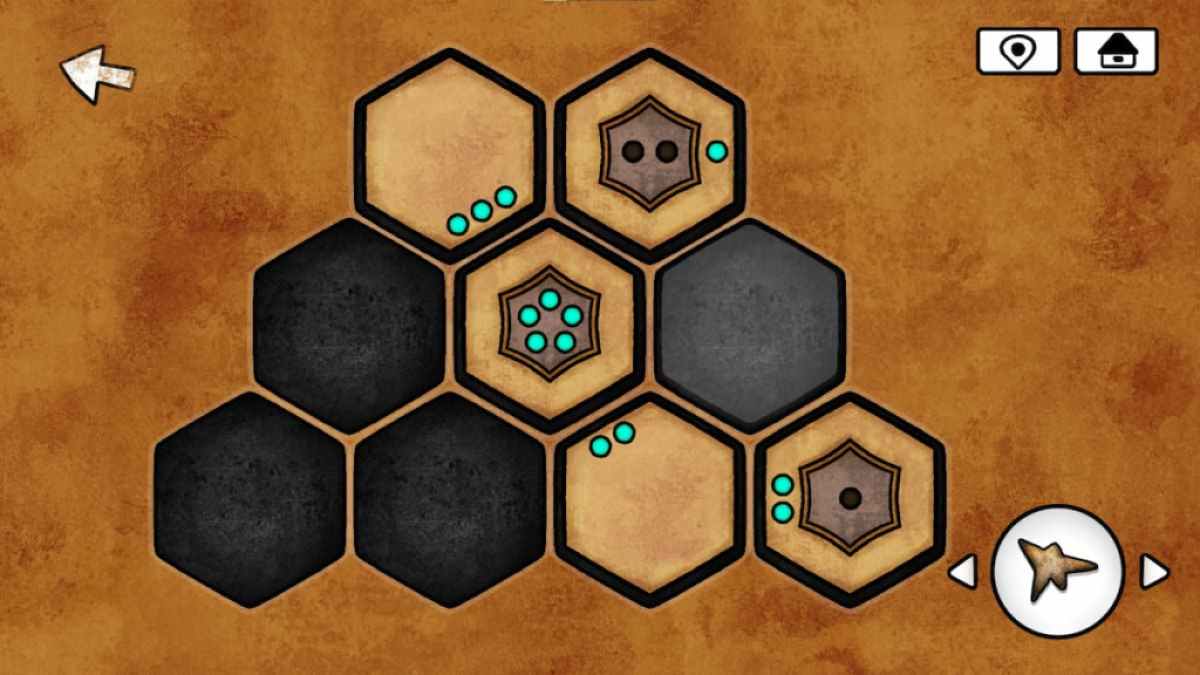
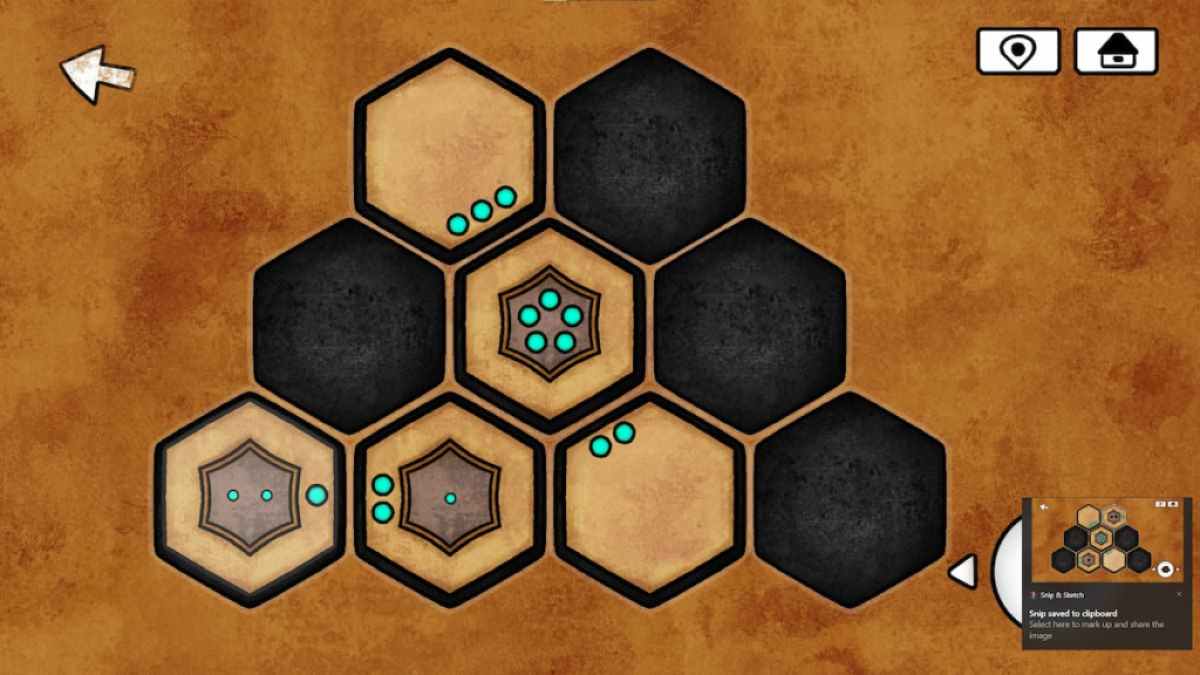
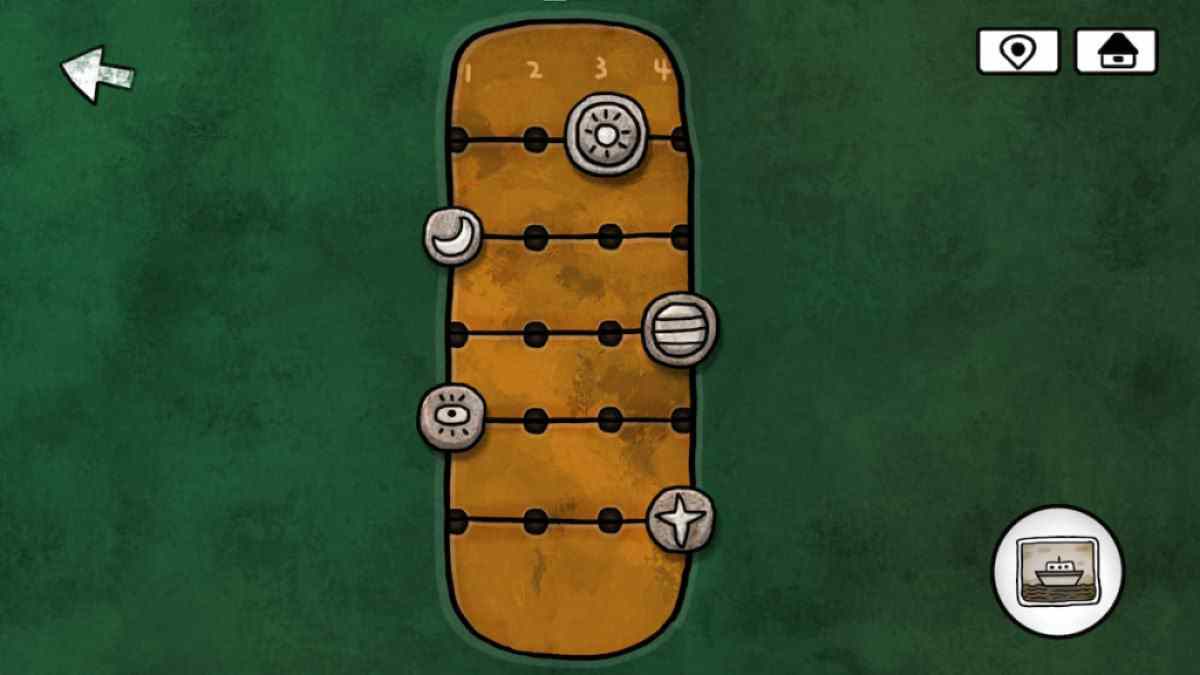
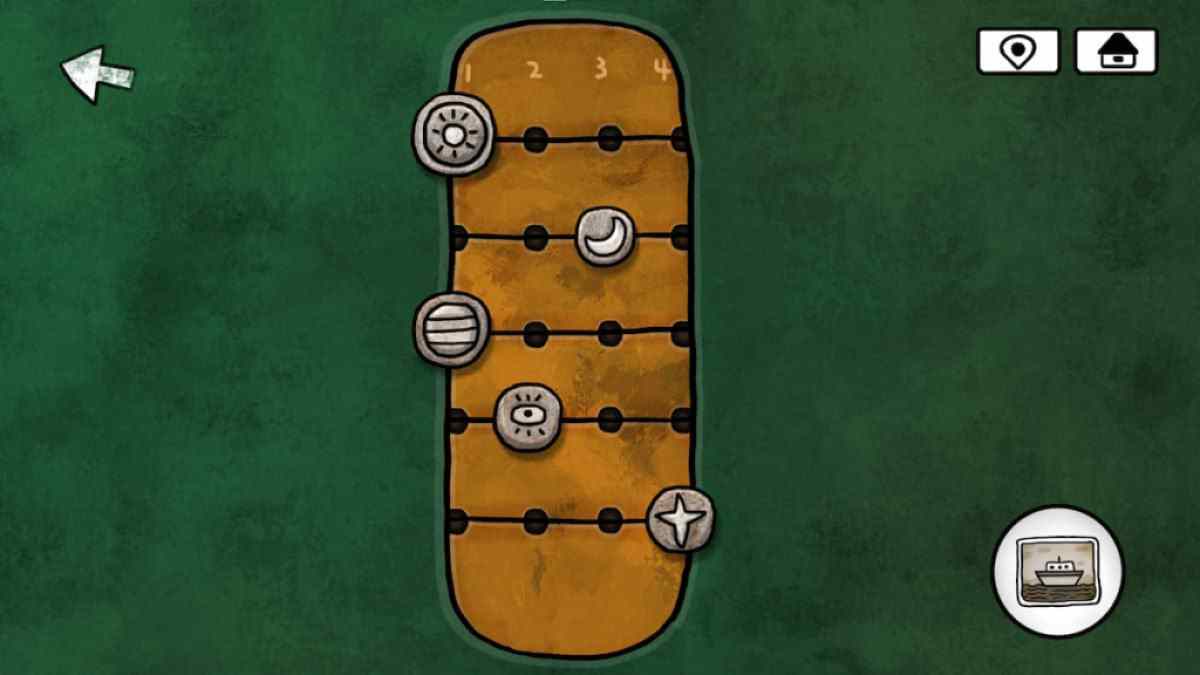
The lock on the threshold is a series of hexagons with circular yap . To complete the puzzle , all of the gob on each hexagon need to be light up .
To get the light in the center of each hexagon to trace up , they must be impact by hexagon contain the same number of holes on their edges . Start by place the five - hole hexagon in the center of the middle row and affect the hexagon with two pickle on the verboten border to the blue right of the feist - hole one .
Move the hexagon with two central hollow to the leftmost cakehole of the bottom row . post the final hexagon , with one hole in the centre , to the right of the antecedently placed one .
Screenshot by Pro Game Guides
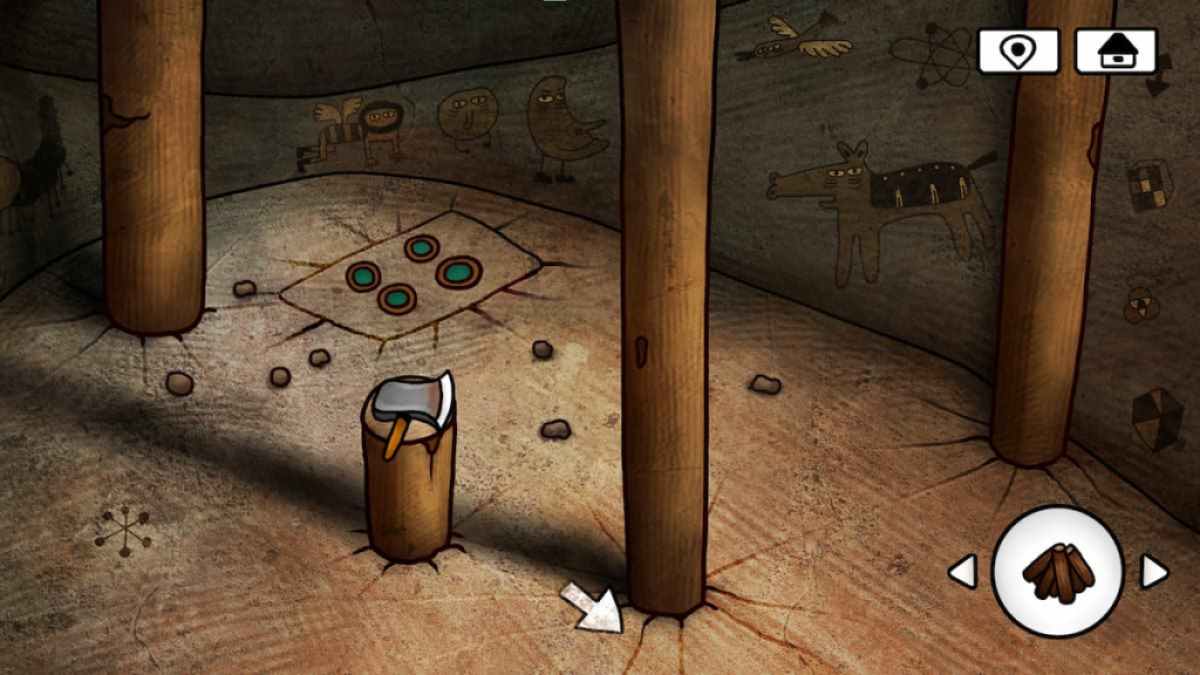
The door will open up to a secret chamber , giving players the " Open Sesame ! " achievement . The ax in this bedchamber can be grab .
The marking on the left side of the flooring is the same marking show being travail up on the goggle box in the room containing the spine puzzle .
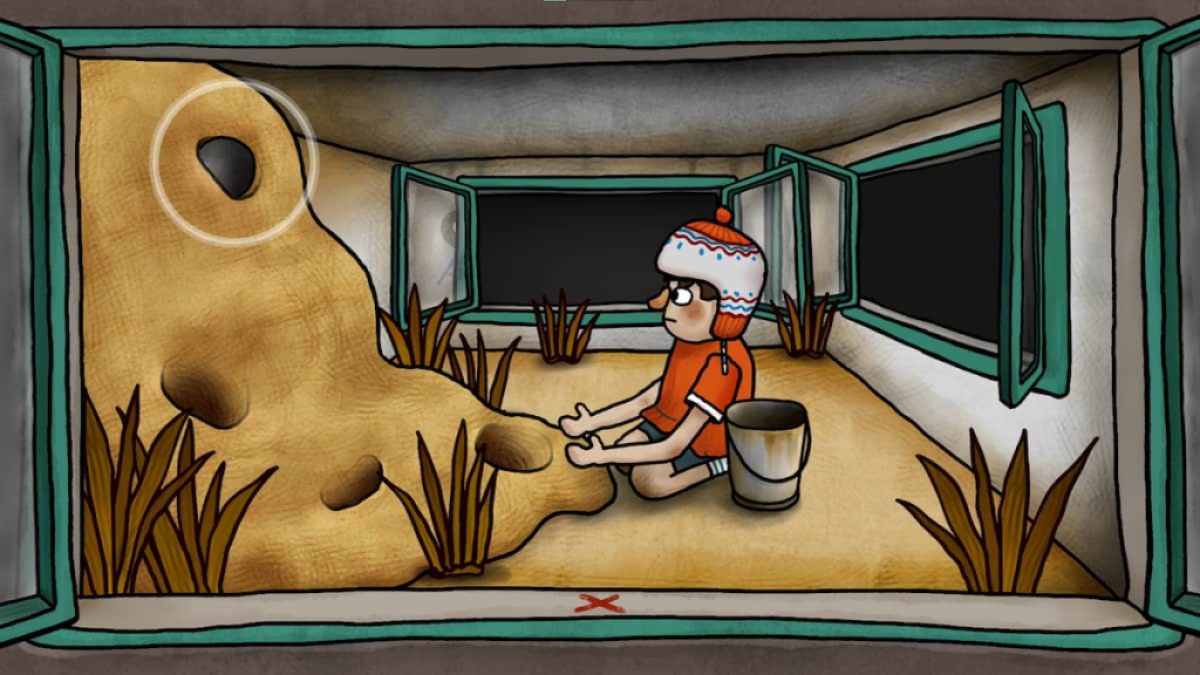
Using the shovel on this piece of music of country will unearth a Sun rune .
Screenshot by Pro Game Guides
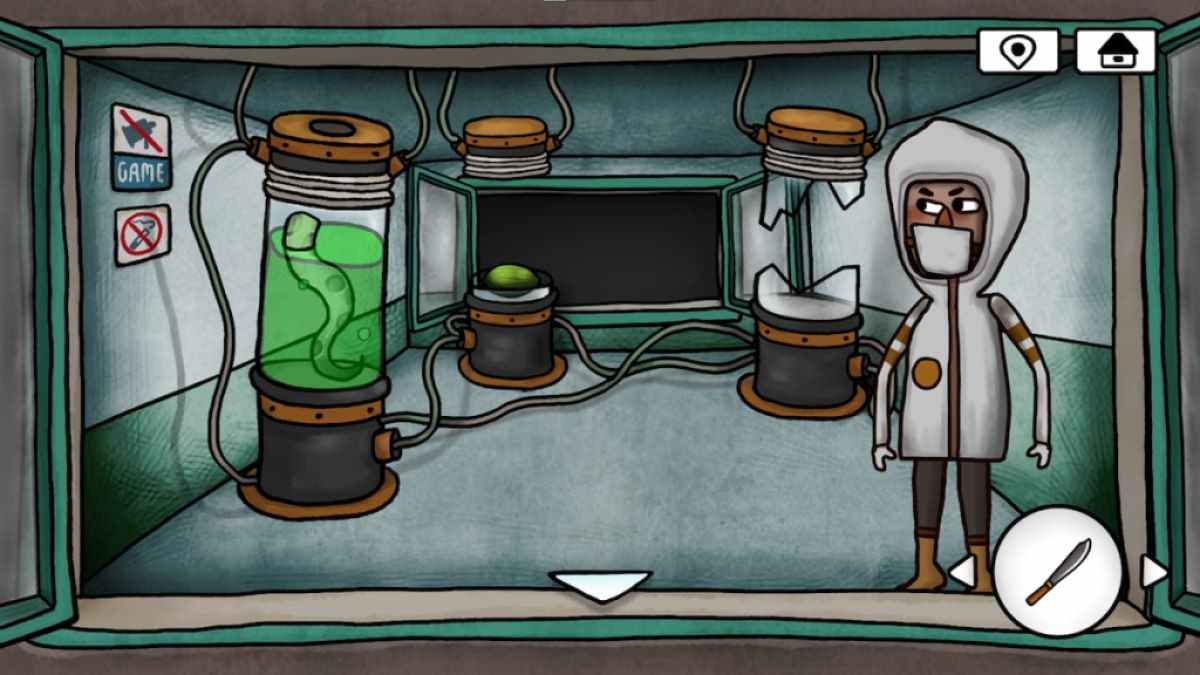
Plant seed puzzle
On the first floor of the spaceship , localize the plant ejaculate into the flames of the left over barrel .
The seed will shoot into a Egyptian water lily , which can be safely grabbed from the container .
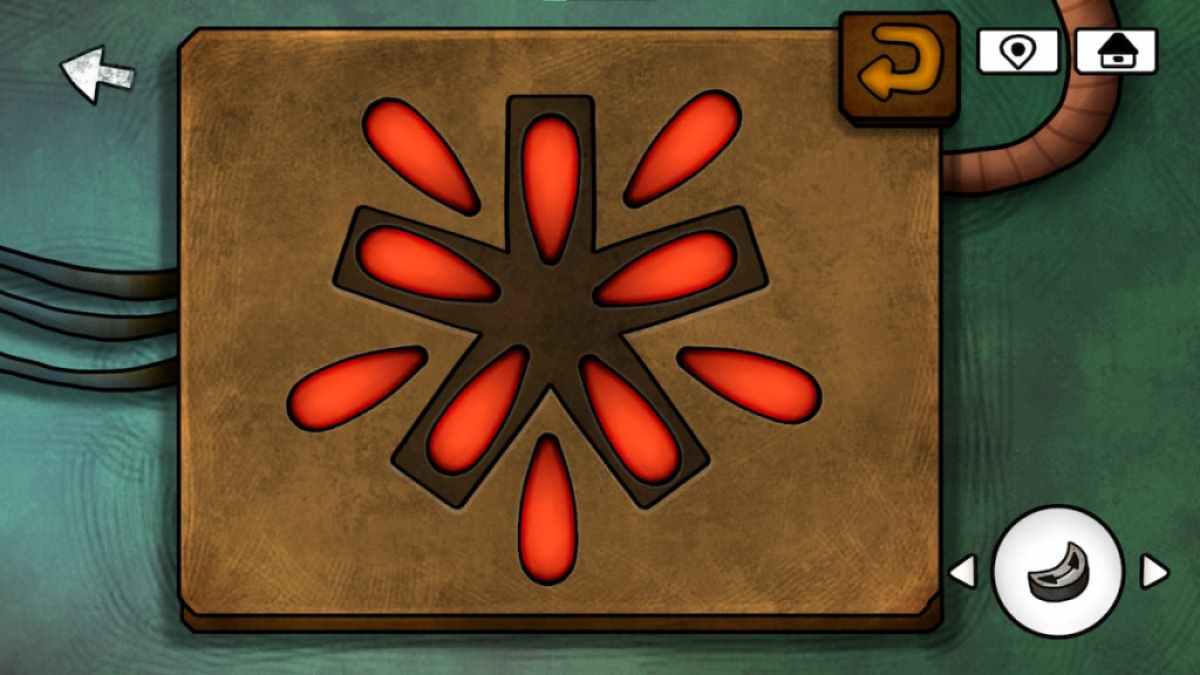
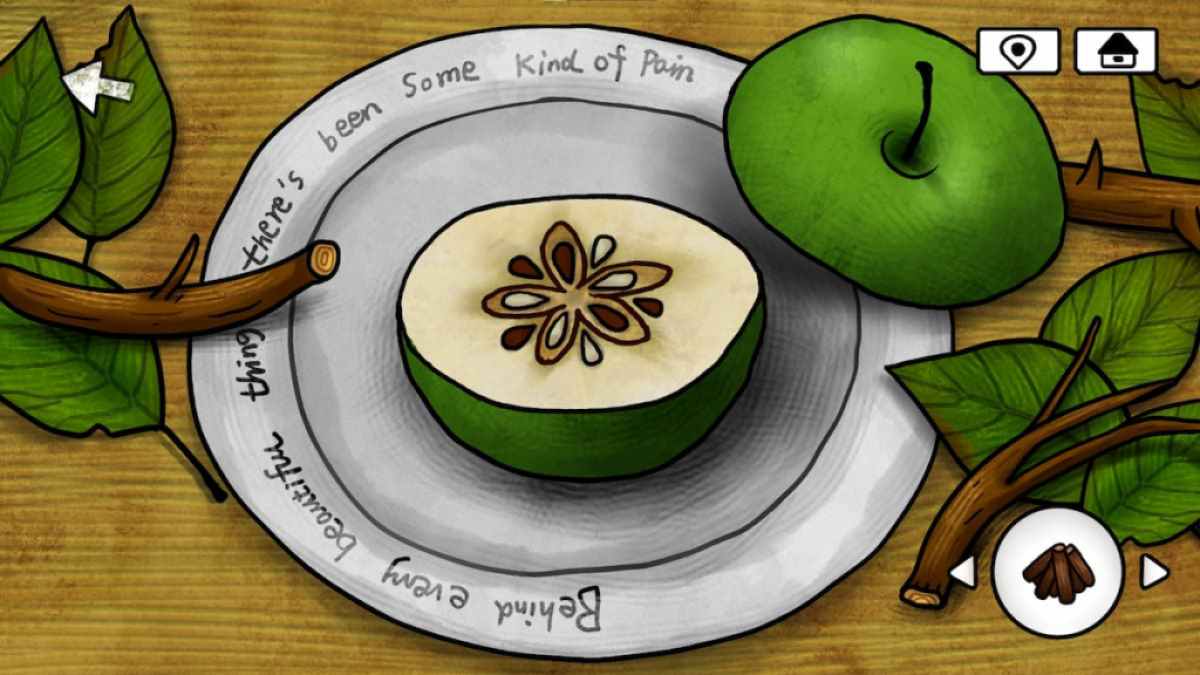
Spaceship second-floor wooden puzzle
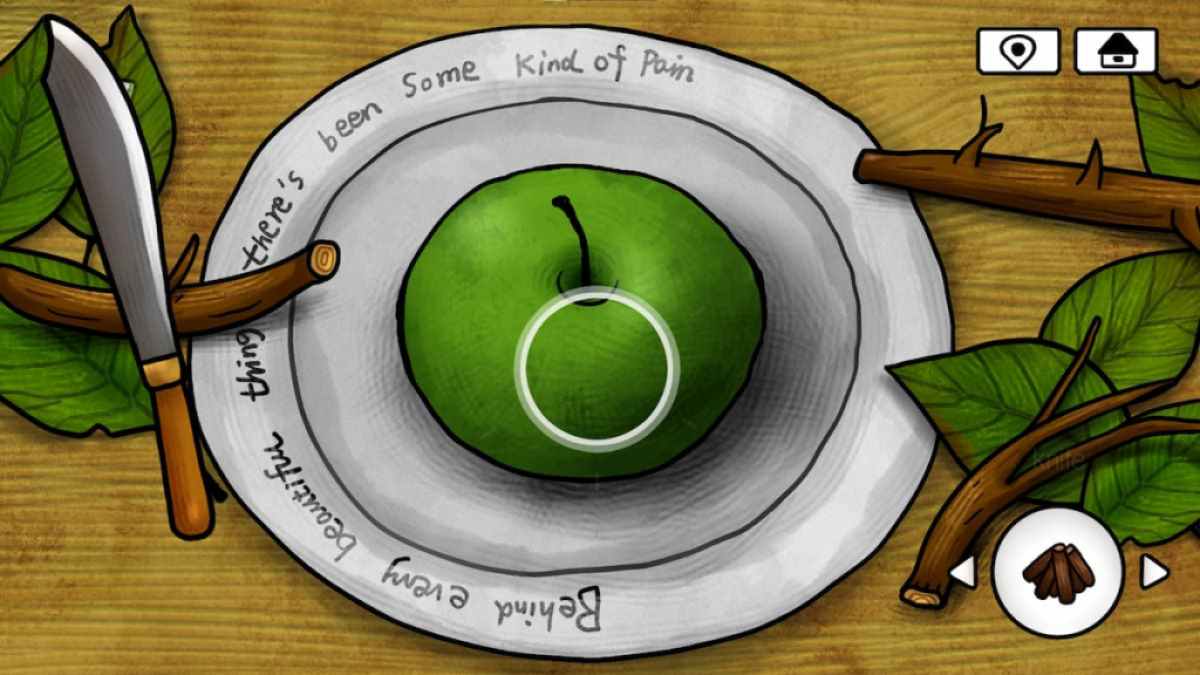
The blossom - shaped teaser on the second floor ask switching certain parts to white while leave behind the rest red .
To see the traffic pattern , the knife must be used on the apple .
The red and white pattern of the seeded player betoken the root for the wood box seat .
Screenshot by Pro Game Guides
The pattern on the box will look like the persona below when it is aright completed .
With the completion of this puzzle , the atom in the nearby mystifier will move wildly before transform into a blank Bronx cheer .
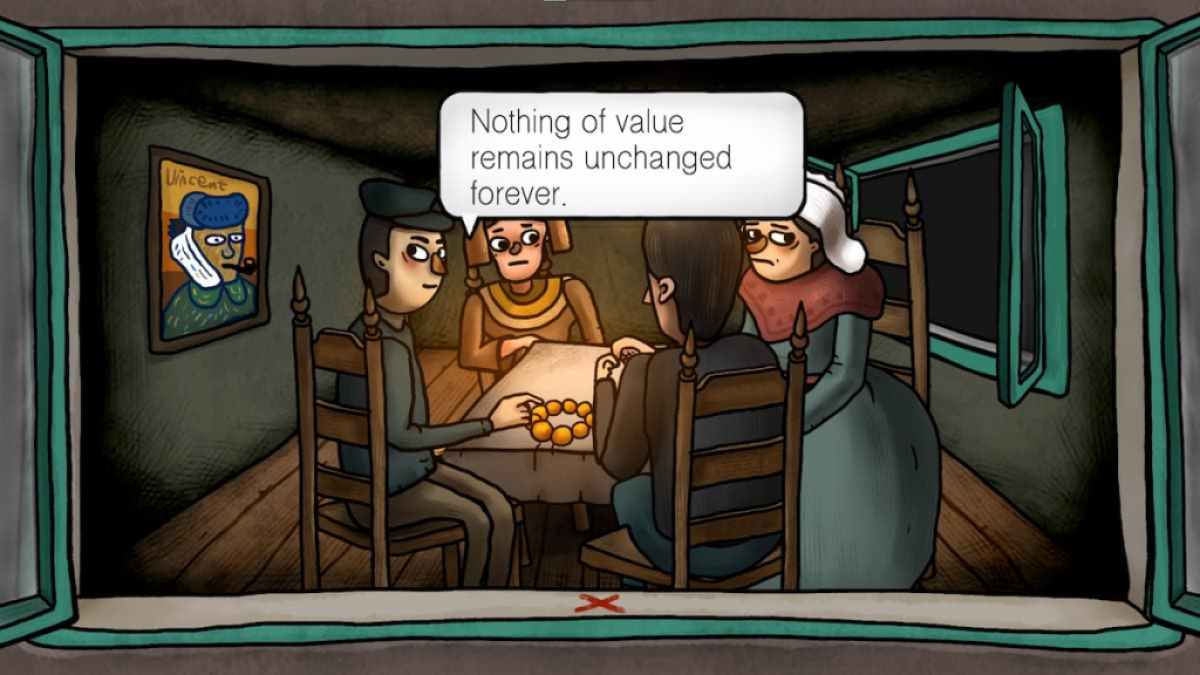
Obtain prayer beads
In the dining room , trade the coin in your inventory for the world ’s prayer beading .
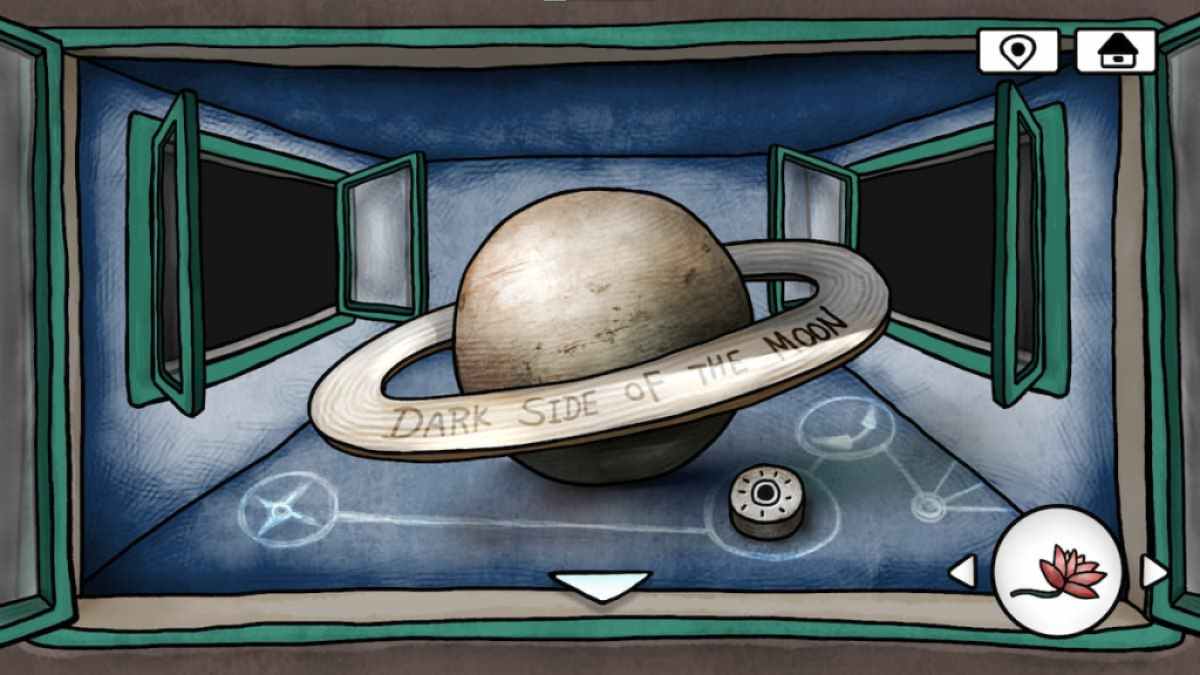
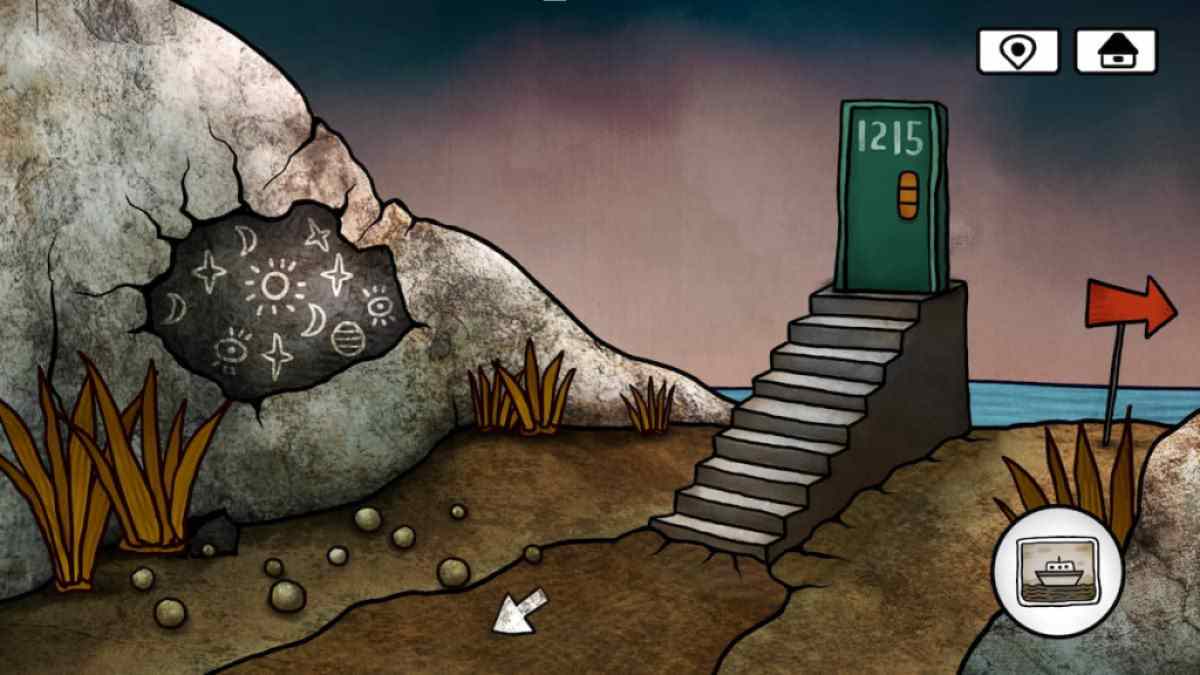
Rune puzzle
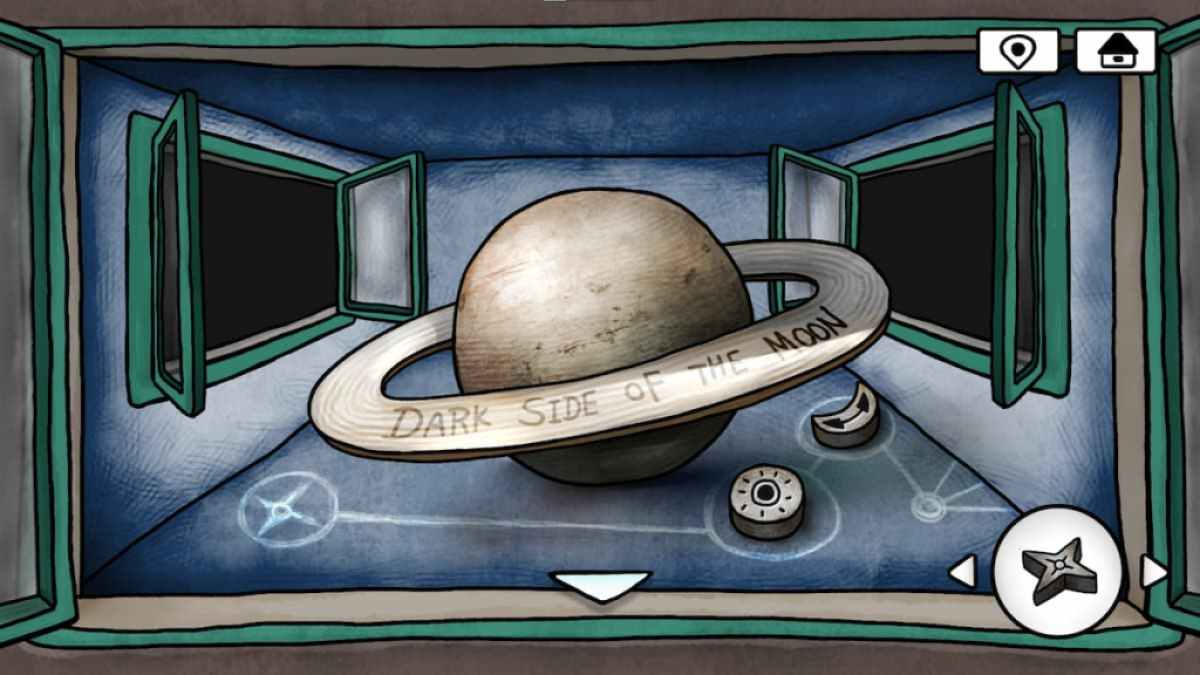
trip to the room containing a ringed planet with the run-in " Dark Side of the Moon " on it . It can be discover to the right hand of the original way , the Mysterious Room .
Set the sun runic letter on the story marking that appear like a sun .
Put the moon rune in the rightmost distance .
Screenshot by Pro Game Guides
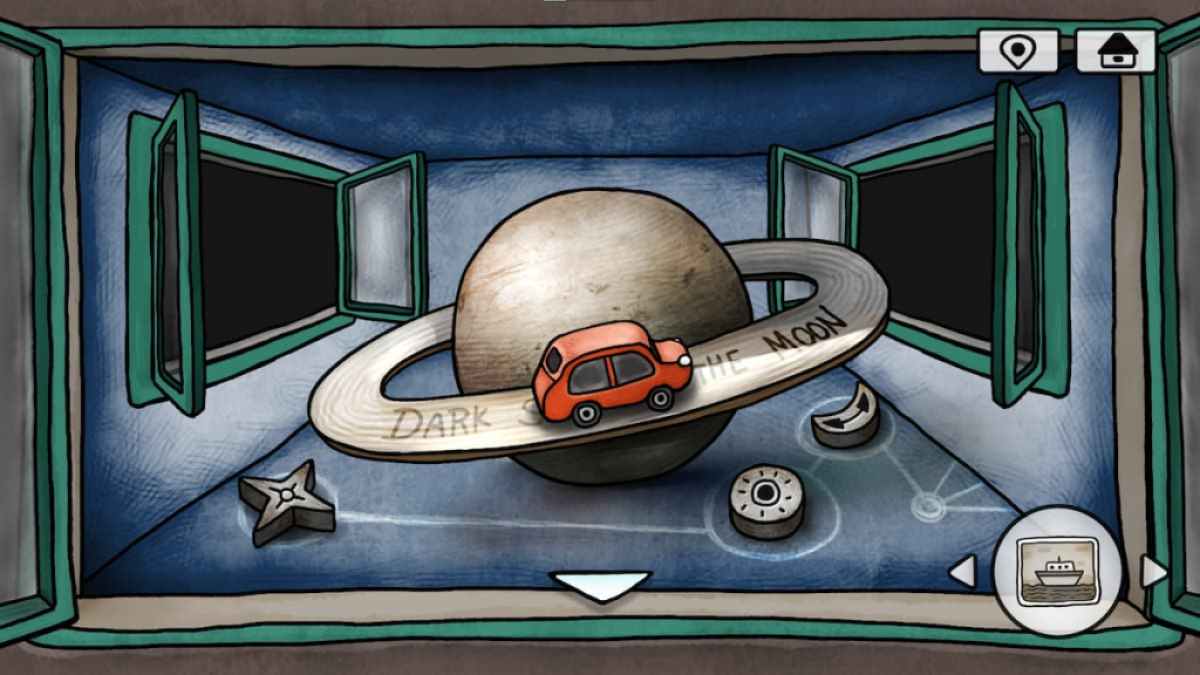
Place the principal rune on the remaining stain . This will get a reddish car to push back around the ring .
flick on the cherry vehicle shows that it is a taxi with a mysterious man driving .
Tapping on the broken front window exposes a puzzler with seven dissimilar symbolic representation .
Screenshot by Pro Game Guides
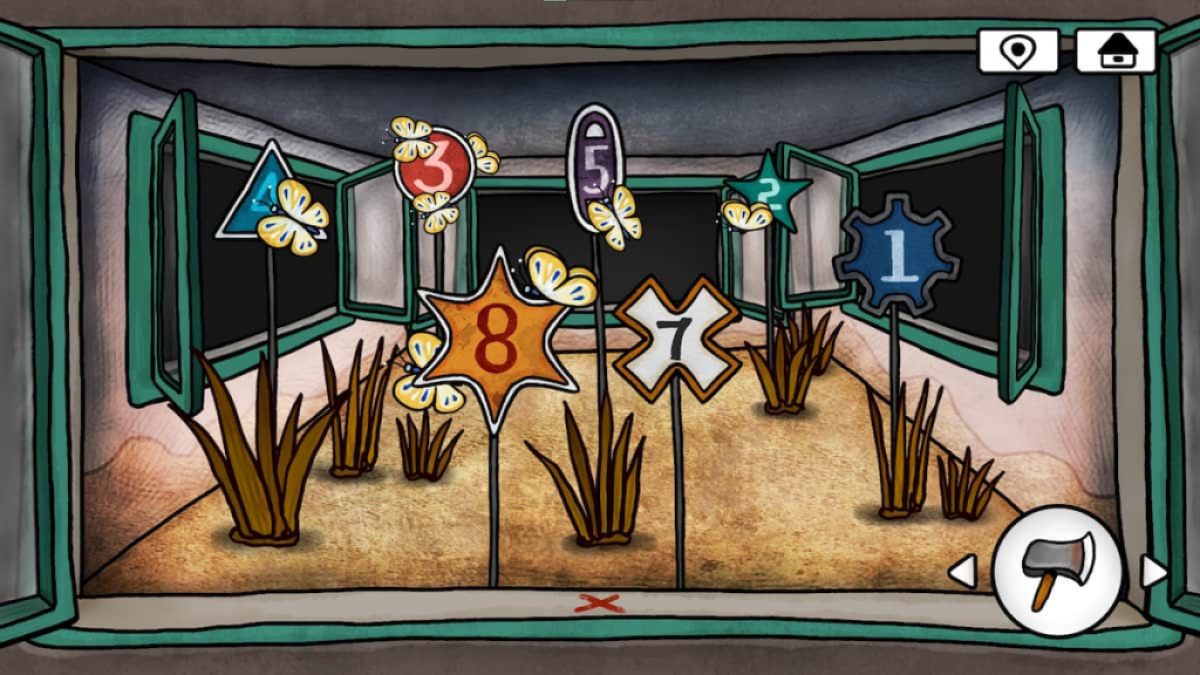
Each of these symbolization correlates to a planetary house in the next room over .
From left to right hand , the number of Transportation above each symbol should be 3 , 8 , 4 , 2 , 1 , 7 , and 5 .
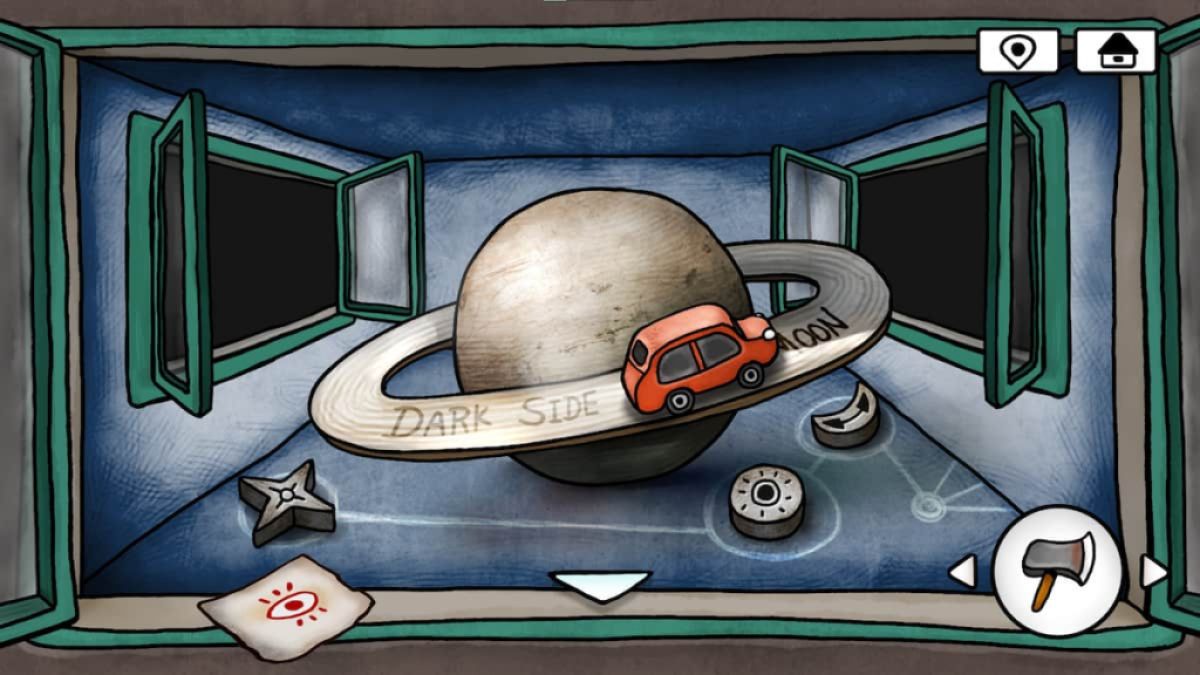
This will cause the car to drive in Mexican valium around the planet ’s ring , dropping a scribble newspaper for your inventory . It will also unlock the " Round - the - World Travel " accomplishment .
Screenshot by Pro Game Guides
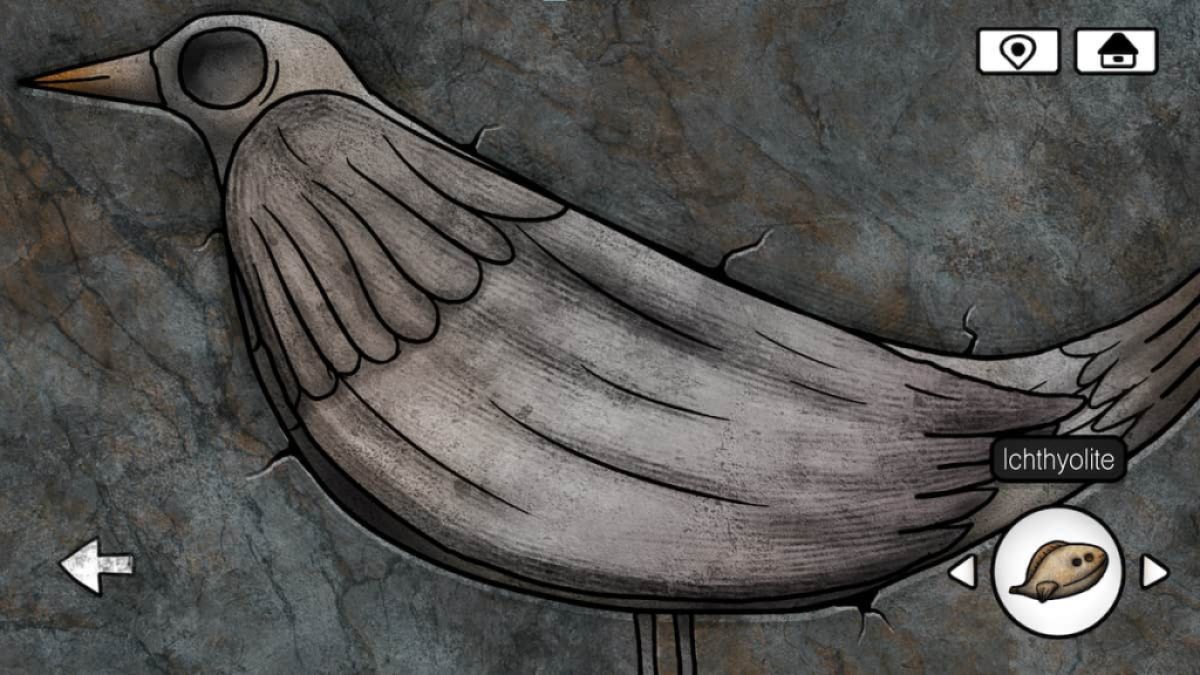
Bird carving puzzle
In the area containing the wireless tower , a skirt can be seen carve into the stone .
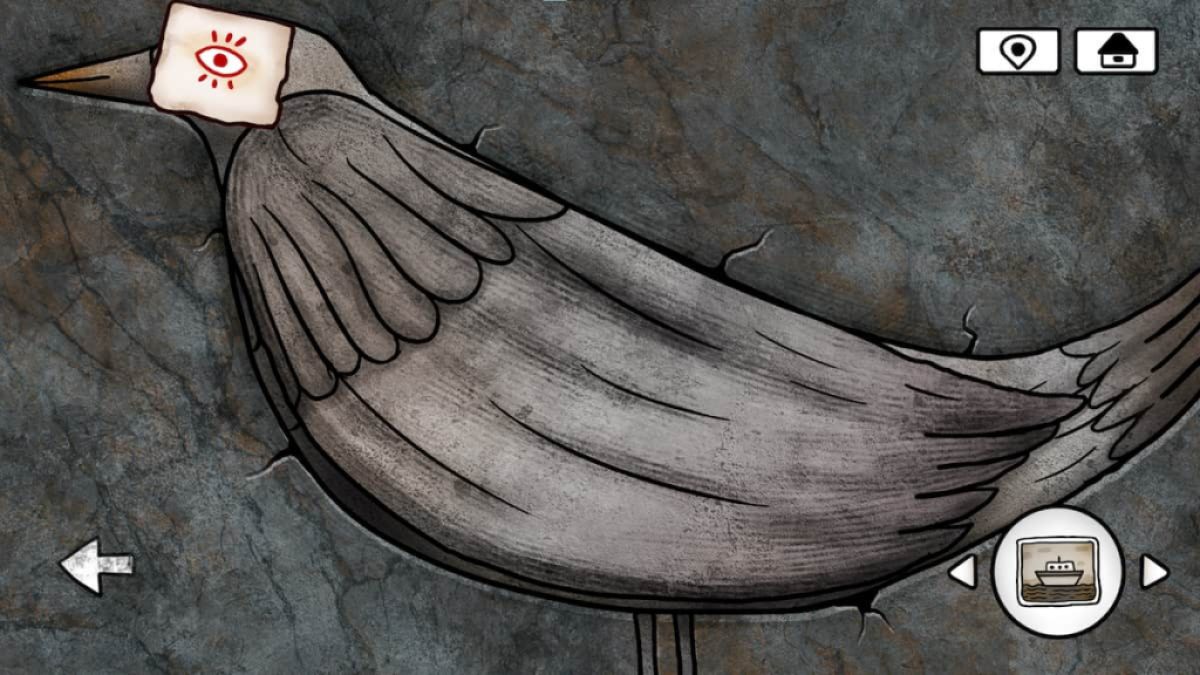
Place the scribble paper onto the bird ’s eye .
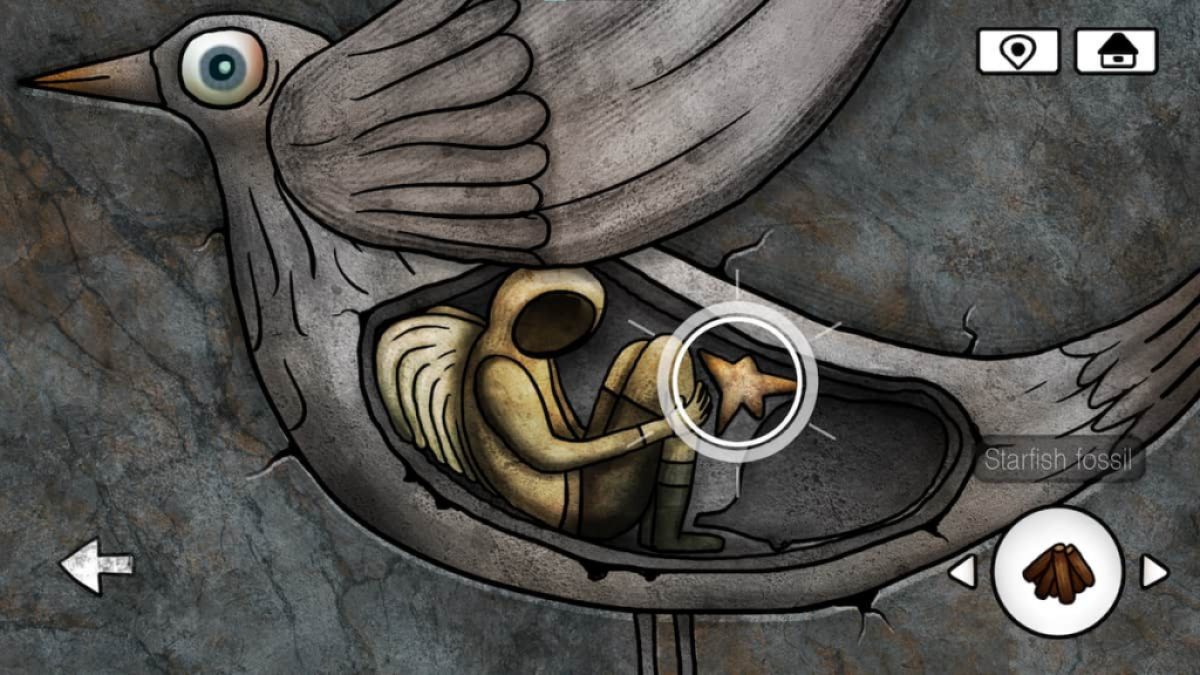
This will open a compartment beneath the wing check two maw . Place the starfish fossil into the first hole .
Screenshot by Pro Game Guides
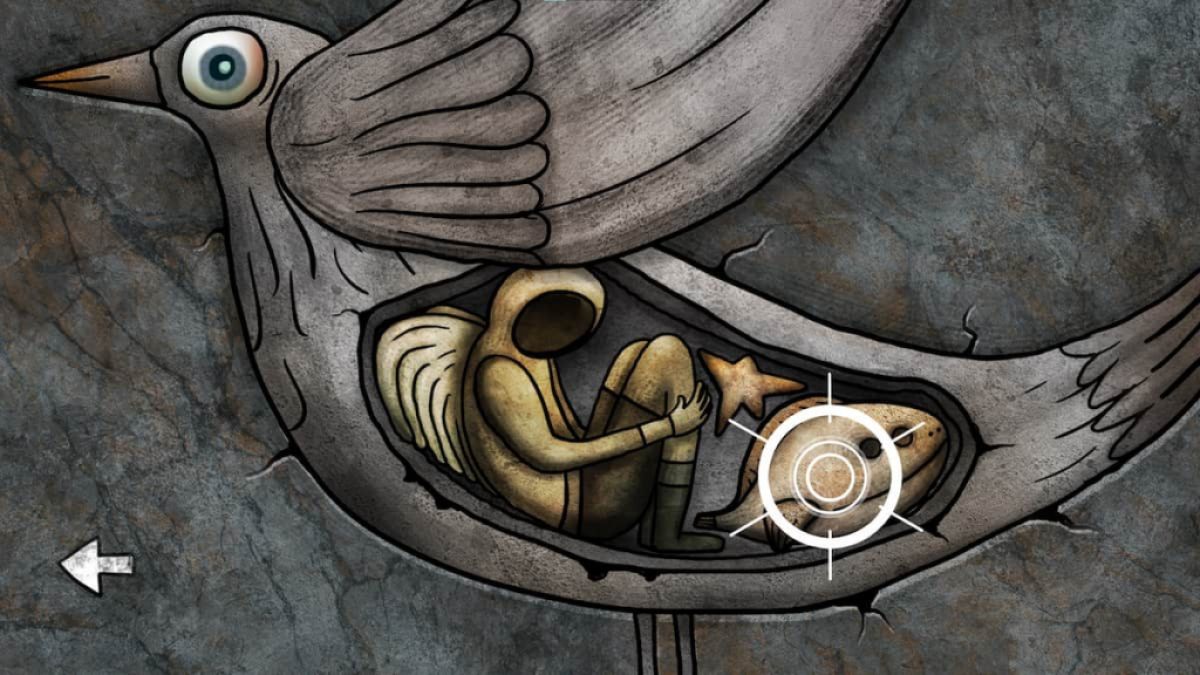
position the ichthyolite into the second hole .
This will turn the radio tower on , scaring the bird off .
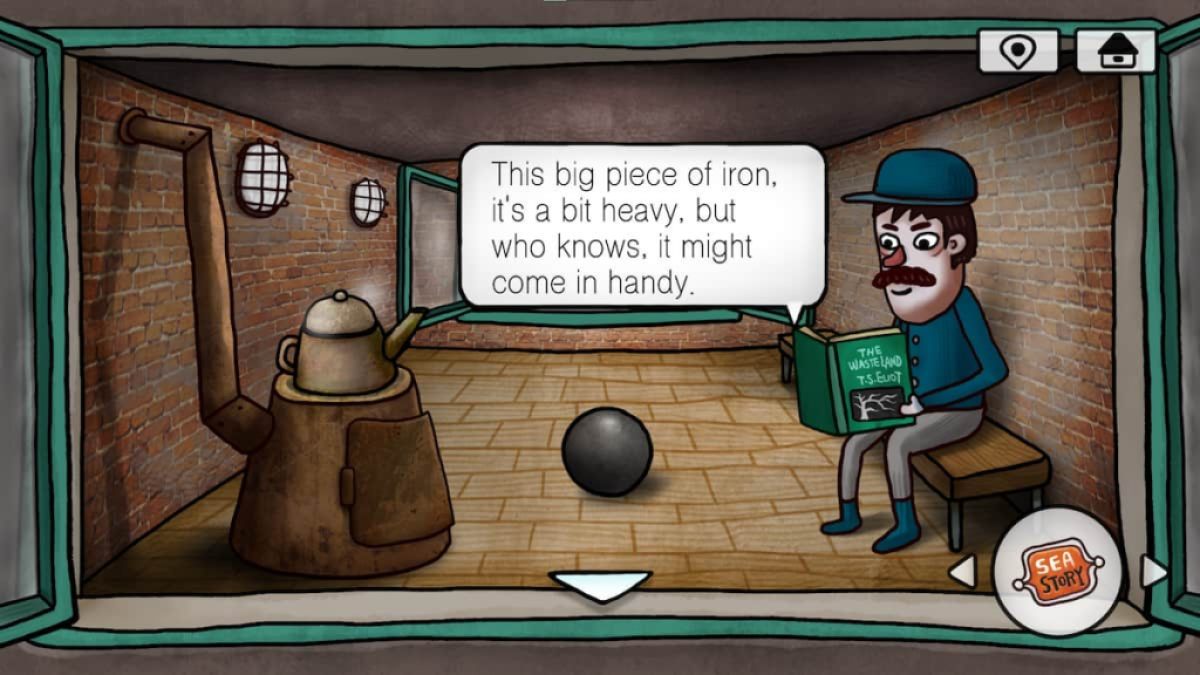
Furnace puzzle
In the engine room , place the firewood from the campfire into the furnace .
blab to the mechanic afterwards to get an branding iron ball .
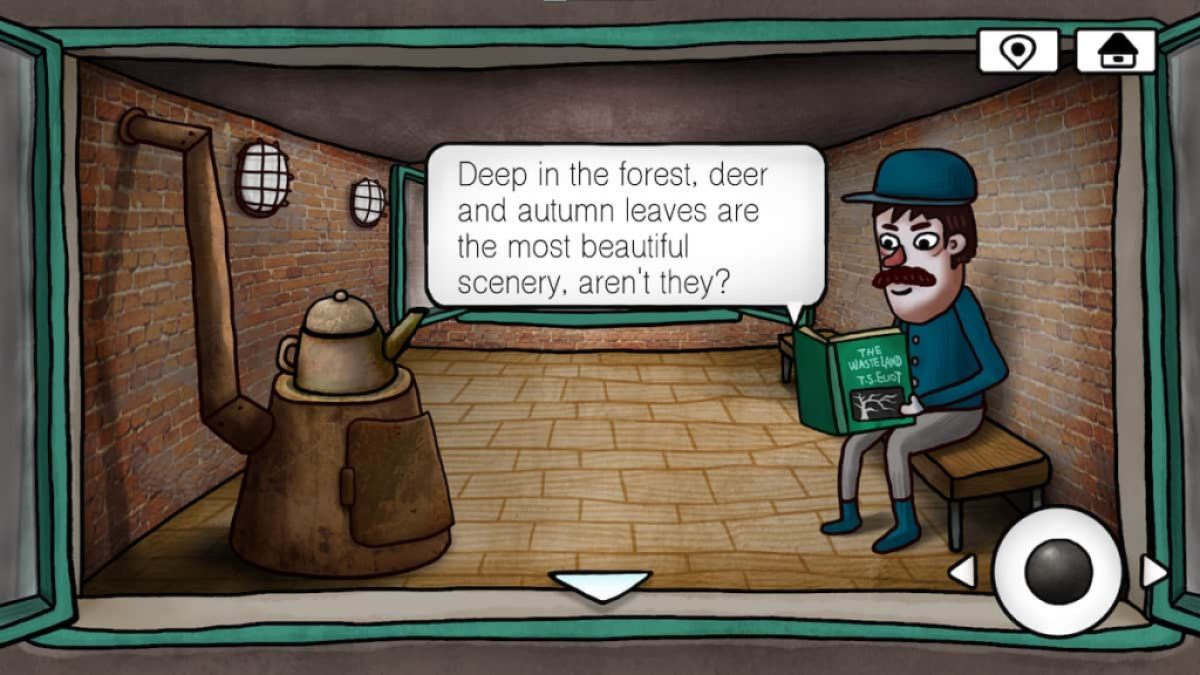
Continuing to babble to the mechanic will lead to him mentioning deer and fall leave .
Screenshot by Pro Game Guides
Visiting the room with the cervid afterward will give you the " Autumn is in the Air " accomplishment .
Iron ball puzzle
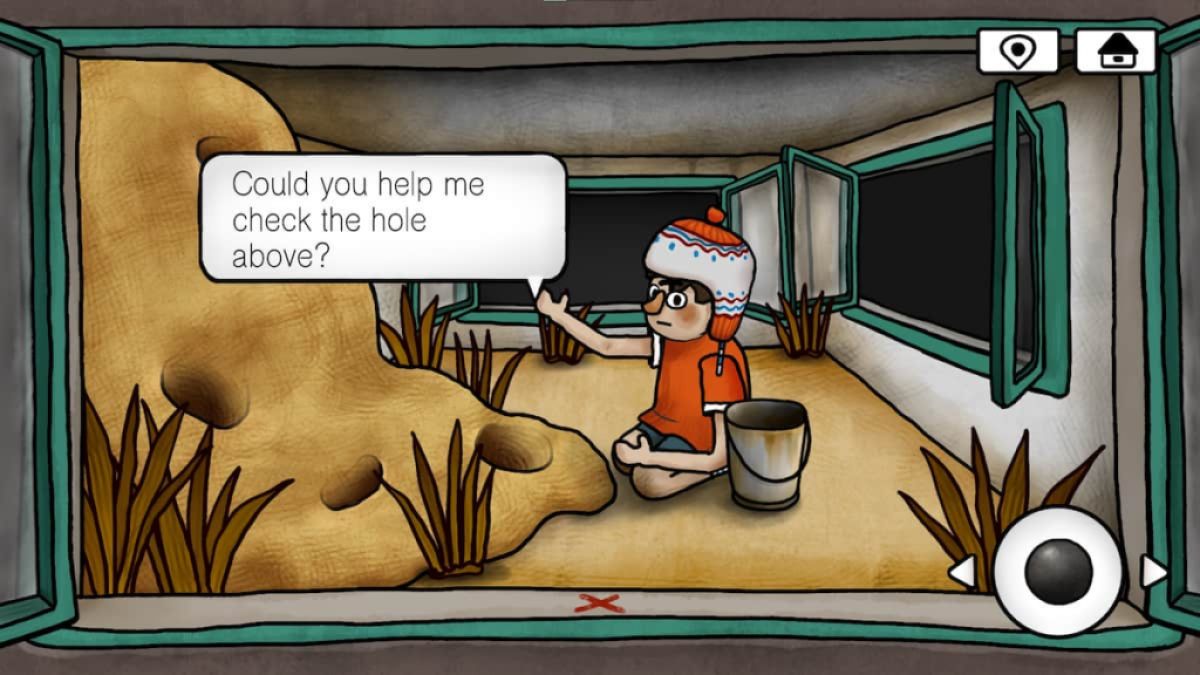
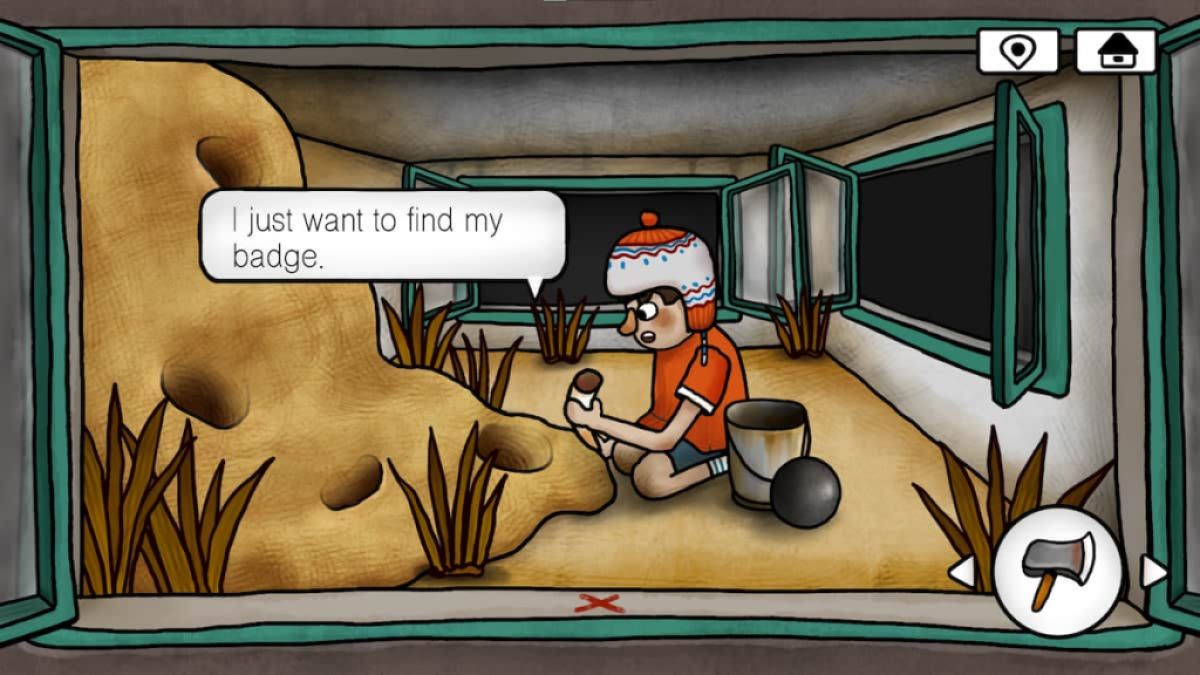
speak to the son after cause the smoothing iron testicle results in him postulate you to check the upper hole .
The iron testis can be dropped into the top hole .
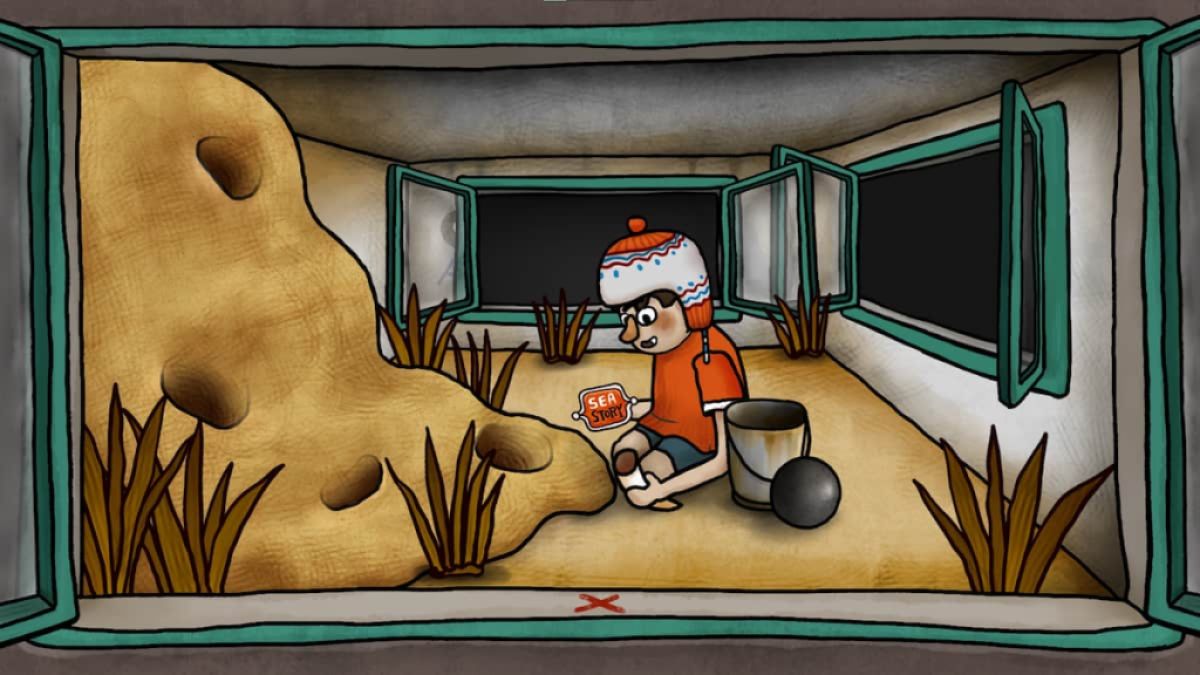
He will get an item and begin talking about how he just wanted to find a badge .

Screenshot by Pro Game Guides
By feed him the badge from the lighthouse , you could obtain tusk .
Grab the atomic number 26 ball again and drop it into the leftmost trap to get a blue controller .
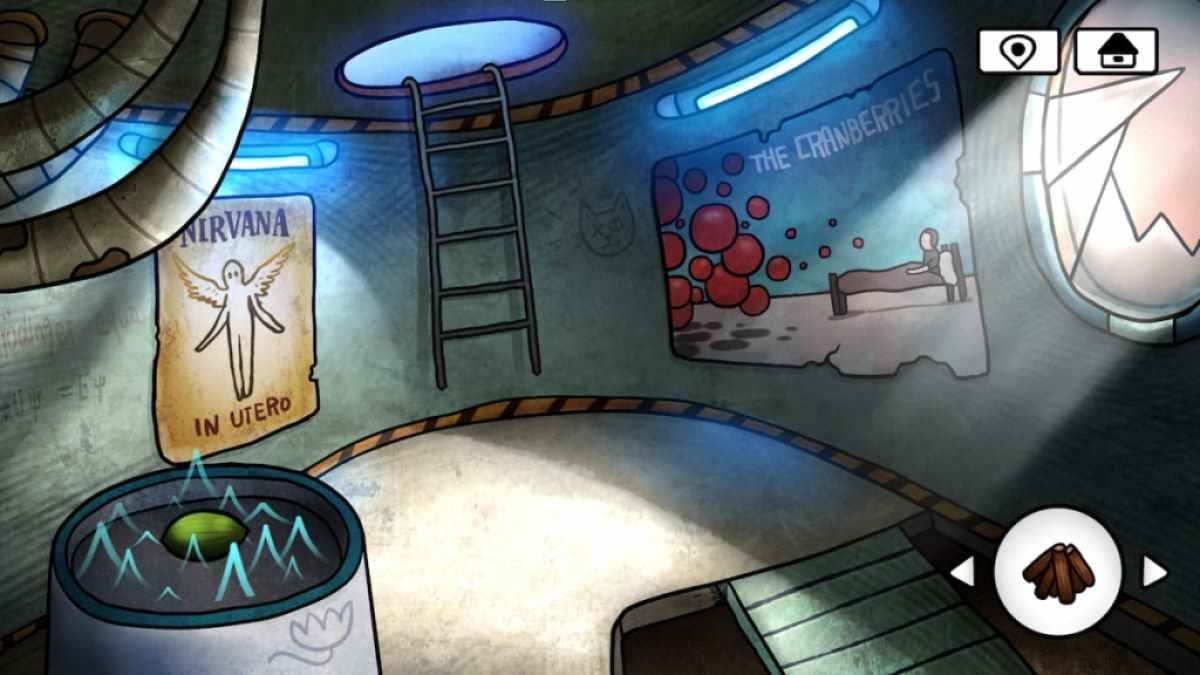
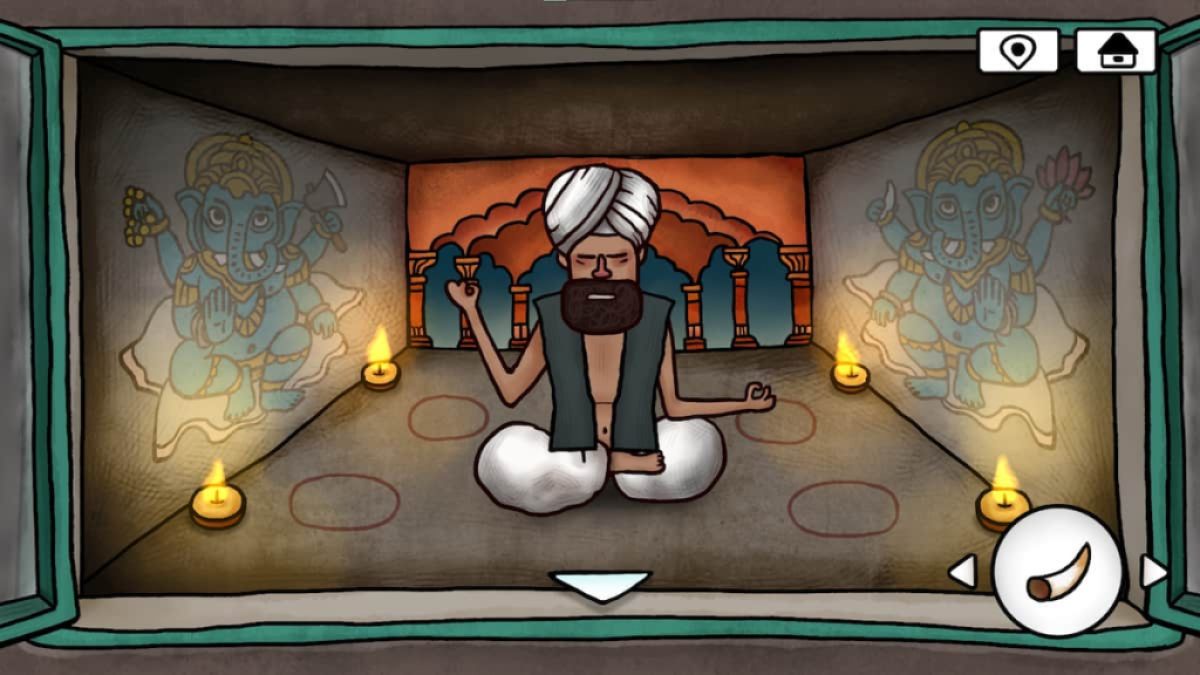
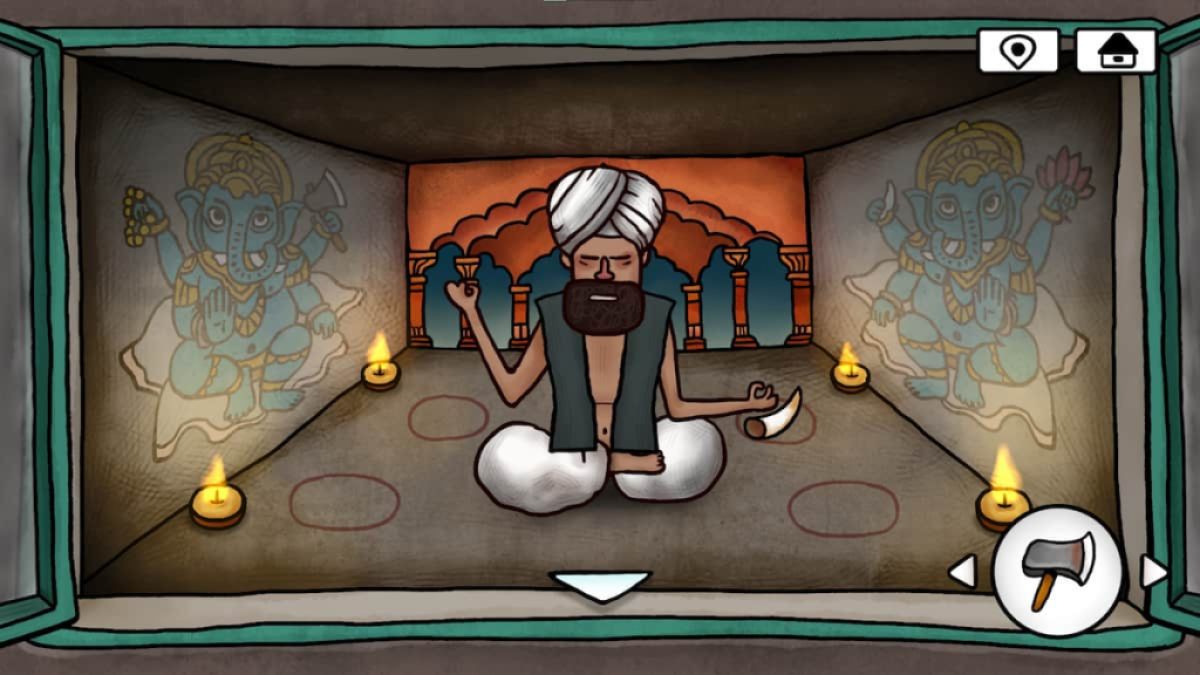
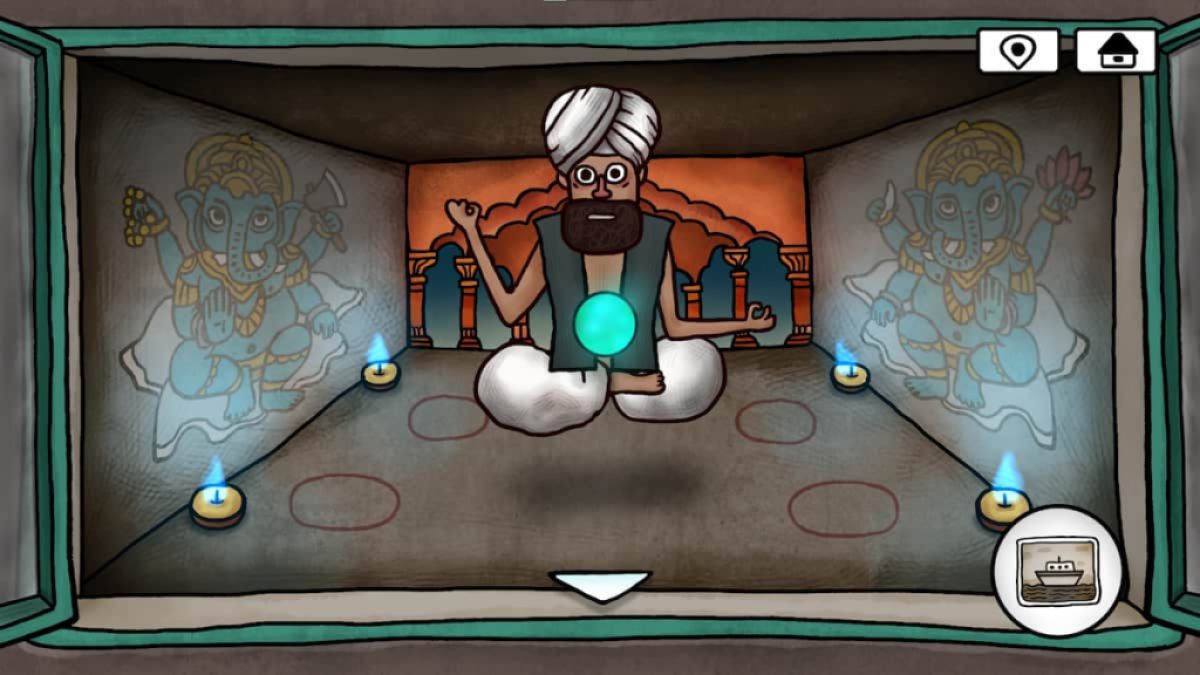
Nirvana puzzle
Behind the musician ’s way is a elbow room belonging to a man seeking Nirvana . The nontextual matter on the bulwark is likely of the Hindu god Ganesha , with each of the portraits holding two items . These items depict the item require as well as the circle they involve to be put in .
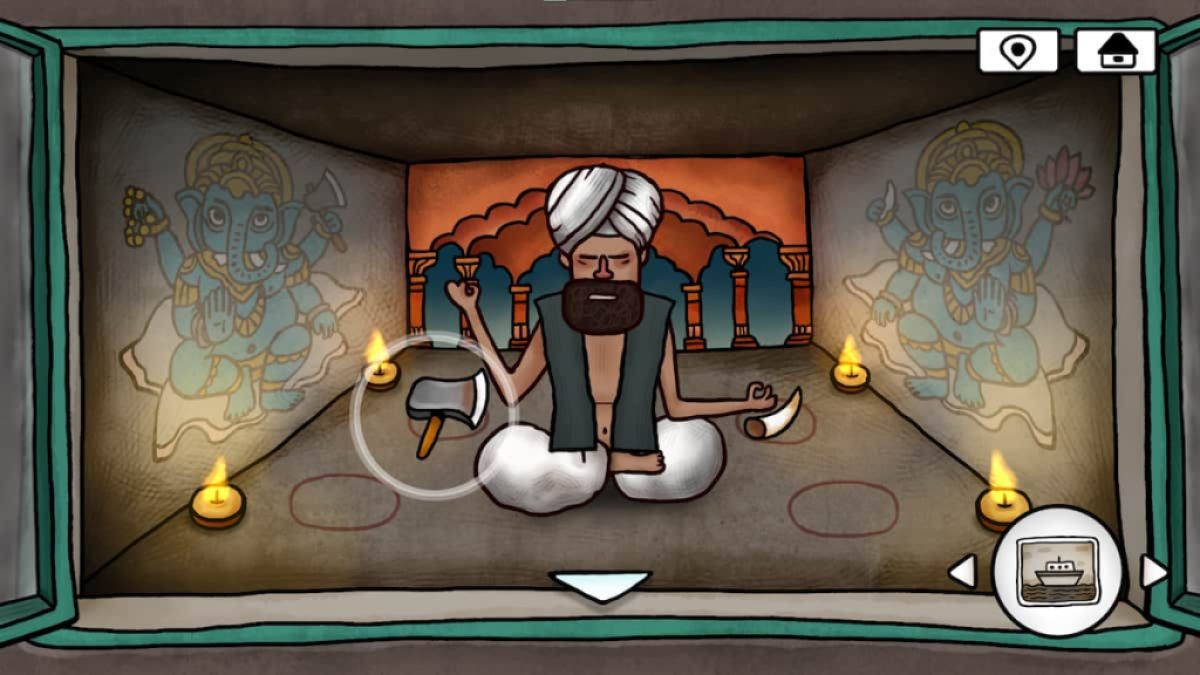
start up by placing the ivory on the back right circle .
Then countersink the ax in the back leave circle .
Screenshot by Pro Game Guides
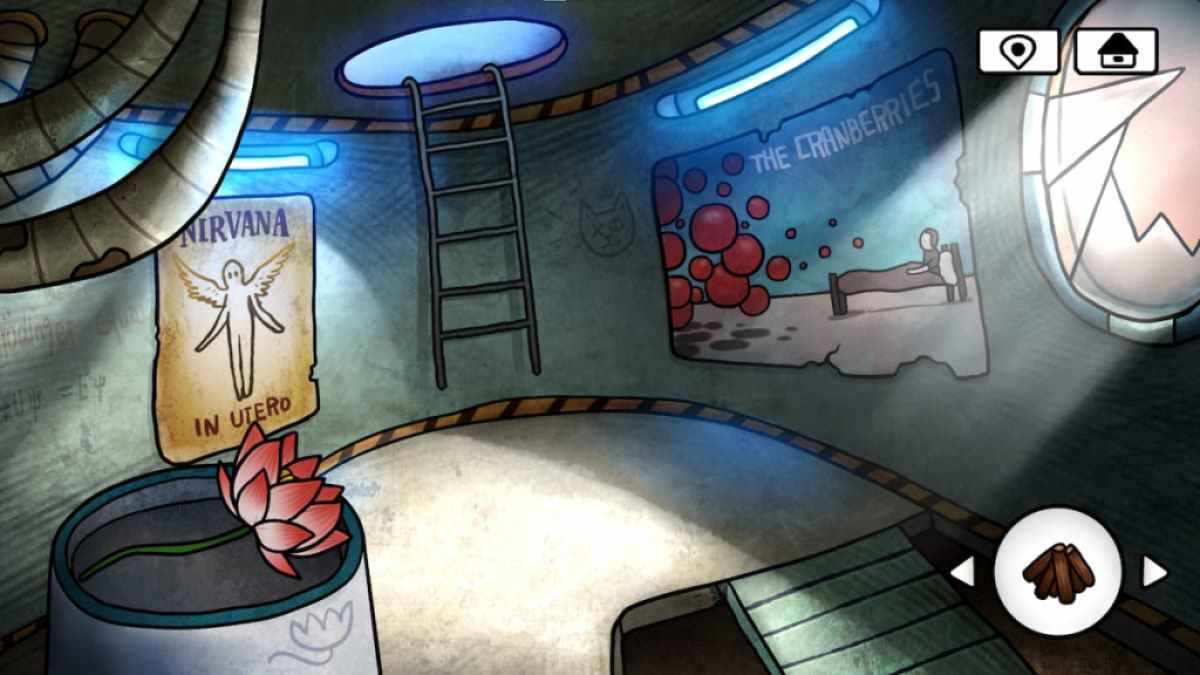
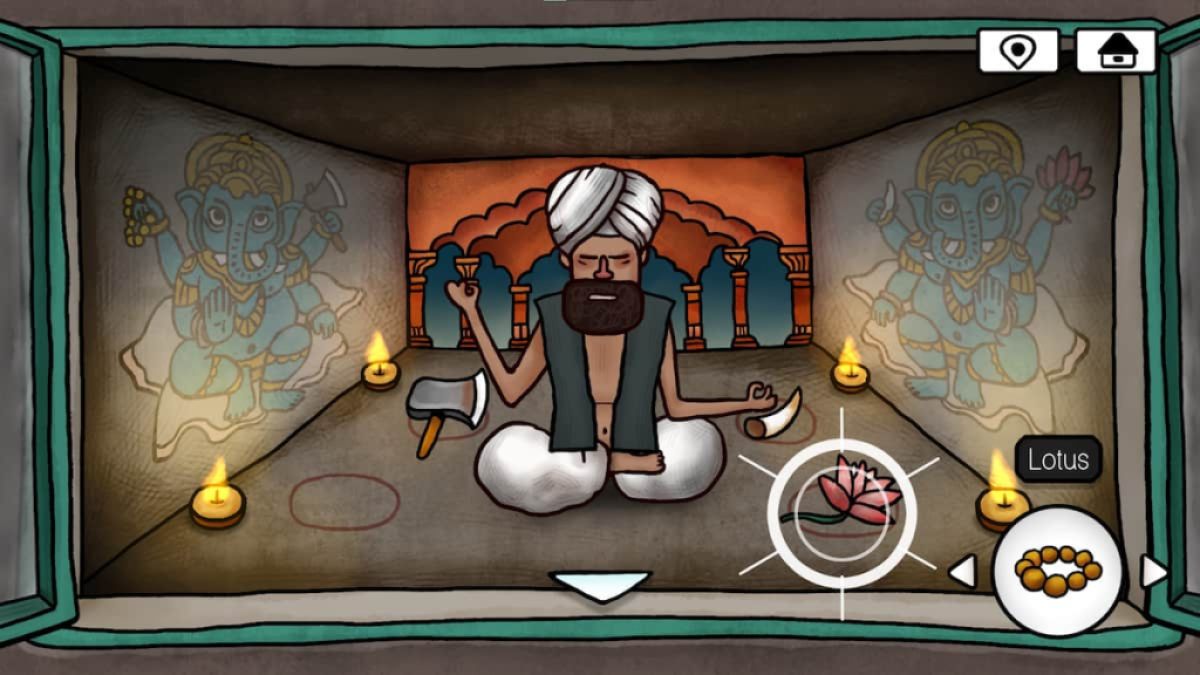
The lotus flower satiate the front right band .
The final detail , the appeal bead , go in the front left circle .
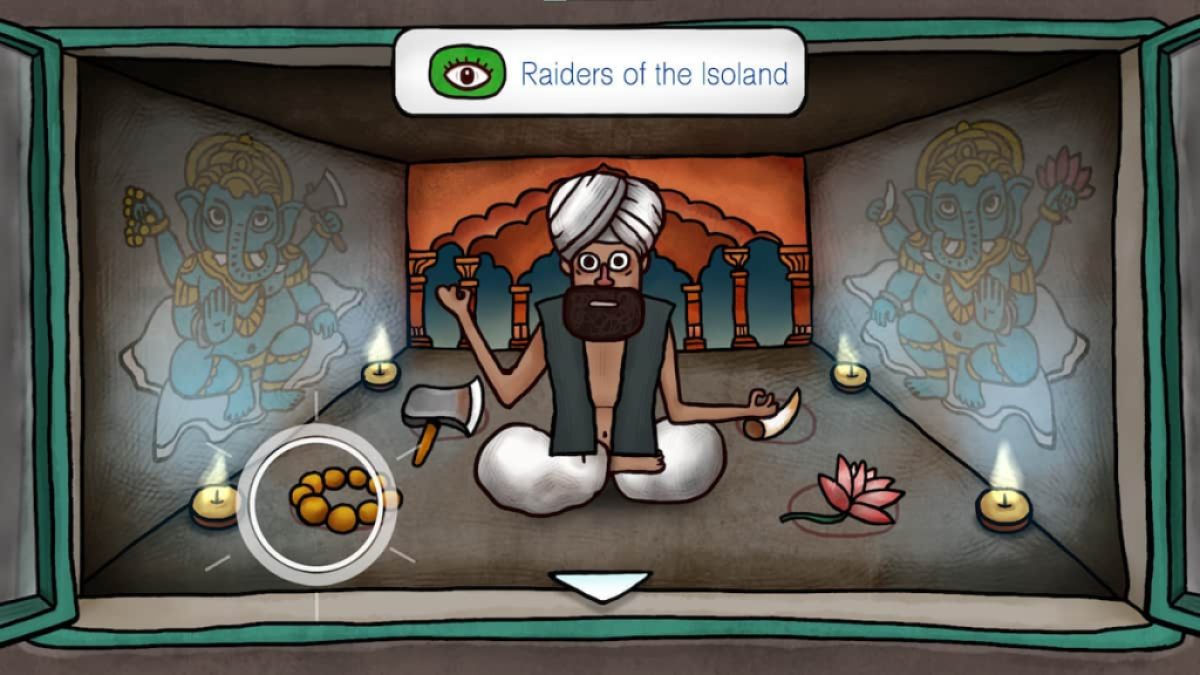
This will make the military man to attain Nirvana , producing a green photosphere and unlocking the " Raiders of the Isoland " achievement .

Screenshot by Pro Game Guides
Related:25 Best Free Virtual Escape Room Games
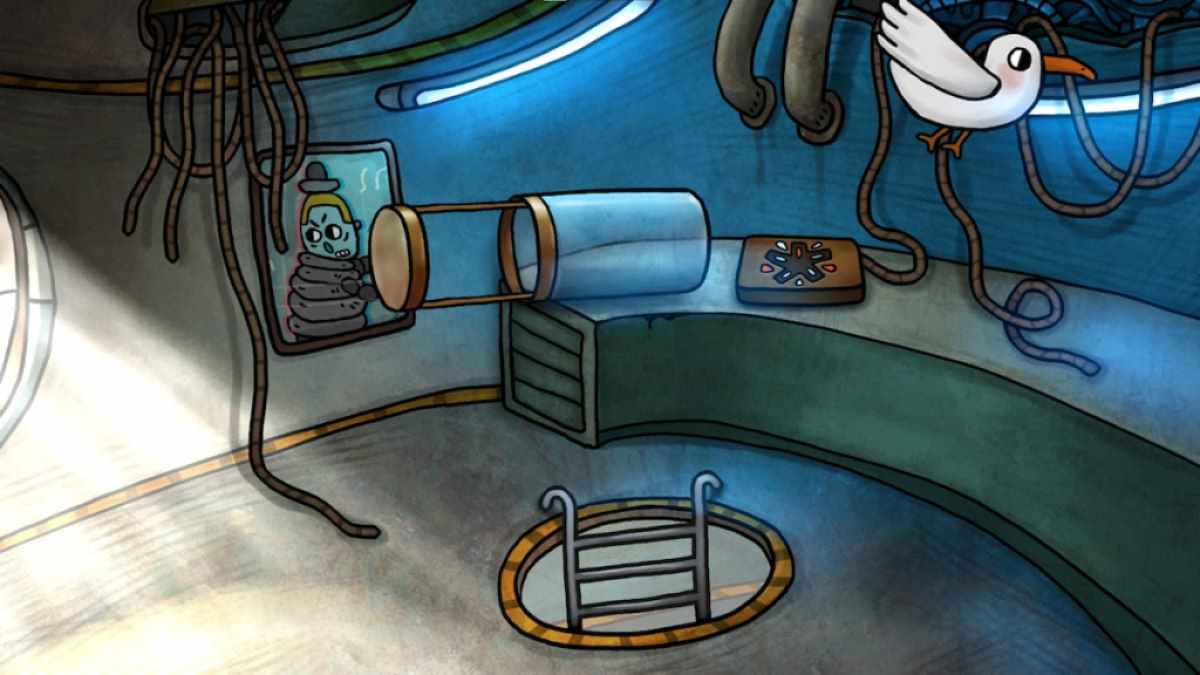
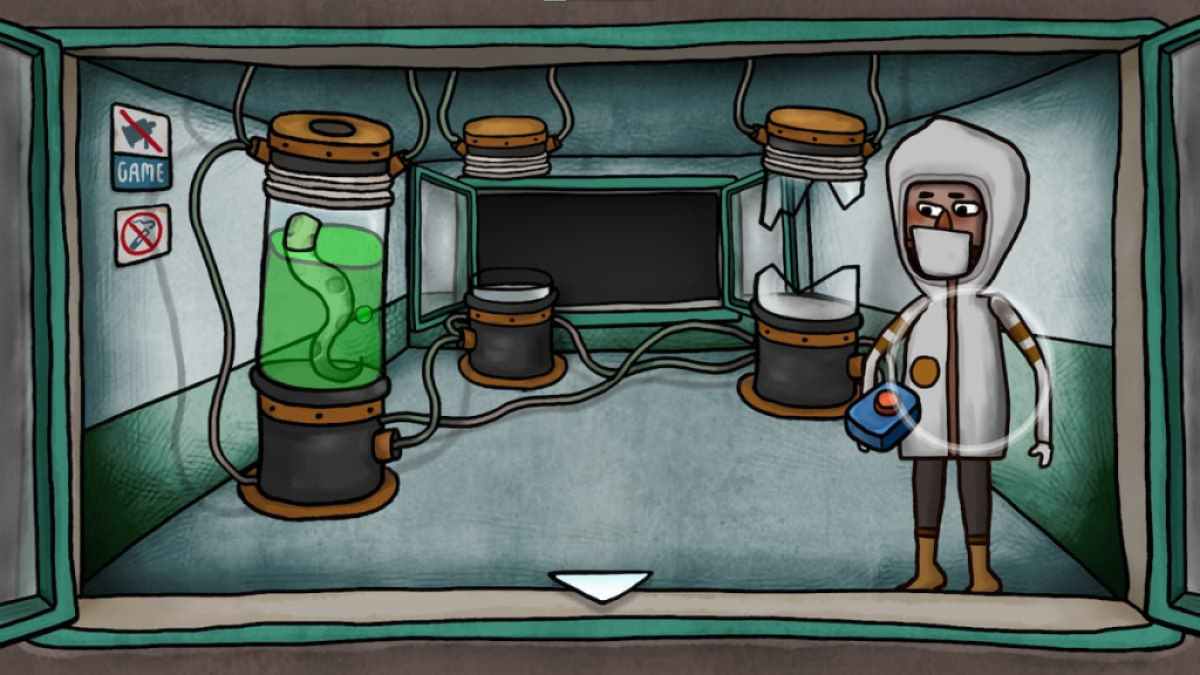
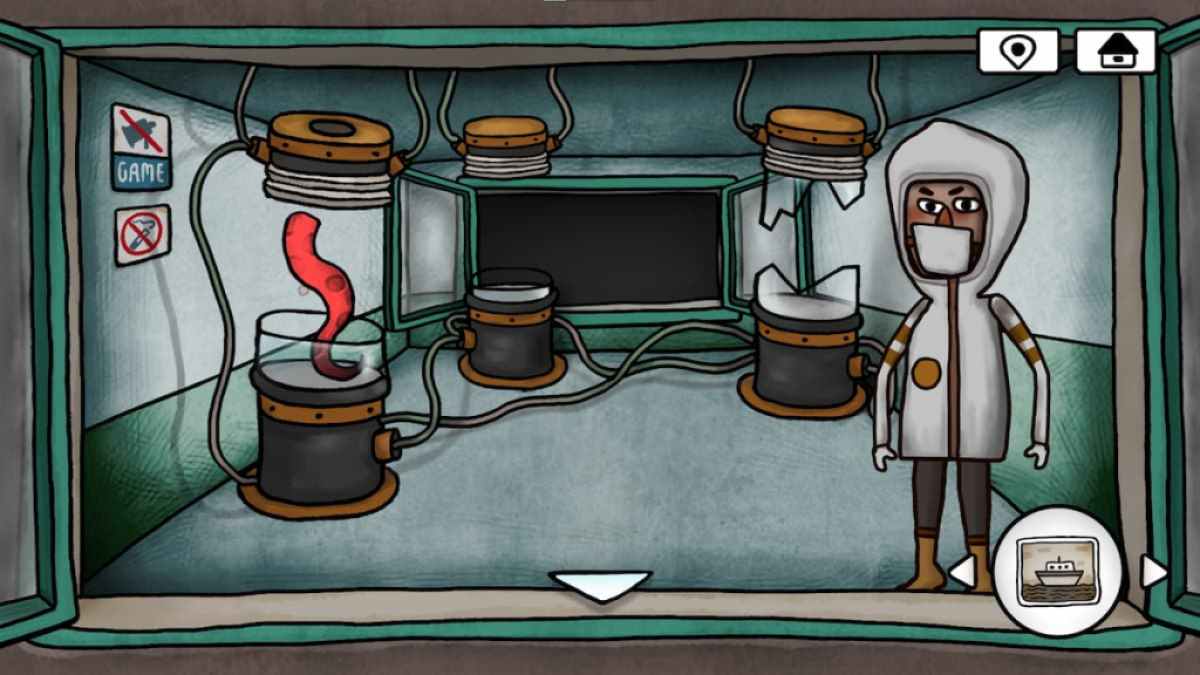
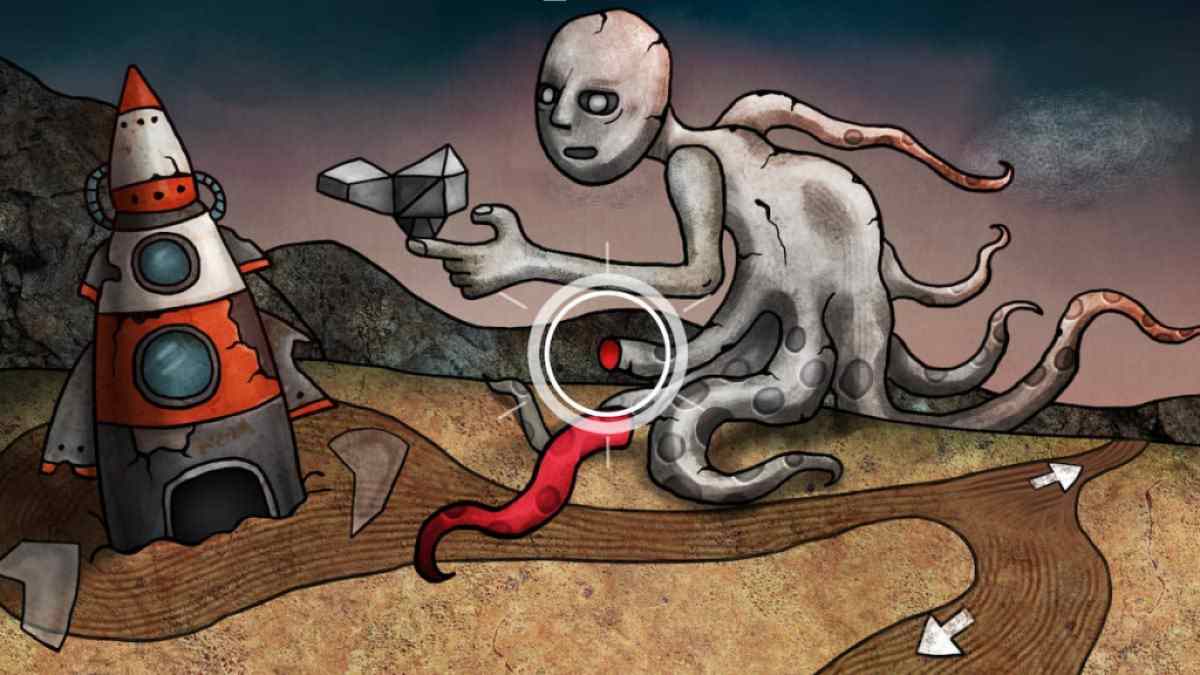
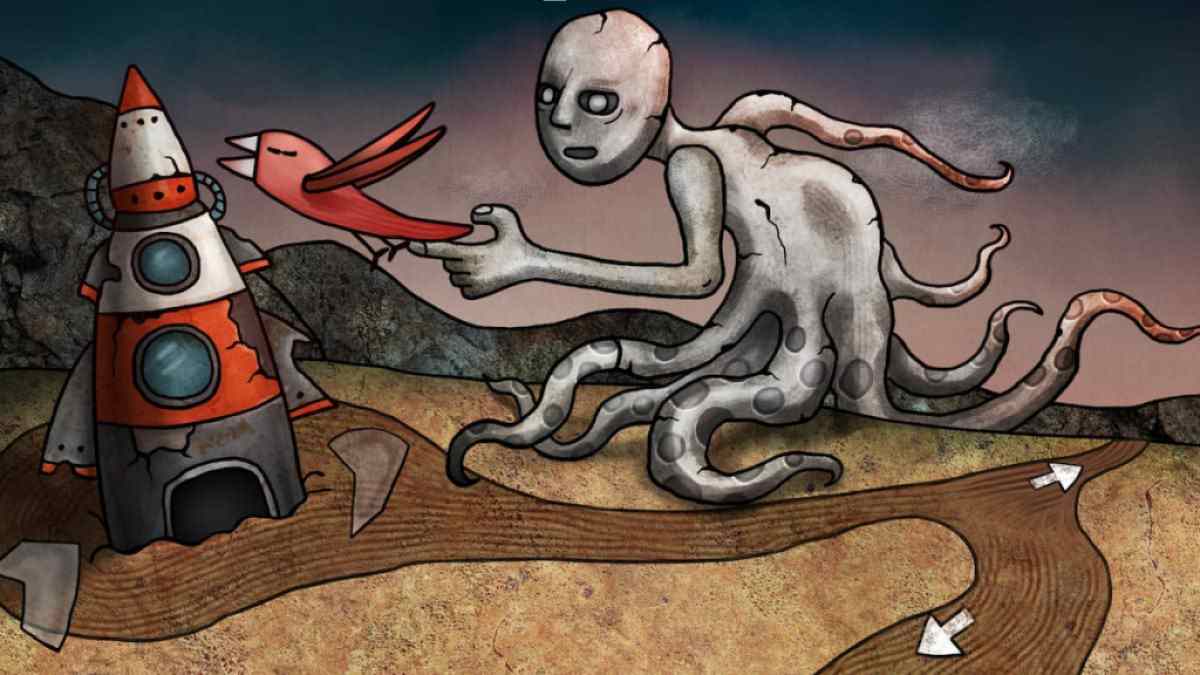
Alien tentacle puzzle
turn over the researcher the gentle restrainer .
This will unlock the pod holding the tentacle , which can now be take hold of .
The stone alien near the starship has a cut - off tentacle that has a coordinated crimson color on the edge . Select the tentacle and attach it here .
Screenshot by Pro Game Guides
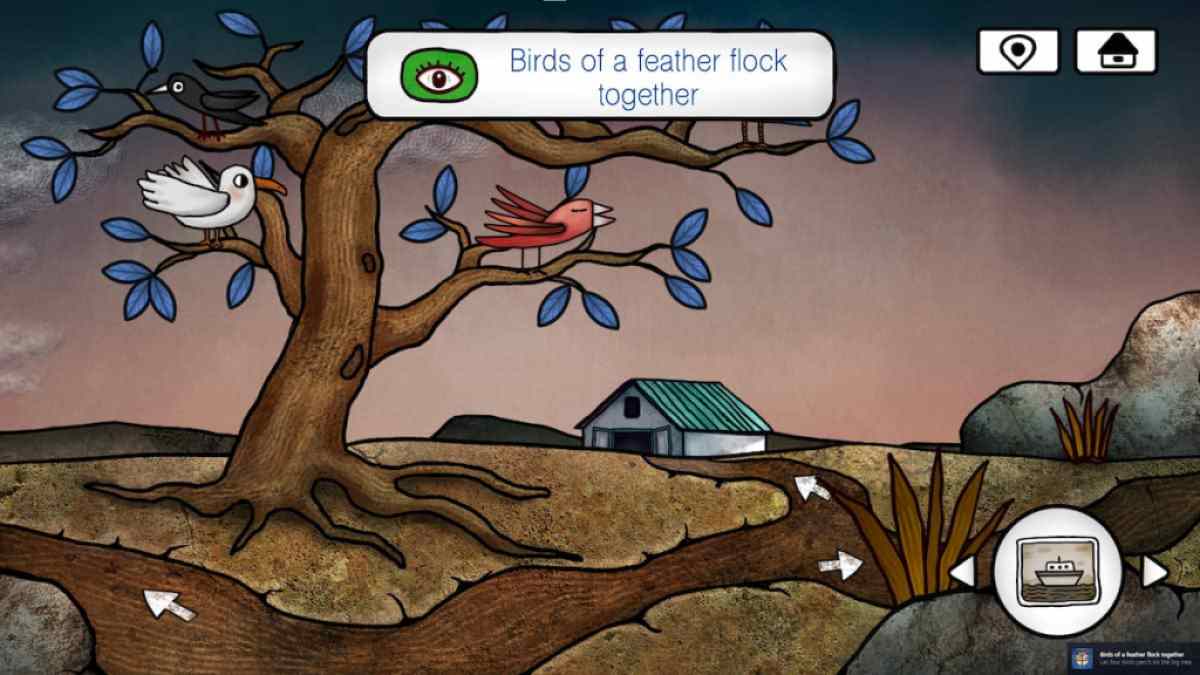
The geometric shape on the alien ’s hired hand will bend into a bird , empty the " Sleeping Bird " achievement .
Looking at the tree diagram in front of the cabin after freeing this bird will additionally unlock the " boo of a Feather Flock Together " achievement .
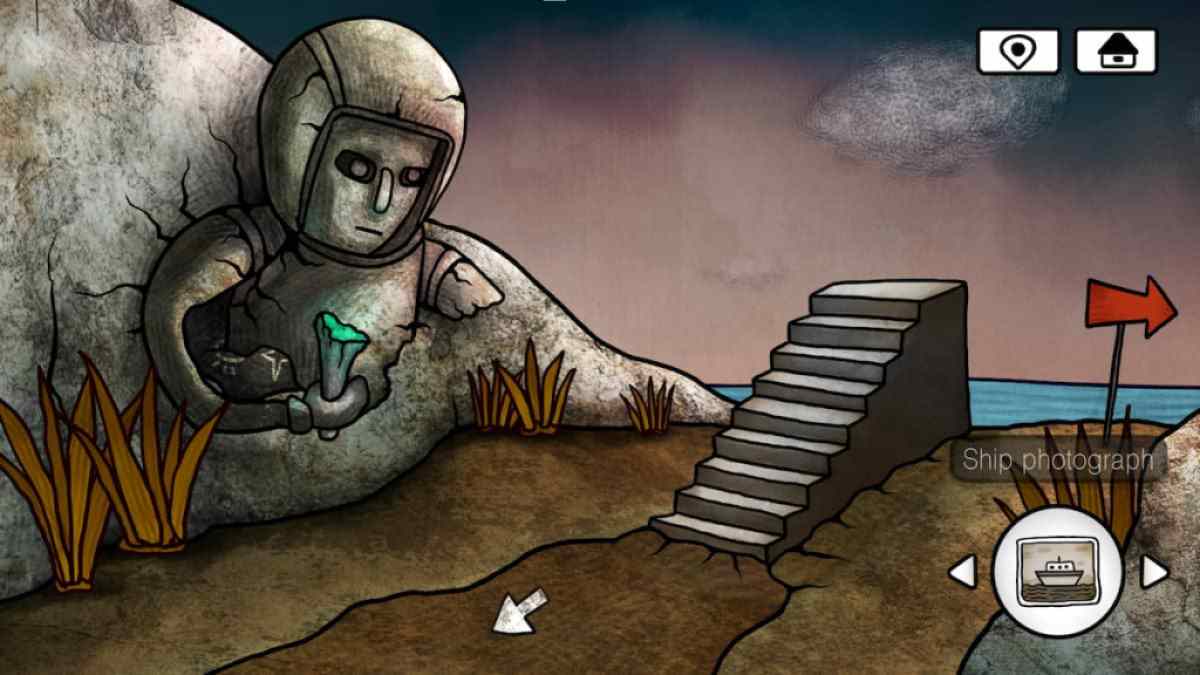
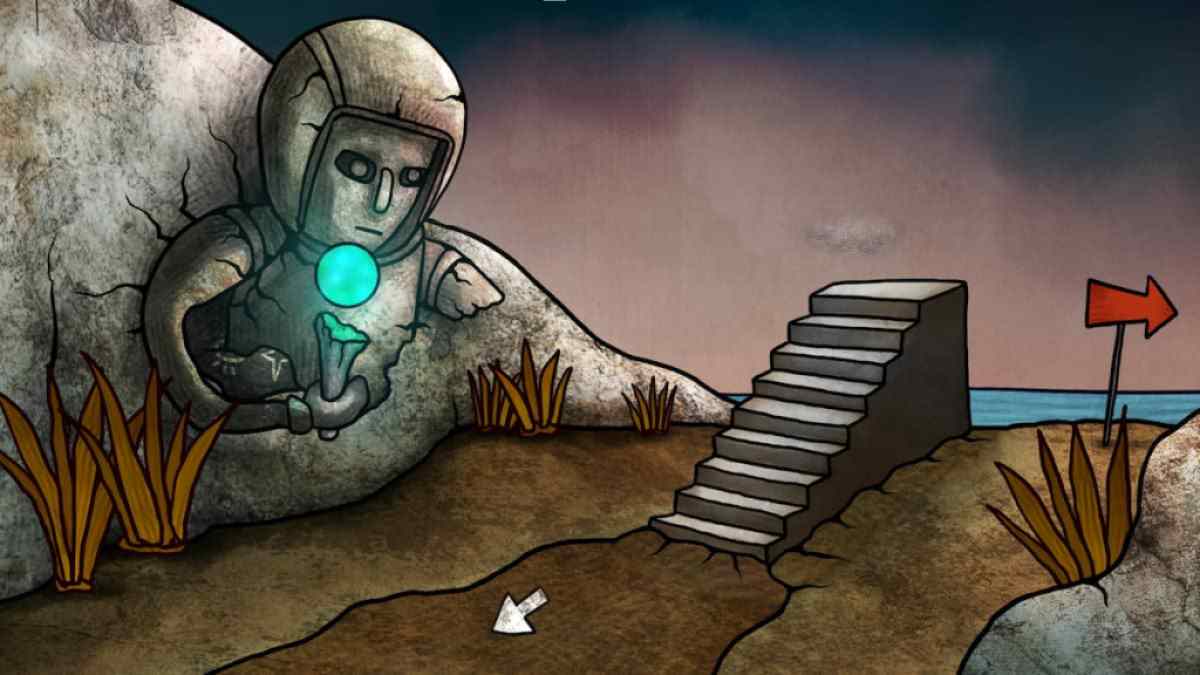
Photosphere puzzle
By the outside staircase , a statue holds a broken handle with a green freshness at the top .
site the dark-green photosphere on top of this handle .
A series of symbols will be revealed where the statue once was , plus a door will appear on top of the stairs .
Screenshot by Pro Game Guides
The lock chamber on the threshold features five symbols and the numbers 1 through 4 .
These numbers gibe to how many times each symbol appears on the paries . The Dominicus appears once , the moon three clip , the major planet once , optic twice , and the superstar appear four times .
Entering the door reveals a campfire on the edge of a stone landscape painting .
Screenshot by Pro Game Guides
target the ship ’s painting into this fire .
This will give you a bidirectional doughnut .
Secret chamber bird puzzle
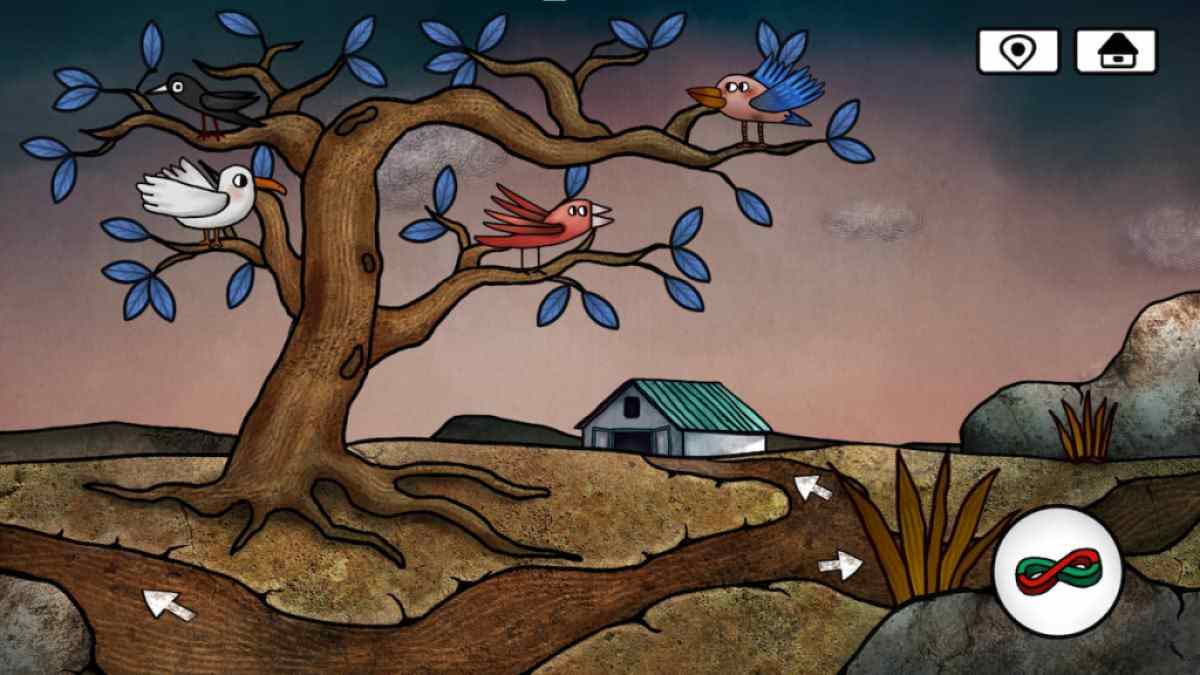
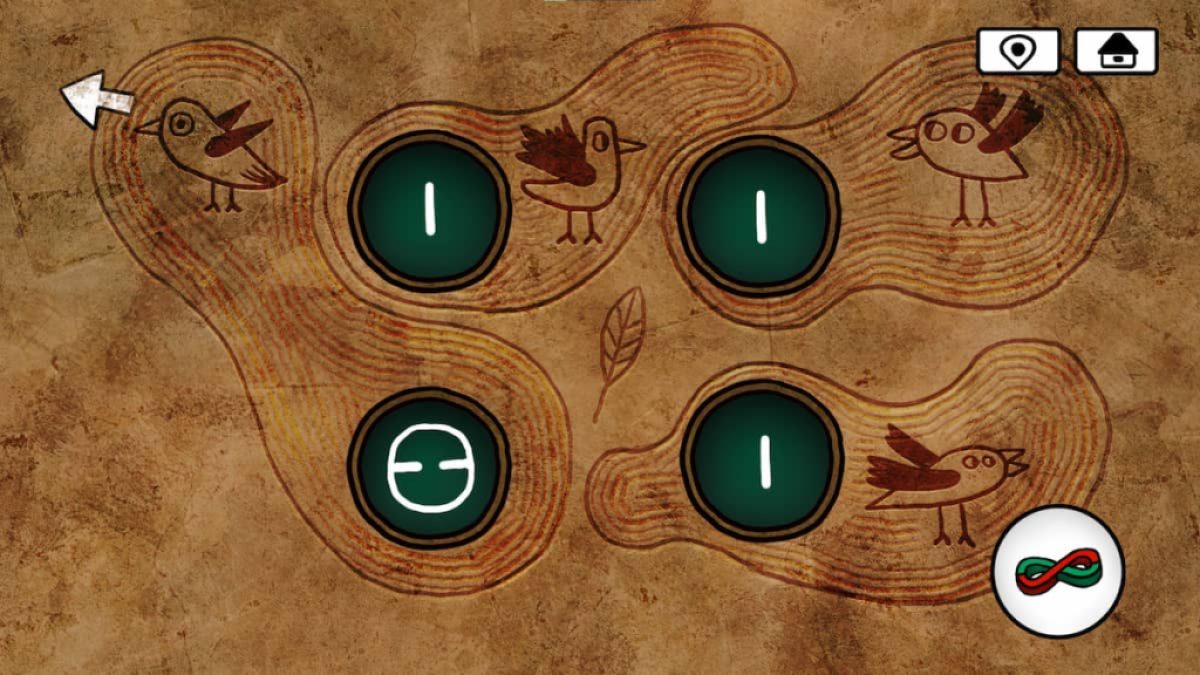
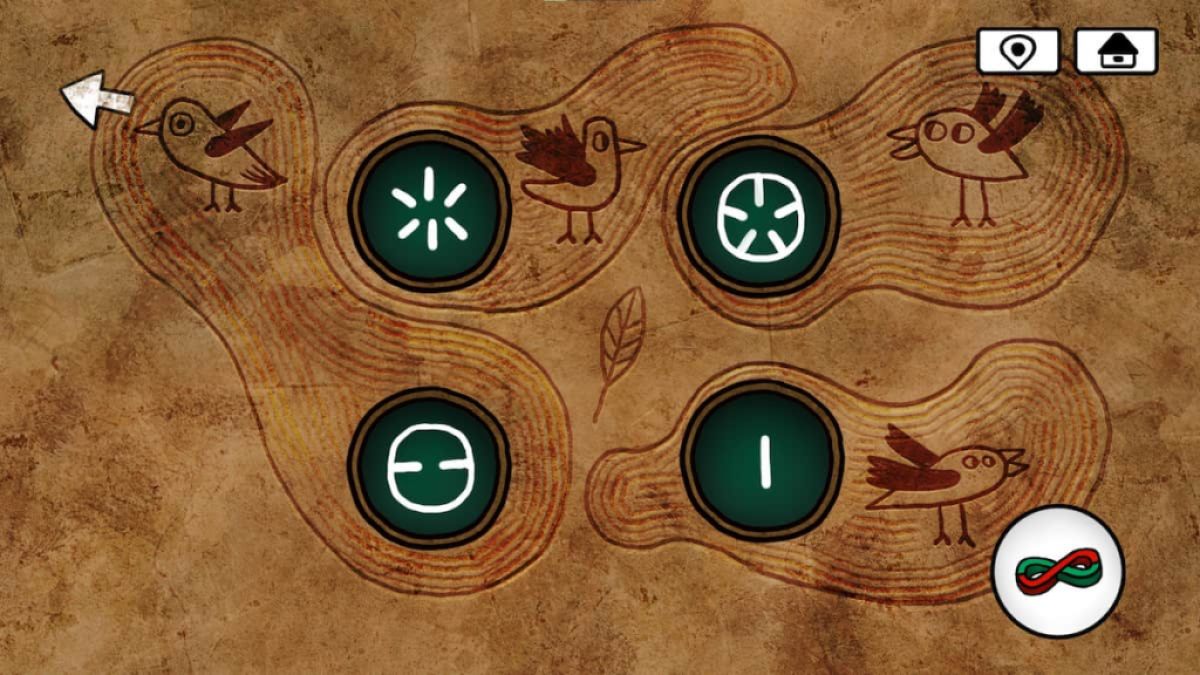
Before direct to the puzzle , await at the four birds on the tree . Take line of how many leave-taking are in each skirt ’s section .
Each blue telephone dial correlate to a specific hoot , differentiate by each boo ’s show . The leaf in the center implies that the act swear specifically on the number of leaves .
The bottom good dial correlates to the bird on the top left branch , which hold 8 leaves .
Screenshot by Pro Game Guides
The top remaining telephone dial correlates to the lower left fowl , whose offshoot check six farewell .
The top proper telephone dial correlates to the dame on the top right leg , whose leg bear ten leave in total . The bottom correct snort is the bird that can be found on the lower rightfulness of the tree diagram . That branch contains eight leaves as well , so the dial should gibe the telephone dial to its left .
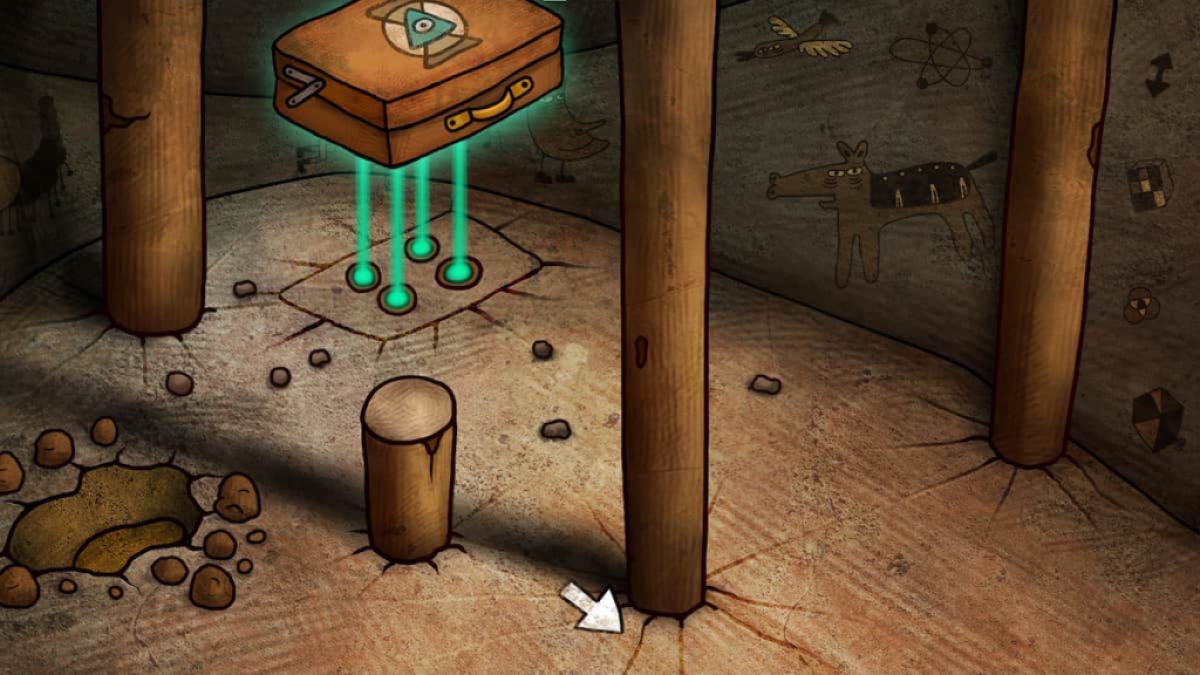
Solving this unlock a mysterious float suitcase .
Screenshot by Pro Game Guides
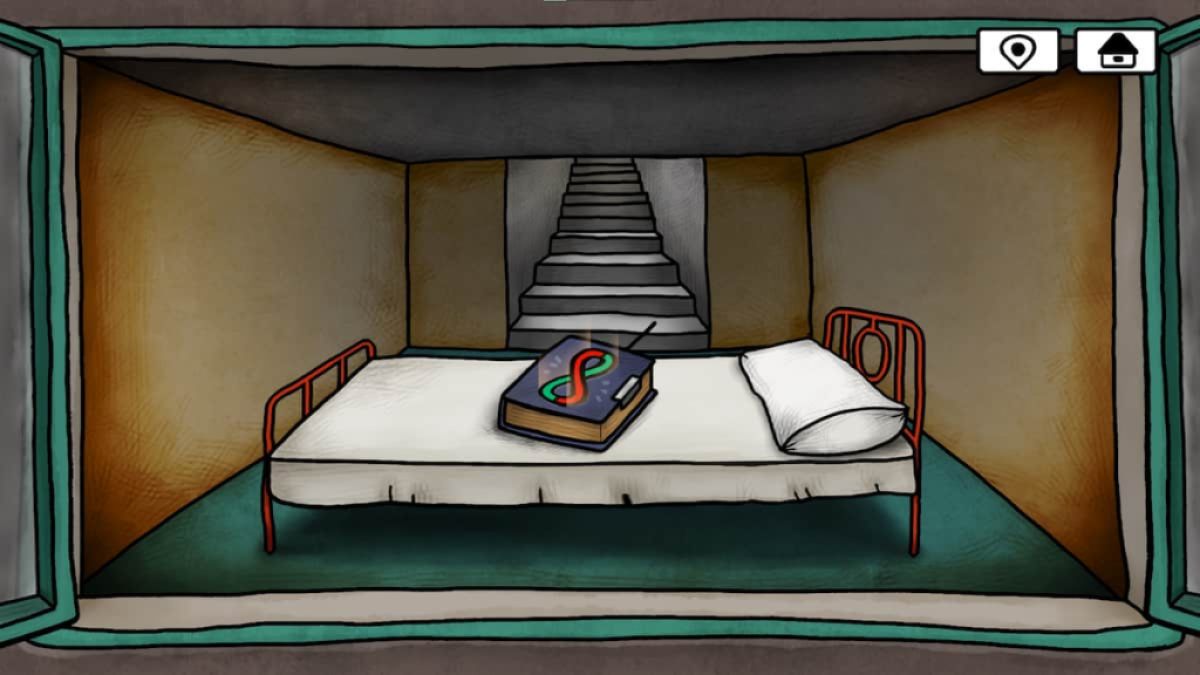
dawn on the suitcase to open it , revealing a staircase .
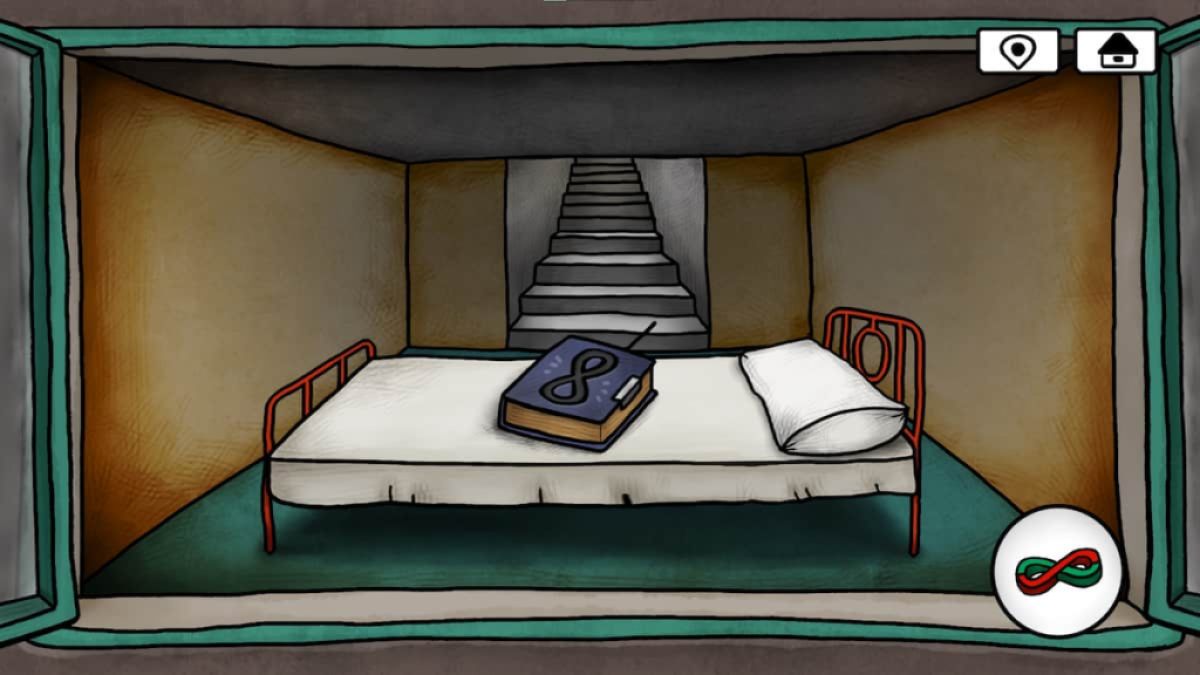
The room at the bottom of the stairway contains a bed with a book on top of it .
Place the bidirectional ring into the rut on the book to complete the game and unlock the " Return to the Stars " accomplishment .

Screenshot by Pro Game Guides
concerned in more point - and - click mystery games to perfect your clue - find attainment ? Check out ourVanishing Act walkthrough ( Adventure Escape Mysteries)here on Pro Game Guides .
Screenshot by Pro Game Guides
Screenshot by Pro Game Guides
Screenshot by Pro Game Guides
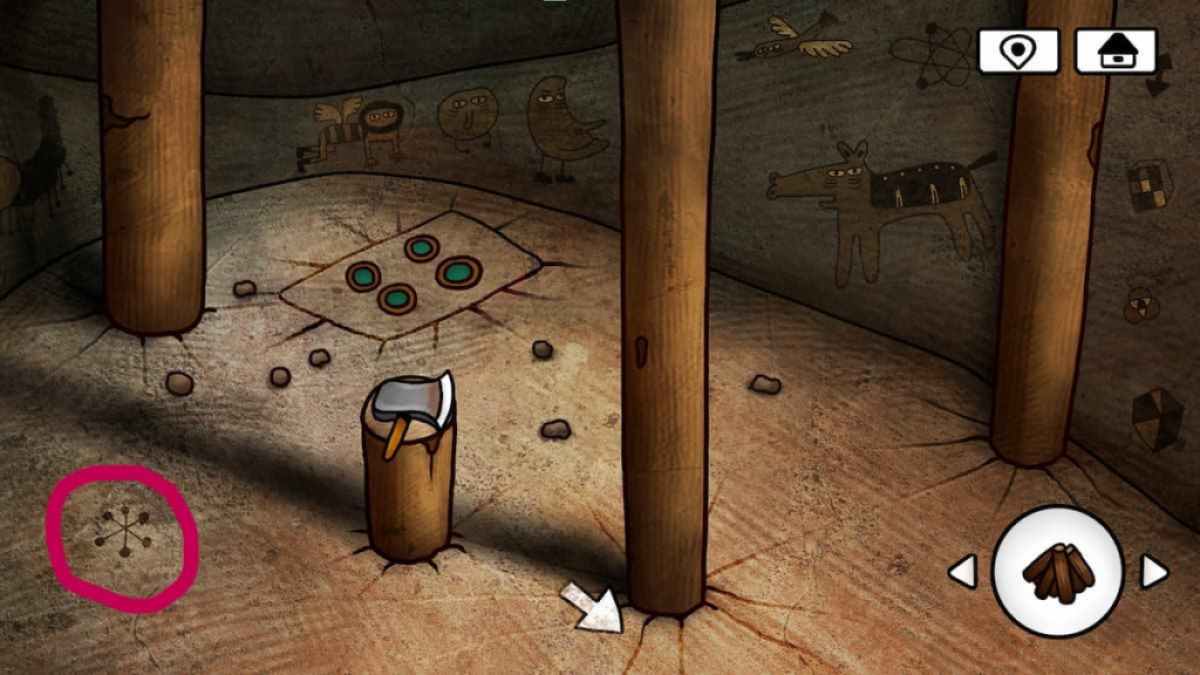
Image by Pro Game Guides
Screenshot by Pro Game Guides
Screenshot by Pro Game Guides
Screenshot by Pro Game Guides
Screenshot by Pro Game Guides
Screenshot by Pro Game Guides
Screenshot by Pro Game Guides

Screenshot by Pro Game Guides
Screenshot by Pro Game Guides
Screenshot by Pro Game Guides

Screenshot by Pro Game Guides
Screenshot by Pro Game Guides
Screenshot by Pro Game Guides
Screenshot by Pro Game Guides

Screenshot by Pro Game Guides

Screenshot by Pro Game Guides
Screenshot by Pro Game Guides

Screenshot by Pro Game Guides
Screenshot by Pro Game Guides
Screenshot by Pro Game Guides
Screenshot by Pro Game Guides
Screenshot by Pro Game Guides
Screenshot by Pro Game Guides

Screenshot by Pro Game Guides
Screenshot by Pro Game Guides
Screenshot by Pro Game Guides
Screenshot by Pro Game Guides

Screenshot by Pro Game Guides
Screenshot by Pro Game Guides
Screenshot by Pro Game Guides
Screenshot by Pro Game Guides
Screenshot by Pro Game Guides

Screenshot by Pro Game Guides
Screenshot by Pro Game Guides
Screenshot by Pro Game Guides
Screenshot by Pro Game Guides
Screenshot by Pro Game Guides
Screenshot by Pro Game Guides
Screenshot by Pro Game Guides
Screenshot by Pro Game Guides
Screenshot by Pro Game Guides
Screenshot by Pro Game Guides
Screenshot by Pro Game Guides
Screenshot by Pro Game Guides
Screenshot by Pro Game Guides
Screenshot by Pro Game Guides
Screenshot by Pro Game Guides
Screenshot by Pro Game Guides
Screenshot by Pro Game Guides

Screenshot by Pro Game Guides

Screenshot by Pro Game Guides

Screenshot by Pro Game Guides
Screenshot by Pro Game Guides

Screenshot by Pro Game Guides
Screenshot by Pro Game Guides

Screenshot by Pro Game Guides
Screenshot by Pro Game Guides
Screenshot by Pro Game Guides

Screenshot by Pro Game Guides
Screenshot by Pro Game Guides
Screenshot by Pro Game Guides
