Everyone has to get it !
Some arm are absolutely deserving the sweat of completing a caboodle of special quests , and Khvostov is one of them . Check out how to get both the fabled and alien Khvostov 7G-0X motorcar rifle in Destiny 2 below .
All Lost Encryption Bits Locations
To start off your journeying of suffer both the legendary and exotic Khvostov 7G-0X auro rifle in Destiny 2 , you need to find out all of theRegion chests . These will contain thefirst nineLost Encryption Bits .
To getsixmore Lost Encryption Bits , you have to go to the Cyst activities . To unlock all six , you have to nail the’Alone in the Dark’quest by Micah six times . You will only see three Cyst markers on the single-valued function , but you’re able to access all of them . There arebird switchesnearby that let you change between one of two Cysts at a localization .
Sword Dance Cyst Location
When you arrive at thesecond areaof the Cyst , head to the edge anddrop down . You ’ll see an first step in thewallof the cave . Go through it , and your path will be impede by a barrier . Break through thebarrier , and the Lost Encryption Bit will be in the pile on the floor .
Searing Light Cyst Location
get the better of the Searing Light Cyst at the start will bring out another path . Gothrough the holeand past the cube on the footing down theleft way . You will see the slew on the level at the close of it .
Aerial Ace
When you defeat the Cyst , head back to the entrance , and you ’ll see a newfangled path expose . Just as you jump across , there will be asmall openingin the paries to theright . The mountain is right through there , along with your Lost Encryption Bit .
Moth Infested Tavern Cyst Location
lead towards the surface area where you crusade theOgre . stick out downbeneath the platformwhere the Ogre is stand , and you ’ll see a muddle in the paries to theleft . Crouch through to find another pile .
Slayer Cyst Location
Complete the Slayer Cyst and a new itinerary will be disclose in the start area . Head to therightand keep conk until you see astone pillarin the middle . The batch you ask to search for the Lost Encryption moment is rightbehind it .
Smothering Darkness Cyst Location
After clearing the Cyst , start with thebig imperial crystalon the roof . flow down to thepath belowand keep pass until you reach the last Lost Encryption act on the trading floor to theright .
Getting the legendary Khvostov 7G-0X
Once you have collected all 15 Lost Encryption Bits , they will combine into a Lost Encryption Code . When you have it , head to theImpasse .
Go across the route to the tunnel . Enter through thedoor to the leftand head up the stairs . Get across the walkway and up another set of stairs until you reach a case . You ’ll get the fabled Khvostov 7G-0X from this case . However , if you need to discover the alien version as well , keep going .
How to get Motes of Light
There are two ways you may get Motes of Light : by collectingVisions of the Travelerand bydefeating bossesin the threeOverthrownzones .
When it comes to the boss in Overthrown geographical zone , they all dropone Mote of Light . Even if you respawn them , they wo n’t put down any longer , so you have to vote down all honcho . Once you get the last one , you ’ll get theMote of Primordial Light , which you will use to unlock the alien Khvostov 7G-0X.
All Visions of Traveler collectible locations
There is a entire ofeightVisions of the Traveler collectible . They are well out of sight and pretty easy to omit if you are n’t explore every corner and cranny because you have a strong concern of missing out like I do . find all of them is also one of the steps to obtaining the alien Khvostov rifle if you need an extra boost to go collect Visions .
The Lost City
The first Vision of Traveler can be found in theLost Cityarea . Keep going until you see thewaterfall . Jump across , and you will feel it in the grass to the rightfield .
The Landing
Once you get toThe Landing , turnleftand jumpoff the cliff . You ’ll see the Vision of the Traveler tucked in at the bottom next to thewaterfall .
The Refraction
Head back up the cliff and towards theRefraction field . Once you enter through the stone logic gate , head instantly to the left and hug the wall . The way willbranchinto two , and you should go down theleftone .
Keep going , and you ’ll reach another branching of the path . Stick to theleft again . When you get to the next region , pass downand head to therightuntil you see a lighter coming in from a threshold . Go through and head to the left until you reach a humble hole in the land . Drop downand head towards another light beam of light through a door .
Once you are backoutsideagain , derail from thecliffto theleftand make your way down . You will find the Vision of the Traveler in a nook at thebottomof the cliff in the water .

The Blooming
In The Blooming , manoeuver down theleft pathuntil you encounter a largegnarled treeagainst the side of a drop . Climb up it , and you ’ll recover a Visionnear the top .
The Seclusion
For the Vision of Traveler , you call for to have activated the Slayer Cyst . Head through the area until you see the closed off path with therunes . You need to scud the matching rune on the walls above you . Once you do that , head down the path , and you ’ll encounter anOgre . You have to kill it before a unexampled path open up up .
When you see astone pillarin the midsection of the track , appear up and to the leftfield , and you ’ll get hold aholeto climb up to . The Vision of the Traveler is at the end of the itinerary .
The Divide
To reach the Vision in the Divide , first go into thecavesat the end of the path . You will be head through the cave system for a while .
Once you get through the snowy part , it is a long trek up . It ’s a pretty straightforward pathup to the topuntil you reach a snow - in facility . The Vision is behind theboxes to the left wing .
The Impasse
In the Impasse area of Destiny 2 The Final Shape , you will find the Vision of Traveler as part of anornamenton a structure . wax up thestairsto hit and peck it up .
The Transgression
Start heading down the path past theSmothering Darkness Cyst . Keep going across the area before you reach a cave .
Going through the cave , you ’ll progress to a complex body part that you need toclimb up . After you go up , turn to therightand jump across the path .
When you see ared lightbetween the trees , you ’ve reached the section . The Vision of Traveler isbehind the treeon the left .

Image by Pro Game Guides
How to get exotic Khvostov 7G-0X
Once you have pose all of the Motes of Light ( along with the Visions of the Traveler ) , you need to determine the exotic Khvostov 7G-0X chest . First , head to theLost City . Go to the left and enter the Tower . You ’ll get to the subdivision with eight poles .
Place the Visions of Traveler on them , and a chest will appear . To unlock it , you will apply your garner Motes of Light . With that , you ’ll get the exotic Khvostov 7G-0X. Enjoy !
If you want to know how to get other weapon , assure out ourDestiny 2 Still Hunt Exotic Sniper Guide – Info , Exotic Perks , and Synergieson Pro Game Guides .

Image by Pro Game Guides

Image by Pro Game Guides

Screenshot by Pro Game Guides

Image by Pro Game Guides

Image via Keer Plays

Image via Esoterickk

Image via Esoterickk

Image via Esoterickk
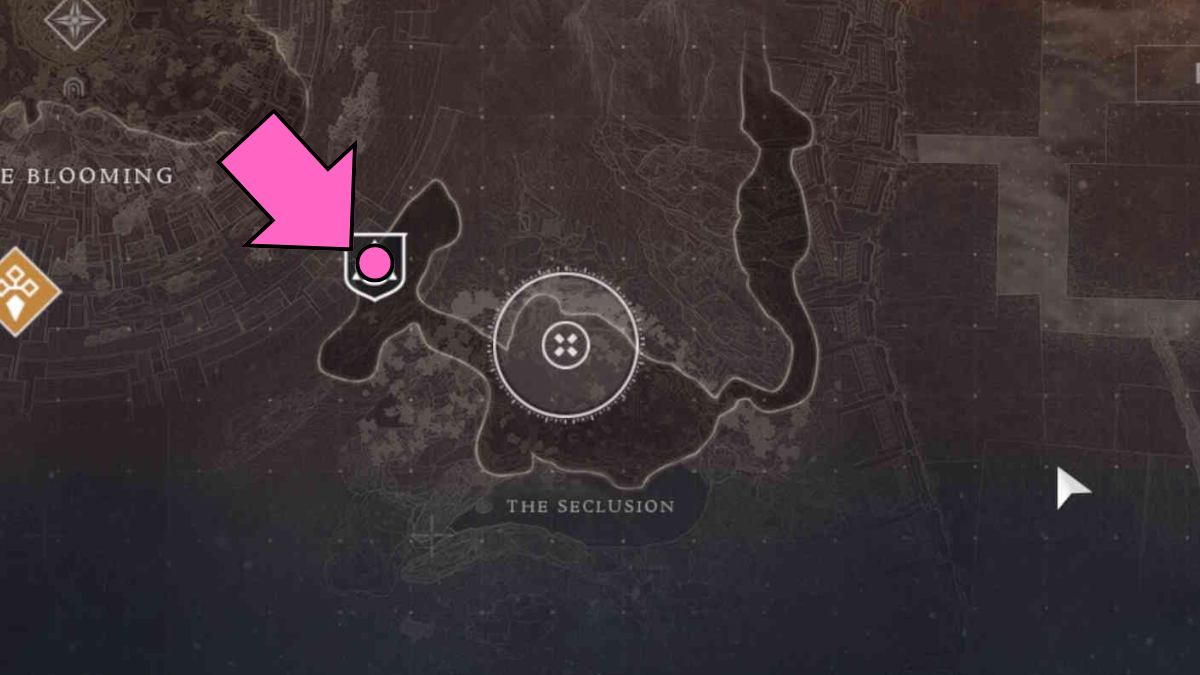
Image by Pro Game Guides
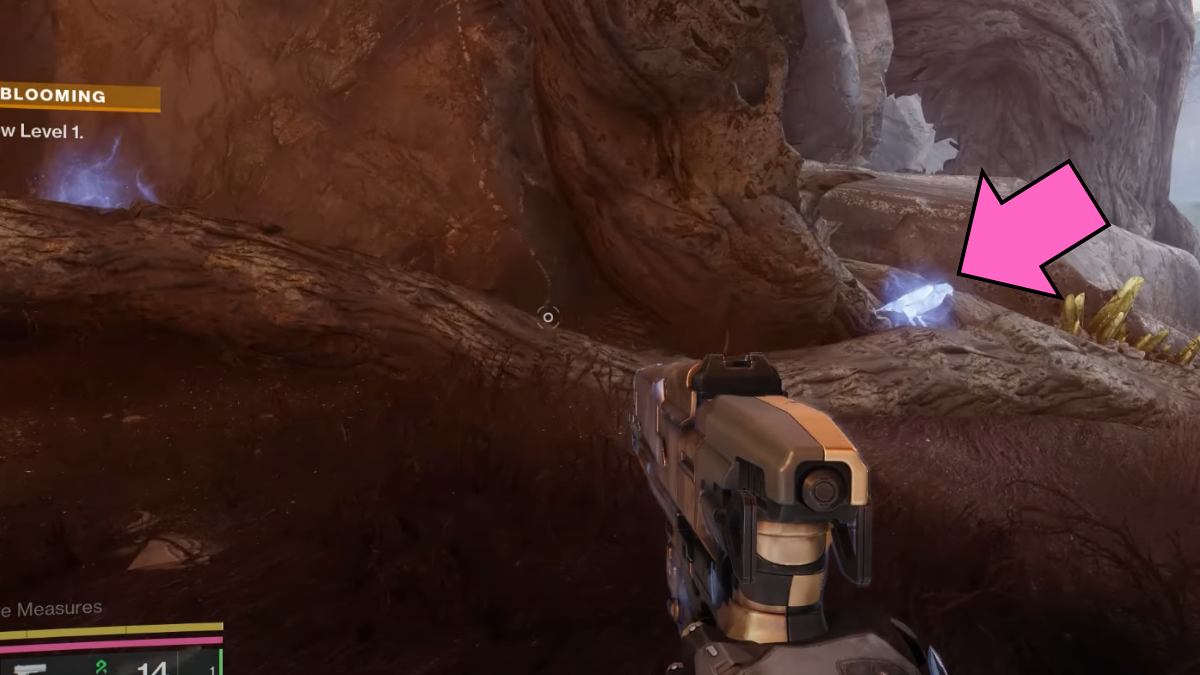
Image via Keer Plays
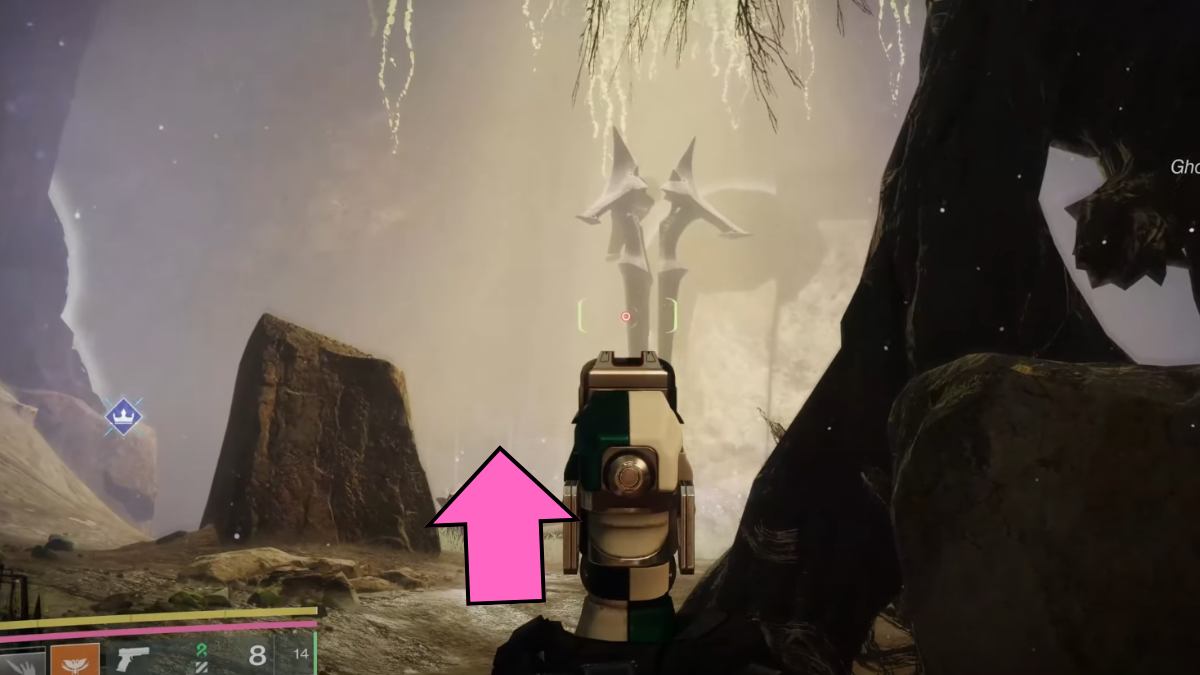
Image via Esoterickk
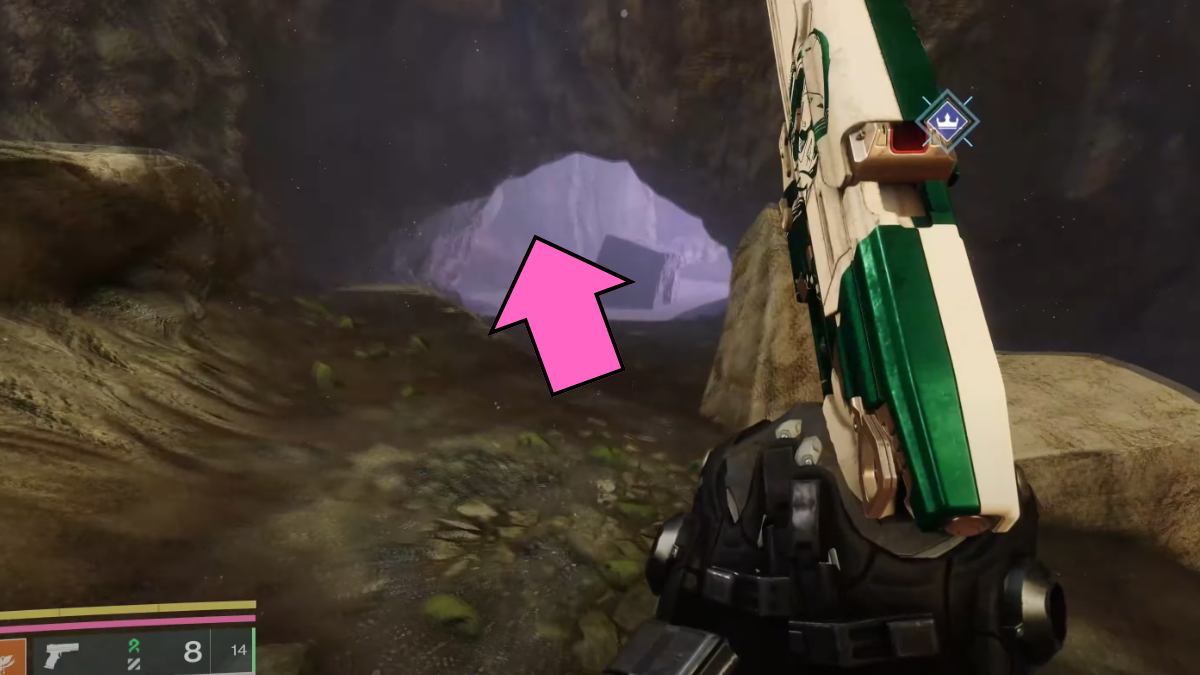
Image via Esoterickk

Image by Pro Game Guides

Image via Keer Plays

Image via Esoterickk

Image via Esoterickk

Image via Esoterickk
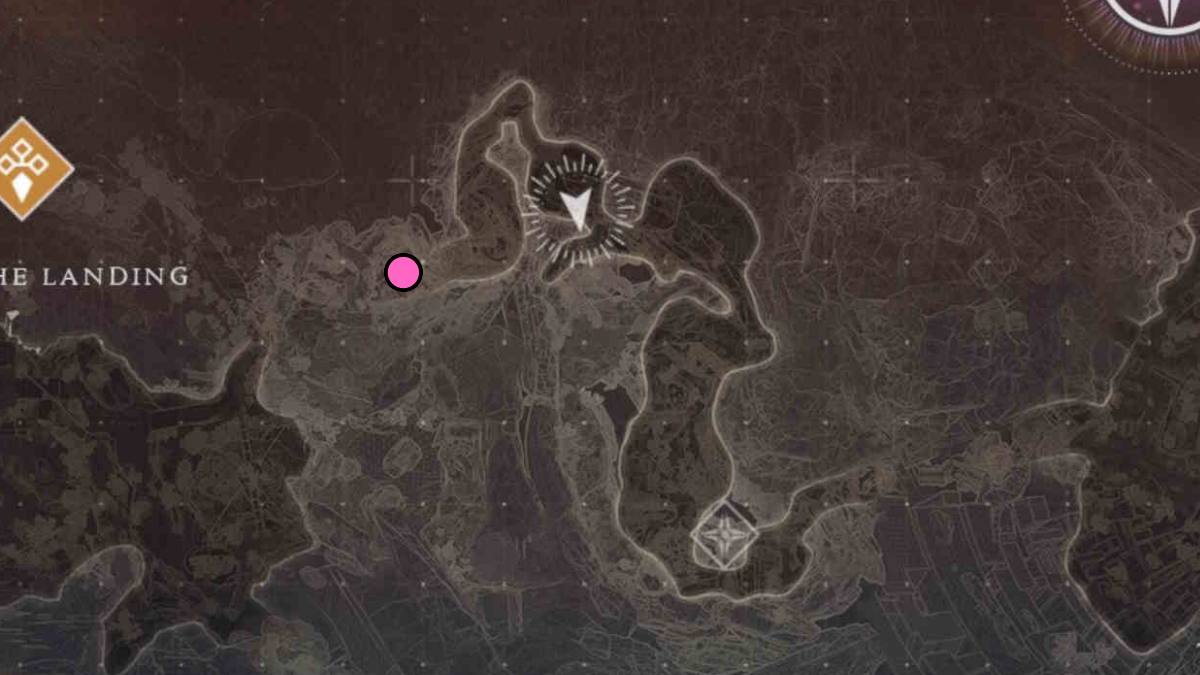
Image by Pro Game Guides

Image via Keer Plays
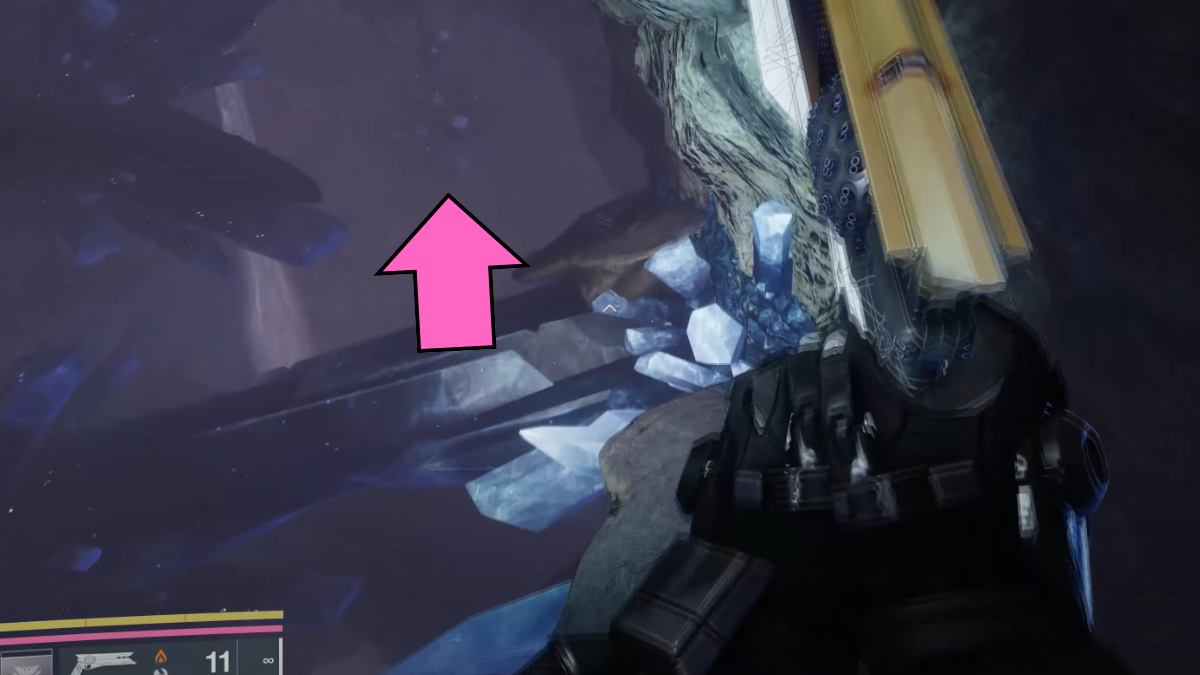
Image via Esoterickk
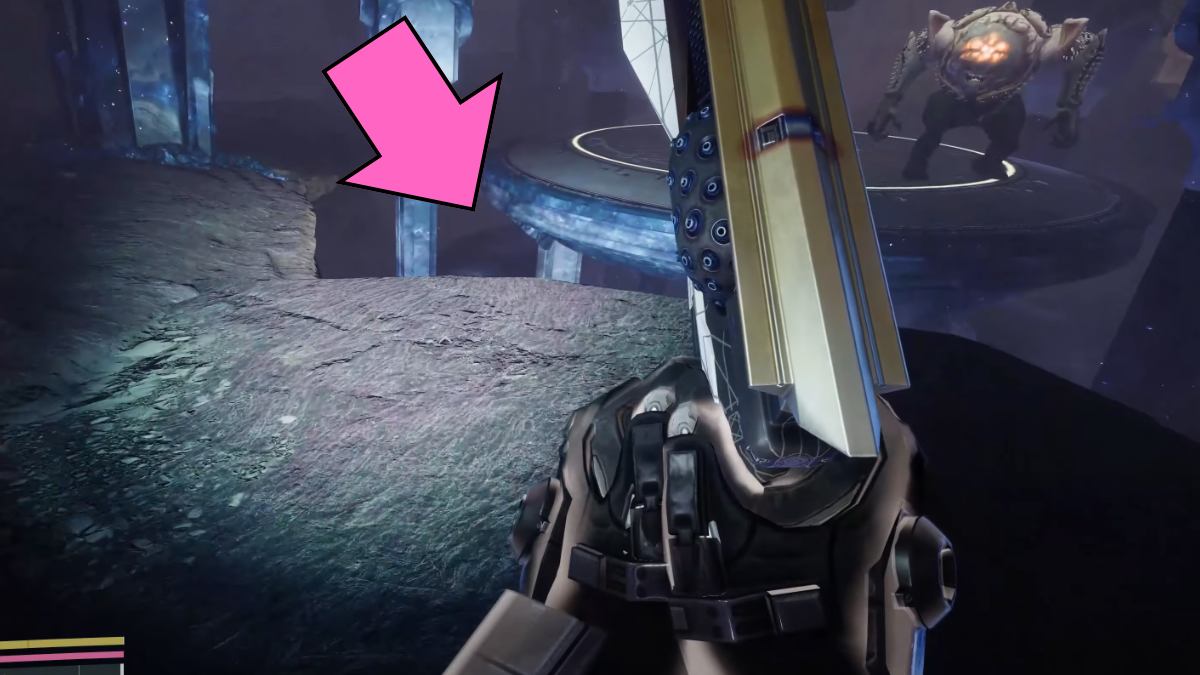
Image via Esoterickk
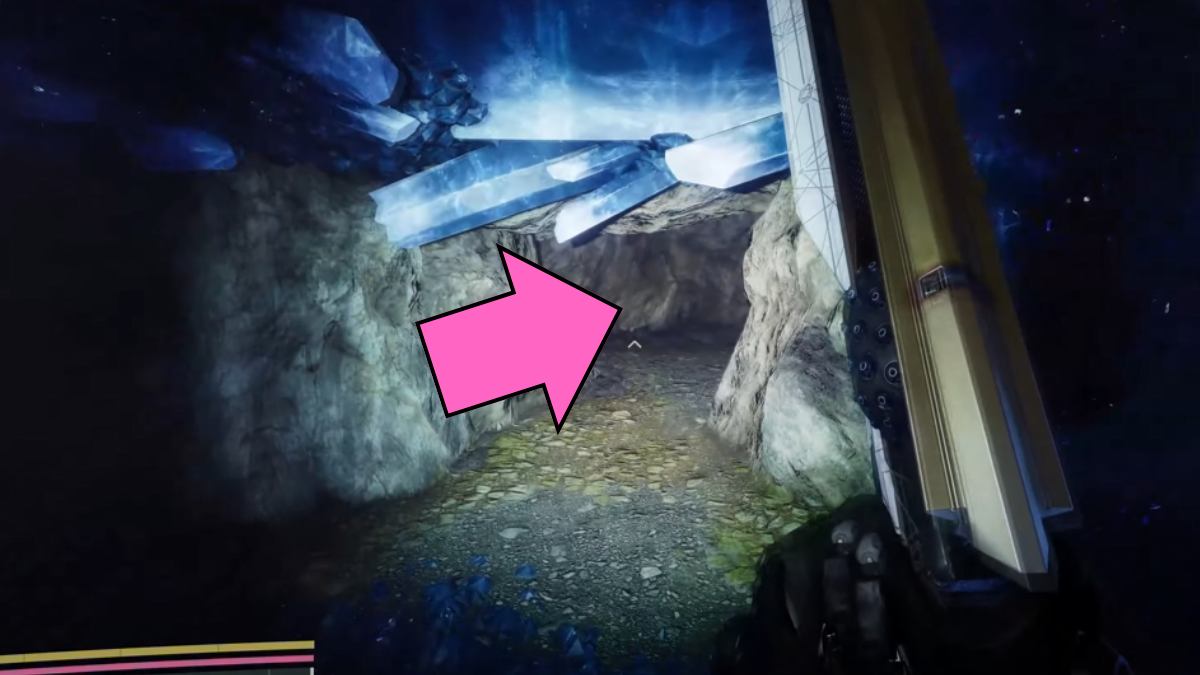
Image via Esoterickk
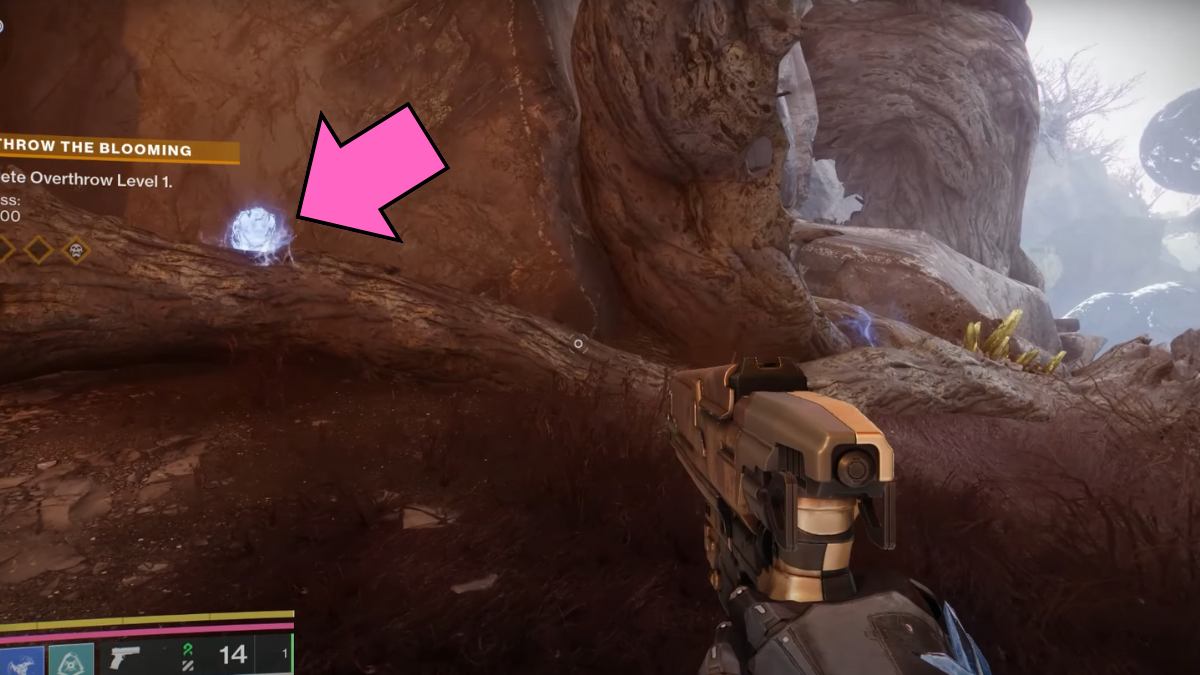
Image via Keer Plays
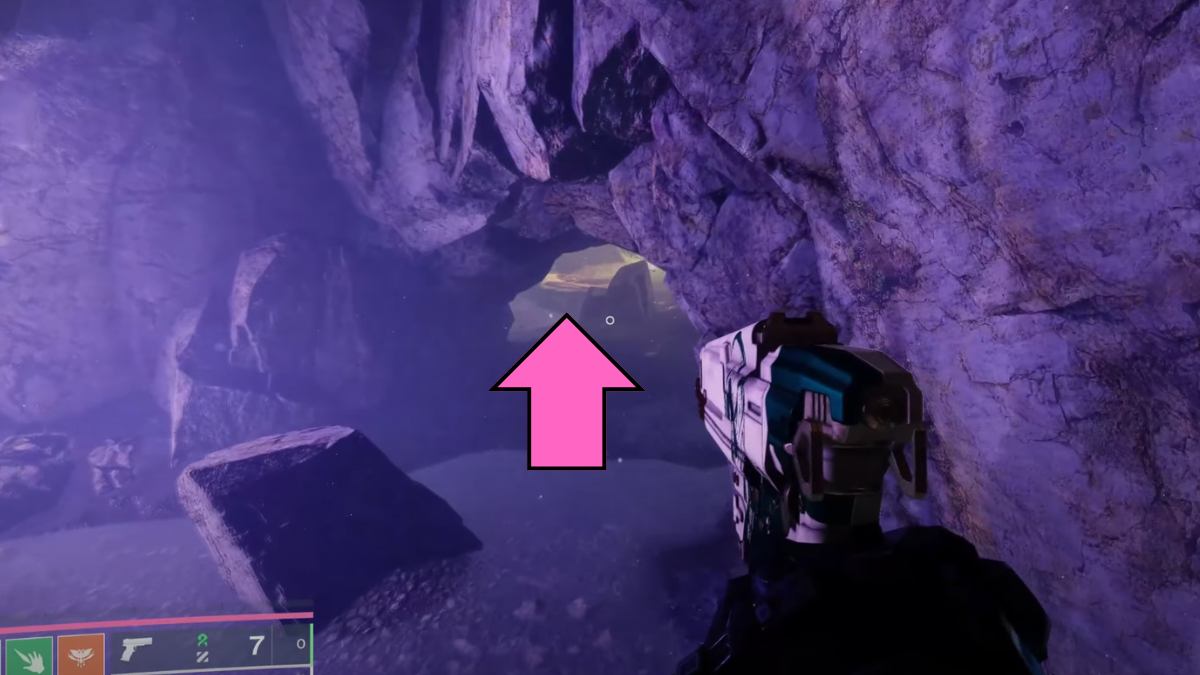
Image via Esoterickk
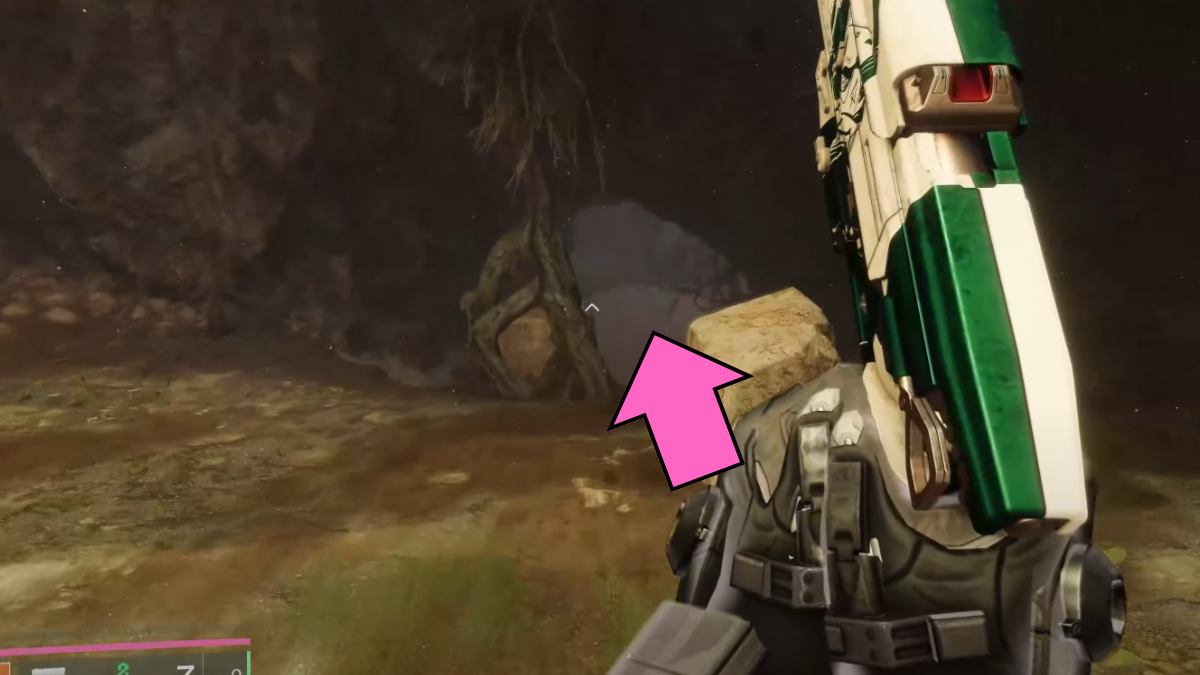
Image via Esoterickk
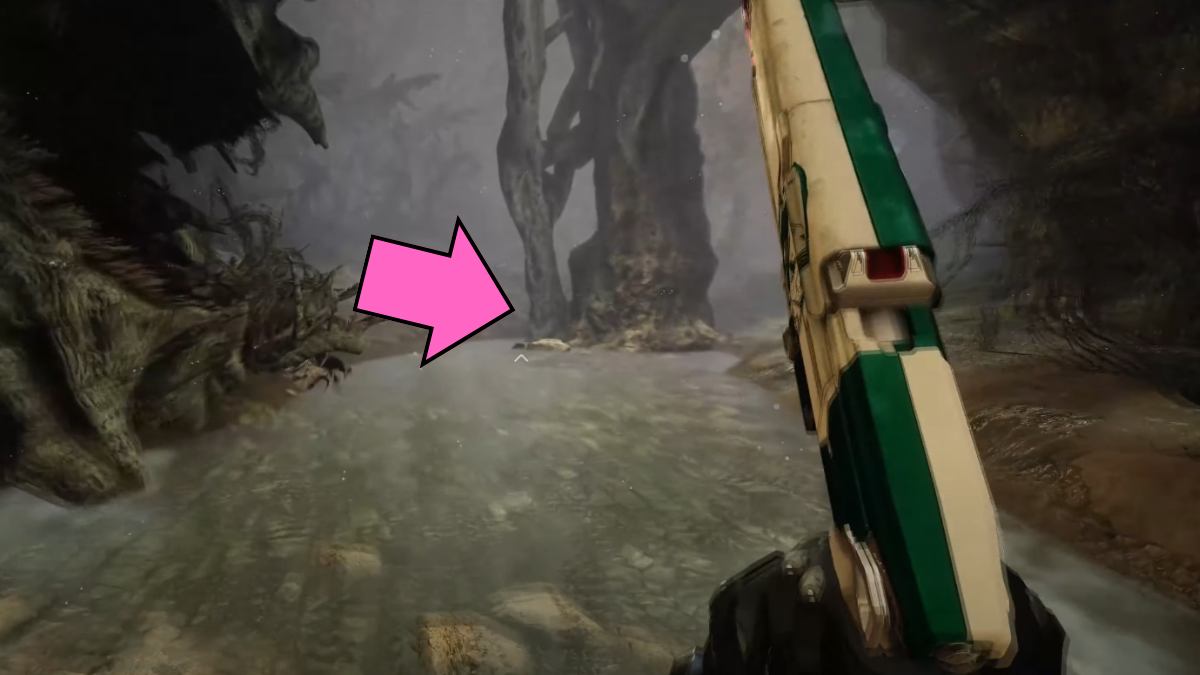
Image via Esoterickk
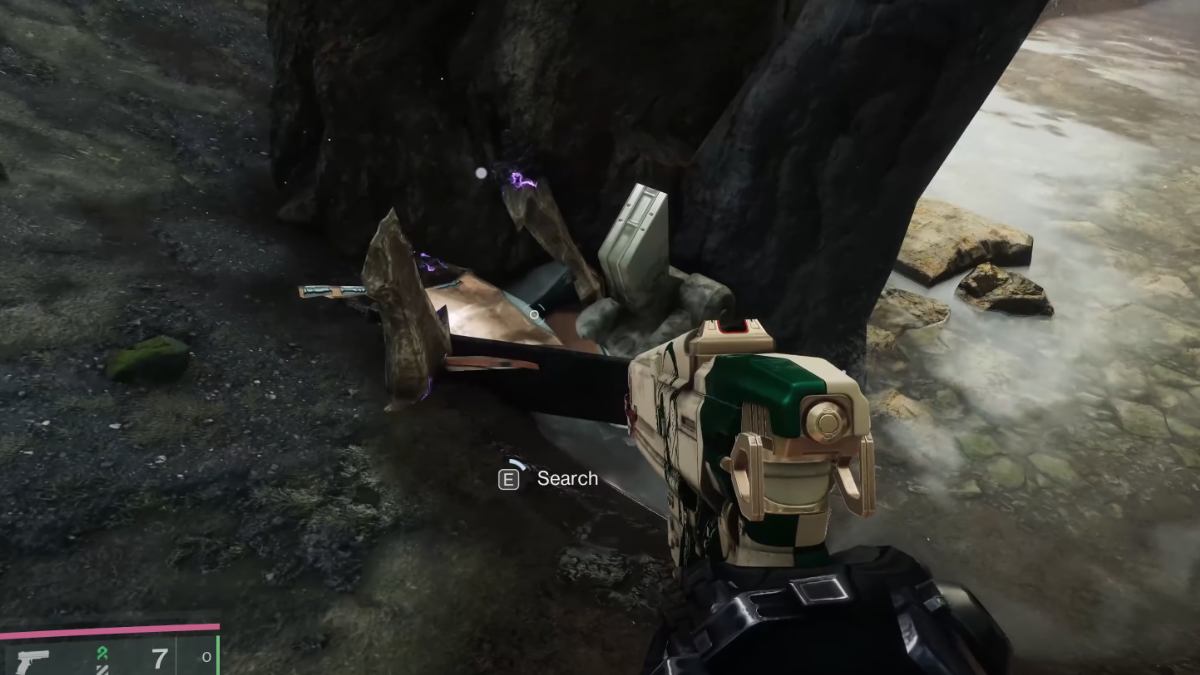
Image via Esoterickk
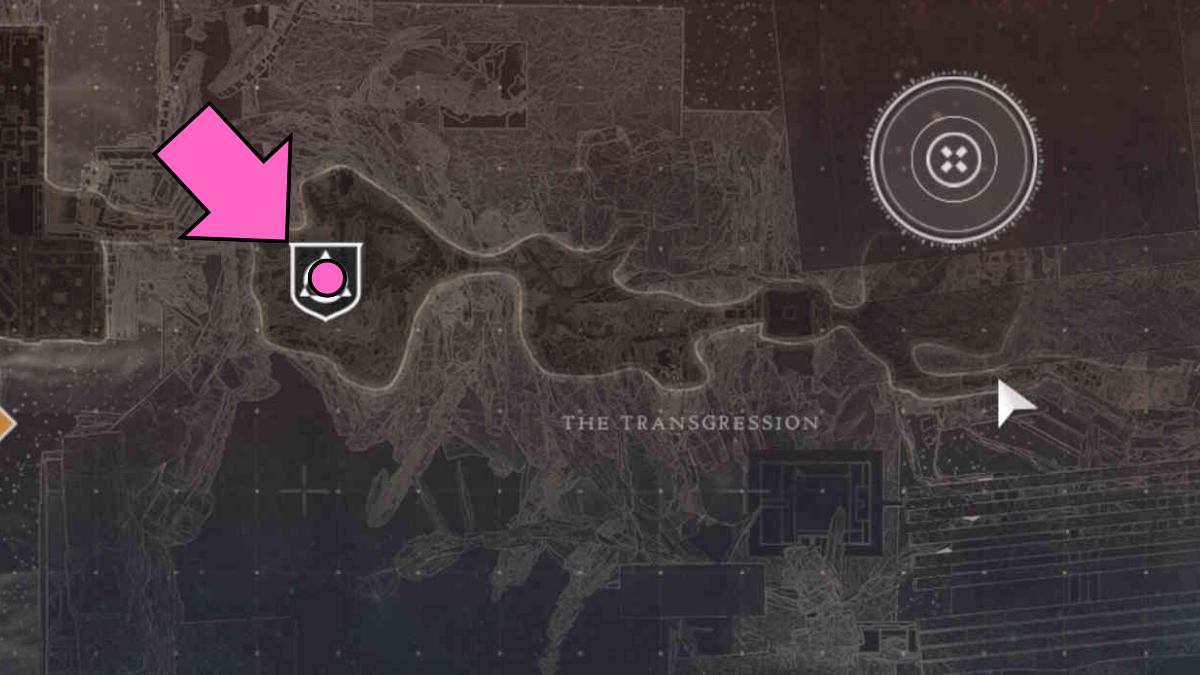
Image by Pro Game Guides
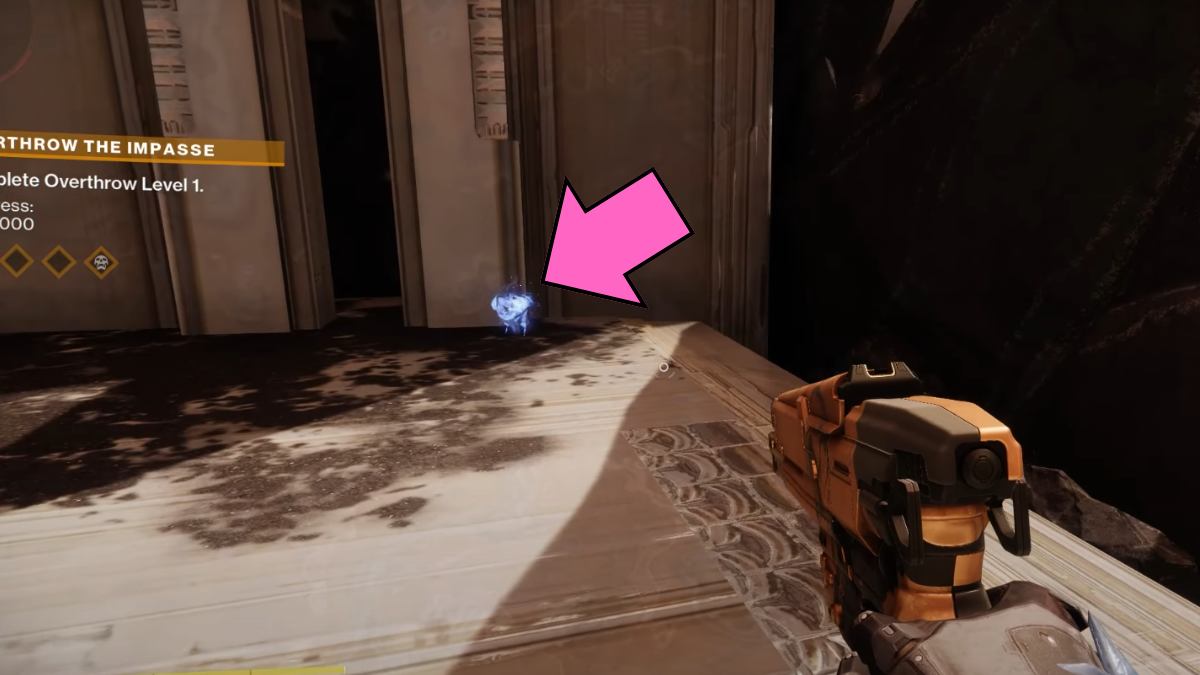
Image via Keer Plays
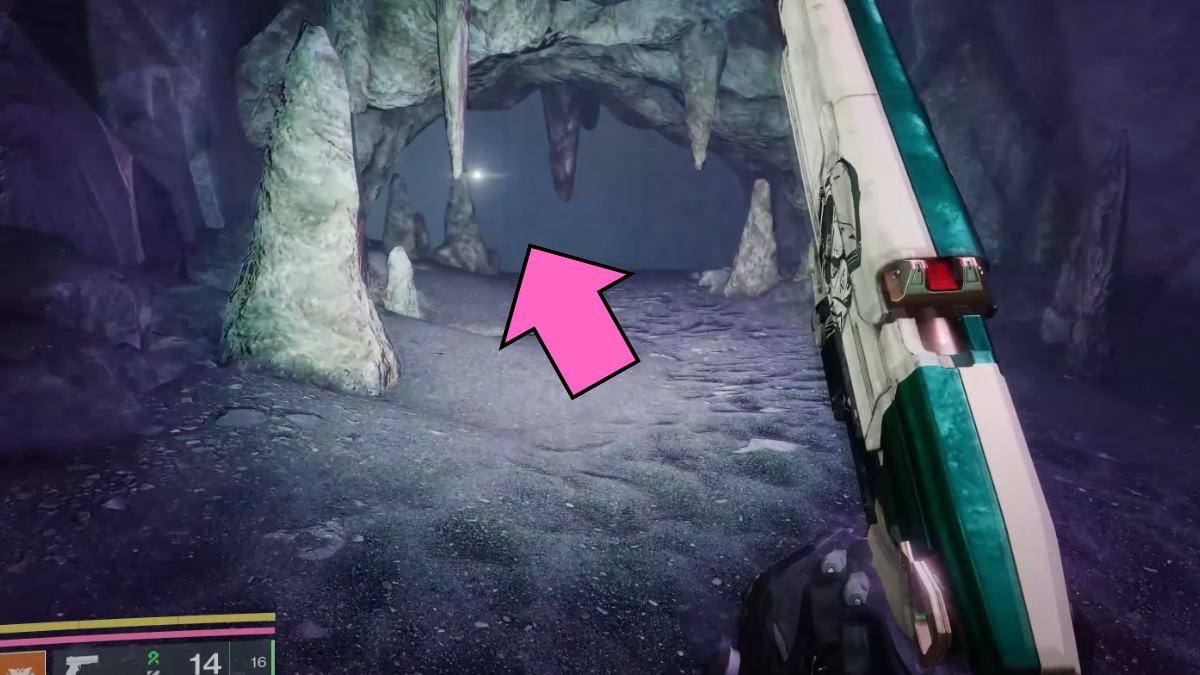
Image via Esoterickk
Image via Esoterickk

Image via Esoterickk

Image via Esoterickk

Image via Esoterickk

Image via Esoterickk

Image by Pro Game Guides

Image via Esoterickk

Image via Esoterickk

Image by Pro Game Guides

Image via Esoterickk

Image via Esoterickk

Image by Pro Game Guides

Image via Esoterickk

Image via Esoterickk

Image via Esoterickk

Image via Esoterickk

Image via Esoterickk

Image via Esoterickk

Image via Esoterickk

Image via Esoterickk

Image by Pro Game Guides

Image via Esoterickk

Image via Pro Game Guides

Image via Esoterickk

Image via Esoterickk

Image via Esoterickk

Image by Pro Game Guides

Image via Esoterickk

Image via Esoterickk

Image via Esoterickk

Image via Esoterickk

Image via Esoterickk

Image via Esoterickk

Image via Esoterickk

Image via Esoterickk

Image via Esoterickk

Image by Pro Game Guides

Image via Esoterickk

Image by Pro Game Guides

Image via Esoterickk

Image via Esoterickk

Image via Esoterickk

Image via Esoterickk

Image via Esoterickk

Image via Esoterickk

Image via Esoterickk

Image via Esoterickk

Image via Esoterickk

Image via Esoterickk

Image via Esoterickk
