" Silence . muteness . Silence . "
So , you ’ve wrap up up the campaign of The Final Shape , had that rather frightening ( yet promising ) draw with the Witness , and now you want the sword you ’re going to break with . Then permit me walk you through how to get the Ergro Sum alien brand in Destiny 2 The Final Shape .
Destiny 2 The FInal Shape - Destined Heroes Quest Guide
Step one is to thrum the main cause if you have n’t already , as you could only start the quest to unlock Ergo Sum , ' specify submarine sandwich ' , after doing so . Speak with Ghost , and he ’ll give you the quest . There are nine steps in total , but do n’t vex , it does n’t take all that long .
Firstly you ’ll be propel to hear to amessage coming in on the radioright beside Ghost , which will reveal the fact that our one-time frenemySavathûnisn’t quite done doing my head in just yet . Listen to the subject matter , and then manoeuver off to do your first quest on the chemical chain , Queens , Part 1.(The marker for which wo n’t be far from the radio in which you received the message . )
I ’ll be providing some abbreviated direction on this delegation , as it has a few mechanics that really puzzle me for a little flake when I was first go through it myself .

Queens, Part 1 Walkthrough Guide
For the most part , this mission is aboveboard , so I ’ll only guide the section that have a special mechanic involved . First of which is the habit of Hive Knight Swords to trip big floating Hive Runes .
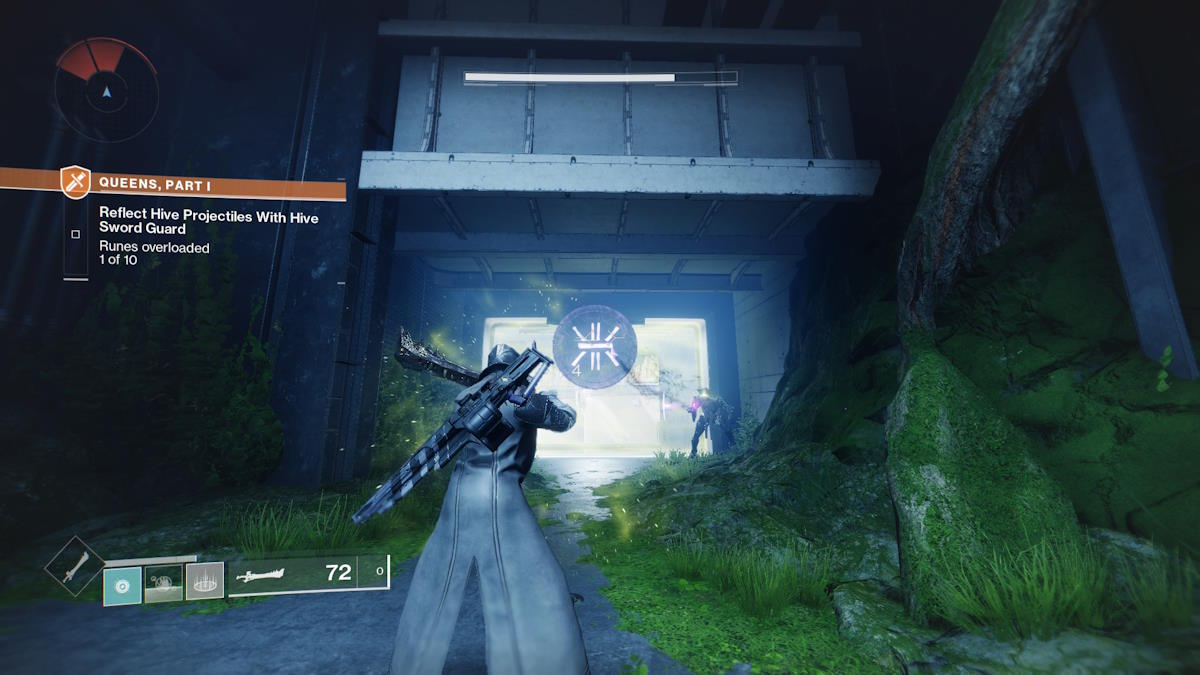
briefly after commence the mission , you ’ll miss down into a small room with aKnight , and anAcolyte . shoot down the Knight so he drops hissword , and then pick it up . You ’ll observe that when you do , the Acolyte gain aninvulnerability shield , which is proficient because for once we do n’t actuallywantto turn something into a fine spread … at least right away .
The manner forwards will be block off by a bigHive Rune , and the trick is to habituate theblockingfeature on the sword toredirect the attackscoming from the Acolyte in the room with you so that theyhit the runic letter .

Screenshot by Pro Game Guides
You ’ll be doing this quite a few times throughout the mission ahead , so best to get some practice in now while it ’s only one Acolyte and not … six Witches or something .
The next country is far larger , and there ’s a total of 10 runic letter to touch off here , but thankfully they ’re all separated and organize by component type . Now here ’s an important part : the colors on the Runes matter , as does the element they get hit with . Different foeman do different types of elemental damage , and you ’ll need to check that you ’re airt the right variety of fire . It ’s best to go off which color they ’re shooting at you , but we ’ll also explain which enemies fervor which element .
Move through this arena , get all those bullets properly parried , and then you ’ll be able to move on to the next section . We ’ll just be doing this again , albeit with one extra step . When you gain the next Rune section , you ’ll see that all of the runic letter have a sort of forcefield around them , so you ’ll need to take that off before we do the reflecting .
Screenshot by Pro Game Guides
This is n’t too difficult either , as it just requires you to perform aheavy attackwith the Hive blade , which will fire a projectile . Aim that rocket at the bright green eyeball above the forcefields , and then proceed with redirecting enemy attacks to spark off the rune again .
go on on with the mission , and eventually , you ’ll come across the ever - lovelySavathûnagain . This is a chief fight with another childlike mechanic , but we ’ll break down the first section just for clarity . When you strive Savathûn , you will see three more Runes , but this time you ’ll also see three shrine that each hold an primary orb . As you might think , your aim is to take hold of these eyeball and throw them directly at the corresponding runic letter . I ’ve include one highlighted example in the image below .
Once you ’ve souse all three ( you may miss , do n’t concern ; I totally did n’t miss double in a run-in though ) you ’ll be capable to deal hurt to Savathûn . finally , once you ’ve done enough , she ’ll move on to a new area and you ’ll repeat this process again , albeit with doubly as much throwing . Once she ’s dealt with , that first mission will be done , and you ’ll be free to keep moving on .
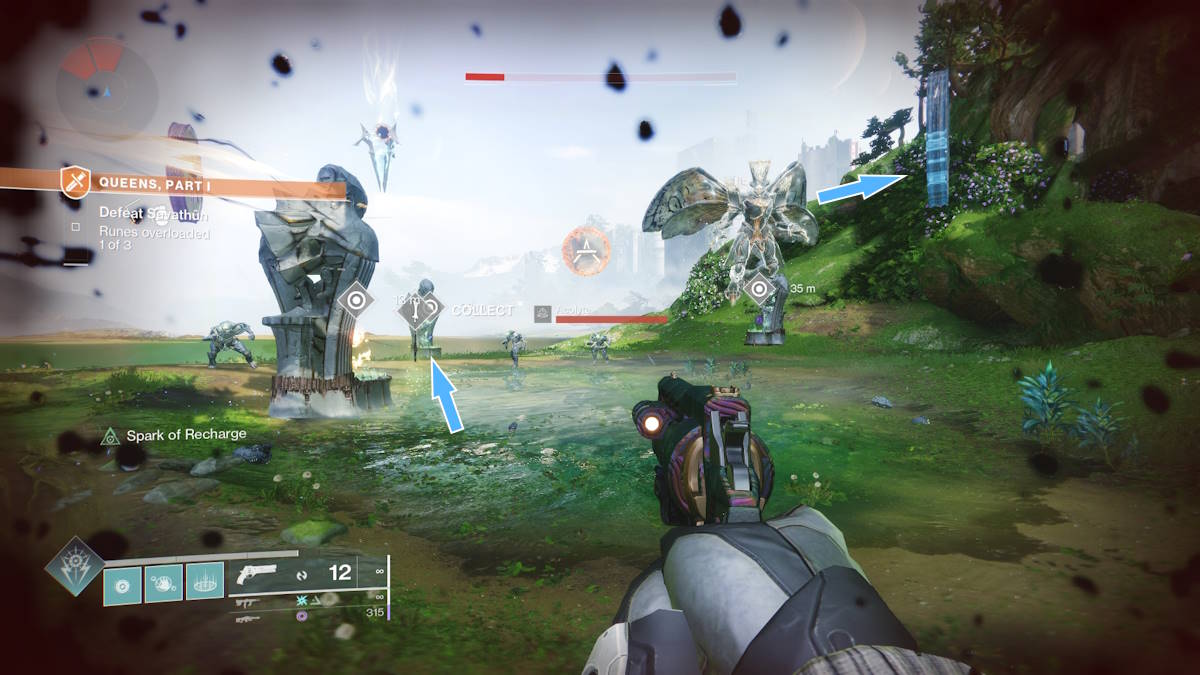
Image by Pro Game Guides
Next Steps
Once you ’re done with the Savathûn mission , you ’ll be directed to precede yourself to a new Guardian : Micah-10 . They require your help save up some lost spook obliterate around the Pale Heart , and this serves as an unveiling to this young activity . Speak with Micah-10 and exhaust the dialogue before moving on .
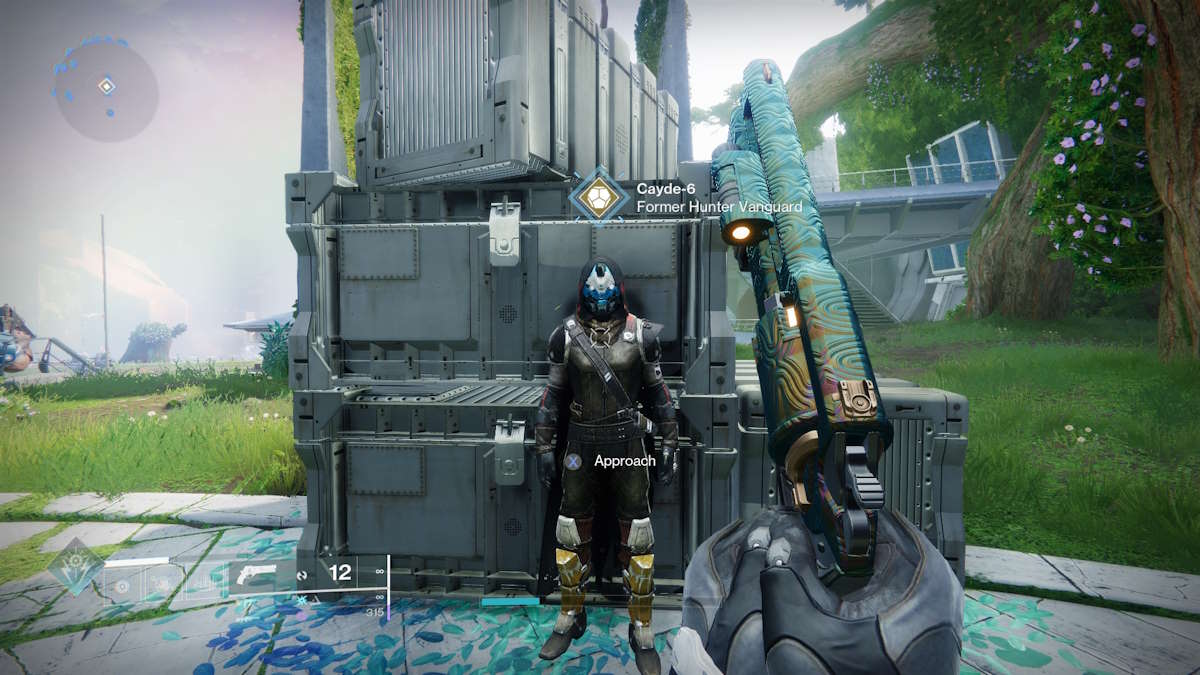
Next up is chatting toCayde-6 , who will give you the quest foranother exotic . you could do that one after ; for now , you have to getthe steel you ’re completely gon na die with .
After speaking with Cayde-6 , you ’ll be prompted to talk toGhostonce more . This will plant you off on quite a extended chain of quest , but they are n’t too difficult . You ’ll be enjoin to go to two separate locations , which we ’ll denounce below , one that will give you some more Light ability , and another that will give you some more Dark abilities .
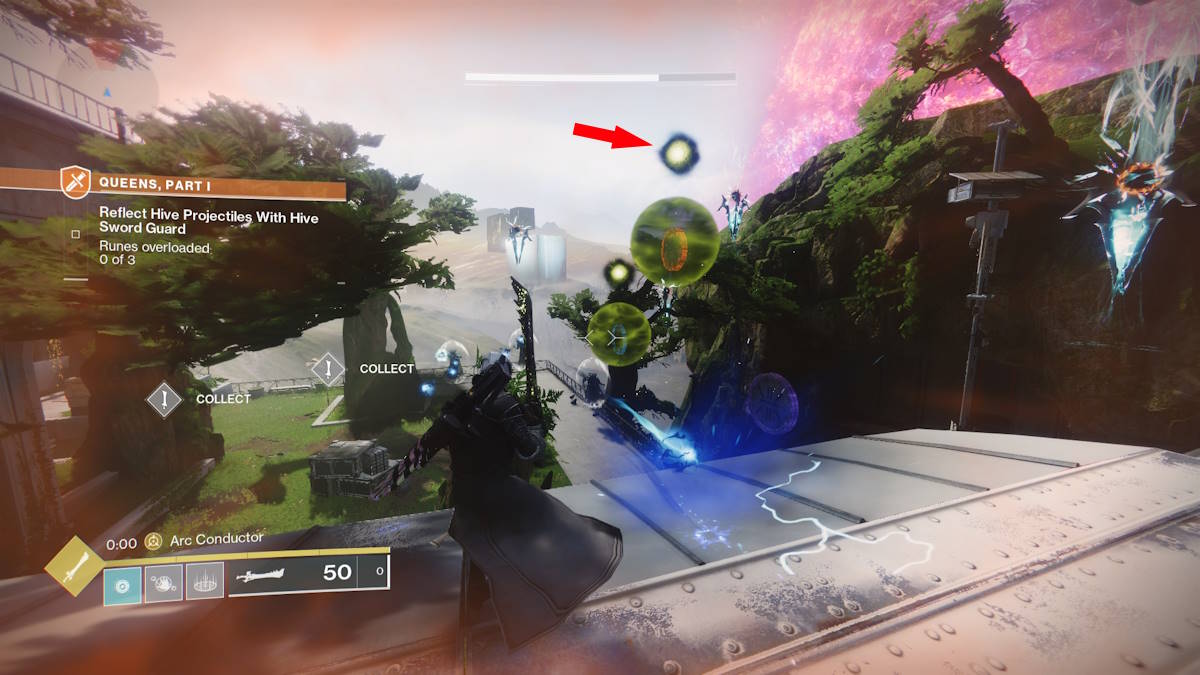
Image by Pro Game Guides
TheLost in Lightquests will have you joining the ever charming Mithrax in his search for a Kell who wrong him quite poorly indeed . The first commission ' The Hollow , Part 1 ' will need you to defend your ghostwriter whilst he hack a Fallen terminal for you . afterward you ’ll have to go and do some more mote detrition , but simple than the main drive . KillLight Eaters for Light Motes , killDark Eaters for Dark Motes , and then take them to where they need to go . And last you ’ll have a boss , but do n’t care , he ’s a big softy . You ’ll ask to drop off some more motes in his phase switching to get him vulnerable again .
The Hollow , Part 2is quite a bit longer , and has you fail back to Europa . You ’ll need todefend exploding shanksfrom enemy fire a few multiplication during this one , but other than that it ’s standard menu . The gaffer at the end can be a bit tough based entirely on the amount of mobs that spawn , and for get him vulnerable , you ’ll take to target theServitorson either side of his arena . Killing them will have them dropArc orbs , which you thendeposit in the midriff of the arena . strike down off three , and more exploding shanks will come to take the party boss harbor off . Repeat until the boss is decent dead .
Found in the Darkis the next segment , and this will have you doingHome , Part 1 and 2 . These deputation have less variety than The Hollow , and for the most part you ’ll be seeking out enemies carry eitherartillery antennae(part 1 ) orunstable exponent cores(part 2 ) . ( They ’ll have markers in game so you know who to shoot . ) You take those antennae / cores and place / throw them on / atgenerators , which have been awkwardly direct on large concrete structures . These two missions comprise of alotof fighting , so make trusted you ’re inclined for quite the slog . Your last boss here will be a tank , and there ’s no mechanics involved asunder from a abbreviated period of invulnerability in which you ’ll have to take in some foe , so just ensure you take a damage Super and your best overweight weapon .

Screenshot by Pro Game Guides
Once you ’ve done both of those quest range , you ’ll be prompted to return once again to the Tower , where you ’ll haveQueens , Part 2waiting for you around the same area you nonplus Queens , Part 1 . This one is rather straight forward too , so we wo n’t go over it here , but take comfort in knowing you ’re near done . You also get to enjoy a bit of a catfight between two of the most powerful beings in being , which is always a expert time when you ’re oppose for your life-time .
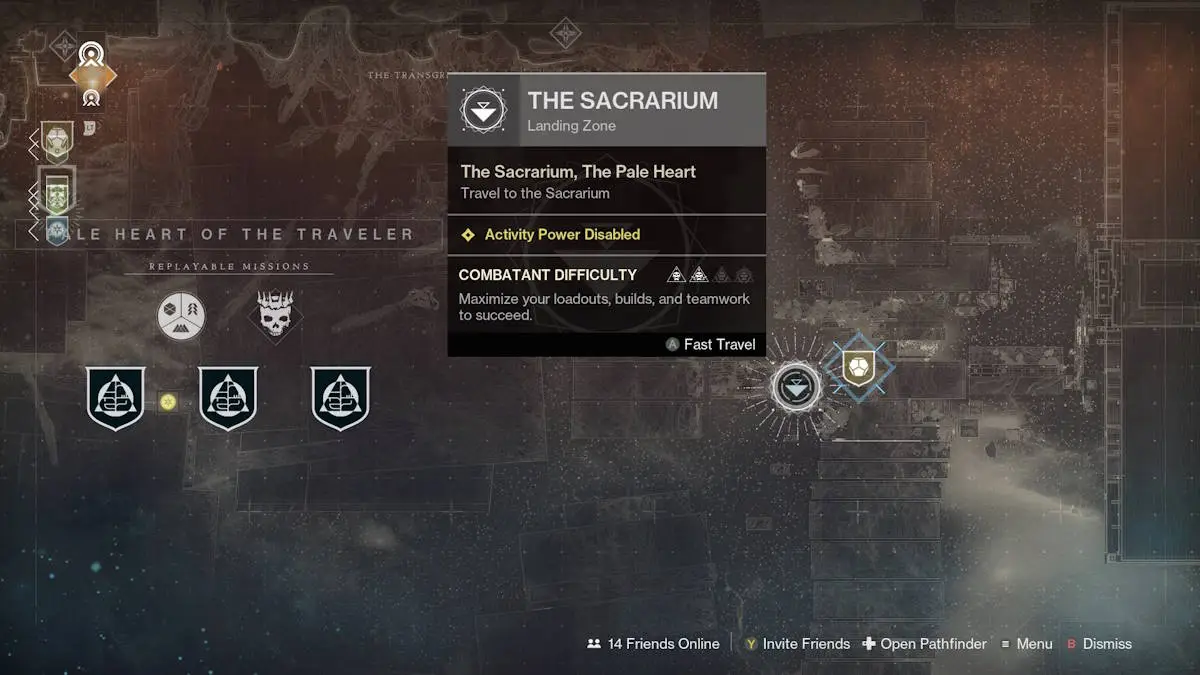
Upon completion of Queens , Part 2 , once more you ’ll return to the Tower to speak with Ghost , and he ’ll give you aDyadic Prismitem , and unlock a new landing place arena on the map for us . Accept the token , go to your music director , and situate ' THE SACRARIUM ' on your single-valued function before flying over to it .
When there , walk in advance , try not to face at the really full-grown and chilling Ghost , and interact with the sword in the ground to rejoin to the place you fought The Witness , andmake your circumstances . I wo n’t put any images of that section here , because it ’s really something you should go through for yourself . And with that , congratulations ! You ’ve successfully unlock Ergo Sum , and can now go off and slice up some poor Dreg in one-half to really put it through its paces .
Screenshot by Pro Game Guides
Ergo Sum God Rolls and Farming
So , Ergo Sum is quite the complex weapon when it comes to Exotics . There ’s been a few Exotics with random rolls before , but only very few and certainly not with this utmost availableness of selection . And as chance has such a part to play in Ergo Sum , it ’s also a very farmable Exotic artillery .
Due to how early it is in the animation of The Final Shape and Ergo Sum , giving an accurate God roll is very hard as the variations are vast . However , a big place to begin is to take what thetypicalgod turn over for any other steel are , and then work from there .
For most swords , the God rolls are deliberate to beJagged Edgefor your blade roll , Swordmaster ’s Guardfor your guard axial rotation , and ordinarily anaggressive framewould be considered the one to push for , but in this instance I ’m not so certain . Due to the nature of Ergo Sum , I believe certain frames will bring themselves far intimately to sure perks . For example , I suspect theWolfpack Roundsexotic perk with theCaster Framewould be far respectable than Wolfpack with an Aggressive underframe , due to the nature of how the Wolfpack Rounds fringe benefit work for Ergo Sum .

Image by Pro Game Guides - Light Cave
Ultimately , this clock time around the best affair to do is to get as many Ergo Sum drop as potential , look forJagged EdgeandSwordmaster ’s Guard , and then experiment with your exotic perks and frames . For model , my first Ergo Sum was the unexampled fancyWave Frame , along with theArc Conductorperk from Riskrunner , which in combination with each other can be absolutelydevastatingagainst large mathematical group of mobs . My second one was a Void one with an aggressive skeletal frame andUnplanned Reprieve , which makes it so my heavy attacks hit like atruck .
In regard to farming Ergo Sum drop , you may gettwoa workweek from thePathfinderbounty line . Get all the way to the end of Pathfinder to encounter your newfangled coil of Ergo Sum . You also have a luck of getting one by doing theOverthrowactivity , and you could do that as many time as you need .
If you ’ve constitute this helpful , and want some more Destiny 2 capacity from us here at Pro Game Guides , check out out our guide onhow to get Prismatic Fragments , and if you ’re one of the ill-omened folks like me who suffered through those early connection problems , we ’ve follow a list ofAll Pre - Raid Cutscenes in The Final Shape Campaign !

Image by Pro Game Guides - Dark Cave

Screenshot by Pro Game Guides
Screenshot by Pro Game Guides

Screenshot by Pro Game Guides

Screenshot by Pro Game Guides

Screenshot by Pro Game Guides
