Why is the battery always idle ?
The only agency you’re able to catch up to Roland is with a boat , but the only one you have approach to is beat . Check out how to charge the gravy holder in Flotsam Vale in Another Crab ’s gem to determine the treasure .
How to charge the boat battery in Another Crab’s Treasure
As Roland is experience by with thetreasure map , the only way to chase him is by sauceboat through all the gunk . However , the only boat does n’t have a working battery . To reload it , you ’ll need to find seven fuses disperse throughout the Skuttleport area . We ’ve list each of their locations below .
First Skuttleport fuse in Another Crab’s Treasure
To recharge the battery , you ’ll have to go throughSkuttleport , Roland ’s Shellfish Corp. ’s primary deoxyephedrine scavenging facility . Right at the start , you ’ll see aplugthat ’s miss a primer . You want to find it to enter the adeptness ’s door . fortunately , thisfirst fuseis just to the left of the door .
Second Skuttleport fuse in Another Crab’s Treasure
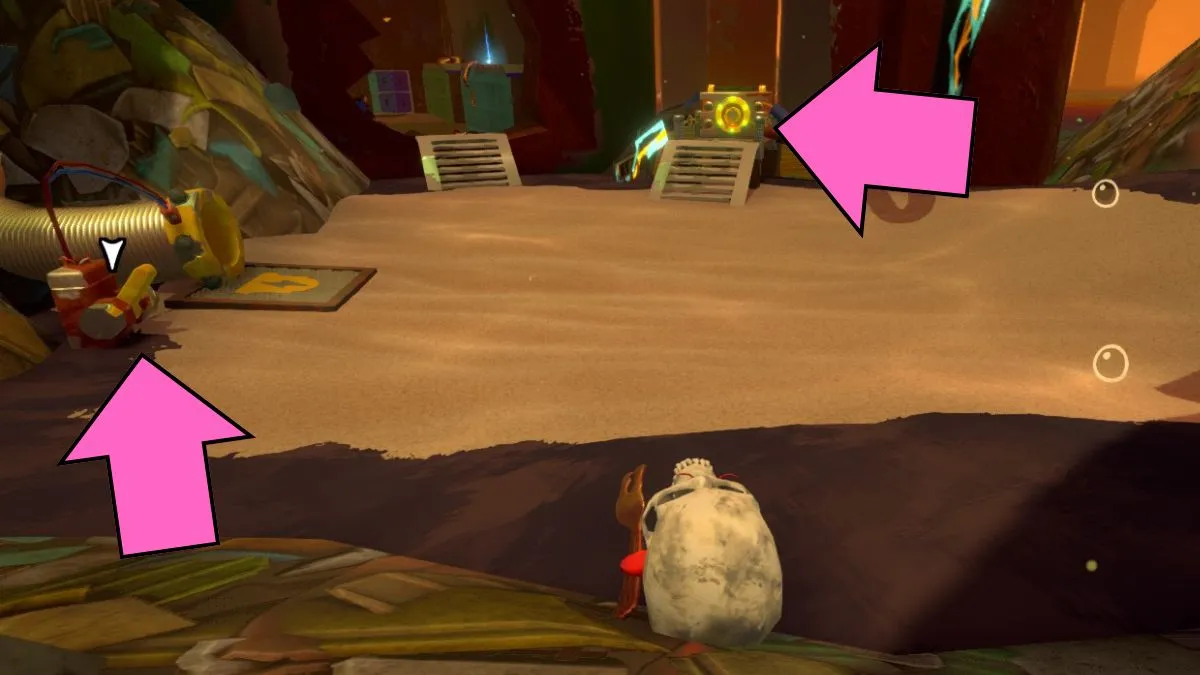
Once you launch the room access , head through the construction and back out of doors again to activate aMoon Snail Shellteleport . Make your way forward until you reach a 2d fireplug . This time , the switch next to it will give you aspring shellinstead of a fuse .
Related : Best Adaptations in Another Crab ’s Treasure
wear out the fountain plate and stand under thebig attracter . Once you are right under it , insistence theblock button , and you will be lift up . Now , it ’s easy to jump onto the political program and grab thesecond fuse . When you stop up it in , go back into the magnet beam and let it take you to a new arena .

Third Skuttleport fuse in Another Crab’s Treasure
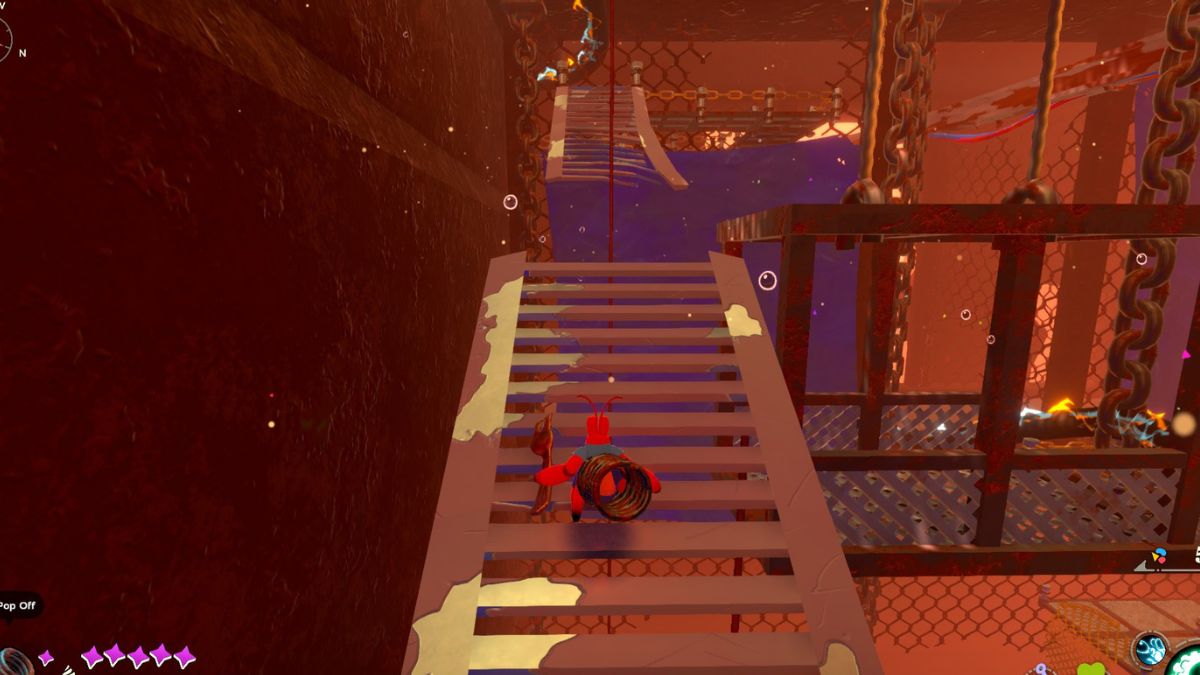
The goal is to mount to the top so you may move to the next building . Climb the stairsand go outside , fighting off all the annoying pediculosis pubis in your way . You ’ll reach acrack in the wallto go back at heart , but be careful ; there is ahammer crabwith electric powers wait to kill you as soon as you ill-treat pes into the building .
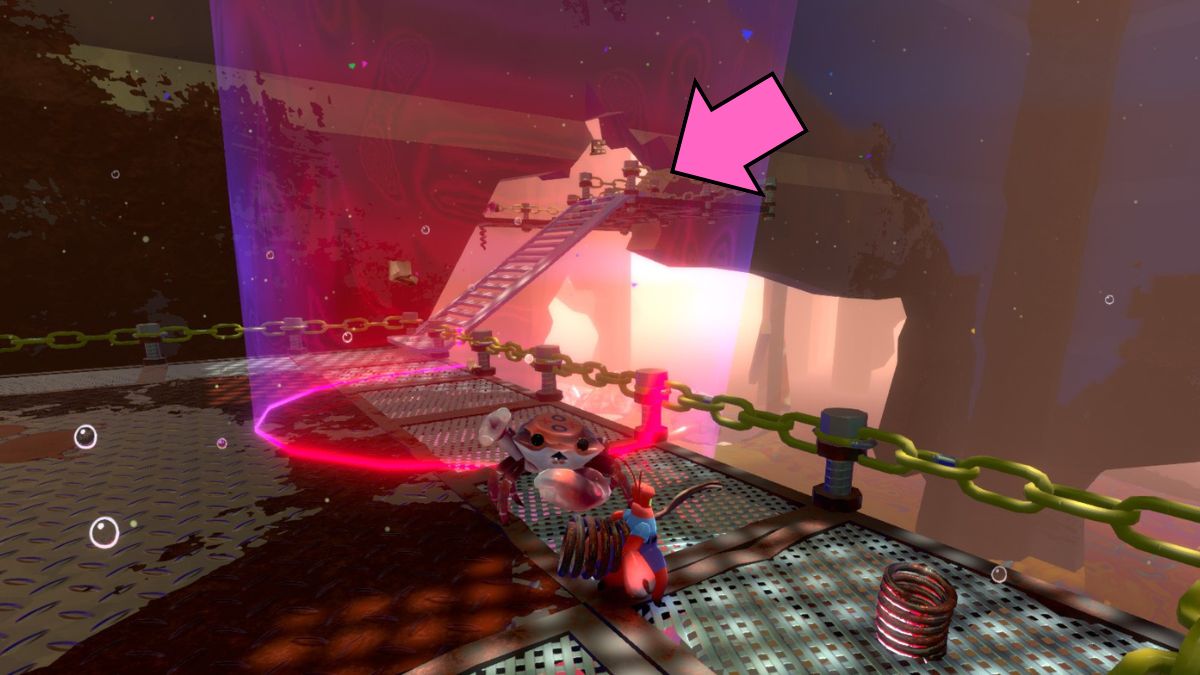
If you do n’t find like fighting it , you may just rapidly spring towards thespongeto the leftfield and onto the ray of light . From here , you will maneuver towards thenet with the urchinsso that you’re able to hook yourself up and climb . Jump onto theledge behind youand you ’ll achieve Firth , another Moon Snail Shell , and a shortcut , which is there in lawsuit you fall to the ground ( which has happened to me so many times ) .
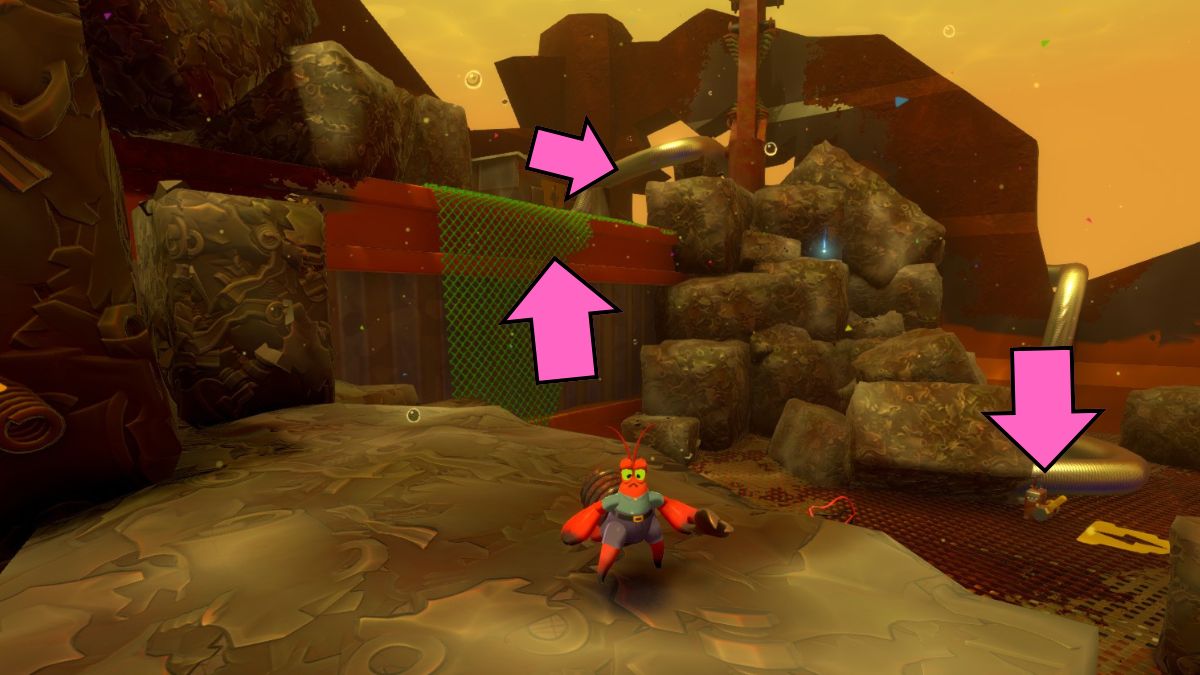
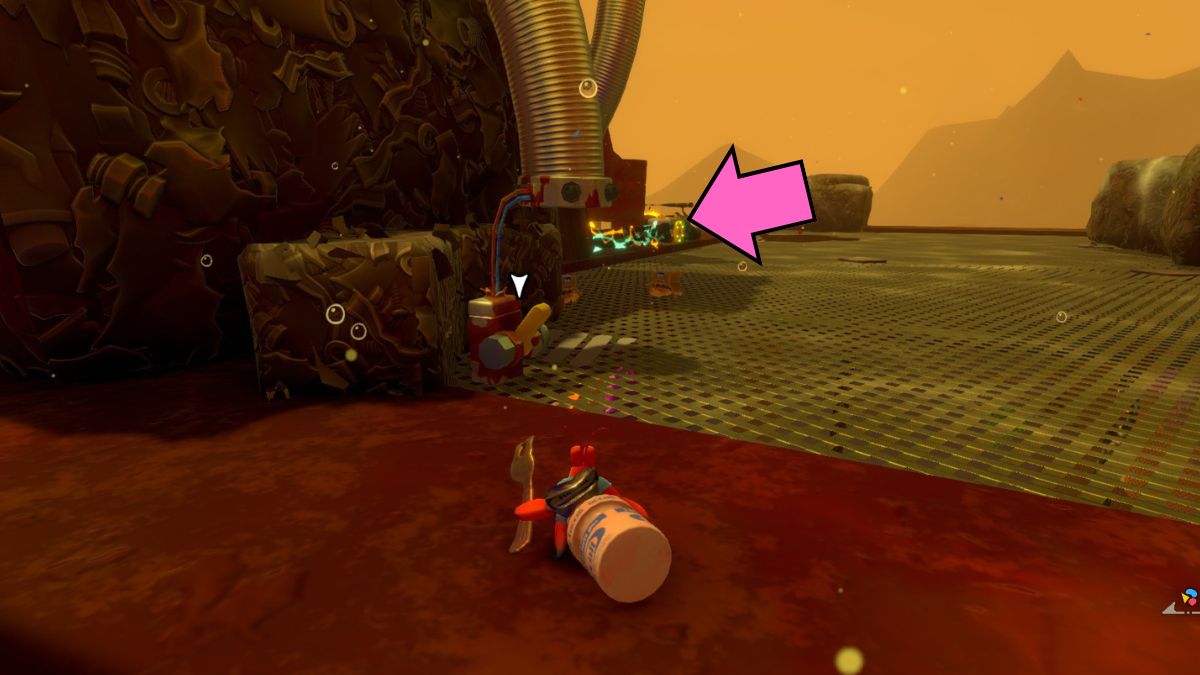
Wait for the heavy attraction to arrive and take you to a fresh construction . It will unload you right in front of thethird fuse plug . The stair that lead up are broken , but you do n’t have to go that way yet anyway . alternatively , knock off all the waydown to the groundand follow the orotund subway . It will take you to thethird fuse .
Screenshot by Pro Game Guides
wax back using varioushooksand put the fusee into the plug . This will activatean elevatorwhich will bridge the gap between the broken stairs . you’re able to now rise up byjumping onto it . Be careful not to slip off as it is pretty annoying to climb all the way up again .
Fourth Skuttleport fuse in Another Crab’s Treasure
Keep go up until you attain the cap and thefourth fuse plug . You ’ll also see another hammering crab in the quoin to the right field . you could easily deflect a fight by going to the left and around the trash block until you reach thefourth fusein the far left over corner . Once you take hold of it , go back the same way and stop up it in .
Fifth Skuttleport fuse in Another Crab’s Treasure
This clip , you’llmove hooksthat you’re able to habituate to cross over to the ceiling of the next construction . On the roof , you ’ll chance another Moon Snail Shell that you need to activate before you godown the holein the trading floor . Once you go down , you ’ll find anothermagnet thatwill take you to the next area .
Keep in judgement that the moment you dangle down to the new building , you ’ll get attack by a hammer crab . There is afifth fuse plugright behind it that you need to find a fuse for . spring down to theplatform belowto avoid getting killed . Kill the crabs and go into the room with thesponge . Jump on it and you ’ll find thefuse .
Sixth Skuttleport fuse in Another Crab’s Treasure
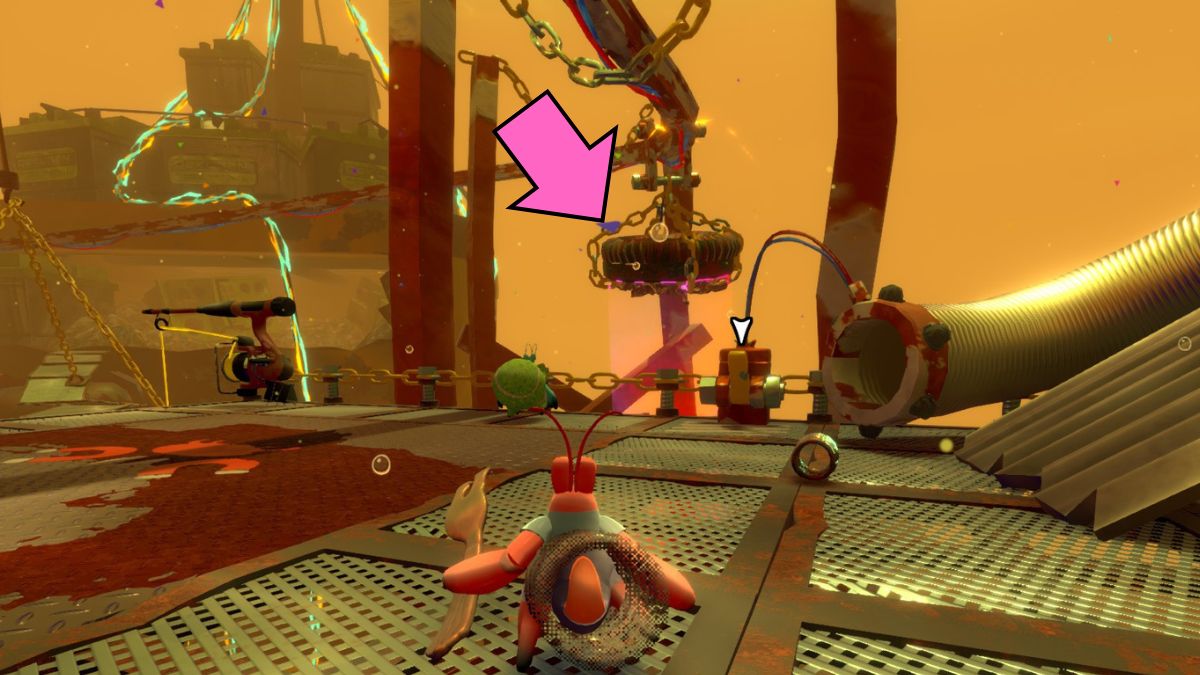
When you stop up in the fuse , a hookwill drop-off down which you need to snaffle onto as it will take you to theroof . Now here is where it gets pretty tricksy . The shift for the fuse is on the ceiling , but the fuse will show up in a different area . You need to be very quickif you want to get it before it disappear . select theswitchthen rush up thegreen net .
Related : Best case in Another Crab ’s Treasure
Once up , jump over the edgeand onto the weapons platform . Hook yourself to thepurple netand cross over , being aware of the urchins , until you’re able to skip over onto theplatformbelow . You ’ll have to make your way across andup the stairsto finally grab thesixth fuse . Theplugis aright underneath ; there ’s also a Moon Snail Shell there that you should activate .

Screenshot by Pro Game Guides
Last Skuttleport fuse in Another Crab’s Treasure
When you plug away in the fuse , two gas canisterswill appear and you may pass through them . In the next orbit , you will get hold the last plug on the ceiling . There ’s also a shift decently next to it , but unhappily , it is n’t that gentle . The switch is for the spring shell , which is utile if you do n’t already have one .
The electrical fuse is approximate , but you’re able to only reach it by stepping under themagnetthat circle this orbit . It will take you up on some trash piles to the right , where a hammer crabmeat and thelast fuseare waiting for you . snap up the priming chop-chop and jump back down to plug it in .
Now you ’re officially done with fuzee . Go down the step and head across the political program to the last area . You ’ll see a piping in the reason . Jump down it to face down and defeat the boss Voltai , the Accumulator . Once you do , you ’ll get theEelectrocute adaptationwhich can charge the battery . stand out down the light beam and make your room back to the gravy holder so that you may give chase .

Screenshot by Pro Game Guides
If you need to get everything in the plot , make certain to learn outAll Trophies and accomplishment in Another Crab ’s Treasureon Pro Game Guides .
Screenshot by Pro Game Guides

Screenshot by Pro Game Guides

Screenshot by Pro Game Guides
Screenshot by Pro Game Guides

Screenshot by Pro Game Guides

Screenshot by Pro Game Guides

Screenshot by Pro Game Guides
Screenshot by Pro Game Guides

Screenshot by Pro Game Guides

Screenshot by Pro Game Guides

Screenshot by Pro Game Guides

Screenshot by Pro Game Guides

Screenshot by Pro Game Guides

Screenshot by Pro Game Guides

Screenshot by Pro Game Guides

Screenshot by Pro Game Guides
Screenshot by Pro Game Guides

Screenshot by Pro Game Guides

Screenshot by Pro Game Guides

Screenshot by Pro Game Guides
Screenshot by Pro Game Guides

Screenshot by Pro Game Guides

Screenshot by Pro Game Guides

Screenshot by Pro Game Guides
