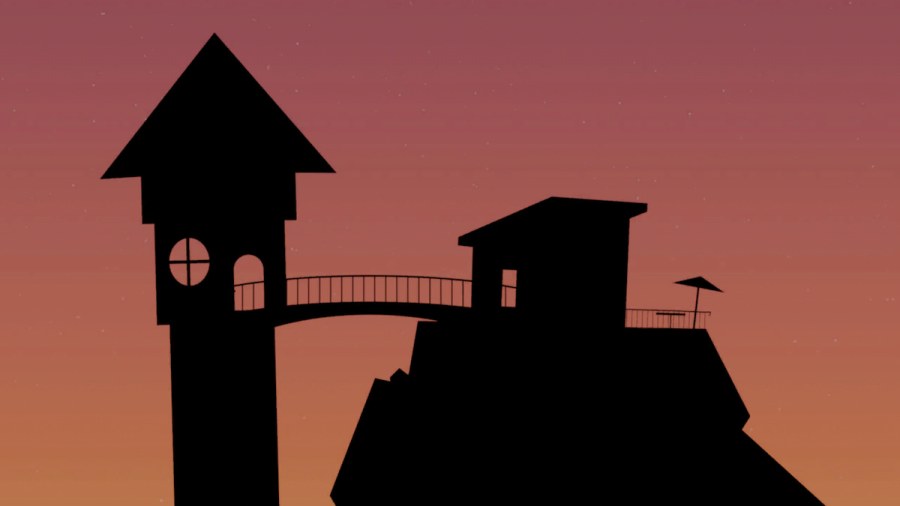
hound your escape is n’t easy , but our Trace Escape Room walkthrough will help .
Trace ( Cool Math Games ) is a free internet browser - base escape room experience along the lines of games such asEscape Simulator . When you get , you find yourself trap in an unfamiliar place and have to break your way out . You ’ll find some aim and hint in your inventory and ask to garner more items and solve puzzler to progress . you’re able to determine the walkthrough and answers you need below if you desire to know how to get the Trace escape way with our walkthrough on Cool Math Games .
How to beat Trace - Walkthrough Guide
The key to beating Trace escape valve room is learning how clicking works . Unlike many point - and - click games , you do n’t get hints from the scene by hover over component part of them . Instead , you need to press an country to zoom into it , often more than once , before you’re able to interact with an object . And even then , you ’ll just have to cluck it , as there are no on - sieve pointers . Once an item is in your stock-taking , you canclick the magnifying glassnext to it for likely cue in thisgame .
Related : Escape Academy Final Level Puzzle Guide and Walkthrough
The bathroom
accumulate thehalf - couplet of scissorsfrom the sink . mark that if you click the picture under the bathroom mirror , you ’ll see that a combination requires a four - digit code . To get the number you need :
Thecrumpled piece of paperis an image of the mirror and sink sphere , with an ten - marks - the - touch where the small roofing tile are by the mirror . Click this arena on the map to whizz along in and find a slack roofing tile . On the back of it is an image of a fish using the same color coding as the five - colour puzzle beneath the toilet . Once again , make the arrows line up to copy the picture , and you ’ll spread the cabinet on the right side of it . spread that threshold to encounter more code identification number ( 1,2,.05,8 ) which are this time below the lines rather than above them . This indicates you involve to divide them , which give you the combination you need ( 5472 ) .
concern : How to complete Escape Artist in Escape Academy
Using this compounding on the fiddling safe behind the picture reveals alightbulb . Take this and go back to the cabinet you openedon the left of the stool , which also has a pumpkin in it . open up the lid of the pumpkin and enter the medulla oblongata to reveal five familiar - bleached dress circle inside it , each with a stick pointing in a different direction . Apply these directions to the pointer on the colored electrical energy ( see below ) toopen the final locker below the sink . Inside is ared tile with a key on it .
Take this and enter it into the panel on thebathroom doorway . This reveals a slue puzzle . Move the piece , so the with child greenish and jaundiced pieces are all on the right , move the carmine small-arm across the top as you do so until all you need to do is maneuver the small empurpled pieces and simply move the scarlet key small-arm over the green lock square . This opens the door .
The house
Walk over to the couch andgrab the metal starunderneath it , a assault and battery under the veracious couch cushion , and anogre figureby the works next to it . There’sanother alloy starstuck to the picture on the wall and ablue canister horsein the top desk drawer . Take all of these item into your inventory .
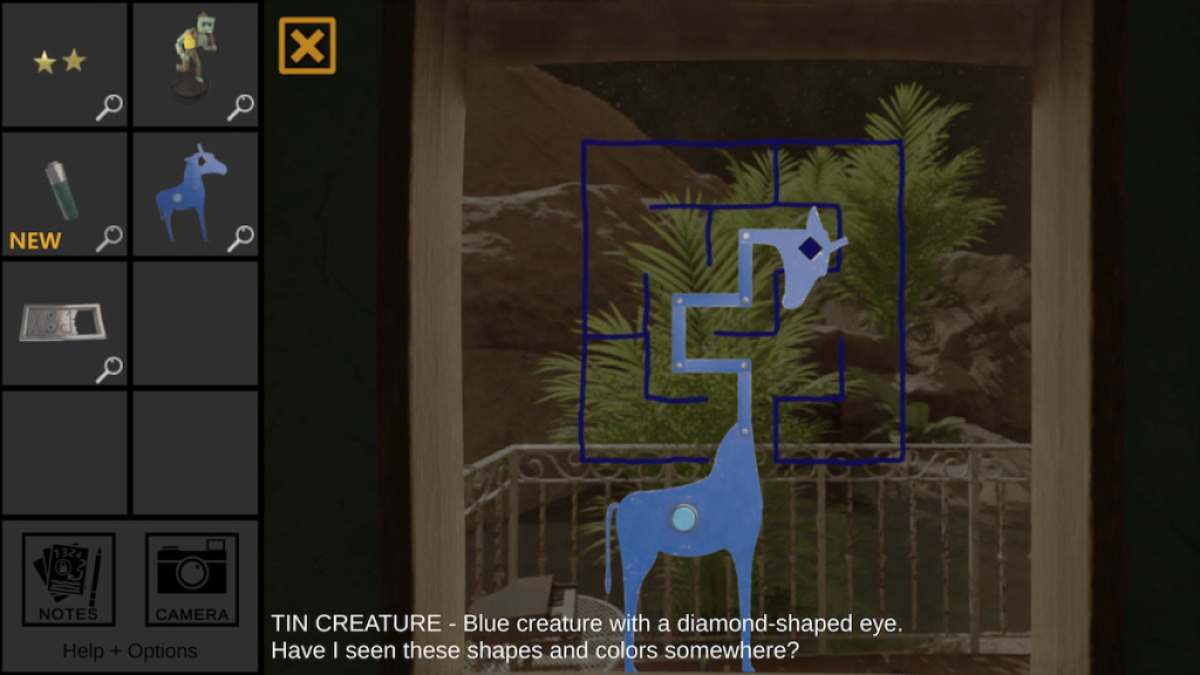
Walk to the bay laurel window and use the camera tonote the pattern of the planets . Now start the cabinet under the windowpane and match the puzzle inside to look like the planet design ( low , high , in-between , gamy , in-between ) . Then press the carmine button underneath the puzzler to open a small hachure and take thebroken metal tabletinside . Now head back to the minuscule hallway by the bath and utilise the tin horse on the mental image on the window by probe the cavalry in your inventory . Its neck will extend . flex its cervix until the ( now giraffe ) toy ’s eye matches the spicy diamond on the window image by follow the snarl route . Then get through the push button on the Giraffa camelopardalis to get themissing composition of the alloy tab .
Click the tall musical composition of art on the wall opposite the toilet door to reveal a metal puzzle . Make it match the ( now accomplished ) metal tablet to let on ared release on the mystifier . Note the long picture on the wall above the fish tankful has six symbols in a quarrel . These equate to the six red button around the room , which need to be pressed in ordering : by the fish tank ; on the fan on the ledge in the recession ; on the information processing system ; in the planet puzzle console ; behind the painting on the puzzle we just solved ; then on the minuscule grey box . Doing so will start the grey box , getting you agreen keyand autility knife . Use the green key on the green room access in the street corner to go out onto the patio .

Screenshot by Pro Game Guides
The patio
snap up thevampire figureon the shelf , then go to the rotary image on the wall that contains four black cubes with potted plant images on each side . impart to right , top to bottom , set them tohanging , tall pot , tall plant life , andpainting . compress the crimson button in the center and grab themetal star . Go to the corner of the patio , where you ’ll be on the other side of the window with the giraffe puzzle . Do the Giraffa camelopardalis teaser again here , claim asecond batteryfrom it . snap up themetal staron the table next to the mini piano . take the air to the main terrace area and get through thse table with the blue tablecloth . Grab themetal starunderneath the table , and hidden in the jigsaw pieces on top of the tabular array , giving you six . Complete the jigsaw on the table to findone slice that is missing . Head back inside .
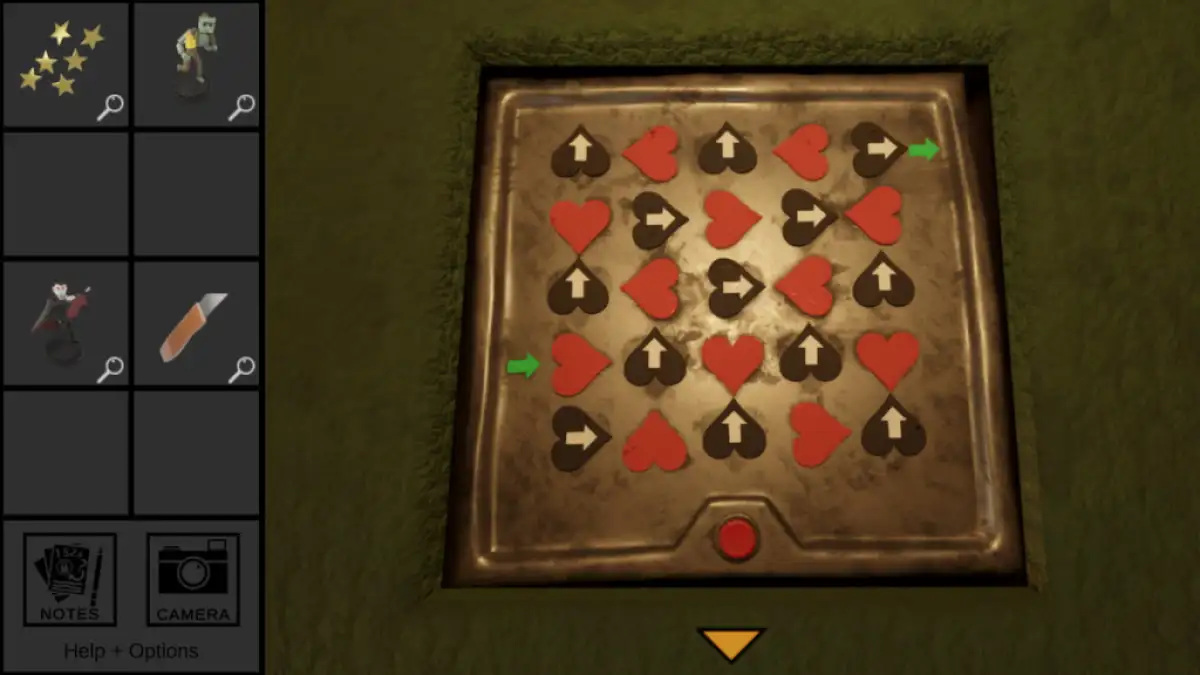
Use the usefulness tongue on the rug under the desk to give away a puzzle of reddened and black hearts . slip in thetwo batteries in the lamp on the deskand turning it on will add arrows to the black hearts , helping you finish the mystifier . You need all the points of the hearts to go in the good direction by bend the black hearts ( see above ) . dawn the red button to launch the box and snap up thepuzzle pieceandyellow hero sandwich . Pop the submarine into the fish tank .
have-to doe with : Escape Simulator – What is Legacy Mode
Screenshot by Pro Game Guide
Go back outdoors and put the last opus into the puzzle . This suggests using theutility knife on the arm of the couch . Go back deep down and click by the plant bay window by the sofa , then on the chair sleeve , then apply the knife to unwrap a panel andtake the pentagon keyfrom inside it . snap under the desk where many numbers are written on the wall . Examine the tonality while zooming in on the numbers , and you ’ll come in the key over them , render you the sequence 9 , 2 , 3 . This is the password to lumber into the computer on the desk . Once logged in , you ’ll have two icons to take from . Click the water pipe bowl on the screen to take ascendance of thesubmarine in the fish armored combat vehicle . Use that to go into the castle in the tank to notice the code263366161on the privileged wall .
The tower
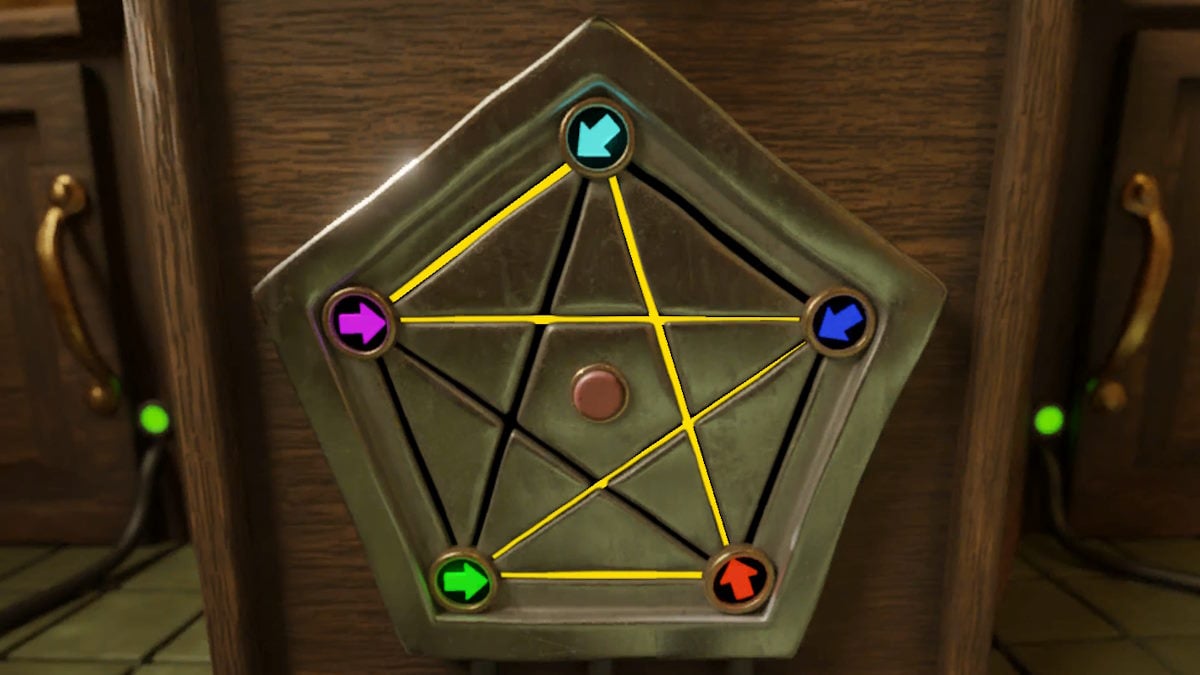
This codeopens the panel on the barricaded door . Inside the panel is a serial publication of colored square into which you need to target your metal asterisk . First , you need the last star . Use the information processing system again , this metre opt the robot and ready itclimbto reveal some instruction . Go to the draws under the fish tank and expend the pedagogy to open and close up the hooking in the order instructed ( X , O , X , O ) , after which you ’ll hear a click . you’re able to now open theUdraw to get a attractor . There ’s a glass tube under the odd side of the mesa with the ticker puzzle underneath it . Use the magnetto get the star .
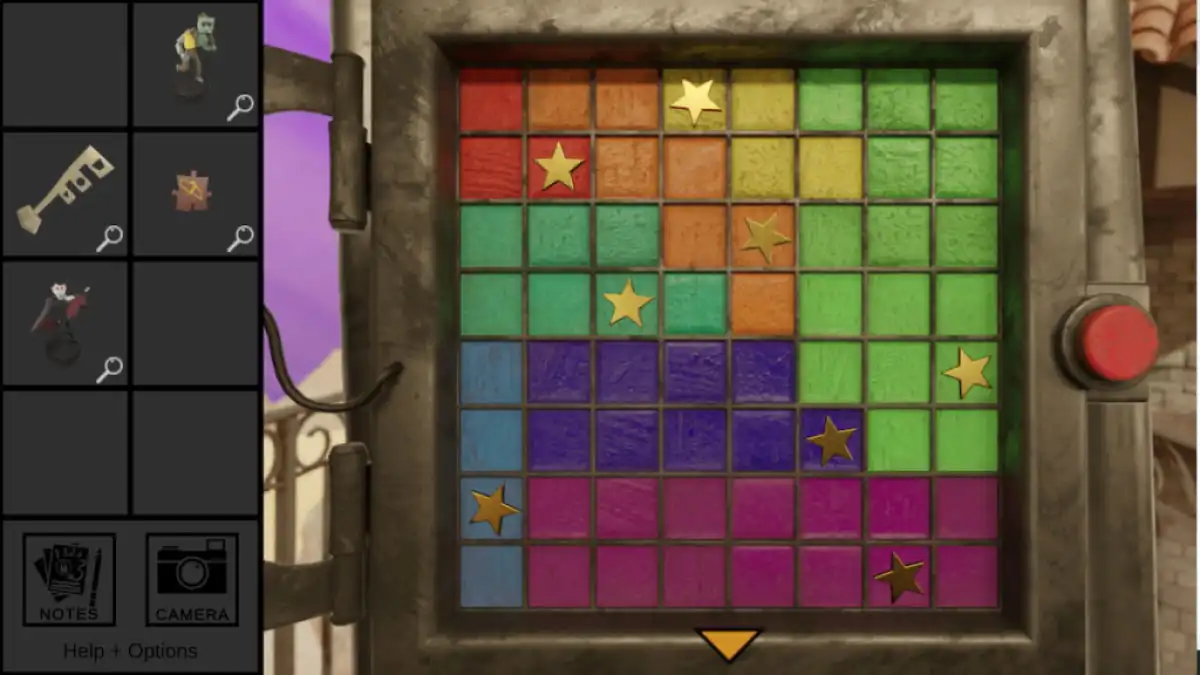
Go back to the panel and put the asterisk in as show above ( so that each row , color , and column has a star with none being next ) . Thisopens the front doorand gives you access to the tugboat . Go inside and round to a small table with a vase containing red flowers . Above the board is another skid puzzler . Set it todown arrow , s , scraggy line , d , x. This open up a hole in the wall , from which you grab a third trope ( phoenix ) and akey for the umbrella . While in the tower , go upstairs andgrab the golem hanging on the conducting wire . Also , look out of the window at the bottom of the stairs , where you ’ll see the wordsCABBAGE FACEDwritten .
Use the key to unlock the umbrella on the porch . afford the umbrella revealsan image on the porch chairperson , which you’re able to take a motion-picture show of . While out here , hang the automaton on the kite string . Now go to the tiny piano on the tabular array and play the notes in the order CABBAGE FACED . This opens the piano and gets you therobotic arminside . Go back inside , add the automatic arm to the sub , pop it back in the tank , and then use the estimator again .
Screenshot by Pro Game Guides
Using the computer
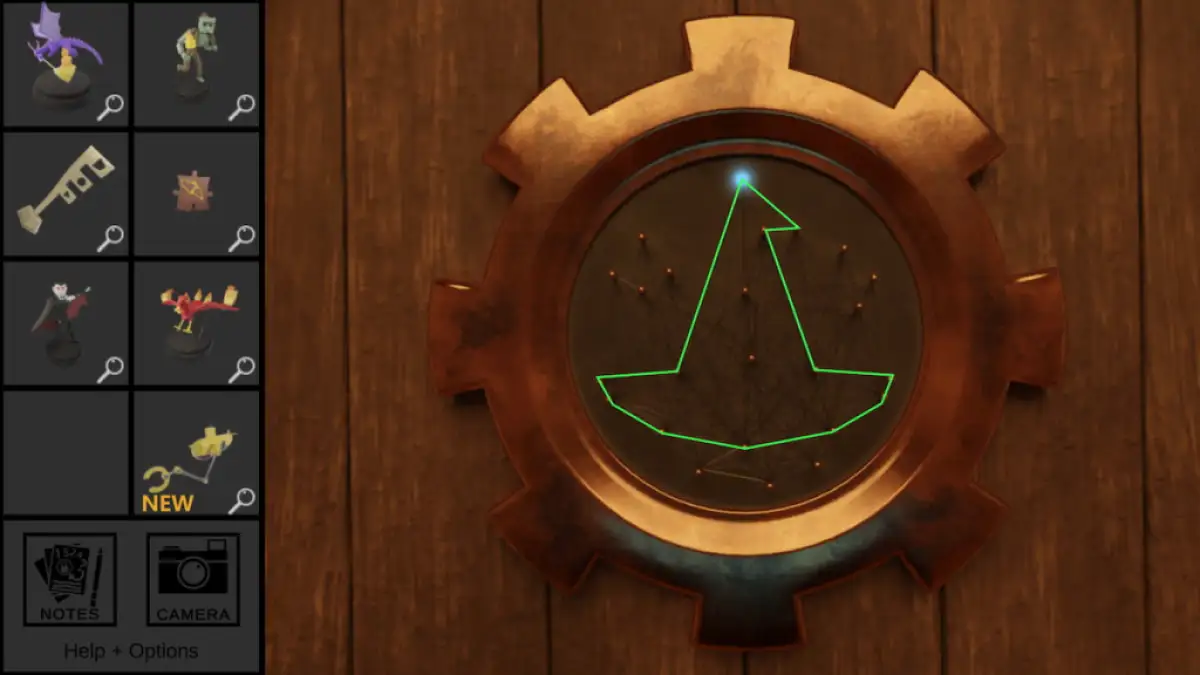
On the computer , apply the robot to first climb and then seem right to see a words of symbols on the span ( circle , square , triangle , sensation , square , triangle , band ) . Use the submarine to go back into the tower , start the chest , and reveal a message sayingI DID DEEDS – the reverse of the number computer code you saw before . Go back into the column and launch the draftsman in the table with the flower on and typewrite I DID DEEDS into the machine , which gives you a fourth fig ( adragon ) . Now go into the key way in the tug through the door . On the wall at the back , use the pin board to decipher out the same prototype that is on the chair on the porch you took a picture of ( a thaumaturgist ’s hat , above ) .
This break an eight - light mystifier above your head in the same room . flick the lights until they all go off . If you take the light just clockwise of 12 - o - clock on a scout face as 1 , get across them in the following order:12356784 . This give you an image on the stone pedestal in the way . You now need to place the four figures on the ten spaces on the plinth at their relevant crossover points ( genus Phoenix = fervidness and wings , vampire = wing and teeth , monster = fire and teeth , firedrake in the midsection ) . For completing the puzzle , you gain ascrewdriver . Go back upstairs in the towboat to the simple machine light by a halcyon lamp andenter the symbols on the bridgeas you saw them through the eyes of the robot . This divulge a flight plan puzzle .
Mathemagic!
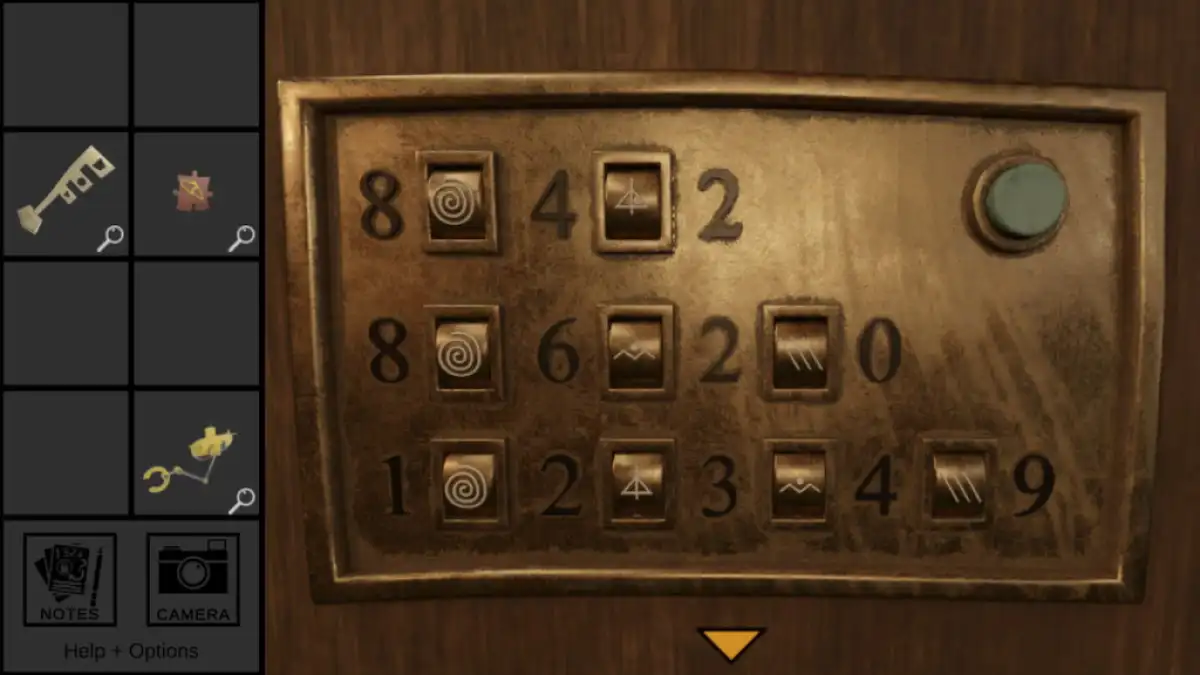
In the main planetary house , use the screwdriver on the metallic element panel underneath the shelf with the rooter which articulate countersign . This reveals six symbols,<0-|- < . Use this as the watchword to enter the Tower part of the political platform on the computer . This in turn opens theMathemagicprogram . dispatch the programme to see the symbolisation combination that is on the safe under the desk . fundamentally , you ’ll find out what math symbol each symbol on the good represents , which you then enter on the safe to make the numbers print there make for ( see above ) . Inside the safe , you ’ll chance the comrade book to theAdventures of a Wayward cosmonauton the table .
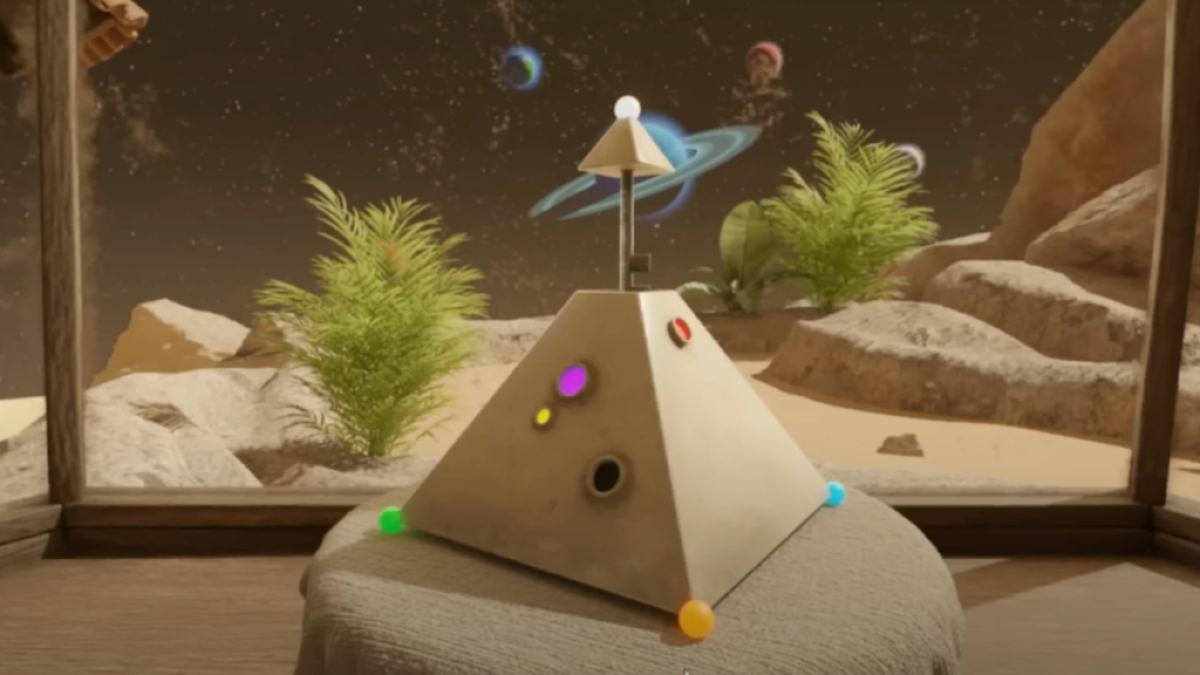
Note the color society of planet visited in both book ( orange , earth , ashen , orange , blue , white-hot ) and thelaunch date 2793 , which you input into the machine on a higher floor in the column . Screenshot the image this founder you on the tabular array and head back into the menage , to the Pyramids of Egypt physical object in the embayment windowpane . fall into place the trilateral points so that the colour fit those on your screenshot and the top of the pyramid bulge out up , giving you the pyramid key . Use the Pyramid Key to reopen the bathroom room access , and the pentagon key toopen the palpebra of the pot , and triumph is yours . It was n’t a sewer at all , but an outflow hatch . Congratulations , you have completed the Trace escape room .
If you savour digital escape way , you should also correspond outFortnite Escape Room Codes ( January 2023 ) – Best Escape Room Maps!and theCafe Bacon Escape Room Walkthroughhere at Pro Game Guides .
Screenshot by Pro Game Guides
Screenshot by Pro Game Guides
Screenshot by Pro Game Guides
Screenshot by Pro Game Guides
Screenshot by Pro Game Guides
