What could be veil in the ruination ?
Hidden Ruins is a classic puzzle escapade game in theAdventure Escape Mysteriesseries that was only added to the AE Mysteries Steam app in June 2024 . If you ’re presently enjoying this Graeco-Roman Professor Burns adventure , read on for my full walkthrough and teaser usher .
How to beat AE Mysteries Hidden Ruins - Full walkthrough
Our adventure begins as Professor Burns , Tawa , Rachel , and Peter are strain to find the hidden downfall of the ancient Kumari Civilization . Toplay the biz on Steam , you must downloadAdventure Escape Mysteriesand blue-ribbon Hidden Ruins once you ’ve spread its app .
The game has eight chapters , which you may easy navigate via the contents lean above . You ’re looking for the Elixir of Life , but it wo n’t be light ! Note that the chapters inthis guide equal the Steam variant of Hidden Ruins . If you ’re playing another version , which has 7 chapters ( alternatively of 8) , note that chapters 3 and 4 here are combined as chapter 3 in honest-to-god interpretation , so all later chapter number for you will be one out ( but all the information you need is here ) .
Hidden Ruins Chapter 1 walkthrough
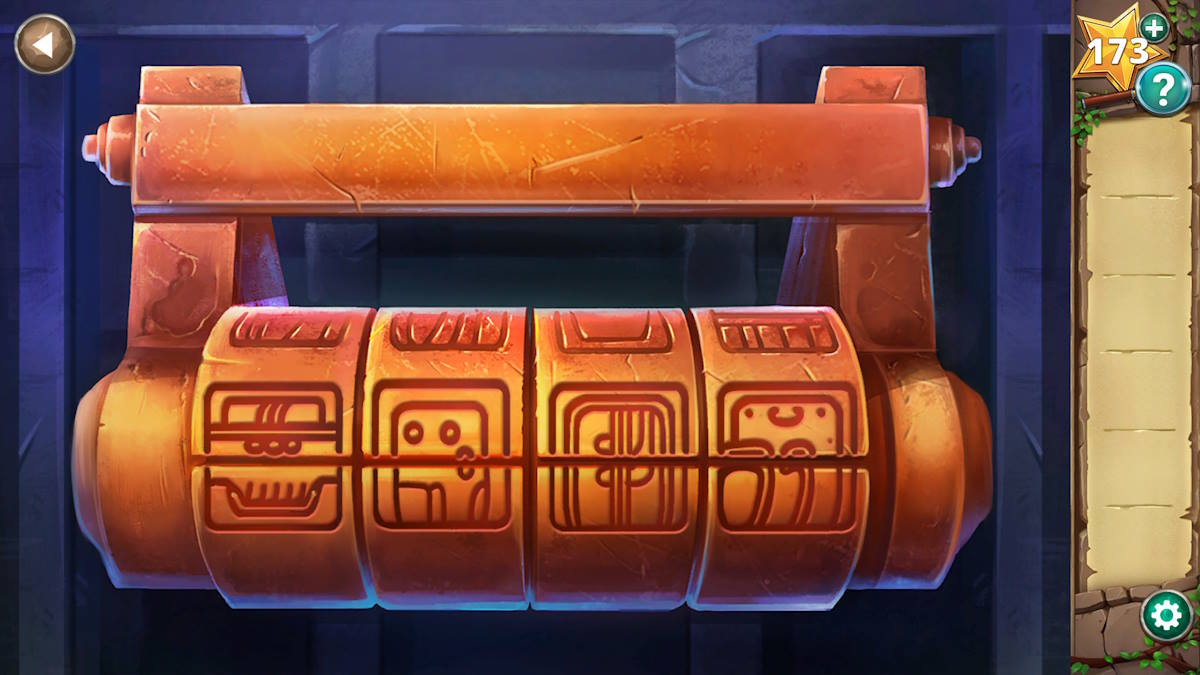
Take theMacheteand theShovelfrom the back of the jeep ( a1 ) , then use the power shovel to hollow around the stone lozenge ( a2 ) to reveal another two symbol ( you could click the Harlan Stone to get a better look ) .
Use the machete to remove the vine from the door ( a3 ) and then click the door for a close - up . You need toalign the rings(by drag them ) so that each of the four symbols on the tablet is at the same slant it is at on the rock tablet ( see the image above ) . Once you do , the doorway will open up . come home it tohead inside .
Take theTorchfrom the figure on the right of the path ( a4 ) and light up it with the brazier on the left ( a5 ) . Now use the lit blowlamp to fire up the first unlit brasier ( a6 ) , and the whole bridge circuit will be lit up . Nowclick the paving material slabsof the bridge that I ’ve label above to advance to the next room ( it was trial run and mistake for me ! ) .

Inside the ruins
In the next room , you ’ll see a smooth stone doomsday in the center ( b1 ) and two departure ( b2 and b3 ) . Move into the left elbow room ( b2 ) .
Take theDaggerfrom the bulwark ( b4 ) , and employ it on the foliage ( b5 ) to get aVine . Now move the rocks on the floor ( b6 ) and keep moving the two piles to reveal two broken small-arm of a prick . Select the vine in your inventory and click the break dick to get aDull Scythe .
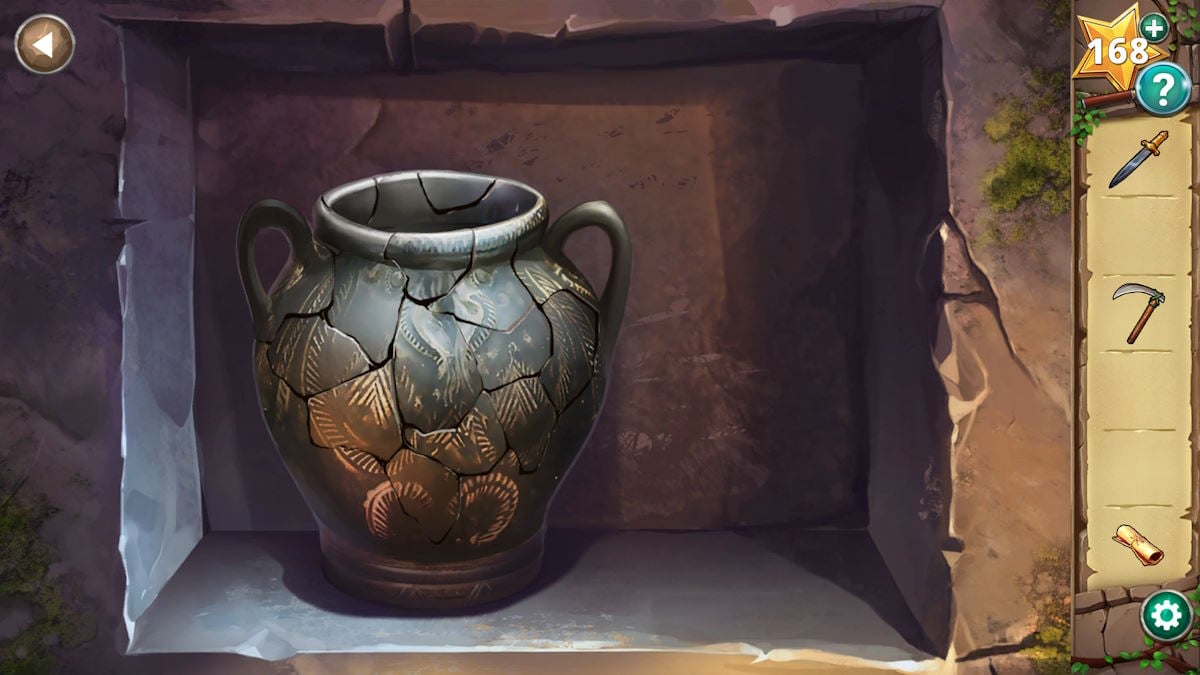
Now leave there and move into the right room ( b3 ) ; take theScroll(b7 ) , and threePottery Shards(b8 ) , and thenadd them to the disordered pot(b9 ) to begin a mystifier . puff the heap piece onto the potful to animate it , which is relatively straightforward as all the pieces are already at the right angle . They also belt down into spot when you get them right , so you know a man is correct . The completed pot is pictured below .
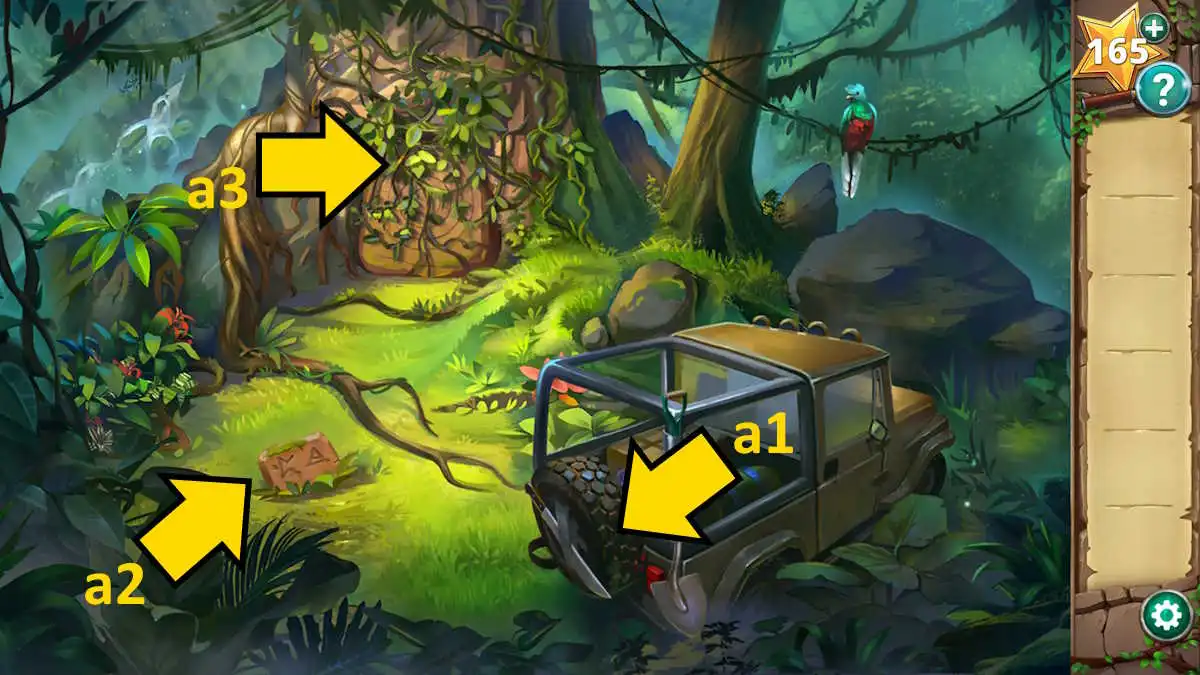
Image by Pro Game Guides
Take aLeaffrom the tree ( b10 ) and use the sticker to skip the Sir Herbert Beerbohm Tree ( b10 ) to reveal some sap . habituate the leaf on the sap to get aLeaf With Sticky Sapand employ it on the mass ( b9 ) to finish the repair . You ’ll now get theAncient Pot .
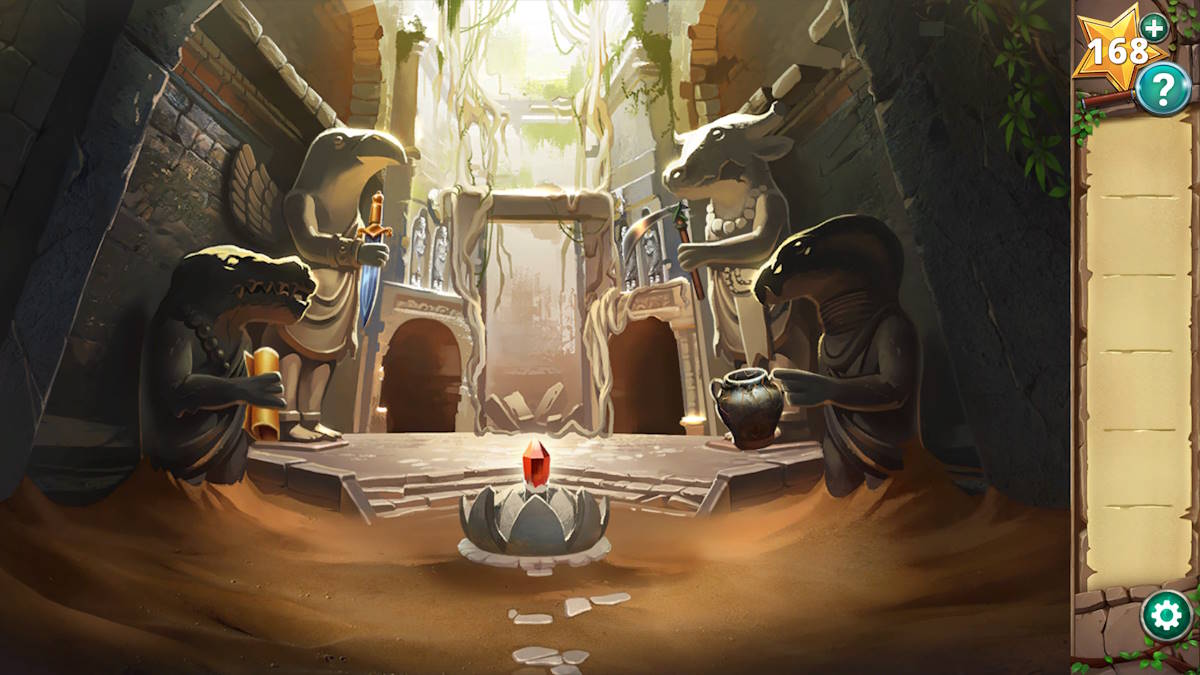
You now have four point in your inventory . attend at the four paintings on the walls of the two way and match the four item to the statues in the main central room . You ’ll get :
Place these item onto the helping hand of each statue and the cardinal dome ( b1 ) will open to reveal theKey of Ages . However , when you take it , you ’re ambush by Larissa and her armed goons ! Thisconcludes Chapter 1 .
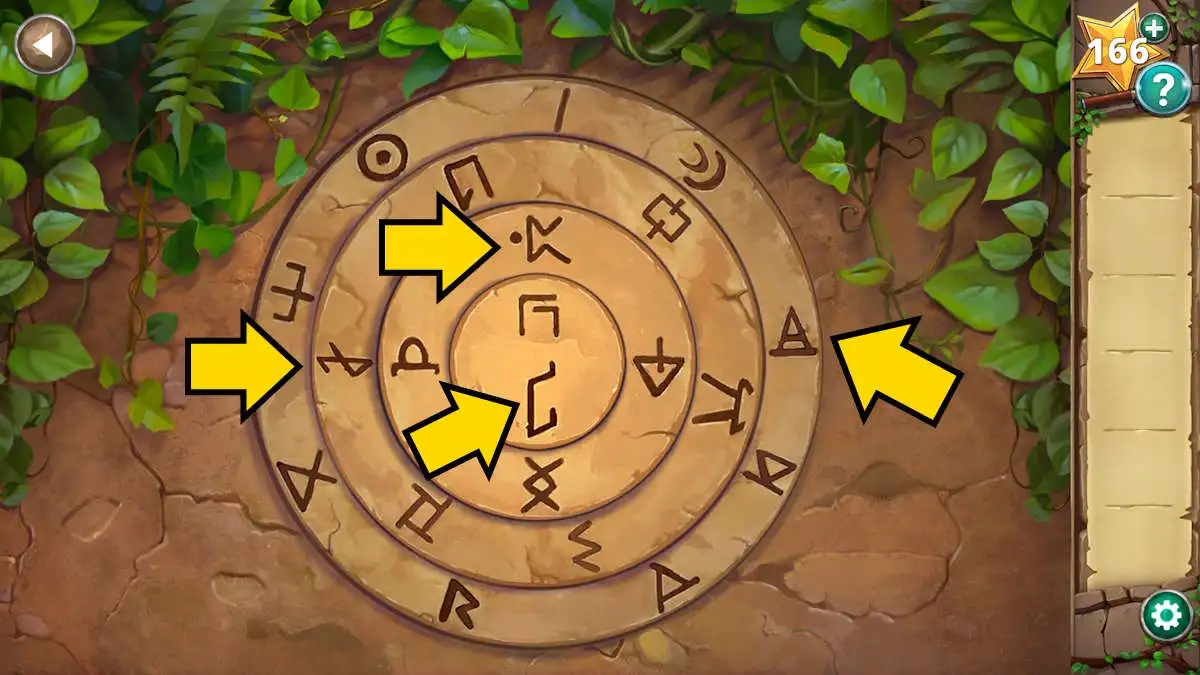
Image by Pro Game Guides
Hidden Ruins Chapter 2 walkthrough - Below the bridge
This time we ’re playing as Tawa , who fall from the nosepiece after the explosion . Take theTorchfrom the rampart ( c1 ) , catch someMushrooms(c2 ) and someDriftwood(c3 ) , and then give the mushrooms to themouse(c4 ) to charm it by from the moss .
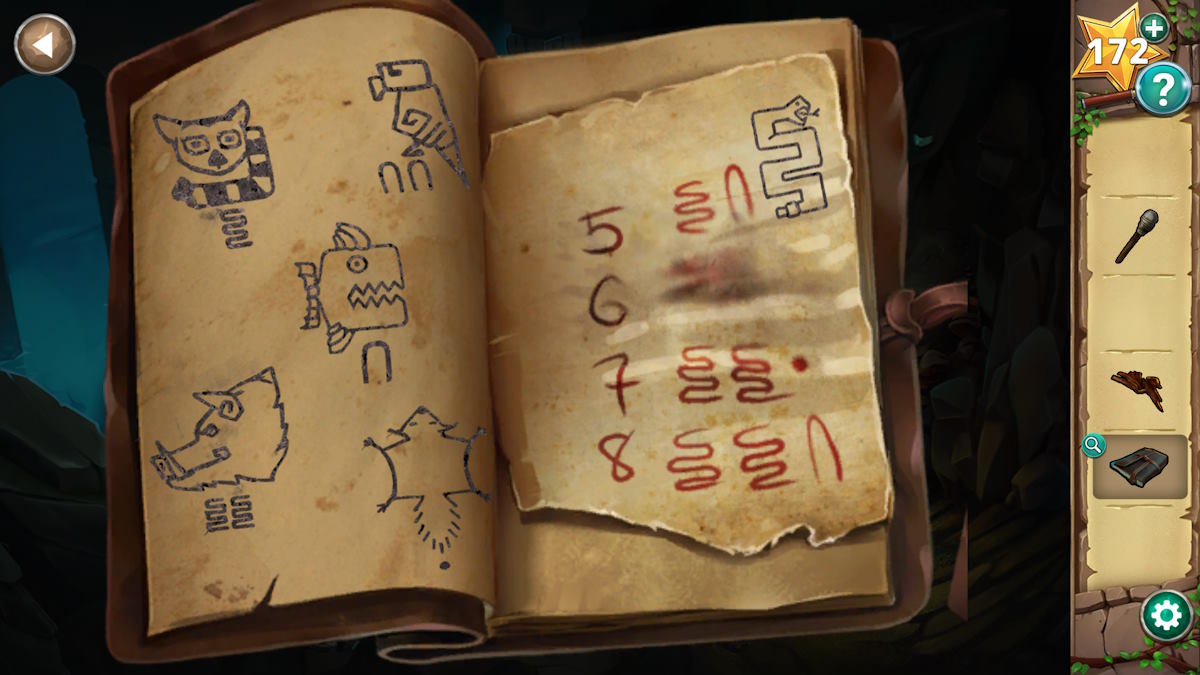
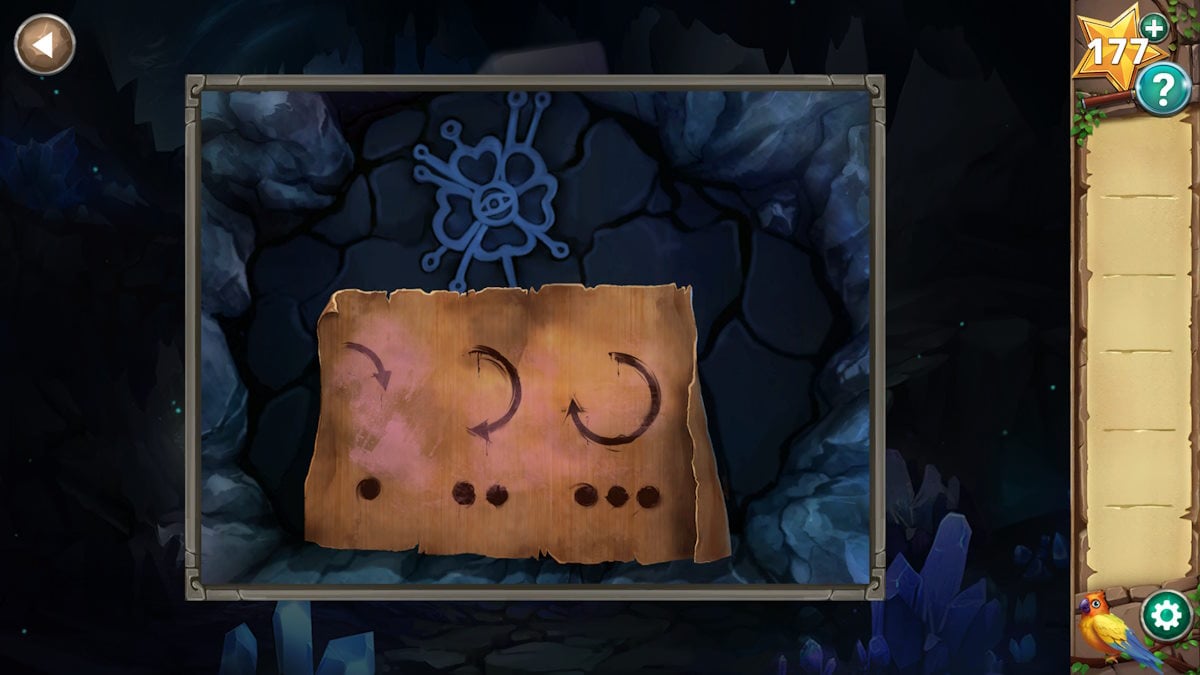
Take theJournalfrom the skeleton ( c5 ) and then fall into place each of the six pillars in the body of water . Each leave you a bit more cognition about theKumari number systemand you ’ll add it all to your daybook automatically ( see above ) .
catch theFlint Rocksthat get loose when you move the skeleton ( c6 ) , add the driftwood to the moss ( c4 ) , and then use the Flint River sway to light it . utilise the flannel mullein on the resulting fire to get aLit Torch , and then dawn the doorway ( c7 ) to move forward .
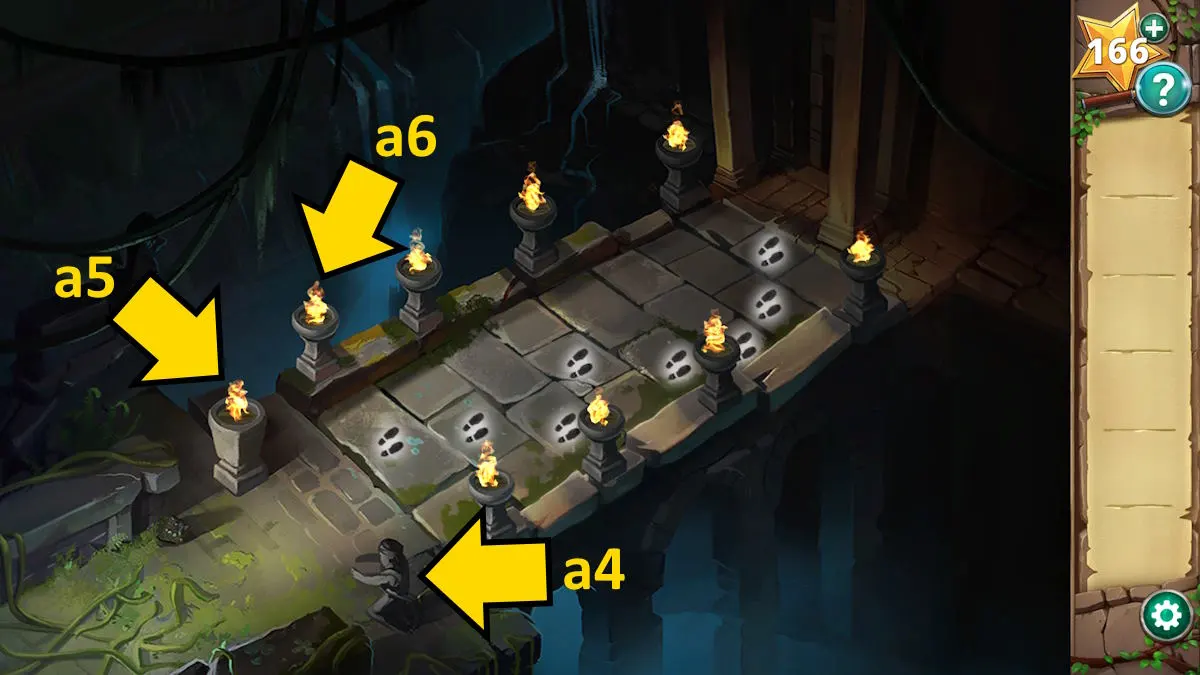
Image by Pro Game Guides
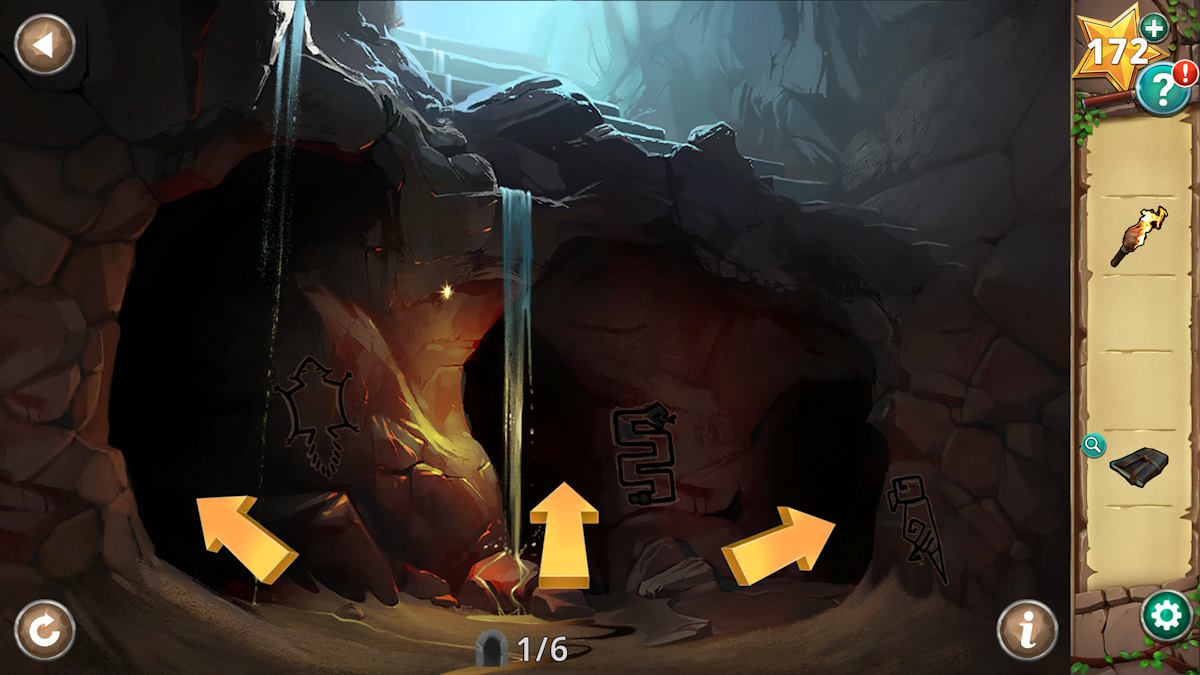
You now enter asix - step mazewhere you need to take the correct tunnel on each cover to advance . you may use your journal to function out the path ( superman represent a 1 , while a wavy line is a 3 ) , but the chronological succession is as come after ( in the example of room 1 above , you ’d go left where the image of the squirrel is paint on the wall ):
The sluice gate room
This leads you to a dark cave , so move your lit woolly mullein over the two torch on the wall to illuminate the elbow room . Take theAnimal Skin(d1 ) and then click the big bucks of skulls ( d2 ) to unveil and take aBone . Dip the skin in the fish crude ( d3 ) to get aGreasy Animal Skin , and then use it to loosen the gem in the skull ( d4 ) and take in theJade Fox . Now you’re able to apply the bone to hit the box at the back of the elbow room ( d5 ) , add the fox , and set about a puzzle .
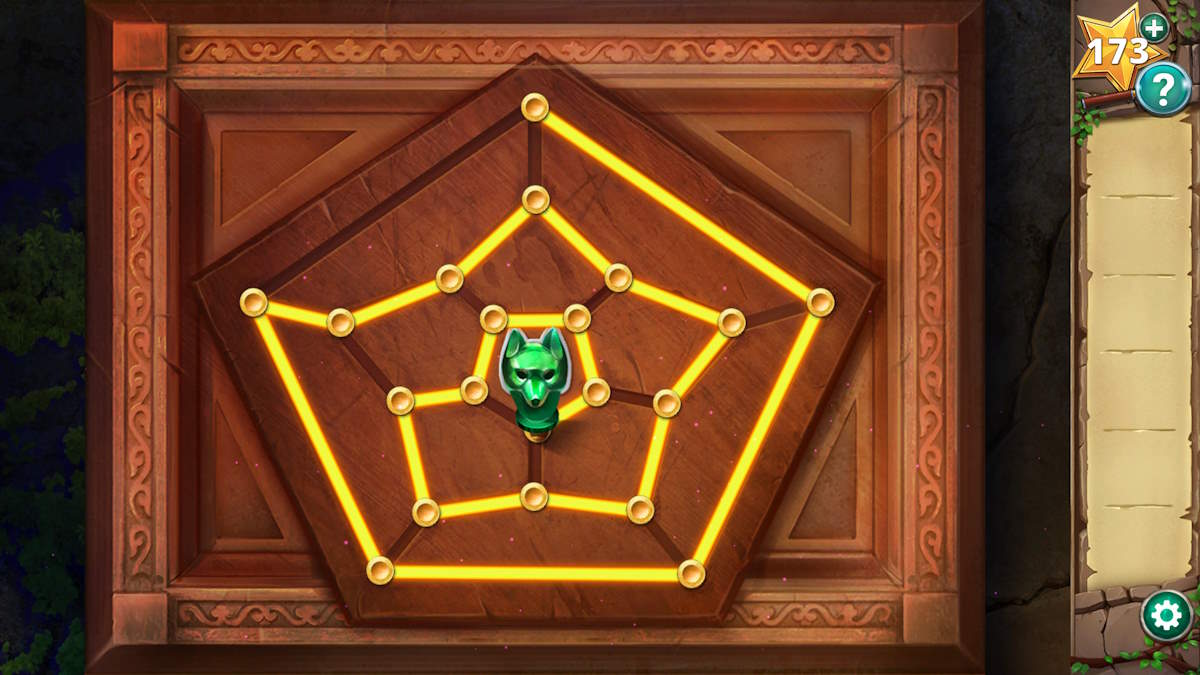
You require todrag the fox headspring around the design , going through every gold circle precisely once , before come in the center . This is done by create a unsubdivided spiral design , move clockwise around the exterior until you ’ve touched all of those band , then doing the same with the primal circle , and at long last the inner one . you could see the track in the range of a function above .
This opens the boxwood , soclick the scroll insideit and memorize the four symbols . Now select the door mechanism ( d6 ) for a near - up , move the eight musical composition so that they match the roll ( see above ) , andthe sluice gate will open . penetrate it to go through .
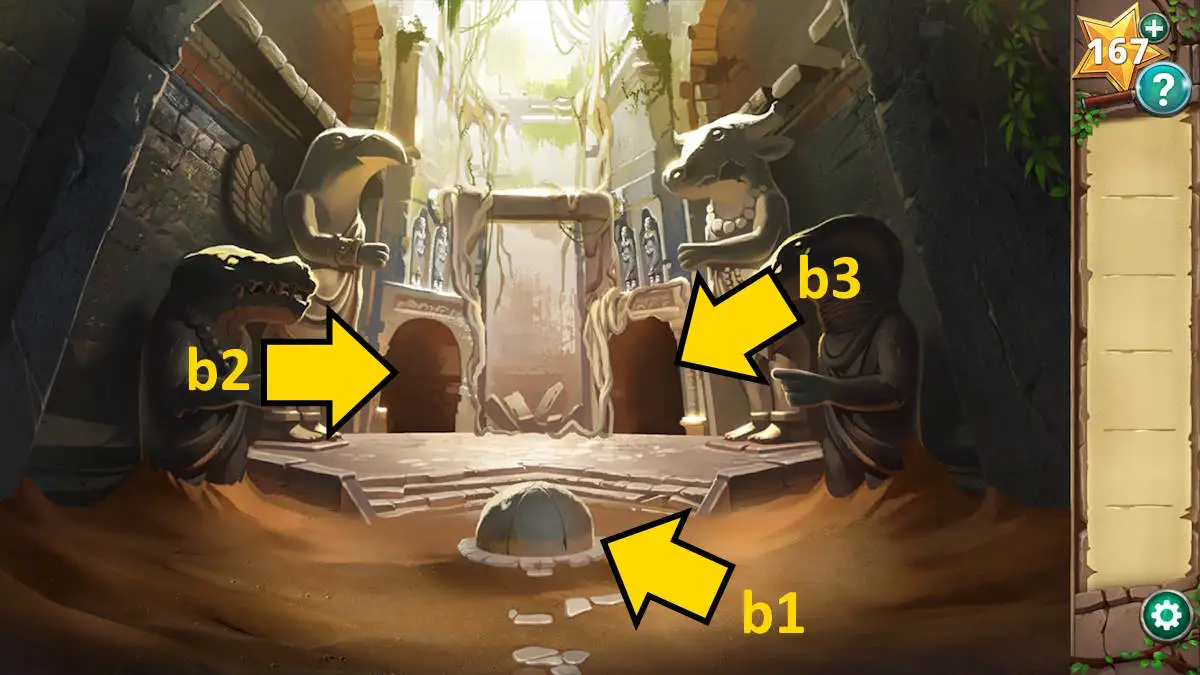
Image by Pro Game Guides
The well puzzle
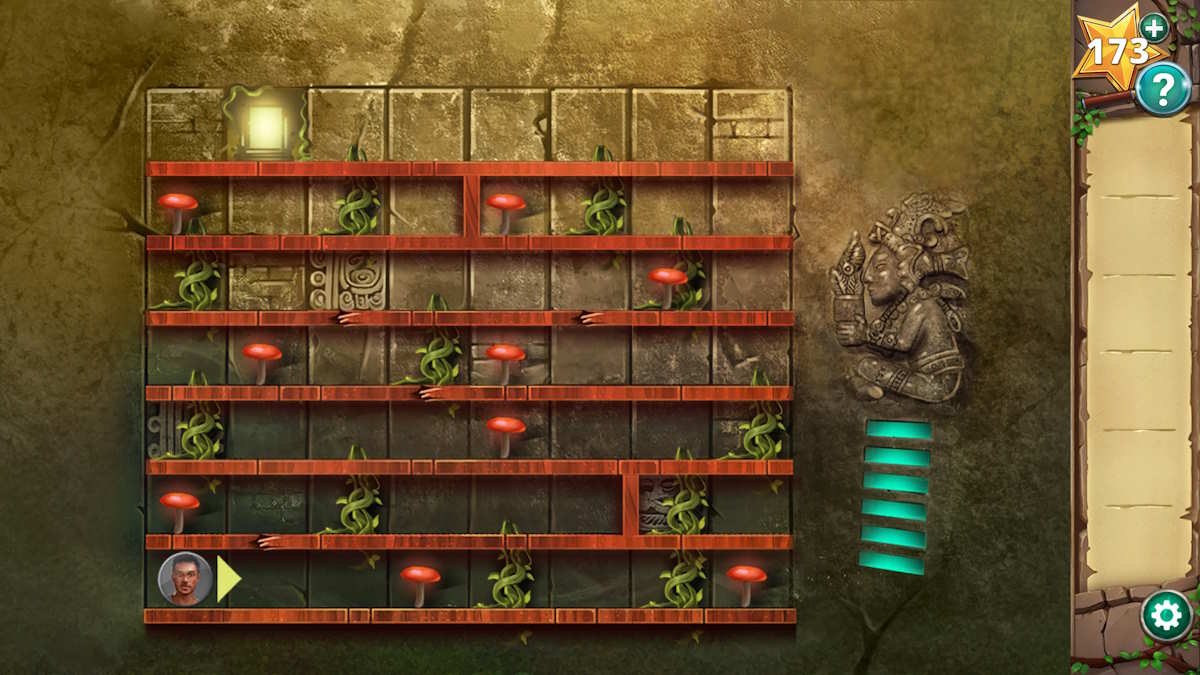
When you come at the bottom of the well , penetrate anywhere at bottom to trigger a puzzle to escape back to the open . Each move will utilise up energy , but eachmushroom will fully replenishit , so apply your move wisely ! I ’ve distinguish out the correct paths below for both the first and 2d screen of this puzzle . For the first section :
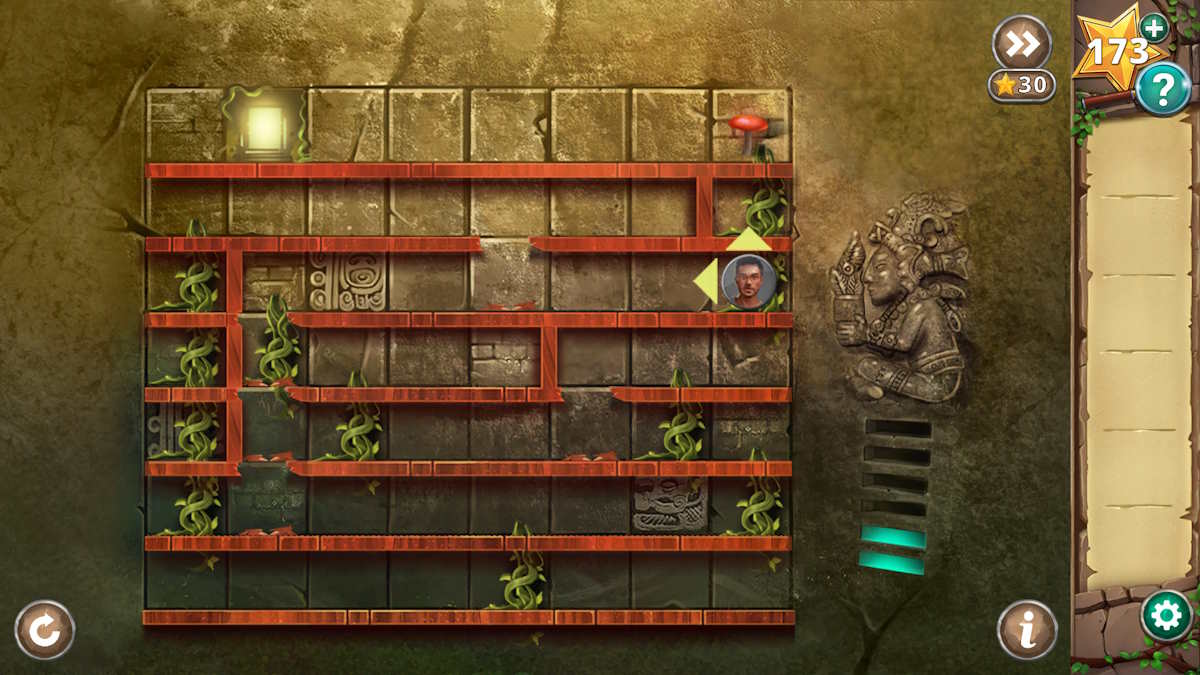
For thesecond section :
Once you exit from the top of the well , you’vecompleted Chapter 2 !
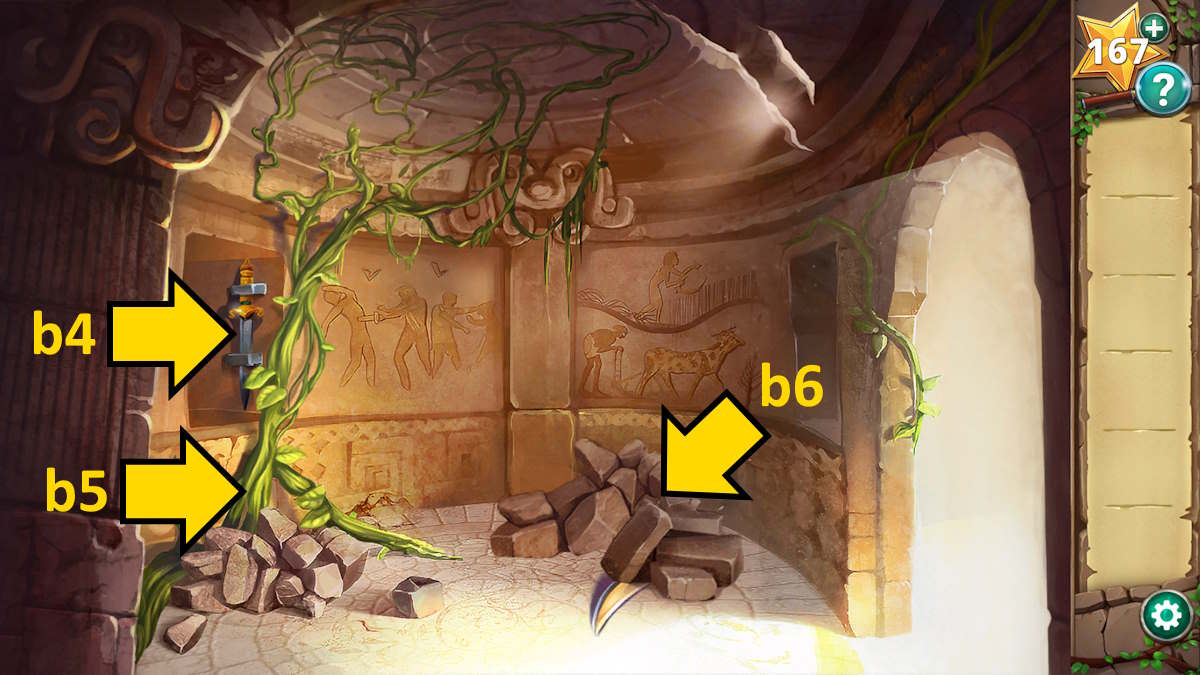
Image by Pro Game Guides
Hidden Ruins Chapter 3 walkthrough - Burns and Rachel
Next , we discover that Professor Burns and Rachel are stuck inside the tabernacle and need to find a way out . catch thefour Fragments(e1 ) and then go into the way on the left over ( e2 ) .
You ’ll findfour more Fragments(e3 ) here , but nothing more for now , so head into the other room ( e4 ) .
Here you ’ll findfour more Fragments(e5 ) as well as aHawk Figure(e6 ) . Head back to the main way andclick the stone tablet(e7 ) . Once Burns has see it , add the 12 fragments to the tablet to begin a teaser . Now piece it together as I ’ve express below .
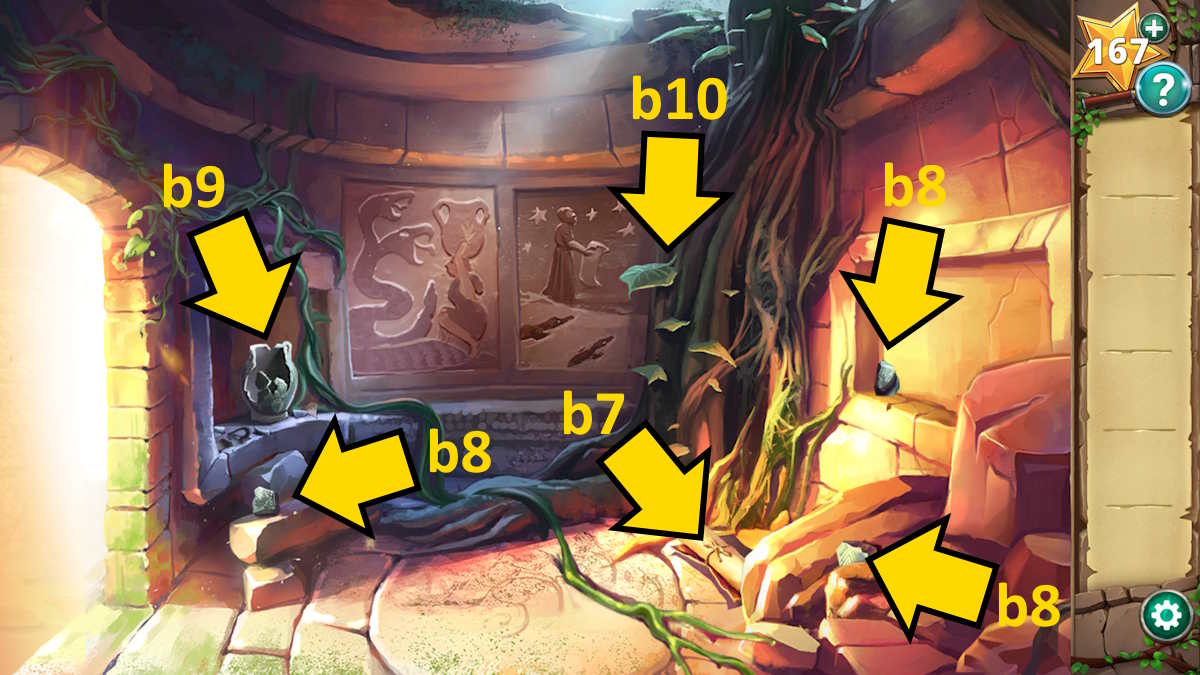
Image by Pro Game Guides
This is a piffling knavish than the earlier one , as you may rotate these pieces by right - clicking them . However , the different ghost of grey act as a good guide to where each opus goes , as do the corner ; and once a slice is in the right place , it can no longer be moved . Once complete , head down the stair that seem next to the pad of paper .
The rooms below the ruins
snaffle theGearfrom the bulwark ( f1 ) and then click the threshold on the right ( f2 ) .
Take theSnake Figurine(f3 ) , and theSieve(f4 ) , and then head back to the first room . habituate the sieve in the puddle ( f5 ) to pile up theKeybefore prompt through the room access on the odd ( f6 ) .
After Rachel ’s selfie disaster , find the 12 items that are wrong from the original look-alike ( marked above ) and then take theCobweb(f7),Crocodile Figurine(by the doorway on the base ) , andBrush(f8 ) . at last , launch the chest ( f9 ) with the key and take theRope .
Screenshot by Pro Game Guides
You now need to head right back up the steps to the room on the left and use the brush to remove the sand in the leftover room ( e8 ) to uncover asecond Gear ; then do the same on the grit in the veracious elbow room ( e9 ) to get athird Gear .
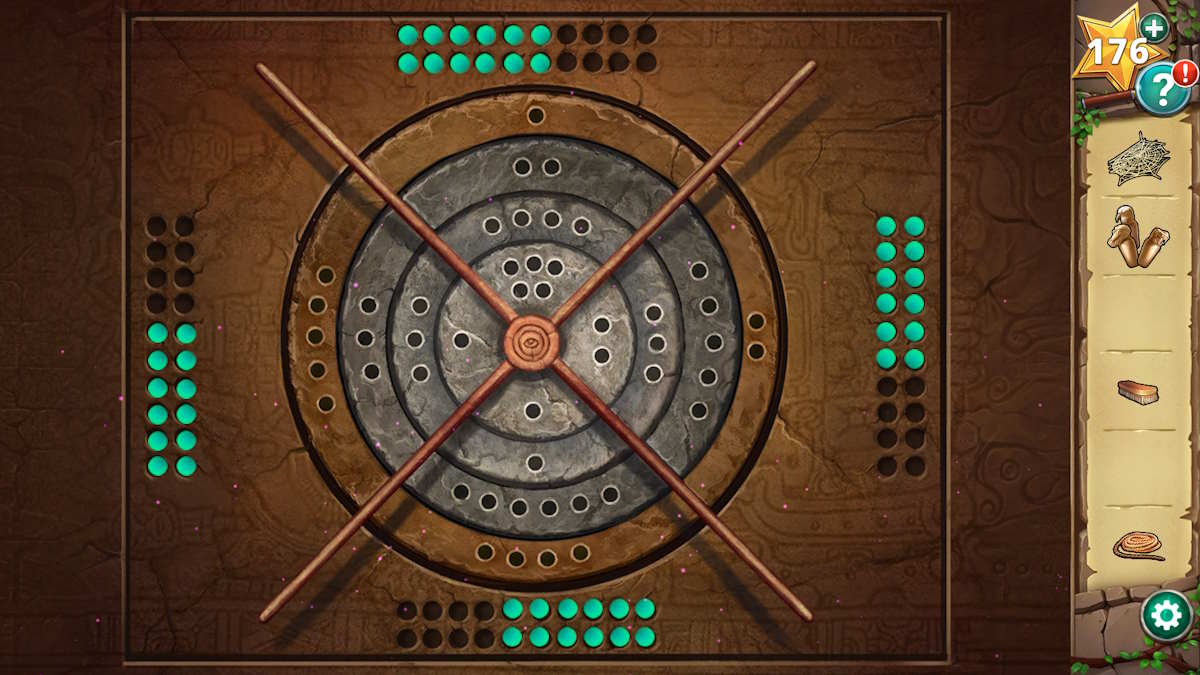
Go back downstairs and add the three gears to thebox in the right - side room(f11 ) . Rotate the gears until the same issue of blue lights ( 12 ) are alight up in each subdivision . Once you do ( see above ) , apulley will appear above the John Cage . Attach the rope to it to free the bird , and then use the cobweb on the bird to help its injury . Click the bird ( Bert ) to pile up it and then utilise Bert ( he appears just below your inventory and can be used like any other particular ) to get theStone Star(f12 ) .
repay to the cardinal room and habituate the stone adept on the grave ( f13 ) to open it and bump anOx shape . Take the four figures into Bert ’s room , dawn the envelope on the green statue ( f14 ) , and add the four statuette to it in the close - up . For this puzzle , you ask to look at the tablet you made before and follow the lines that connect the four animals to unlike contribution of the body . You ’ll get the following :
Screenshot by Pro Game Guides
Place the four figurine on the matching male child parts to complete the puzzle , using the key outer space to let you to convert the ordering of the piece . Once done , thegreen statue will slither asideand a doorway will appear in the box . point through it tocomplete Chapter 3 .
Hidden Ruins Chapter 4 walkthrough - Fixing the drone
The team now needs to get back on the trail of Larissa but to do so they ’ll first have to fix their drone and pad of paper . Move the stone ( g1 ) to get aCheckered Piece , and snap up asecond Checkered Piecefrom the Sir Herbert Beerbohm Tree source ( g2 ) .
Take theSwordfrom the wall ( g3 ) , use it to hoard aVine(g4 ) , take thePlank(g5 ) , then apply the steel to get asecond Vinefrom the room access ( g6 ) and athird Vinefrom the Sir Herbert Beerbohm Tree above where you have the brand ( g7 ) . There ’s now also asecond Planknext to the stairs that drops from the tree . you could also use Bert to vanish up and grab athird Checkered Piece(g8 )
Move through the doorway to the next way and snap up afourth Checkered Piece(h1 ) , athird Plank(h2 ) , and then utilize the blade to get afourth Vine(h3 ) and afifth Vine(h4 ) . When you get this last vine , afifth Checkered Piecewill set down to the dry land , so seize this too .
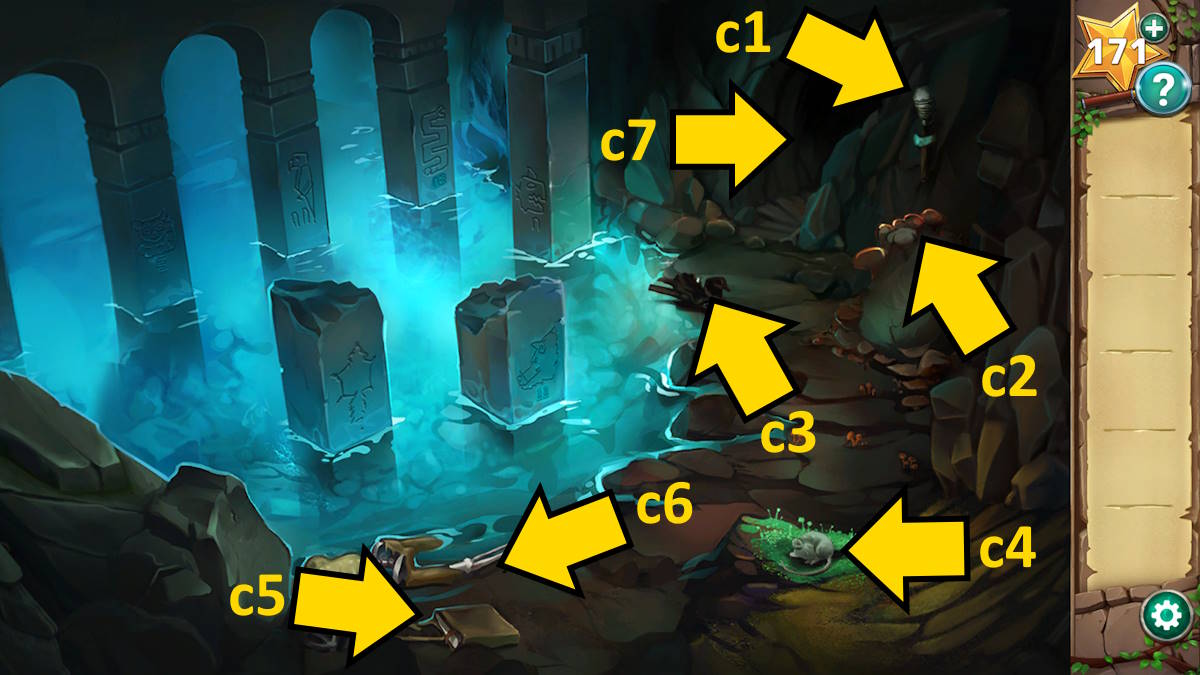
Image by Pro Game Guides
Repairing the bridge to the shrine
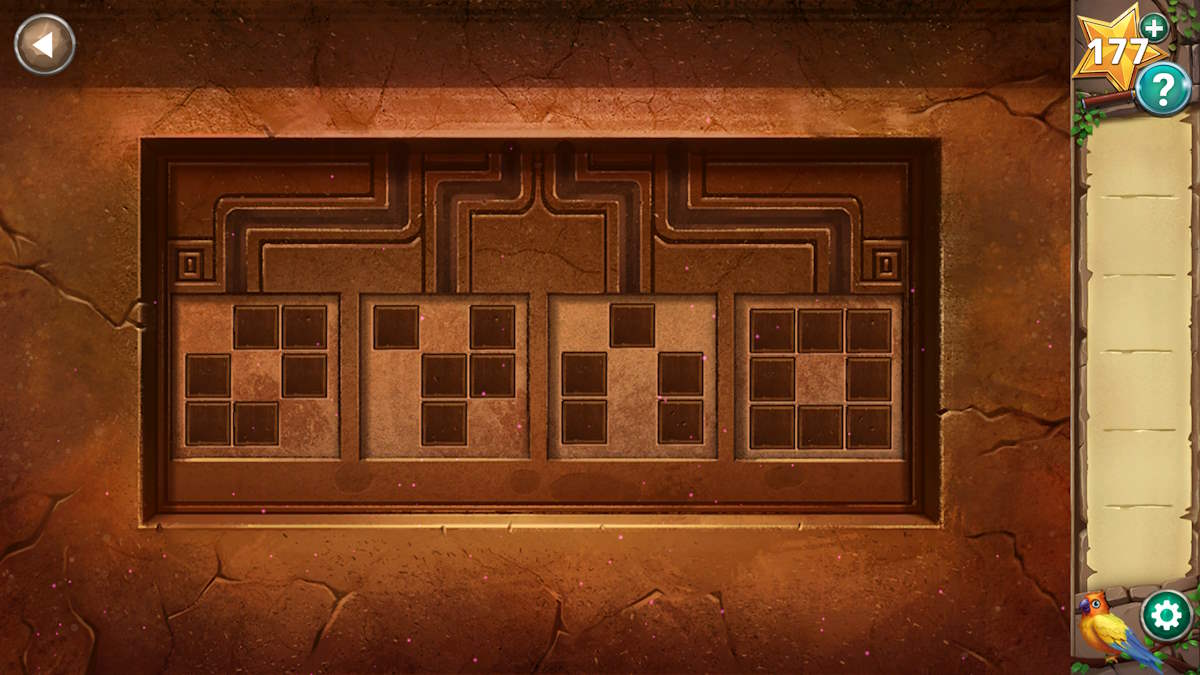
you may now click the paries behind where you slue the vines ( h3 ) , add the checkered pieces , and use them tocreate a chessboard design . Once complete , all the blank will sprain grim . Note the panel has the same amount of quad as the pools outdoors , so copy that pattern to complete the mystifier ( see above ) . Before heading through the door , note thesymbols that seem at the bottom of the four statueshere .
Take afourth Plankfrom the commencement of the bridge ( h5 ) , along with aBird Talon(h6 ) . Return to the original field and use the talon to release the blockage on the weewee tube ( g9 ) , which flushes out afifth Plankfor you to pick up . Go back to the bridge and renovate it , adding one vine followed by one plank , until all five are secured . snap the far side of the bridge togo across to the shrine .
Note thefour symbolization hanging above the shrine(marked above ) , and then guide back to the way with the pools of water . Click the shape below the statue to match those on the shrine , left to right , and the second statue from the left will drop theSpear(h7 ) . pluck it up , head back across to the shrine , and use the lance to recover theComputer Chipsand theDronefrom the Sir Herbert Beerbohm Tree .
Screenshot by Pro Game Guides
Select the tablet(g10 ) and tally the calculator chips to begin your next puzzler . Place the eight chips into the correct spaces ( note you’re able to switch them terminate - on - end , see above for the answer ) , and you ’ll have ascendency of the drone ! Return to the room with the pool , select the monotone in your inventory , sink in theweak plane section of the wall(h8 ) , and click the gap it make tocomplete Chapter 4 .
Hidden Ruins Chapter 5 walkthrough - The river
Next , you need to get across the river . Grab theBanana(i1 ) and theHeavy Rock(i2 ) , and then click the footprints ( i3 ) to move down the river .
Pick up a secondHeavy Rock(i4 ) , theTree Branch(i5 ) , and commit the branch on thetree stump(i6 ) . unfold the plane ’s compartment ( i7 ) using the code481(the number on the plane ’s tail ) , take theCargo Netand theFishing Polefrom inside , and then add the lucre to the branch on the tree stump . Add the two fleshy rocks to the earnings and you ’ll be able to deliver the man from under the planer .
After speak to the survivor , head back to the first screen . Use the fishing rod on the dirt ball ( which were under the heavy rock at i2 ) and then use the rod in the body of water ( i8 ) to catch aFish . Return to the survivor and he ’ll trade you the fish for asecond Banana . institutionalise Bert up to get athird Banana(i9 ) and then get across the background ( i10 ) to move on to the logging camp .
Screenshot by Pro Game Guides
The logging camp
Take theBullhorn(j1 ) , and then click themonkeys(j2 ) for a close - up .
Put the three banana in the bowl and add the loud-hailer . Now give banana tree to the suggest imp ( see above ) and then habituate the loud hailer to jump the rascal . As long as you ’ve given bananas to the correct scalawag , the concluding one will leave out the key into the roll . Take the Key . Use the primal toopen the shed(j3 ) and head at bottom .
Grab theFusefrom the windowsill ( k1 ) , theOil Sprayfrom the table ( k2 ) , and asecond Fusefrom underneath theair generator(k3 ) . Also , click thepiece of paperon the land ( k4 ) and thework fracture board(k5 ) for some clues . If you examined what ’s miss from the diagram to make the three effigy complete , you ’ll see that the lines you ’d suck up to fix them would write out478 . expend this computer code toopen the locker(k6 ) and take someShears , aSaw Blade , and athird Fuse .
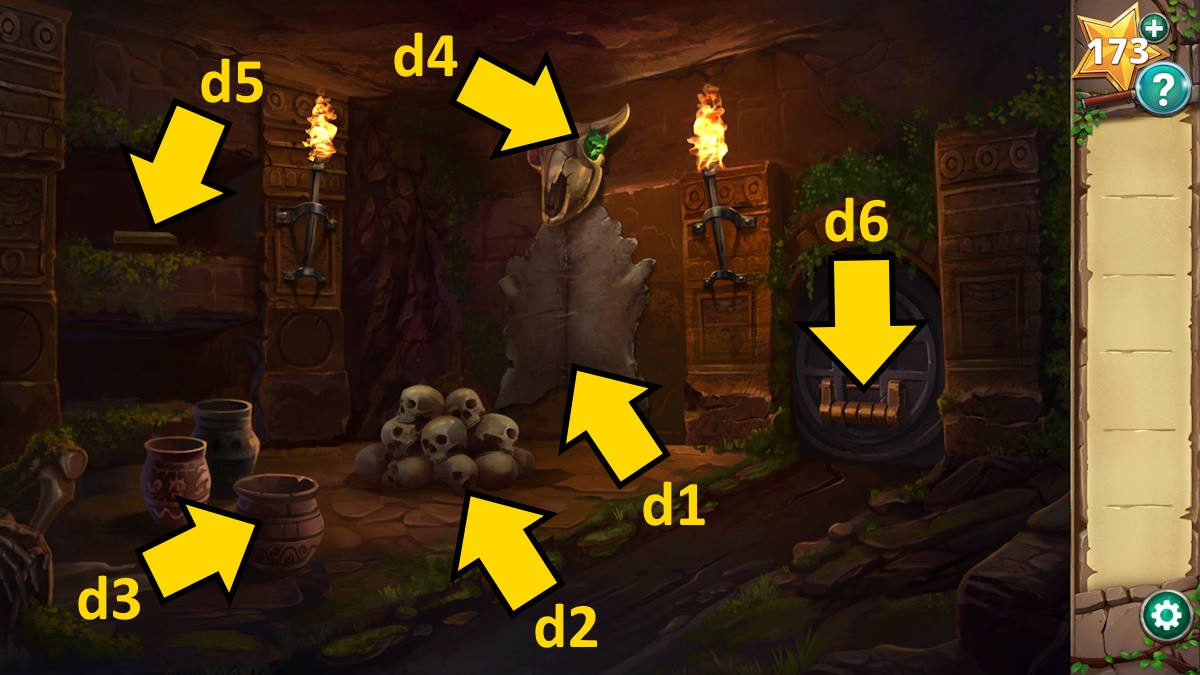
Image by Pro Game Guides
look at the oeuvre fault board , you ’ll notice that on the line you’re able to completely see , that if you deduct the first bit from the second , you get the third . By this logical thinking , you may run out that the four missing turn ( top to bottom ) are9468 .
Go back outside andselect the woodpile(j4 ) to move to the next arena . Add the saw vane to the sawmill ( l1 ) and practice the shears to chop down the tire ( l2 ) , picking up theFlat Tireand aRope . habituate the code9468to launch the door of the forklift truck ( l3 ) , and then use the crude oil on the rust toolbox inside to rule aScrewdriverinside it .
Repairing the forklift truck
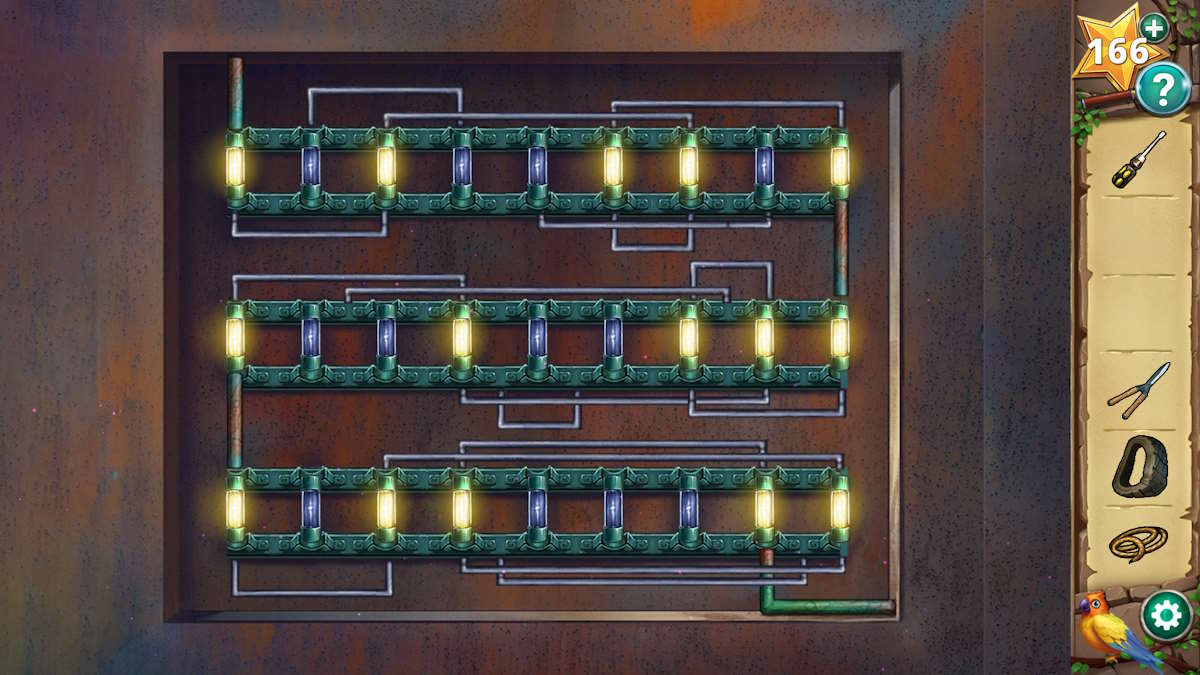
Move back to the shed , use the screwdriver to bump off the front of thefusebox fount on the wall outside(j5 ) , then sink in the fusebox for a stopping point - up and insert your three priming to start a puzzle . You need to slide the metal connectors above and below each wrangle of fuse to make aconnection from the top leftof the circle boardto the bottom right field . See the make out circuit above .
With the power fix , you’re able to go back into the shed anduse the air generator(k3 ) to blow up the flat tyre and take theTire . you’re able to now tally the tire to the forklift hand truck ( l3 ) to make it fully operational . Use the screwdriver as a makeshift handgrip tooperate the sawmill(l1 ) , add the R-2 to the log it chop up to make a raft , but you require another piece of rope to secure the other side .
retrovert to the planeand use the shear to prune down the net you used to stack away the rocks ( i6 ) . murder the rocks from the cut net and you ’ll collectanother Rope . bring back to the forklift , utilise the rope to complete the tidy sum , andthat ’s that for Chapter 5 !
Screenshot by Pro Game Guides
Hidden Ruins Chapter 6 walkthrough - Entering the pyramid
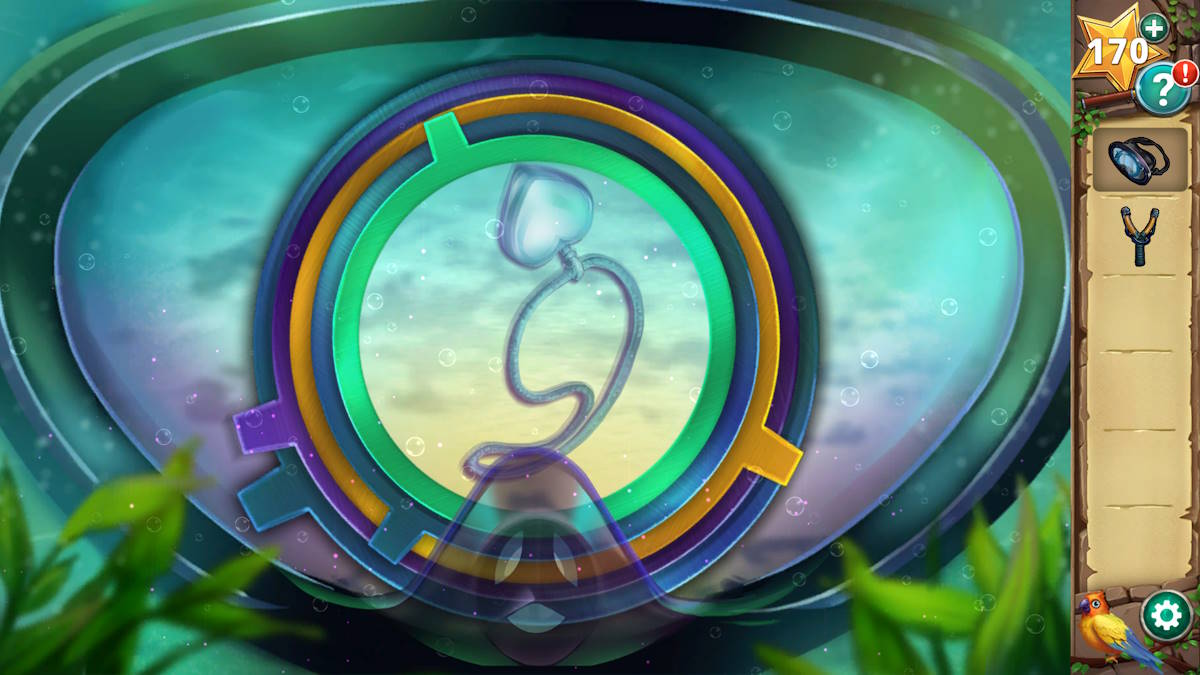
As you regain from the dip down the waterfall , reach the knapsack ( m1 ) to feel aDiving MaskandSlingshot , then use the mask and pick out the water ( m2 ) to bring up a focus puzzle .
ferment the dial to feel three items : a boot , a feeding bottle , and finally aNecklace(see above ) . The angle of the items does n’t weigh as you spread out the dials ; they just need to ordinate , and it is pretty obvious what the physical object are . Also , you ca n’t go wrong here as you may just keep turning them until you ’re done .
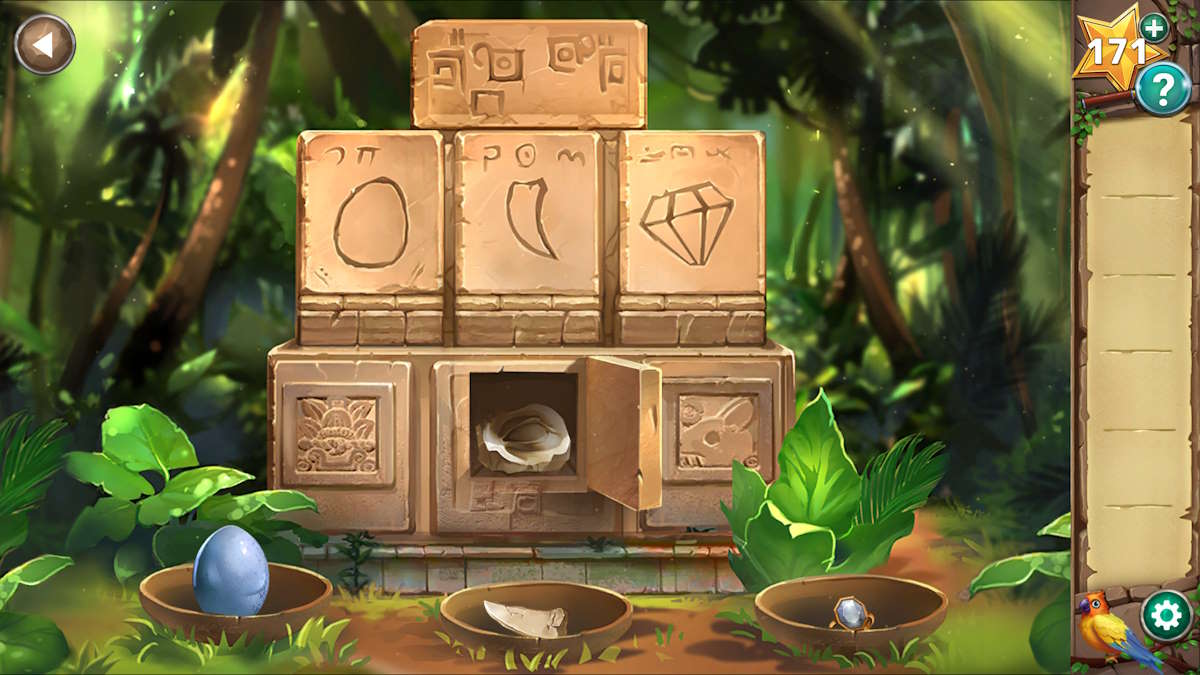
Now choose the monument ( m3 ) to regain you want to make three offerings : an egg , a tooth , and a gem . Afterward , Rachel will say there ’s a diamond in her necklace that she lose on the waterfall . Give her the necklace , and in return , she ’ll open it and give you aDiamond Ring . One offering down , two to go .
Screenshot by Pro Game Guides
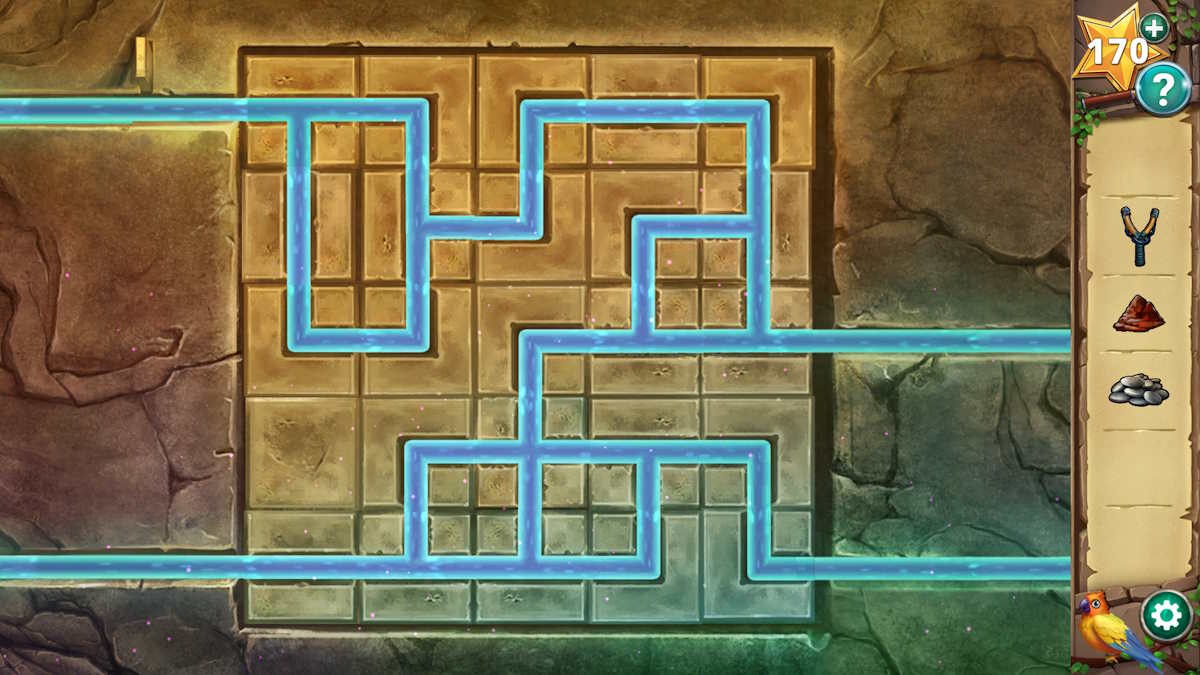
Select thefountainnext ( m4 ) . Pick up someMud(n1 ) , and then click the pattern on thetop of the fountain(n2 ) to get down a teaser . Turn the pipe by clicking them so that water course from the two recess on the left to the two on the right ( see the root below ) . Once complete , water system will course into the fountain .
Note the height of the pillars that have get up in the fountain , counting the lowest as 1 and the tallest as 7 . commemorate these positions , and then head into thecave next to the waterfall(m5 ) .
Pick up thePebbles(o1 ) and then compact the logarithm in the water in the same social club as you noted in the outflow ( I ’ve strike out them above ) . you could now use the clay you pluck up to block thefour holes pumping out steam(o2 ) . This will aid the efflorescence on the island ( o3 ) to bloom .
Screenshot by Pro Game Guides
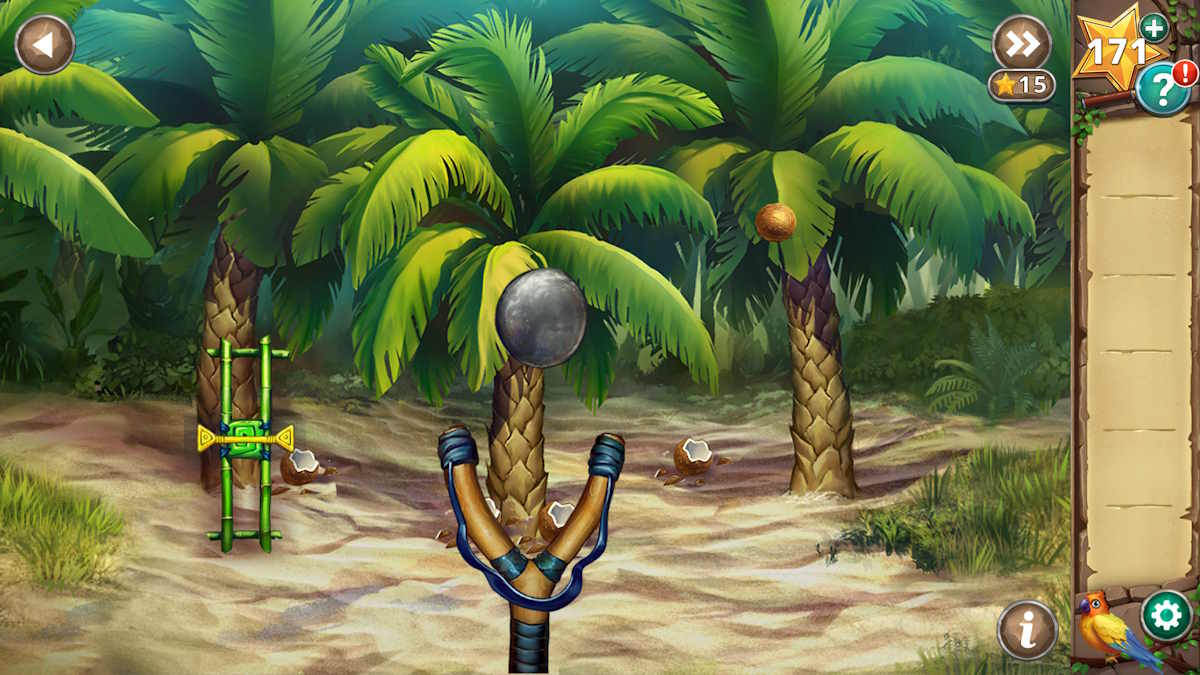
Go back outside and head to thedistant pyramid(m6 ) . choose the sling in your inventory and then click the coconuts ( p1 ) for a close - up . Once you ’re in slingshot intention mode , add the peddles to the picture to start a slingshot miniskirt - game . Once you ’ve knocked down all five cocoa palm , take the oneCoconutthat did n’t break and head back into the cave . Use the coconut on the flower ( o3 ) to get aMeaty Smelling Coconut .
Return to the tabernacle and give the meaty coconut to the crocodile ( p2 ) , which will slink off - but not before dropping aCrocodile Tooth ! Now you just need an egg . Return to the jet and use Bert toattract the bird(n3 ) , allow you to take itsEgg(n4 ) while Bert is singing . hark back to the Lord’s table , come in the three offerings in the basketball hoop , and take theStone Eye(see below ) .
Head to the Pyramids of Egypt next , and post the center in the threshold ( p3 ) to open it . choose the threshold to enter , and you ’ll havecompleted Chapter 6 !
Screenshot by Pro Game Guides
Hidden Ruins Chapter 7 walkthrough - The inner sanctum
The next whole tone in the adventure is to explore the internal holy of the pyramid . You ’re faced with three puzzles ( one on each side of the central door , plus a gold codification box).Look at the computer code box(q1 ) and note the place of the colored gems in relation to each section ( violent , icteric , dark-green , and then spicy and empurple together on the fourth digit ) . There ’s nothing more you could do here for now .
The mechanical maze
guide through the door on the left ( q2 ) to be faced with amechanical maze . Each time you drag your character over one of thesquare dots , a section of the maze will change . Start by going right , left , and then left again to the public square on the far left of the maze to begin with ( marked above ) . The mazeonly change when you move onto one of the squares .
Now move to around12 - o - clockon the outer band , throw away down , and move to around10 - o - clockfor the second square ( see above ) .
From here , moveall the way aroundthe circle to the square that is just through the wall you ’re at when you get ( see above ) .
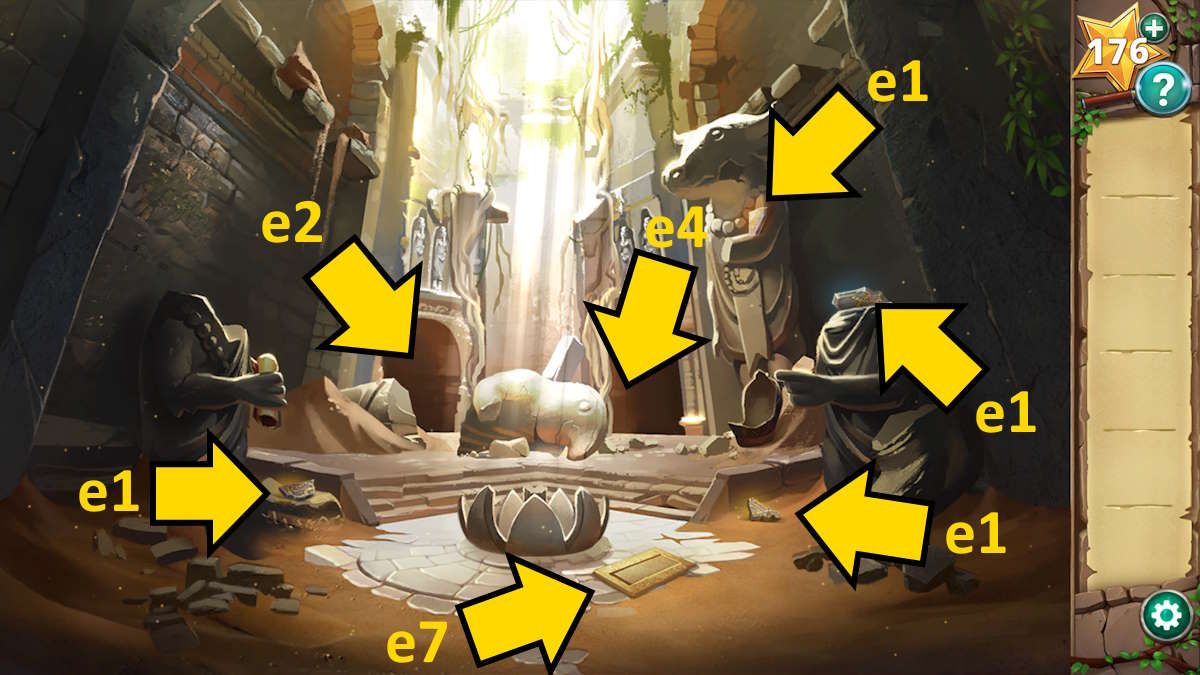
Image by Pro Game Guides
Afterward , retrace your stepsto the public square you were just at ( see above ) ! Note you may alsostep off a square and back onto it to touch off it again . Trigger these two squares until you have the image fancy above .
Now move into thecentral positionand apply the square there , which then reserve you to pace out and move over the square just outside the center . Do so , then do the centre again , to be go out with the labyrinth above . You cannow walk all the means outand through the north - east expiration without going over any more square , and through to the next room .
Passing the wall of flame
You no longer have to navigate the tangle , so you’re able to riposte to the main door way anytime via the passing ( r1 ) . Grab theChunk of Obsidian(r2 ) , start the pedestal ( r3 ) to get hold someOre , and lead back to the door room . Now go through the right-hand - hand room access ( q3 ) to be faced with aflame rampart .
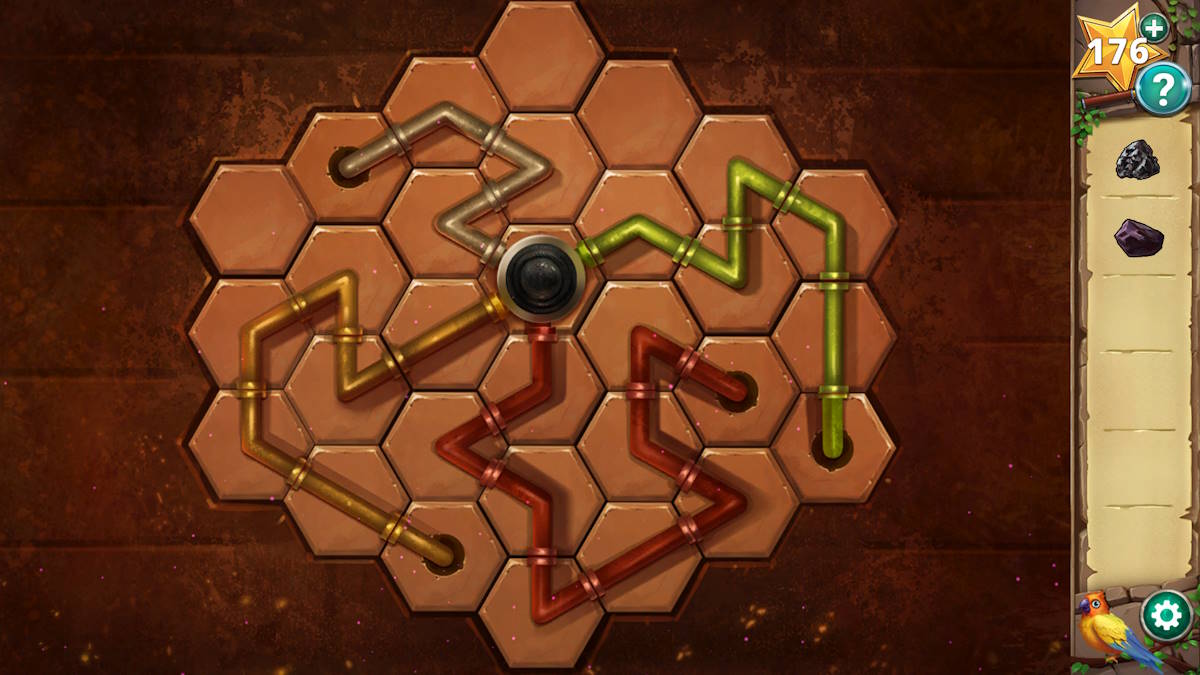
fall into place the machine on the righthand wall to begin apipe teaser . The trick is to connect each of the four colored pipe to the central space . Once complete ( I ’ve included a solvent above ) , theflame wall will drop .
practice the obsidian on the fag Oliver Stone ( s1 ) to getSharpened Obsidian , and place the ore in the smelting bucket ( s2 ) . Look at the Pisces art on the wall ( s3 ) and take down thecolors match those on the lockon the doorway room . For each colour , mentally draw a cable follow the counseling each fish is facing . Each color ( with blue and purple working together ) give you a phone number , which gets you the code ( red 5 , jaundiced 0 , unripe 9 , and blue / purple 8) . Put these together in the right order and you have5098 .
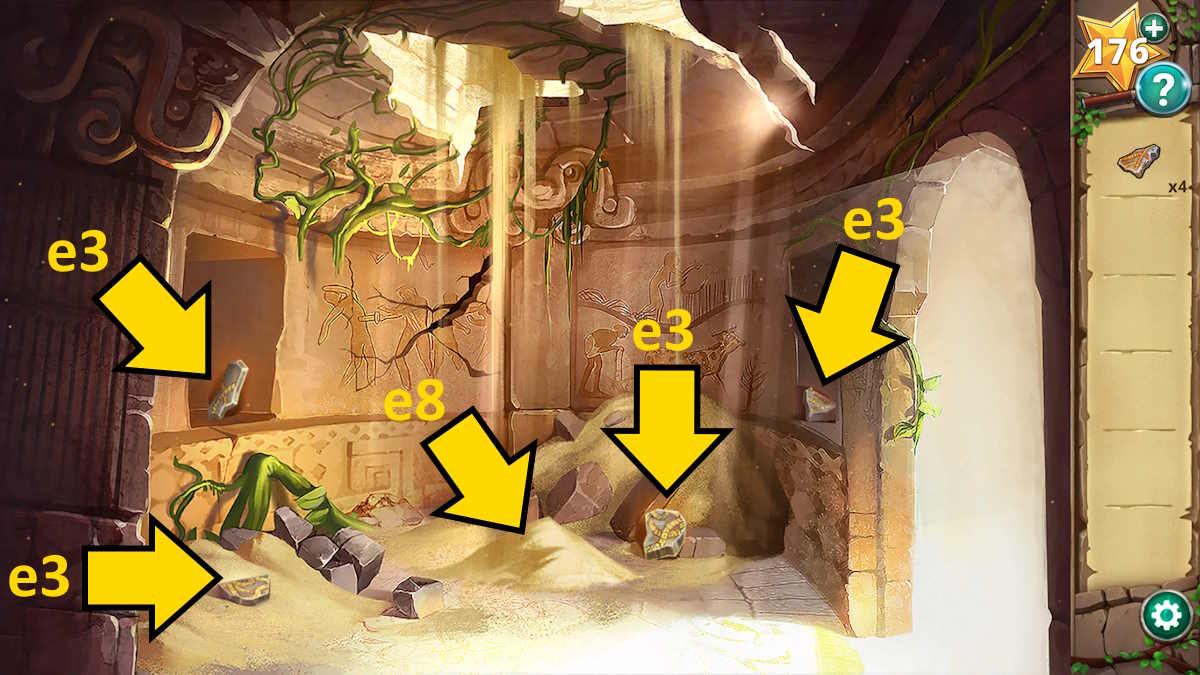
Image by Pro Game Guides
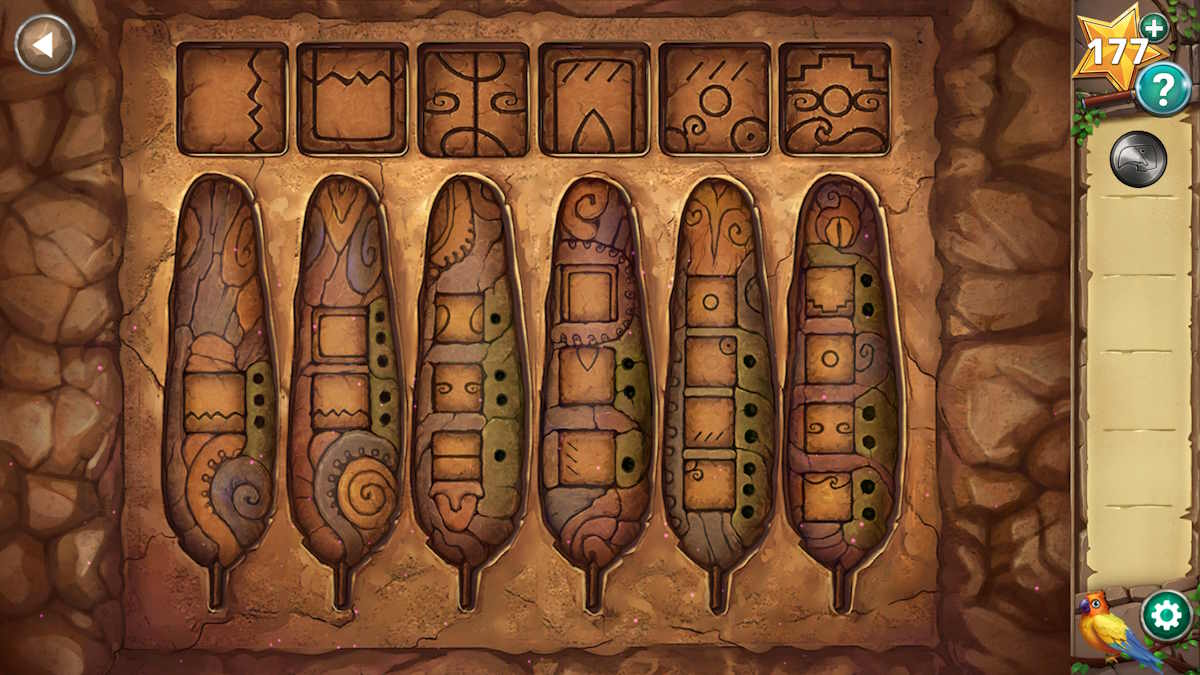
Go back to the door way , enter5098into the code ignition lock ( q1 ) , take theStone Feathers , and then expend the sharpen obsidian to hoard theFlower(q4 ) . you may add the feathers to the lock on the left ( q5 ) , but you do n’t recognize how to resolve that puzzle yet .
Return to the cave beyond the mechanically skillful snarl ( q2 ) , and add the bloom to the howitzer and pestle ( r4 ) to receive someFlower Dye . Use the focalise obsidian to collect a spell ofCrystal(r5 ) , put it on the plinth at the top of the steps ( r6 ) to shine a light on a hint on the paries , and then use the flower dyestuff on the parchment ( r7 ) to reveal another clue ( see above ) .
come back to the smeltery room , click the pattern at the base of the firepit ( s4 ) , and inscribe the codification you just display on the paries to light the fire ( see above ) . The trick here is that you ’re looking tomake the range in white(so in the spaces ) , not in brown . you’re able to now click the smelting bucketful once more ( s2 ) to accumulate someMelted Ore , which you’re able to use on the molding ( s5 ) to then collect aShieldfrom it .
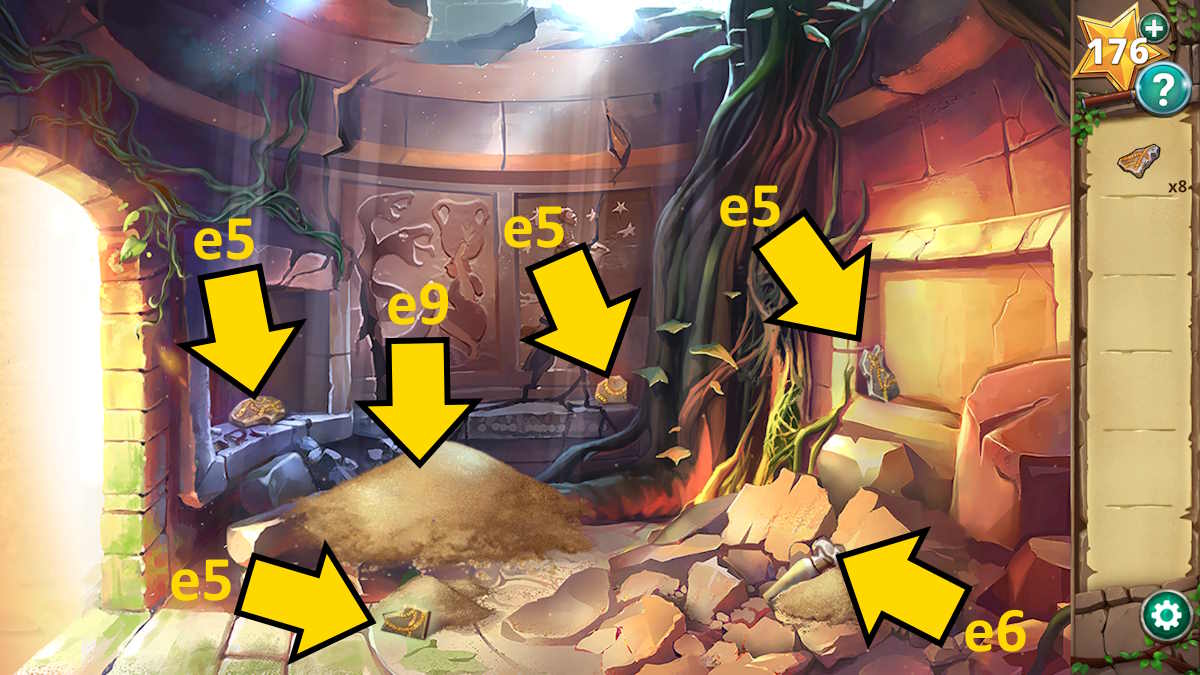
Image by Pro Game Guides
Passing the pit of spikes
Return to the door room and look at thefeathers puzzle(q5 ) . If you appear at the parchment book of instructions , they tell you how many time clockwise each symbol require to be switch to make the persona above it correct . So , it’snot about how many times you turn each image , but what the downhearted images would seem like if you turned each one 90 degrees the number of times the Transportation represent . If you ’re struggle , the resolution is above .
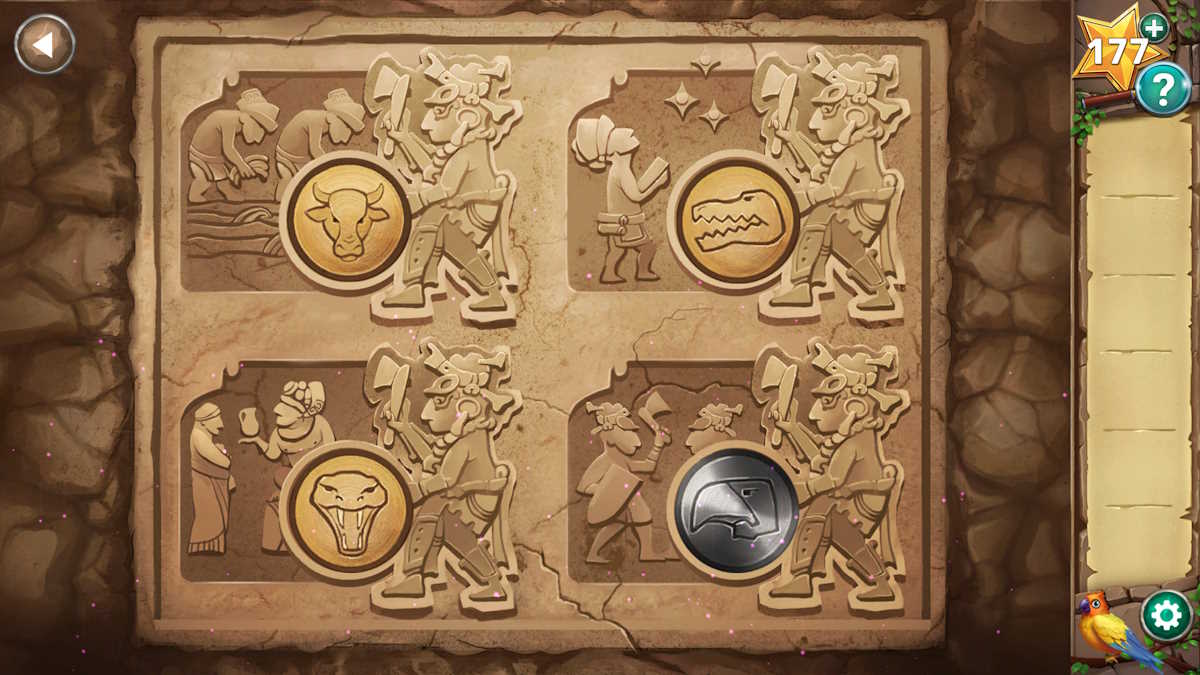
With the bridge half continue , you just need to reset the shield puzzle . Select the puzzle ( q6),add your shield , and then tick each of the four ikon to get a feel for what they comprise . Match the animal as they intimately represent the sentence about the Kumsari lifestyle , and you ’ll have puzzle out the puzzle - andcompleted Chapter 7 .
Hidden Ruins Chapter 8 walkthrough - The race for the elixir
The story is now nearing its end ! Pick up theDial(t1 ) and thePrism(t2 ) , and then snap the wall art ( t3 ) to commence a sliding puzzle .
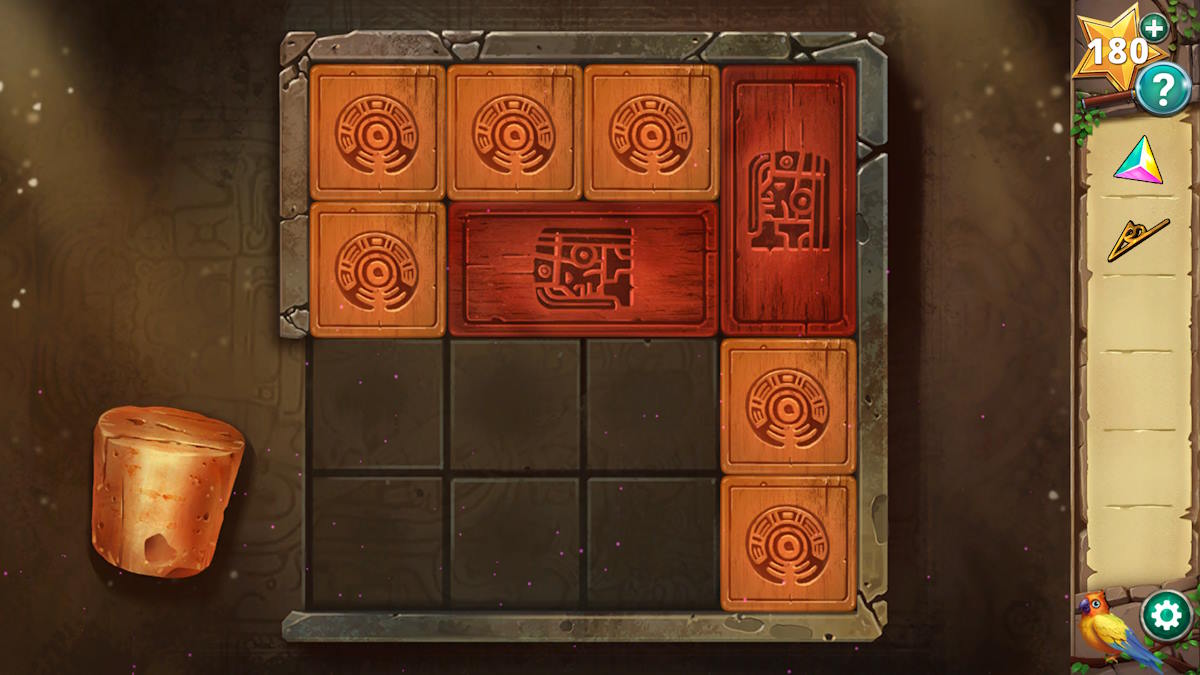
You take to get thecork out of the holeon the bottom allow for . To do so , follow these instruction manual ( using the epitome above ):
you could now continue to scuffle piece clockwise , allowing you to move the conversation stopper clockwise until you could polish off it . Once you do , you ’ll get theCork Plug .

Screenshot by Pro Game Guides
Head through the door on the rightfulness ( t4 ) and take aSickle(u1 ) andGloves(u2 ) from the shelf ; then send Bert up to the top of the same ledge to get you asecond Dial(u3 ) . Also mention the positions of the dials on the whorl to the right of the way ( u4 ) which are mark 3 ( head north ) , 1 ( northwest ) , and 5 ( northeast ) .
The fountain puzzles
Return to the main elbow room and utilize the reaping hook to hack down and compile a piece ofCloth(t5 ) before heading through the unexpended room access ( t6 ) . Pick up yourthird Dial(v1 ) , and use the glove to remove the sticker ( v2 ) to see asecond Prismunderneath . You ’ll also uncover a gob in the fountain here , so expend the cork plug to fill it and the natural spring will fill with water .
Use the fabric in the body of water in the outflow and then habituate the Wet Cloth toclean the bulwark behind the fountain(v3 ) to bring out a pattern ( see below ) . You ’ll see the patterns on the wall match the images on the rock in the natural spring , so adding the bulwark patterns up you get 4 ( top leftfield ) , 6 ( top right ) , 1 ( bottom left ) , and 3 ( bottom rightfield ) .
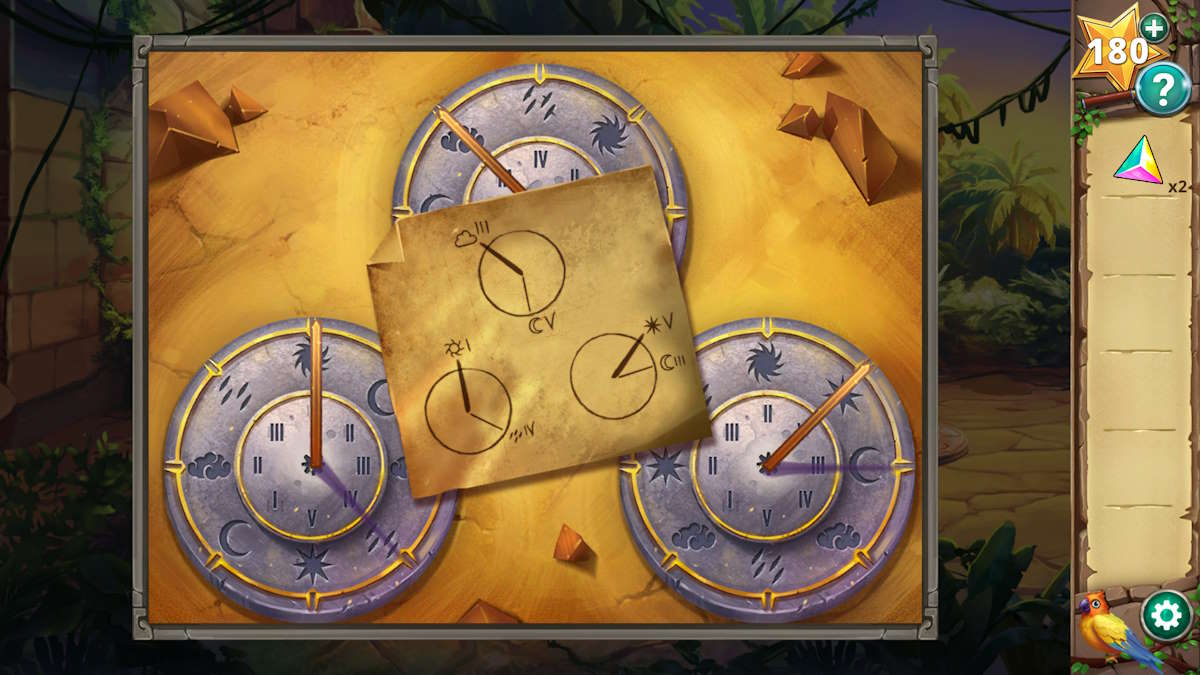
Also mention that the bod in the middle of the outflow is moderate a hiss , and that there are 5 wench in the picture ( admit the one in its hired hand ) . Add the three dials to theweather discs on the ground(v4 ) to start a dial puzzle . You ’re looking for a Romanic numerical on each disk that touch the compass point you got from the clue earlier . Once done ( see below ) you ’ll receive the Sundial Note .
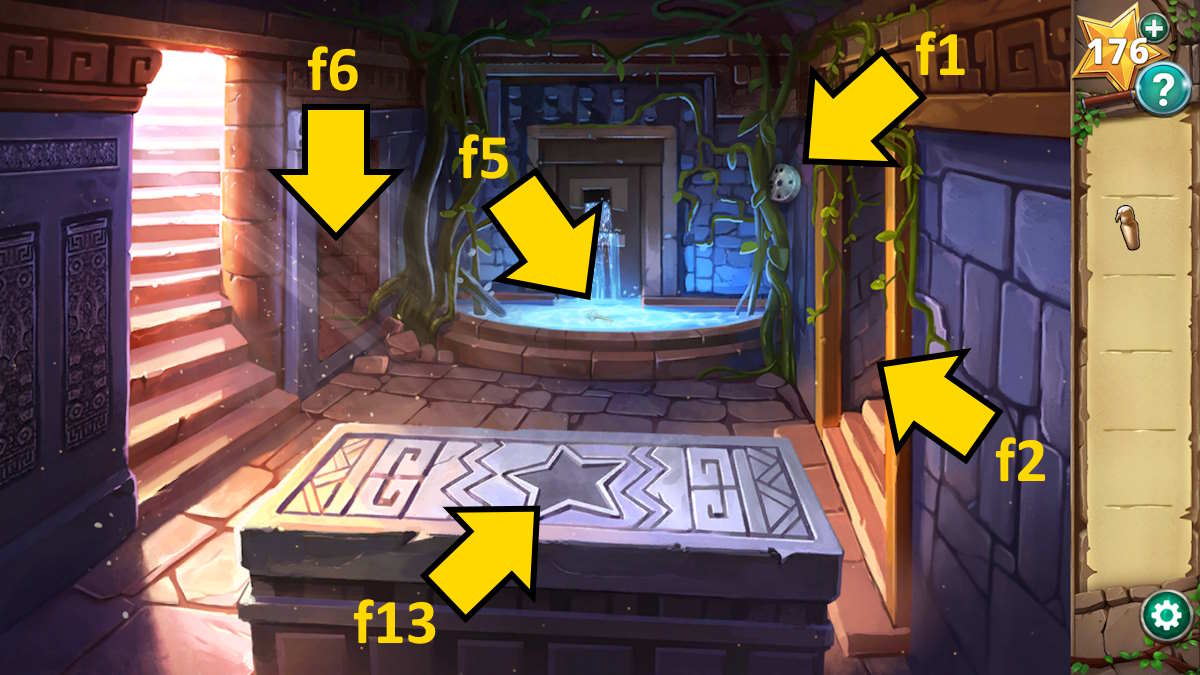
Image by Pro Game Guides
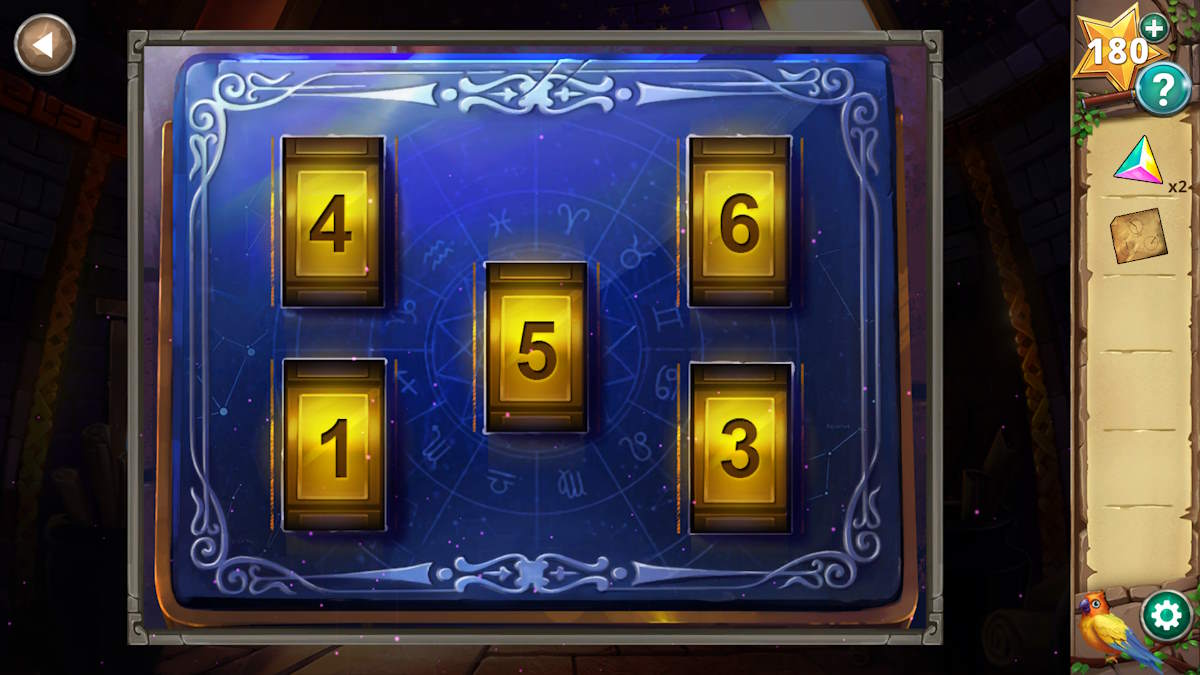
Go back to the room on the rightfulness of the main room and select thepurple box(u5 ) for a close - up . Input the five numbers you discovered in the garden ( four from the plates , with the routine of birds in the heart ) and the box will open up , allowing you to take athird Prism(see below if you ’re unsure ) .
The light beams puzzle
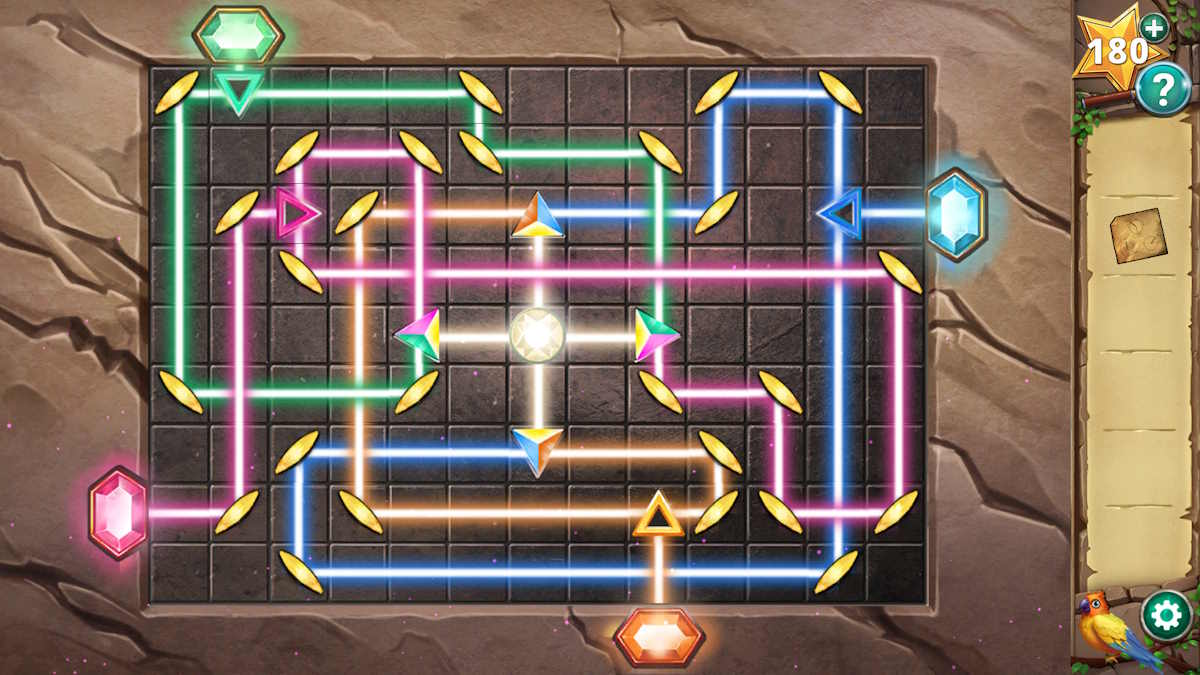
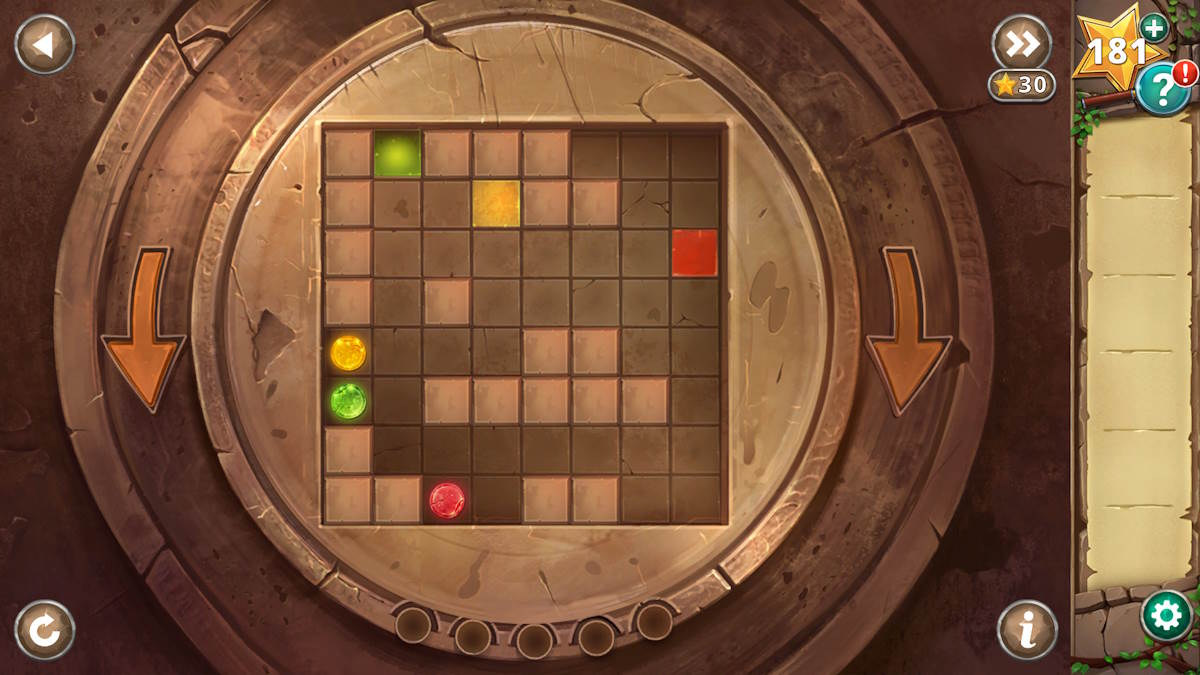
Now you canclick the floorhere ( u6 ) and add the three prisms to commence a light beam of light mystifier . Alter the direction each mirror confront so that each biased stone is lit by a beam of the same vividness . The answer is above . Once done , the floor will open up and atelescope will appearfrom the ground .
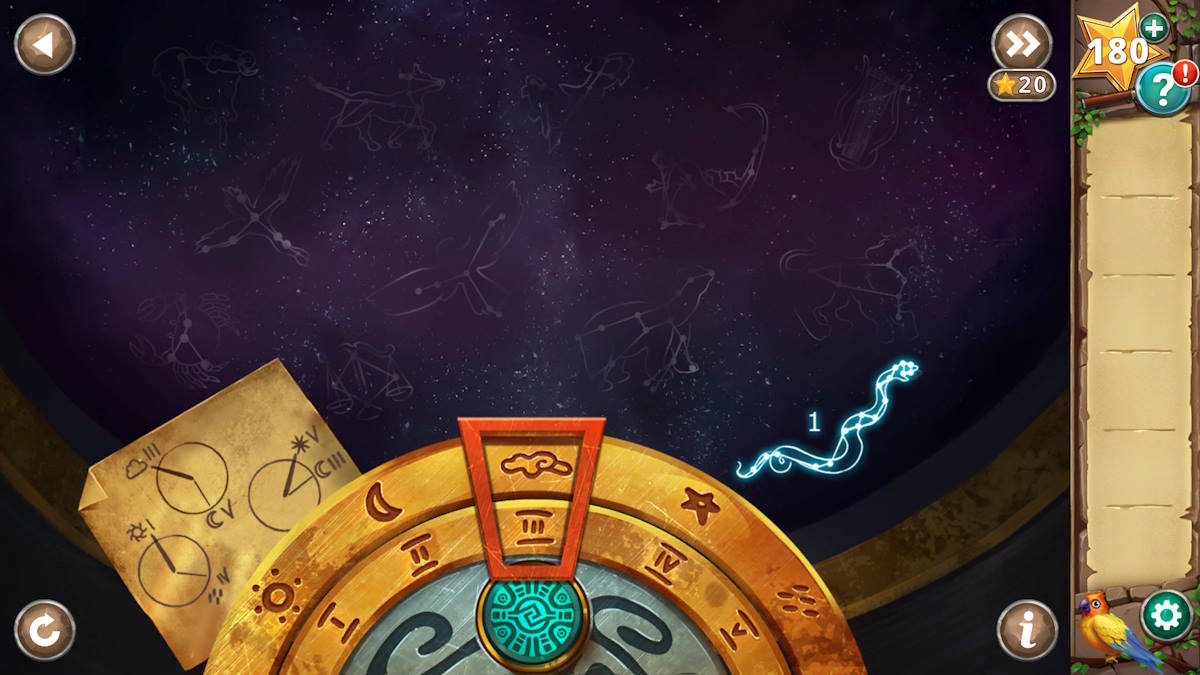
Click the telescope and thenadd the sundial notein the finis - up . You now need to align six identification number - and - weather jazz group , in the correct parliamentary procedure , compress the green release after each . When all six constellations are get down , the box seat the scope is on will open and appropriate you to take aStone Tile . If you ’re stuck on this one , the number - weather combos are as keep abreast :
Return to the central room , select the back paries ( t7 ) , and then total the Harlan Fiske Stone tile . Note that the tile represent the same symbols you saw in the constellations , so press the tile in the same society : snake(top left),lyre(top right),dragon(right top middle),swan(bottom right),ox(above bottom left ) , and thendog(middle right ) . The wall will slue up , enter the way ahead to the philosopher’s stone !
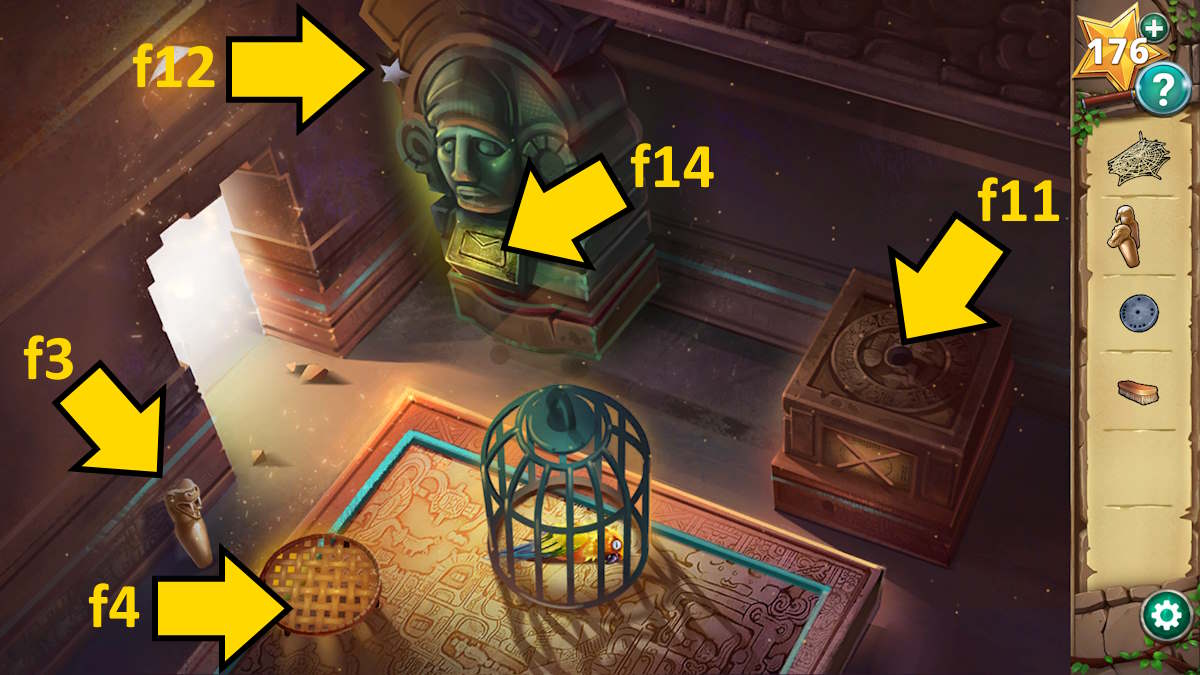
Image by Pro Game Guides
The singing bowls
But of class , it is n’t that round-eyed . pile up theMallet(w1),Twig(w2),Leaf(w3 ) , andfive Bowls(w4 ) . However , when you seek to take the last bowl , it wear . employ one of the bowls in the pool ( w5 ) to get aBowl With Water , then use it on the dry clay ( w6 ) . Now expend the stick on the pixilated clay and use the leaf to collect it and receive aLeaf With Clay . apply the leaf with corpse to animate the disordered bowl , and then take thePatched Bowl .
Next , satisfy all of the bowl up so that you havesix Bowls With Water . Get a close - up of the statue ( w7 ) and add up the six sports stadium to the six spaces ( see above ) . Once placed , click the bowls for a last - up and Tawa will order you they ’re singing bowls . bring the malletto the stopping point - up for another update , where you find you need to playact a particular tune .
Select Bertand your favorable bird brother will sing the tune you call for . Now you just require to use the mallet on the bowls in the correct rules of order , which is as fall out :

Image by Pro Game Guides
When the bottom - leftpanel gets stuck afterward(marked above ) , expend the stick to open it properly and click the disc inside to trigger another puzzler . You need torotate the boardby clicking the remaining and right arrow , making the colored egg put down through their matching holes . The correct sequence of jam is : Right , Right , Right , Left , Left .
Unfortunately , that only open two fingers on the graven image ’s hand ! You ’re go to have to doslightly gruelling interlingual rendition of both puzzlestwo more times to start the hired hand whole ( the euphony part work the same way , but the centre and then bottom jury below the idol open up to reveal the two remaining rotation teaser ) . The solution are as follows :
With all the fingerbreadth of the matinee idol ’s hands released , you could finally snap up theElixir of Life ! But , surprise surprise , Larissa is back to spoil the party . However , your hiss buddy Bert has the last laugh before you escape the aspect andcomplete the Hidden Ruins(congrats ) !
Screenshot by Pro Game Guides
For more Adventure Escape Mysteries walkthroughs , check outAE Mysteries Picture Perfect walkthroughandPuzzle Lovers Walkthrough – Adventure Escape Mysteriesright here at Pro Game Guides !
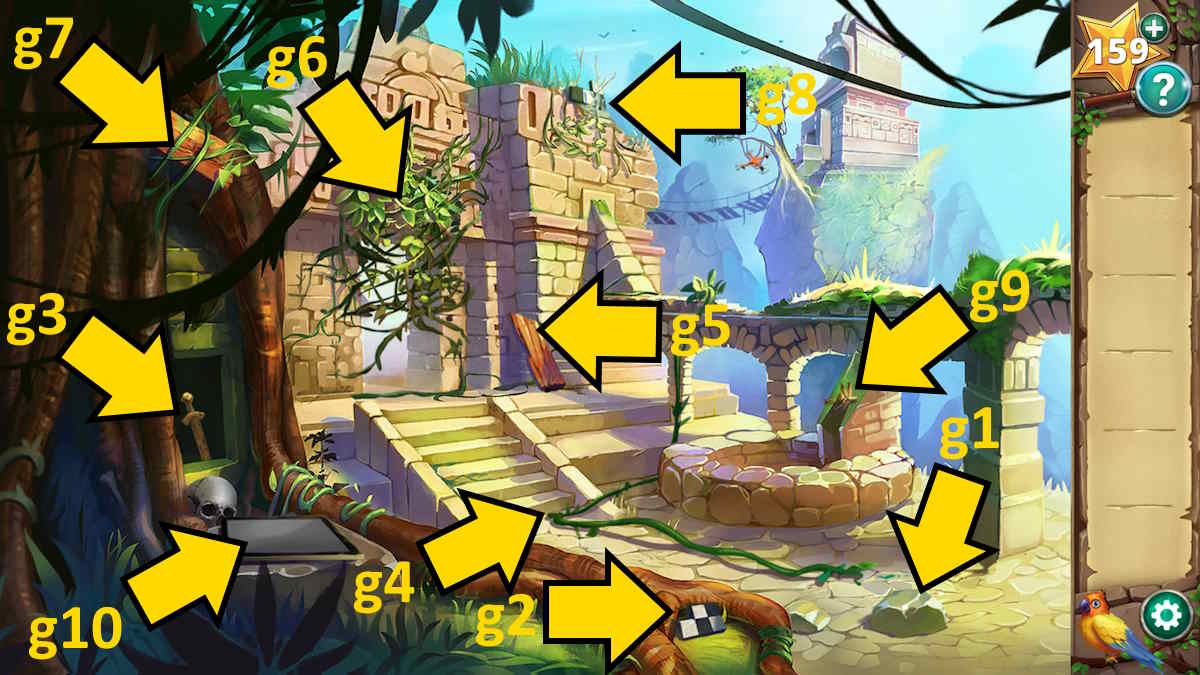
Image by Pro Game Guides
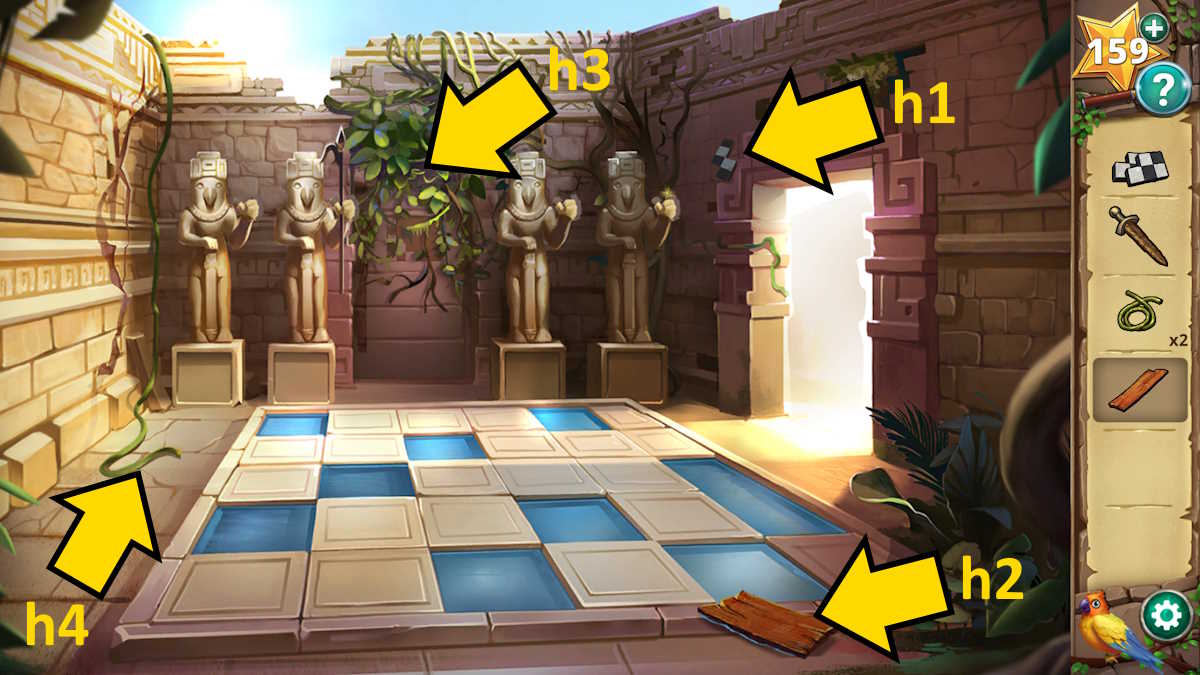
Image by Pro Game Guides
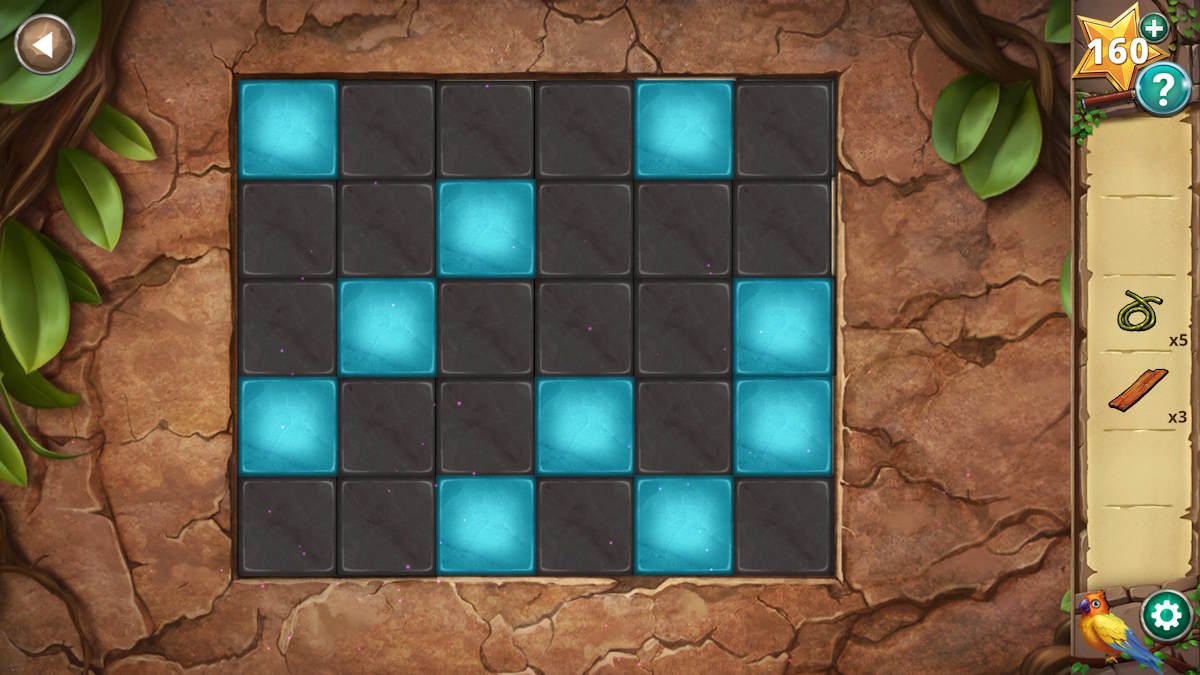
Image by Pro Game Guides
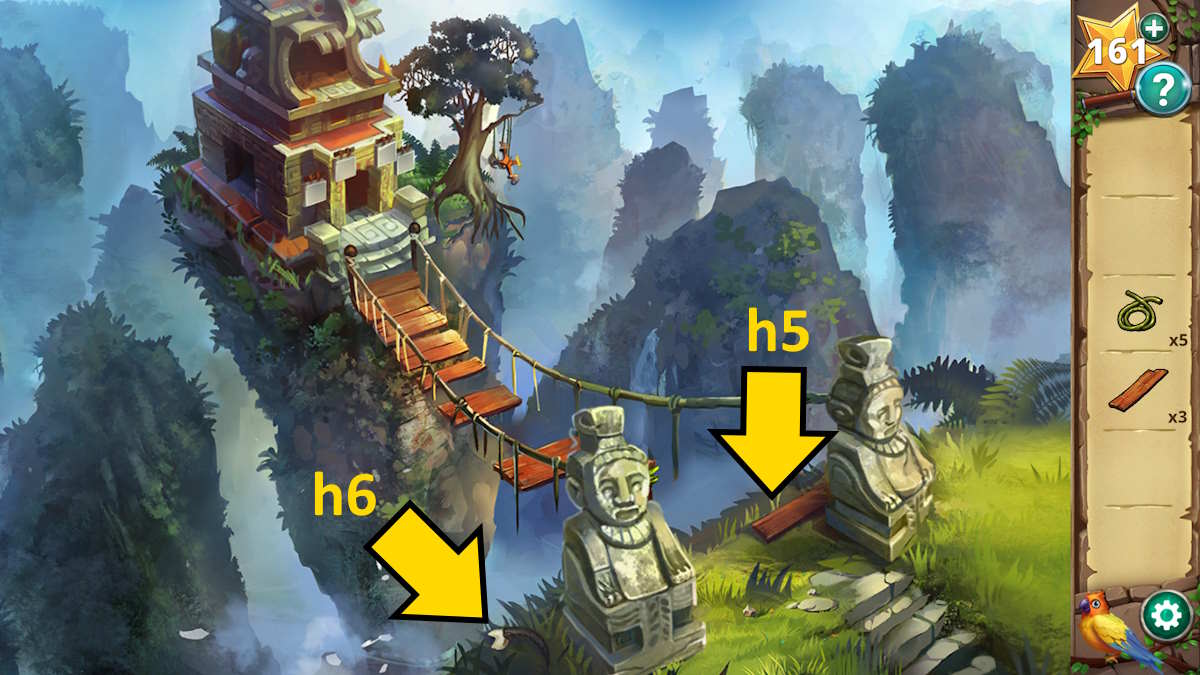
Image by Pro Game Guides
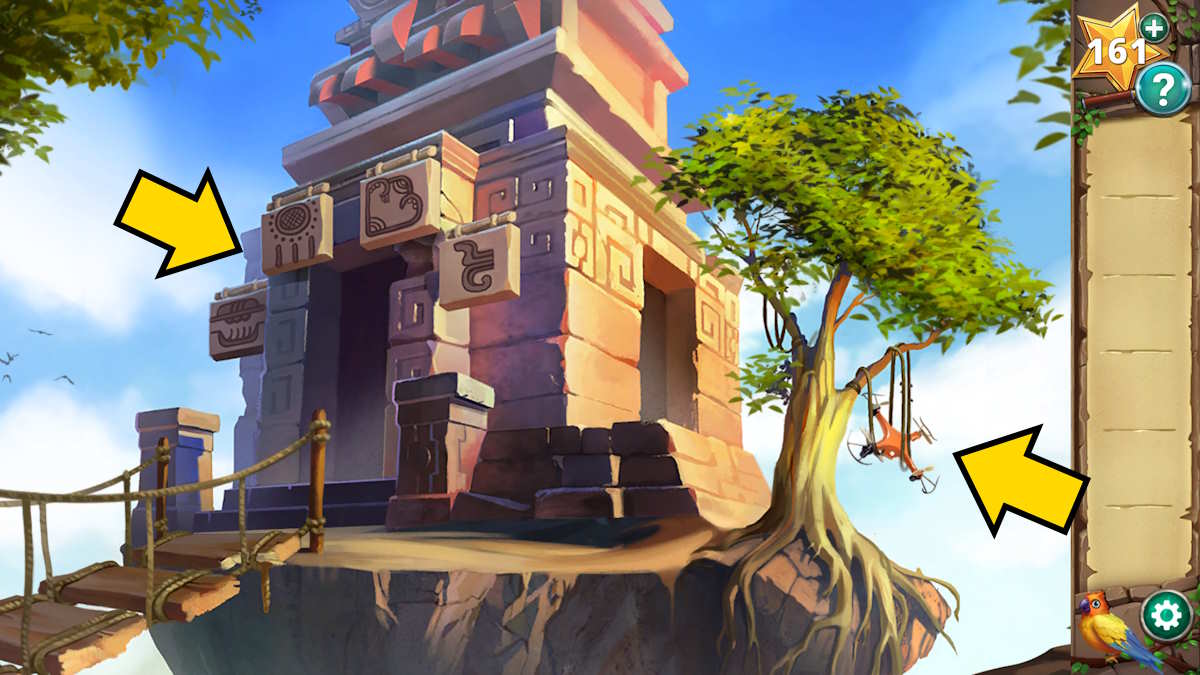
Image by Pro Game Guides
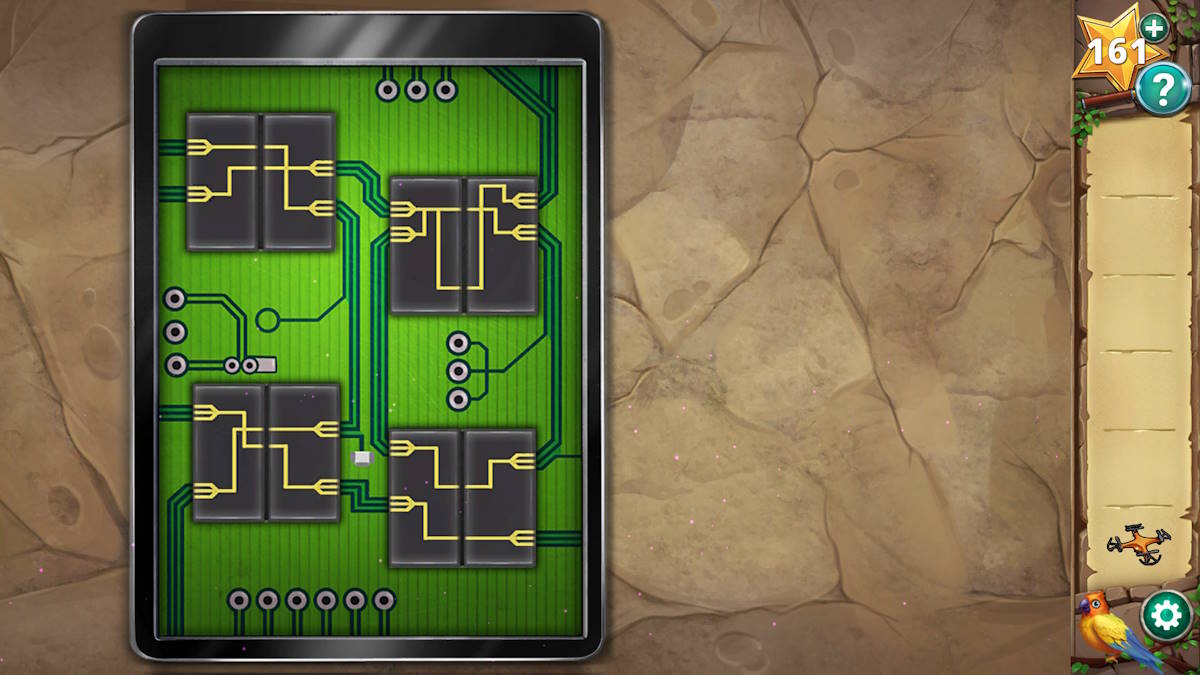
Image by Pro Game Guides
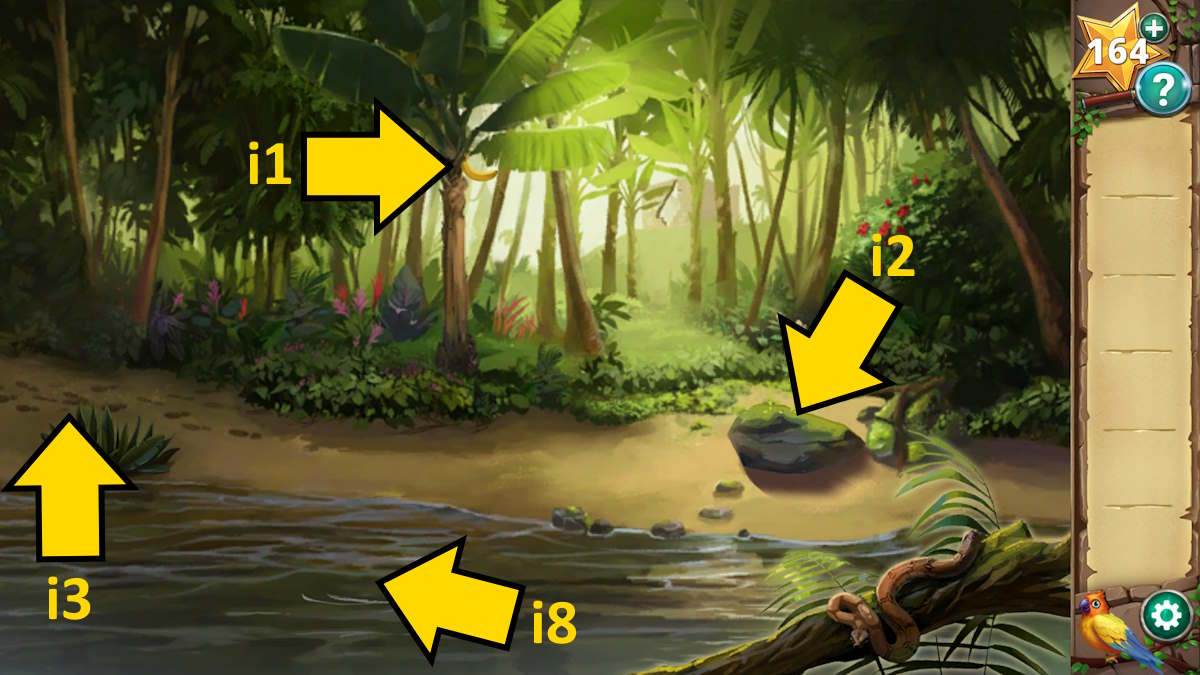
Image by Pro Game Guides
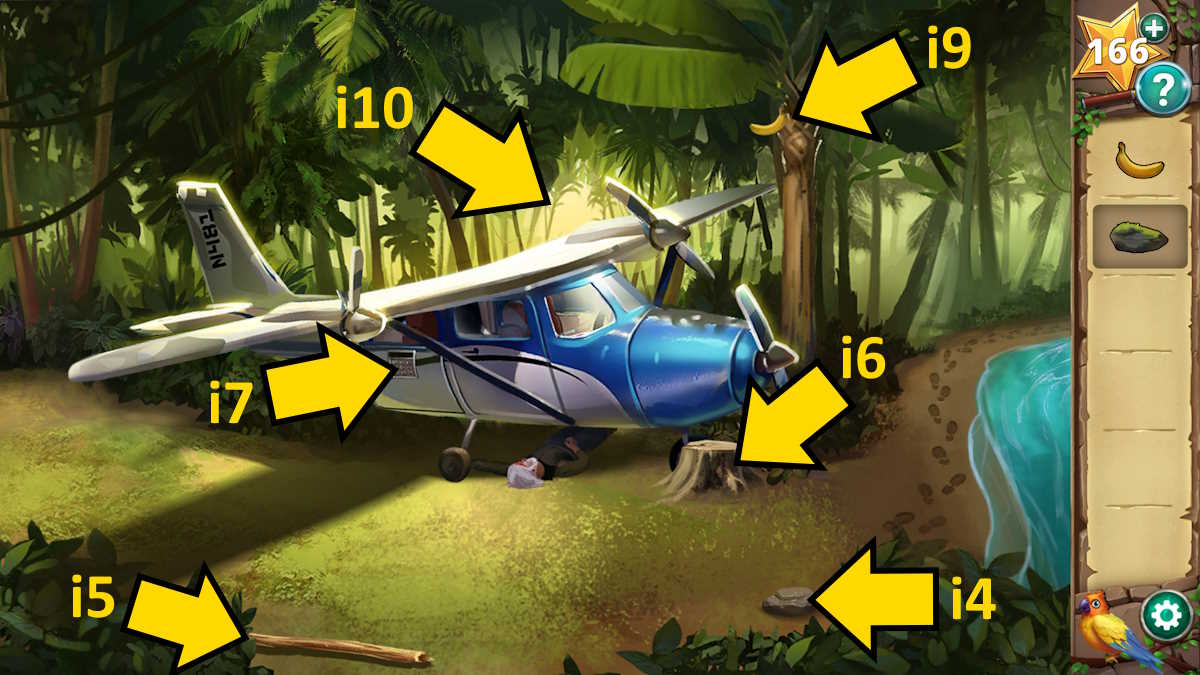
Image by Pro Game Guides
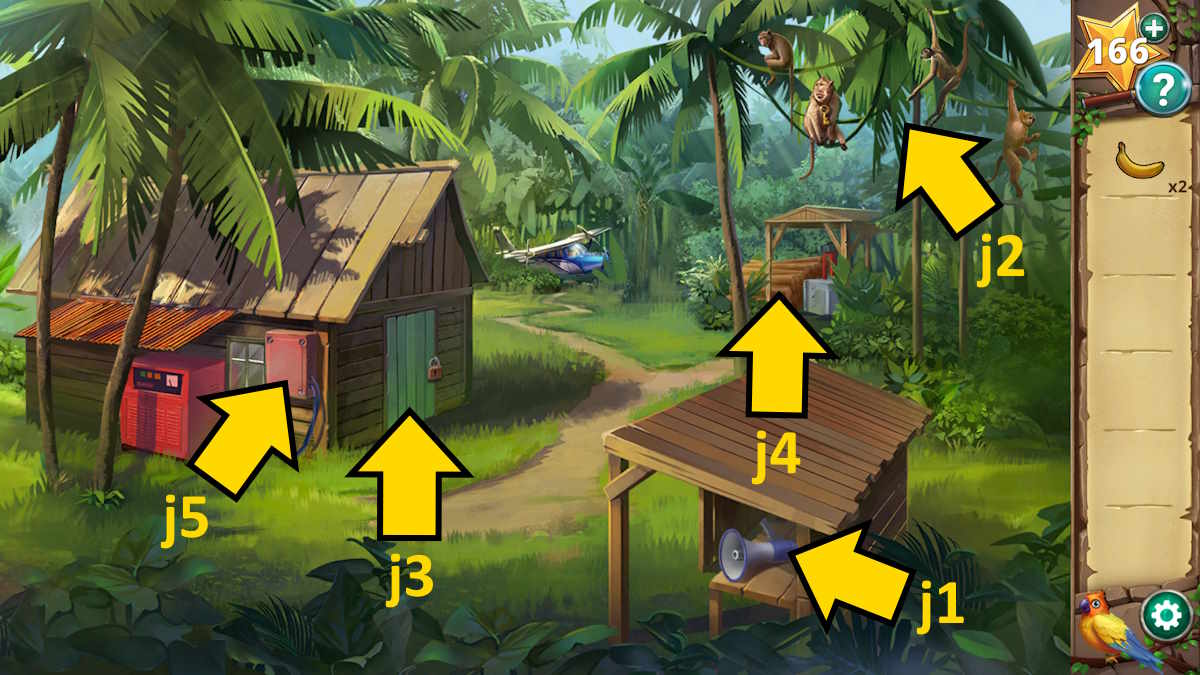
Image by Pro Game Guides
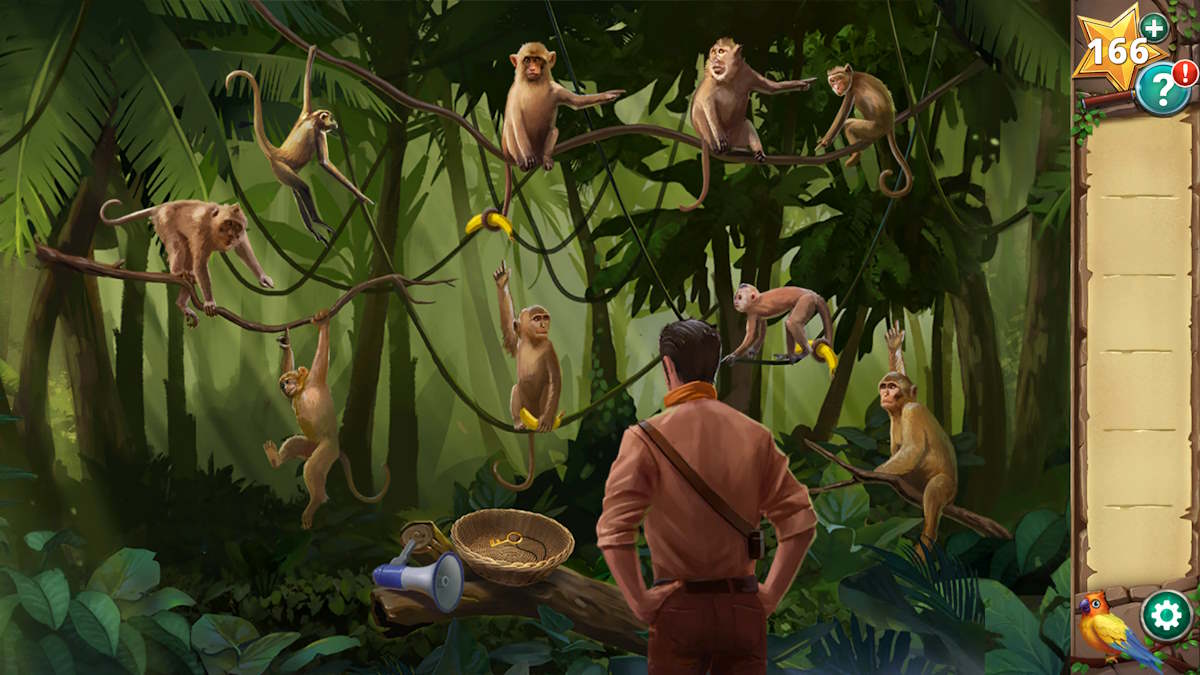
Image by Pro Game Guides
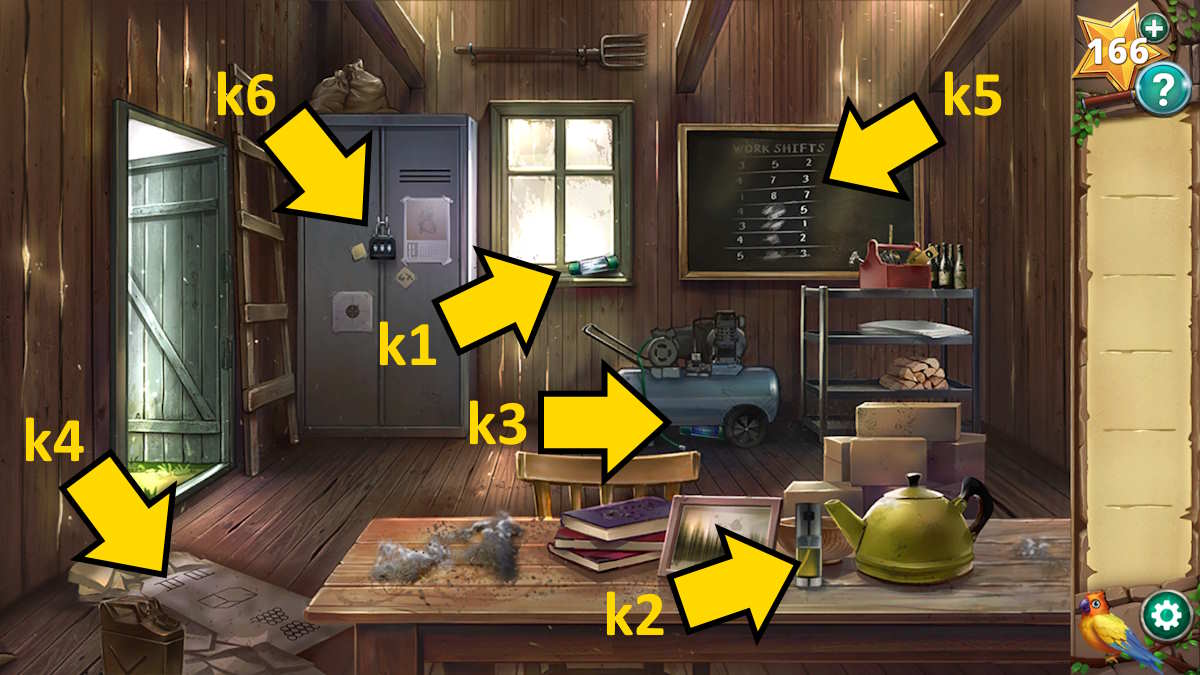
Image by Pro Game Guides
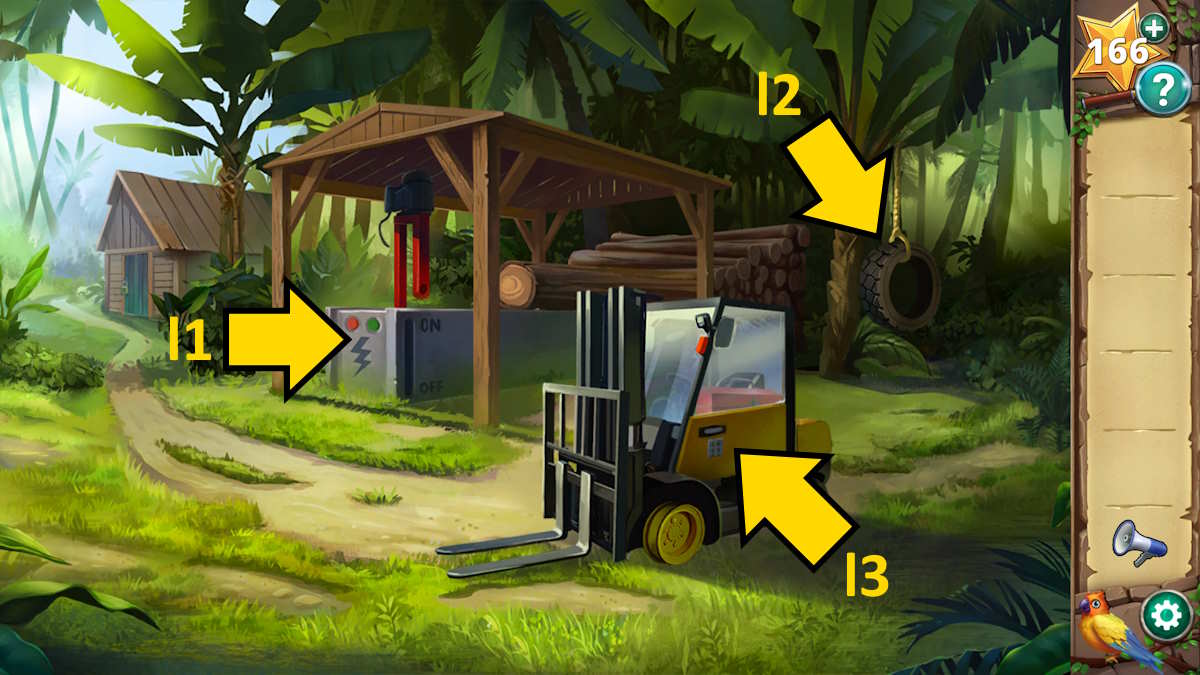
Image by Pro Game Guides
Screenshot by Pro Game Guides

Screenshot by Pro Game Guides
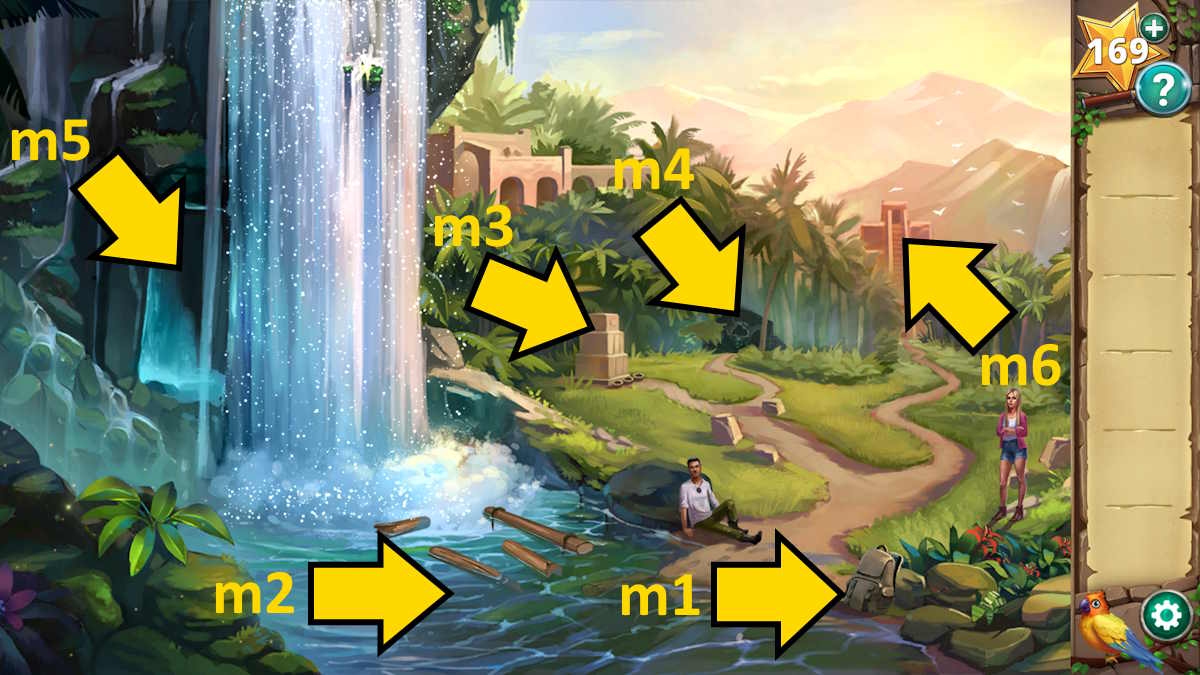
Image by Pro Game Guides
Screenshot by Pro Game Guides
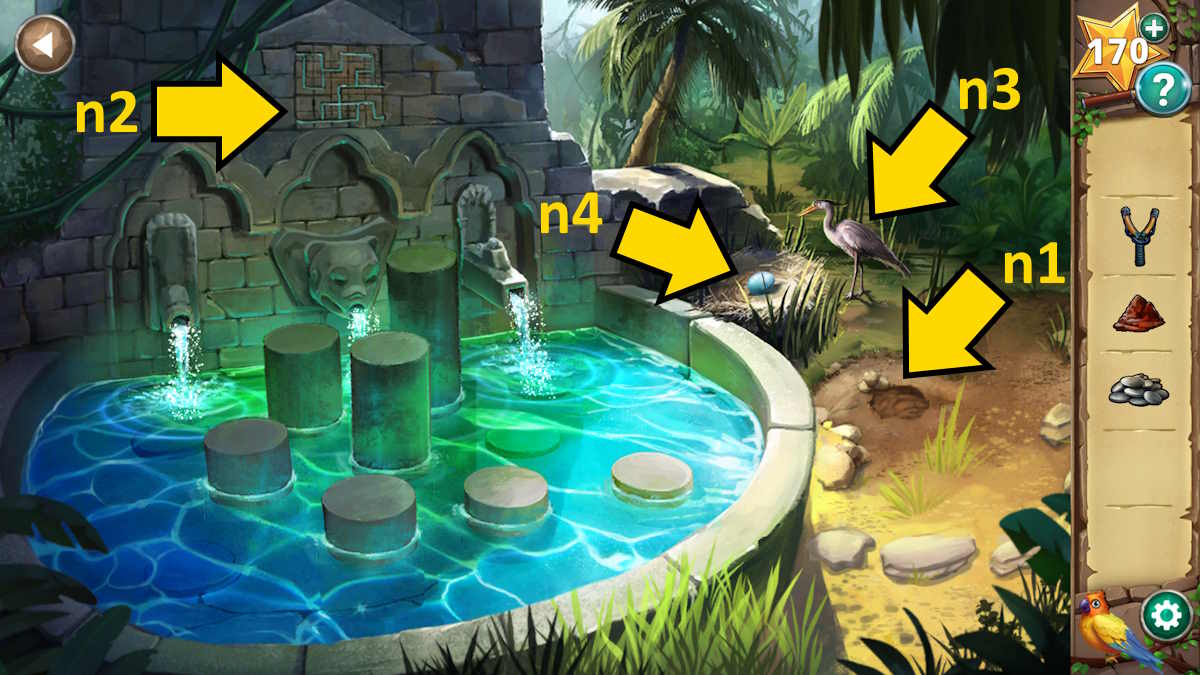
Image by Pro Game Guides
Screenshot by Pro Game Guides
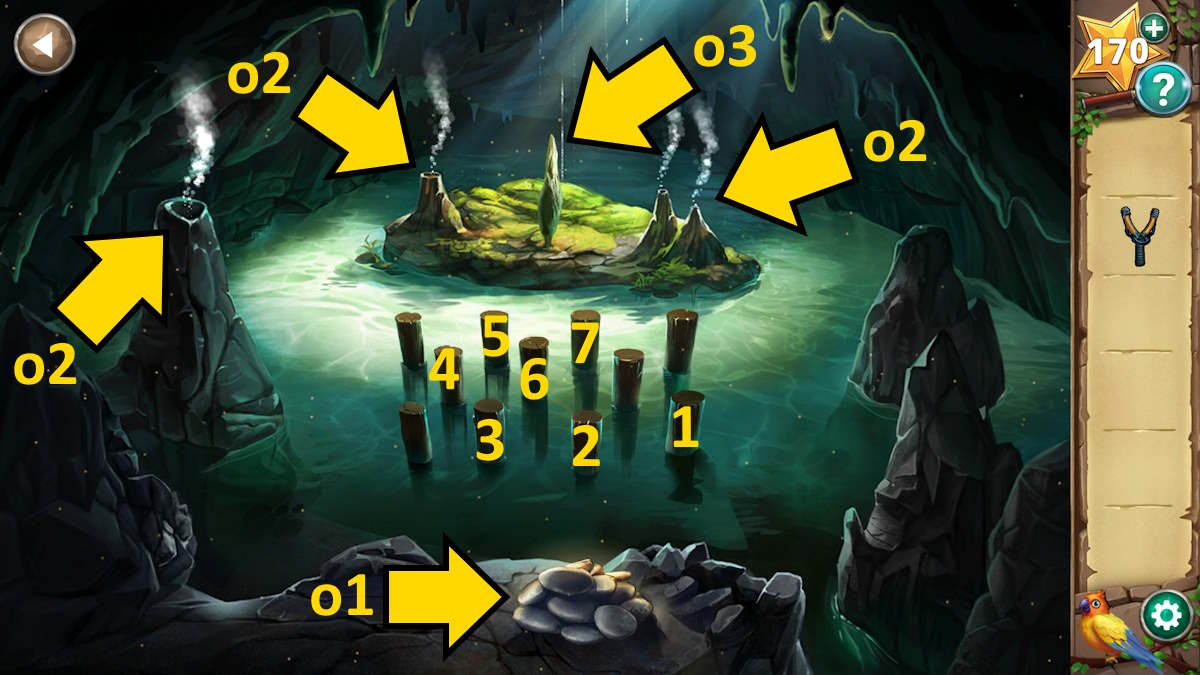
Image by Pro Game Guides
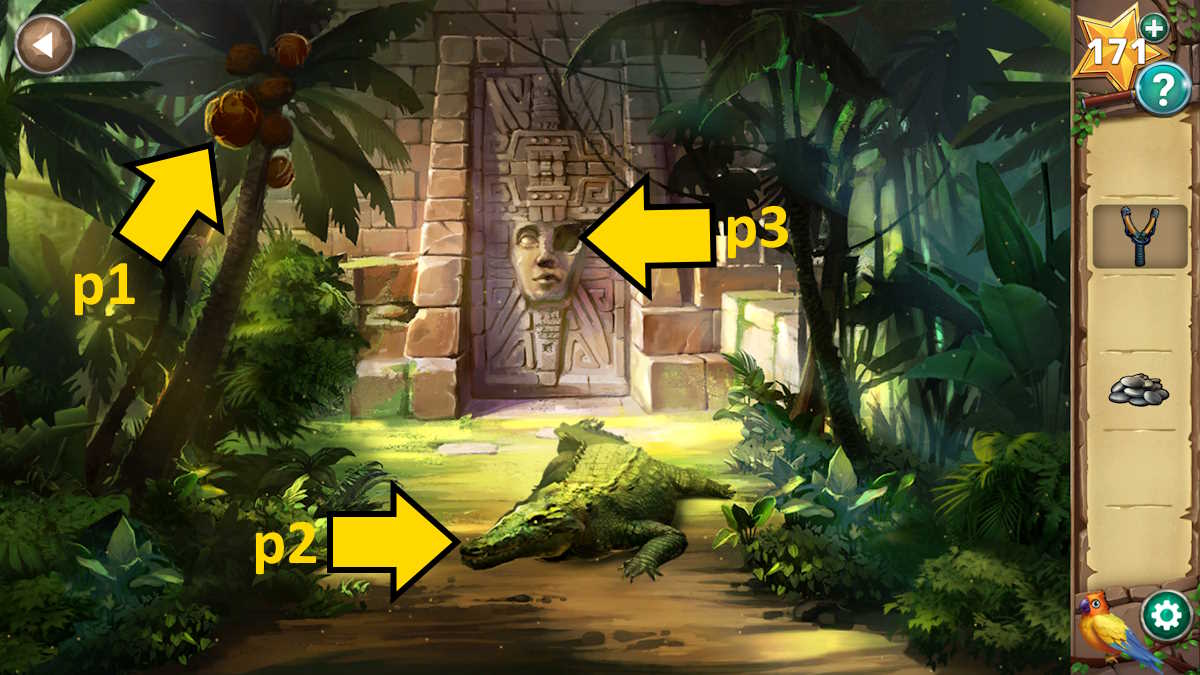
Image by Pro Game Guides
Screenshot by Pro Game Guides
Screenshot by Pro Game Guides
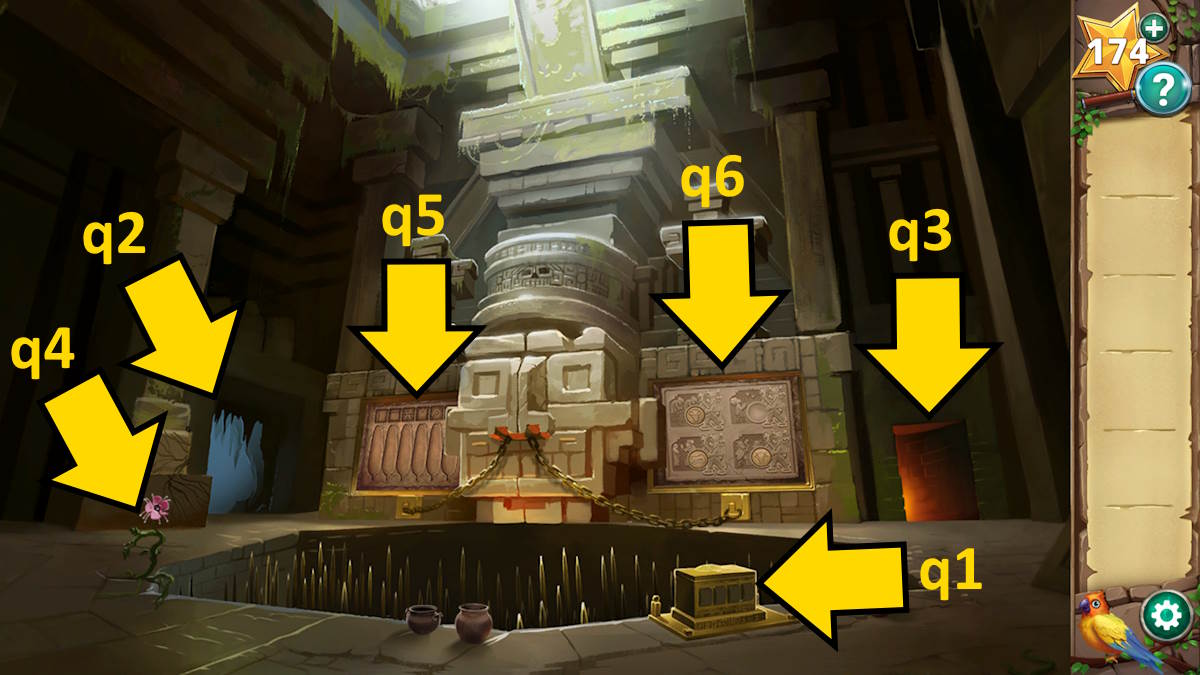
Image by Pro Game Guides
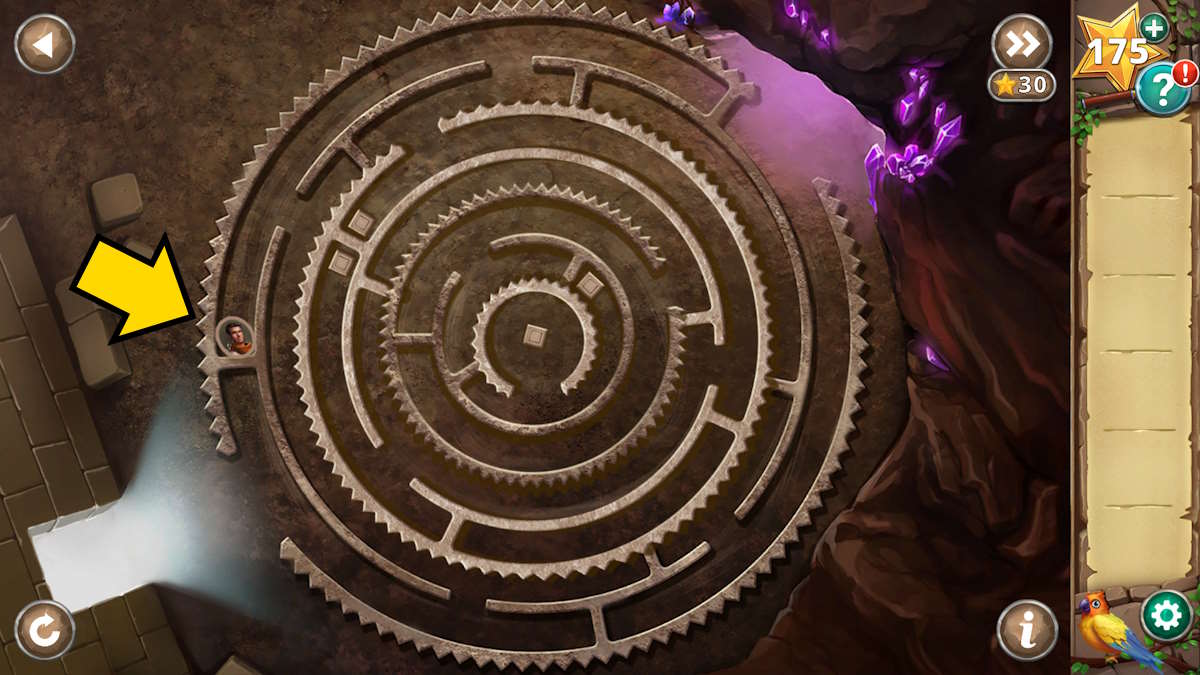
Image by Pro Game Guides
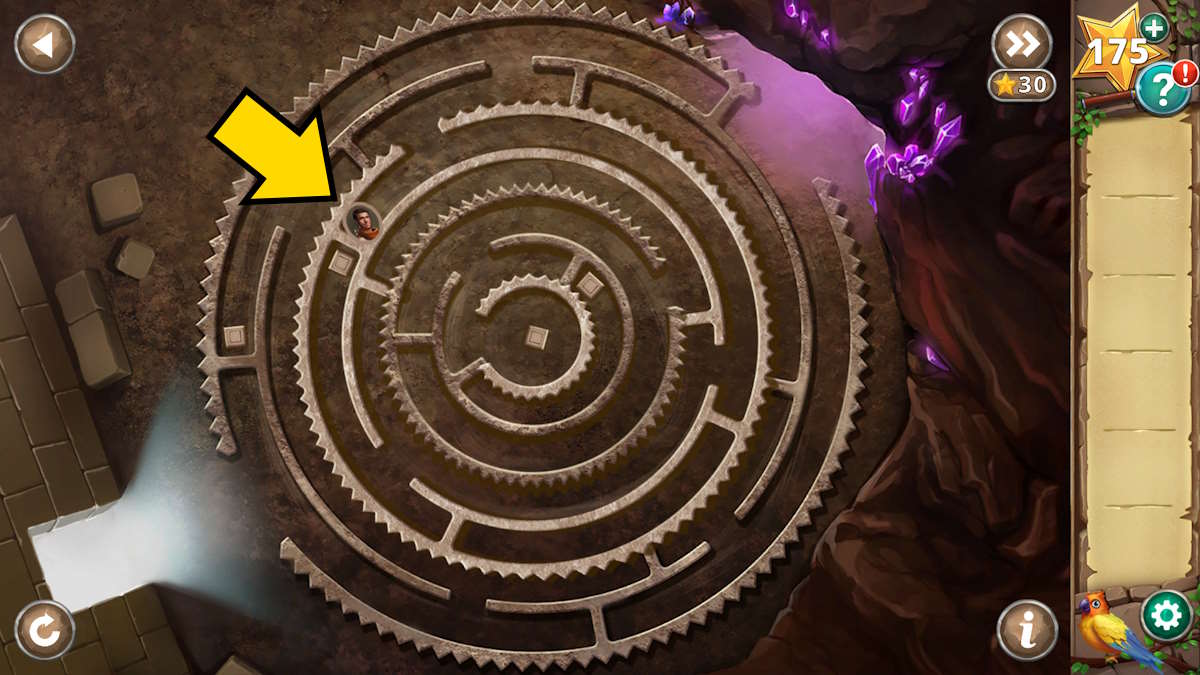
Image by Pro Game Guides
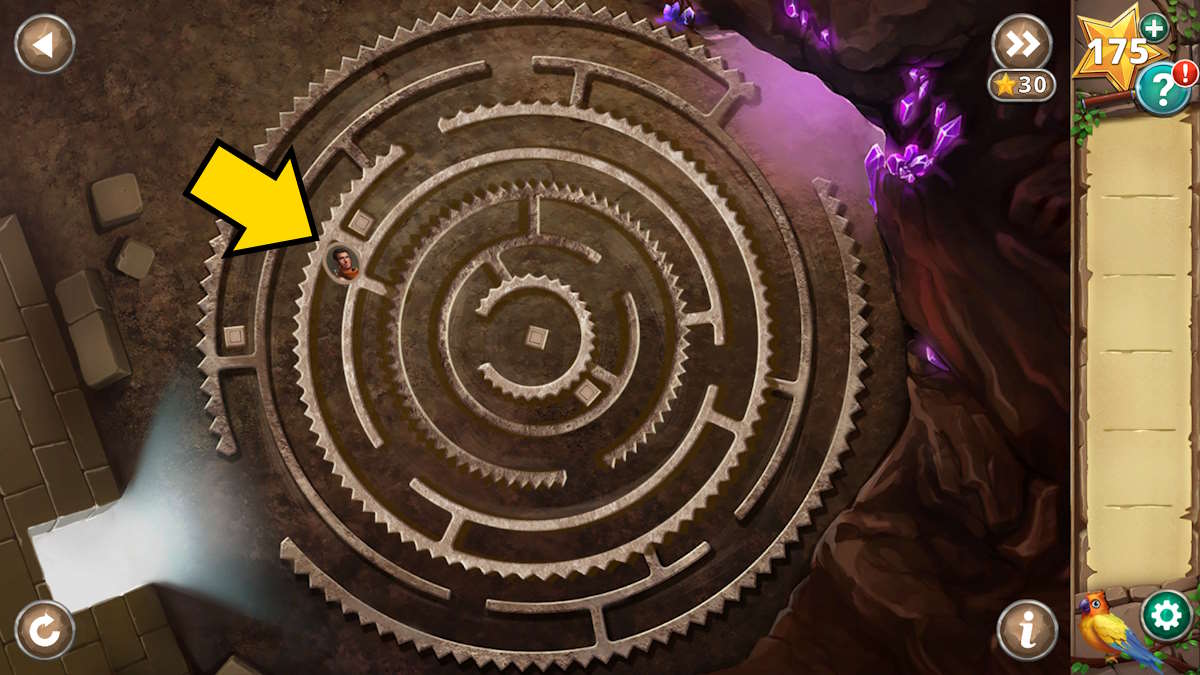
Image by Pro Game Guides
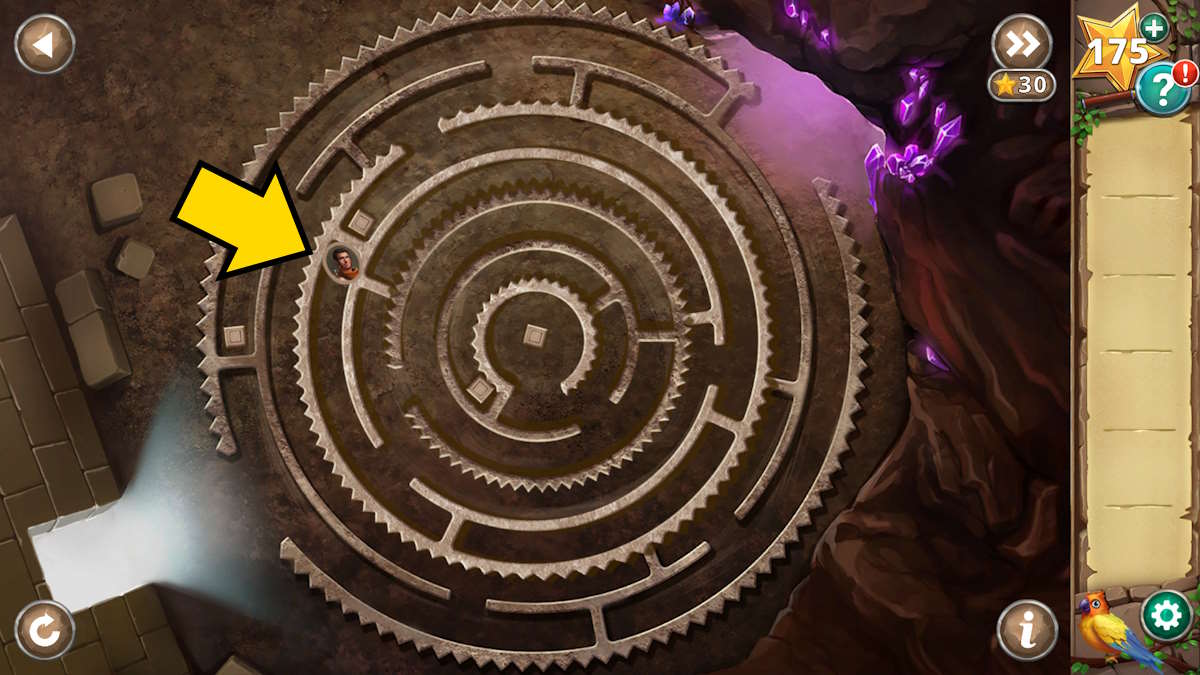
Image by Pro Game Guides
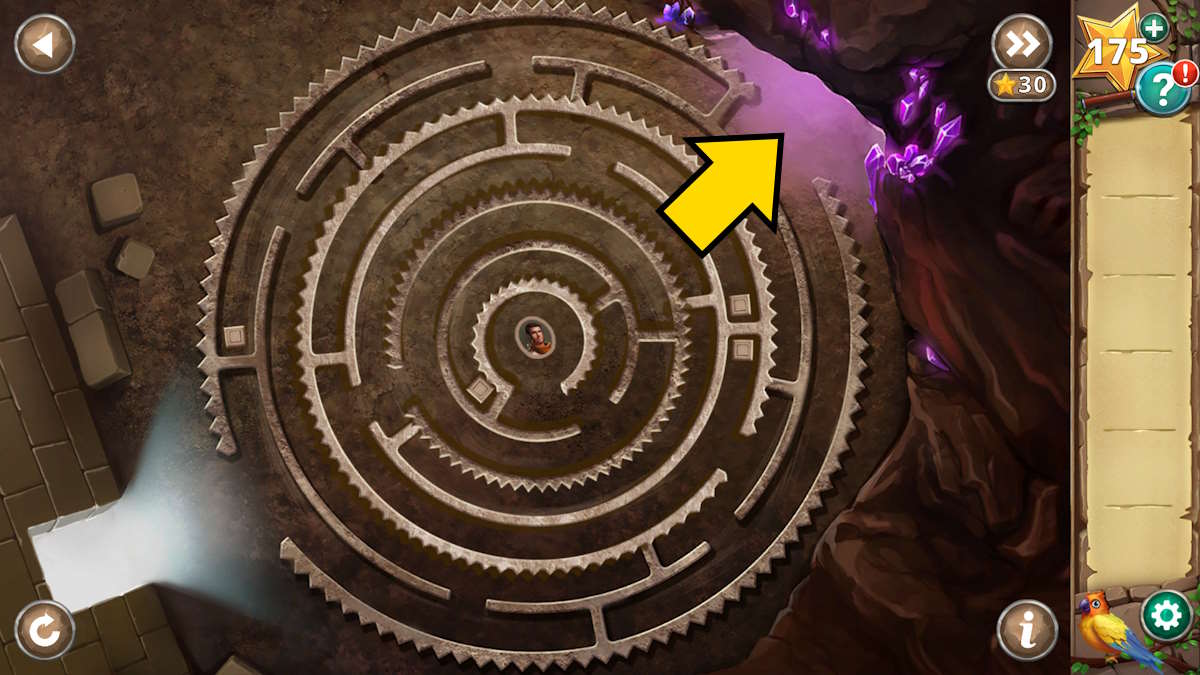
Image by Pro Game Guides
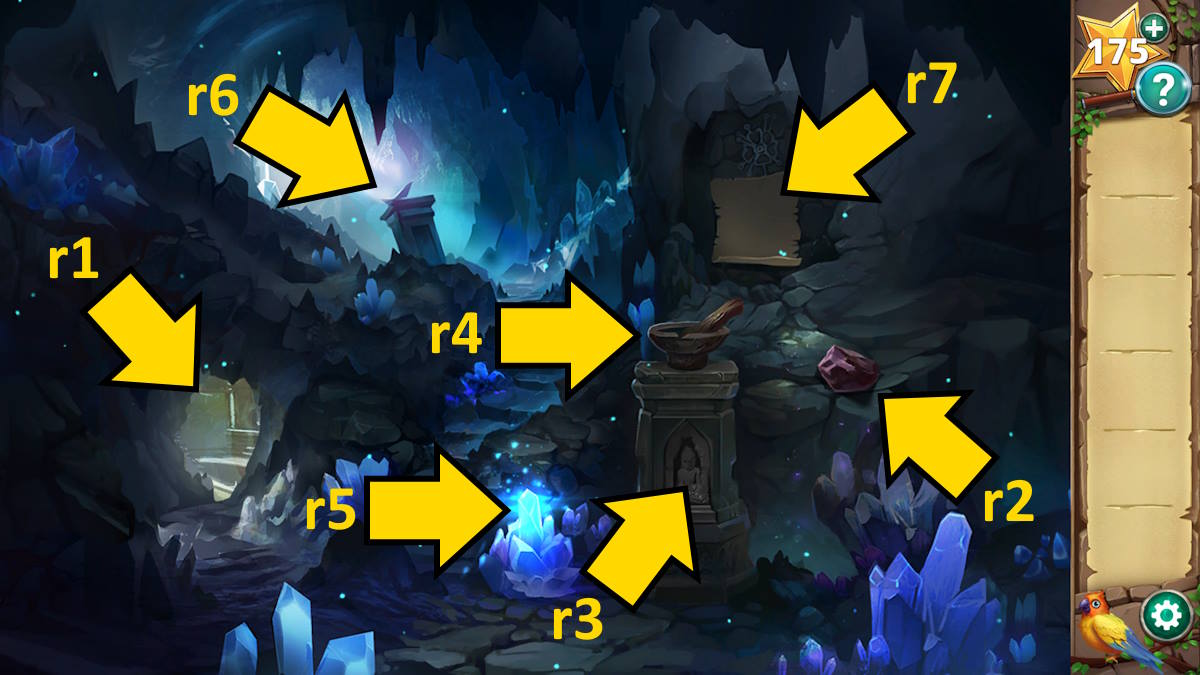
Image by Pro Game Guides
Screenshot by Pro Game Guides
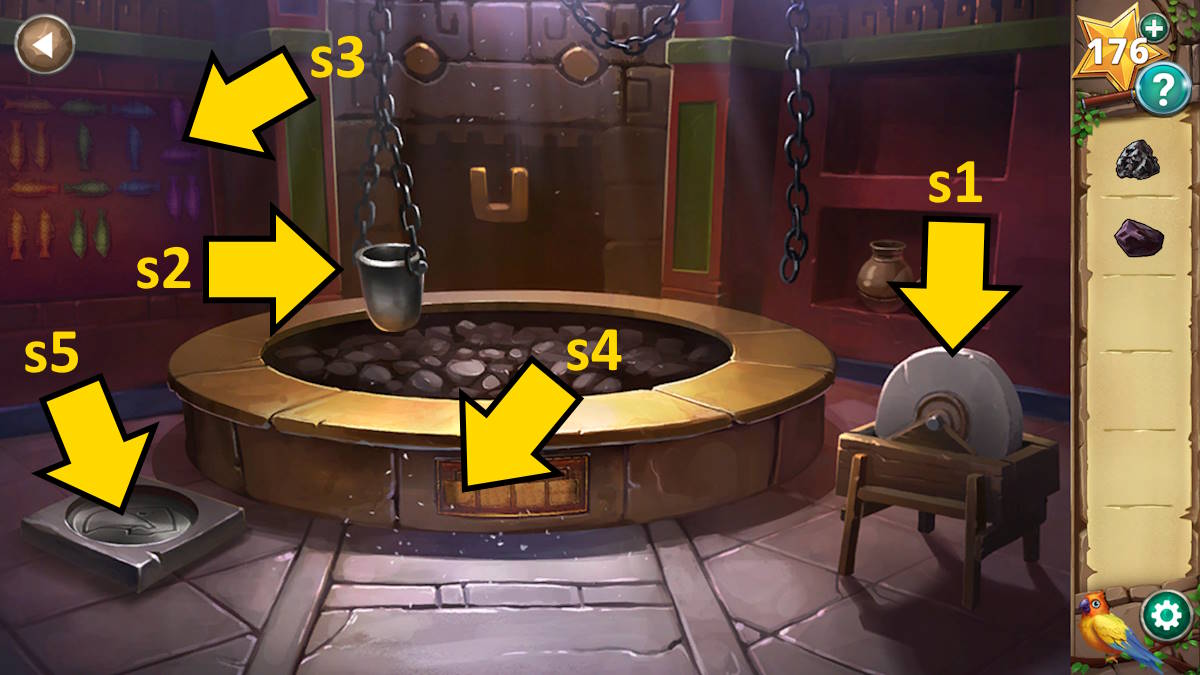
Image by Pro Game Guides
Screenshot by Pro Game Guides
Screenshot by Pro Game Guides
Screenshot by Pro Game Guides
Screenshot by Pro Game Guides
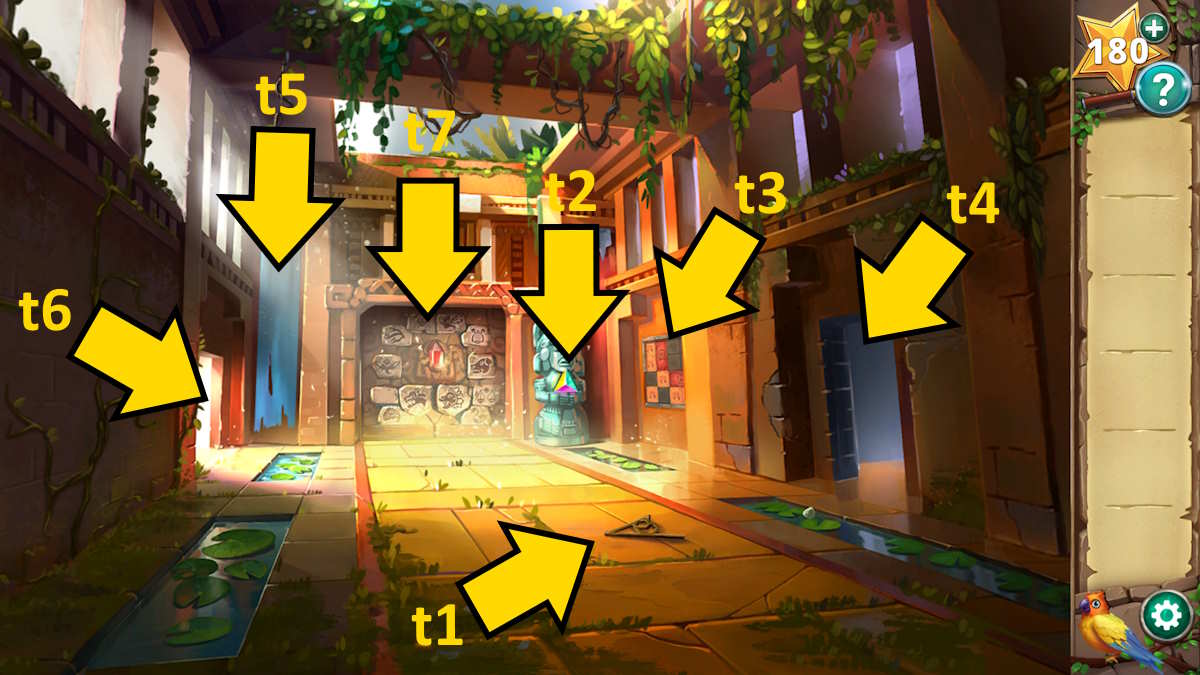
Image by Pro Game Guides
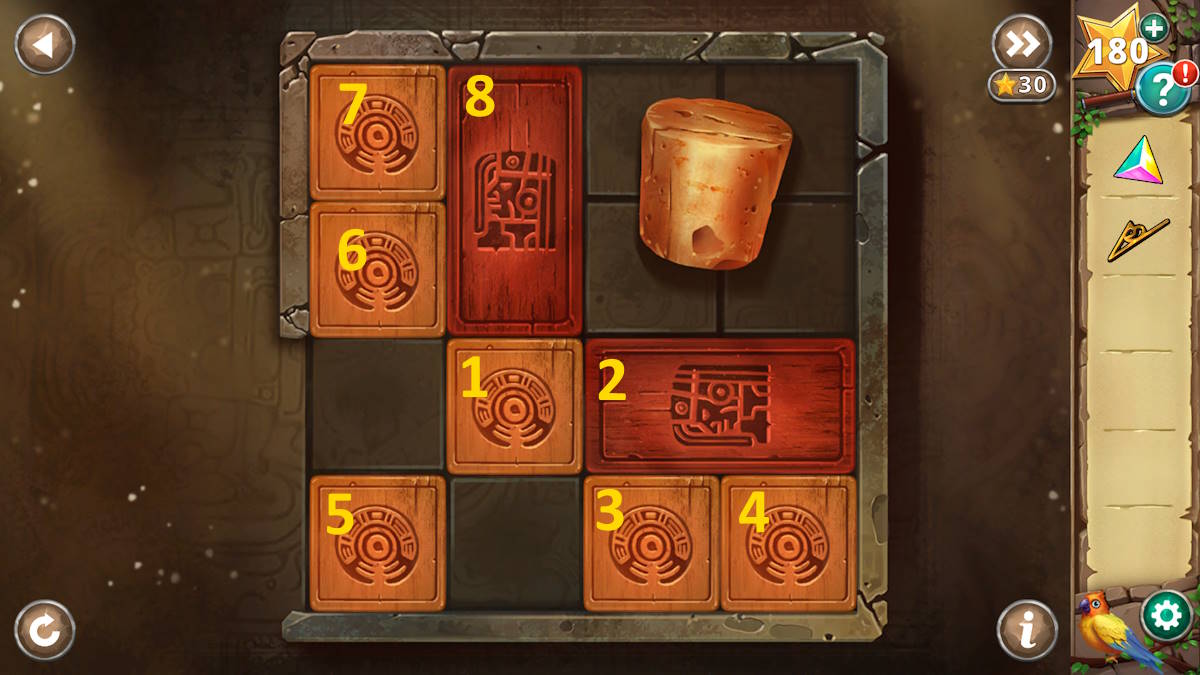
Image by Pro Game Guides
Screenshot by Pro Game Guides
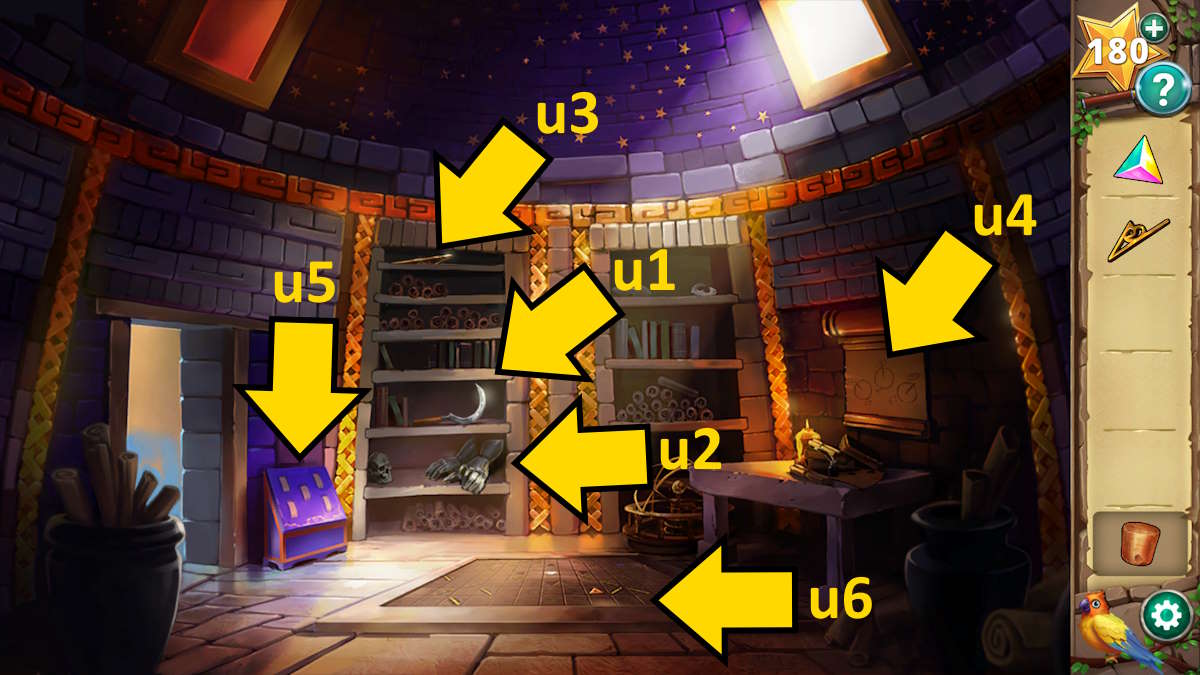
Image by Pro Game Guides
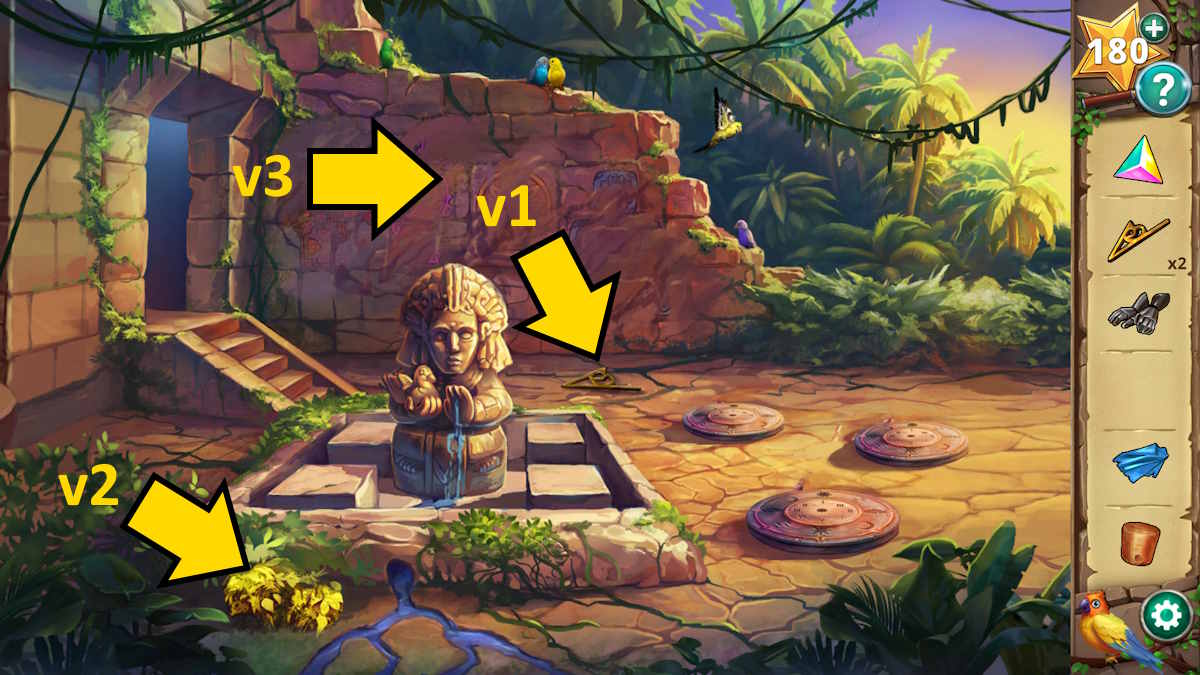
Image by Pro Game Guides
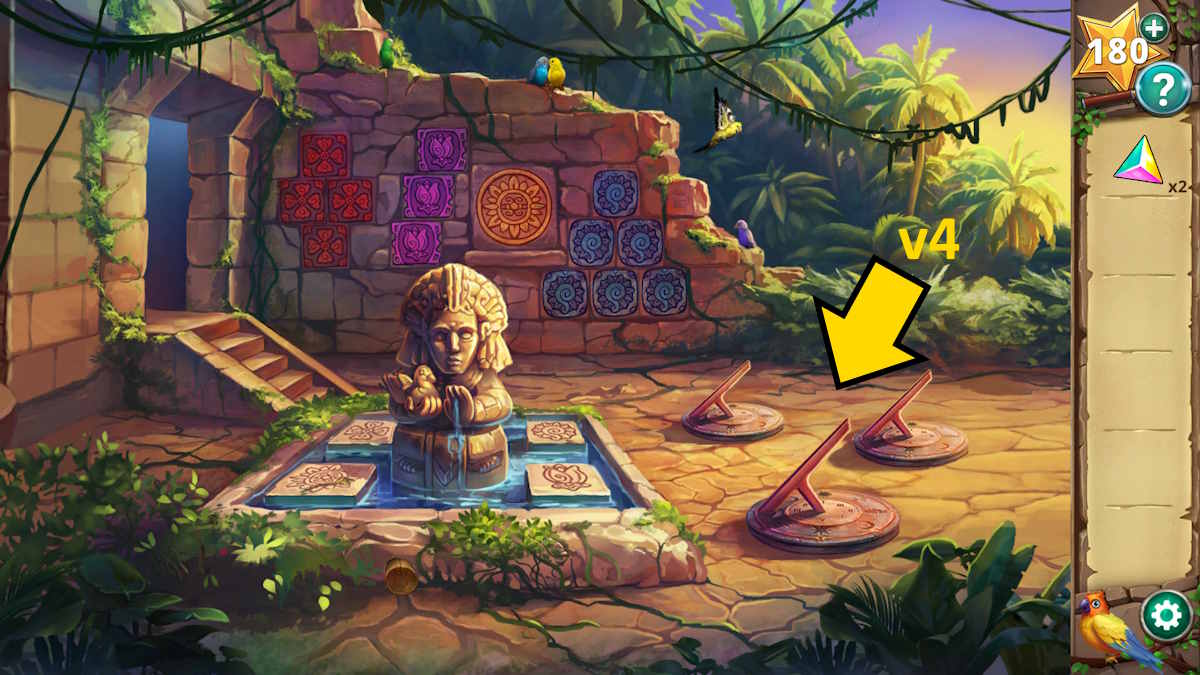
Image by Pro Game Guides
Screenshot by Pro Game Guides
Screenshot by Pro Game Guides
Screenshot by Pro Game Guides
Screenshot by Pro Game Guides
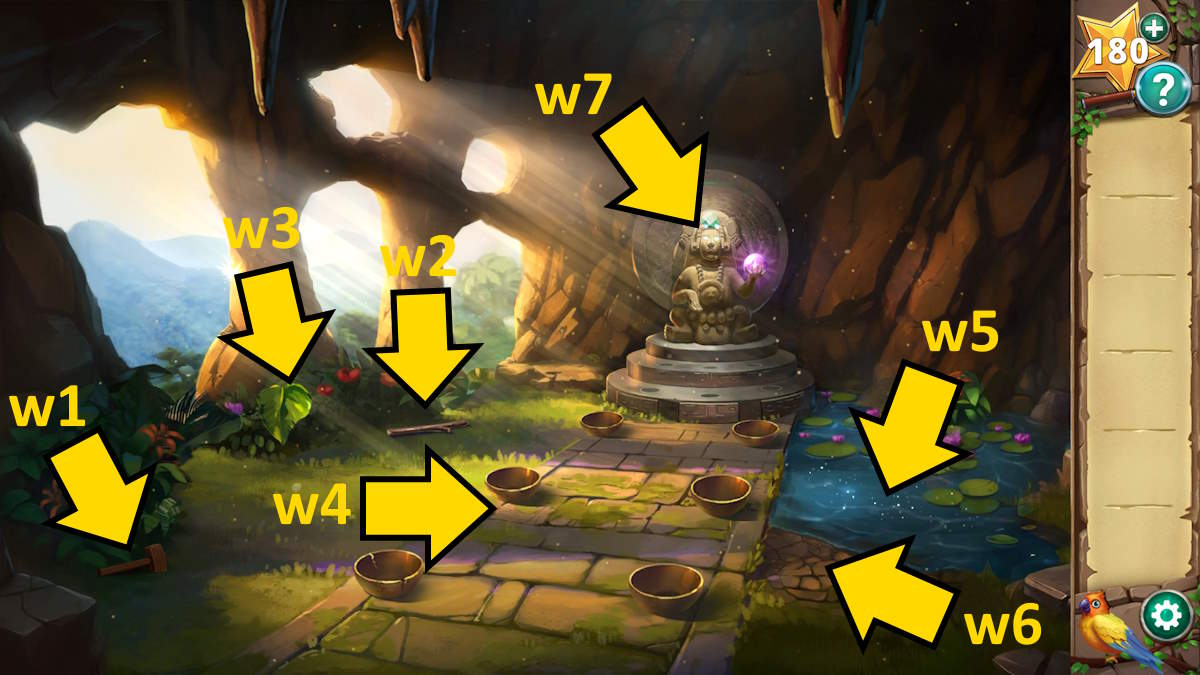
Image by Pro Game Guides
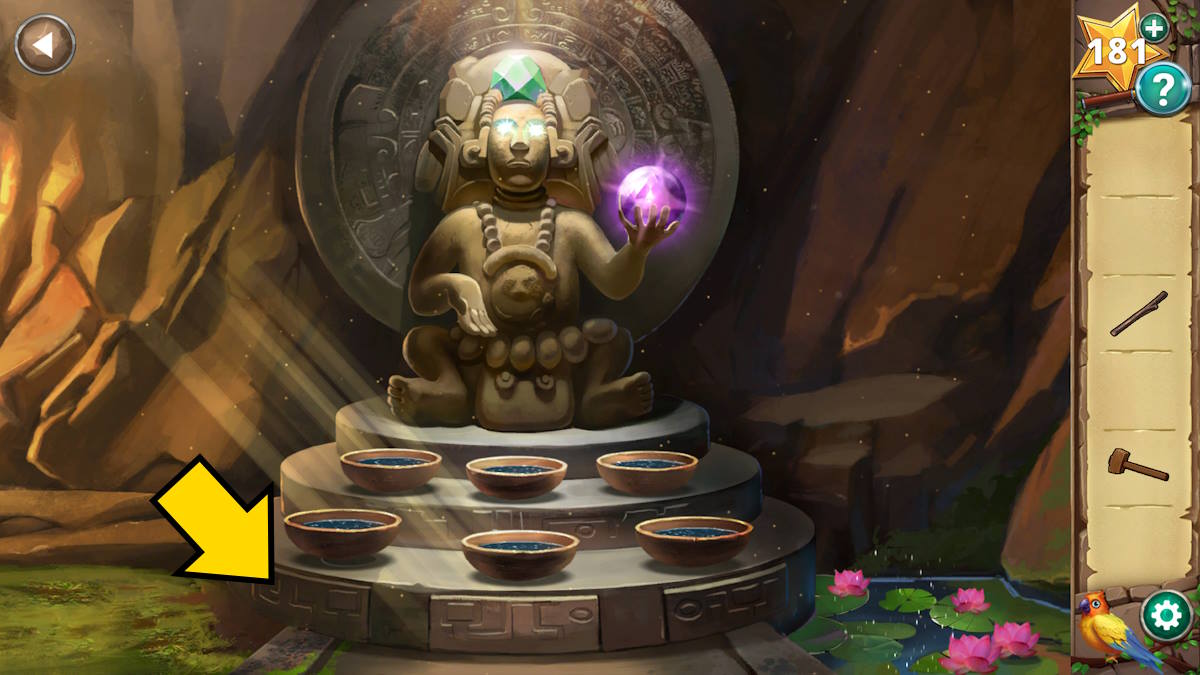
Image by Pro Game Guides
Screenshot by Pro Game Guides
