Shapeshift to solve puzzles !
If you ’re new to the Adventure Escape Mysteries series , it ’s a series of free - to - play teaser and secret object game each with an on - running game plot line across several chapter . understand on for my full walkthrough for Haunted Hunt , a repulsion - theme narration of shapeshifting shenanigans .
A radical called the Hunters find them and destroy them . They have met for one of the Orion to show off their latest pinch , a Shapeshifter . If you ’re stuck on any of the puzzles , read on for our Haunted Hunt walkthrough for thisAdventure Escape Mysteriesgame .
Haunted Hunt Chapter 1 Walkthrough
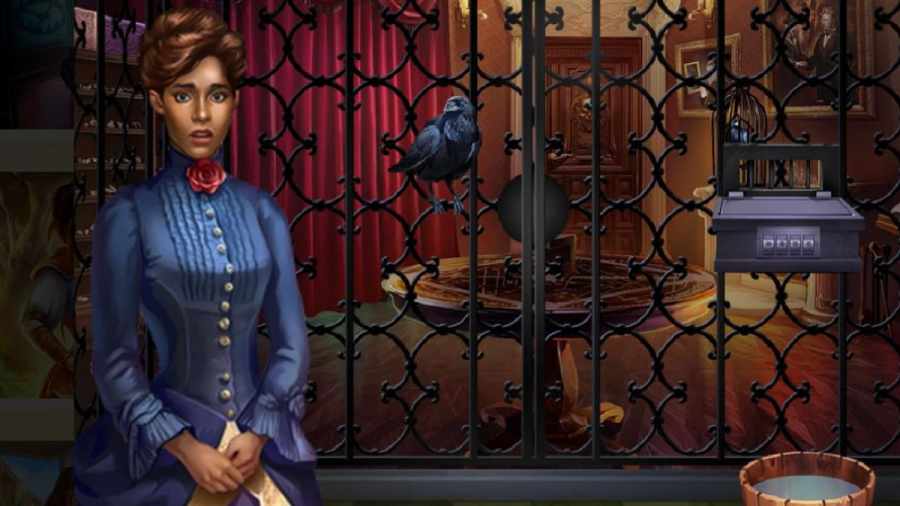
At the beginning of the biz in Chapter 1 , you detect that you yourself are the shapeshifter , captured by the huntsman and placed in a John Milton Cage Jr. . You have finally been left alone , but one of the political party guests seems to be on your side . They rent a raven freein the elbow room . All you necessitate to do istouch it to transformand begin your outflow .
How to escape the cage
penetrate the bowl on the story to get theNapkin(1a ) , then also peck up theEmpty Cup . Use the Napkin on the bowl of urine ( 1b ) to get aWet Napkin , then use it to clean the floor and reveal a foreign formula . The paths join the symbol in a traffic pattern that goesheart , Sunday , eye , andmoon . expend this as the combining to start the box ( 1c ) , then take theBread . employ the cup to tap on the bars ( 1d ) , whichattracts the Raven . expend the cabbage on the raven , which provide you to transform and escape the cell .
How to get the Vampire Teeth
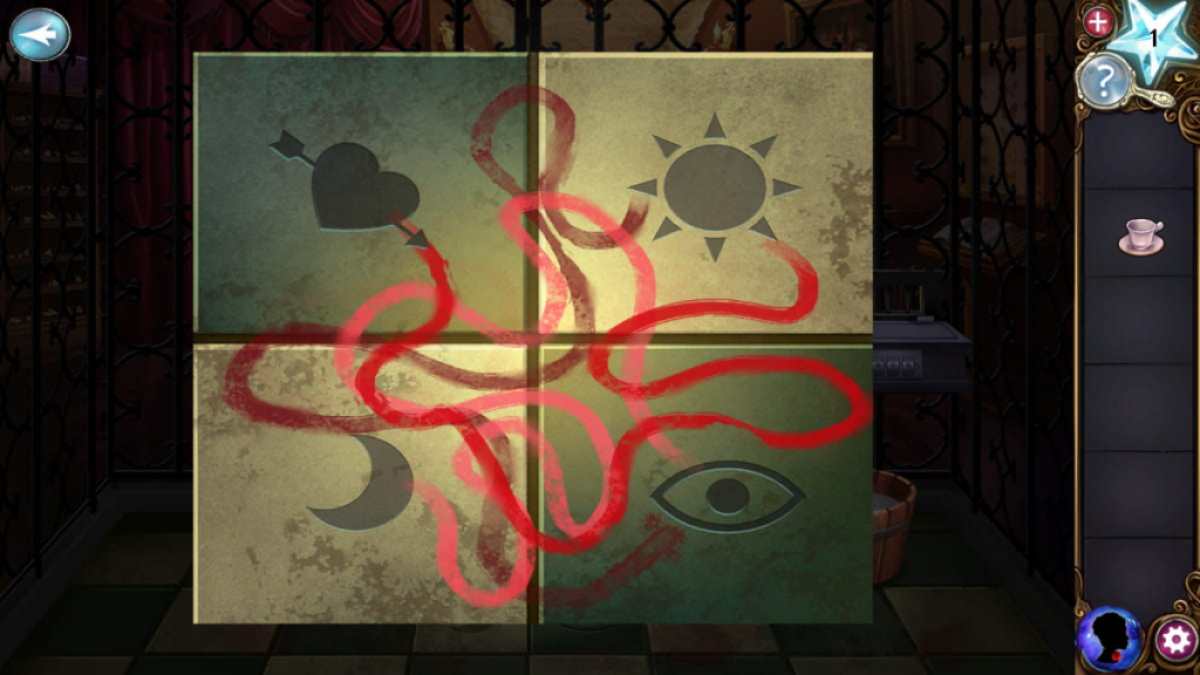
In human descriptor , chatter thebook of butterflies(2a ) and use the book of account ’s jot to put them in ascend order on the personal identification number ( Greenat the top , thenRed , Blue , Pink , Yellow , andOrange ) . This gets you theOrange Fairy Wings . Click the curtain ( 2b ) to attract it back , then take thePoker(2c ) and use it on the mermaid pillow slip lid ( 2d ) to remove it , then on the box ( 2e ) to knock it to the floor . foot up theJeweled Skullfrom inside the box .
In raven phase , blab out to the other raven ( 3a ) and then peck up theLetter Opener(3b ) . come home the mirror behind the pall ( 4a below ) , which will drop it to the floor . you’re able to now return to human form and pick up theMirror(2f ) .
Use theLetter Openeron the curtain ( 2b ) to get aCloth , then click the stand ( 2 guanine ) and put the mirror on it to start a vampire teeth puzzle . only click each set of teeth that does n’t have a reflection to have theVampire Teeth .

Image by Pro Game Guides
How to break out of the room
Become a Raven , take theNetfrom the mermaid case ( 4b ) , and use it on the example . tick the net while it is on the case to get theMermaid Scales . Also take note the pattern scratch into the top of the dentition casing ’s top , which show the particular now you have in a NESW configuration .
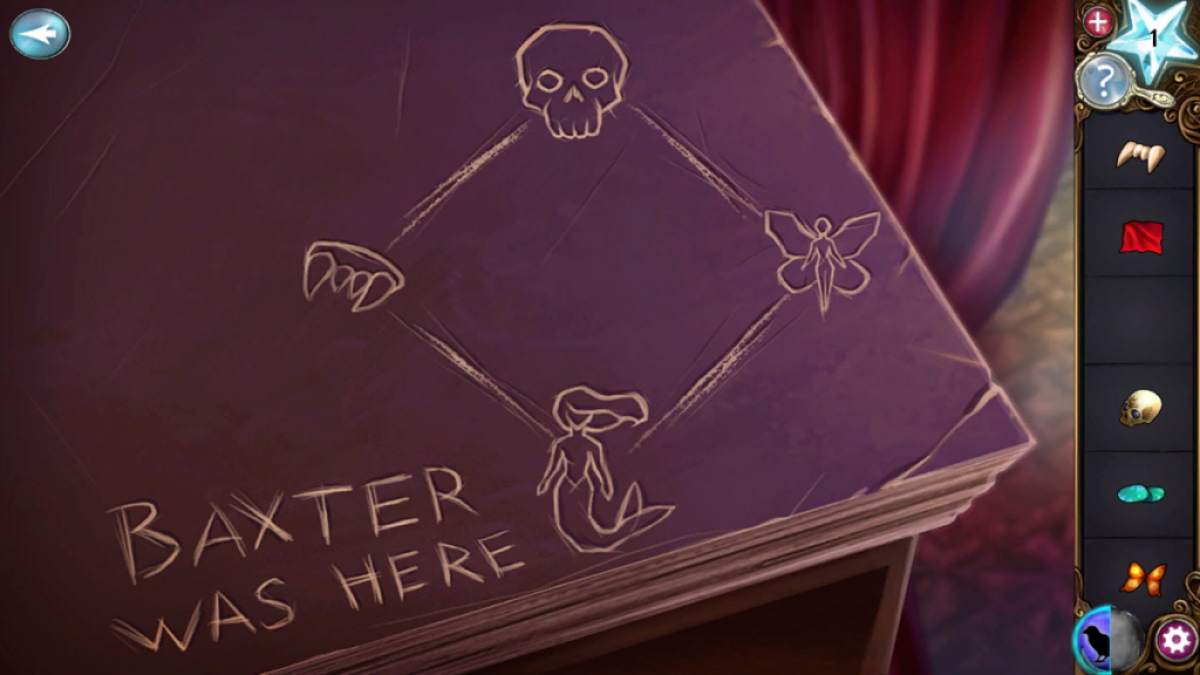
In human form , click the mesa in the center of the way ( 2h ) and place the four objects on the table , then move the objects into the right position using the center berth to help you move the others ( skullat the top , wingson the right hand , mermaid scalesat the bottom , andteethon the right ) . This opens the table up , so go back into human form and take and utilise the material on the polish in the middle of the table to get aGreasy Cloth .
Select the right-hand - hand picture frame ( 2i ) and apply the greasy fabric on the silver name tag at the bottom to reveal the code1841 . tick the doorway ( 2j ) , enter the codification , and felicitation ! You’vecompleted Chapter One .
Screenshot by Pro Game Guides
Haunted Hunt Chapter 2 Walkthrough
At the end ofChapter 1 , Moira has get by her jail cell and used Raven ’s form to intermit herself out of the way she was in . Still snare in the house , she hit upon some séance equipment . Perhaps she can summon a ghost to help her evasion in our Haunted Hunt Chapter 2 walkthrough .
In human form , look at thepainting on the wall(1a ) , which shows the whole step for summoning a ghost . There are six cd here , four of which are illume . Note the aim on the footstall ( the Ouija Board and planchette , plus the reflections of the moonlight on the board ) .
How to enter the secret room
Now get a close - up of thebookshelf(1b ) . You ’ll note five of the books have bar on them :
Go into Raven form and pick up thePlanchette Half(2a ) andCandle(2b ) . Click the painting ( 2c ) to move it aside and take asecond Candlefrom inside . chatter each of thewindow shutters(2d ) until they revivify the pattern of moonshine on the table as it is in the photograph ( see below ) . Then prize theGlobe(2e ) for a close - up . penetrate the five countries in the order above , which will launch the bookcase and divulge a confidential room .
Now back in human form , click the new ingress to go into the hole-and-corner room . Go straight back to Raven form and take yourthird Candle(3a ) , the second half of thePlanchette(3b ) , and theDowsing Rod(3c ) . Then cluck the clothes ( 3d ) , which moves them to discover afourth Candle(4a ) .
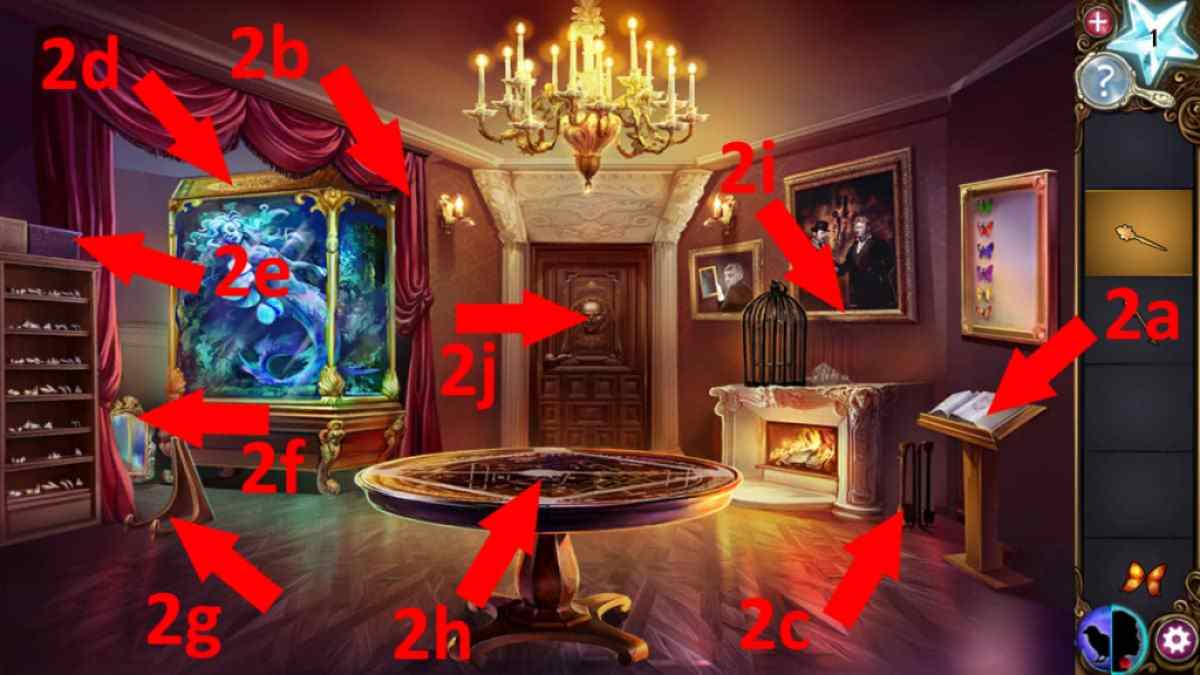
Image by Pro Game Guides
Click the moths on the pocket of the blue jacket ( 4b ) to unwrap aBroken Pocket Watch , with its one continue hand pointing to43 . Also , unfold the left over drawer to get afifth Candle(4c ) .
How to use the Ouija Board
As a human , enter the bottom left closet ( 5a ) to get asixth Candle , then enter the top of the desk and take theOuija Board(5b ) . come home the broken picture show underframe ( 5c ) to get aGlass Pane , then start the box ( 5d ) and get thePendulumfrom at bottom .
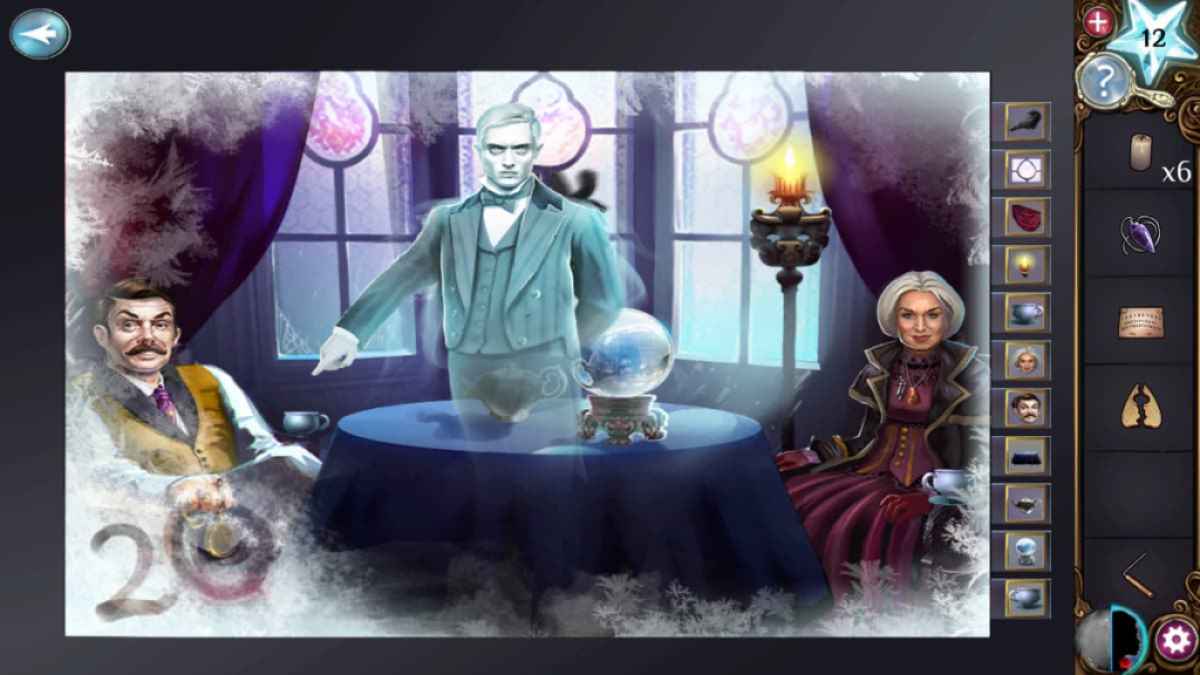
Back in the first elbow room , add the glass pane to theCamerato fix it , then snap it again to reveal a blurry beguile image you need to bring into focus . You do this by moving the tabs on the right into the correct positions ( see the image above if you ’re fight , as it can be quite tricky ) . Once you do , a ghost appear , pointing tothe number 20 in the bottom left of the photo .
When you arrive back out of the exposure , a secondDowsing Rodwill fall from the television camera , so pick it from the flooring under the camera . Add the six cd to the candlesticks , put the Ouija Board on the table , and place the two douse rods on the right pedestal . Next , place the two Planchette halves onto the board and add the pendulum to the left base .
Image by Pro Game Guides
Once done , a compartment open ( 6a ) to break aTinder Boxin a orphic compartment . Take it and apply it to light ( from left-hand ) thefirst , 2d , 5th , andsixthcandles . If you ’ve aright opened the shutters in Raven form , you ’ll get a cut scene , because the plug-in is ready to use !
How to escape the room
press the plank and you ’ll be asked for the ghost ’s meter of death . Move the Planchette to2,0,4 , then3 , at which time Baxter will appear . He ’ll ask you to move the corner by the door , but a trap is triggered before you get a chance . Return toRaven formand fly up through a break that has appeared in the holebehind where you moved the picture(2c ) . This commence a piping connection puzzle .
The exit you necessitate is marked in the image above . throw the pipesas you move to pursue this path , move onto the crack , and you ’ll have completed Chapter 2 of the Haunted Hunt .
Haunted Hunt Chapter 3 Walkthrough
In this third part of ourHaunted Hunt Walkthrough , Chapter 3 line up our chassis - shifting hero Moira in an arsenal having just fly the coop a pernicious trap by flying through the pipes in the form of a raven . What will bechance her next ?
Immediately shift to raven word form and pick up the two readiness ofWood Chipsfrom the console ( 1a ) and the ledge ( 1b ) , plustwo Cobwebs(1c and 1d ) . Click the fix in the wall ( 1e ) to find a third set ofWood Chipsand anotherCobweb , then get to the draftsman ( 1f ) to get aScrewdriverand a quaternary slew ofWood Chips .
Back in human class , take anotherCobweb(2a ) then sink in the threshold back - bequeath ( 2b ) and enter the kitchen .
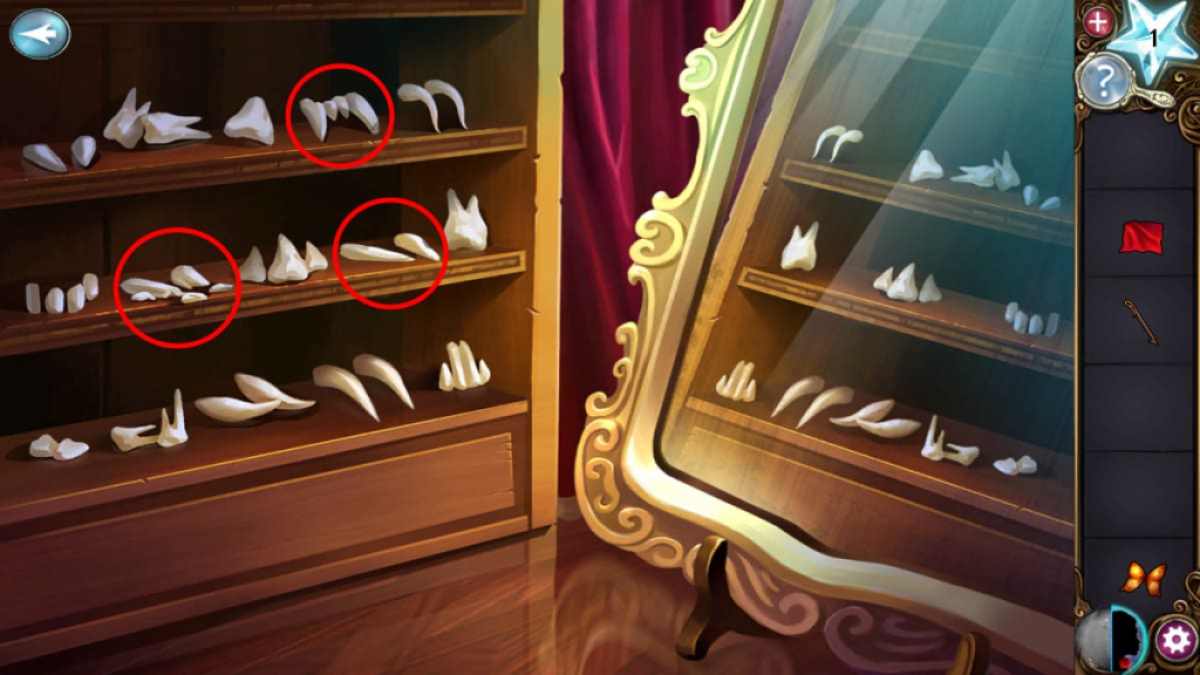
Image by Pro Game Guides
swap to prey course and collect two more sets ofWood Chips(3a and 3b ) , and anotherCobweb(3c ) , then use the screwdriver to get theScrew(3d ) .
As a human , cod theCobweb(4a ) , then go back to the armory . Become a raven and vanish through the muddle once more , adding all the wood chips and then the cobwebs to thenest(5a ) to make out it . Pick up theNest , and also theSaltyou’ll find underneath it afterward . While here , click the beam at the back ( 5b ) and note thepattern in the circle .
How to beat the Magic Barrier
Back in the kitchen in human form , seem at thepattern in the book(4b ) . Go to the armory , take raven shape , and get across themagical pattern(1 g ) . Use the salt on the symbolisation , copying the two sets of symbols you have for the circle and the triangles . This willtake the witching roadblock down .
You now have access to the storage locker ’s lock , but you take the combination . You ’ll find the four answers in raven word form , at locations marked on the image above :
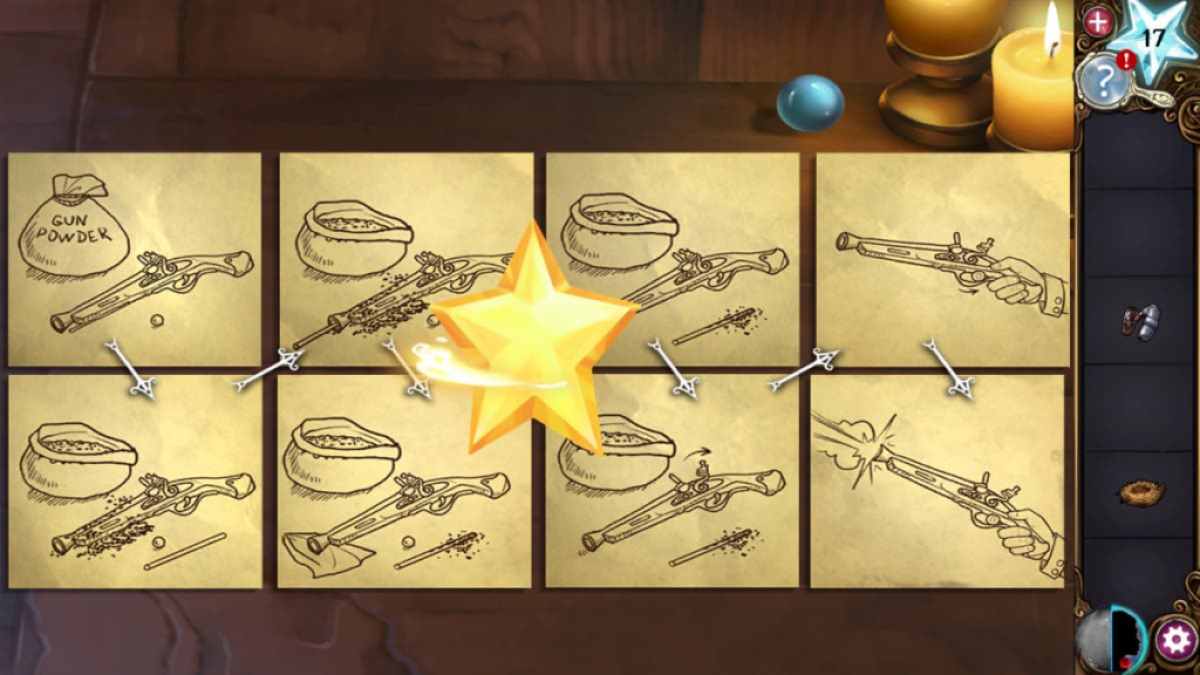
With the storage locker doors opened , you’re able to take thegauntletsfrom the armor suit ( 6a ) . Return to raven form , fly up into the hole , and use the gauntlet to recall theSilver Musket Ball(5d ) .
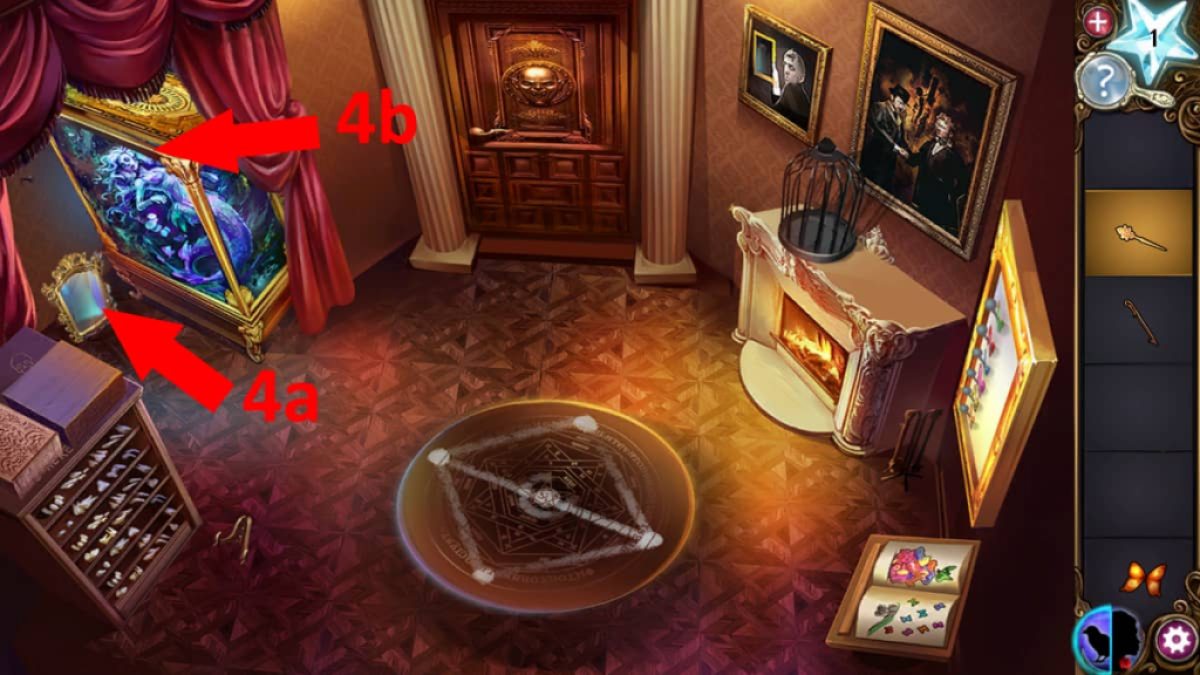
Image by Pro Game Guides
cluck themusketon the tabular array in the armory ( 6b ) and add the silver musket glob , then rearrange the instruction posting until they make sensation . Once arrant , you ’ll receive theLoaded Musket .
How to give the Hellhound some water
Go into the kitchen as a human and apply the musket on thewater pipe(4c ) . Click the mess now in the sinkhole to get theCork , then return to the armory and add the bobber to theHunter ’s Kit(6c ) . you may now move the detail in the kit around by drag them . Once everything is perfectly organized , you ’ll get theBroken Knife Handle .
Go into the kitchen and put the razzing ’s nest in the sink , then utilise the handle on the tap to get running water and take then fill with Water . Give that to the Hellhound who will immediately perk up , but still involve to be set spare .
Completing the Map Puzzle
Back in raven form in the kitchen , you ’ll find apinthat landed on the top shelf ( 7a ) when the musket explode . pluck it up , then click theboard on the back wall(7b ) and use the pin on it to begin a map puzzler . Once consummate , you ’ll need to do it another two prison term to open up a secret compartment in the wall . Still in Raven form , collect theWhetstonefrom the compartment .
Return to human form , go to the armoury , and open theright side of the cabinet(6d ) . habituate the nookie tofix the sabreand the whetstone to sharpen it , then use the gantlet to blame it up . Go back to the kitchen , and use the sabre on the string tofree the now happy hellhound(Beezle ) . When it digest , you ’ll see a kettle of fish where it was laying . dawn the holeand you ’ll fill in Chapter 3 of Haunted Hunt !
Haunted Hunt Chapter 4 Walkthrough
Haunted Hunt is an beforehand - level puzzle secret plan in theAdventure Escape Mysteriesseries . At the conclusion of Chapter 3 , shape - gearstick Moira freed Bezzle the hellhound and discovered a hole in the ground to get away the armoury and kitchen . Now she needs to sneak into Otto ’s individual rooms to find out his plans . If you ’re stuck in Haunted Hunt Chapter 4 , you ’ll find oneself all the clues you require in our walkthrough below .
Begin by clicking the dust in the midsection of the way three time to reveal and hoard theJar of Fish(1a ) and theBell Ringer(1b ) . expend the ringer on theBell(1c ) and then use the Bell ( once affixed ) to pull a quat .
relate : Lost Lands 3 Full Walkthrough ( Golden Curse )
Screenshot by Pro Game Guides
Put the Jar of Fish on thebox(1d ) , then sink in it to knock it off . Once smash , the Arabian tea will wipe out the fish , and while it does , you may adjoin it to be capable toshapeshift into a cat-o'-nine-tails !
Maze Puzzle Solution
get across the end of thecat footprints(2a ) to depart a maze mystifier . At the turn pick , go : leave behind , left , right , right , right , left , right , up at the crossroad , right , and then out . It ’s hard to describe in words , but you ca n’t fail , so you may just require to keep trying .
Otto’s Private Chambers & Library Puzzles
Once you ’re in Otto ’s Private Chambers , revert to human form and take theGhost Book(3a ) , then godownstairs(3b ) to the depository library .
chatter therug(4a ) and thecurtain(4b ) to reveal more of the room and take theCord(4c ) . Move into thebedroom(4d ) .
Pick up theChair Leg(5a ) , take theWheelfrom the middle drawer ( 5b ) , then go back into the subroutine library and use the wheel on the hole at thebottom of the steps(4e ) , and the president leg on thestep(4f ) to ready the steps . you’re able to now range theGhost Bookin the gap on the ledge ( 4 g ) to expose thecrank(6a ) .
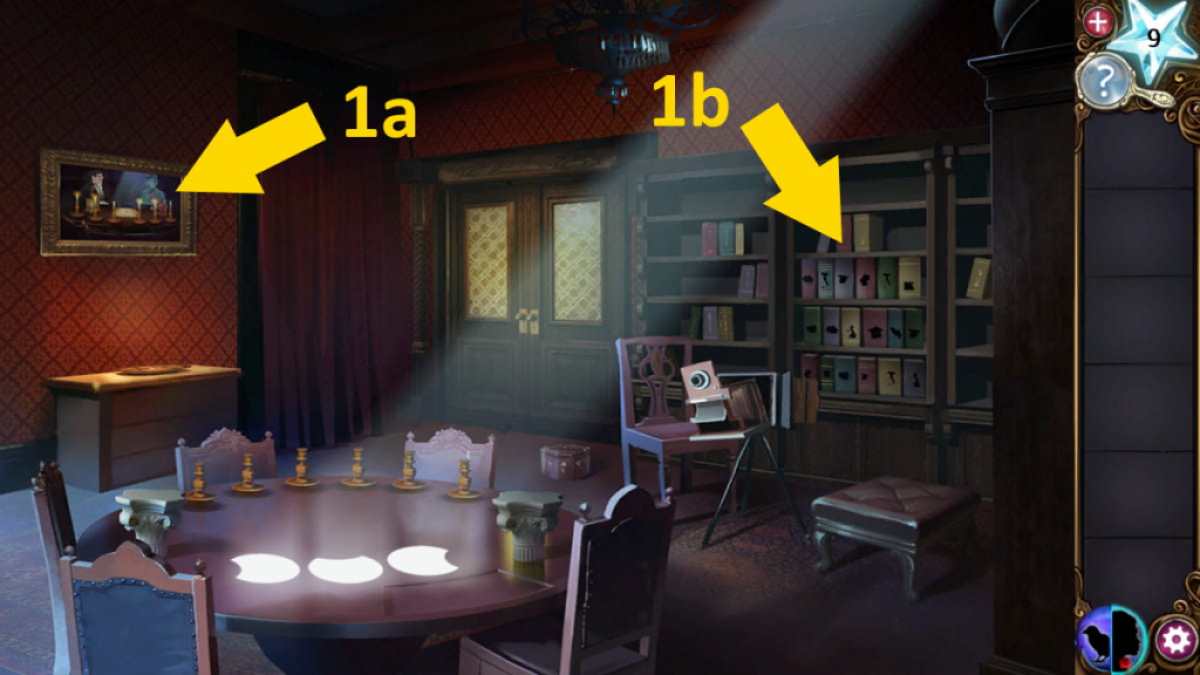
Image by Pro Game Guides
Back in the bedroom , use the cord on thecauldron(5c ) to empty it onto the trading floor . Take theBrass Piecefrom the toppled caldron , and take in aVault Door Ringfrom in the fireplace itself .
Otto’s Room Combination Puzzle Solution
Go back to the first of Otto ’s rooms and use the Brass Piece on thedesk draw(3c ) to start a compounding puzzle . In cat form , look at the road the cat takes and wherever it check , there ’s a hint ( xanthous circle , below ):
Set the Brass Pieces to position25125and the closet will open , from which you’re able to take anotherVault Door Ring . Now go into cat form and you ’ll see there is also aGhost Keyin the cupboard . Take it to the sleeping accommodation and ( still in cat form ) use it to open up the jewellery box ( 5d ) . Take theDiamond RingandTurning Keyfrom inside .
touch : How to stupefy Trace Escape Room - Full Walkthrough
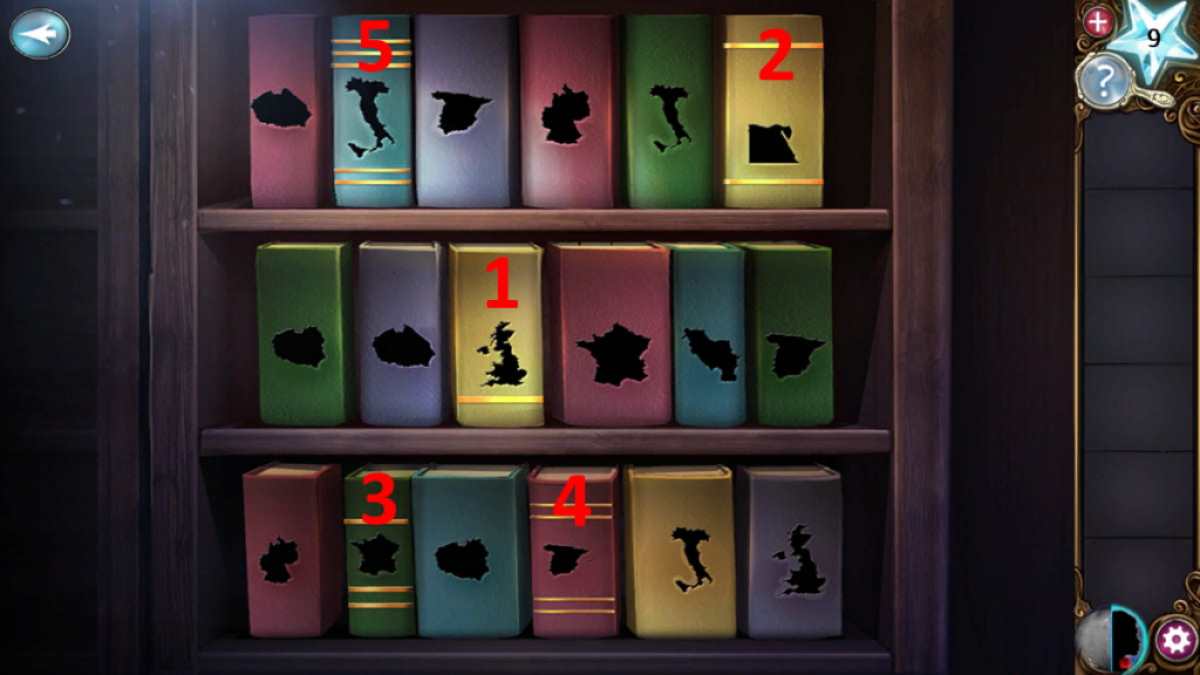
Image by Pro Game Guides
Use the diamond ring tocut the glasson the bookshelf in the program library ( 6b ) and take theOil Can . expend the rock oil on the crank ( 6a ) , then click the crank to lower the pendant . fall into place the lowered pendent to get a thirdVault Door Ring .
Piano and Music Box Puzzle Solution
Go back up to Otto ’s first elbow room and apply the turn key on theMusic Box(3d ) . you could do this multiple times to hear a five - note tune . Now click thepiano(3e ) and reproduce the tune . Luckily you could see the notes in cat conformation , both coming from the music loge and on the piano cay , so you just demand to bet them in the veracious order . The music box is then opened ( 3d ) and you may take the nextVault Door Ringfrom it .
Now select the equipment that wasunderneath the carpeting in the library(6c ) to regain itneeds a combination . In cat class in each room , you ’ll notice some cat start marks , each of which is on an detail with a verbal description pertaining to a time of year ( red forget me drug on the cat figure of speech above ):
So , use code5317to enter the lock and take the finalVault Door Ringfrom the secure beneath .

Image by Pro Game Guides
Otto’s Room Wall Mount Ring Puzzle and Animal Puzzle Solutions
Go up to the first of Otto ’s rooms and put the five rings on theWall Mount(3f ) to begin a halo puzzle . Once solved ( see below ) the vault will open and you could go inside .
Turn into a cat to see the full details of theanimal puzzle on the wall . Each panel can be change over between two animals , oneflyingand oneland - base , in cat form . While in human form , you’re able to interchange each control board betweenblue(sky ) andgreen(ground ) . The panel call for to jump blue and green and have matching animals in cat manakin for thepanel to unfold .
Once open , you will find Otto ’s secret at bottom . And behind his privy ledger , aKey . you could now go back to the library and utilize the central toopen the lock in door(6d ) and finish Chapter 4 !

Image by Pro Game Guides
Haunted Hunt Chapter 5 Walkthrough
The locked door leads to Otto ’s living-room elbow room . mark thepicture on the table(above , and below as b1 ) , which looks like parts of four separate images made into one .
Change to computerized tomography vision and pick up thetwo Ghostly Gears(a1 ) , thenchange the symbolson the cupboard ( a2 ) to match those in the draftsmanship . The top figure is already correct . Click the second range of a function down three times , the third image down once , and the bottom look-alike double .
Once complete , the cupboard will sweep open . fall to human word form now so that you’re able to brush away the cobweb at heart to find someMatchesin the bottom draftsman ( b2 ) and take aKeyfrom the top shelf ( b3 ) .
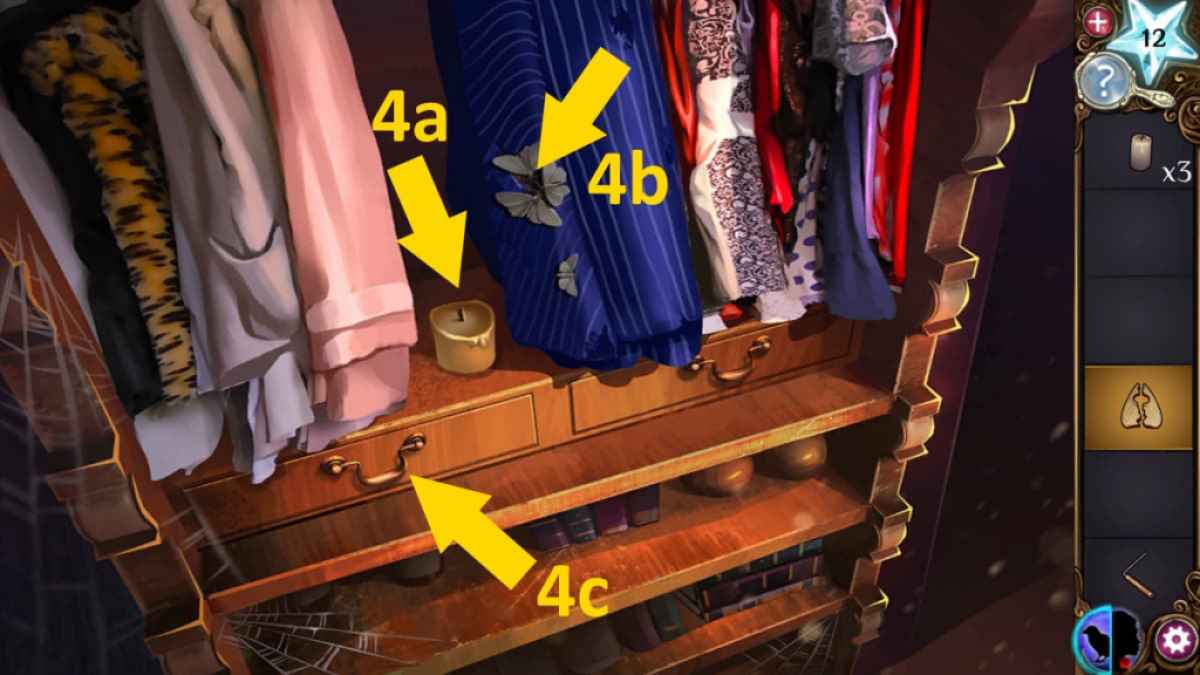
Image by Pro Game Guides
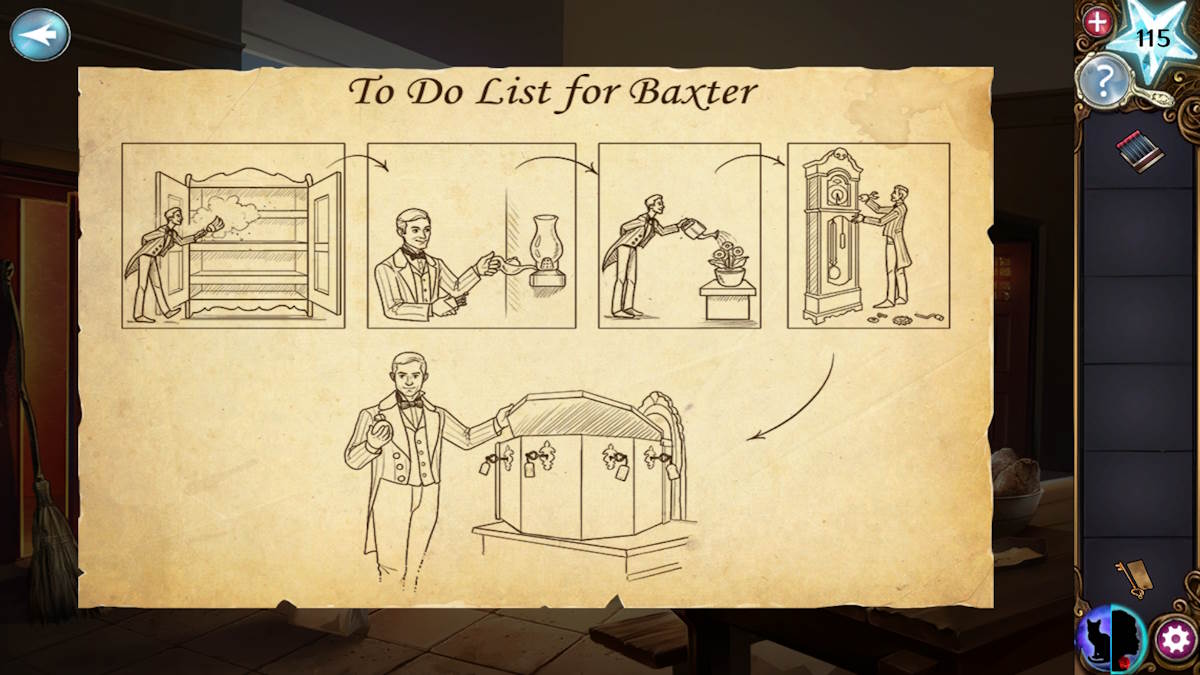
Move through the door on the right ( b4 ) to go into the kitchen . Check out the newspaper publisher on the board to readBaxter ’s to - do list(above , and below as c1 ) . It lists Baxter ’s daily job , which is a clue to what you need to do next . You ’ve already dusted the shelves , so there are four task to go .
The lamps puzzle solution
Open Baxter ’s box ( c2 ) to happen someKerosene Fuel . If you expend the fuel on the lamp here , and then utilize the matches to light it , you ’ll seetwo green dotsappear on the lamp , but they ’ll quickly disappear .
If you move back into the parlor and do the same with the lamp there ( b5 ) , you ’ll only seeone greenish dot , but it will stay put on . Return and light the previous lamp ( c3 ) now , andit will quell lighted . Return to the parlor and use the other door ( b6 ) to enter a sitting room .
Light the kerosene lamp here ( d1 ) , which lights up withthree green dots . This completes this puzzle and opens a hachure below the lamp ( d2 ) , from which you’re able to take asecond Key . Take theWatering Canfrom the couch ( d3 ) , launch the cupboard ( d4 ) , and then switch to cat imagination to find athird Ghostly Gear(below ) .
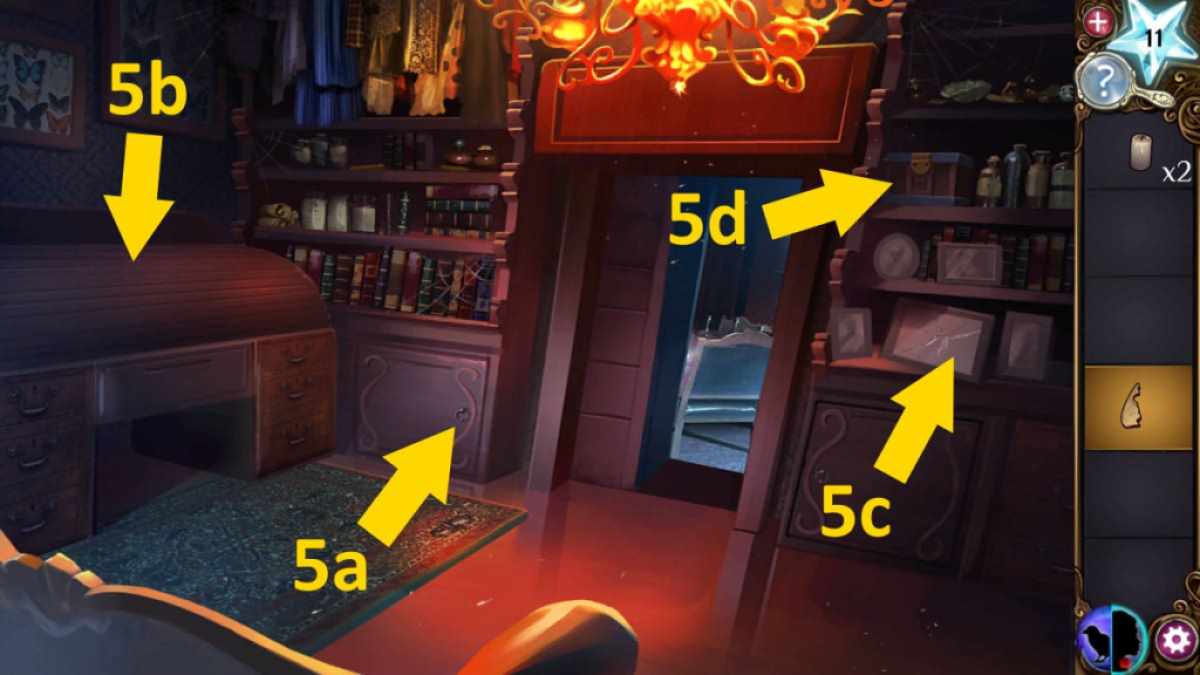
Image by Pro Game Guides
Move to the kitchen and fill the watering can in the sink ( c4 ) to get aFull Watering Can . employ the can to water the flowers in the sitting room , after which you may take athird Key(d5 ) and aContract(d6 ) . translate it to find that Baxter had signed it with Otto to keep his secrets when he began run for him .
The clock gears puzzle solution
Still in the kitchen , await at the box ( c5 ) but through the eyes of the computerized axial tomography to see each of the six digs has afingerprintthat ’s used on it . The third one play off the fingerprint on the contract , so transfer all the others on the guinea pig to match it by come home them ( see above ) . The boxful will open up , provide you to take yourfourth Ghostly Gearfrom at heart .
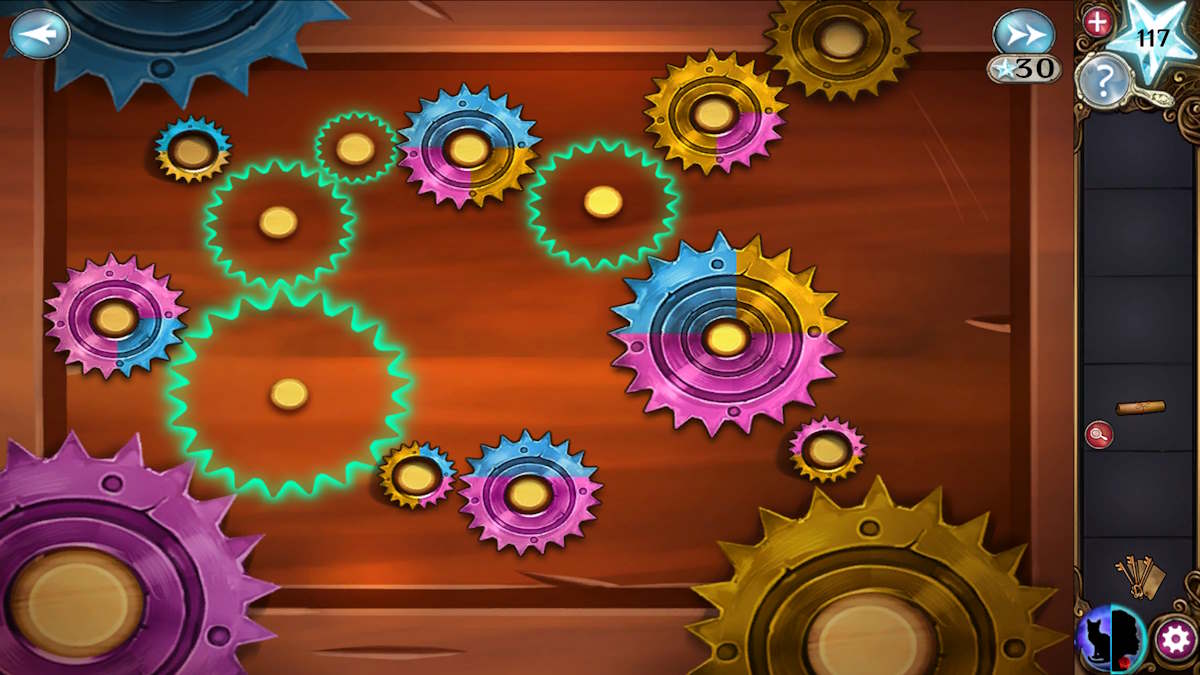
Move back to human form and go into the parlor . spread the clock(b7 ) and add the four gears to begin a color - matching teaser . You ’ll involve to fleet into computed tomography form to see the colors on the ghostly gears and complete the puzzle , ensure all color rival . The answer to the puzzle is pictured above . Once complete , you’re able to take afourth Keyfrom the substructure of the clock .
The purple box puzzles
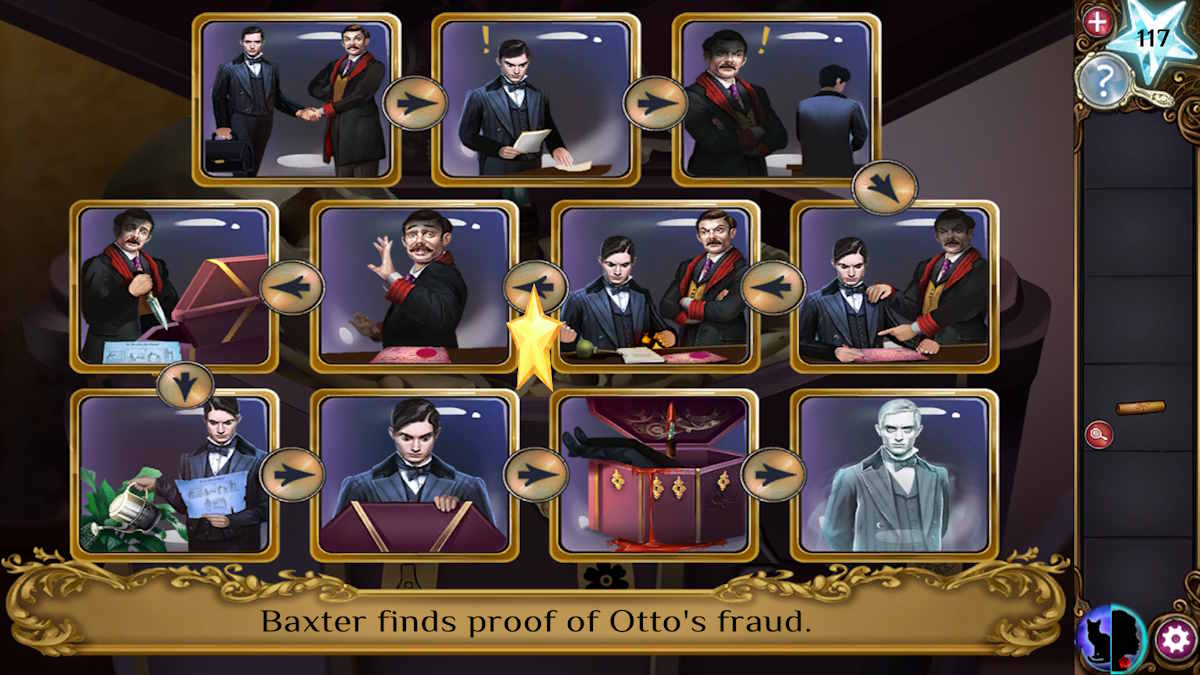
Go into the sitting room andplace the four keysin the great purple boxful ( d7 ) . The order of the Francis Scott Key is visualize above ( it ’s the same as the job number ) . When the box open up , you ’ll need to get the story flat by placing the timeline images in the correct order ( see below ) .
It would seem Baxter is unable to serve you as he is still bound by the contract . When you move the skull after work on out the chronicle , takeBaxter ’s Keyfrom the box . Move back into the kitchen , use the key toopen the back door(c6 ) , and you ’ll have completed Chapter 5 .
Haunted Hunt Chapter 6 Walkthrough
You obtain yourself in another kitchen area , still needing to get upstairs . There ’s a dumbwaiter here but you ’ll necessitate to fix it first . Go into cat form to see aghost pointing at the tabular array .
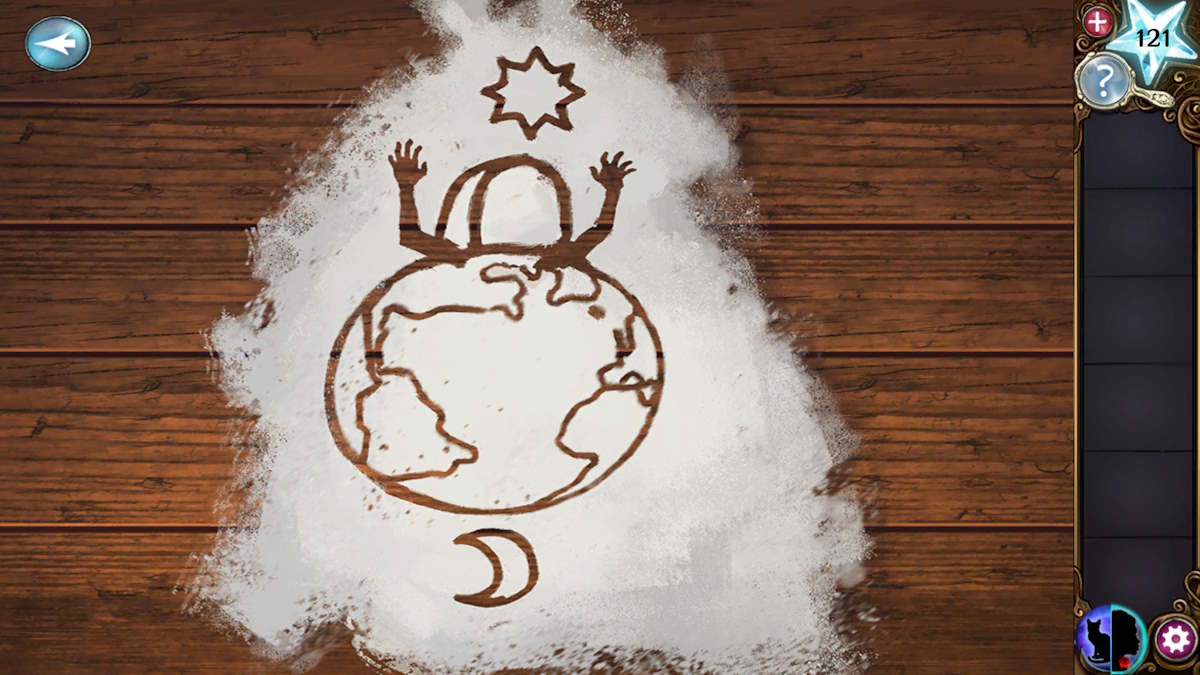
Return to human form to take theFlourfrom the shelf ( e1 ) , convert back to a cat to decant it onto the table ( e2 ) , check out the figure of speech , and then take thePickle Jar(e3 ) .
The bells puzzle solution
Move through the door on the right ( e4 ) into a dormitory and pick up theRope(f1 ) . Change to bozo mannequin to see the numbers on the toll ( f2 , I ’ve marked them on the human image above ) . Now you need to ring each resident ’s Melville Bell ( f3 ) and note the figure of numbers the bells call . This gives you the four computer code to open up their box ( f4 ):
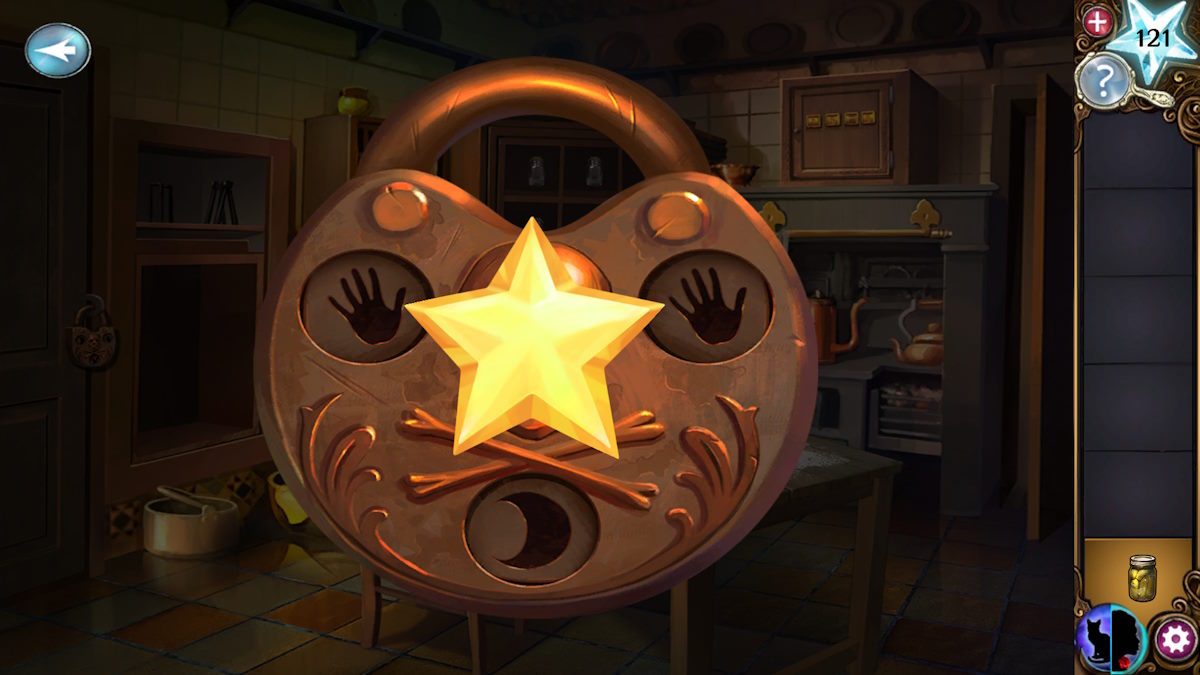
Go back to the kitchen , select the padlock on the door ( e5 ) for a close - up , and set the two top symbolisation to hand and the bottom one to a moon ( tomatch the double in the flour ) .
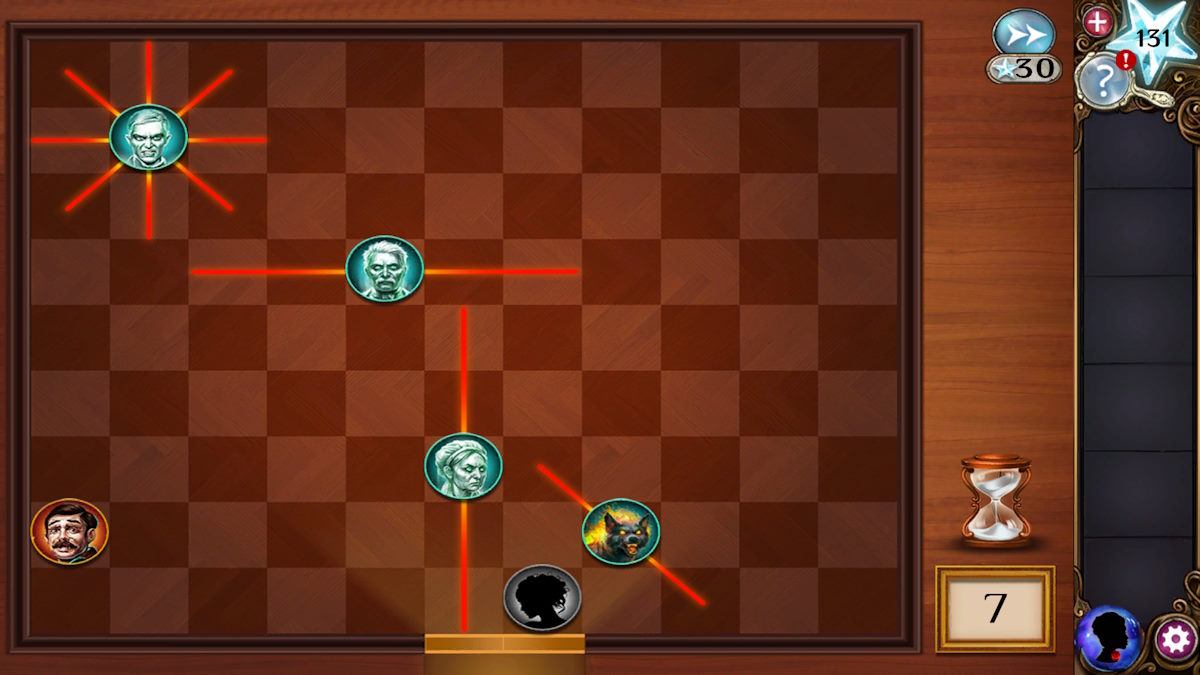
The lasers and lens puzzles
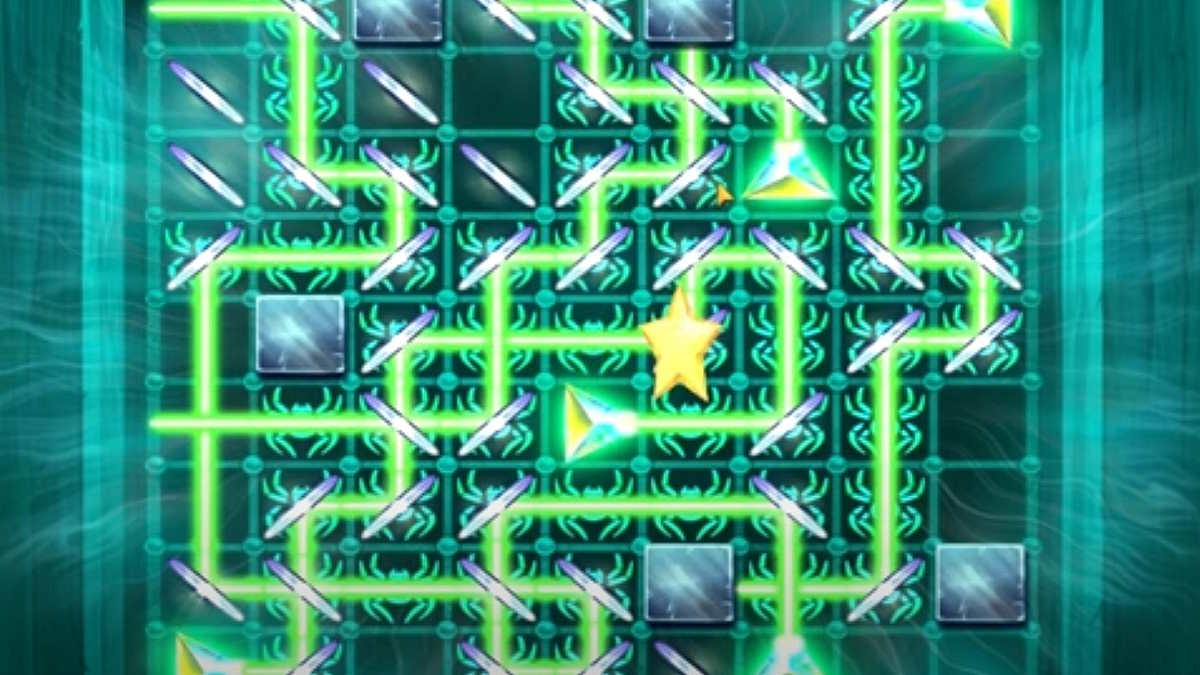
You ’ll regain yourself in a storage sphere . Use the cay to launch the closet ( g1 ) and fall into place on the sorcerous trap inside to start alens and light puzzle . To win this one , you need the light to glitter on every wanderer you may see in human form . However , you take to be in cat form to dispatch it as otherwise , you ca n’t see the laser . I ’ve put the solution below . Once complete , take theWrenchfrom the boxful .
Use the veg shortening on the wheel ( g2 ) to grease it and then the twist to deform it , and the political platform below will rise . Take the secondRed Shoefrom its grizzly message , along with aHorseshoeand some moreRope . Also , pick up theLarge Rusty Wheelthat has fallen off the pulley organisation .
The shrines puzzle
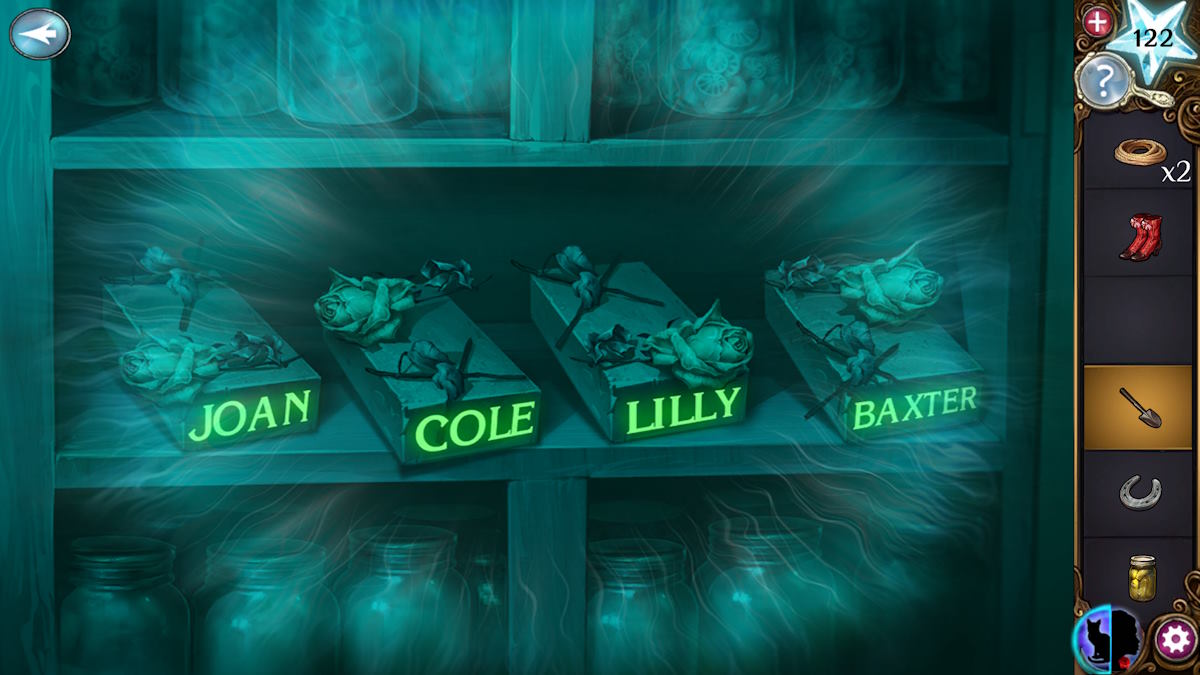
pick out the shrinesnext ( g3 ) for a close - up . depend at them in bozo form and each has a name matching those you saw earlier . Place a matching item on each :
Once concluded ( and still in qat bod ) the ghost will offer you aRusty Small Wheel . A code,4727 , will also appear on the floor .
The bottles puzzle solution
Use the codification in the kitchen to give the box ( e6 ) and take theAlcohol . snap the buffet full of bottles ( e7 ) for a stopping point - up , add the alcohol , and you ’ll start a color - mixing puzzle . Go into cat-o'-nine-tails sort and note down all the colors on the jars . With that done , go back to human form and stream the correct colors into each jar . The solution is below :
Take theAmmonia Cleanerfrom the edge of the cesspool ( e8 ) once the mystifier is complete . Now add the two wheel and the towage forget me drug to the food elevator ( e9 ) , use the ammonia water to make clean the wheels , and you’llhead up in the food elevator . At the top , you ’ll meet Euphemia , which concludes Chapter 6 .
Haunted Hunt Chapter 7 Walkthrough
Just when you mean Euphemia may be there to avail you , she capture you once more ! She ’s a much more skilled hunter than Otto and needs to be consider seriously . She leaves you pin , soyou need to get out . Click the image marked above and list below ( once each ) to solve the first puzzler :
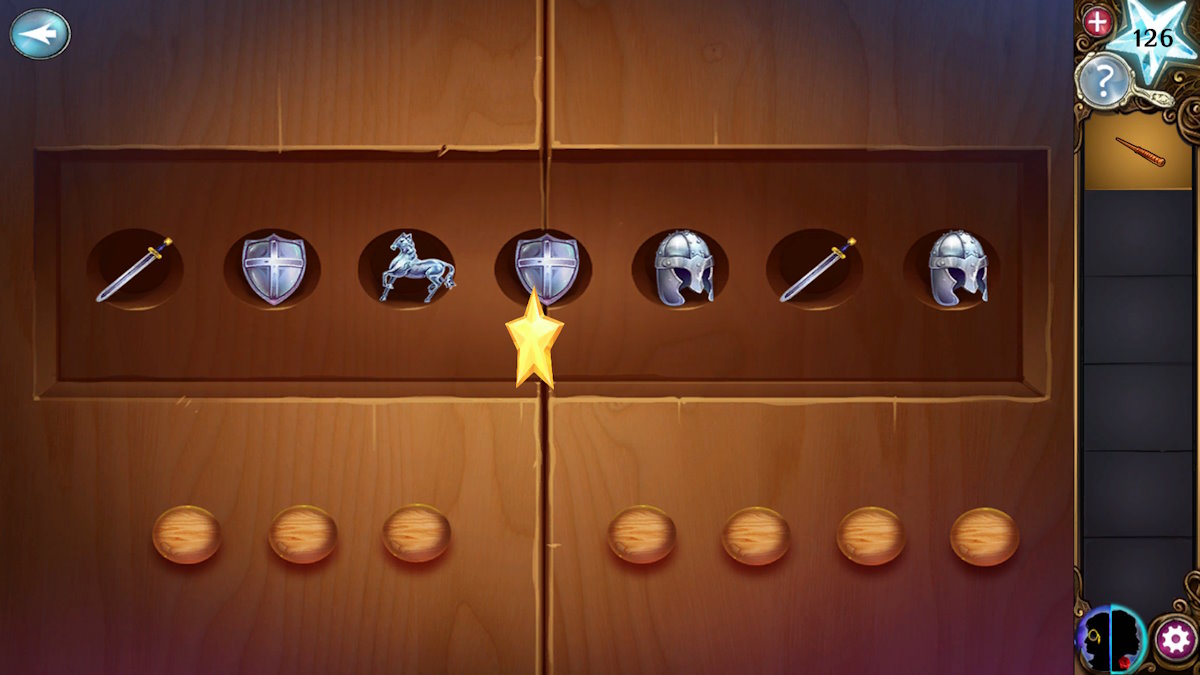
This cakehole Euphemia in the box , so you may explore the room . Take theMiniature Helmet(h1 ) from the table , theMiniature Shieldand separateSwordfrom the crownwork ( h2 ) , a secondMiniature Helmetfrom the top of the cupboard ( h3 ) , aMiniature Horsefrom the shelf ( h4 ) , and a secondMiniature Swordfrom the gramophone tabular array ( h5 ) . Also , cluck the top of the chair ( h6 ) to remove it and retrieve a secondMiniature Shield .
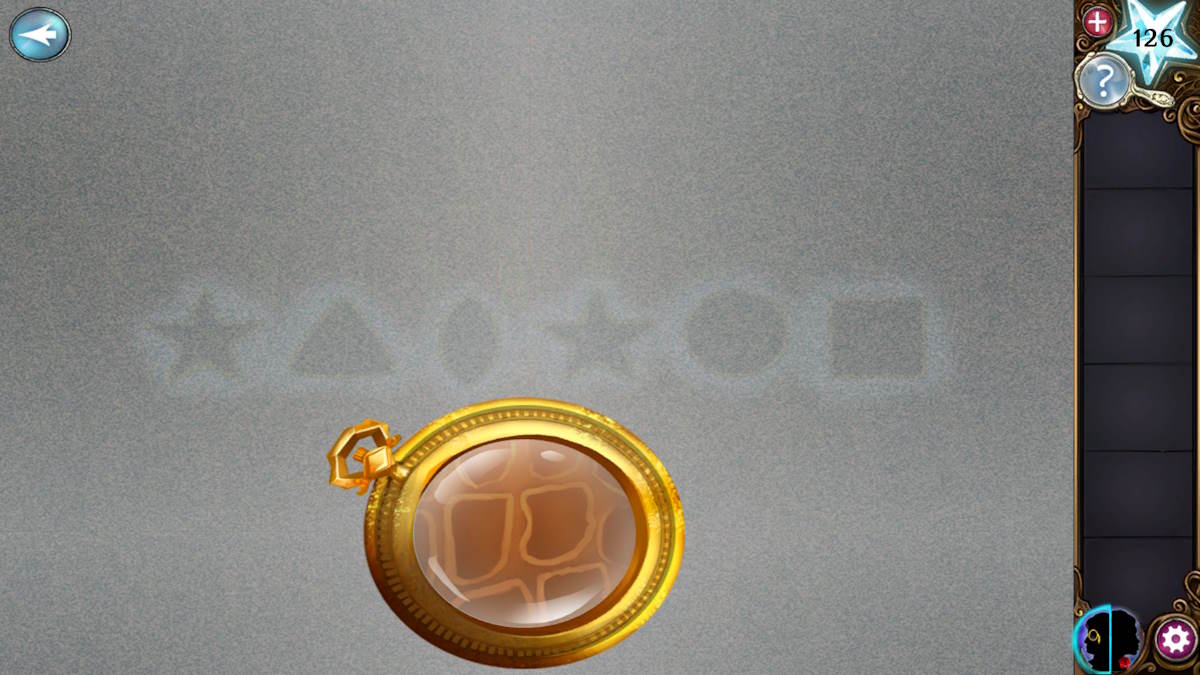
Select thecase in the bottom leftcorner of the way ( h7 ) for a finis - up and alternate to the monocle view ( where you previously changed into a cat ) . You ’ll see a series of shapes :
Screenshot by Pro Game Guides
Solving the miniatures puzzle
Now expect at thewand box(h8 ) , also in eyeglass mode , and tangle those shape from the top course into the midsection to fix and then take theBeam Wand . Get a close - up of the viewing boxwood ( h9 ) and examine the effigy by using the wand through each of the five cakehole in the sides . remark theorder the engagement items appearthat match the miniature versions you ’ve hoard . The order is :
Now select thecupboard door mechanism(h10 ) and add all seven miniature pieces to the wooden knobs . Drag them onto the hole above in the order you ’ve just key and the closet will unfold , allowing you to take theHalberd .
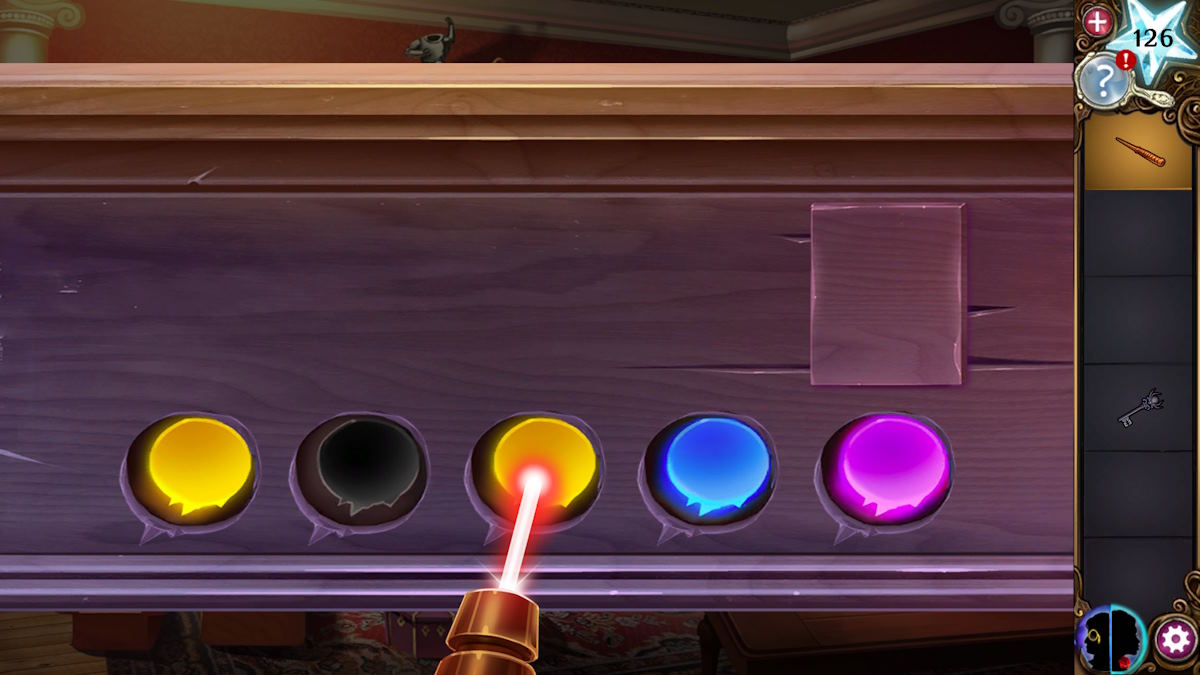
employ the halberd to break the curl on the box below the acoustic gramophone ( h11 ) and takeEuphemia ’s Keyfrom at bottom . Use eyeglass mode to examine the remaining box seat on the floor ( h12 ) and mention the colored star on the side :
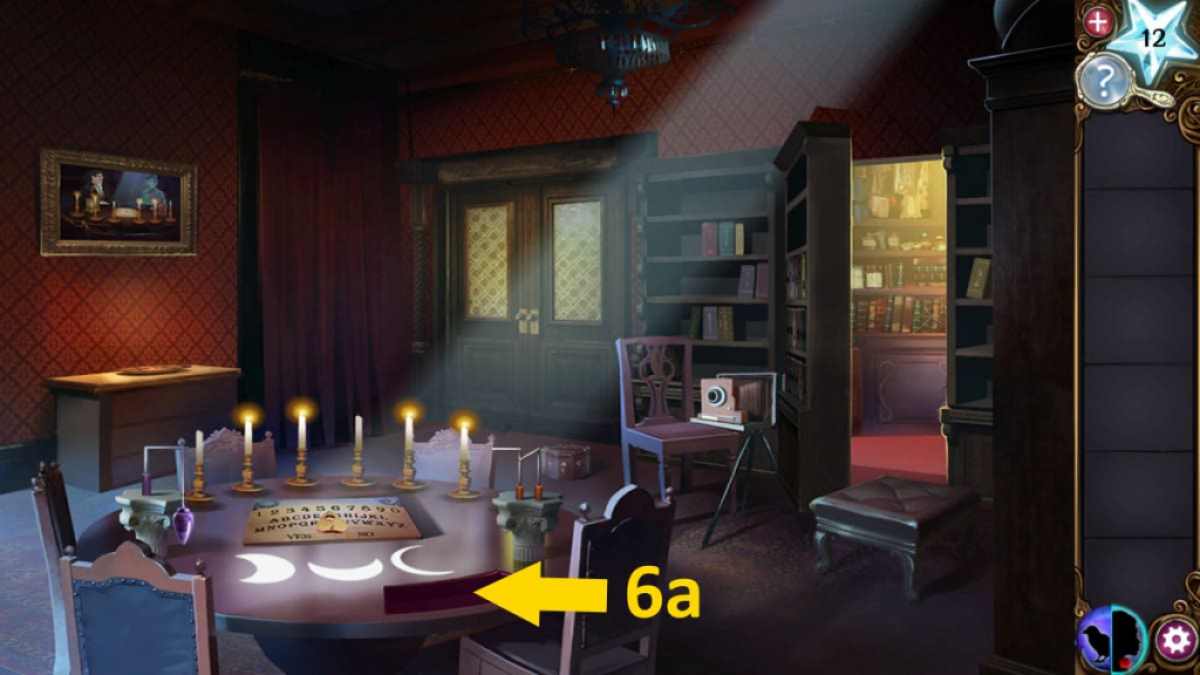
Image by Pro Game Guides
Euphemia’s machine puzzle solved
Use the wand on Euphemia ’s machine ( h13 ) to change the color in the hollow to match this normal . This is tricky as you’re able to only change a hole ’s gloss by moving onto it , and then move on to another circle . Do the following to make it work ( with the non-white circles above being 1 through 5 from left to right ):
This opens a keyhole on the side . Use her keyto open it anda threshold will appear(h14 ) , allowing you to move on to the showdown with Otto and complete Chapter 7 .
Haunted Hunt Chapter 8 Walkthrough
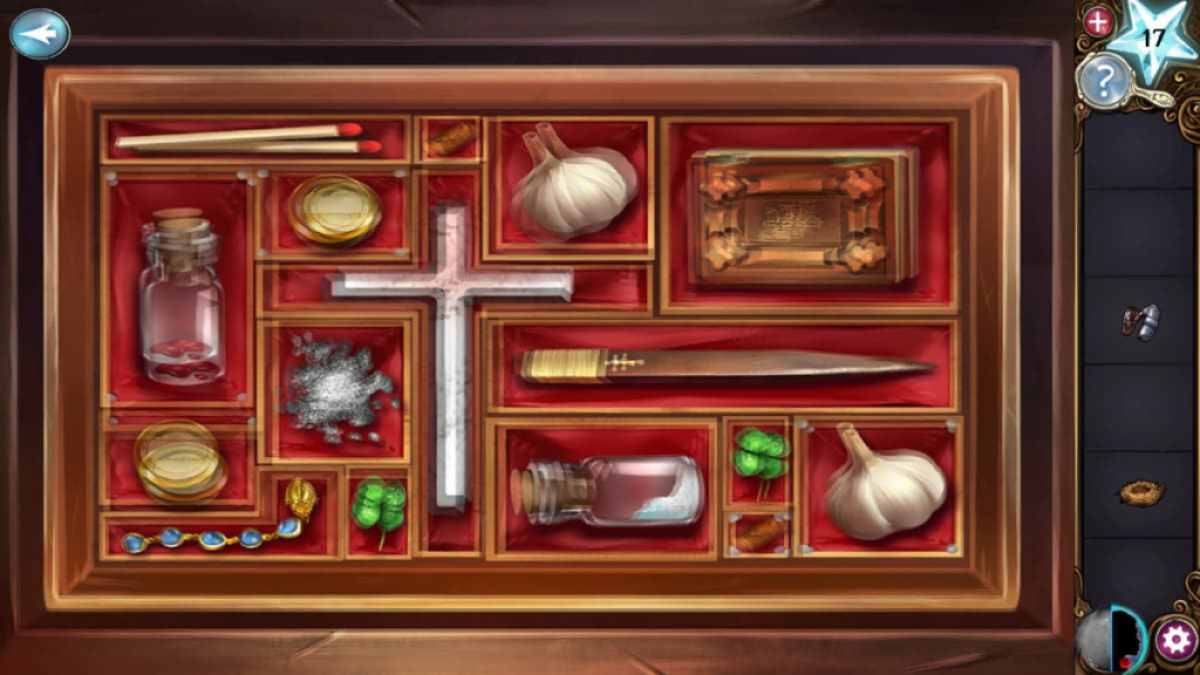
You now postulate to find a room to gather all of Otto ’s victims together for the showdown . plunk up theBust of Otto(i1 ) and take aDiamond Ringfrom the jacket pocket ( i2 ) .
Switch to the eyeglass purview to note the number on the right wing of the two cases ( i3 ) , which is 9 , 7 ( with a dot after it ) , and 2 . The case to its left has three spaces for a code that has a dot , a ' higher ' symbol , and a ' lower ' symbol severally . Use the code792(7 has the window pane , 9 is higher , and then 2 is lower ) to open this type and takeEuphemia ’s Diagramsfor a flamethrower , as well as devices for summoning ghosts .
You also takeEuphemia ’s Map , showing the localisation of her traps , which you could habituate in your inventory as a fast - travel gadget . Also note that , if you search at the function with the eyeglass , the numbers 8 , 4 , 3 , and 7 ( with a dot ) are written on it in loss . The four rooms mark on the function each has a code above it also made up of acid and up or down arrows . Only theSeance Roomhas four number so we can infer the computer code needed there is7843(using the same organisation as before ) . However , we ’ll demand to make the flamethrower before we can inactivate the boxes .
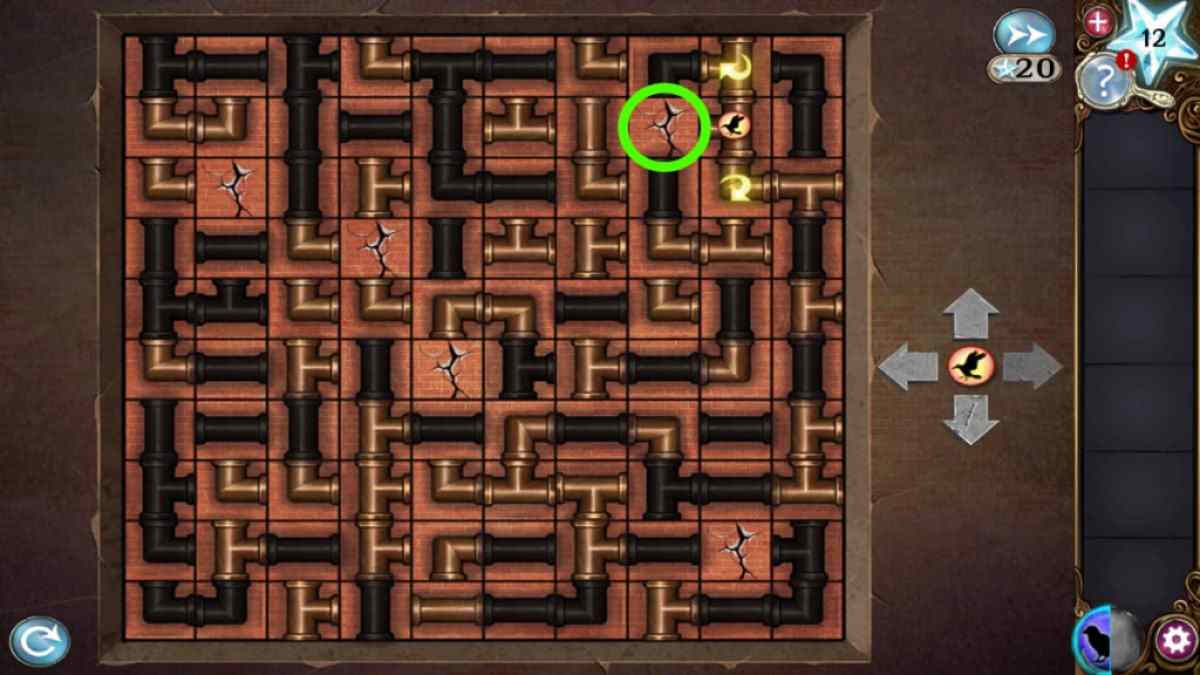
Image by Pro Game Guides
Making the flamethrower
Move into the storeroom ( i4 ) and take aFlintfrom the right closet ( j1),Coals and Woodfrom the fire ( j2 ) , then place Euphemia ’s diagram on the table ( j3 ) . sink in the diagram for a close - up once it ’s on the table and add up the flint , diamond closed chain , coals , and wood onto it to start a color - matching mystifier .
You need to locate the three main items on the central spaces , and then hem in them with plank that equate each other goal - to - end ( like dominoes ) but also the colors on the items . I ’ve included a picture of the complete puzzle above .
Pick up theFlamethrowerfrom the table and use it on the root ( j4 ) . This frees theKnifefrom them , which you may nibble up from the floor . Also , click the bricks that were exposed by burning the source to call for someStones . Finally , use the knife to cut and amass someRope(j5 ) .
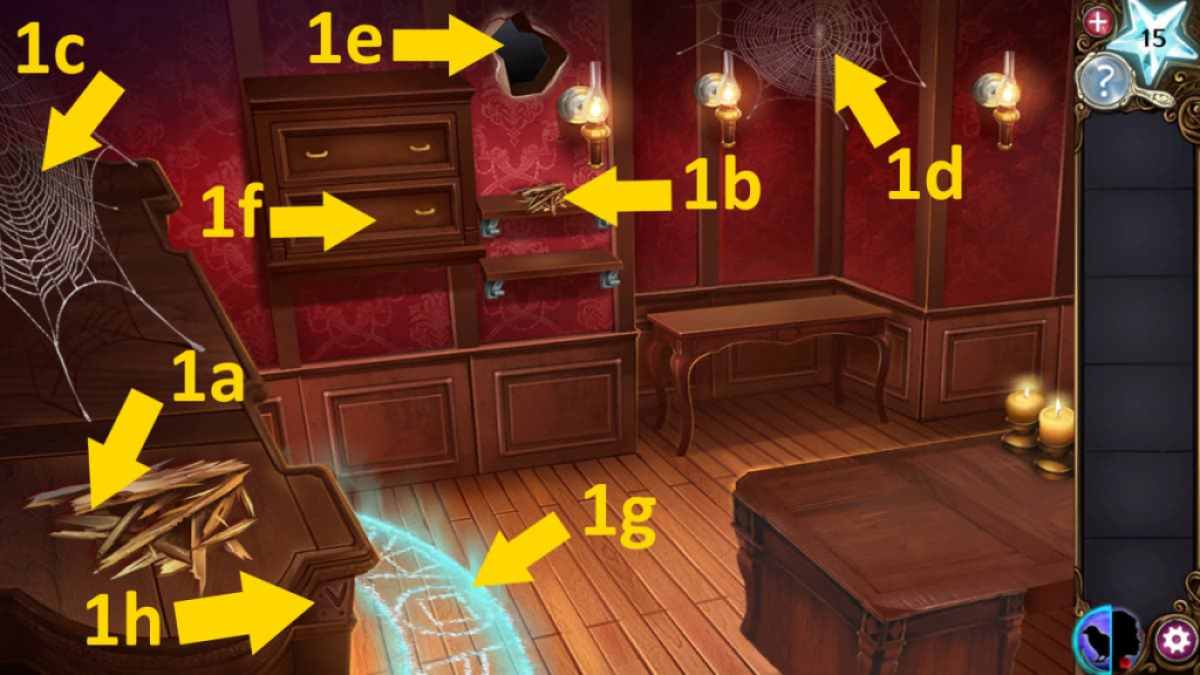
Image by Pro Game Guides
Return to the student residence , add the Mexican valium to the chain ( i5 ) , and tie the bust of Otto to it . This swings and break in the female chest , give up you to foot up theCrystalsthat fall to the flooring .
The seance room and the map codes
start the map and sink in the seance room to go there . utilize the flamethrower on the box seat to immobilize it , click it for a conclusion - up , and practice the code7843to unfold the box andfree Baxter . He enjoin you all the traps must be take out before they can get together you in taking revenge on Otto .
You ’ll observe that the function has been upgraded ( see above ) to show three more ambush in the continue rooms . There are also lots more images on it in eyeglass mode , but not a fifth telephone number . However , one gloss endure through each way , halt the ghost from slide by it and get to the top - fundamental area of the mathematical function , and thesecolors match the look-alike you see in eyeglass modality . The key is the dots , as before , and the number of leg , side , etc the range of a function have . From this we can get the follow code :
Move to each room and utilize the code to disarm the box there , after first damaging the box with the flamethrower . The ghosts are now free to roam ! However , you still require to ascertain a way to marshal them so that Otto can see them .
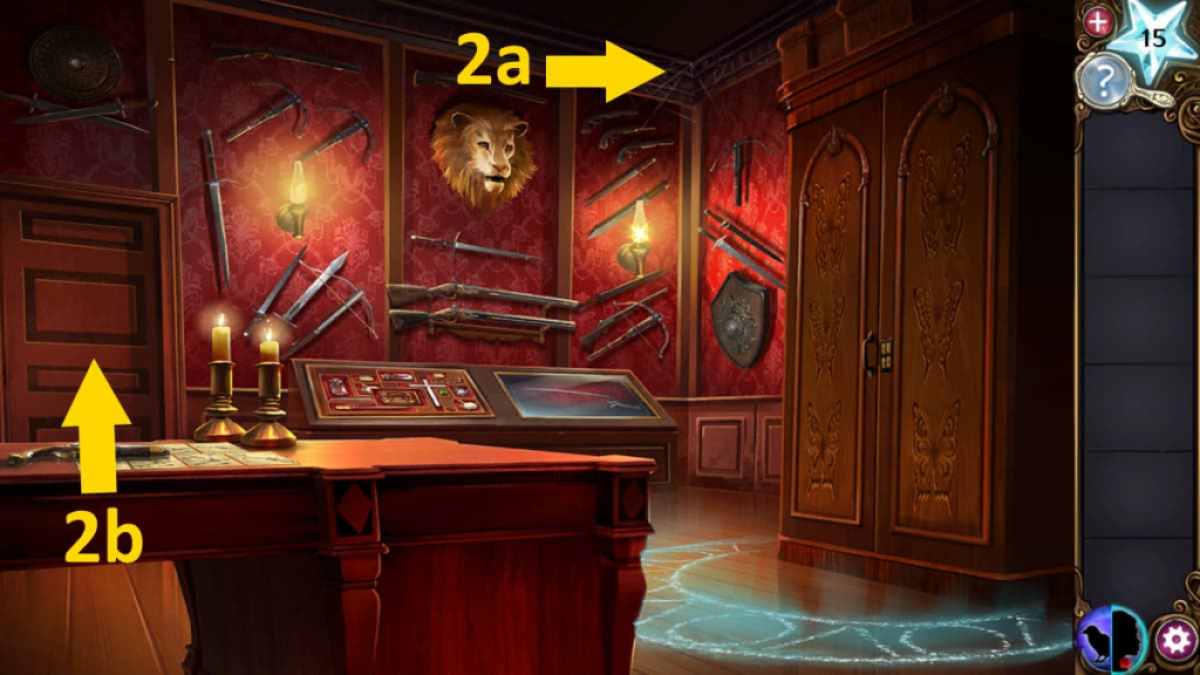
Image by Pro Game Guides
Making and charging the summoning devices
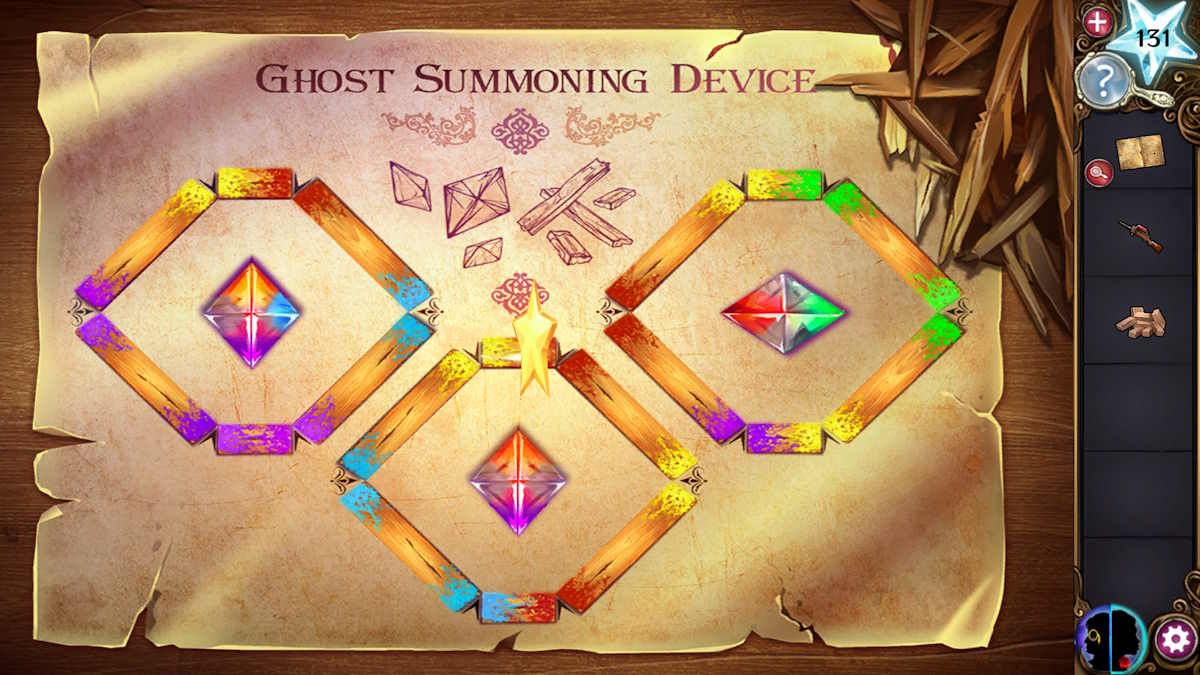
hark back to the stowage , click the mapping on the table ( j3 ) , and add up the crystal to the diagram . This works in the same direction as the flamethrower diagram and I ’ve included the resolution above . Once everlasting , take theInert Ghost Summoning Devicesfrom the tabular array and then click the table to get the instructions on how to use them .
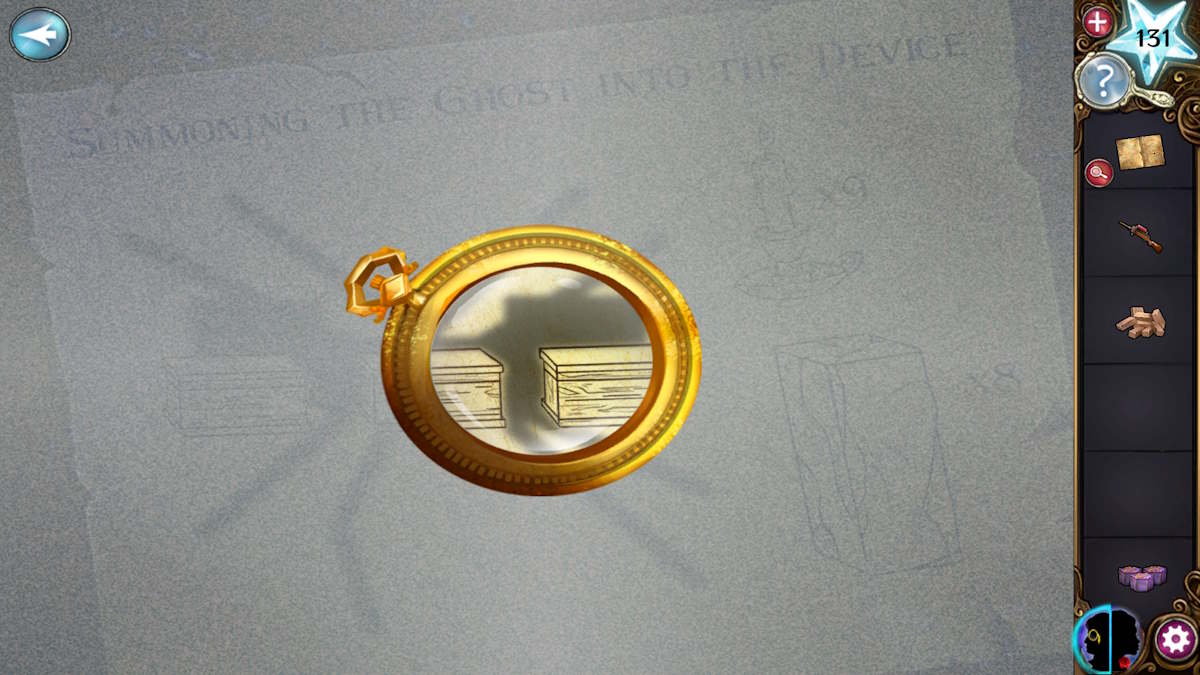
To chance the shape you want to mould in the shadow , use the monocle mode . surprisal surprisal , you need to cast theshadow of a spider . Select the candela ( j6 ) for a finish - up and utilise the flamethrower to light them .
Now add the bricks and the neutral devices , then move the candles to cast the shadow you saw on the diagram . I ’ve envision the candle place above ( you may find it difficult to see the final candle , as it is behind the star in the center ) .

Image by Pro Game Guides
Capturing Otto - The final puzzle
As you move in to confront Otto , the other guests naturally panic ! You need toisolate Otto(top left , above ) until theother guests have fled the room(through the doorway in the middle at the bottom , but you only havelimited time between moves(see the timer on the right , above ) . It should be comparatively easy to trap Otto in the top - left niche , and then in the bottom - right corner later if need be .
The most crucial matter to remember is that while there is a timer , there is no limit to the number of move . Keeping Otto in the way is priority number one ; you could work on the other guests one at a time .
Once it ’s done , you ’ll have thechoice to burn down Otto ’s sign of the zodiac . Doing so will give you a few extra hour of caper , as you have to channelize the flamethrower , but Euphemia will escape either way ( to be continued ? ) . Do whichever makes you finger better , as ultimately the ending remains the same . felicitation ! You ’ve fill out Haunted Hunt .
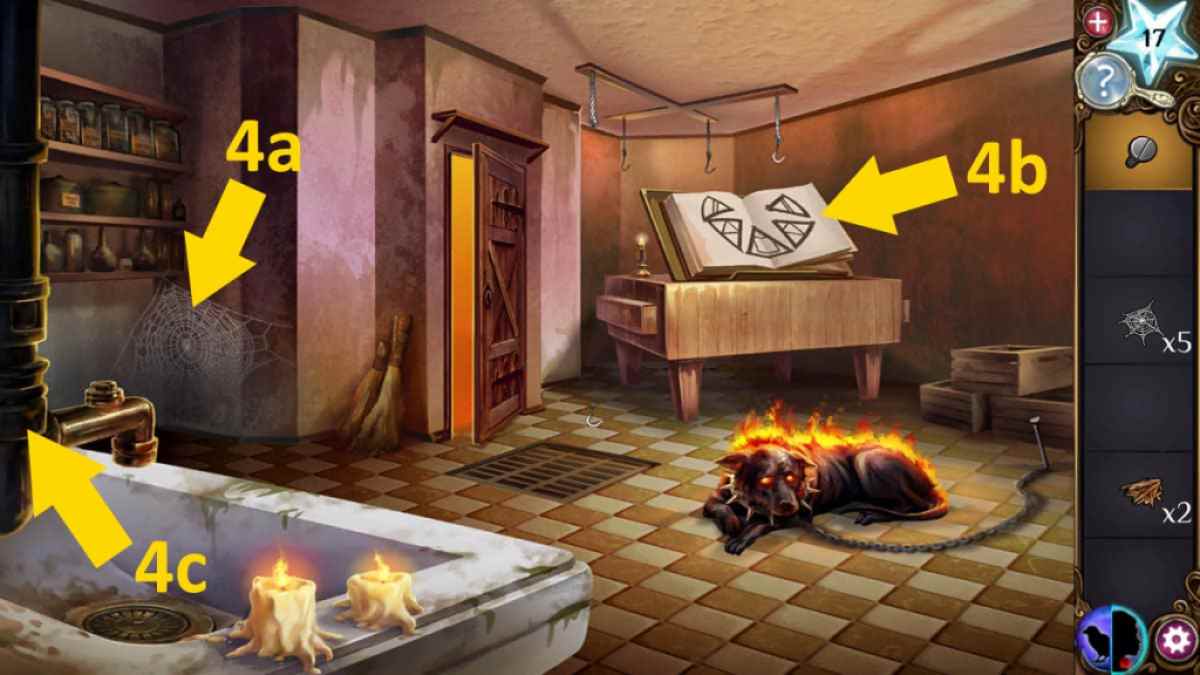
Image by Pro Game Guides
wait for more walkthroughs for free puzzle games ? Check outHow to beat Trace Escape Room - Full WalkthroughandLost Lands 3 Full Walkthrough ( Golden Curse)here at Pro Game Guides !
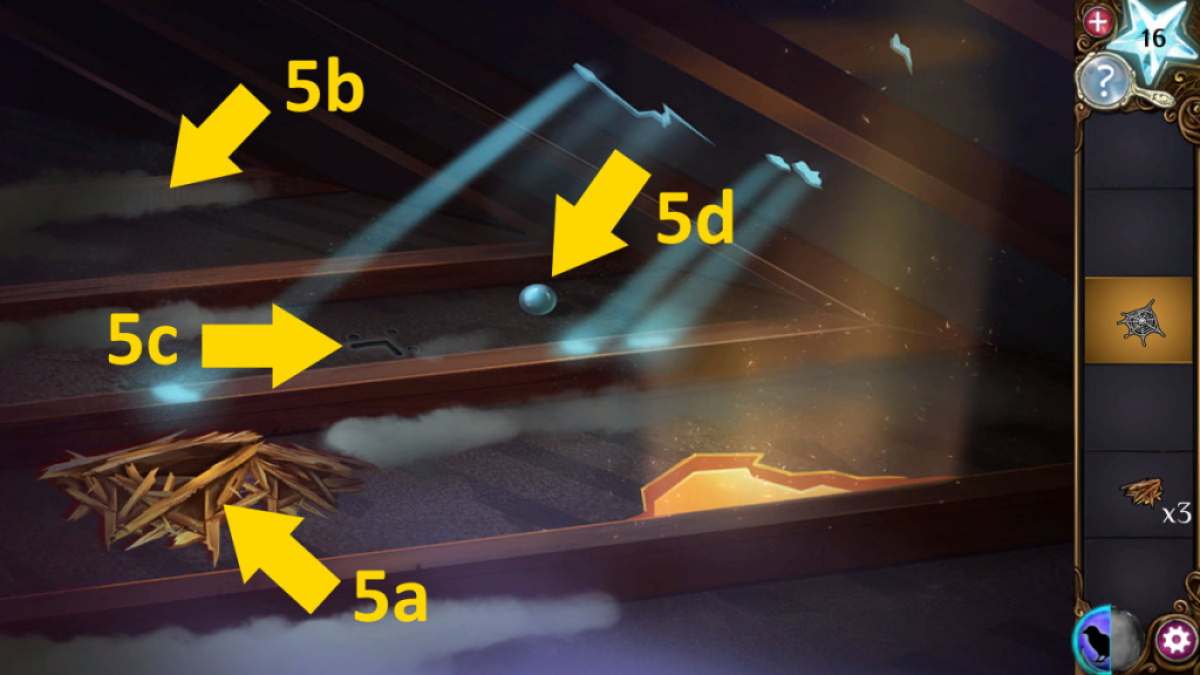
Image by Pro Game Guides
Screenshot by Pro Game Guides
Screenshot by Pro Game Guides
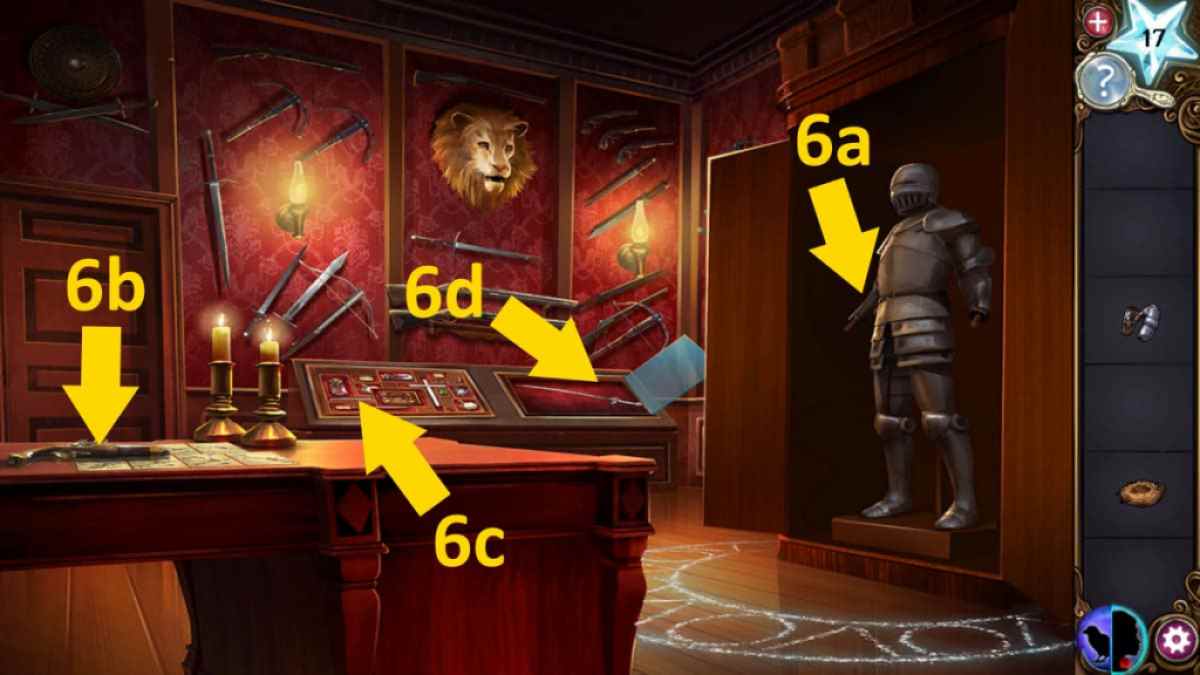
Image by Pro Game Guides
Screenshot by Pro Game Guides
Screenshot by Pro Game Guides
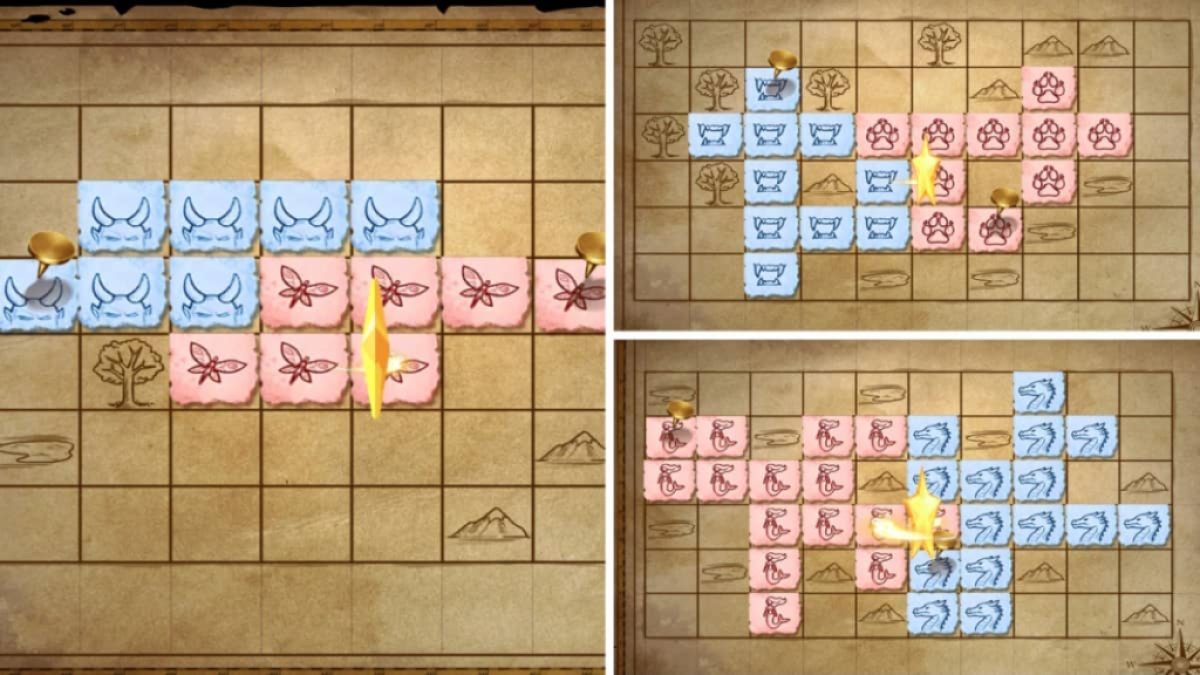
Image by Pro Game Guides
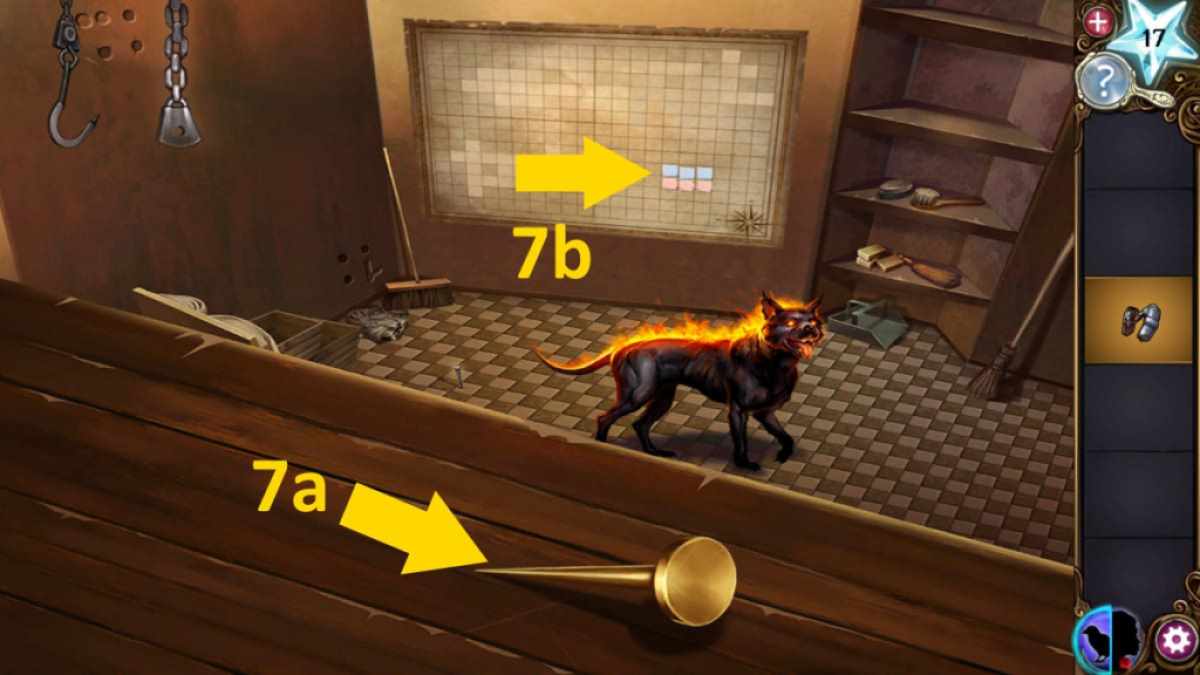
Image by Pro Game Guides
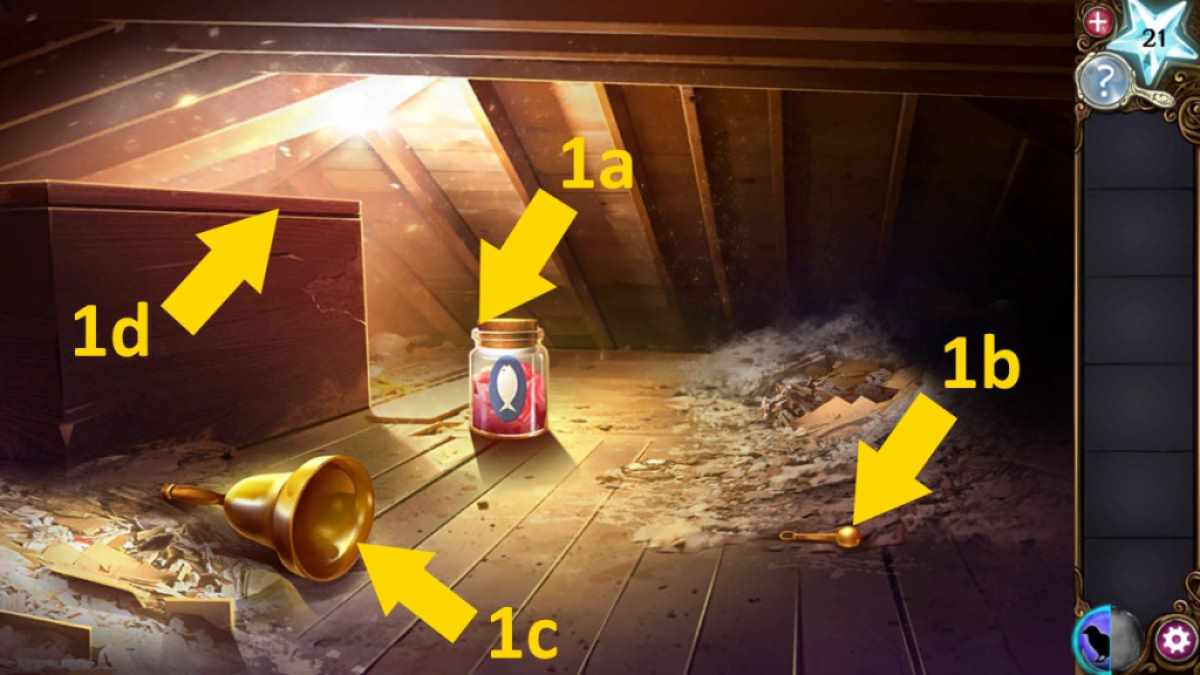
Image by Pro Game Guides
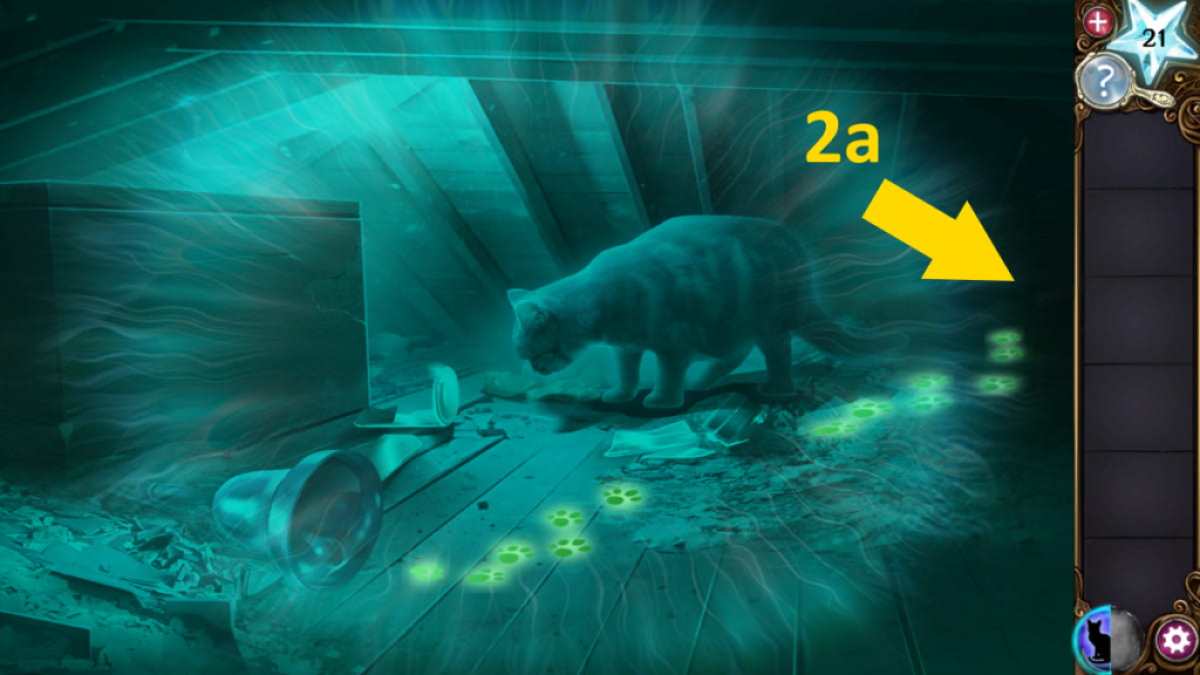
Image by Pro Game Guides
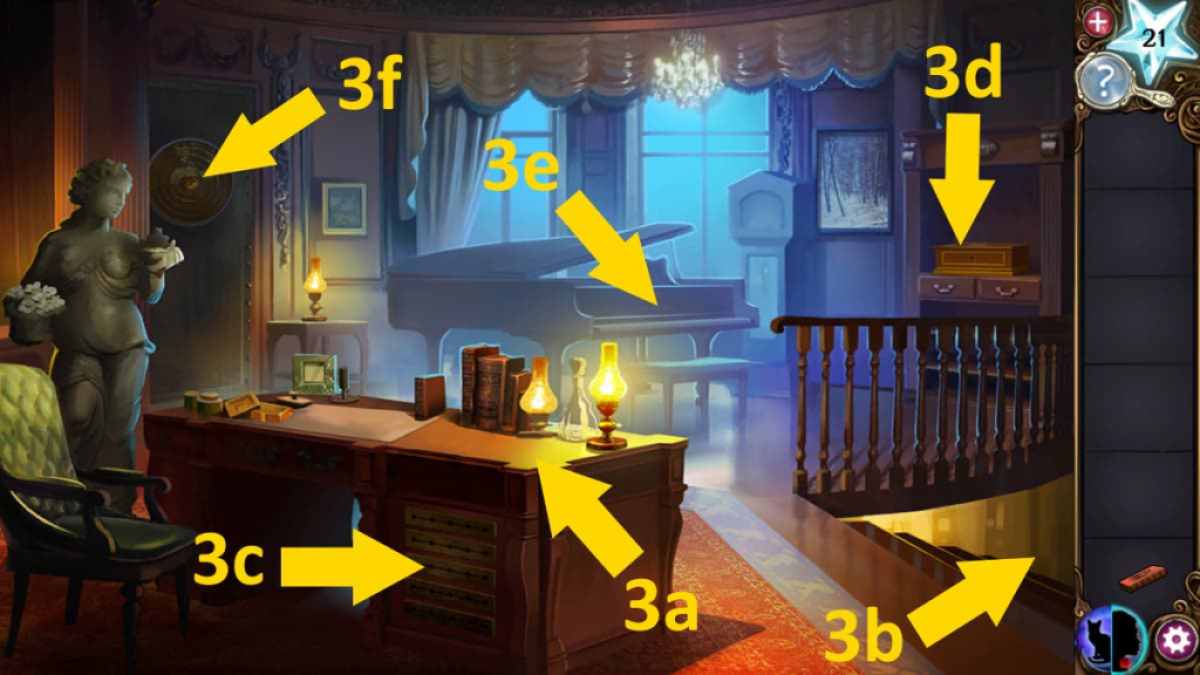
Image by Pro Game Guides
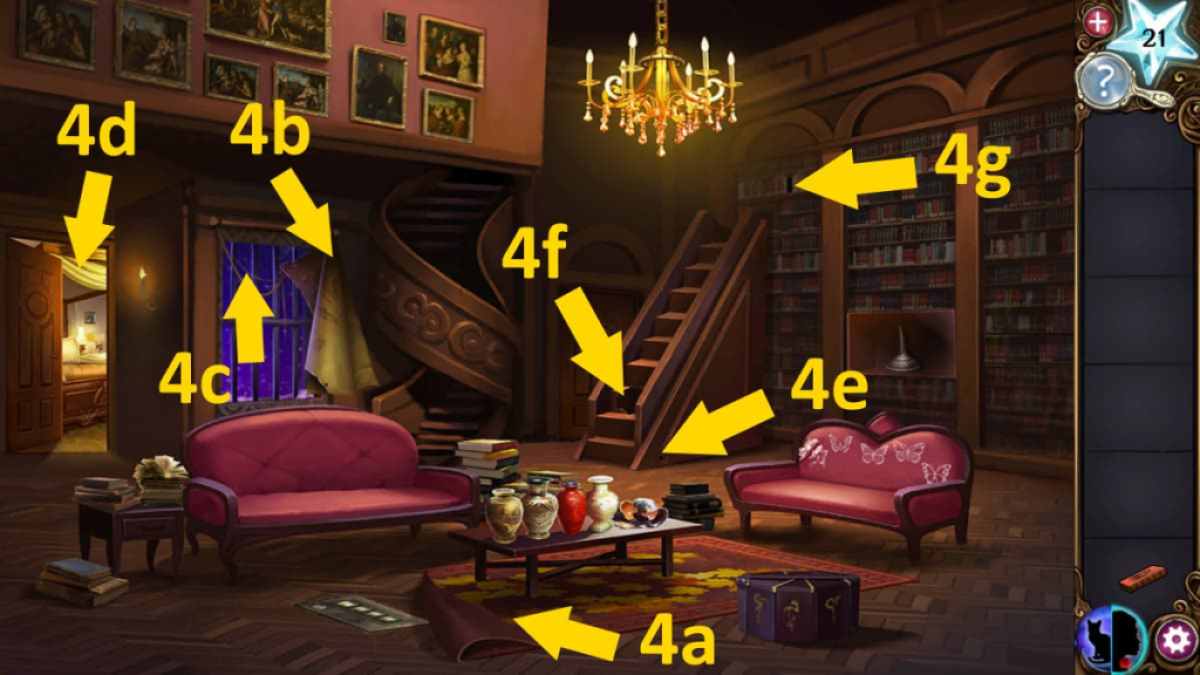
Image by Pro Game Guides
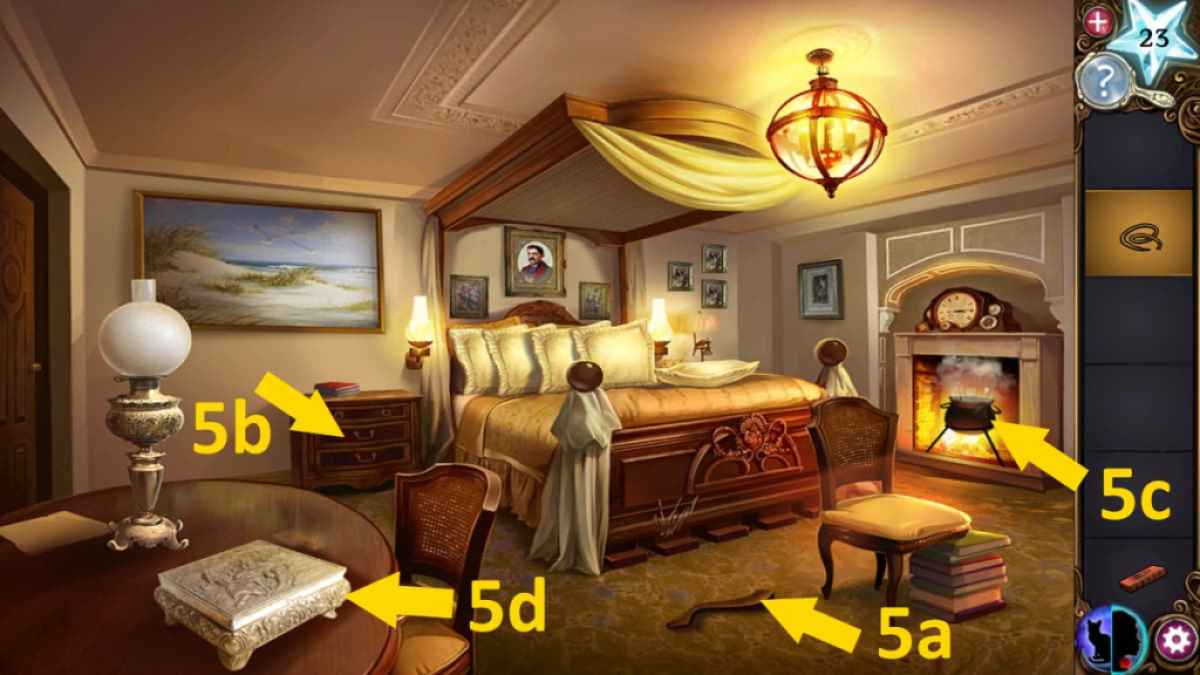
Image by Pro Game Guides
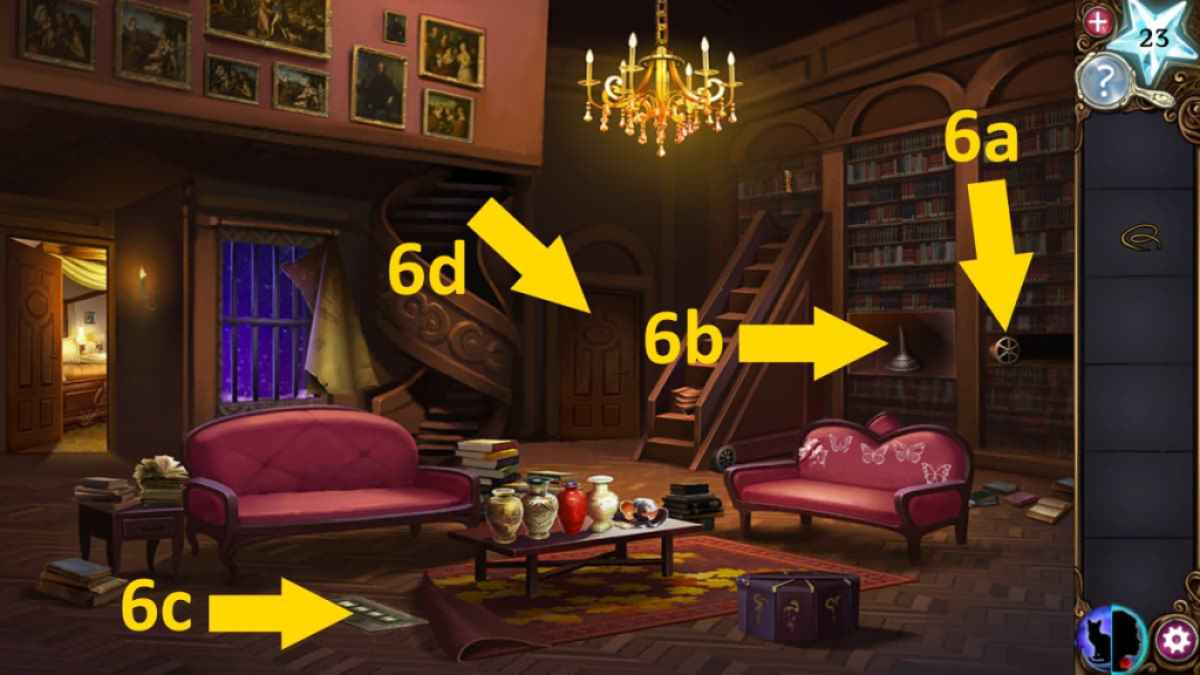
Image by Pro Game Guides
Image by Pro Game Guides

Image by Pro Game Guides
Screenshot by Pro Game Guides
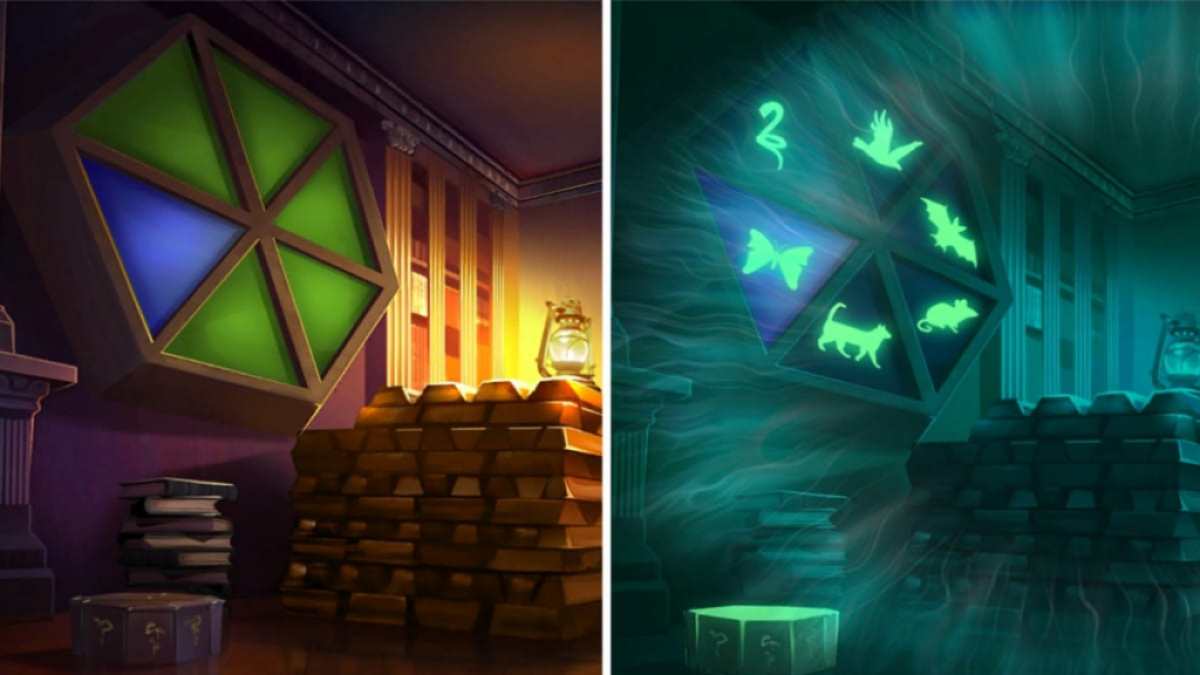
Image by Pro Game Guides

Screenshot by Pro Game Guides

Image by Pro Game Guides
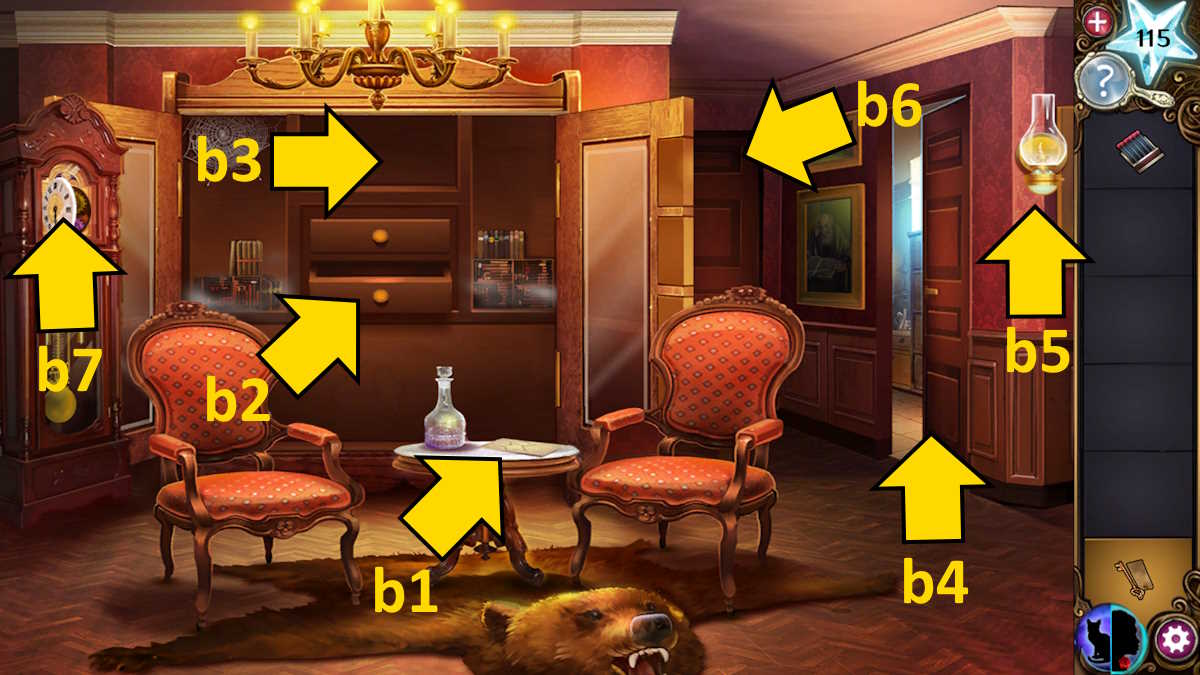
Image by Pro Game Guides
Screenshot by Pro Game Guides
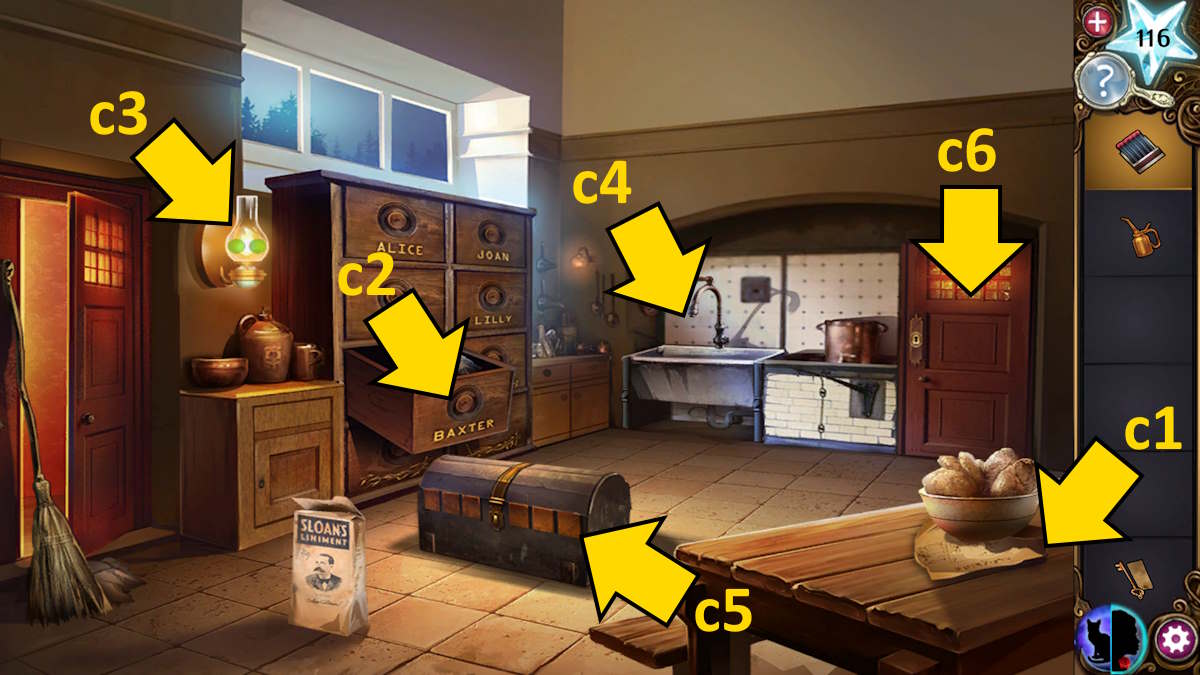
Image by Pro Game Guides

Image by Pro Game Guides
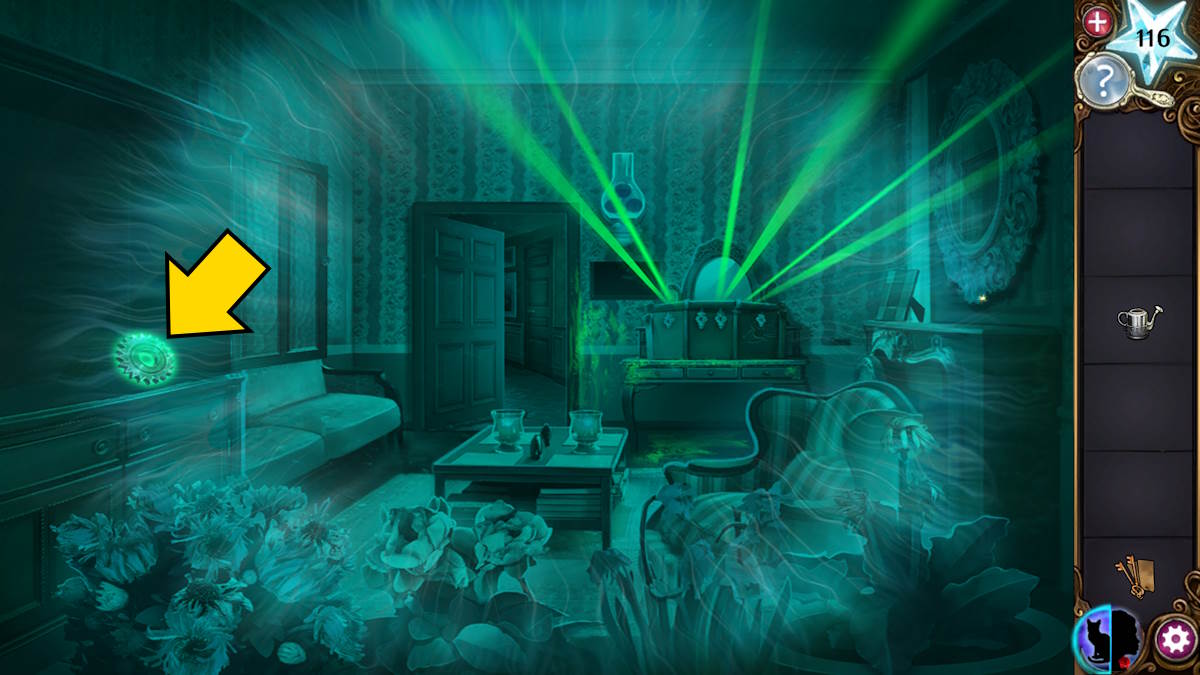
Image by Pro Game Guides

Screenshot by Pro Game Guides
Screenshot by Pro Game Guides

Screenshot by Pro Game Guides
Screenshot by Pro Game Guides
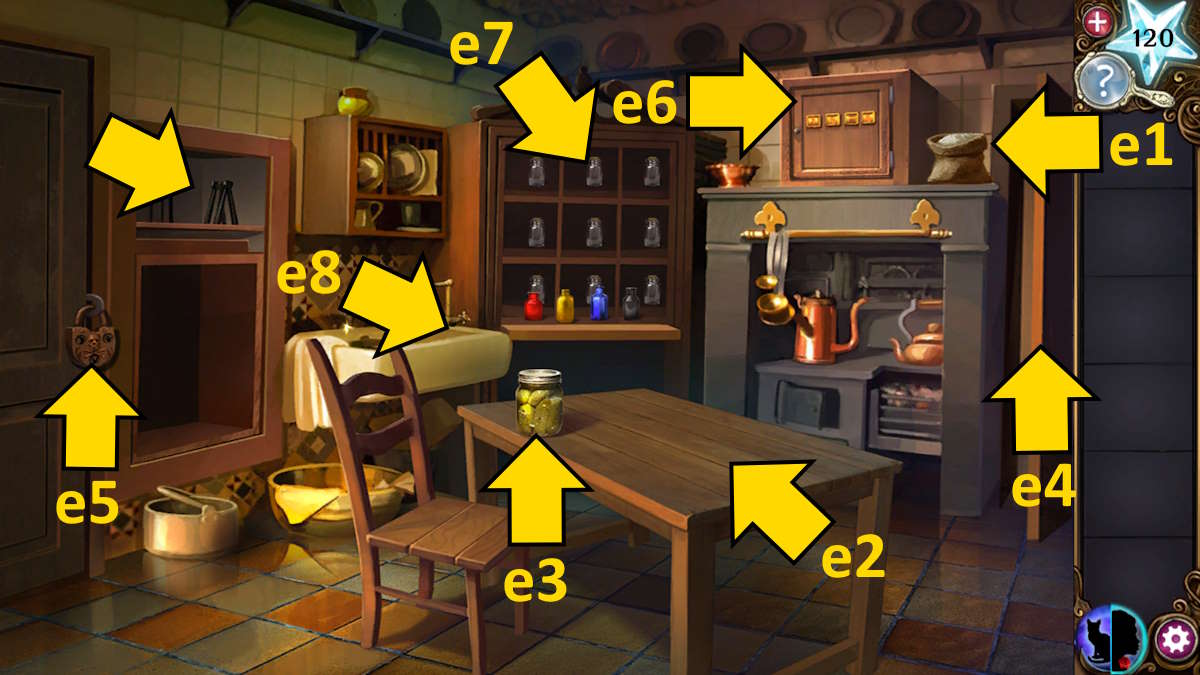
Image by Pro Game Guides
Screenshot by Pro Game Guides
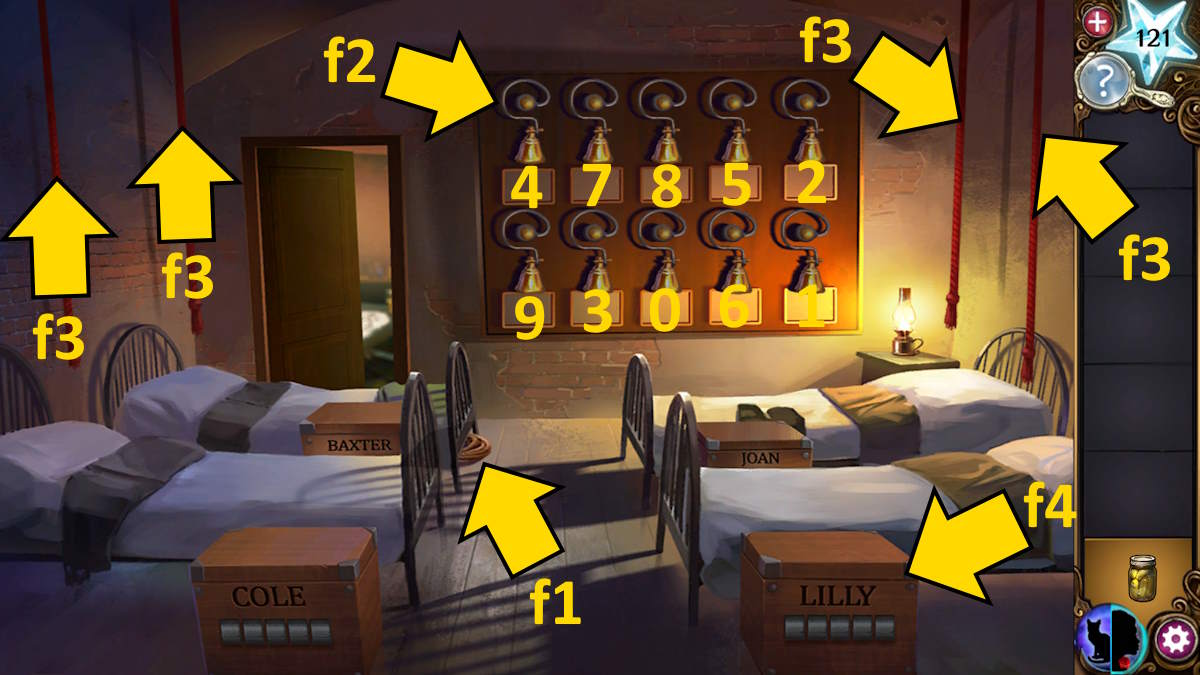
Image by Pro Game Guides
Screenshot by Pro Game Guides
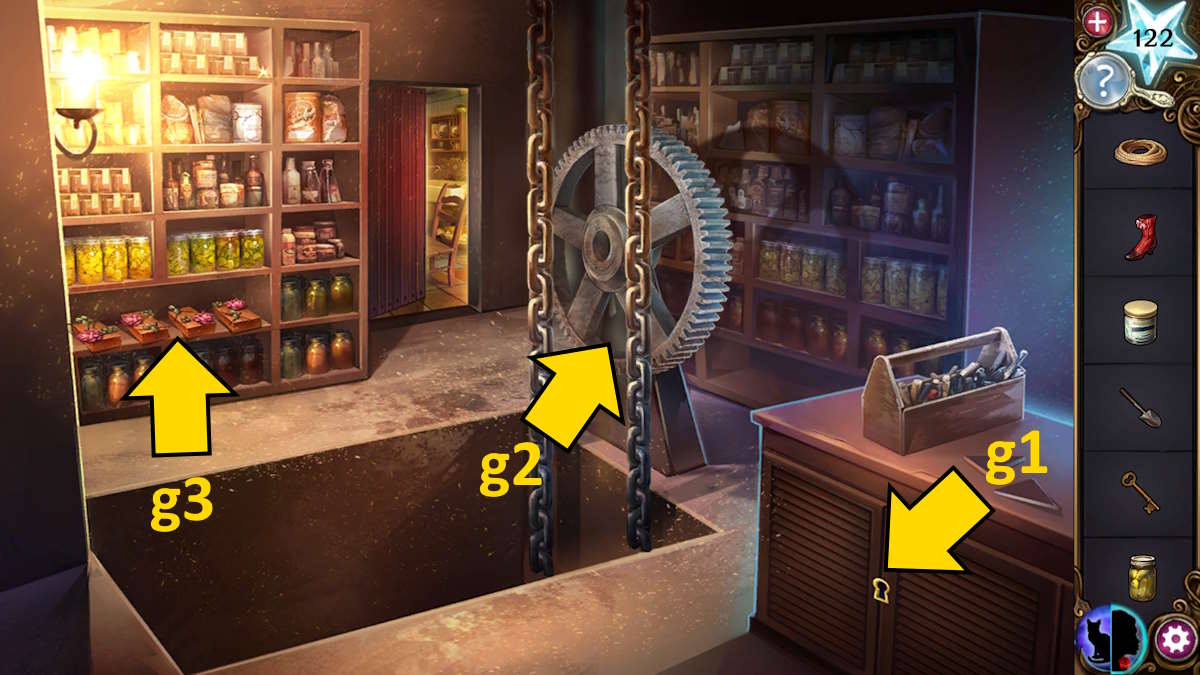
Image by Pro Game Guides
Screenshot by Pro Game Guides
Screenshot by Pro Game Guides
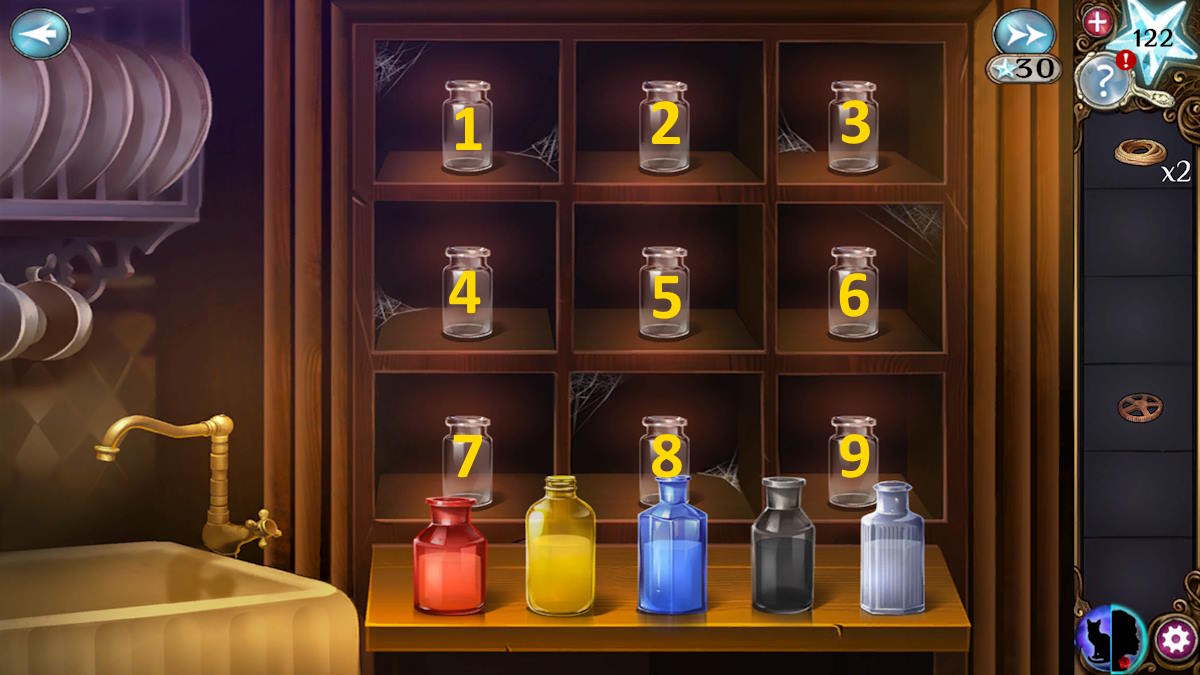
Image by Pro Game Guides
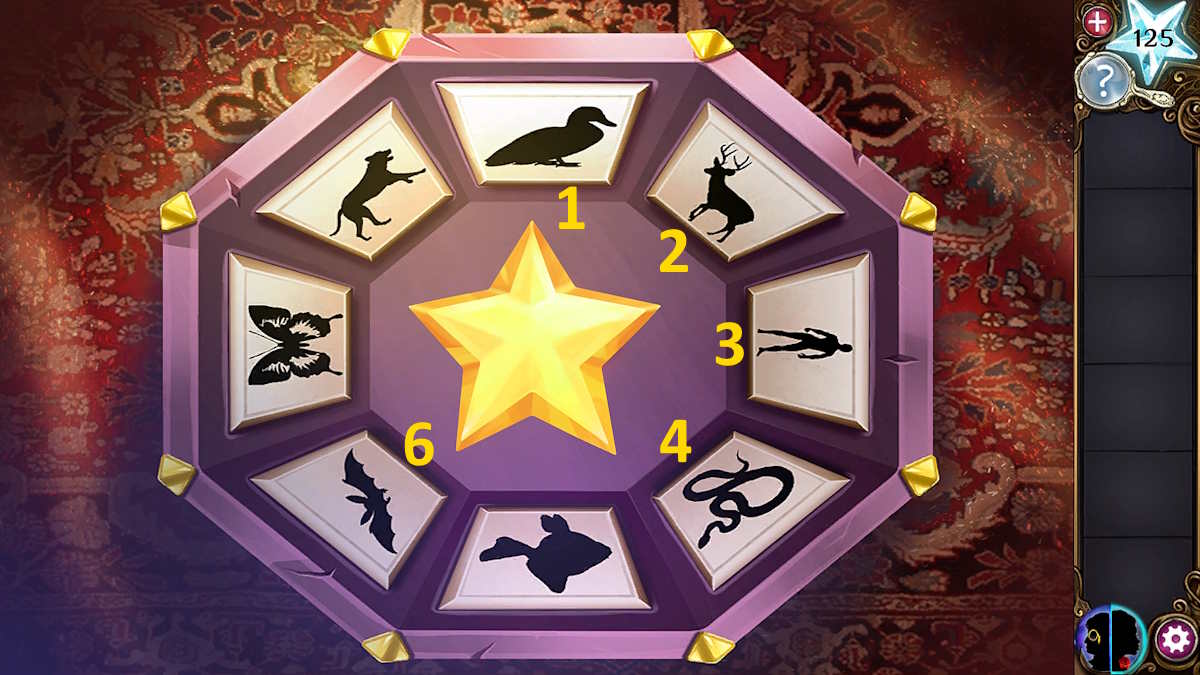
Image by Pro Game Guides
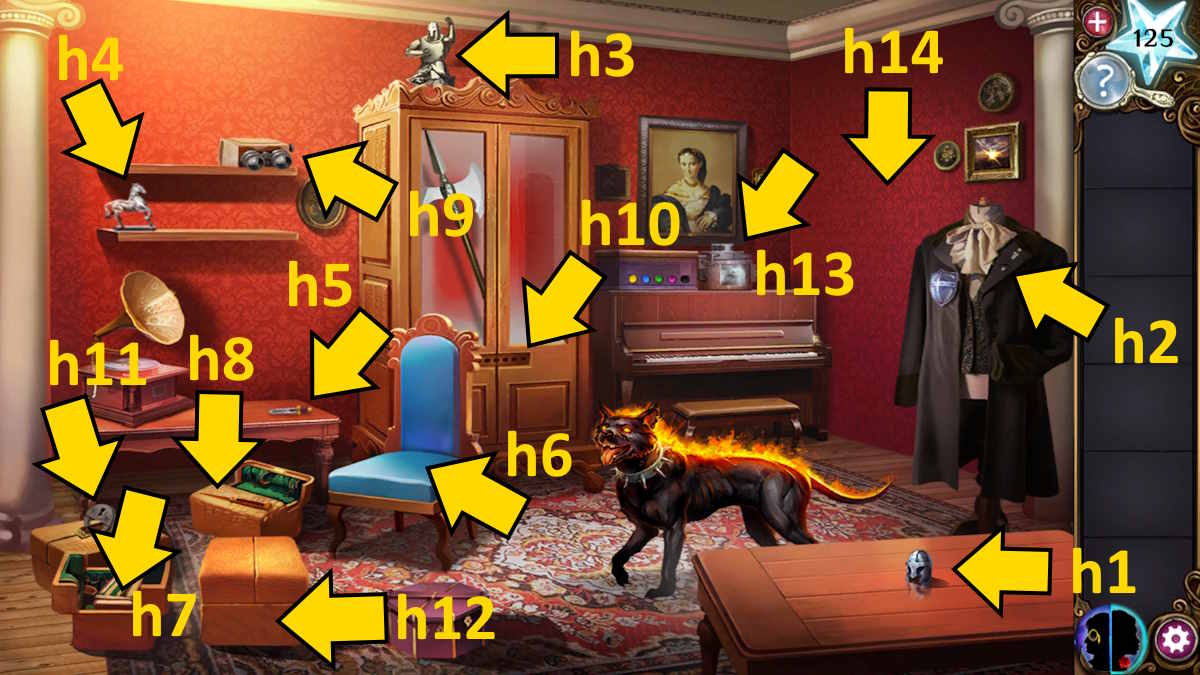
Image by Pro Game Guides
Screenshot by Pro Game Guides
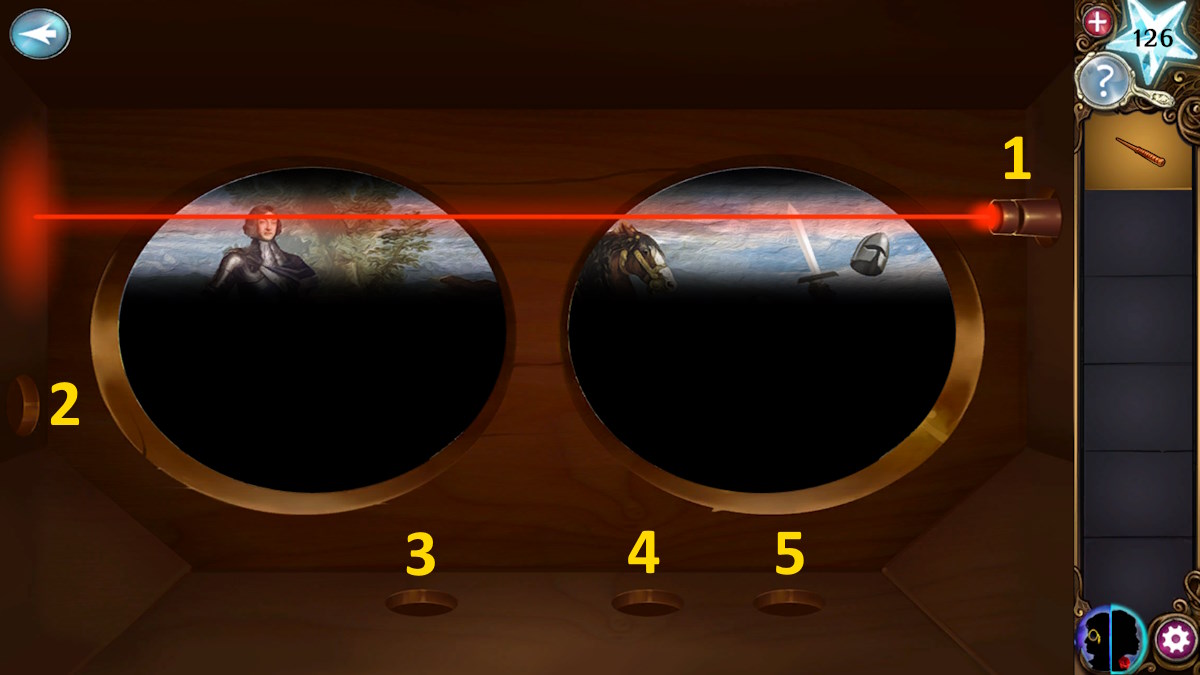
Image by Pro Game Guides
Screenshot by Pro Game Guides
Screenshot by Pro Game Guides
Screenshot by Pro Game Guides
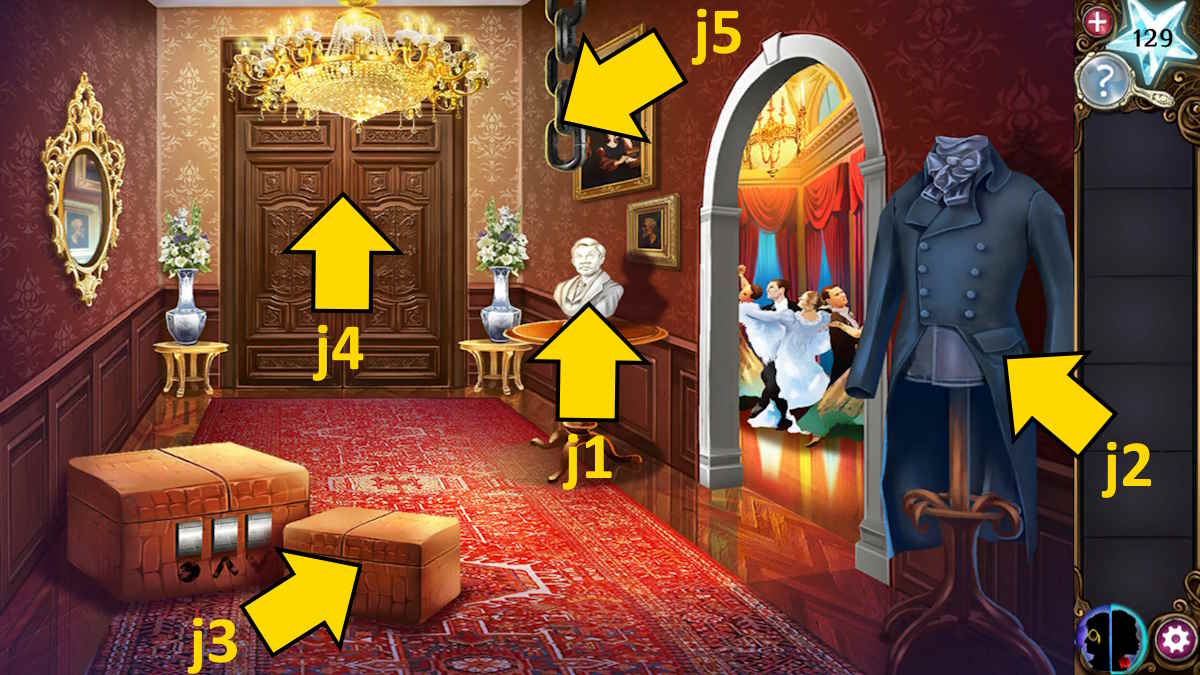
Image by Pro Game Guides
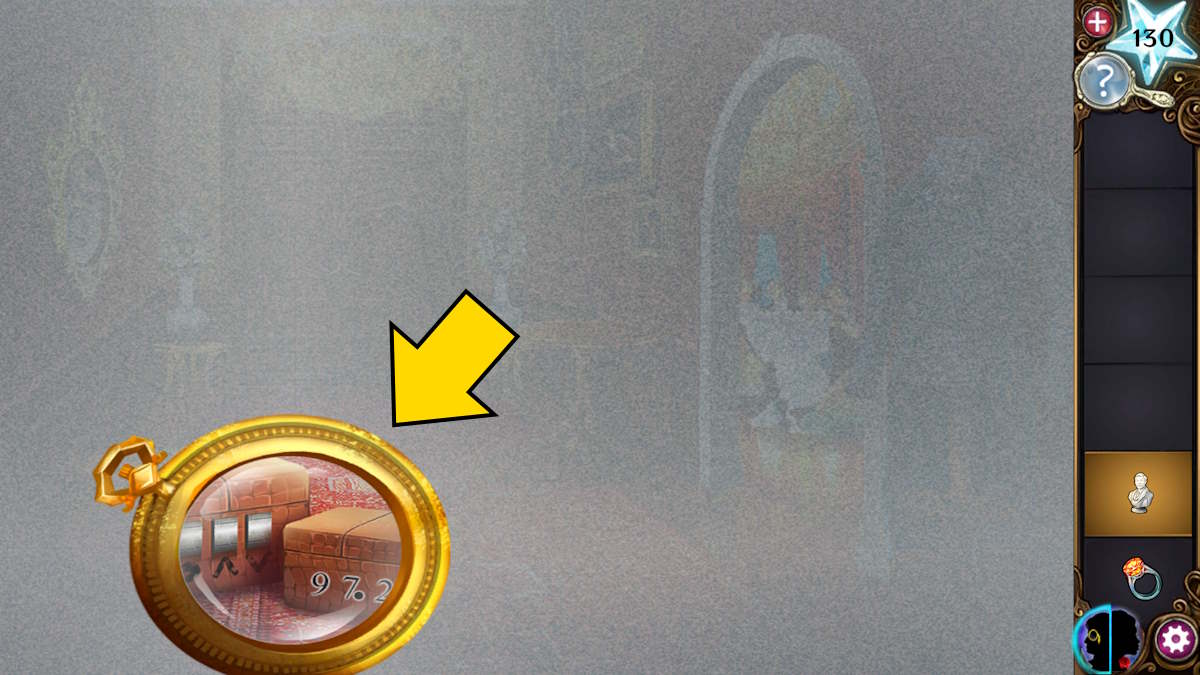
Image by Pro Game Guides
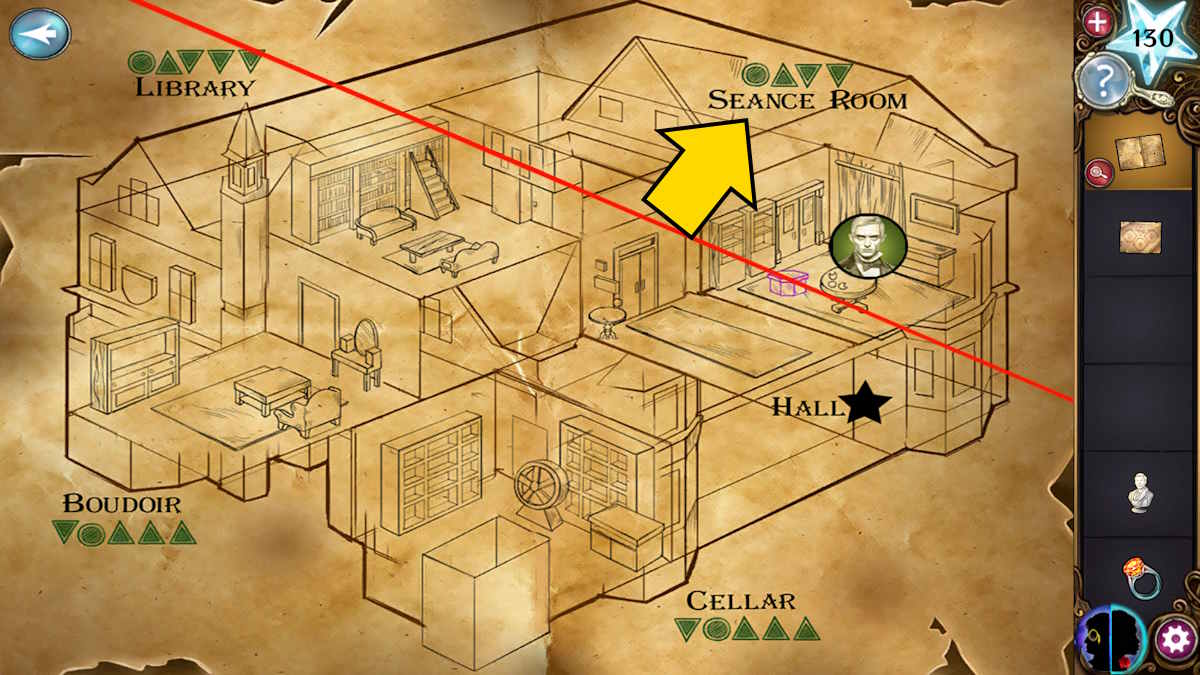
Image by Pro Game Guides
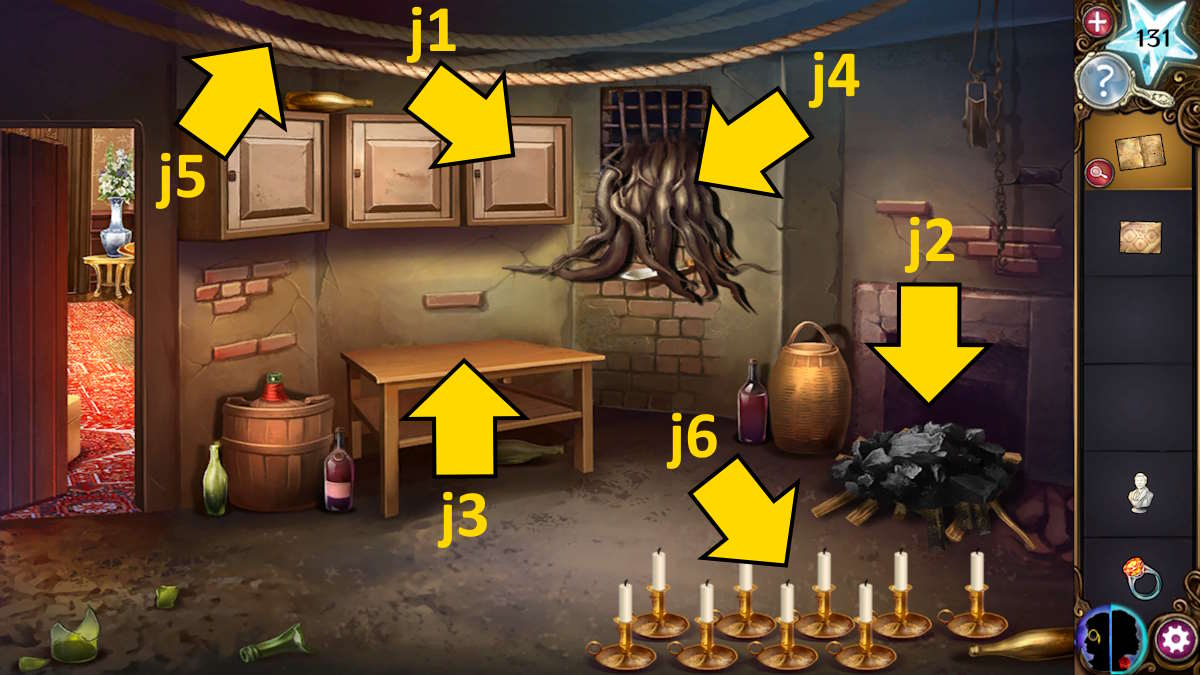
Image by Pro Game Guides

Screenshot by Pro Game Guides
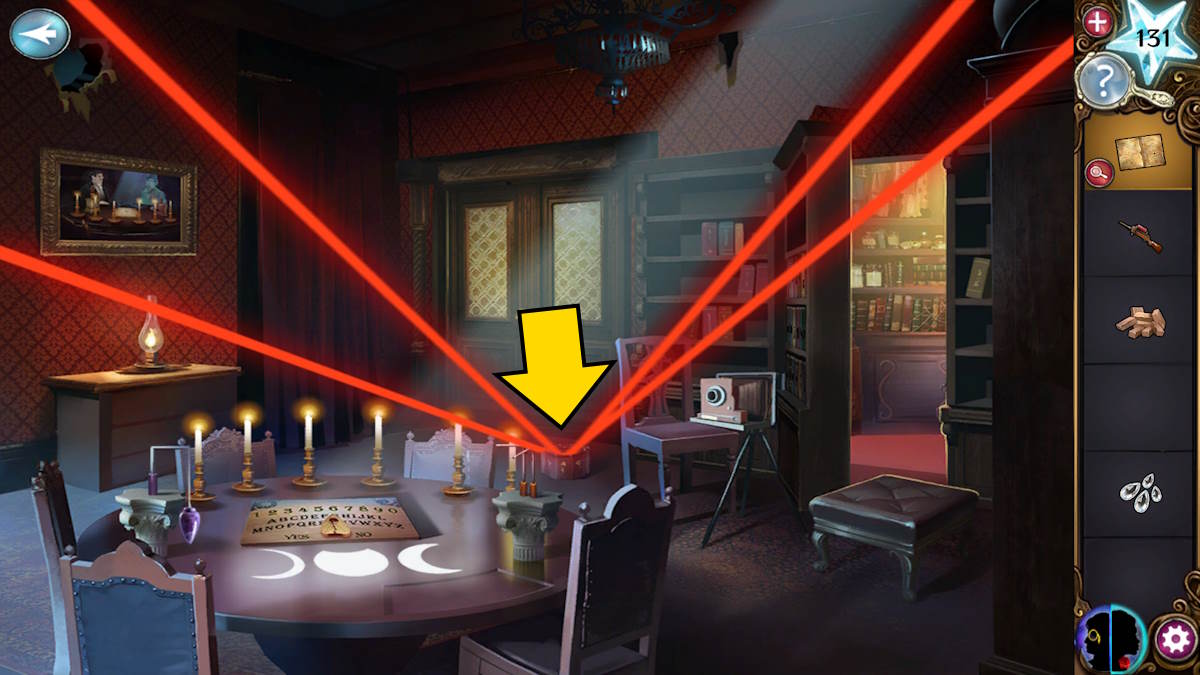
Image by Pro Game Guides
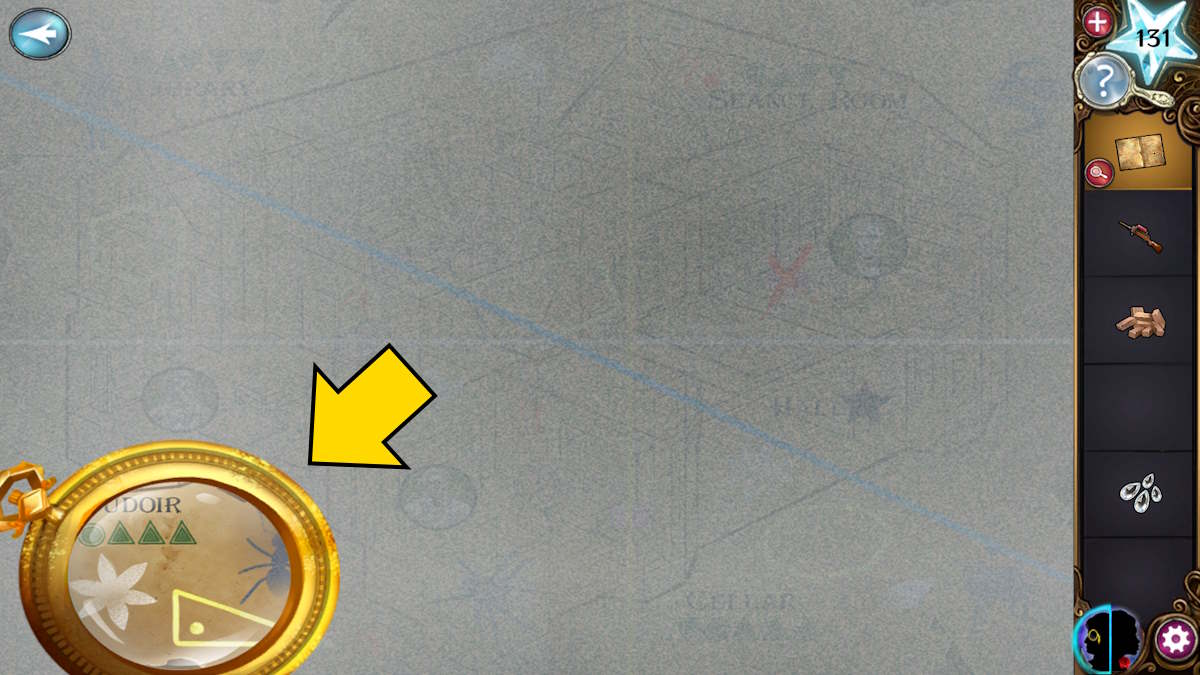
Image by Pro Game Guides
Screenshot by Pro Game Guides
Screenshot by Pro Game Guides
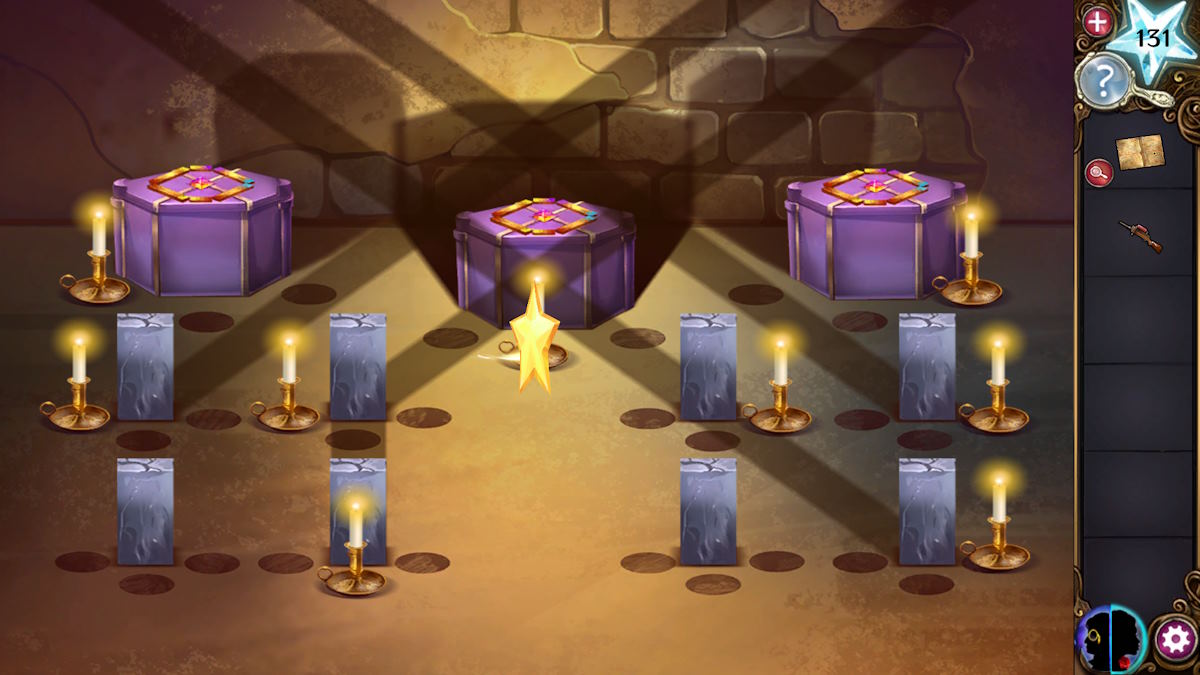
Image by Pro Game Guides

Screenshot by Pro Game Guides
Screenshot by Pro Game Guides
