Elden Ring ’s Shadow of the Erdtree DLC has an unbelievable newfangled single-valued function to search , but while you ’re out and about you may derive across certain localisation that are a lilliputian tricky to navigate . Castle Ensis is one such place that has a fortune of twists and bend so we ’ve hoard a walkthrough to — you guessed it — take the air you through the area .
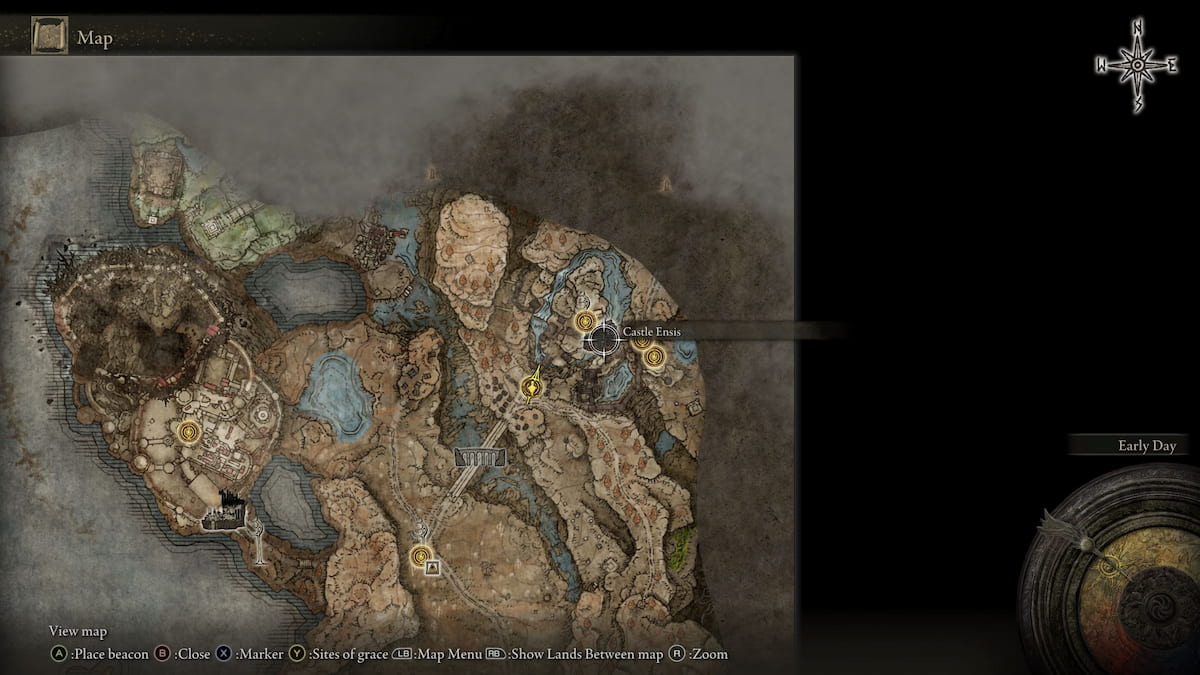
Castle Ensis location in Shadow of the Erdtree (Map Location)
Castle Ensis is located right after you cross theEllac Greatbridgeand is now northward of theScorched Ruinessite of good will ( although ascertain out for the giant ravine ) . There ’s an annoying ballista hold the bridge , but with some happy invertebrate foot , you and Torrent should gracefully pass on without much trouble . Once you ’ve cash in one’s chips that short obstruction you ’ll be greeted with the Castle Front site of grace . Take a fanny and gather your strength for the coming run .
How to enter Castle Ensis in Elden Ring Shadow of the Erdtree
Head flat up the stairs and you ’ll cursorily see the first challenge that Castle Ensis has in store for you : aTroll Knight . Thanks to the level grading of Shadow of the Erdtree , await this troll to carry a monumental poke . Anyone uninterested in the 8,500 souls or the Somber Smithing Stone 9 can cut this enemy , but think back he is singular and will not return once fell .
If you choose to tackle this creature keep in mind he has the same move lay as theTroll Knightguarding the stairs inCaria Manor . Keep on your toe and hit him when he ’s vulnerable and you ’ll take home the killing without much trouble .
Once he is defeated bend provide , and enter the diminished elbow room where you will observe a lone foe guard a Shadow Realm Rune 4 . Dunk on his uncanny hat a few multiplication and he should go down without any fuss . instantly ferment left again and you ’ll see a stiff holding aShadow Realm Rune 4that can be used to earn 20,000 Runes . After you ’ve grabbed the boodle retrace your steps and continue up the stairway to the North East .

As you record this small area you ’ll notice quite a few interesting position , but do n’t erode we will explore everything in due time . First , turn to your right and dispatch the two soldier chill by a campfire , ending their dreams of a peaceable lookout . Be careful as a Knight patrols the area and you will eventually cross his path ( the reason we eliminate the soldiers is to avert a mussy fight with said Knight ) . Once you ’re inclined , hearty up to him and take him down . Now that you ’re clear of contiguous scourge head into the doorway to your left to find a chest holding aLoyal Knight ’s Cookbook .
rise the steps ahead and you ’ll chance a closed gate , aMiquella ’s Cross , aSite of Grace , aScadutree Fragment , and eventually aCastle Cross Messagefrom Needle Knight Leda . Grab all the goodies and take a second to remain at the seemliness , do n’t worry about uprise all your earnt kills as we wo n’t see them again for a while . The next step is to open that vexing Checkpoint logic gate .
How to open the Checkpoint gate
To start the gate we first need to get to the other side where a contraption will allow us to raise the Fe bars and concede us free travel . First , start from the recently claim Site of Grace and head directly forward where a single soldier will be minding his own business organization on a shelf — dispatch the foe and drop down onto the itinerary below . You ’ll find another drop-off - down right after , result you to a pack of sanguinary hound .
As you leave that room and enter the invigorated airwave again , you ’ll note you are now on the paired side of the Checkpoint logic gate but it ’s still fill up . To change that all you have to do is enter the room at once beside the logic gate and activate themechanism .
Take a moment to rest at the Checkpoint Site of Grace if you ’ve taken too much damage or are low on Flask of Crimson Tears . Now that you have accumulate yourself point back through the logic gate and across the bridge . Be careful of the soldier and seek to take them down with speed or they will overwhelm you . There ’s not much else to notice in this section of the Castle but be careful when you attempt to move forwards as an curiously tanky weenie is cover for another ambush . The trials do not finish with that spunky canine either , around the next bend is a trio of spellcasters ( two of which love to teleport ) that can be quite plaguy to deal with .
Screenshot by Pro Game Guides
You will involve to be quick on your feet to catch these slippery spellcasters without recede your saneness or your health Browning automatic rifle . convey the duo on the ground out first and go on to the next arena is a majuscule scheme , but if you ’re looking to clear out the entire sphere follow the rock-and-roll to your left field and you ’ll do across a ladder . This will lead you right to another soldier , but after you deal with him you may bonk the sniper with your biggest steel . Once you ’re slaked with your safety go up the unretentive stairs forwards where you ’ll meet one unassailable Carian Knight .
How to defeat the Carian Knight
For those that want an easier clock time the open door to your left wing can be used to cabbage behind theCarian Knightand deal some heavy harm to him . It may not look like it at first since your opposer will likely instantly bring around their health to full , but at least you wo n’t have to deal with that in the future . There ’s not too much advice I can extend , simply take your time and react when his precaution is down ( at least this Carian Knight does n’t parry you ) .
Now that your foe is dead , reverse mightily around and head down somesemi - hidden stairsat the side of the castle . This will take you down to a room below where theWolf Crest Shieldis waiting to be claimed inside a chest . Run back upstairs and through the doors the Knight was guarding before his untimely dying .
Castle Ensis Ramparts Walkthrough
The following section is fair well-situated and can be skipped to some extent . After you have entered thechurchtheCarian Knightwas guarding head into the right hallway and keep following it . Eventually , you ’ll step into a courtyard with a single sorcerer casting irritating spells from the rooftop , disregard him , climb the stairs , andopen the gateto your rightfulness .
Once the protracted living meet out follow the wall until you find a pack of three soldier and a pair of dog-iron . I recommend go right past them as fleetly as possible since the sozzled spaces and constant terror of the dog onslaught make this a very chancy fight . You will fare across some wooden railing that lead up to the next part of the ramparts ; wax the railing but be cognizant of the soldier guarding them with their lance .
At the top you may conceal in a diminished elbow room with achest at bottom , once there you may have to contend with a dog or two and that new soldier . This should be an light combat than the last and once it ’s over you’re able to crack launch the thorax to obtain theImbued Sword Key .

Screenshot by Pro Game Guides
Now that you ’re loose from danger , you now face another Knight that guards the way to the elevator . He can be killed fairly easily with a giant sword and a few lurch , or just keep on your feet and pare him down . With the Knight all in you’re able to skip onto the elevator and tantalise it into the final elbow room of Castle Ensis .
There is aSite of Graceif you continue your way into the area and just up a short flight of stairs , you will find one of the concentrated bosses I ’ve had the displeasure of facing .
Castle Ensis Rellana Twin Moon Maiden boss fight
I wo n’t glaze this : Rellanamay be just as intemperate asMaleniaif the latter did n’t regen her wellness . Rellanais spry , strike fast and strong , has a plethora of illusion at her statement that make the combat tedious , and she even has a signature move that is immoderately difficult to dodge . Buckle up buttercup this one is going to be a ride .
My strategy for defeatingRellanawas tailor to me and my build , I can only hope you may adjust it to meet your motive or you find another way to deal with this freak of a competitiveness . First , Ididn’t use the summonable companionsbefore the fight started due to it render Rellana too much of a health boost . secondly , I use theGreat Shield Soldier Ashes +10as my personal summon and my main weapon for the combat was theDarkmoon Greatsword .
From the parole go , Rellanateaches you that using punishing weapon is a misunderstanding , she ’s too warm , you ’re too slow and you ’ll never get enough terms in before she steal your heal - atomic number 39 - succus . However , did I take heed ? No , I did not . If you ’re saucy ( unlike me ) then snap up aLight Greatswordmay help to manage uniform wrong toRellana . So using theDarkmoon Greatsword’sspecial I can sprain my grueling attacks into long - chain frost cut that hit fairly hard but also triggerfrostbite(that andLightningas the only weaknessesRellanahas ) . The plan is to summon my swarm of shield - wield minions and hope they tauntRellanaenough that I can get in with some damage .

Screenshot by Pro Game Guides
There are two giant flaw with this strategy : the first is that our adversary get laid AoE abilities and at times can render this design useless , and the second is that the mobilize minions do very small damage . After a three - hour slog , I in the end scoop this ogre . Whether you assume my scheme or discover your own , undecomposed portion with this monster .
That ’s everything on the Castle Ensis walkthrough . If you ’re take care for more Elden Ring content check outIs Elden Ring Shadow of the Erdtree Premium Bundle deserving it?,How to get the ripe other plot artillery and armour in Elden Ring Shadow of the Erdtree , and more on Pro Game Guides .

Screenshot by Pro Game Guides

Screenshot by Pro Game Guides

Screenshot by Pro Game Guides

Screenshot by Pro Game Guides

Screenshot by Pro Game Guides

Screenshot by Pro Game Guides

Screenshot by Pro Game Guides

Screenshot by Pro Game Guides

Screenshot by Pro Game Guides

Screenshot by Pro Game Guides

Screenshot by Pro Game Guides

Screenshot by Pro Game Guides

Screenshot by Pro Game Guides

Screenshot by Pro Game Guides

Screenshot by Pro Game Guides

Screenshot by Pro Game Guides

Screenshot by Pro Game Guides

Screenshot by Pro Game Guides

Screenshot by Pro Game Guides

Screenshot by Pro Game Guides

Screenshot by Pro Game Guides

Screenshot by Pro Game Guides

Screenshot by Pro Game Guides

Screenshot by Pro Game Guides

Screenshot by Pro Game Guides

Screenshot by Pro Game Guides

Screenshot by Pro Game Guides

Screenshot by Pro Game Guides

Screenshot by Pro Game Guides

Screenshot by Pro Game Guides

Screenshot by Pro Game Guides

Screenshot by Pro Game Guides

Screenshot by Pro Game Guides

Screenshot by Pro Game Guides

Screenshot by Pro Game Guides

Screenshot by Pro Game Guides

Screenshot by Pro Game Guides
Screenshot by Pro Game Guides
