Through the looking glass …
In this fourth game in the Darkness and Flame dot - and - click series , Alice is once again on the trail of adventure . If you ’re puzzle anywhere in this puzzler RPG , read on for my over walkthrough .
Darkness and Flame 4 walkthrough - All puzzle solutions
After being sucked through the mirror , you call for to find out what is proceed on . Is it all a dreaming ? Note that I wo n’t give directions throughout this pathfinder ( except the timber part , which is n’t usable on the mapping ) . There ’s a handy , fast change of location map in the bottom right corner of the screenland , which can take you to any currently uncommitted location .
Awakening
Take theMorphing Objectfrom the bed ( a1 ) and theCollectiblefrom the bulwark ( a2 ) . Take thePosterfrom the shelves ( a3 ) , open up the drawer ( a4 ) to find aHairpin , move the cushion on the bed ( a1 ) to take theRibbon , and grab theLadder(a5 ) .
put the placard on the floor under the door , practice the hairpin on the doorlock ( a6 ) to push the key through , and then pull the posting to take theBroken Key . Reassemble the three key piece by choosing the broken headstone in your armoury , then add the ribbon to finish up making theKey . Now you may use the headstone in the doorway and turn it , then the handle , to open it and go through to theCorridor .
TheMorphing Objectis a impression on the paries ( b1 ) , and theCollectibleis the butterfly stroke on the bulwark ( b2 ) . choose the end of the corridor ( b3 ) to startle a secret objects mini - secret plan . You ca n’t run out these as everything you ask is in the figure . Just note that if something is in red text , you ca n’t see it yet . Once terminated , you ’ll obtain theParts Kit .
Select the kit in your inventory to put it together . Hover over each part until your computer mouse highlights one , then click it to add that part to the outfit ( also discover the down soma , which give you a hint to the next piece ) . Once complete , you ’ll have aBee .
Add the bee to the box seat on the sofa ( b4 ) to start up a crusade puzzle . I ’ve put the solution below . Once complete , take theCrystal .
Take theTweezersandMatchesfrom the pouch on the door ( b5 ) , which reveal the door handle . get to the door and note the lamps are broken . absent the impoverished watch glass from the first one , and apply your quartz glass to replace it . you could now channelize through the doorway and verbalize to your mom ( click your mom to commence ) .
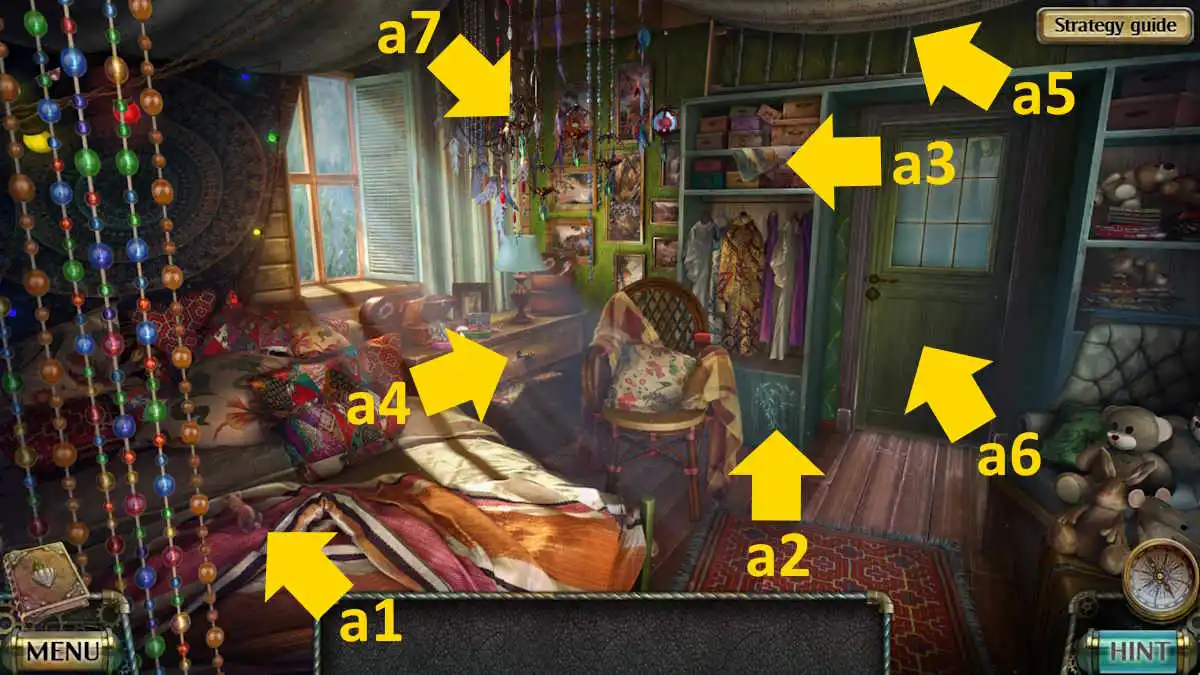
Image by Pro Game Guides
Mom
After the cutscene with your mom , you ’ll receive aKey . Grab theCollectiblefrom the wooden panel ( c1 ) and theMorphing Objectfrom the ledge ( c2 ) . utilize the tweezers on the pink lightbulb ( c3 ) to experience the musicalHint , and utilise the tweezers once more on the cupboard latch ( c4 ) to open it and find aSpatulaand aLadle .
Look at the windowpane ( c5 ) and use the spatula to pry it open , taking theSpoonandGlass Spherefrom the windowsill . Now move back to your bedroom and use the clue on the euphony box in the drawer ( a4 ) . snap the three notes that match the image on the hint , and the box will open up . Take thePuzzle Pieceand theHintfrom the boxwood .
Move back into the corridor and place the run under the animal prize ( b6 ) . Now , you may click the prize and use the spoon to attain asecond Glass Sphere . employ the key on the door ( b7 ) to ascertain it broken .

Image by Pro Game Guides
Click the four door latch in the finale - up to remove the front control panel , sum up the hint , and then chatter the silver knobs until they agree the rule on the hint . The doorway will now open , and you could go out to the Yard .
TheCollectibleis the shuttlecock on the lamp ( d1 ) , while theMorphing Objectis on the shed cap ( d2 ) . Click the horse cavalry for a close - up and take theBrick(d3 ) blocking the cartwheel . get through the horse ’s front legs to line up it missing its shoe , and then its head of hair will find you . You also need a cavalry collar and bridle .
Select the shed door ( d4 ) to ascertain aHorseshoeand use the brick to separate the padlock . Click the open threshold to take care inside and takeHammer , Rake , andHorse Collar . Back outside , choose the area by the water system ( d5 ) for a close - up , and utilise the profligate in the weewee to drag up a chest . Click it until all the moss is remove , and take the secondPuzzle Pieceto trigger a cutscene .
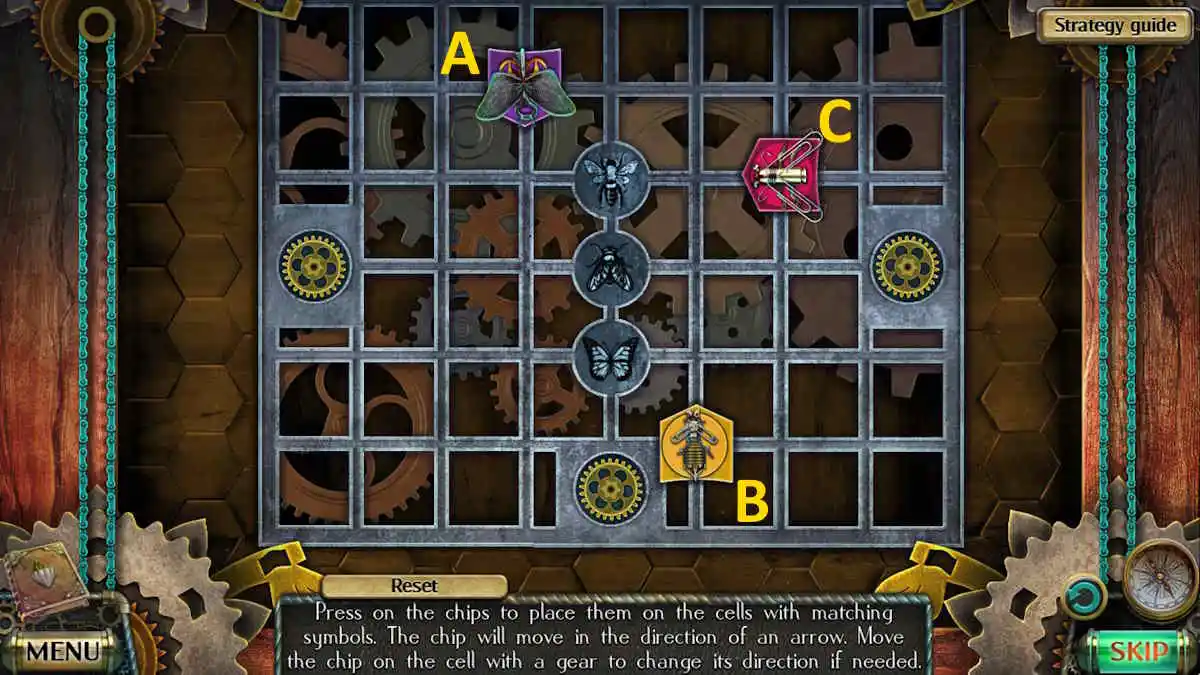
Image by Pro Game Guides
relate : suffer Lands 9 Walkthrough – Full Guide
Memory Flashback
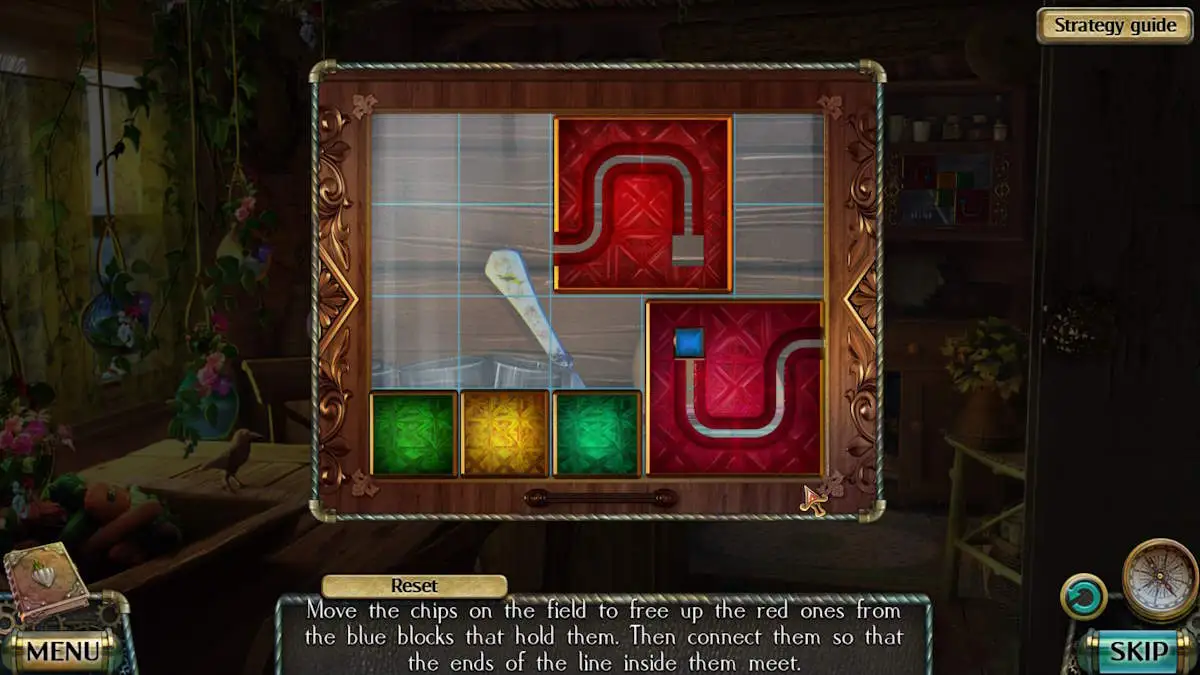
get through the gate ( d6 ) , move the stone in the close - up to receive the secondHorseshoe , and then go back to the kitchen . bring the two mystifier piece to the bulwark closet ( c6 ) to take off a movement puzzle . If you need a jot for this one , move the three pocket-sized squares to the posture suggest above , then move the left red box to the position shown to free the first belittled blue square .
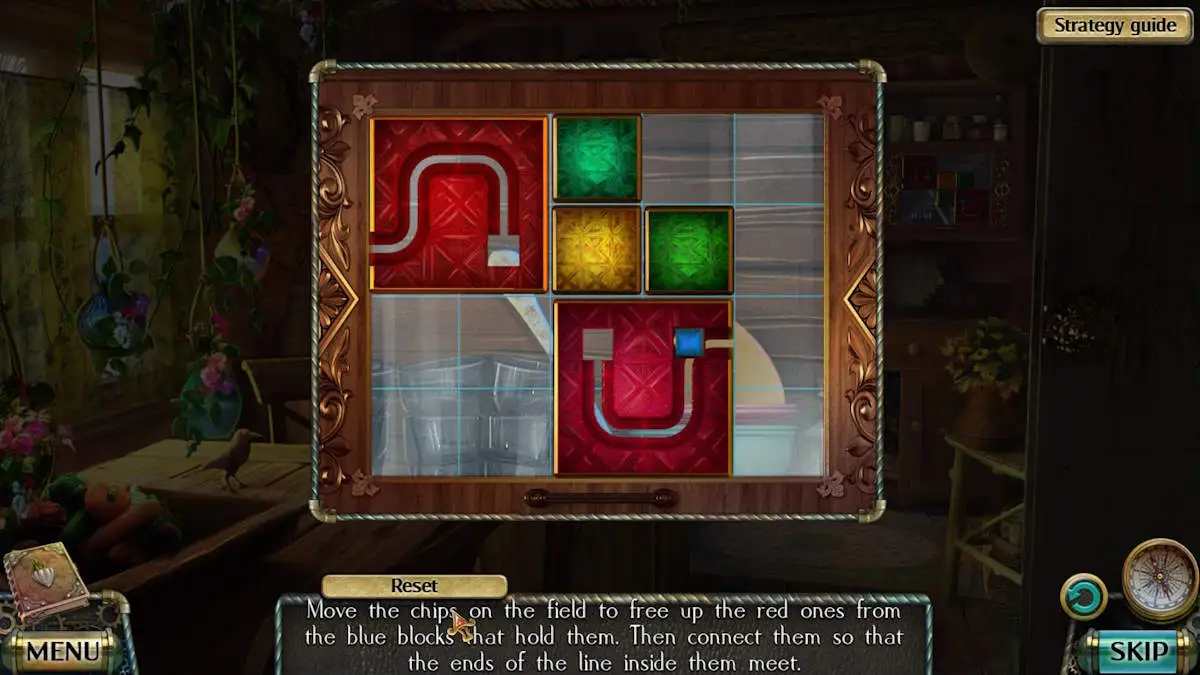
To free the second juicy public square , move the pieces to the positions above . Finally , slide the two red slice so that the silver line in them joins up , and the cupboard will open . Take theKnife . Move into the corridor and use the knife to gratis theBridle(b8 ) .
attend in the shed in the yard ( d4 ) and place the ladle under the red resin on the veracious side of the close - up . Now you may utilise the knife on the resin to free it from the rampart , knocking it into the ladle to get aLadle Full of Resin . Put the ladle on the stove in the kitchen ( c7 ) , click the right cooker button , apply the matches to light the stove , and then take theMedallionfrom the ladle .
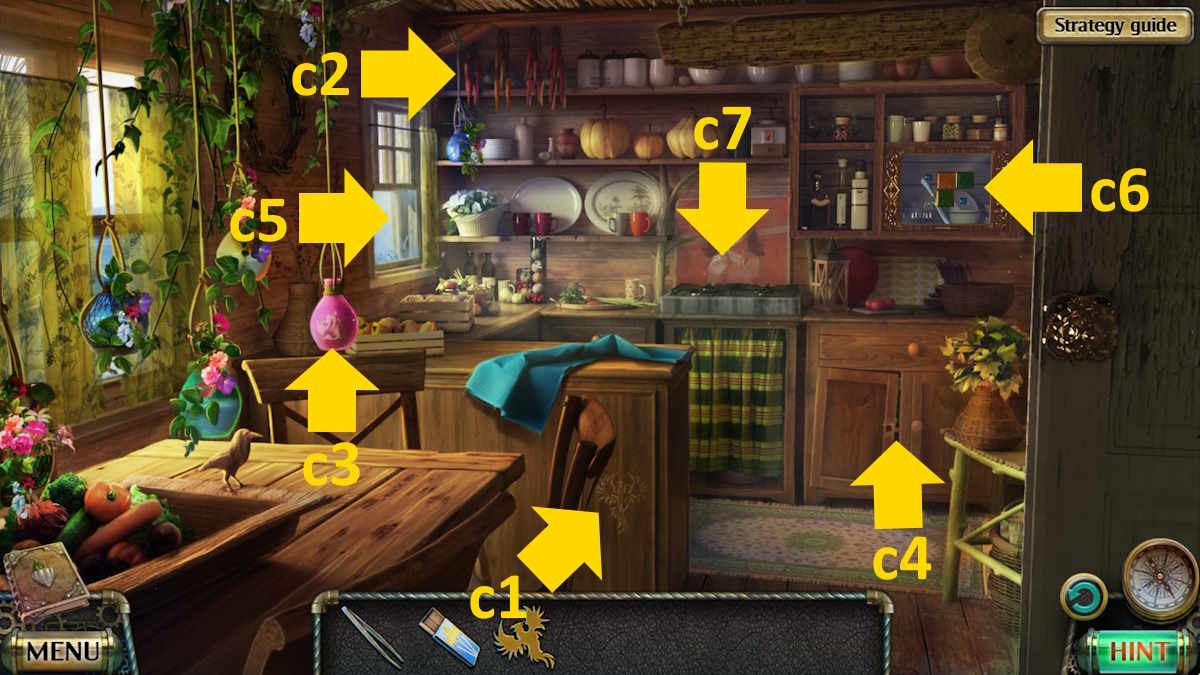
Image by Pro Game Guides
choose the horse , add together the horseshoes , flick the nails ( on the storey in the tight - up ) to add them , and then habituate the hammer to stop up them . Add the horse arrest , then click the two poles on the story in the same close - up to attach the go-cart . Then , bestow the bridle and the horse will move forrard , give you access to your base ( d7 ) . expend your medallion to open it and take theDiary(it wo n’t appear in your inventory ) and theGate Handle .
Use the gate handle on the logic gate ( d6 ) to start a move puzzle . This one is tricky , as when you move a dark-skinned piece , it also moves on the other side of the teaser . The solution is below if you ’re stuck .
Once complete , the sess will open . Head through the gate to Colin ’s yard .
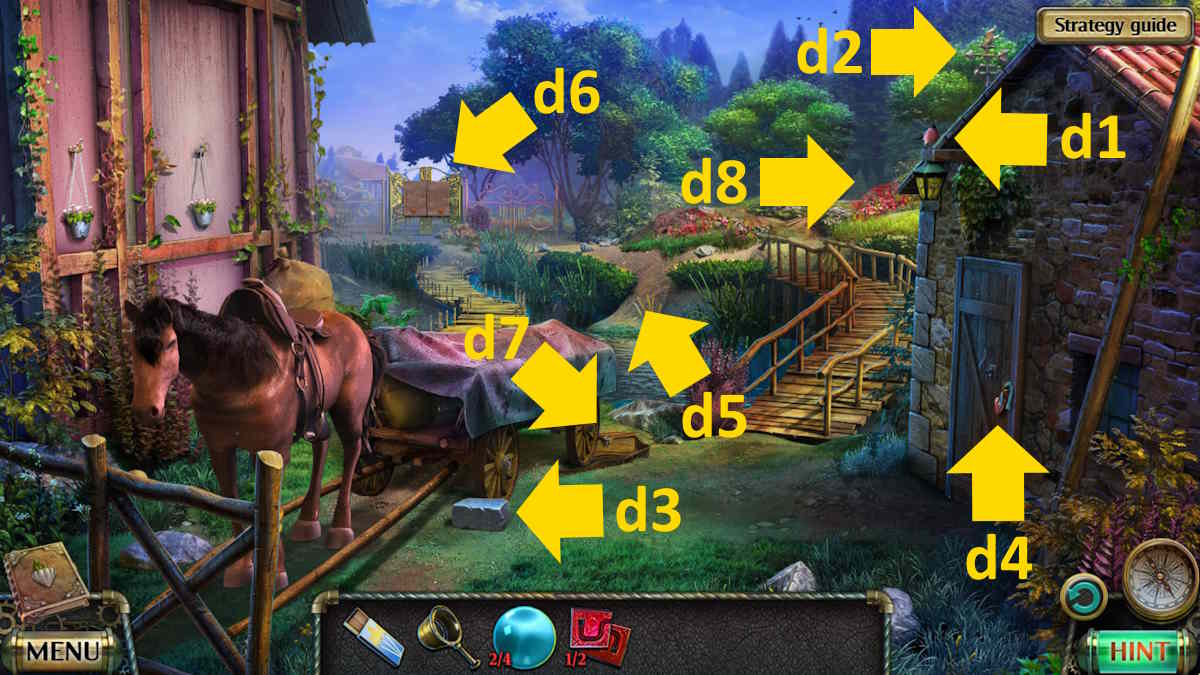
Image by Pro Game Guides
Camilla
After a long cut scene , take the birdCollectible(e1 ) and theMorphing Objectfrom above the treestump ( e2 ) . Get theClayfrom the jetty ( e3 ) , then click the door ( e4 ) to go inside Colin ’s theatre .
TheCollectibleis on the roof ray of light ( f1 ) and theMorphing Objectis on the floor ( f2 ) . Take theHookby the doorway ( f3 ) , then use the knife to unfold the metal cabinet ( f4 ) and take theLubricant(you’ll also get aDull Knifeback ) . Take theBear Figurinefrom the medicine box ( f5 ) , and then channelise back outside to the yard .
relate : AE Mysteries Picture Perfect walkthrough
Screenshot by Pro Game Guides
Use the lube on the out of practice threshold bolt ( e5 ) , taking theHoeand theSkifrom inside the shed . you’re able to now use the ski in the mole close - up ( e3 ) to flip the diver helmet and take theMousetrapfrom inside . utilize the lure in the tree ( e6 ) to take theTied - up Package , and then open it in your armory to find yoursecond Bear Figurineand aRag .
Head back into Colin ’s firm and sum up the bear figurines to the wall safe to open up it and findStain Remover . Take it to the grand next , employ the tag and discolouration remover to clean the Harlan Fiske Stone ( e7 ) , and habituate the clay on the pattern . This opens a draftsman below , where you ’ll find aLever(you also take theCastof the pattern ) .
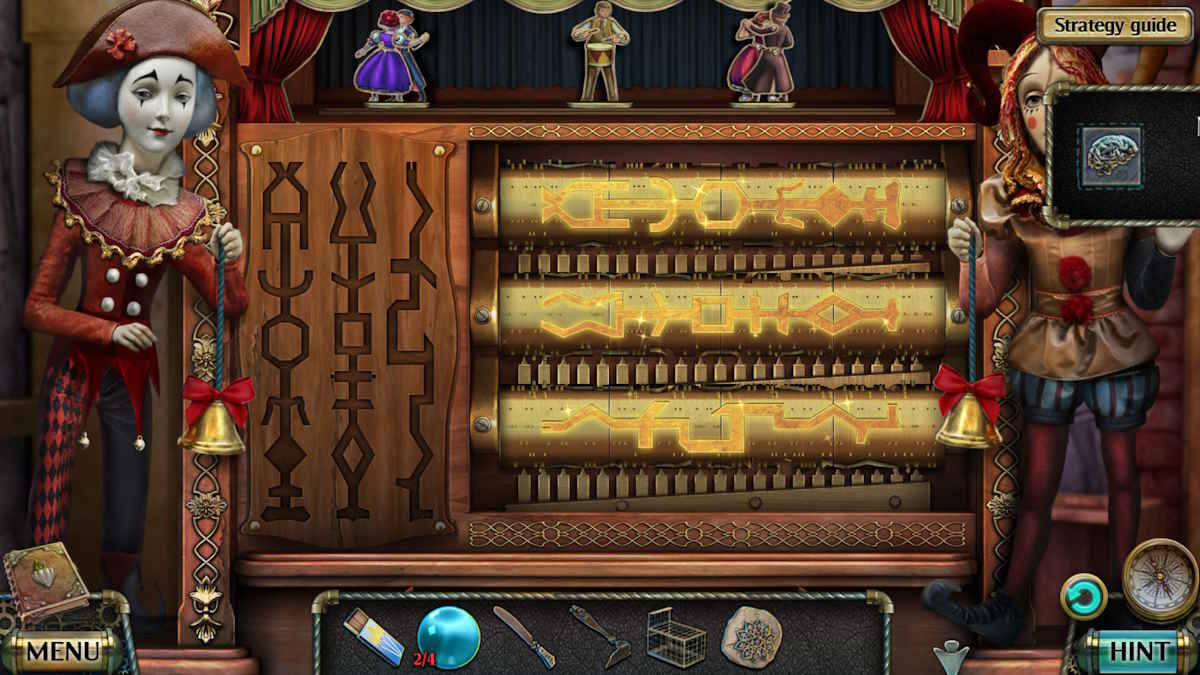
Go back into the house and use the lever on the music corner ( f5 ) , then turn the grip to start a pattern - matching puzzle . Once complete , it should seem like the mental image above . Take theKey . Head back to your planetary house , only to see your momma being kidnapped !
Screenshot by Pro Game Guides
Kidnapping
Select the shed ( d4 ) , put the mousetrap on the floor , and apply the texture pocket already in the clock - up to twit the trap . Take theMouse . Go into the corridor and use the mouse to make the cat chase after it , earmark you to take athird Glass Spherefrom the chair ( b4 ) . Go back to the yard and accompany the snatcher along the forest path ( d8 ) .
Once in the timber , take the left fork in the route ( g1 ) to come to a broken bridge . You need 10 pieces of wood to fix it . Take thefirst Wooden Boardfrom next to the bridge ( h1 ) , then move back to the incoming to the forest and take asecond Wooden Board(g2 ) .
Take the right path here ( g3 ) and take thethird Wooden Boardbefore keep down the path . readable the moss from the rock candy ( i1 ) to regain yourfourth Wooden Board , then continue frontward down the unexpended path ( i2 ) .
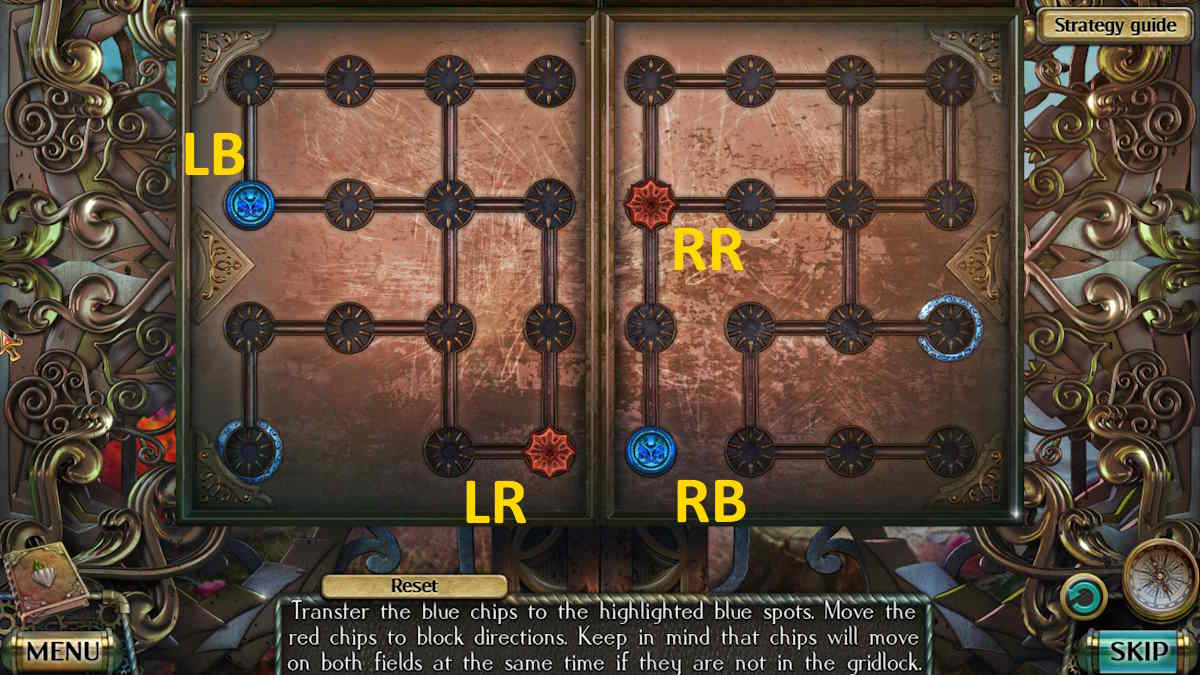
Image by Pro Game Guides
Use theHorseshoe(j1 ) to knock down afifth Wooden Board(j2 ) and then continue forward ( j3 ) . Take thesixth Wooden Boardfrom the tree in the midriff here ( k1 ) , then go left once more ( k2 ) .
Use the firearm ofSlate(l1 ) to dig up yourseventh Wooden Board(l2 ) , then move back down the route and take the ripe fork ( k3 ) . Take theeighth Wooden Boardfrom there , then move back three step to the swampy shot and take the right fork ( i3 ) .
expend theStick(m1 ) to knock down and pull in yourninth Wooden Board , then continue down the path ( m3 ) . Take yourfinal Wooden Boardthere , and refund to the Forest ( you may use the map again now ) . supply the gameboard to the bridge ( h2 ) and continue to the road .
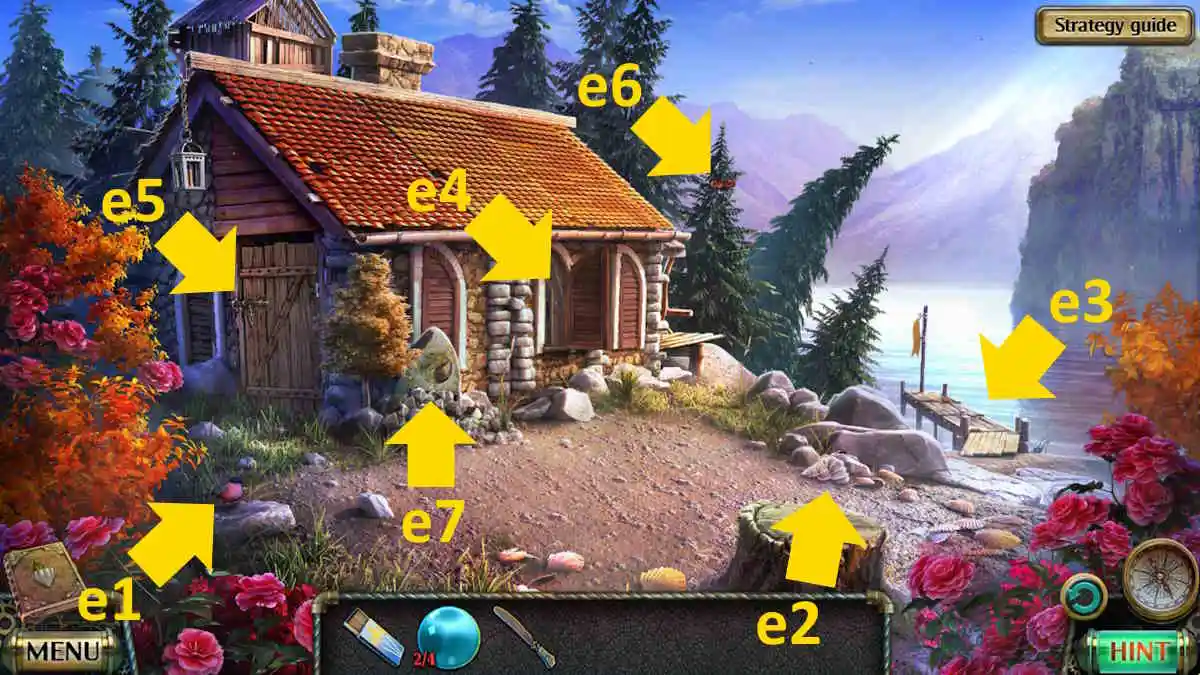
Image by Pro Game Guides
Fixing the vehicle
After a cutscene with the driver , you ’ll get aWrench . you could make out theCollectibleon the rock ‘n’ roll human face ( n1 ) , while theMorphing Objectis on the course ( n2 ) . Grab theBoard(n3),Ship in a Bottle(n4 ) , and then move the branchlet ( n5 ) to get yourfourth Glass Sphere . In the same close - up , place the table on the stone here to start a miss aim miniskirt - game ( n6 ) . Once accomplished , take theWheel .
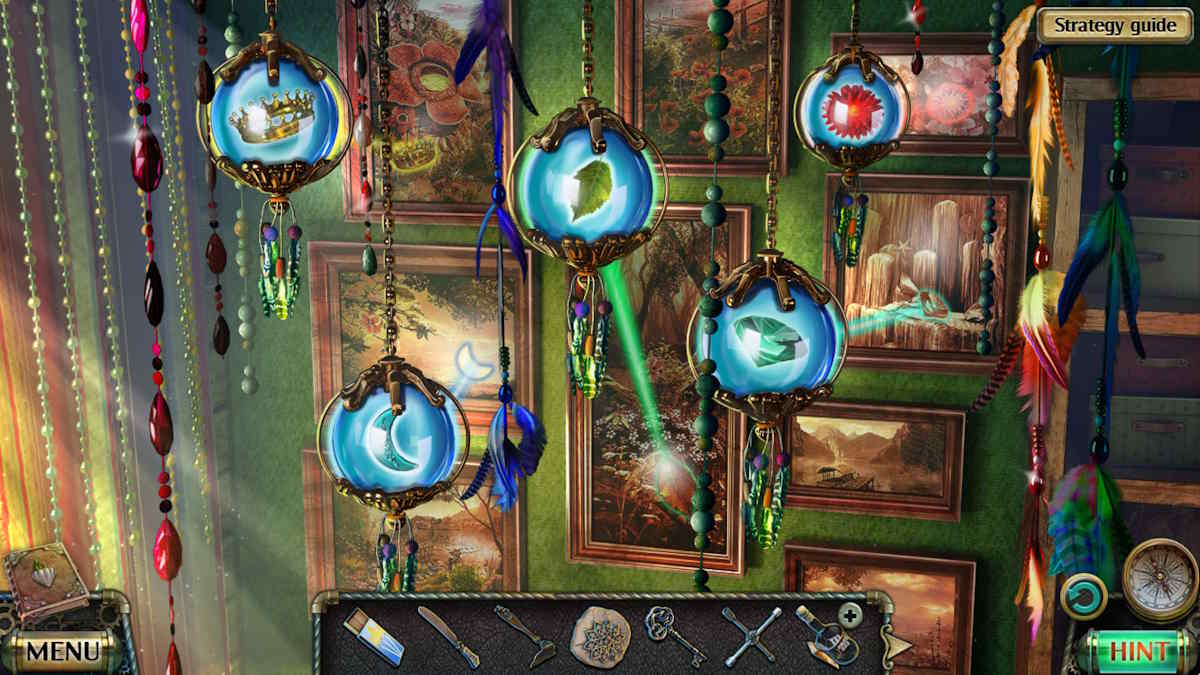
You now need to go right back to your chamber and add the glass spheres to the hanging ornament ( a7 ) to start a matching puzzle . If you ’re stuck , remark you penetrate the top of each sector and swap them around ( you need to switch the two on the left with each other and the two on the right with each other).Note the highlight range of a function .
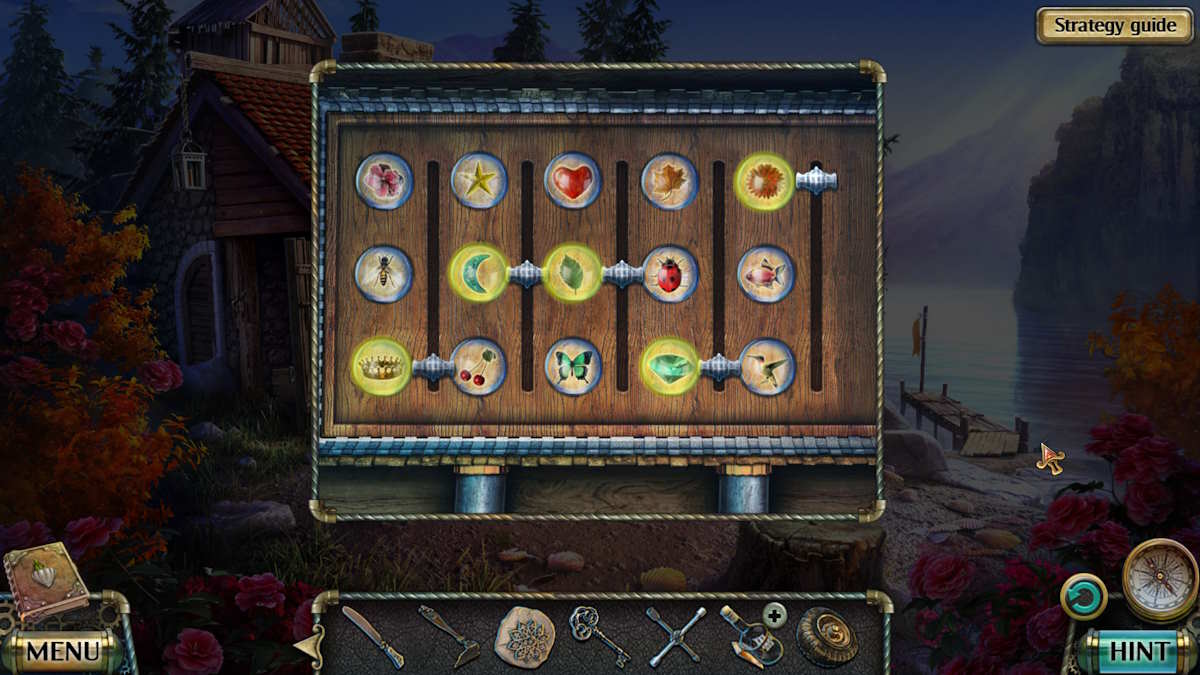
Go to Colin ’s one thousand next , select the shed ( e5 ) , and click the puzzle box seat in spite of appearance . vary the substitution so that the images from the old puzzle are highlighted ( see the image if you ’re stuck ) , and then take theJack .

Image by Pro Game Guides
Return to the disordered fomite , use the seafarer to kindle it , then click where the miss wheel should be ( n7 ) for a finis - up . sum the wheel , use the wrench to tighten it , and thevehicle will be fixed . When it is back upright , you ’ll notice you may now access a trunk at the base of the tree ( n8 ) . reset the leaves from the lock in the penny-pinching - up , utilize the key to open up the trunk , and take theGardening Scissorsfrom inside .
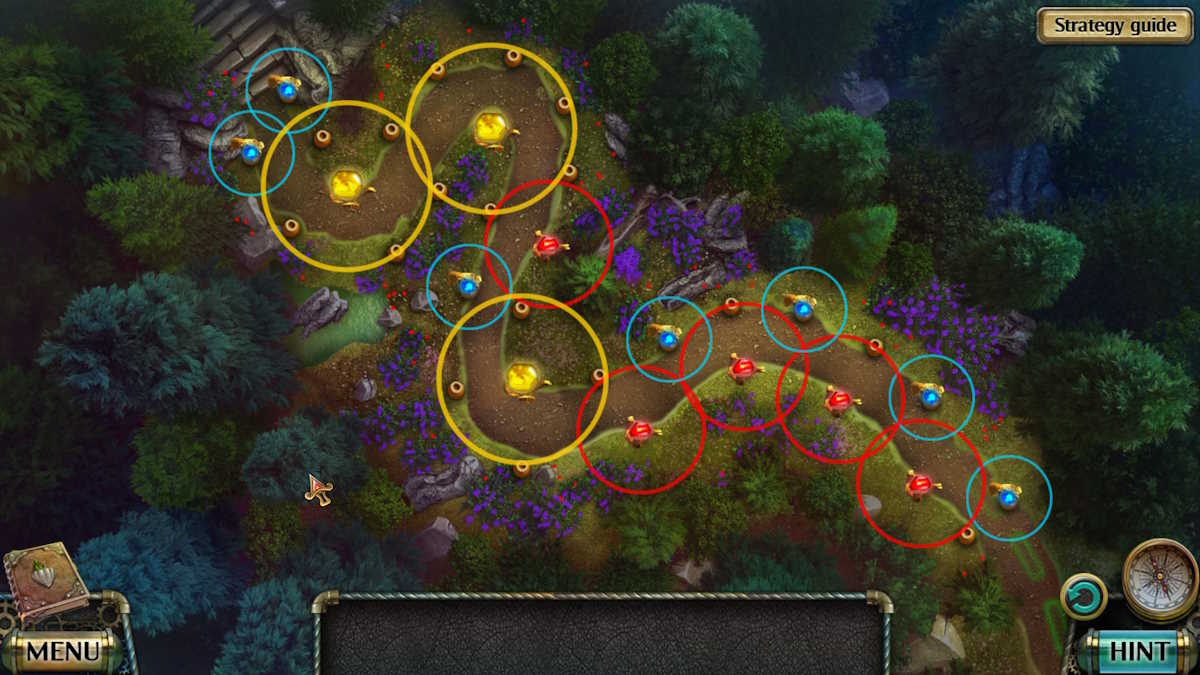
Use the scissors on the weeds blocking the road ( n4 ) to protrude a puzzle . You need to bring in all of the weeds to complete the mystifier . I ’ve marked all dapple to move to ( each meter in a unbowed line from the last marking ) on the image above if you ’re stuck ( the last two are obvious ) . Once complete , savour the cutscene .
The foot of the mountain
You ’ll find theMorphing Objectby a fencing post ( a1 ) and theCollectiblebird properly next to it . apply the hoe on the ground ( a2 ) to find aCorkscrew , take aGrindstonefrom the packsack in the collapsible shelter ( a3 ) , and take theDry LeavesandSnipsfrom the elevator ( a4 ) . Use your dull tongue on the grindstone in your stock to get aKnife
supply the leaves to the campfire ( a5 ) , use the match to light it , and then place the hurl in the attack . Once it is glow , practice the stick that ’s on the ground in the close - up to knock the cast of characters out of the fervency . Pick up theHardened Cast . take the elevator ( a4 ) once more , employ the temper cast as a key on the ascendancy mechanics at bottom , and then penetrate the levers in the close - up to go up .
When you arrive at the top , you require to climb the mountain . As you penetrate the various locating , do n’t move forward when rocks are falling , or you ’ll have to resume . Turn aright ( b1 ) and move through the next two screens to the end of this path . Pick up theMachete , and then manoeuvre back to where the lift drip you and take the forward course ( b2 ) .
Screenshot by Pro Game Guides
employ the machete to clear your way on the next screen , then move forward to the stair . Select the left field of the screen ( c1 ) to go up them and take theBoardyou discover there . Go back down the stairs and click the right hand of the screen ( c2 ) to move forward . apply the board on the next screen , then acquit on along this course .
Go down until you get to the skeleton and take theDynamite . Return to the first screen once more , then take the proper path ( b1 ) to where you got the machete and use the dynamite to reset the rockfall there . maneuver up the steps that clear and you ’ll make it at the Peak .
The snake temple
TheCollectibleis by the pillar ( d1 ) , while theMorphing Objectis among the empty boxes ( d2 ) . Use the tongue on the case ( d3 ) , take theSyringe , and then take theSackfrom the blue box ( d4 ) to bring out a clock - similar puzzle .
Now move out the door ( d5 ) to the entrance to the synagogue , only to find out your way is blocked by snake in the grass . For now , you may only grab theCollectiblefrom the snow ( e1 ) , theMorphing Objectfrom the incline ( e2 ) , and theLong Spearand theMedalion(using the snippet ) from the skeleton ( e3 ) .
Related : Lost Lands 8 Walkthrough ( Sand Captivity )
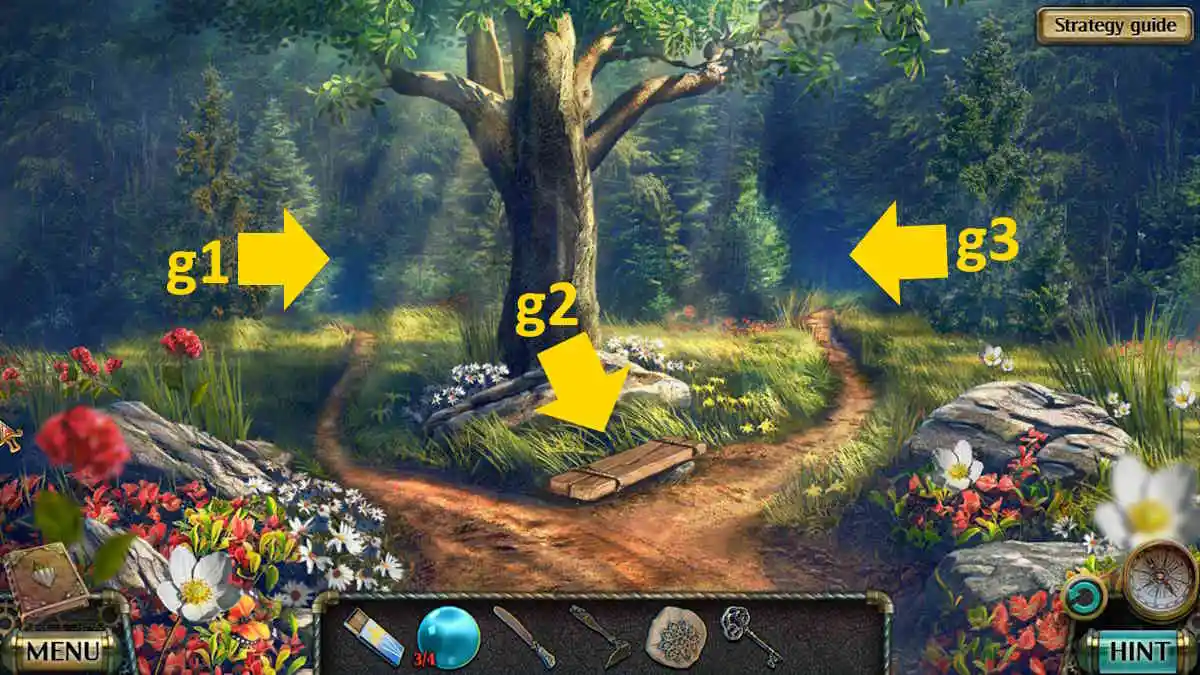
Image by Pro Game Guides
Head back to the foot of the mountain for a cutscene , after which you ’ll have someApples . habituate the medallion to start the wooden boxful in the tent ( a3 ) and take theNail PullerandMagnetfrom inwardly . Use the corkscrew on the ship in a bottle in your inventory to withdraw the lid , and then utilise the attractive feature to retrieve thePart of Mechanism .
Move back up to the crown and use the nail tugger to start the boxful ( d6 ) . This begins a placement mystifier , where you need to bring all of the part to their appropriate items . This one is quite slippery , but everything is on the screen , so you ca n’t fail . I ’ve included a picture of the nail puzzle above for steering .
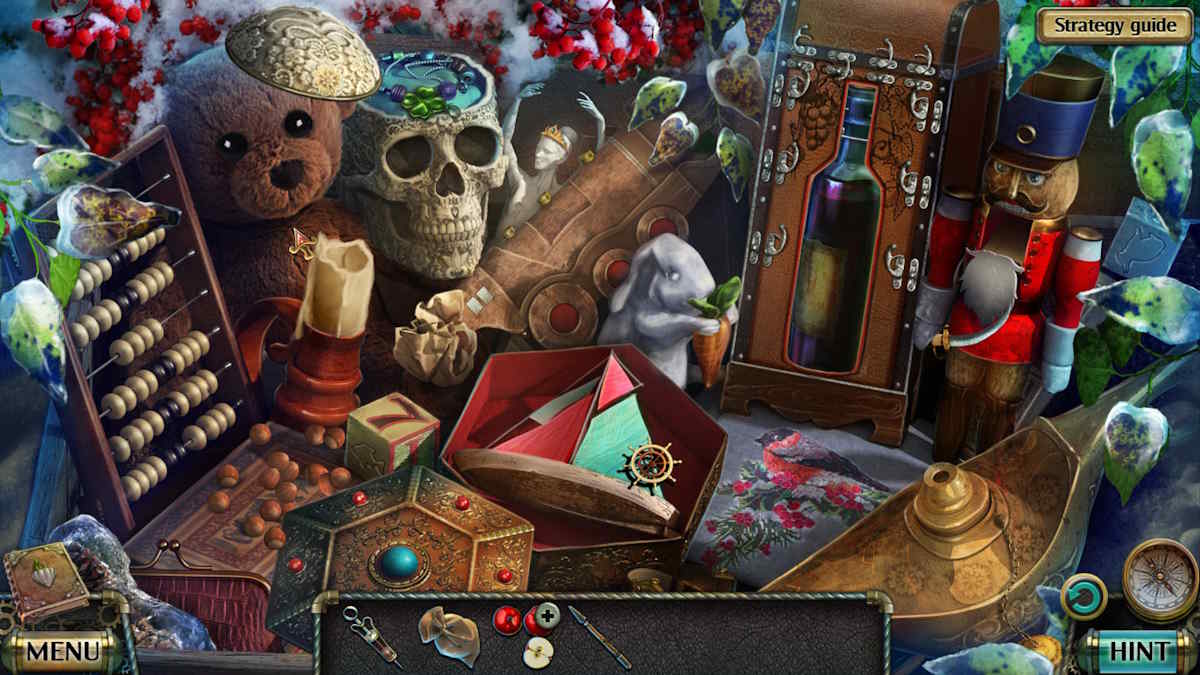
On closing , you’re able to take theBottle of Winefrom the image .
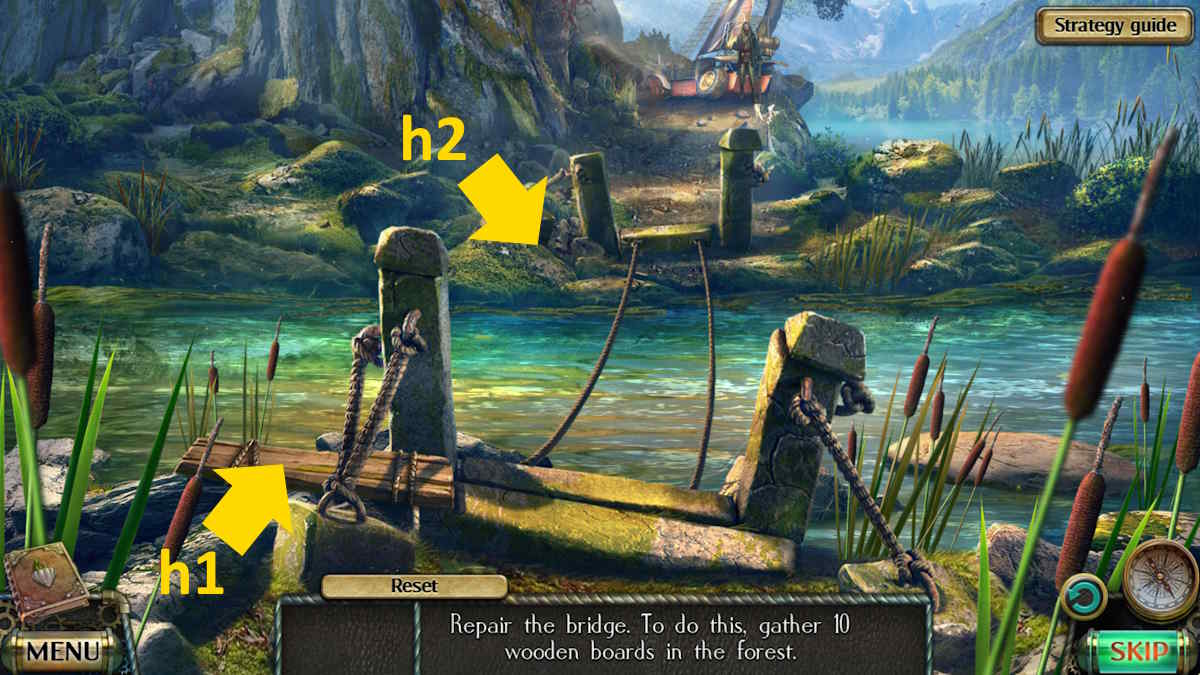
Image by Pro Game Guides
Select the apples in your inventory , bring the wine , and then expend the syringe to make anApple for the Hedgehog . Return to the fundament of the pot , practice the apple to lure the hedgehog ( a6 ) , and then capture and take theHedgehogwith the sack .
Return to the efflorescence and use the spear to take some ice ( d7 ) and expose theCode ( 159 ) . Use the part of the mechanism and the codification on the rotary gadget ( d4 ) to be able to operate it . This look tricky , but all you need to do is turn out counter - clockwise until the forbidden pointer is on 1 , then clockwise to place the center pointer on 5 , and finally turn counter - clockwise so the middle arrow is facing 9 . Once done , you ’ll receive theTriangular Chip .
channelize up to the temple and free the hedgehog on the snakes ( e4 ) to sack them . Use the lever tumbler ( e5 ) to raise the portcullis in front of the door , pick out the door ( e6 ) , and add together the buffalo chip to part a jumping puzzle . You need to bound chip over other poker chip so that only one remain .
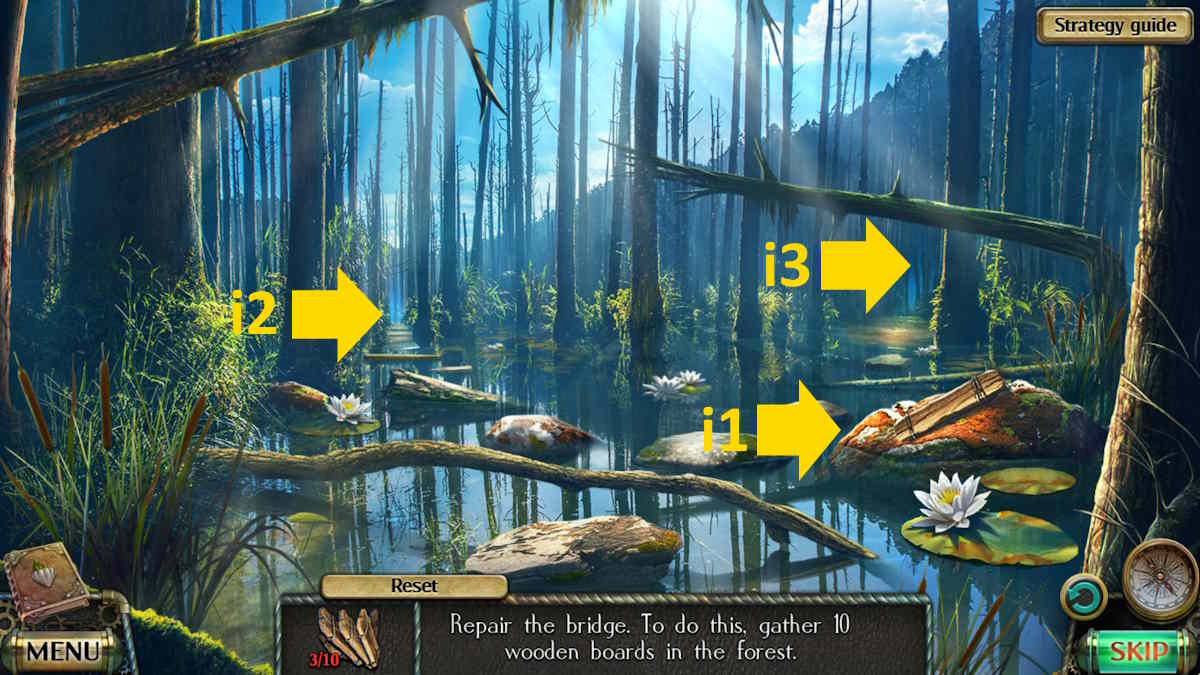
Image by Pro Game Guides
If you ’re finding this mystifier tricky , here ’s the solution :
Once complete , the doors to the tabernacle will open and you’re able to lead inside . After the cut aspect , you ’ll arrive correctly back where you come out the biz . You ’ve beentricked by an elaborate illusion !
The valley of the petrified
Take theCollectiblefrom the statue on the right ( f1 ) and theMorphing Objectfrom next to the H2O ( f2 ) . Take theGripsfrom Farador ( f3 ) , and move the blood-red flower in the same close - up to find somePuzzle Piecesand aHint . promissory note that at-bat are blockade your elbow room forward through the forest ( f4 ) before move onto the Count Ferdinand von Zeppelin ( f5 ) .
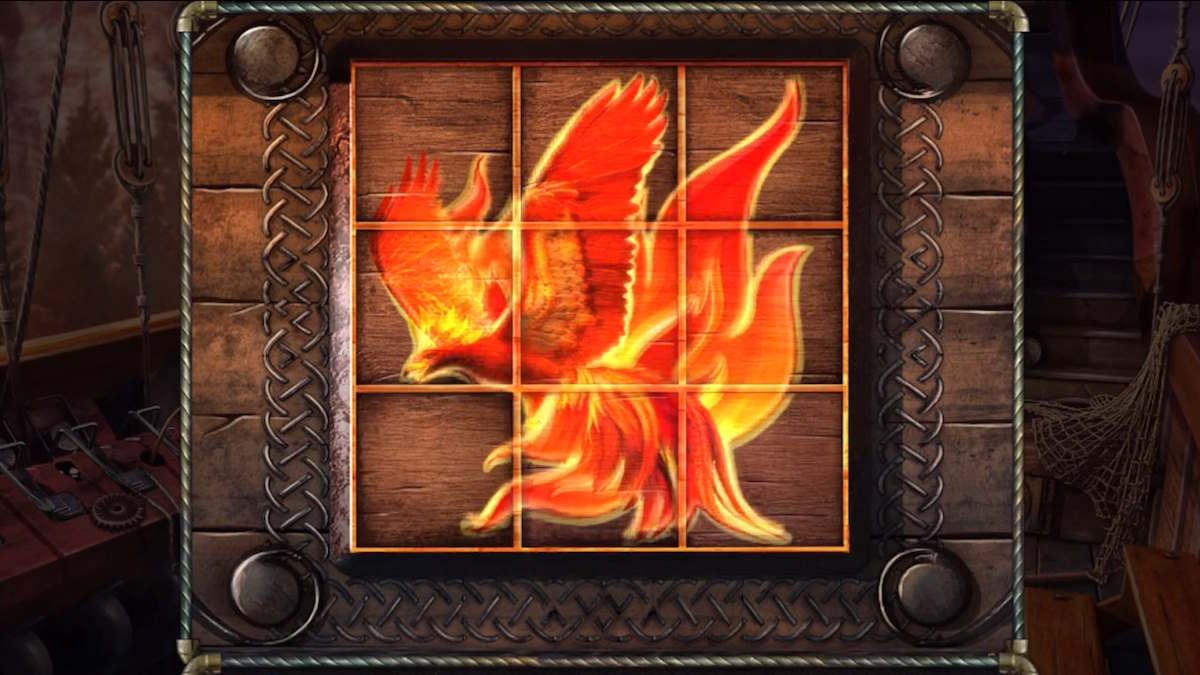
You ’ll find theMorphing Objecton the step ( g1 ) and theCollectibleon the sack ( g2 ) . Take theRope(g3 ) , then move the cyberspace to let out a sliding puzzle underneath ( g4 ) . summate your teaser piece and switch them to complete the moving picture ( you ca n’t fail here , as you merely tick pieces to swap them ) . Once complete ( see below ) , take theSieveandCluefrom the concealed compartment .
Select the ship ’s bicycle ( g5 ) for a close - up and take theGears , then add the mite . Press the stones in the rescript indicated on the hint and the center of the wheel will open , allowing you to take thePliers . Click the controls ( g8 ) and take moreGearsbefore heading back to the meadow .
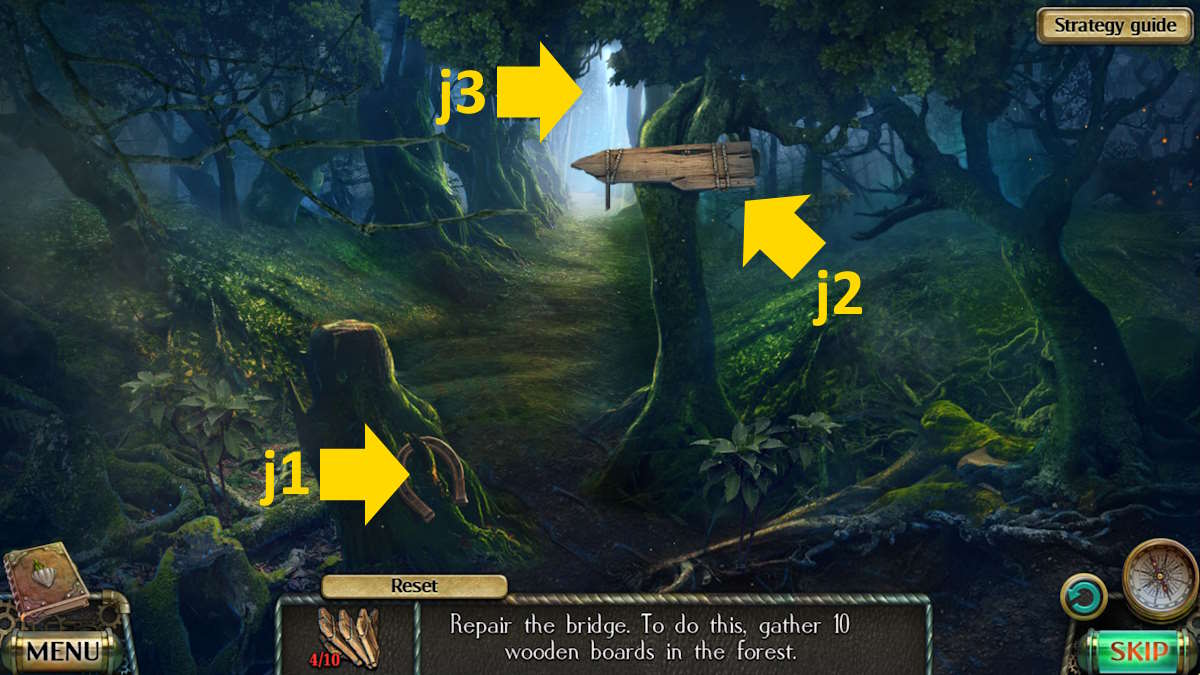
Image by Pro Game Guides
utilise the sieve in the water ( f6 ) to find aDetail , utilize the pair of pliers to remember theMagnifying Glass(f7 ) andPendant(f8 ) , and then take back to the Graf Zeppelin . Select the doors ( g6 ) and then tote up the clue and the detail to initiate a shift teaser . The solution for this is below . Once complete , head into the cabin .
The zeppelin’s cabin
catch theCollectiblefrom the brown cover ( h1 ) , theMorphing Objectfrom the steps ( h2 ) , theRebarfrom the pulley system ( h3 ) , and theRazor Blade , Duct Tape , and finalGearsfrom the table ( h4 ) . Add the gear wheel to the pulley system ( h3 ) and it will drop the John Milton Cage Jr. .
choose the seat ( h5 ) , dawn the cushion for a finale - up , and use the razor blade on the sewing to come up anIce Skate Blade(as you do ) , and then utilise the rebar on the back of the chair and take theTube . start the pipe in your armory to receive a secondGrips .
Related : Vanishing Act walkthrough ( Adventure Escape Mysteries )
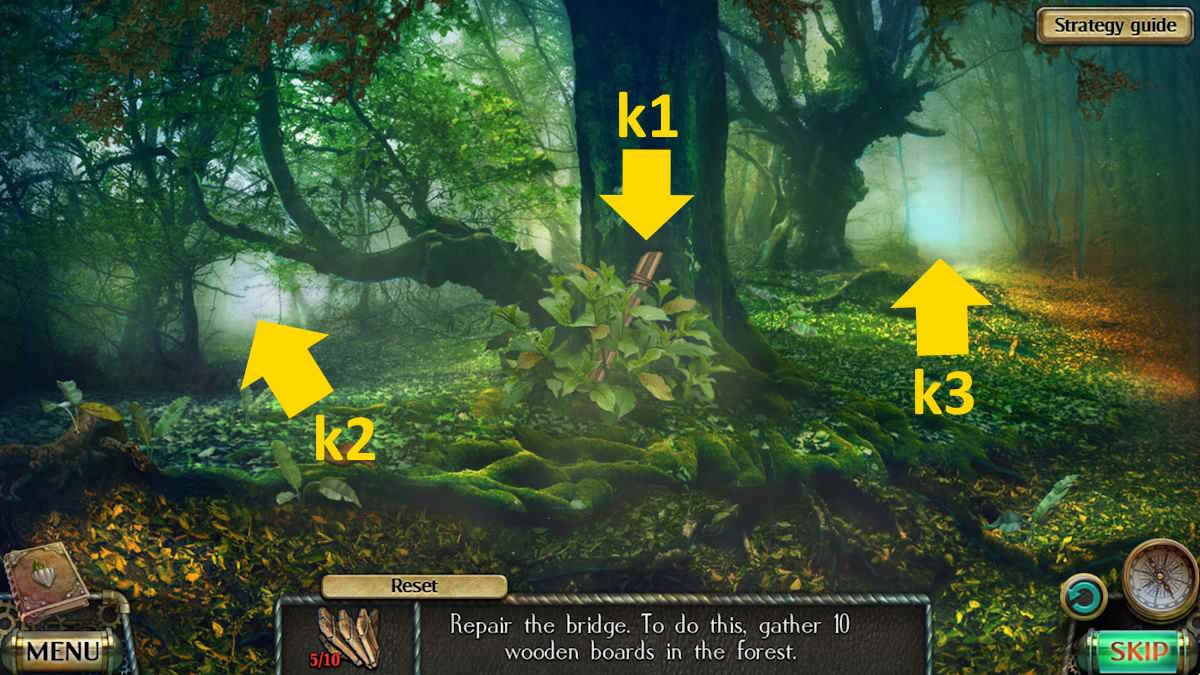
Image by Pro Game Guides
Select the pectus at the back of the cabin ( h6 ) to start out a button puzzle . For a dim-witted answer to this one from a sweet reset , snap the bottom release , then the leftover button , come after by the bottom one three more times . Take theAugerand theWrenchfrom the breast .
head up back out onto the deck and use the tape to fix the hole in the tube ( g7 ) . you’re able to now operate the mechanism ( g8 ) , allowing you to take theKey . Back in the cabin , you may use the keystone to open up the dropped John Cage , hire theOilfrom indoors . Return to the meadow , use the oil on Farador ’s fingerbreadth ( f3 ) , and take theSignet Ring .
Head back into the cabin once more and utilize the signet ring to launch the book on the board ( h4 ) . This bug out a color in mini - game . This is slenderly frustrative , as you have to do the colors in the right order but remove all the sections that are n’t that color each metre .

Image by Pro Game Guides
So , initiate with red ink , click the red button , then select every section except the lips and the two snakes ’ oral cavity . Selectblue next , deleting all the serpent and look section later on . Nowselect green , bring in the boldness section , butalso the bottom - right wing snake section(if you do n’t the yellow-bellied paint ca n’t flow in ) .
Now , add the xanthous , reset the bottom right of the snake , andre - add the greento complete the image . Take the third of theGrips .
The frozen lake
You ’ll find theCollectibleto the left of the pier ( i1 ) and theMorphing Objecton the far shore ( i2 ) . Select the ice ( i3 ) , pour on some oil , and use the magnifying glass to mellow out the sparkler and take the last one of the Grips you ’re miss . Get a close - up of the pier ( i4 ) and use the wrench to unhook the second Ice Skate Blade .
Go back into the cabin and use the grips to launch the hold ( h7 ) , which starts coin detect mini - plot . Once utter , take theIce Skate Shoes . take the shoes in your inventorying , add the blade , and habituate the twist to stiffen them up and get theIce Skates . Head back to the frozen lake , select the skates , and penetrate the other side of the lake ( i5 ) to try and skate across .
After failing , use the plumber’s snake on the shabu by the frozen fisherman ( i6 ) to retrieve a clockHand . Add the hand to the machine on the pier ( i4 ) to start a teaser . You ca n’t flush it here , as you just need to turn each dial until the images associated with it are in the holes of the hand .
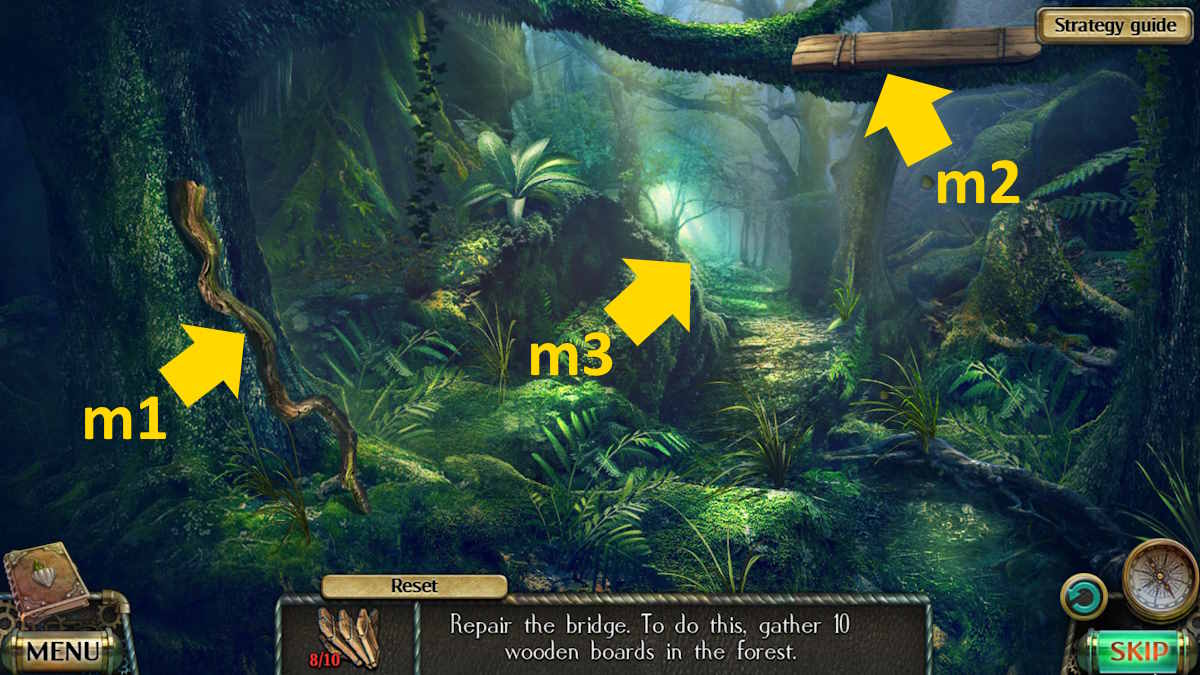
Image by Pro Game Guides
These are as follows ( from outside to in ):
When you ’re done , you ’ll take in theGrappleandPick - up Tool . pick out the hand-to-hand struggle in your armory and add the rophy to get aGrappling Hook . take the far side of the lake once more ( i5 ) , add the rassling lure in the last - up , use the screw auger on the Methedrine here , then penetrate the grappling hook to sequester it to the wimble and make a rophy bridge across to the opposite shoring . chatter the gadget once more to move to the bridgework then the settlement .
Toward the settlement
Click Roger on the bridge circuit for a cutscene , after which you ’ll welcome aClamp . Take theCollectiblefrom the bridge ( j1 ) , and theMorphing Objectfrom the ropes ( j2 ) , and then get across Roger again and use the grappler to tear in your side of the bridge circuit . Use the razor to cut the rophy in the close - up that follow and take thePutty Knife . Finally , total the clinch and apply the wrench to tighten it .
After Roger leaves , choose the blood-red thread ( j3 ) and take theScoop , Silver Key , and theEmpty Bag . Now click the far side of the nosepiece ( j4 ) to catch up with Roger . fall into place the wreckage of the step to clear it , after which Roger will give you theArboreal Key .
You ’ll encounter theCollectibleon the stairway ( k1 ) and theMorphing Objecton the boardwalk ( k2 ) . Take theBoards(k3 ) , reach the barrel ( k4 ) , add the sack , and then use the soap to get aBag of Grainwhile also finding aLense .

Image by Pro Game Guides
Use the putty knife to remove the moss from the wall mechanism ( k5 ) , then add the pendant to trigger it and drop the cage above . Take theHammerfrom the cage and then utilize the tree-living headstone to enter the hut room access ( k6 ) and head inside .
Fixing the stairs
After taking theCollectiblefrom the story ( l1 ) and theMorphing Objectfrom under the board ( l2 ) , move the red cloth ( l3 ) to expose a bird ’s nest . Use the cereal to distract the birds and take the Curtain Wand . Select the hammock ( l4 ) and use the eloquent key to launch the silver loge and get the Nails .
Select the cutting next ( l5 ) to start out a wench - finding mystifier ( keep clicking the image until you find them all ; you ca n’t fail ) . On completion , take the Carved Key . apply the sceptre on the bookshelf ( l6 ) to realise access to it , then use the carved key to get to the book there and take the Set of Patterns . you may also pick out the mesa ( l7 ) and add the set of patterns , but you require some yew wood to do more .
Go back outdoors , add the instrument panel to the pace ( k7 ) , secure them with the nails , and use the hammer to complete the stamping ground . You now have access to the cardinal part of the liquidation .
Screenshot by Pro Game Guides
Entering the town hall
TheCollectibleis on the fence ( a1 ) and theMorphing Objectis on the steps ( a2 ) . Take theHandleand theGolden Keyfrom the death chair ( a3 ) and theHatchetfrom the ascendence hut in the distance ( a4 ) . In that same close - up , use the tomahawk on the tree there to gainYew Wood .
channelize back down to Roger ’s house and use the golden key on the amber loge on the chair ( b1 ) to open it and take aLever . Now pick out the workbench ( b2 ) and add the yew wood . Copy the pattern for the township hall yew key , hound a undivided line . embark on from the top extraneous dot , pull out all around the outside , then go into the eye and draw the lead . Once consummate , take theKey to the Town Hall .
utilise the key fruit on the town hall doorway ( a5 ) and then head inside . After the slice scenery , you ’ll come up theCollectibleon the story ( c1 ) and theMorphing Objecton the stairway ( c2 ) , where you ’ll also observe aBronze Key . Use the bronze key back in Roger ’s house to launch the concluding box ( b1 ) , taking aLensand aLeverfrom inwardly .
Screenshot by Pro Game Guides
Back in the town dorm , practice the levers to start the boxwood ( c3 ) and take theValve . Return to the mastery hut ( a4 ) and add up the valve to the control mechanism to set about a pressure teaser . To finish it , from a reset , change state the dial in the following order :
Once you arrive at the old part of the settlement , you ’ll find theCollectibleabove the door ( d1 ) and theMorphing Objecton the flooring outside the room access ( d2 ) . Take aBeltfrom the tree ( d3 ) , and then use the hatchet on the Sir Herbert Beerbohm Tree to get a while ofAsh Wood . expend the belt to tie back the offshoot jam the door ( d4 ) , then head back to Roger ’s house .
colligate : Lost Lands 5 Walkthrough
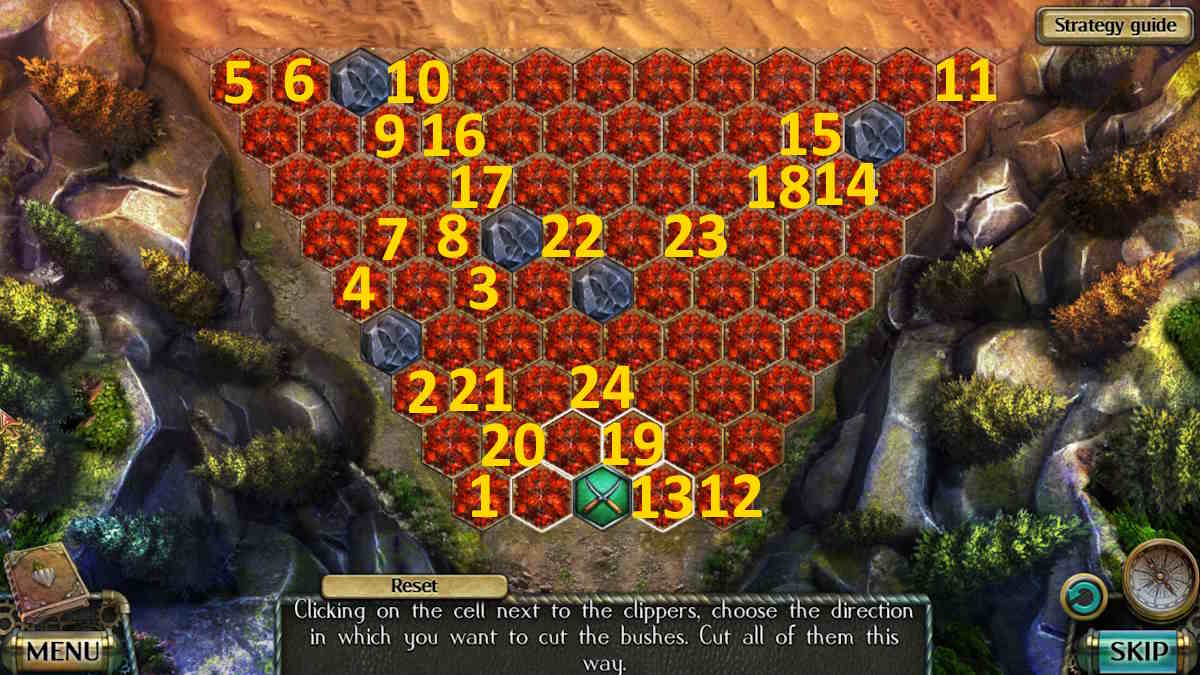
Image by Pro Game Guides
Awakening Albert
put the ash tree wood on the desk and follow the radiation diagram to make aKey for Albert ’s House . I started on the core Elvis , did the leftover side of the pattern ( privileged part first ) , and then completed the right side to finish back in the eye . Take theArboreal Key . employ the samara to afford Albert ’s door ( d4 ) and head inside .
TheCollectibleis by the books on the left over ( e1 ) and theMorphing Objectis in front of Albert ’s professorship ( e2 ) . Take thePickaxe(e3 ) , then open up the top draftsman ( e4 ) to find aScrewdriver . utilize it on the model ( e5 ) to loosen the mouth and take theKey . utilise your grip on the doorway gadget ( e6 ) to open up it , and take theBasketfrom outside ( e7 ) .
practice the tonality to spread the remain draws ( e4 ) and take theAwakening Pollen Recipe , Empty Spray Bottle , Square Valve , Pot , Empty Jar , andFlask . practice the pot to meet somePoison From the River(e7 ) , then take theFanfrom the workbench ( e8 ) . you could also tote up the empty jounce and poison to the formula in your stock list to unclutter it .
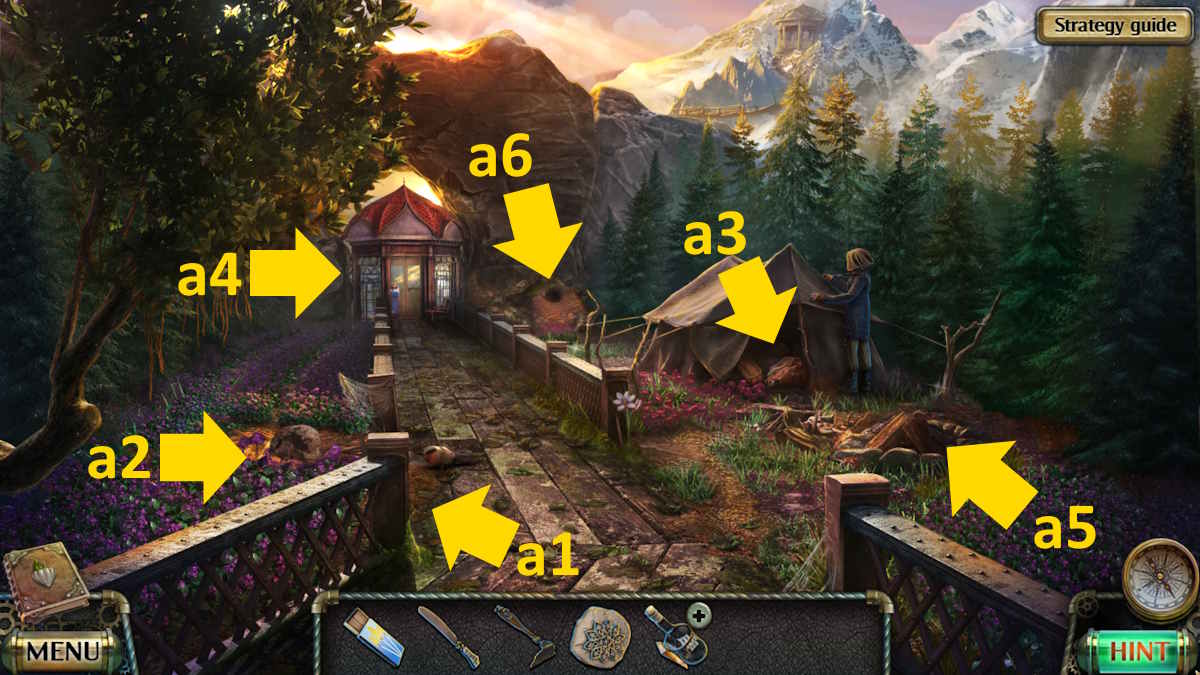
Image by Pro Game Guides
Collect the rest period of the ingredients . Go to the frigid lake and use the basket to get theRed Berries(f1 ) , then to the townsfolk hall and practice the flaskful to get theAloe Juice(c4 ) . you could add both of these to the formula too .
Collecting the ingredients
Now move to the central part of the colony and utilize the pickaxe on the rocks ( a6 ) , utilize the hatchet to get someAmaranth Wood , and then go to Roger ’s mansion and make theKey for the Plumber ’s Houseusing the amaranth Natalie Wood . Take theArboreal Key , go to the pipe fitter ’s house ( d5 ) , and head inside for a miss object mini - plot .
The ropes monastic order ( amount them left to right field ) is5 , 4 , 5 , 1 , 4 , 5 , 3 , 1 , 4 , 5 , 2 , 3 , 1 , 4 , 5 . The shapes you need are as follow : middle - bottom , top rightfulness , and thentop leave .
To complete the sliding puzzler , use the image below . On windup , you ’ll receive aLever Arm .
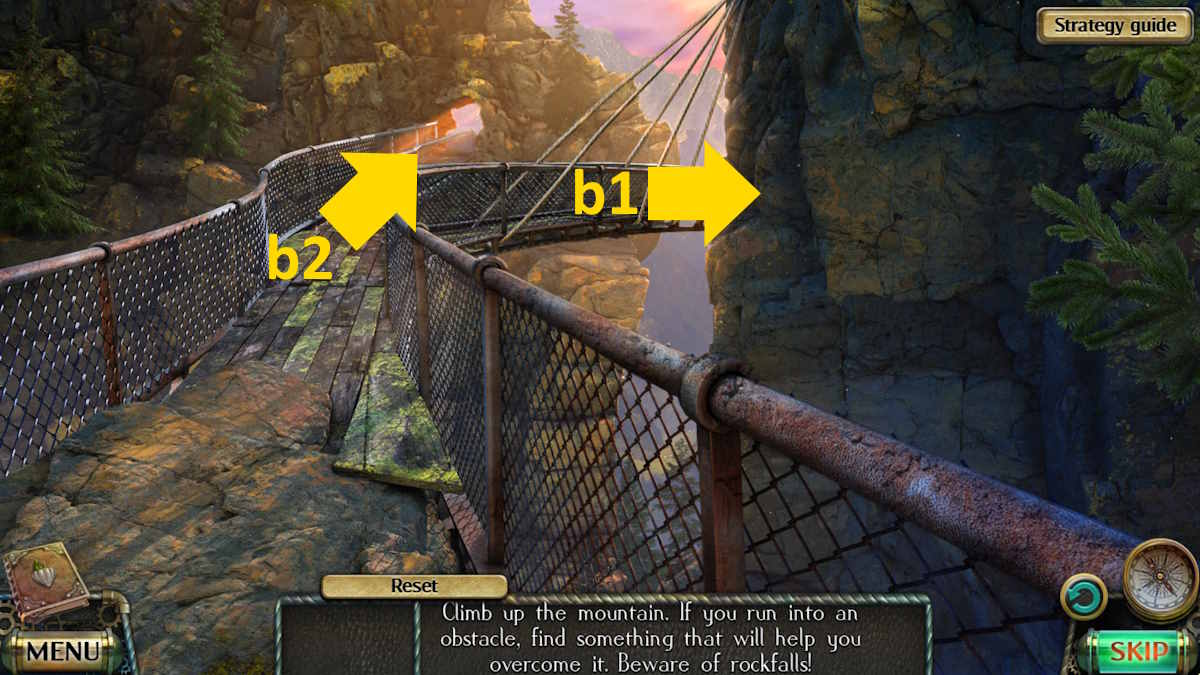
Image by Pro Game Guides
Add the lever arm to the spigot ( d6 ) and utilize the empty spray bottle in the urine to get aSpray Bottle . Select the mobiles for a confining - up ( d7 ) , add the valve , and use it to bend the mobiles . Now snap the small house to start a miniskirt - game . You ca n’t fail here because the point are highlighted as you move the computer mouse over them . Once complete , take theReaping Hookfrom behind the room access .
Finally , you may move to the bridge deck ( f2 ) , spray the heyday with water , and then apply the glean hook to pull together theRed Rose . at long last , move to the meadow and use the reaping lure to gather aSomnolent Flower Bud(f3 ) . impart both flowers to the recipe to incur theBasket With Ingredients , and riposte to Albert ’s house .
add together the ingredients to the work bench ( e8 ) and pursue the teaching to make the pollen .

Image by Pro Game Guides
Select Albert on his professorship ( e9 ) , add the pollen , and then practice the sports fan to wake up Albert .
Going to the gorgon’s temple
Now that Albert has act , take his chair ( e9 ) and move the shock to line up your thirdLense . Go to the township hall , watch out the slash scene , and receive theCup Shaped Key . sum up the lenses to the telescope ( c5 ) , and take down the traffic pattern ( middle left , third from left on the top row , and bottom right ) . Select these push button on the storage locker ( c6 ) to open it .
summate the paint to the unseen door ( c2 ) to start a neglect objective minigame . Once complete , take theCrystals . Go to the meadow , select the crystals in your inventory , and click the path into the forest ( f4 ) to start an illumination puzzle ( see the root above ) . Once complete , you ’ll go far at the snake tabernacle .
TheCollectibleis on the cliff face ( g1 ) and theMorphing Objectis on the slope ( g2 ) . analyze the tabernacle door ( g3 ) , dispatch the Twisted Fork , then take the bushes ( g4 ) to find a Liana and a Snake Key . Use the liana to find the Handle ( g5 ) , and use the handle to spread out the temple doorway . Head deep down .

Image by Pro Game Guides
Get to the library
Take theCollectiblefrom the pillar ( h1 ) , theMorphing Objectfrom the trading floor ( h2 ) , and thePokerfrom the head shut - up ( h3 ) . Move forward to the key Marguerite Radclyffe Hall ( h4 ) .
TheMorphing Objectis one of the Oliver Stone struts ( i1 ) , while theCollectibleis on the righthand wall ( i2 ) . habituate the poker to find theTablet With Engraving(i3 ) , take theGarden Glove(i4 ) , use the fork to get theForged Symbol(i5 ) , take aMirror Fragment(i6 ) , and then head back to the substructure of the temple .
Use the mirror fragment to collect theStrip of Fabric(h5 ) , and then use the glove to take the common ivy ( h6 ) . Move back into the key hall and channelize into the room on the remaining ( i7 ) .

Image by Pro Game Guides
Take theMorphing Objecton the left field of the room ( j1 ) , and theCollectibleon the bulwark just above it ( j2 ) , and then select the hoard to begin a symbolic representation energizing mini - game ( j3 ) . Once ended , take theSnake Key .
take the sword ( j4 ) to encounter aSolar Charmand someStones , and then add the Stone to the mechanism ( j5 ) to determine aLever , aMetal Brush , and a clit . Press the push button to reach the bulwark above ( j6 ) , where you could put the solar charm to find anotherSnake Keyand aPuzzle Piece .
relate : Abandoned Walkthrough & Puzzle Solutions
Screenshot by Pro Game Guides
Back at the fundament of the synagogue , expend the light touch to reset the moss ( h6 ) , then click the third clay roach from the left and take theClay Key(this also opens a compartment in the column to the rightfield of the fountainhead ) .
Head to the central hall and tote up the puzzle piece to the steps ( i5 ) to start an odd - one - out teaser . The animals to select are the second ace from the left wing in each row ( the rabbit and the tortoise ) . This shuts off the flow of poison from the left heart .
channelize through the righthand door ( i8 ) into the abandoned library .
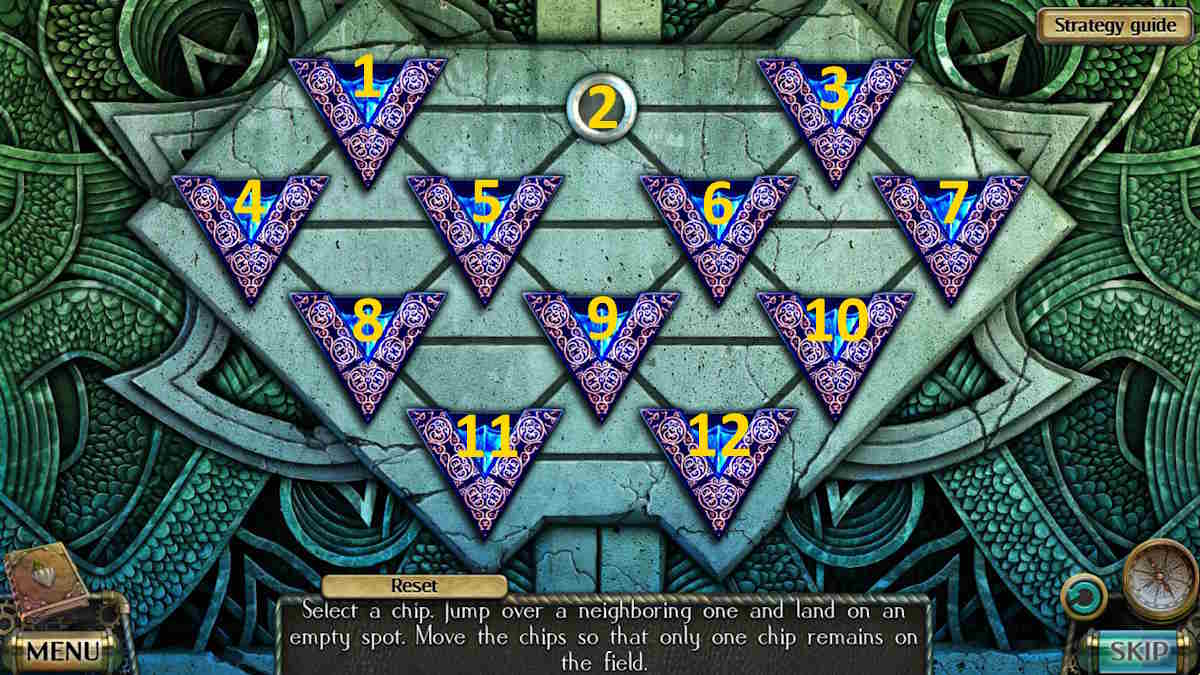
Image by Pro Game Guides
The abandoned library
After collecting theCollectible(k1 ) andMorphing Object(k2 ) , take theDisk With Pattern(k3),Ladder Part(k4 ) , secondLadder Part , three Steps , and aHandle(k5 ) , andtwo more Stepsand asecond Handle(k6 ) . Once you have them all , put theLaddertogether and employ it to get thePlate With A Drawing(k3 ) .
Go to the central hallway and add the plate to the righthand stairs ( i4 ) . You need to spot five difference , which I ’ve marked in the image above . Once unadulterated , the 2nd poison stream will stop . Note the symbol that has appeared on the eyes and frontal bone of the statue .
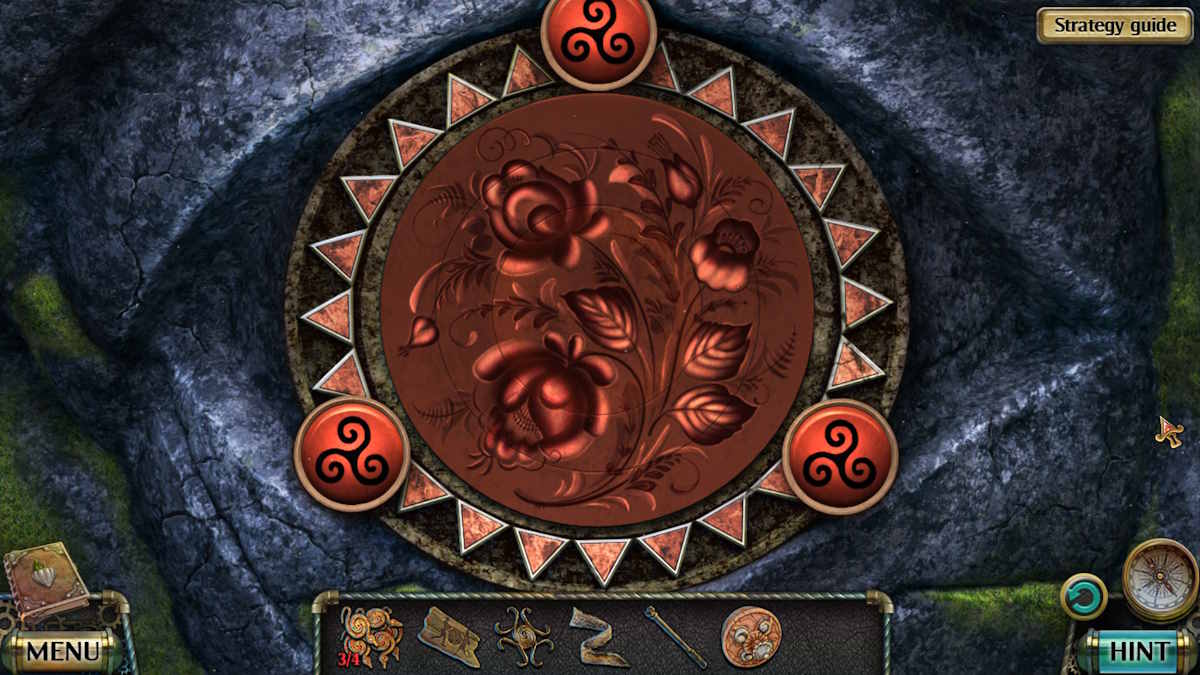
Return to the foot of the tabernacle , select the forefront ( h3 ) , and add the disk to the middle of the puzzle machine . Click each of the three outside circles until they ’re red , as this is the symbol that touch the one you ’ve just seen . Twist the circle parts to create a accomplished image ( see above ) , after which you may take theValve .
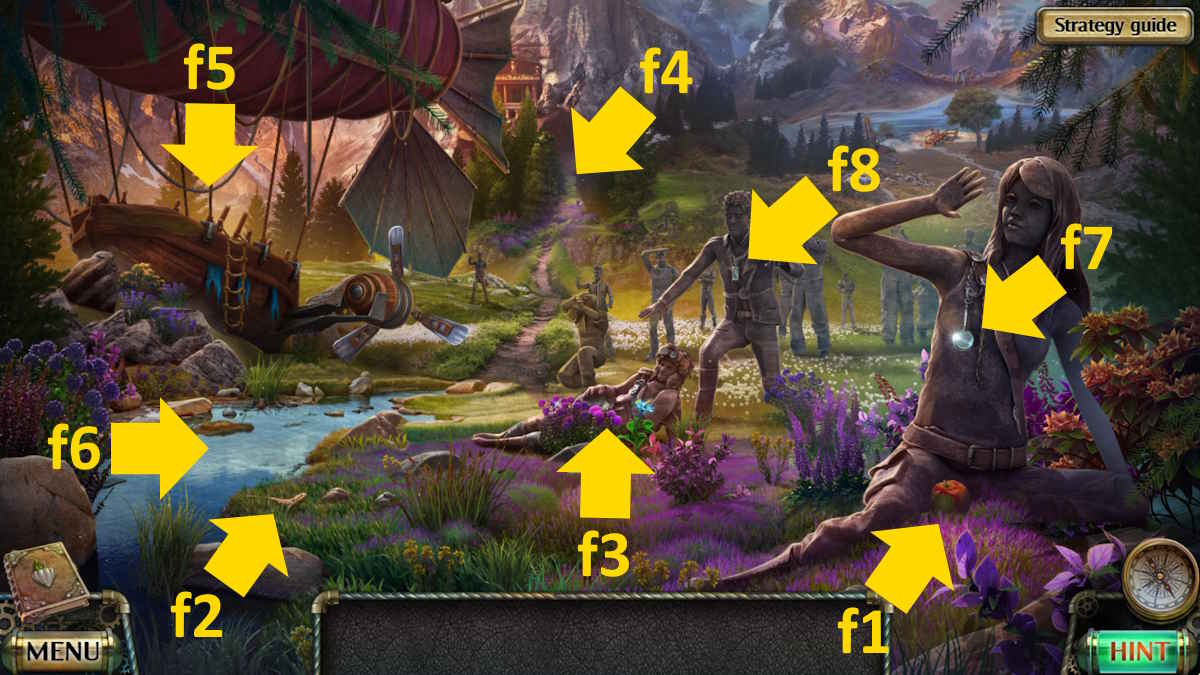
Image by Pro Game Guides
Use the valve on the pipework in the cardinal entrance hall ( i9 ) to drain the poison from the pool . Select the pool ( i3 ) , take theColored Tile , and then lead outside the temple entry and add it to the stair ( g6 ) to start a pair puzzle . pack each row , select the observe green tiles ( number from left to right hand , ignoring the red central roofing tile ):
Once pure , take the finalSnake Key . Go back to the central hall , choose the empty pool once more ( i3 ) , and add the snake keys . The floor will open , allowing you to enter the spiral stairway .
The gorgon’s crypt
TheCollectibleis on the wall ( l1 ) and theMorphing Objectis on one of the ruby-red particular ( l2 ) . Take theMugfrom the far side of the steps , then head down to the gorgon ’s crypt .
Take theMorphing Objectfrom the floor ( m1 ) , theCollectiblefrom the wall ( m2 ) , and aFangfrom the clay bowl ( m3 ) before add up the clay key fruit to it for a slashed scene . Take thePressure Gauge(m4 ) , aRagfrom the sarcophagus ( m5 ) , then tote up the forge symbol to the altar ( m6 ) to discover a bijous mystifier .
If you ’re stuck on this , apply this sequence ( 1 - 3 top quarrel , 4 in the middle , and 5 - 7 bottom run-in ) from a fresh reset to figure out it .
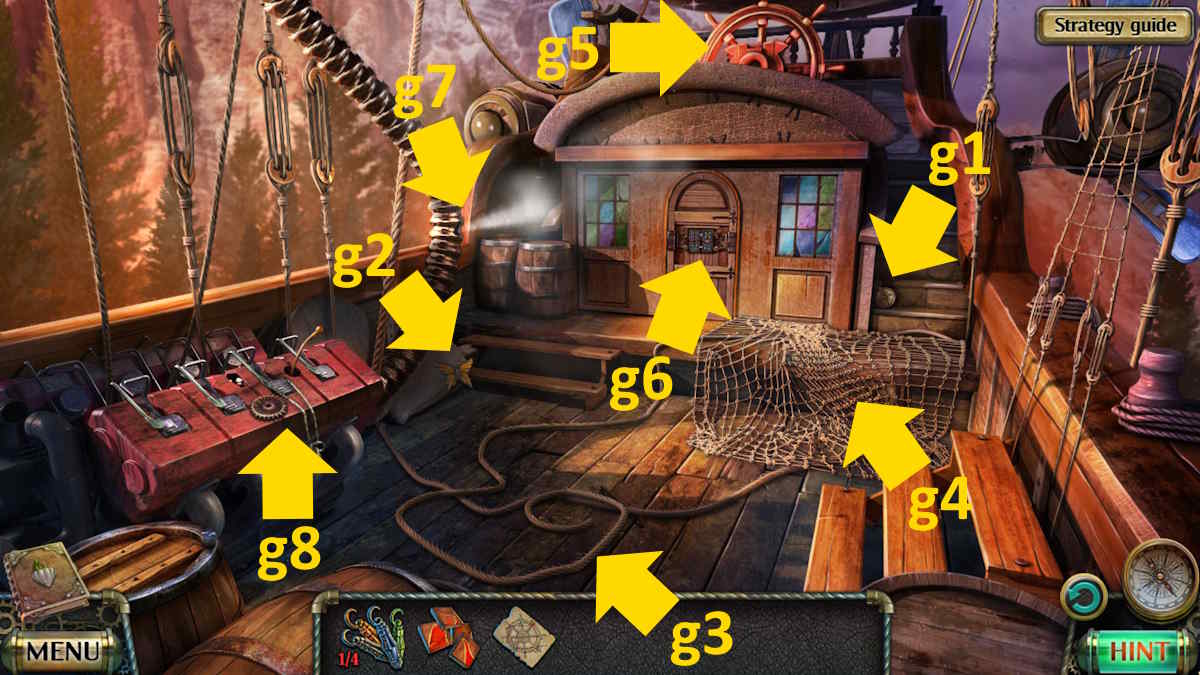
Image by Pro Game Guides
you may now select the cyclorama ( m7 ) to start an object positioning mini - game . Once arrant , take the Eagle Head Figurine and use the mug to get a Mug With Water . Use the mug of water on the fire ( m8 ) to get a Mug of Boiling Water . guide back to the library now and use the mug to steam up the window ( k7 ) to find a code ( 3145 ) .
Finding the book about the gorgon
Move to the coiling stairway , utilize the tag to strip the rampart hanging ( a1 ) , and add the wooden engraving . Once you ’ve got it good , a way will open up ( a2 ) . Take theTank , Hammer with a Chisel , andSawfrom inside it .
Now go to the foot of the temple and use the hammer and chisel to get theOld Torch(b1 ) . get to the torch in your stock , withdraw the sometime ash tree from the end , and add your flight strip of fabric to make aTorch . Light the torch in the gorgon ’s crypt ( c1 ) to get aBurning Torch , which you may then use at the foot of the temple to scare off the scorpion ( b2 ) and take theBottle With Acid .
Head to the treasury next and employ the Zen on the rust fungus ( d1 ) . I ’ve included a picture of how to copy the convention above . The Zen will disband the rusting now , earmark you to take the sword ( Roger will take it for now ) . mark there is a second codification in the hole you drew the sword from,1523 .
Screenshot by Pro Game Guides
Move to the give up library next and choose the case on top of the bookshelf ( e1 ) . Enter the two codes you have , setting3145on the top row and1523on the bottom row ( it wo n’t puzzle out the other way around ) . The shell will toss off overt , allowing you to take theKey . Use the Florida key to reach the padlock ( e2 ) , and take theAnchorage . Once you have it , click the room you just opened to bulge a missing objects minigame . Once you ’re done , you ’ll incur theBook About Gorgn , which triggers a cut scene .
While still in the temple , you’re able to target the tank , anchorage , lever , and pressure gage on the voluted staircase ( a3 ) . you may nowassemble the gadget(I’ve pictured it above ) .
Related : Lost Lands 4 Walkthrough

Image by Pro Game Guides
Crossing the poisonous river
generate to Albert ’s house for another cut scene , after which you ’ll get someRope . you could use the forget me drug at the back of Albert ’s theatre ( f1 ) to rise down to the pristine sea-coast . But before you do , guide to the town hall . Select the death chair at the back of the room ( g1 ) and tot up the bird of Jove ’s heading to start up a puzzle . You require to move the sliders so that the head all drop onto the correct beast . I ’ve included a solution below .
Once done , you could collecttwo Fangsfrom the compartment behind the teaser . Head to the pristine glide .
You ’ll get theCollectibleon the sens ( h1 ) , while theMorphing Objectis by the tree soapbox ( h2 ) . Take theFangin the anchor close - up ( h3 ) before continuing down the track ( h4 ) to the poisonous river .
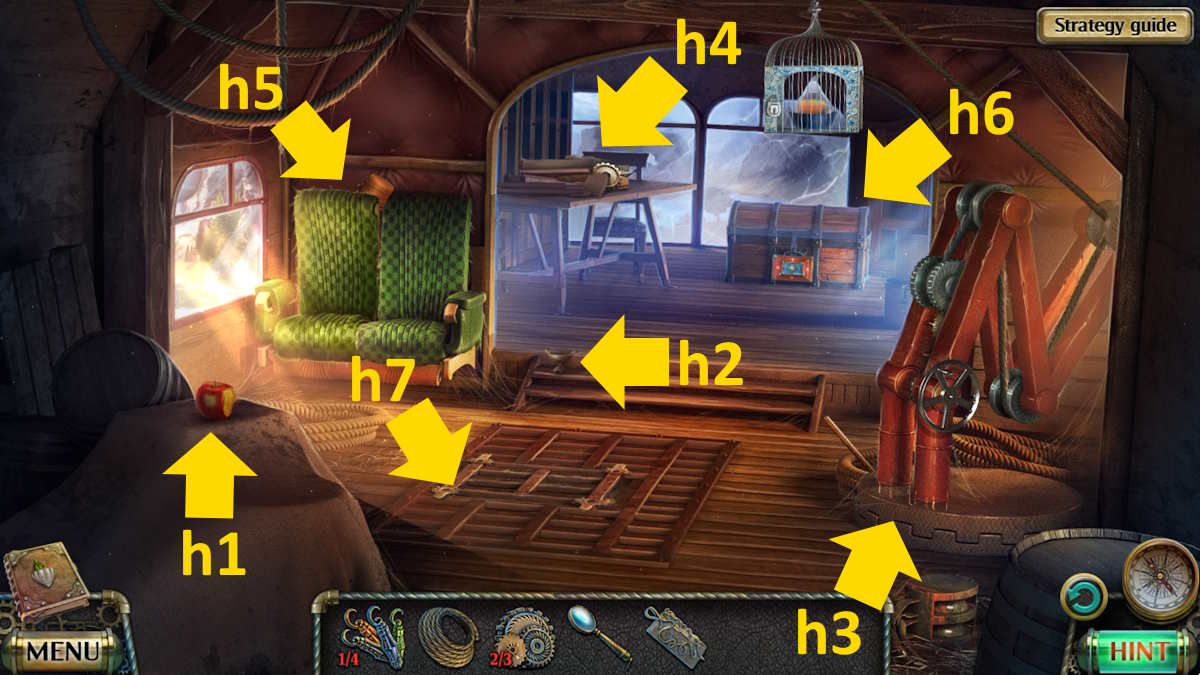
Image by Pro Game Guides
Take theCollectiblefrom the rotting branch ( i1 ) and theMorphing Objectfrom the bank on the proper ( i2 ) . Use the saw to cut the tree root ( i3 ) , causing the tree diagram to settle across the river . Now , you could click the skeleton ( i4 ) on the far side and take theSkeleton Paw .
Use the chela in the scissure ( i5 ) to dig out aHoney Spoon , and then continue forward ( i6 ) to the entrance to the mine .
Entering the mine
After taking theCollectiblefrom the Gunter Grass ( j1 ) and theMorphing Objecton the path ( j2 ) , take theGarden Shovel(j3 ) andfour Multicolored Chipsfrom the path . They ’re all in the same stopping point - up but you have to take root around a bit to find them . Also , take theClippersby the mine entrance ( j4 ) , theSlingshoton the Sir Herbert Beerbohm Tree ( j5 ) , and then direct back to the coast .
Use the saw to cut the tree roots ( h5 ) and then the spadeful to jab under the tree . spread out the pocket there to find aSwimming Mask . Now use the sling to knock down the bird ’s nest ( h6 ) to get aBrush , and the brush on the statue ’s arm on the beach ( h3 ) to raise a rock’n’roll from the ocean . examine to pick up the statuette on the rock ( h7 ) , but you ’ll knock it into the water .
Put on your swim mask and click the water in the stopping point - up to start a missing objective miniskirt - game . This one is clock , but everything you need is there in the figure of speech , and you could readjust the timekeeper by restarting it ( there are no tricksy part to it ) . Once done , you ’ll receive theOwl Figurine .
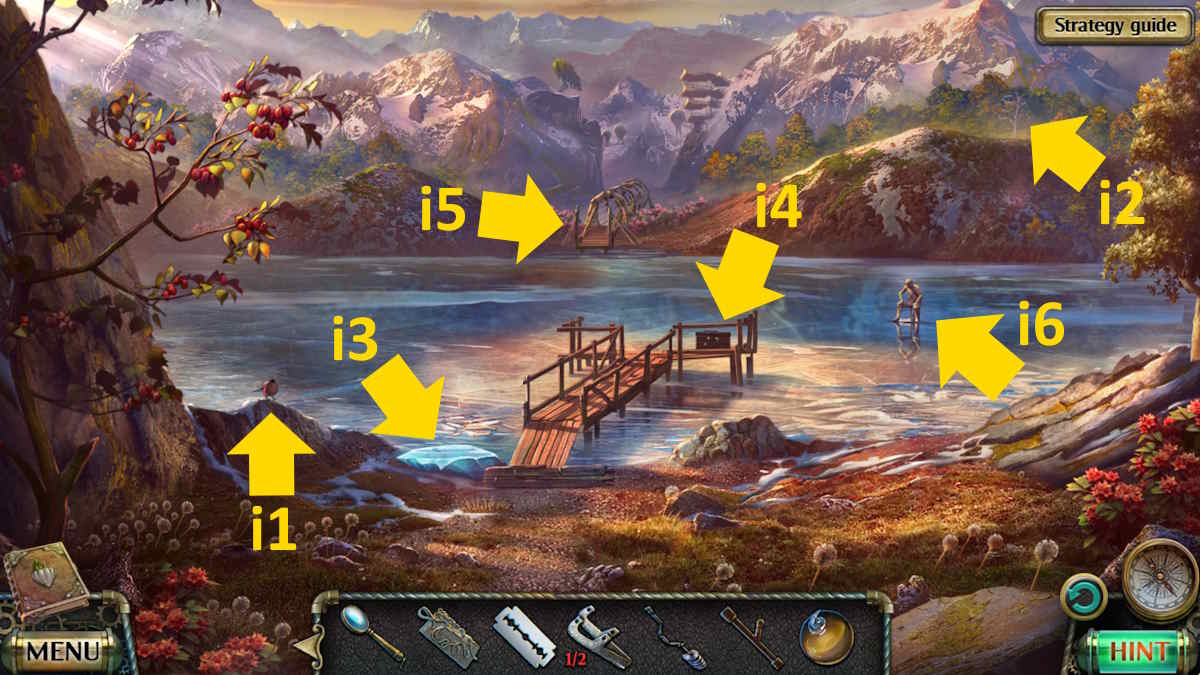
Image by Pro Game Guides
Use the clippers on the rock ( h7 ) to take theChainand then sequester it to the ground tackle ( h3 ) , taking anAnchor With Chain . Now move back to the mine entryway and use the mainstay to move part of the Sir Herbert Beerbohm Tree ( j5 ) , claim thefinal Multicolored Chip . Also , use the spoonful to get aSpoon With Honey .
take the controller box next ( j6 ) and add the figurine . When the box open , add up the chips to start a social movement puzzle . If you ’re stuck on this one , here ’s a solution ( make indisputable to reset the puzzle first ) . cluck the semblance and then the clit on the right the set identification number of times .
This pops open up the door ( j4 ) , so you could nowenter the mine .
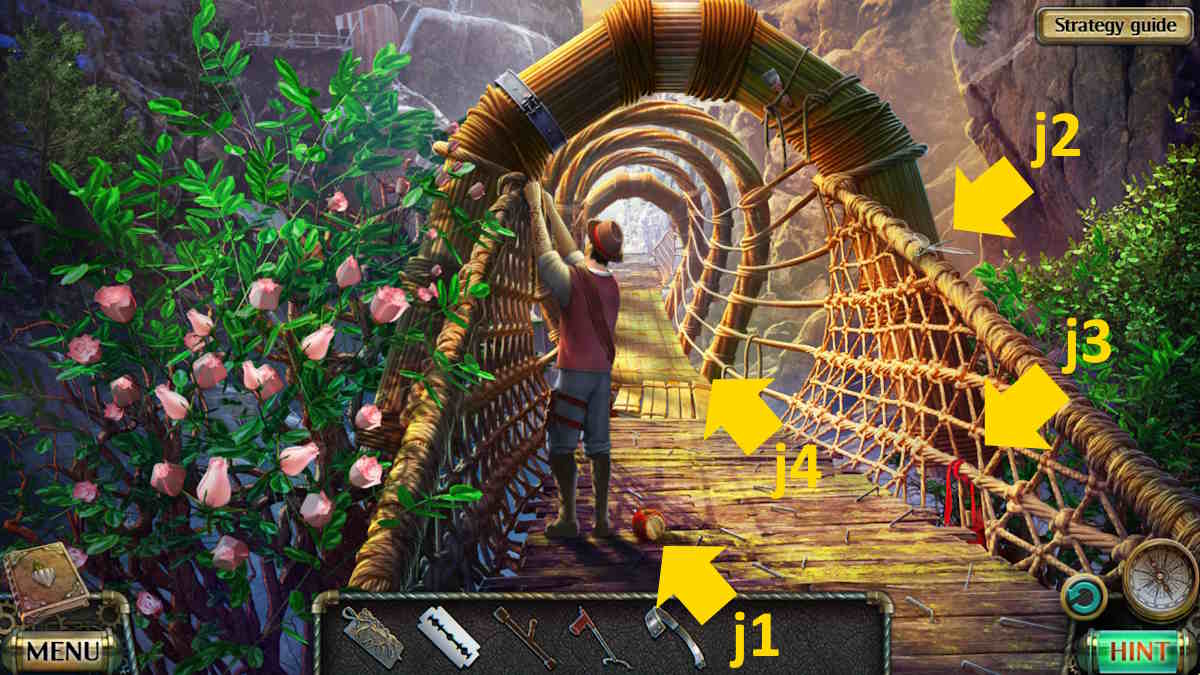
Image by Pro Game Guides
Related : How to puzzle Trace Escape Room – Trace Walkthrough
Finding the mirrarrium
you may find theCollectibleon the wall ( k1 ) and the finalMorphing Objecton the cart ( k2 ) Use the honey to attract the bugs ( k3 ) so that you may take theDental Forcepsand yourfifth Fang .
Return to the toxicant river and employ the forceps on the skeleton ( i4 ) to retrieve thefinal Fangand then channelise back into the mine . take the shield ( k4 ) and add the fangs to start a blocking mini - biz . You require to remove the arrows in the exact good order by clicking the represent fangs , which I ’ve marked in the image below . Once complete , you’re able to take theSpear .
Select the pulley system ( k5 ) next and use the small green Stone in the stuffy - up to pink the red button down a little routine . you could now apply the spear to press the button , whichopens up the hole(k6 ) . tick the ladder in the pickle to drop the ladder down , then click the trap once more to start a hidden objects miniskirt - biz . Once complete , you may take someMirrarrium .
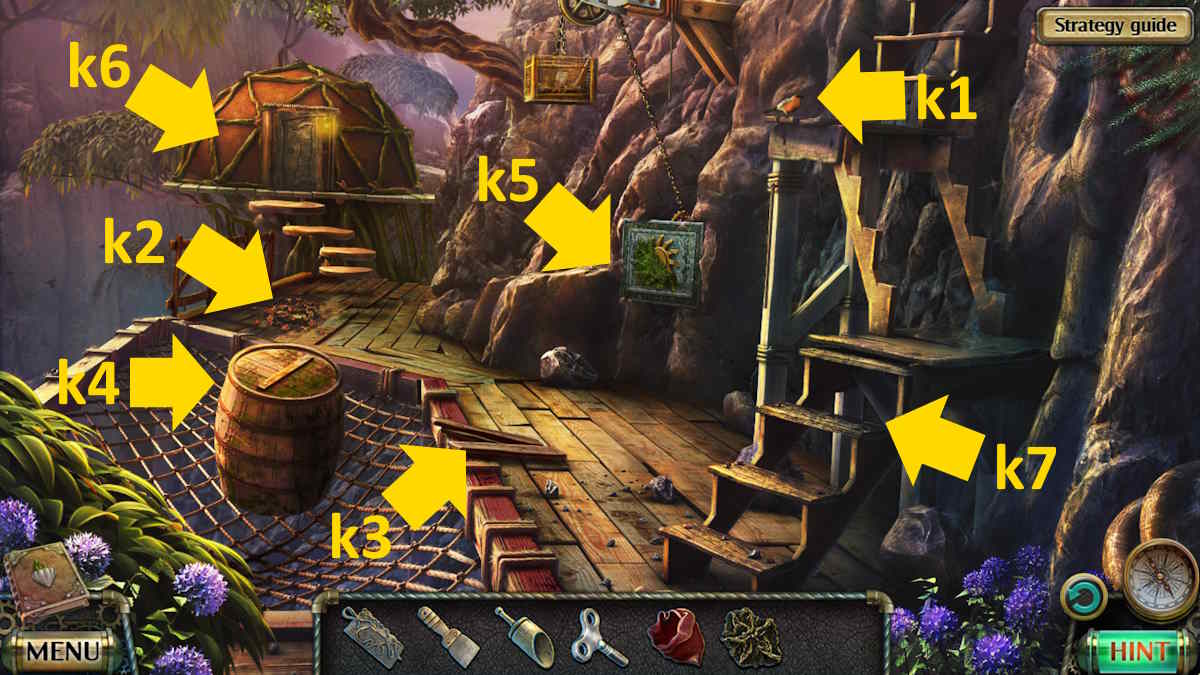
Image by Pro Game Guides
Enjoy the cold shoulder scene , after which you ’ll get theSpecial Swordfrom Albert . Move back to the spiral staircase in the temple and add the Mirrarrium to the mint ( a3 ) . Congratulations ! You ’ve complete the principal game .

Image by Pro Game Guides
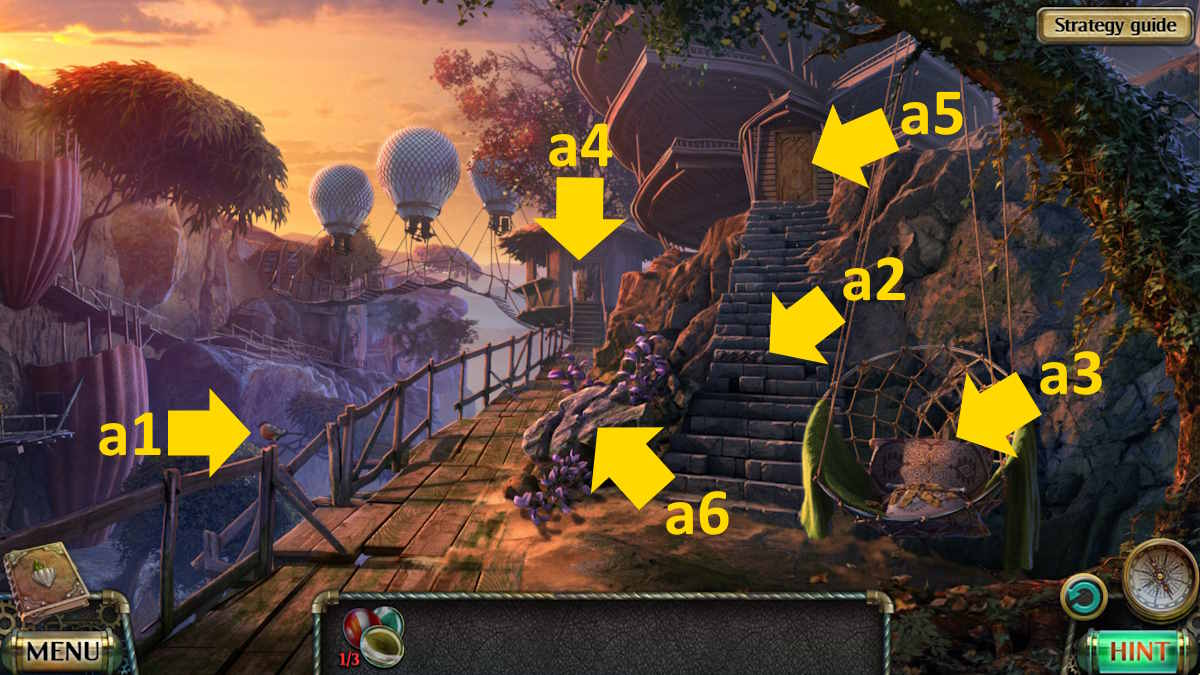
Image by Pro Game Guides
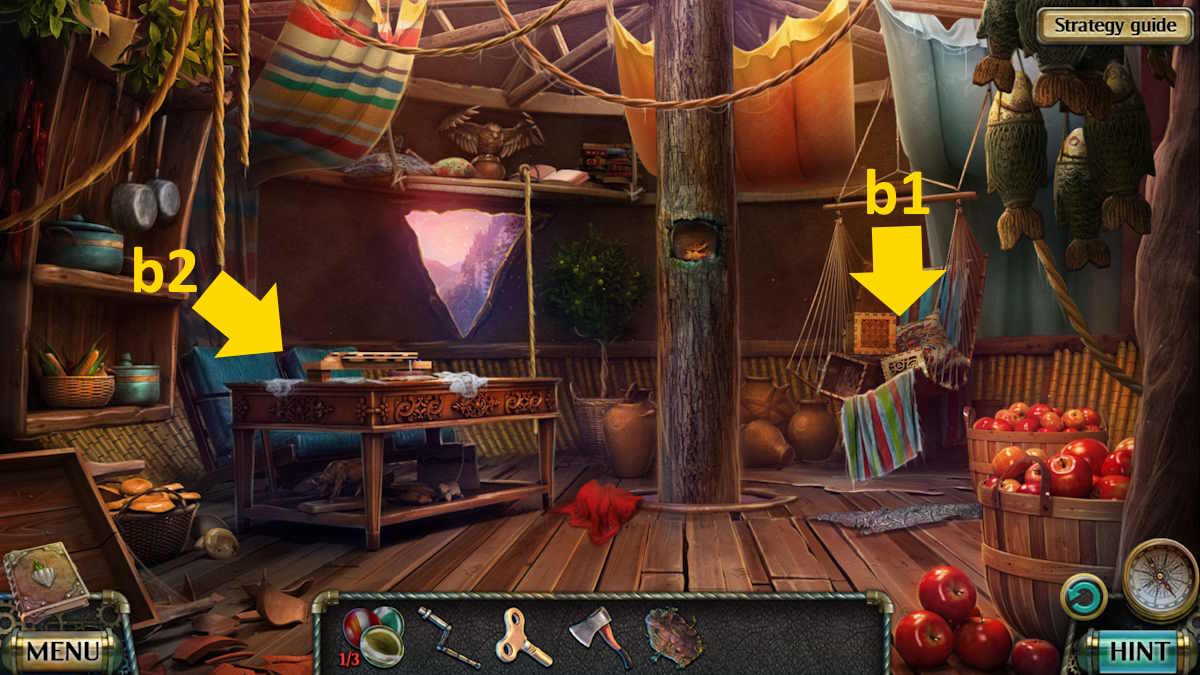
Image by Pro Game Guides
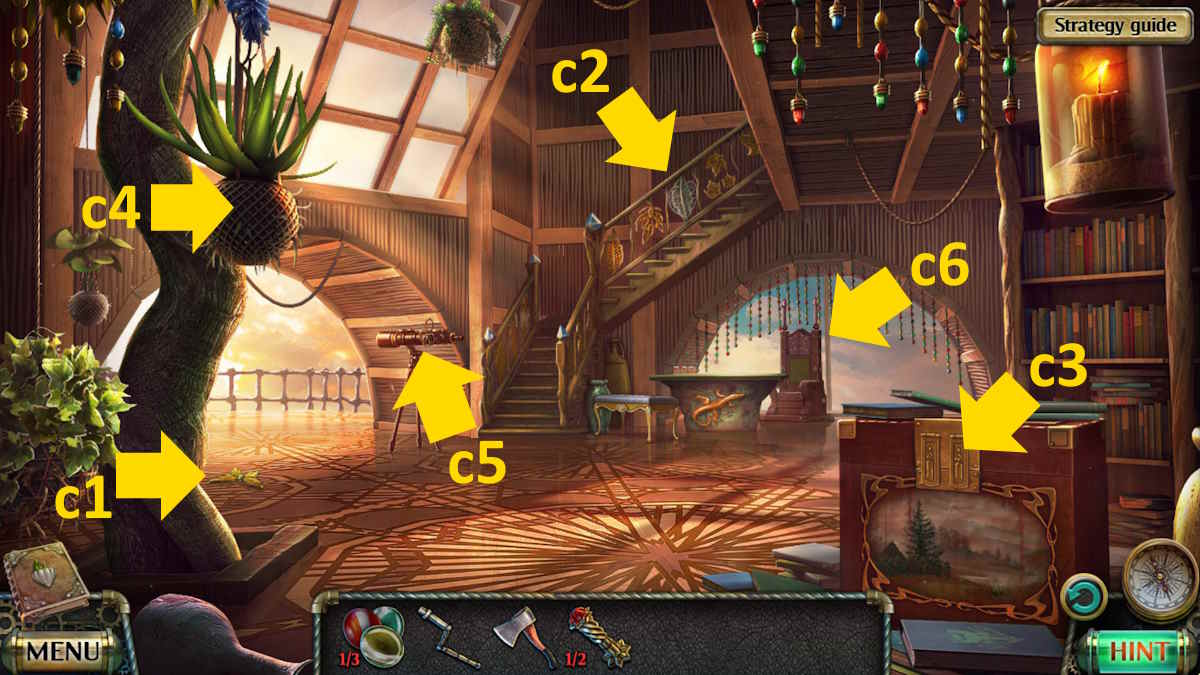
Image by Pro Game Guides
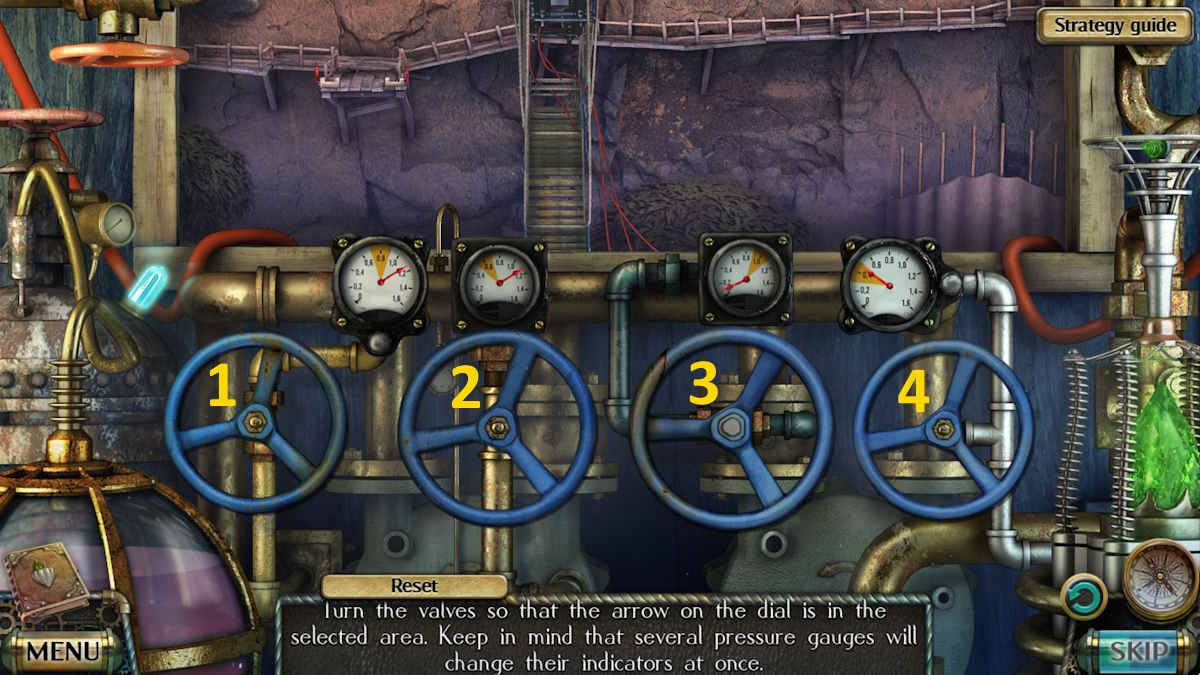
Image by Pro Game Guides

Image by Pro Game Guides
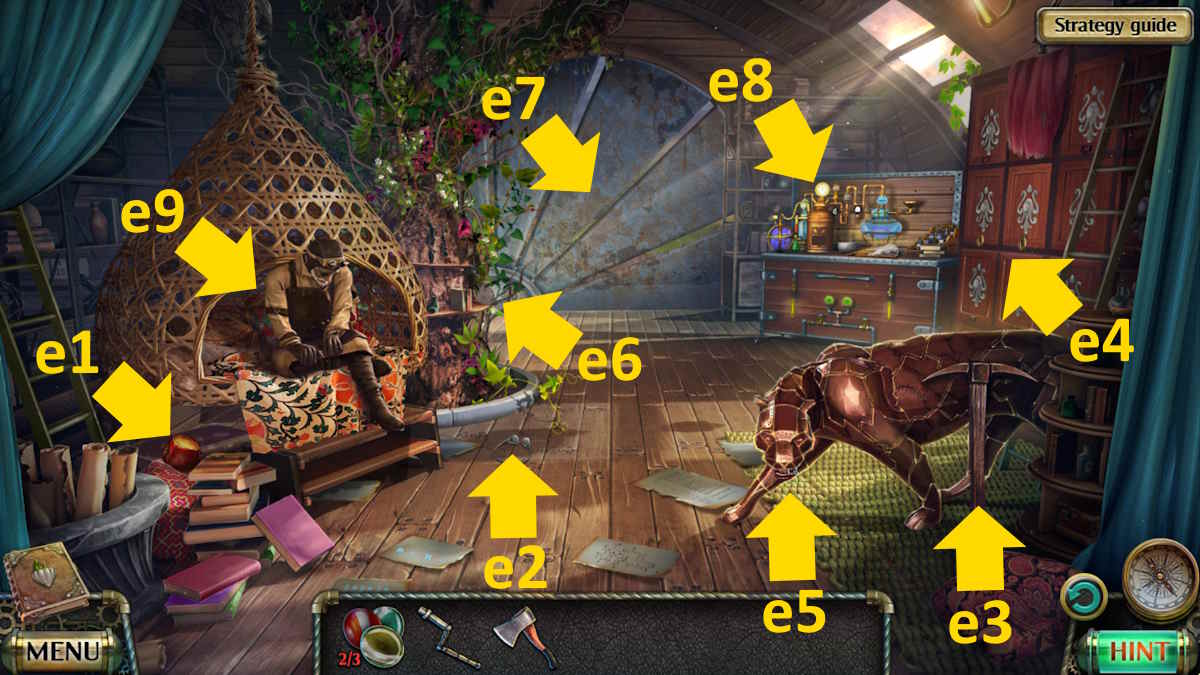
Image by Pro Game Guides
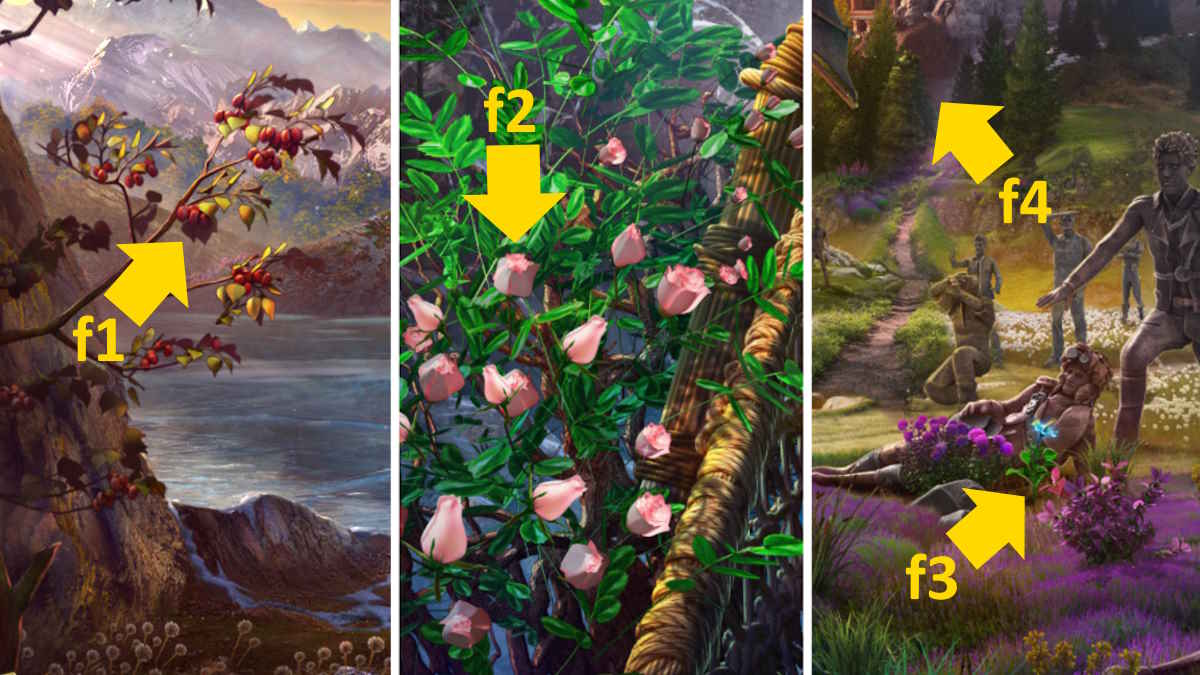
Image by Pro Game Guides
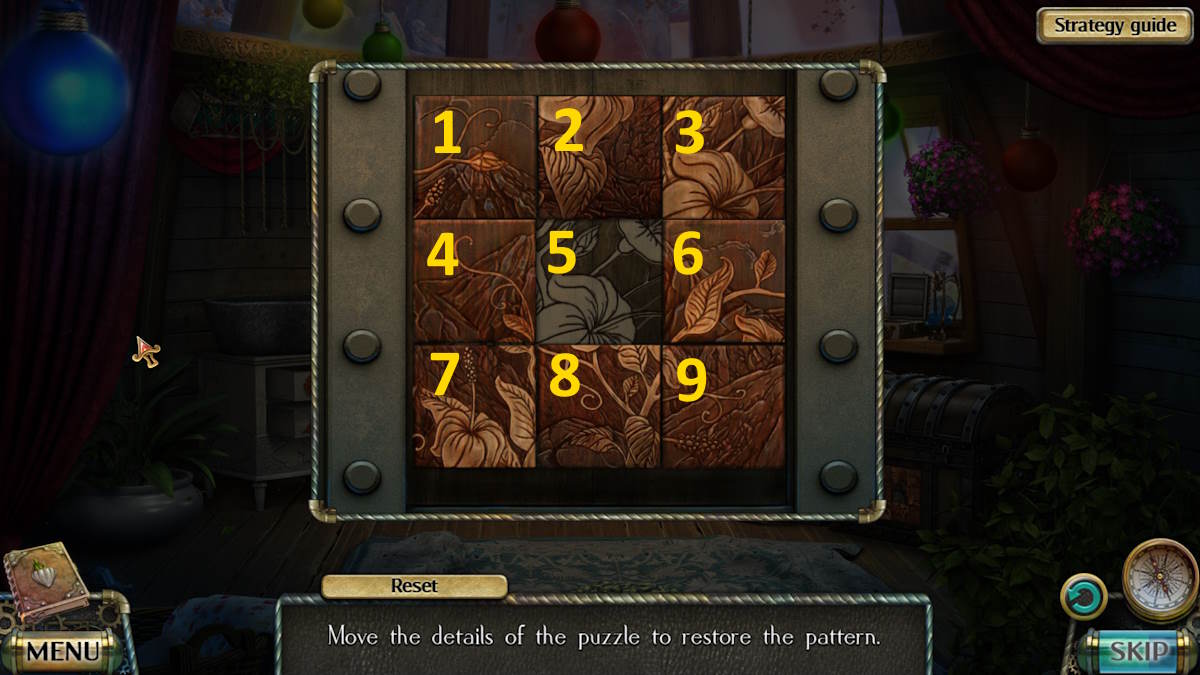
Image by Pro Game Guides
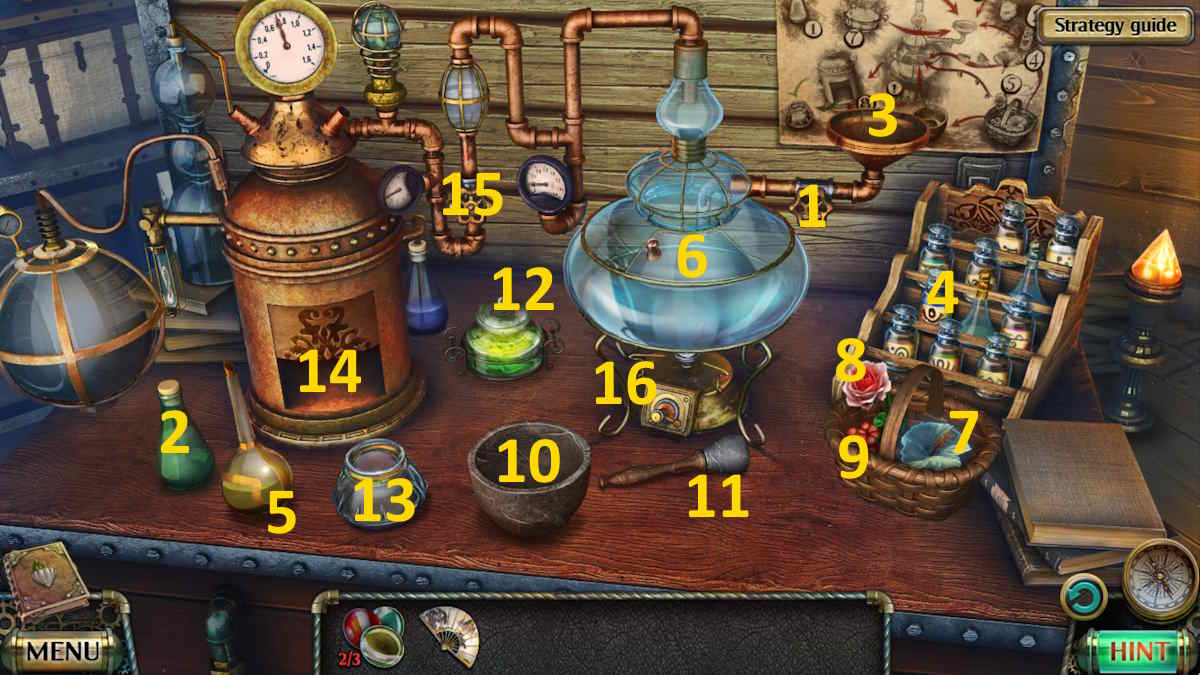
Image by Pro Game Guides
Screenshot by Pro Game Guides
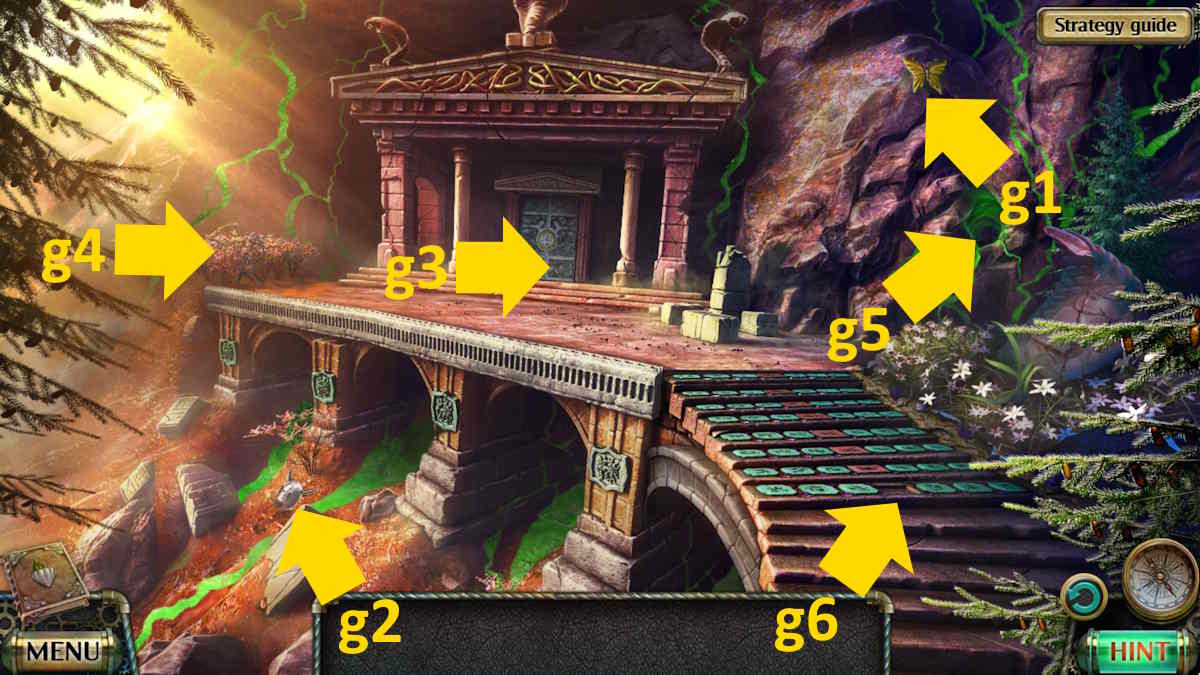
Image by Pro Game Guides
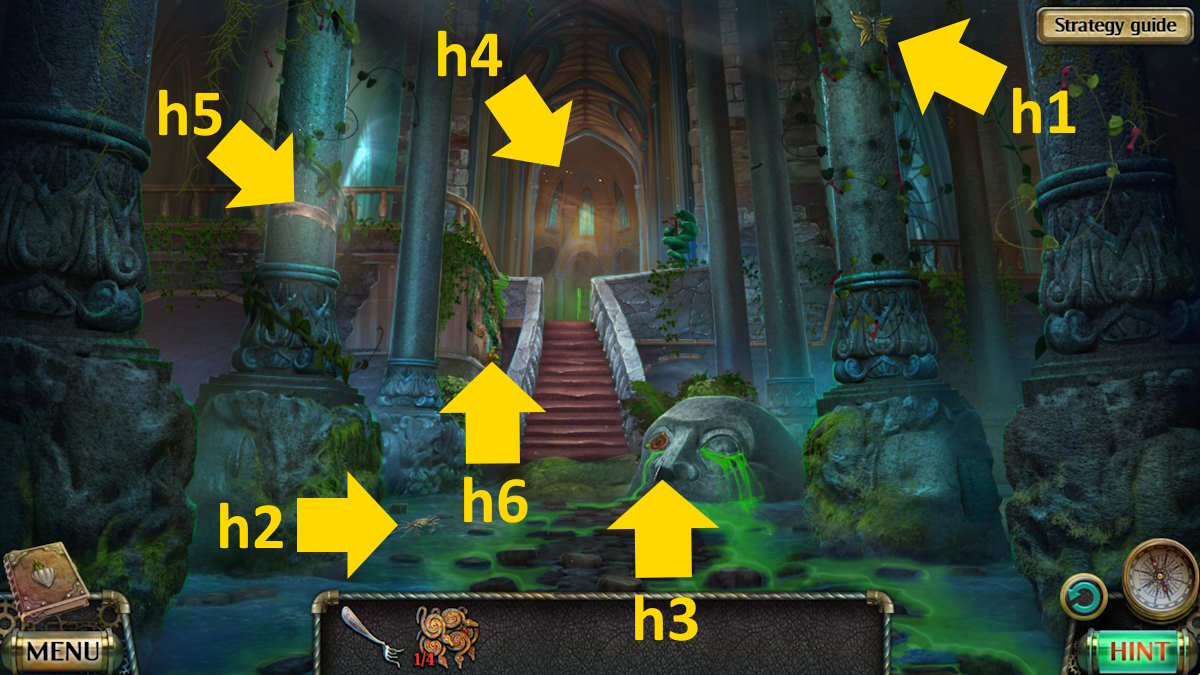
Image by Pro Game Guides
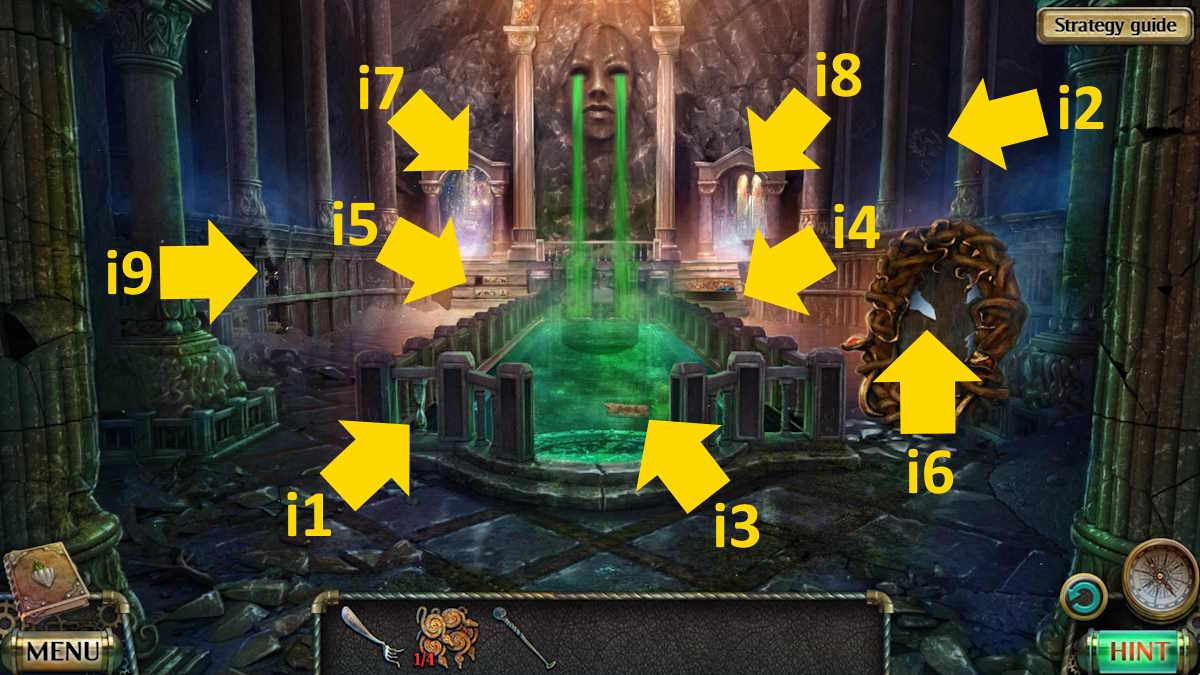
Image by Pro Game Guides
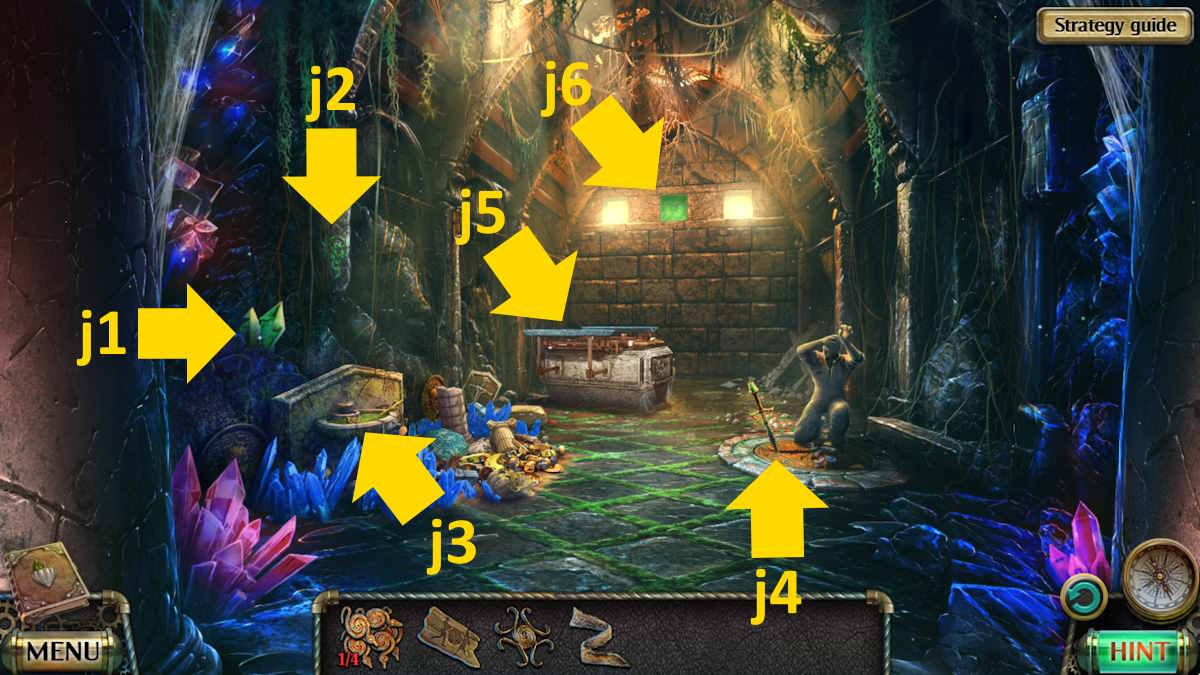
Image by Pro Game Guides
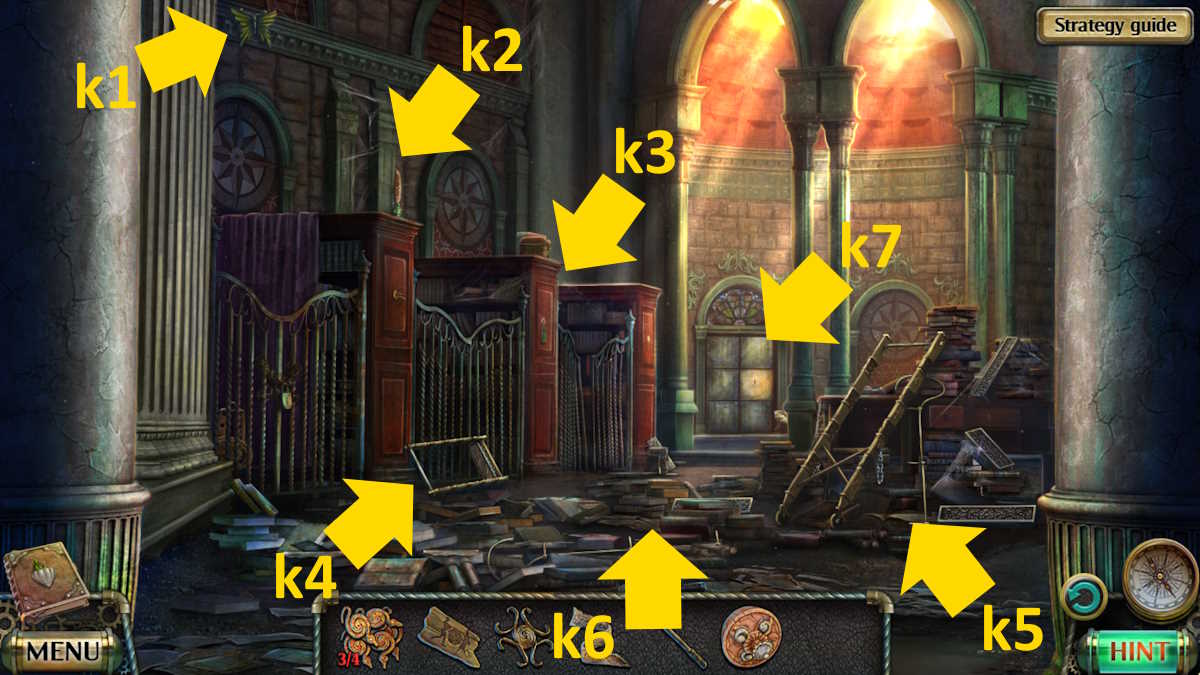
Image by Pro Game Guides
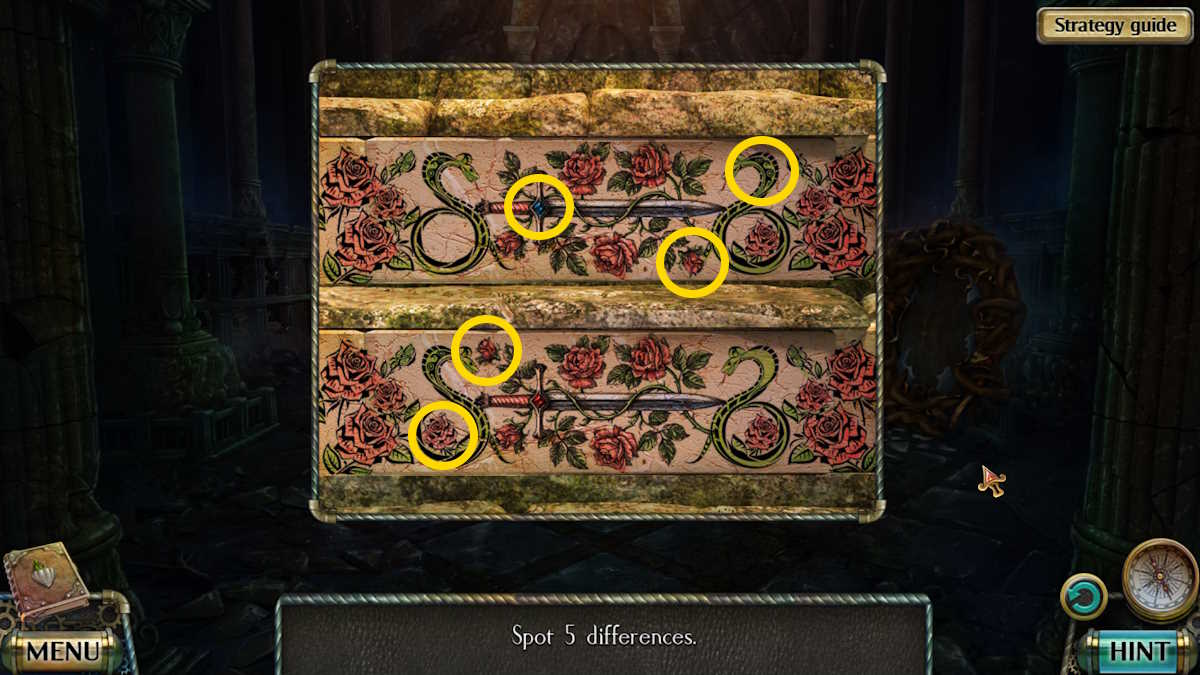
Image by Pro Game Guides
Screenshot by Pro Game Guides
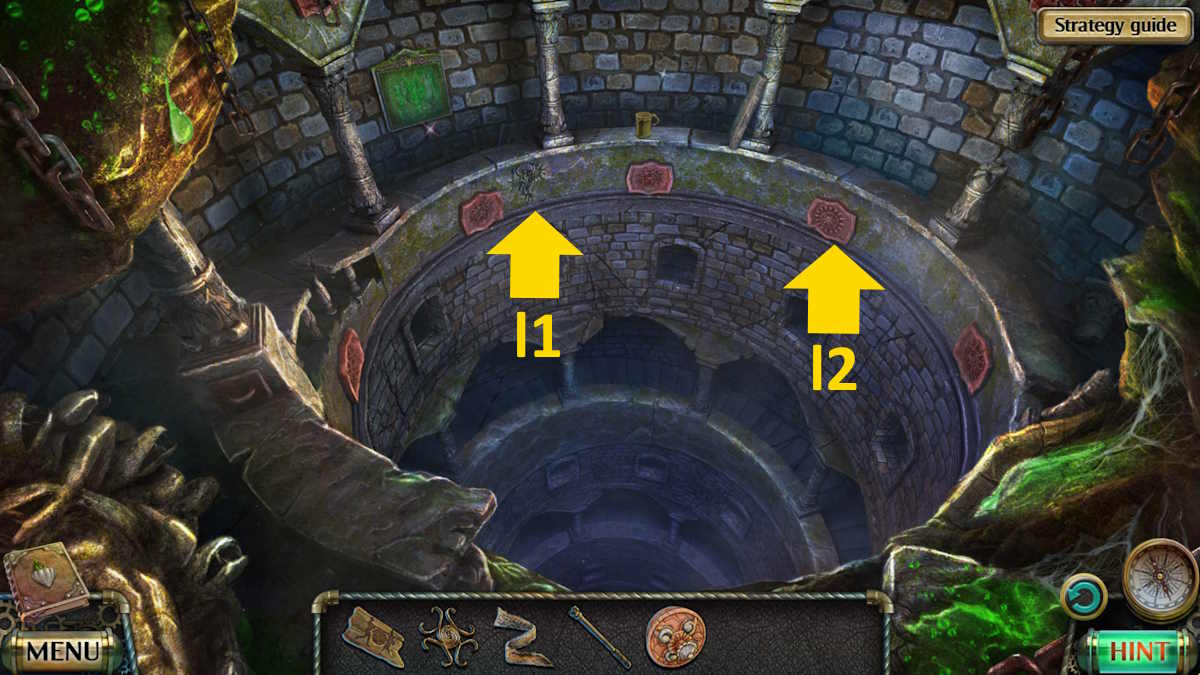
Image by Pro Game Guides
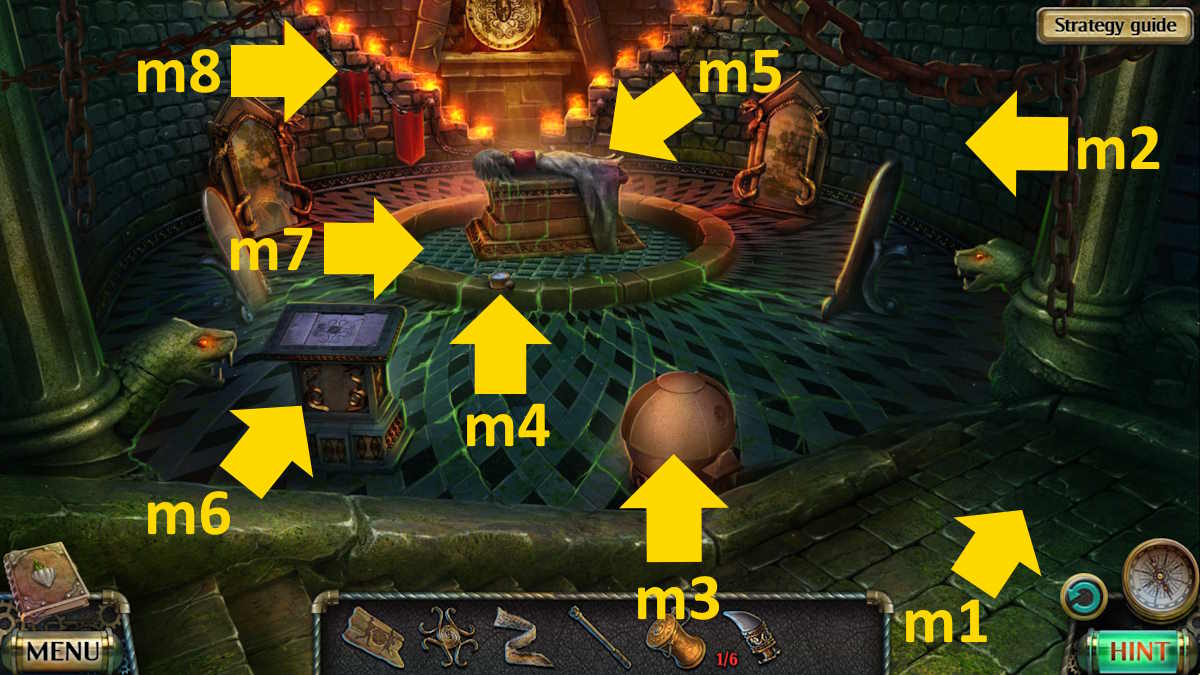
Image by Pro Game Guides

Image by Pro Game Guides
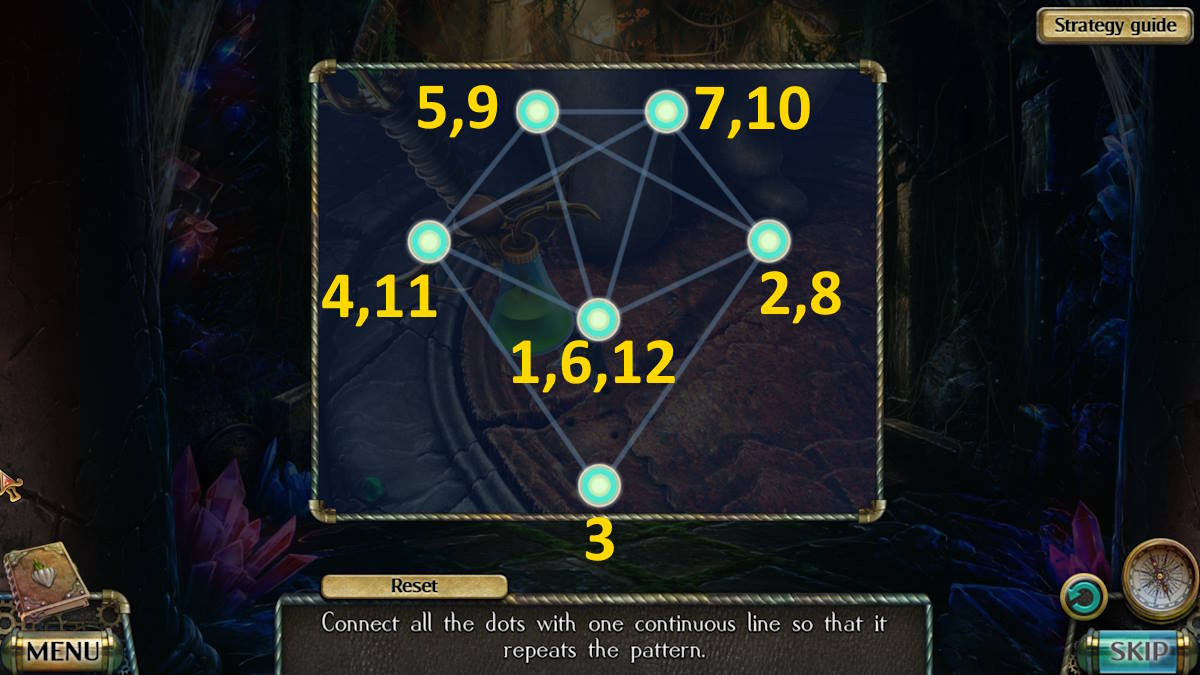
Image by Pro Game Guides
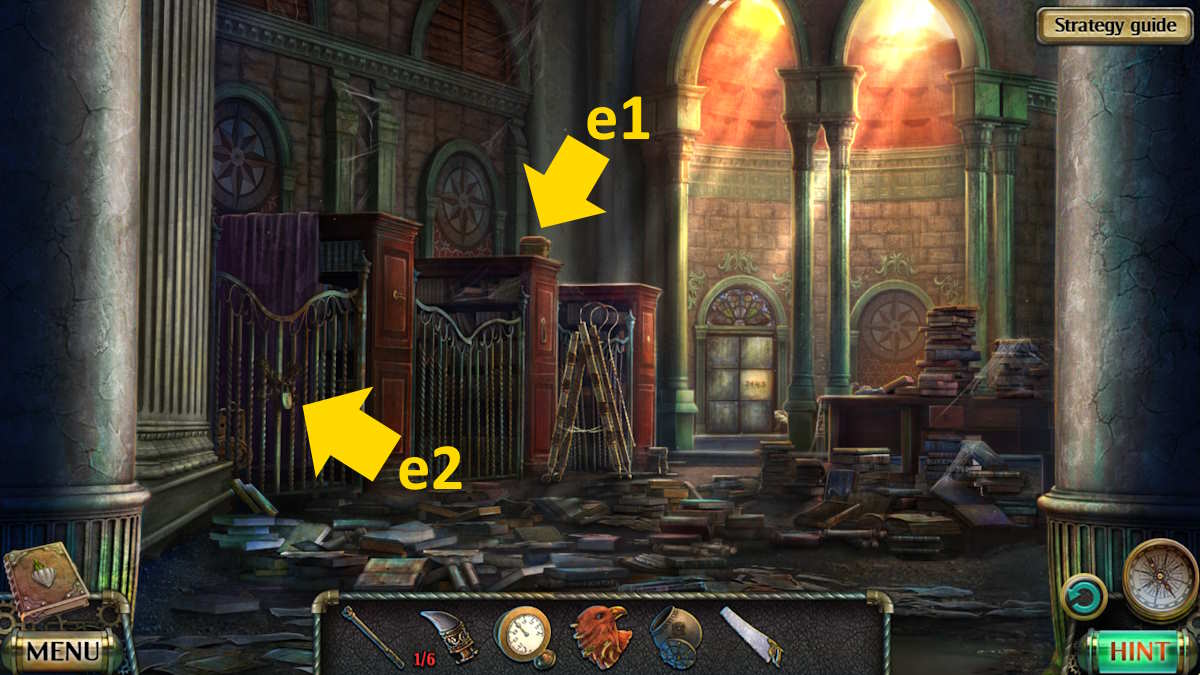
Image by Pro Game Guides
Screenshot by Pro Game Guides

Image by Pro Game Guides
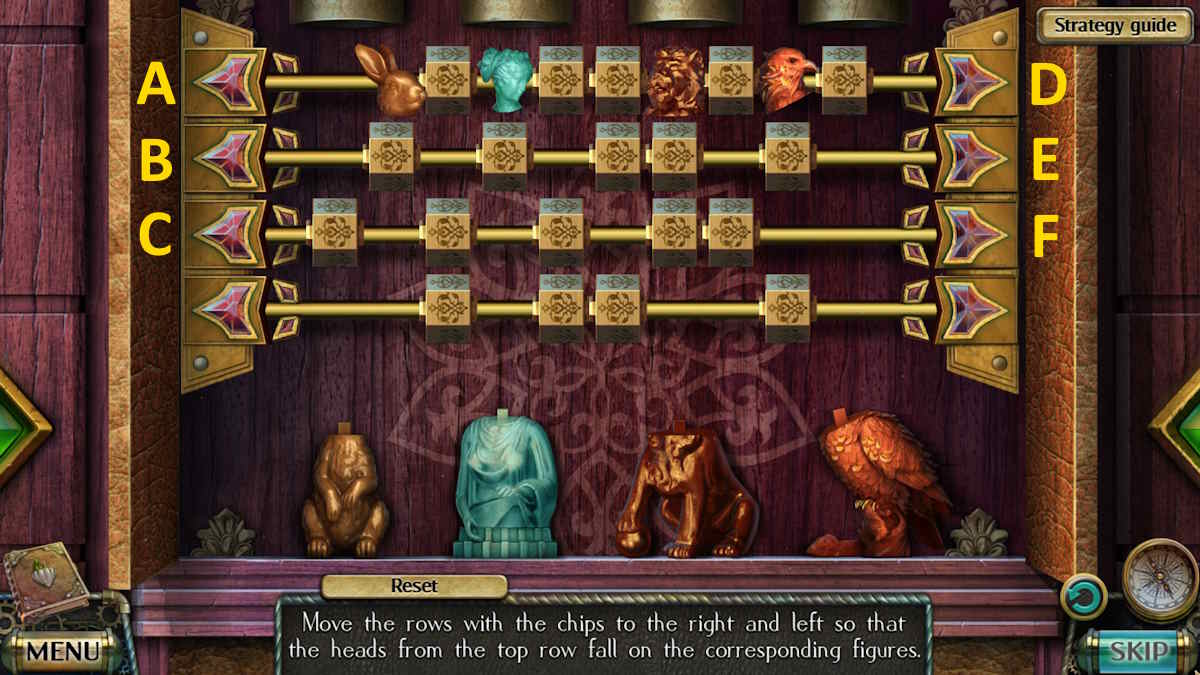
Image by Pro Game Guides

Image by Pro Game Guides
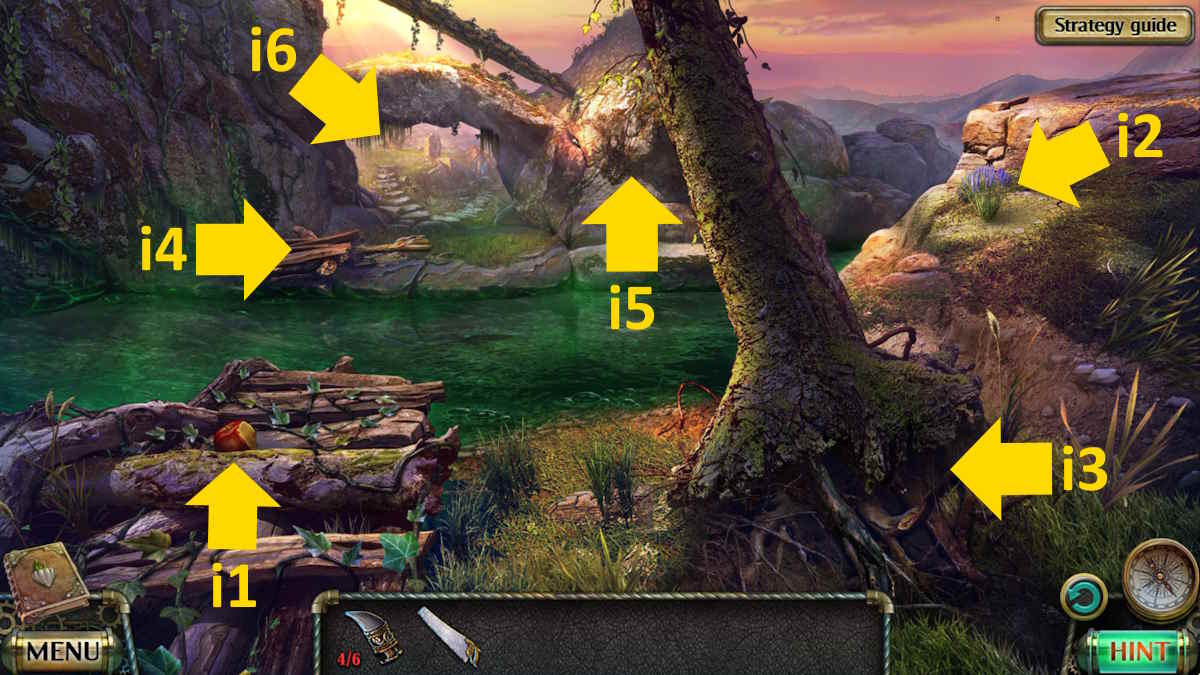
Image by Pro Game Guides

Image by Pro Game Guides
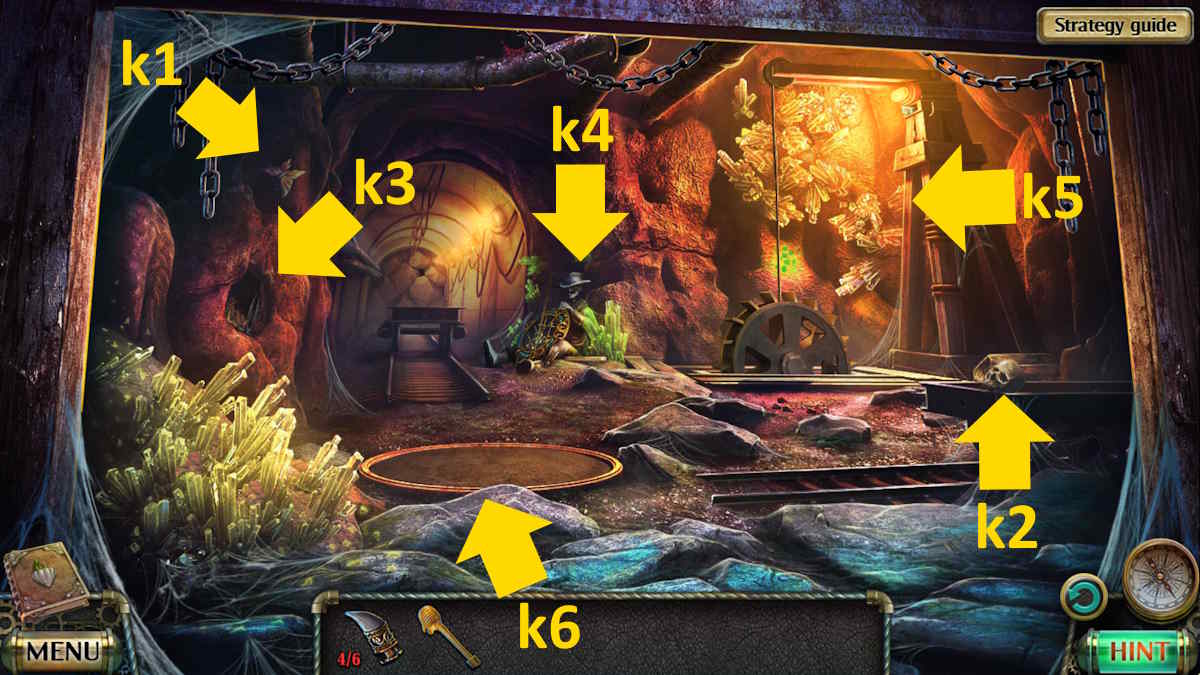
Image by Pro Game Guides

Image by Pro Game Guides
