More puzzles ? Bonus !
Once you ’ve completed the master story in the point - and - click puzzle RPG Darkness and Flame 4 - Enemy in Reflection you’re able to access some outstanding extra content . If you ’re working through the incentive chapter , scan on for my full walkthrough .
Darkness and Flame 4 bonus chapter walkthrough - All puzzle solutions
The walkthrough you ’ll find below is only for the fillip chapter that open up up after you make out the main level in Darkness and Flame 4 - Enemy in Reflection . If you ’re presently working through the main plot , instead point over to myDarkness and Flame 4 walkthrough - Enemy in Reflectionhub page where you ’ll find mystifier solutions and detail locations for the relief of the plot .
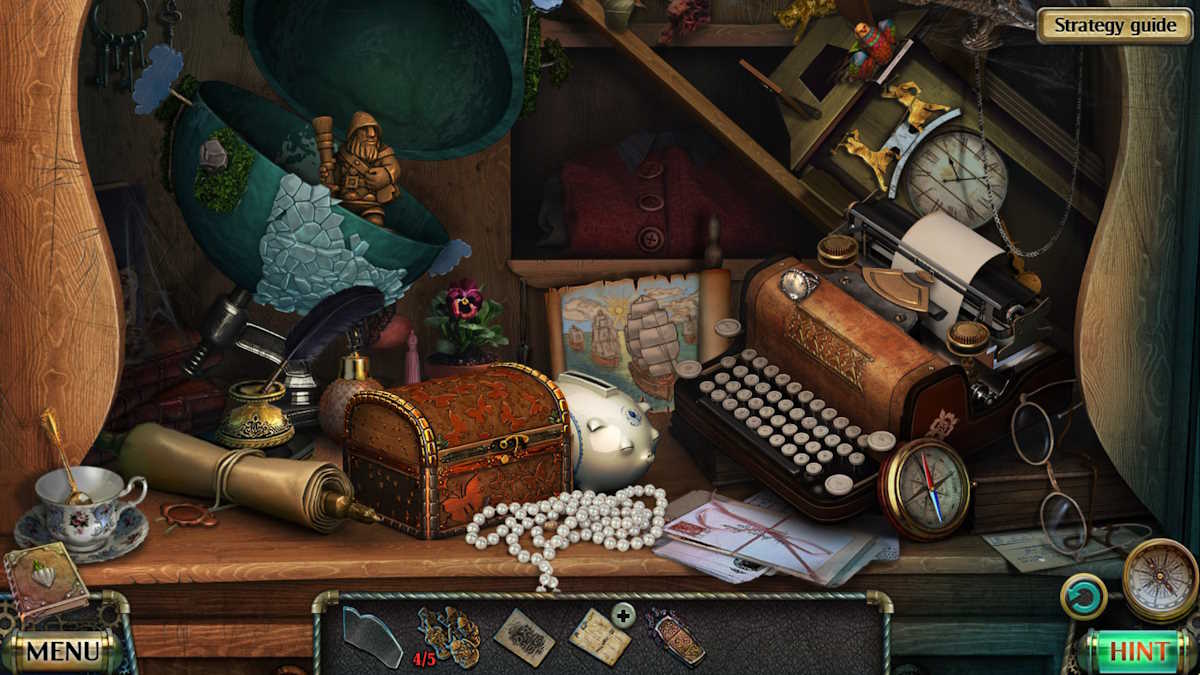
Finding the settlement
Take theCollectiblefrom the ground ( a1 ) , aChair Legfrom the water ( a2 ) , and then move forward to the dreary timber ( a3 ) .
After grab theCollectiblefrom the Sir Herbert Beerbohm Tree root ( b1 ) , repeatedly click the broken pushcart ( b2 ) to line up threeLadder Parts . Head back to the hayfield of the petrified and climb aboard the zeppelin ( a4 ) .
You ’ll find theCollectibleon the deck ( c1 ) , and someRopeon the stair ( c2 ) where you may also use the president stage to pry up the board and find aWhetstoneand aGreen Flower Figurine . Click the rope hanging over the side of the zeppelin ( c3 ) to draw up aBox .

manoeuvre back to the meadow and use the whetstone on the propeller blades ( a5 ) to sharpen them . you’re able to now use the rope on the sharpen blade to getRopes . reach the ladder parts in your stocktaking , add the roofy , get across the short sticks and then the roach , and make theHandmade Ladder .
Go back into the moody forest and utilize the ladder to rise up the dam ( b3 ) and gain access to the swamp . Take theCollectiblefrom the base of the tree diagram ( d1 ) and theLassoandYellow Flower Figurinefrom the boardwalk ( d2 ) before moving on ( d3 ) to the wooden hutch .
relate : Lost Lands 9 Walkthrough – Full pathfinder

Image by Pro Game Guides
Speaking to Teacher Young
TheCollectibleis on the left field of the screen by some careen ( e1 ) . Select the syndicate on the right ( e2 ) to find theRed Flower Figurineand use the reata to get theScrewdriverdown from the roof ( e3 ) . Also , take aGlass Fragmentfrom the tree diagram ( e4 ) and aStickfrom by the front threshold ( e5 ) .
Return to the saturnine forest and summate the figurines to the box ( b4 ) you ’ll get hold after move the leaves . Take theSwamp Shoes , aPatch , and someGasolinefrom inwardly . Go to the swampland , add the shoes and the stick to the swampland water close - up ( d4 ) , and you ’ll have entree to Young ’s front doorway . Take theToad Figurinefrom the doorway ( d5 ) .
Add the toad statuette to the rock ( d6 ) to find a undercover compartment containing aDoor Knocker . tot the disparager to Young ’s door ( d5 ) , use the screwdriver to reduce the bolt , and then knock on the doorway and head deep down .
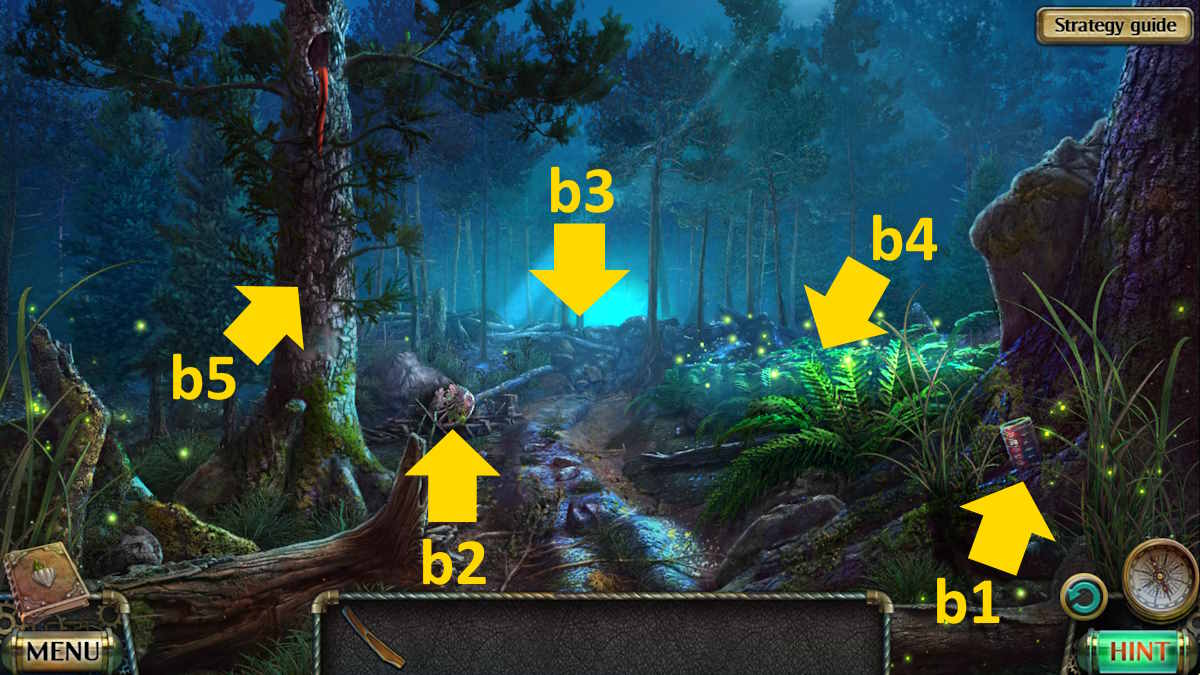
Image by Pro Game Guides
Finding Teacher Yung’s medallion
After the cutscene with Young , grab theCollectiblefrom the level ( f1 ) , and theKeyfrom the basket ( f2 ) , and then move the rug on the basket to start a missing objects mini - plot . take note you call for to penetrate the red button on the gold pendant to free the cog , and that after scavenge the blue crystal its weak points to the 2nd segment of the green heart . Once everlasting , take thePole Climbers .
Take theMatchesplus thePaper And Slate Pencilfrom the table ( f3 ) , and use the key to enter the box in the same conclusion - up to regain aFigurine . Return to the sullen forest and use the pole climbers on the tree ( b5 ) to set out a climb miniskirt - plot . You need to use the accurate veracious branchlet as you climb , or you ’ll need to start again .
If you ’re stick , habituate the following sequence from a fresh reset :
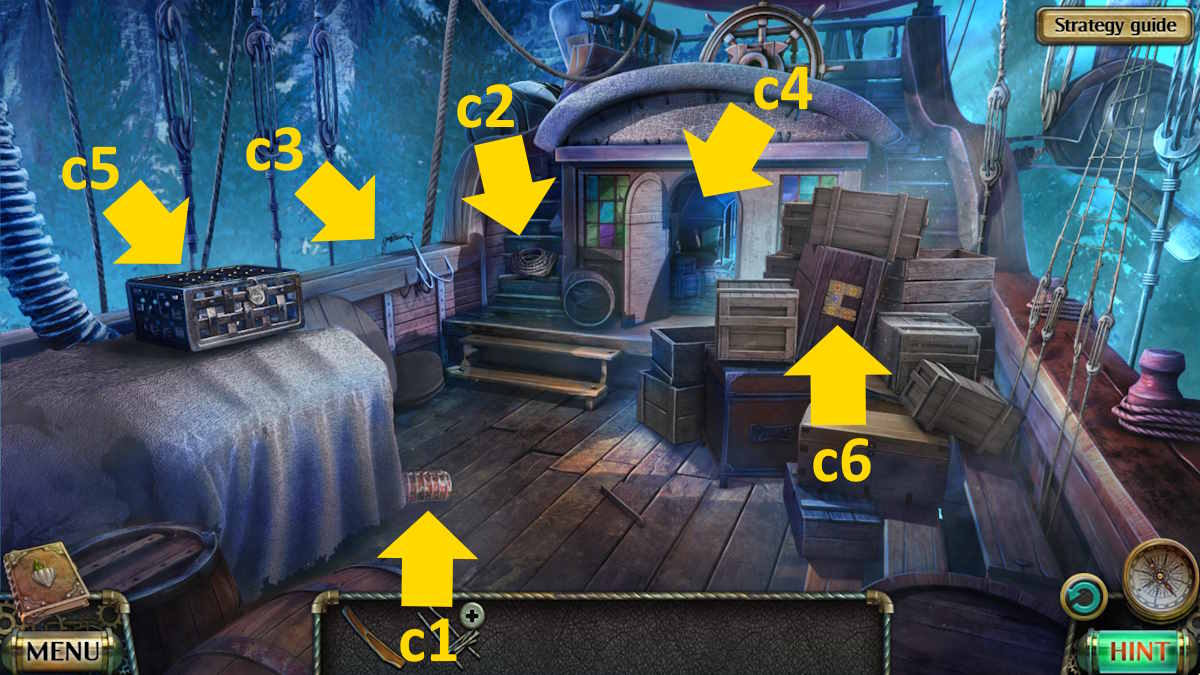
Image by Pro Game Guides
you could now take theLockpick , aFigurine , and aMedallion . Once done , select the tree ( b5 ) once more and use the paper and pencil to take a copy of the etching to gain aHint . Return to instructor Young ( f3 ) , give him the decoration , and keep an eye on the cut fit . Afterward , you ’ll get theTwine Wrapped Envelope . Open it in your armoury to get theIngredients Listand aTablet With Symbols .
Aboard the zeppelin
Return to the Graf Zeppelin , use the lockpick to start the boxwood ( c5 ) , and take theShadealong with yourthird Figurine . Enter the cabin ( c4 ) , take theCollectiblefrom the seats ( g1 ) , add some gasoline to the bowl ( g2 ) , which will be on the ground ) , encompass the bowling ball with the shade , and then ignite it with the match . maneuver the pulley-block ( g3 ) to raise the makeshift lamp andilluminate the room .
Take asecond Patchfrom the cabinet doors ( g4 ) , and then bump off the scarlet rug from the bulwark hanging ( g5 ) to discover someWire Cutters . Use the ship’s boat on the box seat in your inventory to open it . Inside you ’ll find thefinal Patchand someNeedle And Threads .
Select the wall hanging again ( g5 ) , add the patches , and then apply the needle and thread to start a formula instauration mini - game . You musttwist and shift the eight patchesuntil they match the overall blueprint on the dot .
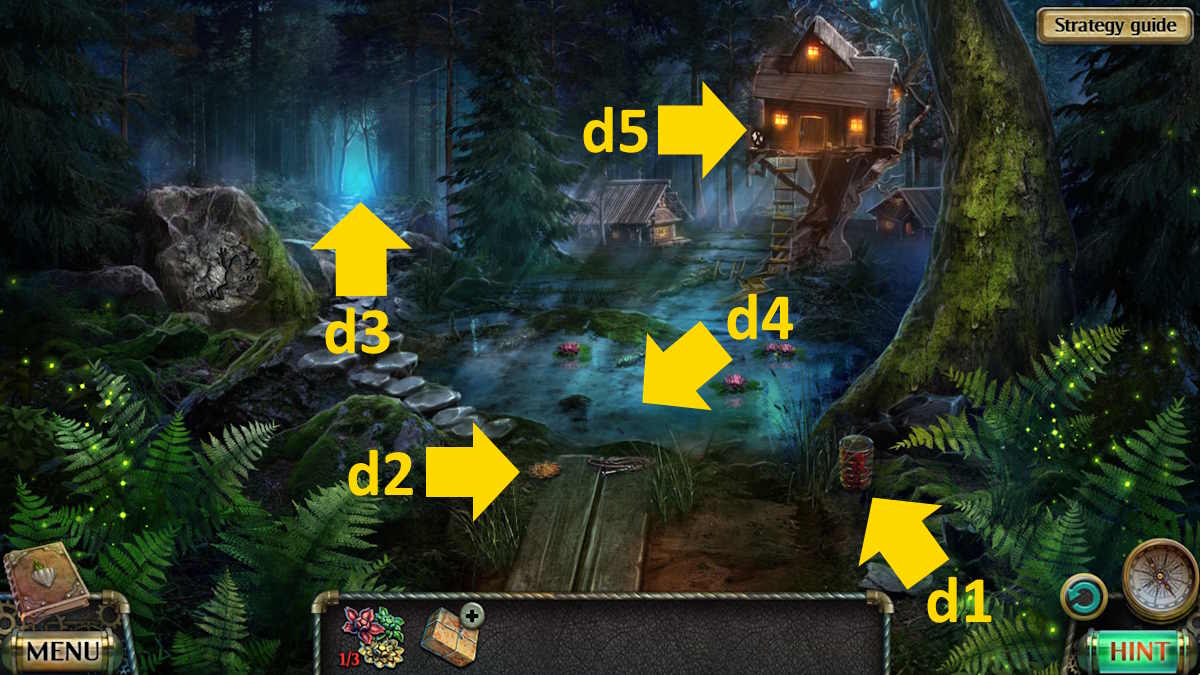
Image by Pro Game Guides
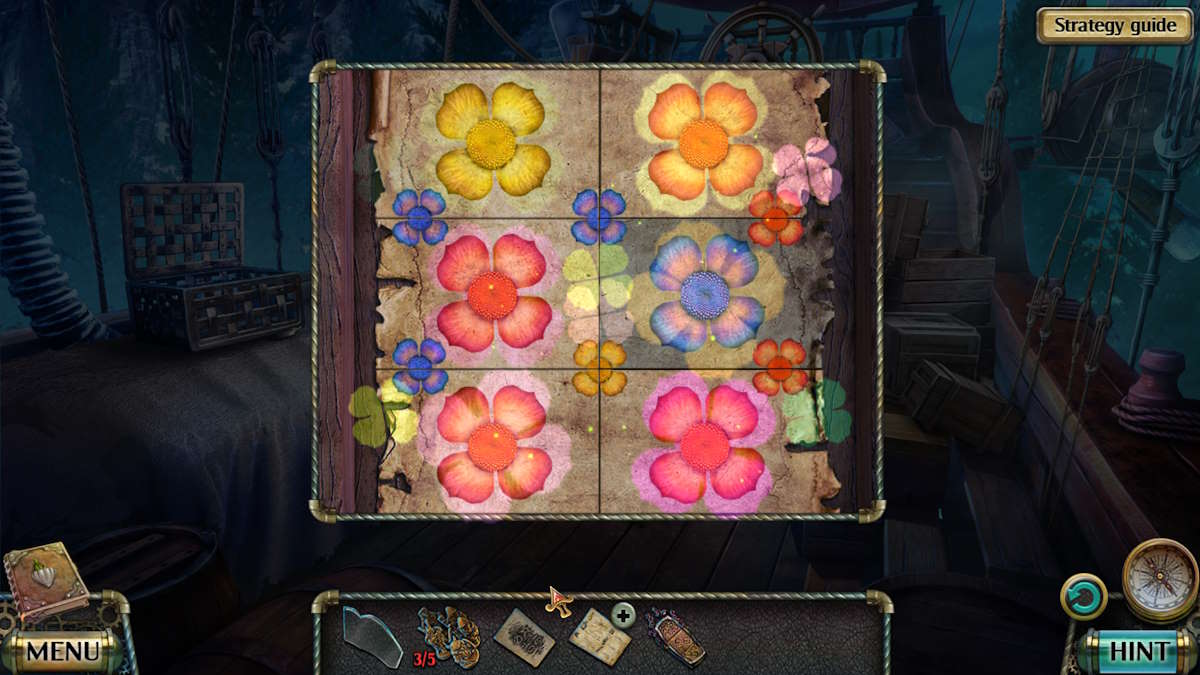
rick the patches to make all the patterns delineate up , and you ’ll be able to take aPart Of The Picture . pass back outside to the deck of the zeppelin and tot the moving picture part to the box ( c6 ) to start a color - matching puzzle . Here ’s a solution if you ’re stuck on this one .
Once gross , the box will open , allowing you to take thefourth Figurineand aKey . Go back into the cabin and apply the Florida key to spread out the cabinet ( g4 ) , start an item - mate mini - game .
Once unadulterated you could cumulate yourfinal Figurinefrom inside the atlas . riposte to Teacher Young ’s hovel and add the statuette to the box on the shelf ( f4 ) , equate the correct weapons , and the box will open . Take theLeech Trapand theGlue .
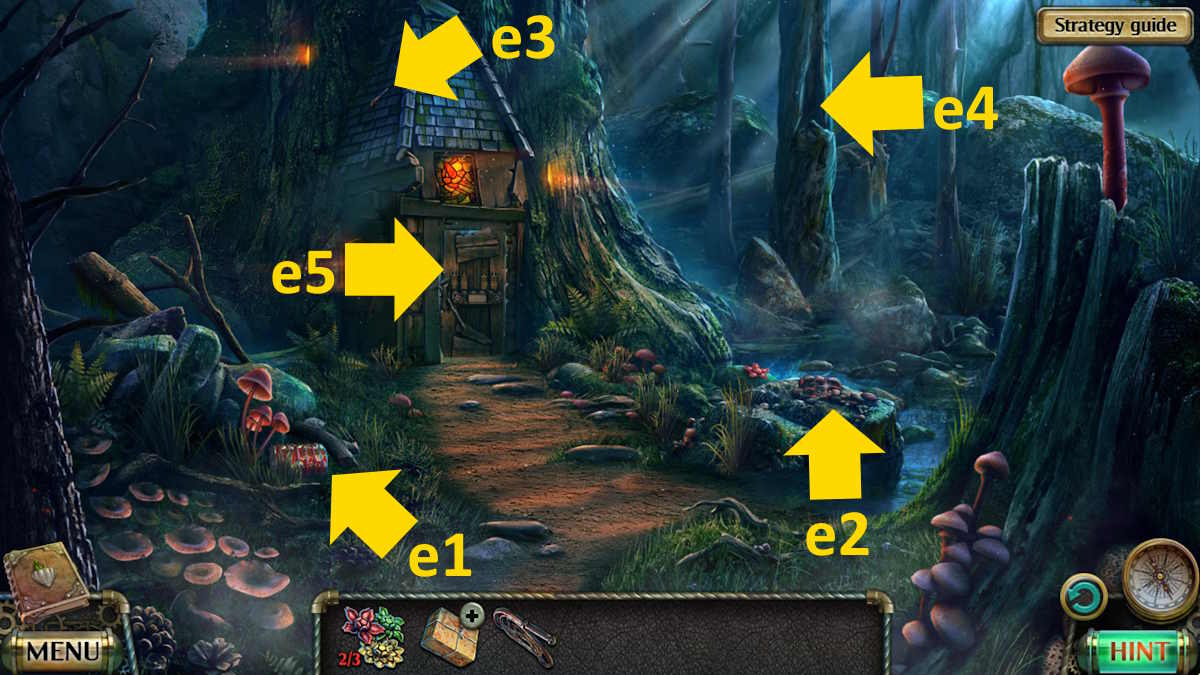
Image by Pro Game Guides
Exploring the settlement
Go to the wooden hovel , add the tab to the mechanics on the door ( e5 ) , and add the hint to start a symbolization puzzle . Lower the first three tablets so only the top is showing and the two on the rightfulness so that the top two subdivision of each one are showing . you may now enter the hut tofind the mystical passing .
you may find theCollectiblefrom the step ( h1 ) , theHintfrom the window ( h2 ) , and then click the bottom segment of the stairs ( h3 ) and take thePoker . dada out of doors and utilize the poker to get theReticulefrom the Sir Herbert Beerbohm Tree ( e4 ) , and then move up the steps ( h4 ) for a gelded scene .
Take theCollectible(i1 ) and then spread the room access ( i2 ) to find aCrowbar . Head up the stairs and go into Albert ’s base ( i3 ) .
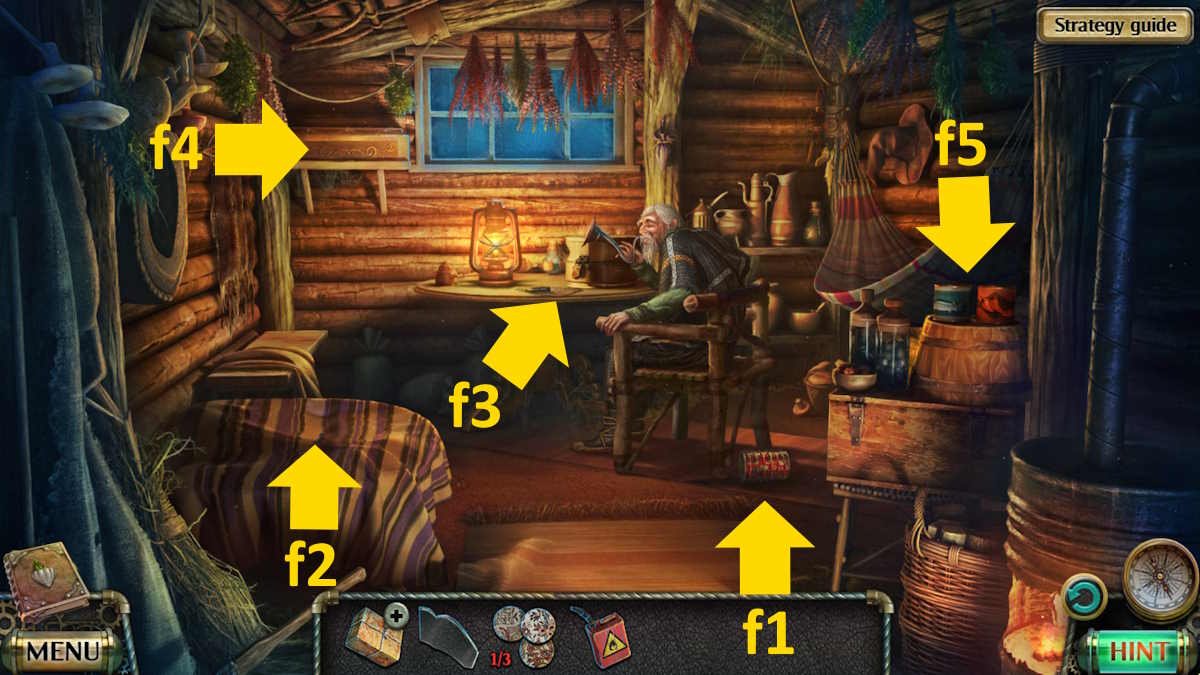
Image by Pro Game Guides
After taking theCollectiblefrom the shelf ( j1 ) , move the cushions on the chair ( j2 ) and take theHandle . Take theHacksawand aToothbrushfrom the ledge on the Sir Herbert Beerbohm Tree ( j3 ) , add the handle in the same finale - up , and use it to lift the chair . Now take aKeyfrom the workbench ( j4 ) and use it to reach the chest ( j6 ) you uncovered underneath the chair . Take theHammerandHarnessfrom inside .
Go back out of doors and use the crowbar to wind the rock ( i4 ) , strike it with the hammer , practice the field glass to cut through the megabucks underneath , and take theTweezers . you could now go back to the mystic musical passage and use the tweezers to recall theEyefrom the lamp ( h5 ) and use the toothbrush to houseclean the crap ( h6 ) on the stairs to discover a pattern .
relate : Echo Bay Murders – Chapter 1 Walkthrough
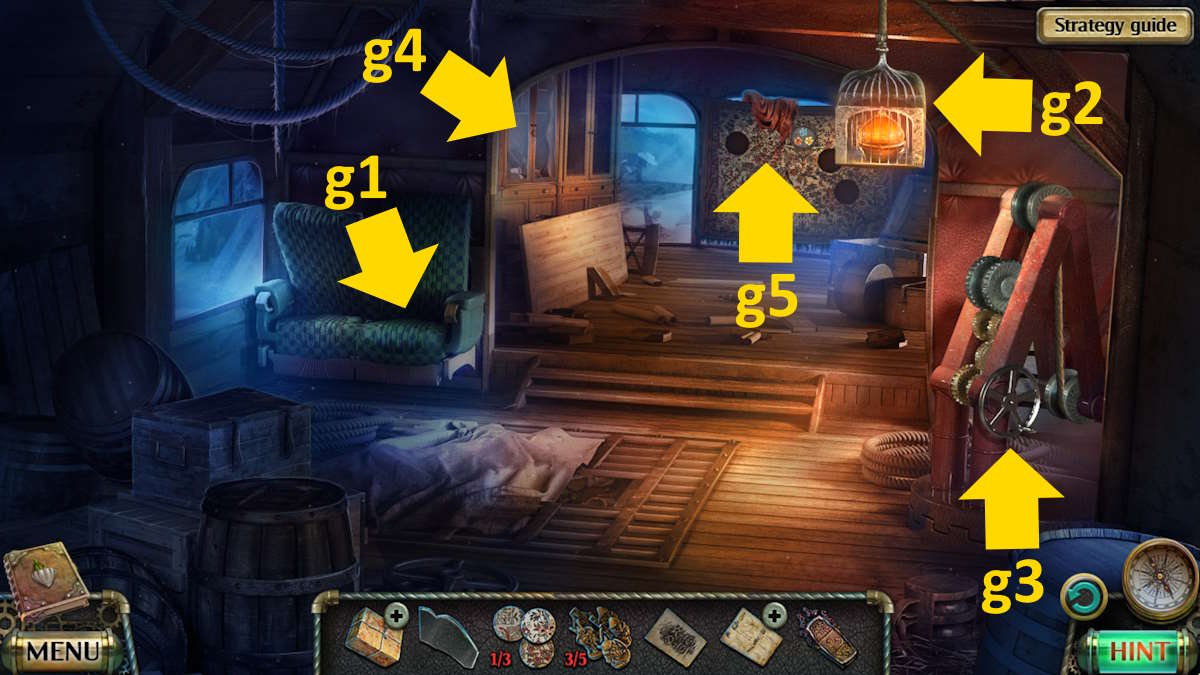
Image by Pro Game Guides
Gathering the ingredients
Head into the timberland and use the hammer to retrieve theWheel(b2 ) . Move to the meadow and use the hack saw on the statue ’s kicking ( a6 ) to attain a piece ofPetrified Material . you’re able to then add up the harness to these statues .
Return to the settlement , and add the roulette wheel to the barrel in the hut ( i2 ) to start out a sequence puzzler . I ’ve marked the correct order on the image above . Once done , the barrel will open and you could take theMetal Plate .
Select the back of Albert ’s house ( j5 ) to go to the laboratory . You ’ll encounter theCollectibleon the storey ( k1 ) and someAcidandMineralsin the cupboard ( k2 ) . Add the eye to the skull here too , to get aMagnetfrom its lip .
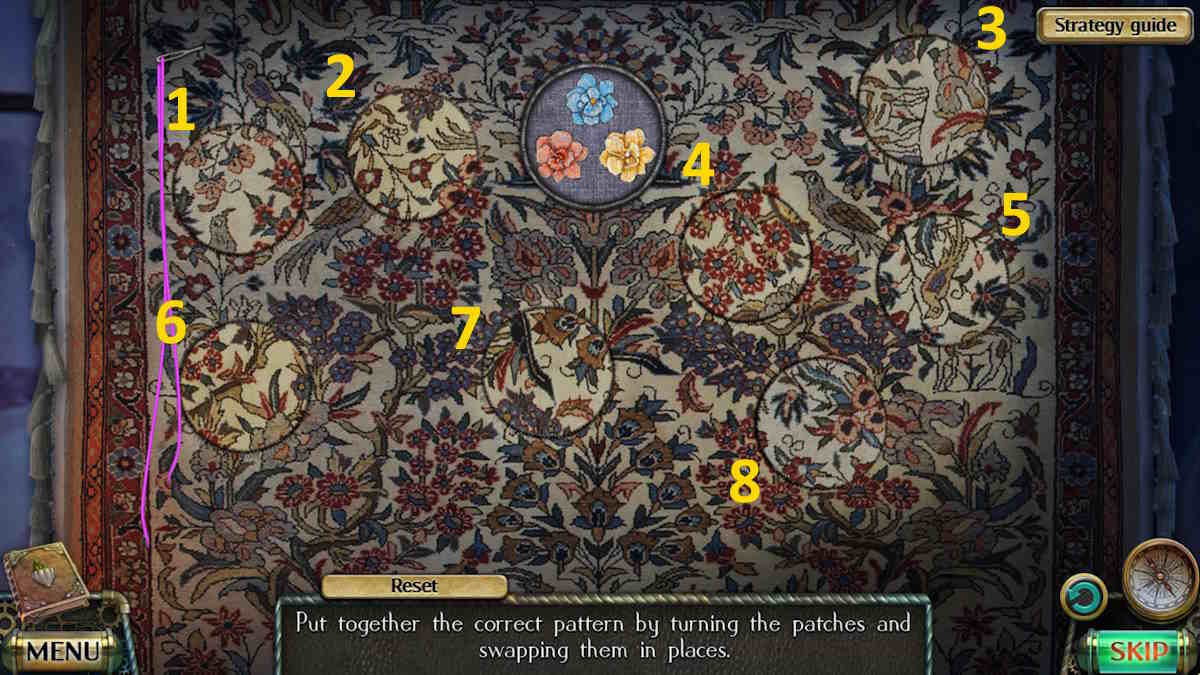
Image by Pro Game Guides
Use the magnet on the boxwood ( k3 ) to recall theKnob , and then use the knob to reach the cupboard ( k4 ) and get theIvy Infusionand aGas Receiver . Go outdoors and use the acid to melt the grating ( i5 ) , grab theShovelfrom behind it , and employ the crowbar to open up the box there to get someTurpentine .
apply the spirit of turpentine on the purse in your inventory to give it and take thePatterned Lens . Take that to the stairway and add it to the hold equipment on the window ( h2 ) , using gum to desexualise it in place . Now look at the pattern on the flooring ( h6 ) , which will unlock to let you to find aKnob . get through to go down the stairs ( h3 ) , add the knob and the hint to the logic gate , and guide the headstone through the maze ( just follow the hint ) to gainaccess to the basement .
The basement
After speaking to Ophelia , she will give you theKey To The Cage . Take the final collectible from above the cage ( l1 ) and theBucket(l2 ) , and expend the key to launch the cage ( l3 ) . apply the metal crustal plate to start the chest ( l4 ) and take theSaddle . cluck the cage ( l3 ) for a conclusion - up and take theCan Opener .
Go back to the dark forest and utilize the shovel to excavate up someImmortelle(b4 ) , then go to the meadow and use the bucket in the stream ( a2 ) to get aBucket With Water . Head to Teacher Youn ’s house next and apply the untier on the potty there ( f5 ) to get someFire PepperandCanned Fish .
Return to the basement , select the cage ( l3 ) , summate the water to the trough , and put the white pepper in the trough . When the bird come to feed , lend the bicycle seat and then takePart Of The Picture(which is in the back correct corner of the same close - up ) . habituate the sack Pisces on the sponger hole in your inventory , go outside the wooden hut , and expend the trap in the kitty ( e2 ) to getLeeches .
Screenshot by Pro Game Guides
Back in the cellar , you could select the paries painting at the back of the elbow room ( l5 ) and add the part of the picture to start an particular - detect puzzle . Once complete , the bird will leave behind and you ’ll be repay to the meadow .
choose the hoot for a finish - up to start a flying mini - game . When you get in back at Albert ’s house , you ’ll be give the missingMethanolfor the potion . impart the wood spirit , petrified materials , leech , minerals , Xeranthemum annuum , and common ivy infusion to get the Ingredients . supply the gas liquidator to the bench ( j4 ) , then add the ingredients and make the potion by follow the instructions . Take theReciever With Gas .
deliver to the laboratory , add the gas to the automobile ( k5 ) , and revive your friends . praise ! You’vecompleted the incentive chapter !
Screenshot by Pro Game Guides
For more point - and - click teaser RPG walkthroughs here at Pro Game Guides , check outLost Lands 8 Walkthrough ( Sand Captivity)andOn Thin Ice – Walkthrough & Solutions ( chapter 1 - 4 ) !

Image by Pro Game Guides

Image by Pro Game Guides
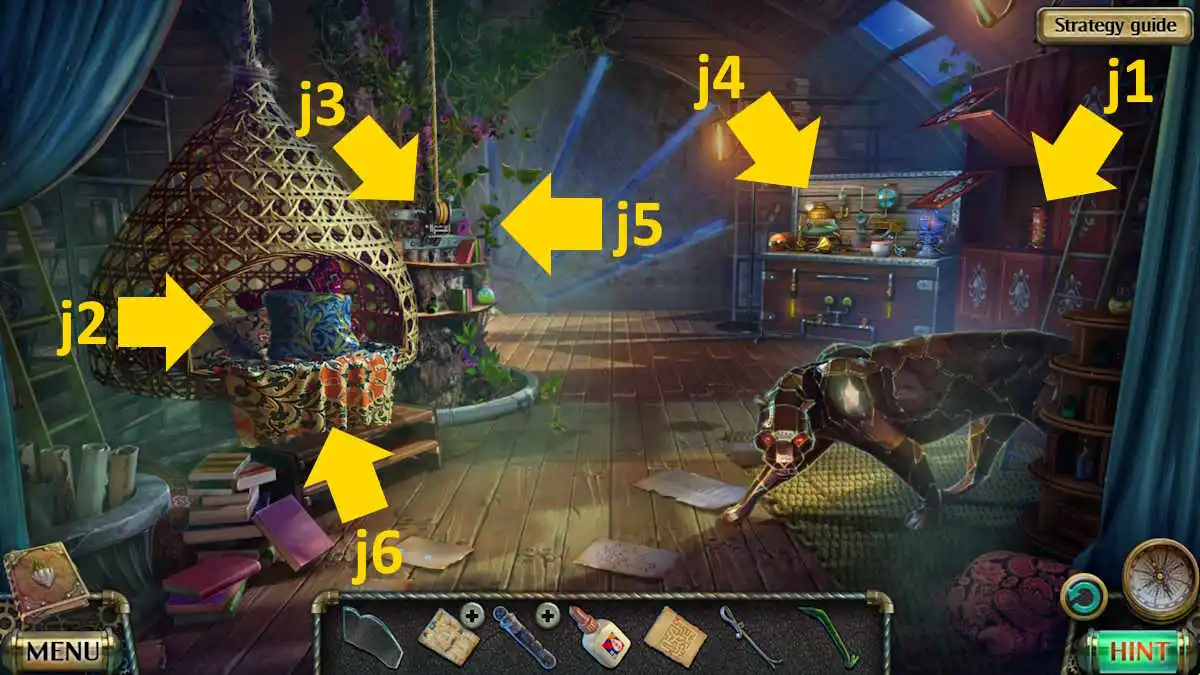
Image by Pro Game Guides
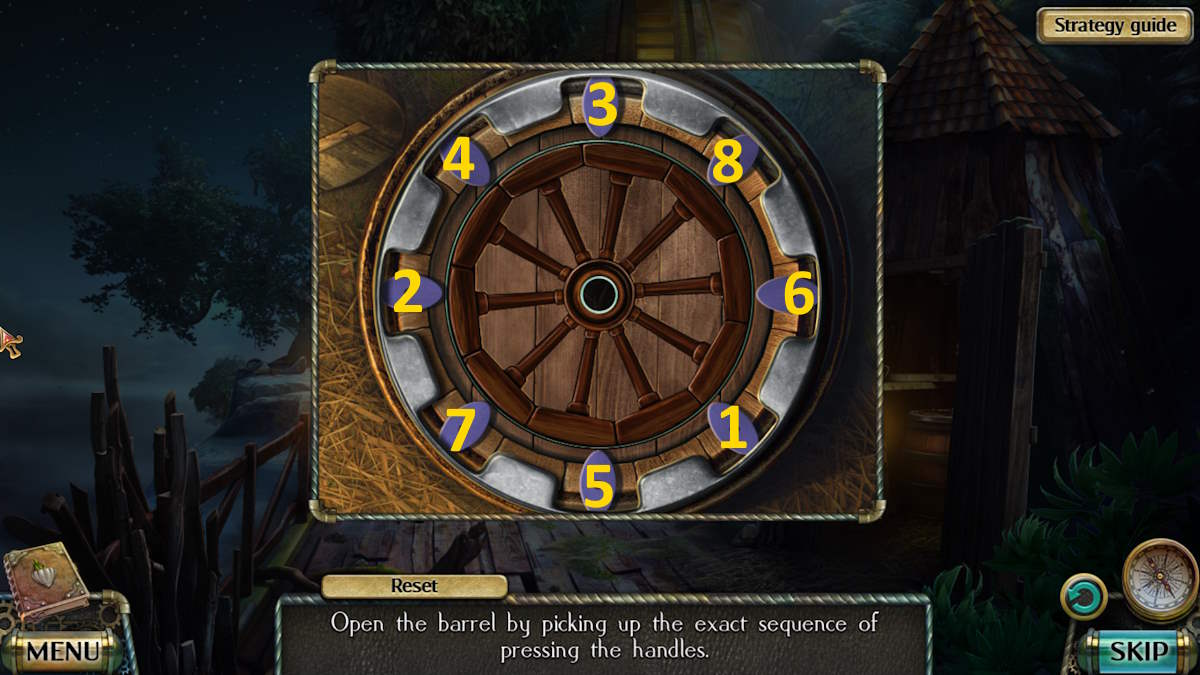
Image by Pro Game Guides

Image by Pro Game Guides
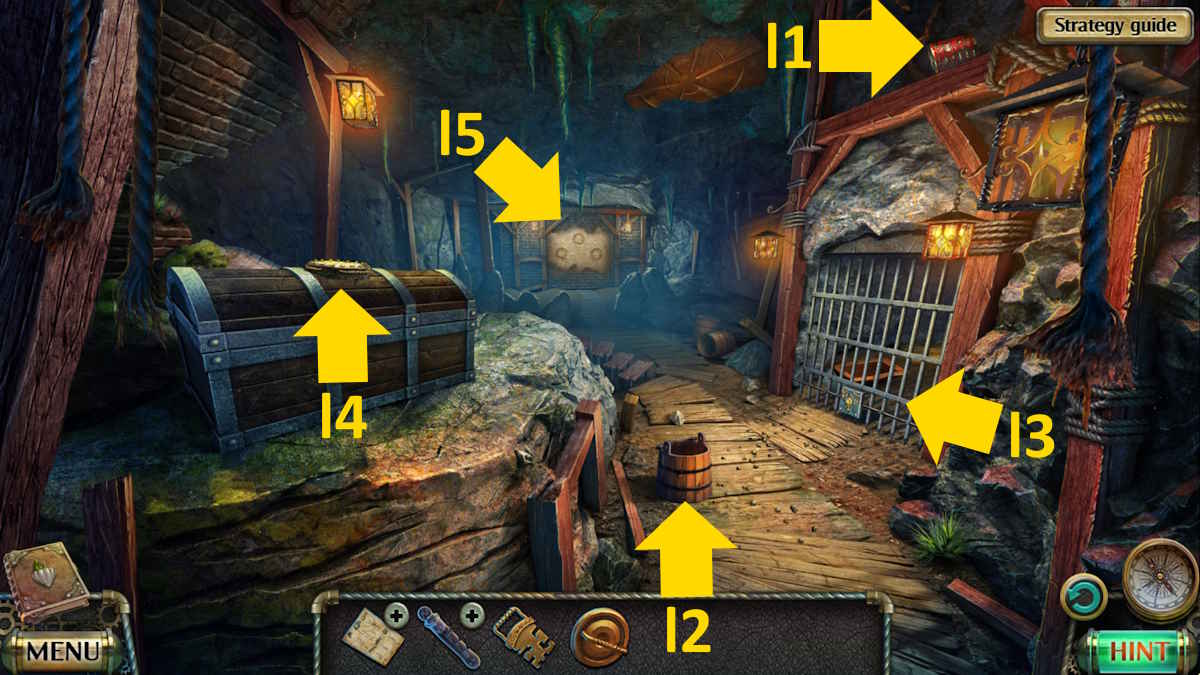
Image by Pro Game Guides
